
QTouch User Manual - BenQ Display Solutions · • Go to Start > all programs > Touchdev Folder >...
46
QTouch User Manual
Transcript of QTouch User Manual - BenQ Display Solutions · • Go to Start > all programs > Touchdev Folder >...

QTouch User Manual
CopyrightCopyright 2016 by BenQ Corporation. All rights reserved. No part of this publication may be reproduced, transmitted, transcribed, stored in a retrieval system or translated into any language or computer language, in any form or by any means, electronic, mechanical, magnetic, optical, chemical, manual or otherwise, without the prior written permission of BenQ Corporation.
All other logos, products, or company names mentioned in this manual may be the registered trademarks or copyrights of their respective companies, and are used for informational purposes only.
DisclaimerBenQ Corporation makes no representations or warranties, either expressed or implied, with respect to the contents hereof and specifically disclaims any warranties, merchantability or fitness for any particular purpose. Further, BenQ Corporation reserves the right to revise this publication and to make changes from time to time in the contents hereof without obligation of BenQ Corporation to notify any person of such revision or changes.
This user manual aims to provide the most updated and accurate information to customers, and thus all contents may be modified from time to time without prior notice. Please visit http://business-display.benq.com/ for the latest version of this manual.
2
Table of contentsIntroduction ..................................................................................................................................5
Operating Environment .................................................................................................................................. 5Installing and Uninstalling Software ............................................................................................................. 5
Software Installation ..................................................................................................................................................................... 5Software Uninstallation ............................................................................................................................................................... 6
Software Interface Introduction ................................................................................................................... 7QTouch Overview ....................................................................................................................................................................... 7
Basic Operation .............................................................................................................................................11Operating Mode .......................................................................................................................................................................... 11Selection and Page Roaming State .......................................................................................................................................... 12Multi-touch Writing.................................................................................................................................................................... 13Multi-touch Gestures ................................................................................................................................................................. 13
Detailed Operation ...................................................................................................................14Start and Exit ..................................................................................................................................................14Page Management ..........................................................................................................................................14
Custom Toolbar.......................................................................................................................................................................... 15Document Management ...............................................................................................................................15
Wdb File Management ............................................................................................................................................................... 16PowerPoint Management ..........................................................................................................................................................16Print Files ...................................................................................................................................................................................... 16Presenting PowerPoint Files ..................................................................................................................................................... 17
Brush Use ........................................................................................................................................................19Pen Color and Thickness ..........................................................................................................................................................21
Text Insert .......................................................................................................................................................22Text Box .......................................................................................................................................................................................22Hand writing Recognition ......................................................................................................................................................... 22
How to Use Eraser .......................................................................................................................................23Erasing Drawing Lines ................................................................................................................................................................23Erasing Objects............................................................................................................................................................................ 24Gesture Eraser ............................................................................................................................................................................ 24Trash Can .....................................................................................................................................................................................24
Geometric Figure and Filling .......................................................................................................................25Graphics Selection ......................................................................................................................................................................25Border Color Selection ............................................................................................................................................................. 25Filling Color Selection................................................................................................................................................................ 26
System Settings ...............................................................................................................................................26Settings ............................................................................................................................................... 26Register ......................................................................................................................................................................................... 28Setting Custom ..................................................................................................................................... 28Multi-screen Writing .......................................................................................................................... 28Preparing and Giving Lesson .................................................................................................................................................... 29Checking Version ........................................................................................................................................................................ 29
Teaching Tools ...............................................................................................................................................30Screen Shade ..................................................................................................................................... 30Spotlight ............................................................................................................................................. 31Broadcast ........................................................................................................................................... 31Lock .................................................................................................................................................... 32Record ................................................................................................................................................. 33Screenshot ......................................................................................................................................... 33Visualizer ............................................................................................................................................ 35Magnifier ............................................................................................................................................. 37
3

Clock ................................................................................................................................................... 37Teaching Tools for Mathematics ............................................................................................................................................. 38Ruler.................................................................................................................................................... 39Triangles ........................................................................................................................................................................................ 39Protractor............................................................................................................................................ 40Compass............................................................................................................................................. 42
Troubleshooting ........................................................................................................................43Get the License .........................................................................................................................44
If failed to Connect to the Server ..............................................................................................................45Upgrade the New Version ...........................................................................................................................46
10/24/16
4
IntroductionBased on touch design, QTouch is a practical electronic pen and eraser with smooth writing and accurate annotation effects. It fully supports multi-touch writing and editing for many a person at the same time. It also supports multi-touch gestures, free dragging, rotating and scaling to any graphics.
QTouch is compatible with PowerPoint and convenient for users to switch from traditional teaching software. With rich teaching resources, QTouch provides curtain, spotlight and many other functions. Clear and simple, users can easily stress the key point in multimedia teaching. It is also easy to use and available for customization.
Operating Environment
Installing and Uninstalling Software
Software InstallationSee the detailed explanation on the software installation below. Unload QTouch if you have installed It before.
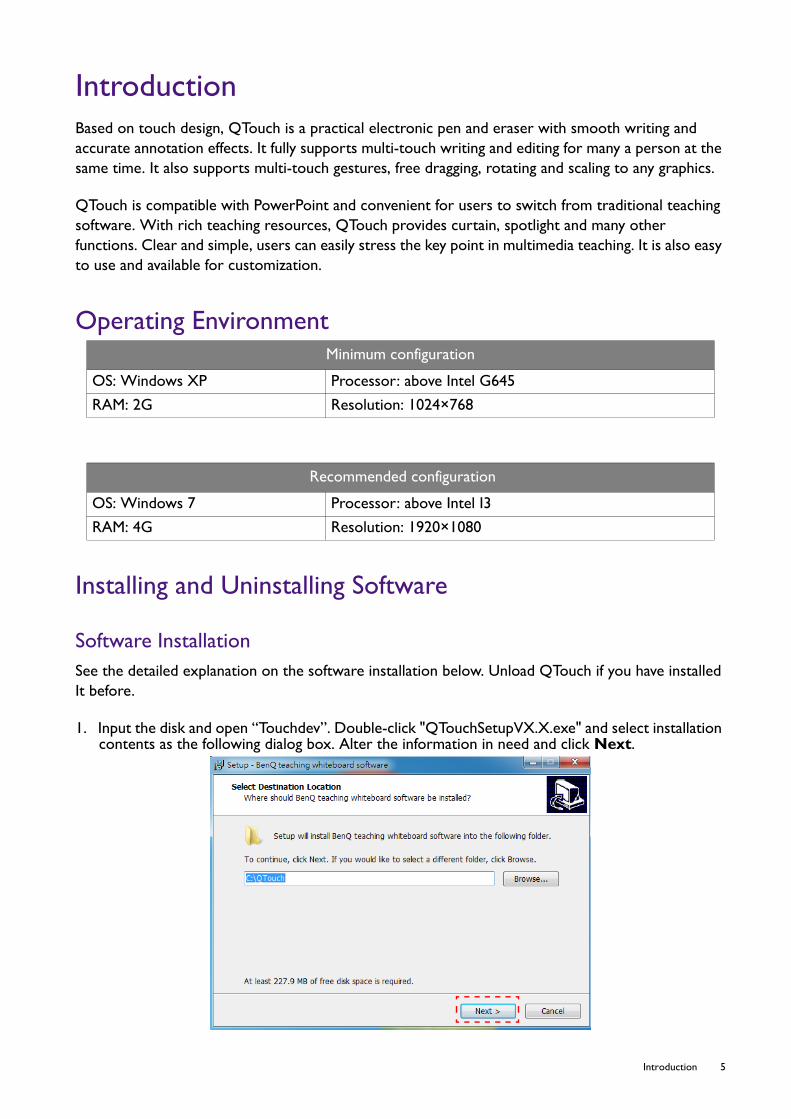
1. Input the disk and open “Touchdev”. Double-click "QTouchSetupVX.X.exe" and select installation contents as the following dialog box. Alter the information in need and click Next.
Minimum configuration
OS: Windows XP Processor: above Intel G645
RAM: 2G Resolution: 1024×768
Recommended configuration
OS: Windows 7 Processor: above Intel I3
RAM: 4G Resolution: 1920×1080
5 Introduction

2. Click Finish to end installation.
3. After installation, check if one of the following two gestures is in tray icon. The installation is successful if you see the icon.
Software Uninstallation• Exit if “Touchdev” is running. Open “control panel” and select “add or remove programs”. Unload
the program after finding out QTouch.
• Go to Start > all programs > Touchdev Folder > Uninstall to enter into Uninstall interface as following:
1. A dialog window will pop up. Click Yes to continue.
2. While seeing a dialog window as follow, click OK to end the uninstalling.
• The blue gesture means that the device has been linked, while the grey one means it hasn't been linked.
• It is recommended that you run Win10 as administrator: right click on the mouse > Run as administrator.
6 Introduction

Software Interface Introduction
QTouch OverviewOpen QTouch to enter full-screen mode. There are three modules on the display interface, shown as below.
Operating Area
The green background is the operating area of the current page, and the toolbar interface in transparency is underneath. The trash can is at the lower right corner. Generally, “Normal brush” is in the default state, you can directly operate within the green area. In most cases, the operating area of QTouch is in green. While in the case of the lower resolution as 1024×768, the working area is in white.
Toolbar
Start QTouch to enter the main interface. Toolbar is at the bottom of the screen. The level one toolbar is clean and simple with different function buttons.
Icon Function Description
File
Click to pop up the secondary toolbar to get the functions.
Toolbar
Operating area
7 Introduction
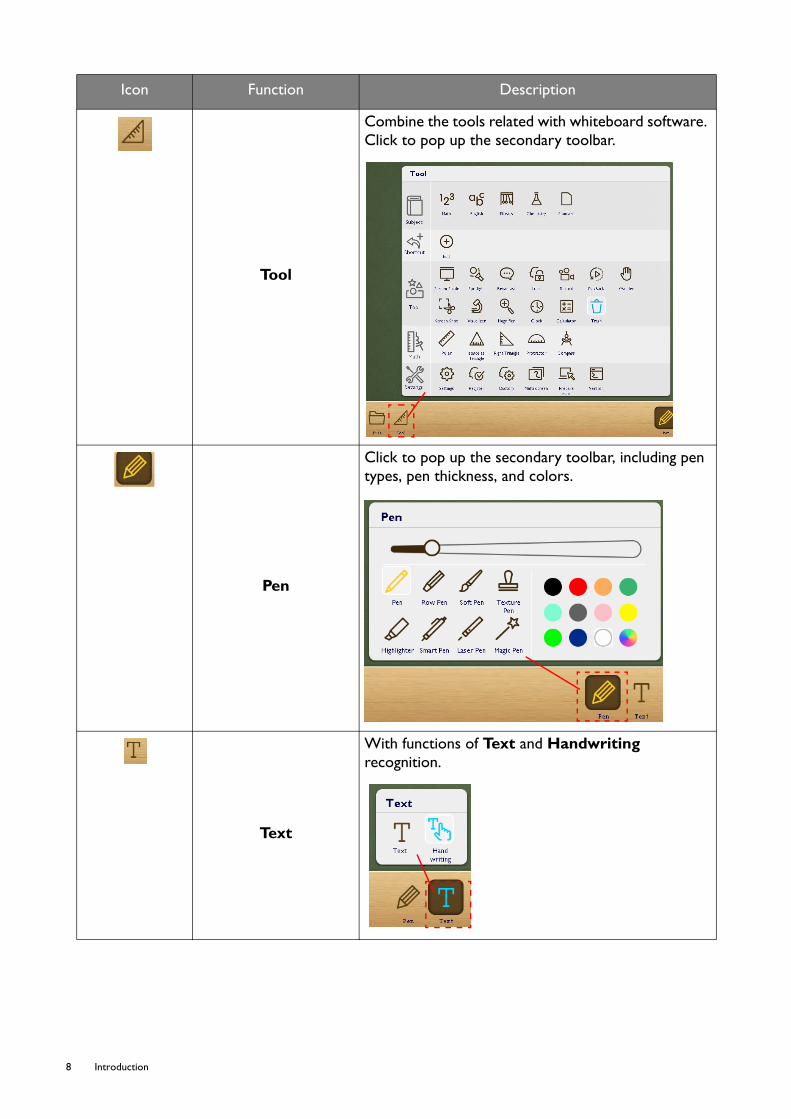
Tool
Combine the tools related with whiteboard software. Click to pop up the secondary toolbar.
Pen
Click to pop up the secondary toolbar, including pen types, pen thickness, and colors.
Text
With functions of Text and Handwriting recognition.
Icon Function Description
8 Introduction

Eraser
Click to pop up the secondary toolbar, including five types of erasers.
Geometry
Click to pop up the secondary toolbar, choose from five different cooperation tools.
Select Click to make choices.
Undo Click to undo the previous operation.
Redo Click to redo the cancelled operation.
Paste Click to perform the paste operation.
Preview Click to pop up/hide the preview window.
Control Click to switch to the control mode.
Exit Click to exit.
You can drag the toolbar to the above or at the below of the screen to suit your use habits.
Icon Function Description
9 Introduction

Floating Toolbar
Floating toolbar is on the right of the screen. Click to switch the interface to the control mode or transparent page. It is in line with that of the main interface, with clean and simple design. It has four buttons by default.
Icon Function Description
Full Screen Mode Click to switch to the full screen mode.
Pen Click to pop up the secondary toolbar, including pen types, pen thickness, and colors.
Screenshot Click to capture the image on the screen and paste it on the current page.
Text With functions of Text and Handwriting recognition.
Tool Click to pop up the secondary toolbar, including Screen Shade, Spotlight, Record, Clock, and Calculator.
10 Introduction

Basic Operation
Operating Mode
Standard (Full screen) Mode
While opening QTouch, the default working mode is mainly used for document editing and demonstrating. The software is at full screen mode and will not be affected by other software. To
switch from other modes to the standard mode, click in the floating toolbar.
Annotation/Control Mode
The minimum working mode in QTouch is reserved as the floating toolbar. It is easy to make use of the related functions, such as annotation and marking. To switch from other modes to the control
mode, click in the main toolbar or the floating toolbar.
11 Introduction

Transparent Page Mode
The transparent page mode in QTouch is similar to the control mode, but with a more powerful function of transparent annotation. Under this mode, you can also use the brush or other functions to make dynamic annotation to the current operation interface. You can only switch from the control
mode to the transparent page mode by clicking in the floating toolbar.
Selection and Page Roaming State
Selection State
While touching the interface of QTouch, you need to switch between “drawing lines” and “select” to
distinguish whether the touch action is drawing lines or select. Click in the main toolbar or the floating toolbar, and it is in the select state. In this case, the touch action is not shown as “drawing lines”, but only as operation to the object.
Page Roaming State
The QTouch page is designed as the “infinite page”. You can move the page randomly by switching to
the roaming state to get a bigger operation interface. Click to enter into the page roaming state under the full-screen mode.
is not in the default interface. Click to retrieve the function.
12 Introduction

Multi-touch Writing
QTouch is designed on the basis of the multi-touch screen input method, fully supporting the function of the multi touch writing. You can operate multi-point drawing and painting and can even use erasers at the same time.
Multi-touch GesturesBased on the multi-touch method, QTouch supports normal touch gestures such as dragging,
zooming, and rotating. By switching to , you can randomly conduct multi-touch function to lines or images on the display.
13 Introduction

Detailed Operation
Start and ExitAs the software is attached to the interactive whiteboard, QTouch needs the whiteboard support to start.The software will be in the restricted state without checking the interactive whiteboard in the system. In this case, it can only be used in a specific period of time. When the whiteboard support is confirmed, the software can be used without any restriction.
Click on the right corner of the toolbar to exit the program.
Page Management
Start the software to enter into the full screen mode. Click on the toolbar to display or hide the preview window. The window can also be dragged to the right boundary of the screen. At the moment, it will hide automatically. The preview window in the software is designed as the main interface of the QTouch page management. Comparing with traditional preview windows, it is specific to the touch input.
Select one preview page, there are four buttons at the lower right corner:
: Insert new page : Clone current page
: Clear to drag the page : Delete the selected
14 Detailed Operation

Custom Toolbar
To customize your toolbar buttons, set QTouch to the standard mode. Click and choose
under Settings.
You can add up to 12 icons to the list. Please note that and are default and cannot be removed.
Document Management
File management facilities of QTouch is realized by clicking . QTouch supports three types of files: Wbd file, PowerPoint file, and multi-media file.
15 Detailed Operation
Wdb File Management
QTouch is compatible with Wbd files. All images and sounds displayed on the QTouch interface can
be saved. Click to pop up the secondary toolbar. The corresponding wdb file management can
be done with these buttons. To insert and save a Wbd file, click to pop up the secondary
toolbar with and . Click the two buttons to act accordingly.
PowerPoint Management
QTouch is compatible with PowerPoint files in Microsoft Office. Click to pop up the secondary toolbar. You can export the current file (PowerPoint file or non-PowerPoint file) to a PowerPoint file
by clicking to act accordingly. Supported versions are Office 2003, Office 2007, and Office 2010. Earlier or later versions may not work.
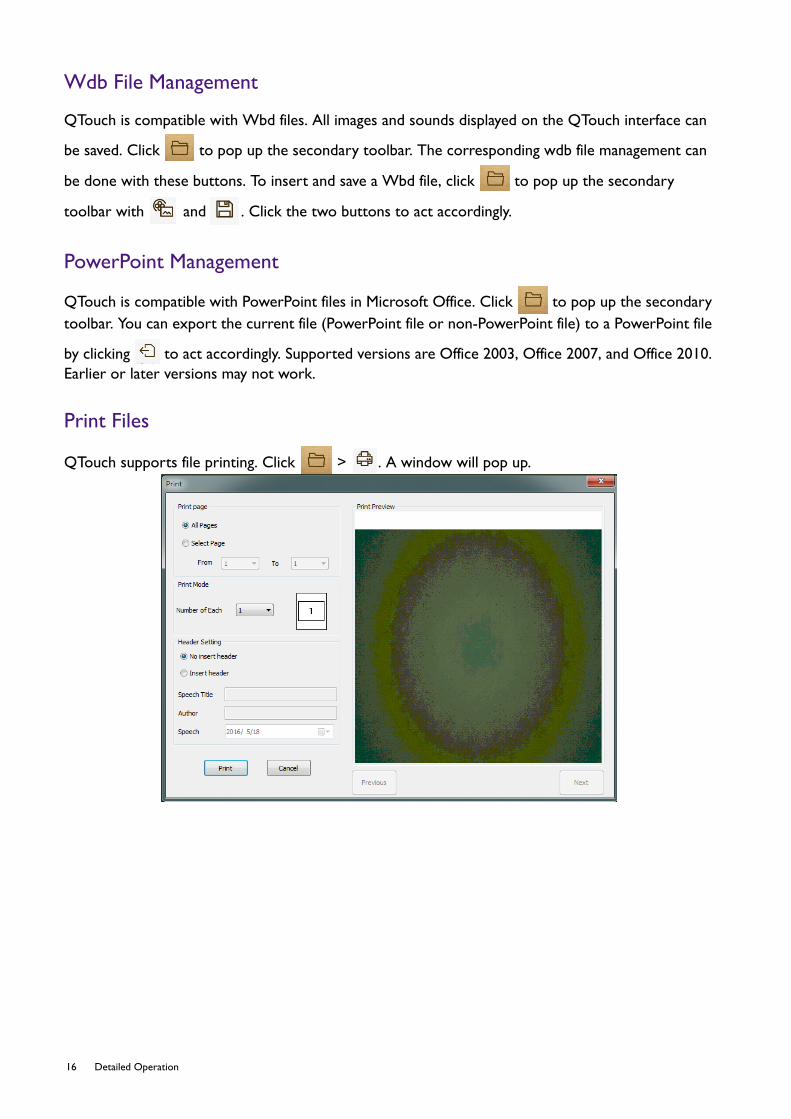
Print Files
QTouch supports file printing. Click > . A window will pop up.
16 Detailed Operation

You can choose to print all pages or select pages by entering page numbers. You can also choose the Print Mode and Header Setting. Header inserting is optional while printing the selected page. You can also add Speech Title and Author.
Presenting PowerPoint FilesWhile presenting PowerPoint files, you can make comments and other operations to PowerPoint files
under the touch mode. Click > and choose a PowerPoint file to be shown.
17 Detailed Operation

While opening the PowerPoint file, you can see pop-up toolbar of QTouch on both sides of the screen. You can switch between PowerPoint annotation and other functions.
Icon Function Description
ArrowClick to realize the mouse function, right or left button function of the touch screen.
PenClick to switch to draw lines and annotation.
ColorClick to set pen colors.
EraserSwitch to the eraser function to clear the lines and annotation on the screen.
Full screen eraserTo clear away the lines and annotation on the whole display.
PreviousClick to go back to the previous page.
NextClick to go to the next page.
RefreshClick to pop up the language dialogue for PowerPoint file; click the preview page to switch to the corresponding page.
ExitClick to save and exit the PowerPoint file. Exit will also close other PowerPoint files not modified in Qtouch.
Play background soundClick to play background sound.
Switch to the main interface
Click to switch to the main interface.
Blank screenClick to enter the blank screen, and click again to exit the blank screen.
18 Detailed Operation
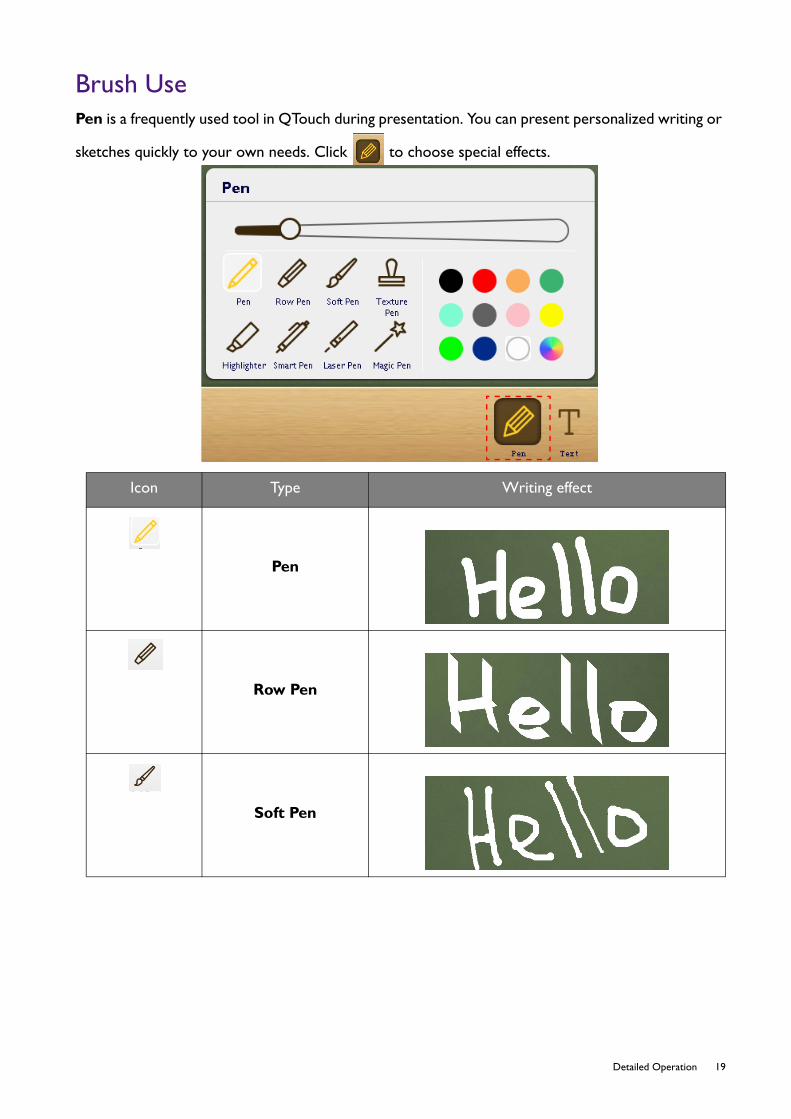
Brush UsePen is a frequently used tool in QTouch during presentation. You can present personalized writing or
sketches quickly to your own needs. Click to choose special effects.
Icon Type Writing effect
Pen
Row Pen
Soft Pen
19 Detailed Operation

Texture Pen For Texture Pen, there are different options to choose from.
Highlighter
With Highlighter, the writing will be a bit transparent and should be used with single touch.
Smart Pen
With Smart Pen, the writing will be automatically imporved.
Laser Pen
With Laser Pen, the writing will gradually fade away.
Icon Type Writing effect
20 Detailed Operation

Pen Color and ThicknessIn QTouch, apart from the direct use of a variety of pens, you can also set the thickness and color to different pens.
For pen color, QTouch provides the most commonly used colors. You can set color in the pallet by right clicking the color.
Magic Pen For Magic Pen, there are different options to choose from.
Icon Type Writing effect
21 Detailed Operation
Text Insert
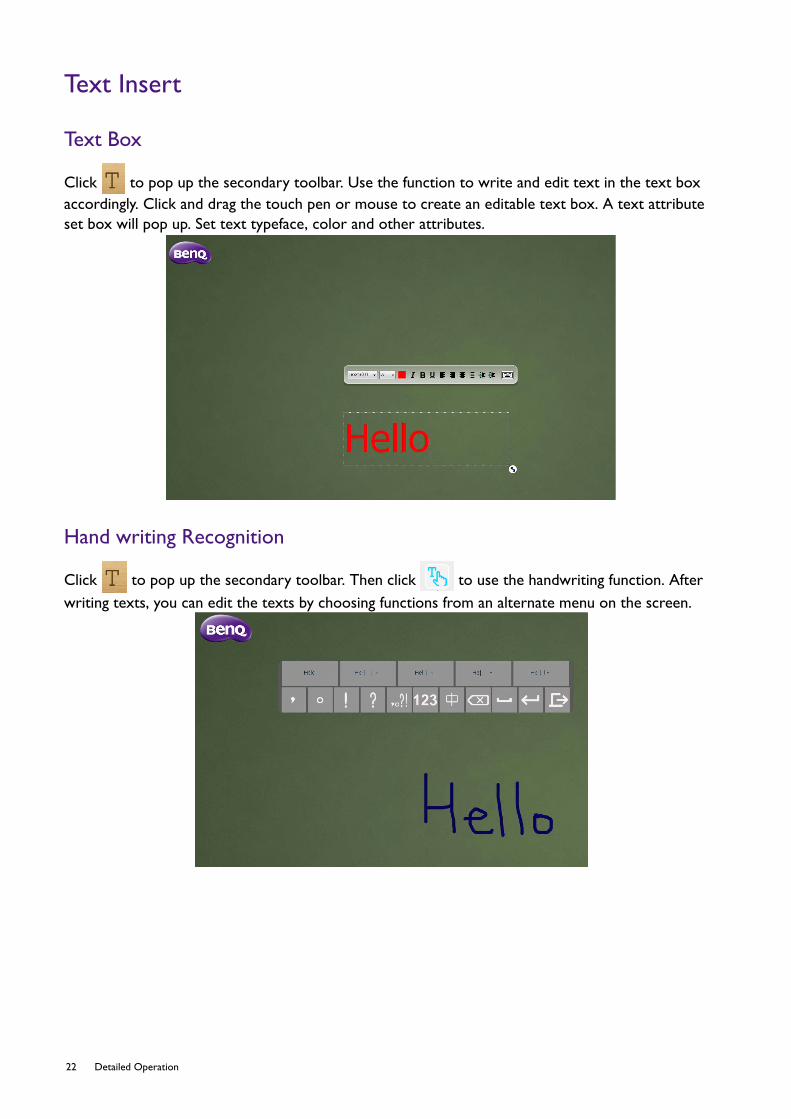
Text Box
Click to pop up the secondary toolbar. Use the function to write and edit text in the text box accordingly. Click and drag the touch pen or mouse to create an editable text box. A text attribute set box will pop up. Set text typeface, color and other attributes.
Hand writing Recognition
Click to pop up the secondary toolbar. Then click to use the handwriting function. After writing texts, you can edit the texts by choosing functions from an alternate menu on the screen.
22 Detailed Operation

By default, if you stop editing for three seconds, the system will automatically choose the highest matching rate option.
How to Use EraserThe eraser can be used to erase writing, insert images, and other saved data left on the page during the presentation. QTouch offers five types of erasers.
Erasing Drawing LinesAll the drawing lines can be erased by the five erasers during the presentation.You can use the Small, Middle, or Large eraser to erase the drawing lines.
Icon Function Description
Small Click to erase writing in a small area.
Middle Click to erase writing in a middle area.
Large Click to erase writing in a large area.
Region Click to erase objects in a rectangular area.
MoveClear Drag right to clear the entire page.
23 Detailed Operation

Erasing Objects
To clear the images or objects inserted on the page, only Region and MoveClear are effective. The other three types can only be used to erase writing lines.
Gesture EraserQTouch supports eraser gestures. While presenting objects over 5cm × 5cm, the touch action on the infrared touch screen is automatically recognized as a Large eraser. This function needs support from the underlying driver of the touch screen.
Trash CanTo delete the drawing, graphing, and inserted multi-media files on the page, you can drag the selected
objects to at the lower right corner.
24 Detailed Operation

Geometric Figure and FillingQTouch has the commonly used shape drawing functions, combining the function of geometric graphing with filling.
Graphics Selection
Click to pop up the secondary tool window and conduct the corresponding operation. You can select different graph shapes.
Border Color Selection
Click to pop up the secondary tool window. QTouch provides the most commonly used colors. You can set border colors in the pallet by clicking right on the color.
25 Detailed Operation
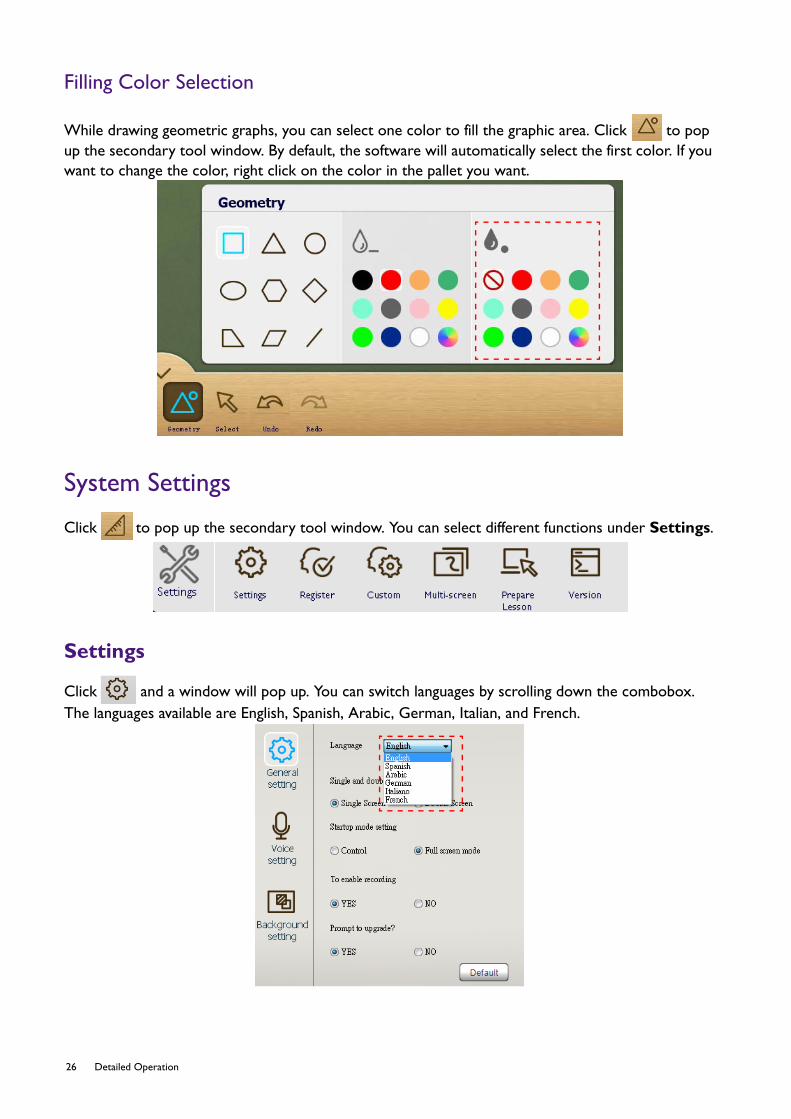
Filling Color Selection
While drawing geometric graphs, you can select one color to fill the graphic area. Click to pop up the secondary tool window. By default, the software will automatically select the first color. If you want to change the color, right click on the color in the pallet you want.
System Settings
Click to pop up the secondary tool window. You can select different functions under Settings.
Settings
Click and a window will pop up. You can switch languages by scrolling down the combobox. The languages available are English, Spanish, Arabic, German, Italian, and French.
26 Detailed Operation

You can continue to adjust other Settings accordingly.
You can also adjust Voice setting and Background.
27 Detailed Operation

Register
Click Register for no time-limit using environment. You have to make sure the network is connected. The local PC firewall and proxy firewall is disable. Then, type the 24-digit license code into the window (but not product number). For the process to get the license, read Get the License (see page 44).
Setting CustomFor more information about setting Custom, read Custom Toolbar (see page 15).
Multi-screen Writing
Click and a window will pop up. You can select up to four screens. You can also select multi-
screen's background. There are also four types of background to choose from.
If an error message "Failed to connect Server" shows, you can:
• Use Wi-Fi connecting to network (do not use internal proxy).
• Use Wi-Fi connecting to cellphone (the external network from Telecommunications company).
• Contact your IT agent for not blocking port 8000.
28 Detailed Operation

Preparing and Giving Lesson
Click to prepare lessons. You can open a file such as a Microsoft Word document to prepare lessons.
Click to go back to the standard mode.
Checking Version
Click to check the version information of QTouch.
29 Detailed Operation

Teaching ToolsQTouch provides common whiteboard teaching tools and divides it into two categories: Tool and
Math. Click to pop up the secondary tool window to get all of the teaching tools.
Screen Shade
Click to activate the curtain function.
Drag the four grips (above, down, left, and right) to draw back the curtain. You can see the
content covered by the curtain. Click to exit Screen Shade.
30 Detailed Operation
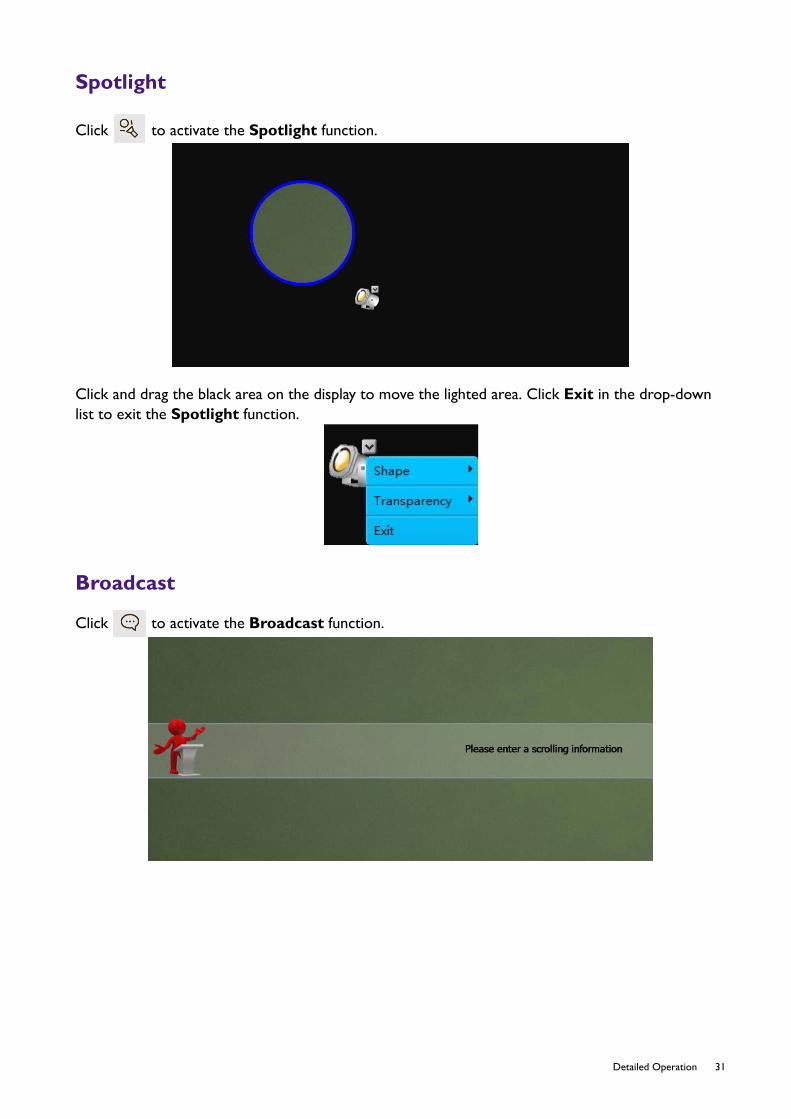
Spotlight
Click to activate the Spotlight function.
Click and drag the black area on the display to move the lighted area. Click Exit in the drop-down list to exit the Spotlight function.
Broadcast
Click to activate the Broadcast function.
31 Detailed Operation
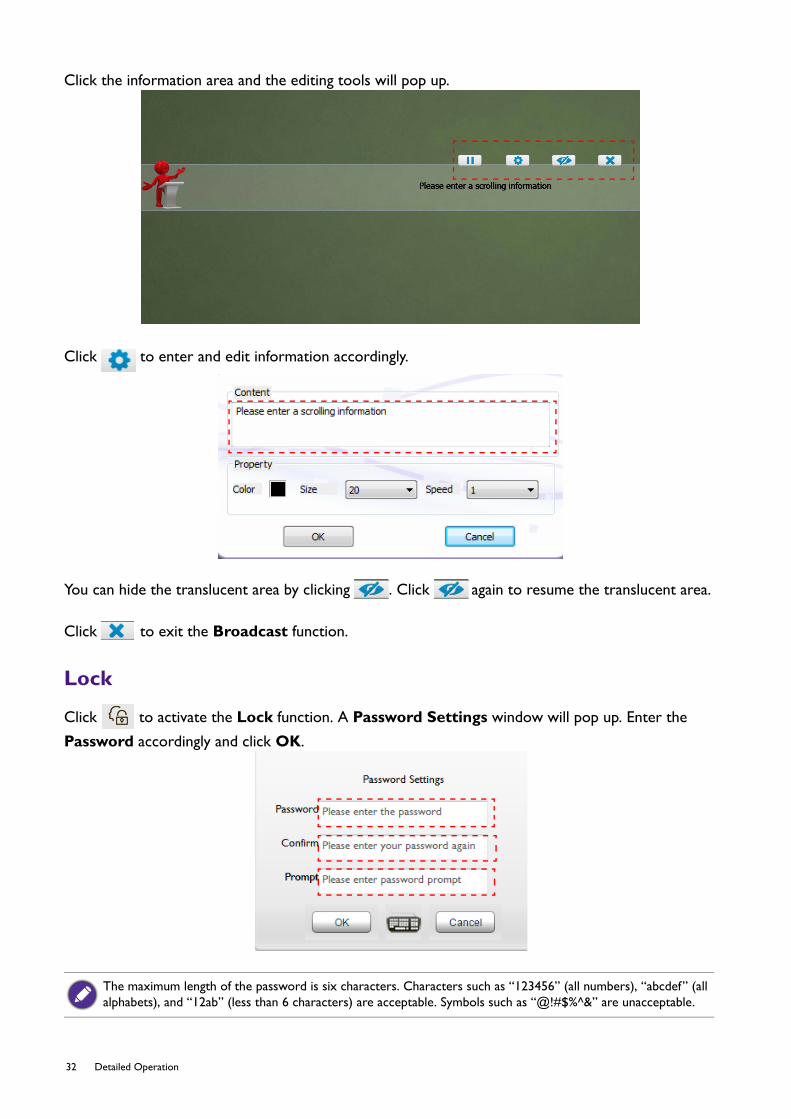
Click the information area and the editing tools will pop up.
Click to enter and edit information accordingly.
You can hide the translucent area by clicking . Click again to resume the translucent area.
Click to exit the Broadcast function.
Lock
Click to activate the Lock function. A Password Settings window will pop up. Enter the
Password accordingly and click OK.
The maximum length of the password is six characters. Characters such as “123456” (all numbers), “abcdef” (all alphabets), and “12ab” (less than 6 characters) are acceptable. Symbols such as “@!#$%^&” are unacceptable.
32 Detailed Operation
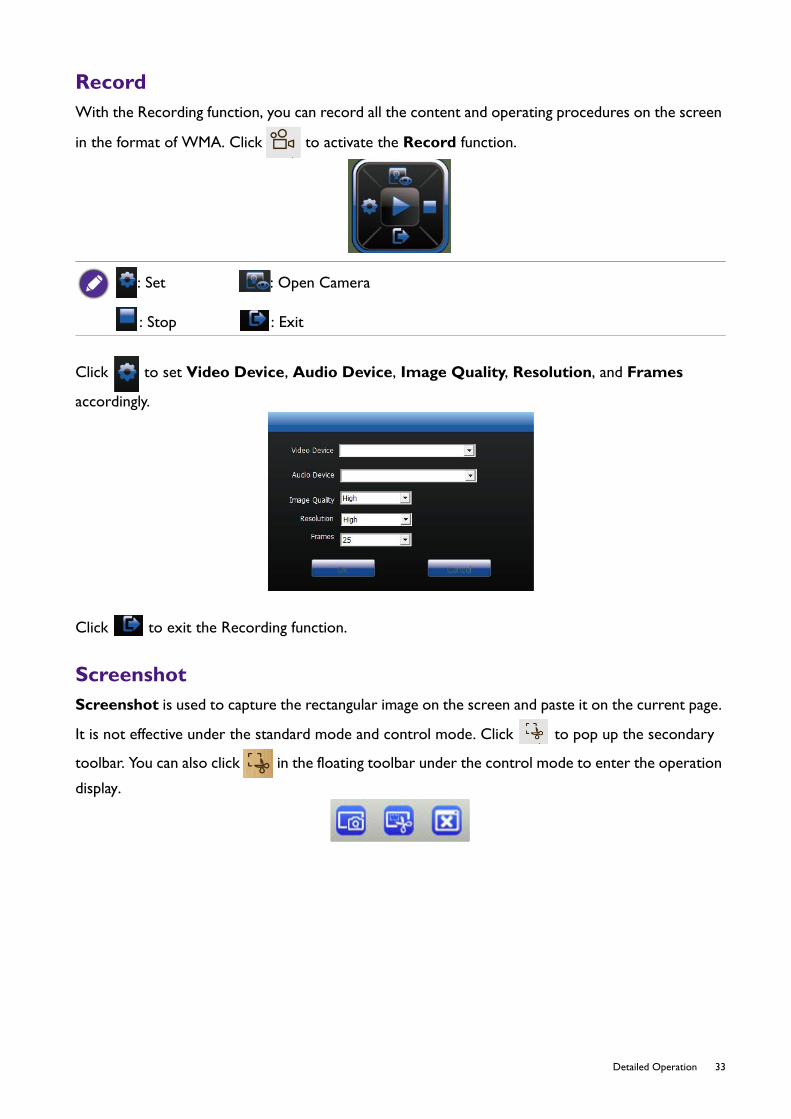
RecordWith the Recording function, you can record all the content and operating procedures on the screen
in the format of WMA. Click to activate the Record function.
Click to set Video Device, Audio Device, Image Quality, Resolution, and Frames
accordingly.
Click to exit the Recording function.
ScreenshotScreenshot is used to capture the rectangular image on the screen and paste it on the current page.
It is not effective under the standard mode and control mode. Click to pop up the secondary
toolbar. You can also click in the floating toolbar under the control mode to enter the operation
display.
: Set : Open Camera
: Stop : Exit
33 Detailed Operation

Click to activate the Photograph function. The whole screen is photographed and can be
pasted to QTouch.
Click to activate the Screenshot function. While entering Screenshot, the QTouch display
will hide automatically. At the moment, the Screenshot region is selected in a rectangle by manual touch or mouse. The boundary of the Screenshot region can be adjusted. Change the region and
click to get the Screenshot page, or click to give up.
34 Detailed Operation

Click to exit Screenshot.
VisualizerIn normal cases, Visualizer is assorted with specialized equipment. But the user can use ordinary
PC cameras as well. Click to activate the Visualizer function.
At the bottom of the Visualizer interface, there is a row of buttons showing various functions of camera as below:
35 Detailed Operation

Icon Function
Click to zoom in.
Click to zoom out.
Click to screenshot.
Click to record a video.
Click to lock the current shooting interface. Click again to unlock the interface.
Click to rotate the interface to the right side.
Click to rotate the interface to the left side.
Click to pop up the setting interface. Adjust Device List, Resolution, Brightness, contrast, and Saturation accordingly.
Click to exit.
36 Detailed Operation

Magnifier
Click to activate the Magnifier function.
Magnifier will zoom in the content within the white dotted border. You can set the visual effect by choosing the following functions:
Clock
Click to activate the Clock function.
Icon Function
Click to choose one rectangular area, and the content will be zoomed in the rectangular area.
Click to lock the enlargement area and drag Magnifier, the enlargement area will not move.
Click to zoom in.
Click to zoom out.
Click to close the tool.
37 Detailed Operation
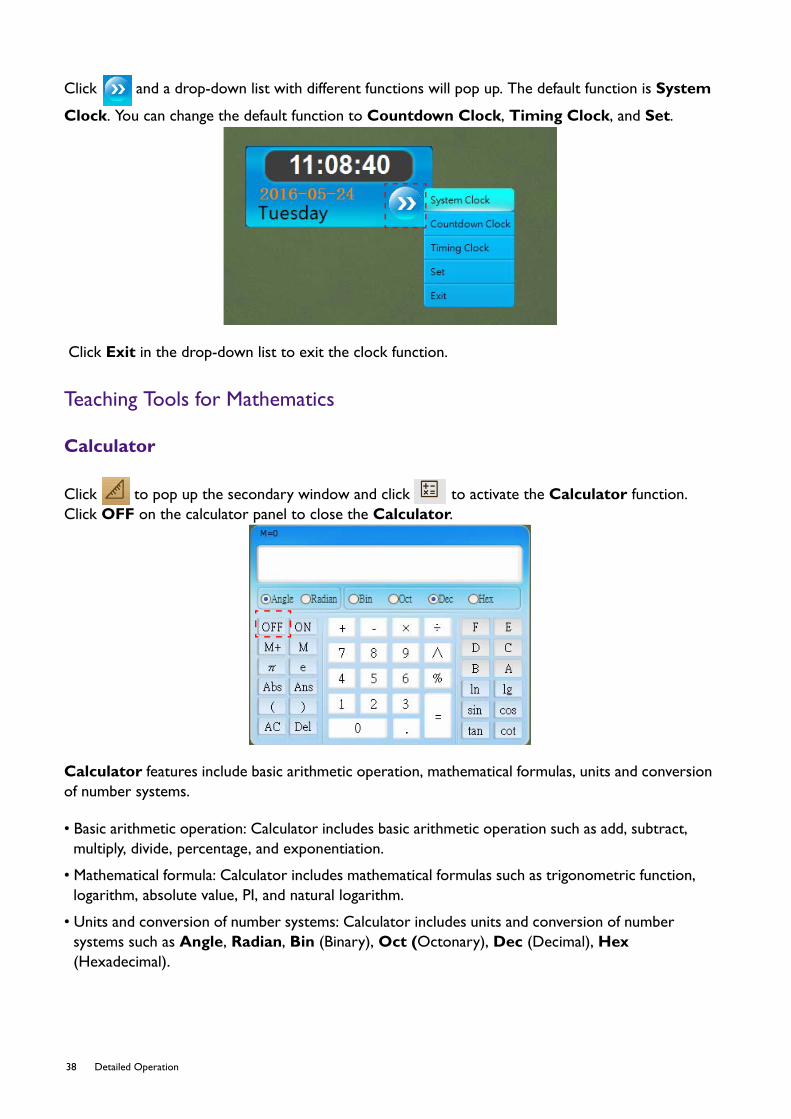
Click and a drop-down list with different functions will pop up. The default function is System
Clock. You can change the default function to Countdown Clock, Timing Clock, and Set.
Click Exit in the drop-down list to exit the clock function.
Teaching Tools for Mathematics
Calculator
Click to pop up the secondary window and click to activate the Calculator function. Click OFF on the calculator panel to close the Calculator.
Calculator features include basic arithmetic operation, mathematical formulas, units and conversion of number systems.
• Basic arithmetic operation: Calculator includes basic arithmetic operation such as add, subtract, multiply, divide, percentage, and exponentiation.
• Mathematical formula: Calculator includes mathematical formulas such as trigonometric function, logarithm, absolute value, PI, and natural logarithm.
• Units and conversion of number systems: Calculator includes units and conversion of number systems such as Angle, Radian, Bin (Binary), Oct (Octonary), Dec (Decimal), Hex (Hexadecimal).
38 Detailed Operation

Ruler
Click to pop up the secondary window and click to activate the Ruler function. While drawing lines near the scale mark of the ruler, the line will automatically become a straight line.
TrianglesThere are two types of triangles in the teaching tool. One is Isosceles triangle, and the other is Right triangle.The triangles can be used to measure length and draw lines.
Click and a drop-down list will pop up. You can switch the Unit to inch, millimeter (MM), and
centimeter (CM).
39 Detailed Operation

Protractor
Click to pop up the secondary window and click to activate the Protractor function. Drag the white dot in the tool and rotate it to get the angle degree while the measured sides coincide
with the tool. Click to draw the angle with certain degrees.
You can edit the angle by clicking on the angle, and a list of function bar will pop up.
: Cut : Copy : Clone : To Bottom
: Delete : Lock : Mirror : Hyperlink
40 Detailed Operation

Click and a drop-down list will pop up. You can switch the Shape to Semicircle or Circle.
You can also switch the Unit to Angle and Radian.
41 Detailed Operation

Compass
Click to pop up the secondary window and click to activate the Compass function. Click and drag the pen label on the right of the Compass and rotate it to draw circles.
You can adjust the degrees by clicking . You can also switch the unit by right clicking on the unit.
The unit options are centimeter and inch.
42 Detailed Operation

TroubleshootingProblem Solution
Gesture eraser cannot be used. Confirm the installation of the latest Touchdev driver and make sure Touchdev procedure is running. Read Installing and Uninstalling Software (see page 5) for more information.
The depicted geometry and pictures on the page cannot be erased.
QTouch has five erasers to choose from. To clear the graphs, images, videos or Flash inserted on the page, only Region and MoveClear are effective. Read How to Use Eraser (see page 23) for more information.
The background color is white after starting QTouch.
While starting QTouch, the default background color is subject to the current display resolution. If it is equal or under 1024 × 768, the default color is white. Otherwise, it is green.
There is no reaction when clicking the buttons in the floating toolbar.
Most of the buttons in the floating toolbar in QTouch can only be used under the transparent page. You can switch to
the transparent page by clicking in the floating toolbar.
There is a gray area on both sides after importing PowerPoint.
In order to keep the normal display scale while importing PowerPoint, QTouch sets the display scale at 4:3. In this case, there is a gray area on both sides of the screen. Within the gray area, it cannot draw lines.
43 Troubleshooting

Get the License1. Go to BenQ website to get the license key:
http://business-display.benq.com/en/FindProduct/ifp/software/qtouch/download.html
http://dsdownload.benq.com/series/3
2. Enter the RP S/N which got from your RP display and customer information for QTouch license.
44 Troubleshooting

3. One License code (24 digits) will be sent to your registered e-mail address.
4. Use the license code in QTouch > Tool > Register.
5. Please connect your PC to the Internet while you register the license code.
If failed to Connect to the Server• Use Wi-Fi connecting to the network instead of using the internal proxy.
• Use Wi-Fi connecting to your cellphone to prevent the company firewall from blocking port 8000. The external network from telecommunications companies should not block the connection.
45 Troubleshooting

Upgrade the New VersionPlease check BLM/BM for the latest QTouch and download it from Display B2B website: http://business-display.benq.com/en/FindProduct/ifp/software/qtouch/download.html
1. Uninstall the old QTouch from Windows start menu > All programs > QTouch > Uninstall
2. Double click “QTouchSetupVX.X.exe” and finish the whole installation.
3. Execute QTouch and check its version: Tool > Version
• If the license had been registered on a PC/NB successfully, it is not necessary to register the license again while upgrading the new version.
• The Check New Version item is cancelled in QTouch 2.2.
46 Troubleshooting


![Atmel QTouch Library PTC Release Note · Atmel PTC QTouch Library [RELEASE NOTES] Atmel-42544-PTC-QTouch-Library_ReleaseNotes 10 Fixed code generation logic for low power mega PTC](https://static.fdocuments.in/doc/165x107/60d59fbe8ad0960085088288/atmel-qtouch-library-ptc-release-note-atmel-ptc-qtouch-library-release-notes-atmel-42544-ptc-qtouch-libraryreleasenotes.jpg)
