Pulsonix Vault Users Guide Vault Users...Pulsonix Vault 5 Pulsonix Vault What is the Vault? Pulsonix...
43
Pulsonix Vault Users Guide
-
Upload
dangnguyet -
Category
Documents
-
view
290 -
download
3
Transcript of Pulsonix Vault Users Guide Vault Users...Pulsonix Vault 5 Pulsonix Vault What is the Vault? Pulsonix...
Pulsonix
Vault Users Guide

2 Pulsonix Vault
Copyright Notice
Copyright WestDev Ltd. 2000-2017
Pulsonix is a Trademark of WestDev Ltd. All rights reserved. E&OE
Copyright in the whole and every part of this software and manual belongs to WestDev Ltd. and may
not be used, sold, transferred, copied or reproduced in whole or in part in any manner or in any media
to any person, without the prior written consent of WestDev Ltd. If you use this manual you do so at
your own risk and on the understanding that neither WestDev Ltd. nor associated companies shall be
liable for any loss or damage of any kind.
WestDev Ltd. does not warrant that the software package will function properly in every hardware
software environment.
Although WestDev Ltd. has tested the software and reviewed the documentation, WestDev Ltd.
makes no warranty or representation, either express or implied, with respect to this software or
documentation, their quality, performance, merchantability, or fitness for a particular purpose. This
software and documentation are licensed 'as is', and you the licensee, by making use thereof, are
assuming the entire risk as to their quality and performance.
In no event will WestDev Ltd. be liable for direct, indirect, special, incidental, or consequential
damage arising out of the use or inability to use the software or documentation, even if advised of the
possibility of such damages.
WestDev Ltd. reserves the right to alter, modify, correct and upgrade our software programs and
publications without notice and without incurring liability.
Microsoft, Windows, Windows NT and Intellimouse are either registered trademarks or trademarks of
Microsoft Corporation.
All other trademarks are acknowledged to their respective owners.
Pulsonix, a division of WestDev Ltd.
Printed in the UK Issue date: 20/09/17 iss 1.3
Pulsonix
20 Miller Court
Severn Drive
Tewkesbury Business Park
Tewkesbury
Glos, GL20 8DN
United Kingdom
Support Phone +44 (0)1684 296 570
Sales Phone +44 (0)1684 296 551
Fax +44 (0)1684 296 515
Email [email protected]
Web www.pulsonix.com
Contents 3
Contents
CONTENTS ................................................................................................................................. 3
PULSONIX VAULT ........................................................................................................................ 5 What is the Vault?........................................................................................................................................ 5 Do I need to use the Vault? .......................................................................................................................... 5 Licensing ..................................................................................................................................................... 5 System Requirements .................................................................................................................................. 6 Installation ................................................................................................................................................... 6
Deployment planning............................................................................................................................. 6 Installing the database server ................................................................................................................. 7 ODBC driver installation ..................................................................................................................... 12
Key Concepts of the Vault ......................................................................................................................... 14 What can be stored in the Vault? ......................................................................................................... 14 What is an ‘item’? ................................................................................................................................ 14 Other Vault item properties ................................................................................................................. 15 Cross References ................................................................................................................................. 15 Managing and updating Vault items .................................................................................................... 15
Preparing your Vault for first use .............................................................................................................. 16 Testing Connection to Vault ................................................................................................................ 16 Alternate ODBC Drivers ..................................................................................................................... 17
Users and Groups ....................................................................................................................................... 17 Groups and Permissions ...................................................................................................................... 18 Users .................................................................................................................................................... 19 Primary and Alternate Sign-in ............................................................................................................. 19 Recovering lost passwords................................................................................................................... 20
Revision Naming ....................................................................................................................................... 20 Choosing a Revision Naming Scheme ................................................................................................. 20 Adding or changing Revision Naming Schemes ................................................................................. 20
Attributes ................................................................................................................................................... 21 How to set them up .............................................................................................................................. 21
Options ...................................................................................................................................................... 22 Database Settings ................................................................................................................................. 22 Personal Settings.................................................................................................................................. 23 Colours ................................................................................................................................................ 24
Folders ....................................................................................................................................................... 24 Folder Names ....................................................................................................................................... 24 Creating and renaming folders ............................................................................................................. 25 Moving folders .................................................................................................................................... 25
Migrating Library Data into the Vault ....................................................................................................... 26 Before you start ................................................................................................................................... 26 Item Names .......................................................................................................................................... 27 Using the ‘Libraries to Vault’ dialog ................................................................................................... 27 Using both Libraries and Vault ............................................................................................................ 28 Shared master libraries ........................................................................................................................ 28
Migrating Design Data into the Vault ........................................................................................................ 30 Before you start ................................................................................................................................... 30
Understanding and managing your Vault contents .................................................................................... 31 The Vault Manager dialog ................................................................................................................... 31

4 Contents
Browser Page ....................................................................................................................................... 31 Search .................................................................................................................................................. 32 Audit Trail ........................................................................................................................................... 33 Reports ................................................................................................................................................. 33 Deleting items from the Vault ............................................................................................................. 33
Using Vault-based data in your application ............................................................................................... 33 Library Search Order ........................................................................................................................... 33 Parts, Footprints and other library items .............................................................................................. 34 Technology and Profile files ................................................................................................................ 37 Schematic Blocks ................................................................................................................................ 37 PCB items for Panels ........................................................................................................................... 37
Reloading data and updating references .................................................................................................... 38 Part references to footprints, symbols and associated parts ................................................................. 38 Design references to library items ....................................................................................................... 38
Vault Admin Tools .................................................................................................................................... 39 Admin tools ......................................................................................................................................... 39 Installation ........................................................................................................................................... 40 Vault Admin application ...................................................................................................................... 40 VAdmin command-line program ......................................................................................................... 41
Vault and Database Connection (PDC) option........................................................................................... 42
Pulsonix Vault 5
Pulsonix Vault
What is the Vault?
Pulsonix Vault is a data management system that can help you organise and manage your Pulsonix
data in a safe and secure way.
In its simplest form it could be viewed as a ‘managed library’, holding Parts, Footprints and other
data in the same way as your existing Pulsonix libraries. However, it is much more than that, as it can
hold design files as well as library data, it controls how they are updated and who can update them,
understands the relationships between items, and maintains a revision history of each item. Pulsonix
Vault can help you organise, manage and track the creation and modification of your important
Pulsonix data, at the same time making that data available where it is needed across your
organisation.
Pulsonix Vault consists of two main elements, a server and a client (or indeed many clients).
Additional elements are used to assist with tasks such as installation, configuration and backup.
Do I need to use the Vault?
You do not have to use the Vault. If for example you wish to use native Pulsonix libraries for your
Part and other library data, and the normal Windows file store for your design files, then that is fine.
There is even a single checkbox on the Options dialog that will hide away or turn off the Vault
features and commands in the user interface.
You may also decide not to use the Vault because your company already has a data or document
management system in place. There is probably no point confusing the issue by trying to use two
different systems to manage your Pulsonix data. If you are unsure about this, we can advise you.
However, even for a single user who does not share their Pulsonix data with anyone else, the Vault
offers data management facilities that should help you maintain your library and design data over
time.
Licensing
The Pulsonix Vault is a licensed item, from Version 9.0 onwards, it will require this license feature to
be available to run. If you are using a version of Pulsonix earlier than Version 8.x, you will require a
new license, this would have been supplied to you under the terms of your maintenance contract.
If you are unsure whether you have it or not, either run the License Manager and check the list of
contents where you’ll see it listed as an option, or contact your local sales office.

6 Pulsonix Vault
System Requirements
The Vault uses an industry-standard Postgres database to store its information. This database will run
on any Windows system that is supported for use with the main Pulsonix application, although you
should consider the information under ‘Deployment Planning’ below before deciding where to install
the server.
Connection to the database from the Pulsonix ‘client’ application is via an ODBC connection, using a
driver that will be installed by the Pulsonix setup program if it is not already there on your system.
To store the actual data files in the Vault, access to a shared network folder is required. This needs to
be a folder that is accessible with both read and write permission directly over your Windows
network.
Installation
There are two main components to the installation. The first is the database server, which is installed
using its own Vault Server Setup installer program.
This program contains several elements that are used to install and launch the Postgres
database server, and to prepare the Vault database for first use.
The second component is the ODBC driver that is needed on each ‘client’ computer to allow
the Pulsonix application to connect to the Postgres database.
Deployment planning
Before installing the Vault database server, there are several things you should consider to ensure you
achieve an optimal experience when using the Vault.
The Postgres database used for the Vault server has a long history of reliable operation across a wide
range of platforms, so the choice is more about the ability of the selected Windows platform to
service the demands of the database server and the clients who wish to use it.
If you expect to have a small number of connected clients, making occasional demands on the Vault
to provide data, then it is feasible to install the server on a ‘workstation’ edition of Windows,
provided you can satisfy the requirements of folder sharing for the Data Files (see below).
If instead you are contemplating large numbers of connected clients making heavy use of the Vault
data, or checking many files in and out, then it is wise to consider installing on a Server edition of
Windows such as Server 2012.
Similarly, the underlying hardware choice largely depends on how heavy you expect your demand to
be. A server that is configured without sufficient memory to cope with the load can cause the
response of the Vault operation to be degraded.
Network speed should not be a significant factor, as it will not be any different from using a network
server for file storage. Storing files – even large design files – via the Vault is no more time-
consuming than saving them to a network folder via the normal File Save commands. However, if
you have been used to storing all your files locally and are now moving to a server-based Vault
configuration, it is quite possible that you may see some increase in file read and save times due to
network latency or bandwidth issues.

Pulsonix Vault 7
Installing the database server
Installing the server tools
The first stage is to run the installer that loads your computer with the tools needed to install the Vault
database and prepare the system for use, as well as admin tools for managing your Vault. This
installer will load onto your computer everything required to create your Vault.
CD Install
If installing from the Pulsonix CD, select Vault Database Server from the start screen that should
automatically appear when you insert the CD. If this start screen does not appear, you can instead
browse to the VaultAdmin folder on the CD and click on the Setup.exe file to start the installation.
Download/Web Install
If receiving Pulsonix via the internet, the Vault Admin installation is a separate download. Again, this
is a self-contained file containing everything required to create your Vault.
Running the install
The VaultAdminSetup program displays a simple installation wizard that lets you load all the Vault
tools onto your computer. You should run this installer on the server on which you are going to install
and run the database. You may also wish to install it on a different computer if you are going to carry
out management activities such as backups from another machine, although due to the amount of data
that needs to be copied out of the Vault data area for a backup, it is recommended that this activity is
actually run directly on the server itself.
8 Pulsonix Vault
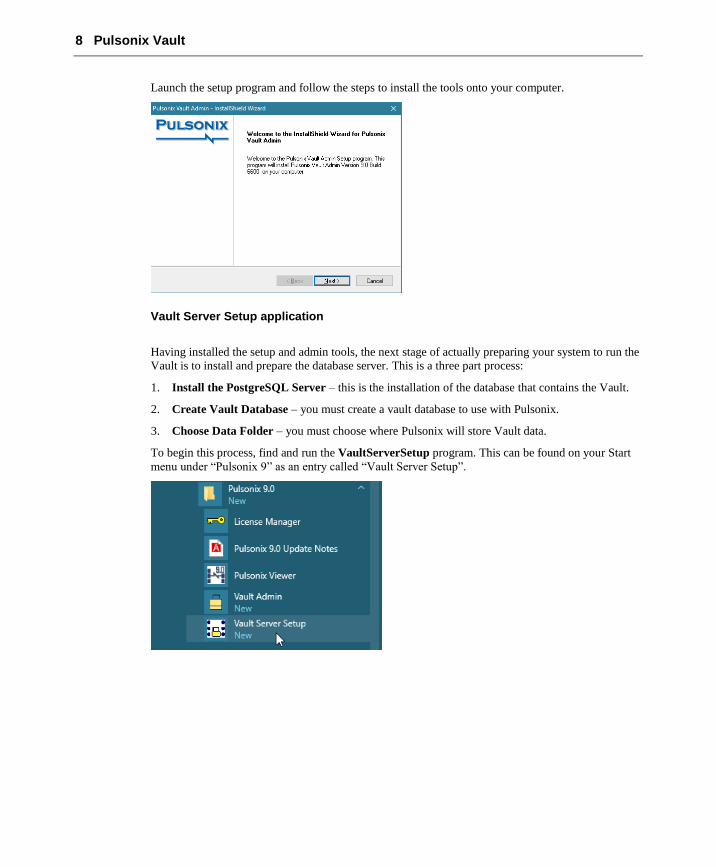
Launch the setup program and follow the steps to install the tools onto your computer.
Vault Server Setup application
Having installed the setup and admin tools, the next stage of actually preparing your system to run the
Vault is to install and prepare the database server. This is a three part process:
1. Install the PostgreSQL Server – this is the installation of the database that contains the Vault.
2. Create Vault Database – you must create a vault database to use with Pulsonix.
3. Choose Data Folder – you must choose where Pulsonix will store Vault data.
To begin this process, find and run the VaultServerSetup program. This can be found on your Start
menu under “Pulsonix 9” as an entry called “Vault Server Setup”.

Pulsonix Vault 9
The first dialog you will be presented with is the choice between setting up a Demo Vault, full or pre-
populated data for use in evaluating the software, or the Install Vault Server option, this is the option
you need to select as this will install an empty database to use with Pulsonix.
This displays a simple dialog to help you through the three stages of setting up your Vault server.
This dialog should be self-explanatory to guide you through the installation steps.
Install PostgreSQL Server
The first step for most installations will be to install the database server itself. Clicking this button
will invoke the Setup program for Postgres, which has a number of steps that you need to follow.
The first is just a simple welcome screen:

10 Pulsonix Vault
Next, you need to enter the password to use for the main Postgres administrator role. You should note
this password down as you will need it later on:
Next, the port number for the client-server communication. The default for this is 5432, which you
should not need to change unless it clashes with some other software you have running on your
network:
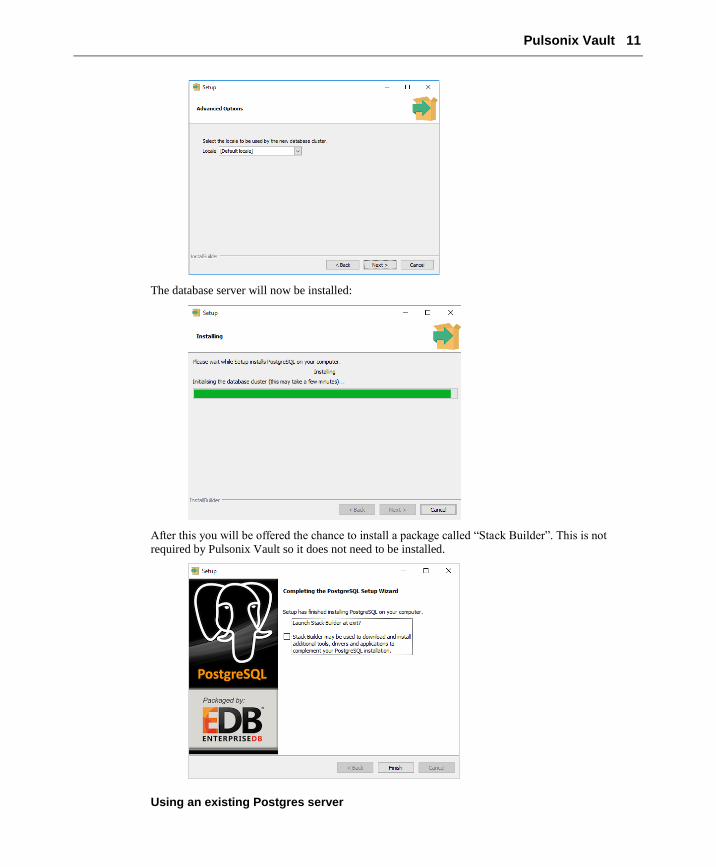
Language Locale can be left as the default setting:
Pulsonix Vault 11
The database server will now be installed:
After this you will be offered the chance to install a package called “Stack Builder”. This is not
required by Pulsonix Vault so it does not need to be installed.
Using an existing Postgres server
12 Pulsonix Vault
As the Vault Setup dialog indicates, if you already have Postgres installed and running, then you may
be able to use that to hold your Pulsonix Vault. All you should need is the relevant sign-in
information to gain admin access to the server to create the database.
However, if you are using a version of Postgres that is significantly older than the one provided with
the Vault Setup, you may encounter issues during installation of the database which could mean you
need to consider upgrading your Postgres to the version bundled with our installer.
Access through Firewalls
To connect Pulsonix clients to the Vault, network access to the Postgres server is required using the
Database Port number you specify for your new Postgres server installation. The default port number
for Postgres is 5432, although you may have chosen a different port when installing Postgres as
described above. Exactly how you open that port in your firewall on both server and clients will
depend on your version of Windows and which security software you are running.
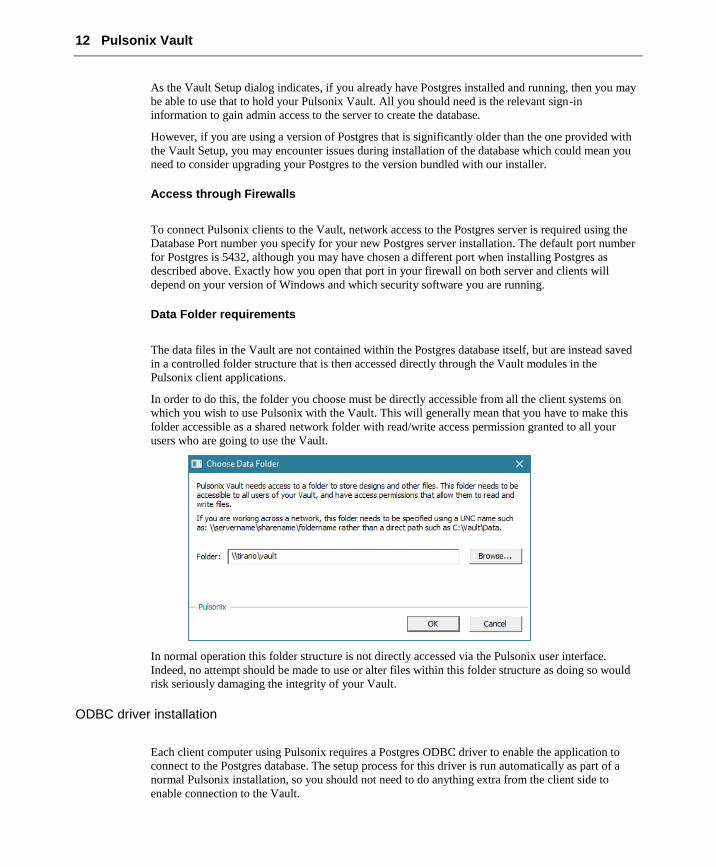
Data Folder requirements
The data files in the Vault are not contained within the Postgres database itself, but are instead saved
in a controlled folder structure that is then accessed directly through the Vault modules in the
Pulsonix client applications.
In order to do this, the folder you choose must be directly accessible from all the client systems on
which you wish to use Pulsonix with the Vault. This will generally mean that you have to make this
folder accessible as a shared network folder with read/write access permission granted to all your
users who are going to use the Vault.
In normal operation this folder structure is not directly accessed via the Pulsonix user interface.
Indeed, no attempt should be made to use or alter files within this folder structure as doing so would
risk seriously damaging the integrity of your Vault.
ODBC driver installation
Each client computer using Pulsonix requires a Postgres ODBC driver to enable the application to
connect to the Postgres database. The setup process for this driver is run automatically as part of a
normal Pulsonix installation, so you should not need to do anything extra from the client side to
enable connection to the Vault.

Pulsonix Vault 13
Adding a missing ODBC driver
If for any reason your system does not have the ODBC driver even after the full Pulsonix setup has
been run, then you can install the driver separately. If you look in the folder where you have already
installed Pulsonix, you should find a sub-folder called “Installers”. In there will be a psqlodbc
installation package (.MSI). Simply launch that installation package and it will update your system to
include the ODBC driver.
You will also find a copy of the same driver MSI file in the folder into which you installed the Vault
Setup tools as part of the server setup.
Checking ODBC drivers and versions
If you want to check which ODBC drivers are present on your computer, you need to use the
Windows Control Panel to do this. Exactly how to do this will depend on your version of Windows,
as there have been some interface changes for ODBC drivers between different Windows versions.
The easiest way is to launch Control Panel, then search for ODBC. On Windows 10 you should see
two entries for 32- and 64-bit ODBC Data Sources, so you need to select the 32-bit entry. On earlier
versions of Windows you may find this is not so clear, on some it will only display one entry that
takes you to the 64-bit version although it doesn’t actually tell you that. The easiest way to be sure in
this situation is to close any ODBC manager dialogs that are already open (as they often don’t tell you
whether they are dealing with 32-bit or 64-bit drivers), press the Windows ‘flag’ key and R to open
the Run dialog, and enter:
%WINDIR%\syswow64\odbcad32.exe
Once you have the Data Source admin dialog running, go to the Drivers tab and you should be able to
scroll down to the entries for Postgres:

14 Pulsonix Vault
You may see a slightly different wording from that shown in the above picture, depending on the
exact version of the Postgres driver that is installed.
Note: if you see a different Postgres driver name, perhaps for an earlier version of Postgres, then this
may still work with the Vault but you may have additional settings to enter when you come to connect
your Pulsonix clients to the Vault (see “Alternate ODBC Drivers” below).
Key Concepts of the Vault
What can be stored in the Vault?
The Vault can hold the following types of ‘library’ data: Parts, Footprints, Schematic Symbols, and
Schematic and PCB Doc Symbols.
It can also hold the following types of file-based data: Schematic and PCB Designs, Schematic and
PCB Technology Files, Schematic and PCB Profiles, Schematic Block Files and PCB Panels.
The Vault is designed to provide you with a secure environment for managing your ‘published’ data.
You may still use locally-stored design files and native libraries for developing data, and release your
completed items to the Vault when you are ready to do so.
What is an ‘item’?
Each item that is placed into the Vault is given a unique item identifier, or “IID”. Each time that item
is saved to the Vault, a new version of the item is created, with this latest version having a new
version timestamp or “Version”. This is distinct from the “Revision”, which is the name given to this
version as defined in your Revision Naming Scheme. In this way, the Vault contains a full history of
all revisions of an item.
The IID combined with the Version uniquely identifies a specific version of an item. In this way a
Part for example can know which exact version of a Footprint it is to use. Not just any version of the
Footprint, only the specific version that is indicated by the IID and Version listed in the information
held along with the Footprint name inside the Part.

Pulsonix Vault 15
Other Vault item properties
In addition to each item having its own Item ID, every Vault installation has its own Vault ID. This
allows the application to clearly identify an item as belonging to the current Vault. This means you
cannot share items across separate Vaults, because there is no safe way of ensuring the uniqueness of
the item ID of items created in different Vaults. You can still take an item from one Vault and check
it into your own Vault as a new item, at which point it will be assigned a new item ID.
Cross References
Depending on the settings you use when publishing your data to the Vault, the application will
maintain cross-references between related items, allowing rapid access to information such as ‘Where
Used’ without having to resort to time-consuming compilation of reports.
Managing and updating Vault items
There are four basic actions which you can use to manage your Vault items. Your Permissions will
control which of these actions are available to you for the various types of item in the Vault.
16 Pulsonix Vault
Check Out
Check Out will “book out” an item from the Vault for you to make changes. This action will be
recorded in the Audit Trail, and the item will be marked as checked-out by you to prevent other users
from making changes to it at the same time. They will still be able to access the item, for example for
a Part they will still be able to use that Part in one of their designs, but they will not be able to check it
out to alter it until you have finished with it.
Check In
After modifying an item, Check In will “book it in” to the Vault to commit your changes. Another
record is placed in the Audit Trail, the item you are checking in is given a new revision, the ‘lock’ on
it is released, and the newly modified item is available for others to use.
You can also Check In an item that is not yet in the Vault, including newly-created items such as
Parts and Footprints.
Uncheck
If you have used Check Out to book out an item to change it and then change your mind, you can use
Uncheck to release your hold on that item.
Copy Out
If you need to use an item for something without actually changing it, then Copy Out can be used to
pull a copy of the item to be stored locally. You might want to use this for example to open a PCB
design to generate manufacturing data or run reports, actions that don’t actually change the design in
a way that you want to record.
Preparing your Vault for first use
Before using the Vault, there are some steps you should go through to make sure everything is set up
how you need it to work. This includes creation of login details if you are sharing the Vault with other
Pulsonix users, initial settings that control how items need to refer to each other, and so on.
Testing Connection to Vault
Launch the Pulsonix application, and from the Setup menu, choose Vault. On the Sign In page, enter
the built-in user name “admin” and the password “password”. This is a predefined user that is created
when the Vault database is installed.
You will also need to enter the name of the server on which the Postgres database server is running,
and alter the port number if you are not using the default setting.

Pulsonix Vault 17
Now click the Test button to verify your connection to the Vault. This will connect via ODBC to the
database server, and check that the Vault database exists and contains valid data. If successful, the
Data Folder field on the dialog will be updated to show the full path to where the Vault data files are
stored, as confirmation that all is well.
Once you have successfully connected, you should change the default password to something more
secure. See “Users and Groups” below for more information about managing Users and Groups.
Alternate ODBC Drivers
If you click Test and get error messages about being unable to connect to the database, or a popup
dialog about selecting a Data Source, then it is possible that either you don’t have a Postgres ODBC
driver installed, or that the version of that driver requires a different connection setup to the ones that
the Pulsonix application knows about.
The drivers Pulsonix knows about are:
• PostgreSQL ANSI
• PostgreSQL ODBC Driver(ANSI)
If you are using a driver that has a slightly different name, you will need to use that name in the
ODBC Driver field of the Vault Setup dialog.
Users and Groups
Each Vault user will need their own Vault sign-in account set up. These are completely separate from
both Windows user accounts and Postgres users or roles, and are only used to manage access to the
facilities of the Vault.
18 Pulsonix Vault
Although in theory you can share one Vault sign-in across multiple Pulsonix users, this is not
recommended as it is the Vault user information that is used to record actions such as checking items
out and back in. If you have multiple Pulsonix users sharing one Vault sign-in, you won’t be able to
tell which user has actually carried out those actions.
Care should be taken when deciding who is able to carry out some of the administrative operations, so
that the security and integrity of your system is assured. For example, any User belonging to a Group
with permission to ‘Alter users and groups’ can replace the password of any User in the system, so
this level of permission should clearly not be available to everyone.
Groups and Permissions
Creating new Groups and editing existing ones
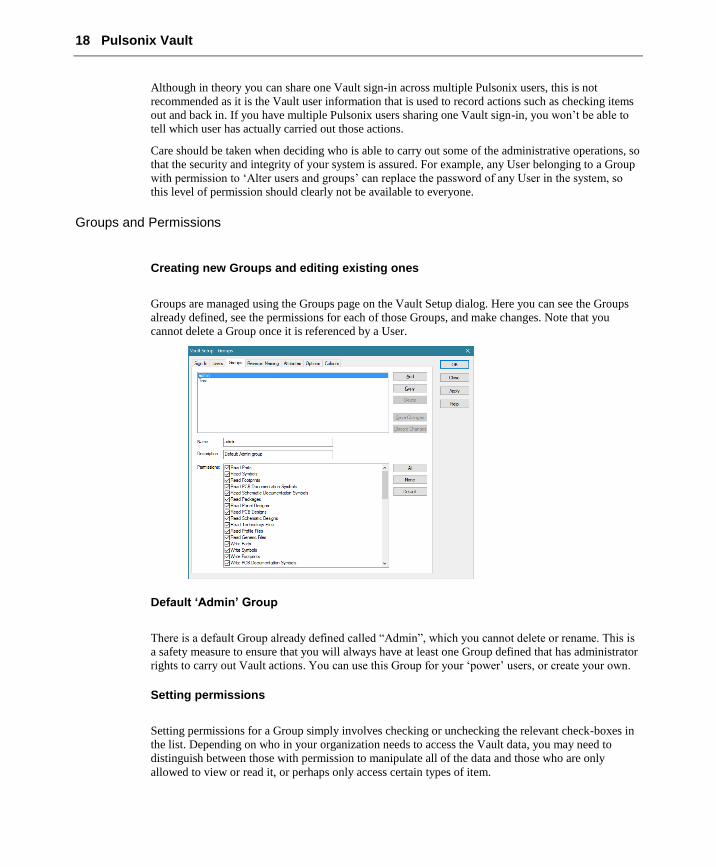
Groups are managed using the Groups page on the Vault Setup dialog. Here you can see the Groups
already defined, see the permissions for each of those Groups, and make changes. Note that you
cannot delete a Group once it is referenced by a User.
Default ‘Admin’ Group
There is a default Group already defined called “Admin”, which you cannot delete or rename. This is
a safety measure to ensure that you will always have at least one Group defined that has administrator
rights to carry out Vault actions. You can use this Group for your ‘power’ users, or create your own.
Setting permissions
Setting permissions for a Group simply involves checking or unchecking the relevant check-boxes in
the list. Depending on who in your organization needs to access the Vault data, you may need to
distinguish between those with permission to manipulate all of the data and those who are only
allowed to view or read it, or perhaps only access certain types of item.
Pulsonix Vault 19
Users
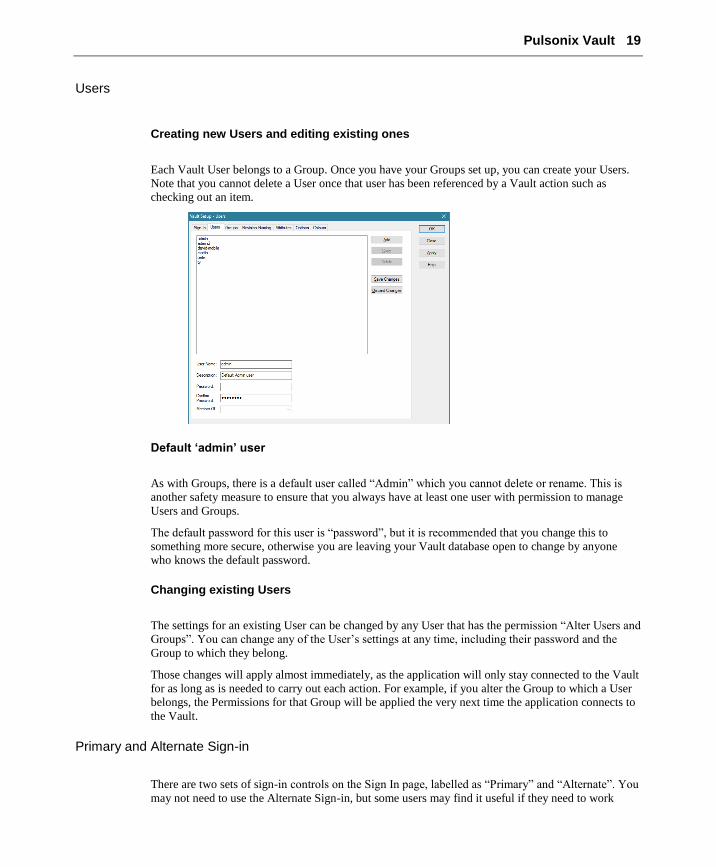
Creating new Users and editing existing ones
Each Vault User belongs to a Group. Once you have your Groups set up, you can create your Users.
Note that you cannot delete a User once that user has been referenced by a Vault action such as
checking out an item.
Default ‘admin’ user
As with Groups, there is a default user called “Admin” which you cannot delete or rename. This is
another safety measure to ensure that you always have at least one user with permission to manage
Users and Groups.
The default password for this user is “password”, but it is recommended that you change this to
something more secure, otherwise you are leaving your Vault database open to change by anyone
who knows the default password.
Changing existing Users
The settings for an existing User can be changed by any User that has the permission “Alter Users and
Groups”. You can change any of the User’s settings at any time, including their password and the
Group to which they belong.
Those changes will apply almost immediately, as the application will only stay connected to the Vault
for as long as is needed to carry out each action. For example, if you alter the Group to which a User
belongs, the Permissions for that Group will be applied the very next time the application connects to
the Vault.
Primary and Alternate Sign-in
There are two sets of sign-in controls on the Sign In page, labelled as “Primary” and “Alternate”. You
may not need to use the Alternate Sign-in, but some users may find it useful if they need to work
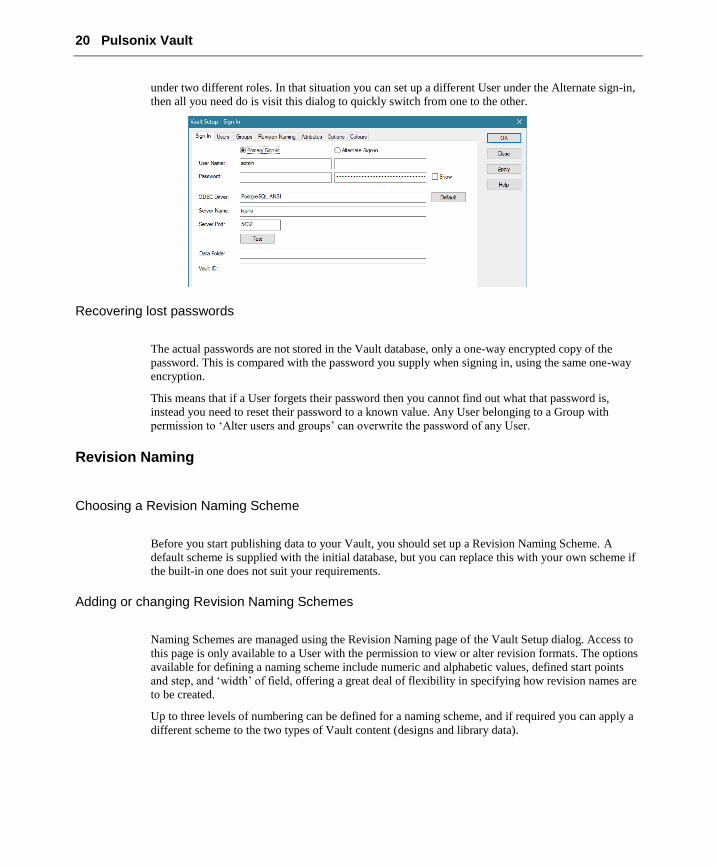
20 Pulsonix Vault
under two different roles. In that situation you can set up a different User under the Alternate sign-in,
then all you need do is visit this dialog to quickly switch from one to the other.
Recovering lost passwords
The actual passwords are not stored in the Vault database, only a one-way encrypted copy of the
password. This is compared with the password you supply when signing in, using the same one-way
encryption.
This means that if a User forgets their password then you cannot find out what that password is,
instead you need to reset their password to a known value. Any User belonging to a Group with
permission to ‘Alter users and groups’ can overwrite the password of any User.
Revision Naming
Choosing a Revision Naming Scheme
Before you start publishing data to your Vault, you should set up a Revision Naming Scheme. A
default scheme is supplied with the initial database, but you can replace this with your own scheme if
the built-in one does not suit your requirements.
Adding or changing Revision Naming Schemes
Naming Schemes are managed using the Revision Naming page of the Vault Setup dialog. Access to
this page is only available to a User with the permission to view or alter revision formats. The options
available for defining a naming scheme include numeric and alphabetic values, defined start points
and step, and ‘width’ of field, offering a great deal of flexibility in specifying how revision names are
to be created.
Up to three levels of numbering can be defined for a naming scheme, and if required you can apply a
different scheme to the two types of Vault content (designs and library data).

Pulsonix Vault 21
Attributes
Within the database, different types of items are stored in their own tables, with fields in those tables
that are appropriate for the type of item. All of them will have a Name field for example, but some
fields are only present for some types of item. A Part for example has fields for Description and Part
Family.
The fields defined for a type of item will control what is available to you when using the Search
dialog and in other places where field names have to be chosen.
You can further customise the table definitions by adding Attribute fields. These will be populated
with values from the defined attributes as items are published to the Vault. You could for example
add a field “Mfr” to the Part table, which will then be populated with Mfr attribute values as parts are
checked into the Vault.
How to set them up
Custom attributes are set up using the Attributes page of the Vault Setup dialog. As with other setup
features, access is controlled by permissions.
22 Pulsonix Vault
Options
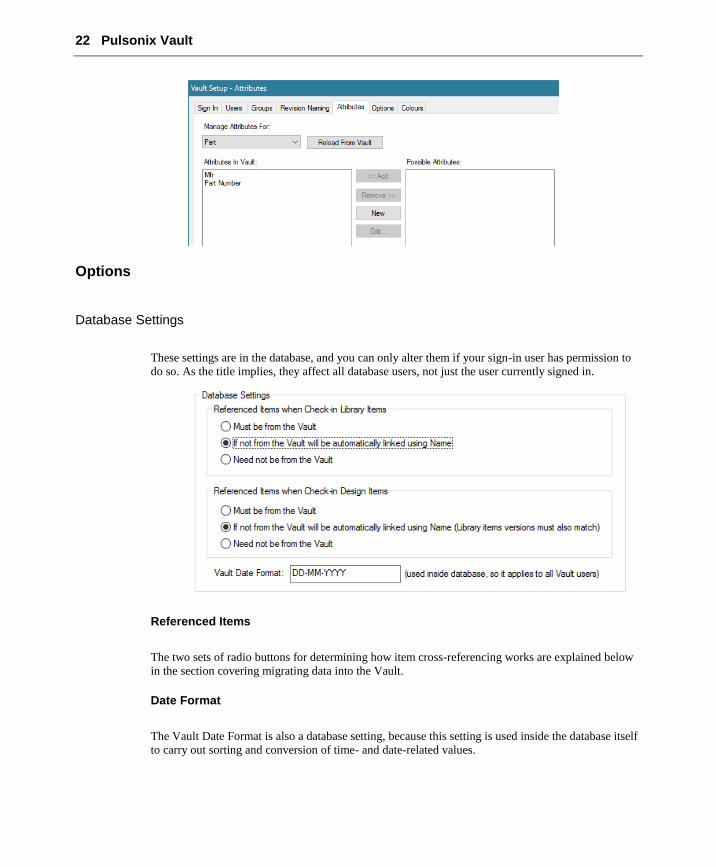
Database Settings
These settings are in the database, and you can only alter them if your sign-in user has permission to
do so. As the title implies, they affect all database users, not just the user currently signed in.
Referenced Items
The two sets of radio buttons for determining how item cross-referencing works are explained below
in the section covering migrating data into the Vault.
Date Format
The Vault Date Format is also a database setting, because this setting is used inside the database itself
to carry out sorting and conversion of time- and date-related values.

Pulsonix Vault 23
Personal Settings
Again as the title implies, these are settings that only affect your own system.
Folder Settings
Setting up these folders to appropriate values will help you to keep your data organised when
interacting with the Vault.
The folder for ‘Transferred Libraries Backup’ is used when migrating library data into the Vault. To
assist you in separating data already migrated from that which has yet to be migrated, completed
library files are moved aside to the folder designated here so that those libraries are no longer looked
at by the application when doing things like filling in lists of library items.
To help keep your ‘local’ working copies of Vault data organised, it is recommended that you check
the ‘Mirror Vault Folder’ box and enter a suitable folder name. This folder name will be used to
construct a suitable location for file-based items retrieved from the Vault.
For example, if you have a PCB design in your Vault in a folder called “\Vault\Designs\Project6”,
and your Mirror folder is “C:\Work\VaultMirror”, when you Check Out that design it will be copied
into the local folder “C:\Work\VaultMirror\Designs\Project6” for you to work on it.
Similarly for working with library data, there are folders for checked-out and copied-out items. These
folders are not optional, you need to set them up before the application will allow you to check or
copy out library items, because it has to make sure that the folders you choose here is included in the
search order for libraries so that the local items are ‘visible’ to all the normal application commands.
24 Pulsonix Vault
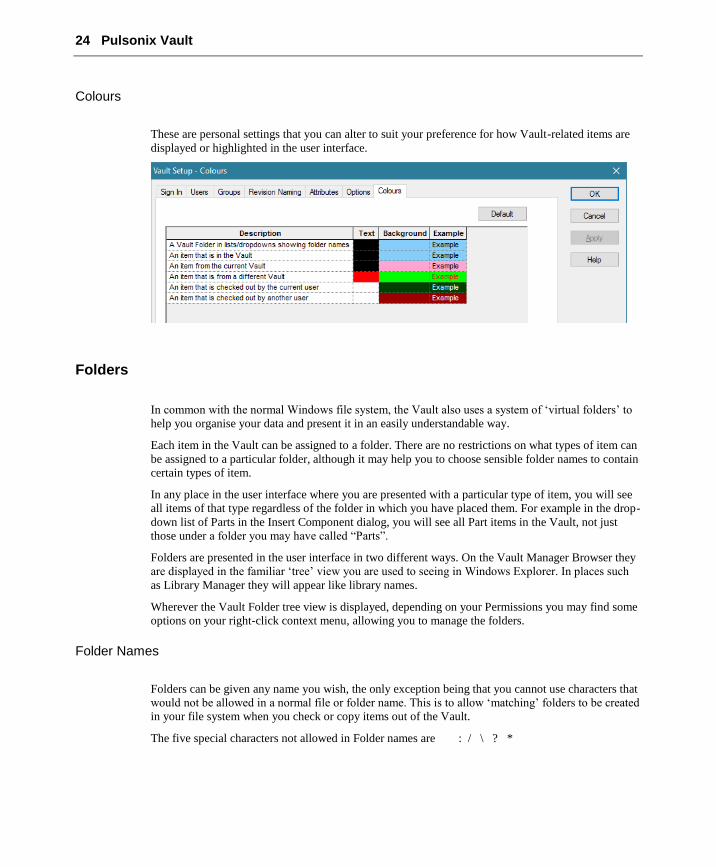
Colours
These are personal settings that you can alter to suit your preference for how Vault-related items are
displayed or highlighted in the user interface.
Folders
In common with the normal Windows file system, the Vault also uses a system of ‘virtual folders’ to
help you organise your data and present it in an easily understandable way.
Each item in the Vault can be assigned to a folder. There are no restrictions on what types of item can
be assigned to a particular folder, although it may help you to choose sensible folder names to contain
certain types of item.
In any place in the user interface where you are presented with a particular type of item, you will see
all items of that type regardless of the folder in which you have placed them. For example in the drop-
down list of Parts in the Insert Component dialog, you will see all Part items in the Vault, not just
those under a folder you may have called “Parts”.
Folders are presented in the user interface in two different ways. On the Vault Manager Browser they
are displayed in the familiar ‘tree’ view you are used to seeing in Windows Explorer. In places such
as Library Manager they will appear like library names.
Wherever the Vault Folder tree view is displayed, depending on your Permissions you may find some
options on your right-click context menu, allowing you to manage the folders.
Folder Names
Folders can be given any name you wish, the only exception being that you cannot use characters that
would not be allowed in a normal file or folder name. This is to allow ‘matching’ folders to be created
in your file system when you check or copy items out of the Vault.
The five special characters not allowed in Folder names are : / \ ? *
Pulsonix Vault 25
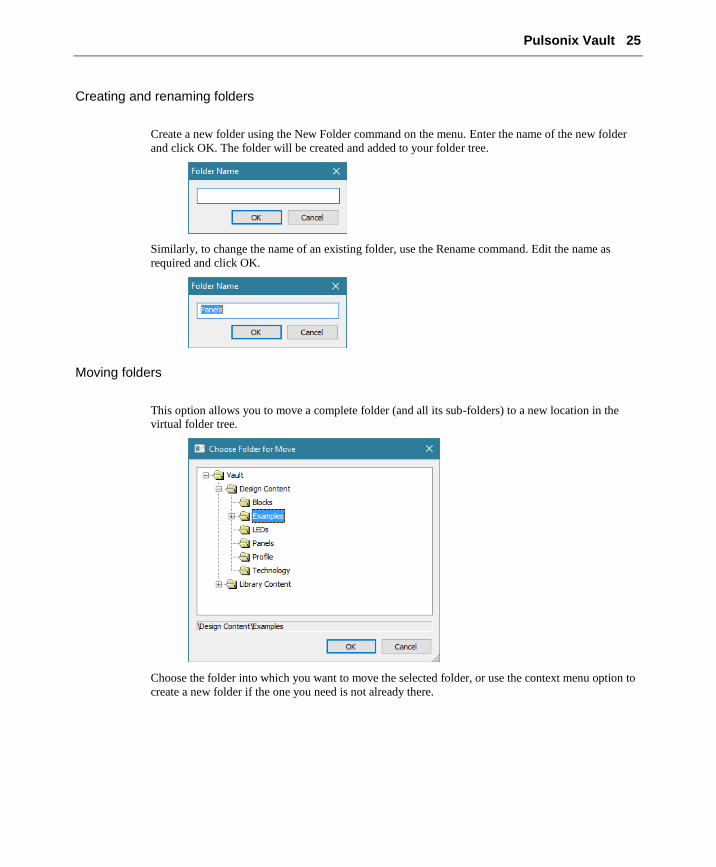
Creating and renaming folders
Create a new folder using the New Folder command on the menu. Enter the name of the new folder
and click OK. The folder will be created and added to your folder tree.
Similarly, to change the name of an existing folder, use the Rename command. Edit the name as
required and click OK.
Moving folders
This option allows you to move a complete folder (and all its sub-folders) to a new location in the
virtual folder tree.
Choose the folder into which you want to move the selected folder, or use the context menu option to
create a new folder if the one you need is not already there.

26 Pulsonix Vault
Migrating Library Data into the Vault
Libraries-To-Vault is a page on the Vault Manager dialog, which is accessed from the File menu or
from the Vault toolbar.
Before you start
Before starting to migrate your library data into the Vault, there are some choices you need to make.
These have been mentioned earlier in the section covering the Options page of the Setup dialog, but
are explained here in more detail.
Some library items are ‘self-contained’, as they don’t reference or ‘point to’ other items. This
includes Footprints, Schematic Symbols, and in fact all types except Parts.
For Parts, they can contain references to Footprints, Schematic Symbols, and/or other Parts (as
Associated Parts). In native libraries, these references work purely by name, so a Footprint in a Part is
just a name, and that name is used to scan the available Footprint libraries to locate an item with that
name. In order to get the most benefit from using the Vault for your library data, the references need
to do more than that.
Referenced Items ‘Must be from the Vault’
This is the ‘strongest’ rule. Choosing this option means that in order to check in a Part to the Vault, all
items referenced by that Part must be from the Vault. That is, your Part must have been created or
updated to point directly to Vault-based items for all its Footprints, Symbols and Associated Parts.
Use this option if you want to impose the strongest possible control on integrity of library data. Doing
this will ensure that you know beforehand precisely which item and version is being used for
everything that each Part needs.
Referenced Items ‘Linked using Name’
This is the ‘middle ground’, allowing you a little more flexibility in how your Part data is configured
before it can be successfully checked in.
With this option selected, any item referenced by a Part still needs to be in the Vault, but you do not
have to ‘preload’ those items into the Part yourself using the Part Editor. Instead, as the Part is
validated during the check-in process, any referenced item that does not have complete Vault
information is looked up by name in the Vault.
As the items are matched up in this way, the relevant item and version identifiers are added to the
references in the Part, so that once the check-in process is complete the Part is fully ‘wired up’ with
proper references to explicit Vault-based items.
This allows you to take an existing native library Part and check it into the Vault without having to go
through any editing process beforehand, as long as the items named do actually exist in the Vault.

Pulsonix Vault 27
This of course means that you do need to check in your Footprints and Schematic Symbols before
checking in any Parts that use them, something that the Library-To-Vault dialog will help you with.
Referenced Items ‘Need not be from Vault’
This is the most ‘relaxed’ setting, allowing you to check in Parts without ensuring that referenced
items exist in the Vault already. No checking or cross-referencing is done, the Parts are simply saved
to the Vault as they are.
Selecting this option means you are using the Vault simply as a kind of ‘file store’, without the added
benefits that the other options give you. You get no ‘Where Used’ or ‘Refers To’ capability, and no
ability to check whether an item is used before allowing you to delete it from the Vault.
Item Names
To be compatible with how all the commands and dialogs in the application work, and to avoid
ambiguity, the Vault will not allow you to store duplicate named items of any given type.
Using the ‘Libraries to Vault’ dialog
Libraries-To-Vault is a page on the Vault Manager dialog, which is accessed from the File menu or
from the Vault toolbar.
Adding libraries
The first stage (after selecting the appropriate ‘Referenced Items’ option) is to choose the libraries
that you want to migrate into the Vault. You can add all the libraries that exist in your library search
order or add individual library files from elsewhere by browsing to them.
You can also choose design files as a source of library data. This may be useful in situations where
you are trying to take library items such as Footprints from an old design file for which you no longer
have the libraries, or perhaps from a design imported from another system.
Below this are some settings which you should review, to ensure that the data is arranged as you
require when posted into the Vault.
To avoid confusion over which libraries have been processed and which haven’t, it is generally
advisable to keep the checkbox ‘Move Completed Libraries to Backup’ checked. Libraries are posted
to the Vault in their entirety, and only moved to backup once the whole library has been successfully
checked in. Once check in is completed for a library, your Vault will become the source for that
28 Pulsonix Vault
library data and having the original library file still in place in its original folder may only lead to
confusion.
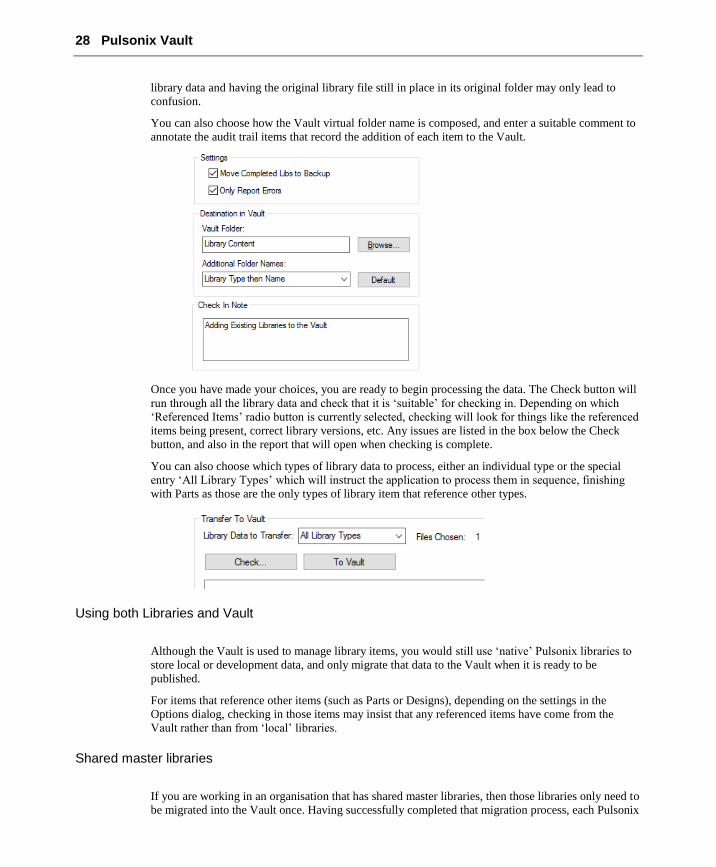
You can also choose how the Vault virtual folder name is composed, and enter a suitable comment to
annotate the audit trail items that record the addition of each item to the Vault.
Once you have made your choices, you are ready to begin processing the data. The Check button will
run through all the library data and check that it is ‘suitable’ for checking in. Depending on which
‘Referenced Items’ radio button is currently selected, checking will look for things like the referenced
items being present, correct library versions, etc. Any issues are listed in the box below the Check
button, and also in the report that will open when checking is complete.
You can also choose which types of library data to process, either an individual type or the special
entry ‘All Library Types’ which will instruct the application to process them in sequence, finishing
with Parts as those are the only types of library item that reference other types.
Using both Libraries and Vault
Although the Vault is used to manage library items, you would still use ‘native’ Pulsonix libraries to
store local or development data, and only migrate that data to the Vault when it is ready to be
published.
For items that reference other items (such as Parts or Designs), depending on the settings in the
Options dialog, checking in those items may insist that any referenced items have come from the
Vault rather than from ‘local’ libraries.
Shared master libraries
If you are working in an organisation that has shared master libraries, then those libraries only need to
be migrated into the Vault once. Having successfully completed that migration process, each Pulsonix

Pulsonix Vault 29
user should then remove the master library folder(s) from their library folder search order, so that they
can switch across to access the master data from the Vault instead of the shared native libraries.

30 Pulsonix Vault
Migrating Design Data into the Vault
Designs-To-Vault is a page on the Vault Manager dialog, which is accessed from the File menu or
from the Vault toolbar.
Before you start
Design items includes actual PCB and Schematic design files, as well as file-based items such as PCB
and Schematic Technology Files and Profiles, and PCB Panels.
As with library data, there are choices available for how rigorous the references between items are
enforced when checking them in.
Referenced Items ‘Must be from the Vault’
This is the ‘strongest’ rule. Choosing this option means that in order to check in a file to the Vault, all
items referenced by that file must be from the Vault. This means all referenced items, including
Technology file, Profile, Parts, Footprints, etc.
Use this option if you want to impose the strongest possible control on integrity of design data. Doing
this will ensure that you know beforehand precisely which item and version is being used for
everything that each file needs.
Referenced Items ‘Linked using Name’
This is the ‘middle ground’, allowing you a little more flexibility in how your design data is
configured before it can be successfully checked in.
With this option selected, any item referenced by a file still needs to be in the Vault, but you do not
have to ‘preload’ those items into the file yourself using the Part Editor. Instead, as the design file is
validated during the check-in process, any referenced item that does not have complete Vault
information is looked up by name in the Vault.
To avoid accidental link-up to the wrong item simply because the names match, the application does
insist that library item versions match as well. Each library item (Footprint, Symbol, etc.) in a design
has a timestamp inside it, the timestamp that is updated as a library item is saved to the library file.
When the design is checked into the Vault, it compares both name and library version to ensure that
the right library item has been found.
As the items are matched up in this way, the relevant item and version identifiers are added to the
references in the design, so that once the check-in process for the design is complete it is fully ‘wired
up’ with proper references to explicit Vault-based items.
This allows you to take an existing design and check it into the Vault without having to go through
any editing process beforehand, as long as the items named do actually exist in the Vault, and they are
the correct version.
Pulsonix Vault 31
Referenced Items ‘Need not be from Vault’
This is the most ‘relaxed’ setting, allowing you to check in design files without ensuring that
referenced items exist in the Vault already. No checking or cross-referencing is done, the files are
simply saved to the Vault as they are.
Selecting this option means you are using the Vault simply as a kind of ‘file store’, without the added
benefits that the other options give you. You get no ‘Where Used’ or ‘Refers To’ capability, and no
ability to check whether an item is used before allowing you to delete it from the Vault.
Understanding and managing your Vault contents
The Vault Manager dialog
This dialog is accessed from the File menu or the Vault toolbar. It is the main interface between
Pulsonix and the connected Vault. From here you can browse the Vault contents, examine the
revision history of items, search for items, and carry out other management tasks.
Browser Page
The Browser page is where you can carry out many of the management tasks relating to your Vault.
At the left-hand side is the folder tree, showing the Vault virtual folders that have been defined.
To the right are two grids and a preview area. The upper grid will display the items found in the
selected folder, those resulting from using a search, or those found by choosing one of the actions
available on items in the lower grid.
The lower grid shows information depending on which of the three modes you select.
For Audit Trail, you will see all the Audit Trail records relating to the item selected in the upper grid.
Thus in the picture below you can see that a part is selected in the upper grid, and its Audit Trail
records displayed below.
You can also select the mode ‘Where Used’, which will list all the places where the item selected in
the upper grid is used. This allows you for example to quickly locate all the Parts and Designs that use
a particular Footprint. Alternatively, the ‘Refers To’ mode shows all the items referenced by the
selected item, for example you can list all the Parts, Footprints and other items used by a Design.
32 Pulsonix Vault
Search
At the top right of the Browser dialog is a Search button, which opens the Search dialog. Here you
can find a set of controls that provide you with the tools to search across the whole Vault for the
information you require.
For each type of Vault item you can match up to three fields, and for each type of item or all types
you can search on the checked-out status.
There are also controls along the top of the dialog that allow you to load and save searches to file so
that they are easily accessible.
Alongside the Search button on the main Browser page is a drop-down list. That list will show the
names of all the Vault search files currently found in the folder you last used to save a Search file.
Pulsonix Vault 33
This allows you to quickly access your favourite searches without having to return to the Search
dialog each time.
Audit Trail
The final page on the Manager dialog is the Audit Trail, where (if your permissions allow) you can
examine the audit trail which records all activity in the Vault.
Here you will see the Audit Trail records listed, and controls to allow you to filter the display by
various parameters including User name and action type.
Note that the Audit Trail can grow quite large so it is not advisable to uncheck the Filter button and
try to display the entire Audit Trail in one go.
Reports
Reports can be generated containing Vault information using the Report Maker. Some items
(components, symbols, etc.) can report their Vault properties such as item ID or revision name, and it
is also possible to iterate through a list of Vault items and report things such as their checked-out state
and related Audit Trail records.
Deleting items from the Vault
Items can be deleted from the Vault, but on certain conditions.
The Delete command will only be available to Users belonging to a Group with Delete permissions
for the type(s) of item selected.
In addition, if an item is cross-referenced from another item then it cannot be deleted. For example a
Footprint that is used by a Part or a Design cannot be removed.
It is also possible to delete a specific version of an item, by right-clicking on the relevant row
showing that version in the Audit Trail view of the details grid in the Browser.
Using Vault-based data in your application
Once data (library data and file-based data) is in the Vault, it is accessible within Pulsonix in much
the same way as native data. In the Insert Component dialog for example, Vault-based Parts are listed
for you to use in the same way as those from your native libraries. Some colour-coding and other
alterations in the way they are presented will help you to distinguish between Vault and native items
where you need to, without getting in the way of normal usage.
Library Search Order
In the Folders page of Library Manager, or the Libraries page of the Folders dialog, you will see that
there is a special entry in the folder list called “[Vault]”. This is the placeholder for all Vault-based
library data, and is automatically included in your folder list to allow you to set the order of
precedence for how library data is ‘discovered’ for things like filling in the list of Parts in Insert
Component.

34 Pulsonix Vault
The library item folder you chose on the Options page of the Vault Setup dialog should be placed
above the Vault pseudo-folder entry, so that when you check out an item from the Vault the
application commands will ‘see’ that local copy first in preference to the one in the Vault.
All your other libraries should probably be positioned below the Vault, so that you know you are
using published Vault data wherever possible, and only referring to locally-stored items for things
you have checked out or those you are still developing and have yet to be published to the Vault.
Parts, Footprints and other library items
Wherever you would normally expect to access library items, your Vault-based library items will also
be included. Each Vault virtual folder which contains the required type of library item will be
displayed as if it was a library, allowing you to easily browse through the available data quickly and
easily.
For example, here in Insert Component you can see each Vault folder that contains Parts is drawn in
the colour we happen to have chosen for Vault folders. This helps you to distinguish Vault-based
items from those you may have in native library files:
Pulsonix Vault 35
Similarly, here in Library Manager you can easily see the Vault-based parts:
If instead you select a library into which you have checked-out the items you need to edit, these will
be displayed clearly in their own colour. In this example, you can see the bright pink items that
36 Pulsonix Vault
indicate that these are from the Vault but not currently in the Vault. This is an important distinction to
make:
Pulsonix Vault 37
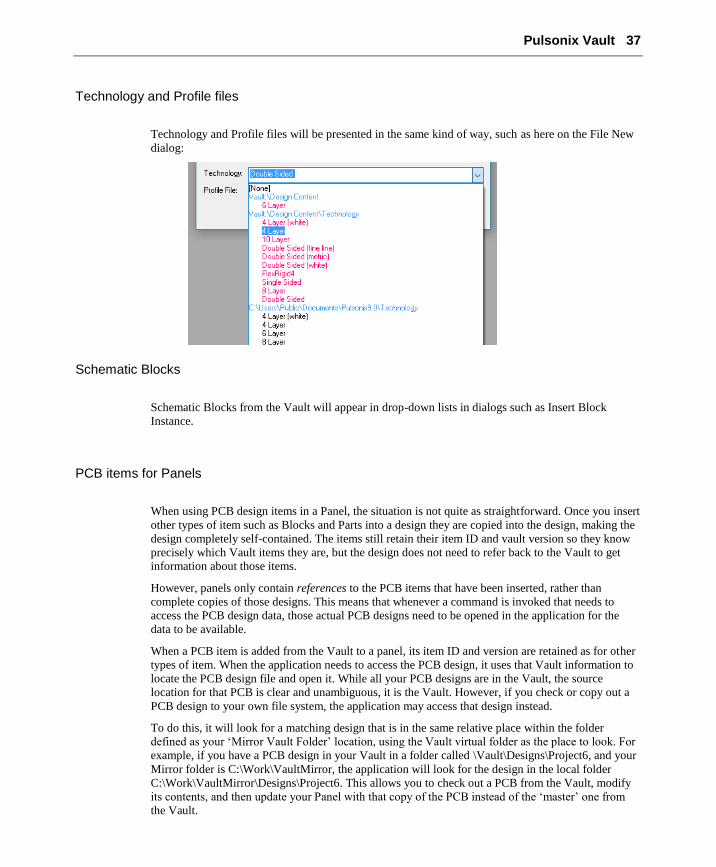
Technology and Profile files
Technology and Profile files will be presented in the same kind of way, such as here on the File New
dialog:
Schematic Blocks
Schematic Blocks from the Vault will appear in drop-down lists in dialogs such as Insert Block
Instance.
PCB items for Panels
When using PCB design items in a Panel, the situation is not quite as straightforward. Once you insert
other types of item such as Blocks and Parts into a design they are copied into the design, making the
design completely self-contained. The items still retain their item ID and vault version so they know
precisely which Vault items they are, but the design does not need to refer back to the Vault to get
information about those items.
However, panels only contain references to the PCB items that have been inserted, rather than
complete copies of those designs. This means that whenever a command is invoked that needs to
access the PCB design data, those actual PCB designs need to be opened in the application for the
data to be available.
When a PCB item is added from the Vault to a panel, its item ID and version are retained as for other
types of item. When the application needs to access the PCB design, it uses that Vault information to
locate the PCB design file and open it. While all your PCB designs are in the Vault, the source
location for that PCB is clear and unambiguous, it is the Vault. However, if you check or copy out a
PCB design to your own file system, the application may access that design instead.
To do this, it will look for a matching design that is in the same relative place within the folder
defined as your ‘Mirror Vault Folder’ location, using the Vault virtual folder as the place to look. For
example, if you have a PCB design in your Vault in a folder called \Vault\Designs\Project6, and your
Mirror folder is C:\Work\VaultMirror, the application will look for the design in the local folder
C:\Work\VaultMirror\Designs\Project6. This allows you to check out a PCB from the Vault, modify
its contents, and then update your Panel with that copy of the PCB instead of the ‘master’ one from
the Vault.
38 Pulsonix Vault
Reloading data and updating references
Part references to footprints, symbols and associated parts
Parts may include references to footprints, schematic symbols and/or associated parts. For a fully
cross-referenced Part in the Vault, links between each version of the Part and the specific versions of
those referenced items are maintained automatically.
When you have been editing a checked-out Footprint and decide to check it back into the Vault, to
save you having to track down all the Parts that use that Footprint and refresh them to point to the
new version of the Footprint, the application can do that for you.
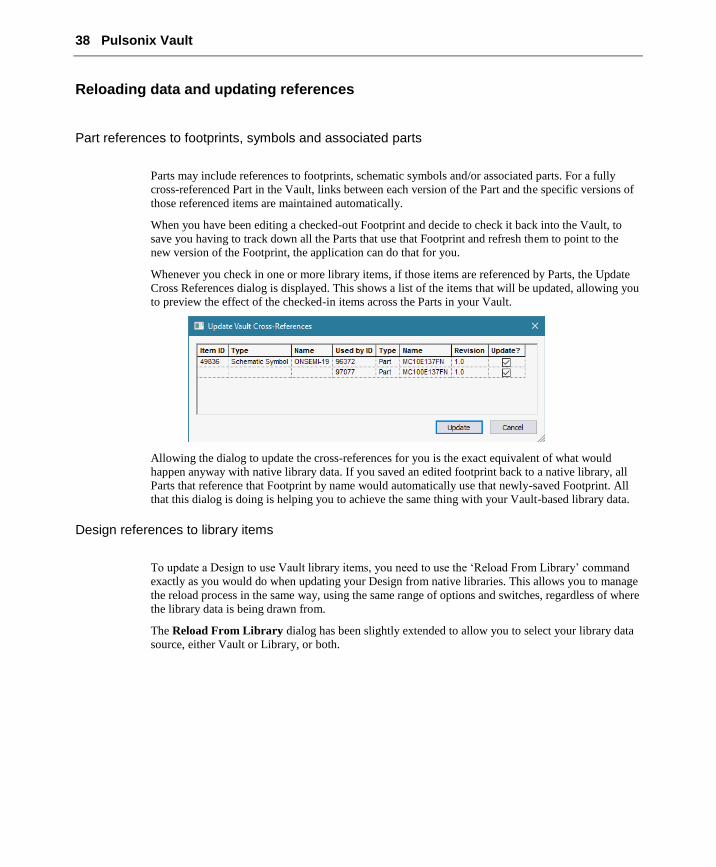
Whenever you check in one or more library items, if those items are referenced by Parts, the Update
Cross References dialog is displayed. This shows a list of the items that will be updated, allowing you
to preview the effect of the checked-in items across the Parts in your Vault.
Allowing the dialog to update the cross-references for you is the exact equivalent of what would
happen anyway with native library data. If you saved an edited footprint back to a native library, all
Parts that reference that Footprint by name would automatically use that newly-saved Footprint. All
that this dialog is doing is helping you to achieve the same thing with your Vault-based library data.
Design references to library items
To update a Design to use Vault library items, you need to use the ‘Reload From Library’ command
exactly as you would do when updating your Design from native libraries. This allows you to manage
the reload process in the same way, using the same range of options and switches, regardless of where
the library data is being drawn from.
The Reload From Library dialog has been slightly extended to allow you to select your library data
source, either Vault or Library, or both.

Pulsonix Vault 39
Vault Admin Tools
Admin tools
Admin tools to manage your Vault data are available as a separate installation package, as they would
not be required by most users. Your data is still secure no matter who is running the Admin tools
though, as the password for the Postgres administrator role is required in order to carry out any of its
operations.
The Vault Admin tools are available as a dialog-based application, and a command-line program. The
latter is useful if you want to run it as a scheduled task to take regular backups.
While the backup and restore processes are running, the Vault database is locked down so that it
cannot be modified in the middle of backup or restore. This means that for the duration of the backup
or restore process, Pulsonix applications will not be able to access the Vault data.

40 Pulsonix Vault
Installation
The admin tools are installed by the same installer you ran to prepare your database server. Simply
use the installed program shortcut, or navigate to the folder where you installed the admin tools and
run the VaultAdmin application.
Vault Admin application
Settings
The settings page contains the details of your Postgres database, and the location of the log file to
which information about each backup and restore action are added. These settings are stored in the
system Registry ready for next time.
Backup
On the Backup page, choose a location and name for your Backup file. The Notes field is optional,
and is included in the header of the backup file to be displayed at the beginning of the Restore
process. Click the Create Backup button to begin the process. Messages are displayed on the dialog
showing you the stages of the backup process, and how far it has got.
Once the first few data files have been collected, the application will calculate an estimate of the
remaining time and display this on the dialog too.
Pulsonix Vault 41
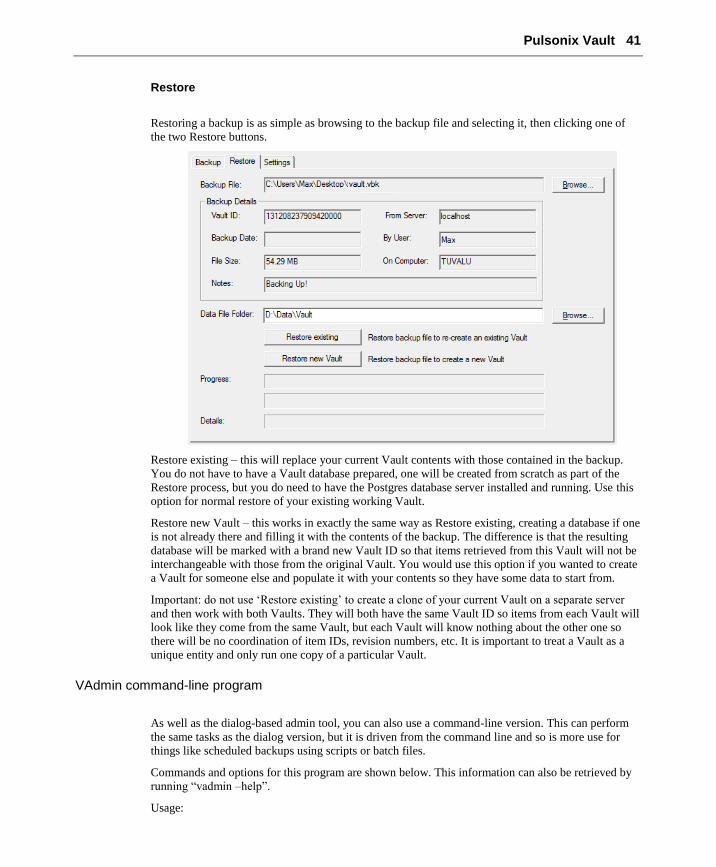
Restore
Restoring a backup is as simple as browsing to the backup file and selecting it, then clicking one of
the two Restore buttons.
Restore existing – this will replace your current Vault contents with those contained in the backup.
You do not have to have a Vault database prepared, one will be created from scratch as part of the
Restore process, but you do need to have the Postgres database server installed and running. Use this
option for normal restore of your existing working Vault.
Restore new Vault – this works in exactly the same way as Restore existing, creating a database if one
is not already there and filling it with the contents of the backup. The difference is that the resulting
database will be marked with a brand new Vault ID so that items retrieved from this Vault will not be
interchangeable with those from the original Vault. You would use this option if you wanted to create
a Vault for someone else and populate it with your contents so they have some data to start from.
Important: do not use ‘Restore existing’ to create a clone of your current Vault on a separate server
and then work with both Vaults. They will both have the same Vault ID so items from each Vault will
look like they come from the same Vault, but each Vault will know nothing about the other one so
there will be no coordination of item IDs, revision numbers, etc. It is important to treat a Vault as a
unique entity and only run one copy of a particular Vault.
VAdmin command-line program
As well as the dialog-based admin tool, you can also use a command-line version. This can perform
the same tasks as the dialog version, but it is driven from the command line and so is more use for
things like scheduled backups using scripts or batch files.
Commands and options for this program are shown below. This information can also be retrieved by
running “vadmin –help”.
Usage:

42 Pulsonix Vault
vaultadmin <Action> [<File>] [<Credentials>] [-m <MessageTo>] [-l <LogPath>] [-p
<PortNumber>] [-s <Server>] [-x <ExePath>] [-n <Notes>]
Where:
<Action> = b[ackup] | r[estore] | c[lone] | i[nstall] | v[iew] | h[elp]
backup = Back up database and attached files to the specified output path.
restore = Restore a database backup from the specified path to recreate an existing vault.
clone = Restore a database backup from the specified path to make a new separate Vault.
install = Install settings in system Registry for future use.
view = Show installed settings from system Registry (except password).
help = This help message.
<MessageTo> = Where to output messages (C=console, L=log file, N=none)
<LogPath> = Fully qualified path to log file where messages are to be appended.
<File> = -f <Path>
<Path> = Fully qualified path to backup file
<Credentials> = -u <UserName> -w <Password>
<UserName> = PostgreSQL role/user with permission to administer the database.
<Password> = The password for this role/user.
<Server> = Computer name of database server (default localhost).
<PortNumber> = Numeric port number for accessing database server (default 5432).
<ExePath> = fully qualified path to PostgreSQL executable programs.
<Notes> = optional notes or comments to be saved with the backup.
The following settings can be supplied on the command line, or will be taken from the values that
have already been prepared on this system using the 'install' command:
<UserName>
<Password>
<Server>
<PortNumber>
<ExePath>
Vault and Database Connection (PDC) option
Pulsonix 9.0 includes integration between the Pulsonix Database Connection (PDC) and the Vault.
An additional PDC connection type of Vault is now available on the Database Connection Setup
page and Database Type:
Pulsonix Vault 43
When this is selected no other PDC connection details need be provided as those from the Vault
Setup are automatically used.
For a Vault PDC, much of the field mapping functionality in the PDC Setup is no longer editable as
the field names shown represent information already built-in to a library part and not additional
attributes that can be added to it like with a conventional PDC setup.
A Vault PDC allows full parametric search capabilities to be applied directly to all parts stored in a
Pulsonix Vault.
The Insert Component option will add to a design, a component using the chosen Vault Part
irrespective of other Pulsonix libraries and the library search path.
The use of PDC from within Change Part is also supported for the Vault PDC.