![NAO Watchdog Jessel Serrano · ALMovementDetection extractor enables to detect movements around the robot ... [azimuth(rad), elevation(rad), confidence], [Head Position[6D]] ] The](https://static.fdocuments.in/doc/165x107/6039d903bc96a8291c56b206/nao-watchdog-jessel-almovementdetection-extractor-enables-to-detect-movements-around.jpg)
PstRotator - QSL.net User Manual.pdf · · 2017-03-12PstRotator (azimuth & elevation control)...
48
PstRotator – Software for Antenna Rotators User’s Manual Rev.7.2 1 PstRotator Software for Antenna Rotators User’s Manual Rev.7.2 © 2017 Codrut Buda – YO3DMU http://www.qsl.net/yo3dmu/index_Page346.htm
Transcript of PstRotator - QSL.net User Manual.pdf · · 2017-03-12PstRotator (azimuth & elevation control)...

PstRotator – Software for Antenna Rotators User’s Manual Rev.7.2
1
PstRotator Software for Antenna Rotators
User’s Manual
Rev.7.2
© 2017 Codrut Buda – YO3DMU
http://www.qsl.net/yo3dmu/index_Page346.htm

PstRotator – Software for Antenna Rotators User’s Manual Rev.7.2
2
Contents
Introduction ................................................................................................................................................. 5
PstRotator (azimuth & elevation control) ................................................................................................ 5
Automatically tracking ............................................................................................................................. 6
Antenna pointing...................................................................................................................................... 6
Maps ........................................................................................................................................................ 7
Communication ............................................................................................................................................ 9
RS232 communication.............................................................................................................................. 9
Global Beam Display ................................................................................................................................. 9
TCP/IP communication ............................................................................................................................. 9
UDP Control (PstRotator control from other programs) ........................................................................ 10
GPS Control (PstRotator control via a serial COM port) ......................................................................... 11
Web Server Setup ................................................................................................................................... 12
Setup .......................................................................................................................................................... 13
Select the rotator controllers from the list. ............................................................................................ 13
My Location ............................................................................................................................................ 14
Presets .................................................................................................................................................... 14
Antenna Offset ....................................................................................................................................... 15
Antenna Limits ....................................................................................................................................... 15
3dB Beam Width .................................................................................................................................... 15
Rotor Refresh Rate ................................................................................................................................. 15
Tracker Refresh Rate .............................................................................................................................. 16
Trackers setup ........................................................................................................................................ 16
Trackers path ................................................................................................................................... 16
Distance Units ........................................................................................................................................ 16
Map Marker Size .................................................................................................................................... 17
Label ....................................................................................................................................................... 17
Parking Setup ......................................................................................................................................... 17
Close by Ext. Program ............................................................................................................................. 17
WX Setup ................................................................................................................................................ 17
WX Info................................................................................................................................................... 17
Point into the Wind ................................................................................................................................ 18
Start as TCP Client .................................................................................................................................. 18
Start in Manual Mode ............................................................................................................................ 18
Confirm Imported Data .......................................................................................................................... 18
Double Click on Map .............................................................................................................................. 18
Use FCC Database ................................................................................................................................... 18
UDP Control............................................................................................................................................ 19
Stay On Top ............................................................................................................................................ 19
Bidirectionality ....................................................................................................................................... 19
PstRotator – Software for Antenna Rotators User’s Manual Rev.7.2
3
Tracker ....................................................................................................................................................... 20
Moon and Sun tracking .......................................................................................................................... 20
Radio Control...................................................................................................................................... 20
Satellites tracking ................................................................................................................................... 22
Flip Mode ........................................................................................................................................... 23
Maps .................................................................................................................................................. 23
Next Pass ............................................................................................................................................ 24
Satellite Pass Prediction ..................................................................................................................... 24
Rig Control .......................................................................................................................................... 25
Using PstRotator / Omnirig with TS-2000 for satellites tracking ........................................................ 25
Using PstRotator / Omnirig with TS-790 for satellites tracking .......................................................... 25
Using PstRotator / Omnirig with the IC-820 / IC-821 / IC-910 for satellites tracking .......................... 25
Using PstRotator / Omnirig with the FT-847 for satellites tracking .................................................... 26
Calibration .......................................................................................................................................... 26
AirScout .................................................................................................................................................. 28
KST2Me .................................................................................................................................................. 29
CC User ................................................................................................................................................... 29
DX Monitor ............................................................................................................................................. 29
WSJT ....................................................................................................................................................... 29
GJTracker ................................................................................................................................................ 30
Z-Track .................................................................................................................................................... 30
Win-Test Setup ....................................................................................................................................... 30
N1MM Setup .......................................................................................................................................... 31
Rotor control ...................................................................................................................................... 31
N1MM Logger.ini file .......................................................................................................................... 32
Rotor Port, Rotor Name ..................................................................................................................... 32
VQLog ..................................................................................................................................................... 33
HamRadioDeluxe .................................................................................................................................... 35
HRD Logbook .......................................................................................................................................... 36
HRD Satellite Tracking ............................................................................................................................ 36
nGenLog ................................................................................................................................................. 36
Logger32 ................................................................................................................................................. 37
LOGic8 .................................................................................................................................................... 37
Swisslog .................................................................................................................................................. 38
HamScope .............................................................................................................................................. 38
DXLab Suite ............................................................................................................................................ 38
AC Log .................................................................................................................................................... 39
BBLogger ................................................................................................................................................ 39
VHFCtest4WIN ........................................................................................................................................ 39
DX4WIN .................................................................................................................................................. 39
MoonSked .............................................................................................................................................. 40
VHFLog ................................................................................................................................................... 41

PstRotator – Software for Antenna Rotators User’s Manual Rev.7.2
4
KLog ........................................................................................................................................................ 41
HalloSat .................................................................................................................................................. 41
WinREF-THF ............................................................................................................................................ 41
WinREF-HF ............................................................................................................................................. 41
JT65-HF ................................................................................................................................................... 41
TRX-Manager .......................................................................................................................................... 41
TACLog ................................................................................................................................................... 42
Wlog2000 ............................................................................................................................................... 42
WriteLog ................................................................................................................................................. 42
SatPC32 .................................................................................................................................................. 43
Orbitron.................................................................................................................................................. 43
Gpredict ................................................................................................................................................. 44
Nova for Windows .................................................................................................................................. 45
Radio-Eyes 1 ........................................................................................................................................... 45
Radio-Eyes CP ......................................................................................................................................... 45
Sidereal .................................................................................................................................................. 46
RA/DEC ....................................................................................................................................................... 46
QRZ.com Callsign database ........................................................................................................................ 47
SP, LP and BD buttons ................................................................................................................................ 47
Remote Control .......................................................................................................................................... 47
Run-time error ‘8020’ ................................................................................................................................. 48
SUPPORT .................................................................................................................................................... 48

PstRotator – Software for Antenna Rotators User’s Manual Rev.7.2
5
Introduction
PstRotator handles just almost every controllable rotator in common use:
Controller Protocol Speed Web site
Prosistel D Prosistel 9800 http://www.prosistel.net
Prosistel C Prosistel 9800
ERC DCU-1 4800 http://www.schmidt-alba.de
ERC3D GS-232A/B 9600
Green Heron RT21 DCU-1 4800
Green Heron RT20 DCU-1 4800
MDS RC-1 DCU-1 4800
Hy Gain DCU-1 4800
Idiom Press Rotor-EZ DCU-1 4800
Yaesu GS-232A/B Az GS-232A/B 9600
Yaesu GS-232A/B Az/El GS-232A/B 9600
AlfaSpid RAK Az AlfaSpid 1200
www.rfhamdesign.com AlfaSpid RAS Az/El AlfaSpid (1 deg accuracy) 600
AlfaSpid RAS Az/El AlfaSpid (0.5 deg accuracy) 600
AlfaSpid BIG-RAS/HR AlfaSpid (0.1 deg accuracy) 460800
M2 RC2800 M2 9600
M2 RC2800P-A M2 9600
Easycomm Easycomm1 9600
Fox Delta ST3 GS-232A/B 19200
AutoTracker - Endeavour Endeavour Electronics 9600
ZL1BPU ZL1BPU 9600
EGIS EGIS (CTS disabled) 9600
Create RAC825 Create 9600
VK5DJ VK5DJ 9600 VK5DJ
EA4TX ARSWIN ARSWIN Program http://www.ea4tx.com
DL7AOT Easycomm1 19200
LVB Tracker GS-232A / Easycomm1 9600
PrimeSat PrimeSat 9600
SARtek SARtek 1200
SAT688 Easycomm1 9600
CX6DD GS-232A/B 4800
WinRotor FUNKBOX WinRotor Program http://www.funkbox.de
SAEBRTrack SAEBRTrack 9600 Saebrtrack
Heathkit HD 1780 Heathkit 9600
F1TE SPID GS-232A/B 9600
Channel Master USB-UIRT interface USB
FT950, FT2000, FTDX5000,
FTDX9000 FT/DX CAT (RTS disabled) 38400
OE5JFL OE5JFL (target Az1/El1) 115200
UltraBeam UB-ONE DCU-1 4800 http://www.ultrabeam.it
TrueNORTH VK3LL/VK3KQ GS-232A via USB Interface 9600 http://www.emdrc.com.au/
Radant APU1-AE Radant APU1 9600 povorotka.ru/
PstRotator (azimuth & elevation control) PstRotator supports separate antenna rotator controllers for Azimuth and Elevation control.
It can control two separate rotor interfaces:
- one for azimuth and the second for elevation, or

PstRotator – Software for Antenna Rotators User’s Manual Rev.7.2
6
- an azimuth & elevation rotor interface
The EA4TX and WinRotor Interfaces are controlled communicating DDE with their own programs.
Connect the rotator interfaces to PC using RS232 cables (or USB to serial convertors) and select
communication ports from the available COM Ports, in the COM1 to COM32 range.
Automatically tracking PstRotator includes automatically tracking for satellite or EME communications, and almost all well-known
loggers are supported.
Moon tracking: EME System, WSJT, GJTracker, MoonSked, Trak_SM, Z-Track
Satellites tracking: GPredict, HalloSat, HRD Satellite Tracker, Nova for Windows, Orbitron,
Sat_Explorer, SatPC32, WinOrbit, Wxtrack, SDR-Radio
Logging / Other programs: AirScout, CommCat, BBLogger, DM780, DX4WIN, DXView,
EasyLog 5, GenLog, HamScope, HRD Logbook, IntDX, KLog, Loki5ace, Log4OM, Logic8,
Logger32, LOG-X, MicroLog, MixW, N1MM, N3FJP’s loggers, nGenLog, QARTest, RCKLog,
Swisslog, TACLog, TRX-Manager, UcxLog, VHF LOG, VHFCtest4WIN, VHF LOG, VQLog,
Winlog32, Win-Test, WinREF-HF, WinREF-THF, Wlog2000, WriteLog, XMLog
DX Cluster clients: CC User, DX Monitor, KST2Me, GPcluster
Radio Astronomy: Radio-Eyes, ASTRONOM
Moon and Sun can be tracked also using internal algorithms.
Sidereal tracking of the celestial bodies uses an internal algorithm too.
Antenna pointing The user interface offers quite a selection of methods for antenna pointing:
mouse click on the Azimuth or Elevation graphic area (compass roses)
left/right/up/down arrows
setting the azimuth / elevation
setting the QTH locator (4, 6 or 8 digits)
mouse click on a map
selecting the DXCC
writing the country prefix, or the full callsign
numeric keypad
The numeric keypad can be used also when the PstRotator is NOT the active window.
So you will don't need to switch in contests the focus between logger and PstRotator, you can
keep the focus on logger.
Ctrl + Up Arrow (8) Move to 0 deg
Ctrl + Page Up (9) Move to 45 deg
Ctrl + Right Arrow (6) Move to 90 deg
Ctrl + Page Down (3) Move to 135 deg
Ctrl + Down Arrow (2) Move to 180 deg
Ctrl + End (1) Move to 225 deg
Ctrl + Left Arrow (4) Move to 270 deg
PstRotator – Software for Antenna Rotators User’s Manual Rev.7.2
7
Ctrl + Home (7) Move to 315 deg
The rotator can be stopped at any moment before to finish the moving. Of course, only if the rotor’s
interface has implemented the STOP command.
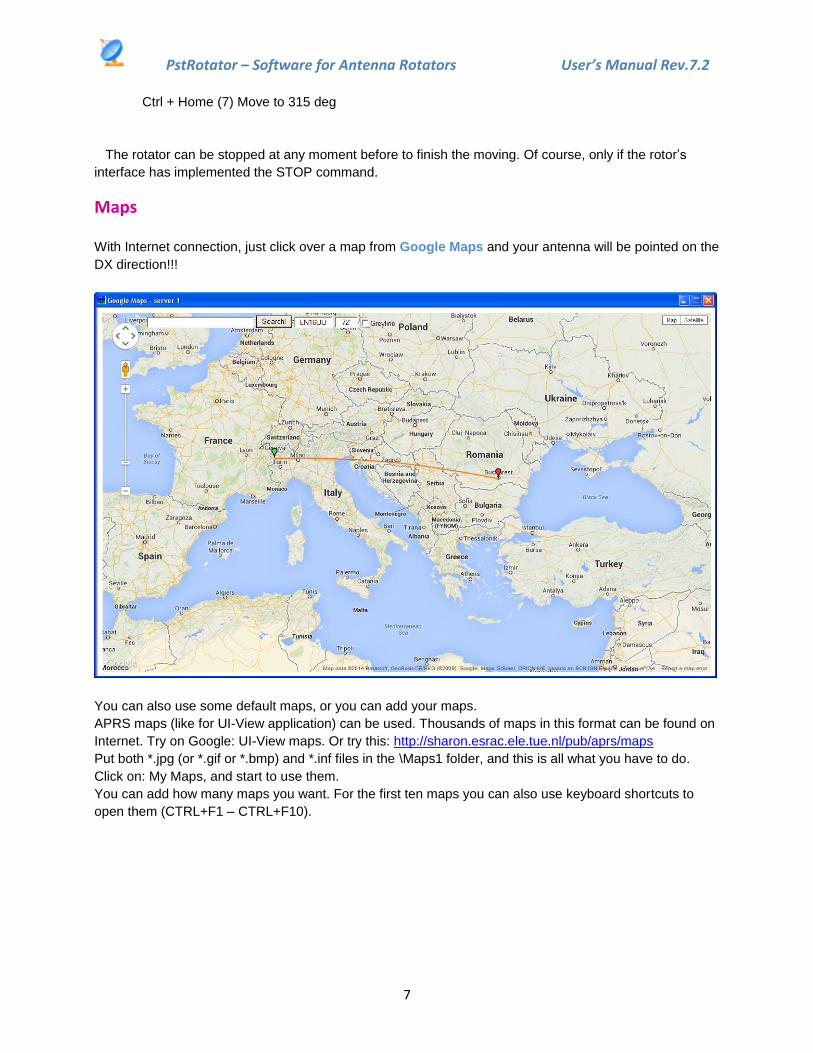
Maps
With Internet connection, just click over a map from Google Maps and your antenna will be pointed on the
DX direction!!!
You can also use some default maps, or you can add your maps.
APRS maps (like for UI-View application) can be used. Thousands of maps in this format can be found on
Internet. Try on Google: UI-View maps. Or try this: http://sharon.esrac.ele.tue.nl/pub/aprs/maps
Put both *.jpg (or *.gif or *.bmp) and *.inf files in the \Maps1 folder, and this is all what you have to do.
Click on: My Maps, and start to use them.
You can add how many maps you want. For the first ten maps you can also use keyboard shortcuts to
open them (CTRL+F1 – CTRL+F10).

PstRotator – Software for Antenna Rotators User’s Manual Rev.7.2
8

PstRotator – Software for Antenna Rotators User’s Manual Rev.7.2
9
Communication
RS232 communication Select RS232 / TCP Server if the rotor controller is connected via RS232 (or a USB to RS232 convertor)
to the PC where the PstRotator program is installed.
Select the COM ports used to connect the rotator controllers to PC in the COM1 – COM32 range.
Global Beam Display PstRotator can pass the position information received from rotor to a Global Beam Display, using for this a
second COM Port (Communication > GPS / AUX COM Port). So you will have all the features of the
PstRotator program, but also a nice electronic display on your wall.
Select the COM port used to connect the Global Beam Display to PC in the COM1 – COM32 range.
TCP/IP communication For the TCP server, “RS232 / TCP Server” must be checked.

PstRotator – Software for Antenna Rotators User’s Manual Rev.7.2
10
Open the “TCP Server Setup” and set the IP ports for the server (the PC where the rotator controller is
RS232 connected).
The default values are 4001 for azimuth and 4002 for elevation.
For the TCP client, check the “TCP Client” and the following window will be opened:
Set the IP address (is the network address for the PC where the server runs).
Set the IP ports (must be the same as for server)
Press the “Connect” button to connect the client to server and remote operation.
The default values are 4001 for azimuth and 4002 for elevation.
In order to not have so much traffic over the network and antenna position to be displayed faster on the
client PC, you can set Refresh Rate = None on the client PC, but be careful to have Refresh rate > 0 on
the server PC.
If the server is a serial server one (serial to Ethernet convertor) and not a PC running the PstRotator
software, you mast to set Refresh Rate > 0 on the client PC.
UDP Control (PstRotator control from other programs) PstRotator can receive commands from other programs via UDP messages. For this:
Go to "Communication/UDP Control Port..." and set the UDP port number where
the program listens. The default value is 12000.
Enable UDP Control in Setup
PstRotator – Software for Antenna Rotators User’s Manual Rev.7.2
11
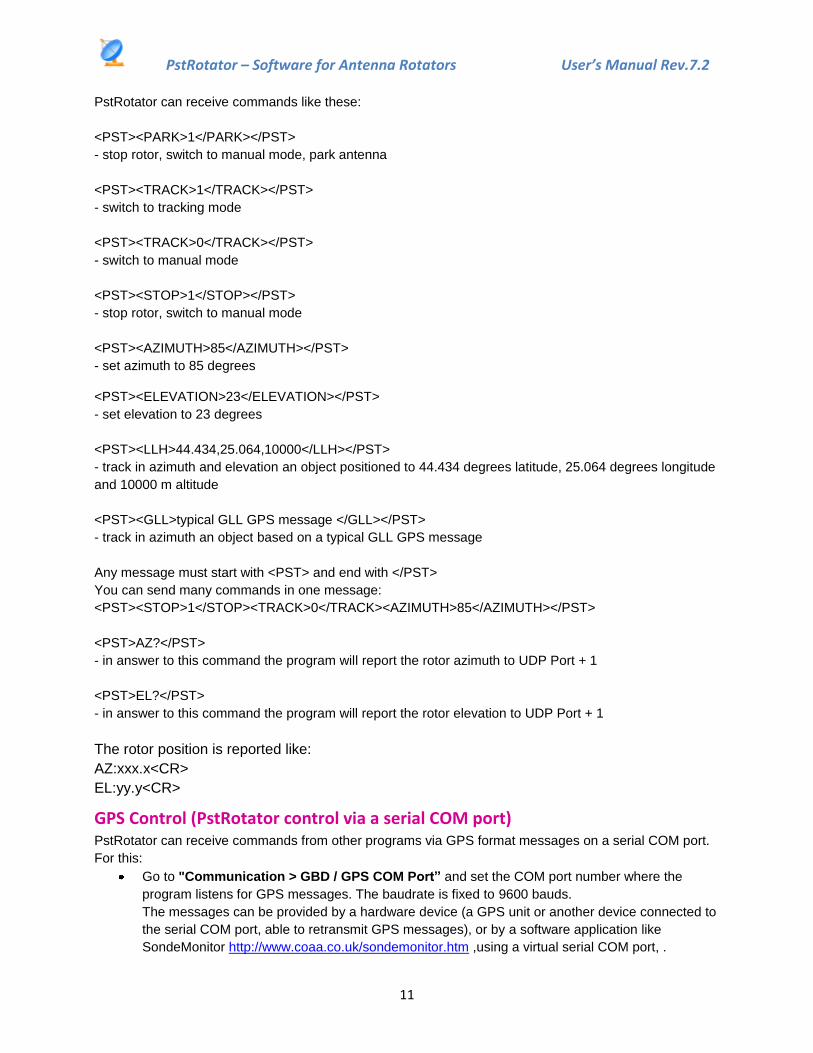
PstRotator can receive commands like these:
<PST><PARK>1</PARK></PST>
- stop rotor, switch to manual mode, park antenna
<PST><TRACK>1</TRACK></PST>
- switch to tracking mode
<PST><TRACK>0</TRACK></PST>
- switch to manual mode
<PST><STOP>1</STOP></PST>
- stop rotor, switch to manual mode
<PST><AZIMUTH>85</AZIMUTH></PST>
- set azimuth to 85 degrees
<PST><ELEVATION>23</ELEVATION></PST>
- set elevation to 23 degrees
<PST><LLH>44.434,25.064,10000</LLH></PST>
- track in azimuth and elevation an object positioned to 44.434 degrees latitude, 25.064 degrees longitude
and 10000 m altitude
<PST><GLL>typical GLL GPS message </GLL></PST>
- track in azimuth an object based on a typical GLL GPS message
Any message must start with <PST> and end with </PST>
You can send many commands in one message:
<PST><STOP>1</STOP><TRACK>0</TRACK><AZIMUTH>85</AZIMUTH></PST>
<PST>AZ?</PST>
- in answer to this command the program will report the rotor azimuth to UDP Port + 1
<PST>EL?</PST>
- in answer to this command the program will report the rotor elevation to UDP Port + 1
The rotor position is reported like:
AZ:xxx.x<CR>
EL:yy.y<CR>
GPS Control (PstRotator control via a serial COM port) PstRotator can receive commands from other programs via GPS format messages on a serial COM port.
For this:
Go to "Communication > GBD / GPS COM Port” and set the COM port number where the
program listens for GPS messages. The baudrate is fixed to 9600 bauds.
The messages can be provided by a hardware device (a GPS unit or another device connected to
the serial COM port, able to retransmit GPS messages), or by a software application like
SondeMonitor http://www.coaa.co.uk/sondemonitor.htm ,using a virtual serial COM port, .

PstRotator – Software for Antenna Rotators User’s Manual Rev.7.2
12
Enable GPS Control in Setup
PstRotator can receive $GPGGA commands (NMEA format) like this:
$GPGGA,194633.656,4410.000000,N,02600.000000,E,1,0,0,8000,M,0,M,,*70
Web Server Setup PstRotatorAz has an embedded Web server, and this can be used to control the rotor from any Web
browser running on a computer or a smartphone.
To use this feature:
- In Communication > Web Server Setup... set the IP address and the port number.
If you intend to access the Web server using a computer from the same local network, or you
don’t use a router, select the first option to use the IP address of the PC.
But if you intend to access the Web server from internet and you use a router, select the second
option and enter the router IP address. You can set it as xxx.xxx.xxx.xxx or put there a "friendly
name".
You can keep the default port 80, or use any other port.
- In Setup enable the Web Server option
- Restart the program
- Set your router to forward the port set in the Web Server Setup.

PstRotator – Software for Antenna Rotators User’s Manual Rev.7.2
13
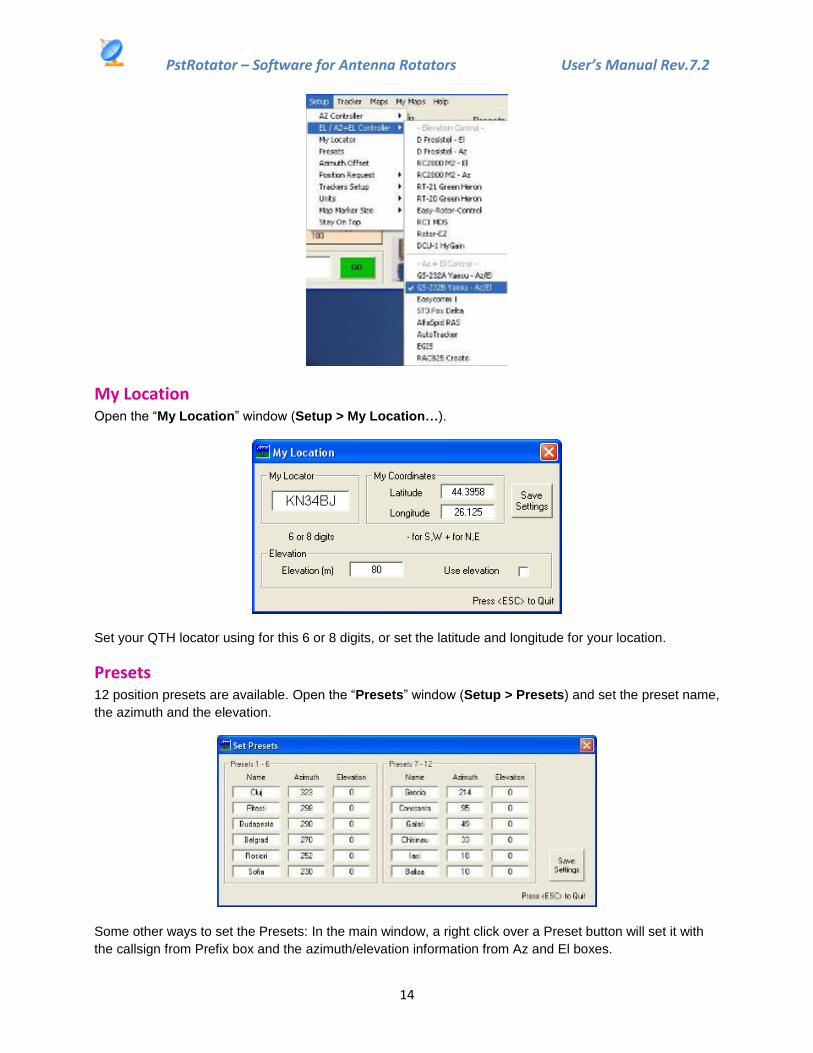
Setup
Select the rotator controllers from the list. It is possible to select two separate controllers: one for azimuth and one for elevation.
Or can be used a single azimuth + elevation rotor interface.
PstRotator – Software for Antenna Rotators User’s Manual Rev.7.2
14
My Location Open the “My Location” window (Setup > My Location…).
Set your QTH locator using for this 6 or 8 digits, or set the latitude and longitude for your location.
Presets 12 position presets are available. Open the “Presets” window (Setup > Presets) and set the preset name,
the azimuth and the elevation.
Some other ways to set the Presets: In the main window, a right click over a Preset button will set it with
the callsign from Prefix box and the azimuth/elevation information from Az and El boxes.

PstRotator – Software for Antenna Rotators User’s Manual Rev.7.2
15
Ctrl+1….Ctrl+6 – set Preset 1…Preset 6
Alt+1….Alt+6 – set Preset 7…Preset 12
Antenna Offset Open the “Antenna Offset” window (Setup > Antenna Offset) and set the azimuth or elevation antenna
offset if your antenna is not exactly adjusted on direction.
The range is -180 to +180 deg for azimuth and -45 to +45 deg for elevation.
The the default values are 0 deg for both azimuth and elevation offset.
Antenna Limits End-point limits can be set for both Azimuth and Elevation.
3dB Beam Width Set the 3dB Beam width of your antenna in order to be displayed on the Compass Rose.
Rotor Refresh Rate The time interval between position requests sent to controller can be adjusted from 0.5 sec to 5 sec.
Open the “Rotor Refresh Rate” window (Setup > Rotor Refresh Rate) and select the time interval value.

PstRotator – Software for Antenna Rotators User’s Manual Rev.7.2
16
The default value is 1 sec.
Tracker Refresh Rate The time interval between the received positions from tracking programs can be adjusted from 0.5 sec to
10 sec.
Open the “Tracker Refresh Rate” window (Setup > Tracker Refresh Rate) and select the time interval
value.
The default value is 0.5 sec.
Trackers setup Some trackers need special settings. Don’t forget to set "Tracking" to Mode in the main window!
Trackers path
These settings are for programs which write the azimuth and elevation data into a file. The PstRotator
program has to know the path for these programs. You need to know where are these programs installed
and modify if it is necessary the default paths.
Distance Units You can select Kilometers or Miles.

PstRotator – Software for Antenna Rotators User’s Manual Rev.7.2
17
Map Marker Size The size of markers on map can be adjusted from x 0.5 to x 5.
Open the “Map Marker Size” window (View > Map Marker Size) and select the size.
Label Use Setup / Label… to put different labels.
Parking Setup Set the position where the antenna will be parked when the “Park” button is pressed.
Close by Ext. Program PstRotator can be automatically closed when another program from computer is closed.
Use a significant part of the external program name, exactly like it appears on the title bar (caps sensitive).
WX Setup PstRotator can display information about the wind speed, wind direction and temperature in your location,
and also can automatically point the antenna into the wind if the wind speed is over the limit.
In this window can be set if the program will use a specific weather station connected to
www.wunderground.com or will use only the information provided by this site based on your location.
Also it can be set the wind speed trigger value for automatically pointing antenna into the wind.
WX Info Open the Wind Info window. The information in this window is refreshed at every 5 minutes.

PstRotator – Software for Antenna Rotators User’s Manual Rev.7.2
18
Point into the Wind Automatically point the antenna into the wind if the wind speed is over the limit. Click on this button to
enable or disable this function.
Start as TCP Client If “Start as TCP Client” is checked, the PstRotator program will start as a TCP Client.
The TCP Client window will be minimized, and the program will automatically connect to the TCP Server
Start in Manual Mode With this option selected the program will start in Manual Mode, else the program will start in the last
mode used before to close the program.
Confirm Imported Data With this option checked, the callsign, locator or azimuth information is passed in the Tracking mode from
logger to PstRotator, but you will need to press the "GO" button to rotate the antenna.
Double Click on Map Use this option to select between click or double click on map to rotate the antenna.
This feature is available for the embedded maps (Maps), My Maps and the Google Maps.
Use FCC Database The program checks when a callsign is write in "Call" textbox in:
- cty.dat
- VHF_USA.mdb (or the FCC.mdb when the “Use FCC Database” option is selected)
- VHF_EU.mdb
- Call3.txt
The FCC database contains over 750,000 active callsigns.
This database is created using the latest EN.dat and HD.dat files from l_amat.zip archive downloaded
from the official FCC web page, and the us_zip_codes.mdb file, a database containing the coordinates for
almost all US zip codes.

PstRotator – Software for Antenna Rotators User’s Manual Rev.7.2
19
The FCC.mdb database contains callsign, locator, name and state.
If a callsign is found in more than one database, the information is taken from the last database. For
example, if a callsign exists in both VHF_EU.mdb and call3.txt, the program will use the information found
in call3.txt.
UDP Control Select this option to enable the UDP communication with an external program. The external program can
stay on the same PC with PstRotatorAz, or on another computer from the local network.
Stay On Top If “View > Stay On Top” is checked, the PstRotator main window will remain on the display when another
program is opened.
Bidirectionality The PstRotator program can control a Yagi and a bi-directional rotary dipole on the same rotator, with the
dipole in line with the Yagi's boom (90° offset from Yagi heading). This mode is BD-90.
A second bidirectional mode (BD-0) supports the SteppIR antennas.
With “Start in Bidirectional-0 Mode” or “Start in Bidirectional-90 Mode” checked the PstRotator
program will start in one of these two bidirectional modes.

PstRotator – Software for Antenna Rotators User’s Manual Rev.7.2
20
Tracker
Moon and Sun tracking In PstRotator select Moon or Sun as Tracker and set Tracking mode in the main window.
PstRotator tracks the Moon or the Sun without any external tracking programs. The azimuth and elevation
of the Moon or the Sun are internal calculated.
A separate EME window is available and it provides a lot of useful information for moonbounce.
Radio Control
It is possible to control the radio for:
a) EME skeds (RX frequency = TX frequency + mutual doppler)
- set the transverter offset value, if you use a transverter
- enter the DX callsign in the EME window. The mutual Doppler will be displayed.
- check the “Use OmniRig” option
- check the “RX correction” option
- set your radio on the sked frequency (the TX frequency will remain on the sked frequency)
- press the AUTO button to keep the RX frequency = TX frequency + mutual doppler

PstRotator – Software for Antenna Rotators User’s Manual Rev.7.2
21
a) EME random QSO (TX frequency = RX frequency - mutual doppler)
- set the transverter offset value, if you use a transverter
- enter the DX callsign in the EME window. The mutual Doppler will be displayed.
- check the “Use OmniRig” option
- check the “TX correction” option
- tune your radio on the frequency where you hear the DX station
- press the AUTO button to correct with the mutual Doppler the TX frequency

PstRotator – Software for Antenna Rotators User’s Manual Rev.7.2
22
Satellites tracking To use the embedded satellites tracker module:
- Select “Satellites” as Tracker.
- Select “Tracking” as Mode
- Select Satellites Tracking in Setup. This will open the “Satellites Tracking” window.
From the “TLE” menu you can download / update / delete the TLE files in the PstRotator folder. The
program will put all the satellites found in all the TLE files in a list.
You can see this list in Setup > Satellites. From there you can select your favorite satellites, and edit their
UpLink / DownLink frequencies and modes.

PstRotator – Software for Antenna Rotators User’s Manual Rev.7.2
23
The favorite satellites will be displayed in the “Favorites” list from Satellites Tracking window.
Select a satellite from this list to track it.
Flip Mode
The program checks for the actual satellite pass if the satellite is visible (or for the next pass if the satellite
is not visible yet), whether the satellite crosses the end points of your azimuth rotor in that pass. If so, it
runs the pass in Flip mode, which means it turns the azimuth antenna in the opposite direction and the
elevation antenna to 180° - elevation. The color of the label with the satellite name will be changed to
yellow.
You must select your rotor type (North Stop / South Stop) in Satellite Tracking Setup > Rotor Stop.
The Flip Mode is available only when you have selected in the main window “Setup > 180 deg Elevation”.
Maps
You can select which map to be used from Satellite Tracking Setup > Map.
Press “Map” to see the selected satellite on the world map.

PstRotator – Software for Antenna Rotators User’s Manual Rev.7.2
24
Next Pass
Use the Next_Pass menu to have the all satellites from Favorites in chronological order. You can select a
satellite from the Next Pass window instead from the Favorites list.
The satellites in range will be displayed in green, and the satellites with AOS < 5 minutes will be displayed
in yellow.
Satellite Pass Prediction
Select a satellite from list and press Satellite Tracking Setup > Predict to see the passes of the selected
satellite.

PstRotator – Software for Antenna Rotators User’s Manual Rev.7.2
25
Rig Control
Two different options for Doppler correction can be chosen:
UP+DN (Uplink and Downlink frequency correction)
With the UP+DN button pressed, the frequencies at the satellite remain constant. If two stations use this
setting, they basically can hear each other during an entire satellite pass without frequency adjustment,
despite the fact that frequency drift due to Dopplershift is different for each of them.
The stations arrive with the same frequency at the satellite despite different Dopplershift values
and all stations hear the same frequency transmitted by the satellite.
UP (Uplink frequency correction only)
That method is widely used for QSO's with stations without automatic frequency correction. They only
need to adjust the Uplink frequency but not both. In principle, no manual adjustments are needed if both
QSO partners use automatic frequency correction, provided that Doppler shift drift is similar for both
stations. This is the case if they are not too far away from each other.
You can use the knob for the radio tuning in both UP+DN and UP modes!
Using PstRotator / Omnirig with TS-2000 for satellites tracking
PstRotator is able to control the TS-2000 radio in both SAT and VFO modes. Dependig by the selected
satellite (uplink and downlink in different bands or in the same band), the mode is automatically selected.
The SAT mode offers a full duplex communication, so you can listen your own signal.
Using PstRotator / Omnirig with TS-790 for satellites tracking
PstRotator uses a customised omnirig ini file (TS-790.ini) to control a TS-790 radio in the SAT mode (full
dupplex communication). This file can be found in the OmniRigIni.zip archive from the PstRotator folder.
Using PstRotator / Omnirig with the IC-820 / IC-821 / IC-910 for satellites
tracking
PstRotator has been optimized to work with the Icom IC-821 and IC-910 transceivers for Mode V/U and
U/V satellites by utilizing the main and sub bands.
In addition, Omnirig ini files (IC-820PST.ini, IC-821PST.ini and IC-910PST.ini) have been written
specifically for this application and can be found in the PstRotator folder as an archive (OmniRigIni.zip).
These files are also available for download on the PstRotator Yahoo Group (the Files section).
We recommend these .ini file should not be used with any other application as it may produce undesirable
results. (IC-821.ini or IC-910.ini should be used instead).
Likewise re-naming it will stop it from working with PstRotator.
IC-820PST.ini, IC-821PST.ini and IC-910PST.ini use VFOA commands to control the sub band for
receive and VFOB commands to control the main band for transmit.
Due to the limitations of the IC-820 / IC-821 / IC-910 CI-v command set, some functions of PstRotator will
not be available however we are constantly working on this to make your satellite experience as slick as
possible.
The rig must be set to VFO mode before you start, not memo-tune.

PstRotator – Software for Antenna Rotators User’s Manual Rev.7.2
26
1. Start up PstRotator.
2. Select “satellites” in the tracker menu.
3. Select the satellite you want to use from the satellites tracking window and Select tracking in the
main window. This will populate the RX and TX frequency boxes, and your Rotators will start
tracking the bird.
4. 4.Tick “use Omnirig” and configure to use Rig= IC-820PST, Rig= IC-821PST or Rig = IC-910PST
5. For SSB transponders-Select UP mode in PstRotator,
Check that the displayed RX frequency in the Omnirig window of PstRotator is in the desired
downlink band, if not, click [VFO A-B] to swap main and sub bands and cycle UP button off then
on.
Note-The Omnirig TX frequency will display 000000000, this is normal.
6. Check that the rig switches to the center of the uplink and downlink passbands.
7. You can now tune the downlink (sub band/rx) frequency and the TX frequency will track the Rig’s
rx frequency.
8. When you want to transmit, turn off manual mode, to prevent frequency updates from disrupting
the transmission, and set rig to main band.
9. As with most tracking programs, you may have to adjust the initial uplink frequency in the Add Sat
menu so you can hear your downlink. However you should only have to do this once for each
satellite you use.
The easy way to do this is to set to UP+DN during a pass, then set linkage to "not linked", this lets
you tweak the downlink only, using >>>/>>/>/+ /-/</<</<<< buttons, until you hear your uplink,
then set linkage back on.
You can then tune across the passband using >>> etc and the offset will be kept.
You can then update the uplink frequency in "add satellite" menu to reflect your offset for next
time.
10. For FM birds - use UP+DN mode, this will correct uplink AND downlink for Doppler. When you
want to transmit, turn off UP+DN mode.
11. Note that when you are in Auto mode the RX frequency display in the Orbitron panel will show the
TX frequency; this is normal and is caused by a limitation in the CI-V command set.
Using PstRotator / Omnirig with the FT-847 for satellites tracking
The FT-847PST.ini file has been written specifically for this application and can be found in the PstRotator
folder as an archive (OmniRigIni.zip). This file is also available for download on the PstRotator Yahoo
Group (the Files section).
Include this file in the Omnirig > Rigs folder.
In OmniRig you must select FT-847PST as rig.
When you press the UP+DN buton, the program will switch the radio in Sat mode, will set the modes and
frequencies according to the selected satellite, and will automatically control both uplink and downlink
frequencies based on the calculated Doppler.
Calibration
PstRotator uses the Doppler.sqf file, the same file which is used by the SATPC32 program.
This file provides useful information about satellites for automatically Doppler correction, in a format like
below:

PstRotator – Software for Antenna Rotators User’s Manual Rev.7.2
27
AO-73,145960.0,435140.0,USB,LSB,REV,0,0,Transponder
The program uses the first six fields:
Satellite Name: Name matching the name in the Keplerian Elements file
Downlink Frequency: True frequency in KHz on which the satellite is transmitting
Uplink Frequency: True frequency in KHz on which the satellite is receiving
Downlink Mode: emission used for this satellite on this downlink frequency
Uplink Mode: emission used for this satellite on this uplink frequency
Tracking Mode: whether the uplink and downlink frequencies track in normal or reverse mode
When you add a satellite in “Favorites”, the same information are saved in the Satellites.txt file, like this:
[FUNCUBE-1 (AO-73)]
DownLink=145960000
UpLink=435140000
RxMode=USB
TxMode=LSB
Linkage=Reverse
When a satellite is selected in “Favorites” or in the “Next Pass” window, all this information is displayed
in program:
Sometime the frequencies need to be corrected for some satellites . The reason could be the drift with
temperature, some changes in time from the initial frequencies, or just an innacurate information in the
Doppler.sqf file.
This correction (named here “Calibration”) is easy to be done if you use two radios (one for TX and one
for RX), or if you use a radio which allow a full duplex communication:
- Select a satellite
- Press the UP+DN button (or the UP button)
- Transmit a signal
- Use the +- buttons from uplink or downlink until you can here your signal
- Press the Save button
The changes are saved in the Satellites.txt file, and will be used by program in the future.

PstRotator – Software for Antenna Rotators User’s Manual Rev.7.2
28
AirScout
In AirScout Options > Track menu, enable "Activate Antenna Tracking" and select "Native Az/El" as
File Output.
In PstRotator:
- select AirScout as Tracker, and select the Tracking mode in the main window
- in Setup > Trackers Setup > AirScout Setup put there the path of the AirScout temporary folder (in my
case it is “C:\Documents and Settings\<user>\Local Settings\Application Data\DL2ALF\AirScout\Tmp” ).
You can use copy-paste from AirScout Options > Database > Open Tmp Directory.

PstRotator – Software for Antenna Rotators User’s Manual Rev.7.2
29
KST2Me KST2Me is a telnet based client for Windows that is tailored to the ON4KST Chats.
There is nothing to be configured in the KST2Me.
In the PstRotator, select KST2Me as Tracker and set Tracking to mode in the main window.
With a mouse click over DX or Submitter, the azimuth information computed by KST2Me is sent to
PstRotator, and this will rotate the antenna on that direction.
CC User CC User is a DX Cluster client program.
There is nothing to be configured in CC User program.
In the PstRotator program select "CC User" from the Tracker menu and change the Mode to Tracking.
An Alt+Click over a callsign in CC User will automatically rotate your antenna.
DX Monitor DX Monitor is a standalone Windows program which monitors the DX announcements available on the
internet at DX Summit.
PstRotator is DX Monitor aware. Simply clicking on a callsign or a beam heading in the DX Monitor
window will transfer the information to the PstRotator control program, ready to turn the rotator with a
single click on GO.
To use PstRotator with DX Monitor, simply select DX Monitor from the Tracker menu and change the
Mode to Tracking.
WSJT In PstRotator select WSJT > Moon, WSJT > Sun or WSJT > Source as Tracker and set Tracking to
Mode in the main window.
Be sure that you have correct configured in Setup > Trackers Setup > Trackers Path the path for the
WSJT folder.
There is nothing to be configured in WSJT to be interfaced with PstRotator.

PstRotator – Software for Antenna Rotators User’s Manual Rev.7.2
30
GJTracker In PstRotator select GJTracker as Tracker and set Tracking to Mode in the main window.
Be sure that you have correct configured in Setup > Trackers Setup > Trackers Path the path for the
GJTracker folder.
There is nothing to be configured in GJTracker to be interfaced with PstRotator.
Z-Track In PstRotator select Z-Track as Tracker and set Tracking to Mode in the main window.
Be sure that you have correct configured in Setup > Trackers Setup > Trackers Path the path for the Z-
Track folder.
There is nothing to be configured in Z-Track to be interfaced with PstRotator.
Win-Test Setup Type a prefix in Win-Test, press CTRL+F12 (or ALT+F12), and the PstRotator will turn the antenna.
You don’t need to have wtRotators on your PC. Win-Test sends broadcast the azimuth information via
UDP and the PstRotator will receive it.
So, you can have the PstRotator on the same PC with Win-Test or on another PC on network.
Or you can have WinTest on a PC and many other PCs with PstRotator installed and every PstRotator will
control an antenna (all antennas will be on the same direction).
Win-Test and PstRotator configuration:
In Win-Test go to “Options>Configure interfaces”, pres “By default” buttons for both “Broadcast
address” and “Port number”, and check “Enable Ethernet network”. And press the “OK” button.
PstRotator – Software for Antenna Rotators User’s Manual Rev.7.2
31
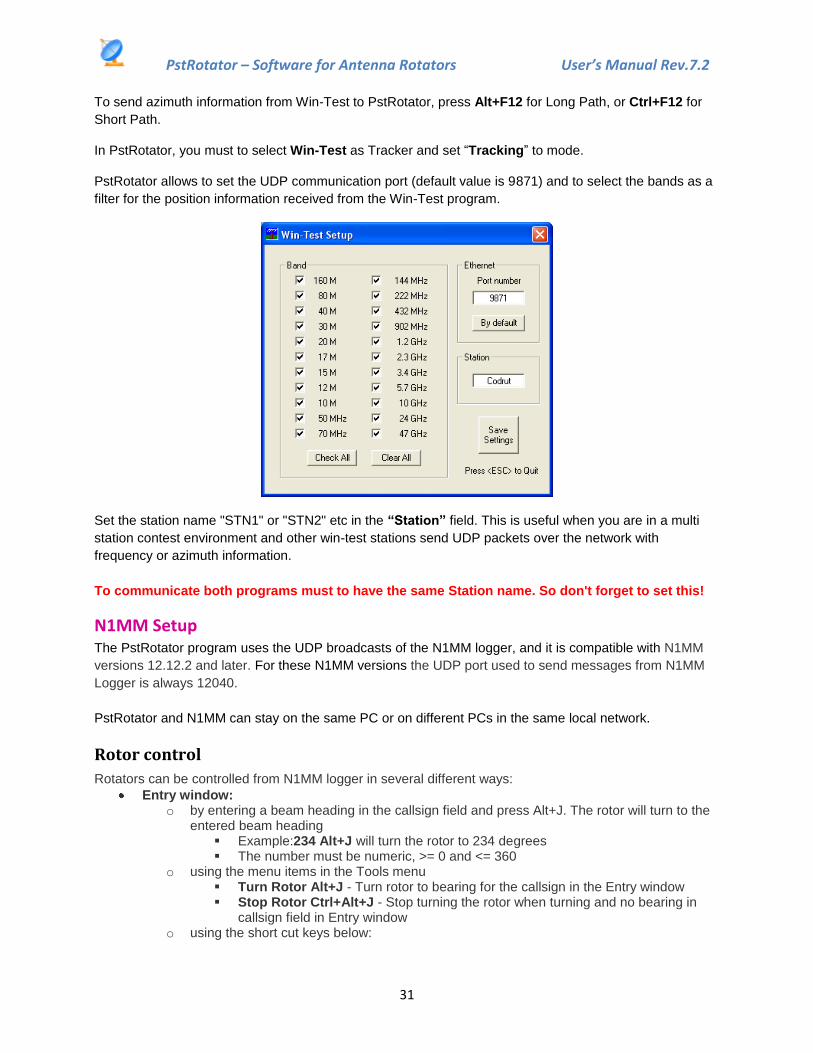
To send azimuth information from Win-Test to PstRotator, press Alt+F12 for Long Path, or Ctrl+F12 for
Short Path.
In PstRotator, you must to select Win-Test as Tracker and set “Tracking” to mode.
PstRotator allows to set the UDP communication port (default value is 9871) and to select the bands as a
filter for the position information received from the Win-Test program.
Set the station name "STN1" or "STN2" etc in the “Station” field. This is useful when you are in a multi
station contest environment and other win-test stations send UDP packets over the network with
frequency or azimuth information.
To communicate both programs must to have the same Station name. So don't forget to set this!
N1MM Setup The PstRotator program uses the UDP broadcasts of the N1MM logger, and it is compatible with N1MM
versions 12.12.2 and later. For these N1MM versions the UDP port used to send messages from N1MM
Logger is always 12040.
PstRotator and N1MM can stay on the same PC or on different PCs in the same local network.
Rotor control
Rotators can be controlled from N1MM logger in several different ways:
Entry window: o by entering a beam heading in the callsign field and press Alt+J. The rotor will turn to the
entered beam heading Example:234 Alt+J will turn the rotor to 234 degrees The number must be numeric, >= 0 and <= 360
o using the menu items in the Tools menu Turn Rotor Alt+J - Turn rotor to bearing for the callsign in the Entry window Stop Rotor Ctrl+Alt+J - Stop turning the rotor when turning and no bearing in
callsign field in Entry window o using the short cut keys below:

PstRotator – Software for Antenna Rotators User’s Manual Rev.7.2
32
Alt+J - Turn rotor to bearing for the callsign in the Entry window or to the callsign in the callframe (when callsign field is empty)
Alt+L - Turn rotor to long path bearing for the callsign in the Entry window Ctrl+Alt+J - Stop turning the rotor when turning and no bearing in callsign field in
Entry window
Bandmap window: by right clicking on a spot and select: 'Turn Rotor'
Available Mult's and Q's window: by right clicking on a spot and select: 'Turn Rotor'
N1MM Logger.ini file
For external UDP broadcasts there are some lines that need to be added manually to the N1MM
Logger.ini file. This has to be done with an external text editor, such as Notepad or Wordpad (there is no
UI for this option). Do not use a word processing program, such as Microsoft Word.
When the section [ExternalBroadcast] is not there it must be added. An example is:
[ExternalBroadcast]
DestinationIPs=127.0.0.1 192.168.1.255
Start with IP address 127.0.0.1 (the pc you are running on) and add other PC's IP-addresses (space
delimited). You can send to multiple IP addresses in the subnet by specifying 255 for the last octet.
E.g. 192.168.1.255 will send to all computers that are in the 192.168.1 subnet.
Do not specify 255 in the higher order octets, or you will risk broadcasting to the internet. While
eventually the packets will be discarded by the internet, it will not endear you to your ISP.
Rotor Port, Rotor Name
Set the same Ethernet port number for both programs. Default value is 12040.
N1MM Setup window in the PstRotator program
The Rotor Description in the N1MM Antennas tab can either be a number, or an alphanumeric name for the rotator. If a number or alphanumeric name in entered in the Rotor Port Antenna tab, then the same number or alphanumeric name must be entered in the PstRotator Rotor Setup form.
Setting “Bands” and “Rotor Port” can be obtained filters for antenna groups. For example, if you have an
antenna for 14,21 and 28 and want to turn it only when you work in these bands, use the same Rotor
Description / Name for both programs (N1MM and PstRotator) and 14,21,28 to Bands in N1MM.

PstRotator – Software for Antenna Rotators User’s Manual Rev.7.2
33
N1MM Configurer window
VQLog
VQLog settings:
- in Configuration / Rotor Control / Sets set the location of the DDE1.exe file from the PstRotator
folder, and press the Enable button
- Check all the checkboxes in the Common window

PstRotator – Software for Antenna Rotators User’s Manual Rev.7.2
34
PstRotator settings:
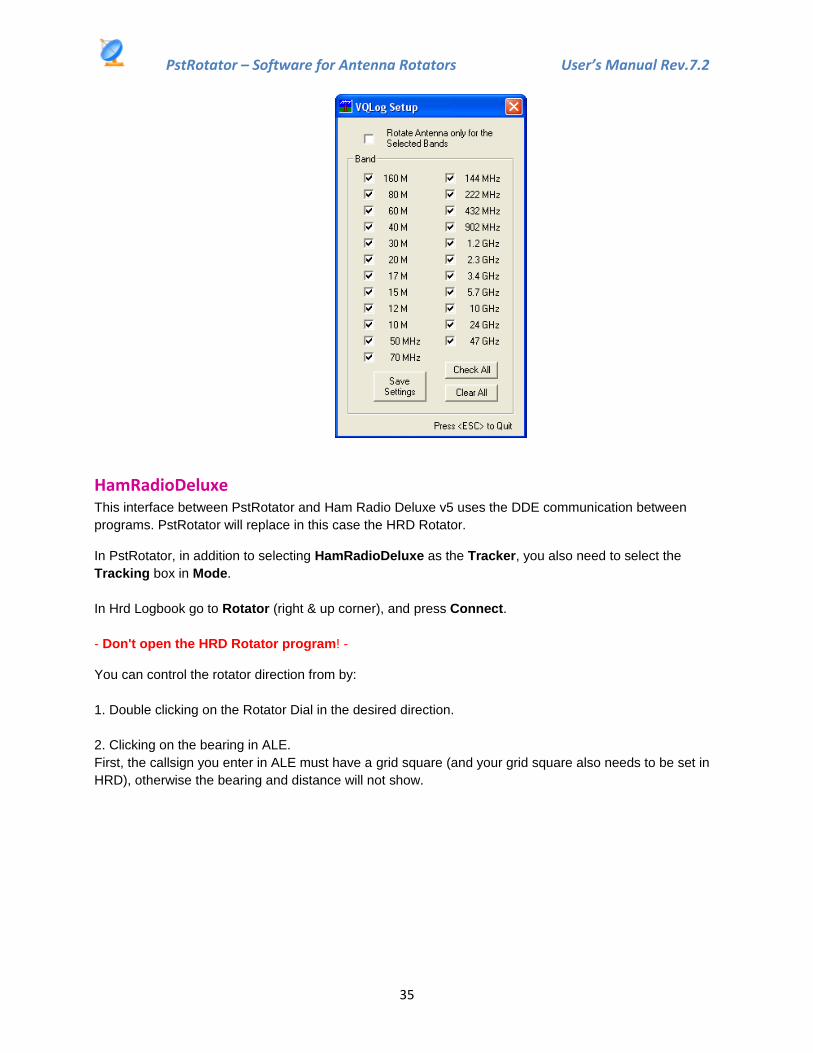
- Select VQLog as Tracker, and Tracking to Mode.
- If you don’t need to rotate antenna for all the bands, or you use many PstRotator instances to
control more than one antenna rotator, check Rotate Antenna only for the Selected Bands
checkbox and select the bands where your antenna works.
PstRotator – Software for Antenna Rotators User’s Manual Rev.7.2
35
HamRadioDeluxe This interface between PstRotator and Ham Radio Deluxe v5 uses the DDE communication between
programs. PstRotator will replace in this case the HRD Rotator.
In PstRotator, in addition to selecting HamRadioDeluxe as the Tracker, you also need to select the
Tracking box in Mode.
In Hrd Logbook go to Rotator (right & up corner), and press Connect.
- Don't open the HRD Rotator program! -
You can control the rotator direction from by:
1. Double clicking on the Rotator Dial in the desired direction.
2. Clicking on the bearing in ALE.
First, the callsign you enter in ALE must have a grid square (and your grid square also needs to be set in
HRD), otherwise the bearing and distance will not show.

PstRotator – Software for Antenna Rotators User’s Manual Rev.7.2
36
3. Double clicking on the Greyline Map in the desired direction.
HRD Logbook This second interface with HamRadioDeluxe makes things easier.
There is nothing to be configured in HRD Logbook.
In PstRotator select HRD Logbook as Tracker, and set the Tracking box in Mode.
Write a callsign in HRD Logbook and PstRotator will capture this callsign and rotate antenna
automatically.
HRD Satellite Tracking Start HRD Satellite Tracking
Go to Tools > DDE Server and select Nova
Select a satellite
Check the RX checkbox
Start PstRotator
Select HRD Satellite as Tracker
Set Tracking to Mode
nGenLog There is nothing to be configured in LOGic8 program.
In the PstRotator program select nGenLog as Tracker and set mode to "Tracking" in the main window.
Write a callsign in the nGenLog - QSO Editor and the PstRotator will compute the azimuth and will turn
antenna on that direction.

PstRotator – Software for Antenna Rotators User’s Manual Rev.7.2
37
Logger32 Open both programs PstRotator and Logger32.
In the PstRotator program select Logger32 as Tracker, and set Tracking to mode in the main window.
Under “Setup / Trackers Setup” it can be find “Logger32 Setup…”. This provides filtering by bands,
giving the possibility to manage more than one rotor. Take a look at “PstRotator managing more than one
rotator (multiple instances)” chapter. You can select the band (or the bands) in which PstRotator program
will control the antenna.
In the Logger32 program:
check to enable global capture of CTL+A and ALT+A keys to turn rotor
enter a callsign
use Ctrl A to send the azimuth information from Logger32 to PstRotator program
LOGic8 Start the LOGic8 program before to start PstRotator.
There is nothing to be configured in LOGic8 program.
In the PstRotator select Logic8 as tracker and set mode to "Tracking" in the main window.

PstRotator – Software for Antenna Rotators User’s Manual Rev.7.2
38
Write a callsign in Logic8 LOG--MAIN window, press TAB, and it will be sent to PstRotator (in the Prefix
field). PstRotator will compute the azimuth and turn antenna on that direction.
Swisslog PstRotator settings:
Select Swisslog as Tracker
Set mode to "Tracking" in the main window
Swisslog settings:
Go to Swisslog/Options/Rotor-Interface and:
Enable EA4TX Rotor Control Interface
Enter the full path of the DDE.exe file from the PstRotator folder (to set DDE.exe as control
program)
Check the "Start automatically" box
Write a callsign in the Swisslog, and press F2 key to rotate antenna on the short path direction.
HamScope Start the HamScope program before to start PstRotator.
There is nothing to be configured in HamScope program.
In the PstRotator select HamScope as tracker and set mode to "Tracking" in the main window.
Write a callsign in HamScope, and it will be sent to PstRotator (in the Prefix field). PstRotator will compute
the azimuth and turn antenna on that direction.
DXLab Suite The first way to interface PstRotator with DXLab suite:
- There is nothing to be configured in DXView program.
PstRotator – Software for Antenna Rotators User’s Manual Rev.7.2
39
- In the PstRotator program select DXView as Tracker and set mode to "Tracking" in the main
window.
The data from the "short" text box is sent to PstRotator. You can write some in that box, or write a
callsign and press "Go".
A second way to interface PstRotator with DXLab Suite:
- setting the N1MM as tracker in the PstRotator and as rotator in DXView/Config/Rotator
Control.
With these settings can be used the SP/LP buttons from DXView, or "rotate to ... heading for ..."
context menu items from SpotCollector. Don’t use this second way if you need also to control from
DXLab a SteppIR SDA controller.
AC Log There is nothing to be configured in AC Log program.
In the PstRotator program select AC Log as Tracker and set mode to "Tracking" in the main window.
Write a callsign in the AC Log and the PstRotator will compute the azimuth and turn antenna.
BBLogger There is nothing to be configured in BBLoger program.
In the PstRotator program select BBLogger as Tracker and set mode to "Tracking" in the main window.
The “AZIMUTH – Short” information from the QSO data window will be sent to PstRotator, and
PstRotator will turn the antenna.
VHFCtest4WIN There is nothing to be configured in VHFCtest4WIN to be interfaced with PstRotator.
In PstRotator select VHFCtest4WIN as Tracker and set mode to "Tracking" in the main window.
PstRotator captures the information from the locator box of the VHFCtest4WIN, and if a valid value is
found, PstRotator calculates the antenna azimuth and rotates it automatically.
DX4WIN In DX4WIN set File/Preferences/Control/Rotator Control
- Type = Message Based
- Message Handshake = ThunderRT6FormDC|DX4PST
Start the PstRotator program, select DX4WIN as tracker and set mode to "Tracking" in the PstRotator
main window before to start the DX4WIN program.
PstRotator – Software for Antenna Rotators User’s Manual Rev.7.2
40
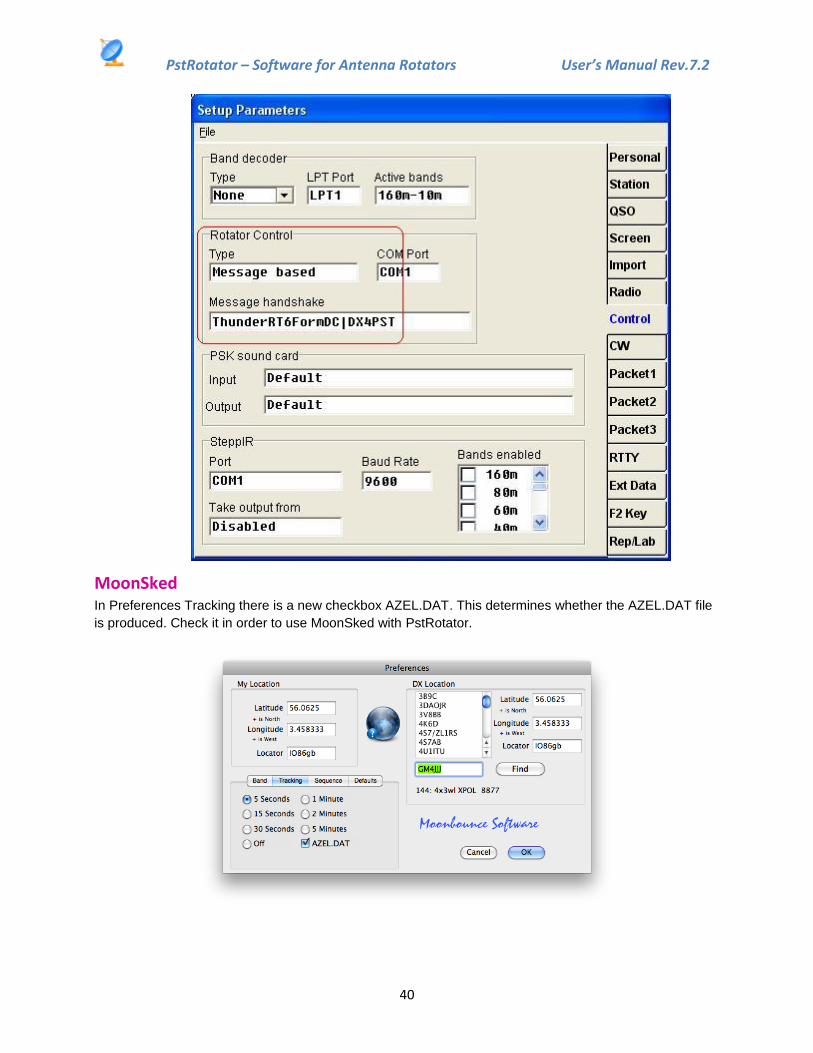
MoonSked In Preferences Tracking there is a new checkbox AZEL.DAT. This determines whether the AZEL.DAT file
is produced. Check it in order to use MoonSked with PstRotator.

PstRotator – Software for Antenna Rotators User’s Manual Rev.7.2
41
Note that azel.dat is only produced when the Moon Track or the Noise Source
Track windows are running. The Noise Source takes priority, so if you have Sun
selected there the tracking data sent to azel.dat will be for the Sun, even if
Moon Track is also open.
In PstRotator select MoonSked as Tracker and set Tracking to mode.
VHFLog There is nothing to be configured in VHFLog to be interfaced with PstRotator.
In PstRotator select VHFLog as Tracker and set mode to "Tracking" in the main window.
PstRotator captures the information from the locator box of the VHFLog, and if a valid value is found,
PstRotator calculates the antenna azimuth and rotates it automatically.
KLog There is nothing to be configured in KLog to be interfaced with PstRotator.
In the PstRotator program select KLog as Tracker and set mode to "Tracking" in the main window.
Write a callsign in the KLog, and the PstRotator will rotate the antenna.
HalloSat In PstRotator select HalloSat as Tracker and set Tracking to Mode in the main window.
There is nothing to be configured in HalloSat to be interfaced with PstRotator.
PstRotator uses the AZ / EL information found in Rotorcontrol window for tracking.
WinREF-THF There is nothing to be configured in WinREF-HF to be interfaced with PstRotator.
In PstRotator select WinREF-THF as Tracker and set mode to "Tracking" in the main window.
PstRotator captures the information from the locator box of the WinREF-HF, and if a valid value is found,
PstRotator calculates the antenna azimuth and rotates it automatically.
WinREF-HF There is nothing to be configured in WinREF-HF to be interfaced with PstRotator.
In the PstRotator program select WinREF-HF as Tracker and set mode to "Tracking" in the main window.
Write a callsign in the WinREF-HF, and the PstRotator will rotate the antenna.
JT65-HF There is nothing to be configured in JT65-HF to be interfaced with PstRotator.
In the PstRotator program select JT65-HF as Tracker and set mode to "Tracking" in the main window.
Write a callsign in the JT65-HF (“TX to Call Sign” text box), and the PstRotator will rotate the antenna.
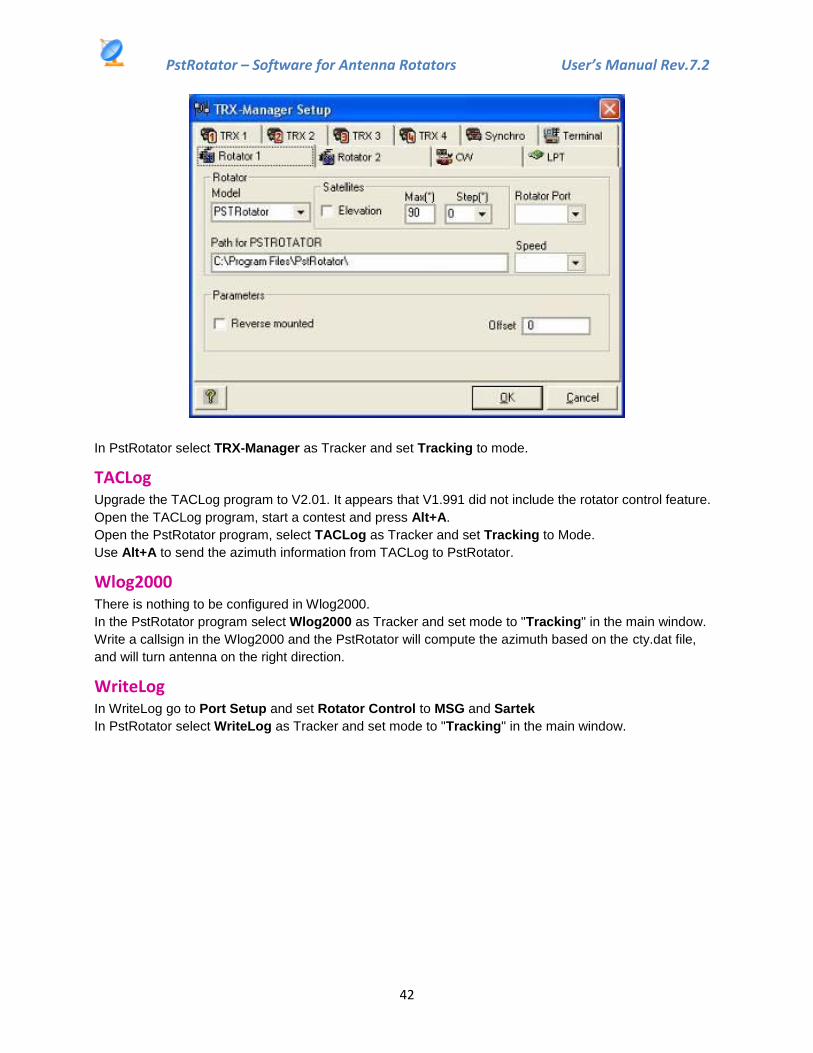
TRX-Manager In TRX-Manager:
- Select PstRotator to rotor model. (Parameters > Setup > Rotator 1 > PstRotator).
- Set Path for PstRotator.
PstRotator – Software for Antenna Rotators User’s Manual Rev.7.2
42
In PstRotator select TRX-Manager as Tracker and set Tracking to mode.
TACLog Upgrade the TACLog program to V2.01. It appears that V1.991 did not include the rotator control feature.
Open the TACLog program, start a contest and press Alt+A.
Open the PstRotator program, select TACLog as Tracker and set Tracking to Mode.
Use Alt+A to send the azimuth information from TACLog to PstRotator.
Wlog2000 There is nothing to be configured in Wlog2000.
In the PstRotator program select Wlog2000 as Tracker and set mode to "Tracking" in the main window.
Write a callsign in the Wlog2000 and the PstRotator will compute the azimuth based on the cty.dat file,
and will turn antenna on the right direction.
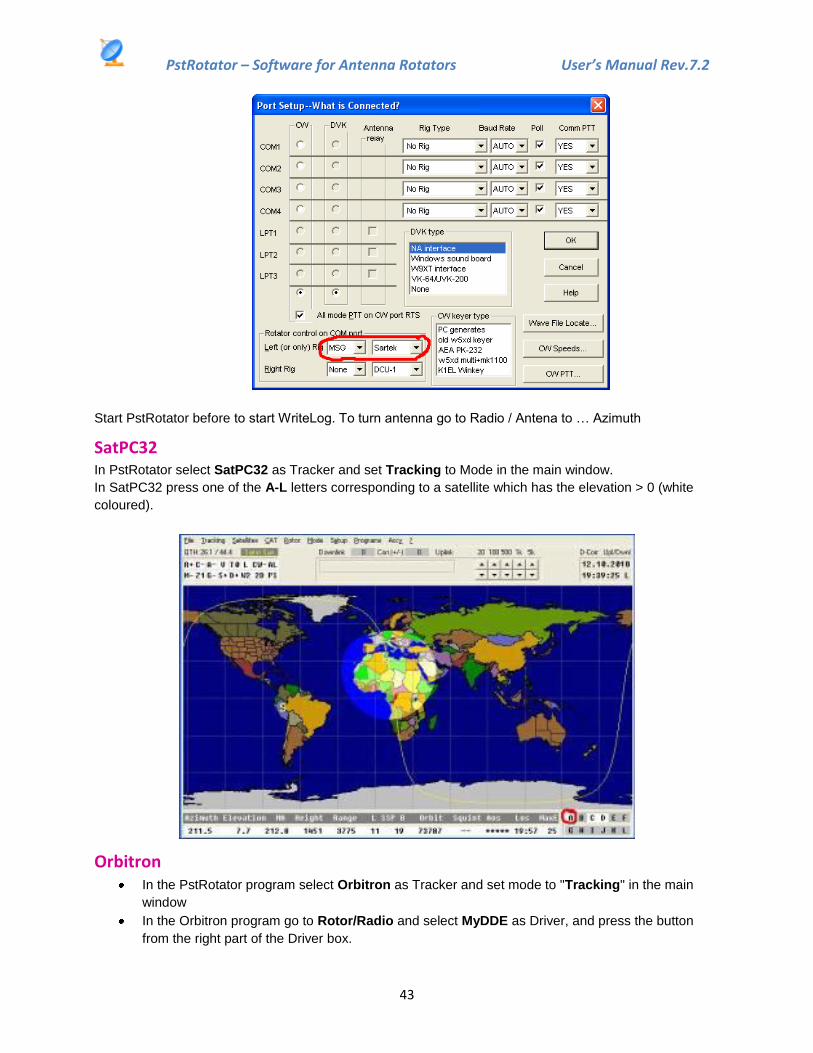
WriteLog In WriteLog go to Port Setup and set Rotator Control to MSG and Sartek
In PstRotator select WriteLog as Tracker and set mode to "Tracking" in the main window.
PstRotator – Software for Antenna Rotators User’s Manual Rev.7.2
43
Start PstRotator before to start WriteLog. To turn antenna go to Radio / Antena to … Azimuth
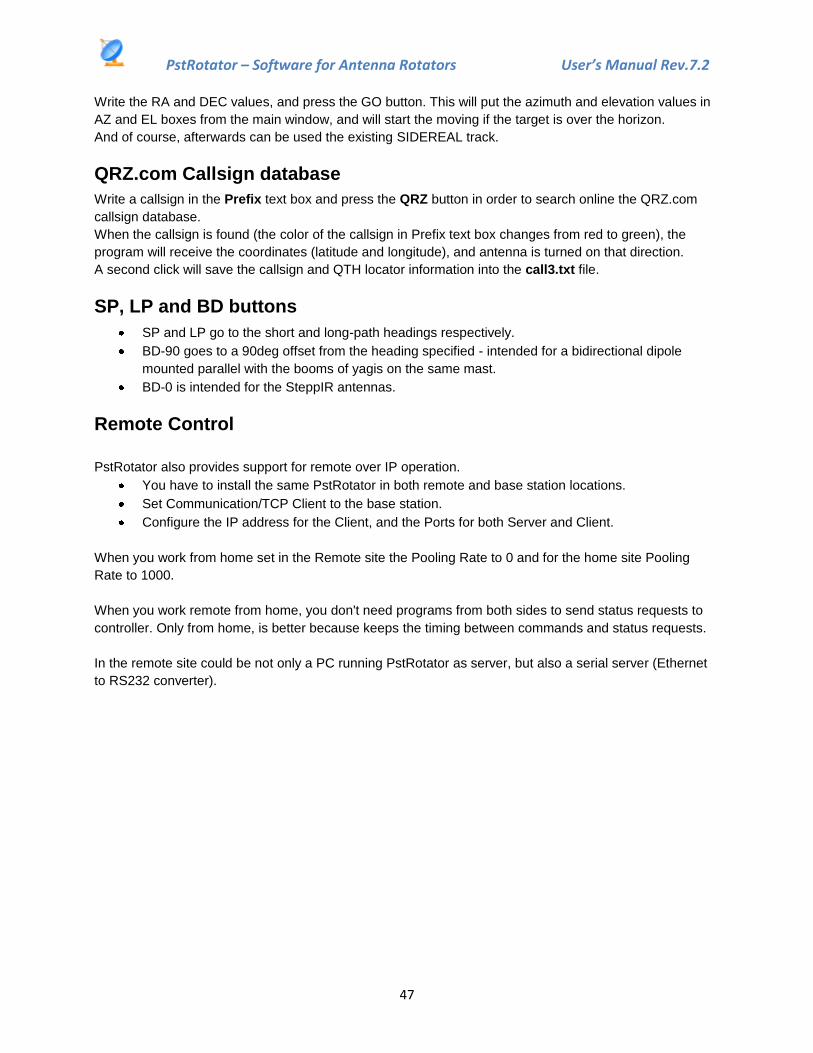
SatPC32 In PstRotator select SatPC32 as Tracker and set Tracking to Mode in the main window.
In SatPC32 press one of the A-L letters corresponding to a satellite which has the elevation > 0 (white
coloured).
Orbitron In the PstRotator program select Orbitron as Tracker and set mode to "Tracking" in the main
window
In the Orbitron program go to Rotor/Radio and select MyDDE as Driver, and press the button
from the right part of the Driver box.

PstRotator – Software for Antenna Rotators User’s Manual Rev.7.2
44
If you don’t have any MyDDE driver selected before, the Orbitron program will ask you for the program
which will be used as tracker. You have to select PstRotator from its folder. Usual this is C:\Program
Files\PstRotator.
If you already used another program as MyDDE driver, you must to erase it from the Orbiton configuration
file:
C:\Program Files\Orbitron\Config\Setup.cfg
Or you can manually add/modify in Setup.cfg:
[Drivers]
MyDDE=C:\Program Files\PstRotator\PstRotator.exe
The next times when you will use Orbiton, this will automatically open the PstRotator program. You need
only to set Tracking to Mode in the main window to start the tracking.
Gpredict In GPredict go to "edit" then "interfaces" then "rotators" and make here a new rotator interface,
you can use the standard port 4533. Best you give it the name, PstRotator.
In PstRotator go to "tracker"and mark Gpredict.
Also in PstRotator mark the tracking option.
In Gpredict select "antenna control", in this box here select "PstRotator" (remember you have
made that interface at begining) and push Engage
In the same box select in Target your satellite and push Track.

PstRotator – Software for Antenna Rotators User’s Manual Rev.7.2
45
Nova for Windows In Nova for Windows you must set DDE Only as Antenna Rotator (Setup/Antenna Rotator).
In PstRotator select Nova as Tracker, and set Tracking mode.
If your OS is Windows7, you must run the programs as Administrator (you can find how to set this at the
end of this document).
Radio-Eyes 1 There is nothing to be configured in Radio-Eyes 1 to be interfaced with PstRotator.
In PstRotator select Radio-Eyes 1 as Tracker and set mode to "Tracking" in the main window.
PST just follows whatever is in the desired ALT-AZ text boxes on the main RE window.
Radio-Eyes CP To use PstRotator with the TCPP you must select Radio Eyes CP under the Tracker menu item in
PstRotator.
You may download the driver from http://radiosky.com/radioeyes/drivers/PstRotatorDriver.exe
Place this file in your Radio Eyes 1\TelescopeDrivers directory.
In the telescope definition file (TDF) you should specify PstRotatorDriver.exe as your driver. The telescope
definition creator/editor might appear as shown below.

PstRotator – Software for Antenna Rotators User’s Manual Rev.7.2
46
Sidereal Sidereal tracking of the antenna
The antenna stays pointed on a celestial target that has been manually pointed on, so that the rotation of
the earth is eliminated. The functionality could be like described below:
You point the antenna manually to the desired celestial target, getting the Azimuth and Elevation
from a suitable planetarium program.
You select "Sidereal" in the Tracker list of PstRotator and press the Tracking button in the Mode
field of the PstRotator window.
The program now converts the AZ / EL coordinates to RA / DEC coordinates, using the observer’s
position and the actual time and stores these values internally.
Each 1 sec. the program takes the stored initial RA / DEC coordinates and converts them back to
AZ / EL, using the new actual time. The new AZ / EL values are used to command the antenna
rotor controller to correct the antenna position if needed.
The antenna will stay pointed at a constant RA / DEC coordinate, and will track any stationary
astronomical object perfectly. Slow moving objects like planets will in practice also be tracked for a very
long period before the error exceeds one degree.
All this without any external tracking programs!
RA/DEC
Enter a RA/DEC coordinate pair from the keyboard and point the antenna in the corresponding AZ/EL
direction.
This would enable to enter a celestial radio source position from a radio star catalog and point the antenna
automatically towards it.
A click on RA/DEC will open a new window containing two text boxes (RA and DEC) and a GO button.
PstRotator – Software for Antenna Rotators User’s Manual Rev.7.2
47
Write the RA and DEC values, and press the GO button. This will put the azimuth and elevation values in
AZ and EL boxes from the main window, and will start the moving if the target is over the horizon.
And of course, afterwards can be used the existing SIDEREAL track.
QRZ.com Callsign database
Write a callsign in the Prefix text box and press the QRZ button in order to search online the QRZ.com
callsign database.
When the callsign is found (the color of the callsign in Prefix text box changes from red to green), the
program will receive the coordinates (latitude and longitude), and antenna is turned on that direction.
A second click will save the callsign and QTH locator information into the call3.txt file.
SP, LP and BD buttons
SP and LP go to the short and long-path headings respectively.
BD-90 goes to a 90deg offset from the heading specified - intended for a bidirectional dipole
mounted parallel with the booms of yagis on the same mast.
BD-0 is intended for the SteppIR antennas.
Remote Control
PstRotator also provides support for remote over IP operation.
You have to install the same PstRotator in both remote and base station locations.
Set Communication/TCP Client to the base station.
Configure the IP address for the Client, and the Ports for both Server and Client.
When you work from home set in the Remote site the Pooling Rate to 0 and for the home site Pooling
Rate to 1000.
When you work remote from home, you don't need programs from both sides to send status requests to
controller. Only from home, is better because keeps the timing between commands and status requests.
In the remote site could be not only a PC running PstRotator as server, but also a serial server (Ethernet
to RS232 converter).

PstRotator – Software for Antenna Rotators User’s Manual Rev.7.2
48
Run-time error ‘8020’
If when you run the PstRotator software get the following error message:
Uninstall the old drivers and install the latest drivers for your USB to RS232 adapter.
If your addapter uses an FTDI chip, you can download the last driver version from:
http://www.ftdichip.com/Drivers/VCP.htm
For an adapter which uses a Prolific chip, the driver can be downloaded from:
http://www.prolific.com.tw/US/ShowProduct.aspx?p_id=225&pcid=41
SUPPORT
Your questions regarding the PstRotator software will be answered fast by [email protected] .
You can also use the support-forum at http://groups.yahoo.com/group/pstrotator to answer questions or to
exchange with other users.
Become a member of this Yahoo-Group and you will automatically be informed about improvements and
news regarding PstRotator program.
The PstRotator web page is http://www.qsl.net/yo3dmu/index_Page346.htm .


![WORK PERFORMED FOR: Asquith Resources Inc. : Other [ ] …...diamond drill record name of property hole no. location latitude elevation started departure azimuth —— finished ——](https://static.fdocuments.in/doc/165x107/5e9738dedb97b318510a85f2/work-performed-for-asquith-resources-inc-other-diamond-drill-record.jpg)