Provisional Registration E-Portfolio User Guide
69
Provisional Registration E-Portfolio User Guide For Portfolio Collaborators September 2020
Transcript of Provisional Registration E-Portfolio User Guide
Provisional
Registration
E-Portfolio User
Guide
For Portfolio
Collaborators
September 2020

Contents 1 Introduction ......................................................................................................................... 4
2 Using the E-Portfolio........................................................................................................... 5
2.1 Help and Additional Information .................................................................................. 5
2.2 Session Timer ............................................................................................................. 5
2.3 User Roles ................................................................................................................... 6
3 Accessing your Learner’s E-Portfolio ................................................................................. 7
3.1 Viewing and editing records ........................................................................................ 8
4 Identifying and Reviewing your Learner’s Development Needs ...................................... 11
4.1 Learning Needs Analysis .......................................................................................... 11
4.1.1 Learning needs analysis icons .......................................................................... 14
5 Supporting your Learner’s Development ......................................................................... 15
5.1 360° Feedback Tool .................................................................................................. 15
5.1.1 Providing feedback ............................................................................................ 15
5.1.2 Reviewing feedback ........................................................................................... 19
5.2 Reflective Summary .................................................................................................. 23
5.3 Meeting Records ....................................................................................................... 25
5.3.1 Creating a meeting record ................................................................................. 25
5.3.2 Reviewing and contributing to a meeting record ............................................... 27
5.4 Action Plans............................................................................................................... 30
5.4.1 Creating an action plan for your learner(s) ........................................................ 30
6 Using Supervised Learning Events (SLEs) to Support Development ............................. 33
6.1 Case Based Discussion (CbD) ................................................................................. 33
6.1.1 Creating a CbD .................................................................................................. 33
6.1.2 Reviewing a CbD ............................................................................................... 36
6.2 Direct Observation of Practical Skills (DOPS) .......................................................... 38
6.2.1 Creating a DOPS ............................................................................................... 38
6.2.2 Reviewing a DOPS ............................................................................................ 41
6.3 Medication Related Consultation Framework (MRCF) ............................................. 43
6.3.1 Creating a MRCF record.................................................................................... 43
6.3.2 Reviewing a MRCF ............................................................................................ 46
6.4 Mini Clinical Evaluation Exercise (Mini-CEX) ........................................................... 48
6.4.1 Creating a mini-CEX .......................................................................................... 48
6.4.2 Reviewing a mini-CEX ....................................................................................... 51
6.5 Supervised Learning Event Actions .......................................................................... 54
7 Continuing Professional Development (CPD) .................................................................. 55

3
8 File Upload ........................................................................................................................ 56
9 Provisional Registration Requirements ............................................................................ 59
9.1 GPhC Requirements ................................................................................................. 59
10 Reviewing progress ...................................................................................................... 60
10.1 Learner’s dashboard ................................................................................................. 60
10.2 Framework summary ................................................................................................ 61
11 Printing Records ........................................................................................................... 64
12 Contact Details .............................................................................................................. 67
13 Glossary ........................................................................................................................ 68
4
1 Introduction The Royal Pharmaceutical Society (RPS) have developed an E-portfolio for provisionally
registered pharmacists to record their learning and development.
The E-portfolio has been designed to be flexible so that a provisionally registered
pharmacist, can work through the elements independently, or as instructed by their training
providers. The E-portfolio also contains forms and templates to enable the provisionally
registered pharmacist to fulfil the requirements of provisional registration as set out by the
General Pharmaceutical Council.
This is a life-long learning portfolio for a provisionally registered pharmacist to collate and
record evidence of their practice throughout their whole career. The RPS will continue to
update and enhance the E-portfolio to ensure that it continues to be user-friendly, intuitive
and functional platform. Learning and development tools will also be reviewed regularly to
ensure that they reflect current pharmacy practice.
This is a technical user guide that outlines the main functions of the E-portfolio for Portfolio
Collaborators to help you navigate the E-portfolio and be able to support your learner’s
progress and comment on their achievements. Portfolio Collaborators include Senior
Pharmacists, Educational Supervisors/Tutors, Practice Supervisors, Workplace Facilitators,
and Employers.
If your learner/s are undertaking a structured training programme, such as a national interim
foundation programme or clinical diploma, please refer to guidance from your employer
and/or training provider.
The RPS are keen to have your feedback on the E-portfolio, if you have any comments or
suggestions for improvements please contact the RPS directly. Contact details are provided
at the end of this user guide.
5
2 Using the E-Portfolio This section contains general information on the technical functionality of the E-portfolio.
2.1 Help and Additional Information
We have included additional help information throughout the E-portfolio to explain what you
need to do.
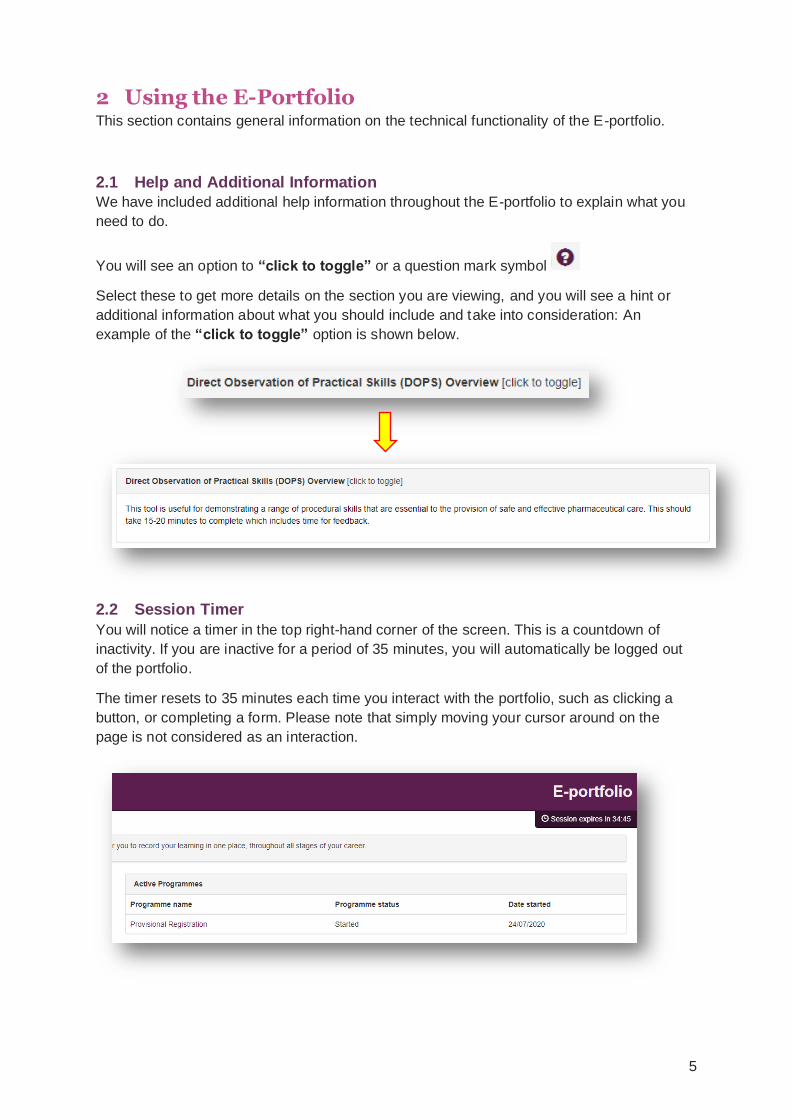
You will see an option to “click to toggle” or a question mark symbol
Select these to get more details on the section you are viewing, and you will see a hint or
additional information about what you should include and take into consideration: An
example of the “click to toggle” option is shown below.
2.2 Session Timer
You will notice a timer in the top right-hand corner of the screen. This is a countdown of
inactivity. If you are inactive for a period of 35 minutes, you will automatically be logged out
of the portfolio.
The timer resets to 35 minutes each time you interact with the portfolio, such as clicking a
button, or completing a form. Please note that simply moving your cursor around on the
page is not considered as an interaction.
6
2.3 User Roles
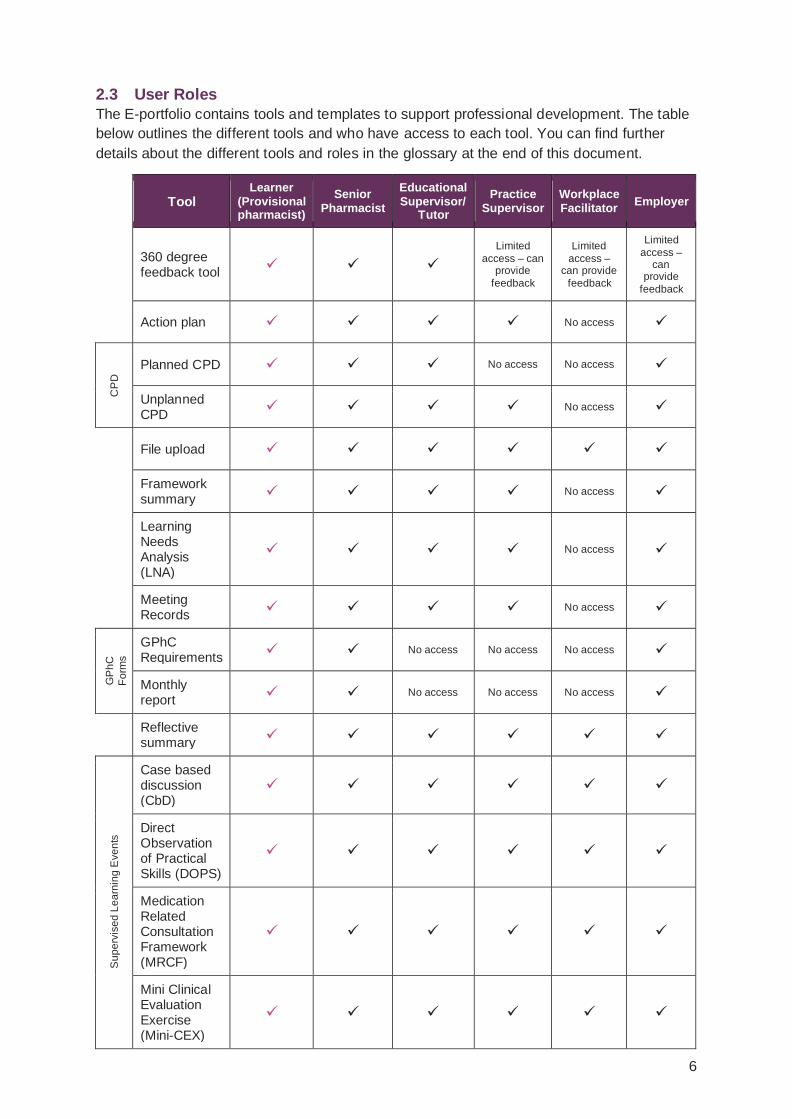
The E-portfolio contains tools and templates to support professional development. The table
below outlines the different tools and who have access to each tool. You can find further
details about the different tools and roles in the glossary at the end of this document.
Tool
Learner (Provisional pharmacist)
Senior Pharmacist
Educational Supervisor/
Tutor
Practice Supervisor
Workplace Facilitator
Employer
360 degree feedback tool
✓ ✓ ✓
Limited
access – can provide
feedback
Limited
access – can provide
feedback
Limited
access – can
provide
feedback
Action plan ✓ ✓ ✓ ✓ No access ✓
CP
D
Planned CPD ✓ ✓ ✓ No access No access ✓
Unplanned CPD
✓ ✓ ✓ ✓ No access ✓
File upload ✓ ✓ ✓ ✓ ✓ ✓
Framework summary
✓ ✓ ✓ ✓ No access ✓
Learning Needs Analysis (LNA)
✓ ✓ ✓ ✓ No access ✓
Meeting Records
✓ ✓ ✓ ✓ No access ✓
GP
hC
Fo
rms
GPhC Requirements
✓ ✓ No access No access No access ✓
Monthly report
✓ ✓ No access No access No access ✓
Reflective summary
✓ ✓ ✓ ✓ ✓ ✓
Su
pe
rvis
ed
Le
arn
ing
Eve
nts
Case based discussion (CbD)
✓ ✓ ✓ ✓ ✓ ✓
Direct Observation of Practical Skills (DOPS)
✓ ✓ ✓ ✓ ✓ ✓
Medication Related Consultation Framework (MRCF)
✓ ✓ ✓ ✓ ✓ ✓
Mini Clinical Evaluation Exercise (Mini-CEX)
✓ ✓ ✓ ✓ ✓ ✓
7
3 Accessing your Learner’s E-Portfolio The E-portfolio can be accessed from the RPS website. If you are a member of the RPS,
you will be able to access the portfolio using your usual login details (membership number or
email address and password).
To access your learner’s E-portfolio, they first need to give you access by inviting you to be a
collaborator. When your learner invites you to be a collaborator you will receive an email with
a link to their E-portfolio, which you can either decline or accept.
TIP: Please check your junk mail folder as the automatic emails can get filtered out as spam.
If you have not received an email giving you access even though your learner has sent one,
please ask the learner to re-send the email. The learner should be able to do this within the
platform.
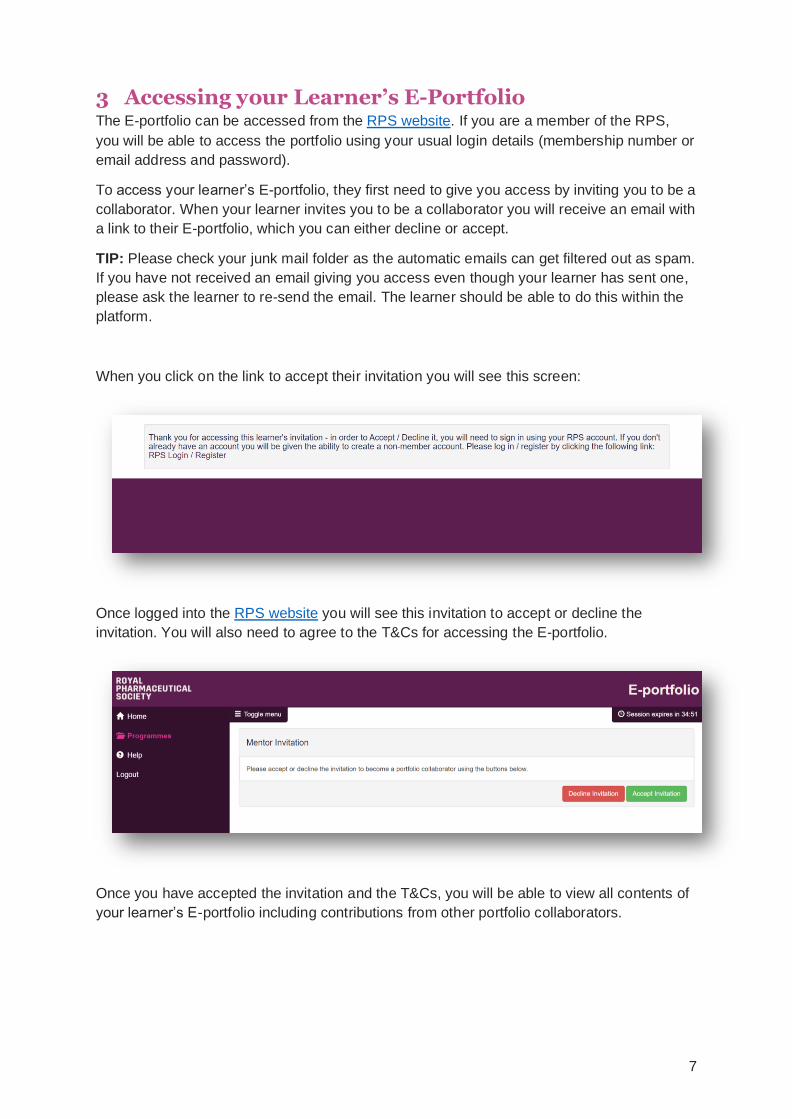
When you click on the link to accept their invitation you will see this screen:
Once logged into the RPS website you will see this invitation to accept or decline the
invitation. You will also need to agree to the T&Cs for accessing the E-portfolio.
Once you have accepted the invitation and the T&Cs, you will be able to view all contents of
your learner’s E-portfolio including contributions from other portfolio collaborators.

8
After you have successfully linked to your learner you will have a new tab in the navigation
menu titled “Your Provisionally Registered Pharmacists”. Select this to view the full list of
provisional registrants (learners) you have linked to.
Once you can see the list selecting the “Go to programme” link will open the learner’s
programme and allow you to assess their records or add records to their programme.
NOTE: Your learner controls who has access to their E-portfolio and can revoke access at
any point, for example, if they move organisation or change roles. If you experience any
issues with accessing a learner’s portfolio, as a first step, you should check that they have
given you access and are linked to you. If they have given you access but you are still
experiencing issues, please contact the RPS for further assistance.
3.1 Viewing and editing records
Your permissions will vary depending on your role (see table in section 2.3). If you find that
you cannot access a section, tool or form that you need to, ask your learner to check that
they have given you the correct level of access.
There are two ways of accessing records and sections of the E-portfolio. Here is an example
of a learner’s dashboard – showing a summary of their E-portfolio content. You can simply
click on any of the tools or forms in each boxed section to view and/or edit the details.
9
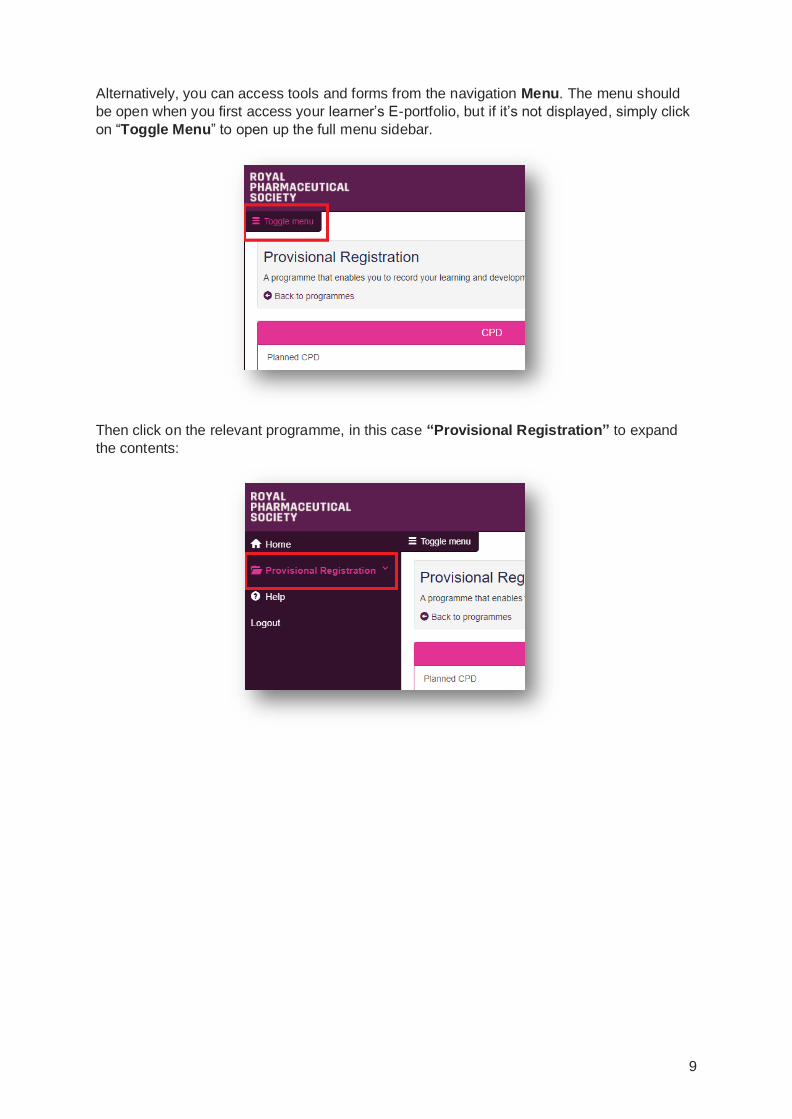
Alternatively, you can access tools and forms from the navigation Menu. The menu should
be open when you first access your learner’s E-portfolio, but if it’s not displayed, simply click
on “Toggle Menu” to open up the full menu sidebar.
Then click on the relevant programme, in this case “Provisional Registration” to expand
the contents:

10
You will then be able to select a tool or form from the list to edit, view and or review. The
tools and forms are displayed in alphabetical order.
You can hide the menu by using the “Toggle Menu” option at any point. This might be helpful
on smaller screens.

11
4 Identifying and Reviewing your Learner’s
Development Needs We have incorporated several tools to enable learners to identify their strengths and areas
for development. Use these tools to help your learner(s) plan their learning.
4.1 Learning Needs Analysis
The learning needs analysis (LNA) enables a learner to assess their practice against the
interim foundation curriculum learning outcomes. You will be able to view their ratings and
make suggestions on how they can address any gaps. Learners are recommended to
complete a learning needs analysis every 6-12months or when their practice changes
significantly, such as a change in hospital rotation, change in role or change in
responsibilities. If your learner is undertaking a formal training programme, check the
requirements of the training provider.
To view your learners’ learning needs analysis, select the “Learning Needs Analysis”
option from the sidebar menu or the “Other Records” area on the learner’s main home
page.
You will be able to view a list of records that are in progress or completed. Select a record
from the list to view the contents.

12
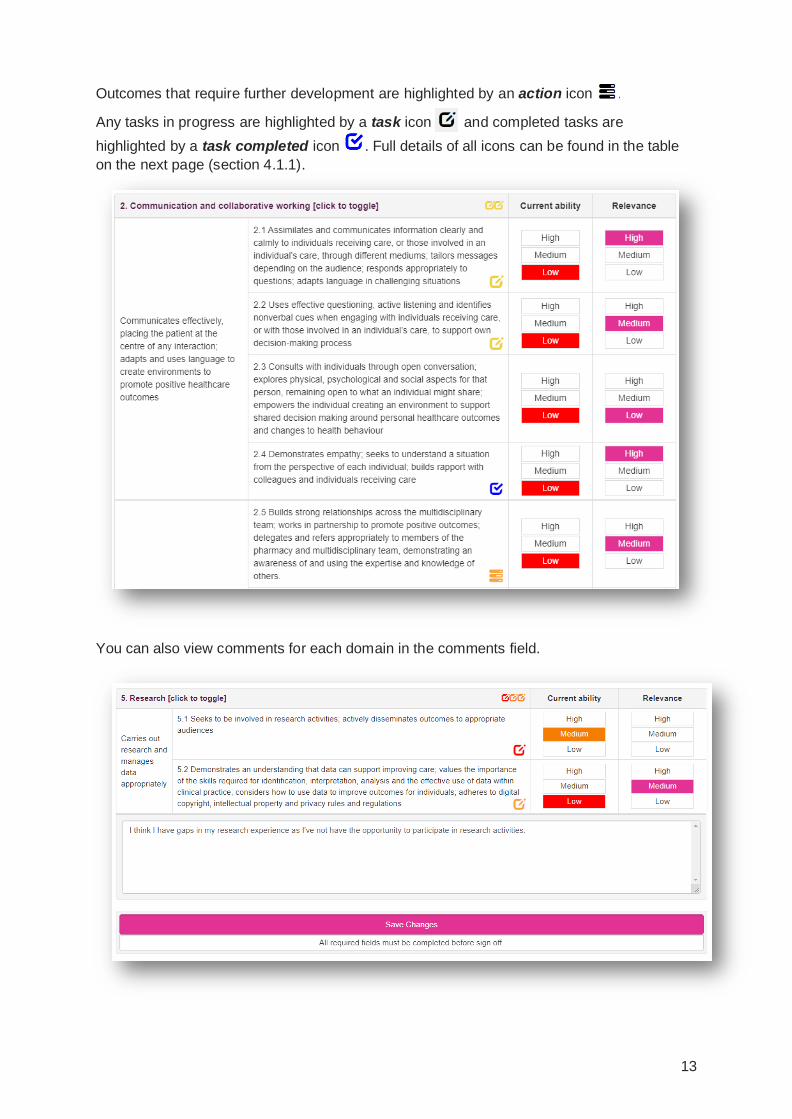
To view your leaner’s rating and any associated tasks, click on the domain titles to expand
and reveal the contents.
13
Outcomes that require further development are highlighted by an action icon .
Any tasks in progress are highlighted by a task icon and completed tasks are
highlighted by a task completed icon . Full details of all icons can be found in the table
on the next page (section 4.1.1).
You can also view comments for each domain in the comments field.

14
You can view linked tasks created in the “Action Plans” area (see section 5.4).
4.1.1 Learning needs analysis icons
The table below summarises the icons that you might see in the learning needs analysis
tool. The action column describes the action a learner can take if they click on the icon within
the learning needs analysis.
Icon Description Action (when icon is clicked)
Low ability – High relevance rating
(Priority 1 action)
Create task
Medium ability – High relevance rating
(Priority 2 action)
Create task
Low ability – Medium relevance rating
(Priority 3 action)
Create task
Medium ability – Medium relevance rating
(Priority 4 action)
Create task
Low ability – High relevance rating
(Priority 1 task)
View and edit task
Medium ability – High relevance rating
(Priority 2 task)
View and edit task
Low ability – Medium relevance rating
(Priority 3 task)
View and edit task
Medium ability – Medium relevance rating
(Priority 4 task)
View and edit task
Task completed View task
You will see a summary of at tasks for each domain at the top of each section.
The tasks icons ( ) indicate how many tasks are in progress and/or have been
completed.

15
5 Supporting your Learner’s Development The E-portfolio contains several tools that you and your learner can use to support their
development. These can be used as required to facilitate and structure learning.
5.1 360° Feedback Tool
The 360° feedback tool is based on the miniTAB, a multisource feedback tool, and evaluates
a learner’s professional behaviour. Learners seek feedback on their practice from
colleagues, peers and patients, ideally 10-15 individuals who can comment on their breadth
of practice. They will also be asked to self-assess themselves against the descriptors
outlined in the 360° feedback tool. Once all feedback has been received, they will need to
reflect upon the comments and set actions.
NOTE: You will only have access to read and edit the 360° feedback tool as a senior
pharmacist or educational supervisor/tutor. All other types of collaborators will only be able
to contribute to the feedback tool if they have been invited to provide feedback by the
learner. Please see our 360° feedback tool guidance for feedback providers.
5.1.1 Providing feedback
You will receive an email from your learner with a link to the form. This email contains a link
that is unique to you and any comments you provide will be attributed to your details.

16
Once you’ve received the email, click on the link to access the feedback form.
Work through the four sections and provide a rating and comments on your learner’s
practice and behaviour.

17
When you have completed your feedback, select “Save and Mark as Complete” to
complete the process.
Please note that once you select this button, you will no longer be able to come back to the
form and make edits.
18
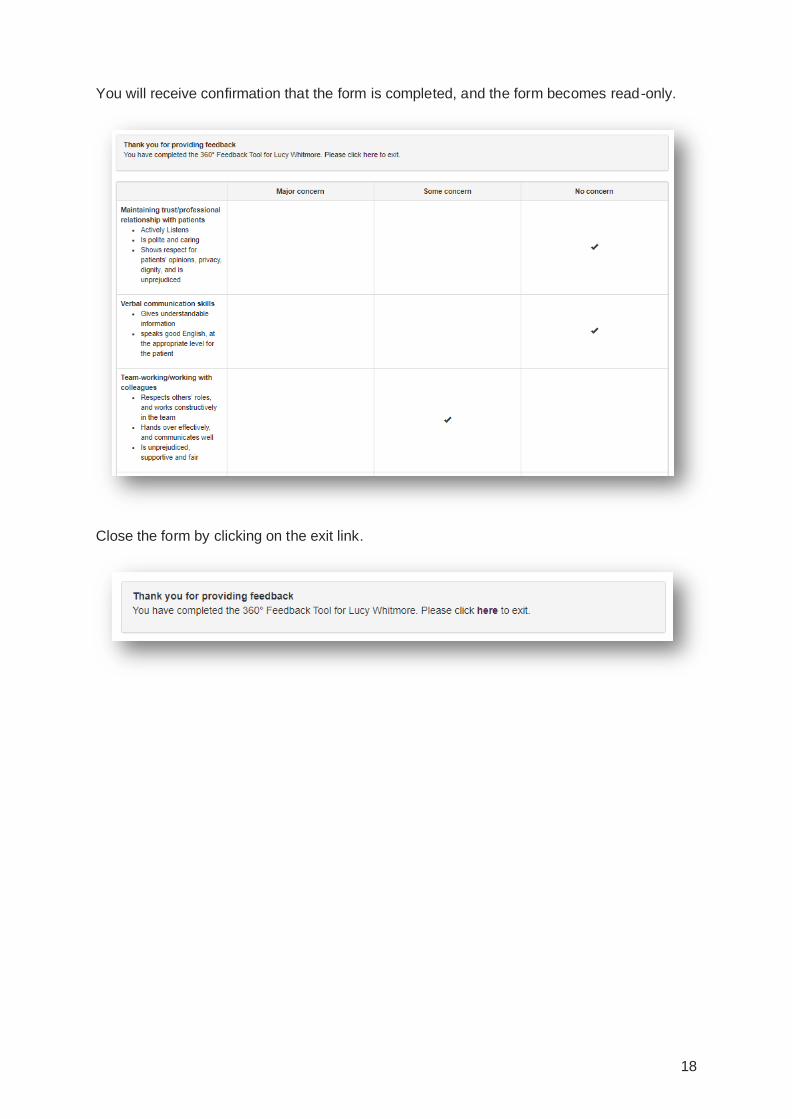
You will receive confirmation that the form is completed, and the form becomes read-only.
Close the form by clicking on the exit link.

19
5.1.2 Reviewing feedback
NOTE This function is only available to educational supervisors/tutors and senior
pharmacists.
To review the 360° feedback select “360° feedback tool” from your learner’s home page or
the navigation menu.
Click in the “Summary report” tab to view the rating and comments. This is displayed as a
heat map. The higher the count of each rating, the darker the shading.

20
If a minimum of five individuals have not provided feedback, you will see a message at the
top of the screen indicating that not enough comments have been received and therefore
you cannot edit or publish the report.
If the threshold has been reached the message will ask you to publish the report. However,
before you publish the report and make the comments available to your learner, you should
review the ratings and add your own comments.
Comments relating to each rating is displayed in a table. You will see the details of each
feedback provider. You can contact individuals directly if you need to ask them for further
clarity on their comments. If you are happy for the comment to be published and revealed to
your learner click Yes in the “Publish” column.

21
Add your comments to the “Senior Pharmacist or Educational Supervisor/Tutor
Comments” field and select “Save” when you are done.
You will be able to return and edit your comments at any point.
Once you are happy with the form and have completed your comments, scroll up to the top
of the page and select “Publish Report and Send to Learner”.

22
The report will then become read-only, and your will see confirmation that it has been
published by you.
You will also be able to view any published reports under the “Previous Reports” tab. Click
on the date to view the contents.

23
5.2 Reflective Summary
The reflective summary encourages learners to take a reflective approach to their learning
and development. It has been designed to be flexible so it can be used for most situations
and practice scenarios, for example encounters during day to day work, patient scenarios,
non-clinical tasks/activities, reviewing feedback provided by colleagues, critical incidences,
and learning events, e.g. CPD.
To access the reflective summary, select “Reflective Summary” from the Navigation menu
Select the record you want to view from the list by clicking “Edit record”.

24
We have also included a section for collaborator comments, but you can also edit other
fields where appropriate. One you are happy with your edits and additions, select “Save and
Continue”.
You will have the opportunity to review edit the mappings. If you do not have any
amendment to the mappings, select “Skip”.
You can view files that your learner has uploaded bit also upload any of your own files that
are associated with this reflective summary. Click “Finish” to save the upload.

25
5.3 Meeting Records
You can record details of development meeting with your learner in the meeting records
section. The form is designed to be flexible so different portfolio collaborators can use it for
different meetings.
5.3.1 Creating a meeting record
To create a record, select the “Meeting Records” navigation menu item as highlighted
below.
Click on the “Add new record” to start creating the meeting record.

26
In the first section you will need to insert the details of the meeting, such as what was
discussed and who was present. Once you are happy with the details you have entered
select the “Save and Continue” button.
This will progress you onto the attachment section, browse for any relevant documents of
the meeting by selecting “Choose Files”, once you have selected a file and given it a
description select the “Save” button to add it to the meeting record.
When you have finished adding attachments select the “Finish” button to complete the
meeting record.

27
5.3.2 Reviewing and contributing to a meeting record
As a portfolio collaborator you will be able to view and edit meeting records created by your
learner(s). First click on the “Meeting Records” option in the menu on the left.
Select the meeting record you want to edit form the list by clicking on “Edit Record”.

28
You will be able to add the details of the meeting here under the “Additional Comments”
field.
Once done, click “Save and continue”.
You will also have the opportunity to attach any relevant files.

29
To attach a file, select “Choose file”. Select the relevant file to attach, enter a name for the
file and click save.
You will receive confirmation that the file has uploaded.
TIP: You can upload as many files as required, there is no limit.
Once you have uploaded all relevant files click “Finish” to end the process.
If you do not have any files to upload you can also click “Finish” to skip and end the
process.
30
5.4 Action Plans
This section enables you to set action plans and individual tasks for your learner(s). This will
become a ‘to-do’ list for their learning and development.
5.4.1 Creating an action plan for your learner(s)
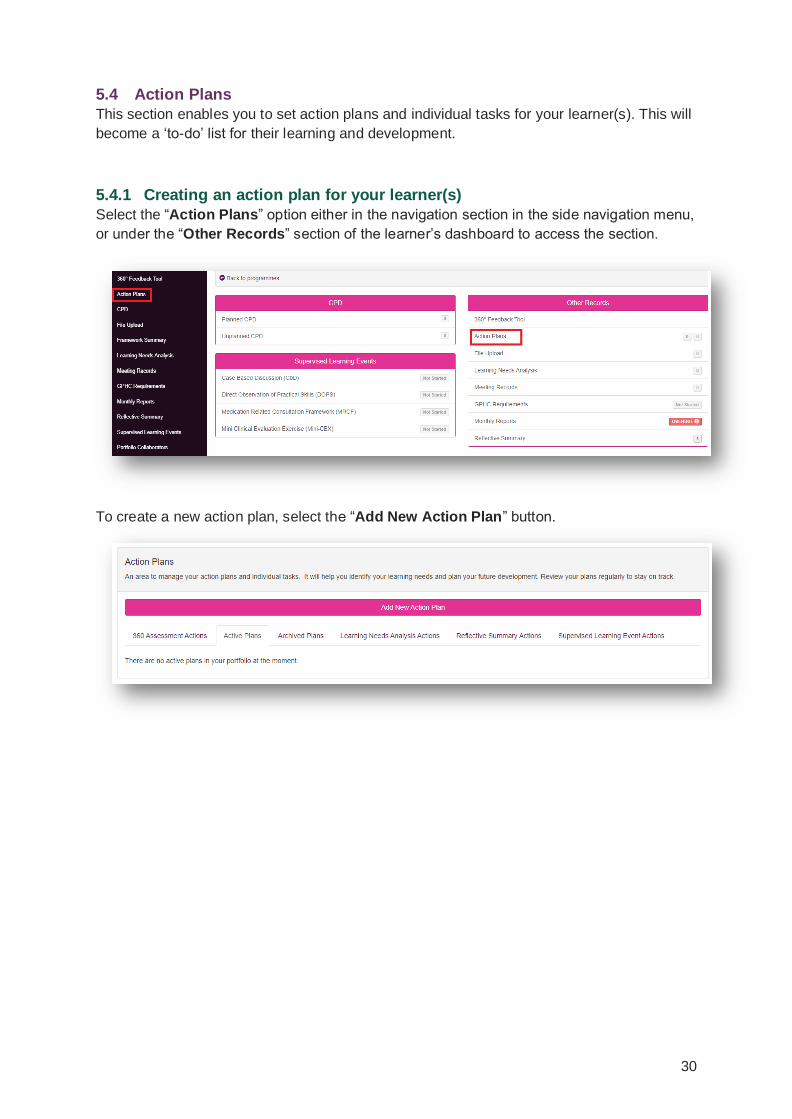
Select the “Action Plans” option either in the navigation section in the side navigation menu,
or under the “Other Records” section of the learner’s dashboard to access the section.
To create a new action plan, select the “Add New Action Plan” button.

31
Here you can insert the details of the action plan. Fill in the details of your action plan and
remember to click on the “Save and finish” button at the bottom of the screen.
You will now be able to see your action plan under the “Active Plans” tab. Select the list
icon to add tasks to your action plan for the learner to work towards.
Tasks will require you to insert a task title and a description of what the task requires.

32
Your learner(s) will be able to view your action plan when they next log into their E-portfolio
and will be able to edit the details as required. All edits will be updated in your view and you
will also be able to make any further necessary edits.

33
6 Using Supervised Learning Events (SLEs) to
Support Development
Supervised learning events tools supports the development of specific knowledge, skills or
attributes. They are also known as workplace based assessments (WBAs) or work based
assessments (WBAs). Examples are:
• Case Based Discussion (CbD)
• Direct Observation of Practical Skills (DOPS)
• Mini Clinical Evaluation Exercise (Mini-CEX)
• Medication Related Consultation Framework (MRCF)
These tools should be completed with your learner as you observe them in practice and
provide feedback on how well they have demonstrated specific knowledge, skills or
attributes.
We have designed these tools to be flexible so your learner can complete sections if helpful.
As a portfolio collaborator, you will have the ability to sign off SLEs.
6.1 Case Based Discussion (CbD)
The tool is a retrospective evaluation of your input into patient care. It assesses clinical
decision-making and the application or use of pharmaceutical knowledge in the care of your
patients. This should take approximately 30-40 minutes to complete which includes time for
discussion.
6.1.1 Creating a CbD
Select the “Case Based Discussions” option under the Supervised Learning Events area
on your learner’s home dashboard page.

34
You can also access it from the menu and selecting “Supervised Learning Events”, then
“Cased Based Discussions”.
Select “Start new” to create a new record.

35
Complete all sections of the tool as instructed.
The details input in the “Agreed Actions” area will be added into the action plans section
(see section 6.5).
Select the learning outcomes which will be relevant to the record. Once selected press the
“Save Changes” button to complete the record.
36
6.1.2 Reviewing a CbD
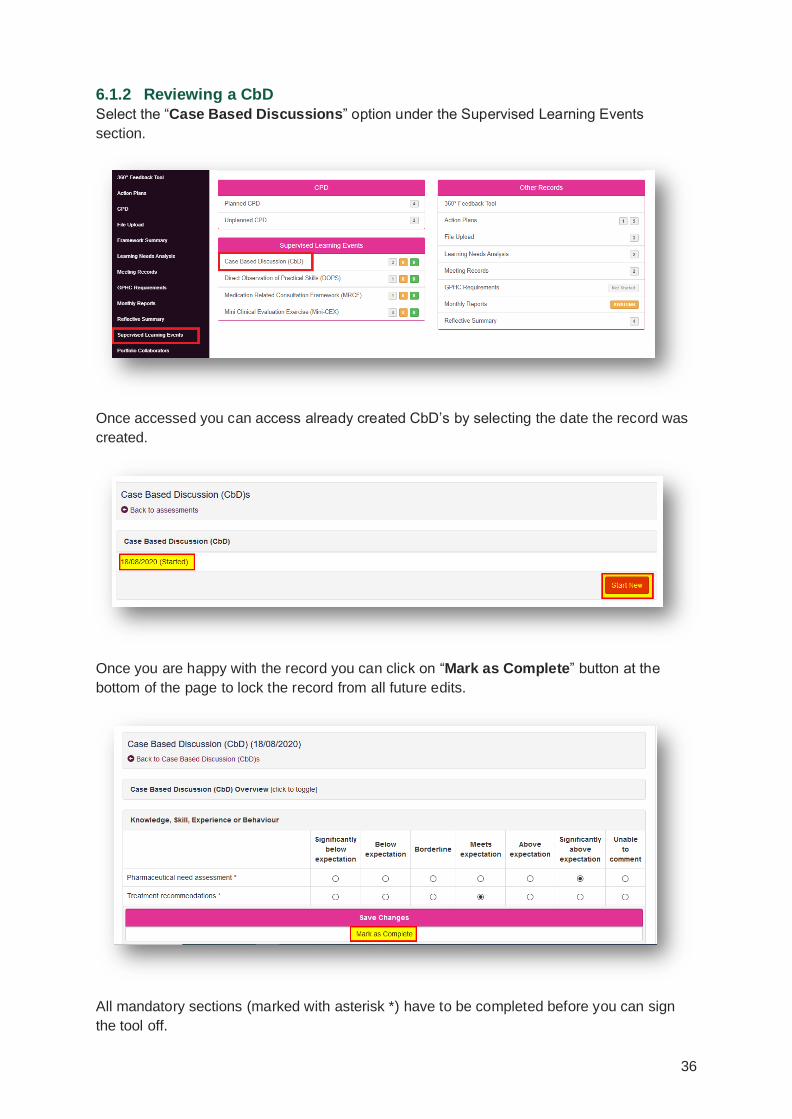
Select the “Case Based Discussions” option under the Supervised Learning Events
section.
Once accessed you can access already created CbD’s by selecting the date the record was
created.
Once you are happy with the record you can click on “Mark as Complete” button at the
bottom of the page to lock the record from all future edits.
All mandatory sections (marked with asterisk *) have to be completed before you can sign
the tool off.

37
Doing so will open a pop-up window for you to confirm the decision, the record will then be
changed to a completed state.
the record then becomes read-only.

38
6.2 Direct Observation of Practical Skills (DOPS)
This tool is useful for demonstrating a range of procedural skills that are essential to the
provision of safe and effective pharmaceutical care. This should take 15-20 minutes to
complete which includes time for feedback.
6.2.1 Creating a DOPS
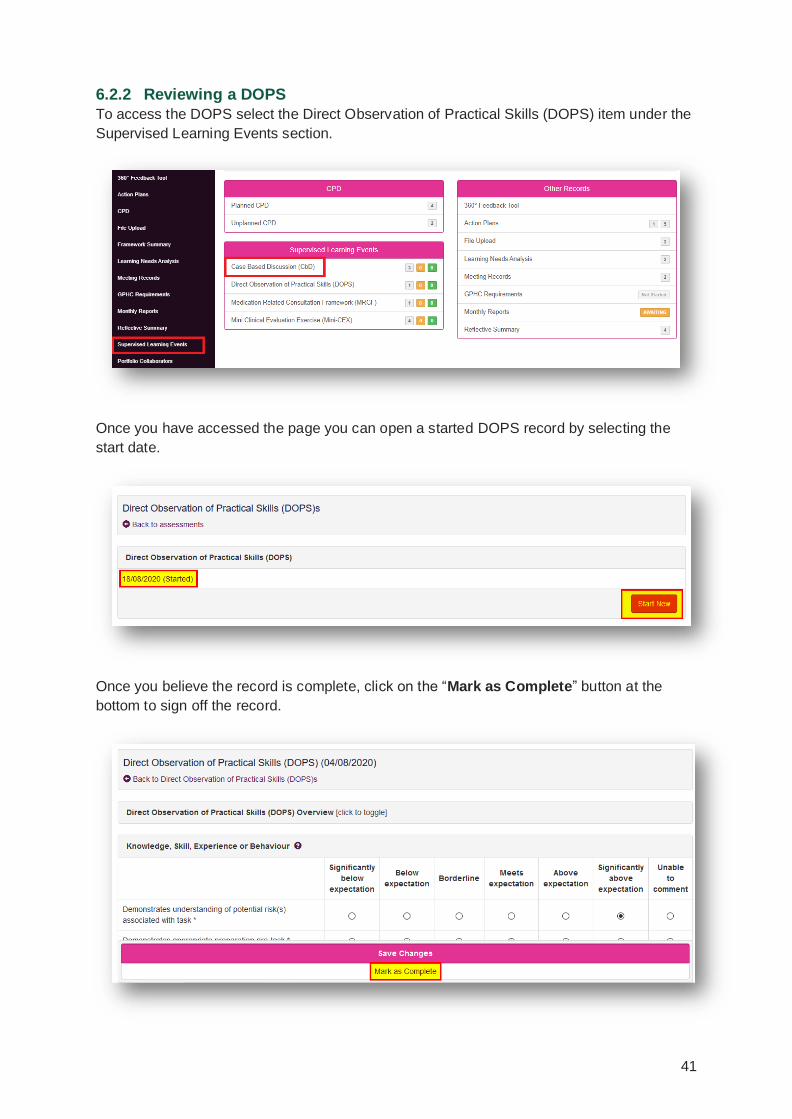
To access the DOPS select the Direct Observation of Practical Skills (DOPS) item under
the Supervised Learning Events area on your learner’s home dashboard page.
You can also access it from the menu and selecting “Supervised Learning Events”, then
“Direct Observation of Practical Skills (DOPS)”.
39
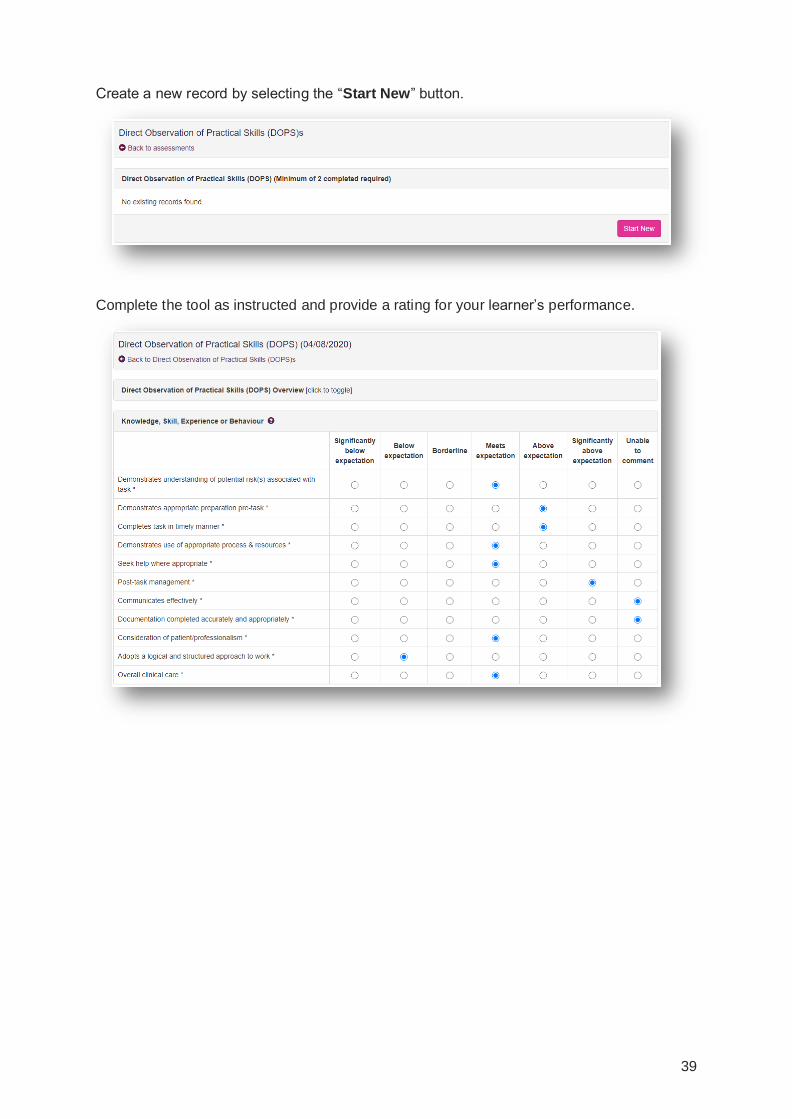
Create a new record by selecting the “Start New” button.
Complete the tool as instructed and provide a rating for your learner’s performance.

40
Further down the page will be the summary of assessment, insert the details relevant to this
summary. Any detail added into the “Agreed Actions” section will be added into the action
plans section.
The details input in the “Agreed Actions” area will be added into the action plans section
(see section 6.5).
Select the learning outcomes which will be relevant to the record. Once selected press the
“Save Changes” button to complete the record.
41
6.2.2 Reviewing a DOPS
To access the DOPS select the Direct Observation of Practical Skills (DOPS) item under the
Supervised Learning Events section.
Once you have accessed the page you can open a started DOPS record by selecting the
start date.
Once you believe the record is complete, click on the “Mark as Complete” button at the
bottom to sign off the record.
42
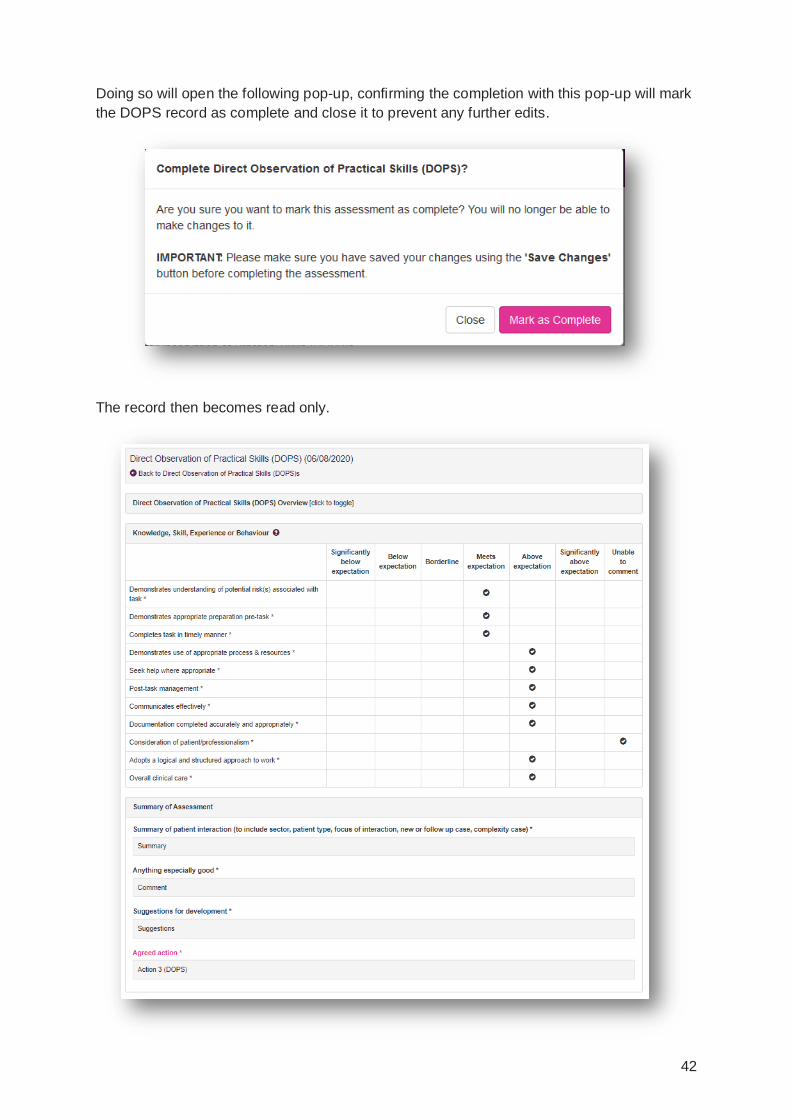
Doing so will open the following pop-up, confirming the completion with this pop-up will mark
the DOPS record as complete and close it to prevent any further edits.
The record then becomes read only.

43
6.3 Medication Related Consultation Framework (MRCF)
This is a reflective tool that can be used to support the development of consultation
behaviours and skills. It provides a structured approach to reviewing a patient’s medicines to
identify any problems they may have, including how the patient adheres to their treatment.
This assessment can take between 10-30 minutes (this will depend on the patient in
question).
6.3.1 Creating a MRCF record
You can access this section by selecting the Medication Related Consultation Framework
(MRCF) option under the Supervised Learning Events area on your learner’s home
dashboard page.
You can also access it from the menu and selecting “Supervised Learning Events”, then
“Medication Related Consultation Framework (MRCF)”

44
This will display the below page, select the “Start New” button to begin creating your record.
You will then see various knowledge/skills regarding the pharmacist and their interaction with
patients, see below screenshot for one example. Each topic per knowledge/skill can only
have one option selected at one time. You will need to mark each question/topic. Any details
you enter into the Learning Needs/Actions area will be added into the Action Plans
section.

45
You will be asked for your overall impression of the pharmacist and what their main
strengths and weaknesses are. The details written in this field will be added into the action
plans section (see section 6.5).
You will then need to select the learning outcomes which are relevant to the record, once
selected press the “Save Changes” button to save the record.

46
6.3.2 Reviewing a MRCF
You can access this section by selecting the Medication Related Consultation Framework
(MRCF) option under the Supervised Learning Events section.
Once you have accessed the page you can open a started MRCF record by selecting the
start date.
Once you believe the record is complete you can select the “Mark as Complete” button to
sign off it off.

47
Doing so will open the following pop-up, confirming the completion with this pop-up will mark
the MRCF record as complete and close it to prevent any further edits.
The record will then become read only.

48
6.4 Mini Clinical Evaluation Exercise (Mini-CEX)
This tool is useful for assessing skills, attitudes and behaviours essential to the provision of
high-quality care. It is a snapshot of practice, involving the observation and assessment of
day-to-day work. This usually takes about 15-20 minutes to complete, which includes time
for discussion.
6.4.1 Creating a mini-CEX
Select the “Mini Clinical Evaluation Exercise (Mini-CEX)” option under the Supervised
Learning Event box on area on your learner’s home dashboard page.
You can also access it from the menu and selecting “Supervised Learning Events”, then
Mini Clinical Evaluation Exercise (Mini-CEX)”.

49
To create a record for this section, select the “Start New” button.
After selecting the start button, you will see the below page, it is important that when seeing
this you do not leave this page.
Complete the tool as instructed and provide a rating for your learner’s performance.
50
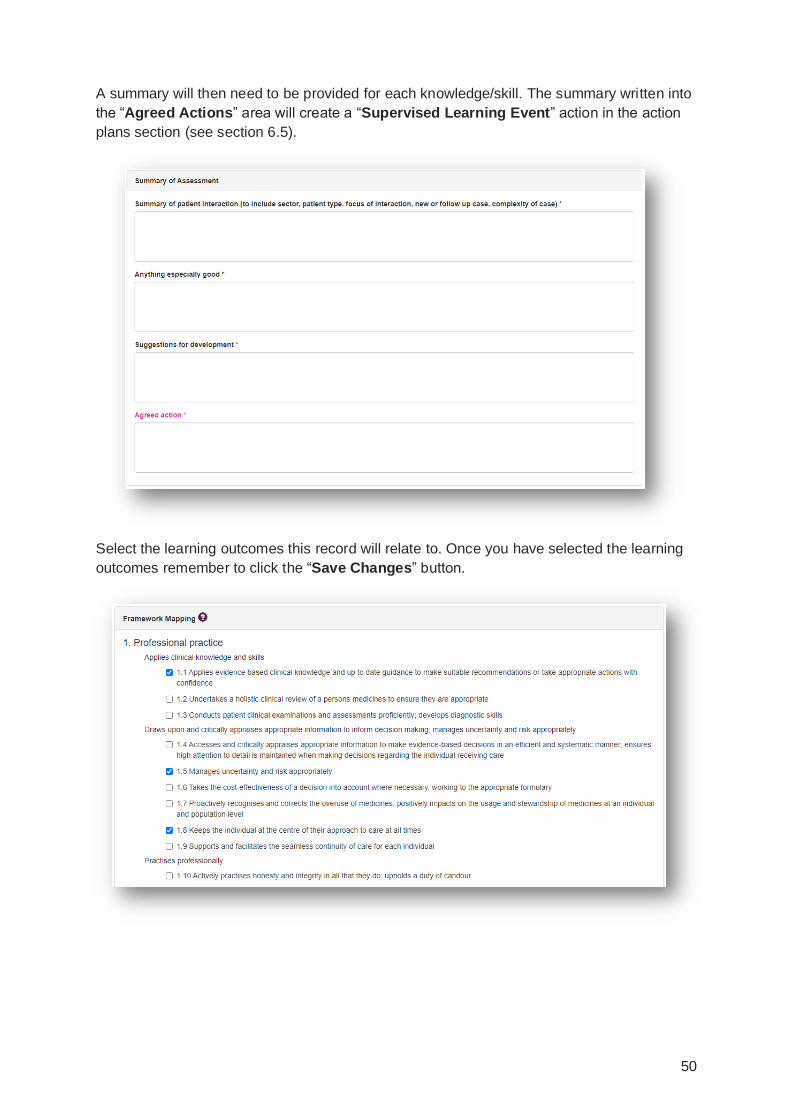
A summary will then need to be provided for each knowledge/skill. The summary written into
the “Agreed Actions” area will create a “Supervised Learning Event” action in the action
plans section (see section 6.5).
Select the learning outcomes this record will relate to. Once you have selected the learning
outcomes remember to click the “Save Changes” button.

51
6.4.2 Reviewing a mini-CEX
Select the “Mini Clinical Evaluation Exercise (Mini-CEX)” option under the Supervised
Learning Events section.
Here you can review a mini-CEX which your learner has already created, by selecting the
start date of the mini-CEX you wish to view.

52
If you are happy with the record, then you can select the “Mark as complete” button
available at the bottom of your screen to sign it off.
Doing so will open the following pop-up, confirming the completion with this pop-up will mark
the MRCF record as complete and close it to prevent any further edits.

53
The record will then become read only.

54
6.5 Supervised Learning Event Actions
Actions created within supervised learning events are listed in the “Supervised Learning
Events Actions” tab. Incomplete actions are displayed at the top of the list. You will also
see details of who created the action.
Completed actions are marked with the date completed.

55
7 Continuing Professional Development (CPD) This section allows you to view records of any planned or unplanned learning. The forms
have been aligned to the forms used by the General Pharmaceutical Council (GPhC) for
revalidation. You will not be able to edit these sections but can view the information
completed by your learner. Use this information to structure your conversations about
learning and development.
Click on “Unplanned CPD” or “Planned CPD” tabs to see the list of CPD records learner
has submitted:
Click on “Print view” to see the details for each record pop up in a new window.

56
8 File Upload This section is for you to upload any files that may be relevant to your learners’ learning and
development. This could include other Supervised Learning Events (SLEs), and training
certificates. This ensures that all information linked to provisional registration is saved in one
place.
The “File Upload” is under the “Other Records” section or the navigation options in the
sidebar navigation menu.
Select “Add new record” to start the creation of your file upload.

57
The first step is to create a title for the record and a description of what the record will be.
Once you have inserted the details select the “Save and continue” button to progress.
You will then need to select the relevant competencies which will be supported by this file
upload. Remember to “Save and continue”.
You will then move onto the attachment section, select “Choose Files” to open your
computer/devices documents and select the file you wish to upload.
When the file is selected add a description to title it and select “Save”, once it has moved
into the Linked Attachments section select “Finish”.

58
You will now be able to see the record on the File Upload page, here you can edit it, print,
or delete.
TIP: You can upload as many files as you wish, there is no limit on the number of files you
can link to each record.

59
9 Provisional Registration Requirements
9.1 GPhC Requirements
In this section your learner(s) can state their current situation about their development and
indicate whether they have access to certain support, as outlined by the GPhC for
provisional registration.
You will not be able to edit these sections but can view the information completed by your
learner. Use this information to structure your conversations about learning and
development.
TIP: If your learner tells you they don’t have access to a mentor yet, you can advise them to
find a mentor using the RPS Mentoring platform: www.rpharms.com/mentoring.
If your learner is an RPS member, they will also be able to access support from peers
through RPS Locals and our dedicated provisional registration WhatsApp groups.
60
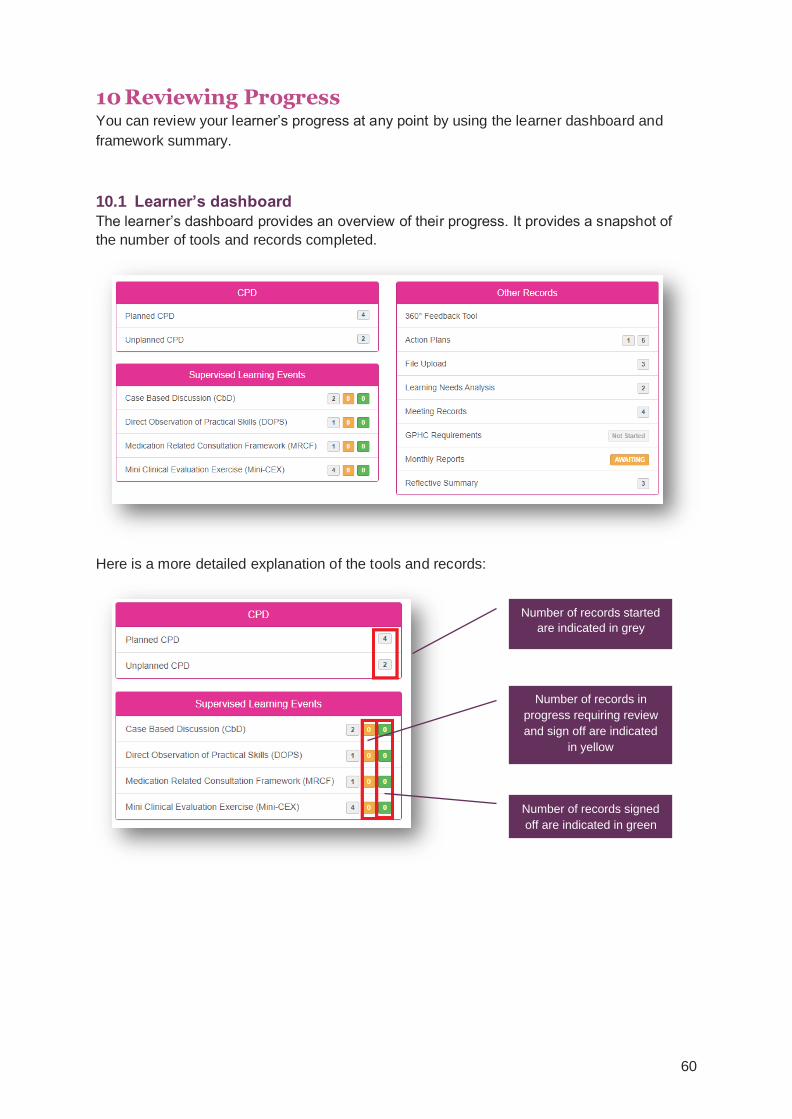
10 Reviewing Progress You can review your learner’s progress at any point by using the learner dashboard and
framework summary.
10.1 Learner’s dashboard
The learner’s dashboard provides an overview of their progress. It provides a snapshot of
the number of tools and records completed.
Here is a more detailed explanation of the tools and records:
Number of records started
are indicated in grey
Number of records in
progress requiring review
and sign off are indicated
in yellow
Number of records signed
off are indicated in green

61
However, not tools are counted, and some will display a status note.
Clicking on any of the counts or status notes will take you to a list of all records for the
relevant section. You will then be able to click on the title of each record to view further
detail.
10.2 Framework summary
We have aligned the tools within our E-portfolio to our interim foundation curriculum. For
each tool learners will be asked to map their learning and development to the learning
outcomes in the curriculum. This provides structure for their on-going development and will
facilitate a seamless transition to the national foundation curriculum and associated
foundation training programmes when these are launched in 2021.
The framework summary provides you with an overview of each tool and/or record mapped
to the interim foundation curriculum.
Select “Framework Summary” from the navigation menu to view the details.
For GPhC requirements,
the status is either ‘Not
started’ or ‘Completed’
For monthly reports the
status is ‘Overdue’,
‘Awaiting’ or ‘Completed’
62
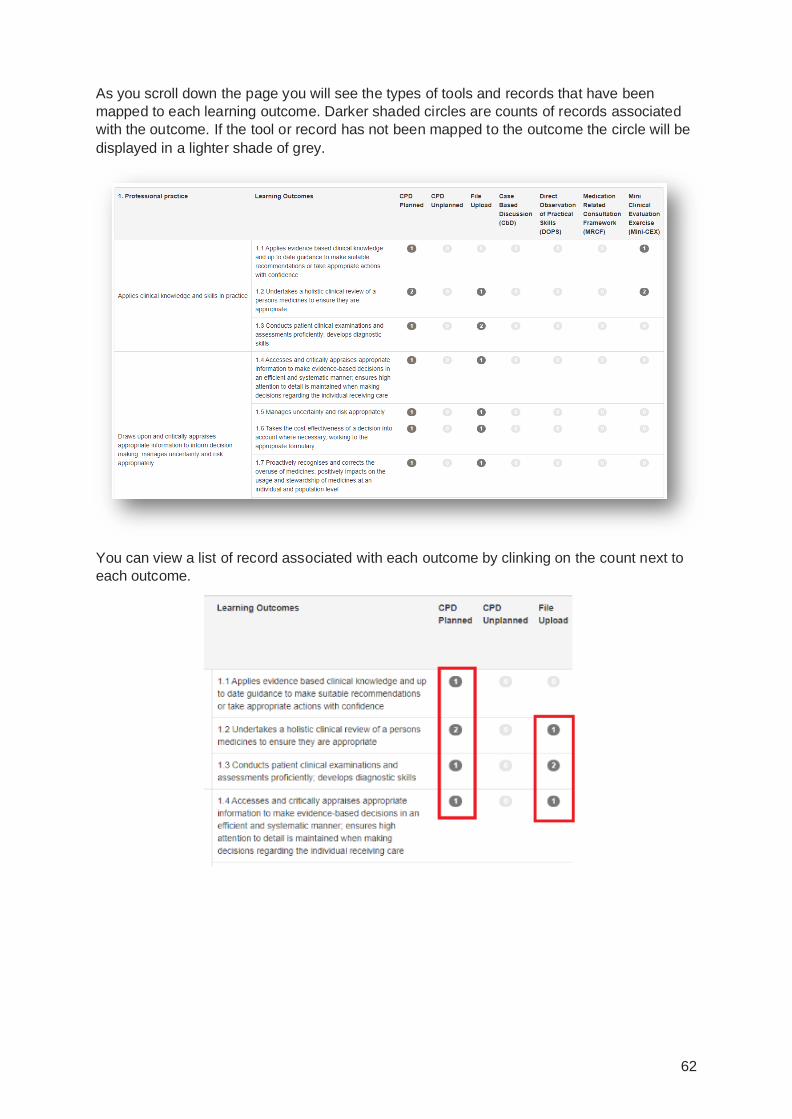
As you scroll down the page you will see the types of tools and records that have been
mapped to each learning outcome. Darker shaded circles are counts of records associated
with the outcome. If the tool or record has not been mapped to the outcome the circle will be
displayed in a lighter shade of grey.
You can view a list of record associated with each outcome by clinking on the count next to
each outcome.

63
A pop-up box will appear with a list of the records. Click on the view icon to view the full
record.
The record will be displayed in read-only format. If files have been attached to the record you
will also be able to click on the link and view the file.

64
11 Printing Records If you need to print of any record you can print the page by right clicking on your mouse to
bring up the options dialogue window, then select “Print”.
This will generate a print friendly pdf document.

65
The E-portfolio also has a function to allow you to print all records in a learner’s programme.
To print a complete portfolio, select “Print Portfolio” from the menu.
Move your cursor to the middle of the page and right click on your mouse to open up the
options up the options dialogue window, then select “Print”.

66
This will generate a print friendly pdf document.
WARNING: Please be aware that completed programmes can be over 100 pages in length.
If you only want to print a selection, it would be best to save the print version as a pdf
document, find the page you require and only print the page(s).

67
12 Contact Details
Visit www.rpharms.com/provreg for further information about the provisional registration.
For any questions about the requirements of provisional registration and RPS products and
service please contact our dedicated support team:
Email: [email protected]
Telephone: 0207 572 2737 (9am to 5pm, Monday to Friday)
If you experience any technical issues or have any feedback on the platform, please contact
our technical team.
Email: [email protected]
Telephone: 0207 572 2737 (9am to 5pm, Monday to Friday)
Acknowledgements
RPS E-Portfolio designed by AXIA
AXIA Digital, Suite 58, Batley Business Park, Batley, West Yorkshire, WF17 6ER

68
13 Glossary
Term Description
Provisional
registration
See the GPhC website for further information:
https://www.pharmacyregulation.org/provisional-registration-pharmacist
Provisional registrant New pharmacist who needs to fulfil GPhC requirements for provisional
registration.
Learner An individual who is using the E-portfolio for their learning and
development.
Senior pharmacist A pharmacist with at least two years’ experience who supports
provisionally registered pharmacist. They will conduct monthly meetings
and review the provisional registration risk assessment.
Tutor An individual who supports a new pharmacist with their learning and
development, usually in the same workplace and/or organisation.
Educational
Supervisor
An individual who supports a new pharmacist with their learning and
development, who may or may not be based in the same workplace or
organisation. Educational supervisors are often linked to a training
provider, including universities.
Employer Individual or organisation employing a pharmacist. They are responsible
for completing a risk assessment before provisionally registered
pharmacists starts.
Registered user A user registered on RPS website who does not have an RPS
membership account.
Mini-Clinical
Evaluation Exercise
(Mini-CEX)
Assesses skills, attitudes and behaviours essential to the provision of
high-quality care. It is a snapshot of practice, involving the observation
and assessment of day-to-day work.
Medication-Related
Consultation
Framework (MRCF)
A reflective tool that can be used to support the development of
consultation behaviours and skills. It provides a structured approach for
reviewing a patient’s medicines to identify any problems they may have.
Case-Based
Discussion (CbD)
A retrospective evaluation of input into patient care. Structured
discussion assesses clinical reasoning, decision-making and the
application or use of pharmaceutical /clinical knowledge in patient care.
Direct Observation of
Practical Skill (DOPS)
Enables pharmacists to demonstrate a range of practical or procedural
skills that are essential to the provision of safe and effective
pharmaceutical care.
Supervised Learning
Event (SLE)
A learning and development tool that supports the development of
specific knowledge, skills or attributes. They are also known as
Workplace based assessments (WBAs) or work based assessments
(WBAs). Examples are Mini-CEX, MRCF, CbD, DOPS.

September 2020 ©