ProSystem fx Practice Management Getting Started … to ProSystem fx® Practice Management 1 About...
171
ProSystem fx ® Practice Management Getting Started Guide
Transcript of ProSystem fx Practice Management Getting Started … to ProSystem fx® Practice Management 1 About...

ProSystem fx®
Practice Management Getting Started Guide

Copyright 2014, WK, CCH. All rights reserved. Material in this publication may not be reproduced or transmitted, in any form or by any means, without prior written permission. Request for that permission should be directed to:
WK, CCH
20101 Hamilton Avenue, Suite 200 Torrance, CA 90502
The contents of this publication are believed to be accurate. However, responsibility cannot be assumed for the information contained herein, and the consequences resulting from the use thereof. Material in this publication is subject to change without notice. This Getting Started Guide and the computer software it describes are designed to provide accurate and authoritative information in regard to the subject matter covered. They are distributed with the understanding that the publisher is not engaged in rendering accounting or other professional service. If legal advice or other expert assistance is required, the services of a competent professional person should be sought. “ProSystem fx Practice Management” is a registered trademark of CCH. “Windows” and “Outlook” are registered trademarks of Microsoft Corporation. All other brand, product, or company names are trademarks or registered trademarks of their respective owners.
May 2014

Getting Started with ProSystem fx Practice Management
i
Table Of Contents
Table Of Contents .........................................................................................i
Welcome to ProSystem fx® Practice Management .................................. 1 About ProSystem fx Practice Management ........................................................................................................................................ 1 Using the Getting Started Guide .......................................................................................................................................................... 2 Using Help ................................................................................................................................................................................................ 4 ProSystem fx Practice Management Helpful Hints .......................................................................................................................... 5 New Firm Checklist ................................................................................................................................................................................ 7 Setting Up a Canadian Firm .................................................................................................................................................................. 9
Getting Started ........................................................................................... 11 Starting ProSystem fx Practice Management ................................................................................................................................... 11 Logging On ............................................................................................................................................................................................. 12 The Dashboard Window ..................................................................................................................................................................... 13
Firm Setup................................................................................................... 15 Setting Up Your Firm ........................................................................................................................................................................... 15 Creating Your Invoice Format ........................................................................................................................................................... 17
Administration ........................................................................................... 19 Setting Up Your Firm Lists ................................................................................................................................................................. 19 Navigating the Lists Menu ................................................................................................................................................................... 21 Quick View - Lists ................................................................................................................................................................................. 22 Adding Items to a List .......................................................................................................................................................................... 23 Editing Items on a List ......................................................................................................................................................................... 24 Deleting Items from a List .................................................................................................................................................................. 25 Creating Your Lists ............................................................................................................................................................................... 26 Creating Your Service Codes .............................................................................................................................................................. 35 Creating Your Employees.................................................................................................................................................................... 37 Creating Your Clients and Prospects ................................................................................................................................................ 38
Time Entry .................................................................................................. 41 Entering Time and Expenses .............................................................................................................................................................. 41 Quick View - Time Entry Folder ....................................................................................................................................................... 42 Quick View - Time Entry .................................................................................................................................................................... 45 Starting Time Entry .............................................................................................................................................................................. 47 Using Time and Expense Entry ......................................................................................................................................................... 48 Time and Expense Entry ..................................................................................................................................................................... 51 Printing the Edit List ............................................................................................................................................................................ 53 Releasing Time for Posting ................................................................................................................................................................. 54 Quick View - Time Administration Options ................................................................................................................................... 55 Using Batch Entry ................................................................................................................................................................................. 57 Printing the Time Exception Report ................................................................................................................................................. 58 Editing Released Time.......................................................................................................................................................................... 59 Updating Time ....................................................................................................................................................................................... 60 Correcting Posted WIP ........................................................................................................................................................................ 61
Billing and Invoicing .................................................................................. 63 Billing Your Clients ............................................................................................................................................................................... 63 Quick View - Billing Activities Menu Options................................................................................................................................ 64 Quick View - Billing and Invoicing ................................................................................................................................................... 65 Starting Billing ........................................................................................................................................................................................ 68 Selecting Clients for Billing ................................................................................................................................................................. 69

ProSystem fx Practice Management
ii
Reviewing and Billing WIP .................................................................................................................................................................. 71 Quick Billing ........................................................................................................................................................................................... 73 Billing Selected WIP ............................................................................................................................................................................. 74 Partial Billing .......................................................................................................................................................................................... 75 Progress Billing ...................................................................................................................................................................................... 76 Reviewing the Bill .................................................................................................................................................................................. 77 Generating Invoices .............................................................................................................................................................................. 79 Printing Invoices.................................................................................................................................................................................... 81 Send Invoices via E-mail...................................................................................................................................................................... 83 Archived Invoices.................................................................................................................................................................................. 85 Billing Fixed Fee Clients ...................................................................................................................................................................... 86 Quick View - Billing Administration Options ................................................................................................................................. 87 Updating Invoices ................................................................................................................................................................................. 88 Reversing Bills ........................................................................................................................................................................................ 89
Accounts Receivable ................................................................................. 91 Recording Payments and Sending Statements ................................................................................................................................. 91 Quick View - Accounts Receivable Menu Options........................................................................................................................ 92 Quick View - Accounts Receivable ................................................................................................................................................... 94 Starting Accounts Receivable .............................................................................................................................................................. 95 Entering a Transaction ......................................................................................................................................................................... 96 Distributing the Payment - Open Item ............................................................................................................................................. 98 Distributing the Payment - Balance Forward .................................................................................................................................. 99 Posting Payments and Memos ......................................................................................................................................................... 100 Applying an Invoice for Later Distribution .................................................................................................................................. 101 Calculating Finance Charges ............................................................................................................................................................ 102 Correcting A/R ................................................................................................................................................................................... 104 Setting Up Statements ....................................................................................................................................................................... 105 Printing Statements ............................................................................................................................................................................ 106 E-mailing Statements ......................................................................................................................................................................... 108
Contact Management ............................................................................. 109 Managing Your Contacts .................................................................................................................................................................. 109 Quick View - Contact Management Folder .................................................................................................................................. 110 Using Contact Management ............................................................................................................................................................. 112 Contact Management Lists ............................................................................................................................................................... 113
Project Management ................................................................................ 115 Managing Projects at Your Firm ..................................................................................................................................................... 115 Quick View - Project Management Navigation Bar Options ................................................................................................... 116 Quick View - Project Management ................................................................................................................................................. 118 Starting Project Management ........................................................................................................................................................... 119 Setting Up a Client Project ............................................................................................................................................................... 120 Adding Project Budgets .................................................................................................................................................................... 121 Adding Detail and Assigning Employees ...................................................................................................................................... 122 Scheduling Employees....................................................................................................................................................................... 124 Using Templates ................................................................................................................................................................................. 126
Project Tracking ....................................................................................... 129 Tracking the Status of Projects ........................................................................................................................................................ 129 Quick View - Project Tracking ........................................................................................................................................................ 130 Selecting the Project and Client ....................................................................................................................................................... 131 Extending Projects ............................................................................................................................................................................. 132 Locating the Project ........................................................................................................................................................................... 133 Setting the Project Status .................................................................................................................................................................. 134
Marketing .................................................................................................. 135 Marketing Your Firm ......................................................................................................................................................................... 135 Quick View - Marketing Options .................................................................................................................................................... 136 Designating Mailer Recipients ......................................................................................................................................................... 137

Getting Started with ProSystem fx Practice Management
iii
Setting Up the Mail Merge ................................................................................................................................................................ 139 Setting a Default Document ............................................................................................................................................................ 141 Using Mail Merge Documents ......................................................................................................................................................... 142
Security ..................................................................................................... 143 Setting Firm Security.......................................................................................................................................................................... 143 Quick View - Security ........................................................................................................................................................................ 144 Security Privileges Overview ............................................................................................................................................................ 145 Changing the Firm Default............................................................................................................................................................... 156 Setting Up Employee Security ......................................................................................................................................................... 157 Setting Up Passwords ........................................................................................................................................................................ 158
Remote Options ....................................................................................... 159 Using Remote Options...................................................................................................................................................................... 159 Remote Workstation Connected to the Network ........................................................................................................................ 160 Remote Workstation Not Connected to the Network ............................................................................................................... 161
Year End Procedures................................................................................ 165 Closing the Prior Year ....................................................................................................................................................................... 165


Getting Started with ProSystem fx Practice Management
1
Welcome to ProSystem fx® Practice Management
About ProSystem fx Practice Management Welcome to ProSystem fx Practice Management, the most powerful interactive time and billing software on the market. ProSystem fx Practice Management combines a full range of time and billing options with the ease of Windows’ graphical interface. Use ProSystem fx Practice Management to keep track of employee time, bill your clients with customized invoices, track client projects, and generate statistical reports for a vast array of information. ProSystem fx Practice Management includes these modules: Time Entry Enter employee time and expenses. Billing Bill client WIP, calculate fixed fee bills, and print
customized invoices. Accounts Receivable Enter payments, credits, and debits, and print client
statements and dunning letters. Projects Set up projects to be completed for clients and track the
progress of a project. An additional module, Project Tracking, allows you to set the status of a return, and extend due dates. Project Tracking can be selected from the Features menu of each module.
Contact Management View contact information for clients and maintain client notes.
Administration Set up and maintain firm lists such as client files, employee files, service codes, and firm information. Update the system with the latest invoicing and time entry transactions.
Reports Run reports on client, employee, service code, project, and scheduling information.
Report Writer Create reports for your firm. Dashboard View summarized and detailed information for the firm,
employees, clients, and projects.

ProSystem fx Practice Management
2
Using the Getting Started Guide The Getting Started Guide is the best place to familiarize yourself with the basic components of ProSystem fx Practice Management. We recommend that you print out and read the Getting Started Guide before you begin working with the software. This guide contains setup information and directions on customizing your software to best meet your firm’s needs. Help is also available throughout ProSystem fx Practice Management to assist you with required and optional features. Please use this guide along with the Help system to set up your software. Note: To print topics in the Getting Started Guide, select the "Getting Started with ProSystem fx Practice Management" book or topic and click Print.
Minimum Hardware Recommendations
Server (a computer working in a server capacity)
Processor 2.4 GHz Intel Pentium-class processor, or an AMD Opteron, AMD Athlon64 or AMD Athlon XP processor
Operating System Microsoft Server 2003 Standard, Enterprise, or Datacenter editions with SP2 or later Windows Server 2003 Web Edition SP2 Windows Small Business Server 2003 with SP2 or later Windows Small Business Server 2008 Windows Small Business Server 2011 Microsoft Server 2008 R1 SP2 and R2 Microsoft Server 2012
Memory 4 GB+ recommended
Server Hard Disk 650 MB Additional Disk space temporarily needed for Extraction folder including the Practice Management 650
MB would be: Server Space 1.3 GB
Client (a computer not working in a server capacity)
Processor 800-megahertz (MHz) Intel Pentium-class processor, or an AMD Opteron, AMD Athlon64 or AMD Athlon XP processor
Operating System Vista Business Edition and above Windows 7 Professional Edition and above Windows 8, Pro, and Enterprise Editions
Memory 2 GB of RAM (or higher) recommended
Workstation Hard Disk 150 MB

Getting Started with ProSystem fx Practice Management
3
Remote Workstation 711 MB additional disk space 2 GB of memory recommended
Databases Supported
SQL 2005, SQL 2008, SQL 2008 R2, and SQL 2012 MSDE and SQL Server 2005 Express, and SQL 2008 Express
Display
800 x 600 or higher resolution with recommended system colors of 16, 24, or 32 bit DPI at 96. DPI up to 144 is supported for Invoicing and Statements. 1024 x 768 or higher resolution required for Dashboard and Report Writer
Other
Microsoft Internet Explorer 7 or later is required Microsoft Office 2007, Office 2010 Standard OEM (32 bit) and Office 2010 Professional (32 bit) are
supported Microsoft Office 2010 OEM and Professional (64 bit) are supported (Note: Coolbar and Mail Monitor are
not compatible with Microsoft Office 64 bit) Microsoft Office 2013 Standard OEM and Office 2013 Professional are supported
NOTE: CCH Coolbar is not compatible with Office 2013 32bit or 64bit while Mail Monitor is not compatible with Office 2013 64 bit
Install the latest Windows service packs and critical updates from the Windows Update site

ProSystem fx Practice Management
4
Using Help If you need help on any option in ProSystem fx Practice Management, press F1 or use the Help menu. Help gives you detailed information about the tasks and options in ProSystem fx Practice Management. In Help you can select a topic, search for a topic associated with a phrase, find information about a word or phrase, move back through the topics you’ve viewed, and print topics. To use Help 1. Press F1 to display help associated with the current window. 2. Use the scroll bar to display more text in the help window. 3. Jumps are displayed in blue with a solid underline. Click to jump to a related topic. 4. Click the Related Topics button to view a list of topics related to the current topic. 5. Click Help Topics to display tabs for Contents, Index, and Search. 6. In Contents, double-click books to open them and view the topics inside. 7. To exit help, click the [X] button in the upper-right corner. Tips To print a single topic from Contents, click the topic and click Print. To print a group of topics from Contents, click a book to print all help topics within the book.

Getting Started with ProSystem fx Practice Management
5
ProSystem fx Practice Management Helpful Hints The following hints relate to moving around in and using ProSystem fx Practice Management. To determine the location of your host database, whether or not you are remote, the date you last
imported data, and the version of ProSystem fx Practice Management you are using, select About on the Help menu.
To view who is currently logged into ProSystem fx Practice Management, select Active Processes on the Help menu.
Select Help Topics on the Help menu to access the Table of Contents and Index for ProSystem fx Practice Management Help.
Press the F1 key to access Help on the current window. Press ALT+TAB to toggle between ProSystem fx Practice Management and the Help file (or any other
application you have running). Follow the New Firm Checklist
Information will print out as it was entered, so be consistent when using all upper case or upper and lower case letters in data entry.
to make sure that ProSystem fx Practice Management is set up properly. The New Firm Checklist is available from the Help menu in Administration.
In addition to printing reports, you can also save the report to a file (Save As), send the report as an e-mail attachment, or export as a PDF, RTF, HTML, or Excel file using the Printer/Format Selection
When previewing a report, you can zoom in by left-clicking anywhere on the report and zoom out by right-clicking.
window. You can also preview the report on screen.
Many menu options and command buttons can be accessed by using shortcut keys. Pressing ALT and the underlined letter on the menu/button will select the item as if you had used your mouse.
The TAB key moves you to the next field. Pressing TAB + SHIFT moves you to the previous field. Pressing ENTER selects an item from a drop-down list. Click OK or Cancel (or use the Hot keys) to exit windows in ProSystem fx Practice Management. Pressing
the ENTER key does not select the OK button by default. Pressing the ESC key does not select the Cancel button by default.
With your cursor in the field, press the down arrow to scroll through a drop-down list. Press ALT+Down Arrow to view the drop-down list.
Press HOME to move your cursor to the beginning of the text field. Press END to move your cursor to the end of the text field.
Dates can be entered by clicking the calendar and using the arrows to select the date or by entering the date (type either 6/22/13 or 06222013) and pressing TAB.
If you enter a month in the date field and press TAB, the current date for the month you enter will be selected. For example, if you type "July" and it is 6/22/2013, the date reflects 7/22/2013.
To select a range of items on a list, click the first item on the list and hold down the SHIFT key while you click the final item in the range.
To select random items on a list, hold down the CTRL key and click with your mouse on the items you want to select.
Many lists can be sorted on-screen, making it easier for you to locate information. To sort a list, click the column heading that corresponds to the sort you want to apply to the list. For example, if you want to sort by client name, click the Client Name column heading. Click the column heading again to reverse the sort order.
Many lists can be filtered, allowing you to target specific information. To view a specific group of items, click the column heading of the type of criteria you would like to view. Then click an item that contains the specific criteria and right-click. Select the filter. You can combine criteria to further narrow the list.

ProSystem fx Practice Management
6
When viewing a list of items on-screen, right-click the list to open the Report Output Options dialog box and print this information, save it to a file, or attach it to an email message.
Make sure that you exit ProSystem fx Practice Management and use the Windows Shut Down option (on the Start bar) before you turn off your computer.
ProSystem fx Practice Management does not have its own printer setup feature, but utilizes the Windows printer setup. Be aware that printing in ProSystem fx Practice Management may change the orientation of your printer and affect other software programs.
Because security privileges are linked to an employee’s logon code, it is a good idea to require upper-level staff to use a password
The terms update and post mean the same thing.
when logging in. This will ensure that a data entry staff member cannot log on with a partner’s code and use the partner’s security rights.
To print a window press ALT+PRINT SCREEN. Then open a word processing document or an image file processor (such as Microsoft’s Paint or Word) and press CTRL+V.
Email can be done using SMTP as an alternative to Microsoft® Outlook. If your firm selects the SMTP method, our applications will talk directly to the mail server. Keep in mind that if SMTP is used, it is a global decision for the firm that affects all staff. In addition, because the messages are no longer being routed through an account Outbox, there is no audit trail. To set up the SMTP mail option, select Email Server Setup from Administration/Firm.

Getting Started with ProSystem fx Practice Management
7
New Firm Checklist When you first set up your firm in ProSystem fx Practice Management, follow these steps to make sure your setup is complete. For information on adding Canadian requirements to ProSystem fx Practice Management, see Setting Up a Canadian Firm.
Log on
Start ProSystem fx Practice Management. Log on as SUPERVISOR, entering your password. Double-click the Administration option.
Create your firm
Select Firm Setup on the Firm menu. Set up your firm by entering name and address information, general information, and by defining custom fields.
Create your invoice format
Select Invoice Formats on the Firm menu. Define a default invoice format for your firm.
Create your lists
Use the Lists menu found on the navigation bar in Administration to set up your list items in the following order: Bank Accounts Departments Regions Offices Reasons Finance Charges Sales Tax NAIC Code Summaries NAIC Codes Line of Business Skill Levels Service Codes CPE Categories CPE Types Employees Clients Affiliate Types Project Types Project Positions Standard Paragraphs Many items, such as Offices and Skill Levels, are optional but may be useful in organizing your firm and in reporting. The order above does not match the order of the navigation bar; however, you will find it easier to set up your firm by following the setup order.

ProSystem fx Practice Management
8
Create your service codes
Select Service Codes under Lists on the navigation bar in Administration. Service codes are broken into three levels: Category, Subcategory, and Service Code. Plan your service codes on paper first to save time.
Create your employees
Select Employee Setup under Lists/Employees on the navigation bar in Administration. Set up your employees by entering name and address information, employee profile information, bill rates, etc. If you plan to interface ProSystem fx Practice Management with ProSystem fx CPA Accounting CPAAccounts Payable, the employee codes entered in ProSystem fx Practice Management and the employee codes entered for staff who will work on CPAAccounts Payable must match. If the codes do not match, the interface will not be enabled.
Select security
Select Security Setup on the Firm menu if you need to establish security privileges for your employees. You may also make passwords mandatory at login through Security Setup. Refer to the Security Privileges Overview to help you plan your firm’s security.
Create your clients
Select Clients under Lists on the navigation bar in Administration. Set up your clients by entering status and billing information and assigning staff. Tips When you first log on to ProSystem fx Practice Management you should, at the very least, enter your firm
information and create one employee. Go to Security Setup from the Firm menu and give that employee rights to the Supervisor privileges. This will allow you to set up clients and employees and change security privileges without logging in as SUPERVISOR.

Getting Started with ProSystem fx Practice Management
9
Setting Up a Canadian Firm There are several features in ProSystem fx Practice Management that were designed with Canadian firms in mind. They include calculating QST, printing applied sales tax, and customizing invoice text. Follow the steps outlined below to set up ProSystem fx Practice Management in accordance with Canadian requirements.
Customizing Invoice Text
To add Canadian text to invoices 1. Go to Administration and select Invoice Formats on the Firm menu.
2. If you would like your GST # to print on every invoice, add it to your invoice footer by clicking Format Footer. Then select the Print Footer check box on the Page Format tab. Or, enter your GST # in the Custom 1 (Custom Fields tab) and pull the keyword Firm Custom#1 onto invoices in Billing.
3. Select the Custom Text tab and change the text on your invoice to read "GST" or "General Sales Tax" instead of Sales Tax. You can also change Sales Tax Applied to "GST Applied."
Calculating Sales Tax
To set up the GST 1. Go to Administration and select Sales Tax States from the navigation bar.
2. Set up a sales tax called GST and enter the GST tax rate.
3. Open the Client Tracking folder for all clients subject to this tax and select the Sales Tax tab. (From the navigation bar in Administration select Lists/Clients/Tracking Folder.)
4. Click New and select GST from the drop-down. Enter the sales tax rate to calculate on progress bills. If the client is subject to a Provincial Sales Tax on invoices, enter the PST rate. If the client is subject to Quebec Sales Tax, select the Include GST check box to calculate tax on services and the GST.
5. Finally, open each Service Code that is subject to sales tax and click the Sales Tax button. Select GST as the sales tax that will calculate on the service code. (From the navigation bar in Administration select Lists/Service Codes.)
Formatting the Invoice
To format the invoice 1. Once you bill a client, you'll need to add some items to the invoice. Repeat these steps for each client
subject to GST. 2. Generate the invoice and click the Format Options button.
3. If you have included your GST # in your invoice footer, be sure that the Print Footer check box is selected.
4. To print sales tax collected on progress bills separately, do not select the "Net Sales Tax Applied with Sales Tax" check box. Click OK.
5. If you added your GST# as a Firm Custom field, pull the keyword FirmCustom#1 onto the invoice.

ProSystem fx Practice Management
10
6. When you exit the Invoice window, be sure to save the current settings as the default. This will apply the format options you selected in steps 2 through 4 to every invoice you generate for the client.

Getting Started with ProSystem fx Practice Management
11
Getting Started
Starting ProSystem fx Practice Management Once you’ve installed ProSystem fx Practice Management you are ready to start the software. ProSystem fx Practice Management can be started from the Program menu or from a shortcut (if you’ve created one). Follow one of the two methods below to start the software. To start ProSystem fx Practice Management Click Start, point to Programs, point to ProSystem fx Practice Management and then select Administration.

ProSystem fx Practice Management
12
Logging On
To log on BEFORE you have set up your firm and employees 1. Log on as SUPERVISOR. Once you have created employees, everyone will log on with their unique
Employee Code, assigned in the Employee list.
2. Enter the password you want to use with the SUPERVISOR logon. Passwords are optional for all logon codes except SUPERVISOR. You can modify the security privileges for any employee to require passwords and protect employee data.
3. Click the Logon button to continue to the Firm Setup folder.
To log on AFTER you have set up your firm and employees 1. When you select Dashboard, the Logon window appears.
2. Enter the Employee Code assigned to you on the Employee list and click Logon. If you have a password, enter it and click Logon.
3. The Dashboard window appears defaulting to the Main menu.

Getting Started with ProSystem fx Practice Management
13
The Dashboard Window
Once you have set up your firm, this window will display when you select Dashboard. Double-click the title to select the different task modules in ProSystem fx Practice Management. To enter time, select Time Entry. To bill clients and generate and print invoices, select Billing. To enter and post payments, select Accounts Receivable. To create projects and schedule employees, select Projects. To review client information on-screen, select Contact Management. To set up the firm, invoice formats, list items, and to post time and bills, select Administration. To print standard reports, select Reports. To create custom reports, select Report Writer. Dashboard options are also available: The Firm Dashboard by Client Management Position includes four tabs: Firm Summary, My
Summary, My Projects, My Clients, and My Project Overruns. Separate firm level dashboards are available for each client management position. Click on any employee on the Firm Summary panel and the Work in Process, Billing, and Accounts Receivables panes will update to only reflect data for clients assigned to the selected employee for the chosen firm level client management position dashboard. A variety of graphs are also available on these tabs to assist with interpreting firm information. From the graphs you can print, save as an image, or export to Excel.
The Employee Dashboard includes three tabs: My Calendar View (the MTD Calendar), My Time, and My Assignments.
The Client Dashboard includes five tabs: Contact Information, Client Notes, PTD/YTD Activity, Current/Prior Year, and All Engagements.
The Project Dashboard includes Track Projects, Track Milestones, and Track Detail Tasks views. You can set project status from the Project Dashboard and self assign (assign yourself to a budget detail task if the associated project position is not yet assigned).
Security for the Dashboards and Self Assign is available in Administration/File/Security Setup. The Employee Dashboard defaults to enabled for all employees.
In all Dashboards you can resize sections by clicking and dragging the horizontal and vertical dividers. Panes on the Firm Dashboard can be moved and resized. Click the button in the upper-right corner of the pane to make it the Primary pane in the panel.

ProSystem fx Practice Management
14
Select User Options/User Default View to identify the preference for the default view (Main Menu, Firm Dashboard, Employee Dashboard, Client Dashboard, or Project Dashboard), and the Default tab in the selected Default View.
Tips Access Dashboard like any Practice Management module using the Features menu or Tray. To open
Dashboard from another module, select the Features menu and choose Dashboard. From the Tray, right-click the Tray icon, navigate to Practice Features Launcher, and choose Dashboard.
Dashboard can also be set as the default module by double-clicking the Tray icon. To set Dashboard as the default, right-click the Tray icon and select Preferences. On the General tab, verify Practice Features Launcher is selected. Select Practice Features Launcher from the navigation bar. Click the drop-down for Default Feature, choose Dashboard, and click Save. Double-click the Tray icon and the Dashboard module will launch.
To track tax returns, select Project Tracking from the Features menu of any of the modules. 1024 x 768 or higher resolution is required for Dashboard.

Getting Started with ProSystem fx Practice Management
15
Firm Setup
Setting Up Your Firm
Firm Setup contains information about your firm. When creating your firm you must set up your firm and set up at least one employee before you exit ProSystem fx Practice Management. To enter firm information 1. Log on as SUPERVISOR. Enter your password and click Logon.
2. If you have not created your firm, the Firm Setup window appears when you log on.
3. Enter the Name and Address
4. Select the
of your firm.
General Information
5. If you want to customize the client staff position labels throughout ProSystem fx Practice Management, making them more meaningful for your firm, select the
tab and select the choices suitable for your firm.
Client Staff Positions
6. If you want to customize the project tracking status labels throughout ProSystem fx Practice Management, making them more meaningful for your firm, select the
tab.
Project Status Dates
7. Select the
tab.
Time Notifications
8. Select the
tab and enter optional settings for Paid Time Off warnings and MTD Calendar Time Notifications.
Time Entry
9. Click the OK button to save the firm information. A Checklist for Setting Up Your Firm appears. Click the Close button.
tab and enter optional settings to associate user-defined information (for example, a municipality code for tax reporting) to all time and expense entries and set Time Entry and Project prompts.

ProSystem fx Practice Management
16
10. Before you exit ProSystem fx Practice Management select Employees on the navigation bar in Administration and set up the system administrator. Give that employee set up privileges (select Security Setup on the Firm menu.) Then, log on using that employee’s code to finish setting up your firm list.

Getting Started with ProSystem fx Practice Management
17
Creating Your Invoice Format
Use the Invoice Format option from the Firm menu to format the look of your firm’s default invoice. When you create clients you can choose to either use the format created here or create a format specifically for that client. You can also select any invoice format for a client at the time of billing. Select Custom Header-Footer to create additional headers-footers to apply as an Office default or as an override at the client level. Select French Format Options to format the look of your Firm’s default French language invoices (if your Firm has French-speaking clients). To add the default invoice format 1. Choose Invoice Formats on the Firm menu in Administration.
2. On the Page Size
3. Select
tab, enter paper size and margins.
Page Format
4. Select
and select what information will print on the invoice.
WIP Format
5. Select
to display a list of default formats. Select the format you would like to use as the default.
Date Format
6. Select
to select the way in which dates will print in the heading and the body of the invoice.
Custom Text
7. Select
to customize standard text that prints on the invoice.
Custom Fields
8. Select
to enter custom descriptions that can be added to invoices.
Status Descriptions
9. Select
to customize the reviewed statuses that can be assigned to your edit invoices.
Office Options
10. Click the Format Header button to change the default formatting for the header of page 1 of the invoice.
to specify which office should be referenced when utilizing office keywords on invoices.
11. Click the Format Page 2 Header
12. Click the
button to change the default formatting for the header of page 2 and all subsequent pages of the invoice.
Format Footer button to change the default formatting for the footer of the invoice.

ProSystem fx Practice Management
18
13. Select Reset Fonts
14. Click Save Settings to save your changes.
to select the font you want to use for your firm’s invoices and statements. The default font is Arial 10 point.
To add a custom header-footer 1. Select Custom Header-Footer on the Firm menu to set up a custom header/footer. Enter the
description and specify the language (English or French). You can associate a custom header-footer set with an office (or group of offices). Options are also available to select the font and size you wish to use for your custom headers and footers.

Getting Started with ProSystem fx Practice Management
19
Administration
Setting Up Your Firm Lists
Before you enter your List information, let’s look at the Administrative Activities window. You can view these options by double-clicking Administration on the Main menu within Dashboard, by selecting Activities on the navigation bar in Administration, or by selecting the Activities menu in Administration. This window gives you access to administrative tasks such as updating time and billings for the firm. Available Time Entry options include using Batch Entry, editing released time, correcting WIP, and updating time and expenses. Available Billing and Invoicing options include billing worksheets, printing a billing edit list, and updating (posting) invoices. File
If your firm wants to take advantage of the Remote feature, this can be set up from the File menu. Select File to use the optional General Ledger and Payroll Interface options.
Firm Use the Firm menu to set up or change the firm, invoice formats, security, set up alerts, link the ProSystem fx CPA Accounting client master setup, and to process year-end.
Preferences Use the Preferences menu to trim your client and employee lookups, or to change your password.
Help Use the Help menu to review the New Firm Checklist, and see who is logged into ProSystem fx Practice Management. Select the About ProSystem fx Practice Management option to verify what version you’re using and the location of your firm and database.
Lists When setting up your firm, use the navigation bar on the left side of the window to select the Lists menu to add service codes, employees, clients, and other lists of information used by your firm.

ProSystem fx Practice Management
20
Client Find and Change The Client Find and Change option allows you to edit client information for multiple clients at once. Select the Client Find and Change category from the navigation bar on the left side of the window.
Employee Find and Change The Employee Find and Change option allows you to edit employee information for multiple employees at once. Select the Employee Find and Change category from the navigation bar on the left side of the window.
Lead Find and Change The Lead Find and Change option allows you to edit lead information for multiple leads at once. Select the Lead Find and Change category from the navigation bar on the left side of the window.
Business Affiliate Find and Change The Business Affiliate Find and Change option allows you to edit information for multiple business affiliates at once. Select the Business Affiliate Find and Change category from the navigation bar on the left side of the window.
Referral Find and Change The Referral Find and Change option allows you to edit information for multiple referrals at once. Select the Referral Find and Change category from the navigation bar on the left side of the window.

Getting Started with ProSystem fx Practice Management
21
Navigating the Lists Menu
The Lists menu allows you to set up basic list information from Clients to Work Types. The menu is found on the navigation bar in Administration and is organized for quick access to the options that you will use the most after you are set up. The Getting Started Guide does not follow the order on the menu. Since this is initial setup, the guide follows an order necessary to set up all options. Most of the items that you will set up are found on the Lists menu on the navigation bar in Administration. These items include employees, clients, service codes (descriptions of tasks performed), etc. If need be, you can print a list (such as Bank Accounts, Skill Levels, etc.) by right-clicking with your mouse on the displayed list. Please note that this will print the list as it appears on-screen and will not include any additional details. See Reports to print detailed lists of Clients and Service Codes.
Lists
Buttons that help you manage your lists are found on each list window. Edit
The Edit button allows you to edit the selected list item. New
The New button opens a blank setup screen where you can create a new list item. Delete
The Delete button allows you to delete the selected list item. Close
The Close button closes the current list window.
Windows and Folders
You will see the same buttons on most of the windows and folders where you add new items. OK
The OK button saves the current entry and closes the window. New
The New button saves the current entry and clears the window without closing it. This is useful if you are adding more than one item at a time.
Cancel The Cancel button closes the window or folder without saving any new information.
In addition to a main folder, the Client Setup and Employee Setup options also have a Tracking folder that holds information such as client contacts and employee CPE information.

ProSystem fx Practice Management
22
Quick View - Lists Movement
To move forward in a window, press the TAB key. To move back in a window, press SHIFT+TAB.
Entry and Editing
To edit an item double-click the item. To enter CPE or Banked Hours use the Employee Tracking folder. To set up multiple engagements for a client click Add Engagement and designate one of the engagements as the master. To do this, select the Master Client Folder check box on the Mailing tab of Client Setup. In billing, the name and address information from the Master Client folder is used on a multiple-engagement invoice. When searching for an item, enter as many characters as possible to view a more refined list. To better view multiple lists at once, use the Tile Horizontally or Tile Vertically options on the Windows menu.
Saving and Exiting To save an entry without closing the window, click New rather than OK. To close several open windows at one time click Close on the Windows menu.

Getting Started with ProSystem fx Practice Management
23
Adding Items to a List To add items to a list 1. Choose an option from the Lists menu found on the navigation bar in Administration.
2. Click the New button.
3. Enter information into the available fields.
4. If there is more than one file folder on the window, click the other tabs and enter the window information.
5. If you want to add any notes for clients/leads, employees, business affiliates, or referrals, click the Notes button.
6. If you want to add information for client/lead, employee, business affiliates, or referral custom fields, click the Custom button and enter custom information.
7. Click OK or click New to set up another item.
Tips If you are adding an employee and you wish to add CPE or banked hours, click Tracking Folder. Select
the appropriate tab to make your entries. If you are adding a client and you wish to add contacts, marketing information, business affiliates, sales tax,
or project due dates, click Tracking Folder. Select the appropriate tab or button to make your entries. When adding notes information, simple word processing features such as cut (CTRL+X), copy
(CTRL+C), and paste (CTRL+V) are available. Notes are associated with the item until they are erased. When creating service codes, you must add a category and subcategory before you can add a service code.

ProSystem fx Practice Management
24
Editing Items on a List To edit items on a list 1. Choose an option from the Lists menu found on the navigation bar in Administration.
2. Select an item on the list and click Edit.
3. If there is more than one folder tab, click the appropriate tab to access the portion of the folder you need to edit.
4. If you want to edit custom fields or notes, click the appropriate button and change the information.
5. Once completed, click OK.
Tips If you are editing an employee and you wish to change information such as CPE or banked hours,
highlight the employee and click Tracking Folder. Click the appropriate tab to make the changes. If you are editing a client and you wish to change information such as contacts, marketing information,
business affiliates, sales tax, or project due dates, click Tracking Folder. Select the appropriate tab or button to make your changes.
An easy way to edit client information for multiple clients, employees, leads, business affiliates, or referrals is through the Find and Change options found on the navigation bar in Administration.
When editing notes information, simple word processing features such as cut (CTRL+X), copy (CTRL+C), and paste (CTRL+V) are available. Notes are associated with the item until they are erased.
If you are editing a portion of a service code, click the plus sign of the appropriate category or subcategory to access the item the needs editing.
If you want to change a sales tax rate assigned to a service code, click Sales Tax on the Service Code Setup folder and use the drop-down list to change the assigned sales tax rate.

Getting Started with ProSystem fx Practice Management
25
Deleting Items from a List To delete items from a list 1. Choose an option from the Lists menu found on the navigation bar in Administration.
2. Select an item and click Delete.
3. Click Yes when asked if you are sure you want to delete the record. If you are deleting a list item that is used by a WIP entry you are given the option of replacing the item with another one. This is useful if a client is bought out or if you need to consolidate your service codes. To do so, search for the service code or client with which you want to replace the selected item and click OK.
Tips If you need to delete employee information such as CPE or banked hours, highlight the employee and
click Tracking Folder. Select the appropriate tab and make your deletion. If you need to delete client information such as contacts, marketing information, business affiliates, sales
tax, or project due dates, select the client and click Tracking Folder. Select the appropriate tab or button and make your deletion.
If you want to delete a client note, click Notes in Client Setup. Select the note you wish to delete and click the Delete button.
If you are deleting an engagement, you have the option of either deleting or replacing. If the engagement has been billed with another engagement on a multi-engagement billing, the engagement can be replaced, providing the client number is the same. You do not have to roll to the master client. If the engagement account has been billed alone, validation is required and the engagement can be rolled to any client.
If you are deleting a portion of a service code, click the plus sign of the appropriate category or subcategory to access the item you want to delete.
If you are deleting a Time Entry Custom code you have the option of either deleting or replacing. Because the code can be used for tax reporting purposes, and because tax laws change from year to year, deleting a Time Entry Custom code does not delete the code from history records. It removes the code from the list for future use only. If you select to replace, the Time Entry Custom code will be replaced with the new value you select.

ProSystem fx Practice Management
26
Creating Your Lists Refer to the Lists Menu Helpful Hints for tips on Lists items.
Bank Accounts
Bank Description Enter the name of the firm’s bank. When entering payments in Accounts Receivable you can indicate the bank account. You can then tie cash receipts reports to bank deposits.
Departments
Department Name Enter the department name to identify the working branches of your firm (Tax, Audit, etc.). You may print standard employee reports sorted by department. Other departmental reporting may be customized.
Regions
Region Description Enter the region name. Offices may be assigned to regions and region totals can be printed on reports.
Offices
Description Enter a description for this office
Region Click the drop-down button to select a region. Region totals can be printed on reports.
Name and Address Enter the name and address information for the firm’s physical locations. You can generate reports by office that detail statistics for clients and employees assigned to the office.
Telephone, Fax 1 and 2 Enter the phone numbers. You can refer to these numbers quickly on-screen and on reports.
Internal Reference The internal reference field gives you the ability to add another field in Office Setup for in-house reference only. This field will not print on invoices, statements, or reports.
Reasons
Reason Description Enter user-defined reasons for invoicing write-downs, A/R credits, and WIP transfers.
Reason Type Enter the type code for Billing, A/R, and WIP transfers. Reports with reasons listed can highlight problem areas of the firm. We recommend entering the codes BIL, AR, and TRF to identify the areas of billing, receivables, and transfers.
Finance Charges
Description Enter the name of the finance charge. Clients assigned this finance charge are then eligible for a late charge.

Getting Started with ProSystem fx Practice Management
27
Days From Invoice Date Enter the number of days at which an invoice becomes "past due." If you enter 30, finance charges could be applied if a bill is not paid in 30 days.
Minimum Balance Enter the minimum amount to which a finance charge can be applied. Define the lowest account balance that a client can have and still have a finance charge calculated. Any balance below this amount is exempt from a finance charge.
Finance Chg on Chg Click here if you want this finance charge compounded over time. Select this only if you want to compound finance charges. Leave this box cleared if you want only simple interest calculated on this charge.
Finance Charge Indicate whether this is a finance charge or flat late fee. If this is a finance charge, enter the monthly percent and minimum charge. If this is a flat late fee, enter the late fee.
Monthly Percent Enter the percent (rate) to be charged to clients for this charge. This defines the percentage calculation on a client’s outstanding balance. For example, 5.00 entered here means a 5% finance charge can be calculated on outstanding balances.
Minimum Charge Enter the minimum amount that can be applied to a client’s account. This amount is levied even if the calculated charge is less than the minimum amount.
Flat Late Fee Enter the Late Fee Amount.
Sales Tax
Sales Tax State Enter the abbreviation of the state in which this sales tax applies. Sales tax must be assigned to both service codes and clients or it cannot be calculated.
State Authority Enter the agency or group responsible for the collection of the sales tax. This allows you to further identify the origins of this sales tax.
Start Date Enter the date on which this sales tax has or will become effective. When this date is reached, sales tax begins calculating automatically.
Tax Rate % Enter the percentage of tax to be calculated on billed amounts.
NAIC Code Summaries
NAIC Code Summary Description A list of summary descriptions is provided for you. You can enter any additional industry descriptions to be identified by a NAIC Code for NAIC reporting. Once a summary description is added here, it can be assigned to a NAIC Code on the NAIC Code list.
NAIC Codes
Description A list of NAIC Codes is provided for you. You can enter any additional codes and descriptions that can be assigned to clients for NAIC reporting. This allows you to generate reports of clients sorted by NAIC Code, showing the industries in which you have the greatest concentration of clients.

ProSystem fx Practice Management
28
NAIC Code Summary Select the industry (Agriculture/Forestry, Mining, Construction, etc.) that is identified by this NAIC Code. This allows you to classify your NAIC Codes by industry. If you need to add a new summary description, select NAIC Code Summaries under Lists on the navigation bar in Administration.
Line of Business
Code Use this optional list to create a list of industry codes and descriptions that are meaningful to your firm. This allows you to generate reports of clients sorted by Line of Business, showing industries in which you have the greatest concentration of clients. In addition you can summarize revenue by Line of Business if the client uses the General Ledger Interface to CPAClient Write-Up.
Description Enter a description for each line of business code.
In/Out Status
Status Description This list of employee status descriptions (Appointment, Lunch, Meeting, etc.) is used on the In/Out Log tab of Time and Expense Entry. A group of default status descriptions is entered for you automatically. You can add, edit, or remove status descriptions from the list. Use this option to customize the In/Out Log for your firm’s specific needs.
Note Topics
Topic Name Note Topics are used to classify or sort Notes. Enter the topic name and click OK. The topics entered here will be added to the Topic listing and will be available for selection when entering notes.
Skill Levels
Skill Description Enter a description for this skill level. Skill levels identify the staff hierarchy in your firm by level of experience and responsibility and help you see the productivity percentages of your employees. Examples of skill levels include partner, staff, support, etc. You can sort or group employees by skill level on some reports.
Time Entry Custom
Code If you plan to use the optional Time Entry Custom feature, and have enabled this feature in Firm Setup, enter a code to enter in Time Entry. This code will be associated with the time or expense transaction and can be used for reporting (for example, a municipality code for tax reporting).
Description Enter a description for this Time Entry Custom code.
CPE Categories
CPE Category Description Enter a CPE Category description. These categories will be added to the drop-down in the Client tracking folder and used when entering CPE information for employees.

Getting Started with ProSystem fx Practice Management
29
CPE Types
CPE Type Description Enter a CPE Type description. The types added here will be added to the drop-down list in the Employee Tracking folder and used to enter CPE credits for your employees
Project Types
Project Type A list of project types is provided for you. Projects are the specific work assignments scheduled with due dates for your clients. Any additional projects can be added for your firm. Projects (and their due dates) can be assigned to clients on the Client Tracking folder or through Project Management. You can review the status of projects for clients on the Project Due Dates tab of Time Entry.
Time Entry Default Select this check box to include the project type on the Time Entry prompt. When employees enter time for this project type, a list of projects assigned to the client for this project type will display. Employees can select the correct project from the list to track budget to actual hours on projects.
Associate project type with services Select a category or sub category from the list to associate the project type with a group of service codes. These service codes will be associated with any project created with this project type for Standard Time Entry.
Employee Bill Rate Any project detail positions created with this project type (where a detail non-expense service code is not entered) will default to the employee bill rate entered here. The default rate may change depending on the service code selected and whether the client has custom bill rates. Detail positions created at the Category or Subcategory will use this bill rate.
IRS Form If this project is associated with an IRS tax form, enter the form name here for reporting purposes.
Year End Select to calculate the due date from either the client’s Fiscal Year End or from the Calendar Year End.
Original Due Enter the number of months after the year end date to determine the original due date of the project. Then enter any additional number of days. For example, if you are calculating from the calendar year end, and the project is due on April 15, enter 3 months and 15 days. If you are calculating from the fiscal year end and the project is due 3 months after the client’s fiscal year end, enter 3 months. These numbers will be used to calculate the Due Date in Project Management whenever you assign this project to a client.
1st Extension Enter the number of months after the due date to determine the first extension due date. Then enter any additional number of days.
2nd Extension Enter the number of months after the 1st
Target Date
extension date to determine the second extension due date. Then enter any additional number of days.
Enter the number of days prior to the due date that you are targeting for completion of the project. This date will be used when scheduling employees for the project.
Start Date Enter the number of days prior to the due date that you are planning to start work on the project. This date will be used when scheduling employees.
Automatic Roll Forward Select this option to enable an automatic roll of projects for this project type. The roll forward will function only for projects without budget detail. If you select the automatic roll forward, indicate whether

ProSystem fx Practice Management
30
to keep the existing project description, clear it, or enter a new description. You can also clear the notes from a project associated with this project type. To initiate the roll forward, enter the Delivered Date for the project by updating Tracking Status from within any online module of ProSystem fx Practice Management.
Link Service Codes Use this option to filter services by project type for Project Based Time Entry. In Project Based Time Entry, your staff chooses the project before the service code when entering time entry transactions. Set up links between the project type and permissible service codes here, ensuring that your firm employees are entering accurate service codes available only for the project type.
Project Positions
Position Description Enter the name of the management position.
New Project Options
Positions can be assigned to employees in Project Management as employee types or responsibilities. Tax Review and Tax Preparer are default list items.
Custom Fields - Project
Description Enter the description for the custom field used to identify the custom field. Project custom fields entered here will be available when setting up projects where project specific information can be entered.
Type Enter the type of information that should be entered for this custom field. You may select text, date, money, number, rate, check box, or a drop-down list.
Default Value Enter the client information that you would like to default for this project custom field. (optional)
Maximum Length Enter the maximum number of characters (between 1-250) you would like to define for the custom field information. (optional)
Standard Paragraphs
Invoice Paragraph Paragraph Description
A list of standard paragraphs is provided for you. If you wish to add additional billing paragraphs, enter a description to identify this invoice paragraph.
Keywords To insert a keyword in your paragraph select one from the keywords list. For example, ~Client All Address prints all client address lines.
Paragraph Type the text of the billing paragraph here. Standard Paragraph text can be printed on any invoice regardless of the invoice format.
E-mail Paragraph
Paragraph Descriptions Enter a paragraph description to identify this e-mail paragraph.
Keywords To insert a keyword in your e-mail paragraph select one from the keywords list. For example, ~Client All Address prints all client address lines.

Getting Started with ProSystem fx Practice Management
31
Paragraph Type the text for the message that will be used as the e-mail text when sending invoices and statements by e-mail.
Default Select this check box to set this e-mail paragraph as the default making this paragraph the default e-mail text used when sending e-mail invoices and statements. The e-mail message may be changed.
Entity Types
Entity Type Description A list of entity types is provided for you. To add to the list, enter an entity description. Use Entity Types to group like clients together on-screen or in reporting.
Work Types
Work Type Description Enter a user-defined work type. Examples include Tax and Audit. Use Work Types to group clients by the type of work you perform for them in reporting or to sort like clients together on-screen.
Affiliate Types
Affiliate Type Description Business Affiliates are the people or companies who do business with a particular client. Enter an affiliate type. The name entered here can be assigned to a client’s business affiliate, allowing you to identify and group a client’s affiliates, such as their attorney, stockbroker, or banker.
Custom Fields - Business Affiliates
Description Enter a description for the business affiliate custom field used as the field name displayed. Business affiliate custom fields entered here will be available when entering business affiliate information where affiliate specific information can be entered.
Type Select the type of information that should be entered for this custom field. You may select text, date, money, number, rate, check box, or drop-down list. If you select drop-down list, you must enter the maximum length of the entry (between 1-250 characters).
Default Value Enter the information that you would like to default for new business affiliates. (optional)
Maximum Length If selecting text or drop-down list types, enter the maximum number of characters (between 1-250) you would like to define for the custom field information.
Business Affiliates
Business Name Business Affiliates are the people or companies who do business with a particular client. Enter the firm name, primary contact information, and address of the business affiliate. These affiliates can then be associated with the Client in the Client Tracking folder.
Affiliate Type Select the affiliate type to identify the group for this business affiliate.

ProSystem fx Practice Management
32
Contact Information Enter the address and contact information for the individual contacts representing this business affiliate. These contacts can then be associated with clients in the Client Tracking folder.
Custom Fields - Client/Lead
Description Enter a description for the client custom field used as the field name displayed. Client/lead custom fields entered here will be available when entering client information where client specific information can be entered.
Paragraph Code Enter an alpha (or numeric) code if you would like this custom field to be available when creating Standard Paragraphs.
Type Select the type of information that should be entered for this custom field. You may select text, date, money, number, rate, check box, or drop-down list. If you select drop-down list, you must enter the maximum length of the entry (between 1-250 characters).
Default Value Enter the default value that will display for this custom field for new clients/leads. (optional)
Maximum Length Enter the maximum number of characters (between 1-250) you would like to define for the custom field information. (optional)
Custom Fields - Employee
Description Enter a description for the employee custom field used as the field name displayed. Employee custom fields entered here will be available when entering employee information where employee specific information can be entered.
Type Select the type of information that should be entered for this custom field. You may select text, date, money, number, rate, check box, or drop-down list. If you select drop-down list, you must enter the maximum length of the entry (between 1-250 characters).
Default Value Enter the client information that you would like to default for new employees. (optional)
Maximum Length If selecting text or drop-down list types, enter the maximum number of characters (between 1-250) you would like to define for the custom field information.
Contact Categories
Contact Category Description Enter the Contact Category description used to identify the contacts set up for clients in the Client Tracking folder.
Tracking Status
Status Description A list of the various stages in tax return preparation used in Project Tracking is provided for you. You can modify the list, delete items, or add items. Using Project Tracking, you can set the status of a client’s return on-screen and assigned employees can check on the status of any project.

Getting Started with ProSystem fx Practice Management
33
Use Move Up and Move Down to order this status description in the overall Tracking Status list. You will probably want to order the items in chronological order as a return moves through the processing stages. The Status Descriptions will appear in Project Tracking in the order assigned here.
Leads
New Lead Leads are prospective clients and can be entered either through Lists (in Administration) or in Contact Management. Leads are separate from the Client/Prospect list to give each staff member the ability to work their own list of new business opportunities without bringing them officially into the list of active clients. Enter the lead name and address information, the owner of the lead, and whether or not the lead is shared with other employees.
Contacts Enter the address and contact information for the individual contacts representing this lead.
Custom Fields - Referrals
Description Enter a description for the referral custom field used as the field name displayed. Referral custom fields entered here will be available when entering referral information where referral specific information can be entered.
Type Select the type of information that should be entered for this custom field. You may select text, date, money, number, rate, check box, or drop-down list. If you select drop-down list, you must enter the maximum length of the entry (between 1-250 characters).
Default Value Enter the client information that you would like to default for new referrals. (optional)
Maximum Length If selecting text or drop-down list types, enter the maximum number of characters (between 1-250) you would like to define for the custom field information.
Referrals - Name and Address
Last, First Name Referrals are found under Marketing on the Lists menu. Referrals are the network of contacts referring business to your firm. Referrals are optional and can be entered at any time. You will edit the Referrals list regularly as your referral sources grow. Enter the last and first names of the referral. The name entered here will be available in the Client Tracking folder, allowing you to track who referred a client to you. This name will also be used as the referral contact in Contact Management.
Salutation Enter a salutation for this referral, if any.
Title Enter the job title of the referral, if any.
Firm Enter the place of business of the referral. The firm name will be used as the referral in Contact Management.
Address Enter the complete address for the referral.
Referral Code Enter a unique code for the referral. Codes can be a combination of alphabetic and/or numeric characters.

ProSystem fx Practice Management
34
Referrals - Status/Phone/Description
Status Select Active if this referral is currently referring business to your firm. If not, clear the check box. Enter the active or inactive date as is appropriate.
Telephone, Fax Enter the telephone and fax numbers for this referral.
E-Mail Enter the referral’s e-mail address.
Employee associated with referral Select the employee in your firm associated with this referral. If you have not set up your Employee list, you can enter this information later.
Type of referral Select the type of referral that describes this referral.
Mailers
Mailer Description Use the Mailer list (from Marketing on the Lists menu) to link clients, prospects, business affiliates, leads, and referrals with the various mailings your firm uses. Enter a name for each mailer. Examples include Firm Newsletter, Audit Newsletter, and Physician’s Letter. Any client, prospect, business affiliate, lead, or referral can be designated to receive a mailer. See the Marketing chapter for more information. When you are ready to send a mailing to a designated group, use the Merge option on the Mailers list (or Quick Labels
) to create and print mailing labels.
Marketing Methods
Description Marketing Methods are found under Marketing on the Lists and are used to identify the techniques you use to acquire new clients. Enter a description of a marketing method your firm uses. Examples include Newspaper Ad, Firm Sponsored Event, and Nonprofit Affiliation. When you add your clients and prospects, you can identify the marketing methods responsible for the new business. Reports can then be generated showing which marketing methods are most profitable for your firm.

Getting Started with ProSystem fx Practice Management
35
Creating Your Service Codes
Service codes identify each task performed by employees in the firm. When employees enter time and expenses, they choose service codes to indicate the type of work performed. Service codes are classified into groups called categories and subcategories. For example, you could have a category called Tax with several subcategories, such as 1040. Under the 1040 subcategory you could have several detailed service codes such as "1040 Preparation" and "1040 Signoff." Statistics are available at the detail service code level in addition to the summary levels of category and subcategory. All service codes must contain a category, subcategory and a detail (service code) level. Plan your service codes on paper first before you enter them in ProSystem fx Practice Management. When entering service codes, remember that a category must be added before a subcategory can be assigned to it. Likewise, a category and subcategory must be added before a service code can be assigned to them. If you are printing French language invoices, entry of French text for categories, subcategories, and service codes is available. To add a category 1. Choose Service Codes on the Lists menu found on the navigation bar in Administration. The Service
Code
2. Click the New Category button. The
list appears.
Category Setup
3. Enter up to five characters for the category code. Then enter a reports description and invoice paragraph. Select the French tab to enter a separate French language reports description and invoice paragraph (if printing French language invoices).
window opens.
4. Click OK to save the information and return to the previous window or click New to add another category.
To add a subcategory 1. Choose Service Codes on the Lists menu found on the navigation bar in Administration. The Service
Code list appears.
2. Click the New Subcategory button. The Category/Subcategory Setup window opens.

ProSystem fx Practice Management
36
3. Select the category to which this subcategory should be added.
4. Enter up to five characters for the subcategory code. Then, enter a reports description and invoice paragraph. Select the French tab to enter a separate French language reports description and invoice paragraph (if printing French language invoices).
5. Click OK to save the information and return to the previous window or click New to add another subcategory.
To add a service code 1. Choose Service Codes on the Lists menu found on the navigation bar in Administration. The Service
Code list appears.
2. Click the New Service button. The Service Code Setup
3. Enter up to five characters for the service code and then enter a description and invoice paragraph. Select the French tab to enter a separate French language reports description and invoice paragraph (if printing French language invoices).
window opens.
4. Select the category and subcategory and the Department to which you want to assign this service code.
5. Enter all general information for the service code, including the type of work (regular, sick, etc.). Indicate whether the service code is time-based, expense-based, or a reimbursable expense and enter an invoice paragraph for the service code. Enter all pertinent service code billing information. If this is an expense or reimbursable expense-based service code for mileage or other units of measure, select the Mileage/Units check box and enter the rate per mile or unit. If this is a time-based service code, enter any surcharge amount to add to each hour of WIP.
6. To assign a sales tax to this service code, click the Sales Tax button. Click Add to add a sales tax rate to this service code. Select the taxing authority and click OK.
7. Click OK to save the information and return to the previous window or click New to add another service code.

Getting Started with ProSystem fx Practice Management
37
Creating Your Employees
The Employee list contains information about your firm’s employees. To enter an employee 1. Select Employee Setup
2. The
under Lists/Employees on the navigation bar in Administration. Click New.
Name/Address
3. Select the
tab of the Employee Setup folder appears. Enter the employee general information. If you plan to interface ProSystem fx Practice Management with ProSystem fx CPA Accounting CPAAccounts Payable, make sure that the employee codes you enter in ProSystem fx Practice Management match the firm employee codes you enter in CPAAccounts Payable.
Employee Profile
4. Select
tab to enter department and skill level information for the employee.
Billing Rates
5. Select the
to enter the billable rates, nonbillable rate, and cost amount for the employee.
CPA Information
6. Select the
tab to enter CPA information.
Other
7. If you want to include information concerning
tab to enter the employee status and yearly allowances of paid time off.
CPE or Banked Hours
8. If you want to add notes associated with this employee, click the Notes button.
, click the Tracking button. Select the appropriate tab and enter the employee’s information.
9. If you want to enter information for any custom fields that have been defined in Firm Setup, click the Custom button.
10. Click OK to return to the Employee list or click New to add another employee.

ProSystem fx Practice Management
38
Creating Your Clients and Prospects
The Client list contains information about your firm’s clients and prospects. Clients who employ your firm for more than one task (such as tax and audit work) can be set up with engagements (or accounts). If a client has engagements, set up the client first and then add the engagements. To enter a client or prospect 1. Choose Clients
2. Click the New Client button.
from the Lists menu found on the navigation bar in Administration.
3. Enter all relevant client information on the Client
4. If the client’s mailing address is different than the address entered here, click the
tab. Select French as the invoice language for French-speaking clients.
Mailing
5. Select the
tab and enter the mailing address.
Federal/ID/Phone/Email
6. Select the
tab to enter client ID, telephone, and e-mail information.
Profile/Description
7. Select the
tab to enter FYE, entity type, work type, and NAIC code and/or Line of Business information.
Staff
8. Select the
tab to assign employees to the client.
Billing
9. Select the
tab to enter invoicing and statement defaults and overrides.
Billing Fees
10. Select the
tab to enter any billing agreements for the client.
Status/Office
11. To include information concerning
tab to enter status information. Use this tab to identify whether this is an Active Client or an Active Prospect.
Contacts, Marketing, Business Affiliates, Sales Tax, or Projects, or to assign a Mailer
12. If you want to establish any customized billing rates for this client, click the
to the client, click the Tracking button.
Bill Rates
13. Click the Notes button to enter any notes that pertain to this client.
button. The Standard Billing Rate will be used unless you specify another billing rate.
14. Click the Custom button to enter client custom information.
15. Click OK to save the information and return to the previous window or click New to add another client.

Getting Started with ProSystem fx Practice Management
39
To enter an engagement 1. On the Client list, select the client for whom an engagement needs to be added.
2. Click the Add Engagement button.
3. Change any information unique to this engagement on each tab of Client Setup.
4. Choose one of the client’s engagements or "accounts" as the Master by clicking the Master Client Folder check box on the Mailing tab of that engagement’s Client folder.
5. To include information concerning Contacts, Marketing, Business Affiliates, Sales Tax, or Projects, or to assign a Mailer
6. Click OK to save the information and return to the previous window or click New if you are adding more than one engagement for the client.
to the client select the engagement and click the Tracking button.

ProSystem fx Practice Management
40

Getting Started with ProSystem fx Practice Management
41
Time Entry
Entering Time and Expenses Individual employees can enter their own time and expenses from their desktops using Time Entry. There are two posting methods available for Time Entry, Edit and Post Update Mode and "Real Time" Update Mode, which are selected in Security Setup. Once time and expenses have been entered, they must be released and posted before they are available through Billing as WIP. If an administrative staff member enters all employee timesheets, all work can be done using Batch Time Entry in Administration. If using Real Time Update Mode, the entries are released and posted in one step, removing the Administrator’s involvement in the posting process. If using Edit and Post Update Mode, the entries are released from Time Entry, reviewed and edited through Edit Released Time, and Posted to Work-in-Process through Update Time in Administration. Entries are identified with “U” (Unreleased) prior to being released and with “R” (Released) once they are released and posted. To use Time Entry 1. Add time and expenses for active clients and active prospects.
2. Print an edit list. Review it for errors.
3. Release time and expenses. (If you are using Real Time Update Mode time and expenses will be released and posted in one step.)
4. Update Time (post) if you are using Edit and Post Update Mode.

ProSystem fx Practice Management
42
Quick View - Time Entry Folder Enter time or expenses
Use the Time and Expense Entry tab to enter time and expenses. In Standard Time Entry, select a client and the service code corresponding to the work you completed for the client. If you are using Project Based Time Entry, enter the project before entering the service code for the transaction. Enter the hours you worked, or, for an expense code, enter the flat amount of the expense. Enter a memo regarding your work. If there is a project associated with the transaction, select the project. Unreleased time is identified as “U” (Unreleased) and released or posted time is identified as “R” (Released).
Locate employees
Use the In/Out Log tab to let co-workers know if you are available or not. Click Edit to enter your status, expected return time, comments, phone extension, or e-mail address. If you need to change the status of another employee, select that employee. Use the list to see the whereabouts of all active employees on the system. If you want to view a specific employee, enter the full (or partial) last name to move to that section of the list. Click Refresh List to refresh any changes made to an employee’s status.
Appointments
Click the Appointments button to open the Appointment feature. Each employee may enter and track their appointments, personal tasks, marketing ticklers, follow-ups, and client projects. The appointment slot that corresponds to the current day and time will be highlighted. To make an appointment on another day, click the day on the Calendar. Double-click a time interval and enter the appointment. Click OK to save the entry. Note that installing CCH Coolbar on a workstation disables Appointments for this workstation in ProSystem fx Practice Management. In CCH Coolbar, Microsoft Outlook replaces the Appointments feature.
Track due date tasks
Projects with a due date that falls in the current month to which the current employee is assigned are listed on the Due Dates tab. Enter a date range and click List Due Dates to change the due date range. You can also select to view past due and completed projects. To view all employees assigned to a project, click View Project Employees. In Batch Entry, the current employee is the employee selected from the Change Emp button. To view or update the project status, click Tracking Status.
Track marketing info
If you enter time for a Marketing service code (set up in Administration/Lists/Service Codes with a Marketing type) the Marketing Information window appears if you have retained the firm default to prompt for marketing information. Use the Marketing Log tab to enter detailed information about the marketing event. You can track time spent on leads as well as leads, clients, prospects, referrals, or business affiliates. Use the Marketing Tickler tab to enter reminder information that can be printed on reports and displays on the Due Dates tab and in the Appointment Manager in Time Entry, and in Notes.
Track CPE information
If you enter time for a CPE service code the Employee CPE Credit window appears if you have retained the firm default to prompt for CPE information. Use this window to enter CPE credit hours and class information.

Getting Started with ProSystem fx Practice Management
43
Review posted transactions Click the Timesheet Lookup tab. Click the drop-down for the type of posted hours to view (all hours, banked, used, sick, vacation, CPE, holiday, personal, marketing, nonbillable, other nonbillable, billable, or summary). Enter a date range and click List Entries to view hours for a specific time frame. Transactions may be sorted by Date, Client, Service, Hours, or Memo by clicking the appropriate column heading. To view specific data, click the column you would like to search, then right-click the item that contains the data you would like to find. Select the filter option. Right-click and select Undo All Filter(s) to view all entries. Timesheet Lookup views other than Banked or Used are available for remote workstations.
View Alerts
Click the Alerts tab to view, review, or dismiss the alerts that have been generated for the current employee. Click Show Details to view the details of the Alert. Detail can also be selected by double-clicking on the alert. Click Mark Reviewed to change the status of the Alert from new to reviewed. Click Dismiss Alert to delete the alert. Click Remind Me Later to select the number of days or date that the program will send a reminder notice.
Add Notes
Click Notes to access Notes. You can enter Client/Prospect, Referral, Business Affiliate, or My Lead Notes. Select the client whose notes, marketing ticklers, follow-ups, or appointments you would like to view. You may add, edit, print, or delete. Click New to add a note, marketing tickler, follow-up, or appointment. Billing notes can also be entered and printed on Billing Worksheets. Note that installing CCH Coolbar on a workstation disables Appointments for this workstation in ProSystem fx Practice Management. In CCH Coolbar, Microsoft Outlook replaces the Appointments feature.
Update projects/tasks
To mark a project, personal task, marketing tickler, or follow-up as completed ("Done"), select the Due Dates tab. Change the date range if needed. Once the task is listed, double-click the task or click Mark Completed. Enter the completion date for this employee. (Today’s date will default.)
Check client limits
On the Quick Looks menu, click Billers - Client Credit Limits to view a list of clients whose WIP or A/R exceeds their respective limits. Information includes the client name, client code, WIP, WIP limit, A/R, and A/R limit.
Check billers
On the Quick Looks menu, click Mgr Partner - Bill Write Downs. A list of billers who are invoicing with write-downs appears. Information includes the biller name, client name, invoice amount, and write-down. This option is automatically restricted for all employees. To enable the option for managing partners, select Security Setup from the Firm menu in Administration and change the security for the appropriate employees.
Update remote users
Remote users need to update their database in order to have current client, service code, and employee lists. If your workstation is remote and connected to the network, select Import on the File menu to import the latest information.

ProSystem fx Practice Management
44
If your workstation is not connected to the host, there will be an exchange of data files between you and the firm (host) administrator. The administrator will build remote files and send the remote file to you. Copy the file onto your workstation and select Import on the File menu to update your client and service code information. In addition, you will release time into a file that must be sent to the firm administrator. The administrator will import this file for posting.

Getting Started with ProSystem fx Practice Management
45
Quick View - Time Entry Add time or expenses
Click the correct date. Standard Time Entry is used by default for all timekeepers in the firm. In Standard Time Entry, choose a client and service code. If you have entered a time service code, enter the hours. If you have entered an expense service code, enter the flat rate. If there is a project associated with this transaction, select the project when prompted. If you want to enter a reference, enter the memo and click Save. You have the option of having the program assist with project selection based on the chosen service. To associate a category or subcategory of service with a project type, go to Project Setup – Link Service Codes. If you are a remote user, be sure to import client and service code information (select Import on the File menu) to keep your database current. If you are a remote user not connected to the network, you will import files you receive from your firm (host) administrator.
Using Project Based Time Entry to add time or expenses
If your firm is project centric, you have the option of enabling Project Based Time Entry in which you choose a client and identify the project before entering the service code. With Project Based Time Entry you can also set up links between project types and permissible service codes, ensuring that your firm employees are entering accurate service codes available only for the project type. To enable Project Based Time Entry first set up the links between project types and service codes in Project Setup – Link Service Codes. Next, enable security for employees who will use Project Based Time Entry in Security Setup. Look for Time Entry – Project Based Entry in the security list. If you want employees to have the option of overriding a linked service code for a project, you can also select the option to allow the override of service codes in Security Setup.
Edit unreleased entries
Click the correct date on the Calendar. Double-click the entry you need to edit. Change the information on the window and click Save.
View MTD hours
Click MTD Hours to view and print the calendar. Choose the month and year you wish to review. Click the drop-down button to view all posted, released, unreleased time, or all time. You can then select all hours, billable hours, or nonbillable hours for the time selected. A Productivity Ratio is also displayed. MTD Hours is also available for remote workstations that are not connected to the host. To view MTD Hours for any employee, use Batch Time Entry.
Bank or use hours
Click Bank Hours to enter hours banked or used. Select the date. The total beginning banked hours is displayed. Enter the hours and then click Bank or Use.
Change an entry date
Click Correct Date to display all unreleased entries for the current employee. Select the entries you need to transfer and enter the new date. Click Transfer Entries.
Print unreleased time
Click the Print button. Enter the date range and, if available, the employee name range. Click Print to print or preview the edit list.

ProSystem fx Practice Management
46
Use the timer If the Timer option on the Windows Tray is not active, the Timer button displays as Timer (Off). To start the Timer and track time spent on a client, click the Timer button or select it from the Windows Tray. Unlimited timers are available. For Standard Time Entry, enter the client name/code and service code for the timer you wish to use. You can also select the project, Time Entry Custom field (if activated), and add an internal memo. For Project Based Time Entry, enter the client name/code, select a project, and choose a service code for the timer you want to use. You can also select the Time Entry Custom Fields (if activated), and add an internal memo. Click Record & Report to clear the timer and start again or click Record to record the time. The Timer button displays as Time (On) when the Timer option is available for use in the Tray. Remember that when entries are recorded, the Timer will round to the interval you selected in Firm Setup. The Timer button is not available in Batch Entry but timers are available from the Windows Tray and can be used independently of ProSystem fx Practice Management.
Release time to post
If you are running in Edit and Post Update mode (selected by default), click Release to release time for posting. Enter the time frame that you wish to release. Click Release to release time. You can also select Release Time from the Activities menu. If you are a remote user not connected to the network, click Remote Release to release your time. A file containing your time entry transactions is created. Send this file to your firm administrator, who will import the file for posting.
Release and post time
If you are running in "Real Time" Update mode clicking the Real Time Release button will release and post the time entries in one step. Enter the time frame that you wish to release. You can also select Release Time from the Activities menu. Real Time Update mode is selected in Security Settings and can be selected for individual employees or for the entire firm.

Getting Started with ProSystem fx Practice Management
47
Starting Time Entry To start from the Time Entry icon 1. Double-click the Time Entry icon.
2. Log on using the employee code assigned to you in the Employee list. If your firm uses passwords, enter your password.
To start from the Dashboard icon 1. Double-click the Dashboard icon.
2. Log on using the employee code assigned to you in Employee Setup. If your firm uses passwords, enter your password.
3. Select Time Entry on the Main Menu.

ProSystem fx Practice Management
48
Using Time and Expense Entry
Use Time and Expense Entry to record time and expenses related to client accounts. If an administrator enters time and expenses for staff members, use Batch Entry from the Activities menu of Administration. By default, Standard Time Entry is used for all timekeepers in the firm. If your firm is project centric, you have the option of enabling Project Based Time Entry. With Project Based Time Entry you can also set up links between project types and permissible service codes, ensuring that your firm employees are entering accurate service codes available only for the project type. Enabling Project Based Time Entry is a two-step process:
• First, set up the links between project types and service codes in Project Setup – Link Service Codes. • Second, enable security for employees who will use Project Based Time Entry in Security Setup.
Look for Time Entry – Project Based Entry in the security list. If you want employees to have the option of overriding a linked service code for project, you can also select the option to allow the override of service codes in Security Setup.
To add time or expenses using Timesheet Entry 1. Choose the date of the transaction by clicking the day on the Calendar. The month and year may be
changed by clicking the arrows to the left or right of the month/year. The system date is the default.
2. Choose a client for whom you worked by either entering the client name and selecting from the list, or by clicking the drop-down button to view a list of all clients. You can also enter the client code preceded by a slash (for example, /101 for client code 101). Use the slash to switch between searching by client name and client code. Press ENTER to select a client.
3. If you are using Standard Time Entry, the service code displays before the project. If you have defined a category/subcategory to help choose a project, the project associated with the selected service will default but can be changed to a different project if desired. You can define the associated category/subcategory on the Type Definition tab of the Project Setup (select Project Types under Create Lists in Project Management, or select Project Types from the navigation bar in Administration). If you are using Project Based Time Entry, once you select the project, the linked (included) service codes for the project type are available in the service code lookup. By default all services are linked to the project type. If none have been excluded, then all services will be available. You can link specific services to a project type on the Link Service Codes tab in Project Setup (select Project Types under Create Lists in Project Management, or select Project Types from the navigation bar in Administration). If you have security to override the filtered list, click the Trim/Untrim button to display or trim the full service code

Getting Started with ProSystem fx Practice Management
49
list. This may be helpful, for example, if you need to enter an expense service code which could be used for any project type.
4. If you select a time service code, enter the number of hours worked. Include the decimal point for a fraction of hours. The rate will automatically appear if the rate is marked to display in the employee’s folder. (Employees are set up from the Lists menu found on the navigation bar in Administration.) If you select a mileage/units expense or reimbursable expense service code, the column heading will change to Units. Enter the number of units (miles, copies, etc.) incurred in the expense. The units entered are multiplied by the rate (entered in Administration/Lists/Service Codes) in the calculation of the expense. If you select a regular expense service code (not designated for mileage/units), enter the dollar amount of the expense (include the decimal point).
5. If there are any projects assigned to this client, which were set up to prompt employees in Time Entry, these projects will be available in the project lookup. The project which defaults, if any, is dependent on time entry method (Standard or Project Based), how the firm options to require projects are configured, as well as the client’s billable status. Dependent on the configuration of project related options, No Selection may be available if you do not wish to associate a project with this transaction. If you are using Standard Time Entry, the project displays after the service code. If you have defined a category/subcategory to help choose a project, the project associated with the selected service will default. You can define the associated category/subcategory on the Type Definition tab of the Project Setup (select Project Types under Create Lists in Project Management, or select Project Types from the navigation bar in Administration). If you are using Project Based Time Entry, the project displays before the service code, after you select the client. The list of available services will be based on those linked to the project type. If none have been excluded, then all services will be available. You can link services to a project type on the Link Service Codes tab in Project Setup (select Project Types under Create Lists in Project Management, or select Project Types from the navigation bar in Administration).
6. If you are using the optional Time Entry Custom feature, the last entry made for this field will default. You can change it if you wish.
7. If you want a memo included with the entry, enter text in the Memo box. You can mark the memo as internal. Click OK to save the memo.
8. Click Save.
9. If you have entered time for a Marketing service code (and if you retained the firm default to prompt for marketing information), the Marketing Information window displays. Enter event information for any lead, client, prospect, referral, or business affiliate. You can also enter a marketing tickler as a reminder.
10. If you have entered time for a CPE service code (and if you retained the firm default to prompt for CPE information), the Employee CPE Credit window displays. Enter CPE credit and class information.
11. Click the Print button to print an edit list of all the time and expense entries that are waiting to be released. Review the edit list for errors. It is much easier to catch and correct errors before time is released and posted.
To change a transaction 1. Choose the date of the entry you want to change by clicking the day on the Calendar.
2. Double-click the transaction to move it from the list to the entry section.
3. Make your changes and then press ENTER or click Save. The changed transaction is redisplayed in the grid.

ProSystem fx Practice Management
50
4. If you want to cancel any changes to the transaction while it is in the entry line, click Cancel.
To delete a transaction 1. Choose the date of the transaction you want to delete by clicking the day on the Calendar.
2. Select the transaction in the list.
3. Right-click and select Delete item.

Getting Started with ProSystem fx Practice Management
51
Time and Expense Entry Date
Click the desired date on the Calendar. The date you select will become the transaction date for the entry. Time and expense entries are released and posted by transaction date range. You can also view WIP in Billing and Invoicing by the date entered here.
Client Name/Code
Type the first characters of the client or prospect’s sort name. The Client list appears as soon as you enter the first character. Highlight the client (or prospect) and press ENTER. You can also click the drop-down button to view all clients or enter the client code preceded by a slash (for example, /101 for client code 101). Use the slash to switch between searching by name and by code. Recorded entries will eventually be posted to WIP, increasing the amount the client owes the firm.
Service Code
Type the first characters of the category to view an abbreviated selection list. Highlight a service code and press ENTER. The service code you choose should be the one that corresponds to a task (time or expense) that an employee performed for a client or for the firm. Unless you chose a client with custom billing rates, the billing rate used will be the rate defined for this service code. If you are using Standard Time Entry, the service code displays before the project. If you are using Project Based Time Entry, once you select the project, the linked (included) services for the project type are available in the service code lookup.
Hours/Units If you chose a time service code, enter the number of hours the employee worked. Enter the decimal point for fractions of hours. The number of hours is multiplied by the appropriate billing rate (plus any surcharge) to calculate WIP. If this is a mileage/units expense or reimbursable expense service code, the column heading will change to Units. Enter the number of units (miles, copies, etc.) incurred in the expense. The units entered are multiplied by the rate (entered in Administration/Lists/Service Codes) in the calculation of the expense.
Rate/Exp
If you chose a regular expense service code (not designated for mileage/units), enter a flat rate. Enter the decimal point if you are entering dollars and cents. If you chose a time service code, the employee’s hourly rate for the service code’s billing level is used to calculate WIP. This rate only appears if the rate is marked to display in Employee Setup. If a mileage/units expense or reimbursable expense service code is entered, the rate entered for the service code displays and the expense is calculated. If you do not want to enter a memo, press ENTER to complete the transaction.
Project
Once you enter the service code, the Project field is enabled if the client for whom you’re entering time has undelivered projects assigned to their account and those projects have been set up in Project Management to prompt employees. If you are using Standard Time Entry, the project displays after the service code. If you are using Project Based Time Entry, the project displays before the service code, after you select the client. If there are any projects assigned to this client, that were set up to prompt employees in Time Entry, these projects will be available in the project lookup. The project that defaults, if any, is dependent on time entry

ProSystem fx Practice Management
52
method (Standard or Project Based), how the firm options to require projects are configured as well as on the client’s billable status. Dependent on the configuration of project related options, No Selection may be available if you do not wish to associate a project with this transaction.
Time Entry Custom
If you are using this option, the caption for the optional Time Entry Custom field (entered in Firm Setup) is enabled to identify this field. Click the drop-down to show a list of Time Entry Custom descriptions and codes. If this option was required (in Firm Setup) you must select one custom code from the list for each time and expense transaction entered. "No Selection" is not an entry option. This field will default from the last entry made.
Memo
If you want any notes associated with this entry enter them in the Memo window. This memo can be marked as internal. Click Save to complete the entry. You can view Time Entry memos in Billing and Invoicing. Memos can help billers identify specific work assignments for clients.
Marketing Information
If you enter time for a Marketing service code (set up in Administration/Service Codes with a Marketing type) the Marketing Information window appears if you retained the firm default to prompt for marketing information. Use the Marketing Log tab to enter detailed information about the marketing event. You can track time spent on leads as well as clients, prospects, referrals, or business affiliates. Use the Add Marketing Tickler tab to enter reminder information that can be printed on reports and displays on the Due Dates tab and in the Appointment Manager in Time Entry, and in Client Notes.
CPE Information
If you enter time for a CPE service code, the Employee CPE Credit window displays if you retained the firm default to prompt for CPE information. Use this window to enter CPE credit hours and class information.

Getting Started with ProSystem fx Practice Management
53
Printing the Edit List It is always a good idea to check your time and expense entries before you release them for posting. This printout shows all the time entries that are waiting to be released for the date range you enter. It’s much easier to correct any errors before they are released and posted to Work-in-Process. To review entries for errors 1. Click the Print button on the Time Entry folder.
2. Enter the date range.
3. Select Print Expanded Memo if you want to print the memo information on the edit list.
4. Select Print Transaction Count to print the total number of transactions on the edit list.
5. Select Print Project Information to print the project description and due date for the projects assigned to the entries on the Time Entry window.
6. Select Print Time Entry Custom Information to print this optional information on the edit list.
7. Select Print only Reimbursable Expenses to print only reimbursable expenses on the edit list.
8. If you are using Batch Time Entry or Edit Released Time (from Administration), enter the range of employees to include on the edit list.
9. Click Print to print the edit list. Use the Printer/Format Selection window to print, preview, or save the report. The report will print in landscape mode.
10. Review the list for errors.

ProSystem fx Practice Management
54
Releasing Time for Posting There are two update modes available that effect what happens when the transactions are released through Time Entry, Edit and Post Update Mode and Real Time Update Mode. In Edit and Post Update Mode time is entered and released by the employee in Time Entry and posted in a separate step by the Administrator through Update Time. Real Time Update Mode allows employees to release and post their time in one step, by clicking the Release button, removing the Administrator’s involvement in the posting process.
Edit and Post Update Mode
In Edit and Post Update Mode, time and expenses must be released after they have been entered. Releasing time and expenses informs the software that the entries are ready to be posted to Work-in-Process by the Administrator. Entries can be reviewed and edited through Edit Released Time prior to posting. Time and expense entries must be posted through the Update Time option found in Administrative Activities in Administration to update clients' work-in-process and statistics and to make the entries available for billing. Click the Release button on the Time Entry folder when you are ready to "release" time for posting. Released transactions are then posted by the Administrator. You can also print reports of released time before posting to see who has entered time and to check the entries for errors. Only those entries in the date range selected here will be made available for posting.
Real Time Update Mode
In Real Time Update Mode, time and expense entries are released and posted in one step by clicking the Real Time Release button in Time Entry. Releasing/posting the entries updates the clients' work-in-process and statistics and makes the entries available for billing. In Real Time Update Mode, click the Real Time Release button on the Time Entry folder when you are ready to "release and post" time. The released and posted transactions are then available for billing. Only the entries in the date range selected here will be released and posted. To release (or release and post) time and expenses 1. Click the Release button (Real Time Release in Real Time Update Mode) in the Time Entry folder.
2. Enter the time frame of entries you want to release (or release and post if you are in Real Time Update mode).
3. Click Release. If you are releasing time from a remote workstation, see Remote Options
for more information.
Tips If you are using Batch Time Entry, remember to choose each employee whose time and expenses you
want to release.

Getting Started with ProSystem fx Practice Management
55
Quick View - Time Administration Options Entry for one employee
Select TimeSheet Entry from the Administration Activities menu or select Time and Expense Entry on the ProSystem fx Practice Management window.
Entry for several
Select Batch Time Entry from the Administration Activities menu to enter time for several employees. Check time not entered
Select Print Time Exception Report from the Administration Activities menu. Select a date range and range of employees, offices, departments, skill levels, or regions. You can also include employees with daily hours less than a user-defined minimum and include banked hours on the report. If the firm budgets time to employees, select Use Employee Budget Hours to print a different report identifying employees who have not met their employee budgets.
Prevent release of time
Select Lock Releasing of Time from the Administrative Activities window to prevent employees from releasing time or importing remote files. Updating Time (posting) automatically turns this option off. To activate this option you must have privileges in Security Setup to Edit Released Time.
Edit a released entry
Select Edit Released Time from the Administration Activities menu. Select the employee and date of the entry you need to change. Double-click to move the transaction to the entry line. Make your changes and press ENTER or click Save. This option is available to administrators who are on-line or who are running remote and are connected to the host. It is not available if running in Real Time Update Mode.
Post time & expenses
Select Print Register and Post Time from the Administrative Activities window. Enter the date range for the entries you wish to post. Choose a few employees or right-click and then click Select All. Click Print Register and then click Post. Remember that you must release time from Timesheet or Batch Time Entry before it can be posted.
Correct posted entries
Select Correct WIP - Unbilled from the Administrative Activities window. Enter the client and engagement for the client whose WIP you want to transfer or delete. Enter the employee associated with the transaction. Enter the date of the transaction. Click Search WIP. Select the transaction(s) you want to change. If you want to change the date, employee, client, or service code for a specific WIP transaction, or modify other information such as hours, rate, project, memo, or Time Entry Custom field, click Correct WIP Detail. If you want to correct the client, click Correct Client and enter a new client. If you want to correct the service code, click Correct Service Code and enter the new service code. If you want to delete the transaction, click Delete WIP.
Correct WIP projects
Select Correct WIP - Projects from the Administrative Activities window. Enter the client name or client code of the WIP transaction to be assigned. Select the type of WIP you would like to view; Unbilled WIP, Billed WIP, or All WIP. The WIP transactions meeting the criteria will display in the grid. The transactions can be sorted by any of the displayed fields including the Project, Description, Engagement,

ProSystem fx Practice Management
56
Due Date, Delivered, Service Code, Employee, Date, Hours, Units, Fees, Expenses, Surcharge, Sort Name, or Memo. Review the transactions and select those that need to be unassigned or reassigned. To remove time assigned to a project, click Unassign WIP. To reassign time to a project, click Reassign WIP.

Getting Started with ProSystem fx Practice Management
57
Using Batch Entry Use Batch Time Entry if a control person enters all time and expenses for your firm. To add time and expenses using Batch Entry 1. Choose Batch Time Entry from the Activities menu on the Administration window.
2. Click the Change Emp button to select the employee for whom you are entering time and expenses.
3. Follow the instructions for Time and Expense Entry
to enter the transaction. Notice that the Timer button is not available in Batch Time Entry but that the timer is available from the Windows Tray.
To review entries for errors 1. Click the Print button on the Batch Entry window.
2. Enter the date range.
3. Select Print Expanded Memo if you want to print the memo information on the edit list.
4. Select Print Transaction Count to print the total number of transactions on the edit list.
5. Select Print Project Information to print the project description and due date for the projects assigned to the entries in Time Entry.
6. Select Print Time Entry Custom Information if you are using this optional feature and if you want the edit list to show the custom code and description associated with the transaction in Time Entry.
7. Select Print only Reimbursable Expenses to print only reimbursable expenses on the edit list.
8. Enter the employee name range. This step is optional.
9. Click Print to print the edit list. If you want to view the report on screen, select Preview Output.
10. Review the list for errors.
To release time and expenses 1. When using Batch Time Entry, you must release the entries for each employee. Click Change Emp to
select each employee whose time has been entered.
2. Click the Release button (Real Time Release in Real Time Update Mode).
3. Enter the time frame for the entries you wish to release for posting.
4. Click Release to release time.
5. Repeat steps 1-4 for each employee whose time needs to be released.

ProSystem fx Practice Management
58
Printing the Time Exception Report The Time Exception Report prints the amount of hours entered by employees for a specific date range. Use the report to determine which employees have not entered time. This report can be selected from the Administrative Activities window or the Edit Lists menu in Reports. To print the report 1. Choose Print Time Exception Report from the Activities menu of Administration or the Administrative
Activities window. The Time Exception Report criteria window displays.
2. Select the criteria for the report in the navigation bar. Options include Employee, Office, Department, Skill Level, or Region.
3. Select the date range of the report.
4. The report will automatically print only those employees with less than 8 hours per day. A different value may be entered. If the firm budgets time to employees, select the Use Employee Budget Hours option to print a different report identifying employees who have not met their employee budgets.
5. Select Banked Hours check box to include banked hours on the report.
6. Select Posted Time check box to include posted time on the report.
7. Select Paid Time Off Employee Hours to include an optional Paid Time off page with the Time Exception Report for management review. The report shows the yearly allowance, actual time taken, and variance for sick, vacation, and personal time.
8. Use the tabs to select specific criteria you want included on the report. These tabs will be active depending on which sort you choose from the Criteria tab. If more than one tab is active, combine criteria on the tabs to narrow the scope of your report. Right-click on any column in any list (employee, regions/offices, or selected sort) to print, filter, select all, or deselect all. Filter options include equal to (=), not equal to (<>), greater than (>), or less than (<). If filters are in place you can also select to Show Current Filter(s), Undo Last Filter, and Undo All Filter(s).
9. Click Print to print, preview, or save the report.
Tips To select a single item, click with your mouse. To select a group of items, click the first item in the group. Holding down the SHIFT key, click the final
item you want to be included and click with your mouse. To select multiple items at random, hold down the CTRL key while clicking with your mouse.
Getting Started with ProSystem fx Practice Management
59
Editing Released Time You can edit or delete any transactions that have been released but not yet posted using Edit Released Time. Although other options are available in Edit Released Time, you should use this option ONLY to edit entries that were released incorrectly. This option is available to administrators who are running remote and are connected to the host. This feature is not available when using Real Time Update Mode in Time Entry. To edit released time or expenses 1. Choose Edit Released Time from the Activities menu on the Administration window.
2. Click the Change Emp button to select the employee whose time and expense entries you want to edit or delete.
3. Select the date of the entry you want to change by clicking the day on the Calendar. The transactions for that date appear on the grid.
4. If you want to change the date of a transaction, click Correct Date. Select the transaction(s) you need to correct and enter the new date. Click Transfer Entries.
5. If you want to delete a transaction, select the transaction, right-click, and select Delete item.
6. To change a transaction, double-click it to move it from the list to the entry window. Make your changes and then press ENTER or click Save.
7. If you want to cancel any changes made while the transaction is in the entry line, click Cancel.

ProSystem fx Practice Management
60
Updating Time Posting Time updates WIP with time and expenses entered in Timesheet or Batch Entry. Time and expenses must be posted to WIP before they appear on billing worksheets and on billing windows. Keep a current backup in case of a power failure during a post. If a power outage occurs during a post, you should restore the backup and re-post. To update time and expenses 1. Select Lock Releasing of Time from the Administrative Activities window in Administration. This
prevents employees from releasing time while you are updating time.
2. Choose Print Register and Update Time from Administrative Activities.
3. Enter the date range for the entries you want to post. If the entries do not fall within the date range or they have not been released, they will not be available for the post.
4. Click the Selected check box to select any employee. If you want to post all employees’ time and expenses, right-click and choose to Select All.
5. Click the Print Register button and print the posting register. The register prints in landscape mode.
6. Click the Post button.
Tips Before you post, print a Time Exception Report (from the Activities menu in Administration) to make
sure all employees have entered their time for the period you are posting. Because posting is done by date range, it is a good idea to make sure the From date does not pre-date your
Fiscal Year beginning date. This keeps any time entries from being posted to a prior year. If using Real Time Update Mode in Time Entry, time and expense entries are released and posted in one
step by clicking the Real Time Release button in Time Entry.

Getting Started with ProSystem fx Practice Management
61
Correcting Posted WIP Use Correct WIP to correct any transactions posted to WIP. You can change the client to whom time entries are posted, change the service code on a transaction, or delete the transaction. You cannot change WIP amounts. To correct WIP 1. Select Correct WIP - Unbilled from the Administrative Activities window. Correct WIP is also available
from the Billing window.
2. Enter the client whose WIP you want to transfer or delete and press TAB.
3. Enter the employee associated with the WIP transaction and press TAB.
4. Enter the date of the WIP transaction.
5. Click Search WIP.
6. Highlight the WIP transaction(s) or right-click and choose Select All to select all transactions. Click Deselect All to clear transactions.
7. To correct the date, employee, client, or service code of the selected WIP transaction, or to modify other information such as hours, rate, project, memo, and Time Entry Custom field, click Correct WIP Detail. Make any necessary changes and click OK to complete the correction.
8. To correct the client only, click Correct Client. On the Correct Client window, search for the client to whom you want the WIP transferred. Enter the client name or client code preceded by a slash (/). Click OK to complete the correction.
9. To correct the service code only, click Correct Service Code. On the Correct Service Code window, search for the service code to which you want the WIP transferred. If you would like the WIP amount to be recalculated based on the billing rate of the new service code, select The Correct WIP Rate/Amount check box. If you do not select this box, the WIP amount will not change. ProSystem fx Practice Management will verify that you change a fee-based service code to another fee-based service code and an expense-based service code to another expense-based code. If you do not, an error message will appear and you will be unable to complete the correction.
10. If you want to delete the WIP transaction, click Delete WIP. Make sure you want to remove this transaction (or transactions) from the client’s account before you click the Delete WIP button. Deleted WIP transactions are removed from the client’s account and are no longer available for billing.
11. Click Close to exit the window.
Tips You can search based on a single entry to client code, employee number or date or any combination of the
three. For a record of corrected WIP transactions, print the WIP Correction and Deletion Log Report
If the Security option for “Allow Rate and Amount Corrections Before Lock Reconciliation Date” (in Administration/Firm/Security Setup) has been turned off for this employee, the first column in the list displays a lock icon. If the lock is closed, the transaction is prior to the Lock Reconciliation Date and the rate and amount cannot be modified (the Correct WIP Rate/Amount check box will be disabled when clicking Correct Client or Correct Service Code). When clicking Correct WIP Detail, the Hours/Units and Rate/Expense fields will be disabled. If the lock is open, the transaction is dated after the Lock Reconciliation Date and the rate and amount can be modified. The lock column does not display if the security option is set to Yes.
in Reports.

ProSystem fx Practice Management
62

Getting Started with ProSystem fx Practice Management
63
Billing and Invoicing
Billing Your Clients Billing and Invoicing allows partners or billing managers to review and bill clients. If you are designated as a partner or billing manager, use Billing and Invoicing to choose the clients and amounts to bill. You can choose to use billing worksheets or bill on-screen. If you bill on-screen you can view your list of clients in sort name order, name order, client code order, WIP order, AR order, entity type order, engagement code order, sort code order, or group order. In Billing you can review a client’s account and bill all WIP or bill only WIP for specified categories, subcategories, service codes, projects, or expenses. You can generate invoices, print edit invoices, review them, and then print or e-mail final invoices. Once all invoices have been generated and printed (or e-mailed), the administrative staff member can then post them from the Administrative Activities window. To use Billing and Invoicing 1. Print billing worksheets.
2. Select items to bill.
3. Generate invoices.
4. Final print invoices.
5. Update (post) invoices.

ProSystem fx Practice Management
64
Quick View - Billing Activities Menu Options Use billing worksheets
Select Billing Worksheet from the Activities menu (also available from Administration). You can print worksheets for a date range by client, primary partner, bill manager, manager, secondary partner, responsible person, tax reviewer, tax preparer, office, region, department, NAIC code, line of business, entity, work type, or group. You can also print the cost, select to page break by client, print billable WIP only, and print invoice, prior year, or current year history. You can print A/R and/or WIP Aging as of a cut-off date. Billing notes can also be printed. Billing worksheets can be previewed prior to printing.
Review bills
Select Billing Edit List from the Activities menu (also available from Administration) to print an edit list and see the clients and amounts you have selected for billing. You can print in detail or summary and print by client, primary partner, bill manager, manager, secondary partner, responsible person, tax reviewer, tax preparer, office, or region. You can also select the Billing Review button for a series of windows designed for review.
Apply progress
Select Apply Progress if you have a number of clients who were sent a progress bill. WIP may now be posted and you may simply want to apply the progress bills against WIP. You may or may not want to send invoices to these clients, and you might want to adjust the WIP up or down. In any case, this option allows you to quickly complete the billing process for statistical reporting.

Getting Started with ProSystem fx Practice Management
65
Quick View - Billing and Invoicing View a list of clients
If you are a bill manager or partner, your clients are automatically listed. If you are not designated as a bill manager or partner, select an employee from the Bill List Criteria window. Enter the appropriate client criteria (clients with WIP greater than zero, fixed fee clients, or all clients). Select the Selected Billers, Selected Partners, or All Billers option to view clients. To bill for a different manager or partner, click the New Billers button. Select an employee from the Bill List Criteria window. Enter the appropriate client criteria (clients with WIP greater than zero, fixed fee clients, or all clients). Select the Selected Billers, Selected Partners, or All Billers option to view clients.
Review for selection
Sort clients by clicking column headings: Status, Sort Name, Client Name, Client Code, WIP Amount, AR Amount, Entity Type, Engagement Code, Sort Code, and Group. (Use the scroll bar to view Entity Type, etc.) You may also search for a client by any of these criteria. To do so, click the column heading and enter the specific criteria into the search field. The nearest match will be highlighted.
Review WIP on-screen
Select the client and click the Bill button. The navigation bar on the Billing Selection window allows you to filter WIP entries, giving you more flexibility when billing clients. WIP can be filtered by Service Code category, subcategory, expense, or project. This allows clients to be easily billed for an entire project. You may also break the entries into billable time and expenses, if expenses have been entered. Use the navigation bar to select the WIP you would like to display. To show more detail, select the appropriate button along the bottom of the window.
Bill all WIP
Click the Quick Bill button. Enter the billed amount or percentage, writing the bill up or down if you wish.
Bill selected WIP
Click in the Bill column of the transaction you want to bill. Enter a write-up/down
After selecting the transactions to bill, click the Adjust Selected button and enter the adjusted billed amount or percentage to adjust all selected transactions.
Enter a partial bill
Select a WIP transaction (or select Category for a group of transactions) and click the Partial Bill button. Enter the amount or percentage you want to bill. You can also enter either a write-up or write-down.
Enter a progress bill
Click the Progress Bill button and enter the progress bill amount. This creates a credit against WIP. Bill a billing agreement
All billing agreements set up for the client (in Clients/Billing Fees) display in the navigation bar under Billing Agreements. They are sorted by frequency. Click on the agreement to bill all WIP associated with it.

ProSystem fx Practice Management
66
Review client billing After making your billing selections, click the Recap Billing button. If you want the Billing Recap window to automatically appear when generating invoices, select the Display check box on the Billing Recap window.
Enter a reference
Click the Recap Billing button. Enter an invoice reference that will appear with Prior Invoice information on-screen and on billing worksheets.
Designate a reason
Click the Recap Billing button. Click the reason drop-down arrow to select the reason you want associated with this write-up/down. (Reasons are set up under Lists/Other on the navigation bar in Administration.)
Allocate to the firm
Click the Recap Billing button. Select the Firm Allocation check box to allocate the write-up/downs to the firm rather than the employee.
Override sales tax
Click the Recap Billing button and select to override the calculated sales tax. You can override the sales tax on services, additional sales tax (such as the PST), or any applied sales tax.
Review prior invoices
Click the Prior Invoices button. Prior invoices are listed in a grid. To view the WIP that made up an invoice, select the invoice and click Invoice WIP. To view the actual invoice, click View Invoice.
Correct WIP If you need to correct WIP during the billing process, click the Correct WIP button. You can then either correct or delete WIP, correct WIP projects, or correct WIP detail.
Generate an invoice
Click the Generate Invoice button to generate the invoice. You can edit it on-screen if you wish. The Generate Invoice button switches to Review Invoice once an invoice has been generated for the client.
Print an invoice
Click Print Edit from the Invoice window to print an edit invoice without the invoice number and date. Click Print Final to print a final invoice with an invoice number and date. Click Save/Exit to save the invoice. To e-mail an invoice to the client, select the Send via Email check box on the Invoice Printer Selection window after the invoice is selected for final print.
Number an invoice
When a transaction is marked for billing and the invoice window is closed or an invoice is generated, an invoice number is assigned to that bill. If the billing is first canceled and the client’s billing screen is closed, the invoice number was never generated. To ensure that the invoice number is not lost if you decide against billing at the time, after selecting line items to bill, click Cancel Billing then close. Otherwise, the invoice number will be erased and your invoices will be out of sequence.
Bill a fixed fee
Select the New Biller option. Then select Fix Fee Clients and the appropriate biller or partner. Now click the Fixed Fee Billing button on the Client Selection window. All clients for this biller or partner with a

Getting Started with ProSystem fx Practice Management
67
Fixed Fee in their client folder who do not have a current invoice or transactions marked for billing are listed. Sort clients by clicking the column headings. Click in the Bill column next to the client you wish to bill. If you need to adjust the amount, click the Adjust amount button and enter the amount to bill. You can generate invoices for all clients marked for billing (by clicking Generate invoices) or generate and print final invoices in one step by selecting Generative Invoices - Print Final.
Add Client Notes
Click Client Notes from the Billing window to add, edit, delete, or print note entries, marketing ticklers, follow-ups, or appointments. Click New to add a note, marketing tickler, follow-up, or appointment. Billing notes can also be entered and printed on Billing Worksheets. Note that installing CCH Coolbar on a workstation disables Appointments for this workstation in ProSystem fx Practice Management. In CCH Coolbar, Microsoft Outlook replaces the Appointments feature.
ProSystem fx Practice Management
68
Starting Billing To start from the Billing icon 1. Double-click the Billing icon.
2. Log on using the employee code assigned to you in the Employee list. If your firm uses passwords, enter your password.
To start from the Dashboard icon 1. Double-click the Dashboard icon.
2. Log on to ProSystem fx Practice Management using the employee code assigned to you in the Employee list. If your firm uses passwords, enter your password.
3. Double-click Billing on the Main Menu.
To view the client list 1. If you are designated as a partner or bill manager, your client list will be displayed. Skip to Step 5.
If you are not designated as a manager or partner, the Bill List Criteria window appears. Proceed to Step 2.
2. Select the employee(s) for whom you want to bill.
3. Select Clients with WIP greater than zero to view clients with positive or negative WIP balances (clients with zero balances will not be listed), or click All Clients if you want to view all clients assigned to this employee.
4. Select the Selected Billers or Selected Partners button to generate a list of clients for whom the selected employee(s) are either the bill manager or the partner.
5. If you wish to bill fixed fee clients, click the New Biller button. Then select the “Fix fee clients” option and click Selected Billers, Selected Partners, or All Billers to activate fixed fee billing.
6. If you need to bill for another manager or partner, click the New Biller button and repeat steps 2-4.
Tips To view a complete list of clients with a WIP balance, select Clients with WIP greater than zero and then
select All Billers.

Getting Started with ProSystem fx Practice Management
69
Selecting Clients for Billing
The first two columns on the Client Selection window indicate the billing status of the client: A check mark in the first column shows that the client has been selected for billing. A pair of glasses in the first column shows that an edit invoice has been printed for the client. A push-pin in the first column shows that the edit invoice has been assigned a reviewed status. An envelope in the first column shows that a final invoice has been printed and that the bill is ready for
posting. The Status, Sort Name, Client Name, Client Code, WIP, AR, Entity, Engagement Code, Sort Code, and Group for each client are displayed in columns. (Use the horizontal scroll bar to view additional columns.) You may sort the client list by these criteria as well as search for a client using these criteria. ProSystem fx Practice Management offers many ways for you to find clients for billing: Client Code is most useful when viewing clients with multiple engagements. Sort Code allows you to customize the list based on the sort code assigned to each client on the Billing
tab of Client Setup. WIP allows you to view the clients who can generate the most revenue for your firm or, in other words,
who have the most time and expenses incurred. AR lets you view the clients who owe you the most money from past billings. Click Bill to view the selected client’s WIP. Transactions can be viewed and billed separately or together. To select a client to review or bill 1. Use the columns on the Client Selection window to easily find the client you want to bill.
To sort clients, click the column heading (Status, Sort Name, Client Name, Client Code, WIP, AR, Entity, Engagement Code, Sort Code, or Group) of the sort you want to apply to the client list. For example, click Client Name to sort the clients by name. Click the column heading again to reverse the sort order. You may also search for a client by any of the displayed criteria. Click the column heading of the category you want to search and enter the name, code, or amount in the search field at the top of the screen. For example, if you were looking for Client Code 00932, you would click the Client Code column and enter 00932 in the search field. The nearest matching item will be highlighted.

ProSystem fx Practice Management
70
If you want to change the Bill Thru Date for WIP, click Change Bill Thru Date and enter a different cutoff date. After you enter the new date, a column displays in the billing window containing all posted billable WIP entered on or before this date, netted with any unapplied progress, for each client in the list.
2. When you have found the client you want to bill, double-click the client.
3. If the client has more than one engagement, the Client Engagement Selection window displays the WIP amount for each of the client’s engagements. To review or bill selected engagements, select the engagement and click Bill. Click the Select All button to combine and review all engagements. If you choose to combine more than one engagement, the name and address for the Master Client from Client Setup is used on the invoice. You can edit this information on the invoice if needed.
4. The Billing window opens displaying the navigation bar on the left side of the window and the WIP transactions for the selected client.

Getting Started with ProSystem fx Practice Management
71
Reviewing and Billing WIP
When you choose a client and click Bill, the Billing window appears displaying the WIP for this client. The navigation bar on the left side of the Billing Selection window allows you to filter WIP entries, giving you more flexibility when billing clients. WIP can be filtered by all service code categories, individual service code categories, subcategories, expenses, all projects, individual projects, or projects broken by service code categories or subcategories. You may also break the entries into billable time and expenses if expenses have been entered. To show further detail, select the appropriate button along the bottom of the window. You can also view the daily log of entries for this client’s WIP, which includes the Time Entry memo, and memos for this client’s WIP. The service code totaling button that is "on" is highlighted. To review a client’s WIP 1. Select the way that you would like to display and bill the client’s WIP from the navigation bar. You can
select to display All Categories, which shows all service categories entered for this client. All Projects shows all WIP for the client broken into the project(s) where the WIP has been assigned. You may also filter the WIP entries by individual service code categories, subcategories, individual projects, or projects broken by service code categories or subcategories. If expenses have been entered, the entries can be filtered by billable time or expenses.
2. Use the service code totals buttons across the bottom of the grid to view the client’s WIP with different levels of detail.
3. Click the Change Bill Thru Date button to enter a different cutoff date for WIP detail. Enter the new date or click the Calendar button and select a date. All WIP entered before or on this date is listed. Transactions entered after this date will not be available.
4. If you need more information about this client’s account, you can view all WIP transactions that include a memo (Memo button), or you can view invoices that you have generated for this client in the past (Prior Invoices button).
5. Click the Bill column to mark a transaction for billing. Repeat this for all transactions you wish to bill.
6. Once you have chosen the transaction(s) you want to bill, you can view a recap of the billing items (Recap Billing button) and then generate an invoice for this client.

ProSystem fx Practice Management
72
7. Click Cancel Billing to remove billing indicators for the selected transaction(s) and delete an edit invoice. If you close the billing window at this point, the invoice number assigned to the invoice will be erased and may not be used again. To retain the invoice number, be sure that a transaction is selected for billing before you close the window.
Tips Click Select All if you want to bill the majority of the WIP transactions. You can then remove the billing
indicator on the transactions you do not want to bill by clicking the transactions to clear the check mark and remove them from the billing.
To quickly bill selected transactions that do not need adjusting, click Generate Invoice. The full amount of WIP is relieved for the selected transactions with no write-up or write-down.
Generate Invoice switches with Review Invoice, depending on the invoice status. Once an invoice has been generated, a pair of glasses appears in the first column next to the Status column
of the Client Selection window. Remember that the five invoice review status descriptions can be customized for your firm (Status
Descriptions tab in Firm Invoice Format Setup) and that security can be set by employee for the status description. All invoice status descriptions you do not have security rights to set will be disabled.

Getting Started with ProSystem fx Practice Management
73
Quick Billing Billing all WIP is called Quick Billing. This type of billing reduces the client’s current WIP to zero. You can specify any amount that you want to appear on the invoice. Any difference between the billing amount you enter and actual WIP is written up or down. If you need to apply a progress amount to a bill, you can do so using the Quick Bill option. Applying a prior progress amount subtracts the progress amount from the billed amount on the invoice. You cannot Quick Bill if you are viewing the WIP by one category or one project. To Quick Bill, select All Categories or All Projects from the navigation bar and click the Quick Bill button. To quick bill a client 1. After selecting the client and the WIP entries, click the Quick Bill button.
2. Select to bill by amount or percent.
3. Enter the amount or percentage that you want to bill this client (Billed Amount). The Billed Amount defaults to the amount of actual WIP (or 100%). You can write up or write down the Standard WIP Amount if you wish. You can also enter any amount to be applied from a previous progress bill (Apply Progress Amount). If you want to specify a Value Bill, select the Value Bill check box. Value Bills shelter employees from write-downs over which they had no control. Use Value Bills if the firm specifies a set fee amount for a job regardless of the number of hours worked. Any write-up or write-down will automatically be allocated to the firm. If your firm uses the Employee Bill Amounts method to calculate write-ups/downs, and if your firm selected to exclude expenses in the write-up/down calculation, use the Include Expenses in Write Up/Dn check box to override the firm default. You must have security privileges to override the firm default.
4. Click OK.
5. Click the Recap Billing button to review your billing actions or allocate the write-up/down to the firm.
6. If you are ready to generate an invoice, click the Generate Invoice button. If not, click Close.
7. If you change your mind, click Cancel Billing to undo your actions. Closing the window at this point erases an invoice number, creating a gap in your invoice number order. To retain the invoice number, be sure that a transaction is selected for billing before you close the window.
Tips Generate Invoice switches with Review Invoice, depending on the invoice status. Once an invoice has been generated, a pair of glasses appears in the first column next to the Status column
on the Client Selection window.

ProSystem fx Practice Management
74
Billing Selected WIP You can pick and choose the entries you want to bill. From the navigation bar on the left side of the window select the filter to view and bill specific WIP entries for the client. Select a transaction by clicking in the Bill column. Unless adjusted, a selected transaction bills at full value. If you want to bill all WIP transactions, click the Select All button. If you want to bill a majority of WIP, click the Select All button and then click the transactions you do not want to bill to clear the check mark and remove a transaction from billing. If you do not want to bill clients at the face amount of their WIP, click the Adjust Selected button. To select transactions to bill 1. Click in the Bill column. A check mark appears.
2. Repeat this for all transactions you wish to bill.
To adjust all selected WIP transactions 1. Click the Adjust Selected button.
2. Select to bill by amount or percent.
3. Enter the amount or percentage you want to bill (Billed Amount). The difference will either be written up or written down using the allocation method chosen when your firm was set up. You can also enter any amount to be applied from a previous progress bill (Apply Progress Amount). If your firm uses the Employee Bill Amounts method to calculate write-ups/downs, and if your firm selected to exclude expenses in the write-up/down calculation, use the Include Expenses in Write Up/Dn check box to override the firm default. You must have security privileges to override the firm default. When you have finished your adjustments, click OK.
4. Click the Recap Billing button to review your billing actions or change the allocation to the firm.
5. If you are ready to generate an invoice, click the Generate Invoice button. If not, click Close to save your work.
6. If you change your mind, click Cancel Billing to undo your actions. Closing the window at this point erases an invoice number, creating a gap in your invoice number order. To retain the invoice number, be sure that a transaction is selected for billing before you close the window.
Tips Generate Invoice switches with Review Invoice, depending on the invoice status. Once an invoice has been generated, a pair of glasses appears in the first column on the Client Selection
window. Remember that the five invoice status descriptions can be customized for your firm (Status Descriptions
tab in Firm Invoice Format Setup) and that security can be set by employee for the status description. All invoice status descriptions you do not have security rights to set will be disabled.

Getting Started with ProSystem fx Practice Management
75
Partial Billing Use partial billing if you do not want to bill the entire WIP amount. With Partial Bill, you can select your transactions, enter the amount or percentage you want to bill, and enter the amount to remain in ending WIP. If you want to partial bill a complete category, select the service category from the navigation bar. Otherwise, you must partial bill each transaction individually. To partial bill 1. Select a transaction that you want to partial bill by clicking in the Bill column.
2. Click the Partial Bill button.
3. Select to bill by amount or percent.
4. Enter the amount or percentage you want to bill (Amount Billed). Then enter the amount you want left in Ending WIP (if any). The write-up/down will be calculated. If your firm uses the Employee Bill Amounts method to calculate write-ups/downs, and if your firm selected to exclude expenses in the write-up/down calculation, use the Include Expenses in Write Up/Dn check box to override the firm default. You must have security privileges to override the firm default.
5. Repeat this step for all transactions that you want to partial bill.
6. Click the Recap Billing button to review your billing actions or change the allocation to the firm.
7. If you are ready to generate an invoice, click the Generate Invoice button. If not, click Close to save your work.
8. If you change your mind, click Cancel Billing to undo your actions. Closing the window at this point erases an invoice number, creating a gap in your invoice number order. To retain the invoice number, be sure that a transaction is selected for billing before you close the window.
Tips Generate Invoice switches with Review Invoice, depending on the invoice status. Once an edit invoice has been generated, a pair of glasses appears in the first column on the Client
Selection window.

ProSystem fx Practice Management
76
Progress Billing A progress bill is a credit against WIP. The progress bill amount appears on the client’s invoice but does not relieve any WIP. Instead, it adds to the client’s balance due. When you finally bill the client’s WIP, you will apply the progress amount against the WIP to reach the net balance due. To calculate the net amount owed by the client, apply the prior progress amount to an invoice using the Quick Bill and Adjust Selected billing methods. From these options you can enter any billed amount and any progress amount that you want applied. If you change the billed amount, the difference between the amount you enter here and the full WIP value is written up/down. If you change the progress amount that you want applied, the remaining progress amount can be applied to a future WIP value. You cannot apply more than the total progress amount. To progress bill a client 1. Click the Progress Bill button.
2. Enter the amount to progress bill this client (Progress Bill Amount) and click OK.
3. Click the Recap Billing button to review your billing actions or change the allocation to the firm.
4. If you are ready to generate an invoice, click the Generate Invoice button. If not, click Close to save your work.
5. If you change your mind, click Cancel Billing to undo your actions. Closing the window at this point erases an invoice number, creating a gap in your invoice number order. To retain the invoice number, be sure that a transaction is selected for billing before you close the window.
6. Final print the invoice.
7. Post the invoice using the Activities menu in Administration.
To apply a progress amount to an invoice 1. Click the Quick Bill or Adjust Selected button.
2. Enter the Billed Amount.
3. Enter the amount to be applied from a previous progress bill (Apply Progress Amount).
4. Click OK.
5. Click the Recap Billing button to review your billing actions or change the allocation to the firm.
6. If you are ready to generate an invoice, click the Generate Invoice button. If not, click Close to save your work.
7. If you change your mind, click Cancel Billing to undo your actions. Closing the window at this point erases an invoice number, creating a gap in your invoice number order. To retain the invoice number, be sure that a transaction is selected for billing before you close the window.
Tips Generate Invoice switches with Review Invoice, depending on the invoice status. Once an edit invoice has been generated, a pair of glasses appears in the first column on the Client
Selection window.

Getting Started with ProSystem fx Practice Management
77
Reviewing the Bill Two options are available for billing review: Billing Review and Recap Billing. Click the Billing Review button to review all billing and invoicing decisions. Billing Review is a collection of windows you can use to review clients currently in the billing cycle. You can move back and forth between the Recap, WIP Detail, Invoice Review, Invoice History, Client Notes, and 24 Month View by clicking the buttons at the top of the window. You can also move between clients without leaving the Billing Review windows by clicking the Previous Client and Next Client buttons. To use Billing Review 1. Bill WIP transactions.
2. Click Billing Review.
3. Use the Recap window to review the WIP Reconciliation and Invoice Reconciliation and billing status information.
4. Select WIP Detail to review the WIP being billed. WIP can be edited from this window.
5. Select Invoice Review to review the client’s invoice. The invoice can be printed or edited from this window.
6. Select Invoice History to review the client’s previous invoices. You can select to view an invoice or view invoice WIP from this window.
7. Select Client Notes to review notes entered for this client. Notes can be added, edited, deleted, or printed from this window.
8. Select 24 Month View to review the client’s monthly production, billing and A/R history for the current and prior year.
9. Click Close to return to the Billing window.
You can also click the Recap Billing button to review billing, change the allocation method, enter a reason for a write-up/down, or override sales tax. You can allocate any write-up/down to either the employees who worked on the account or to the firm as a whole. Unless you specifically select to allocate to the firm here, the write-up/down is allocated to employees using the method selected in Firm Setup in Administration (by employee hours or by employee billed amounts). To use the Billing Recap window 1. Bill WIP transactions.
2. Click Recap Billing.
3. Review the Reconciliation section (WIP and Invoice Reconciliation columns).
4. Select a reason if there is a write-up/down on this invoice by clicking the reason drop-down arrow (reasons are entered through the Lists menu on the navigation bar in Administration.).
5. If you have security clearance, enter any notes information for the reviewer. Use this note for staff or client comments available only to qualified employees.
6. Type a reference in the Invoice Reference field. This field is optional and is for internal purposes only.

ProSystem fx Practice Management
78
7. If you have calculated sales tax, you can select to either use the calculated amount or enter an override amount. You can override the sales tax on services, additional sales tax, such as the PST, or any applied sales tax.
8. If there is a write-up/down and you want to allocate it to the firm as a whole rather than to individual employees, select the check box to allocate write up/down to firm instead of employee.
9. Select the Display check box if you want the Billing Recap screen to open automatically when generating invoices. If you prefer to click the Recap Billing button manually to review your billing, leave the check box empty.
10. Click Continue.

Getting Started with ProSystem fx Practice Management
79
Generating Invoices When you are ready to generate the invoice, click the Generate Invoice button. The invoice is displayed. Line and Col (column) indicators are available that correspond to the movement of the cursor in the window so you know where you are on the page at all times. You can edit this invoice, change the invoice format, add paragraphs, change the status of the edit mode, and make formatting changes before you print the invoice. If you want to make formatting changes, click the Format Options button. Choose which items to print. When you Save the invoice, you are asked if you want to save the changes as the current default. If you save the formatting as the default, these settings will automatically be used the next time you generate an invoice for this client. To generate an invoice 1. Click the Generate Invoice button on the Billing window. (You can also generate an invoice by clicking
the Edit Invoice button on the Client Selection window.)
2. If you have selected to view the Billing Recap window when generating invoices, this window opens first. Enter information as needed. Click Continue.
To edit an invoice 1. Use the text editor to change the text and formatting of the invoice.
If you want to change the attributes of any text, highlight the text and click the font and size drop-down buttons. You can also click the Bold, Italic, and Underline buttons for special effects. These buttons switch on and off. If you want to change the alignment, click the text paragraph and then click one of the alignment buttons (Left, Right, Center, or Justified). Click the spell check button to spell check your text. If necessary, you can insert a page break from the Edit menu. If you need to cut, paste, or copy text, click the Edit menu.
2. To change the Invoice Format click the Format drop-down and select a different invoice format (Free Form, Previous Invoices, Stand Alone Paragraphs, Paragraph/Description By Category, Paragraph/Description By Subcategory, Paragraph/Description By Service Code, WIP Detail By Date, WIP Detail By Category, WIP Detail By Subcategory, WIP Detail By Service Code, Paragraph/Descr – By Engagement Category, Paragraph/Descr – By Engagement Subcategory, Paragraph/Descr – By Engagement Service Code, WIP Detail – By Engagement Date, WIP Detail – By Engagement Category, WIP Detail – By Engagement SubCategory, WIP Detail – By Engagement Service Code, Project WIP Detail – By Category, Project WIP Detail – By SubCategory, and Project WIP Detail – By Service Code).
3. To add a Standard Paragraph, position the cursor on the text window and click. Then select a paragraph from the Paragraph drop-down.
4. To change the Invoice Status, select the status from the drop-down list. Remember that the five invoice review status descriptions can be customized for your firm (Status Descriptions tab in Firm Invoice Format Setup) and that security can be set by employee for the status descriptions. All invoice status descriptions you do not have security rights to set will be disabled.
5. To change any format options, click the Format Options button. You can customize the invoice for this client by changing the page format, the information that prints at the bottom of the invoice (A/R Aging and Footer), and the employee information.

ProSystem fx Practice Management
80
Select Print a courtesy line for Write Downs to print the amount that was written down. The words "Courtesy Discount" will also print (unless you change the text on the Custom Text tab of Invoice Formats from the Preferences menu of Administration). If the Net Sales Tax Applied with Sales Tax check box is selected, the sales tax collected will net against the sales tax calculated. If you would like to include prior balance information, select the Statement/Invoice Format Options tab. Select to print either summary or detail balance information. If you select balance detail, A/R transactions will print. Select to include detailed activity from the last invoice or the last 30, 60, or 90 days.
6. Invoice totals are automatically checked before printing, but if you’ve edited the invoice, you may want to click Check Totals to verify that the invoice total agrees with the billing total. These totals must agree before you can leave the window. If you are using an engagement or project format (Paragraph/Descr – By Engagement Category, WIP Detail – By Engagement Category, Project WIP Detail – By Category, etc.), Check Totals is not supported.
7. To insert an employee summary in the invoice, position the cursor where you wish the summary to appear and click Insert Employee Summary on the menu bar. You can select from seven different formats for the summary.
8. If you need to exit the window before you print the invoice, click Save/Exit to save the invoice. The invoice will be saved and a pair of glasses will appear in the first column of the Client Selection window indicating that an invoice has been generated. If you have changed the format you are asked if you want to save the changes as the invoice format default for the client. Answer accordingly.

Getting Started with ProSystem fx Practice Management
81
Printing Invoices Once the invoice has been generated and edited, you are ready to print it. Typically you will print an edit invoice, make any changes, and then print a final invoice. Edit invoices do not contain invoice dates or numbers. The word "EDIT" prints in the date column. Print edit invoices to review the text and invoice amount before printing final invoices. Final invoices print the invoice date, which you assign, and invoice number, which is automatically assigned. You must final print invoices before they can be posted. A printer selection box allows you to select the printer, which must be able to underline. The font selection list comes from the default printer. Invoices print in portrait mode. The printer selection window also allows you to select to send the final invoice to the client via e-mail. To print an individual edit invoice 1. To select an invoice for printing, select the client on the Client Selection window. Click Edit Invoice.
2. Click Print Edit from the Invoice window.
3. A printer selection box appears. Select a printer, printer attributes, and to print multiple copies.
4. Once you print an edit invoice, a pair of glasses will appear in the first column for the client on the Client Selection window.
To print an individual final invoice 1. To select an invoice for final printing, double-click the client. You are taken to the Billing screen. Click
Review Invoice.
2. Click Print Final from the Invoice window.
3. The Invoice Date window appears. Enter the date to print on the final invoice. This date is used as the aging date in Accounts Receivable.
4. A printer selection box appears. Select a printer, printer attributes, to print multiple copies, or to send the invoice by e-mail if needed. Final invoices cannot be printed to a generic text printer. An error listing prints if there are any problems. Errors must be corrected before a final invoice can be printed.
5. Once you print a final invoice, an envelope will appear in the first column next to the status for the client on the Client Selection window.
6. If you change your mind after you final print an invoice, double-click the client on the Client Selection window. The Final Invoice Options appear, allowing you to reprint the invoice, undo the final print, or e-mail the invoice.
To print invoices for multiple clients 1. On the Client Selection window, click Print Invoices.
2. If you need to shorten the list, right-click any column in the list and select to filter the list and target the client invoices you need to print. Click the column headings to apply a sort to the on-screen list. Invoices will print in the on-screen sort order.
3. Hold down the CTRL key and click the appropriate client invoices, or right-click and choose Select All to select all client invoices.

ProSystem fx Practice Management
82
4. To print edit invoices, click Print Edit. To print final invoices, click Print Final.
5. A printer selection box appears. Select a printer, printer attributes, to print multiple copies, or to send the invoices via e-mail. Final invoices cannot be printed to a generic text printer.
6. If you are printing final invoices, the Invoice Date window appears. Enter the date to print on the final invoice. This date is used as the aging date in Accounts Receivable. An error listing prints for any invoices with problems. Errors must be corrected before a final invoice can be printed.
7. If you printed edit invoices, a pair of glasses will appear in the first column next to the status for each client whose invoice you printed. If you printed final invoices, an envelope will appear in the first column next to the status for each client whose invoice you printed.
Tips The client address printing on each invoice depends upon what is billed. If you are invoicing an
engagement, the invoice uses the engagement address. If you are invoicing more than one engagement, the invoice uses the Master Client address.
Note that if you batch print invoices by clicking Print Invoices, you will not be able to view your invoices before they are printed.
Remember that if you are using an invoice format that subtotals by engagement or project (Paragraph/Descr – By Engagement Category, WIP Detail – By Engagement Category, Project WIP Detail – By Category, etc.) that invoice totals will not be checked. You will need to verify that the invoice total agrees with the billing total prior to printing.

Getting Started with ProSystem fx Practice Management
83
Send Invoices via E-mail Invoices can be generated and e-mailed to clients through Billing. The e-mail option is available from the Printer Selection window when final printing an invoice or a group of invoices, or from the Final Print Options window selected by double-clicking on an invoice that has been final printed. To send single invoices via e-mail 1. To final print and e-mail an invoice, bill the client and generate the invoice. Once you are ready to final
print and send the invoice, select the client and click Edit Invoice.
2. Click Print Final from the Invoice window.
3. The Invoice Date window appears. Enter the date to print on the final invoice. This date is used as the aging date in Accounts Receivable.
4. On the Printer Selection window select the Send via E-mail check box.
5. On the Email Invoice window, enter the e-mail address (es). If you have entered an e-mail address for the client contacts in the Client Tracking folder and selected this contact to receive invoices by e-mail the address will default.
6. Enter the text of the e-mail message or select a standard e-mail paragraph. The standard e-mail paragraphs
entered through Standard Paragraphs on the navigation bar in Administration will display in the drop-down list and can be selected as the text of your e-mail message. To attach a file to the message, click Attach File, browse to the location of the file, and click Open. When you are satisfied with the message, click Send to send the e-mail message and the attached invoice.
To batch print and send multiple invoices via e-mail Multiple invoices can also be final printed and sent via e-mail from the Batch Print window. When e-mailing multiple invoices, you must enter the e-mail address for the client contacts and select the contact to receive e-mail invoices on the Contact tab of the Client Tracking folder prior to generating the invoices. 1. When you have finished billing clients, editing invoices, and are ready to final print, click Print Invoices
on the Client Selection window. The Batch Print window will list all invoices that have been generated (that have not been final printed). Select the clients that have invoices ready for final print and e-mail from
2. Click Print Final.
this list.
3. On the Print Invoices Printer Selection window, select one of the e-mail output methods for the invoices.
4. The Invoice Date window appears. Enter the date to print on the final invoice. This date is used as the aging date in Accounts Receivable.
5. On the Email Invoice window, the e-mail addresses entered for the client contacts in the Client Tracking folder will default.
6. Enter the text of the message, or select an e-mail standard paragraph (set up under Standard Paragraphs on the navigation bar in Administration). Select keywords from the drop-down to customize the message.
7. To attach a file to the message, click Attach File, browse to the location of the file, and click Open.
8. Use the Apply Email Message to Remaining Messages check box to quickly send all generated invoices to the corresponding client contact address entered in the Client Tracking folder. The program will copy the message entered in the text field and any files attached, attach each invoice generated, and
ProSystem fx Practice Management
84
automatically enter the addresses entered for the client contacts selected to receive invoices via email in the Client Tracking folder.
9. Click Send Email to generate and send the e-mail message and invoices to the selected clients. If you have selected the Apply Email Message to Remaining Messages check box clicking Send Email will send all invoices selected. If you have not selected this check box you must click Send Email to send each message with the attached invoice.

Getting Started with ProSystem fx Practice Management
85
Archived Invoices When invoices are final printed, they are archived. Archiving saves a compressed copy of the invoice electronically in an archived file. You can then reprint the invoice at a later date for audit or review. To view or print archived invoices from the Billing window 1. Click the Prior Invoices button on the Billing window to view invoices for the current client.
2. Click View Invoice to view the archived invoice. You can then print or e-mail the invoice if you wish.
To view or print archived invoices from Contact Management 1. Search for the client whose invoices you would like to view and click the Invoices tab.
2. Click View Invoice to view the archived invoice. You can then print or e-mail the invoice if you wish.
To view or print archived invoices from Reports 1. Click Archived Invoices on the Reports window.
2. Enter a client sort name, an invoice number, or a final invoice date range to search for invoices that have been archived.
3. Click Search For Invoices. All invoices found in the search will appear in the grid.
4. Select the invoice you wish to view or print.
5. Click View Invoice to view the archived invoice. You can then select to print if you wish.
6. Click Print to print the archived invoice.
7. Click Clear Search to begin a new search. Click Close when you are finished.

ProSystem fx Practice Management
86
Billing Fixed Fee Clients Use Fixed Fee Billing if you have clients that are billed a fixed amount each month (or periodically) regardless of WIP. These clients can be issued an invoice for the amount of the Fixed Fee in Client Setup. Any client on the list can be included in or excluded from each billing run. To bill fixed fee clients 1. Click the New Biller button on the Client Selection window.
2. Select the Fix fee clients option. Then click Selected Billers or Selected Partners to generate a list of fixed fee clients for whom this employee is either the bill manager or partner. Or, click All Billers to generate a list for all bill managers.
3. All fixed fee clients for the biller or partner selected are listed.
4. To bill the fixed fee clients, select Fixed Fee Billing on the Client Selection window.
5. All fixed fee clients who do not have an unposted invoice (edit or final) or transactions marked for billing are displayed. Sort clients by clicking column headings: Client Name, Sort Code, Client Code, Last Invoice, WIP Amount, or Invoice Amount.
6. All clients will be selected to bill. Click in the Bill column to clear any selected clients you do not wish to bill.
7. To adjust the billing amount click the Adjust amount button. The Current WIP Amount and Fixed Fee amount are displayed. Enter the amount to bill.
8. Click Generate Invoices. Invoices will be generated for all clients marked for billing. You may add paragraphs or edit the standard information to appear on the invoices.
9. Select Generate Invoices - Print Final if you want to automatically generate and print final invoices without review.
Tips Right-click any column in the list to print, filter, select all, or deselect all. Filter options include equal to
(=), not equal to (<>), greater than (>), and less than (<). If filters are in place you can also select to Show Current Filter(s), Undo Last Filter, and Undo All Filter(s).
To create a unique invoice for each fixed fee client, bill clients individually. Use Edit Invoice on the Client Selection window to make changes to a client’s invoice.

Getting Started with ProSystem fx Practice Management
87
Quick View - Billing Administration Options Reverse billings
Select Reverse Billings from the Administrative Activities window. Reversing an invoice restores WIP and any payments against the invoice are moved to Later Distribution in Accounts Receivable. Enter the Invoice Number and press TAB. The Invoice Date, Client Number, and Invoice Amount are displayed. Click Reverse Invoice to reverse this invoice.
Use billing worksheets
Select Print Billing Worksheet from the Administrative Activities menu (also available from the Billing window). You can print worksheets for a date range by client, primary partner, bill manager, manager, secondary partner, responsible person, tax reviewer, tax preparer, office, region, department, NAIC code, line of business, entity, work type, or group. You can print the client address, staff assigned, print cost, select to page break by client, print billable WIP only, and print invoice history, prior year history, or current year history. You can print A/R and/or WIP Aging as of a cut-off date. Billing worksheets can be previewed prior to printing.
Review before posting
Select Print Billing Edit List from the Administrative Activities menu (also available from the Billing window) to print an edit list and see the clients and amounts you have selected for billing. You can print in detail or summary and print by client, primary partner, bill manager, manager, secondary partner, responsible person, tax reviewer, tax preparer, office, or region.
Post bills
Select Update Invoices from the Administrative Activities menu to post invoices. Invoices must be final printed before their corresponding bills can be posted. You select a posting date when you post invoices. You can post by bill manager, primary partner, client, or ProSystem fx Tax invoice number. Select the bill managers, primary partners, clients, or ProSystem fx Tax invoice number you wish to post, or right-click in the list and choose to Select All. Click Print Register to print a billing register and then click Post.

ProSystem fx Practice Management
88
Updating Invoices Updating Invoices updates A/R with invoiced amounts, relieves the billed transactions from WIP, and automatically archives final invoices. Invoices must be posted before payments can be applied to them in Accounts Receivable. Before you post, print a Billing Register. Keep a current backup in case of a power failure during a post. If a power outage occurs during a post, you should restore the backup and re-post. To post invoices 1. Choose Update Invoices from the Administrative Activities window.
2. Enter the Accounting Period posting date. This is the date with which transactions will be posted to Accounts Receivable and should fall in the same accounting period as the invoice final print date.
3. Select to post by bill manager, primary partner, client, or ProSystem fx Tax invoice number, and click OK. (If you are interfaced to ProSystem fx Tax, you can select to post by Invoice Number to import and post the tax invoices.)
4. Select the Selected check box for the employee, client, or ProSystem fx Tax invoice number to select their bills for posting. If you want to post bills for all bill managers, partners, clients, or ProSystem fx Tax invoice numbers, right-click on the list and choose Select All.
5. Click Print Register to print the Billing Register.
6. Click Post when you are ready to post.

Getting Started with ProSystem fx Practice Management
89
Reversing Bills Reverse Billings allows you to reverse transactions billed in error. Invoiced transactions are restored to WIP and the invoice is deleted from Accounts Receivable. Any payments made against the invoice remain in A/R but are moved to Later Distribution. The invoice is marked as reversed in the archive file. To reverse billings 1. Select Reverse Billings from the Administrative Activities window in Administration.
2. Enter the Invoice Number for the invoice you wish to reverse and press TAB.
3. The Invoice Date, Client Number, and Invoice Amount are displayed for verification.
4. Click Reverse Invoice.
5. Print the Invoice History Report (in Reports) for an audit trail of reversed bills. Select Reverse Invoices Only on the Criteria tab of the report.

ProSystem fx Practice Management
90

Getting Started with ProSystem fx Practice Management
91
Accounts Receivable
Recording Payments and Sending Statements Enter payments, credit memos, debit memos, and bad debt write-offs for clients and make adjustments to client accounts in Accounts Receivable. Most firms designate a control person to enter payments and memos. Payment distributions can be either open item or balance forward, depending on the balance method selected in Firm Setup. Open item payments are applied to specified invoice(s) or finance charge(s). Balance forward payments are applied to the oldest invoice (or finance charge). In either case, you can apply payments to invoices or finance charges of your choice. If you are not ready to apply the payment, you can mark it for Later Distribution. Select Apply Later Distribution on the Accounts Receivable window when you are ready to apply the payment. You can correct mistakes made during payment entry by redistributing a payment, correcting the client associated with a payment, or voiding a payment using Correct Client. Like time and expenses, once payments and memos have been entered, they must be posted to update the database. To use Accounts Receivable 1. Enter payments and memos.
2. Post payments and memos.
3. Apply any unapplied payments and memos.
4. Calculate and post finance charges.
5. Set up statements.
6. Print or e-mail statements.
7. Print dunning letters.

ProSystem fx Practice Management
92
Quick View - Accounts Receivable Menu Options Enter payments/memos
Select Enter Payments to enter payments, credit memos, debit memos, bad debt write-offs, and adjustments. First, enter payment information (employee, deposit date, transaction type, bank/reason, client, amount, check/document # and date) and then click Distribute. The distribution window appears so you can distribute the entry accordingly. To add or review entries for another employee select the employee from the drop-down list.
Print deposit slip
Select Print Deposit Slip if you want to print optional deposit slips for bank deposits. Deposit slips can be set up for banks from either Accounts Receivable or Administration/Lists/Other/Bank Accounts. To print deposit slips, build the payment list using either unposted or posted payments. You can also select to use a date range and list payments entered by all employees or a selected employee. Selected payments can be ordered on the deposit slip by order entered, selected list order, client name, or client code.
Update A/R
Select Update A/R to post payments, memos, and write-offs. This updates A/R and statistical files for reporting. Enter a post date and select the client(s) you wish to post (or click Select All for all clients). Click Register for a printout of posted A/R entries then click Post.
Apply service charges
Select Calculate Finance Charges to calculate service charges on overdue accounts. Enter the cut-off date for A/R transactions used in the finance charge calculation and the date you want to use for the charges. Then click Calculate. To post, select the clients and click Update System. Before a finance charge can calculate, it must be entered in the Finance Charges list and assigned in Client Setup.
Print/E-mail statements
Select Print/Email Statements to print or e-mail statements for clients. To set up statements, select the Page Format, Print Criteria, and Page Setup tabs and establish format, criteria, and print settings. To print statements, select the sort from the navigation bar. Then select the Criteria tab to enter aging criteria. If you do not want to generate a statement for clients with a current invoice, enter a cutoff date for invoices. Enter the statement dates. Then use the additional tabs to print by your sort option. Finally, click Print/Review. Select one of the e-mail output methods on the Printer Selection window to send the statement to the client as an e-mail attachment.
Print dunning letters
Select Dunning Letters to create and print letters to notify clients that their account is past due. Use one of the template letters provided for you or create and use custom letters. Select the sort criteria, amount owed, and aging period to determine which clients qualify to receive a letter. Up to five separate letters with different criteria can be printed at one time.

Getting Started with ProSystem fx Practice Management
93
Distribute later You don’t have to distribute every payment or memo at the time of entry. You can mark payments for later distribution. Then, when you are ready, select Apply Later Distribution. Select the transaction from the list and apply the payment. You can also net later distribution transactions to a zero balance.
Correct posting errors
Select Correct A/R to correct a posted A/R transaction. Enter the client, entry type, and a date range. Click Void to delete the selected transaction. Click Correct Client to move the transaction to another client’s account. Click Redistribute to apply the transaction to another invoice or finance charge.
View A/R totals
Select Lookup A/R to view A/R on-screen. Enter a client name or code and a date range for transactions. Right-click and use the filter options to view a specific group of entries. Sort the entries by client code, engagement, client name, date, invoice, type, check number, posted/unposted entries, or amount by clicking the column heading.
Enter A/R Notes
Select A/R Notes Entry to add or view notes associated with specific A/R transactions for a selected client. You can add, edit, delete, or print the entries. Notes can be entered here, or from Enter Payments.

ProSystem fx Practice Management
94
Quick View - Accounts Receivable Enter general information
Click the Enter Payments button on the A/R window. Select the employee. Enter the Deposit Date. Select the Entry Type (payment, credit memo, debit memo, bad debt write-off, or adjustment). When entering a payment, select a Bank (set up under Lists on the navigation bar in Administration). If you are entering a memo or adjustment, select a Reason (also set up on the navigation bar). To add or review entries for another employee select the employee from the drop-down list.
Enter the payment
Enter the client name or client code preceded by a slash. Enter the payment or memo amount (enter the decimal point if necessary). Enter the Check or Document #, then enter the Check or Document Date and click Distribute. To find the client by invoice number click the [?] button.
Distribute the payment
If your firm is setup for Open Item distribution, select the invoice or finance charge you want to apply the entry to and click Apply. Once the full payment is applied, click OK. If your firm is setup for Balance Forward distribution, the payment is applied to the oldest invoice. If you want to apply the payment to a different invoice or finance charge, double-click the entry you want to change. Make the changes and click Apply. Once the full payment is applied, click OK. Only payments will be automatically distributed using Balance Forward distribution. Memos and adjustments must be distributed manually.
View paid invoices
When distributing positive adjustments or debit memos, you can view paid and unpaid invoices by selecting Show Invoices which are Paid in Full.
Review client’s A/R
Select Lookup A/R on the distribution window to review a client’s entire A/R account. Distribute unapplied entries
When you are ready to distribute payments and memos in Later Distribution, select Apply Later Distribution on the A/R window. Select the payment you want to distribute, and click Distribute. Follow the steps described above to distribute the payment. If a client has items in Later Distribution that net to a zero balance, you can move them from Later Distribution to the client’s A/R by clicking Net to Zero.

Getting Started with ProSystem fx Practice Management
95
Starting Accounts Receivable To start from the Accounts Receivable icon 1. Double-click the Accounts Receivable icon.
2. Log on using the employee code assigned to you in the Employee list. If your firm uses passwords, enter your password.
To start from the Dashboard icon 1. Double-click the Dashboard icon.
2. Log on to ProSystem fx Practice Management using the employee code assigned to you in the Employee list. If your firm uses passwords, enter your password.
3. Double-click Accounts Receivable on the Main Menu to select Accounts Receivable.
4. Use the buttons to make your selections. To enter payments, credit and debit memos, and bad debt write-offs select Enter Payments. To apply any unapplied payments select Apply Later Distribution. To calculate and post finance charges select Calculate Finance Charges. Post payments and memos using Update A/R. Format and print (or e-mail) statements from Print/Email Statements. Print client overdue notices using Dunning Letters. Correct posting errors using Correct A/R. View receivables transactions on-screen with Lookup A/R.
Tips The A/R menu from the menu bar also contains these options.

ProSystem fx Practice Management
96
Entering a Transaction
Enter the general information for the payment or memo. Select the Employee, Deposit Date, Type, and Bank. Bank accounts must be set up in the Banks list in Administration before they will appear here. Transactions are listed in the Deposit summary for the selected Bank. If you are entering a credit memo, debit memo, write-off, or adjustment, a list of Reasons will be available instead of banks. Reasons are set up under Lists on the navigation bar in Administration. When all payments and memos have been entered, click Edit List to print an edit list prior to posting. The Edit List can be sorted by type/client or transaction date. When selecting the transaction type, remember that both a payment and credit memo reduce the selected client’s A/R balance. A payment is an entry against billings while a credit memo is used to reduce A/R for reasons not
associated with a payment. A debit memo increases the A/R balance of the client you have chosen. Use this method to charge a client
for a dollar amount that is not included in WIP. If you want to write off uncollectible balances, you can specify a bad debt write-off. This also reduces
outstanding A/R balances. This will be labeled as a write-off on statements. Adjustments change the A/R balance but do not appear as separate line items on statements.

Getting Started with ProSystem fx Practice Management
97
To enter a transaction 1. Select Enter Payments on the A/R window.
2. If you want to change the employee, select a different employee.
3. If you want to change the Deposit Date from the system date, enter a new date.
4. Select an Entry Type. Payment is the default type.
5. If you are entering a payment, select a Bank from the list. This field is optional. Entered payments will display in the Deposit Summary grid, including client, transaction type, document number, document date, and amount. If you choose a bank for the payment deposit, only payments for the selected bank will be listed, including a current deposit total for the bank.
6. If the type of transaction is a credit memo, debit memo, bad debt write-off, or adjustment, select a reason for the transaction. For transactions other than payments, the Deposit Summary grid will reflect the selected transaction type, displaying all credit memos together, all debit memos together, etc.
7. Enter the client name or client code preceded by a slash (for example, /101 for client code 101). Use the slash to switch between searching by client name and code. Press TAB.
8. Enter the amount. If this is a payment, you can enter one total amount that can then be distributed to multiple invoices. Enter the decimal point if dollars and cents are involved. Press TAB.
9. Enter the Check or Document # and press TAB.
10. Enter the Check or Document Date. This is for your information only. The default date is the system date.
11. Click Distribute to distribute the payment. Depending on whether you have selected Open Item or Balance Forward in Firm Setup, the corresponding distribution window will open.
Tips You may also enter payments by selecting the Enter Payments option from the A/R menu. The employee currently logged in will default on the Payment Entry window. If you need to add or review
entries for another employee, select the employee from the drop-down list.

ProSystem fx Practice Management
98
Distributing the Payment - Open Item If you selected Open Item distribution in Firm Setup (in Administration), you will apply the payment to a specific invoice or finance charge. To distribute using open item 1. Unpaid invoices and finance charges are listed by engagement, including information such as invoice #
or finance charge date, engagement code, net engagement amount, finance charge amount, and net invoice amount. If you are entering positive adjustments or debit memos, you can view paid and unpaid invoices by selecting Show Invoices which are Paid in Full. Net invoice amounts that appear in blue indicate an invoice that was billed to multiple engagements.
2. Select the invoice to which you want to apply the payment or memo. The Principal Amount, Finance Charges, and Sales Tax are calculated based on the invoice and the amount to be applied. You can change these amounts if you wish. To apply the distribution, double-click the invoice, or click Apply.
3. Repeat step 2 until there is 0.00 Remaining.
4. If you do not want to distribute the payment or memo at this time, select Later Distribution at the bottom of the invoice list and click Apply.
5. If you need to apply the payment or memo to a finance charge, scroll to the bottom of the invoice list and select the finance charge. Click Apply.
6. If you want to remove an invoice from the distribution grid and undo the distribution, click the invoice and press the DELETE key.
7. If you want to change a distribution, double-click the invoice in the grid to move it to the Select Invoice/Finance Charge area. Enter the Principal Amount, Finance Charges, and Sales Tax to be applied to the selected invoice and click Apply.
8. Click OK to complete the distribution and return to the Enter Payments window. The distributed entry appears in the Deposit Summary grid for reference.
9. Click Edit List to print a list of transactions entered for each client. You must select a beginning and ending date for the transactions to include on the edit list.
10. If you wish to enter A/R Note information for a transaction, select the transaction and click A/R Entry Note. Enter the note information and click OK.
11. Click Done when all payments and memos have been entered and you are ready to post.

Getting Started with ProSystem fx Practice Management
99
Distributing the Payment - Balance Forward If you selected Balance Forward distribution in Firm Setup (in Administration), the payment is automatically applied to the oldest invoice(s). Credit memos, debit memos, write-offs, and adjustments must be distributed manually. To distribute using balance forward 1. The payment is automatically distributed to the oldest invoice first. Once the oldest invoice if paid in full,
any overage is applied to the next-oldest invoice. To accept the distribution that appears in the grid, click OK.
2. If you do not want to distribute the payment at this time, double-click the entry in the grid to move it to the Select Invoice/Finance Charge area. Select Later Distribution at the bottom of the list and click Apply.
3. If you need to apply a payment to a finance charge, scroll to the bottom of the invoice list and double-click the finance charge (or select the finance charge and click Apply).
4. If you want to remove an invoice from the distribution grid and undo the distribution, click the invoice and press the DELETE key.
5. If you want to change a distribution, double-click the invoice in the grid to move it to the Select Invoice/Finance Charge area. Enter the Principal Amount, Finance Charges, and Sales Tax to be applied to the selected invoice and click Apply. Repeat this process until there is 0.00 Remaining.
6. Click OK to complete the distribution and return to the Enter Payments window where you may continue entering additional payments and memos. The distributed entry appears in the Deposit Summary grid for reference.
7. Click Edit List to print a list of transactions entered for each client. You must select a beginning and ending date for the transactions to include on the edit list.
8. If you wish to enter A/R Note information for a transaction, select the transaction and click A/R Entry Note. Enter the note information and click OK.
9. Click Done when all payments and memos have been entered and you are ready to post.
Tips If you are entering positive adjustments or debit memos, you can view paid and unpaid invoices by
selecting Show Invoices which are Paid in Full. Net invoice amounts that appear in blue indicate an invoice that was billed to multiple engagements.

ProSystem fx Practice Management
100
Posting Payments and Memos Click Update A/R to reduce A/R with payments, credit memos, and bad debt write-offs and to increase A/R with debit memos and adjustments. Most firms update A/R as part of their monthly routine. Before you post, print a Register. Keep a current backup in case of a power failure during a post. If a power outage occurs during a post, you should restore the backup and re-post. To post accounts receivable 1. Select Update A/R on the A/R window.
2. Enter a posting date to indicate the accounting period for your entries.
3. Select to post entries by All Employees or Selected Employees.
4. Select the employee if posting by Selecting Employees.
5. Click the Selected check box to select a client's payments, memos, etc. for posting.
6. If you want to post A/R for all clients, right-click in the list and Select All.
7. Click Register to print a register.
8. Click Post when you are ready to post.
Tips You can also select Update A/R from the A/R menu.

Getting Started with ProSystem fx Practice Management
101
Applying an Invoice for Later Distribution To apply an amount in Later Distribution to an invoice or finance charge 1. Select Apply Later Distribution on the Accounts Receivable window.
2. To search for a specific transaction, click the column heading of the criteria you would like to search and enter the client name, etc. in the find field at the top of the screen. As you do so, the nearest match will be highlighted.
3. Double-click on the transaction that needs to be applied and the Distribution window displays.
4. Select the invoice or finance charge to which you want to apply the transaction.
5. Click Apply. The selected invoice/finance charge appears in the Distribution Summary grid.
6. Continue this process until the full amount of the later distribution has been applied and the remaining amount is zero.
7. Click OK to accept the distributions and return to the Later Distribution window.
8. Click Done when all distributions have been made.
To net Later Distribution amounts to a zero balance 1. Select Apply Later Distribution on the Accounts Receivable window.
2. To search for a specific transaction, click the column heading of the criteria you would like to search and enter the client name, etc. in the find field at the top of the screen. As you do so, the nearest match will be highlighted.
3. Select a client transaction and click Net to Zero.
4. The Net to Zero window contains the selected client’s Later Distribution transactions. Select the transactions that net to a zero balance. Netting transactions to zero will remove them from Later Distribution and add them to the client’s accounts receivable.
5. Click OK to net to zero and return to the Later Distribution window.
6. Click Done when all distributions have been made.
Tips You can also select Apply Later Distributions from the A/R menu. When a transaction is applied or transactions are netted to a zero balance, the client's A/R account is
automatically updated. Posting is not necessary.

ProSystem fx Practice Management
102
Calculating Finance Charges
Use this feature to calculate finance charges on client accounts. Remember that before a client can qualify for a finance charge, the charge must be entered in the Finance Charges list and in Client Setup for the client. (Finance Charges are set up under Lists on the navigation bar in Administration.) To calculate finance charges 1. Click Calculate Finance Charges on the A/R window.
2. The last date finance charges were updated is provided. Enter the Cutoff Date for charge calculations, and the Finance Charge Date to use for the calculated transaction(s). In most cases, the Cutoff Date and the Finance Charge Date will be the last day of the accounting period.
3. Click Calculate. Finance charges will calculate for all clients that qualify as of the cutoff date you enter. These amounts are placed in temporary storage until you update the system. (See "To post finance charges.")
4. Clients with calculated finance charges are listed. Click to select the client(s) who will receive the charges. If you change your mind, click Undo Calc to clear the charges from the list and begin again.
5. Click Print Edit List to print an edit list of charges and review them in detail.
To post finance charges 1. Select the clients from the list whose finance charges you would like to post.
2. Click Update System on the Calculate Finance Charges window.
3. Print an Edit List or preview it on-screen. The Edit List includes the client name, client number, and finance charge amounts. After checking the register, click Continue to post the finance charges to A/R.
4. Click Close when finished.

Getting Started with ProSystem fx Practice Management
103
Tips Right-click on any column in the list to print, filter, select all, or deselect all. To select more than one client, hold down the CTRL key while selecting the clients who will receive
charges. You may also calculate finance charges by selecting Calculate Finance Charges from the A/R menu.

ProSystem fx Practice Management
104
Correcting A/R Payments or memos posted in error to Accounts Receivable can be corrected or deleted. Follow these steps to correct client information or redistribute an entry. To correct client information 1. Select Correct A/R on the Accounts Receivable window. Enter the client name or code (preceded by a
period or slash) of the client whose account you need to correct.
2. Select A/R Entries or Finance Charges as the Entry Type.
3. Enter a date range to narrow the search further.
4. When you have entered the search criteria, click Search AR. Transactions meeting the search criteria for the selected client will display, including information such as engagement code, transaction type, document date, and transaction amount.
5. To view a specific group of transactions, click the column heading of the type of criteria you would like view. Then select an item that contains the specific criteria, right-click, and select to filter. You can combine criteria to further narrow the list.
6. Select the transaction you need to correct and click Correct Client.
7. Enter the new client name or in the search field and click OK.
8. Use the distribution window to apply the A/R entry to the new client’s invoice(s) and finance charge(s). When the total amount has been correctly applied, click OK.
To distribute an A/R entry to a different invoice 1. Select Correct A/R on the Accounts Receivable window. Enter the client name or code (preceded by a
period or slash) of the client whose account you need to correct.
2. Select either A/R Entries or Finance Charges as the Entry Type.
3. Enter a date range to narrow the search further.
4. When you have entered the search criteria, click Search AR. Transactions meeting the search criteria for the selected client will display, including information such as engagement code, transaction type, document date, and transaction amount.
5. To view a specific group of transactions, click the column heading of the type of criteria you would like to view. Then select an item that contains the specific criteria, right-click, and select to filter. You can combine criteria to further narrow the list.
6. Select the transaction you need to redistribute and click Redistribute.
7. Use the distribution window to apply the A/R entry to a different invoice or finance charge. When the total amount has been correctly applied, click OK.
Tips You can also select Correct A/R from the A/R menu. Right-click on any column in the list to print or filter. Filter options include equal to (=), not equal to
(<>), greater than (>), and less than (<). If filters are in place you can also select to Show Current Filter(s), Undo Last Filter, and Undo All Filters.

Getting Started with ProSystem fx Practice Management
105
Setting Up Statements Use this option to create a default statement format for your firm. Statements can be printed or e-mailed in addition to invoices if you wish. Statements include payments, finance charges, and invoiced amounts. Statements print in portrait mode. To set up the statement format 1. Select the Print/Email Statements option on the A/R window.
2. Select the format style, either Balance Forward or Open Item, on the Format tab. Open the Print Criteria, Format, and Page Setup tabs to enter the page setup. You can also establish the format for the statement header (Format Header button) and footer (Format Footer
button). Choose the keywords for your firm and client information that you want to print on statements. Position the keywords where you want the information printed and choose the desired fonts. Only set up the footer if the print footer check box is selected. Preview the statement setup by clicking Test.
Tips Click the Test button from the Page Setup tab to view a sample statement. The sample prints with the
header and footer you have chosen. Use this option to test your statement formatting before you print one for a client.

ProSystem fx Practice Management
106
Printing Statements
Once the default format has been established, you can print statements. First, set up the dates for the statement calculation on the Criteria tab. Then select the Print Criteria tab to select the statements to print. To print statements 1. Select the Print/Email Statements option on the A/R window.
2. On the Criteria
3. If you would like a statement that prints the outstanding amount per invoice only, use the Open Item type of statement (on the Page Setup tab) and set the beginning balance date the same as the cutoff date.
tab, enter the Balance Forward date. Unpaid invoices and finance charges are netted as of this date. Generally, this is the first day of the accounting period. Enter the Cutoff date. All A/R activity will print from the balance forward date to the cutoff date. Generally, this is the last day of the accounting period. Enter the Statement date. Generally, this is the last day of the accounting period. If you are printing a group of statements, select the order in which you want statements to print. Options are by client name or code or by office and then by client name or code.
4. "One statement for each master client" is selected by default. This means that statements will print by client. If you want to print by engagement instead, select "Separate statements for each engagement." Then, if you have combined engagements on one invoice and print statements by engagement, each engagement statement will only print the amount of the invoice that is attributed to that engagement. You can also select "Use engagement billing option for statements."
5. Select the Print Criteria tab. If you want to print statements for clients with unpaid balances select the corresponding check box. Enter the minimum unpaid amount and the number of days old required to print a statement. If you want to include finance charges in the amount select the check box.

Getting Started with ProSystem fx Practice Management
107
6. To print statements for clients with unpaid invoices, select the corresponding check box. Enter the minimum unpaid amount on invoices required to print an invoice. Enter the number of days old (from the invoice date) required to print a statement. Select the “Include Finance Charge in unpaid aged balance” check box if you would like to include the finance charge amount.
7. Select the “Print Statements for Clients with a Credit Balance” check box to print credit balance statements.
8. Select the check box to print statements for clients with a zero balance. Clear the check box to refrain from printing zero balance statements.
9. If you don’t want to print a statement because the client received an invoice during the billing period, select the “Do Not Print Statement If Current Invoice” check box. Most firms who do not levy finance charges select this box if the invoice style they use includes a balance forward and grand total. Normally, if you select this box but have calculated current finance charges, statements will print because finance charges do not print on invoices. Select the “Suppress even if they have a current finance charge” check box if you do not want statements to print that only include finance charges. Enter a starting date for an invoice to qualify as current to suppress the printing of statements. Use the first day of the accounting period.
10. Select the Format tab and select the check box to suppress printing of voided entries. You can also select to summarize finance charges.
11. Use the navigation bar to print statements by client, primary partner, bill manager, manager, secondary partner, responsible person, tax reviewer, tax preparer, office, region, department, NAIC code, line of business, entity, work type, or group. Use the additional tabs to select the employees, regions/offices, etc. for the statements, based on your sort selection.
12. Click Print/Review to print the selected statements. Select the printer you wish to use to print the statements or click one of the e-mail output options to e-mail the statements. Statements print in portrait mode. If you are printing by biller, partner, or office, the statements begin printing after each client is qualified. After the statements print, the A/R Statement Report appears on-screen showing whether a statement was printed for each client, and the reason if one was not printed. Click Print to print the Statement Report. If you are printing by client, each statement is displayed on-screen. You may edit the statement and then click the Print/Exit button when you are ready to print. The statement prints and you are returned to the Criteria tab for selection of another client, if desired.
Tips When selecting employees, regions/offices, etc. right-click in the list to print, filter, select all, or deselect
all. To select at random, hold down the CTRL key and click individual items. You can also select Print Statements from the A/R menu.

ProSystem fx Practice Management
108
E-mailing Statements Statements can be generated and e-mailed to clients through Accounts Receivable. The e-mail option is available from the Printer Selection window when printing statements. To print and send multiple statements via e-mail Statements can be printed and sent via e-mail. When e-mailing statements, you must enter the e-mail address for the client contacts and select the contact to receive e-mail statements on the Contact tab of the Client Tracking folder prior to generating statements. 1. To send statements via e-mail, select Print/Email Statements from the Accounts Receivable window.
2. Select the criteria required to qualify for a statement and click Print.
3. Select one of the e-mail output options on the Printer Selection window to send the statements via e-mail.
4. On the Email Statement window, the e-mail addresses entered for the client contacts in the Client Tracking folder will default.
5. Enter the text of the message, or select an e-mail standard paragraph (set up under Standard Paragraphs on the navigation bar in Administration). Select keywords from the drop-down to customize the message.
6. To attach a file to the message, click Attach File, browse to the location of the file, and click Open.
7. Use the Apply Email Message to Remaining Messages check box to quickly send all generated statements to the client contact addresses entered in the Client Tracking folder. The program will copy the message entered in the text field and any files attached, attach each statement generated, and automatically enter the addresses (entered for the client contacts selected to receive statements via email in the Client Tracking folder).
8. Click Send Email to generate and send the e-mail message and statements to the selected clients. If you have selected the Apply Email Message to Remaining Messages check box clicking Send Email will send all statements selected. If you have not selected this check box you must click Send Email to send each message with the attached statement.

Getting Started with ProSystem fx Practice Management
109
Contact Management
Managing Your Contacts Contact Management is an on-screen inquiry and analysis tool that gives you quick access to a variety of client and prospect information. While the majority of the information is "read-only," you can make client notes, marketing ticklers, follow-ups, and appointments by clicking the Notes button, add leads and lead contacts, generate Quick Labels, Quick Letters, or send e-mail messages. You can also load contact information from ProSystem fx Practice Management into Outlook. The navigation bar gives you the opportunity to display lists of clients, client contacts, business affiliates, business affiliate contacts, referrals, or referral contacts. You can also display lists of My Leads and My Lead Contacts (showing new business opportunities you are currently working) and use Lead Find and Change to find lead information and change it. The Address tab displays the client's name, code, address, telephone, fax number, e-mail address, year-end month, and federal identification number. To copy the client address to the clipboard for use in other programs (such as Microsoft Word) right-click on the client’s address and click the copy address button once it appears. You can then copy the address information from the clipboard to the other program. Click Edit Client Address to change the client’s address. Changing the client address will update the address in Client Setup (and in all ProSystem fx CPA Accounting Suite products if the client has been linked through Client Master Setup).

ProSystem fx Practice Management
110
Quick View - Contact Management Folder View Mailing address
Select the Mailing tab to review mailing information. Information in the list can be customized by selecting Preferences in the menu bar. Click Edit Client Address to change the client’s mailing address. Click Edit Client Address to change the client’s address. Changing the client address will update the mailing address in Client Setup (and in all ProSystem fx CPA Accounting products if the client has been linked through Client Master Setup).
View contact information Select the Contact tab to review the information for each client contact that was set up in the Client Tracking folder. Information in the list can be customized by selecting Preferences in the menu bar. Also listed is whether a contact is the AP contact or not, a title, and a salutation for the contact. Click View Contact Notes to view notes for the selected contact.
View business affiliates
Select the Affiliate tab to view business affiliate information and contact information for your client’s banker, lawyer, or other business associate. Information in the list can be customized by selecting Preferences in the menu bar. Business affiliates are also set up in the Client Tracking folder.
Review unbilled WIP
Select the WIP tab to view Work-in-Process that has not been billed for this client. You can also select to include history (invoiced WIP). Information in the list can be customized by selecting Preferences in the menu bar. Totals are provided for hours, expenses and fees. The client’s WIP limit is also provided. An additional column for Invoice No is available for selection to help distinguish billed WIP from Unbilled WIP. If a value in this column is zero, it represents unbilled WIP. This additional column can be added and positioned from the Preferences menu option My Contact Management Info/WIP. Once added, the Invoice No column may be used to sort and filter WIP details.
Identify problem accounts
Select the A/R tab to view detailed history for this client. Information in the list can be customized by selecting Preferences in the menu bar. Click the Open AR Balance Only checkbox to show only those items on which an outstanding balance is owed. A total outstanding AR balance and the dates of the last invoice and payment and the client’s AR limit are also displayed. You can add a column for AR Net to show the net amount remaining for those items with an outstanding balance. Go to Preferences/My Contact Management Info/AR to add this column. If the invoice was archived and you want to view or print it, click View Invoice. To view the Invoice Reconciliation for any invoice click View Invoice WIP. The detail for each invoice is displayed.
Review past invoices
Select the Invoices tab to view invoice history for the client. Information in the list can be customized by selecting Preferences in the menu bar. To view the actual invoice, click View Invoice. To view the WIP that made up an invoice, highlight the invoice and click View Invoice WIP. Right-click and select the filter to target specific criteria. If a client questions a segment of a bill, you can easily find the information using this option.
View or update client projects
Select the Projects tab to view the due date projects that have been created for this client. Information in the list can be customized by selecting Preferences in the menu bar. Click Tracking Status to view or update the project status or to mark an employee’s task as completed. Click View Project Employees to view the employee(s) assigned to the project.

Getting Started with ProSystem fx Practice Management
111
Check personnel Select the Staff tab to review the personnel assigned to the client. Information in the list can be customized by selecting Preferences in the menu bar. These staff assignments are made in Client Setup.
View information
Select the Profile tab to view general client information. This information was initially entered in Client Setup. Information in the list can be customized by selecting Preferences in the menu bar. Select the Custom tab to view client custom field information. The field number, description, and client information are listed.
View or add notes
Click the Notes button on the Contact Management folder to select notes. Notes, marketing ticklers, follow-ups, and appointments entered here can be viewed from Time Entry, Billing and Invoicing, and Client Setup, or on the Features menu. You can sort the notes by employee, topic, or date by clicking the column heading for the sort you want to apply. To view a more complete note, clear the Summary check box. Double-click to edit a highlighted note. Click New to add a note to the list. Note that installing CCH Coolbar on a workstation disables Appointments for this workstation in ProSystem fx Practice Management. In CCH Coolbar, Microsoft Outlook replaces the Appointments feature.
Display Lists
Select List of Clients, Client Contacts, Business Affiliates, Business Affiliate Contacts, Referrals, Referral Contacts, My Leads, or My Lead Contacts from the navigation bar to display the list of each. This list can be sorted by the primary sort selected on the navigation bar. Once selected, use the list to display individual information, send a Quick Letter, generate Quick Labels, or send an e-mail message.
Add and edit leads
Use Setup Leads to create lead information for new business opportunities. Leads can be added in Contact Management and also from the Marketing Tickler and Follow-up windows (available with Client Notes, Time and Expense Entry, and Appointment Manager)
Create Letter
Select the Quick Letter option in Options to create and generate a quick letter to the selected client, client contact, business affiliate, business affiliate contact, referral, or referral contact.
Quick Labels
Select the Quick Labels option from Actions to create and generate quick labels for the selected clients, client contacts, business affiliates, business affiliate contacts, referrals, or referral contacts.
Send E-mail
Select the Send Email option from Actions to create and send an e-mail message to the selected clients, client contacts, business affiliates, business affiliate contacts, referrals, or referral contacts.
Load Contacts
Select Sync to Outlook (File menu) to load client Contacts from ProSystem fx Practice Management into Outlook. You can load Contacts by partner, by selected clients, or for all clients. Make your partner or client selection and click the corresponding button. Contacts will be loaded into your Outlook address book, complete with the name, address, phone numbers, etc., you entered in ProSystem fx Practice Management.

ProSystem fx Practice Management
112
Using Contact Management
To use Contact Management
Individual Clients 1. Enter the client’s sort name or client code preceded by a slash and select a client from the list.
Information for Active Clients, Hold Clients, and Active Prospects may be viewed in this manner.
2. The Address tab displays the client’s address, e-mail address, telephone, fax number, year-end month, and federal identification number.
3. Click the Notes button to view and add client notes, marketing ticklers, and follow-ups.
4. If you are using Microsoft Outlook as your e-mail software, you can send an e-mail to a client directly from Contact Management by clicking an e-mail address. When you click the address, Outlook’s e-mail message window opens. Enter your message and click Send. You can send e-mail messages to the client’s primary address (on the Address tab), or to a client contact or business affiliate.
5. Click the appropriate tab to view contact management information for this client.
6. If you need a printout of Contact Management information, right-click the appropriate tab. You can also export Contact Management information to a file if needed.
7. Select Sync to Outlook on the File menu to load client contacts from ProSystem fx Practice Management into your Outlook address book.

Getting Started with ProSystem fx Practice Management
113
Contact Management Lists Display Lists 1. Select List of Clients, Client Contacts, Business Affiliates, Business Affiliate Contacts, Referrals, Referral
Contacts, My Leads, or My Lead Contacts from the navigation bar to display the list of each.
2. From the navigation bar, on the left side of the window, select the primary sort which will determine how the list will display.
3. Select the clients, contacts, etc. from the list.
4. Double-click to review the Contact Management folders, or select Quick Letter, Quick Labels, or Send Email from the Actions menu.
Tips To copy the client’s address to the clipboard for use in other programs (such as Microsoft Word or Excel),
right-click on the client’s address. Click the Copy Address button when it appears. You can then paste the information where it is needed.
Select Quick Letter Options, Quick Label Options, or Send Email Options from the Options menu to set up the format and to select the addresses used for each option prior to using each feature.
Select the Mail Merge option to link to the Mail Merge feature without leaving Contact Management.

ProSystem fx Practice Management
114

Getting Started with ProSystem fx Practice Management
115
Project Management
Managing Projects at Your Firm Project Management is one of the optional features of ProSystem fx Practice Management. Projects are set up through the Project Types option (found under Lists on the navigation bar in Administration). These due date projects become the basis of the project list available in Project Management, on the Projects tab of the Client Tracking folder, and in Project Tracking. In Project Management you will assign projects to clients, calculate hours and projected WIP, and schedule employees. When setting up projects, you do not have to assign a specific employee. If an employee enters time for a client that has client projects set up, the employee will be prompted to associate the entry with a project. The list of projects available in Time Entry is determined by selecting the Prompt Employees check box in Project Setup. The entered time will be counted as actual hours and dollars on budget to actual reports. Reports dealing with Project Management are available on the Due Date, and Projects tabs of Reports. Due dates are not tied to your firm’s fiscal year and may be entered for any year. To use Project Management 1. Set up the client project with a due date.
2. Set up hours and expected revenues and assign employees.
3. Schedule the hours for the employees assigned to the project.

ProSystem fx Practice Management
116
Quick View - Project Management Navigation Bar Options Create Lists
Select Create Lists (from the navigation bar in Project Management) to enter the setup information such as Setup Tracking Status, Setup Project Types, Setup Project Positions, Setup Project Custom Fields, Setup Teams, Setup Employee Daily Hours, and Setup Project Options. (Project types, project positions, project custom fields, and tracking status are also available from the Lists menu found on the navigation bar in Administration.)
Setup templates
Select Setup Project Templates from the navigation bar to set up project templates. Project templates may be set up for standard profiles of projects that apply to many clients. These templates can be copied to lists of clients and then modified with specific information as needed.
Copy templates
Select Copy Template to Clients from the navigation bar to copy the templates that have been created to a list of clients. You can then add any detail information, or modify the project for each individual client.
Setup projects
Projects are set up through Project Management or the Client Tracking folder. The Project Types are entered through Create Lists in Project Management or from the Lists menu found on the navigation bar in Administration. These due date projects become the basis of the project list available here, on the Projects tab of the Client Tracking folder, and in Project Tracking. In Project Management you will assign projects to clients, calculate hours and projected WIP, and schedule employees.
Copy projects
Often you will have several clients who share the same project type and due date. Once the project is set up for one client, it can be copied to a list of clients by selecting Copy Project to Clients from the navigation bar in Project Management. Select the project type and the project that you would like to copy. Click Copy to Another Client. Select the clients and click Copy to copy the project to each of the selected clients.
Set project frequencies
Select Replicate Projects-Frequencies from the navigation bar to quickly replicate projects that are repeat business, such as quarterly write ups. Select the project type, original due date range, and the frequency of the client project. Set the frequency as weekly, bi-weekly, monthly, semi-monthly, quarterly, semi-annual, or annual. Click Review Client List. Select from the list the projects you would like to replicate. Depending on your selection, the appropriate number of projects for the selected client will be created with the corresponding due dates.
Edit Projects
Select Project Find and Change to add or edit a project or a list of projects. This feature allows you to make changes to many projects at one time. The options available include Assign Project Budget Hours, Assign Project Budget $, Assign Detail, Assign Dates, Edit Project Descriptions, Edit In Charge, Edit Time Entry Prompt, Edit Non-Recurring, and Edit Custom Fields. Select Project Find and Change – Detail Positions to add or edit staff information. This feature allows you to make changes to many projects at one time. The options available include Edit Assigned Position, Position Hours, Employee, Start/Target Dates, Skill Level, Team, Service, Budget $, Schedule, Detail Position, and Edit Individual Position-All Fields.

Getting Started with ProSystem fx Practice Management
117
Track Projects Project Tracking allows you to track the status of a project, mark a task as completed, locate the employee who last worked on the project, extend projects that have past their due dates, and even print extension forms. Project Tracking can be found on the Features menu of any module in ProSystem fx Practice Management, or on the navigation bar in Project Management.
Extend Projects
You may need to file for extensions on specific client projects, such as tax returns. Extension calculation information was entered for each project type through Setup Project Types. Each project can have up to two extensions; however, you can override a calculated extension if needed. To extend due dates, go to Extend Projects. (This can be found on the navigation bar found in Project Tracking or Project Management.) Once the extension date is selected, extension forms can be printed for each client.
View employee projects
The View by Employee feature allows you to see the projects that have been scheduled or assigned to an individual employee or view the entire staff’s scheduled hours for any week selected. To view the projects assigned to individual employees, select View Individual Schedules. Select an employee and click the View Employee Calendar button to view the employee’s assignments in a monthly calendar format. Select View Monthly Schedules to view daily hours and monthly schedules for all employees.
Roll multiple projects Select Roll Projects to New Year from the navigation bar. Select the original due date range of the projects you would like to roll. Select the sort criteria. From the list of available projects, select the project(s) you want to roll or right-click and Select All. When you are ready, click Roll to New Year. Select the information you would like to include. If you include detail, you can change the hourly rate and enter a percentage change, which allows you to build in an increase in staff rates from year to year. You can either print an exception list or override the project if the project already exists in the new year. Click Select Client Projects to Roll.
Delete project(s)
Select Delete Projects by Date from the Utilities feature of the navigation bar. Enter a due date range for the projects you want to delete. Click Delete to display all projects meeting the criteria selected. From this list, select the projects that you want to delete and click Delete.

ProSystem fx Practice Management
118
Quick View - Project Management View Projects
Select Setup Project from the navigation bar in Project Management to view or edit client projects. Select the primary sort criteria, the date type, date range, and the secondary sort criteria to view a list of existing projects. Highlight a project and click Edit to edit the project information. (You can also edit project information from the Project Find and Change feature found on the navigation bar.)
Create a new project
Select Setup Project from the navigation bar in Project Management to create a new client project. Click New and select the client name and the project type. Enter a description to help you distinguish between similar projects. The Original Due Date, Current Due Date, Start Date, and Target Date are defaulted based on the Project Type information, but can be changed. These dates are used in reporting and when scheduling employees. They also appear on the Project Due Dates tab in Time Entry. Click OK. The "Prompt employees to select project when entering time" checkbox should be selected if you want employees to be prompted to associate time and expense entries (made in Time Entry) with this project. Selecting this check box allows you to track budget to actual figures.
Optional budget
Creating budgets is optional in Project Management. If you would like to create a budget for the project, enter the number of hours required to complete the project, the revenue it should produce, the employee (if any) who will be in charge, and a note if needed. If you do not intend to use this project next year, mark the project as non-recurring. (Non-recurring projects will not be copied when projects are rolled into the new year.) To create detailed budgets and schedule employees, click Detail.
Detail Project
Select Detail on the Project Setup window to add detailed budget information for the project or to assign or schedule employees. Adding detail is optional, but can be useful if you wish to assign detailed budgets to employees, or break down the project into specific tasks. You may add as much or as little detail as needed, and you can add as many detailed budgets as you need. Enter the project position, budget hours, employee, start date, target date, skill, team, service code, and the expected amount produced by this portion of the detail.
Schedule hours Employees can be scheduled for their work on projects. Hours can be scheduled automatically (click Quick Schedule) or manually (click Calendar Schedule/Manual Schedule). If you change your mind, click Clear Project Hours and start again.
Copy projects
Often you may do the same type of work for several clients. To save time, once a project is set up it can be copied to other clients. On the Project Management navigation bar, select Copy Project to Clients. Select the sort criteria and the project type. A list of all projects meeting the criteria display. Select the project that you would like to copy and click Copy to Another Client. Select the client or clients and click Copy to copy the project to each of the selected clients.
Getting Started with ProSystem fx Practice Management
119
Starting Project Management To start from the Project Management icon 1. Double-click the Project Management icon.
2. Log on using the employee code assigned to you in the Employee list. If your firm uses passwords, enter your password.
To start from the Dashboard icon 1. Double-click the Dashboard icon.
2. Log on to ProSystem fx Practice Management using the employee code assigned to you in the Employee list. If your firm uses passwords, enter your password.
3. Select Projects on the Main Menu.

ProSystem fx Practice Management
120
Setting Up a Client Project Before you set up a client project, make sure that the project type you need to assign has been set up on the Project Type list in Administration or Project Management. To set up a project 1. Select Setup Project from the Project Management navigation bar.
2. Click New from the Project Setup window.
3. Select the Client Name from the drop-down list.
4. Select the Project Type. Project types are set up from Create Lists in Project Management or from the Lists menu found on the navigation bar in Administration.
5. Enter a Description for the project. This description can be used to help you differentiate one project from another project with the same due date.
6. The Original Due, Current Due, Start, and Target Dates are defaulted based on information entered in the Project Types list. If needed, use the Calendar to change the dates. These dates are used for reporting purposes, to schedule employees, and they appear on the Due Dates tab in Time Entry. The Start Date is the day that you intend to start work on the project. This date will be used as the beginning date if scheduling employee hours. The Target Date is the date targeted for completion of the project. This date will be used as the end date if scheduling employee hours.
7. If you would like employees to be able to associate time and expenses with this project while in Time Entry, select the “Prompt Employees to select project when entering time” check box. Doing so will allow you to track budget to actual hours and amounts.
8. If you will not create a budget for this project, click OK to save the project information.

Getting Started with ProSystem fx Practice Management
121
Adding Project Budgets Once a project has been established for the client, you can designate the hours estimated to complete the project and set the revenue amount expected upon completion. Project budgets are optional and can be set up with as much or as little detail as you like. To add project budgets 1. Select the project and click Edit.
2. Enter the hours required to complete the project.
3. Enter the revenue amount that will be generated by the project.
4. Enter the employee (if any) that will be in charge of the project.
5. If you do not intend to use this project next year, mark the project as non-recurring. (Non-recurring projects will not be copied when projects are rolled into the new year.)
6. Click OK to save the budget information. If you would like to add detail or assign employees to this budget click Detail.

ProSystem fx Practice Management
122
Adding Detail and Assigning Employees
Select Detail on the Project Setup window to add detailed budget information for the project and to assign and schedule employees. The detail added for each project displays on the Detail Recap window, including position, hours, employee, skill, amount, and whether the employee has been scheduled. Adding detail is optional, and can be as specific or as general as you like. To add detail 1. Click Detail to add detail to the project budget.
2. Select the position. Positions may include Accounting Preparer, Accounting Reviewer, Audit Administrator, Field Auditor, Tax Reviewer, and Tax Preparer. These positions are set up in Project Position Setup on the navigation bar (or from the Lists menu found on the navigation bar in Administration).
3. Enter the budget hours required to complete this portion of the detailed budget.
4. If you want to assign a specific employee to this detail, select an employee. Once the employee is selected the employee’s skill level automatically appears. The employee must be assigned before they can be scheduled.
5. The Start Date is the day that you intend to start work on the project. This date defaults based on the information entered in Project Type Setup, but can be changed. This date will be used as the beginning date if scheduling employee hours.
6. The Target Date is the date targeted for completion of the project. This date also defaults based on the information entered in Project Type Setup, but can be changed. This date will be used as the end date if scheduling employee hours.
7. If you do not want to assign a specific employee but know the skill level required for this project, select the appropriate skill level.

Getting Started with ProSystem fx Practice Management
123
8. Select the team responsible for the project. (Teams are entered from Create Lists/Setup Project Teams.)
9. Enter the service code for the project if you want detailed tracking. If you want a broader scope, enter the category or subcategory.
10. The amount is the revenue generated by this portion of the detail. If you selected a time-based service code and assigned an employee, the amount will automatically be calculated as the hours times the rate based on the service code. If you selected an expense-based service code, category, or subcategory the amount is not calculated. Enter the revenue amount that will be generated.
11. Click Save to save the detail information. The detail information entered will display on the Detail Recap window.
12. Click New to continue adding detail to the project budget.

ProSystem fx Practice Management
124
Scheduling Employees
Once a project has been established and employees have been assigned, you can schedule hours for the employee(s) assigned to the project. Employees can be scheduled automatically or manually. Click Quick Schedule to schedule the employee automatically. Calendar Schedule allows you to automatically or manually schedule the employee, as well as viewing a calendar of the scheduled hours for the project or for the employee. Select the appropriate option depending on the employee hours you want to view. The default is current project scheduled employee hours; however; you can also see the employee’s scheduled hours for all projects. To auto schedule 1. If you have not already done so, set up staff hours. Select Assign Employee Hours (under Create Lists)
on the navigation bar. Select the employee and click Assign Daily Hours. Enter the daily hours each employee is available for project scheduling. If staff hours have already been set up, skip to step 2.
2. Click Quick Schedule on the Detail Project window. Note that this feature is also available through Calendar Schedule. Click Auto Schedule Hours to auto schedule employees.
3. Beginning with the first day available for the employee between the Start and Target dates, the employee is scheduled accordingly from that day until the target date. Weekends will not be scheduled. An employee will only be scheduled the number of hours listed in Assign Employee Hours. Holidays are not excluded. If you need to schedule an employee for a weekend or for specific dates, you should schedule manually.
4. To undo auto scheduling, click Clear Project Hours and start again.

Getting Started with ProSystem fx Practice Management
125
To manually schedule hours 1. Click Manual Schedule on the Detail Project window. Use this option to override Auto Scheduling if
needed.
2. A window displays the project dates. (The project date range lists every available day between the start date and the target date.)
3. Enter the first day of the schedule in the Find Date box (or select a date from the Calendar). You can then schedule hours for the employee or adjust any of the hours previously scheduled. Columns display the total available hours for this employee (based on the Employee Daily Hours and any Project Custom Hours), the scheduled hours on all projects on this date (including the selected project), and any available hours.
4. You may schedule any number of hours per day, including Saturday and Sunday. Totals are provided for Project Hours, Scheduled Hours, and Non-scheduled Hours. Grand totals display for total hours, total scheduled hours, and total available hours. Schedule each day until all project hours are scheduled.
5. To undo the scheduling, click Clear Hours and start again.
To view individual employee schedules 1. From the navigation bar, select View by Employee.
2. To view an individual employee’s schedule select View Individual Schedules.
3. Select the employee and click View Employee Calendar.
To view staff monthly schedules 1. From the navigation bar, select View by Employee.
2. To view the monthly schedule for all employees select View Monthly Schedules.
3. Select Employee Detail View to view Scheduled Hours, Available Hours, or Overbooked hours. To see detail for any employee, click View Employee Detail. Click View Future Conflicts for a list of any days that have been over scheduled.
4. Select Project View to view the Project Hours. Enter the beginning date of the month you would like to view. The corresponding hours will display.
Tips If you need to review what hours employees have been scheduled or what hours are available prior to
scheduling employees, click the [?] button on the Detail project window. This will show the weekly scheduled or available hours for your staff. Click View Employee Detail to see the project detail scheduled for an employee.

ProSystem fx Practice Management
126
Using Templates If you have many clients for whom you’re completing similar projects, you can create project templates to copy to clients. This saves setup time and effort. Templates can be added, edited, copied, or deleted. When entering a template, enter the project information. The template can be budgeted and detail budgets can be added. Budgeting templates and adding detail are optional. But remember budget information will be copied to each client along with the template. To set up a template 1. Select Setup Project Templates on the Project Management navigation bar.
2. Click New. If you want to edit an existing template, select the template and click Edit.
Adding project information to the template 1. Enter the Template Name.
2. Enter a description for this project template. This will help you distinguish between templates with similar due dates.
3. Select the Project Type. The project types on this list were set up in Project Type Setup in Project Management (or on the Lists menu found on the navigation bar in Administration).
4. The due date is the date the completed project is due. This date defaults based on the information entered in Project Type Setup, but can be changed.
5. The Start Date is the day that you intend to start work on the project. This date defaults based on the information entered in Project Type Setup, but can be changed.
6. The Target Date is the date targeted for completion of the project. This date also defaults based on the information entered in Project Type Setup, but can be changed.
7. If you would like employees to be able to associate time and expenses with this project while in Time Entry, select "Prompt employees to select project when entering time." Doing so will allow you to track budget to actual hours and amounts.
8. Click OK to save the template or continue to add budget information to the template.
To add template budgets 1. Enter the hours required to complete the project.
2. Enter the revenue amount that will be generated by the project.
3. Enter the employee (if any) that will be in charge of the project.
4. Click OK to save the template budget information. If you would like to add detail or assign employees to this template budget click Detail. Keep in mind that any budgets or detail entered, including employees assigned, will be copied to every project that is created using this template.
To add detail to templates 1. Click Detail to add detail to the template budget.
2. Select the position. Positions may include Accounting Preparer, Accounting Reviewer, Audit Administrator, Field Auditor, Tax Reviewer, and Tax Preparer. These positions are set up in Project

Getting Started with ProSystem fx Practice Management
127
Position Setup on the navigation bar (or from the Lists menu found on the navigation bar in Administration).
3. Enter the hours required to complete this portion of the detailed budget.
4. If you want to assign a specific employee to this template, select an employee. Once the employee is selected the employee’s skill level automatically appears. Remember that once you assign this employee, the employee will be assigned to every project created from this template.
5. The Start Date is the day that you intend to start work on the project. This date defaults based on the information entered in Project Type Setup, but can be changed. This date will be used as the beginning date if scheduling employee hours.
6. The Target Date is the date targeted for completion of the project. This date also defaults based on the information entered in Project Type Setup, but can be changed. This date will be used as the end date if scheduling employee hours.
7. If you do not want to assign a specific employee but know the skill level required for this project, select the appropriate skill level.
8. Select the team responsible for the project. (Teams are entered from Create Lists/Setup Project Teams.)
9. Enter the service code for the project if you want detailed tracking. If you want a broader scope, enter the category or subcategory.
10. The amount is the revenue generated by this portion of the detail. If you selected a time-based service code and assigned an employee, the amount will automatically be calculated as the hours times the rate based on the service code. If you selected an expense-based service code, category, or subcategory the amount is not calculated. Enter the revenue amount that will be generated.
11. Click Save to save the detail information. The detail information entered will display on the Detail Recap window.
12. Click New to continue adding detail to the project template.
Copying templates to clients 1. Select Copy Template to Clients from the navigation bar.
2. Select the Project Type of the template you want to copy. A list of all templates for that project type will display.
3. Select the template you want to copy to clients and click Copy Template to Clients.
4. Select the primary sort from the navigation bar upon which the client list will be built. The choices are Client, Primary Partner, Secondary Partner, Responsible Person, Manager, Bill Manager, Tax Reviewer, Tax Preparer, Entity Type, Work Type, Line of Business, and Department. Select the secondary sort to narrow the list. The secondary sort field will be determined by the primary sort criteria. (For example, if your primary sort is Primary Partner, select the partner’s name as the secondary sort. Clients assigned to the selected primary partner will display.)
5. Select the client(s) and click Copy to copy the template to the selected clients. To select a group of clients, click the first client in the group. Holding down the SHIFT key, click the final client you want to be included. To select multiple clients at random, hold down the CTRL key while clicking with your mouse.
6. You will be notified if the project already exists for the selected client(s). You can choose to overwrite the existing project or to leave the project, and not to copy the template.

ProSystem fx Practice Management
128

Getting Started with ProSystem fx Practice Management
129
Project Tracking
Tracking the Status of Projects Project Tracking is found on the Features menu of all modules of ProSystem fx Practice Management. There is not, however, a Project Tracking option on the main ProSystem fx Practice Management window. Projects are set up through the Project Types list in Administration. They become the basis of the Firm Project list available in the Client Tracking folder and in Project Management. On the Projects tab of the Client Tracking folder, projects with due dates are assigned to a client. In Project Management, projects are also assigned to clients; additionally, project tasks are created, employees are assigned to projects, and employees are scheduled for project tasks. In Project Tracking, you can track the status of a project, mark a task as completed, locate who last worked on a project, and extend project due dates. A default list for the various stages in the processing of a return is provided for you. Use the Tracking Status option in Administration to modify this list as needed. Project Tracking reports are available from the Projects tab of the Reports folder (Print Reports). To use Project Tracking 1. Look up projects by primary and secondary sort criteria.
2. Select the project you need to work on.
3. Set the project status.
4. Locate the project file in your firm.
5. Extend the project due date.

ProSystem fx Practice Management
130
Quick View - Project Tracking Track Projects
Select the primary criteria, the date type, date range, and the secondary criteria to view client projects. All client projects meeting the selected criteria are displayed. Select a project to locate the project file or to update the project status.
Project File Locator
Click Project File Locator to view all current WIP for the category and date range entered for the client associated with the project. Using this information, you can see which employee last worked on the project and the amount of WIP posted to the project.
Self Assign
When displaying projects in the Track Detail Tasks view, the Self Assign option is available when selecting project list criteria By Assigned Position (with the exception of By ALL). Use this to assign yourself to the selected position for the selected project or projects, if the position has not yet been assigned. Security must be enabled for Self Assign and is available in the Project Tracking (Dashboard) Privileges section of Security Setup.
Set Project Status
Click Set Project Status to view or update the project status or mark an employee position on the project completed. Select the new project status on the Project Status tab. If appropriate, enter the received, prepared, reviewed, completed, or delivered date. The Assigned Employees tab lists all employees assigned to the project. Use this tab to review project employees and mark the employee project position as completed. Click Mark Completed. Enter the completion date. Click Mark Completed to mark the employee position completed on this project as of the date entered.
Extend due dates
Select Extend Projects from the navigation bar in Project Tracking. Select the Project Type and original due date for the project you need to extend, then click List Projects. Clients with the selected project type and due date appear on the grid. You can extend all clients (right-click and Select All), or select individual clients. Once the clients are selected, click Extend Project(s). Select either the 1st or 2nd
extension option. If you want to override the date, select Override Date and enter the new extension date.
Print Extension Forms Federal Extension forms can be displayed on-screen or printed for the extended client project. To print extension forms, enter the tax year and select the appropriate form. You can select to print forms with client information, print blank forms, display blank forms, or display interactive forms with client information. Click Extend client projects to extend the client project and generate any extension forms selected.

Getting Started with ProSystem fx Practice Management
131
Selecting the Project and Client
Before you can use Project Tracking projects must have been created for clients in either Project Management or the Client Tracking folder. Once you have set up the project you are ready to start tracking its progress through your firm. To select the project and client 1. From the navigation bar select the project list criteria to locate the project.
2. Select the date type. You can select Original Due, Current Due, Start Date, or Target Date. Enter the corresponding date range.
3. Select the secondary criteria to further narrow the project listing. The secondary criteria will depend on the primary criteria selected.
4. Select Show delivered projects or Show completed projects to include projects that have been completed or delivered on the client project list. If you do not want these projects to list, clear the check boxes.
5. All projects meeting the search criteria are displayed.
6. To view a specific group of items, click the column heading of the type of criteria you would like view. Then click an item that contains the specific criteria, right-click, and select the filter. You can combine criteria to further narrow the list. You can also sort the displayed list to find projects more easily. Click the column heading to sort the column.
7. Highlight the project you wish to review and click the appropriate button.

ProSystem fx Practice Management
132
Extending Projects You may need to file for extensions on specific client returns. Extension calculation information was entered for each project in the Project Type list in Administration. Each project can have up to two extensions; however, you may override an extension if needed. To extend projects 1. Select Extend Projects from the navigation bar in Project Tracking or Project Management.
2. Select the Project Type and original due date for the project you need to extend.
3. Select Show delivered projects or Show completed projects to include projects that have been completed or delivered on the client project list. If you do not want these projects to list, clear the check boxes. Click List Projects. Clients with the selected project type and due date appear on the grid.
4. Select the clients whose project you need to extend. Right-click and Select All to select the entire client list, or select individual clients with your mouse. Click Extend Project(s).
5. Click the Extension Calculation option for the 1st or 2nd
6. If you need to override the extension date, select Override Date and enter the extension date.
extension. Calculations will be made based on the information given for the project in the Due Date Projects list.
To print federal extension forms 1. Enter the Tax Year for the extensions.
2. Select the appropriate federal extension forms.
3. Select the option for generating the extension forms. You have the option to print or display blank forms, or forms containing client information. The forms can be generated on-screen allowing you to review or edit the forms, prior to printing or they can be sent directly to the printer. Select Do Not Print Forms if you are extending the project but do not want to print extension forms at this time. Select Print All Forms with Client Information to have ProSystem fx Practice Management enter the client information and send the forms directly to the printer. Select Print Blank Forms for each Client to print a blank form for each extended client project. Select Display Interactive Blank Forms to display blank forms on-screen, allowing you to enter the client information prior to printing. Select Display Interactive Forms with Client Info to have ProSystem fx Practice Management enter the client information and display the forms on-screen. The information can be edited or added to prior to printing.
4. Click Extend client projects to extend the client projects and generate any selected extension forms.
Tips To select a range of clients for extension, hold down the SHIFT key and click the final item in the range
with your mouse. To select clients for extension at random, hold down the CTRL key and click with your mouse on the
items you want to select. If you mistakenly extend the due date for a project, use the override date to enter the correct due date and
undo your mistake.

Getting Started with ProSystem fx Practice Management
133
Locating the Project You may need to find out which firm employee last worked on a project to locate a tax return or verify the status of a project. In Project Tracking you can view the WIP entered for a project, which allows you to pin point which employee worked on a project last. To view project time 1. Click Project File Locator.
2. All current WIP for the service code and date range entered for the selected client is displayed. The grid displays the transaction date, employee name, service code description, hours, and amount.
3. Select another category if you need to view a different group of hours.
4. The default date range is year to date, however, you can change the date range by entering new dates.

ProSystem fx Practice Management
134
Setting the Project Status Project Tracking lets you view the status of a project, the tracking dates as the project progresses, and the employees assigned to the project. To set the status 1. Select Project Tracking from Project Management or the Features menu.
2. Select the project and click Set Project Status. The client name, project type, current status, and current due date are displayed at the top of the window.
3. Select the status that reflects the project’s progress towards completion. Use the Tracking Status option on the Lists menu in Administration to change this status list if needed.
4. Enter any applicable tracking dates. You can enter the dates the return was received, prepared, reviewed, completed, and delivered. Project Tracking Date labels can be customized for your firm from Administration/Firm/Firm Setup/Project Status Dates tab.
5. Select the Assigned Employees tab. All employees that were assigned to the project in Project Management are displayed. Click Mark Completed to enter the completion date and mark an employee’s position as completed.
6. Click OK to save any status information you entered.
Tips To initiate the roll forward for a project with an auto roll enabled project type, enter the Delivered Date
for the project by updating Tracking Status from within any online module within ProSystem fx Practice Management. When you click OK, the project will roll forward to the new year.
Note that for existing projects, enabling of auto roll for a project type may affect existing delivered projects that have not yet been rolled to the new year if these projects’ tracking dates are reviewed.
You can also change project status from the Project Dashboard.
Getting Started with ProSystem fx Practice Management
135
Marketing
Marketing Your Firm ProSystem fx Practice Management allows you to track marketing methods used by your firm and determine how your firm attains new business. Marketing methods such as referrals, mailers, and advertising are available in reporting, showing the most profitable methods by which your firm acquires new clients. To use marketing features 1. Create referrals and marketing methods. 2. Record how new clients are acquired. 3. Create prospects and leads. 4. Create and designate mailers. 5. Print mailer labels.

ProSystem fx Practice Management
136
Quick View - Marketing Options Create prospects
Just as you create a client folder containing address, contact, status, and staff information, you may create a folder for a prospective client. Choose the Clients option from the Lists menu found on the navigation bar in Administration. Create a prospect as you would a client, being sure to designate the status (on the Status/Office tab) as Active Prospect. When you take on a prospect as a client, change the status to Active Client. You may enter time and expenses for prospects as you would clients; however, you cannot bill prospects.
Record referrals, etc.
Using the Marketing tab of the Client Tracking folder, record how you acquired a new client. Employees, referrals, and marketing methods are available on lists. Select which is responsible for bringing this new client to the firm. (Employees, Referrals, and Marketing Methods are set up from the Lists menu, found on the navigation bar in Administration.)
Track new business
On the Marketing tab of the Client Tracking folder, you may designate a new client as new business or an engagement as expanded business. This option allows you to track whether the majority of your business is new or expanded.
Designate mailers
Mailers are created from the Marketing feature on the Lists menu found on the navigation bar in Administration. Once they are created, you may designate clients, prospects, referrals, business affiliates, or leads to receive a mailer, from the Mailing tab of the Tracking folder or from the Mailer feature found on the Lists menu on the navigation bar in Administration. You may send a mailer to all clients or to a particular group of clients. For example, you have created the mailer Tax Newsletter, and want to send it to prospective clients who file Individual 1040 Tax. Use the Prospects option in Mailers to group prospects by type. Then select all Individual 1040 Tax prospects to receive the mailer.
Print mailing labels
Print labels using Quick Labels or Word’s mail merge option. Click Merge on the Mailers list to open the Merge Document Interface window. Click Merge Setup to set up labels and run the mail merge. You can set a default merge document by clicking Default Document Setup and then use this default document to quickly generate future labels by clicking Use Default Document. Click Quick Labels on the Mailer List menu to quickly create basic mailing labels. Select the type of label and click the fields you want to include to set up the label. The label set up can be saved by clicking Save Format.
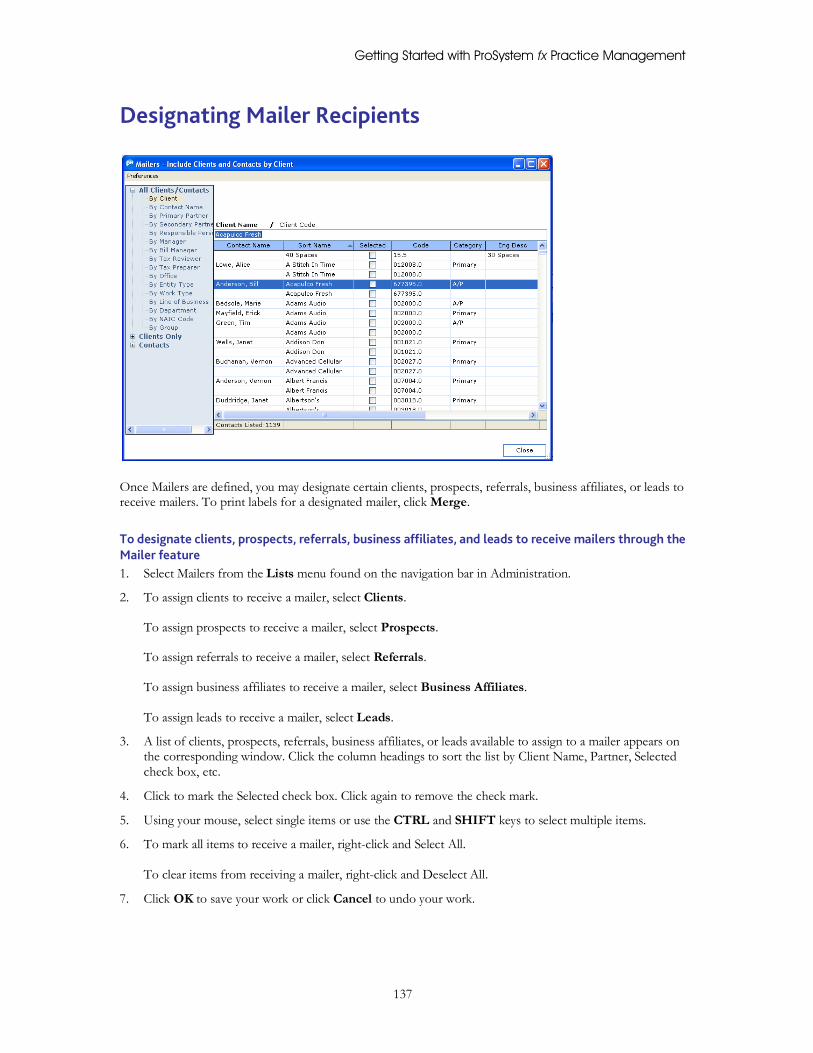
Getting Started with ProSystem fx Practice Management
137
Designating Mailer Recipients
Once Mailers are defined, you may designate certain clients, prospects, referrals, business affiliates, or leads to receive mailers. To print labels for a designated mailer, click Merge. To designate clients, prospects, referrals, business affiliates, and leads to receive mailers through the Mailer feature 1. Select Mailers from the Lists menu found on the navigation bar in Administration.
2. To assign clients to receive a mailer, select Clients. To assign prospects to receive a mailer, select Prospects. To assign referrals to receive a mailer, select Referrals. To assign business affiliates to receive a mailer, select Business Affiliates. To assign leads to receive a mailer, select Leads.
3. A list of clients, prospects, referrals, business affiliates, or leads available to assign to a mailer appears on the corresponding window. Click the column headings to sort the list by Client Name, Partner, Selected check box, etc.
4. Click to mark the Selected check box. Click again to remove the check mark.
5. Using your mouse, select single items or use the CTRL and SHIFT keys to select multiple items.
6. To mark all items to receive a mailer, right-click and Select All. To clear items from receiving a mailer, right-click and Deselect All.
7. Click OK to save your work or click Cancel to undo your work.

ProSystem fx Practice Management
138
To designate client or prospect contacts to receive mailers through the Mailing tab in the Client Tracking folder 1. Select the Mailers tab in the Client Tracking folder.
2. Select to group by mailers or contacts.
3. Select the Mailer or Contact (depending on the grouping selected) and click Edit.
4. Click to mark the Selected check box. Click again to remove the check mark.
5. To mark all items to receive a mailer, right-click and Select All. To clear items from receiving a mailer, right-click and Deselect All.
6. Click OK to save your work.

Getting Started with ProSystem fx Practice Management
139
Setting Up the Mail Merge
Once you have designated a group of clients, prospects, and/or referrals to receive a mailer, select Merge on the Mailers list. Use the Merge Document Interface window to set up labels, run the mail merge, and set a default merge document. To set up labels using Mail Merge 1. On the Mailers list, click Merge.
2. Click Merge Setup. Word’s Mail Merge Help window appears.
3. Mailing Labels is the default merge type; Document1 is the default name for the main document.
4. Click the On-Screen Steps and follow the instructions. Your database is the default Data Source. (To find the path of your database, go to Help/About anywhere in ProSystem fx Practice Management. The path to your database is listed.)
5. Preview the Labels as needed and click Print.
6. Close the Labels document without saving it and save the Main document if you plan on using this label setup again.
To set up labels using Quick Labels 1. Select the type of labels you will be printing from the drop-down.
2. Select the information from the Fields drop-down that you want to include on the labels. Be sure to include spaces and punctuation between fields.
3. Click Save Format to save the label format so that it can be used the next time you need to print labels. (The next time you print labels click Reset Format to restore the saved label format so that you can quickly create labels without having to re-enter the format.)
4. Click Print to print the labels containing client data.
5. Use the Printer/Format Selection window to select print options including printing multiple copies, previewing the labels on-screen, and selecting your printer or printer options.

ProSystem fx Practice Management
140
Tips For more information on selecting labels and working with merge documents, see Word’s online and print
documentation.

Getting Started with ProSystem fx Practice Management
141
Setting a Default Document Each time you set up mailing labels using Merge Setup on the Merge Document Interface, a new Main mail merge document is created. You can set one of your Main documents as the default document to use for running merge and printing labels. To set a default main document 1. On the Mailers list, click Merge.
2. Click Default Document Setup.
3. Locate your mail merge main documents.
4. Select a main document that contains the most common label setup. When you set this document as the default, you can run a merge and create labels in one step.
5. Click Open to set the selected document as your default.
6. The default document path and file name is displayed under Default Document Setup for reference.
Tips For more information on working with merge documents, see Word’s online and print documentation.

ProSystem fx Practice Management
142
Using Mail Merge Documents Each time you set up mailing labels using Merge Setup on the Merge Document Interface, a new Main mail merge document is created. If you have set one of these documents as the default, you can quickly run the mail merge and create labels in one step. Or, you can use any of the Main documents for a specific label set. To select your default document 1. On the Mailers list, click Merge.
2. To print a default set of labels, click Use Default Document.
3. Preview the labels and click Print.
To select another main document 1. On the Mailers list, click Merge.
2. If you would like to print a set of labels that differs from the default, click Use Other Merge Document.
3. Locate your mail merge main documents.
4. Select a main document that contains the label setup you need and click Open.
5. Preview the labels and click Print.
Tips For more information on working with merge documents, see Word’s online and print documentation.

Getting Started with ProSystem fx Practice Management
143
Security
Setting Firm Security One of the decisions your firm will need to make is whether or not you will change employee security settings. Security is automatically built into ProSystem fx Practice Management at the lowest level. All employees can perform all tasks with the exception of tasks normally assigned to the System Administrator (who will use the SUPERVISOR logon). Passwords are not required at log in except for the SUPERVISOR. You do not need to make any changes to security unless you want to turn options off for employees or you want your employees to use passwords. Security has a built-in default setting. If you decide to change security, we recommend that you follow these guidelines. Security guidelines 1. Log on as SUPERVISOR.
2. Decide if you want to change the firm default. If not, skip to step 4.
3. Most firms may want to change the default setting so that all options are turned off except Staff Time Privileges (time and expense entry) and Contact Management Privileges as this covers the majority of employees. However, under each of these categories there are privileges that you may want to deny all employees, such as Manager Partner Alert or Modify Client Address. When you change the firm default it becomes the default for all employees except the SUPERVISOR.
4. Identify the employees who will have access to the majority of the options in ProSystem fx Practice Management, such as Billing and Invoicing, Reports, and Accounts Receivable. Make changes to one of these employees’ security settings and copy their settings to the other employees who will also have this level of access. Security settings are saved each time you move from one employee to another.
You can change the default setting as many times as you wish. However, keep in mind that security settings for some employees will not be changed if their settings differed from the prior default setting. For example, if the firm default was No to Billing and Invoicing, but you changed specific bill managers’ security settings to Yes, the setting for Billing and Invoicing for these bill managers will not revert back to No when you change the default.

ProSystem fx Practice Management
144
Quick View - Security Change the firm default
In Security Setup, select Default for All Employees. Click an option to change the security setting from Yes to No or vice versa. Click the group heading, such as Staff Time Privileges, to change the setting for a group of items. Changing the default automatically changes security settings for any employee currently assigned to the default settings.
Change security
In Security Setup, select Individual Employee Privileges. Use the Employee List drop-down button to select the employee whose security privileges you want to change. Click an option to change the security setting from Yes to No or vice versa. Click the group heading, such as Staff Time Privileges, to change the setting for a group of items. If the employee’s security setting for an option differs from the default settings, it is displayed in red.
Copy employee security
In Security Setup, click Copy Options. A Clone window opens. In the Copy From box, select the employee who will be the basis of the copy. All firm employees are displayed in the Copy To list. You can sort the list by employee or skill level (allowing you to copy security settings by skill level). Select the employee to receive the copy. To copy to more than one employee, either press SHIFT and drag the mouse to highlight a group of employees, or press CTRL and click to select employees at random. Click OK to complete the copy.
Set up passwords
In Security Setup, select either Individual Employee Privileges or select Default for all Employees. Change Use Password to Yes. The next time employees log on, they will enter a password they define for themselves.
Reset passwords
In Security Setup, click Reset Passwords. Select the employees you wish to reset by clicking the "Selected" check box. Then click Reset. Passwords for these employees will be reset to the default. The next time the selected employees log on, they will need to enter a new password.
Change passwords
Select Change My Password from the Preferences menu. Enter the Old Password. Enter the New Password and confirm it by entering the password again.

Getting Started with ProSystem fx Practice Management
145
Security Privileges Overview The Security Privileges described below may be applied (or restricted) to employees from the Security Setup window accessed through the Firm menu of Administration.
Supervisor Privileges
Apply when logged on under name SUPERVISOR. May be assigned to any employee, preferably an office manager or equivalent. Delete
Delete items from a list. Security Setup
Assign security privileges for all employees. Security - Client/Employee Lookup
Select the client and employee lookups displayed by employees for each module.
Remote Manager
Allows employees to access the Remote Manager feature that contains Build Remote Program Installer, Import Remote Files, and Create Remote Employee Data Files.
Use Password
Makes a password mandatory at logon.
Preferences My Lookups
Allows employees to trim down their client and employee lookups throughout the program. The ability to trim the service code lookup in Time Entry is also included.
Administration Privileges
The following privileges are optional under Administration: Utilities
Run Administration utilities (Recalculate WIP/TE Rates and Create Expense Transaction for All Clients). Batch Time Entry
Enter time for any employee. Time Exception List
Print a report of employees who have released less than a designated amount of hours. Lock Releasing of Time
Prevents employees from releasing time. Edit Released Time
Correct any released time. Time Edit List
Print an edit list of unreleased time for a given employee in a given time period. Update Time
Post time to the host database so that it becomes WIP. Correct WIP
Transfer WIP to another client or service code.

ProSystem fx Practice Management
146
Correct WIP Detail Edit and change a posted WIP transaction.
Delete WIP Use Correct WIP to delete an incorrect WIP transaction.
Correct WIP Projects Enter or correct time associated with client projects.
Transfer - Lump Sum WIP Make a lump sum dollar transfer from one client to one or more clients in Administration.
Client Setup Add and edit client folders including staff assignments, general information, project assignments, etc.
Client Bill Rates Set up billing rates for a client.
Client Projects Create and view client projects on the projects tab of the Client Tracking folder.
Employees Add and edit employee folders. This includes bill rates, cost to firm, personal information, skill level, vacation hours allotment, etc.
Employee - Internet Time Entry Setup Access to the Employee Internet Time Entry Setup option on the navigation bar in Administration, where employees are given access to the Internet Time Entry feature.
Employee – CCH Coolbar Setup Access to the Employee Coolbar Setup option on the navigation bar in Administration, where employees are given access to CCH Coolbar, an add-on to ProSystem fx Practice Management.
Service Codes Add and edit service codes to be used by the firm in Time Entry.
Office Setup Enter, edit, and delete offices.
Business Affiliate Setup Add and edit business affiliates and contacts for your clients.
Lead Setup Add and edit leads.
Other Setup Add and edit list items such as bank accounts, departments, finance charges, etc. (See Lists/Other on the navigation bar in Administration.)
Custom Field Setup - Client/Lead Add and edit client/lead custom fields on the navigation bar in Administration.
Custom Field Setup - Employee Add and edit employee custom fields on the navigation bar in Administration.
Custom Field Setup - Project Add and edit project custom fields on the navigation bar in Administration.
Custom Field Setup - Referral Add and edit referral custom fields on the navigation bar in Administration.
Custom Field Setup - Business Affiliate Add and edit business affiliate custom fields on the navigation bar in Administration.

Getting Started with ProSystem fx Practice Management
147
Firm Setup and Invoice Formats Set up the firm preferences and the invoice formats, including billing methods, payment distribution methods, archiving invoices, and the firm’s preferred invoice format.
Lock Reconciliation Date Control the dates on Real Time entries released for the firm.
Force Post Date of Invoice to Equal Final Print Date Disable the Accounting Period for Posting date in Update Invoices and force the post date of invoices to be the same as the final print date.
Allow Corrections Before Lock Reconciliation Date Rights to make corrections to invoices, reverse billings, time entries (Correct WIP), and A/R (Correct A/R) dated before the lock reconciliation date.
Allow Rate and Amount Corrections Before Lock Reconciliation Date Rights to modify the rate or amount of a WIP transaction (Correct WIP) dated on or before the lock reconciliation date.
Set WIP Approval Date Approve WIP for billing through a specified date; the date entered here defaults as the "Bill Through Date" in Billing.
Year End Procedures Roll all transactions to the new year.
Alert Setup Set up the alert assignments and alert conditions.
CPA Accounting Client Master Setup Access to ProSystem fx CPA Accounting Master Client Setup which links the client address entered in with the client address for clients in other ProSystem fx CPA Accounting products.
GL Interface Set Up Options for the Export to ProSystem fx Write-Up or CPAClient Write-Up and the Export Month End Update which exports the journal entries.
Disable Logins Rights to restrict employees from logging into the software through View Active Processes.
Billing and Invoicing Privileges
The following privileges are optional under Billing and Invoicing: Override Expense Exclusions
Override the firm preference to exclude expenses from billing write-up/downs when using employee Bill amounts.
Billing Worksheets Print a billing worksheet for review.
Billing and Invoicing Bill WIP, generate, edit, and print invoices. Billing includes write-ups and write-downs.
Print Final Invoices Print final invoices for clients.
Billing Edit List Print an edit list of transactions being billed.
Update Billing Relieve WIP and post it to A/R.
Reverse Billings Reverse bills so that transactions are recovered as WIP.

ProSystem fx Practice Management
148
Notes to Reviewer Enter or edit notes to review on the Billing Recap.
Correct WIP Transfer WIP to another client or service code.
Correct WIP - Detail Edit and change a posted WIP transaction.
Correct WIP - Projects Enter or correct time associated with client projects.
Transfer - Lump Sum WIP Make a lump sum dollar transfer of WIP from one client to one or more clients in Billing.
Invoice Review Status Change
The following privileges control access to the five invoice review status options in Billing and Invoicing. Note that Reviewed Status 5 is listed at the top and that Reviewed Status 1 is listed last. Staff members assigned to the top status (Reviewed Status 5) have security for all five levels. Staff members assigned to Status 3 do not have security for levels 4 and 5. Staff members assigned to Status 1 do not have security for any other level. Firm-defined labels for these status levels can be set in Administration/Firm/Invoice Formats. Reviewed Status 5
Security for all five reviewed status levels. Reviewed Status 4
Security for reviewed status levels 1 through 4. Reviewed Status 3
Security for reviewed status levels 1 through 3. Reviewed Status 2
Security for reviewed status levels 1 through 2. Reviewed Status 1
Security for reviewed status level 1 only.
Reporting Privileges
The following privileges are optional under Reporting: Clients
Run client-based reports. Employees
Run employee-based reports. Service Code
Run service code-based reports. Marketing
Run marketing-based reports. Due Dates
Run project-based reports. Schedules
Run scheduling reports. Projects
Run reports related to project tracking status. Archived Invoices
View and print archived invoices.

Getting Started with ProSystem fx Practice Management
149
On Screen Look View MTD hours for any given employee.
Enable Processing Queues on My Workstation Allow print queue processing on this workstation.
Show Cost on Billing Worksheet Show the hourly cost to the firm to employ someone with this skill level on the Billing Worksheet. The employee cost is entered on the Billing Rates tab of the Employee folder.
Show Cost on Employee Time Analysis Report Show the hourly cost to the firm to employ someone with this skill level on the Employee Time Analysis Report. The employee cost is entered on the Billing Rates tab of the Employee folder.
Custom Library Allow access to the Custom Library add-on.
Report Writer
Report Writer - Setup Create reports using the report writer.
Report Writer - Delete Delete existing report writer reports.
Accounts Receivable Privileges
The following privileges are optional under Accounts Receivable: Enter Payments
Enter client payments. Print Deposit Slip
Set up and print deposit slip for bank deposits. Update AR
Post A/R transactions. Calculate Finance Charge
Calculate finance charges on client accounts. Print Statements
Print client statements. Dunning Letters
Print overdue notices for client accounts. Apply Later Distribution
Apply payments to Later Distribution, where they can be held and applied to an invoice at a later date. Correct AR
Void an AR entry, transfer the entry to a different client, or redistribute an AR entry to a different invoice. Lookup AR
Lookup the AR history for a client. A/R Entry Notes
Enter and edit accounts receivable notes associated with payments and AR entries. Load Beginning Balances
Load the beginning AR balance for a client.
Staff Time Privileges
The following privileges are optional under Staff Time Privileges:

ProSystem fx Practice Management
150
Staff Time Entry Allows employees to enter their own time and expenses.
Banked Hours Allow employee to bank or use comp hours.
Bill Manager Alert View billers with write-downs, including which client was written down and by how much.
Client Credit Limits View the total WIP and AR produced and the limits entered for each client.
Key Indicators – Firm Management Report View and print firm management information applicable to partners only and view the Firm Dashboard.
Key Indicators – Employee Management Report View and print employee management information applicable to partners only.
MTD Calendar Time Notification Enable calendar pop-ups designed to remind employees to enter and/or release their time.
Time Entry Real Time Update Mode
Real Time Update Mode Changes the employee to Real Time Update mode in Time Entry, where time will be released and posted in one step by the employee when clicking the Real Time Release button.
Time Entry – Project Based Entry Project Based Time Entry is an alternate time entry method, allowing you to enter the project before entering the service code for the transaction.
Allow override of service codes Allow employee to override the linked service codes for any project in Project Based Time Entry.
Appointment Manager Privileges
View Appointments of Other Users Allow the employee to view appointments of other employees, by selecting Change Employee on the Appointments window.
Change Appointments of Other Users Allow the employee to view and edit the appointments of another employee.
Include Project Due Dates Allow the employee to view the projects that they have been assigned on the Due Dates Projects tab of the Appointment Manager.
Contact Management Privileges
The following privileges are optional under Contact Management: Client WIP
View all unbilled WIP for a client. Client AR
View Accounts Receivable history for a client. Client Invoices
View invoice history for a client. Client Projects
View the projects created for a client. Modify Client Contacts
View or edit the contact information set up for each client.

Getting Started with ProSystem fx Practice Management
151
Delete Client Contacts Delete the contact information set up for each client.
Modify Client Address Change the address for the client in Contact Management, which will update the address in Client Setup. (If the client has been linked through CPA Accounting Client Master Setup, found on the Firm menu in Administration, the client address will also be changed throughout the ProSystem fx CPA Accounting products.)
Modify Client Custom Fields View or edit the custom field information set up for each client.
Allow Selection of multiple clients, referrals, etc. Allow the employee to select multiple clients, contacts, etc. by using the CTRL or SHIFT keys.
Allow edit of shared Leads Allow the edit of leads marked as shared by employees.
Business Affiliate Lists View business affiliates.
Referral Lists View referrals.
Project Management Privileges
The following privileges are optional under Project Management: Project Custom Setup
Add, edit, or delete project custom fields under Create Lists in Project Management. Project Status Setup
Add, edit, delete, or reorder project status descriptions. Project Type Setup
Add, edit, or delete project types. Project Position Setup
Add, edit, or delete position descriptions. Project Team Setup
Add, edit, or delete project teams. Project Custom Hours Setup
Add, edit, or delete project custom hours. Assign Employee Hours
Set the daily hours for employees. Set Project Option Defaults
Select the project options including setting the default Time Entry prompt and defaulting the project dates to the current year.
Set Up Project Templates Enter project templates.
Copy Project Templates Copy the project templates to clients.
Project Lists – All Projects (not limited by Employee Logged On/In Charge) Allow the employee to view all projects meeting the criteria selected in Project Management. Select No to allow the employee to only view the projects where they are assigned or selected as the employee in charge.
Set Up Projects – Add Projects Add projects through Set Up Projects.
Set Up Projects – Edit Projects

ProSystem fx Practice Management
152
Edit projects through Set Up Projects. Set Up Projects – Delete Projects
Delete projects through Set Up Projects. Project Management Reports
Print Project Management reports. Copy Projects to Clients
Copy projects from one client or multiple clients. Replicate Projects – Frequency
Replicate projects that are repeated on a regular basis. Edit Projects – Replace Employee
Replace the employee scheduled on a project (or projects) with another employee (or employees). View by Employee – Individual Schedules
View the individual schedules of employees including the project list view and the calendar view. View by Employee – All Employees (not limited by Employee Logged On/In Charge)
Allow the employees to view all employee individual schedules. Select No to allow the employee to view only their own schedule. (The employee identification pulls from the logon code, so the employee will see only the schedules of the user logged into the program.)
View by Employee – Monthly Schedules View the monthly schedules by employee view or by project view for use in scheduling projects.
Roll Projects to New Year Recreates existing projects in the new year adding appropriate due dates.
View Clients without Projects View the list of clients that do not have projects created.
Delete Projects by Date Deletes all projects within the specified date range.
Project Tracking (Dashboard) Privileges
The following privileges are optional under Project Tracking: Extend Date
Extend due dates on returns. Set Return Status
Change the status of a return. Set Received Date
Enter the date the project was received (if using the default status) or enter custom status information. Set Prepared Date
Enter the date the project was prepared (if using the default status) or enter custom status information. Set Reviewed Date
Enter the date the project was reviewed (if using the default status) or enter custom status information. Set Completed Date
Enter the date the project was completed (if using the default status) or enter custom status information. Set Delivered Date
Enter the date the project was delivered (if using the default status) or enter custom status information. Assigned Employees
View the Assigned Employee(s) and mark their portion of the project as completed. View Projects
View project information only.

Getting Started with ProSystem fx Practice Management
153
View Projects Detail Positions View project detail positions only.
Edit Projects Edit project information.
Edit Projects - All Projects (not limited by Employee Logged On/In Charge) Edit projects (not limited by the employee logged on or "in charge").
Edit Projects - All Projects (not limited by Employee Logged On/Assigned) Edit projects (not limited by the employee logged on or assigned).
Edit Project Detail Positions Edit project detail positions.
Self Assign Assign yourself to a budget detail task if the associated project position has not yet been assigned.
Edit Project Detail – All Employees (not limited by Employee Logged On/In Charge) Edit project detail for all employees (not limited by the employee logged on).
Edit Project Custom Fields Edit project custom fields.
Edit Project Notes Edit project notes.
Marketing Privileges
The following privileges are optional under Marketing: Referral Setup
Set up referral sources for the firm. Mailer Setup
Set up mailers, designate clients, prospects, and referrals to receive mailers, and create mailing labels. Market Method Setup
Define marketing methods.
Employee Budgeting
Giving an employee rights to Employee Budgeting gives them rights to access the Employee Budget Setup feature in Administration. This also gives them the ability to set their own budget in Time Entry.
Payroll Interface
The following privileges are optional under Administration: Payroll Setup
Set up the Payroll interface. Payroll Employee Setup
Set up employees for the Payroll interface. Payroll Processing
Process payroll information for the Payroll interface. Payroll Generate
Generate payroll for export to ProSystem fx CPAPayroll or Sage Abra.
ProSystem fx Tax Linking
Link Client Folder from Practice Management Link client name and address from ProSystem fx Practice Management to ProSystem fx Tax.

ProSystem fx Practice Management
154
Link Client Folder from Tax Application Link the client name and address from ProSystem fx Tax to ProSystem fx Practice Management.
Setup Client Folder from Tax Application Set up client information in ProSystem fx Practice Management from ProSystem fx Tax.
Edit Client from Tax Application Edit client name and address information from ProSystem fx Tax.
Update Tax File with Changes to Client Folder in Practice Management Update the tax file with changes to the client folder in ProSystem fx Practice Management.
Firm Dashboard
Firm Summary as Primary Partner View summarized client data by Primary Partner staff position.*
Firm Summary as Secondary Partner View summarized client data by Secondary Partner staff position.*
Firm Summary as Bill Manager View summarized client data by Bill Manager staff position.*
Firm Summary as Responsible Person View summarized client data by Responsible Person staff position.*
Firm Summary as Manager View summarized client data by Manager staff position.*
Firm Summary as Tax Preparer View summarized client data by Tax Preparer staff position.*
Firm Summary as Tax Reviewer View summarized client data by Tax Reviewer staff position.*
My Summary View summary of data for clients assigned to the employee for the selected position.
My Projects View projects for clients assigned to the employee for the selected position.
My Clients View WIP and AR totals for clients assigned to the employee for the selected position.
My Project Overruns View project overruns assigned to the employee for the selected position.
*The “Firm Summary” security items only secure the Firm Summary tab for the specified staff position.
Employee Dashboard
My Calendar View Access My Calendar View tab to view different types of time (released, posted etc) in calendar format by month/year.
My Time Access My Time tab to view different categories of time in calendar format by week/month/year as well as to view different categories (billable, non-billable, etc.) of time.
My Assignments Access My Assignments tab to view project assignment, task, follow-up, and appointment information.

Getting Started with ProSystem fx Practice Management
155
Client Dashboard
Contact Information View General Information, Contacts, Balances, and Invoices.
Client Notes View, add, edit, and print client notes, marketing ticklers, follow-ups, and appointments.
PTD/YTD Activity View reconciled summarized WIP and AR activity as well as detailed transactions.
Current/Prior Year View production, billing, and accounts receivable data summarized by month as well as compare production and billing data by employee or service for both current and prior year.
All Engagements View production, billing, and accounts receivable data by engagement by month for both current and prior year.
Project Dashboard
Tracking View Track Milestones and Track Detail Tasks.
Tips Security defaults may be changed with new releases. You should make it a habit to check security after
installing a new release. The option Reverse Billing is available from the Administration module in ProSystem fx Practice
Management. The option Time Exception List is available from the Administration and Reports modules in ProSystem
fx Practice Management. Marketing options are available from the navigation bar in the Administration module in ProSystem fx
Practice Management. The Employee Security List Report is available by clicking the Print Security List button in Security
Setup. The report is used to show the differences between the default security selected for your firm and the security features selected for individual employees. If you select to enable password expiration, the report will also show employees without passwords, and employees with passwords expired.
For a list of all security features selected for an employee, select the employee (in Security Setup) and right-click on the Security Privileges list.

ProSystem fx Practice Management
156
Changing the Firm Default
The SUPERVISOR is the only employee with automatic access to Security. The SUPERVISOR log in is intended for initial set up only. Be sure to give the system administrator privileges to Security Setup so they can change employee security after the initial setup. All options in ProSystem fx Practice Management are listed on the security privileges list. An option that is enabled for an employee will have a check mark in the Yes column. A disabled option will have a check mark in the No column. To change the firm default 1. Log on as SUPERVISOR and enter your password.
If the SUPERVISOR forgets their password, call Support to find out the "password of the day" in an emergency.
2. Select Security Setup from the Firm menu in Administration.
3. The default settings for all employees are listed.
4. Select Default for All Employees.
5. Click an option to change the security setting from Yes to No or vice versa.
6. Click the group heading, such as Staff Time Privileges, to change the setting for a group of items.
Tips You can undo your changes by clicking the Undo Changes button. Keep in mind, however, that this will
only undo any changes since the last time you saved the current default and does not return to the original default.
Any individual employee settings that differ from the firm default settings will be indicated.

Getting Started with ProSystem fx Practice Management
157
Setting Up Employee Security Identify the employees who need access to more ProSystem fx Practice Management options than the default security settings allow. Once you set up security for an employee, you can then copy their security settings to any number of employees who require the same security privileges. To change security for an employee 1. Select Security Setup on the Firm menu in Administration.
2. Select Individual Employee Privileges. Select the employee whose settings you wish to change from the employee list.
3. Click an option to change the security setting from Yes to No or vice versa. These settings will pertain only to this employee.
4. Click the group heading, such as Staff Time Privileges, to change the setting for a group of items.
To copy security to other employees 1. Click Copy Options. On the Copy Security Setup window, select the employee whose security settings
you want to copy.
2. All employees display in the list. You can sort by employee or skill level. Sorting by skill level allows you to group employees by skill level if you wish to copy security settings by skill level. In the Copy To box, press SHIFT and click and drag the mouse to copy to a group of employees. Or, press CTRL and click to select employees at random.
3. Click OK to complete the copy.
Tips You can undo your changes by clicking the Undo Changes button on the Security Setup window. Keep
in mind, however, that this will only undo any changes since the last time you changed the employee’s privileges and does not return to the original default.
Employee settings are saved when you complete assigning security privileges for one employee and select another employee or exit security setup.
Any individual employee settings that differ from the firm default settings display “Yes” in the Override column.

ProSystem fx Practice Management
158
Setting Up Passwords The default for using passwords is No, except for the SUPERVISOR. Mark Use Password Yes to make a password mandatory at log in. Passwords are optional but can be used to protect employee and firm data. To add passwords 1. Select Security Setup from the Preferences menu in Administration.
2. Change Use Password to Yes by clicking in the Yes column.
3. The next time employees log on, they will need to enter a password that they define.
To change passwords 1. Select Change My Password from the Preferences menu in Administration.
2. Enter the Old Password.
3. Enter the New Password.
4. Confirm the new password by entering it again.
To reset passwords 1. Click Reset Passwords in Security Setup.
2. Use the Reset Employee Passwords window to select the employees for whom you wish to reset the password back to the default.
3. Once the employees are selected, click Reset.
4. The next time these employees log on, they will need to enter a new password that they define.
Tips If most of the employees in your firm will use passwords, change the firm default so that Use Passwords is
marked Yes and then change Use Passwords to No for those employees who will not need to enter a password.

Getting Started with ProSystem fx Practice Management
159
Remote Options
Using Remote Options When you installed ProSystem fx Practice Management, you set up the workstations for staff members who enter and release time. If you selected Remote Components for any workstation, additional procedures are required to keep the remote workstation updated properly with the latest clients, service codes, and employees. Keep in mind also that each time we send a software release, remote workstations must be updated with the latest software. Remote workstations can be either connected to the network or independent from the network. Independent remote workstations not connected to the network might include those belonging to staff members who work in the field and transmit their information to the main office electronically. A schedule should be established to keep each remote workstation database updated and to send released time back to the host network. To use Remote Options 1. Update the database on remote workstations.
2. Release time back to the network (host).
3. Update remote workstations when you receive a new ProSystem fx Practice Management software release.

ProSystem fx Practice Management
160
Remote Workstation Connected to the Network Running remote while connected to the network cuts down on network traffic. When you need to update your remote user database (with clients, service codes, employees, etc.), select Import from the File menu of Time Entry. You can select to import changed data only, or import all data. This copies the latest versions of these tables from the server to your remote user database. When you need to release your time for posting, click the Release button. To update your remote user database if you are connected to the network 1. Select Import from the File menu in Time Entry. You can then select to import changed data only, or
import all data. Click OK. To save time, especially if you have many clients, you may choose to only update data that has changed since the last time you imported from the host database. You may want to use both options to see which is faster and most effective for your remote users.
2. Remember to import regularly to keep the files on your hard drive up-to-date. Use the About/Additional Info feature on the Help menu to see the date you last imported data. You will be reminded to import when exiting the application if it has been more than a week since you last updated.
To release your time if you are connected to the network 1. Click the Release button on the Time Entry window.
2. Enter the time frame you wish to release for posting.
3. Click Release to release time. Your time entries will be released directly to the host database.
Install Software for Remote Users Each time we send a software release, remote workstations must be updated with the latest software. If the remote employee is connected to the network, specific files must be installed on the workstation. See the Installation Guide (or Release Bulletin) for information on Workstation Setup (Updating Individual Workstations).

Getting Started with ProSystem fx Practice Management
161
Remote Workstation Not Connected to the Network If your workstation is not connected to the network, several procedures must be followed by both the host administrator and the remote employee to exchange data files. Because the remote workstation is not connected to the network, a special file must be built on the network that contains the latest clients, service codes, employees, etc. This file is then transmitted via the method of your choice to the remote site where it is imported to update the remote user database. When a remote user is ready to release time, a file is built on the remote user workstation containing the released time. This file is then transmitted via the method of your choice to the network administrator where it is imported and can be posted. (Remote workstations not connected to the network cannot run in Real Time Update Mode.) Remote workstations not connected to the network can access the MTD Hours and Timesheet Lookup options in Time Entry. To view the latest posted time in Timesheet Lookup, the remote user database must be updated whenever time is posted. In MTD Hours, the drop-down box will combine posted and released time, with a separate option for unreleased time. To update your remote user database if you are NOT connected to the network The Host Administrator follows these steps to build the remote employee export files that include the most recent table updates (clients, service codes, employees, etc.) for remote employees who are unable to connect to the network. 1. On the File menu in Administration, point to Remote Manager and select Create Remote Employee
Data Files.
2. A list displays all employees and the date of the last export.
3. Choose the employee(s) from the list who will receive updated tables (client, service code, employee, etc.).
4. Click Create Remote Files. A file (EmpNum.RE7, where EmpNum is the employee code) is created for each selected employee. This file is located in the \exports subdirectory of the host database. For example, if the host database is on o:\cpas\vpm\vpmdata, and the remote employee code is 200, the complete path with file is: o:\cpas\vpm\vpmdata\host database name\exports\200.RE7
5. The Printer/Format Selection window appears. Select Preview Output to view the Remote Export File List. This report contains the employees and the file locations of the remote files. Select Print to send the report to the printer.
6. Transfer these files to your remote employees via the communication method of your choice.
Once the import file (.RE7 file) has been received, each Remote Employee follows these steps to load it. 1. A folder will be created in the My Documents\Practice Management folder with the name of your
database. If you have previously imported data, this folder already exists.
2. Copy the .RE7 file to the My Documents\Practice Management folder.
3. From Time Entry, select Import on the File menu to update the client, service code, employee, etc. tables in the remote user database.
4. Enter the location of the Remote Import File. The file name and location default to that of the previous update.

ProSystem fx Practice Management
162
5. Click OK to continue. The appropriate database tables will be updated on your remote workstation. Once the remote user database is updated successfully, the .RE7 file is deleted.
To release time if you are NOT connected to the network 1. The Remote Employee follows these steps when they are ready to release time. If you are not
connected to the network, the Release button in Time Entry displays as Remote Release. 2. Remember to print an edit list and check your entries before you release them for posting.
3. Click Remote Release from Time Entry. You can also select the Remote Release Time option from the Activities menu.
4. Enter the time frame you want to release for posting.
5. Click Remote Release to release time.
6. A file (EmpNum.RR7, where EmpNum is the employee code) is created that contains the released time for the remote employee. This file is located in the My Documents\Practice Management folder. For example, if the employee code is 200, the complete path with file is: My Documents\Practice Management\200.RR7 If the EmpNum.RR7 file is found, a message asks, "Do you wish to append more time to this database?" If you choose Yes, these time entries will be added to the existing file. If the existing file has already been sent to the network host you will have duplicate entries, so use caution when answering this question. If you choose No, another question appears: "Do you wish to start a new remote release database?" Click Yes to overwrite the existing file. Click No to start the Remote Release process again.
7. The Printer/Format Selection window appears. Select Preview Output to view the Remote Release Time Entry Register. Select Print to print the Register. A message indicates that your remote release file is ready for transfer to the host. Note the location of the file and click OK to continue.
8. Transfer the file to the network via the communication method of your choice.
9. Once the file has been transferred, delete the EmpNum.RR7 file from your workstation to prepare for the next transfer.
Once the EmpNum.RR7 file(s) have been transmitted, the Host Administrator follows these steps to load it. 1. Copy all remote EmpNum.RR7 files into the \imports folder from the host database. For the initial
import, create a folder named imports in the folder with your database name (found in the vpmdata folder). For example, if the host database is on o:\cpas\vpm\vpmdata, and the remote employee code is 200, the complete path with file would be: o:\cpas\vpm\vpmdata\host database name\imports\200.RR7
2. On the File menu in Administration, point to Remote Manager, and select Import Remote.
3. A list displays all employees and the time frame for the released transactions.
4. Select the employees you wish to import (or right-click and choose Select All) and click Remote Import. As each employee’s released time is imported, the EmpNum.RR7 file will be deleted so that double posting will not occur.
5. The Printer/Format Selection window appears. Select Preview Output to view a report of invalid transactions. Invalid transactions will not be available for posting and must be re-entered.
6. Select Print to print the report.
7. Re-enter any invalid transactions that printed on the report and release them.

Getting Started with ProSystem fx Practice Management
163
8. The released time is ready for posting.
To install or update software for individual remote workstations NOT connected to the network 1. Each time we send a software release, remote workstations must be updated with the latest software. If
the remote employee is not connected to the network, an update must be built so that remote employees can load the latest software on their workstations.
2. The Host Administrator follows these steps to build either an initial installation or an update for remote employees who are unable to connect to the network (host).
3. On the File menu in Administration, point to Remote Manager and select Build Remote Program Installer.
4. Click the OK button. At the completion of the build a message displays with the location of the installer components and the executable to be run by remote employees.
Once the update has been received at the remote site each Remote Employee follows these steps to install it. 1. To update the remote site, the remote employee must run Practice Management Workstation.exe
from the directory created in the Build routine.
2. When setup is complete, you will be prompted to identify yourself from a displayed list of employees.
3. The remote install may be run multiple times should it be necessary to perform the install on more than one workstation at the remote site.
4. If remote employees share a workstation, run the remote install on the workstation. Then click the Start button. Point to Programs, and select ProSystem fx Practice Management. Select New User and double-click the first employee who will be using this workstation. Only one employee can be selected at a time. Do this for each employee using the workstation.

ProSystem fx Practice Management
164

Getting Started with ProSystem fx Practice Management
165
Year End Procedures
Closing the Prior Year If you have finished processing all transactions for the prior fiscal year and have reconciled your reports, you are ready to close the year. Year End Procedures changes the fiscal year end date for the firm and calculates client beginning balances for the new fiscal year. You must complete all postings and billings for the year before you close it; however, you may post time, billings, and payments for the new year before you run Year End Procedures. If you are billing in the new year for prior year accounting (i.e., billing for December in January), do not use dates from both years. Be sure that the invoice date you assign when final printing an invoice and the invoice posting date (Update Invoices option) are in the same fiscal year. This is especially important for progress bills, because if these dates are not in the same year, your beginning balance for the new year will not reconcile with the ending balance of the previous year. Likewise, if you are entering payments and memos in the new year for prior year accounting, do not use dates from both years. Be sure that the deposit date you assign when you enter a payment or memo and the transaction posting date are in the same fiscal year. If possible, you should run Year End Procedures before the end of the first month of the new year. To use Year End Procedures 1. Enter and post all time entries for the year being closed.
2. Complete and post all billings for the year being closed.
3. Enter and post all A/R entries for the year being closed.
4. Print a Data Integrity Report before printing year-end reports to make sure the firm is in balance. If your firm is in balance, the report will be blank. Continue to the next step.
5. Print all YTD reports for the year being closed.
6. Make a current backup.
7. Make sure all employees are logged out of ProSystem fx Practice Management.
8. Select Year End Procedures from the Firm menu on the Administration window. A warning appears to remind you that all employees should be logged out of ProSystem fx Practice Management. Click OK.
9. Check the dates for Old Current Year and New Current Year. If these dates are correct, click OK.
10. Client numbers are displayed as they are processed. When processing is complete, click Done.
11. Print a Data Integrity Report again to verify that the firm is still in balance. If it is not, contact us for assistance.