Product Informa PEDO Bench - Boyd Industries - PEDO Bench Manu… · 1 PBM‐001 Rev 1 Product...
12
PBM‐001 Rev 1 Product InformaƟon Manual PEDO Bench Includes Models: PB4000 & PB4001 12900 44th Street North Clearwater, Florida 33762 800‐255‐2693 * 727‐561‐9292 FAX: 727‐561‐9393 SALES FAX: 727‐573‐1682 SERVICE www.boydindustries.com PB4000 PB4001
Transcript of Product Informa PEDO Bench - Boyd Industries - PEDO Bench Manu… · 1 PBM‐001 Rev 1 Product...

1
PBM‐001 Rev 1
Product Informa on Manual
PEDO Bench Includes Models: PB4000 & PB4001
12900 44th Street North Clearwater, Florida 33762
800‐255‐2693 * 727‐561‐9292 FAX: 727‐561‐9393 SALES FAX: 727‐573‐1682 SERVICE www.boydindustries.com
PB4000
PB4001

2
PBM‐001 Rev 1
Table of Contents
Title Page Table of Contents Introduc on Applica on of Product Warranty Statement Safety Precau ons About Your Product Descrip on of Product Line General Product Informa on Product Specifica ons Feature Opera on Drawer Removal / Installa on and Adjustment Unpacking and Installa on Procedure Light Post Installa on (Op onal) General Maintenance and Care Cleaning Informa on Infec on Control Service Informa on Authorized Representa ve (Europe Only)
1 2 3 4 5‐8 9 10 11 12
3
PBM‐001 Rev 1
Intended Use and Application of Product
This product is designed to allow dental procedures to be performed in a horizontal posi on with an adjustable back rest and head rest. The PEDO bench has built in storage for non‐flammable items. The delivery system (PB4000 only) is located close to the head of the bench (either le or right hand are available) to allow for easy access.
Warranty Statement All Boyd manufactured products are warranted against defects in material or workmanship only. No other warran es are expressed or implied. This warranty shall extend for three (3) years for parts and one (1) year for labor. The Boyd warranty only covers products manufactured by Boyd. Products distributed, not manufactured, by Boyd carry the stated manufacturer’s warranty. The warranty period commences upon invoice date of the equipment. Wri en no ce of breach must be submi ed to Boyd Industries, Inc. within this period. Boyd reserves the right to repair or replace, at its sole discre on, the item in ques on. Warranty is voided if items are misused or product is improperly maintained or installed. The warranty does not cover any altera on of the product from its original condi on or if product is used in any way other than the product’s design intent. An authorized service technician must perform all service and maintenance. Any warranty labor must be first approved by Boyd. Failure to coordinate warranty service may result in denial of warranty repair. Wri en log and receipts for service must be maintained to validate the warranty on Boyd manufactured products. No claim for consequen al damages will be allowed. Freight damage or mishandling by any third party will not be considered a warranty item. Improper installa on by a third party causing damage to the equipment is not a warranty item.
Introduc on
Congratula ons on your purchase of the Boyd PEDO Bench
Boyd Industries, Inc. has spent years designing and developing the best products available in the world today. The following features make your Boyd product the most advanced and func onal product available in the market: PB4000 & PB4001:
Manually adjustable seat back
Cabinet drawer storage
Op onal a ached light
Op onal instrument tray PB4000 Only:
3‐Way Syringe
Dry hand piece hook up
Wet hand piece hook up
High Volume Evacua on (HVE)
Saliva ejec on (SE)
PSI indicator
Op onal assistant package
Op onal bo led (clean) water system

4
PBM‐001 Rev 1
PEDO Bench
Safety Precau ons
Read instruc ons: All safety and opera ng instruc ons including this manual should be read before this product is installed or operated.
Follow instruc ons: All use and opera on instruc ons should be followed.
Owners manual: Retain manual for future reference regarding safety and opera on instruc on.
Heed warnings: Adhere to all warnings and cau ons on the equipment and in the manual.
Accessories: Do not use any accessories not recommended by Boyd as they may cause hazards.
Cleaning: See General Maintenance and Care sec on
Servicing: Do not a empt to service this product yourself. Refer any repairs to a qualified service representa ve.
Heat / Open flame: Equipment must be installed away from heat sources such as radiators, heat registers or other sources of heat or open flame.
Weight restric on: This bench is designed to safely support a pa ent weight of 300 lbs. (136.07 kg) that is evenly distributed across the seat. Always
use the anchoring system to ensure stability of this product. Do not a empt to place all of a pa ent’s weight on the back rest with it in a raised posi on.

5
PBM‐001 Rev 1
Descrip on of Product Line
About Your PEDO Bench
Model: PB4000 & PB4001
Features: Manual Back Storage areas Instrument Tray (Op onal) Light Assembly (Op onal) Chair side units (PB4000 only) Assistant package (Op onal) (PB4000 only)
General Product Informa on
Cabinet: Wood Construc on
Upholstery: Standard upholstery is vinyl Upgrades are available Movement: Manual Seat back Net Weight: 100 lbs (45.35 kg) Liquid Protec on: Ordinary equipment (IPX1) Flammable Gases: Not suitable for use in the presence of flammable gases or where such gases may accumulate in
concentra on. (Closed Space) Opera on Mode: Con nuous Opera ng Temperature: 5° C to 40° C (41° F to 104° F) Temperature: Rela ve Humidity: 20% to 90% @ 30° C ‐ Not condensing Atmospheric Pressure: 97kPa Storage / Transporta on Temperature: ‐10° C TO 50° C (14° F TO 122° F) Temperature: Rela ve Humidity: 20% to 90% @ 30° C ‐ Not condensing Atmospheric Pressure: 45 to 115kPa Weight Capacity: 350 lbs (158.75 kg) Subject to normal weight distribu on Note: Do not sit on back of seat sec on. This sec on is not designed to support the full weight of pa ent.
Do not li or slide bench using back sec on or seat upholstery. Warning: Do not modify this equipment without authoriza on from Boyd Industries, Inc.
6
PBM‐001 Rev 1
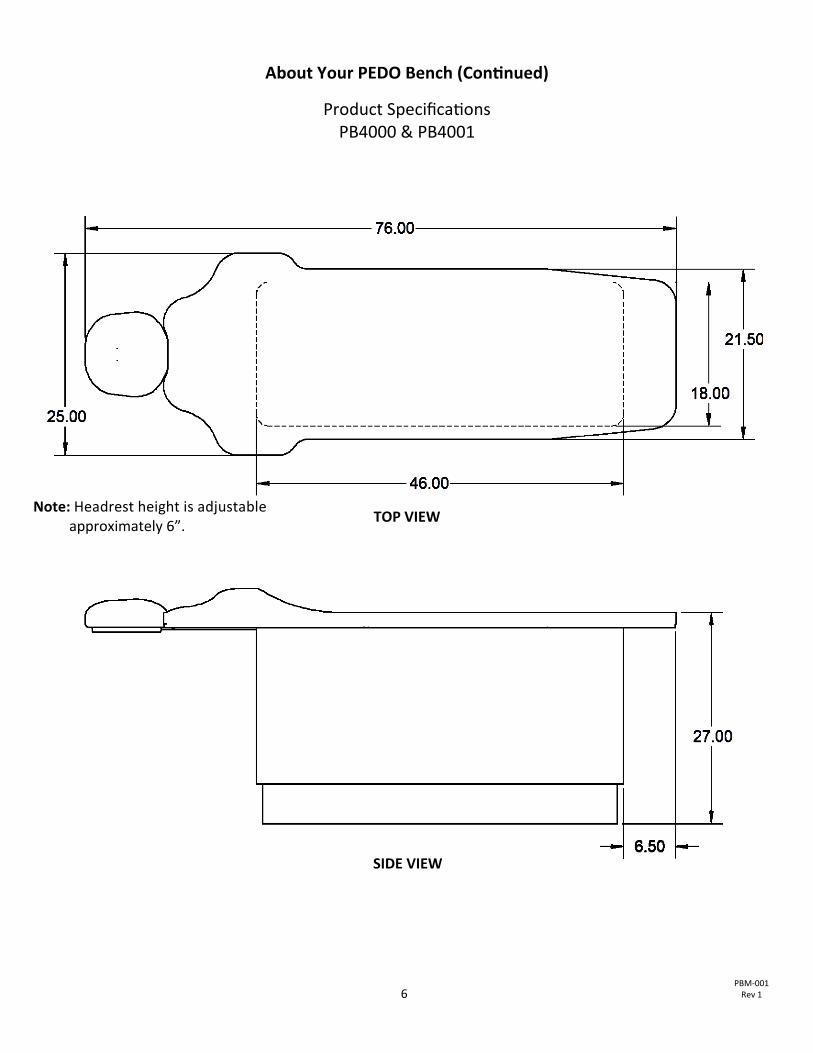
Product Specifica ons PB4000 & PB4001
About Your PEDO Bench (Con nued)
Note: Headrest height is adjustable approximately 6”.
TOP VIEW
SIDE VIEW

7
PBM‐001 Rev 1
Feature Opera on
About Your PEDO Bench (Con nued)
Headrest: The headrest will adjust in and out to comfortably accommodate the pa ent. Foot protector: The foot protector snaps on and off for ease of cleaning and replacement. Backrest: Ac vate the release lever on the bo om of the back to posi on the back sec on.
Adjustment release lever is located on the bo om right side of the back sec on.
Note: Drawer size, quan ty of drawers and toe kick size can be customized per order upon customer request and affect overall bench height.
Note: Refer to Delivery Unit Product Manual (DSM‐001) for handpiece instrumenta on package.

8
PBM‐001 Rev 1
Drawer Removal/Installa on and Adjustment
About Your PEDO Bench (Con nued)
Drawer Removal:
1 Pull drawer all the way out. 2 Press and hold release levers (2) on bo om front of drawer and li drawer upward in front un l it is free from slider. 3 Discon nue holding release levers. 4 Pull drawer off back tabs of slider.
Drawer Installa on: 1 Pull sliders (2) all the way out.
2 Place drawer loosely on slider. 3 Insert tabs on slider (2) into holes (2) on back wall of drawer and front locks should snap into posi on. 4 Close drawer
Adjustment Height:
Adjust the height of the drawer face by sliding the red tab located under the drawer in the release lever assembly. Push the tab to‐ward the rear of the drawer to raise the drawer face and toward the front of the drawer to lower drawer face.
Release Levers Drawer Opened Li and Remove
Hole Loca on
Red Adjustment Tab
Tab Loca on
Slider
9
PBM‐001 Rev 1
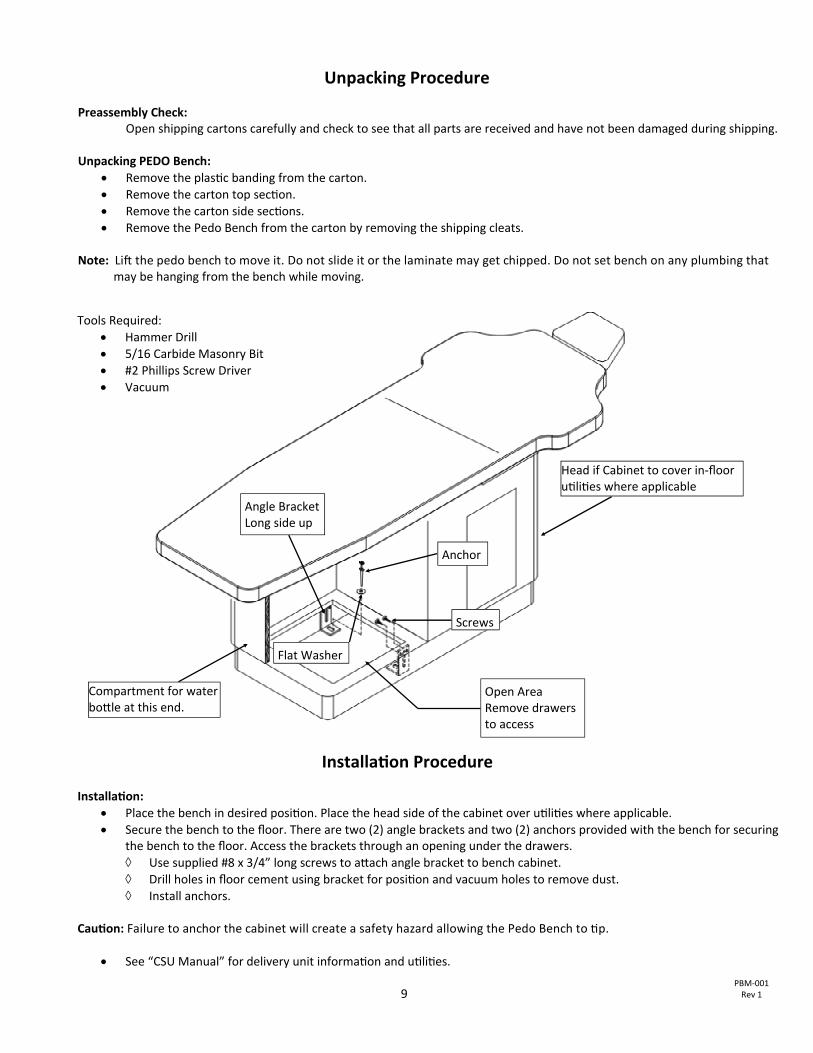
Installa on Procedure
Preassembly Check: Open shipping cartons carefully and check to see that all parts are received and have not been damaged during shipping. Unpacking PEDO Bench:
Remove the plas c banding from the carton.
Remove the carton top sec on.
Remove the carton side sec ons.
Remove the Pedo Bench from the carton by removing the shipping cleats. Note: Li the pedo bench to move it. Do not slide it or the laminate may get chipped. Do not set bench on any plumbing that
may be hanging from the bench while moving.
Unpacking Procedure
Head if Cabinet to cover in‐floor u li es where applicable
Compartment for water bo le at this end.
Installa on:
Place the bench in desired posi on. Place the head side of the cabinet over u li es where applicable.
Secure the bench to the floor. There are two (2) angle brackets and two (2) anchors provided with the bench for securing the bench to the floor. Access the brackets through an opening under the drawers.
Use supplied #8 x 3/4” long screws to a ach angle bracket to bench cabinet.
Drill holes in floor cement using bracket for posi on and vacuum holes to remove dust.
Install anchors. Cau on: Failure to anchor the cabinet will create a safety hazard allowing the Pedo Bench to p.
See “CSU Manual” for delivery unit informa on and u li es.
Anchor
Screws
Angle Bracket Long side up
Flat Washer
Open Area Remove drawers to access
Tools Required:
Hammer Drill
5/16 Carbide Masonry Bit
#2 Phillips Screw Driver
Vacuum

10
PBM‐001 Rev 1
Light Post Installa on (Op onal)
The light post installs in the loca on shown below on either side of the bench for units manufactured a er January 2012. Call Boyd Industries for informa on on a aching a light post on units manufactured prior to this date.
Benches ordered with the light post op on will arrive with the T‐nuts installed and holes cleared in the cabinet to a ach the light post in the loca on requested. Use the hardware provided to a ach the post to the side of the bench and adjust the leveler pad so that it touches the floor and helps to support the post. Retrofi ng an exis ng bench: All units manufactured a er January 2012 have the mount T‐nuts installed on both sides for adding a light post at any me. The holes are covered by the exterior laminate and will need to be opened up to allow for moun ng. Drill holes in the laminate with a 3/16” diameter drill bit from inside the cabinet using the exis ng T‐nut loca ons as a guide. Once located, clear the holes from the outside and a ach light post as noted above.
Route the cord from the light thru the top of the post and out the hole at the bo om of the post. Note: Be sure that there is a plas c sleeve insert in the top of the post before inser ng the light. Route the cord thru the access hole in the side of the Pedo Bench and connect it to the power transformer inside of the bench.
Use the hardware provided to a ach the light post to the side of the Pedo Bench.
Adjust the leveler so that it touches the floor.
11
PBM‐001 Rev 1
Infec on Control All established infection control policies should be followed. All work surfaces and patient contact surfaces should be disinfected between patients and at the end of the day using a product that is EPA registered as ‘hospital disinfectant’ and labeled for ‘tuberculocidal’ activity. PB4000 Only:
Hand pieces and metal syringe tips must be autoclaved between patients.
Check manufacturer information for details. (270°F @ 20psi for 30 minutes)
SE, HVE, Tubing, Keyboards and work surfaces must be cleaned and disinfected between patients and at the end of each day. Use a product that is EPA registered as ‘hospital disinfectant’ and labeled for ‘tuberculocidal’ activity.
Two (2) such products are: Tri‐cide (800)342‐3096 Medocadcio (800)777‐7072 Do not attempt to clean and re‐use disposable tips that are designed for one (1) patient use only.
General Maintenance and Care Cleaning
It is recommended that the chair and equipment be thoroughly cleaned and disinfected in accordance with the appropriate FDA guidelines. Use only cleaners and disinfectants approved for cleaning vinyl. Do not use strong or harsh cleaners as they may cause the vinyl color to fade. Apply the cleaner to a towel, not directly to the vinyl. Refer to vinyl manufacturer’s data on Boyd’s website for cleaning products. (www.boydindustries.com/support)
Technical Service
For parts, service, or technical information contact:
Worldwide: Boyd Industries, Inc. 12900 44th Street North Clearwater, Florida USA 33762 tel: 1‐727‐471‐5071 (direct service line) 1‐800‐255‐2693 fax: 1‐727‐561‐9393

12
PBM‐001 Rev 1
Boyd Industries, Inc 12900 44th Street N Clearwater, FL 33762 U.S.A