Pro Flame Series Operation - Desa Tech
14
Desa Heating LLC Desa Heating LLC Proflame Series Operation Proflame Series Operation
Transcript of Pro Flame Series Operation - Desa Tech

Desa Heating LLCDesa Heating LLC
Proflame Series OperationProflame Series Operation

Control ComponentsControl Components
Desa Proflame units, LMFP33 and LDL39 serieshave two integral control components – the remoteand the receiver unit.

Remote ControlRemote Control
nn Allows adjustment of BTU Allows adjustment of BTU output (flame height)output (flame height)
nn Allows thermostatic Allows thermostatic operation of the heater.operation of the heater.
nn Allows sleep timer Allows sleep timer operation in 15 minute operation in 15 minute intervals up to 90 minutes.intervals up to 90 minutes.

Remote (cont.)Remote (cont.)
nn BTU/Flame BTU/Flame height controlheight control
nn Thermostatic Thermostatic FunctionFunction
nn Timer functionTimer function
nn IndicatorIndicator

Remote (cont.)Remote (cont.)
nn U ses three “A A A ” U ses three “A A A ” batteries.batteries.
nn Programmable Programmable addresses to avoid addresses to avoid conflict with other conflict with other remote devicesremote devices

ReceiverReceiver
nn Connects to gas valve Connects to gas valve stepper motor to stepper motor to control BTU output.control BTU output.
nn Dip switches to control Dip switches to control address (must match address (must match with corresponding with corresponding remote).remote).
nn Auto/Man switch to Auto/Man switch to allow for nonallow for non--remote remote operationoperation

Receiver (cont.)Receiver (cont.)
nn Pow ered by four “A A ” Pow ered by four “A A ” batteries.batteries.
nn Beep codes to indicate Beep codes to indicate “w orking” or “low “w orking” or “low battery.”battery.”

TroubleshootingTroubleshooting
�� If the remote does If the remote does not come on when not come on when the power button is the power button is pressed, replace pressed, replace the batteries. If the batteries. If

Troubleshooting (cont.)Troubleshooting (cont.)
nn IF the remote IF the remote appears to be appears to be working, but you get working, but you get no reaction from the no reaction from the heater:heater:
1) Check the 1) Check the batteries in the batteries in the receiver and replace receiver and replace as neededas needed

Troubleshooting (cont.)Troubleshooting (cont.)
2) Check the dip2) Check the dip--switchswitchsettings on the receiver:settings on the receiver:
a.a. Locate the receiver in Locate the receiver in your heater.your heater.
b.b. Remove the receiver and Remove the receiver and turn to the side with the turn to the side with the eight dip switches, labeled eight dip switches, labeled “address.”“address.”
c.c. C heck that sw itches “1” C heck that sw itches “1” and “3” are up w hile the and “3” are up w hile the rest are downrest are down
d.d. Remove one battery for Remove one battery for fifteen seconds and fifteen seconds and replace in order to reset replace in order to reset the receiver. the receiver.

Troubleshooting (cont.)Troubleshooting (cont.)
3) Check the code in the 3) Check the code in the remote by: remote by:
a.a. Move the indicator to Move the indicator to the timer using the the timer using the down button.down button.
b.b. Press the minus Press the minus button ten times or button ten times or until the remote goes until the remote goes blank.blank.
c.c. Press the up or down Press the up or down key to change the key to change the given code to “005”.given code to “005”.
d.d. Press the minus key Press the minus key once more.once more.
Troubleshooting (cont.)Troubleshooting (cont.)
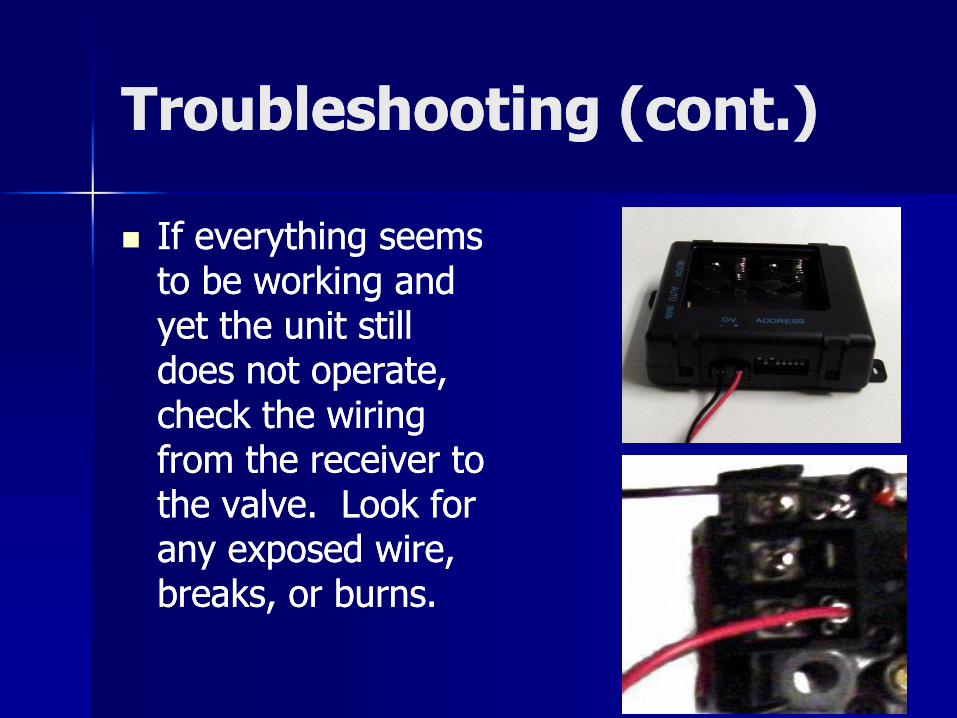
nn If everything seems If everything seems to be working and to be working and yet the unit still yet the unit still does not operate, does not operate, check the wiring check the wiring from the receiver to from the receiver to the valve. Look for the valve. Look for any exposed wire, any exposed wire, breaks, or burns.breaks, or burns.

Troubleshooting (cont.)Troubleshooting (cont.)
If the rem ote is show ing “A U X ” If the rem ote is show ing “A U X ”
a.a. Move the indicator to the Move the indicator to the timer using the down timer using the down buttonbutton
b.b. Press the minus button Press the minus button ten times or until the ten times or until the remote goes blank remote goes blank –– the the remote enters setremote enters set--up modeup mode..
c.c. Press the ON/OFF button Press the ON/OFF button five times five times -- this removes the this removes the “A U X ” Functions“A U X ” Functions..
d.d. Press the minus button Press the minus button once more once more –– this returns the this returns the remote to normal operationremote to normal operation

Troubleshooting (cont.)Troubleshooting (cont.)
If the remote is in Celsius If the remote is in Celsius
a.a. Move the indicator to Move the indicator to the timer using the the timer using the down button.down button.
b.b. Press the minus Press the minus button ten times or button ten times or until the remote goes until the remote goes blank.blank.
c.c. Press the plus button Press the plus button once.once.
d.d. Press the minus Press the minus button once morebutton once more