Priscilla - Blank Quiltingblankquilting.net/projects/Priscilla.pdfPriscilla Fabrics in the ... Tonal...
6
A Free Project Sheet From Ivory Version Ivory Version Black Version Black Version Finished Quilt Size: 73” x 85” Finished Tote Size: 14” x 10” x 4” 49 West 37th Street, 14th floor, New York, NY 10018 Toll Free: 800-294-9495 fax: 212-679-4578 www.blankquilting.com Priscilla
-
Upload
trinhtuyen -
Category
Documents
-
view
214 -
download
0
Transcript of Priscilla - Blank Quiltingblankquilting.net/projects/Priscilla.pdfPriscilla Fabrics in the ... Tonal...

A Free Project Sheet From
Ivory Version
Ivory Version
Black Version
Black Version
Finished Quilt Size: 73” x 85”Finished Tote Size: 14” x 10” x 4”
49 West 37th Street, 14th floor, New York, NY 10018Toll Free: 800-294-9495
fax: 212-679-4578www.blankquilting.com
Priscilla
Priscilla
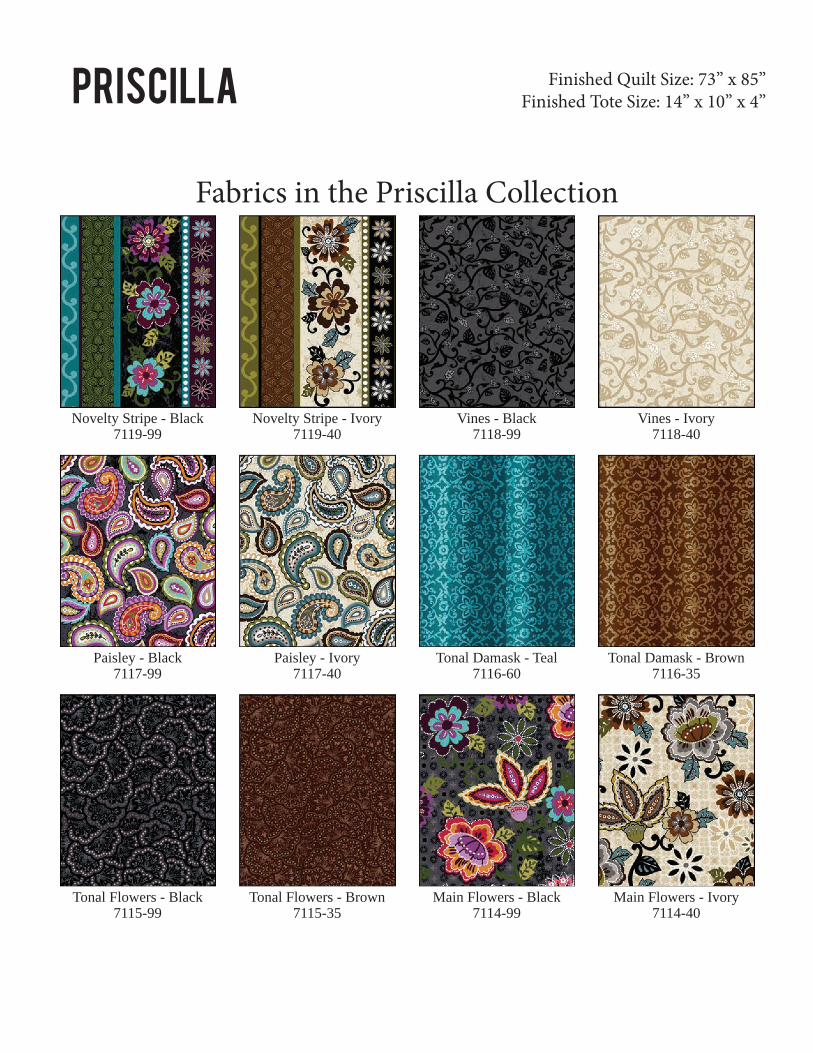
Fabrics in the Priscilla Collection
Finished Quilt Size: 73” x 85”Finished Tote Size: 14” x 10” x 4”
Novelty Stripe - Black7119-99
Novelty Stripe - Ivory7119-40
Vines - Black7118-99
Paisley - Black7117-99
Tonal Flowers - Black7115-99
Main Flowers - Black7114-99
Main Flowers - Ivory7114-40
Tonal Flowers - Brown7115-35
Paisley - Ivory7117-40
Tonal Damask - Teal7116-60
Tonal Damask - Brown7116-35
Vines - Ivory7118-40
Priscilla
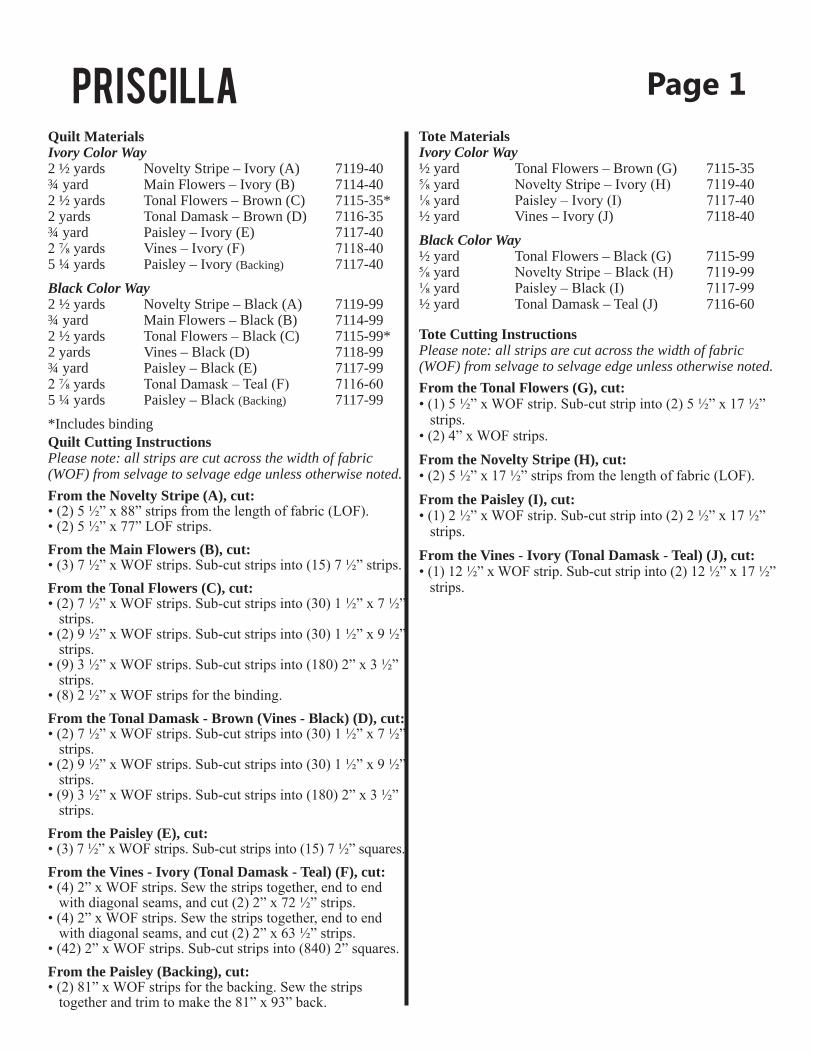
Quilt Cutting Instructions Please note: all strips are cut across the width of fabric (WOF) from selvage to selvage edge unless otherwise noted.
Tote Cutting Instructions Please note: all strips are cut across the width of fabric (WOF) from selvage to selvage edge unless otherwise noted.
Page 1Quilt Materials Ivory Color Way2 ½ yards Novelty Stripe – Ivory (A) 7119-40¾ yard Main Flowers – Ivory (B) 7114-402 ½ yards Tonal Flowers – Brown (C) 7115-35*2 yards Tonal Damask – Brown (D) 7116-35¾ yard Paisley – Ivory (E) 7117-402 ⅞ yards Vines – Ivory (F) 7118-405 ¼ yards Paisley – Ivory (Backing) 7117-40Black Color Way2 ½ yards Novelty Stripe – Black (A) 7119-99¾ yard Main Flowers – Black (B) 7114-992 ½ yards Tonal Flowers – Black (C) 7115-99*2 yards Vines – Black (D) 7118-99¾ yard Paisley – Black (E) 7117-992 ⅞ yards Tonal Damask – Teal (F) 7116-605 ¼ yards Paisley – Black (Backing) 7117-99*Includes binding
From the Novelty Stripe (A), cut:• (2) 5 ½” x 88” strips from the length of fabric (LOF).• (2) 5 ½” x 77” LOF strips. From the Main Flowers (B), cut:• (3) 7 ½” x WOF strips. Sub-cut strips into (15) 7 ½” strips.From the Tonal Flowers (C), cut:• (2) 7 ½” x WOF strips. Sub-cut strips into (30) 1 ½” x 7 ½” strips.• (2) 9 ½” x WOF strips. Sub-cut strips into (30) 1 ½” x 9 ½” strips.• (9) 3 ½” x WOF strips. Sub-cut strips into (180) 2” x 3 ½” strips.• (8) 2 ½” x WOF strips for the binding. From the Tonal Damask - Brown (Vines - Black) (D), cut:• (2) 7 ½” x WOF strips. Sub-cut strips into (30) 1 ½” x 7 ½” strips.• (2) 9 ½” x WOF strips. Sub-cut strips into (30) 1 ½” x 9 ½” strips.• (9) 3 ½” x WOF strips. Sub-cut strips into (180) 2” x 3 ½” strips.From the Paisley (E), cut:• (3) 7 ½” x WOF strips. Sub-cut strips into (15) 7 ½” squares.From the Vines - Ivory (Tonal Damask - Teal) (F), cut:• (4) 2” x WOF strips. Sew the strips together, end to end with diagonal seams, and cut (2) 2” x 72 ½” strips.• (4) 2” x WOF strips. Sew the strips together, end to end with diagonal seams, and cut (2) 2” x 63 ½” strips.• (42) 2” x WOF strips. Sub-cut strips into (840) 2” squares.From the Paisley (Backing), cut:• (2) 81” x WOF strips for the backing. Sew the strips together and trim to make the 81” x 93” back.
Tote Materials Ivory Color Way½ yard Tonal Flowers – Brown (G) 7115-35⅝ yard Novelty Stripe – Ivory (H) 7119-40⅛ yard Paisley – Ivory (I) 7117-40½ yard Vines – Ivory (J) 7118-40Black Color Way½ yard Tonal Flowers – Black (G) 7115-99⅝ yard Novelty Stripe – Black (H) 7119-99⅛ yard Paisley – Black (I) 7117-99½ yard Tonal Damask – Teal (J) 7116-60
From the Tonal Flowers (G), cut:• (1) 5 ½” x WOF strip. Sub-cut strip into (2) 5 ½” x 17 ½” strips.• (2) 4” x WOF strips.From the Novelty Stripe (H), cut:• (2) 5 ½” x 17 ½” strips from the length of fabric (LOF).From the Paisley (I), cut:• (1) 2 ½” x WOF strip. Sub-cut strip into (2) 2 ½” x 17 ½” strips. From the Vines - Ivory (Tonal Damask - Teal) (J), cut:• (1) 12 ½” x WOF strip. Sub-cut strip into (2) 12 ½” x 17 ½” strips.
Priscilla
Fig. 1 Fig. 2
Fig. 6
Fig. 8
Fig. 4Fig. 3
Fig. 7
Fig. 9
Fig. 10
Fig. 11
Fig. 5
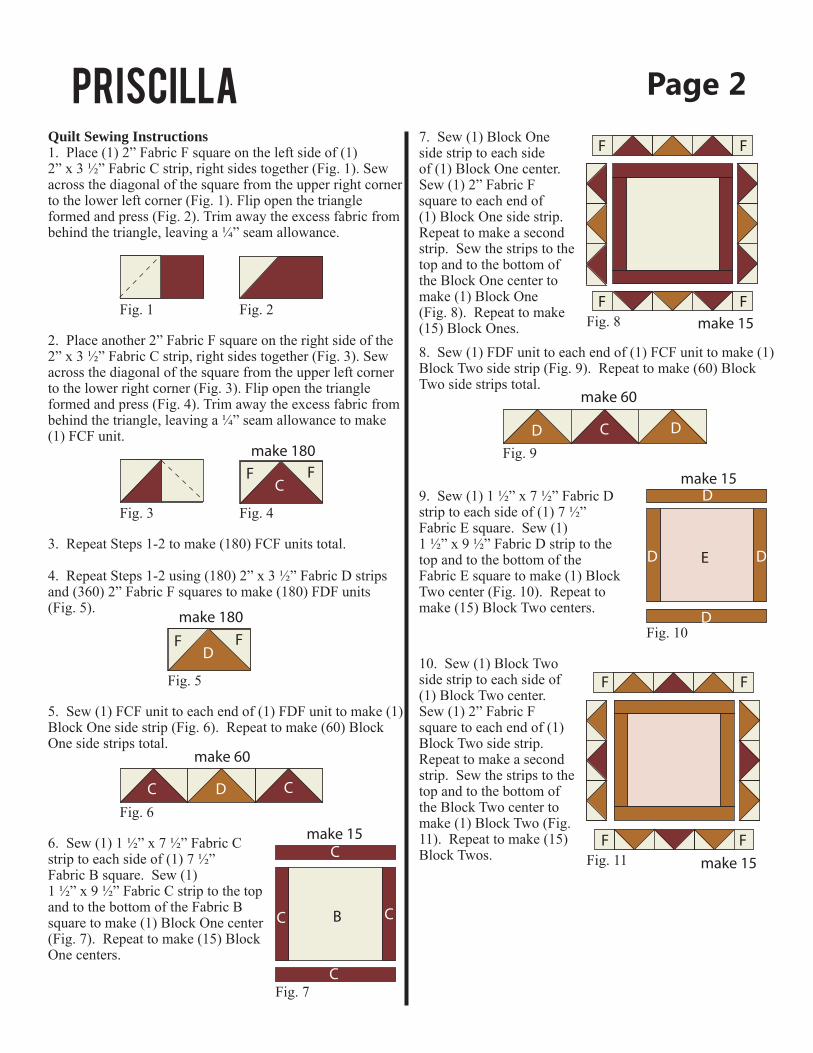
Page 2Quilt Sewing Instructions1. Place (1) 2” Fabric F square on the left side of (1) 2” x 3 ½” Fabric C strip, right sides together (Fig. 1). Sew across the diagonal of the square from the upper right corner to the lower left corner (Fig. 1). Flip open the triangle formed and press (Fig. 2). Trim away the excess fabric from behind the triangle, leaving a ¼” seam allowance.
2. Place another 2” Fabric F square on the right side of the 2” x 3 ½” Fabric C strip, right sides together (Fig. 3). Sew across the diagonal of the square from the upper left corner to the lower right corner (Fig. 3). Flip open the triangle formed and press (Fig. 4). Trim away the excess fabric from behind the triangle, leaving a ¼” seam allowance to make (1) FCF unit.
CF Fmake 180
3. Repeat Steps 1-2 to make (180) FCF units total.
4. Repeat Steps 1-2 using (180) 2” x 3 ½” Fabric D strips and (360) 2” Fabric F squares to make (180) FDF units (Fig. 5).
DF Fmake 180
5. Sew (1) FCF unit to each end of (1) FDF unit to make (1) Block One side strip (Fig. 6). Repeat to make (60) Block One side strips total.
C CD
make 60
6. Sew (1) 1 ½” x 7 ½” Fabric C strip to each side of (1) 7 ½” Fabric B square. Sew (1) 1 ½” x 9 ½” Fabric C strip to the top and to the bottom of the Fabric B square to make (1) Block One center (Fig. 7). Repeat to make (15) Block One centers.
C
C
C CB
make 15
7. Sew (1) Block One side strip to each side of (1) Block One center. Sew (1) 2” Fabric F square to each end of (1) Block One side strip. Repeat to make a second strip. Sew the strips to the top and to the bottom of the Block One center to make (1) Block One (Fig. 8). Repeat to make (15) Block Ones.
F F
F Fmake 15
8. Sew (1) FDF unit to each end of (1) FCF unit to make (1) Block Two side strip (Fig. 9). Repeat to make (60) Block Two side strips total.
CD D
make 60
9. Sew (1) 1 ½” x 7 ½” Fabric D strip to each side of (1) 7 ½” Fabric E square. Sew (1) 1 ½” x 9 ½” Fabric D strip to the top and to the bottom of the Fabric E square to make (1) Block Two center (Fig. 10). Repeat to make (15) Block Two centers.
E
D
D
D D
make 15
10. Sew (1) Block Two side strip to each side of (1) Block Two center. Sew (1) 2” Fabric F square to each end of (1) Block Two side strip. Repeat to make a second strip. Sew the strips to the top and to the bottom of the Block Two center to make (1) Block Two (Fig. 11). Repeat to make (15) Block Twos.
F
F
F
Fmake 15

Priscilla
Fig. 12
Page 3Quilt Top Assembly (Refer to the Quilt Layout while assembling.)11. Sew (3) Block Ones and (2) Block Twos together, alternating them, to make Row One. Repeat to make Rows Three and Five.
12. Sew (3) Block Twos and (2) Block Ones together, alternating them, to make Row Two. Repeat to make Rows Four and Six.
13. Sew the six rows together, in numerical order, to make the quilt top.
14. Sew (1) 2” x 72 ½” Fabric F strip to each side of the quilt top. Sew (1) 2” x 63 ½” Fabric F strip to the top and to the bottom of the quilt top.
15. Center (1) 5 ½” x 88” Fabric A strip on one side of the quilt top and pin in place. Start sewing the strip a ¼” from the top edge of the quilt top and stop a ¼” from the bottom edge. DO NOT TRIM THE EXCESS. Repeat with the opposite side.
Quilt Layout
18. Layer and quilt as desired.
19. Sew the (8) 2 ½” x WOF Fabric C strips together, end to end with 45-degree seams, to make the binding. Fold this long strip in half lengthwise with wrong sides together and press.
20. Bind as desired.
17. Starting at the sewn seam (represented by the arrow in Figure 12), draw a 45-degree line to the edge of the fabric. Sew on the drawn line. Trim the excess fabric leaving a ¼” seam. Repeat this step with the remaining corners.
16. Repeat Step 15 to sew (1) 5 ½” x 77” Fabric A strip to the top and to the bottom of the quilt top, making sure to stop and start ¼” away from each end of the quilt top. To miter each corner, fold the quilt top on a diagonal, wrong side together. This should line up the strips from adjacent sides (Fig. 12).
Quilt To
p
Folded on
the Diag
onal

©2014 Blank Quilting Corp.
Priscilla Page 4
28. Repeat Step 27 with the two outer bag pieces to make the outer bag unit, make sure to catch the handle bottoms in the seam.
Tote Assembly29. Place the bag, with handles, right sides together with the lining, aligning the top raw edges of the bag, and lining and pin together, making sure the handles are tucked down in between the two layers and out of the way of the seam area. Sew the lining and bag together.
30. Turn the bag and lining right side out through the opening in the lining. Press as needed and top stitch the opening closed. Put the lining into the bag, aligning the sides and bottom.
Fig. 13 Fig. 14 Fig. 15 Fig. 16
Fig. 17
Fig. 18
Fig. 19 Fig. 20
Tote Sewing Instructions21. To make the Straps, fold (1) 4” x WOF Fabric G strip in half, lengthwise and press (Fig. 13). Open the folded fabric and fold each long edge to the creased centerline and press (Fig. 14).
22. Fold the pressed fabric in half again and press to make (1) 1” x 21” strip (Fig. 15). Top stitch down both long sides ⅛” in from the edge (Fig. 16) to make (1) handle. Note the strip will be one quarter of the width of strip you start with.
make 2
23. Repeat Steps 21-22 to make a second handle.
24. Sew (1) 5 ½” x 17 ½” Fabric G strip, (1) 5 ½” x 17 ½” Fabric H strip and (1) 2 ½” x 17 ½” Fabric I strip together lengthwise to make the bag front (Fig. 17). Repeat to make the bag back.
make 2
I
H
G
25. Position one handle on the front of the bag 5” in from each side and aligning the raw ends with the bottom edge of the bag (Fig. 18). Top stitch the handle in place, stopping ½” from the top edge. Repeat with the bag back and the second handle.
make 2
26. Place the (2) 12 ½” x 17 ½” Fabric J strips, right sides together. Stitch down the two short sides and across the bottom, leaving a 4” opening for turning to make the lining.
27. Measure in from the side edge 2” and up from the bottom edge 2” at each lining corners. Cut out the square of fabric (Fig. 19). Open the cut bottom and align the bottom edge with the side edge and sew the two edges together (Fig. 20). Repeat with the other bottom corner to make the box bottom.


![HOME [queeniebridal.com]...BROOCHES LACE BORDERS WREATHS BRIDESMAID FLOWERS DRESS FLOWERS FAMILY FLOWERS GROOM FLOWERS HEAD FLOWERS OTHER ACCESSORIES HOME ABOUT US BRIDAL GOWNS BOUQUETS](https://static.fdocuments.in/doc/165x107/6046947d70039863261e7053/home-brooches-lace-borders-wreaths-bridesmaid-flowers-dress-flowers-family.jpg)