PrinterOn Enterprise Administration Support Guide · PrinterOn Enterprise Administration Support...
59
PrinterOn Enterprise Administration Support Guide Version 2.5 Doc Rev: 1.1
Transcript of PrinterOn Enterprise Administration Support Guide · PrinterOn Enterprise Administration Support...

PrinterOn Enterprise Administration Support Guide
Version 2.5 Doc Rev: 1.1

Enterprise Administration Support Guide | 2
Table of Contents
1. Overview ............................................................................................................................................................4
2. Hardware and Operating System Requirements ...........................................................................................5
2.1. Hardware Requirements ..............................................................................................................................5
2.2. Software Requirements ................................................................................................................................5
2.3. Network Requirements .................................................................................................................................5
2.4. Email Print Support ......................................................................................................................................6
3. The Enterprise Server Architecture Overview ...............................................................................................7
3.1. Central Print Service ....................................................................................................................................7
3.2. PrintAnywhere ..............................................................................................................................................7
3.2.1. Web Plugins ..........................................................................................................................................7
3.2.2. PrintAnywhere Status Server ................................................................................................................8
3.2.3. PrintAnywhere Processing Server ........................................................................................................8
3.3. PrinterOn PrintWhere Driver Server Edition ................................................................................................8
3.4. Print Delivery Station ....................................................................................................................................8
3.5. Print Delivery Hub ........................................................................................................................................8
3.6. Network Identification and Access ...............................................................................................................9
4. Capacity and Scalability Recommendations .............................................................................................. 10
4.1. Processing Times ...................................................................................................................................... 10
4.2. Capacity and Server Planning................................................................................................................... 10
5. Printer Deployment Recommendations ...................................................................................................... 12
5.1. Printer Model Support ............................................................................................................................... 12
5.2. New Printer Model Support ....................................................................................................................... 13
6. Common Installation Scenarios ................................................................................................................... 14
6.1. Dedicated Single Server Deployment ....................................................................................................... 14
6.2. Single Server Deployment with Print Management Server Integration..................................................... 15
6.3. Deployment with Multiple Physical Locations ........................................................................................... 16
6.4. High Usage Deployment and Redundancy ............................................................................................... 17
6.4.1. Option 1.............................................................................................................................................. 17
6.4.2. Option 2.............................................................................................................................................. 18
7. Common Release Scenarios ......................................................................................................................... 19
7.1. Release via Web Browser ......................................................................................................................... 19
7.2. Release via Ricoh MFP Device Browser .................................................................................................. 19
8. Common Authentication Scenarios ............................................................................................................. 20
8.1. Authentication Using LDAP or AD............................................................................................................. 20
8.2. Email Printing and LDAP or AD Validation ............................................................................................... 20
8.3. Authentication Using PrinterOn ACL ......................................................................................................... 20
9. PrinterOn Enterprise Email Print Overview ................................................................................................. 21
9.1. How it works .............................................................................................................................................. 21
9.2. Email Security ........................................................................................................................................... 22
9.3. Recommended Message Routing Configuration ...................................................................................... 22
9.4. Example Mail Routing Configuration Diagram .......................................................................................... 22
9.5. Email Domain Configuration ..................................................................................................................... 23
9.6. Catch-All Configuration ............................................................................................................................. 23
9.6.1. Exchange 2003 Catchall .................................................................................................................... 23

Enterprise Administration Support Guide | 3
9.6.2. Exchange 2010 Catchall .................................................................................................................... 23
9.6.3. hMailServer Catchall .......................................................................................................................... 23
9.6.4. Lotus Domino Catchall ....................................................................................................................... 24
9.7. Small Deployment Configuration............................................................................................................... 26
9.8. Email Printing Deployment Configuration – ActiveSync Environment ...................................................... 26
9.9. Email Server Configuration ....................................................................................................................... 27
9.9.1. Mail Server Mailbox Configuration ..................................................................................................... 27
9.9.2. Microsoft Exchange Mailbox using MAPI .......................................................................................... 28
9.9.3. Outgoing Email Configuration ............................................................................................................ 30
9.10. PrintAnywhere Server Client Configuration for Exchange MAPI .............................................................. 30
9.10.1. MAPI Client Configuration.................................................................................................................. 31
9.11. PrintAnywhere Server Client Configuration for IBM Domino .................................................................... 32
9.11.1. IBM Domino Client Configuration ...................................................................................................... 32
10. Enterprise Server Clustering ........................................................................................................................ 34
10.1. PrintAnywhere Clustering .......................................................................................................................... 34
10.1.1. Basic Clustered Deployment ............................................................................................................. 34
10.1.2. Advanced Redundancy Clustered Deployment ................................................................................. 34
10.1.3. Additional Requirements .................................................................................................................... 35
10.1.4. Configuration Steps ........................................................................................................................... 35
10.1.5. Clustering Notes ................................................................................................................................ 37
10.2. Print Delivery Hub Server Clustering ........................................................................................................ 38
10.2.1. System Capacity ................................................................................................................................ 38
10.2.2. Network Layout .................................................................................................................................. 38
10.2.3. Multi-Node PDH Clusters ................................................................................................................... 39
10.2.4. Configuration Steps ........................................................................................................................... 40
11. Service Monitoring Recommendations ....................................................................................................... 43
12. Identifying Problem Location ....................................................................................................................... 46
12.1. High Level Overview ................................................................................................................................. 46
12.2. Key Troubleshooting Data Points ............................................................................................................. 46
13. How To’s ......................................................................................................................................................... 48
13.1. How to Configure the PrinterOn Local Driver ............................................................................................ 48
13.2. How to Collect PrinterOn Enterprise Log Files ......................................................................................... 50
13.3. How to Manually Print and Configure PrintWhere .................................................................................... 50
13.4. How to enable AD/LDAP authentication with PrintWhere ......................................................................... 54
13.5. How to Manually Upgrade Java ................................................................................................................ 54
13.6. How to Manually Upgrade Apache Tomcat .............................................................................................. 56
13.6. How to enable PrintAnywhere to receive print jobs from CPS residing on an alternate server ................ 58
Trademarks and Servicemarks ............................................................................................................................ 59
Copyright Notice .................................................................................................................................................... 59

Enterprise Administration Support Guide | 4
1. Overview
The goal of this document is to provide information required to deploy and manage a PrinterOn Enterprise
service. The document will provide:
A technical overview of the Enterprise Server and its architectural components.
Capacity and scalability recommendations
Common deployment scenarios
Configuration details for common scenarios including:
o Authentication
o Email printing
o Clustering
Server monitoring guidelines
Troubleshooting assistance

Enterprise Administration Support Guide | 5
2. Hardware and Operating System Requirements
Please note that in most deployments the Enterprise software components are installed on a single server. In
some cases the individual components may be installed on separate servers to facilitate load balancing and
clustering. The requirements below are for single server installations, the Common Installation Scenarios section
provides more information for multiple server options.
The PrinterOn Enterprise Server should be installed on a dedicated operating system image. This may be a
dedicated physical server or virtual machine managed by software such as VMWare.
2.1. Hardware Requirements
A dedicated physical server or virtual machine
Intel compatible processor with 2GHz multi-core processor
2 GB RAM minimum (4 GB recommended)
2 GB of free disk space for PrinterOn Enterprise software and third party applications
Windows Server 2008 including 2008R2 (32 or and 64-bit) with current patches installed
‒ All Editions supported except HPC
Windows Server 2012 including 2012R2 (with current patches installed)
‒ All Editions supported
Internet Explorer 9 or greater, with current patches installed
Internet access is available at all times
NOTEL: IIS (Internet Information Services) must be disabled if installed; otherwise the Apache/Tomcat Web
Server must be configured to run on a port other than 80
2.2. Software Requirements
(Recommended) Microsoft Office 2007 or later
‒ Including Word, Excel, PowerPoint and Visio
‒ If integrating with Microsoft Exchange, installing Microsoft Outlook is recommended
(Required) Internet Explorer 9 or later
(Optional) OpenOffice.org or LibreOffice 4.0 or later
‒ Note that only OpenOffice or LibreOffice should be installed at one time.
Apache Tomcat (included with installation)
2.3. Network Requirements
DNS and network routing must be set up to allow the Enterprise Server to communicate with the following
address:
http://www.printeron.net
https://secure1.printeron.net
https://secure2.printeron.net
https://download1.printeron.net
Outgoing Internet communication on TCP ports 80, 443 must be permitted, along with the responses that are
returned.
For internal network communication, inbound and outbound access on port 631 is recommended.

Enterprise Administration Support Guide | 6
2.4. Email Print Support
PrinterOn Enterprise supports three email protocols; select the option that best fits your environment.
Microsoft Exchange using MAPI
‒ MAPI is Microsoft’s proprietary messaging API, use this if your server does not support the IMAP
4 protocol.
‒ PrinterOn Enterprise will only respond to print requests using the SMTP, this must be enabled on
your Exchange server
IMAP4 Compatible server
‒ IMAP4 is a commonly used protocol for Internet email, the PrinterOn Enterprise server may
connect to your mail server using IMAP4.
IBM Domino Server using Notes API
‒ Notes API is IBM’s proprietary access protocol that encompasses a set of subroutines and data
structures to grant third-party applications authorized access to Domino Server and Lotus Notes
Client databases.
As part of the deployment, a dedicated mail server may be installed and deployed on the PrinterOn Enterprise
server. The hMailServer (www.hmailserver.com) is a free, Windows-based email server that is both simple to
install and configure. It may be used to enable email printing on your PrinterOn Enterprise Server.
Enterprise Administration Support Guide | 7
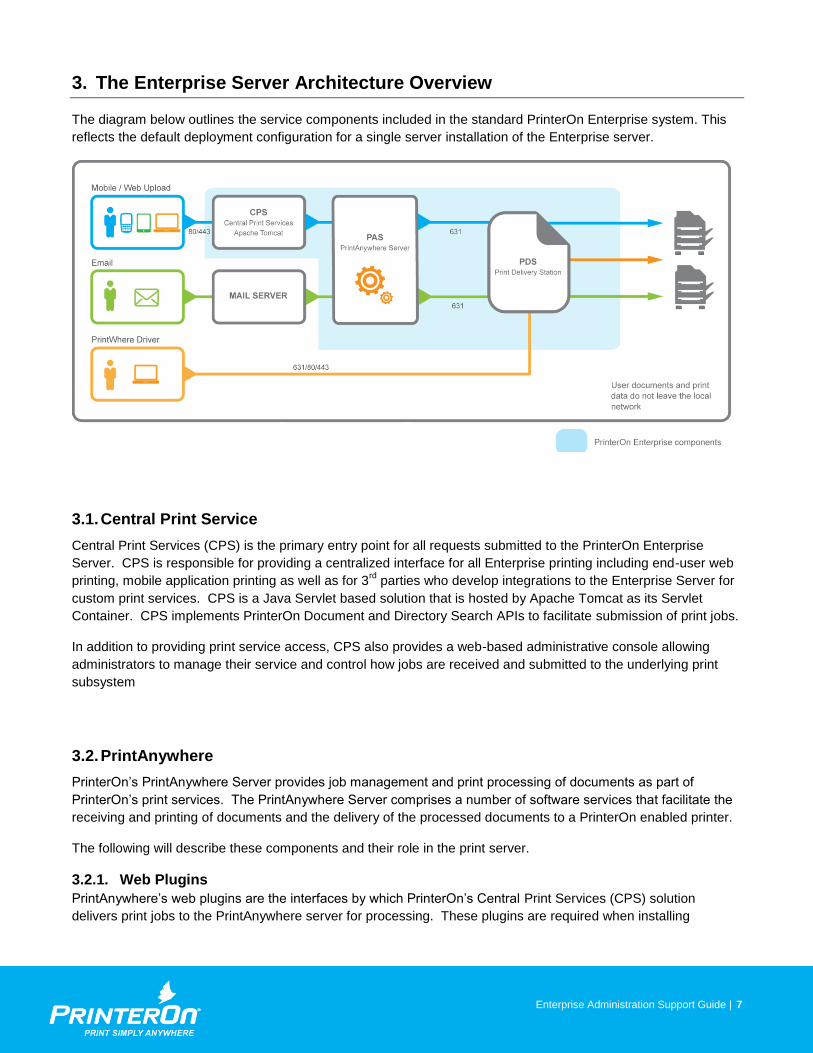
3. The Enterprise Server Architecture Overview
The diagram below outlines the service components included in the standard PrinterOn Enterprise system. This
reflects the default deployment configuration for a single server installation of the Enterprise server.
3.1. Central Print Service
Central Print Services (CPS) is the primary entry point for all requests submitted to the PrinterOn Enterprise
Server. CPS is responsible for providing a centralized interface for all Enterprise printing including end-user web
printing, mobile application printing as well as for 3rd
parties who develop integrations to the Enterprise Server for
custom print services. CPS is a Java Servlet based solution that is hosted by Apache Tomcat as its Servlet
Container. CPS implements PrinterOn Document and Directory Search APIs to facilitate submission of print jobs.
In addition to providing print service access, CPS also provides a web-based administrative console allowing
administrators to manage their service and control how jobs are received and submitted to the underlying print
subsystem
3.2. PrintAnywhere
PrinterOn’s PrintAnywhere Server provides job management and print processing of documents as part of
PrinterOn’s print services. The PrintAnywhere Server comprises a number of software services that facilitate the
receiving and printing of documents and the delivery of the processed documents to a PrinterOn enabled printer.
The following will describe these components and their role in the print server.
3.2.1. Web Plugins
PrintAnywhere’s web plugins are the interfaces by which PrinterOn’s Central Print Services (CPS) solution
delivers print jobs to the PrintAnywhere server for processing. These plugins are required when installing

Enterprise Administration Support Guide | 8
PrinterOn’s CPS solution. These plugins are available, as part of the installation, as either a Java Servlet or
ISAPI based interface.
3.2.2. PrintAnywhere Status Server
The PrintAnywhere Status Server is responsible for managing all incoming and in-process print requests. All print
jobs received via email, the web or from mobile apps are first received by the Status Server. The Status Server is
responsible for delivering requests to available Processing Servers and managing the jobs while they are being
processed. Status Servers may be clustered to provide greater redundancy in a multi-server environment.
3.2.3. PrintAnywhere Processing Server
The PrintAnywhere Processing Server is responsible for converting a document received by the server into a
printer usable format. The Processing Server integrates with applications installed on the server and the
PrinterOn PrintWhere Driver to render documents. Multiple Processing Servers may be installed as part of a
PrintAnywhere “cluster” to increase capacity and redundancy.
3.3. PrinterOn PrintWhere Driver Server Edition
The PrinterOn PrintWhere driver is installed as part of the Processing Server. It is a key component of the overall
printing process and is integrated into the Processing Server as part of a PrintAnywhere deployment.
The PrintWhere Driver is managed by the Processing Server using an internal API system. The Processing
Server encapsulates communication between PrintAnywhere and the PrintWhere driver using a subcomponent of
PrintAnywhere named the PrintWhere Bridge (PWCBridge.exe).
3.4. Print Delivery Station
Print Delivery Station’s (PDS) role is to provide a bridge between the PrinterOn delivery infrastructure and the
physical printer or print queue. PDS communication is based on the IPP specification and provides extensions to
the protocol for advanced functionality such as encryption. The simplest description of PDS is an IPP print server
that supports various connection protocols to printers or print queues.
IPP is based on HTTP and uses custom HTTP headers for metadata delivery and a structured
binary body to deliver print data.
PDS implements an IPP listener to receive print jobs from PrintWhere.
Print jobs received by PDS can be delivered to their destination automatically or manually based
on the PrinterOn configuration.
The process of receiving jobs and delivering them to their destination remains the same
regardless of whether PDS is configured to hold for user input prior to delivering to their
destination.
3.5. Print Delivery Hub
For Enterprise deployments delivering print jobs to printers installed in disparate networks, delivery of print jobs
from a PrinterOn Enterprise Server or the PrinterOn PrintWhere universal driver directly to the PDSs may not be
possible. In other cases, leveraging a simple and rapid deployment of print devices, such as Ricoh HotSpot
printers, will benefit from the centralized installation of PDH. In this arrangement, print jobs are delivered to the
PDH setup and the PDS servers communicate with PDH to detect and download the print jobs.

Enterprise Administration Support Guide | 9
In such a scenario, the PDH service must be accessible over the network to the PDS servers. The PDH service
can be installed in a central network operating center. Access to the PDH will be configured such that the
PrintAnywhere Server, desktop PrintWhere clients and PDS deployments can access the PDH server. This
configuration generally minimizes network changes, as the PDH is the only service requiring incoming network
traffic access.
3.6. Network Identification and Access
PrinterOn print clients, such as PrintAnywhere and PrintWhere, and Print Delivery Station deployments are
designed to access the Print Delivery Hub service as a single entity. As a result when deploying a multi-node
setup, care must be taken to ensure the cluster is addressable via a single DNS entry and that load balancers
accept traffic for that name and forward the traffic appropriately to each and any PDH server in the cluster.

Enterprise Administration Support Guide | 10
4. Capacity and Scalability Recommendations
When determining how best to deploy a PrinterOn Enterprise solution within your environment, it is important to
understand how users will use the service. Most significantly it is important to understand the printing habits of
users and how much print volume they are expected to generate through the server.
PrinterOn’s Enterprise solution is designed to allow the solution to grow as usage increases. This is
accomplished by adding additional PrintAnywhere servers to your PrinterOn’s Enterprise solution as the amount
of print volume increases. PrinterOn’s Enterprise solution is able to accommodate thousands of users and print
devices within a single deployment. The solution will seamlessly manage the service as you enable more print
devices in your environment and more users begin to leverage the solution.
The key metrics to investigate when developing a PrinterOn Enterprise deployment that meets the needs of your
organization: understand how much print volume is expected from your users and when users typically print. The
following will provide some information regarding the processing capabilities of an Enterprise server with the
intention of providing some high level recommendations for your deployment.
4.1. Processing Times
A number of factors affect the time it takes to process and print a job received from a user. These include items
such as the type of document, the size of the document and complexity of the document as well as the printer
being used.
In general the following metrics are used by PrinterOn when calculating expected processing times. These
values are then used to assist in planning for capacity requirements based on expected usage.
As a general guide PrinterOn expects a real-world experience whereby the majority of print jobs are processed in
under 20 seconds. This time frame is one that is generally considered acceptable from a user experience
standpoint and includes a wide variety of user submitted documents. In most cases print jobs are actually
processed in a much shorter time frame and PrinterOn expects jobs to be completed in approximately 10
seconds.
75% of jobs are processed in under 10 seconds
85% of jobs are processed in under 20 seconds
95% of jobs are processing in under 30 and 60 seconds.
NOTE: Jobs which typically take longer than 20 seconds to process are generally due to complex content or
users submitted print jobs that are not supported by the service, such as jobs that may require a password to
open the document.
4.2. Capacity and Server Planning
Based on the values provided above, PrinterOn generally recommends a single PrintAnywhere Server
deployment when user volume is expected to be up to 3000 jobs / 8-hour work day. With the availability of the
service 24-hours a day, users tend to distribute the work over a wider period of the day allowing them to submit
print jobs at any time in the day and retrieve at any time. These use cases allow for even greater capacity for the
service. The PrinterOn Enterprise server will also manage the processing of print jobs when large volumes of
jobs are submitted in a short period of time. In these cases jobs may be queued prior to processing which could
lead to slightly longer response times to users.
In addition to planning for overall volume, it is also important to consider peak usage for your service. In some
situations spikes in volume over a small period of time may affect how you configure and organize your
deployment to ensure minimal disruptions during these periods.

Enterprise Administration Support Guide | 11
The following table provides some guidelines for capacity planning to address overall volume while also handling
peak usage periods. Your specific requirements may vary depending or printing usage patterns
# of jobs/day Recommended # of PrintAnywhere Servers
< 3000 1 PrintAnywhere Server
3000 - 6000 2 PrintAnywhere Servers
6000 - 9000 3 PrintAnywhere Servers
9000 - 12000 4 PrintAnywhere Servers
Enterprise Administration Support Guide | 12
5. Printer Deployment Recommendations
When deploying print devices within your organization, understanding where devices will be deployed and
accessed by users is an important aspect of deciding how to install and manage your PrinterOn Enterprise
solution. This will help determine what software to deploy and how to organize your printer enabling software.
PrinterOn’s Print Delivery Station (PDS) software is the component of the PrinterOn Enterprise solution used to
enable printing devices with mobile/color print capabilities. The PDS software is responsible for connecting print
devices to the Enterprise print infrastructure. When a user submits a print job, the final output will first be
delivered to the PDS software before being released to the print device itself.
The PDS software is capable of supporting single devices or many with a single installation. PrinterOn generally
recommends deploying a PDS server to support a group of print devices based on where they are located within
your organization. If your organization has printers deployed across multiple buildings or even multiple
geographic regions, PrinterOn would recommend deploying a PDS server for each facility.
The PDS software provides the flexibility of deploying a single server for all your devices or multiple installations
managing “groups” of printers. For example, if your organization wishes to enable 50 print devices within one
building and an additional 25 devices in a separate building, PrinterOn would recommend installing a PDS server
for each building. PrinterOn’s PDS software will also accommodate the deployment if the buildings are located in
different geographic locations within a single country or across the world.
If your organization is integrating PrinterOn with an existing Print Management Server, PrinterOn recommends
installing the PDS software on the server that is hosting the Print Management Software. The PDS software
provides the ability to simply connect the configured output queues with your Print Management Server’s existing
print queues thereby extending the capabilities of your existing infrastructure.
5.1. Printer Model Support
When configuring your PrinterOn Enterprise printers, appropriate drivers/converters must be selected for your
printers and/or MFPs.
The PrinterOn web administrator console provides a list of supported manufacturers and models. Simply select
the make and model if it is available. In some cases a single driver may support a range of models. If you do not
see your exact device listed, you may use a different model in the device series.
If no specific model or series is available a manufacturer based Universal Driver may be also available. These
are available for a number of manufacturers and support many models. In some cases a universal driver for one
manufacturer may also support a model from a different manufacturer.
PrinterOn also offers generic Postscript drivers for both color and black and white devices. This may be used if
your specific model is not available. Finally, if your deployment is using a desktop or server based PDS
installation the PrinterOn PrintSpots Universal driver may be used. The PrintSpots Universal Driver converts your
documents to an intermediate format to be delivered to the PrinterOn PDS. The Print Delivery Station can be
configured to use a local print driver to convert the intermediate document for your specific make and model.

Enterprise Administration Support Guide | 13
5.2. New Printer Model Support
PrinterOn’s technology supports hundreds of different printer models and manufacturers. Occasionally a customer
may request support for a printer model that is not named in our list of supported printers. This may be due to the
introduction of a new device by a printer manufacturer or the need to support an older legacy printer.
There are a few questions we ask to help us determine if a printer can be included in our product offering:
Does the Printer fail to function correctly with an existing universal or alternate driver provided by
PrinterOn?
Is the Printer currently being manufactured or available for purchase by consumers?
Can the Printer’s OEM print driver be installed in a Windows environment without the physical
printer being present?
Does the printer support PCL or PostScript Languages?
If the answer is ‘Yes’ to all of the above questions, we will endeavor to provide, at no charge, support for the
requested printer.
Should any of the above answers be “no”, PrinterOn will, at its sole discretion, evaluate and assess the technical
feasibility and costs associated with supporting the printer. If we determine the printer can be integrated and
supported, engineering fees may be incurred and passed along to partners or end-users. The engineering fee is
only applied for printers that can be successfully integrated by PrinterOn and approved by the purchaser.

Enterprise Administration Support Guide | 14
6. Common Installation Scenarios
The following section describes some of the most common installation deployment scenarios. The examples are
for reference only. The PrinterOn Enterprise Server is a flexible and modular system that can be adapted to your
specific requirements.
6.1. Dedicated Single Server Deployment
The simplest deployment scenario is to install all PrinterOn Enterprise components on a single dedicated server.
This is the default option when deploying the PrinterOn Enterprise solution using PrinterOn’s installer.
In this deployment the installer will install the following components on the server:
Apache Tomcat
PrinterOn’s Central Print Services (CPS) (hosted by Apache Tomcat)
PrinterOn PrintAnywhere Server (PAS) – document rendering server
PrinterOn Dr. Print – PrintAnywhere rendering add-on
PrinterOn Print Delivery Station (PDS) – Print Release Client and printer enabler

Enterprise Administration Support Guide | 15
6.2. Single Server Deployment with Print Management Server Integration
This deployment scenario is very similar to the Dedicated Single Server Deployment. It is recommended when
deploying the solution alongside an existing Print Management solution. In this deployment, the core service and
document processing services are installed on a dedicated server. The Print Delivery Station software is installed
directly on the Print Management Server. Print jobs received by the Print Delivery Station are directly submitted
to the Print Management Server.
In this deployment the installer will install the following components on the server:
Dedicated PrinterOn Enterprise Server
Apache Tomcat
PrinterOn’s Central Print Services (CPS) (hosted by Apache Tomcat)
PrinterOn PrintAnywhere Server (PAS)– document rendering server
PrinterOn Dr. Print – PrintAnywhere rendering add-on
Print Management Server
PrinterOn Print Delivery Station (PDS) – Print Release Client and printer enabler

Enterprise Administration Support Guide | 16
6.3. Deployment with Multiple Physical Locations
This deployment scenario may be used when there are several buildings or locations within the organization with
printers available only within those locations and not across the WAN.
There will be multiple Print Delivery Station Licenses and printers for each location will be assigned to the
corresponding PDS license.
This deployment allows users to submit to printers they normally wouldn’t have access to when travelling between
offices.
Dedicated PrinterOn Enterprise Server
Apache Tomcat
PrinterOn’s Central Print Services (CPS) (hosted by Apache Tomcat)
PrinterOn PrintAnywhere Server (PAS) – document rendering server
PrinterOn Dr. Print – PrintAnywhere rendering add-on
Print Server in Location A
PrinterOn Print Delivery Station (PDS) – Print Release Client and printer enabler
Print Server in Location B
PrinterOn Print Delivery Station (PDS) – Print Release Client and printer enabler

Enterprise Administration Support Guide | 17
6.4. High Usage Deployment and Redundancy
This deployment may be used when the print volume exceeds the capacity of a single PrintAnywhere server or
where large spikes in usage over a brief period of time exceed the capacity of a single server.
The PrintAnywhere server is designed to distribute print jobs across members of the cluster. Additional
configuration within PrintAnywhere is required for clustering.
6.4.1. Option 1
This option describes the installation of multiple PrintAnywhere servers on separate physical servers. By
installing additional document rendering servers on separate physical servers the system is able to handle some
hardware failures and redirect jobs to other servers.
PrinterOn Enterprise Server – Enterprise Server 1
Apache Tomcat
PrinterOn’s Central Print Services (CPS) (hosted by Apache Tomcat)
PrinterOn PrintAnywhere Server (PAS) – Primary server and document rendering server
PrinterOn Dr. Print – PrintAnywhere rendering add-on
PrinterOn Print Delivery Station (PDS) – Print Release Client and printer enabler
PrintAnywhere Server 2 – Physical Server 2
PrinterOn PrintAnywhere Server – document rendering server
PrintAnywhere Server 3 – Physical Server 3
PrinterOn PrintAnywhere Server – document rendering server

Enterprise Administration Support Guide | 18
6.4.2. Option 2
This option describes the installation of multiple PrintAnywhere servers on a single server using multiple virtual
machines. Some parts of the printing process are dependent on hard disk access while others are bound by the
servers CPU. This deployment approach allows the Enterprise server to take greater advantage of the server’s
physical capabilities. The installation also includes installation PrintAnywhere installations on separate physical
servers to provide hardware redundancy.
NOTE: It is important to ensure the minimum required memory is allocated to every PrintAnywhere
virtual machine.
PrinterOn Enterprise Server – Enterprise Server 1, Virtual Machine 1
Apache Tomcat
PrinterOn’s Central Print Services (CPS) (hosted by Apache Tomcat)
PrinterOn PrintAnywhere Server (PAS) – Primary server and document rendering server
PrinterOn Dr. Print – PrintAnywhere rendering add-on
PrinterOn Print Delivery Station (PDS) – Print Release Client and printer enabler
PrintAnywhere Server 2 – Enterprise Server 1, Virtual Machine 2
PrinterOn PrintAnywhere Server – document rendering server
PrintAnywhere Server 3 – Enterprise Server 2, Virtual Machine 1
PrinterOn PrintAnywhere Server – document rendering server
PrintAnywhere Server 4 – Enterprise Server 2, Virtual Machine 2
PrinterOn PrintAnywhere Server – document rendering server

Enterprise Administration Support Guide | 19
7. Common Release Scenarios
The following section describes some of the most common release scenarios. The examples are for reference
only. The PrinterOn Enterprise Server is a flexible and modular system that can be adapted to your specific
requirements.
7.1. Release via Web Browser
Integrated into the Print Delivery Station (PDS) is a web-based release page that can be accessed from any
browser on the same network as PDS. Browser address is http://[IP address or DNS of PDS machine]:8181.
Requirements:
User must be on the same network as the server hosting Print Delivery Station
Web browser
Port 8181 must be open inbound on the PDS server
7.2. Release via Ricoh MFP Device Browser
Integrated into the Print Delivery Station (PDS) is a web-based release page that can be accessed from any
browser on the same network as PDS. MFP Device Browser address is http://[IP address or DNS of PDS
machine]:8181/mfp.
Requirements:
Printer must be on the same network as the server hosting Print Delivery Station
Ricoh MFP browser installed on printer
Port 8181 must be open inbound on the PDS server

Enterprise Administration Support Guide | 20
8. Common Authentication Scenarios
The following section describes some of the most common authentication scenarios. The examples are for
reference only. The PrinterOn Enterprise Server is a flexible and modular system that can be adapted to your
specific requirements.
8.1. Authentication Using LDAP or AD
PrinterOn Enterprise can use existing LDAP or AD configurations to authenticate users when printing.
Configuration is done in the Authentication tab of the CPS Admin Console (http://localhost/cps/admin). The job
owner name would then be the network login entered.
Requirements:
Existing LDAP or AD
Details on server URL, User ID attribute and search DN
For configurations with users in multiple OU’s, a Bind DN and password is required as well
8.2. Email Printing and LDAP or AD Validation
When the PrinterOn Enterprise Server is integrated with a 3rd party print management solution it is important to
associate user information with the print job to ensure proper tracking of print jobs. When also supporting email
printing additional steps must be taken to locate and link the user’s account information with their email address.
The PrinterOn Central Print Services provides the necessary services to allow the PrintAnywhere Server (that is
responsible for processing email print jobs) to request user information from the email address of a received print
job.
The Enterprise Email User Lookup feature will perform the following to identify the email print user and associated
job owner information:
PrintAnywhere receives the print job and identifies the user’s email address.
PrintAnywhere performs a CPS email address API lookup request operation.
CPS uses the LDAP/AD configuration to search for the email address in all configured LDAP/AD servers.
o Note 1: CPS uses the name configured in the “User Email Attribute” to perform the email address
lookup. Changing this value will allow CPS to search email address information in other fields.
If found, CPS will return the value stored in the “User ID Attribute” and returns the information to
PrintAnywhere
PrintAnywhere includes the information along with the print data to allow 3rd
party systems to identify the
user.
8.3. Authentication Using PrinterOn ACL
PrinterOn has a feature to add unique Access Control Lists (ACLs) to each PrinterOn-enabled printer. You can
add domains or individual email addresses. Only these users would be able to view and print to the selected
printer. If using individual email addresses, those users must have a PrinterOn account. Within the CPS Admin
Console, enable the “Authenticate using PrinterOn ACL”. When logging into your print service, users will enter
their PrinterOn credentials that will be authenticated against PrinterOn’s user database.

Enterprise Administration Support Guide | 21
9. PrinterOn Enterprise Email Print Overview
PrinterOn’s Enterprise Solution has been designed to provide email based printing capabilities as part of an
overall Enterprise printing platform. PrinterOn recognizes that deployment and configurations within an
organization may vary significantly and developed a solution that is flexible and adaptable to your specific
requirements.
In addition the PrinterOn Enterprise solution has been designed to be as unobtrusive as possible allowing for a
deployment that requires minimal changes to your existing installation. This document will outline a number of
deployment options to allow you to select a deployment that best suits your needs.
The PrinterOn Enterprise solution is comprised of a number of separate software components that are
responsible for different steps in the print workflow. The PrintAnywhere Server, which is included with the
PrinterOn Enterprise installation, is responsible for providing email print capabilities. This document will focus on
the configuration of the PrintAnywhere Server as well as providing recommendations, best practices and
configuration suggestions for your deployment.
9.1. How it works
At a high level, the PrintAnywhere Server is designed to simply monitor a specific mail server mailbox for
incoming email print jobs. The PrintAnywhere Server may be configured to monitor mailboxes using the standard
IMAP4 protocol, IBM Notes API Integration or may also leverage Microsoft’s Messaging API to monitor a mailbox
when using a Microsoft Exchange server.
When an email is received by the mailbox, the service extracts the attachments from the email and also saves a
copy of the email body in a format that can be processed by the printing engine. After processing a newly
received email print job, the service automatically deletes the message from the mailbox.
Within the PrinterOn system every print device is assigned a unique email address. These email addresses are
configurable and may be changed at any point. When a user submits a print job to your email print service, the
user may simply forward their email to the printer’s unique email address such as boardroom-
[email protected]. When the PrintAnywhere server receives the email, it extracts the email address to
determine to which printer to deliver the job. The email address is used to identify the printer and determine what
configuration options have been configured for a particular printer.
After it has finished processing a print job, the PrintAnywhere server will respond to the user who submitted the
print job. When extracting information from the original email, the service will determine the sender’s email
address to determine where to respond. The PrintAnywhere server will respond to the user informing them that
the job is complete and provide information such as the number of pages in the print job and a release code for
the job.

Enterprise Administration Support Guide | 22
9.2. Email Security
The PrinterOn server only performs the most rudimentary validation of the email address and domain. It is
typically the responsibility of the upstream email server and configured SPAM software to ensure the validity of
the incoming email addresses prior to being delivered to the Enterprise Server.
The Enterprise Server integration for email printing is one where the Enterprise Server simply acts as a mail client
much like Outlook or any other mail client. Like these clients, they assume the mail server is providing a level of
security prior to delivering the messages. This approach allows the Enterprise Server to be flexible while
leveraging existing SPAM or virus investments.
9.3. Recommended Message Routing Configuration
The PrintAnywhere Server monitors a single mailbox to receive and process email print requests. To facilitate
receiving email print requests different options are available depending on the number of printers supported within
your installation.
The simplest deployment option is to create a mailbox on your existing mail server to receive print email print
requests. In this deployment scenario, the PrintAnywhere server will act as a simple mail client and monitor for
new email messages in the mailbox.
The following diagram illustrates a more complex but recommended deployment and configuration for supporting
email printing within your organization. The goal of this deployment approach is to isolate email printing and the
PrintAnywhere server from your corporate mail server.
A mail server, such as the free Windows based hMailserver (www.hmailserver.com) may be installed directly on
the PrintAnywhere server. This mail server will be dedicated for receiving and processing all email print requests.
All email print messages will be routed directly to this mail server to be processed by the server. If your
organization uses Microsoft Exchange, you may consider configuring an Internal Relay Domain to direct
messages to a subdomain such as print.company.com.
9.4. Example Mail Routing Configuration Diagram

Enterprise Administration Support Guide | 23
9.5. Email Domain Configuration
When configuring your service to support email printing, how users identify the print location is important. In
addition to the end-user’s experience it may be helpful to segregate email print jobs from other email traffic within
your network. By segregating email traffic additional flexibility is available in how and where your email print jobs
are processed.
PrinterOn recommends that you configure a subdomain within your existing domain structure to support email
printing. For example, if your company domain is www.companyxyz.com an appropriate email domain would be
@print.companyxyz.com. By adding the @print.companyxyz.com subdomain for printing you also have the
option of deploying a separate email server dedicated to email printing.
For example, your primary corporate email may be managed by a server for all messages routed to
@companyxzy.com. You may then install a dedicated mail server (possibly a low-cost or free alternative such as
hMailserver (http://hmailserver.com) on the PrintAnywhere server itself.
Mail received at the @print.companyxyz.com subdomain may be routed to this mail server for handling only email
print jobs. This approach also aligns with the use of email server catchalls as emails received by the mail server
should be intended for email printing.
9.6. Catch-All Configuration
Email Catchalls are a vital part of PrintAnywhere’s email printing solution. The PrintAnywhere email plugin
monitors a single mail folder for incoming messages. By leveraging the mail server’s catchall capabilities users
may simply forward emails to the mail server using the printer’s name in the email address. The catchall directs
all unknown emails to the mailbox monitored by PrintAnywhere.
Configuring an email server’s catchall feature varies from server to server. Below are some links to assist in
getting starting.
9.6.1. Exchange 2003 Catchall
The following Microsoft Knowledge Base article how to configure an Exchange 2003 to capture all email
for a particular domain:
http://support.microsoft.com/kb/324021
9.6.2. Exchange 2010 Catchall
The following Microsoft Knowledge Base article how to configure an Exchange 2010 to capture all email
for a particular domain:
http://technet.microsoft.com/en-us/library/bb691132.aspx
9.6.3. hMailServer Catchall
The hMailServer (http://www.hmailserver.com) provides a simple configuration to support catchalls. To
configure catchalls with the hMailServer review the following steps.
NOTE: You must configure the PrintAnywhere email print mailbox prior to performing these steps.
1. Launch the hMailServer administrator interface
2. Select “Domains” and then the domain configured for PrintAnywhere email printing.
3. Select the “Advanced” tab.
4. In the “Catchall address” section enter the email address and domain of the mailbox
previously created to receive print quests.

Enterprise Administration Support Guide | 24
5. Click Save.
9.6.4. Lotus Domino Catchall
The Lotus Domino server provides a simple configuration to support catchall. It involves leveraging the ‘Group’
feature.
Creating a Group in the Domino world is simple. It involves launching the Domino Server Administrator
application and creating a new Group Document in the Domino Directory. During the creation process, you can
specify the registered users to be added to the group. You may also defer the addition of users to a later time.
There is no limit to the number of Domino user accounts that you can attach to a group.
The steps are as follows:
Make sure that you have Editor or Author access with the necessary privileges [‘GroupCreator’] required for creating a new Group Document in the IBM Lotus Domino Directory.
From the Domino Administrator or Web Administrator, click the ‘People & Groups’ tab.
Select Domino Directories, and then select Groups - Add Group.

Enterprise Administration Support Guide | 25
Fill out the following fields on the Basics tab by assigning values for (see image below): o Group Name – A descriptive name o Group Type – Setting the group type to ‘Mail Only’ will allow the group to function as a mailing
list o Mail Domain – The Domino domain to be associated with the group’s mail address o Internet Address – Email address for the mail group o Members – Users who will receive the emails when they have been addressed to this mail group

Enterprise Administration Support Guide | 26
NOTE: The email address used for the ‘Internet Address’ will be the printer’s email address as defined on the PrinterOn.com PrintSpot; each printer will need to have a mail account created. The mailbox to be monitored by the PrinterOn Enterprise Server needs to be added as a ‘Member’ of the mailing group.
9.7. Small Deployment Configuration
When supporting a small number of supported printers, the simplest configuration option is to associate multiple
email addresses with a single mailbox on your mail server. This option involves the least amount of configuration
for your mail server, particularly if using a Microsoft Exchange server.
PrinterOn provides two email addresses for every PrinterOn enabled printer. The first is a 12-digit numeric email
address such as [email protected]. The other is a configurable alpha-numeric address such
as [email protected]. The numeric address is guaranteed to be unique and will never
change throughout the lifespan of the printer. The alpha-numeric address is configurable through PrinterOn’s
administration tools and may be modified in the future.
When configuring a small number of printers you may retrieve the address from the PrinterOn administrative
website and add these as optional addresses for your email print mailbox. Users may then submit print jobs to
these address and all emails will be routed to the common mailbox.
NOTE: When using this configuration with Microsoft Exchange, it is necessary to hide the mailbox from the
Exchange Address lists. Users can add the printer addresses to their personal contacts for frequent use.
9.8. Email Printing Deployment Configuration – ActiveSync Environment
If you are enabling email printing and also using Microsoft’s ActiveSync to enable mobile devices to connect to
your Exchange server, the email alias deployment option described above may not meet all your requirements.
Microsoft’s ActiveSync does not support the same email alias capabilities when connecting with some iOS and
Android devices. In these cases all emails will be delivered to the default email addressed configured for the
mailbox as opposed to the addressed entered by the user.
To support this deployment, PrinterOn has come up with 2 solutions. One involves creating individual Exchange
mailboxes for each print device, one involves creating Distribution Groups.
There is currently no specific solution for the ActiveSync issue (as it is an MS issue) but we have provided the
customer with 2 workaround solutions.
Using Exchange’s Automatically Forward option:
1. Create individual email mailboxes for each printer and one for a main mobile print mailbox
2. Ensure each mailbox on Exchange is completely created. This is done by logging into the mailbox
using a service like Outlook.
3. For each mailbox, on the Exchange server, access the mailbox's "Delivery Options" and enable
the "Automatically Forward" option
a. In the Select Recipients dialog box select the central PrinterOn mailbox created earlier.

Enterprise Administration Support Guide | 27
b. Select the option to delete the messages after forwarding.
When this is done, messages are copied to the main print mailbox and the original recipient and sender
information is preserved.
See the last section of the following KB for more details.
http://support.microsoft.com/kb/281926
Using Exchange’s Distribution Groups:
1. Create one main mobile print mailbox
a. This can be named anything
2. Ensure this mailbox is completely created. This is done by logging into the mailbox using a
service like Outlook
3. For each printer email address, on the Exchange server, create a Distribution Group
4. Each Distribution Alias should reflect the printer name as created at printeron.com
5. Once the group is created, modify the Distribution Group properties
6. Go to the Members tab and click Add
a. Select the main mobile print mailbox that was created in step 1
When this is done, messages are copied to the main print mailbox and the original recipient and sender
information is preserved.
9.9. Email Server Configuration
The following section will review the configuration requirements of a mail server to support PrinterOn’s email print
capabilities. The document will review some of the common configuration requirements as well as provide a
description of how the PrintAnywhere server will communicate with the server.
9.9.1. Mail Server Mailbox Configuration
In this section we will describe configuring a mailbox to be used by the PrintAnywhere Server. Information
regarding how to configure your mailbox for multiple printers will be discussed in a later section.
In order to receive and process email print jobs, the PrintAnywhere server will connect and monitor a single email
mailbox on your mail server. The PrintAnywhere server is able to connect and monitor a mailbox using either
Microsoft’s Message API (MAPI) or using the IMAP4 protocol. Note that it is possible to use IMAP4 to support
email printing when using an Exchange mail server. Depending on your choice, configuration of your mailbox and
providing access may vary.
Email Address Configuration:
When configuring your mailbox, special consideration should be taken to the “default” email address associated
with the mailbox.
When PrintAnywhere responds to a user it will respond using the “reply-to” address configured in
the PrintAnywhere Configuration Tool.
PrinterOn recommends setting the reply-to address in the configuration tool in a format such as
When configuring your mailbox, the default email address should match the email address
configured in the PrintAnywhere Configuration.

Enterprise Administration Support Guide | 28
By default the PrintAnywhere server will NOT respond to emails it receives that are addressed to
the default email address.
In some situations such as poorly implemented out-of-office replies, a user’s email client may automatically
respond to an email it receives when submitting a print job. By ensuring the default address matches the reply-to
address configured, the PrintAnywhere server will ignore emails inadvertently sent to this address. The
PrintAnywhere server will then be free to process only print jobs sent to specific email addresses
9.9.2. Microsoft Exchange Mailbox using MAPI
There are no special requirements when creating a mailbox for PrintAnywhere on a Microsoft Exchange mail
server. When creating a mailbox to be used by PrintAnywhere the following should be considered:
Configuration:
PrinterOn Enterprise uses a printer’s SMTP email address to determine the destination printer name,
therefore if using Exchange servers prior to 2007 ensure that SMTP services are enabled and the server
is capable of using SMTP addressing. X.400 addressing is not supported.
If using an existing corporate Exchange server for email printing as well, Exchange 2007 or later is
required. If using a separate Exchange server Exchange 2003 is supported.
PrinterOn Enterprise will only respond to print requests using the SMTP, this must be enabled on your
Exchange server
PrinterOn Enterprise must be on the same Window’s domain as the Exchange server to connect to the
server.
The PrinterOn Enterprise Server Window’s services must be configured with user credentials that have
read and write access to the mailbox configured on the Exchange server
Permissions:
PrinterOn Enterprise must be on the same Windows domain as the Exchange server to connect to the
server.
The PrintAnywhere server will connect to the Exchange mailbox using the credentials associated
with the Windows Service account chosen during installation. Note the credentials may be
changed after installation either using the Windows Service Control Panel or using the
PrintAnywhere Configuration Tool.
The user assigned to the PrintAnywhere server should be given full read/write access to the
Exchange mailbox created for email printing.

Enterprise Administration Support Guide | 29
IMAP4 Mailbox Configuration
Similar to a MAPI configuration, there are no special requirements when creating a mailbox for PrintAnywhere
using an IMAP4 based mail server.
IMAP4 is a commonly used protocol for Internet email, the PrinterOn Enterprise server may connect to
your mail server using IMAP4.
Most modern email servers support IMAP4 including Microsoft Exchange
PrinterOn Enterprise will only respond to print requests using the SMTP, this must be enabled on your
mail server
Permissions:
When creating a mailbox for PrintAnywhere to monitor for print jobs, take note of the username
and password assigned to the IMAP4 mailbox. This information will be used to configure the
IMAP4 connector in the PrintAnywhere Configuration Tool.
New Mail Notification:
The PrintAnywhere server is capable of receiving automatic new mail notification from your IMAP4 mail server.
This is accomplished by leveraging the IMAP4 IDLE command available in most modern IMAP4 servers. When a
new message is received a notification is automatically sent to the PrintAnywhere server.
If your mail server does not support the IMAP4 IDLE command, the PrintAnywhere server will gracefully
downgrade to a polling process to check for new incoming messages. The PrintAnywhere server is able to
determine whether your mail server supports the IDLE command when it connects to the server.

Enterprise Administration Support Guide | 30
9.9.3. Outgoing Email Configuration
In all cases, the PrintAnywhere server uses SMTP to respond to users when processing print jobs. When
configuring your PrintAnywhere server, you will be required to enter server information as well as user credentials
to connect to an SMTP server.
When sending email responses to users, the PrintAnywhere server will connect to the SMTP server to create a
new email for the job. It will use information such as the reply-to address and sender name configured in the
PrintAnywhere Configuration Tool to create the response email.
NOTE: In the case of an Exchange server, this means you must enable Exchange’s SMTP service if it is not
enabled already.
9.10. PrintAnywhere Server Client Configuration for Exchange MAPI
If you intend to provide email print support using an Exchange server, the PrintAnywhere server may use
Microsoft’s Message APIs (MAPI) to communicate with the Exchange server and receive print job requests.
In order to support MAPI communication, you must ensure that MAPI is installed on the PrintAnywhere Server.
Depending on your installation this process may vary.
If you have installed a version of Microsoft Office that includes Microsoft Outlook, no additional
installation steps are required. MAPI is included as part of the Outlook installation.
Do NOT install MAPI if you have installed Microsoft Outlook.
If you are installing PrintAnywhere without Outlook installed you must download Microsoft’s MAPI
installer from Microsoft’s website.
‒ http://www.microsoft.com/download/en/details.aspx?id=1004

Enterprise Administration Support Guide | 31
9.10.1. MAPI Client Configuration
To communicate using MAPI a Microsoft Mail Profile must be created on the PrintAnywhere Server. The
PrintAnywhere server will use this mail profile to connect to the Exchange mail server. After creating a mail
profile, you may select it in the PrintAnywhere Configuration Tool.
NOTE: You must install MAPI prior to creating a mail profile.
NOTE: The MAPI mail profile MUST be created by the Window’s account that will be used to run the
PrintAnywhere server. Microsoft Mail Profile information is stored within the user space of the Window’s registry.
If you have installed Microsoft Outlook as part of your Office installation:
Microsoft provides a “Mail” Control Panel item that may be used to create your mail profile.
Use this Control Panel to configure the mail profile.
To confirm that the mail profile is correctly configured you may start Outlook, select the mail
profile if prompted and confirm that Outlook is able to communicate with Exchange.
If you have NOT installed Microsoft Outlook as part of your installation:
PrinterOn has provided a small application to assist in creating a mail profile to be used by the
PrintAnywhere Server.
The application “CreateProfile.exe” is located in the PrintAnywhere installation directory under
Program Files\PrinterOn Corporation\PrintAnywhere.
This application simply launches Microsoft’s mail profile assistant.
Enterprise Administration Support Guide | 32
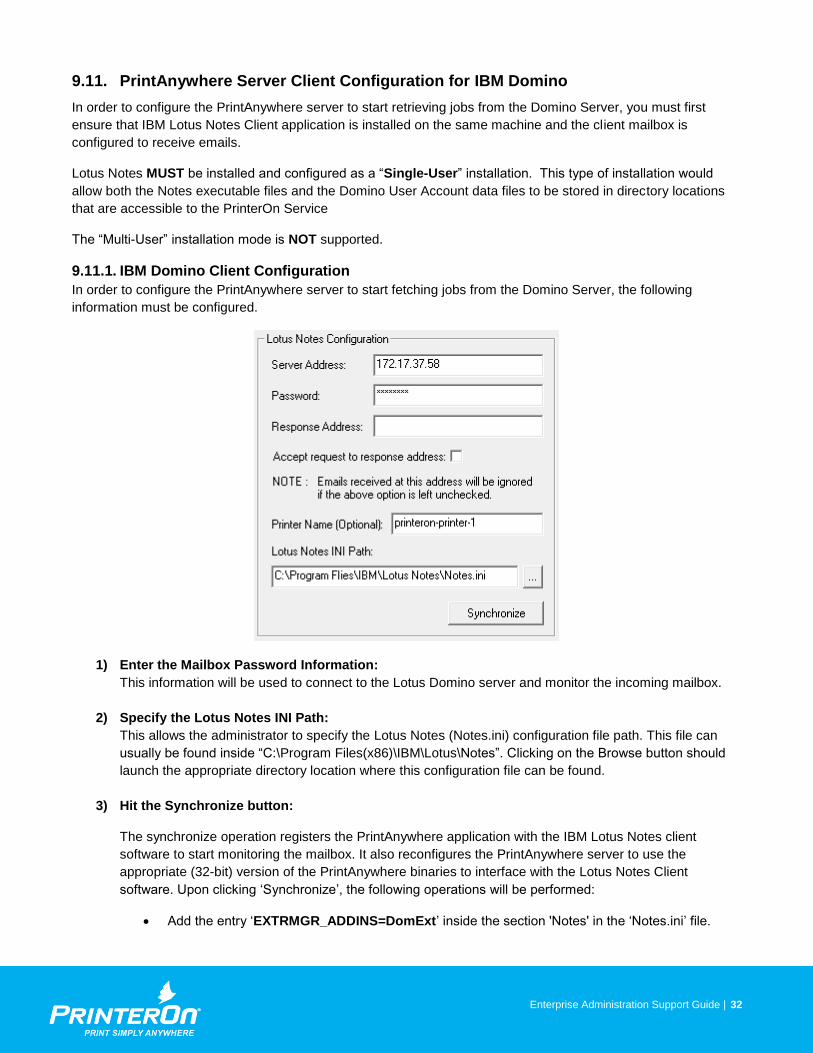
9.11. PrintAnywhere Server Client Configuration for IBM Domino
In order to configure the PrintAnywhere server to start retrieving jobs from the Domino Server, you must first
ensure that IBM Lotus Notes Client application is installed on the same machine and the client mailbox is
configured to receive emails.
Lotus Notes MUST be installed and configured as a “Single-User” installation. This type of installation would
allow both the Notes executable files and the Domino User Account data files to be stored in directory locations
that are accessible to the PrinterOn Service
The “Multi-User” installation mode is NOT supported.
9.11.1. IBM Domino Client Configuration
In order to configure the PrintAnywhere server to start fetching jobs from the Domino Server, the following
information must be configured.
1) Enter the Mailbox Password Information:
This information will be used to connect to the Lotus Domino server and monitor the incoming mailbox.
2) Specify the Lotus Notes INI Path:
This allows the administrator to specify the Lotus Notes (Notes.ini) configuration file path. This file can
usually be found inside “C:\Program Files(x86)\IBM\Lotus\Notes”. Clicking on the Browse button should
launch the appropriate directory location where this configuration file can be found.
3) Hit the Synchronize button:
The synchronize operation registers the PrintAnywhere application with the IBM Lotus Notes client
software to start monitoring the mailbox. It also reconfigures the PrintAnywhere server to use the
appropriate (32-bit) version of the PrintAnywhere binaries to interface with the Lotus Notes Client
software. Upon clicking ‘Synchronize’, the following operations will be performed:
Add the entry ‘EXTRMGR_ADDINS=DomExt’ inside the section 'Notes' in the ‘Notes.ini’ file.

Enterprise Administration Support Guide | 33
Copies the 32 bit version of the binary file 'NDomExt.dll' from inside ‘{PrintAnywhere Installation Directory}/PasPort/32’ to the Lotus Notes Installation directory.
Creates or updates the file ‘NDomExt.ini’ inside the Lotus Notes Installation Directory. This file includes the encrypted mailbox password information.
Copies the 32 bit version of PasPort executable and dependent binaries from inside ‘{PrintAnywhere Installation Directory}/PasPort/32’ to ‘{PrintAnywhere Installation Directory}/PasPort’.

Enterprise Administration Support Guide | 34
10. Enterprise Server Clustering
10.1. PrintAnywhere Clustering
There are many advantages to implementing clustering for your Enterprise deployment. Enabling and configuring
basic clustering with PrinterOn Enterprise is simple and can be completed with minimal effort and time.
Clustering is primarily supplied and managed by the PrintAnywhere server. The solution has been designed to
minimize configuration and maintenance.
PrintAnywhere offers two forms of clustering depending on your deployment needs and requirements, Basic
Clustering for increased job processing capacity and Advanced Redundancy Clustering that provides backup
service should issues occur with physical hardware or to simplify service upgrades.
10.1.1. Basic Clustered Deployment
Basic clustering involves attaching a second PrintAnywhere Processing Server to the primary server’s Status
Server. The Processing Server is responsible for converting/rendering documents supplied by the user. The
Status Server is responsible for distributing jobs across available Processing Servers. The benefits of
implementing basic clustering are:
Increased overall capacity of the service.
Response time for print requests will decrease when multiple print jobs are received in a short
period of time.
Resiliency of the service will increase when processing complex, incompatible documents or
when a server is experiencing technical difficulty.
Simplified maintenance when upgrading as servers may be upgraded independently allowing the
overall service to continue processing user print requests.
10.1.2. Advanced Redundancy Clustered Deployment
Advanced Redundancy Clustering involves installing and associating a second PrintAnywhere Status Server to
the primary PrintAnywhere Server’s Status Server. The Status Server is responsible for managing incoming job
requests and distributing jobs across available Processing Servers to be printed. The benefits of implementing
advanced redundancy clustering are:
Increased overall capacity of the service.
Response time for print requests will decrease when multiple print jobs are received in a short
period of time.
Resiliency of the service will increase when processing complex, incompatible documents or
when a server is experiencing technical difficulty.
Simplified maintenance when upgrading as servers may be upgraded independently allowing the
overall service to continue processing user print requests.

Enterprise Administration Support Guide | 35
10.1.3. Additional Requirements
PrinterOn recommends deploying the necessary basic clustering components on the same physical box as your
primary Enterprise Server using separate virtual machines. This approach allows the deployment to minimize
additional costs and yet can still provide the same performance as a separate physical server. Requirements:
An additional virtual machine prepared with the necessary applications for processing documents.
Sufficient memory on the host physical server to allocate the minimum recommended memory to
each virtual machine.
Each virtual machine must be addressable on the network as the Status Server must be able to
respond and communicate with each Processing Server and the Processing Server must be able
to independently resolve and communicate with the Status Server.
10.1.4. Configuration Steps
The following section will describe the configuration requirements for implementing basic clustering.
In the section below two PrintAnywhere servers will be configured to communicate with each other. One server
will be referred to as the “primary” PrintAnywhere server. The primary server is typically the PrintAnywhere server
installed as part of the initial PrinterOn Enterprise installation. The “secondary” will be an additional
PrintAnywhere server used to handle additional volume and temporary increases in usage.
1. Log in at www.printeron.com/administrators and click the Software icon .
2. Scroll to the PrintAnywhere section and add a new PrintAnywhere server to your service.
3. Enter a Description of your additional server and select “Get Serial Number”
4. Using your second virtual machine launch the Enterprise installer and follow the instructions supplied to install the PrinterOn Enterprise server.
a. When prompted selected “Custom Install”

Enterprise Administration Support Guide | 36
b. Select the PrintAnywhere Server component in the supplied list.
c. Continue installation.
5. Launch the PrintAnywhere Configuration Utility on the Primary server.
6. Navigate to the “Advanced->Job Processers” tab. You will notice the existing local Processing Server configured already
7. Click the “Add” button to add a new Processing Server
NOTE: Selecting PrintAnywhere will install the necessary components for a secondary processing server.
It will install all the components the PrintAnywhere server relies on for printing with the exception of any 3rd
party application for printing.

Enterprise Administration Support Guide | 37
a. Enter the hostname or IP server information for the new Processing Server.
b. Enter the default port for Processing Server communication as 5200
c. Enter the serial number for the Processing Server created earlier.
d. Click OK.
8. Save your settings in the Configuration Utility.
9. Restart the Status Server using the General tab of the Configuration utility.
10. Your configuration is complete.
10.1.5. Clustering Notes
When configuring your service for clustering or diagnosing issues, it is useful to understand the behavior of the
server once configured for the clustering. The following provides a brief overview of the clustering behavior.
The Status Server delivers jobs to Processing Servers in the order they appear in the
Configuration Utility.
The Status Server delivers new jobs to the least busy server each time a new job arrives. As a
result, in a low volume deployment with clustering enabled, the first Processing Server in the list
will receive the bulk of the jobs.
The Processing Server reports its capabilities to the Status Server during a “Synchronization”
process. This process:
o Informs the Status Server which applications and formats are supported by each
configured Processing Server.
o Allows the Status Server to determine whether a Processing Server is running.
NOTE: If the Serial Number entered in this section does not match the serial number configured in the
Processing Server, users will receive an error when submitting jobs to the server.

Enterprise Administration Support Guide | 38
o Occurs every 2 minutes, allowing the Status Server to update its state information when
idle.
The Status Server is also informed of the state of the Processing Server each time a job is
submitted or completed allowing the Status Server to maintain an up to date state of all
Processing Servers.
If a configured Processing Server is not available when the Status Server is started, the Status
Server will continue to automatically check its status every 2 minutes. When the Processing
Server is started, the Status Server will automatically detect and start using the Processing
Server.
When all Processing Servers in a cluster are unavailable the Status Server will reject incoming
jobs.
10.2. Print Delivery Hub Server Clustering
Deploying multiple PDH instances in either a one cluster or two cluster configuration can increase availability of
the printing service, increase overall capacity and allow for part of the system to be disabled for maintenance
purposes.
Note that clients such as PrintAnywhere and the PrintWhere Universal Print Driver may be configured to
communicate with a PDH server and also configured to communicate directly to a PDS. This configuration option
is managed on a per-printer basis. The software will first attempt to communicate directly to PDS (which provides
a performance advantage). If the software determines it cannot contact the PDS, it will use the configured PDH
as an alternate route to deliver print jobs.
10.2.1. System Capacity
A single PDH server can handle at least 1,000 PDS servers concurrently and at least 100,000 print jobs per day. Please note that one PDS may provide access to multiple printers or MFPs. Increasing the number of PDH servers used (either in a single cluster or in a two cluster setup) allows for a larger number of PDSs to be handled concurrently.
10.2.2. Network Layout
Without using any PDH servers, the PrinterOn system may send print jobs directly to PDS or print jobs may be
sent through PrinterOn’s hosted PDH service, which is typically used with PrinterOn hosted and managed
services.
For Enterprise deployments delivering print jobs to printers installed in disparate networks (that is, network
segments in separate physical locations, possibly different cities, states or countries), delivery of print jobs from a
PrinterOn Enterprise Server or the PrinterOn PrintWhere universal driver directly to the PDSs may not be
possible. In cases where printing directly is not possible, it becomes desirable to deploy a PDH server to provide
simplified access to remote printers and MFPs connected to PrinterOn’s Print Delivery Station software. In this
arrangement, print jobs are delivered to the PDH setup and the PDS servers communicate with PDH to detect
and download the print jobs.
In such a scenario, the PDH service must be accessible over the network to the PDS servers. The PDH service
can be installed in a central network operating center. Access to the PDH will be configured such that the
PrintAnywhere Server, desktop PrintWhere clients and PDS deployments can access the PDH server. This
configuration generally minimizes network changes, as the PDH is the only service requiring incoming network
traffic access.

Enterprise Administration Support Guide | 39
10.2.3. Multi-Node PDH Clusters
This configuration is designed to provide cluster of PDH servers that share a common common storage
subsystem where print job data and metadata files are stored. The common storage subsystem is typically a
network shared file system. Each Peer in the cluster may be deployed either on a distinct virtual machine on a
single physical server or may be deployed on a separate physical server.
This deployment is designed to increase redundancy of the data delivery infrastructure.

Enterprise Administration Support Guide | 40
10.2.4. Configuration Steps
The following section will describe the configuration requirements for implementing basic clustering. The
following assumes that multiple PDH servers have been installed and are available to be configured on the
network.
Replicate the steps described below on each Print Delivery Hub Server.
1. Launch the PDH administration console.
2. Select the Job Storage tab to configure the shared job storage location.
3. Press the “Browse” button and select the print storage location to set as the Print Request Directory.
4. Next select the “Scalability” tab. This PSH instance must be assigned a Peer ID. This ID uniquely identifies the PDH instance in the cluster. This value MUST be unique and only selected once.
All PDH servers will be linked as a single cluster sharing print data and status information using a
share storage system. Print data that is pending download to a print device will persist in the
storage system until the job is downloaded by the printer and subsequently deleted by PDH.

Enterprise Administration Support Guide | 41
a. Select a value from the “Peer ID for this Computer”.
5. Select the “Cluster Peers” tab to configure the other members of the Cluster.
A cluster peer, also referred to as a node, is a fully functional Print Delivery Hub Server. A PDH Peer is intended to provide increased reliability, maintainability and performance. For a multi-node setup, care must be taken to ensure the cluster is addressable via a single DNS entry and that load balancers accept traffic for that name and forward the traffic appropriately to each and any PDH server in the cluster.

Enterprise Administration Support Guide | 42
6. Select the Add button and repeat the process for each node in the cluster.
a. Specify the communication scheme, either HTTP or HTTPS to use for inter-node communication.
b. Specify the DNS name or IP address of the remote node.
c. Specify the communication port for the remote note. Typically this can be left at the default value.
d. Click OK to close the dialog.
7. Click OK on the main administration console and start the PDH server.
8. Replicate the steps on each PDH node in the cluster.
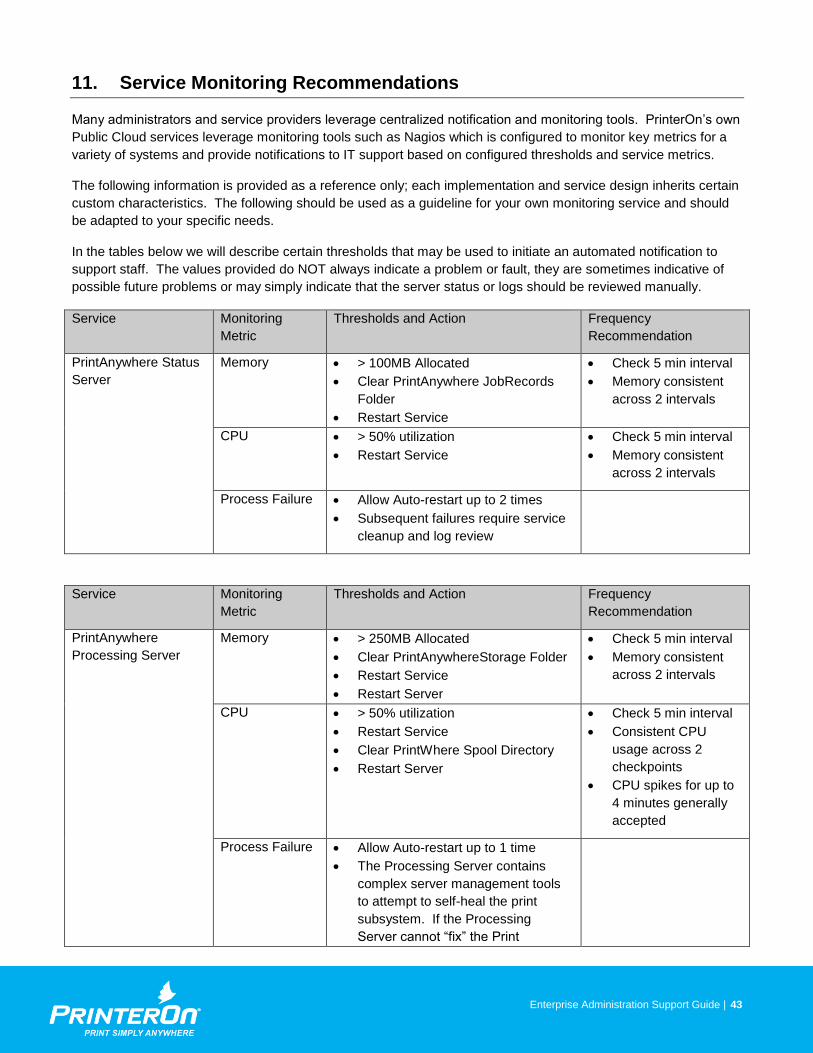
Enterprise Administration Support Guide | 43
11. Service Monitoring Recommendations
Many administrators and service providers leverage centralized notification and monitoring tools. PrinterOn’s own
Public Cloud services leverage monitoring tools such as Nagios which is configured to monitor key metrics for a
variety of systems and provide notifications to IT support based on configured thresholds and service metrics.
The following information is provided as a reference only; each implementation and service design inherits certain
custom characteristics. The following should be used as a guideline for your own monitoring service and should
be adapted to your specific needs.
In the tables below we will describe certain thresholds that may be used to initiate an automated notification to
support staff. The values provided do NOT always indicate a problem or fault, they are sometimes indicative of
possible future problems or may simply indicate that the server status or logs should be reviewed manually.
Service Monitoring
Metric
Thresholds and Action Frequency
Recommendation
PrintAnywhere Status
Server
Memory > 100MB Allocated
Clear PrintAnywhere JobRecords
Folder
Restart Service
Check 5 min interval
Memory consistent
across 2 intervals
CPU > 50% utilization
Restart Service
Check 5 min interval
Memory consistent
across 2 intervals
Process Failure Allow Auto-restart up to 2 times
Subsequent failures require service
cleanup and log review
Service Monitoring
Metric
Thresholds and Action Frequency
Recommendation
PrintAnywhere
Processing Server
Memory > 250MB Allocated
Clear PrintAnywhereStorage Folder
Restart Service
Restart Server
Check 5 min interval
Memory consistent
across 2 intervals
CPU > 50% utilization
Restart Service
Clear PrintWhere Spool Directory
Restart Server
Check 5 min interval
Consistent CPU
usage across 2
checkpoints
CPU spikes for up to
4 minutes generally
accepted
Process Failure Allow Auto-restart up to 1 time
The Processing Server contains
complex server management tools
to attempt to self-heal the print
subsystem. If the Processing
Server cannot “fix” the Print

Enterprise Administration Support Guide | 44
Subsystem it will shut itself off.
After auto-shutoff review logs for re-
registration notifications
Restart Server and re-install
PrintWhere
Service Monitoring
Metric
Thresholds and Action Frequency
Recommendation
PrintAnywhere
PasPort Server
Memory > 100MB Allocated
Restart Service
Restart Server
Check 5 min interval
Memory consistent
across 2 intervals
CPU > 50% utilization
Restart Service
Clear Monitored Mailbox of
messages
Restart Server
Check 2 min interval
Consistent CPU
usage across 2
checkpoints
Mailbox > 5 messages pending in the
managed mailbox inbox
Restart Service
Clear Monitored Mailbox of
messages
Check 5 min interval
Consistent CPU
usage across 2
checkpoints
Process Failure Allow Auto-restart up to 1 time
The Processing Server contains
complex server management tools
to attempt to self-heal the print
subsystem. If the Processing
Server cannot “fix” the Print
Subsystem it will shut itself off.
After auto-shutoff review logs for re-
registration notifications
Restart Server and re-install
PrintWhere
Service Monitoring
Metric
Thresholds and Action Frequency
Recommendation
CPS Tomcat
Memory > 100MB Allocated
Restart Service
Check 5 min interval
Memory consistent
across 2 intervals
CPU > 50% utilization
Restart Service
Check 5 min interval
Memory consistent
across 2 intervals
Process Failure Allow Auto-restart up to 2 times

Enterprise Administration Support Guide | 45
Subsequent failures require service
cleanup and log review
Service Monitoring
Metric
Thresholds and Action Frequency
Recommendation
PWCRoute.exe
Memory > 250MB Allocated
Restart Processing Server Service
Clear PrintWhere Spool Directory
Restart Sever
Check 5 min interval
Memory consistent
across 2 intervals
CPU > 50% utilization
Restart Service
Check 5 min interval
Memory consistent
across 2 intervals
Service Monitoring
Metric
Thresholds and Action Frequency
Recommendation
Windows Print
Spooler
Memory > 768MB Allocated
Restart Service
Restart Servier
Check 5 min interval
Memory consistent
across 2 intervals
CPU > 50% utilization
Restart Service
Check 5 min interval
Memory consistent
across 2 intervals
Process Failure Allow Auto-restart up to 2 times
Subsequent failures require service
cleanup and log review
Service Monitoring
Metric
Thresholds and Action Frequency
Recommendation
Windows System
Memory > 768MB Allocated
Restart Service
Restart Server
Check 5 min interval
Memory consistent
across 2 intervals
CPU > 50% utilization
Restart Service
Check 5 min interval
Memory consistent
across 2 intervals
Process Failure Allow Auto-restart up to 2 times
Subsequent failures require service
cleanup and log review

Enterprise Administration Support Guide | 46
12. Identifying Problem Location
To address an unexpected issue with the Enterprise server, determining where and what component is at fault is
a critical part of the process. The following is intended to provide assistance with this process. The process will
involve investigating major components or the communication between them.
12.1. High Level Overview
A few key symptoms and information may assist in reducing the problem space significantly. The Enterprise
system may be divided into 3 primary divisions:
Submission & Job Reception
o Includes API clients, CPS and PrintAnywhere Status Server
Job Processing/Printing
o Includes primarily the PrintAnywhere server
May be impacted by access to end point printers or services
Job Delivery
o Includes PDS, PDH and HotSpot printers.
Impacts submission from the PrintAnywhere Server
In addition to these 3 items the overall configuration may be the cause of an issue. That overall configuration and
the information that binds the systems together will also be discussed below.
12.2. Key Troubleshooting Data Points
Two key data points may be used to help assist and rapidly divide the problem space into smaller pieces. These
do not always identify the root cause of the issue but do aid with a rapid assessment of where to review.
Job Reference ID:
Once a job has been accepted by the PrintAnywhere Server, a Job Reference ID is attached to the job,
specifically the Status Server subcomponent. The presence or absence of a Job Reference ID provides a major
clue where to start investigating issues
If a Job Reference ID has NOT been retuned, it is highly likely that:
o The job did not get submitted to the Status Server
o The problem resides in CPS
o The problem resides in the data submitted with the request including:
Missing required parameters
Missing or corrupt data file
Invalid API format
o Troubleshooting should focus on:
CPS & Tomcat logs
Status Server logs
If a Job Reference ID is returned, it is highly likely that:
o The job was received by the PrintAnywhere Server
o The problem resides within the PrintAnywhere Server
o The problems may include:
Invalid printer information
Communication issues amongst PrintAnywhere components
Issues printing specific documents

Enterprise Administration Support Guide | 47
o Troubleshooting should focus on:
Status Server and Processing Server logs
User Messages
Once a job has been accepted by the service, specifically PrintAnywhere, all messages will be returned with a
code prefix that helps identify the component that reported the message.
For Example:
o PAS0108 – Returned from PrintAnywhere
o PWC0100 – Returned from PrintWhere
This information can be used to quickly isolate whether the issue was caused by PrintAnywhere, PrintWhere
communication or other components.
Generally the User Message contains the message ID from the component that originated the message. For
example, an issue may originate in communication between PrintWhere and the destination device, or in
PrintAnywhere when handling a document, and the prefix will help isolate this information.
o Example: PAS0002: The job has been processed.
o Example: PWC4510: Unable to contact the printer.
Message Prefix Base Reporting Component
PAS PrintAnywhere
PWC PrintWhere
PTS Configuration & Licensing
FCS Print Delivery Station

Enterprise Administration Support Guide | 48
13. How To’s
13.1. How to Configure the PrinterOn Local Driver
In most Enterprise installations, selecting a driver from PrinterOn’s extensive list will provide you the necessary
functionality and rendering fidelity you require for optimal printed output. However in some exceptional
circumstances, using the native OEM local print driver is required.
What are the benefits of using the PrinterOn Local Driver?
Allows for print driver support for nearly all manufacturers printer or MFPs.
In what circumstances should I use a PrinterOn Local Driver?
If your deployment consists of printers or MFPs, such as Canon MFP using UFRII print driver, then you may be required to use the PrinterOn Local Driver.
If a printer in your deployment is experiencing some problems related to rendering, or incorrect behavior associated with features like duplexing, page ranges, collating etc, then the PrintSpot driver option may mitigate some of those issues.
Are there any limitations to using the PrinterOn Local Driver?
It is only available when using the PrinterOn Server Enterprise or Express editions
Configuring the PrinterOn Local Driver
Manually download and install the driver that you want to use on PrinterOn server
Go to the Printer properties under the Advanced tab o Find out the exact name of the installed driver.

Enterprise Administration Support Guide | 49
On PrinterOn portal under the printer’s required setting, choose PrintSpot Local Driver
In Local Driver Name filed, type the exact same name provided from step 2 (highlighted in screenshot).
Save the settings.
The next time, you try to print to that PrinterOn printer, PrinterOn Enterprise Server will use the locally installed
driver to render the document.

Enterprise Administration Support Guide | 50
13.2. How to Collect PrinterOn Enterprise Log Files
1. From the start menu access Start->All Programs->PrinterOn Corporation->Central Print Services->CPS
Dashboard
2. This will launch the CPS Dashboard.
3. Select the “Support” Tab
4. Choose “Zip Support Log Files”
5. You will be prompted to specify the save location for the printerOnLogs.zip file.
6. Save the file and deliver to PrinterOn for further review.
13.3. How to Manually Print and Configure PrintWhere
PrintWhere is the underlying print controller and driver used by the Enterprise server to perform the document
rendering. The software is used in a “Server Mode” that allows for the automatic configuration of print locations
and control of the print process.

Enterprise Administration Support Guide | 51
When your Enterprise Server is unable to complete a successful print job, usually the initial print job started by the
server, or when a document fails to print in an expected timeframe, you may manually use PrintWhere to confirm
the proper configuration and print workflow.
1. Launch an application such as Notepad on your server
2. Select “File -> Print”
3. Ensure PrintWhere is selected in the “Select Printer” section of the dialog. Do not select the Plug-ins.
These are used by PrintWhere to generate the output for your specific device.
4. Then select “Preferences”

Enterprise Administration Support Guide | 52
5. In the PrintWhere Preferences dialog enter the name of you PrinterOn enabled printer (or the 12 digit
unique ID).
6. After entering the device identifier press the Verify button.
7. The PrintWhere application will now attempt to configure and include all components necessary for your
specific device.
8. This initial step may take a minute. This process only occurs the first time the printer is used on your
server.
9. Following a successful setup the dialog will present information about the device.
10. Click OK

Enterprise Administration Support Guide | 53
11. Click Print
12. PrintWhere will now start the print process.
NOTES:
If at any point an error or warning occurs that causes the process to fail this may give an indication as to the
reason your server cannot print.
Your PrintWhere driver is currently configured to run in a server mode. When PrintWhere is configured in this
mode it may not present you with all the dialogs and user interaction required to complete the entire print process
without some additional intervention.
NOTE: Generally though if you are able to follow the process described above and receive no errors the server
will operate as expected. The following steps are provided for purely technical debugging purposes and are not
intended to be used by end users.
To disable the “Server Mode” for PrintWhere access the registry:
Stop the PrintAnywhere services (Processing Server, Status Server, PasPort)
HKEY_LOCAL_MACHINE\SOFTWARE\PrinterOn Corporation\PrintWhere 4.4
Locate the “Server” entry and change the value to 0
Follow the steps presented above to reset the printer information.
Note that when the PrintAnywhere server is restarted it will reset this value automatically.

Enterprise Administration Support Guide | 54
13.4. How to enable AD/LDAP authentication with PrintWhere
Simply log in to your account. Select the Printer Icon and choose the printer you’d like to enable authentication
for. Select the Payment & Authorization tab. In the “Authorizing Users” section, select Redirect to authorize user,
track pages or bill customer and User Authorize URL. Enter the pathname of the server which hosts the PrinterOn
CPS Admin application. It will be similar to servername-or-ipaddress/cps/aaaLogin.jsp. E.g.,
192.168.1.20/cps/aaaLogin.jsp. Save your settings and test the driver.
13.5. How to Manually Upgrade Java
The information provided for upgrading Java on your Enterprise Server should only be performed to apply critical
security updates. PrinterOn validates and certifies the version of Java distributed with the solution and strongly
recommends only using the versions supplied by PrinterOn with your PrinterOn software.
1. Before starting the upgrade process, browse to www.java.com and download the latest version of
Java.
2. If Print Delivery Station is installed, ensure it is completely stopped.
a. In the Task Bar->Right Click on the PDS icon and select Exit
b. Start the Services Control Panel and locate and stop the Print Delivery Station service
3. If Apache Tomcat is installed, ensure it is completely stopped.
a. Start the Services Control Panel and locate and stop the Apache Tomcat service
NOTE: It is very important to follow the steps as described below. During the installation you will be
prompted by the Print Delivery Station to repair the installation. The Print Delivery Station is designed to
detect when the version of Java included has been damaged and/or removed. It is important that during
the upgrade process that this repair process does not occur.

Enterprise Administration Support Guide | 55
2. Stop any other Java applications running to ensure a successful upgrade. You may be prompted
by the Java installer to stop some applications that are still running.
4. Uninstall all copies of Java
a. Launch the “Programs and Features” Control Panel
b. If multiple copies of Java are installed, uninstall each version individually
5. After all copies of Java are uninstalled, reboot your computer
6. Following the reboot of your computer, you will be prompted with a message asking whether you
wish to repair the PDS software. Choose NO.
7. Install the latest version of Java, which you previously downloaded.
8. Restart applications such as Print Delivery Station & Apache Tomcat to continue.

Enterprise Administration Support Guide | 56
13.6. How to Manually Upgrade Apache Tomcat
The information provided for upgrading Tomcat on your Enterprise Server should only be performed to apply
critical security updates. PrinterOn validates and certifies the version of Tomcat distributed with the solution and
strongly recommends only using the versions supplied by PrinterOn with your PrinterOn software.
1. Before starting the upgrade process, browse to tomcat.apache.org and download the latest
version of Tomcat.
a. Download the 32-bit Windows Zip option
b. Decompress the downloaded file
2. Backing up settings and applications
a. Browse to the Tomcat Directory. Typically located at: C:\Program Files\PrinterOn
Corporation\Apache Tomcat
b. Make a copy of the following files all located under the Tomcat Directory. Please note
that if you have not made changes to these files, it may not be necessary to back up all
files.
i. ~\Apache Tomcat\conf\Server.xml
ii. ~\Apache Tomcat\conf\Web.xml
iii. ~\Apache Tomcat\conf\cps_config.xml
iv. ~\Apache Tomcat\webapps\cps\cps_config.xml
3. Stop the Apache Tomcat Service using the Services Control Panel
4. Rename the Apache Tomcat folder under PrinterOn to Apache Tomcat-backup
5. Copy the previously decompressed zip file to the PrinterOn Directory and rename the directory to
Apache Tomcat
NOTE: It is important to note that Tomcat does not offer a direct upgrade process that preserves settings
and configuration options. The process will provide information on moving settings from your existing
Tomcat to the upgraded version. This process is normally performed automatically by the PrinterOn
installation. As a result the process described will provide details on backing up your Tomcat and
Enterprise settings. It is very important to ensure all settings are backed before continuing.
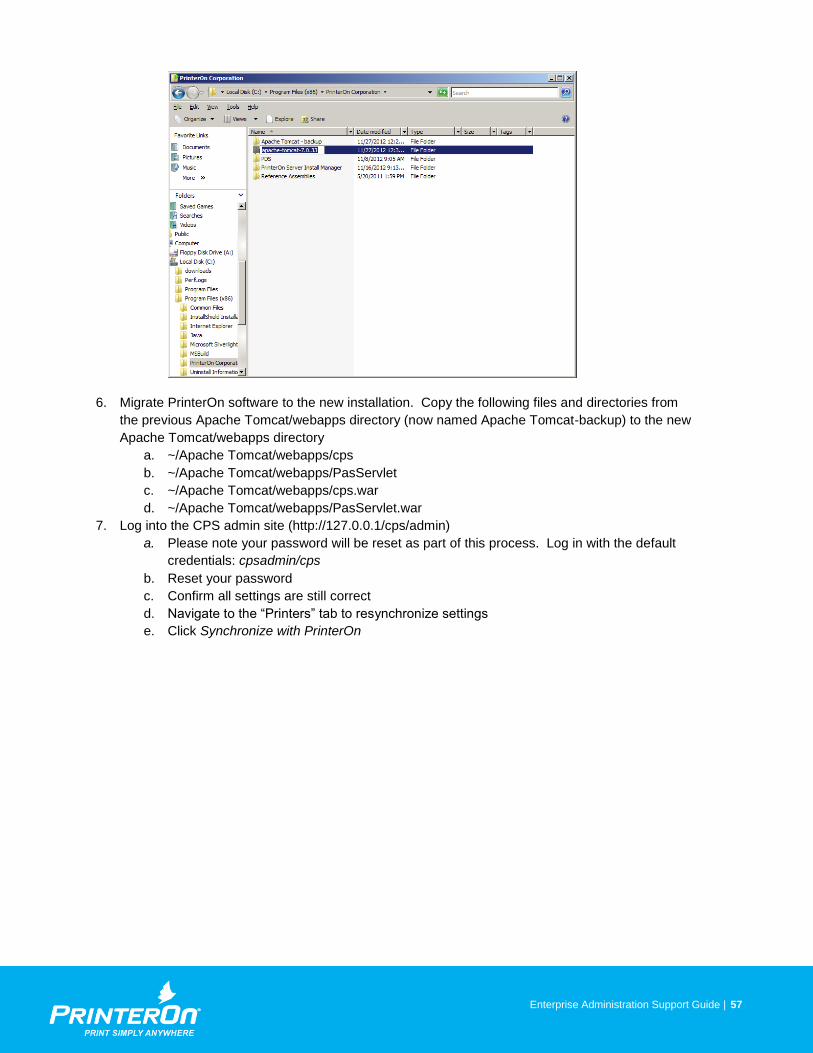
Enterprise Administration Support Guide | 57
6. Migrate PrinterOn software to the new installation. Copy the following files and directories from
the previous Apache Tomcat/webapps directory (now named Apache Tomcat-backup) to the new
Apache Tomcat/webapps directory
a. ~/Apache Tomcat/webapps/cps
b. ~/Apache Tomcat/webapps/PasServlet
c. ~/Apache Tomcat/webapps/cps.war
d. ~/Apache Tomcat/webapps/PasServlet.war
7. Log into the CPS admin site (http://127.0.0.1/cps/admin)
a. Please note your password will be reset as part of this process. Log in with the default
credentials: cpsadmin/cps
b. Reset your password
c. Confirm all settings are still correct
d. Navigate to the “Printers” tab to resynchronize settings
e. Click Synchronize with PrinterOn

Enterprise Administration Support Guide | 58
13.6. How to enable PrintAnywhere to receive print jobs from CPS residing on an
alternate server
This section will outline the changes necessary to Apache Tomcat in order to accept print requests delivered from
CPS when CPS is on a different server. These changes are required for Enterprise 2.3 and later. The
component versions affected are CPS 2.3.08 and PrintAnywhere 4.6DI.
1. From the server hosting PrintAnywhere, stop the Apache Tomcat service
2. Navigate to C:\Program Files (x86)\PrinterOn Corporation\Apache Tomcat\Conf
3. Edit the server.xml file in Notepad
4. Locate this section:
<Context path="/PasServlet">
<Valve className="org.apache.catalina.valves.RemoteAddrValve"
allow="127\.0\.0\.1"
/>
</Context> 5. Change the “allow=” value to reflect the IP address of the server hosting CPS
a. For example: allow="172\.16\.39\.52" OR allow="172.16.39.52"
b. If enabling email printing, or you have multiple CPS servers, you can enter multiple IPs by
separating with a pipe character (|). For example: allow="127.0.0.1|172.16.39.52"
6. Save changes to server.xml
7. Start the Apache Tomcat service
NOTE: When upgrading your software, these values must be manually entered into the server.xml file.

Enterprise Administration Support Guide | 59
Trademarks and Servicemarks
The following are trademarks or registered trademarks of PrinterOn Corporation in Canada and other countries:
PrinterOn, PrintSpots, PrintWhere, PrintAnywhere, “Print Simply Anywhere”, the PrinterOn “bird”, the PrinterOn
Logotype and the PrinterOn Signature.
The following are trademarks or registered trademarks of other companies:
Windows, Internet Explorer, Microsoft Word, Microsoft Excel, Microsoft PowerPoint, and Microsoft Visio are
trademarks or registered trademarks of Microsoft Corporation.
iPad, iPhone and AirPrint and OS X are trademarks or registered trademarks of Apple.
iOS is a trademark or registered trademark of Cisco in the U.S. and other countries and is used by Apple under
license.
Android, Chrome OS and Chromebook are trademarks or registered trademarks of Google Inc.
BlackBerry is a registered trademark of Research in Motion Limited.
Other brands and their products are trademarks or registered trademarks of their respective holders.
Copyright Notice
© Copyright 2015 by PrinterOn Inc.
All rights reserved. No part of this publication may be reproduced, stored in a retrieval system, or transmitted, in
any form or by any means, electronic, mechanical, photocopy, recording, or otherwise, without the prior written
permission of PrinterOn Inc.
Disclaimer:
PrinterOn Inc. makes no warranty with respect to the adequacy of this documentation, programs, or hardware,
which it describes for any particular purpose, or with respect to the adequacy to produce any particular result. In
no event shall PrinterOn Inc. be held liable for special, direct, indirect, or consequential damages, losses, costs,
charges, claims, demands, or claim for lost profits, fees, or expenses of any nature or kind.