Preventative Maintenance Form - mid-pac.com terminal tractor preventative maintenance form 2010 or...
8
KALMAR TERMINAL TRACTOR PREVENTATIVE MAINTENANCE FORM 2010 OR NEWER ENGINES SYNTHETIC (TES-295) LUBE AND ALLISON HIGH-CAPACITY FILTERS USED IN THE TRANSMISSION
Transcript of Preventative Maintenance Form - mid-pac.com terminal tractor preventative maintenance form 2010 or...
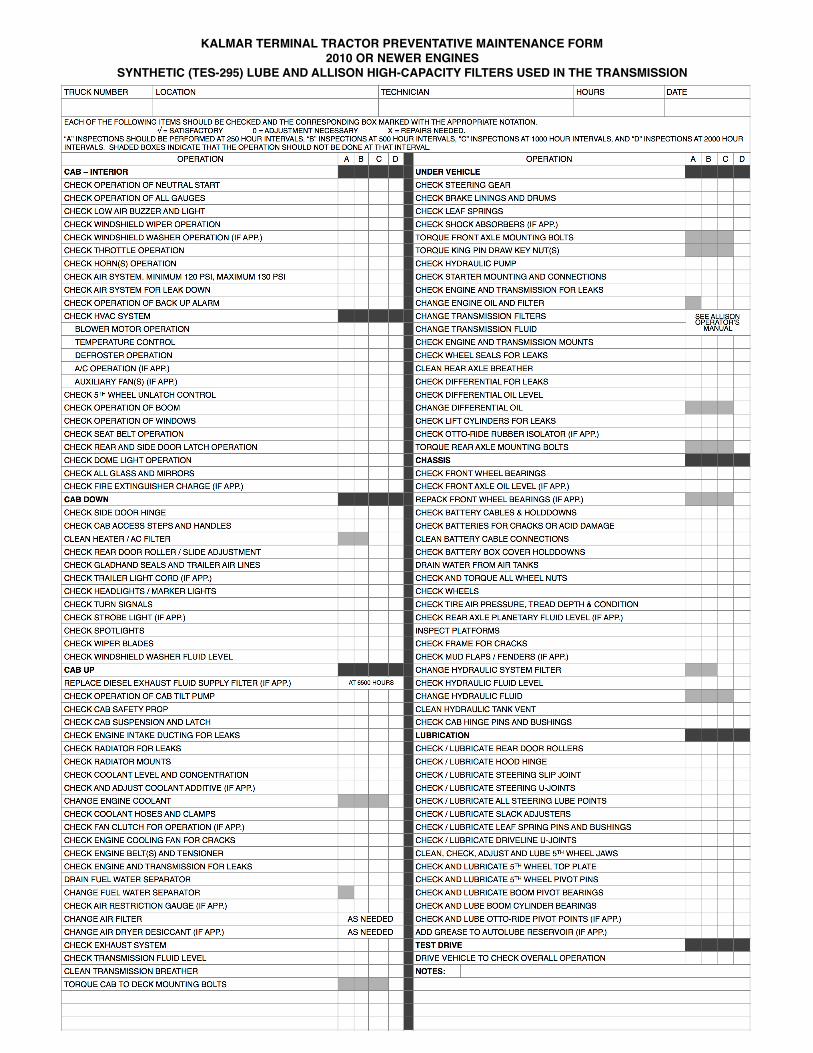
KALMAR TERMINAL TRACTOR PREVENTATIVE MAINTENANCE FORM2010 OR NEWER ENGINES
SYNTHETIC (TES-295) LUBE AND ALLISON HIGH-CAPACITY FILTERS USED IN THE TRANSMISSION
Preventative Maintenance Guidelines
Cab InteriorCheck Operation of Neutral Start – Move the gear selector to any position other than “N” and attempt to start the engine. The engine should not crank with the selector in any position other than “N”.
Check Operation of All Gauges – With the engine is running verify that all gauges are functional.
Check Low Air Buzzer and Light – Apply and release the brake pedal until air pressure drops below 90 PSI. At that point, the low air buzzer and dash warning light should come on.
Check Windshield Wiper Operation – Turn on the windshield wiper on and confirm full and smooth travel of the wiper arm. Listen for any noises that might indicate a worn wiper motor.
Check Windshield Washer Operation (If Applicable) – Depress the washer button and confirm the flow and pattern of the washer fluid.
Check Throttle Operation – Depress and release the foot throttle and check for binding and ease of operation.
Check Horn(s) Operation – Sound electric and air horns (if applicable) to confirm proper operation.
Check Air System. Minimum 120 PSI, Maximum 130 PSI – Start engine and run at fast idle. Maximum system pressure should be limited to a minimum of 120 psi and a maximum of 130 psi.
Check Air System for Leak Down – Disconnect the gladhands from any trailer. Run engine at fast idle and allow air pressure to stabilize at 120 psi for at least one minute. Shut off engine and observe dash gauge(s) for 2 minutes. The drop in pressure should not exceed 2 psi over the two-minute period.
Check Operation of Back Up Alarm – With engine running, move the gear selector to reverse and listen for back up alarm.
Check HVAC System
Blower Motor Operation – With the key on, insure that the blower motor operates at each position of the blower speed switch.
Temperature Control – Confirm proper operation of the temperature control switch.
Defroster Operation – With the engine running and the defroster control turned on, confirm airflow from the defroster vents.
Air Conditioner Operation – With the engine running and the air conditioner control turned on, confirm cooled airflow from the defroster vents.
Auxiliary Fan(s) (If Applicable) – With the key on turn on the auxiliary fans and confirm operation.
Check 5th Wheel Unlatch Control – With system air pressure above 100 psi confirm that the 5th wheel jaws unlatch when the dash control is activated.
Check Operation of Boom – With the engine running at fast idle activate the boom control and insure full extension and retraction.
Check Operation of Windows – Confirm that all regulated and sliding windows open and close fully.
Check Seat Belt Operation – Insure that the seatbelt latch fastens and unfastens properly.
Check Rear and Side Door Latch Operation – Operate the side door latch from inside and outside the cab to insure proper operation.
Check Dome Light Operation – With key on, turn on cab dome light and confirm operation.
Check all Glass and Mirrors – Inspect all glass and mirrors for cracks and breaks.
Check Fire Extinguisher Charge (If Applicable) – If the vehicle is equipped with a fire extinguisher confirm that it is properly charged.
Cab DownCheck Side Door Hinges – Inspect door hinge for wear and damage.
Check Cab Access Steps and Handles – Inspect all steps and grab handles for proper mounting and the absence of cracks.
Clean Heater / AC Filter – Remove HVAC filter and vacuum or blow clean with low-pressure air.
Check Rear Door Roller / Slide Adjustment –
Check Gladhand Seals and Trailer Air Lines – Inspect seals for tears and wear. Check air lines for kinks or cracks.
Check Trailer Light Cord (If Applicable) – Inspect light cord for cuts and abrasions. As the lights of the truck are checked confirm that a trailer connected with the light cord also has lights. This can be done either with a trailer connected or with a “test box”.
Check Headlights / Marker Lights – Start engine, turn on light switches and confirm lights are burning.
Check Turn Signals – With key on, activate the turn signal switch and the flasher to confirm that the turn signals are working.
Check Strobe Light (If Applicable) – With the key on, turn on the strobe light to confirm its operation.
Check Spotlights - With the key on, turn on the spotlight(s) to confirm its operation.
Check Wiper Blades – Inspect wiper blades for tears or excessive wear.
Check Windshield Washer Fluid Level – Raise the hood and fill washer bottle as necessary.
Cab UpReplace diesel exhaust fluid supply filter – Replace the diesel exhaust fluid supply filter located in the diesel exhaust fluid dosing unit (pump). The pump is located between the frame rails, under the boom, just forward of the differential.
Check Operation of Cab Tilt Pump – Pull cab release cable and activate cab tilt switch. Cab should rise.
Check Cab Safety Prop – Inspect the cab safety prop that encloses the cab lift cylinder. It should drop freely into place to support the cab when it is in the raised position. The lower cab cylinder pin and bracket should be inspected for signs of fatigue.
Check Cab Suspension and Latch – Inspect the linkages of the suspension system for excessive wear and proper alignment. Inspect the air bag for leaks or signs of abrasion. Inspect the lock jaw for excessive wear and proper operation.
Check Intake Ducting for Leaks – Inspect all engine clean air tubes and hoses for leaks. All clamps should be checked for proper torque and all joints should be properly aligned.
Check Radiator for Leaks – Inspect radiator core and tanks for signs of coolant leaks.
Check Radiator Mounts – Inspect radiator mounts for wear or excessive looseness.
Check Coolant Level and Concentration – Check cooling system level. Coolant should be visible in radiator sight glass. It is not necessary for the coolant to be at the top of the sight glass. Test and maintain the proper antifreeze level of concentration as outlined in the appropriate engine operator’s manual.
Change Engine Coolant – Flush the cooling system and replace with clean coolant of the appropriate concentration.
Check Coolant Hoses and Clamps – Inspect all hoses for abrasion, cracks, holes and routing. Check all clamps for proper torque.
Check Fan Clutch for Operation (If Applicable) – Run engine to confirm that the fan clutch engages at the proper temperature.
Check Engine Cooling Fan for Cracks – Shut engine off if running. Inspect fan blades for signs of cracking.
Check Engine Belts and Tensioner – Inspect belt(s) for cracking and wear. Belt tensioner should be checked for proper operation.
Check Engine and Transmission for Leaks – Perform a visual inspection of the engine and transmission looking for any fluid leaks visible from above.
Drain Fuel Water Separator – Open the drain valve on the fuel / water separator and allow water to drain from the filter.
Change Fuel Water Separator – Replace fuel filter following the instructions in the engine operator’s manual.
Check Air Restriction Gauge (If Applicable) – Record reading on gauge, reset, start engine, run to high idle and shut off engine. If reading remains on zero, the gauge may be defective or the intake piping has a leak. The cause must be investigated and the gauge replaced and/or the piping repaired.
If the initial gauge reading indicates that the filter should be changed, do so at this time. See the next item on the PM form.
Change Air Filter – The air filter should be changed as needed. If the truck is equipped with a restriction gauge, replace the filter when the gauge indicates it is appropriate.
Change Air Dryer Desiccant (If Applicable) – The desiccant should be changed as needed. Change as soon as water is evident when system air tanks are drained.
Check Exhaust System – Visually inspect all of the exhaust system components for leaks and / or damage.

Check Transmission Fluid Level – With the engine running use the transmission dipstick to check the fluid level per the guidelines in the transmission operator’s manual.
Clean Transmission Breather – Confirm that the breather, located on top of the transmission, is clean and the passage is open. Do not spray directly with high pressure or cleaning solvents.
Torque Cab to Deck Mounting Bolts – Re-torque the four cab to deck fasteners.
Under VehicleCheck Steering Gear – Inspect steering gear for fluid leaks and excessive play. Inspect the steering linkage for wear or looseness.
Check Brake Linings and Drums – Visually check linings and drums for wear and cracks. If the lining is 0.25” thick or less in any location the shoes should be replaced or relined.
Check Leaf Springs – Inspect leaf springs for cracking or excessive deflection. Inspect spring pins and shackles for wear.
Check Shock Absorbers (If Applicable) – Inspect shock absorbers for leaks.
Torque Front Axle Mounting Bolts – Re-torque front axle mounting bolts. 210 lb/ft
Torque King Pin Draw Key Nuts – Re-torque steer axle king pin draw key nut(s).
Check Hydraulic Pump –Inspect hydraulic pump for leaks.
Check Starter Mounting and Connections – Confirm that starter mounting bolts are tight. Inspect electrical connections for good contact at starter terminals.
Check Engine and Transmission for Leaks - Perform a visual inspection of the engine and transmission looking for any fluid leaks visible from below.
Change Engine Oil and Filter – Drain and replace engine oil. Use oil meeting, at least, the minimum specifications provided in the engine operator’s manual. Replace the oil filter.
Change Transmission Filters –Note – this DOES NOT include the pan screen. The screen should only be replaced during overhaul.
Change Transmission Fluid– Drain and replace transmission fluid. Use fluid meeting, at least, the minimum specifications provided in the transmission operator’s manual.
Check Engine and Transmission Mounts – Re-torque engine and transmission mounts. Inspect isolator material and replace if deteriorated.
Check Wheel Seals for Leaks – Inspect front and rear hubs for signs of oil leaks. Replace if leaking.
Clean Rear Axle Breather – Insure that the rear axle vent turns freely.
Check Differential for Leaks – Inspect rear axle housing for signs of leaks. Repair as necessary.
Check Differential Oil Level – Check the differential oil level per the component manufacturer’s instructions.
Change Differential Oil – Drain and replace differential oil. Use oil meeting, at least, the minimum specifications of the component manufacturer.

Check Lift Cylinders for Leaks – Inspect cylinders for signs leaking. Repair as necessary.
Check Otto-Ride Rubber Isolator (If Applicable) – Inspect the isolator for signs of cracking or loss of elasticity. Replace as necessary.
Torque Rear Axle Mounting Bolts – Re-torque rear axle mounting bolts. Nut at 400 lb/ft, Bolt at 600 lb/ft
ChassisCheck Front Wheel Bearings – Raise and support the front axle. Check for excessive play in wheel bearing.
Check Front Axle Oil Level (If Applicable) – Check oil level in front axle hubcaps. Fill to proper level as necessary.
Repack Front Wheel Bearings (If Applicable) – Remove front hubs and repack the bearings using grease meeting, at least, the minimum specifications of the component manufacturer.
Check Battery Cables and Hold-downs – Inspect battery for signs of abrasion or breaking. Repair and reroute as needed. Insure that batteries are properly secured.
Check Batteries for Cracks or Acid Damage – Inspect batteries for signs of damage. Replace as necessary.
Clean Battery Cable Connections – Remove cable terminals from batteries, clean connections, reattach cable terminals.
Check Battery Box Cover Hold-downs – Check bolts or rubber latches to insure that the battery box cover is secured.
Drain Water from Air Tanks – With air system charged, open each manual drains until all moisture is removed from system.
Check and Torque All Wheel Nuts – Inspect all wheel nuts for signs of wear or damage. Loosen outer nuts on dual wheels before tightening inner nuts. Re-torque all nuts to 450 – 500 ft/lbs.
Check Wheels – Inspect all wheels for signs of damage including oversized holes and cracks.
Check Air Tire Pressure, Tread Depth and Condition – Inspect tires for damage and wear. Adjust to the proper air pressure.
Check Rear Axle Planetary Fluid Level (If Applicable) – Check and adjust lubricant level in planetary housings per the component manufacturer’s instructions.
Inspect Platforms - Inspect platforms for proper mounting and the absence of cracks and trip points.
Check Frame for Cracks – Inspect frame rails and cross-members for cracks and bending.
Check Mud Flaps / Fenders (If Applicable) – If equipped with mud flaps and or fender, inspect these items for proper mounting and damage.
Change Hydraulic System Filter – Remove and replace the external hydraulic filter.
Check Hydraulic Fluid Level – Start engine, raise and lower the boom two to three times to insure that system components are filled. Lower boom to full down position, shut off engine and check fluid level on tank gauge. Fill as necessary.
Change Hydraulic Fluid – Drain hydraulic tank and refill with Dexron III automatic transmission fluid.
Clean Hydraulic Tank Vent – Remove any dirt collecting around vent and insure that vent is clear.
Check Cab Hinge Pins and Bushings – Inspect pins and bushings for wear or damage.
LubricationCheck / Lubricate Rear Door Rollers – Inspect upper rollers. Replace if binding or damaged. Lubricate.
Check / Lubricate Hood Hinge - Inspect hood hinge for wear and damage. Lubricate.
Check / Lubricate Steering Slip Joint - Inspect slip joint for wear or damage. Lubricate with lithium grease.
Check / Lubricate Steering U-Joints - Inspect u-joints for wear or damage. Lubricate with lithium grease.
Check / Lubricate All Steering Lube Points – Inspect king pins, tie rod ends and drag link ends for wear or damage. Lubricate with lithium grease.
Check / Lubricate Slack Adjusters – Inspect brake slack adjusters for wear or damage. Measure the brake actuator stroke. If this measurement exceeds the component manufacturer’s recommendation check brake lining and adjuster to determine which is the cause of the excessive stroke and repair as necessary.
Check / Lubricate Leaf Spring Pins and Bushings – Inspect spring pins, hangers and pin bushings for wear or damage. Lubricate with lithium grease.
Check / Lubricate Driveline U-Joints – Inspect driveline and u-joints for wear or damage. Lubricate with lithium grease.
Clean, Check and Adjust 5th Wheel Jaws – Remove dirt and excessive grease from the 5th wheel jaws. Using a 5th wheel jaw gauge measure the free play. If free play exceeds 1/8” determine the cause of the excessive play and either repair or replace the jaws per the component manufacturer’s recommendation.
Check / Lubricate 5th Wheel Top Plate – Clean and inspect the 5th wheel top plate for cracks or other damage. Apply lithium grease to the surface of the top plate.
Check / Lubricate 5th Wheel Pivot Pins - Inspect 5th wheel pivot pins for wear or damage. Lubricate with lithium grease.
Check / Lubricate Boom Pivot Bearings – Inspect boom pivot bearings for wear or damage. Lubricate with lithium grease.
Check / Lubricate Upper Cylinder Bearings – Inspect upper boom cylinder bearings for wear or damage. Lubricate with lithium grease.
Check / Lubricate Otto-Ride Pivot Points – If applicable. Inspect all Otto-Ride pivot points for wear or damage. On Otto-Ride systems equipped with a single point lube system inspect lube lines to insure delivery of lubricant to all points. Depending on the type of lube system lubricate single point or each pivot point with lithium grease.
Add Grease to Autolube Reservoir – If the vehicle is equipped with an automatic lubrication system inspect all lubrication points for sufficient grease. Fill the system’s reservoir with the proper type and quantity of grease per the component manufacturer’s recommendation.
Test DriveDrive Vehicle to Check Overall Operation – Start and drive vehicle. Test the operation of all systems and components.