Preparing for the School Census Autumn 2013...
77
Preparation Guide applicable to 7.152 onwards Preparing for the School Census Autumn 2013 Return English Secondary/Middle deemed Secondary Schools IMPORTANT NOTE: Capita Children’s Services has made this document available in Microsoft® Word format to enable you to edit the information supplied herein. Capita Children’s Services cannot be held responsible for any changes, errors or omissions resulting from the subsequent editing of this supplied document.
Transcript of Preparing for the School Census Autumn 2013...

IMPORTANT NOTE: Capita Children’s Services has made this document available in Microsoft® Word format to enable you to edit the information supplied herein. Capita Children’s Services cannot be held responsible for any changes, errors or omissions resulting from the subsequent editing of this supplied document.Preparing for the School Census
Autumn 2013 Return
English Secondary/Middle deemed Secondary Schools
applicable to onwards
Preparation Guide

School Census Autumn 2013 Preparation Check ListUse this check list to tick off each of the preparation tasks when they have been completed.
Complete Description
Check with your System Administrator/Manager that you have the appropriate permissions to run the School Census and record associated data (please see Setting Permissions on page 3).
Upgrade to the SIMS 2013 Summer Release (SIMS 7.152) or later as soon as possible to enable dry runs to be carried out (please see What Version of SIMS is Required? on page 3).
Check with your System Administrator/Manager that the latest fileset version has been imported (please see Importing Revised Filesets for Validation and Reports on page 4).
Carry out a dry run to determine what information needs to be updated (please see Why Carry out a Dry Run? on page 9).
Check School Level information (please see Preparing School Level Information on page 17).
Check that leavers and re-admissions have been recorded (please see Recording Leavers and Re-Admissions on page 25).
Delete any student records that have been created in error (please see Deleting Unwanted Student Records on page 28).
Check the students’ basic details (please see Checking Student Details on page 21).
Check the students’ various registration details:
Check the enrolment status, admission date and boarder status (please see Checking Enrolment Status, Admission Date and Boarder Status on page 30).
Check and correct UPNs (please see Checking Unique Pupil Numbers on page 31).
Check and correct Unique Learner Numbers (please see Checking Unique Learner Numbers on page 33).
Check and correct part-time student information (please see Checking Student's Part-Time Details on page 33).
Check and correct the national curriculum year group (please see Checking National Curriculum Year Groups on page 35).
Check and correct each student home address (please see Checking Home Address Information on page 40).
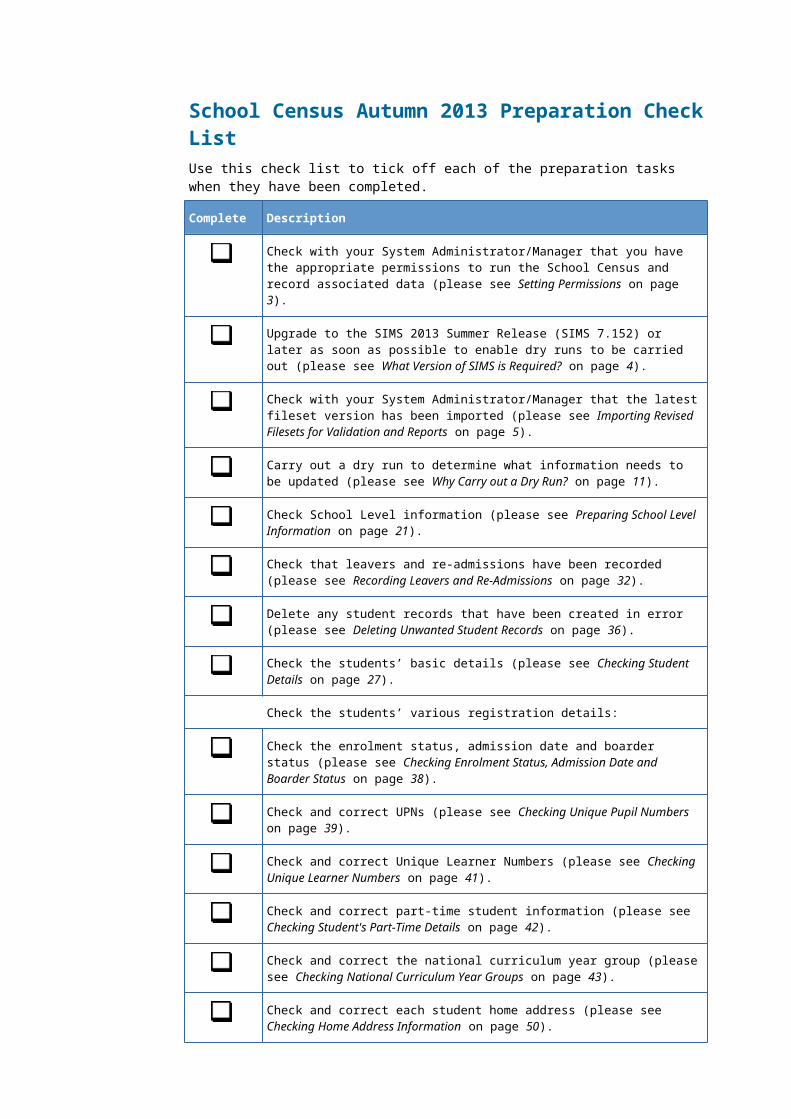
Check free school meal eligibility information (please see Checking FreeSchool Meals Eligibility on page 41).
Check ethnic and cultural information (please see Checking Ethnic and Cultural Information on page 43).
Check the Youth Support Services Agreement (YSSA) status (please see Checking Additional Information on page 43).
Complete Description
Check and correct special educational needs information (please see Checking Special Educational Needs Information on page 44).
Check exclusions information (please see Preparing Exclusions Information on page 46).
Check attendance data (please see Preparing Attendance Information on page 52).
If applicable to your school, check the Hours for Early Years children (applicable to schools that have 2, 3 or 4 year olds pupils only).For more information, please refer to the Primary version of this guide, which is available on our SupportNet website (http://support.capitaes.co.uk) by entering CENSUS13 in the Site Search field on the SupportNet Home page then clicking the Go button.
Check Post 16 information recorded in Course Manager (please see Preparing Post 16 Information in Course Manager on page 53) (applicable to Secondary schools with a Sixth Form only).Refer to the Preparing Post 16 Data for the School Census Autumn 2013 guide, which is available on our SupportNet website (http://support.capitaes.co.uk) by entering CENSUS13 in the Site Search field on the SupportNet Home page then clicking the Go button.
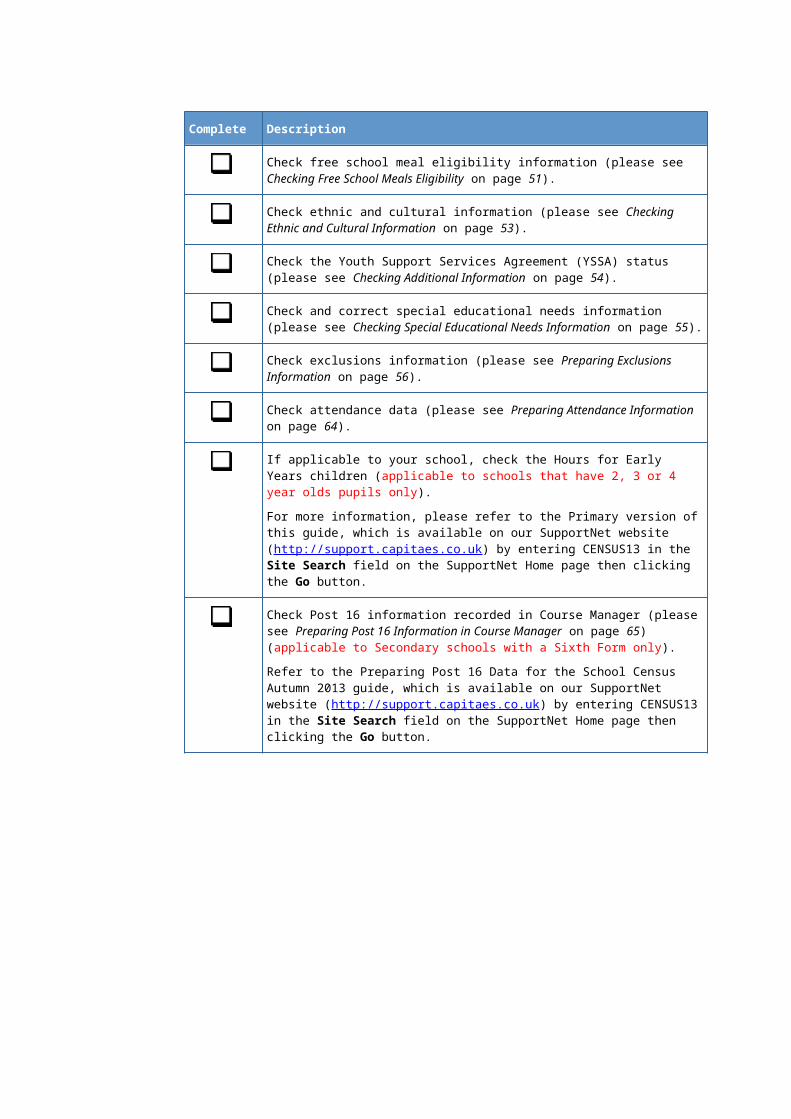
C|Contents
01| Getting Started1
Introduction................................................................................1How has the School Census Autumn Return Changed Since Last Year?..........................................................................................2Setting Permissions.....................................................................3What Version of SIMS is Required?...............................................4Importing Revised Filesets for Validation and Reports...................4
Before Importing the Revised Files.......................................5Importing the Revised Files..................................................5
School Census Return Process Flow..............................................7
02| Carrying out a Dry Run................................................9Why Carry out a Dry Run?............................................................9The Dry Run Process....................................................................9
Resolving Validation Errors and Checking Queries...............11Producing Detail Reports....................................................14
03| Preparing School Level Information...........................17Checking Establishment Details..................................................17Checking School Telephone and Email Information......................18
04| Preparing Student Level Information.........................21Checking Student Details...........................................................21Updating Information Using the Bulk Update Routine..................22Recording Leavers and Re-Admissions........................................26
Recording a Leaver............................................................26Re-Admitting a Student......................................................28
Deleting Unwanted Student Records..........................................29Checking a Student’s Basic Details.............................................30
Recording a Student’s Change of Surname..........................31Checking Registration Details....................................................31
Checking Enrolment Status, Admission Date and Boarder Status...............................................................................32Checking Unique Pupil Numbers.........................................32
Notes

Checking Unique Learner Numbers.....................................34Checking Student's Part-Time Details..................................34
Checking National Curriculum Year Groups.................................36Checking the Student's Year Taught In Record....................37Checking the Year Taught In via the Pastoral Structure by Curriculum Year.................................................................38Checking the Year Taught In via the Pastoral Structure for the Whole School.....................................................................40
Checking Home Address Information..........................................41Checking Free School Meals Eligibility........................................42Checking Ethnic and Cultural Information...................................44Checking Additional Information................................................44Checking Special Educational Needs Information.........................45Preparing Exclusions Information...............................................47
Recording an Exclusion.......................................................48Checking In Care Details for Excluded Students...................49
Checking Hours for Early Years Children.....................................52Preparing Attendance Information..............................................53Preparing Post 16 Information in Course Manager.......................54
05| What Next?...............................................................57Where Can I Get More Information?............................................57
Index............................................................................59
01| Getting Started
01|Getting StartedIntroduction.................................................................................1How has the School Census Autumn Return Changed Since Last Year?...........................................................................................1Setting Permissions......................................................................3What Version of SIMS is Required?................................................3Importing Revised Filesets for Validation and Reports....................4School Census Return Process Flow...............................................6
IntroductionThis preparation guide has been produced to help you to identify the most common tasks that need to be carried out before running the School Census Autumn 2013 Return.It is applicable to all maintained Secondary schools, Middle deemed Secondary schools, CTCs and Academies (where applicable to these school types). Also, Service Children’s Education (Secondary schools) and on a voluntary basis.For Secondary schools with a sixth form, an additional Preparation guide is available, which deals specifically with Post 16 data: Preparing Post 16 Data for the School Census Autumn 2013 Return guide.Information in this guide, which relates to a specific school type only, e.g. Middle deemed Secondary schools, is indicated where applicable.
NOTE: The graphics in this preparation guide are based on a Secondary dataset. The contents of the graphics (dates, names, etc.) are examples only of what you might expect to see when using SIMS to prepare for the forthcoming School Census Return.
Preparing for the School Census Autumn 2013 Return 1
01| Getting Started
How has the School Census Autumn Return Changed Since Last Year?Routines | Statutory Returns | School CensusCensus date – Thursday 3 October 2013.Changes to the School Census Autumn Return include the following:
Changes to Data Items Collected for the ReturnRemoved:
Post 16 Learning Aim Exam ResultPost 16 Learning Aim Outcome.
Replaced:Eligibility for free school meals on census day has been replaced by eligibility for free school meals records.Connexions Assent has been replaced by Youth Support Services Agreement (YSSA).
Added:Discount Code (AO Discount Code where Result exists, otherwise QWS Discount Code).
Collection of Attendance DataSession attendance for pupil's who were four years of age on 31/08/2012 is collected in the Autumn return for the first time. Reason for absence is not required.Attendance data for the second half of the Summer term is collected for the first time. The data for the two half-terms (01/04/2013 to 26/05/2013 and 27/05/2013 to 31/07/2013) is collected separately so as to maintain comparability with previous collections.
Addition of New ReportsFree School Meal Eligibility: On-roll students on census day who are eligible for free school meals on or after 17/05/2013 and up to and including Autumn census day (03/10/2013).Learning Aims by Status Report: Learning Aims from 01/08/2012 to 03/10/2013 (including both on-roll and leavers). The report totals the Learning Aims by status for academic year 2012/2013 and 2013/2014 and by each year taught in (YTI).
Retrieving Authorised Census Returns FilesTools | Statutory Returns Tools | Retrieve Authorised Census Return FilesThe menu route originally named Tools | Statutory Return Tools | Authorised Census Returns has been changed to more accurately describe the functionality.Authorised return files (.XML) and all associated reports can now be downloaded from the Document Management Server (DMS) to a specified folder. The files are displayed automatically on download but can also be viewed by clicking the Select a Folder button, if required.
2 Preparing for the School Census Autumn 2013 Return
01| Getting Started
Setting PermissionsThe following permissions are applicable to users who deal with returns.
Producing the ReturnTo produce the return, you must be a member of the Returns Manager user group in System Manager.
Editing and Preparing DataUsers who edit and prepare data must have permissions to access other areas of SIMS, e.g. student details, school details, etc. These users must be a member of any of the following user groups in System Manager:
Administration AssistantAdmissions OfficerSchool Administrator.
Importing Revised FilesThe Import Fileset functionality enables updates to the Validation Errors Summary and the Summary report (derived from files supplied by the Statutory Body), and detail reports (provided by SIMS), to be imported into SIMS between SIMS releases. To use the Import Fileset functionality (via Tools | Setups | Import | Fileset), you must be a member of any of the following user groups in System Manager:
Personnel OfficerReturns ManagerSystem Manager.
For more information about the Import Fileset functionality, please refer to the applicable preparation guide, available on our SupportNet website (http://support.capitaes.co.uk).
Where to find More Information about PermisssionsPlease see your System Administrator/Manager if you are not sure whether you have the required permissions. For more information, please refer to the Managing SIMS Users, Groups and Databases handbook.For a list of the permissions available for each release, please refer to the appropriate permissions spreadsheet, which can be found on our SupportNet website (http://support.capitaes.co.uk) by entering PERMLIST in the Site Search field on the SupportNet Home page then clicking the Go button.
Preparing for the School Census Autumn 2013 Return 3
01| Getting Started
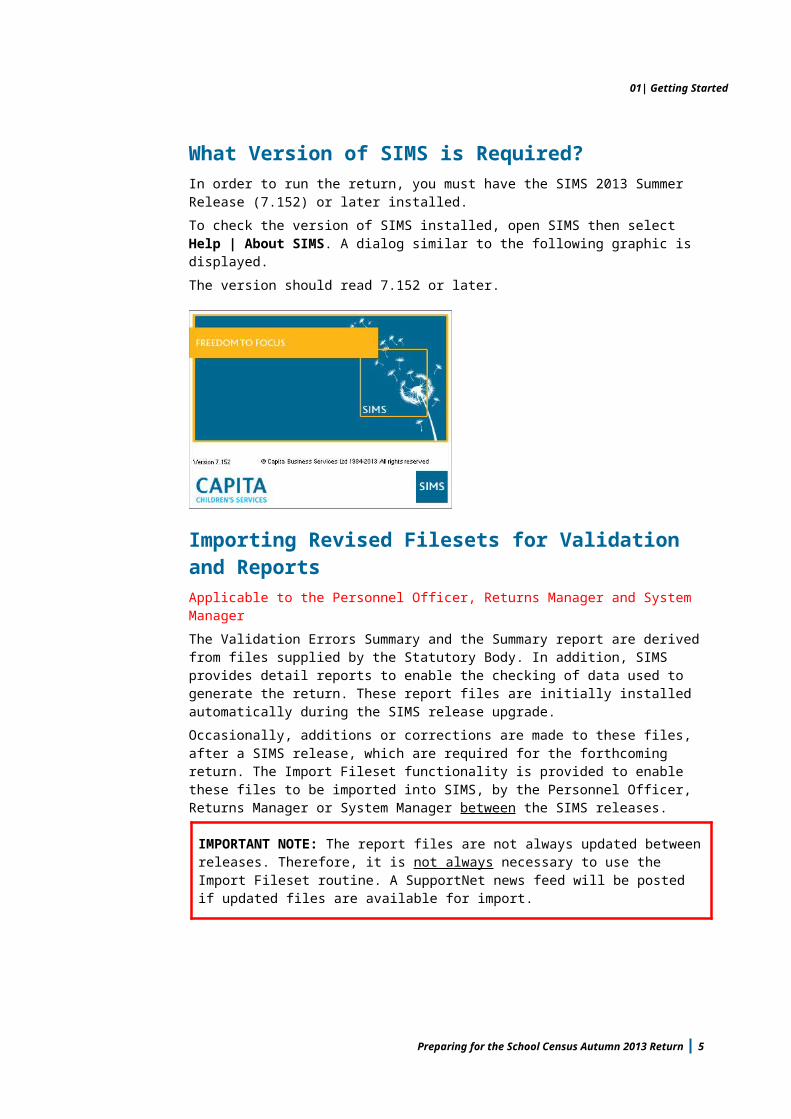
What Version of SIMS is Required?In order to run the return, you must have the SIMS 2013 Summer Release (7.152) or later installed.To check the version of SIMS installed, open SIMS then select Help | About SIMS. A dialog similar to the following graphic is displayed.The version should read 7.152 or later.
Importing Revised Filesets for Validation and ReportsApplicable to the Personnel Officer, Returns Manager and System ManagerThe Validation Errors Summary and the Summary report are derived from files supplied by the Statutory Body. In addition, SIMS provides detail reports to enable the checking of data used to generate the return. These report files are initially installed automatically during the SIMS release upgrade.Occasionally, additions or corrections are made to these files, after a SIMS release, which are required for the forthcoming return. The Import Fileset functionality is provided to enable these files to be imported into SIMS, by the Personnel Officer, Returns Manager or System Manager between the SIMS releases.
IMPORTANT NOTE: The report files are not always updated between releases. Therefore, it is not always necessary to use the Import Fileset routine. A SupportNet news feed will be posted if updated files are available for import.
If revised files are supplied, the fileset will be available as a .ZIP file, which should be downloaded from SupportNet, unzipped, then imported into the SIMS Document Management Server (DMS) via Tools | Setups | Import Fileset. Ensure that the DMS is configured correctly before attempting to import the files.
4 Preparing for the School Census Autumn 2013 Return
01| Getting Started
TIP: To check which version of the fileset is currently in use, select Routines | Statutory Returns | <census name> to display the Census Return browser. The Validation Fileset ID is displayed in the header of the browser. For information about the latest available Fileset version, please check the applicable News Feed on our SupportNet website (http://support.capitaes.co.uk).
Before Importing the Revised FilesTo enable the file(s) to be imported successfully, ensure that the DMS is configured correctly. This is achieved via Tools | Setups | Document Management Server. Click the Test server connection button to check if the specified DMS is available for use and functioning correctly.If the connection is unsuccessful, check the following details:
The Protocol field defaults to http and should not be edited.The Computer name should be the name/number of the PC on which the DMS is installed.The Port number is usually 8080. The number must be between 0 and 65535.The Active check box must be selected, indicating that the server is in use.
Click the Test server connection button again. If the DMS is now working correctly, click the Save button.Additional Resources:Setting up and Administering SIMS handbook
Importing the Revised Files1. If revised files are supplied, download the required ZIP file from SupportNet
to a folder of your choice. The SupportNet resource number is quoted in the associated news item.
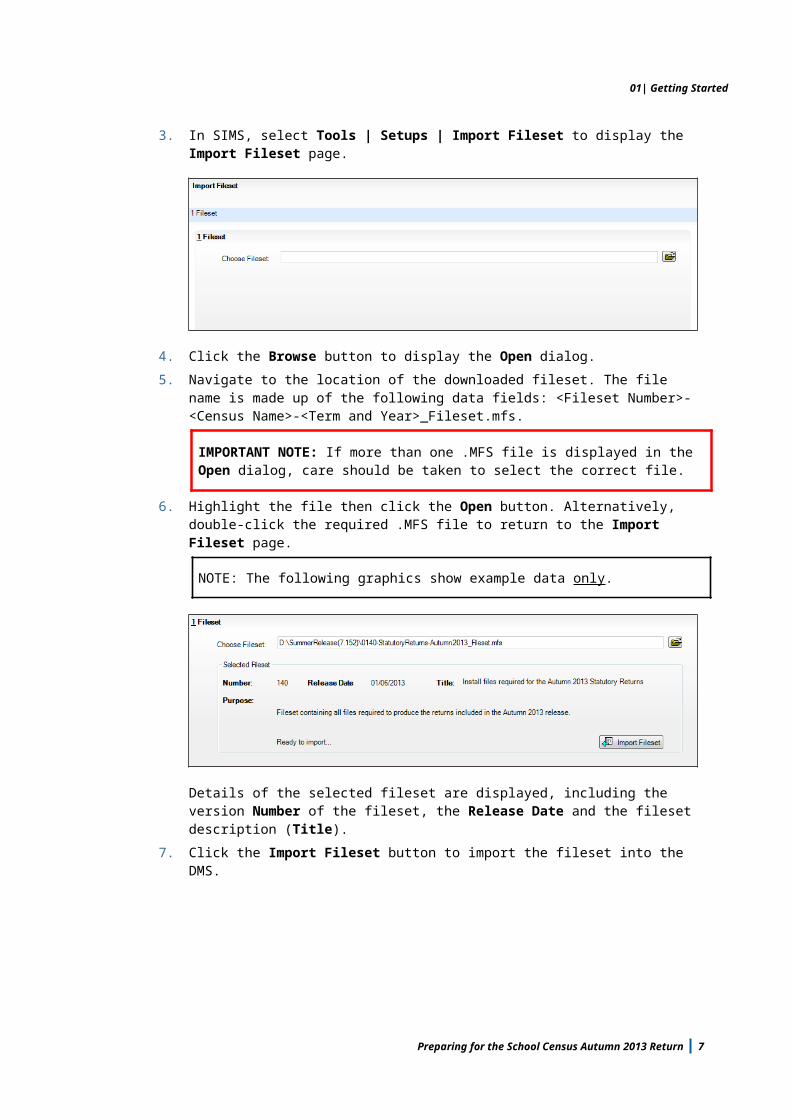
2. Unzip the ZIP file to a folder of your choice.3. In SIMS, select Tools | Setups | Import Fileset to display the Import
Fileset page.
4. Click the Browse button to display the Open dialog.5. Navigate to the location of the downloaded fileset. The file name is made up
of the following data fields: <Fileset Number>-<Census Name>-<Term and Year>_Fileset.mfs.
Preparing for the School Census Autumn 2013 Return 5
01| Getting Started
IMPORTANT NOTE: If more than one .MFS file is displayed in the Open dialog, care should be taken to select the correct file.
6. Highlight the file then click the Open button. Alternatively, double-click the required .MFS file to return to the Import Fileset page.
NOTE: The following graphics show example data only.
Details of the selected fileset are displayed, including the version Number of the fileset, the Release Date and the fileset description (Title).
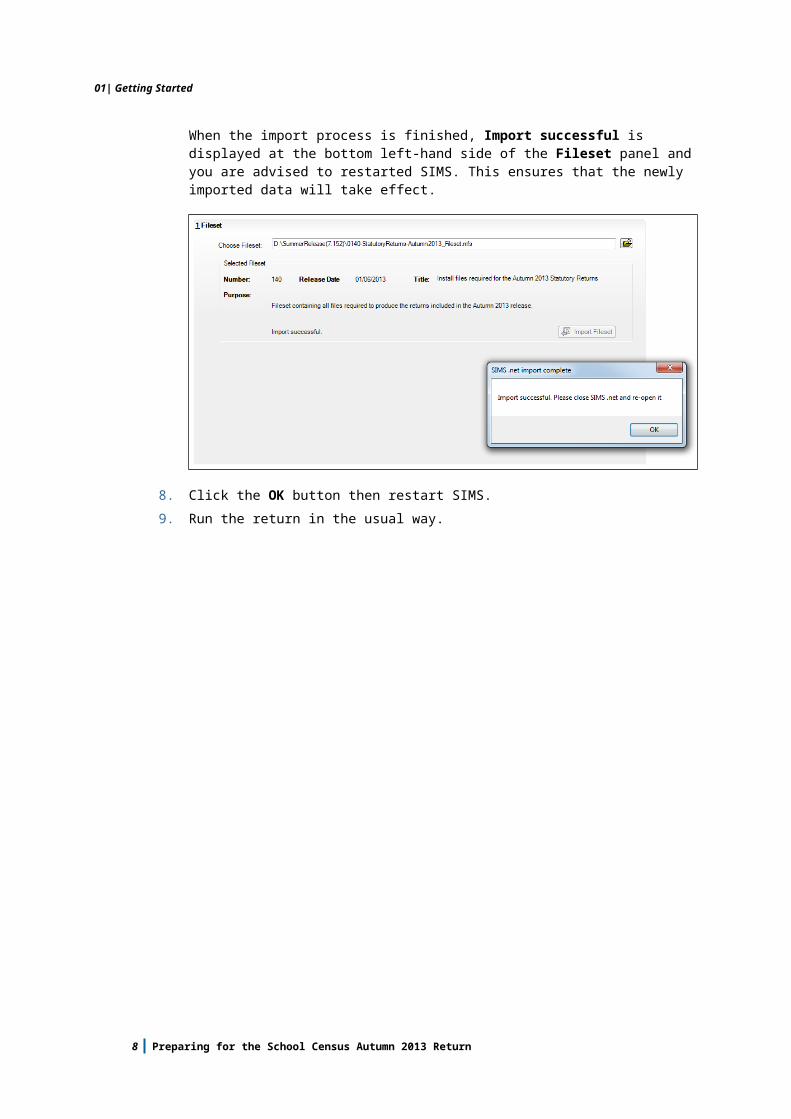
7. Click the Import Fileset button to import the fileset into the DMS. When the import process is finished, Import successful is displayed at the bottom left-hand side of the Fileset panel and you are advised to restarted SIMS. This ensures that the newly imported data will take effect.
8. Click the OK button then restart SIMS.9. Run the return in the usual way.
6 Preparing for the School Census Autumn 2013 Return
01| Getting Started
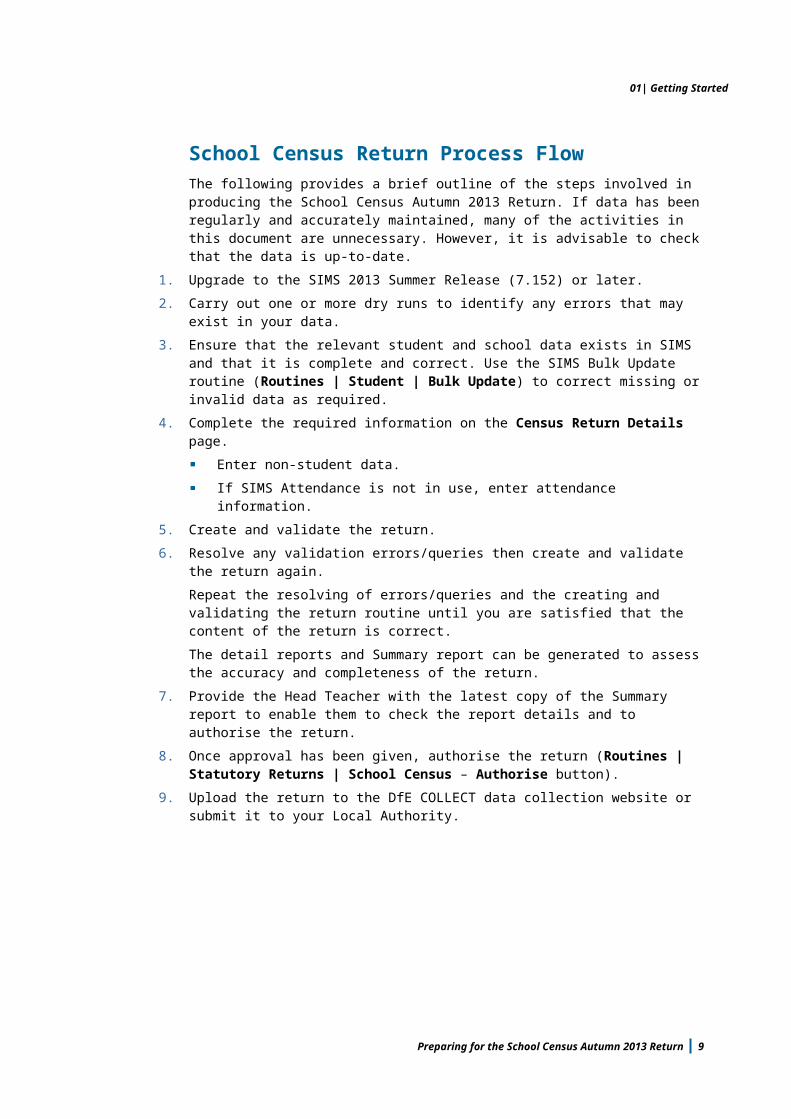
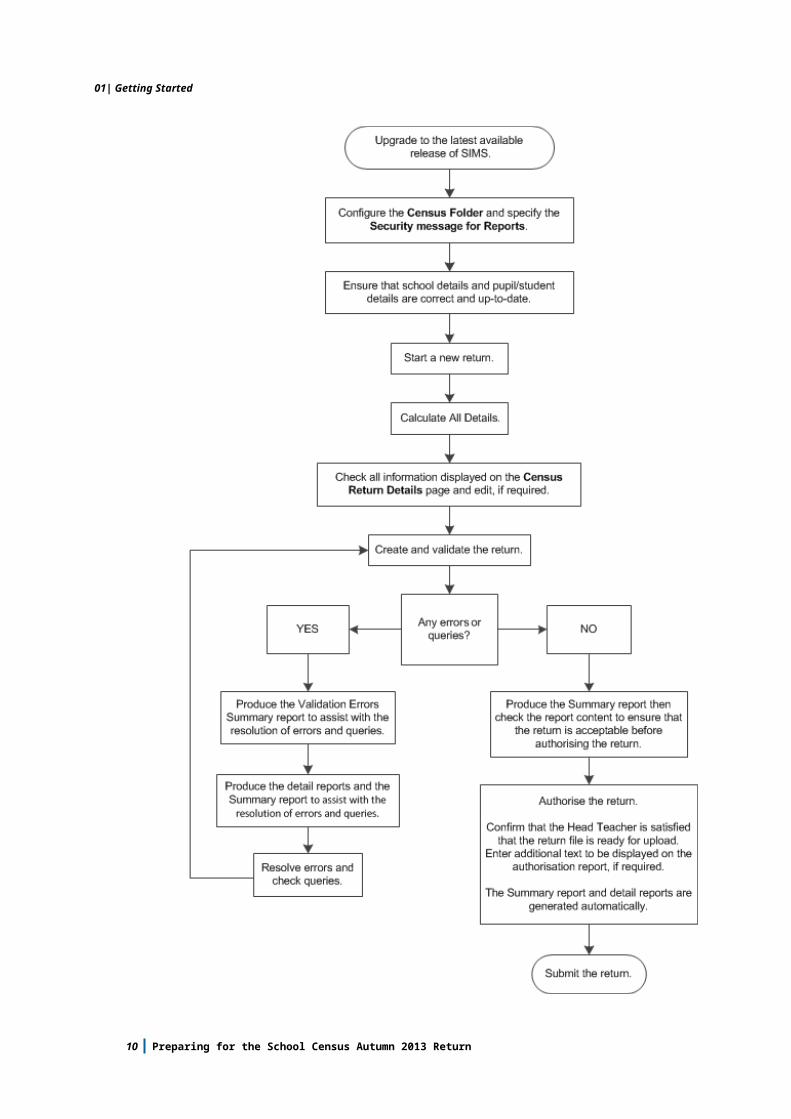
School Census Return Process FlowThe following provides a brief outline of the steps involved in producing the School Census Autumn 2013 Return. If data has been regularly and accurately maintained, many of the activities in this document are unnecessary. However, it is advisable to check that the data is up-to-date.
1. Upgrade to the SIMS 2013 Summer Release (7.152) or later.2. Carry out one or more dry runs to identify any errors that may exist in your
data.3. Ensure that the relevant student and school data exists in SIMS and that it is
complete and correct. Use the SIMS Bulk Update routine (Routines | Student | Bulk Update) to correct missing or invalid data as required.
4. Complete the required information on the Census Return Details page.Enter non-student data.If SIMS Attendance is not in use, enter attendance information.
5. Create and validate the return.6. Resolve any validation errors/queries then create and validate the return
again.Repeat the resolving of errors/queries and the creating and validating the return routine until you are satisfied that the content of the return is correct.The detail reports and Summary report can be generated to assess the accuracy and completeness of the return.
7. Provide the Head Teacher with the latest copy of the Summary report to enable them to check the report details and to authorise the return.
8. Once approval has been given, authorise the return (Routines | Statutory Returns | School Census – Authorise button).
9. Upload the return to the DfE COLLECT data collection website or submit it to your Local Authority.
Preparing for the School Census Autumn 2013 Return 7
01| Getting Started
8 Preparing for the School Census Autumn 2013 Return
02| Carrying out a Dry Run
02|Carrying out a Dry RunWhy Carry out a Dry Run?.............................................................9The Dry Run Process.....................................................................9
Why Carry out a Dry Run?When you have upgraded to the SIMS 2013 Summer Release (7.152), you can carry out one or more dry runs of the School Census Autumn 2013 Return.The purpose of a dry run is to produce the Validation Errors Summary, which details the corrections that need to be made to your data to make it acceptable for inclusion in the return. To make you aware of potential issues, it is advisable to do this as early as possible, even if you know that your data has not yet been fully prepared or checked.Whilst a significant number of errors may be generated, many of the errors that relate to students, e.g. language, can be fixed quickly using the Bulk Update routine.
The Dry Run Process1. Select Routines | Statutory Returns | School Census to display the
Census Return for Autumn Term browser.
2. Select an existing School Census Folder or enter a new location in which the School Census files will be stored. You may wish to make this a temporary folder for the purposes of producing a dry run.
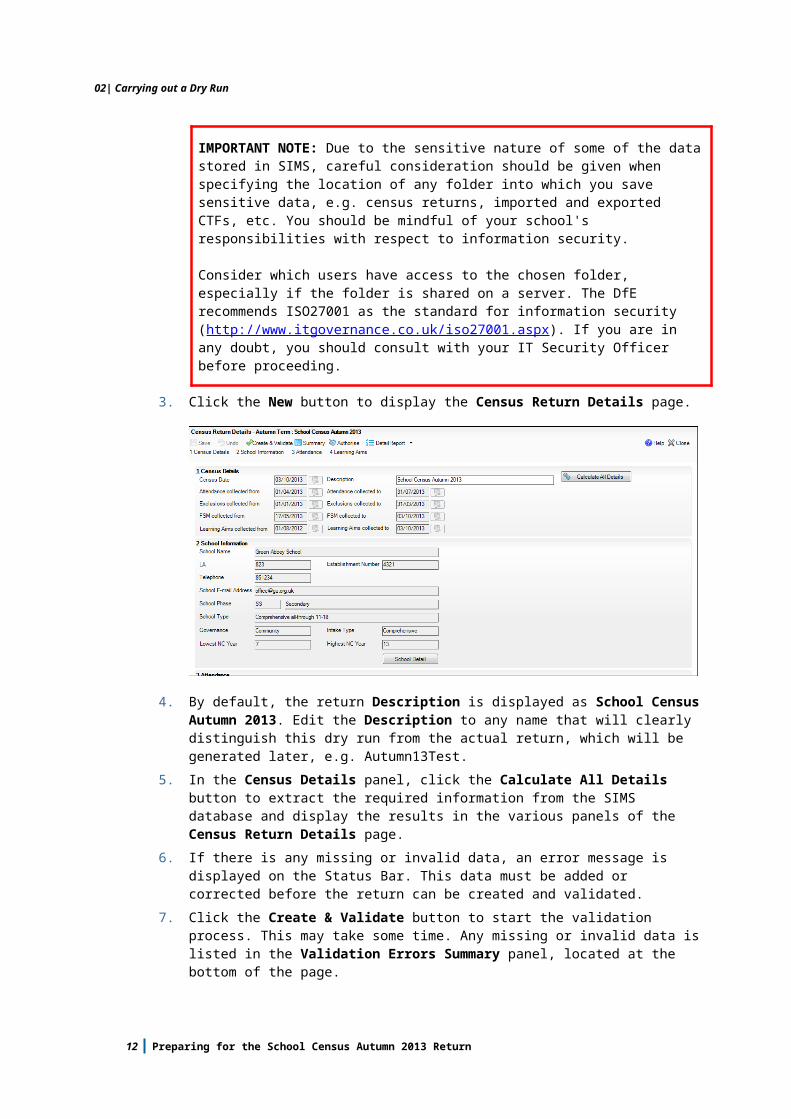
IMPORTANT NOTE: Due to the sensitive nature of some of the data stored in SIMS, careful consideration should be given when specifying the location of any folder into which you save sensitive data, e.g. census returns, imported and exported CTFs, etc. You should be mindful of your school's responsibilities with respect to information security.
Consider which users have access to the chosen folder, especially if the folder is shared on a server. The DfE recommends ISO27001 as the standard for information security (http://www.itgovernance.co.uk/iso27001.aspx). If you are in any doubt, you should consult with your IT Security Officer before proceeding.
Preparing for the School Census Autumn 2013 Return 9
02| Carrying out a Dry Run
3. Click the New button to display the Census Return Details page.
4. By default, the return Description is displayed as School Census Autumn 2013. Edit the Description to any name that will clearly distinguish this dry run from the actual return, which will be generated later, e.g. Autumn13Test.
5. In the Census Details panel, click the Calculate All Details button to extract the required information from the SIMS database and display the results in the various panels of the Census Return Details page.
6. If there is any missing or invalid data, an error message is displayed on the Status Bar. This data must be added or corrected before the return can be created and validated.
7. Click the Create & Validate button to start the validation process. This may take some time. Any missing or invalid data is listed in the Validation Errors Summary panel, located at the bottom of the page.Additional Resources:Detailed information about completing the individual panels on the Census Return Details page is available in the Producing the School Census Autumn 2013 Return (English Secondary/Middle deemed Secondary Schools).
10 Preparing for the School Census Autumn 2013 Return

02| Carrying out a Dry Run
Resolving Validation Errors and Checking QueriesAfter creating the return file and validating the data, any errors and queries found are listed in the Validation Errors Summary panel at the bottom of the Census Return Details page.
The Validation Errors Summary panel header displays the number of errors and queries found during the Create and Validate process.Details about the errors and queries that have been found are displayed in the following columns.
Column Description
Type Displays the type of validation rule:Failure (F displayed in red) indicates an error, which must be corrected.Query (Q displayed in black) indicates that there are unusual data conditions. These should be considered and corrected, if necessary.
Sequence Shows the error or query number.
Message Displays the text of the error or query message.
Location Lists the specific record containing the error or query.
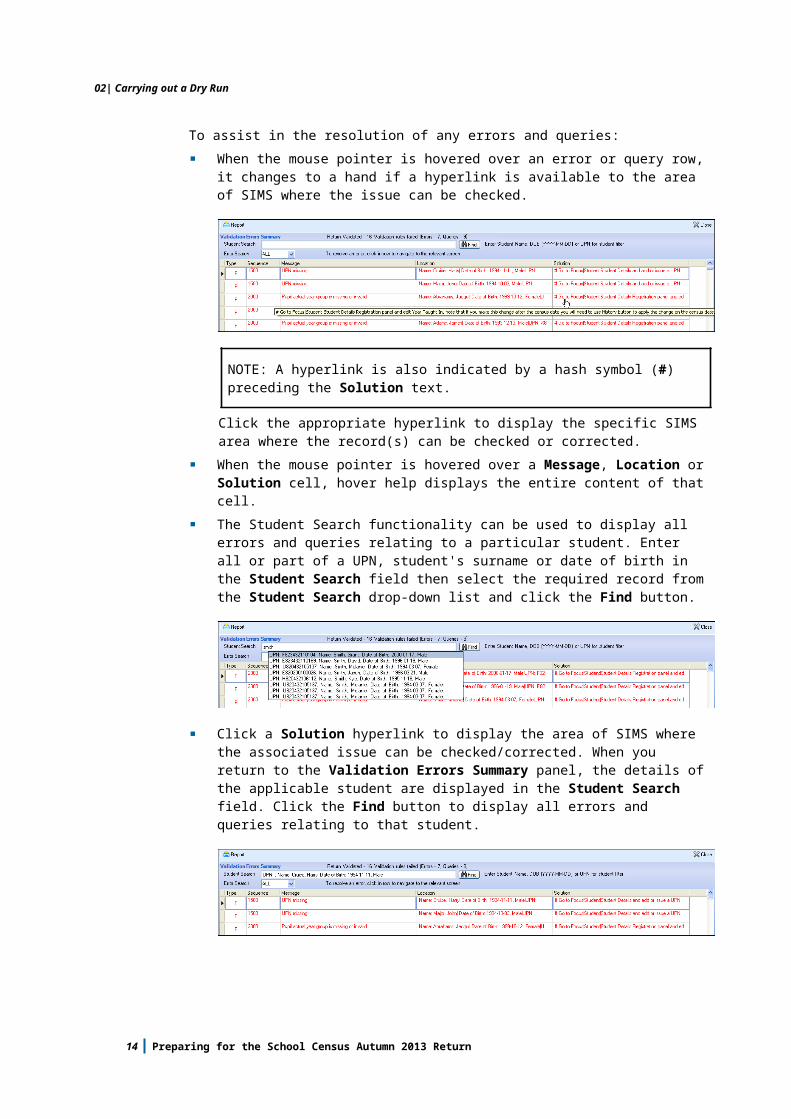
Solution Provides a suggestion on how the error can be corrected or the query checked. Many solutions have a hyperlink (indicated by a #) to the appropriate area of SIMS.
To assist in the resolution of any errors and queries:When the mouse pointer is hovered over an error or query row, it changes to a hand if a hyperlink is available to the area of SIMS where the issue can be checked.
Preparing for the School Census Autumn 2013 Return 11
02| Carrying out a Dry Run
NOTE: A hyperlink is also indicated by a hash symbol (#) preceding the Solution text.
Click the appropriate hyperlink to display the specific SIMS area where the record(s) can be checked or corrected.When the mouse pointer is hovered over a Message, Location or Solution cell, hover help displays the entire content of that cell.The Student Search functionality can be used to display all errors and queries relating to a particular student. Enter all or part of a UPN, student's surname or date of birth in the Student Search field then select the required record from the Student Search drop-down list and click the Find button.
Click a Solution hyperlink to display the area of SIMS where the associated issue can be checked/corrected. When you return to the Validation Errors Summary panel, the details of the applicable student are displayed in the Student Search field. Click the Find button to display all errors and queries relating to that student.
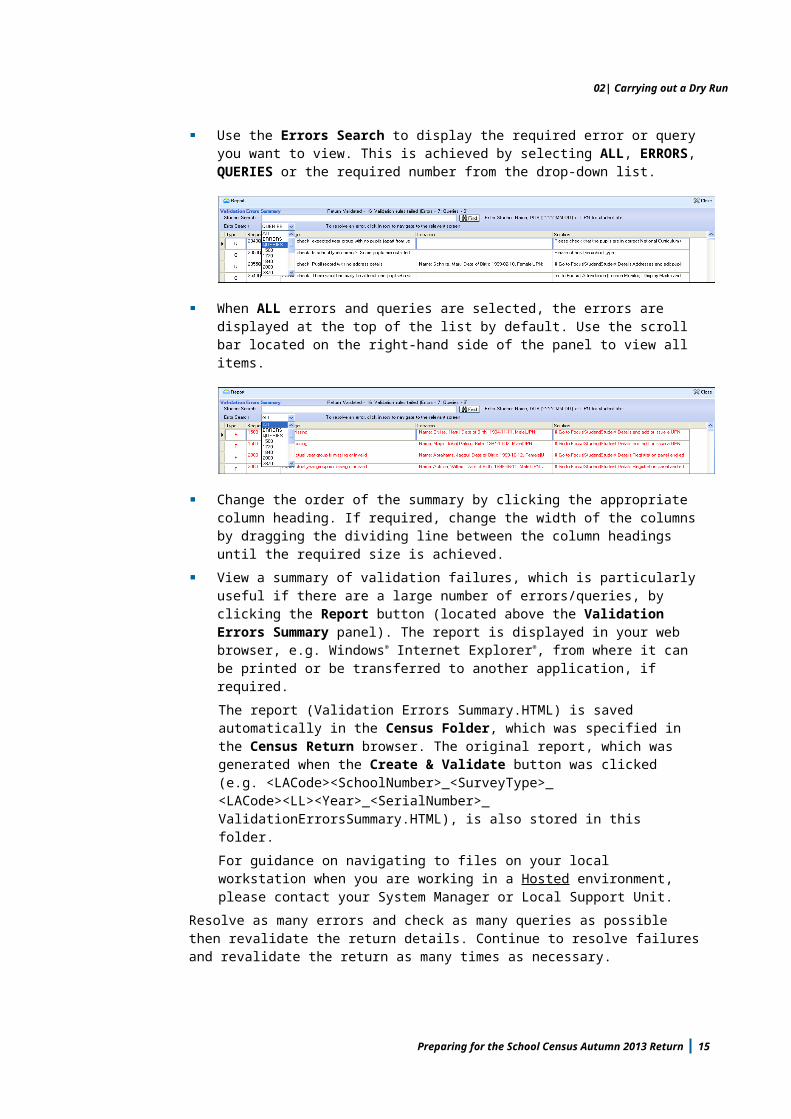
Use the Errors Search to display the required error or query you want to view. This is achieved by selecting ALL, ERRORS, QUERIES or the required number from the drop-down list.
When ALL errors and queries are selected, the errors are displayed at the top of the list by default. Use the scroll bar located on the right-hand side of the panel to view all items.
12 Preparing for the School Census Autumn 2013 Return

02| Carrying out a Dry Run
Change the order of the summary by clicking the appropriate column heading. If required, change the width of the columns by dragging the dividing line between the column headings until the required size is achieved.View a summary of validation failures, which is particularly useful if there are a large number of errors/queries, by clicking the Report button (located above the Validation Errors Summary panel). The report is displayed in your web browser, e.g. Windows® Internet Explorer®, from where it can be printed or be transferred to another application, if required.The report (Validation Errors Summary.HTML) is saved automatically in the Census Folder, which was specified in the Census Return browser. The original report, which was generated when the Create & Validate button was clicked (e.g. <LACode><SchoolNumber>_<SurveyType>_ <LACode><LL><Year>_<SerialNumber>_ValidationErrorsSummary.HTML), is also stored in this folder.For guidance on navigating to files on your local workstation when you are working in a Hosted environment, please contact your System Manager or Local Support Unit.
Resolve as many errors and check as many queries as possible then revalidate the return details. Continue to resolve failures and revalidate the return as many times as necessary.
NOTE: All errors must be resolved and all queries must be investigated.
If at any point you wish to hide the list of error and queries, click the Close button located at the top right-hand side of the Validation Errors Summary panel. The list is displayed again when the Create and Validate process is run.Many of the errors generated can be fixed quickly using bulk update functionality (via Routines | Student | Bulk Update). For more information, please refer to the Managing Pupil/Students handbook.In addition to the Validation Errors Summary, an Errors and Resolutions document containing a list of all errors/queries that can be generated is being produced. Explanations and information on how to resolve the errors or whether the queries can be ignored are also included. The document can help to identify the order in which errors should be corrected. For example, if a UPN is missing, several UPN related errors might be generated. Therefore, adding missing UPNs can remove several errors.The Validation Errors and Resolutions document will be posted to the SupportNet website (http://support.capitaes.co.uk) as soon as it is complete.
Producing Detail ReportsDetail Reports can be used to check the data stored in SIMS that has been used to create the return. The reports can be produced as soon as the return has been validated.The following reports are currently available:
On Roll Basic Details ReportLeavers Basic Details ReportExclusions ReportAttendance Report
Preparing for the School Census Autumn 2013 Return 13
02| Carrying out a Dry Run
Absentees ReportSEN ReportAddress Detail ReportFree School Meal Eligibility ReportOn Roll Learning Aims ReportLeavers Learning Aims ReportLearning Aims by Status Report.
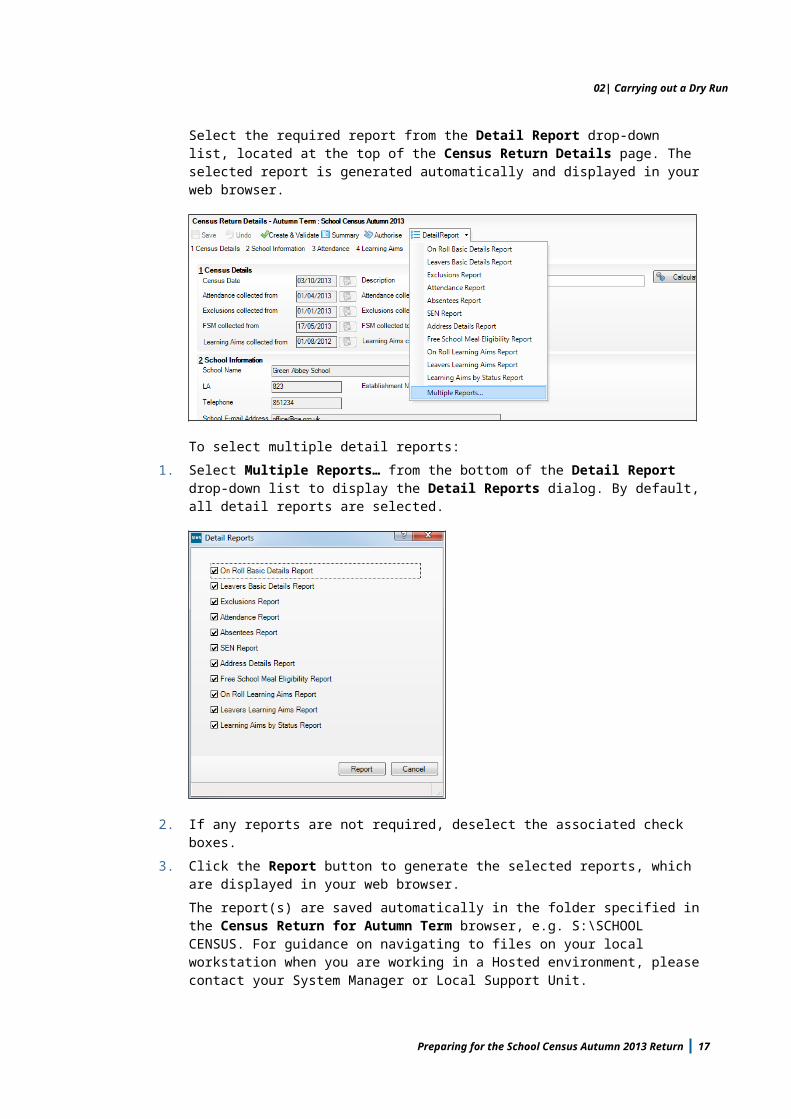
To select a single detail report:Select the required report from the Detail Report drop-down list, located at the top of the Census Return Details page. The selected report is generated automatically and displayed in your web browser.
To select multiple detail reports:1. Select Multiple Reports… from the bottom of the Detail Report
drop-down list to display the Detail Reports dialog. By default, all detail reports are selected.
2. If any reports are not required, deselect the associated check boxes.3. Click the Report button to generate the selected reports, which are
displayed in your web browser.
14 Preparing for the School Census Autumn 2013 Return
02| Carrying out a Dry Run
The report(s) are saved automatically in the folder specified in the Census Return for Autumn Term browser, e.g. S:\SCHOOL CENSUS. For guidance on navigating to files on your local workstation when you are working in a Hosted environment, please contact your System Manager or Local Support Unit.
TIP: If required, the report can be transferred to a spreadsheet application, which enables the data to be sorted and the column order to be changed, etc. In your web browser, right-click the report then select the required option, e.g. Export to Microsoft Excel, from the drop-down list.
Completed
Preparing for the School Census Autumn 2013 Return 15
02| Carrying out a Dry Run
16 Preparing for the School Census Autumn 2013 Return
03| Preparing School Level Information
03|Preparing School Level InformationChecking Establishment Details...................................................17Checking School Telephone and Email Information.......................18
Checking Establishment DetailsThe following establishment details are required for the return and therefore need to be checked to ensure that they are recorded correctly in SIMS:
School TypeSchool GovernanceIntake Type.
The following read-only items are also collected. Please contact your Local Support Unit if the information displayed in SIMS is incorrect.
School NameLA numberEstablishment NumberSchool PhaseCurriculum Years (highest and lowest national curriculum year group).
1. Select Focus | School | School Details to display the School Details page.
Preparing for the School Census Autumn 2013 Return 17
03| Preparing School Level Information
2. Check that the details displayed in the Establishment panel are correct.3. Ensure that the School Type, School Governance and Intake Type are
displayed correctly. Select as required from the drop-down lists, if required.
NOTE: The School Name, LA number, Establishment Number and School Phase were set up when SIMS was installed. If these details are incorrect, please contact your Local Support Team for assistance.
Information for Academies:Academies should ensure that the following information is recorded, if applicable:
The School Type and School Governance.Select Academies from the applicable drop-down lists.The school’s Previous Name and Date Name Changed.The Previous Estab Number and Date Number Changed.The number information is used by School Census. If the DfE number has changed for sponsor-led Academies, historical information is not collected and the date of arrival is reported as the date the DfE number changed.The Previous URN Number and Date Number Changed.
NOTE: The date that the establishment's URN changed is used by other census returns.
4. If you have edited the Establishment panel, click the Save button.
Completed
Checking School Telephone and Email InformationThe following school contact details are collected for the return and therefore need to be checked to ensure that they are up-to-date and correctly recorded in SIMS:
School Email AddressSchool Telephone Number
1. Select Focus | School | School Details to display the School Details page.
2. Click the Contact Details hyperlink to display the Contact Details panel.
3. Ensure that a Telephone number has been recorded (including the STD code).
18 Preparing for the School Census Autumn 2013 Return
03| Preparing School Level Information
4. Ensure that the school’s official communications Email address has been recorded correctly (it must include the @ character together with a minimum of one full stop).The email address must be the account used on a regular basis. It must also be accessible to the Head Teacher as it might be used for future DfE correspondence.
Completed
Preparing for the School Census Autumn 2013 Return 19

03| Preparing School Level Information
20 Preparing for the School Census Autumn 2013 Return

04| Preparing Student Level Information
04|Preparing Student Level InformationChecking Student Details............................................................21Updating Information Using the Bulk Update Routine...................21Recording Leavers and Re-Admissions.........................................25Deleting Unwanted Student Records............................................28Checking a Student’s Basic Details..............................................28Checking Registration Details......................................................30Checking National Curriculum Year Groups..................................35Checking Home Address Information...........................................40Checking Free School Meals Eligibility.........................................41Checking Ethnic and Cultural Information....................................43Checking Additional Information..................................................43Checking Special Educational Needs Information..........................44Preparing Exclusions Information................................................46Checking Hours for Early Years Children......................................50Preparing Attendance Information...............................................52Preparing Post 16 Information in Course Manager........................53
Checking Student DetailsBefore starting the School Census return, check that all on-roll students are recorded in SIMS and that as far as possible, the information is up-to-date and accurate. Ensure that:
new students have been added.any leavers have been recorded as such.
NOTE: Ensure that a student’s first language and boarder status are entered before they are recorded as a leaver.
any duplicate or unwanted student records have been deleted.part-time details have been checked/updated.student details have been updated where required.
The following sections in this guide provide additional information and specific instructions on checking and editing student level data. Some of this data can be checked/updated using the Bulk Update routine.When you have upgraded to the SIMS 2013 Summer Release (7.152), you are strongly advised to carry out one or more dry runs in order to identify the validation errors and queries that must be resolved before the return is submitted.
Updating Information Using the Bulk Update RoutineTo prevent validation errors from occurring, it is advisable to check your SIMS data for accuracy before the return is created and validated.
Preparing for the School Census Autumn 2013 Return 21
04| Preparing Student Level Information
Many items can be checked using the Bulk Update routine. This functionality enables you to search for missing or invalid data then update in bulk. For example, it is possible to search for all students who do not have a First Language recorded against their name. From the students found, a value can be assigned to all or several students. This prevents the need to enter/change values manually for individual students.
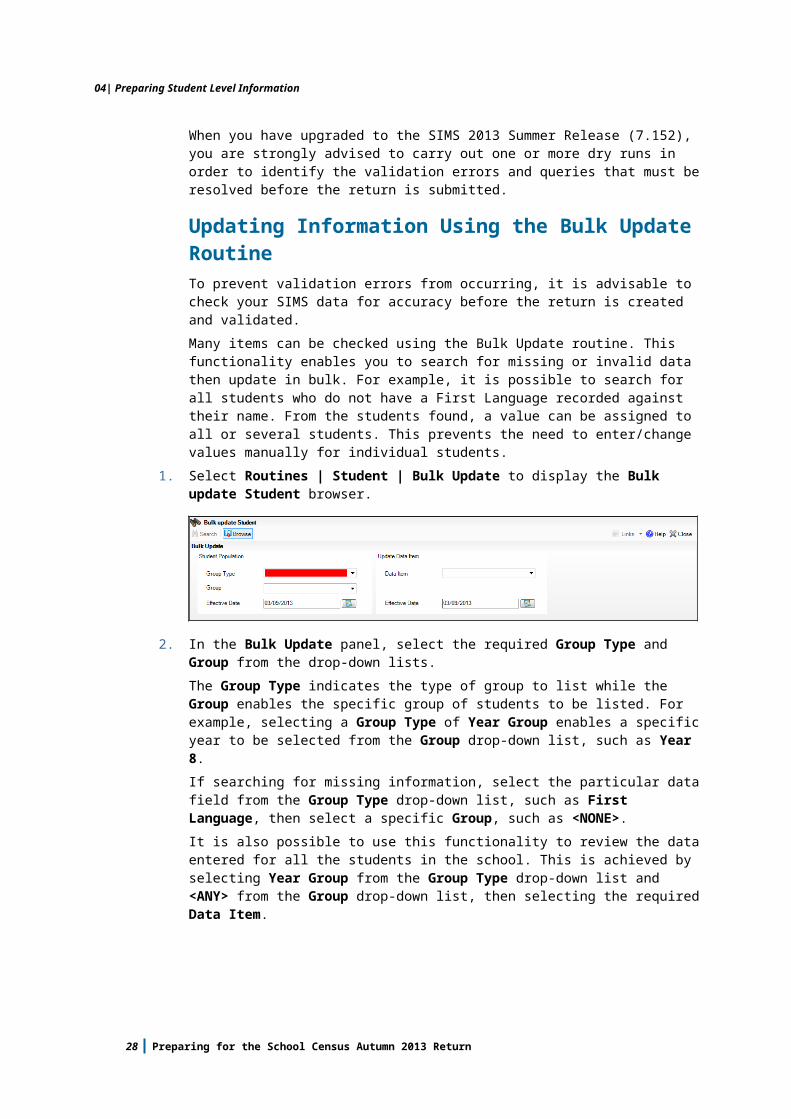
1. Select Routines | Student | Bulk Update to display the Bulk update Student browser.
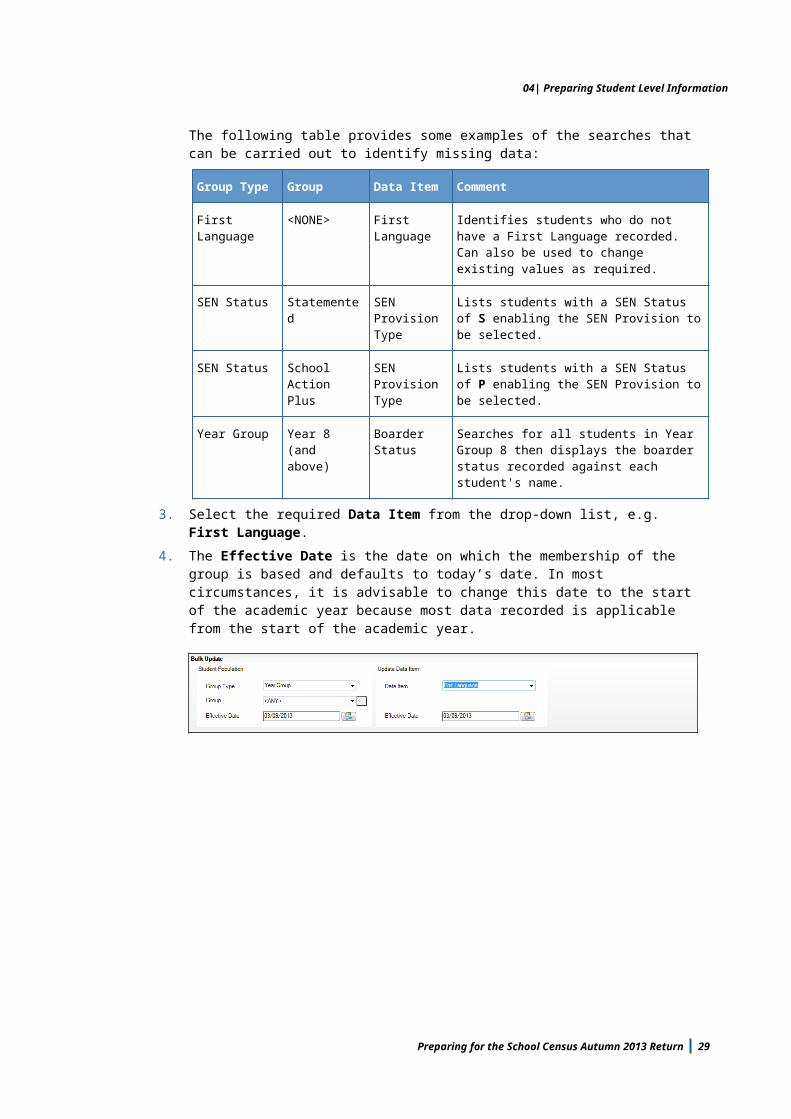
2. In the Bulk Update panel, select the required Group Type and Group from the drop-down lists.The Group Type indicates the type of group to list while the Group enables the specific group of students to be listed. For example, selecting a Group Type of Year Group enables a specific year to be selected from the Group drop-down list, such as Year 8.If searching for missing information, select the particular data field from the Group Type drop-down list, such as First Language, then select a specific Group, such as <NONE>.It is also possible to use this functionality to review the data entered for all the students in the school. This is achieved by selecting Year Group from the Group Type drop-down list and <ANY> from the Group drop-down list, then selecting the required Data Item.The following table provides some examples of the searches that can be carried out to identify missing data:
Group Type Group Data Item Comment
First Language
<NONE> First Language
Identifies students who do not have a First Language recorded. Can also be used to change existing values as required.
SEN Status Statemented SEN Provision Type
Lists students with a SEN Status of S enabling the SEN Provision to be selected.
SEN Status School Action Plus
SEN Provision Type
Lists students with a SEN Status of P enabling the SEN Provision to be selected.
Year Group Year 8 (and above)
Boarder Status
Searches for all students in Year Group 8 then displays the boarder status recorded against each student's name.
3. Select the required Data Item from the drop-down list, e.g. First Language.
22 Preparing for the School Census Autumn 2013 Return
04| Preparing Student Level Information
4. The Effective Date is the date on which the membership of the group is based and defaults to today’s date. In most circumstances, it is advisable to change this date to the start of the academic year because most data recorded is applicable from the start of the academic year.
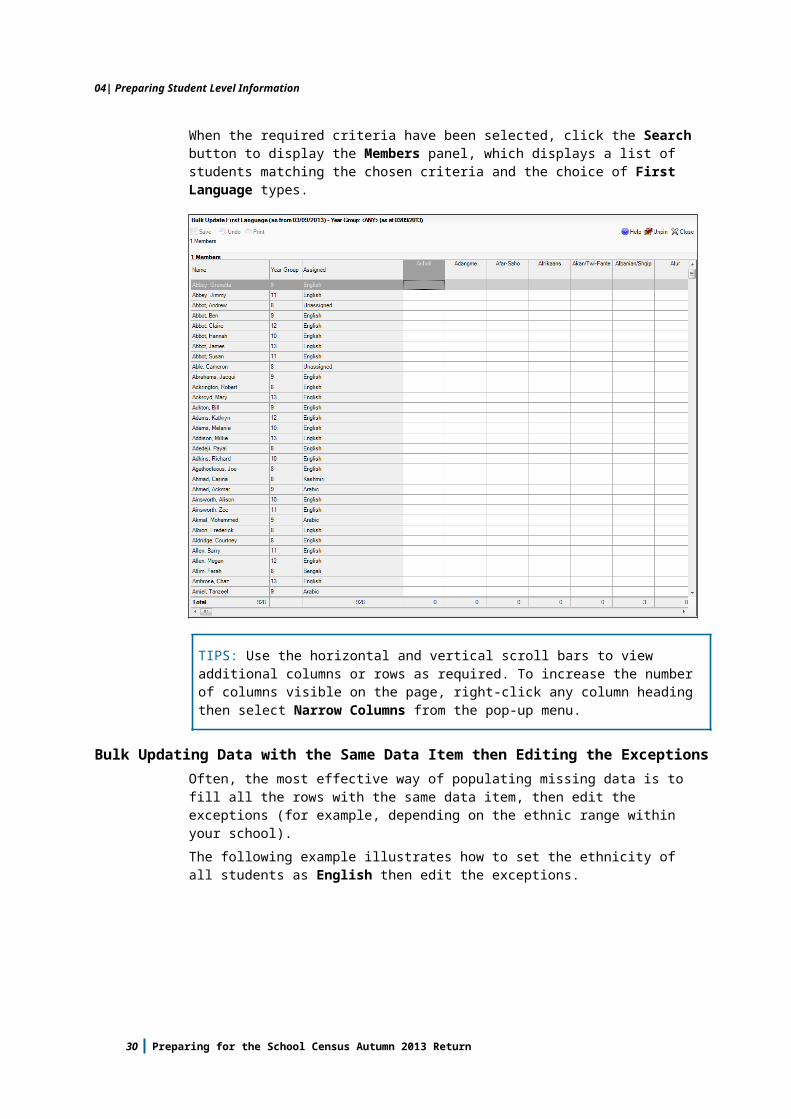
When the required criteria have been selected, click the Search button to display the Members panel, which displays a list of students matching the chosen criteria and the choice of First Language types.
TIPS: Use the horizontal and vertical scroll bars to view additional columns or rows as required. To increase the number of columns visible on the page, right-click any column heading then select Narrow Columns from the pop-up menu.
Bulk Updating Data with the Same Data Item then Editing the ExceptionsOften, the most effective way of populating missing data is to fill all the rows with the same data item, then edit the exceptions (for example, depending on the ethnic range within your school).The following example illustrates how to set the ethnicity of all students as English then edit the exceptions.
Preparing for the School Census Autumn 2013 Return 23

04| Preparing Student Level Information
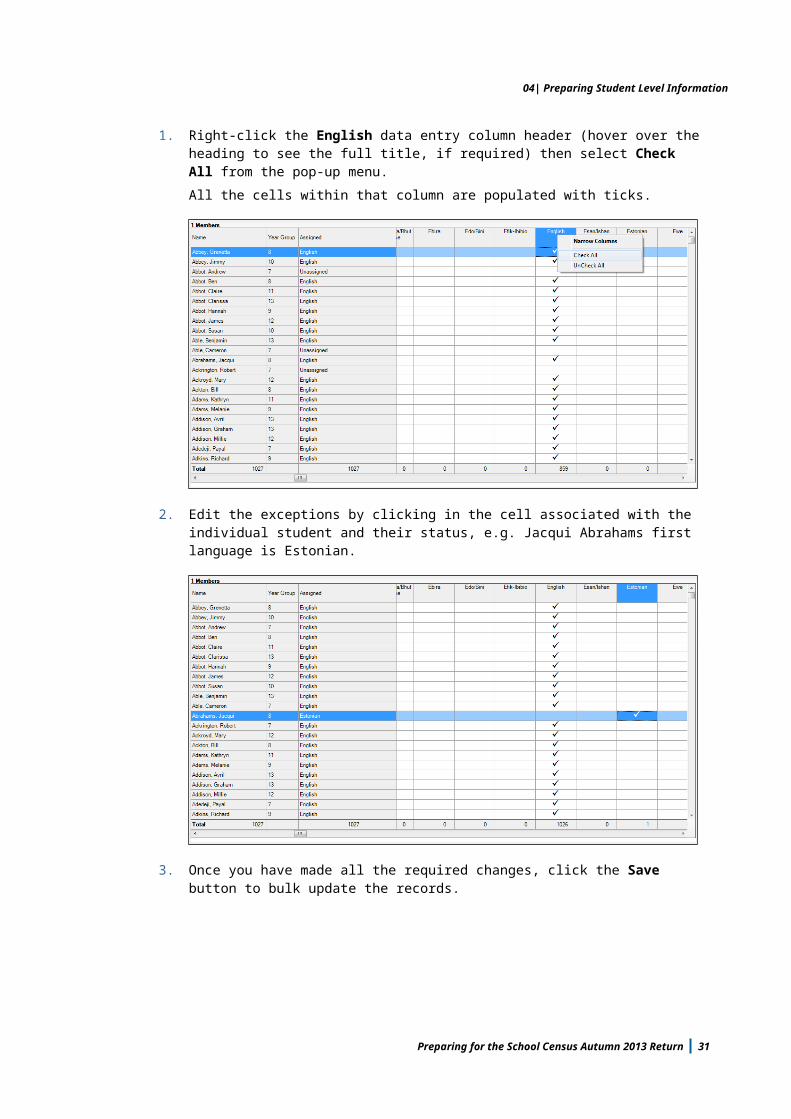
1. Right-click the English data entry column header (hover over the heading to see the full title, if required) then select Check All from the pop-up menu.All the cells within that column are populated with ticks.
2. Edit the exceptions by clicking in the cell associated with the individual student and their status, e.g. Jacqui Abrahams first language is Estonian.
3. Once you have made all the required changes, click the Save button to bulk update the records.
24 Preparing for the School Census Autumn 2013 Return
04| Preparing Student Level Information
Bulk Updating Data for a Selection of StudentsThere are two ways of selecting a number of students.Entering Values for a Selection of Students
1. Highlight the first student you wish to select then hold down the Ctrl key and highlight the other required students.
2. Release the Ctrl key, then click one of the highlighted cells in the required data item column. A tick indicates that the student has been assigned that value.Entering Values for Sequentially Listed StudentsThis way can be used for assigning a value to a group of sequentially listed students. For example, clicking the Assigned column heading displays all unassigned student at the top of the list.
3. Highlight the first student in the group, hold down the Shift key then click the last student in the group (alternatively, hold down the Shift key and press the Down Arrow key).
4. Release the Shift key then click one of the highlighted cells in the required data item column. A tick indicates that the student has been assigned that value.
Recording Leavers and Re-AdmissionsEnsure that all your leavers are taken off-roll and any returning students are re-admitted.The accuracy of student numbers can be checked by running the Population Analysis (Dated) report (Reports | Run Report – Focus – Student). This is a predefined report that gives a breakdown of the number of students (including figures by gender) for each registration group in each year, together with a grand total.
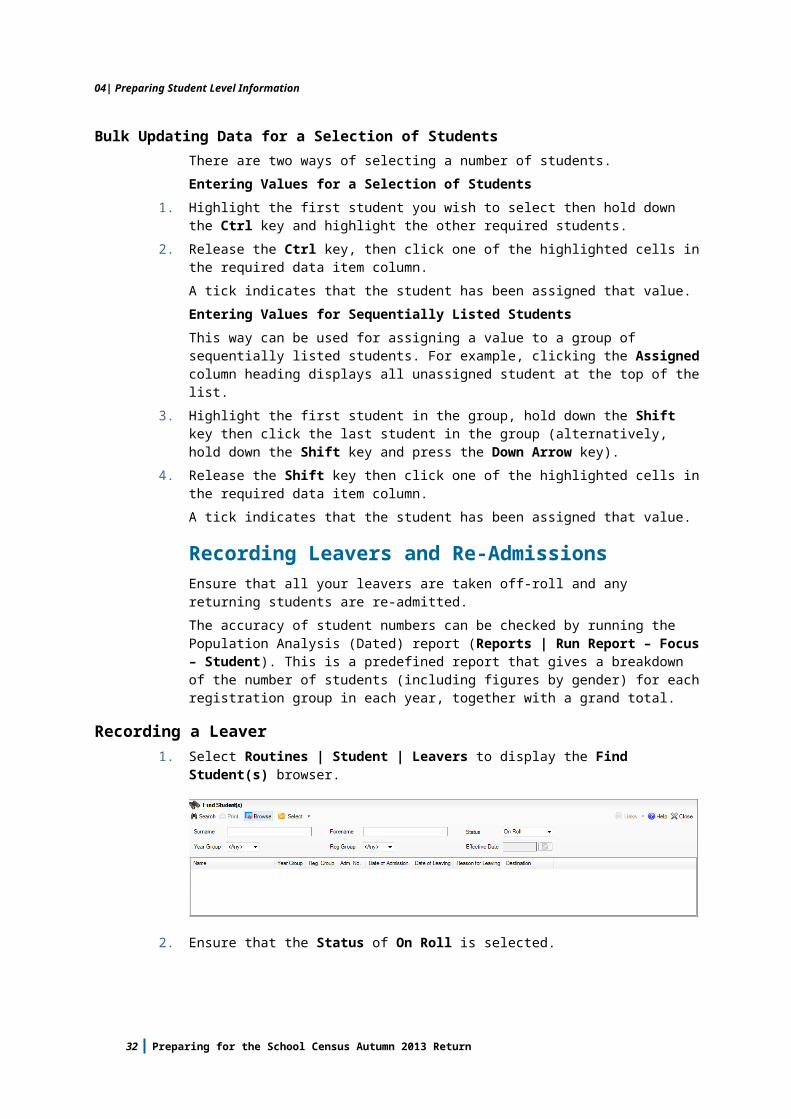
Recording a Leaver1. Select Routines | Student | Leavers to display the Find Student(s)
browser.
2. Ensure that the Status of On Roll is selected.3. Click the Search button to display a list of all on-roll students.
Preparing for the School Census Autumn 2013 Return 25
04| Preparing Student Level Information
4. Highlight the student(s) you wish to record as leavers then click the Select button. The selected student(s) are displayed in the Students panel.
5. In the Leaving Information panel, enter the Date of Leaving (collected for the return) or click the Calendar button and select the required date.The date of leaving should be the date that the student is actually leaving the school, unless they are transferring from Junior/Primary phase to Secondary phase because Local Authorities normally specify the dates to be used for school transfers so that they match. For example, some authorities prefer not to have any gaps between dates and may suggest a date of leaving (the old school) of 4 September and the date of admission (into the new school) of 5 September. If you are in any doubt, please contact your Local Authority for advice.
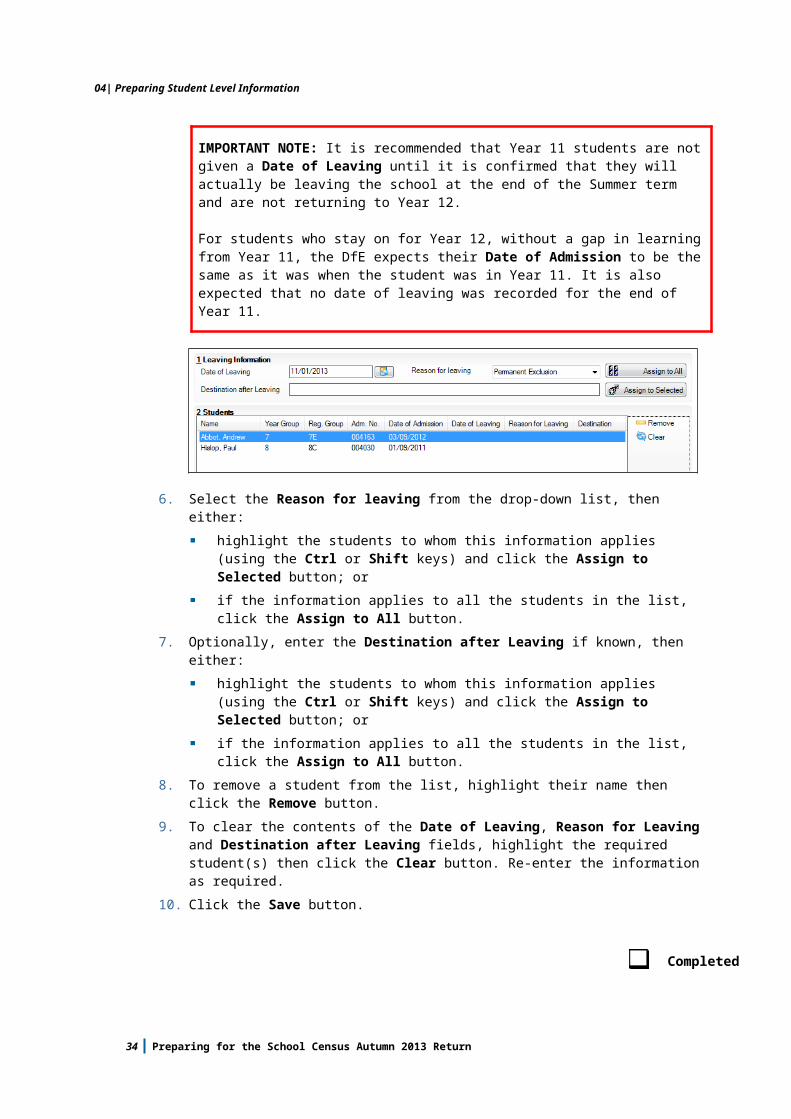
IMPORTANT NOTE: It is recommended that Year 11 students are not given a Date of Leaving until it is confirmed that they will actually be leaving the school at the end of the Summer term and are not returning to Year 12.
For students who stay on for Year 12, without a gap in learning from Year 11, the DfE expects their Date of Admission to be the same as it was when the student was in Year 11. It is also expected that no date of leaving was recorded for the end of Year 11.
26 Preparing for the School Census Autumn 2013 Return
04| Preparing Student Level Information
6. Select the Reason for leaving from the drop-down list, then either:highlight the students to whom this information applies (using the Ctrl or Shift keys) and click the Assign to Selected button; orif the information applies to all the students in the list, click the Assign to All button.
7. Optionally, enter the Destination after Leaving if known, then either:highlight the students to whom this information applies (using the Ctrl or Shift keys) and click the Assign to Selected button; orif the information applies to all the students in the list, click the Assign to All button.
8. To remove a student from the list, highlight their name then click the Remove button.
9. To clear the contents of the Date of Leaving, Reason for Leaving and Destination after Leaving fields, highlight the required student(s) then click the Clear button. Re-enter the information as required.
10. Click the Save button.
Completed
Re-Admitting a StudentAny student who leaves the school and subsequently decides to return must be re-admitted.
NOTES: Do not remove the leaving date, as the student’s period of absence from the school will not be recorded.
However, if a student is intending to leave but subsequently changes their mind and decides not to leave, the date of leaving can be removed, as continuous attendance has been maintained.
1. Select Focus | Student | Student Details to display the Find Student browser.
2. Click the New button to display the Add Student page. It is necessary to enter limited information here as you know that the person already exists.
3. Click the Continue button to display a list of Matched People, based on the criteria entered on the Add Student page.
4. Highlight the required student then click the Open button. The following warning message is displayed:The selected student is a leaver. Do you want to re-admit the student?
5. Click the Yes button if you are certain that this is the student who should be re-admitted. Their details are displayed on the Student Details page.
6. Complete the mandatory fields (Date of birth, Gender, Year Group, Enrolment Status, Year Taught In and Admission Date) and check any other details that may have changed since they were last on-roll, such as their address.
7. Check that the original UPN is displayed.
Preparing for the School Census Autumn 2013 Return 27
04| Preparing Student Level Information
If it did not previously exist, generate a new UPN by clicking the button adjacent to the UPN field to display the Issue UPN dialog.Select either the Issue Permanent or Issue Temporary UPN radio button then click the OK button to return to the Registration panel.The temporary/permanent UPN is issued on save.
8. Click the Save button to re-admit the student.
NOTE: If the student’s registration status has changed from when they were previously on-roll, their enrolment status should be changed via Routines | Student | Change Enrolment Status.
Completed
Deleting Unwanted Student RecordsIf there are students who have been entered in error (such as duplicates), ensure that they are deleted so that they are not included in the return. This is achieved via Routines | Student | Delete Student. After selecting the required student, you have the opportunity to review and print their information before deleting their record permanently.
WARNING: The deletion is irreversible, therefore a student should be deleted only if they have been entered in error.
Completed
Checking a Student’s Basic DetailsEnsure that the basic details for all students is up-to-date and correct. It may be necessary to make changes for a number of reasons, e.g. to correct inaccurately entered information, legal adoption, change of legal surname, etc.The following information is collected in the return:
Legal Forename (mandatory information in SIMS)Middle NamesLegal Surname (mandatory information in SIMS)Former SurnamePreferred Surname (mandatory information in SIMS)Gender (mandatory information in SIMS)Date of Birth (mandatory information in SIMS).
1. Select Focus | Student | Student Details to display the Find Student browser.
28 Preparing for the School Census Autumn 2013 Return
04| Preparing Student Level Information
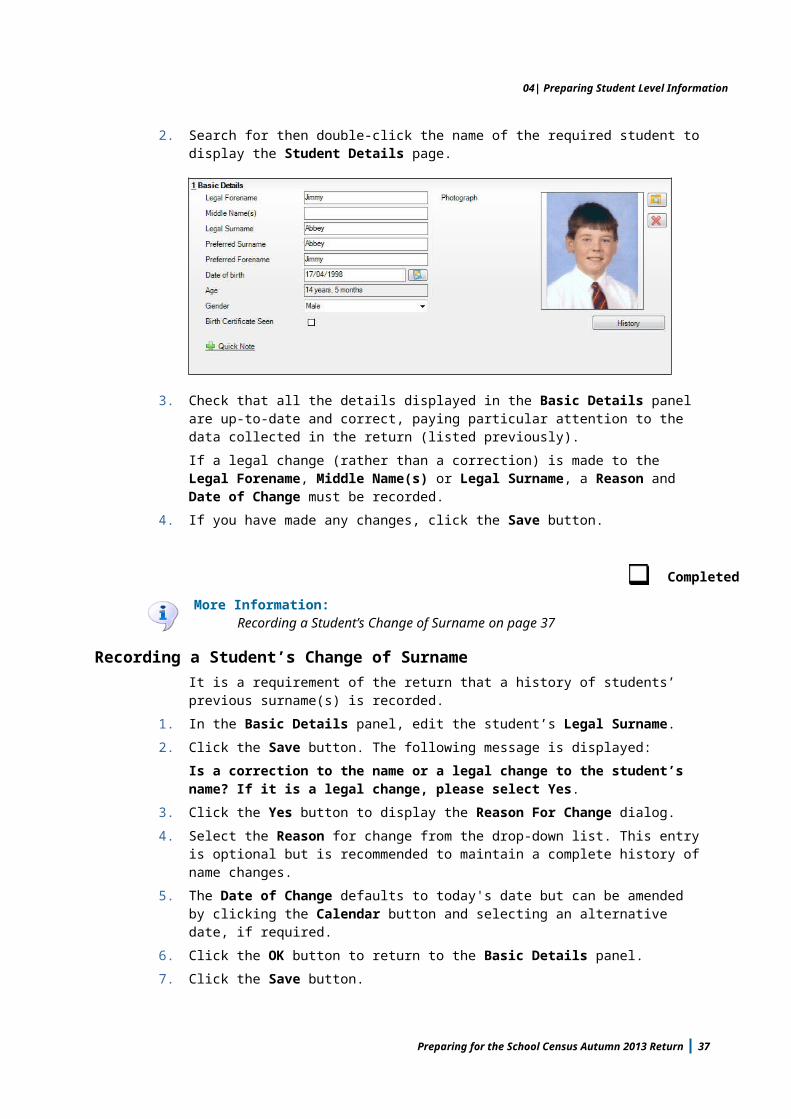
2. Search for then double-click the name of the required student to display the Student Details page.
3. Check that all the details displayed in the Basic Details panel are up-to-date and correct, paying particular attention to the data collected in the return (listed previously).If a legal change (rather than a correction) is made to the Legal Forename, Middle Name(s) or Legal Surname, a Reason and Date of Change must be recorded.
4. If you have made any changes, click the Save button.
Completed
More Information:Recording a Student’s Change of Surname on page 29
Recording a Student’s Change of SurnameIt is a requirement of the return that a history of students’ previous surname(s) is recorded.
1. In the Basic Details panel, edit the student’s Legal Surname.2. Click the Save button. The following message is displayed:
Is a correction to the name or a legal change to the student’s name? If it is a legal change, please select Yes.
3. Click the Yes button to display the Reason For Change dialog.4. Select the Reason for change from the drop-down list. This entry is optional
but is recommended to maintain a complete history of name changes.5. The Date of Change defaults to today's date but can be amended by
clicking the Calendar button and selecting an alternative date, if required.6. Click the OK button to return to the Basic Details panel.7. Click the Save button.
Preparing for the School Census Autumn 2013 Return 29
04| Preparing Student Level Information
8. To view a list of the student’s previous names, click the History button to display the Previous Names for dialog.
9. Click the Cancel button to return to the Basic Details panel.
Completed
Checking Registration DetailsThe following registration information is collected in the return and should therefore be checked and corrected, if necessary:
Enrolment Status (mandatory information in SIMS)Admission Date (mandatory information in SIMS)Year Taught In, i.e. National Curriculum Year Group (mandatory information in SIMS)Boarder StatusUPNFormer UPN (this is a read-only field, which is populated automatically if the UPN is changed)Unique Learner NumberPart-Time Indicator.
Checking Enrolment Status, Admission Date and Boarder StatusThe following information is collected in the return and should therefore be checked and corrected if necessary:
Enrolment Status (mandatory information in SIMS)Admission Date (mandatory information in SIMS)Boarder Status.
1. Select Focus | Student | Student Details to display the Find Student browser.
2. Search for then double-click the name of the required student to display the Student Details page.
30 Preparing for the School Census Autumn 2013 Return

04| Preparing Student Level Information
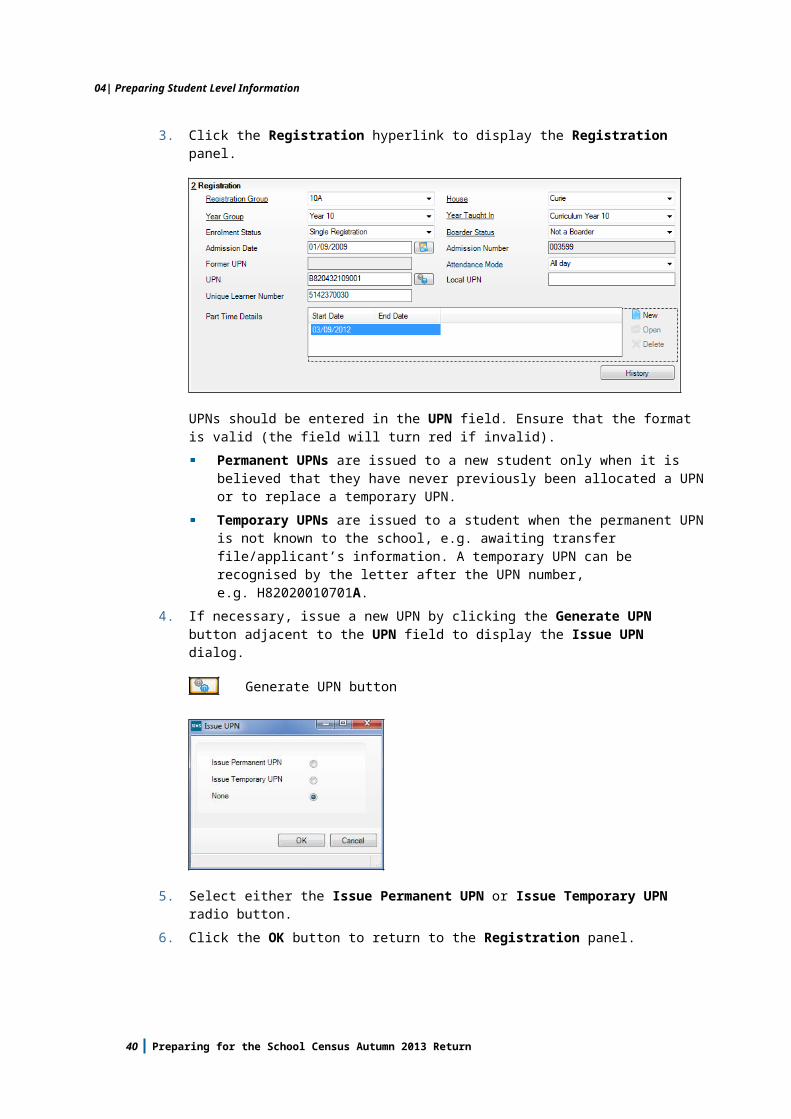
3. Click the Registration hyperlink to display the Registration panel.
4. Check the student’s Enrolment Status. Select the correct enrolment status from the drop-down list, if required.
5. Ensure that the Admission Date is correct. Edit the date or click the Calendar button and select a different date, if required.
6. Check the Boarder Status. Select the correct boarder status from the drop-down list, if required.
7. Click the Save button.
Completed
Checking Unique Pupil NumbersThe following information is collected in the return:
UPNFormer UPN (this is a read-only field, which is automatically populated if the UPN is changed).
Ensure that all students have a UPN recorded and that all UPNs are in the correct format. A temporary UPN is acceptable in some circumstances.
1. Select Focus | Student | Student Details to display the Find Student browser.
2. Search for then double-click the name of the required student to display the Student Details page.
Preparing for the School Census Autumn 2013 Return 31
04| Preparing Student Level Information
3. Click the Registration hyperlink to display the Registration panel.
UPNs should be entered in the UPN field. Ensure that the format is valid (the field will turn red if invalid).
Permanent UPNs are issued to a new student only when it is believed that they have never previously been allocated a UPN or to replace a temporary UPN.Temporary UPNs are issued to a student when the permanent UPN is not known to the school, e.g. awaiting transfer file/applicant’s information. A temporary UPN can be recognised by the letter after the UPN number, e.g. H82020010701A.
4. If necessary, issue a new UPN by clicking the Generate UPN button adjacent to the UPN field to display the Issue UPN dialog.
Generate UPN button
5. Select either the Issue Permanent UPN or Issue Temporary UPN radio button.
6. Click the OK button to return to the Registration panel. The UPN is generated automatically when the record is saved and the previous UPN is displayed in the Former UPN field, if applicable.
7. Click the Save button.
Completed
32 Preparing for the School Census Autumn 2013 Return
04| Preparing Student Level Information
Checking Unique Learner NumbersA Unique Learner Number (ULN) is a 10-digit identifier that is retained and stays with the student’s learning record throughout their lives. Currently, this applies to students over the age of 14 involved in UK education or training. The 14-19 Diploma is the main requirement for ULNs but Functional Skills and routine examination entry are also requesting their use.Learning Records Service (previously known as the Managing Information Across Partners Programme) issues and maintains a ULN record for applicable students. ULNs can be obtained in one or more of the following ways:
The new DfE ULN service (to upload a CTF file via a web page on the S2S website).The Learner Registration Service Web Portal (to obtain individual ULNs).The Key to Success website (https://www.keytosuccess.education.gov.uk/).
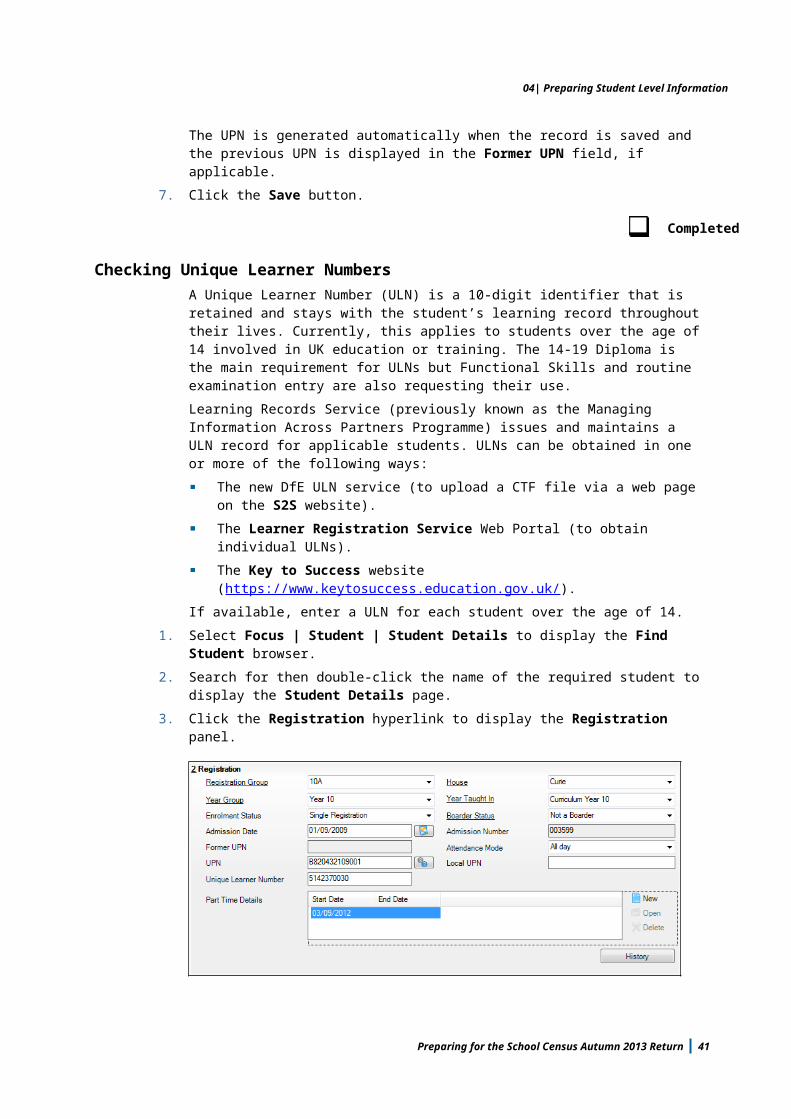
If available, enter a ULN for each student over the age of 14.1. Select Focus | Student | Student Details to display the Find Student
browser.2. Search for then double-click the name of the required student to display the
Student Details page.3. Click the Registration hyperlink to display the Registration panel.
4. Check the content of the Unique Learner Number field. Enter the 10-digit identifier, if not currently displayed.
5. Click the Save button to save any changes, if applicable.
Completed
Checking Student's Part-Time DetailsPart-time details applies mostly to Nursery schools (or schools with nursery age children) and Primary schools with Reception years. However, any student can be marked as part-time if their attendance is anything less than 10 sessions per week.
Preparing for the School Census Autumn 2013 Return 33
04| Preparing Student Level Information
For dual registered students, time in other schools should be taken into account. For example, three full days in one school and two full days in another school should not be classified by either school as part-time.When recording part-time details, a minimum of a Start Date needs to be entered in the Part Time Details section.
1. Select Focus | Student | Student Details to display the Find Student browser.
2. Search for then double-click the name of the required student to display the Student Details page.
3. Click the Registration hyperlink to display the Registration panel.
4. Check the details displayed in the Part Time Details section. A minimum of a Start Date must be shown.
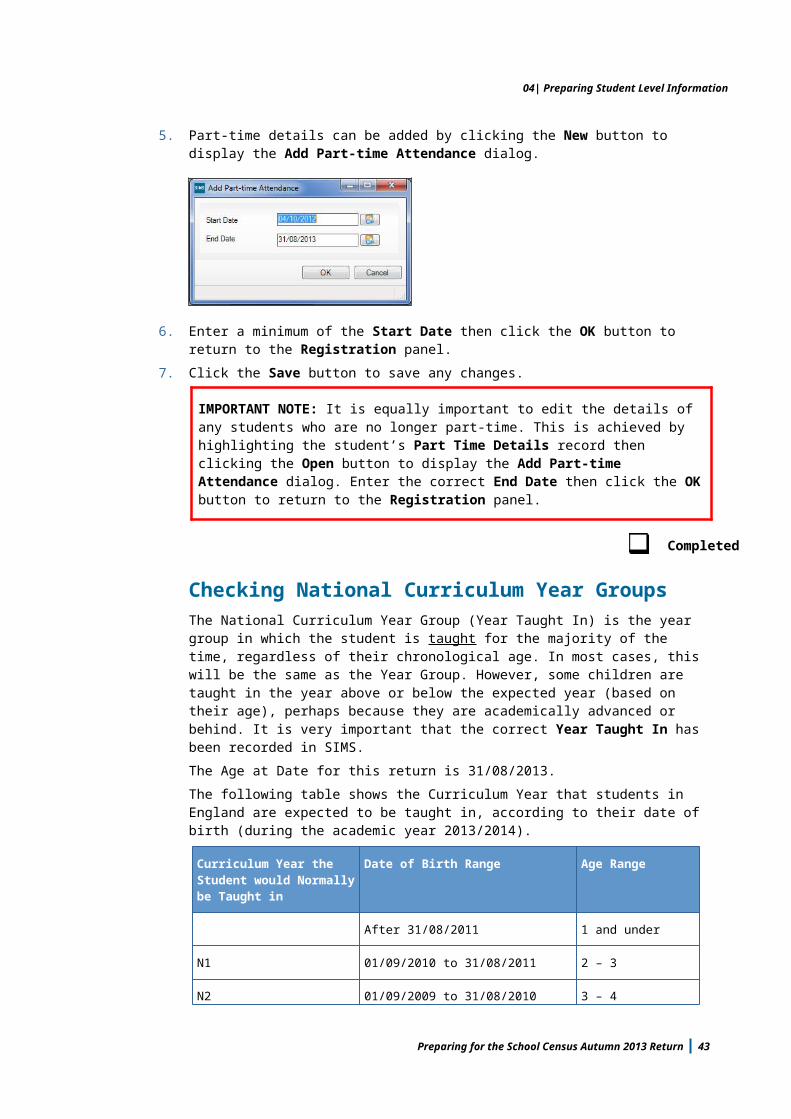
5. Part-time details can be added by clicking the New button to display the Add Part-time Attendance dialog.
6. Enter a minimum of the Start Date then click the OK button to return to the Registration panel.
7. Click the Save button to save any changes.
IMPORTANT NOTE: It is equally important to edit the details of any students who are no longer part-time. This is achieved by highlighting the student’s Part Time Details record then clicking the Open button to display the Add Part-time Attendance dialog. Enter the correct End Date then click the OK button to return to the Registration panel.
Completed
34 Preparing for the School Census Autumn 2013 Return
04| Preparing Student Level Information
Checking National Curriculum Year GroupsThe National Curriculum Year Group (Year Taught In) is the year group in which the student is taught for the majority of the time, regardless of their chronological age. In most cases, this will be the same as the Year Group. However, some children are taught in the year above or below the expected year (based on their age), perhaps because they are academically advanced or behind. It is very important that the correct Year Taught In has been recorded in SIMS.The Age at Date for this return is 31/08/2013.The following table shows the Curriculum Year that students in England are expected to be taught in, according to their date of birth (during the academic year 2013/2014).
Curriculum Year the Student would Normally be Taught in
Date of Birth Range Age Range
After 31/08/2011 1 and under
N1 01/09/2010 to 31/08/2011 2 – 3
N2 01/09/2009 to 31/08/2010 3 – 4
R 01/09/2008 to 31/08/2009 4 – 5
1 01/09/2007 to 31/08/2008 5 – 6
2 01/09/2006 to 31/08/2007 6 – 7
3 01/09/2005 to 31/08/2006 7 – 8
4 01/09/2004 to 31/08/2005 8 – 9
5 01/09/2003 to 31/08/2004 9 – 10
6 01/09/2002 to 31/08/2003 10 – 11
7 01/09/2001 to 31/08/2002 11 – 12
8 01/09/2000 to 31/08/2001 12 – 13
9 01/09/1999 to 31/08/2000 13 – 14
10 01/09/1998 to 31/08/1999 14 – 15
11 01/09/1997 to 31/08/1998 15 – 16
12 01/09/1996 to 31/08/1997 16 – 17
13 01/09/1995 to 31/08/1996 17 – 18
31/08/1994 or earlier 19+
There are three way to check a student’s curriculum year and date of birth in SIMS:
Preparing for the School Census Autumn 2013 Return 35

04| Preparing Student Level Information
via individual student records (Focus | Student | Student Details).via the pastoral structure by curriculum year (Focus | School | Pastoral Structure | Current Structure).via the pastoral structure for the whole school (Focus | School | Pastoral Structure | Current Structure).
Additional Resources:Managing Pupil/Students handbookSetting up and Administering SIMS handbook
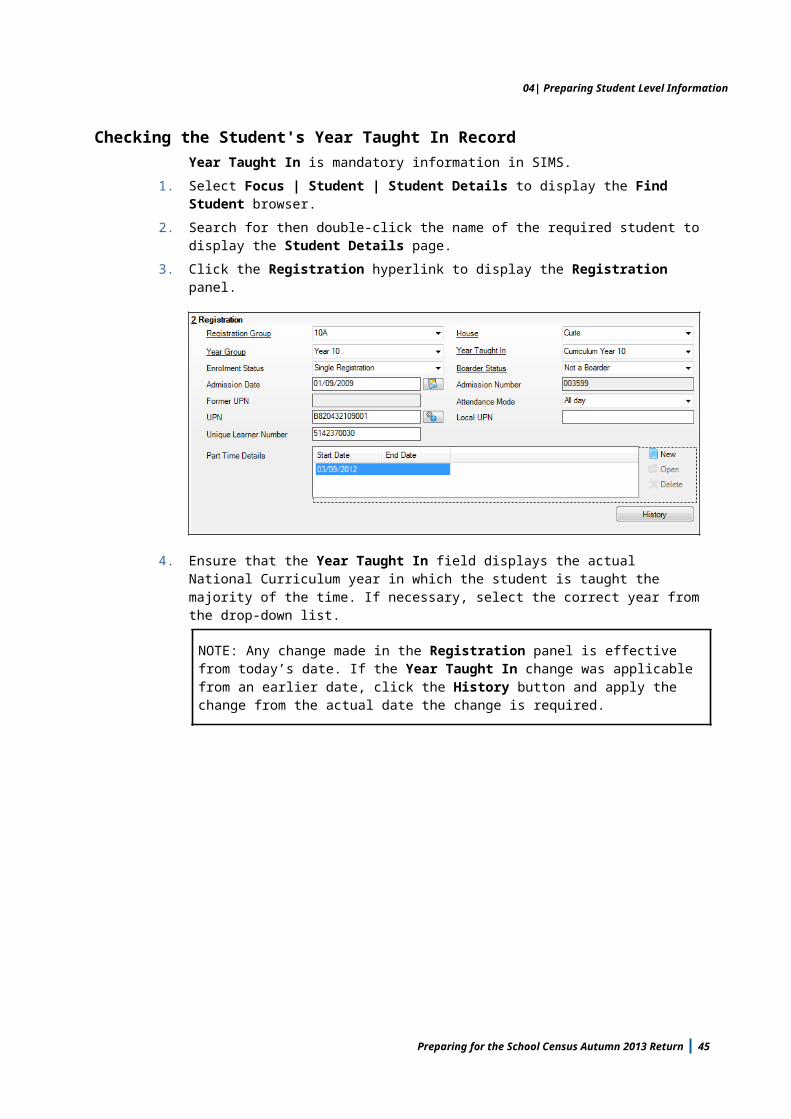
Checking the Student's Year Taught In RecordYear Taught In is mandatory information in SIMS.
1. Select Focus | Student | Student Details to display the Find Student browser.
2. Search for then double-click the name of the required student to display the Student Details page.
3. Click the Registration hyperlink to display the Registration panel.
4. Ensure that the Year Taught In field displays the actual National Curriculum year in which the student is taught the majority of the time. If necessary, select the correct year from the drop-down list.
NOTE: Any change made in the Registration panel is effective from today’s date. If the Year Taught In change was applicable from an earlier date, click the History button and apply the change from the actual date the change is required.
36 Preparing for the School Census Autumn 2013 Return

04| Preparing Student Level Information
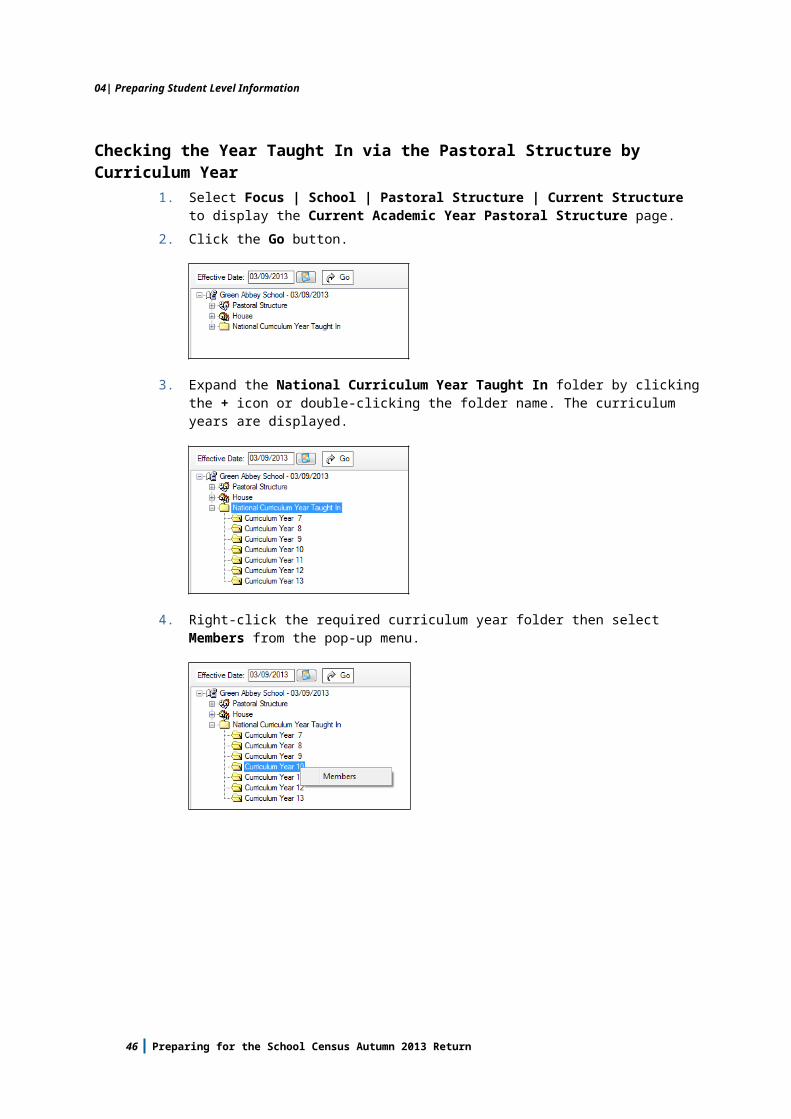
Checking the Year Taught In via the Pastoral Structure by Curriculum Year
1. Select Focus | School | Pastoral Structure | Current Structure to display the Current Academic Year Pastoral Structure page.
2. Click the Go button.
3. Expand the National Curriculum Year Taught In folder by clicking the + icon or double-clicking the folder name. The curriculum years are displayed.
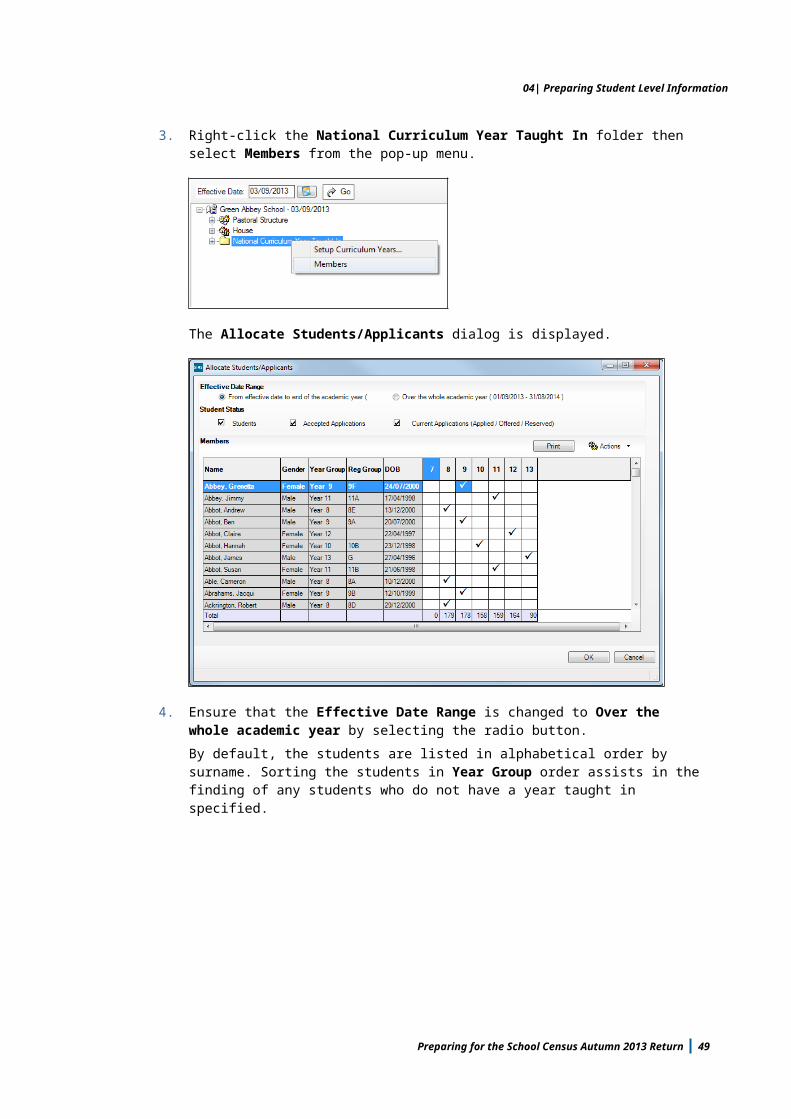
4. Right-click the required curriculum year folder then select Members from the pop-up menu.
Preparing for the School Census Autumn 2013 Return 37
04| Preparing Student Level Information
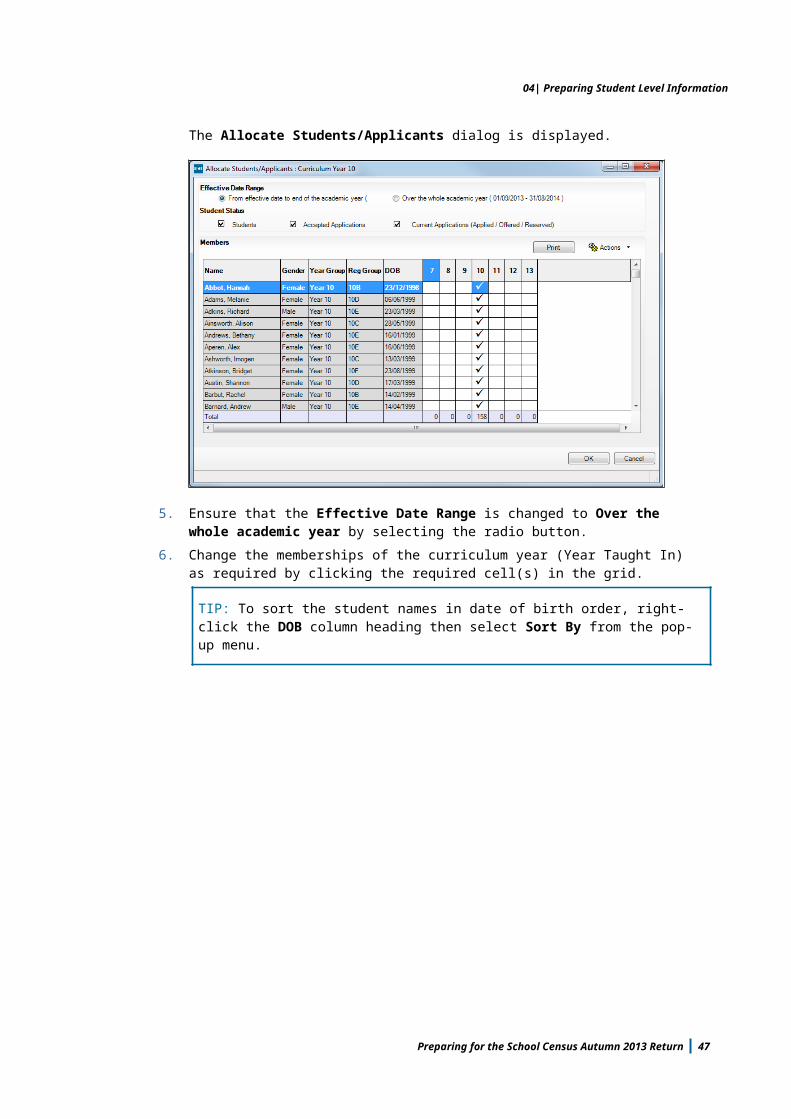
The Allocate Students/Applicants dialog is displayed.
5. Ensure that the Effective Date Range is changed to Over the whole academic year by selecting the radio button.
6. Change the memberships of the curriculum year (Year Taught In) as required by clicking the required cell(s) in the grid.
TIP: To sort the student names in date of birth order, right-click the DOB column heading then select Sort By from the pop-up menu.
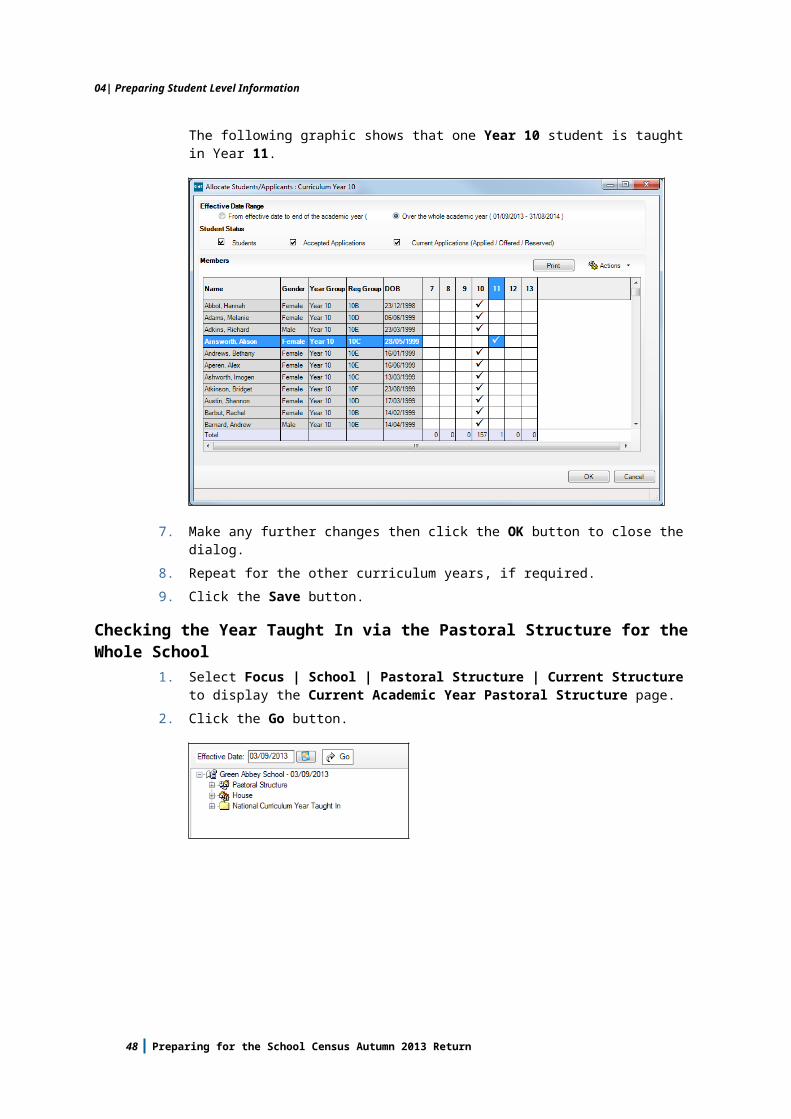
The following graphic shows that one Year 10 student is taught in Year 11.
38 Preparing for the School Census Autumn 2013 Return
04| Preparing Student Level Information
7. Make any further changes then click the OK button to close the dialog.8. Repeat for the other curriculum years, if required.9. Click the Save button.
Checking the Year Taught In via the Pastoral Structure for the Whole School
1. Select Focus | School | Pastoral Structure | Current Structure to display the Current Academic Year Pastoral Structure page.
2. Click the Go button.
3. Right-click the National Curriculum Year Taught In folder then select Members from the pop-up menu.
The Allocate Students/Applicants dialog is displayed.
Preparing for the School Census Autumn 2013 Return 39

04| Preparing Student Level Information
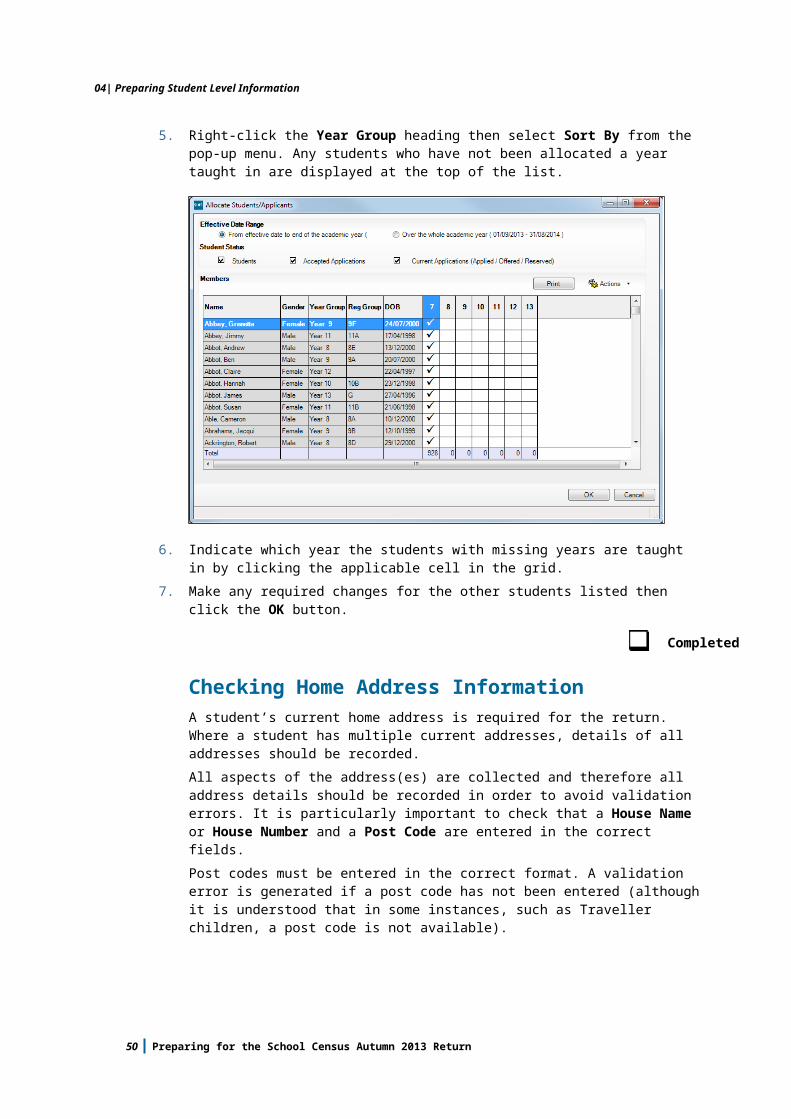
4. Ensure that the Effective Date Range is changed to Over the whole academic year by selecting the radio button.By default, the students are listed in alphabetical order by surname. Sorting the students in Year Group order assists in the finding of any students who do not have a year taught in specified.
5. Right-click the Year Group heading then select Sort By from the pop-up menu. Any students who have not been allocated a year taught in are displayed at the top of the list.
6. Indicate which year the students with missing years are taught in by clicking the applicable cell in the grid.
7. Make any required changes for the other students listed then click the OK button.
Completed
Checking Home Address InformationA student’s current home address is required for the return. Where a student has multiple current addresses, details of all addresses should be recorded.All aspects of the address(es) are collected and therefore all address details should be recorded in order to avoid validation errors. It is particularly important to check that a House Name or House Number and a Post Code are entered in the correct fields.Post codes must be entered in the correct format. A validation error is generated if a post code has not been entered (although it is understood that in some instances, such as Traveller children, a post code is not available).
40 Preparing for the School Census Autumn 2013 Return
04| Preparing Student Level Information
1. Select Focus | Student | Student Details to display the Find Student browser.
2. Search for then double-click the name of the required student to display the Student Details page.
3. Click the Addresses hyperlink to display the Addresses panel.
4. Check that the Post Code and House Number/Name exist and that they are valid. If you have Windows® Internet Explorer®, these details can be checked by clicking the Address button to display the address location on a map.
NOTE: British Forces Post Office numbers can now be added as post codes.
5. If you have edited the address, click the Save button.6. If the student has an additional current address, i.e. a Second Home, enter
the additional address then click the Continue button (adjacent to the address) to display the New Address Details panel.
7. Enter the remaining address details and the Address Type then click the Save button to refresh the display.
Completed
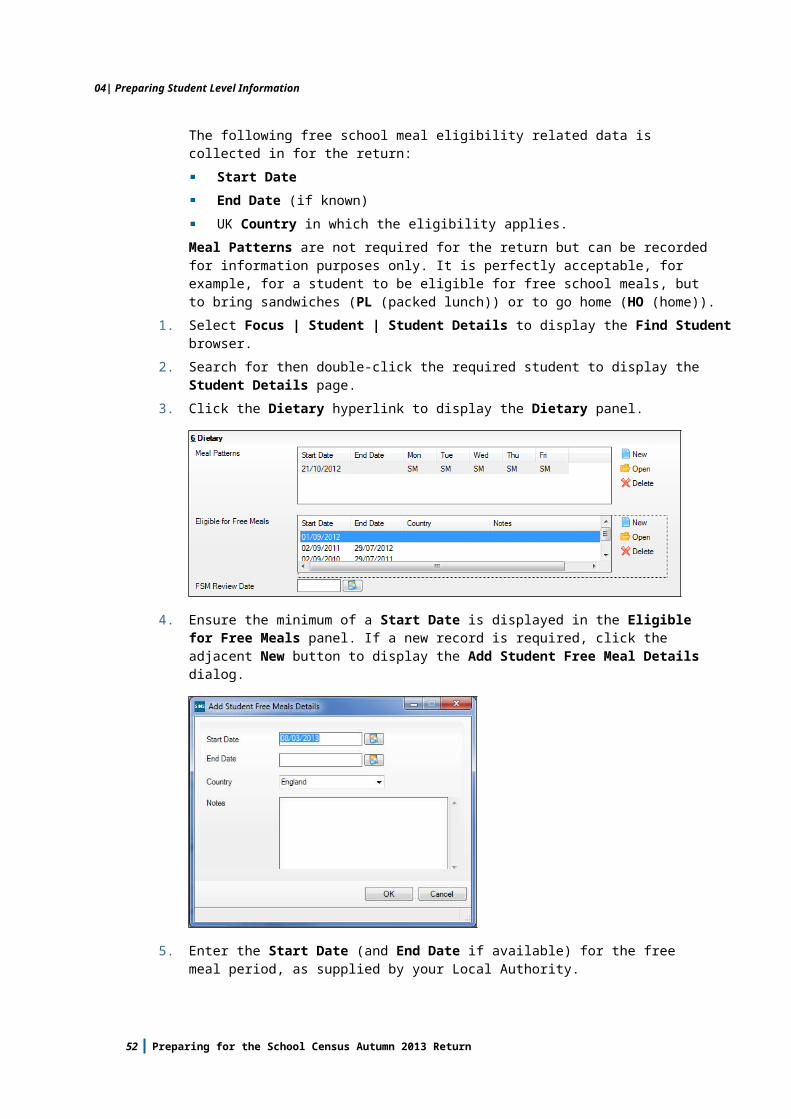
Checking Free School Meals EligibilityThe collection of free school meal eligibility at any point since the last census day (including those eligible on census day) is collected for the return.Only students who have been approved by the LA to receive a free school meal should be recorded in SIMS as being eligible. It is advisable to check that all eligible students are recorded.The following free school meal eligibility related data is collected in for the return:
Start DateEnd Date (if known)UK Country in which the eligibility applies.
Preparing for the School Census Autumn 2013 Return 41

04| Preparing Student Level Information
Meal Patterns are not required for the return but can be recorded for information purposes only. It is perfectly acceptable, for example, for a student to be eligible for free school meals, but to bring sandwiches (PL (packed lunch)) or to go home (HO (home)).
1. Select Focus | Student | Student Details to display the Find Student browser.
2. Search for then double-click the required student to display the Student Details page.
3. Click the Dietary hyperlink to display the Dietary panel.
4. Ensure the minimum of a Start Date is displayed in the Eligible for Free Meals panel. If a new record is required, click the adjacent New button to display the Add Student Free Meal Details dialog.
5. Enter the Start Date (and End Date if available) for the free meal period, as supplied by your Local Authority.
6. Ensure that the Country in which the eligibility applies is correct. Select from the drop-down list, if required.
7. Notes can be entered, if required.8. Click the OK button to return to the Dietary panel, where the new
information is displayed.9. Click the Save button to save any changes.
Ensure that this information is checked/amended on a regular basis.
Completed
42 Preparing for the School Census Autumn 2013 Return
04| Preparing Student Level Information
Checking Ethnic and Cultural InformationThe following ethnic and cultural information is collected in the return:First Language
A First Language other than English should be recorded where a student was exposed to the language during early development and continues to be exposed to this language at home or in the community.If the child was exposed to more than one language (which may include English) during early development, the language other than English should be recorded, irrespective of the student’s proficiency in English.
1. Select Focus | Student | Student Details to display the Find Student browser.
2. Search for then double-click the required student to display the Student Details page.
3. Click the Ethnic/Cultural hyperlink to display the Ethnic/Cultural panel.
4. Select the student’s First Language from the drop-down list.5. Click the Save button.
Completed
Checking Additional InformationEnsure that the Youth Support Services Agreement (YSSA) status is recorded in SIMS.The YSSA replaces Connexions. It applies to students between age 12 and 25 with special educational needs and students between age 12 and 20 with no special educational needs.The Bulk Update routine can be used to assign and edit these values for a specific selection of student at the same time, if required (please see Updating Information Using the Bulk Update Routine on page 21).
1. Select Focus | Student | Student Details to display the Find Student browser.
2. Search for then double-click the required student to display the Student Details page.
Preparing for the School Census Autumn 2013 Return 43
04| Preparing Student Level Information
3. Click the Additional Information hyperlink to display the Additional Information panel.
4. Select the applicable Youth Support Services Agreement (YSSA) status from the drop-down list. YSSA has replaced Connexions Assent.
5. Ensure that the Pupil Premium Indicator for year 2013/2014 check box is selected, if applicable. To enter a note related to the applicable year, click the Search button adjacent to the Notes field.Although Pupil Premium information is not collected for the return, it is important for school that are in receipt of the this funding, which is allocated to children from low-income families, to be able to give a full account of its use. The national school performance tables now include information about the progress of students in receipt of Pupil Premium and information is required to be sent to parents about how it has been used and what impact it has had on student progress.
Completed
Checking Special Educational Needs InformationThe following Special Educational Needs (SEN) items are collected in the return:SEN Status (SEN Provision)
N - No Special Educational NeedA - School/Early Years ActionP - School/Early Years Action+S - Statement.
1. Select Focus | Student | Special Educational Needs to display the Find SEN Student browser.
2. Select the required SEN Status from the drop-down list. Additional search criteria can be selected, if required, e.g. Year Group.
44 Preparing for the School Census Autumn 2013 Return
04| Preparing Student Level Information
3. Click the Search button to display a list of students who match the criteria.
4. Double-click the name of the required student to display the Student SEN details page.
5. Check the details displayed in the Basic SEN Details panel, ensuring that the Status is correct. If necessary, select the correct Status from the drop-down list.
NOTE: N - No Special Educational Need should be used only if a SEN Status was previously assigned but A, P and S are not currently relevant.
NOTE: At least one Special Educational Need, e.g. Visual Impairment, must be recorded for all students with a SEN Status of P - School/Early Years Action+ or S - Statement.
6. Update the other information on the Student SEN details page, if required, then click the Save button.For more information about Special Educational Needs, please refer to the DfE website (http://www.education.gov.uk/schools/pupilsupport/sen).
Completed
Preparing for the School Census Autumn 2013 Return 45
04| Preparing Student Level Information
Preparing Exclusions InformationExclusions information is required for students who were subject to any exclusion with a start date during the period 01/01/2013 to 31/03/2013 inclusive. Exclusions should not be counted if the Head Teacher withdrew them, or if the student was re-instated by the Discipline Committee or an independent Appeal Panel.
NOTE: To ensure that overturned exclusions are not included in the PRU Census, it is important that the Discipline Committee and Exclusion Appeal results are recorded in the Appeal Details panel (via Focus | Student | Exclusions).
The following exclusion related data items are collected for the return:Exclusion Type (category, e.g. fixed period, lunchtime or permanent).Exclusion Reason (select one code to provide the main reason).Exclusion Start Date.Actual number of sessions (Length) - required for fixed period and lunchtime exclusions.SEN Provision (please see Checking Special Educational Needs Information on page 44).In Care indicator (please see Checking In Care Details for Excluded Students on page 48).
NOTE: The Start Date, End Date (if known) and LA Details must be entered for any type of exclusion recorded for any students in care.
IMPORTANT NOTE about Permanent Exclusions: Any permanently excluded students should be marked as leavers as soon as the exclusion has been confirmed by the LA. Before making them a leaver, ensure that you have recorded the following information:
▪ In Care indicator (if applicable)▪ SEN Status (if applicable – note that Never Assigned is not an acceptable value for excluded students▪ Ethnicity▪ Ethnic Source▪ Part-time indicator (if applicable)▪ Date of Admission.
46 Preparing for the School Census Autumn 2013 Return
04| Preparing Student Level Information
Recording an Exclusion1. Select Focus | Student | Exclusions to display the Find Exclusions
Student browser.
2. Search for then double-click the required student to display the Exclusion Details page.
3. Click the New button adjacent to the Exclusions panel to display the Add Exclusion dialog.
Preparing for the School Census Autumn 2013 Return 47
04| Preparing Student Level Information
4. Select the exclusion Type and the Reason for the exclusion from the respective drop-down lists.
5. Enter the exclusion Start Date and End Date. Alternatively, click the appropriate Calendar button then select the required date.
6. Select a Start Time from the drop-down list, i.e. AM or PM.7. Click the Calculate button to populate the Length School Days field
automatically.
8. Click the OK button to save the exclusion and return to the Exclusion Details page, where a summary of the new exclusion is displayed.
The Academic Year and the total number of exclusion days in that year are displayed at the bottom of the page.
9. Click the Save button to save the exclusion.For more information about exclusions, please refer to the DfE website (http://www.education.gov.uk/schools/pupilsupport/behaviour/exclusion).
Completed
Checking In Care Details for Excluded StudentsIn care details are collected for students who were subject to any exclusion with a start date during the period 01/01/2013 to 31/03/2013 inclusive. Any student in care (looked after children) should be recorded as such in SIMS. A child is considered ‘In Care’ or ‘Looked After’ if he or she is in the care of the Local Authority or is provided with accommodation for more than 24 hours by the authority. Please consult the person at school with the designated authority for in care children, e.g. the SEN Co-ordinator, if you are unsure.Minimum details are required to set up an in care record, i.e. the Care Authority and a Start Date.
Adding a New In Care Record1. Select Focus | Student | Student Details to display the Find Student
browser.
48 Preparing for the School Census Autumn 2013 Return

04| Preparing Student Level Information
2. Search for then double-click the required student to display the Student Details page.
3. Click the Welfare hyperlink to display the Welfare panel.
4. Click the New button adjacent to the In Care Details panel to display the Add In Care Details dialog.
5. Click the Care Authority browser button to display the Select Local Authority dialog.
Preparing for the School Census Autumn 2013 Return 49
04| Preparing Student Level Information
6. Search for the required Care Authority by entering all or part of the name in the LA name field then click the Search button.
7. Double-click the Name of the required authority to return to the Add In Care Details dialog.
8. Enter the Start Date (and End Date if known) for the in care period.
NOTE: If the student was imported via CTF, the in care details Start Date defaults to the date the CTF was imported. If the actual in care Start Date is different, it should be manually amended to the correct date or date of admission. There is also an Effective Date button so, for instance, if the file is imported on the 10th of the months but the effective date is set to the 1st, the memberships will start on the 1st.
Additional information can be recorded, if required, before clicking the OK button to return to the Welfare panel.
9. The In Care status is displayed as Currently In Care and a summary is displayed in the In Care Details section.
Completed
Checking Hours for Early Years ChildrenApplicable to schools with 2, 3 or 4 year old pupils only
50 Preparing for the School Census Autumn 2013 Return

04| Preparing Student Level Information
Hours at Setting and Funded Hours are collected from all schools that have pupils aged 2, 3 and 4 on-roll on census day. The hours collected in this return are for the week in which the census day falls.Hours at Setting reflects the number of hours that the child attends the setting during census week.Funded Hours signifies the level of free entitlement of education attracted by the child in that setting. This data is used to determine the Dedicated Schools Grant allocation, which the DfE uses to fund Local Authorities for the provision of education.All schools (with the exception of City Technology Colleges and non-maintained Special schools) are required to submit the Funded Hours as a separate data item, while still providing Hours at Setting.Data is collected for the following:
Pupils aged 2 at 31/12/2013 (with date of birth between 01/01/2011 and 31/12/2011) With Special Educational Needs.Pupils aged 2 at 31/08/2013 but aged 3 by 31/12/2013 (with date of birth between 01/09/2010 and 31/12/2010).Pupils aged 3 at 31/08/2013 (with date of birth between 01/09/2009 and 31/08/2010).Pupils aged 4 at 31/08/2013 (with date of birth between 01/09/2008 and 31/08/2009).
1. Select Tools | Statutory Return Tools | Update Hours for Early Years to display the Update Hours page.If available, the hours data is brought forward from the previous census. This data should be reviewed and updated, if required.
2. To add or edit the number of Hours at Setting or Funded Hours for an individual pupil, highlight the required pupil then click the applicable cell and enter the required number.
Preparing for the School Census Autumn 2013 Return 51

04| Preparing Student Level Information
IMPORTANT NOTES: A value between 0 and 99.5 must be entered for each pupil. 0 (zero) is a valid value. If the value entered is within this range but higher than expected by the DfE, a validation error is displayed when the return is created and validated. An explanation as to why the value is higher should be recorded on the COLLECT Portal.
Hours must be entered in increments of 0.5 only.
If any cell in either the Hours at Setting or Funded Hours column is left blank, a validation error is displayed when the return is created and validated. Enter a value between 0 and 99.5.
3. If most of the pupils are receiving the same number of hours, the following method can be used to quickly populate the column:a. In the Pupil View panel, select the required year group from the Year
Taught In drop-down list. The selected pupils only are displayed in the Pupils panel.
b. Right-click in the Pupils panel then select Select All from the drop-down list.
c. Click in one of the highlighted cells of the column you wish to populate, i.e. Hours at Setting or Funded Hours, then enter the number of hours that is applicable to the majority of pupils.The number is entered automatically for all selected pupils.
d. Click to the right of the grid to deselect all pupils.e. Edit the entry for each pupil who is receiving a different number of hours.
This is achieved by highlighting the required pupil then clicking in the associated Hours at Setting or Funded Hours cell (as applicable) and entering the required number.
4. Click the Save button.
Completed
Preparing Attendance InformationSummer term attendance data (including attendance codes and the number of sessions missed) should be provided for non-boarder students aged four to 15 inclusive on 31/08/2012 who were on-roll for at least one session during each Summer half term, i.e. from 01/04/2013 to 26/05/2013 and 27/05/2013 to 31/07/2013.The attendance data collected in this return includes:
Attendance Codes (i.e. the reasons for absence)Number of Sessions Missed.
If you use SIMS Attendance or SIMS Lesson Monitor, attendance data is entered in the return automatically, provided that there are no missing marks.
IMPORTANT NOTE: If you use SIMS Attendance or SIMS Lesson Monitor, ensure that all missing marks and unexplained absences for the previous term have been dealt with before commencing the School Census Return.
52 Preparing for the School Census Autumn 2013 Return

04| Preparing Student Level Information
If you do not use SIMS Attendance or SIMS Lesson Monitor and you do not use a software package that writes back to the SIMS database, or if you have not converted to the code of practice for attendance codes, you need to calculate and enter the following information manually on the Census Details page (via Routines | Statutory Returns | School Census):
Possible SessionsSessions Missed due to Authorised AbsenceSessions Missed due to Unauthorised Absence.
For information and advice about school attendance, please refer to the DfE website (http://www.education.gov.uk/schools/pupilsupport/behaviour/attendance).Additional Resources:Producing the School Census Autumn 2013 Return handbookManaging Pupil/Student Attendance handbook (SIMS Attendance users)Monitoring Session and Lesson Attendance handbook (SIMS Lesson Monitor users)
Completed
Preparing Post 16 Information in Course ManagerApplicable to Secondary schools with a Sixth Form onlyLearning Aims data is collected from Secondary schools with Sixth Forms, (including Middle deemed Secondary schools, City Technology Colleges and Academies (including Free schools)).The Post 16 Learning Aims are collected only once a year (in the School Census Autumn Return) for students who were/are in National Curriculum Year Group (Year Taught In) 12 or above during the period from 01/08/2012 to 03/10/2013.
IMPORTANT NOTES:
Learning Aims are collected for students for whom the school wishes to claim Post 16 funding from the Education Funding Agency (EFA). These students must be/have been in National Curriculum Year Group (Year Taught In) 12 or above during the previous/current academic year as stated previously.
Learners are expected to be in National Curriculum Year 12 and above if the majority of their learning is at level 3 or above.
Students in Actual National Curriculum Year Group 11 (or below) with the majority of their learning at level 2 are no longer included in the return.
Preparing for the School Census Autumn 2013 Return 53
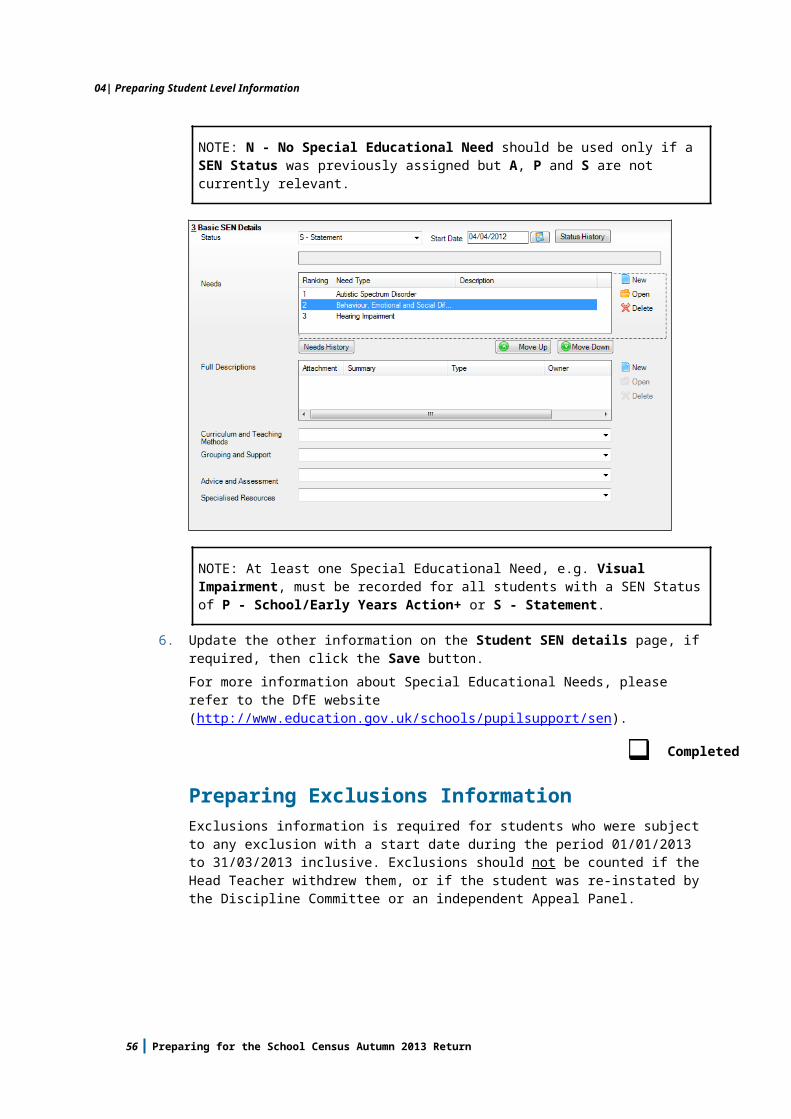
04| Preparing Student Level Information
It is important to ensure that the information entered in Course Manager is up-to-date and accurate before starting the return.When creating the School Census Autumn 2013 Return, the Learning Aims panel is provided to deal with the Post 16 information required for the return. Detailed information about the functionality provided in this panel is available in the Producing the School Census Autumn 2013 Return (English Secondary and Middle deemed Secondary) handbook.A document dedicated to the preparation of Post 16 data (Preparing Post 16 Data for the School Census Autumn 2013 Return guide) is available on our SupportNet website (http://support.capitaes.co.uk) by entering CENSUS13 in the Site Search field on the SupportNet Home page then clicking the Go button.
Completed
54 Preparing for the School Census Autumn 2013 Return

04| Preparing Student Level Information
Preparing for the School Census Autumn 2013 Return 55
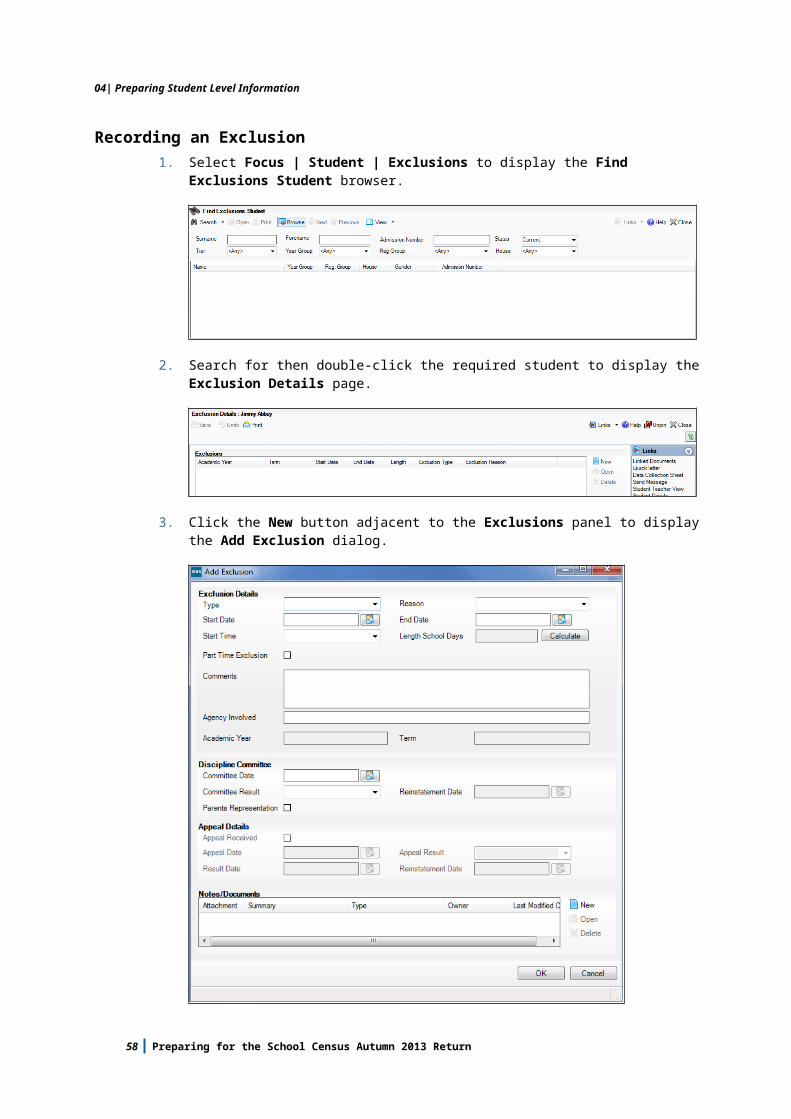
05| What Next?
05|What Next?
After carrying out the preparation routines documented in this guide, ensure that any subsequent changes at your school (e.g. student basic detail changes, SEN provisions changes, leavers and admissions/re-admissions, etc.) are recorded accurately in SIMS.The SIMS 2013 Summer Release (7.152) must be installed before completing the School Census Autumn 2013 Return. However, it is advisable to check whether a later version of SIMS is available, then upgrade to the current release, if necessary.You should now be ready to produce the final School Census Autumn 2013 Return.
Where Can I Get More Information?In addition to this preparation guide a handbook outlining how to produce the School Census Autumn 2013 Return (via Routines | Statutory Returns | School Census), an Errors and Resolutions document (which provides suggestions on how to resolve any validation errors or queries) and an additional Preparation guide dealing specifically with Post 16 data are being prepared:
Producing the School Census Autumn 2013 Return (English Secondary/Middle deemed Secondary Schools) handbookSchool Census 2013 Errors and Resolutions documentPreparing Post 16 Data for the School Census Autumn 2013 Return guide.
You may also find the information in the Managing Pupil/Students handbook helpful, as it provides details about the processes that relate to the management of student data in SIMS.These documents, together with other useful information, e.g. news items, are available on our SupportNet website (http://support.capitaes.co.uk). To locate the documents, enter CENSUS13 in the Site Search field on the SupportNet Home page then click the Go button. A list of all available supporting information will be displayed, from which the required resources can be selected. Please check SupportNet on a regular basis because documents will be posted as soon as they become available.A wide range of documentation, including handbooks, mini guides, quick reference sheets, etc. can be accessed via the Documentation Centre by clicking the Documentation button located at the top of the SIMS Home Page. Once open, click the required category button then select the required document.References to other documents mentioned in this handbook can be accessed via the Documentation Centre unless otherwise specified.There is a comprehensive online help system available in SIMS, accessed by clicking the applicable Help button or by pressing F1 from anywhere in the software.The Service Desk provides a dedicated website that lists all the available documentation, together with all related solutions and any other useful resources (http://support.capitaes.co.uk/websupport/hottopics.aspx).
Preparing for the School Census Autumn 2013 Return 57

05| What Next?
Once open, select the required topic from the list, e.g. School Census – Autumn 2013.The DfE website (http://www.education.gov.uk/) also contains preparation and guidance documentation.
58 Preparing for the School Census Autumn 2013 Return
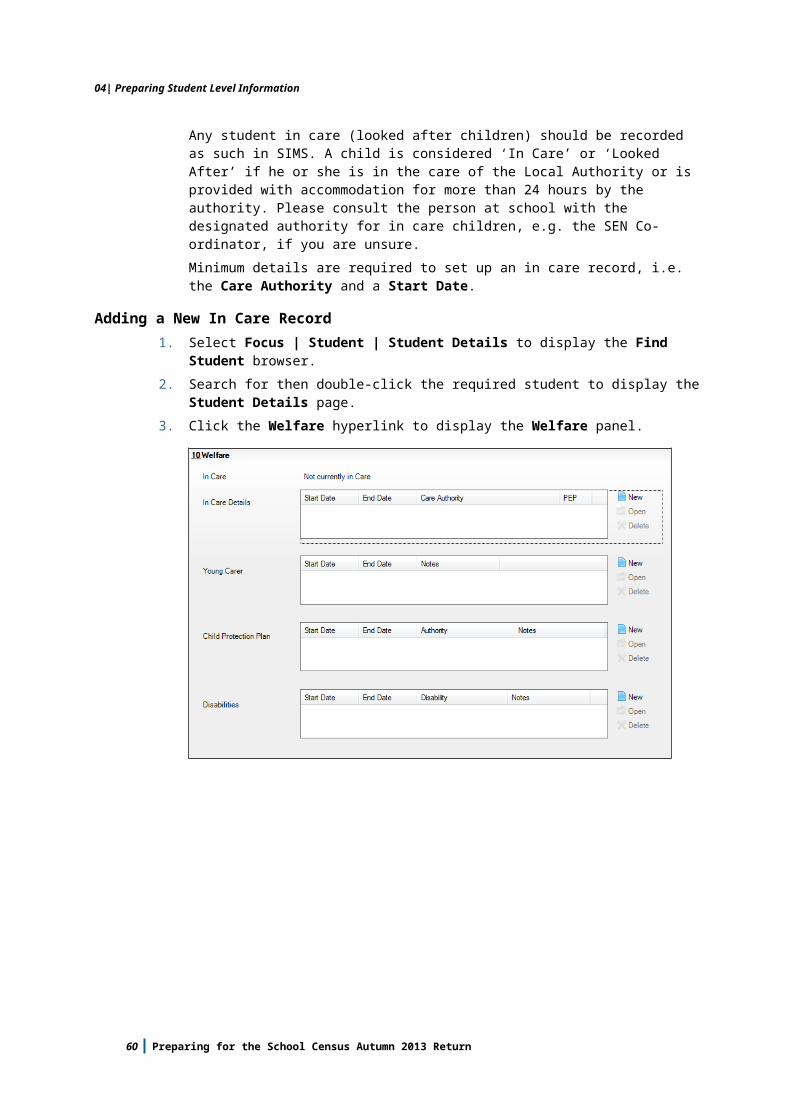
I| Index
IndexAaccess rights...............................................3admission date.....................................3, 32attendance data...................................4, 53
Bbasic details (student)....................3, 21, 30boarder status......................................3, 32bulk update process
examples...............................................22using......................................................22
CCourse Manager
preparing post 16 information...............54
Ddeleting
student records.................................3, 29detail reports
generating.............................................14dry run
create and validate................................11detail reports.........................................14process....................................................9reasons for a dry run...............................9
Eearly years
funded hours.........................................52hours at setting.....................................52
enrolment status..................................3, 32establishment details...............................17
telephone and email address................18ethnic and cultural information.............4, 44exclusions
adding a record.....................................48adding an in care record........................50overview............................................4, 47
Ffileset
Preparing for the School Census Autumn 2013 Return 59

I| Index
importing.................................................4permissions.............................................3
first language...........................................22former UPN...........................................3, 32free school meals eligibility..................3, 42funded hours............................................52
Hhome address.......................................3, 41hours at setting........................................52
Iin care details.....................................49, 50
Llearner support code............................4, 44learning aims
updating................................................54leavers
recording...............................................26
Nnational curriculum year group.............3, 36
Ppart-time student information..............3, 34permissions................................................3post 16 information
Course Manager....................................54preparation
minimum version of SIMS........................4permissions.............................................3
printingvalidation errors summary.....................11
process flow chart......................................7
Rre-admitting students.....................3, 26, 28registration details....................................31reports
generating detail reports.......................14population analysis (dated) report.....3, 26printing summary report.......................11
Preparing for the School Census Autumn 2013 Return 60
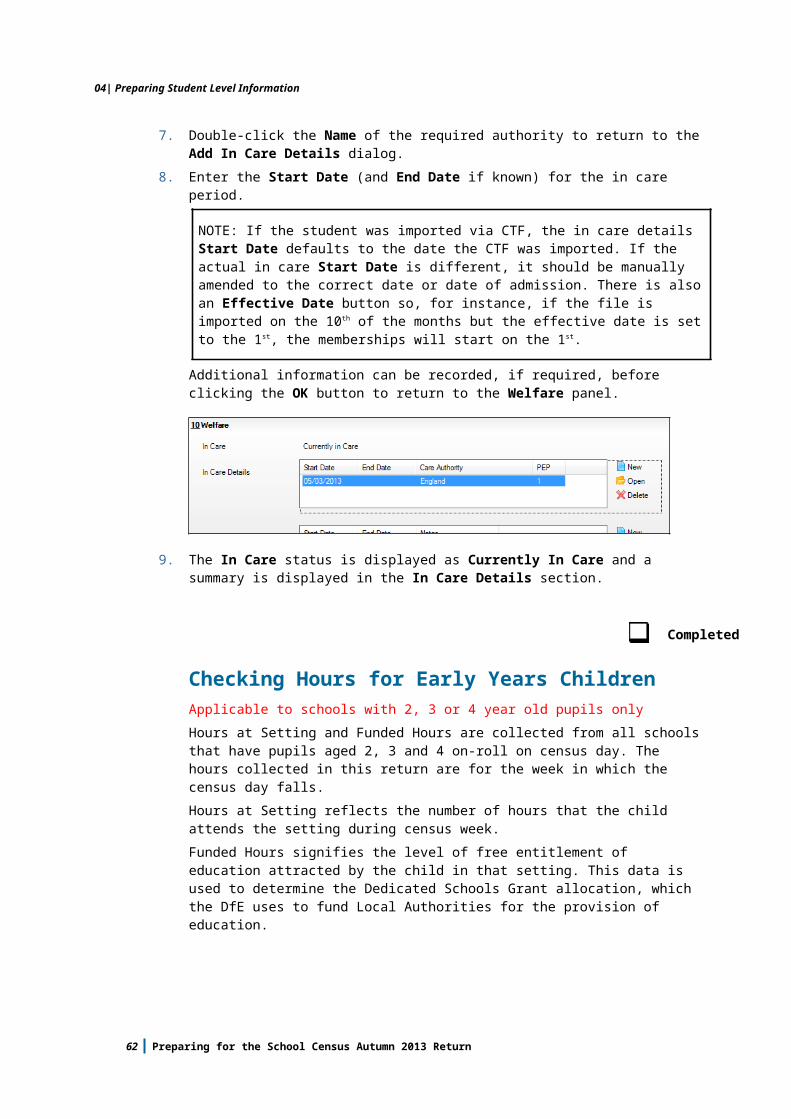
I| Index
revised fileset.........................................3, 4
Sschool information
establishment details............................17telephone and email..............................18
school meals.........................................3, 42service children in care.........................4, 44special educational needs....................4, 45student level information..........................30student’s basic detail......................3, 21, 30surname
recording a change................................31
Ttelephone and email address (school)......18
Uunique learner number.........................3, 34updating
learning aims.........................................54UPN
former UPN........................................3, 32permanent/temporary.......................3, 32
Yyear taught in
checking individual records...................37checking via pastoral structure
by curriculum year.............................38by whole school..................................40
date of birth/age ranges....................3, 36youth support services agreement.......4, 44
Preparing for the School Census Autumn 2013 Return 61