PRACTICAL USER GUIDE - Sitrad · USER REGISTRATION USER GROUPS All fields with * must be filled so...
26
PRACTICAL USER GUIDE
Transcript of PRACTICAL USER GUIDE - Sitrad · USER REGISTRATION USER GROUPS All fields with * must be filled so...

PRACTICAL USER
GUIDE
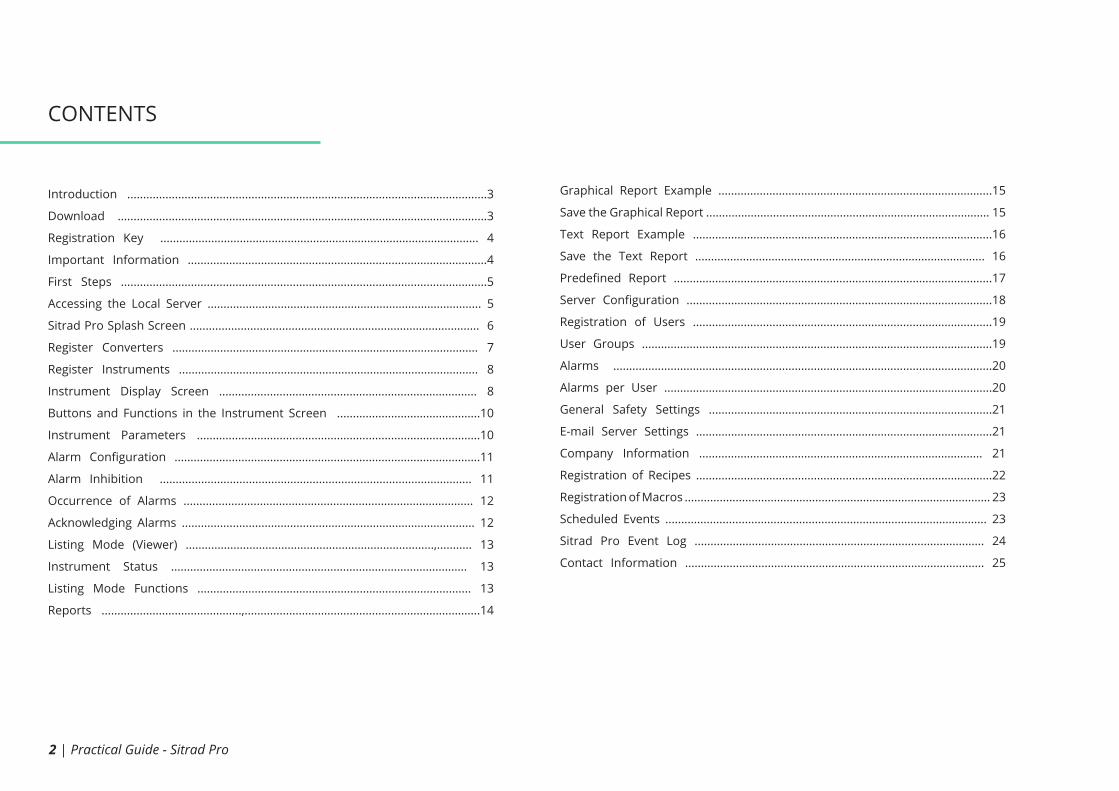
CONTENTS
2 | Practical Guide - Sitrad Pro
Introduction .................................................................................................................3
Download ....................................................................................................................3
Registration Key .................................................................................................... 4
Important Information ..............................................................................................4
First Steps ...................................................................................................................5
Accessing the Local Server ...................................................................................... 5
Sitrad Pro Splash Screen ........................................................................................... 6
Register Converters ................................................................................................ 7
Register Instruments .............................................................................................. 8
Instrument Display Screen ................................................................................. 8
Buttons and Functions in the Instrument Screen .............................................10
Instrument Parameters .........................................................................................10
Alarm Configuration ................................................................................................11
Alarm Inhibition .................................................................................................. 11
Occurrence of Alarms ........................................................................................... 12
Acknowledging Alarms ............................................................................................ 12
Listing Mode (Viewer) ..............................................................................,........... 13
Instrument Status ............................................................................................. 13
Listing Mode Functions ...................................................................................... 13
Reports ............................................,..........................................................................14
Graphical Report Example ......................................................................................15
Save the Graphical Report ......................................................................................... 15
Text Report Example ..............................................................................................16
Save the Text Report ........................................................................................... 16
Predefined Report ....................................................................................................17
Server Configuration ................................................................................................18
Registration of Users ..............................................................................................19
User Groups ..............................................................................................................19
Alarms .......................................................................................................................20
Alarms per User .......................................................................................................20
General Safety Settings .........................................................................................21
E-mail Server Settings .............................................................................................21
Company Information ......................................................................................... 21
Registration of Recipes .............................................................................................22
Registration of Macros ................................................................................................ 23
Scheduled Events ..................................................................................................... 23
Sitrad Pro Event Log ........................................................................................... 24
Contact Information .............................................................................................. 25

Sitrad Pro is the new version of the already renowned Full Gauge Controls software for remote management of refrigeration, heating, air conditioning, and solar heating installations.
Using Sitrad Pro is very easy. It was created so that anyone can enjoy its benefits without the need for much knowledge of technology, meeting the strictest market requirements because it was developed by one especially dedicated engineering team from Full Gauge Controls.
Even so, we have developed this tutorial to facilitate your first steps when using the software.
If you have any questions, please contact us by e-mail at [email protected]
Sitrad Pro is available to be downloaded for free at www.sitrad.com. Download the software and install it following the step by step instructions of the installation wizard.
INTRODUCTION
DOWNLOAD
Practical Guide - Sitrad Pro | 3
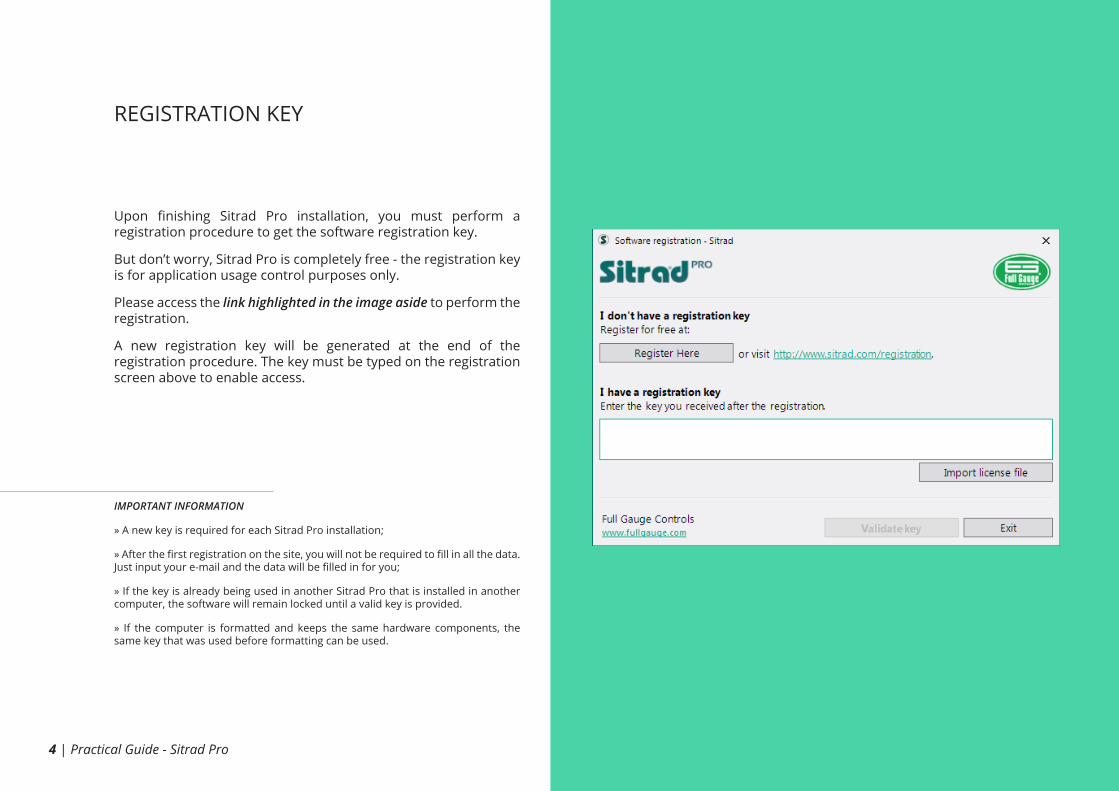
Upon finishing Sitrad Pro installation, you must perform a registration procedure to get the software registration key.
But don’t worry, Sitrad Pro is completely free - the registration key is for application usage control purposes only.
Please access the link highlighted in the image aside to perform the registration.
A new registration key will be generated at the end of the registration procedure. The key must be typed on the registration screen above to enable access.
IMPORTANT INFORMATION
» A new key is required for each Sitrad Pro installation;
» After the first registration on the site, you will not be required to fill in all the data. Just input your e-mail and the data will be filled in for you;
» If the key is already being used in another Sitrad Pro that is installed in another computer, the software will remain locked until a valid key is provided.
» If the computer is formatted and keeps the same hardware components, the same key that was used before formatting can be used.
REGISTRATION KEY
4 | Practical Guide - Sitrad Pro
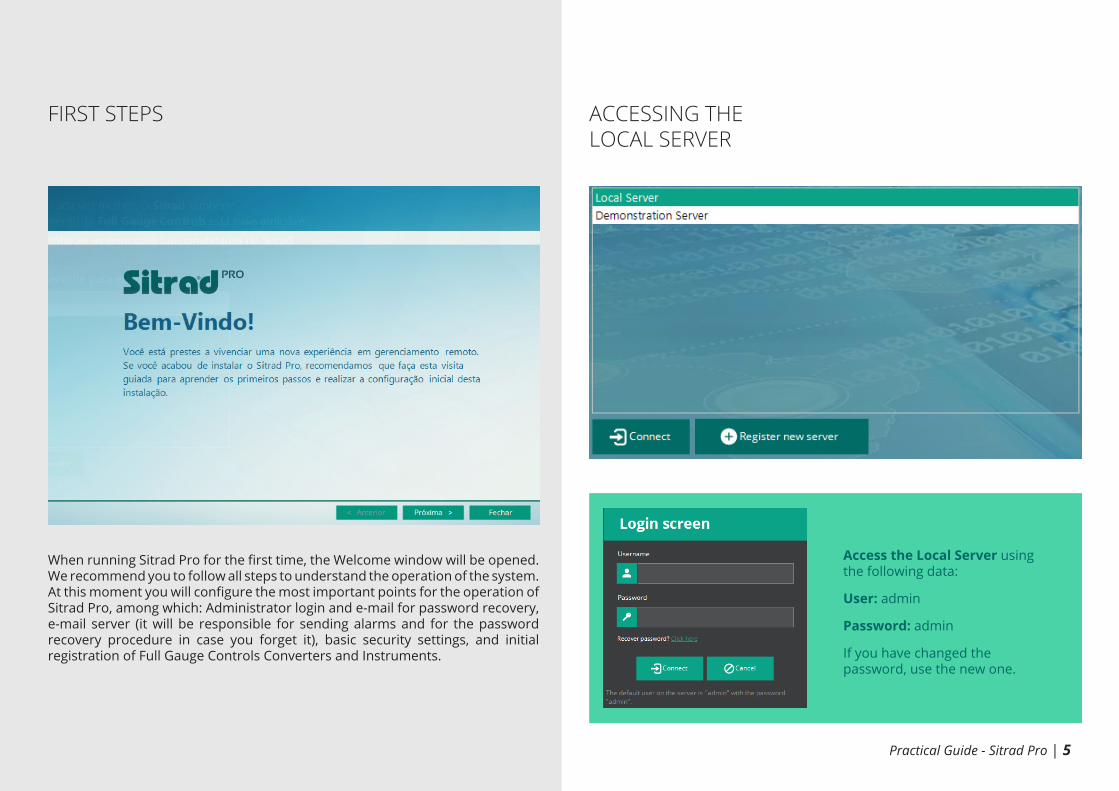
When running Sitrad Pro for the first time, the Welcome window will be opened. We recommend you to follow all steps to understand the operation of the system. At this moment you will configure the most important points for the operation of Sitrad Pro, among which: Administrator login and e-mail for password recovery, e-mail server (it will be responsible for sending alarms and for the password recovery procedure in case you forget it), basic security settings, and initial registration of Full Gauge Controls Converters and Instruments.
Access the Local Server using the following data:
User: admin
Password: admin
If you have changed the password, use the new one.
FIRST STEPS ACCESSING THE LOCAL SERVER
Practical Guide - Sitrad Pro | 5
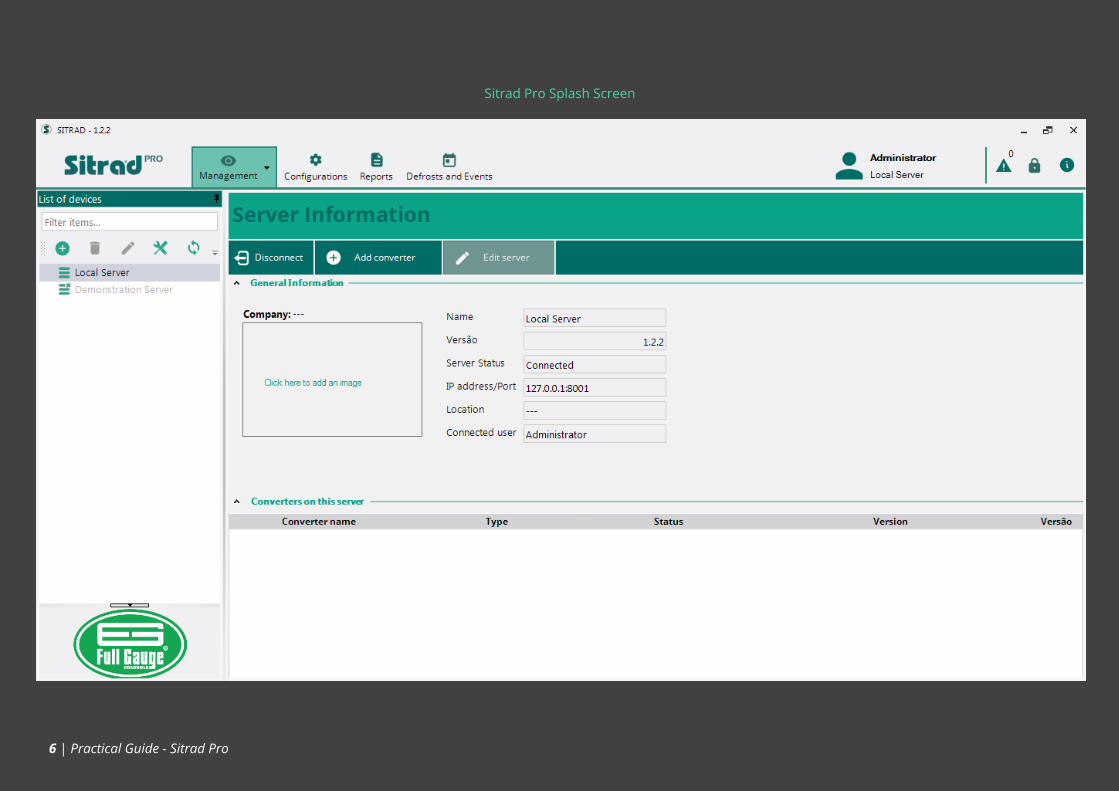
Sitrad Pro Splash Screen
6 | Practical Guide - Sitrad Pro

If you have not registered Converters and Instruments on the initial configuration tab, follow the steps below:
1. You can register a converter by clicking on the button marked “Add Converter (+)” on the server screen
2. Click on “Search Automatically”. Sitrad Pro will automatically locate all converters connected to the computer or in the internal network.
Another option is to click on the button highlighted on the side to automatically register a converter that is connected to the computer or in the network.
REGISTER CONVERTERS
Note:
In specific cases, use the other options for manual registration, for example, when you need to access an Ethernet converter that is not on the same computer network.
Sitrad Pro allows communicating with the converter TCP-485* using the MAC address (Check whether the converter is Version 03). This makes the prior configuration of this converter unnecessary, just connect it to the network.
4. Double click on the desired converter
5. Click on “Save”
To register a converter:
Practical Guide - Sitrad Pro | 7
1
3
2
4
5

After all converters are registered, you can start to register instruments. There are two options for that:
Option 1:
Click “Search Instruments” on the converter screen.
Option 2:
1. Select the desired converter
2. Click on the button highlighted on the side to locate the instruments connected to this converter.
The search can be made automatically in all addresses of the RS-485 network or in a specific instrument address. When the instrument is located, the registration is made automatically and the instrument will be visible on the left side column.
REGISTER INSTRUMENTS
8 | Practical Guide - Sitrad Pro
2
1

Instrument Display Screen
Access to the instrument parameters
Buttons and Functions in the Instrument Screen
Alarm Configuration
Alarm Inhibition
Occurrence of Alarms of this specific instrument
Toggle Refrigeration / Defrost Status
Practical Guide - Sitrad Pro | 9

Instrument Parameters
Update values
Function Filter
Delivery of Recipes
Print parameters
Save parameters as a new recipe
Copy parameters to the Clipboard
Buttons and Functions in the Instrument parameters screen
10 | Practical Guide - Sitrad Pro
Function in BOLD: Means that this function has changed and is different from the Factory Default

ALARM CONFIGURATION
In the alarm configuration window, you can configure several types of alarms, which may change according to the instrument. To configure the desired alarm:
Sitrad Pro also allows the inhibiting alarms for a certain time. You will need to fill out a Justification because this information will be recorded in the Sitrad Pro Event Log.
1. Click on “Configure”
2. Enable the Alarm (Non-virtual alarms - generated by the instruments themselves - cannot be disabled)
3. Define the limits;
4. Save.
ALARM INHIBITIONNumber of Alarms Occurring
Instrument identification - Server
Alarm Description
Start Date and Time
End Date and Time
Alarm Acknowledgement
12
3
4
Practical Guide - Sitrad Pro | 11

The acknowledged alarms will be saved in the Sitrad Pro Event Log.
We will talk about the Event Log later.
The Sitrad Pro also allows to inhibit alarms for a determined period. But to do so, it will be necessary justify this action once it will go to the event log of Sitrad Pro.
1. Select the Alarm you want to Acknowledge
2. Click on “recognize”.
ACKNOWLEDGING ALARMS
ALARM INHIBITION
2
1
12 | Practical Guide - Sitrad Pro
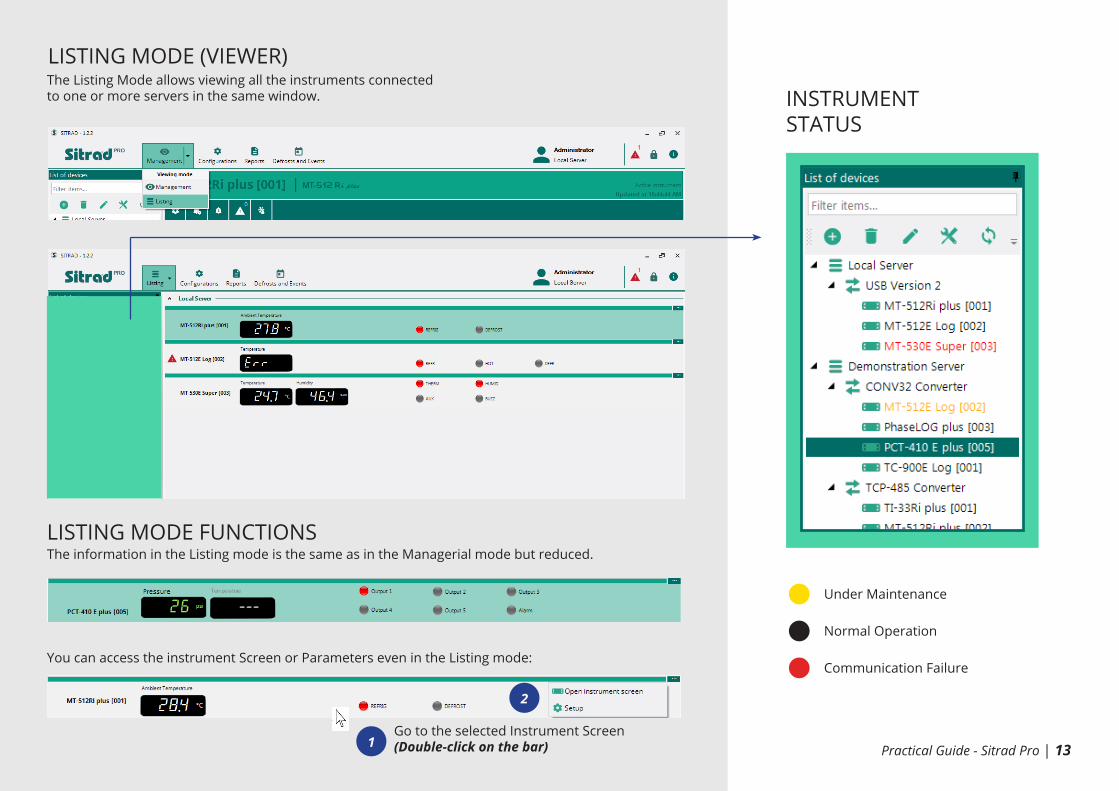
LISTING MODE (VIEWER)
INSTRUMENT STATUS
The Listing Mode allows viewing all the instruments connected to one or more servers in the same window.
Under Maintenance
Normal Operation
Communication Failure
LISTING MODE FUNCTIONS
You can access the instrument Screen or Parameters even in the Listing mode:
Go to the selected Instrument Screen(Double-click on the bar)
The information in the Listing mode is the same as in the Managerial mode but reduced.
1
2
Practical Guide - Sitrad Pro | 13

REPORTS
Sitrad Pro allows creating the following types of reports:
Graphical Report | shows all information recorded in Sitrad Pro by an instrument in a Cartesian plane.
Text Report | shows all information recorded in Sitrad Pro by an instrument in text mode (spreadsheet).
Alarm Report | shows all alarms which occurred during the period in the selected instrument.
Temperature overview | you can select the exact moment you want to know the temperature. This report will inform the current temperature (Set Point), the deviation between the measured temperature and the Set Point, the process the instrument was in, and the instrument Status.
Predefined report | when a report is generated, you can save its predefinitions, allowing the quicker generation of new reports in the future, and helping users who need to perform this procedure several times per day/week have the ability to access the information always in the same instrument and in the same period. The predefinitions contain models of instruments, values, state of the outputs, and period.
14 | Practical Guide - Sitrad Pro

Graphical Report Example
Access to the Chart Functions
Return to the Chart
Editing the Chart
GRAPHICAL REPORT | EDITING
SAVE | EXPORT AND PRINT THE GRAPHICAL REPORT
1. Click the button on the above screen
2. Choose the desired option:
- Export to PNG
- Save as Predefinition
- Exit
Practical Guide - Sitrad Pro | 15
11
2
2
33

Save as Predefinition
Printing Options
Export to Excel
Filter in the Report
TEXT REPORT
16 | Practical Guide - Sitrad Pro
PREDEFINED REPORT
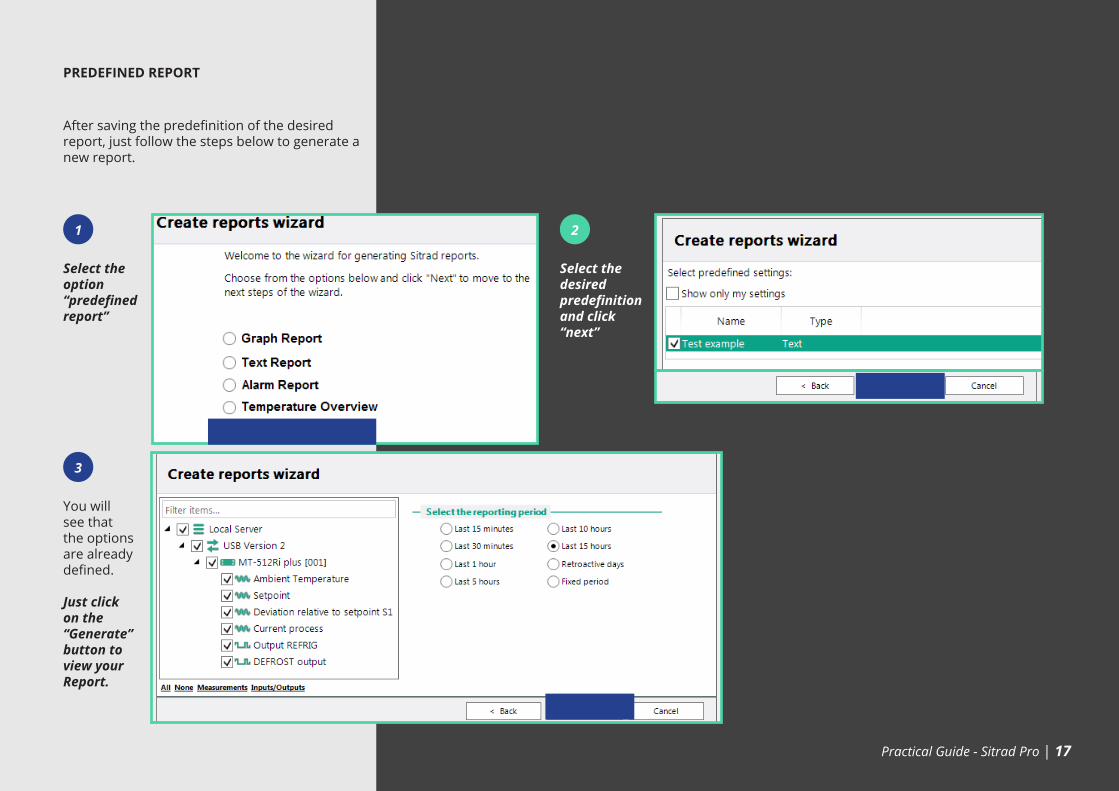
After saving the predefinition of the desired report, just follow the steps below to generate a new report.
Select the option “predefined report”
You will see that the options are already defined.
Just click on the “Generate” button to view your Report.
Select the desired predefinition and click “next”
1
3
2
Practical Guide - Sitrad Pro | 17

SERVER CONFIGURATION
Create new users................................................
Manage / Create Groups...............................................
Edit Access Permissions.......................................
For Full Gauge Controls use only
General alarm configurations
....................................
Sitrad Pro Event Log..........................................
...............................................
Sitrad Pro General Configurations............................
Define which alarms each user will receive........................
E-mail configurations.............................
General Configurations......................................
General Configurations.........
General Configurations.............................................
General Configurations..............................................
General Configurations.....................................
18 | Practical Guide - Sitrad Pro

USER REGISTRATION USER GROUPSAll fields with * must be filled so that the registration can be completed. The E-mail is necessary to the password recovery and to receive alerts.
This option allows Managing and Generating new User Groups.As a factory default, the system has three groups of users with predefined access permissions. However, the system administrator is free to assign and remove permissions.
The predefined groups of Sitrad Pro are:
AdministratorWith full system access
TechnicianWith access to all system functions, except to manage Users and Permission Groups
OperatorBasically views and generates reports only
The access rights are configured in the function Permissions.
Practical Guide - Sitrad Pro | 19

ALARMS
This field must be configured according to the customer needs. This function defines which alarms each user will receive.
ALARMS PER USER
20 | Practical Guide - Sitrad Pro

This function defines which alarms each user will receive.
E-MAIL CONFIGURATION
If you have not configured the e-mail server in the initial tab, configure it in this function. This function must be configured with the customer data.
COMPANY INFORMATIONThis function allows inserting the name and image of the company. This information is displayed when a report is generated or on Sitrad Pro homepage.
Which will send e-mails
GENERAL SAFETY SETTINGSThis field must be configured according to the customer needs.
Practical Guide - Sitrad Pro | 21

REGISTRATION OF RECIPES
This function allows making a prior configuration of a certain instrument so that this recipe can be sent to several instruments later. This function facilitates the configuration of several instruments of the same model that will perform the exact same function. Typically used in the production line. The recipe name, instrument model, instrument version, and units of measurement (if available) are defined on the screen below.
Then the values of each function are defined. And at the end, just Save it.
22 | Practical Guide - Sitrad Pro

Practical Guide - Sitrad Pro | 23
1
2
CADASTRO DE MACROS
SCHEDULED EVENTS
Macros are basically a rule that is applied to the instrument at a certain time.
This function allows scheduling Macros, Reports, and Alarm Inhibitions. The events must be scheduled according to the customer needs.
Define the desired name
Select the desired Function
Change the value as required
Save
1
2
33
4
4

Sitrad Pro records all the information, changes, and accesses in its own database so that they can be queried later. Many different details are recorded, ranging from a simple access to the registration of a new user. Information such as parameter changes is also recorded, even if the changes are made directly in the instrument by physical means.
Aside you can see some examples of information recorded by the Sitrad Pro Event Log.
4
SITRAD PRO EVENT LOG
Create a new manual record
Define a specific message to filter Logs
Define severity
Define the date/time
Search the LogsEdit a record created manually
Print Event Log
Delete a created record
2
2
1
1
3
3 4
24 |Practical Guide - Sitrad Pro

Ful l Gauge Controls appreciates your business. For more information or questions about the configuration of
Sitrad Pro and/or other Ful l Gauge Controls software and instruments, please contact us by cal l ing
+55 51 3778 3434 or e-mail [email protected]

PRACTICAL USER
GUIDE


![[USER Registration MANUAL] - workflow.jfda.joworkflow.jfda.jo/Content/User-Registration-Manual-English.pdf · Table of Content 1 Introduction ..... 1](https://static.fdocuments.in/doc/165x107/5d2501ce88c99326698c2dc8/user-registration-manual-table-of-content-1-introduction-1.jpg)