
Practical Plastic Surgery For Nonsurgeons · Practical Plastic Surgery for Nonsurgeons NADINE B....
385
Nadine B. Semer, M.D. Practical Plastic Surgery For Nonsurgeons
Transcript of Practical Plastic Surgery For Nonsurgeons · Practical Plastic Surgery for Nonsurgeons NADINE B....

PracticalPlasticSurgery forNonsurgeons
NADINE B. SEMER, MDClinical InstructorDivision of Plastic SurgeryUniversity of Southern California
School of MedicineLos Angeles, California
illustrations byMARTHE ADLER-LAVAN, MDPhiladelphia, Pennsylvania
HHAANNLLEEYY && BBEELLFFUUSS,, IINNCC.. Philadelphia
Publisher: HANLEY & BELFUS, INC.Medical Publishers210 S. 13th StreetPhiladelphia, PA 19107(215) 546-4995FAX (215) 790-9330www.hanleyandbelfus.com
PRACTICAL PLASTIC SURGERY FOR NONSURGEONS ISBN 1-56053-478-8
© 2001 by Hanley & Belfus, Inc. All rights reserved. No part of this book maybe reproduced, reused, republished, or transmitted in any form or by anymeans without written permission of the publisher.
Last digit is the print number: 9 8 7 6 5 4 3 2 1
Library of Congress Cataloging-in-Publication Data
Practical plastic surgery for nonsurgeons / by Nadine B. Semer.p. ; cm.
Includes bibliographical references and index.ISBN 1-56053-478-8 (alk. paper)
1. Surgery, Plastic. 2. Rural health services. I. Semer, Nadine B, 1960–[DNLM: 1. Reconstructive Surgical Procedures. WO 600 P895 2001]
RD118.P73 2001617.9'5—dc21
00-054179
DDeeddiiccaattiioonn
To Chris and Jenny McConnachie, Cosimo Stornioloand Meredith Weir, and all health care providersworldwide who are working to bring quality medicalcare to people living in rural areas
And to David, who helped me to see that anything ispossible

IInntteerrnnaattiioonnaall MMeeddiiccaall MMiissssiioonnss
The following is a short list of organizations that sponsor international medicalmissions. There are many more. The World Wide Web and local medical/profes-sional societies are other sources of information. The minimum time commitmentranges from a few days to several months to years. Some are religious-based or-ganizations. Listing here does not imply recommendation or endorsement of anyof these organizations. If you are interested in international work, research theorganization well.
The best advice I can offer to health professionals going to work in any rural areais to be open to anything, be as flexible as possible, and above all respect thepeople you are working with and the people you are serving.
Nadine B. Semer, [email protected]
OOrrggaanniizzaattiioonn UU..SS.. CCoonnttaacctt IInnffoorrmmaattiioonn aanndd IInntteerrnneett AAddddrreessss
American Medical Student Association 1902 Association Drive, Reston, VA 20191(703) 620-6600; www.amsa.org
Catholic Medical Mission Board 10 West 17th Street, New York, NY 10011(800) 678-5659; www.cmmb.org
CB International 1501 West Mineral Avenue, Littleton, CO 80120(800) 487-4224; www.cbi.org
Doctors of the World-USA 375 West Broadway, 4th Floor, New York, NY 10012(888) 817-HELP; www.dowusa.org
Doctors Without Borders, USA 6 East 39th Street, 8th Floor, New York, NY 10016Médecins San Frontières (212) 679-6800; www.doctorswithoutborders.org
The Flying Hospital, Inc. 11836 Fishing Pointe Drive, Newport News, VA 23606(757) 873-6794; www.flyinghospital.org
Global Volunteers 375 East Little Canada Road, St. Paul, MN 55117(800) 487-1074; www.globalvolunteers.org
Health Volunteers Overseas P.O. Box 65157, Washington, DC 20035(202) 296-0928; www.hvousa.org
Himalayan HealthCare, Inc. P.O. Box 737, Planetarium Station, New York, NY 10024(212) 829-8691; www.himalayan-healthcare.org
International Medical Corps 11500 West Olympic Blvd., Suite 506, Los Angeles, CA 90064(310) 826-7800; www.imc-la.com
International Rescue Committee 122 East 42nd Street, New York, NY 10168(212) 551-3000; www.intrescom.org
Interplast, Inc. 300-B Pioneer Way, Mountain View, CA 94041(650) 962-0123; www.interplast.org
Mercy Ships P.O. Box 2020, Garden Valley, TX 75771(800) 424-7447; http://mercyships.org/index.htm
Operation Smile 6435 Tidewater Drive, Norfolk, VA 23509(757) 321-7645; www.operationsmile.org
Physicians for Peace 229 West Bute Street, Suite 900, Norfolk, VA 23510(757) 625-7569; www.physicians-for-peace.org
Presbyterian Church (USA), Worldwide 100 Witherspoon Street, Louisville, KY 40202Ministries Division, Mission Service (800) 779-6779; www.pcusa.org/msrRecruitment Office
Project Hope 255 Carter Hall Lane, Millwood, VA 22646(800) 544-4673; www.projhope.org
Chapter 1Suturing: The Basics . . . . . . . . . . . . . . . . . . . . . . . . . . . . . . . . . . . . . . . . . 1
Chapter 2Basic Surgical Techniques . . . . . . . . . . . . . . . . . . . . . . . . . . . . . . . . . . . . . 21
Chapter 3Local Anesthesia . . . . . . . . . . . . . . . . . . . . . . . . . . . . . . . . . . . . . . . . . . . . 29
Chapter 4Protecting Yourself from Infectious Diseases . . . . . . . . . . . . . . . . . . . . . . 45
Chapter 5Evaluation of the Acutely Injured Patient . . . . . . . . . . . . . . . . . . . . . . . . . . 49
Chapter 6Evaluation of an Acute Wound . . . . . . . . . . . . . . . . . . . . . . . . . . . . . . . . . 57
Chapter 7Gunshot Wounds . . . . . . . . . . . . . . . . . . . . . . . . . . . . . . . . . . . . . . . . . . . 67
Chapter 8Nutrition . . . . . . . . . . . . . . . . . . . . . . . . . . . . . . . . . . . . . . . . . . . . . . . . . . 73
Chapter 9Taking Care of Wounds . . . . . . . . . . . . . . . . . . . . . . . . . . . . . . . . . . . . . . . 79
Chapter 10Secondary Wound Closure . . . . . . . . . . . . . . . . . . . . . . . . . . . . . . . . . . . . 85
Chapter 11Primary Wound Closure . . . . . . . . . . . . . . . . . . . . . . . . . . . . . . . . . . . . . . 91
Chapter 12Skin Grafts . . . . . . . . . . . . . . . . . . . . . . . . . . . . . . . . . . . . . . . . . . . . . . . . 97
Chapter 13Local Flaps . . . . . . . . . . . . . . . . . . . . . . . . . . . . . . . . . . . . . . . . . . . . . . . . 111
Chapter 14Distant Flaps . . . . . . . . . . . . . . . . . . . . . . . . . . . . . . . . . . . . . . . . . . . . . . . 121
Chapter 15Scar Formation . . . . . . . . . . . . . . . . . . . . . . . . . . . . . . . . . . . . . . . . . . . . . 137
v
TTaabbllee ooff CCoonntteennttss
vi Contents
Chapter 16Facial Lacerations . . . . . . . . . . . . . . . . . . . . . . . . . . . . . . . . . . . . . . . . . . . 145
Chapter 17Pressure Sores . . . . . . . . . . . . . . . . . . . . . . . . . . . . . . . . . . . . . . . . . . . . . 161
Chapter 18Chronic Wounds . . . . . . . . . . . . . . . . . . . . . . . . . . . . . . . . . . . . . . . . . . . . 173
Chapter 19Soft Tissue Infections . . . . . . . . . . . . . . . . . . . . . . . . . . . . . . . . . . . . . . . . 183
Chapter 20Burns . . . . . . . . . . . . . . . . . . . . . . . . . . . . . . . . . . . . . . . . . . . . . . . . . . . . 191
Chapter 21Fractures of the Tibia and Fibula . . . . . . . . . . . . . . . . . . . . . . . . . . . . . . . . 205
Chapter 22Skin Cancer . . . . . . . . . . . . . . . . . . . . . . . . . . . . . . . . . . . . . . . . . . . . . . . . 221
Chapter 23Cleft Lip/Palate . . . . . . . . . . . . . . . . . . . . . . . . . . . . . . . . . . . . . . . . . . . . . 235
Chapter 24Breast Surgery . . . . . . . . . . . . . . . . . . . . . . . . . . . . . . . . . . . . . . . . . . . . . 244
Chapter 25Facial Fractures . . . . . . . . . . . . . . . . . . . . . . . . . . . . . . . . . . . . . . . . . . . . . 251
Chapter 26The Normal Hand Exam . . . . . . . . . . . . . . . . . . . . . . . . . . . . . . . . . . . . . . 257
Chapter 27Evaluating the Injured Hand . . . . . . . . . . . . . . . . . . . . . . . . . . . . . . . . . . . 267
Chapter 28Hand Splinting and General Aftercare . . . . . . . . . . . . . . . . . . . . . . . . . . . . 275
Chapter 29Fingertip and Nail Bed Injuries . . . . . . . . . . . . . . . . . . . . . . . . . . . . . . . . . 283
Chapter 30Finger Fractures and Dislocations . . . . . . . . . . . . . . . . . . . . . . . . . . . . . . . 293
Chapter 31Traumatic Hand and Finger Amputations . . . . . . . . . . . . . . . . . . . . . . . . . 303
Chapter 32Tendon Injuries of the Hand . . . . . . . . . . . . . . . . . . . . . . . . . . . . . . . . . . . 307
Contents vii
Chapter 33Nerve and Vascular Injuries of the Hand . . . . . . . . . . . . . . . . . . . . . . . . . . 313
Chapter 34Hand Burns . . . . . . . . . . . . . . . . . . . . . . . . . . . . . . . . . . . . . . . . . . . . . . . . 321
Chapter 35Hand Crush Injury and Compartment Syndrome . . . . . . . . . . . . . . . . . . . 329
Chapter 36Hand Infections: General Information . . . . . . . . . . . . . . . . . . . . . . . . . . . . 339
Chapter 37Specific Types of Hand Infections . . . . . . . . . . . . . . . . . . . . . . . . . . . . . . . 347
Chapter 38Chronic Hand Conditions . . . . . . . . . . . . . . . . . . . . . . . . . . . . . . . . . . . . . 355
Chapter 39Exploration of an Injured Hand or Forearm . . . . . . . . . . . . . . . . . . . . . . . . 367
Index . . . . . . . . . . . . . . . . . . . . . . . . . . . . . . . . . . . . . . . . . . . . . . . . . . . . . 375

The intent of this book is to bring relief to people who sustain com-monly encountered injuries and wounds. Without corrective treat-ment, these problems can destroy livelihoods and families. Immediate,acute care often stabilizes the patient, but may leave the patient with aminor or major disability. Lacking the resources typical of wealthierpopulations, even minor disabilities can have a devastating economicand social impact.
Plastic surgeons have developed reconstructive surgical techniquesthat can restore the injured person to a productive and fulfilling life.Unfortunately, this type of surgery has frequently been obscured by acloud of unawareness or perceived difficulty.
Practical Plastic Surgery for Nonsurgeons describes straightforward plas-tic surgical information and techniques. This book will be useful tohealth care providers with limited access to specialists, especiallyproviders who serve in rural and non-industrial settings. Medical stu-dents, nurse practitioner students, and residents in a wide variety ofspecialties will also benefit from this knowledge.
This book is intended for an audience far different from that of mostother plastic surgery texts. There are many remarkable books that de-scribe advanced techniques commonplace in my home city of LosAngeles. These excellent volumes describe superb results obtained byelite surgeons working with expensive equipment.
This book describes practical techniques that may be easily learned bya variety of medical professionals who have access only to basic equip-ment. Plastic surgical procedures are described in a clear, concise, step-by-step fashion. Someone without advanced surgical skills can use thisbook and provide effective treatment. Illustrative cases are used to helpthe reader understand the importance of plastic surgery input in a va-riety of situations. Explanation is given as to when and why it may beprudent to transfer care to a specialist.
It is my hope that this book will provide a greater understanding ofhow plastic surgical techniques can contribute to improved patientoutcomes. This, in turn, should allow many injured patients to regainnormal function and their rightful place in the community.
Nadine B. Semer, MDLos Angeles, California
ix
PPrreeffaaccee
SSUUTTUURRIINNGG:: TTHHEE BBAASSIICCSS
Suturing is the joining of tissues with needle and “thread,” so that thetissues bind together and heal. The “thread” is actually specializedsuture material.
Health care providers frequently encounter wounds in need of sutur-ing, and it is important to become proficient. You can practice your su-turing skills on pigs’ feet, available at a butcher shop. This chapter givesyou all the necessary information to perform basic suturing, including:
• Types of needles and suture material
• Selection of material for various wounds and situations
• Techniques
Information about the proper use of local anesthetics for pain controlwhile placing sutures is discussed in chapter 3.
SSuuttuurree NNeeeeddlleessThere are two broad classifications of needles: curved and straight. Astraight needle can be used without instruments. A curved needle mustbe handled with forceps and a needle holder.
Although hand sewing with a straight needle does not require forceps,the technique is cumbersome and entails a much higher risk of ac-cidentally sticking yourself. Hence, suturing with a straight needle is
1
Chapter 1
KKEEYY FFIIGGUURREESS::Curved needles: tapered and cutting Simple suturesEversion of skin edges Continuous vs. interrupted closureInstruments: needle holder Mattress suturesInstruments: forceps with teeth Buried intradermal suturesInstruments: suture scissors Figure-of-eight suturesHolding scissors and needle holder Instrument tieNeedle in the needle holder Skin stapler in positionHolding the forceps Staple remover: clamp removing the stapleFace bites vs. body bites Adhesive stripsNeedle entering tissues at 90° angle

2 Practical Plastic Surgery for Nonsurgeons
uncommon and not recommended if curved needles are available.Generally, forceps and needle holders are available, and a curvedneedle is used for suturing. There are two types of curved needles.
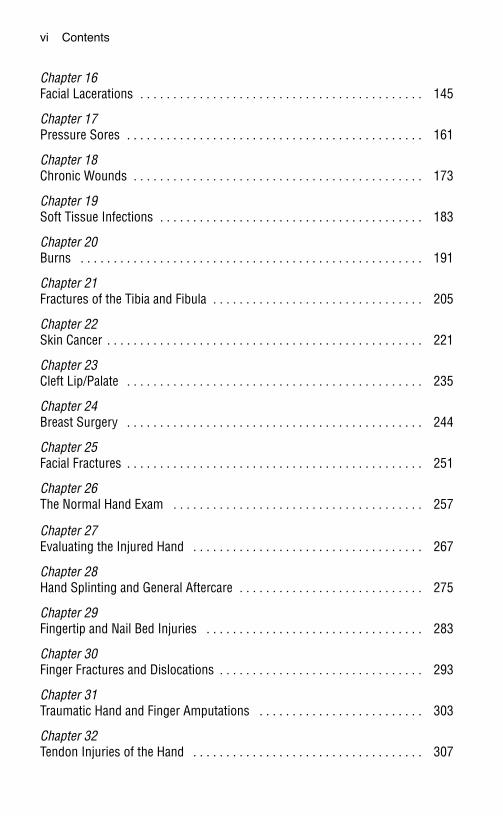
Cutting Needle. A cutting needle is used primarily for suturing theskin. It has a very sharp tip with sharp edges, which are needed to passthrough the skin. Since you will place primarily skin sutures, you gen-erally will use a cutting needle.
Tapered Needle. Tapered needles, or “round-bodied” needles, havea sharp tip with smooth edges and are less traumatic to the surround-ing tissues. They are used primarily on the deeper, subcutaneous tis-sues, blood vessels, and intestinal anastomoses. A tapered needle is notgood for simple skin suturing because it is difficult to pass the taperedneedle through the skin.
SSuuttuurree SSiizzeessSutures come in various sizes. The bigger the suture material, usuallythe bigger the needle. The sizing of sutures is similar to the sizing ofneedles for injection: the bigger the number, the smaller the size of thesuture. Suture sizes range from 00 (very large, used to close the abdom-inal wall—about the size of large fishing line) to 10-0 (very tiny, usedfor microvascular anastomoses—as fine as a human hair). You gener-ally will use sizes in the middle range: 3-0 to 5-0.
It is best to use small sutures on the face, such as 5-0 or 6-0. Smaller su-tures are associated with decreased scarring, which is a concern withfacial wounds. (See chapter 16, “Facial Lacerations,” for more specificdetails.) On areas where cosmetic concerns are less important, 3-0 or 4-0 sutures are best, because the larger size makes the technique easierand the thicker sutures are stronger. The tendency is to use smaller su-tures on children because of their more delicate skin. Rarely do youneed anything larger than a 4-0 suture.
A, Tapered needle used for suturing subcutaneous tissue, fascia, and otherdeep structures. B, Cutting needle used for suturing skin. Note the differencespecifically around the tip of each needle.
Suturing: The Basics 3
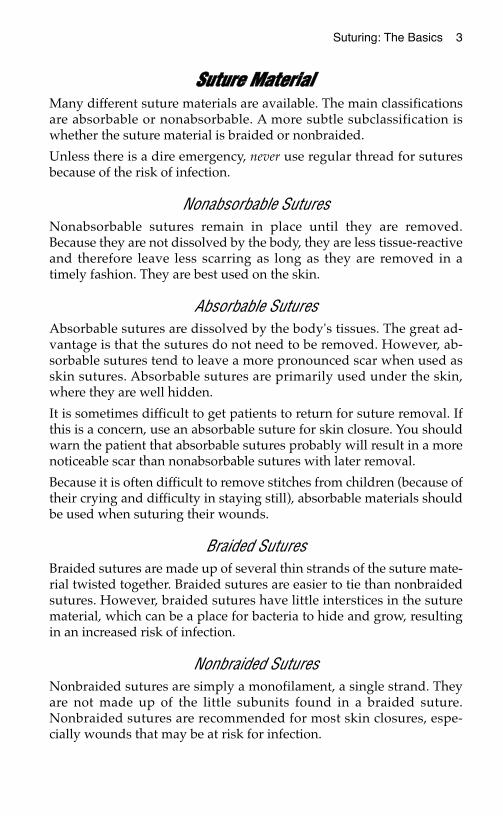
SSuuttuurree MMaatteerriiaallMany different suture materials are available. The main classificationsare absorbable or nonabsorbable. A more subtle subclassification iswhether the suture material is braided or nonbraided.
Unless there is a dire emergency, never use regular thread for suturesbecause of the risk of infection.
Nonabsorbable SuturesNonabsorbable sutures remain in place until they are removed.Because they are not dissolved by the body, they are less tissue-reactiveand therefore leave less scarring as long as they are removed in atimely fashion. They are best used on the skin.
Absorbable SuturesAbsorbable sutures are dissolved by the body's tissues. The great ad-vantage is that the sutures do not need to be removed. However, ab-sorbable sutures tend to leave a more pronounced scar when used asskin sutures. Absorbable sutures are primarily used under the skin,where they are well hidden.
It is sometimes difficult to get patients to return for suture removal. Ifthis is a concern, use an absorbable suture for skin closure. You shouldwarn the patient that absorbable sutures probably will result in a morenoticeable scar than nonabsorbable sutures with later removal.
Because it is often difficult to remove stitches from children (because oftheir crying and difficulty in staying still), absorbable materials shouldbe used when suturing their wounds.
Braided SuturesBraided sutures are made up of several thin strands of the suture mate-rial twisted together. Braided sutures are easier to tie than nonbraidedsutures. However, braided sutures have little interstices in the suturematerial, which can be a place for bacteria to hide and grow, resultingin an increased risk of infection.
Nonbraided SuturesNonbraided sutures are simply a monofilament, a single strand. Theyare not made up of the little subunits found in a braided suture.Nonbraided sutures are recommended for most skin closures, espe-cially wounds that may be at risk for infection.
4 Practical Plastic Surgery for Nonsurgeons
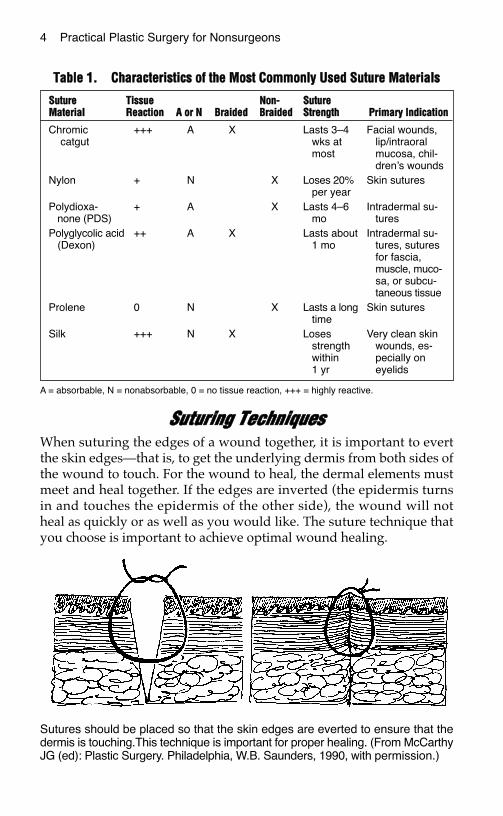
TTaabbllee 11.. CChhaarraacctteerriissttiiccss ooff tthhee MMoosstt CCoommmmoonnllyy UUsseedd SSuuttuurree MMaatteerriiaallss
A = absorbable, N = nonabsorbable, 0 = no tissue reaction, +++ = highly reactive.
SSuuttuurriinngg TTeecchhnniiqquueessWhen suturing the edges of a wound together, it is important to evertthe skin edges—that is, to get the underlying dermis from both sides ofthe wound to touch. For the wound to heal, the dermal elements mustmeet and heal together. If the edges are inverted (the epidermis turnsin and touches the epidermis of the other side), the wound will notheal as quickly or as well as you would like. The suture technique thatyou choose is important to achieve optimal wound healing.
SSuuttuurree TTiissssuuee NNoonn-- SSuuttuurreeMMaatteerriiaall RReeaaccttiioonn AA oorr NN BBrraaiiddeedd BBrraaiiddeedd SSttrreennggtthh PPrriimmaarryy IInnddiiccaattiioonn
Chromic +++ A X Lasts 3–4 Facial wounds,catgut wks at lip/intraoral
most mucosa, chil-dren’s wounds
Nylon + N X Loses 20% Skin suturesper year
Polydioxa- + A X Lasts 4–6 Intradermal su-none (PDS) mo tures
Polyglycolic acid ++ A X Lasts about Intradermal su-(Dexon) 1 mo tures, sutures
for fascia,muscle, muco-sa, or subcu-taneous tissue
Prolene 0 N X Lasts a long Skin suturestime
Silk +++ N X Loses Very clean skinstrength wounds, es-within pecially on1 yr eyelids
Sutures should be placed so that the skin edges are everted to ensure that thedermis is touching.This technique is important for proper healing. (From McCarthyJG (ed): Plastic Surgery. Philadelphia, W.B. Saunders, 1990, with permission.)
Suturing: The Basics 5
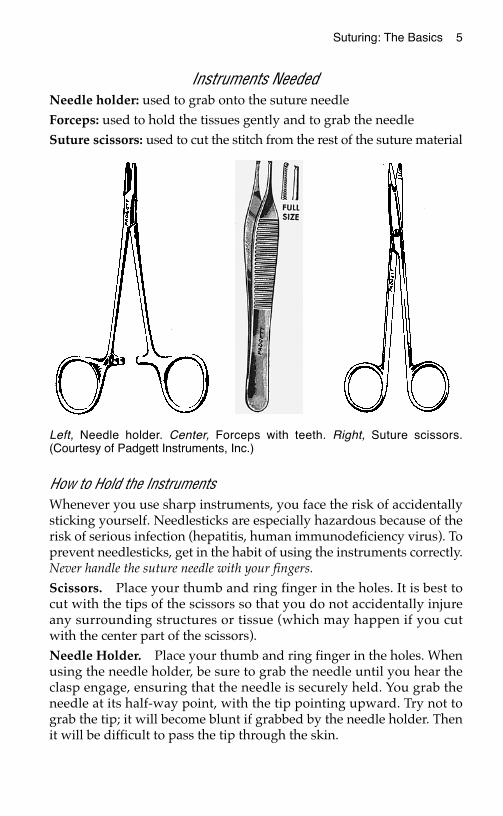
Instruments NeededNeedle holder: used to grab onto the suture needleForceps: used to hold the tissues gently and to grab the needleSuture scissors: used to cut the stitch from the rest of the suture material
How to Hold the InstrumentsWhenever you use sharp instruments, you face the risk of accidentallysticking yourself. Needlesticks are especially hazardous because of therisk of serious infection (hepatitis, human immunodeficiency virus). Toprevent needlesticks, get in the habit of using the instruments correctly.Never handle the suture needle with your fingers.
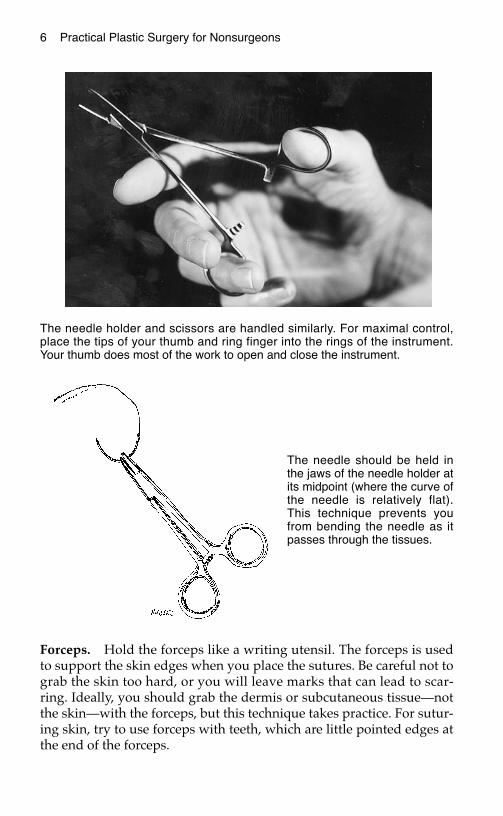
Scissors. Place your thumb and ring finger in the holes. It is best tocut with the tips of the scissors so that you do not accidentally injureany surrounding structures or tissue (which may happen if you cutwith the center part of the scissors).Needle Holder. Place your thumb and ring finger in the holes. Whenusing the needle holder, be sure to grab the needle until you hear theclasp engage, ensuring that the needle is securely held. You grab theneedle at its half-way point, with the tip pointing upward. Try not tograb the tip; it will become blunt if grabbed by the needle holder. Thenit will be difficult to pass the tip through the skin.
Left, Needle holder. Center, Forceps with teeth. Right, Suture scissors.(Courtesy of Padgett Instruments, Inc.)
6 Practical Plastic Surgery for Nonsurgeons
Forceps. Hold the forceps like a writing utensil. The forceps is usedto support the skin edges when you place the sutures. Be careful not tograb the skin too hard, or you will leave marks that can lead to scar-ring. Ideally, you should grab the dermis or subcutaneous tissue—notthe skin—with the forceps, but this technique takes practice. For sutur-ing skin, try to use forceps with teeth, which are little pointed edges atthe end of the forceps.
The needle holder and scissors are handled similarly. For maximal control,place the tips of your thumb and ring finger into the rings of the instrument.Your thumb does most of the work to open and close the instrument.
The needle should be held inthe jaws of the needle holder atits midpoint (where the curve ofthe needle is relatively flat).This technique prevents youfrom bending the needle as itpasses through the tissues.

Suturing: The Basics 7
Placing the SuturesFor most areas of the body, except the face (see chapter 16, “FacialLacerations”), the sutures should be placed in the skin 3–4 mm fromthe wound edge and 5–10 mm apart.
Hold the forceps as you would hold a writing instrument.
Sutures placed on the face should be approx-imately 2–3 mm from the skin edge and 3–5mm apart. Sutures placed elsewhere on thebody should be approximately 3–4 mm fromthe skin edge and 5–10 mm apart.

8 Practical Plastic Surgery for Nonsurgeons
Start on the side of the wound opposite and farthest from you toensure that you are always sewing toward yourself. By sewing towardyourself, the suturing process is made easier from a biomechanicalstandpoint.
Do not drive yourself crazy by placing too many sutures.
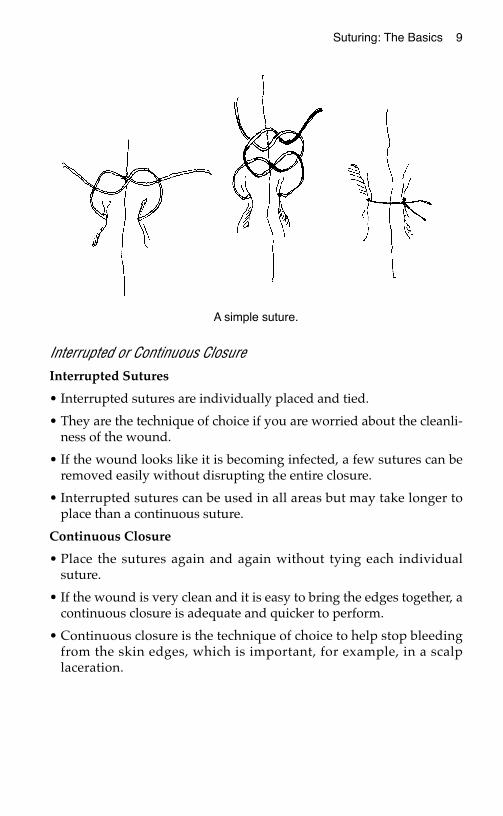
Simple SuturesIndication. This technique is the easiest to perform. It is used formost skin suturing.
Technique
1. Start from the outside of the skin, go through the epidermis intothe subcutaneous tissue from one side, then enter the subcuta-neous tissue on the opposite side, and come out the epidermisabove.
2. To evert the edges, the needle tip should enter at a 90° angle tothe skin. Then turn your wrist to get the needle through thetissues.
3. You can use simple sutures for a continuous or interrupted closure.
The needle tip should enter the tissues perpendicular to the skin. Once theneedle tip has penetrated through the top layers of the skin, twist your wristso that the needle passes through the subcutaneous tissue and thencomes out into the wound. This technique helps to ensure that skin edgeswill evert.
Suturing: The Basics 9
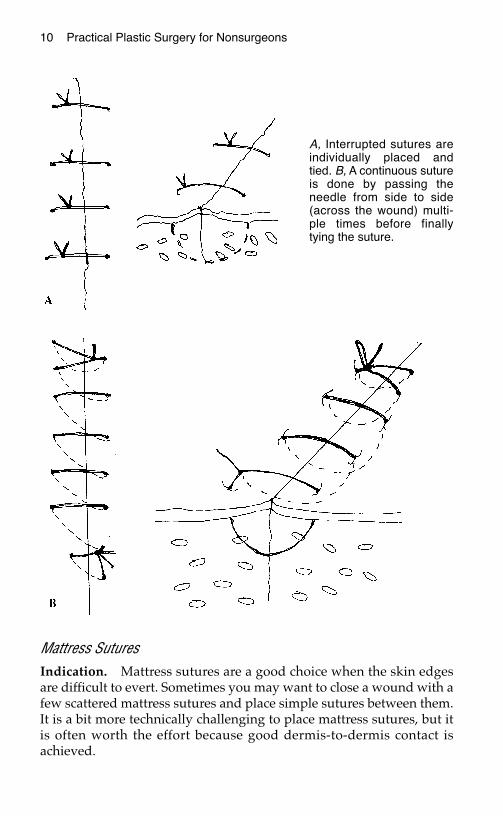
Interrupted or Continuous ClosureInterrupted Sutures
• Interrupted sutures are individually placed and tied.
• They are the technique of choice if you are worried about the cleanli-ness of the wound.
• If the wound looks like it is becoming infected, a few sutures can beremoved easily without disrupting the entire closure.
• Interrupted sutures can be used in all areas but may take longer toplace than a continuous suture.
Continuous Closure
• Place the sutures again and again without tying each individualsuture.
• If the wound is very clean and it is easy to bring the edges together, acontinuous closure is adequate and quicker to perform.
• Continuous closure is the technique of choice to help stop bleedingfrom the skin edges, which is important, for example, in a scalplaceration.
A simple suture.
10 Practical Plastic Surgery for Nonsurgeons
Mattress SuturesIndication. Mattress sutures are a good choice when the skin edgesare difficult to evert. Sometimes you may want to close a wound with afew scattered mattress sutures and place simple sutures between them.It is a bit more technically challenging to place mattress sutures, but itis often worth the effort because good dermis-to-dermis contact isachieved.
A, Interrupted sutures areindividually placed andtied. B, A continuous sutureis done by passing theneedle from side to side(across the wound) multi-ple times before finallytying the suture.
Suturing: The Basics 11
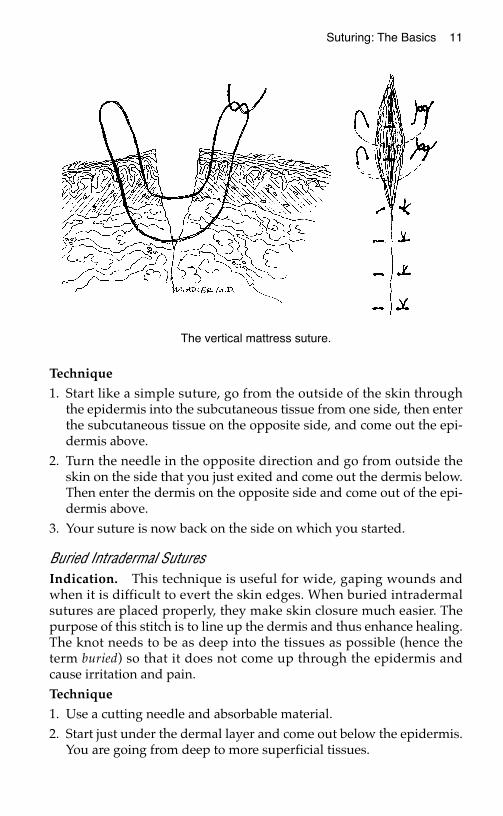
Technique
1. Start like a simple suture, go from the outside of the skin throughthe epidermis into the subcutaneous tissue from one side, then enterthe subcutaneous tissue on the opposite side, and come out the epi-dermis above.
2. Turn the needle in the opposite direction and go from outside theskin on the side that you just exited and come out the dermis below.Then enter the dermis on the opposite side and come out of the epi-dermis above.
3. Your suture is now back on the side on which you started.
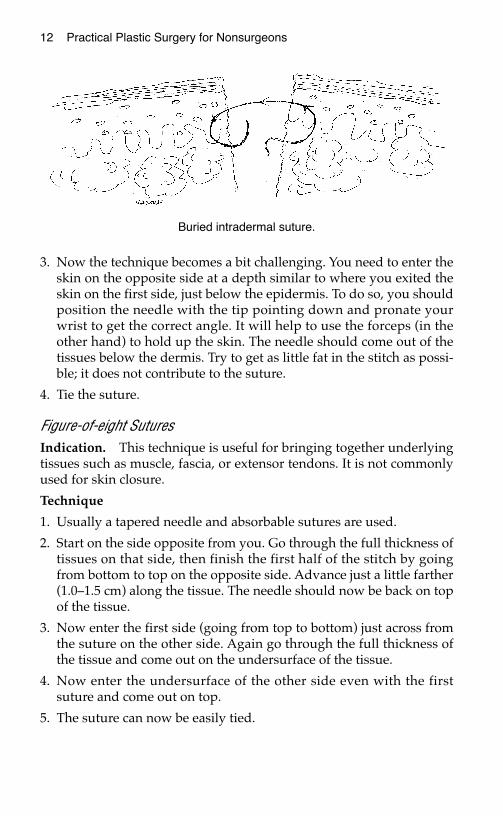
Buried Intradermal SuturesIndication. This technique is useful for wide, gaping wounds andwhen it is difficult to evert the skin edges. When buried intradermalsutures are placed properly, they make skin closure much easier. Thepurpose of this stitch is to line up the dermis and thus enhance healing.The knot needs to be as deep into the tissues as possible (hence theterm buried) so that it does not come up through the epidermis andcause irritation and pain.Technique
1. Use a cutting needle and absorbable material. 2. Start just under the dermal layer and come out below the epidermis.
You are going from deep to more superficial tissues.
The vertical mattress suture.
12 Practical Plastic Surgery for Nonsurgeons
3. Now the technique becomes a bit challenging. You need to enter theskin on the opposite side at a depth similar to where you exited theskin on the first side, just below the epidermis. To do so, you shouldposition the needle with the tip pointing down and pronate yourwrist to get the correct angle. It will help to use the forceps (in theother hand) to hold up the skin. The needle should come out of thetissues below the dermis. Try to get as little fat in the stitch as possi-ble; it does not contribute to the suture.
4. Tie the suture.
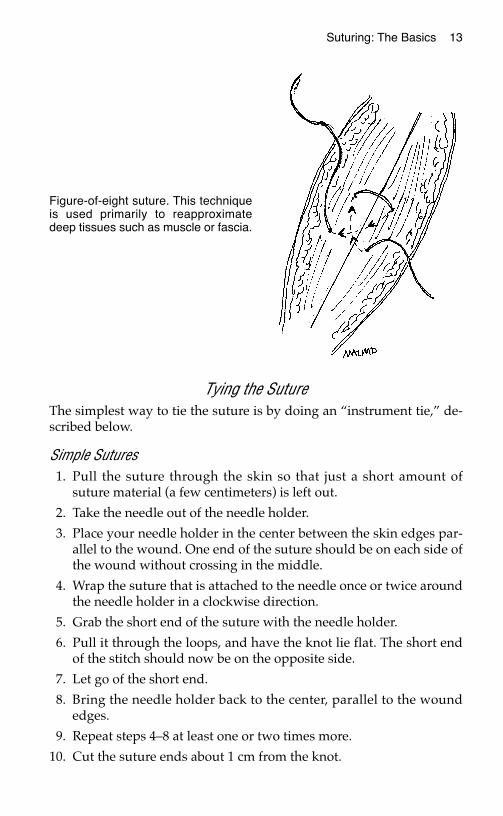
Figure-of-eight SuturesIndication. This technique is useful for bringing together underlyingtissues such as muscle, fascia, or extensor tendons. It is not commonlyused for skin closure.
Technique
1. Usually a tapered needle and absorbable sutures are used.
2. Start on the side opposite from you. Go through the full thickness oftissues on that side, then finish the first half of the stitch by goingfrom bottom to top on the opposite side. Advance just a little farther(1.0–1.5 cm) along the tissue. The needle should now be back on topof the tissue.
3. Now enter the first side (going from top to bottom) just across fromthe suture on the other side. Again go through the full thickness ofthe tissue and come out on the undersurface of the tissue.
4. Now enter the undersurface of the other side even with the firstsuture and come out on top.
5. The suture can now be easily tied.
Buried intradermal suture.
Suturing: The Basics 13
Tying the Suture The simplest way to tie the suture is by doing an “instrument tie,” de-scribed below.
Simple Sutures1. Pull the suture through the skin so that just a short amount of
suture material (a few centimeters) is left out.
2. Take the needle out of the needle holder.
3. Place your needle holder in the center between the skin edges par-allel to the wound. One end of the suture should be on each side ofthe wound without crossing in the middle.
4. Wrap the suture that is attached to the needle once or twice aroundthe needle holder in a clockwise direction.
5. Grab the short end of the suture with the needle holder.
6. Pull it through the loops, and have the knot lie flat. The short endof the stitch should now be on the opposite side.
7. Let go of the short end.
8. Bring the needle holder back to the center, parallel to the woundedges.
9. Repeat steps 4–8 at least one or two times more.
10. Cut the suture ends about 1 cm from the knot.
Figure-of-eight suture. This techniqueis used primarily to reapproximatedeep tissues such as muscle or fascia.

14 Practical Plastic Surgery for Nonsurgeons
Mattress Sutures1. Pull the suture through the skin so that just a short amount of suture
material (a few centimeters) is left out.
2. Take the needle out of the needle holder.
3. Both ends of the suture are on the same side. Place your needleholder between the ends of the suture.
4. Wrap the suture that is attached to the needle once or twice aroundthe needle holder in a clockwise direction.
5. Grab the short end with the needle holder.
6. Pull it through the loops, and have the knot lie flat. The short end ofthe stitch should now be on the opposite side.
7. Let go of the short end.
Instrument tie. Two loops of suture are wrapped around the distal portion of theneedle holder, and the free end of the suture is then grasped and pulledthrough the loop thus formed. A third suture loop is wrapped around the needleholder in the opposite direction and pulled in a direction opposite to the first tieto form a square knot. Note that the short end of the suture switches sides as itis passed through the loop to create each knot. (From Simon RR, Brenner BE(eds): Emergency Procedures and Techniques, 3rd ed. Philadelphia, LippincottWilliams & Wilkins, 1994, with permission.)
Suturing: The Basics 15
8. Bring the needle holder back to the center, between the sutureends.
9. Repeat steps 4–8 at least one or two times more.
10. Cut the suture ends about 1 cm from the knot.
Continuous Suture1. Do not pull the next to-the-last stitch all the way through; leave it
as a loop.
2. Place your needle holder between the loop and the suture attachedto the needle. The needle holder should be almost perpendicular tothe wound.
3. Wrap the suture that is attached to the needle once or twice aroundthe needle holder in a clockwise direction.
4. Grab the loop with the needle holder.
5. Pull it through, and have the knot lie flat. The short loop shouldnow be on the opposite side.
6. Let go of the loop.
7. Bring the needle holder back to the center between the loop andthe suture end.
8. Repeat steps 3–7 at least one or two times more.
9. Cut the suture ends about 1 cm from the knot.
SSuuttuurree RReemmoovvaallIf the sutures are taken out within 7–10 days, suture removal is usuallyeasy and should not cause more than a pinching sensation to the pa-tient. (See chapter 11, “Primary Closure,” for more details concerningthe timing of suture removal.)
Simple Sutures1. Cut the suture where it is exposed, crossing the wound edges.
2. Remove the entire stitch by grabbing the knot with a clamp or for-ceps and pulling gently.
Mattress SuturesRemoval of mattress sutures can be a little more difficult.
1. Grab the knot and try to lift it up a little; this should allow you tosee a space between the suture strands.
16 Practical Plastic Surgery for Nonsurgeons
2. Cut one strand of the suture under the knot.
3. Remove the entire stitch by grabbing the knot with a clamp or for-ceps and pulling gently. This suture will be a little harder to removethan a simple suture.
4. If you accidentally cut both ends of the suture, you will leave suturematerial behind.
5. Look on the opposite side of the skin for the suture. Grab it with aclamp or forceps, and gently remove the remaining suture material.
Continuous Sutures1. Cut the suture in several places where it is exposed, crossing the
wound edges.
2. Remove portions of the stitch by grabbing an end with a clamp orforceps and pulling gently.
3. The sutures to the knot must be cut in several places for removal.
AAlltteerrnnaattiivveess ttoo SSuuttuurriinnggOther techniques can bring skin edges together to “suture” a woundclosed without using sutures. These techniques require more expen-sive equipment than regular suturing.
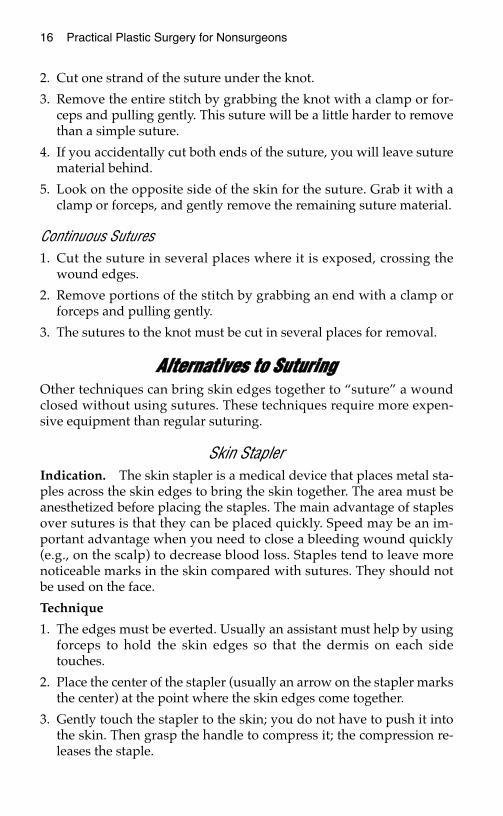
Skin StaplerIndication. The skin stapler is a medical device that places metal sta-ples across the skin edges to bring the skin together. The area must beanesthetized before placing the staples. The main advantage of staplesover sutures is that they can be placed quickly. Speed may be an im-portant advantage when you need to close a bleeding wound quickly(e.g., on the scalp) to decrease blood loss. Staples tend to leave morenoticeable marks in the skin compared with sutures. They should notbe used on the face.
Technique
1. The edges must be everted. Usually an assistant must help by usingforceps to hold the skin edges so that the dermis on each sidetouches.
2. Place the center of the stapler (usually an arrow on the stapler marksthe center) at the point where the skin edges come together.
3. Gently touch the stapler to the skin; you do not have to push it intothe skin. Then grasp the handle to compress it; the compression re-leases the staple.
Suturing: The Basics 17
4. Release the handle, and move the stapler a few millimeters back toseparate the staple from the stapling device.
5. The staples should be placed about 1 cm apart.
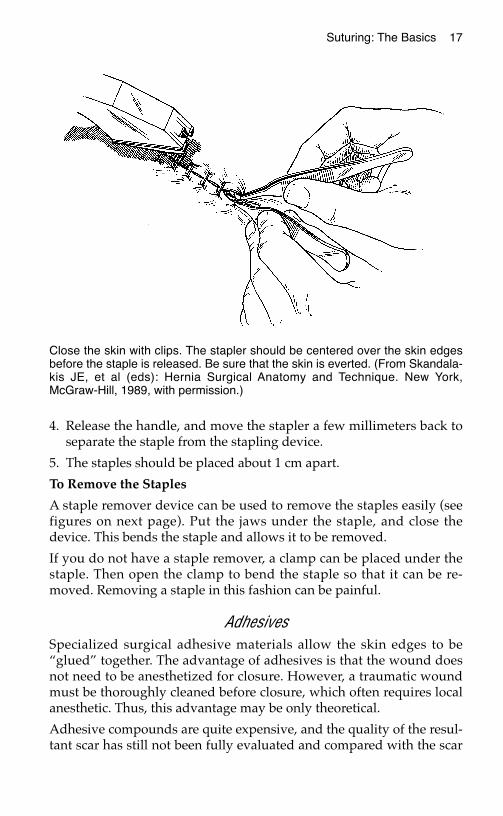
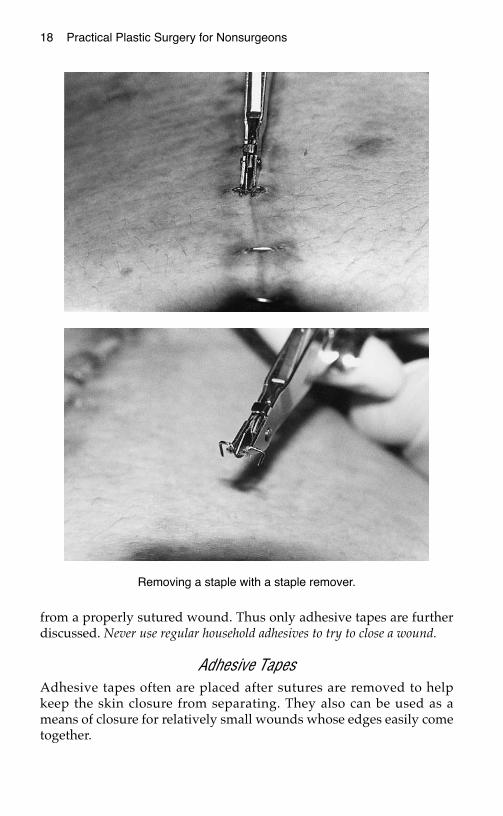
To Remove the Staples
A staple remover device can be used to remove the staples easily (seefigures on next page). Put the jaws under the staple, and close thedevice. This bends the staple and allows it to be removed.
If you do not have a staple remover, a clamp can be placed under thestaple. Then open the clamp to bend the staple so that it can be re-moved. Removing a staple in this fashion can be painful.
AdhesivesSpecialized surgical adhesive materials allow the skin edges to be“glued” together. The advantage of adhesives is that the wound doesnot need to be anesthetized for closure. However, a traumatic woundmust be thoroughly cleaned before closure, which often requires localanesthetic. Thus, this advantage may be only theoretical.
Adhesive compounds are quite expensive, and the quality of the resul-tant scar has still not been fully evaluated and compared with the scar
Close the skin with clips. The stapler should be centered over the skin edgesbefore the staple is released. Be sure that the skin is everted. (From Skandala-kis JE, et al (eds): Hernia Surgical Anatomy and Technique. New York,McGraw-Hill, 1989, with permission.)
18 Practical Plastic Surgery for Nonsurgeons
from a properly sutured wound. Thus only adhesive tapes are furtherdiscussed. Never use regular household adhesives to try to close a wound.
Adhesive TapesAdhesive tapes often are placed after sutures are removed to helpkeep the skin closure from separating. They also can be used as ameans of closure for relatively small wounds whose edges easily cometogether.
Removing a staple with a staple remover.

Suturing: The Basics 19
After thoroughly cleansing the wound, gently hold the skin edges to-gether with your fingers or a forceps. Cut the tape so that at least 2–3cm are on each side of the skin edge once the tape is in place.
Place tape strips one at a time, several millimeters apart. The tapesshould be placed across (perpendicular to) the long axis of the wound.Tapes stay in place for several days and should be allowed to fall off ontheir own. The patient can wash the area but should do so gently.
A, Closing the wound with adhesive strips. B, Placing adhesive strips to rein-force wound closure when sutures are removed.

20 Practical Plastic Surgery for Nonsurgeons
BBiibblliiooggrraapphhyy1. Edgerton M: The Art of Surgical Technique. Baltimore, Williams & Wilkins, 1988.2. McCarthy JG: Introduction to plastic surgery. In McCarthy JG (ed): Plastic Surgery.
Philadelphia, W.B. Saunders, 1990, pp 48–54.
BBAASSIICC SSUURRGGIICCAALL TTEECCHHNNIIQQUUEESS
The previous chapter discussed suturing techniques. This chapter de-scribes additional basic surgical skills. All rural healthcare providersshould be proficient in these techniques.
MMaakkiinngg aann IInncciissiioonnMany of the procedures explained in subsequent chapters of this bookinvolve making incisions into the skin. Whether it be to remove a sus-picious lesion or to create a flap for wound coverage, you must learnhow to make an incision safely and efficiently. You will use a knife witha very sharp blade. It is important to know how to use the knife prop-erly to prevent accidental injury to the patient or yourself.
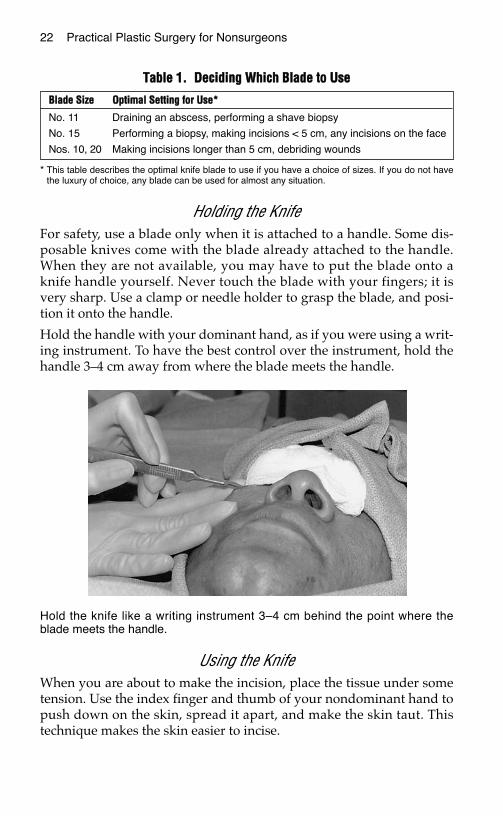
Which Blade to UseKnife blades come in various sizes (see figure below). There is no orderlyscale to follow as with needle sizes. A no. 11 blade comes to a sharppoint, whereas a no. 15 blade has a rounded end. A no. 10 blade is twicethe size of the no. 15, and a no. 20 blade is bigger than the no. 10. It canbe confusing, but most blades come with a picture on the packaging.
21
Chapter 2
KKEEYY FFIIGGUURREESS::Knife blades Tying off a vesselHolding the knife Stick tieContinuous locking suture
Commonly used knife blades. A, no. 11 blade; B, no. 15 blade; C, no. 10 blade.
22 Practical Plastic Surgery for Nonsurgeons
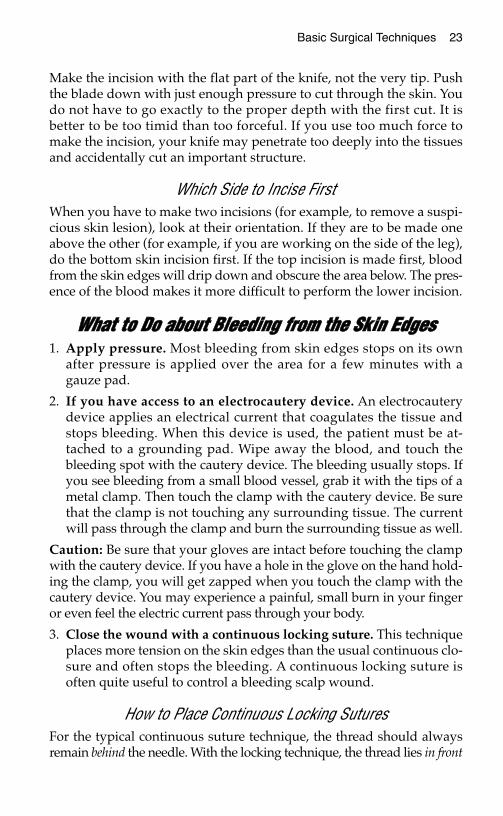
Holding the KnifeFor safety, use a blade only when it is attached to a handle. Some dis-posable knives come with the blade already attached to the handle.When they are not available, you may have to put the blade onto aknife handle yourself. Never touch the blade with your fingers; it isvery sharp. Use a clamp or needle holder to grasp the blade, and posi-tion it onto the handle.
Hold the handle with your dominant hand, as if you were using a writ-ing instrument. To have the best control over the instrument, hold thehandle 3–4 cm away from where the blade meets the handle.
Using the KnifeWhen you are about to make the incision, place the tissue under sometension. Use the index finger and thumb of your nondominant hand topush down on the skin, spread it apart, and make the skin taut. Thistechnique makes the skin easier to incise.
TTaabbllee 11.. DDeecciiddiinngg WWhhiicchh BBllaaddee ttoo UUssee
* This table describes the optimal knife blade to use if you have a choice of sizes. If you do not havethe luxury of choice, any blade can be used for almost any situation.
BBllaaddee SSiizzee OOppttiimmaall SSeettttiinngg ffoorr UUssee**
No. 11 Draining an abscess, performing a shave biopsy
No. 15 Performing a biopsy, making incisions < 5 cm, any incisions on the face
Nos. 10, 20 Making incisions longer than 5 cm, debriding wounds
Hold the knife like a writing instrument 3–4 cm behind the point where theblade meets the handle.
Basic Surgical Techniques 23
Make the incision with the flat part of the knife, not the very tip. Pushthe blade down with just enough pressure to cut through the skin. Youdo not have to go exactly to the proper depth with the first cut. It isbetter to be too timid than too forceful. If you use too much force tomake the incision, your knife may penetrate too deeply into the tissuesand accidentally cut an important structure.
Which Side to Incise FirstWhen you have to make two incisions (for example, to remove a suspi-cious skin lesion), look at their orientation. If they are to be made oneabove the other (for example, if you are working on the side of the leg),do the bottom skin incision first. If the top incision is made first, bloodfrom the skin edges will drip down and obscure the area below. The pres-ence of the blood makes it more difficult to perform the lower incision.
WWhhaatt ttoo DDoo aabboouutt BBlleeeeddiinngg ffrroomm tthhee SSkkiinn EEddggeess1. Apply pressure. Most bleeding from skin edges stops on its own
after pressure is applied over the area for a few minutes with agauze pad.
2. If you have access to an electrocautery device. An electrocauterydevice applies an electrical current that coagulates the tissue andstops bleeding. When this device is used, the patient must be at-tached to a grounding pad. Wipe away the blood, and touch thebleeding spot with the cautery device. The bleeding usually stops. Ifyou see bleeding from a small blood vessel, grab it with the tips of ametal clamp. Then touch the clamp with the cautery device. Be surethat the clamp is not touching any surrounding tissue. The currentwill pass through the clamp and burn the surrounding tissue as well.
Caution: Be sure that your gloves are intact before touching the clampwith the cautery device. If you have a hole in the glove on the hand hold-ing the clamp, you will get zapped when you touch the clamp with thecautery device. You may experience a painful, small burn in your fingeror even feel the electric current pass through your body.
3. Close the wound with a continuous locking suture. This techniqueplaces more tension on the skin edges than the usual continuous clo-sure and often stops the bleeding. A continuous locking suture isoften quite useful to control a bleeding scalp wound.
How to Place Continuous Locking SuturesFor the typical continuous suture technique, the thread should alwaysremain behind the needle. With the locking technique, the thread lies in front
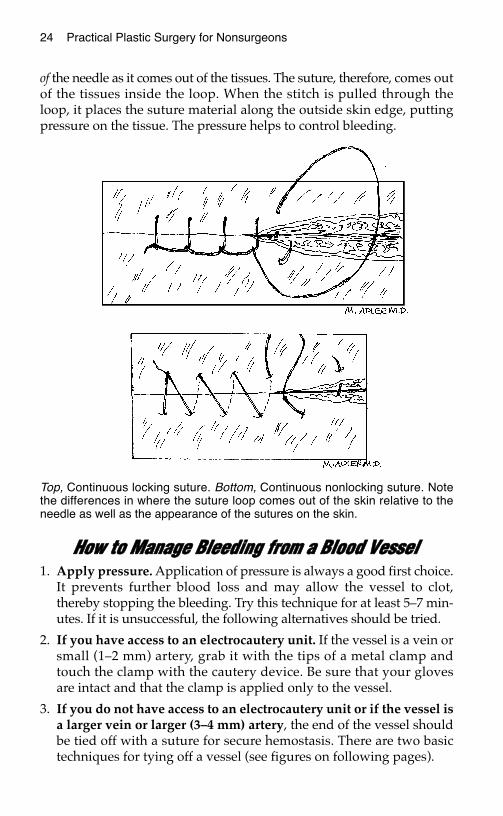
24 Practical Plastic Surgery for Nonsurgeons
of the needle as it comes out of the tissues. The suture, therefore, comes outof the tissues inside the loop. When the stitch is pulled through theloop, it places the suture material along the outside skin edge, puttingpressure on the tissue. The pressure helps to control bleeding.
HHooww ttoo MMaannaaggee BBlleeeeddiinngg ffrroomm aa BBlloooodd VVeesssseell1. Apply pressure. Application of pressure is always a good first choice.
It prevents further blood loss and may allow the vessel to clot,thereby stopping the bleeding. Try this technique for at least 5–7 min-utes. If it is unsuccessful, the following alternatives should be tried.
2. If you have access to an electrocautery unit. If the vessel is a vein orsmall (1–2 mm) artery, grab it with the tips of a metal clamp andtouch the clamp with the cautery device. Be sure that your glovesare intact and that the clamp is applied only to the vessel.
3. If you do not have access to an electrocautery unit or if the vessel isa larger vein or larger (3–4 mm) artery, the end of the vessel shouldbe tied off with a suture for secure hemostasis. There are two basictechniques for tying off a vessel (see figures on following pages).
Top, Continuous locking suture. Bottom, Continuous nonlocking suture. Notethe differences in where the suture loop comes out of the skin relative to theneedle as well as the appearance of the sutures on the skin.
Basic Surgical Techniques 25
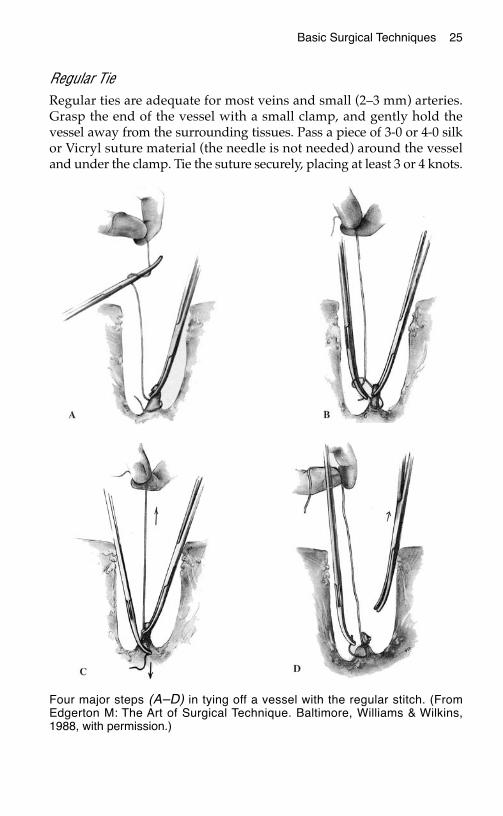
Regular TieRegular ties are adequate for most veins and small (2–3 mm) arteries.Grasp the end of the vessel with a small clamp, and gently hold thevessel away from the surrounding tissues. Pass a piece of 3-0 or 4-0 silkor Vicryl suture material (the needle is not needed) around the vesseland under the clamp. Tie the suture securely, placing at least 3 or 4 knots.
Four major steps (A–D) in tying off a vessel with the regular stitch. (FromEdgerton M: The Art of Surgical Technique. Baltimore, Williams & Wilkins,1988, with permission.)
26 Practical Plastic Surgery for Nonsurgeons
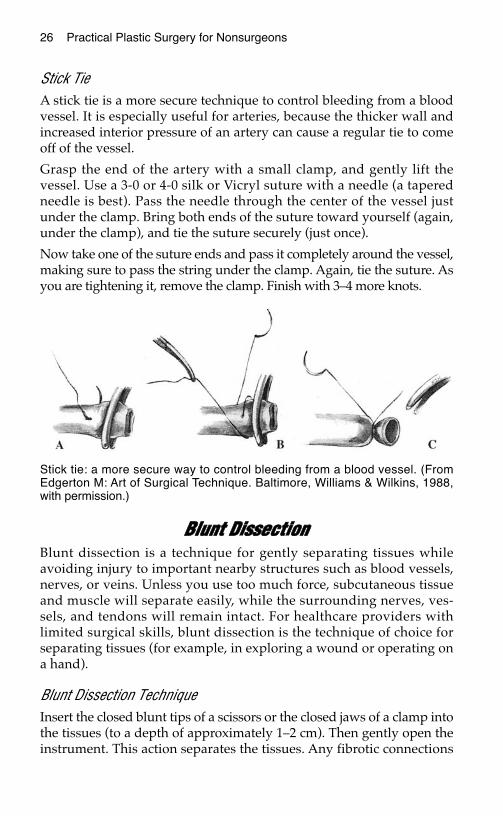
Stick TieA stick tie is a more secure technique to control bleeding from a bloodvessel. It is especially useful for arteries, because the thicker wall andincreased interior pressure of an artery can cause a regular tie to comeoff of the vessel.
Grasp the end of the artery with a small clamp, and gently lift thevessel. Use a 3-0 or 4-0 silk or Vicryl suture with a needle (a taperedneedle is best). Pass the needle through the center of the vessel justunder the clamp. Bring both ends of the suture toward yourself (again,under the clamp), and tie the suture securely (just once).
Now take one of the suture ends and pass it completely around the vessel,making sure to pass the string under the clamp. Again, tie the suture. Asyou are tightening it, remove the clamp. Finish with 3–4 more knots.
BBlluunntt DDiisssseeccttiioonnBlunt dissection is a technique for gently separating tissues whileavoiding injury to important nearby structures such as blood vessels,nerves, or veins. Unless you use too much force, subcutaneous tissueand muscle will separate easily, while the surrounding nerves, ves-sels, and tendons will remain intact. For healthcare providers withlimited surgical skills, blunt dissection is the technique of choice forseparating tissues (for example, in exploring a wound or operating ona hand).
Blunt Dissection TechniqueInsert the closed blunt tips of a scissors or the closed jaws of a clamp intothe tissues (to a depth of approximately 1–2 cm). Then gently open theinstrument. This action separates the tissues. Any fibrotic connections
Stick tie: a more secure way to control bleeding from a blood vessel. (FromEdgerton M: Art of Surgical Technique. Baltimore, Williams & Wilkins, 1988,with permission.)
Basic Surgical Techniques 27
that are not important structures can then be safely cut with the scis-sors. Repeat these maneuvers as needed.
Alternatively, you can gently use your index finger covered with agauze pad to separate tissues. This technique is especially useful forelevating a skin flap off an underlying muscle.
SShhaarrpp DDiisssseeccttiioonnSharp dissection is a technique for separating the tissues using a knifeor scissors. You must be careful not to cut accidentally an importantstructure. For healthcare providers without surgical expertise, sharpdissection should be used primarily in emergencies, for making a holein the neck to create an airway, or for trying to enlarge a deep hole tocontrol life-threatening bleeding. In addition, sharp dissection is usedfor undermining tissues (see below) or excising a lesion.
UUnnddeerrmmiinniinngg SSkkiinn EEddggeessTo undermine skin edges, you cut beneath the skin along the edge of awound to free the skin from its deep tissue attachments. The purposeis to increase skin mobility, which is important for a tension-freewound closure. It is also a necessary skill for performing local flaps.
TechniquePinch the tissues around the edge of the wound with the forceps toensure that the local anesthetic is still working. Give additional anes-thetic as required. Lift the skin edge with the forceps, and with a knifeor a scissors cut into the deep subcutaneous tissue along the length ofthe wound (try to stay at the same depth) until the skin has the re-quired mobility.
An alternative method involves separating the skin and subcutaneoustissue from the underlying muscle. The plane of dissection is just abovethe fascia, the thin layer of connective tissue that overlies the muscle.By undermining the skin along this deeper plane, you may encounterless bleeding than if you cut directly into the subcutaneous tissue layer.
BBiibblliiooggrraapphhyyEdgerton M: The Art of Surgical Technique. Baltimore, Williams & Wilkins, 1988.
LLOOCCAALL AANNEESSTTHHEESSIIAA
Full surgical evaluation of a wound and suture placement can bequite painful. You must anesthetize the injured area to perform theseprocedures properly. The administration of a local anesthetic allowsyou to evaluate and treat wounds in the emergency department orclinic. If you are unable to attain adequate pain control, the patientshould be taken to the operating room for exploration under generalanesthesia.
Local anesthetics work by reversibly blocking nerve conduction. Theyprimarily block the sensation of sharp pain; they do not block pressuresensation. Therefore, in an area that has been adequately anesthetized,the patient will not feel the sharp needle stick during suture placementbut may feel a vague sensation of pressure. This information should beshared with the patient.
The duration of effect depends on how long the agent stays in the im-mediate working area before being absorbed into the circulation orbroken down by the surrounding tissues.
TTooppiiccaall AAggeennttss Topical agents (agents applied on top of the surrounding skin and ab-sorbed into the area to provide anesthesia without injections) are nowavailable. However, they are quite expensive and can be used only onthe surface, not deep within an open wound. They can be quite effec-tive for performing simple excisions or starting intravenous lines.Although topical agents may become important in the future, becauseof their expense and limited usefulness, they are not discussed furtherin this chapter.
29
Chapter 3
KKEEYY FFIIGGUURREESS::Digital block/anatomy Ulnar nerve infiltrationSensation to hand Facial block: Median nerve infiltration skeleton
30 Practical Plastic Surgery for Nonsurgeons
Application of cold works for only a few minutes but may allowenough time to place one or two stitches. Cold also may help by de-creasing the pain of local anesthetic injection. It can be especially usefulin children. Have the patient hold ice over the area for 5 minutes beforeinjection. Another way to apply cold is to spray the area with ethylchloride solution.
IInnjjeeccttaabbllee LLooccaall AAnneesstthheettiiccssThe easiest and most reliable way to anesthetize a wound is to inject alocal anesthetic. There are two techniques: (1) direct injection of thelocal anesthetic agent into the area around the wound and (2) injectionof the anesthetic agent around a sensory nerve that supplies sensationto the injured area. Both methods are addressed below, but first the twomost commonly used anesthetic agents are discussed. Neither needs tobe refrigerated, which is important in the rural setting.
Lidocaine (Lignocaine)Lidocaine is the most commonly used and least expensive agent. Theusual total dose that can safely be given is 3–5 mg/kg body weight. Donot give more than this amount at one time. The anesthesia becomes effec-tive after 5–10 minutes and lasts, on average, from 45 minutes to 1 hour.
Bupivacaine (Marcaine)Bupivacaine is a longer-acting agent than lidocaine, but it is also moreexpensive. The usual total dose that can safely be administered at onetime is 2.0–3.0 mg/kg. Bupivacaine takes a few minutes longer tobecome effective than lidocaine (10–15 vs. 5–10 minutes), but its effectcan last 2–4 hours.
The longer duration of effect can be valuable. Some wounds take morethan 1 hour to clean and suture. In addition, bupivacaine gives resid-ual pain control after the procedure is completed. Hand injuries are es-pecially prone to pain, making bupivacaine a good choice for treatinghand and finger injuries.
If both lidocaine and bupivacaine are available, they can be mixed to-gether in equal parts and administered with one syringe. This combi-nation gives the advantages of the quicker onset of anesthesia from thelidocaine with the longer duration of action of the bupivacaine.
Calculating the Amount to AdministerTo calculate the mg dose, multiply the ml of solution that you plan togive by the concentration of the solution (mg/ml). The following table
Local Anesthesia 31
converts the commercially available anesthetic solutions to the mg/mlconcentration of the anesthetic agent.
Example: You expect to inject 30 ml of 1.0% lidocaine to anesthetize arelatively large wound:
30 ml × 10 mg/ml = 300 mg of lidocaine
The patient is a 70-kg man. A 70-kg man can receive 3–5 mg/kg or210–350 mg of lidocaine. Your 30-ml dose is on the high end of the“safe” range.
AdditivesIt is sometimes useful to add additional drugs to the local anestheticsolutions to optimize their effect.
BicarbonateBoth lidocaine and bupivacaine are acidic and therefore painful wheninjected. One way to lessen this pain is to add injectable sodium bicar-bonate to the local anesthetic solution. Your patient will be grateful forthis extra step. It is essential to use commercially prepared bicarbonatefor injections. Do not try home-grown formulations. Be careful: addingtoo much bicarbonate to the anesthetic solution can lead to the forma-tion of crystals. The proper mixtures are as follows:
• Lidocaine: add 1 ml of bicarbonate to each 9 ml of lidocaine beforeinjection.
• Bupivacaine: add 1 ml of bicarbonate to each 19 ml of bupivacainebefore injection.
EpinephrineEpinephrine is a vasoconstrictor that shrinks blood vessels and thusreduces bleeding from the wound and surrounding skin edges. Thismakes wound examination and repair easier to perform. Epi-nephrine also decreases absorption of the anesthetic agent, whichmay allow safe injection of more than the usually recommended
CCoonncceennttrraattiioonn ooff AAggeenntt iinn CCoommmmeerrcciiaallllyy AAvvaaiillaabbllee AAnneesstthheettiicc SSoolluuttiioonnss
AAggeenntt CCoommmmeerrcciiaall SSoolluuttiioonn ((%%)) CCoonncceennttrraattiioonn ((mmgg//mmll))
Lidocaine 0.5 51.0 102.0 20
Bupivacaine 0.25 2.50.50 5.0
32 Practical Plastic Surgery for Nonsurgeons
amount of anesthetic agent. Epinephrine requires 5–7 minutes to takeeffect. The maximal dosages of lidocaine and bupivacaine with epi-nephrine are as follows:
• Lidocaine with epinephrine increases to 7 mg/kg, and its effect lasts11⁄2–2 hours.
• Bupivacaine with epinephrine: dosing essentially stays the same at2.0–3.0 mg/kg, and its effect still lasts 2–4 hours.
Lidocaine and bupivacaine are available in solutions premixed withepinephrine , but you can add it to the anesthetic solution yourself. Bevery careful, however, because the amount of epinephrine to add isvery small:
1. Add 0.25 ml of 1:1000 epinephrine to 50 ml of local agent (50 ml isthe usual-sized vial). This will give a 1:200,000 dilution—safe formost procedures.
2. Err on the side of adding a little less rather than a little more if youare drawing the epinephrine with a syringe larger than 1 ml.
Contraindications to Adding Epinephrine
In certain circumstances the vasoconstricting effects of epinephrine canbe detrimental and may lead to tissue loss. Examples include:
• Digital block (numbing the whole finger)
• On the tip of the nose
• On the penis
• Injury that results in a very ragged and irregular laceration. Epinephrineworsens the already compromised circulation of the skin edges.
Indications for Adding Epinephrine
• Straight cut with healthy-looking skin edges
• On the face, oral mucosa, and scalp, which have excellent blood cir-culation
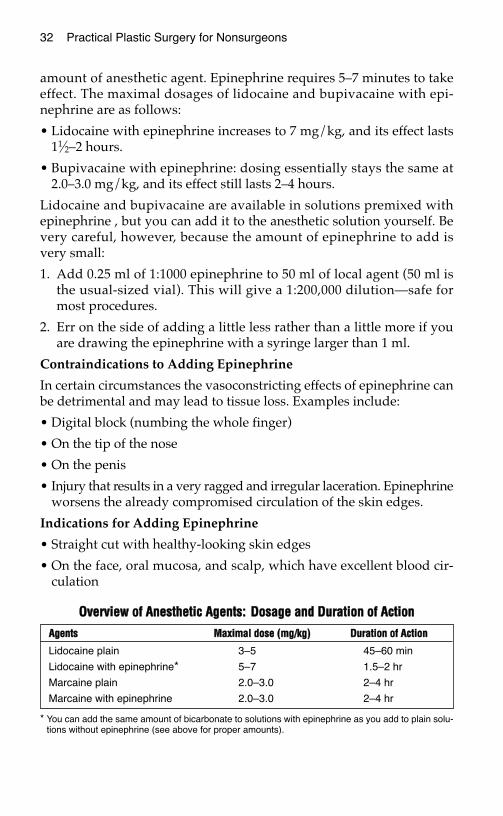
OOvveerrvviieeww ooff AAnneesstthheettiicc AAggeennttss:: DDoossaaggee aanndd DDuurraattiioonn ooff AAccttiioonn
* You can add the same amount of bicarbonate to solutions with epinephrine as you add to plain solu-tions without epinephrine (see above for proper amounts).
AAggeennttss MMaaxxiimmaall ddoossee ((mmgg//kkgg)) DDuurraattiioonn ooff AAccttiioonn
Lidocaine plain 3–5 45–60 min
Lidocaine with epinephrine* 5–7 1.5–2 hr
Marcaine plain 2.0–3.0 2–4 hr
Marcaine with epinephrine 2.0–3.0 2–4 hr
Local Anesthesia 33
SSaaffeettyy HHiinnttssCaution about injections: It is quite dangerous to insert the syringeneedle in the wrong place and inject the solution into an artery by mis-take. A good habit to develop when giving any type of injection is todraw back on the syringe (i.e., pull back on the plunger) before injecting thesolution. If you draw back and get blood, reposition the needle anddraw back again. This technique prevents an accidental intra-arterialinjection, which can cause serious complications. If you draw backblood with the initial insertion, you have not created a major problem.Because you are using a small needle, you should not do significantdamage to the blood vessel, but you may need to hold pressure overthe area for a few minutes to decrease bruising.
Caution about maximal safe dosage: Be aware of how much you areinjecting to avoid exceeding the safe doses. Average-sized wounds (upto 4–5 cm) usually present no problem, but it is easy to forget aboutdosage concerns when you are working on larger wounds. All anes-thetic agents have systemic as well as local effects. The safe dosage isbased on the total weight of the patient (thus the maximal doses aregiven as mg of agent/kg of patient body weight). Overdose can lead toseizures and even cardiovascular collapse or death due to the myocar-dial depressant and vasodilator effects of these agents.
HHooww ttoo AAddmmiinniisstteerr tthhee LLooccaall AAnneesstthheettiicc
Direct Infiltration Around the WoundIn many cases, injecting the anesthetic agent around the wound isan easy and reliable way to anesthetize the area. It is best to use assmall a needle as possible. The bigger the number, the smaller theneedle: use a 25- or 27-gauge needle, and inject slowly. Injection ofthe anesthetic agent can be painful, and a slower injection ratecauses less pain.
You can inject directly into the wound to get the anesthetic into the sur-rounding skin if the wound is reasonably clean. Alternatively, inject inthe noninjured skin along the outside of the wound. Inject until yousee the skin start to swell.
One technique is to push the needle into the tissues completely to thehub, and then slowly infiltrate the anesthetic as you bring the needleout of the tissues. Be sure to allow enough time for the agent to takeeffect before starting your procedure (at least 5 minutes).
34 Practical Plastic Surgery for Nonsurgeons
Nerve BlocksIn some areas of the body, discrete nerves that are responsible for sen-sation to the injured area are easy to locate. In these instances, localanesthesia can be infiltrated around (not into) the sensory nerve forpain control to the area around the wound. This approach is advanta-geous because the patient needs to undergo fewer injections than ifyou anesthetize the entire wound margins directly.
Nerve blocks are also a good choice when the wound is deep, be-cause they often give a more complete block of the entire area, notjust the skin. This approach is especially appropriate for largerwounds, because it usually requires less anesthetic agent than directinfiltration.
Whenever possible, use a relatively small needle (23- or 25-gauge) forthe injection. Always draw back on the syringe before injecting the anes-thetic. The nerves that you are blocking often are located near bloodvessels.
Caution: You are probably injecting the anesthetic directly into thenerve if the patient complains of strong electric shocks or severe painradiating along the distribution of the nerve. Stop the injection immedi-ately and reposition the needle.
It usually takes a few minutes longer for the anesthetic to take effectthan with direct wound injection. Often you must wait 10–15 minutesafter giving a nerve block before proceeding with the procedure.
NNeerrvvee BBlloocckkss ffoorr HHaanndd IInnjjuurriieessLidocaine, bupivacaine, or a combination of the two solutions can beused. Add bicarbonate if it is available. Epinephrine should not be usedfor anesthetizing the hand and fingers.
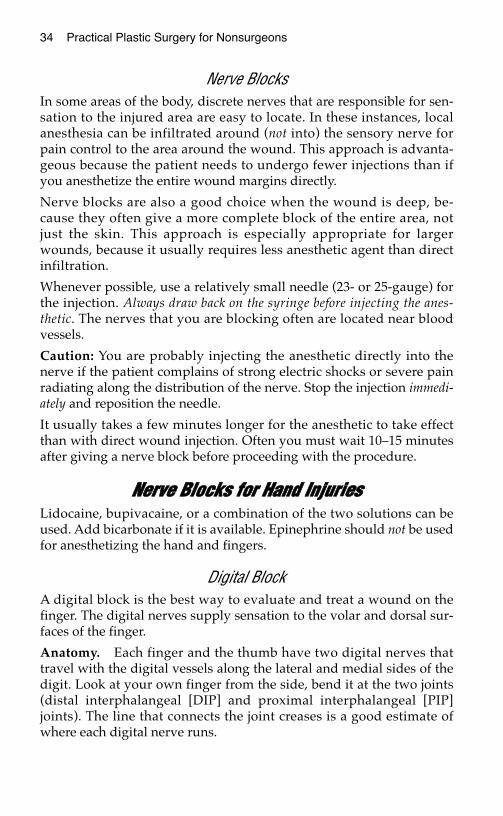
Digital BlockA digital block is the best way to evaluate and treat a wound on thefinger. The digital nerves supply sensation to the volar and dorsal sur-faces of the finger.
Anatomy. Each finger and the thumb have two digital nerves thattravel with the digital vessels along the lateral and medial sides of thedigit. Look at your own finger from the side, bend it at the two joints(distal interphalangeal [DIP] and proximal interphalangeal [PIP]joints). The line that connects the joint creases is a good estimate ofwhere each digital nerve runs.
Local Anesthesia 35
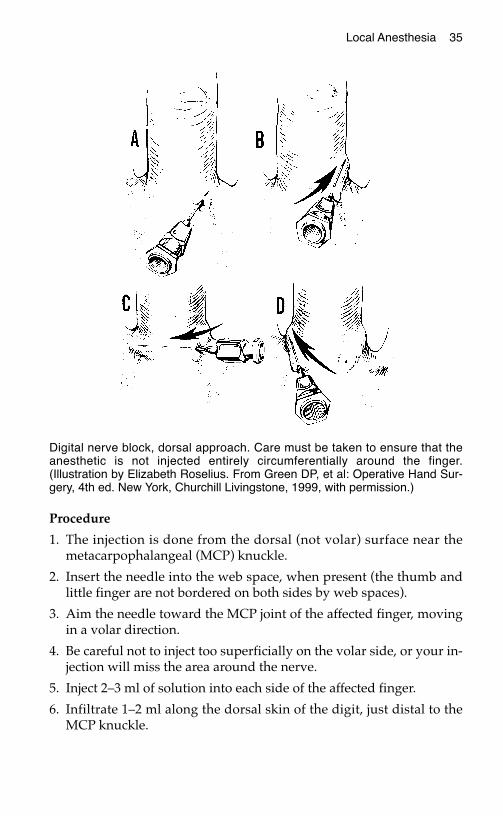
Procedure
1. The injection is done from the dorsal (not volar) surface near themetacarpophalangeal (MCP) knuckle.
2. Insert the needle into the web space, when present (the thumb andlittle finger are not bordered on both sides by web spaces).
3. Aim the needle toward the MCP joint of the affected finger, movingin a volar direction.
4. Be careful not to inject too superficially on the volar side, or your in-jection will miss the area around the nerve.
5. Inject 2–3 ml of solution into each side of the affected finger.
6. Infiltrate 1–2 ml along the dorsal skin of the digit, just distal to theMCP knuckle.
Digital nerve block, dorsal approach. Care must be taken to ensure that theanesthetic is not injected entirely circumferentially around the finger.(Illustration by Elizabeth Roselius. From Green DP, et al: Operative Hand Sur-gery, 4th ed. New York, Churchill Livingstone, 1999, with permission.)
36 Practical Plastic Surgery for Nonsurgeons
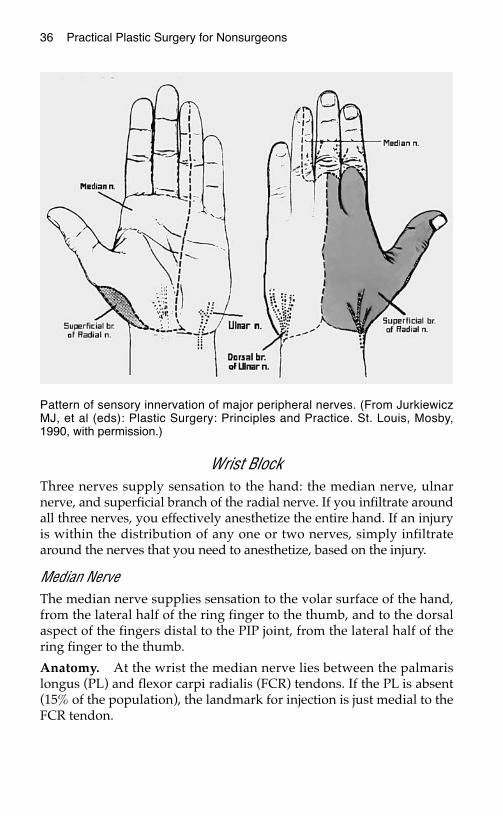
Wrist BlockThree nerves supply sensation to the hand: the median nerve, ulnarnerve, and superficial branch of the radial nerve. If you infiltrate aroundall three nerves, you effectively anesthetize the entire hand. If an injuryis within the distribution of any one or two nerves, simply infiltratearound the nerves that you need to anesthetize, based on the injury.
Median NerveThe median nerve supplies sensation to the volar surface of the hand,from the lateral half of the ring finger to the thumb, and to the dorsalaspect of the fingers distal to the PIP joint, from the lateral half of thering finger to the thumb.
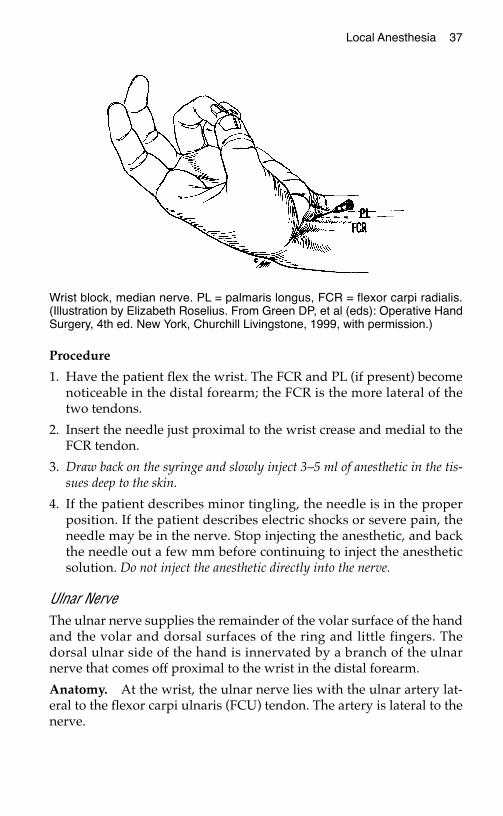
Anatomy. At the wrist the median nerve lies between the palmarislongus (PL) and flexor carpi radialis (FCR) tendons. If the PL is absent(15% of the population), the landmark for injection is just medial to theFCR tendon.
Pattern of sensory innervation of major peripheral nerves. (From JurkiewiczMJ, et al (eds): Plastic Surgery: Principles and Practice. St. Louis, Mosby,1990, with permission.)
Local Anesthesia 37
Procedure
1. Have the patient flex the wrist. The FCR and PL (if present) becomenoticeable in the distal forearm; the FCR is the more lateral of thetwo tendons.
2. Insert the needle just proximal to the wrist crease and medial to theFCR tendon.
3. Draw back on the syringe and slowly inject 3–5 ml of anesthetic in the tis-sues deep to the skin.
4. If the patient describes minor tingling, the needle is in the properposition. If the patient describes electric shocks or severe pain, theneedle may be in the nerve. Stop injecting the anesthetic, and backthe needle out a few mm before continuing to inject the anestheticsolution. Do not inject the anesthetic directly into the nerve.
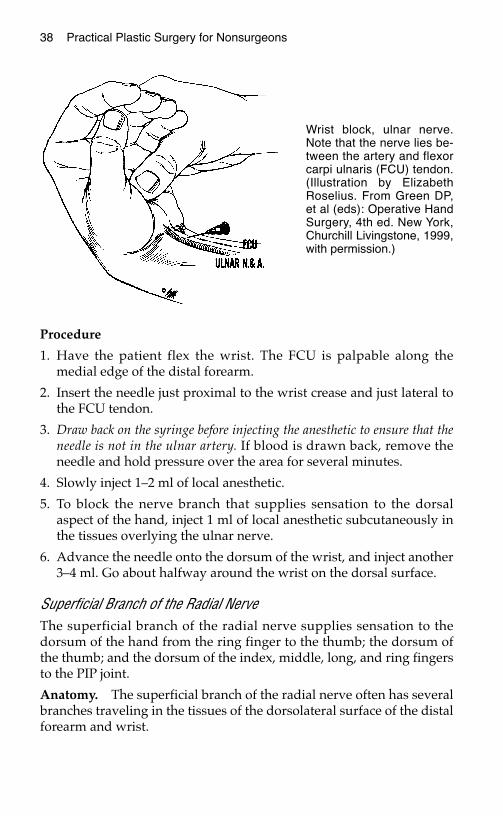
Ulnar NerveThe ulnar nerve supplies the remainder of the volar surface of the handand the volar and dorsal surfaces of the ring and little fingers. Thedorsal ulnar side of the hand is innervated by a branch of the ulnarnerve that comes off proximal to the wrist in the distal forearm.
Anatomy. At the wrist, the ulnar nerve lies with the ulnar artery lat-eral to the flexor carpi ulnaris (FCU) tendon. The artery is lateral to thenerve.
Wrist block, median nerve. PL = palmaris longus, FCR = flexor carpi radialis.(Illustration by Elizabeth Roselius. From Green DP, et al (eds): Operative HandSurgery, 4th ed. New York, Churchill Livingstone, 1999, with permission.)
38 Practical Plastic Surgery for Nonsurgeons
Procedure
1. Have the patient flex the wrist. The FCU is palpable along themedial edge of the distal forearm.
2. Insert the needle just proximal to the wrist crease and just lateral tothe FCU tendon.
3. Draw back on the syringe before injecting the anesthetic to ensure that theneedle is not in the ulnar artery. If blood is drawn back, remove theneedle and hold pressure over the area for several minutes.
4. Slowly inject 1–2 ml of local anesthetic.
5. To block the nerve branch that supplies sensation to the dorsalaspect of the hand, inject 1 ml of local anesthetic subcutaneously inthe tissues overlying the ulnar nerve.
6. Advance the needle onto the dorsum of the wrist, and inject another3–4 ml. Go about halfway around the wrist on the dorsal surface.
Superficial Branch of the Radial NerveThe superficial branch of the radial nerve supplies sensation to thedorsum of the hand from the ring finger to the thumb; the dorsum ofthe thumb; and the dorsum of the index, middle, long, and ring fingersto the PIP joint.
Anatomy. The superficial branch of the radial nerve often has severalbranches traveling in the tissues of the dorsolateral surface of the distalforearm and wrist.
Wrist block, ulnar nerve.Note that the nerve lies be-tween the artery and flexorcarpi ulnaris (FCU) tendon.(Illustration by ElizabethRoselius. From Green DP,et al (eds): Operative HandSurgery, 4th ed. New York,Churchill Livingstone, 1999,with permission.)
Local Anesthesia 39
Procedure
1. Feel for the radial artery pulse in the distal forearm, approximately2 cm proximal to the wrist crease.
2. Insert the needle laterally to the point where you feel the pulse, andinject 1–2 ml of local anesthetic subcutaneously. Draw back on the sy-ringe before injection.
3. Advance the needle into the tissues on the dorsum of the distal fore-arm.
4. Inject an additional 3–4 ml of solution halfway around the dorsalsurface of the wrist.
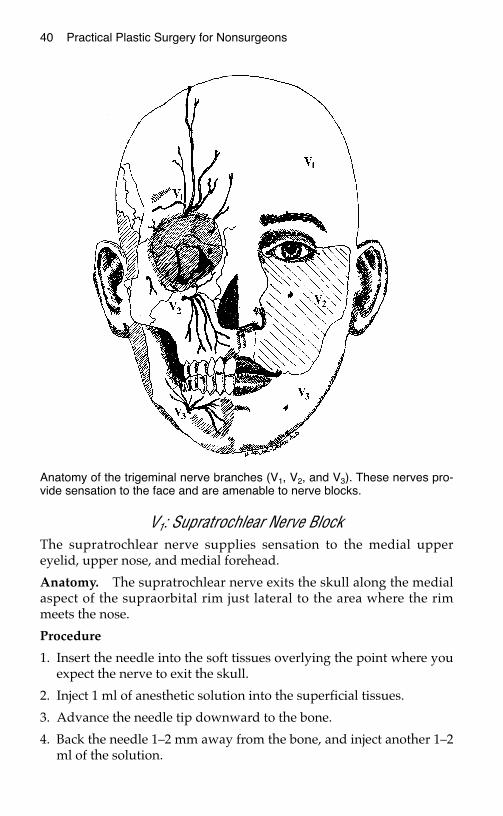
NNeerrvvee BBlloocckkss ffoorr FFaacciiaall IInnjjuurriieessThe nerves that supply sensation to the areas most commonly affectedby facial trauma exit the skull along a line drawn perpendicular to themidpoint of the pupil. These nerves, designated as V1, V2, and V3, arebranches of the fifth cranial (trigeminal) nerve.
Lidocaine and/or bupivacaine can be used for facial nerve blocks. Addbicarbonate if it is available. Epinephrine is often a useful addition tothe anesthetic solution.
V1: Supraorbital Nerve BlockThe supraorbital nerves supply sensation to the upper eyelid and over-lying forehead. A supraorbital nerve is located on each side of the face.
Anatomy. If you divide the supraorbital rim into thirds, the supraor-bital nerve exits the skull at the point where the central and medialthirds meet.
Procedure
1. Insert the needle into the eyebrow overlying the point where thenerve exits the skull.
2. Inject 1 ml of anesthetic solution into the superficial tissues.
3. Advance the needle downward to the bone. You will feel the needlehitting against a hard surface when it meets the bone.
4. Back the needle 1–2 mm away from the bone, and inject another 2–3ml of local anesthetic.
40 Practical Plastic Surgery for Nonsurgeons
V1: Supratrochlear Nerve BlockThe supratrochlear nerve supplies sensation to the medial uppereyelid, upper nose, and medial forehead.
Anatomy. The supratrochlear nerve exits the skull along the medialaspect of the supraorbital rim just lateral to the area where the rimmeets the nose.
Procedure
1. Insert the needle into the soft tissues overlying the point where youexpect the nerve to exit the skull.
2. Inject 1 ml of anesthetic solution into the superficial tissues.
3. Advance the needle tip downward to the bone.
4. Back the needle 1–2 mm away from the bone, and inject another 1–2ml of the solution.
Anatomy of the trigeminal nerve branches (V1, V2, and V3). These nerves pro-vide sensation to the face and are amenable to nerve blocks.
Local Anesthesia 41
Caution: For a forehead wound above the medial third of the eyebrow,both the supraorbital nerve and supratrochlear nerve probably need tobe blocked on the side of the injury.
V2: Infraorbital Nerve BlockThe infraorbital nerves supply sensation to the upper lip, cheek, lateralaspect of the nose, and lower eyelid. There is one nerve on each side ofthe face.
Anatomy. The infraorbital nerve comes out of the skull about 1⁄2 cmbelow the orbital rim along the vertical line drawn perpendicular tothe midpoint of the pupil.
Procedure
1. Insert the needle into the cheek skin at the point where the verticalline drawn perpendicular to the midpoint of the pupil meets a hori-zontal line drawn from the bottom of the nose.
2. Advance the needle tip 2–3 mm into the tissues.
3. Inject 1 ml of solution.
4. Advance the needle tip further, going in a slightly superior directionas you pass through the tissues until you hit the underlying bone.The tip ultimately should travel superiorly about 1 cm.
5. Back the needle out 1–2 mm, and inject another 2–3 ml of the anes-thetic.
V3: Mental Nerve BlockThe mental nerves supply sensation to the lower lip and the skin im-mediately below it. There is one mental nerve on each side of theface.
Anatomy. The mental nerve exits from the mandible a few mm belowand 5–10 mm lateral to the inferior aspect of the lower canine toothroot.
Procedure.
1. The mental nerve block is performed in the mouth.
2. Insert the needle into the mucosa a few mm below and 5–7 mm lat-eral to the root of the lower canine tooth.
3. Advance the needle tip until it hits the bone.
4. Inject 2–3 ml of solution.
42 Practical Plastic Surgery for Nonsurgeons
SSeeddaattiioonnSedation can be a useful adjunct to local anesthetic. A sedative de-creases the patient’s anxiety about the upcoming procedure and in-creases the patient’s cooperation. This, in turn, makes the procedureeasier and safer to perform.
In the setting of exploring or closing a wound, the purpose of sedativemedications is not to put the patient to sleep, but to make him or hersomewhat drowsy and less anxious.
Caution: Sedative medications can cause respiratory depression.Always start with small doses, and gradually give additional medica-tion until the desired amount of sedation is obtained. Patients shouldbe monitored closely (blood pressure, heart rate, and respiratory rate)during and for at least 1 hour after the procedure is completed.
There are many sedatives from which to choose. The following tablegives information about two commonly used benzodiazepines.
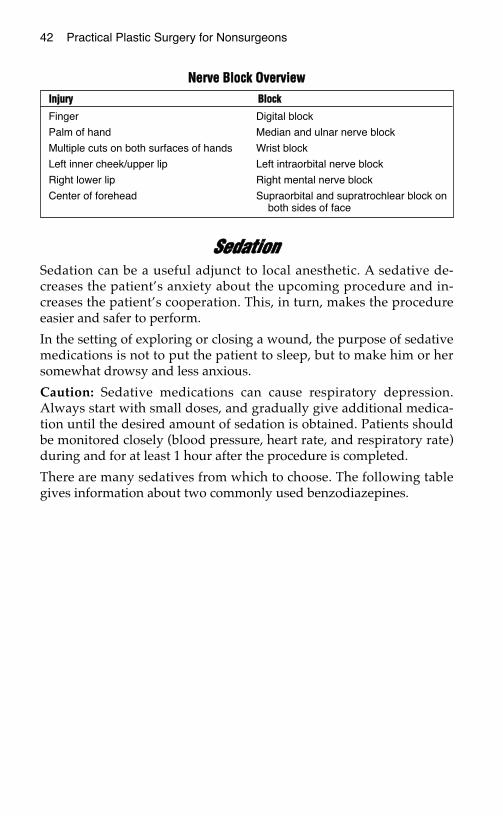
NNeerrvvee BBlloocckk OOvveerrvviieewwIInnjjuurryy BBlloocckk
Finger Digital block
Palm of hand Median and ulnar nerve block
Multiple cuts on both surfaces of hands Wrist block
Left inner cheek/upper lip Left intraorbital nerve block
Right lower lip Right mental nerve block
Center of forehead Supraorbital and supratrochlear block onboth sides of face
Local Anesthesia 43
FFoorr IInnffoorrmmaattiioonn OOnnllyy:: AAddddiittiioonnaall BBlloocckkss ffoorrPPrroocceedduurreess oonn tthhee UUppppeerr EExxttrreemmiittyy
These procedures are technically more difficult and require special equip-ment. Although discussed for completeness, they are beyond the realm ofa health care provider without expertise in delivering anesthesia.
Bier BlockIn a Bier block, also called intravenous regional anesthesia, the affectedhand or forearm is exsanguinated and an upper arm tourniquet is in-flated. The venous circulation of the hand or forearm is then filled withlidocaine via a catheter placed in a hand vein before exsanguination. Inthis manner, the hand and forearm are anesthetized. The block lastsabout 45–60 minutes.
Warning: The tourniquet must work perfectly. If the tourniquet doesnot hold its pressure, the injected lidocaine may become systemic andcause serious side effects (e.g., seizures, cardiac arrhythmias/arrest). Inaddition, for a very short procedure (< 15–20 minutes), the lidocaine inthe veins will still be at too high a concentration for the tourniquet tobe deflated. Usually, the tourniquet can be released safely after 25–30minutes.
Axillary BlockAn axillary block essentially anesthetizes the proximal portions of the
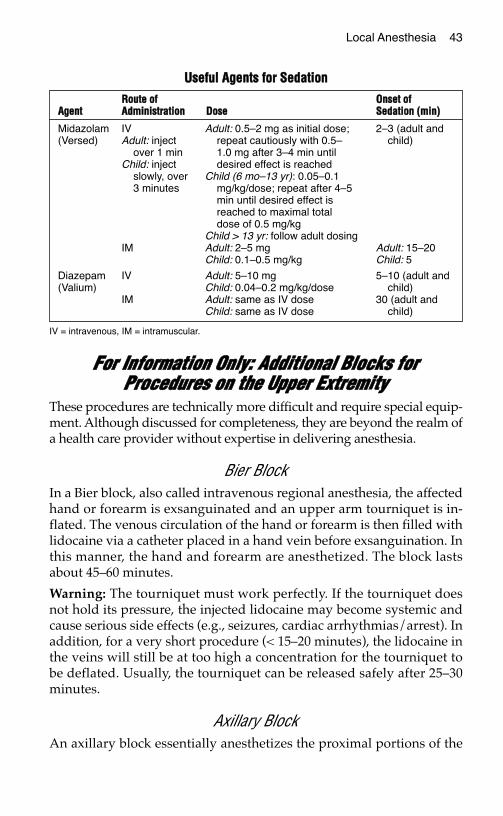
UUsseeffuull AAggeennttss ffoorr SSeeddaattiioonn
IV = intravenous, IM = intramuscular.
RRoouuttee ooff OOnnsseett ooffAAggeenntt AAddmmiinniissttrraattiioonn DDoossee SSeeddaattiioonn ((mmiinn))
Midazolam IV Adult: 0.5–2 mg as initial dose; 2–3 (adult and(Versed) Adult: inject repeat cautiously with 0.5– child)
over 1 min 1.0 mg after 3–4 min untilChild: inject desired effect is reached
slowly, over Child (6 mo–13 yr): 0.05–0.13 minutes mg/kg/dose; repeat after 4–5
min until desired effect isreached to maximal totaldose of 0.5 mg/kg
Child > 13 yr: follow adult dosingIM Adult: 2–5 mg Adult: 15–20
Child: 0.1–0.5 mg/kg Child: 5
Diazepam IV Adult: 5–10 mg 5–10 (adult and(Valium) Child: 0.04–0.2 mg/kg/dose child)
IM Adult: same as IV dose 30 (adult andChild: same as IV dose child)
44 Practical Plastic Surgery for Nonsurgeons
nerves that become the median, ulnar, and radial nerves in the forearmand hand. Technically these portions of the nerves are called the cordsof the brachial plexus. The axillary block is commonly used to provideanesthesia for hand procedures.
Usually a mixture of lidocaine and bupivacaine is used for infiltration.An axillary block is useful for procedures that take up to 21⁄2 hours.
The landmark for injection of the anesthetic is the axillary artery, whichis easy to feel in the inner aspect of the upper arm. However, injectingin the vicinity of the axillary artery is not without risk; possible compli-cations include injury to the artery or accidental intra-arterial injection.A nerve stimulator can be used to help to identify the nerve andthereby lessen these risks. Even so, an axillary block should be doneonly by health care providers with expertise in delivering anesthesia.
BBiibblliiooggrraapphhyy1. Cousing MJ, Bridenbaugh PO: Neural Blockade in Clinical Anesthesia and
Management of Pain, 3rd ed. Philadelphia, Lippincott Williams & Wilkins, 1997.2. Longnecker DE, Morgan GE, Tinker JH: Principles and Practices of Anesthesiology,
2nd ed. St. Louis, Mosby, 1997.
PPRROOTTEECCTTIINNGG YYOOUURRSSEELLFFFFRROOMM IINNFFEECCTTIIOOUUSS DDIISSEEAASSEESS
Healthcare providers are at risk for contracting serious infectious dis-eases. Although the human immunodeficiency virus (HIV) is oftenthe most feared, the hepatitis B virus (HBV) and hepatitis C virus(HCV) are actually much more contagious than HIV, because asmaller inoculum can cause infection.
Healthcare workers who are inexperienced at technical proceduresand find themselves having to treat open wounds and perform inva-sive procedures are especially at risk for two important reasons. First,treatment of an open wound almost always necessitates exposure toblood and body fluids. Blood and body fluids represent the primarymode of transmission of these contagious agents. Second, the treat-ment of open wounds and the performance of even simple procedures(for example, suturing) involves the use of sharp instruments.Inexperience on the part of the healthcare provider is a major riskfactor contributing to an accidental needlestick or other traumaticinjury during such procedures.
SSccooppee ooff tthhee PPrroobblleemmThese statistics are presented not to scare you, but to emphasize thatthe risk is genuine.
Human Immunodeficiency VirusWorld Prevalence: Over 47 million people worldwide have been in-fected with HIV since the start of the epidemic. In 1998, HIV causedover 2 million deaths. In some countries in Africa, 1 in 4 people is in-fected with HIV. Ninety-five percent of cases occur in the developingworld.
Prevalence in the U.S. Approximately 1 in 200 people carries HIV.
45
Chapter 4
46 Practical Plastic Surgery for Nonsurgeons
Hepatitis B VirusWorld Prevalence. There are over 350 million chronic carriers of HBVworldwide. In developing nations, 8–15% of the population are chroniccarriers. This percentage drops to less than 5% in developed nations.Five to ten percent of chronically infected people will develop chronicliver disease that may lead to death.
Prevalence in the U.S. Approximately 1 million people are chroni-cally infected with HBV.
Hepatitis C VirusWorld Prevalence. Three percent of the world’s population is infectedwith HCV. There are more than 170 million chronic carriers of HCV.About 50–70% of infected people will develop chronic liver disease.HCV infection is the leading disease necessitating liver transplantation.
Prevalence in the U.S. Approximately 4 million people are chroni-cally infected with HCV.
Delta Hepatitis VirusThe delta hepatitis virus (HDV) primarily affects patients infected withHBV. A patient infected with both HBV and HDV has an increased riskfor the development of fulminant hepatitis compared with a patient in-fected with HBV alone (the risk doubles to 20%). About 70–80% ofpeople infected with HBV and HDV develop chronic hepatitis.
Prevalence in the U.S. Unknown
SSiimmppllee PPrreeccaauuttiioonnss tthhaatt MMaakkee aa DDiiffffeerreennccee• Wash your hands before and after examining every patient. This is
the single most important way to prevent the spread of infectiousdiseases.
• Wear gloves. Gloves should be worn whenever you anticipate con-tact with mucous membranes, open wounds, or body substances(e.g., urine, feces, blood). Also wear gloves when handling itemssoiled with blood or body fluids or performing any type of invasiveprocedure. Do not go from patient to patient wearing the same pairof gloves. Gloves are not a substitute for proper hand washing. Afterremoving your gloves, remember to wash your hands.
• Double-glove whenever possible during procedures involvingsharp instruments. Double gloves may feel uncomfortable at first,but you will get used to them. Try wearing a glove a half size largernext to your skin, and wear your regular size over the larger glove.

Protecting Yourself from Infectious Diseases 47
• Wear goggles. Eye protection is always advisable during procedures.Get your own pair, and keep them in your pocket. You will beamazed at how much material accumulates on the lenses, even whenyou are not aware that any material has been sprayed. The gogglesused for racket sports are quite comfortable and often very useful.When you wear a mask over your mouth, the goggles may fog up be-cause exhaled air escapes from under the mask around the edges ofyour nose. To prevent your lenses from fogging, tape the mask toyour cheeks and to the bridge of your nose to prevent air escape.
• Get vaccinated against HBV. All healthcare providers should be im-munized against HBV. The vaccine is 95% effective in preventing in-fection. The current vaccine is completely artificial, i.e., no humanproducts are part of the vaccine. There is no chance of contractingHBV, HCV, or HIV from the vaccine. The vaccine is administered as aseries of three intramuscular injections. The second dose is given 1month after the first injection, and the third dose is given 6 monthsafter the first injection.
• Observe proper use and disposal of all sharp instruments. Needlesfor injection should not be recapped by hand. Accidents often occurduring manual recapping. Keep the cap on your tray, and slide theneedle back into the cap when you have finished using it. Do notattempt to bend needles or other sharp objects. Use your instru-ments when placing sutures—not your fingers! Suturing is often dif-ficult for the novice, but get in the habit of using only instrumentsto hold and reposition the needle. With practice, this technique be-comes easier. Do not leave needles or other sharp instruments lyingaround. Always place them in a container marked “sharp instru-ments” after use.
• Adequately sterilize all reusable materials. This practice is vital toprotect healthcare providers and their patients from serious infec-tious diseases. Never reuse needles or syringes without properly ster-ilizing them.
• Keep all countertops and other surfaces clean. It is important to reg-ularly clean all surfaces that may have become contaminated byblood or other body fluids. HBV can survive for at least 1 week indried blood on various surfaces. A disinfectant made of dilute bleachshould be used for regular cleaning.
48 Practical Plastic Surgery for Nonsurgeons
PPoosstteexxppoossuurree TTrreeaattmmeennttExposure to potentially infectious blood or body fluids includes needle-sticks, splashing of fluids in the face or eyes, and contact with bodyfluids or blood through an open wound on your skin. Although intactskin is usually a good protective barrier, irritated or chapped skin (forexample, from cold weather) can be penetrated by some viruses. If, de-spite following all of the above recommendations, you are exposed topotentially infectious blood or body fluids, certain steps can be takento decrease your risk for becoming ill.
• If you are exposed to HBV and have not been previously vacci-nated: Hepatitis B immunoglobulin (HBIG) should be given (5.0 mlintramuscularly). HBIG is most effective when administered within24 hours of a needlestick, but some protection is still afforded if it isgiven in the first few days after exposure. You also should begin theHBV vaccination regimen.
• If you are exposed to HCV: Unfortunately, there is no way to preventinfection after HCV exposure. However, close observation is war-ranted, and at the first sign of hepatitis, interferon therapy should beinstituted. Although early interferon therapy, before any signs orsymptoms of hepatitis have developed, does not prevent illness, oncesigns and symptoms become apparent, interferon may prevent seriousillness.
• If you are exposed to HIV: If you have access to drugs used to treatHIV infection, a short course of medication is often recommendedafter a significant exposure. Usually, exposure to infected urine doesnot warrant treatment. Recommendations for treatment usually arerelated to the patient’s HIV titer and to the healthcare worker’sdegree of exposure. For example, a hollow needlestick from a patientwith a high HIV titer definitely warrants postexposure treatment—optimally, a combination of zidovudine, 200 mg 3 times/day;lamivudine, 150 mg 2 times/day, and indinavir, 800 mg 3 times/day.All are given orally.
BBiibblliiooggrraapphhyy1. Gilbert DN, Moellering RC, Sande MA (eds): The Sanford Guide to Antimicrobial
Therapy, 29th ed. Vermont, Antimicrobial Therapy Inc., 1999, pp 112, 128.2. www.cdc.gov/epo/mmwr (Postexposure prophylaxis).3. www.osha.gov (Universal precautions).4. www.who.int (World Health Organization surveillance statistics).
EEVVAALLUUAATTIIOONN OOFF TTHHEE AACCUUTTEELLYYIINNJJUURREEDD PPAATTIIEENNTT
This book primarily describes treatments for stable patients who havea specific injury or problem wound. They have been evaluated pre-viously by a general surgeon, trauma surgeon, or emergency de-partment physician, who has ruled out other, more life-threateninginjuries.
Because health care providers cannot know what situation they mayface, all of us must be aware of how to evaluate a patient with poten-tially serious injuries. This chapter provides basic principles for the im-portant, life-saving initial evaluation and treatment of a patient whomay have suffered a serious traumatic injury. It is not intended to be afull, detailed description of first-line treatments, but it does provideuseful information for all health care providers.
Be sure to get as detailed a history as possible (from the patient, family,or whoever brought the patient to medical attention), but do not wastetime. Your primary objective is to identify and treat potentially life-threatening injuries.
AABBCCss ooff TTrraauummaa CCaarreeFollowing the ABCs (airway, breathing, circulation) and DE (disabilityand exposure) of trauma care prevents you from getting sidetracked bythe patient’s obvious injury (arm fracture, for example) and therebymissing a more life-threatening but less obvious injury.
AirwayAn open airway (i.e., the path from the nose/mouth to the lungs) isvital for the patient to be able to breathe. You need to determine
49
Chapter 5
KKEEYY FFIIGGUURREESS::Emergency cricothyrotomyEmergency needle thoracostomy
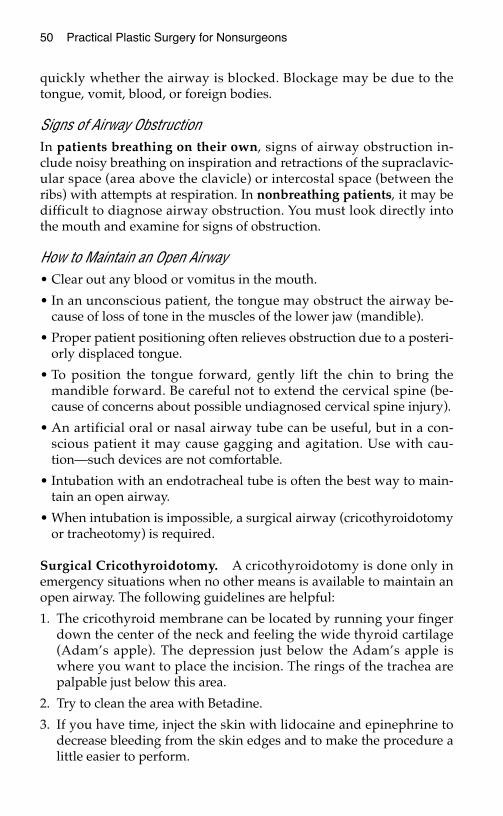
50 Practical Plastic Surgery for Nonsurgeons
quickly whether the airway is blocked. Blockage may be due to thetongue, vomit, blood, or foreign bodies.
Signs of Airway ObstructionIn patients breathing on their own, signs of airway obstruction in-clude noisy breathing on inspiration and retractions of the supraclavic-ular space (area above the clavicle) or intercostal space (between theribs) with attempts at respiration. In nonbreathing patients, it may bedifficult to diagnose airway obstruction. You must look directly intothe mouth and examine for signs of obstruction.
How to Maintain an Open Airway• Clear out any blood or vomitus in the mouth.
• In an unconscious patient, the tongue may obstruct the airway be-cause of loss of tone in the muscles of the lower jaw (mandible).
• Proper patient positioning often relieves obstruction due to a posteri-orly displaced tongue.
• To position the tongue forward, gently lift the chin to bring themandible forward. Be careful not to extend the cervical spine (be-cause of concerns about possible undiagnosed cervical spine injury).
• An artificial oral or nasal airway tube can be useful, but in a con-scious patient it may cause gagging and agitation. Use with cau-tion—such devices are not comfortable.
• Intubation with an endotracheal tube is often the best way to main-tain an open airway.
• When intubation is impossible, a surgical airway (cricothyroidotomyor tracheotomy) is required.
Surgical Cricothyroidotomy. A cricothyroidotomy is done only inemergency situations when no other means is available to maintain anopen airway. The following guidelines are helpful:
1. The cricothyroid membrane can be located by running your fingerdown the center of the neck and feeling the wide thyroid cartilage(Adam’s apple). The depression just below the Adam’s apple iswhere you want to place the incision. The rings of the trachea arepalpable just below this area.
2. Try to clean the area with Betadine.
3. If you have time, inject the skin with lidocaine and epinephrine todecrease bleeding from the skin edges and to make the procedure alittle easier to perform.

Evaluation of the Acutely Injured Patient 51
4. The neck should be in neutral position with the chin held slightlyforward.
5. Hold the thyroid cartilage between your thumb and middle finger(actually you are stabilizing the larynx). Use your index finger tohelp identify the cricothyroid membrane.
6. Using a no. 15 knife blade, make a horizontal incision no more than2 cm long, just below the Adam’s apple. Be sure to stay in thecenter of the neck. Do not make this incision too large, or you mayinjure a nearby vein, thereby causing significant bleeding andmaking the procedure very difficult.
7. Staying in the midline, gently push the knife so that it goes throughthe cricothyroid membrane. Do not push inward too far; use onlythe knife tip. You do not want to injure the esophagus, which is im-mediately behind the trachea.
8. Insert the back of the knife handle (not the blade) through theopening that you have just made, and rotate the handle to enlargethe opening.
9. Place the largest possible pediatric endotracheal tube through theopening. Give oxygen and ventilate the patient through this tube.
10. Secure the tube in place with tape or sutures.
Emergency cricothyroidotomy. A, The larynx is stabilized between the left thumband middle finger. The tip of the index finger is inserted over the cricothyroidmembrane. Keep the index finger in this position to identify the position of thecricothyroid membrane as you perform the procedure. B, The endotracheal tubein position. (From Simon RR, Brenner BE (eds): Emergency Procedures andTechniques, 3rd ed. Baltimore, Williams & Wilkins, 1994, with permission.)
52 Practical Plastic Surgery for Nonsurgeons
BreathingBreathing relates to getting oxygen to the tissues. All patients with anypossibility of having sustained a head injury or with an altered level ofconsciousness should be given supplemental oxygen, which usuallycan be administered with a face mask or nasal prongs.
Listen for bilateral breath sounds, demonstrating that both lungs are in-flated (see “tension pneumothorax” below). Problems that interfere withoxygen getting to the tissues are often related to significant chest trauma.
CirculationCirculation pertains to the patient’s blood pressure and secure intra-venous access. Start an intravenous line with the largest availablecatheter, and hang a liter of 0.9% saline.
The most common reason for hypotension (low blood pressure) in a traumapatient is blood loss, either external or internal. Control obvious hemor-rhage. Be careful of scalp wounds—a lot of blood can be lost fromthe scalp. A closed fracture of the femur can result in the loss of aliter of blood into the tissues of the thigh, which may not be immedi-ately obvious.
A head injury in and of itself does not cause hypotension. Look for an-other source. In contrast, a spinal cord injury can result in profoundhypotension without blood loss (see “Neurogenic shock” below) be-cause of loss of vascular tone.
How to Determine Blood PressureWithout a Working Blood Pressure CuffFeel for palpable pulses at the wrist (radial artery), groin (femoralartery), and neck (carotid artery).
Other Causes of Hypotension/Shock that Can Leadto Death if not Quickly DiagnosedTension pneumothorax occurs when the lung has collapsed and air sur-rounds the lung. If the air is not removed and the lung reexpanded, build-up of pressure in the chest may cause the lung, great vessels, and even
MMiinniimmaall AApppprrooxxiimmaattee LLooccaattiioonn ooff PPaallppaabbllee PPuullssee SSyyssttoolliicc BBlloooodd PPrreessssuurree ((mmmmHHgg))
Radial artery 80
Femoral artery but not radial artery 70
Carotid artery but not femoral and radial arteries 60

Evaluation of the Acutely Injured Patient 53
heart to be compressed and pushed to the opposite side. This process im-pairs blood flow to and from the heart and leads to hypotension.
Cardiac tamponade is a build-up of fluid in the sac around the heart. Itcan lead to cardiac dysfunction and shock.
Neurogenic shock occurs with an injury that causes paralysis—i.e., aspinal cord injury, not a head injury. Because of the loss of nerve input,the blood vessels dilate. Even with minimal blood loss, the patientcannot maintain proper vascular tone, and hypotension develops.
Acute myocardial infarction (heart attack) or any cause of cardiac dys-function can result in hypotension.
DisabilityThe following brief exam helps to evaluate patients for the presence ofa neurologic deficit:
1. Check the pupils. Are they equal, round, and reactive to light?
2. Is the patient conscious?
3. Can the patient move the fingers and toes?
4. For patients with a suspected head injury, the Glasgow Coma Score(GCS) should be determined. Fifteen, the highest (best) score, indi-cates that the patient is awake and alert; three, the lowest (worst)score, indicates that the patient is unconscious and unresponsive.
Add up the points. An uninjured patient who is not intoxicated shouldscore 15 points. A score of 13 points may indicate minor injury; scoresof 9–12, moderate injury; and scores < 8, severe injury.
GGllaassggooww CCoommaa SSccoorree
CCaatteeggoorryy BBeesstt RReessppoonnssee PPooiinnttss AAssssiiggnneedd
Eye opening None 1Opens eyes to painful stimulus 2Opens eyes to voice 3Opens eyes spontaneously 4
Verbal response None 1Unintelligible sounds 2Inappropriate words 3Disoriented but converses 4Fully oriented and converses appropriately 5
Motor response None 1Decerebrate posturing (abnormal extension) 2Decorticate posturing (abnormal flexion) 3Moves randomly to painful stimulation 4Localizes pain 5Obeys commands 6
54 Practical Plastic Surgery for Nonsurgeons
Caution: Do not assume that a low GCS is due to intoxication. A drunkperson can definitely have a serious head injury. Do a thorough work-up (usually a computed tomography [CT] scan is required).
ExposureAll clothing should be removed so that the patient is fully exposed.Removal of clothing allows you to examine the patient thoroughly forsigns of injury. It may seem silly, but you do not want to be fooled.
Patients usually are lying on their back during the evaluation. To ex-amine the back for evidence of spine injury, log-roll the patient (i.e.,roll the patient in one motion, keeping the back straight and prevent-ing any twisting motion of the spine).
CCaassee SSttuuddyyAn 18-year-old man is brought into the hospital after being stabbed inthe right upper arm with an icepick. He complains of pain in the armbut otherwise seems to be uninjured. You roll up his sleeve to examinethe arm and see entrance and exit sites. Since he has good pulses inthe extremities, you think that he is stable. While you are doing somepaperwork, he becomes very short of breath and hypotensive. Whathappened?
If you had removed his shirt, you would have seen that the puncturewent through the arm and into the right chest. A pneumothorax devel-oped. Because he was young and healthy, he was able to tolerate ituntil the pressure built up in the chest cavity. At that point he devel-oped a tension pneumothorax—a true emergency!
Only when the patient is stable from the perspective of the ABCs can you un-dertake specific evaluation of more obvious injuries.
NNeeeeddllee TThhoorraaccoossttoommyyNeedle thoracostomy is a life-saving procedure that is easy to do in pa-tients with tension pneumothorax. All health care providers should beaware of this technique.
If conscious, the patient with tension pneumothorax is severely shortof breath and blood pressure is low. If unconscious, the patient maysimply be hypotensive and not breathing well.
If you listen over the chest for breath sounds, you may appreciate aloss of breath sounds on the side of the pneumothorax, but this may bedifficult to appreciate in the emergency setting.
Evaluation of the Acutely Injured Patient 55
Another method is to feel the patient’s neck. The trachea shifts awayfrom the side with the tension pneumothorax.
If you cannot hear breath sounds in either side of the chest, the tracheais in the midline, and the patient is in shock, treat both sides of thechest. The patient may have bilateral tension pneumothoraces.
Equipment Needed1. Large catheter for intravenous access (12 or 14 gauge). A large-bore
needle can be used if a catheter is not available, but the catheter issafer. The needle can injure an underlying structure more easily.
2. Betadine, if available.
Procedure1. Apply Betadine to the chest. Simply pour it on—this is an emer-
gency!
2. Place the catheter, with the needle in place, into the affected side ofthe chest at the second interspace in the midclavicular line (theimaginary line drawn perpendicular to the clavicle at its midpoint).
3. Locate the second interspace.
• The second interspace is the space between ribs 2 and 3.
• It can be located by feeling for the spot on the breastbone (ster-num) where the manubrium and sternum meet (the point whereyou can feel an elevation in the bone as you rub your fingers upand down the breastbone).
• Move your fingers to the right or left chest (depending on wherethe problem is). You should be at the second interspace when youare at the midclavicular line.
4. The intercostal vessels run just below each rib. To prevent injury tothese vessels, the catheter should be inserted into the chest at thesecond interspace just above the third rib.
5. If you inserted a catheter, remove the needle, but leave the catheterin place. You will hear a big whoosh from the escaping air.
6. Leave the catheter in place until help arrives.
7. If you used a needle, you should hear the air escape as soon as youenter the pleural space. Leave the needle in place until help arrives.
8. The patient requires a chest tube for definitive treatment of thepneumothorax, but you may have just saved the patient’s life.

56 Practical Plastic Surgery for Nonsurgeons
BBiibblliiooggrraapphhyy1. Creech O, Pearce CW: Stab and gunshot wounds of the chest. Am J Surg 105: 469–483,
1963.2. Melio FR: Priorities in the multiple trauma patient. Emerg Med Clin North Am
16:29–43, 1998.3. Simon RR, Brenner BE: Emergency Procedures and Techniques, 3rd ed. Baltimore,
Williams & Wilkins, 1994, pp 71–75.4. Walls RM: Cricothyroidotomy. Emerg Med Clin North Am 6:725–736, 1988.5. Walls RM: Management of the difficult airway in the trauma patient. Emerg Med Clin
North Am 16:45–61, 1998.
Emergency needle thoracostomy. At the midclavicular line, insert a large (14-gauge) needle or vascular catheter into the chest at the second interspace justabove the third rib. You will hear a large rush of air when the needle enters thechest.
EEVVAALLUUAATTIIOONN OOFF AANN AACCUUTTEE WWOOUUNNDD
This chapter explains the basics for evaluation and treatment of anacute wound. Proper evaluation helps to determine the appropriatenext step—formal wound exploration or wound closure.
The first step is to control blood loss and evaluate the need for otheremergency procedures (see chapter 5, “Evaluation of the AcutelyInjured Patient”). The second step is to obtain a thorough historyabout the patient and the events surrounding the injury.
AAbboouutt tthhee PPaattiieennttTetanus Immunization Status
Tetanus is a devastating disease, causing muscle spasms that can leadto muscle rigidity and seizures. Without adequate treatment, one inthree adults with tetanus will die. Although immunization has madetetanus uncommon, it always lurks in the background.
If the patient has not had a tetanus booster within 5 years, and thewound is tetanus-prone (see Table 2), a booster should be given. If thewound is not tetanus-prone but the patient has not had a tetanusbooster within 10 years, a booster should be given. Patients who havenever been immunized need human tetanus immunoglobulin as well astetanus toxoid followed by completion of the full tetanus toxoid series.
TTaabbllee 11.. DDoosseess ooff AAnnttiitteettaannuuss DDrruuggss
57
Chapter 6
KKEEYY FFIIGGUURREE::Irrigating a wound
DDrruugg NNuummbbeerr ooff DDoosseess DDoossaaggee
Tetanus toxoid: booster 1 0.5 ml intramuscularly
Tetanus toxoid: full immuni- 3 0.5 ml intramuscularly; repeat in 4 wkzation regimen and 6–12 mo after second injection
Human tetanus immunoglobulin 1 250 U, deep intramuscular injection
58 Practical Plastic Surgery for Nonsurgeons
Note: Tetanus toxoid and immunoglobulin must be kept refrigerated atall times during transport from the factory. This requirement may be aproblem in remote areas.
Pulsatile Bleeding at Time of InjuryEven if the patient is not bleeding at the time of your examination, thehistory of bright red, pulsatile bleeding at the time of injury implies anarterial injury. A thorough vascular exam is required, and formal surgi-cal wound exploration is almost always indicated.
Medical IllnessesPatients with diabetes are more prone to infections and wound-healingproblems. Encourage diabetic patients to keep glucose levels well con-trolled to decrease the risk of complications. Malnourished patientsand patients with human immunodeficiency infection (HIV) or a his-tory of cancer also have wound-healing difficulties.
Smoking HistoryTobacco smoking dramatically decreases circulation to the skin andslows down the wound-healing process. Medical professionals have aduty to tell all patients not to smoke. But the patient with an openwound should be specifically warned that smoking interferes with andperhaps prevents the healing process. Smoking also increases the riskfor wound complications and poor cosmetic outcome.
EEvveennttss SSuurrrroouunnddiinngg tthhee IInnjjuurryyTiming of the Injury
It is best to close an open wound within 6 hours of injury. Do not closea wound after 6 hours because the risk of infection becomes unaccept-ably high.Wounds on the face are exceptions to this rule. The face has an excel-lent blood supply, which makes infection less likely. In addition, cos-metic concerns are important. It is therefore acceptable to close awound on the face that is older than 6 hours (perhaps up to 24 hours orat most 48 hours), as long as you can clean it thoroughly.
Nature of the Injury• A wound caused by a clean knife has a low risk of infection.• A dirty wound carries a risk for tentanus. Wood may break off and
leave pieces behind, increasing the risk for subsequent infection ifthe wound is not explored and washed out thoroughly.
Evaluation of an Acute Wound 59
• Any wound that may contain a foreign body should be explored andthe foreign body removed.
• Animal bites, especially cat bites, often penetrate more deeply thanyou think. Bites on the hand should raise concern about involvementof an underlying joint. Oral bacteria may cause severe infections (seechapter 36, “Hand Infections”). Always consider the risk of rabies.
• Human bites also are associated with specific oral bacteria that maycause serious infections (see chapter 36, “Hand Infections”).
• If any object penetrated the patient’s clothing or shoes before pierc-ing the skin, the chance for infection is increased because pieces ofclothing may become embedded in the underlying tissues. If anobject penetrated the patient’s tennis shoes, be concerned about apossible pseudomonal infection.
• Crush injuries may be associated with greater underlying damagethan initially appreciated (see chapter 35, “Crush Injury”).
• Gunshot wounds: see chapter 37, “Gunshot Wounds.”
• Thermal or electrical injury: see chapter 20, “Burns.”
Concerns about Tetanus
TTaabbllee 22.. RRiisskkss ffoorr TTeettaannuuss
Concerns about RabiesBe aware of the risk of rabies in the area where you work. Some coun-tries—England, for example—have no cases of rabies because of tightanimal controls. In most other countries, rabies is a real concern.
The primary animals associated with rabies infections include bats,raccoons, skunks, and foxes. Because different areas have a differentrisk for specific animals, know your area. Dogs and cats also can be in-fected; be sure to ask if the animal has been vaccinated against rabies.Livestock, rodents (e.g., rats, mice, squirrels), and rabbits are almostnever associated with a risk of rabies.
WWoouunndd CChhaarraacctteerriissttiiccss TTeettaannuuss--pprroonnee NNoott tteettaannuuss--pprroonnee
Time since injury > 6 hr < 6 hr
Depth of injury > 1 cm < 1 cm
Mechanism of injury Crush, burn, gunshot, frostbite, Sharp cut (knife, cleanpuncture through clothing glass)
Devitalized tissue Present in None present
Contamination (e.g., Yes Nodirt, saliva, grass)

60 Practical Plastic Surgery for Nonsurgeons
If you have fears that the animal is rabid:
1. Thoroughly clean the wound with soap and water.
2. Administer human rabies immunoglobulin, 20 IU/kg total. If possi-ble, administer one-half of this around the wound, and give the restin the gluteal area intramuscularly (IM).
3. Administer one of the three types of rabies vaccines currently avail-able: 1.0 ml IM in the deltoid area of adults and older children, outerthigh (not gluteal area) in younger children. Repeat on days 3, 7, 14,and 28.
EExxaammiinnaattiioonn ooff tthhee WWoouunnddThe wound must be cleansed thoroughly to allow full evaluation of theextent of injury.
Cleansing the WoundCleansing a wound hurts. Often you must start by anesthetizing thearea. Infiltrate a local anesthetic around the wound, or administer anerve block using a few milliliters of lidocaine (see chapter 3, “LocalAnesthesia,” for a more thorough discussion).
For most simple wounds (i.e., no exposed bone or other vital organ),clean technique is adequate. You can use clean gloves and gauze in-stead of sterile ones.
The wound needs to be fully washed out to remove all foreign materialand decrease bacterial content.
Irrigate the wound with several hundred milliliters of sterile salineuntil all dirt and foreign material are removed. Then irrigate a bit more(an additional 50–100 ml, depending on the size of the wound).
In patients with a puncture wound, you need to irrigate into the punc-ture, not just the external opening. You may need to cut into the punc-ture wound and enlarge it by 1–2 cm to appreciate the full depth ofpenetration and allow proper cleansing.
Wound IrrigationIrrigation does not mean merely pouring some saline over the wound.You must apply the solution with some force to remove embeddeddebris and decrease the bacterial count.
The best method is to make an irrigating device out of a syringe (20–50ml) with a 20-gauge angiocatheter (or whatever you use for intra-venous access) or a blunt-tipped needle (a sharp needle can be used,
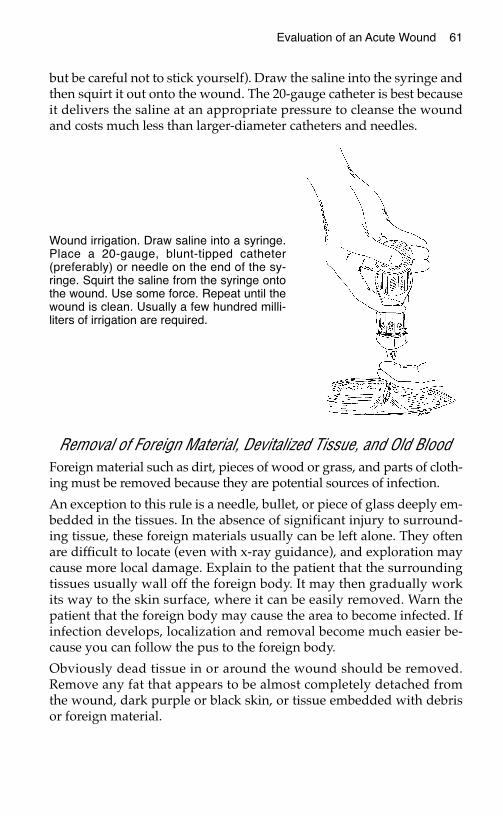
Evaluation of an Acute Wound 61
but be careful not to stick yourself). Draw the saline into the syringe andthen squirt it out onto the wound. The 20-gauge catheter is best becauseit delivers the saline at an appropriate pressure to cleanse the woundand costs much less than larger-diameter catheters and needles.
Removal of Foreign Material, Devitalized Tissue, and Old BloodForeign material such as dirt, pieces of wood or grass, and parts of cloth-ing must be removed because they are potential sources of infection.
An exception to this rule is a needle, bullet, or piece of glass deeply em-bedded in the tissues. In the absence of significant injury to surround-ing tissue, these foreign materials usually can be left alone. They oftenare difficult to locate (even with x-ray guidance), and exploration maycause more local damage. Explain to the patient that the surroundingtissues usually wall off the foreign body. It may then gradually workits way to the skin surface, where it can be easily removed. Warn thepatient that the foreign body may cause the area to become infected. Ifinfection develops, localization and removal become much easier be-cause you can follow the pus to the foreign body.
Obviously dead tissue in or around the wound should be removed.Remove any fat that appears to be almost completely detached fromthe wound, dark purple or black skin, or tissue embedded with debrisor foreign material.
Wound irrigation. Draw saline into a syringe.Place a 20-gauge, blunt-tipped catheter(preferably) or needle on the end of the sy-ringe. Squirt the saline from the syringe ontothe wound. Use some force. Repeat until thewound is clean. Usually a few hundred milli-liters of irrigation are required.

62 Practical Plastic Surgery for Nonsurgeons
Old blood also must be removed. Blood is an excellent media for bacte-ria proliferation and infection.
If you are unable to remove the objectionable material completely,formal surgical exploration in the operating room with more adequateanesthesia (general and more local) is required.
EEvvaalluuaattiioonn ffoorr IInnjjuurryy ttoo UUnnddeerrllyyiinngg SSttrruuccttuurreess
Vascular InjuryIf the injury is near a pulse point (e.g., in the groin near the femoralartery), check to be sure that a pulse is palpable in the nearby vessel—even if there is no active bleeding at the time of examination.
Check also for a palpable pulse in the vessel distal to the injury; for ex-ample, check pulses behind the knee or in the foot for a possiblefemoral artery injury.
Look for pulsatile bright red arterial bleeding or dark red venous oozing.
Ensure that circulation to structures distal to the wound is adequate.Do so by checking capillary refill in the fingers or toes, as appropriate.
Testing Capillary RefillA well-vascularized finger or toe generally has a pink hue under thenail. If it is blue or very pale, circulation may be impaired. Comparewith the uninjured side to determine the patient’s baseline status.
If you pinch the tip of the finger or toe, as appropriate, it should blanch(i.e., turn pale.)
Release the pressure. The color should return to normal within 2–3 sec-onds. A longer period may imply an arterial injury. A shorter periodmay imply a problem with venous circulation.
An arterial injury usually necessitates urgent surgical exploration inthe operating room.
Nerve InjuryIf injury occurs along the course of an important nerve, check for sen-sory and motor function.
A nerve injury in and of itself does not warrant urgent operation at thetime of injury. A surgeon should explore the wound thoroughly andrepair any injured nerves in the near future. The acute needs are thor-ough cleansing and loose closure to prevent infection and allow thewound to be fully explored at a later date.
Evaluation of an Acute Wound 63
Tendon InjuryIf the injury occurs over the course of a tendon, evaluate the action ofthe affected tendon to ensure that it is appropriate.
A tendon injury in and of itself also does not warrant urgent operationat the time of injury. A surgeon should explore the wound thoroughlyand repair any injured tendons in the near future. Again, the acuteneeds are thorough cleansing and loose closure to prevent infectionand allow the wound to be fully explored at a later date.
Fracture or Joint DislocationIn patients with an obvious bony deformity or a bone that is tender topalpation, get an x-ray to look for fracture or dislocation.
An open wound over a fracture or dislocation classifies it as an “open”or “compound” fracture or dislocation. This distinction is importantbecause an open bone injury is associated with a higher risk of infec-tion than a closed injury. Therefore, patients with an open injury mustbe placed on antibiotics immediately (a first-generation cephalosporinwith or without an aminoglycoside, depending on the amount of boneand soft tissue contamination).
Unless the patient will be treated by an orthopedic surgeon within 24hours, the wound should be cleansed thoroughly under general or re-gional anesthesia in the operating room. A finger fracture can becleansed thoroughly with a digital block for local anesthesia. This pro-cedure can be done in the emergency area or office.
If the wound can be closed, do so loosely. If soft tissue loss is apparentor if the skin is too tight to close primarily, the wound should bepacked with sterile gauze moistened with saline or dilute Betadine.Reduce (align) the fracture or dislocation as best as possible, and im-mobilize the area. The patient should be evaluated by an orthopedicsurgeon and possibly a reconstructive plastic surgeon if there is softtissue loss.
WWhhaatt ttoo DDoo NNeexxtt
Active BleedingApply point pressure over the wound. It is not enough to place gauzein the wound and wrap the area with an Ace wrap. You should place awad of gauze over the injured area and use two fingers to apply pointpressure. Push down firmly onto the wound. You may need to hold thepressure for 10–15 minutes before the bleeding will stop. If the bleed-ing is arterial, exploration is required.
64 Practical Plastic Surgery for Nonsurgeons
If the patient has an exsanguinating (life-threatening) hemorrhage dueto an extremity injury, place a tourniquet or blood pressure cuff proxi-mal (closer to the heart) to the injury. The blood pressure cuff must beinflated to at least 50 mmHg above arterial pressure. This techniquehurts and places the tissues at risk for ischemic injury. Therefore, thetourniquet should not be left in place for more than 15–20 minutes. If atourniquet is needed, urgent operative exploration is required.
Foreign Body in the Depths of a WoundGet an x-ray. Although many materials do not show up on x-rays, youmay be able to see air or other indicators that give information aboutthe depth of injury. The x-ray also can tell you whether an underlyingjoint was violated; air in the joint indicates injury.
Stab Wound over the Chest or AbdomenYou need to be concerned about penetration into the chest or abdomi-nal (sometimes both) cavities. Such injuries should not be closed; theyrequire further examination and evaluation to rule out internal in-juries. Call a general surgeon.
* * *Before further treatment, “paint” (i.e., wipe) the wound and the sur-rounding tissues with a small amount of Betadine or some other anti-bacterial agent.
The wound is now ready for one of the following definitive treatments.
FFoorrmmaall WWoouunndd EExxpplloorraattiioonnThe patient is taken to the operating room and given general or regionalanesthesia so that the wound can be fully cleaned and surgically exam-ined under sterile conditions. Formal wound exploration is indicated inwounds with underlying vascular injuries, open fractures or dislocations,and wounds with extensive contamination, debris, or devitalized tissue.
WWoouunndd CClloossuurreeThe method of closure often depends on the specific characteristics ofthe wound. Reconstructive plastic surgeons have organized the vari-ous techniques for wound closure into a hierarchy, sometimes calledthe “reconstructive ladder,” that ranges from the simplest to the mostcomplex techniques. This hierarchy is set up so that if the first “step”does not work, it will not hinder attempts at the next step on theladder. The “reconstructive ladder” gives you a logical way to thinkabout how to close an open wound, regardless of its cause. Whether it
Evaluation of an Acute Wound 65
be an acute, traumatic wound or a wound that resulted from excising atumor, the same principles apply. A brief overview follows; each stepon the ladder is discussed more completely in subsequent chapters.
1. Secondary closure (leave the wound open). Sometimes it is best not toclose a wound. Treat it with dressings, and allow it to heal on its own(healing by secondary intention). This technique is useful if soft tissue lossis apparent, if the wound cannot be closed without tension, or if you haveconcerns about infection. Certain wounds, however, require formal closure:
• Wounds with exposed vital structures, such as exposed bone, tendon,or nerve.
• Wounds in areas overlying creases; for example, the front of theelbow (antecubital fossa), back of the knee (popliteal fossa), orarmpit. Subsequent scar contracture may severely limit function.
If formal closure is required, one of the following options should be used:
2. Primary closure. Skin edges around the wound are sutured to-gether. The wound must be “clean” (i.e., no foreign material, no devi-talized tissue, and no active bleeding). Tension in the closed woundshould be minimal; therefore, there must be adequate skin to bring to-gether without tension. As described earlier, primary closure is bestdone within 4–6 hours of injury. Except on the face or over a vital struc-ture, delayed closure results in an unacceptably high infection risk,even with adequate cleansing.
3. Skin grafting. When the wound requires closure but cannot beclosed primarily, a skin graft is often useful. Skin is taken from one areaof the body as a free graft and placed over the wound. There are essen-tially two types of skin grafts: split thickness and full thickness. Skingrafts will not survive over exposed tendon or bone if the thin connec-tive tissue covering is destroyed by the injury. A flap is required.
4. Local flaps. Like skin grafts, local flaps are used when the woundcannot be closed primarily. Flaps are needed for wounds with exposedunderlying structures that require more than skin graft coverage. Alocal flap is created by moving nearby tissue—sometimes skin, some-times muscle, sometimes both—to the wound for closure.
5. Distant flaps. When no useful local tissue is available to close thewound, tissue can be brought from a distant area. Sometimes the tissueis temporarily disconnected from the body; this technique is also called afree flap or a free tissue transfer. Tissue transfers also may be “walked”along the body in stages.
BBiibblliiooggrraapphhyyGross A, et al: The effect of pulsating water jet lavage on experimental contaminatedwounds. J Oral Surg 29:187, 1971.
GGUUNNSSHHOOTT WWOOUUNNDDSS
This chapter describes how to treat the external, surface woundscaused by a bullet. The evaluation for underlying injury related to gun-shot wounds in an extremity also is discussed. A plastic surgeon isoften called to help manage such injuries.
The evaluation of a patient with chest, abdomen, or head/neck gun-shot wounds is beyond the scope of this text. However, chapter 5 ad-dresses the initial evaluation of any patient who has sustained asignificant traumatic injury.
IInniittiiaall TTrreeaattmmeenntt ooff SSttaabbllee PPaattiieennttssBy definition, a stable patient is awake and alert with stable vitalsigns. Especially in patients with a gunshot wound, it is preferablethat a general surgeon or experienced emergency physician completea full evaluation before your arrival to ensure that the patient is truly“stable.”
Expose the Injured AreaYou need to evaluate the injured area thoroughly. All clothing shouldbe removed to ensure that no injury is missed and to allow you to esti-mate the trajectory (path) of the bullet. This information is important,because knowing the approximate course of the bullet helps you to de-termine the probability for injury to underlying structures.
Do not probe the wound blindly. Blind probing of the gunshot wound canbe dangerous. It may dislodge the clot in an injured blood vessel thathas stopped bleeding, thus leading to significant blood loss.
67
Chapter 7
KKEEYY FFIIGGUURREESS::Entrance/exit wounds
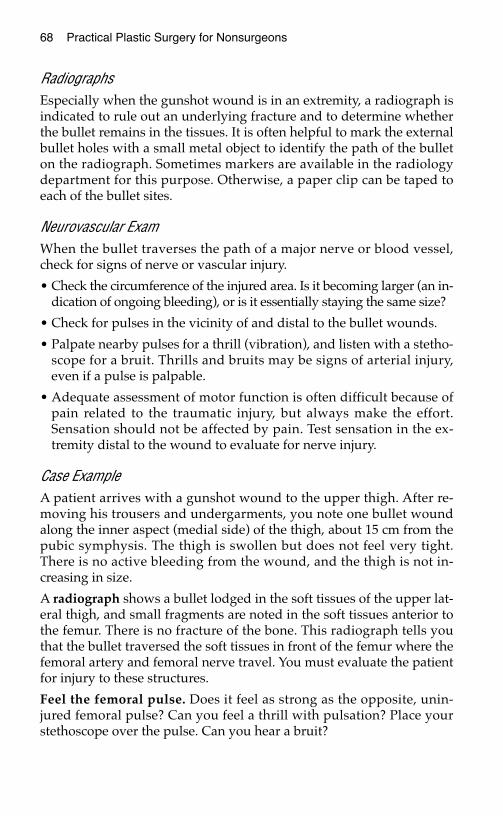
68 Practical Plastic Surgery for Nonsurgeons
RadiographsEspecially when the gunshot wound is in an extremity, a radiograph isindicated to rule out an underlying fracture and to determine whetherthe bullet remains in the tissues. It is often helpful to mark the externalbullet holes with a small metal object to identify the path of the bulleton the radiograph. Sometimes markers are available in the radiologydepartment for this purpose. Otherwise, a paper clip can be taped toeach of the bullet sites.
Neurovascular ExamWhen the bullet traverses the path of a major nerve or blood vessel,check for signs of nerve or vascular injury.
• Check the circumference of the injured area. Is it becoming larger (an in-dication of ongoing bleeding), or is it essentially staying the same size?
• Check for pulses in the vicinity of and distal to the bullet wounds.
• Palpate nearby pulses for a thrill (vibration), and listen with a stetho-scope for a bruit. Thrills and bruits may be signs of arterial injury,even if a pulse is palpable.
• Adequate assessment of motor function is often difficult because ofpain related to the traumatic injury, but always make the effort.Sensation should not be affected by pain. Test sensation in the ex-tremity distal to the wound to evaluate for nerve injury.
Case ExampleA patient arrives with a gunshot wound to the upper thigh. After re-moving his trousers and undergarments, you note one bullet woundalong the inner aspect (medial side) of the thigh, about 15 cm from thepubic symphysis. The thigh is swollen but does not feel very tight.There is no active bleeding from the wound, and the thigh is not in-creasing in size.
A radiograph shows a bullet lodged in the soft tissues of the upper lat-eral thigh, and small fragments are noted in the soft tissues anterior tothe femur. There is no fracture of the bone. This radiograph tells youthat the bullet traversed the soft tissues in front of the femur where thefemoral artery and femoral nerve travel. You must evaluate the patientfor injury to these structures.
Feel the femoral pulse. Does it feel as strong as the opposite, unin-jured femoral pulse? Can you feel a thrill with pulsation? Place yourstethoscope over the pulse. Can you hear a bruit?
Gunshot Wounds 69
Feel for the distal pulses of the popliteal artery (behind the knee), dor-salis pedis artery (top of the foot), and posterior tibial artery (behindthe medial malleolus). The popliteal artery often is difficult to findeven in uninjured patients.
Check motor function of the femoral nerve. Can the patient extend theknee? Extension may be difficult because of pain in the thigh. The pa-tient should be able to move his toes and ankle. These functions areunder the control of the sciatic nerve, which travels along the posterioraspect of the thigh.
Check sensation. The femoral nerve is responsible for sensation to theanterior and medial aspects of the thigh. Touch the patient with yourhand or with the end of a clean needle. Can he feel the touch?
If you identify a problem, further studies (possibly an arteriogram foran injured vessel) or exploration is warranted. The care of this patientthen should be transferred to a specialist.
Typically the entrance wound issmaller and tidier than the exit site.

70 Practical Plastic Surgery for Nonsurgeons
CCaarree ooff tthhee EExxtteerrnnaall WWoouunnddThe amount of injury at the entrance and exit (if present) sites is relatedto the caliber of the bullet, the angle at which the bullet traverses the tis-sues, the distance from the gun, and even the type of bullet. Usually,there is more damage to the skin at the exit site than at the entrance site(see figure on preceding page).
Excision of the edges of all bullet wounds used to be recommended,but now it is not always necessary.
When the bullet wound is relatively clean: Often the entrance woundis very clean, with regular skin edges and no gunpowder imbedded inthe surrounding skin.
• Clean the area well with gentle soap and water or an antibacterialscub solution. Then rinse with saline. The wound then may be cov-ered with gauze. If necessary, anesthetize the area with lidocainebefore cleansing.
• Such wounds should not be closed primarily (i.e., with sutures).
• Wet-to-dry dressings or antibiotic ointment with dry gauze shouldbe applied 1–2 times/day until the wound has healed.
• Oral antibiotics are not needed.
When the bullet wound has irregular edges embedded with foreignmaterial: Risk for infection is high. Excision of the skin edges is indi-cated to minimize the risk.
How to Excise the Skin Edges1. Infiltrate the area around the wound with local anesthetic.
2. Use a scalpel to excise the necrotic skin. Remove only the tissue thatis purple or black (i.e., seems dead).
3. If gunpowder is embedded in surrounding skin, which otherwiselooks alive, use the flat edge of the scalpel to scrape off the foreignmaterial. Alternatively, use a forceps to grab the debris, and cut itout with the scalpel.
4. Remove any dead fat or subcutaneous tissue visible in the wound.
5. The wound should not be closed primarily. Treat the wound as pre-viously described.
GGuunnsshhoott WWoouunnddss ttoo tthhee FFaacceeGunshot wounds to the face should be cleansed as described above.Because of the cosmetic concerns, most facial wounds should be
Gunshot Wounds 71
loosely closed to reduce the amount of subsequent scarring. Full-thick-ness wounds (i.e., wounds that communicate with the oral cavity or godown to bone) must be closed in layers. See chapter 16, “Facial Lacera-tions” for specific details.
DDoo YYoouu NNeeeedd ttoo RReemmoovvee tthhee BBuulllleett??Contrary to television medical shows, the presence of a bullet in thesoft tissues, in and of itself, is not an absolute indication for surgery.Operations are required to repair underlying injured structures, notspecifically to remove the bullet, unless it is near an important struc-ture and may cause trouble if it migrates.
In certain cases, however, the bullet must be removed. These excep-tions are related to the nature of the ammunition. For this reason it isimportant to have information about the type of gun and bullet thatcaused the injury.
A shotgun/buckshot injury causes a great deal of damage to underly-ing soft tissue, and numerous pellets and foreign debris are lodged inthe tissues. Most importantly, wadding is part of the ammunition andoften becomes lodged in the soft tissues along with the pellets. Shot-gun/buckshot injuries warrant exploration to remove dead tissue, toremove as many of the pellets as possible, to remove the wadding, andto wash out the wound. If such exploration is not done, the risk for se-rious infection is high.
It may be tempting to try to remove a single bullet that on radiographsdoes not seem too deeply embedded in the tissues. If the bullet cannotbe easily palpated in the superficial skin, removal is not recommended.Removal is always more difficult than you think, and you risk injury tosurrounding structures. It is usually best to leave the bullet alone. Overtime, the bullet will either be walled off by the body and stay in place,causing no subsequent problems, or gradually work its way to the sur-face. Once the bullet can be felt directly under the skin, it can be re-moved easily with local anesthetic.
BBiibblliiooggrraapphhyy1. Fackler ML: Civilian gunshot wounds and ballistics: Dispelling the myths. Emerg
Med Clin North Am 16:17–28, 1998.2. Modrall JG, Weaver Fam Yellin AE: Diagnosis and management of penetrating vascu-
lar trauma and the injured extremity. Emerg Med Clin North Am 16:129–144, 1998.
NNUUTTRRIITTIIOONN
Poor nutrition can negate all the benefits of proper wound care or ad-vanced medical interventions. Studies have shown that malnourishedpatients often require longer hospitalizations, have more postoperativecomplications, and have delayed wound and fracture healing com-pared with well-nourished patients.
Usually, patients who do not ingest adequate amounts of calories andprotein are also not meeting vitamin and mineral requirements.Malnutrition essentially depletes physiologic reserves and leads tomany problems, including impaired wound healing and impairedimmune function.
Elective surgery is often contraindicated and therefore not performedin malnourished patients. This illustrates the importance of under-standing the basics of nutrition as they affect wound healing.
TTyyppeess ooff MMaallnnuuttrriittiioonn
MarasmusMalnutrition due to inadequate caloric intake is called marasmus. Thepatient has severe physical wasting due to the loss of fat and somatic(skeletal) muscle. This condition is seen not only in the developingworld and in times of famine but also in patients with cancer oranorexia. Although the patient is not taking in sufficient calories, he orshe is getting sufficient protein. As a result, measured serum proteinstores (see below) are adequate.
KwashiorkorPatients with kwashiorkor take in sufficient calories but do not meettheir protein needs. The typical patient has thin arms and legs witha large protruding belly and peripheral edema (swelling in the softtissues).
73
Chapter 8
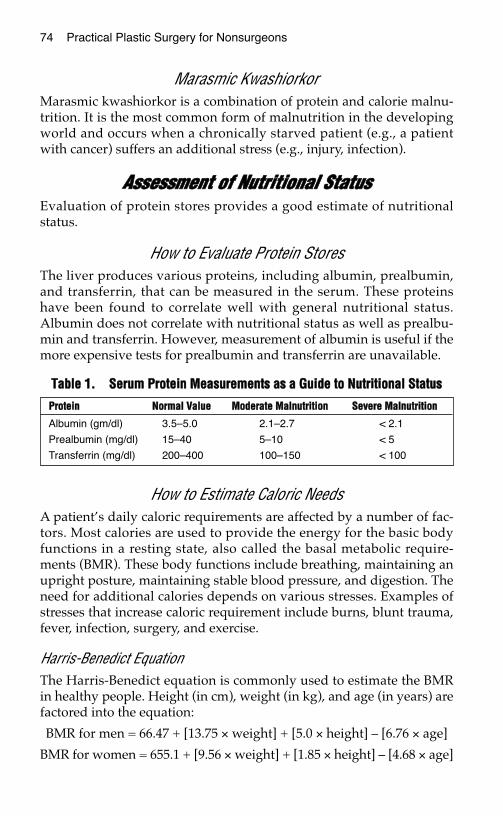
74 Practical Plastic Surgery for Nonsurgeons
Marasmic KwashiorkorMarasmic kwashiorkor is a combination of protein and calorie malnu-trition. It is the most common form of malnutrition in the developingworld and occurs when a chronically starved patient (e.g., a patientwith cancer) suffers an additional stress (e.g., injury, infection).
AAsssseessssmmeenntt ooff NNuuttrriittiioonnaall SSttaattuussEvaluation of protein stores provides a good estimate of nutritionalstatus.
How to Evaluate Protein StoresThe liver produces various proteins, including albumin, prealbumin,and transferrin, that can be measured in the serum. These proteinshave been found to correlate well with general nutritional status.Albumin does not correlate with nutritional status as well as prealbu-min and transferrin. However, measurement of albumin is useful if themore expensive tests for prealbumin and transferrin are unavailable.
How to Estimate Caloric NeedsA patient’s daily caloric requirements are affected by a number of fac-tors. Most calories are used to provide the energy for the basic bodyfunctions in a resting state, also called the basal metabolic require-ments (BMR). These body functions include breathing, maintaining anupright posture, maintaining stable blood pressure, and digestion. Theneed for additional calories depends on various stresses. Examples ofstresses that increase caloric requirement include burns, blunt trauma,fever, infection, surgery, and exercise.
Harris-Benedict EquationThe Harris-Benedict equation is commonly used to estimate the BMRin healthy people. Height (in cm), weight (in kg), and age (in years) arefactored into the equation:
BMR for men = 66.47 + [13.75 × weight] + [5.0 × height] – [6.76 × age]
BMR for women = 655.1 + [9.56 × weight] + [1.85 × height] – [4.68 × age]
TTaabbllee 11.. SSeerruumm PPrrootteeiinn MMeeaassuurreemmeennttss aass aa GGuuiiddee ttoo NNuuttrriittiioonnaall SSttaattuuss
PPrrootteeiinn NNoorrmmaall VVaalluuee MMooddeerraattee MMaallnnuuttrriittiioonn SSeevveerree MMaallnnuuttrriittiioonn
Albumin (gm/dl) 3.5–5.0 2.1–2.7 < 2.1
Prealbumin (mg/dl) 15–40 5–10 < 5
Transferrin (mg/dl) 200–400 100–150 < 100
Nutrition 75
To determine total energy needs, the BMR must be multiplied by factorsfor activity and stress levels. Activity factors are 1.2 for patients atbedrest and 1.3 for ambulatory patients. Stress factors range from 1.2 forminor surgery or a fracture, to 1.8–2.0 for severe sepsis or severe burns.
ExampleA 35-year-old women weighs 60 kg and is 5 feet tall. While workingshe fell and broke her arm. What are her caloric needs? Because heightmust by in cm, 5 feet must be converted to 152.4 cm:
BMR = 655.1 + [9.56 × 60] + [1.85 × 152.4] – [4.68 × 35]
BMR = 655.1 + 573.6 + 281.94 – 163.8 = 1346.84 kcal/day
Total needs = 1346.84 × 1.3 (she is ambulatory) × 1.2 (minor fracture)
Total needs = 2101.07 kcal/day
A Simpler Formula to Estimate Caloric NeedsTo get a general estimate of daily caloric requirements, multiply the pa-tient’s weight in kg by 25–40, depending on stress level (25 = lowstress, 40 = high stress, as in patients with burns or sepsis). For the pa-tient above:
Total needs = 60 × 30 (the fracture adds a little to the stress level) = 1800kcal/day
PPrrootteeiinnProtein is probably the most important nutrient. It is broken down intoindividual amino acids, which are important building blocks for bone,muscle, and skin. Thus, adequate protein intake is vital for normalwound healing. Protein is found in food derived from animals andplants. Not all sources of protein contain all of the necessary aminoacids required to maintain adequate protein stores; in other words,they are not considered to be “complete” protein sources.
In general, animal sources (e.g., eggs, meat, milk) contain all of the re-quired amino acids. Dried beans, peanuts, and soy-derived foods arethe best nonanimal sources of protein. Although protein is present incereals and grains, they are not complete sources of protein. Corn maybe a good source, but often much protein is lost during processing.Fruits and vegetables contain little protein.
Patients who have limited access to animal protein must combine veg-etable protein sources carefully to provide complete proteins each day.Sources of vegetable protein include rice and beans, cereal with milk,and noodles with cheese.
76 Practical Plastic Surgery for Nonsurgeons
How to Estimate Protein NeedsThe adult U.S. recommended dietary allowance (RDA) for protein is0.75 gm/kg of body weight/day, which for an average-sized adult is45–60 gm/day. Children and infants have higher protein requirements(1–2 gm/kg/day).
Stress, such as infection, burns, or traumatic injury, increases proteinbreakdown and thus protein requirements. Even under these circum-stances, the requirements usually do not increase by more than 50% ofthe RDA.
During times of stress, precise measurements of nitrogen loss can bedetermined by collecting the urine produced over a 24-hour periodand measuring its urea nitrogen content. Multiply this number by 1.25to estimate total nitrogen lost. Determine how much nitrogen the pa-tient took in based on diet. If the patient is losing more nitrogen thanhe or she is taking in, more nitrogen must be ingested to prevent deple-tion of protein stores.
IImmppoorrttaanntt VViittaammiinnss aanndd MMiinneerraallss The following vitamins and minerals are important for proper woundhealing. Because vitamins and minerals cannot be made by the body,they must be ingested. They serve as cofactors in many enzymaticreactions that are necessary for normal physiologic functioning.Although supplements are indicated in patients with deficiencies, littleevidence indicates that higher supplemental doses have beneficial ef-fects in patients with adequate vitamin/mineral stores.
Note: These nutrients have other important physiologic effects, butonly their effect on wound healing is discussed below. All of the listedminerals (calcium, copper, iron, magnesium, manganese, and zinc) areimportant in collagen synthesis.
Vitamin ABecause vitamin A is fat-soluble, it can be stored by the body. It isneeded for the formation and maintenance of healthy skin and hair. Itis a cofactor for collagen synthesis and is also important for normalimmune function. Studies have shown that in patients taking chronic,high-dose steroids, Vitamin A is particularly important for properwound healing. In this specific population, higher daily doses than theRDA may be beneficial for a short period (few weeks). In patients whoare not taking steroids and who ingest a healthy diet, extra doses of vi-tamin A can be harmful.

Nutrition 77
RDA: 5,000 IU/day.
In patients taking steroids with an open wound: 25,000 IU/dayorally; 200,000 IU/8 hr topically.
Sources: liver, egg yolks, fortified milk and cheese, dark green leafyvegetables, deep orange fruits/vegetables, fortified cereals.
Vitamin C (Ascorbic Acid)Because vitamin C is water-soluble, it is not stored in significantamounts in the body. Patients must take in enough vitamin C on adaily basis to prevent deficiency. It is an important cofactor for colla-gen synthesis.
RDA: 60 mg/day.
Sources: citrus fruits, potatoes, tomatoes, broccoli, green peppers.
Vitamin EVitamin E is needed to maintain proper immune function and propercell health. In patients with wounds exposed to radiation, vitamin Ecan counteract the negative effects of radiation on wound healing.
RDA: 30 IU/day.
Sources: vegetable oils, wheat germ, whole grain cereals, dried beans,nuts, green leafy vegetables, eggs, seeds.
CalciumCalcium is found primarily in bones and teeth. Every day 700 mg ofcalcium is turned over between plasma and bone.
RDA: 400–1200 mg/day.
Sources: dairy products, green leafy vegetables, dried beans, nuts,whole grains.
CopperRDA: none at present, but the estimated safe and adequate daily di-etary intake (ESADDI) is 1.3–3 mg/day.
Sources: shellfish, dried beans, nuts, organ meats, whole grains, potatoes.
IronRDA: men, 10 mg/day; women, 15 mg/day.
Sources: liver, shellfish, meat, poultry, and fish; dried beans and wholegrains.
78 Practical Plastic Surgery for Nonsurgeons
MagnesiumRDA: 250–350 mg/day.
Sources: found widely in vegetables and nuts.
ManganeseESADDI: 2–5 mg/day.
Sources: whole grains, nuts, dried beans, vegetables, fruits, tea, instantcoffee.
ZincZinc is important for wound epithelialization and increases woundstrength.
RDA: men, 15 mg/day; women, 12 mg/day.
Sources: meat, fish, poultry, milk products, beans, whole grains, nuts.
BBiibblliiooggrraapphhyy1. Mora RJF: Malnutrition: Organic and functional consequences. World J Surg 23:
530–535, 1999.2. Ruberg RL: Role of nutrition in wound healing. Surg Clin North Am 64:705–714, 1984.3. Van Way CW: Nutrition Secrets. Philadeplhia, Hanley & Belfus, 1999.
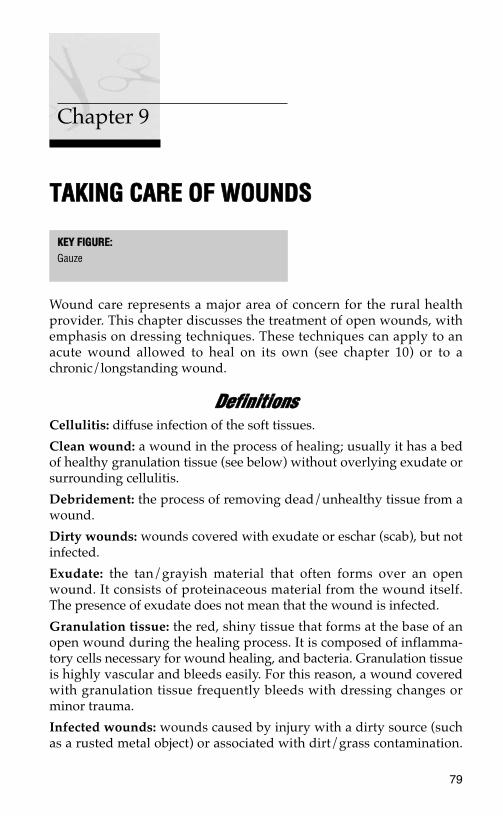
TTAAKKIINNGG CCAARREE OOFF WWOOUUNNDDSS
Wound care represents a major area of concern for the rural healthprovider. This chapter discusses the treatment of open wounds, withemphasis on dressing techniques. These techniques can apply to anacute wound allowed to heal on its own (see chapter 10) or to achronic/longstanding wound.
DDeeffiinniittiioonnssCellulitis: diffuse infection of the soft tissues.
Clean wound: a wound in the process of healing; usually it has a bedof healthy granulation tissue (see below) without overlying exudate orsurrounding cellulitis.
Debridement: the process of removing dead/unhealthy tissue from awound.
Dirty wounds: wounds covered with exudate or eschar (scab), but notinfected.
Exudate: the tan/grayish material that often forms over an openwound. It consists of proteinaceous material from the wound itself.The presence of exudate does not mean that the wound is infected.
Granulation tissue: the red, shiny tissue that forms at the base of anopen wound during the healing process. It is composed of inflamma-tory cells necessary for wound healing, and bacteria. Granulation tissueis highly vascular and bleeds easily. For this reason, a wound coveredwith granulation tissue frequently bleeds with dressing changes orminor trauma.
Infected wounds: wounds caused by injury with a dirty source (suchas a rusted metal object) or associated with dirt/grass contamination.
79
Chapter 9
KKEEYY FFIIGGUURREE::Gauze
80 Practical Plastic Surgery for Nonsurgeons
A chronic wound, covered with necrotic (dead) material and sur-rounded by cellulitis, also is described as an infected wound.
SSuupppplliieessThe following supplies are basic for taking care of a wound.
Newly Developed MaterialsCurrently, in affluent areas of the world, hydrocolloid-type dressingsand growth factor formulations aid in the wound-healing process.However, these products are quite expensive and not readily available.As of yet, they do not necessarily yield the superior results that war-rant the added expense. For these reasons, hydrocolloid-type dressingsand growth factor formulations are not discussed.
Dressing MaterialsThe best material to use for dressings is plain cotton gauze. Usually,all that is needed is just enough gauze to cover the wound lightly; mul-tiple layers are unnecessary and wasteful.
There is nothing sterile about your skin or an open wound. Bacteriacolonize the surface of both. For this reason, you do not have to usesterile technique to change dressings. Clean technique is usuallysufficient.
Sterile Technique vs. Clean TechniqueSterile technique uses instruments and supplies that have been specif-ically treated so that no bacterial or viral particles are present on theirsurfaces. Examples of sterilized supplies include instruments that have
Gauze usually comes folded into a square. For dressings, it is best to open thegauze so that a single layer is in contact with the open wound.

Taking Care of Wounds 81
been autoclaved (subjected to high temperatures to kill microorgan-isms) and gauze and gloves that have been especially prepared at thefactory and are individually packaged. Procedures in an operatingroom are usually done with sterile technique.
Clean technique uses instruments and supplies that are not as thor-oughly treated to rid surfaces of all microorganisms. Nonsterile glovesand gauze, which come many in a package, are examples of “clean”supplies. Clean supplies are less expensive than sterile supplies. Hence,appropriate use of clean techniques can save valuable resources.
The occasions when a sterile dressing should be used are notedthroughout the text.
SolutionsVarious solutions are available for wound care. They are poured ontothe gauze, and then the moistened gauze is placed over the wound.They also can be used to cleanse the wound. The following table de-scribes commonly used solutions.
TTaabbllee 11.. SSoolluuttiioonnss ffoorr DDrreessssiinnggss
* Keep the solution in a sealed container; refrigerate if possible. Solutions stay fresh for several days.
SSoolluuttiioonn PPrreeppaarraattiioonn UUssaaggee NNootteess
Betadine Purchased premade in container To clean wounds, Toxic to healthy tis-Best diluted for dressings: 1 part to use for sues; best used
Betadine to at least 3 or 4 dressings in diluted form forparts saline or sterile water Especially good few days at time.
for infected Then use anotherwounds solution for
dressings.Safe on face and
around eyes.
Saline* To 1 liter of water add 1 tsp salt To clean wounds, Safe anywhere onBoil solution for at least 60 sec to use for bodyCool before use dressingsEssentially equivalent to and
cheaper than prepackagedliter of saline solution
Sterile Boil 1 liter of water for at least To clean wounds Safe anywhere onwater* 60 sec body
Cool before use
Dakin’s To 1 liter of saline solution add To use for Better antibacterialsolution* 1–2 tsp (5–10 cc) liquid bleach dressings agent than saline
Some pharmacies keep Dakin’s Do not use aroundsolution in stock eyes
When available, best diluted: 1part Dakin’s to 3–4 partssaline or sterile water
82 Practical Plastic Surgery for Nonsurgeons
Useful Antibiotic OintmentsSome wounds (e.g., burn ) are best treated with antibiotic ointments.The antibiotic is absorbed into the tissues of the wound to prevent in-fection. The ointment keeps the wound moist and helps to decrease thepain caused by a wound that has become too dry.
TTyyppeess ooff DDrreessssiinngg TTeecchhnniiqquueessThe following dressing techniques are easy to do and require the leastamount of materials. Unless otherwise noted, clean technique is suffi-cient. Pain medication is sometimes needed to make the dressingchange process more tolerable for the patient. Usually, an oral agentcan be used; it is best to administer it 30 minutes before the dressingchange.
Note: At least once a day, usually at the time of a dressing change, thewound should be cleaned with gentle soap and water or washed withsaline.
Wet-to-Dry
IndicationThe objective of the wet-to-dry dressing technique is to clean a woundor to prevent build-up of exudate. It is called a “wet-to-dry” dressingbecause you place a moist dressing on the wound and allow it to dry.When the dressing is removed, it takes with it the exudate, debris, andnonviable tissue that have become stuck to the gauze. Wet-to-drydressings are indicated for wounds that are dirty or infected.
TechniqueMoisten a gauze dressing with solution, and squeeze out the excessfluid. The gauze should be damp, not soaking wet. Completely openthe gauze (it usually comes folded), and place it on the wound. You donot need many layers. Then cover with a thin layer of dry gauze.
TTaabbllee 22.. EExxaammpplleess ooff AAnnttiibbiioottiicc OOiinnttmmeennttss aanndd TThheeiirr UUsseess
* Use only a topical antibiotic ointment specifically labeled for ophthalmologic use around the eyes.Bacitracin has an ophthalmologic formulation, as do garamycin and erythromycin ointments.
OOiinnttmmeenntt IInnddiiccaattiioonn CCoommmmeennttss
Silver sulfadiazine Burns Do not use around eyes(Silvadene)
Bacitracin Open wounds, face burns Do not use around eyes*
Triple antibiotic Open wounds, face burns Do not use around eyes
Taking Care of Wounds 83
When changing the dressing, pour a few milliliters of saline (or water)on the bottom layer of gauze if it has completely dried out. Thistechique prevents the removal of healthy new tissue from the surfaceof the wound. Remove the dressing gently to avoid causing pain.
How Often?Optimally, a wet-to-dry dressing should be changed 3–4 times/day,depending on how much debridement is needed. The dressing shouldbe changed more frequently for a dirty wound than for a clean wound.However, depending on the availability of dressing material and per-sonnel, the dressings may be changed less often. Gradually the woundwill become cleaner and heal.
Wet-to-Wet
IndicationA wet-to-wet dressing does not debride the wound, which remains asit is. The dressing remains wet so that when the gauze is removed, thetop layers of the healing wound are not removed with it. This dressingshould be used on clean, granulating wounds with no overlying exu-date in need of removal.
TechniqueMoisten the gauze dressing with solution. It should not be soakingwet, but it should be a little wetter than damp. Unfold the gauze, placeit over the wound, and then cover with dry gauze. The dressing shouldstill be wet or damp when it is changed. If the bottom layer of gauzehas dried out, saturate the gauze with saline or water before removal.
How Often?The wet-to-wet dressing should be changed at least twice a day to pre-vent drying.
Antibiotic Ointment
IndicationAntiobiotic ointment may be used as an alternative to wet-to-wetdressings for a clean wound that is healing well and has no need fordebridement.
84 Practical Plastic Surgery for Nonsurgeons
Technique Coat the wound with a small amount of ointment. A thick layer of an-tibiotic ointment over the wound offers no advantage and wastes sup-plies. Cover with a dry gauze if the wound is large or if it is in an areathat will be covered with bedclothing or rubbed by clothing. Otherwisethe wound can be left open to air with the antibiotic ointment alone.
How Often?Remove the old ointment with gentle soap and water or saline, andreapply the ointment once or twice a day.
WWhheenn ttoo UUssee WWhhiicchh DDrreessssiinngg• For wounds that are infected or covered with exudate, use a wet-to-
dry dressing.
• For uninfected wounds that are in the process of healing and have noneed of debridement, use a wet-to-wet dressing or antibiotic oint-ment. You may use a wet-to-dry dressing, but it may cause more painthan the other two options.
BBiibblliiooggrraapphhyy1. Ladin DA: Understanding dressings. Clin Plast Surg 25:433–441, 1998.2. Steed D: Modifying the wound healing response with exogenous growth factors. Clin
Plast Surg 25:397–405, 1998.
SSEECCOONNDDAARRYY WWOOUUNNDD CCLLOOSSUURREE
Secondary wound closure is also referred to as closure by secondaryintention. The skin edges of the wound are not sutured together; thewound is left “open.” Dressings are applied regularly to keep thewound clean, and the wound gradually closes and heals on its own.Secondary wound closure requires little technical expertise. It is thesimplest and, therefore, lowest rung on the “reconstructive ladder.”This chapter discusses the important background knowledge you musthave when deciding to allow secondary wound closure.
CCaavveeaattssAlthough it is often true that the easiest treatment is the one to choose,you must be aware of what secondary wound closure involves fromthe patient’s perspective.
Extended Healing PeriodIt may take several weeks to even months for the wound to heal usingdressings alone. This extended healing period can cause considerablehardship for the patient. From a financial standpoint, the patient maynot be able to return to work with the open wound. In addition, dress-ing supplies, no matter how simple you make them, can get expensive.
Wound LocationThe location of the wound may make it impossible for the patient tochange the dressings. For example, the patient will require outside as-sistance to care for a wound on the back or the buttocks. It also may bedifficult to keep the dressings in place during treatment of a facialwound.
85
Chapter 10
KKEEYY FFIIGGUURREE::Dead space under skin closure
86 Practical Plastic Surgery for Nonsurgeons
PainThe sensation associated with an open wound can range from some-what bothersome to quite painful. Dressing changes are often painfulas well. Some pain medications are addictive when given for the longperiod required for a large wound to heal.
ScarringWounds that are allowed to heal secondarily tend to have larger andmore noticeable scars than the scars that results from primary closure.Secondary healing also has a greater tendency for hypertrophicscar/keloid formation, which can be bothersome and unsightly.
Scar tightness and contracture can be especially problematic in areassuch as the upper cheek, where a tight scar can pull down and distortthe lower eyelid, or in the arm pit (axilla), where scar problems canlead to limited shoulder mobility and function.
A wound that heals secondarily has a less stable scar—that is, the scaris more easily injured than the scar from a wound with primary clo-sure. Over the years less stable scars may be chronically injured. Theymay reheal only to be reinjured again and again. This cycle can be quitetroublesome and also is associated with a risk for the development ofan aggressive skin cancer.
AAcccceeppttaabbllee SSeettttiinnggss ffoorr SSeeccoonnddaarryy CClloossuurreeWounds that will heal with an acceptable scar if the skin edges are notsutured together can be allowed to heal secondarily. Examples include:
• Relatively small wounds. Wounds smaller than 11⁄2 cm often healquite well by secondary intention. Even wounds with a diameter of3–4 cm or larger, with no exposed tendons, bones, or other importantstructures, can be allowed to heal secondarily when lack of surgicalexpertise allows no other option. Be sure to keep in mind the abovecaveats when wounds > 2 cm are allowed to close by secondary in-tention.
• Second-degree burns. Second-degree burns are often allowed to healwith local wound care alone. See chapter 20, “Burns,” for a morethorough discussion.
SSeeccoonnddaarryy CClloossuurree aass tthhee TTrreeaattmmeenntt ooff CChhooiicceeSome wounds should not be closed with sutures. Instead, they shouldbe left open and treated with dressing changes until they heal.Examples include:
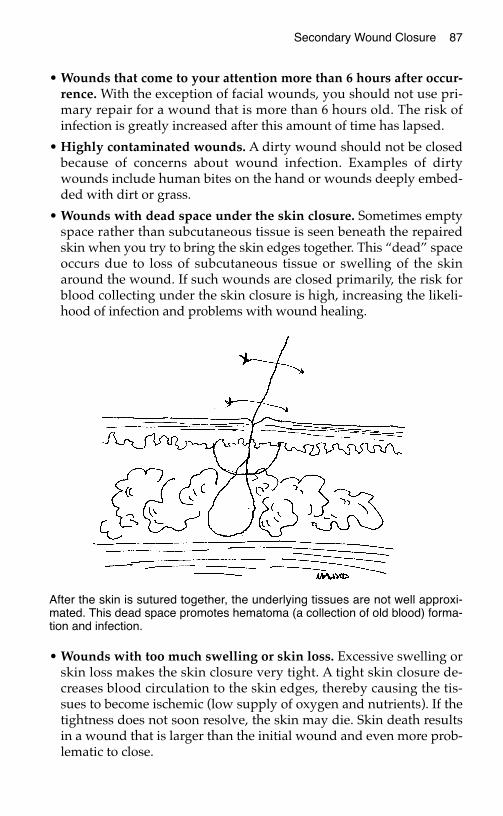
Secondary Wound Closure 87
• Wounds that come to your attention more than 6 hours after occur-rence. With the exception of facial wounds, you should not use pri-mary repair for a wound that is more than 6 hours old. The risk ofinfection is greatly increased after this amount of time has lapsed.
• Highly contaminated wounds. A dirty wound should not be closedbecause of concerns about wound infection. Examples of dirtywounds include human bites on the hand or wounds deeply embed-ded with dirt or grass.
• Wounds with dead space under the skin closure. Sometimes emptyspace rather than subcutaneous tissue is seen beneath the repairedskin when you try to bring the skin edges together. This “dead” spaceoccurs due to loss of subcutaneous tissue or swelling of the skinaround the wound. If such wounds are closed primarily, the risk forblood collecting under the skin closure is high, increasing the likeli-hood of infection and problems with wound healing.
• Wounds with too much swelling or skin loss. Excessive swelling orskin loss makes the skin closure very tight. A tight skin closure de-creases blood circulation to the skin edges, thereby causing the tis-sues to become ischemic (low supply of oxygen and nutrients). If thetightness does not soon resolve, the skin may die. Skin death resultsin a wound that is larger than the initial wound and even more prob-lematic to close.
After the skin is sutured together, the underlying tissues are not well approxi-mated. This dead space promotes hematoma (a collection of old blood) forma-tion and infection.
88 Practical Plastic Surgery for Nonsurgeons
CCoonnttrraaiinnddiiccaattiioonnss ttoo SSeeccoonnddaarryy CClloossuurreeCertain wounds should not be allowed to heal by secondary intention.These are wounds that are associated with exposure of an importantunderlying structure or are located in areas where a tight scar will beparticularly problematic. Such wounds should be closed primarily. Ifprimary closure is not possible, one of the other options from the re-constructive ladder must be chosen (see following chapters).
Exposure of a Vital StructureSometimes wounds occur over important structures such as fracturesites, tendons, or prosthetic devices (e.g., artificial joints). If these struc-tures are not covered by healthy soft tissue, there is an almost 100%risk for the structure to become infected or die.
To avoid permanent disability, a wound that results in exposure of animportant structure should optimally be closed quickly (within days)with healthy tissue.
Areas Where a Tight Scar is Undesirable
Wounds over CreasesSecondary closure is not useful on wounds that are larger than 3–4 cmand located over creases (e.g., front of the elbow [antecubital fossa],armpit [axilla]). The scar that results from secondary closure will causetightness across the crease and may result in significant limitation ofmovement. If splints and movement exercises are used diligently (seechapter 15, “Scar Formation”), this problem may be avoided. But evenwith the best of care, limitation of movement often results.
Face Wounds Near the Lower EyelidIn many areas of the face, a wound can be allowed to heal secondarilywithout significant cosmetic ill effects. However, wounds on the cheeknear the lower eyelid may pull the eyelid downward if allowed to healsecondarily. The result not only is cosmetically unacceptable but alsomay expose the eye to injury.
GGuuiiddeelliinneess ffoorr UUssee ooff SSeeccoonnddaarryy CClloossuurreeIf you decide to treat a wound by secondary intention, the wound mustbe evaluated thoroughly and cleaned rigorously. The appropriatedressing regimen must then be implemented. See chapter 9, “TakingCare of Wounds,” for specific dressing recommendations.
Secondary Wound Closure 89
Unless the wound involves a human or a deep animal bite, antibiotics(oral or intravenous) are not required. However, you should see the pa-tient within a few days to ensure that no signs of infection are presentand that the wound is being cared for properly.
Signs of InfectionSigns of wound infection include redness, warmth, swelling, and ten-derness in the tissues around the wound. Drainage of pus from thewound is also a sign of infection.
Gray exudate on top of the wound does not mean that the wound is in-fected. It is often just proteinaceous debris from the wound itself. Agreen, somewhat sweet-smelling, creamy material is a sign of coloniza-tion by Pseudomonas bacteria. Without signs of surrounding soft tissueinfection, antibiotics are not required. However, you should treat thewound with wet-to-dry dressing changes, preferably with Dakin’s so-lution, and increase the number of changes each day.
Change in Dressing RegimenDo not be afraid to change dressing regimens. You may start with adressing regimen of antibiotic ointment covered with dry gauze. Aftera few days, a lot of exudate covers the wound. At this point you shouldchange to a wet-to-dry dressing and observe how the wound pro-gresses. Once the wound has improved in appearance, you can go backto the antibiotic ointment or continue with the wet-to-dry dressings.
Duration of Wound DressingThe dressings should be continued until the wound heals. Oftenduring the course of secondary healing, the wound develops a dryeschar (scab). The patient can cover the area with dry gauze or evenleave it uncovered. As the wound heals, the eschar gradually falls off.
If the wound is near a crease, encourage the patient to exercise the areato prevent formation of a tight scar. Splints also may be useful. Seechapter 15, “Scar Formation,” for more details.
BBiibblliiooggrraapphhyy1. Goldwyn RM, Rueckert F: The value of healing by secondary intention for sizable de-
fects of the face. Arch Surg 112:285, 1977.2. Montandon D, D’Andiron G, Gabbiani G: The mechanism of wound contraction and
epithelialization. Clin Plast Surg 4:325, 1977.
PPRRIIMMAARRYY WWOOUUNNDD CCLLOOSSUURREE
In primary wound closure, the skin edges of the wound are sutured to-gether to close the defect. Whenever possible and practical, primaryclosure is the best way to close an acute open wound.
AAddvvaannttaaggeess ooff PPrriimmaarryy WWoouunndd CClloossuurree• Primary wound closure simplifies wound care for the patient, who
simply needs to keep the suture line clean and dry. Secondarywound closure requires several dressing changes per day.
• A wound closed primarily heals much more quickly and with lesspain than a wound allowed to heal with dressings alone.
• Primary closure involves fewer problems with abnormal scarringand has a better cosmetic outcome.
• All vital, underlying structures are covered.
CCoonnttrraaiinnddiiccaattiioonnss ttoo PPrriimmaarryy WWoouunndd CClloossuurreeConcern about wound infection is the main reason not to close awound primarily. If infection develops, the resultant deformity may beworse than that caused by the initial injury alone. The following cir-cumstances are associated with an unacceptably high risk of infection:
• An acute wound > 6 hours old (with the exception of facial wounds)
• Foreign debris in the wound that cannot be completely removed(e.g., a wound with a lot of embedded dirt that you cannot cleancompletely)
• Active oozing of blood from the wound
• Dead space under the skin closure
• Too much tension on the wound
91
Chapter 11
KKEEYY FFIIGGUURREE::Everting skin edges
92 Practical Plastic Surgery for Nonsurgeons
BBeeffoorree PPrriimmaarryy CClloossuurree
Clean WoundThe wound must first be evaluated thoroughly for injury to underlyingstructures to rule out the need for urgent exploration in the operat-ing room. (See chapter 6, “Evaluation of an Acute Wound,” for specificdetails.)
The wound must then be cleansed.
Evaluating and cleansing a wound can hurt; remember pain control.
Anesthetize the Area Before SuturingIf local anesthetic was administered for wound cleansing, check toensure that the anesthesia is still effective.
Pinch the tissues with your forceps, or gently touch the skin edges witha needle. If the patient feels sharp pain, more anesthetic is required.
Pressure sensation is not dulled by local anesthetics. With adequateanesthesia, the patient may still feel a sensation of pressure when youpinch the tissues with the forceps, but it should not hurt.
AgentsInjectable lidocaine (lignocaine) or bupivacaine should be used. Forwounds of the face or scalp, the addition of epinephrine decreasesbleeding caused by the placement of sutures. The effects of lidocainelast approximately 1 hour; the effects of bupivacaine last 2–4 hours.
Administration1. Inject the anesthetic with as small a needle as possible. A 25–gauge
needle is acceptable, but use the smallest needle that you have. Thelarger the number, the smaller the needle: a 25-gauge needle is muchsmaller than an 18-gauge needle.
2. Inject slowly. It is acceptable to inject into the wound after it hasbeen cleaned. If the tissues are dirty, however, inject into the skinsurrounding the wound to prevent foreign material from beingpushed into the uninjured surrounding tissues.
3. Inject enough anesthetic to make the tissues swell just a little.
4. If the injury is in an area where a nerve block can be done (e.g., onthe finger), do a nerve block. It provides better anesthesia.
5. Allow 5–10 minutes for the anesthetic to take effect.See chapter 3, “Local Anesthetics,” for more details.
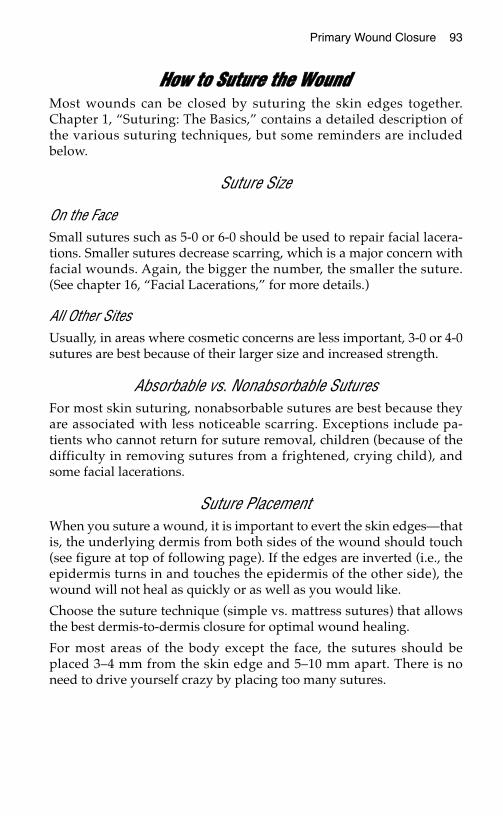
Primary Wound Closure 93
HHooww ttoo SSuuttuurree tthhee WWoouunnddMost wounds can be closed by suturing the skin edges together.Chapter 1, “Suturing: The Basics,” contains a detailed description ofthe various suturing techniques, but some reminders are includedbelow.
Suture Size
On the FaceSmall sutures such as 5-0 or 6-0 should be used to repair facial lacera-tions. Smaller sutures decrease scarring, which is a major concern withfacial wounds. Again, the bigger the number, the smaller the suture.(See chapter 16, “Facial Lacerations,” for more details.)
All Other SitesUsually, in areas where cosmetic concerns are less important, 3-0 or 4-0sutures are best because of their larger size and increased strength.
Absorbable vs. Nonabsorbable SuturesFor most skin suturing, nonabsorbable sutures are best because theyare associated with less noticeable scarring. Exceptions include pa-tients who cannot return for suture removal, children (because of thedifficulty in removing sutures from a frightened, crying child), andsome facial lacerations.
Suture PlacementWhen you suture a wound, it is important to evert the skin edges—thatis, the underlying dermis from both sides of the wound should touch(see figure at top of following page). If the edges are inverted (i.e., theepidermis turns in and touches the epidermis of the other side), thewound will not heal as quickly or as well as you would like.
Choose the suture technique (simple vs. mattress sutures) that allowsthe best dermis-to-dermis closure for optimal wound healing.
For most areas of the body except the face, the sutures should beplaced 3–4 mm from the skin edge and 5–10 mm apart. There is noneed to drive yourself crazy by placing too many sutures.
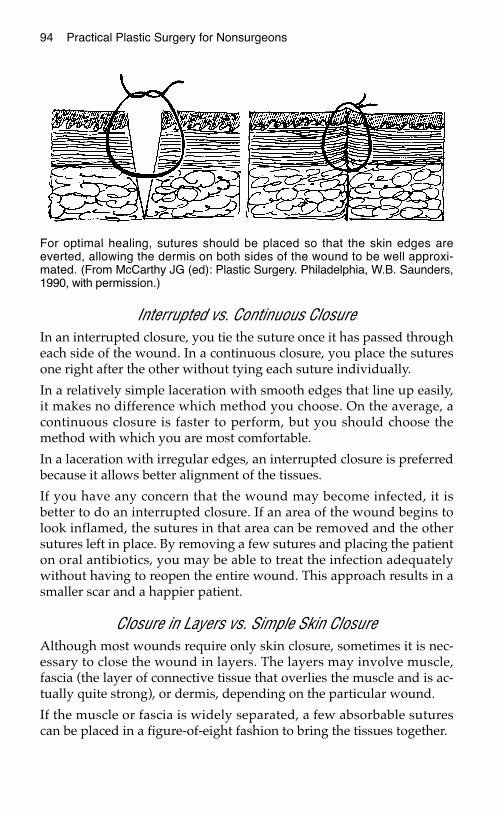
94 Practical Plastic Surgery for Nonsurgeons
Interrupted vs. Continuous ClosureIn an interrupted closure, you tie the suture once it has passed througheach side of the wound. In a continuous closure, you place the suturesone right after the other without tying each suture individually.
In a relatively simple laceration with smooth edges that line up easily,it makes no difference which method you choose. On the average, acontinuous closure is faster to perform, but you should choose themethod with which you are most comfortable.
In a laceration with irregular edges, an interrupted closure is preferredbecause it allows better alignment of the tissues.
If you have any concern that the wound may become infected, it isbetter to do an interrupted closure. If an area of the wound begins tolook inflamed, the sutures in that area can be removed and the othersutures left in place. By removing a few sutures and placing the patienton oral antibiotics, you may be able to treat the infection adequatelywithout having to reopen the entire wound. This approach results in asmaller scar and a happier patient.
Closure in Layers vs. Simple Skin ClosureAlthough most wounds require only skin closure, sometimes it is nec-essary to close the wound in layers. The layers may involve muscle,fascia (the layer of connective tissue that overlies the muscle and is ac-tually quite strong), or dermis, depending on the particular wound.
If the muscle or fascia is widely separated, a few absorbable suturescan be placed in a figure-of-eight fashion to bring the tissues together.
For optimal healing, sutures should be placed so that the skin edges areeverted, allowing the dermis on both sides of the wound to be well approxi-mated. (From McCarthy JG (ed): Plastic Surgery. Philadelphia, W.B. Saunders,1990, with permission.)
Primary Wound Closure 95
If the wound is widely separated or the closure will be under some ten-sion, a few buried dermal sutures are useful. Such sutures are placed inthe skin layer just below the epidermis and should be made of an ab-sorbable material.
AAfftteerrccaarree1. After suturing the wound closed, apply a small amount of antibiotic
ointment over the suture line and cover the area with a dry gauze.
2. After 24 hours, remove the original dressing.
3. The patient can wash the area with gentle soap and water the dayafter the repair. A shower is fine, but if the patient wants to take abath, the injured area should not be allowed to soak in the water formore than a few minutes.
4. A small amount of antibiotic ointment can be applied daily for thefirst few days; then leave the area open to air.
5. If the injured area is on the hand, foot, or calf, have the patient ele-vate the affected extremity. Elevation decreases swelling in the in-jured area and thereby improves healing.
SSuuttuurree RReemmoovvaallSutures should be removed according to the following guidelines:
• Face: 5–7 days
• Hand: 10–14 days
• Elsewhere: 7–10 days
To decrease scarring, skin sutures are removed while the scar tissue isstill relatively weak compared with the final scar strength (which is notattained for several months). To help maintain the wound closure, it isuseful to place Steristrips (if available) across the scar once the sutureshave been removed. These strips fall off on their own, and the patientcan wash the area, even with the strips in place.
WWhhaatt ttoo DDoo iiff tthhee SSuuttuurree LLiinnee BBeeccoommeess RReeddIf the suture puncture sites start to become red and irritated-lookingbut the surrounding skin area is not tender or red, simply remove thesutures. No antibiotics should be needed. This reaction probably repre-sents nothing more than inflammation and irritation from the sutures.As a precaution, you should check the patient within 24–48 hours to besure.

96 Practical Plastic Surgery for Nonsurgeons
If the area around the sutures becomes red, tender, and swollen, an in-fection probably has developed. Remove a few sutures, and open thewound. Try to express any underlying fluid or pus, and clean the areawith saline or other antibacterial solution. If you cannot fully drain theunderlying fluid or fully cleanse the area by taking out a few sutures,all of the sutures should be removed, the wound opened, and the areatreated with wet-dry dressings. Oral antibiotics are also needed.
DDeellaayyeedd PPrriimmaarryy CClloossuurreeDelayed primary closure is a compromise between primary repair andallowing an acute wound to heal secondarily. This option may be con-sidered for a wound with characteristics that require secondary closure(e.g., a wound over 6 hours old) even though primary closure is prefer-able (e.g., a large wound or a wound near a skin crease).
In delayed primary closure, you initially treat the wound with wet-to-dry dressing changes for a few (2–3) days with the hope of being ableto suture the wound closed within 3–4 days.
During the few days of dressing changes, the reasons for not closingthe wound initially may resolve. The dressings should clean thewound, the tissue swelling caused by the trauma may subside, and allbleeding may be fully controlled. If the wound shows no signs of infec-tion and can be closed without tension, it may be possible to close thewound primarily within a few days.
Delayed primary closure is a relatively simple technique and avoidshaving to choose a more complex method for wound closure.
BBiibblliiooggrraapphhyyMillard DR: Principlization of Plastic Surgery. Boston, Little, Brown, 1986.
SSKKIINN GGRRAAFFTTSS
A skin graft involves taking a piece of skin from an uninjured area ofthe body (called the donor site) and using it to provide coverage for anopen wound. When primary closure is impossible because of softtissue loss and closure by secondary intention is contraindicated, a skingraft is the next rung on the reconstructive ladder. It is not a technicallydifficult procedure but does require some surgical skills. For a success-ful result, you need a thorough understanding of how skin grafts healand how to perform the procedure.
BBaacckkggrroouunndd iinnffoorrmmaattiioonn
Anatomy of SkinThe thickness of human skin is quite variable. The eyelids have thethinnest skin (0.5 mm), and the thickest skin is found on the soles ofthe feet (> 5.0 mm).
EpidermisThe epidermis is the top portion of the skin. The outer layers of the epi-dermis are formed by essentially dead, nonreplicating cells. The inner-most layer contains the cells capable of replication, which are responsiblefor wound healing and skin pigmentation.
DermisImmediately below the epidermis is the dermis. It is made primarily of col-lagen and is much thicker than the epidermal layer. The dermal-epidermal
97
Chapter 12
KKEEYY FFIIGGUURREESS::Skin anatomy with Mesher
graft thickness Skin graftHumby knife Tying the dressing Using the dermatome in placeUsing the Humby knife Defatting the FTSG
98 Practical Plastic Surgery for Nonsurgeons
junction is irregular and has the appearance of ridges. This anatomicarrangement accounts for the skin’s strength and prevents injury fromnormal shear forces. Nerve endings, hair follicles, and sweat glands arelocated in the dermis. All skin grafts must include at least a portion of thedermal layer for survival.
Subcutaneous TissueThe subcutaneous fatty tissue below the dermis provides padding forthe skin. The base of many hair follicles and sweat glands, as well asmany important nerves for pressure sensation, reside in the subcuta-neous tissue. Because of these important skin components, I includethe subcutaneous tissue as a layer of the skin. However, it is not in-cluded in a skin graft. Fat attached to the graft interferes with transportof nutrients to the important upper skin layers. Therefore, no fatshould be included in the skin graft.
How a Skin Graft SurvivesWhen the skin graft is harvested from the donor site, it is completelyseparated from its blood supply. In its new position covering the openwound, the graft initially survives by diffusion of nutrients from thewound bed into the graft. Diffusion of nutrients keeps the skin graft
Cross-section of human skin showing the epidermis and dermis (derived fromtwo different germ layers). The relative thickness of skin grafts is shown. Thethicker the graft, the more characteristics of normal skin it will provide. (FromCohen M (ed): Mastery of Plastic and Reconstructive Surgery. Boston, Little,Brown, 1994, with permission.)
Skin Grafts 99
alive for, at most, 3–5 days. During this period, blood vessels begin togrow from the wound bed into the graft. By the time the graft is nolonger able to survive by diffusion of nutrients alone, this vascular net-work has formed and becomes the primary mechanism for providingnutrients to the graft.
In the first several weeks after the procedure, the skin graft looks quitered and irregular compared with normal surrounding skin. Reassurethe patient that the appearance will improve dramatically over the nextseveral months, but the skin-grafted area will never look completelynormal. It can take at least 1 year to see the final appearance of thegraft. See chapter 15, “Scar Formation,” for more details
When is a Wound Ready for Grafting?A wound will accept a skin graft when there is no overlying deadtissue and the wound is clean, beefy red (from granulation tissue), andwithout surrounding infection. Skin grafts heal well over muscle.Therefore, if muscle is exposed in the wound, skin can be grafted atany time, as long as the wound is otherwise clean.
Contraindications to Wound Closure with a Skin GraftA wound that has exposed tendon or bone can be successfully coveredwith a skin graft only if the thin layer of tissue connecting the tendon or
TTaabbllee 11.. CCoommppeennssaattiinngg ffoorr FFaaccttoorrss tthhaatt IInntteerrffeerree wwiitthh GGrraafftt SSuurrvviivvaall
* Granulation tissue is the beefy red tissue that develops as a wound heals. It has an excellent bloodsupply but also contains bacteria in its crevices.
FFaaccttoorr CCoommppeennssaattiioonn
Dirty wound (e.g., Debride the wound and treat it with wet-to-dry dressingssurrounding in- until the wound looks clean. Use antibiotics to clearfection, necrotic signs of surrounding infection. The skin graft can betissue over wound) done once the wound has improved in appearance and
there are no signs of surrounding infection.
Fat in base of wound Fat has a poor blood supply and may not be able to sup-port the graft. Treat the wound with wet-to-dry dressingsuntil granulation tissue* begins to appear. Then do theskin graft.
Shear forces between Movement of the graft over the wound interferes with vas-graft and base of cular ingrowth. The graft must be kept well secured towound the wound by the dressing. If the graft is on an extremity,
consider using a splint for immobilization of the limb.
Blood or serum Fluid collection under the graft prevents the ingrowth ofcollection under blood vessels necessary for graft survival. Fluid collectiongraft can be prevented by cutting holes in the graft and keep-
ing the graft well secured to the wound. If the graft is on the leg, the patient should be kept on bedrest, with the leg elevated at all times for at least the first 4–5 days.
100 Practical Plastic Surgery for Nonsurgeons
bone (paratenon or periosteum, respectively) is intact. These connectivetissues contain the vascular structures necessary for skin graft survival. Ifthe paratenon or periosteum is absent, the graft will not survive. Underthese circumstances, some type of flap is needed for wound closure.
SSpplliitt--tthhiicckknneessss SSkkiinn GGrraaffttA split-thickness skin graft (STSG) is composed of the top layers of skin(the epidermis and part of the dermis). The graft is placed over an openwound to provide coverage and promote healing. The STSG donor siteis essentially a second-degree burn because only part of the dermis isincluded in the graft. The donor site will heal on its own because somedermal elements remain.
IndicationsAn STSG is indicated in most wounds that cannot be closed primarilyand when closure by secondary intention is contraindicated. It is alsoindicated for a relatively large wound (> 5–6 cm in diameter) thatwould take many weeks to heal secondarily. A skin graft providesmore stable coverage for large wounds than the scar that results fromsecondary closure. A large wound also heals more quickly with a skingraft than with dressing changes alone. The wound must be clean. Allnecrotic tissue must be removed before skin grafting, and there shouldbe no signs of infection in the surrounding tissues.
Anesthesia of the Donor SiteBecause of the relatively large size of the graft to be taken, the patientusually requires either general or spinal anesthesia for adequate paincontrol. However, if the required graft is no more than several centime-ters in diameter, the donor site can be anesthetized by local infiltrationof tissues with lidocaine or bupivacaine.
Preparation of the Donor SiteThe most common donor site is the anterior or lateral aspect of thethigh. If the wound to be covered is on the back, try to take the graftfrom the lateral thigh, but the posterior thigh is also acceptable. Use ofthe posterior thigh as a donor site is a bit more painful and difficult forthe patient to care for postoperatively.
Any betadine or other antibacterial solution used to prepare the donorsite should be washed off with saline. Then the donor site should bedried. Apply a sterile lubricant (e.g., mineral oil, K-Y jelly) to the donorsite and to the instrument you will be using to harvest the graft.
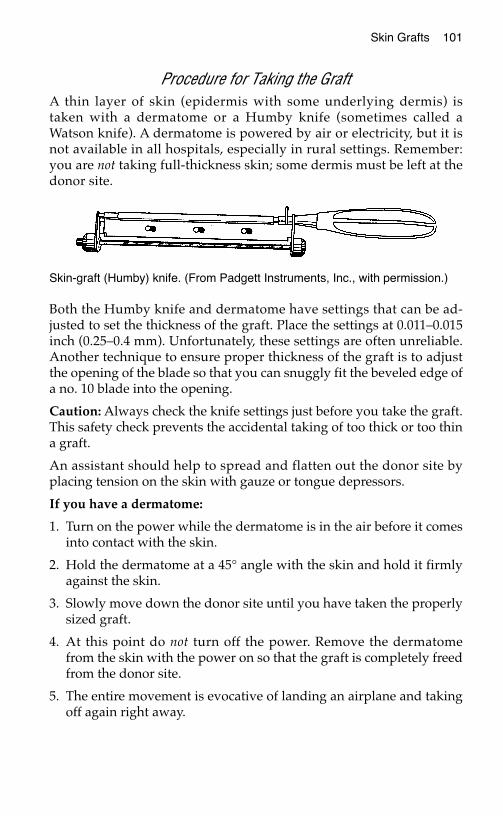
Skin Grafts 101
Procedure for Taking the GraftA thin layer of skin (epidermis with some underlying dermis) istaken with a dermatome or a Humby knife (sometimes called aWatson knife). A dermatome is powered by air or electricity, but it isnot available in all hospitals, especially in rural settings. Remember:you are not taking full-thickness skin; some dermis must be left at thedonor site.
Both the Humby knife and dermatome have settings that can be ad-justed to set the thickness of the graft. Place the settings at 0.011–0.015inch (0.25–0.4 mm). Unfortunately, these settings are often unreliable.Another technique to ensure proper thickness of the graft is to adjustthe opening of the blade so that you can snuggly fit the beveled edge ofa no. 10 blade into the opening.
Caution: Always check the knife settings just before you take the graft.This safety check prevents the accidental taking of too thick or too thina graft.
An assistant should help to spread and flatten out the donor site byplacing tension on the skin with gauze or tongue depressors.
If you have a dermatome:
1. Turn on the power while the dermatome is in the air before it comesinto contact with the skin.
2. Hold the dermatome at a 45° angle with the skin and hold it firmlyagainst the skin.
3. Slowly move down the donor site until you have taken the properlysized graft.
4. At this point do not turn off the power. Remove the dermatomefrom the skin with the power on so that the graft is completely freedfrom the donor site.
5. The entire movement is evocative of landing an airplane and takingoff again right away.
Skin-graft (Humby) knife. (From Padgett Instruments, Inc., with permission.)
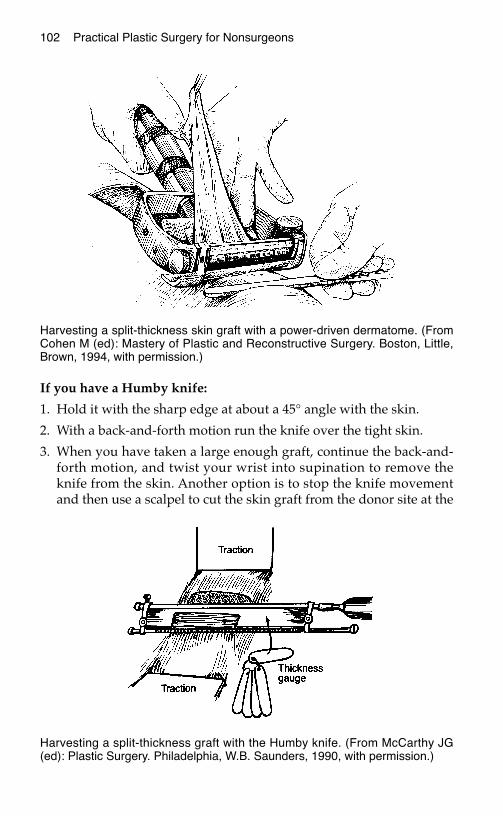
102 Practical Plastic Surgery for Nonsurgeons
If you have a Humby knife:
1. Hold it with the sharp edge at about a 45° angle with the skin.
2. With a back-and-forth motion run the knife over the tight skin.
3. When you have taken a large enough graft, continue the back-and-forth motion, and twist your wrist into supination to remove theknife from the skin. Another option is to stop the knife movementand then use a scalpel to cut the skin graft from the donor site at the
Harvesting a split-thickness skin graft with a power-driven dermatome. (FromCohen M (ed): Mastery of Plastic and Reconstructive Surgery. Boston, Little,Brown, 1994, with permission.)
Harvesting a split-thickness graft with the Humby knife. (From McCarthy JG(ed): Plastic Surgery. Philadelphia, W.B. Saunders, 1990, with permission.)

Skin Grafts 103
blade edge. You may need to open the knife fully to remove the skinfrom the instrument.
Preparation of the Skin GraftIt is best to cut multiple slices in the graft to prevent blood and serumfrom accumulating under the graft. The cuts also help to expand thegraft, allowing you to take a graft that is slightly smaller than the openwound. Use the tip of a knife or a small scissors to create the cuts in thegraft. Some operating rooms have special equipment, called meshers,for this purpose. The mesher is a hand-cranked instrument that createspie-cuts in the skin.
A, The mesher, a device used tomake fine cuts in skin grafts. B, Theskin graft is placed on the rough sideof the carrier and passed through themesher. C, The meshed graft cannow be spread over a larger area.(From Chase CA: Altas of Hand Sur-gery. Philadelphia, W.B. Saunders,1973, with permission.)
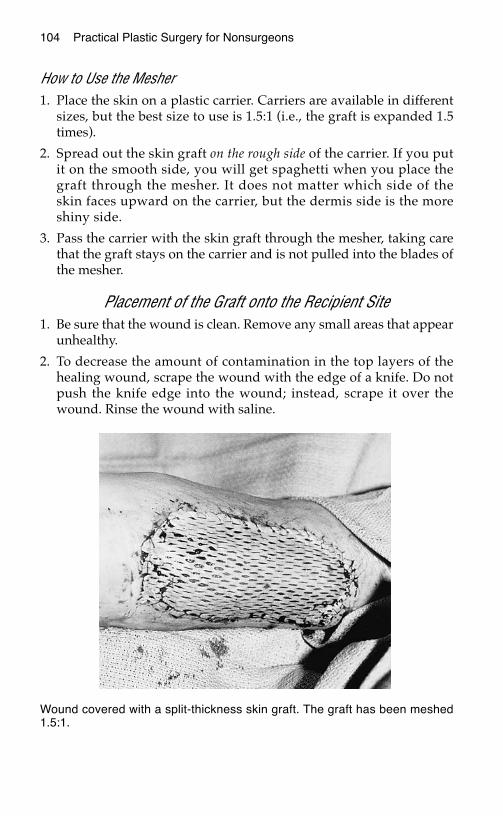
104 Practical Plastic Surgery for Nonsurgeons
How to Use the Mesher1. Place the skin on a plastic carrier. Carriers are available in different
sizes, but the best size to use is 1.5:1 (i.e., the graft is expanded 1.5times).
2. Spread out the skin graft on the rough side of the carrier. If you putit on the smooth side, you will get spaghetti when you place thegraft through the mesher. It does not matter which side of theskin faces upward on the carrier, but the dermis side is the moreshiny side.
3. Pass the carrier with the skin graft through the mesher, taking carethat the graft stays on the carrier and is not pulled into the blades ofthe mesher.
Placement of the Graft onto the Recipient Site1. Be sure that the wound is clean. Remove any small areas that appear
unhealthy.
2. To decrease the amount of contamination in the top layers of thehealing wound, scrape the wound with the edge of a knife. Do notpush the knife edge into the wound; instead, scrape it over thewound. Rinse the wound with saline.
Wound covered with a split-thickness skin graft. The graft has been meshed1.5:1.
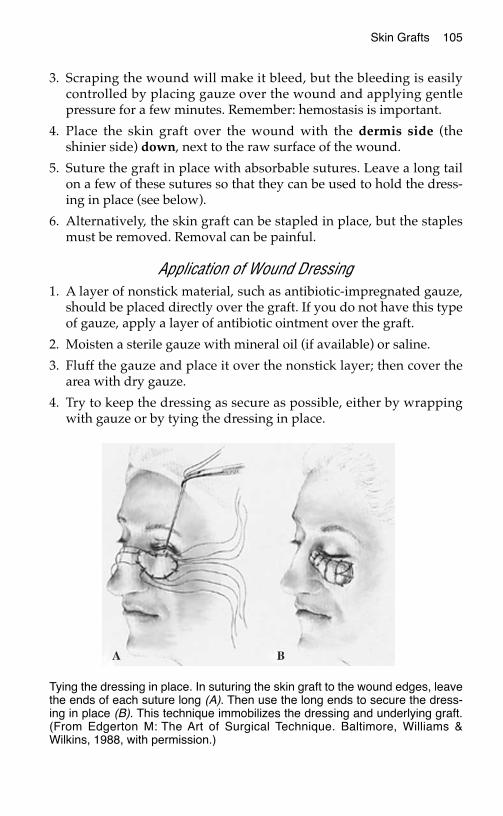
Skin Grafts 105
3. Scraping the wound will make it bleed, but the bleeding is easilycontrolled by placing gauze over the wound and applying gentlepressure for a few minutes. Remember: hemostasis is important.
4. Place the skin graft over the wound with the dermis side (theshinier side) down, next to the raw surface of the wound.
5. Suture the graft in place with absorbable sutures. Leave a long tailon a few of these sutures so that they can be used to hold the dress-ing in place (see below).
6. Alternatively, the skin graft can be stapled in place, but the staplesmust be removed. Removal can be painful.
Application of Wound Dressing1. A layer of nonstick material, such as antibiotic-impregnated gauze,
should be placed directly over the graft. If you do not have this typeof gauze, apply a layer of antibiotic ointment over the graft.
2. Moisten a sterile gauze with mineral oil (if available) or saline.
3. Fluff the gauze and place it over the nonstick layer; then cover thearea with dry gauze.
4. Try to keep the dressing as secure as possible, either by wrappingwith gauze or by tying the dressing in place.
Tying the dressing in place. In suturing the skin graft to the wound edges, leavethe ends of each suture long (A). Then use the long ends to secure the dress-ing in place (B). This technique immobilizes the dressing and underlying graft.(From Edgerton M: The Art of Surgical Technique. Baltimore, Williams &Wilkins, 1988, with permission.)
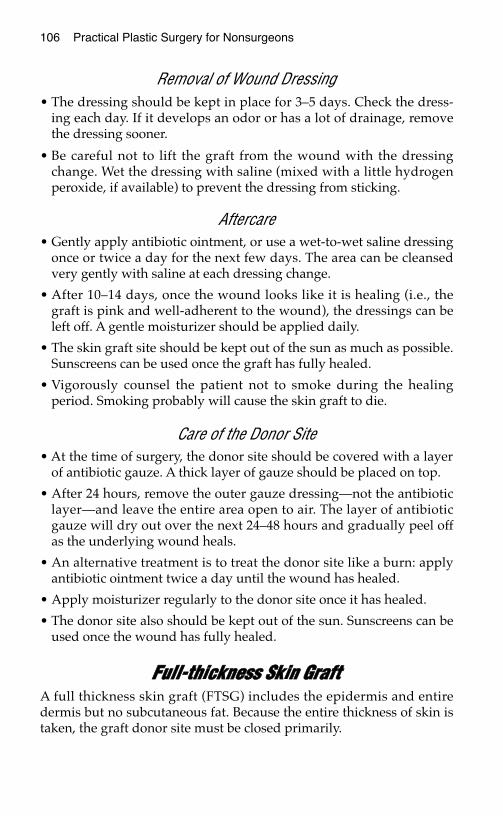
106 Practical Plastic Surgery for Nonsurgeons
Removal of Wound Dressing• The dressing should be kept in place for 3–5 days. Check the dress-
ing each day. If it develops an odor or has a lot of drainage, removethe dressing sooner.
• Be careful not to lift the graft from the wound with the dressingchange. Wet the dressing with saline (mixed with a little hydrogenperoxide, if available) to prevent the dressing from sticking.
Aftercare• Gently apply antibiotic ointment, or use a wet-to-wet saline dressing
once or twice a day for the next few days. The area can be cleansedvery gently with saline at each dressing change.
• After 10–14 days, once the wound looks like it is healing (i.e., thegraft is pink and well-adherent to the wound), the dressings can beleft off. A gentle moisturizer should be applied daily.
• The skin graft site should be kept out of the sun as much as possible.Sunscreens can be used once the graft has fully healed.
• Vigorously counsel the patient not to smoke during the healingperiod. Smoking probably will cause the skin graft to die.
Care of the Donor Site• At the time of surgery, the donor site should be covered with a layer
of antibiotic gauze. A thick layer of gauze should be placed on top.
• After 24 hours, remove the outer gauze dressing—not the antibioticlayer—and leave the entire area open to air. The layer of antibioticgauze will dry out over the next 24–48 hours and gradually peel offas the underlying wound heals.
• An alternative treatment is to treat the donor site like a burn: applyantibiotic ointment twice a day until the wound has healed.
• Apply moisturizer regularly to the donor site once it has healed.
• The donor site also should be kept out of the sun. Sunscreens can beused once the wound has fully healed.
FFuullll--tthhiicckknneessss SSkkiinn GGrraaffttA full thickness skin graft (FTSG) includes the epidermis and entiredermis but no subcutaneous fat. Because the entire thickness of skin istaken, the graft donor site must be closed primarily.
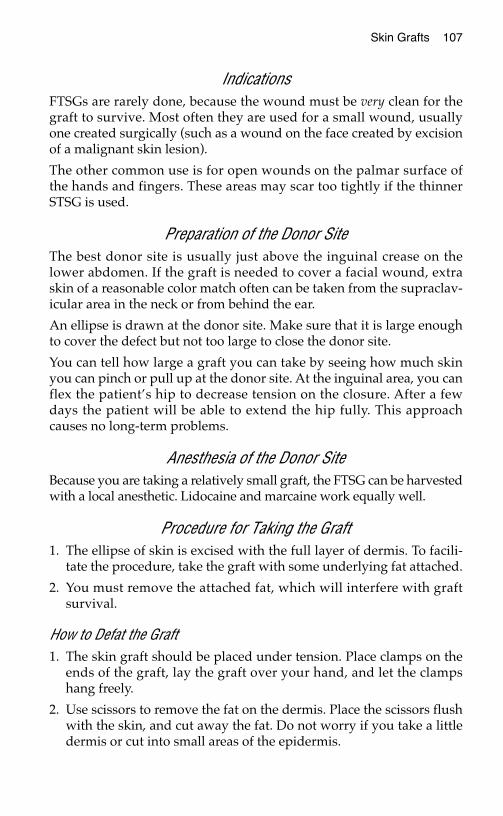
Skin Grafts 107
IndicationsFTSGs are rarely done, because the wound must be very clean for thegraft to survive. Most often they are used for a small wound, usuallyone created surgically (such as a wound on the face created by excisionof a malignant skin lesion).
The other common use is for open wounds on the palmar surface ofthe hands and fingers. These areas may scar too tightly if the thinnerSTSG is used.
Preparation of the Donor SiteThe best donor site is usually just above the inguinal crease on thelower abdomen. If the graft is needed to cover a facial wound, extraskin of a reasonable color match often can be taken from the supraclav-icular area in the neck or from behind the ear.
An ellipse is drawn at the donor site. Make sure that it is large enoughto cover the defect but not too large to close the donor site.
You can tell how large a graft you can take by seeing how much skinyou can pinch or pull up at the donor site. At the inguinal area, you canflex the patient’s hip to decrease tension on the closure. After a fewdays the patient will be able to extend the hip fully. This approachcauses no long-term problems.
Anesthesia of the Donor SiteBecause you are taking a relatively small graft, the FTSG can be harvestedwith a local anesthetic. Lidocaine and marcaine work equally well.
Procedure for Taking the Graft1. The ellipse of skin is excised with the full layer of dermis. To facili-
tate the procedure, take the graft with some underlying fat attached.
2. You must remove the attached fat, which will interfere with graftsurvival.
How to Defat the Graft1. The skin graft should be placed under tension. Place clamps on the
ends of the graft, lay the graft over your hand, and let the clampshang freely.
2. Use scissors to remove the fat on the dermis. Place the scissors flushwith the skin, and cut away the fat. Do not worry if you take a littledermis or cut into small areas of the epidermis.
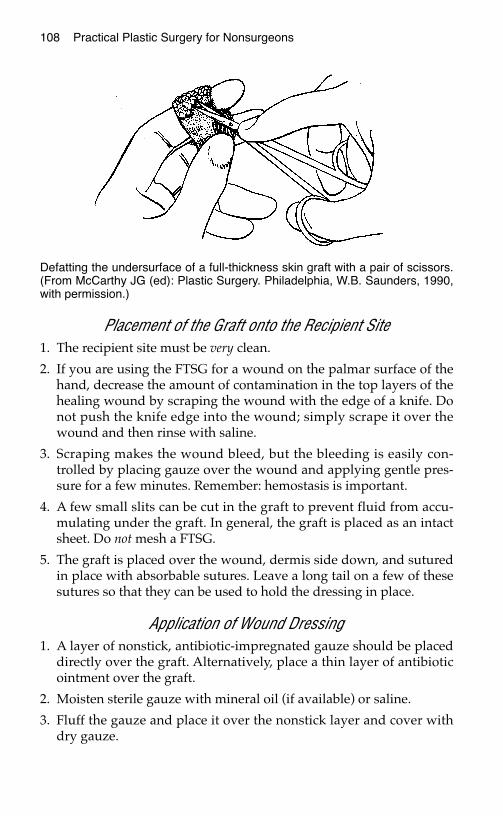
108 Practical Plastic Surgery for Nonsurgeons
Placement of the Graft onto the Recipient Site1. The recipient site must be very clean.
2. If you are using the FTSG for a wound on the palmar surface of thehand, decrease the amount of contamination in the top layers of thehealing wound by scraping the wound with the edge of a knife. Donot push the knife edge into the wound; simply scrape it over thewound and then rinse with saline.
3. Scraping makes the wound bleed, but the bleeding is easily con-trolled by placing gauze over the wound and applying gentle pres-sure for a few minutes. Remember: hemostasis is important.
4. A few small slits can be cut in the graft to prevent fluid from accu-mulating under the graft. In general, the graft is placed as an intactsheet. Do not mesh a FTSG.
5. The graft is placed over the wound, dermis side down, and suturedin place with absorbable sutures. Leave a long tail on a few of thesesutures so that they can be used to hold the dressing in place.
Application of Wound Dressing1. A layer of nonstick, antibiotic-impregnated gauze should be placed
directly over the graft. Alternatively, place a thin layer of antibioticointment over the graft.
2. Moisten sterile gauze with mineral oil (if available) or saline.
3. Fluff the gauze and place it over the nonstick layer and cover withdry gauze.
Defatting the undersurface of a full-thickness skin graft with a pair of scissors.(From McCarthy JG (ed): Plastic Surgery. Philadelphia, W.B. Saunders, 1990,with permission.)
Skin Grafts 109
4. Keep the dressing as secure as possible, either by wrapping withgauze or by tying the dressing in place.
Removal of Wound Dressing The dressing should be kept in place for 3–5 days. Check the dressingeach day. If the wound develops an odor or has a lot of drainage,remove the dressing sooner.
Be careful not to lift the graft off of the wound with dressing changes.If necessary, wet the dressing with saline (mixed with a little hydrogenperoxide if available) to prevent it from sticking.
AftercareApply antibiotic ointment, or use a wet-to-wet saline dressing once ortwice a day for the next few days.
Cleanse the area gently with saline at each dressing change.
The epidermis (very top layer) may become black and peel off. Do notbe overly concerned. As long as the underlying dermis is attached andvascularized, the graft should heal.
After 7–10 days, once the graft looks like it is healing (i.e., it is pink andwell-adherent), the dressings can be left off. A gentle moisturizershould be applied.
The skin graft site should be kept out of the sun as much as possible. Agentle sunscreen should be used.
Vigorously counsel the patient not to smoke during the healing period.Smoking probably will cause the skin graft to die.
Care of the Donor SiteThe donor site should be closed primarily and covered with antibioticointment and dry gauze. The dressing can be removed after 24 hours.
Apply a small amount of antibiotic ointment and dry gauze for 2–3days. Then the area can be left open.
Clean daily with gentle soap and water.
Remove the sutures after 7–10 days.
BBiibblliiooggrraapphhyyReus WF, Mathes SJ: Wound closure. In Jurkeiwicz MJ, Krizek TJ, Mathes SJ, Ariyan S(eds): Plastic Surgery: Principles and Practice. St. Louis, Mosby, 1990, pp 20–22.
LLOOCCAALL FFLLAAPPSS
DDeeffiinniittiioonnssA flap is a piece of tissue with a blood supply that can be used to coveran open wound. A flap can be created from skin with its underlyingsubcutaneous tissue, fascia, or muscle, either individually or in somecombination. Depending on the reconstructive requirements, evenbone can be included in a flap.
A local flap implies that the tissue is adjacent to the open wound inneed of coverage, whereas in a distant flap, the tissue is brought froman area away from the open wound.
Local flap coverage of a wound is the next higher rung up the recon-structive ladder after a skin graft. Examples of wounds that require flapcoverage include wounds with exposed bone, tendon, or other vitalstructure and large wounds over a flexion crease, for which a split-thickness skin graft or secondary closure would result in tight scarring.
Donor site: where the flap originates.
Recipient site: the open wound/soft tissue defect in need of coverage.
Pedicle: the blood supply of the flap (i.e., its arterial inflow andvenous outflow). The pedicle varies from a wide bridge of tissue (skin,subcutaneous tissue, muscle, or some combination) to an isolatedartery and vein.
Most local flaps can be classified as either (1) skin flaps, which are skinand subcutaneous tissue with or without the underlying fascia, or (2)muscle flaps, which are created from a muscle with or without the at-tached overlying skin.
111
Chapter 13
KKEEYY FFIIGGUURREESS::Axial flap noting pedicle Rhomboid flapRandom flap noting Rotation flap
pedicle and 3:1 ratio V-Y advancement flap
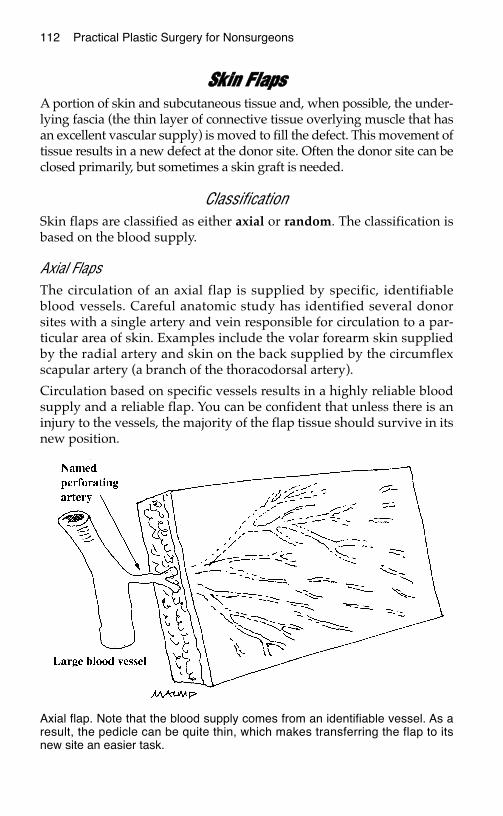
112 Practical Plastic Surgery for Nonsurgeons
SSkkiinn FFllaappssA portion of skin and subcutaneous tissue and, when possible, the under-lying fascia (the thin layer of connective tissue overlying muscle that hasan excellent vascular supply) is moved to fill the defect. This movement oftissue results in a new defect at the donor site. Often the donor site can beclosed primarily, but sometimes a skin graft is needed.
ClassificationSkin flaps are classified as either axial or random. The classification isbased on the blood supply.
Axial FlapsThe circulation of an axial flap is supplied by specific, identifiableblood vessels. Careful anatomic study has identified several donorsites with a single artery and vein responsible for circulation to a par-ticular area of skin. Examples include the volar forearm skin suppliedby the radial artery and skin on the back supplied by the circumflexscapular artery (a branch of the thoracodorsal artery).
Circulation based on specific vessels results in a highly reliable bloodsupply and a reliable flap. You can be confident that unless there is aninjury to the vessels, the majority of the flap tissue should survive in itsnew position.
Axial flap. Note that the blood supply comes from an identifiable vessel. As aresult, the pedicle can be quite thin, which makes transferring the flap to itsnew site an easier task.
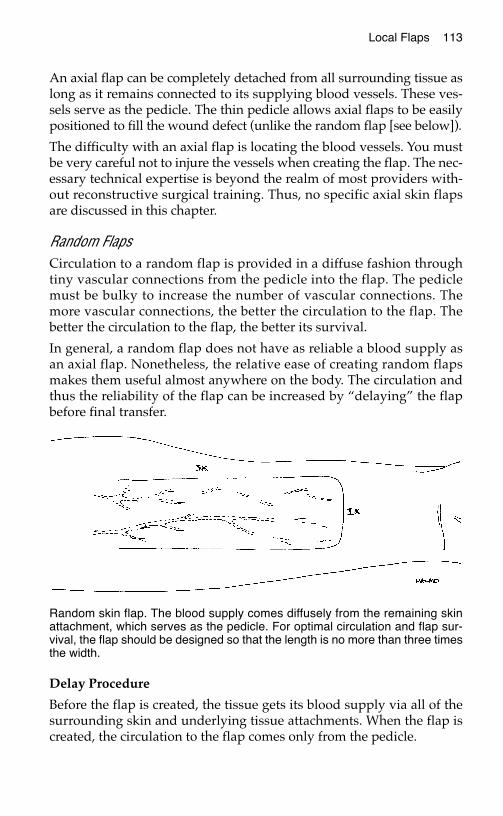
Local Flaps 113
An axial flap can be completely detached from all surrounding tissue aslong as it remains connected to its supplying blood vessels. These ves-sels serve as the pedicle. The thin pedicle allows axial flaps to be easilypositioned to fill the wound defect (unlike the random flap [see below]).
The difficulty with an axial flap is locating the blood vessels. You mustbe very careful not to injure the vessels when creating the flap. The nec-essary technical expertise is beyond the realm of most providers with-out reconstructive surgical training. Thus, no specific axial skin flapsare discussed in this chapter.
Random FlapsCirculation to a random flap is provided in a diffuse fashion throughtiny vascular connections from the pedicle into the flap. The pediclemust be bulky to increase the number of vascular connections. Themore vascular connections, the better the circulation to the flap. Thebetter the circulation to the flap, the better its survival.
In general, a random flap does not have as reliable a blood supply asan axial flap. Nonetheless, the relative ease of creating random flapsmakes them useful almost anywhere on the body. The circulation andthus the reliability of the flap can be increased by “delaying” the flapbefore final transfer.
Delay Procedure
Before the flap is created, the tissue gets its blood supply via all of thesurrounding skin and underlying tissue attachments. When the flap iscreated, the circulation to the flap comes only from the pedicle.
Random skin flap. The blood supply comes diffusely from the remaining skinattachment, which serves as the pedicle. For optimal circulation and flap sur-vival, the flap should be designed so that the length is no more than three timesthe width.

114 Practical Plastic Surgery for Nonsurgeons
The purpose of the delay procedure is to enable the pedicle to assumeits role as the main source of circulation before the flap is moved to itsnew position. This goal is obtained by making some of the incisionsneeded to create the flap but not separating the flap from the underly-ing tissues. The flap is not moved to its new position; instead, the skinedges are sutured together loosely.
The total blood supplied to the flap initially decreases when the inci-sions are made. This decrease promotes opening of new vascular chan-nels between the pedicle and flap. Thus, more blood will flow into theflap through the pedicle than if the delay procedure had not been done.
Delaying the flap before final transfer allows more confidence in theviability of the flap. Wait about 7–10 days after the delay procedurebefore moving the flap to the recipient site.
TTeecchhnniiqquueess ffoorr CCrreeaattiinngg RRaannddoomm LLooccaall FFllaappssWhen creating a random local skin flap, you take advantage of the rel-atively loose, excess skin in the vicinity of the skin defect. Randomflaps require less technical expertise than axial flaps. Because they canbe quite useful for covering an open wound, several types of randomflaps are discussed in detail below.
General InformationRandom flap procedures often can be done under local anesthesia ifthe area (flap plus defect) is not too large (< 8–10 cm). For larger areas,general anesthesia probably will be required.
Be sure to clean the wound thoroughly before creating and placing the flap.Use a scrub brush or the flat part of a scalpel to scrape away the top layerof granulation tissue from the wound. Then wash with saline. The woundprobably will bleed, but gentle pressure should control the bleeding.
Hint: Outline the flap before making any incisions. A water-based magicmarker allows you to make corrections to your design before making anyincisions. Incorrect marks can be removed by wiping with alcohol.
The part of the flap at highest risk for poor circulation is the tip of theflap (the tissue farthest from the pedicle). Unfortunately, the tip of theflap is usually the most important part of the flap because it is the partthat provides coverage for the open wound.
To optimize circulation and reliability of a random flap, plastic surgeonsheed the 3:1 rule. The flap should not be longer than 3 times its width.Delaying the flap is also useful.
Local Flaps 115
Unfortunately, the thickness of the pedicle can make it difficult tomove the flap to its new position. Minimal tension should be applied to theflap when it is sutured into place. Tension on the flap decreases circulationand can lead to tissue necrosis (death). You can tell that too much ten-sion has been applied if portions of the flap look pale once it is in itsnew position.
If the donor site cannot be closed primarily without placing tension onthe flap, avoid primary closure. A skin graft can be used to cover thedonor site defect—or, if the defect is just a few cm, it can be allowed toheal secondarily.
For coverage of a wound > 7–8 cm, it is useful to place a drain underthe flap to prevent collection of fluid, which will interfere with healing.The drain can be a suction drain, if available, or a passive drain (e.g.,Penrose drain). A piece of sterile glove can substitute for a Penrosedrain. The drain usually can be removed after 48 hours.
Rhomboid Flaps
IndicationsRhomboid flaps are useful for wounds up to 4 or 5 cm in diameter onthe face, trunk, or extremity. They are especially useful when there isnot enough laxity in the surrounding tissues to create one of the otherflaps discussed below.
Procedure1. Measure the diameter of the defect.
2. Determine the site of greatest surrounding skin laxity (pinch the tis-sues to see where it is easiest to pull up on the skin). Draw a linefrom the wound edge into this tissue. This line, which represents thefirst incision, should be approximately 75% of the wound diameter.
3. Draw another line at a 60° angle to this extension, parallel to theedge of the defect. This line should be the same length as the line instep 2. These lines outline your flap.
4. Be careful not to make the pedicle of the flap too narrow.
5. Make the incisions along the lines placed in steps 2 and 3. Incise theskin and subcutaneous tissue of the flap down to, but not including,the underlying muscle.
6. Use a knife to lift the flap off the underlying muscle, trying to keepthe fascia attached to the flap to enhance circulation. You shouldalso separate the pedicle and some of the tissues around the wound
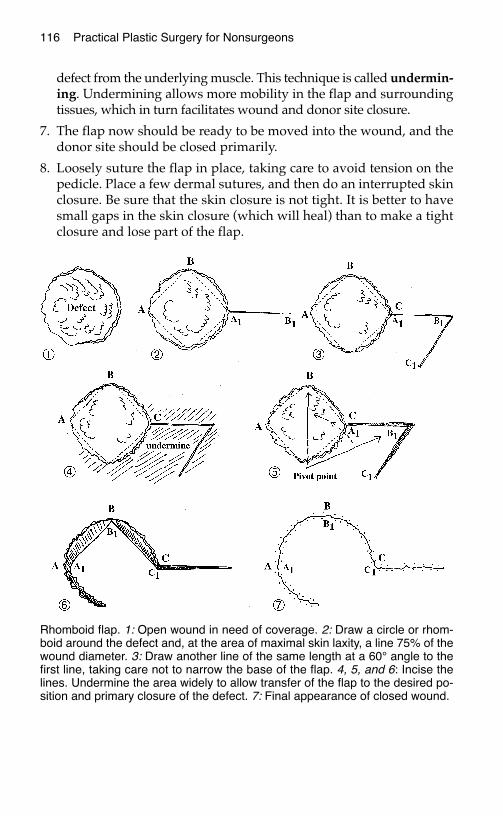
116 Practical Plastic Surgery for Nonsurgeons
defect from the underlying muscle. This technique is called undermin-ing. Undermining allows more mobility in the flap and surroundingtissues, which in turn facilitates wound and donor site closure.
7. The flap now should be ready to be moved into the wound, and thedonor site should be closed primarily.
8. Loosely suture the flap in place, taking care to avoid tension on thepedicle. Place a few dermal sutures, and then do an interrupted skinclosure. Be sure that the skin closure is not tight. It is better to havesmall gaps in the skin closure (which will heal) than to make a tightclosure and lose part of the flap.
Rhomboid flap. 1: Open wound in need of coverage. 2: Draw a circle or rhom-boid around the defect and, at the area of maximal skin laxity, a line 75% of thewound diameter. 3: Draw another line of the same length at a 60° angle to thefirst line, taking care not to narrow the base of the flap. 4, 5, and 6: Incise thelines. Undermine the area widely to allow transfer of the flap to the desired po-sition and primary closure of the defect. 7: Final appearance of closed wound.
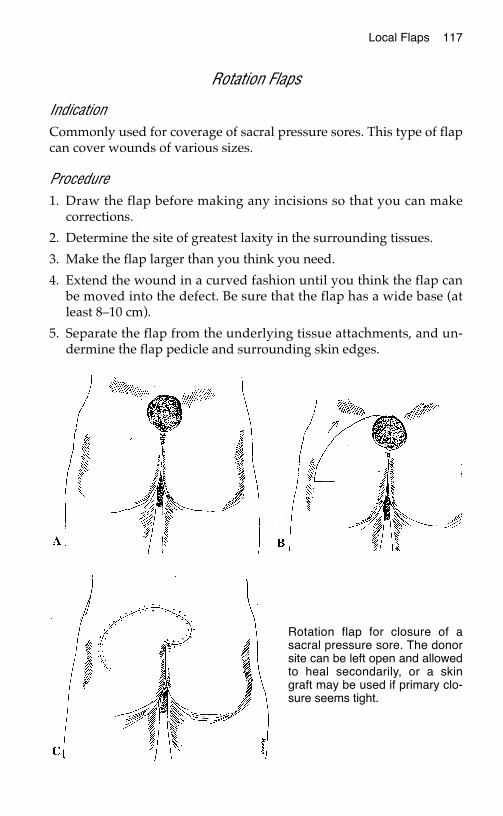
Local Flaps 117
Rotation Flaps
IndicationCommonly used for coverage of sacral pressure sores. This type of flapcan cover wounds of various sizes.
Procedure1. Draw the flap before making any incisions so that you can make
corrections.
2. Determine the site of greatest laxity in the surrounding tissues.
3. Make the flap larger than you think you need.
4. Extend the wound in a curved fashion until you think the flap canbe moved into the defect. Be sure that the flap has a wide base (atleast 8–10 cm).
5. Separate the flap from the underlying tissue attachments, and un-dermine the flap pedicle and surrounding skin edges.
Rotation flap for closure of asacral pressure sore. The donorsite can be left open and allowedto heal secondarily, or a skingraft may be used if primary clo-sure seems tight.
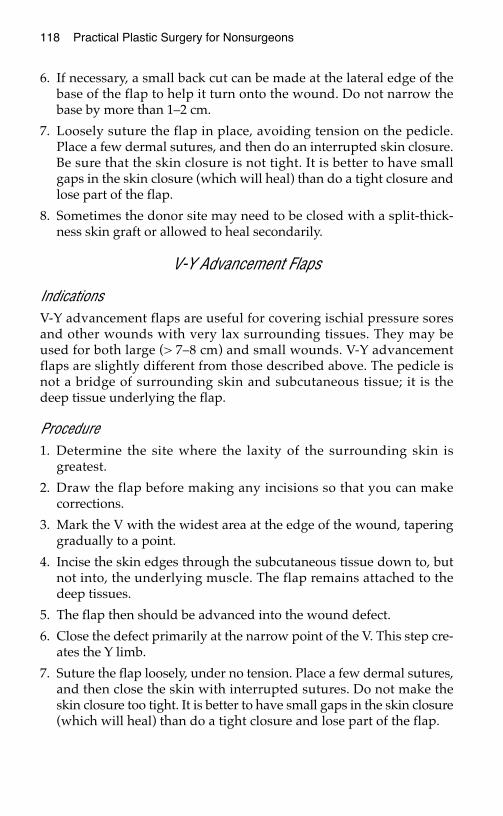
118 Practical Plastic Surgery for Nonsurgeons
6. If necessary, a small back cut can be made at the lateral edge of thebase of the flap to help it turn onto the wound. Do not narrow thebase by more than 1–2 cm.
7. Loosely suture the flap in place, avoiding tension on the pedicle.Place a few dermal sutures, and then do an interrupted skin closure.Be sure that the skin closure is not tight. It is better to have smallgaps in the skin closure (which will heal) than do a tight closure andlose part of the flap.
8. Sometimes the donor site may need to be closed with a split-thick-ness skin graft or allowed to heal secondarily.
V-Y Advancement Flaps
IndicationsV-Y advancement flaps are useful for covering ischial pressure soresand other wounds with very lax surrounding tissues. They may beused for both large (> 7–8 cm) and small wounds. V-Y advancementflaps are slightly different from those described above. The pedicle isnot a bridge of surrounding skin and subcutaneous tissue; it is thedeep tissue underlying the flap.
Procedure1. Determine the site where the laxity of the surrounding skin is
greatest.
2. Draw the flap before making any incisions so that you can makecorrections.
3. Mark the V with the widest area at the edge of the wound, taperinggradually to a point.
4. Incise the skin edges through the subcutaneous tissue down to, butnot into, the underlying muscle. The flap remains attached to thedeep tissues.
5. The flap then should be advanced into the wound defect.
6. Close the defect primarily at the narrow point of the V. This step cre-ates the Y limb.
7. Suture the flap loosely, under no tension. Place a few dermal sutures,and then close the skin with interrupted sutures. Do not make theskin closure too tight. It is better to have small gaps in the skin closure(which will heal) than do a tight closure and lose part of the flap.
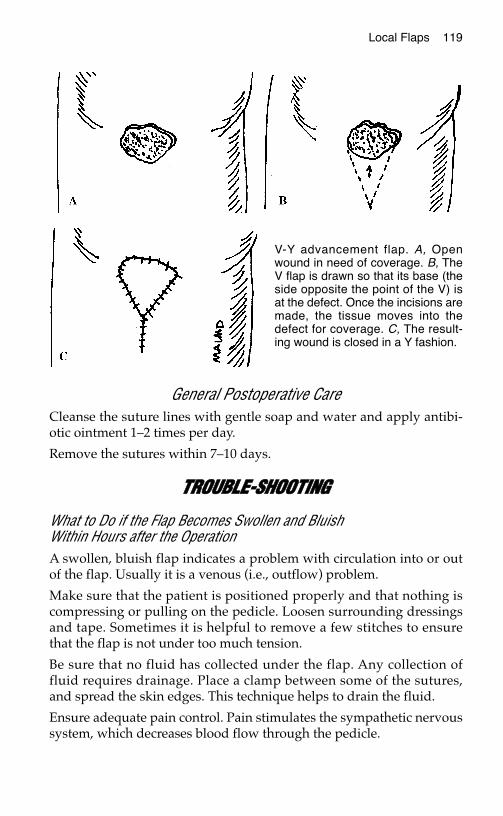
Local Flaps 119
General Postoperative CareCleanse the suture lines with gentle soap and water and apply antibi-otic ointment 1–2 times per day.
Remove the sutures within 7–10 days.
TTRROOUUBBLLEE--SSHHOOOOTTIINNGG
What to Do if the Flap Becomes Swollen and BluishWithin Hours after the OperationA swollen, bluish flap indicates a problem with circulation into or outof the flap. Usually it is a venous (i.e., outflow) problem.
Make sure that the patient is positioned properly and that nothing iscompressing or pulling on the pedicle. Loosen surrounding dressingsand tape. Sometimes it is helpful to remove a few stitches to ensurethat the flap is not under too much tension.
Be sure that no fluid has collected under the flap. Any collection offluid requires drainage. Place a clamp between some of the sutures,and spread the skin edges. This technique helps to drain the fluid.
Ensure adequate pain control. Pain stimulates the sympathetic nervoussystem, which decreases blood flow through the pedicle.
V-Y advancement flap. A, Openwound in need of coverage. B, TheV flap is drawn so that its base (theside opposite the point of the V) isat the defect. Once the incisions aremade, the tissue moves into thedefect for coverage. C, The result-ing wound is closed in a Y fashion.
120 Practical Plastic Surgery for Nonsurgeons
What to Do If Part of the Flap DiesA few days after the procedure, you may notice that a part of the flaphas become purplish. A purple color indicates inadequate circulationto that part of the flap, and the tissue may eventually die.
If there is no evidence of infection, you may simply leave the flapalone. With time, this tissue will demarcate and die and then sepa-rate—or you may have to cut off the dead tissue. While this process isoccurring, the underlying tissues will heal.
MMuussccllee FFllaappssMuscle flaps involve moving a local muscle to cover a defect. A muscleflap is often done to cover an exposed bone or fracture, usually in thecalf. The muscle is freed from the surrounding tissues but left attachedto its blood supply. A muscle flap is an axial flap.
Compared with skin flaps, muscle flaps bring in a robust, new circula-tion to the injured site and thus enhance wound healing. The use ofmuscle flaps to cover exposed fractures has markedly decreased themorbidity associated with open (compound) fractures.
For rural practitioners without access to a specialist, the muscle flaps ofgreatest utility involve primarily the lower extremity (see chapter 21,“Fractures of the Tibia and Fibula”).
BBiibblliiooggrraapphhyy1. Dhar SC, Taylor GI: The delay phenomenon: The story unfolds. Plast Reconstr Surg
104:2079–2091, 1999.2. Taylor GI, Corlett RJ, Caddy CM, Zelt RG: An anatomic review of the delay phenome-
non. II: Clinical applications. Plast Reconstr Surg 89:408–418, 1992.
DDIISSTTAANNTT FFLLAAPPSS
A distant flap involves moving tissue (skin, fascia, muscle, bone, orsome combination) from one part of the body, where it is dispensable,to another part, where it is needed. A distant flap is required whenthere is no healthy soft tissue adjacent to an open wound with which toprovide adequate coverage.
These complex procedures are at the highest rung of the reconstructiveladder. Therefore, a distant flap is the treatment of choice when other,simpler procedures are not applicable.
TTyyppeess ooff DDiissttaanntt FFllaappssDistant flaps are divided into two categories: attached and free.
An attached distant flap implies that the area with the open woundinitially is attached to the flap at the distant donor site. For example,the patient may have an open wound on the hand that requires softtissue coverage. The donor site for the distant flap may be the chest(see chest flap below). Thus, the patient’s hand initially is attached tothe chest.
The blood supply to the flap initially comes from its pedicle (the bridgeof tissue connecting the flap to its donor site). Gradually, over a fewweeks, the flap develops in-growth of vessels from the recipient site(the wound). These new vessels bring blood to the flap, and the flapgradually becomes less dependent on the donor site circulation for sur-vival. After a few weeks, the flap can be separated from its donor siteand survive in the new area.
121
Chapter 14
KKEEYY FFIIGGUURREESS::Chest flap Design of groin flapCross arm flap Examples of groin flapCross leg flap Examples of free flaps
122 Practical Plastic Surgery for Nonsurgeons
Patient inconvenience is a major drawback to attached flaps. Also, at-tached flaps are usually random flaps (see chapter 13, “Local Flaps”);therefore, they are not always completely reliable.
Free flaps, which are axial flaps, were developed to circumvent theproblems inherent in attached distant flaps. Tissue supplied by anamed vascular pedicle is detached completely from the donor site.The flap is then transferred to the open wound. With the aid of a mi-croscope or other form of magnification, the flap’s blood vessels (oftenjust a few millimeters in diameter) are painstakingly connected toblood vessels at the recipient site. As you can imagine, a free flap is atechnically difficult procedure and requires special equipment notreadily available in many rural areas.
In contrast, attached distant flaps do not require such highly skilledspecialists, but they do require basic surgical skills. Attached flapsoften are quite useful when specialty care is unavailable. For example,an attached flap can make the difference between a healed functionalhand and a severely damaged dysfunctional hand in a rural patientwho has sustained severe soft tissue injury. This chapter focuses pri-marily on attached distant flaps.
AAttttaacchheedd DDiissttaanntt FFllaappssThe procedure for creating and placing attached distant flaps followsmany of the same rules that apply to local flaps. You should reviewchapter 13, “Local Flaps,” for important background information.
Remember the 3:1 rule: for optimal circulation the flap length shouldbe no more than 3 times the flap width. A delay procedure should bedone if a larger flap is required.
As always, be sure that the wound is thoroughly cleansed before at-taching the flap. All necrotic tissue must be removed. For a wound onthe hand, it is best to debride the wound using a tourniquet. This tech-nique allows you to remove the dead tissue carefully and avoid injuryto important nearby structures. Be sure to remove the tourniquet andstop all bleeding before suturing the flap to the defect.
If the wound is covered by necrotic tissue, debride the wound a day ortwo before flap closure. If the wound is clean and granulating, use ascrub brush or the flat part of a scalpel blade to remove the top layer ofgranulation tissue before covering the wound with the flap.
Distant Flaps 123
Chest Flap
IndicationsAn open wound on the hand or forearm with exposed tendons/bones.
AnesthesiaA chest flap can be done under general anesthesia. However, localanesthesia for the donor site and a block for the recipient site is some-times preferable. Local anesthesia and recipient site block ensure thatthe patient will not accidentally pull the flap attachments apart whenawakening from general anesthesia.
Procedure1. Ask the awake patient to position the injured hand over the chest in
the most comfortable position. Stay away from breast tissue.
2. Mark this area. The flap should be drawn in such a way that thehand can be comfortably attached to the chest, but you must makesure that the pedicle does not become kinked. Usually the flap isdrawn so that the pedicle is based inferiorly, but it can be designedwith almost any orientation. Be sure that no scars from previous in-juries are located within the flap or pedicle.
3. Design the flap so that it is slightly larger than the defect.
4. Make the incision through skin and subcutaneous tissue and intothe underlying fascia (the thin layer of connective tissue over themuscle). Do not incise the muscle. The fascia contributes to theblood supply of the flap; therefore, it is important to keep it attachedto the flap whenever possible.
5. Elevate the flap off the deep underlying tissues.
6. Loosely stitch the three free sides of the flap in place. Use a few dermalsutures, and then close the skin with interrupted, simple sutures. Theclosure does not have to be perfect. If the flap is stitched too tightly, itmay compromise circulation and result in partial flap loss.
7. If possible, the donor site on the chest should be closed primarily,but usually a split-thickness skin graft is needed. Alternatively, ifthe wound is just a few cm in diameter, the donor site may be al-lowed to heal secondarily.
8. Antibiotic ointment and saline-moistened gauze dressings shouldbe placed on the exposed undersurface of the flap. Apply antibioticointment around the edges of the flap.
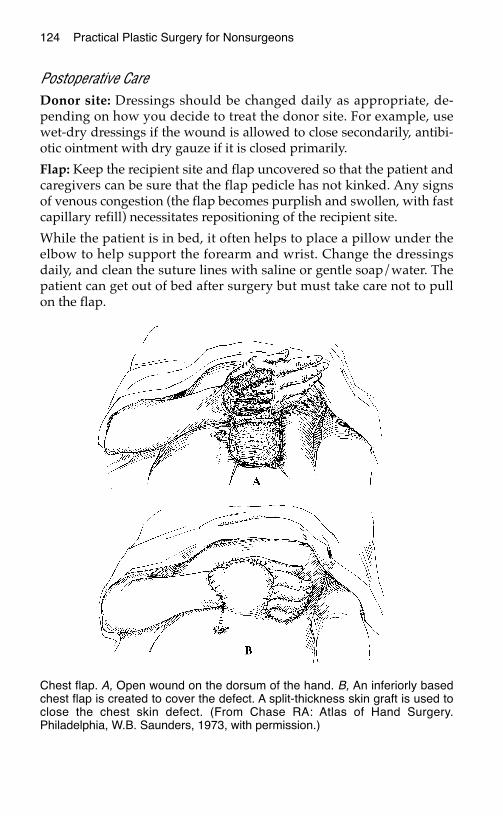
124 Practical Plastic Surgery for Nonsurgeons
Postoperative CareDonor site: Dressings should be changed daily as appropriate, de-pending on how you decide to treat the donor site. For example, usewet-dry dressings if the wound is allowed to close secondarily, antibi-otic ointment with dry gauze if it is closed primarily.
Flap: Keep the recipient site and flap uncovered so that the patient andcaregivers can be sure that the flap pedicle has not kinked. Any signsof venous congestion (the flap becomes purplish and swollen, with fastcapillary refill) necessitates repositioning of the recipient site.
While the patient is in bed, it often helps to place a pillow under theelbow to help support the forearm and wrist. Change the dressingsdaily, and clean the suture lines with saline or gentle soap/water. Thepatient can get out of bed after surgery but must take care not to pullon the flap.
Chest flap. A, Open wound on the dorsum of the hand. B, An inferiorly basedchest flap is created to cover the defect. A split-thickness skin graft is used toclose the chest skin defect. (From Chase RA: Atlas of Hand Surgery.Philadelphia, W.B. Saunders, 1973, with permission.)
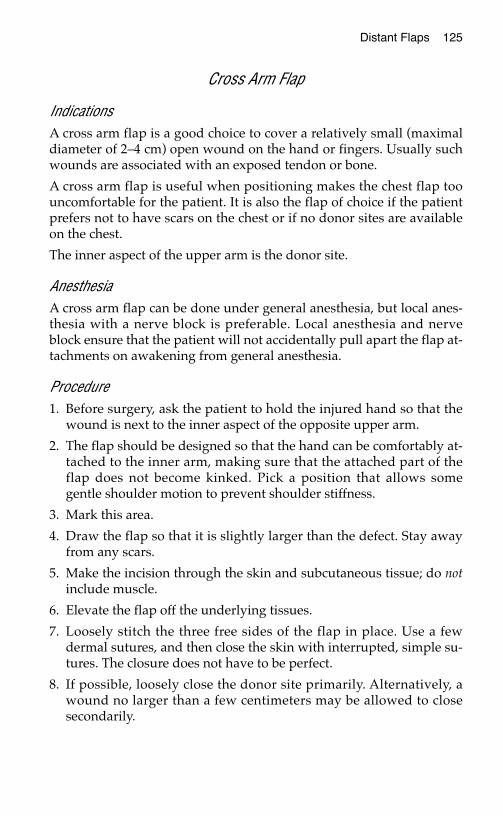
Distant Flaps 125
Cross Arm Flap
IndicationsA cross arm flap is a good choice to cover a relatively small (maximaldiameter of 2–4 cm) open wound on the hand or fingers. Usually suchwounds are associated with an exposed tendon or bone.
A cross arm flap is useful when positioning makes the chest flap toouncomfortable for the patient. It is also the flap of choice if the patientprefers not to have scars on the chest or if no donor sites are availableon the chest.
The inner aspect of the upper arm is the donor site.
AnesthesiaA cross arm flap can be done under general anesthesia, but local anes-thesia with a nerve block is preferable. Local anesthesia and nerveblock ensure that the patient will not accidentally pull apart the flap at-tachments on awakening from general anesthesia.
Procedure1. Before surgery, ask the patient to hold the injured hand so that the
wound is next to the inner aspect of the opposite upper arm.
2. The flap should be designed so that the hand can be comfortably at-tached to the inner arm, making sure that the attached part of theflap does not become kinked. Pick a position that allows somegentle shoulder motion to prevent shoulder stiffness.
3. Mark this area.
4. Draw the flap so that it is slightly larger than the defect. Stay awayfrom any scars.
5. Make the incision through the skin and subcutaneous tissue; do notinclude muscle.
6. Elevate the flap off the underlying tissues.
7. Loosely stitch the three free sides of the flap in place. Use a fewdermal sutures, and then close the skin with interrupted, simple su-tures. The closure does not have to be perfect.
8. If possible, loosely close the donor site primarily. Alternatively, awound no larger than a few centimeters may be allowed to closesecondarily.
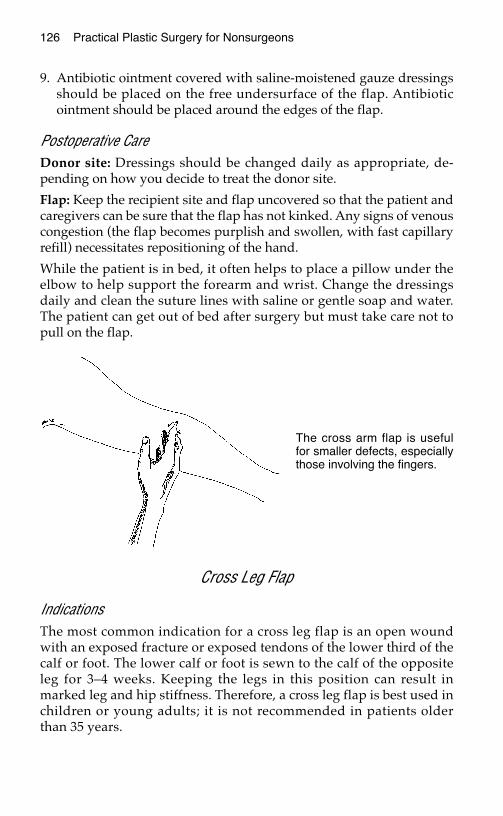
126 Practical Plastic Surgery for Nonsurgeons
9. Antibiotic ointment covered with saline-moistened gauze dressingsshould be placed on the free undersurface of the flap. Antibioticointment should be placed around the edges of the flap.
Postoperative CareDonor site: Dressings should be changed daily as appropriate, de-pending on how you decide to treat the donor site.
Flap: Keep the recipient site and flap uncovered so that the patient andcaregivers can be sure that the flap has not kinked. Any signs of venouscongestion (the flap becomes purplish and swollen, with fast capillaryrefill) necessitates repositioning of the hand.
While the patient is in bed, it often helps to place a pillow under theelbow to help support the forearm and wrist. Change the dressingsdaily and clean the suture lines with saline or gentle soap and water.The patient can get out of bed after surgery but must take care not topull on the flap.
Cross Leg Flap
IndicationsThe most common indication for a cross leg flap is an open woundwith an exposed fracture or exposed tendons of the lower third of thecalf or foot. The lower calf or foot is sewn to the calf of the oppositeleg for 3–4 weeks. Keeping the legs in this position can result inmarked leg and hip stiffness. Therefore, a cross leg flap is best used inchildren or young adults; it is not recommended in patients olderthan 35 years.
The cross arm flap is usefulfor smaller defects, especiallythose involving the fingers.
Distant Flaps 127
AnesthesiaEither general or spinal anesthesia is required for cross leg flaps.
Procedure1. Before administration of anesthesia, determine the best position for
the patient’s legs so that a flap of tissue taken from the noninjuredposteromedial calf will lie easily over the defect with the least dis-comfort.
2. Draw the flap on the posteromedial side of the calf, overlying thegastrocnemius muscle. The flap should be slightly larger than thewound defect.
3. The flap should be designed so that it is superiorly based.
4. Incise the skin, subcutaneous tissue, and fascia overlying the gastroc-nemius muscle. Elevate the flap along the plane between the fasciaand underlying muscle. The fascia must stay attached to the flap.
5. Move the flap over to the open wound.
6. Loosely stitch the three free sides of the flap in place. Place a fewdermal sutures, and then close the skin with interrupted sutures.The closure does not have to be perfect.
7. The donor site should be covered with a split-thickness skin graft.
8. Place antibiotic ointment and saline-moistened gauze along thefree undersurface of the flap. Apply antibiotic ointment around allsuture lines.
9. The patient’s legs must be immobilized together to prevent acci-dentally separating the legs and tearing the suture line. This is bestachieved with plaster. Use a lot of padding under the plaster.
10. Cut out a window in the plaster and padding over the flap so thatthe flap can be observed and cleansed daily.
Postoperative CareDonor site: Treat as you would the site of a split-thickness skin graft.
Flap: Keep the recipient site and flap uncovered so that the patient andcaregivers can be sure that the flap has not kinked. Any signs of venouscongestion (the flap becomes purplish and swollen, with fast capillaryrefill) necessitates repositioning of the legs.
In adults, plaster immobilization often can be removed after 4–5 days.Then a splint or gauze wrap can be created to keep the legs in theproper position.
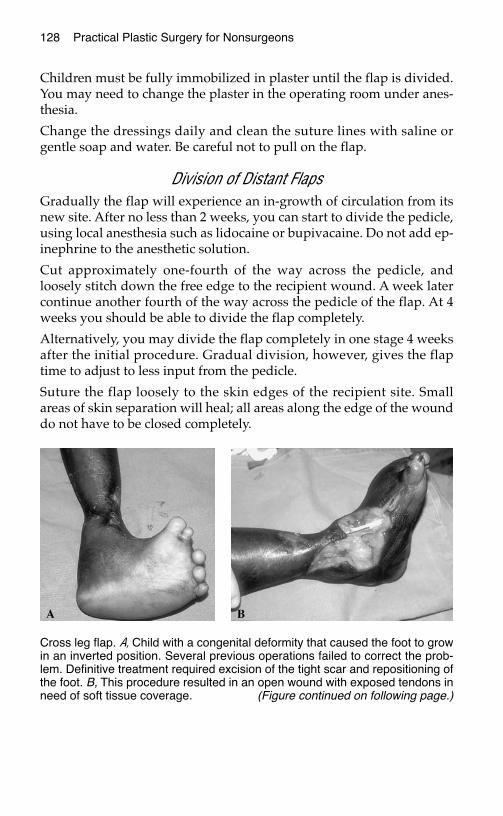
Children must be fully immobilized in plaster until the flap is divided.You may need to change the plaster in the operating room under anes-thesia.
Change the dressings daily and clean the suture lines with saline orgentle soap and water. Be careful not to pull on the flap.
Division of Distant FlapsGradually the flap will experience an in-growth of circulation from itsnew site. After no less than 2 weeks, you can start to divide the pedicle,using local anesthesia such as lidocaine or bupivacaine. Do not add ep-inephrine to the anesthetic solution.
Cut approximately one-fourth of the way across the pedicle, andloosely stitch down the free edge to the recipient wound. A week latercontinue another fourth of the way across the pedicle of the flap. At 4weeks you should be able to divide the flap completely.
Alternatively, you may divide the flap completely in one stage 4 weeksafter the initial procedure. Gradual division, however, gives the flaptime to adjust to less input from the pedicle.
Suture the flap loosely to the skin edges of the recipient site. Smallareas of skin separation will heal; all areas along the edge of the wounddo not have to be closed completely.
128 Practical Plastic Surgery for Nonsurgeons
Cross leg flap. A, Child with a congenital deformity that caused the foot to growin an inverted position. Several previous operations failed to correct the prob-lem. Definitive treatment required excision of the tight scar and repositioning ofthe foot. B, This procedure resulted in an open wound with exposed tendons inneed of soft tissue coverage. (Figure continued on following page.)
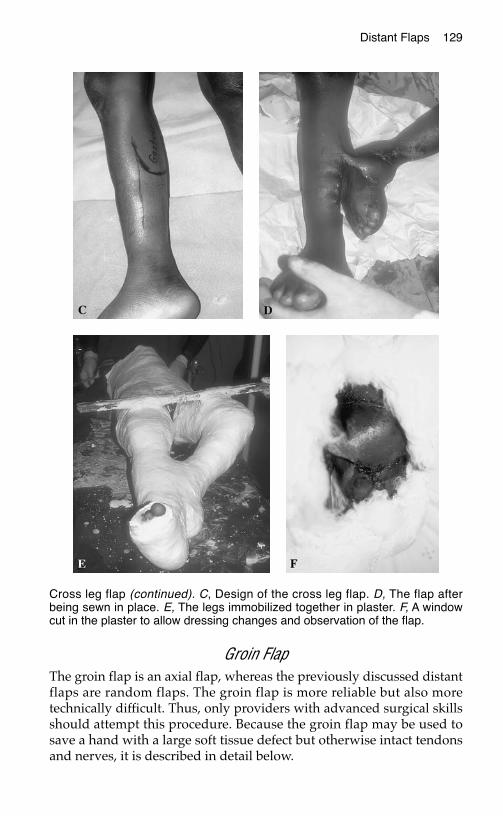
Distant Flaps 129
Groin FlapThe groin flap is an axial flap, whereas the previously discussed distantflaps are random flaps. The groin flap is more reliable but also moretechnically difficult. Thus, only providers with advanced surgical skillsshould attempt this procedure. Because the groin flap may be used tosave a hand with a large soft tissue defect but otherwise intact tendonsand nerves, it is described in detail below.
Cross leg flap (continued). C, Design of the cross leg flap. D, The flap afterbeing sewn in place. E, The legs immobilized together in plaster. F, A windowcut in the plaster to allow dressing changes and observation of the flap.
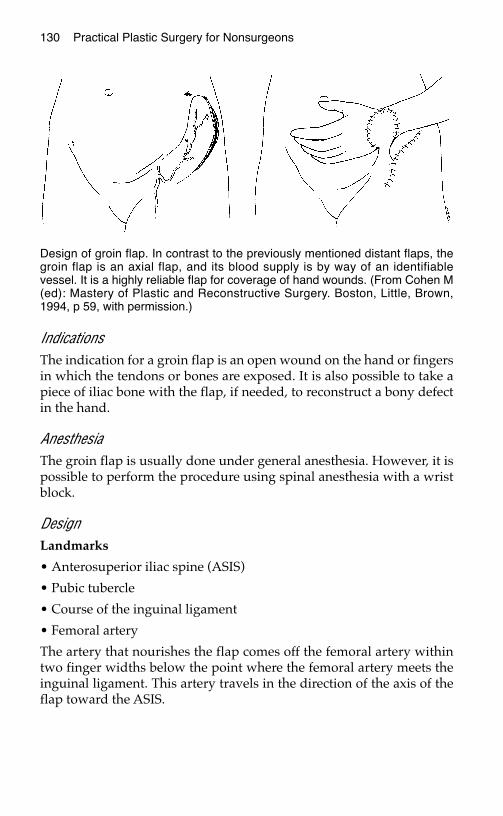
130 Practical Plastic Surgery for Nonsurgeons
IndicationsThe indication for a groin flap is an open wound on the hand or fingersin which the tendons or bones are exposed. It is also possible to take apiece of iliac bone with the flap, if needed, to reconstruct a bony defectin the hand.
AnesthesiaThe groin flap is usually done under general anesthesia. However, it ispossible to perform the procedure using spinal anesthesia with a wristblock.
DesignLandmarks
• Anterosuperior iliac spine (ASIS)
• Pubic tubercle
• Course of the inguinal ligament
• Femoral artery
The artery that nourishes the flap comes off the femoral artery withintwo finger widths below the point where the femoral artery meets theinguinal ligament. This artery travels in the direction of the axis of theflap toward the ASIS.
Design of groin flap. In contrast to the previously mentioned distant flaps, thegroin flap is an axial flap, and its blood supply is by way of an identifiablevessel. It is a highly reliable flap for coverage of hand wounds. (From Cohen M(ed): Mastery of Plastic and Reconstructive Surgery. Boston, Little, Brown,1994, p 59, with permission.)
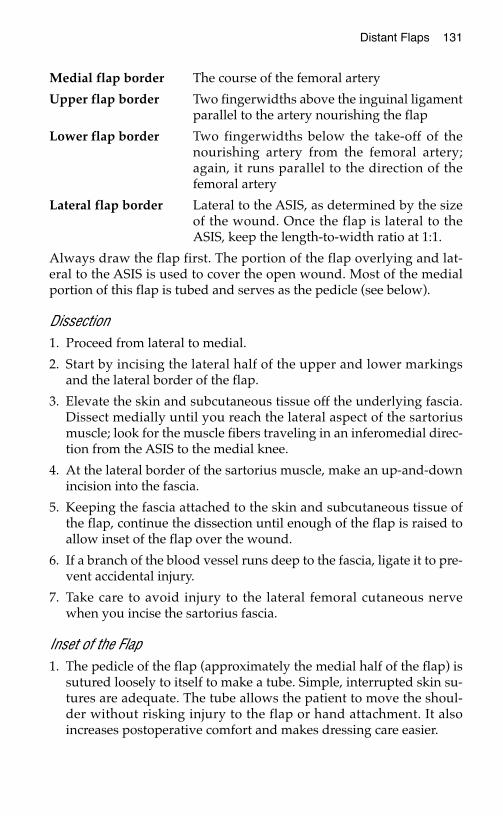
Distant Flaps 131
Medial flap border The course of the femoral artery
Upper flap border Two fingerwidths above the inguinal ligamentparallel to the artery nourishing the flap
Lower flap border Two fingerwidths below the take-off of thenourishing artery from the femoral artery;again, it runs parallel to the direction of thefemoral artery
Lateral flap border Lateral to the ASIS, as determined by the sizeof the wound. Once the flap is lateral to theASIS, keep the length-to-width ratio at 1:1.
Always draw the flap first. The portion of the flap overlying and lat-eral to the ASIS is used to cover the open wound. Most of the medialportion of this flap is tubed and serves as the pedicle (see below).
Dissection1. Proceed from lateral to medial.
2. Start by incising the lateral half of the upper and lower markingsand the lateral border of the flap.
3. Elevate the skin and subcutaneous tissue off the underlying fascia.Dissect medially until you reach the lateral aspect of the sartoriusmuscle; look for the muscle fibers traveling in an inferomedial direc-tion from the ASIS to the medial knee.
4. At the lateral border of the sartorius muscle, make an up-and-downincision into the fascia.
5. Keeping the fascia attached to the skin and subcutaneous tissue ofthe flap, continue the dissection until enough of the flap is raised toallow inset of the flap over the wound.
6. If a branch of the blood vessel runs deep to the fascia, ligate it to pre-vent accidental injury.
7. Take care to avoid injury to the lateral femoral cutaneous nervewhen you incise the sartorius fascia.
Inset of the Flap1. The pedicle of the flap (approximately the medial half of the flap) is
sutured loosely to itself to make a tube. Simple, interrupted skin su-tures are adequate. The tube allows the patient to move the shoul-der without risking injury to the flap or hand attachment. It alsoincreases postoperative comfort and makes dressing care easier.
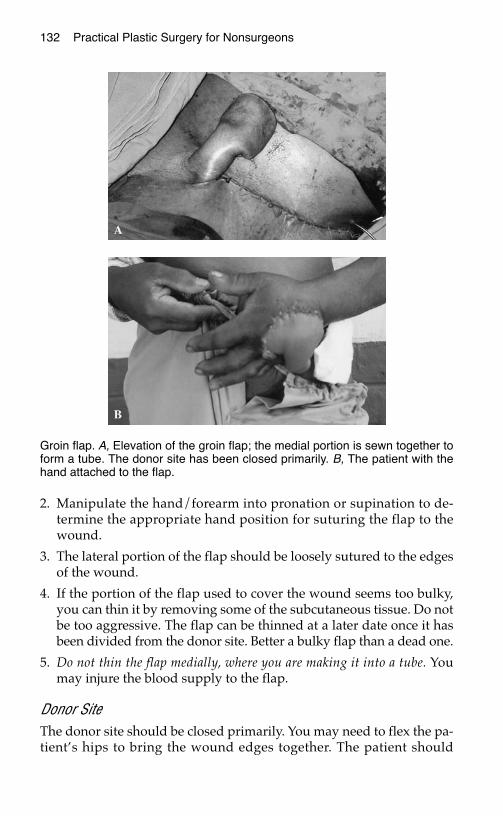
132 Practical Plastic Surgery for Nonsurgeons
2. Manipulate the hand/forearm into pronation or supination to de-termine the appropriate hand position for suturing the flap to thewound.
3. The lateral portion of the flap should be loosely sutured to the edgesof the wound.
4. If the portion of the flap used to cover the wound seems too bulky,you can thin it by removing some of the subcutaneous tissue. Do notbe too aggressive. The flap can be thinned at a later date once it hasbeen divided from the donor site. Better a bulky flap than a dead one.
5. Do not thin the flap medially, where you are making it into a tube. Youmay injure the blood supply to the flap.
Donor SiteThe donor site should be closed primarily. You may need to flex the pa-tient’s hips to bring the wound edges together. The patient should
Groin flap. A, Elevation of the groin flap; the medial portion is sewn together toform a tube. The donor site has been closed primarily. B, The patient with thehand attached to the flap.
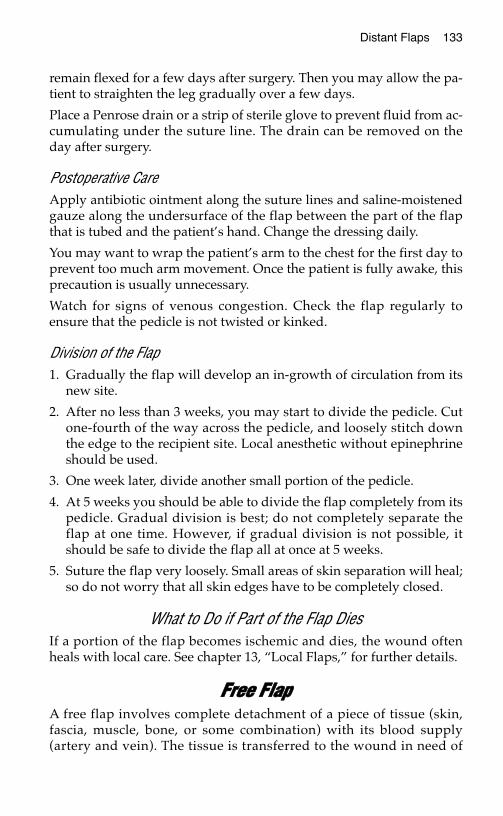
Distant Flaps 133
remain flexed for a few days after surgery. Then you may allow the pa-tient to straighten the leg gradually over a few days.
Place a Penrose drain or a strip of sterile glove to prevent fluid from ac-cumulating under the suture line. The drain can be removed on theday after surgery.
Postoperative CareApply antibiotic ointment along the suture lines and saline-moistenedgauze along the undersurface of the flap between the part of the flapthat is tubed and the patient’s hand. Change the dressing daily.
You may want to wrap the patient’s arm to the chest for the first day toprevent too much arm movement. Once the patient is fully awake, thisprecaution is usually unnecessary.
Watch for signs of venous congestion. Check the flap regularly toensure that the pedicle is not twisted or kinked.
Division of the Flap1. Gradually the flap will develop an in-growth of circulation from its
new site.
2. After no less than 3 weeks, you may start to divide the pedicle. Cutone-fourth of the way across the pedicle, and loosely stitch downthe edge to the recipient site. Local anesthetic without epinephrineshould be used.
3. One week later, divide another small portion of the pedicle.
4. At 5 weeks you should be able to divide the flap completely from itspedicle. Gradual division is best; do not completely separate theflap at one time. However, if gradual division is not possible, itshould be safe to divide the flap all at once at 5 weeks.
5. Suture the flap very loosely. Small areas of skin separation will heal;so do not worry that all skin edges have to be completely closed.
What to Do if Part of the Flap DiesIf a portion of the flap becomes ischemic and dies, the wound oftenheals with local care. See chapter 13, “Local Flaps,” for further details.
FFrreeee FFllaappA free flap involves complete detachment of a piece of tissue (skin,fascia, muscle, bone, or some combination) with its blood supply(artery and vein). The tissue is transferred to the wound in need of
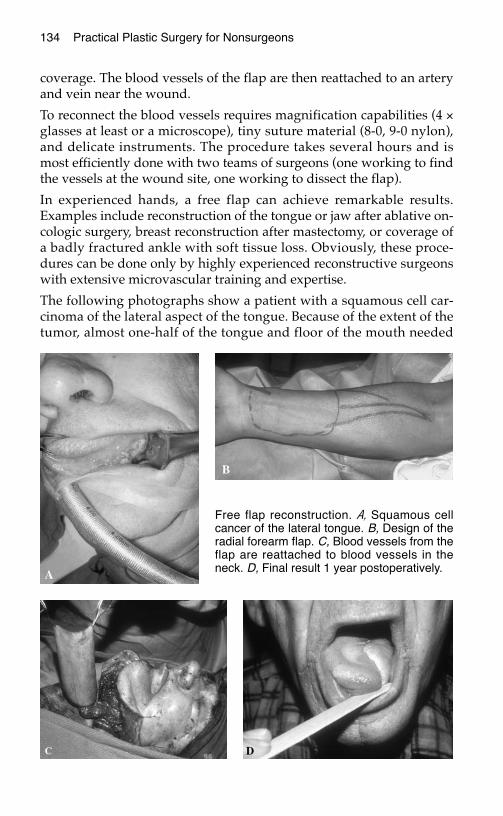
134 Practical Plastic Surgery for Nonsurgeons
coverage. The blood vessels of the flap are then reattached to an arteryand vein near the wound.
To reconnect the blood vessels requires magnification capabilities (4 ×glasses at least or a microscope), tiny suture material (8-0, 9-0 nylon),and delicate instruments. The procedure takes several hours and ismost efficiently done with two teams of surgeons (one working to findthe vessels at the wound site, one working to dissect the flap).
In experienced hands, a free flap can achieve remarkable results.Examples include reconstruction of the tongue or jaw after ablative on-cologic surgery, breast reconstruction after mastectomy, or coverage ofa badly fractured ankle with soft tissue loss. Obviously, these proce-dures can be done only by highly experienced reconstructive surgeonswith extensive microvascular training and expertise.
The following photographs show a patient with a squamous cell car-cinoma of the lateral aspect of the tongue. Because of the extent of thetumor, almost one-half of the tongue and floor of the mouth needed
Free flap reconstruction. A, Squamous cellcancer of the lateral tongue. B, Design of theradial forearm flap. C, Blood vessels from theflap are reattached to blood vessels in theneck. D, Final result 1 year postoperatively.
Distant Flaps 135
to be resected. The reconstruction was done with a free flap takenfrom the volar surface of the forearm and based on the radial artery(called a radial forearm flap).
The reconstructed tongue is almost normal in size. Thus the patientwas able to eat and speak normally. The flap also tolerated postopera-tive radiation treatment without complication. These results would behard to attain with any other reconstructive technique.
BBiibblliiooggrraapphhyy1. Chase RA: Atlas of Hand Surgery. Philadelphia, W.B. Saunders, 1973, pp 120–127.2. Chuang DCC, Colony LH, Chen HC, Wei FC: Groin flap design and versatility. Plast
Reconstr Surg 84:100–107, 1989.3. Daniel RK, Taylor GI: Distant transfer of an island flap by microvascular anastomoses.
Plast Reconstr Surg 52:111–117, 1973.4. Puckett CL, Reinisch JF: Gastrocnemius musculocutaneous cross-leg flap. In Strauch
D, Vasconez LO, Hall-Findlay EJ (eds): Grabb’s Encyclopedia of Flaps. Boston, Little,Brown, 1990, pp 1703–1705.
5. Strauch B, Yu HL (eds): Atlas of Microvascular Surgery. New York, Thieme MedicalPublishers, 1993.
SSCCAARR FFOORRMMAATTIIOONN
This chapter gives background information about the scarring process.Treatment options for problematic scars are also discussed.
NNoorrmmaall CCoouurrssee ooff SSccaarr MMaattuurraattiioonn
StrengthScar tissue is never as strong as normal, uninjured skin. For the first3–4 weeks after injury, the wound can easily be reopened by minimaltrauma. By 6 weeks, the scar has attained approximately 50% of itsfinal strength. During the next 12 months, the scar gradually increasesits ability to withstand injury, but it never attains normal strength.
AppearanceThe period of maximal collagen production (the primary component ofskin and scar tissue) is the first 4–6 weeks after a wound has closed.During this period the scar may appear red and be slightly firm andraised.
Over the next several months, changes in the rate of collagen produc-tion and degradation occur. Normal healing results in normal typesand amounts of collagen in the area. On the surface, normal healing isillustrated by the fading of redness and softening of the scar.
I usually tell patients that it will take at least 1 year for the scar toachieve its final appearance. Scars in children may continue to changeand improve for several years.
137
Chapter 15
KKEEYY FFIIGGUURREESS::Hypertrophic scarBuried dermal suture
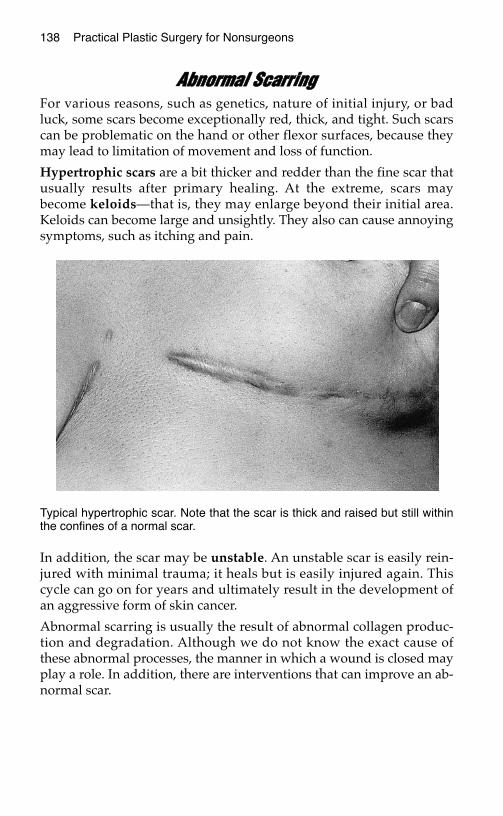
138 Practical Plastic Surgery for Nonsurgeons
AAbbnnoorrmmaall SSccaarrrriinnggFor various reasons, such as genetics, nature of initial injury, or badluck, some scars become exceptionally red, thick, and tight. Such scarscan be problematic on the hand or other flexor surfaces, because theymay lead to limitation of movement and loss of function.
Hypertrophic scars are a bit thicker and redder than the fine scar thatusually results after primary healing. At the extreme, scars maybecome keloids—that is, they may enlarge beyond their initial area.Keloids can become large and unsightly. They also can cause annoyingsymptoms, such as itching and pain.
In addition, the scar may be unstable. An unstable scar is easily rein-jured with minimal trauma; it heals but is easily injured again. Thiscycle can go on for years and ultimately result in the development ofan aggressive form of skin cancer.
Abnormal scarring is usually the result of abnormal collagen produc-tion and degradation. Although we do not know the exact cause ofthese abnormal processes, the manner in which a wound is closed mayplay a role. In addition, there are interventions that can improve an ab-normal scar.
Typical hypertrophic scar. Note that the scar is thick and raised but still withinthe confines of a normal scar.
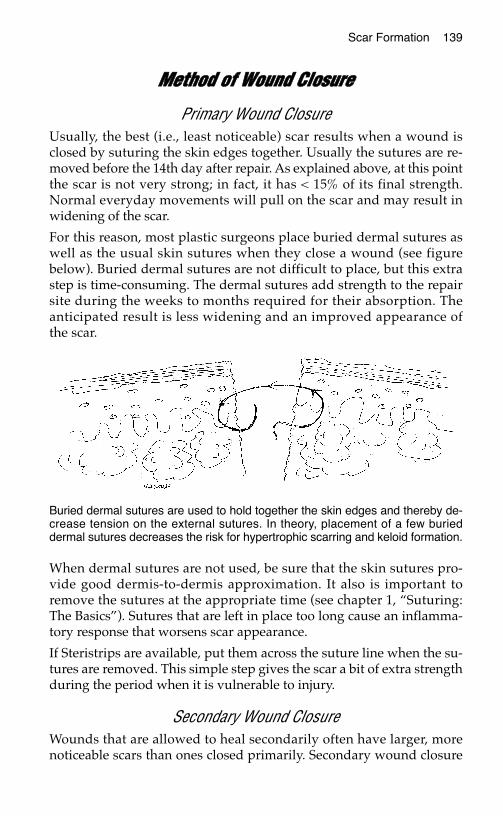
Scar Formation 139
MMeetthhoodd ooff WWoouunndd CClloossuurree
Primary Wound ClosureUsually, the best (i.e., least noticeable) scar results when a wound isclosed by suturing the skin edges together. Usually the sutures are re-moved before the 14th day after repair. As explained above, at this pointthe scar is not very strong; in fact, it has < 15% of its final strength.Normal everyday movements will pull on the scar and may result inwidening of the scar.
For this reason, most plastic surgeons place buried dermal sutures aswell as the usual skin sutures when they close a wound (see figurebelow). Buried dermal sutures are not difficult to place, but this extrastep is time-consuming. The dermal sutures add strength to the repairsite during the weeks to months required for their absorption. Theanticipated result is less widening and an improved appearance ofthe scar.
When dermal sutures are not used, be sure that the skin sutures pro-vide good dermis-to-dermis approximation. It also is important toremove the sutures at the appropriate time (see chapter 1, “Suturing:The Basics”). Sutures that are left in place too long cause an inflamma-tory response that worsens scar appearance.
If Steristrips are available, put them across the suture line when the su-tures are removed. This simple step gives the scar a bit of extra strengthduring the period when it is vulnerable to injury.
Secondary Wound ClosureWounds that are allowed to heal secondarily often have larger, morenoticeable scars than ones closed primarily. Secondary wound closure
Buried dermal sutures are used to hold together the skin edges and thereby de-crease tension on the external sutures. In theory, placement of a few burieddermal sutures decreases the risk for hypertrophic scarring and keloid formation.
140 Practical Plastic Surgery for Nonsurgeons
also is associated with a higher incidence of hypertrophic scarring andkeloid formation.
HHooww tthhee PPaattiieenntt CCaann HHeellppOnce the sutures have been removed and the wound looks well healed,rubbing or gently massaging the scar with a mild moisturizing cream(e.g., Vaseline, aloe, cocoa butter) a few times each day promotes softeningand lightening of scar tissue, especially on the face and hands. A creamwith vitamin E may be helpful. Patients should not spend a large sum ofmoney on fancy creams because no conclusive evidence indicates that ex-pensive formulations improve the scar’s final appearance. Gentle massageshould be continued for at least 4–6 weeks.
Patients should stay out of the sun as much as possible, and always usea sunscreen (SPF > 20). Scars exposed to the sun (especially if sunburndvelops) not only stay red longer but also may not fade as much asnormally expected.
All patients should maintain good nutrition, and diabetics shouldmaintain good glucose control.
Providers must counsel patients aggressively about the ill effects oftobacco products on wound healing. Some of the components in ciga-rettes cause a decrease in blood circulation to the skin, which results inpoor wound healing and may even lead to tissue loss. Dramatic ad-verse reactions due to the effects of smoking have been reported.
IInntteerrvveennttiioonnss ffoorr PPrroobblleemmaattiicc SSccaarrss
Scars that are Too TightThese treatments can be tried individually or in some combination.
Gentle MassageInstruct the patient in the massage techniques described above.
Silicone Gel SheetsOnce the sutures have been removed and the wound looks wellhealed, you can cover the wound with silicone gel sheets. Although itis not entirely understood how they work, silicone gel sheets can bequite effective. They can be obtained from pharmacies but usually re-quire a prescription (although this policy is changing in the UnitedStates).
Scar Formation 141
How to use the silicone gel sheet
1. Cut a piece large enough to cover the scar completely.
2. The sheet should be left in place as long as tolerated—even all day.The longer it is in place, the better.
3. The patient should remove the sheet to wash. Deodorant soapsshould not be used to cleanse the area; they may cause a rash. Onepiece of gel sheet can be used repeatedly.
4. Sheets should be used for at least 2–3 months to make an apprecia-ble difference.
SplintingThe purpose of splinting is to prevent loss of function and restriction ofmovement from a tight scar. Especially on the hand and in a crease,splinting can be quite useful. The splint should be molded so that itstretches the tight scar.
Case example: If a tight scar across the front of elbow prevents the pa-tient from fully extending the forearm, the following steps may help:
• Make a splint that holds the elbow in as much extension as tolerated.Gradually the scar will become less tight because of the remodelingdue to splinting and scar massage (remember, you can add other“scar is too tight” treatments). With time the patient will be able toextend the elbow more fully.
• The splint can be made out of simple plaster of Paris (see chapter 28,“Hand Splinting and General Aftercare”).
• If the splint interferes with the patient’s ability to work, encouragethe patient to wear it at night.
• New splints should be made as the patient can more fully extend atthe elbow.
• This process may take many months, but is worth the effort to im-prove function.
Pressure GarmentsPressure garments, measured and fitted to the individual patient, canbe worn under everyday clothing. They are designed to apply continu-ous pressure over the area of concern. Theoretically, the pressure causesthe underlying scar to become ischemic and thus leads to remodeling.
Pressure garments should be worn 18–24 hours/day for a minimum of4–6 months. Medical supply stores and pharmacies can order pressuregarments, which are expensive. Prescriptions usually are required.
142 Practical Plastic Surgery for Nonsurgeons
Scars that are Too Red
Reassurance and RemindersReassure the patient that scars will fade on their own, but the processtakes time. Remind the patient to avoid sun exposure whenever possi-ble and to use sunscreen when exposure cannot be avoided. Ultravioletlight injures normal skin as well as scars. A sunburned scar may notfade as well as normally expected.
Make-upOnce the sutures have been removed and the wound looks well healed,the patient can apply gentle make-up until the scar fades on its own. Itis best to use make-up with a sunscreen to prevent sun injury. Make-upalone does not protect the tissues from the ill effects of the sun.
Keloids and Hypertrophic ScarsTry the treatments described under “Scars that are Too Tight.” Massage,silicone gel sheets, splinting, and pressure garments may help. In addi-tion, the treatments listed below may be useful. Each can be tried indi-vidually, but often they work better in combination with anothermethod. For example, inject the keloid with steroids and use a pressuregarment daily. Or excise the keloid, close the wound meticulously, andthen use silicone gel sheeting after the sutures have been removed.
Steroid InjectionInject triamcinolone acetonide into the dermis of the keloid—approxi-mately 1 mg for every 1–2 cm of scar. It is best to use a tuberculin sy-ringe because you are working with small amounts of medication. Besure to check the mg/ml of the solution (different bottles may have dif-ferent drug concentrations). The total amount of injected triamcinoloneshould not exceed 30 mg.
Caution: Steroid injection hurts. You can add 0.5–1.0 ml of lidocaine tothe steroid solution.
It takes several weeks to see any noticeable change in the scar. Steroidinjection can be repeated after 4–6 weeks, but I do not recommend in-jecting the same area more than 2 or 3 times. The response to steroid in-jection is quite variable. The reported percentages of patients obtainingsome improvement (not necessarily resolution of the scar) after steroiduse range from 50% to 100%.
The patient should be warned of the risks associated with the injectionof steroids. Infection may develop at the injection site, and the injected
Scar Formation 143
area may become lighter in color than the surrounding skin. Be espe-cially careful in treating diabetic patients. Steroids may cause an eleva-tion of blood glucose level.
Pressure EarringsSome patients develop keloids after ear piercing. Earrings designed toapply pressure to the earlobe are commercially available. They workbest on small keloids (< 1 cm). Pressure earrings are especially usefulwhen combined with excision of the keloid. Once the excision sutureshave been removed, the patient should wear the earring for at least 2or 3 months (longer is better). This approach may prevent recurrenceof the keloid.
ExcisionCaution: Excision of a keloid often results in formation of anotherkeloid. The recurrence rate after excision ranges from 45% to 100%.
At times, however, it is worthwhile to excise the bothersome keloid. Forexample, patients with a keloid associated with ear piercing may have asuccessful outcome if, as previously described, after excision they wear acompression earring regularly. Another example when excision may besuccessful is if the initial injury was not closed with sutures (i.e., it wasallowed to heal secondarily). In this case, excision of the keloid followedby primary skin closure may be helpful. Even under these more favor-able circumstances, you must warn patients that the keloid may recur.
If you excise the keloid, a close dermal approximation of the skin edgesis especially important. Close approximation requires placement ofburied dermal sutures prior to skin closure. Therefore, excision of akeloid and primary closure should be undertaken only by clinicianswith excellent suturing skills.
Radiation TherapyIf radiation therapy facilities are available, low-dose therapy helps toprevent the development of a keloid. Usually it is performed only onpatients known to develop severe keloids who are scheduled for surgi-cal procedures. The radiation is administered as early as the first post-operative day.
As with other treatment methods, the success rate is variable, rangingfrom 10% to 94% in different studies.
144 Practical Plastic Surgery for Nonsurgeons
Unstable ScarsWhen larger wounds or wounds over creases are allowed to heal sec-ondarily, the scar may be easily injured and reopen. Although usuallyit heals with local wound care measures, this cycle often repeats itselfagain and again. Excision of the entire scar may be indicated. The re-sultant skin defect requires closure with a more durable skin graft orflap (see chapters 12, 13, and 14 on “Skin Grafts,” “Local Flaps,” and“Distant Flaps” for details about these techniques).
BBiibblliiooggrraapphhyyNiessen FB, Spauwen PHM, Schalkwijk J, Kon M: On the nature of hypertrophic scarsand keloids: A review. Plast Reconstr Surg 104:1435–1458, 1999.
FFAACCIIAALL LLAACCEERRAATTIIOONNSS
The face has several unique properties that dictate the choice of treat-ment after injury. This chapter describes basic principles for the treat-ment of facial wounds as well as treatment recommendations forinjuries involving specific areas of the face.
UUnniiqquuee PPrrooppeerrttiieess ooff FFaacciiaall LLaacceerraattiioonnssCosmetic Concerns
Although most people do not want an unsightly scar anywhere on thebody, they are especially concerned about scars on their face. Thus, pri-mary closure, which usually results in the least noticeable scar, is thepreferred treatment for most facial lacerations. Fortunately, because ofthe laxity of facial skin, most wounds can be repaired primarily unlessthey have significant tissue loss or tissue swelling.
Better Blood Supply and CirculationThe skin of the face has a more abundant blood supply compared withother areas of the body. As a result, lacerations on the face can be closedmore than 6 hours after injury (the usual time limit for closure of anacute laceration) without a high risk for subsequent wound infection.As long as the wound can be cleansed thoroughly, facial lacerationsoften can be closed even the day after injury.
Because of the better blood supply, a wound that is closed primarilycan tolerate more tension on the suture line than is usually allowed.But do not take this principle to an extreme. If there is significantblanching of the skin with the closure, you may not want to close thewound completely. In this instance, merely place a few sutures to closethe wound partially and thus decrease the size of the scar.
145
Chapter 16
KKEEYY FFIIGGUURREESS::Tissue flap Lip anatomySuture bites: face vs. rest of body Soft tissue loss
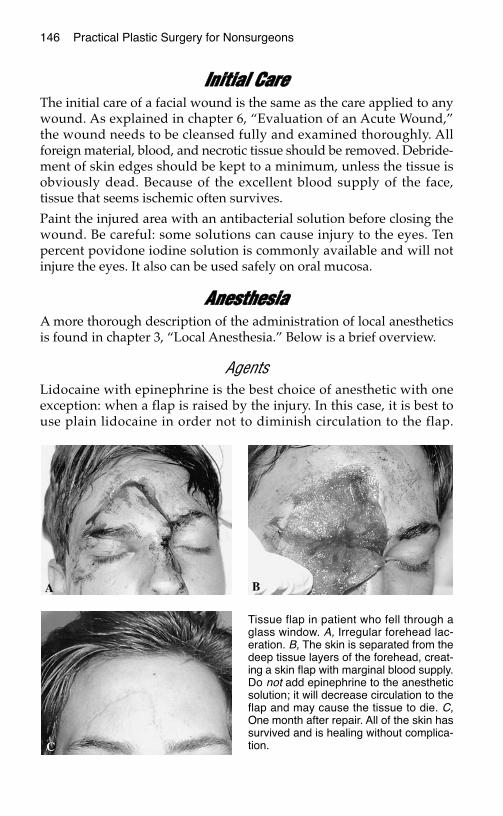
146 Practical Plastic Surgery for Nonsurgeons
IInniittiiaall CCaarreeThe initial care of a facial wound is the same as the care applied to anywound. As explained in chapter 6, “Evaluation of an Acute Wound,”the wound needs to be cleansed fully and examined thoroughly. Allforeign material, blood, and necrotic tissue should be removed. Debride-ment of skin edges should be kept to a minimum, unless the tissue isobviously dead. Because of the excellent blood supply of the face,tissue that seems ischemic often survives.
Paint the injured area with an antibacterial solution before closing thewound. Be careful: some solutions can cause injury to the eyes. Tenpercent povidone iodine solution is commonly available and will notinjure the eyes. It also can be used safely on oral mucosa.
AAnneesstthheessiiaaA more thorough description of the administration of local anestheticsis found in chapter 3, “Local Anesthesia.” Below is a brief overview.
AgentsLidocaine with epinephrine is the best choice of anesthetic with oneexception: when a flap is raised by the injury. In this case, it is best touse plain lidocaine in order not to diminish circulation to the flap.
Tissue flap in patient who fell through aglass window. A, Irregular forehead lac-eration. B, The skin is separated from thedeep tissue layers of the forehead, creat-ing a skin flap with marginal blood supply.Do not add epinephrine to the anestheticsolution; it will decrease circulation to theflap and may cause the tissue to die. C,One month after repair. All of the skin hassurvived and is healing without complica-tion.
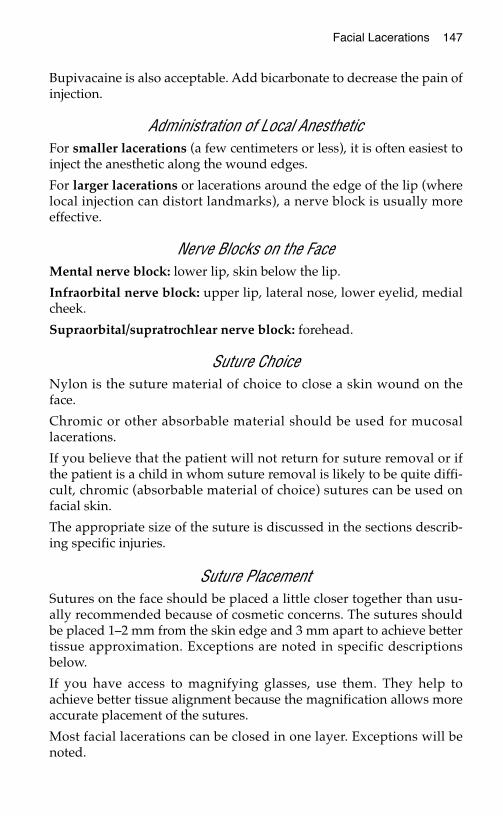
Facial Lacerations 147
Bupivacaine is also acceptable. Add bicarbonate to decrease the pain ofinjection.
Administration of Local AnestheticFor smaller lacerations (a few centimeters or less), it is often easiest toinject the anesthetic along the wound edges.
For larger lacerations or lacerations around the edge of the lip (wherelocal injection can distort landmarks), a nerve block is usually moreeffective.
Nerve Blocks on the FaceMental nerve block: lower lip, skin below the lip.
Infraorbital nerve block: upper lip, lateral nose, lower eyelid, medialcheek.
Supraorbital/supratrochlear nerve block: forehead.
Suture ChoiceNylon is the suture material of choice to close a skin wound on theface.
Chromic or other absorbable material should be used for mucosallacerations.
If you believe that the patient will not return for suture removal or ifthe patient is a child in whom suture removal is likely to be quite diffi-cult, chromic (absorbable material of choice) sutures can be used onfacial skin.
The appropriate size of the suture is discussed in the sections describ-ing specific injuries.
Suture PlacementSutures on the face should be placed a little closer together than usu-ally recommended because of cosmetic concerns. The sutures shouldbe placed 1–2 mm from the skin edge and 3 mm apart to achieve bettertissue approximation. Exceptions are noted in specific descriptionsbelow.
If you have access to magnifying glasses, use them. They help toachieve better tissue alignment because the magnification allows moreaccurate placement of the sutures.
Most facial lacerations can be closed in one layer. Exceptions will benoted.

148 Practical Plastic Surgery for Nonsurgeons
Continuous vs. Interrupted ClosureA laceration in which skin edges can be aligned easily and without ten-sion can be closed with either technique.
Irregular lacerations or lacerations in which you are concerned aboutthe potential for infection should be closed in an interrupted fashionfor the following reasons:
1. If, a few days after wound closure, a localized area starts to look in-fected, you can treat the infection without having to open the entirewound. Just remove a few sutures in the area that looks red, open theskin, and wash the wound with saline. This will allow the wound todrain and may allow the infection to resolve while keeping the resul-tant scar relatively small. The patient also should be given antibiotics.
2. If the wound had been closed by placing the sutures in a continuousfashion, partial removal of the suture is not possible. If the woundlooks infected, the entire suture will need to be removed and thusthe entire wound will reopen. This results in a much larger scar.
Suture bites: face vs. rest of the body. Sutures placed on the face should beapproximately 1–2 mm from the skin edge and approximately 3 mm apart. Thistechnique requires the use of small suture material.
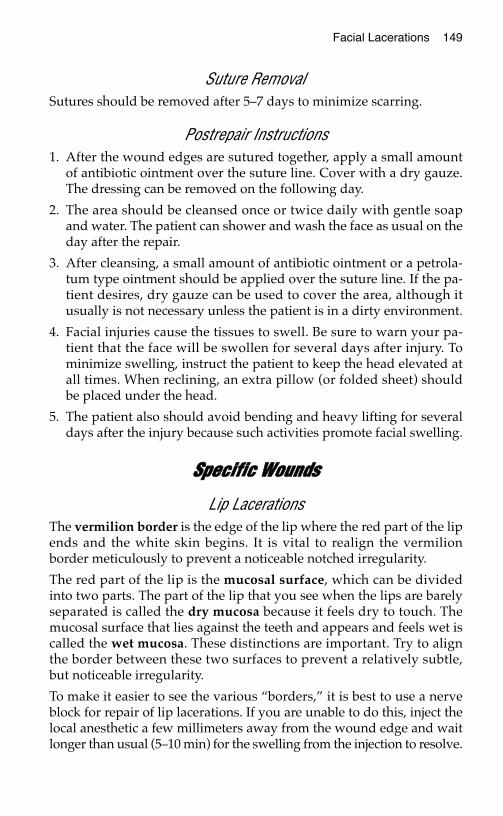
Facial Lacerations 149
Suture RemovalSutures should be removed after 5–7 days to minimize scarring.
Postrepair Instructions1. After the wound edges are sutured together, apply a small amount
of antibiotic ointment over the suture line. Cover with a dry gauze.The dressing can be removed on the following day.
2. The area should be cleansed once or twice daily with gentle soapand water. The patient can shower and wash the face as usual on theday after the repair.
3. After cleansing, a small amount of antibiotic ointment or a petrola-tum type ointment should be applied over the suture line. If the pa-tient desires, dry gauze can be used to cover the area, although itusually is not necessary unless the patient is in a dirty environment.
4. Facial injuries cause the tissues to swell. Be sure to warn your pa-tient that the face will be swollen for several days after injury. Tominimize swelling, instruct the patient to keep the head elevated atall times. When reclining, an extra pillow (or folded sheet) shouldbe placed under the head.
5. The patient also should avoid bending and heavy lifting for severaldays after the injury because such activities promote facial swelling.
SSppeecciiffiicc WWoouunnddss
Lip LacerationsThe vermilion border is the edge of the lip where the red part of the lipends and the white skin begins. It is vital to realign the vermilionborder meticulously to prevent a noticeable notched irregularity.
The red part of the lip is the mucosal surface, which can be dividedinto two parts. The part of the lip that you see when the lips are barelyseparated is called the dry mucosa because it feels dry to touch. Themucosal surface that lies against the teeth and appears and feels wet iscalled the wet mucosa. These distinctions are important. Try to alignthe border between these two surfaces to prevent a relatively subtle,but noticeable irregularity.
To make it easier to see the various “borders,” it is best to use a nerveblock for repair of lip lacerations. If you are unable to do this, inject thelocal anesthetic a few millimeters away from the wound edge and waitlonger than usual (5–10 min) for the swelling from the injection to resolve.
150 Practical Plastic Surgery for Nonsurgeons
Mucosal Lacerations• The key to successful repair is to realign the wet-dry mucosal border,
as explained above.
• Place the first stitch at the border between the wet and dry surfaces.
• Use absorbable sutures, 4-0, and try to sew the wet mucosa to wetmucosa and the dry mucosa to dry mucosa.
• It is important to evert the edges; use mattress sutures if necessary.
• Tie at least 4 or 5 knots in the sutures to prevent the sutures fromcoming undone because the patient unconsciously pulls at them withthe tongue.
Partial-thickness Lacerations that Cross the Vermilion Border• The key to successful repair is to approximate the vermilion border
as well as possible.
• Align the red/white margin first. Place the initial suture just abovethe vermilion border in the white upper lip skin. Use a 5-0 or 6-0suture.
• If the stitch does not seem to be well-placed, remove it and try again.
• Place the remaining sutures in the lip skin (5-0 or 6-0) and lip mucosa(4-0 or 5-0). Be sure to evert the skin edges.
Full-thickness LacerationsIn full-thickness lip lacerations, the outer skin, lip muscle, and mucosahave all been cut. Full-thickness lip lacerations often look scary.Because muscle retracts when cut, the lip wound looks larger and morecomplex than it is. Most of these wounds can be repaired easily.Primary repair is possible even if approximately one-fourth of theupper or lower lip is lost. Repair includes the following steps:
Important anatomic landmarks of the lip.
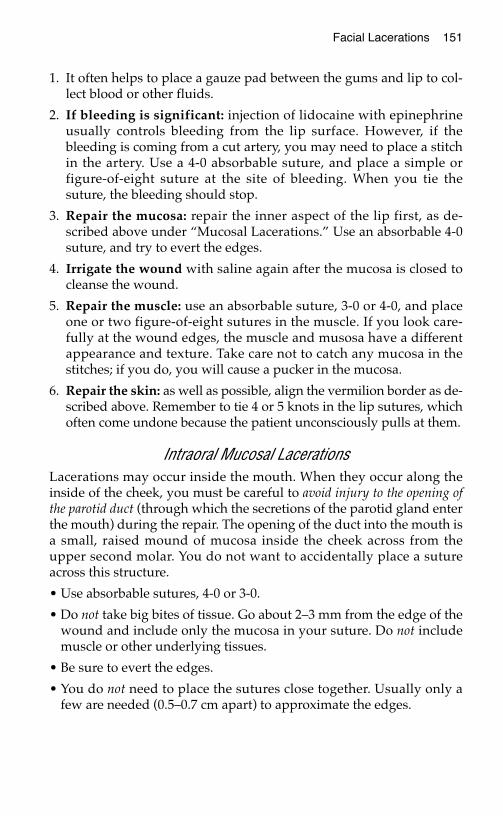
Facial Lacerations 151
1. It often helps to place a gauze pad between the gums and lip to col-lect blood or other fluids.
2. If bleeding is significant: injection of lidocaine with epinephrineusually controls bleeding from the lip surface. However, if thebleeding is coming from a cut artery, you may need to place a stitchin the artery. Use a 4-0 absorbable suture, and place a simple orfigure-of-eight suture at the site of bleeding. When you tie thesuture, the bleeding should stop.
3. Repair the mucosa: repair the inner aspect of the lip first, as de-scribed above under “Mucosal Lacerations.” Use an absorbable 4-0suture, and try to evert the edges.
4. Irrigate the wound with saline again after the mucosa is closed tocleanse the wound.
5. Repair the muscle: use an absorbable suture, 3-0 or 4-0, and placeone or two figure-of-eight sutures in the muscle. If you look care-fully at the wound edges, the muscle and musosa have a differentappearance and texture. Take care not to catch any mucosa in thestitches; if you do, you will cause a pucker in the mucosa.
6. Repair the skin: as well as possible, align the vermilion border as de-scribed above. Remember to tie 4 or 5 knots in the lip sutures, whichoften come undone because the patient unconsciously pulls at them.
Intraoral Mucosal LacerationsLacerations may occur inside the mouth. When they occur along theinside of the cheek, you must be careful to avoid injury to the opening ofthe parotid duct (through which the secretions of the parotid gland enterthe mouth) during the repair. The opening of the duct into the mouth isa small, raised mound of mucosa inside the cheek across from theupper second molar. You do not want to accidentally place a sutureacross this structure.
• Use absorbable sutures, 4-0 or 3-0.
• Do not take big bites of tissue. Go about 2–3 mm from the edge of thewound and include only the mucosa in your suture. Do not includemuscle or other underlying tissues.
• Be sure to evert the edges.
• You do not need to place the sutures close together. Usually only afew are needed (0.5–0.7 cm apart) to approximate the edges.
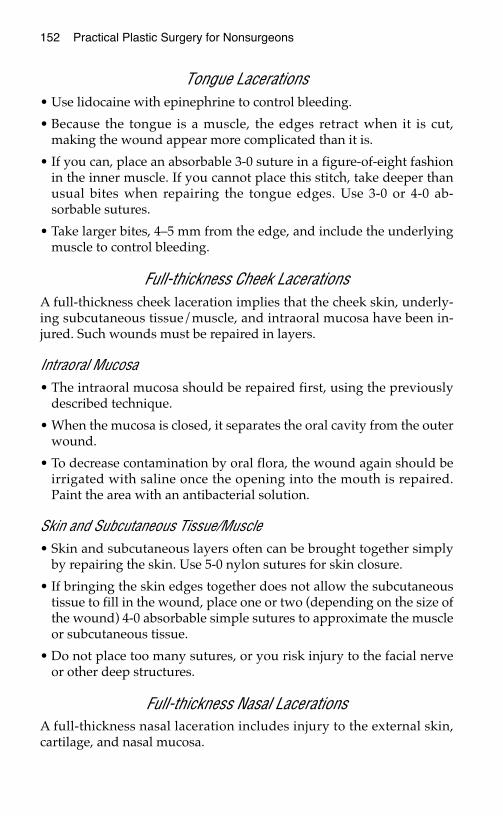
152 Practical Plastic Surgery for Nonsurgeons
Tongue Lacerations• Use lidocaine with epinephrine to control bleeding.
• Because the tongue is a muscle, the edges retract when it is cut,making the wound appear more complicated than it is.
• If you can, place an absorbable 3-0 suture in a figure-of-eight fashionin the inner muscle. If you cannot place this stitch, take deeper thanusual bites when repairing the tongue edges. Use 3-0 or 4-0 ab-sorbable sutures.
• Take larger bites, 4–5 mm from the edge, and include the underlyingmuscle to control bleeding.
Full-thickness Cheek LacerationsA full-thickness cheek laceration implies that the cheek skin, underly-ing subcutaneous tissue/muscle, and intraoral mucosa have been in-jured. Such wounds must be repaired in layers.
Intraoral Mucosa• The intraoral mucosa should be repaired first, using the previously
described technique.
• When the mucosa is closed, it separates the oral cavity from the outerwound.
• To decrease contamination by oral flora, the wound again should beirrigated with saline once the opening into the mouth is repaired.Paint the area with an antibacterial solution.
Skin and Subcutaneous Tissue/Muscle• Skin and subcutaneous layers often can be brought together simply
by repairing the skin. Use 5-0 nylon sutures for skin closure.
• If bringing the skin edges together does not allow the subcutaneoustissue to fill in the wound, place one or two (depending on the size ofthe wound) 4-0 absorbable simple sutures to approximate the muscleor subcutaneous tissue.
• Do not place too many sutures, or you risk injury to the facial nerveor other deep structures.
Full-thickness Nasal LacerationsA full-thickness nasal laceration includes injury to the external skin,cartilage, and nasal mucosa.
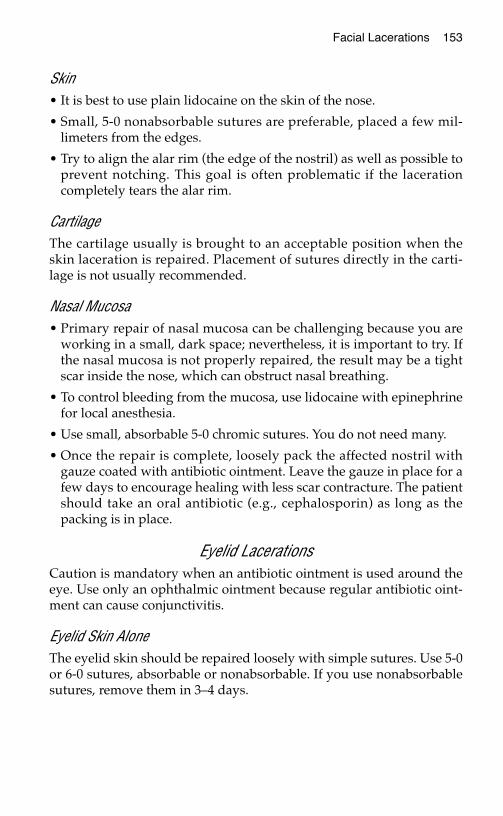
Facial Lacerations 153
Skin• It is best to use plain lidocaine on the skin of the nose.
• Small, 5-0 nonabsorbable sutures are preferable, placed a few mil-limeters from the edges.
• Try to align the alar rim (the edge of the nostril) as well as possible toprevent notching. This goal is often problematic if the lacerationcompletely tears the alar rim.
CartilageThe cartilage usually is brought to an acceptable position when theskin laceration is repaired. Placement of sutures directly in the carti-lage is not usually recommended.
Nasal Mucosa• Primary repair of nasal mucosa can be challenging because you are
working in a small, dark space; nevertheless, it is important to try. Ifthe nasal mucosa is not properly repaired, the result may be a tightscar inside the nose, which can obstruct nasal breathing.
• To control bleeding from the mucosa, use lidocaine with epinephrinefor local anesthesia.
• Use small, absorbable 5-0 chromic sutures. You do not need many.
• Once the repair is complete, loosely pack the affected nostril withgauze coated with antibiotic ointment. Leave the gauze in place for afew days to encourage healing with less scar contracture. The patientshould take an oral antibiotic (e.g., cephalosporin) as long as thepacking is in place.
Eyelid LacerationsCaution is mandatory when an antibiotic ointment is used around theeye. Use only an ophthalmic ointment because regular antibiotic oint-ment can cause conjunctivitis.
Eyelid Skin AloneThe eyelid skin should be repaired loosely with simple sutures. Use 5-0or 6-0 sutures, absorbable or nonabsorbable. If you use nonabsorbablesutures, remove them in 3–4 days.
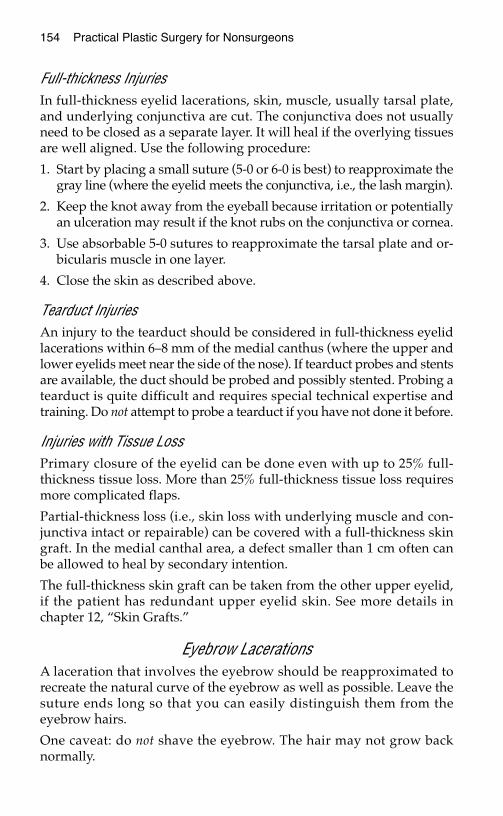
154 Practical Plastic Surgery for Nonsurgeons
Full-thickness InjuriesIn full-thickness eyelid lacerations, skin, muscle, usually tarsal plate,and underlying conjunctiva are cut. The conjunctiva does not usuallyneed to be closed as a separate layer. It will heal if the overlying tissuesare well aligned. Use the following procedure:
1. Start by placing a small suture (5-0 or 6-0 is best) to reapproximate thegray line (where the eyelid meets the conjunctiva, i.e., the lash margin).
2. Keep the knot away from the eyeball because irritation or potentiallyan ulceration may result if the knot rubs on the conjunctiva or cornea.
3. Use absorbable 5-0 sutures to reapproximate the tarsal plate and or-bicularis muscle in one layer.
4. Close the skin as described above.
Tearduct InjuriesAn injury to the tearduct should be considered in full-thickness eyelidlacerations within 6–8 mm of the medial canthus (where the upper andlower eyelids meet near the side of the nose). If tearduct probes and stentsare available, the duct should be probed and possibly stented. Probing atearduct is quite difficult and requires special technical expertise andtraining. Do not attempt to probe a tearduct if you have not done it before.
Injuries with Tissue LossPrimary closure of the eyelid can be done even with up to 25% full-thickness tissue loss. More than 25% full-thickness tissue loss requiresmore complicated flaps.
Partial-thickness loss (i.e., skin loss with underlying muscle and con-junctiva intact or repairable) can be covered with a full-thickness skingraft. In the medial canthal area, a defect smaller than 1 cm often canbe allowed to heal by secondary intention.
The full-thickness skin graft can be taken from the other upper eyelid,if the patient has redundant upper eyelid skin. See more details inchapter 12, “Skin Grafts.”
Eyebrow LacerationsA laceration that involves the eyebrow should be reapproximated torecreate the natural curve of the eyebrow as well as possible. Leave thesuture ends long so that you can easily distinguish them from theeyebrow hairs.
One caveat: do not shave the eyebrow. The hair may not grow backnormally.
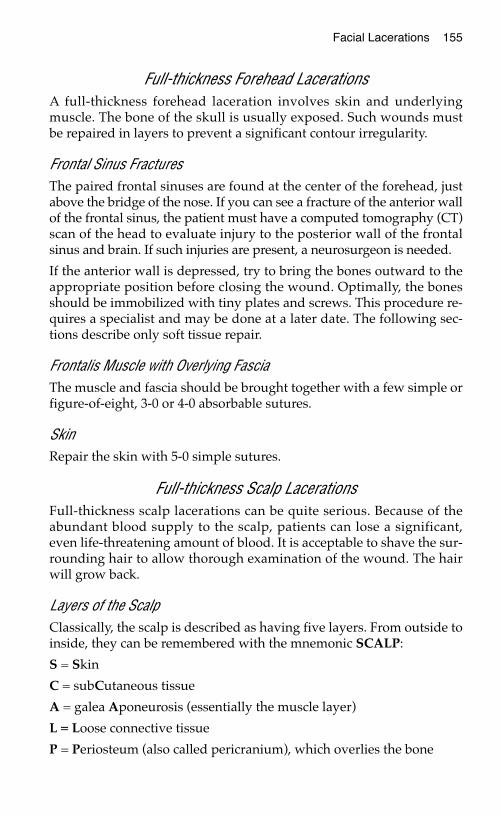
Facial Lacerations 155
Full-thickness Forehead LacerationsA full-thickness forehead laceration involves skin and underlyingmuscle. The bone of the skull is usually exposed. Such wounds mustbe repaired in layers to prevent a significant contour irregularity.
Frontal Sinus FracturesThe paired frontal sinuses are found at the center of the forehead, justabove the bridge of the nose. If you can see a fracture of the anterior wallof the frontal sinus, the patient must have a computed tomography (CT)scan of the head to evaluate injury to the posterior wall of the frontalsinus and brain. If such injuries are present, a neurosurgeon is needed.
If the anterior wall is depressed, try to bring the bones outward to theappropriate position before closing the wound. Optimally, the bonesshould be immobilized with tiny plates and screws. This procedure re-quires a specialist and may be done at a later date. The following sec-tions describe only soft tissue repair.
Frontalis Muscle with Overlying FasciaThe muscle and fascia should be brought together with a few simple orfigure-of-eight, 3-0 or 4-0 absorbable sutures.
SkinRepair the skin with 5-0 simple sutures.
Full-thickness Scalp LacerationsFull-thickness scalp lacerations can be quite serious. Because of theabundant blood supply to the scalp, patients can lose a significant,even life-threatening amount of blood. It is acceptable to shave the sur-rounding hair to allow thorough examination of the wound. The hairwill grow back.
Layers of the ScalpClassically, the scalp is described as having five layers. From outside toinside, they can be remembered with the mnemonic SCALP:
S = Skin
C = subCutaneous tissue
A = galea Aponeurosis (essentially the muscle layer)
L = Loose connective tissue
P = Periosteum (also called pericranium), which overlies the bone

156 Practical Plastic Surgery for Nonsurgeons
For practical purposes, in patients with a full-thickness scalp laceration(i.e., all layers of the scalp are divided and the skull is exposed), youmust close the galea and the skin.
Closing the galea layer often controls the brisk bleeding associatedwith scalp wounds. If a wound infection develops at the site of injury,closure of the galea layer also prevents the infection from spreadingunder the entire scalp. Once infection reaches the loose connectivetissue plain (deep to the galea), it can spread widely. Closure of thegalea prevents this potentially serious complication.
How to Control Bleeding as Well as Close the Wound1. Lidocaine with epinephrine should be used whenever possible for
local anesthesia.
2. Suture together the galea layer with 3-0 or 4-0 Vicryl or chromic su-tures. They can be placed in a simple fashion or in a figure-of-eightfashion.
3. Close the skin with a continuous locking suture of 3-0 nylon orVicryl. The skin stapler (if available) is a useful, fast technique forscalp closure.
Full-thickness External Ear Lacerations
Posterior Side of the EarUse 4-0 or 5-0 absorbable sutures. It is best to place them in an inter-rupted fashion.
Cartilage1. If the cartilage is highly irregular, gently trim the edges to smooth it
out.
2. Be sure to cleanse the wound meticulously when the cartilage is in-volved. All foreign material must be removed. If dirt is embeddedin the cartilage, the cartilage should be trimmed to remove the dirtparticles.
3. No sutures need to be placed in the cartilage. When placing suturesin the skin, try to include the perichondrium (the thin layer of loosetissue overlying the cartilage). In this way, the cartilage edges arebrought together as the skin is repaired.
Facial Lacerations 157
Anterior Side of the EarUse 4-0 or 5-0 nonabsorbable sutures placed in an interrupted fashion.Absorbable sutures also may be used.
How to Prevent Hematoma FormationA particularly concerning complication associated with ear lacerationsis the development of a hematoma. If blood collects and pressurebuilds up between the skin and cartilage, the result may be a notice-able ear deformity, so-called cauliflower ear. A properly placed dress-ing helps to prevent this complication. You should see the patient onthe next day, if possible, to check for a hematoma.
Dressing
1. Add antibiotic ointment to a piece of gauze, and place it over therepair site. Gently press it onto the external ear to conform to theshape of the ear.
2. Open and fluff up several dry gauze pads, and place them aroundthe ear, filling the contours of the ear with gauze. Make sure to placesome gauze behind the ear as well.
3. Gently wrap the head and ear with gauze wrap and a light Acewrap. Do not make the wrap tight. Try to leave it in place for 24–48hours.
What to Do if a Hematoma DevelopsIf the patient returns (usually within the first few days after injury)with pain and swelling of the ear, a hematoma may be present. Theear looks purplish, and the swelling demonstrates some “give” whenyou push on it. Blood may ooze out of the suture line, and the ear maybe slightly warm. If a hematoma develops, follow the procedure out-lined below:
1. The sutures should be removed and the blood drained.
2. The wound should be thoroughly washed and then closed loosely.
3. Use fewer sutures than you used the first time.
4. Apply a dressing similar to the original one.
5. An oral antibiotic, taken for 24 hours, may be a useful precaution.
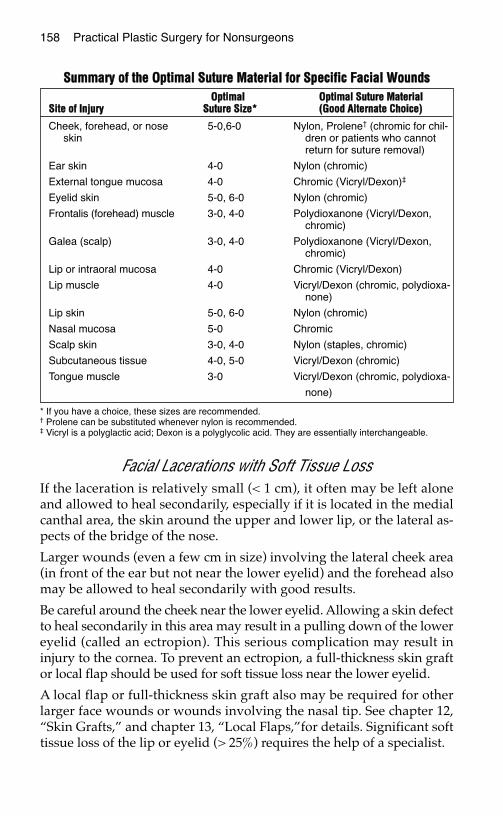
158 Practical Plastic Surgery for Nonsurgeons
Facial Lacerations with Soft Tissue LossIf the laceration is relatively small (< 1 cm), it often may be left aloneand allowed to heal secondarily, especially if it is located in the medialcanthal area, the skin around the upper and lower lip, or the lateral as-pects of the bridge of the nose.
Larger wounds (even a few cm in size) involving the lateral cheek area(in front of the ear but not near the lower eyelid) and the forehead alsomay be allowed to heal secondarily with good results.
Be careful around the cheek near the lower eyelid. Allowing a skin defectto heal secondarily in this area may result in a pulling down of the lowereyelid (called an ectropion). This serious complication may result ininjury to the cornea. To prevent an ectropion, a full-thickness skin graftor local flap should be used for soft tissue loss near the lower eyelid.
A local flap or full-thickness skin graft also may be required for otherlarger face wounds or wounds involving the nasal tip. See chapter 12,“Skin Grafts,” and chapter 13, “Local Flaps,”for details. Significant softtissue loss of the lip or eyelid (> 25%) requires the help of a specialist.
SSuummmmaarryy ooff tthhee OOppttiimmaall SSuuttuurree MMaatteerriiaall ffoorr SSppeecciiffiicc FFaacciiaall WWoouunnddss
* If you have a choice, these sizes are recommended.† Prolene can be substituted whenever nylon is recommended. ‡ Vicryl is a polyglactic acid; Dexon is a polyglycolic acid. They are essentially interchangeable.
OOppttiimmaall OOppttiimmaall SSuuttuurree MMaatteerriiaallSSiittee ooff IInnjjuurryy SSuuttuurree SSiizzee** ((GGoooodd AAlltteerrnnaattee CChhooiiccee))
Cheek, forehead, or nose 5-0,6-0 Nylon, Prolene† (chromic for chil-skin dren or patients who cannot
return for suture removal)
Ear skin 4-0 Nylon (chromic)
External tongue mucosa 4-0 Chromic (Vicryl/Dexon)‡
Eyelid skin 5-0, 6-0 Nylon (chromic)
Frontalis (forehead) muscle 3-0, 4-0 Polydioxanone (Vicryl/Dexon,chromic)
Galea (scalp) 3-0, 4-0 Polydioxanone (Vicryl/Dexon,chromic)
Lip or intraoral mucosa 4-0 Chromic (Vicryl/Dexon)
Lip muscle 4-0 Vicryl/Dexon (chromic, polydioxa-none)
Lip skin 5-0, 6-0 Nylon (chromic)
Nasal mucosa 5-0 Chromic
Scalp skin 3-0, 4-0 Nylon (staples, chromic)
Subcutaneous tissue 4-0, 5-0 Vicryl/Dexon (chromic)
Tongue muscle 3-0 Vicryl/Dexon (chromic, polydioxa-
none)
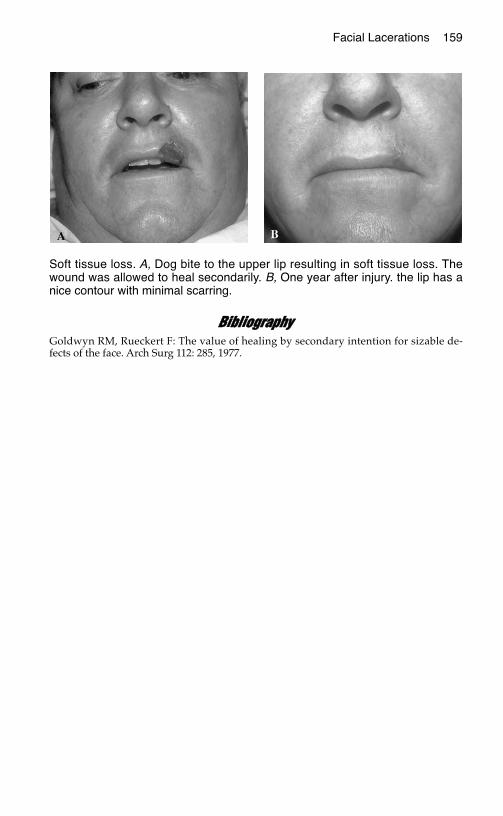
Facial Lacerations 159
BBiibblliiooggrraapphhyyGoldwyn RM, Rueckert F: The value of healing by secondary intention for sizable de-fects of the face. Arch Surg 112: 285, 1977.
Soft tissue loss. A, Dog bite to the upper lip resulting in soft tissue loss. Thewound was allowed to heal secondarily. B, One year after injury. the lip has anice contour with minimal scarring.
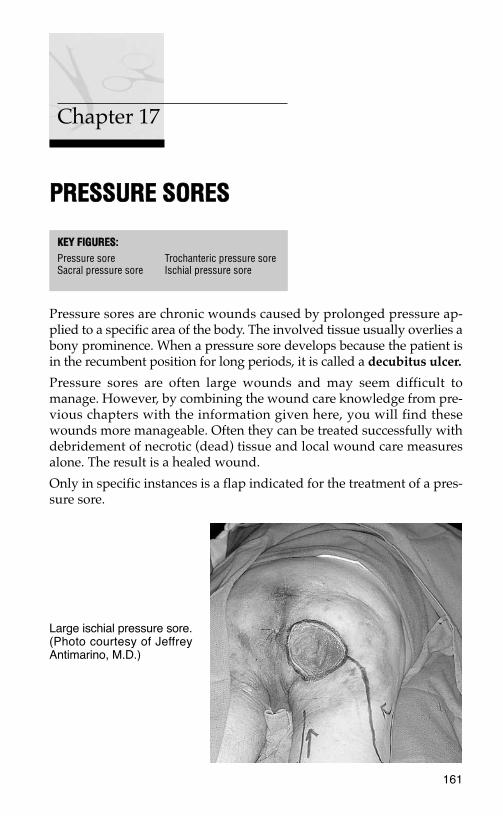
PPRREESSSSUURREE SSOORREESS
Pressure sores are chronic wounds caused by prolonged pressure ap-plied to a specific area of the body. The involved tissue usually overlies abony prominence. When a pressure sore develops because the patient isin the recumbent position for long periods, it is called a decubitus ulcer.
Pressure sores are often large wounds and may seem difficult tomanage. However, by combining the wound care knowledge from pre-vious chapters with the information given here, you will find thesewounds more manageable. Often they can be treated successfully withdebridement of necrotic (dead) tissue and local wound care measuresalone. The result is a healed wound.
Only in specific instances is a flap indicated for the treatment of a pres-sure sore.
161
Chapter 17
KKEEYY FFIIGGUURREESS::Pressure sore Trochanteric pressure soreSacral pressure sore Ischial pressure sore
Large ischial pressure sore.(Photo courtesy of JeffreyAntimarino, M.D.)
162 Practical Plastic Surgery for Nonsurgeons
CCaauusseess ooff PPrreessssuurree SSoorreessThe basic problem that leads to the development of a pressure sore isapplication of elevated pressure to soft tissue for too long a time. Thepressure causes direct injury to the tissues. Unrelieved pressure eleva-tion for as little as 2 hours can cause permanent tissue injury and sub-sequent tissue death.
PPeeooppllee aatt RRiisskkCommunication between the central nervous system and the body (viathe peripheral nervous system) allows detection of elevated pressure atthe tissue level. Feedback mechanisms result in the diminution of pres-sure so that tissue injury does not occur. People who are ambulatoryand without neurologic abnormalities make regular, subtle positionchanges without conscious effort because of these feedback mechanisms.Thus, under normal circumstances, people do not develop a pressuresore when they sleep in a recumbent position for several hours.
Any condition that prevents these subtle position changes or interfereswith the communication between the central nervous system and pe-ripheral nervous system places the person at risk for the developmentof a pressure sore.
Patient Populations at High Risk• Paraplegic or quadriplegic patients, who usually are wheelchair-de-
pendent or bedridden and need help in changing positions. Theyalso may lack the ability to sense an elevation in tissue pressurewhen they remain in the same position for too long a time.
• Patients with decreased sensation due to neurologic disorders. Forexample, children with meningomyelocele have diminished sensa-tion below the spinal cord abnormality. Thus, the central nervoussystem cannot monitor the pressure in the insensate areas.
• Patients with impaired mental capacity. Patients with severe de-mentia or patients who have suffered debilitating head injuries areoften bedridden and move very little when left alone.
• Seriously ill patients in an intensive care unit. Patients who havesustained serious burns or multiple fractures are particularly at risk.They are often in considerable pain, which may be exacerbated bymovement. Thus they tend to stay in one position unless assisted bya caregiver. In addition, pain medications keep them drowsy, whichalso inhibits movement.
Pressure Sores 163
Additional Risk Factors • Malnutrition makes the tissues more prone to injury. It also delays
wound healing.
• Incontinence can cause the skin in the buttocks and perineal area tobe chronically moist. The tissues become macerated and more sus-ceptible to breakdown with minimal trauma. In addition, contamina-tion of an open wound with urine and feces interferes with woundhealing.
• Tobacco use. The nicotine in tobacco decreases circulation to tis-sues, thus exacerbating the lack of circulation caused by the effectsof pressure on the tissues. Tobacco use also contributes to poorwound healing.
PPrreevveennttiioonnFor patients at high risk for developing a pressure sore, prevention isthe key. To avoid the development of pressure sores in bedridden pa-tients, encourage the patients (and their caregivers) to change positionsregularly (at least every 2 hours). Paraplegic patients who spend pro-longed periods in a wheelchair should lift themselves off their buttocksfor just a few seconds every 15 minutes.
Cushioning of pressure points is also important. For example, placepillows or cushions between the patient’s knees and ankles to preventpressure in these areas. Have the patient sit on a pillow as well. Specialpressure-dissipating cushions can be fitted to the patient’s wheelchair.
Cessation of smoking and maintenance of adequate nutrition are vitalfor prevention. Proper hygiene of the buttocks and perineum is alsoimportant.
TTaabbllee 11.. AArreeaass PPrroonnee ttoo tthhee DDeevveellooppmmeenntt ooff PPrreessssuurree SSoorreess
UUnnddeerrllyyiinnggAArreeaa ooff BBooddyy BBoonnyy PPrroommiinneennccee CCoommmmeennttss
Base of buttocks Ischium Tends to occur in patients confined towheelchair and in seated position formuch of the time
Upper outer thigh Greater trochanter Tends to occur in patients who spendprolonged periods in bed
Heel of foot Calcaneus May occur in both of above patientpopulations
Back of head Occiput of skull Tends to occur in patients who spendprolonged periods in bed
Lower back Sacrum Tends to occur in patients who spendprolonged periods in bed
164 Practical Plastic Surgery for Nonsurgeons
PPrreessssuurree SSoorree SSttaaggiinngg SSyysstteemmA staging scale is important for documentation and communication.Recognition of a pressure sore in its early stages allows aggressive in-tervention, which may prevent the development of a large, full-thick-ness wound.
The staging system is based on skin appearance. However, the skin ismuch more resistant to the effects of pressure than the underlying fatand muscle. Thus by the time you see significant changes in the skin,damage has already occured in the underlying soft tissue fat andmuscle. You must institute treatment measures quickly.
Stage I Redness of intact skin that does not blanch (when you presson the area the redness does not go away). Earliest stage,before start of skin breakdown.
Stage II Partial-thickness skin loss involving the epidermis anddermis. The ulcer is superficial and may look like a blisteror shallow crater.
Stage III Full-thickness skin loss involving the underlying subcuta-neous fat but not the muscle.
Stage IV Full-thickness skin loss with extensive destruction, tissuenecrosis, or damage in muscle, bone, or supporting struc-tures (e.g., tendon, joint capsule).
From U.S. Department of Health and Human Services: Pressure Ulcers in Adults:Prediction and Prevention. Clinical Practice Guideline No. 3, Publication 97-0047, 1992.
TTrreeaattmmeenntt
All Patients in the Process of Developing a Pressure Sore1. Reinforce the necessity of regular position changes to patient and
caregivers.
2. Institute measures to relieve the pressure in the at-risk area. Pillows,foam mattresses, and foam splints are useful.
3. Proper nutrition is a must. High-protein drinks and puddings areuseful. Supplemental vitamins and minerals also should be given(especially vitamin C and zinc).
4. Patients should remain active. They should not be placed on bed restor kept from their usual activities.
5. The patient should refrain from using tobacco products.
6. The wound should be kept free from urine or fecal contamination.Temporary use of a Foley catheter (or intermittent catheterization)
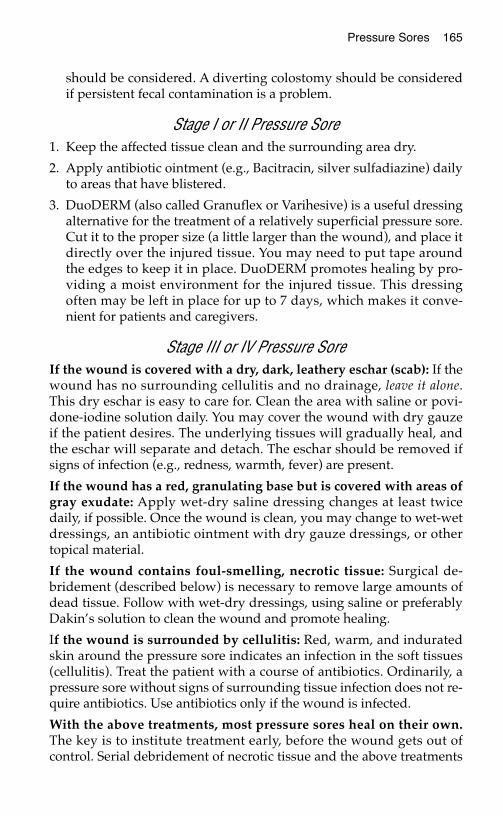
Pressure Sores 165
should be considered. A diverting colostomy should be consideredif persistent fecal contamination is a problem.
Stage I or II Pressure Sore 1. Keep the affected tissue clean and the surrounding area dry.
2. Apply antibiotic ointment (e.g., Bacitracin, silver sulfadiazine) dailyto areas that have blistered.
3. DuoDERM (also called Granuflex or Varihesive) is a useful dressingalternative for the treatment of a relatively superficial pressure sore.Cut it to the proper size (a little larger than the wound), and place itdirectly over the injured tissue. You may need to put tape aroundthe edges to keep it in place. DuoDERM promotes healing by pro-viding a moist environment for the injured tissue. This dressingoften may be left in place for up to 7 days, which makes it conve-nient for patients and caregivers.
Stage III or IV Pressure SoreIf the wound is covered with a dry, dark, leathery eschar (scab): If thewound has no surrounding cellulitis and no drainage, leave it alone.This dry eschar is easy to care for. Clean the area with saline or povi-done-iodine solution daily. You may cover the wound with dry gauzeif the patient desires. The underlying tissues will gradually heal, andthe eschar will separate and detach. The eschar should be removed ifsigns of infection (e.g., redness, warmth, fever) are present.
If the wound has a red, granulating base but is covered with areas ofgray exudate: Apply wet-dry saline dressing changes at least twicedaily, if possible. Once the wound is clean, you may change to wet-wetdressings, an antibiotic ointment with dry gauze dressings, or othertopical material.
If the wound contains foul-smelling, necrotic tissue: Surgical de-bridement (described below) is necessary to remove large amounts ofdead tissue. Follow with wet-dry dressings, using saline or preferablyDakin’s solution to clean the wound and promote healing.
If the wound is surrounded by cellulitis: Red, warm, and induratedskin around the pressure sore indicates an infection in the soft tissues(cellulitis). Treat the patient with a course of antibiotics. Ordinarily, apressure sore without signs of surrounding tissue infection does not re-quire antibiotics. Use antibiotics only if the wound is infected.
With the above treatments, most pressure sores heal on their own.The key is to institute treatment early, before the wound gets out ofcontrol. Serial debridement of necrotic tissue and the above treatments
166 Practical Plastic Surgery for Nonsurgeons
promote gradual healing even of a large pressure sore. Although it maytake weeks to months for the wound to close completely, this is the opti-mal course of treatment for a pressure sore. On rare occasions, localflaps can be used to obtain wound closure (see descriptions below).
SSuurrggiiccaall IInntteerrvveennttiioonnSurgical intervention is required when the wound has so much deadtissue that formal debridement is needed to clean the wound. Oc-casionally, the wound can be closed with a local flap.
DebridementDebridement of small, necrotic areas can be performed at the bedside.But for large or deep wounds, it is better to do the debridement in thecontrolled environment of the operating room.
The patient will lose blood when large amounts of dead tissue are cutaway. Be sure to check the patient’s hemoglobin/hematocrit before de-briding a large pressure sore. A transfusion may be required.
Often the patient has no feeling in the area of the pressure sore.Sedation (to allay fears and increase comfort on the operating table)may be all that is needed.
Using a scalpel (or a scissors) and forceps, cut away all dead tissue.
If the tissue bleeds, it is probably healthy; if it does not bleed, it is prob-ably dead.
Dead bone or tendon in the wound must be removed. Place a clamp onthe tendon, and put the tendon under tension (i.e., pull on the clamp).Then cut off all of the exposed tendon. Bone can be removed with abone rongeur or an osteotome. Remove the outer layers of the exposedbone until you reach bleeding bone.
Clean the wound with saline mixed with a small amount of povidone-iodine solution if available, and pack the wound with a gauze dress-ing. Leave the dressing in place for 24 hours. Then remove the packing,and start regular wet-dry dressings.
Debridement may be repeated (serial debridement) if, because of con-cerns about blood loss, all necrotic tissue cannot be removed at onetime.
Local Flaps Closing a pressure sore with a local flap is an advanced treatment thatrequires surgical expertise. A local flap is not indicated for all pressure
Pressure Sores 167
sores. Most heal with local care. Unless you are particular about whomyou operate on, the risk for recurrence of the pressure sore is quite high(often over 50%).
If you perform a flap on a patient who is not a good surgical candidate(e.g., a patient who is malnourished, actively smoking, or noncompli-ant with position changes), he or she may end up not only with a re-current pressure sore but also with a poorly healing donor site.
IndicationsSpecific reason for development of the pressure sore. For example, aparaplegic patient who has had no previous pressure sores (despitebeing in a wheelchair for 10 years) but develops one when he or she ishospitalized for pneumonia and unable to change positions.
Excellent nutritional status. Albumin > 3.5 gm/dl, prealbumin > 20mg/dl, transferrin > 250 mg/dl (2.5 gm/L). If the patient is malnour-ished, the flap will not heal and surgery is pointless. There is also ahigh risk that the donor site will heal poorly.
The patient must not smoke.
Highly motivated patients who want to be at home. Some patientslive alone or have little home support. They may be unable to gohome because of concerns about wound care. If patients in this situa-tion meet the nutritional requirements and show that they are moti-vated enough to change positions regularly, local flap closure may beindicated.
Preoperative ConsiderationsBefore flap closure, the pressure sore must be debrided thoroughly. It isoften useful to debride the wound surgically a day or so before theplanned flap. All necrotic tissue and dead bone must be removed.
Caution: Debridement of pressure sores and flap closure can lead tosignificant blood loss. The patient’s hematocrit must be above 27(hemoglobin at least 8–9), and blood must be available for the operat-ing room.
A closed suction drain should be available to place under the flap toprevent fluid accumulation postoperatively. If a closed suction drain isnot available, a passive drain (Penrose drain or a piece of sterile glove)should be placed under the flap. See chapter 13, “Local Flaps,” for ad-ditional information.
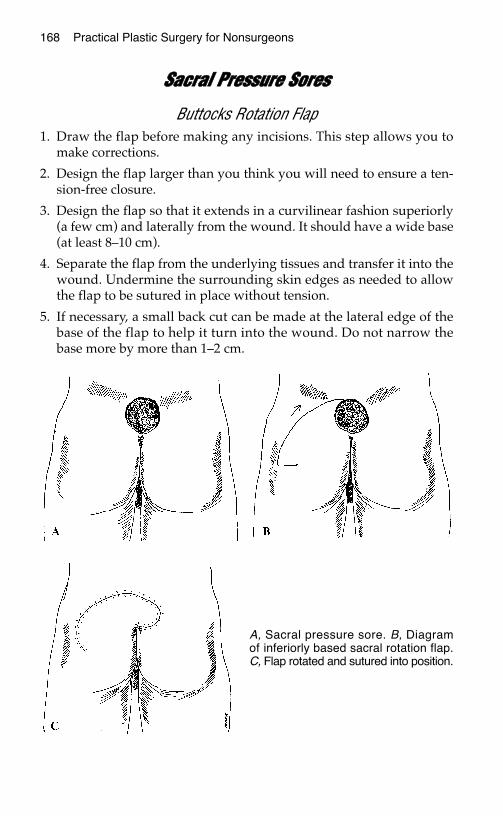
168 Practical Plastic Surgery for Nonsurgeons
SSaaccrraall PPrreessssuurree SSoorreess
Buttocks Rotation Flap1. Draw the flap before making any incisions. This step allows you to
make corrections.
2. Design the flap larger than you think you will need to ensure a ten-sion-free closure.
3. Design the flap so that it extends in a curvilinear fashion superiorly(a few cm) and laterally from the wound. It should have a wide base(at least 8–10 cm).
4. Separate the flap from the underlying tissues and transfer it into thewound. Undermine the surrounding skin edges as needed to allowthe flap to be sutured in place without tension.
5. If necessary, a small back cut can be made at the lateral edge of thebase of the flap to help it turn into the wound. Do not narrow thebase more by more than 1–2 cm.
A, Sacral pressure sore. B, Diagramof inferiorly based sacral rotation flap.C, Flap rotated and sutured into position.
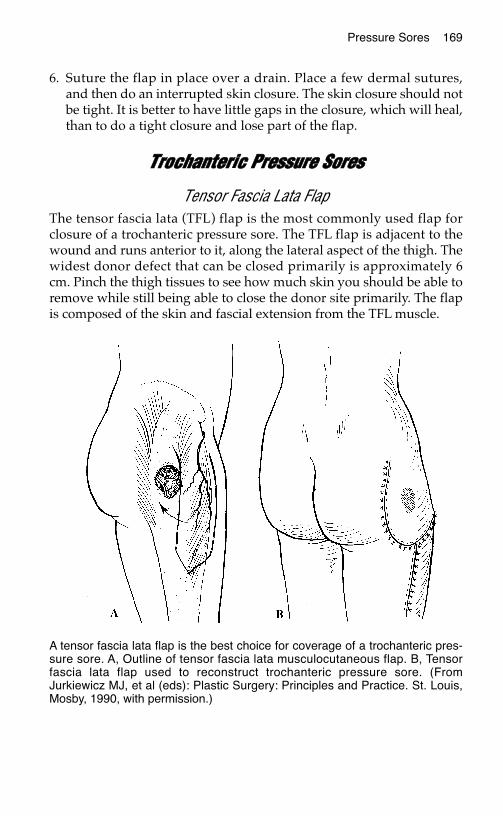
Pressure Sores 169
6. Suture the flap in place over a drain. Place a few dermal sutures,and then do an interrupted skin closure. The skin closure should notbe tight. It is better to have little gaps in the closure, which will heal,than to do a tight closure and lose part of the flap.
TTrroocchhaanntteerriicc PPrreessssuurree SSoorreess
Tensor Fascia Lata FlapThe tensor fascia lata (TFL) flap is the most commonly used flap forclosure of a trochanteric pressure sore. The TFL flap is adjacent to thewound and runs anterior to it, along the lateral aspect of the thigh. Thewidest donor defect that can be closed primarily is approximately 6cm. Pinch the thigh tissues to see how much skin you should be able toremove while still being able to close the donor site primarily. The flapis composed of the skin and fascial extension from the TFL muscle.
A tensor fascia lata flap is the best choice for coverage of a trochanteric pres-sure sore. A, Outline of tensor fascia lata musculocutaneous flap. B, Tensorfascia lata flap used to reconstruct trochanteric pressure sore. (FromJurkiewicz MJ, et al (eds): Plastic Surgery: Principles and Practice. St. Louis,Mosby, 1990, with permission.)
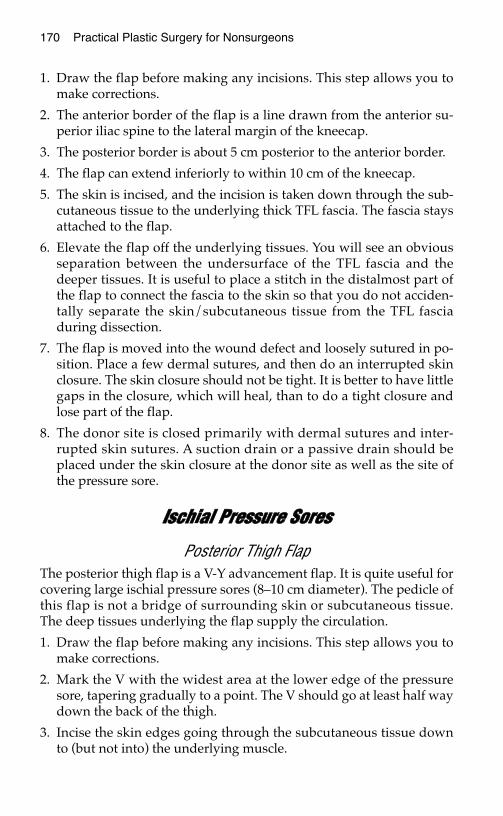
170 Practical Plastic Surgery for Nonsurgeons
1. Draw the flap before making any incisions. This step allows you tomake corrections.
2. The anterior border of the flap is a line drawn from the anterior su-perior iliac spine to the lateral margin of the kneecap.
3. The posterior border is about 5 cm posterior to the anterior border.
4. The flap can extend inferiorly to within 10 cm of the kneecap.
5. The skin is incised, and the incision is taken down through the sub-cutaneous tissue to the underlying thick TFL fascia. The fascia staysattached to the flap.
6. Elevate the flap off the underlying tissues. You will see an obviousseparation between the undersurface of the TFL fascia and thedeeper tissues. It is useful to place a stitch in the distalmost part ofthe flap to connect the fascia to the skin so that you do not acciden-tally separate the skin/subcutaneous tissue from the TFL fasciaduring dissection.
7. The flap is moved into the wound defect and loosely sutured in po-sition. Place a few dermal sutures, and then do an interrupted skinclosure. The skin closure should not be tight. It is better to have littlegaps in the closure, which will heal, than to do a tight closure andlose part of the flap.
8. The donor site is closed primarily with dermal sutures and inter-rupted skin sutures. A suction drain or a passive drain should beplaced under the skin closure at the donor site as well as the site ofthe pressure sore.
IIsscchhiiaall PPrreessssuurree SSoorreess
Posterior Thigh FlapThe posterior thigh flap is a V-Y advancement flap. It is quite useful forcovering large ischial pressure sores (8–10 cm diameter). The pedicle ofthis flap is not a bridge of surrounding skin or subcutaneous tissue.The deep tissues underlying the flap supply the circulation.
1. Draw the flap before making any incisions. This step allows you tomake corrections.
2. Mark the V with the widest area at the lower edge of the pressuresore, tapering gradually to a point. The V should go at least half waydown the back of the thigh.
3. Incise the skin edges going through the subcutaneous tissue downto (but not into) the underlying muscle.
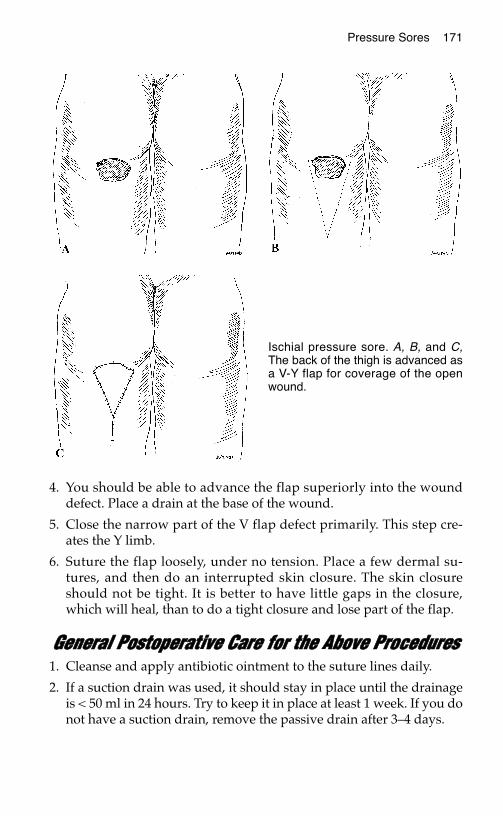
Pressure Sores 171
4. You should be able to advance the flap superiorly into the wounddefect. Place a drain at the base of the wound.
5. Close the narrow part of the V flap defect primarily. This step cre-ates the Y limb.
6. Suture the flap loosely, under no tension. Place a few dermal su-tures, and then do an interrupted skin closure. The skin closureshould not be tight. It is better to have little gaps in the closure,which will heal, than to do a tight closure and lose part of the flap.
GGeenneerraall PPoossttooppeerraattiivvee CCaarree ffoorr tthhee AAbboovvee PPrroocceedduurreess1. Cleanse and apply antibiotic ointment to the suture lines daily.
2. If a suction drain was used, it should stay in place until the drainageis < 50 ml in 24 hours. Try to keep it in place at least 1 week. If you donot have a suction drain, remove the passive drain after 3–4 days.
Ischial pressure sore. A, B, and C,The back of the thigh is advanced asa V-Y flap for coverage of the openwound.
172 Practical Plastic Surgery for Nonsurgeons
3. In general, the patient should apply no pressure to the surgical siteuntil the suture line has healed (usually 2–3 weeks). The patientthen should be allowed to place weight over the area for limited pe-riods (10–15 minutes 3 or 4 times daily). If the suture line stays intact(i.e., it does not start to separate), gradually decrease the restrictionson positioning.
4. Leave the skin sutures in place for at least 14 days unless there aresigns of irritation from the sutures.
BBiibblliiooggrraapphhyy1. Cervo FA, Cruz AC, Posillico JA: Pressure ulcers: Analysis of guidelines for treatment
and management. Geriatrics 55(3):55–60, 2000.2. Disa JJ, Carlton JM, Goldberg NH: Efficacy of operative cure in pressure sore patients.
Plast Reconstr Surg 89:272–278, 1992.3. Hopkins A, Gooch S, Danks F: A programme for pressure sore prevention and man-
agement. J Wound Care 7:37–40, 1998.
CCHHRROONNIICC WWOOUUNNDDSS
Chronic wounds are open wounds that for some reason simply will notheal. They may be present for months or even years. Often, especiallyin rural settings, the wounds have not received adequate care. Themost important component of the overall treatment plan must be toidentify and treat the underlying cause that interferes with normalwound healing.
Begin by taking a thorough history to find out about the patient’s med-ical status as well as information about the events that contributed tothe development of the wound. Next, thoroughly examine the wound.From this information, the underlying cause for the nonhealing woundusually can be identified.
Once the cause is identified and properly treated, the basic principle ofchronic wound treatment is essentially the same as those of secondarywound healing: regular dressing changes. For large wounds, a skingraft or flap may be required for final closure.
This chapter discusses the most common underlying causes (withtreatments) for a nonhealing wound. In addition, a few specific, prob-lematic chronic wounds are described.
CCoommmmoonn CCaauusseess aanndd TTrreeaattmmeennttss
Neglected Wound/Poor Wound CareEspecially in the rural setting, many chronic wounds do not healsimply because of inadequate wound care. Without proper care, thewound becomes covered with dead (necrotic) tissue. To achievewound closure, all necrotic tissue must be removed (debrided), eitherwith wet-to-dry dressings or with surgical debridement.
173
Chapter 18
KKEEYY FFIIGGUURREESS::Open wound Wound covered with skin graft

174 Practical Plastic Surgery for Nonsurgeons
Surgical DebridementWhen a wound is covered with black, dead tissue or thick gray/greenexudate, dressings alone may be inadequate. Surgical removal of a sig-nificant amount of necrotic tissue may allow successful wound closurewith wet-to-dry dressings.
Using a forceps, pick up an edge of the dead tissue and cut it off thewound with a scalpel or scissors. This procedure usually is not painfulbecause the tissue that you are cutting into is already dead. If it hurts,you are near healthy tissue.
Bleeding tissue is a good sign and indicates that you are in an area ofhealthy tissue. Dead tissue does not bleed.
This procedure can be repeated as often as necessary. You do not haveto remove all necrotic tissue with one procedure.
Once the necrotic tissue has been removed, regular dressing changesshould be started. Wet-to-dry dressings are the most appropriatechoice. Dressings should be changed at least 2 times daily and opti-mally 3 or 4 times (in areas where dressing supplies are plentiful) untilthe wound heals. See chapter 9, “Taking Care of Wounds,” for a de-tailed description of dressing options.
Foreign Material in the Depths of the WoundA foreign body in the depths of a wound may prevent healing. Foreignmaterial such as glass, wood, or metal fragments can cause an inflam-matory reaction in the tissues that will not resolve until the foreign ma-terial is removed.
The history often provides information that leads you to suspect thatforeign materials may be the problem. An x-ray may be useful, butmany foreign objects do not show up on x-rays.
Often foreign material is removed with overlying dead tissue duringsurgical debridement, allowing the wound to heal with dressing changes.
InfectionIf signs of surrounding soft tissue infection (redness, warmth, pain,swelling) are present, oral or intravenous antibiotics should be given.The presence of an open wound, in and of itself, does not necessitateoral or intravenous antibiotic administration.
Infection of the underlying bone (chronic osteomyelitis) may cause achronic nonhealing wound. An x-ray may show irregularity in the pe-riosteum (the thin layer of connective tissue around the bone), andsigns of bone destruction may be seen.
Chronic Wounds 175
Infection of the bone often requires at least 6 weeks of antibiotics. Inaddition, orthopedic and reconstructive surgical expertise is usuallyrequired for successful treatment because bone debridement and cov-erage with a muscle flap may be required for control and resolution ofthe infection—especially when an infection develops after an openfracture.
TobaccoTobacco use interferes with wound healing through a combination oftwo mechanisms:
1. The vasoconstrictive effects of nicotine decrease local blood circula-tion to the skin. Thus, less blood and oxygen (and other factors thatpromote healing) reach the wound.
2. The carbon monoxide present in tobacco smoke further decreasesoxygen delivery to the tissues because carbon monoxide decreasesthe ability of hemoglobin to release oxygen to the tissues.
All patients should be counseled not to smoke, especially patients withopen wounds. When the patient stops smoking, the improvement inthe wound may be dramatic.
CancerIn a long-standing wound that looks clean but still will not heal, thewound may be harboring an underlying cancer. Often such woundslook a little different from the usual chronic wound. The tissues aroundthe wound edges may be raised and highly irregular, and irregular redpatches may be seen in the surrounding skin.
The concern about an underlying cancer is especially applicable inchronic wounds in elderly patients and on sun-exposed areas of thebody.
We tend to expect basal cell or squamous cell skin cancers to be relativelysmall (< 2–3 cm), but, if left untreated, they can grow to be quite large.Cancer of the breast and soft tissue sarcomas can erode through the skinto create a chronic open wound. Usually, these two types of cancer areassociated with a large soft tissue mass underlying the wound.
For such wounds to heal, the entire lesion—i.e., the entire area in-volved with cancer—must be excised. If the wound is small (< 1–2 cm),immediate excision is indicated. In larger wounds, an incisional biopsyshould be done to get a preliminary diagnosis, which helps to plan thedefinitive resection. See chapter 22, “Skin Cancer,” for details.
176 Practical Plastic Surgery for Nonsurgeons
MalnutritionFor a wound to heal, the patient’s nutritional status must be sound. Anadequate diet supplying the proper amount of calories and protein ona daily basis is very important. The importance of nutritional factors inwound healing is illustrated by the fact that elective surgery often iscontraindicated in patients without adequate protein stores.
How to Assess Nutritional StatusThe liver produces various proteins that have been found to correlatewell with nutritional status. Examples include albumin, prealbumin,and transferrin. Although albumin does not correlate with nutritionalstatus as well as the other two, measurement of serum albumin is help-ful if the more expensive tests for prealbumin and transferrin are un-available.
Vitamin C, vitamin A, iron, and zinc are also important nutrients forproper wound healing. In malnourished patients, vitamin/mineralsupplements may be beneficial. In adequately nourished patients, how-ever, extra doses of these nutrients are not necessarily useful.
As stated below in the discussion of radiation, vitamin E may be usefulin a wound exposed to radiation. However, high doses of vitamin E in-terfere with normal wound healing in patients without a deficiency.
Although nutritional supplements may be required in severely mal-nourished patients, nutritional counseling may be all that is needed formost patients. Nutritional supplements, such as high protein/caloriedrinks/puddings, are often quite expensive and unnecessary. Seechapter 8, “Nutrition,” for more detailed information.
DiabetesAn elevated blood glucose level decreases the body’s natural ability toheal wounds. For this reason, patients with diabetes must watch theirdiet and regularly check glucose levels. High glucose levels should betreated with the appropriate medications (insulin or an oral agent) tomaintain the best possible blood glucose control.
PPrrootteeiinn NNoorrmmaall VVaalluuee
Albumin 3.5–5.0 gm/dl
Prealbumin 10–40 mg/dl
Transferrin 200–400 mg/dl
Chronic Wounds 177
MedicationsAsk all patients about use of prescription and over-the-counter med-ications. Several classes of medications interfere with wound healing:
SteroidsSteroids significantly interfere with normal wound healing. Vitamin Amay counteract the effects of steroids and promote healing. Try givingvitamin A orally (25,000 IU/day) or topically (200,000 IU/8 hours) for1–2 weeks, and see if the wound begins to heal.
Nonsteroidal Anti-inflammatory Drugs (NSAIDs)NSAIDs (e.g., aspirin, ibuprofen) interfere with wound healing by de-creasing collagen production. The precise mechanism is not fully un-derstood. If the patient has a chronic wound and is taking NSAIDs, seeif switching to another type of medication (e.g., acetaminophen) resultsin improved wound healing.
Radiation InjuryThe patient may give a history of previous radiation therapy to the areaaround the wound. Radiation damages the ability of the tissues to pro-mote new blood vessel growth as well as interferes with cellular func-tions necessary for wound healing. These effects are not reversible oncethe radiation exposure has been completed and in fact may worsen withtime. Because of these effects, a seemingly minor injury in an area thatpreviously received radiation may result in a chronic, open wound.
Vitamin E has been shown to improve wound strength in areas ex-posed to radiation. It may be useful to try a short course (1–2 weeks) oforal vitamin E supplementation (100–400 IU/day) to see whether thestatus of the wound improves.
Often the entire wound may need to be excised to remove the damaged,radiated tissue. Especially if no reconstructive specialists are available,try local wound care for a few weeks after excision to see whether thewound begins to heal. If this treatment is unsuccessful, a split-thicknessskin graft or, more likely, a flap may be required for wound closure.
SSppeecciiffiicc PPrroobblleemmaattiicc WWoouunnddss
Leg UlcersLeg ulcers usually are caused by problems in either the arterial circula-tion or the venous circulation (or sometimes a combination of the two).
178 Practical Plastic Surgery for Nonsurgeons
Arterial InsufficiencyLeg ulcers due to blockages in the arterial circulation tend to developover the medial aspect of the ankle. Compare the temperature of thepatient’s feet: is one foot cooler than the other? Coolness is a sign of in-adequate arterial blood flow.
Check for the presence of palpable pulses in the foot and ankle. If youcannot feel the dorsalis pedis artery (on the top of the foot) or the pos-terior tibial artery (behind the medial malleolus), the patient probablyhas a problem in the arterial circulation. Even if you cannot feel a pulsein the foot vessels, blood flow to the foot may be sufficient to allow aproperly treated wound to heal. Absence of a pulse, however, does in-dicate that the vessels are significantly diseased.
There are many high-tech ways to examine the patency of the bloodvessels of the legs. Some are invasive (e.g., arteriogram, in which dye isinjected into the vessels and x-rays are taken), and some are not (e.g.,Doppler studies using sound waves to examine the vessels). A simpletest to measure blood flow to the foot is as follows:
1. Measure the systolic blood pressure in the foot and divide thisnumber by the systolic blood pressure in the arm (at the brachialartery, the usual place to check blood pressure).
2. The result is the ankle/brachial index (ABI), which compares bloodflow to the ankle with blood flow through the upper extremity.Because the upper extremity is rarely affected by vascular disease,the ABI allows you to determine the degree of diminution of bloodflow to the foot.
3. An ABI > 0.5 indicates that sufficient blood reaches the foot to allowwound healing.
4. An ABI < 0.4 indicates poor blood flow to the foot. Healing probablywill not occur unless a vascular bypass is done to bring more bloodinto the lower extremity.
Venous InsufficiencyUlcers due to problems with the venous circulation tend to be on thelateral side of the ankle or lower calf. Arterial pulses are usuallynormal. Such ulcers can become quite large (10–15-cm wounds arecommon).
The foot, ankle, or calf around the wound is often chronically swollen,and obvious skin changes are present. Skin changes include woody in-duration (the skin feels very hard) and brawny discoloration. Enlargedvaricose veins are usually present.
Chronic Wounds 179
Combination Arterial and Venous InsufficiencyUnfortunately, many patients with leg ulcers do not have purely arter-ial or purely venous problems. Often the disease involves both arteriesand veins.
TreatmentLeg ulcers are often quite difficult to treat. Although we try to avoidamputation, sometimes it is the only successful treatment option.
If the cause is inadequate arterial circulation:
1. If the ABI is > 0.5, the wound has a high likelihood of healing withproper local care (dressings) or a skin graft.
2. If the ABI is < 0.4, the chance of healing without vascular bypass tobring more blood to the area is low.
3. If no one with vascular surgical expertise is available, it is worthtrying local wound care to see if the wound improves. If this at-tempt is unsuccessful, amputation may be the only way to obtain aclosed wound.
If the cause is venous insufficiency:
An important component of treatment is to decrease the swelling in thefoot or calf:
1. The patient should elevate the affected leg as much as possible. Inbed the foot should be propped on a pillow. When the patient isseated, the foot should be propped on a stool so that it does notdangle dependently.
2. The patient also should wrap the leg with Ace wraps or wear sup-port stockings to improve blood flow through the veins and out thelower leg. This strategy also helps to decrease leg swelling.
3. The Ace wraps should start at the toes and gradually go up to the calf.Be sure that the wrap is not too tight. It should be tighter at the toe thanat the ankle and tighter at the ankle than at the calf. If the Ace wrap isnot properly applied (i.e., if it is tighter at the ankle than the foot), it willcause constriction at the ankle and worsen the swelling in the foot.
4. In patients with arterial and venous problems, take care that the Acewraps and support stockings do not impede arterial circulation.
Venous ulcers are notoriously difficult to treat. In some patients, espe-cially those treated before the tissues of the leg become hard andwoody, control of swelling and proper wound care allow venous ulcersto heal. For large venous ulcers, a split-thickness skin graft may be in-dicated, but there is a high chance that the graft will not work.
180 Practical Plastic Surgery for Nonsurgeons
If the problem is a combination of arterial and venous insufficiency:
Each problem must be addressed separately. However, if the arterialinflow is poor, no matter how aggressively the venous problems aretreated, wound healing will not occur.
Pressure SoresA pressure sore is a chronic wound caused by prolonged application ofpressure to an area of soft tissue. Usually these wounds develop overa bony prominence. (See chapter 17, “Pressure Sores,” for detailedinformation.)
OOvveerrvviieeww ooff TTrreeaattiinngg CChhrroonniicc OOppeenn WWoouunnddssThe key strategies to promote healing of a chronic open wound can besummarized as follows:
• Remove all dead tissues overlying the wound with either dressingsor surgical debridement.
• Remove any foreign material from the wound.
• Treat with oral or intravenous antibiotics if signs of underlying orsurrounding infection are present. The presence of an open wound inand of itself does not necessitate antibiotic administration.
• Identify other underlying causes that may prevent wound healing.Provide appropriate treatment.
• Because good nutrition is essential for wound healing, be sure thatthe patient gets enough calories and protein. A multivitamin may behelpful, but encourage the patient to eat a nutritious diet.
• Stop smoking.
• Adequate local wound care is essential. Dressings should be changedat least twice daily (3–4 times is optimal for a dirtier wound), and thewound should be cleansed with gentle soap and water or saline witheach dressing change. Wet-to-dry dressings are often the method ofchoice. Wet-to-wet dressings or antibiotic ointment can be used oncethe wound is clean.
It may take weeks or even months for a wound to heal in this manner,but you should see gradual improvement. It is a good idea to measurethe dimensions of the wound at each visit to document how the woundis progressing.
Large wounds (> 8–10 cm) may take many months to heal. Once thewound is clean and starting to heal, it may be useful to consider cover-ing the wound with a split-thickness skin graft or a flap to hastenwound healing (see the appropriate chapters for more details).

Chronic Wounds 181
BBiibblliiooggrraapphhyy1. Nwomeh BC, Yager DR, Cohen IK: Physiology of the chronic wound. Clin Plast Surg
25:407–414, 998.2. Stadelmann WK, Digenis AG, Tobin GR: Impediments to wound healing. Am J Surg
176(Suppl 2A):39S–47S, 998.
A, Large (12 × 6 cm) chronic wound on the back of the calf. B, Wound coveredwith a split-thickness skin graft to promote closure.

SSOOFFTT TTIISSSSUUEE IINNFFEECCTTIIOONNSS
Soft tissue infections can be difficult to treat. All health care providers,especially those practicing in rural settings, must be able to differenti-ate between infections that need treatment with antibiotics alone andinfections that require incision and drainage or more radical debride-ment. Serious consequences can result when a severe infection requir-ing operative management is misdiagnosed as a minor infection.
CCeelllluulliittiiss vvss.. AAbbsscceessssCellulitis is a diffuse infection of the soft tissues with no localized areaof pus amenable to drainage. The affected area is described as in-durated (i.e., warm, red, and swollen). It is also painful. A componentof lymphangitis (infection involving the lymphatics) is indicated byred streaking, progressing proximally from the affected area.
An abscess is a localized collection of pus, often with a component ofsurrounding cellulitis (with the above signs). One sign of an abscess isan area of fluctuance; that is, when you apply gentle digital pressureover the area, you can push and feel a “give,” indicating the presence offluid underneath. Another sign is that an abscess often seems to “point;”that is, the skin starts to thin from the pressure of the fluid underneath.
The distinction between cellullitis and abscess is important. The maintreatment for an abscess is incision and drainage (cutting into the ab-scess and widely opening the abscess cavity). Cellulitis does not war-rant this intervention.
GGaannggrreenneeThe term gangrene is used to describe tissues that are dead. There aretwo subtypes of gangrene: dry and wet. The distinction is important.
Dry gangrene describes tissues that are generally black and dried out,with a distinct border between dead tissue and surrounding healthytissue. Sometimes dry gangrenous tissues fall off on their own (drygangrenous toes can fall off with minimal manipulation). However,
183
Chapter 19
184 Practical Plastic Surgery for Nonsurgeons
debridement is usually required, but it is not emergent. Dry gangreneusually places the patient at no health risk as long as it does not becomeinfected (see below).
In contrast to dry gangrene, wet gangrene can be a significant healthrisk. It connotes active infection (noted by pain, swelling, redness, anddrainage of pus) in the tissues surrounding the obviously dead tissue.Urgent debridement is required to prevent further tissue loss andworsening soft tissue infection.
NNeeccrroottiizziinngg FFaasscciiiittiissNecrotizing fasciitis is a serious, life-threatening infection of the fascia(the thin connective tissue overlying the muscle and under the skinand subcutaneous tissue). The popular press calls it the disease of“flesh-eating bacteria.”
Necrotizing fasciitis is not common, but it must be considered in evalu-ating a patient with a soft tissue infection that seems to be progressingrapidly to surrounding tissues. This diagnosis should be consideredwhen the patient is “sicker” than you would expect for simple cellulitis.
The skin is swollen but often without many signs of cellulitis. The skinsimply does not look “right.” You may be able to feel subcutaneous airin the soft tissues, or you may see air in the soft tissues on x-ray (no airis present in normal soft tissues on x-ray).
The patient is often quite ill, with high fever, low blood pressure, gen-eral weakness, or even shock, and the infection spreads quickly.Radical debridement and even amputation may be necessary to savethe patient’s life.
Treatment requires aggressive operative debridement (opening the softtissue spaces, as with an abscess) to remove affected tissue, intravenousantibiotics, close monitoring of the patient, and aggressive treatment ofsepticemia. Hyperbaric oxygen also may be indicated but does not re-place aggressive operative treatment. Patients with necrotizing fasciitisshould be treated by a surgeon with critical care expertise.
EEvvaalluuaattiioonn ooff PPaattiieennttss wwiitthh SSoofftt TTiissssuuee IInnffeeccttiioonn
History
Antecedent TraumaAsk about traumatic injury to the area before the signs of infectiondeveloped.
Soft Tissue Infections 185
Cuts from glass and punctures from metal objects should raise concernabout the presence of a foreign body in the soft tissues.
History of an animal bite should raise concern about specific bacterialorganisms that may require a particular antibiotic (see discussion ofspecific treatments below).
Medical IssuesInfections in patients with diabetes are often worse than you expect,and more difficult to treat. You must treat these infections aggressively,and be sure to control the patient’s blood sugar.
Ask about the patient’s tetanus immunization status, and give abooster as indicated.
Physical ExaminationThe classic signs of infection are redness, warmth, swelling, and pain.
Look closely for puncture wounds or other signs of trauma.
Try to distinguish between a localized collection of pus that needsdrainage and diffuse infection. Check for fluctuance, as previouslydescribed.
Determine whether the induration is spreading to surrounding areas.Do red streaks extend proximally from the affected area?
Feel for crepitus (subcutaneous air) in the soft tissues, which is a signof necrotizing fasciitis. Press on the soft tissues. If air is present underthe skin, it will feel as if you are pressing on crinkled layers of cello-phane or popping air bubbles beneath the skin.
Assess the patient for fever, chills, low blood pressure, generalizedweakness, and malaise.
Check for enlarged lymph nodes in the surrounding area (groin orarmpit, as appropriate).
Determine whether a fluctuant area is present over a pulse point (e.g.,in the groin over the femoral artery or on the volar aspect of the elbowover the brachial artery).
Additional StudiesAdditional studies for all patients should include a complete bloodcount with a white blood cell count and X-ray evaluation of the in-fected area.
186 Practical Plastic Surgery for Nonsurgeons
If the infectious process overlies a pulse point, the underlying arterymay be involved, resulting in a pseudoaneurysm (an outpouching ofthe artery). Before any surgical intervention, you must evaluate thevessel with an ultrasound/duplex scan.
If a pseudoaneurysm is present, a surgeon with vascular expertisemust be involved in the patient’s care. If you incise and drain the ab-scess without proper equipment and expertise, you will open the bloodvessel, which may result in massive blood loss and death of the patient.
What to Look for on the X-ray• Foreign bodies
• Unsuspected fractures/dislocations
• Underlying bone infection (bone edges appear irregular becausebone has been destroyed by infection)
• Air in the soft tissues (when previous incision and drainage have notbeen done), which strongly indicates necrotizing fasciitis. Localizedair may be present in the soft tissues in the immediate vicinity of anincision and drainage site, but diffuse air in the tissues is a sign of anecrotizing infection.
GGeenneerraall TTrreeaattmmeennttThe patient must be evaluated carefully to distinguish among simplecellulitis, an abscess in need of incision and drainage (I & D), or necro-tizing fasciitis in need of emergent radical debridement.
If the patient is stable with normal blood pressure and has no fluctu-ance, the probable diagnosis is cellulitis. Treatment with antibioticsand warm compresses is indicated. Watch for signs of progression,which may indicate an underlying abscess or need for a change in an-tibiotic therapy.
If the patient is stable but fluctuance is present, the abscess requiressimple I & D. In addition, a short course of oral antibiotics may be useful.
If the patient is quite ill, with evidence of an abscess or possible signsof necrotizing fasciitis or wet gangrene, he or she requires intravenousantibiotics, intravenous fluids, and urgent operative intervention.
GGuuiiddee ttoo AAnnttiibbiioottiiccssAntibiotic administration is often the cornerstone of the treatment ofsoft tissue infections. The following are general guidelines:
Soft Tissue Infections 187
1. Remind the patient that more than one dose of an antibiotic isneeded to see any significant difference.
2. Follow the patient closely because changes in antibiotic therapymay be needed. In addition, an area that you thought was merelycellulitis may show signs of an abscess at a later time.
3. Whenever possible, send a specimen of any drainage from the areato the lab for aerobic and anaerobic culture and Gram stain. The re-sults of these studies help to guide your choice of antibiotic therapy.
Basic Skin InfectionsThe infecting organisms are usually staphylococci or streptococci. Treatwith an extended penicillin (a drug related to penicillin that coverspenicillin-resistant organisms) or a first-generation cephalosporin.
Animal BitesPasteurella spp. are associated with cat and dog bites. Treatment re-quires an antipseudomonal antibiotic (e.g., amoxicillin/clavulanate orcefuroxime). On the hand, cat bites have a much higher incidence ofsubsequent infection than dog bites (80% vs. 5%, respectively).
Human BitesEikenella spp., other anaerobes, and streptococci are associated withhuman bite infections. If the patient is seen early after the injurybefore signs of infection have developed, treat with amoxicillin/clavulanate. Once signs of infection are present, intravenous antibi-otics such as amoxicillin/sulbactam or ticarcillin/clavulanate are in-dicated. The pathogens associated with human bites can cause seriousinfections that must be followed closely and treated aggressively, es-pecially in bites to the hand (see chapter 36, “Hand Infections,” forspecific information).
Seawater and Shellfish InjuryIf the affected area has the typical signs of cellulitis, treatment shouldcover bacteria of the Vibrio species. Appropriate agents include tetracy-cline or an aminoglycoside.
Freshwater InjuryAeromonas hydrophila is associated with freshwater infection. A fluoro-quinolone or trimethoprim/sulfamethoxazole should be used.
188 Practical Plastic Surgery for Nonsurgeons
Enlarged Lymph Nodes in the Affected AreaThe presence of enlarged lymph nodes may indicate cat-scratch dis-ease, Mycobacterium marinum infection, sporotrichosis, or nocardial in-fection. An infectious disease specialist should be involved in thetreatment of such patients.
Concerns about Foreign BodiesIf a foreign body is present in the infected tissues, the infection proba-bly will not resolve until it is removed. However, a foreign body in softtissues without cellulitis does not have to be removed unless it is caus-ing symptoms.
IInncciissiioonn aanndd DDrraaiinnaaggee ooff aann AAbbsscceessss1. Do not be timid. You want to open the abscess cavity fully to prevent
the abscess from reforming.
2. Local anesthetic often does not work well in infected tissues, but ablock can be quite useful. Sometimes no anesthetic is required, oryou may need only light sedation (see chapter 3, “Local Anesthesia,”for more details).
3. Make a longitudinal incision through the most fluctuant part of theabscess. Do not make the incision too small. It is often useful toexcise an ellipse of skin, because the opening must be large enoughto drain the abscess completely and allow you to pack the cavitywith gauze.
4. Use the tips of a clamp to explore the abscess cavity gently and toensure that it has been completely opened.
5. Send a specimen to the microbiology lab for evaluation.
6. Pack the wound with gauze.
Postoperative Care1. The gauze packing should remain in place for 1 day.
2. Remove the gauze. Then repack the cavity with saline-moistenedgauze and cover with dry gauze. The dressing should be changed2–3 times/day until the wound has healed.
3. The patient may wash the area with gentle soap and water at eachdressing change. Showering is permitted.
4. Antibiotics should be continued until the surrounding cellulitis re-solves (probably for a few days).

Soft Tissue Infections 189
Temporizing Measure for an Abscess in Need of DrainageSometimes you cannot perform the I & D without general anesthesiabecause of pain in the area and the extensive nature of the abscess. Ifyou have to wait to get to the operating room for formal exploration,you can initiate treatment without anesthesia and prevent the patientfrom becoming more symptomatic.
An abscess can be decompressed by placing a large needle (18 gauge isadequate) into the cavity and aspirating the pus with a syringe. Thistechnique relieves some of the pressure building up in the abscesspocket and helps to prevent the infection from worsening before defin-itive I & D is performed. Send a small amount of the aspirated fluid tothe microbiology lab for analysis.
BBiibblliiooggrraapphhyy1. Gilbert DN, Moellering RC, Sande MA (eds): The Sanford Guide to Antimicrobial
Therapy, 29th ed. Vermont, Antimicrobial Therapy Inc., 1999.2. Stevens DL: Cellulitis and abscesses. In Root RK (ed): Clinical Infectious Diseases.
New York, Oxford University Press, 1999, pp 501–503.3. Swartz MN: Cellulitis and subcutaneous tissue infection. In Mandell GL, Bennett JE,
Dolin R (eds): Principles and Practice of Infectious Diseases, 5th ed. New York,Churchill Livingstone, 2000, pp 1037–1057.
BBUURRNNSS
Burns can be serious injuries and are a major cause of morbidity anddisability worldwide. This chapter describes techniques that give thebest chance of survival and reduce the risk of long-term disability.When treating patients with a severe burn, you must be prepared toprovide extensive care over many days or even weeks. If you cannotmeet this commitment, consider transferring the patient to a facilitythat specializes in the care of burns.
IImmppoorrttaanntt FFuunnccttiioonnss ooff SSkkiinnIntact, uninjured skin plays a vital role in maintaining health. A burncauses significant damage that compromises the ability of the skin toperform its key functions (see table below).
191
Chapter 20
KKEEYY FFIIGGUURREESS::Rule of 9’s adult, child
TTaabbllee 11.. TThhee PPhhyyssiioollooggiicc CCoonnsseeqquueenncceess ooff BBuurrnn iinnjjuurryy
SSkkiinn FFuunnccttiioonn CCoonnsseeqquueennccee ooff BBuurrnn IInnjjuurryy aanndd RReeqquuiirreedd IInntteerrvveennttiioonn
Contributes to tem- Patient is prone to lose body heat. You must keep patientperature regulation covered and warm at all times to prevent hypothermia.by preventingheat loss
Keeps bacteria and Patient is at high risk for infection. Antibiotic ointments aremicroorganisms used on burn wound, but no systemic antibiotics are indi-from invading body cated unless signs of specific infection are present.
Check tetanus immunization status; give booster if needed.
Prevents water loss Patient loses tremendous amount of fluid into burned skin.Burn also causes release of factors that make all bodytissues, not just skin, “leaky” to protein as well as water.Intravascular volume can be greatly depleted by largeburn (> 20% body surface area)
Common cause of death from large burn is renal failure dueto inadequate fluid resuscitation during first 24–48 hrsafter acute burn (see “Basic rules for fluid resuscitation”below for prevention strategies)
192 Practical Plastic Surgery for Nonsurgeons
MMeecchhaanniissmm ooff IInnjjuurryyA burn can be caused by thermal (heat) injury, electricity, or causticchemicals. Aside from the resultant skin damage, each mechanism hasassociated complicating factors of which you should be aware.
Thermal InjuryThermal injury is the most common cause of burns. In addition todamage to the skin, you must be alert for the possibility of inhalationinjury—a burn to the patient’s airway (pharynx, trachea, even lungs).Failure to diagnose inhalation injury can result in airway swelling andobstruction, which, if untreated, can lead to death.
Signs that may indicate inhalation injury include singed nasal hairs,carbon particles in the sputum, hoarseness, and elevated carbonmonoxide (CO) levels in the blood. If you can test for CO, do so.Another way to tell whether the blood contains a significant amount ofCO is to look at its color. Blood is bright red when CO is present.
Optimally, bronchoscopy is used to assess edema of the airways andsigns of burns in the oropharynx, pharynx, or lower airways.
If signs of airway swelling or burns are present, an endotracheal tube shouldbe placed to protect the airway. Because the swelling worsens over thefirst 24–48 hours after acute injury, it is best to intubate early. It may beimpossible to get the endotracheal tube in place once significantairway swelling has occurred.
Electrical InjuryElectrical burns cause injury by a combination of thermal injury anddirect effects of the electrical current (cell membrane instability and de-naturation of cell proteins).
It is often difficult to assess the magnitude of injury because the onlyvisible indication may be damaged skin at the entrance and exit sites.Significant deep tissue injury often is present along the course of the electricalcurrent through the body.
Muscle is often the most seriously injured tissue. You must be on thealert for compartment syndrome (swelling of muscle groups that canlead to muscle necrosis). In patients with significant muscle damage,myoglobin is present in the urine, which appears purplish or red.Myoglobinuria requires aggressive treatment to prevent renal failure.The patient should be given sodium bicarbonate in intravenous fluidsto make the urine more alkaline, and urine output should be main-tained at over 50 ml/hr by giving intravenous fluids as well as intra-venous furosemide or mannitol.

Burns 193
Because the heart is a muscle, be alert for cardiac dysfunction.Arrhythmias are common. Patients should be monitored closely andarrhythmias treated appropriately.
Chemical InjuryChemicals cause damage by reacting with the tissue proteins in amanner that leads to tissue death. Chemical injury is different fromthermal injury in that chemicals can continue to cause damage until they areremoved or neutralized.
In general, the chemical agents are either acids or bases. Basic solutionstend to penetrate deeper into the tissues and thus cause more damagethan acidic solutions.
The key to initial treatment is to remove all clothing that may have con-tacted the chemical and to irrigate the injured area continuously withwater for at least 2 hours or longer.
Try to find out the exact chemical that caused the injury. Poison controlcenters located in almost every state are useful sources of informationabout the best way to treat various chemical injuries. A useful web ad-dress is:
www.medwebplus.com/subject/Poison_Control_Centers.html
It is difficult to estimate the depth of injury from a chemical at initialpresentation. Close observation and daily examination of the burnwound are vital for proper treatment.
No matter what the inciting incident, patients with a burn are evalu-ated and treated in the same manner as outlined below.
IInniittiiaall TTrreeaattmmeenntt1. Remove all clothing from the affected area.
2. Immediately cover the burned areas with saline-moistened gauze.Use saline that is lukewarm—not too cool.
Special ConsiderationsIf the patient has been injured by hot tar: Tar is not absorbed; do nottry to remove it by scraping and pulling. Such actions serve only toworsen the burn and injure additional skin. Simply apply petrolatum-based antibiotic ointments to the area (Neosporin or Bacitracin), andthe tar will separate as the burns heal.
If grease is present on the burned tissues: Grease often can be removedby gently rubbing with the same petrolatum-based antibiotic ointments.
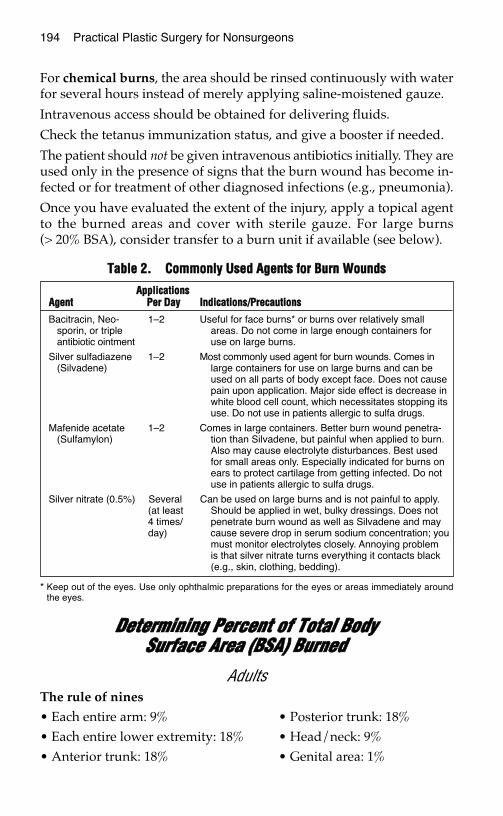
194 Practical Plastic Surgery for Nonsurgeons
For chemical burns, the area should be rinsed continuously with waterfor several hours instead of merely applying saline-moistened gauze.
Intravenous access should be obtained for delivering fluids.
Check the tetanus immunization status, and give a booster if needed.
The patient should not be given intravenous antibiotics initially. They areused only in the presence of signs that the burn wound has become in-fected or for treatment of other diagnosed infections (e.g., pneumonia).
Once you have evaluated the extent of the injury, apply a topical agentto the burned areas and cover with sterile gauze. For large burns(> 20% BSA), consider transfer to a burn unit if available (see below).
DDeetteerrmmiinniinngg PPeerrcceenntt ooff TToottaall BBooddyy SSuurrffaaccee AArreeaa ((BBSSAA)) BBuurrnneedd
AdultsThe rule of nines
• Each entire arm: 9% • Posterior trunk: 18%• Each entire lower extremity: 18% • Head/neck: 9%• Anterior trunk: 18% • Genital area: 1%
TTaabbllee 22.. CCoommmmoonnllyy UUsseedd AAggeennttss ffoorr BBuurrnn WWoouunnddss
* Keep out of the eyes. Use only ophthalmic preparations for the eyes or areas immediately aroundthe eyes.
AApppplliiccaattiioonnssAAggeenntt PPeerr DDaayy IInnddiiccaattiioonnss//PPrreeccaauuttiioonnss
Bacitracin, Neo- 1–2 Useful for face burns* or burns over relatively smallsporin, or triple areas. Do not come in large enough containers forantibiotic ointment use on large burns.
Silver sulfadiazene 1–2 Most commonly used agent for burn wounds. Comes in(Silvadene) large containers for use on large burns and can be
used on all parts of body except face. Does not causepain upon application. Major side effect is decrease inwhite blood cell count, which necessitates stopping itsuse. Do not use in patients allergic to sulfa drugs.
Mafenide acetate 1–2 Comes in large containers. Better burn wound penetra-(Sulfamylon) tion than Silvadene, but painful when applied to burn.
Also may cause electrolyte disturbances. Best usedfor small areas only. Especially indicated for burns onears to protect cartilage from getting infected. Do notuse in patients allergic to sulfa drugs.
Silver nitrate (0.5%) Several Can be used on large burns and is not painful to apply.(at least Should be applied in wet, bulky dressings. Does not4 times/ penetrate burn wound as well as Silvadene and may day) cause severe drop in serum sodium concentration; you
must monitor electrolytes closely. Annoying problemis that silver nitrate turns everything it contacts black(e.g., skin, clothing, bedding).
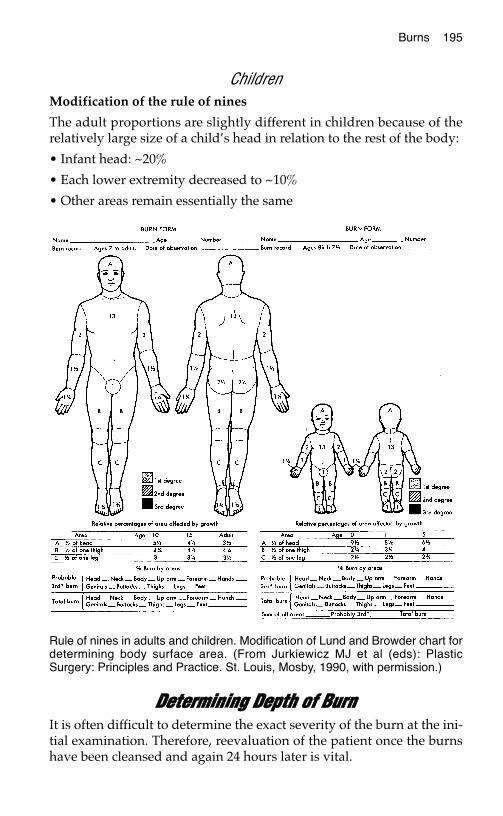
ChildrenModification of the rule of nines
The adult proportions are slightly different in children because of therelatively large size of a child’s head in relation to the rest of the body:
• Infant head: ~20%
• Each lower extremity decreased to ~10%
• Other areas remain essentially the same
DDeetteerrmmiinniinngg DDeepptthh ooff BBuurrnnIt is often difficult to determine the exact severity of the burn at the ini-tial examination. Therefore, reevaluation of the patient once the burnshave been cleansed and again 24 hours later is vital.
Burns 195
Rule of nines in adults and children. Modification of Lund and Browder chart fordetermining body surface area. (From Jurkiewicz MJ et al (eds): PlasticSurgery: Principles and Practice. St. Louis, Mosby, 1990, with permission.)
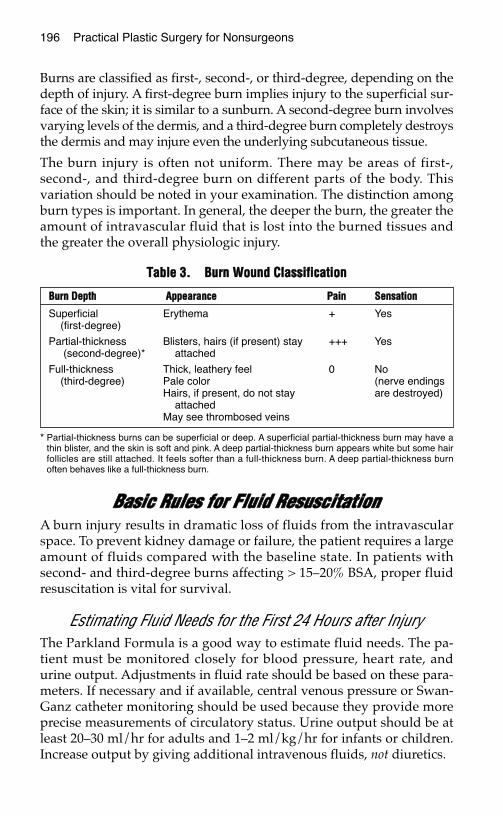
196 Practical Plastic Surgery for Nonsurgeons
Burns are classified as first-, second-, or third-degree, depending on thedepth of injury. A first-degree burn implies injury to the superficial sur-face of the skin; it is similar to a sunburn. A second-degree burn involvesvarying levels of the dermis, and a third-degree burn completely destroysthe dermis and may injure even the underlying subcutaneous tissue.
The burn injury is often not uniform. There may be areas of first-,second-, and third-degree burn on different parts of the body. Thisvariation should be noted in your examination. The distinction amongburn types is important. In general, the deeper the burn, the greater theamount of intravascular fluid that is lost into the burned tissues andthe greater the overall physiologic injury.
BBaassiicc RRuulleess ffoorr FFlluuiidd RReessuusscciittaattiioonnA burn injury results in dramatic loss of fluids from the intravascularspace. To prevent kidney damage or failure, the patient requires a largeamount of fluids compared with the baseline state. In patients withsecond- and third-degree burns affecting > 15–20% BSA, proper fluidresuscitation is vital for survival.
Estimating Fluid Needs for the First 24 Hours after InjuryThe Parkland Formula is a good way to estimate fluid needs. The pa-tient must be monitored closely for blood pressure, heart rate, andurine output. Adjustments in fluid rate should be based on these para-meters. If necessary and if available, central venous pressure or Swan-Ganz catheter monitoring should be used because they provide moreprecise measurements of circulatory status. Urine output should be atleast 20–30 ml/hr for adults and 1–2 ml/kg/hr for infants or children.Increase output by giving additional intravenous fluids, not diuretics.
TTaabbllee 33.. BBuurrnn WWoouunndd CCllaassssiiffiiccaattiioonn
* Partial-thickness burns can be superficial or deep. A superficial partial-thickness burn may have athin blister, and the skin is soft and pink. A deep partial-thickness burn appears white but some hairfollicles are still attached. It feels softer than a full-thickness burn. A deep partial-thickness burnoften behaves like a full-thickness burn.
BBuurrnn DDeepptthh AAppppeeaarraannccee PPaaiinn SSeennssaattiioonn
Superficial Erythema + Yes(first-degree)
Partial-thickness Blisters, hairs (if present) stay +++ Yes(second-degree)* attached
Full-thickness Thick, leathery feel 0 No(third-degree) Pale color (nerve endings
Hairs, if present, do not stay are destroyed)attached
May see thrombosed veins
Burns 197
Parkland Formula
4 ml × patient wt (kg) × %BSA = fluids for first 24 hr
One-half of this amount is given over the first 8 hours after injury; therest is given over the next 16 hours.
The intravenous fluid of choice in adults is Ringer’s lactate. Normalsaline is the next best option. Do not use dextrose solutions for the ini-tial fluids. In children, use Ringer’s lactate, but also administer 5% dex-trose in one-fourth normal saline solution (D5
1⁄4NS) for maintenanceglucose needs.
Example: A 70-kg man has sustained a 55% BSA burn, of which 10% isfirst-degree, 20% is second-degree, and 10% is third-degree. Fluids re-quired for the first 24 hours:
4 ml × 70 kg × (20 + 10)%BSA = 8400 ml
(I told you that we were talking a lot of fluid!) The total BSA that youcalculate includes second- and third-degree burns; first-degree burnsare not included.
Give 4200 ml over the first 8 hours, then 4200 ml over the next 16hours. The amount of fluid given per hour is also an important point:
• If the patient presents immediately after the burn, give 4200/8 = 525ml/hr for the first 8 hours, then 4200/16 = 262 ml/hr for the next 16hours.
• If the patient presents 2 hours after the injury, give 4200/6 (fluidmust be given over 8 hours after injury, not after presentation) = 700ml/hr over the next 6 hours, then 4200/16 = 262 ml/hr for the next16 hours.
PPaaiinn CCoonnttrroollFew injuries are more painful than a burn. Thus, an important part ofthe management is adequate pain control. Everything related to a burninjury and its treatment is painful. Keep this in mind, and do not skimpon pain medications. Morphine is often the medication of choice. Forpatients with large burns, intravenous injection is the best way to adminis-ter the medication. Absorption of subcutaneous or intramuscular injectionsis not reliable. Oral pain medications may be indicated with a small burnwound, but they are not useful in patients with significant burn injury.
MorphineIntravenous morphine is the pain medication of choice. An adult canbe given 2–3 mg at a time, titrated to pain control. Do not give too
198 Practical Plastic Surgery for Nonsurgeons
much, because excessive morphine can cause the patient to stopbreathing.
Guideline for dosing: do not administer more than 0.1 mg of mor-phine per kg of patient weight (0.1 mg/kg) over a 1–2-hour period.This rule applies to both children and adults.
SedationIntravenous sedation can be given along with pain medication. It is es-pecially useful during the initial evaluation and before dressingchanges. Sedation may decrease the need for pain medication and alle-viates the anxiety often associated with painful procedures. Be cau-tious, and monitor the patient closely because sedatives also candepress the respiratory drive.
A short-acting agent such as midazolam (Versed) is quite useful. Ifnone is available, diazepam (Valium) is another option. See chapter 3,“Local Anesthesia,” for detailed dosing information.
SSuubbsseeqquueenntt CCaarree ooff BBuurrnn WWoouunnddssPatients with a large burn have difficulty in maintaining body temper-ature. During dressing changes, the patient may become quite hy-pothermic if precautions are not taken. If possible, warm the room, usewarming lights, uncover parts of the wound individually instead of re-moving all of the dressings at the same time, and use lukewarm, notcold saline.
Examine the burns daily to look for signs of infection (e.g., induration,blanching erythema, increased redness/warmth).
First-degree BurnsClean daily with gentle soap and water.
Apply a gentle moisturizer (aloe, cocoa butter, something without per-fumes) or antibiotic ointment once or twice daily.
First-degree burns require several days to heal.
Second-degree BurnsIf the blisters are intact, it is usually best to leave them alone. The areaunder the blister essentially represents a sterile environment and pro-motes healing. An exception is the blister that is so tight that it inter-feres with the circulation of surrounding tissues. Such blisters shouldbe opened and the loose skin removed.
Burns 199
If the blisters have opened, the skin should be removed gently. Thisprocedure usually requires a pair of forceps and a pair of scissors.Removing the skin should not hurt.
Apply antibiotic ointment—usually Silvadene on the body, Bacitracinon the face—twice daily, and cover with dry gauze.
Clean the burn wound with saline, and remove the old ointment beforeapplying new ointment.
Dressing and cleansing the wound are often quite painful. Be sure togive pain medication before changing the dressings.
Superficial second-degree burns usually heal within 10–14 days,whereas deep second-degree burns often take 3–4 weeks. Deeper burnsare also prone to thick, hypertrophic scarring. Therefore, unless the areais very small (< 4–5 cm in diameter), tangential excision (see below) isoften recommended for deep second-degree burns.
Third-degree BurnsApply antibiotic ointment—usually Silvadene on the body, Baci-tracinon the face—twice daily, and cover with dry gauze.
Clean the burn wound with saline and remove the old ointment beforeapplying new ointment.
Full-thickness burns take at least 4 weeks to heal and often heal with ahypertrophic scar. Except for small (< 4–5 cm in diameter) third-degree burns, tangential excision and split-thickness skin grafting usu-ally are recommended
FFlluuiiddss aafftteerr tthhee FFiirrsstt 2244 HHoouurrssBecause the capillaries are no longer as “leaky” after the first 24 hours,the fluids are changed from crystalloid (Ringer’s lactate) to protein-containing solutions (colloids). Colloids provide improved intravascu-lar volume expansion.
In general, give 0.3–0.5 ml/kg/%BSA over 24 hours.
In addition, 5% dextrose in water or 5% dextrose in 0.45 saline is givento maintain urine output of at least 20 ml/hr.
After this regimen, fluids should be administered according to the pa-tient’s overall condition.
200 Practical Plastic Surgery for Nonsurgeons
NNuuttrriittiioonnaall CCoonncceerrnnssA severe burn injury causes severe metabolic disturbances and a con-comitant increase in caloric requirements. Chapter 8, “Nutrition,” ex-plains how to estimate caloric needs; for a severe burn injury (> 40%BSA), the basal metabolic rate is multiplied by a factor of 2–2.5, alarger factor than for any other injury. Depletion of nutritional storesis a distinct risk. Caloric requirements reach their peak at approxi-mately 7–10 days after injury and do not return to normal until allburns have healed.
Nutritional support is vital for the treatment of a severely burned pa-tient. If the patient cannot ingest enough calories orally, a nasogastricor other type of enteral feeding tube must be placed to supply calories.If the patient cannot tolerate feedings through the gastrointestinaltract, central intravenous nutritional support should be started.
TTaannggeennttiiaall EExxcciissiioonnFor deep second- and third-degree burns larger than a few centimeters,tangential excision followed by split-thickness skin grafting is recom-mended. It leads to faster healing, with more stable skin coverage. Intangential excision, only the burned tissue is removed; uninjured tissueis left alone.
Careful tangential excision of the burn and split thickness skin graftingshould be done relatively early (within days of the injury) if possible.Usually the procedure is done in the operating room under generalanesthesia. A special knife or dermatome (see chapter 12, “SkinGrafts”) is used. Be sure to excise only the tissue that is burned. Youwill know when you have reached healthy tissue because it will bleed.In general, dead tissue does not bleed.
This procedure can cause significant blood loss. Usually only smallareas (< 10% BSA) are done at any one time, and blood should be avail-able for transfusion. Patients always lose more blood than you expect.Hemostasis usually can be obtained by holding a gauze pad over thearea and applying pressure for a few minutes. Sometimes topicalthrombin or epinephrine solutions can be applied as well.
The wound is then ready for split-thickness skin grafting (see chapter12, “Skin Grafts,” for details).
Caution: Tangential excision should be done only by a practitionerwith special surgical skills who is comfortable performing skin graft-ing. Unless only a small area (e.g., part of the arm) is involved, this pro-cedure can be quite difficult to perform safely.
Burns 201
SSppeecciiffiicc IInnjjuurriieess
Hand BurnsSee chapter 34, “Hand Burns,” for detailed information. Simple tech-niques can prevent permanent loss of hand function.
Electrical Burns of the Mouth in ChildrenElectrical burns of the mouth usually occur when the child bites downon an electrical cord. Such injuries usually involve a burn of the lipcommissure (where the upper lip meets the lower lip).
The eschar (scab) that forms at the commissure separates after 10–14days. Separation may be accompanied by significant bleeding from thelabial artery. You should warn parents about this potential event. Theycan control the bleeding by holding gauze over the area and pinchingthe lip at the commissure. The bleeding should stop after 5–10 minutesof pressure, but medical treatment may be needed.
Burns on the Dorsum of the FootSecond-degree burns on the top of the foot initially may seem insignif-icant and, in fact, often heal with local care alone. However, impropermanagement may result in a more extensive tissue loss than youexpect. Exposure or injury to the underlying tendons may result andcan be quite problematic to treat.
Proper Treatment1. Apply the usual antibiotic ointment and dressings, as described
above.
2. The patient should wear no shoes or boots on the injured foot untilthe burn is healing well.
3. The foot should be kept elevated at all times.
4. The patient should not put weight on the affected foot until you aresure that the burn is healing properly.
RReeffeerrrraall ttoo BBuurrnn CCeenntteerrA burn center is a tertiary care center that specializes in the multidisci-plinary care of patients with acute burn injuries. Burn centers serve animportant purpose and are responsible for improved outcomes in se-verely injured burn patients. Only second- or third-degree burnsshould be referred. If you are lucky enough to have one available, thefollowing criteria may be applied for referral:
202 Practical Plastic Surgery for Nonsurgeons
1. Burns of the genitalia, face, hands, and feet
2. Burns involving over 10% BSA in patients younger than 10 years orolder than 50 years
3. Burns involving over 20% BSA in patients of any age
4. Inhalation injury
5. Other significant trauma
6. Third-degree burns involving over 5–10% BSA
7. Multiple medical problems as well as significant burn injury
Do not be reluctant to transfer. Burn patients are seriously ill and havethe potential for developing many complications. They are best treatedat centers that specialize in burn care.
Even if you decide to transfer the patient to a burn center, you should not hes-itate to start the appropriate treatment. The first few hours after an injuryare critical, and measures such as fluid resuscitation, burn dressings,and pain control must be initiated and implemented appropriatelywhile awaiting transfer.
FFrroossttbbiitteeFrostbite is an injury caused by prolonged exposure to cold tempera-ture that results in freezing of soft tissues and formation of ice crys-tals. Ice crystals form not only inside cells but also inside the smallestof blood vessels, causing occlusion. Occlusion ultimately leads totissue loss.
Initial TreatmentThis information applies to patients who present at the time of injury.Some patients do not seek treatment for several days or weeks afterinjury. The treatment that follows is not for delayed presentation (seenext section for treatment after the acute thermal process has resolved).
Rapid Rewarming1. The first line of treatment for patients with acute frostbite injury is
rapid rewarming of the tissue. Rewarming should be done onlywhen you are certain that the tissue will not again be exposed tocold.
2. Immerse the affected part in warm water (104–108°F or 40–42°C).Use of hotter water may cause a burn injury, whereas use of coolerwater may not provide the benefits of rewarming. It usually takesabout 20–30 minutes to rewarm the tissues.
Burns 203
3. Rewarming hurts. Give the patient pain medication, preferably in-travenous morphine.
4. Do not massage the affected tissue.
After Tissues are Rewarmed orif Patient Presents Days after Injury
1. Unroof only those blisters with clear fluid.
2. Blisters filled with blood should be left alone. They are signs ofdeeper tissue injury.
3. Gently elevate the affected area to decrease swelling.
4. Apply aloe vera to the affected areas, and cover with a gauzedressing.
5. Antiplatelet medications may be useful (e.g., aspirin, 80–325 mg/day).
6. Use gentle range-of-motion exercises to prevent joint stiffness.
7. For hand injuries, remember to splint the hand in neutral position.
8. Change the dressing daily, or prescribe whirlpool treatments, ifavailable.
9. Check the patient’s tetanus toxoid status, and treat appropriately.
10. Antibiotics are used only if signs of infection are present in the sur-rounding soft tissue.
Note: The cornerstone of treatment of a frostbite injury is to allow theinjured tissues to demarcate. The dead tissue turns black, graduallyshrivels, and eventually falls off. After dermarcation, you will debrideonly the tissue that does not survive the injury.
During the first few days or even weeks after the initial injury, tissuethat at first appeared unlikely to survive may actually heal. By waitingfor the tissues to demarcate, you can tell definitively which tissue isdead, and you will not remove more tissue than necessary. Another in-dication for surgical debridement of injured tissue is development ofan infection that does not resolve with antibiotic therapy.
Long-term Effects1. Joint stiffness and arthritis are common.
2. The affected area may be permanently sensitive to cold temperatures.
3. In children, frostbite injures the growth plate of the bones and mayresult in diminution of bone growth.

204 Practical Plastic Surgery for Nonsurgeons
BBiibblliiooggrraapphhyy1. Luce EA: Electrical injuries. In McCarthy JG (ed): Plastic Surgery. Philadelphia, W.B.
Saunders, 1990, pp 814–830.2. Robson MC, Smith DJ: Cold injuries. In McCarthy JG (ed): Plastic Surgery.
Philadelphia, W.B. Saunders, 1990, pp 849–866.3. Salisbury RE: Thermal burns. In McCarthy JG (ed): Plastic Surgery. Philadelphia, W.B.
Saunders, 1990, pp 787–813.
FFRRAACCTTUURREESS OOFF TTHHEETTIIBBIIAA AANNDD FFIIBBUULLAA
Fractures of the tibia and fibula are a special concern because missingearly warning signs can result in a useless leg.
The tibia and the fibula are the two long bones of the calf. Fractures ofthese bones often result from a sport-related injury or motor vehicle ac-cident. Most fractures of the tibia and fibula (tib-fib fractures) healwithout complication, and the patient is able to resume his or hernormal activities.
However, potentially serious complications can develop, and you mustbe aware of their early warning signs. With this knowledge, you canintervene before permanent tissue damage develops. Early interven-tion may make the difference between a normally functioning patientwith a well-healed fracture and disaster.
CCaassee EExxaammpplleeAn 18-year-old boy was playing football and collided with anotherplayer, injuring his right leg. He tried to keep playing, but because thepain was so intense he could not place any weight on the leg. He satout the rest of the game and then came in for evaluation.
The calf was swollen and tender, and the x-ray showed a minimallydisplaced mid-shaft tib-fib fracture. No orthopedic surgeon was avail-able. After finding the fracture in Campbell’s Orthopaedics, you placedhim in a cast, gave him crutches and pain medications, and sent himhome.
205
Chapter 21
KKEEYY FFIIGGUURREESS::Calf anatomy Longstanding openHow to do fasciotomy fractureGastrocnemius and Gastrocnemius flap
neighboring structures

206 Practical Plastic Surgery for Nonsurgeons
He returns a few days later in horrible pain. You remove the cast. Hiscalf is very tight and swollen, and except for the lateral aspect he hasno sensation in his foot. When you move his ankle, the pain intensifiesin his calf. You check for pulses in his feet, and they are present.
A general surgeon takes one look at the patient, and immediately sendshim to the operating room. Incisions are made in the calf, and much ofthe calf muscle is dead.
The boy’s leg will never function as it did before the injury. He willhave a life-long disability.
What happened? First you need some basic background information.
CClloosseedd vvss.. OOppeenn FFrraaccttuurreessFractures are usually classified as closed or open.
A closed fracture means that the skin around the fracture site is intact.In terms of bone healing, closed fractures have a favorable prognosisbecause of the low risk for infection of the bone (osteomyelitis) at thefracture site. However, complications may arise, as illustrated by thecase example.
In an open fracture, also called a compound fracture, the skin aroundthe fracture site has been punctured. Open fractures are more seriousinjuries because it generally takes greater forces to disrupt the skin andfracture the bones. An open fracture greatly increases the risk for thedevelopment of osteomyelitis, and osteomyelitis increases the risk forpoor healing.
The quality of the soft tissue around the fractured bones plays a role infracture healing. Feel your own calf. The anterior surface of the tibia iscovered only by skin; there is not much padding around this bone.Significant injury to the skin around the tibia can result in exposure ofthe bone and thus a greater risk for poor healing of the fracture.
The higher the energy of the injury, the more significant the injury tothe soft tissue and the greater the potential for problems. Falling off astep results in a low-energy injury; being hit by a car results in a high-energy injury.
EEsssseennttiiaall EElleemmeennttss ooff tthhee PPhhyyssiiccaall EExxaammiinnaattiioonn1. Is the skin intact? (open vs. closed fracture)
2. If the skin is punctured, what can you see in the wound? Foreign ma-terial must be removed, and dead muscle or skin should be cut out.If the fracture site is exposed, soft tissue coverage may be needed.
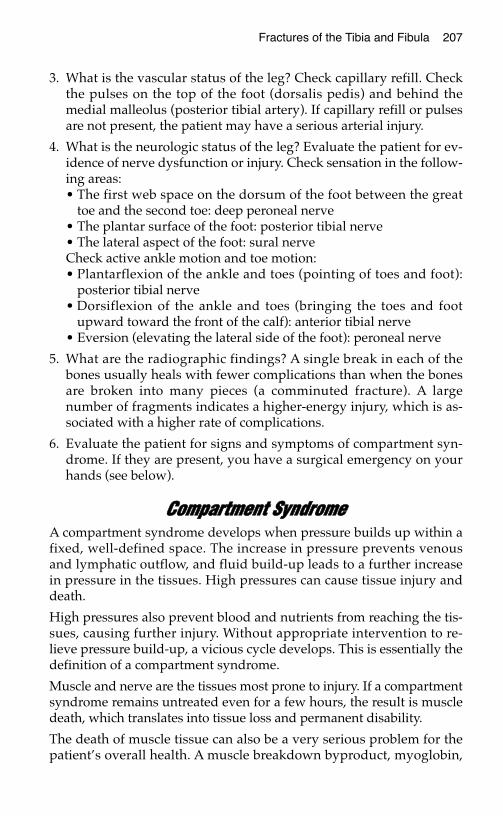
Fractures of the Tibia and Fibula 207
3. What is the vascular status of the leg? Check capillary refill. Checkthe pulses on the top of the foot (dorsalis pedis) and behind themedial malleolus (posterior tibial artery). If capillary refill or pulsesare not present, the patient may have a serious arterial injury.
4. What is the neurologic status of the leg? Evaluate the patient for ev-idence of nerve dysfunction or injury. Check sensation in the follow-ing areas:• The first web space on the dorsum of the foot between the great
toe and the second toe: deep peroneal nerve• The plantar surface of the foot: posterior tibial nerve• The lateral aspect of the foot: sural nerveCheck active ankle motion and toe motion:• Plantarflexion of the ankle and toes (pointing of toes and foot):
posterior tibial nerve• Dorsiflexion of the ankle and toes (bringing the toes and foot
upward toward the front of the calf): anterior tibial nerve• Eversion (elevating the lateral side of the foot): peroneal nerve
5. What are the radiographic findings? A single break in each of thebones usually heals with fewer complications than when the bonesare broken into many pieces (a comminuted fracture). A largenumber of fragments indicates a higher-energy injury, which is as-sociated with a higher rate of complications.
6. Evaluate the patient for signs and symptoms of compartment syn-drome. If they are present, you have a surgical emergency on yourhands (see below).
CCoommppaarrttmmeenntt SSyynnddrroommeeA compartment syndrome develops when pressure builds up within afixed, well-defined space. The increase in pressure prevents venousand lymphatic outflow, and fluid build-up leads to a further increasein pressure in the tissues. High pressures can cause tissue injury anddeath.
High pressures also prevent blood and nutrients from reaching the tis-sues, causing further injury. Without appropriate intervention to re-lieve pressure build-up, a vicious cycle develops. This is essentially thedefinition of a compartment syndrome.
Muscle and nerve are the tissues most prone to injury. If a compartmentsyndrome remains untreated even for a few hours, the result is muscledeath, which translates into tissue loss and permanent disability.
The death of muscle tissue can also be a very serious problem for thepatient’s overall health. A muscle breakdown byproduct, myoglobin,
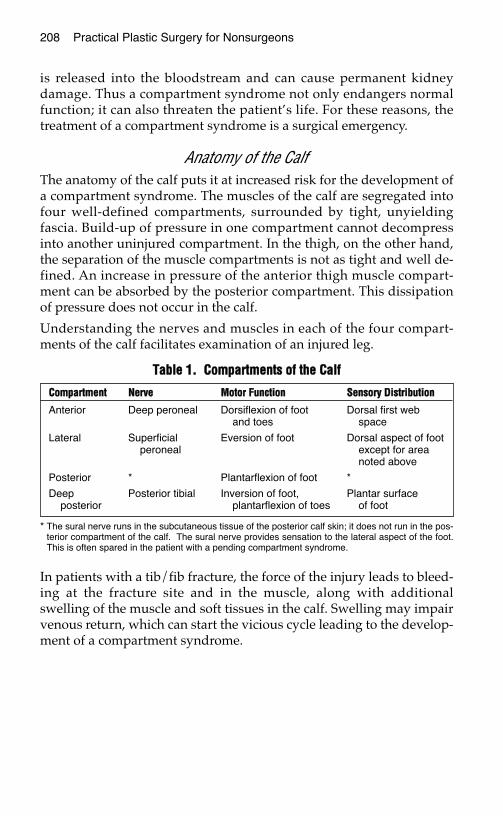
208 Practical Plastic Surgery for Nonsurgeons
is released into the bloodstream and can cause permanent kidneydamage. Thus a compartment syndrome not only endangers normalfunction; it can also threaten the patient’s life. For these reasons, thetreatment of a compartment syndrome is a surgical emergency.
Anatomy of the CalfThe anatomy of the calf puts it at increased risk for the development ofa compartment syndrome. The muscles of the calf are segregated intofour well-defined compartments, surrounded by tight, unyieldingfascia. Build-up of pressure in one compartment cannot decompressinto another uninjured compartment. In the thigh, on the other hand,the separation of the muscle compartments is not as tight and well de-fined. An increase in pressure of the anterior thigh muscle compart-ment can be absorbed by the posterior compartment. This dissipationof pressure does not occur in the calf.
Understanding the nerves and muscles in each of the four compart-ments of the calf facilitates examination of an injured leg.
In patients with a tib/fib fracture, the force of the injury leads to bleed-ing at the fracture site and in the muscle, along with additionalswelling of the muscle and soft tissues in the calf. Swelling may impairvenous return, which can start the vicious cycle leading to the develop-ment of a compartment syndrome.
TTaabbllee 11.. CCoommppaarrttmmeennttss ooff tthhee CCaallff
* The sural nerve runs in the subcutaneous tissue of the posterior calf skin; it does not run in the pos-terior compartment of the calf. The sural nerve provides sensation to the lateral aspect of the foot.This is often spared in the patient with a pending compartment syndrome.
CCoommppaarrttmmeenntt NNeerrvvee MMoottoorr FFuunnccttiioonn SSeennssoorryy DDiissttrriibbuuttiioonn
Anterior Deep peroneal Dorsiflexion of foot Dorsal first web and toes space
Lateral Superficial Eversion of foot Dorsal aspect of foot peroneal except for area
noted above
Posterior * Plantarflexion of foot *
Deep Posterior tibial Inversion of foot, Plantar surface posterior plantarflexion of toes of foot
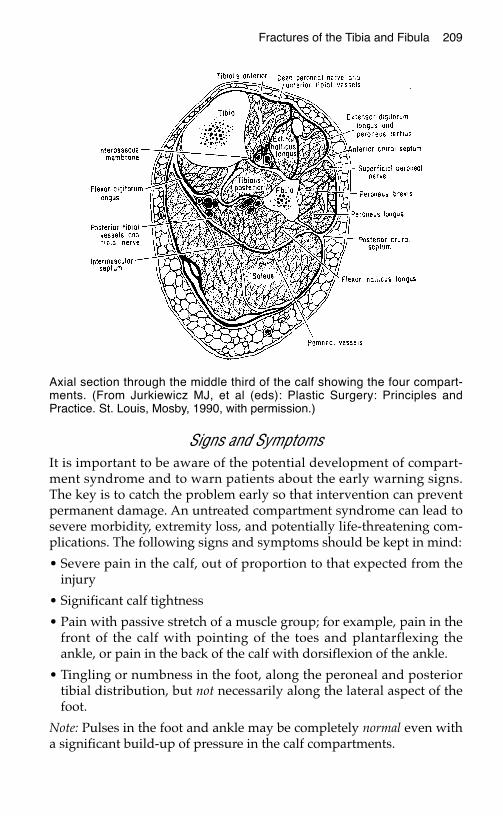
Fractures of the Tibia and Fibula 209
Signs and SymptomsIt is important to be aware of the potential development of compart-ment syndrome and to warn patients about the early warning signs.The key is to catch the problem early so that intervention can preventpermanent damage. An untreated compartment syndrome can lead tosevere morbidity, extremity loss, and potentially life-threatening com-plications. The following signs and symptoms should be kept in mind:
• Severe pain in the calf, out of proportion to that expected from theinjury
• Significant calf tightness
• Pain with passive stretch of a muscle group; for example, pain in thefront of the calf with pointing of the toes and plantarflexing theankle, or pain in the back of the calf with dorsiflexion of the ankle.
• Tingling or numbness in the foot, along the peroneal and posteriortibial distribution, but not necessarily along the lateral aspect of thefoot.
Note: Pulses in the foot and ankle may be completely normal even witha significant build-up of pressure in the calf compartments.
Axial section through the middle third of the calf showing the four compart-ments. (From Jurkiewicz MJ, et al (eds): Plastic Surgery: Principles andPractice. St. Louis, Mosby, 1990, with permission.)
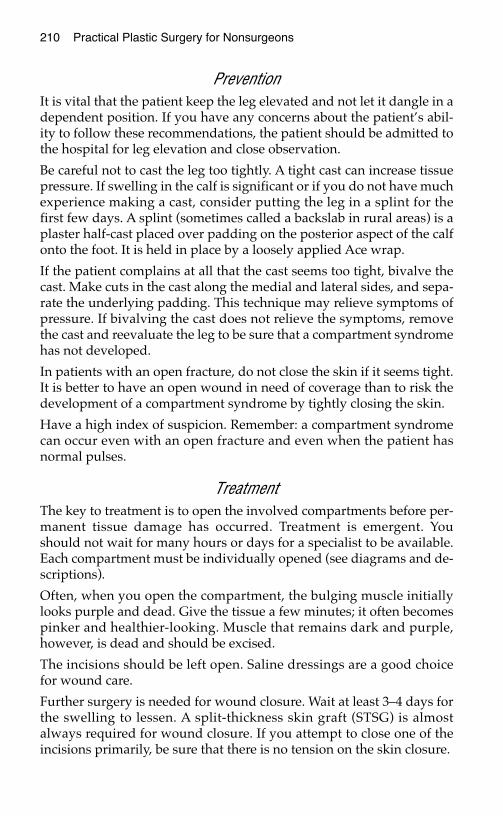
210 Practical Plastic Surgery for Nonsurgeons
PreventionIt is vital that the patient keep the leg elevated and not let it dangle in adependent position. If you have any concerns about the patient’s abil-ity to follow these recommendations, the patient should be admitted tothe hospital for leg elevation and close observation.
Be careful not to cast the leg too tightly. A tight cast can increase tissuepressure. If swelling in the calf is significant or if you do not have muchexperience making a cast, consider putting the leg in a splint for thefirst few days. A splint (sometimes called a backslab in rural areas) is aplaster half-cast placed over padding on the posterior aspect of the calfonto the foot. It is held in place by a loosely applied Ace wrap.
If the patient complains at all that the cast seems too tight, bivalve thecast. Make cuts in the cast along the medial and lateral sides, and sepa-rate the underlying padding. This technique may relieve symptoms ofpressure. If bivalving the cast does not relieve the symptoms, removethe cast and reevaluate the leg to be sure that a compartment syndromehas not developed.
In patients with an open fracture, do not close the skin if it seems tight.It is better to have an open wound in need of coverage than to risk thedevelopment of a compartment syndrome by tightly closing the skin.
Have a high index of suspicion. Remember: a compartment syndromecan occur even with an open fracture and even when the patient hasnormal pulses.
TreatmentThe key to treatment is to open the involved compartments before per-manent tissue damage has occurred. Treatment is emergent. Youshould not wait for many hours or days for a specialist to be available.Each compartment must be individually opened (see diagrams and de-scriptions).
Often, when you open the compartment, the bulging muscle initiallylooks purple and dead. Give the tissue a few minutes; it often becomespinker and healthier-looking. Muscle that remains dark and purple,however, is dead and should be excised.
The incisions should be left open. Saline dressings are a good choicefor wound care.
Further surgery is needed for wound closure. Wait at least 3–4 days forthe swelling to lessen. A split-thickness skin graft (STSG) is almostalways required for wound closure. If you attempt to close one of theincisions primarily, be sure that there is no tension on the skin closure.
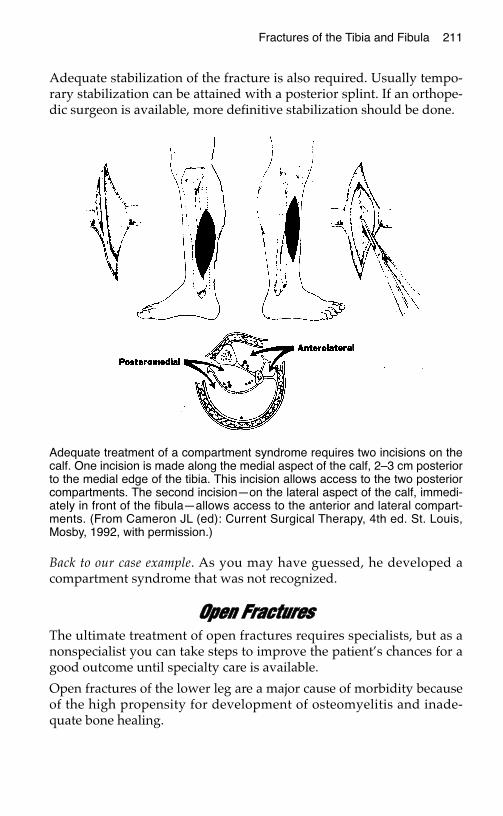
Fractures of the Tibia and Fibula 211
Adequate stabilization of the fracture is also required. Usually tempo-rary stabilization can be attained with a posterior splint. If an orthope-dic surgeon is available, more definitive stabilization should be done.
Back to our case example. As you may have guessed, he developed acompartment syndrome that was not recognized.
OOppeenn FFrraaccttuurreessThe ultimate treatment of open fractures requires specialists, but as anonspecialist you can take steps to improve the patient’s chances for agood outcome until specialty care is available.
Open fractures of the lower leg are a major cause of morbidity becauseof the high propensity for development of osteomyelitis and inade-quate bone healing.
Adequate treatment of a compartment syndrome requires two incisions on thecalf. One incision is made along the medial aspect of the calf, 2–3 cm posteriorto the medial edge of the tibia. This incision allows access to the two posteriorcompartments. The second incision—on the lateral aspect of the calf, immedi-ately in front of the fibula—allows access to the anterior and lateral compart-ments. (From Cameron JL (ed): Current Surgical Therapy, 4th ed. St. Louis,Mosby, 1992, with permission.)
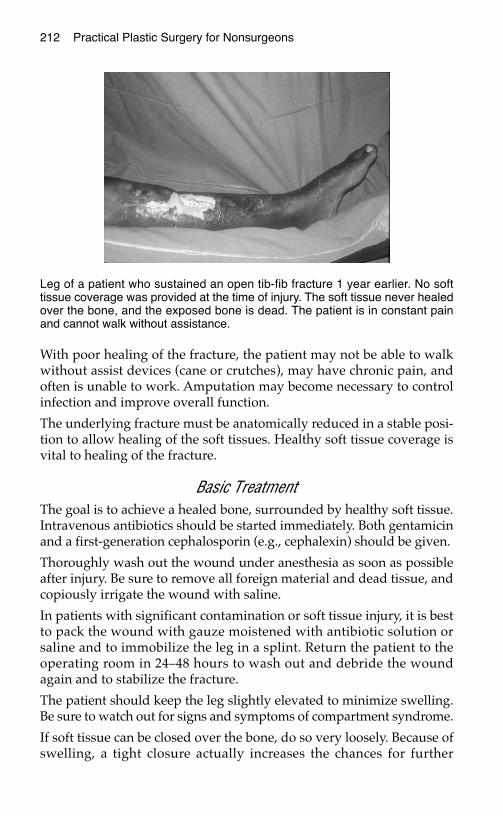
212 Practical Plastic Surgery for Nonsurgeons
With poor healing of the fracture, the patient may not be able to walkwithout assist devices (cane or crutches), may have chronic pain, andoften is unable to work. Amputation may become necessary to controlinfection and improve overall function.
The underlying fracture must be anatomically reduced in a stable posi-tion to allow healing of the soft tissues. Healthy soft tissue coverage isvital to healing of the fracture.
Basic Treatment The goal is to achieve a healed bone, surrounded by healthy soft tissue.Intravenous antibiotics should be started immediately. Both gentamicinand a first-generation cephalosporin (e.g., cephalexin) should be given.
Thoroughly wash out the wound under anesthesia as soon as possibleafter injury. Be sure to remove all foreign material and dead tissue, andcopiously irrigate the wound with saline.
In patients with significant contamination or soft tissue injury, it is bestto pack the wound with gauze moistened with antibiotic solution orsaline and to immobilize the leg in a splint. Return the patient to theoperating room in 24–48 hours to wash out and debride the woundagain and to stabilize the fracture.
The patient should keep the leg slightly elevated to minimize swelling.Be sure to watch out for signs and symptoms of compartment syndrome.
If soft tissue can be closed over the bone, do so very loosely. Because ofswelling, a tight closure actually increases the chances for further
Leg of a patient who sustained an open tib-fib fracture 1 year earlier. No softtissue coverage was provided at the time of injury. The soft tissue never healedover the bone, and the exposed bone is dead. The patient is in constant painand cannot walk without assistance.

Fractures of the Tibia and Fibula 213
tissue loss, making the wound more difficult to manage. If musclearound the fracture can be sutured together to cover the bone, do so. Ifthe skin cannot be closed, place a STSG over the muscle. This techniqueis much preferable to tight skin closure.
If only a small area of bone (< 1–11⁄2 cm in diameter) is exposed, thewound may heal secondarily with dressing changes. For largerwounds, a local muscle flap or distant flap is required to cover the frac-ture and promote proper healing. Flaps require surgical expertise (seebelow). Optimally, the fracture site should be covered within the firstweek after injury.
LLooccaall MMuussccllee FFllaappssLocal muscle flaps should be undertaken only by someone with surgi-cal skills. Several muscles in the calf can be used as a local flap to coveran exposed tib-fib fracture site. Muscle flaps also bring robust circula-tion to the fracture site and thereby improve healing of the injured bone.
The use of muscle flaps has markedly decreased the morbidity associ-ated with open fractures. Studies have shown that muscle flaps pro-mote fracture healing; the average time for proper healing decreasesfrom 9 to 5 months. The risk of developing osteomyelitis also decreasesfrom 40% to 5%, and the amputation rate decreases from almost 30% to5% when muscle flap coverage of an exposed bone or fracture is donewithin the first week after injury.
Proximal and Middle Third of the Calf:Gastrocnemius Flap
The gastrocnemius muscle is the most superficial muscle of the poste-rior aspect of the calf. It accounts for most of the muscle mass at the topof the calf. The gastrocnemius muscle originates from the distal femurand joins the underlying soleus muscle to form the Achilles tendon.
The main vascular supply enters the gastrocnemius muscle proximallynear the knee joint. The muscle can be divided from the Achillestendon and underlying soleus muscle without interfering with itsblood supply. It should be divided longitudinally at its midline so thatyou take only one-half of the muscle.
The gastrocnemius muscle then can be easily moved to cover woundsin the middle and proximal third of the calf. Sometimes the origin ofthe muscle has to be divided to allow increased movement into thewound. Usually the medial gastrocnemius is used. If the lateralmuscle is used, it must swing around the fibula, which decreases therange of the flap.
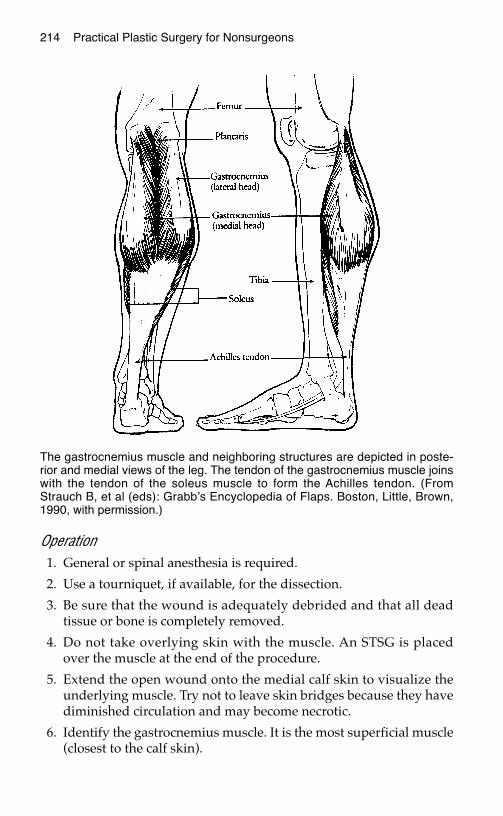
214 Practical Plastic Surgery for Nonsurgeons
Operation1. General or spinal anesthesia is required.
2. Use a tourniquet, if available, for the dissection.
3. Be sure that the wound is adequately debrided and that all deadtissue or bone is completely removed.
4. Do not take overlying skin with the muscle. An STSG is placedover the muscle at the end of the procedure.
5. Extend the open wound onto the medial calf skin to visualize theunderlying muscle. Try not to leave skin bridges because they havediminished circulation and may become necrotic.
6. Identify the gastrocnemius muscle. It is the most superficial muscle(closest to the calf skin).
The gastrocnemius muscle and neighboring structures are depicted in poste-rior and medial views of the leg. The tendon of the gastrocnemius muscle joinswith the tendon of the soleus muscle to form the Achilles tendon. (FromStrauch B, et al (eds): Grabb’s Encyclopedia of Flaps. Boston, Little, Brown,1990, with permission.)

Fractures of the Tibia and Fibula 215
7. Separate the gastrocnemius muscle from the overlying skin andunderlying soleus muscle. This procedure often can be donebluntly or with electrocautery. Be gentle.
8. You will see the vascular pedicle coming into the deep surface ofthe muscle around the knee. Do not divide or injure these vessels.
9. In the back of the calf, the medial and lateral parts of the musclecome together in the midline. The muscle fibers form a V, whosepoint marks a natural plane between the two halves of the muscle.The muscle can be divided along this line and then detached fromthe Achilles tendon using electrocautery.
10. Try to bring the muscle around to the defect. The proximalmuscle may need to be freed to allow sufficient length. This pro-cedure can be done safely, but be careful not to injure the vascularpedicle.
Patient with an exposed, open tib-fib fracture. The injury is less than 48 hoursold, and the bone is being covered with a gastrocnemius flap. Note the externalfixator, which is stabilizing the fracture.
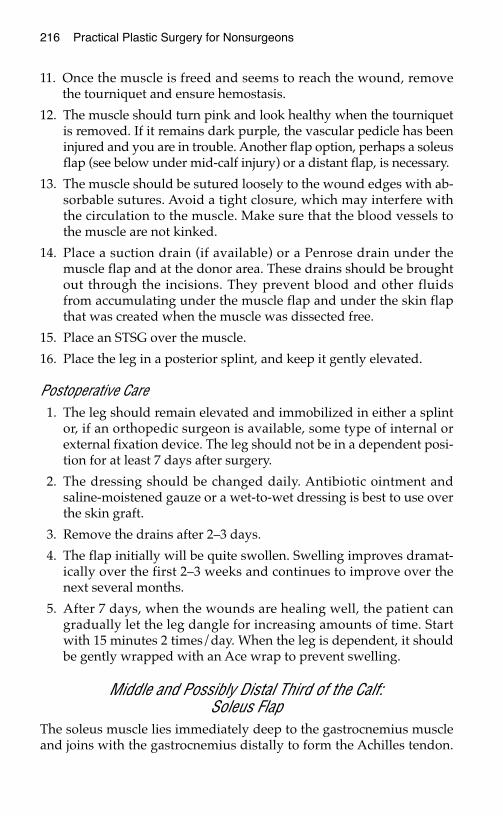
216 Practical Plastic Surgery for Nonsurgeons
11. Once the muscle is freed and seems to reach the wound, removethe tourniquet and ensure hemostasis.
12. The muscle should turn pink and look healthy when the tourniquetis removed. If it remains dark purple, the vascular pedicle has beeninjured and you are in trouble. Another flap option, perhaps a soleusflap (see below under mid-calf injury) or a distant flap, is necessary.
13. The muscle should be sutured loosely to the wound edges with ab-sorbable sutures. Avoid a tight closure, which may interfere withthe circulation to the muscle. Make sure that the blood vessels tothe muscle are not kinked.
14. Place a suction drain (if available) or a Penrose drain under themuscle flap and at the donor area. These drains should be broughtout through the incisions. They prevent blood and other fluidsfrom accumulating under the muscle flap and under the skin flapthat was created when the muscle was dissected free.
15. Place an STSG over the muscle.
16. Place the leg in a posterior splint, and keep it gently elevated.
Postoperative Care 1. The leg should remain elevated and immobilized in either a splint
or, if an orthopedic surgeon is available, some type of internal orexternal fixation device. The leg should not be in a dependent posi-tion for at least 7 days after surgery.
2. The dressing should be changed daily. Antibiotic ointment andsaline-moistened gauze or a wet-to-wet dressing is best to use overthe skin graft.
3. Remove the drains after 2–3 days.
4. The flap initially will be quite swollen. Swelling improves dramat-ically over the first 2–3 weeks and continues to improve over thenext several months.
5. After 7 days, when the wounds are healing well, the patient cangradually let the leg dangle for increasing amounts of time. Startwith 15 minutes 2 times/day. When the leg is dependent, it shouldbe gently wrapped with an Ace wrap to prevent swelling.
Middle and Possibly Distal Third of the Calf:Soleus Flap
The soleus muscle lies immediately deep to the gastrocnemius muscleand joins with the gastrocnemius distally to form the Achilles tendon.
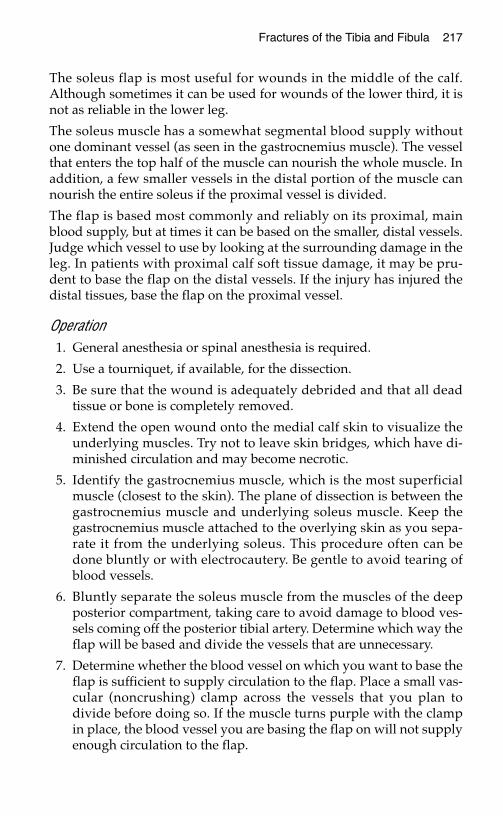
Fractures of the Tibia and Fibula 217
The soleus flap is most useful for wounds in the middle of the calf.Although sometimes it can be used for wounds of the lower third, it isnot as reliable in the lower leg.
The soleus muscle has a somewhat segmental blood supply withoutone dominant vessel (as seen in the gastrocnemius muscle). The vesselthat enters the top half of the muscle can nourish the whole muscle. Inaddition, a few smaller vessels in the distal portion of the muscle cannourish the entire soleus if the proximal vessel is divided.
The flap is based most commonly and reliably on its proximal, mainblood supply, but at times it can be based on the smaller, distal vessels.Judge which vessel to use by looking at the surrounding damage in theleg. In patients with proximal calf soft tissue damage, it may be pru-dent to base the flap on the distal vessels. If the injury has injured thedistal tissues, base the flap on the proximal vessel.
Operation1. General anesthesia or spinal anesthesia is required.
2. Use a tourniquet, if available, for the dissection.
3. Be sure that the wound is adequately debrided and that all deadtissue or bone is completely removed.
4. Extend the open wound onto the medial calf skin to visualize theunderlying muscles. Try not to leave skin bridges, which have di-minished circulation and may become necrotic.
5. Identify the gastrocnemius muscle, which is the most superficialmuscle (closest to the skin). The plane of dissection is between thegastrocnemius muscle and underlying soleus muscle. Keep thegastrocnemius muscle attached to the overlying skin as you sepa-rate it from the underlying soleus. This procedure often can bedone bluntly or with electrocautery. Be gentle to avoid tearing ofblood vessels.
6. Bluntly separate the soleus muscle from the muscles of the deepposterior compartment, taking care to avoid damage to blood ves-sels coming off the posterior tibial artery. Determine which way theflap will be based and divide the vessels that are unnecessary.
7. Determine whether the blood vessel on which you want to base theflap is sufficient to supply circulation to the flap. Place a small vas-cular (noncrushing) clamp across the vessels that you plan todivide before doing so. If the muscle turns purple with the clampin place, the blood vessel you are basing the flap on will not supplyenough circulation to the flap.
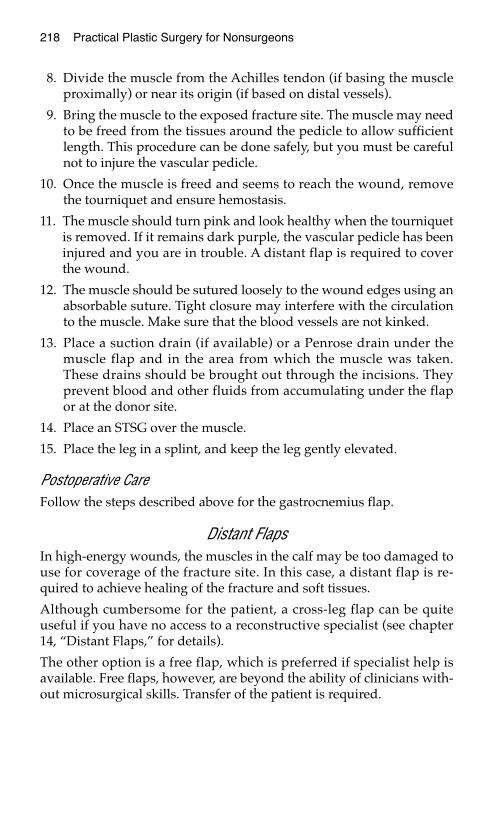
218 Practical Plastic Surgery for Nonsurgeons
8. Divide the muscle from the Achilles tendon (if basing the muscleproximally) or near its origin (if based on distal vessels).
9. Bring the muscle to the exposed fracture site. The muscle may needto be freed from the tissues around the pedicle to allow sufficientlength. This procedure can be done safely, but you must be carefulnot to injure the vascular pedicle.
10. Once the muscle is freed and seems to reach the wound, removethe tourniquet and ensure hemostasis.
11. The muscle should turn pink and look healthy when the tourniquetis removed. If it remains dark purple, the vascular pedicle has beeninjured and you are in trouble. A distant flap is required to coverthe wound.
12. The muscle should be sutured loosely to the wound edges using anabsorbable suture. Tight closure may interfere with the circulationto the muscle. Make sure that the blood vessels are not kinked.
13. Place a suction drain (if available) or a Penrose drain under themuscle flap and in the area from which the muscle was taken.These drains should be brought out through the incisions. Theyprevent blood and other fluids from accumulating under the flapor at the donor site.
14. Place an STSG over the muscle.
15. Place the leg in a splint, and keep the leg gently elevated.
Postoperative CareFollow the steps described above for the gastrocnemius flap.
Distant FlapsIn high-energy wounds, the muscles in the calf may be too damaged touse for coverage of the fracture site. In this case, a distant flap is re-quired to achieve healing of the fracture and soft tissues.
Although cumbersome for the patient, a cross-leg flap can be quiteuseful if you have no access to a reconstructive specialist (see chapter14, “Distant Flaps,” for details).
The other option is a free flap, which is preferred if specialist help isavailable. Free flaps, however, are beyond the ability of clinicians with-out microsurgical skills. Transfer of the patient is required.

Fractures of the Tibia and Fibula 219
BBiibblliiooggrraapphhyy1. Byrd HS, Spicer TE, Cierney G: Management of open tibial fractures. Plast Reconstr
Surg 76:719–730, 1985.2. Cohen BE: Gastrocnemius muscle and musculocutaneous flap. In Strauch B, Vasconez
LO, Hall-Findlay EJ (eds): Grabb’s Encyclopedia of Flaps. Boston, Little, Brown, 1990,pp 1695–1702.
3. Hertel R, Lambert SM, Muller S, et al: On the timing of soft-tissue reconstruction foropen fractures of the lower leg. Arch Orthop Trauma Surg 119: 7–12, 1999.
4. McBryde AM, Mays JT: Compartment syndrome. In Cameron JL (ed): CurrentSurgical Therapy, 6th ed. St. Louis, Mosby, 1998, pp 974–979.
5. Tobin GR: Soleus flaps. In Strauch B, Vasconez LO, Hall-Findlay EJ (eds): Grabb’sEncyclopedia of Flaps. Boston, Little, Brown, 1990, pp 1706–1711.
6. Yaremchuk MJ, Gan BS: Soft tissue management of open tibia fractures. Acta OrthopBelg 62(Suppl 1):188–192, 1996.
SSKKIINN CCAANNCCEERR
The most commonly performed plastic surgical procedures involve theremoval of suspicious, possibly cancerous skin lesions. This undertak-ing usually is not highly technical and, particularly for lesions locatedon areas other than the face, often does not require special surgical ex-pertise. In areas where few or no specialists are available, it is reason-able for a clinician with basic surgical skills to initiate treatment.However, you should have certain important background knowledgebefore removing a suspicious lesion. Lack of this knowledge may havenegative consequences for your patient.
This chapter presents the basics concerning the most commonly en-countered skin cancers and the proper techniques for excising a suspi-cious skin lesion. In addition, a brief explanation of what to do for thepatient diagnosed with a specific type of skin cancer is included.
WWhhaatt MMaakkeess aa SSkkiinn LLeessiioonn SSuussppiicciioouussSeveral characteristics should make you suspect cancer may be present.An open wound that, despite proper care, just will not heal or one thattemporarily heals and then opens again warrants further investigation.Red, raised lesions that do not go away, increase in size, or have smallblood vessels at their base should raise suspicion. Skin cancer may de-velop at the site of a preexisting mole, but not all moles are precancerous.
When to be Concerned about a MoleIf a patient reports a change in what had been a stable mole (i.e., onethat has not changed in appearance for many years), biopsy/excisionshould be done. These changes include but are not limited to:
221
Chapter 22
KKEEYY FFIIGGUURREESS::Typical melanoma Incisional biopsyBasal cell carcinoma Excisional biopsySquamous cell carcinoma Shave biopsyPunch equipment Lazy S incisionPunch biopsy
222 Practical Plastic Surgery for Nonsurgeons
• Increase in size • Ulceration/bleeding
• Change in color • Irritation
CCoommmmoonnllyy EEnnccoouunntteerreedd SSkkiinn CCaanncceerrss
Melanoma
Melanoma is potentially the most serious of all skin cancers because ofits propensity for metastatic spread. There is still no successful adju-vant therapy (such as chemotherapy or radiation treatment); surgeryremains the primary mode of treatment. The incidence of melanoma isincreasing worldwide.
The thickness of the lesion and the depth of skin penetration determinethe need for subsequent surgery as well as the patient’s prognosis. Thisis why proper excision is important and should not be taken lightly.
EtiologyThe risk for developing melanoma is related to the patient’s history ofsun exposure and genetic background. People with fair skin, who sun-burn easily, have a higher incidence of melanoma than darker-skinnedpeople, who rarely sunburn.
What It Looks LikeAlthough sun exposure is a causative factor for the development ofmelanoma, the lesions are not necessarily found on sun-exposedareas. Melanoma can occur anywhere on the body, including thepalms of the hands, soles of the feet, perineal area, and under finger-nails or toenails.
Appearance of a typical melanoma. (From Fitzpatrick JE, Aeling JL (eds):Dermatology Secrets. Philadelphia, Hanley & Belfus, 1996, with permission.)

Skin Cancer 223
Most melanomas arise from preexisting moles. Classically, a melanomais described as looking like a very dark brown or black mole, but coloris not the only characteristic that should raise suspicion. Other charac-teristics of a pigmented mole that are considered to be worrisome (butnot diagnostic) for melanoma include:
• Asymmetry
• Irregular shape
• Border irregularity—the edges of the mole are ragged instead ofsmooth
• Color variability—a benign mole tends to have a uniform color. Aworrisome mole will have some portions lighter or darker than thepredominant color. Also, a dark mole that has lost some of its pig-mentation is worrisome.
• Diameter > 6 mm—moles > 6 mm are at a significant risk for mela-noma and should be excised. (However, if a mole of this size hasbeen present for years, is light brown in color, and has not changed atall in appearance, it probably does not have to be removed.)
Note: Many elderly people develop very dark brown/black moles thatappear to be “stuck on” or glued to the skin surface. They do not looklike typical moles, which are embedded in the skin. These lesions,known as seborrheic keratoses, are benign despite their dark pigmen-tation. However, if any of the above mentioned signs is associated withone of these lesions, it should be removed.
Basal Cell Carcinoma
Appearance of a typical basal cell carcinoma.
224 Practical Plastic Surgery for Nonsurgeons
Basal cell carcinoma (BCC) is the most common type of skin cancer. Itoccurs primarily on sun-exposed skin and often looks like a small ulceror nonhealing area with raised edges and a red base. BCCs usually donot metastasize, but they can recur if not adequately excised. They alsohave a propensity to burrow into deeper tissues, which can make com-plete excision difficult.
Squamous Cell Carcinoma
Squamous cell carcinoma (SCC) is less common than BCC but morecommon than melanoma. SCC almost always arises on sun-exposedareas, often in an area with previous skin damage. It usually appearsas an ulcerative lesion with crusting, but it can be a raised, solid, red-dish lesion. SCC can metastasize to lymph nodes, but metastasis is notas common as with melanoma.
SCC can develop in a chronic wound (i.e., a longstanding pressure soreor a burn that never achieved a stable scar). Such lesions involve ahigher incidence of metastatic spread than usually is associated withSCC. They are more aggressive tumors.
WWhhaatt ttoo DDoo WWhheenn SSoommeeoonnee PPrreesseennttss wwiitthh aa SSuussppiicciioouuss LLeessiioonn
Start with a Good HistoryHistory of skin cancer, either personally or in the family. Melanomaand even some forms of BCC may run in families. Patients with a per-sonal history of skin cancer are at a higher-than-normal risk for devel-oping another similar skin cancer.
Appearance of a typical squamous cell carcinoma.
Skin Cancer 225
History of sun exposure. This question is not aimed only at findingout whether the patient spends hours in the sun trying to tan, but alsoapplies to patients whose work or hobbies keeps them outdoors in thesun. As noted above, sun exposure is a causative factor for most pri-mary skin cancers.
History of the lesion. How long has the lesion been present? Has itchanged recently? A longstanding, stable lesion (i.e., one that has notchanged for several years) is less worrisome than a lesion of short du-ration that has changed in appearance.
Weight change or other change in overall medical status. Weight loss,general fatigue, or simply not feeling well can be signs of metastaticspread if no other reasons can be found.
Physical ExaminationNote the specific characteristics of the lesion, such as size, color, andulceration.
Examine the entire patient for other suspicious lesions. It is vital todo a thorough examination so that other lesions are not missed. Withmelanoma on an extremity, you should be particularly concernedabout lesions proximal to the one under suspicion. Proximal lesions in-dicate a more aggressive stage of disease.
Check for enlargement of lymph nodes in the area where the lesionwould drain. Enlargement may imply lymphatic spread of cancer.
Check for enlargement of the liver, which also can be a sign ofmetastatic spread.
HHooww ttoo MMaakkee tthhee DDiiaaggnnoossiiss:: BBiiooppssyyA definitive diagnosis requires removing the entire lesion (or just arepresentative portion) and sending it to a pathologist for formalevaluation.
TTaabbllee 11.. LLyymmpphh NNooddee DDrraaiinnaaggee AArreeaass
LLooccaattiioonn ooff SSuussppiicciioouuss LLeessiioonn AArreeaa ttoo CChheecckk ffoorr EEnnllaarrggeemmeenntt ooff DDrraaiinniinngg LLyymmpphh NNooddeess
Hand/arm Axilla (armpit)
Foot/leg Groin/inguinal area
Face Cervical (neck) area
Trunk Axilla and inguinal areas; these lesions havemultiple drainage sites
226 Practical Plastic Surgery for Nonsurgeons
Biopsy Techniques
Incisional BiopsyAn incisional biopsy removes a small, representative sample of thelesion, not the entire lesion. It should include the full thickness of skininto the underlying subcutaneous tissue.
Excisional BiopsyThe entire lesion with a rim of surrounding, normal-appearing tissueis removed with an excisional biopsy. Again, the full thickness of theinvolved skin is removed. The resultant defect is larger than with anincisional biopsy and usually is closed primarily. However, depend-ing on the size of the lesion, other choices for wound closure may bemore appropriate.
Shave Biopsy/ExcisionA shave biopsy removes the lesion with only the top layers of skin,which seem to be grossly involved with the lesion. This is more cor-rectly called a shave excision. Because only the top layers of skin are re-moved rather than the full thickness of skin, the defect will heal wellwith local wound care alone.
When to Do Which Biopsy Technique
TTaabbllee 22.. IInnddiiccaattiioonnss ffoorr EEaacchh TTyyppee ooff BBiiooppssyy TTeecchhnniiqquuee
LLeessiioonnTTeecchhnniiqquuee CChhaarraacctteerriissttiiccss RReeaassoonniinngg BBeehhiinndd BBiiooppssyy CChhooiiccee
Excisional biopsy < 1–2 cm Wounds of this size usually are easy to closeand may allow treatment with one proce-
dure.
Incisional biopsy Large lesions: Large wounds may be difficult to close. In-> 3 cm on body cisional biopsy allows you to make the diag-or > 2 cm on nosis and plan further treatment. It is oftenface good to make the diagnosis before making
a large wound, especially on the face.
Shave biopsy/ Only for obviously Unless you are well trained in recognizing skinexcision benign lesions, cancers, you probably should not perform
seborrheic shave excisions. Especially on a pigmentedkeratitis lesion with any chance of being melanoma,
shave excision is not recommended be-cause it makes thickness measurements (important for staging and treatment deci-sions) impossible.
Skin Cancer 227
How to Do the BiopsyGeneral procedures common to all techniques:
• The excision can be done using clean technique for gloves andgauze, but the instruments and suture material should be sterile.
• Place the patient in as comfortable a position as possible, sitting orreclining as appropriate. Because some patients faint or feel light-headed during the procedure, it is best for them to be reclining.
• Administer local anesthetic (usually lidocaine; see chapter 3, “LocalAnesthesia”). Use as small a needle as possible, and inject slowly.Injection of local anesthetics hurts. If bicarbonate is available, add itto the solution before injection.
• Do not inject directly into the lesion; inject into the surroundingnormal tissues.
• “Paint” the area, i.e., apply an antimicrobial solution to the lesionand surrounding skin before making any incisions.
• The biopsy specimen should be taken to the pathologist in a smallcontainer with formalin. There should be at least enough formalinin the container to cover the lesion.
Incisional BiopsyAn incisional biopsy needs to be only a few mm in width and should betaken from an area representative of the entire lesion. Stay away fromareas with a lot of crusting. It is usually best to take the biopsy towardthe periphery of the lesion, because the center of a large lesion is oftennecrotic tissue, which may not yield a diagnosis on pathologic evalua-tion. It is useful to include a rim of normal-appearing skin at the marginto aid the pathologist. The biopsy specimen should be full-thicknessskin, including the upper portion of the underlying subcutaneous tissue.
Punch biopsy procedure. If you have access to a punch biopsy in-strument, use it. This instrument has a sharp, hollow, circular end thateasily takes the biopsy for you.
1. The skin around the lesion should be held under some tension.
2. Hold the instrument perpendicular to the lesion.
3. Push the sharp end gently into the lesion; then twist 180°.
4. Remove the instrument.
5. The specimen can be removed by gently grasping the skin surfacewith a forceps, pulling it upwards, and cutting the subcutaneoustissue attachment on the undersurface of the specimen.
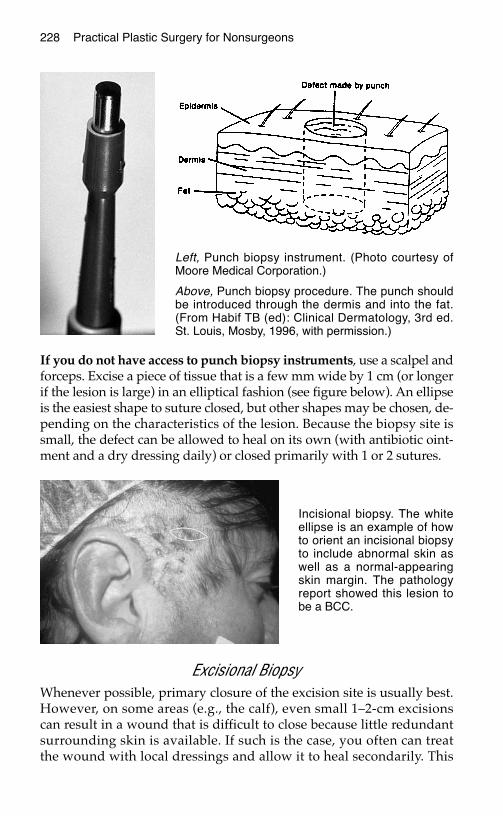
228 Practical Plastic Surgery for Nonsurgeons
If you do not have access to punch biopsy instruments, use a scalpel andforceps. Excise a piece of tissue that is a few mm wide by 1 cm (or longerif the lesion is large) in an elliptical fashion (see figure below). An ellipseis the easiest shape to suture closed, but other shapes may be chosen, de-pending on the characteristics of the lesion. Because the biopsy site issmall, the defect can be allowed to heal on its own (with antibiotic oint-ment and a dry dressing daily) or closed primarily with 1 or 2 sutures.
Excisional BiopsyWhenever possible, primary closure of the excision site is usually best.However, on some areas (e.g., the calf), even small 1–2-cm excisionscan result in a wound that is difficult to close because little redundantsurrounding skin is available. If such is the case, you often can treatthe wound with local dressings and allow it to heal secondarily. This
Left, Punch biopsy instrument. (Photo courtesy ofMoore Medical Corporation.)
Above, Punch biopsy procedure. The punch shouldbe introduced through the dermis and into the fat.(From Habif TB (ed): Clinical Dermatology, 3rd ed.St. Louis, Mosby, 1996, with permission.)
Incisional biopsy. The whiteellipse is an example of howto orient an incisional biopsyto include abnormal skin aswell as a normal-appearingskin margin. The pathologyreport showed this lesion tobe a BCC.

Skin Cancer 229
approach is especially useful on the forehead or lateral cheek (in frontof the ear), behind the ear, and on the calf.
If you believe that primary closure is possible, remove the lesion as anellipse to facilitate closure (see figure below). If you have a markingpen, it is helpful to draw the ellipse or whatever shape you intend touse before making the incision. Usually you should draw the ellipse inthe direction of the lesion if one dimension is larger than the other or inthe direction of the most redundant skin. If you cannot determine thebest direction, excise the lesion as it appears. Once the lesion is re-moved, the surrounding skin tension will open the wound and showyou the best way to finish the ellipse to facilitate closure.
Remember: you want to include a 1–2-mm rim of normal-appearingtissue around the lesion. In general, the length of the ellipse should be3 times its width.
Make the incision. If the markings have one limb of the ellipse abovethe other, do the bottom limb first. This will prevent any bleeding fromthe top limb from dripping down and obscuring your ability to easilymake the lower incision (a lesson learned the hard way by many).
Cut through the skin and dermis and into the subcutaneous tissue.This should be a full-thickness skin biopsy. The thickness of the skinvaries over different areas of the body. The back has very thick skin
Excisional biopsy. The most common way to excise a lesion is in the form of anellipse. The long axis should be approximately 2–3 times the diameter of thelesion so that the closure will be smooth. Undermining may be required toobtain wound closure.
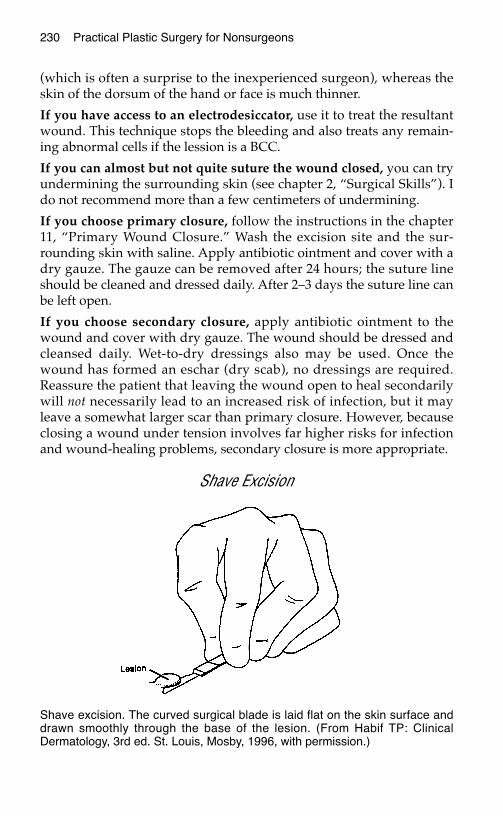
230 Practical Plastic Surgery for Nonsurgeons
(which is often a surprise to the inexperienced surgeon), whereas theskin of the dorsum of the hand or face is much thinner.
If you have access to an electrodesiccator, use it to treat the resultantwound. This technique stops the bleeding and also treats any remain-ing abnormal cells if the lession is a BCC.
If you can almost but not quite suture the wound closed, you can tryundermining the surrounding skin (see chapter 2, “Surgical Skills”). Ido not recommend more than a few centimeters of undermining.
If you choose primary closure, follow the instructions in the chapter11, “Primary Wound Closure.” Wash the excision site and the sur-rounding skin with saline. Apply antibiotic ointment and cover with adry gauze. The gauze can be removed after 24 hours; the suture lineshould be cleaned and dressed daily. After 2–3 days the suture line canbe left open.
If you choose secondary closure, apply antibiotic ointment to thewound and cover with dry gauze. The wound should be dressed andcleansed daily. Wet-to-dry dressings also may be used. Once thewound has formed an eschar (dry scab), no dressings are required.Reassure the patient that leaving the wound open to heal secondarilywill not necessarily lead to an increased risk of infection, but it mayleave a somewhat larger scar than primary closure. However, becauseclosing a wound under tension involves far higher risks for infectionand wound-healing problems, secondary closure is more appropriate.
Shave Excision
Shave excision. The curved surgical blade is laid flat on the skin surface anddrawn smoothly through the base of the lesion. (From Habif TP: ClinicalDermatology, 3rd ed. St. Louis, Mosby, 1996, with permission.)

Skin Cancer 231
Performing a shave excision requires a scalpel and forceps. Place thescalpel so that it is flat against the skin with the sharp edge parallel tothe skin. Using a back-and-forth sawing motion, pass the knife underthe lesion, taking only the top layers of skin. Dermis should remain atthe excision site when the lesion is removed.
The resultant defect should be treated with an electrodessicator if pos-sible. The electrodessicator heats the tissues and kills superficial cancercells if the lesion is BCC. Apply antibiotic ointment to the wound andcover with a dry gauze. Repeat daily until a dry scab forms. Thewound can then be left open.
Marking the Tissue SpecimenFor all excisions, it is helpful to mark the specimen so that the patholo-gist can orient the lesion. Place a nonabsorbable stitch at the superioredge of the specimen, and tie it in place. Cut the ends, and note on thespecimen slip what the marking stitch represents (i.e., superiormargin). Another stitch can be placed along the medial or lateralmargin. Cut the suture ends longer than the stitch on the superiormargin. Again, be sure to explain what you have done on the pathol-ogy slip (i.e., long stitch = lateral margin).
If the lesion is malignant and goes to the edge of the specimen, thepathologist can report which edge of the specimen is involved. This in-formation simplifies the repeat excision.
WWhhaatt tthhee PPaatthhoollooggyy RReeppoorrtt MMeeaannssiinn TTeerrmmss ooff FFuurrtthheerr TTrreeaattmmeenntt
If the lesion is benign:
You are done. Remove the sutures when appropriate. If you did an in-cisional biopsy and part of the lesion remains, you can remove the re-mainder by using the shave biopsy technique, if the patient so desires.
If the lesion is fully excised BCC or SCC:
You are done. Remove the sutures when appropriate. The patientshould be seen again in 3–6 months and then yearly. Look for new le-sions, and check the excision site for recurrence.
If the lesion is BCC that was not fully excised:
If you have a close margin (< 0.1 mm) and treated the area with theelectrodessicator at the time of the excision, you can either watchclosely (see the patient every 3 months for the first year and then semi-annually) or re-excise. Repeat excision is recommended if you expect
232 Practical Plastic Surgery for Nonsurgeons
follow-up to be difficult or impossible or if you did not have access toan electrodessicator.
If the lesion is SCC that has not been fully excised:
Re-excise. You should take a bit more grossly “normal” tissue with re-excision of SCC than with re-excision of BCC.
Re-excision of BCC or SCCThe re-excision can be done at the time of diagnosis or after a fewweeks when the tissues have begun to heal.
If the defect was closed primarily, the portion of the suture line con-taining the positive margin should be excised as an ellipse. Rememberto take a few mm margin around the suture line to ensure a clearmargin (i.e., no residual tumor).
If the biopsy site is healing secondarily, excise the involved margin,making sure to take at least a few mm of grossly normal surroundingskin.
If the positive margin is the deep margin: make sure that you godeeper into the subcutaneous tissues than on the first excision.
IIff MMeellaannoommaa iiss DDiiaaggnnoosseeddPatients diagnosed with melanoma should see a specialist. However, ifno specialist is accessible, further excision is required. The extent of there-excision is determined by the depth of the primary lesion. The fol-lowing is a basic guide to further treatment.
A lesion < 1.0 mm is considered a very thin melanoma, but it stillneeds to be re-excised with a 1-cm margin all the way around the scar.Often such re-excision is curative.
A lesion of 1.0–4.0 mm is considered an intermediate-thickness mela-noma. Re-excision is required with 1.5–2-cm margins. Often you willnot be able to close the resultant defect primarily. A split-thickness skingraft or a local flap may be the best option for closure. In the presenceof clinically palpable lymph nodes, lymphadenectomy is recom-mended. This procedure is beyond the abilities of a nonsurgeon; referthe patient to a specialist.
A lesion > 4 mm is considered a thick melanoma and is associatedwith a high likelihood of metastatic spread at the time of diagnosis. Tocontrol local disease, re-excision with 2–3-cm margins is recom-mended. Split-thickness skin grafting or a local flap often is required.In the presence of clinically palpable lymph nodes, lymphadenectomyis recommended.
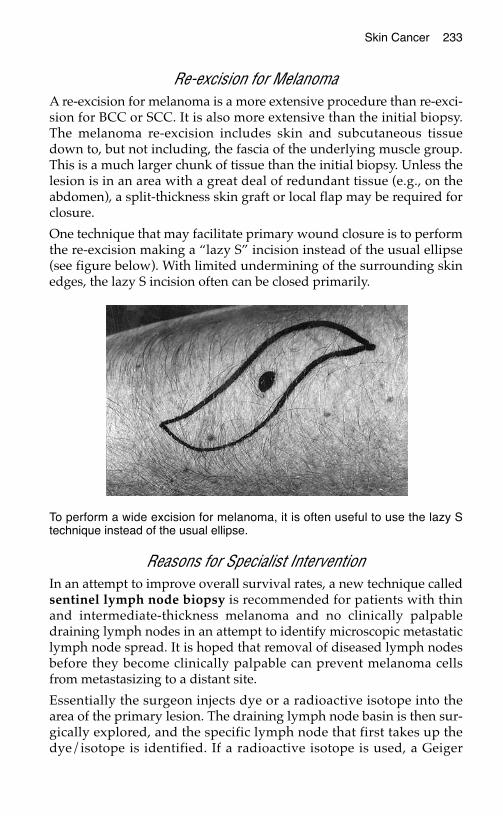
Skin Cancer 233
Re-excision for MelanomaA re-excision for melanoma is a more extensive procedure than re-exci-sion for BCC or SCC. It is also more extensive than the initial biopsy.The melanoma re-excision includes skin and subcutaneous tissuedown to, but not including, the fascia of the underlying muscle group.This is a much larger chunk of tissue than the initial biopsy. Unless thelesion is in an area with a great deal of redundant tissue (e.g., on theabdomen), a split-thickness skin graft or local flap may be required forclosure.
One technique that may facilitate primary wound closure is to performthe re-excision making a “lazy S” incision instead of the usual ellipse(see figure below). With limited undermining of the surrounding skinedges, the lazy S incision often can be closed primarily.
Reasons for Specialist InterventionIn an attempt to improve overall survival rates, a new technique calledsentinel lymph node biopsy is recommended for patients with thinand intermediate-thickness melanoma and no clinically palpabledraining lymph nodes in an attempt to identify microscopic metastaticlymph node spread. It is hoped that removal of diseased lymph nodesbefore they become clinically palpable can prevent melanoma cellsfrom metastasizing to a distant site.
Essentially the surgeon injects dye or a radioactive isotope into thearea of the primary lesion. The draining lymph node basin is then sur-gically explored, and the specific lymph node that first takes up thedye/isotope is identified. If a radioactive isotope is used, a Geiger
To perform a wide excision for melanoma, it is often useful to use the lazy Stechnique instead of the usual ellipse.
234 Practical Plastic Surgery for Nonsurgeons
counter-like device is used to find the lymph node; if dye is used, thesurgeon looks for a blue lymph node. The lymph node is then re-moved, and the pathologist examines it thoroughly for melanoma. Ifno cancer is found, no further treatment is performed. If cancer is pre-sent, a formal lymph node dissection is performed. So far this ap-proach shows promise for catching the cancer at the earliest possiblestage with the least amount of patient morbidity.
For All Patients with MelanomaCheck for enlargement of draining lymph nodes, and order a chest ra-diograph to look for signs of metastases. The patient should be fol-lowed every 3–6 months for several years to look for recurrence at theexcision site, new satellite lesions in the skin heading toward the drain-ing lymph area, enlargement of draining lymph nodes, and enlarge-ment of the liver.
IImmppoorrttaanntt PPoosstteexxcciissiioonn IInnssttrruuccttiioonnss ffoorr AAllll PPaattiieennttssRemind all patients that sun exposure is a causative factor in most pri-mary skin cancers. All patients who have been seen for a suspiciousskin lesion should be counseled about the importance of staying out ofthe sun as much as possible. The regular use of a good sunscreen (SPF> 15) must be emphasized.
BBiibblliiooggrraapphhyy1. Balch C, Houghton A, Sober A, Soong S (eds): Cutaneous Melanoma, 3rd ed. St. Louis,
Quality Medical Publishing, 1998.2. Goldberg DP: Assessment and surgical treatment of basal cell skin cancer. Clin Plast
Surg 24:673–686, 1997.3. Roth JJ, Granick MS: Squamous cell and adnexal carcinomas of the skin. Clin Plast
Surg 24:687–700, 1997.4. Wagner JD, Gordon MS, Chuang TY, Coleman JJ: Current therapy of cutaneous
melanoma. Plast Reconstr Surg 105:1774–1799, 2000.5. www.skin-cancer.com6. www.melanoma.net
CCLLEEFFTT LLIIPP//PPAALLAATTEE
Also known as “harelip,” cleft lip with or without a cleft palate is themost common craniofacial birth defect. It is beyond the scope of thistext to describe the specific surgical procedures used to correct thisanomaly. In fact, the treatment of cleft lip/palate remains a challengingproblem even for plastic and reconstructive surgeons.
All health care providers, especially those in rural settings, should havean understanding of basic background information so that they can ed-ucate parents and ensure that the child receives proper treatment.
DDeeffiinniittiioonnss
Cleft LipA cleft lip results when the developing tissues of the lip do not com-pletely fuse. The lip is divided into two parts, and an incorrect align-ment of the lip muscles (orbicularis oris) results.
A cleft lip primarily involves the upper lip, although rare forms offacial clefting can involve the lower lip. The typical cleft lip ofteninvolves the nose, with resultant distortion of the nostrils and nasalsill.
Cleft PalateThe palate is essentially the roof of the mouth. It is composed of twoparts, the hard palate and the soft palate. The teeth erupt in the ante-rior hard palate (called the alveolar ridge), and the posterior hardpalate serves as the base of the nasal cavity.
235
Chapter 23
KKEEYY FFIIGGUURREESS::Unilateral cleft lip Cleft lip: preoperativeBilateral cleft lip and postoperativeCleft palate Pierre Robin syndrome
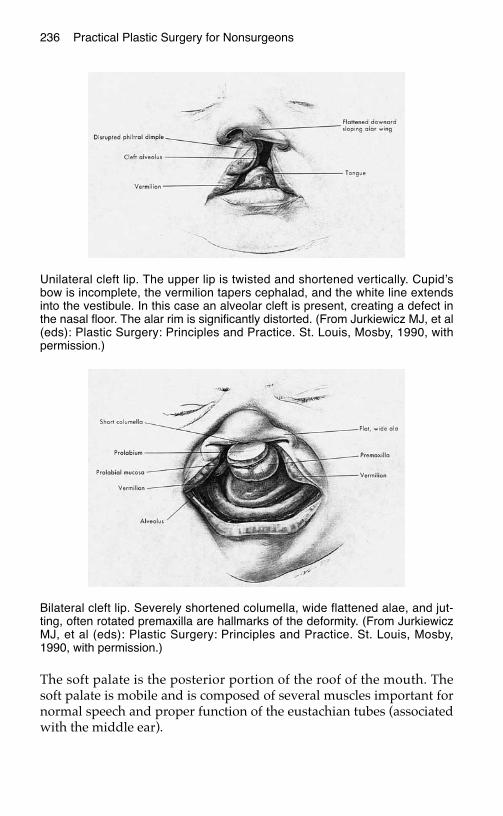
The soft palate is the posterior portion of the roof of the mouth. Thesoft palate is mobile and is composed of several muscles important fornormal speech and proper function of the eustachian tubes (associatedwith the middle ear).
236 Practical Plastic Surgery for Nonsurgeons
Unilateral cleft lip. The upper lip is twisted and shortened vertically. Cupid’sbow is incomplete, the vermilion tapers cephalad, and the white line extendsinto the vestibule. In this case an alveolar cleft is present, creating a defect inthe nasal floor. The alar rim is significantly distorted. (From Jurkiewicz MJ, et al(eds): Plastic Surgery: Principles and Practice. St. Louis, Mosby, 1990, withpermission.)
Bilateral cleft lip. Severely shortened columella, wide flattened alae, and jut-ting, often rotated premaxilla are hallmarks of the deformity. (From JurkiewiczMJ, et al (eds): Plastic Surgery: Principles and Practice. St. Louis, Mosby,1990, with permission.)
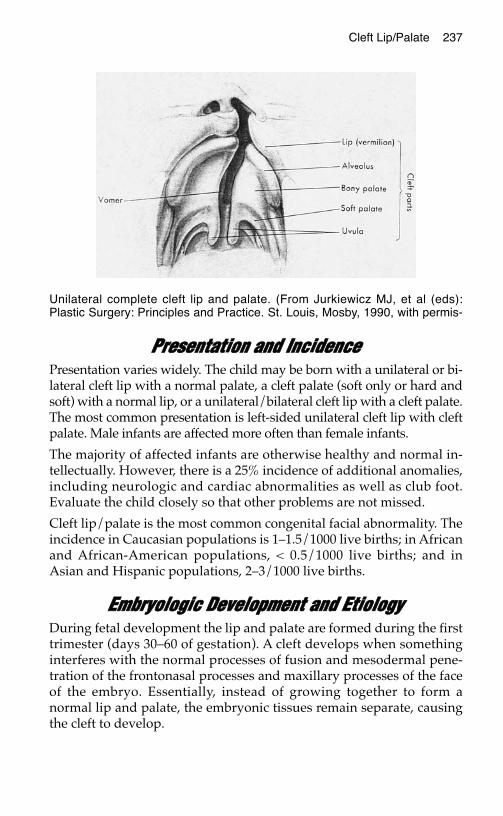
PPrreesseennttaattiioonn aanndd IInncciiddeenncceePresentation varies widely. The child may be born with a unilateral or bi-lateral cleft lip with a normal palate, a cleft palate (soft only or hard andsoft) with a normal lip, or a unilateral/bilateral cleft lip with a cleft palate.The most common presentation is left-sided unilateral cleft lip with cleftpalate. Male infants are affected more often than female infants.
The majority of affected infants are otherwise healthy and normal in-tellectually. However, there is a 25% incidence of additional anomalies,including neurologic and cardiac abnormalities as well as club foot.Evaluate the child closely so that other problems are not missed.
Cleft lip/palate is the most common congenital facial abnormality. Theincidence in Caucasian populations is 1–1.5/1000 live births; in Africanand African-American populations, < 0.5/1000 live births; and inAsian and Hispanic populations, 2–3/1000 live births.
EEmmbbrryyoollooggiicc DDeevveellooppmmeenntt aanndd EEttiioollooggyyDuring fetal development the lip and palate are formed during the firsttrimester (days 30–60 of gestation). A cleft develops when somethinginterferes with the normal processes of fusion and mesodermal pene-tration of the frontonasal processes and maxillary processes of the faceof the embryo. Essentially, instead of growing together to form anormal lip and palate, the embryonic tissues remain separate, causingthe cleft to develop.
Cleft Lip/Palate 237
Unilateral complete cleft lip and palate. (From Jurkiewicz MJ, et al (eds):Plastic Surgery: Principles and Practice. St. Louis, Mosby, 1990, with permis-
238 Practical Plastic Surgery for Nonsurgeons
Parents without clefts who have one child with a cleft lip/palate havea 5% chance of having another child with a cleft lip/palate (comparedwith the usual 0.14% risk in parents with no family history of cleft). Ifboth one parent and one child have a cleft or if two normal parentshave two children with clefts, the likelihood of a cleft in another childincreases to 15–20%. These data seem to suggest a genetic component.
The development of cleft lip/palate, however, probably is due to acombination of multiple factors—for example, folic acid deficiency, ad-vanced maternal/paternal age, use of anticonvulsants (phenytoin orphenobarbital), alcohol intake, and possibly smoking. A viral etiologyalso has been suggested.
It is quite common for the parents of a child with a cleft to give a his-tory that includes none of the above factors. In some rural cultures, acleft palate is thought to represent a sign of evil or wrong-doing on thepart of the family. Parents are often quite guilt-ridden, thinking thatthey did something to cause the defect. Therefore, it is important to assureparents that they did nothing wrong to cause the child’s abnormality.
IImmmmeeddiiaattee CCoonncceerrnnss
Adequate NutritionThe initial concern for an infant with cleft lip/palate is ingestion ofadequate calories and fluids to maintain health and allow propergrowth.
An infant’s ability to suck is related to two factors: the ability of the ex-ternal lips to perform the necessary sucking movements and the abilityof the palate to allow the necessary build-up of pressure inside themouth so that foodstuff can be propelled into the mouth.
Infants with cleft lip/palate have sufficient external lip muscle move-ments. Therefore, an isolated cleft lip usually does not interfere withthe child’s ability to suck, although it may take some practice not tolose a lot of milk out of the cleft lip defect.
In contrast, a child with a cleft palate with or without a cleft lip has dif-ficulty sucking properly. The cleft in the palate impedes the properbuild-up of pressure inside the mouth. For the same amount of effort,the infant with a cleft palate does not ingest as much milk as a normalinfant. This increase in the work of feeding may lead to insufficientintake of calories for proper growth and health.
Cleft Lip/Palate 239
Helpful StrategiesThe child should be fed with the head upright at about a 45° angle.
Usually bottle feeding is needed. If possible, use a nipple made for pre-mature infants because it has a larger opening than normal. An alterna-tive is to cut an X in the tip of a regular nipple to enlarge the opening.The larger-than-normal opening allows more liquid to flow out of thenipple with less suction.
A squeezable bottle also facilitates getting the milk into the infant’smouth.
If you are in an area with access to a pediatric orthodontist, an appli-ance can be made to fit into the infant’s mouth and cover the cleftdefect. This appliance, called an obturator, greatly improves the infant’sability to suck and ingest calories with less energy expenditure.
Do not be alarmed when milk comes out of the infant’s nose. Thepalate serves to separate the nasal cavity from the oral cavity. Thepresence of a cleft in the palate removes this separation so that foodand liquids easily pass from the mouth and come out of the nose.
IInniittiiaall CCoorrrreeccttiivvee OOppeerraattiioonnssCorrection of the cleft lip/palate deformity is not a life-preservingmedical necessity. However, nontreatment often results from lack ofaccess to specialists rather than a conscious decision to leave the childuntreated.
A cleft lip/palate is a challenging deformity to repair. Usually, the lip isrepaired at around 3 months of age. In full-term, healthy infants, how-ever, repair may be undertaken at an earlier age.
In utero repair of the cleft lip defect is a subject of ongoing research.Clefts usually can be seen on prenatal ultrasound, and it has beenshown that fetal tissues heal without the scars usually seen in infantsand adults.
The palate is repaired at a separate operation, usually when the infantis around 12 months of age. In areas with limited access to specialists,however, the lip and palate can be repaired at the same time. In fact,even in the developed world where plastic surgeons are abundant,some authorites believe that simultaneous repair of the lip and palatemay yield better results than separate repairs.
Often, if the infant has recurring ear infections, pressure-equalizing(PE) tubes are needed. Usually they are inserted at the time of palaterepair.
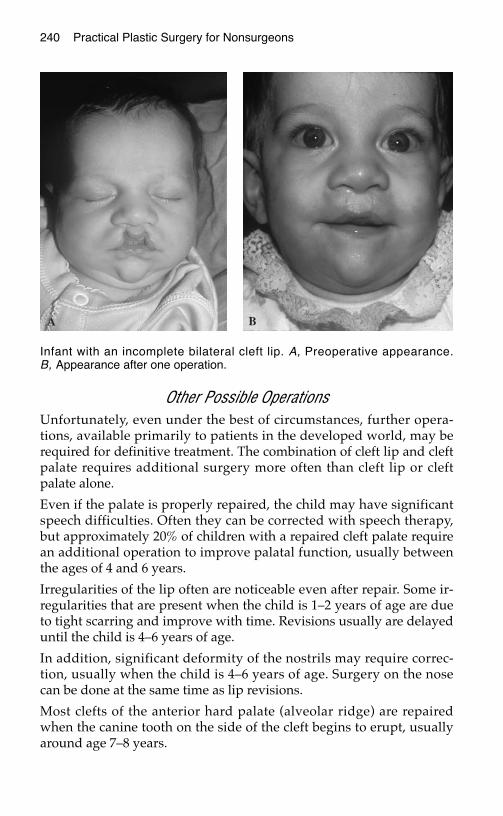
240 Practical Plastic Surgery for Nonsurgeons
Other Possible OperationsUnfortunately, even under the best of circumstances, further opera-tions, available primarily to patients in the developed world, may berequired for definitive treatment. The combination of cleft lip and cleftpalate requires additional surgery more often than cleft lip or cleftpalate alone.
Even if the palate is properly repaired, the child may have significantspeech difficulties. Often they can be corrected with speech therapy,but approximately 20% of children with a repaired cleft palate requirean additional operation to improve palatal function, usually betweenthe ages of 4 and 6 years.
Irregularities of the lip often are noticeable even after repair. Some ir-regularities that are present when the child is 1–2 years of age are dueto tight scarring and improve with time. Revisions usually are delayeduntil the child is 4–6 years of age.
In addition, significant deformity of the nostrils may require correc-tion, usually when the child is 4–6 years of age. Surgery on the nosecan be done at the same time as lip revisions.
Most clefts of the anterior hard palate (alveolar ridge) are repairedwhen the canine tooth on the side of the cleft begins to erupt, usuallyaround age 7–8 years.
Infant with an incomplete bilateral cleft lip. A, Preoperative appearance.B, Appearance after one operation.
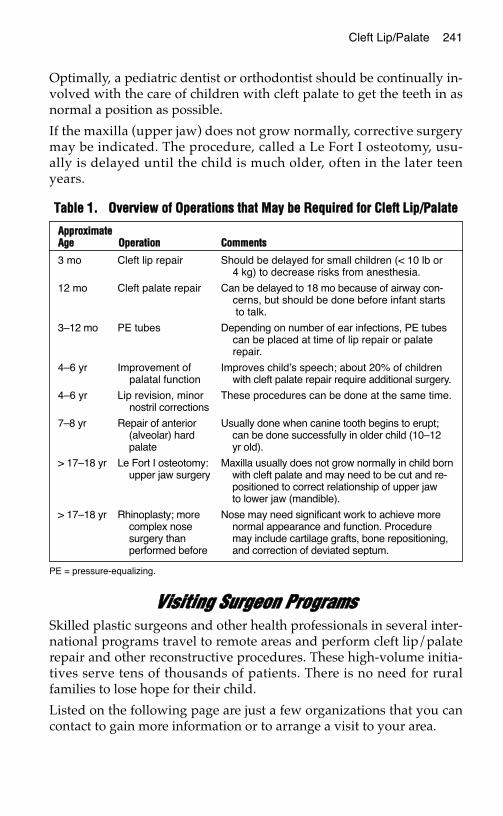
Optimally, a pediatric dentist or orthodontist should be continually in-volved with the care of children with cleft palate to get the teeth in asnormal a position as possible.
If the maxilla (upper jaw) does not grow normally, corrective surgerymay be indicated. The procedure, called a Le Fort I osteotomy, usu-ally is delayed until the child is much older, often in the later teenyears.
VViissiittiinngg SSuurrggeeoonn PPrrooggrraammssSkilled plastic surgeons and other health professionals in several inter-national programs travel to remote areas and perform cleft lip/palaterepair and other reconstructive procedures. These high-volume initia-tives serve tens of thousands of patients. There is no need for ruralfamilies to lose hope for their child.
Listed on the following page are just a few organizations that you cancontact to gain more information or to arrange a visit to your area.
TTaabbllee 11.. OOvveerrvviieeww ooff OOppeerraattiioonnss tthhaatt MMaayy bbee RReeqquuiirreedd ffoorr CClleefftt LLiipp//PPaallaattee
PE = pressure-equalizing.
Cleft Lip/Palate 241
AApppprrooxxiimmaatteeAAggee OOppeerraattiioonn CCoommmmeennttss
3 mo Cleft lip repair Should be delayed for small children (< 10 lb or4 kg) to decrease risks from anesthesia.
12 mo Cleft palate repair Can be delayed to 18 mo because of airway con-cerns, but should be done before infant startsto talk.
3–12 mo PE tubes Depending on number of ear infections, PE tubescan be placed at time of lip repair or palaterepair.
4–6 yr Improvement of Improves child’s speech; about 20% of childrenpalatal function with cleft palate repair require additional surgery.
4–6 yr Lip revision, minor These procedures can be done at the same time.nostril corrections
7–8 yr Repair of anterior Usually done when canine tooth begins to erupt;(alveolar) hard can be done successfully in older child (10–12palate yr old).
> 17–18 yr Le Fort I osteotomy: Maxilla usually does not grow normally in child bornupper jaw surgery with cleft palate and may need to be cut and re-
positioned to correct relationship of upper jaw to lower jaw (mandible).
> 17–18 yr Rhinoplasty; more Nose may need significant work to achieve morecomplex nose normal appearance and function. Proceduresurgery than may include cartilage grafts, bone repositioning,performed before and correction of deviated septum.
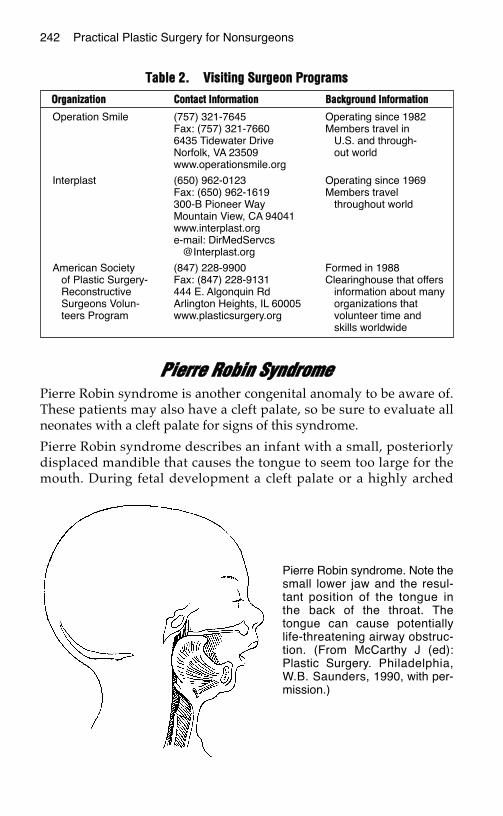
PPiieerrrree RRoobbiinn SSyynnddrroommeePierre Robin syndrome is another congenital anomaly to be aware of.These patients may also have a cleft palate, so be sure to evaluate allneonates with a cleft palate for signs of this syndrome.
Pierre Robin syndrome describes an infant with a small, posteriorlydisplaced mandible that causes the tongue to seem too large for themouth. During fetal development a cleft palate or a highly arched
TTaabbllee 22.. VViissiittiinngg SSuurrggeeoonn PPrrooggrraammss
242 Practical Plastic Surgery for Nonsurgeons
OOrrggaanniizzaattiioonn CCoonnttaacctt IInnffoorrmmaattiioonn BBaacckkggrroouunndd IInnffoorrmmaattiioonn
Operation Smile (757) 321-7645 Operating since 1982Fax: (757) 321-7660 Members travel in6435 Tidewater Drive U.S. and through-Norfolk, VA 23509 out worldwww.operationsmile.org
Interplast (650) 962-0123 Operating since 1969Fax: (650) 962-1619 Members travel300-B Pioneer Way throughout worldMountain View, CA 94041www.interplast.orge-mail: DirMedServcs
@Interplast.org
American Society (847) 228-9900 Formed in 1988of Plastic Surgery- Fax: (847) 228-9131 Clearinghouse that offersReconstructive 444 E. Algonquin Rd information about manySurgeons Volun- Arlington Heights, IL 60005 organizations thatteers Program www.plasticsurgery.org volunteer time and
skills worldwide
Pierre Robin syndrome. Note thesmall lower jaw and the resul-tant position of the tongue inthe back of the throat. Thetongue can cause potentiallylife-threatening airway obstruc-tion. (From McCarthy J (ed):Plastic Surgery. Philadelphia,W.B. Saunders, 1990, with per-mission.)
Cleft Lip/Palate 243
palate forms to accommodate the relatively large tongue. Early recog-nition of newborns with Pierre Robin syndrome is mandatory to avoidserious complications.
Immediate ConcernsAffected infants may present with episodes of severe respiratory dis-tress. When the infant is in an upright position or with the head for-ward, the tongue falls forward and the airway opens. If the infant isplaced in the supine position (lying down, face up—the usual positionin which an infant is placed to sleep), the tongue falls backward andblocks the airway, causing severe respiratory distress. If unrecognized,this syndrome can result in death.
Treatment• The infant must be monitored closely and kept in the prone (face-
down) position for sleep.
• The child should sit upright in a somewhat forward position wheneating.
• Occasionally the tongue needs to be stitched to the lower lip to pre-vent the tongue from falling backward.
• Rarely, in very severe cases, the infant may require a tracheotomy tomaintain an adequate airway.
• If the infant has a cleft palate, repair is usually delayed until the childis a few years old because of airway concerns.
• As the infant grows, the mandible grows. Respiratory concernsbecome less problematic. Usually, no other treatment is required.
BBiibblliiooggrraapphhyy1. Mackool RJ, Gittes GK, Longaker MT: Scarless healing. Clin Plast Surg 25:357–366,
1998.2. Stal S, Klebuc M, et al: Algorithms for the treatment of cleft lip and palate. Clin Plast
Surg 25:493–507, 1998.
BBRREEAASSTT SSUURRGGEERRYY
In the developed world, breast reconstruction after mastectomy andbreast reduction (reduction mammaplasty) are common reconstructiveprocedures. They require a combination of artistic and technical skills,which can be obtained only through many years of surgical training.
Because of their highly technical nature, no specific procedures are dis-cussed in detail. Instead, this chapter offers basic information.
BBrreeaasstt RReeccoonnssttrruuccttiioonn
Evolution of ProceduresOver the past 25 years, because of advances in plastic surgical techniques,the esthetic quality of breast reconstruction has improved greatly. Beforethe early 1970s, breast reconstruction was a multistaged procedure inwhich a distant random flap was transferred to the chest in a series of op-erations. The results were not always successful, nor were the recon-structed breasts consistently cosmetically pleasing.
Snyderman and Guthrie reported the use of a silicone implant forbreast reconstruction in 1971. Their achievement was remarkable be-cause for the first time a breast was reconstructed in a single procedure.Although it was not necessarily a cosmetic triumph, patients were sopleased to have a breast after one operation that they considered theprocedure worthwhile.
Implant reconstruction is still a popular option for breast reconstruc-tion, although now saline implants are used. To achieve the best aes-thetic result, implant reconstruction is often not a single procedure.Initially, a tissue expander (a modified implant to which the surgeon
245
Chapter 24
KKEEYY FFIIGGUURREESS::Saline implant reconstructionLatissimus dorsi reconstructionFree TRAM reconstruction
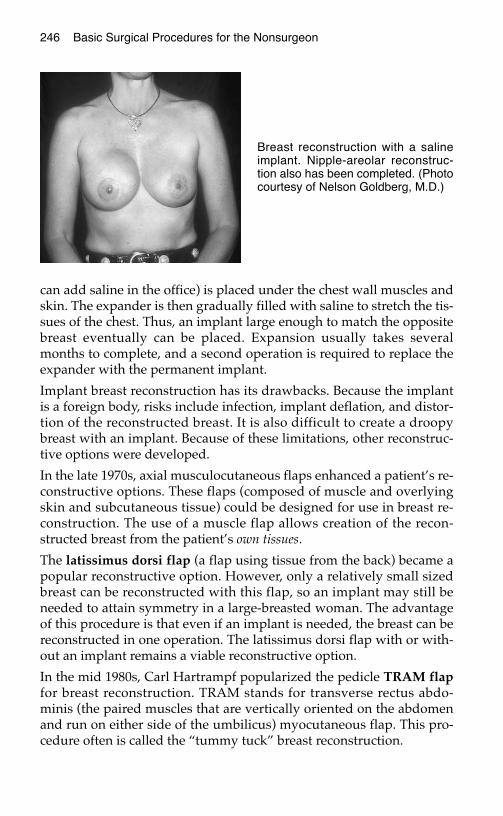
can add saline in the office) is placed under the chest wall muscles andskin. The expander is then gradually filled with saline to stretch the tis-sues of the chest. Thus, an implant large enough to match the oppositebreast eventually can be placed. Expansion usually takes severalmonths to complete, and a second operation is required to replace theexpander with the permanent implant.
Implant breast reconstruction has its drawbacks. Because the implantis a foreign body, risks include infection, implant deflation, and distor-tion of the reconstructed breast. It is also difficult to create a droopybreast with an implant. Because of these limitations, other reconstruc-tive options were developed.
In the late 1970s, axial musculocutaneous flaps enhanced a patient’s re-constructive options. These flaps (composed of muscle and overlyingskin and subcutaneous tissue) could be designed for use in breast re-construction. The use of a muscle flap allows creation of the recon-structed breast from the patient’s own tissues.
The latissimus dorsi flap (a flap using tissue from the back) became apopular reconstructive option. However, only a relatively small sizedbreast can be reconstructed with this flap, so an implant may still beneeded to attain symmetry in a large-breasted woman. The advantageof this procedure is that even if an implant is needed, the breast can bereconstructed in one operation. The latissimus dorsi flap with or with-out an implant remains a viable reconstructive option.
In the mid 1980s, Carl Hartrampf popularized the pedicle TRAM flapfor breast reconstruction. TRAM stands for transverse rectus abdo-minis (the paired muscles that are vertically oriented on the abdomenand run on either side of the umbilicus) myocutaneous flap. This pro-cedure often is called the “tummy tuck” breast reconstruction.
246 Basic Surgical Procedures for the Nonsurgeon
Breast reconstruction with a salineimplant. Nipple-areolar reconstruc-tion also has been completed. (Photocourtesy of Nelson Goldberg, M.D.)
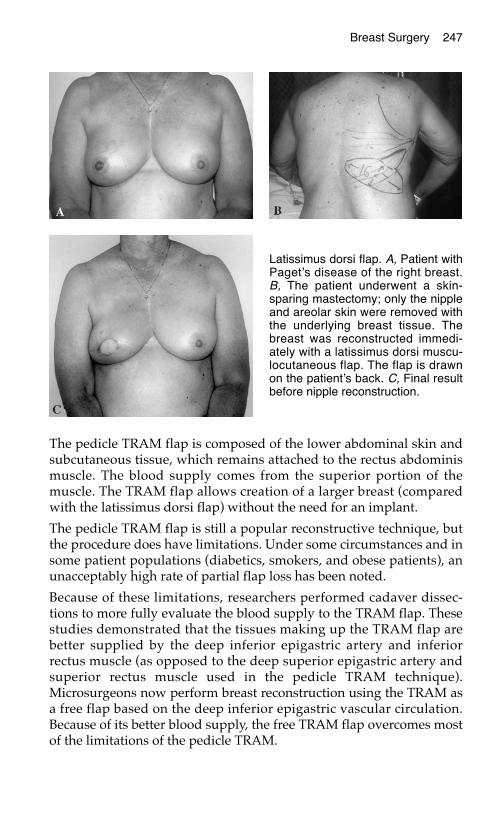
Breast Surgery 247
The pedicle TRAM flap is composed of the lower abdominal skin andsubcutaneous tissue, which remains attached to the rectus abdominismuscle. The blood supply comes from the superior portion of themuscle. The TRAM flap allows creation of a larger breast (comparedwith the latissimus dorsi flap) without the need for an implant.
The pedicle TRAM flap is still a popular reconstructive technique, butthe procedure does have limitations. Under some circumstances and insome patient populations (diabetics, smokers, and obese patients), anunacceptably high rate of partial flap loss has been noted.
Because of these limitations, researchers performed cadaver dissec-tions to more fully evaluate the blood supply to the TRAM flap. Thesestudies demonstrated that the tissues making up the TRAM flap arebetter supplied by the deep inferior epigastric artery and inferiorrectus muscle (as opposed to the deep superior epigastric artery andsuperior rectus muscle used in the pedicle TRAM technique).Microsurgeons now perform breast reconstruction using the TRAM asa free flap based on the deep inferior epigastric vascular circulation.Because of its better blood supply, the free TRAM flap overcomes mostof the limitations of the pedicle TRAM.
Latissimus dorsi flap. A, Patient withPaget’s disease of the right breast.B, The patient underwent a skin-sparing mastectomy; only the nippleand areolar skin were removed withthe underlying breast tissue. Thebreast was reconstructed immedi-ately with a latissimus dorsi muscu-locutaneous flap. The flap is drawnon the patient’s back. C, Final resultbefore nipple reconstruction.
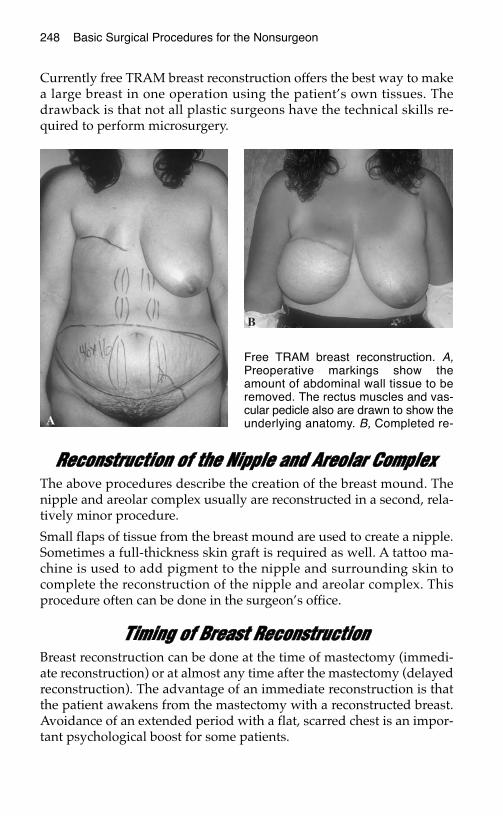
248 Basic Surgical Procedures for the Nonsurgeon
Currently free TRAM breast reconstruction offers the best way to makea large breast in one operation using the patient’s own tissues. Thedrawback is that not all plastic surgeons have the technical skills re-quired to perform microsurgery.
RReeccoonnssttrruuccttiioonn ooff tthhee NNiippppllee aanndd AArreeoollaarr CCoommpplleexxThe above procedures describe the creation of the breast mound. Thenipple and areolar complex usually are reconstructed in a second, rela-tively minor procedure.
Small flaps of tissue from the breast mound are used to create a nipple.Sometimes a full-thickness skin graft is required as well. A tattoo ma-chine is used to add pigment to the nipple and surrounding skin tocomplete the reconstruction of the nipple and areolar complex. Thisprocedure often can be done in the surgeon’s office.
TTiimmiinngg ooff BBrreeaasstt RReeccoonnssttrruuccttiioonnBreast reconstruction can be done at the time of mastectomy (immedi-ate reconstruction) or at almost any time after the mastectomy (delayedreconstruction). The advantage of an immediate reconstruction is thatthe patient awakens from the mastectomy with a reconstructed breast.Avoidance of an extended period with a flat, scarred chest is an impor-tant psychological boost for some patients.
Free TRAM breast reconstruction. A,Preoperative markings show theamount of abdominal wall tissue to beremoved. The rectus muscles and vas-cular pedicle also are drawn to show theunderlying anatomy. B, Completed re-
Breast Surgery 249
Because of concerns that reconstruction may interfere with surveil-lance for recurrent breast cancer, general surgeons initially were hesi-tant to refer patients for immediate breast reconstruction. Studies haveshown that these concerns are unwarranted. Immediate breast recon-struction does not interfere with surveillance or mask evidence of re-current disease.
Some patients may not be appropriate candidates for immediate recon-struction because of the extent of disease or concerns that postopera-tive radiation or chemotherapy may affect the reconstruction. Delayedreconstruction is always an option and can be performed months oreven years after cancer treatments have been completed. The timing ofbreast reconstruction is ultimately decided on an individual basis afterthorough discussion between the patient and her doctors.
Currently, women with breast cancer have many options for breast re-construction. Depending on the patient’s reconstructive needs and ex-pectations, the prognosis for obtaining a matched pair of breasts aftermastectomy is excellent.
BBrreeaasstt RReedduuccttiioonnLarge, pendulous breasts (D–DDD or even larger cup sizes) can be asource of embarrassment for some women and also may cause signifi-cant neck, upper back, and shoulder pain. These symptoms can signifi-cantly interfere with their ability to work.
Breast reduction (reduction mammaplasty) decreases the size of thebreasts, so that they are more appropriately proportioned to the patient’sbody habitus. Attaining an aesthetically pleasing result is a high priority.
Classically, this procedure involves large incisions to remove exces-sive breast tissue and to reposition the nipple and areolar complex.These incisions result in long scars (around the areola, from theareola to the inframammary fold, and along the inframammary fold).These scars can be problematic as well as noticeable. Other complica-tions of breast reduction include loss of nipple sensation, inability tobreast feed, and loss of the nipple/areolar complex. Despite theserisks, most women who undergo breast reduction are quite pleasedwith the results.
To obviate the need for such large incisions and to decrease the risksfor other complications, liposuction is beginning to be included in theoperative technique. Currently, plastic surgeons are developing othermodifications to decrease the risks inherent in breast reduction.
250 Basic Surgical Procedures for the Nonsurgeon
GGyynneeccoommaassttiiaaGynecomastia is the term for abnormal enlargement of the male breast.It is commonly encountered in pubescent males or older men becauseof hormonal considerations. Gynecomastia associated with pubertyusually resolves within a few years; no surgery should be considereduntil the patient is at least 19 or 20 years of age.
When evaluating a patient with gynecomastia, be sure to get a thoroughmedical history. Medications associated with gynecomastia includecimetidine, spironolactone, digitalis, and reserpine. Be sure to inquireabout recreational drug use because marijuana also has been implicated.
You must examine the patient’s testicles to rule out the presence of atesticular tumor, which may produce hormones responsible for breastenlargement. Especially with unilateral enlargement or when a a dis-crete breast mass is palpable, you must rule out the possibility of anunderlying breast cancer. (Yes, men can get breast cancer). Blood teststo evaluate the levels of various hormones also should be done.
Gynecomastia is quite challenging to treat. Simple mastectomy used to bethe treatment of choice, but esthetic considerations make it a poor option.Currently, liposuction with or without additional formal excision ofbreast tissue (using a small incision along the areola) is the treatment ofchoice and has resulted in a markedly improved esthetic outcome.
BBiibblliiooggrraapphhyyBreast reconstruction
1. Hartrampf CR, Scheflan M, Black PW: Breast reconstruction with a transverse ab-dominal island flap. Plast Reconstr Surg 69:216–225, 1982.
2. Maxwell GP: Latissimus dorsi breast reconstruction: An aesthetic assessment. ClinPlast Surg 8:373–387, 1981.
3. Schusterman MA: The free TRAM flap. Clin Plast Surg 25:191–195, 1998.4. Slavin SA, Schnitt SJ, Duda RB, et al: Skin-sparing mastectomy and immediate recon-
struction: Oncologic risks and aesthetic results in patients with early-stage breastcancer. Plast Reconstr Surg 102:49–62, 1998.
5. Snyderman RK Guthrie RH: Reconstruction of the female breast following radicalmastectomy. Plast Reconstr Surg 47:565, 1971.
6. Spear SL, Majidian A: Immediate breast reconstruction in two stages using textured, in-tegrated valve tissue expanders and breast implants: A retrospective review of 171 con-secutive breast reconstructions from 1989–1996. Plast Reconstr Surg 101: 53–63, 1998.
Breast reduction/Gynecomastia7. Hammond DC: Short scar periareolar inferior pedicle reduction (SPAIR) mamma-
plasty. Plast Reconstr Surg 103:890–901, 1999.8. Hidalgo DA: Improving safety and aesthetic results in inverted T scar breast reduc-
tion. Plast Reconstr Surg 103:874–886, 1999.9. Lejour M: Vertical mammaplasty: Update and appraisal of late results. Plast Reconstr
Surg 104:771–781, 1999.10. Rosenberg GJ: Gynecomastia. In Spear SL (ed): Surgery of the Breast: Principles and
Art. Philadelphia, Lippincott Williams and Wilkins, 1998, pp 831–841.
FFAACCIIAALL FFRRAACCTTUURREESS
Definitive treatment for most facial fractures requires advanced surgi-cal skills and special equipment. However, certain interventions thatmay improve patient outcome do not require special skills. This chap-ter provides basic information about the initial evaluation and treat-ment of patients with a facial fracture. In addition, an easy-to-performprocedure specifically for the treatment of a mandible (lower jaw) frac-ture is described to assist the provider with no access to specialty care.
IInniittiiaall PPaattiieenntt EEvvaalluuaattiioonnThe type of injury that results in a facial fracture can cause other signif-icant injuries. When examining a patient with a possible facial fracture,you must be vigilant not to overlook a potentially life-threateninginjury.
If the patient was reported to have lost consciousness or if the patienthas any signs of altered level of consciousness, you must rule-out acerebral injury.
Patients with a facial fracture also may have a cervical spine injury. Becareful with positioning of the patient’s head and neck until you aresure that the cervical spine is not injured.
Be sure the patient is breathing easily and has a stable airway. Patientswith a fractured lower jaw or severe fracture of the midface (cheek-bones, nose, and/or upper jaw) may have difficulty with breathing.Difficulty with breathing can result from blockage of the airway bybleeding from the fracture site or by displaced bones.
Patients with injury around the eye, should have a thorough eye exam.
See chapter 5, “Evaluation of the Acutely Injured Patient,” for morespecific information.
251
Chapter 25
KKEEYY FFIIGGUURREE::Ivy loops
252 Practical Plastic Surgery for Nonsurgeons
DDiiaaggnnoossiiss
Physical ExamMost patients who sustain any type of facial trauma have significantsoft tissue swelling. However, swelling alone does not signify a frac-ture. Feel along the jaws, cheeks, orbital rim, and base of the nose. Youare looking for bony instability or a “step-off” irregularity of the bones,which indicates a fracture.
If the fracture involves tooth-bearing bone, patients often report thattheir teeth do not seem to meet correctly or that the teeth do not feel“right” during biting down. Check to see whether the patient can ade-quately open and close his or her mouth.
Examining the Patient’s Bite• Use a tongue depressor to pull each cheek away from the teeth.
• Have the patient gently close the mouth and bring the teeth together.
• Examine the vertical midline between the upper and lower centralincisors. Does it line up?
• Look along the lateral side of the molars. Are the molars lined upequally, or do you see space between the upper and lower teeth onone side but not the other?
• Ask the patient whether any findings you note are new or old. Newchanges probably represent the result of a fracture involving tooth-bearing bone.
• If the jaw is fractured, look inside the mouth for a laceration of thegum overlying the fracture. If the gum is torn, the fracture is an openfracture that requires treatment with antibiotics.
Patients with a fracture of the cheek bone or orbit often report numb-ness of the inner cheek and upper lip on the side of the fracture. Thenumbness is due to injury of the infraorbital nerve (V2) as it emergesfrom the bone under the inferior orbital rim. Normal sensation oftenreturns within 1–2 months of injury. The eyelids on the side of theinjury show significant swelling, and the conjunctiva may be blood-stained.
Radiologic StudiesThe best way to evaluate the mandible is with a Panorex radiographthat shows the entire upper and lower jaws.
Facial Fractures 253
If you have access to a computed tomography (CT) scanner, order aface scan with axial and coronal views. CT is the best way to diagnosea fracture of the other facial bones. Note: To allow coronal views, thepatient must hyperextend at the neck or lie prone with the neck bent.The cervical spine must be cleared of injury before obtaining coronalviews on a CT scan of the face.
Plain radiographs of the face should be obtained if you cannot get aCT scan. When interpreting the radiographs, begin by looking at themaxillary sinuses (the large paired sinuses on either side of the nose).Usually, the sinuses are areas of black (air), surrounded by white boneand located on either side of the nose. If fluid is present in the sinus, itlooks white instead of black. The presence of fluid may be due to afracture and should alert you to check the radiographs carefully for afracture on the same side of the face.
BBaassiicc IInniittiiaall TTrreeaattmmeenntt If the patient has a fracture of the jaw with laceration of the overlyingmucosa, start antibiotics—usually penicillin. The patient also shouldrinse the mouth with salt water several times each day to decrease bac-terial content. These interventions are necessary to decrease the chancefor infection of the bone.
To decrease swelling: When the patient is lying in bed, the headshould be elevated with pillows or by raising the head of the bed. Thepatient should avoid bending and heavy lifting, which can worsenfacial swelling. The application of cool compresses to the face alsohelps to decrease swelling.
If the patient has a significant facial fracture, especially with involve-ment of tooth-bearing bone, it is best to transfer the patient to a facilitywhere specialty help is available. If transfer is impossible, most mid-face fractures will heal, although the patient’s appearance may be al-tered significantly.
Patients with a mandibular fracture and reasonably aligned teethwho can open and close the mouth easily can be treated with a soft dietfor 4–6 weeks.
In contrast, patients with an unstable mandibular fracture (i.e., withmobile bone segments or inablity to open and close the mouth effec-tively) have a significant amount of pain and are unable to eat. Thistype of injury heals poorly without reduction of the fracture and im-mobilization of the jaws. Without proper treatment, the patient may beleft with permanent pain and difficulty in eating.
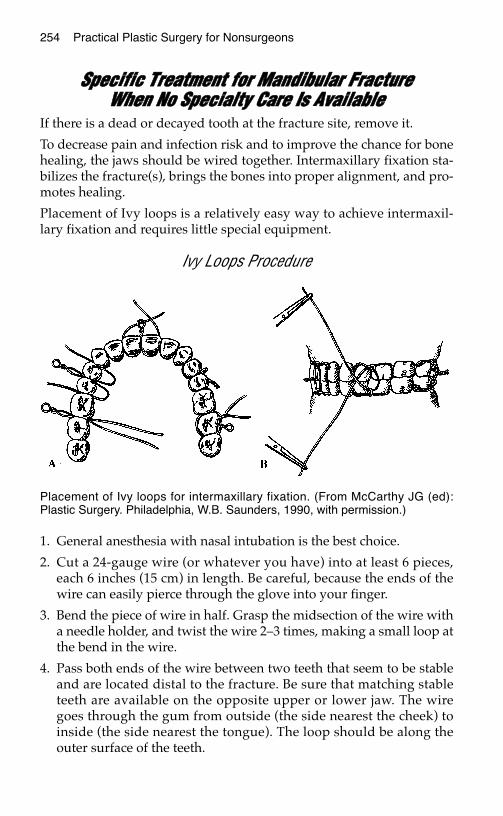
254 Practical Plastic Surgery for Nonsurgeons
SSppeecciiffiicc TTrreeaattmmeenntt ffoorr MMaannddiibbuullaarr FFrraaccttuurree WWhheenn NNoo SSppeecciiaallttyy CCaarree IIss AAvvaaiillaabbllee
If there is a dead or decayed tooth at the fracture site, remove it.
To decrease pain and infection risk and to improve the chance for bonehealing, the jaws should be wired together. Intermaxillary fixation sta-bilizes the fracture(s), brings the bones into proper alignment, and pro-motes healing.
Placement of Ivy loops is a relatively easy way to achieve intermaxil-lary fixation and requires little special equipment.
Ivy Loops Procedure
1. General anesthesia with nasal intubation is the best choice.
2. Cut a 24-gauge wire (or whatever you have) into at least 6 pieces,each 6 inches (15 cm) in length. Be careful, because the ends of thewire can easily pierce through the glove into your finger.
3. Bend the piece of wire in half. Grasp the midsection of the wire witha needle holder, and twist the wire 2–3 times, making a small loop atthe bend in the wire.
4. Pass both ends of the wire between two teeth that seem to be stableand are located distal to the fracture. Be sure that matching stableteeth are available on the opposite upper or lower jaw. The wiregoes through the gum from outside (the side nearest the cheek) toinside (the side nearest the tongue). The loop should be along theouter surface of the teeth.
Placement of Ivy loops for intermaxillary fixation. (From McCarthy JG (ed):Plastic Surgery. Philadelphia, W.B. Saunders, 1990, with permission.)
Facial Fractures 255
5. Take one end of the wire and wrap it around the tooth in front bypassing it through the gum, going from inside to outside.
6. Wrap the other end of the wire around the tooth behind in thesame manner. Both wire ends should be on the outside of the teeth.
7. Pull on the ends to keep the wire snug along the teeth.
8. Pass one wire end through the loop.
9. Bring the wire ends together, and manually twist them in clock-wise direction once or twice.
10. Use a needle holder to grasp the twisted wire a few centimeters awayfrom the gum. Pull up on the needle holder, and twist the wire in aclockwise fashion until the wire seems snug. Look closely at the wirewhile doing so. If the appearance of the wire changes from shiny todull, stop—or you will break the wire and have to start again.
11. Repeat this process on the corresponding teeth on the opposite jawand on teeth on the other side of the fracture. You will need to placethe wires around at least 4 pairs of teeth.
12. Use a wire cutter to shorten the twisted wire ends to a length of 1cm. Bend the wire into the surface of the gum so that the wire endsdo not cut into the cheek mucosa.
13. When all of the wires have been placed, bring the patient’s jaws to-gether and try to line up the teeth. Be sure that the tongue is notcaught between the teeth.
14. Use additional wire to connect each pair of loops and thereby bringthe top and bottom jaws together. This technique immobilizes thejaws and fracture sites. Twist the wire (as previously described) inplace.
15. The jaws should stay wired together for approximately 6 weeks.To ensure adequate nutrition, the patient should eat pureed foodsand drink lots of liquids. Most patients lose weight. Encourage pa-tients to ingest sufficient calories. Be sure to discourage smoking.Poor nutrition and tobacco use impair fracture healing.
16. The teeth should be carefully brushed at least 1–2 times each day,and the mouth should be rinsed with salt water after meals andbefore going to bed.
17. When pain is no longer present at the fracture site (usually after4–6 weeks), remove the connecting wires and allow the patient toeat nothing harder than soft foods for an additional 2–3 weeks.
18. If the patient develops pain at the fracture site, reconnect the jawsfor another 2–3 weeks.

256 Practical Plastic Surgery for Nonsurgeons
19. If, after removing the connecting wires, the patient can eat and thefracture site remains pain-free, remove the wires from the teeth.
Note: When the connecting wires are first removed, the patient’s abil-ity to open the mouth will be limited. This problem will improve overthe subsequent days and weeks.
BBiibblliiooggrraapphhyy1. Manson PN: Facial Injuries. In McCarthy JG (ed): Plastic Surgery. Philadelphia, W.B.
Saunders, 1990, pp 867–1141.2. Markowitz BL, Sinow JD, Kawamoto HK Jr, et al: Prospective comparison of axial
computed tomography and standard and panoramic radiographs in the diagnosis ofmandibular fractures. Ann Plast Surg 42:163–169, 1999.
3. Plaiser BR, Punjabi AP, Super DM, Haug RH: The relationship between facial frac-tures and death from neurologic injury. J Oral Maxillofac Surg 58:708–712, 2000.
4. Sinclair D, Schwartz M, Gruss J, McLellan B: A retrospective review of the relationshipbetween facial fractures, head injuries, and cervical spine injuries. J Emerg Med6:109–112, 1988.
TTHHEE NNOORRMMAALL HHAANNDD EEXXAAMM
For most people, good hand function is essential for day-to-day living,as well as the ability to support a family. Especially in areas that have aweak economic safety net, even minor hand injuries can have a dispro-portionately devastating effect on individual well-being.
Effective, early treatment of hand injuries can produce dramatic bene-fits in the final outcome of hand function. Conversely, lack of properearly treatment may cause a seemingly trivial injury to result in severelimitation of hand function and permanent disability.
The first step in providing optimal care of a hand injury is to know thebasic principles of normal hand function, which are described in thischapter. The following chapters explain how to evaluate an injuredhand and detail the treatment of specific hand injuries.
AAnnaattoommiicc DDeeffiinniittiioonnssIt is important to describe the hand in anatomic position: the arms areat the patient’s sides with the palms facing forward so that the littlefinger is medial (also described as ulnar), next to the body, and thethumb is lateral (also described as radial), away from the body. Thedorsal surface is the back of the hand, where the extensor tendons arelocated, and the volar surface is the palmar/front surface of the hand,where the flexor tendons are located.
Proximal means closer to the heart, and distal means farther away.
The thenar eminence represents the soft tissue bulk on the volar sur-face of the hand just proximal to the thumb; it includes the intrinsicmuscles to the thumb.
257
Chapter 26
KKEEYY FFIIGGUURREESS::Volar landmarks Intrinsic musclesSensory innervation Vascular supplyFDS motor function Finger rotationalFDP tendon function deformityThumb opposition
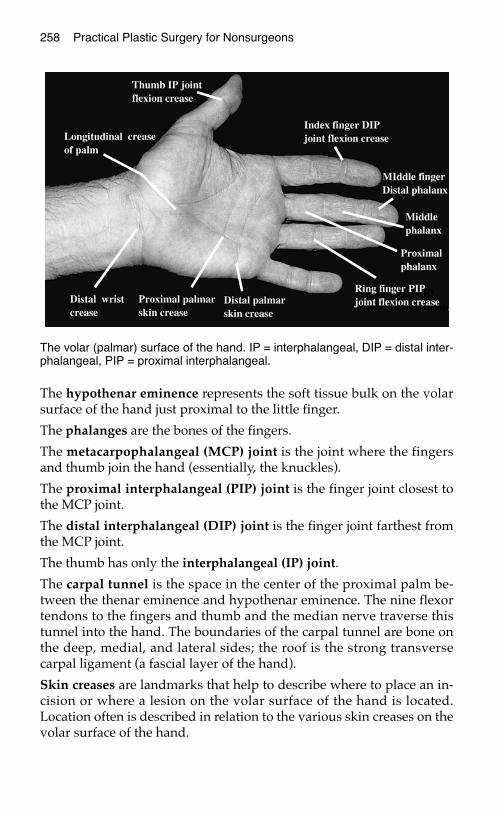
258 Practical Plastic Surgery for Nonsurgeons
The hypothenar eminence represents the soft tissue bulk on the volarsurface of the hand just proximal to the little finger.
The phalanges are the bones of the fingers.
The metacarpophalangeal (MCP) joint is the joint where the fingersand thumb join the hand (essentially, the knuckles).
The proximal interphalangeal (PIP) joint is the finger joint closest tothe MCP joint.
The distal interphalangeal (DIP) joint is the finger joint farthest fromthe MCP joint.
The thumb has only the interphalangeal (IP) joint.
The carpal tunnel is the space in the center of the proximal palm be-tween the thenar eminence and hypothenar eminence. The nine flexortendons to the fingers and thumb and the median nerve traverse thistunnel into the hand. The boundaries of the carpal tunnel are bone onthe deep, medial, and lateral sides; the roof is the strong transversecarpal ligament (a fascial layer of the hand).
Skin creases are landmarks that help to describe where to place an in-cision or where a lesion on the volar surface of the hand is located.Location often is described in relation to the various skin creases on thevolar surface of the hand.
The volar (palmar) surface of the hand. IP = interphalangeal, DIP = distal inter-phalangeal, PIP = proximal interphalangeal.
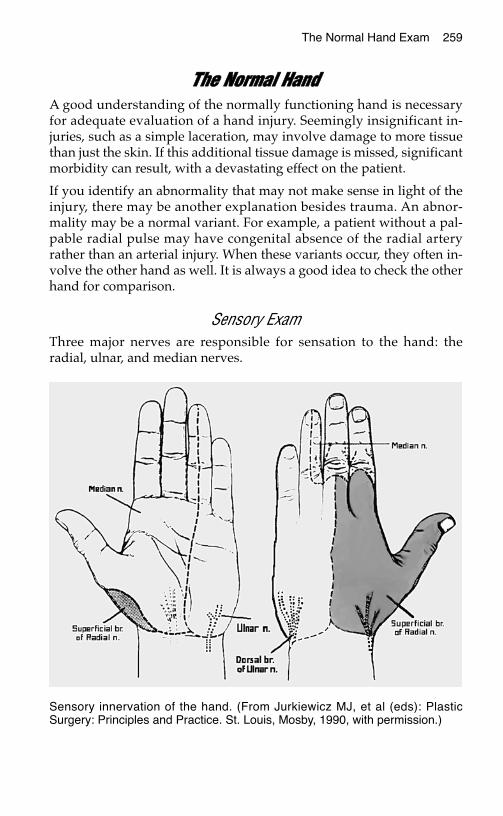
The Normal Hand Exam 259
TThhee NNoorrmmaall HHaannddA good understanding of the normally functioning hand is necessaryfor adequate evaluation of a hand injury. Seemingly insignificant in-juries, such as a simple laceration, may involve damage to more tissuethan just the skin. If this additional tissue damage is missed, significantmorbidity can result, with a devastating effect on the patient.
If you identify an abnormality that may not make sense in light of theinjury, there may be another explanation besides trauma. An abnor-mality may be a normal variant. For example, a patient without a pal-pable radial pulse may have congenital absence of the radial arteryrather than an arterial injury. When these variants occur, they often in-volve the other hand as well. It is always a good idea to check the otherhand for comparison.
Sensory ExamThree major nerves are responsible for sensation to the hand: theradial, ulnar, and median nerves.
Sensory innervation of the hand. (From Jurkiewicz MJ, et al (eds): PlasticSurgery: Principles and Practice. St. Louis, Mosby, 1990, with permission.)
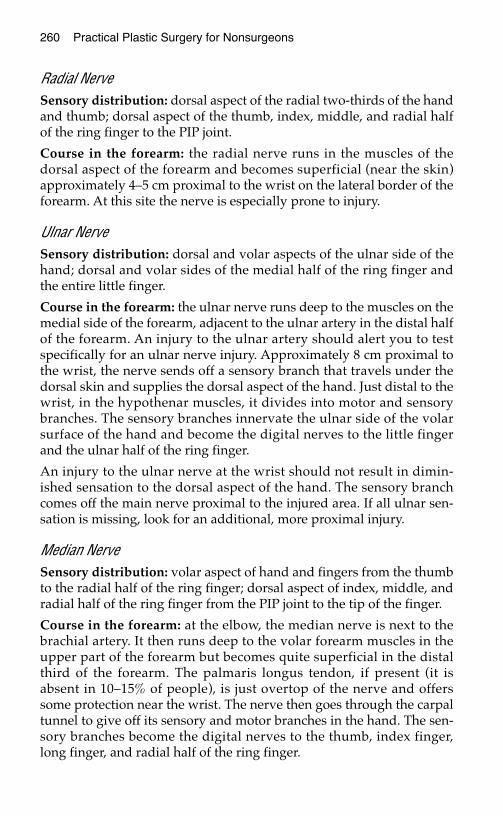
260 Practical Plastic Surgery for Nonsurgeons
Radial NerveSensory distribution: dorsal aspect of the radial two-thirds of the handand thumb; dorsal aspect of the thumb, index, middle, and radial halfof the ring finger to the PIP joint.
Course in the forearm: the radial nerve runs in the muscles of thedorsal aspect of the forearm and becomes superficial (near the skin)approximately 4–5 cm proximal to the wrist on the lateral border of theforearm. At this site the nerve is especially prone to injury.
Ulnar NerveSensory distribution: dorsal and volar aspects of the ulnar side of thehand; dorsal and volar sides of the medial half of the ring finger andthe entire little finger.
Course in the forearm: the ulnar nerve runs deep to the muscles on themedial side of the forearm, adjacent to the ulnar artery in the distal halfof the forearm. An injury to the ulnar artery should alert you to testspecifically for an ulnar nerve injury. Approximately 8 cm proximal tothe wrist, the nerve sends off a sensory branch that travels under thedorsal skin and supplies the dorsal aspect of the hand. Just distal to thewrist, in the hypothenar muscles, it divides into motor and sensorybranches. The sensory branches innervate the ulnar side of the volarsurface of the hand and become the digital nerves to the little fingerand the ulnar half of the ring finger.
An injury to the ulnar nerve at the wrist should not result in dimin-ished sensation to the dorsal aspect of the hand. The sensory branchcomes off the main nerve proximal to the injured area. If all ulnar sen-sation is missing, look for an additional, more proximal injury.
Median NerveSensory distribution: volar aspect of hand and fingers from the thumbto the radial half of the ring finger; dorsal aspect of index, middle, andradial half of the ring finger from the PIP joint to the tip of the finger.
Course in the forearm: at the elbow, the median nerve is next to thebrachial artery. It then runs deep to the volar forearm muscles in theupper part of the forearm but becomes quite superficial in the distalthird of the forearm. The palmaris longus tendon, if present (it isabsent in 10–15% of people), is just overtop of the nerve and offerssome protection near the wrist. The nerve then goes through the carpaltunnel to give off its sensory and motor branches in the hand. The sen-sory branches become the digital nerves to the thumb, index finger,long finger, and radial half of the ring finger.

The Normal Hand Exam 261
Motor ExamMany people do not realize that a large part of hand and finger move-ment is governed by muscles and tendons originating in the forearm.To move the hand and fingers requires proper functioning of bothmuscles originating in the forearm (extrinsic muscles) and musclesoriginating in the hand itself (intrinsic muscles).
If limitation in movement is due to dysfunction of an extrinsic muscle,you must determine whether the injury involves the distal tendon orthe nerve supply. Dysfunction of the intrinsic muscles usually is due toan injury to the nerve supply.
If the hand or fingers do not flex (bend) or extend (straighten) appro-priately and with adequate strength compared with the noninjuredhand or fingers, you must determine the precise cause so that appro-priate treatment can be given. This process is detailed and methodical.However, with practice and an understanding of what you are testing,the motor exam takes only a few minutes to complete.
Extrinsic Muscle/Tendon Evaluation The flexor digitorum superficialis (FDS) inserts into the middlephalanx of each finger. It is tested by blocking the finger MCP jointand asking the patient to flex the PIP joint. To block the MCP joint,hold the proximal phalanx in extension just distal to the MCP joint,so that the MCP joint is unable to bend when the patient tries to flexthe finger.
Testing flexor digitorum superficialis function.
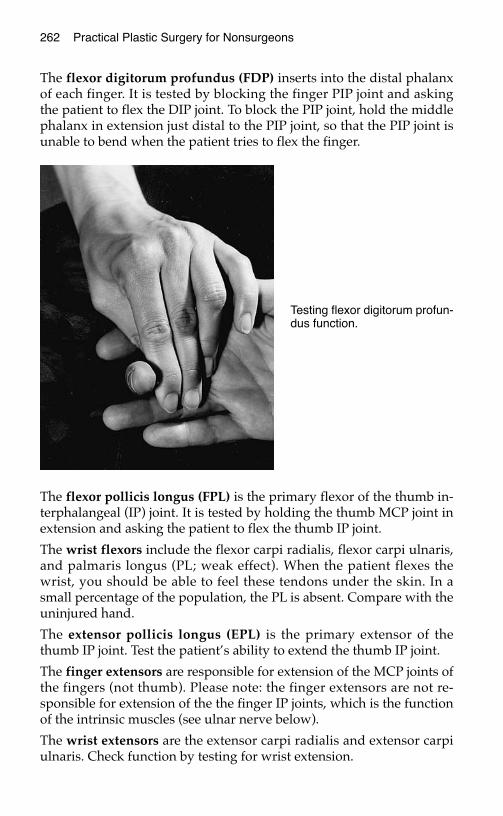
The flexor digitorum profundus (FDP) inserts into the distal phalanxof each finger. It is tested by blocking the finger PIP joint and askingthe patient to flex the DIP joint. To block the PIP joint, hold the middlephalanx in extension just distal to the PIP joint, so that the PIP joint isunable to bend when the patient tries to flex the finger.
The flexor pollicis longus (FPL) is the primary flexor of the thumb in-terphalangeal (IP) joint. It is tested by holding the thumb MCP joint inextension and asking the patient to flex the thumb IP joint.
The wrist flexors include the flexor carpi radialis, flexor carpi ulnaris,and palmaris longus (PL; weak effect). When the patient flexes thewrist, you should be able to feel these tendons under the skin. In asmall percentage of the population, the PL is absent. Compare with theuninjured hand.
The extensor pollicis longus (EPL) is the primary extensor of thethumb IP joint. Test the patient’s ability to extend the thumb IP joint.
The finger extensors are responsible for extension of the MCP joints ofthe fingers (not thumb). Please note: the finger extensors are not re-sponsible for extension of the the finger IP joints, which is the functionof the intrinsic muscles (see ulnar nerve below).
The wrist extensors are the extensor carpi radialis and extensor carpiulnaris. Check function by testing for wrist extension.
262 Practical Plastic Surgery for Nonsurgeons
Testing flexor digitorum profun-dus function.

Evaluation of Extrinsic Muscle/Intrinsic Muscle Nerve Supply
Radial NerveHand: no motor innervation to the intrinsic muscles.
Forearm: innervates the forearm muscles that provide extension of thewrist, thumb, and all finger MCP joints.
Median NerveHand: primarily thumb opposition (bringing the thumb tip to meet thetip of each finger).
Forearm: innervates the muscles that flex the thumb, wrist (FCR), allPIP joints, and DIP joints of the index and middle fingers.
Ulnar NerveHand: the ulnar nerve provides the dominant innervation to the intrin-sic muscles of the hand: flexion of the MCP joints and extension of theIP joints of the fingers and adduction of the thumb. It is best to checkthe first dorsal interossei (the muscle along the index metacarpal bonein the thumb web). Ask the patient to abduct the index finger againstresistance. Alternatively, you may ask the patient to hold a piece ofpaper between adjacent fingers that are fully extended.
Forearm: innervates the muscles that flex the wrist (flexor carpi ul-naris) and DIP joints of the ring and little fingers.
The Normal Hand Exam 263
To test function of the motor branch of the median nerve, bring the thumb andlittle finger together in opposition. Keep the thumb IP joint at 0° so that you donot confuse action of the flexor pollicis longus with action of the thenar muscles.
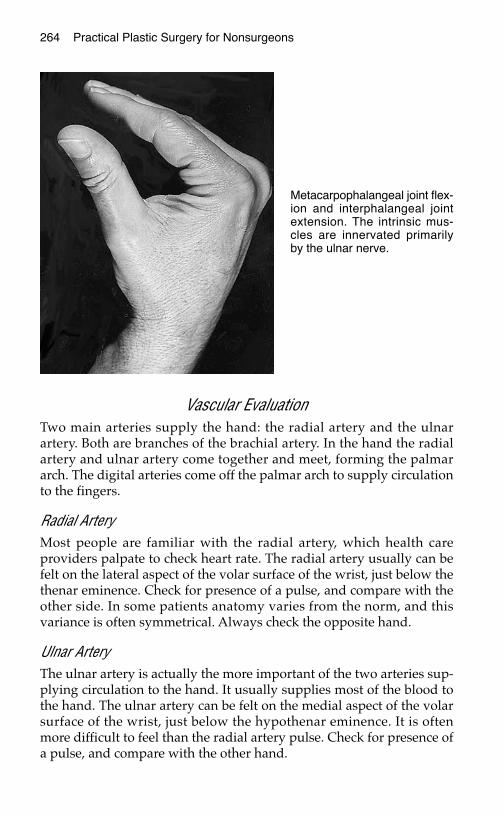
Vascular EvaluationTwo main arteries supply the hand: the radial artery and the ulnarartery. Both are branches of the brachial artery. In the hand the radialartery and ulnar artery come together and meet, forming the palmararch. The digital arteries come off the palmar arch to supply circulationto the fingers.
Radial ArteryMost people are familiar with the radial artery, which health careproviders palpate to check heart rate. The radial artery usually can befelt on the lateral aspect of the volar surface of the wrist, just below thethenar eminence. Check for presence of a pulse, and compare with theother side. In some patients anatomy varies from the norm, and thisvariance is often symmetrical. Always check the opposite hand.
Ulnar ArteryThe ulnar artery is actually the more important of the two arteries sup-plying circulation to the hand. It usually supplies most of the blood tothe hand. The ulnar artery can be felt on the medial aspect of the volarsurface of the wrist, just below the hypothenar eminence. It is oftenmore difficult to feel than the radial artery pulse. Check for presence ofa pulse, and compare with the other hand.
264 Practical Plastic Surgery for Nonsurgeons
Metacarpophalangeal joint flex-ion and interphalangeal jointextension. The intrinsic mus-cles are innervated primarilyby the ulnar nerve.
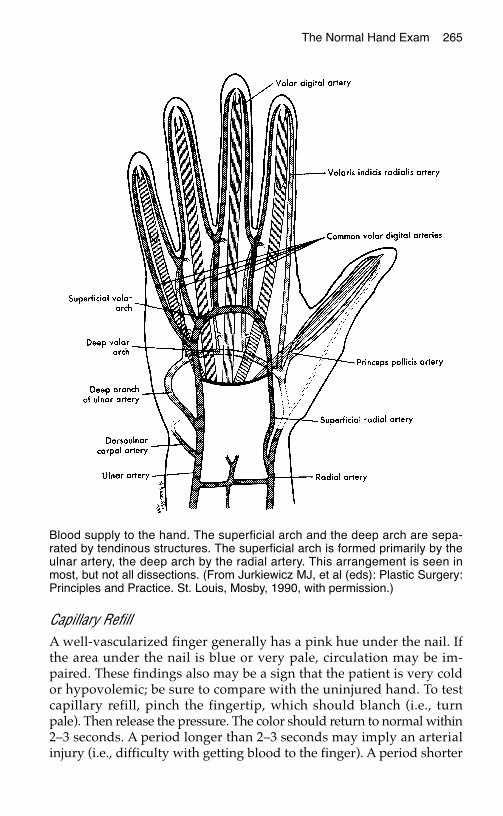
The Normal Hand Exam 265
Capillary RefillA well-vascularized finger generally has a pink hue under the nail. Ifthe area under the nail is blue or very pale, circulation may be im-paired. These findings also may be a sign that the patient is very coldor hypovolemic; be sure to compare with the uninjured hand. To testcapillary refill, pinch the fingertip, which should blanch (i.e., turnpale). Then release the pressure. The color should return to normal within2–3 seconds. A period longer than 2–3 seconds may imply an arterialinjury (i.e., difficulty with getting blood to the finger). A period shorter
Blood supply to the hand. The superficial arch and the deep arch are sepa-rated by tendinous structures. The superficial arch is formed primarily by theulnar artery, the deep arch by the radial artery. This arrangement is seen inmost, but not all dissections. (From Jurkiewicz MJ, et al (eds): Plastic Surgery:Principles and Practice. St. Louis, Mosby, 1990, with permission.)
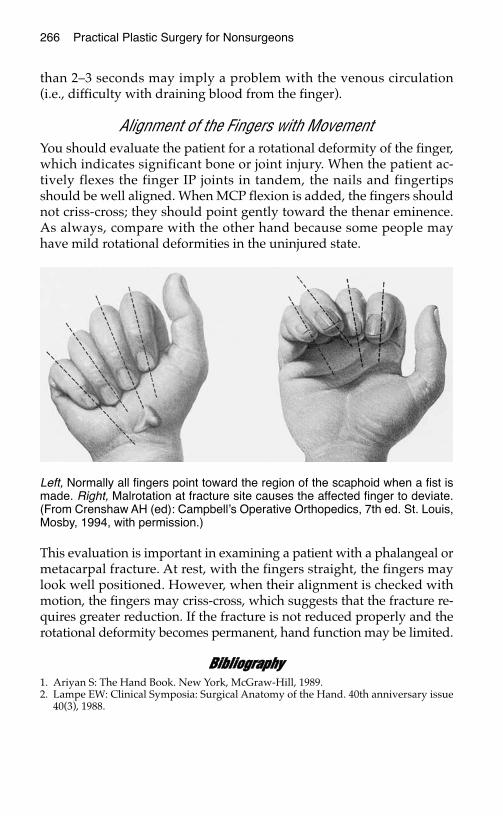
than 2–3 seconds may imply a problem with the venous circulation(i.e., difficulty with draining blood from the finger).
Alignment of the Fingers with MovementYou should evaluate the patient for a rotational deformity of the finger,which indicates significant bone or joint injury. When the patient ac-tively flexes the finger IP joints in tandem, the nails and fingertipsshould be well aligned. When MCP flexion is added, the fingers shouldnot criss-cross; they should point gently toward the thenar eminence.As always, compare with the other hand because some people mayhave mild rotational deformities in the uninjured state.
This evaluation is important in examining a patient with a phalangeal ormetacarpal fracture. At rest, with the fingers straight, the fingers maylook well positioned. However, when their alignment is checked withmotion, the fingers may criss-cross, which suggests that the fracture re-quires greater reduction. If the fracture is not reduced properly and therotational deformity becomes permanent, hand function may be limited.
BBiibblliiooggrraapphhyy1. Ariyan S: The Hand Book. New York, McGraw-Hill, 1989.2. Lampe EW: Clinical Symposia: Surgical Anatomy of the Hand. 40th anniversary issue
40(3), 1988.
266 Practical Plastic Surgery for Nonsurgeons
Left, Normally all fingers point toward the region of the scaphoid when a fist ismade. Right, Malrotation at fracture site causes the affected finger to deviate.(From Crenshaw AH (ed): Campbell’s Operative Orthopedics, 7th ed. St. Louis,Mosby, 1994, with permission.)

EEVVAALLUUAATTIINNGG TTHHEE IINNJJUURREEDD HHAANNDD
Patients with hand injuries have many different presentations, rangingfrom a swollen, tender finger or a small laceration on the palm of thehand to a severely mangled hand. This chapter explains how to evalu-ate patients with a hand injury. It is important to do a complete examof every injured hand so that no important injuries are missed.As usual, the first priority is to control life-threatening hemorrhage.Apply point pressure over the wound. This does not mean to placegauze in the wound and wrap the area with an Ace bandage. It meansto place a wad of gauze over the injured area and to apply firm pointpressure to the injured site with two fingers. The pressure may need tobe maintained for several minutes before the bleeding stops. In pa-tients with arterial bleeding, exploration is required.If the patient has a rapid, exsanguinating hemorrhage that cannot becontrolled with point pressure, place a tourniquet or blood pressurecuff proximal (closer to the heart) to the injury. If a blood pressure cuffis used, it must be inflated to at least 50 mmHg above the patient’s sys-tolic pressure.Caution: Tourniquets hurt and place the tissues at risk for ischemicinjury. Optimally, the tourniquet should not be left in place for morethan 15–20 minutes. If a tourniquet is needed, so is urgent operativeexploration.For patients with a non–life-threatening injury, the following ele-ments are crucial to the evaluation of an injured hand.
IImmppoorrttaanntt EElleemmeennttss ooff tthhee HHiissttoorryyAs discussed more thoroughly in chapter 6, “Evaluation of an AcuteWound,” it is important to obtain a good history from the patient.
267
Chapter 27
KKEEYY FFIIGGUURREESS::Normal postureForearm injury involving flexor tendonsFlexor tendon injury in the hand
268 Practical Plastic Surgery for Nonsurgeons
Information about what caused the injury may have important impli-cations for treatment.
Nature of InjuryHuman bites are very dirty wounds. Never close a human bite to thehand. Such injuries require specific antibiotics, and surgical explo-ration and wash-out in the operating room may be necessary.
Animal bites. About 80% of cat bites become infected compared with5% of dog bite wounds. Remember to ask about the animal’s rabiesvaccination status.
Glass wound. Did the glass shatter? Are foreign bodies retained in thewound?
Knife/sharp object wound. The object may have penetrated moredeeply than you think.
Dirty wound. Worry about particulate matter in the wound, and checktetanus immunization status.
Burn. Is injury due to thermal, chemical, or electrical burn? Each hasdifferent implications. See chapters 20, “Burns,” and 34, “Hand Burns.”
Component of a crush injury. Crush mechanisms involve a more ex-tensive injury than you may initially expect. See chapter 35, “HandCrush Injury and Compartment Syndrome.”
Other Important Questions1. Is the injured hand the dominant hand? If the injury involves the
dominant hand, treatment outcome is especially important. Thisconsideration may affect which treatment modalities you select.
2. What is the patient’s tetanus immunization status? Update as needed.See chapter 6, “Evaluation of an Acute Wound,” for tetanus boosterrecommendations.
3. Did pulsatile bleeding occur at the time of injury? Pulsatile bleeding(blood squirting out with some force as opposed to a continuous ooze)implies an arterial injury and usually mandates surgical exploration.
4. Was any deformity noted immediately after injury? Ask about animmediate deformity that has since disappeared. Many patients areable to reduce (realign) a dislocated joint right after the injury sothat it appears normal at the time of exam. However, the injuredfinger may still require protective splinting even if it appears to bein its normal position.

Evaluating the Injured Hand 269
5. Does the patient have a history of previous trauma to the hand? Aprevious injury may be the cause of an abnormal exam instead ofthe acute injury. Be sure to ask whether the functional deficit or con-tour abnormality identified on the exam was present before the cur-rent trauma.
PPhhyyssiiccaall EExxaammiinnaattiioonn ooff tthhee IInnjjuurreedd HHaannddRemove immediately all rings that the patient is wearing. Injury to ahand often leads to significant swelling. The rings may become quitetight, possibly to the point that they cut off circulation to the finger. Ifthe ring is tight, lubricating jelly or antibiotic ointment is often useful.If this strategy is unsuccessful, the ring may need to be cut off with aring cutter or strong wire cutter.
Full evaluation of the injured hand may necessitate anesthesia to con-trol the pain so that the patient can cooperate with the exam. See chap-ter 3, “Local Anesthesia,” for specific information. Be sure to testsensation distal to the injury before administering local anesthetic. Once youhave given the anesthetic, it is too late to test for sensory function.
Vascular Exam
Active BleedingIs the wound actively bleeding during the exam? If so, is the bleedingpulsatile, with bright red blood (probable arterial injury), or continu-ous, with darker blood (probable venous injury)?
Capillary RefillCheck for capillary refill of the digits distal to the injury. Is the tissuepink, indicating sufficient circulation, or is it bluish or pale, indicatinginadequate circulation to the distal tissue?
Radial and Ulnar PulsesMake sure that the radial and ulnar pulses are intact, even if capillaryrefill of the hand seems normal. Missing an arterial injury can haveserious consequences (see chapter 33, “Nerve and Vascular Injuries ofthe Hand”).
Note what happens when you press on either the radial or ulnar artery.Does the pulse of the other artery disappear? In patients with an injuryto the radial artery in the mid-forearm, for example, you may still feel apulse in the radial artery at the wrist. In most people the radial and ulnararteries come together in the hand to form the palmar arch. Because of
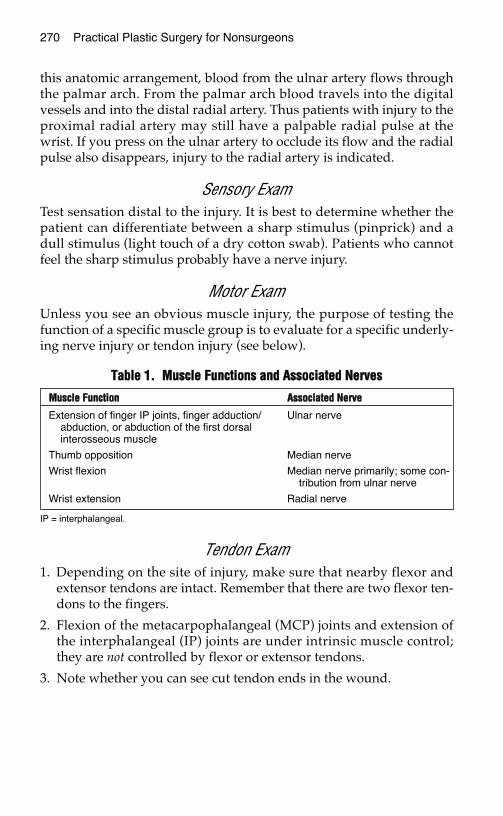
270 Practical Plastic Surgery for Nonsurgeons
this anatomic arrangement, blood from the ulnar artery flows throughthe palmar arch. From the palmar arch blood travels into the digitalvessels and into the distal radial artery. Thus patients with injury to theproximal radial artery may still have a palpable radial pulse at thewrist. If you press on the ulnar artery to occlude its flow and the radialpulse also disappears, injury to the radial artery is indicated.
Sensory ExamTest sensation distal to the injury. It is best to determine whether thepatient can differentiate between a sharp stimulus (pinprick) and adull stimulus (light touch of a dry cotton swab). Patients who cannotfeel the sharp stimulus probably have a nerve injury.
Motor ExamUnless you see an obvious muscle injury, the purpose of testing thefunction of a specific muscle group is to evaluate for a specific underly-ing nerve injury or tendon injury (see below).
Tendon Exam1. Depending on the site of injury, make sure that nearby flexor and
extensor tendons are intact. Remember that there are two flexor ten-dons to the fingers.
2. Flexion of the metacarpophalangeal (MCP) joints and extension ofthe interphalangeal (IP) joints are under intrinsic muscle control;they are not controlled by flexor or extensor tendons.
3. Note whether you can see cut tendon ends in the wound.
TTaabbllee 11.. MMuussccllee FFuunnccttiioonnss aanndd AAssssoocciiaatteedd NNeerrvveess
IP = interphalangeal.
MMuussccllee FFuunnccttiioonn AAssssoocciiaatteedd NNeerrvvee
Extension of finger IP joints, finger adduction/ Ulnar nerveabduction, or abduction of the first dorsalinterosseous muscle
Thumb opposition Median nerve
Wrist flexion Median nerve primarily; some con-tribution from ulnar nerve
Wrist extension Radial nerve
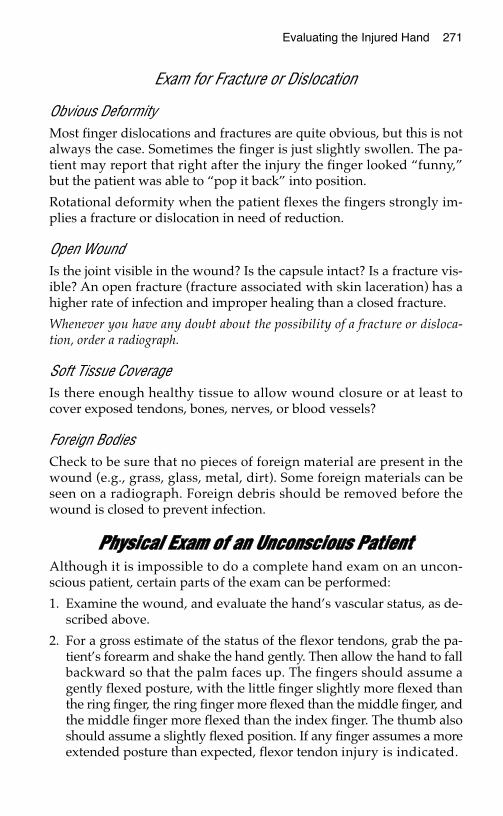
Evaluating the Injured Hand 271
Exam for Fracture or Dislocation
Obvious DeformityMost finger dislocations and fractures are quite obvious, but this is notalways the case. Sometimes the finger is just slightly swollen. The pa-tient may report that right after the injury the finger looked “funny,”but the patient was able to “pop it back” into position.
Rotational deformity when the patient flexes the fingers strongly im-plies a fracture or dislocation in need of reduction.
Open WoundIs the joint visible in the wound? Is the capsule intact? Is a fracture vis-ible? An open fracture (fracture associated with skin laceration) has ahigher rate of infection and improper healing than a closed fracture.
Whenever you have any doubt about the possibility of a fracture or disloca-tion, order a radiograph.
Soft Tissue CoverageIs there enough healthy tissue to allow wound closure or at least tocover exposed tendons, bones, nerves, or blood vessels?
Foreign BodiesCheck to be sure that no pieces of foreign material are present in thewound (e.g., grass, glass, metal, dirt). Some foreign materials can beseen on a radiograph. Foreign debris should be removed before thewound is closed to prevent infection.
PPhhyyssiiccaall EExxaamm ooff aann UUnnccoonnsscciioouuss PPaattiieennttAlthough it is impossible to do a complete hand exam on an uncon-scious patient, certain parts of the exam can be performed:
1. Examine the wound, and evaluate the hand’s vascular status, as de-scribed above.
2. For a gross estimate of the status of the flexor tendons, grab the pa-tient’s forearm and shake the hand gently. Then allow the hand to fallbackward so that the palm faces up. The fingers should assume agently flexed posture, with the little finger slightly more flexed thanthe ring finger, the ring finger more flexed than the middle finger, andthe middle finger more flexed than the index finger. The thumb alsoshould assume a slightly flexed position. If any finger assumes a moreextended posture than expected, flexor tendon injury is indicated.
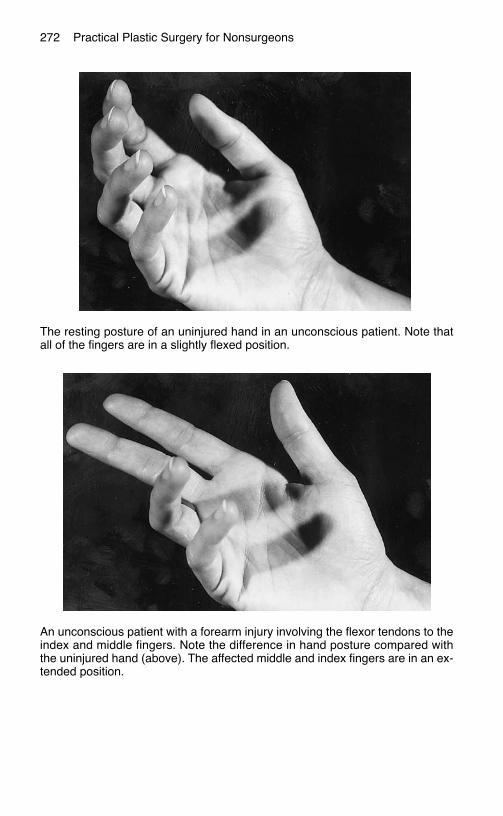
272 Practical Plastic Surgery for Nonsurgeons
The resting posture of an uninjured hand in an unconscious patient. Note thatall of the fingers are in a slightly flexed position.
An unconscious patient with a forearm injury involving the flexor tendons to theindex and middle fingers. Note the difference in hand posture compared withthe uninjured hand (above). The affected middle and index fingers are in an ex-tended position.
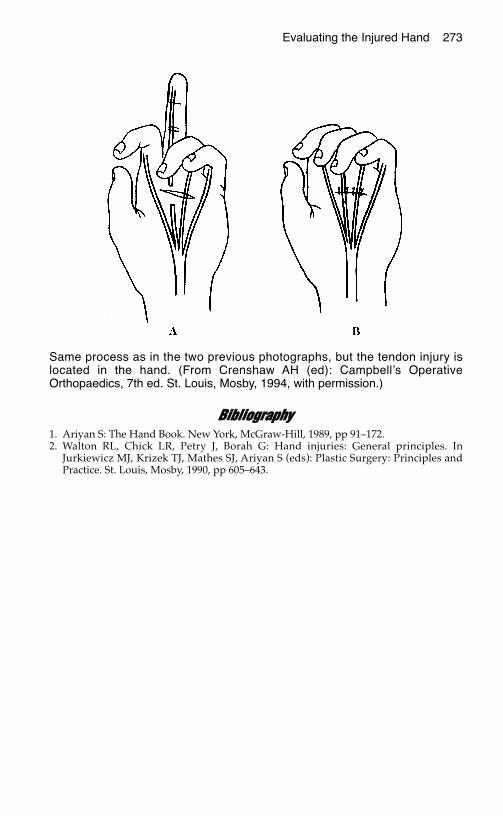
Evaluating the Injured Hand 273
BBiibblliiooggrraapphhyy1. Ariyan S: The Hand Book. New York, McGraw-Hill, 1989, pp 91–172.2. Walton RL, Chick LR, Petry J, Borah G: Hand injuries: General principles. In
Jurkiewicz MJ, Krizek TJ, Mathes SJ, Ariyan S (eds): Plastic Surgery: Principles andPractice. St. Louis, Mosby, 1990, pp 605–643.
Same process as in the two previous photographs, but the tendon injury islocated in the hand. (From Crenshaw AH (ed): Campbell’s OperativeOrthopaedics, 7th ed. St. Louis, Mosby, 1994, with permission.)
HHAANNDD SSPPLLIINNTTIINNGG AANNDD GGEENNEERRAALL AAFFTTEERRCCAARREE
SSpplliinnttiinnggThe hand and fingers often need a period of immobilization afterinjury to allow the tissues to heal properly. For most hand injuries, asplint rather than a cast is the method of choice.
Splint vs. CastA cast immobilizes the injured hand by completely surrounding it withhard, inflexible materials (plaster or fiberglass). The inflexibility of a castcan cause serious problems if the injured tissues swell or if the cast isplaced too tightly. Potential problems include skin loss due to pressure onthe skin from the tight cast or possibly development of a compartmentsyndrome (see chapter 55, “Hand Crush Injury and Compartment Syn-drome”) if the tightness compromises blood circulation to the extremity.
A splint is essentially a half cast used for immobilization. The extrem-ity is not completely bound by inflexible materials. Therefore, a splintis safer than a cast because it usually can accommodate tissue swellingwithout becoming too tight.
MaterialsPlace cotton gauze between each finger to absorb perspiration.
Rolls or sheets of plaster of Paris are used to make the splint. Fiberglassrolls also can be used but are much more expensive than plaster rolls.Fiberglass is used in the same way as plaster for creating a splint.
275
Chapter 28
KKEEYY FFIIGGUURREESS::Neutral position for basic Thumb spica splint
splinting Ulnar gutter splintNeutral position splint Finger immobilizationSplint for flexor tendon injury Proper elevation ofSplint for extensor tendon injured hand
injury
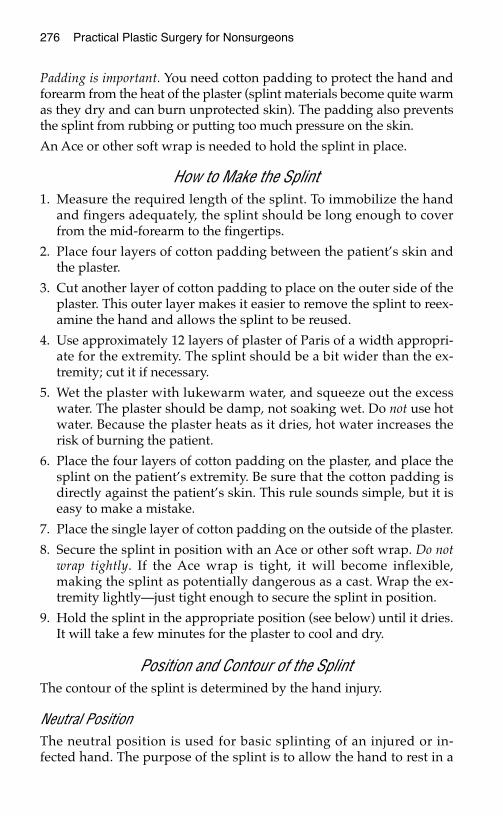
276 Practical Plastic Surgery for Nonsurgeons
Padding is important. You need cotton padding to protect the hand andforearm from the heat of the plaster (splint materials become quite warmas they dry and can burn unprotected skin). The padding also preventsthe splint from rubbing or putting too much pressure on the skin.
An Ace or other soft wrap is needed to hold the splint in place.
How to Make the Splint1. Measure the required length of the splint. To immobilize the hand
and fingers adequately, the splint should be long enough to coverfrom the mid-forearm to the fingertips.
2. Place four layers of cotton padding between the patient’s skin andthe plaster.
3. Cut another layer of cotton padding to place on the outer side of theplaster. This outer layer makes it easier to remove the splint to reex-amine the hand and allows the splint to be reused.
4. Use approximately 12 layers of plaster of Paris of a width appropri-ate for the extremity. The splint should be a bit wider than the ex-tremity; cut it if necessary.
5. Wet the plaster with lukewarm water, and squeeze out the excesswater. The plaster should be damp, not soaking wet. Do not use hotwater. Because the plaster heats as it dries, hot water increases therisk of burning the patient.
6. Place the four layers of cotton padding on the plaster, and place thesplint on the patient’s extremity. Be sure that the cotton padding isdirectly against the patient’s skin. This rule sounds simple, but it iseasy to make a mistake.
7. Place the single layer of cotton padding on the outside of the plaster.
8. Secure the splint in position with an Ace or other soft wrap. Do notwrap tightly. If the Ace wrap is tight, it will become inflexible,making the splint as potentially dangerous as a cast. Wrap the ex-tremity lightly—just tight enough to secure the splint in position.
9. Hold the splint in the appropriate position (see below) until it dries.It will take a few minutes for the plaster to cool and dry.
Position and Contour of the SplintThe contour of the splint is determined by the hand injury.
Neutral PositionThe neutral position is used for basic splinting of an injured or in-fected hand. The purpose of the splint is to allow the hand to rest in a
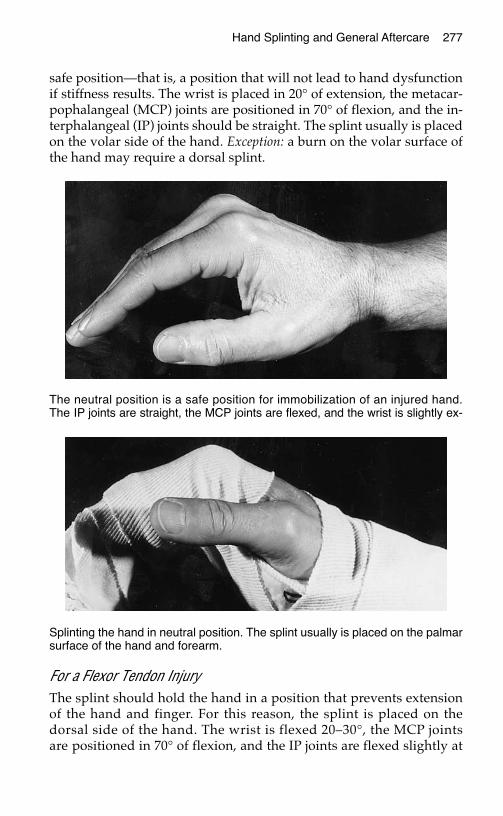
safe position—that is, a position that will not lead to hand dysfunctionif stiffness results. The wrist is placed in 20° of extension, the metacar-pophalangeal (MCP) joints are positioned in 70° of flexion, and the in-terphalangeal (IP) joints should be straight. The splint usually is placedon the volar side of the hand. Exception: a burn on the volar surface ofthe hand may require a dorsal splint.
For a Flexor Tendon InjuryThe splint should hold the hand in a position that prevents extensionof the hand and finger. For this reason, the splint is placed on thedorsal side of the hand. The wrist is flexed 20–30°, the MCP jointsare positioned in 70° of flexion, and the IP joints are flexed slightly at
Hand Splinting and General Aftercare 277
The neutral position is a safe position for immobilization of an injured hand.The IP joints are straight, the MCP joints are flexed, and the wrist is slightly ex-
Splinting the hand in neutral position. The splint usually is placed on the palmarsurface of the hand and forearm.
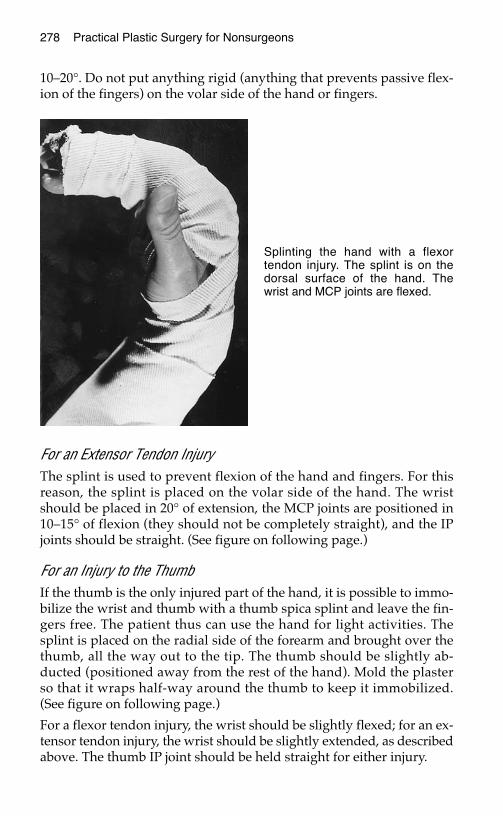
10–20°. Do not put anything rigid (anything that prevents passive flex-ion of the fingers) on the volar side of the hand or fingers.
For an Extensor Tendon InjuryThe splint is used to prevent flexion of the hand and fingers. For thisreason, the splint is placed on the volar side of the hand. The wristshould be placed in 20° of extension, the MCP joints are positioned in10–15° of flexion (they should not be completely straight), and the IPjoints should be straight. (See figure on following page.)
For an Injury to the ThumbIf the thumb is the only injured part of the hand, it is possible to immo-bilize the wrist and thumb with a thumb spica splint and leave the fin-gers free. The patient thus can use the hand for light activities. Thesplint is placed on the radial side of the forearm and brought over thethumb, all the way out to the tip. The thumb should be slightly ab-ducted (positioned away from the rest of the hand). Mold the plasterso that it wraps half-way around the thumb to keep it immobilized.(See figure on following page.)
For a flexor tendon injury, the wrist should be slightly flexed; for an ex-tensor tendon injury, the wrist should be slightly extended, as describedabove. The thumb IP joint should be held straight for either injury.
278 Practical Plastic Surgery for Nonsurgeons
Splinting the hand with a flexortendon injury. The splint is on thedorsal surface of the hand. Thewrist and MCP joints are flexed.

For an Injury to the Little FingerIf the little finger is the only involved finger, it is possible to immobi-lize the wrist and little finger with an ulnar gutter splint and leave therest of the hand free. The patient thus has more use of the hand. Thesplint is placed on the ulnar side of the forearm and hand and then ex-tended just beyond the little finger. Mold the plaster so that it partially
Hand Splinting and General Aftercare 279
Splinting the hand with an extensortendon injury. The splint is on the palmarsurface of the hand. The wrist is ex-tended, and the MCP joints are almost,but not quite, at 10–15° of flexion.
Thumb spica splint. The thumb and wrist are immobilized, but the rest of thefingers are free.

wraps around the little and ring fingers. The ring finger is included toadd extra protection to prevent accidental movement of the littlefinger. The wrist, MCP joints, and IP joints should be positioned aswith flexor or extensor tendon injury, depending on the exact nature ofthe injury to the little finger.
For Injury to a Single Finger Commercially available aluminum splints with foam rubber paddingcan be shaped to the proper position to immobilize a single digit. Thistype of splint is indicated for immobilization of a phalangeal fractureor dislocation. If such splints are not available, plaster with padding ora tongue depressor cut to the appropriate size also can be used.
280 Practical Plastic Surgery for Nonsurgeons
Ulnar gutter splint for the little finger. The little and ring fingers as well as thewrist are immobilized. The thumb and index and middle fingers are free.
When only one finger needs to be immobilized, an aluminum splint is quiteuseful.
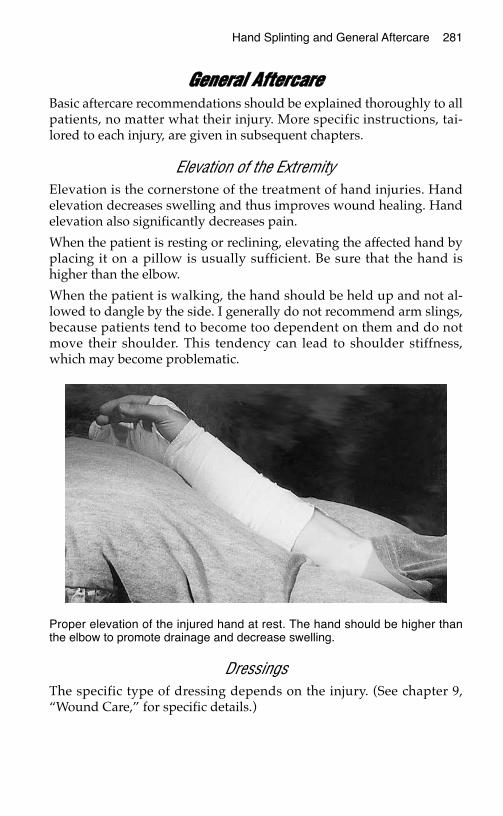
GGeenneerraall AAfftteerrccaarreeBasic aftercare recommendations should be explained thoroughly to allpatients, no matter what their injury. More specific instructions, tai-lored to each injury, are given in subsequent chapters.
Elevation of the ExtremityElevation is the cornerstone of the treatment of hand injuries. Handelevation decreases swelling and thus improves wound healing. Handelevation also significantly decreases pain.
When the patient is resting or reclining, elevating the affected hand byplacing it on a pillow is usually sufficient. Be sure that the hand ishigher than the elbow.
When the patient is walking, the hand should be held up and not al-lowed to dangle by the side. I generally do not recommend arm slings,because patients tend to become too dependent on them and do notmove their shoulder. This tendency can lead to shoulder stiffness,which may become problematic.
DressingsThe specific type of dressing depends on the injury. (See chapter 9,“Wound Care,” for specific details.)
Hand Splinting and General Aftercare 281
Proper elevation of the injured hand at rest. The hand should be higher thanthe elbow to promote drainage and decrease swelling.
282 Practical Plastic Surgery for Nonsurgeons
MotionIt is your responsibility to tell the patient when it is permissible to startmoving the hand and fingers. Specific information is given for differ-ent hand injuries in subsequent chapters. Once patients are allowed tostart moving the injured hand and fingers they should be given in-structions for various ways to exercise the hands.
Passive Range-of-motion ExercisesThe patient (or another person) gently moves the finger joints pas-sively ( i.e., without use of the patient’s own muscle contractions).
Active Range-of-motion ExercisesThe patient should actively flex and extend the entire finger by usingthe muscles of the forearm and hand. To exercise the distal IP joint andprevent stiffness, the patient should hold the finger straight at theproximal IP joint and actively move the distal IP joint.
The above exercises can be easier to do if the patient places his or her handin warm water for a few minutes before attempting the exercises. Warmthallows the fingers to move more easily by making the tissues more supple.The patient can even do the exercises while the hand is soaking.
Duration of SplintingUnless you tell the patient to remove the splint to clean the hand or todo gentle range-of-motion exercises, the splint should be removed onlyunder your supervision. However, be sure to show the patient how towrap the splint in place so that it can be loosened if the patient feelsthat the splint is tight.
Specific information about how long to splint the hand after varioushand injuries is discussed in subsequent chapters.
SmokingVigorously counsel the patient not to smoke during the healingprocess. Smoking considerably reduces blood circulation in the handand thus may lead to unnecessary tissue loss, delayed bone and tendonhealing, and poor functional outcome.
BBiibblliiooggrraapphhyy1. Coppard BM, Lohman H: Introduction to Splinting: A Critical-Thinking and Problem-
Solving Approach. St. Louis, Mosby, 1996.2. Falkenstein N, Weiss-Lessard S: Hand Rehabilitation: A Quick Reference Guide and
Review. St. Louis, Mosby, 1999.
FFIINNGGEERRTTIIPP AANNDD NNAAIILL BBEEDD IINNJJUURRIIEESS
Hand injuries are commonly encountered by health care providersthroughout the world. In the United States alone, the hand is involvedin approximately 10% of all accident cases seen in the emergencydepartment.
Hand injuries are particularly important to treat, because good handfunction frequently is necessary to hold a job and support a family.Specific injuries and their basic evaluation and treatment are discussedin this and subsequent chapters.
Although specialists are required for optimal final treatment of someinjuries, often the care given by the first-line provider has a dramaticeffect on the ultimate outcome. Accurate evaluation and proper initialbasic care can significantly improve outcome and decrease disability.
You should be aware of the basics of treatment in case you find your-self the only health care provider around.
FFiinnggeerrttiipp IInnjjuurriieessFingertip injuries are probably the most commonly encountered handinjury. The best treatment is usually the simplest. A fingertip injury cancause short-term disability but generally should not affect long-termhand function. Improper treatment, however, can result in a stiff fingerand reduce long-term hand function.
Initial CareIt is often useful to start by giving a digital block with either lidocaineor bupivacaine (see chapter 3, “Local Anesthesia”). The block allowsyou to examine and evaluate the finger completely. Although the
283
Chapter 29
KKEEYY FFIIGGUURREESS::Digital tourniquet Thenar flapBone rongeur Repair of nail bedFingernail with hematoma

284 Practical Plastic Surgery for Nonsurgeons
wounds may not be large, fingertip injuries are often quite painful. Itmay be necessary to place a digital tourniquet to control slow bleedingfrom the wound, which prevents a thorough examination.
Digital TourniquetA digital tourniquet is easy to create and makes exam and repair muchsimpler. Do not keep the tourniquet in place for more than 25–30 min-utes. The tourniquet can be made from a surgical glove that is one sizesmaller than the patient’s hand:
1. Cut off the ring or little finger from the glove; then cut off its tip.
2. Put the piece of glove on the injured finger.
3. Roll the cut end of the glove from distal to proximal to force theblood out of the finger and to control bleeding.
Clean the wound with gentle soap and water, and irrigate it withsaline.
Remove all foreign material and dead tissue. To remove grease,Bacitracin or another petrolatum-based antibiotic ointment is oftenuseful.
Digital tourniquet. Left, Cut off the finger from a glove and place it on the in-jured finger. Right, Roll the glove proximally to create the tourniquet.
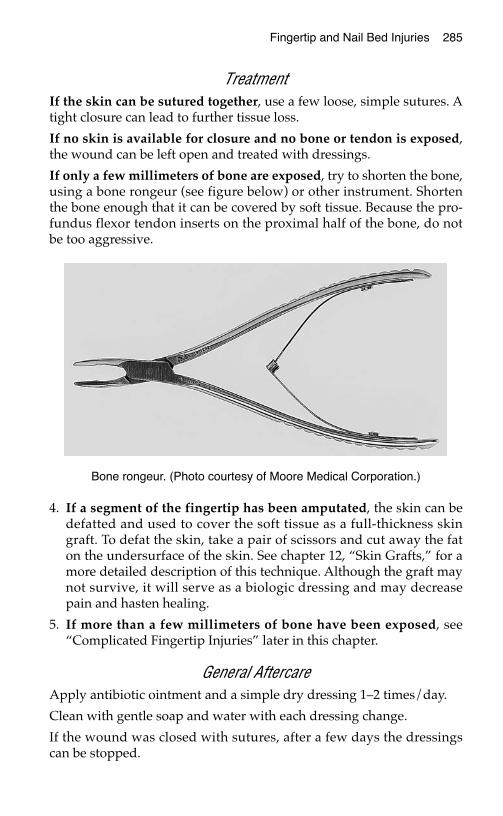
Fingertip and Nail Bed Injuries 285
TreatmentIf the skin can be sutured together, use a few loose, simple sutures. Atight closure can lead to further tissue loss.
If no skin is available for closure and no bone or tendon is exposed,the wound can be left open and treated with dressings.
If only a few millimeters of bone are exposed, try to shorten the bone,using a bone rongeur (see figure below) or other instrument. Shortenthe bone enough that it can be covered by soft tissue. Because the pro-fundus flexor tendon inserts on the proximal half of the bone, do notbe too aggressive.
4. If a segment of the fingertip has been amputated, the skin can bedefatted and used to cover the soft tissue as a full-thickness skingraft. To defat the skin, take a pair of scissors and cut away the faton the undersurface of the skin. See chapter 12, “Skin Grafts,” for amore detailed description of this technique. Although the graft maynot survive, it will serve as a biologic dressing and may decreasepain and hasten healing.
5. If more than a few millimeters of bone have been exposed, see“Complicated Fingertip Injuries” later in this chapter.
General AftercareApply antibiotic ointment and a simple dry dressing 1–2 times/day.
Clean with gentle soap and water with each dressing change.
If the wound was closed with sutures, after a few days the dressingscan be stopped.
Bone rongeur. (Photo courtesy of Moore Medical Corporation.)
286 Practical Plastic Surgery for Nonsurgeons
If the wound was left open, continue the dressing changes until thewound has healed. If the wound becomes covered with a grayish ma-terial, change to a wet-to-dry saline dressing for a few days, untilwound appearance improves.
Encourage the patient to use the finger and hand to prevent joint stiff-ness. Active and passive range-of-motion exercises also should be en-couraged.
Initially, acetaminophen alone may be insufficient to control pain.Fingertip injuries can be quite painful for the first several days.
Strongly encourage the patient not to smoke. The use of tobacco prod-ucts significantly slows the healing process of fingertip wounds.
The patient should keep the affected hand elevated to decreaseswelling and pain and to promote healing.
More Complicated Fingertip Injuries
Open Fracture of the Distal PhalanxOpen fractures involve a soft tissue wound around the fracture site.They are more serious than closed fractures because of the higher riskfor infection.
When the fracture does not involve the distal interphalangeal (DIP)joint, it usually can be treated by manipulating the fracture into align-ment and closing the soft tissues. Closing the soft tissues serves tosplint the bone.
If the fracture involves the joint surface, full reduction (proper align-ment of the pieces) is necessary to preserve joint motion. Full reductionrequires special skills and equipment (often K-wires or screws) thatbelong to the realm of the hand surgeon. Without the intervention of ahand surgeon, the wound will heal, but the patient probably will beleft with a very stiff joint and little normal motion.
The wound should be cleansed thoroughly, and the patient should begiven oral antibiotics for several days. The antibiotics prevent bone in-fection (osteomyelitis), which can become a chronic problem and maybe quite difficult to treat.
The finger should be immobilized in a splint that prevents the patientfrom moving only the DIP joint. The DIP joint should be in an extendedposition. The proximal interphalangeal (PIP) and metacarpopha-langeal (MCP) joints should be free. The splint should be used until thefingertip is no longer tender (probably 7–10 days). No other stabiliza-tion of the bone usually is required.
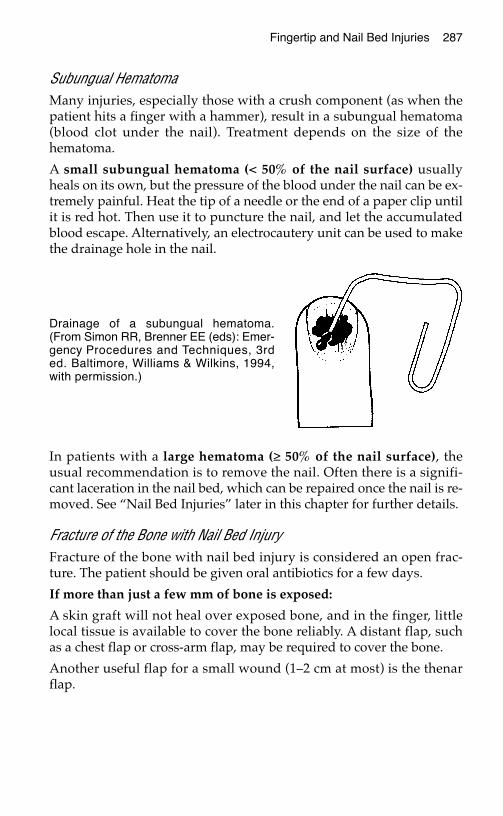
Fingertip and Nail Bed Injuries 287
Subungual HematomaMany injuries, especially those with a crush component (as when thepatient hits a finger with a hammer), result in a subungual hematoma(blood clot under the nail). Treatment depends on the size of thehematoma.
A small subungual hematoma (< 50% of the nail surface) usuallyheals on its own, but the pressure of the blood under the nail can be ex-tremely painful. Heat the tip of a needle or the end of a paper clip untilit is red hot. Then use it to puncture the nail, and let the accumulatedblood escape. Alternatively, an electrocautery unit can be used to makethe drainage hole in the nail.
In patients with a large hematoma (≥ 50% of the nail surface), theusual recommendation is to remove the nail. Often there is a signifi-cant laceration in the nail bed, which can be repaired once the nail is re-moved. See “Nail Bed Injuries” later in this chapter for further details.
Fracture of the Bone with Nail Bed InjuryFracture of the bone with nail bed injury is considered an open frac-ture. The patient should be given oral antibiotics for a few days.
If more than just a few mm of bone is exposed:
A skin graft will not heal over exposed bone, and in the finger, littlelocal tissue is available to cover the bone reliably. A distant flap, suchas a chest flap or cross-arm flap, may be required to cover the bone.
Another useful flap for a small wound (1–2 cm at most) is the thenarflap.
Drainage of a subungual hematoma.(From Simon RR, Brenner EE (eds): Emer-gency Procedures and Techniques, 3rded. Baltimore, Williams & Wilkins, 1994,with permission.)

288 Practical Plastic Surgery for Nonsurgeons
Thenar FlapA thenar flap involves bending the injured finger to the thenar emi-nence at the base of the thumb (by the MCP flexion crease). The injuredfinger is essentially sutured into the palm so that the finger and theskin flap from the thenar eminence grow together. Later, the finger isseparated with its newly acquired tissue.
Indications. A thenar flap is used to cover a fingertip injury whenbone is exposed and preservation of finger length is important. Thenarflaps should be done only in patients younger than 30 years. Signifi-cant joint stiffness may result if they are used in older patients.
The thenar flap is best used to provide coverage for the index andmiddle fingers. The ring and little fingers do not reach the thenar areavery well. A similar type of flap can be designed over the hypothenareminence for coverage of injuries of the ring and little fingers.
Procedure. A thenar flap can be done under local anesthesia using awrist block. The following steps are essential:
1. Observe where the injured finger makes contact with the thenar em-inence just proximal to the MCP joint of the thumb.
Thenar flap for coverage of fingertip injury.(Illustration by Elizabeth Roselius © 1998.From Green DP, et al (eds): Operative HandSurgery, 4th ed. New York, Churchill Living-stone, 1999, with permission.)
Fingertip and Nail Bed Injuries 289
2. Mark the three sides of a proximally based flap (i.e., the skin shouldstay attached at the side closest to the wrist). The flap should beslightly longer and wider than the defect.
3. Incise the three sides of the flap, and raise the flap with subcuta-neous tissue attached to the skin. Do not go too deeply; you mayinjure the digital nerves of the thumb.
4. Suture the flap loosely to the fingertip.
5. A full–thickness skin graft can be sutured to the donor site, or thedonor area can be allowed to heal on its own with dressings.
6. Apply a dorsal splint to keep the affected finger flexed into thepalm. The splint prevents the patient from accidentally extendingthe finger and thereby pulling the finger off the flap.
7. Divide the flap (i.e., cut through area where the skin remains at-tached to the palm) after 10–14 days. Sew the edge of the flap to theopen wound of the finger very loosely. Do not worry about achiev-ing perfect skin closure; small gaps between the flap and fingertipwill heal with dressings.
8. Antibiotic ointment and dry dressings should be used as neededpostoperatively.
NNaaiill BBeedd IInnjjuurriieessThe nail bed is often involved with injuries to the fingertips. Unfortu-nately, even with the most precise repair, the nail may not grow backwith a completely normal appearance. Be sure to warn the patientabout this risk.
Nails grow slowly. A normal, uninjured nail takes approximately 100days to reach full length (to the end of the finger). With injury to thenail bed or fingertip, growth is delayed by almost 1 month.
As noted above, if a nail bed injury is associated with a fracture of thedistal phalanx, treat the injury as an open fracture.
If a subungual hematoma is > 50% of the nail surface, a significant lac-eration usually is found in the nail bed. Repair of the laceration war-rants removal of the nail for formal exploration.
Repair of an injured nail bed can be quite difficult because the tissuesare very delicate and friable. Recent studies have shown that if the nailand surrounding nail margin are intact, removal of the nail and repairof nail bed lacerations are unnecessary in both children and adults. Butyou must still drain the hematoma.
290 Practical Plastic Surgery for Nonsurgeons
If a subungual hematoma is accompanied by injury to the margin of thenail, the nail should be removed to allow proper repair of the nail bedand its surrounding tissues. A digital block and a digital tourniquetmake the procedure much easier. Nail bed tissue is highly vascular.
Removing the Nail1. Use a digital block. This procedure hurts!
2. Place the digital tourniquet once the finger is anesthetized. Alterna-tively, you can wait to place the tourniquet until the nail has beenremoved.
3. Place a small hemostat clamp just beneath the nail (between the nailand nail bed).
4. Gradually spread the clamp (open its jaws) to free the nail com-pletely from the underlying nailbed.
5. Gradually advance the clamp proximally, until it is under the proxi-mal portion of the nail (where it emerges from under the skin).
6. Grab the nail with the clamp, and pull. It may take some effort.
7. Clean the nail, and save it in saline-moistened gauze or a cleansingsolution (e.g., Betadine). The nail may be useful for splinting the nailbed repair.
Repair1. Use as small an absorbable suture as you can find (6-0 chromic is
best) to repair the nail bed. Some type of magnification often is help-ful. (See figure on following page.)
2. Nail bed tissue is highly friable and difficult to sew—much like su-turing wet toilet paper. Take small amounts of tissue, and do notpull up on the needle as you pass through the tissue. Take yourtime. This procedure can be frustrating.
3. Once the repair has been completed, place the nail back on the nailbed to serve as a splint. Be sure to slide the proximal part of the nailunder the skin fold at the base of the nail. This technqiue preventsthe skin fold from scarring down to the nail bed.
4. If necessary, place a single stitch through the nail and the distal fin-gertip skin to hold it in place. Remove this stitch after a few days.
5. The injured nail will be pushed off by the growth of the new nail.
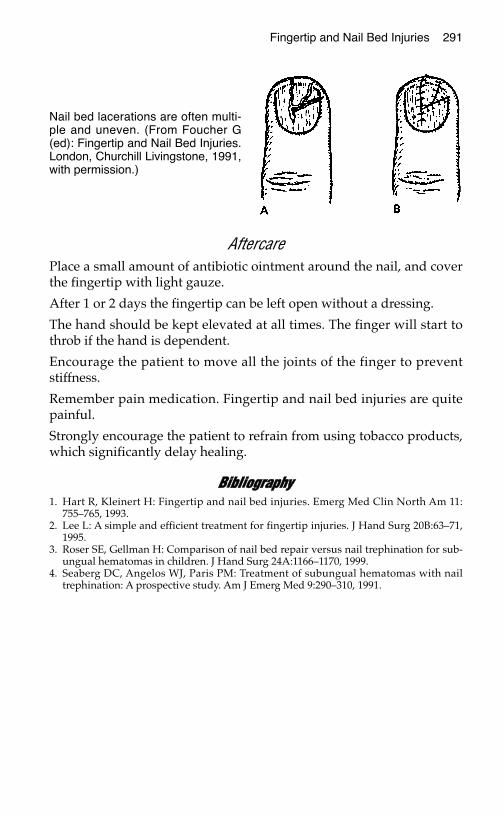
Fingertip and Nail Bed Injuries 291
AftercarePlace a small amount of antibiotic ointment around the nail, and coverthe fingertip with light gauze.
After 1 or 2 days the fingertip can be left open without a dressing.
The hand should be kept elevated at all times. The finger will start tothrob if the hand is dependent.
Encourage the patient to move all the joints of the finger to preventstiffness.
Remember pain medication. Fingertip and nail bed injuries are quitepainful.
Strongly encourage the patient to refrain from using tobacco products,which significantly delay healing.
BBiibblliiooggrraapphhyy1. Hart R, Kleinert H: Fingertip and nail bed injuries. Emerg Med Clin North Am 11:
755–765, 1993.2. Lee L: A simple and efficient treatment for fingertip injuries. J Hand Surg 20B:63–71,
1995.3. Roser SE, Gellman H: Comparison of nail bed repair versus nail trephination for sub-
ungual hematomas in children. J Hand Surg 24A:1166–1170, 1999.4. Seaberg DC, Angelos WJ, Paris PM: Treatment of subungual hematomas with nail
trephination: A prospective study. Am J Emerg Med 9:290–310, 1991.
Nail bed lacerations are often multi-ple and uneven. (From Foucher G(ed): Fingertip and Nail Bed Injuries.London, Churchill Livingstone, 1991,with permission.)
FFIINNGGEERR FFRRAACCTTUURREESS AANNDD DDIISSLLOOCCAATTIIOONNSS
Because we use our hands for so many things, finger fractures and dislo-cations are common injuries. Unless they are associated with significantsoft tissue injury, definitive treatment is not emergent. Often the initialevaluation and necessary splinting can be done by a nonspecialist.
This chapter describes basic treatments for finger fractures and disloca-tions that can be done by all health care providers. For the best possibleoutcome, however, more highly technical procedures may be required.Whenever possible, patients with all but the simplest injuries shouldbe referred to a hand specialist for definitive treatment.
An occupational therapist also should be consulted to help with reha-bilitation once the fracture or dislocation has been properly treated.
In areas where specialists are not available, the basic interventions dis-cussed in this chapter can help the patient attain an acceptable func-tional outcome.
DDeeffiinniittiioonnssTo reduce a fracture or dislocation means to restore the proper anatomicand functional alignment of the bone or joint. For most hand injuries,functional status is most important to the patient.
An open fracture or dislocation implies a wound in the soft tissuesoverlying the bone injury. In a closed injury the surrounding skin isintact. This distinction is important. An open fracture or dislocationhas a high risk for infection. To prevent this complication, careful andthorough wash-out of the wound is required. The patient also shouldbe given antibiotics (the oral route is usually sufficient, but extent ofinjury is the determining factor) for at least 48 hours after the repair. A
293
Chapter 30
KKEEYY FFIIGGUURREESS::Rotational deformityBuddy tapingReduction of metacarpal fracture
294 Practical Plastic Surgery for Nonsurgeons
closed fracture or dislocation is not associated with a high risk of infec-tion; thus, the patient does not require treatment with antibiotics.
FFiinnggeerr FFrraaccttuurreessCompared with leg fractures, finger fractures may seem to be insignifi-cant injuries. However, finger fractures can be quite problematic.Without proper treatment, a finger fracture can lead to significant limi-tation in hand function and disability.
AnesthesiaAdminister a digital block before attempting to reduce a fracture. Use acombination of lidocaine and bupivacaine whenever possible to helpwith postprocedure pain control.
Distal Phalangeal FracturesThe distal phalanx is the most commonly fractured bone of the finger.Distal phalangeal fractures are classified into three types: tuft fractures,shaft fractures, and intraarticular fractures.
Tuft FracturesA tuft fracture involves the most distal portion of the bone. It usually iscaused by a crush mechanism, such as hitting the tip of the finger witha hammer. A tuft fracture is often an open fracture because of itscommon association with injury to the surrounding soft tissues and/ornail bed. Even without injury to surrounding soft tissue, the fracture isconsidered open in the presence of nail bed injury.
Treatment
1. The soft tissue wound should be cleansed thoroughly, and all for-eign material should be removed.
2. In patients with a subungual hematoma > 50% of the nail surface,consider removing the nail to allow repair of the nail bed (see chap-ter 29, “Fingertip and Nail Bed Injuries”).
3. Soft tissues should be sutured loosely in an interrupted fashion. Use4-0 nylon or chromic material. Repair the nail bed with 5-0 or 6-0chromic sutures. Repair of soft tissues usually leads to adequate re-duction of the fracture.
4. Cover the suture line with antibiotic ointment and dry gauze. Thedressing should be changed daily.
5. Keep the finger elevated as much as possible.
Finger Fractures and Dislocations 295
6. Strongly advise the patient to avoid smoking. Tobacco productsslow the healing process.
7. Provide pain medication. Tuft fractures are often quite painful andtender for several days.
8. The patient may wear a protective splint or bulky dressing over thefingertip and distal interphalangeal (DIP) joint to prevent move-ment. The splint also protects the finger from accidental reinjury.However, do not immobilize the entire finger with the dressing orsplint. Complete immoblization leads to unnecessary finger stiffness.
9. Once the finger is less tender (usually within 10–14 days), encour-age the patient to gradually resume normal use of the finger.
Shaft FracturesShaft fractures involve the central portion of the distal phalanx. Theyalso are associated often with soft tissue or nail bed injuries. As de-scribed above, repair of any soft tissue usually leads to adequate re-duction of the fracture.
For further bone stabilization, a 20-gauge needle can be passed manu-ally from the end of the fingertip into the bone segments. This procedureshould be done before repair of any soft tissue injury (if present). Theneedle easily passes through the soft tissues into the bone if it is pushedfirmly with a twisting motion. Bend the top part of the needle (the hub)so that it does not protrude too far from the end of the fingertip.
Basically, shaft fractures are treated like tuft fractures. If a needle is usedto stabilize the fracture, remove it when the fingertip is no longer tender.
Intraarticular FracturesIntraarticular fractures involve the joint surface of the distal phalanx atthe DIP joint. The patient may present with a mallet deformity (inabil-ity to extend the DIP joint fully) if the fracture involves the bony inser-tion of the extensor tendon. In this setting, treat the finger like a malletfinger, as described in chapter 32, “Tendon Injuries of the Hand.”
If there is no evidence of mallet deformity, the joint surface should bealigned as meticulously as possible to ensure optimal function. Such in-juries are best referred to a hand specialist. If no specialist is available:
1. Manipulate the finger to align the bone pieces as precisely as possible.
2. Immobilize the DIP joint in 0–10° of flexion for 10–14 days. You canuse a plaster splint or make a splint from a tongue depressor. Alter-natively, the 20-gauge needle technique (described above) can beused to immobilize the DIP joint.
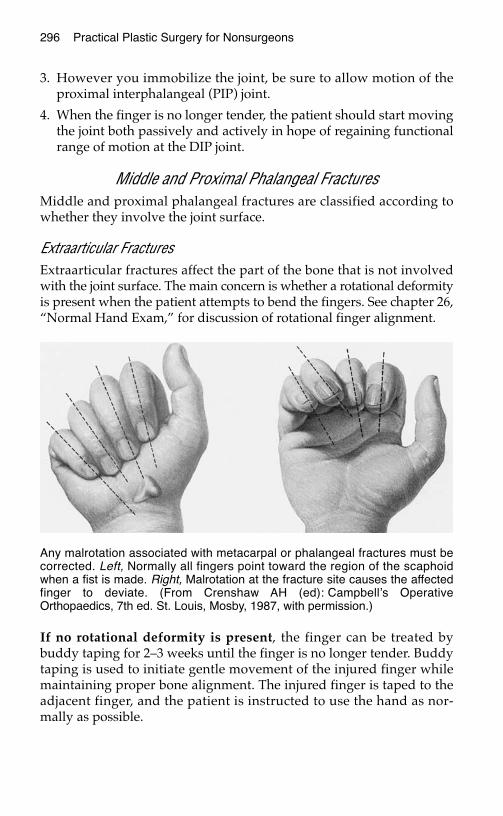
296 Practical Plastic Surgery for Nonsurgeons
3. However you immobilize the joint, be sure to allow motion of theproximal interphalangeal (PIP) joint.
4. When the finger is no longer tender, the patient should start movingthe joint both passively and actively in hope of regaining functionalrange of motion at the DIP joint.
Middle and Proximal Phalangeal FracturesMiddle and proximal phalangeal fractures are classified according towhether they involve the joint surface.
Extraarticular FracturesExtraarticular fractures affect the part of the bone that is not involvedwith the joint surface. The main concern is whether a rotational deformityis present when the patient attempts to bend the fingers. See chapter 26,“Normal Hand Exam,” for discussion of rotational finger alignment.
If no rotational deformity is present, the finger can be treated bybuddy taping for 2–3 weeks until the finger is no longer tender. Buddytaping is used to initiate gentle movement of the injured finger whilemaintaining proper bone alignment. The injured finger is taped to theadjacent finger, and the patient is instructed to use the hand as nor-mally as possible.
Any malrotation associated with metacarpal or phalangeal fractures must becorrected. Left, Normally all fingers point toward the region of the scaphoidwhen a fist is made. Right, Malrotation at the fracture site causes the affectedfinger to deviate. (From Crenshaw AH (ed): Campbell’s OperativeOrthopaedics, 7th ed. St. Louis, Mosby, 1987, with permission.)
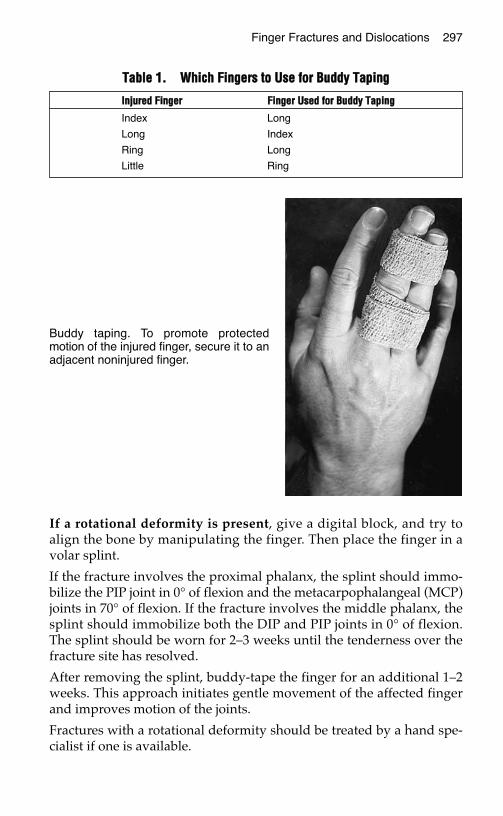
If a rotational deformity is present, give a digital block, and try toalign the bone by manipulating the finger. Then place the finger in avolar splint.
If the fracture involves the proximal phalanx, the splint should immo-bilize the PIP joint in 0° of flexion and the metacarpophalangeal (MCP)joints in 70° of flexion. If the fracture involves the middle phalanx, thesplint should immobilize both the DIP and PIP joints in 0° of flexion.The splint should be worn for 2–3 weeks until the tenderness over thefracture site has resolved.
After removing the splint, buddy-tape the finger for an additional 1–2weeks. This approach initiates gentle movement of the affected fingerand improves motion of the joints.
Fractures with a rotational deformity should be treated by a hand spe-cialist if one is available.
Finger Fractures and Dislocations 297
TTaabbllee 11.. WWhhiicchh FFiinnggeerrss ttoo UUssee ffoorr BBuuddddyy TTaappiinngg
IInnjjuurreedd FFiinnggeerr FFiinnggeerr UUsseedd ffoorr BBuuddddyy TTaappiinngg
Index Long
Long Index
Ring Long
Little Ring
Buddy taping. To promote protectedmotion of the injured finger, secure it to anadjacent noninjured finger.
298 Practical Plastic Surgery for Nonsurgeons
Intraarticular FracturesIntraarticular fractures involve the portion of bone that makes up thejoint surface. Proper reduction is required to obtain adequate range ofmotion and finger function once the bone has healed. Intraarticularfractures usually require operative exploration for proper bony stabi-lization (with pins or screws) and thus should be treated by a handspecialist if one is available. If no hand specialist is available, try thetreatment described for extraarticular fractures.
Metacarpal FracturesMetacarpal fractures are included in this chapter because they canaffect the position and function of the affected finger. A poorly alignedmetacarpal fracture can cause a rotational deformity.
Metacarpal fractures may occur anywhere along the bone. Many re-quire some type of pin fixation or stabilization for optimal treatment.Therefore, you should consult a hand specialist whenever possible.
If no specialist is available, begin by checking finger rotation. If the fin-gers maintain proper alignment and the fracture looks reasonably wellpositioned on radiographs, a short period (2–4 weeks until the fracturesite is no longer tender) of cast or splint immobilization may be all thatis required.
If a rotational deformity is present, reduction and manipulation mustbe performed before immobilization.
Fracture ReductionBefore the fracture is reduced a wrist block or a hematoma blockshould be given for pain control.
Hematoma Block
1. Draw up 3–5 ml of lidocaine in a syringe.
2. Clean the area overlying the fracture with alcohol or povidone-iodine solution. This procedure must be done under sterile condi-tions so that you do not contaminate the area around the fracturesite and cause an infection.
3. Insert the needle into the tissues overlying the fracture until the tipof the needle contacts bone. Then back up the needle a few millime-ters and inject 1–2 ml of solution.
4. Without completely removing it from the skin, back up the needleand reposition the tip by a centimeter or so. Then inject the rest ofthe solution.
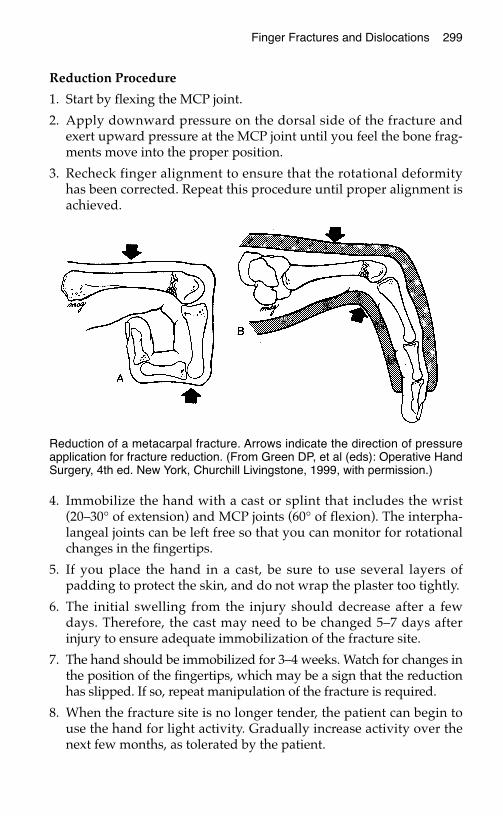
Finger Fractures and Dislocations 299
Reduction Procedure
1. Start by flexing the MCP joint.
2. Apply downward pressure on the dorsal side of the fracture andexert upward pressure at the MCP joint until you feel the bone frag-ments move into the proper position.
3. Recheck finger alignment to ensure that the rotational deformityhas been corrected. Repeat this procedure until proper alignment isachieved.
4. Immobilize the hand with a cast or splint that includes the wrist(20–30° of extension) and MCP joints (60° of flexion). The interpha-langeal joints can be left free so that you can monitor for rotationalchanges in the fingertips.
5. If you place the hand in a cast, be sure to use several layers ofpadding to protect the skin, and do not wrap the plaster too tightly.
6. The initial swelling from the injury should decrease after a fewdays. Therefore, the cast may need to be changed 5–7 days afterinjury to ensure adequate immobilization of the fracture site.
7. The hand should be immobilized for 3–4 weeks. Watch for changes inthe position of the fingertips, which may be a sign that the reductionhas slipped. If so, repeat manipulation of the fracture is required.
8. When the fracture site is no longer tender, the patient can begin touse the hand for light activity. Gradually increase activity over thenext few months, as tolerated by the patient.
Reduction of a metacarpal fracture. Arrows indicate the direction of pressureapplication for fracture reduction. (From Green DP, et al (eds): Operative HandSurgery, 4th ed. New York, Churchill Livingstone, 1999, with permission.)
300 Practical Plastic Surgery for Nonsurgeons
JJooiinntt DDiissllooccaattiioonnssFor treatment purposes, finger joint dislocations can be classified aseither simple or complex. A simple dislocation involves no fracture ofthe bone and can be reduced easily. A complex dislocation is not re-ducible or is associated with fracture of one of the involved bones. Themain concern is whether the dislocation is reducible.
Simple MCP Joint DislocationsReduction of an MCP joint dislocation demands particular care. An in-correct reduction can change a simple dislocation into a complex one.
Reduction Technique1. You may need to give a wrist block or gentle sedation for pain
control.
2. Flex the wrist to keep the flexor tendons slack.
3. Avoid pulling on the finger and placing extension forces onto thejoint.
4. Apply direct digital pressure on the dorsal side of the base of theproximal phalanx, and push the proximal phalanx in a volar direc-tion to reposition the proximal phalanx above the metacarpal head.
After ReductionThe joint will slide into a flexed position once the dislocation has beenreduced. The patient is allowed to use the finger, but a splint should beplaced on the dorsal surface of the hand (onto the finger) to prevent ex-tension of the MCP joint beyond 0°. The patient should wear the splintuntil the joint is completely non-tender, usually for 2–3 weeks.
Active and passive range-of-motion exercises should be done for sev-eral months to attain full motion in the joint.
Simple Interphalangeal Joint DislocationsOften the patient presents after the dislocation is reduced. If reductionis required, use the following technique.
Reduction Technique1. A digital block may be required for pain control.
2. Apply gentle traction to the finger by grasping the finger distal tothe affected joint. Gently pull on the finger, and the dislocationshould reduce.

Finger Fractures and Dislocations 301
After ReductionThe affected joint(s) should be immobilized with a dorsal splint, keep-ing the joint in 20–30° of flexion for 5–7 days until the tenderness sig-nificantly decreases.
The finger then should be buddy-taped for another 2–3 weeks. Whenthe affected joint is completely pain-free, the taping can be stopped.
Joint stiffness may remain for months. The patient should continuerange-of-motion exercises until the finger moves normally.
Complex DislocationsThe treatment of a complex dislocation requires operative exploration,the description of which is beyond the scope of this text. Complex dis-locations require referral to a hand specialist.
BBiibblliiooggrraapphhyy1. Glickel SZ, Barron OA, Eaton RG: Dislocations and ligament injuries in the digits. In
Green DP, Hotchkiss RN, Pederson WC (eds): Green’s Operative Hand Surgery, 4thed. New York, Churchill Livingstone, 1999, pp 772–808.
2. Kiefhaber TR, Stern PJ: Fracture dislocations of the proximal interphalangeal joint. JHand Surg 23A:368–380, 1998.
3. Stern PJ: Fractures of the metacarpals and phalanges. In Green DP, Hotchkiss RN,Pederson WC (eds): Green’s Operative Hand Surgery, 4th ed. New York, ChurchillLivingstone, 1999, pp 711–771.
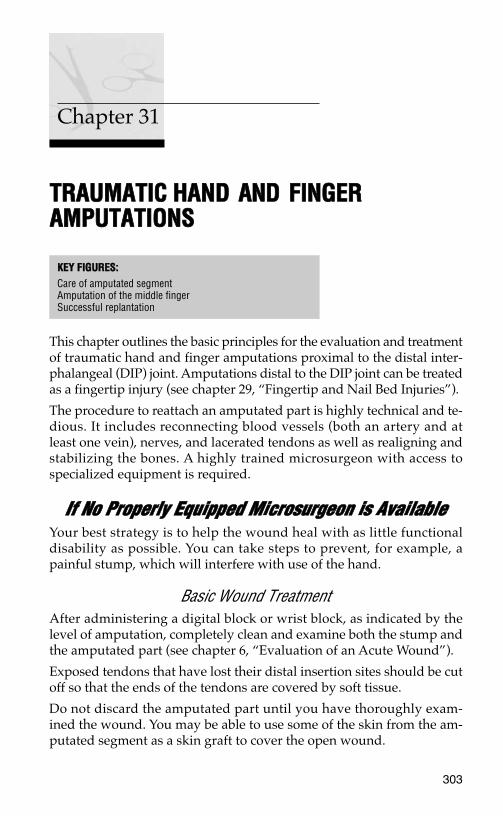
TTRRAAUUMMAATTIICC HHAANNDD AANNDD FFIINNGGEERRAAMMPPUUTTAATTIIOONNSS
This chapter outlines the basic principles for the evaluation and treatmentof traumatic hand and finger amputations proximal to the distal inter-phalangeal (DIP) joint. Amputations distal to the DIP joint can be treatedas a fingertip injury (see chapter 29, “Fingertip and Nail Bed Injuries”).
The procedure to reattach an amputated part is highly technical and te-dious. It includes reconnecting blood vessels (both an artery and atleast one vein), nerves, and lacerated tendons as well as realigning andstabilizing the bones. A highly trained microsurgeon with access tospecialized equipment is required.
IIff NNoo PPrrooppeerrllyy EEqquuiippppeedd MMiiccrroossuurrggeeoonn iiss AAvvaaiillaabblleeYour best strategy is to help the wound heal with as little functionaldisability as possible. You can take steps to prevent, for example, apainful stump, which will interfere with use of the hand.
Basic Wound TreatmentAfter administering a digital block or wrist block, as indicated by thelevel of amputation, completely clean and examine both the stump andthe amputated part (see chapter 6, “Evaluation of an Acute Wound”).
Exposed tendons that have lost their distal insertion sites should be cutoff so that the ends of the tendons are covered by soft tissue.
Do not discard the amputated part until you have thoroughly exam-ined the wound. You may be able to use some of the skin from the am-putated segment as a skin graft to cover the open wound.
303
Chapter 31
KKEEYY FFIIGGUURREESS::Care of amputated segmentAmputation of the middle fingerSuccessful replantation
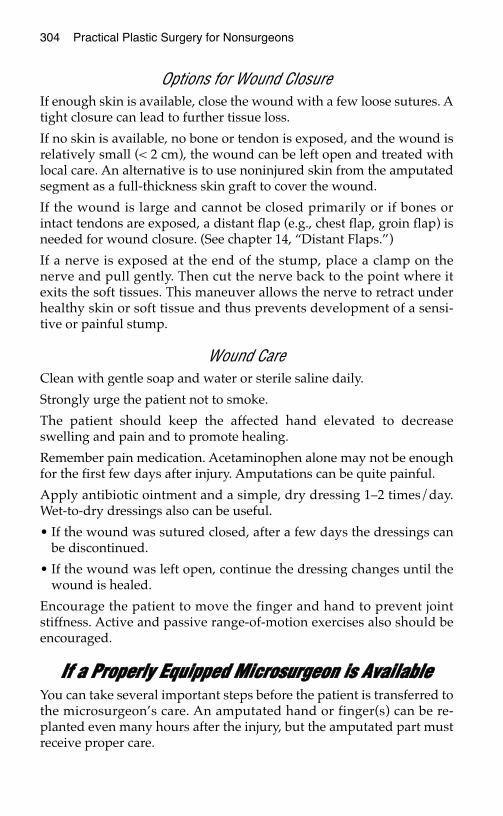
304 Practical Plastic Surgery for Nonsurgeons
Options for Wound ClosureIf enough skin is available, close the wound with a few loose sutures. Atight closure can lead to further tissue loss.
If no skin is available, no bone or tendon is exposed, and the wound isrelatively small (< 2 cm), the wound can be left open and treated withlocal care. An alternative is to use noninjured skin from the amputatedsegment as a full-thickness skin graft to cover the wound.
If the wound is large and cannot be closed primarily or if bones orintact tendons are exposed, a distant flap (e.g., chest flap, groin flap) isneeded for wound closure. (See chapter 14, “Distant Flaps.”)
If a nerve is exposed at the end of the stump, place a clamp on thenerve and pull gently. Then cut the nerve back to the point where itexits the soft tissues. This maneuver allows the nerve to retract underhealthy skin or soft tissue and thus prevents development of a sensi-tive or painful stump.
Wound CareClean with gentle soap and water or sterile saline daily.
Strongly urge the patient not to smoke.
The patient should keep the affected hand elevated to decreaseswelling and pain and to promote healing.
Remember pain medication. Acetaminophen alone may not be enoughfor the first few days after injury. Amputations can be quite painful.
Apply antibiotic ointment and a simple, dry dressing 1–2 times/day.Wet-to-dry dressings also can be useful.
• If the wound was sutured closed, after a few days the dressings canbe discontinued.
• If the wound was left open, continue the dressing changes until thewound is healed.
Encourage the patient to move the finger and hand to prevent jointstiffness. Active and passive range-of-motion exercises also should beencouraged.
IIff aa PPrrooppeerrllyy EEqquuiippppeedd MMiiccrroossuurrggeeoonn iiss AAvvaaiillaabblleeYou can take several important steps before the patient is transferred tothe microsurgeon’s care. An amputated hand or finger(s) can be re-planted even many hours after the injury, but the amputated part mustreceive proper care.
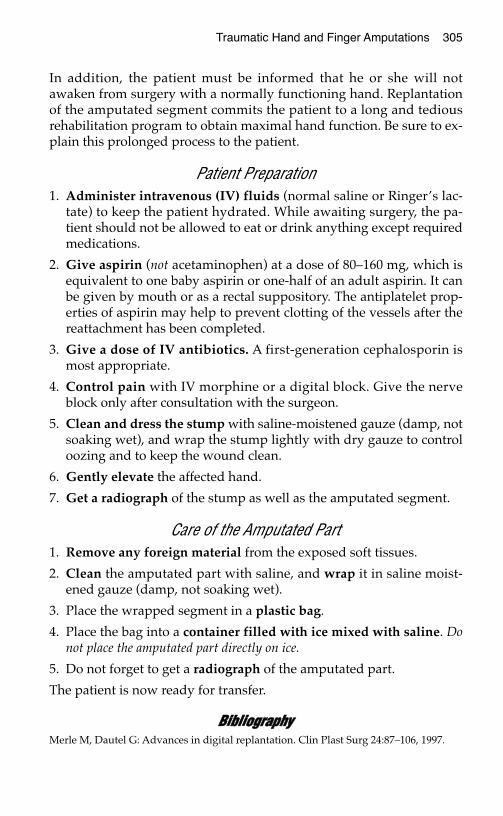
Traumatic Hand and Finger Amputations 305
In addition, the patient must be informed that he or she will notawaken from surgery with a normally functioning hand. Replantationof the amputated segment commits the patient to a long and tediousrehabilitation program to obtain maximal hand function. Be sure to ex-plain this prolonged process to the patient.
Patient Preparation1. Administer intravenous (IV) fluids (normal saline or Ringer’s lac-
tate) to keep the patient hydrated. While awaiting surgery, the pa-tient should not be allowed to eat or drink anything except requiredmedications.
2. Give aspirin (not acetaminophen) at a dose of 80–160 mg, which isequivalent to one baby aspirin or one-half of an adult aspirin. It canbe given by mouth or as a rectal suppository. The antiplatelet prop-erties of aspirin may help to prevent clotting of the vessels after thereattachment has been completed.
3. Give a dose of IV antibiotics. A first-generation cephalosporin ismost appropriate.
4. Control pain with IV morphine or a digital block. Give the nerveblock only after consultation with the surgeon.
5. Clean and dress the stump with saline-moistened gauze (damp, notsoaking wet), and wrap the stump lightly with dry gauze to controloozing and to keep the wound clean.
6. Gently elevate the affected hand.
7. Get a radiograph of the stump as well as the amputated segment.
Care of the Amputated Part1. Remove any foreign material from the exposed soft tissues.
2. Clean the amputated part with saline, and wrap it in saline moist-ened gauze (damp, not soaking wet).
3. Place the wrapped segment in a plastic bag.
4. Place the bag into a container filled with ice mixed with saline. Donot place the amputated part directly on ice.
5. Do not forget to get a radiograph of the amputated part.
The patient is now ready for transfer.
BBiibblliiooggrraapphhyyMerle M, Dautel G: Advances in digital replantation. Clin Plast Surg 24:87–106, 1997.
306 Practical Plastic Surgery for Nonsurgeons
Care of the amputated segment. The am-putated segment should be cooled imme-diately by wrapping it in a moist salinegauze, placing it in a sealed plastic bag,and immersing it in an iced saline con-tainer. (From McCarthy J (ed): PlasticSurgery. Philadelphia, W.B. Saunders,1990, with permission.)
Traumatic amputation of the middle finger. A, Hand with missing finger.B, Amputated segment.
One year after successful replantation. A and B, Patient has regained excellentfunction of her hand.
TTEENNDDOONN IINNJJUURRIIEESS OOFF TTHHEE HHAANNDD
Most hand specialists believe that the earlier a tendon injury is re-paired, the better the final result. However, repair of a lacerated flexortendon is not a surgical emergency mandating immediate repair.
If the tendon ends are easily identifiable in the wound, you shouldrepair the tendon when you first see the patient. However, if immediaterepair is not possible or if you do not have the necessary surgical skills,the tendon can be repaired at a later time when a specialist is available.The overall outcome will not be adversely affected by delayed repair.
The most important point is to thoroughly wash out the wound and looselyclose the skin as soon as possible after injury. This treatment prevents woundinfection and allows safe performance of definitive repair at a later time(preferably within 7–10 days).
FFlleexxoorr TTeennddoonn IInnjjuurriieess Suspect a flexor tendon injury if the patient is unable to actively flexthe distal (DIP) or proximal interphalangeal (PIP) joint of a finger, theinterphalangeal (IP) joint of the thumb, or the wrist.
Partial and complete flexor tendon lacerations should be repaired toprevent disability. Repair requires careful exploration in the operatingroom (the proximal end of the cut tendon almost always retracts and istherefore difficult to locate) and advanced surgical skills. A clinicianwith technical expertise in hand surgery should repair flexor tendoninjuries; the procedure can be quite challenging.
An important part of the initial treatment after repair of the overlyingopen wound is to place the hand in a splint. For injury to the flexortendon of the thumb, use a thumb spica splint. For injury to the flexor
307
Chapter 32
KKEEYY FFIIGGUURREESS::Extensor surface of hand Injured finger inMallet finger stack splintMallet splints Repair of open mallet

tendon of the finger or wrist, immobilize the entire hand by applying adorsal splint that covers the forearm, hand, and fingers. For more de-tailed information about splinting, see chapter 28, “Hand Splinting andGeneral Aftercare.” The patient should wear the splint until he or sheis evaluated by a specialist.
EExxtteennssoorr TTeennddoonn IInnjjuurriieess An extensor tendon injury should be suspected when the patientcannot extend the metacarpophalangeal (MCP) joint of a finger or thethumb, the IP joint of the thumb, or the wrist.
Injury to the extensor tendon mechanism on the dorsal surface of thefinger is evidenced by an inability to extend the PIP and DIP joints.Unless the patient has lacerations over each finger, generalized inabil-ity to extend the PIP and DIP joints of all fingers probably representsan ulnar nerve injury rather than a tendon injury.
In wounds over the dorsal surface of the hand or a finger, the cut endsof the tendon often can be identified with minimal wound exploration.Therefore, an extensor tendon injury often can be repaired on initialevaluation without taking the patient to the operating room.
308 Practical Plastic Surgery for Nonsurgeons
Dorsal view of the handshowing extensor tendons,accessory communicatingtendons (vincular accesso-rium), and extensor expan-sions. (From Crenshaw AH(ed): Campbell’s OperativeOrthopaedics, 7th ed. St.Louis, Mosby, 1987, withpermission.)
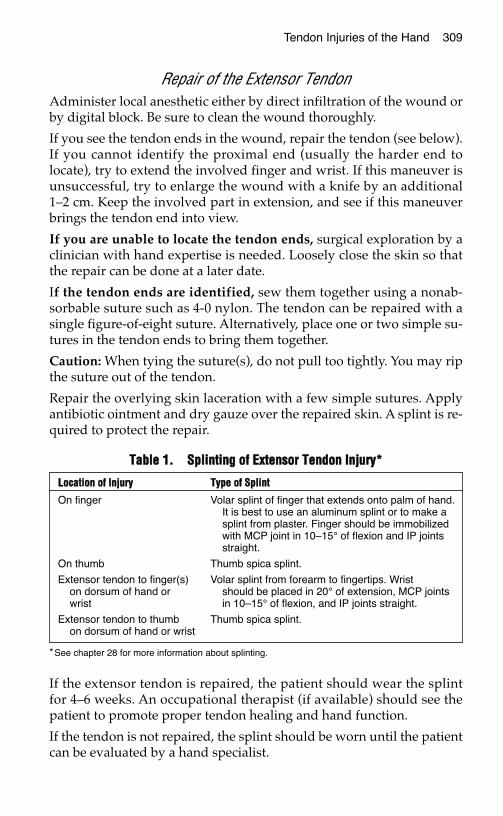
Tendon Injuries of the Hand 309
Repair of the Extensor TendonAdminister local anesthetic either by direct infiltration of the wound orby digital block. Be sure to clean the wound thoroughly.
If you see the tendon ends in the wound, repair the tendon (see below).If you cannot identify the proximal end (usually the harder end tolocate), try to extend the involved finger and wrist. If this maneuver isunsuccessful, try to enlarge the wound with a knife by an additional1–2 cm. Keep the involved part in extension, and see if this maneuverbrings the tendon end into view.
If you are unable to locate the tendon ends, surgical exploration by aclinician with hand expertise is needed. Loosely close the skin so thatthe repair can be done at a later date.
If the tendon ends are identified, sew them together using a nonab-sorbable suture such as 4-0 nylon. The tendon can be repaired with asingle figure-of-eight suture. Alternatively, place one or two simple su-tures in the tendon ends to bring them together.
Caution: When tying the suture(s), do not pull too tightly. You may ripthe suture out of the tendon.
Repair the overlying skin laceration with a few simple sutures. Applyantibiotic ointment and dry gauze over the repaired skin. A splint is re-quired to protect the repair.
If the extensor tendon is repaired, the patient should wear the splintfor 4–6 weeks. An occupational therapist (if available) should see thepatient to promote proper tendon healing and hand function.
If the tendon is not repaired, the splint should be worn until the patientcan be evaluated by a hand specialist.
TTaabbllee 11.. SSpplliinnttiinngg ooff EExxtteennssoorr TTeennddoonn IInnjjuurryy**
*See chapter 28 for more information about splinting.
LLooccaattiioonn ooff IInnjjuurryy TTyyppee ooff SSpplliinntt
On finger Volar splint of finger that extends onto palm of hand.It is best to use an aluminum splint or to make asplint from plaster. Finger should be immobilizedwith MCP joint in 10–15° of flexion and IP jointsstraight.
On thumb Thumb spica splint.
Extensor tendon to finger(s) Volar splint from forearm to fingertips. Wriston dorsum of hand or should be placed in 20° of extension, MCP jointswrist in 10–15° of flexion, and IP joints straight.
Extensor tendon to thumb Thumb spica splint.on dorsum of hand or wrist
310 Practical Plastic Surgery for Nonsurgeons
MMaalllleett FFiinnggeerrMallet finger results from injury of the extensor tendon at its insertioninto the distal phalanx. The patient cannot fully extend the finger at theDIP joint. Without adequate treatment, the finger will not completelystraighten, which can be quite bothersome. For example, patients will notbe able to get objects out of their pocket, a common everyday activity.
In contrast to most tendon injuries, a mallet finger can result from aclosed injury (no cut to the overlying skin that also injured the tendon) aswell as an injury with an overlying skin laceration. A closed mallet injuryis caused by sudden, forced flexion of an extended finger. The tendonis torn off the distal phalanx, and sometimes the bone is fractured.
Closed Mallet Deformity
With No Underlying Fracture or a Fracture of < 50% of the Articular Joint SurfaceThe best treatment is a volar splint—either the commercially availablesplint (Stack finger splint) or an aluminum foam splint. If neither isavailable, a splint can be made from plaster or from a piece of a tonguedepressor (with cotton padding). The splint should be long enough toimmobilize only the DIP joint. The PIP joint should not be immobilized.
Position the DIP joint in slight hyperextension. Caution: Be careful notto hyperextend the joint too much because skin necrosis may result.Look at your own finger—you can see the skin blanch (indicating di-minished blood circulation) when you overly hyperextend the DIPjoint. This effect should be avoided.
If you are unable to get the joint into proper hyperextension with avolar splint, a dorsal splint can be used. Again, immobilize only the DIPjoint. You must be careful because of the higher incidence of skin break-down when the splint is placed over the dorsal surface of the joint.
Mallet finger. The patient cannot actively extend the DIP joint.

Tendon Injuries of the Hand 311
Tape is used to keep the splint in place. The splint is removed only tocleanse the finger (once daily). The patient should keep the joint in ex-tension while the splint is off. The splint stays in place continuously forat least 6 weeks.
After 6 weeks, if the finger is nontender and the patient can activelyhold the finger in full extension, the splint can be removed during theday, but only light activity should be allowed. The patient should wearthe splint at night for another 4 weeks and when doing strenuous workwith the hand.
If after 6 weeks the patient cannot actively hold the finger in full ex-tension, the splint should remain in place continuously for another 4weeks.
If at any time after the splint is removed the patient notices loss orweakness of full active extension of the DIP joint, the splint should bereplaced and worn continuously for another 4–6 weeks.
This treatment regimen can be successful even if the patient does notseek treatment until several months after the initial injury.
Splints for treatment of mallet finger. (Illustration by Elizabeth Roselius © 1998.From Green DP, et al (eds): Operative Hand Surgery, 4th ed. New York,Churchill Livingstone, 1999, with permission.)
Injured finger in a Stack splint.
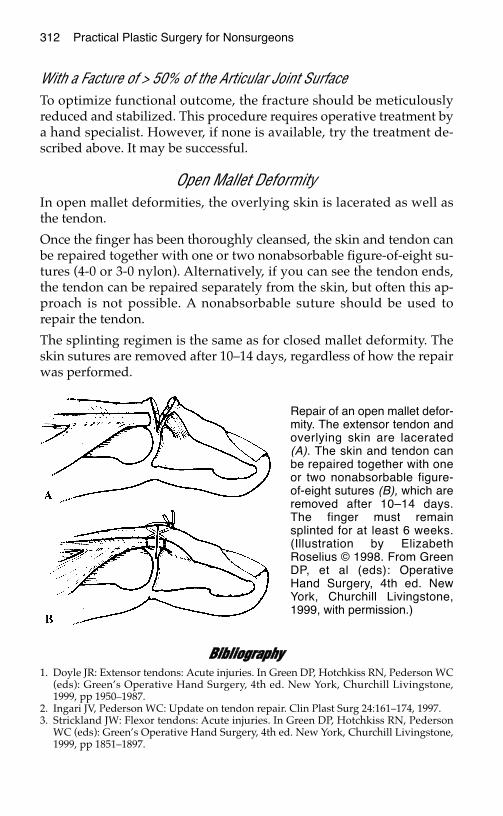
312 Practical Plastic Surgery for Nonsurgeons
With a Facture of > 50% of the Articular Joint SurfaceTo optimize functional outcome, the fracture should be meticulouslyreduced and stabilized. This procedure requires operative treatment bya hand specialist. However, if none is available, try the treatment de-scribed above. It may be successful.
Open Mallet DeformityIn open mallet deformities, the overlying skin is lacerated as well asthe tendon.
Once the finger has been thoroughly cleansed, the skin and tendon canbe repaired together with one or two nonabsorbable figure-of-eight su-tures (4-0 or 3-0 nylon). Alternatively, if you can see the tendon ends,the tendon can be repaired separately from the skin, but often this ap-proach is not possible. A nonabsorbable suture should be used torepair the tendon.
The splinting regimen is the same as for closed mallet deformity. Theskin sutures are removed after 10–14 days, regardless of how the repairwas performed.
BBiibblliiooggrraapphhyy1. Doyle JR: Extensor tendons: Acute injuries. In Green DP, Hotchkiss RN, Pederson WC
(eds): Green’s Operative Hand Surgery, 4th ed. New York, Churchill Livingstone,1999, pp 1950–1987.
2. Ingari JV, Pederson WC: Update on tendon repair. Clin Plast Surg 24:161–174, 1997.3. Strickland JW: Flexor tendons: Acute injuries. In Green DP, Hotchkiss RN, Pederson
WC (eds): Green’s Operative Hand Surgery, 4th ed. New York, Churchill Livingstone,1999, pp 1851–1897.
Repair of an open mallet defor-mity. The extensor tendon andoverlying skin are lacerated(A). The skin and tendon canbe repaired together with oneor two nonabsorbable figure-of-eight sutures (B), which areremoved after 10–14 days.The finger must remainsplinted for at least 6 weeks.(Illustration by ElizabethRoselius © 1998. From GreenDP, et al (eds): OperativeHand Surgery, 4th ed. NewYork, Churchill Livingstone,1999, with permission.)
NNEERRVVEE AANNDD VVAASSCCUULLAARR IINNJJUURRIIEESSOOFF TTHHEE HHAANNDD
Nerves and blood vessels of the hand and fingers usually are quite del-icate, and some are quite small. Optimal repair of injuries often re-quires the microsurgical expertise of a reconstructive surgeon. However,an understanding of basic principles is useful when you find yourselfwithout specialist support.
NNeerrvvee IInnjjuurriieess
Nerve PhysiologyWhen a nerve is cut, the distal part of the nerve slowly dies andcannot regrow. The proximal part of the nerve will regenerate.However, without proper treatment, there is no guarantee that thenerve will grow correctly or that function (sensory or motor) will berestored.
The nerve laceration should be repaired by sewing the cut ends to-gether. Repair increases the likelihood that the living proximal partwill grow in the proper direction, along the path left by the disintegrat-ing distal part.
Nerves grow at a rate of 1 mm/day once the reparative process begins(usually within a few weeks of injury).
Remind the patient that even if the nerve is repaired, normal sensationand movement will not be apparent immediately after the procedure.It will take many months to know the final outcome.
313
Chapter 33
KKEEYY FFIIGGUURREESS::Digital nerve location on fingerEpineurial repair
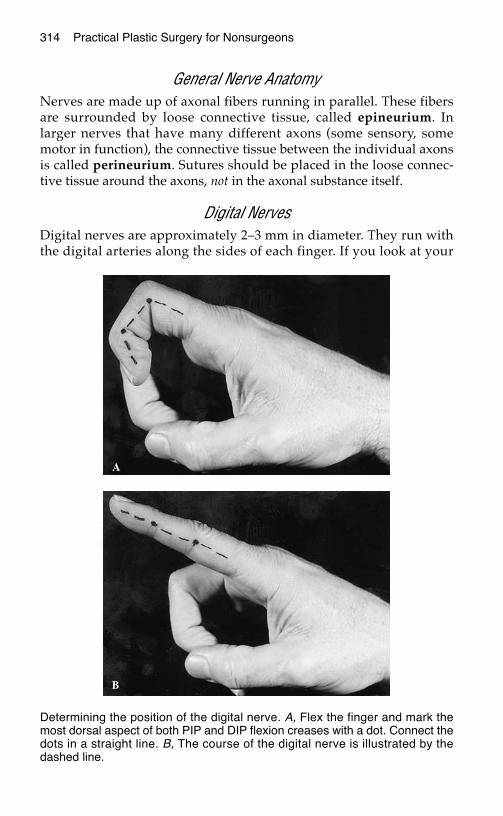
314 Practical Plastic Surgery for Nonsurgeons
General Nerve AnatomyNerves are made up of axonal fibers running in parallel. These fibersare surrounded by loose connective tissue, called epineurium. Inlarger nerves that have many different axons (some sensory, somemotor in function), the connective tissue between the individual axonsis called perineurium. Sutures should be placed in the loose connec-tive tissue around the axons, not in the axonal substance itself.
Digital NervesDigital nerves are approximately 2–3 mm in diameter. They run withthe digital arteries along the sides of each finger. If you look at your
Determining the position of the digital nerve. A, Flex the finger and mark themost dorsal aspect of both PIP and DIP flexion creases with a dot. Connect thedots in a straight line. B, The course of the digital nerve is illustrated by thedashed line.
Nerve and Vascular Injuries of the Hand 315
finger from the side and completely flex the distal (DIP) and proximalinterphalangeal (PIP) joints, the neurovascular bundle runs along aline that connects the flexion creases of these joints.
Digital nerves are purely sensory. If a digital nerve is cut, the patientfeels numbness on the corresponding side of the finger. Motor functionin the finger should be normal, because it is controlled by the tendons,whose muscles are innervated more proximally in the forearm.Impairment of motor function (other than pain with movement) sug-gests that tendon injury also is present.
Injury to a digital nerve at any point proximal to the DIP flexion creaseshould be repaired. In the fingertip (distal to the DIP flexion crease),the nerve divides into its terminal branches, which are too small torepair. With distal nerve injuries, sensation may return without formalnerve repair.
Larger NervesNerves in the forearm and wrist (e.g., median and ulnar nerves at thewrist) are much larger than digital nerves; their diameters range from5–10 mm. Most have both motor and sensory functions. When youlook at the cut ends of the nerve, especially under magnification, youcan see that the inner nerve fibers are of various diameters and thatsome fibers seem to be grouped together within the nerve.
For optimal outcome, the proximal sensory fibers should be suturedto the distal sensory fibers and the proximal motor fibers to the distalmotor fibers. Specialists sometimes repair larger nerves with electo-physiologic guidance. This technique uses electric stimulators to iden-tify which fibers are sensory and which are motor. Thus, the surgeoncan determine exactly which fibers should go together. However, thisspecialized equipment usually is found only in high-technology handcenters.
Your best strategy is to try to align the nerve, using whatever land-marks you can discern. For example, try to line up the tiny blood ves-sels in the connective tissue around the nerve and fibers of similar size.
Nerve RepairFor optimal results, use at least twofold magnification (glasses or mi-croscope). The more magnification, the better. Twofold magnificationglasses make the image appear twice as large as with the naked eye.
Use the most delicate instruments you have—jewelers forceps, fineneedle holders, fine scissors—and the smallest needle you can find (8-0or 9-0 nylon is best).
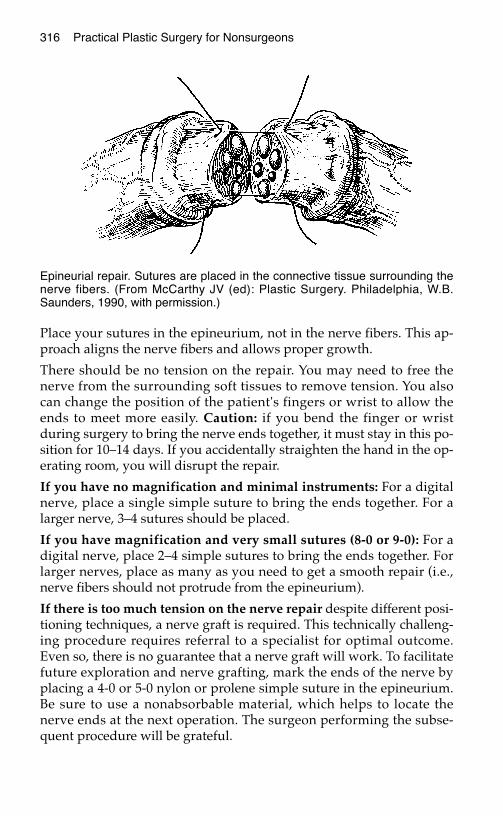
Place your sutures in the epineurium, not in the nerve fibers. This ap-proach aligns the nerve fibers and allows proper growth.
There should be no tension on the repair. You may need to free thenerve from the surrounding soft tissues to remove tension. You alsocan change the position of the patient's fingers or wrist to allow theends to meet more easily. Caution: if you bend the finger or wristduring surgery to bring the nerve ends together, it must stay in this po-sition for 10–14 days. If you accidentally straighten the hand in the op-erating room, you will disrupt the repair.
If you have no magnification and minimal instruments: For a digitalnerve, place a single simple suture to bring the ends together. For alarger nerve, 3–4 sutures should be placed.
If you have magnification and very small sutures (8-0 or 9-0): For adigital nerve, place 2–4 simple sutures to bring the ends together. Forlarger nerves, place as many as you need to get a smooth repair (i.e.,nerve fibers should not protrude from the epineurium).
If there is too much tension on the nerve repair despite different posi-tioning techniques, a nerve graft is required. This technically challeng-ing procedure requires referral to a specialist for optimal outcome.Even so, there is no guarantee that a nerve graft will work. To facilitatefuture exploration and nerve grafting, mark the ends of the nerve byplacing a 4-0 or 5-0 nylon or prolene simple suture in the epineurium.Be sure to use a nonabsorbable material, which helps to locate thenerve ends at the next operation. The surgeon performing the subse-quent procedure will be grateful.
316 Practical Plastic Surgery for Nonsurgeons
Epineurial repair. Sutures are placed in the connective tissue surrounding thenerve fibers. (From McCarthy JV (ed): Plastic Surgery. Philadelphia, W.B.Saunders, 1990, with permission.)
Nerve and Vascular Injuries of the Hand 317
Postoperative CareThe repair should be immobilized by splinting the hand or finger for aminimum of 10–14 days.
If the finger or hand required special positioning to get the nerveends to meet during the operation, the patient should begin to openthe finger or hand slowly (over the subsequent 1–2 weeks) to avoid dis-ruption of the repair.
If a motor nerve is injured, the patient should move the joints of thehand regularly to prevent stiffness. It takes months for the nerve tostart working again. Even if the nerve repair is successful, the patientmay not regain function if the joints have become stiff from disuse.
If a sensory nerve is injured, remind the patient to be careful aroundvery hot, very cold, or sharp objects to prevent accidental injury to theinsensate area.
VVaassccuullaarr IInnjjuurriieessFirst, address the risk of exsanguination (bleeding to death), which is areal danger with arterial injuries.
If serious bleeding persists: Apply point pressure over the wound.This does not mean placing gauze in the wound and wrapping thearea with an Ace bandage. It means placing a wad of gauze over theinjured area and using two fingers to apply firm point pressure to theinjured site. You may need to hold the pressure for several minutesbefore the bleeding stops. If the bleeding is arterial, exploration isneeded.
If you cannot control an exsanguinating hemorrhage, place a tourni-quet or blood pressure cuff proximal to the injury (closer to the heart).If you use a blood pressure cuff, it must be inflated to at least 50 mmHgabove systolic arterial pressure (usually to at least 200–250 mmHg).Tourniquets hurt and place the tissues at risk for ischemic injury. Thetourniquet should not be left in place for more than 15–20 minutes. If atourniquet is needed, urgent operative exploration is required.
Patients with a history of pulsatile bleeding (blood squirting outfrom a hand or forearm wound) must be explored surgically, even inthe absence of active bleeding at the time of exam. Failure to tie off orrepair the vessel is associated with a high incidence of pseudoaneurysm(outpouching of the vessel). A pseudoaneurysm can be dangerous be-cause of its propensity for rupture in the future.
318 Practical Plastic Surgery for Nonsurgeons
Digital ArteryBleeding from a digital artery usually can be controlled by repairingthe skin laceration and applying pressure over the injured area. In therare instance when this approach fails, the vessel can be tied off with avery small suture (5-0 or 6-0 silk or chromic).
Caution: The digital nerve is adjacent to the artery. Do not accidentallyplace the suture around the nerve as well as the artery. If you accidentallytie off a digital nerve, the patient will have considerable postoperative pain.
Radial ArteryAlthough we palpate the radial artery to check heart rate, it is not thedominant source of circulation to the hand. Many patients with a radialartery injury still have adequate circulation in the injured hand, as evi-denced by good capillary refill and normal hand temperature (com-pared with the other hand). The artery does not necessarily need to berepaired or reconstructed. The vessel can be tied off with minimal mor-bidity. Remember to tie off both ends of the vessel.
Because a significant amount of pressure pushes blood through anartery, a preferable and more secure way to tie off a larger artery is touse a “stick tie.” Both techniques are discussed in the chapter 2, “BasicSurgical Skills.”
However, if circulation to the hand is insufficient, as evidenced by poorcapillary refill and cold skin, the vessel should be repaired. Repair ofthe blood vessel involves joining together the two severed parts of theartery so that blood can flow as it did before the injury. Blood vessels inthe distal forearm are quite small, and repair requires microsurgicalequipment and expertise. Transfer to a specialist is vital to save thehand.
Ulnar ArteryThe ulnar artery is the dominant artery to the hand in most people.Thus, if it is injured, it should be repaired or reconstructed. Repair re-quires microsurgical expertise, because the ulnar artery is even smallerthan the radial artery.
The vessel should be tied off only if no one with microsurgical skills isavailable or if the patient is actively bleeding. In addition, some pa-tients have sufficient circulation to the hand even if the ulnar artery isinjured. In these few patients, the vessel can be safely tied off. In general,however, it is not recommended to tie off the ulnar artery permanentlyif specialists are available for referral.

Nerve and Vascular Injuries of the Hand 319
BBiibblliiooggrraapphhyy1. Modrall JG, Weaver FA, Yellin AE: Diagnosis and management of penetrating vascu-
lar trauma and the injured extremity. Emerg Med Clin North Am 16:129–144, 1998.2. Watchmaker GP, Mackinnon SE: Advances in peripheral nerve repair. Clin Plast Surg
24:63-73, 1997.
HHAANNDD BBUURRNNSS
Severe hand burns are especially problematic injuries because of theirpropensity for causing long-term disability. Proper treatment of theburned hand may mean that the patient can return to work and anormal lifestyle.
Unfortunately, if a large portion of the body is burned, the importance ofthe hands in terms of overall functional outcome is often overlooked.But if not properly treated, burns of the hand can result in severe dys-function and significant morbidity. Simple interventions can make ahuge difference in final outcome.
This chapter discusses specific interventions for treatment of a handburn. A thorough discussion of the treatment of the “whole patient”with a burn injury is found in chapter 20, “Burns.”
IInniittiiaall TTrreeaattmmeenntt • Cleanse the burned hand with a gentle soap and cool water. Saline-
moistened gauze also may be used for cleansing. Remove any clothingor other material attached to the burned tissues.
• Grease embedded in burned tissues often can be removed by gentlywiping with a petrolatum ointment. If tar is stuck onto the skin, leaveit alone; it will separate as the tissues heal. If you pull the tar off, youprobably will remove healthy skin, making the injury worse than itneeded to be.
• Make sure that the patient’s tetanus immunizations are up to date.
• Pain medication is important; intravenous administration of mor-phine is the most useful approach.
321
Chapter 34
KKEEYY FFIIGGUURREESS::Neglected handEscharotomy
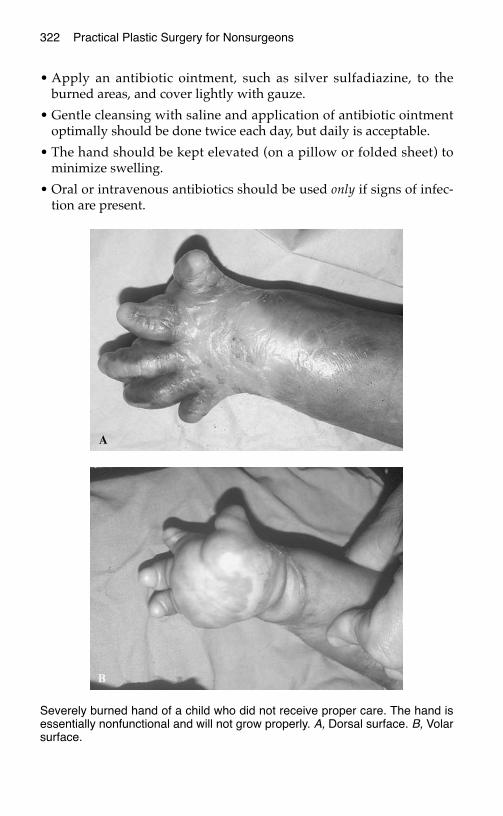
322 Practical Plastic Surgery for Nonsurgeons
• Apply an antibiotic ointment, such as silver sulfadiazine, to theburned areas, and cover lightly with gauze.
• Gentle cleansing with saline and application of antibiotic ointmentoptimally should be done twice each day, but daily is acceptable.
• The hand should be kept elevated (on a pillow or folded sheet) tominimize swelling.
• Oral or intravenous antibiotics should be used only if signs of infec-tion are present.
Severely burned hand of a child who did not receive proper care. The hand isessentially nonfunctional and will not grow properly. A, Dorsal surface. B, Volarsurface.
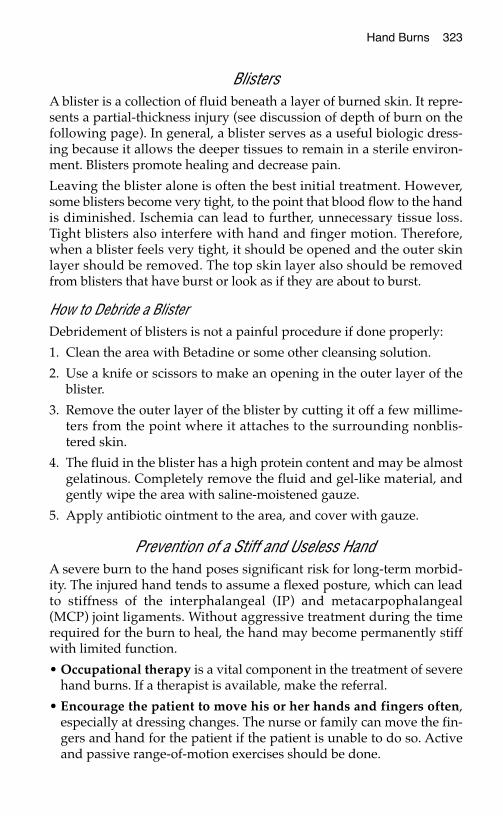
Hand Burns 323
BlistersA blister is a collection of fluid beneath a layer of burned skin. It repre-sents a partial-thickness injury (see discussion of depth of burn on thefollowing page). In general, a blister serves as a useful biologic dress-ing because it allows the deeper tissues to remain in a sterile environ-ment. Blisters promote healing and decrease pain.
Leaving the blister alone is often the best initial treatment. However,some blisters become very tight, to the point that blood flow to the handis diminished. Ischemia can lead to further, unnecessary tissue loss.Tight blisters also interfere with hand and finger motion. Therefore,when a blister feels very tight, it should be opened and the outer skinlayer should be removed. The top skin layer also should be removedfrom blisters that have burst or look as if they are about to burst.
How to Debride a BlisterDebridement of blisters is not a painful procedure if done properly:
1. Clean the area with Betadine or some other cleansing solution.
2. Use a knife or scissors to make an opening in the outer layer of theblister.
3. Remove the outer layer of the blister by cutting it off a few millime-ters from the point where it attaches to the surrounding nonblis-tered skin.
4. The fluid in the blister has a high protein content and may be almostgelatinous. Completely remove the fluid and gel-like material, andgently wipe the area with saline-moistened gauze.
5. Apply antibiotic ointment to the area, and cover with gauze.
Prevention of a Stiff and Useless HandA severe burn to the hand poses significant risk for long-term morbid-ity. The injured hand tends to assume a flexed posture, which can leadto stiffness of the interphalangeal (IP) and metacarpophalangeal(MCP) joint ligaments. Without aggressive treatment during the timerequired for the burn to heal, the hand may become permanently stiffwith limited function.
• Occupational therapy is a vital component in the treatment of severehand burns. If a therapist is available, make the referral.
• Encourage the patient to move his or her hands and fingers often,especially at dressing changes. The nurse or family can move the fin-gers and hand for the patient if the patient is unable to do so. Activeand passive range-of-motion exercises should be done.

324 Practical Plastic Surgery for Nonsurgeons
• Pain control is important because movement hurts.
• Place the hand in a splint to prevent it from assuming the flexed po-sition that ultimately may limit function. The splint should keep thewrist in 20° of extension, the MCP joints in 70° of flexion, and the IPjoints as straight as possible. The padding for the splint should bechanged if it becomes soiled. At a minimum, the patient should wearthe splint at night; critically injured patients should wear the splint atall times until the burns have healed.
• Careful tangential excision of the burn and split-thickness skingrafting should be done relatively early (within days of the injury ifpossible) for full-thickness burns. This will prevent the development oftight scars, which can lead to severe movement limitations. Only healthcare providers with surgical expertise should undertake these proce-dures. See the discussion of surgical treatments for more information.
DDeetteerrmmiinniinngg DDeepptthh ooff BBuurrnnAs explained in chapter 20, “Burns,” it is often difficult to determinethe severity of the burn at the first examination. Reevaluate the burnonce it has been cleansed and regularly thereafter. Burns are describedas first degree (superficial), second degree (partial thickness), and thirddegree (full thickness).
The skin of the hand has a wide range of thickness. The skin over thedorsum of the hand is much thinner than the skin over the palmar sur-face. A more severe burn injury is required to cause a full-thicknessburn to the palmar vs. the dorsal surface. Because the extensor tendonsare so close to the surface, full-thickness burns to the dorsal surface ofthe hand can be especially problematic.
TTaabbllee 11.. BBuurrnn WWoouunndd CCllaassssiiffiiccaattiioonn
* Partial-thickness burns can be superficial or deep. A superficial partial-thickness burn may have athin blister, and the skin will be soft and pink. A deep partial-thickness burn appears white and feelssofter than a full-thickness burn; some hair follicles are still attached. A deep partial-thickness burnoften behaves like a full-thickness burn.
BBuurrnn DDeepptthh AAppppeeaarraannccee PPaaiinn SSeennssaattiioonn
Superficial (first-degree) Erythema + Yes
Partial thickness* (second Blisters, hairs (if present) stay +++ Yesdegree) attached
Full thickness (third Thick, leathery feel 0 Nodegree) Pale color
Hairs (if present) do not stayattached
Thombosed veins may be seen
Hand Burns 325
Estimating the depth of the burn is important to approximate time tohealing. First- and superficial second-degree burns should heal within2 weeks, whereas deep second- and third-degree burns can take 3–4weeks or longer to heal.
If the burns do not show significant evidence of healing after 7–10 daysor if a full-thickness burn occurs in an area where tight scarring islikely, consideration should be given to early surgical intervention (seeTangential Excision).
SSuurrggiiccaall TTrreeaattmmeennttss
EscharotomySevere, circumferential full-thickness burns of the hand and fingersrequire extra precautions. The burned skin becomes leathery and losesall elasticity. As the underlying tissues swell (from a combination ofthe burn injury and from the fluid that the patient receives), theburned skin cannot “give,” and pressure builds up in the tissues.Pressure build-up can lead to decreased circulation, which can resultin further loss of tissue.
In all patients with severe burns, check for palpable pulses at the wrist.If they are not present, blood circulation to the tissues probably is inad-equate because of the tightness of the burned tissues. An escharotomymust be done emergently to prevent further tissue loss.
Escharotomy is the placing of incisions into the burned tissues to releasethe tightness. Do not extend the incisions into the deeper tissues; cutthrough the burned tissue only. Incisions must be placed with care to pre-vent injury to the important underlying nerves, tendons, and vessels.
Escharotomy can be done at the bedside. Caution: Escharotomy can bea bloody procedure. Be sure that blood is available, along with gauze,clamps, and an electrocautery device.
Although the eschar itself has no sensation, the procedure can be quitepainful. Intravenous morphine or intravenous sedation/general anes-thesia is required.
To Treat the FingersAn incision is made along the side of the finger. Usually only one inci-sion is needed on each finger. Try to avoid placing the incisions on theradial borders of the fingers. Placing the incisions along the ulnar sur-faces of the fingers will prevent future problems with scar sensitivitywhen the patient attempts to grasp objects.
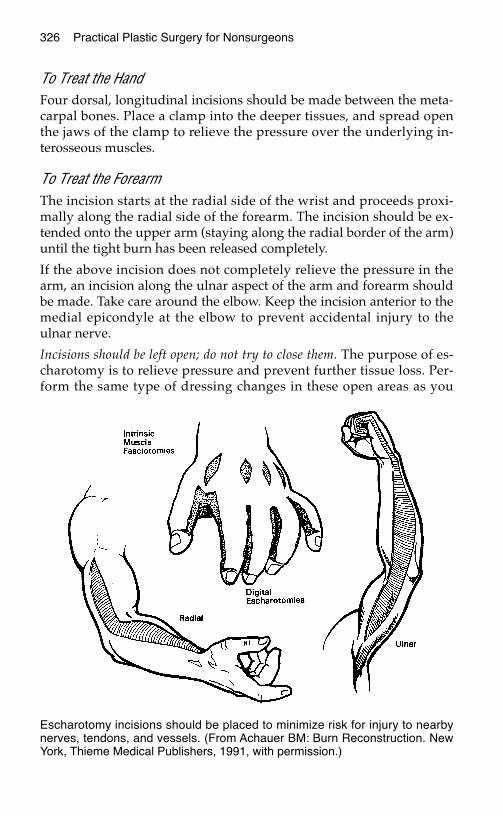
326 Practical Plastic Surgery for Nonsurgeons
To Treat the Hand Four dorsal, longitudinal incisions should be made between the meta-carpal bones. Place a clamp into the deeper tissues, and spread openthe jaws of the clamp to relieve the pressure over the underlying in-terosseous muscles.
To Treat the Forearm The incision starts at the radial side of the wrist and proceeds proxi-mally along the radial side of the forearm. The incision should be ex-tended onto the upper arm (staying along the radial border of the arm)until the tight burn has been released completely.
If the above incision does not completely relieve the pressure in thearm, an incision along the ulnar aspect of the arm and forearm shouldbe made. Take care around the elbow. Keep the incision anterior to themedial epicondyle at the elbow to prevent accidental injury to theulnar nerve.
Incisions should be left open; do not try to close them. The purpose of es-charotomy is to relieve pressure and prevent further tissue loss. Per-form the same type of dressing changes in these open areas as you
Escharotomy incisions should be placed to minimize risk for injury to nearbynerves, tendons, and vessels. (From Achauer BM: Burn Reconstruction. NewYork, Thieme Medical Publishers, 1991, with permission.)
Hand Burns 327
perform to the burned skin. Alternatively, you may apply saline-moist-ened gauze to the incisions.
Be sure to keep the hand elevated and in a splint to minimize swelling. Split-thickness skin grafts will be required for final wound healing.
Tangential ExcisionTangential excision is a method to remove burned tissue. See chapter20, “Burns,” for specific details. Care must be taken to avoid removinguninjured tissue. To perform this procedure you must have technicalexpertise to avoid injury to underlying tendons, nerves, and bloodvessels.
The excision should be done with a tourniquet on the extremity. Thetourniquet allows you to excise more accurately only the burnedtissue. It is important to leave the thin layer of tissue surrounding thetendons (peritenon) intact, if it is not burned. This tissue is vital for suc-cessful skin grafting. If the peritenon is burned, skin grafting is notpossible. A distant flap is required for wound closure.
When the tourniquet is released, the area will bleed uniformly, lettingyou know that all burned tissue has been removed.
The wound is then ready for split-thickness skin grafting. See chapter12, “Skin Grafts,” for details.
Postoperative Care after Tangential Excision and Skin GraftingKeep the hand elevated (on a pillow or folded sheet) to minimizeswelling.
Keep the hand in a splint, as previously described.
The splint should be worn at all times for the first 2 weeks. As thegrafts heal, the patient can wear the splint only at night. Critically in-jured patients should wear the splint at all times.
Once the grafts have begun to “stick” (5–6 days), start gentle active andpassive range-of-motion exercises of the hand and fingers.
After a few weeks, as the grafts heal and the patient begins to use thehand more, the splint can be worn only at night. The splint should beused at night for at least 1–2 months.
CCaarree aafftteerr BBuurrnnss oorr SSkkiinn GGrraaffttss hhaavvee HHeeaalleeddOnce the tissues have healed, it is important to start treatment to pre-vent the scars from becoming thick and tight:
Scar massage is a useful modality that requires no special equipment.

328 Practical Plastic Surgery for Nonsurgeons
Gently rub the fingers and hand with a mild moisturizing cream 2–3times/day to soften scars, diminish itching, and improve functionaloutcome.
The best way to prevent hypertrophic scarring is to fit the patient witha pressure garment (if available). The pressure garment should beworn for as many hours of the day as the patient tolerates for severalmonths.
For further discussion of these and other useful treatments, see chapter15, “Scar Formation.”
BBiibblliiooggrraapphhyy1. Achauer BM: The burned hand. In Green DP, Hotchkiss RN, Pederson WC (eds):
Green’s Operative Hand Surgery, 4th ed. New York, Churchill Livingstone, 1999, pp2045–2060.
2. Robson MC, Smith DJ: Burned hand. In Jurkiewicz MJ, Krizek TJ, Mathes SJ, Aryian S(eds): Plastic Surgery: Principles and Practice. St. Louis, Mosby, 1990, pp 781–802.
HHAANNDD CCRRUUSSHH IINNJJUURRYY AANNDD CCOOMMPPAARRTTMMEENNTT SSYYNNDDRROOMMEE
The previous chapters about the hand have discussed easily identifi-able, individual injuries to the upper extremity. A crush injury is morecomplex and may affect all of the tissues of the hand and forearm. It is,therefore, more difficult to treat. The risk of long-term disability after acrush injury is quite high.
Initially, the affected hand and forearm may appear to have sufferedonly minor damage because external wounds are few. Significantdamage to the skin and underlying tissues may not become apprecia-ble for hours or even days after the injury. Initial care plays an impor-tant role in final functional outcome.
Most of the necessary interventions require surgical expertise. How-ever, the initial examiner must be aware of all of the potential problemsthat may develop so that proper specialty help can be obtained. Thischapter outlines such problems and discusses specific treatment forcompartment syndrome (the most severe complication of crush injury)if specialty help is not available. It may save not only hand functionbut also the patient’s life.
CCrruusshh IInnjjuurryy:: DDeeffiinniittiioonn aanndd EExxaammpplleessA crush injury occurs when a compressive type of force is applied tothe tissues. At the site of injury the tissues experience several forces si-multaneously, including shearing, contusion, and stretching in addi-tion to pressure. This scenario is much different from what the tissuesexperience when injured, for example, with a knife.
Examples of crush injuries include the following:
329
Chapter 35
KKEEYY FFIIGGUURREESS::Volar forearm fasciotomy incisionsHand/dorsal forearm fasciotomy incisionsFinger fasciotomy incisions
330 Practical Plastic Surgery for Nonsurgeons
• Getting the fingers, hand, or forearm caught in a wringer or rollermachine.
• A motor vehicle accident that occurs as the patient is resting an armalong the window sill on the outside of the car. The car flips overonto that side, crushing the extremity.
• Getting the hand or forearm caught between two heavy objects thatare compressed together.
EEffffeeccttss oonn tthhee TTiissssuueess
Skin and Subcutaneous TissueThe skin may be seriously injured with multiple lacerations and contu-sions. Foreign material may be embedded in the wounds. Alterna-tively, the skin may look largely intact. However, large flaps of skinmay have been created by the injury. If the skin is detached from theunderlying fascia and muscle (degloving injury), the circulation to theskin is greatly compromised. The result can be significant skin loss.
In addition, blood and serum may collect in the tissue plains betweenskin and muscle. Build-up of pressure may cause further tissuedamage and possibly a compartment syndrome (see below).
MuscleDirect pressure injury and shearing forces lead to overstretching andtearing of the muscle. The results are bleeding and swelling within themuscle itself. A compartment syndrome with potentially devastatingconsequences may develop (see below). In addition, disruption ofmuscle-tendon connections may result in loss of function.
TendonsAlthough a crush injury probably will not tear a tendon completely,the stretching forces may create small, partial tears. During the healingprocess, scar tissue forms to heal such tears and may cause the tendonsto adhere to surrounding tissues. Adhesions may interfere significantlywith the tendon’s ability to glide smoothly, resulting in loss of jointmotion and hand function.
NervesUsually, nerves are not torn by a crush injury. However, the nerve’sability to conduct electrical impulses may be temporarily or possiblypermanently disrupted. It may take weeks to even months to deter-mine whether the loss of nerve activity is permanent.
Hand Crush Injury and Compartment Syndrome 331
With damage to sensory nerves, the patient may experience tinglingand numbness (paresthesias) or even painful hypersensitivity to touch.With damage to motor nerves, weakness or complete loss of functionmay result.
Blood VesselsBlood vessels can be injured by direct compression (depending on howlong the extremity was crushed) or shearing forces, which may injure theinner layer (the intima). Either mechanism can cause the vessel to clot.
If the injured vessel is an artery, the surrounding tissues lose theirblood supply and ischemia results. If the injured vessels are veins,diminution of venous outflow from the damaged area leads to a build-up of pressure in the tissues. This pressure may contribute to the for-mation of compartment syndrome (see below).
Injury to a major artery or to the veins of the extremity can result indevastating tissue loss if appropriate intervention is not forthcoming.
Bone and JointsJoint capsules and surrounding ligaments may rupture, resulting injoint dislocation or joint instability. Fractures may occur, and often thebone is broken into several pieces (comminuted fracture).
In children, the growth plates of the bones may be disrupted.Disruption of growth plates interferes with subsequent bone growth,and the bone may not grow to its proper length.
IInniittiiaall AApppprrooaacchh ttoo PPaattiieennttss wwiitthh aa CCrruusshheedd HHaanndd oorr FFoorreeaarrmm
The key is to get a good history and do a thorough exam. You shouldhave a high index of suspicion so that you do not miss a potentiallydevastating underlying injury.
HistoryIt is important to know the nature of the injury as well as backgroundinformation about the patient to guide your physical exam and treat-ment options. Information that you should obtain includes:
• Extent of injury (e.g., fingers, hands, forearms)
• Mechanism of injury
• Force of crush (some pieces of equipment have known compressionforces)
332 Practical Plastic Surgery for Nonsurgeons
• Duration of crush forces (seconds, minutes?)
• History of previous injury or chronic hand problems (e.g., symptomscompatible with carpal tunnel syndrome)
• Smoking history (encourage patients not to smoke because smokingmay worsen the injury to the tissues)
• Tetanus toxoid status (be sure tetanus immunizations are up to date)
Physical ExamThe injured extremity must be thoroughly examined. Particular atten-tion should be paid to the following factors. An asterisk indicates thatpositive findings may indicate a compartment syndrome.
• Appearance of skin (look for blisters, open wounds, elevated areas,foreign material, other abnormalities)
• Circulation to the hand (palpable pulses in the radial and ulnar arter-ies, capillary refill in the fingers)
• Palpation of forearm and hand (significant swelling, tissue tightness)*
• Neurologic exam (e.g., complaints of tingling or numbness, ability todifferentiate between sharp and dull objects, ability to move fingers)*
• Pain out of proportion to injury (e.g., additional pain when you pas-sively move fingers or wrist)*
• Deformity indicating possible bone or joint injury
• Radiographic studies to document a fracture
* Finding may indicate the presence of a compartment syndrome.
WWhhaatt ttoo DDoo NNeexxtt1. If you find evidence of arterial compromise, exploration and vascu-
lar reconstruction are needed. A specialist is required.
2. Fractures or dislocations should be reduced and treated appropri-ately. See chapter 30 for specific information.
3. If the patient has no evidence of a compartment syndrome (seebelow) but reports numbness and tingling of the hand consistentwith compression of the median nerve, a carpal tunnel releaseshould be done. This procedure decreases the pressure on themedian nerve and may prevent permanent neural damage. Seechapter 38 for details about surgical release of the median nerve.
4. Lacerations to the skin should be cleansed thoroughly and exam-ined carefully. If the tissues are soft and the skin is still attached tothe underlying muscle, the wounds may be loosely closed. If you
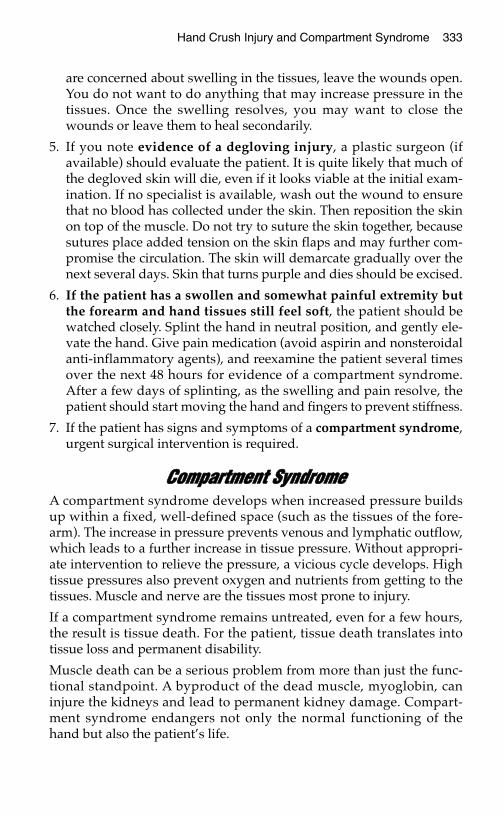
Hand Crush Injury and Compartment Syndrome 333
are concerned about swelling in the tissues, leave the wounds open.You do not want to do anything that may increase pressure in thetissues. Once the swelling resolves, you may want to close thewounds or leave them to heal secondarily.
5. If you note evidence of a degloving injury, a plastic surgeon (ifavailable) should evaluate the patient. It is quite likely that much ofthe degloved skin will die, even if it looks viable at the initial exam-ination. If no specialist is available, wash out the wound to ensurethat no blood has collected under the skin. Then reposition the skinon top of the muscle. Do not try to suture the skin together, becausesutures place added tension on the skin flaps and may further com-promise the circulation. The skin will demarcate gradually over thenext several days. Skin that turns purple and dies should be excised.
6. If the patient has a swollen and somewhat painful extremity butthe forearm and hand tissues still feel soft, the patient should bewatched closely. Splint the hand in neutral position, and gently ele-vate the hand. Give pain medication (avoid aspirin and nonsteroidalanti-inflammatory agents), and reexamine the patient several timesover the next 48 hours for evidence of a compartment syndrome.After a few days of splinting, as the swelling and pain resolve, thepatient should start moving the hand and fingers to prevent stiffness.
7. If the patient has signs and symptoms of a compartment syndrome,urgent surgical intervention is required.
CCoommppaarrttmmeenntt SSyynnddrroommeeA compartment syndrome develops when increased pressure buildsup within a fixed, well-defined space (such as the tissues of the fore-arm). The increase in pressure prevents venous and lymphatic outflow,which leads to a further increase in tissue pressure. Without appropri-ate intervention to relieve the pressure, a vicious cycle develops. Hightissue pressures also prevent oxygen and nutrients from getting to thetissues. Muscle and nerve are the tissues most prone to injury.
If a compartment syndrome remains untreated, even for a few hours,the result is tissue death. For the patient, tissue death translates intotissue loss and permanent disability.
Muscle death can be a serious problem from more than just the func-tional standpoint. A byproduct of the dead muscle, myoglobin, caninjure the kidneys and lead to permanent kidney damage. Compart-ment syndrome endangers not only the normal functioning of thehand but also the patient’s life.
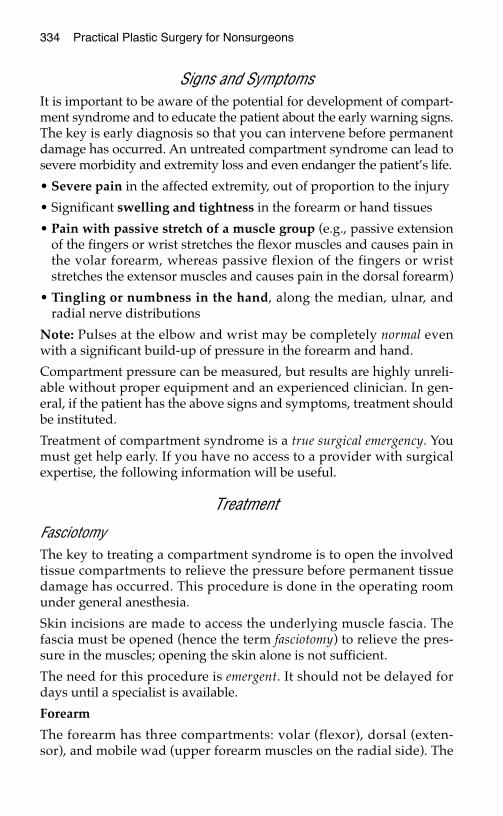
334 Practical Plastic Surgery for Nonsurgeons
Signs and SymptomsIt is important to be aware of the potential for development of compart-ment syndrome and to educate the patient about the early warning signs.The key is early diagnosis so that you can intervene before permanentdamage has occurred. An untreated compartment syndrome can lead tosevere morbidity and extremity loss and even endanger the patient’s life.
• Severe pain in the affected extremity, out of proportion to the injury
• Significant swelling and tightness in the forearm or hand tissues
• Pain with passive stretch of a muscle group (e.g., passive extensionof the fingers or wrist stretches the flexor muscles and causes pain inthe volar forearm, whereas passive flexion of the fingers or wriststretches the extensor muscles and causes pain in the dorsal forearm)
• Tingling or numbness in the hand, along the median, ulnar, andradial nerve distributions
Note: Pulses at the elbow and wrist may be completely normal evenwith a significant build-up of pressure in the forearm and hand.
Compartment pressure can be measured, but results are highly unreli-able without proper equipment and an experienced clinician. In gen-eral, if the patient has the above signs and symptoms, treatment shouldbe instituted.
Treatment of compartment syndrome is a true surgical emergency. Youmust get help early. If you have no access to a provider with surgicalexpertise, the following information will be useful.
Treatment
FasciotomyThe key to treating a compartment syndrome is to open the involvedtissue compartments to relieve the pressure before permanent tissuedamage has occurred. This procedure is done in the operating roomunder general anesthesia.
Skin incisions are made to access the underlying muscle fascia. Thefascia must be opened (hence the term fasciotomy) to relieve the pres-sure in the muscles; opening the skin alone is not sufficient.
The need for this procedure is emergent. It should not be delayed fordays until a specialist is available.
Forearm
The forearm has three compartments: volar (flexor), dorsal (exten-sor), and mobile wad (upper forearm muscles on the radial side). The
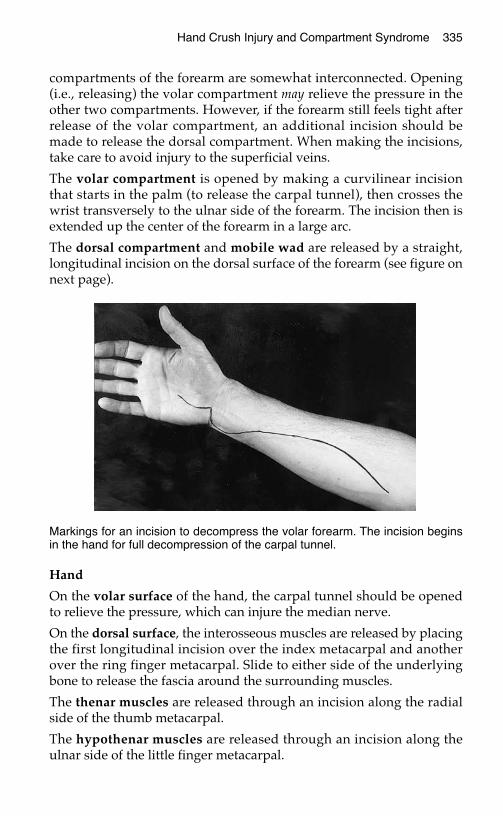
Hand Crush Injury and Compartment Syndrome 335
compartments of the forearm are somewhat interconnected. Opening(i.e., releasing) the volar compartment may relieve the pressure in theother two compartments. However, if the forearm still feels tight afterrelease of the volar compartment, an additional incision should bemade to release the dorsal compartment. When making the incisions,take care to avoid injury to the superficial veins.
The volar compartment is opened by making a curvilinear incisionthat starts in the palm (to release the carpal tunnel), then crosses thewrist transversely to the ulnar side of the forearm. The incision then isextended up the center of the forearm in a large arc.
The dorsal compartment and mobile wad are released by a straight,longitudinal incision on the dorsal surface of the forearm (see figure onnext page).
Hand
On the volar surface of the hand, the carpal tunnel should be openedto relieve the pressure, which can injure the median nerve.
On the dorsal surface, the interosseous muscles are released by placingthe first longitudinal incision over the index metacarpal and anotherover the ring finger metacarpal. Slide to either side of the underlyingbone to release the fascia around the surrounding muscles.
The thenar muscles are released through an incision along the radialside of the thumb metacarpal.
The hypothenar muscles are released through an incision along theulnar side of the little finger metacarpal.
Markings for an incision to decompress the volar forearm. The incision beginsin the hand for full decompression of the carpal tunnel.
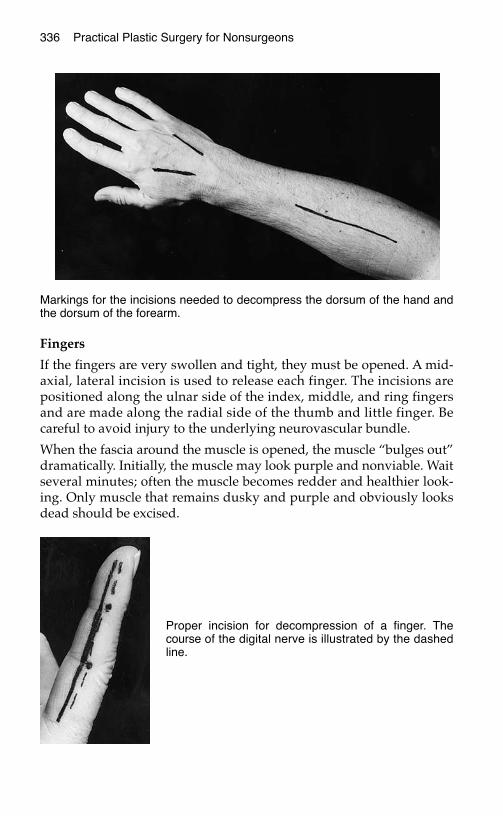
336 Practical Plastic Surgery for Nonsurgeons
Fingers
If the fingers are very swollen and tight, they must be opened. A mid-axial, lateral incision is used to release each finger. The incisions arepositioned along the ulnar side of the index, middle, and ring fingersand are made along the radial side of the thumb and little finger. Becareful to avoid injury to the underlying neurovascular bundle.
When the fascia around the muscle is opened, the muscle “bulges out”dramatically. Initially, the muscle may look purple and nonviable. Waitseveral minutes; often the muscle becomes redder and healthier look-ing. Only muscle that remains dusky and purple and obviously looksdead should be excised.
Markings for the incisions needed to decompress the dorsum of the hand andthe dorsum of the forearm.
Proper incision for decompression of a finger. Thecourse of the digital nerve is illustrated by the dashedline.
Hand Crush Injury and Compartment Syndrome 337
Postfasciotomy Care 1. The incisions should be left open. Saline dressings or antibiotic
gauze may be placed over the open wounds. Be sure that the dress-ings are applied loosely. Daily dressing changes can be started 24–48hours after the operation. The patient may require anesthesia for theinitial dressing change.
2. A splint should be used to keep the hand in neutral position.
3. The hand should be gently elevated (higher than the elbow) to pro-mote venous return and decrease swelling.
4. Further surgery is needed for wound closure. In general, wait atleast 3–4 days for the swelling to decrease. A split-thickness skingraft is almost always required for wound closure. If you attempt toclose any of the incisions primarily, make certain that there is no ten-sion on the skin.
5. Adequate stabilization is required for all fractures. Usually, tempo-rary stabilization can be attained with a splint. If an orthopedic sur-geon is available, more definitive bone stabilization can be performedat the time of fasciotomy or wound closure.
Prevention of the Vicious Cycle the Leads to a Compartment Syndrome
Elevate the hand and forearm. The patient must keep the injured handand forearm gently elevated and not let them dangle in a dependentposition The dependent position promotes swelling of injured tissues.The hand should be higher than the elbow.
Use a splint instead of a cast for immobilization of broken bonesuntil the swelling has decreased. A tight cast can contribute to an in-crease in tissue pressure. If there is a fair amount of swelling in theforearm or hand or if you do not have much experience making a cast,consider putting the extremity in a splint for the first few days.Although a splint does not immobilize the fracture as well as a cast, itis worth taking this precaution initially to prevent the development ofa compartment syndrome.
Be sure that the splint is held loosely in place. It is possible to secure thesplint too tightly with an Ace wrap—be careful.
If you have placed the patient in a cast: If the patient complains thatthe cast seems too tight or reports numbness in the fingers, bivalve thecast immediately. Make cuts in the cast along the medial and lateralsides, and separate the underlying padding. If this maneuver does not
338 Practical Plastic Surgery for Nonsurgeons
relieve the symptoms, the cast should be removed and the extremity ex-amined closely for signs of a compartment syndrome.
If an open wound is present: Do not close the skin if it seems at alltight. It is better to have an open wound that heals with an ugly scarthan to risk the development of a compartment syndrome by closingthe skin tightly.
Keep a high index of suspicion. A compartment syndrome can occureven with an open wound and even when the patient has normalpulses.
BBiibblliiooggrraapphhyy1. Buchler U, Hastings H: Combined injuries. In Green DP, Hotchkiss RN, Pederson WC
(eds): Green’s Operative Hand Surgery, 4th ed. New York, Churchill Livingstone,1999, pp 1631–1650.
2. Rowland SA: Fasciotomy: The treatment of compartment syndrome. In Green DP,Hotchkiss RN, Pederson WC (eds): Green’s Operative Hand Surgery, 4th ed. NewYork, Churchill Livingstone, 1999, pp 689–710.

HHAANNDD IINNFFEECCTTIIOONNSS:: GGEENNEERRAALL IINNFFOORRMMAATTIIOONN
Hand infections are relatively common problems. Seemingly minor in-juries can sometimes lead to significant infections. Proper treatment isvital to prevent long-term disability.
CCeelllluulliittiiss vvss.. AAbbsscceessssCellulitis is a diffuse infection of the soft tissues. No localized area ofpus can be drained. The affected area is described as indurated (i.e.,warm, red, and swollen). The hand is also painful. A component oflymphangitis (infection involving the lymphatics) may be indicated byred streaking in the tissues, progressing proximally up the arm. Thetreatment of cellulitis centers on the administration of the appropriateantibiotic regimen.
An abscess is a localized collection of pus, often with a component ofcellulitis in the surrounding soft tissues (with the above signs). Onesign of an abscess is an area of fluctuance. When you apply gentle dig-ital pressure over the area of the presumed abscess, you feel a “give,”indicating the presence of fluid beneath the skin. Another sign is that anabscess often seems to “point”; that is, the skin starts to thin from the pres-sure of the fluid underneath. The primary treatment of an abscess is in-cision and drainage (I & D)—cutting open the roof of the abscess toallow the pus to drain. Antibiotic therapy may be needed, but the in-fectious process will not resolve with antibiotics alone.
From the above information, you can see that the distinction betweenthe two entities is important because their treatments are different. I & Dis indicated for an abscess, whereas cellulitis does not warrant thisintervention.
339
Chapter 36
KKEEYY FFIIGGUURREE::Elevation and splinting
340 Practical Plastic Surgery for Nonsurgeons
GGaannggrreenneeThe term gangrene is used to describe tissues that are dead. There aretwo subtypes of gangrene, wet and dry. The distinction is important.
Dry gangrene describes tissues that are generally black and dried out.There is a distinct border between the dead tissue and surroundinghealthy tissue. Sometimes the dead tissues fall off on their own; drygangrenous fingertips can fall off with minimal manipulation. However,debridement usually is required, but it is not emergent. Dry gangreneusually places the patient at no health risk as long as it does notbecome infected (see below).
In contrast to dry gangrene, wet gangrene can be a significant healthrisk. Wet gangrene connotes active infection (noted by pain, swelling,redness, and drainage of pus) in the tissues surrounding the obviouslydead tissue. Urgent debridement is required to prevent further tissueloss and worsening of soft tissue infection.
NNeeccrroottiizziinngg FFaasscciiiittiissNecrotizing fasciitis is a serious, potentially life-threatening infectionof the fascia (the thin connective tissue overlying the muscle under theskin and subcutaneous tissue). The popular press calls it the disease offlesh-eating bacteria.
Necrotizing fasciitis is not common. However, it must be considered inthe evaluation of patients with a hand infection that seems to berapidly progressing proximally up the forearm. Necrotizing fasciitisshould also be considered when the patient is sicker than you wouldexpect for simple cellulitis.
The skin is swollen, but often without the typical signs of cellulitis. Theskin simply does not look “right.” You may be able to feel subcuta-neous air in the soft tissues of the arm, or you may see air in the softtissues on x-rays (normally, no air is present in soft tissues on x-ray).
The patient is often quite ill (high fever, low blood pressure, generalweakness, and even shock may be present). The infection can spreadquickly up the arm and into the chest. Radical debridement and evenamputation may be necessary to save the patient’s life.
Treatment requires aggressive operative debridement (opening up thesoft tissue spaces, as with an abscess) to remove diseased tissue, intra-venous antibiotics, and close monitoring for aggressive treatment ofsepticemia. Hyperbaric oxygen also may be indicated but does not re-place aggressive operative treatment. Patients with necrotizing fasciitisshould be treated by a surgeon with critical care expertise.
Hand Infections: General Information 341
EEvvaalluuaattiioonn ooff aann IInnffeecctteedd HHaanndd
HistoryAsk the patient about events that may have led to the development ofthe infection. This information may help to guide your treatment.
Antecedent TraumaA history of being cut by glass or sustaining a puncture wound shouldraise concern about the presence of a foreign body in the soft tissues.
Ask whether the patient was bitten by an animal. An animal’s canineteeth, especially those of a cat, may penetrate much deeper into the un-derlying tissues than you expect. Find out what type of animal was in-volved; different animals have specific bacterial organisms that mayrequire a particular antibiotic. Ask about the possibility of rabies expo-sure (see chapter 6, “Evaluation of an Acute Wound,” for informationabout rabies prevention).
If the patient has a wound over a metacarpophalangeal knuckle, youmust ask specifically whether the wound is due to human teeth. Peopleare often embarrassed to admit that they have been in a fight. Askpoint-blank: Did you punch someone in the mouth? Did someone biteyou? This information is important because the human mouth hasstrong pathogens that can lead to significant soft tissue destruction.Choice of specific antibiotics is based on the usual organisms found inthe human mouth.
Recent History of SwimmingWell-managed swimming pools usually are treated adequately withchemicals, and the ocean has such a high salt content that neithervenue is associated with specific organisms that cause infection.However, streams, ponds, lakes, and aquariums are associated withspecific bacteria that can cause significant infections. In addition, askwhether the injury occurred while the patient was working on a boator fishing.
Medical IssuesPatients with diabetes often develop infections that are unexpectedlydifficult to treat. You must treat such infections aggressively andensure that blood sugar is well controlled.
Ask about the patient’s tetanus immunization status.
342 Practical Plastic Surgery for Nonsurgeons
Physical Examination1. The classic signs of a hand infection are redness, warmth, swelling,
and pain. The swelling associated with a hand infection is oftenquite pronounced.
2. Look closely for puncture wounds and other signs of trauma.
3. Determine whether the patient has a localized collection of pus thatrequires drainage or diffuse soft tissue infection.
4. Look for induration extending proximally up the forearm.
5. Look for red streaks extending up the arm.
6. If the forearm is involved, palpate for crepitus or subcutaneous airin the forearm tissues (signs of necrotizing fasciitis). To test for crepi-tus, press on the soft tissues. If air is present under the skin, it willfeel as if you are pressing on crinkled layers of cellophane or pop-ping air bubbles beneath the skin.
7. Look for signs of systemic illness (fever, chills, low blood pressure,generalized weakness, and malaise).
8. Look for evidence of enlarged lymph nodes in the armpit or back ofthe elbow.
Additional StudiesThe basic studies include complete blood count with a white blood cellcount and x-ray evaluation of the infected area. Include the forearm ifthe induration extends proximally up the forearm. Blood culturesshould be done if the patient is febrile or looks ill. If there is an openwound present, culture it.
What to Assess on X-rays1. Foreign bodies
2. Unsuspected fractures or dislocations
3. Evidence of joint contamination: air in the joint, destruction of jointsurfaces, foreign material in the joint. Any of these findings war-rants operative exploration.
4. Underlying bone infection: the bone edges appear irregular if boneis involved with the infectious process. If bone is involved, 4–6weeks of antibiotic therapy are needed.
5. Air in the soft tissues strongly indicates necrotizing fasciitis.Localized air may be present in the soft tissues at the immediatevicinity of an I & D site, but diffuse air in the tissues is a sign ofnecrotizing infection.
Hand Infections: General Information 343
IImmppoorrttaannccee ooff KKeeyy EElleemmeennttss iinn tthhee HHiissttoorryyaanndd PPhhyyssiiccaall EExxaammiinnaattiioonn
Foreign BodiesIf a foreign body is located in the infected tissues, the infection will notresolve unless it is removed. However, a foreign body in soft tissues with-out cellulitis does not have to be removed unless it is causing symptoms.
Animal BitesPasteurella multocida and Staphylococcus aureus are associated with catand dog bites. Treatment with an antipseudomonal and antistaphylo-coccal antibiotic (amoxicillin/clavulanate, cefuroxime) is required. Catbites often penetrate more deeply than you expect and may involveunderlying joints or tendons. Exploration and washout of the joint andtendon may be required. Cat bites have a much higher incidence ofsubsequent infection than dog bites (80% vs. 5%, respectively).
Human BitesEikenella corrodens, other anaerobes, and Streptococcus viridans are asso-ciated with infections caused by a human bite. If the patient is seenearly after the injury, before signs of infection have developed, treatwith amoxicillin/clavulanate. Once signs of infection are present, in-travenous antibiotics, such as amoxicillin/sulbactam or ticarcillin/clavulanate, are indicated. Operative exploration also may be requiredif the underlying joint is affected. In addition, abscess formation iscommon after a human bite.
Seawater and Shellfish-related InjuryIf the infected tissues are swollen and red but not particularly hot ortender, the causative organism may be Mycobacterium marinum. Treat-ment requires long-term (3 months) administration of doxycycline orrifampin/ethambutol. An infectious disease specialist should be in-volved in the treatment of such patients.
If the infected area has all of the typical signs of cellulitis, treatmentshould cover bacteria of the Vibrio species; tetracycline or an aminogly-coside may be used.
Freshwater InjuryAeromonas hydrophila is associated with freshwater infection. A fluoro-quinolone or trimethoprim/sulfamethoxazole should be used fortreatment.

344 Practical Plastic Surgery for Nonsurgeons
Red StreakingRed streaking is a sign of lymphangitis, which means that the infectionis traveling through the lymphatic system. Staphylococcal infectionsare most commonly associated with this physical finding.
Enlarged Lymph Nodes Around the Elbow or ArmpitThe presence of enlarged lymph nodes may indicate cat-scratch dis-ease, a Mycobacterium marinum infection, sporotrichosis or nocardial in-fection. An infectious disease specialist should be consulted becausethese unusual infections can be difficult to treat.
GGeenneerraall IInniittiiaall TTrreeaattmmeennttThe infected hand is often diffusely swollen. Initially it may be difficultto determine whether the patient has an abscess in need of drainage. Ifthe patient otherwise looks well and has no signs of flexor tenosynovitis(see chapter 37, “Specific Types of Hand Abscesses”), underlying jointinfection, or necrotizing fasciitis, treat conservatively. Do not make cutsin the skin looking for an abscess; you may well find nothing.
Conservative Approach1. Start the appropriate antibiotics.
2. Splint the hand in neutral position (see chapter 28, “Hand Splintingand General Aftercare”), and elevate the hand. These two interven-tions are the cornerstone of treatment for all hand infections.Splinting and elevation significantly reduce swelling, thus makingit easier to determine whether an abscess is present.
The proper way to elevate an injured hand. The hand should be higher than theelbow to promote drainage and decrease swelling in the hand.
Hand Infections: General Information 345
3. Warm (not hot) compresses applied to the inflamed area of the handmay be useful.
4. After 24 hours reevaluate the hand.
• Significant improvement may be seen. If there is no evidence of anabscess, continue splinting, elevation, and antibiotics. The splintshould be removed once pain and swelling have resolved.Regular exercise then becomes important to prevent stiffness.Continue the antibiotics for 7–10 days until the infectious processhas resolved completely.
• Alternatively, a localized collection of pus in need of drainagemay be identifiable. The following chapter discusses specific typesof hand abscesses and their treatment.
BBiibblliiooggrraapphhyy1. Gilbert DN, Moellering RC, Sande MA (eds): The Sanford Guide to Antimicrobial
Therapy, 29th ed. Vermont, Antimicrobial Therapy, Inc., 1999. 2. Lampe EW: Clinical Symposia: Surgical Anatomy of the Hand. 40th anniversary issue
40(3):31–36, 1988.
SSPPEECCIIFFIICC TTYYPPEESS OOFF HHAANNDD IINNFFEECCTTIIOONNSS
FFeelloonnA felon is an abscess of the fingertip along the volar skin pad. The finger-tip is swollen and quite painful. Without proper treatment, the infectioncan progress and cause serious complications. Necrosis of the fingertipskin, osteomyelitis (infection of the underlying bone), and even flexortenosynovitis (see description later in this chapter) may result.
If the infectious process is caught before abscess formation, it can betreated with antibiotics alone. If no improvement is observed with an-tibiotics or if fluctuance is present, incision and drainage are necessary.
Incision and Drainage1. Anesthetize the finger with a digital block using lidocaine, bupiva-
caine, or a mixture of the two.
2. Clean the fingertip with some type of antibacterial agent.
3A. If the “point” (i.e., area of maximal tenderness and fluctuance) ison the volar fingertip pad, make a longitudinal incision over thispoint. Take care to keep the incision distal to the distal interpha-langeal (DIP) flexion crease.
B. If the “point” is on the lateral surface, make a longitudinal inci-sion on the ulnar side of the digit (radial side for the thumb orlittle finger) parallel to the expected position of the digital nerve.Take care to keep distal and dorsal to the DIP flexion crease to pre-vent injury to the digital nerve and artery.
4. Use a clamp to open the incision and thoroughly drain the space.
347
Chapter 37
KKEEYY FFIIGGUURREESS::FelonParonychiaCollar button abscess

348 Practical Plastic Surgery for Nonsurgeons
5. If you have access to a microbiology lab, send a specimen of the pusfor culture to identify the causative organism.
6. Irrigate the abscess cavity with sterile saline.
7. Pack a small piece of gauze into the cavity, and cover the fingertipwith dry gauze.
Aftercare• Keep the hand elevated.
• Remove the packing the next day, and clean the finger with gentlesoap and water or saline.
• If possible, repack the cavity with saline-moistened gauze. Changethis dressing 1 or 2 times each day.
• Once you cannot pack the cavity with gauze, simply apply antibioticointment to the area and cover with a dry gauze 1 or 2 times each day.
• Be sure to wash the finger with gentle soap and water or saline twicedaily.
Two ways to drain a felon. A, Midline verti-cal incision. B, Lateral incision. (FromCrenshaw AH (ed): Campbell’s OperativeOrthopaedics, 7th ed. St. Louis, Mosby,1987, with permission.)

• Encourage active and passive range-of-motion exercises to preventthe finger from becoming stiff.
• Continue the oral antibiotics for several days, until the tendernessand redness resolve.
PPaarroonnyycchhiiaaA paronychia is an infection around the fingernail, in the surroundingskin fold (eponychial fold). It usually is caused by Staphylococcusaureus. The skin around the proximal portion of the fingernail isswollen, and the finger is quite tender.
If the infection is caught early, the finger can be successfully treated bysoaking it in warm, soapy water several times a day and giving oral an-tibiotics. If pus is present around the base of the nail, drainage is needed.
Drainage1. Anesthetize the finger with a digital block using lidocaine, bupiva-
caine, or a mixture of the two.
2. Soak the finger in warm, soapy water for 5–10 minutes.
3. Place the tips of a closed clamp under the skin fold around the nailto open the abscess. Wash the space out with saline, and then pack itwith a small piece of gauze.
4. Remove the gauze the next day. Instruct the patient to continue thewarm soaks and cover with antibiotic ointment and dry gauze 2 or 3times/day.
Specific Types of Hand Infections 349
Treatment of a paronychia. A, Ele-vation and removal of one-fourthof the nail to decompress theparonychium. B, Incision of theparonychial fold with the blade di-rected away from the nail bed andmatrix. (Illustration by ElizabethRoselius © 1998. From GreenDP, et al (eds): Operative HandSurgery, 4th ed. New York,Churchill Livingstone, 1999, withpermission.)
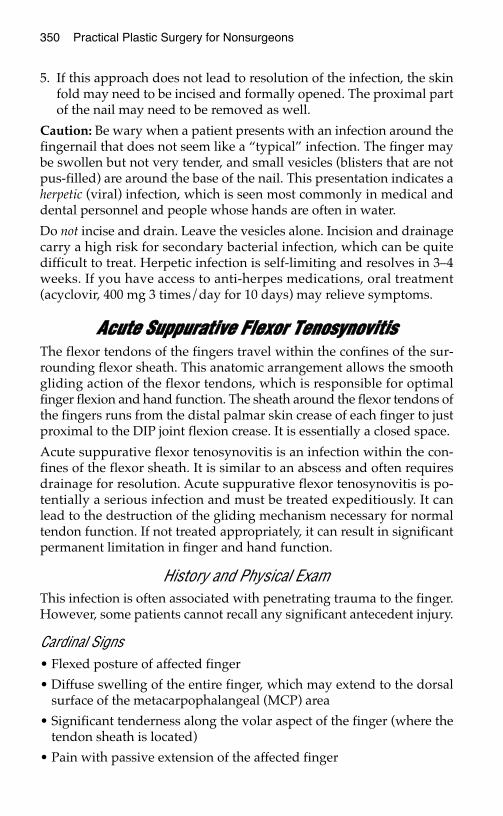
350 Practical Plastic Surgery for Nonsurgeons
5. If this approach does not lead to resolution of the infection, the skinfold may need to be incised and formally opened. The proximal partof the nail may need to be removed as well.
Caution: Be wary when a patient presents with an infection around thefingernail that does not seem like a “typical” infection. The finger maybe swollen but not very tender, and small vesicles (blisters that are notpus-filled) are around the base of the nail. This presentation indicates aherpetic (viral) infection, which is seen most commonly in medical anddental personnel and people whose hands are often in water.
Do not incise and drain. Leave the vesicles alone. Incision and drainagecarry a high risk for secondary bacterial infection, which can be quitedifficult to treat. Herpetic infection is self-limiting and resolves in 3–4weeks. If you have access to anti-herpes medications, oral treatment(acyclovir, 400 mg 3 times/day for 10 days) may relieve symptoms.
AAccuuttee SSuuppppuurraattiivvee FFlleexxoorr TTeennoossyynnoovviittiissThe flexor tendons of the fingers travel within the confines of the sur-rounding flexor sheath. This anatomic arrangement allows the smoothgliding action of the flexor tendons, which is responsible for optimalfinger flexion and hand function. The sheath around the flexor tendons ofthe fingers runs from the distal palmar skin crease of each finger to justproximal to the DIP joint flexion crease. It is essentially a closed space.
Acute suppurative flexor tenosynovitis is an infection within the con-fines of the flexor sheath. It is similar to an abscess and often requiresdrainage for resolution. Acute suppurative flexor tenosynovitis is po-tentially a serious infection and must be treated expeditiously. It canlead to the destruction of the gliding mechanism necessary for normaltendon function. If not treated appropriately, it can result in significantpermanent limitation in finger and hand function.
History and Physical ExamThis infection is often associated with penetrating trauma to the finger.However, some patients cannot recall any significant antecedent injury.
Cardinal Signs• Flexed posture of affected finger
• Diffuse swelling of the entire finger, which may extend to the dorsalsurface of the metacarpophalangeal (MCP) area
• Significant tenderness along the volar aspect of the finger (where thetendon sheath is located)
• Pain with passive extension of the affected finger
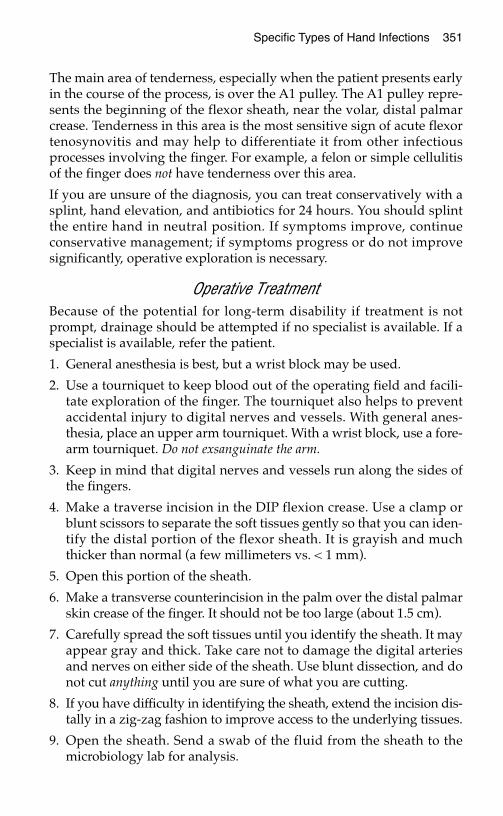
Specific Types of Hand Infections 351
The main area of tenderness, especially when the patient presents earlyin the course of the process, is over the A1 pulley. The A1 pulley repre-sents the beginning of the flexor sheath, near the volar, distal palmarcrease. Tenderness in this area is the most sensitive sign of acute flexortenosynovitis and may help to differentiate it from other infectiousprocesses involving the finger. For example, a felon or simple cellulitisof the finger does not have tenderness over this area.
If you are unsure of the diagnosis, you can treat conservatively with asplint, hand elevation, and antibiotics for 24 hours. You should splintthe entire hand in neutral position. If symptoms improve, continueconservative management; if symptoms progress or do not improvesignificantly, operative exploration is necessary.
Operative TreatmentBecause of the potential for long-term disability if treatment is notprompt, drainage should be attempted if no specialist is available. If aspecialist is available, refer the patient.
1. General anesthesia is best, but a wrist block may be used.
2. Use a tourniquet to keep blood out of the operating field and facili-tate exploration of the finger. The tourniquet also helps to preventaccidental injury to digital nerves and vessels. With general anes-thesia, place an upper arm tourniquet. With a wrist block, use a fore-arm tourniquet. Do not exsanguinate the arm.
3. Keep in mind that digital nerves and vessels run along the sides ofthe fingers.
4. Make a traverse incision in the DIP flexion crease. Use a clamp orblunt scissors to separate the soft tissues gently so that you can iden-tify the distal portion of the flexor sheath. It is grayish and muchthicker than normal (a few millimeters vs. < 1 mm).
5. Open this portion of the sheath.
6. Make a transverse counterincision in the palm over the distal palmarskin crease of the finger. It should not be too large (about 1.5 cm).
7. Carefully spread the soft tissues until you identify the sheath. It mayappear gray and thick. Take care not to damage the digital arteriesand nerves on either side of the sheath. Use blunt dissection, and donot cut anything until you are sure of what you are cutting.
8. If you have difficulty in identifying the sheath, extend the incision dis-tally in a zig-zag fashion to improve access to the underlying tissues.
9. Open the sheath. Send a swab of the fluid from the sheath to themicrobiology lab for analysis.
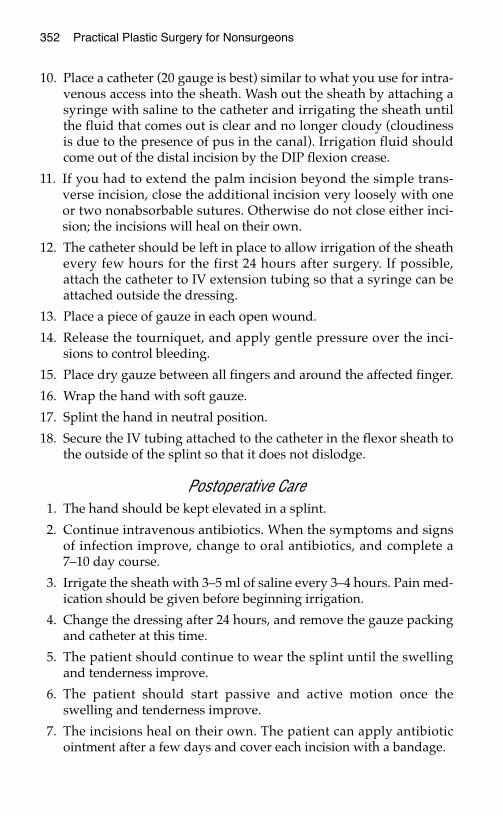
352 Practical Plastic Surgery for Nonsurgeons
10. Place a catheter (20 gauge is best) similar to what you use for intra-venous access into the sheath. Wash out the sheath by attaching asyringe with saline to the catheter and irrigating the sheath untilthe fluid that comes out is clear and no longer cloudy (cloudinessis due to the presence of pus in the canal). Irrigation fluid shouldcome out of the distal incision by the DIP flexion crease.
11. If you had to extend the palm incision beyond the simple trans-verse incision, close the additional incision very loosely with oneor two nonabsorbable sutures. Otherwise do not close either inci-sion; the incisions will heal on their own.
12. The catheter should be left in place to allow irrigation of the sheathevery few hours for the first 24 hours after surgery. If possible,attach the catheter to IV extension tubing so that a syringe can beattached outside the dressing.
13. Place a piece of gauze in each open wound.
14. Release the tourniquet, and apply gentle pressure over the inci-sions to control bleeding.
15. Place dry gauze between all fingers and around the affected finger.
16. Wrap the hand with soft gauze.
17. Splint the hand in neutral position.
18. Secure the IV tubing attached to the catheter in the flexor sheath tothe outside of the splint so that it does not dislodge.
Postoperative Care1. The hand should be kept elevated in a splint.
2. Continue intravenous antibiotics. When the symptoms and signsof infection improve, change to oral antibiotics, and complete a7–10 day course.
3. Irrigate the sheath with 3–5 ml of saline every 3–4 hours. Pain med-ication should be given before beginning irrigation.
4. Change the dressing after 24 hours, and remove the gauze packingand catheter at this time.
5. The patient should continue to wear the splint until the swellingand tenderness improve.
6. The patient should start passive and active motion once theswelling and tenderness improve.
7. The incisions heal on their own. The patient can apply antibioticointment after a few days and cover each incision with a bandage.
Specific Types of Hand Infections 353
Note: There is no such thing as acute suppurative extensor tenosynovitisbecause there is no sheath around the extensor tendons of the fingers.
Patients with rheumatoid arthritis may develop a noninfectious teno-synovitis, which essentially is inflammation of the tendons caused bythe underlying rheumatic disease. Often the tendons are involvedmore proximally at the wrist, and flexor or extensor tendons may be af-fected. This inflammatory disorder is quite different from an acute in-fectious process and does not require antibiotics or urgent surgicalintervention. The symptoms are more chronic, and the physical find-ings are not as dramatic as those due to an infectious process.
AAbbsscceessss oonn tthhee DDoorrssaall SSuurrffaaccee ooff tthhee HHaannddThe patient often presents with a very swollen hand and fingers. At firstit may be difficult to appreciate the abscess cavity because of the diffusenature of the swelling. In the presence of an obvious abscess, proceedto incision and drainage. If you are not certain whether or not an ab-scess is present, and the patient does not appear ill, treat conservativelyat first with splint, hand elevation, and antibiotics for 1 day. Often after24 hours of conservative treatment, the swelling decreases in areas notinvolved with the abscess. The abscess cavity is then identifiable.
Incision and Drainage1. If the skin overlying the abscess is very thin (i.e., the abscess is
“pointing”), no anesthetic may be required.
2. If the patient is in too much pain, local anesthetics may not be veryuseful because they do not work well in infected tissues. However, ablock may work, or, if indicated by the extent of the abscess, generalanesthesia may be required.
3. Make a longitudinal incision through the most fluctuant part of theabscess. Do not be timid when making the incision. Excise an ellipseof skin so that the opening is large enough to drain the abscess com-pletely and to allow packing of the cavity with gauze.
4. Use the tips of a clamp to explore the abscess cavity. Make sure thatthe cavity does not extend to the volar side of the hand. If it does, acounterincision should be made over the volar extension of thecavity. This extension allows better drainage of the entire abscess. Ifyou need to make a counterincision on the volar surface, first injectsome anesthetic into the area.
5. Pack the wound with gauze.
6. Use a splint to keep the hand in neutral position.
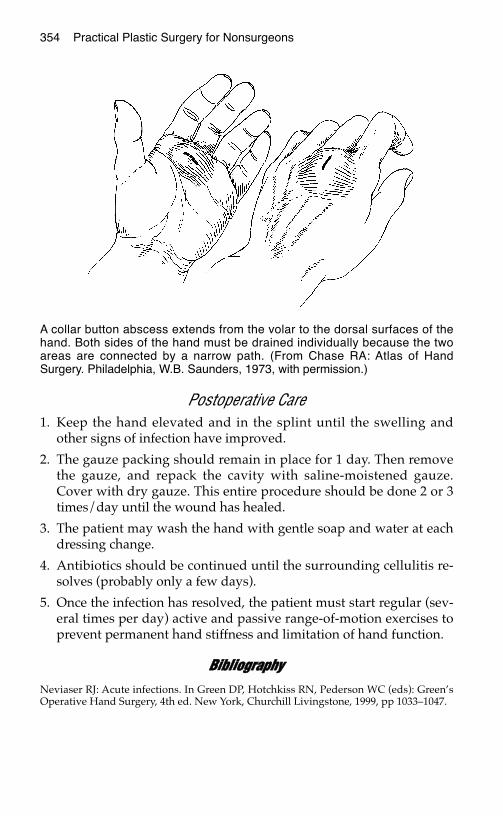
354 Practical Plastic Surgery for Nonsurgeons
Postoperative Care1. Keep the hand elevated and in the splint until the swelling and
other signs of infection have improved.
2. The gauze packing should remain in place for 1 day. Then removethe gauze, and repack the cavity with saline-moistened gauze.Cover with dry gauze. This entire procedure should be done 2 or 3times/day until the wound has healed.
3. The patient may wash the hand with gentle soap and water at eachdressing change.
4. Antibiotics should be continued until the surrounding cellulitis re-solves (probably only a few days).
5. Once the infection has resolved, the patient must start regular (sev-eral times per day) active and passive range-of-motion exercises toprevent permanent hand stiffness and limitation of hand function.
BBiibblliiooggrraapphhyyNeviaser RJ: Acute infections. In Green DP, Hotchkiss RN, Pederson WC (eds): Green’sOperative Hand Surgery, 4th ed. New York, Churchill Livingstone, 1999, pp 1033–1047.
A collar button abscess extends from the volar to the dorsal surfaces of thehand. Both sides of the hand must be drained individually because the twoareas are connected by a narrow path. (From Chase RA: Atlas of HandSurgery. Philadelphia, W.B. Saunders, 1973, with permission.)
CCHHRROONNIICC HHAANNDD CCOONNDDIITTIIOONNSS
Chronic hand pain is a common complaint, especially among peoplewho work with their hands. What initially may seem to be only an an-noying pain can turn into significant disability without adequatetreatment. This chapter discusses several of the most commonly en-countered chronic hand disorders.
TTrriiggggeerr FFiinnggeerr
Anatomic BackgroundThe flexor tendons travel through a connective tissue, synovial-linedtube as they course through the fingers. This tube runs from themetacarpophalangeal (MCP) joint (just proximal to the MCP flexioncrease as you look at the palm of the hand) to a point immediatelyproximal to the distal interphalangeal (DIP) joint.
This tube is highly pliable and thin. The tissue is slightly thicker inseveral areas, called pulleys. The purpose of the pulleys is to preventthe tendons from bowstringing during finger flexion. This action isimportant for adequate grip strength and proper hand function. Themost important pulleys are A1, A2, and A3, which overlie the MCPjoint, the proximal phalanx, and the proximal interphalangeal (PIP)joint, respectively.
The digital neurovascular bundles (digital nerve and vessels) runalong either side of the tube in the soft tissue.
355
Chapter 38
KKEEYY FFIIGGUURREESS::Pulley system of fingers Carpal tunnel anatomyTrigger finger release Carpal tunnel releaseA1 pulley opening incision
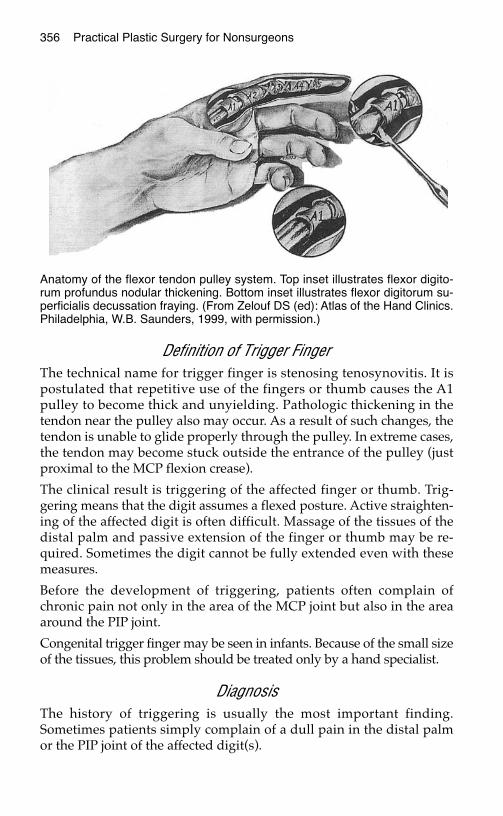
356 Practical Plastic Surgery for Nonsurgeons
Definition of Trigger FingerThe technical name for trigger finger is stenosing tenosynovitis. It ispostulated that repetitive use of the fingers or thumb causes the A1pulley to become thick and unyielding. Pathologic thickening in thetendon near the pulley also may occur. As a result of such changes, thetendon is unable to glide properly through the pulley. In extreme cases,the tendon may become stuck outside the entrance of the pulley (justproximal to the MCP flexion crease).
The clinical result is triggering of the affected finger or thumb. Trig-gering means that the digit assumes a flexed posture. Active straighten-ing of the affected digit is often difficult. Massage of the tissues of thedistal palm and passive extension of the finger or thumb may be re-quired. Sometimes the digit cannot be fully extended even with thesemeasures.
Before the development of triggering, patients often complain ofchronic pain not only in the area of the MCP joint but also in the areaaround the PIP joint.
Congenital trigger finger may be seen in infants. Because of the small sizeof the tissues, this problem should be treated only by a hand specialist.
DiagnosisThe history of triggering is usually the most important finding.Sometimes patients simply complain of a dull pain in the distal palmor the PIP joint of the affected digit(s).
Anatomy of the flexor tendon pulley system. Top inset illustrates flexor digito-rum profundus nodular thickening. Bottom inset illustrates flexor digitorum su-perficialis decussation fraying. (From Zelouf DS (ed): Atlas of the Hand Clinics.Philadelphia, W.B. Saunders, 1999, with permission.)

Chronic Hand Conditions 357
On physical exam, feel the tissue just proximal to the MCP joint at thedistal palmar skin crease. This is the location of the A1 pulley. Gentlyflex and extend the affected digit, and you may feel a small “knot”moving back and forth. This “knot” clinches the diagnosis in a patientwith the above clinical symptoms.
Nonoperative TreatmentSteroid injection around the A1 pulley may provide symptomatic relief,which can delay the need for surgery for many months. Betamethasoneis commonly used; inject 0.25–0.50 ml around the A1 pulley. Warn thepatient that it will take a few weeks to see whether the injection is suc-cessful. A second steroid injection can be given 6 weeks after the initialinjection if no improvement has been noted. Sometimes the second in-jection is successful even if the first resulted in little improvement.
How to Inject the A1 Pulley1. Draw the steroid solution into a syringe. Use a small needle (≤ 21
gauge) for the injection.
2. The landmark for the A1 pulley is the distal palmar skin crease ofthe affected digit.
3. Starting with an injection of a local anesthetic is not necessary be-cause it will hurt just as much as the steroid injection. But give thepatient a choice.
4. Alternatively, 1 ml of lidocaine can be added to the steroid solutionto help alleviate the chronic pain temporarily.
5. Stick the needle into the tissues. You need to go deeper than the su-perficial skin. If the patient reports feeling pins and needles, you areprobably in the digital nerve. Back out a few millimeters, and repo-sition the needle.
6. Draw back on the syringe to ensure that you are not in a bloodvessel.
7. Ask the patient to flex and extend the finger with the needle inplace. If the needle moves with the tendon, it may be lodged in thesubstance of the tendon. Back out the needle a few millimeters, andask the patient to move the finger again. Keep adjusting the needleuntil the needle tip is no longer in the tendon.
8. Once the needle is in the correct position, inject one-half of the solu-tion in the syringe. Move the needle a few millimeters to anotherposition near the A1 pulley, check for the above positioning con-cerns, and inject the remainder of the steroid solution.
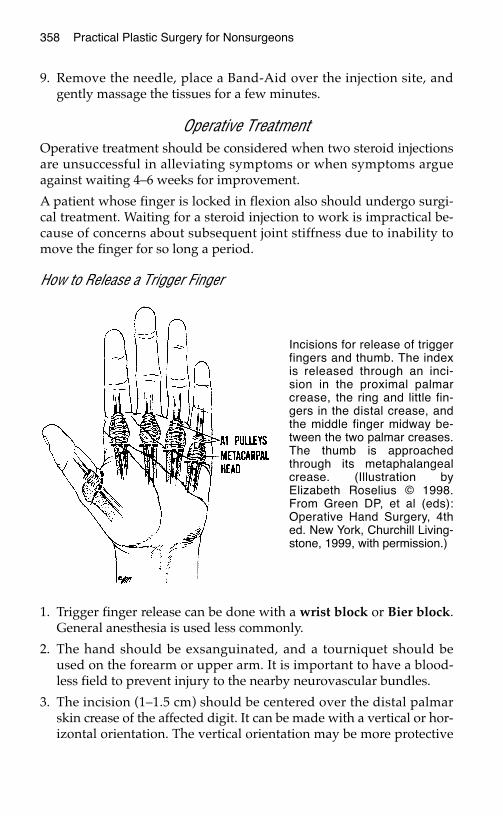
358 Practical Plastic Surgery for Nonsurgeons
9. Remove the needle, place a Band-Aid over the injection site, andgently massage the tissues for a few minutes.
Operative TreatmentOperative treatment should be considered when two steroid injectionsare unsuccessful in alleviating symptoms or when symptoms argueagainst waiting 4–6 weeks for improvement.
A patient whose finger is locked in flexion also should undergo surgi-cal treatment. Waiting for a steroid injection to work is impractical be-cause of concerns about subsequent joint stiffness due to inability tomove the finger for so long a period.
How to Release a Trigger Finger
1. Trigger finger release can be done with a wrist block or Bier block.General anesthesia is used less commonly.
2. The hand should be exsanguinated, and a tourniquet should beused on the forearm or upper arm. It is important to have a blood-less field to prevent injury to the nearby neurovascular bundles.
3. The incision (1–1.5 cm) should be centered over the distal palmarskin crease of the affected digit. It can be made with a vertical or hor-izontal orientation. The vertical orientation may be more protective
Incisions for release of triggerfingers and thumb. The indexis released through an inci-sion in the proximal palmarcrease, the ring and little fin-gers in the distal crease, andthe middle finger midway be-tween the two palmar creases.The thumb is approachedthrough its metaphalangealcrease. (Illustration byElizabeth Roselius © 1998.From Green DP, et al (eds):Operative Hand Surgery, 4thed. New York, Churchill Living-stone, 1999, with permission.)
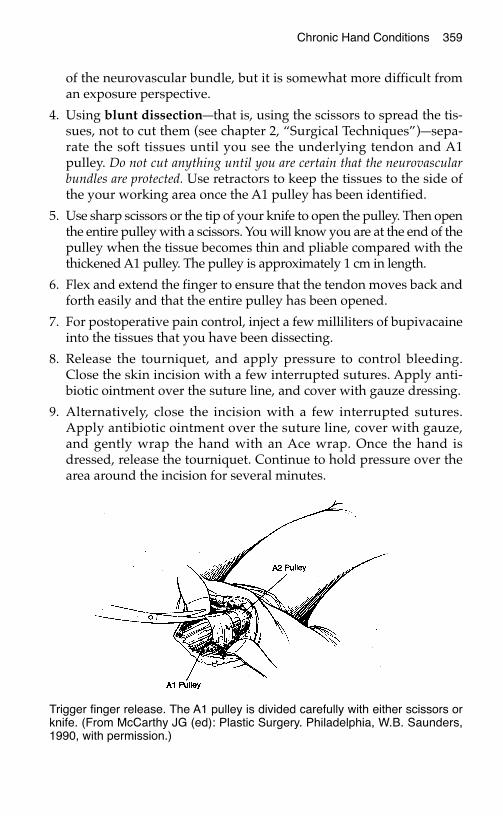
Chronic Hand Conditions 359
of the neurovascular bundle, but it is somewhat more difficult froman exposure perspective.
4. Using blunt dissection—that is, using the scissors to spread the tis-sues, not to cut them (see chapter 2, “Surgical Techniques”)—sepa-rate the soft tissues until you see the underlying tendon and A1pulley. Do not cut anything until you are certain that the neurovascularbundles are protected. Use retractors to keep the tissues to the side ofthe your working area once the A1 pulley has been identified.
5. Use sharp scissors or the tip of your knife to open the pulley. Then openthe entire pulley with a scissors. You will know you are at the end of thepulley when the tissue becomes thin and pliable compared with thethickened A1 pulley. The pulley is approximately 1 cm in length.
6. Flex and extend the finger to ensure that the tendon moves back andforth easily and that the entire pulley has been opened.
7. For postoperative pain control, inject a few milliliters of bupivacaineinto the tissues that you have been dissecting.
8. Release the tourniquet, and apply pressure to control bleeding.Close the skin incision with a few interrupted sutures. Apply anti-biotic ointment over the suture line, and cover with gauze dressing.
9. Alternatively, close the incision with a few interrupted sutures.Apply antibiotic ointment over the suture line, cover with gauze,and gently wrap the hand with an Ace wrap. Once the hand isdressed, release the tourniquet. Continue to hold pressure over thearea around the incision for several minutes.
Trigger finger release. The A1 pulley is divided carefully with either scissors orknife. (From McCarthy JG (ed): Plastic Surgery. Philadelphia, W.B. Saunders,1990, with permission.)

360 Practical Plastic Surgery for Nonsurgeons
Postoperative Care1. Acetaminophen or nonsteroidal anti-inflammatory agents should
be adequate for postoperative pain control.
2. Keep the hand elevated to decrease swelling and decrease pain.
3. The patient should be encouraged to use the hand for light activitieswithin 1–2 days after surgery.
4. Remove the dressing the day after surgery, and clean with gentlesoap and water daily.
5. Apply antibiotic ointment to the suture line daily for the first fewdays. Cover with dry gauze as needed.
6. After 10–14 days, remove the sutures. Instruct the patient to increasegradually the activities performed with the hand until the patienthas resumed regular activities.
CCaarrppaall TTuunnnneell SSyynnddrroommee
Anatomic Background
Anatomy of the carpal tunnel. The median nerve and flexor tendons transversethe carpal tunnel, lying beneath the transverse carpal ligament. (Illustration byElizabeth Roselius © 1998. From Green DP, et al (eds): Operative HandSurgery, 4th ed. New York, Churchill Livingstone, 1999, with permission.)
Chronic Hand Conditions 361
The carpal tunnel is essentially the space in the center of the palm justdistal to the wrist. The carpal tunnel is bound by bone on three sides,and the transverse carpal ligament is the roof (i.e., the most superficialboundary). It is a relatively tight, fixed space.
The median nerve travels through the enclosed space of the carpaltunnel with the nine flexor tendons to the fingers and thumb. Anythingthat decreases the size of the tunnel, such as tissue swelling from repeti-tive hand and wrist movements, can place pressure on the mediannerve. Pressure on the nerve causes dysfunction and clinical symptoms.
Although the median nerve at the wrist is primarily sensory, it givesoff a motor branch to the thenar muscles responsible for opposition.The motor branch of the median nerve can originate from the mainnerve before going under the transverse carpal ligament, in the carpaltunnel, or, most commonly, after leaving the confines of the carpaltunnel. The motor branch also can pierce through the ligament to in-nervate the muscles. It is important to have a thorough understandingof this anatomy to prevent injury to the motor branch if operative in-tervention is undertaken.
Definition of Carpal Tunnel SyndromeThe symptoms of carpal tunnel syndrome (CTS) include pain and tin-gling in the hand and distal forearm as well as numbness along themedian nerve distribution of the hand. Hand clumsiness may occur,and the symptoms often are aggravated when the hands are in exten-sion or grasping objects. Examples include reading the newspaper orgrasping the steering wheel while driving.
Night awakenings with hand numbness, and pain in the hand or distalforearm are also common complaints. Significant weakness and musclewasting are late symptoms.
DiagnosisGentle tapping on the median nerve at the wrist causes tingling or the feel-ing of electric shocks. This phenomenon is called a positive Tinel’s sign.Development of numbness in the median nerve distribution with flex-ion of the wrist, called a positive Phalen’s sign, is also indicative of CTS.
Special electrophysiologic tests can be done to measure the nerve con-duction velocity and the status of the muscles supplied by the mediannerve. Although the physical signs and symptoms are often enough todiagnose CTS, these studies are useful when the diagnosis is in doubt.Electrophysiologic studies are also useful for documentation andmedicolegal purposes.
362 Practical Plastic Surgery for Nonsurgeons
Nonoperative TreatmentOften stopping or at least decreasing the amount of time in which thehand performs repetitive movements is necessary for symptom relief.
In addition, splinting the hand in neutral position (immobilizing onlythe wrist in 10–20° of flexion) during work and sleep may alleviate thesymptoms. It often takes several weeks to see improvement. The splintshould be used for at least 6–8 weeks before determining that it is nothelpful. If symptoms improve, the splint should be worn an additional1–2 months.
The use of nonsteroidal anti-inflammatory agents (e.g., ibuprofen,naproxen sodium), may help to relieve pain and decrease swelling.
A cornerstone of therapy is evaluation by an occupational or othermovement therapist, who can teach the patient how to use the entireupper extremity in a more efficient manner. By incorporating use of theentire arm instead of just the hand or wrist, the patient distributes thestrain of work more evenly. This approach should remove some of thestresses on the wrist and hand and may alleviate symptoms.
Another option, which should be used with caution, is to inject steroidsaround the median nerve. Betamethasone, 0.75–1.0 ml, can be injectedin a manner similar to performing a median nerve block (see chapter 3,“Local Anesthesia”). You must take care to avoid injection into themedian nerve, which can cause nerve injury and further problems.
Operative TreatmentCarpal tunnel release (CTR) involves dividing the transverse carpalligament to relieve the tightness in the carpal tunnel and thereby de-crease pressure on the median nerve. Worldwide, CTR is performedmost often by making a longitudinal incision in the palm and dividingthe transverse carpal ligament under direct vision. Alternatively, inareas with access to endoscopic technology, CTR can be done with asmall incision near the wrist or in the palm, with use of an endoscopeto visualize and divide the ligament.
Although this operation is considered by many to be relatively minor,this writer does not agree. Complications, including injury to themedian nerve or its motor branch and incomplete release of the trans-verse carpal ligament, may occur even when the operation is per-formed by a clinician with extensive hand surgical training. Thisprocedure should be undertaken only if you have surgical expertiseand a thorough understanding of the anatomy in the area. The patientshould have significant signs and symptoms of CTS , including dener-vation of the thenar muscles.
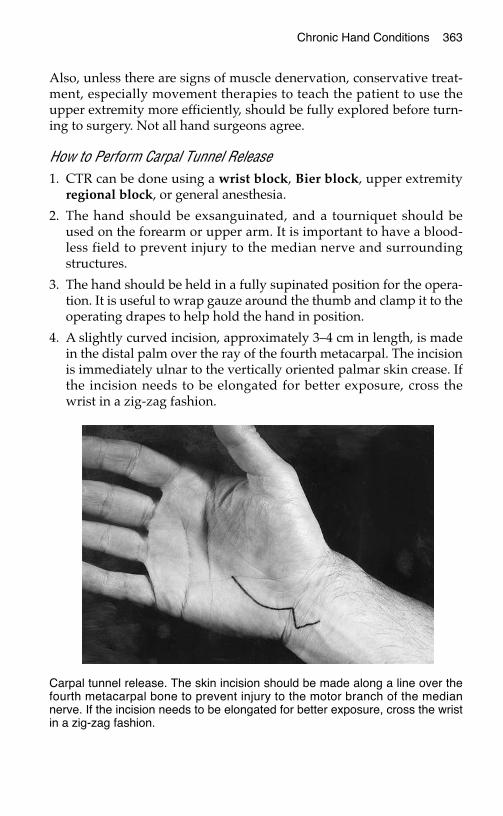
Chronic Hand Conditions 363
Also, unless there are signs of muscle denervation, conservative treat-ment, especially movement therapies to teach the patient to use theupper extremity more efficiently, should be fully explored before turn-ing to surgery. Not all hand surgeons agree.
How to Perform Carpal Tunnel Release1. CTR can be done using a wrist block, Bier block, upper extremity
regional block, or general anesthesia.
2. The hand should be exsanguinated, and a tourniquet should beused on the forearm or upper arm. It is important to have a blood-less field to prevent injury to the median nerve and surroundingstructures.
3. The hand should be held in a fully supinated position for the opera-tion. It is useful to wrap gauze around the thumb and clamp it to theoperating drapes to help hold the hand in position.
4. A slightly curved incision, approximately 3–4 cm in length, is madein the distal palm over the ray of the fourth metacarpal. The incisionis immediately ulnar to the vertically oriented palmar skin crease. Ifthe incision needs to be elongated for better exposure, cross thewrist in a zig-zag fashion.
Carpal tunnel release. The skin incision should be made along a line over thefourth metacarpal bone to prevent injury to the motor branch of the mediannerve. If the incision needs to be elongated for better exposure, cross the wristin a zig-zag fashion.
364 Practical Plastic Surgery for Nonsurgeons
5. If you are not experienced with this procedure, do not try to beslick by using a small incision. Make an incision that allows you tosee clearly what you are doing.
6. Gently separate the tissues using blunt dissection. You need smallself-retaining retractors or assistants who can hold retractors tokeep the soft tissues out of the way.
7. You will encounter a muscle, the little known palmaris brevis.Gently tease the fibers to get them out of the way.
8. Beneath this muscle layer is the gray/white transverse carpalligament.
9. Make a small opening in this layer with the tip of the knife orscissors.
10. Carefully extend the opening a few millimeters until you can seethe underlying median nerve (it is a smooth, cream-colored struc-ture). Then place a clamp into the opening in the ligament to pro-tect the nerve, and use the tips of the scissors to divide fully thetransverse carpal ligament. Dividing the transverse carpal liga-ment opens the carpal tunnel.
11. The distal extent of the ligament ends just before the palmar arch (animportant vascular structure). Take care not to injure this vessel.
12. The ligament extends proximally onto the distal forearm as a fas-cial layer. Open the distal part of this layer by gently pushing thethe barely open scissors from the leading edge of the fascia in thepalm toward the distal forearm. You will know that you have di-vided the fascia thoroughly when you can easily pass your fingerinto the distal forearm without feeling any tightness. (This step isnecessary only if the surgical incision has not crossed the wrist. Ifthe incision has crossed the wrist, the fascial layer will be openedduring normal dissection.)
13. For completeness, feel for a mass in the carpal tunnel. A mass is arare cause of CTS.
14. For postoperative pain control, inject a few milliliters of bupiva-caine into the tissues that you have dissected.
15. Release the tourniquet before closing the incision, and be sure thathemostasis is adequate. Close the wound with a few interruptedsutures, and cover with antibiotic ointment and dry fluffed gauze.Wrap the hand gently with an Ace wrap.
16. Alternatively, place a few interrupted sutures to close the incision.Apply antibiotic ointment over the suture line, and cover withfluffed gauze. Wrap the hand gently with an Ace wrap, and apply
Chronic Hand Conditions 365
gentle pressure to the area around the incision. Then release thetourniquet.
Postoperative Care1. Acetaminophen or a nonsteroidal anti-inflammatory agent should
be sufficient for pain control.
2. Keep the hand elevated as much as possible.
3. An ice pack placed on the volar aspect of the hand helps to alleviatesome of the pain and swelling.
4. The soft dressing can be removed the day after surgery. The sutureline should be cleansed with gentle soap and water each day. Keepthe suture line covered with a gauze, and wrap the hand gently withan Ace wrap. The hand can be used for light activities, and gentlerange-of-motion exercises should be done with the fingers.
5. Remove the sutures after 14 days.
6. Once the sutures are removed, gently massage the scar for severalmonths to keep it from getting tight.
7. Gradually increase the use of the affected hand until the patient hasresumed regular activities.
8. Occupational therapy is quite useful in the postoperative period.
OOsstteeooaarrtthhrriittiissThe most common joint disease of the upper extremity is osteoarthritis(OA). Although there are several other types of arthritis, OA is the onlyform discussed because of its high prevalence. Approximately 70% ofpeople over 65 years of age have changes consistent with OA.
OA is caused by loss of joint cartilage and growth of new bone at thejoint edges. The joints primarily affected are the finger DIP joints andthe thumb carpometacarpal joint. The PIP and MCP joints are involvedless often.
Symptoms include pain with hand use, joint enlargement and defor-mity, and joint stiffness with loss of motion.
The primary goals of treatment are relief of pain and maintenance ofadequate hand function. Acetaminophen and nonsteroidal anti-inflam-matory agents are the most useful medications. Several homeopathicremedies (e.g., arnica) also can be quite useful.
Occupational therapy or other movement therapy to encourage efficientuse of the entire upper extremity is an important adjunct to treatment.
366 Practical Plastic Surgery for Nonsurgeons
Surgery usually is done only for intractable pain and joint destructionthat leads to significant loss of hand function. The most common pro-cedure is fusion (arthrodesis) of the affected DIP joint. Arthrodesis orarthroplasty (joint replacement) may be indicated for a severely symp-tomatic PIP joint. These highly technical procedures should be doneonly by a hand specialist.
BBiibblliiooggrraapphhyy1. Kozin SH: The anatomy of the recurrent branch of the median nerve. J Hand Surg
23A:852–858, 1998.2. Palmer AK, Toivonen DA: Complications of endoscopic and open carpal tunnel re-
lease. J Hand Surg 24A:561–565, 1999.3. Taras JS, Miskovsky C: Nonoperative management of trigger digits. Atlas Hand Clin
4:1–8, 1999.
EEXXPPLLOORRAATTIIOONN OOFF AANN IINNJJUURREEDDHHAANNDD OORR FFOORREEAARRMM
When exploring an injured forearm or hand, you must be aware of thesurrounding tendons, nerves, and blood vessels. You do not want toinjure one of these structures accidentally. This chapter explains basicprinciples about how to operate safely on an injured hand or forearm.It is not intended to qualify you as a hand specialist; it is intended forrural health care providers who have no access to hand or reconstruc-tive specialists. The chapter also provides important background infor-mation for all health care providers.
AAnneesstthheessiiaaTo operate on an upper extremity properly, you must provide adequateanesthesia. Either general anesthesia or some type of nerve block mustbe given so that the patient feels no pain and is able to stay completelystill during the operation. (See chapter 3, “Local Anesthesia.”)
TToouurrnniiqquueett UUsseeThe hand has an excellent blood supply. Thus, any incision into the tis-sues will ooze blood continuously throughout the procedure, making itdifficult to see exactly what you are doing. To prevent inadvertent injuryto the important nearby structures (tendons, nerves, and blood vessels),it is best to operate in a bloodless field. This means that the circulation tothe hand must be temporarily interrupted while you operate.To interrupt the vascular supply to the hand, a tourniquet is placedproximal to the site where you are working to compress the blood ves-sels supplying the extremity.
367
Chapter 39
KKEEYY FFIIGGUURREESS::Tourniquet Dorsal incisionsMidlateral finger incisions Proximal and distalBrunner zigzag incisions extension of woundVolar surface incisions
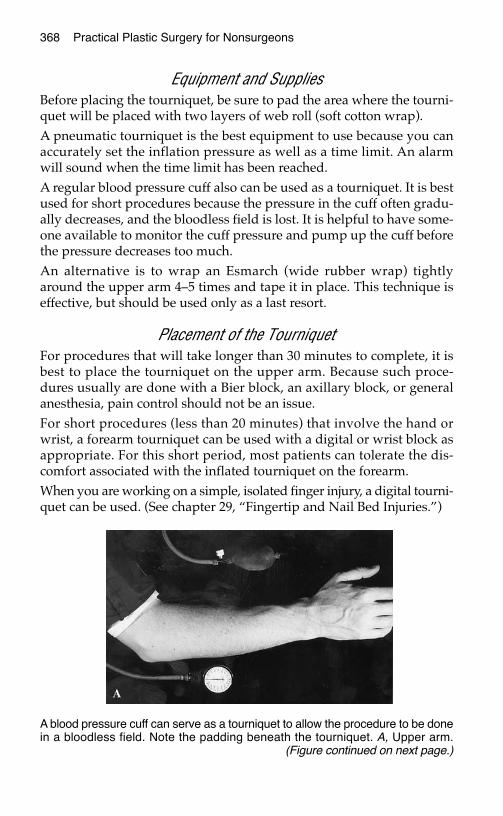
368 Practical Plastic Surgery for Nonsurgeons
Equipment and SuppliesBefore placing the tourniquet, be sure to pad the area where the tourni-quet will be placed with two layers of web roll (soft cotton wrap).A pneumatic tourniquet is the best equipment to use because you canaccurately set the inflation pressure as well as a time limit. An alarmwill sound when the time limit has been reached.A regular blood pressure cuff also can be used as a tourniquet. It is bestused for short procedures because the pressure in the cuff often gradu-ally decreases, and the bloodless field is lost. It is helpful to have some-one available to monitor the cuff pressure and pump up the cuff beforethe pressure decreases too much.An alternative is to wrap an Esmarch (wide rubber wrap) tightlyaround the upper arm 4–5 times and tape it in place. This technique iseffective, but should be used only as a last resort.
Placement of the TourniquetFor procedures that will take longer than 30 minutes to complete, it isbest to place the tourniquet on the upper arm. Because such proce-dures usually are done with a Bier block, an axillary block, or generalanesthesia, pain control should not be an issue.For short procedures (less than 20 minutes) that involve the hand orwrist, a forearm tourniquet can be used with a digital or wrist block asappropriate. For this short period, most patients can tolerate the dis-comfort associated with the inflated tourniquet on the forearm.When you are working on a simple, isolated finger injury, a digital tourni-quet can be used. (See chapter 29, “Fingertip and Nail Bed Injuries.”)
A blood pressure cuff can serve as a tourniquet to allow the procedure to be donein a bloodless field. Note the padding beneath the tourniquet. A, Upper arm.
(Figure continued on next page.)
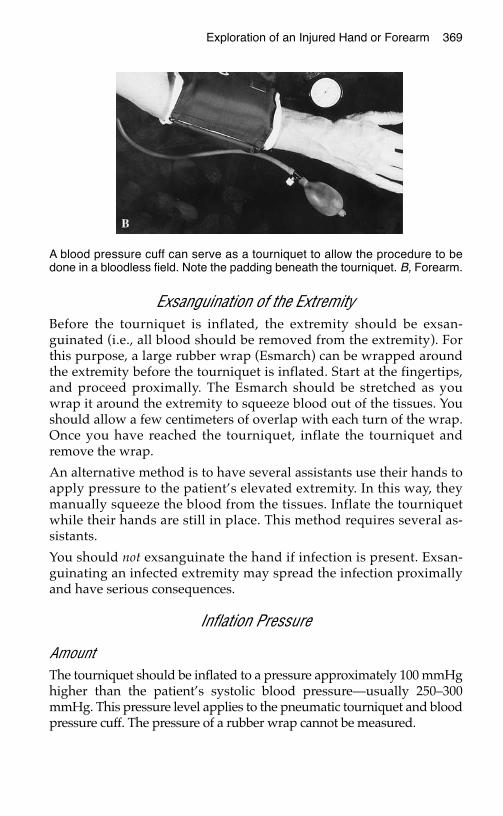
Exploration of an Injured Hand or Forearm 369
Exsanguination of the ExtremityBefore the tourniquet is inflated, the extremity should be exsan-guinated (i.e., all blood should be removed from the extremity). Forthis purpose, a large rubber wrap (Esmarch) can be wrapped aroundthe extremity before the tourniquet is inflated. Start at the fingertips,and proceed proximally. The Esmarch should be stretched as youwrap it around the extremity to squeeze blood out of the tissues. Youshould allow a few centimeters of overlap with each turn of the wrap.Once you have reached the tourniquet, inflate the tourniquet andremove the wrap.
An alternative method is to have several assistants use their hands toapply pressure to the patient’s elevated extremity. In this way, theymanually squeeze the blood from the tissues. Inflate the tourniquetwhile their hands are still in place. This method requires several as-sistants.
You should not exsanguinate the hand if infection is present. Exsan-guinating an infected extremity may spread the infection proximallyand have serious consequences.
Inflation Pressure
AmountThe tourniquet should be inflated to a pressure approximately 100 mmHghigher than the patient’s systolic blood pressure—usually 250–300mmHg. This pressure level applies to the pneumatic tourniquet and bloodpressure cuff. The pressure of a rubber wrap cannot be measured.
A blood pressure cuff can serve as a tourniquet to allow the procedure to bedone in a bloodless field. Note the padding beneath the tourniquet. B, Forearm.
370 Practical Plastic Surgery for Nonsurgeons
DurationA pneumatic tourniquet can stay in place for 2 hours before it is neces-sary to let down the tourniquet (release the pressure).
If you are using an Esmarch wrap as a tourniquet, I recommend re-moval after 1–11⁄2 hours.
If necessary, the tourniquet can be reinflated after the extremity isgiven a few minutes of uninterrupted blood flow.
Tourniquet ReleaseWhen the tourniquet is released, circulation returns to the extremity.For the first 5–10 minutes, the blood flow is greater than usual andthe hand becomes very red. This increase in blood flow is due to theeffects of ischemia on the tissues. The vessels dilate for the first fewminutes after blood flow returns. The initial effect is increased bleed-ing from the incision, which can be a little scary if you are not ex-pecting it.
To prevent blood loss, place saline-moistened gauze in the woundbefore deflating the tourniquet and apply gentle pressure while thetourniquet comes off. Continue the pressure for several minutes.
Of course, the bleeding may be due to an injured vessel. If it is particu-larly brisk and does not decrease after several minutes of direct pres-sure, the wound should be checked thoroughly to rule out vascularinjury. If you have any concern that you may have accidentally injureda blood vessel during the procedure, the tourniquet should be deflatedbefore the incision is closed.
Make sure that all pulses are intact after the tourniquet is released. Thetourniquet can cause a blood vessel to clot, although clotting is un-usual and occurs only in severely diseased blood vessels.
If you are reasonably sure that you have not accidentally injured ablood vessel during the procedure, you may close the wound before re-leasing the tourniquet. Be sure to use a secure dressing and to applygentle pressure to the area before deflating the tourniquet.
IInncciissiioonnssDepending on the reason for exploration, you may not have muchchoice about where to place the incision. If the patient has a lacerationor an abscess, its location dictates the placement of the incision. Evenin these situations, however, you may need to extend the incision foradequate exploration and treatment. Thus you should know the basicsabout proper placement of incisions on the hand.
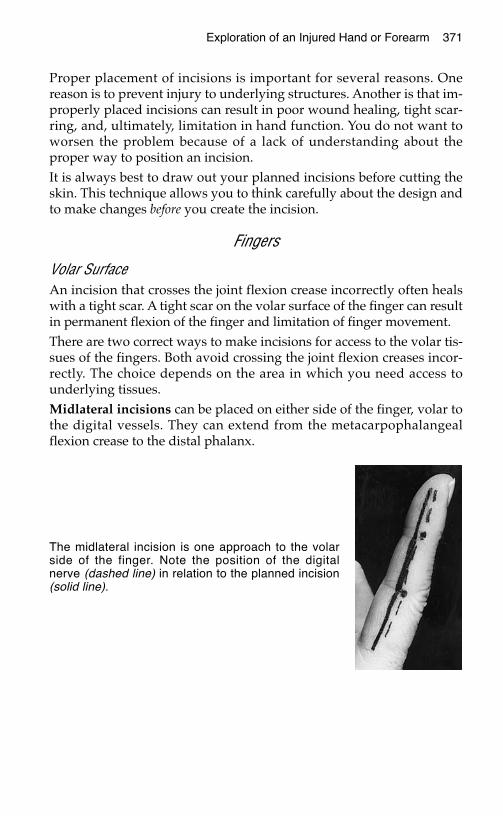
Proper placement of incisions is important for several reasons. Onereason is to prevent injury to underlying structures. Another is that im-properly placed incisions can result in poor wound healing, tight scar-ring, and, ultimately, limitation in hand function. You do not want toworsen the problem because of a lack of understanding about theproper way to position an incision. It is always best to draw out your planned incisions before cutting theskin. This technique allows you to think carefully about the design andto make changes before you create the incision.
Fingers
Volar SurfaceAn incision that crosses the joint flexion crease incorrectly often healswith a tight scar. A tight scar on the volar surface of the finger can resultin permanent flexion of the finger and limitation of finger movement.There are two correct ways to make incisions for access to the volar tis-sues of the fingers. Both avoid crossing the joint flexion creases incor-rectly. The choice depends on the area in which you need access tounderlying tissues.Midlateral incisions can be placed on either side of the finger, volar tothe digital vessels. They can extend from the metacarpophalangealflexion crease to the distal phalanx.
Exploration of an Injured Hand or Forearm 371
The midlateral incision is one approach to the volarside of the finger. Note the position of the digitalnerve (dashed line) in relation to the planned incision(solid line).
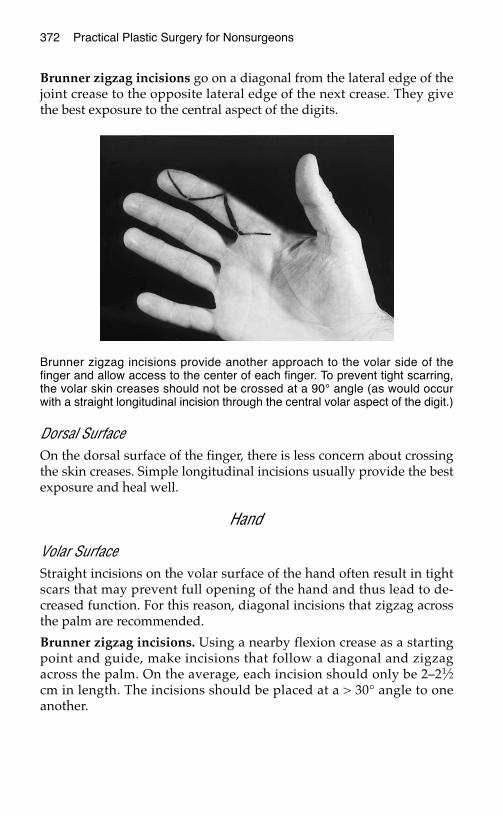
Brunner zigzag incisions go on a diagonal from the lateral edge of thejoint crease to the opposite lateral edge of the next crease. They givethe best exposure to the central aspect of the digits.
Dorsal SurfaceOn the dorsal surface of the finger, there is less concern about crossingthe skin creases. Simple longitudinal incisions usually provide the bestexposure and heal well.
Hand
Volar Surface Straight incisions on the volar surface of the hand often result in tightscars that may prevent full opening of the hand and thus lead to de-creased function. For this reason, diagonal incisions that zigzag acrossthe palm are recommended.
Brunner zigzag incisions. Using a nearby flexion crease as a startingpoint and guide, make incisions that follow a diagonal and zigzagacross the palm. On the average, each incision should only be 2–21⁄2cm in length. The incisions should be placed at a > 30° angle to oneanother.
372 Practical Plastic Surgery for Nonsurgeons
Brunner zigzag incisions provide another approach to the volar side of thefinger and allow access to the center of each finger. To prevent tight scarring,the volar skin creases should not be crossed at a 90° angle (as would occurwith a straight longitudinal incision through the central volar aspect of the digit.)

Dorsal SurfaceAs on the fingers, a tight scar on the dorsal surface of the hand may in-terfere with hand function. Longitudinal incisions usually provide thebest exposure.
Alternatively, to prevent the need for multiple longitudinal incisions ifyou need access to a large area of the dorsal surface, a transverse inci-sion is acceptable.
Exploration of an Injured Hand or Forearm 373
Incision for the volar surface of the hand. The palmar skin creases should beincorporated into the incisions. The incisions then should be extended in azigzag fashion.
Incisions on the dorsal surface of the hand and fingers. Multiple choices areavailable depending on where exposure is needed. Placement is not as criticalas on the volar surface.
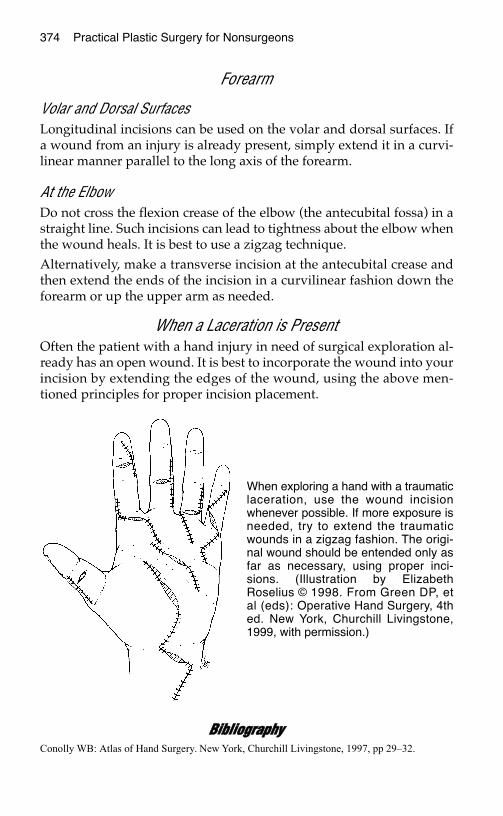
374 Practical Plastic Surgery for Nonsurgeons
Forearm
Volar and Dorsal SurfacesLongitudinal incisions can be used on the volar and dorsal surfaces. Ifa wound from an injury is already present, simply extend it in a curvi-linear manner parallel to the long axis of the forearm.
At the ElbowDo not cross the flexion crease of the elbow (the antecubital fossa) in astraight line. Such incisions can lead to tightness about the elbow whenthe wound heals. It is best to use a zigzag technique. Alternatively, make a transverse incision at the antecubital crease andthen extend the ends of the incision in a curvilinear fashion down theforearm or up the upper arm as needed.
When a Laceration is PresentOften the patient with a hand injury in need of surgical exploration al-ready has an open wound. It is best to incorporate the wound into yourincision by extending the edges of the wound, using the above men-tioned principles for proper incision placement.
BBiibblliiooggrraapphhyyConolly WB: Atlas of Hand Surgery. New York, Churchill Livingstone, 1997, pp 29–32.
When exploring a hand with a traumaticlaceration, use the wound incisionwhenever possible. If more exposure isneeded, try to extend the traumaticwounds in a zigzag fashion. The origi-nal wound should be entended only asfar as necessary, using proper inci-sions. (Illustration by ElizabethRoselius © 1998. From Green DP, etal (eds): Operative Hand Surgery, 4thed. New York, Churchill Livingstone,1999, with permission.)
ABCs (airway, breathing, circulation), oftrauma care, 49–53
Abdomen, stab wounds to, 64Abscess
aspiration of, 189“collar button,” 354decompression of, 189definition of, 339differentiated from cellulitis, 183, 339fluctuance of, 183, 185, 186, 339of the hand, 347–354
acute suppurative flexortenosynovitis, 347, 350–353
on dorsal surface, 353–354felon, 347–349, 351paronychia, 349–350
human bite wound-related, 343incision and drainage of, 188–189, 339,
353–354Adhesives, as suturing alternative, 17–18Adhesive tape, as suturing alternative,
18–19Aeromonas hydrophila infections, 187, 343Air, subcutaneous. See CrepitusAirway management, in trauma patients,
49–51Airway obstruction, facial fracture-
related, 251Airways, thermal injury to, 192Albumin, serum levels of
as nutritional status indicator, 74, 176in pressure sore patients, 167
Alcohol abuse, maternal, as cleftlip/palate cause, 238
Altered level of consciousness, asindication for supplemental oxygentherapy, 52
American Society of Plastic Surgery,Reconstructive Surgeons VolunteerProgram of, 242
Amputated parts, care of, 305Amputation
necrotizing fasciitis-related, 340traumatic, of finger, 303–306
of fingertip, 285Anesthesia. See also Local anesthesia
in facial laceration care, 146–147
Anesthesia (cont.)in surgical exploration of upper-
extremity injuries, 367Animal bite wounds, 59, 185, 187, 268,
341, 343Ankle/brachial index (ABI), 178, 179Ankle fractures, free flap coverage of,
133–134Anterosuperior iliac spine, as groin flap
anatomic landmark, 130, 131Antibacterial solutions
as eye injury cause, 146for facial laceration care, 146
Antibiotic ointmentas burn treatment, 82, 197, 198, 199, 321for grease removal from wounds, 284ophthalmic, 153for pressure sore treatment, 165for primary wound closure, 95as wet-to-wet dressing alternative,
83–84Aquatic bacteria, as infection cause, 187,
341, 343Areola, reconstruction of, 248Arrhythmia, electrical injury-related, 193Arterial injuries
acute, 62crush injury-related, 331, 332hand injury-related, 268
Arterial insufficiencycapillary refill in, 265–266as leg ulcer cause, 177, 178, 179, 180
Arthritis. See also Osteoarthritis;Rheumatoid arthritis
frostbite-related, 204Arthrodesis, 366Arthroplasty, 366Ascorbic acid. See Vitamin CAspirin
use by traumatic amputation patients,305
Axial groin flap, 129–133Axial musculocutaneous flaps, 246Axillary nerve block, 43
Bacitracinas burn treatment, 82, 198, 199
375
Index
Page numbers in boldface type indicate complete chapters.
376 Index
Bacitracin (cont.)for grease removal from wounds, 284as open wound treatment, 82
Backslab, 210Bacteria, “flesh-eating.” See Fasciitis,
necrotizingBacterial infections
aquatic bacteria-related, 187, 341, 343suture-related, 3
Basal cell carcinoma, 223–224as chronic wound cause, 175re-excision of, 231–232treatment of, 231
Basal metabolic requirements (BMR),74–75
Betadineas wound cleanser, 81
Bicarbonate, as local anesthesia additive,31, 39, 146
Bier block, 42–43in carpal tunnel release, 363in trigger finger release, 358
Biopsysentinel lymph node, 233–234of skin lesions, 225–231
excisional, 226, 228–230incisional, 226, 227–228punch, 227–228shave biopsy/excision, 226, 230–231
Bite wounds, 89animal, 59, 185, 187, 268, 341, 343human, 59, 187, 268, 341
Blisters, 323burn-related, 324pus-filled, 350
Blood, driedhuman immunodeficiency virus
survival time in, 47removal from acute wounds, 62
Blood-borne pathogen exposure, safetyprecautions for, 45–48
Blood flow, in foot, 178Blood glucose. See also Diabetic patients
effect on wound healing, 58, 176Blood pressure cuff, use as tourniquet, 64,
267, 317, 368, 369Blood pressure measurement, without
blood pressure cuff, 52Blood vessels
crush injuries to, 331suturing of, 24–26tying off of, 24–25
Blunt dissection, 26–27Body fluids exposure, safety precautions
for, 45–48Body surface area (BSA), of burns,
193–194, 196, 198, 202
Boneexposure of, in fingertip injuries, 285,
287infection of. See Osteomyelitis
Bone growth, frostbite-related impairmentof, 204
Bone rongeur, 285Brain injury, facial fracture-associated, 251Breast surgery, 245–250
breast mound reconstruction, 245–248with free flaps, 133–134with implants, 245–246with latissimus dorsi flap, 246nipple and areolar reconstruction in,
246, 248with pedicle transverse rectus
abdominis muscle flap, 246–248timing of, 248–249
breast reduction, 245, 249in gynecomastia, 250
Bronchoscopy, for airway thermal injuryevaluation, 192
Buckshot injuries, 71Buddy taping, of phalangeal fractures,
296, 297Bullets
embedded in tissue, 61radiographic evaluation of, 68removal from wounds, 71
Bupivacaine, as local anesthetic, 30–31, 32in digital nerve blocks, 283in facial nerve blocks, 39, 146in primary wound closure, 92
Burns, 59, 191–204antibiotic ointments for, 82, 197, 198,
199, 321body surface area (BSA) of, 194–195,
196, 198, 202depth of, 195–196first-degree, 196, 198, 324, 325fluid resuscitation in, 196–197, 199of the hand, 201, 268, 321–328
aftercare for, 327–328care during healing, 323–324determination of depth of, 324–325escharotomy of, 325–326initial treatment of, 321–324surgical treatment of, 325–327tangential excision of, 324, 327
initial treatment of, 193–194, 321–324nutritional concerns associated with,
200pain control for, 197–198physiologic consequences of, 191as pressure sore risk factor, 162second-degree, 86, 196, 198–199, 201,
324, 325

Index 377
Burns (cont.)subsequent care for, 198–199tangential excision of, 199, 200, 324,
327third-degree, 196, 199, 202, 324, 325
Calcaneus, pressure sores of, 163Calcium, 77Calf
compartments of, 208, 209compartment syndrome of, 207–211
Caloric requirementsof burn patients, 200estimation of, 74–75
Cancer. See also specific types of canceras chronic wound cause, 175as impaired wound healing cause, 58
Capillary refillevaluation of, 62in hand injuries, 265–266, 269in radial artery injury, 318in tibial and fibular fractures, 207
Carbon monoxide, blood content of, 192Carpal tunnel
anatomy of, 360–361definition of, 258
Carpal tunnel release, 332, 335, 362–365Carpal tunnel syndrome, 360–365
definition of, 361diagnosis of, 361nonoperative treatment of, 362operative treatment (release) of, 332,
335, 362–365Casts
for hand injuries, 275for metacarpal fractures, 299tight, as compartment syndrome cause,
210Cat-bite wounds, 59, 187, 268, 341Catgut sutures, 4Cat-scratch disease, 344“Cauliflower ear,” 157Cellulitis, 187
chronic wound-related, 80definition of, 79, 183, 339differentiated from abscess, 183, 339of the finger, 351pressure sore-related, 165treatment of, 186
Cervical spine injury, facial fracture-associated, 251
Cheekfractures of, 252lacerations of
full-thickness, 152intraoral, 151–152
Chemical burns, 193, 197
Chest, stab wounds to, 64Chest flaps, 121, 122–124
for fingertip fracture with nail bedinjury coverage, 287
Childrenabsorbable suture use in, 93, 147burns in, 194frostbite in, 204local anesthesia injections in, 30oral electrical burns in, 201scarring in, 137suture removal from, 3
Circumflex scapular artery, as axial flapblood supply source, 112
Cleansingof acute wounds, 60–61of burned hands, 321, 322of facial lacerations, 146of gunshot wounds, 70of local flap placement sites, 114of nerve injuries, 62of skin graft donor sites, 100of tendon injuries, 63, 307
Clean techniques, 81Cleft lip/palate, 235–243
definition of, 235–237embryologic development and etiology
of, 237–238incidence of, 237in utero repair of, 239initial corrective operations for, 239–241nutritional concerns in, 238–239Pierre Robin syndrome-associated,
242–243presentation of, 237visiting surgeon programs for, 241–242
Clothingpenetration of, by foreign objects, 59removal from patients
from gunshot wound patients, 67from trauma patients, 54
Cold, anesthetic effect of, 30Collagen
in scar healing, 137synthesis of, nutrient requirements for,
76Colloid resuscitation, of burn patients, 200Compartment syndromes, 192, 207–211,
330, 331, 333–338definition of, 207etiology of, 333prevention of, 210signs and symptoms of, 209treatment of, 210–211, 334–335“vicious cycle” of, 333, 337–338
Computed tomography, of facialfractures, 253
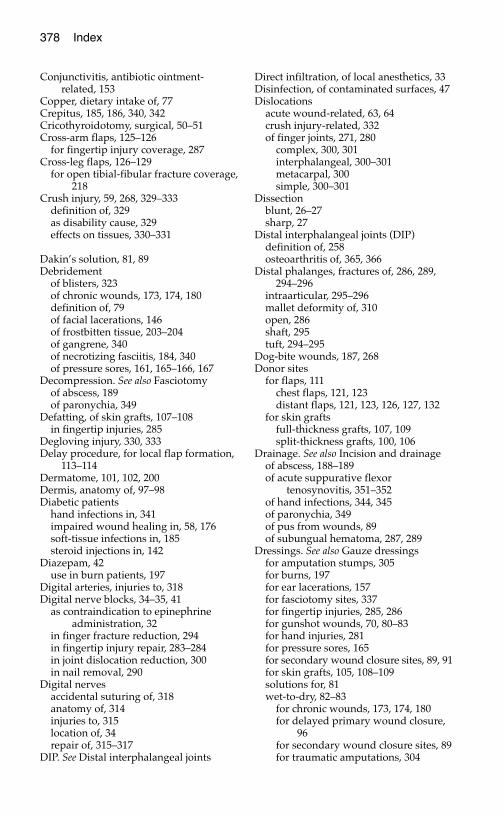
378 Index
Conjunctivitis, antibiotic ointment-related, 153
Copper, dietary intake of, 77Crepitus, 185, 186, 340, 342Cricothyroidotomy, surgical, 50–51Cross-arm flaps, 125–126
for fingertip injury coverage, 287Cross-leg flaps, 126–129
for open tibial-fibular fracture coverage,218
Crush injury, 59, 268, 329–333definition of, 329as disability cause, 329effects on tissues, 330–331
Dakin’s solution, 81, 89Debridement
of blisters, 323of chronic wounds, 173, 174, 180definition of, 79of facial lacerations, 146of frostbitten tissue, 203–204of gangrene, 340of necrotizing fasciitis, 184, 340of pressure sores, 161, 165–166, 167
Decompression. See also Fasciotomyof abscess, 189of paronychia, 349
Defatting, of skin grafts, 107–108in fingertip injuries, 285
Degloving injury, 330, 333Delay procedure, for local flap formation,
113–114Dermatome, 101, 102, 200Dermis, anatomy of, 97–98Diabetic patients
hand infections in, 341impaired wound healing in, 58, 176soft-tissue infections in, 185steroid injections in, 142
Diazepam, 42use in burn patients, 197
Digital arteries, injuries to, 318Digital nerve blocks, 34–35, 41
as contraindication to epinephrineadministration, 32
in finger fracture reduction, 294in fingertip injury repair, 283–284in joint dislocation reduction, 300in nail removal, 290
Digital nervesaccidental suturing of, 318anatomy of, 314injuries to, 315location of, 34repair of, 315–317
DIP. See Distal interphalangeal joints
Direct infiltration, of local anesthetics, 33Disinfection, of contaminated surfaces, 47Dislocations
acute wound-related, 63, 64crush injury-related, 332of finger joints, 271, 280
complex, 300, 301interphalangeal, 300–301metacarpal, 300simple, 300–301
Dissectionblunt, 26–27sharp, 27
Distal interphalangeal joints (DIP)definition of, 258osteoarthritis of, 365, 366
Distal phalanges, fractures of, 286, 289,294–296
intraarticular, 295–296mallet deformity of, 310open, 286shaft, 295tuft, 294–295
Dog-bite wounds, 187, 268Donor sites
for flaps, 111chest flaps, 121, 123distant flaps, 121, 123, 126, 127, 132
for skin graftsfull-thickness grafts, 107, 109split-thickness grafts, 100, 106
Drainage. See also Incision and drainageof abscess, 188–189of acute suppurative flexor
tenosynovitis, 351–352of hand infections, 344, 345of paronychia, 349of pus from wounds, 89of subungual hematoma, 287, 289
Dressings. See also Gauze dressingsfor amputation stumps, 305for burns, 197for ear lacerations, 157for fasciotomy sites, 337for fingertip injuries, 285, 286for gunshot wounds, 70, 80–83for hand injuries, 281for pressure sores, 165for secondary wound closure sites, 89, 91for skin grafts, 105, 108–109solutions for, 81wet-to-dry, 82–83
for chronic wounds, 173, 174, 180for delayed primary wound closure,
96for secondary wound closure sites, 89for traumatic amputations, 304

Index 379
Dressings (cont.)wet-to-wet, 83
antibiotic ointment as alternative to,83–84
for pressure sores, 165DuoDERM, as pressure sore dressing, 165
Ear, full-thickness external lacerations of,156–157
Ear piercing, as keloid cause, 142–143Ectropion, 158Eikenella infections, of bite wounds, 187,
343Electrical burns, 192–193
oral, in children, 201Electric stimulation, as nerve injury repair
technique, 315Electrocautery devices, 23, 24
use in skin lesion biopsy, 230, 231–232Electrodiagnostic studies, of carpal tunnel
syndrome, 361Elevation
of burned hand, 322, 326of forearm, in compartment syndrome,
337of hand, in compartment syndrome, 337of infected hand, 344, 345of injured hand, 281
Endotracheal intubationfor airway patency, 50in inhalation injury patients, 192
Epidermis, anatomy of, 97Epinephrine, as local anesthesia additive,
31–32Epineurium, 313–314
suture placement in, 315, 316–317Escharotomy, of burns to the hand,
325–326Esmarch, 368, 369, 370Ethyl chloride, anesthetic action of, 30Exposure, of trauma patients, 54Extensor pollicis longus tendon, motor
examination of, 262Extensor tendons, of the hand
motor examination of, 262splinting of, 278, 279
Extraarticular fractures, of middle orproximal phalanges, 296–297
Extrinsic muscles, of hand, evaluation of,261–262, 263
Exudatedefinition of, 79
Eyebrows, lacerations of, 154–155Eyelids
lacerations of, 153–154lower, involvement in facial wound
closure, 88
Facial injuriesfractures, 251–256
basic initial treatment of, 253diagnosis of, 252–253initial evaluation of, 251mandibular fractures, 253–256
gunshot wounds, 70–71lacerations, 145–159
anesthesia for, 146–147initial care for, 146jaw fracture-related, 253soft-tissue loss associated with,
158–159specific types of, 149–159suturing of, 147–149unique properties of, 145
near lower eyelid, 88nerve blocks for, 38–41, 147suture removal from, 95wound closure of, 58
local anesthesia for, 92suture sizes for, 2suturing techniques for, 93
Fasciitis, necrotizing, 184, 186, 340, 342, 344Fasciotomy
of calf, 210–211of fingers, 336of forearm, 334–335of hand, 335–336
Felon, 347–349, 351Femur, closed fractures of, as blood loss
cause, 52Fingers. See also Distal phalanges; Middle
phalanges; Proximal phalangesamputated, replantation of, 304–305digital nerves of, 34digital tourniquet use in, 368escharotomy of, 325exploratory incisions in, 371–372fasciotomy of, 336fractures of, 63, 271, 293–299
anesthesia for, 294definitions related to, 293–294distal phalangeal, 294–296metacarpal, 298–299middle and proximal phalangeal,
296–298shaft, 295
joint dislocations of, 300–301lacerations of, mallet deformity
associated with, 312little, splinting of, 279–280nerve blocks of, 34–35, 41
as contraindication to epinephrineadministration, 32
rotational deformities of, 266, 268, 271,296, 297
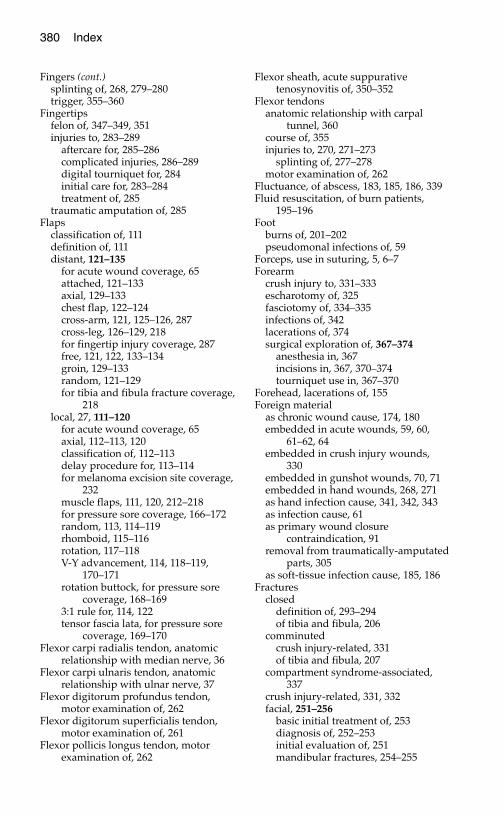
380 Index
Fingers (cont.)splinting of, 268, 279–280trigger, 355–360
Fingertipsfelon of, 347–349, 351injuries to, 283–289
aftercare for, 285–286complicated injuries, 286–289digital tourniquet for, 284initial care for, 283–284treatment of, 285
traumatic amputation of, 285Flaps
classification of, 111definition of, 111distant, 121–135
for acute wound coverage, 65attached, 121–133axial, 129–133chest flap, 122–124cross-arm, 121, 125–126, 287cross-leg, 126–129, 218for fingertip injury coverage, 287free, 121, 122, 133–134groin, 129–133random, 121–129for tibia and fibula fracture coverage,
218local, 27, 111–120
for acute wound coverage, 65axial, 112–113, 120classification of, 112–113delay procedure for, 113–114for melanoma excision site coverage,
232muscle flaps, 111, 120, 212–218for pressure sore coverage, 166–172random, 113, 114–119rhomboid, 115–116rotation, 117–118V-Y advancement, 114, 118–119,
170–171rotation buttock, for pressure sore
coverage, 168–1693:1 rule for, 114, 122tensor fascia lata, for pressure sore
coverage, 169–170Flexor carpi radialis tendon, anatomic
relationship with median nerve, 36Flexor carpi ulnaris tendon, anatomic
relationship with ulnar nerve, 37Flexor digitorum profundus tendon,
motor examination of, 262Flexor digitorum superficialis tendon,
motor examination of, 261Flexor pollicis longus tendon, motor
examination of, 262
Flexor sheath, acute suppurativetenosynovitis of, 350–352
Flexor tendonsanatomic relationship with carpal
tunnel, 360course of, 355injuries to, 270, 271–273
splinting of, 277–278motor examination of, 262
Fluctuance, of abscess, 183, 185, 186, 339Fluid resuscitation, of burn patients,
195–196Foot
burns of, 201–202pseudomonal infections of, 59
Forceps, use in suturing, 5, 6–7Forearm
crush injury to, 331–333escharotomy of, 325fasciotomy of, 334–335infections of, 342lacerations of, 374surgical exploration of, 367–374
anesthesia in, 367incisions in, 367, 370–374tourniquet use in, 367–370
Forehead, lacerations of, 155Foreign material
as chronic wound cause, 174, 180embedded in acute wounds, 59, 60,
61–62, 64embedded in crush injury wounds,
330embedded in gunshot wounds, 70, 71embedded in hand wounds, 268, 271as hand infection cause, 341, 342, 343as infection cause, 61as primary wound closure
contraindication, 91removal from traumatically-amputated
parts, 305as soft-tissue infection cause, 185, 186
Fracturesclosed
definition of, 293–294of tibia and fibula, 206
comminutedcrush injury-related, 331of tibia and fibula, 207
compartment syndrome-associated, 337
crush injury-related, 331, 332facial, 251–256
basic initial treatment of, 253diagnosis of, 252–253initial evaluation of, 251mandibular fractures, 254–255

Index 381
Fractures (cont.)of fingers, 63, 266, 280, 271, 293–299
anesthesia for, 294definitions related to, 293–294distal phalangeal, 286, 289, 294–296mallet deformity-associated, 310,
312metacarpal, 266, 298–299middle and proximal phalangeal
fractures, 296–298shaft fractures, 295
frontal sinus, 155gunshot wound-related, 68hand infection-related, 342open (compound), 63, 64
definition of, 293of distal phalanx, 286of the fingertips, 287, 289hand injury-associated, 271muscle flap coverage for, 120of tibia and fibula, 206, 210, 211–218
with overlying wounds, 88of tibia and fibula, 205–219
case example of, 205–206closed fractures, 206comminuted, 207compartment syndrome associated
with, 207–211distant flap coverage for, 218free flap coverage for, 218local muscle flap coverage for,
212–218open (compound) fractures, 206, 210,
211–218Free flaps, 133–134
for tibia and fibula fracture coverage,218
Freshwater-associated bacterial infections,187, 341
Frostbite, 202–204
Gangrenedry, 183–184, 340wet, 184, 186, 340
Gastrocnemius flaps, 213–216Gastrocnemius muscle, anatomy of,
213–214Gauze dressings, 80, 81
saline-moistened, for burns, 197for skin grafts, 105as wet-to-dry dressings, 82–83as wet-to-wet dressings, 83
Glasgow Coma Scale, 53–54Gloves
nonsterile, 81protective, 46sterile, 80–81
Goggles, protective, 47Granulation tissue, definition of, 79Grease
removal from burned tissues, 197, 321removal from fingertip wounds, 284
Groin flap, 129–133Gunshot wounds, 59, 67–71
bullet removal from, 71entrance and exit sites of, 69, 70external wound care for, 69–70initial treatment of, in stable patients,
67–69Gynecomastia, 250
Hand. See also Fingersabscesses of, 347–354
acute suppurative flexortenosynovitis, 347, 350–353
on dorsal surface, 353–354felon, 347–349, 351paronychia, 349–350
amputated, replantation of, 304–305anatomic positions of, 257–258blood supply to, 264–265, 318chronic conditions of, 355–366
carpal tunnel syndrome, 360–365osteoarthritis, 365–366trigger finger, 355–360
finger alignment of, 266infections of, 339–345
bite wound-related, 59evaluation of, 341–342general initial treatment of, 344–345
normal, examination of, 257–266extrinsic muscle/intrinsic muscle
nerve supply evaluation in,263–264
motor examination, 261–262sensory examination, 259–260vascular evaluation in, 264–266
Hand injuriesbite wounds, 59, 187, 268, 341, 343burns, 201, 268, 321–328
aftercare for, 327–328care during healing, 323–324determination of depth of, 324–325escharotomy of, 325–326initial treatment of, 321–324surgical treatment of, 325–327tangential excision of, 324, 327
crush injuries, 59, 268, 331–333dressings for, 281evaluation of, 267–273
motor examination in, 270patient history in, 267–269physical examination in, 269–271sensory examination in, 270
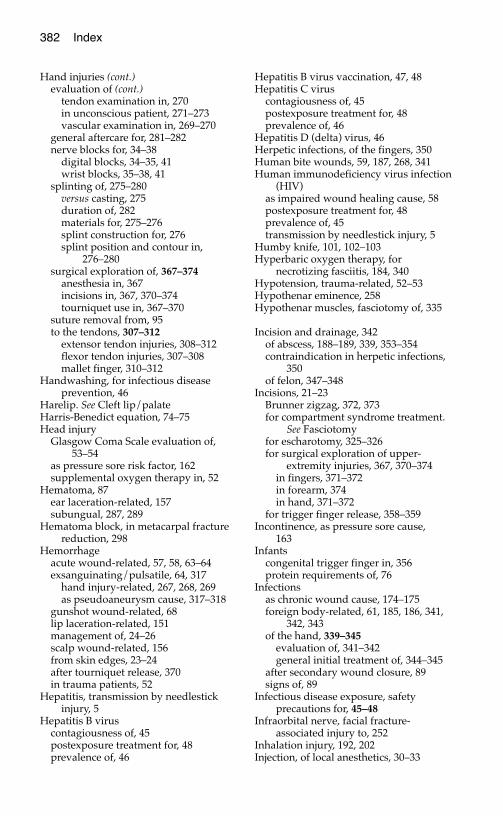
382 Index
Hand injuries (cont.)evaluation of (cont.)
tendon examination in, 270in unconscious patient, 271–273vascular examination in, 269–270
general aftercare for, 281–282nerve blocks for, 34–38
digital blocks, 34–35, 41wrist blocks, 35–38, 41
splinting of, 275–280versus casting, 275duration of, 282materials for, 275–276splint construction for, 276splint position and contour in,
276–280surgical exploration of, 367–374
anesthesia in, 367incisions in, 367, 370–374tourniquet use in, 367–370
suture removal from, 95to the tendons, 307–312
extensor tendon injuries, 308–312flexor tendon injuries, 307–308mallet finger, 310–312
Handwashing, for infectious diseaseprevention, 46
Harelip. See Cleft lip/palateHarris-Benedict equation, 74–75Head injury
Glasgow Coma Scale evaluation of,53–54
as pressure sore risk factor, 162supplemental oxygen therapy in, 52
Hematoma, 87ear laceration-related, 157subungual, 287, 289
Hematoma block, in metacarpal fracturereduction, 298
Hemorrhageacute wound-related, 57, 58, 63–64exsanguinating/pulsatile, 64, 317
hand injury-related, 267, 268, 269as pseudoaneurysm cause, 317–318
gunshot wound-related, 68lip laceration-related, 151management of, 24–26scalp wound-related, 156from skin edges, 23–24after tourniquet release, 370in trauma patients, 52
Hepatitis, transmission by needlestickinjury, 5
Hepatitis B viruscontagiousness of, 45postexposure treatment for, 48prevalence of, 46
Hepatitis B virus vaccination, 47, 48Hepatitis C virus
contagiousness of, 45postexposure treatment for, 48prevalence of, 46
Hepatitis D (delta) virus, 46Herpetic infections, of the fingers, 350Human bite wounds, 59, 187, 268, 341Human immunodeficiency virus infection
(HIV)as impaired wound healing cause, 58postexposure treatment for, 48prevalence of, 45transmission by needlestick injury, 5
Humby knife, 101, 102–103Hyperbaric oxygen therapy, for
necrotizing fasciitis, 184, 340Hypotension, trauma-related, 52–53Hypothenar eminence, 258Hypothenar muscles, fasciotomy of, 335
Incision and drainage, 342of abscess, 188–189, 339, 353–354contraindication in herpetic infections,
350of felon, 347–348
Incisions, 21–23Brunner zigzag, 372, 373for compartment syndrome treatment.
See Fasciotomyfor escharotomy, 325–326for surgical exploration of upper-
extremity injuries, 367, 370–374in fingers, 371–372in forearm, 374in hand, 371–372
for trigger finger release, 358–359Incontinence, as pressure sore cause,
163Infants
congenital trigger finger in, 356protein requirements of, 76
Infectionsas chronic wound cause, 174–175foreign body-related, 61, 185, 186, 341,
342, 343of the hand, 339–345
evaluation of, 341–342general initial treatment of, 344–345
after secondary wound closure, 89signs of, 89
Infectious disease exposure, safetyprecautions for, 45–48
Infraorbital nerve, facial fracture-associated injury to, 252
Inhalation injury, 192, 202Injection, of local anesthetics, 30–33

Index 383
Instrumentssharp
disposal of, 47safety precautions for use of, 46, 47
sterile, 80–81for suturing, 5–7
Interferon therapy, for hepatitis Cpatients, 48
Intermaxillary fixation, Ivy loopsprocedure for, 254–256
Interosseous muscles, fasciotomy of, 335Interphalangeal joints (IP)
burn-related stiffness of, 323definition of, 258extension of, 264, 270
Interplast, 242Intravenous access, in trauma patients, 52Intrinsic muscles
dysfunction of, 261evaluation of, 263
Intubation. See also Endotrachealintubation
for airway patency, 50IP. See Interphalangeal jointsIron, dietary intake of, 77Iron supplementation, for wound healing,
176Irrigation
of acute wounds, 60–61of chemical injuries, 193of flexor sheath, 352
Ischial pressure sores, 161, 163, 170–171Ivy loops procedure, for intermaxillary
fixation, 254–256
Jawfractures of, 253, 254–256
Jointscrush injuries to, 331dislocations of. See Dislocationsfrostbite-related stiffness of, 204hand infection-associated
contamination of, 342
Keloids, 138, 139, 142ear piercing-related, 142–143secondary wound closure-related, 86
Keratoses, seborrheic, 223Knife, skin-graft (Humby), 101, 102–103Knife blades, for incisions, 21–23Knife wounds, 58, 64, 268Kwashiorkor, 73
marasmic, 74
Labial arteryhemorrhage from, lip burn-related, 201injuries to, 151
Lacerationsof the cheek
as ectropion cause, 158full-thickness, 152intraoral, 151–152
crush injury-related, 332–333of the face, 145–159
anesthesia for, 146–147initial care for, 146jaw fracture-related, 253soft-tissue loss associated with,
158–159specific types of, 149–159suturing of, 147–149unique properties of, 145
of the forearm, 374Latissimus dorsi flaps, 246Leg, ulcers of, 177–180Lidocaine
as local anesthetic, 30–31, 32in axillary blocks, 43in Bier blocks, 42–43in digital nerve blocks, 283in facial lacerations, 146in facial nerve blocks, 39in primary wound closure, 92in scalp lacerations, 156in wound cleansing, 60
Lignocaine. See LidocaineLip
burn injuries of, 201lacerations of, 149–151
Local anesthesia, 29–44action mechanism of, 29additives to, 31–32direct infiltration of, 33dosage of, 30–31, 32, 33duration of action of, 32for facial lacerations, 146–147in gunshot wound treatment, 71injection of, 30–33
safety precautions for, 33as nerve blocks, 30, 34–42
axillary blocks, 43Bier blocks, 39–43in facial injury repair, 39–41, 147in hand injury repair, 34–39, 41with sedation, 41–42in wound cleansing, 60, 92
overdose of, 33topical agents, 29–30
Lymphadenectomy, in melanomapatients, 232
Lymphangitis, 183, 339, 344Lymph nodes, enlarged
hand injury-related, 342, 344skin cancer-related, 225

384 Index
Mafenide acetate, as burn treatment, 198Magnesium, dietary intake of, 77Mallet finger, 310–312
closed, 310–312distal phalangeal fracture-related, 295open, 312
Malnutrition, 73–74as chronic wound cause, 176as impaired wound healing cause, 58,
73Mammaplasty, reduction, 245, 249Mandible, fractures of, 253, 254–256Marasmus, 73, 74Marcaine. See BupivacaineMassage, of scar tissue, 140, 142Mastectomy
breast reconstruction after. See Breastreconstruction
as gynecomastia treatment, 250MCP. See Metacarpophalangeal jointsMedian nerve
anatomic relationship with carpaltunnel, 360, 361
anatomy of, 36compression of. See Carpal tunnel
syndromefunction testing of, 263, 270sensory distribution of, 259, 260
Median nerve block, 35–37Melanoma
appearance of, 222–223etiology of, 222genetic factors in, 224physical examination of, 225re-excision of, 232–233sentinel lymph node biopsy of, 233–234
Mental nerve blocks, 41, 147Mesher, 103, 104Metacarpal fractures, 266, 298–299Metacarpophalangeal joints (MCP)
burn-related stiffness of, 323definition of, 258human bite wounds to, 341osteoarthritis of, 365
Midazolam, 42use in burn patients, 197
Middle phalanges, fractures of, 296–298extraarticular, 296–297intraarticular, 298
Mole, cancerous, 221–222, 223Motion, of injured hand and fingers, 282Motor examination
of injured hand, 270of normal hand, 261–262
Motor nerves, of hand, injuries to, 317,331
Mouth, lacerations of, 151–152
Mucosa, oral, lacerations of, 150–152Mycobacterium marinum infections, of the
hand, 343, 344Myoglobinuria, 192–193, 207–208, 333
Nail bed injuries, 287, 289–291Nails
growth rate of, 289paronychia of, 349–350removal of, 290
Nasal airway tubes, 50Needles
for injections, proper use and disposalof, 47
for suturing, 1–2, 6holder for, 5, 6proper use and disposal of, 47
Needlestick injuries, 5, 47–48Nerve blocks, 34–41
in attached distant flap placement, 124in facial injury repair, 38–41, 147
infraorbital, 38, 40–41mental nerve, 41supraorbital, 38, 39–40, 41supratrochlear, 38, 40, 41
in hand injury repair, 34–38digital block, 34–35, 41wrist block, 35–38, 41
in primary wound closure, 92in surgical exploration of upper-
extremity injuries, 367in wound cleansing, 60
Nerve grafts, 316–317Nerve injuries, 62, 313–317
crush injuries, 330repair of, 315–317
Nerves, anatomy of, 313–314Neurovascular bundles, digital, 355Neurovascular examination, of gunshot
wound patients, 68, 69Nipple, reconstruction of, 248Nonsteroidal anti-inflammatory drugs
(NSAIDs)as carpal tunnel syndrome treatment,
362deleterious effect on wound healing,
177Nose, lacerations of, 153Numbness, in the hand
carpal tunnel syndrome-related, 361compartment syndrome-related, 334
Nutrition, 73–78Nutritional status
assessment of, 74–75, 176of pressure sore patients, 167required for wound healing, 76–78, 176,
180
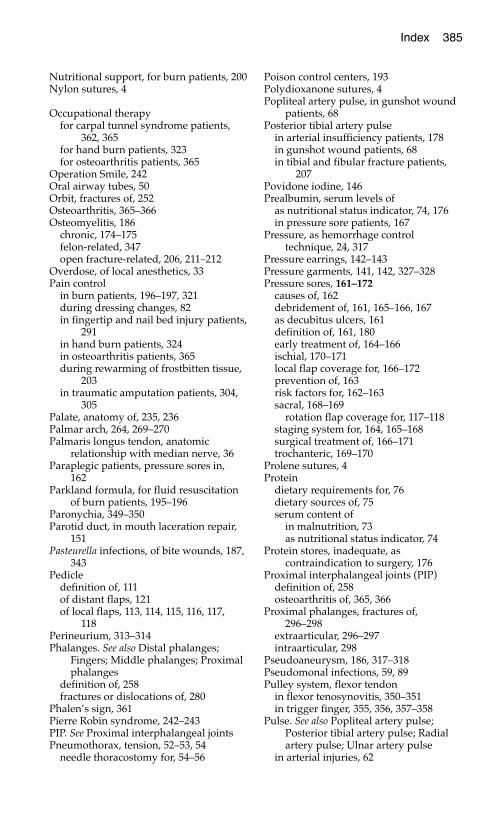
Index 385
Nutritional support, for burn patients, 200Nylon sutures, 4
Occupational therapyfor carpal tunnel syndrome patients,
362, 365for hand burn patients, 323for osteoarthritis patients, 365
Operation Smile, 242Oral airway tubes, 50Orbit, fractures of, 252Osteoarthritis, 365–366Osteomyelitis, 186
chronic, 174–175felon-related, 347open fracture-related, 206, 211–212
Overdose, of local anesthetics, 33Pain control
in burn patients, 196–197, 321during dressing changes, 82in fingertip and nail bed injury patients,
291in hand burn patients, 324in osteoarthritis patients, 365during rewarming of frostbitten tissue,
203in traumatic amputation patients, 304,
305Palate, anatomy of, 235, 236Palmar arch, 264, 269–270Palmaris longus tendon, anatomic
relationship with median nerve, 36Paraplegic patients, pressure sores in,
162Parkland formula, for fluid resuscitation
of burn patients, 195–196Paronychia, 349–350Parotid duct, in mouth laceration repair,
151Pasteurella infections, of bite wounds, 187,
343Pedicle
definition of, 111of distant flaps, 121of local flaps, 113, 114, 115, 116, 117,
118Perineurium, 313–314Phalanges. See also Distal phalanges;
Fingers; Middle phalanges; Proximalphalanges
definition of, 258fractures or dislocations of, 280
Phalen’s sign, 361Pierre Robin syndrome, 242–243PIP. See Proximal interphalangeal jointsPneumothorax, tension, 52–53, 54
needle thoracostomy for, 54–56
Poison control centers, 193Polydioxanone sutures, 4Popliteal artery pulse, in gunshot wound
patients, 68Posterior tibial artery pulse
in arterial insufficiency patients, 178in gunshot wound patients, 68in tibial and fibular fracture patients,
207Povidone iodine, 146Prealbumin, serum levels of
as nutritional status indicator, 74, 176in pressure sore patients, 167
Pressure, as hemorrhage controltechnique, 24, 317
Pressure earrings, 142–143Pressure garments, 141, 142, 327–328Pressure sores, 161–172
causes of, 162debridement of, 161, 165–166, 167as decubitus ulcers, 161definition of, 161, 180early treatment of, 164–166ischial, 170–171local flap coverage for, 166–172prevention of, 163risk factors for, 162–163sacral, 168–169
rotation flap coverage for, 117–118staging system for, 164, 165–168surgical treatment of, 166–171trochanteric, 169–170
Prolene sutures, 4Protein
dietary requirements for, 76dietary sources of, 75serum content of
in malnutrition, 73as nutritional status indicator, 74
Protein stores, inadequate, ascontraindication to surgery, 176
Proximal interphalangeal joints (PIP)definition of, 258osteoarthritis of, 365, 366
Proximal phalanges, fractures of, 296–298
extraarticular, 296–297intraarticular, 298
Pseudoaneurysm, 186, 317–318Pseudomonal infections, 59, 89Pulley system, flexor tendon
in flexor tenosynovitis, 350–351in trigger finger, 355, 356, 357–358
Pulse. See also Popliteal artery pulse;Posterior tibial artery pulse; Radialartery pulse; Ulnar artery pulse
in arterial injuries, 62
386 Index
Pulse (cont.)as blood pressure measure, 52in gunshot wound patients, 68–69
Punch biopsy procedure, 227–228Puncture wounds. See also Bite wounds
cleansing of, 60as hand infection cause, 341, 342as soft-tissue infection cause, 185
Quadriplegic patients, pressure sores in,162, 163
Rabies, 59–60, 268, 341Radial artery
as axial flap blood supply source, 112injury to, 318
palpable radial pulse associated with,270
location of, 264, 265Radial artery pulse, 52, 264
in injured hand, 269–270location of, 38
Radial forearm flap, 134Radial nerve
function testing of, 270sensory distribution of, 259, 260
Radial nerve block, 38Radiation therapy
as chronic wound cause, 177for keloid prevention, 143
Radiography. See also X-raysPanorex, for mandibular fracture
evaluation, 252Random flaps
distant, 121–129local, 113, 114–119
Recommended dietary allowances (RDA)for minerals, 77–78for protein, 76for vitamins, 77
Redness, of skininfection-related, 89scar-related, 141–142around suture line, 95–96
Red streaking, of skinhand infection-related, 342lymphangitis-related, 339, 344
Regional anesthesia, intravenous (Bierblock), 42–43, 358, 363
Regional block, upper-extremity axillaryblock, 43
Rehabilitation, of traumatic amputationpatients, 305
Replantation, of traumatically-amputatedparts, 304–305
Respiratory depression, sedativemedication-related, 42
Rewarming, of frostbitten tissue, 203Rheumatoid arthritis, tenosynovitis
associated with, 353Rhinoplasty, in cleft lip/palate patients,
241Ringer’s lactate solution, 196Rings, removal from injured hands, 269Rotational deformity, of fingers, 266, 268,
271, 296, 297Rotation flaps, 168–169Rule of nines, for determination of burned
body surface area, 193–194
Sacrum, pressure sores of, 163, 168–169rotation flap coverage for, 117–118
Saline, as wound cleanser, 81Scalp injuries
blood loss from, 52full-thickness lacerations, 155–156local anesthesia use in, 92
SCALP mnemonic, for layers of the scalp,155–156
Scars, 137–144abnormal, 138adhesive materials-related, 17–18appearance of, 137burn-related, 324clinician’s care for, 140–143contracture of, secondary wound
closure-related, 86excessive redness of, 141–142facial wounds-related, 93, 145hypertrophic, 138, 139, 142maturation of, 137patient’s care for, 140secondary wound closure-related, 86,
88, 89strength of, 137suture-related, 2, 3tight, secondary wound closure-related,
86, 88, 89unstable, 138
secondary wound closure-related, 86Scissors, suture, 5, 6Seawater-associated bacterial infections,
187Sedation, as adjunct to local anesthesia, 42
of burn patients, 197Sensory examination, of injured hand,
270Sentinel lymph node biopsy, 233–234Sharp instruments
disposal of, 47safety precautions for use of, 46, 47
Shave excision, of skin lesions, 230–231Shellfish-related bacterial infections, 187Shock, 53

Index 387
Shotgun injuries, 71Silicone breast implants, 245Silicone gel sheets, application to scars,
140–141, 142Silk sutures, 4Silver nitrate, as burn treatment, 198Silver sulfadiazene, as burn treatment, 82,
198, 199, 321Sinuses, frontal, fractures of, 155Skin
anatomy of, 97–98defatting of, for skin flaps, 107–108
in fingertip injuries, 285functions of, 191ischemia-related death of, 87
Skin cancer, 221–234basal cell carcinoma, 223–224
as chronic wound cause, 175treatment of, 231
biopsy of, 225–231excisional, 226, 228–230incisional, 226, 227–228pathology report of, 231–232punch procedure, 227–228shave biopsy/excision, 226, 230–231
evaluation of, 224–225melanoma
appearance of, 222–223etiology of, 222genetic factors in, 224physical examination of, 225re-excision of, 232–233sentinel lymph node biopsy of,
233–234postexcision care for, 234squamous cell carcinoma, 221, 223, 224
as chronic wound cause, 175tongue reconstruction in, 134treatment of, 231–232
unstable scar-associated, 86Skin creases
definition of, 258wound closure over, 88, 89
Skin edgesexcision of, in gunshot wounds, 70hemorrhage from, 23–24, 31undermining of, 27
Skin grafts, 97–109for acute wounds, 65anatomic basis for, 97–99contraindications to, 99–100for eyelid laceration coverage, 154for facial wound coverage, 158full-thickness, 106–109
amputated skin as, 303, 304defatting of, 107–108for fingertip injury coverage, 285
Skin grafts (cont.)split-thickness, 100–106
aftercare for, 106for burn coverage, 199, 201for chronic wound coverage, 181for compartment syndrome-related
wound closure, 210–211graft harvesting technique in,
101–103for hand burn coverage, 324, 326, 327for melanoma excision site coverage,
232for open fracture coverage, 212placement of, 104–105preparation of, 103–104for venous ulcer coverage, 179wound dressing for, 105–106
for unstable scar coverage, 143Skin redness
infection-related, 89scar-related, 141–142as streaking
hand infection-related, 342lymphangitis-related, 339, 344
around suture line, 95–96Skin staples, 16–17, 18Skull, occiput, pressure sores of, 163Smoking
as impaired wound healing cause, 58,175, 282
in crush injury patients, 332in skin graft recipients, 106, 109in traumatic amputation patients, 304
Soft tissue, facial laceration-related loss of,158–159
Soft-tissue coverage, of hand injuries, 271Soft-tissue infections, 183–189
antibiotic therapy for, 186–188evaluation of patients with, 184–186general treatment of, 186incision and drainage of, 188–189
Soft-tissue tumors, as chronic openwound cause, 175
Soleus flap, 216–218Spinal cord injury
examination of, 54as hypotension cause, 52, 53
Splintingof acute suppurative flexor
tenosynovitis, 351, 352of burned hands, 324, 327as carpal tunnel syndrome treatment,
337, 362of crush injuries, 333of distal interphalangeal joint fractures,
286of distal phalangeal fractures, 295
388 Index
Splinting (cont.)of extensor tendon injuries, 308of finger injuries, 268of flexor tendon injuries, 307–308of hand injuries, 275–280of infected hands, 344, 345of mallet finger, 310–311, 312of metacarpal fractures, 299of phalangeal fractures, with rotational
deformity, 297post-fasciotomy, 337of tibial and fibular fractures, 210of tight scars, 141of tuft fractures, 295
Splints, Stack (volar), 310, 311Squamous cell carcinoma, 221, 223, 224
as chronic wound cause, 175re-excision of, 232tongue reconstruction in, 134
Stab wounds, 58, 64, 268Staphylococcal infections, of the hand,
343, 344, 349Staples, skin, 16–17, 18Sterile technique, 80–81Steristrips, 139Steroid injections
as carpal tunnel syndrome treatment,362
as keloid treatment, 142as trigger finger treatment, 357–358
Steroids, deleterious effect on woundhealing, 177
Stick ties, 26, 318Streptococcus viridans infections, human
bite wound-related, 343Stress, effect on dietary protein
requirements, 76Sulfamylon, as burn treatment, 198Sun exposure, as skin cancer risk factor,
222, 223, 225, 234Sunscreen
application to scars, 140, 141use by skin cancer patients, 234
Supraorbital nerve block, 38, 39–40, 41, 147Supratrochlear nerve block, 38, 40, 41, 147Surgical techniques, basic, 21–27
blunt dissection, 26–27hemorrhage management, 23–25incisions, 21–23sharp dissection, 27undermining skin edges, 27
Suture line, redness and irritation of,95–96
Suturesabsorbable versus nonabsorbable, for
primary wound closure, 93buried intradermal, 11–12, 139
Sutures (cont.)continuous, 9, 10, 15, 16
vs. interrupted, for facial wounds,148–149
for facial wounds, 148–149, 158figure-of-eight, 12–13mattress, 10–11, 14–16, 93removal of, 3, 15–16, 95, 149
in children, 3from facial lacerations, 149in primary wound closure, 95
for scalp lacerations, 156simple, 93size of, in primary wound closure, 93
Suturing, 1–20alternatives to, 16–19of blood vessels, 24–26contraindications to, 86–87of extensor tendon injuries, 308of eyebrow lacerations, 154–155of eyelid lacerations, 153, 154of facial lacerations, 147–149of fingertip wounds, 285instruments for, 5–7of intraoral lacerations, 151–152of lip lacerations, 150, 151–152of nail bed tissue, 290needles for, 1–2, 6
holder for, 5, 6needlestick injury prevention during, 47of nerve injuries, 314, 315–317for primary wound closure, 93–95effect on scarring, 139suture materials for, 3–4techniques of, 5–15
suture placement, 7–13suture removal, 3, 15–16, 95, 149
Swellingcompartment syndrome-related, 334excessive, as contraindication to
primary wound closure, 87facial laceration-related, 149hand infection-related, 342, 344infection-related, 89
Tamponade, cardiac, 53Tangential excision, of burns, 199,
200–201, 325–326Tar, adherence to burn wounds, 197, 321Tearduct injury, 154Tendon injuries, 63
crush injuries, 330of the hand, 307–312
examination of, 270extensor tendon injuries, 308–312flexor tendon injuries, 307–308mallet finger, 310–312
Index 389
Tendon injuries (cont.)traumatic amputation-related, 303
Tendons, with overlying wounds, 88Tenosynovitis
flexor, 344acute suppurative, 347, 350–353
rheumatoid arthritis-associated, 353stenosing. See Trigger finger
Tensor fascia lata flaps, 169–170Tetanus, risk factors for, 58, 59Tetanus immunization, 59Thenar eminence, 257
use as flap, 287–289Thenar flaps, for fingertip injuries,
287–289Thenar muscles, fasciotomy of, 335Thermal injury, 192Thigh, as skin graft donor site, 100Thoracostomy, needle, 54–56Thumb. See also Interphalangeal joints (IP)
splinting of, 278, 279Thumb spica splint, 278–279Tibia and fibula, fractures of, 205–219
case example of, 205–206closed fractures, 206comminuted, 207compartment syndrome associated
with, 207–211distant flap coverage for, 218free flap coverage for, 218local muscle flap coverage for, 212–218open (compound) fractures, 206, 210,
211–218Tinel’s sign, 361Tingling, in the hand
carpal tunnel syndrome-related, 361compartment syndrome-related, 334
Tobacco use. See also SmokingTongue
as airway obstruction cause, 50in Pierre Robin syndrome, 243
free flap reconstruction of, 133–134lacerations of, 152
Tooth alignment, in facial fracturepatients, 252
Topical agentsfor burns, 198local anesthetic, 29–30
Tourniquetsuse with Bier blocks, 42–43in carpal tunnel release, 363, 364, 365digital, 284, 368in exsanguinating hemorrhage control,
64, 317in fingernail removal, 290in hand injuries, 267as ischemia cause, 267, 317
Tourniquets (cont.)pain associated with use of, 317in suppurative flexor tenosynovitis
drainage, 351in tangential excision of burns, 327in trigger finger release, 358
TRAM (transverse rectus abdominismuscle) flap, 246–248
Transferrin, serum levels ofas nutritional status indicator, 74, 176in pressure sore patients, 167
Transverse rectus abdominis muscle(TRAM) flap, 246–248
Trauma patientsevaluation of, 49–56
ABCs of, 49–53case study of, 54
needle thoracostomy in, 54–56neurologic examination in, 53–54
Trigeminal nerve branches, anatomy of,38, 39, 40, 41
Trigger finger, 355–360Triple antibiotic ointment, 82Trochanter, pressure sores of, 163, 169–170Tuft fractures, 294–295Tying off, of blood vessels, 24–25
Ulcersdecubitus, 161of the leg, 177–180
Ulnar arteryinjury to, 318–319
ulnar nerve injury associated with,260
location of, 264, 265Ulnar artery pulse, 264Ulnar gutter splint, 279–280Ulnar nerve
function testing of, 263, 270injuries to, 308sensory distribution of, 259, 260
Ulnar nerve block, 37Unconscious patients, hand injury
evaluation in, 271–273Undermining, of skin edges, 27
Valium. See DiazepamVaricose veins, 178Vascular examination, of injured hand,
269–270Vascular injuries, hand, 317–319
crush injury-related, 331Vasoconstriction
epinephrine-related, 31, 32, 151, 152,153
nicotine-related, 175Vegetables, as protein source, 75
390 Index
Venous insufficiencycapillary refill in, 265–266as leg ulcer cause, 177, 178, 179, 180
Vermilion border, in lip lacerations, 149,150, 151
Vesicles, herpetic infection-associated, 350
Vibrio infections, 187, 343Visiting surgeon programs, 241–242Vitamin A, 76–77Vitamin A supplementation, for wound
healing, 176, 177Vitamin C, 77Vitamin C supplementation
for pressure sore prevention, 164for wound healing, 176
Vitamin E, 77Vitamin E supplementation, for wound
healing, 176, 177V-Y advancement flaps, 114, 118–119,
170–171
Water, sterile, as wound cleanser, 81Watson knife. See Knife, skin-graft
(Humby)Wound care, 79–84
dressing techniques for, 82–84inadequate, as chronic wound cause,
173supplies for, 80–82
Wound closureguidelines for, 88–89primary, 91–96
aftercare in, 95anesthetization for, 92contraindications to, 91delayed, 96of facial wounds, 145scarring associated with, 139of skin lesion biopsy sites, 228,
229–230, 232suturing procedure in, 93–95
“reconstructive ladder” of, 64–65, 85secondary, 85–89
contraindications to, 88indications for, 86–87scarring associated with, 139of skin lesion biopsy sites, 228–229,
230, 232skin edge undermining in, 27, 115–116of traumatic amputations, 304
Wound healingimpairment of
malnutrition-related, 58, 73medical illness-related, 58
Wound healing (cont.)impairment of (cont.)
smoking-related, 58, 106, 109, 175,282, 304, 332
nutritional requirements during, 76–78,176, 180
after primary would closure, 91after secondary wound closure, 85effect of suture techniques on, 4
Woundsacute, 57–65
closure of, 58, 64–65contaminated, 58, 59, 64events surrounding, 58–60examination of, 60–62formal (surgical) exploration of, 58,
62, 63, 64hemorrhage control in, 57, 58, 63–64injury to underlying structures in,
62–63patient history in, 57–58
chronic, 173–181causes and treatment of, 173–177, 180infected, 80problematic wounds, 177–180squamous cell carcinoma
development in, 224clean, definition of, 79dirty/contaminated
definition of, 79of the hand, 268secondary closure of, 87wet-to-dry dressings for, 82–83
infectedafter primary closure, 95–96definition of, 79–80wet-to-dry dressings for, 82–83
large, split-thickness skin grafts for,100–106
Wrist nerve blocksof median nerve, 35–37of radial nerve, 38of ulnar nerve, 37
X-raysof facial fractures, 253of foreign bodies, 61, 64of gunshot wounds, 68of hand infections, 342of soft-tissue infections, 185, 186of traumatic amputations, 305
Zinc, dietary intake of, 77Zinc supplementation
for wound healing, 176

From the Preface: The intent of this book is to bring relief to people who sustain commonly encountered injuries and wounds. Without corrective treatment, these problems can destroy livelihoods and families. Immedi-ate, acute care often stabilizes the patient, but may leave the patient with a minor or major disability. Lacking the resources typical of wealthier popula-tions, even minor disabilities can have a devastating economic and social impact.
Plastic surgeons have developed reconstructive surgical techniques that can restore the injured person to a productive and fulfilling life. Unfortu-nately, this type of surgery has frequently been obscured by a cloud of unawareness or perceived difficulty.
Practical Plastic Surgery For Nonsurgeons describes straightforward plas- tic surgical information and techniques. This book will be useful to health-care providers with limited access to specialists, especially providers who serve in rural and non-industrial settings. Medical students, nurse practitio-ner students, and residents in a wide variety of specialties will also benefit from this knowledge.
Copyright © 2011 Global HELP OrganizationOriginally published by Hanley & Belfus, Inc. (Copyright © 2001)Original ISBN-10: 1-56053-478-8