Polarimeter - Laboratorium-apparatuur.nl webshop … Connecting the Polarimeter to the Power Supply...
70
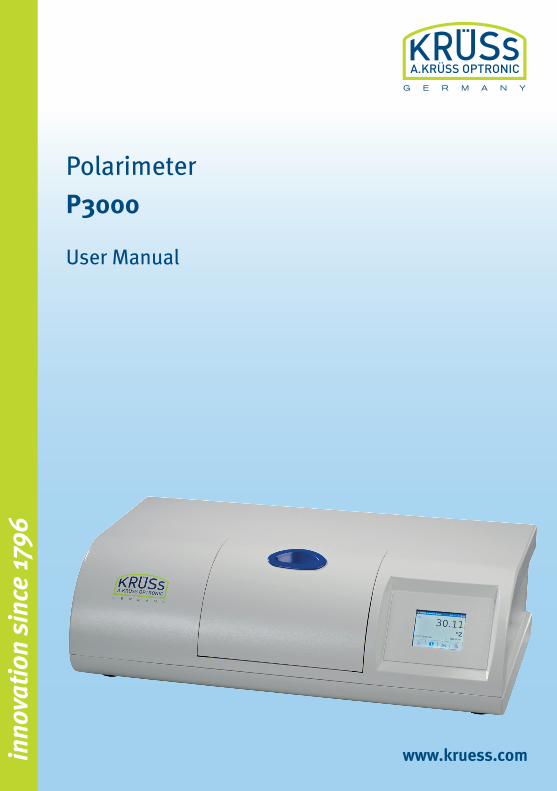
www.kruess.com innovation since 1796 Polarimeter P3000 User Manual
-
Upload
trinhnguyet -
Category
Documents
-
view
223 -
download
0
Transcript of Polarimeter - Laboratorium-apparatuur.nl webshop … Connecting the Polarimeter to the Power Supply...
www.kruess.cominno
vatio
n si
nce
1796
Polarimeter
P3000
User Manual


1
Table of Contents Chapter - 1 Introduction ................................................................................... 5
1.1 Application Examples ..................................................................... 5
1.2 Reading Information ....................................................................... 6
Chapter - 2 General Safety Instructions ............................................................ 7
Chapter - 3 Instrument Description ................................................................... 9
3.1 Scope of Delivery ............................................................................ 9
3.2 Optional Accessories ...................................................................... 9
3.3 Required Reagents ......................................................................... 9 Calibration .................................................................................. 9 Accuracy Check ........................................................................... 9 Sample Dilution ........................................................................... 9
3.4 Instrument Images ........................................................................ 10 Instrument Front View of P3000 .................................................. 10 Instrument Back View of P3000 ................................................... 10 Polarimeter Tubes ...................................................................... 10
3.5 Screen Descriptions ...................................................................... 11 Main Menu ............................................................................... 11 Explanation of Buttons ................................................................ 11 Explanation of Display Window ................................................... 12
3.6 Measurement Principle .................................................................. 13
Chapter - 4 Basic Operation ............................................................................. 14
4.1 Buttons ......................................................................................... 14
4.2 Defining the System Settings ........................................................16
4.3 Defining the Instrument Settings ................................................... 17
4.4 Performing the Calibrations .......................................................... 18
Chapter - 5 Initial Startup ................................................................................ 19
5.1 Installation .................................................................................... 19 Choosing a Suitable Location ..................................................... 19 Connecting a Printer .................................................................. 19

2
Connecting the Polarimeter to the Power Supply ........................... 19
5.2 Preparing the Instrument after Installation ................................... 20 Switching on the Instrument ........................................................ 20 Switching on the Printer .............................................................. 20 Connecting the Temperature Sensor ............................................ 21 Calibrating the Temperature Sensor ............................................ 21 Checking (Validating) the Instrument ............................................ 22
Chapter - 6 Routine Operation ........................................................................ 26
6.1 Preparing the Instrument .............................................................. 26 Switching on the Instrument ........................................................ 26 Changing the Instrument Parameters ........................................... 27
6.2 Executing a Measurement ............................................................. 29 Determining the Blank ................................................................ 29 Resetting the Blank ..................................................................... 30 Supplying a Sample ................................................................... 30 Connecting a Temperature Sensor .............................................. 30 Starting the Measurement ........................................................... 31 Measurement ............................................................................ 31 After Measurement ..................................................................... 31
6.3 Measurement Results ................................................................... 32 Measurement Result Display ....................................................... 32 Printing the Displayed Measurement Result ................................... 32 Switching off the Instrument ........................................................ 32
Chapter - 7 Settings ....................................................................................... 33
7.1 System Settings ........................................................................... 33 Opening the Menu .................................................................... 33 Explanations .............................................................................. 34 Switching the Printer on and off ................................................... 35 Selecting the Language .............................................................. 36 Input of Date and Time .............................................................. 37
7.2 Instrument Settings ...................................................................... 38 Opening the Menu .................................................................... 38 Explanations .............................................................................. 39 Selecting the Scale ..................................................................... 40 Selecting the Weighted Sugar Sample .......................................... 40 Selecting the Polarimeter Tube .................................................... 42 Selecting the Temperature .......................................................... 43

3
7.3 Calibrating the Measurement Range ............................................. 44 Opening the Menu .................................................................... 44 Canceling the Calibration ........................................................... 45 Resetting the Calibration ............................................................. 46 Performing the Calibration .......................................................... 46 Blank Measurement ................................................................... 46 Input of the Quartz Standard ....................................................... 46 Input of the Quartz Temperature ................................................. 48 Measuring the Quartz Standard .................................................. 49 Accepting the Calibration ........................................................... 49 Rejecting the Calibration ............................................................ 50
7.4 Calibrating the Temperature Sensor .............................................. 51 Prerequisites .............................................................................. 51 Calling the Function ................................................................... 51 Measuring the Temperature ........................................................ 52 Input of the Thermometer Temperature ........................................ 53
7.5 Blank ............................................................................................ 56 Calling the Blank Function .......................................................... 56 Resetting the Blank ..................................................................... 57 Measuring the Blank .................................................................. 57 Saving the New Blank ................................................................. 58 Rejecting the New Blank ............................................................. 58
Chapter - 8 Maintenance, Care & Inspection ................................................... 59
8.1 Regular Maintenance and Care ..................................................... 59 Daily ......................................................................................... 59 Weekly ...................................................................................... 59 Yearly ....................................................................................... 59 When necessary ......................................................................... 59
8.2 Changing the Fuse ........................................................................ 60
8.3 Maintenance by Service ................................................................ 60
Chapter - 9 Troubleshooting Table ................................................................. 61
Chapter - 10 Transport, Storage and Disposal .................................................. 62
Transport .................................................................................. 62 Storage ..................................................................................... 62 Disposal .................................................................................... 62
Chapter - 11 Appendix ...................................................................................... 63

4
11.1 Technical Specifications ............................................................... 63
11.2 Ordering Information .................................................................... 65
11.3 Consumables ................................................................................ 66

Chapter - 1 Introduction / 1.1 Application Examples
5
Chapter - 1 Introduction The Polarimeter P3000 is very easy to operate and is designed for the fully automated measurement of optical rotation. The measurement sample is filled into the polarimeter tube, inserted into the sample chamber and measured. The results are shown on the display and, if connected, printed out on a printer. The operator dialog is available in German and English.
1.1 Application Examples
Application areas for the polarimeter are, amongst others: • Pharmaceutical Industry Monitoring of chemical processes Purity control and determination of
concentrations Testing of substances listed in the German
Pharmacopoeia (DAB) • Chemical Industry Purity control and determination of
concentrations Analysis of optically active components
(qualitative und quantitative) Determination of configuration changes Monitoring of chemical processes
• Food Industry Determination of concentrations Purity control Quality control
• Sugar and Sweetener-Industry Quality control of raw materials and end
products Determination of fructose and glucose
• Cosmetic Industry • Beverage Industry / Breweries

Chapter - 1 Introduction / 1.2 Reading Information
6
1.2 Reading Information
Although instrument operation of the P3000 is easy, we recommend attentive reading of this manual to ensure correct and optimal use of all functions. Symbols This manual uses the following symbols:
• Listings Instructions to do something
Text in italics refers to text in dialog windows. Reference to further information in this manual.
Finding Information • Look up in the table of contents.
• Should a problem occur, refer to Chapter - 9 Troubleshooting Table

Chapter - 2 General Safety Instructions
7
Chapter - 2 General Safety Instructions Hazards during normal specified operation:
Danger!
Electric shock by damaged instrument or power cable.
Before switching on the instrument, make sure that the instrument and the power cable are undamaged.
Only operate instruments that have been properly installed and maintained.
Danger!
Electric shock by entering liquids.
Before cleaning, switch off the instrument and disconnect the power supply.
Do not allow liquids to enter the instrument.
Do not spray the instrument for cleaning.
Make sure the instrument is completely dry before connecting to the power supply.
Danger!
Electric shock
Before changing the fuse, switch off the instrument and disconnect the power cable.
Warning!
Damage to the retina by the LED light source.
Do not look directly into the LED light source.
Careful!
Danger of pinching your hand.
Close the sample chamber lid carefully.
Chapter - 2 General Safety Instructions
8
Careful!
Damage to electrical components by condensate formation.
Wait at least one hour after transporting the instrument in a cooler environment (e.g. cold room or outdoors) before connecting to the power supply.
Careful!
Overheating damage.
Do not place the instrument near a heat source (e.g. heating).
Do not expose to direct sunlight.
Allow for unhindered air circulation.
Attention!
Aggressive chemicals may damage the instrument's paint or the plastic housing!
Clean the instrument with neutral cleaning agents only.
DO NOT use aggressive chemicals for cleaning, such as strong or weak acids or bases, acetone, formaldehyde, chlorinated hydrocarbons or phenols.
If the instrument comes into contact with aggressive chemicals, clean immediately with a neutral cleaning agent.
Chapter - 3 Instrument Description / 3.1 Scope of Delivery
9
Chapter - 3 Instrument Description This chapter describes the following topics:
• Scope of delivery • Optional accessories • Instrument images • Required reagents • Screen description • Measurement principle
3.1 Scope of Delivery
The following items are included in the delivery of the polarimeters P3000: • Polarimeter P3000
• Power cable • Touchscreen pen • Polarimeter tubes:
1 x 100 mm glass tube with middle funnel 1 x 200 mm glass tube with middle funnel
• User manual
3.2 Optional Accessories
• Printer • various polarimeter tubes
3.3 Required Reagents
Calibration For calibration of the instrument, quartz standards are used. See Ordering Information.
Accuracy Check For checking the accuracy of the instrument's measurements you may use: • Quartz standards • Standard solutions with known concentrations
Sample Dilution The solution used for sample dilution depends on the sample material to be measured and should not itself be optically active.

Chapter - 3 Instrument Description / 3.4 Instrument Images
10
3.4 Instrument Images
Instrument Front View of P3000
Sample chamber port
Touchscreen user interface
Instrument Back View of P3000
The P3000 provides the following connections: • Printer connection (for direct result output) • Power supply connection with power switch and
fuse Power switch & fuse &
power supply connection Printer connection (serial interface)
Polarimeter Tubes The polarimeter tube is available in two different
lengths: • 100 mm • 200 mm • various other types optionally available

Chapter - 3 Instrument Description / 3.5 Screen Descriptions
11
3.5 Screen Descriptions
This chapter briefly describes the following screens of the polarimeter P3000: Main Menu In the main menu the measurements are started and
the results are displayed. The buttons lead to further submenus.
Display window for results, unit, blank as well as instrument and system settings.
Operation of buttons via touchscreen.
Explanation of Buttons
Opens the menus for :
• System settings
• Instrument settings
• Calibration (measurement range, temperature sensor)
• Blank
Provides the following information:
• Instrument and firmware settings
• Date of last calibration
• Version of user interface and data base

Chapter - 3 Instrument Description / 3.5 Screen Descriptions
12
Prints the result shown on the display.
Starts the measurement.
Explanation of Display Window
11.000 °Z Measurement result of the sample with unit.
Blank Blank used for calculation of the sample result.
Connected printer is switched on.
The motor is switched on.
No display: motor is switched off. It switches off automatically a few seconds after the measurement.
The temperature sensor is connected to the sample polarimeter tube and the measured temperature during sample measurement is 20.0 °C in this example.
Explanations: see Chapter 7.4 Calibrating the Temperature Sensor.
No temperature display: no temperature sensor connected.
Size of the employed polarimeter tube. Is selected in the instrument settings.
Selected wavelength (fixed setting).

Chapter - 3 Instrument Description / 3.6 Measurement Principle
13
3.6 Measurement Principle
The polarimeter measures the optical rotation of the orientation of plane-polarized light caused by optically active substances. In principle, it consists of two polarization filters, the polarizer and the analyzer, each of which allows only a certain orientation of plane-polarized light to pass through. The polarimeter measures the optical activity or the optical rotation of a chemical substance. The following equation defines the relation between the optical rotation, the specific rotation and the sample concentration:
c = concentration [g/l] α = measured optical rotation [°] l = tube length [dm] [α]T = specific rotation, dependent on temperature (°C) and wavelength
The optical rotation is, amongst others, dependent on the following parameters:
• Type of sample
• Concentration of the optically active components
• Light wavelength
• Temperature of sample
• Tube length

Chapter - 4 Basic Operation / 4.1 Buttons
14
Chapter - 4 Basic Operation The instrument is operated by a touchscreen display using four touchscreen buttons.
4.1 Buttons
Operation of the polarimeter is performed using these four buttons:
Opens the submenus for : • System settings (printer, language, date/time) • Instrument settings (scale, polarimeter tube,
temperature) • Calibration (measurement range, temperature
sensor) • Blank
Returns to the main menu.
Selection of desired settings (system settings, instrument settings, instrument calibration, blank).
Opens the menu, e.g. for system settings.

Chapter - 4 Basic Operation / 4.1 Buttons
15
Opens the wiindow with the following information about the P3000:
• Instrument and firmware settings.
• Date of last calibration.
• Version of the user interface and data base.
Returns to the main menu.
Page up and page down in the information pages.
Prints the result shown in the display.
Starts the measurement.
Chapter - 4 Basic Operation / 4.2 Defining the System Settings
16
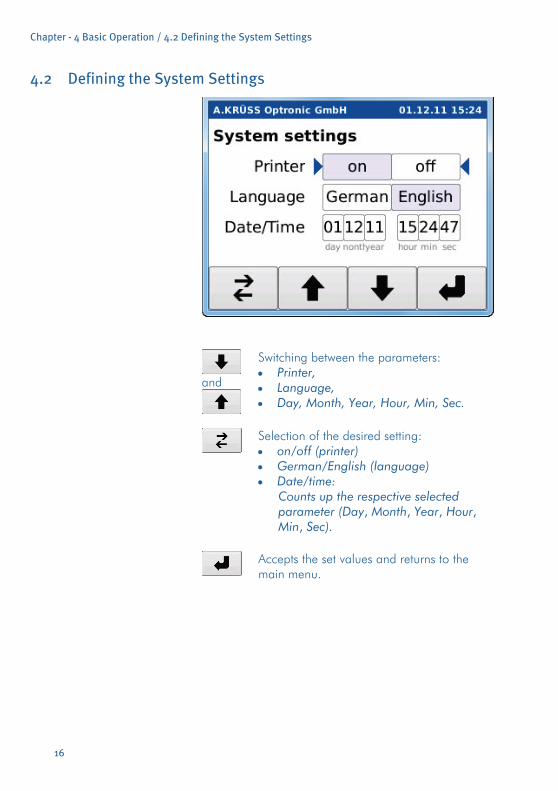
4.2 Defining the System Settings
and
Switching between the parameters: • Printer, • Language, • Day, Month, Year, Hour, Min, Sec.
Selection of the desired setting: • on/off (printer) • German/English (language) • Date/time:
Counts up the respective selected parameter (Day, Month, Year, Hour, Min, Sec).
Accepts the set values and returns to the main menu.

Chapter - 4 Basic Operation / 4.3 Defining the Instrument Settings
17
4.3 Defining the Instrument Settings
Selection of parameters (scale, polarimeter tube, temperature).
Selection of parameter setting.
Accepts the set values and returns to the main menu.

Chapter - 4 Basic Operation / 4.4 Performing the Calibrations
18
4.4 Performing the Calibrations
The functions for performing the calibrations of the measurement range and the temperatue sensor are accessed using the button Calibration.
Performing the calibrations see Chapter 7.4 Calibrating the Temperature Sensor.
Selection of calibration functions (measurement range and temperature sensor).
Returns to the settings menu.
Accepts the set values and returns to the main menu.
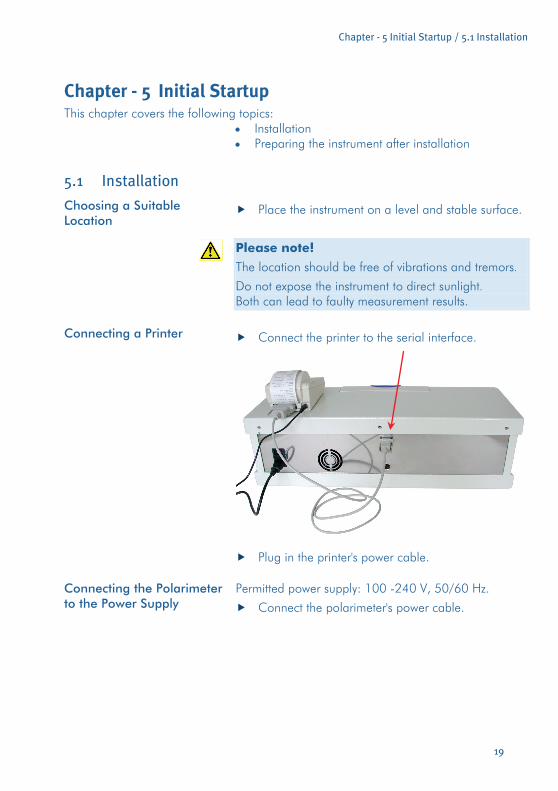
Chapter - 5 Initial Startup / 5.1 Installation
19
Chapter - 5 Initial Startup This chapter covers the following topics:
• Installation • Preparing the instrument after installation
5.1 Installation
Choosing a Suitable Location
Place the instrument on a level and stable surface.
Please note!
The location should be free of vibrations and tremors.
Do not expose the instrument to direct sunlight. Both can lead to faulty measurement results.
Connecting a Printer Connect the printer to the serial interface.
Plug in the printer's power cable.
Connecting the Polarimeter to the Power Supply
Permitted power supply: 100 -240 V, 50/60 Hz.
Connect the polarimeter's power cable.

Chapter - 5 Initial Startup / 5.2 Preparing the Instrument after Installation
20
5.2 Preparing the Instrument after Installation
After installation the instrument is basically ready for operation. Only if a temperature sensor is used, the sensor must first be calibrated before performing the first measurement A.Krüss recommends validation of the P3000 after transport and installation.
Warning!
Damage to the retina by the LED light source.
Do not look directly into the LED light source in the sample chamber.
Switching on the Instrument
Switch on the polarimeter (switch is located at the back of the instrument).
Stabilizing the light source! After switching on the instrument the light source must reach thermal equilibrium, i.e. to achieve highest precision, you should wait approx. 10 - 15 minutes before starting the first measurement.
Switching on the Printer If a printer is connected, it must be switched on in the
system settings as follows:
Open the settings menu with .
Use the buttons and to select the system settings and press .
Select the printer with the buttons and .
Switch the printer on with the button .
Accept the settings with .

Chapter - 5 Initial Startup / 5.2 Preparing the Instrument after Installation
21
Connecting the Temperature Sensor
If desired, connect the temperature sensor.
Calibrating the Temperature Sensor
If a temperature sensor is connected, the sensor must first be calibrated before operating the instrument.
The calibration consists of two temperature measurements:
• Temperature measurement with the connected temperature sensor
• Temperature measurement with a specified thermometer.
The P3000 determines the temperature difference between the sensor and the specified thermometer and corrects the deviation of the sensor for all following measurements.
Performing the calibration: see Chapter 7.4 Calibrating the Temperature Sensor.

Chapter - 5 Initial Startup / 5.2 Preparing the Instrument after Installation
22
Checking (Validating) the Instrument
Although the P3000 is calibrated ex works, the instrument's accuracy should always be checked after transport. The instrument check is carried out as follows: • Set the instrument parameters • Measure the blank • Measure the quartz standard or a standard solution
of known concentration. • If the results show a significant deviation from the
nominal values of the quartz standards or the test standards, the measurement range must be re-calibrated.
Setting the Instrument Parameters
The instrument's default settings are as follows:
• Scale = °
• Polarimeter tube = 100.0 mm
• Temperature °C
If desired, these settings can be changed as follows.
Open the settings menu with .
Select the Instrument settings with the buttons and and press .
Chapter - 5 Initial Startup / 5.2 Preparing the Instrument after Installation
23
Use the buttons and to select the desired
instrument settings (scale, polarimeter tube or temperature).
Set the desired parameter with the button .
Exit the selected instrument setting with the buttons and and select the next instrument setting that you want to change.
Exit the menu Instrument Settings with .
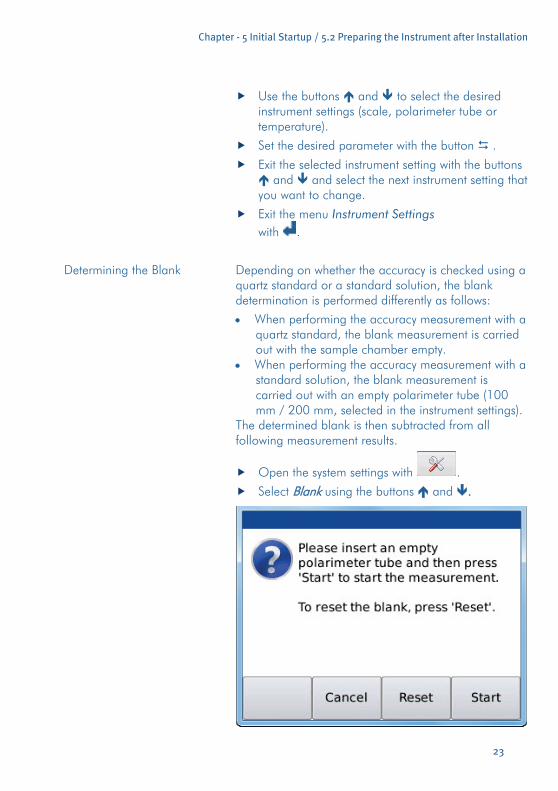
Determining the Blank Depending on whether the accuracy is checked using a
quartz standard or a standard solution, the blank determination is performed differently as follows:
• When performing the accuracy measurement with a quartz standard, the blank measurement is carried out with the sample chamber empty.
• When performing the accuracy measurement with a standard solution, the blank measurement is carried out with an empty polarimeter tube (100 mm / 200 mm, selected in the instrument settings).
The determined blank is then subtracted from all following measurement results.
Open the system settings with .
Select Blank using the buttons and .

Chapter - 5 Initial Startup / 5.2 Preparing the Instrument after Installation
24
Leave the sample chamber empty or insert an empty polarimeter tube into the sample chamber.
Close the lid.
Start the blank measurement with Start.
To save the blank value press Save.
The blank is saved and the result is shown in the main menu.

Chapter - 5 Initial Startup / 5.2 Preparing the Instrument after Installation
25
Measuring the Standard Insert the quartz standard into the sample chamber.
or
Fill the standard into the polarimeter tube.
Close the sample chamber
Start the measurement with .
The measurement result is displayed. If the result matches the value of the quartz standard or the value of the standard solution, you may start with routine operation.
If the results show larger deviations from the nominal values, the measurement range should be re-calibrated. See 7.3 Calibrating the Measurement Range.

Chapter - 6 Routine Operation / 6.1 Preparing the Instrument
26
Chapter - 6 Routine Operation This chapter supplies information on the following topics:
• What to do after switching on the instrument. • How to prepare measurements. • How to start the measurement. • What must be done after measuring. • How to print out the results.
6.1 Preparing the Instrument
Switching on the Instrument
Warning!
Damage to the retina by the LED light source.
Do not look directly into the LED light source in the sample chamber.
Switch on the polarimeter.
Stabilizing the light source!
After switching on the instrument the light source must reach thermal equilibrium, i.e. to achieve highest precision, you should wait approx. 10 - 15 minutes before starting the first measurement.
Switch on the printer, if desired.
The main menu opens. The last selected instrument parameters are set.

Chapter - 6 Routine Operation / 6.1 Preparing the Instrument
27
Starting from the main menu, all necessary settings for a measurement are defined.
Changing the Instrument Parameters
Before starting a measurement, the following instrument parameters can be changed:
• Scale (unit)
• Polarimeter tube (100 mm / 200 mm)
• Temperature (°C / °F / off)
For a description of the instrument parameters see Chapter 7.2 Instrument Settings.
Open the settings menu with .
Select Instrument settings with the buttons and .
Please note!
After changing the polarimeter tube size, a new blank must be determined with the selected polarimeter tube.
See Chapter 7.5 Blank.
Chapter - 6 Routine Operation / 6.1 Preparing the Instrument
28
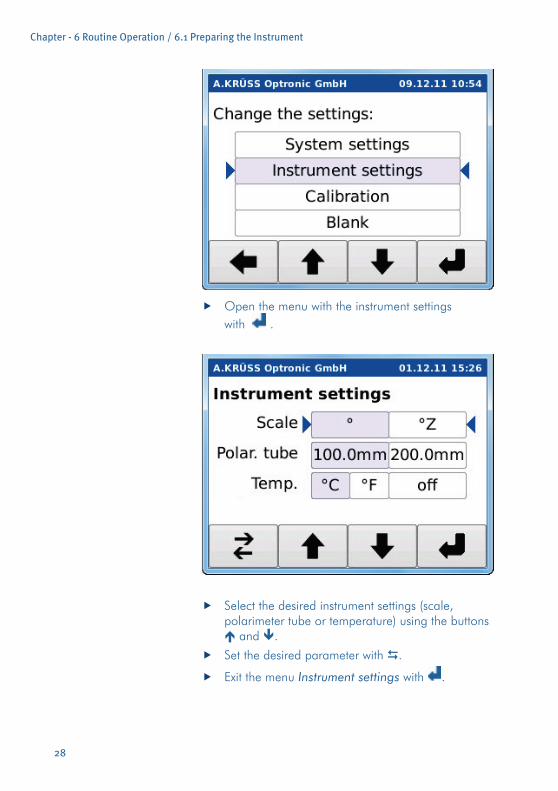
Open the menu with the instrument settings
with .
Select the desired instrument settings (scale, polarimeter tube or temperature) using the buttons and .
Set the desired parameter with .
Exit the menu Instrument settings with .

Chapter - 6 Routine Operation / 6.2 Executing a Measurement
29
6.2 Executing a Measurement
After changing the polarimeter tube, changing of the dilution medium or after opening the polarimeter tube, a blank measurement of the polarimeter tube must be performed first. Determining the Blank
Open the system setting with .
Select Blank with the buttons and .
Insert the empty polarimeter tube into the sample chamber.
Close the lid of the sample chamber.
Press Start.
Accept the measured blank with Save.
The blank is saved and is subtracted from all following measurement results.
For a detailled description see Chapter 7.5 Blank.

Chapter - 6 Routine Operation / 6.2 Executing a Measurement
30
Resetting the Blank If the saved blank should not be considered in the following sample measurements, the blank must be reset to zero.
Open the system setting with .
Select Blank with the buttons and and press .
Press Reset.
The blank is reset to zero.
Supplying a Sample Fill the sample into the polarimeter tube with which the blank has been determined.
The polarimeter tube must be completely filled and virtually free of air bubbles.
Please note! Faulty measurement results are caused by air bubbles!
A possibly existing air bubble must not interfere with the tube's optical path.
Connecting a Temperature Sensor
If desired, connect the temperature sensor.
Careful!
Danger of pinching your hand.
Close the sample chamber lid carefully.
Close the lid of the sample chamber.
Chapter - 6 Routine Operation / 6.2 Executing a Measurement
31
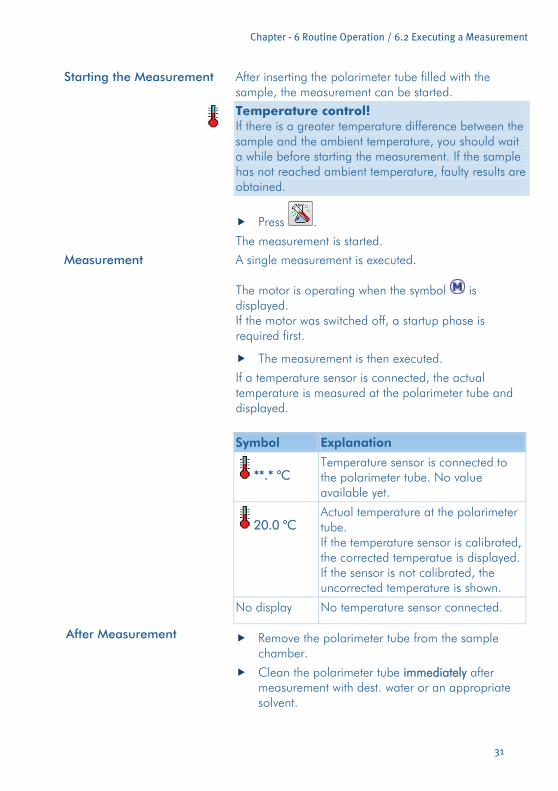
Starting the Measurement After inserting the polarimeter tube filled with the sample, the measurement can be started.
Temperature control!
If there is a greater temperature difference between the sample and the ambient temperature, you should wait a while before starting the measurement. If the sample has not reached ambient temperature, faulty results are obtained.
Press .
The measurement is started. Measurement A single measurement is executed.
The motor is operating when the symbol is displayed. If the motor was switched off, a startup phase is required first.
The measurement is then executed.
If a temperature sensor is connected, the actual temperature is measured at the polarimeter tube and displayed.
Symbol Explanation
**.* °C
Temperature sensor is connected to the polarimeter tube. No value available yet.
20.0 °C
Actual temperature at the polarimeter tube. If the temperature sensor is calibrated, the corrected temperatue is displayed. If the sensor is not calibrated, the uncorrected temperature is shown.
No display No temperature sensor connected.
After Measurement Remove the polarimeter tube from the sample chamber.
Clean the polarimeter tube immediately after measurement with dest. water or an appropriate solvent.

Chapter - 6 Routine Operation / 6.3 Measurement Results
32
After cleaning, the sample tube is again available for the next sample measurement.
The motor of the polarimeter is automatically switched off after a few seconds.
6.3 Measurement Results
Measurement Result Display
The measurement result is displayed together with the unit.
Printing the Displayed Measurement Result
Press .
The measurement result shown on the display is printed out on the connected printer.
Switching off the Instrument
Switch off the printer.
Switch off the polarimeter (switch located on the back of the instrument).
Chapter - 7 Settings / 7.1 System Settings
33
Chapter - 7 Settings This chapter covers the following topics:
• How to switch the printer on and off. • How to select the language. • How to set date, time and language. • How to set the scale and the polarimeter tube. • How to switch the temperature measurement on
and off. • How to calibrate the measurement range.
• How to calibrate the temperature sensor. • How to reset the measurement range (to ex works
setting) • How to perform a blank measurement. • How to reset a blank.
7.1 System Settings
All required system settings are defined in this menu: • Printer
• Language • Date and time
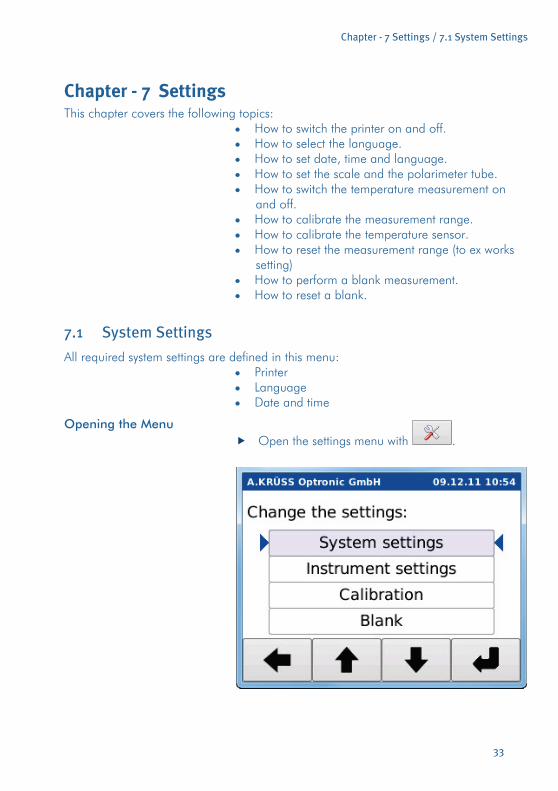
Opening the Menu Open the settings menu with .
Chapter - 7 Settings / 7.1 System Settings
34
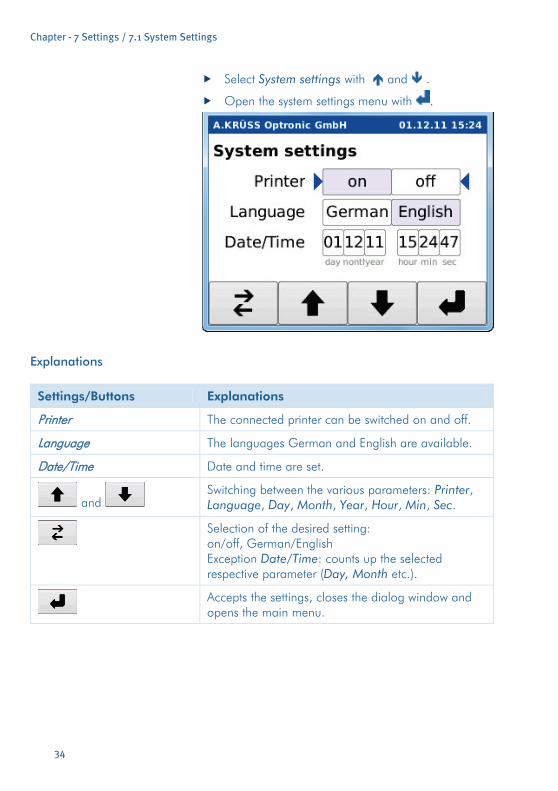
Select System settings with and .
Open the system settings menu with .
Explanations
Settings/Buttons Explanations
Printer The connected printer can be switched on and off.
Language The languages German and English are available.
Date/Time Date and time are set.
and Switching between the various parameters: Printer, Language, Day, Month, Year, Hour, Min, Sec.
Selection of the desired setting: on/off, German/English Exception Date/Time: counts up the selected respective parameter (Day, Month etc.).
Accepts the settings, closes the dialog window and opens the main menu.

Chapter - 7 Settings / 7.1 System Settings
35
Switching the Printer on and off
If a printer is connected, it can be switched on and off with the P3000.
Open the system settings with .
Select Printer using the buttons and .
Switch the printer on or off with the button .
Exit the menu System settings with .
The selected parameter is accepted.

Chapter - 7 Settings / 7.1 System Settings
36
Selecting the Language The languages German and English are available.
Open the system settings with .
Select Language using the buttons and .
Select the language German or English with the button .
Exit the menu System settings with .
The selected parameters are accepted.
Chapter - 7 Settings / 7.1 System Settings
37
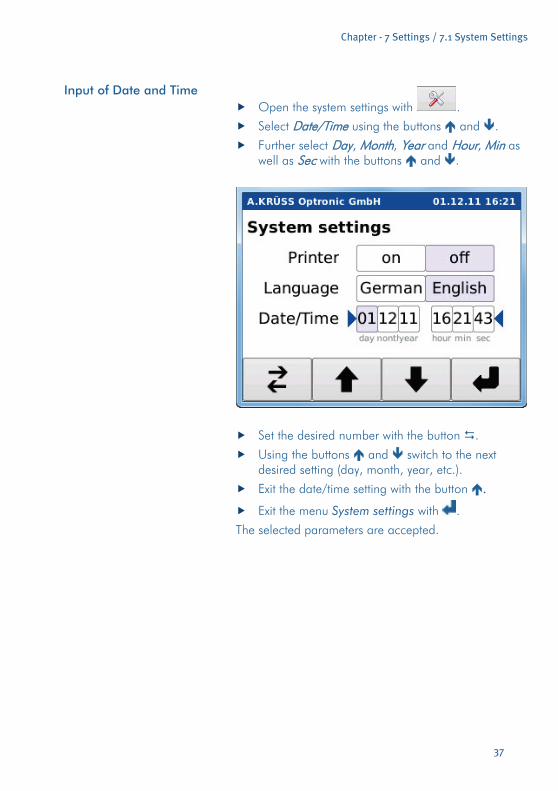
Input of Date and Time
Open the system settings with .
Select Date/Time using the buttons and .
Further select Day, Month, Year and Hour, Min as well as Sec with the buttons and .
Set the desired number with the button .
Using the buttons and switch to the next desired setting (day, month, year, etc.).
Exit the date/time setting with the button .
Exit the menu System settings with .
The selected parameters are accepted.

Chapter - 7 Settings / 7.2 Instrument Settings
38
7.2 Instrument Settings
In the instrument settings the parameters for the measurement are set. Parameters for the measurement are:
• Scale (unit) • Length of the polarimeter tube [mm] • Wavelength [nm]
Currently only the wavelength 589 nm is available. • Actual temperature at the polarimeter tube [°C / °F
/ off] Except for the wavelength, all required parameters for the measurement are selected in the instrument settings. Opening the Menu
Open the settings menu with .
Select Instrument settings using the buttons and .
Open the menu with .

Chapter - 7 Settings / 7.2 Instrument Settings
39
Explanations
Settings/Buttons Explanations
Scale Selection of the unit:
° Opt. Rotation. Actual measured value.
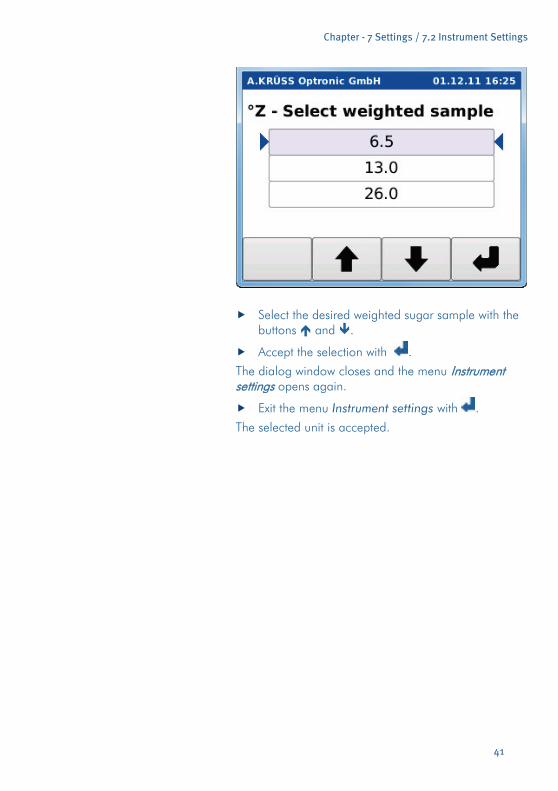
°Z International sugar scale. For this unit the weighted sugar sample in g/cm³ is selected: • 6.5 g/cm³ • 13.0 g/cm³ • 26.0 g/cm³
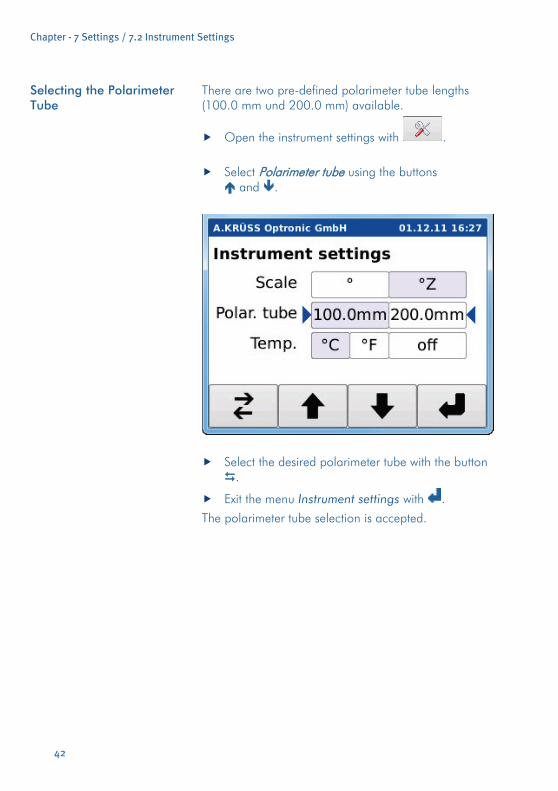
Polarimeter tube Selection of thr pre-defined polarimeter tube length: • 100.0 mm • 200.0 mm
Temperature If a temperature sensor is connected, the temperature at the polarimeter tube is measured. The temperature unit is selectable.
°C / °F Selection of the temperature unit for temperature display. Selecting the unit automatically activates temperature display.
off No temperature sensor connected or no temperature display.
Chapter - 7 Settings / 7.2 Instrument Settings
40
and Switching between the parameters: Scale, Polarimeter tube, Temperature.
Selection of the desired parameter settings: °/°Z, 100.0 mm/200.0 mm, °C/°F/off.
The settings are accepted, the dialog window is closed and the main menu opens.
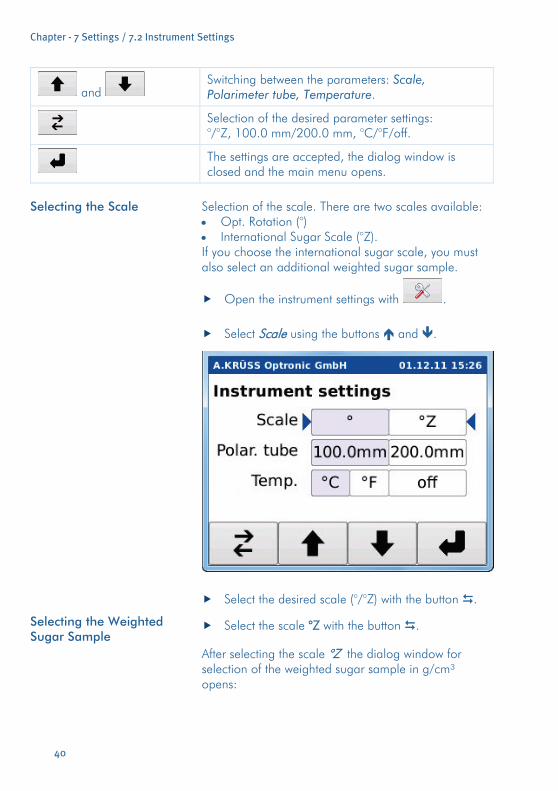
Selecting the Scale Selection of the scale. There are two scales available:
• Opt. Rotation (°) • International Sugar Scale (°Z). If you choose the international sugar scale, you must also select an additional weighted sugar sample.
Open the instrument settings with .
Select Scale using the buttons and .
Select the desired scale (°/°Z) with the button .
Selecting the Weighted Sugar Sample
Select the scale °Z with the button .
After selecting the scale °Z the dialog window for selection of the weighted sugar sample in g/cm³ opens:
Chapter - 7 Settings / 7.2 Instrument Settings
41
Select the desired weighted sugar sample with the buttons and .
Accept the selection with .
The dialog window closes and the menu Instrument settings opens again.
Exit the menu Instrument settings with .
The selected unit is accepted.
Chapter - 7 Settings / 7.2 Instrument Settings
42
Selecting the Polarimeter Tube
There are two pre-defined polarimeter tube lengths (100.0 mm und 200.0 mm) available.
Open the instrument settings with .
Select Polarimeter tube using the buttons and .
Select the desired polarimeter tube with the button .
Exit the menu Instrument settings with .
The polarimeter tube selection is accepted.

Chapter - 7 Settings / 7.2 Instrument Settings
43
Selecting the Temperature If a temperature sensor is connected, the temperature
at the polarimeter tube is measured. The temperature unit is selectable. Unit selection automatically activates
the display, e.g.: 20.0 °C.
Open the instrument settings with .
Select Temperature using the buttons and .
Select the desired temperature unit with the button .
Exit the menu Instrument settings with .
The temperature settings are accepted.

Chapter - 7 Settings / 7.3 Calibrating the Measurement Range
44
7.3 Calibrating the Measurement Range
The calibration consists of two measurements:
• Blank measurement of the empty sample chamber. • Quartz standard measurement.
For the quartz standard measurement the optical rotation of the quartz standard at 20 °C and the actual temperature of the quartz are entered. Using this data the polarimeter automatically determines the nominal value for the optical rotation at the prevailing actual temperature. Calibration should be performed in regular intervals. Calibration should be performed immediately, if result accuracy fails to lie in the desired range. Opening the Menu
Open the settings menu with .
Select Calibration with the buttons and .
Open the dialog window Calibration with .
Chapter - 7 Settings / 7.3 Calibrating the Measurement Range
45
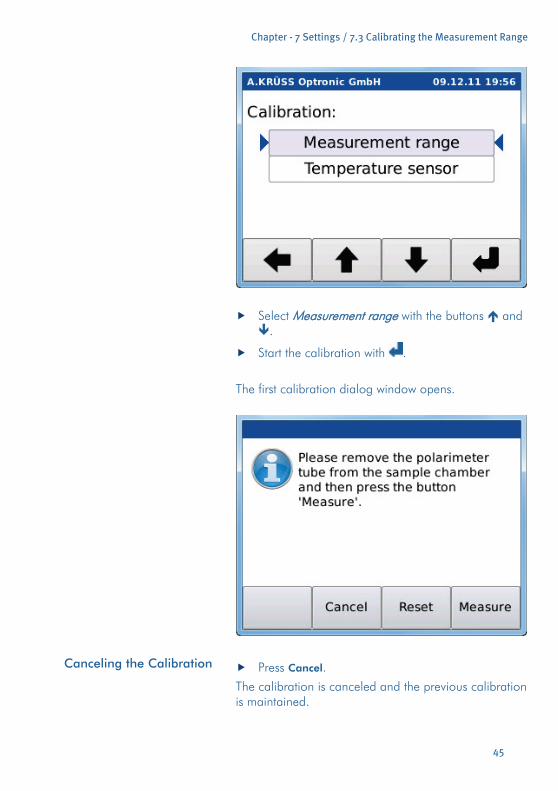
Select Measurement range with the buttons and .
Start the calibration with .
The first calibration dialog window opens.
Canceling the Calibration Press Cancel.
The calibration is canceled and the previous calibration is maintained.

Chapter - 7 Settings / 7.3 Calibrating the Measurement Range
46
Resetting the Calibration Press Reset.
The calibration is reset to the ex works setting. Performing the Calibration For calibration the polarimeter blank is measured with
the empty sample chamber first.
Remove the polarimeter tube from the sample chamber and close the lid.
Start the blank measurement with Measure.
Blank Measurement
The polarimeter blank is determined.
Input of the Quartz Standard
After the measurement the dialog window for input of the quartz standard opens first:

Chapter - 7 Settings / 7.3 Calibrating the Measurement Range
47
Exits the calibration menu and returns to the main menu. The previous calibration is maintained.
Selection of the desired • value, decimal point, sign • functions:
CLR = Deletion of the complete value. DEL = Deletion of the last input character.
Accepts the value selected with the button or executes the function (CLR / DEL).
Accepts the input value, closes the window and opens the dialog window for input of the quartz temperature.
Input of the quartz standard's optical rotation.
Accept the value with .
The dialog window for input of the quartz temperature opens.
Chapter - 7 Settings / 7.3 Calibrating the Measurement Range
48
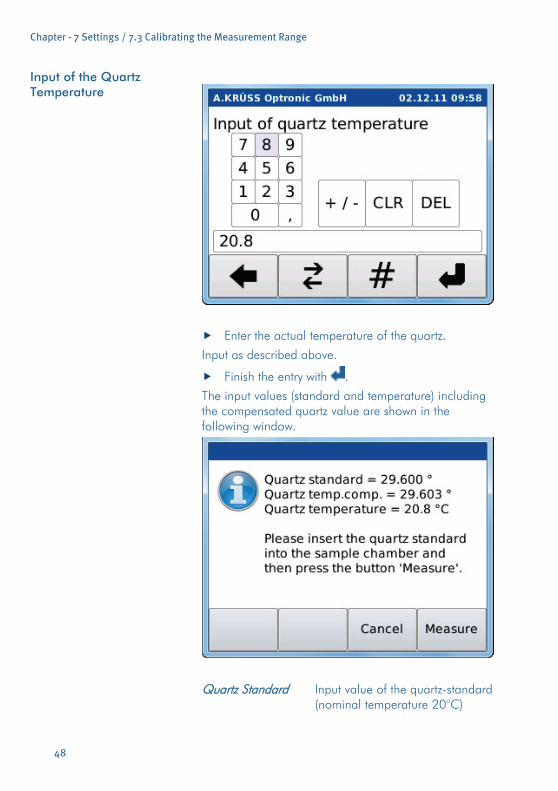
Input of the Quartz Temperature
Enter the actual temperature of the quartz.
Input as described above.
Finish the entry with .
The input values (standard and temperature) including the compensated quartz value are shown in the following window.
Quartz Standard Input value of the quartz-standard (nominal temperature 20°C)

Chapter - 7 Settings / 7.3 Calibrating the Measurement Range
49
Quartz temp.comp. Opt. rotation of the quartz standard at the actual temperature.
Quartz Temperature Input actual temperature of the quartz standard.
Measuring the Quartz Standard
Insert the quartz standard into the sample chamber.
Close the sample chamber.
Press Measure.
The quartz standard is measured. The measured result is calculated and displayed.
The calibration results are not directly connected with the nominal values of the quartz standards. Example: Nominal Value of quartz standard = 29,600°, but calibration point found = 22,457°
Accepting the Calibration Accept the calculated calibration values shown on
the display with .
The old calibration value is overwritten with the new value. The date of the calibration is saved in the instrument.

Chapter - 7 Settings / 7.3 Calibrating the Measurement Range
50
Please note! The date of the last calibration can be called up any
time with the button in the main menu. Rejecting the Calibration Press Reset to reject the calculated calibration
value shown on the display.
The old calibration remains valid. The new calibration is discarded.

Chapter - 7 Settings / 7.4 Calibrating the Temperature Sensor
51
7.4 Calibrating the Temperature Sensor
The calibration consists of two temperature measurements:
• Temperature measurement with the temperature sensor
• Temperature measurement with a specified thermometer.
The temperatue difference between the sensor and the specified thermometer is determined and compensated. The temperature sensor must be calibrated:
• before the first use of the sensor • once a year • if necessary, i.e. when result accuracy lies outside of
the expected range. Prerequisites For calibration you need:
• a temperature sensor • a certified thermometer • a vessel with water
Calling the Function Open the settings menu with .
Select Calibration with the buttons and and press .
The dialog window Calibration opens.
Chapter - 7 Settings / 7.4 Calibrating the Temperature Sensor
52
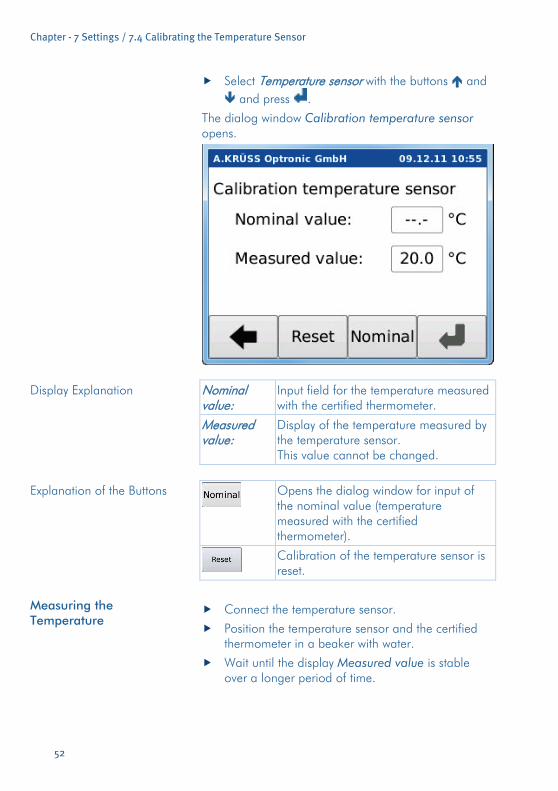
Select Temperature sensor with the buttons and and press .
The dialog window Calibration temperature sensor opens.
Display Explanation Nominal value:
Input field for the temperature measured with the certified thermometer.
Measured value:
Display of the temperature measured by the temperature sensor. This value cannot be changed.
Explanation of the Buttons
Opens the dialog window for input of the nominal value (temperature measured with the certified thermometer).
Calibration of the temperature sensor is reset.
Measuring the Temperature
Connect the temperature sensor.
Position the temperature sensor and the certified thermometer in a beaker with water.
Wait until the display Measured value is stable over a longer period of time.

Chapter - 7 Settings / 7.4 Calibrating the Temperature Sensor
53
Wait for thermal equilibrium! If thermal equilibrium has not been reached when entering the nominal value, the calibration may lead to faulty results. Sensor, thermometer, water and room temperature must be the same. If the temperature display is stable over a longer period of time, thermal equilibrium is given.
Input of the Thermometer Temperature
Make a note of the temperature measured with the specified thermometer.
Press the button Nominal.
Enter the temperature measured with the specified thermometer as follows:
Select the number with the button and accept
the selected number with #.
Repeat this procedure until the value has been completely entered.
Save the nominal temperature with .

Chapter - 7 Settings / 7.4 Calibrating the Temperature Sensor
54
Accept the nominal temperature with .
Nominal temperature
Input of the value measured with the specified thermomter.
Actual temperature
Value measured with the temperature sensor.
Press Ok.
The temperature difference is calculated and all following temperatures measured with the sensor are corrected with this value. The program returns to the main menu.
Chapter - 7 Settings / 7.4 Calibrating the Temperature Sensor
55
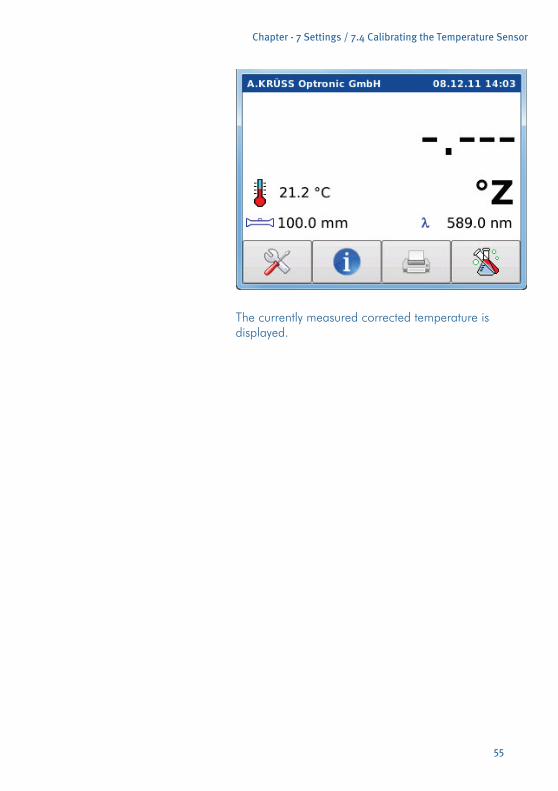
The currently measured corrected temperature is displayed.

Chapter - 7 Settings / 7.5 Blank
56
7.5 Blank
The function Blank allows you to perform a new blank measurement and to reset a saved blank value to zero. A blank measurement must be performed:
• after each change of the polarimeter tube • after changing the dilution medium • after opening the polarimeter tube
Calling the Blank Function
Open the setting menu with .
Select Blank using the buttons and .
Start the function Blank with .
The first dialog window opens:

Chapter - 7 Settings / 7.5 Blank
57
Resetting the Blank If the saved blank should not be considered in the
following sample measurements, the blank must be reset to zero.
Press Reset.
Measuring the Blank Insert the empty / with dilution medium filled
polarimeter tube which will be used for the following measurements into the sample chamber.
Close the lid.
Start the blank measurement with Start.

Chapter - 7 Settings / 7.5 Blank
58
Saving the New Blank If you would like to accept the new blank shown on the display:
Press Save.
The new blank is saved and the main menu showing the new blank value opens.
Rejecting the New Blank If you do not want to accept the blank value shown on
the display:
Press Cancel.
The new blank is discarded and the old blank is maintained.

Chapter - 8 Maintenance, Care & Inspection / 8.1 Regular Maintenance and Care
59
Chapter - 8 Maintenance, Care & Inspection This chapter covers the following topics: • What to do daily / weekly / yearly / when necessary
• Changing the fuse • Maintenance by service
8.1 Regular Maintenance and Care
The instrument is virtually maintenance-free. Daily After completing the measurements clean the
polarimeter tube.
Weekly Clean the display and housing with a commercial cleaning or disinfecting agent.
Yearly Calibrate the temperatue sensor.
To perform see Chapter 7.4 Calibrating the Temperature Sensor.
When necessary Check the accoracy of the polarimeter.
To perform see Chapter 6.1 Preparing the Instrument.
Calibrate the polarimeter.
To perform see Chapter 7.3 Calibrating the Measurement Range.

Chapter - 8 Maintenance, Care & Inspection / 8.2 Changing the Fuse
60
8.2 Changing the Fuse
Please note! Disconnect the power plug before changing the fuse.
Disconnect the power plug.
Change the fuse above the power switch.
Re-connect the power plug.
8.3 Maintenance by Service
The Polarimeter P8000 requires no regular maintenance by service. If the instrument is malfunctioning, please contact:
A.Krüss Optronic GmbH Alsterdorfer Straße 276-278 22297 Hamburg GERMANY
Tel. +49 (0)40 - 514317-0 Fax: +49 (0)40 - 514317-60 Internet: www.kruess.com Email: [email protected]

Chapter - 9 Troubleshooting Table
61
Chapter - 9 Troubleshooting Table This chapter offers help to eliminate possibly occuring errors quickly.
Error Possible causes Remedy
Faulty measurement results
• Glass plates at the ends of the polarimeter tube are dirty or stained.
• Clean the glass plates.
• Polarimeter tube dirty. • Clean the polarimeter tube.
• Air bubbles in the optical path of the polarimeter tube.
• Fill in additional sample into the polarimeter tube.
• Sample liquid extremely dark. • Dilute the sample.
• Saved blank was not measured with the current polarimeter tube.
• Measure the blank with the currently used polarimeter tube.
See Chapter 7.5 Blank.
• Calibration data is obsolete. • Re-calibrate the measurement range.
See Chapter 7.3 Calibrating the .
• Calibration data of the temperature sensor faulty
• Re-calibrate the temperature sensor.
See Chapter 7.4 Calibrating the Temperature Sensor.
Inferior precision • Polarimeter was not cleaned thoroughly between sample measurements.
• Clean the polarimeter tube thoroughly after each measurement with dest. water or an appropriate solvent.
• Sample has not yet reached room temperature.
• Wait until the sample has reached room temperature.
Instrument cannot be switched on
• Fuse blown • Change the fuse.
See Chapter 8.2 Changing the Fuse.

Chapter - 10 Transport, Storage and Disposal
62
Chapter - 10 Transport, Storage and Disposal Transport For transport purposes use the original packaging
only.
Transport must be carried out at ambient temperatures between -20°C and +60°C and at max. 95% relative humidity.
Storage Storage for longer periods of time must be carried out at ambient temperatures between +5°C and +45°C and at max. 95% relative humidity.
Disposal For disposal of the product please observe the corresponding legal regulations. Information for disposal of electrical and electronic equipment in the European Community. Electrical devices are disposed of according to national regulations on the basis of the EC Directive 2002/96/EC on waste electrical and electronic equipment (WEEE). Accordingly, all equipment delivered in the business-to-business sector after August 13, 2005, which applies to this product, cannot be disposed of as municipal or domestic waste.
These devices are marked with the adjoining symbol. Please observe the corresponding legal regulations for disposal. Because regulations differ from country to country, we recommend contacting your supplier, if necessary. In Germany, compulsary labeling is in effect since March 23, 2006. For all equipment delivered from August 13, 2005 onwards, the manufacturer must offer an appropriate option for returns. For all equipment delivered before August 13, 2005 the last user is responsible for proper disposal.
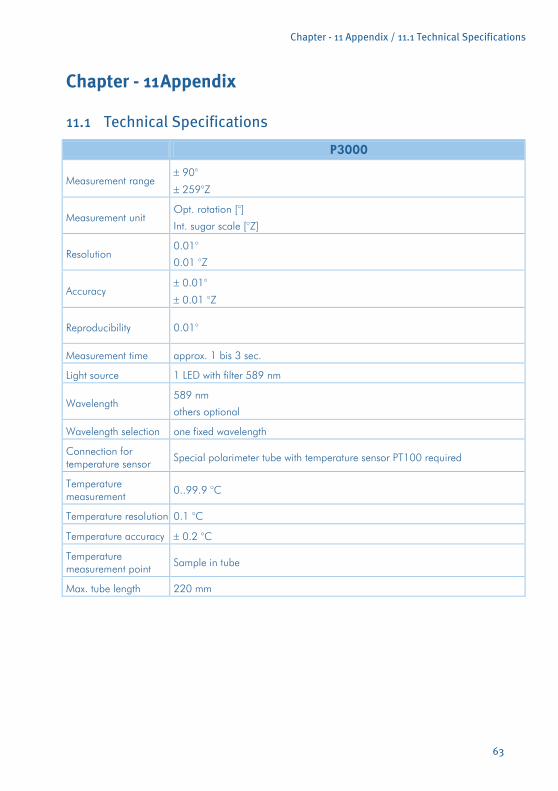
Chapter - 11 Appendix / 11.1 Technical Specifications
63
Chapter - 11 Appendix
11.1 Technical Specifications
P3000
Measurement range ± 90°
± 259°Z
Measurement unit Opt. rotation [°]
Int. sugar scale [°Z]
Resolution 0.01°
0.01 °Z
Accuracy ± 0.01°
± 0.01 °Z
Reproducibility 0.01°
Measurement time approx. 1 bis 3 sec.
Light source 1 LED with filter 589 nm
Wavelength 589 nm
others optional
Wavelength selection one fixed wavelength
Connection for temperature sensor
Special polarimeter tube with temperature sensor PT100 required
Temperature measurement
0..99.9 °C
Temperature resolution 0.1 °C
Temperature accuracy ± 0.2 °C
Temperature measurement point
Sample in tube
Max. tube length 220 mm

Chapter - 11 Appendix / 11.1 Technical Specifications
64
Sample transmissibility min 0.1% (OD3)
Calibration automatically (menu guided)
Display LCD TFT 5.7“ 320x240 Pixel
User interface Touchscreen
Interfaces RS232 (Printer)
Power supply 100 - 240 V −, 50/60 Hz
Printer connection RS-232 serial interface
Dimensions 65 x 20 x 36 cm
Chapter - 11 Appendix / 11.2 Ordering Information
65
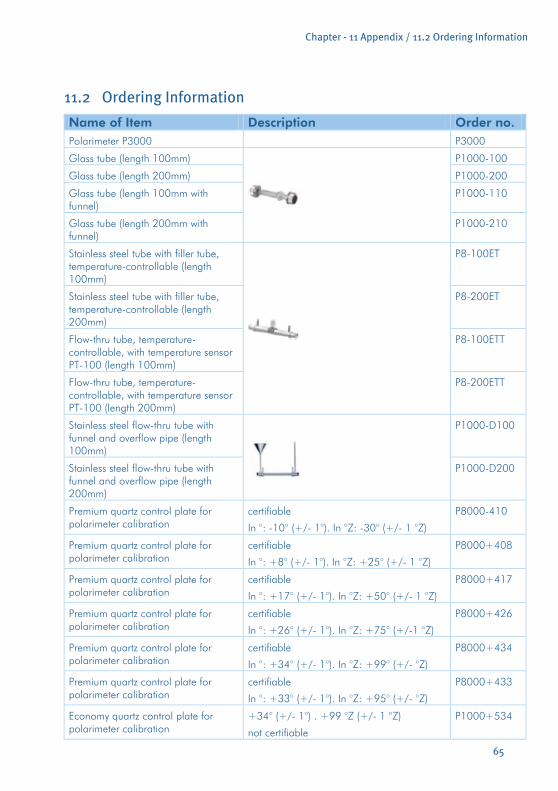
11.2 Ordering Information
Name of Item Description Order no. Polarimeter P3000 P3000
Glass tube (length 100mm)
P1000-100
Glass tube (length 200mm) P1000-200
Glass tube (length 100mm with funnel)
P1000-110
Glass tube (length 200mm with funnel)
P1000-210
Stainless steel tube with filler tube, temperature-controllable (length 100mm)
P8-100ET
Stainless steel tube with filler tube, temperature-controllable (length 200mm)
P8-200ET
Flow-thru tube, temperature-controllable, with temperature sensor PT-100 (length 100mm)
P8-100ETT
Flow-thru tube, temperature-controllable, with temperature sensor PT-100 (length 200mm)
P8-200ETT
Stainless steel flow-thru tube with funnel and overflow pipe (length 100mm)
P1000-D100
Stainless steel flow-thru tube with funnel and overflow pipe (length 200mm)
P1000-D200
Premium quartz control plate for polarimeter calibration
certifiable
In °: -10° (+/- 1°). In °Z: -30° (+/- 1 °Z)
P8000-410
Premium quartz control plate for polarimeter calibration
certifiable
In °: +8° (+/- 1°). In °Z: +25° (+/- 1 °Z)
P8000+408
Premium quartz control plate for polarimeter calibration
certifiable
In °: +17° (+/- 1°). In °Z: +50° (+/- 1 °Z)
P8000+417
Premium quartz control plate for polarimeter calibration
certifiable
In °: +26° (+/- 1°). In °Z: +75° (+/-1 °Z)
P8000+426
Premium quartz control plate for polarimeter calibration
certifiable
In °: +34° (+/- 1°). In °Z: +99° (+/- °Z)
P8000+434
Premium quartz control plate for polarimeter calibration
certifiable
In °: +33° (+/- 1°). In °Z: +95° (+/- °Z)
P8000+433
Economy quartz control plate for polarimeter calibration
+34° (+/- 1°) . +99 °Z (+/- 1 °Z)
not certifiable
P1000+534

Chapter - 11 Appendix / 11.3 Consumables
66
Economy quartz control plate for polarimeter calibration in °:
+17° in °Z: +49 °Z not certifiable P1000+517
Economy quartz control plate for polarimeter calibration in °:
-17° in °Z: -49 °Z not certifiable P1000-517
Economy quartz control plate for polarimeter calibration in °:
-34° in °Z: -99 °Z not certifiable P1000-534
Please contact us if you require a different type of polarimeter tube.
Glass coverplate for polarimeter tube Pack with 2 pcs. P1000-150
Spare sodium lamp P1000-300
11.3 Consumables
Name of Item Description Order no. Printer for normal paper 24-characters CBM 910
Paper roll for printer CBM910 CBM910P
Ink ribbon for printer CBM910 CBM910F
A.Krüss Optronic GmbH Alsterdorfer Straße 276-278 22297 Hamburg GERMANY
Tel. +49 (0)40 - 514317-0 Fax: +49 (0)40 - 514317-60 Internet: www.kruess.com Email: [email protected]

67
Warranty Conditions A. KRUESS Optronic warrants that the instruments of the digital polarimeter family will be free from defects in materials and workmanship after the date of delivery for a time period of 24 months. During this warranty period A. KRUESS Optronic will repair or replace products which fall under the warranty conditions. For warranty repairs or service the instrument must be returned to A. KRUESS Optronic. In the case of warranty repairs A. KRUESS Optronic will bear the delivery costs. For all other deliveries the customer will bear the delivery costs. A. KRUESS Optronic warrants that the hardware which A. KRUESS Optronic has determined for use with this instrument will operate free from defects when applied according our manufacturer's instructions. A. KRUESS Optronic does not warrant error-free and uninterrupted operation of the instrument or that this user manual is free of error. A. KRUESS Optronic will not be liable for consequential damages. Limited Warranty: The preceding warranty does not apply to errors and defects caused by improper handling, software not supplied by A. KRUESS Optronic, modification, abuse or by operation outside of the stated environment or by unauthorized maintenance. Further claims are excluded and will not be accepted. A. KRUESS Optronic explicitly does not warrant the applicability or the economic use for certain applications. A. KRUESS Optronic reserves the right to change this user manual and the technical specifications of the described instrument at any time. This digital polarimeter is only then ready for shipment when it is appropriately packed in the complete original packaging including the plastic moldings. If necessary, please order a replacement packaging from your supplier.
A.Krüss Optronic GmbH Alsterdorfer Straße 276-278 22297 Hamburg GERMANY
Tel. +49 (0)40 - 514317-0 Fax: +49 (0)40 - 514317-60 Internet: www.kruess.com Email: [email protected]

A.KRÜSS Optronic GmbHAlsterdorfer Straße 276-27822297 Hamburg | Germany
Tel +49-(0)40-51 43 17-0Fax +49-(0)40-51 43 17-60
eMail [email protected] www.kruess.com Ve
rsio
n 0.
1 |
Upd
ated
: Dec
embe
r 20
11 |
Sub
ject
to c
hang
es a
nd m
ay c
onta
in e
rror
s.