
Pocket iQ™ Hardware and Software Manual - NEXIQ.com · PDF filePocket iQ™ Hardware...
195
Pocket iQ ™ Hardware and Software User Manual
Transcript of Pocket iQ™ Hardware and Software Manual - NEXIQ.com · PDF filePocket iQ™ Hardware...

Pocket iQ™Hardware and Software User
Manual

Pocket iQ™ Hardware and Software User Manual
IDSC Holdings LLC retains all ownership rights to the Pocket iQ™ and its documentation. The Pocket iQ™ source code is a confidential trade secret of IDSC Holdings LLC. You may not decipher or decompile Pocket iQ™ software, develop source code for the Pocket iQ™, or knowingly allow others to do so. The Pocket iQ™ and its documentation may not be sublicensed or transferred without the prior written consent of IDSC Holdings LLC.
This manual, as well as the software it describes, is furnished under license and may only be used or copied in accordance with the terms of such license. The content of this manual is furnished for informational use only, is subject to change without notice, and should not be construed as a commitment by IDSC Holdings LLC. IDSC Holdings LLC assumes no responsibility or liability for any errors or inaccuracies that may appear in this book.
Except as permitted by such license, no part of this publication may be reproduced, or transmitted, in any form or by any means, electronic, mechanical, or otherwise, without the prior written permission of IDSC Holdings LLC.
NEXIQ Technologies is a trademark of IDSC Holdings LLC. .
©2013 IDSC Holdings LLC. All rights reserved. All other marks are trademarks or registered trademarks of the respective holders. Pictures for illustration purposes only. Specifications are subject to change without notice.
www.nexiq.com
The device complies with Part 15 of the FCC Rules. Operation is subject to the following two conditions: (1) this device may not cause harmful interference, and (2) this device must accept any interference received, including interference that may cause undesired operation. This device contains FCC-ID-POOWML-C30XX.
Approved in accordance to R&TTE directive transmitter module marked by “CE product label”, manufactured by MITSUMI Incorporated to OEM product.
Part No. 993080 Revised 11/22/2013
Chapter 1:Using this Manual ..................................................1
Manual Overview ...........................................................................2
Conventions ...................................................................................3
Chapter 2:Registration and Software Activation .......................5
Registering Pocket iQ™ ................................................................6
Registering Pocket iQ™ with Internet Access ......................................6
Registering Pocket iQ™ with Internet Access and Proxy Settings .....14
Entering the Necessary Proxy Settings ...........................................14
Registering Pocket iQ™ ..................................................................24
Registering Pocket iQ™ without Internet Access ...............................31
Activating Your Software Applications .........................................35
Activating an Application Using Pocket iQ™ ......................................35
Activating an Application Using the Website ......................................40
Copying Activation Codes to a Memory Stick .................................40
Copying Activation Codes Manually ................................................43
Chapter 3:Pocket iQ™ Hardware and User Interface ..............47
Pocket iQ™ Components ............................................................48
Component Checklist ......................................................................... 49
Product Specifications .................................................................50
Hardware Overview .....................................................................51
Front View ..........................................................................................51
Top View ............................................................................................52
Bottom View .......................................................................................52
Back View ...........................................................................................53
Pocket iQ™ Hardware and Software Manual iii

iv Po
User Interface Overview ..............................................................54
The Home Menu .................................................................................54
Connected: The Diagnostics Menu ................................................. 54
Disconnected: Home ....................................................................... 55
The Admin Menu ................................................................................ 56
Navigation .......................................................................................... 57
Tool Buttons .................................................................................... 57
Screen Icons ................................................................................... 58
Chapter 4:Using the Diagnostics Menu ................................. 59
Connecting to a Vehicle ..............................................................60
Beginning the Scanning Process ................................................ 62Scanning the vehicle Using Heavy Duty Scan (Auto) ........................ 63
Scanning a Vehicle Using Heavy Duty Scan (Manual) ...................... 69
When the Scan is Complete ............................................................... 75
Using the Vehicle Summary ........................................................76
Viewing Fault Information ............................................................77Selecting a Different Component ....................................................... 82
Saving Fault Information .............................................................86Clearing Faults ................................................................................... 92
Overview: The Home Menu .........................................................95
Connected: The Diagnostics Menu .................................................... 95
Disconnected: Home .......................................................................... 96
Running Tests .............................................................................97
Viewing Categories (Live Data) .................................................101
Viewing Vehicle Specifications and Trip Data ...........................106
Vehicle Specs ...................................................................................106
Trip Data ...........................................................................................110
Viewing and Changing Parameters ...........................................113
Viewing Parameter Details ...............................................................113
Changing Parameter Details ............................................................116
cket iQ™ Hardware and Software Manual

Managing Saved Files ...............................................................124
Viewing Saved Files .........................................................................124
Copying a File ..................................................................................128
Printing a File ...................................................................................131
Deleting a File ..................................................................................134
Disconnect from Vehicle ............................................................136
Advanced Tools..........................................................................138
Chapter 5:Using the Admin Menu ....................................... 139
Introduction to the Admin Menu .................................................140
Updating Pocket iQ™ ................................................................143
Managing Software Applications ...............................................148Install Applications ............................................................................148
Activate Applications ........................................................................150
Uninstall Applications .......................................................................151
Setting the Date and Time .........................................................155
Setting the Date ................................................................................157
Selecting a Time Zone .....................................................................158
Setting the Time ...............................................................................159
Managing Connections ..............................................................160
Managing Networks ..........................................................................162
Connecting to Your Network: Ethernet ..........................................163
Managing Proxy Settings for Your Network ..................................169
Managing Printers ............................................................................171
Adding a Network Printer 1 ..............................................................71
Adding a USB Printer ....................................................................177
Setting the Default Printer .............................................................178
Pocket iQ™ Hardware and Software Manual v

vi Po
Configuring Pocket iQ™ ............................................................180
Register Device ................................................................................181
Owner Information ............................................................................182
Calibrate Touch Screen ....................................................................184
Selecting your Language Preference ...............................................186
Change Units of Measure .................................................................188
Adjust Screen Brightness .................................................................189
Obtaining Information about the Pocket iQ™ ............................190
cket iQ™ Hardware and Software Manual
1
Using this Manual
Manual Overview, page 2
Conventions, page 3
This chapter provides an overview of this manual’s organization and the conventions used throughout.
NOTE:
i The screens used in this manual for illustrating the features and functions of the Pocket iQ™ may vary from the actual screens you see when running your own application. The screens shown in this manual are for demonstrative purposes only.
Pocket iQ™ Hardware and Software Manual 1
2 Po
Chapter 1 • Using this Manual
Manual OverviewThis manual provides basic and detailed information to support you in using the Pocket iQ™.
This manual is composed of the following sections:
• Table of Contents—helps you to find the information you are looking for quickly and easily.
• Chapter 1: Using this Manual—provides an overview of this user’s manual.
• Chapter 2: Registration and Software Activation—provides detailed in-structions for registering Pocket iQ™ as a first-time user. It also provides detailed instructions for activating the Pocket iQ™ software applications.
• Chapter 3: Pocket iQ™ Hardware and User Interface—provides an over-view of the Pocket iQ™ hardware; also includes an overview of the Pocket iQ™ user interface.
• Chapter 4: Using the Diagnostics Menu—provides detailed instructions for using the diagnostic features found the on the main Diagnostic menu (i.e., Home) when Pocket iQ™ is connected to a vehicle.
• Chapter 5: The Admin Menu—provides detailed instructions for using the features of the Pocket iQ™ Admin Menu. The procedures in this chapter assume that Pocket iQ™ is not connected to a vehicle and that a system administrator is performing the procedures in a non-shop setting.
Each chapter begins with an “at-a-glance” list of the chapter contents, along with corresponding page numbers.
cket iQ™ Hardware and Software Manual

- Conventions
ConventionsThis section provides descriptions of the conventions used throughout this guide.
Special Messages
Note
NOTE provides an explanation, comment, or tip related to the subject matter that is being discussed.
Example:
NOTE:
i Refer to the page number provided for each described component for fur-ther details.
Important
IMPORTANT indicates a situation which, if not avoided, may result in damage to the test equipment or vehicle.
Example:
IMPORTANT:
ä Keep all cables clear of moving or hot engine parts.
Caution
CAUTION indicates a potentially hazardous situation which, if not avoided, may result in moderate or minor injury to the operator or to bystanders.
Example:
CAUTION:
ä Do not use the unit to perform tests on household or industrial sources.
Pocket iQ™ Hardware and Software Manual 3

4 Po
Chapter 1 • Using this Manual
Warning
WARNING indicates a potentially hazardous situation which, if not avoided, could result in death or serious injury to the operator or bystanders.
Example:
WARNING:
ä Use appropriate hand protection when handling hot engine components.
Troubleshooting
Information intended to help you to address or anticipate potential issues are pre-sented in the following manner:
Specialized Text
The following specially formatted text is used to help you to differentiate certain elements discussed within this manual:
• Emphasis: Used to draw your attention to particularly important information.
• FEATURE: Used to highlight the name of a specific feature.
Example: “Use COPY to save the report to a USB memory stick.”
• Field/Line: Used to highlight the name of a field or a line of text from a display.
Example: “A check mark is placed in the check box next to the Total Fuel Used parameter.”
• Menu Items: Used to highlight a series of menu selections.
Example: “From the Start menu, select Connect/Scan Vehicle
Heavy Duty (Auto Scan) HDS J1708.”
• Screen titles: Used to highlight the title of a screen displayed.
Example: “The Manage Reports screen is displayed.”
If the “No ECMs detected” message is displayed, check to make sure that the Pocket iQ™ is connected to the vehicle and the key is in the on position.
cket iQ™ Hardware and Software Manual

2
Registration and Software Activation
Registering Pocket iQ™, page 6
Registering Pocket iQ™ with Internet Access, page 6
Registering Pocket iQ™ with Internet Access and Proxy Settings, page 14
Registering Pocket iQ™ without Internet Access, page 31
Activating Your Software Applications, page 35
Activating an Application Using Pocket iQ™, page 35
Activating an Application Using the Website, page 40
Copying Activation Codes to a Memory Stick, page 40
Copying Activation Codes Manually, page 43
This chapter provides detailed instructions for registering Pocket iQ™ as a first-time user. It also provides instructions for activating your Pocket iQ™ software applications.
Pocket iQ™ Software and Hardware User’s Manual 5

6 Po
Chapter 2 • Registration and Software Activation
Registering Pocket iQ™Before you can start using your Pocket iQ™ device, you’ll need to register it. If you don’t already have a user account, you’ll need to create one.
There are three methods available:
• Registering Pocket iQ™ with Internet Access (pg. 6)
• Registering Pocket iQ™ with Internet Access and Proxy Settings (pg. 14)
• Registering Pocket iQ™ without Internet Access (pg. 31)
Registering Pocket iQ™ with Internet Access
NOTE:
i The following procedure assumes that you have Internet access and that your local network is not configured using a proxy server. If you do not have Internet access, see Registering Pocket iQ™ without Internet Access on page 31 of this manual.
To register the device with Internet access:
1 Plug your Ethernet cable into the bottom of the Pocket iQ™ device.
This assumes that the other end of the Ethernet cable is plugged into your network.
2 Push the power button on the device to power it up.
cket iQ™ Software and Hardware User’s Manual

- Registering Pocket iQ™
The Home screen is displayed.
Figure 2.1 Home Screen
3 Select Admin.
Pocket iQ™ Software and Hardware User’s Manual 7

8 Po
Chapter 2 • Registration and Software Activation
The Admin menu is displayed.
Figure 2.2 Admin Menu
4 Select Configure Pocket iQ.
cket iQ™ Software and Hardware User’s Manual
- Registering Pocket iQ™
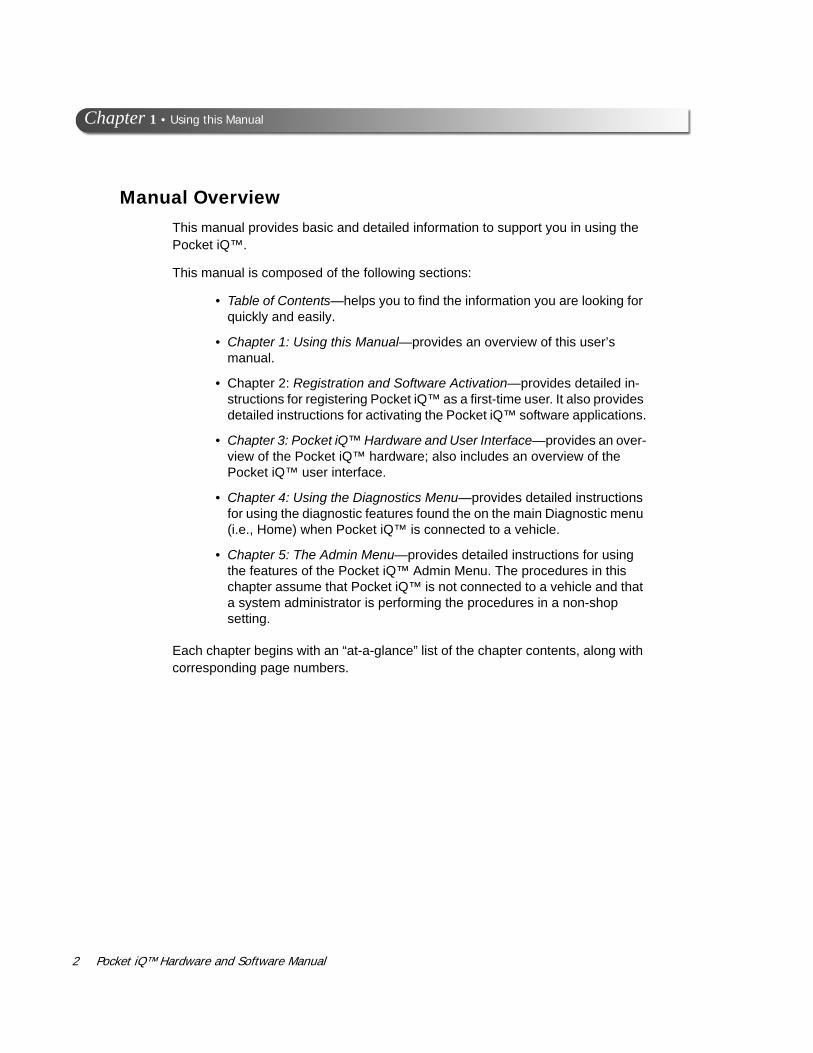
The Configure screen is displayed.
Figure 2.3 Configure Screen
5 Select Register Device.
Pocket iQ™ Software and Hardware User’s Manual 9
10 Po
Chapter 2 • Registration and Software Activation
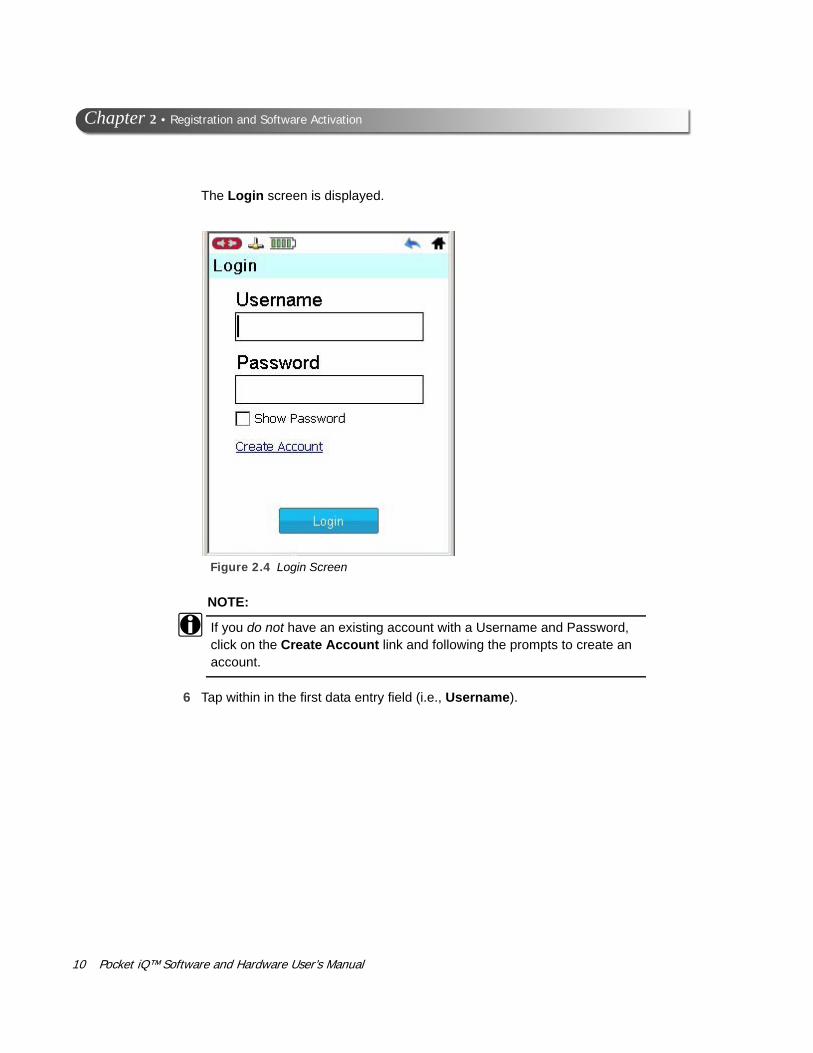
The Login screen is displayed.
Figure 2.4 Login Screen
NOTE:
i If you do not have an existing account with a Username and Password, click on the Create Account link and following the prompts to create an account.
6 Tap within in the first data entry field (i.e., Username).
cket iQ™ Software and Hardware User’s Manual

- Registering Pocket iQ™
The pop-up keyboard is displayed.
Figure 2.5 Pop-up Keyboard
7 Use the keyboard to enter your Username.
8 Use the Down Arrow on the tool to tab to the next field.
9 Enter the appropriate Password.
10 Tap the Submit button (i.e., the green check mark at the bottom of the display).
Pocket iQ™ Software and Hardware User’s Manual 11

12 Po
Chapter 2 • Registration and Software Activation
The following confirmation message is displayed.
Figure 2.6 Confirmation Message
11 Tap Yes.
cket iQ™ Software and Hardware User’s Manual

- Registering Pocket iQ™
The following screen is displayed.
Figure 2.7
12 Tap OK.
You are returned to the Configure screen (Figure 2.3).
13 Tap the Back icon at the top of the display to return to the Admin menu.
You are now ready to activate your software applications.
14 Move on to Activating Your Software Applications on page 35 of this manual.
Pocket iQ™ Software and Hardware User’s Manual 13

14 Po
Chapter 2 • Registration and Software Activation
Registering Pocket iQ™ with Internet Access and Proxy Settings
This section will cover the following topics:
• Entering the Necessary Proxy Settings (pg. 14)
• Registering the Device (pg. 24)
Entering the Necessary Proxy Settings
If your local network is configured using a proxy server, you will need to enter in-formation to tell Pocket iQ™ how to communicate with it. The following table lists the information required to make these settings.
NOTE:
i It’s a good idea to gather the required information before you begin. In most cases, you’ll want to get together with the designated IT person or network administrator at your location. He or she will have the information you’ll need to make the necessary Network settings.
TABLE 1 Proxy Settings
Proxy Server Settings Record the Information Here
Server
Port
Authentication (yes or no)
Domain
User Name
Password
cket iQ™ Software and Hardware User’s Manual
- Registering Pocket iQ™
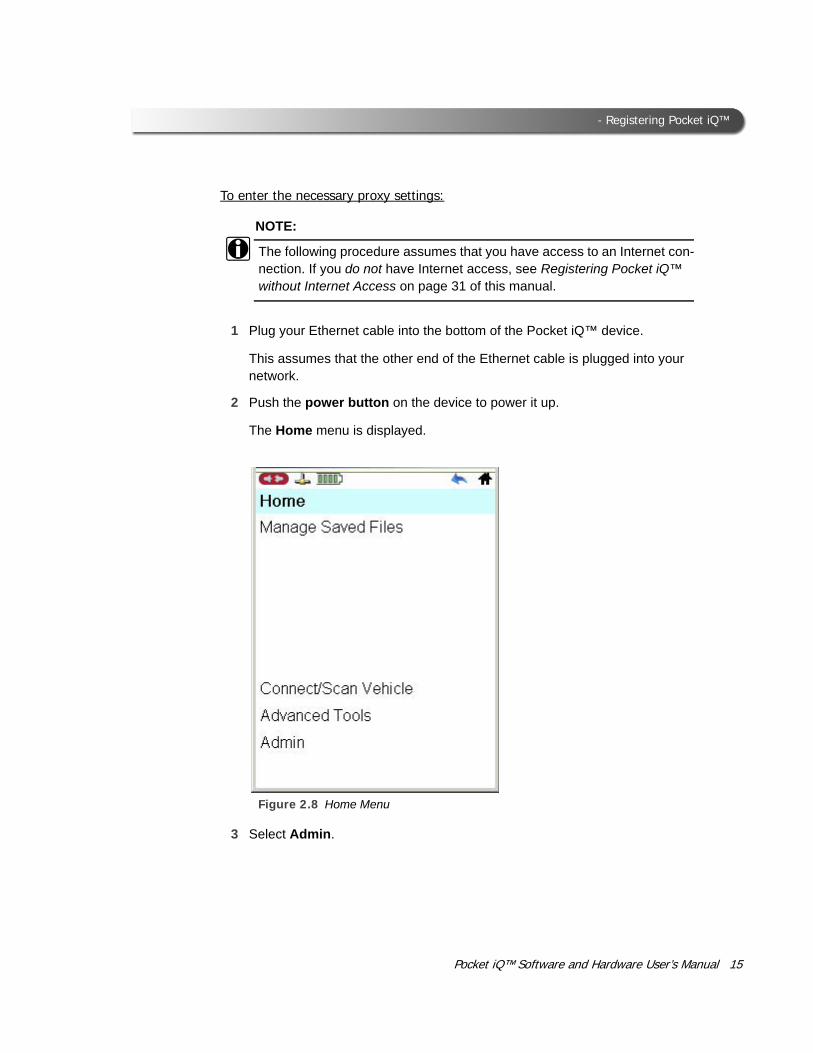
To enter the necessary proxy settings:
NOTE:
i The following procedure assumes that you have access to an Internet con-nection. If you do not have Internet access, see Registering Pocket iQ™ without Internet Access on page 31 of this manual.
1 Plug your Ethernet cable into the bottom of the Pocket iQ™ device.
This assumes that the other end of the Ethernet cable is plugged into your network.
2 Push the power button on the device to power it up.
The Home menu is displayed.
Figure 2.8 Home Menu
3 Select Admin.
Pocket iQ™ Software and Hardware User’s Manual 15

16 Po
Chapter 2 • Registration and Software Activation
The Admin menu is displayed.
Figure 2.9 Admin Menu
4 Select Manage Connections.
cket iQ™ Software and Hardware User’s Manual

- Registering Pocket iQ™
The Connections screen is displayed.
Figure 2.10 Connections Screen
5 Select Network.
Pocket iQ™ Software and Hardware User’s Manual 17

18 Po
Chapter 2 • Registration and Software Activation
The Networks screen is displayed.
Figure 2.11 Networks Screen
6 Select Proxy.
cket iQ™ Software and Hardware User’s Manual

- Registering Pocket iQ™
The HTTP Proxy screen is displayed.
Figure 2.12 HTTP Proxy Screen
7 Select Manual.
Pocket iQ™ Software and Hardware User’s Manual 19

20 Po
Chapter 2 • Registration and Software Activation
The HTTP Proxy screen is displayed again.
Figure 2.13
8 Tap within the first data entry field (i.e., Server).
9 Use the keyboard to enter the information.
NOTE:
i You can use the Down Arrow on the tool to tab through the data entry fields.
10 Place a check mark in the Authentication box if your proxy server requires a password.
11 When you have entered all the information, tap the Submit button (i.e., the green check mark at the bottom of the display).
12 Tap OK.
cket iQ™ Software and Hardware User’s Manual

- Registering Pocket iQ™
The Networks screen is displayed.
Figure 2.14 Networks Screen
13 Select Ethernet.
Pocket iQ™ updates network information.
Pocket iQ™ Software and Hardware User’s Manual 21

22 Po
Chapter 2 • Registration and Software Activation
The IP Settings screen is displayed.
Figure 2.15 IP Settings Screen
The default is Automatically.
NOTE:
i The default setting (i.e., Automatically) tells Pocket iQ™ to automatically obtain a dynamic IP address. You may, however, want to assign Pocket iQ™ a static (i.e., fixed) IP address. To do this, please contact the designated IT person or network administrator for your location for assistance with this task.
14 Tap Next to accept the default.
cket iQ™ Software and Hardware User’s Manual

- Registering Pocket iQ™
Pocket iQ™ makes the connection to the network, and the Connection Details screen is displayed.
Figure 2.16 Connection Details Screen
15 Tap Exit.
The Networks screen is displayed.
You are now ready to register the Pocket iQ™.
16 Move on to Registering Pocket iQ™ on page 24, next in this manual.
Pocket iQ™ Software and Hardware User’s Manual 23

24 Po
Chapter 2 • Registration and Software Activation
Registering Pocket iQ™
Once you have entered the necessary proxy settings, you are ready to register your Pocket iQ™.
To register Pocket iQ™
1 Navigate to the Home menu.
Figure 2.17 Home Menu
2 Select Admin.
cket iQ™ Software and Hardware User’s Manual

- Registering Pocket iQ™
The Admin menu is displayed.
Figure 2.18 Admin Menu
3 Select Configure Pocket iQ.
Pocket iQ™ Software and Hardware User’s Manual 25

26 Po
Chapter 2 • Registration and Software Activation
The Configure screen is displayed.
Figure 2.19 Configure Screen
4 Select Register Device.
cket iQ™ Software and Hardware User’s Manual
- Registering Pocket iQ™
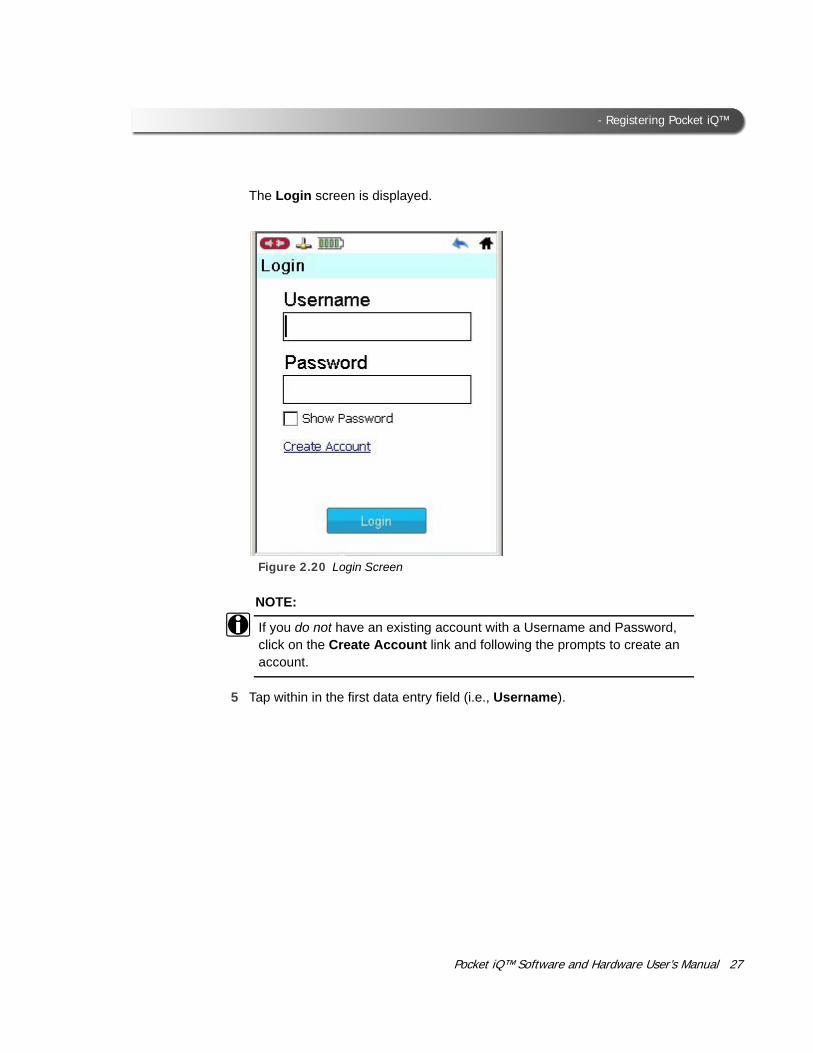
The Login screen is displayed.
Figure 2.20 Login Screen
NOTE:
i If you do not have an existing account with a Username and Password, click on the Create Account link and following the prompts to create an account.
5 Tap within in the first data entry field (i.e., Username).
Pocket iQ™ Software and Hardware User’s Manual 27

28 Po
Chapter 2 • Registration and Software Activation
The pop-up keyboard is displayed.
Figure 2.21 Pop-up Keyboard
6 Use the keyboard to enter your Username.
7 Use the Down Arrow on the tool to tab to the next field.
8 Enter the appropriate Password.
9 Tap the Submit button (i.e., the green check mark at the bottom of the display).
cket iQ™ Software and Hardware User’s Manual

- Registering Pocket iQ™
The following confirmation message is displayed.
Figure 2.22 Confirmation Message
10 Tap Yes.
Pocket iQ™ Software and Hardware User’s Manual 29
30 Po
Chapter 2 • Registration and Software Activation
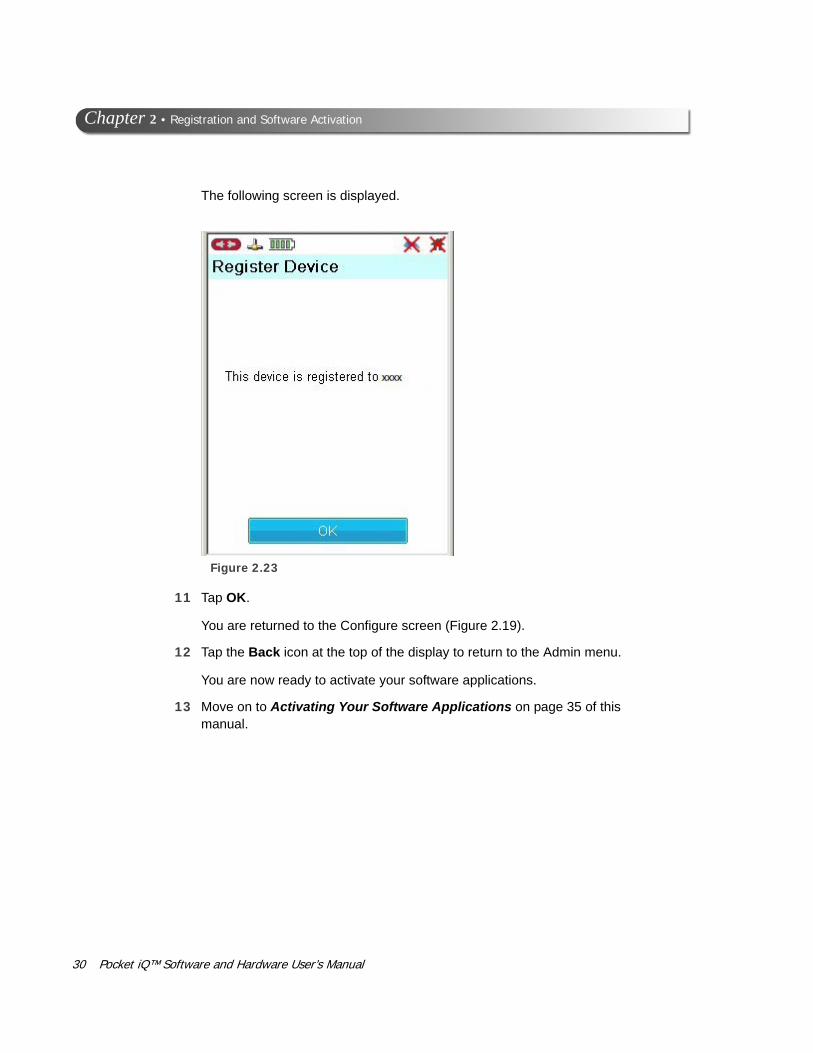
The following screen is displayed.
Figure 2.23
11 Tap OK.
You are returned to the Configure screen (Figure 2.19).
12 Tap the Back icon at the top of the display to return to the Admin menu.
You are now ready to activate your software applications.
13 Move on to Activating Your Software Applications on page 35 of this manual.
cket iQ™ Software and Hardware User’s Manual

- Registering Pocket iQ™
Registering Pocket iQ™ without Internet Access
If you do not have Internet access for your Pocket iQ™ (i.e., you don’t have an Internet network in your shop), you’ll have to go somewhere (for example, your home or a public library with Internet access) where you can do the following:
• Visit the iQ™ Product Family website
• Create a User Account and Password
• Obtain Activation Codes for your software
NOTE:
i If you do have Internet access directly from your Pocket iQ™ (i.e., by means of an Ethernet cable and a local network), you don’t need to create a User Account through the iQ™ Product Family website. Instead, go to Registering Pocket iQ™ with Internet Access on page 6, in this manual.
Before you can start using your Pocket iQ™, you need to create a User Account and Password.
To create a user account:
1 Visit the iQ™ Product Family website at the following address: prolinkiq.nexiq.com.
NOTE:
i For more information on using the iQ™ Product Family website, see the iQ™ Companion and iQ™ Product Family Website User’s Manual.
2 Click Create a User Account from the iQ™ Family menu on the left side of the page.
Pocket iQ™ Software and Hardware User’s Manual 31

32 Po
Chapter 2 • Registration and Software Activation
The Create a User Account page is displayed.
Figure 2.24 Create a User Account Page
3 Enter the following information:
—Name
—Company Name
—Address 1
—Address 2
—City
—State
—Postal/ZIP Code
—Country
—Phone Number
—E-mail Address
NOTE:
i Company Name, Address 2, and E-mail Address are optional.
4 Enter a User ID.
cket iQ™ Software and Hardware User’s Manual

- Registering Pocket iQ™
5 Enter a Password.
NOTE:
i Enter at least six characters for the password. Passwords are case-sensitive.
6 Enter the Password again to confirm it.
7 Click Submit.
The Account Creation Complete message is displayed.
Figure 2.25 Account Creation Complete Message
8 Click Continue.
Pocket iQ™ Software and Hardware User’s Manual 33

34 Po
Chapter 2 • Registration and Software Activation
The Device Registration page is displayed.
Figure 2.26 Device Registration Page
9 Click the Register a New Device link below the instructions.
To register your Pocket iQ™, you will need the following information:
—Device Serial Number
—Device Product Key
NOTE:
i The serial number and the product key for the device are located on a sticker on the back of your Pocket iQ™.
10 Enter the Device Serial Number and the Device Product Key.
11 Click Register.
When the system has confirmed that the serial number and product key are valid, a Registered Devices section is displayed at the bottom of the Device Registration Page.
12 Move on to Activating an Application Using the Website, on page 40 of this manual.
cket iQ™ Software and Hardware User’s Manual

- Activating Your Software Applications
Activating Your Software ApplicationsBefore you can activate an application, you need to obtain an Activation Code. You use the Activate Applications feature to activate software applications for use on the Pocket iQ™. There are two options:
• Activating an Application Using Pocket iQ™ (pg. 35)
• Activating an Application Using the Website (pg. 40)
Activating an Application Using Pocket iQ™
The following procedure assumes that you have already:
• Successfully created a User Account and Password
• Registered your Pocket iQ™
It also assumes that you have Internet access.
To Activate an Application Using Pocket iQ™:
1 Plug your Ethernet cable into the bottom of the Pocket iQ™ device.
This assumes that the other end of the Ethernet cable is plugged into your network.
2 Navigate to the Admin menu.
Pocket iQ™ Software and Hardware User’s Manual 35

36 Po
Chapter 2 • Registration and Software Activation
The Admin menu is displayed.
Figure 2.27 Admin Menu
3 Select Manage Applications.
cket iQ™ Software and Hardware User’s Manual

- Activating Your Software Applications
The Manage Applications screen is displayed.
Figure 2.28 Manage Applications Screen
4 Select Activate Applications.
Pocket iQ™ Software and Hardware User’s Manual 37

38 Po
Chapter 2 • Registration and Software Activation
The Registration screen is displayed.
Figure 2.29 Registration Screen
NOTE:
i The Software Product Key is printed on a sticker on the inside of the CD case shipped with your device.
5 Tap within the first box.
cket iQ™ Software and Hardware User’s Manual

- Activating Your Software Applications
6 The pop-up keyboard is displayed.
Figure 2.30 Keyboard
7 Use the keyboard to enter the Software Product Key.
8 Tap the Submit button (i.e., the green check mark located at the bottom of the display).
Pocket iQ™ checks the iQ™ Product Family website, verifies the Software Product Key, and automatically downloads the required Activation Codes.
The Activation Successful screen is displayed.
9 Tap OK.
Pocket iQ™ Software and Hardware User’s Manual 39

40 Po
Chapter 2 • Registration and Software Activation
Activating an Application Using the Website
The following procedure assumes that you have already:
• Successfully created a User Account and Password
• Registered your Pocket iQ™
It also assumes that you have Internet access.
There are two options for copying the Activation Codes:
• To a USB memory stick (pg. 40)
• Copying the codes manually (pg. 43)
Copying Activation Codes to a Memory Stick
You copy the required Activation Code to a USB memory stick, place the memory stick into the USB port on the Pocket iQ™, and then activate the software.
To copy Activation Codes to a memory stick:
1 Visit the iQ™ Product Family website at the following address: prolinkiq.nexiq.com.
NOTE:
i For more information on using the iQ™ Product Family website, see the iQ™ Companion and iQ™ Product Family Website User’s Manual.
2 Click Log In from the iQ™ Family menu on the left side of the page.
3 Enter your User ID.
4 Enter your Password.
5 Click the Login button, located under the Password field.
6 Navigate to the Device Registration page.
7 Locate the Registered Devices section near the bottom of the page.
8 Click the plus sign (+) for the Pocket iQ™.
A Product Activation History for the device lists applications by product key, software title, software version, activation code, and activation file.
9 Click the link Add New Software / Product Key at the bottom of the page.
cket iQ™ Software and Hardware User’s Manual

- Activating Your Software Applications
10 Enter the Software Serial Number and the Software Product Key.
NOTE:
i The Software Serial Number and the Software Product Key are printed on a sticker on the inside of the CD case shipped with your device.
11 Click Activate.
The application is added to the device’s Product Activation History, which displays the activation code and the activation file name for each application.
NOTE:
i The activation file name is a link. Clicking this link enable you to save the file to a USB memory stick and then install the file on your Pocket iQ™.
12 Click the application file name link.
A File Download dialog box is displayed.
13 Insert the memory stick into a USB port on your PC.
14 Click Save to save the file to a USB memory stick.
NOTE:
i You must save the file to the root directory of the USB memory stick (i.e., not in a folder).
15 Remove the memory stick from the PC.
16 Insert the memory stick into the USB port on the bottom of the Pocket iQ™.
17 Navigate to the Admin menu.
Pocket iQ™ Software and Hardware User’s Manual 41

42 Po
Chapter 2 • Registration and Software Activation
The Admin menu is displayed.
Figure 2.31 Admin Menu
18 Select Manage Applications.
19 Select Activate Applications.
The Pocket iQ™ displays a list of installed applications currently on the device.
20 Select the appropriate application suite, and tap Activate.
The Pocket iQ™ locates the Activation Code file on the memory stick, and activates the application.
An “Activation Success” message is displayed.
21 Tap OK.
22 Tap the Back icon at the top of the display.
23 Tap the Back icon again to return to the Admin menu (Figure 2.31).
cket iQ™ Software and Hardware User’s Manual

- Activating Your Software Applications
Copying Activation Codes Manually
The following procedure assumes that you have already:
• Successfully created a User Account and Password
• Registered your Pocket iQ™
It also assumes that you have Internet access.
To copy Activation Codes manually:
1 Visit the iQ™ Product Family website at the following address: prolinkiq.nexiq.com.
NOTE:
i For more information on using the iQ™ Product Family website, see the iQ™ Companion and iQ™ Product Family Website User’s Manual.
2 Click Log In from the iQ™ Family menu on the left side of the page.
3 Enter your User ID.
4 Enter your Password.
5 Click the Login button, located under the Password field.
6 Navigate to the Device Registration page.
7 Locate the Registered Devices section near the bottom of the page.
8 Click the plus sign (+) for the Pocket iQ™.
A Product Activation History for the device lists applications by product key, software title, software version, activation code, and activation file.
9 Click the link Add New Software / Product Key at the bottom of the page.
10 Enter the Software Serial Number and the Software Product Key.
NOTE:
i The Software Serial Number and the Software Product Key are printed on a sticker on the inside of the CD case shipped with your device.
11 Click Activate.
Pocket iQ™ Software and Hardware User’s Manual 43

44 Po
Chapter 2 • Registration and Software Activation
The application is added to the device’s Product Activation History, which displays the activation code and the activation file name for each application.
12 Copy the Activation Codes from the website, and retain them for later use.
NOTE:
i The website sends you an e-mail containing the Activation Code. The Acti-vation Code is also displayed on the Product Activation History screen on the website. For more information on the website, see the iQ™ Com-panion and iQ™ Product Family Website User’s Manual.
13 Navigate to the Admin menu.
Figure 2.32 Admin Menu
14 Select Manage Applications.
15 Select Activate Applications.
The Pocket iQ™ displays a list of installed applications currently on the device.
16 Select the appropriate application suite, and tap Activate.
cket iQ™ Software and Hardware User’s Manual

- Activating Your Software Applications
The Pocket iQ™ searches the storage device for activation files. If no acti-vation files are found, the Pocket iQ™ asks if you want to enter a code manually.
17 Tap Yes.
18 Type in the code using the pop-up keyboard.
19 Tap the Submit button (i.e., the green check mark located at the bottom of the display).
An “Activation Success” message is displayed.
20 Tap OK.
21 Tap the Back icon at the top of the display.
22 Tap the Back icon again to return to the Admin Menu (Figure 2.32).
Pocket iQ™ Software and Hardware User’s Manual 45

3
Pocket iQ™ Hardware and User Interface
Pocket iQ™ Components, page 48
Component Checklist, page 49
Product Specifications, page 50
Hardware Overview, page 51
User Interface Overview, page 54
The Home Menu, page 54
The Admin Menu, page 56
Navigation, page 57
Tool Buttons, page 57
Screen Icons, page 58
This chapter provides an overview of the Pocket iQ™ hardware, including a detailed product specification. It also provides an overview of the Pocket iQ™ user interface.
NOTE:
i Screen shots used throughout this guide are for illustrative purposes only. All data shown is fictitious in nature.
Pocket iQ™ Hardware and Software User’s Manual 47
48 Po
Chapter 3 • Pocket iQ™ Hardware and User Interface
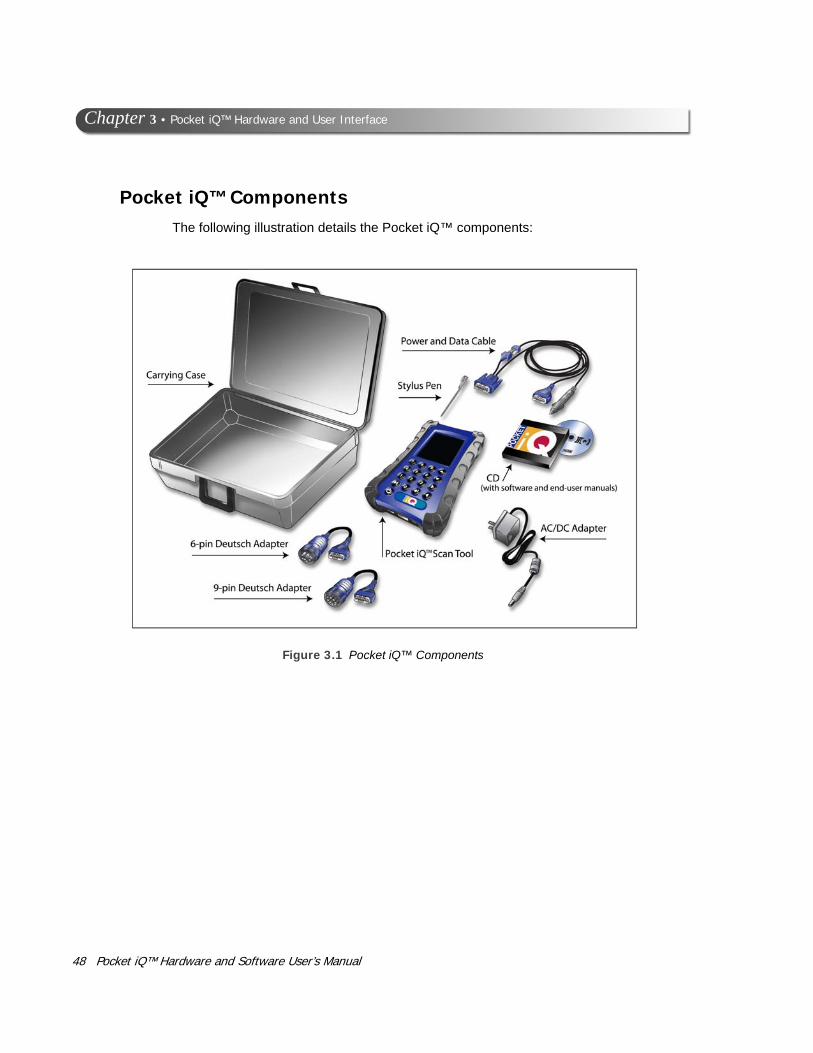
Pocket iQ™ ComponentsThe following illustration details the Pocket iQ™ components:
Figure 3.1 Pocket iQ™ Components
cket iQ™ Hardware and Software User’s Manual

- Pocket iQ™ Components
Component Checklist
The following components are included with your Pocket iQ™ kit. Be sure you have all the items before using the device:
Pocket iQ™ Scan Tool
Stylus Pen
Power and Data Cable
6-pin Deutsch Adapter
9-pin Deutsch Adapter
AC/DC Adapter
CD (with software and end-user manuals)
Carrying Case
Pocket iQ™ Hardware and Software User’s Manual 49

50 Po
Chapter 3 • Pocket iQ™ Hardware and User Interface
Product SpecificationsThe Pocket iQ™ is configured with the following specifications:
Item Specification
Physical Dimensions 7.5” x 4.25” x 1.75”
Weight 1.10 lbs
System
Main CPU Freescale i.MX35 -ARM11 core running at 532 MHz with a 266 MHz bus
Vehicle COM CPU Freescale MCF52256, 48 MHz
Memory SDRAM 128 MB
Flash 256 MB
Solid-state drive 2 GB or greater
Operating System Windows embedded CE 6.0
Display 240 x 320 QVGA, color transflective TFT with touch-screen and backlight
Input Device Keypad, touch-screen, and full alphanumeric software keyboard
Vehicle Protocols Two CAN channels support for J1939, J2284, ISO 15765
ISO 9141/KW2000
J1708
J1850 (VPW, PWM)
GM 160 baud
GM 8192, 9600 UART (ALDL)
Power Source Internal battery: 2200mAh @ 3.7V Li-polymer
Charging: via AC/DC adaptor or vehicle power
Internal battery operating time: typically five hours
External I/O USB host and device
Ethernet 10Base-T/100Base-T
AC/DC Power Adapter Connector
AC input 100-240 V, 0.8A, 50/60Hz
DC output 15V 1.2A
cket iQ™ Hardware and Software User’s Manual

- Hardware Overview
Hardware OverviewThis section introduces the Pocket iQ™, its ports, and its connections.
Front View
Figure 3.2 Front View of the Pocket iQ™
Pocket iQ™ Hardware and Software User’s Manual 51

52 Po
Chapter 3 • Pocket iQ™ Hardware and User Interface
Top View
Figure 3.3 Top View of the Pocket iQ™
Bottom View
Figure 3.4 Bottom View of the Pocket iQ™
cket iQ™ Hardware and Software User’s Manual

- Hardware Overview
Back View
Figure 3.5 Back View of the Pocket iQ™
Pocket iQ™ Hardware and Software User’s Manual 53
54 Po
Chapter 3 • Pocket iQ™ Hardware and User Interface
User Interface OverviewThe Pocket iQ™ user interface has two primary menus.
• Home
• Admin
The Home Menu
The Home menu has two states:
• Connected (i.e., the main Diagnostics menu)
• Disconnected (i.e., Home)
NOTE:
i For detailed information on both the Home/Diagnostics menu, refer to Chapter 4: Using the Diagnostics Menu, later in this manual.
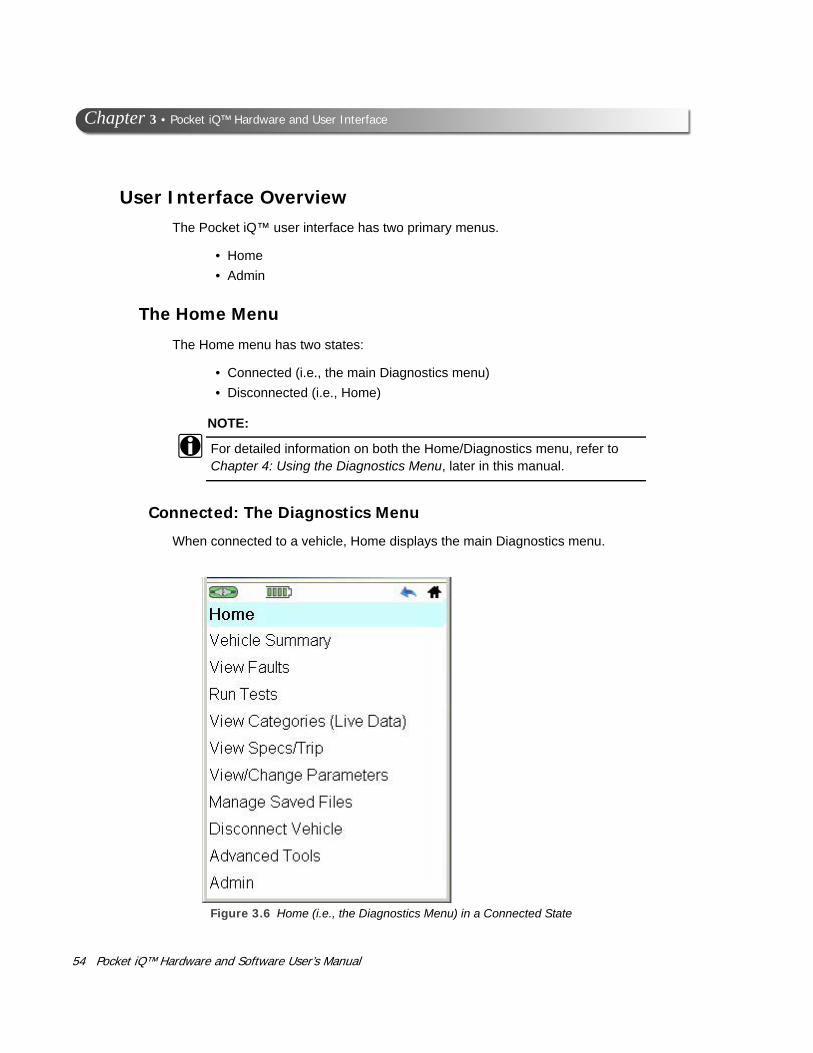
Connected: The Diagnostics Menu
When connected to a vehicle, Home displays the main Diagnostics menu.
Figure 3.6 Home (i.e., the Diagnostics Menu) in a Connected State
cket iQ™ Hardware and Software User’s Manual

- User Interface Overview
Disconnected: Home
In a disconnected state, the features available are limited to the following four items:
• Manage Saved Files
• Connect/Scan Vehicle
• Advanced Tools
• Admin
Figure 3.7 Home in a Disconnected State
NOTE:
i When Pocket iQ™ is connected to a vehicle, the Connection icon is green. When not connected, the icon is red.
Pocket iQ™ Hardware and Software User’s Manual 55

56 Po
Chapter 3 • Pocket iQ™ Hardware and User Interface
The Admin Menu
You use the Admin menu to perform various administrative tasks (e.g., registering Pocket iQ™, managing ethernet connections, and selecting a printer).
NOTE:
i
Figure 3.8 Admin Menu
For detailed information on the Admin Menu, refer to Chapter 5: Using the Admin Menu, later in this manual.
NOTE:
i You can access the Admin menu when the Pocket iQ™ is connected to a vehicle or disconnected.
cket iQ™ Hardware and Software User’s Manual

- User Interface Overview
Navigation
Pocket iQ™ provides two methods of navigating its screens and features. You can make your selections by tapping on the screen with the stylus, or you can use the buttons on the tool itself. Most users will probably use a combination of both.
NOTE:
i The procedures documented in this manual will use, for the most part, the stylus method of making selections. You could, however, just as easily use the buttons on the tool.
Tool Buttons
Pocket iQ™ provides a full keypad on the tool itself for navigation and data entry. The following are special navigation buttons.
Keypad Button Is Used To:
Up Arrow Move up an item in a list or on a screen.
Down Arrow Move down an item in a list or on a screen.
Forward Button Move from one item on a screen to another (similar to the Tab button).
Back Button Return to the previous screen.
Under certain conditions, pressing the Back button is the only way to return to the previous screen.
Enter Key or Button Select an item (much like the Enter key on a PC).
Pocket iQ™ Hardware and Software User’s Manual 57

58 Po
Chapter 3 • Pocket iQ™ Hardware and User Interface
Screen Icons
There are five icons across the top of the display.
Tab Button Tab from one item on a screen to another.
Power Button Power the tool on and off.
When not connected to an external power source, the device will automatically go into Standby Mode after 10 minutes.
Quickly press and release the Power button to exit Standby Mode; to enter Standby Mode, repeat the same action.
Numbers 0 through 9 Enter numbers during data entry.
Icons What the Icon Provides:
Connection A visual confirmation of the tool’s connection status; changes from red (not connected) to green (connected).
Networks A way to navigate to the Networks menu; use the stylus to tap the icon. From the Networks menu, the following choices are available:
• Ethernet
• Proxy
Battery Power A visual confirmation of the state of battery power.
Back Button A way to navigate to the previous screen; use the stylus to tap the icon.
Home A way to navigate to the Home menu; use the stylus to tap the icon.
Keypad Button Is Used To:
cket iQ™ Hardware and Software User’s Manual

4
Using the Diagnostics Menu
Connecting to a Vehicle, page 60
Beginning the Scanning Process, page 62
Scanning the vehicle Using Heavy Duty Scan (Auto), page 63
Scanning a Vehicle Using Heavy Duty Scan (Manual), page 69
When the Scan is Complete, page 75
Using the Vehicle Summary, page 76
Viewing Fault Information, page 77
Overview: The Home Menu, page 95
Running Tests, page 97
Viewing Categories (Live Data), page 101
Viewing Vehicle Specifications and Trip Data, page 106
Viewing and Changing Parameters, page 113
Managing Saved Files, page 124
Disconnect from Vehicle, page 136
Advanced Tools, page 138
This chapter provides detailed instructions for using the diagnostic features found on the Diagnostics menu (i.e., Home) when Pocket iQ™ is connected to a vehicle.
NOTE:
i Screen shots used throughout this guide are for illustrative purposes only. All data shown is fictitious in nature.
Pocket iQ™ Hardware and Software User’s Manual 59

60 Po
Chapter 4 • Using the Diagnostics Menu
Connecting to a Vehicle
Prior to using Pocket iQ™, you must connect to a vehicle using the power and data cable and the appropriate adapter. The vehicle should be in a key-on, engine-off state.
NOTE:
i To view an illustration of the Pocket iQ™ components, including the adapt-ers mentioned in the following procedure, refer to Figure 3.1 in Chapter 3 of this manual.
To connect to a vehicle:
1 Connect the blue power and data cable to the power/data port on the top of the Pocket iQ™.
2 Select the appropriate adapter for the vehicle to which to want to connect.
Choices include the following:
• 6-pin Deutsch adapter
• 9-pin Deutsch adapter
3 Connect one end of the adapter to the blue power and data cable.
4 Attach the other end of the adapter (e.g., the Deutsch connector end) to the vehicle’s diagnostic connector.
Pocket iQ™ automatically powers up.
NOTE:
i To power down the Pocket iQ™, press and hold the Power button.
NOTE:
i Standby Mode—You can place the device in Standby Mode by quickly pressing and releasing the Power button. When not connected to an exter-nal power source, the device will automatically go into Standby Mode after 10 minutes. Quickly press and release the Power button to exit Standby Mode.
cket iQ™ Hardware and Software User’s Manual

- Connecting to a Vehicle
When you power up the Pocket iQ™, the following screen is displayed.
Figure 4.1 Home Screen
Pocket iQ™ Hardware and Software User’s Manual 61

62 Po
Chapter 4 • Using the Diagnostics Menu
Beginning the Scanning ProcessThe following scanning options are available:
• Heavy Duty Scan (Auto)—Scans the vehicle, presents a list of ECUs detected during scanning (J1708 and J1939), and enables you to select up to six (6) ECUs from the list.
• Heavy Duty Scan (Manual)—Scans the vehicle, presents a list of ECUs detected during scanning (J1708 and J1939), and enables you to select one ECU from the list.
• Demo Scan—Provides a preview of functionality for demonstration pur-poses only.
The remainder of this section covers the following topics:
• Heavy Duty Scan (Auto) (pg. 63)
• Heavy Duty Scan (Manual) (pg. 69)
• When the Scan is Complete (pg. 75)
cket iQ™ Hardware and Software User’s Manual

- Beginning the Scanning Process
Scanning the vehicle Using Heavy Duty Scan (Auto)
You use the Heavy Duty Scan (Auto) feature when you want Pocket iQ™ to auto-matically identify the available modules on the vehicle and the appropriate Pocket iQ™ software applications. You can select up to six modules to load.
To begin the scanning process:
1 From the Home screen (Figure 4.1), tap Connect/Scan Vehicle.
The Scan Vehicle screen is displayed.
Figure 4.2 Scan Vehicle Screen
2 Select the scanning option appropriate for the vehicle to which you are con-nected, for example, Heavy Duty Scan (Auto).
Pocket iQ™ Hardware and Software User’s Manual 63
64 Po
Chapter 4 • Using the Diagnostics Menu
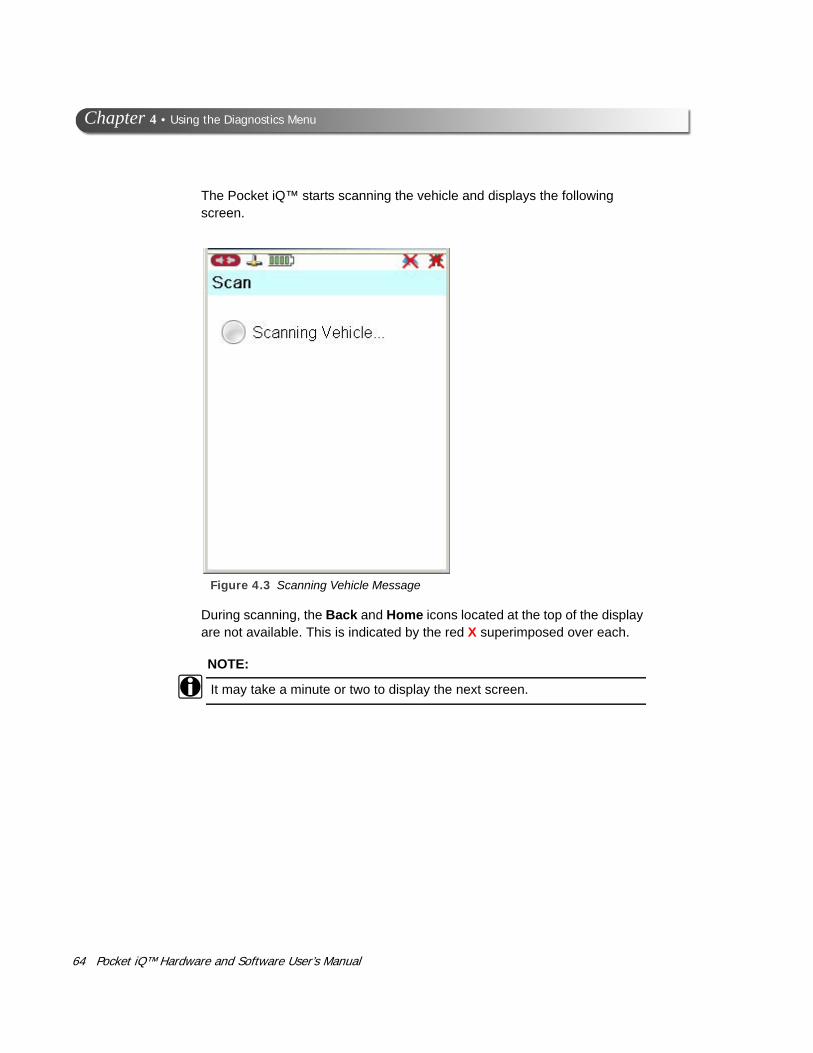
The Pocket iQ™ starts scanning the vehicle and displays the following screen.
Figure 4.3 Scanning Vehicle Message
During scanning, the Back and Home icons located at the top of the display are not available. This is indicated by the red X superimposed over each.
NOTE:
i It may take a minute or two to display the next screen.
cket iQ™ Hardware and Software User’s Manual

- Beginning the Scanning Process
When the modules on the vehicle are detected, Pocket iQ™ displays the Module Selection screen.
Figure 4.4 Module Selection Screen
NOTE:
i The device displays the available modules (e.g., Engine #1) followed by the name of the Pocket iQ™ software application(s) that will be used to communicate with the module (e.g., J1708 and International (1, 2, 3 Box)).
3 Make your selections by tapping the item you want to load with the stylus.
NOTE:
i You can select up to six modules from the list.
Pocket iQ™ Hardware and Software User’s Manual 65

66 Po
Chapter 4 • Using the Diagnostics Menu
Your selections are highlighted.
Figure 4.5 Module Selection Screen with Items Highlighted
4 Tap Load.
cket iQ™ Hardware and Software User’s Manual
- Beginning the Scanning Process
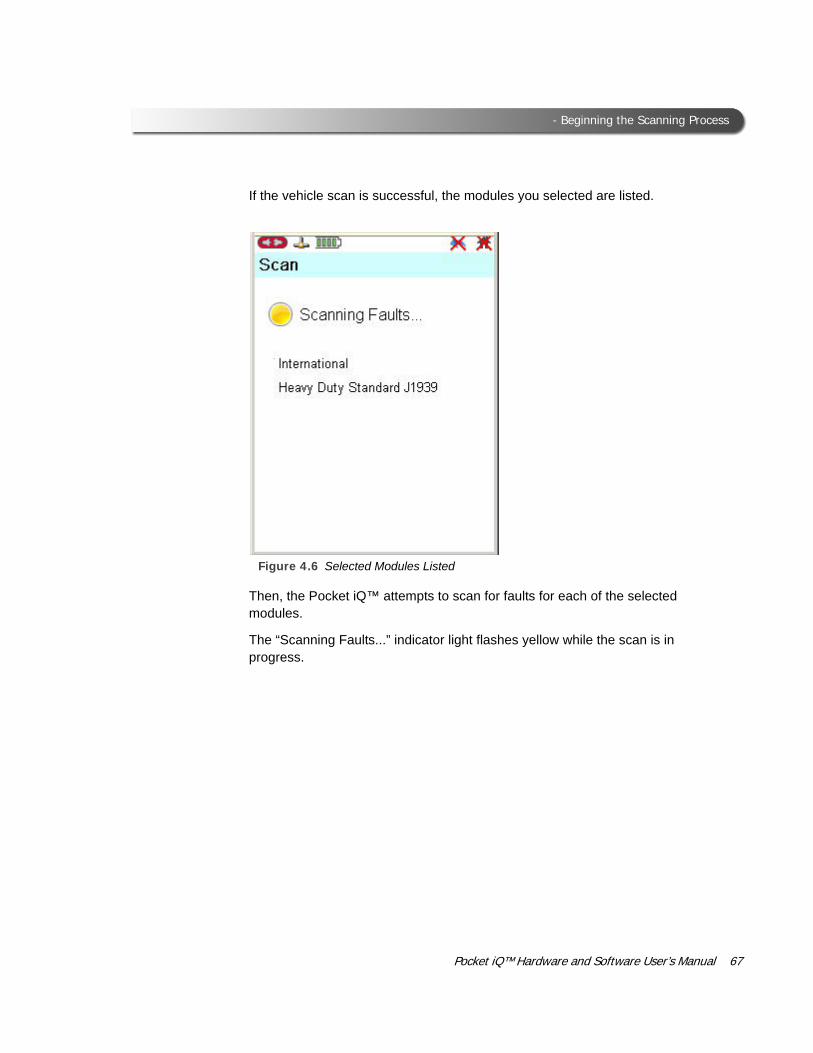
If the vehicle scan is successful, the modules you selected are listed.
Figure 4.6 Selected Modules Listed
Then, the Pocket iQ™ attempts to scan for faults for each of the selected modules.
The “Scanning Faults...” indicator light flashes yellow while the scan is in progress.
Pocket iQ™ Hardware and Software User’s Manual 67

68 Po
Chapter 4 • Using the Diagnostics Menu
When a module’s faults are scanned successfully, a green check mark appears to the left of the module in the list.
When all the faults of all the modules are scanned successfully, the following screen is displayed.
Figure 4.7 Green Check Marks Indicate Success
Move on to When the Scan is Complete on page 75 of this chapter.
cket iQ™ Hardware and Software User’s Manual

- Beginning the Scanning Process
Scanning a Vehicle Using Heavy Duty Scan (Manual)
You use the Heavy Duty Scan (Manual) feature when you want to manually select the module you want to load from a list presented by Pocket iQ™. You can select only one module to load.
To begin the scanning process:
1 From the Home screen (Figure 4.1), tap Connect/Scan Vehicle.
The Scan Vehicle screen is displayed.
Figure 4.8 Scan Vehicle Screen
2 Select the scanning option appropriate for the vehicle to which you are con-nected, for example, Heavy Duty Scan (Manual).
Pocket iQ™ Hardware and Software User’s Manual 69

70 Po
Chapter 4 • Using the Diagnostics Menu
The Pocket iQ™ starts scanning the vehicle and displays the following screen.
Figure 4.9 Scanning Vehicle Message
During scanning, the Back and Home icons located at the top of the display are not available. This is indicated by the red X superimposed over each.
NOTE:
i It may take a minute or two to display the next screen.
cket iQ™ Hardware and Software User’s Manual

- Beginning the Scanning Process
The Manual Connect screen is displayed.
Figure 4.10 Manual Connect Screen
3 Use the scroll bar at the right to scroll through the list.
NOTE:
i You can also use the Down Arrow on the tool.
4 Select a module from the first box (e.g., Heavy Duty Standard J1708).
Pocket iQ™ Hardware and Software User’s Manual 71

72 Po
Chapter 4 • Using the Diagnostics Menu
Your selection is highlighted.
Figure 4.11 Selection Highlighted
5 Select the ECU highlighted in the second box (e.g., Engine #1).
cket iQ™ Hardware and Software User’s Manual

- Beginning the Scanning Process
The Load button is activated.
Figure 4.12 Load Button Activated
6 Tap Load with the stylus.
Pocket iQ™ Hardware and Software User’s Manual 73

74 Po
Chapter 4 • Using the Diagnostics Menu
When the module’s faults are scanned successfully, a green check mark appears to the left of the module in the list, and the following screen is displayed.
Figure 4.13 A Green Check Mark Indicate Success
Move on to When the Scan is Complete, next in this chapter.
cket iQ™ Hardware and Software User’s Manual

- Beginning the Scanning Process
When the Scan is Complete
When the Pocket iQ™ has successfully scanned the vehicle, the Home menu (i.e., the main Diagnostics menu) is displayed.
Figure 4.14 Home Menu in a Connected State
At this point, you are ready to start using the features available on the Home menu (i.e., main Diagnostics menu).
The remainder of this chapter will cover the features available from this menu:
• Vehicle Summary (pg. 76)
• View Faults (pg. 77)
• Run Tests (pg. 97)
• View Categories (Live Data) (pg. 101)
• View Specs/Trip (pg. 106)
• View/Change Parameters (pg. 113)
• Manage Saved Files (pg. 124)
• Disconnect Vehicle (pg. 136)
• Advanced Tools (pg. 138)
• Admin (see Chapter 5 of this manual)
Pocket iQ™ Hardware and Software User’s Manual 75

76 Po
Chapter 4 • Using the Diagnostics Menu
Using the Vehicle SummaryThe Vehicle Summary is available from the Home menu (i.e., the main Diagnos-tics menu).
The Vehicle Summary provides detailed information for the vehicle to which you are connected. The Vehicle Summary also enables you to:
• View Fault information (i.e., navigate to the Faults screen) (pg. 77)
To navigate to the Home menu, tap the Home icon at the top of the display with the stylus.
To navigate to the Faults screen, tap either Active or Inactive on the display.
Figure 4.15 Sample Vehicle Summary
cket iQ™ Hardware and Software User’s Manual

- Viewing Fault Information
Viewing Fault InformationWhen connected to a vehicle, you can access the Faults screen from the Home menu (i.e., the Main Diagnostics menu).
To view fault information:
Figure 4.16 Main Diagnostics Menu
1 Tap View Faults.
Pocket iQ™ Hardware and Software User’s Manual 77

78 Po
Chapter 4 • Using the Diagnostics Menu
The Faults screen is displayed.
Figure 4.17 Faults Screen
Faults are displayed in two categories:
• Active
• Inactive
The number of faults for each category is also displayed to the right of the category (e.g., Active: 12 and Inactive: 0).
The black arrow to the left of the category indicates that you can expand the category to display additional information.
2 Tap the fault category with the stylus (e.g., Inactive: 12).
cket iQ™ Hardware and Software User’s Manual

- Viewing Fault Information
The category expands revealing additional detail.
Figure 4.18 Inactive Fault Category Expanded
NOTE:
i If there are multiple faults in the category, the expanded view lists each fault.
3 To expand the information even further, tap the fault you wish to view (e.g., DTC: 115).
Pocket iQ™ Hardware and Software User’s Manual 79
80 Po
Chapter 4 • Using the Diagnostics Menu
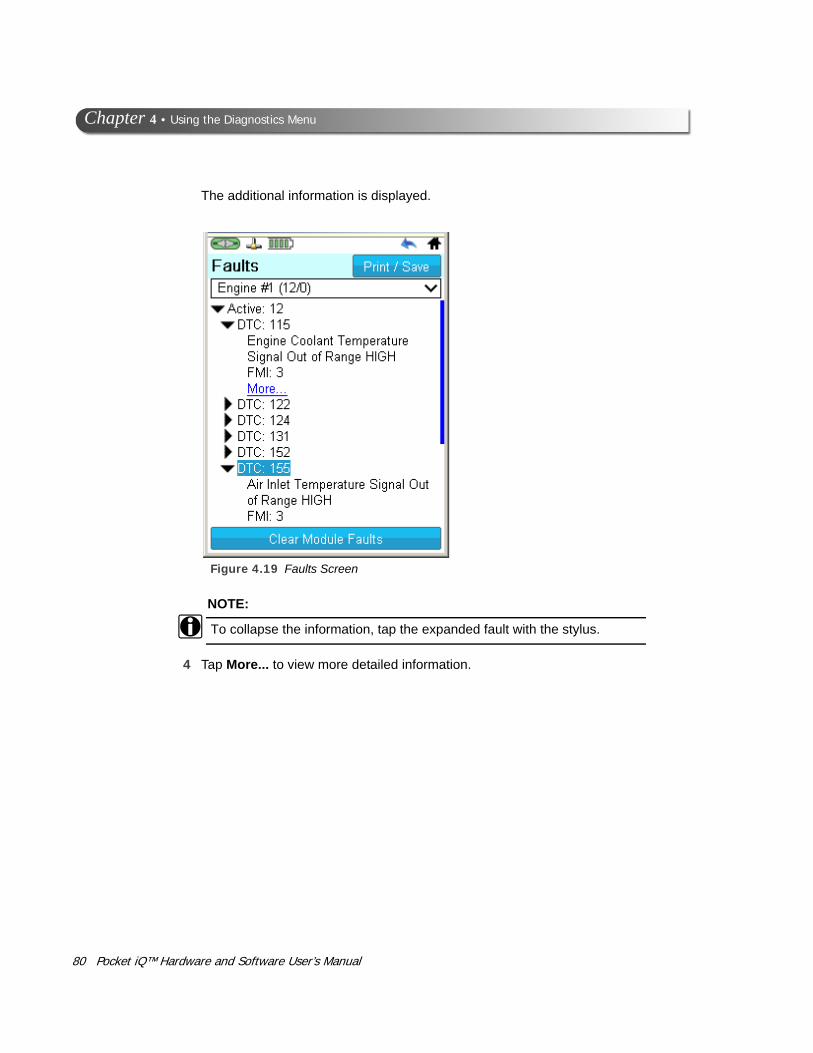
Figure 4.19 Faults Screen
The additional information is displayed.
NOTE:
i To collapse the information, tap the expanded fault with the stylus.
4 Tap More... to view more detailed information.
cket iQ™ Hardware and Software User’s Manual

- Viewing Fault Information
The Fault Details screen is displayed.
Figure 4.20 Fault Details Screen
5 Use the Back button at the top of the display to return to the Faults screen (Figure 4.19).
6 Continue selecting faults until you are finished viewing fault information.
Pocket iQ™ Hardware and Software User’s Manual 81

82 Po
Chapter 4 • Using the Diagnostics Menu
Selecting a Different Component
To display fault information for a different vehicle component, tap the Vehicle Component bar at the top of the display just below the title. The black arrow at the far right of the bar indicates a drop-down menu that you can tap on the bar to display more information.
To select a different vehicle component:
1 Tap the Vehicle Component bar to display the drop-down menu (e.g., Engine #1).
Figure 4.21 Vehicle Component Bar
cket iQ™ Hardware and Software User’s Manual

- Viewing Fault Information
The drop-down menu is displayed.
Figure 4.22 Vehicle Component Drop-down Menu
2 Tap on a different component to view fault information for that module (e.g., Retarder - Engine).
Pocket iQ™ Hardware and Software User’s Manual 83

84 Po
Chapter 4 • Using the Diagnostics Menu
The Faults screen is displayed again, displaying fault information for the module you selected.
Figure 4.23 Retarder - Engine Selected
The current selection (i.e., Retarder - Engine) is highlighted in blue at the top of the screen.
3 When you are finished viewing information, tap the Home icon at the top of the display, to navigate to the Diagnostics menu (i.e., Home).
cket iQ™ Hardware and Software User’s Manual

- Viewing Fault Information
The Diagnostics menu (i.e., Home) is displayed.
Figure 4.24 Diagnostics Menu
Pocket iQ™ Hardware and Software User’s Manual 85

86 Po
Chapter 4 • Using the Diagnostics Menu
Saving Fault InformationYou use the Print/Save button at the top of the Faults screen to save fault infor-mation to a file.
To save fault information to a file:
1 Navigate to the Faults screen.
Figure 4.25 Faults Screen
2 Tap on the Print/Save button at the top of the display.
cket iQ™ Hardware and Software User’s Manual

- Saving Fault Information
The Print or Save Report screen is displayed.
Figure 4.26 Print or Save Report Screen
3 Select Save to file.
4 Tap Continue.
Pocket iQ™ Hardware and Software User’s Manual 87
88 Po
Chapter 4 • Using the Diagnostics Menu
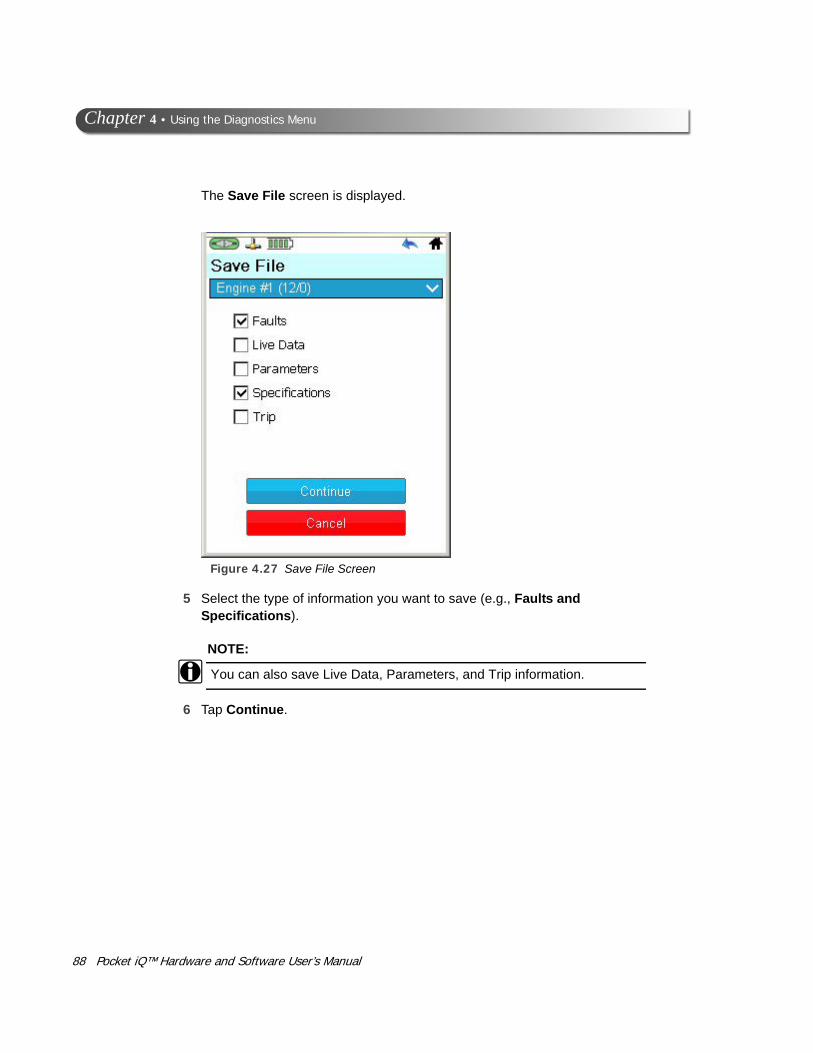
The Save File screen is displayed.
Figure 4.27 Save File Screen
5 Select the type of information you want to save (e.g., Faults and Specifications).
NOTE:
i You can also save Live Data, Parameters, and Trip information.
6 Tap Continue.
cket iQ™ Hardware and Software User’s Manual
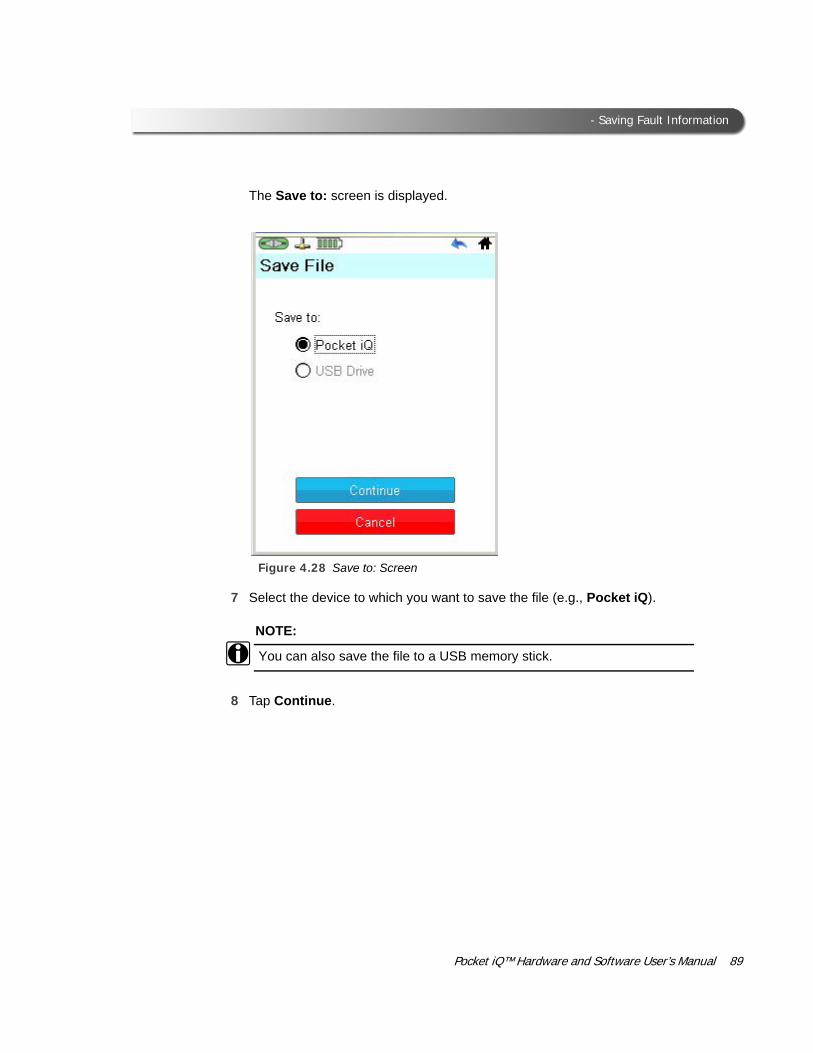
- Saving Fault Information
Figure 4.28 Save to: Screen
The Save to: screen is displayed.
7 Select the device to which you want to save the file (e.g., Pocket iQ).
NOTE:
i You can also save the file to a USB memory stick.
8 Tap Continue.
Pocket iQ™ Hardware and Software User’s Manual 89
90 Po
Chapter 4 • Using the Diagnostics Menu
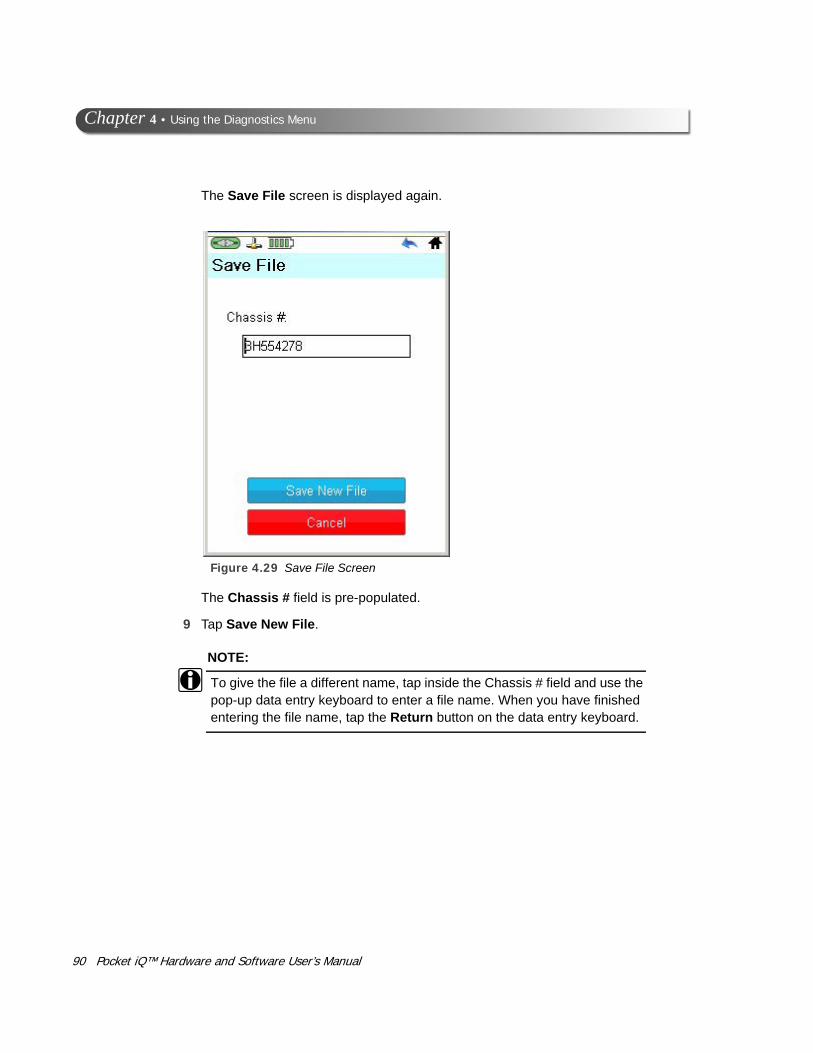
The Save File screen is displayed again.
Figure 4.29 Save File Screen
The Chassis # field is pre-populated.
9 Tap Save New File.
NOTE:
i To give the file a different name, tap inside the Chassis # field and use the pop-up data entry keyboard to enter a file name. When you have finished entering the file name, tap the Return button on the data entry keyboard.
cket iQ™ Hardware and Software User’s Manual

- Saving Fault Information
The Save Successful message is displayed.
Figure 4.30 Save Successful message
10 Tap OK.
The Faults screen is displayed again (Figure 4.25).
NOTE:
i To view the file you just saved, use the Manage Saved Files option on the Home screen. See Managing Saved Files on page 124 of this chapter.
Pocket iQ™ Hardware and Software User’s Manual 91

92 Po
Chapter 4 • Using the Diagnostics Menu
Clearing Faults
To clear faults you use the Clear Module Faults bar at the bottom of the display.
NOTE:
i When Pocket iQ™ clears faults, it clears both Active and Inactive faults. Following the clearing process, Pocket iQ™ scans the vehicle again and re-displays any faults that are still active on the selected component.
To clear faults:
1 Navigate to the Faults screen.
Figure 4.31 Faults Screen
2 Tap the Clear Module Faults bar at the bottom of the display.
cket iQ™ Hardware and Software User’s Manual

- Saving Fault Information
Figure 4.32 Clearing Faults Message
The following screen is displayed.
The faults are cleared, and the vehicle is scanned again.
NOTE:
i Any faults that are still active will be re-displayed.
3 Tap the Home icon at the top of the display to navigate to the main Diagnostics menu.
Pocket iQ™ Hardware and Software User’s Manual 93

94 Po
Chapter 4 • Using the Diagnostics Menu
Figure 4.33 Main Diagnostics Menu (i.e., Home)
The main Diagnostics menu is displayed.
cket iQ™ Hardware and Software User’s Manual

- Overview: The Home Menu
Overview: The Home Menu
The Home menu has two states:
• Connected (i.e., the main Diagnostics menu)
• Disconnected (i.e., Home)
NOTE:
i When Pocket iQ™ is connected to a vehicle, the Connection icon is green. When not connected, the icon is red.
Connected: The Diagnostics Menu
When connected to a vehicle, Home displays the main Diagnostics menu.
NOTE:
i When navigating to the Home menu is not an option (e.g., when running a test), a red X is superimposed on the Home icon.
Figure 4.34 Home in a Connected State (i.e., the Main Diagnostics Menu)
Pocket iQ™ Hardware and Software User’s Manual 95

96 Po
Chapter 4 • Using the Diagnostics Menu
The remainder of this chapter will cover the following features available from the main Diagnostics menu (i.e., Home in a connected state):
• Vehicle Summary (see pg. 76, earlier in this chapter)
• View Faults (see page 77 earlier, in this chapter)
• Run Tests (see pg. 97)
• View Categories (Live Data) (see pg. 101)
• View Specs/Trip (see pg. 106)
• View/Change Parameters (see pg. 113)
• Manage Saved Files (see pg. 124)
• Disconnect Vehicle (see pg. 136)
• Advanced Tools (see pg. 138)
• Admin (see Chapter 5, later in this manual)
Disconnected: Home
In a disconnected state, the features available are limited to the following items:
• Manage Saved Files (see pg. 124)
• Connect/Scan Vehicle (see pg. 62)
• Advanced Tools (see pg. 138)
• Admin
Figure 4.35 Home in a Disconnected State
(see Chapter 5, later in this manual)
cket iQ™ Hardware and Software User’s Manual
- Running Tests
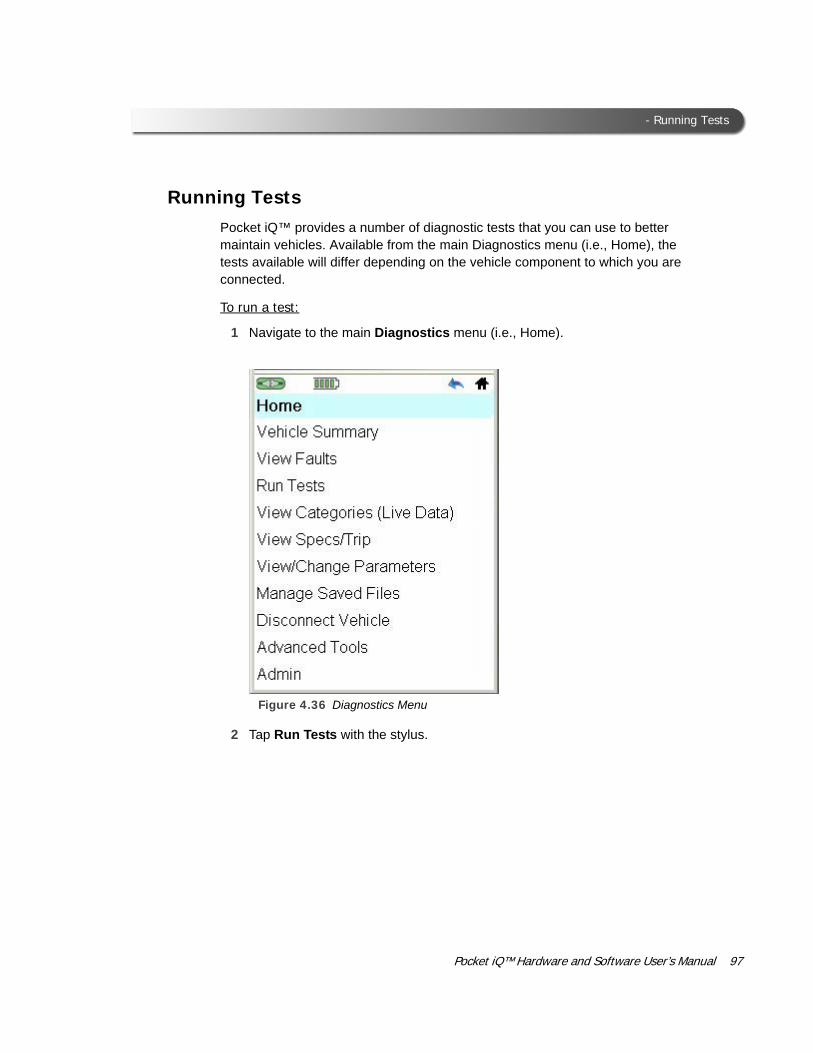
Running TestsPocket iQ™ provides a number of diagnostic tests that you can use to better maintain vehicles. Available from the main Diagnostics menu (i.e., Home), the tests available will differ depending on the vehicle component to which you are connected.
To run a test:
1 Navigate to the main Diagnostics menu (i.e., Home).
Figure 4.36 Diagnostics Menu
2 Tap Run Tests with the stylus.
Pocket iQ™ Hardware and Software User’s Manual 97

98 Po
Chapter 4 • Using the Diagnostics Menu
The following screen is displayed.
Figure 4.37 Tests Menu
3 Select the test group from which you’d like to choose a test (e.g., Key On Engine Running Tests).
cket iQ™ Hardware and Software User’s Manual

- Running Tests
A caution message is displayed.
Figure 4.38 Caution Message
4 Read and observe the instructions on the screen.
5 Tap OK.
Pocket iQ™ Hardware and Software User’s Manual 99

100 Po
Chapter 4 • Using the Diagnostics Menu
The Key On Engine Running Tests menu is displayed.
Figure 4.39 KOER Tests Menu
6 Select the test you wish to run (e.g., Cylinder Cutout).
The appropriate screen for the test you selected is displayed.
7 Follow the on-screen prompts and instructions until you reach the end of the test.
NOTE:
i Some tests require the vehicle to be in a particular state. If this is the case for the test you select, Pocket iQ™ will provide specific prerequisites that must be met before starting the test.
When the test is complete, you will be returned to the Tests menu (Figure 4.37).
cket iQ™ Hardware and Software User’s Manual

- Viewing Categories (Live Data)
Viewing Categories (Live Data)Pocket iQ™ enables you to view categories (i.e., live vehicle data) for any of the available modules.
To view live data:
1 Navigate to the main Diagnostics menu (i.e., Home).
Figure 4.40 Main Diagnostics Menu
2 Select View Categories (Live Data).
Pocket iQ™ Hardware and Software User’s Manual 101

102 Po
Chapter 4 • Using the Diagnostics Menu
The Live Data screen is displayed.
Figure 4.41 Live Data Screen
NOTE:
i You can use the scroll bar on the side of the screen to scroll down the list.
3 Select a session from the list (e.g., General Engine).
cket iQ™ Hardware and Software User’s Manual
- Viewing Categories (Live Data)
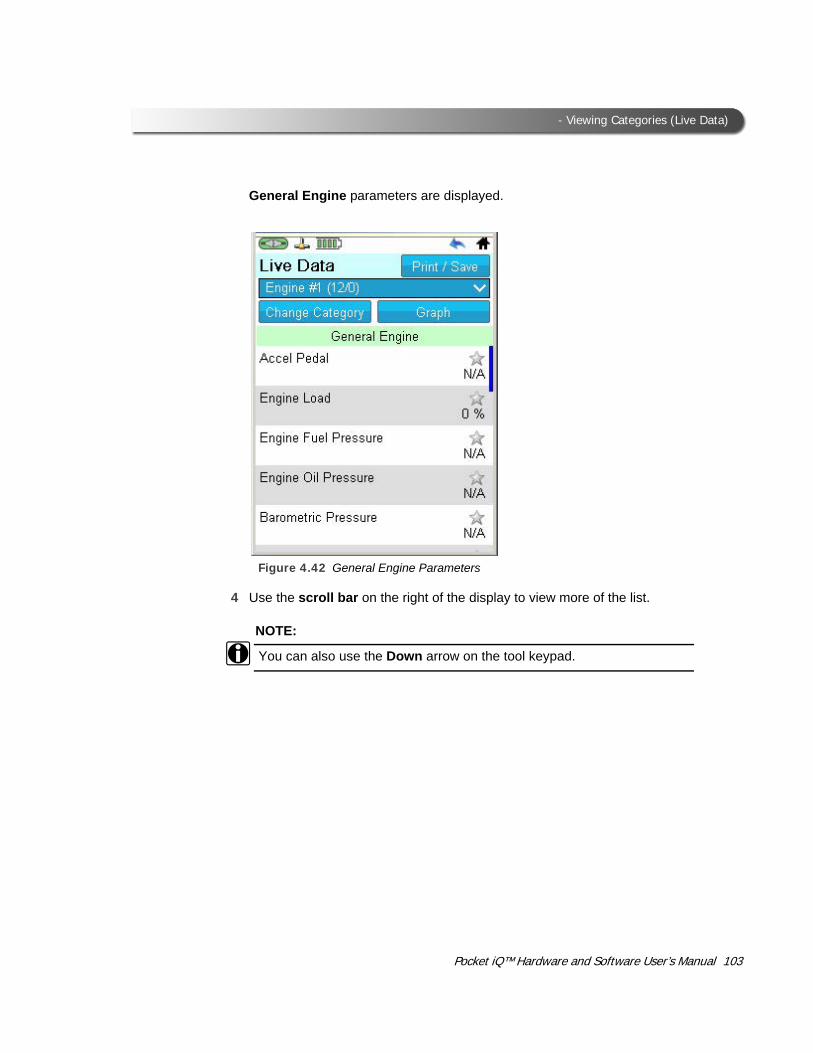
General Engine parameters are displayed.
Figure 4.42 General Engine Parameters
4 Use the scroll bar on the right of the display to view more of the list.
NOTE:
i You can also use the Down arrow on the tool keypad.
Pocket iQ™ Hardware and Software User’s Manual 103
104 Po
Chapter 4 • Using the Diagnostics Menu
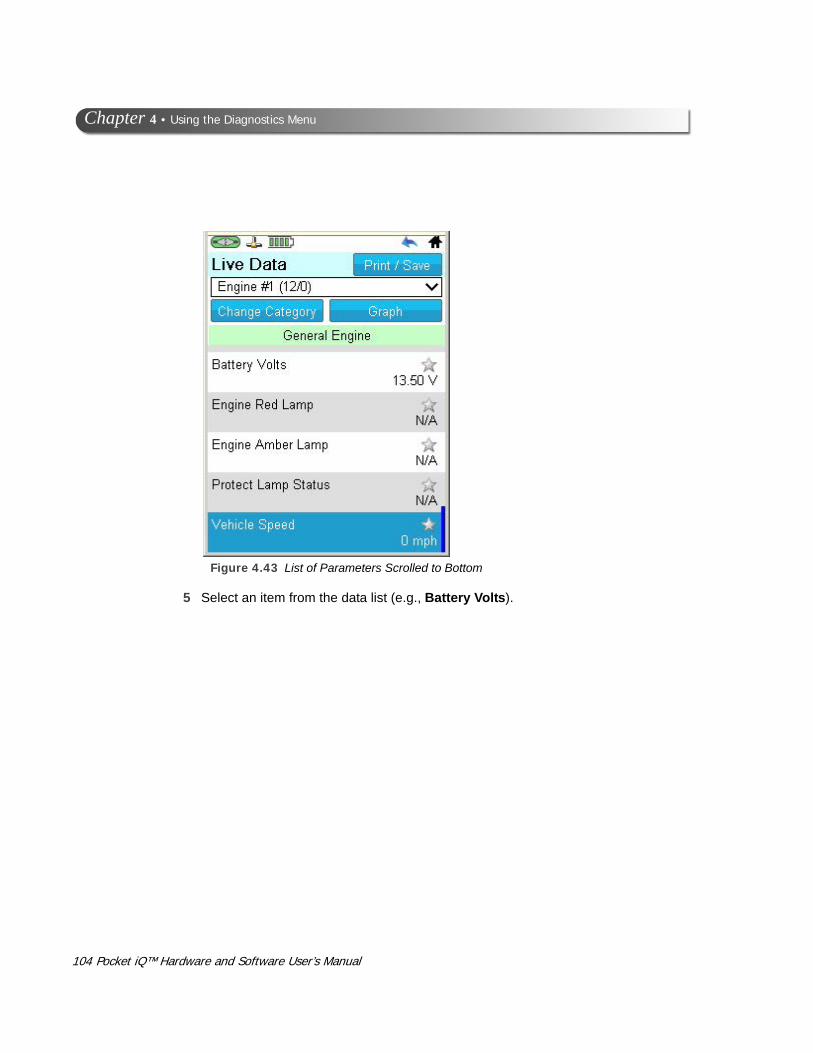
Figure 4.43 List of Parameters Scrolled to Bottom
5 Select an item from the data list (e.g., Battery Volts).
cket iQ™ Hardware and Software User’s Manual
- Viewing Categories (Live Data)
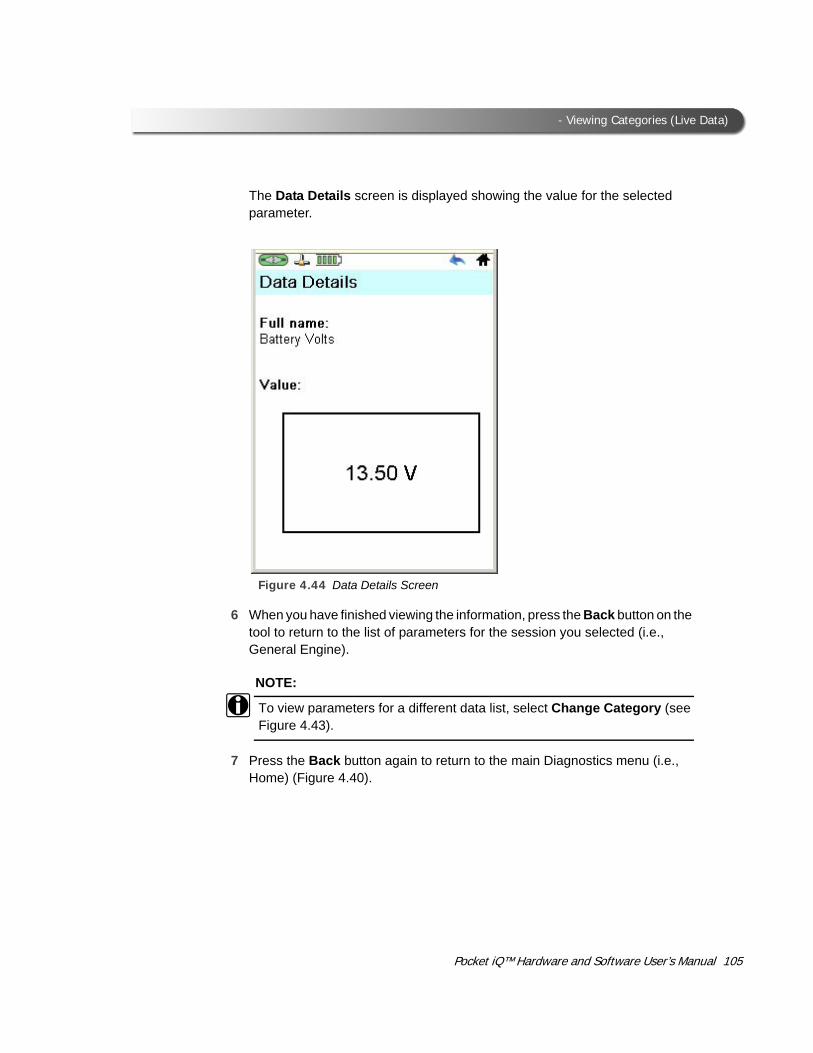
The Data Details screen is displayed showing the value for the selected parameter.
Figure 4.44 Data Details Screen
6 When you have finished viewing the information, press the Back button on the tool to return to the list of parameters for the session you selected (i.e., General Engine).
NOTE:
i To view parameters for a different data list, select Change Category (see Figure 4.43).
7 Press the Back button again to return to the main Diagnostics menu (i.e., Home) (Figure 4.40).
Pocket iQ™ Hardware and Software User’s Manual 105

106 Po
Chapter 4 • Using the Diagnostics Menu
Viewing Vehicle Specifications and Trip Data
Pocket iQ™ enables you to view the following information:
• Vehicle Specs (pg. 106)
• Trip Data (pg. 110)
Vehicle Specs
You use the View Specs/Trip feature to view information for any of the vehicle components to which Pocket iQ™ is connected.
NOTE:
i Specs may not be available for all vehicle components.
To view vehicle specifications:
1 Navigate to the main Diagnostics menu (i.e., Home).
Figure 4.45 Main Diagnostics Menu
2 Select View Specs/Trip.
cket iQ™ Hardware and Software User’s Manual

- Viewing Vehicle Specifications and Trip Data
The Specs/Trip screen is displayed.
Figure 4.46 Specs/Trip Screen
3 Select the component for the data you would like to view (e.g., Engine #1).
Pocket iQ™ Hardware and Software User’s Manual 107
108 Po
Chapter 4 • Using the Diagnostics Menu
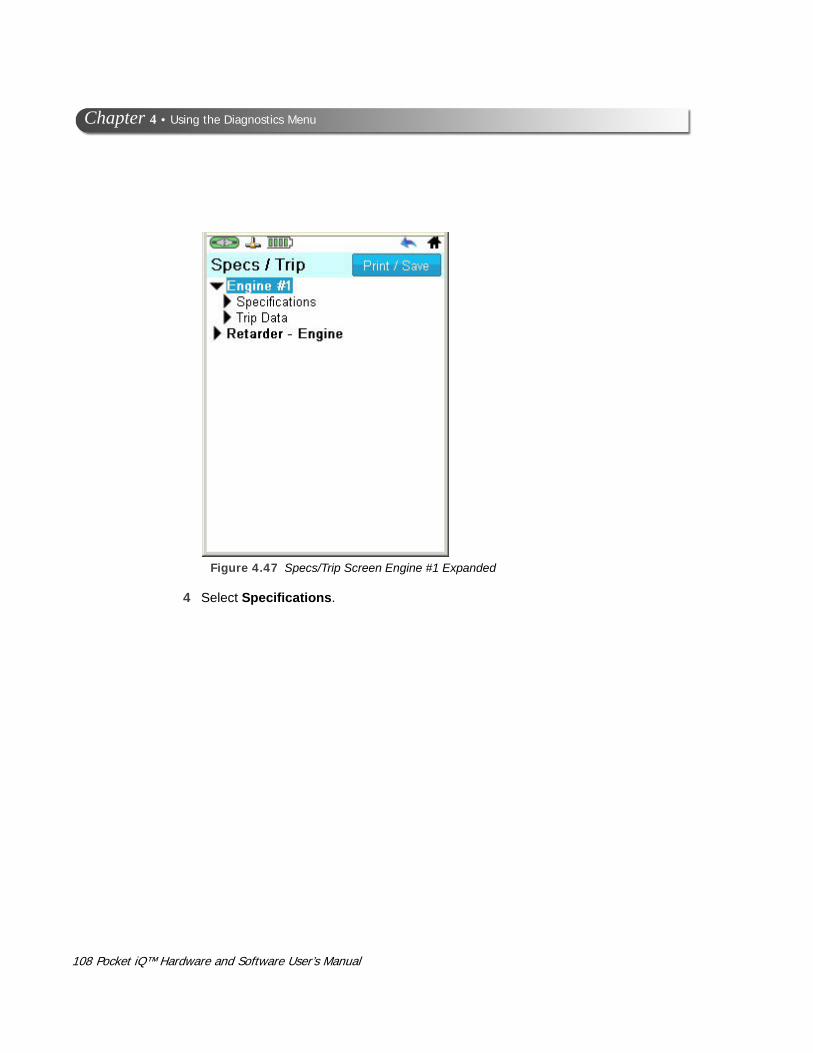
Figure 4.47 Specs/Trip Screen Engine #1 Expanded
4 Select Specifications.
cket iQ™ Hardware and Software User’s Manual

- Viewing Vehicle Specifications and Trip Data
Figure 4.48 Engine Specifications
The screen is displayed again with the relevant data.
NOTE:
i You can use the Print/Save button to print the information or save it to a file that you can view at a later time. See Viewing Saved Files later in this chapter.
5 When you have finished viewing the data, press the Back button at the top of the display or on the tool to return to the main Diagnostics menu (i.e., Home) (Figure 4.45).
Pocket iQ™ Hardware and Software User’s Manual 109

110 Po
Chapter 4 • Using the Diagnostics Menu
Trip Data
You use the View Specs/Trip feature to view trip information.
NOTE:
i Trip information may not be available for all components.
To view trip information:
1 From the main Diagnostics menu (Figure 4.45), select View Specs/Trip.
Figure 4.49 Specs/Trip Screen
2 Select the appropriate component (e.g., Engine #1).
cket iQ™ Hardware and Software User’s Manual

- Viewing Vehicle Specifications and Trip Data
Figure 4.50 Specs/Trip Screen Engine #1 Expanded
3 Select Trip Data.
Pocket iQ™ Hardware and Software User’s Manual 111

112 Po
Chapter 4 • Using the Diagnostics Menu
Figure 4.51 Trip Data Detail
NOTE:
i You can use the Print/Save button to print the information or save it to a file that you can view at a later time. See Viewing Saved Files later in this chapter.
4 When you have finished viewing the information, press the Back button on the tool to return to the main Diagnostics menu (i.e., Home) (Figure 4.45).
cket iQ™ Hardware and Software User’s Manual

- Viewing and Changing Parameters
Viewing and Changing ParametersYou use the View/Change Parameters feature to both view and change (i.e., program) parameters.
• Viewing Parameter Details (pg. 113)
• Changing Parameter Details (pg. 116)
Viewing Parameter Details
You use the View/Change Parameters feature to view parameter details for any of the components to which the Pocket iQ™ is connected.
To view parameter details:
1 Navigate to the main Diagnostics menu (i.e., Home).
Figure 4.52 Diagnostics Menu
2 Select View/Change Parameters.
Pocket iQ™ Hardware and Software User’s Manual 113

114 Po
Chapter 4 • Using the Diagnostics Menu
The Parameters screen is displayed.
Figure 4.53 Parameters Screen
3 Select a category (e.g., Cruise Control).
cket iQ™ Hardware and Software User’s Manual

- Viewing and Changing Parameters
The Parameters screen for the session you selected is displayed.
Figure 4.54 Parameters Screen
NOTE:
i You can use the Print/Save button to print the information or save it to a file that you can view at a later time. See Viewing Saved Files later in this manual.
4 When you are finished viewing the information, tap the Change Category button at the top of the display to return to the list of available data items (Figure 4.53).
5 Continue selecting data items until you are finished viewing information.
NOTE:
i You can also view data for another vehicle component (e.g., Retarder -Engine) by selecting that component from the Component drop-down menu.
Pocket iQ™ Hardware and Software User’s Manual 115

116 Po
Chapter 4 • Using the Diagnostics Menu
Changing Parameter Details
You use the View/Change Parameters feature to change/calibrate parameters for any of the components to which the Pocket iQ™ is connected.
To view parameter details:
1 Navigate to the main Diagnostics menu (i.e., Home).
Figure 4.55 Diagnostics Menu
2 Select View/Change Parameters.
cket iQ™ Hardware and Software User’s Manual

- Viewing and Changing Parameters
The Parameters screen is displayed.
Figure 4.56 Parameters Screen
3 Select a category (e.g., Cruise Control).
Pocket iQ™ Hardware and Software User’s Manual 117

118 Po
Chapter 4 • Using the Diagnostics Menu
The Parameters screen for the category you selected is displayed.
Figure 4.57 Cruise Control Parameters
4 Select the parameter you wish to change (e.g., Cruise Control Vehicle Speed High Limit).
cket iQ™ Hardware and Software User’s Manual

- Viewing and Changing Parameters
The Parameter Details screen is displayed.
Figure 4.58 Parameter Details Screen
5 Tap within the New Value data entry field.
Pocket iQ™ Hardware and Software User’s Manual 119

120 Po
Chapter 4 • Using the Diagnostics Menu
The pop-up keyboard is displayed.
Figure 4.59 Pop-up Keyboard
6 Use the keyboard to enter the new value.
7 Tap the Submit button (the green check mark located at the bottom of the display).
cket iQ™ Hardware and Software User’s Manual

- Viewing and Changing Parameters
The Parameters screen is displayed with the Program button indicating that 1 change is pending.
Figure 4.60 Value Updated Message
8 Tap the Program button.
NOTE:
i You can also continue to change other parameters and program them all at a later time. To change another parameter, tap the Change Category button.
Pocket iQ™ Hardware and Software User’s Manual 121

122 Po
Chapter 4 • Using the Diagnostics Menu
The following screen is displayed.
Figure 4.61 Parameter Screen
9 Tap Update All.
NOTE:
i Depending on the parameters you changed, you may see a series of mes-sages advising you to turn the ignition off and then back on.
cket iQ™ Hardware and Software User’s Manual

- Viewing and Changing Parameters
An Update Successful message is displayed.
Figure 4.62 Update Successful Message
10 Tap OK.
You are returned to the Parameters screen (Figure 4.57).
11 Use the Home icon at the top of the display. to return to the Main Diagnostics menu (i.e., Home) (Figure 4.55).
Pocket iQ™ Hardware and Software User’s Manual 123

124 Po
Chapter 4 • Using the Diagnostics Menu
Managing Saved Files
You use the Manage Saved Files feature to perform the following activities for any files you have saved to Pocket iQ™:
• View (pg. 124)
• Copy (pg. 128)
• Print (pg. 131)
• Delete (pg. 131)
Viewing Saved Files
You access your saved files from the Home menu (in both states, connected and disconnected.
To view a saved file:
1 Navigate to the Home menu.
Figure 4.63 Home Menu
2 Select Manage Saved Files.
cket iQ™ Hardware and Software User’s Manual

- Managing Saved Files
The Saved Files screen is displayed.
Figure 4.64 Saved Files Screen
3 Tap the View icon (i.e., the magnifying glass) next to the file you wish to view.
You can save files on Pocket iQ™ for multiple vehicles. Use the Chassis # drop-down menu to view a list of vehicles for which you have saved files. Once you select a vehicle from the list, the saved files associated with the selected vehicle are listed.
Pocket iQ™ Hardware and Software User’s Manual 125

126 Po
Chapter 4 • Using the Diagnostics Menu
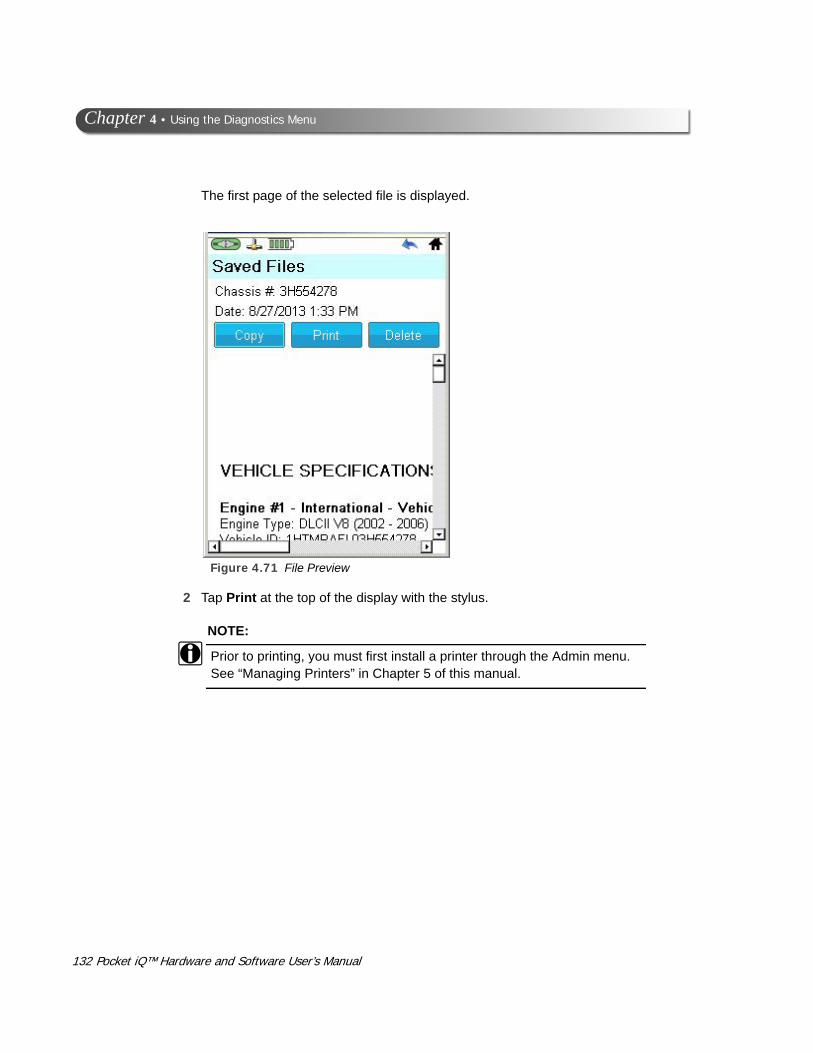
The first page of the selected file is displayed.
Figure 4.65 File Preview
4 Use the scroll bars at the side and bottom of the display to view all the information.
cket iQ™ Hardware and Software User’s Manual

- Managing Saved Files
Figure 4.66 File Preview Scrolled to Reveal More Info
5 When you have finished viewing the information, you can do any of the following:
—Copy the file to a USB memory stick.
—Print the file to a printer to which you are connected.
—Delete the file from Pocket iQ™
—Press the Back button on the tool to return to the Saved Files screen (Figure 4.64).
NOTE:
i You can also Copy and Delete saved files from the primary Saved Files screen (Figure 4.64).
Pocket iQ™ Hardware and Software User’s Manual 127

128 Po
Chapter 4 • Using the Diagnostics Menu
Copying a File
You can copy a saved file (or multiple files) to a USB memory stick from the primary Saved Files screen.
NOTE:
i Files saved to Pocket iQ™ are saved in portable document format (i.e., PDF files).
To copy a file:
1 Select the file (or files) you wish to copy by placing a check mark in the box to the left of the file date.
2 Tap Copy at the top of the display.
Figure 4.67 Saved Files Screen
cket iQ™ Hardware and Software User’s Manual

- Managing Saved Files
Pocket iQ™ asks if you want to copy the file, or files, to a USB memory stick.
Figure 4.68 Do You Want to Copy Query
3 Tap Copy.
A message directing you to insert a USB memory stick is displayed.
4 Insert a USB memory stick into the USB port on the bottom of the tool.
5 Tap OK.
Pocket iQ™ Hardware and Software User’s Manual 129

130 Po
Chapter 4 • Using the Diagnostics Menu
The file, or files, are copied to your USB memory stick, and the following confirmation message is displayed.
Figure 4.69 Confirmation Message
6 Remove the USB memory stick from the bottom of the tool.
7 Tap OK.
You are returned to the primary Saved Files screen (Figure 4.67).
cket iQ™ Hardware and Software User’s Manual
- Managing Saved Files
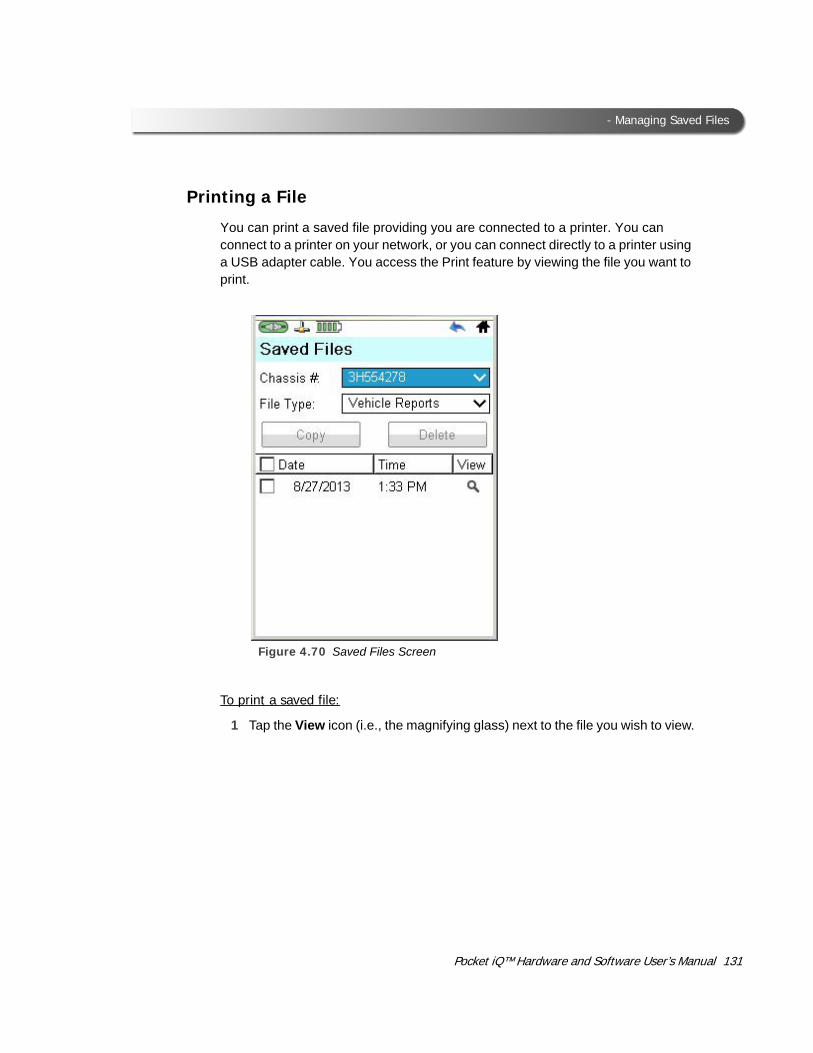
Printing a File
You can print a saved file providing you are connected to a printer. You can connect to a printer on your network, or you can connect directly to a printer using a USB adapter cable. You access the Print feature by viewing the file you want to print.
To print a saved file:
1 Tap the View icon (i.e., the magnifying glass) next to the file you wish to view.
Figure 4.70 Saved Files Screen
Pocket iQ™ Hardware and Software User’s Manual 131
132 Po
Chapter 4 • Using the Diagnostics Menu
The first page of the selected file is displayed.
Figure 4.71 File Preview
2 Tap Print at the top of the display with the stylus.
NOTE:
i Prior to printing, you must first install a printer through the Admin menu. See “Managing Printers” in Chapter 5 of this manual.
cket iQ™ Hardware and Software User’s Manual

- Managing Saved Files
The Select Printer screen is displayed.
Figure 4.72 Select Printer Screen
3 Use the Printer drop-down menu to select the appropriate printer.
4 If you wish to print more than one copy, use the No. of Copies drop-down to select up to five copies.
5 Tap Print.
You are returned to the file preview (Figure 4.71).
6 Use the Back icon at the top of the display, to return to the primary Saved Files screen (Figure 4.70).
Pocket iQ™ Hardware and Software User’s Manual 133

134 Po
Chapter 4 • Using the Diagnostics Menu
Deleting a File
You can delete a saved file from the primary Saved Files screen.
To delete a saved file:
1 Select the file (or files) you wish to delete by placing a check mark in the box to the left of the file date.
2 Tap Delete at the top of the display with the stylus.
Figure 4.73 Saved Files Screen
cket iQ™ Hardware and Software User’s Manual
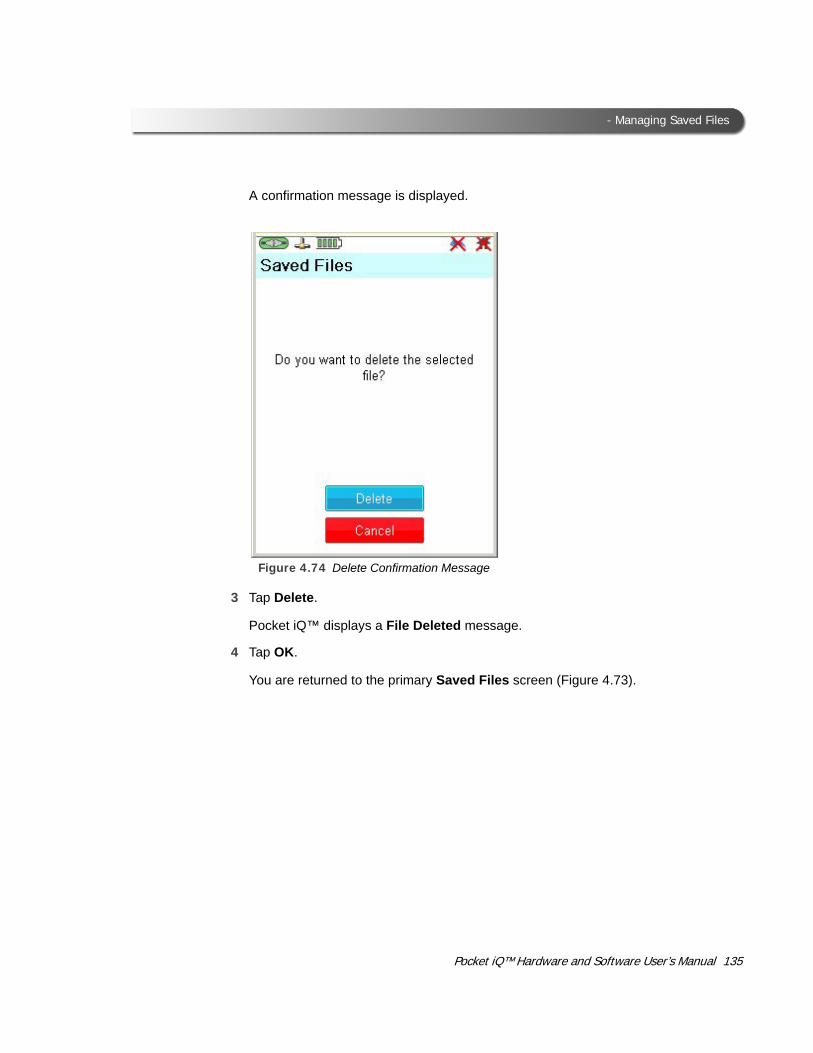
- Managing Saved Files
A confirmation message is displayed.
Figure 4.74 Delete Confirmation Message
3 Tap Delete.
Pocket iQ™ displays a File Deleted message.
4 Tap OK.
You are returned to the primary Saved Files screen (Figure 4.73).
Pocket iQ™ Hardware and Software User’s Manual 135

136 Po
Chapter 4 • Using the Diagnostics Menu
Disconnect from VehicleYou access the Disconnect Vehicle feature from the Home menu (i.e., the main Diagnostics menu).
To disconnect from the vehicle:
1 Tap Disconnect Vehicle.
Figure 4.75 Home Menu in a Connected State
cket iQ™ Hardware and Software User’s Manual

- Disconnect from Vehicle
The Home menu (in a disconnected state) is displayed.
Figure 4.76 Home in a Disconnected State
From this menu you can:
—Manage Saved Files (see pg. 124 earlier in this manual)
—Connect and scan a different vehicle (see pg. 62 earlier in this manual)
—Navigate to the Advanced Tools menu see pg. 138, next in this manual)
—Navigate to the Admin menu (see Chapter 5 of this manual)
—Power down the Pocket iQ™
NOTE:
i To power down the Pocket iQ™, press and hold the power button on the tool.
Pocket iQ™ Hardware and Software User’s Manual 137

138 Po
Chapter 4 • Using the Diagnostics Menu
Advanced Tools
IMPORTANT:
ä The features available from the Advanced Tools menu are reserved for Customer Support troubleshooting purposes. For more information, please contact Customer Support at (800) 639-6774.
You access the Advanced Tools menu from the main Diagnostics menu (i.e., Home).
Figure 4.77 Advanced Tools Menu
cket iQ™ Hardware and Software User’s Manual

5
Using the Admin Menu
Introduction to the Admin Menu, page 140
Updating Pocket iQ™, page 143
Managing Software Applications, page 148
Setting the Date and Time, page 155
Managing Connections, page 160
Configuring Pocket iQ™, page 180
Register Device, page 181
Owner Information, page 182
Calibrate Touch Screen, page 184
Selecting your Language Preference, page 186
Change Units of Measure, page 188
Adjust Screen Brightness, page 189
Obtaining Information about the Pocket iQ™, page 190
This chapter provides detailed instructions for using the Pocket iQ™ Admin menu.
NOTE:
i Screen shots used throughout this guide are for illustrative purposes only. All data shown is fictitious in nature.
Pocket iQ™ Hardware and Software User’s Manual 139

140 Po
Chapter 5 • Using the Admin Menu
Introduction to the Admin Menu
NOTE:
i The procedures in this chapter assume that Pocket iQ™ is not connected to a vehicle and that a system administrator is performing the procedures in a non-shop setting. It is also assumed that you have an available Inter-net connection, have previously registered Pocket iQ™, and have activated your software applications. For more information on registering Pocket iQ™, see Chapter 2: Registration and Software Activation, ear-lier in this manual.
When you power up Pocket iQ™, a splash screen is displayed.
After a few moments, the Home screen is displayed.
NOTE:
i For detailed information on Home menu and its features, refer to “Over-view: The Home Menu” in Chapter 3 of this manual.
Figure 5.1 Home Menu (Disconnected State)
cket iQ™ Hardware and Software User’s Manual

- Introduction to the Admin Menu
To display the Admin menu:
1 Select Admin.
The Admin menu is displayed.
Figure 5.2 Admin Menu
NOTE:
i Pocket iQ™ provides two methods of navigating its screens and features. You can make your selections by tapping on the screen with the stylus, or you can use the buttons on the device itself. Most users will probably use a combination of both.The remainder of this manual describes procedures using the stylus to make selections. You could, however, just as easily use the buttons on the device.
Pocket iQ™ Hardware and Software User’s Manual 141

142 Po
Chapter 5 • Using the Admin Menu
The following table details the features available from the Admin menu.
Menu Choice Description
Update Pocket iQ Enables you to update Pocket iQ™ with avail-able system and software updates. An Ethernet cable and an Internet connection are required.
Manage Applications Enables you to manage the software applica-tions installed on the Pocket iQ™. The following features are available:
• Install Applications
• Activate Applications
• Uninstall Applications
Date/Time Enables you to change date and/or time on your device. You can also select your time zone.
Manage Connections Enables you to manage and set up network con-nections and printers.
Configure Pocket iQ Provides access to the Configuration Menu from which you can do the following:
• Register Pocket iQ™
• Update owner information
• Calibrate the Pocket iQ™ touchscreen
• Select a language preference
• Change display units (English or Metric)
• Adjust Pocket iQ™ screen brightness
About Pocket iQ Displays detailed information on Pocket iQ™, including the following:
• System Bundle version and version history.
• Device serial number.
• Operating System version.
• List of applications loaded on your device, in-cluding version numbers.
cket iQ™ Hardware and Software User’s Manual

- Updating Pocket iQ™
Updating Pocket iQ™
You can update Pocket iQ software (i.e., the system bundle and software applica-tions) by connecting to the Internet. To do this you will need an Ethernet cable and access to the Internet.
NOTE:
i You can also update your device if you have a USB memory stick that con-tains the necessary update files.
To update your device using an Ethernet cable:
1 Plug your Ethernet cable into the Pocket iQ™ Ethernet port (located on the bottom of the device).
This assumes that the other end of the Ethernet cable is already plugged into your network.
2 Navigate to the Admin menu.
Figure 5.3 Admin Menu
3 Select Update Pocket iQ from the Admin menu.
Pocket iQ™ Hardware and Software User’s Manual 143

144 Po
Chapter 5 • Using the Admin Menu
The Install Updates screen is displayed, listing updates available for installation.
Figure 5.4 Install Updates Screen
4 Tap Install All.
cket iQ™ Hardware and Software User’s Manual
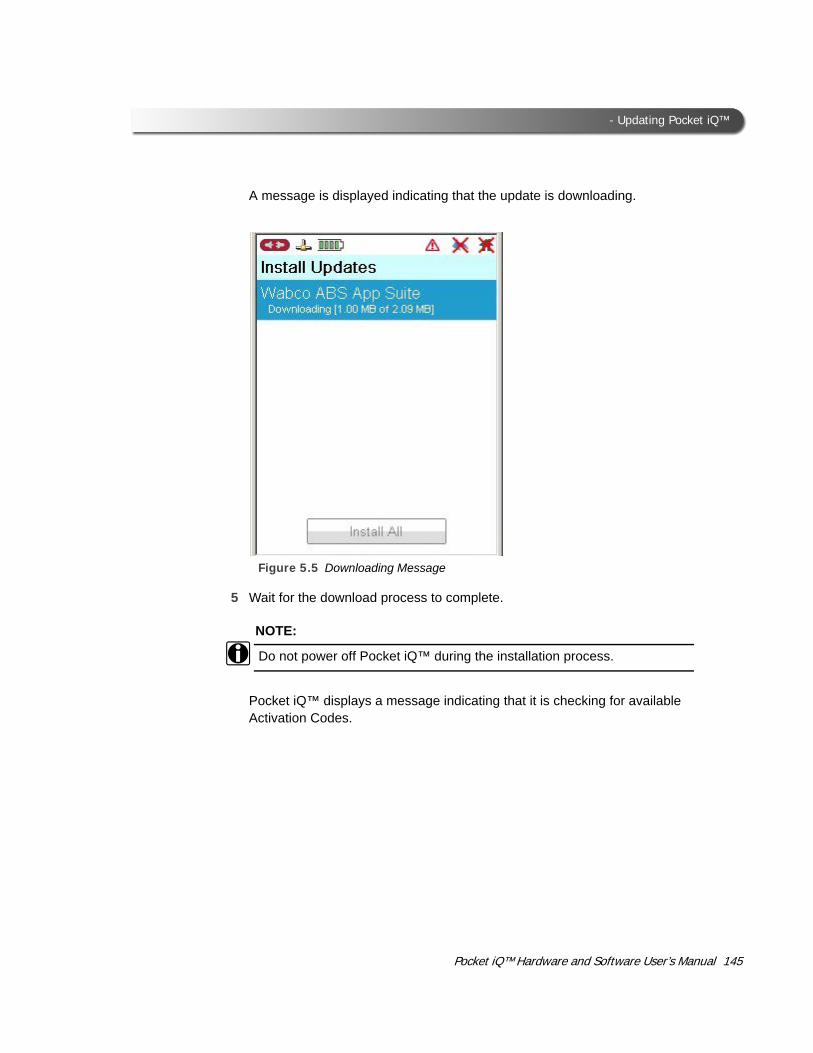
- Updating Pocket iQ™
A message is displayed indicating that the update is downloading.
Figure 5.5 Downloading Message
5 Wait for the download process to complete.
NOTE:
i Do not power off Pocket iQ™ during the installation process.
Pocket iQ™ displays a message indicating that it is checking for available Activation Codes.
Pocket iQ™ Hardware and Software User’s Manual 145

146 Po
Chapter 5 • Using the Admin Menu
The following screen is displayed, indicating that the update has been installed (in this example Wabco ABS App Suite).
Figure 5.6 Update Installed
NOTE:
i Some updates requires a restart. If a restart is required, a Restart button appears on the screen instead of an OK button. Tap Restart. Pocket iQ™ will restart and display the Home menu.
6 Tap the Back icon at the top of the display to return to the Admin menu (Figure 5.3).
cket iQ™ Hardware and Software User’s Manual

- Updating Pocket iQ™
The Admin menu is displayed.
Figure 5.7 Admin Menu
Pocket iQ™ Hardware and Software User’s Manual 147

148 Po
Chapter 5 • Using the Admin Menu
Managing Software ApplicationsYou use the Manage Applications feature to do the following:
• Install Applications (pg. 148)
• Activate Applications (pg. 150)
• Uninstall Applications (pg. 151)
Install Applications
To install applications:
1 Select Manage Applications on the Admin menu (Figure 5.7).
Figure 5.8 Manage Applications Screen
2 Tap Install Applications.
cket iQ™ Hardware and Software User’s Manual

- Managing Software Applications
The Install Applications screen is displayed.
Figure 5.9 Install Applications Screen
3 Select the application you wish to install.
4 Tap the Install button.
5
You are returned to the Manage Applications screen (Figure 5.8).
Pocket iQ™ Hardware and Software User’s Manual 149

150 Po
Chapter 5 • Using the Admin Menu
Activate Applications
In most cases, you activation your software application when you register Pocket iQ™ as a first time user. An Internet connection is required.
NOTE:
i For detailed instructions on activating your Pocket iQ™ software applica-tions, see Activating Your Software Applications, in Chapter 2 of this manual.
The Activate Applications screen is accessed from the Manage Applications screen (Figure 5.8).
NOTE:
i You can only activate one application at a time.
Figure 5.10 Activate Applications Screen
cket iQ™ Hardware and Software User’s Manual

- Managing Software Applications
Uninstall Applications
To uninstall software applications:
1 Select Manage Applications from the Admin menu (Figure 5.7).
Figure 5.11 Manage Applications Screen
2 Tap Uninstall Applications.
Pocket iQ™ Hardware and Software User’s Manual 151

152 Po
Chapter 5 • Using the Admin Menu
The Uninstall Applications screen is displayed.
Figure 5.12 Uninstall Applications Screen
3 Select the application you want to uninstall.
NOTE:
i You can only select one application at a time.
4 Tap the Uninstall button.
cket iQ™ Hardware and Software User’s Manual
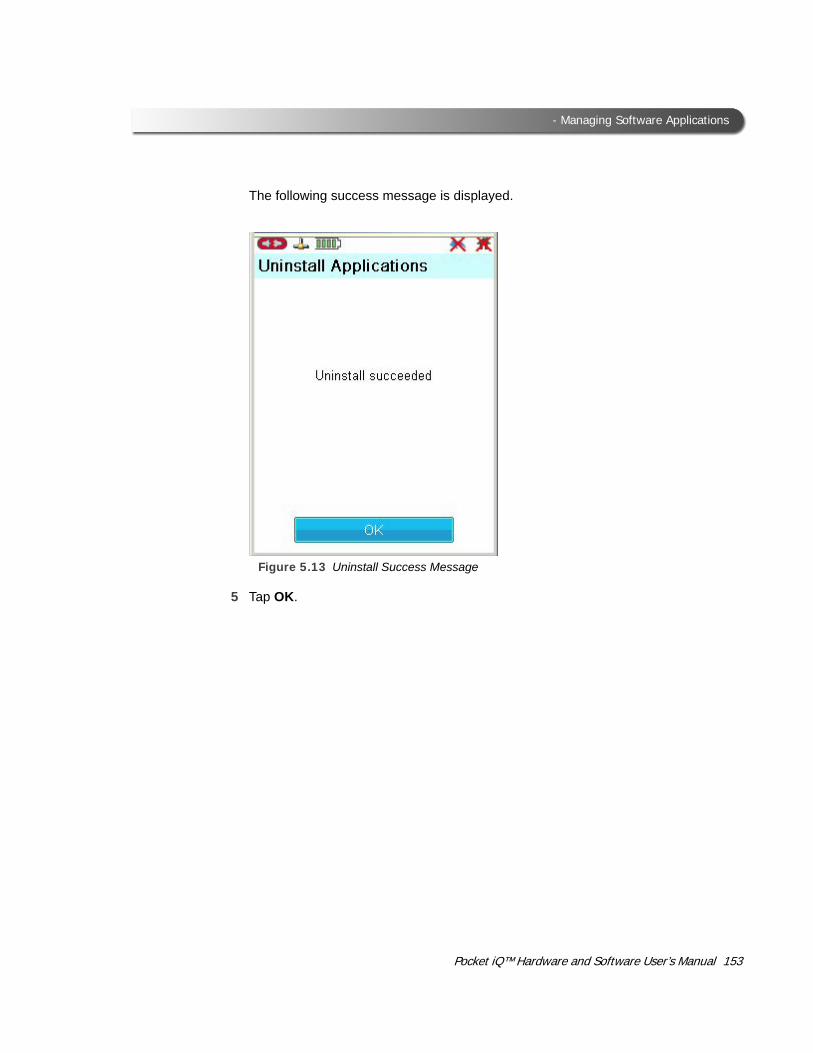
- Managing Software Applications
The following success message is displayed.
Figure 5.13 Uninstall Success Message
5 Tap OK.
Pocket iQ™ Hardware and Software User’s Manual 153

154 Po
Chapter 5 • Using the Admin Menu
The Uninstall Applications screen is displayed again.
Figure 5.14 Uninstall Applications Screen
6 Do one of the following:
—Select another application to uninstall.
—Tap the Back icon at the top of the display to return to the Manage Appli-cations screen (Figure 5.11).
—Tap the Back icon at the top of the display twice to return to the Admin menu (Figure 5.7).
cket iQ™ Hardware and Software User’s Manual

- Setting the Date and Time
Setting the Date and TimeFrom time to time (e.g., if the battery is completely exhausted), you may need to correct the date and/or time for the device.
To set the date and/or time:
1 Start from the Admin menu.
Figure 5.15 Admin Menu
2 Select Date/Time.
Pocket iQ™ Hardware and Software User’s Manual 155

156 Po
Chapter 5 • Using the Admin Menu
The Date/Time screen is displayed, showing the current device date and time:
Figure 5.16 Date/Time Screen
From this screen you can perform the following tasks:
—Modify the Date settings (pg. 157)
—Select the appropriate Time Zone (pg. 158)
—Modify the Time settings (pg. 159)
cket iQ™ Hardware and Software User’s Manual

- Setting the Date and Time
Setting the Date
To set the device date:
1 Tap the Date entry on the Date/Time screen.
Figure 5.17 Date Screen
2 Using the drop-drown arrow at the right of each field, change the year, month, and/or day as needed.
3 Tap Save Date to return to the Date/Time screen (Figure 5.16).
Pocket iQ™ Hardware and Software User’s Manual 157
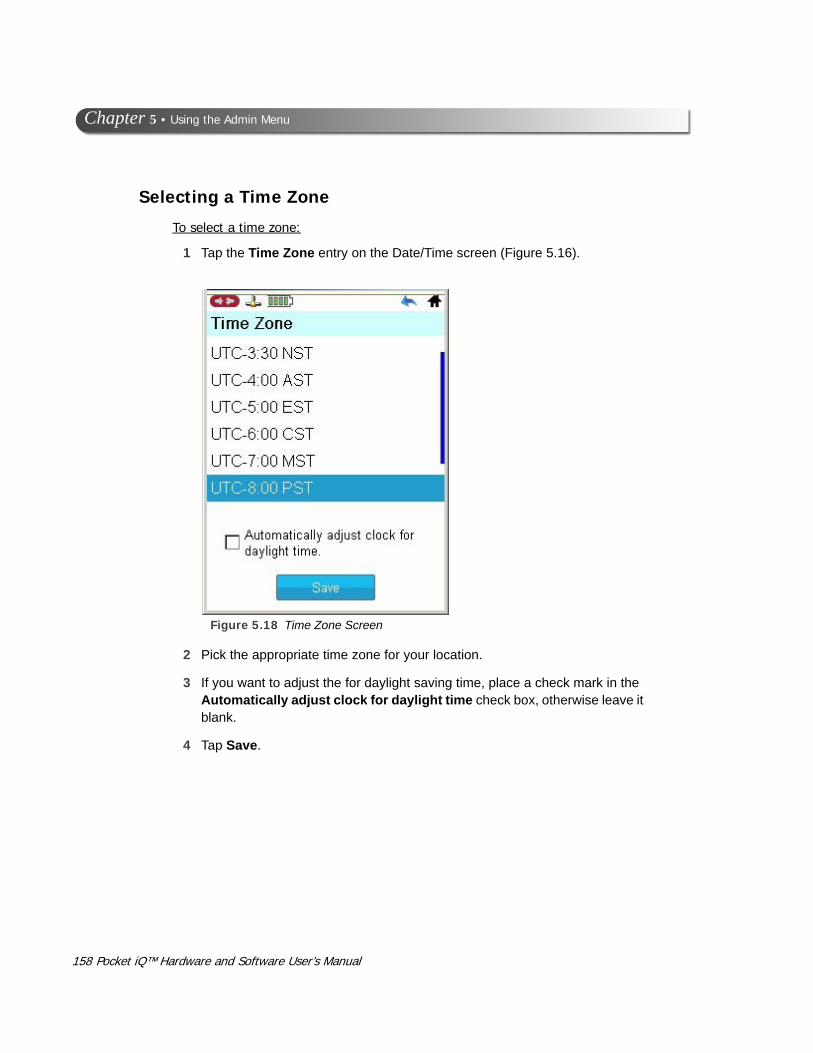
158 Po
Chapter 5 • Using the Admin Menu
Selecting a Time Zone
To select a time zone:
1 Tap the Time Zone entry on the Date/Time screen (Figure 5.16).
Figure 5.18 Time Zone Screen
2 Pick the appropriate time zone for your location.
3 If you want to adjust the for daylight saving time, place a check mark in the Automatically adjust clock for daylight time check box, otherwise leave it blank.
4 Tap Save.
cket iQ™ Hardware and Software User’s Manual

- Setting the Date and Time
Setting the Time
To set the device time:
1 Tap the Time entry on the Date/Time screen (Figure 5.16).
Figure 5.19 Time Screen
2 Using the drop-drown arrow at the right of each screen, change the hour and/or minutes as needed.
3 Tap the AM or PM radio button to select day or night.
4 Tap Save Time to return to the Date/Time screen (Figure 5.16).
5 Use the Back button to return to the Admin menu (Figure 5.15).
NOTE:
i Pocket iQ™ provides two Back buttons. One is located on the screen (i.e., the blue arrow located in the upper-right corner of the display) and the other is on the keypad on the tool.
Pocket iQ™ Hardware and Software User’s Manual 159

160 Po
Chapter 5 • Using the Admin Menu
Managing ConnectionsThe Manage Connections feature on the Admin menu enables you to set up and maintain a variety of networks and printers used with your device.
To manage connections:
1 Start from the Admin menu.
Figure 5.20 Admin Menu
2 Select Manage Connections.
cket iQ™ Hardware and Software User’s Manual

- Managing Connections
The Connections screen is displayed.
Figure 5.21 Connections Screen
From this menu you can perform the following tasks:
—Manage Networks (see pg. 162)
—Manage Printers (see pg. 171)
Pocket iQ™ Hardware and Software User’s Manual 161

162 Po
Chapter 5 • Using the Admin Menu
Managing Networks
To manage your network connections:
1 Select Networks on the Connections screen (Figure 5.21).
Figure 5.22 Networks Screen
2 Make a selection from the menu.
• Ethernet—to view or make changes to how you connect to your local network via an Ethernet (i.e., wired) connection (see pg. 163).
• Proxy—to view or make changes to proxy settings (see pg. 169).
cket iQ™ Hardware and Software User’s Manual

- Managing Connections
Connecting to Your Network: Ethernet
Prior to connecting to your local network using an Ethernet connection, you will need to decide how you are going to set up the IP address for Pocket iQ™. There are two choices:
• Dynamic IP Address—Pocket iQ™ automatically selects an IP address
• Static IP Address—you assign an IP address that does not change
NOTE:
i Depending on how your local network is set up, you may need to make proxy settings (e.g., Domain, Username, and Password) prior to making an Ethernet connection. See Managing Proxy Settings for Your Net-work on page 169, later in this manual.
With a Dynamic IP Address
If you want to let Pocket iQ™ automatically assign a dynamic IP address, you need to plug your network cable (i.e., the Ethernet cable you plug into your PC or laptop if you are not running wireless) into the bottom of the Pocket iQ™ device prior to making your IP settings.
To connect to the Ethernet network with a dynamic IP address:
1 Plug your Ethernet cable into the bottom of the Pocket iQ™ device.
This assumes that the other end of the Ethernet cable is plugged into your network.
2 Select Ethernet from the Networks screen (Figure 5.22).
Pocket iQ™ updates network information.
Pocket iQ™ Hardware and Software User’s Manual 163
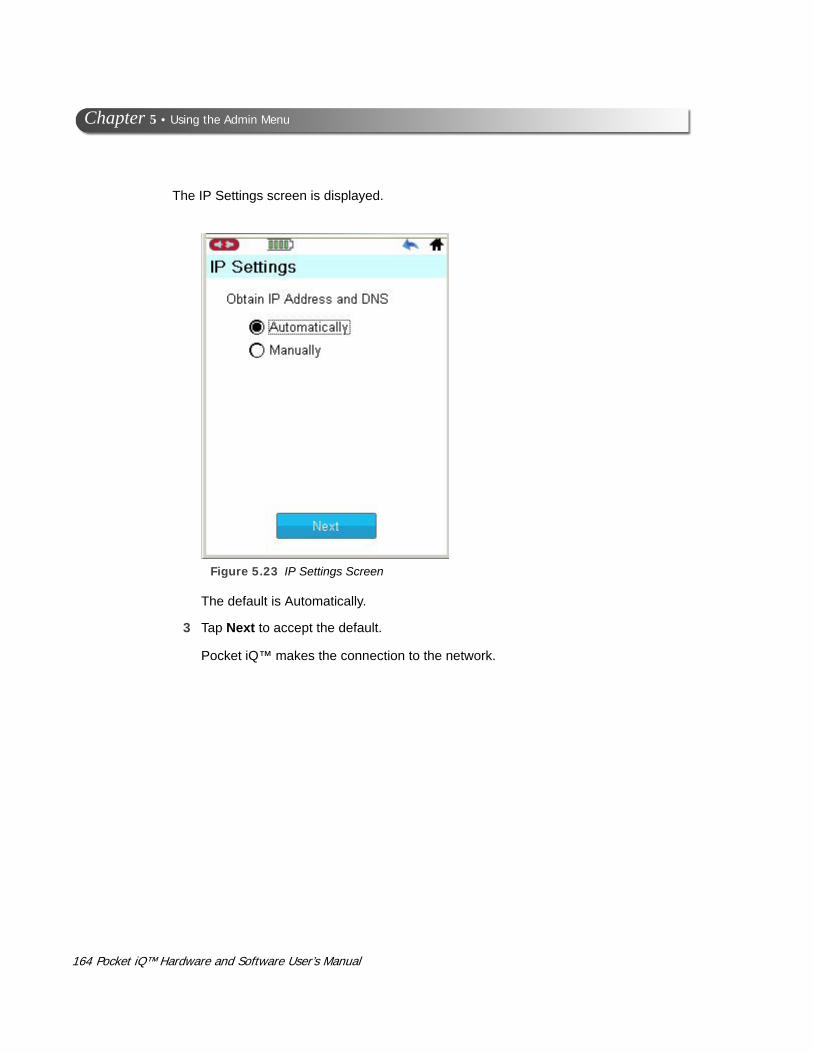
164 Po
Chapter 5 • Using the Admin Menu
The IP Settings screen is displayed.
The default is Automatically.
3 Tap Next to accept the default.
Pocket iQ™ makes the connection to the network.
Figure 5.23 IP Settings Screen
cket iQ™ Hardware and Software User’s Manual

- Managing Connections
The Connection Details screen is displayed.
Figure 5.24 Connection Details
4 Tap Exit.
Pocket iQ™ Hardware and Software User’s Manual 165

166 Po
Chapter 5 • Using the Admin Menu
You are returned to the Networks screen.
Figure 5.25 Networks Screen
cket iQ™ Hardware and Software User’s Manual

- Managing Connections
With a Static IP Address
If you wish to configure Pocket iQ™ with a static IP address, please contact the designated IT person or network administrator for your location for assistance with this task.
NOTE:
i Depending on how your local network is set up, you may need to make proxy settings (e.g., Domain, Username, and Password) prior to making an Ethernet connection. See Managing Proxy Settings for Your Net-work on page 169, later in this manual.
To connect to the Ethernet network with a static IP address:
1 Plug your Ethernet cable into the bottom of the Pocket iQ™ device.
This assumes that the other end of the Ethernet cable is plugged into your network.
2 Select Ethernet from the Networks screen (Figure 5.22).
Pocket iQ™ Hardware and Software User’s Manual 167

168 Po
Chapter 5 • Using the Admin Menu
Pocket iQ™ updates network information, and displays the IP Settings screen.
Figure 5.26 IP Settings Screen
3 Select Manually.
NOTE:
i To continue, please contact the designated IT person or network adminis-trator for your location for assistance with this task.
cket iQ™ Hardware and Software User’s Manual
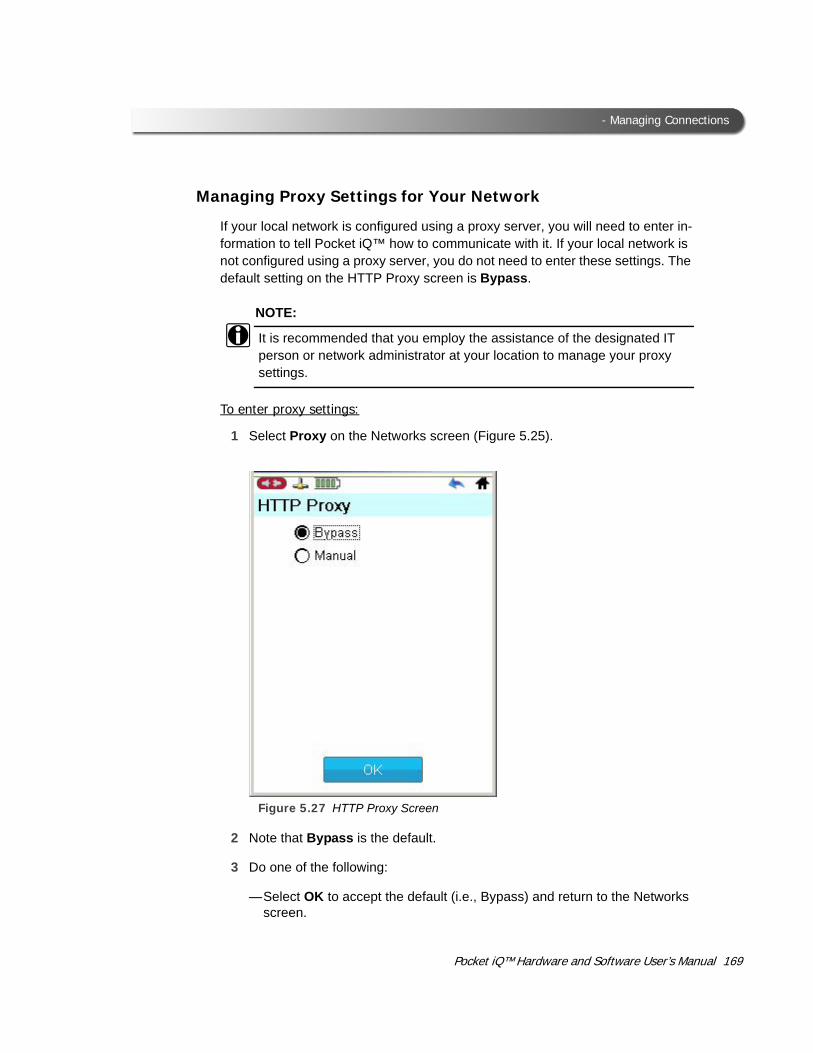
- Managing Connections
Managing Proxy Settings for Your Network
If your local network is configured using a proxy server, you will need to enter in-formation to tell Pocket iQ™ how to communicate with it. If your local network is not configured using a proxy server, you do not need to enter these settings. The default setting on the HTTP Proxy screen is Bypass.
NOTE:
i It is recommended that you employ the assistance of the designated IT person or network administrator at your location to manage your proxy settings.
To enter proxy settings:
1 Select Proxy on the Networks screen (Figure 5.25).
Figure 5.27 HTTP Proxy Screen
2 Note that Bypass is the default.
3 Do one of the following:
—Select OK to accept the default (i.e., Bypass) and return to the Networks screen.
Pocket iQ™ Hardware and Software User’s Manual 169

170 Po
Chapter 5 • Using the Admin Menu
—Select Manual to change proxy settings.
If you selected Manual, the following screen is displayed.
Figure 5.28 Changing Proxy Settings
4 Fill in the required information on the HTTP Proxy screen.
—Server
—Port
—Authentication (place a check mark in the box if your proxy server requires a password)
• Domain
• User name
• Password
5 Tap OK.
A confirmation message is displayed.
6 Tap OK.
You are returned to the Networks screen (Figure 5.22).
cket iQ™ Hardware and Software User’s Manual

- Managing Connections
Managing Printers
From the Printers screen you can perform the following tasks:
• Add Network Printer (pg. 171)
• Add USB Printer (pg. 177)
• Set Default Printer (pg. 178)
Adding a Network Printer
It may be preferable to have the designated IT person or network administrator for you location perform this task for you.
NOTE:
i This procedure assumes that you have a wireless network connection and that you want to connect to an existing network printer.
To add network printer:
1 Start from the Connections screen.
Figure 5.29 Connections Screen
Pocket iQ™ Hardware and Software User’s Manual 171

172 Po
Chapter 5 • Using the Admin Menu
2 Select Printers.
Figure 5.30 Printers Screen
3 Select Add Network Printer.
cket iQ™ Hardware and Software User’s Manual
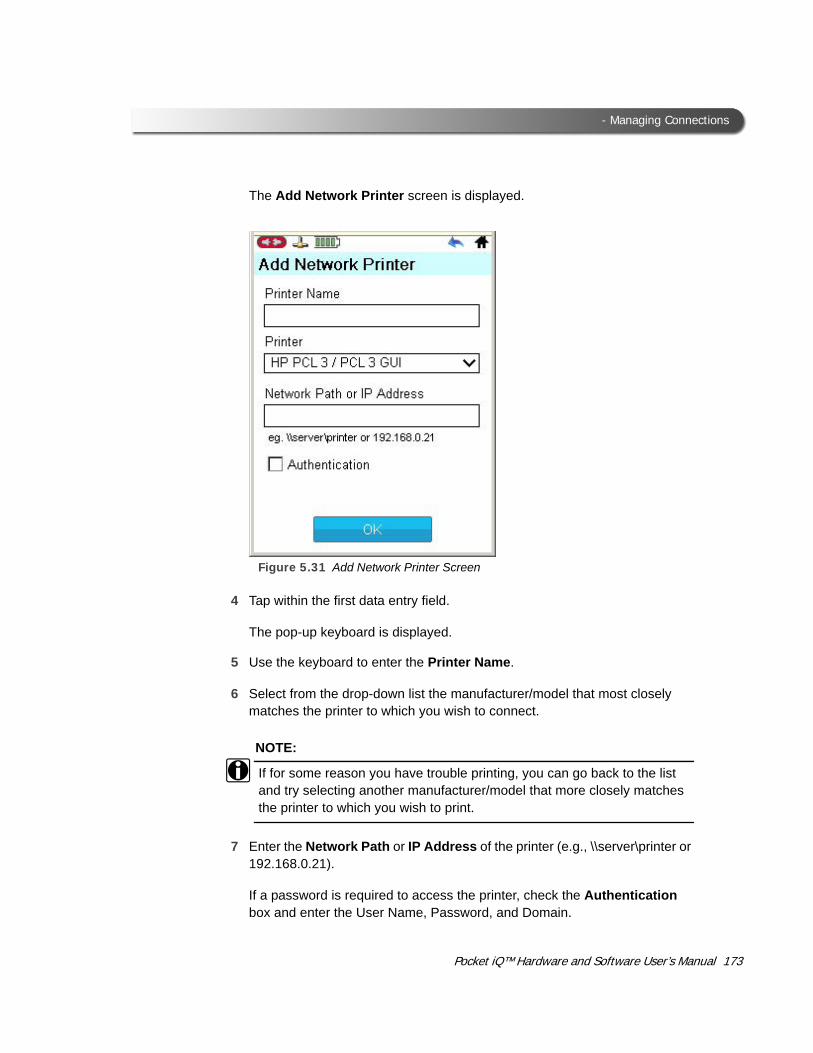
- Managing Connections
The Add Network Printer screen is displayed.
Figure 5.31 Add Network Printer Screen
4 Tap within the first data entry field.
The pop-up keyboard is displayed.
5 Use the keyboard to enter the Printer Name.
6 Select from the drop-down list the manufacturer/model that most closely matches the printer to which you wish to connect.
NOTE:
i If for some reason you have trouble printing, you can go back to the list and try selecting another manufacturer/model that more closely matches the printer to which you wish to print.
7 Enter the Network Path or IP Address of the printer (e.g., \\server\printer or 192.168.0.21).
If a password is required to access the printer, check the Authentication box and enter the User Name, Password, and Domain.
Pocket iQ™ Hardware and Software User’s Manual 173

174 Po
Chapter 5 • Using the Admin Menu
8 Tap OK.
Figure 5.32 Print Test Screen
9 Tap Print Test Page.
cket iQ™ Hardware and Software User’s Manual

- Managing Connections
The Print Test Page screen is displayed again.
Figure 5.33 Print Test Page Indicating Page Sent
10 Check the printer for the test page.
NOTE:
i If the page did not print, you can use the Back button to go back and try again.
11 Tap OK.
12 Tap Done.
Pocket iQ™ Hardware and Software User’s Manual 175

176 Po
Chapter 5 • Using the Admin Menu
The Printers screen is displayed and the printer you added is now dis-played on the list.
Figure 5.34 Printers Screen
13 Press the Back button twice to return to the Admin Menu (Figure 5.2).
cket iQ™ Hardware and Software User’s Manual

- Managing Connections
Adding a USB Printer
The easiest way to connect Pocket iQ™ to a printer is to use a USB A/B cable.
To add a USB printer:
1 Connect one end of a USB A/B cable to the bottom of your Pocket iQ™ device.
2 Connect the other end of the cable to the printer to which you want to print.
3 Select Add USB Printer from the Printers screen (Figure 5.34).
Figure 5.35 Add USB Printer Screen
4 Enter the Printer Name (e.g., HP 1320 PLC 6).
5 Select from the drop-down list the manufacturer/model that most closely matches the printer to which you wish to connect.
NOTE:
i If for some reason you have trouble printing, you can go back and try selecting another manufacturer/model that more closely matches the printer to which you wish to connect.
6 Tap OK.
Pocket iQ™ Hardware and Software User’s Manual 177

178 Po
Chapter 5 • Using the Admin Menu
Setting the Default Printer
You use the Set Default Printer screen to select a printer from a list of printers already set up to use as your default printer.
To set the default printer:
1 Select Set Default Printer on the Printers screen (Figure 5.30).
Figure 5.36 Set Default Printer Screen
2 Select the printer from the list.
cket iQ™ Hardware and Software User’s Manual

- Managing Connections
The Printers screen is displayed again.
Figure 5.37 Printers Screen
Note that the default printer you selected now has a check mark next to the printer name.
NOTE:
i If you want to delete the printer, select the printer name with the stylus. The Printer Details screen is displayed. Scroll down to the bottom of the screen, and tap Delete.
3 Press the Back button twice to return to the Admin menu (Figure 5.2).
Pocket iQ™ Hardware and Software User’s Manual 179

180 Po
Chapter 5 • Using the Admin Menu
Configuring Pocket iQ™
Pocket iQ™ configuration tasks are accomplished through the Configure menu, which you access through the Admin menu (Figure 5.2).
The following options are available from the Configure menu:
• Register Device—enables you to register your Pocket iQ™ as a first time user. An Internet connection is required.
• Owner Information—provides features for updating owner information.
• Calibrate Touch Screen—enables you to fine tune the accuracy of the Pocket iQ™ touch screen.
• Select Language—gives you the opportunity to select the language used on Pocket iQ™ screens and messages.
• Change Units—enables you to choose English or metric units of measure.
• Adjust Screen Brightness—enables you to adjust Pocket iQ™ screen brightness.
Figure 5.38 Configure Menu
cket iQ™ Hardware and Software User’s Manual

- Configuring Pocket iQ™
Register Device
You need to register your Pocket iQ™ only once (a task you perform as a first-time user). An Internet connection is required.
NOTE:
i For detailed instructions on registering Pocket iQ™, see Chapter 2: Reg-istration and Software Activation, earlier in this manual.
Pocket iQ™ Hardware and Software User’s Manual 181

182 Po
Chapter 5 • Using the Admin Menu
Owner Information
You use the Owner Info screen to enter information about the owner of the unit, a task that takes place when you create your user account. You can also use this screen to update existing information. An Internet connection is required.
NOTE:
i For information on creating a user account, please refer to Chapter 2: Registration and Software Activation earlier in this manual.
Red asterisks before a field indicate required fields.
To update owner information:
1 Tap Owner Information on the Configure menu (Figure 5.38).
Figure 5.39 Owner Info Screen
NOTE:
i Use the Change Country button if you want to change the country from the one displayed (e.g., United States).
cket iQ™ Hardware and Software User’s Manual

- Configuring Pocket iQ™
2 Use the Down Arrow button on the tool to navigate to the field you want to change (i.e., User Name).
The pop-up keyboard is displayed.
Figure 5.40 Owner Info Screen with Keyboard
3 Use the keyboard to enter the required information.
NOTE:
i You can use the Down Arrow button on the tool to tab to the next field. You can also use the scroll bar.
4 Continue entering the information until you have complete all the required fields (i.e., those with red asterisks).
5 Use the Down Arrow on the tool to navigate to the bottom of the screen.
6 Tap Save.
An update successful message is displayed.
7 Tap OK.
You are returned to the Configure menu (Figure 5.38).
Pocket iQ™ Hardware and Software User’s Manual 183

184 Po
Chapter 5 • Using the Admin Menu
Calibrate Touch Screen
To calibrate the touch screen:
1 Tap Calibrate Touch Screen on the Configure menu (Figure 5.38).
The following screen appears:
Figure 5.41 Calibrating the Touch Screen (1)
2 Using your stylus, tap the center of the X.
Pocket iQ™ will then start to move the X around the screen as part of the calibration process.
3 Continue tapping the center of each X displayed.
cket iQ™ Hardware and Software User’s Manual

- Configuring Pocket iQ™
The following screen is displayed.
Figure 5.42 Calibrating the Touch Screen (2)
4 Tap the screen one last time to save the calibration.
NOTE:
i If you fail to tap the screen within the prescribed time limit, Pocket iQ™ will revert to the previous calibration.
The Configure menu is displayed (Figure 5.38).
Pocket iQ™ Hardware and Software User’s Manual 185

186 Po
Chapter 5 • Using the Admin Menu
Selecting your Language Preference
To select the language to be used:
1 Tap Select Language on the Configure menu (Figure 5.38).
Figure 5.43 Selecting the Language
NOTE:
i At the present time, only English is available.
cket iQ™ Hardware and Software User’s Manual
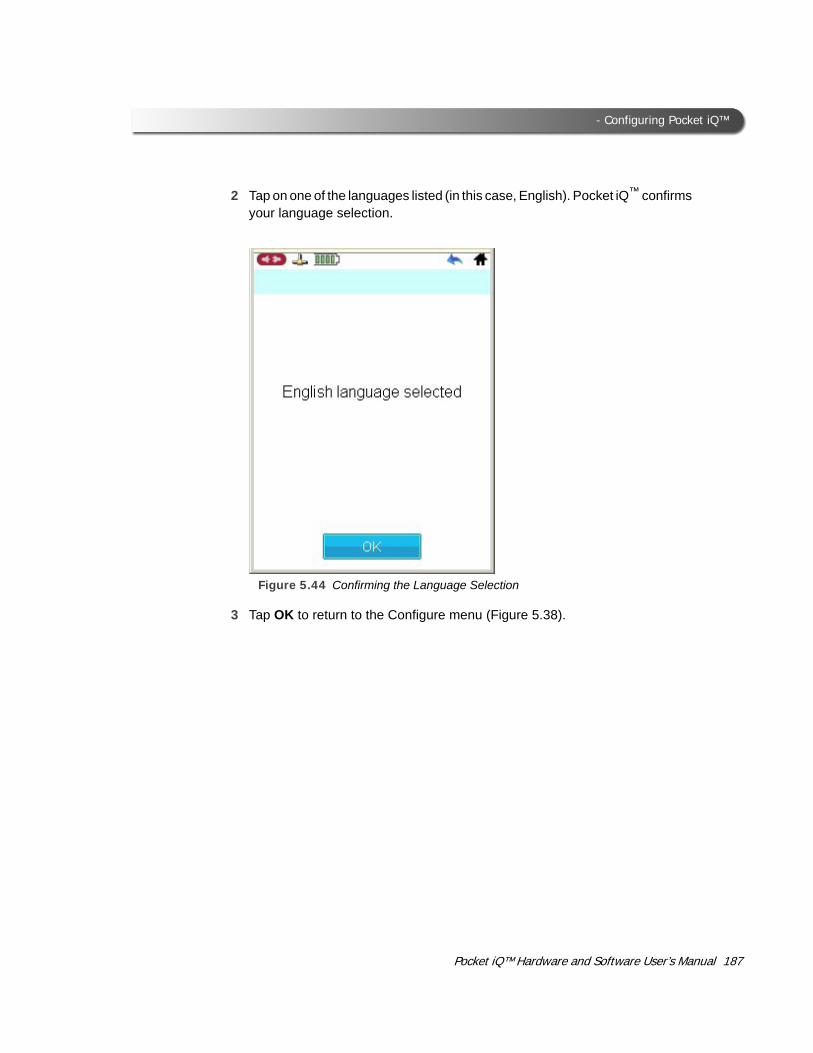
- Configuring Pocket iQ™
2 Tap on one of the languages listed (in this case, English). Pocket iQ™ confirms your language selection.
Figure 5.44 Confirming the Language Selection
3 Tap OK to return to the Configure menu (Figure 5.38).
Pocket iQ™ Hardware and Software User’s Manual 187

188 Po
Chapter 5 • Using the Admin Menu
Change Units of Measure
To change the units of measure:
1 Tap Change Units on the Configure menu (Figure 5.38).
The system displays two radio buttons: English and metric.
Figure 5.45 Changing Units of Measure
2 Tap the radio button representing the units you want to use, and tap Save Units to return to the Configure menu (Figure 5.38).
cket iQ™ Hardware and Software User’s Manual
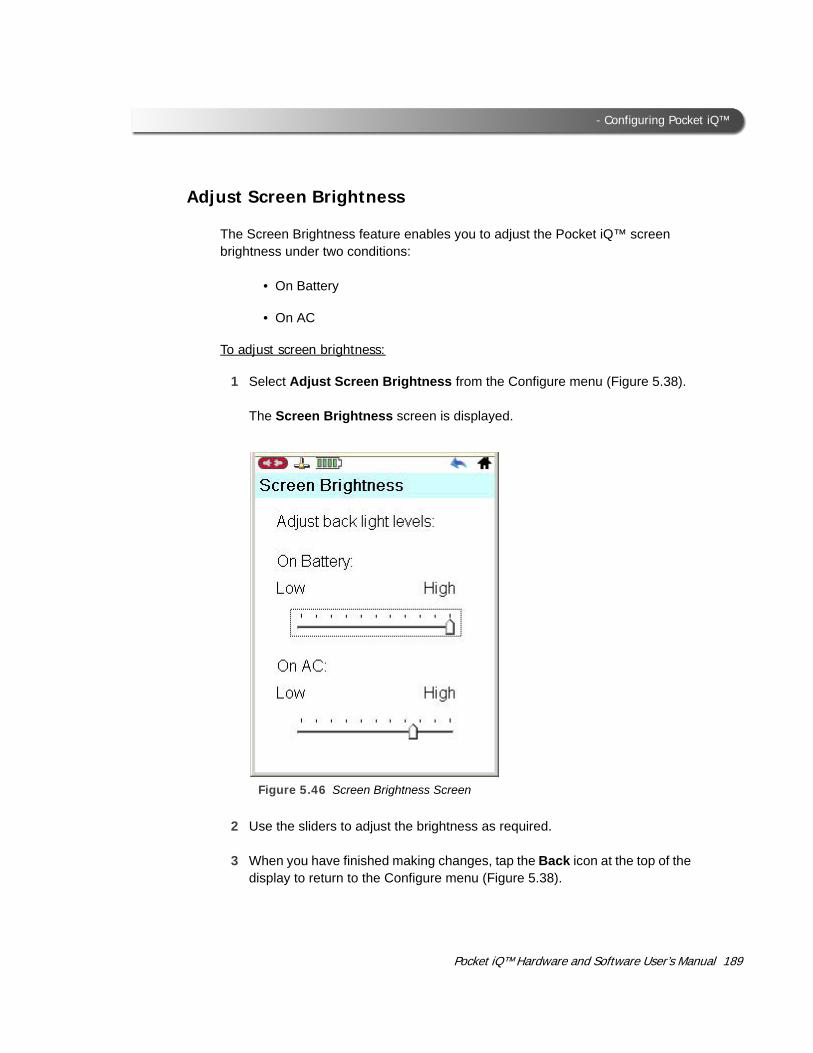
- Configuring Pocket iQ™
Adjust Screen Brightness
The Screen Brightness feature enables you to adjust the Pocket iQ™ screen brightness under two conditions:
• On Battery
• On AC
To adjust screen brightness:
1 Select Adjust Screen Brightness from the Configure menu (Figure 5.38).
The Screen Brightness screen is displayed.
Figure 5.46 Screen Brightness Screen
2 Use the sliders to adjust the brightness as required.
3 When you have finished making changes, tap the Back icon at the top of the display to return to the Configure menu (Figure 5.38).
Pocket iQ™ Hardware and Software User’s Manual 189

190 Po
Chapter 5 • Using the Admin Menu
Obtaining Information about the Pocket iQ™
You access the About Pocket iQ feature from the Admin menu. The information displayed includes:
• System bundle information and version history
• Device serial number
• System operating software information
• Application suite details (e.g., application version numbers)
To display detailed information about the device:
1 Tap About Pocket iQ on the Admin menu (Figure 5.2).
Figure 5.47 Pocket iQ Information
2 Scroll down the list of information using the scroll bar at the right of the screen.
3 When you are finished, tap the Back icon at the top of the display (or press the Back button the tool) to return to the Admin Menu (Figure 5.2).
cket iQ™ Hardware and Software User’s Manual