
PNL Series - Shini USA · PNL series can optionally material fence to facilitate regrind conveying....
34
PNL Series Belt Conveyor Date: Apr, 2013 Version: Ver.B (English)
Transcript of PNL Series - Shini USA · PNL series can optionally material fence to facilitate regrind conveying....

PNL Series Belt Conveyor
Date: Apr, 2013
Version: Ver.B (English)


3(34)
Contents
1. General Description .................................................................................. 7
1.1 Coding Principle ................................................................................... 8
1.2 Feature................................................................................................. 8
1.3 Technical Specifications..................................................................... 10
1.3.1 Dimensions.............................................................................. 10
1.4 Safety Regulations ............................................................................. 11
1.4.1 Safety Signs and Labels .......................................................... 11
1.5 Exemption Clause.............................................................................. 13
2. Structural Features and Working Principle ........................................... 14
2.1 Function Description .......................................................................... 14
2.1.1 Working Principle..................................................................... 14
2.2 Assembly Drawing ............................................................................. 16
2.2.1 Assembly Drawing ................................................................... 16
2.2.2 Parts list................................................................................... 17
2.2.3 Holder Parts............................................................................. 21
2.2.4 Pedestal Parts ......................................................................... 22
2.3 Electrical Circuit Diagram................................................................... 23
2.3.1 Main Electrical Circuit .............................................................. 23
2.3.2 Electrical Components List ...................................................... 24
3. Installation Testing.................................................................................. 25
3.1 Attention............................................................................................. 25
3.2 Horizontal Installation......................................................................... 25
3.3 Power Connections ............................................................................ 26
4. Operation.................................................................................................. 27
4.1 Start/Stop the Machine....................................................................... 27
4.2 Adjustment of the Height of the Conveyor.......................................... 27
4.3 Adjusting Adjustor Panel .................................................................... 27
4.4 Adjusting the Central Postion of the PU Belt...................................... 28
5. Trouble Shooting..................................................................................... 30
6. Service and Maintenance........................................................................ 31
4(34)
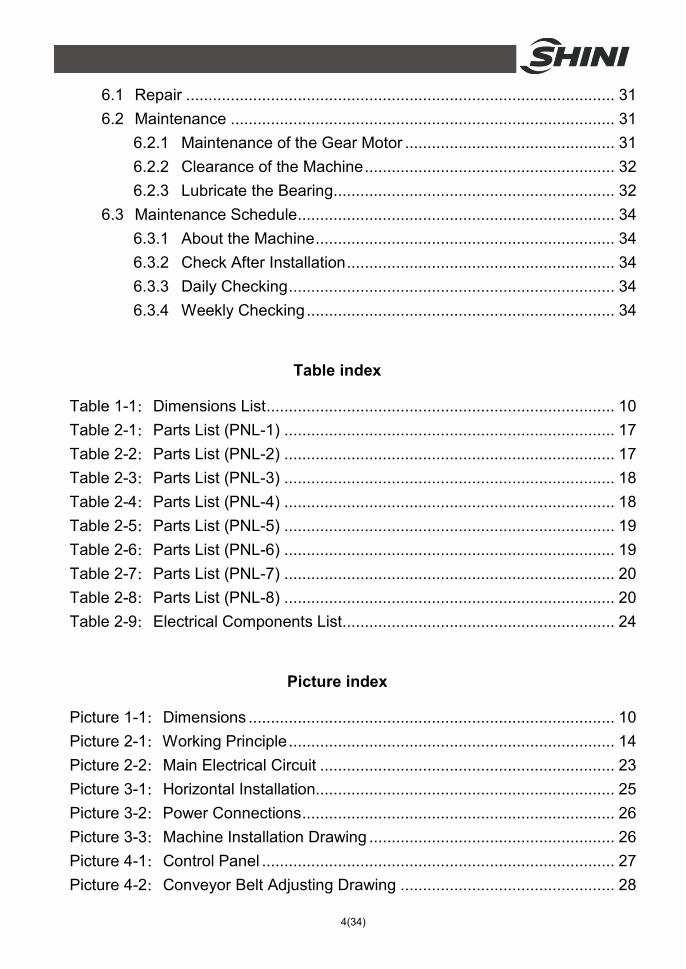
6.1 Repair ................................................................................................ 31
6.2 Maintenance ...................................................................................... 31
6.2.1 Maintenance of the Gear Motor ............................................... 31
6.2.2 Clearance of the Machine........................................................ 32
6.2.3 Lubricate the Bearing............................................................... 32
6.3 Maintenance Schedule....................................................................... 34
6.3.1 About the Machine................................................................... 34
6.3.2 Check After Installation............................................................ 34
6.3.3 Daily Checking......................................................................... 34
6.3.4 Weekly Checking..................................................................... 34
Table index
Table 1-1:Dimensions List.............................................................................. 10
Table 2-1:Parts List (PNL-1) .......................................................................... 17
Table 2-2:Parts List (PNL-2) .......................................................................... 17
Table 2-3:Parts List (PNL-3) .......................................................................... 18
Table 2-4:Parts List (PNL-4) .......................................................................... 18
Table 2-5:Parts List (PNL-5) .......................................................................... 19
Table 2-6:Parts List (PNL-6) .......................................................................... 19
Table 2-7:Parts List (PNL-7) .......................................................................... 20
Table 2-8:Parts List (PNL-8) .......................................................................... 20
Table 2-9:Electrical Components List............................................................. 24
Picture index
Picture 1-1:Dimensions .................................................................................. 10
Picture 2-1:Working Principle......................................................................... 14
Picture 2-2:Main Electrical Circuit .................................................................. 23
Picture 3-1:Horizontal Installation................................................................... 25
Picture 3-2:Power Connections...................................................................... 26
Picture 3-3:Machine Installation Drawing ....................................................... 26
Picture 4-1:Control Panel ............................................................................... 27
Picture 4-2:Conveyor Belt Adjusting Drawing ................................................ 28

5(34)
Picture 4-3:PVC Adjusting Drawing................................................................ 28
Picture 6-1:Gear Motor................................................................................... 32
Picture 6-2:Bearing Lubricate Brawing........................................................... 33

6(34)

7(34)
1. General Description
Please read this manual carefully before using this machine in order to operate correctly against any damage caused due to improper operation.
Forbidden to process flammable or toxic material!
Shini manufactures four types of belt conveyor under technical license from a leading European manufacturer.
PNL series conveyor feature reliable performance and ease of operation and are suitable for use with CB or SV series conveyor or as stand-alone units.
Model: PNL-2

8(34)
1.1 Coding Principle PNL - x - Lxxxx
Belt Conveyor
Conveyor Belt Length (mm)
Model of Conveyor Belt Width
1.2 Feature ● Mounted on patented "FUTURE" floor stand. ● PVC belt is adopted for smooth and efficient conveying. ● Height adjustable floor stand. PNL series has angel adjustable function with
a range of 0o ~ 25o. ● PNL series can optionally material fence to facilitate regrind conveying. ● Sidewalls for PNL series are 75 mm respectively. ● PNL series are equipped with speed regulators as standard. The safe
regulating range for normal use is 3~6m/min. ● Power supply for PNL series are 1Φ, 230VAC, 50/60Hz.

9(34)
All service work should be carried out by a person with technical training or corresponding professional experience. The manual contains instructions for both handling and servicing. Chapter 6, which contains service instructions intended for service engineers. Other chapters contain instructions for the daily operator.
Any modifications of the machine must be approved by SHINI in order to avoid personal injury and damage to machine. We shall not be liable for any damage caused by unauthorized change of the machine.
Our company provides excellent after-sales service. Should you have any problem during using the machine, please contact the company or the local vendor.
Headquarter and Taipei factory: Tel: (886) 2 2680 9119 Shini Plastics Technologies (Dongguan), Inc: Tel: (86) 769 8111 6600 Shini Plastics Technologies India Pvt.Ltd.: Tel: (91) 250 3021 166

10(34)
1.3 Technical Specifications 1.3.1 Dimensions
Picture 1-1:Dimensions
Table 1-1:Dimensions List
Model PNL-1 PNL-2 PNL-3 PNL-4 PNL-5 PNL-6 PNL-7 PNL-8
W (mm) 440 520 590 720 820 1020 1220 1420
W1 (mm) 450 530 600 730 830 1030 1230 1430
W2 (mm) 220 300 370 500 600 800 1000 1200
D (mm) 500 500 500 500 500 500 500 500
D1 (mm) 650 650 650 650 650 650 650 650
Weight (kg) 93 100 106 117 126 143 160 180
We reserve the right to change specifications without prior notice.

11(34)
1.4 Safety Regulations To avoid any body injures and damages of the machine, please obey the regulations in this manual. When operating this machine, please obey the regulations as follows.
1.4.1 Safety Signs and Labels
Electrical installation should be done by qualified electricians. Turn off the main switch and control switch before servicing and maintenance.
Warning! The sound level produced by the machine is < 70dB (max) at the position of the operator.
Notice: Noise level test refers to the following conditions: 1m around the machine, 1.6m above the machine.
Warning! 1) Don't use the machine and don't try to repair it before carefully read
this manual and understood all its parts completely. 2) In particular, it is important to adopt the precaution listed in section a
'safety instruction'. 3) It is forbidden to use the machine in any condition or for any use
different from what is indicated in the manual. SHINI has no responsibility for breakdowns, trouble, or injuries caused by improper operation.
Attention! No need for regular inspection because all the electrical parts in the control unit are fixed tightly!

12(34)
Attention! The maximum weight of the pieces to be carried on the conveyor belt must not be over 56kg in total (Conveying capacity is less than 56kg as the set value of the regulator is smaller than 4.5m/min). The conveyor belts are not suitable to transport loose material.
Attention! These conveyor belts can be easily used by all of the personnel of the plant they are installed in, and they do not present any risk for the operator, if used properly. Therefore, it is recommended to read the manual carefully before using the machine.
Attention! SHINI claims no responsibility when: 1) Use of the conveyor belt is in any way openly opposed to what is
indicated in the present instruction manual. 2) There are feeding defects. 3) There is a serious deficiency of the foreseen maintenance. 4) Non-authorized changes are adopted. 5) Spare parts that are non-authorized or not suitable for the actual
model are used. 6) There are exceptional events. Please don’t disassemble the protector
sponge and quick tube & nip in the outlet of collecting material box.
Danger! Risk of fire: Risk of fire is present whenever the conditions of the conveyor belts are not suitable for the operation they are used for (in particular: temperature of the pieces carried). Adjust the condition of the conveyor belt according to the table shown here below.
Risks of high temperature: These conveyor belts are designed for transporting molded parts, i.e. hot pieces. If you need to operate on the

13(34)
conveyor belt, use safety gloves ( in particular where the parts fall on the belt).
Type of belt Max. temp. of parts
PVC 60℃
Attention! The packing material must not be left around, and it must be disposed of according to the regulations in force. It is possible to lift the conveyor with a fork lift.
Danger! To protect the operator's safety, and the integrity of the machine, assure the stable lifting of the conveyor. Once the conveyor belt is running, it is necessary to fix the machine by locking the castors. Moreover, suitable slings or fixtures must be attached, to keep it steady during transportation.
1.5 Exemption Clause The following statements clarify the responsibilities and regulations born by any buyer or user who purchases products and accessories from Shini (including employees and agents). Shini is exempted from liability for any costs, fees, claims and losses caused by reasons below:
1. Any careless or man-made installations, operation and maintenances upon machines without referring to the Manual prior to machine using.
2. Any incidents beyond human reasonable controls, which include man-made vicious or deliberate damages or abnormal power, and machine faults caused by irresistible natural disasters including fire, flood, storm and earthquake.
3. Any operational actions that are not authorized by Shini upon machine, including adding or replacing accessories, dismantling, delivering or repairing.
4. Employing consumables or oil media that are not appointed by Shini.

14(34)
2. Structural Features and Working Principle 2.1 Function Description
PNL series conveyor feature reliable performance and ease of operation and are suitable for use with CB or SV series conveyor or as stand - alone units.
2.1.1 Working Principle
Parts name:
1. Gearmotor 2. Speed governor 3. PVC belt 4. Adjusting screw nut
5. Plug in screw 6. Adjusting board 7. Base 8. Driving wheel
9. Star knob 10. Castor with brake
Picture 2-1:Working Principle
The conveyor belts of this series are made up of: Equipped with a 4 swivel castors (10) and locking facility support frame (7), the conveyor belt can be easily moved to the working area. The conveying rotor located on the top end is directly connected to the gear motor (1). Matched with the motor, there is a speed regulator (3) which has the function to start, stop and regulate the belt. The screw nut (4) connected to the butterfly

15(34)
screw (5), is used for adjusting the height of conveyor, and there are two knobs will be used for controlling the moving direction and tightness degree. Moreover, the belt is connected to the support frame, so it is possible to change its inclination by adjusting the two bolts. Generally speaking , the operator will stand at the conveyor top end (discharging area), and the controlling parts are located here as well.
16(34)
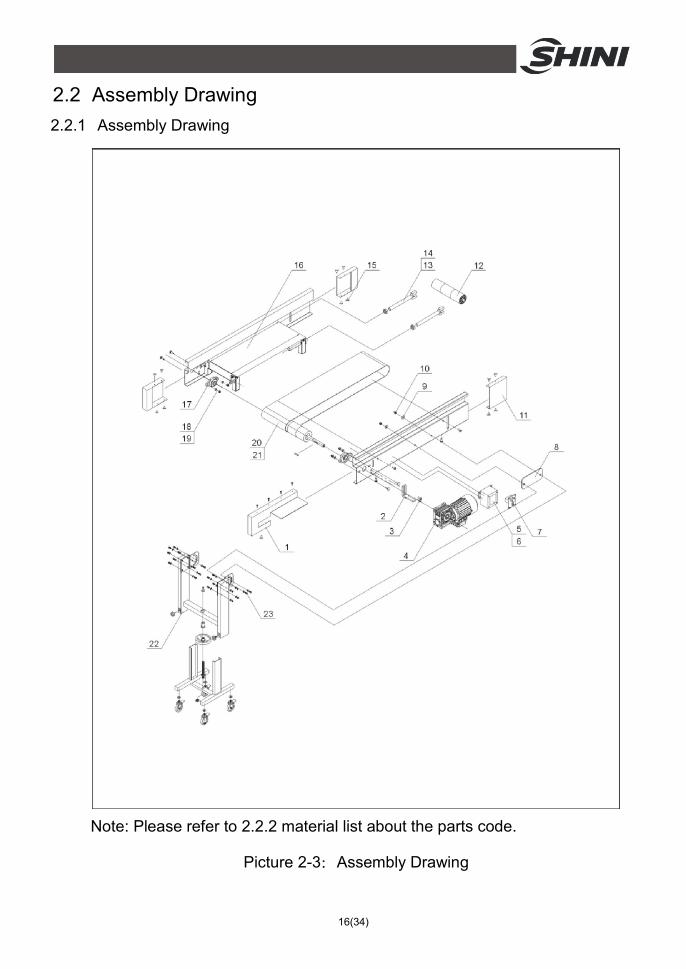
2.2 Assembly Drawing 2.2.1 Assembly Drawing
Note: Please refer to 2.2.2 material list about the parts code.
Picture 2-3:Assembly Drawing

17(34)
2.2.2 Parts list Table 2-1:Parts List (PNL-1)
No. Name Part No. No. Name Part No. 1 End cover 2 BL56000042020 13 Butterfly screw BH10401101140
2 Motor holder BL56000000420 14 Hexagon thin nut YW64200100000
3 Hexagon screw bolt YW60082500300 15 Hexagon self-tapping screw
YW66061210000
4 Gear motor YM50102000000 16 Conveying belt assembly map
-
5 Speed governor shell BL56000240020 17 Bearing block parts YW11205100100
6 Speed governor cover BL56000140020 18 Flat gasket YW66122400000
7 Speed governor YE80200000100 19 Star screw nut YW64012100000
8 Holder pad BL56004300020 20 Conveying belt YR00120000200
9 Gasket YW66122400000 21 Conveying wheel YW08041200000
10 Star screw nut YW64012100000 22 Exploded view of pedestal
BL56110020021
11 End cover 1 BL56000041020 23 Hexagon screw bolt YW60122500100
12 Iron stick YW08010600600
Table 2-2:Parts List (PNL-2)
No. Name Part No. No. Name Part No. 1 End cover 2 BL56000042020 13 Butterfly screw BH10401101140
2 Motor holder BL56000000420 14 Hexagon thin nut YW64200100000
3 Hexagon screw bolt YW60082500300 15 Hexagon self-tapping screw
YW66061210000
4 Gear motor YM50102000000 16 Conveying belt assembly map
-
5 Speed governor shell BL56000240020 17 Bearing block parts YW11205100100
6 Speed governor cover BL56000140020 18 Flat gasket YW66122400000
7 Speed governor YE80200000100 19 Star screw nut YW64012100000
8 Holder pad BL56004300020 20 Conveying belt YR00220000200
9 Gasket YW66122400000 21 Conveying wheel YW08020500500
10 Star screw nut YW64012100000 22 Exploded view of pedestal
-
11 End cover 1 BL56000041020 23 Hexagon screw bolt YW60122500100
12 Iron stick YW08020600600 * means possible broken parts. ** means easy broken part. and spare backup is suggested. Please confirm the version of manual before placing the purchase order to guarantee that the item number of the spare part is in accordance with the real object.

18(34)
Table 2-3:Parts List (PNL-3)
No. Name Part No. No. Name Part No. 1 End cover 2 BL56000042020 13 Butterfly screw BH10401101140
2 Motor holder BL56000000420 14 Hexagon thin nut YW64200100000
3 Hexagon screw bolt YW60082500300 15 Hexagon self-tapping screw
YW66061210000
4 Gear motor YM50102000000 16 Conveying belt assembly map
-
5 Speed governor shell BL56000240020 17 Bearing block parts YW11205100100
6 Speed governor cover BL56000140020 18 Flat gasket YW66122400000
7 Speed governor YE80200000100 19 Star screw nut YW64012100000
8 Holder pad BL56004300020 20 Conveying belt YR00320000200
9 Gasket YW66122400000 21 Conveying wheel YW08030500500
10 Star screw nut YW64012100000 22 Exploded view of pedestal
-
11 End cover 1 BL56000041020 23 Hexagon screw bolt YW60122500100
12 Iron stick YW08030600600
Table 2-4:Parts List (PNL-4)
No. Name Part No. No. Name Part No. 1 End cover 2 BL56000042020 13 Butterfly screw BH10401101140
2 Motor holder BL56000000420 14 Hexagon thin nut YW64200100000
3 Hexagon screw bolt YW60082500300 15 Hexagon self-tapping screw
YW66061210000
4 Gear motor YM50102000000 16 Conveying belt assembly map
-
5 Speed governor shell BL56000240020 17 Bearing block parts YW11205100100
6 Speed governor cover BL56000140020 18 Flat gasket YW66122400000
7 Speed governor YE80200000100 19 Star screw nut YW64012100000
8 Holder pad BL56004300020 20 Conveying belt YR00420000400
9 Gasket YW66122400000 21 Conveying wheel YW08041701700
10 Star screw nut YW64012100000 22 Exploded view of pedestal
-
11 End cover 1 BL56000041020 23 Hexagon screw bolt YW60122500100
12 Iron stick YW08041801800 * means possible broken parts. ** means easy broken part. and spare backup is suggested. Please confirm the version of manual before placing the purchase order to guarantee that the item number of the spare part is in accordance with the real object.

19(34)
Table 2-5:Parts List (PNL-5)
No. Name Part No. No. Name Part No. 1 End cover 2 BL56000042020 13 Butterfly screw BH10401101140
2 Motor holder BL56000000420 14 Hexagon thin nut YW64200100000
3 Hexagon screw bolt YW60082500300 15 Hexagon self-tapping screw
YW66061210000
4 Gear motor YM50102000000 16 Conveying belt assembly map
-
5 Speed governor shell BL56000240020 17 Bearing block parts YW11205100100
6 Speed governor cover BL56000140020 18 Flat gasket YW66122400000
7 Speed governor YE80200000100 19 Star screw nut YW64012100000
8 Holder pad BL56004300020 20 Conveying belt YR00520000200
9 Gasket YW66122400000 21 Conveying wheel YW08044501700
10 Star screw nut YW64012100000 22 Exploded view of pedestal
-
11 End cover 1 BL56000041020 23 Hexagon screw bolt YW60122500100
12 Iron stick YW08050600600
Table 2-6:Parts List (PNL-6)
No. Name Part No. No. Name Part No. 1 End cover 2 BL56000042020 13 Butterfly screw BH10401101140
2 Motor holder BL56000000420 14 Hexagon thin nut YW64200100000
3 Hexagon screw bolt YW60082500300 15 Hexagon self-tapping screw
YW66061210000
4 Gear motor YM50102000000 16 Conveying belt assembly map
-
5 Speed governor shell BL56000240020 17 Bearing block parts YW11205100100
6 Speed governor cover BL56000140020 18 Flat gasket YW66122400000
7 Speed governor YE80200000100 19 Star screw nut YW64012100000
8 Holder pad BL56004300020 20 Conveying belt YR00620000200
9 Gasket YW66122400000 21 Conveying wheel YW08046004500
10 Star screw nut YW64012100000 22 Exploded view of pedestal
-
11 End cover 1 BL56000041020 23 Hexagon screw bolt YW60122500100
12 Iron stick YW09502800000 * means possible broken parts. ** means easy broken part. and spare backup is suggested. Please confirm the version of manual before placing the purchase order to guarantee that the item number of the spare part is in accordance with the real object.
20(34)
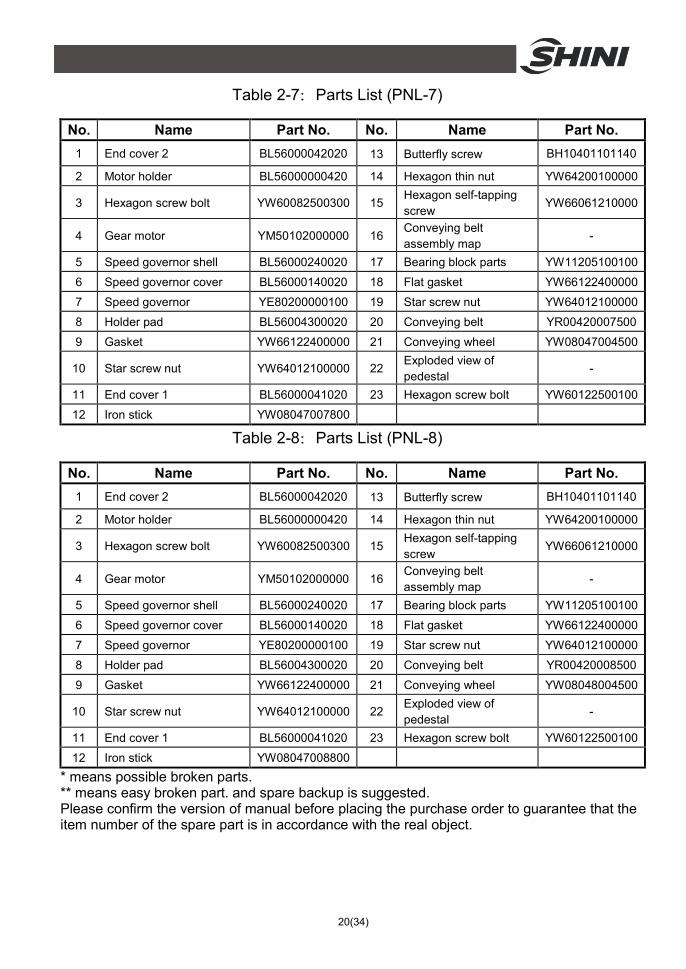
Table 2-7:Parts List (PNL-7)
No. Name Part No. No. Name Part No. 1 End cover 2 BL56000042020 13 Butterfly screw BH10401101140
2 Motor holder BL56000000420 14 Hexagon thin nut YW64200100000
3 Hexagon screw bolt YW60082500300 15 Hexagon self-tapping screw
YW66061210000
4 Gear motor YM50102000000 16 Conveying belt assembly map
-
5 Speed governor shell BL56000240020 17 Bearing block parts YW11205100100
6 Speed governor cover BL56000140020 18 Flat gasket YW66122400000
7 Speed governor YE80200000100 19 Star screw nut YW64012100000
8 Holder pad BL56004300020 20 Conveying belt YR00420007500
9 Gasket YW66122400000 21 Conveying wheel YW08047004500
10 Star screw nut YW64012100000 22 Exploded view of pedestal
-
11 End cover 1 BL56000041020 23 Hexagon screw bolt YW60122500100
12 Iron stick YW08047007800
Table 2-8:Parts List (PNL-8)
No. Name Part No. No. Name Part No. 1 End cover 2 BL56000042020 13 Butterfly screw BH10401101140
2 Motor holder BL56000000420 14 Hexagon thin nut YW64200100000
3 Hexagon screw bolt YW60082500300 15 Hexagon self-tapping screw
YW66061210000
4 Gear motor YM50102000000 16 Conveying belt assembly map
-
5 Speed governor shell BL56000240020 17 Bearing block parts YW11205100100
6 Speed governor cover BL56000140020 18 Flat gasket YW66122400000
7 Speed governor YE80200000100 19 Star screw nut YW64012100000
8 Holder pad BL56004300020 20 Conveying belt YR00420008500
9 Gasket YW66122400000 21 Conveying wheel YW08048004500
10 Star screw nut YW64012100000 22 Exploded view of pedestal
-
11 End cover 1 BL56000041020 23 Hexagon screw bolt YW60122500100
12 Iron stick YW08047008800 * means possible broken parts. ** means easy broken part. and spare backup is suggested. Please confirm the version of manual before placing the purchase order to guarantee that the item number of the spare part is in accordance with the real object.

21(34)
2.2.3 Holder Parts
Parts name:
1. Side plate 2. Hexagon screw bolt 3. Beam 2 assembly map
4. Panel 2 5. Cross socket sunk screw 6. Panel 1
7. Side plate 2 8. Hexagon screw 9. Beam 1 assembly map
Picture 2-3:Holder Parts

22(34)
2.2.4 Pedestal Parts
Parts name:
1. Lifter assembly map 2. Adjusting bolt 3. Flat gasket
4. Adjusting plate 5. Hexagon screw bolt 6. Flat gasket
7. Lock nut 8. Star screw 9. Adjusting sleeve
10. Driving wheel 11. Pedestal welding map 12. Star screw nut
13. Inner hexagon cylindrical screw 14. Spring gasket 15. Flat gasket
16. Castor 17. Flat gasket 18. Main screw
Picture 2-3:Pedestal Parts

23(34)
2.3 Electrical Circuit Diagram 2.3.1 Main Electrical Circuit
Picture 2-2:Main Electrical Circuit

24(34)
2.3.2 Electrical Components List Table 2-9:Electrical Components List
NO. Symbol Name Specification Part NO.
1 Q1 Circuit breaker 1.6~2.5A YE40000000400
2 Waterproof box - YE51802300000
3 SP Adjuster 230V 50/60Hz 200W YE80200000100
4 M1 Motor* 230V 200W 50/60Hz YM50102000000
* means possible broken parts. ** means easy broken part. and spare backup is suggested. Please confirm the version of manual before placing the purchase order to guarantee that the item number of the spare part is in accordance with the real object.
25(34)
3. Installation Testing Read this chapter carefully before installation, Must observe the installation steps as follows!
The connection of the power supply should be done by qualified electricians only!
3.1 Attention 1) Verify that the power supply corresponds to the specifications of the plate
near the controls of the conveyor. 2) Connect the power cable and the PE wire accroding to the local regulations. 3) Use independent power cable and switch, Make sure that the diameter of the
cable is not smaller than the cable used in the control box. 4) The connection end of the power cable should be safely and tightly. 5) This series use the power with 3phase and 4wire, (L) connect to the live wire
of the power, and the PE should be connected. 6) Power supply requirement:
Main power voltage: ±10% Main power frequency: ±2%
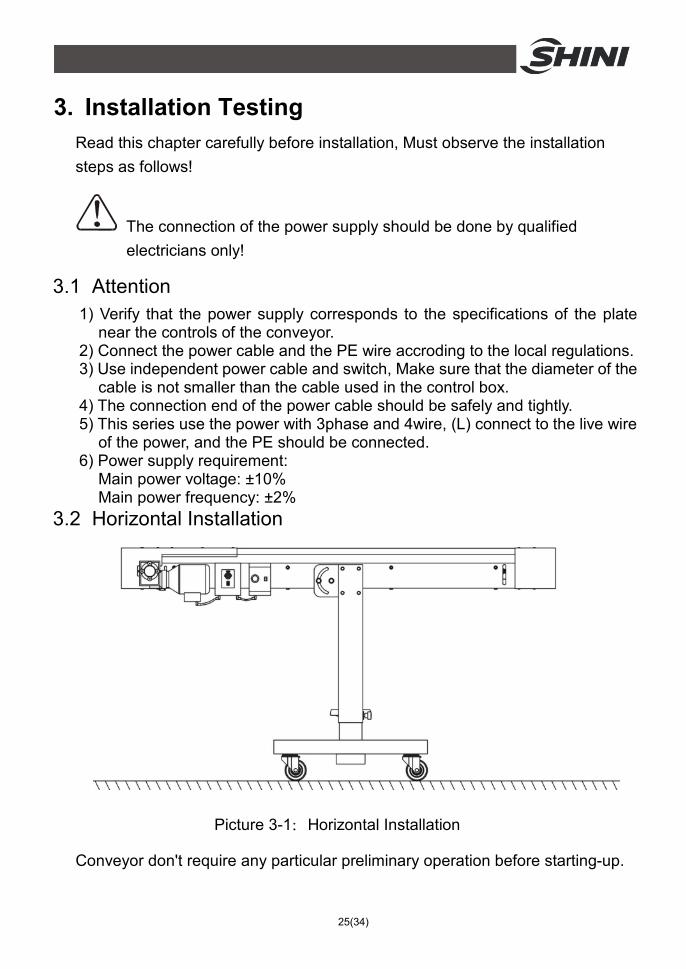
3.2 Horizontal Installation
Picture 3-1:Horizontal Installation
Conveyor don't require any particular preliminary operation before starting-up.

26(34)
With reference to the layout of the cables, make sure that they are protected against damage and that they don't hamper the operators.
3.3 Power Connections The wire of the horizontal belt conveyor, speed regulator and motor protector should be connected strictly comply with the wiring diagram.
Picture 3-2:Power Connections
Attention! After the power connected, check the direction of the motor rotation, if the motor reverses, please turn off the power, change over the connecting wires of the L terminal and the CW or the CCW terminals of the speed regulator.
Picture 3-3:Machine Installation Drawing

27(34)
4. Operation 4.1 Start/Stop the Machine
1) Rotate the motor protector knob, and connect to power. 2) Turn on the RUN / STOP switch of the speed regulator, the belt conveyor
starts running. 3) Adjust the knob of the speed regulator to change the rotating speed of the
belt conveyor.
The safe range of speed regulation for normal use is 3~6m/min (the scale on control panel is 4.5~10).
Picture 4-1:Control Panel
Loosen the lockup screw (1), take out the hexagonal screw (3) (M10×75), to adjust the conveyor belt to the required height, and then tighten the screw nut again (1).
4.2 Adjustment of the Height of the Conveyor Loosen the plum flower screw (3), turn the rotation wheel (1), adjust conveyor to demand height, then tighten the plum flower screw (3).
4.3 Adjusting Adjustor Panel Loosen the lockup adjusting screw (2) to adjust the conveyor belt to the required height, and then tighten the screw again (2).

28(34)
Picture 4-2:Conveyor Belt Adjusting Drawing
Adjustable gradient is 0o~25o!
If the screw does not locked after adjusting the conveyor belt, the conveyor belt will lost it's balance!
4.4 Adjusting the Central Postion of the PU Belt Rotate this nut to adjust the central space of the PU Belt
Picture 4-3:PVC Adjusting Drawing
Danger!

29(34)
To check the proper centering it is necessary to make the machine run. However, the adjustment must be done when the machine is stopped, and then the belt must be made to run only for the time necessary to verify its proper centering.
Attention! On a monthly basis verify that the external temperature of the motor and gearbox is not too high (it should be between 60 and 20℃). In case it is different, contact the technicians at SHINI directly.
Attention! 1) The maximum weight of the pieces to be carried on the conveyor belt
must not be over 56kg in total(Conveying capacity is less than 56kg as the set value of the regulator is smaller than 4.5m/min)..
2) Not suitable to transport loose material. 3) The maximum resistant temperature of PU belt is 60℃。
The operator, or the maintenance technician, must wear suitable work clothes, without free parts. They must not wear chains, bracelets, or other objects which may be caught by mechanical parts in movement. In case of long hair, special hairnets must be used, to aviod the risk of being caught.

30(34)
5. Trouble Shooting
Failures Solutions
Connect the power, rotate the motor protector knob and turn on the RUN / STOP switch of the speed regulator, the motor doesn't run.
1. Check the speed regulator to see if the knob is pointing to 0, if so, adjust the speed knob.
2. Check the circuit according to wiring diagram, the possible reasons can be as follows:
a:The power is failure. b:The circuit is disconnected. c:The motor protector is damaged. d:The motor is failure.
The circuit breaker often trips off.
Check the circuit according to wiring diagram, the possible reasons can be as follows: a:The setting value of the breaker was too low, adjust the value
to 1.1 times of the current one. b:Short circuit may exist. c:The motor protector is damaged. d:The motor is failure.

31(34)
6. Service and Maintenance
6.1 Repair To avoid any body injury and damage of the machine, all of the repair work should be done by professional person only. It is the duty of the operator to keep the machine clean from foreign matter, such as deposits, oil, or other materials. So it is necessary to clean the machine at the end of every working shift. This must be performed when the machine is stopped, in stable starting of the machine.
6.2 Maintenance 6.2.1 Maintenance of the Gear Motor
Check if the reduced gears box is oil leaking and it should be examined periodicity. When you find that the oil is reduced or the colour of it changed dark and black, you must complement it or replace it immediately. Please be noticed that keep the surface of the gear motorcleaning. Move away the dust and the

32(34)
contamination in time so as to keep a good distribute of the heat.
Picture 6-1:Gear Motor
Danger! Operating temperature range of gear motor is: 20℃-60℃.
6.2.2 Clearance of the Machine
Please keep the machine clean from foreign matter, such as deposits, oil, or other materials. Do the cleanly work everyday.
It is forbidden to use flammable liquids during the cleaning operation. Periodically check the status of the PU belt, and replace it, if necessary. Once the machine has been cleaned, the operator must check for worn out or damaged parts (in which case, he must replace it immediately),or for parts which are not firmly fixed (in which case, he should fix them, if this is possible).
The machine protection and safety devices must not be removed, unless a specific repair and/or maintenance action is required. These protections must be put back as soon as the reason for their removal has disappeared, in any case, they must be installed before starting the machine.
If using compressed air, the operator must wear safety glasses, and make sure that nobody is near the machine, because they may be hit by materials and dust.
6.2.3 Lubricate the Bearing

33(34)
On a monthly basis lubricate the two supporters near the unloading area of the conveyor, below the protection cover, as indicated by the drawing.
Picture 6-2:Bearing Lubricate Brawing
Stop the machine and unplug the power supply before doing the repair or maintenance work.
34(34)
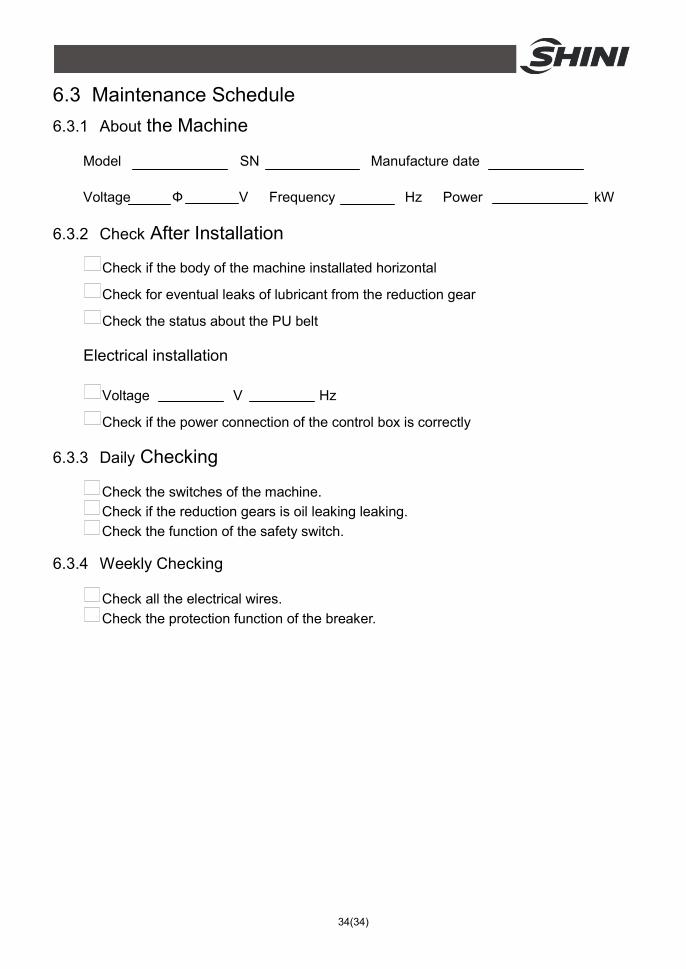
6.3 Maintenance Schedule 6.3.1 About the Machine
Model SN Manufacture date
Voltage Ф V Frequency Hz Power kW
6.3.2 Check After Installation
Check if the body of the machine installated horizontal
Check for eventual leaks of lubricant from the reduction gear
Check the status about the PU belt
Electrical installation
Voltage V Hz
Check if the power connection of the control box is correctly
6.3.3 Daily Checking
Check the switches of the machine. Check if the reduction gears is oil leaking leaking. Check the function of the safety switch.
6.3.4 Weekly Checking
Check all the electrical wires. Check the protection function of the breaker.