PKL - eMaskView Quick Reference Guideemaskview.pkl.co.kr/native/eMaskView_UsersManual.pdf ·...
15
Quick Reference Guide PKL - eMaskView
Transcript of PKL - eMaskView Quick Reference Guideemaskview.pkl.co.kr/native/eMaskView_UsersManual.pdf ·...
Quick Reference Guide
PKL - eMaskView

eMaskView Requirements Customer’s Desktop and PKL Server
• DeskTop Environment
– O/S: WindowsXP, Windows7 32 and 64bit
– JAVA: 1.6x or 1.7x
– S/W: Secure Global Desktop Client ( Download )
• eMaskView Server URL
– http://emaskview.pkl.co.kr
– http://203.232.76.59
• Firewall
– It needs to be opened at the customer’s firewall.
– TCP Ports
• 80, 443
• 3144
• 5307
• User Account
– Please contact PKL CS to get your account. CS will then provide a temporary
account for eMaskView Server access.

JOBVIEW Login Screen (1)
- Launch the Emaskview client program
( ttawebtop.exe)

JOBVIEW Login Screen (2)
- Followed by a eMaskView ‘Login’ screen
• login to eMaskView Server
Location : http://emaskview.pkl.co.kr
Username : Customer ID
Password : Customer Password
• Click ‘OK’ button
• Click ‘Accept’ button

JOBVIEW Login Screen (3) - You will be presented with the JobView Webtop screen…
- Double Click on ‘EBV’ or ‘K2QV’

JOBVIEW Login Screen (4) - You will be presented with the second Login window
- Enter your 2nd Username and password
-. Click ‘OK’
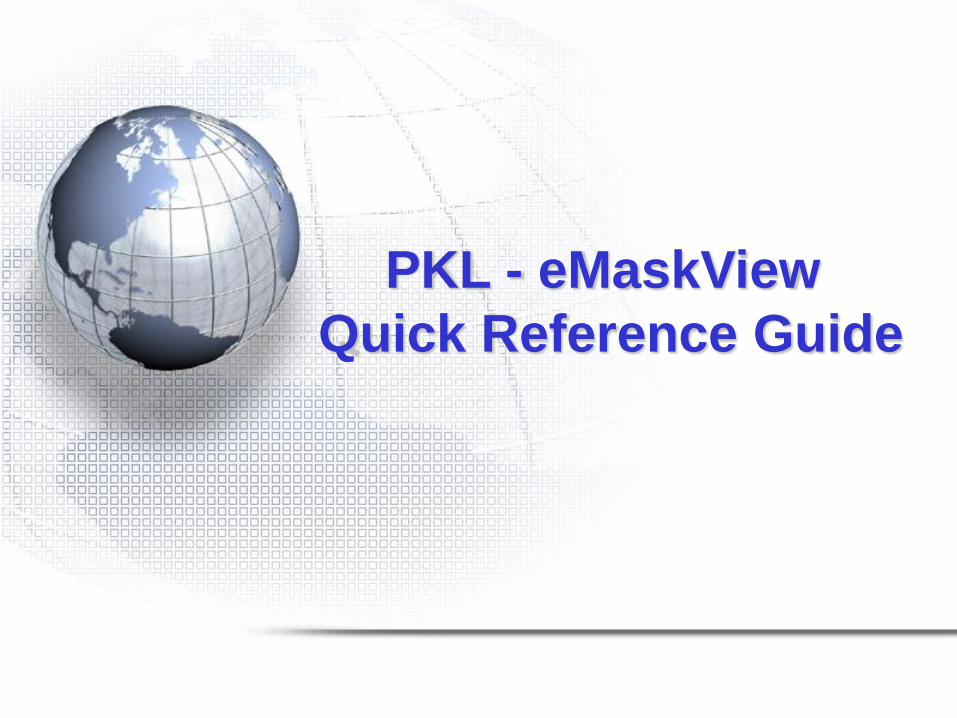
Area Type Button
Data List Tool Bar
Ruler
Main Tool Bar
Search Bar
Area Bar
Screen window
Data List Wondow
Move Button
Grid Display
Mouse Position Display
Start-up Window Reference Guide
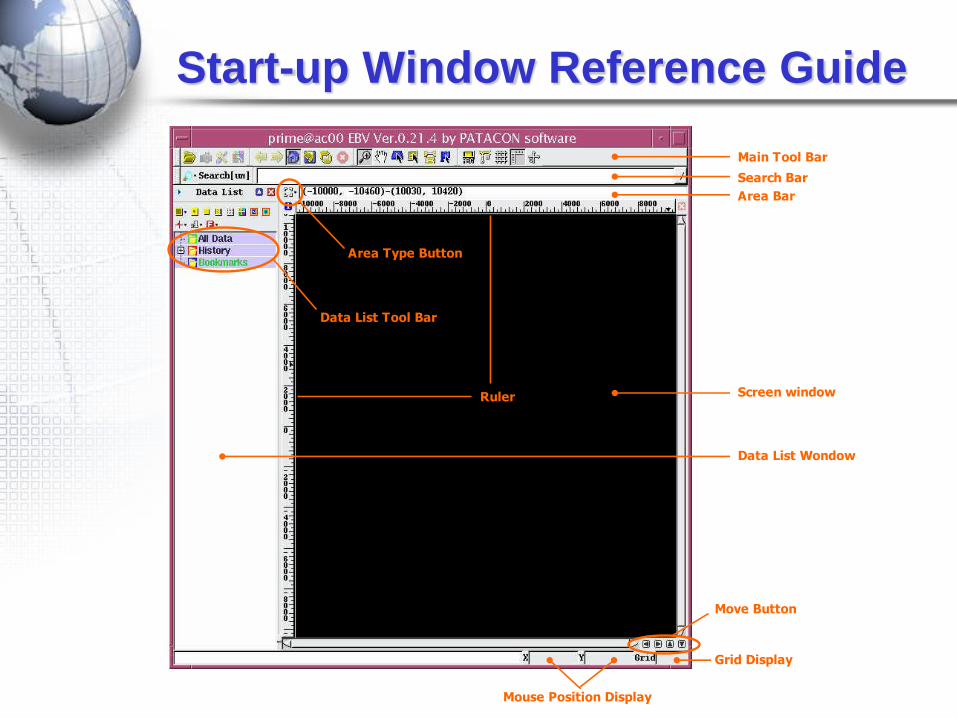
Main Tool Bar Reference Guide
Open File Full Map Display
Reload
Refresh
Zoom In/Out
Move
Search & Measure
Cell Search
Auto Measure
Add Mark
Cell/Chip Name
Enable to Snap
Ruler
Grid
Show Axis

- Select the MEBES at Fillter
- Double Click on ‘MEBES File Name’
- Click on ‘Open’
Setp1: Click ‘File Open’
Note: File list in current Directory
Step2: Click the Jobdeck (~.JB, ~.jb) or the GDS file
Step3: Click on ‘OK’
JOBDECK Open Screen (1)

JOBDECK Open Screen (2)
- If the file is specified, “Job Layer Select Dialog” is appeared.
- You have to check layer numbers (layout name) to open.
Note: All layers always open to default.
Layer select which you want to open.
Option1) You can specify two or more layers.
How to:
You press [Shift Key] on your keyboard with click left button .
Step4~5 :Combo box with choices “None” always
Step6: Click on ‘OK’
Step4:
Step5:

JOBDECK Open Screen (3)
- Data List
: Check the data list as like follow.
Note: If you click left button ~.JB, ~.jb or GDS on the data list window. You can turn on/off the display.
Switch
“Turn off” “Turn on”

JOBDECK Open Screen (4)
- Open Data List Menu :You can open data list menu by right button click on listed file. You can use almost all functionalities from the data list tool bar.
Step7: Click on right button, then Paint menu click.
Note: Display patterns color fill
Step8: Click on Left button
Note: All layers display.
Step9: Click on Left button
Note: You can select layer number to open.
Change mirroring (Y mirror =Glass up view)
Change Scaling
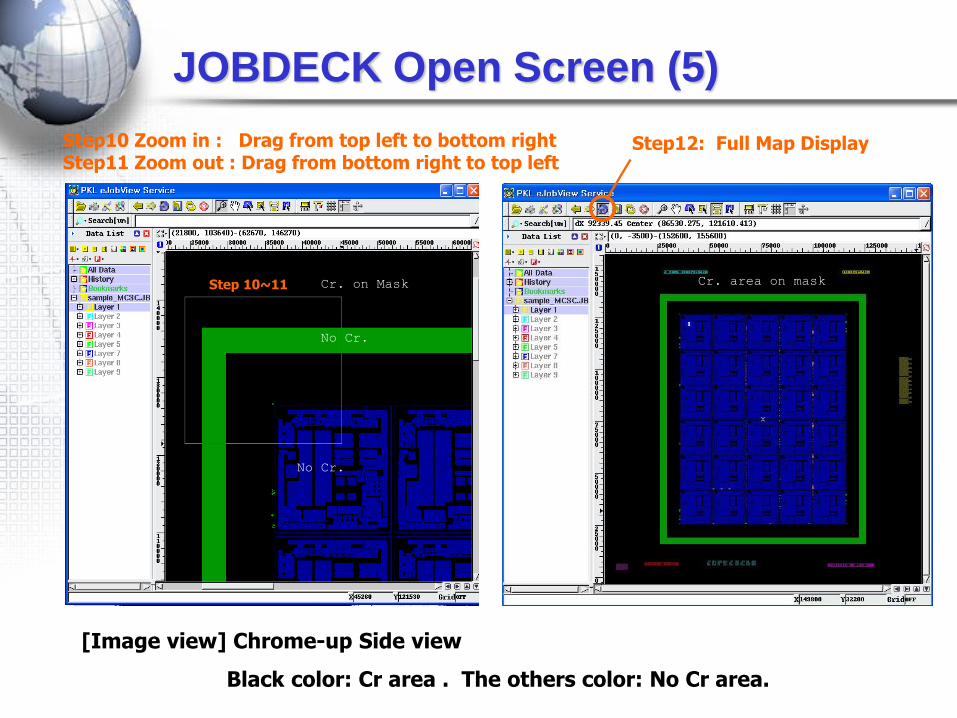
JOBDECK Open Screen (5)
Step10 Zoom in : Drag from top left to bottom right Step11 Zoom out : Drag from bottom right to top left
Step 10~11
Step12: Full Map Display
[Image view] Chrome-up Side view
Black color: Cr area . The others color: No Cr area.
Cr. on Mask Cr. area on mask
No Cr.
No Cr.

JOBDECK Open Screen (6)
- Auto Measure Mode :You can choose this mode from the main tool bar [Auto Measure], or “Screen Menu” opened by right button click on the screen window. With pressing Left Key, you can check distance and coordinate of pattern. Moreover, the behavior of left button drag is the same with “Zoom In/Out” mode.
Click either one!
If you press [Shift Key] on your keyboard, the measure direction will be changed in order of “0 degrees” to “135 degrees” with 45 degrees step.
Moreover, if you click with pressing Ctrl Key, you can do auto-measure without removing the previous result.
Step13

JOBVIEW Logout Screen (1) - Click ‘Log Out’ on the left bottom.
- To exit the eMaskView session, click ‘Y‘ the Confirm button.