Photoshop CS3
23
Adobe Photoshop is a graphics editing program developed and published by Adobe Systems. It was first released in 1990 for Macintosh exclusively. Creating New File When creating a new file, click File then New. Or you can simply hold Ctrl+N as the keyboard shortcut. Upon clicking New, a dialog box will appear. It has the name of the document, image size, and its contents. Resolution: Resolution refers to the number of pixels in a full size image. An image with hi resolution contains more information than an image with lo resolution, and therefore, one can always convert a hi- res image to a lo-res image. However, because information is lost in the conversion, the reverse is not true. If you were to increase the resolution of a lo-res image, the result would be fuzzy. Screen resolution is close to 72 pixels per inch, so if you are working with graphics to be viewed only on screen, 72 should be fine. Depending on the printer you are using, you would want to increase this above 72 for graphics that will be printed. 300 is usually an acceptable resolution for images to be printed; 150 would be the lowest acceptable resolution for printing.
Transcript of Photoshop CS3

Adobe Photoshop is a graphics editing program developed and published by Adobe Systems. It was first released in 1990 for Macintosh exclusively.
Creating New FileWhen creating a new file, click File then New. Or you can simply hold Ctrl+N as the keyboard shortcut.
Upon clicking New, a dialog box will appear. It has the name of the document, image size, and its contents.
Resolution: Resolution refers to the number of pixels in a full size image. An image with hi resolution contains more information than an image with lo resolution, and therefore, one can always convert a hi-res image to a lo-res image. However, because information is lost in the conversion, the reverse is not true. If you were to increase the resolution of a lo-res image, the result would be fuzzy.
Screen resolution is close to 72 pixels per inch, so if you are working with graphics to be viewed only on screen, 72 should be fine. Depending on the printer you are using, you would want to increase this above 72 for graphics that will be printed. 300 is usually an acceptable resolution for images to be printed; 150 would be the lowest acceptable resolution for printing.
Image Size: Resolution should not be confused with image size, which is also expressed in pixels. Image size deals with the actual number of pixels tall and wide an image is. For an idea of how the two differ, go to Image Size in the Image menu, and plug in different numbers for image size and resolution.
Color mode: Color mode refers to the types of colors you will be using in your image. CMYK and RGB are the most important of these modes to be familiar with.
CMYK is the setting for images that will be printed to paper. The letters refer to the four channels of color used to create every color available: cyan, magenta, yellow, and black.
RGB refers to the three channel color mode suitable for images to be viewed on the web: red, green, and blue.
Now that we have an open Photoshop document, we can begin to use some of the basic Photoshop tools.
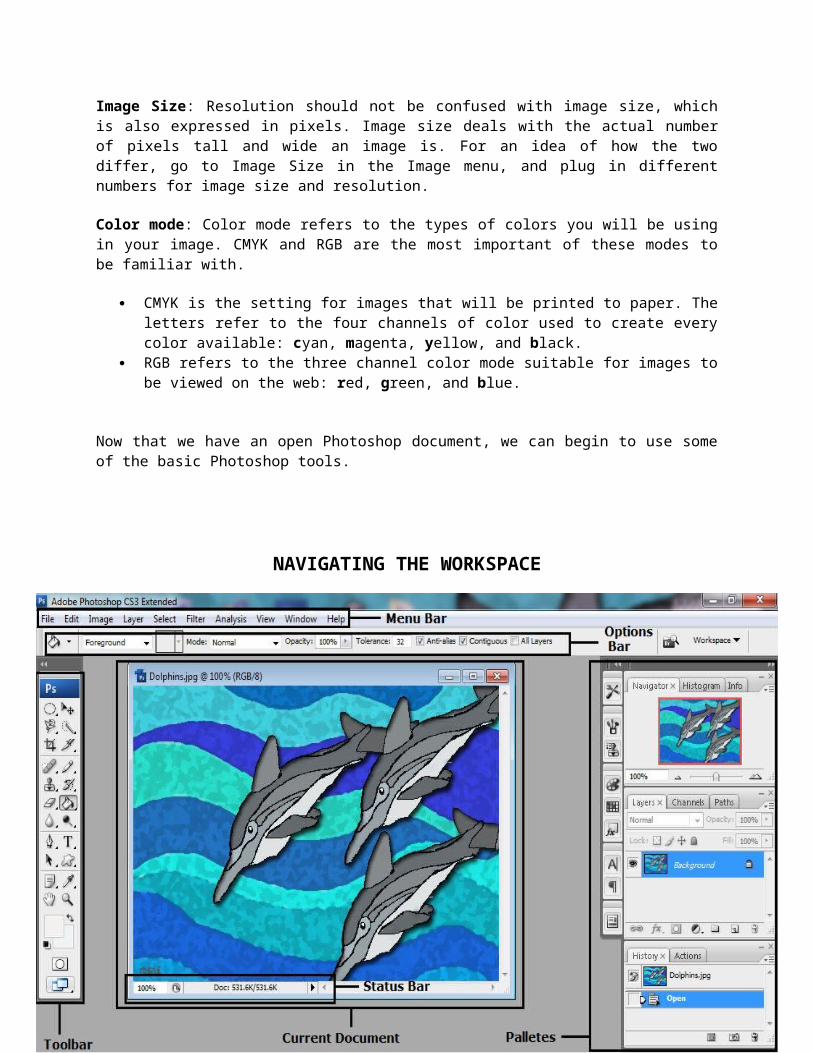
NAVIGATING THE WORKSPACE
The Menu Bar
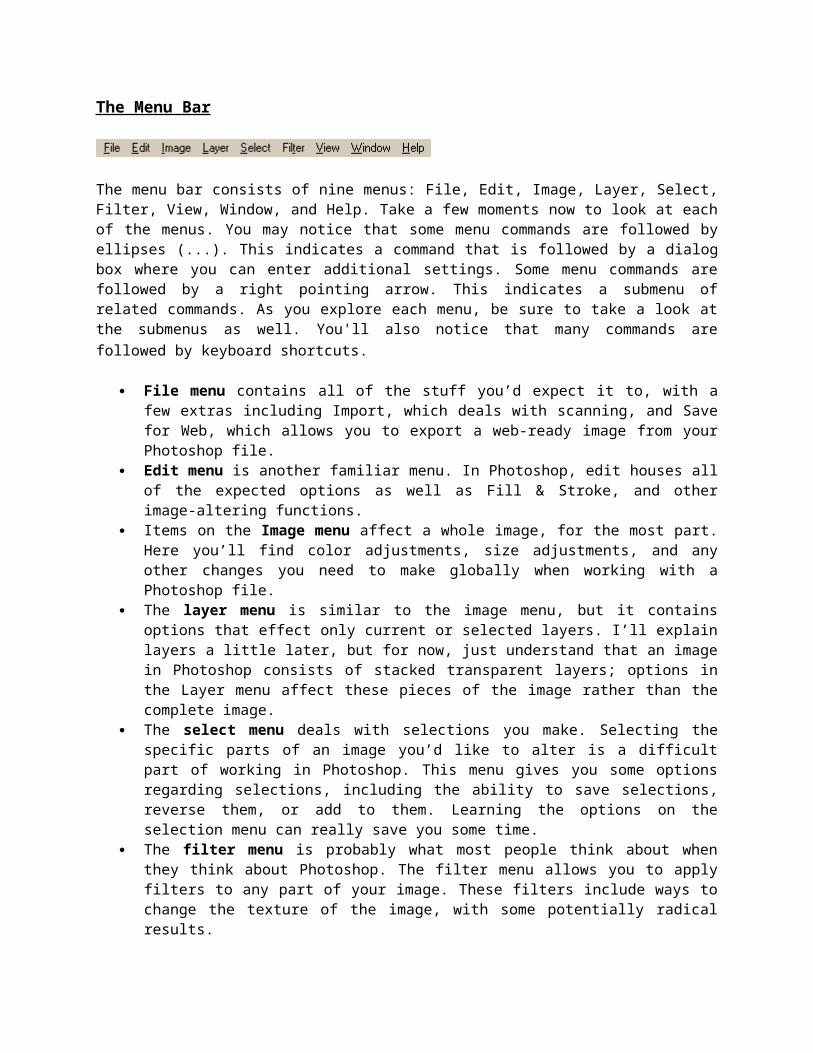
The menu bar consists of nine menus: File, Edit, Image, Layer, Select, Filter, View, Window, and Help. Take a few moments now to look at each of the menus. You may notice that some menu commands are followed by ellipses (...). This indicates a command that is followed by a dialog box where you can enter additional settings. Some menu commands are followed by a right pointing arrow. This indicates a submenu of related commands. As you explore each menu, be sure to take a look at the submenus as well. You'll also notice that many commands are followed by keyboard shortcuts.
File menu contains all of the stuff you’d expect it to, with a few extras including Import, which deals with scanning, and Save for Web, which allows you to export a web-ready image from your Photoshop file.
Edit menu is another familiar menu. In Photoshop, edit houses all of the expected options as well as Fill & Stroke, and other image-altering functions.
Items on the Image menu affect a whole image, for the most part. Here you’ll find color adjustments, size adjustments, and any other changes you need to make globally when working with a Photoshop file.
The layer menu is similar to the image menu, but it contains options that effect only current or selected layers. I’ll explain layers a little later, but for now, just understand that an image in Photoshop consists of stacked transparent layers; options in the Layer menu affect these pieces of the image rather than the complete image.
The select menu deals with selections you make. Selecting the specific parts of an image you’d like to alter is a difficult part of working in Photoshop. This menu gives you some options regarding selections, including the ability to save selections, reverse them, or add to them. Learning the options on the selection menu can really save you some time.
The filter menu is probably what most people think about when they think about Photoshop. The filter menu allows you to apply filters to any part of your image. These filters include ways to change the texture of the image, with some potentially radical results.
The view menu is where you change the view settings. You can use this to show and display guidelines on the image, and to zoom in and out, among other things.
The window menu allows you to toggle back and forth between hide and show for each interface element. This is the first place you should go if you lose track of a particular window while you’re working.
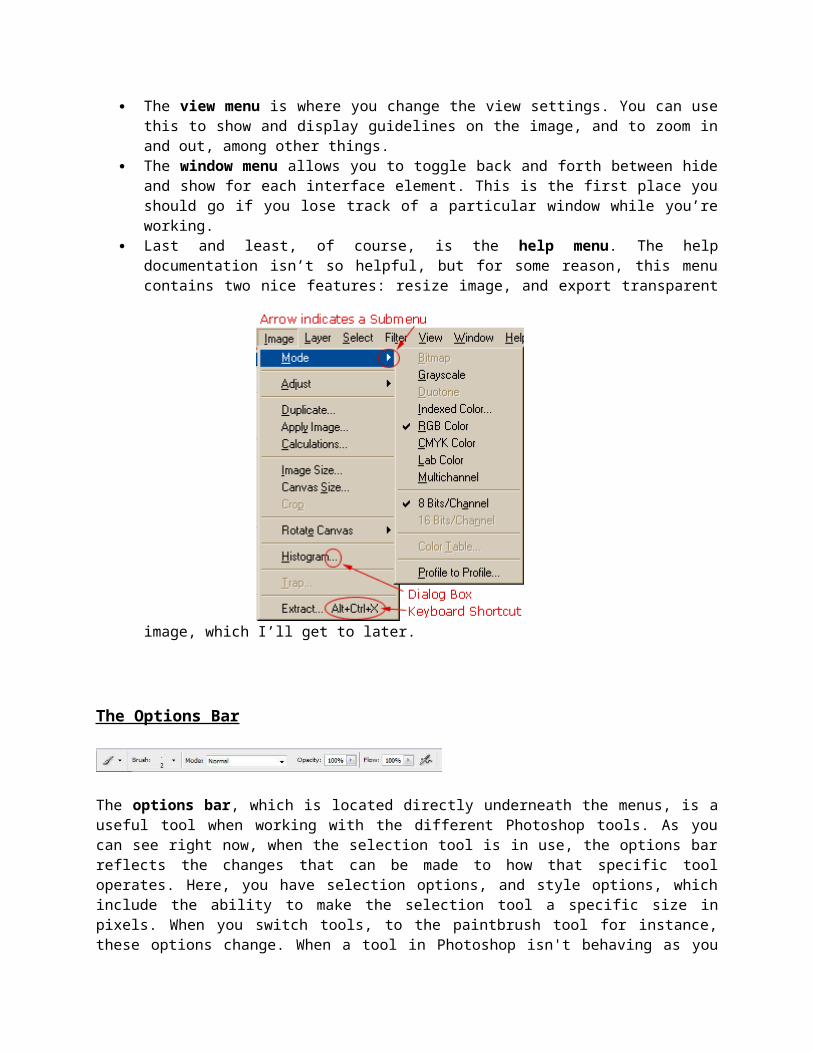
Last and least, of course, is the help menu. The help documentation isn’t so helpful, but for some reason, this menu contains two nice features: resize image, and export transparent image, which I’ll get to later.
The Options Bar
The options bar, which is located directly underneath the menus, is a useful tool when working with the different Photoshop tools. As you can see right now, when the selection tool is in use, the options bar reflects the changes that can be made to how that specific tool operates. Here, you have selection options, and style options, which include the ability to make the selection tool a specific size in pixels. When you switch tools, to the paintbrush tool for instance, these options change. When a tool in Photoshop isn't behaving as you expect it to, the options bar should be the first place you look to fix it.
The Status Bar
To the far left of the status bar you will see the magnification level of the active document. You can swipe your cursor in this area and type in a new number to change the magnification of your document.
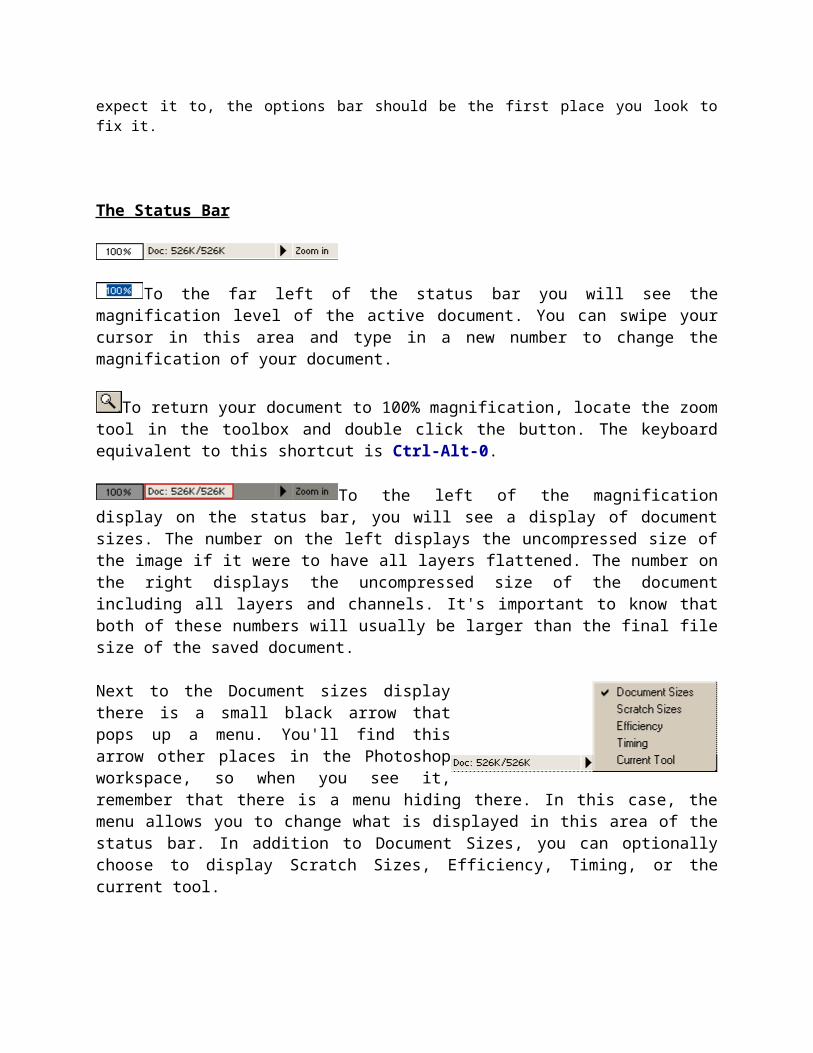
To return your document to 100% magnification, locate the zoom tool in the toolbox and double click the button. The keyboard equivalent to this shortcut is Ctrl-Alt-0.
To the left of the magnification display on the status bar, you will see a display of document sizes. The number on the left displays the uncompressed size of the image if it were to have all layers flattened. The number on the right displays the uncompressed size of the document including all layers and channels. It's important to know that both of these numbers will usually be larger than the final file size of the saved document.
Next to the Document sizes display there is a small black arrow that pops up a menu. You'll find this arrow other places in the Photoshop workspace, so when you see it, remember that there is a menu hiding there. In this case, the menu allows you to change what is displayed in this area of the status bar. In addition to Document Sizes, you can optionally choose to display Scratch Sizes, Efficiency, Timing, or the current tool.
The Palettes
When you first open Photoshop, the palettes are stacked along the right edge of your screen in palette groups. The first group contains the Navigator, Info, and Options palettes. Next is the Color Swatches, and Brushes palettes. Below that are the History and Actions Palettes. Finally, you have the Layers, Channels, and Paths Palettes.All sorts of information is displayed in these palletes, and therefore they can get a little confusing. They display location information, tool options, and history, among other things.
Palette groups can be moved around in the workspace by clicking on the title bar and dragging. Each palette group has a collapse and a close button in the title bar area.
Color Palette Expanded
Color Palette Partially Collapsed
Color Palette Completely Collapsed
The Toolbar
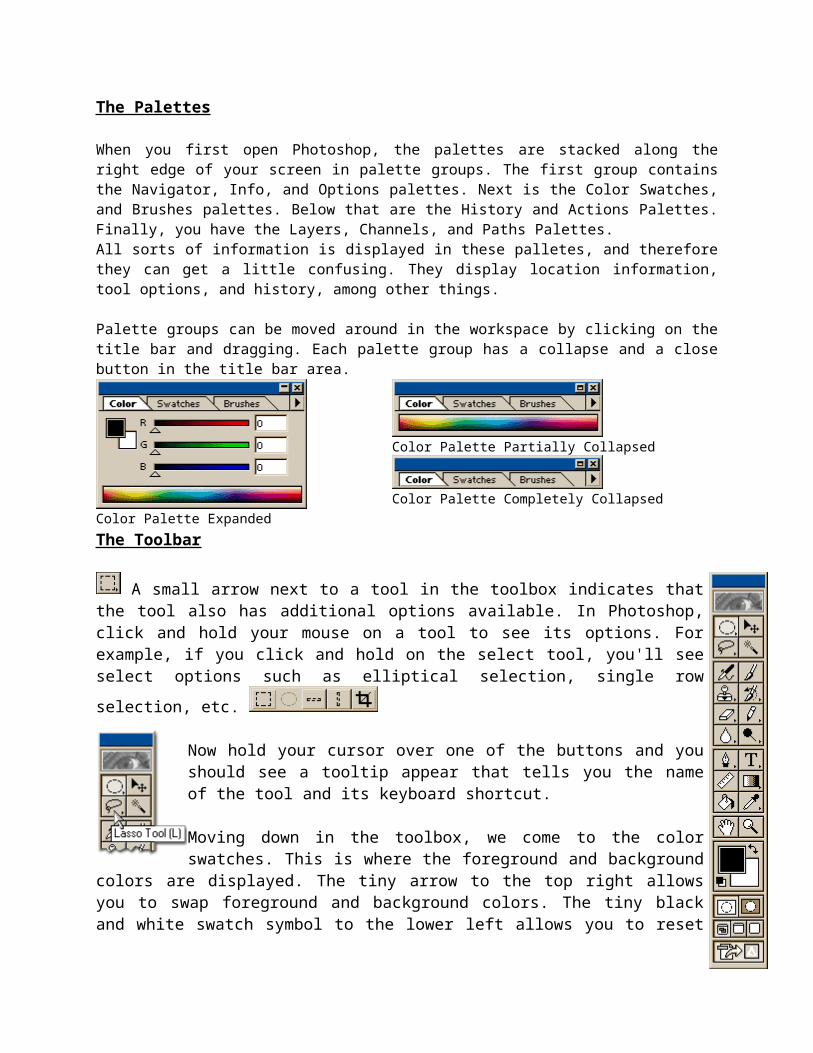
A small arrow next to a tool in the toolbox indicates that the tool also has additional options available. In Photoshop, click and hold your mouse on a tool to see its options. For example, if you click and hold on the select tool, you'll see select options such as elliptical selection, single row
selection, etc.
Now hold your cursor over one of the buttons and you should see a tooltip appear that tells you the name of the tool and its keyboard shortcut.
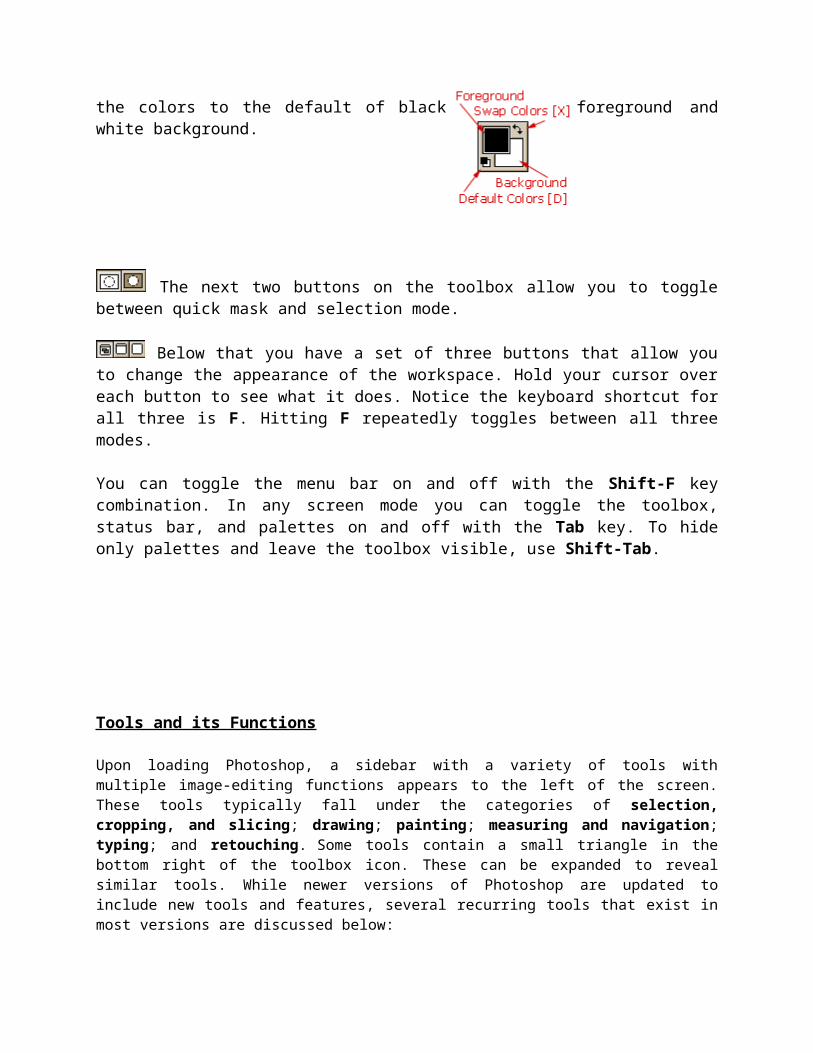
Moving down in the toolbox, we come to the color swatches. This is where the foreground and background colors are displayed. The tiny arrow to the top right allows you to swap
foreground and background colors. The tiny black and white swatch symbol to the lower left allows you to reset the colors to the default of black foreground and white background.
The next two buttons on the toolbox allow you to toggle between quick mask and selection mode.
Below that you have a set of three buttons that allow you to change the appearance of the workspace. Hold your cursor over each button to see what it does. Notice the keyboard shortcut for all three is F. Hitting F repeatedly toggles between all three modes.
You can toggle the menu bar on and off with the Shift-F key combination. In any screen mode you can toggle the toolbox, status bar, and palettes on and off with the Tab key. To hide only palettes and leave the toolbox visible, use Shift-Tab.
Tools and its Functions
Upon loading Photoshop, a sidebar with a variety of tools with multiple image-editing functions appears to the left of the screen. These tools typically fall under the categories of selection, cropping, and slicing; drawing; painting; measuring and navigation; typing; and retouching. Some tools contain a small triangle in the bottom right of the toolbox icon. These can be expanded to reveal similar tools. While newer versions of Photoshop are updated to include new tools and features, several recurring tools that exist in most versions are discussed below:
Selection Tools GalleryThe marquee tool can make selections that are single row, single column, rectangular and elliptical. Once an area of an image is highlighted, the move tool
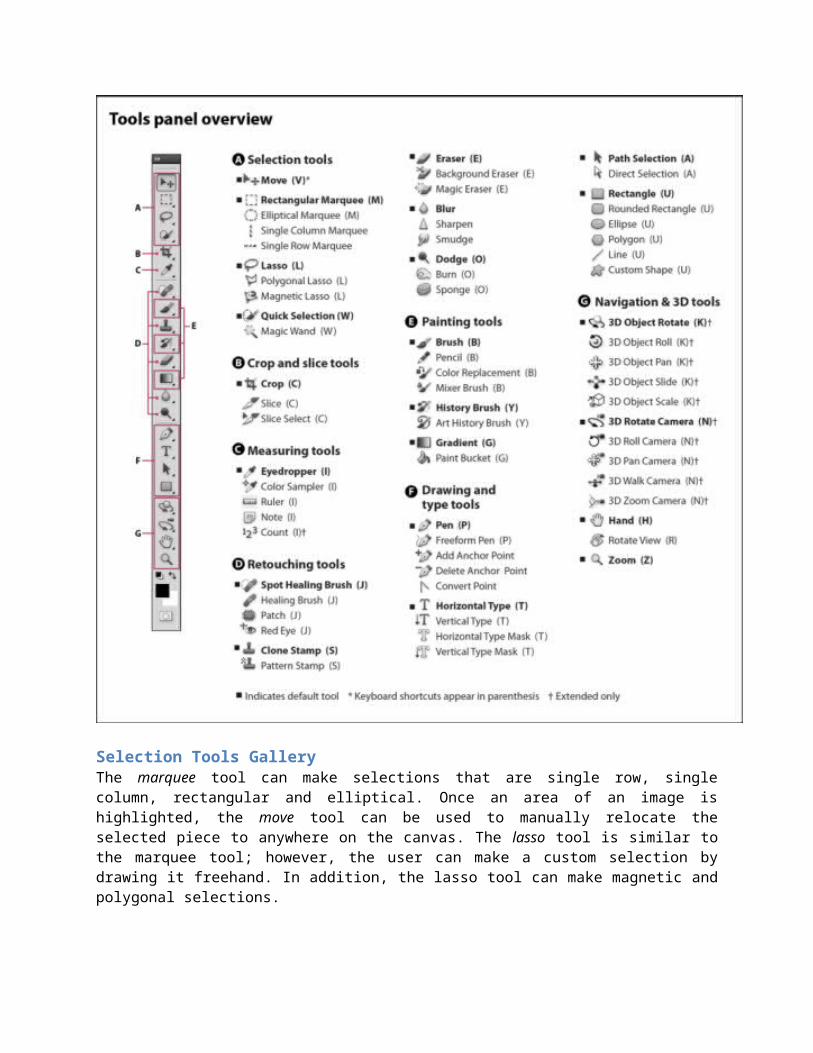
can be used to manually relocate the selected piece to anywhere on the canvas. The lasso tool is similar to the marquee tool; however, the user can make a custom selection by drawing it freehand. In addition, the lasso tool can make magnetic and polygonal selections.
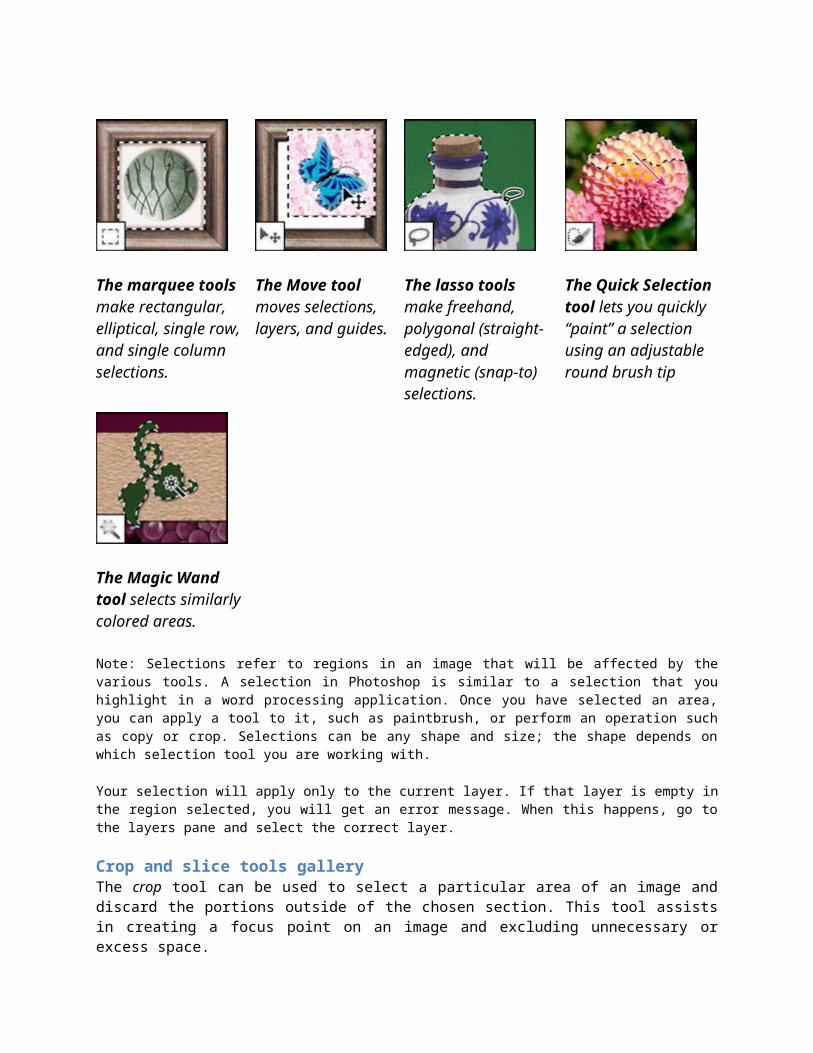
The marquee tools make rectangular, elliptical, single row, and single column selections.
The Move tool moves selections, layers, and guides.
The lasso tools make freehand, polygonal (straight-edged), and magnetic (snap-to) selections.
The Quick Selection tool lets you quickly “paint” a selection using an adjustable round brush tip
The Magic Wand tool selects similarly colored areas.
Note: Selections refer to regions in an image that will be affected by the various tools. A selection in Photoshop is similar to a selection that you highlight in a word processing application. Once you have selected an area, you can apply a tool to it, such as paintbrush, or perform an operation such as copy or crop. Selections can be any shape and size; the shape depends on which selection tool you are working with.
Your selection will apply only to the current layer. If that layer is empty in the region selected, you will get an error message. When this happens, go to the layers pane and select the correct layer.
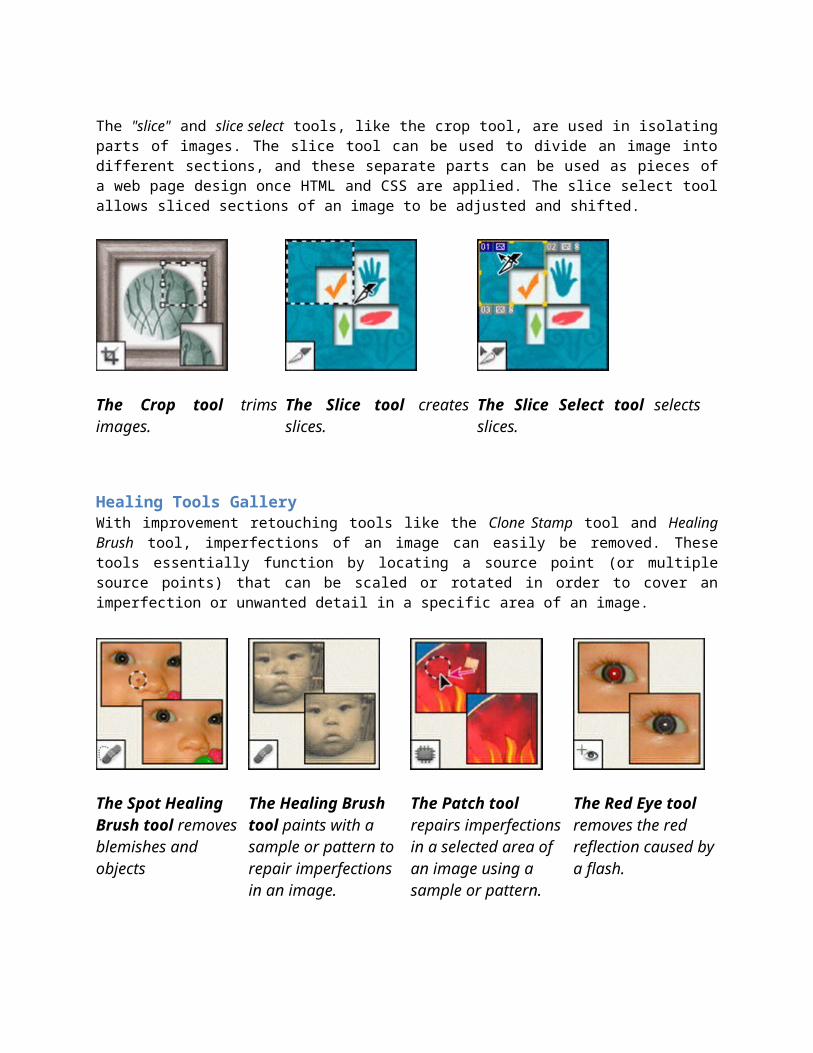
Crop and slice tools gallery The crop tool can be used to select a particular area of an image and discard the portions outside of the chosen section. This tool assists in creating a focus point on an image and excluding unnecessary or excess space.
The "slice" and slice select tools, like the crop tool, are used in isolating parts of images. The slice tool can be used to divide an image into different sections, and these separate parts can be used as pieces of a web page design once HTML and CSS are applied. The slice select tool allows sliced sections of an image to be adjusted and shifted.
The Crop tool trims images. The Slice tool creates slices. The Slice Select tool selects slices.
Healing Tools GalleryWith improvement retouching tools like the Clone Stamp tool and Healing Brush tool, imperfections of an image can easily be removed. These tools essentially function by locating a source point (or multiple source points) that can be scaled or rotated in order to cover an imperfection or unwanted detail in a specific area of an image.
The Spot Healing Brush tool removes blemishes and objects
The Healing Brush tool paints with a sample or pattern to repair imperfections in an image.
The Patch tool repairs imperfections in a selected area of an image using a sample or pattern.
The Red Eye tool removes the red reflection caused by a flash.
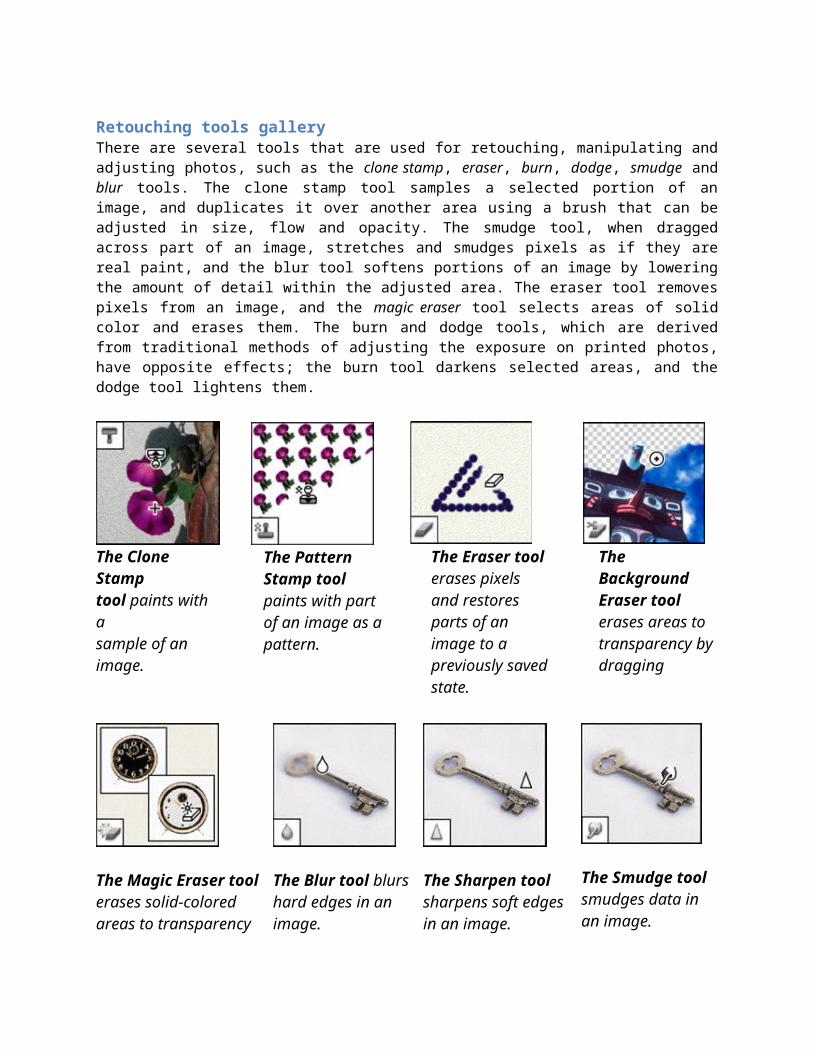
Retouching tools gallery There are several tools that are used for retouching, manipulating and adjusting photos, such as the clone stamp, eraser, burn, dodge, smudge and blur tools. The clone stamp tool samples a selected portion of an image, and duplicates it over another area using a brush that can be adjusted in size, flow and opacity. The smudge tool, when dragged across part of an image, stretches and smudges pixels as if they are real paint, and the blur tool softens portions of an image by lowering the amount of detail within the adjusted area. The eraser tool removes pixels from
an image, and the magic eraser tool selects areas of solid color and erases them. The burn and dodge tools, which are derived from traditional methods of adjusting the exposure on printed photos, have opposite effects; the burn tool darkens selected areas, and the dodge tool lightens them.
The Clone Stamp tool paints with a sample of an image.
The Pattern Stamp tool paints with part of an image as a pattern.
The Eraser tool erases pixels and restores parts of an image to a previously saved
state.The Background Eraser tool erases areas to transparency by dragging
The Magic Eraser tool erases solid-colored areas to transparency with a single click.
The Blur tool blurs hard edges in an image.
The Sharpen tool sharpens soft edges in an image.
The Smudge tool smudges data in an image.
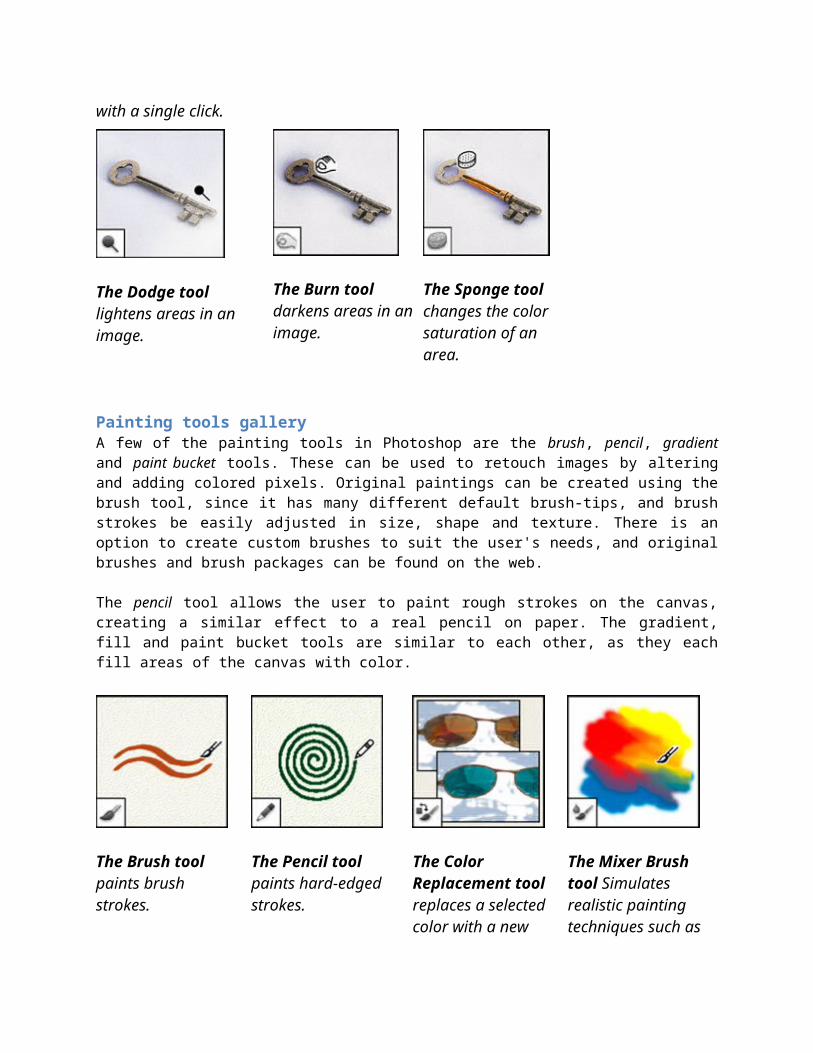
The Dodge tool lightens areas in an image.
The Burn tool darkens areas in an image.
The Sponge tool changes the color saturation of an area.
Painting tools gallery A few of the painting tools in Photoshop are the brush, pencil, gradient and paint bucket tools. These can be used to retouch images by altering and adding colored pixels. Original paintings can be created using the brush tool, since it has many different default brush-tips, and brush strokes be easily adjusted in size, shape and texture. There is an option to create custom brushes to suit the user's needs, and original brushes and brush packages can be found on the web.
The pencil tool allows the user to paint rough strokes on the canvas, creating a similar effect to a real pencil on paper. The gradient, fill and paint bucket tools are similar to each other, as they each fill areas of the canvas with color.
The Brush tool paints brush strokes.
The Pencil tool paints hard-edged strokes.
The Color Replacement tool replaces a selected color with a new color.
The Mixer Brush tool Simulates realistic painting techniques such as blending canvas colors and varying paint wetness.
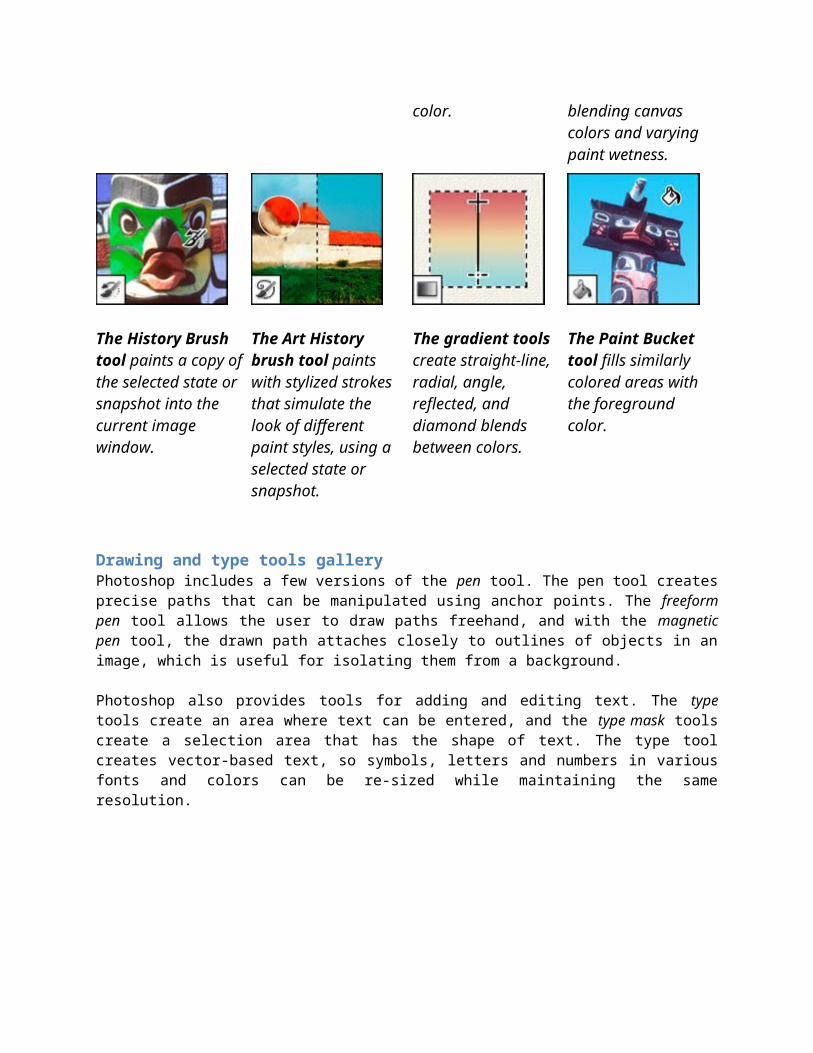
The History Brush tool paints a copy of the selected state or snapshot into the current image window.
The Art History brush tool paints with stylized strokes that simulate the look of different paint styles, using a selected state or snapshot.
The gradient tools create straight-line, radial, angle, reflected, and diamond blends between colors.
The Paint Bucket tool fills similarly colored areas with the foreground color.
Drawing and type tools gallery Photoshop includes a few versions of the pen tool. The pen tool creates precise paths that can be manipulated using anchor points. The freeform pen tool allows the user to draw paths freehand, and with the magnetic pen tool, the drawn path attaches closely to outlines of objects in an image, which is useful for isolating them from a background.
Photoshop also provides tools for adding and editing text. The type tools create an area where text can be entered, and the type mask tools create a selection area that has the shape of text. The type tool creates vector-based text, so symbols, letters and numbers in various fonts and colors can be re-sized while maintaining the same resolution.
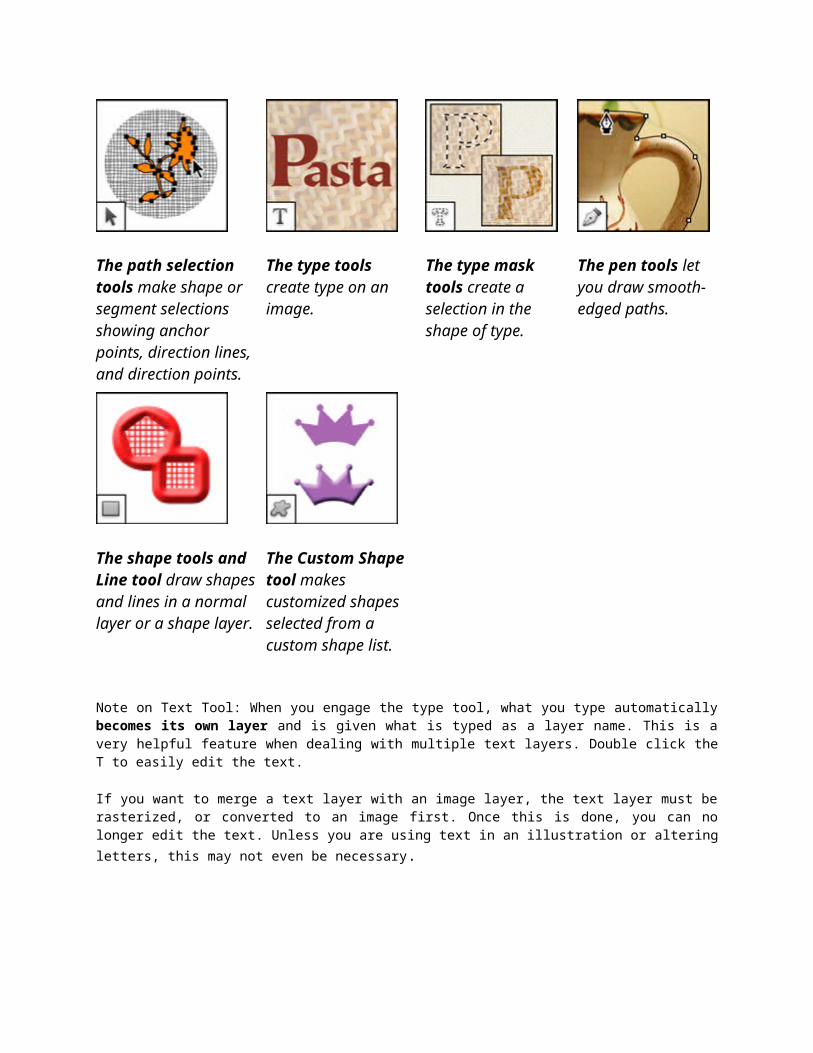
The path selection tools make shape or segment selections showing anchor points, direction lines, and direction points.
The type tools create type on an image.
The type mask tools create a selection in the shape of type.
The pen tools let you draw smooth-edged paths.
The shape tools and Line tool draw shapes and lines in a normal layer or a shape layer.
The Custom Shape tool makes customized shapes selected from a custom shape list.
Note on Text Tool: When you engage the type tool, what you type automatically becomes its own layer and is given what is typed as a layer name. This is a very helpful feature when dealing with multiple text layers. Double click the T to easily edit the text.
If you want to merge a text layer with an image layer, the text layer must be rasterized, or converted to an image first. Once this is done, you can no longer edit the text. Unless you are using text in an illustration or altering letters, this may not even be necessary.
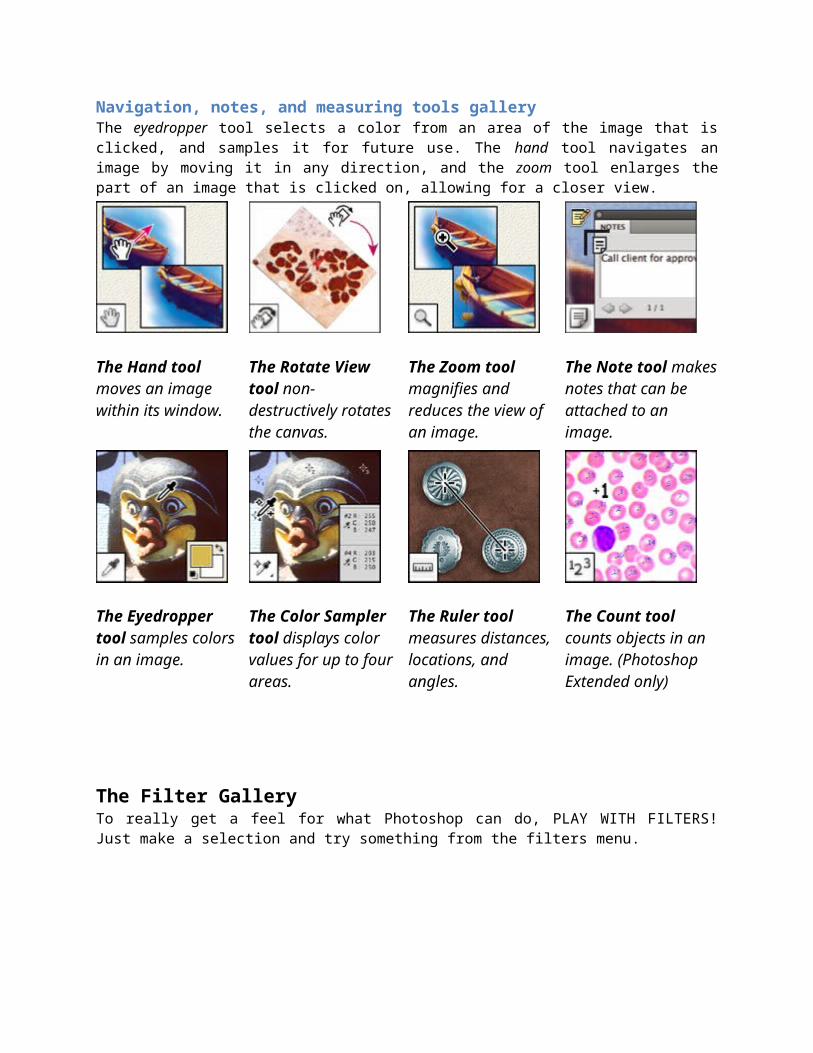
Navigation, notes, and measuring tools gallery The eyedropper tool selects a color from an area of the image that is clicked, and samples it for future use. The hand tool navigates an image by moving it in any direction, and the zoom tool enlarges the part of an image that is clicked on, allowing for a closer view.
The Hand tool moves an image within its window.
The Rotate View tool non-destructively rotates the canvas.
The Zoom tool magnifies and reduces the view of an image.
The Note tool makes notes that can be attached to an image.
The Eyedropper tool samples colors in an image.
The Color Sampler tool displays color values for up to four areas.
The Ruler tool measures distances, locations, and angles.
The Count tool counts objects in an image. (Photoshop Extended only)
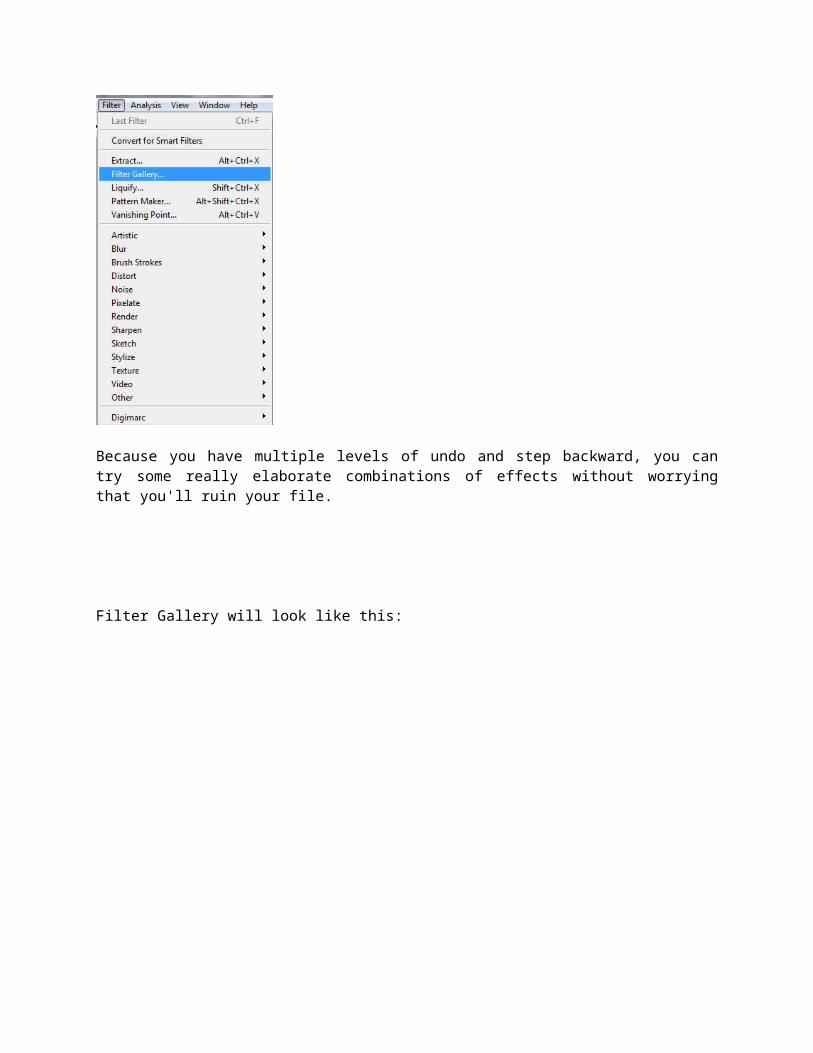
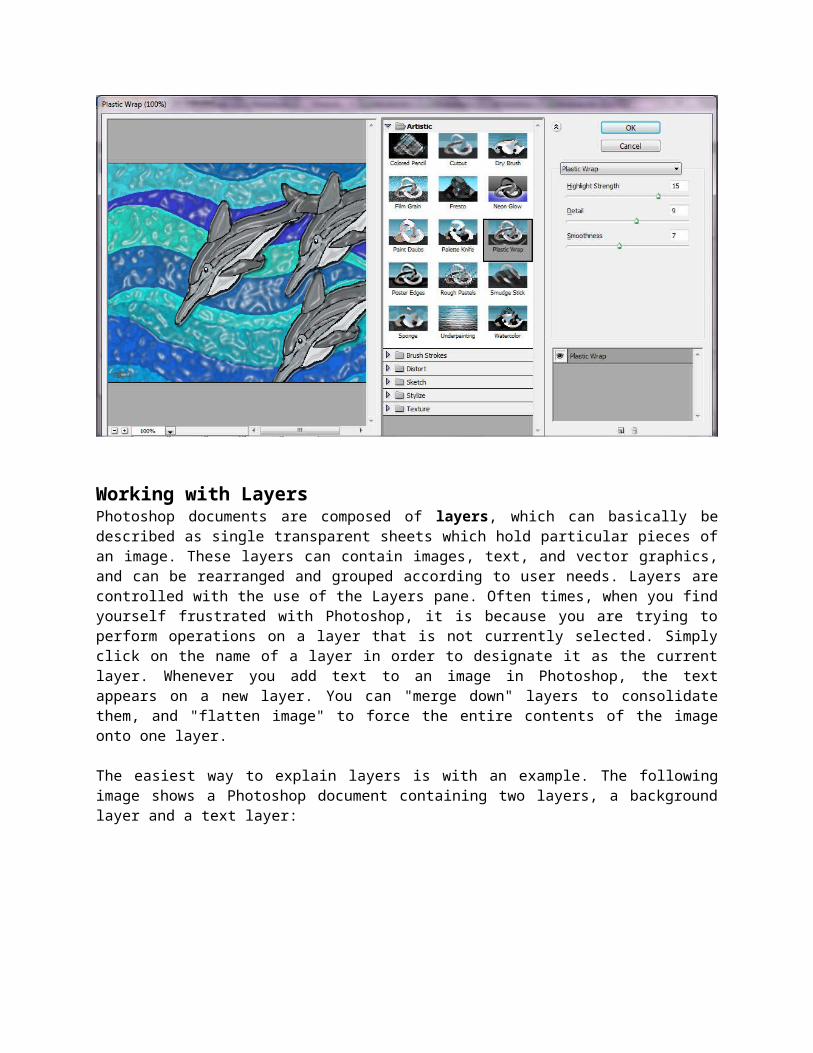
The Filter GalleryTo really get a feel for what Photoshop can do, PLAY WITH FILTERS! Just make a selection and try something from the filters menu.
Because you have multiple levels of undo and step backward, you can try some really elaborate combinations of effects without worrying that you'll ruin your file.
Filter Gallery will look like this:
Working with LayersPhotoshop documents are composed of layers, which can basically be described as single transparent sheets which hold particular pieces of an image. These layers can contain images, text, and vector graphics, and can be rearranged and grouped according to user needs. Layers are controlled with the use of the Layers pane. Often times, when you find yourself frustrated with Photoshop, it is because you are trying to perform operations on a layer that is not currently selected. Simply click on the name of a layer in order to designate it as the current layer. Whenever you add text to an image in Photoshop, the text appears on a new layer. You can "merge down" layers to consolidate them, and "flatten image" to force the entire contents of the image onto one layer.
The easiest way to explain layers is with an example. The following image shows a Photoshop document containing two layers, a background layer and a text layer:
Each layer can be manipulated, drawn on, and moved around independently of any other layer. Imagine that each layer is actually a physical sheet of clear plastic, with the graphic imprinted on the plastic:
The Layers PaletteWhen we open an existing file or create a brand new one, the canvas in front of us lies on its own layer. Generally this layer is already named background and we can see it in the layers palette on the right hand side of the program.
The layers palette is the control panel for layers in Photoshop. Layers can be placed one on top of another and moved around by clicking on the layer name and dragging the mouse up or down.
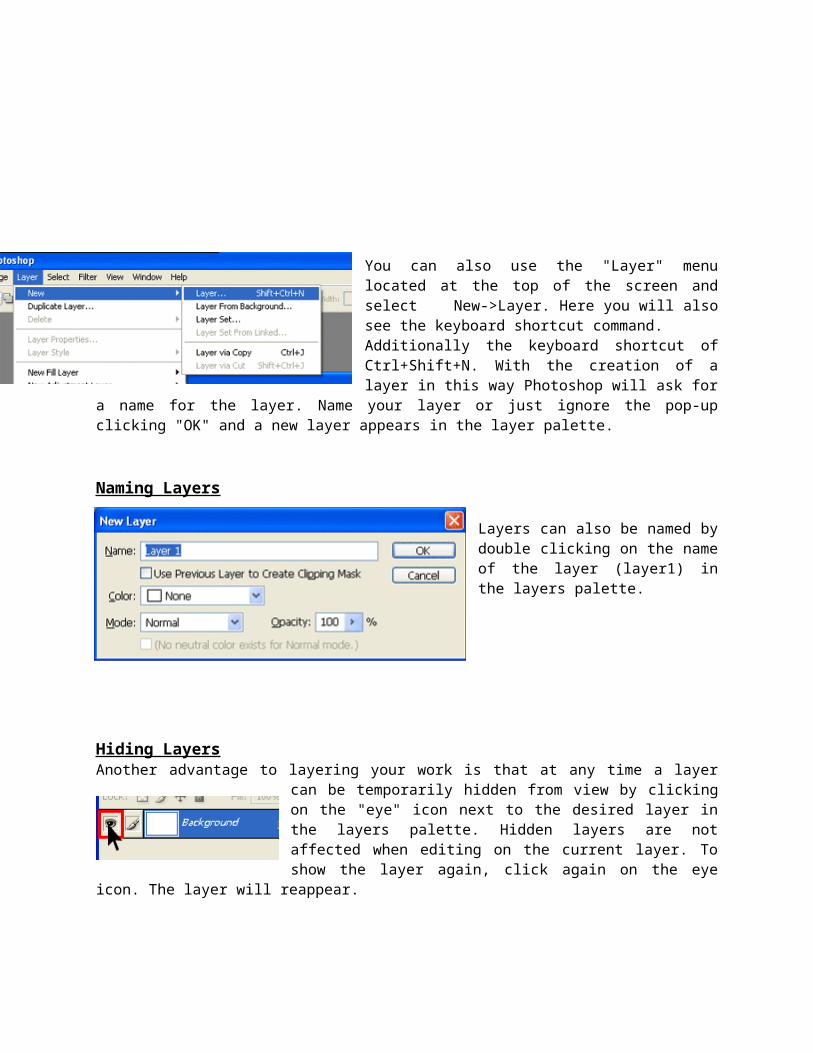
Creating LayersThere are a number of ways to create a layer. The simplest involves clicking on the "Create New Layer" icon at the bottom right of the layers palette.
You can also use the "Layer" menu located at the top of the screen and select New->Layer. Here you will also see the keyboard shortcut command.Additionally the keyboard shortcut of Ctrl+Shift+N. With the creation of a layer in this way Photoshop
will ask for a name for the layer. Name your layer or just ignore the pop-up clicking "OK" and a new layer appears in the layer palette.
Naming Layers
Layers can also be named by double clicking on the name of the layer (layer1) in the layers palette.
Hiding LayersAnother advantage to layering your work is that at any time a layer can be temporarily hidden from view by clicking on the "eye" icon next to the desired layer
in the layers palette. Hidden layers are not affected when editing on the current layer. To show the layer again, click again on the eye icon. The layer will reappear.
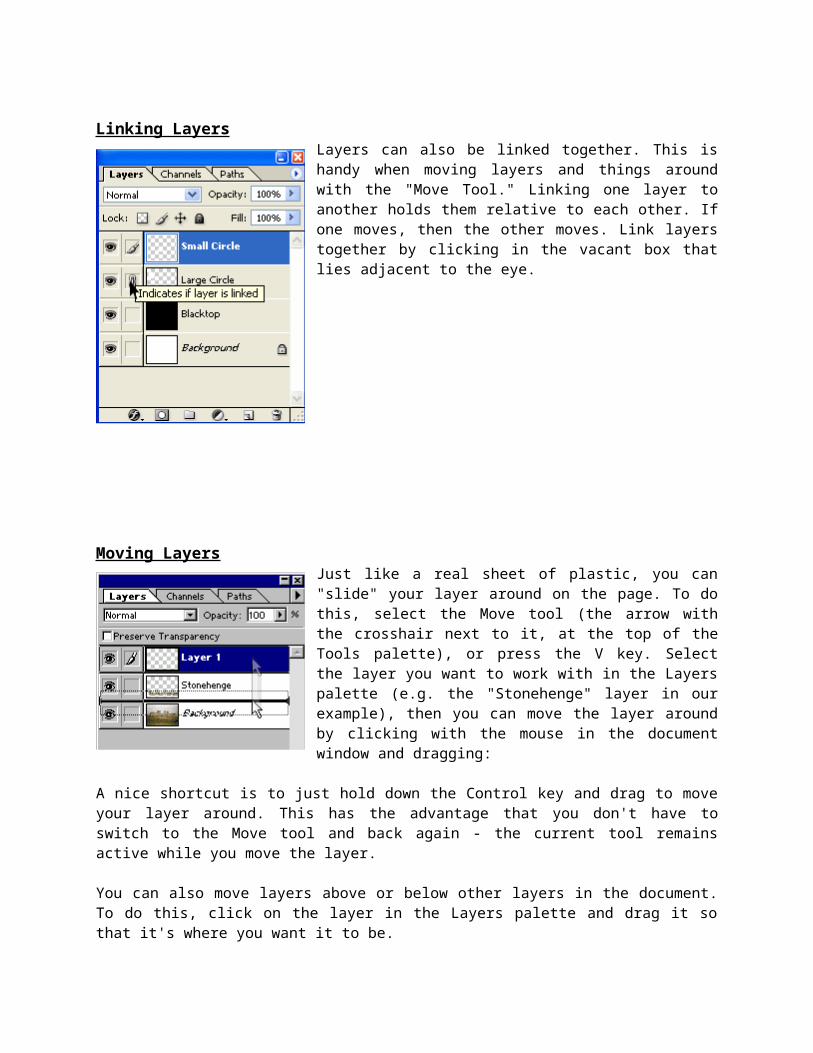
Linking LayersLayers can also be linked together. This is handy when moving layers and things around with the "Move Tool." Linking one layer to another holds them relative to each other. If one moves, then the other moves. Link layers together by clicking in the vacant box that lies adjacent to the eye.
Moving LayersJust like a real sheet of plastic, you can "slide" your layer around on the page. To do this, select the Move tool (the arrow with the crosshair next to it, at the top of the Tools palette), or press the V key. Select the layer you want to work with in the Layers palette (e.g. the "Stonehenge" layer in our example), then you can move the layer around by clicking with the mouse in the document window and dragging:
A nice shortcut is to just hold down the Control key and drag to move your layer around. This has the
advantage that you don't have to switch to the Move tool and back again - the current tool remains active while you move the layer.
You can also move layers above or below other layers in the document. To do this, click on the layer in the Layers palette and drag it so that it's where you want it to be.
Copying layersYou'll often want to duplicate an existing layer so that you can work on a copy of it. To make a copy of a layer, either drag the layer in the Layers palette to the New icon at the bottom of the palette, or select the layer and then select Layer > Duplicate Layer (this method allows you to name the new layer too).

Deleting layersIf you get carried away with your layers and you want to delete one, find the layer in the Layers palette and drag it down to the little trash can icon. Or select Delete Layer from the Layer menu.
Saving Photoshop DocumentAfter editing an image, you can save the current document as a photoshop document or .psd. A .psd file is the file format in which Photoshop saves documents by default. It is a multi-layer document that retains its full editing options when saved. In many cases you will export webgraphics from a .psd document.
The edited image can also be saved as JPEG, PNG, GIF, BMP, etc.
PHOTOSHOP
Group 2Abrigo, JanetAgoot, Ma. RegelAnion, CathyrineAquino, Maria FatimaBallano, RiemarCabual, Joana AshleyCemania, Mark JohnEscalante, Queenie Mae
Jamero, Jose CarlosNuñez, JesterQuipit, SofiaSantioque, MaronTabobo, QuennieTarnate, AngelicaBC II-3