PHOTOSHOP - 114.79.143.8114.79.143.8/studentdesk/Download/Photoshop.pdf · Duplicate Layer- Using...
216
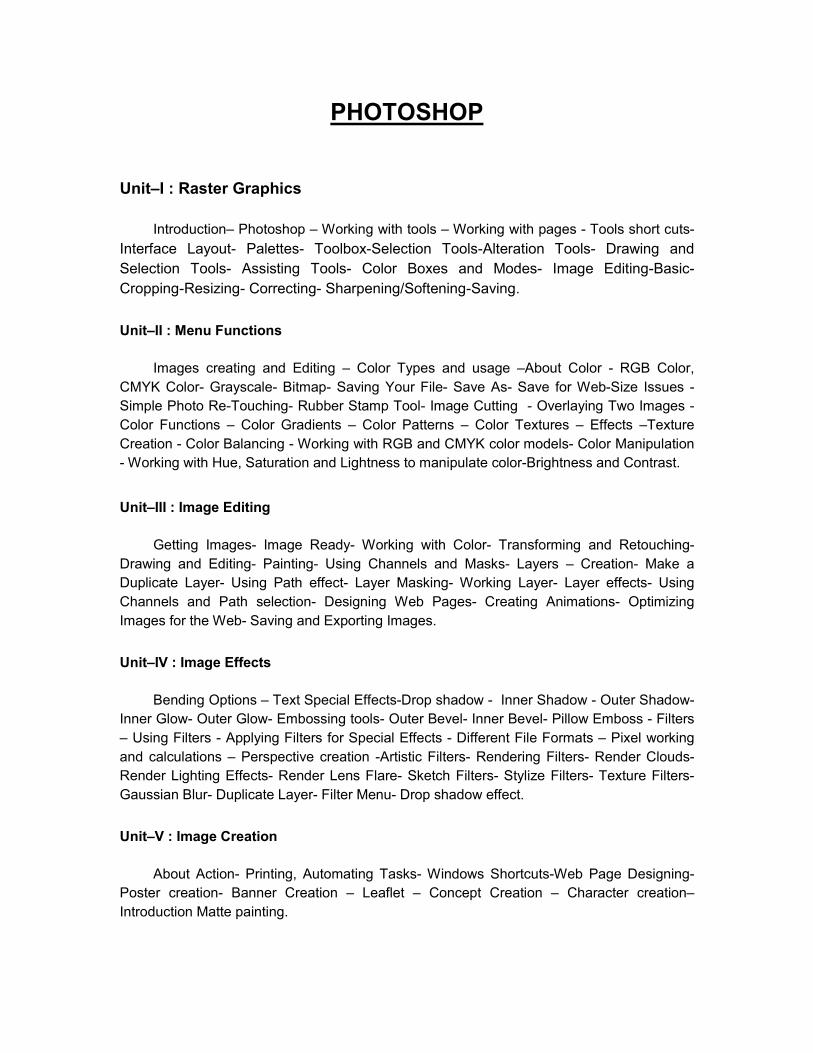
PHOTOSHOP Unit–I : Raster Graphics Introduction– Photoshop – Working with tools – Working with pages - Tools short cuts- Interface Layout- Palettes- Toolbox-Selection Tools-Alteration Tools- Drawing and Selection Tools- Assisting Tools- Color Boxes and Modes- Image Editing-Basic- Cropping-Resizing- Correcting- Sharpening/Softening-Saving. Unit–II : Menu Functions Images creating and Editing – Color Types and usage –About Color - RGB Color, CMYK Color- Grayscale- Bitmap- Saving Your File- Save As- Save for Web-Size Issues - Simple Photo Re-Touching- Rubber Stamp Tool- Image Cutting - Overlaying Two Images - Color Functions – Color Gradients – Color Patterns – Color Textures – Effects –Texture Creation - Color Balancing - Working with RGB and CMYK color models- Color Manipulation - Working with Hue, Saturation and Lightness to manipulate color-Brightness and Contrast. Unit–III : Image Editing Getting Images- Image Ready- Working with Color- Transforming and Retouching- Drawing and Editing- Painting- Using Channels and Masks- Layers – Creation- Make a Duplicate Layer- Using Path effect- Layer Masking- Working Layer- Layer effects- Using Channels and Path selection- Designing Web Pages- Creating Animations- Optimizing Images for the Web- Saving and Exporting Images. Unit–IV : Image Effects Bending Options – Text Special Effects-Drop shadow - Inner Shadow - Outer Shadow- Inner Glow- Outer Glow- Embossing tools- Outer Bevel- Inner Bevel- Pillow Emboss - Filters – Using Filters - Applying Filters for Special Effects - Different File Formats – Pixel working and calculations – Perspective creation -Artistic Filters- Rendering Filters- Render Clouds- Render Lighting Effects- Render Lens Flare- Sketch Filters- Stylize Filters- Texture Filters- Gaussian Blur- Duplicate Layer- Filter Menu- Drop shadow effect. Unit–V : Image Creation About Action- Printing, Automating Tasks- Windows Shortcuts-Web Page Designing- Poster creation- Banner Creation – Leaflet – Concept Creation – Character creation– Introduction Matte painting.
Transcript of PHOTOSHOP - 114.79.143.8114.79.143.8/studentdesk/Download/Photoshop.pdf · Duplicate Layer- Using...
PHOTOSHOP
Unit–I : Raster Graphics
Introduction– Photoshop – Working with tools – Working with pages - Tools short cuts-
Interface Layout- Palettes- Toolbox-Selection Tools-Alteration Tools- Drawing and
Selection Tools- Assisting Tools- Color Boxes and Modes- Image Editing-Basic-
Cropping-Resizing- Correcting- Sharpening/Softening-Saving.
Unit–II : Menu Functions
Images creating and Editing – Color Types and usage –About Color - RGB Color,
CMYK Color- Grayscale- Bitmap- Saving Your File- Save As- Save for Web-Size Issues -
Simple Photo Re-Touching- Rubber Stamp Tool- Image Cutting - Overlaying Two Images -
Color Functions – Color Gradients – Color Patterns – Color Textures – Effects –Texture
Creation - Color Balancing - Working with RGB and CMYK color models- Color Manipulation
- Working with Hue, Saturation and Lightness to manipulate color-Brightness and Contrast.
Unit–III : Image Editing
Getting Images- Image Ready- Working with Color- Transforming and Retouching-
Drawing and Editing- Painting- Using Channels and Masks- Layers – Creation- Make a
Duplicate Layer- Using Path effect- Layer Masking- Working Layer- Layer effects- Using
Channels and Path selection- Designing Web Pages- Creating Animations- Optimizing
Images for the Web- Saving and Exporting Images.
Unit–IV : Image Effects
Bending Options – Text Special Effects-Drop shadow - Inner Shadow - Outer Shadow-
Inner Glow- Outer Glow- Embossing tools- Outer Bevel- Inner Bevel- Pillow Emboss - Filters
– Using Filters - Applying Filters for Special Effects - Different File Formats – Pixel working
and calculations – Perspective creation -Artistic Filters- Rendering Filters- Render Clouds-
Render Lighting Effects- Render Lens Flare- Sketch Filters- Stylize Filters- Texture Filters-
Gaussian Blur- Duplicate Layer- Filter Menu- Drop shadow effect.
Unit–V : Image Creation
About Action- Printing, Automating Tasks- Windows Shortcuts-Web Page Designing-
Poster creation- Banner Creation – Leaflet – Concept Creation – Character creation–
Introduction Matte painting.

2
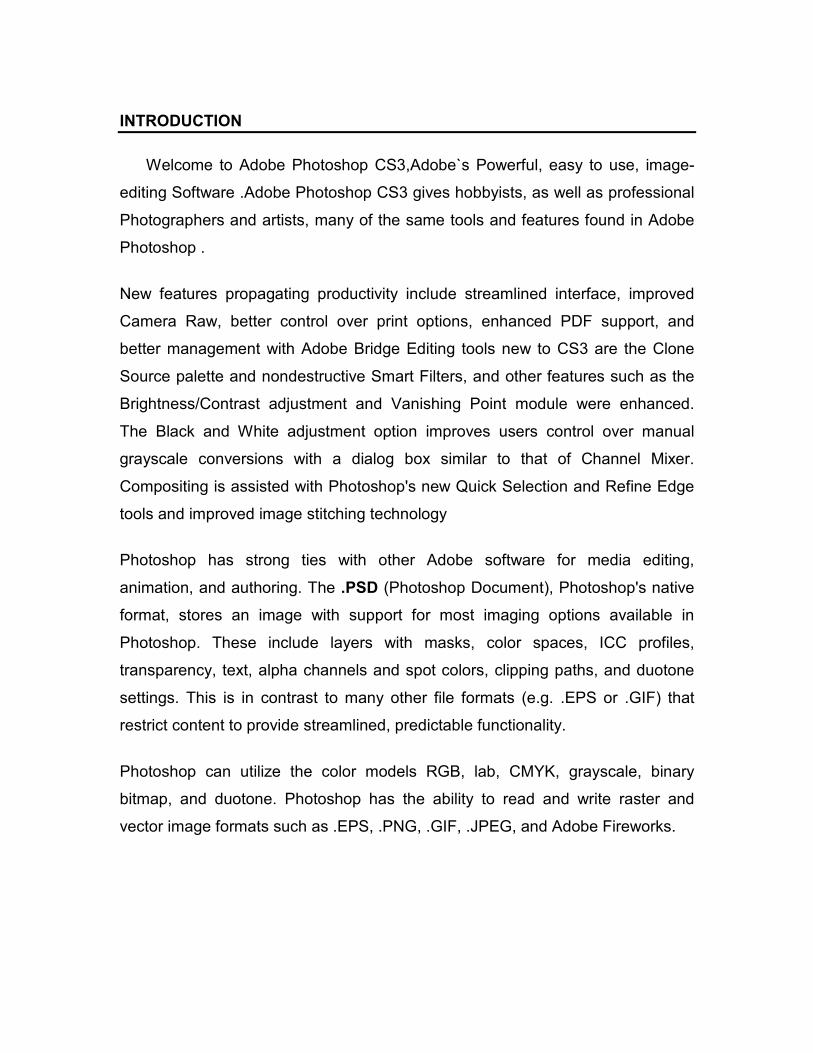
INTRODUCTION
Welcome to Adobe Photoshop CS3,Adobe`s Powerful, easy to use, image-
editing Software .Adobe Photoshop CS3 gives hobbyists, as well as professional
Photographers and artists, many of the same tools and features found in Adobe
Photoshop .
New features propagating productivity include streamlined interface, improved
Camera Raw, better control over print options, enhanced PDF support, and
better management with Adobe Bridge Editing tools new to CS3 are the Clone
Source palette and nondestructive Smart Filters, and other features such as the
Brightness/Contrast adjustment and Vanishing Point module were enhanced.
The Black and White adjustment option improves users control over manual
grayscale conversions with a dialog box similar to that of Channel Mixer.
Compositing is assisted with Photoshop's new Quick Selection and Refine Edge
tools and improved image stitching technology
Photoshop has strong ties with other Adobe software for media editing,
animation, and authoring. The .PSD (Photoshop Document), Photoshop's native
format, stores an image with support for most imaging options available in
Photoshop. These include layers with masks, color spaces, ICC profiles,
transparency, text, alpha channels and spot colors, clipping paths, and duotone
settings. This is in contrast to many other file formats (e.g. .EPS or .GIF) that
restrict content to provide streamlined, predictable functionality.
Photoshop can utilize the color models RGB, lab, CMYK, grayscale, binary
bitmap, and duotone. Photoshop has the ability to read and write raster and
vector image formats such as .EPS, .PNG, .GIF, .JPEG, and Adobe Fireworks.
4
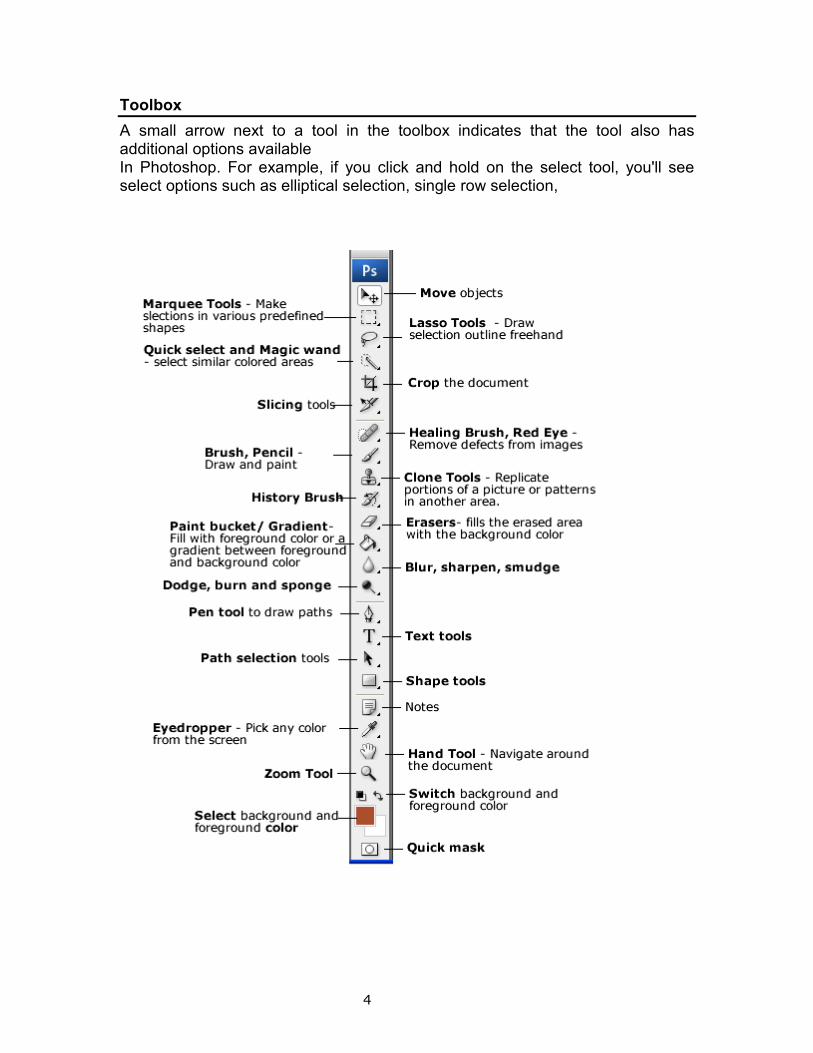
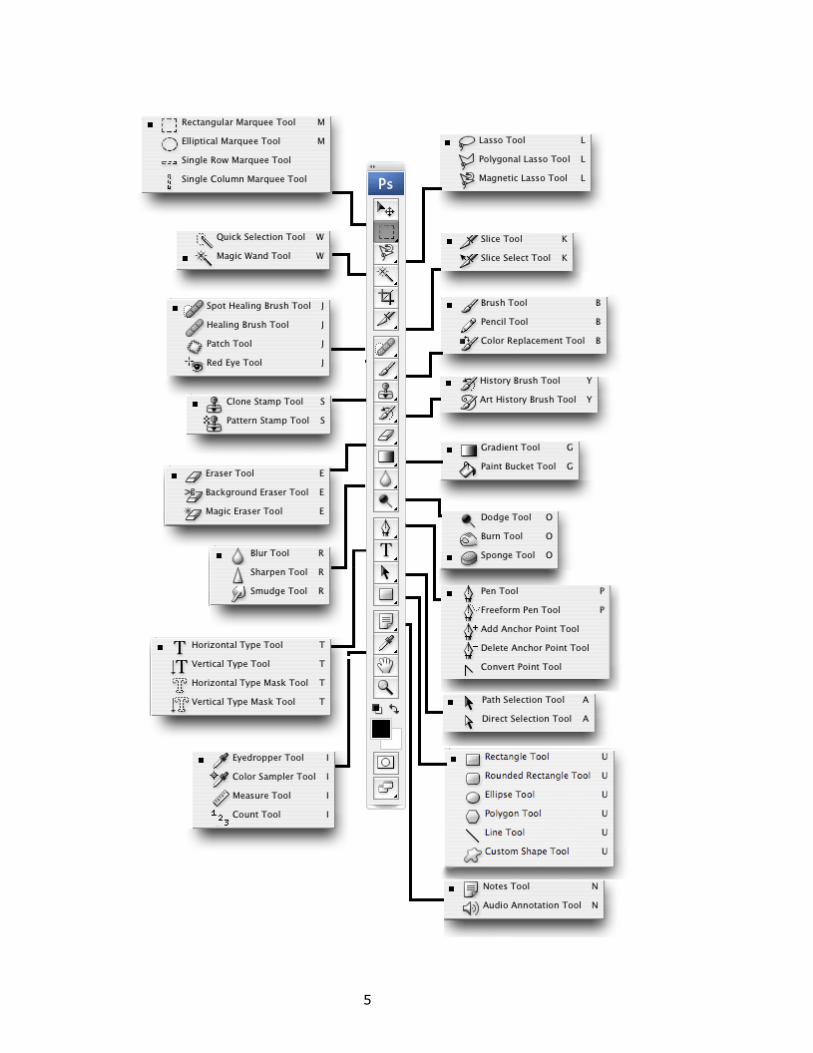
Toolbox
A small arrow next to a tool in the toolbox indicates that the tool also has additional options available In Photoshop. For example, if you click and hold on the select tool, you'll see select options such as elliptical selection, single row selection,
5
6
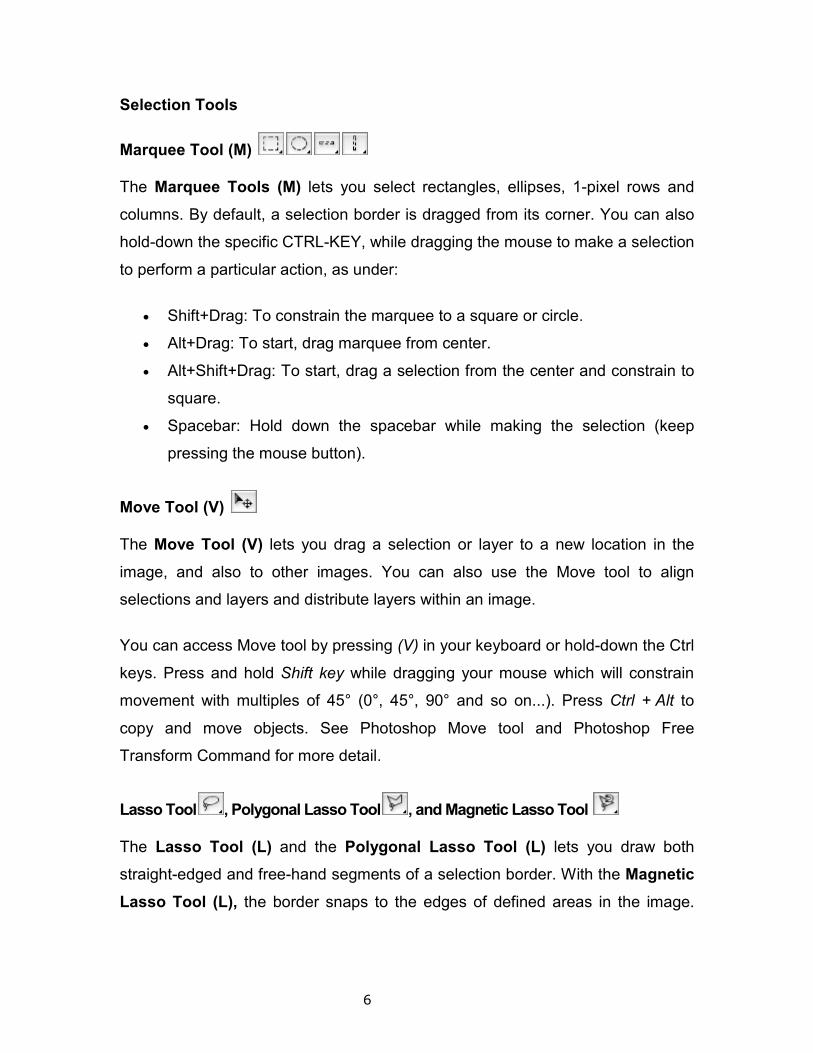
Selection Tools
Marquee Tool (M)
The Marquee Tools (M) lets you select rectangles, ellipses, 1-pixel rows and
columns. By default, a selection border is dragged from its corner. You can also
hold-down the specific CTRL-KEY, while dragging the mouse to make a selection
to perform a particular action, as under:
• Shift+Drag: To constrain the marquee to a square or circle.
• Alt+Drag: To start, drag marquee from center.
• Alt+Shift+Drag: To start, drag a selection from the center and constrain to
square.
• Spacebar: Hold down the spacebar while making the selection (keep
pressing the mouse button).
Move Tool (V)
The Move Tool (V) lets you drag a selection or layer to a new location in the
image, and also to other images. You can also use the Move tool to align
selections and layers and distribute layers within an image.
You can access Move tool by pressing (V) in your keyboard or hold-down the Ctrl
keys. Press and hold Shift key while dragging your mouse which will constrain
movement with multiples of 45° (0°, 45°, 90° and so on...). Press Ctrl + Alt to
copy and move objects. See Photoshop Move tool and Photoshop Free
Transform Command for more detail.
Lasso Tool , Polygonal Lasso Tool , and Magnetic Lasso Tool
The Lasso Tool (L) and the Polygonal Lasso Tool (L) lets you draw both
straight-edged and free-hand segments of a selection border. With the Magnetic
Lasso Tool (L), the border snaps to the edges of defined areas in the image.
7
While you are using Lasso tool you can hold-down Alt key to switch between
draw free-hand and draw straight-edged. (See also Photoshop Lasso Tool)
Quick Selection Tool and Magic Wand Tool
You can use the Quick Selection Tool (W), new in Photoshop CS3, to quickly
paint a selection using an adjustable round brush tip. As you drag, the selection
expands outward and automatically finds and follows defined edges in the image.
The Magic Wand Tool (W) lets you select an area by color range without having
to trace its outline. You can specify the color range, or tolerance, for the Magic
Wand tool's selection at tool's option bar. Enter a low value to select the few
colors very similar to the pixel you click, or enter a higher value to select a
broader range of colors.
Crop and Slice Tools
Crop Tool (C)
Cropping is the process of removing portions of an image to create focus or
strengthen the composition. You can crop an image using the Crop tool and the
Crop command (Image » Crop).
The Crop Tool (C) works similarly to the Rectangular Marquee tool. You can
drag to draw Rectangular area to select part of image you want to include.
Moreover Crop tool include bounding box around selected area that allow you to
resize, move or perspective the select area similar Free Transform Command.
You can also crop and resize your selected area to target resolution that you
specify in option bar.
Slice Tool and Slice Selection Tool
Use Slice Tool (K) tool to divide large images to small connected pieces of
rectangle image that is useful for building website. You can select the slice area
8
manually or create from guides, by clicking Slice from Guide button at Slice Tool
option bar.
To move, duplicate, combine, divide, resize, delete, arrange, align, and distribute
user slices, using Slice Select Tool (K). You can save Slice to html file that
includes all pieces, plot in to html table that are connected and show as a
complete large image when viewed by the web browser.
Slices are also advantageous when working with images that contain different
types of data. For example, if one area of an image needs to be optimized in GIF
format to support an animation, but the rest of the image is better optimized in
JPEG format, you can isolate the animation using a Slice.
Retouching Tools
Spot Healing Brush Tool and Healing Brush Tool
The Healing Brush Tool (J) lets you correct imperfections, causing them to
disappear into the surrounding image. Like the cloning tools, you use the Healing
Brush tool to paint with sampled pixels from an image or pattern. However, the
Healing Brush tool also matches the texture, lighting, transparency, and shading
of the sampled pixels to the source pixels. As a result, the repaired pixels blend
seamlessly into the rest of the image.
The Spot Healing Brush Tool (J) is different from the Healing Brush Tool in that
it does not require you to make a selection or define a source point before using
it. You can select a blending mode for the healing, and choose between proximity
match or create texture. You can also sample all layers which allow you to use
the spot healing tool on a new layer for non-destructive editing.
Patch Tool and Red Eye Tool
9
The Patch Tool (J) lets you repair a selected area with pixels from another area
or a pattern. Like the Healing Brush tool, the Patch tool matches the texture,
lighting, and shading of the sampled pixels to the source pixels. You can also use
the Patch tool to clone isolated areas of an image.
The Red Eye Tool (J) use to correct red eye error that may produced by using
electronic flash. You can roughly select around the eye and set pupil diameter to
easily correct the red eye.
Clone Stamp Tool and Pattern Stamp Tool
The Clone Stamp Tool (S) can be used to fix your image. It allows you to paint
with the sample from area you select to another image or part of the same
image. You can also clone part of one layer over another layer. Because you can
use any Photoshop Brush with the Clone Stamp tool, you have a lot of control
over the size of the area you clone. You can also use opacity and flow settings in
the options bar to finesse the way you apply the cloned area.
The Pattern Stamp Tool (S) takes sample from Pattern preset instead from
sample point in the image. You can select a pattern from the pattern libraries or
create your own patterns.
Eraser Tool , Background Eraser and Magic Eraser Tool
The Eraser Tool (E) delete pixels in the image as you drag through them. If
you're working in the background or in a layer with transparency locked, the
pixels change to the background color. Otherwise, the pixels are erased to
transparency. You can also use the eraser to return to the affected area to a
state selected in the History palette.
10
The Background Eraser Tool (E) allows you to erase the background while
maintaining the edges of an object in the foreground. By specifying different
sampling and tolerance options, you can control the range of the transparency
and the sharpness of the boundaries.
The background eraser samples the color in the center of the brush, also called
the hot spot, and deletes that color wherever it appears inside the brush. It also
performs color extraction at the edges of any foreground objects, so that color
halos are not visible if the foreground object is later pasted into another image.
And please note that, the background eraser overrides the lock transparency
setting of a layer.
When you click in a layer with the Magic Eraser Tool (E), the tool automatically
changes all similar pixels. If you're working in the background or in a layer with
locked transparency, the pixels change to the background color; otherwise, the
pixels are erased to transparency. You can choose to erase continuous pixels
only or all similar pixels on the current layer.
Blur Tool , Sharpen Tool and Smudge Tool
The Blur Tool (R) softens hard edges or areas in an image to reduce detail as
you drag. You can specify area and amount of blur by modifying brush shape
and dynamic. Blur tool blur image by lessening the amount of color contrast
between neighboring pixels.
In contrast, The Sharpen Tool (R) focuses soft edges to increase clarity by
selectively sharpens by increasing the contrast between neighboring pixels.
The Smudge Tool (R) simulates the actions of dragging a finger through wet
paint. The tool picks up color where the stroke begins and pushes it in the
direction you drag. This tool can be effective for smoothing out colors and
textures.
11
Dodge Tool and Burn Tool
Dodge Tool (O) and Burn Tool (O) are used to lighten or darken areas of the
image; the names are based on a traditional photographer's technique.
Photographers hold back light to lighten an area on the print (dodging) or
increase the exposure to darken areas on a print.
Sponge Tool
The Sponge Tool (O) subtly changes the color saturation of an area depend on
the mode you're selected. In Desaturate mode, the Sponge tool robs an image of
color when working inside a color image. If you switch to saturate mode, the
Sponge tool adds more color in color images. In Grayscale mode, the tool
saturation mode will increases contrast of the image and in opposite,
desaturation mode, decreases contrast by moving gray levels away from or
toward the middle gray. See also Photoshop Tool Blending Mode.
Use Direct Selection Tool (A) to select a path segment and click one of the
segment's anchor points or drag a marquee over part of the segment. To select
additional path components or segments, select the Path Selection tool or the
Direct Selection tool, and then hold down Shift while selecting additional paths or
segments.
Painting Tools
Brush Tool , Pencil Tool (B) and Color Replacement Tool
The Brush Tool (B) and Pencil Tool (B) paint a line of any thickness that you
specify via the Options bar. You can make the line sharp or blurry, but it's always
slightly soft or hard edge stroke for Pencil Tool. Normally, the Brush tool and
12
Pencil tool applies a continuous stream of color and stops applying paint
whenever you stop dragging. See Photoshop Painting tool for more detail.
The Color Replacement Tool (B) simplifies replacing specific colors in your
image when you paint. You can paint over a targeted color with a corrective
color. For example, you can select sample color as red, and painted foreground
color to correct a person's red eyes in an image. The Color Replacement tool
doesn't work in images in Bitmap, Indexed, or Multichannel color modes.
History Brush and Art History Brush Tool
This tool works similar to the Brush Tool except the History Brush (H) and Art
History Brush Tool (H) which allows you to paint from specified history state or
snapshot as the source data. The History Brush tool paints by recreating the
specified source data, while the Art History Brush tool uses that data along with
the options you set to create different colors and artistic styles. See Photoshop
Painting tool for more detail.
Gradient Tool and Paint Bucket Tool
The Gradient Tool (G) fills solid or blended color to any area of the image. The
Gradient tool creates a gradual blend between multiple colors. You can choose
from preset gradient fills or create your own.
The Paint Bucket Tool (G) fills adjacent pixels that are similar in color value to
the pixels you click. It works very similar to Magic Wand tool but Paint Bucket fills
solid color instead of making selection.
Tip: You can change the color of the background outside image area (default is
50% gray) by assigning new color to Foreground color. Select Paint Bucket Tool
hold-down Shift key and click the area outside the image area to fill color.
Drawing and Type Tools
13
Path Selection Tool and Direct Selection Tool
Use Path Selection Tool (A) to select a path component and click anywhere
inside the path component. If a path consists of several path components, only
the path component under the pointer is selected. To display the bounding box
along with the selected path, select Show Bounding Box in the options bar.
Use Direct Selection Tool (A) to select a path segment and click one of the
segment's anchor points or drag a marquee over part of the segment. To select
additional path components or segments, select the Path Selection tool or the
Direct Selection tool, and then hold down Shift while selecting additional paths or
segments.
Horizontal Type Tool and Vertical Type Tool
Use Horizontal Type Tool (T) and Vertical Type Tool (T) to create horizontal or
vertical type anywhere in an image. When you create type, a new type layer is
added to the Layers palette. In Photoshop, you can also create a selection
border in the shape of the type.
Depending on how you use the type tools, you can enter point type or paragraph
type. Point type is useful for entering a single word. You can create point type by
clicking on the image to set an insertion point for the type. The paragraph type is
useful for entering and formatting the type as one or more paragraphs. You can
create paragraph type by dragging the tool to define a bounding box for the type.
Horizontal Type Mask Tool and Vertical Type Mask Tool
Horizontal Type Mask Tool (T) or Vertical Type Mask Tool (T) lets you create
a selection in the shape of the type. Type selections appear on the active layer,
and can be moved, copied, filled, or stroked just like any other selection. You can
14
also create text on a path by using any type tool. To create text on path, position
the pointer on the path, so the baseline indicators of the type tool turn to and
click. After clicking, an insertion point appears on the path.
Pen Tool and Freeform Pen Tool
The Pen Tool (P) lets you create straight lines and smooth flowing curves as
new Path or Shape layer or Fill pixels , by selecting an icon at the tool
option bar. For most users, the Pen tool provides the best control and greatest
accuracy for drawing. The Freeform Pen Tool (P) lets you draw as if you were
drawing with a pencil on paper. Anchor points are added automatically as you
draw. You do not determine where the points are positioned, but you can adjust
them once the path is complete.
The Magnetic Pen is an option of the Freeform Pen tool that lets you draw a path
that snaps to the edges of defined areas in your image. You can define the range
and sensitivity of the snapping behavior, as well as the complexity of the resulting
path. The Magnetic Pen and Magnetic Lasso tools share many of the same
options.
Convert Point Tool
You can add, delete or convert anchor point using Add Anchor Point Tool and
Delete Anchor Point Tool. If you have selected Auto Add/Delete in the options
bar for the Pen tool or Freeform Pen tool, when you click at active path's line
segment, a point is added, and when you click an existing point, it is deleted. The
cursor will change to indicate that you can add anchor point or change to
while you hover the cursor over existing point.
The Convert Point Tool lets you convert a smooth curve to a sharp curve or to a
straight segment, and vice versa. While you using Pen tool or Freeform Pen tool

15
you can also convert anchor point by holding down Alt (Option), the cursor will
turn to , key and click at the point you want to convert.
Shape Tool (U)
Photoshop provides six Shape Tools that enables you to draw geometric and
predefined shapes. By default, the shapes are separated off into independent
Shape layers , which are a mix of objects and pixels. The vector-based outlines
of the shapes print at the maximum resolution of your printer, but the interiors
may consist of solid colors, gradients, or pixel-based patterns and images.
Other than shape layer, you can also use Shape tool to create Path or Fill pixels
by select Path button or Fill Pixels Button at the tool option bar. Like making
a selection you can also combine, delete or intersect and moreover exclude
overlap area of new shape with current shape by select the operation you like to
in tool option bar or holding down some keyboard keys.
Note, Measurement and Navigation Tools
Notes Tool and Audio Annotation Tool
Notes Tool (N) and Audio Annotation Tool (N) allows you to add notes and
audio annotations anywhere on a Photoshop image canvas. When you create a
note, a resizable window appears for typing text. When you record an audio
annotation, you must have a microphone plugged into the audio-in port of your
computer.
You can import both kinds of annotations from Photoshop documents saved in
PDF or from Acrobat documents saved in PDF or Form Data Format (FDF).
Eyedropper tool and Color Sampler Tool
The Eyedropper Tool (I)
background color. You can click to sample color, assign to foreground from the
active image or from anywhere else on the screen, or hold
to sample color and assign to background color.
sampled by the Eyedropper tool
sample the color values of a 3
sample size of the eyedropper affects the color readouts displayed in t
palette.
Note: While using Eyedropper Tool you can hold down
color sampler point.
Color Sample Tool (I) let you assign up to four permanent color sampler point,
with before/after value for color adjustment. The color va
section at the bottom of Info Palette
Measure Tool and Count Tool (CS3 Only)
The Measure Tool (I) calculates the distance between any two points in the work
area. You can use measure tool to measure location, angle and distance wh
show in option bar and also Info Palette.
angle of rotation when use with
You can use Count Tool (I)
manually, you click the image with the C
number of clicks. The count number is displayed on the item and in the Count
Tool options bar. Photoshop can also automatically count multiple selected areas
in an image, and record the results in the
Hand Tool
16
Eyedropper Tool (I) samples color to designate a new foreground or
background color. You can click to sample color, assign to foreground from the
active image or from anywhere else on the screen, or hold-down Alt key and click
to sample color and assign to background color. You can also specify the area
Eyedropper tool. For example, you can set the eyedropper to
sample the color values of a 3-by-3-pixel area under the pointer. Modifying the
sample size of the eyedropper affects the color readouts displayed in t
While using Eyedropper Tool you can hold down Shift key and click to add
let you assign up to four permanent color sampler point,
with before/after value for color adjustment. The color value will show in new
Info Palette.
and Count Tool (CS3 Only)
calculates the distance between any two points in the work
area. You can use measure tool to measure location, angle and distance wh
show in option bar and also Info Palette. Measure Tool can also use to correct
angle of rotation when use with Rotate Canvas Command.
Count Tool (I) to count objects in an image. To count objects
manually, you click the image with the Count tool and Photoshop tracks the
number of clicks. The count number is displayed on the item and in the Count
Tool options bar. Photoshop can also automatically count multiple selected areas
in an image, and record the results in the Measurement Log Palette.
samples color to designate a new foreground or
background color. You can click to sample color, assign to foreground from the
key and click
You can also specify the area
. For example, you can set the eyedropper to
pixel area under the pointer. Modifying the
sample size of the eyedropper affects the color readouts displayed in the Info
key and click to add
let you assign up to four permanent color sampler point,
lue will show in new
calculates the distance between any two points in the work
area. You can use measure tool to measure location, angle and distance which is
can also use to correct
to count objects in an image. To count objects
ount tool and Photoshop tracks the
number of clicks. The count number is displayed on the item and in the Count
Tool options bar. Photoshop can also automatically count multiple selected areas
17
If the entire image is not visible in the document window, you can navigate to bring
another area of the image into view by using the Hand Tool (T). To pan you click on the
image and drag your image to navigate over the image, while you use another tool you
can temporarily switch to use Hand Tool by holding down Space-bar.
Zoom Tool
Use Zoom Tool (Z) to magnify or reduce your view using various methods. The
window's title bar displays the zoom percentage as does the status bar at the
bottom of the window. When Zoom Tool is selected your cursor will turn to ,
click the center of the area of the image you want to magnify or drag over the
area to magnify that area inside the zoom marquee to display at the highest
possible magnification. To zoom-out hold-down Alt, your cursor will turn to ,
click on the center of area of the image you want to reduce. While the other tool
is selected, you can temporarily switch and use the Zoom tool by holding down
Ctrl+ Space-bar, indicated by your cursor which will turn to , to zoom-in and
Alt+ Space-bar, indicated by your cursor will turn to , to zoom-out. You can
also use Ctrl+ plus key (+) to zoom-in or Ctrl+ minus key (-) to zoom out.
Switch Color, Quick Mask and Screen mode
At the bottom of the tool bar you can click the button or use its short-cuts, indicated in (
), to do following:
Back ground & Foreground Color Switch (X) : Click this button or press "X",
to switch between background colors to foreground color.
Reset Back ground & Foreground Color (D) : Click this button or press "D",
to reset background color to white and foreground color to black.
Toggle Quick Mask (Q) : Click this button or press "Q", to turn quick-mask
on or off.
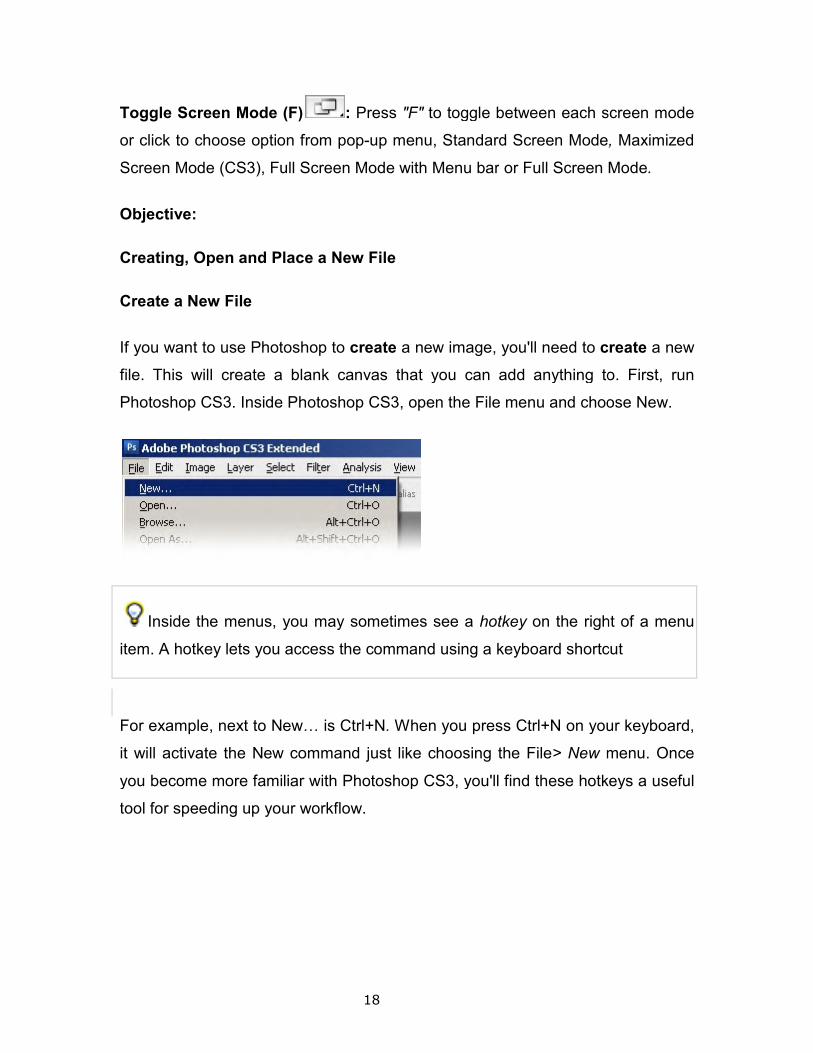
Toggle Screen Mode (F)
or click to choose option from pop
Screen Mode (CS3), Full Screen Mode with Menu bar
Objective:
Creating, Open and Place a New File
Create a New File
If you want to use Photoshop to
file. This will create a blank canvas that you can add anything to. First, run
Photoshop CS3. Inside Photoshop CS3, open the
Inside the menus, you may sometimes see a
item. A hotkey lets you access the command using a
For example, next to NewJ is
it will activate the New command just like choosing the
you become more familiar with Photoshop CS3, you'll find these hotkeys a useful
tool for speeding up your workflow.
18
: Press "F" to toggle between each screen mode
or click to choose option from pop-up menu, Standard Screen Mode
Full Screen Mode with Menu bar or Full Screen Mode
Creating, Open and Place a New File
If you want to use Photoshop to create a new image, you'll need to create
file. This will create a blank canvas that you can add anything to. First, run
Photoshop CS3. Inside Photoshop CS3, open the File menu and choose
Inside the menus, you may sometimes see a hotkey on the right of a menu
item. A hotkey lets you access the command using a keyboard shortcut
NewJ is Ctrl+N. When you press Ctrl+N on your keyboard,
it will activate the New command just like choosing the File> New menu. Once
you become more familiar with Photoshop CS3, you'll find these hotkeys a useful
tool for speeding up your workflow.
to toggle between each screen mode
, Maximized
Full Screen Mode.
create a new
file. This will create a blank canvas that you can add anything to. First, run
menu and choose New.
on the right of a menu
keyboard shortcut
on your keyboard,
menu. Once
you become more familiar with Photoshop CS3, you'll find these hotkeys a useful
19
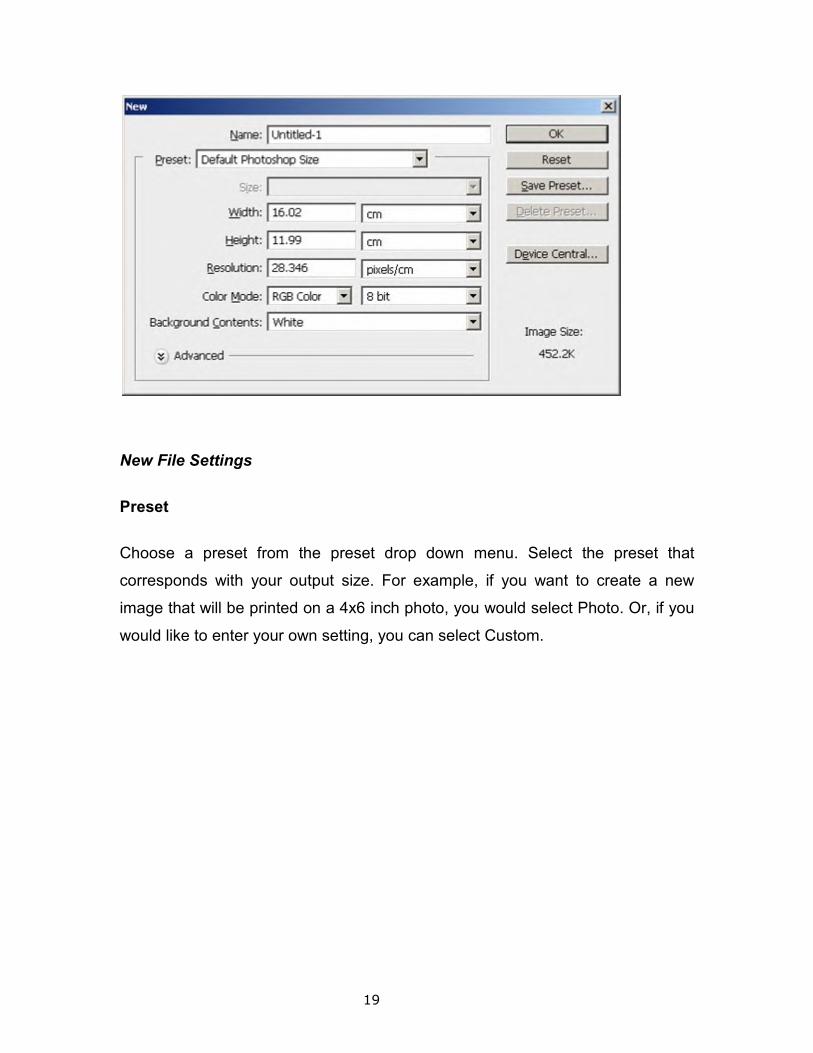
New File Settings
Preset
Choose a preset from the preset drop down menu. Select the preset that
corresponds with your output size. For example, if you want to create a new
image that will be printed on a 4x6 inch photo, you would select Photo. Or, if you
would like to enter your own setting, you can select Custom.

20
Width and Height
The standard size for a web banner is 468x60 pixels so you would enter in 468
pixels as the width and 60 pixels ad the height.
Note: That whenever you modify any settings, the preset will change to Custom
automatically.
Resolution
After we set the width and height, we need to set the resolution. We won't get
into too much detail in this first lesson but you'll need to remember two settings:
72 pixels/inch
Standard resolution for images that will be displayed on a standard computer
monitor (i.e. image for web use).
300 pixels/inch
21
This resolution is used for high quality printing. When you choose this resolution,
your image may appear larger on your computer screen (about four times the
actual size). This is normal and it is because standard monitors can only display
a maximum of 72 pixels per inch.
Color Mode
There are five color mode settings you can choose from but there are two that
you'll probably ever use:
RGB Color
For images to be displayed on the Internet or RGB devices such as a monitor,
cell phone, or iPod.
CMYK Color
For images that will be printed. This mode simulates the color used by printers
(Cyan, magenta, yellow, and black) and usually displays duller color than RGB
mode. This is caused by the subtractive color effect of printers where the color
gets darker as more ink is added.
In addition to choosing RGB or CMYK color mode, you'll have to choose the bit
depth of the image. Most of the time, you'll be using 8 bit color. This setting
generally means how much tonal value and color it can display. For example, if
you created an image of a gradient that fades from black to white, it will appear
smoother in 16 bit compared to 8 bit.
However, that is not to say that you should always use the highest bit depth. That
is because you don't always need it. For example, if you're creating an image for
viewing on a computer monitor, you will not notice a difference between 8 bit and
16 bit due to the limited amount of values the computer monitor can display. If
you are printing the image on a high quality printer, you may take advantage of
16 bit color to display more color.
22
Background Contents
The background contents setting let you choose what the background color for
your image. There are three settings for you to choose from:
White
Uses white as the background color.
Background Color
Uses the background color already set as your background color. This has to be
set before you choose File New. To change this setting, click cancel to exit out of
the new window. Look for the color pallet that looks like the image below and
click on the bottom white square. A window will appear where you can select the
color you wish to use as your background color. Once you're done you can
choose File New again and select Background Color as your setting and it'll
create a new file with the background color you have just selected.
Transparent
Does not use a background color. Suitable if you will be creating images with
transparent backgrounds such as GIF or PNG files.
Open Files
You can open files using the Open command and Open Recent command. You
can also open files into Photoshop from Adobe Bridge or Adobe Photoshop
Lightroom.
When opening certain files, such as camera raw and PDF, you specify settings
and options in a dialog box before the files completely open in Photoshop.
In addition to still images, Photoshop CS3 Extended users can open and edit
video and image sequence files. For more information, see
image sequences.
Note: Photoshop uses plug
file format does not appear in the Open dialog box or in the File
you may need to install the format’s plug
Sometimes Photoshop may not be able to determine the correct format for a file.
This can happen, for example, because the file has been transferred between
two operating systems. Sometimes a transfer between and Windows can cause
the file format to be mislabeled. In
format in which to open the file.
You can retain layers, masks, transparency, compound shapes, slices, image
maps, and editable type when bringing your Illustrator art into Photoshop. In
Illustrator, export the art in
contains elements that Photoshop doesn’t support, the appearance of the
artwork is preserved, but the layers are merged and the artwork is rasterized.
Browse
23
When opening certain files, such as camera raw and PDF, you specify settings
and options in a dialog box before the files completely open in Photoshop.
In addition to still images, Photoshop CS3 Extended users can open and edit
video and image sequence files. For more information, see Import video
Photoshop uses plug-in modules to open and import many file formats. If a
file format does not appear in the Open dialog box or in the File Import submenu,
you may need to install the format’s plug-in module.
oshop may not be able to determine the correct format for a file.
example, because the file has been transferred between
two operating systems. Sometimes a transfer between and Windows can cause
the file format to be mislabeled. In such cases, you must specify the correct
format in which to open the file.
You can retain layers, masks, transparency, compound shapes, slices, image
maps, and editable type when bringing your Illustrator art into Photoshop. In
Illustrator, export the art in the Photoshop (PSD) file format. If your Illustrator art
contains elements that Photoshop doesn’t support, the appearance of the
artwork is preserved, but the layers are merged and the artwork is rasterized.
When opening certain files, such as camera raw and PDF, you specify settings
and options in a dialog box before the files completely open in Photoshop.
In addition to still images, Photoshop CS3 Extended users can open and edit
Import video files and
in modules to open and import many file formats. If a
Import submenu,
oshop may not be able to determine the correct format for a file.
example, because the file has been transferred between
two operating systems. Sometimes a transfer between and Windows can cause
h cases, you must specify the correct
You can retain layers, masks, transparency, compound shapes, slices, image
maps, and editable type when bringing your Illustrator art into Photoshop. In
the Photoshop (PSD) file format. If your Illustrator art
contains elements that Photoshop doesn’t support, the appearance of the
artwork is preserved, but the layers are merged and the artwork is rasterized.
24
Let's begin by stating what a File Browser is. File Browser isn't a replacement for
Windows Explorer or the Apple Finder. In other words "asset" or "file
management" are not File Browsers intended use. In a sense you could think of
the File Browser as a Digital Light Box, but then that would ignore the fact that it
does much more than allow the digital Photographer to preview a batch of
images prior to editing. The File Browser is a workflow tool, which has been
designed so that digital photographers can, amongst other things: view, rotate,
search, sort, flag, rank and annotate digital image files directly from within Adobe
Photoshop. File Browser also provides you with the facility to automate
Photoshop processes such as: renaming images; insert metadata; convert
camera raw files; build contact sheets and web photo galleries; and create PDF
presentations. However, all of this flexibility comes at a price with some users
finding that it has an unwelcome impact on the overall performance of the
25
application. Nevertheless, with careful setup and a better understanding of how
File Browser processes and caches images you should realise significant
improvements in your Photoshop workflow.
This is best suited to pictures. It shows files in thumbnails rather than as usual
icons which the open option shows. So basically a same thing, but with a much
better capability to explore and see detailed information about images.
Device Central in CS3
Create Mobile Content with Adobe Device Central and Photoshop
1. Start Photoshop.
2. Select File > New.
3. Click Device Central to close the dialog box in Photoshop and open
Device Central.
4. Select a content type.
5. The available Devices list on the left is updated and shows the devices
that support the content type selected.
6. In the Available Devices list, select a single target device or multiple
devices (or select a set or individual device in the Device Sets list).
7. Device Central lists proposed document sizes based on the device or
devices you selected (if the devices have different display sizes).
Depending on the design or content you are developing, you can create
a separate mobile document for each display size or try to find one size
appropriate for all devices. When choosing the second approach, you
may want to use the smallest or largest suggested document size as a
common denominator. You can even specify a custom size at the bottom
of the tab.
8. Click Create.
9. A blank PSD file with the specified size opens in Photoshop. The new file
has the following parameters set by default:
26
10. Color Mode: RGB/8bit
11. Resolution: 72 ppi
12. Color Profile: SRGB IEC61966-2.1
13. Fill the blank PSD file with content in Photoshop.
14. When you finish, select File > Save for Web & Devices.
15. In the Save for Web & Devices dialog box, select the desired format and
change other export settings as desired.
16. Click Device Central.
17. A temporary file with the export settings specified is displayed in the
Device Central Emulator tab. To continue testing, double-click the name
of a different device in the Device Sets or Available Devices lists.
18. If, after previewing the file in Device Central, you need to make changes
to the file, go back to Photoshop.
19. In the Photoshop Save For Web & Devices dialog box, make
adjustments, such as selecting a different format or quality for export.
20. To test the file again with the new export settings, click the Device
Central button.
21. When you are satisfied with the results, click Save in the Photoshop
Save For Web & Devices dialog box.
Note: To simply open Device Central from Photoshop (instead of creating
and testing a file), select File > Device Central.
Bridge
Customizing the Bridge Window
To change the backdrop and thumbnail data in the Bridge window★★★★
1. Choose Edit Preferences (Ctrl-K/Cmd-K). The Preferences dialog box
opens.
27
2. On the left side, click General, and in the Appearance area, A do any of
the following:
a. Move the User Interface Brightness slider to set the gray value for
the side panes.
b. Move the Image Backdrop slider to set a separate backdrop value
for the center pane and the Preview panel.B (When we work in
Bridge, we use black for our center pane and dark gray for the side
panes, but for printing reasons, we used lighters colors for the
figures in this book.)
c. Choose an Accent Color for the border around the currently
selected folder, thumbnail, or stack, and for categories in the
Metadata panel.
3. Click Thumbnails to switch to that pane. From the Detail: Show menus,
choose to display up to four additional lines of metadata (image info)
below the image thumbnails. Use this option to list information that’s
important to you. Also decide whether to Show Tooltips.
4. Click OK.
To customize the layout of Bridge
Do any of the following:
• To make a panel taller/shorter, drag the horizontal bar
upward/downward;A other panels in the same group will scale
accordingly.
• To make a whole pane wider or narrower, drag the vertical bar
sideways;B the center pane will resize accordingly.
28
• To display only the Content pane in a compact window, click the Compact
Mode button in the upper right corner of the Bridge window; click it
again to restore the full window.
• To minimize/collapse any panel (except Content) to a tab only, double-
click its tab.
• Drag any panel tab (name) into another panel group (release the mouse
when the blue “drop zone” frame appears around the desired group).
• Drag a panel tab above/below another panel (release the mouse when a
horizontal blue drop zone line appears in the desired location).
• To have the center pane fill the entire window, click the Show/Hide
Panels button in the lower left corner of the Bridge window or press
Tab; repeat to redisplay the side panes.
• To change the size of the thumbnails, move the thumbnail slider (below
the Content panel);C or click the Smaller Thumbnail Size button or
Larger Thumbnail Size button.
• To display image thumbnails and folders in the Content panel, check
Show Folders on the View menu. To display image thumbnails but not
folders, choose the command again (to remove the check mark).
A. Moving the horizontal bar upward shortens the Favorites/Folder panels
and lengthens the Filter panel.
B. Moving the vertical bar for the right pane to the left widens the Preview
and Metadata panels.
C. Moving the thumbnail slider resizes the thumbnails in the center pane.
If you save your customized workspaces in Bridge, you won’t have to spend
time setting up your workspace each time you relaunch the application.
29
To save a Bridge workspace
1. Choose a size and location of the overall Bridge window, a size (and
groupings) for the panels, and a thumbnail size for the Content panel.
2. From any of the 3 workspace menus in the lower right corner of the
Bridge window, choose Save Workspace. The Save Workspace dialog
box opens.
3. Enter a Name for the workspace, choose a Keyboard Shortcut (or choose
None), check Save Window Location as Part of Workspace and/or check
Save Sort Order as Part of Workspace (both are optional), then click
Save. (To access saved workspaces)
• To choose any predefined or saved workspace, choose the workspace
name from one of the workspace menus. The workspace you choose will
become the default for that button. Click the button to redisplay that
particular workspace.
• Any changes you make to the current workspace, such as resizing a
panel, will be saved to the button you assigned that workspace to. (Click a
different workspace button, then click the button for the modified
workspace, and you’ll see what we mean.) To redisplay a workspace
without your changes, choose it from the workspace menu instead of
clicking the button.
Save for Web and Device
Exporting / Saving Photoshop Slices as a Web Page
In earlier versions of Photoshop saving a sliced image for the web could only be
done with Image Ready but now it's all built into Adobe Photoshop CS3. The
following portion of the tutorial will show you how to save the sliced website
30
design we made in Photoshop as an HTML file with associated images.
Steps to Follow:
1. With your sliced graphic open choose File menu > Save for Web &
Devices (Alt+Shift+Ctrl+S). This brings up the Save For Web & Devices
window.
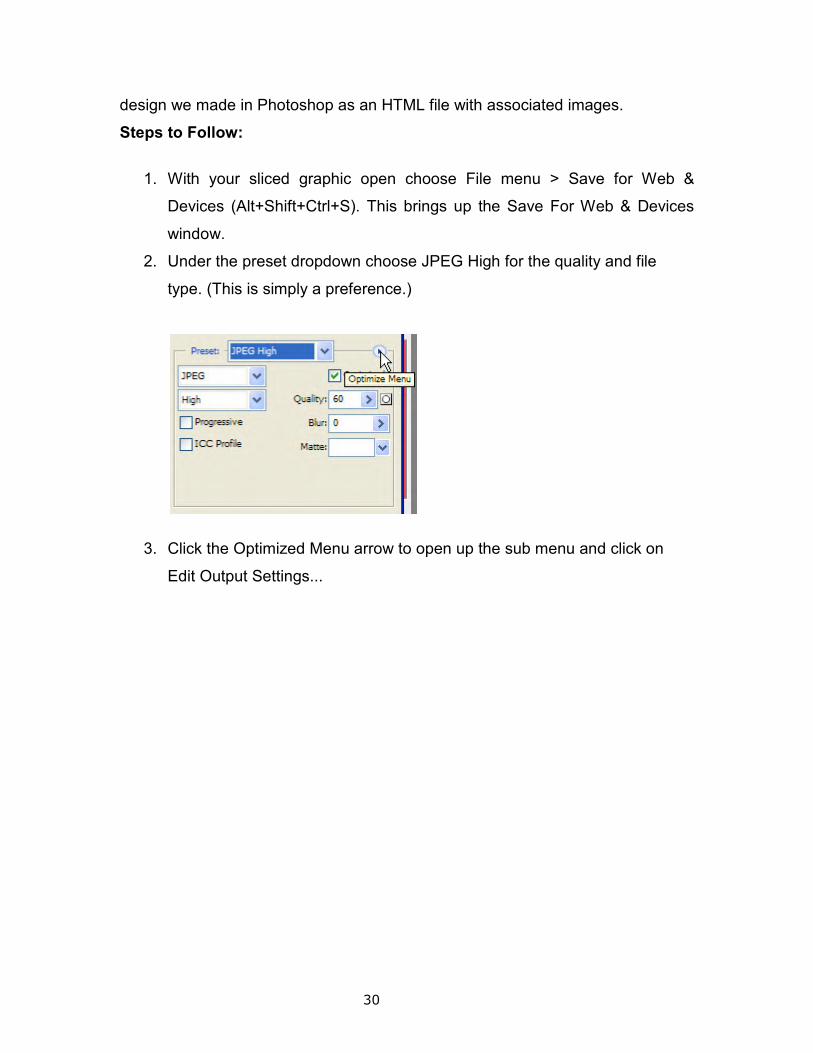
2. Under the preset dropdown choose JPEG High for the quality and file
type. (This is simply a preference.)
3. Click the Optimized Menu arrow to open up the sub menu and click on
Edit Output Settings...
31
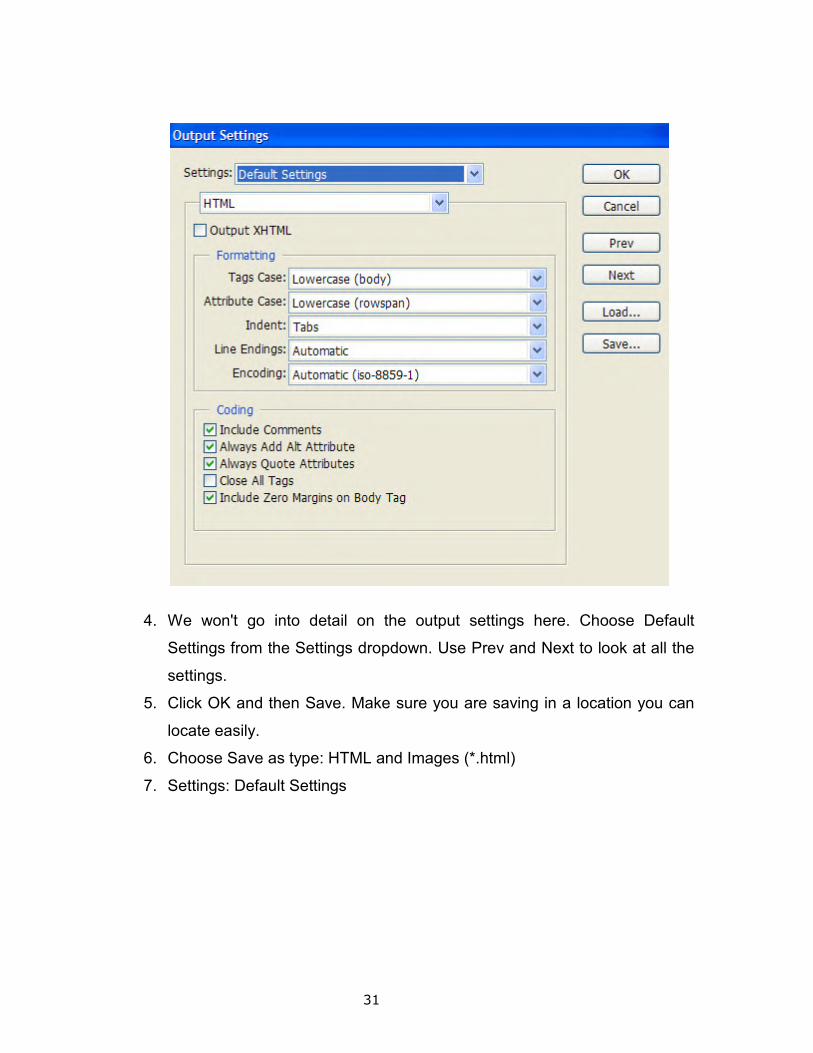
4. We won't go into detail on the output settings here. Choose Default
Settings from the Settings dropdown. Use Prev and Next to look at all the
settings.
5. Click OK and then Save. Make sure you are saving in a location you can
locate easily.
6. Choose Save as type: HTML and Images (*.html)
7. Settings: Default Settings

32
8. Slices: All Slices
9. Click Save
Revert
Undoing changes can be accomplished with the Edit > Undo command, History
palette, and Edit > Revert. When you revert an image, you return the image to
the last time it was saved.
Step One
Open a new blank Photoshop document (File > New).
Step Two Add some text to the document by selecting t4he Text tool, clicking the workspace and typing.
Step Three
Save your document (File > Save).
Step Four
Choose the Text tool and type to add another Text layer.
Step Five
Choose File > Revert and the document is back to the point where it was saved.
Patterns
A pattern is an image that is repeated, or
selection. Photoshop comes with a variety of preset patterns.
You can create new patterns and save them in libraries for use with different
tools and commands. Preset pa
options bar for the Paint Bucket, Pattern Stamp, Healing Brush, and Patch tools,
as well as in the Layer Style dialog box. You can change how patterns are
displayed in the pop-up palettes by choosing a display
palette menu. You can also manage pattern presets using the preset manager.
Photoshop also provides the Pattern Maker filter to create pattern presets, or fill a
layer or selection with a custom pattern.
A pattern is an image that i
selection. Photoshop comes with a variety of preset patterns which are displayed
in pop-up palettes in the options bar for the Paint Bucket, Pattern Stamp, Healing
Brush, and Patch tools, as well as in the
teach you how to create new patterns and save them in libraries for use with
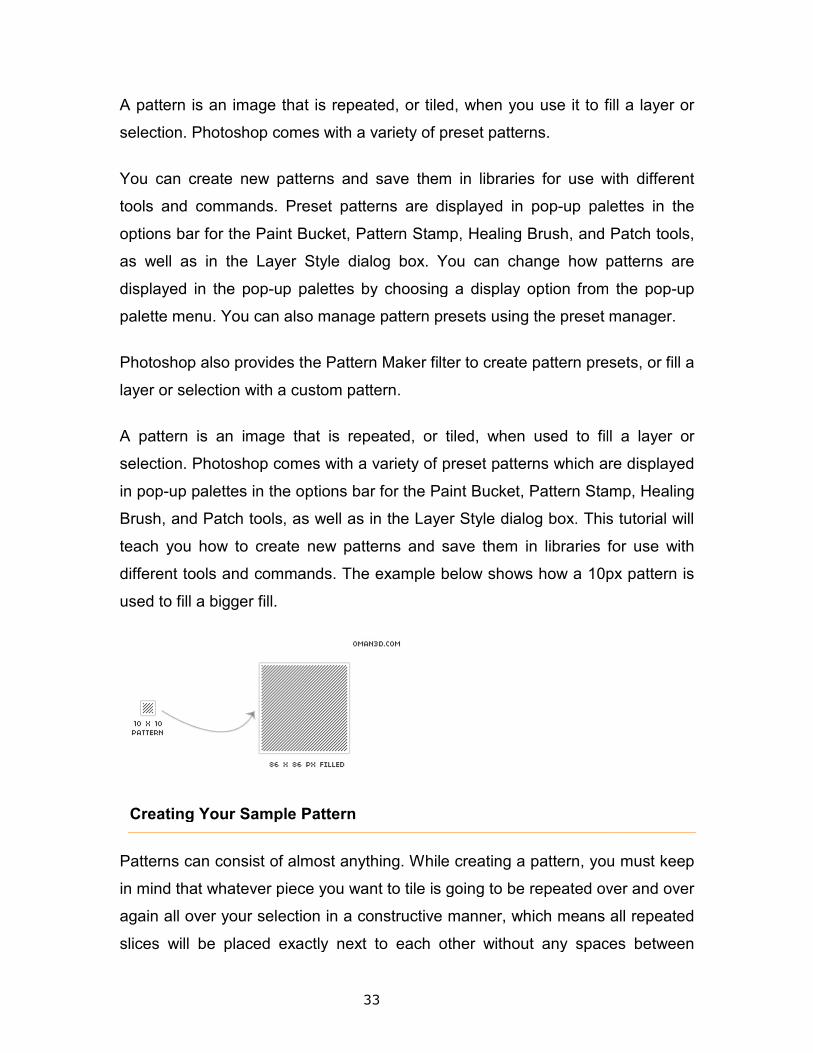
different tools and commands. The example below shows how a 10px pattern is
used to fill a bigger fill.
Creating Your Sample Pattern
Patterns can consist of almost anything. While creating a pattern, you must keep
in mind that whatever piece you want to tile is going to be repeated over and over
again all over your selection in a constructive manner, which means all repeated
slices will be placed exactly next to each other without any spaces between
33
A pattern is an image that is repeated, or tiled, when you use it to fill a layer or
selection. Photoshop comes with a variety of preset patterns.
You can create new patterns and save them in libraries for use with different
tools and commands. Preset patterns are displayed in pop-up palettes in the
options bar for the Paint Bucket, Pattern Stamp, Healing Brush, and Patch tools,
as well as in the Layer Style dialog box. You can change how patterns are
up palettes by choosing a display option from the pop
palette menu. You can also manage pattern presets using the preset manager.
Photoshop also provides the Pattern Maker filter to create pattern presets, or fill a
layer or selection with a custom pattern.
A pattern is an image that is repeated, or tiled, when used to fill a layer or
selection. Photoshop comes with a variety of preset patterns which are displayed
up palettes in the options bar for the Paint Bucket, Pattern Stamp, Healing
Brush, and Patch tools, as well as in the Layer Style dialog box. This tutorial will
teach you how to create new patterns and save them in libraries for use with
different tools and commands. The example below shows how a 10px pattern is
Creating Your Sample Pattern
Patterns can consist of almost anything. While creating a pattern, you must keep
in mind that whatever piece you want to tile is going to be repeated over and over
again all over your selection in a constructive manner, which means all repeated
l be placed exactly next to each other without any spaces between
, when you use it to fill a layer or
You can create new patterns and save them in libraries for use with different
up palettes in the
options bar for the Paint Bucket, Pattern Stamp, Healing Brush, and Patch tools,
as well as in the Layer Style dialog box. You can change how patterns are
option from the pop-up
palette menu. You can also manage pattern presets using the preset manager.
Photoshop also provides the Pattern Maker filter to create pattern presets, or fill a
s repeated, or tiled, when used to fill a layer or
selection. Photoshop comes with a variety of preset patterns which are displayed
up palettes in the options bar for the Paint Bucket, Pattern Stamp, Healing
Layer Style dialog box. This tutorial will
teach you how to create new patterns and save them in libraries for use with
different tools and commands. The example below shows how a 10px pattern is
Patterns can consist of almost anything. While creating a pattern, you must keep
in mind that whatever piece you want to tile is going to be repeated over and over
again all over your selection in a constructive manner, which means all repeated
l be placed exactly next to each other without any spaces between
34
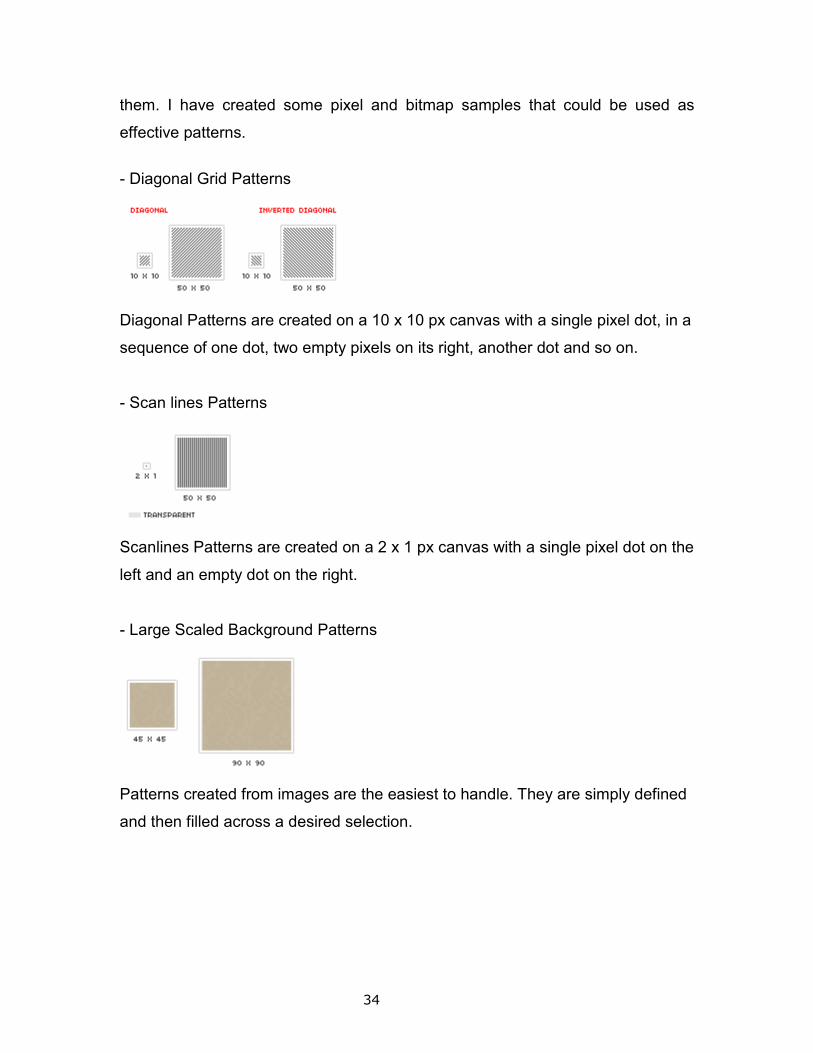
them. I have created some pixel and bitmap samples that could be used as
effective patterns.
- Diagonal Grid Patterns
Diagonal Patterns are created on a 10 x 10 px canvas with a single pixel dot, in a
sequence of one dot, two empty pixels on its right, another dot and so on.
- Scan lines Patterns
Scanlines Patterns are created on a 2 x 1 px canvas with a single pixel dot on the
left and an empty dot on the right.
- Large Scaled Background Patterns
Patterns created from images are the easiest to handle. They are simply defined
and then filled across a desired selection.
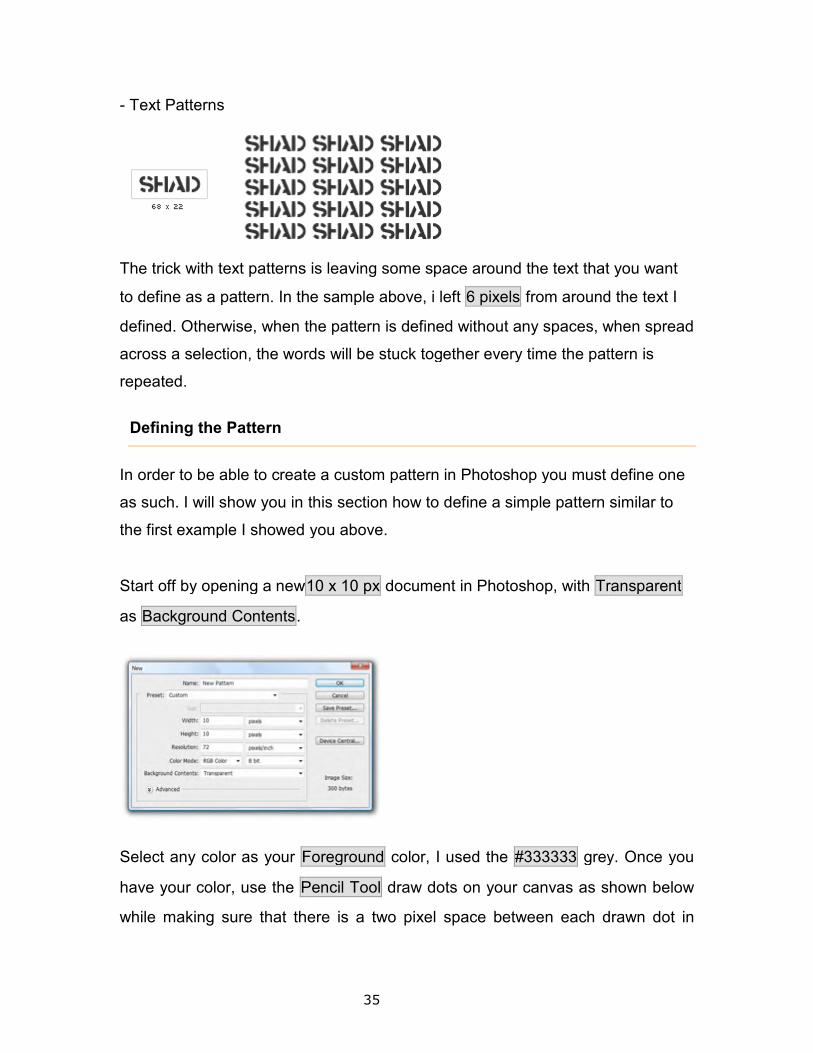
- Text Patterns
The trick with text patterns is leaving some space around the text that you want
to define as a pattern. In the sample above, i left
defined. Otherwise, when the pattern is defined without any spaces, when spread
across a selection, the words will be stuck together every time the pattern is
repeated.
Defining the Pattern
In order to be able to create a custom pattern in Photoshop you must define one
as such. I will show you in this section how to define a simple pattern similar to
the first example I showed you above.
Start off by opening a new
as Background Contents.
Select any color as your Foreground
have your color, use the Pencil
while making sure that there is
35
The trick with text patterns is leaving some space around the text that you want
a pattern. In the sample above, i left 6 pixels from around the text I
defined. Otherwise, when the pattern is defined without any spaces, when spread
across a selection, the words will be stuck together every time the pattern is
In order to be able to create a custom pattern in Photoshop you must define one
as such. I will show you in this section how to define a simple pattern similar to
the first example I showed you above.
Start off by opening a new10 x 10 px document in Photoshop, with Transparent
Foreground color, I used the #333333 grey. Once you
Pencil Tool draw dots on your canvas as shown below
while making sure that there is a two pixel space between each drawn dot in
The trick with text patterns is leaving some space around the text that you want
from around the text I
defined. Otherwise, when the pattern is defined without any spaces, when spread
across a selection, the words will be stuck together every time the pattern is
In order to be able to create a custom pattern in Photoshop you must define one
as such. I will show you in this section how to define a simple pattern similar to
Transparent
grey. Once you
draw dots on your canvas as shown below
a two pixel space between each drawn dot in
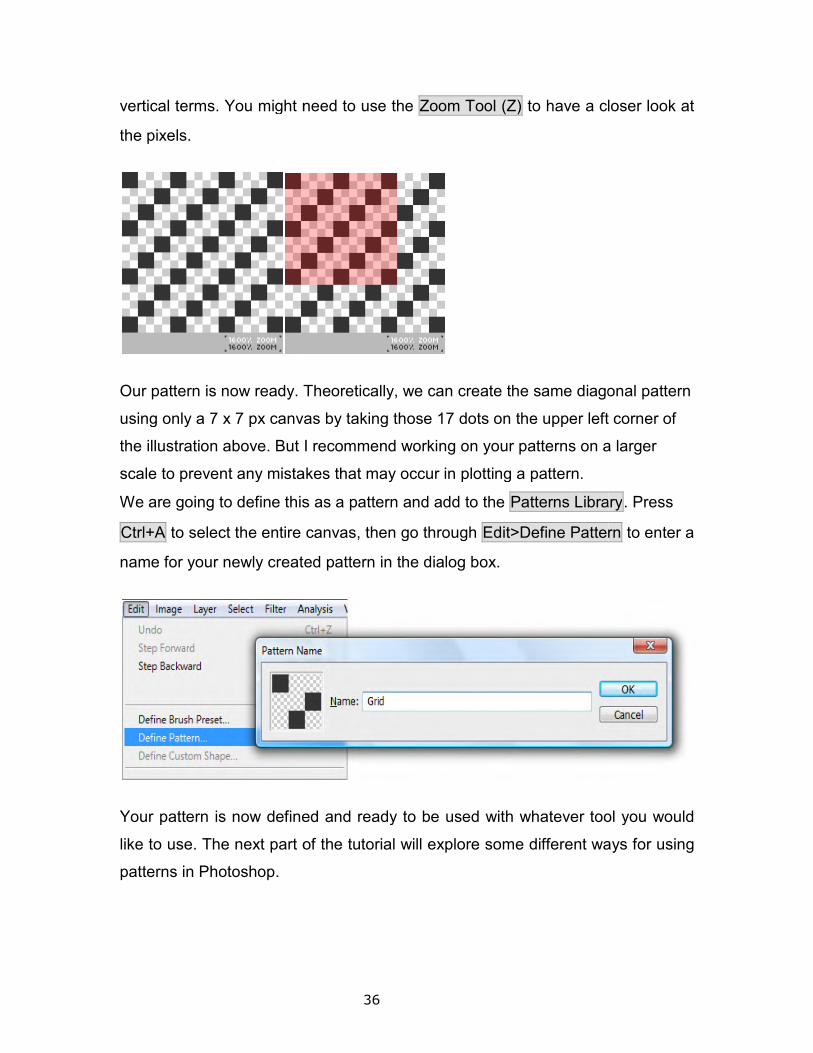
vertical terms. You might need to use the
the pixels.
Our pattern is now ready. Theoretically, we can create the same diagonal pattern
using only a 7 x 7 px canvas by ta
the illustration above. But I recommend working on your patterns on a larger
scale to prevent any mistakes that may occur in plotting a pattern.
We are going to define this as a pattern and add to the
Ctrl+A to select the entire canvas, then go through
name for your newly created pattern in the dialog box.
Your pattern is now defined and ready to be used with whatever tool you would
like to use. The next part of the tutorial will explore some different ways for using
patterns in Photoshop.
36
vertical terms. You might need to use the Zoom Tool (Z) to have a closer look at
Our pattern is now ready. Theoretically, we can create the same diagonal pattern
using only a 7 x 7 px canvas by taking those 17 dots on the upper left corner of
the illustration above. But I recommend working on your patterns on a larger
scale to prevent any mistakes that may occur in plotting a pattern.
We are going to define this as a pattern and add to the Patterns Library
to select the entire canvas, then go through Edit>Define Pattern
name for your newly created pattern in the dialog box.
Your pattern is now defined and ready to be used with whatever tool you would
part of the tutorial will explore some different ways for using
to have a closer look at
Our pattern is now ready. Theoretically, we can create the same diagonal pattern
king those 17 dots on the upper left corner of
the illustration above. But I recommend working on your patterns on a larger
Library. Press
Pattern to enter a
Your pattern is now defined and ready to be used with whatever tool you would
part of the tutorial will explore some different ways for using
37
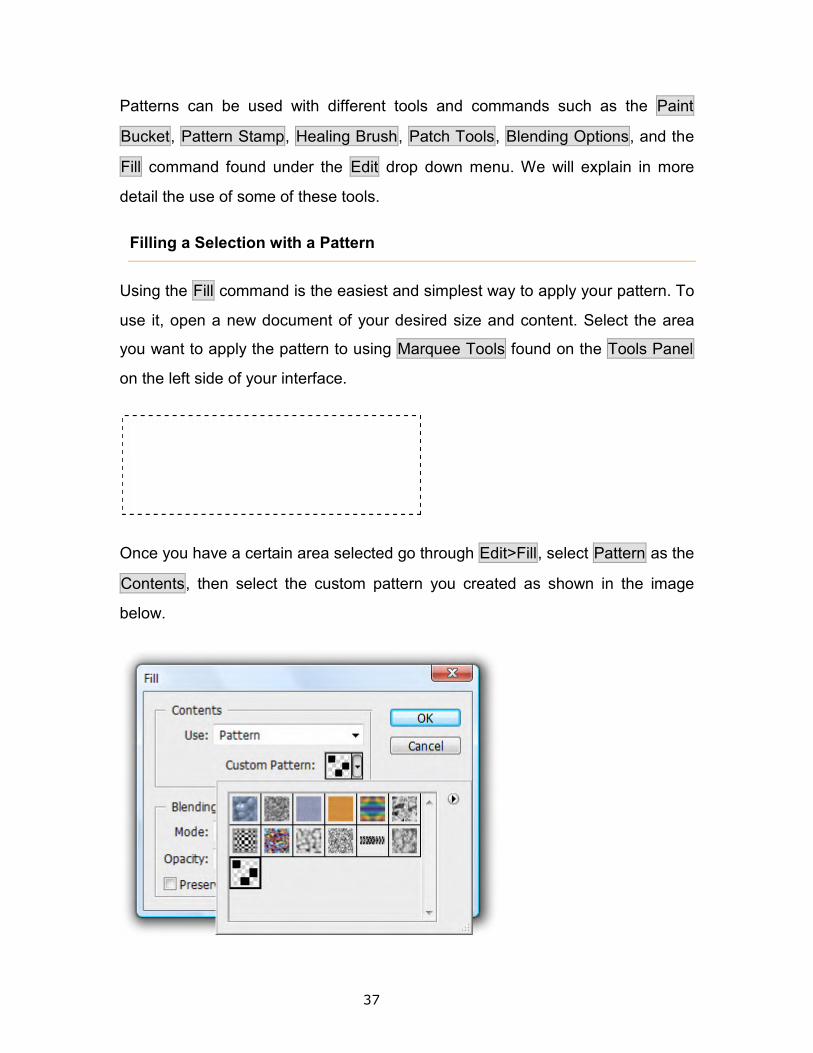
Patterns can be used with different tools and commands such as the Paint
Bucket, Pattern Stamp, Healing Brush, Patch Tools, Blending Options, and the
Fill command found under the Edit drop down menu. We will explain in more
detail the use of some of these tools.
Filling a Selection with a Pattern
Using the Fill command is the easiest and simplest way to apply your pattern. To
use it, open a new document of your desired size and content. Select the area
you want to apply the pattern to using Marquee Tools found on the Tools Panel
on the left side of your interface.
Once you have a certain area selected go through Edit>Fill, select Pattern as the
Contents, then select the custom pattern you created as shown in the image
below.
38
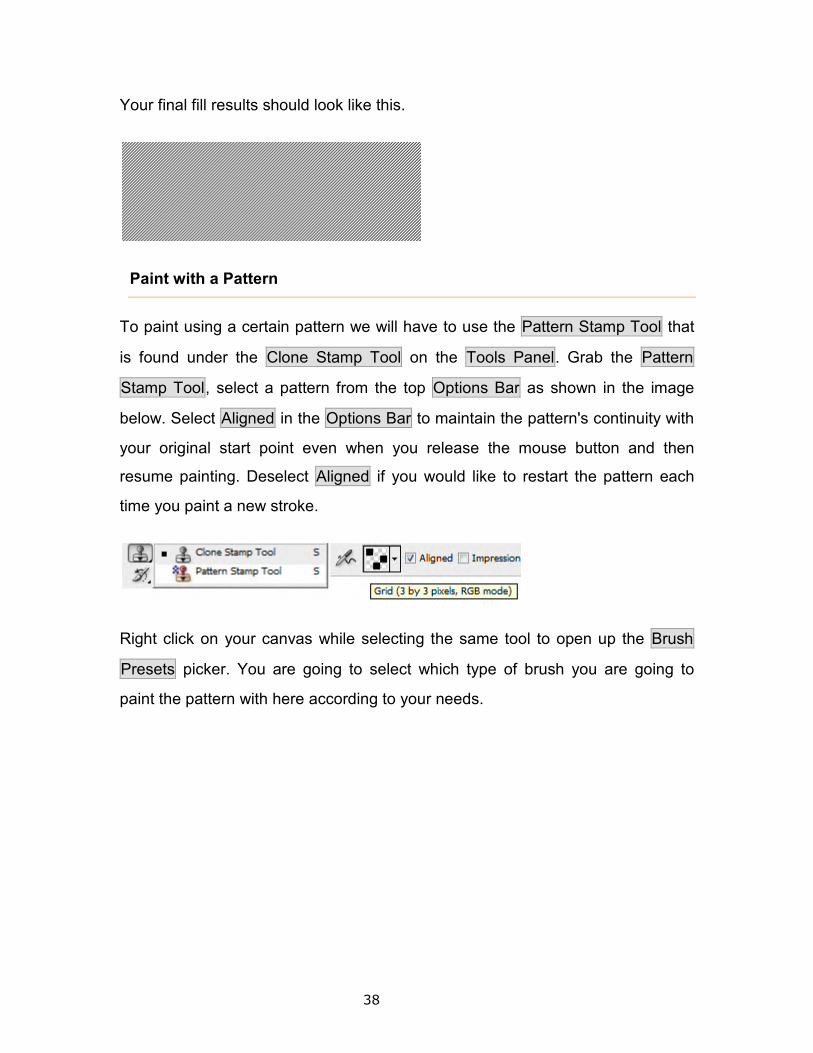
Your final fill results should look like this.
Paint with a Pattern
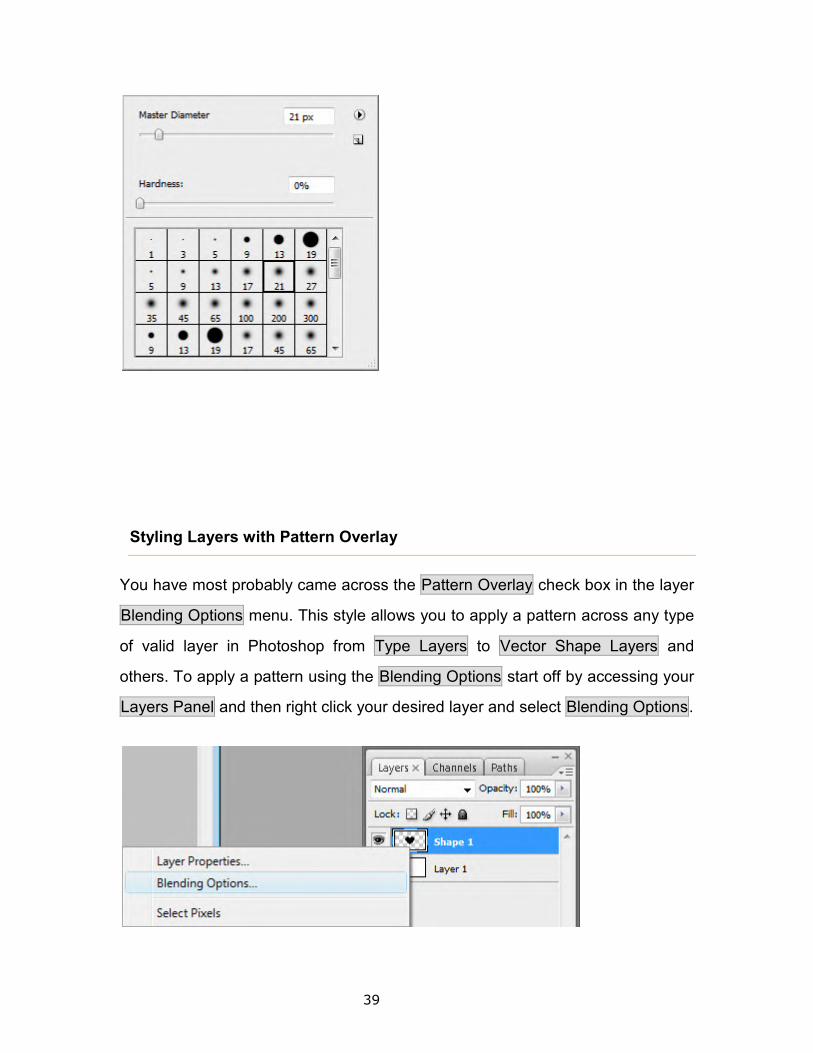
To paint using a certain pattern we will have to use the Pattern Stamp Tool that
is found under the Clone Stamp Tool on the Tools Panel. Grab the Pattern
Stamp Tool, select a pattern from the top Options Bar as shown in the image
below. Select Aligned in the Options Bar to maintain the pattern's continuity with
your original start point even when you release the mouse button and then
resume painting. Deselect Aligned if you would like to restart the pattern each
time you paint a new stroke.
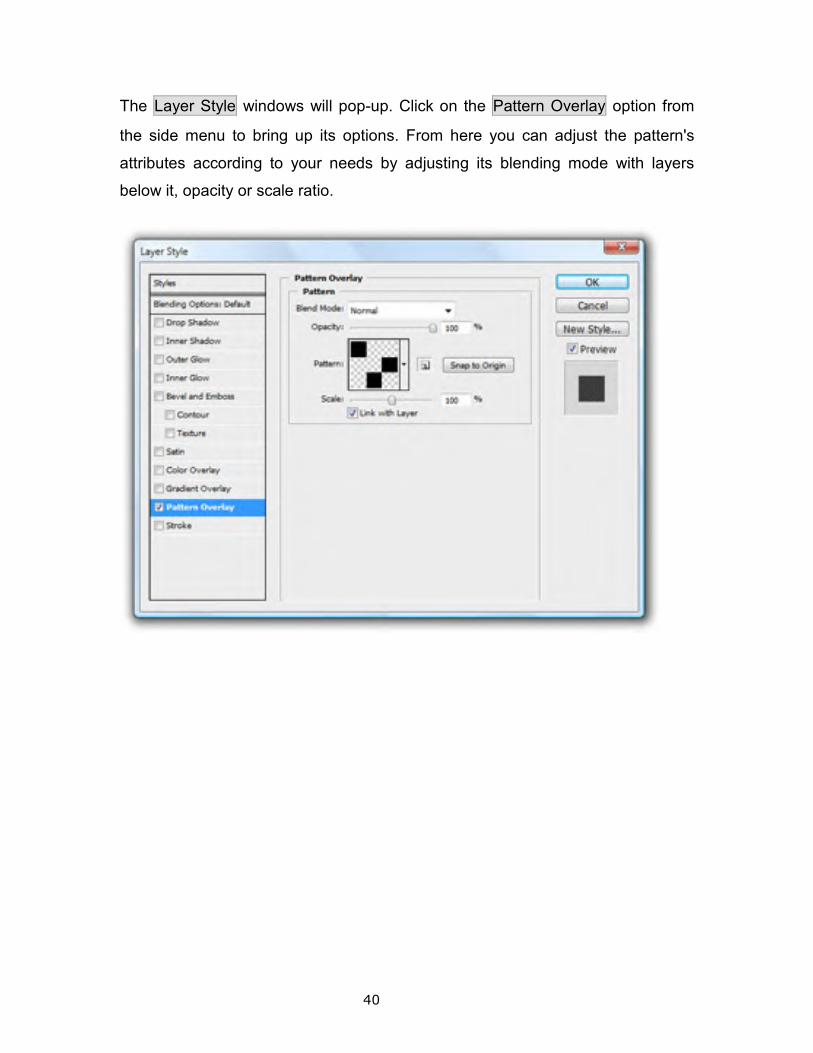
Right click on your canvas while selecting the same tool to open up the Brush
Presets picker. You are going to select which type of brush you are going to
paint the pattern with here according to your needs.
39
Styling Layers with Pattern Overlay
You have most probably came across the Pattern Overlay check box in the layer
Blending Options menu. This style allows you to apply a pattern across any type
of valid layer in Photoshop from Type Layers to Vector Shape Layers and
others. To apply a pattern using the Blending Options start off by accessing your
Layers Panel and then right click your desired layer and select Blending Options.
40
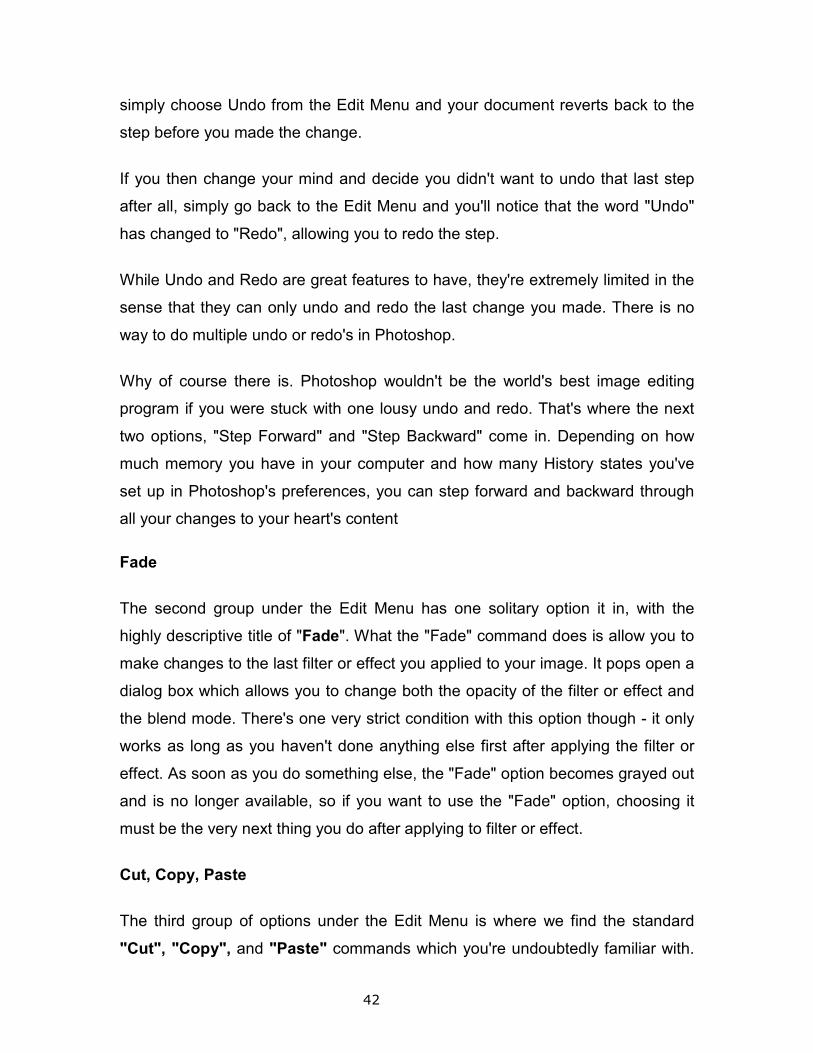
The Layer Style windows will pop-up. Click on the Pattern Overlay option from
the side menu to bring up its options. From here you can adjust the pattern's
attributes according to your needs by adjusting its blending mode with layers
below it, opacity or scale ratio.

41
Edit Menu
Undo and Redo
The first group under the Edit Menu is our Undo and Redo section. If you make
a mistake while working on a document and want to undo the change you made,
42
simply choose Undo from the Edit Menu and your document reverts back to the
step before you made the change.
If you then change your mind and decide you didn't want to undo that last step
after all, simply go back to the Edit Menu and you'll notice that the word "Undo"
has changed to "Redo", allowing you to redo the step.
While Undo and Redo are great features to have, they're extremely limited in the
sense that they can only undo and redo the last change you made. There is no
way to do multiple undo or redo's in Photoshop.
Why of course there is. Photoshop wouldn't be the world's best image editing
program if you were stuck with one lousy undo and redo. That's where the next
two options, "Step Forward" and "Step Backward" come in. Depending on how
much memory you have in your computer and how many History states you've
set up in Photoshop's preferences, you can step forward and backward through
all your changes to your heart's content
Fade
The second group under the Edit Menu has one solitary option it in, with the
highly descriptive title of "Fade". What the "Fade" command does is allow you to
make changes to the last filter or effect you applied to your image. It pops open a
dialog box which allows you to change both the opacity of the filter or effect and
the blend mode. There's one very strict condition with this option though - it only
works as long as you haven't done anything else first after applying the filter or
effect. As soon as you do something else, the "Fade" option becomes grayed out
and is no longer available, so if you want to use the "Fade" option, choosing it
must be the very next thing you do after applying to filter or effect.
Cut, Copy, Paste
The third group of options under the Edit Menu is where we find the standard
"Cut", "Copy", and "Paste" commands which you're undoubtedly familiar with.
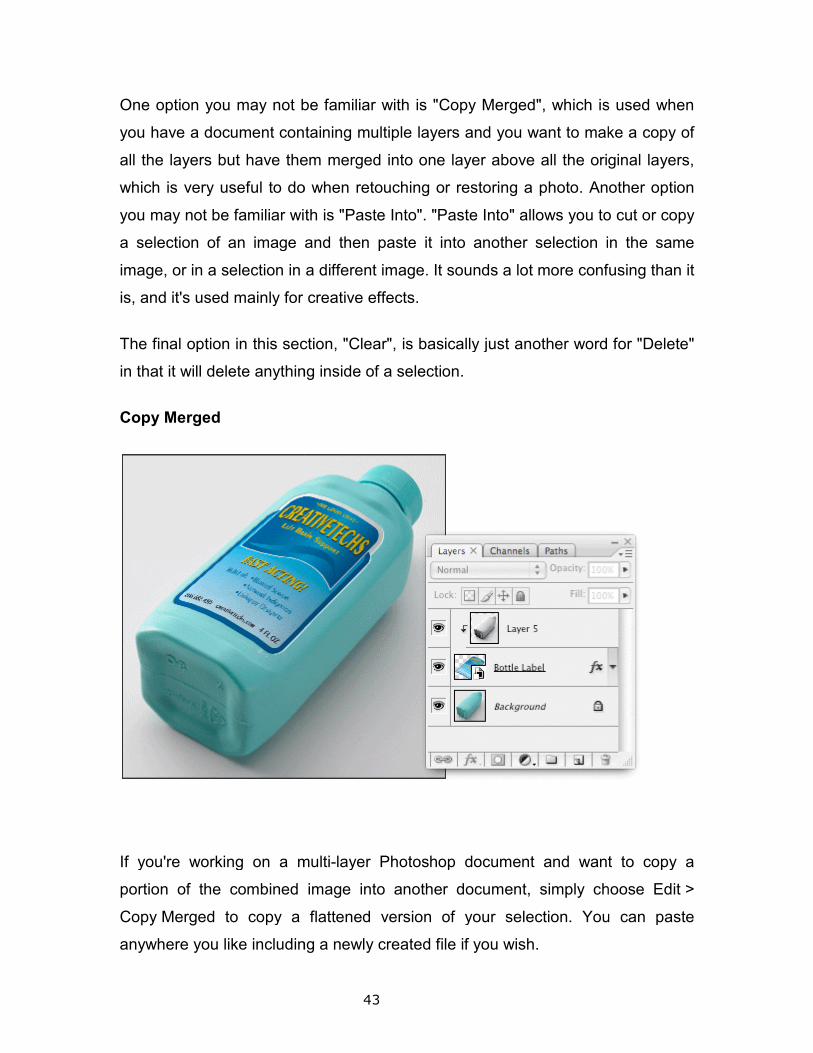
One option you may not be familiar with is "Copy Merged", which is used when
you have a document containing multiple layers and you want to make a copy of
all the layers but have them merged into one layer above all the original layers,
which is very useful to do when retouching or restoring a photo. Another option
you may not be familiar with is "Paste Into". "Paste Into" allows you to cut or copy
a selection of an image and then paste it into another selection in the same
image, or in a selection in a dif
is, and it's used mainly for creative effects.
The final option in this section, "Clear", is basically just another word for "Delete"
in that it will delete anything inside of a selection.
Copy Merged
If you're working on a multi
portion of the combined image into another document, simply choose
Copy Merged to copy a flattened version of your selection. You can paste
anywhere you like including a ne
43
One option you may not be familiar with is "Copy Merged", which is used when
you have a document containing multiple layers and you want to make a copy of
all the layers but have them merged into one layer above all the original layers,
l to do when retouching or restoring a photo. Another option
you may not be familiar with is "Paste Into". "Paste Into" allows you to cut or copy
a selection of an image and then paste it into another selection in the same
image, or in a selection in a different image. It sounds a lot more confusing than it
is, and it's used mainly for creative effects.
The final option in this section, "Clear", is basically just another word for "Delete"
in that it will delete anything inside of a selection.
If you're working on a multi-layer Photoshop document and want to copy a
portion of the combined image into another document, simply choose
to copy a flattened version of your selection. You can paste
anywhere you like including a newly created file if you wish.
One option you may not be familiar with is "Copy Merged", which is used when
you have a document containing multiple layers and you want to make a copy of
all the layers but have them merged into one layer above all the original layers,
l to do when retouching or restoring a photo. Another option
you may not be familiar with is "Paste Into". "Paste Into" allows you to cut or copy
a selection of an image and then paste it into another selection in the same
ferent image. It sounds a lot more confusing than it
The final option in this section, "Clear", is basically just another word for "Delete"
layer Photoshop document and want to copy a
portion of the combined image into another document, simply choose Edit >
to copy a flattened version of your selection. You can paste
44
Purging Photoshop
The Purge command under the Edit Menu is located all by itself in its own group,
and it allows us to free up system memory that's being used by the Undo
command, the Clipboard, the History palette, or all three at once. This is useful if
your computer has limited resources available and you're finding that the size of
your document is causing Photoshop to perform poorly. Keep in mind though that
once you've purged the information from your system's memory, it's gone
forever, so it's a good idea to invest in as much memory for your system as you
can afford. No amount of memory is enough for Photoshop, but still, the more
you have, the better your chances of avoiding any noticeable performance
issues.
Adobe PDF Presents and the Preset Manager
The File Info option, grouped all by itself, does precisely what its name implies. It
brings up a rather large dialog box where you can view, add and edit information
about the document, such as the Document Title, Author, Description, Copyright
Information, and much, much more.
Color Settings & Profiles
The second last group under the Edit Menu deserved an entire website unto itself
and has to do with Photoshop's color settings and profiles.
Keyboard Shortcuts, Menus & Preferences
Finally, way down at the bottom of the Edit Menu is where we can change the
default keyboard shortcuts that Photoshop comes with. We can even make our
own shortcuts that didn't exist by default.
Photoshop CS3 Essential Preferences: How to Access the Preferences
45
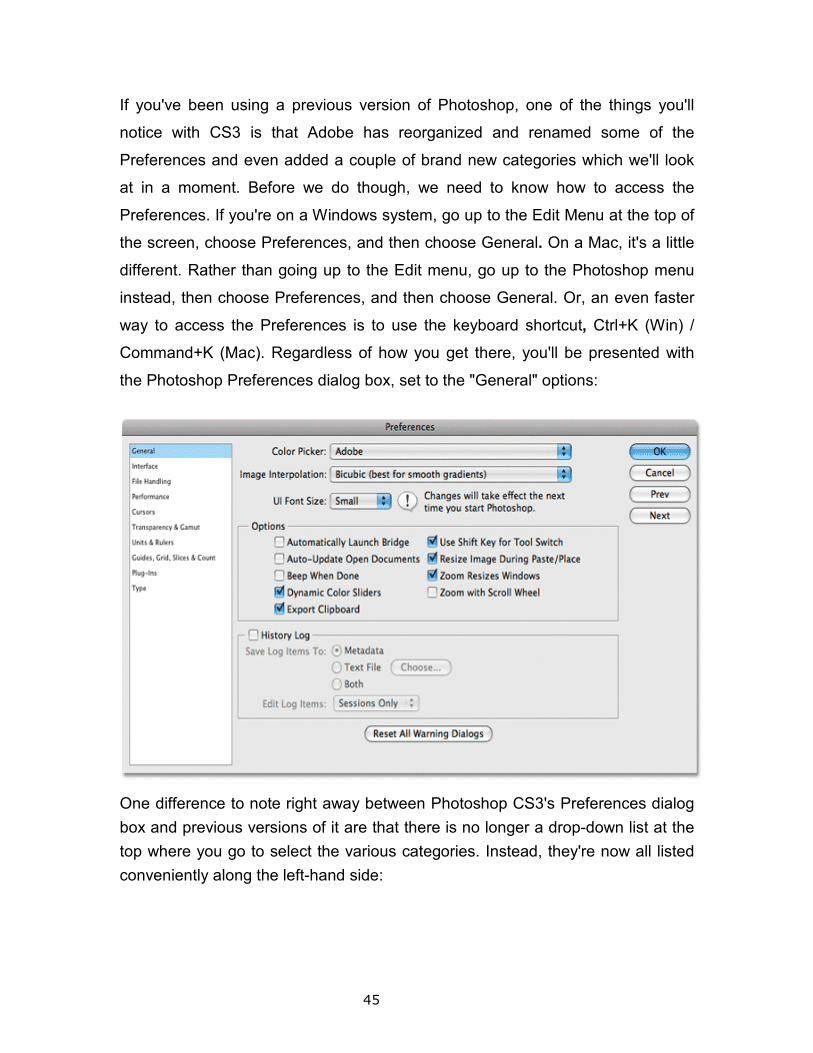
If you've been using a previous version of Photoshop, one of the things you'll
notice with CS3 is that Adobe has reorganized and renamed some of the
Preferences and even added a couple of brand new categories which we'll look
at in a moment. Before we do though, we need to know how to access the
Preferences. If you're on a Windows system, go up to the Edit Menu at the top of
the screen, choose Preferences, and then choose General. On a Mac, it's a little
different. Rather than going up to the Edit menu, go up to the Photoshop menu
instead, then choose Preferences, and then choose General. Or, an even faster
way to access the Preferences is to use the keyboard shortcut, Ctrl+K (Win) /
Command+K (Mac). Regardless of how you get there, you'll be presented with
the Photoshop Preferences dialog box, set to the "General" options:
One difference to note right away between Photoshop CS3's Preferences dialog
box and previous versions of it are that there is no longer a drop-down list at the
top where you go to select the various categories. Instead, they're now all listed
conveniently along the left-hand side:
46
Since we already have the "General" Preferences open, let's start by looking at a
few important General options.
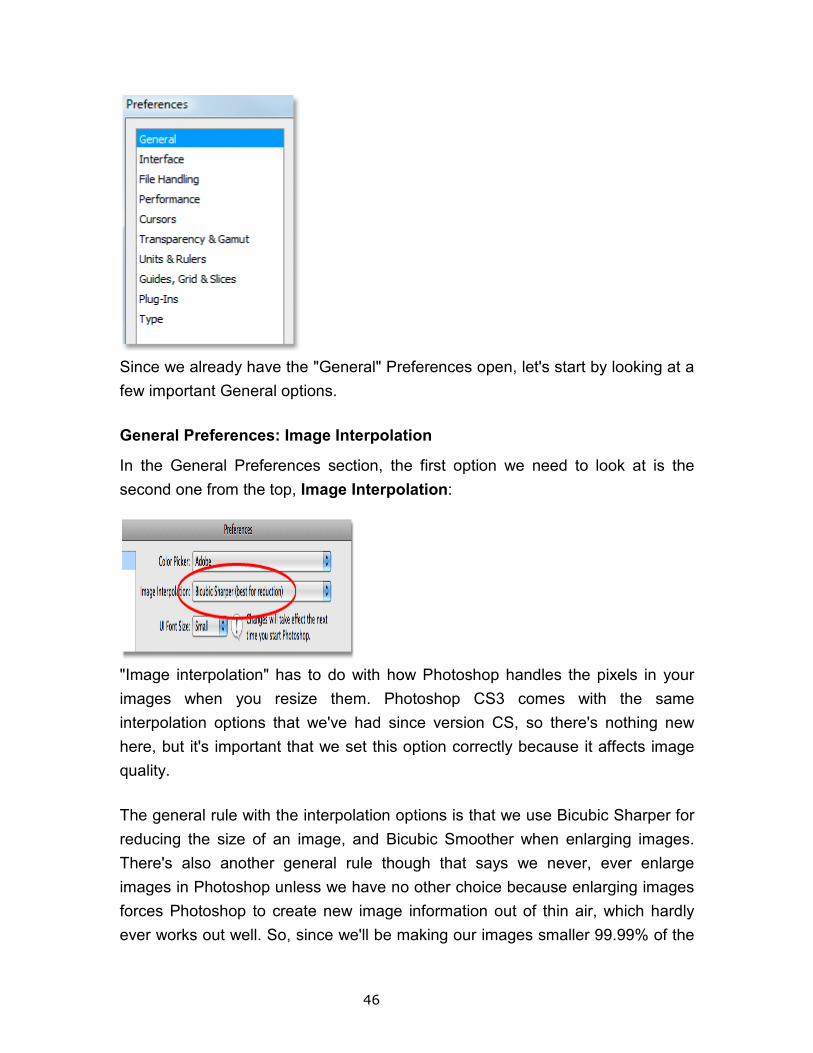
General Preferences: Image Interpolation
In the General Preferences section, the first option we need to look at is the
second one from the top, Image Interpolation:
"Image interpolation" has to do with how Photoshop handles the pixels in your
images when you resize them. Photoshop CS3 comes with the same
interpolation options that we've had since version CS, so there's nothing new
here, but it's important that we set this option correctly because it affects image
quality.
The general rule with the interpolation options is that we use Bicubic Sharper for
reducing the size of an image, and Bicubic Smoother when enlarging images.
There's also another general rule though that says we never, ever enlarge
images in Photoshop unless we have no other choice because enlarging images
forces Photoshop to create new image information out of thin air, which hardly
ever works out well. So, since we'll be making our images smaller 99.99% of the
47
time, it's a good idea to set our Image Interpolation option to Bicubic Sharper.
Setting this option here also affects other areas in Photoshop, like what happens
when we crop or transform images. So go ahead then and set this option to
"Bicubic Sharper".
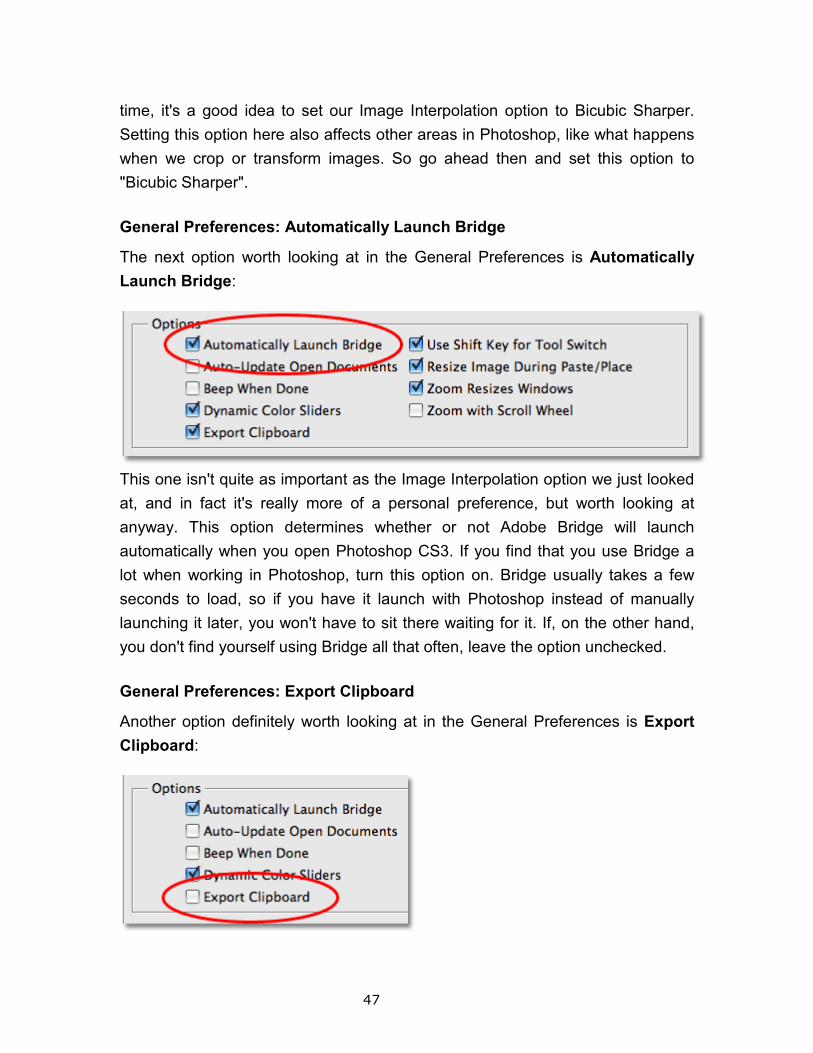
General Preferences: Automatically Launch Bridge
The next option worth looking at in the General Preferences is Automatically
Launch Bridge:
This one isn't quite as important as the Image Interpolation option we just looked
at, and in fact it's really more of a personal preference, but worth looking at
anyway. This option determines whether or not Adobe Bridge will launch
automatically when you open Photoshop CS3. If you find that you use Bridge a
lot when working in Photoshop, turn this option on. Bridge usually takes a few
seconds to load, so if you have it launch with Photoshop instead of manually
launching it later, you won't have to sit there waiting for it. If, on the other hand,
you don't find yourself using Bridge all that often, leave the option unchecked.
General Preferences: Export Clipboard
Another option definitely worth looking at in the General Preferences is Export
Clipboard:
48
Unless you're in the habit of copying Photoshop files and pasting them into other
programs, which is highly unlikely, turn this option off (uncheck it). Leaving it on
will only slow your computer down for no good reason and may even throw up a
nice little error message from time to time. No need for it.
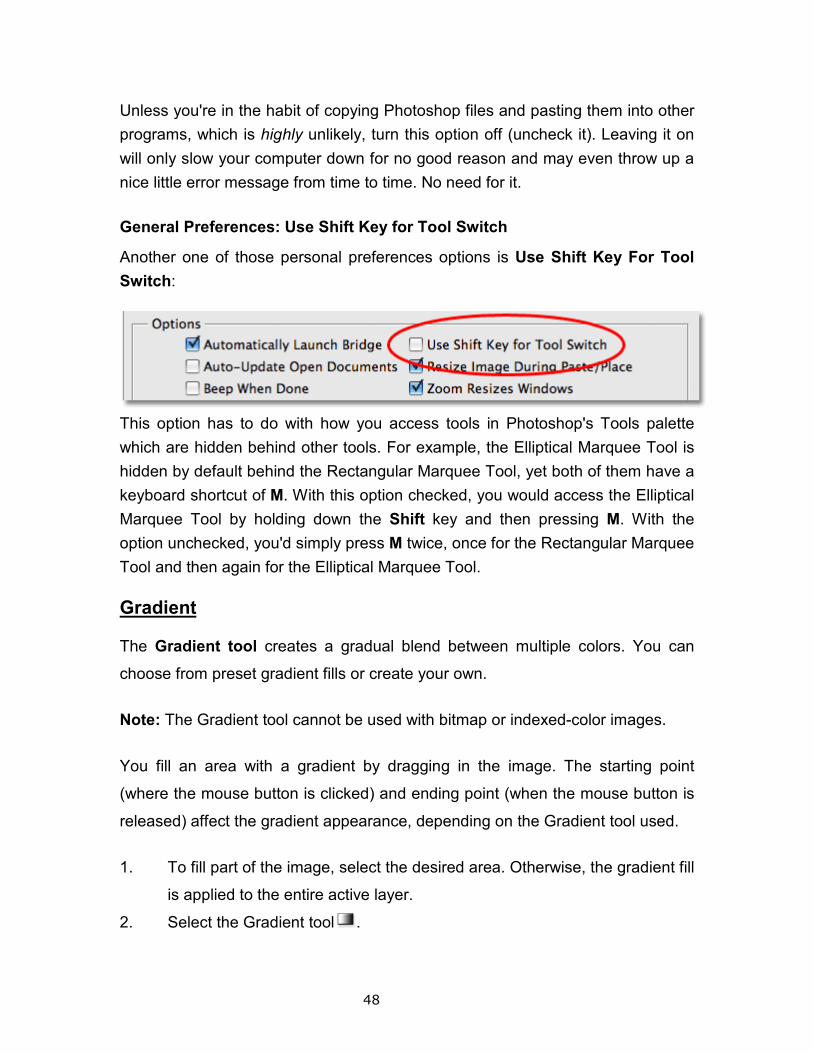
General Preferences: Use Shift Key for Tool Switch
Another one of those personal preferences options is Use Shift Key For Tool
Switch:
This option has to do with how you access tools in Photoshop's Tools palette
which are hidden behind other tools. For example, the Elliptical Marquee Tool is
hidden by default behind the Rectangular Marquee Tool, yet both of them have a
keyboard shortcut of M. With this option checked, you would access the Elliptical
Marquee Tool by holding down the Shift key and then pressing M. With the
option unchecked, you'd simply press M twice, once for the Rectangular Marquee
Tool and then again for the Elliptical Marquee Tool.
Gradient
The Gradient tool creates a gradual blend between multiple colors. You can
choose from preset gradient fills or create your own.
Note: The Gradient tool cannot be used with bitmap or indexed-color images.
You fill an area with a gradient by dragging in the image. The starting point
(where the mouse button is clicked) and ending point (when the mouse button is
released) affect the gradient appearance, depending on the Gradient tool used.
1. To fill part of the image, select the desired area. Otherwise, the gradient fill
is applied to the entire active layer.
2. Select the Gradient tool .
49
3. Choose a gradient fill in the options bar:
• Click the triangle next to the gradient sample to pick a preset
gradient fill.
• Click inside the gradient sample to view the Gradient Editor. Select
a preset gradient fill, or create a new gradient fill. Then click OK.
4. Select an option for applying the gradient fill in the options bar:
Linear gradient
Shades from the starting point to the ending point in a straight line.
Radial gradient
Shades from the starting point to the ending point in a circular pattern.
Angle gradient
Shades in a counterclockwise sweep around the starting point.
Reflected gradient
Shades using symmetric linear gradients on either side of the starting
point.
Diamond gradient
Shades from the starting point outward in a diamond pattern. The ending
point defines one corner of the diamond.
5. Do the following in the options bar:
• Specify a blending mode and opacity for the paint. (See List of
blending modes.)
• To reverse the order of colors in the gradient fill, select Reverse.
• To create a smoother blend with less banding, select Dither.
• To use a transparency mask for the gradient fill, select
Transparency. (See Specify the gradient transparency.)
50
Position the pointer in the image where you want to set the starting point of the
gradient, and drag to define the ending point.
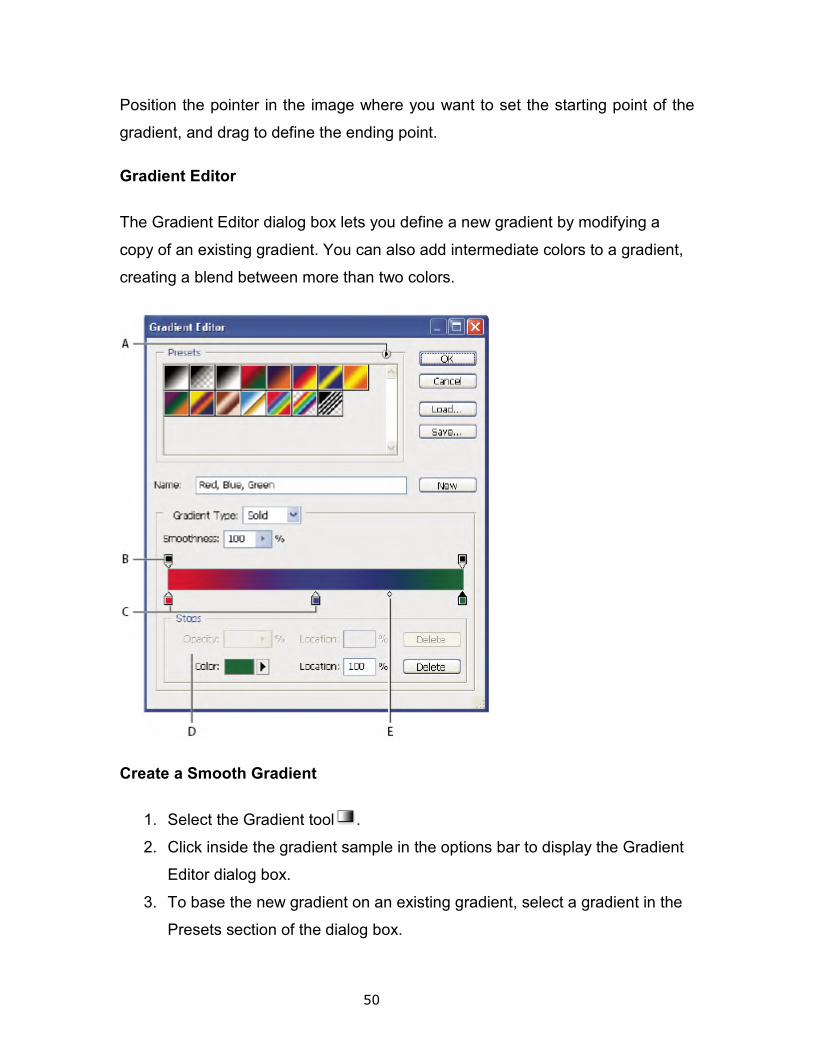
Gradient Editor
The Gradient Editor dialog box lets you define a new gradient by modifying a
copy of an existing gradient. You can also add intermediate colors to a gradient,
creating a blend between more than two colors.
Create a Smooth Gradient
1. Select the Gradient tool .
2. Click inside the gradient sample in the options bar to display the Gradient
Editor dialog box.
3. To base the new gradient on an existing gradient, select a gradient in the
Presets section of the dialog box.

51
4. Choose Solid from the Gradient Type pop-up menu.
5. To define the starting color of the gradient, click the left color stop under
the gradient bar. The triangle above the stop turns black , indicating that
the starting color is being edited.
6. To choose a color, do one of the following:
• Double-click the color stop, or click the color swatch in the Stops
section of the dialog box. Choose a color, and click OK.
• Choose an option from the Color pop-up menu in the Stops section
of the dialog box.
• Position the pointer over the gradient bar (the pointer turns into the
eyedropper), and click to sample a color, or click anywhere in the
image to sample a color from the image.
7. To define the ending color, click the right color stop under the gradient bar.
Then choose a color.
8. To adjust the location of the starting point or ending point, do one of the
following:
• Drag the corresponding color stop left or right to the location you
want.
• Click the corresponding color stop, and enter a value for Location in
the Stops section of the dialog box. A value of 0% places the point
at the far left end of the gradient bar; a value of 100%, at the far
right end.
9. To adjust the location of the midpoint (where the gradient displays an even
mix of the starting and ending colors), drag the diamond below the
gradient bar to the left or right, or click the diamond, and enter a value for
Location.
10. To add intermediate colors to a gradient, click below the gradient bar to
define another color stop. Specify the color and adjust the location and
midpoint for the intermediate point as you would f
point.
11. To delete the color stop you are editing, click Delete, or drag the stop
downwards until it disappears.
12. To control how gradual the transitions are between color bands in the
gradient, enter a value in the Smoothness text box
Smoothness pop-up slider.
13. If desired, set transparency values for the gradient.
14. Enter a name for the new gradient.
15. To save the gradient as a preset, click New after you have finished
creating the gradient.
Dynamic Range View
HDR Images
The dynamic range of HDR
computer monitors. When you open an HDR image in Photoshop, it can look
very dark or washed out. Photoshop lets you adjust the preview so that the
monitor displays an HDR image wh
out or too dark. The preview settings are stored in the HDR image file (PSD,
PSB, and TIFF only) and are applied whenever the file is opened in Photoshop.
Preview adjustments don’t edit the HDR image file, all the H
information remains intact. Use the Exposure adjustment (Image
Adjustments > Exposure) to make exposure edits to the 32
To view 32-bit readouts in the Info palette, click the
Info palette and choose 32
1. Open a 32-bpc HDR image in Photoshop, and choose View
Preview Options.
52
To add intermediate colors to a gradient, click below the gradient bar to
define another color stop. Specify the color and adjust the location and
midpoint for the intermediate point as you would for a starting or ending
To delete the color stop you are editing, click Delete, or drag the stop
downwards until it disappears.
To control how gradual the transitions are between color bands in the
gradient, enter a value in the Smoothness text box, or drag the
up slider.
If desired, set transparency values for the gradient.
Enter a name for the new gradient.
To save the gradient as a preset, click New after you have finished
creating the gradient.
HDR images exceeds the display capabilities of standard
computer monitors. When you open an HDR image in Photoshop, it can look
very dark or washed out. Photoshop lets you adjust the preview so that the
monitor displays an HDR image whose highlights and shadows aren’t washed
out or too dark. The preview settings are stored in the HDR image file (PSD,
PSB, and TIFF only) and are applied whenever the file is opened in Photoshop.
Preview adjustments don’t edit the HDR image file, all the H
information remains intact. Use the Exposure adjustment (Image
> Exposure) to make exposure edits to the 32-bpc HDR image.
bit readouts in the Info palette, click the Eyedropper
Info palette and choose 32-Bit from the pop-up menu.
bpc HDR image in Photoshop, and choose View
To add intermediate colors to a gradient, click below the gradient bar to
define another color stop. Specify the color and adjust the location and
or a starting or ending
To delete the color stop you are editing, click Delete, or drag the stop
To control how gradual the transitions are between color bands in the
, or drag the
To save the gradient as a preset, click New after you have finished
images exceeds the display capabilities of standard
computer monitors. When you open an HDR image in Photoshop, it can look
very dark or washed out. Photoshop lets you adjust the preview so that the
ose highlights and shadows aren’t washed
out or too dark. The preview settings are stored in the HDR image file (PSD,
PSB, and TIFF only) and are applied whenever the file is opened in Photoshop.
Preview adjustments don’t edit the HDR image file, all the HDR image
information remains intact. Use the Exposure adjustment (Image >
bpc HDR image.
Eyedropper icon in the
bpc HDR image in Photoshop, and choose View > 32-Bit
2. In the 32-bit Preview Options dialog box, choose an option from the
Method menu:
Exposure and Gamma
Adjusts the brightness and contrast.
Highlight Compression
Compresses the highlight values in the HDR image so they fall within the
luminance values range of the 8
3. If you chose Exposure and Gamma, move the Exposure and Gamma
sliders to adjust the brightness and contrast of the imag
4. Click OK.
You can also adjust the preview of an HDR image open in Photoshop
by clicking the triangle in the status bar of the document window and
choosing 32-Bit Exposure from the pop
the white point for viewing
to the default exposure setting. Since the adjustment is made per view,
you can have the same HDR image open in multiple windows, each with a
different preview adjustment. Preview adjustments made with this
are not stored in the HDR image file.
Match the Color in Different Images
The Match Color command matches colors between multiple images, between
multiple layers, or between multiple selections. It also lets you adjust the colors in
an image by changing the luminance, changing the color range, and neutralizing
a color cast. The Match Color command works only in RGB mode.
When you use the Match Color command, the pointer becomes the
Eyedropper tool. Use the Eyedropper tool while adjusting the image
color pixel values in the Info palette. This palette gives you feedback about
changes in color values as you use the Match Color command.
53
bit Preview Options dialog box, choose an option from the
Exposure and Gamma
Adjusts the brightness and contrast.
pression
Compresses the highlight values in the HDR image so they fall within the
luminance values range of the 8- or 16-bpc image file.
If you chose Exposure and Gamma, move the Exposure and Gamma
sliders to adjust the brightness and contrast of the image preview.
You can also adjust the preview of an HDR image open in Photoshop
by clicking the triangle in the status bar of the document window and
Bit Exposure from the pop-up menu. Move the slider to set
the white point for viewing the HDR image. Double-click the slider to return
to the default exposure setting. Since the adjustment is made per view,
you can have the same HDR image open in multiple windows, each with a
different preview adjustment. Preview adjustments made with this
are not stored in the HDR image file.
Match the Color in Different Images
command matches colors between multiple images, between
multiple layers, or between multiple selections. It also lets you adjust the colors in
anging the luminance, changing the color range, and neutralizing
a color cast. The Match Color command works only in RGB mode.
When you use the Match Color command, the pointer becomes the
Eyedropper tool. Use the Eyedropper tool while adjusting the image
color pixel values in the Info palette. This palette gives you feedback about
changes in color values as you use the Match Color command.
bit Preview Options dialog box, choose an option from the
Compresses the highlight values in the HDR image so they fall within the
If you chose Exposure and Gamma, move the Exposure and Gamma
e preview.
You can also adjust the preview of an HDR image open in Photoshop
by clicking the triangle in the status bar of the document window and
up menu. Move the slider to set
click the slider to return
to the default exposure setting. Since the adjustment is made per view,
you can have the same HDR image open in multiple windows, each with a
different preview adjustment. Preview adjustments made with this method
command matches colors between multiple images, between
multiple layers, or between multiple selections. It also lets you adjust the colors in
anging the luminance, changing the color range, and neutralizing
When you use the Match Color command, the pointer becomes the
Eyedropper tool. Use the Eyedropper tool while adjusting the image to view the
color pixel values in the Info palette. This palette gives you feedback about
54
The Match Color command matches the colors in one image (the source image)
with those in another image (the target image). This is useful when you’re trying
to make the colors in different photos consistent, or when certain colors (such as
skin tones) in one image must match the colors in another image. In addition to
matching the color between two images, the Match Color command can match
the color between different layers in the same image.
Make a selection in the source and target images.
If you don’t make a selection, then the Match Color command matches the
overall image statistics between images.
Make the image that you want to target active, and then choose Image >
Adjustments > Match Color.
If you’re applying the Match Color command to a specific layer in the target
image, make sure that layer is active when you choose the Match Color
command.
From the Source menu in the Image Statistics area of the Match Color dialog
box, choose the source image whose colors you’ll be matching in the target
image. Choose none when you don’t want to reference a different image to
calculate the color adjustment. With None chosen, the target image and the
source image are the same.
If necessary, use the Layer menu to choose the layer from the source image
whose colors you want to match. You can also choose Merged from the Layer
menu to match the colors from all the layers in the source image.
If you made a selection in the image, do one or more of the following:
• In the Destination Image area, select Ignore Selection When Applying
Adjustment if you’re applying the adjustment to the entire target image.
55
This option ignores the selection in the target image and applies the
adjustment to the entire target image.
• In the Image Statistics area, select Use Selection in Source to Calculate
Colors if you made a selection in the source image and want to use the
colors in the selection to compute the adjustment. Deselect this option to
ignore the selection in the source image, and use the colors from the
entire source image to compute the adjustment.
• In the Image Statistics area, select Use Selection in Target to Calculate
Adjustment if you made a selection in the target image and want to use
the colors in the selection to calculate the adjustment. Deselect this option
to ignore the selection in the target image and compute the adjustment by
using the colors of the entire target image.
To automatically remove a color cast in the target image, select the Neutralize
option. Make sure the Preview option is selected so that your image is updated
as you make adjustments.
To increase or decrease the brightness in the target image, move the
Luminance slider. Alternatively, enter a value in the Luminance text box. The
maximum value is 200, the minimum is 1, and the default is 100.
To adjust the color saturation in the target image, adjust the Color Intensity
slider. Alternatively, enter a value in the Color Intensity text box. The maximum
value is 200, the minimum is 1 (which produces a grayscale image), and the
default is 100.
To control the amount of adjustment applied to the image, move the Fade
slider. Moving the slider to the right reduces the adjustment.
Click OK.
1. Make a selection in the layer you want to match. This is useful when
matching a color region (for example, facial skin tones) in one layer with a
region in another.
56
If you don’t make a selection, then the Match Color matches the colors of
the entire source layer.
2. Make sure the layer you want to target (apply the color adjustment to) is
active, and then choose Image > Adjustments > Match Color.
3. From the Source menu in the Image Statistics area of the Match Color
dialog box, make sure that the image in the Source menu is the same as
the target image.
4. Use the Layer menu to choose the layer whose colors you want to match.
You can also choose Merged from the Layer menu to match the colors
from all the layers.
5. If you made a selection in the image, do one or more of the following:
• In the Destination Image area, select Ignore Selection When
Applying Adjustment if you’re applying the adjustment to the entire
target layer. This option ignores the selection in the target layer and
applies the adjustment to the entire target layer.
• In the Image Statistics area, select Use Selection in Source to
Calculate Colors if you made a selection in the source image and
want to use the color in the selection to compute the adjustment.
Deselect this option to ignore the selection in the source layer and
use the colors in the entire source layer to compute the adjustment.
• In the Image Statistics area, select Use Selection in Target to
Calculate Adjustment if you want to use only the colors in the
selected area of the target layer to compute the adjustment.
Deselect this option to ignore the selection and use the colors of
the entire target layer to compute the adjustment.
6. To automatically remove a color cast in the target layer, Select the
Neutralize option. Make sure the Preview option is selected so that your
image is updated as you make adjustments.
57
7. To increase or decrease the brightness in the target layer, move the
Luminance slider. Alternatively, enter a value in the Luminance text box.
The maximum value is 200, the minimum is 1, and the default is 100.
8. To adjust the range of color pixel values in the target layer, adjust the
Color Intensity slider. Alternatively, enter a value in the Color Intensity text
box. The maximum value is 200, the minimum is 1 (which produces a
grayscale image), and the default is 100.
9. To control the amount of adjustment applied to the image, adjust the Fade
slider. Moving the slider to the right reduces the amount of adjustment.
10. Click OK.
The Match Color command can adjust the brightness, color saturation, and color
balance in an image. The advanced algorithms in the Match Color command give
you better control over luminance and color components of the image. Because
you are adjusting the color in a single image rather than matching the colors
between two images, the image you’re correcting is both the source and the
target image.
1. Choose Image > Adjustments > Match Color.
2. In the Image Statistics area, make sure None is chosen in the Source
menu. The option specifies that the source and the target are the same
image.
3. To automatically remove a color cast, select the Neutralize option. Make
sure the Preview option is selected so that your image is updated as you
make adjustments.
4. To increase or decrease the brightness in the image, adjust the
Luminance slider. Moving the Luminance slider to the left darkens the
image, and moving the slider to the right brightens the image. The
luminance control tries not to clip pixels (change them to pure black/no
detail or pure white/no detail) in either the shadows or highlights.
However, it may clip pixels because an image can have only either 8-bit or
16-bit values.
58
5. To expand or reduce the color pixel values in the image, adjust the Color
Intensity slider. Moving the Color Intensity slider to the left reduces the
color range, and the image becomes monochromatic. Moving the Color
Intensity to the right increases the color range and intensifies the colors.
6. To control the amount of adjustment applied to the image, adjust the Fade
slider. Moving the slider to the right reduces the amount of adjustment.
Note: You can use the Match Color controls separately to apply a single
correction to the image. For example, you can adjust only the Luminance
slider to brighten/darken an image without affecting the color. Or you can
use the controls in different combinations, depending on the color
correction you’re making.
7. Click OK.
Hue/Saturation
The Hue/Saturation command lets you adjust the hue, saturation, and
brightness of a specific color component in an image or simultaneously adjust all
the colors in an image. This command is especially good for fine-tuning colors in
a CMYK image so that they are in the gamut of an output device. You can save
settings in the Hue/Saturation dialog box and load them for reuse in other
images.
Do one of the following:
• Choose Image > Adjustments > Hue/Saturation.
• Choose Layer > New Adjustment Layer > Hue/Saturation. Click OK in the
New Layer dialog box. The two color bars in the dialog box represent the
colors in their order on the color wheel. The upper color bar shows the
color before the adjustment; the lower bar shows how the adjustment
affects all of the hues at full saturation.
Choose which colors to adjust using the Edit pop-up menu:
59
• Choose Master to adjust all colors at once.
• Choose one of the other preset color ranges listed for the color you want
to adjust.
For Hue, enter a value or drag the slider until you are satisfied with the colors.
The values displayed in the text box reflect the number of degrees of rotation
around the wheel from the pixel’s original color. A positive value indicates
clockwise rotation; a negative value, counterclockwise rotation. Values can range
from -180 to +180.
Color wheel
A. Saturation
B. Hue
For Saturation, enter a value or drag the slider to the right to increase the
saturation or to the left to decrease it.
The color shifts away from or toward the center of the color wheel. Values can
range from -100 (percentage of desaturation, duller colors) to +100 (percentage
of saturation increase).
60
For Lightness, enter a value or drag the slider to the right to increase the
lightness (add white to a color) or to the left to decrease it (add black to a color).
Values can range from -100 (percentage of black) to +100 (percentage of white).
Note: Click the Reset button to undo a setting in the Hue/Saturation dialog box.
Press Alt (Windows) or Option (Mac OS) to change the Cancel button to Reset
1. Do one of the following:
• Choose Image > Adjustments > Hue/Saturation.
• Choose Layer > New Adjustment Layer > Hue/Saturation. Click OK
in the New Layer dialog box.
2. In the Hue/Saturation dialog box, choose a color from the Edit menu.
Four color wheel values (in degrees) appear in the dialog box. They
correspond to the adjustment sliders that appear between the color bars.
The two inner vertical sliders define the color range. The two outer triangle
sliders show where the adjustments on a color range “fall off” (fall-off is a
feathering or tapering of the adjustments instead of a sharply defined
on/off application of the adjustments).
3. Use either the eyedropper tools or the adjustment sliders to modify the
range of colors.
• Click or drag in the image with the Eyedropper tool to select a
color range. To expand the range, click or drag in the image with
the Add To Sample Eyedropper tool . To reduce the range of
color, click or drag in the image with the Subtract From Sample
Eyedropper tool . While an eyedropper tool is selected, you can
also press Shift to add to the range, or Alt (Windows) or Option
(Mac OS) to subtract from it.
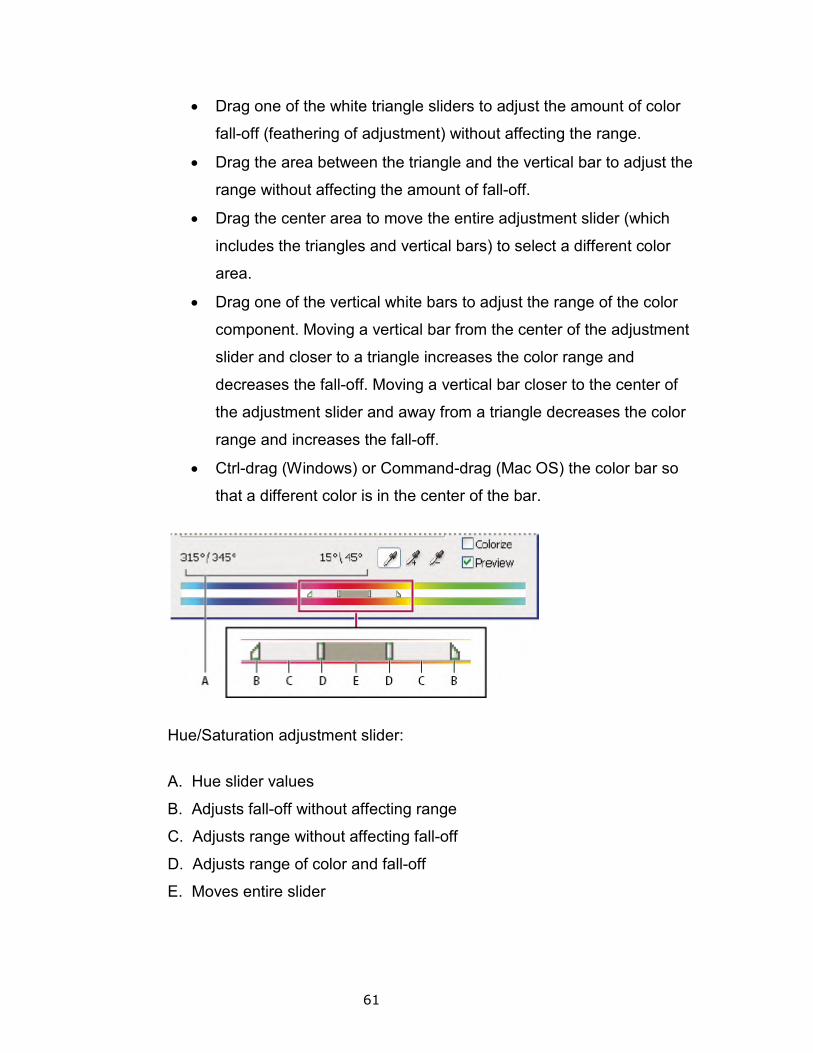
61
• Drag one of the white triangle sliders to adjust the amount of color
fall-off (feathering of adjustment) without affecting the range.
• Drag the area between the triangle and the vertical bar to adjust the
range without affecting the amount of fall-off.
• Drag the center area to move the entire adjustment slider (which
includes the triangles and vertical bars) to select a different color
area.
• Drag one of the vertical white bars to adjust the range of the color
component. Moving a vertical bar from the center of the adjustment
slider and closer to a triangle increases the color range and
decreases the fall-off. Moving a vertical bar closer to the center of
the adjustment slider and away from a triangle decreases the color
range and increases the fall-off.
• Ctrl-drag (Windows) or Command-drag (Mac OS) the color bar so
that a different color is in the center of the bar.
Hue/Saturation adjustment slider:
A. Hue slider values
B. Adjusts fall-off without affecting range
C. Adjusts range without affecting fall-off
D. Adjusts range of color and fall-off
E. Moves entire slider
62
If you modify the adjustment slider so that it falls into a different color
range, the name in the Edit menu changes to reflect this change. For
example, if you choose Yellow and alter its range so that it falls in the red
part of the color bar, the name changes to Red 2. You can convert up to
six of the individual color ranges to varieties of the same color range (for
example, Red through Red 6).
Note: By default, the range of color selected when you choose a color
component is 30° wide, with 30° of fall-off on either side. Setting the fall-off
too low can produce banding in the image.
1. If you are colorizing a grayscale image, choose Image > Mode > RGB
Color to convert the image to RGB.
2. Do one of the following to open the Hue/Saturation dialog box:
• Choose Image > Adjustments > Hue/Saturation.
• Choose Layer > New Adjustment Layer > Hue/Saturation. Click OK
in the New Layer dialog box.
3. Select the Colorize option. If the foreground color is black or white, the
image is converted to a red hue (0°). If the foreground color is not black or
white, the image is converted to the hue of the current foreground color.
The lightness value of each pixel does not change.
4. (Optional) Use the Hue slider to select a new color. Use the Saturation
and Lightness sliders to adjust the saturation and lightness of the pixels.
Custom Shapes
We can access any of our currently available shapes by selecting the Custom
Shape Tool from the Tools palette, then right-clicking (Win) / anywhere inside
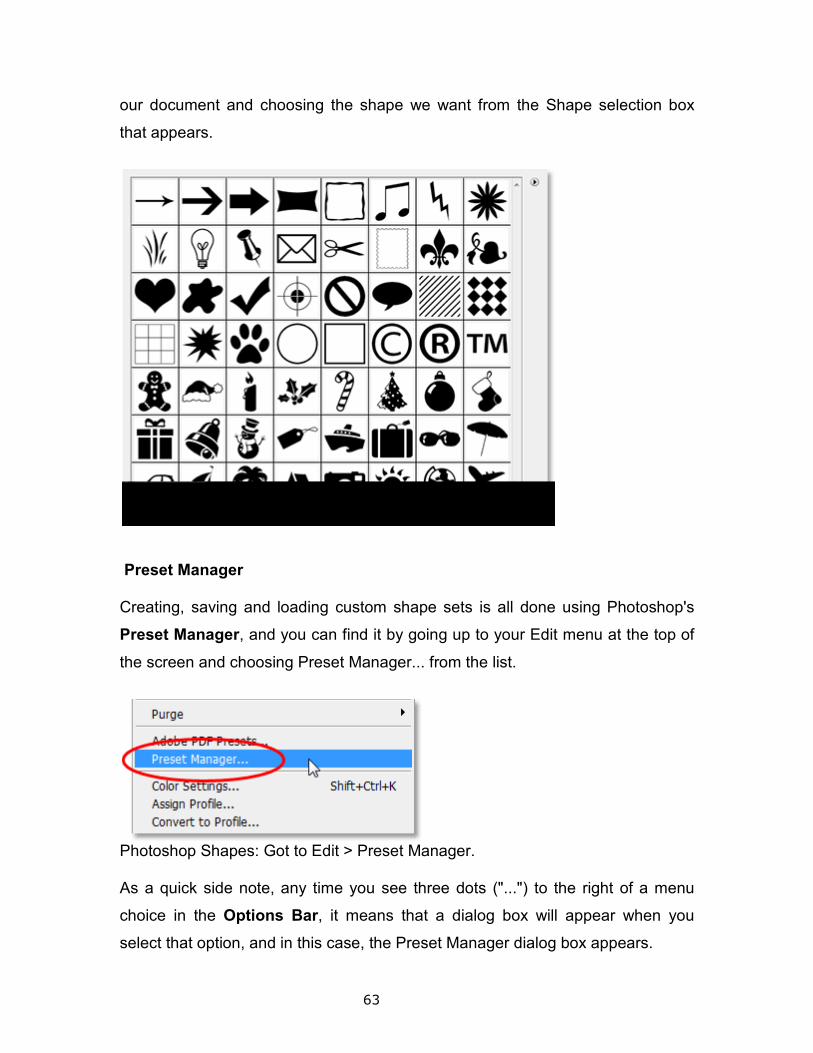
63
our document and choosing the shape we want from the Shape selection box
that appears.
Preset Manager
Creating, saving and loading custom shape sets is all done using Photoshop's
Preset Manager, and you can find it by going up to your Edit menu at the top of
the screen and choosing Preset Manager... from the list.
Photoshop Shapes: Got to Edit > Preset Manager.
As a quick side note, any time you see three dots ("...") to the right of a menu
choice in the Options Bar, it means that a dialog box will appear when you
select that option, and in this case, the Preset Manager dialog box appears.
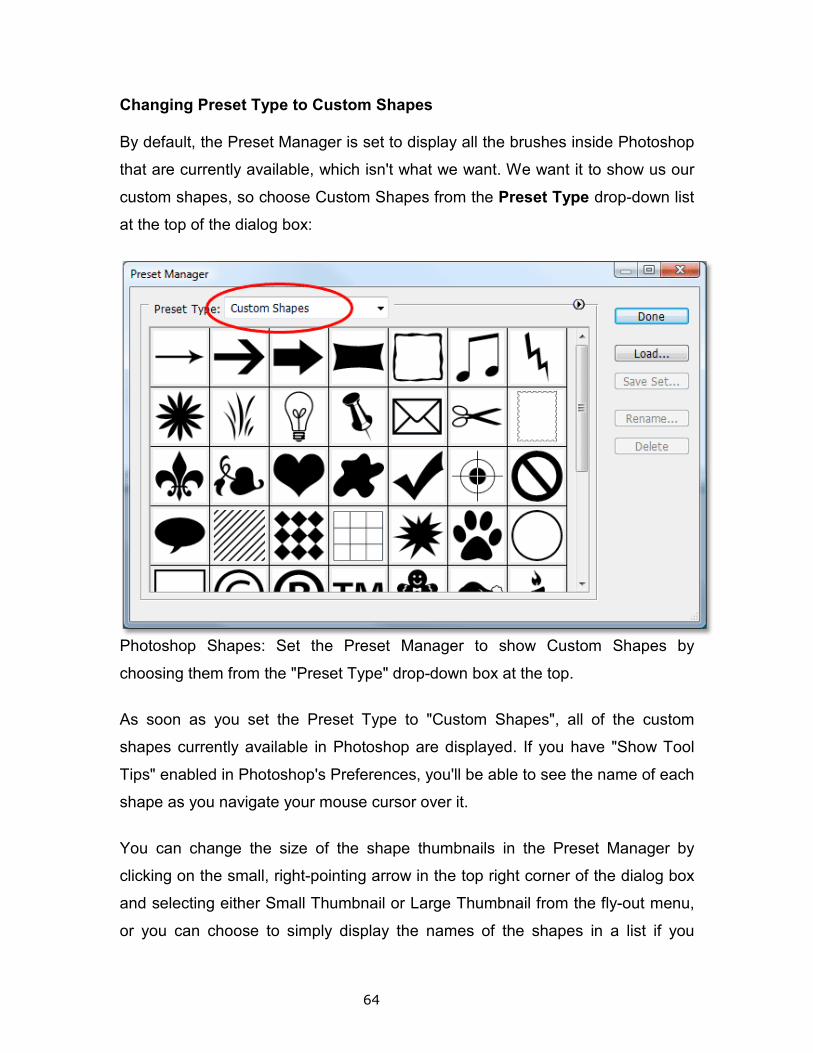
64
Changing Preset Type to Custom Shapes
By default, the Preset Manager is set to display all the brushes inside Photoshop
that are currently available, which isn't what we want. We want it to show us our
custom shapes, so choose Custom Shapes from the Preset Type drop-down list
at the top of the dialog box:
Photoshop Shapes: Set the Preset Manager to show Custom Shapes by
choosing them from the "Preset Type" drop-down box at the top.
As soon as you set the Preset Type to "Custom Shapes", all of the custom
shapes currently available in Photoshop are displayed. If you have "Show Tool
Tips" enabled in Photoshop's Preferences, you'll be able to see the name of each
shape as you navigate your mouse cursor over it.
You can change the size of the shape thumbnails in the Preset Manager by
clicking on the small, right-pointing arrow in the top right corner of the dialog box
and selecting either Small Thumbnail or Large Thumbnail from the fly-out menu,
or you can choose to simply display the names of the shapes in a list if you
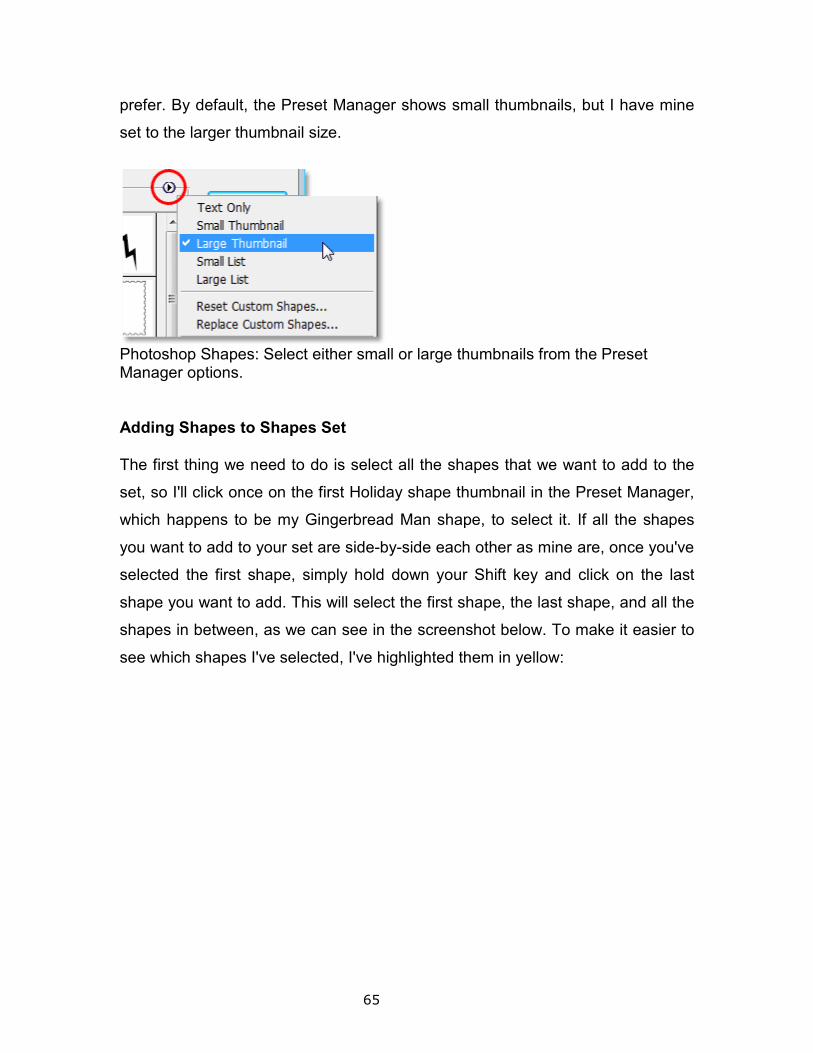
65
prefer. By default, the Preset Manager shows small thumbnails, but I have mine
set to the larger thumbnail size.
Photoshop Shapes: Select either small or large thumbnails from the Preset Manager options. Adding Shapes to Shapes Set
The first thing we need to do is select all the shapes that we want to add to the
set, so I'll click once on the first Holiday shape thumbnail in the Preset Manager,
which happens to be my Gingerbread Man shape, to select it. If all the shapes
you want to add to your set are side-by-side each other as mine are, once you've
selected the first shape, simply hold down your Shift key and click on the last
shape you want to add. This will select the first shape, the last shape, and all the
shapes in between, as we can see in the screenshot below. To make it easier to
see which shapes I've selected, I've highlighted them in yellow:
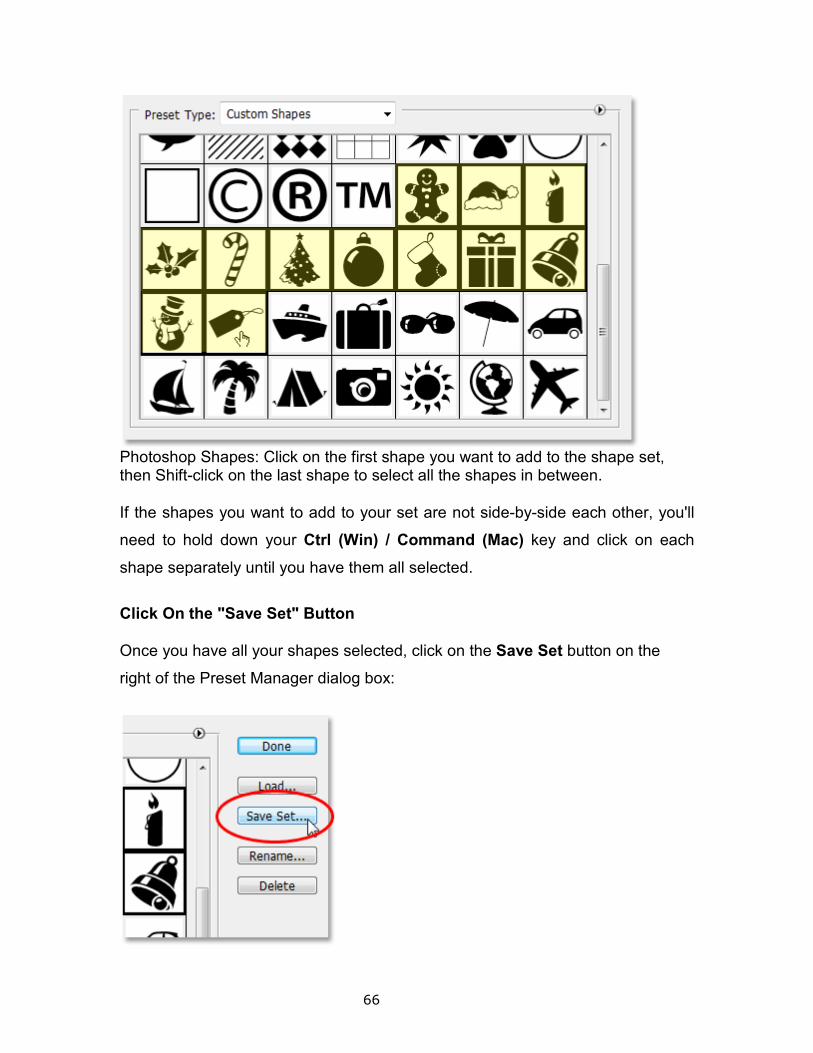
66
Photoshop Shapes: Click on the first shape you want to add to the shape set, then Shift-click on the last shape to select all the shapes in between.
If the shapes you want to add to your set are not side-by-side each other, you'll
need to hold down your Ctrl (Win) / Command (Mac) key and click on each
shape separately until you have them all selected.
Click On the "Save Set" Button
Once you have all your shapes selected, click on the Save Set button on the
right of the Preset Manager dialog box:
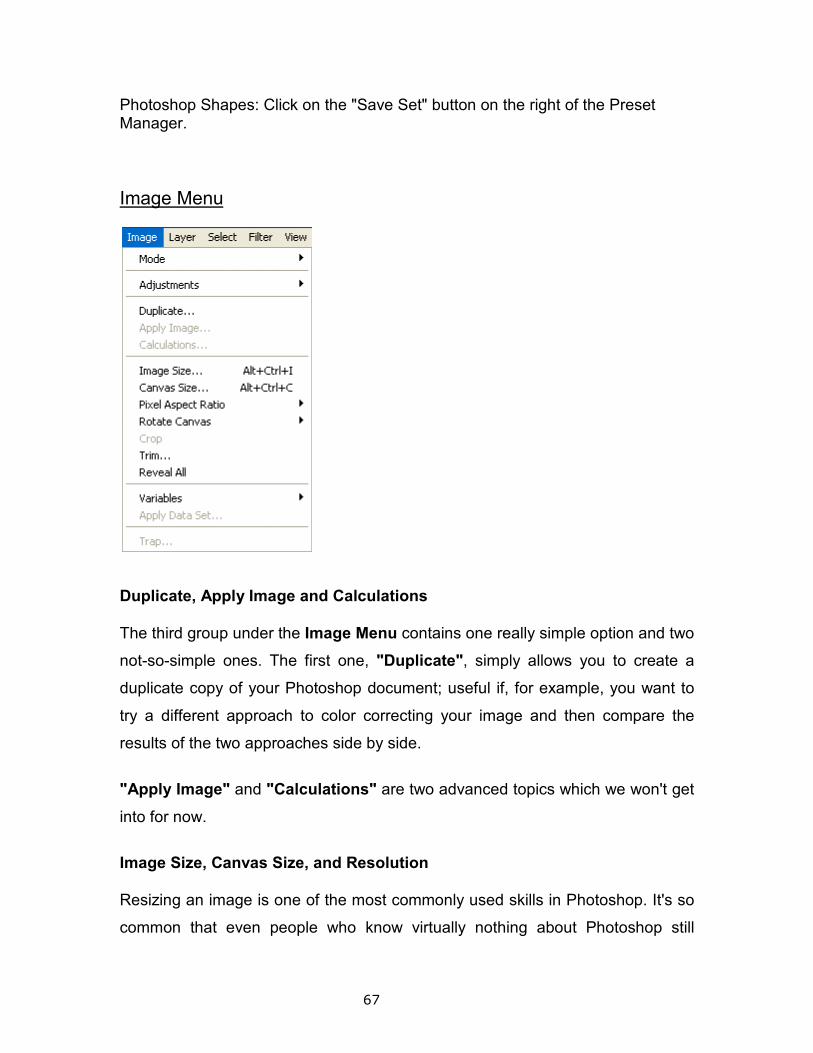
67
Photoshop Shapes: Click on the "Save Set" button on the right of the Preset Manager.
Image Menu
Duplicate, Apply Image and Calculations
The third group under the Image Menu contains one really simple option and two
not-so-simple ones. The first one, "Duplicate", simply allows you to create a
duplicate copy of your Photoshop document; useful if, for example, you want to
try a different approach to color correcting your image and then compare the
results of the two approaches side by side.
"Apply Image" and "Calculations" are two advanced topics which we won't get
into for now.
Image Size, Canvas Size, and Resolution
Resizing an image is one of the most commonly used skills in Photoshop. It's so
common that even people who know virtually nothing about Photoshop still
68
manage to use it to resize their images, which should give you an indication of
how incredibly easy it is to do. However, there are some things you need to keep
in mind when resizing your images, as we'll see in this Photoshop tutorial.
First, we need a photo for our lesson:
This is a photo taken on a trip to Mexico. Of course, the actual photo was much
larger than this, but I've resized it in Photoshop to something more suitable for
the web page. How did I do that? Quite simply, really. To resize an image in
Photoshop, the first thing you need to do is go up to the Image menu at the top
of the screen and select "Image Size" from the list of options. This will bring up
the Image Size dialog box, as shown below:
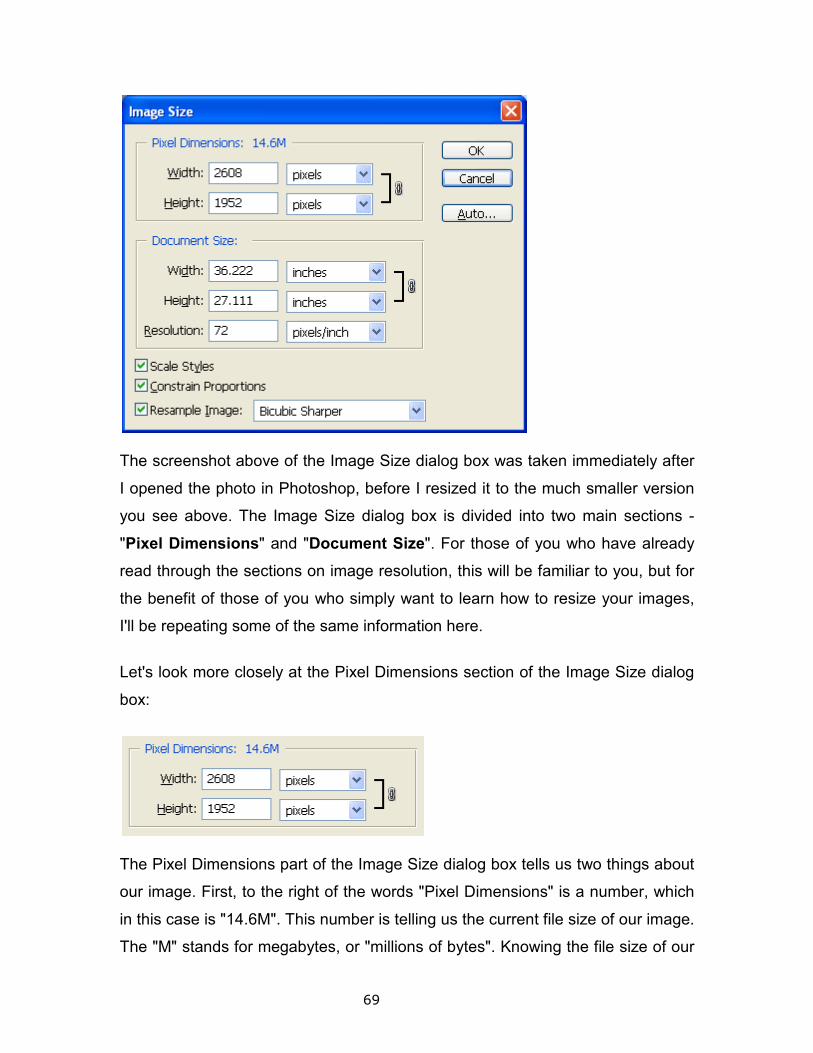
69
The screenshot above of the Image Size dialog box was taken immediately after
I opened the photo in Photoshop, before I resized it to the much smaller version
you see above. The Image Size dialog box is divided into two main sections -
"Pixel Dimensions" and "Document Size". For those of you who have already
read through the sections on image resolution, this will be familiar to you, but for
the benefit of those of you who simply want to learn how to resize your images,
I'll be repeating some of the same information here.
Let's look more closely at the Pixel Dimensions section of the Image Size dialog
box:
The Pixel Dimensions part of the Image Size dialog box tells us two things about
our image. First, to the right of the words "Pixel Dimensions" is a number, which
in this case is "14.6M". This number is telling us the current file size of our image.
The "M" stands for megabytes, or "millions of bytes". Knowing the file size of our
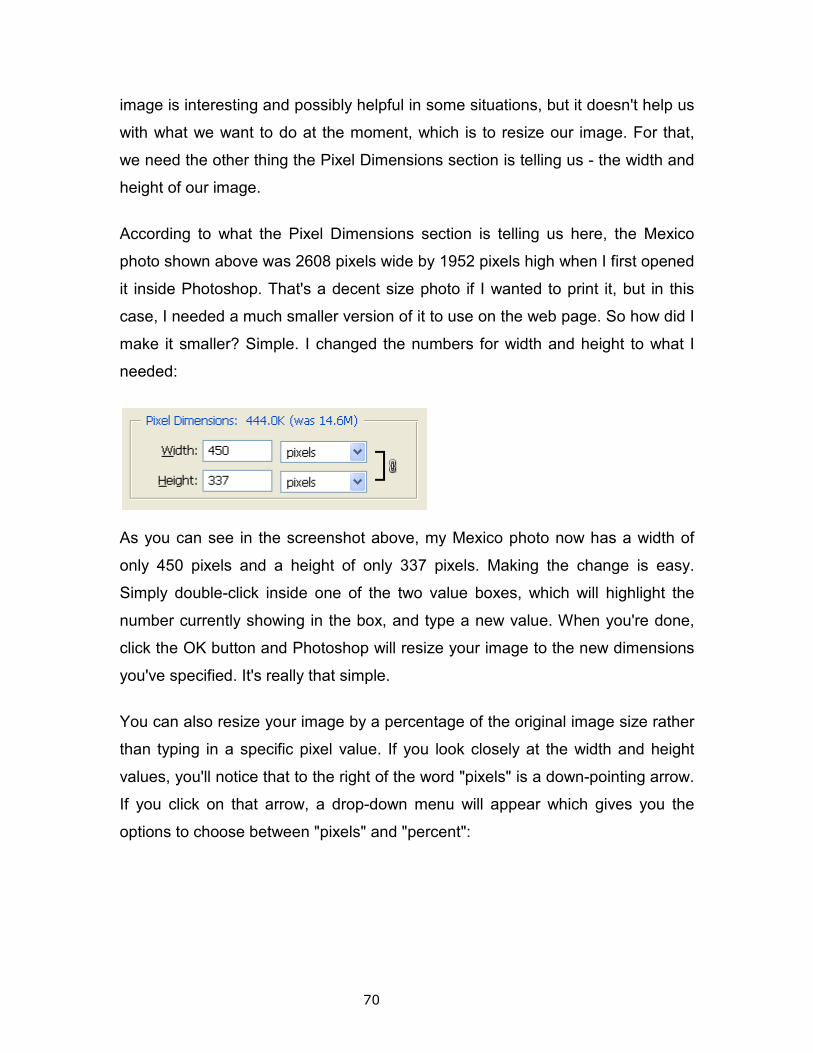
70
image is interesting and possibly helpful in some situations, but it doesn't help us
with what we want to do at the moment, which is to resize our image. For that,
we need the other thing the Pixel Dimensions section is telling us - the width and
height of our image.
According to what the Pixel Dimensions section is telling us here, the Mexico
photo shown above was 2608 pixels wide by 1952 pixels high when I first opened
it inside Photoshop. That's a decent size photo if I wanted to print it, but in this
case, I needed a much smaller version of it to use on the web page. So how did I
make it smaller? Simple. I changed the numbers for width and height to what I
needed:
As you can see in the screenshot above, my Mexico photo now has a width of
only 450 pixels and a height of only 337 pixels. Making the change is easy.
Simply double-click inside one of the two value boxes, which will highlight the
number currently showing in the box, and type a new value. When you're done,
click the OK button and Photoshop will resize your image to the new dimensions
you've specified. It's really that simple.
You can also resize your image by a percentage of the original image size rather
than typing in a specific pixel value. If you look closely at the width and height
values, you'll notice that to the right of the word "pixels" is a down-pointing arrow.
If you click on that arrow, a drop-down menu will appear which gives you the
options to choose between "pixels" and "percent":
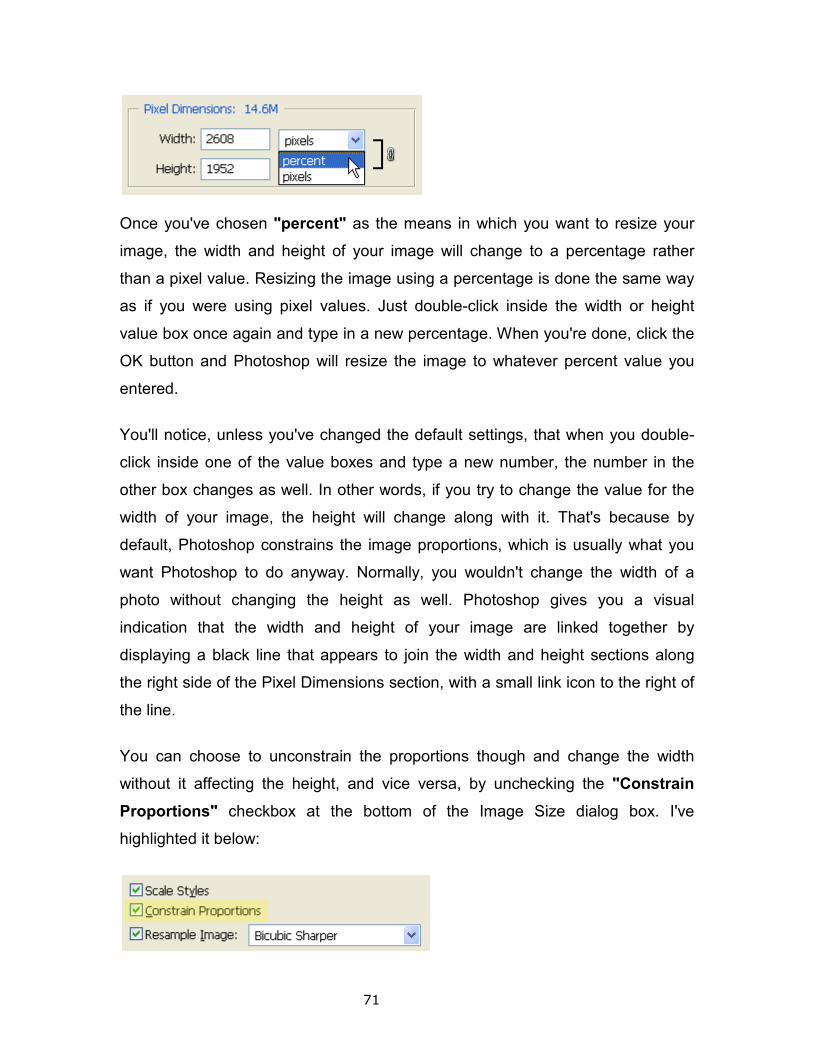
71
Once you've chosen "percent" as the means in which you want to resize your
image, the width and height of your image will change to a percentage rather
than a pixel value. Resizing the image using a percentage is done the same way
as if you were using pixel values. Just double-click inside the width or height
value box once again and type in a new percentage. When you're done, click the
OK button and Photoshop will resize the image to whatever percent value you
entered.
You'll notice, unless you've changed the default settings, that when you double-
click inside one of the value boxes and type a new number, the number in the
other box changes as well. In other words, if you try to change the value for the
width of your image, the height will change along with it. That's because by
default, Photoshop constrains the image proportions, which is usually what you
want Photoshop to do anyway. Normally, you wouldn't change the width of a
photo without changing the height as well. Photoshop gives you a visual
indication that the width and height of your image are linked together by
displaying a black line that appears to join the width and height sections along
the right side of the Pixel Dimensions section, with a small link icon to the right of
the line.
You can choose to unconstrain the proportions though and change the width
without it affecting the height, and vice versa, by unchecking the "Constrain
Proportions" checkbox at the bottom of the Image Size dialog box. I've
highlighted it below:
72
As you can see, by default, the Constrain Proportions option is checked. Simply
uncheck it if you want to be able to change the width and height of your image
independently of each other.
Resizing and Image Quality
There's something you need to keep in mind though when it comes to resizing
your image and image quality. The basic rule is, it's usually okay to make your
image smaller without losing much in the way of image quality. However, you will
absolutely lose image quality if you try to make your image larger. Let's look at an
example:
Here's the photo again that I used above:
As we saw earlier, this image has dimensions of 450 pixels wide by 337 pixels
high. I'm going use the Image Size dialog box to make this image 50% of this
size. I do that by choosing "Percent" as the means in which I want to resize my
image, and then double-click inside the "Width" value box and type "50". Since I
have "Constrain Proportions" checked at the bottom of the dialog box, Photoshop
will automatically change the height percentage as well to match the change I
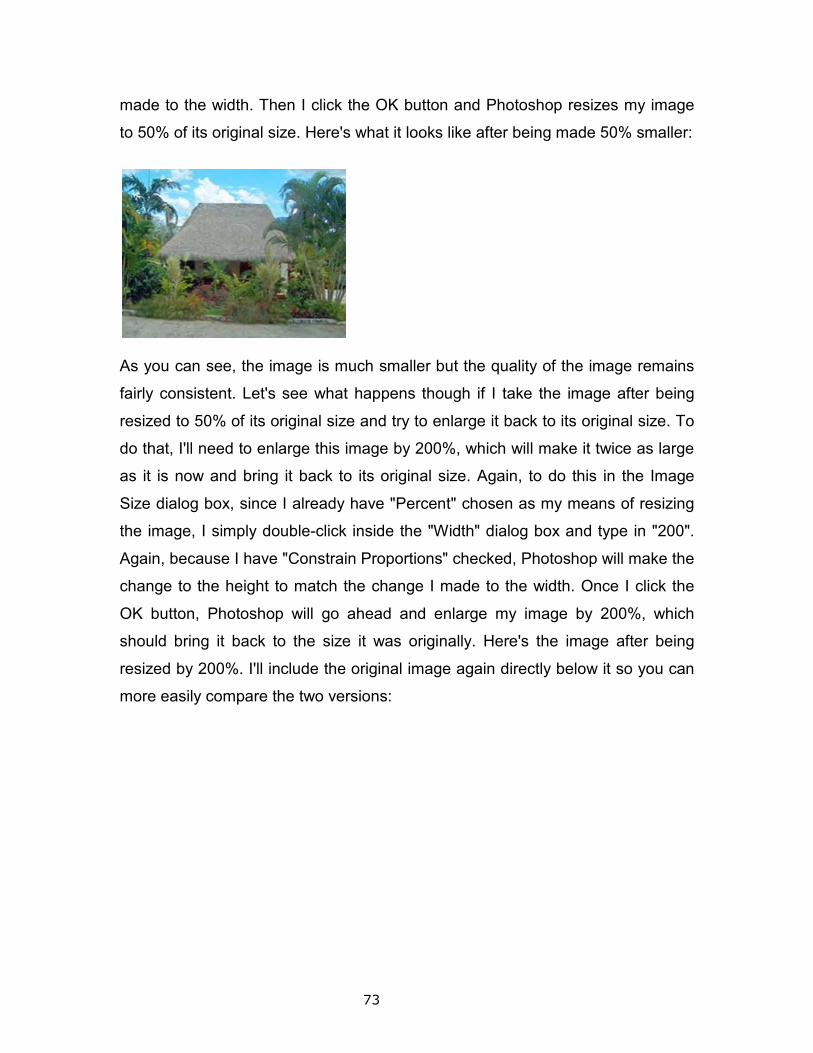
73
made to the width. Then I click the OK button and Photoshop resizes my image
to 50% of its original size. Here's what it looks like after being made 50% smaller:
As you can see, the image is much smaller but the quality of the image remains
fairly consistent. Let's see what happens though if I take the image after being
resized to 50% of its original size and try to enlarge it back to its original size. To
do that, I'll need to enlarge this image by 200%, which will make it twice as large
as it is now and bring it back to its original size. Again, to do this in the Image
Size dialog box, since I already have "Percent" chosen as my means of resizing
the image, I simply double-click inside the "Width" dialog box and type in "200".
Again, because I have "Constrain Proportions" checked, Photoshop will make the
change to the height to match the change I made to the width. Once I click the
OK button, Photoshop will go ahead and enlarge my image by 200%, which
should bring it back to the size it was originally. Here's the image after being
resized by 200%. I'll include the original image again directly below it so you can
more easily compare the two versions:
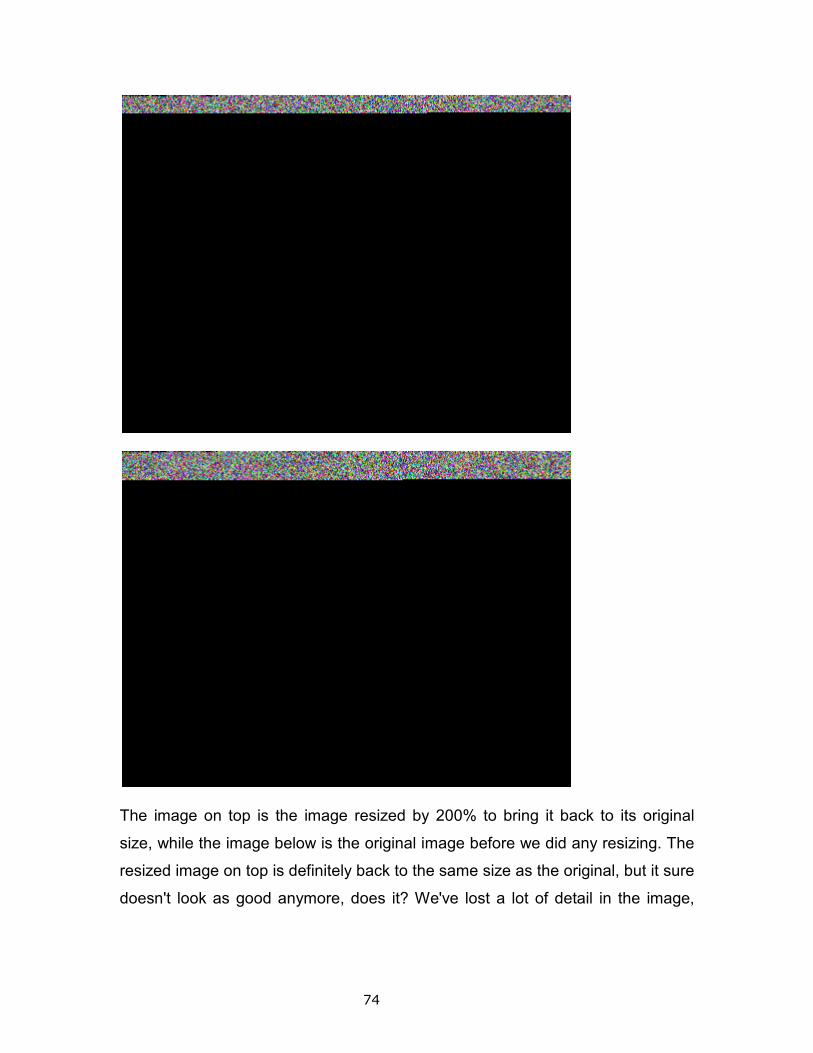
74
The image on top is the image resized by 200% to bring it back to its original
size, while the image below is the original image before we did any resizing. The
resized image on top is definitely back to the same size as the original, but it sure
doesn't look as good anymore, does it? We've lost a lot of detail in the image,
75
and now it appears soft and blurry. If I was to try and enlarge it even further, the
image quality would be even worse.
Here's what's happening. When you open up an image inside Photoshop and
then use the Image Size dialog box to make the image smaller, Photoshop
makes it smaller essentially by throwing away pixels. That's how Photoshop
makes images smaller, by taking some of the pixels and throwing them out the
window.
Canvas Size
The canvas size is the full editable area of an image. The Canvas Size
command lets you increase or decrease an image’s canvas size. Increasing the
canvas size adds space around an existing image. Decreasing an image’s
canvas size crops into the image. If you increase the canvas size of an image
with a transparent background, the added canvas is transparent. If the image
doesn’t have a transparent background, there are several options for determining
the color of the added canvas.
1. Choose Image > Canvas Size.
2. Do one of the following:
a. Enter the dimensions for the canvas in the Width and Height
boxes. Choose the units of measurement you want from the
pop-up menus next to the Width and Height boxes.
b. Select Relative, and enter the amount you want to add or
subtract from the image’s current canvas size. Enter a
positive number to add to the canvas, and enter a negative
number to subtract from the canvas.
3. For Anchor, click a square to indicate where to position the existing
image on the new canvas.
4. Choose an option from the Canvas Extension Color menu:
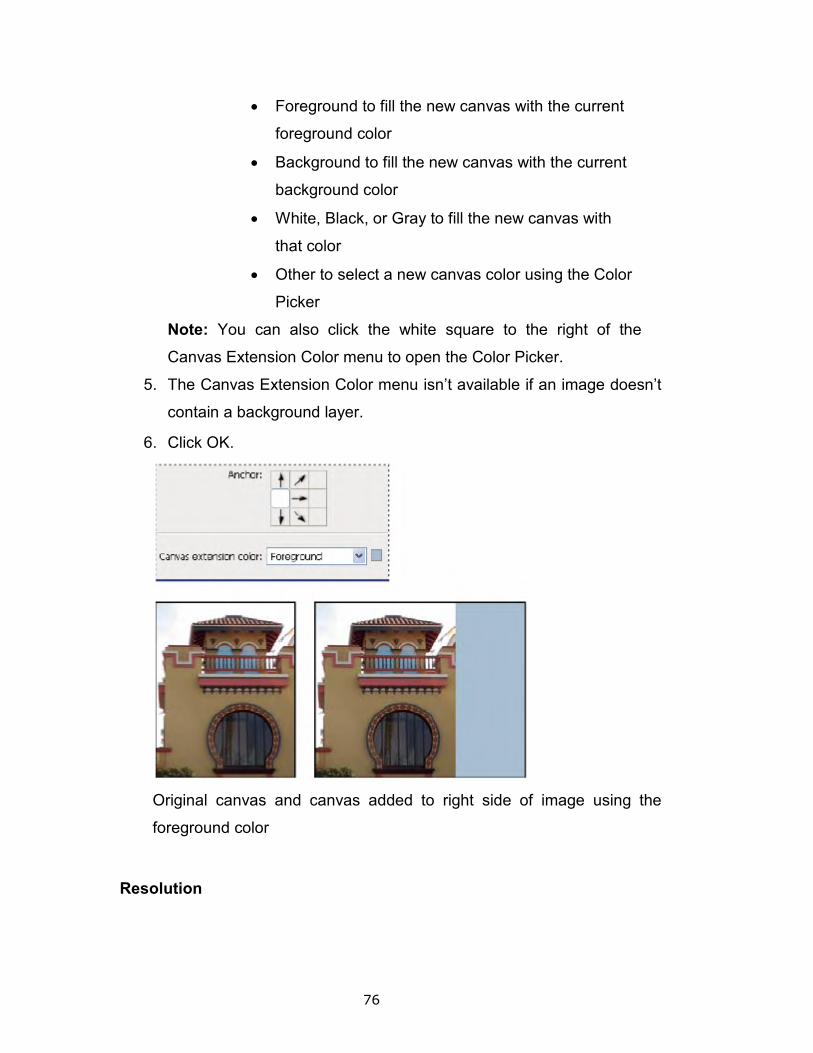
76
• Foreground to fill the new canvas with the current
foreground color
• Background to fill the new canvas with the current
background color
• White, Black, or Gray to fill the new canvas with
that color
• Other to select a new canvas color using the Color
Picker
Note: You can also click the white square to the right of the
Canvas Extension Color menu to open the Color Picker.
5. The Canvas Extension Color menu isn’t available if an image doesn’t
contain a background layer.
6. Click OK.
Original canvas and canvas added to right side of image using the
foreground color
Resolution
77
The issue of resolution can sometimes get confusing because the same word is
often applied to different aspects of photography. Imagine, for a moment, that the
word ‘Device’ was the name for a camera, a computer screen and a printer. If
you were having a conversation with a friend and were discussing a photographic
workflow from capture to print, imagine the confusion that could occur (“which
device called device are you now referring to?”).
This is what currently happens when some people talk about resolution but don’t
have a good understanding of when and how to use the word appropriately or
clarify what they are referring to. When you talk about resolution you have to add
a second word before or after the word resolution, e.g. optical resolution (of your
lens), image resolution (the file), monitor resolution, printer resolution etc. Before
we dive into the extended answer I will supply you with the short answer of
‘which one is right’ (for people who want to know how many, but don’t really want
to know why).Images being prepared for viewing on a screen are measured in
pixels, not in inches.
Here are some examples:
HD TV 1280 x 720 (720p): (less than one million pixels or ‘1-Megapixel’)
Full HD TV (1080p): 1920 x 1080 (just over 2 million pixels)
24-inch wide-screen computer monitor: 1920 x 1200 (2.3 million pixels)
20-inch wide-screen computer monitor: 1680 x 1050 (1.75 million pixels)
Standard data projector presenting a PowerPoint presentation: 1024 x 768
If you are cropping your images for screen enter the pixel dimensions in the
width and height fields in the Options bar, e.g. for a slideshow on a 24-inch
monitor enter 1920 px in the width field and 1200 px in the height field. You do
not need to enter anything in the resolution field, but if this worries you, then
enter 96 in the resolution field and choose the pixels/inch option.
Images to be printed on paper are measured in inches or centimeters and have a
third measurement, which instructs Photoshop how big, or small the image pixels
are to be printed. This is stated in pixels per inch or ‘ppi’.
78
Inkjet printers: 240ppi
Most Books and Magazines: 300ppi (unless instructed otherwise by your printer)
Print Service providers: 200 – 300ppi (contact your print centre for info)
Type in the size of your image in inches or centimeters and enter in the required
pixels per inch in the pixels/inch (ppi) field.
Use the Crop Tool and not Image Size to Crop Your Images
Many photographers try to use the Image Size dialog box instead of the Crop
Tool to crop an image. You can change the Image Size using this dialog box but
you cannot crop. You cannot make an oblong image square without squashing
the image (you would need to uncheck the ‘Constrain Proportions’ check box to
do this). You can make an image smaller or bigger but you cannot change the
‘Aspect Ratio’ or shape of your image using this dialog box. In the illustration
above the width can be set to 1920 pixels but the height cannot be made to be
1080 pixels unless the image is squashed or the width changes.
More Information about Image Resolution
79
Printing images on paper is where image resolution (ppi) is important. It now
becomes one of three important instructions to enable Photoshop to get it right,
width and height in inches and the ‘size’ of the pixels. The resolution determines
how many pixels should fit along the width and height of every inch. More is good
up the point where the printer can’t deal with the extra information and discards
it. Inkjet printer resolution is stated in dots per inch (dpi) and is usually 720 dpi,
1440 dpi or 2880 dpi.
In some instances the term dpi is often used where ppi would be more
appropriate, e.g scanning resolutions and monitor resolutions are often referred
to in dpi when ppi would be the more appropriate term (in these instances dpi
and ppi are the same). The word dot, however, should really be reserved for
when we are talking about dots of ink – which cannot be rendered square - no
matter how clever the printer is!
If you want to view an image on a screen then it helps to know the pixel
dimensions of this screen to ensure your image look as good as possible. You do
not need to know the resolution in dots per inch (dpi) or pixels per inch (ppi).
Most screen applications ignore this measurement when displaying images. If the
pixel dimensions of the image are the same as the pixel dimensions of the
screen then your image will fill the screen - end of story.
‘Actual Pixels’ - one image pixel is displayed by one monitor pixel. At 50%
magnification four image pixels are displayed by one screen pixel (images also
look pretty good at this zoom level). So what happens to all those extra pixels
that are not being displayed when you are viewing at 50%? Basically they are
surplus to requirement – Photoshop can’t reduce the size of the image on the
screen and display all the pixels.
The actual number of pixels per inch being displayed by a monitor is not
something you need to know (trust me on this one). Screens are measured in
80
inches but the images that appear on these screens are measured in pixels. So
long as you have enough pixels the image will fill the screen. If you just have to
know then I suggest you get your ruler out and measure the width of an 800 pixel
wide image when it is displayed at 100% on your monitor. If you measure the
image as 8-inches then you will now know your monitor is displaying images at
100 ppi - but I suspect the quality of your life is unlikely to be enriched by this
knowledge.
Some software manufacturers refer to screen resolution as 72ppi or 96ppi but
this is an approximate figure only for older style CRT monitors. Many high quality
LCD screens for computers are 100ppi while a 50-inch LCD TV is probably half
this figure. Don’t get hung up on this measurement when dealing with images for
screen. It does not matter. Most web applications ignore the measurement.
Trim
If you’re not concerned so much with the dimensions of the photo, but simply
want to clean up the empty space around an object, using the Trim function can
be quicker and more effective than the crop tool.
Let’s pretend that we took a picture of a coffee mug sitting on a table. Now, we’ve
opened it in Photoshop and decided that all we really need to see is the mug, not
all of the table surrounding it. This picture would be a perfect candidate for
trimming.
First, go to Image and then down to Trim. You may choose to trim away empty
space on just a few sides or on all sides. Then, click OK and Photoshop
automatically trims the excess waste off the sides of your pictures. This can be a
good alternative to the crop tool at times.
Trap
The final group under the Image Menu contains the "Trap" option. Trapping is a
printing term which has to do with preventing small gaps in your image when
81
having it printed due to a slight misregistration on the printing press. It's not
something you normally have to worry about unless you're having your images
professionally printed at a print shop, in which case you'll need to ask someone
there what trap value to enter in the dialog box, if anything.
Layer Menu
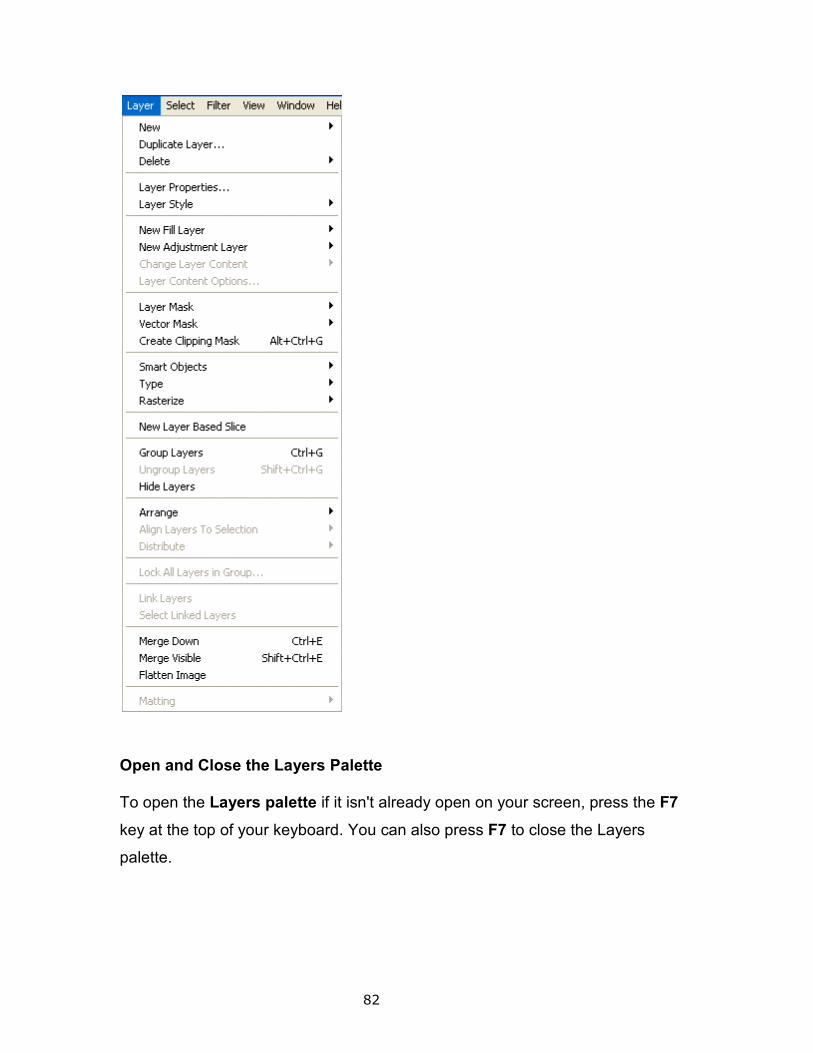
82
Open and Close the Layers Palette
To open the Layers palette if it isn't already open on your screen, press the F7
key at the top of your keyboard. You can also press F7 to close the Layers
palette.

83
Create a New Layer
To create a new layer, press Shift+Ctrl+N (Win) / Shift+Command+N (Mac).
This will pop-up Photoshop's New Layer dialog box where you can name the
layer, as well as set some other options:
To create a new layer and bypass the "New Layer" dialog box, press
Shift+Ctrl+Alt+N (Win) / Shift+Command+Option+N (Mac).
Create a New Layer below the Currently Selected Layer
By default, Photoshop adds a new layer above the layer currently selected in the
Layers palette. To tell Photoshop to add the new layer below the currently
selected layer, hold down the Ctrl (Win) / Command (Mac) key and click on the
New Layer icon at the bottom of the Layers palette:
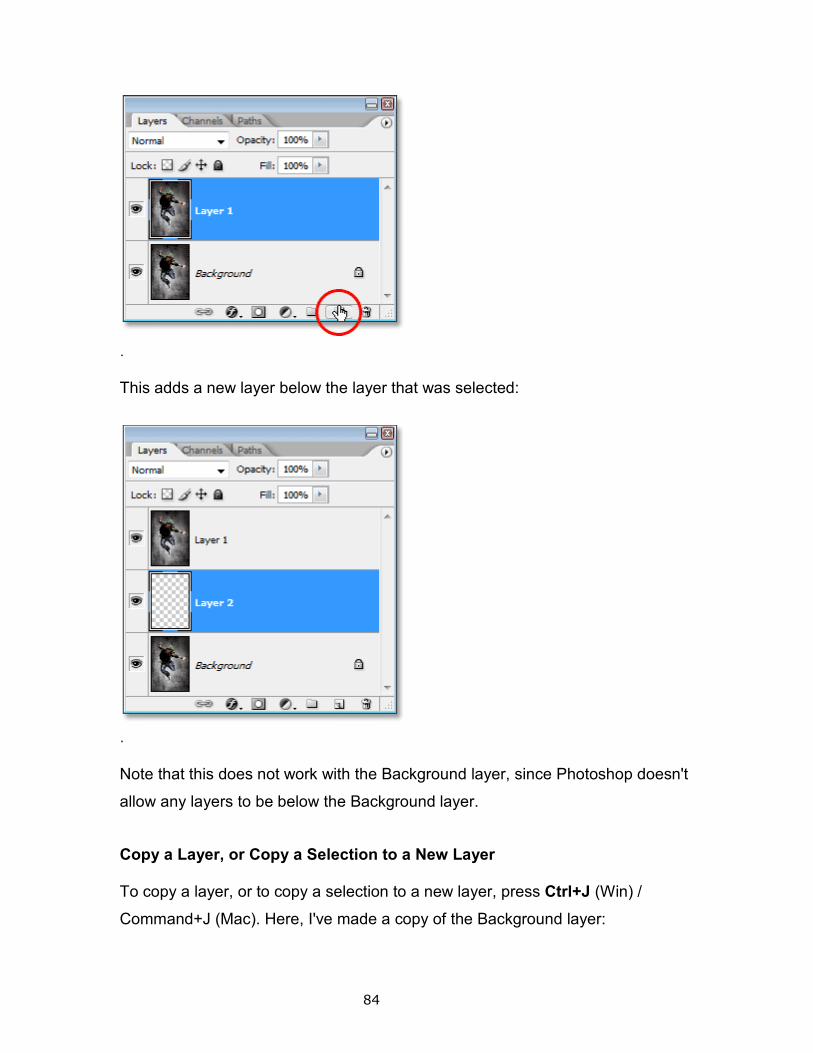
84
.
This adds a new layer below the layer that was selected:
.
Note that this does not work with the Background layer, since Photoshop doesn't
allow any layers to be below the Background layer.
Copy a Layer, or Copy a Selection to a New Layer
To copy a layer, or to copy a selection to a new layer, press Ctrl+J (Win) /
Command+J (Mac). Here, I've made a copy of the Background layer:
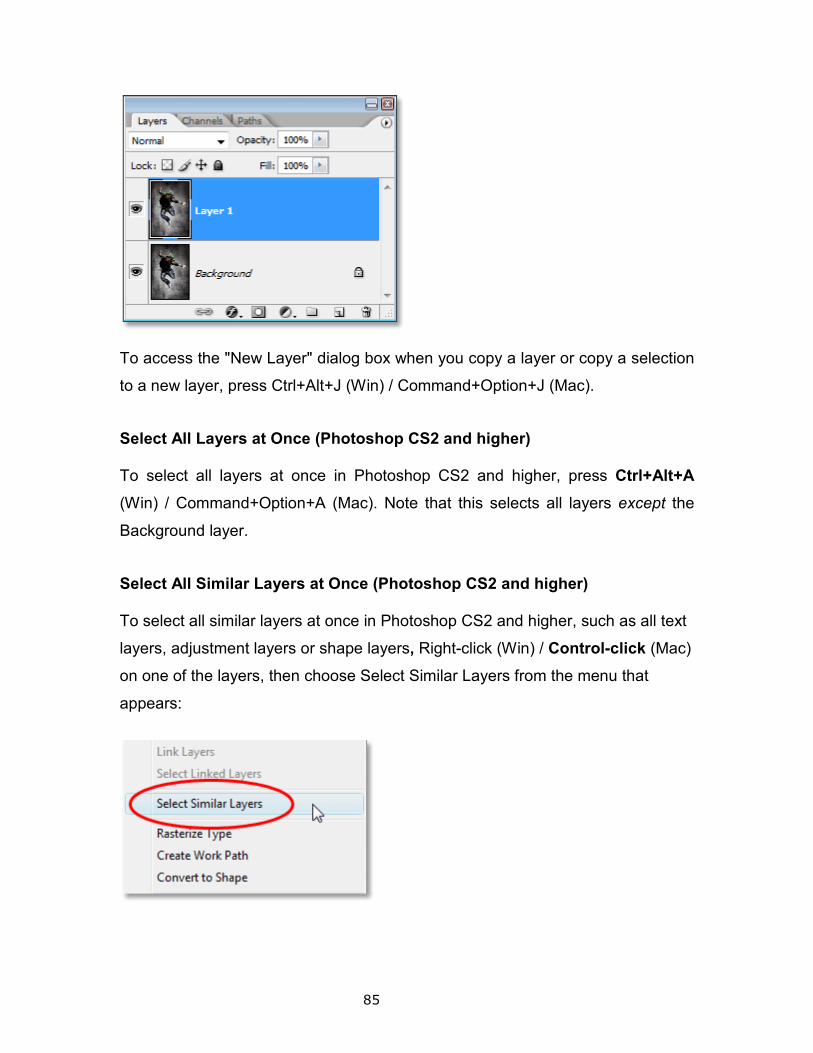
85
To access the "New Layer" dialog box when you copy a layer or copy a selection
to a new layer, press Ctrl+Alt+J (Win) / Command+Option+J (Mac).
Select All Layers at Once (Photoshop CS2 and higher)
To select all layers at once in Photoshop CS2 and higher, press Ctrl+Alt+A
(Win) / Command+Option+A (Mac). Note that this selects all layers except the
Background layer.
Select All Similar Layers at Once (Photoshop CS2 and higher)
To select all similar layers at once in Photoshop CS2 and higher, such as all text
layers, adjustment layers or shape layers, Right-click (Win) / Control-click (Mac)
on one of the layers, then choose Select Similar Layers from the menu that
appears:
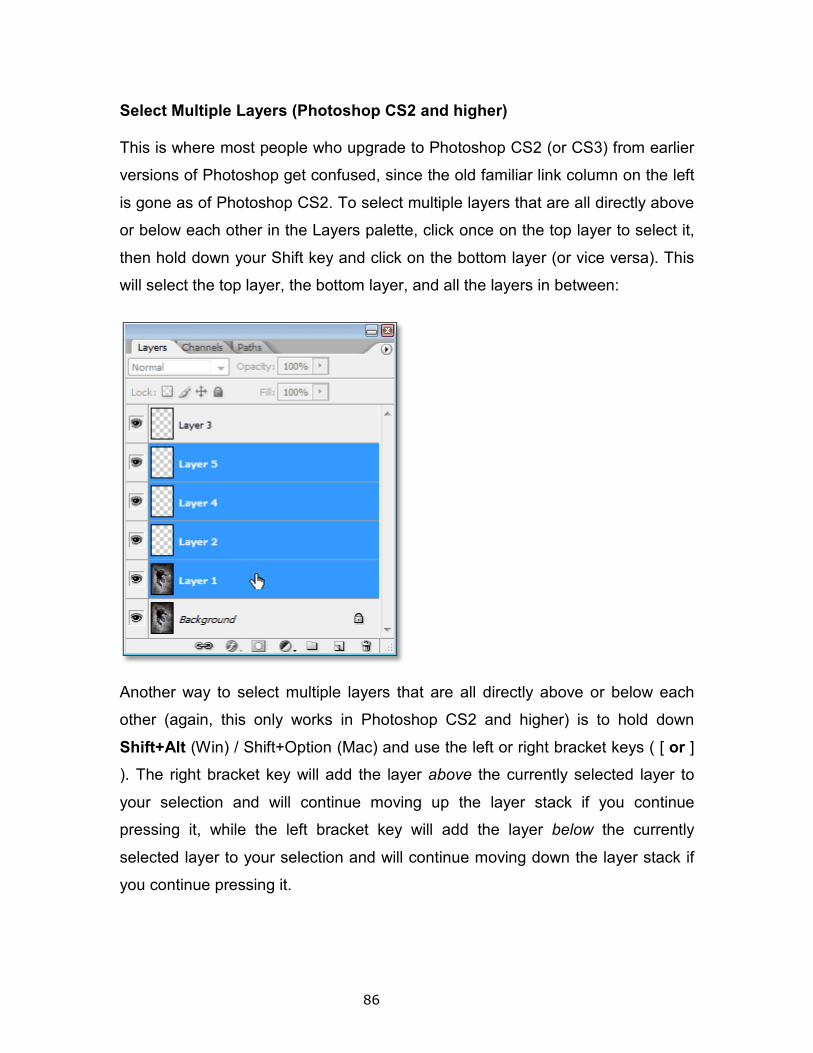
86
Select Multiple Layers (Photoshop CS2 and higher)
This is where most people who upgrade to Photoshop CS2 (or CS3) from earlier
versions of Photoshop get confused, since the old familiar link column on the left
is gone as of Photoshop CS2. To select multiple layers that are all directly above
or below each other in the Layers palette, click once on the top layer to select it,
then hold down your Shift key and click on the bottom layer (or vice versa). This
will select the top layer, the bottom layer, and all the layers in between:
Another way to select multiple layers that are all directly above or below each
other (again, this only works in Photoshop CS2 and higher) is to hold down
Shift+Alt (Win) / Shift+Option (Mac) and use the left or right bracket keys ( [ or ]
). The right bracket key will add the layer above the currently selected layer to
your selection and will continue moving up the layer stack if you continue
pressing it, while the left bracket key will add the layer below the currently
selected layer to your selection and will continue moving down the layer stack if
you continue pressing it.
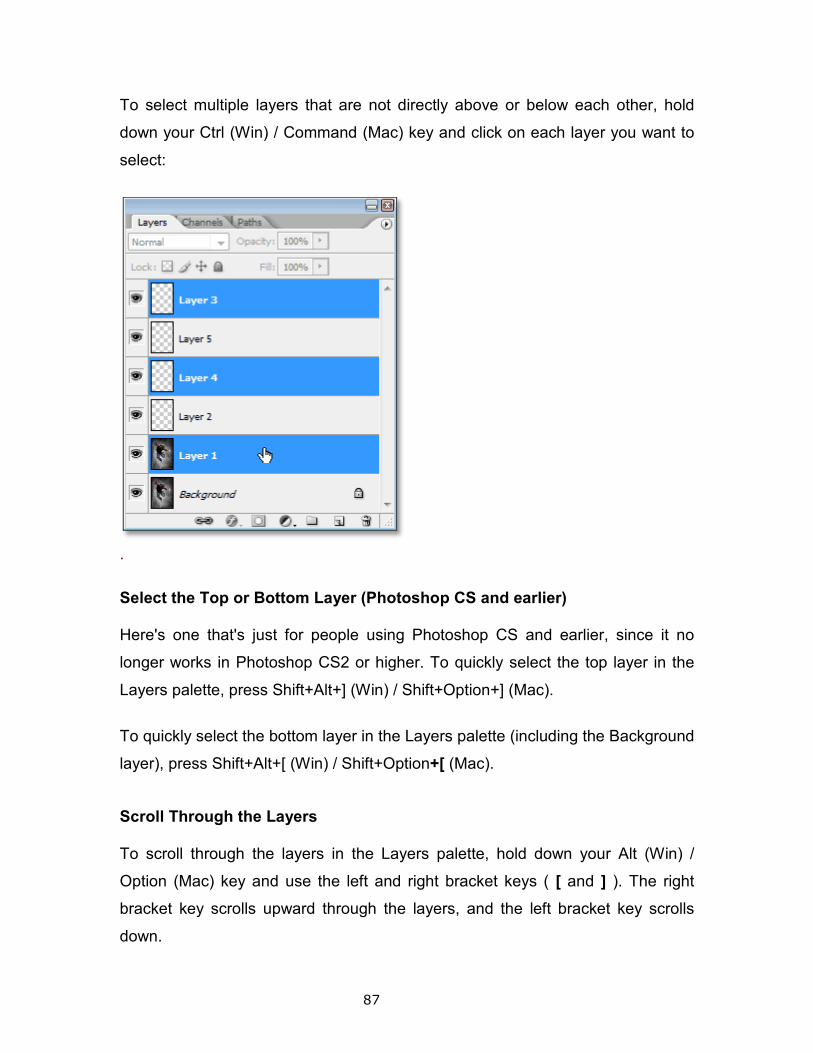
87
To select multiple layers that are not directly above or below each other, hold
down your Ctrl (Win) / Command (Mac) key and click on each layer you want to
select:
.
Select the Top or Bottom Layer (Photoshop CS and earlier)
Here's one that's just for people using Photoshop CS and earlier, since it no
longer works in Photoshop CS2 or higher. To quickly select the top layer in the
Layers palette, press Shift+Alt+] (Win) / Shift+Option+] (Mac).
To quickly select the bottom layer in the Layers palette (including the Background
layer), press Shift+Alt+[ (Win) / Shift+Option+[ (Mac).
Scroll Through the Layers
To scroll through the layers in the Layers palette, hold down your Alt (Win) /
Option (Mac) key and use the left and right bracket keys ( [ and ] ). The right
bracket key scrolls upward through the layers, and the left bracket key scrolls
down.
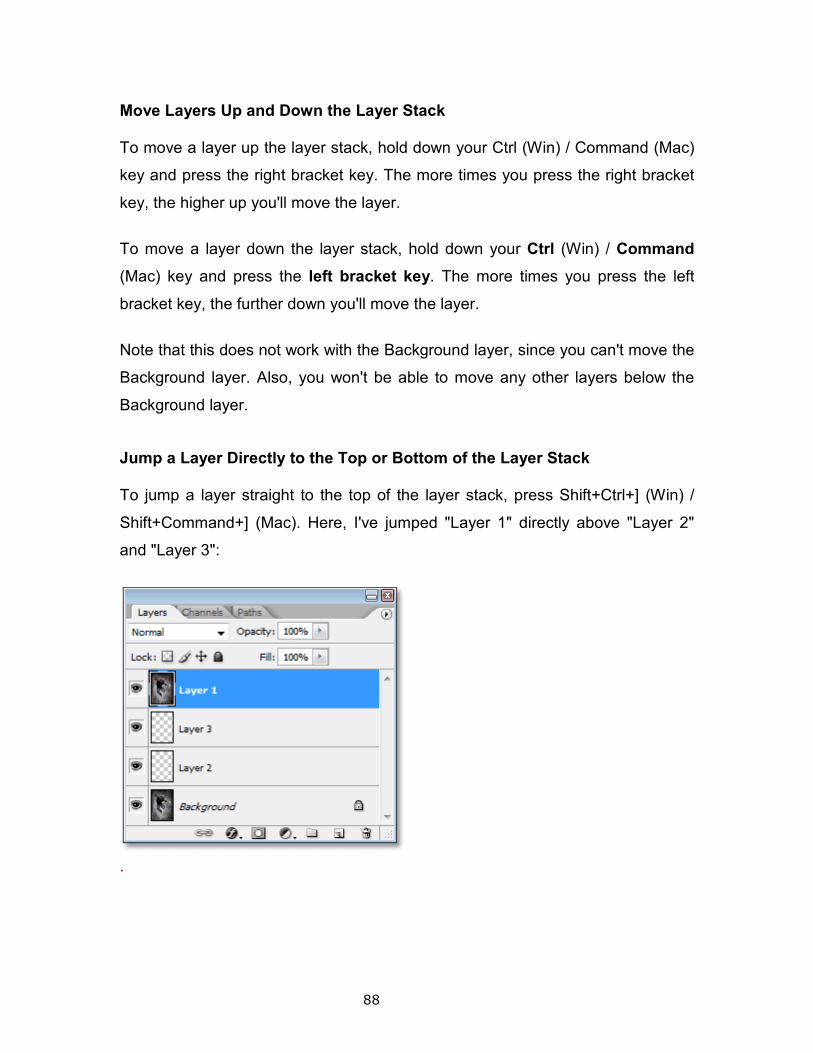
88
Move Layers Up and Down the Layer Stack
To move a layer up the layer stack, hold down your Ctrl (Win) / Command (Mac)
key and press the right bracket key. The more times you press the right bracket
key, the higher up you'll move the layer.
To move a layer down the layer stack, hold down your Ctrl (Win) / Command
(Mac) key and press the left bracket key. The more times you press the left
bracket key, the further down you'll move the layer.
Note that this does not work with the Background layer, since you can't move the
Background layer. Also, you won't be able to move any other layers below the
Background layer.
Jump a Layer Directly to the Top or Bottom of the Layer Stack
To jump a layer straight to the top of the layer stack, press Shift+Ctrl+] (Win) /
Shift+Command+] (Mac). Here, I've jumped "Layer 1" directly above "Layer 2"
and "Layer 3":
.
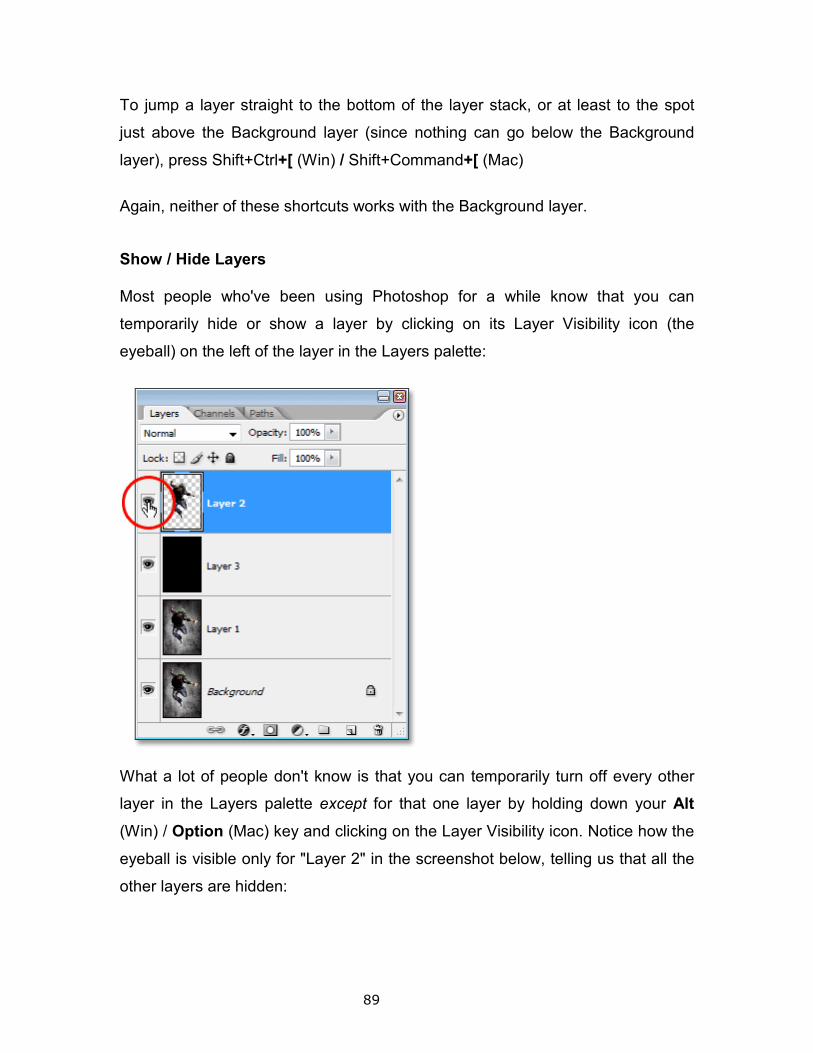
89
To jump a layer straight to the bottom of the layer stack, or at least to the spot
just above the Background layer (since nothing can go below the Background
layer), press Shift+Ctrl+[ (Win) / Shift+Command+[ (Mac)
Again, neither of these shortcuts works with the Background layer.
Show / Hide Layers
Most people who've been using Photoshop for a while know that you can
temporarily hide or show a layer by clicking on its Layer Visibility icon (the
eyeball) on the left of the layer in the Layers palette:
What a lot of people don't know is that you can temporarily turn off every other
layer in the Layers palette except for that one layer by holding down your Alt
(Win) / Option (Mac) key and clicking on the Layer Visibility icon. Notice how the
eyeball is visible only for "Layer 2" in the screenshot below, telling us that all the
other layers are hidden:
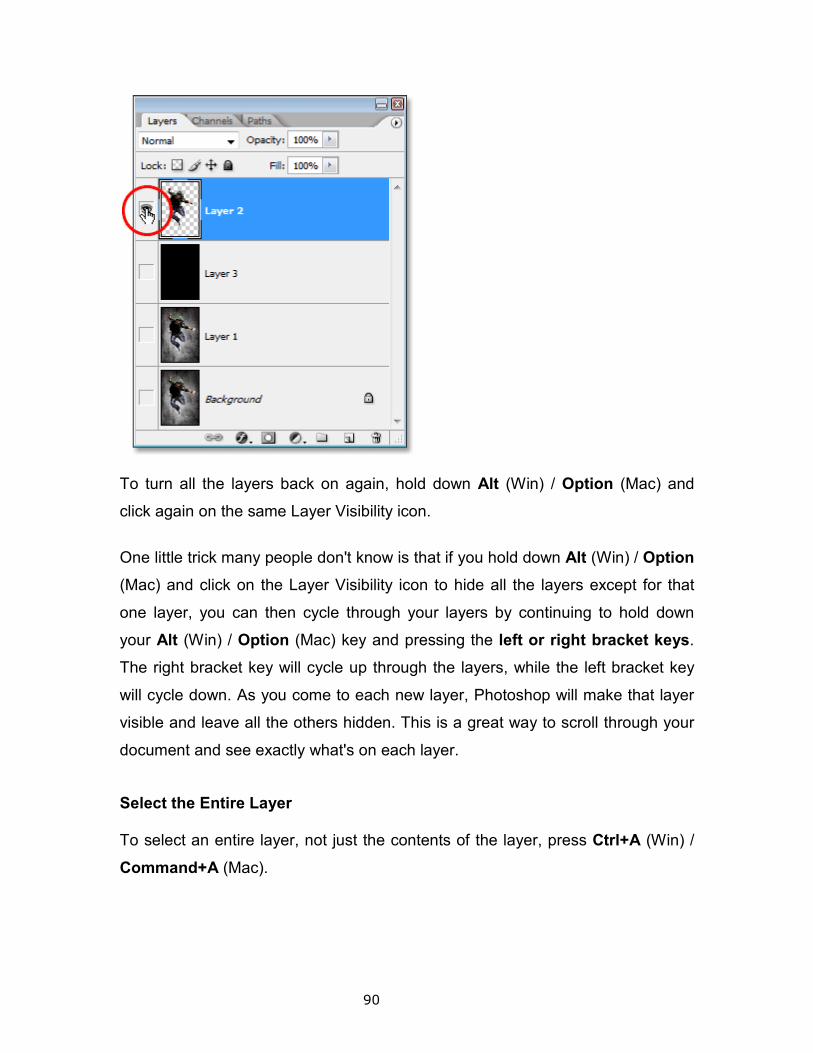
90
To turn all the layers back on again, hold down Alt (Win) / Option (Mac) and
click again on the same Layer Visibility icon.
One little trick many people don't know is that if you hold down Alt (Win) / Option
(Mac) and click on the Layer Visibility icon to hide all the layers except for that
one layer, you can then cycle through your layers by continuing to hold down
your Alt (Win) / Option (Mac) key and pressing the left or right bracket keys.
The right bracket key will cycle up through the layers, while the left bracket key
will cycle down. As you come to each new layer, Photoshop will make that layer
visible and leave all the others hidden. This is a great way to scroll through your
document and see exactly what's on each layer.
Select the Entire Layer
To select an entire layer, not just the contents of the layer, press Ctrl+A (Win) /
Command+A (Mac).

91
Select the Contents of a Layer (Photoshop CS and earlier)
In Photoshop CS and earlier, to select the contents of a layer, hold down Ctrl
(Win) / Command (Mac) and click anywhere on the layer in the Layers palette.
Select the Contents of a Layer (Photoshop CS2 and higher)
This is another area where people who are upgrading to Photoshop CS2 or CS3
from an earlier version of Photoshop run into problems. To select the contents of
a layer in Photoshop CS2 or higher, hold down Ctrl (Win) / Command (Mac) and
click directly on the layer's preview thumbnail in the Layers palette:
Create a New Layer Group from Layers (Photoshop CS2 and higher)
In Photoshop CS and earlier, we had Layer Sets. As of Photoshop CS2, we have
Layer Groups. Same thing, different name. To create a Layer Group from a
layer or from several layers, first select the layer(s) you want to include in the
Layer Group, then press Ctrl+G (Win) / Command+G (Mac):
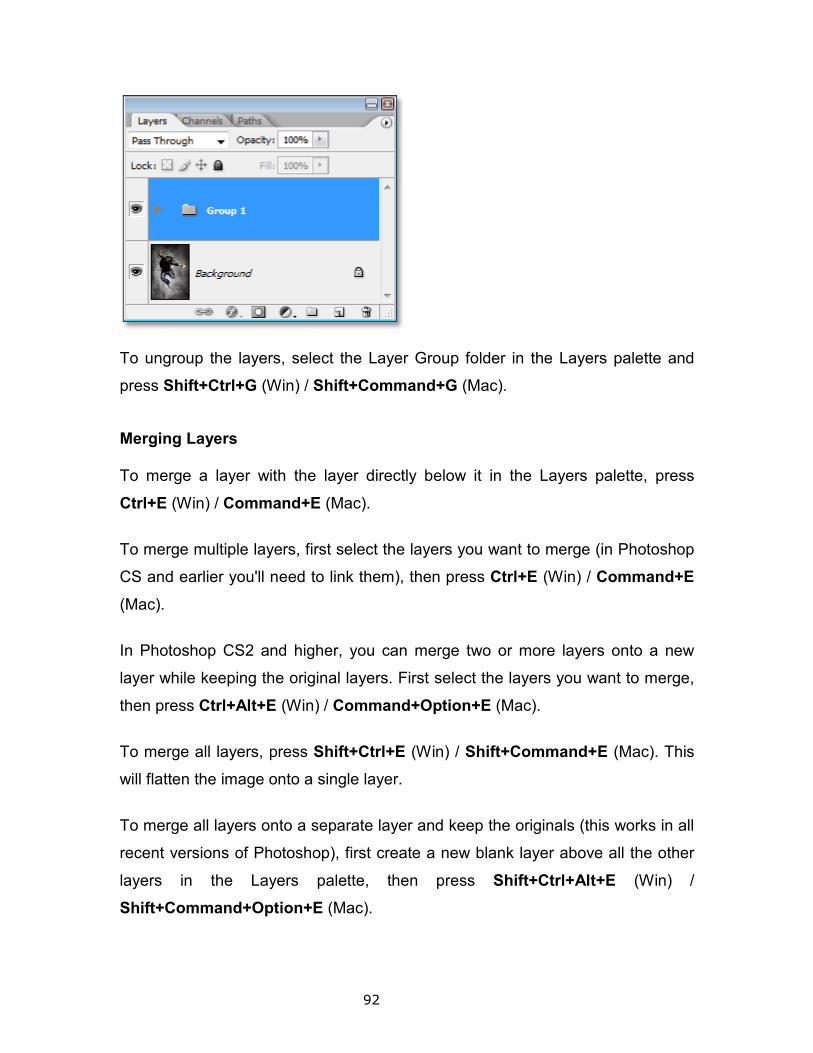
92
To ungroup the layers, select the Layer Group folder in the Layers palette and
press Shift+Ctrl+G (Win) / Shift+Command+G (Mac).
Merging Layers
To merge a layer with the layer directly below it in the Layers palette, press
Ctrl+E (Win) / Command+E (Mac).
To merge multiple layers, first select the layers you want to merge (in Photoshop
CS and earlier you'll need to link them), then press Ctrl+E (Win) / Command+E
(Mac).
In Photoshop CS2 and higher, you can merge two or more layers onto a new
layer while keeping the original layers. First select the layers you want to merge,
then press Ctrl+Alt+E (Win) / Command+Option+E (Mac).
To merge all layers, press Shift+Ctrl+E (Win) / Shift+Command+E (Mac). This
will flatten the image onto a single layer.
To merge all layers onto a separate layer and keep the originals (this works in all
recent versions of Photoshop), first create a new blank layer above all the other
layers in the Layers palette, then press Shift+Ctrl+Alt+E (Win) /
Shift+Command+Option+E (Mac).
93
Create a Clipping Mask (Photoshop CS and earlier)
To create clipping masks in Photoshop CS and earlier, press Ctrl+G (Win) /
Command+G (Mac).
To release the clipping mask, press Shift+Ctrl+G (Win) / Shift+Command+G
(Mac).
Create a Clipping Mask (Photoshop CS2 and higher)
To create a clipping mask in Photoshop CS2 and higher, press Ctrl+Alt+G (Win)
/ Command+Option+G (Mac).
The same shortcut also releases the clipping mask.
Cycle through Layer Blend Modes
When trying to decide on a layer blend mode, most people choose one from the
Blend Mode drop-down list in the top left corner of the Layers palette, see what
effect it has on their image, then they choose a different one from the list, see
what effect it has, then they choose another, and so on, and so on. There's a
much better way.
To cycle through all the different layer blend modes, just hold down your Shift
key and use the + (plus) and - (minus) keys. The plus key scrolls down through
the list, and the minus key scrolls up:
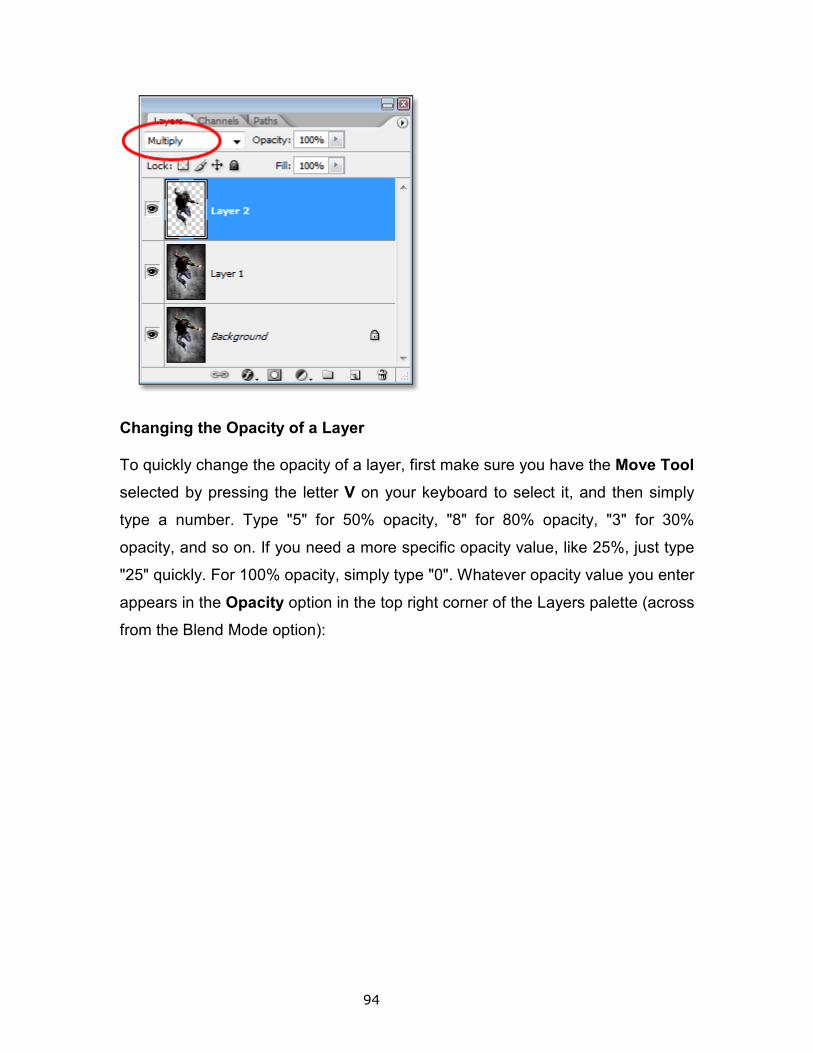
94
Changing the Opacity of a Layer
To quickly change the opacity of a layer, first make sure you have the Move Tool
selected by pressing the letter V on your keyboard to select it, and then simply
type a number. Type "5" for 50% opacity, "8" for 80% opacity, "3" for 30%
opacity, and so on. If you need a more specific opacity value, like 25%, just type
"25" quickly. For 100% opacity, simply type "0". Whatever opacity value you enter
appears in the Opacity option in the top right corner of the Layers palette (across
from the Blend Mode option):
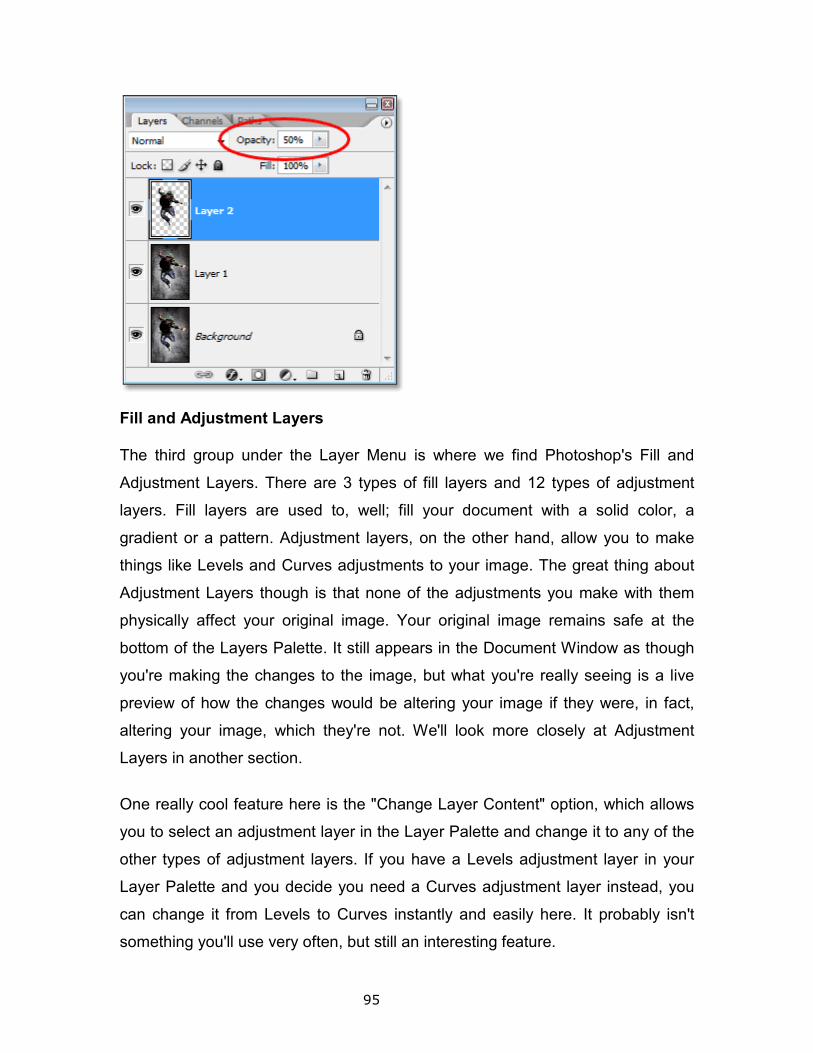
95
Fill and Adjustment Layers
The third group under the Layer Menu is where we find Photoshop's Fill and
Adjustment Layers. There are 3 types of fill layers and 12 types of adjustment
layers. Fill layers are used to, well; fill your document with a solid color, a
gradient or a pattern. Adjustment layers, on the other hand, allow you to make
things like Levels and Curves adjustments to your image. The great thing about
Adjustment Layers though is that none of the adjustments you make with them
physically affect your original image. Your original image remains safe at the
bottom of the Layers Palette. It still appears in the Document Window as though
you're making the changes to the image, but what you're really seeing is a live
preview of how the changes would be altering your image if they were, in fact,
altering your image, which they're not. We'll look more closely at Adjustment
Layers in another section.
One really cool feature here is the "Change Layer Content" option, which allows
you to select an adjustment layer in the Layer Palette and change it to any of the
other types of adjustment layers. If you have a Levels adjustment layer in your
Layer Palette and you decide you need a Curves adjustment layer instead, you
can change it from Levels to Curves instantly and easily here. It probably isn't
something you'll use very often, but still an interesting feature.
96
The final option in this group, "Layer Content Options", is one you'll only use if
you're being paid by the hour. If you need to alter the settings in one of your
adjustment layers, you can select the adjustment layer in the Layers Palette and
then select "Layer Content Options" from the Layer Menu to make changes to
the adjustment. However, since double-clicking on the adjustment layer in the
Layers Palette does the exact same thing, you might as well forget this last
option even exists in the Layer Menu.
Smart Objects, Type and Rasterize Layer
The next group under the Layer Menu is where we find options for type, such as
the amount of anti-aliasing we want on our type, whether we want horizontal or
vertical type, an option to convert our type to a shape so we can do all sorts of
cool things to it we otherwise couldn't while it was still editable type, and options
that allow us to warp the type into different shapes while still keeping the ability to
fully edit the text.
We also have the option here to "rasterize" the contents of the layer. In other
words, take the type or other vector shape and convert it to actual pixels.
The very first option in the list though, which I've purposely saved for last, is
Smart Objects, which is an amazing new feature in Photoshop CS2 that is
changing the way things are done inside Photoshop. We won't get into a huge
discussion about Smart Objects here, but this is where you can take the contents
of your layer and convert them into a smart object.
Layer Based Slices
The sixth group under the Layer Menu has one option in it, "New Layer Based
Slice". Slices have to do with optimizing images for the web and involve dividing
an image into sections which can be optimized individually and saved in different
file formats if needed, and then put back together again as one complete image
in a web page. It's sort of like creating a puzzle out of your image in Photoshop
(or ImageReady) so you can put the puzzle back together again in your web
97
page (if that makes no sense to you and you're not or have no plans to be a web
designer, feel free to forget all about it).
The "New Layer Based Slice" option is simply an easy way to create a sliced
section of your image. It will create a slice automatically based on the contents of
a layer. So if, for example, you have a rectangular shape on its own layer in your
document and, with that layer selected in the Layers Palette, you choose "New
Layer Based Slice", Photoshop will create a slice using that rectangular shape as
the slice dimensions. Again, this is of interest primarily to web designers.
Grouping and Hiding Layers
The next group under Layer is for grouping/ungrouping and hiding/showing
layers. If while working on a Photoshop document you find that you're creating
many layers (which is usually the case), it's often times easier to manage those
layers if you group similar layers together. For example, if you have a bunch of
layers that were used to correct a color problem in an image, you may want to
group those layers together into a folder and name the folder "Color corrections".
Or you may have multiple type layers which could be grouped into a "Type"
folder. Similarly, you can choose to remove any layers from a group at any time.
Hiding and showing layers is basically for turning the visibility of layers on and
off. You can also click on the small eyeball icon beside the layers in the Layers
Palette to accomplish the same thing, which is much easier than going up to the
Layer Menu every time.
Arranging and Aligning Layers
The eighth group under the Layer Menu is for arranging, aligning, and distributing
layers.
"Arranging" layers means changing their stacking order in the Layers Palette so
you can move layers above or below other layers.

98
"Aligning" layers allows you to align the top, bottom, left or right edge of the
contents of a layer or layers to the edge of the contents of another layer, or to the
edge of the document, or to a selection.
"Distribute" layers allows you to spread out the contents of multiple layers equal
distance from either other based on their top, bottom, left, or right edges, or their
vertical or horizontal centers.
Locking Layers
Continuing our journey down the Layer Menu, we come to another group with
only one option, "Lock layers". This option allows us to either lock the layer
completely so we can't move it or do anything to it accidentally, or we can lock
only certain aspects of the layer, such as only the areas that are transparent, or
only the areas that are not transparent, or we can lock the position of the
contents of the layer so we can't accidentally move what's on the layer. Or, we
can choose to lock it all down at once which leaves us with a layer we can still
see but can't make any accidental changes to.
Linking Layers
The third last group in the Layer Menu allows us to link layers together so you
can select multiple layers at once. In Photoshop CS2, this option has become
irrelevant since we can now select multiple layers simply by clicking on a layer
and then holding the Shift key down while clicking on a second layer, which will
select both layers plus any layers in between. To select multiple layers that are
not stacked directly above or below each other in the Layers Palette, simply hold
down the Ctrl key (Win) or the Command key (Mac) and click on the layers you
want to select.
Merging and Flattening
The second last group in the Layer Menu is for merging layers and flattening the
image. The difference between the two is that merging layers allows you to
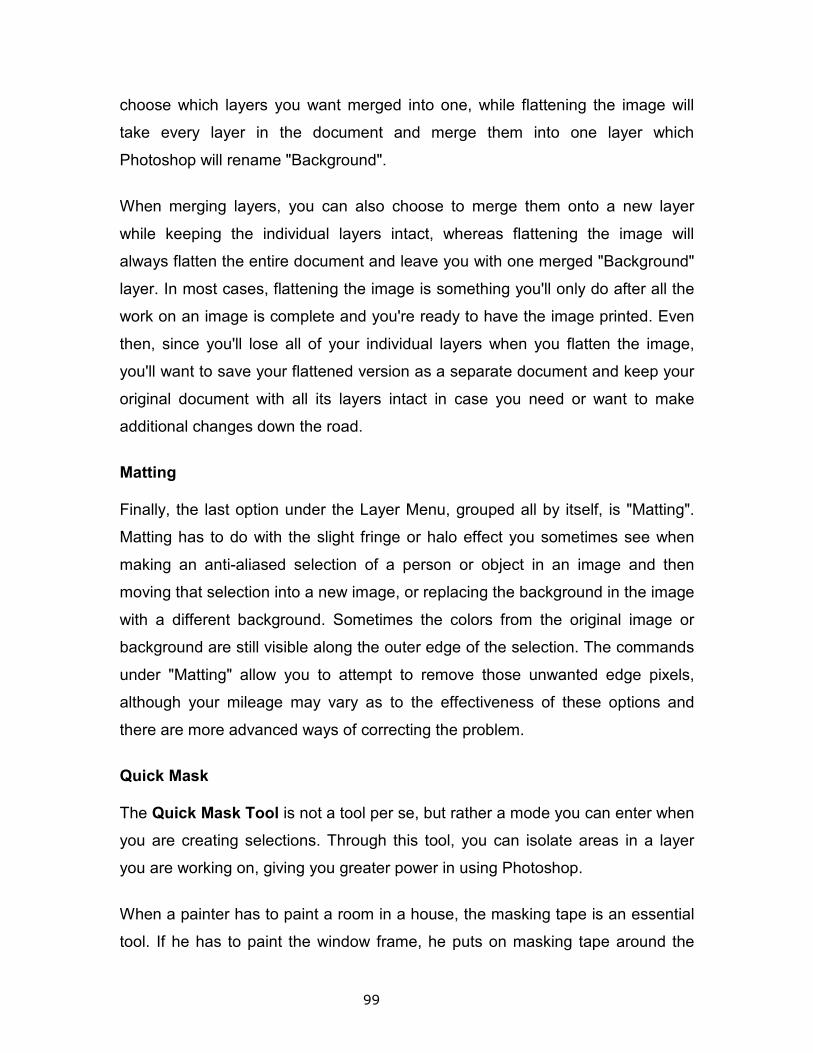
99
choose which layers you want merged into one, while flattening the image will
take every layer in the document and merge them into one layer which
Photoshop will rename "Background".
When merging layers, you can also choose to merge them onto a new layer
while keeping the individual layers intact, whereas flattening the image will
always flatten the entire document and leave you with one merged "Background"
layer. In most cases, flattening the image is something you'll only do after all the
work on an image is complete and you're ready to have the image printed. Even
then, since you'll lose all of your individual layers when you flatten the image,
you'll want to save your flattened version as a separate document and keep your
original document with all its layers intact in case you need or want to make
additional changes down the road.
Matting
Finally, the last option under the Layer Menu, grouped all by itself, is "Matting".
Matting has to do with the slight fringe or halo effect you sometimes see when
making an anti-aliased selection of a person or object in an image and then
moving that selection into a new image, or replacing the background in the image
with a different background. Sometimes the colors from the original image or
background are still visible along the outer edge of the selection. The commands
under "Matting" allow you to attempt to remove those unwanted edge pixels,
although your mileage may vary as to the effectiveness of these options and
there are more advanced ways of correcting the problem.
Quick Mask
The Quick Mask Tool is not a tool per se, but rather a mode you can enter when
you are creating selections. Through this tool, you can isolate areas in a layer
you are working on, giving you greater power in using Photoshop.
When a painter has to paint a room in a house, the masking tape is an essential
tool. If he has to paint the window frame, he puts on masking tape around the
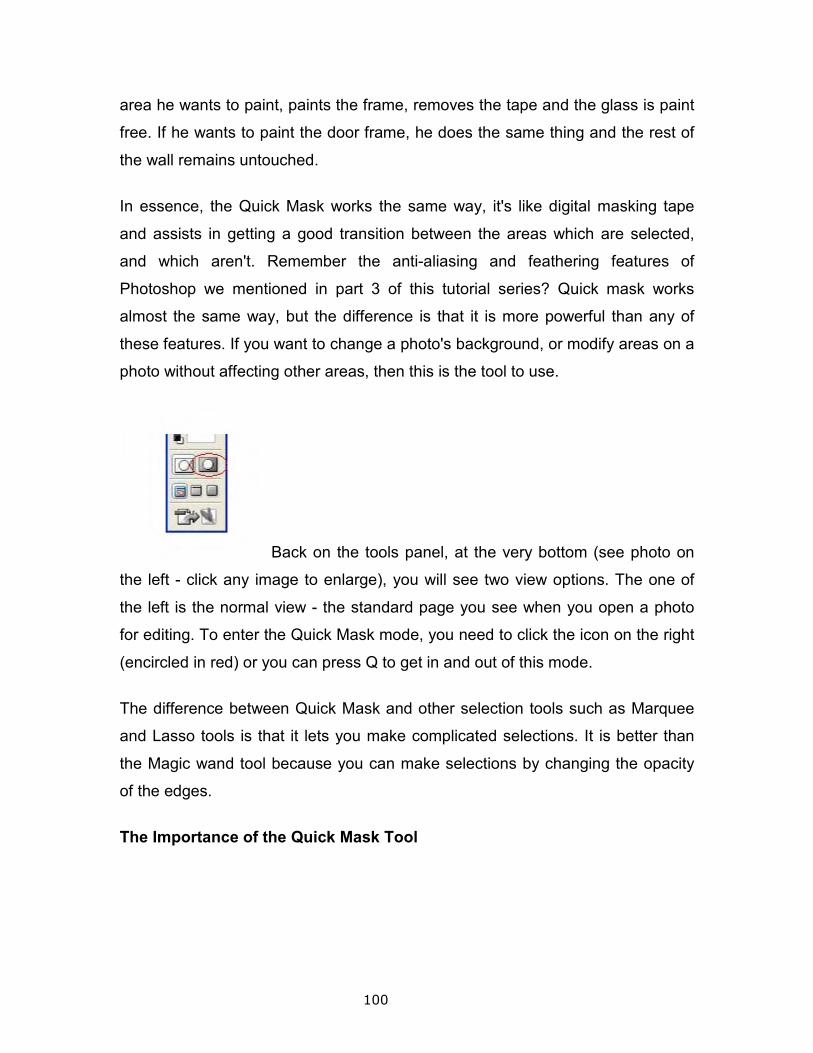
100
area he wants to paint, paints the frame, removes the tape and the glass is paint
free. If he wants to paint the door frame, he does the same thing and the rest of
the wall remains untouched.
In essence, the Quick Mask works the same way, it's like digital masking tape
and assists in getting a good transition between the areas which are selected,
and which aren't. Remember the anti-aliasing and feathering features of
Photoshop we mentioned in part 3 of this tutorial series? Quick mask works
almost the same way, but the difference is that it is more powerful than any of
these features. If you want to change a photo's background, or modify areas on a
photo without affecting other areas, then this is the tool to use.
Back on the tools panel, at the very bottom (see photo on
the left - click any image to enlarge), you will see two view options. The one of
the left is the normal view - the standard page you see when you open a photo
for editing. To enter the Quick Mask mode, you need to click the icon on the right
(encircled in red) or you can press Q to get in and out of this mode.
The difference between Quick Mask and other selection tools such as Marquee
and Lasso tools is that it lets you make complicated selections. It is better than
the Magic wand tool because you can make selections by changing the opacity
of the edges.
The Importance of the Quick Mask Tool
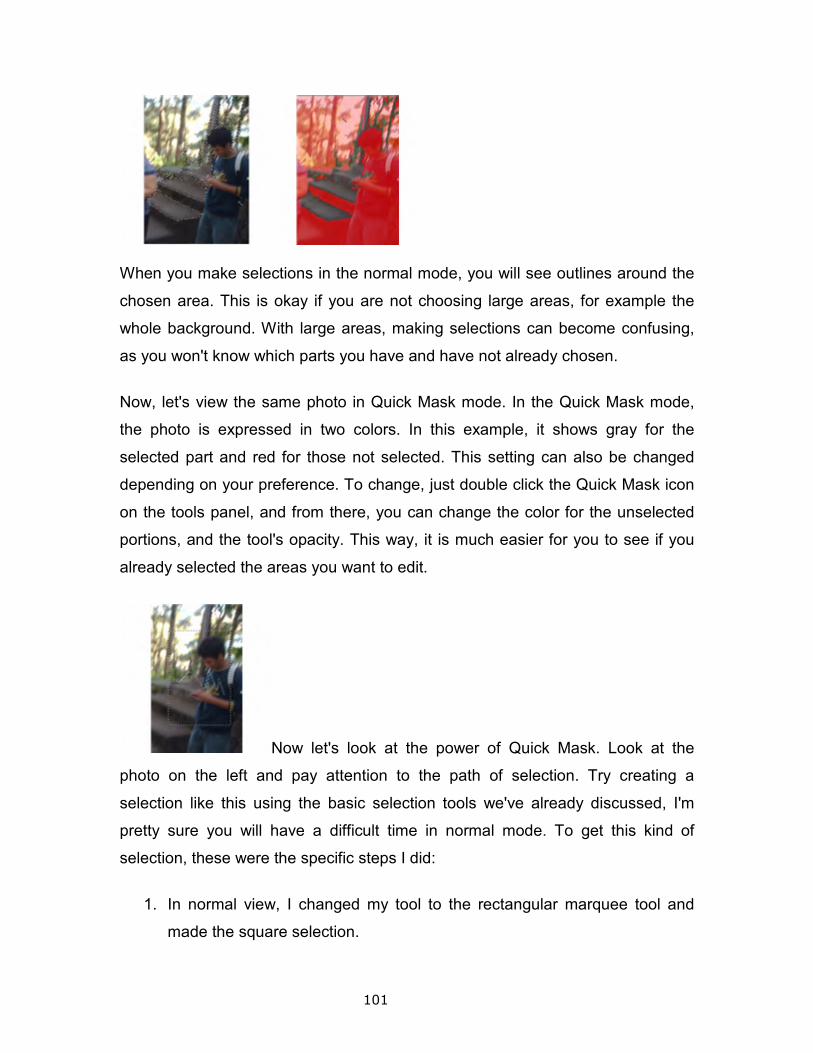
101
When you make selections in the normal mode, you will see outlines around the
chosen area. This is okay if you are not choosing large areas, for example the
whole background. With large areas, making selections can become confusing,
as you won't know which parts you have and have not already chosen.
Now, let's view the same photo in Quick Mask mode. In the Quick Mask mode,
the photo is expressed in two colors. In this example, it shows gray for the
selected part and red for those not selected. This setting can also be changed
depending on your preference. To change, just double click the Quick Mask icon
on the tools panel, and from there, you can change the color for the unselected
portions, and the tool's opacity. This way, it is much easier for you to see if you
already selected the areas you want to edit.
Now let's look at the power of Quick Mask. Look at the
photo on the left and pay attention to the path of selection. Try creating a
selection like this using the basic selection tools we've already discussed, I'm
pretty sure you will have a difficult time in normal mode. To get this kind of
selection, these were the specific steps I did:
1. In normal view, I changed my tool to the rectangular marquee tool and
made the square selection.
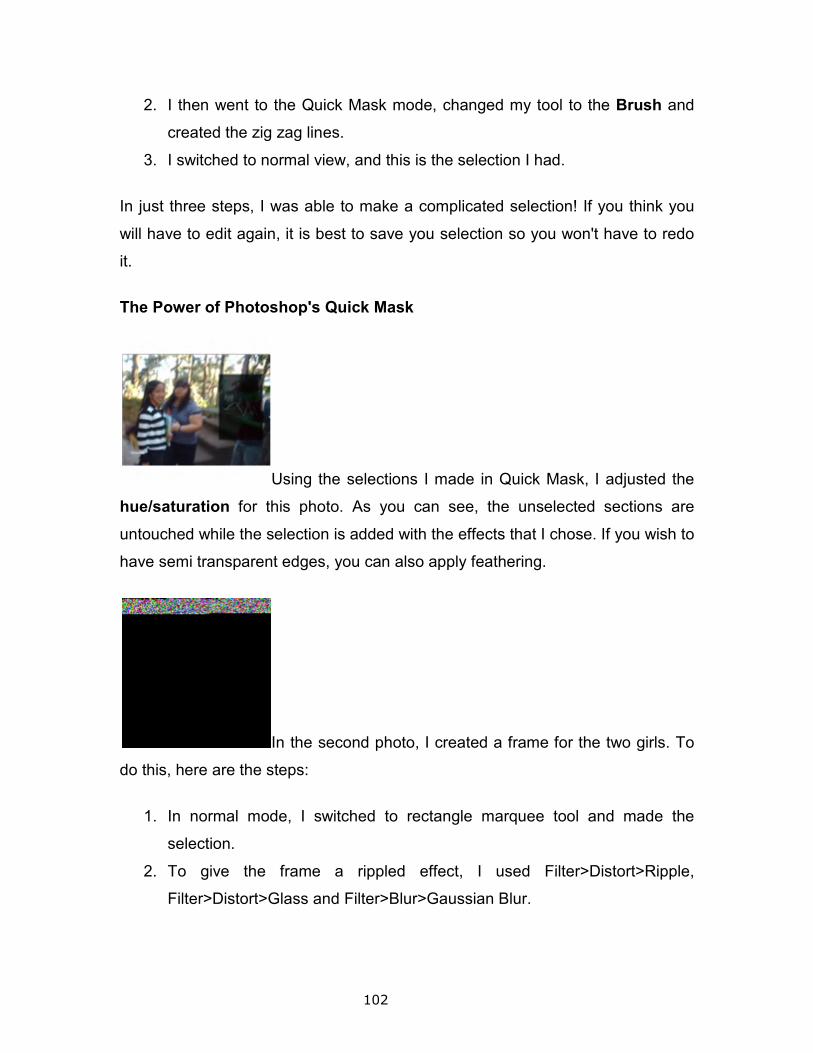
102
2. I then went to the Quick Mask mode, changed my tool to the Brush and
created the zig zag lines.
3. I switched to normal view, and this is the selection I had.
In just three steps, I was able to make a complicated selection! If you think you
will have to edit again, it is best to save you selection so you won't have to redo
it.
The Power of Photoshop's Quick Mask
Using the selections I made in Quick Mask, I adjusted the
hue/saturation for this photo. As you can see, the unselected sections are
untouched while the selection is added with the effects that I chose. If you wish to
have semi transparent edges, you can also apply feathering.
In the second photo, I created a frame for the two girls. To
do this, here are the steps:
1. In normal mode, I switched to rectangle marquee tool and made the
selection.
2. To give the frame a rippled effect, I used Filter>Distort>Ripple,
Filter>Distort>Glass and Filter>Blur>Gaussian Blur.
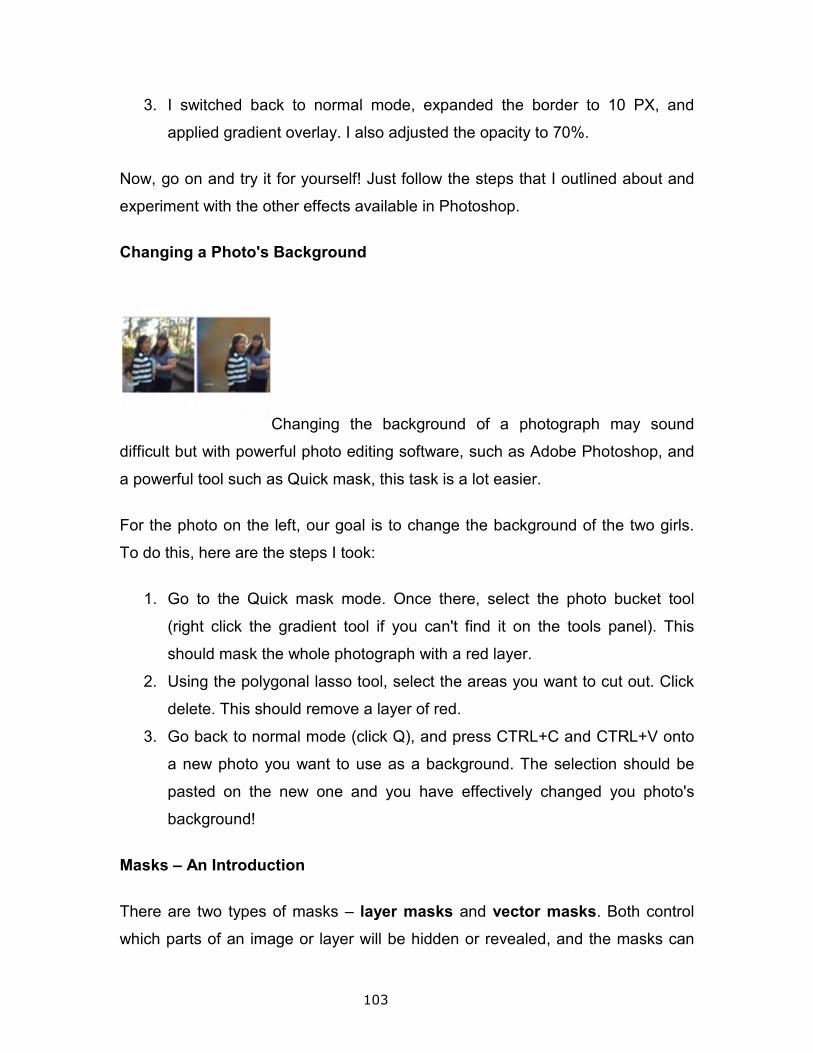
103
3. I switched back to normal mode, expanded the border to 10 PX, and
applied gradient overlay. I also adjusted the opacity to 70%.
Now, go on and try it for yourself! Just follow the steps that I outlined about and
experiment with the other effects available in Photoshop.
Changing a Photo's Background
Changing the background of a photograph may sound
difficult but with powerful photo editing software, such as Adobe Photoshop, and
a powerful tool such as Quick mask, this task is a lot easier.
For the photo on the left, our goal is to change the background of the two girls.
To do this, here are the steps I took:
1. Go to the Quick mask mode. Once there, select the photo bucket tool
(right click the gradient tool if you can't find it on the tools panel). This
should mask the whole photograph with a red layer.
2. Using the polygonal lasso tool, select the areas you want to cut out. Click
delete. This should remove a layer of red.
3. Go back to normal mode (click Q), and press CTRL+C and CTRL+V onto
a new photo you want to use as a background. The selection should be
pasted on the new one and you have effectively changed you photo's
background!
Masks – An Introduction
There are two types of masks – layer masks and vector masks. Both control
which parts of an image or layer will be hidden or revealed, and the masks can
104
have special effects and styles applied to them. Once you’re sure of the effects
that you want to add, you can then apply them. This allows you to see what the
changes will look like before actually changing any pixels in the image itself.
Layer masks are created with the painting and selection tools; vector masks are
created with the Pen and Shape tools.
In the Layers palette, the masks that you create are shown as thumbnails inside
the appropriate layer. A vector mask’s thumbnail image is the path that you’ve
created using the Pen tool. A layer mask’s thumbnail is a rectangle with a black
background that represents the grayscale channel created when you add the
layer mask. You can create a vector mask that shows or hides an entire layer
and shows the contents of a shape, or you can create an inverted mask, where
the entire page is colored and the shape is knocked out of the image.
Note: When you use the Pen tool and create a new shape layer, the new path
appears automatically as a vector mask in the Paths palette.
Using Vector Masks
Let’s look at the different ways that a vector mask can be used, created, and/or edited:
• Add a vector mask that shows or hides an entire layer
• Add a vector mask that shows only the content inside the shape that has
been created by a path
• Edit a vector mask that is already created
• Remove, disable, or enable a vector mask
• Convert a vector mask to a layer mask (rasterize the vector data)
Additionally:
• To add a vector mask that hides or shows an entire layer, select the layer
from the Layer palette that you want to add the vector mask to. Choose
Layer>Add Vector Mask>Hide All or Reveal All. (If these are grayed
out, make a copy of the layer first.)
105
• To add a vector mask that shows the contents of a shape, select the layer
to apply the mask to in the Layers palette, select the path from the Paths
palette, and choose Layer>Add Vector Mask>Current Path.
• To edit a vector mask, click the vector mask thumbnail in either the Layer
or Paths palettes. Edit the mask using the Shape or Pen tools.
• To delete a vector mask, select it and choose Layer>Delete Vector
Mask.
• To enable or disable a vector mask, select it and then choose
Layer>Enable Vector Mask or Layer>Disable Vector Mask.
• To convert a vector mask to a layer mask, choose Layer>Rasterize>Vector
Mask.
Using Layer Masks
A layer mask is represented in the Layers palette as a rectangle with a black
background and the shape of the selection in white or gray. Layer masks can be
used to hide or reveal entire layers or selections on layers. The black part of the
layer mask (in the mask’s thumbnail in the Layers palette) is hidden.
To create a Layer mask that hides or reveals an entire layer:
1. Make sure no selection is currently active, and select the layer to mask in
the Layers palette.
2. Choose Layer>Add Layer Mask>Reveal All to reveal the entire layer or
Layer>Add Layer Mask>Hide All to hide the entire layer.
To create a layer mask that hides or reveals a selection only:
1. Select the layer you add the mask to in the Layers palette.
2. Make the selection for the mask using a selection tool.
3. Choose Layer>Add Layer Mask and either Reveal Selection or Hide
Selection. Only the selection will be hidden or shown, and this selection
can be edited independently of the other parts of the image.
106
To work with layer masks those have been created:
1. Select the layer in the Layers palette that contains the mask you wish to
edit. Click once on the layer mask thumbnail to make it active.
2. Select an editing or painting tool.
3. Paint with white to subtract from the image, black to add to it, and gray to
partially hide the layer. You can switch to using the foreground and
background colors in the toolbox and revert to the original black and white
there too.
4. When complete, you can either apply or discard the mask by holding down
the Shift key and clicking once on the mask in the Layers palette. A red X
indicates that the mask is discarded.
Using layer masks allows you to separate and control specific parts of an image
by producing a stencil of a selection. This stencil can be altered but the area
around it is protected from change. These selections can then be saved for later
use by saving the mask in an alpha channel. This is briefly detailed next.
A Little about Alpha Channels
You can save a selection as an alpha channel mask. Saving the selection as a
mask will allow you to keep your work for later use. Alpha channels are storage
areas for data, like selections. When selections are saved as a mask, this
channel is created automatically; to save a selection manually, open the
Channels palette and click on the save selection as channel icon.
You can open the Channels palette using Window>Channels. With the selection
active in the image, you can save selection as channel icon. A new channel
appears called Alpha 1, which can be renamed. These alpha channels can be
deleted, added, and edited using the painting and editing tools, and opacity and
other mask options can be set. Alpha channels can be converted to spot color
channels for spot color separations.
107
Once the mask has been saved as a channel, you can paint with white to erase
part of the mask, black to add to the mask, or gray to apply opacity to the mask.
Selecting and Deselecting
The first group in the Select Menu is straightforward for the most part. "All"
allows you to select everything on a layer; "Deselect" removes the selection.
"Reselect" will reselect the last selection you made. The only not-so-
straightforward option here is "Inverse", which will select everything that outside
of your selection and deselect everything that was originally selected. In other
words, if you drag out a rectangular selecting in the middle of a layer, Photoshop
will select everything within that rectangular selection and leave everything
outside of the rectangular shape deselected. By choosing "Inverse", Photoshop
will do the exact opposite. It will select everything that was outside of the
rectangular selection area and deselect everything that's inside of it. You may be
wondering why you'd ever want to do something like that, but it actually comes in
very handy more often than you'd think. For example, sometimes it's easier to
select everything you don't want selected in an image (perhaps the object you
want selected is framed by a solid colored background, in which case selecting
the background would be easier than selecting the object) and then inverse the
selection to select everything you did want to select.
Selecting and Deselecting Layers
The second group under the Select Menu may seem very similar to the first
group, but they're actually quite different. The first group selects the
<em>contents</em> of a layer, while the options in this second group select the
layers themselves.
The first option, "All Layers", will as the name implies select every layer in your
document. The second option, "Deselect Layers", will deselect any layers you
had selected.
108
The third option though is very handy indeed. "Similar Layers" will automatically
select every layer in your document that is of the same type as the layer you
currently have selected. If you have a type (as in text) layer selected, "Similar
Layers" will select every type layer in your document. Have a shape layer
selected? It will select every shape layer in your document. And of course, if you
have a layer containing pixels selected, it will select every layer containing pixels.
This is extremely handy if, for example, you need to change the font used on
every type layer in the document from, say, Arial to Helvetica. Simply select one
type layer, then select "Similar Layers" from the Select Menu, switch to your
Type tool, change the font up in the options bar to Helvetica, and presto! The font
used on every type layer in the document is now Helvetica.
Color Range
The third group under the Select Menu contains just one option, "Color Range".
Choosing this option opens up the Color Range dialog box allowing you to make
a selection based on the colors in the image.
Feather and Modify
The Select Menu's fourth group contains options for altering our selections after
we've made them
The first option, "Feather", allows us to give our selections a soft, "feathered"
edge rather than the hard, unnatural edge we normally get with selections. You
can set the amount of feathering from 0.2 (virtually no feathering at all) to 250,
which is most likely way too much. The amount of feathering needed will depend
on the effect you're trying to achieve as well as the resolution of the image.
Higher resolution images will require more feathering to achieve the same results
than lower resolution images do.
The second option in this group, "Modify", allows you to modify your selection in
one of four different ways. You can add a border to your selection, which
essentially creates a second selection around your initial selection, leaving
109
everything between the two selections selected. You can then fill the area with a
color to create a border effect similar to what you would achieve when stroking a
selection. There's also an option here to "Smooth" your selection, which will,
depending on the amount of smoothing you enter into the dialog box, smooth out
any hard angles in your selection. And finally, you can choose to either "Expand"
or "Contract" your selection by the number of pixels you enter into the dialog box.
Grow and Similar
The fifth group under the Select Menu is where we find the "Grow" and
"Similar" commands. These commands are similar to the "Expand" command in
the group above, with one key difference. While "Expand" simply expands the
selection by a specified number of pixels, "Grow" and "Similar" use the tolerance
range you've specified in the Magic Wand options to select pixels that are similar
in color and tonal value to the pixels in your selection.
"Grow" will include all adjacent pixels that fall within the Magic Wand's tolerance
range, while "Similar" will select all pixels that fall within the tolerance range
regardless of their location in the image.
You can choose the "Grow" and "Similar" commands over and over again as
needed to increase your selection in increments.
Transform Selection
The next group in the Select Menu is "Transform Selection" and is one you'll
most likely use a lot. It allows you to move, resize, and distort a selection after
you've already made it (and here's the cool part) without affecting anything inside
the selection. The selection itself is completely independent of anything that
appears to be inside of the selection while you're resizing or reshaping it.
To accept the changes you've made to your selection and to make it an active
selection again, simply press Enter.
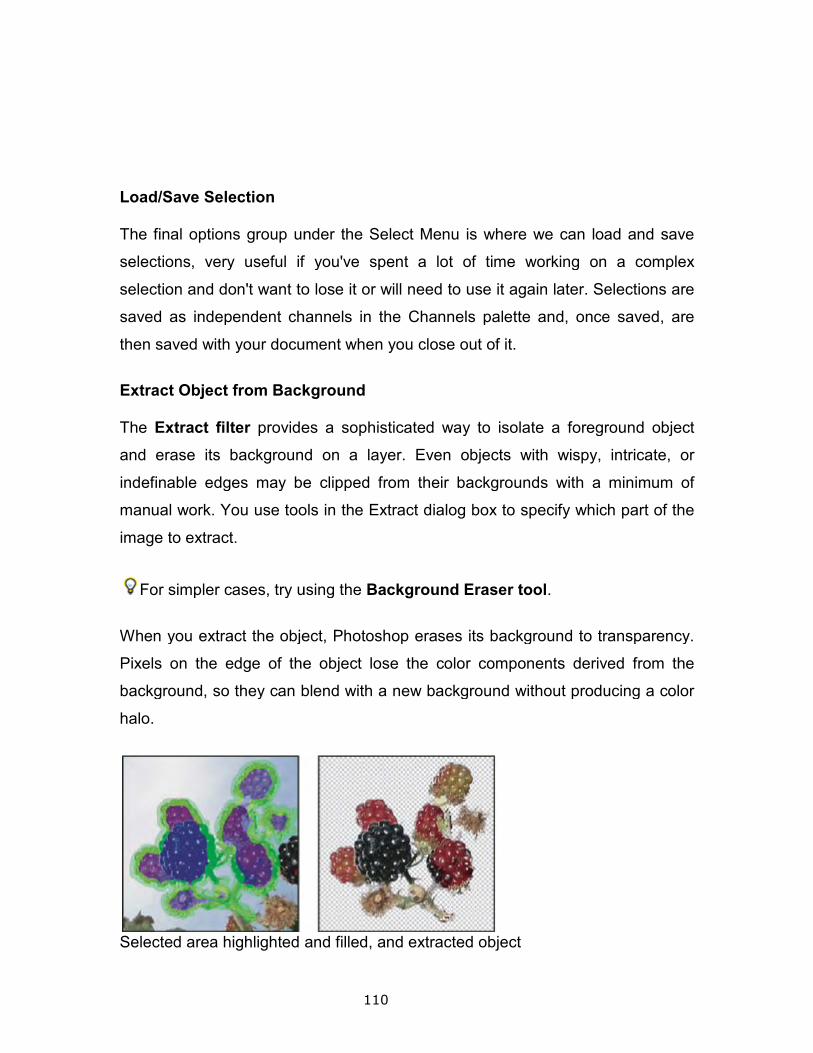
Load/Save Selection
The final options group under the Select Menu is where we can load and save
selections, very useful if you've spent a lot of time working
selection and don't want to lose it or will need to use it again later. Selections are
saved as independent channels in the Channels palette and, once saved, are
then saved with your document when you close out of it.
Extract Object from Back
The Extract filter provides a sophisticated way to isolate a foreground object
and erase its background on a layer. Even objects with wispy, intricate, or
indefinable edges may be clipped from their backgrounds with a minimum of
manual work. You use tools in the Extract dia
image to extract.
For simpler cases, try using the
When you extract the object, Photoshop erases its background to transparency.
Pixels on the edge of the object lose the color components derive
background, so they can blend with a new background without producing a color
halo.
Selected area highlighted and filled, and extracted object
110
The final options group under the Select Menu is where we can load and save
selections, very useful if you've spent a lot of time working on a complex
selection and don't want to lose it or will need to use it again later. Selections are
saved as independent channels in the Channels palette and, once saved, are
then saved with your document when you close out of it.
Background
provides a sophisticated way to isolate a foreground object
and erase its background on a layer. Even objects with wispy, intricate, or
indefinable edges may be clipped from their backgrounds with a minimum of
manual work. You use tools in the Extract dialog box to specify which part of the
For simpler cases, try using the Background Eraser tool.
When you extract the object, Photoshop erases its background to transparency.
Pixels on the edge of the object lose the color components derive
background, so they can blend with a new background without producing a color
Selected area highlighted and filled, and extracted object
The final options group under the Select Menu is where we can load and save
on a complex
selection and don't want to lose it or will need to use it again later. Selections are
saved as independent channels in the Channels palette and, once saved, are
provides a sophisticated way to isolate a foreground object
and erase its background on a layer. Even objects with wispy, intricate, or
indefinable edges may be clipped from their backgrounds with a minimum of
log box to specify which part of the
When you extract the object, Photoshop erases its background to transparency.
Pixels on the edge of the object lose the color components derived from the
background, so they can blend with a new background without producing a color
You can add back opacity to the background and create other effects using
the Edit > Fade command
1. In the Layers palette
extract. If you select a background layer, it becomes a normal layer after
the extraction. If the layer contains a selection, the extraction erases the
background only in the selected area.
To avoid losing the original image information, duplicate the layer or
make a snapshot of the original image state.
2. Choose Filter > Extract
• Brush Size
• Enter a value, or drag the slider to
Highlighter tool
• You also use the Brush Size option to specify the width of the
Eraser, Cleanup, and Edge Touchup tools.
• Highlight
Choose a preset color option for the highlight that appears around objects
when you use the Edge Highlighter tool, or choose Other to pick a custom
color for the highlight.
FillChoose a preset color option, or choose Other to pick a custom color
for the area covered by the Fill tool.
Smart Highlighting Select this option if you are highligh
helps you keep the highlight on the edge, and applies a highlight that is
just wide enough to cover the edge, regardless of the current brush size.
111
You can add back opacity to the background and create other effects using
> Fade command after an extraction.
Layers palette, select the layer containing the object you want to
extract. If you select a background layer, it becomes a normal layer after
the extraction. If the layer contains a selection, the extraction erases the
nd only in the selected area.
To avoid losing the original image information, duplicate the layer or
make a snapshot of the original image state.
> Extract, and then specify tool options:
Enter a value, or drag the slider to specify the width of the Edge
Highlighter tool .
You also use the Brush Size option to specify the width of the
Eraser, Cleanup, and Edge Touchup tools.
Choose a preset color option for the highlight that appears around objects
e Edge Highlighter tool, or choose Other to pick a custom
color for the highlight.
FillChoose a preset color option, or choose Other to pick a custom color
for the area covered by the Fill tool.
Smart Highlighting
Select this option if you are highlighting a well-defined edge. The option
helps you keep the highlight on the edge, and applies a highlight that is
just wide enough to cover the edge, regardless of the current brush size.
You can add back opacity to the background and create other effects using
, select the layer containing the object you want to
extract. If you select a background layer, it becomes a normal layer after
the extraction. If the layer contains a selection, the extraction erases the
To avoid losing the original image information, duplicate the layer or
specify the width of the Edge
You also use the Brush Size option to specify the width of the
Choose a preset color option for the highlight that appears around objects
e Edge Highlighter tool, or choose Other to pick a custom
FillChoose a preset color option, or choose Other to pick a custom color
defined edge. The option
helps you keep the highlight on the edge, and applies a highlight that is
just wide enough to cover the edge, regardless of the current brush size.
112
Note: If you use Smart Highlighting to mark an object edge that’s near
another edge, decrease the brush size if conflicting edges pull the
highlight off the object edge. If the object edge has a uniform color on one
side and high-contrast edges on the other side, keep the object edge
within the brush area but center the brush on the uniform color.
• Specify Extraction options.
• Textured Image.
• Select this option if the foreground or background of your image
contains a lot of texture.
• Smooth.
• Enter a value or drag the slider to increase or decrease the
smoothness of the outline. It’s usually best to begin with zero or a
small value to avoid unwanted blurring of details. If there are sharp
artifacts in the extraction result, you can increase the Smooth value
to help remove them in the next extraction.
• Channel.
• Choose the alpha channel from the Channel menu to base the
highlight on a selection saved in an alpha channel. The alpha
channel should be based on a selection from the edge boundary. If
you modify a highlight based on a channel, the channel name in the
menu changes to Custom. Your image must have an alpha channel
for the Channel option to be available.
• Force Foreground.
• Select this option if the object is especially intricate or lacks a clear interior.
3. Select the Edge Highlighter tool , and draw to define the edge of the
object you want to extract. Drag so that the highlight slightly overlaps both
the foreground object and its background. Use a large brush to cover
wispy, intricate edges where the foreground blends into the background,
as with hair or trees.
Use either the Zoom tool or the Hand tool to adjust the view as
needed.
If you need to erase the highlight, select the Eraser tool
over the highlight. To erase the entire highlight, press Alt+Backspace if the
object has a well
complete enclosure. You do not need to highlight areas where the object
touches the image boundaries. If the object lacks a clear interior, highlight
the entire object.
Note: You can’t highlight t
Image or Force Foreground.
4. Define the foreground area by doing one of the following:
• If the object has a well
Click inside the object to fill its interior. Clicking a fil
again with the Fill tool removes the fill.
• If you’ve selected Force Foreground, select the Eyedropper tool
, and click inside the object to sample the foreground color,
or click in the Color text box and use a color picker to select the
foreground
contain tones of a single color.
5. Click Preview to preview the extracted object. Zoom in as needed.
• Show.
• Choose a menu option to switch between views of the original and
the extracted image.
• Display.
• Choose a menu option to preview the extracted object against a
colored matte background or a grayscale background.
113
Use either the Zoom tool or the Hand tool to adjust the view as
If you need to erase the highlight, select the Eraser tool , and drag it
over the highlight. To erase the entire highlight, press Alt+Backspace if the
as a well-defined interior, make sure the highlight forms a
complete enclosure. You do not need to highlight areas where the object
touches the image boundaries. If the object lacks a clear interior, highlight
You can’t highlight the entire object if you’ve selected Textured
Image or Force Foreground.
Define the foreground area by doing one of the following:
If the object has a well-defined interior, select the Fill tool
Click inside the object to fill its interior. Clicking a fil
again with the Fill tool removes the fill.
If you’ve selected Force Foreground, select the Eyedropper tool
, and click inside the object to sample the foreground color,
or click in the Color text box and use a color picker to select the
foreground color. This technique works best with objects that
contain tones of a single color.
Click Preview to preview the extracted object. Zoom in as needed.
Choose a menu option to switch between views of the original and
the extracted image.
Choose a menu option to preview the extracted object against a
colored matte background or a grayscale background.
Use either the Zoom tool or the Hand tool to adjust the view as
, and drag it
over the highlight. To erase the entire highlight, press Alt+Backspace if the
defined interior, make sure the highlight forms a
complete enclosure. You do not need to highlight areas where the object
touches the image boundaries. If the object lacks a clear interior, highlight
he entire object if you’ve selected Textured
defined interior, select the Fill tool .
Click inside the object to fill its interior. Clicking a filled area
If you’ve selected Force Foreground, select the Eyedropper tool
, and click inside the object to sample the foreground color,
or click in the Color text box and use a color picker to select the
color. This technique works best with objects that
Click Preview to preview the extracted object. Zoom in as needed.
Choose a menu option to switch between views of the original and
Choose a menu option to preview the extracted object against a

• To display a transparent background, choose none.
6. Improve the extraction by doing one of the following:
• Choose new Highlight and Fill
Edge Highlighter tool. Define the foreground area once more,
and then preview the extracted object.
• Specify new Extraction settings (Smooth, Force Foreground, or
Color) and then preview the extracted object.
When you are sa
touchups.
7. Touch up the extraction results by doing one of the following:
• To erase background traces in the extracted area, use the
Cleanup tool
cumulative effect. You
in the extracted object. Hold down Alt (Windows) or Option
(Mac OS) while dragging to add back opacity.
• To edit the edge of the extracted object, use the Edge Touchup
tool . The tool sharpens edges and has a cumul
there is no clear edge, the
the object or subtracts opacity from the background.
You can also clean up the image after an extraction by using the
Background Eraser and History Brush tools in the toolbox.
8. Click OK to apply the final extraction. On the layer, all pixels outside the
extracted object are erased to transparency.
Varnishing Point
Step One
114
To display a transparent background, choose none.
Improve the extraction by doing one of the following:
Choose new Highlight and Fill options and draw again with the
Edge Highlighter tool. Define the foreground area once more,
and then preview the extracted object.
Specify new Extraction settings (Smooth, Force Foreground, or
Color) and then preview the extracted object.
When you are satisfied with the extraction, you can do the final
Touch up the extraction results by doing one of the following:
To erase background traces in the extracted area, use the
Cleanup tool . The tool subtracts opacity and has a
cumulative effect. You can also use the Cleanup tool to fill gaps
in the extracted object. Hold down Alt (Windows) or Option
OS) while dragging to add back opacity.
To edit the edge of the extracted object, use the Edge Touchup
. The tool sharpens edges and has a cumulative effect. If
there is no clear edge, the Edge Touchup tool adds opacity to
the object or subtracts opacity from the background.
You can also clean up the image after an extraction by using the
Background Eraser and History Brush tools in the toolbox.
Click OK to apply the final extraction. On the layer, all pixels outside the
extracted object are erased to transparency.
options and draw again with the
Edge Highlighter tool. Define the foreground area once more,
Specify new Extraction settings (Smooth, Force Foreground, or
tisfied with the extraction, you can do the final
To erase background traces in the extracted area, use the
. The tool subtracts opacity and has a
can also use the Cleanup tool to fill gaps
in the extracted object. Hold down Alt (Windows) or Option
To edit the edge of the extracted object, use the Edge Touchup
ative effect. If
tool adds opacity to
You can also clean up the image after an extraction by using the
Click OK to apply the final extraction. On the layer, all pixels outside the

115
I want to place For Sale text on the barn's roof and have it snap to all three
planes of that roof.
Create your text and make sure the resolution is the same as your target image
and the dimensions are appropriate to fit nicely. In this case, the only reason I
had a black background on the text was to see the white lettering.
With the text layer selected, press Cmd-A, to select the text, then Cmd-C, to copy
it (Win: Cntl-A, Cntl-C). Now click the target image, the barn in this case, to make
it active.
Step Two
116
Press Filter > Vanishing Point.
The top two tools on the left are for selecting a plane (top icon), and for creating
a plane (icon with the "plus" sign). The first thing I did was to create a plane on
the bottom roof (difficult to see here, but there's a thin, blue line around the
bottom roof).
After that, I dragged up another plane at 90 degrees to the first — Cmd-Click and
Hold-Drag a middle handle (Win: Cntl-Click and Hold-Drag). Now, and this is
brand new to Vanishing Point CS3, hover your cursor over the middle handle of
the new plane and press the Option key (Win: Alt key). You will see a curved
arrow appear, circled in red. You can now click and drag. As you do, you will
change the angle the second plane makes with the first — like opening and
closing a book. You can also manually enter the exact number of degrees you
want, circled in green, or click for the slider and drag that around.
I used the same technique to create a third plane on the top roof.
You can control the size of the grid in each plane (the number of cross-hatch
lines) by clicking Grid Size, circled in blue, and dragging the slider.
Step Three
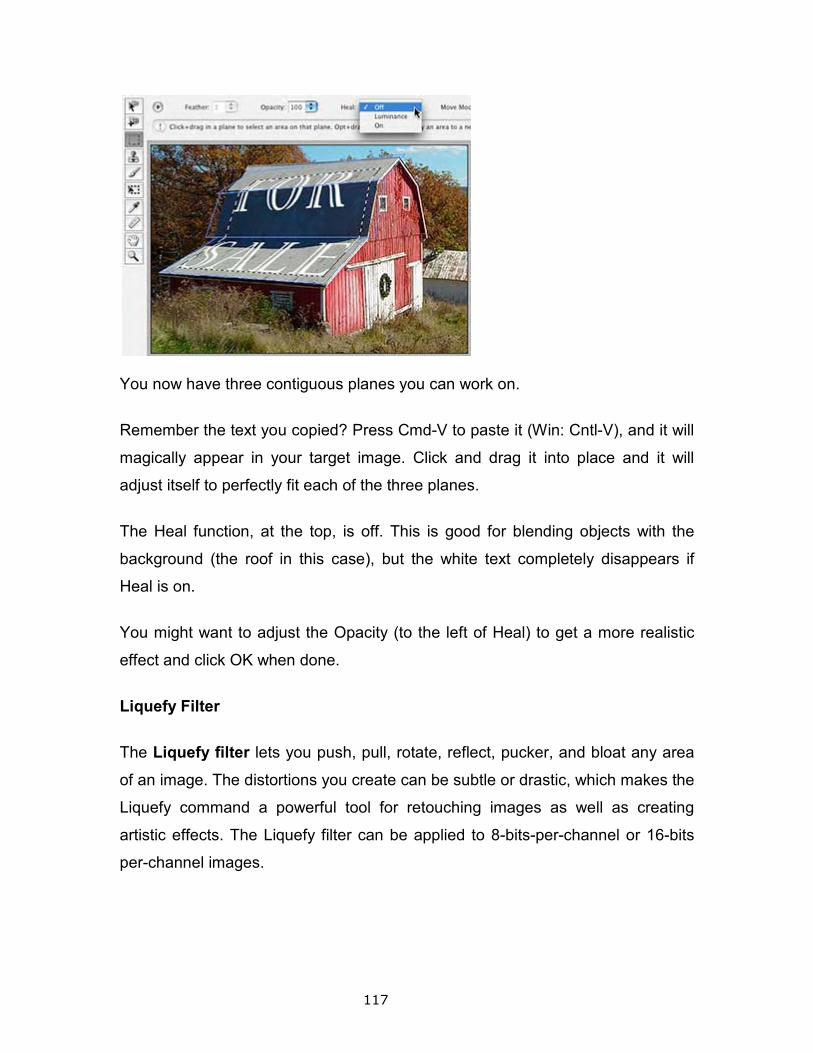
117
You now have three contiguous planes you can work on.
Remember the text you copied? Press Cmd-V to paste it (Win: Cntl-V), and it will
magically appear in your target image. Click and drag it into place and it will
adjust itself to perfectly fit each of the three planes.
The Heal function, at the top, is off. This is good for blending objects with the
background (the roof in this case), but the white text completely disappears if
Heal is on.
You might want to adjust the Opacity (to the left of Heal) to get a more realistic
effect and click OK when done.
Liquefy Filter
The Liquefy filter lets you push, pull, rotate, reflect, pucker, and bloat any area
of an image. The distortions you create can be subtle or drastic, which makes the
Liquefy command a powerful tool for retouching images as well as creating
artistic effects. The Liquefy filter can be applied to 8-bits-per-channel or 16-bits
per-channel images.
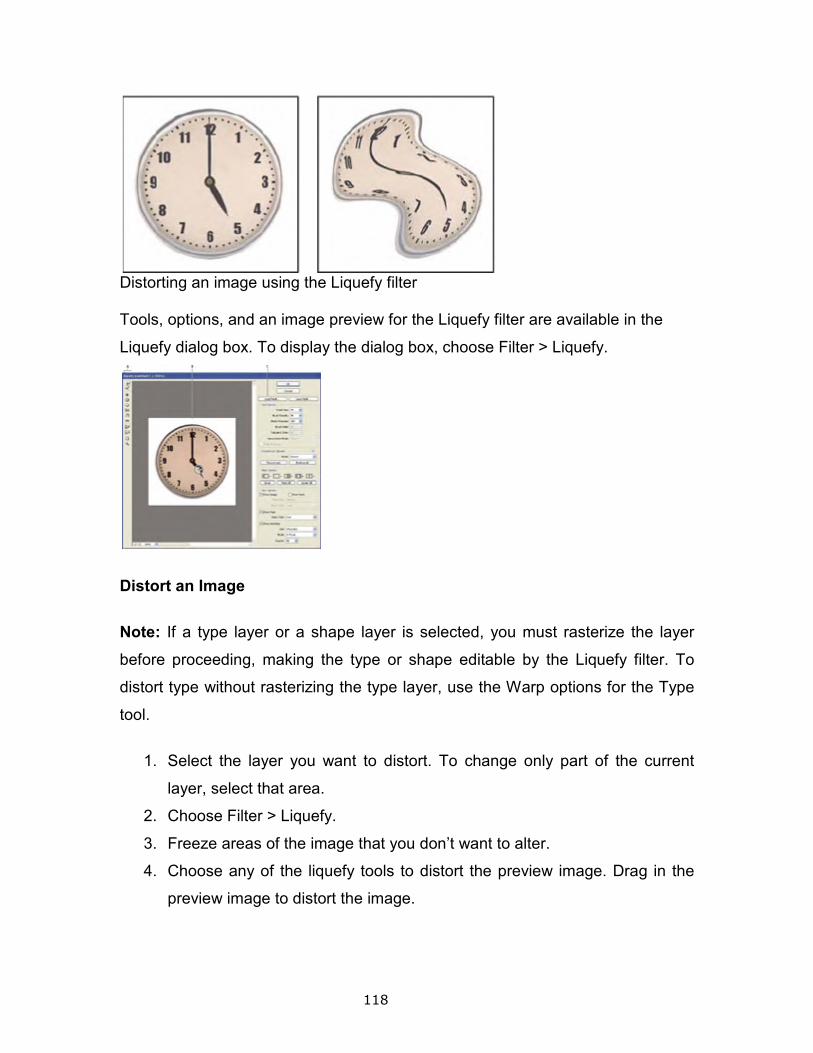
118
Distorting an image using the Liquefy filter
Tools, options, and an image preview for the Liquefy filter are available in the
Liquefy dialog box. To display the dialog box, choose Filter > Liquefy.
Distort an Image
Note: If a type layer or a shape layer is selected, you must rasterize the layer
before proceeding, making the type or shape editable by the Liquefy filter. To
distort type without rasterizing the type layer, use the Warp options for the Type
tool.
1. Select the layer you want to distort. To change only part of the current
layer, select that area.
2. Choose Filter > Liquefy.
3. Freeze areas of the image that you don’t want to alter.
4. Choose any of the liquefy tools to distort the preview image. Drag in the
preview image to distort the image.
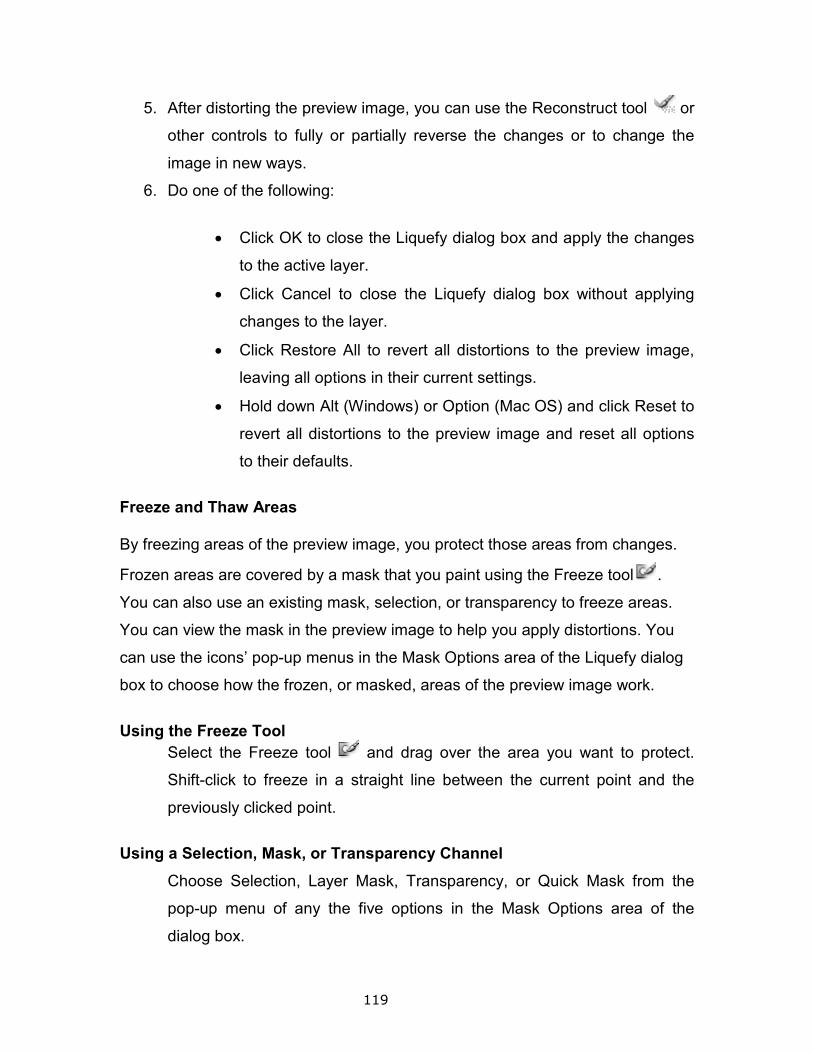
119
5. After distorting the preview image, you can use the Reconstruct tool or
other controls to fully or partially reverse the changes or to change the
image in new ways.
6. Do one of the following:
• Click OK to close the Liquefy dialog box and apply the changes
to the active layer.
• Click Cancel to close the Liquefy dialog box without applying
changes to the layer.
• Click Restore All to revert all distortions to the preview image,
leaving all options in their current settings.
• Hold down Alt (Windows) or Option (Mac OS) and click Reset to
revert all distortions to the preview image and reset all options
to their defaults.
Freeze and Thaw Areas
By freezing areas of the preview image, you protect those areas from changes.
Frozen areas are covered by a mask that you paint using the Freeze tool .
You can also use an existing mask, selection, or transparency to freeze areas.
You can view the mask in the preview image to help you apply distortions. You
can use the icons’ pop-up menus in the Mask Options area of the Liquefy dialog
box to choose how the frozen, or masked, areas of the preview image work.
Using the Freeze Tool
Select the Freeze tool and drag over the area you want to protect.
Shift-click to freeze in a straight line between the current point and the
previously clicked point.
Using a Selection, Mask, or Transparency Channel
Choose Selection, Layer Mask, Transparency, or Quick Mask from the
pop-up menu of any the five options in the Mask Options area of the
dialog box.
120
Freezing all Thawed Areas
Click the Mask All button in the Mask Options area of the dialog box.
Inverting Thawed and Frozen Areas
Click Invert All in the Mask Options area of the dialog box.
Showing or Hiding Frozen Areas
Select or deselect Show Mask in the View Options area of the dialog box.
Changing the Color of Frozen Areas
Choose a color from the Mask Color pop-up menu in the View Options
area of the dialog box.
Reconstruct Distortions
After you distort the preview image, you can use a variety of controls and
reconstruction modes to reverse changes or redo the changes in new ways.
Reconstructions can be applied two ways. You can apply a reconstruction to the
entire image, smoothing out the distortion in unfrozen areas, or you can use the
reconstruction tool to reconstruct specific areas. If you want to prevent
reconstruction of distorted areas, you can use the Freeze tool.
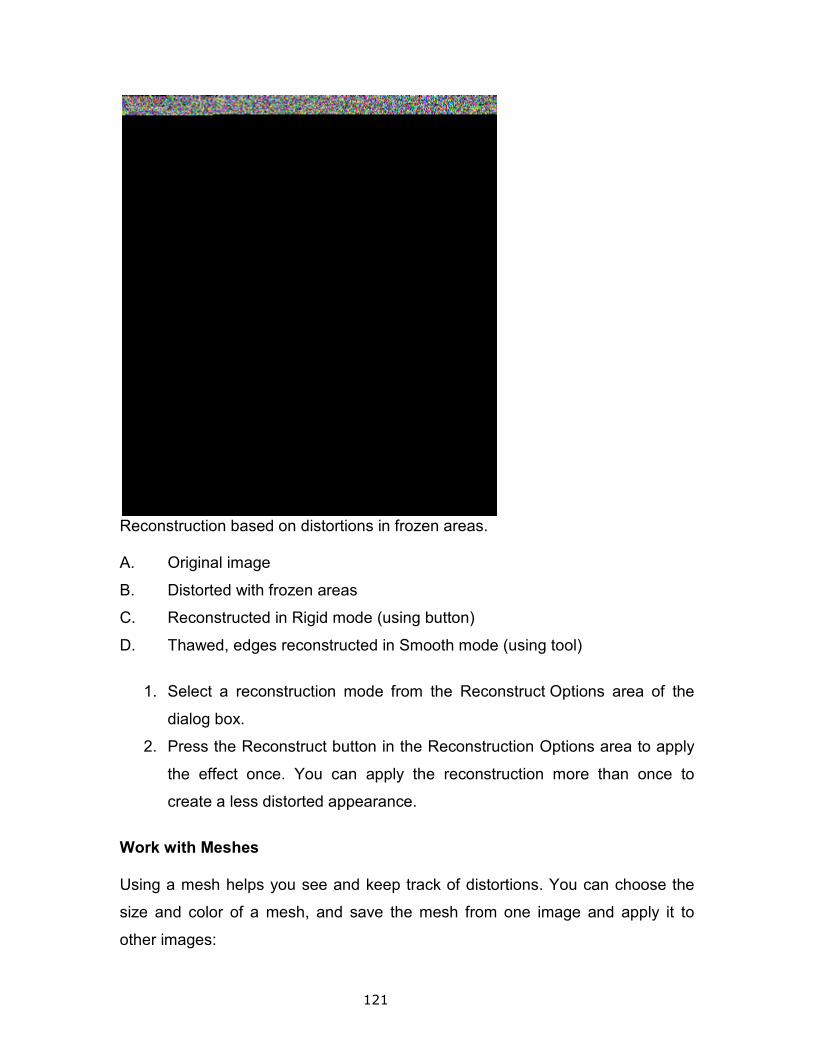
121
Reconstruction based on distortions in frozen areas. A. Original image
B. Distorted with frozen areas
C. Reconstructed in Rigid mode (using button)
D. Thawed, edges reconstructed in Smooth mode (using tool)
1. Select a reconstruction mode from the Reconstruct Options area of the
dialog box.
2. Press the Reconstruct button in the Reconstruction Options area to apply
the effect once. You can apply the reconstruction more than once to
create a less distorted appearance.
Work with Meshes
Using a mesh helps you see and keep track of distortions. You can choose the
size and color of a mesh, and save the mesh from one image and apply it to
other images:
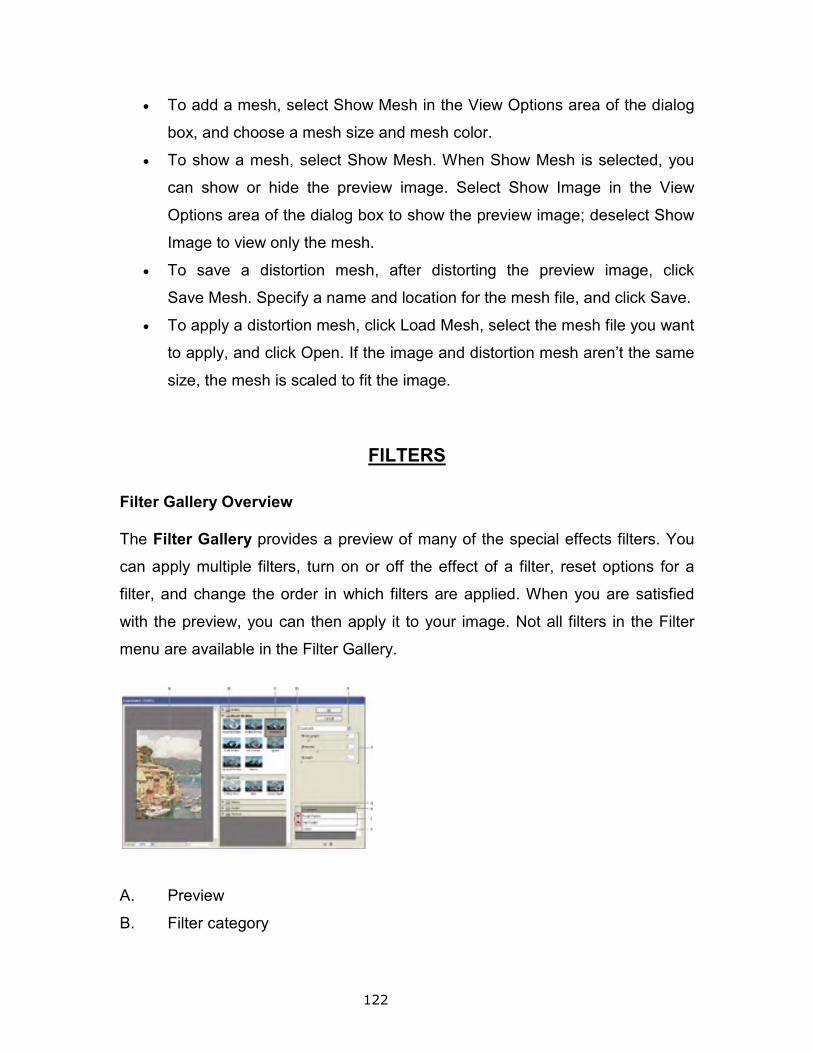
122
• To add a mesh, select Show Mesh in the View Options area of the dialog
box, and choose a mesh size and mesh color.
• To show a mesh, select Show Mesh. When Show Mesh is selected, you
can show or hide the preview image. Select Show Image in the View
Options area of the dialog box to show the preview image; deselect Show
Image to view only the mesh.
• To save a distortion mesh, after distorting the preview image, click
Save Mesh. Specify a name and location for the mesh file, and click Save.
• To apply a distortion mesh, click Load Mesh, select the mesh file you want
to apply, and click Open. If the image and distortion mesh aren’t the same
size, the mesh is scaled to fit the image.
FILTERS
Filter Gallery Overview
The Filter Gallery provides a preview of many of the special effects filters. You
can apply multiple filters, turn on or off the effect of a filter, reset options for a
filter, and change the order in which filters are applied. When you are satisfied
with the preview, you can then apply it to your image. Not all filters in the Filter
menu are available in the Filter Gallery.
A. Preview
B. Filter category

C. Thumbnail of selected filter
D. Show/Hide filter thumbnails
E. Filters pop-up menu
F. Options for selected filter
G. List of filter effects to apply or arrange
H. Filter effect selected but not applied
I. Filter effects applied cumulatively but not sel
J. Hidden filter effect
Apply Filters from the Filter Gallery
Filter effects are applied in the order you select them. You can rearrange filters
after you apply them by dragging a filter name to another position in the list of
applied filters. Rearranging filter effects can dramatically change the way your
image looks. You can also delete applied filters by selecting the filter and clicking
the Delete Layer.
To save time when trying various filters, experiment by selecting a small,
representative part of your image.
1. Do one of the following:
• To apply a filter to an entire layer, make sure that the layer is
active or selected.
• To apply a filter to an area of a layer, select that
• To apply a filter nondestructively, so you can change your filter
settings later, select the Smart Object that contains the image
content that you want to filter.
2. Choose Filter > Filter Gallery.
3. Click a filter name to add the first filter. You may need to click the inverted
triangle next to the filter categ
123
Thumbnail of selected filter
Show/Hide filter thumbnails
up menu
Options for selected filter
List of filter effects to apply or arrange
Filter effect selected but not applied
Filter effects applied cumulatively but not selected
Apply Filters from the Filter Gallery
Filter effects are applied in the order you select them. You can rearrange filters
after you apply them by dragging a filter name to another position in the list of
anging filter effects can dramatically change the way your
image looks. You can also delete applied filters by selecting the filter and clicking
To save time when trying various filters, experiment by selecting a small,
rt of your image.
Do one of the following:
To apply a filter to an entire layer, make sure that the layer is
active or selected.
To apply a filter to an area of a layer, select that area.
To apply a filter nondestructively, so you can change your filter
settings later, select the Smart Object that contains the image
content that you want to filter.
> Filter Gallery.
Click a filter name to add the first filter. You may need to click the inverted
triangle next to the filter category to see the complete list of filters. Once
Filter effects are applied in the order you select them. You can rearrange filters
after you apply them by dragging a filter name to another position in the list of
anging filter effects can dramatically change the way your
image looks. You can also delete applied filters by selecting the filter and clicking
To save time when trying various filters, experiment by selecting a small,
To apply a filter to an entire layer, make sure that the layer is
area.
To apply a filter nondestructively, so you can change your filter
settings later, select the Smart Object that contains the image
Click a filter name to add the first filter. You may need to click the inverted
ory to see the complete list of filters. Once
124
added, the filter appears in the applied filter list in the lower right corner of
the Filter Gallery dialog box.
4. Enter values or select options for the filter you selected.
5. Do any of the following:
• To apply filters cumulatively, click the New Effect Layer icon ,
and choose an additional filter to apply. Repeat this procedure
to add more filters.
• To rearrange applied filters, drag the filter to a new position in
the applied filter list in the lower right corner of the Filter Gallery
dialog box.
• To remove applied filters, select a filter in the applied filter list,
and click the Delete Layer icon .
6. When you’re satisfied with the results, click OK.
Generate a Pattern using the Pattern Maker
The Pattern Maker filter slices and reassembles an image to make a pattern.
The Pattern Maker works in two ways:
• Fills a layer or selection with a pattern. The pattern can be made of one
large tile, or multiple duplicate tiles.
• Creates tiles that you can save as a pattern preset and use with other
images.
You can generate multiple patterns from the same sample until you find one that
you like.
125
1. Do one of the following:
• Select the layer that contains the area from which you want to
generate the pattern. The layer you select will be replaced by the
generated pattern, so it’s a good idea to make a copy of the layer
first.
• To generate a pattern in a new layer or file, make a rectangular
selection of the image you are using to generate the pattern, and
choose Edit > Copy. Then add a layer to the image, or create a new
file with the dimensions you want the final image to have.
2. Choose Filter > Pattern Maker.
3. Specify the source of the pattern.
• Choose Use Clipboard As Sample to use the contents of the
clipboard if you copied an image before you opened the Pattern
Maker.
• Make a selection in the preview area with the Pattern Maker’s
Marquee tool . To move the selection marquee, drag it to a
different location.
Note: You can use the Zoom and Hand tools to navigate in the preview
area. Use Alt (Windows) or Option (Mac OS) with the Zoom tool to zoom
out. The magnification appears at the bottom of the dialog box.
4. Specify the tile size.
• Enter pixel dimensions in the Width and Height boxes.
• Click Use Image Size to generate a pattern with one tile that fills
the layer.
126
5. Click Generate. You can press Esc to cancel the generation. The preview
area is tiled with the generated pattern.
• To switch between the generated preview and the source
image, choose an option from the Show menu.
• To view the boundary of individual tiles, click Tile Boundaries.
• To offset the tiles in the generated pattern, choose a direction
from the Offset pop-up menu and specify an offset amount in
the Amount text box. The offset amount is a percentage of the
tile dimension in the specified direction. The offset has no effect
on saved pattern preset tiles.
6. Click Generate Again to generate additional patterns using the same
options, or adjust the options and then click Generate Again.
• Smoothness.
• Adjusts the sharp edges in the pattern. Increase the smoothness to
reduce edges.
• Sample Detail.
• Specifies the size of pattern slices in the tile.
• A high value maintains more of the original detail in the pattern.
• A low value uses smaller slices in the tile.
• Tiles take longer to generate when you use a high value.
7. Navigate through the generated tiles in the Tile History panel to select the
tile that you want to use to fill the layer or to save as a pattern preset.
• To move through the tiles you’ve generated, click the First Tile
button, Previous Tile button, Next Tile button, or Last Tile
button. Or, type the number of the pattern preview you want to
view, and press Enter (Windows) or Return (Mac OS).

127
• To view how the tile looks as a repeating pattern in the preview
area, make sure that Update Pattern Preview is selected. If tile
previewing is slow, deselect this option, find the tile you want,
and then select the option.
• To delete a tile and pattern preview, navigate to the tile you
want to delete, and click the Delete icon.
• To save a tile as a preset pattern, navigate to the tile you want
to save, and click the Preset Pattern button. Enter a preset
name, and click OK. When you save a tile as a preset pattern,
only a single tile is saved, not the full, generated pattern.
Tile History buttons
A. Preset Pattern
B. First Tile
C. Previous Tile
D. Next Tile
E. Last Tile
F. Delete icon
8. When you are satisfied with a pattern preview and you have saved the
tiles that you might want to use in the future, click OK to fill the layer or
selection.
If you are creating preset patterns only, click Cancel to close the dialog
box without filling the layer.

128
Noise Filters
The Noise filters add or remove noise, or pixels with randomly distributed color
levels. This helps to blend a selection into the surrounding pixels. Noise filters
can create unusual textures or remove problem areas, such as dust and
scratches.
Add Noise
Applies random pixels to an image, simulating the effect of shooting
pictures on high-speed film. You can also use the Add Noise filter to
reduce banding in feathered selections or graduated fills or to give a more
realistic look to heavily retouched areas. Options for noise distribution
include Uniform and Gaussian. Uniform distributes color values of noise
using random numbers between 0 and plus or minus the specified value,
creating a subtle effect. Gaussian distributes color values of noise along a
bell-shaped curve, creating a speckled effect. The Monochromatic option
applies the filter to only the tonal elements in the image without changing
the colors.
Despeckle
Detects the edges in an image (areas where significant color changes
occur) and blurs all of the selection except those edges. This blurring
removes noise while preserving detail.
Dust & Scratches
Reduces noise by changing dissimilar pixels. To achieve a balance
between sharpening the image and hiding defects, try various
combinations of Radius and Threshold settings. Or apply the filter to
selected areas in the image. See also Apply the Dust and Scratches filter.
Median
Reduces noise in an image by blending the brightness of pixels within a
selection. The filter searches the radius of a pixel selection for pixels of
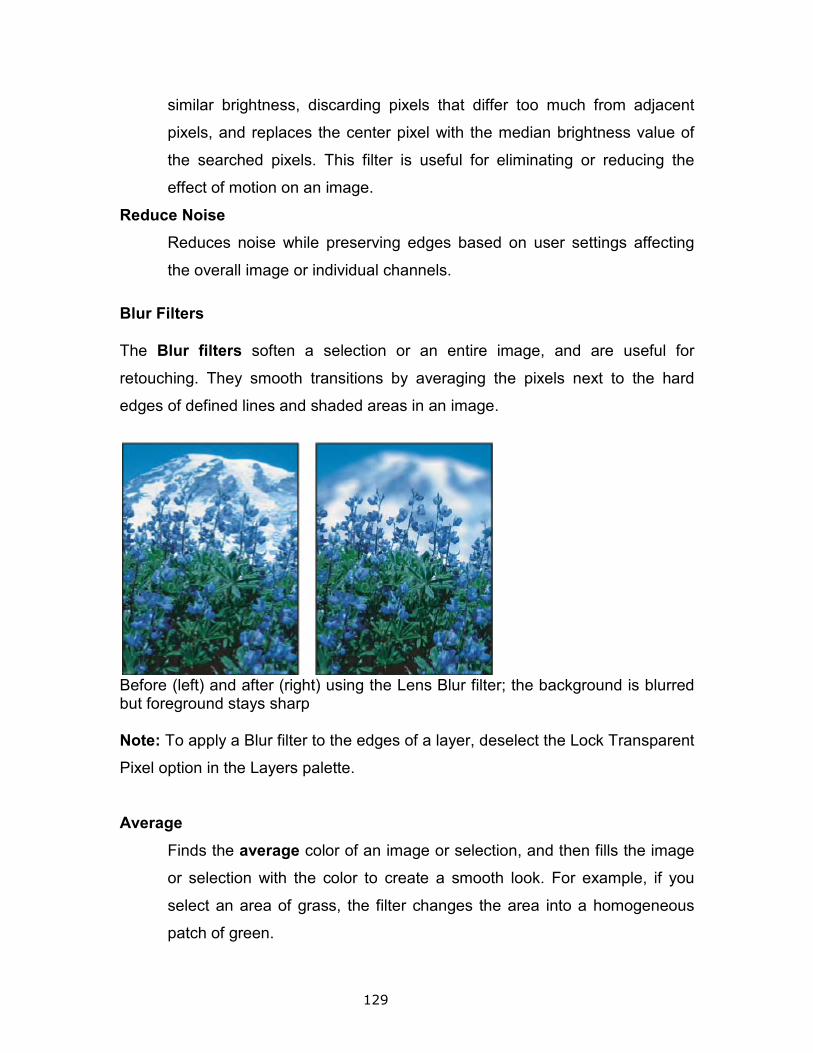
129
similar brightness, discarding pixels that differ too much from adjacent
pixels, and replaces the center pixel with the median brightness value of
the searched pixels. This filter is useful for eliminating or reducing the
effect of motion on an image.
Reduce Noise
Reduces noise while preserving edges based on user settings affecting
the overall image or individual channels.
Blur Filters
The Blur filters soften a selection or an entire image, and are useful for
retouching. They smooth transitions by averaging the pixels next to the hard
edges of defined lines and shaded areas in an image.
Before (left) and after (right) using the Lens Blur filter; the background is blurred but foreground stays sharp Note: To apply a Blur filter to the edges of a layer, deselect the Lock Transparent
Pixel option in the Layers palette.
Average
Finds the average color of an image or selection, and then fills the image
or selection with the color to create a smooth look. For example, if you
select an area of grass, the filter changes the area into a homogeneous
patch of green.
130
Blur and Blur More
Eliminate noise where significant color transitions occur in an image. Blur
filters smooth transitions by averaging the pixels next to the hard edges of
defined lines and shaded areas. The effect of the Blur More filter is three
or four times stronger than that of the Blur filter.
Box Blur
Blurs an image based on the average color value of neighboring pixels.
This filter is useful for creating special effects. You can adjust the size of
the area used to calculate the average value for a given pixel; a larger
radius results in greater blurring.
Gaussian Blur
Quickly blurs a selection by an adjustable amount. Gaussian refers to the
bell-shaped curve that is generated when Photoshop applies a weighted
average to the pixels. The Gaussian Blur filter adds low-frequency detail
and can produce a hazy effect.
Lens Blur
Adds blur to an image to give the effect of a narrower depth of field so that
some objects in the image stay in focus and others areas are blurred. See
Add lens blur.
Motion Blur
Blurs in the specified direction (from –360º to +360º) and at a specified
intensity (from 1 to 999). The filter’s effect is analogous to taking a picture
of a moving object with a fixed exposure time.
Radial Blur
Simulates the blur of a zooming or rotating camera to produce a soft blur.
Choose Spin to blur along concentric circular lines, and then specify a
131
degree of rotation. Choose Zoom to blur along radial lines, as if zooming
into or out of the image, and specify a value from 1 to 100. Blur quality
ranges from Draft (for fast but grainy results) or Good and Best for
smoother results, which are indistinguishable from each other except on a
large selection. Specify the origin of the blur by dragging the pattern in the
Blur Center box.
Shape Blur
Uses the specified kernel to create the blur. Choose a kernel from the list
of custom shape presets, and use the radius slider to adjust its size. You
can load different shape libraries by clicking the triangle and choosing
from the list. Radius determines the size of the kernel; the larger the
kernel, the greater the blur.
Smart Blur
Blurs an image with precision. You can specify a radius, a threshold, and
a blur quality. The Radius value determines the size of the area searched
for dissimilar pixels. The Threshold value determines how dissimilar the
pixels must be before they are affected. You also can set a mode for the
entire selection (Normal) or for the edges of color transitions (Edge Only
and Overlay). Where significant contrast occurs, Edge only applies black-
and-white edges, and Overlay Edge applies white.
Surface Blur
Blurs an image while preserving edges. This filter is useful for creating
special effects and for removing noise or graininess. The Radius option
specifies the size of the area sampled for the blur. The Threshold option
controls how much the tonal value of neighboring pixels must diverge from
the center pixel value before being part of the blur. Pixels with tonal value
differences less than the Threshold value are excluded from the blur.
Artistic Filters
Filters from the Artistic submenu help you achieve painterly and artistic effects for
a fine arts or commercial project. For example, use the
or typography. These filters replicate natural or traditional media effects. All the
Artistic filters can be applied through the Filter Gallery.
Colored Pencil
Draws an image using colored pencils on a solid background. Important
edges are retained and given a rough crosshatch appearance; the solid
background color shows through the smoother areas.
For a parchment effect, change the background color just before
applying the Colored Pencil filter to a selected area.
Cutout
Makes an image appear as though it were constructed from roughly cut
pieces of colored paper. High
and colored images are built up from several layer
Dry Brush
Paints the edges of the image using a dry brush technique (between oil
and watercolor). The filter simplifies an image by reducing its range of
colors to areas of common color.
Film Grain
Applies an even pattern to the sh
more saturated pattern is added to the lighter areas. This filter is useful for
eliminating banding in blends and visually unifying elements from various
sources.
Fresco
Paints an image in a coarse style using short, r
daubs.
132
Filters from the Artistic submenu help you achieve painterly and artistic effects for
mmercial project. For example, use the Cutout filter
or typography. These filters replicate natural or traditional media effects. All the
Artistic filters can be applied through the Filter Gallery.
Draws an image using colored pencils on a solid background. Important
edges are retained and given a rough crosshatch appearance; the solid
background color shows through the smoother areas.
For a parchment effect, change the background color just before
applying the Colored Pencil filter to a selected area.
Makes an image appear as though it were constructed from roughly cut
pieces of colored paper. High-contrast images appear as if in silhouette,
and colored images are built up from several layers of colored paper.
Paints the edges of the image using a dry brush technique (between oil
and watercolor). The filter simplifies an image by reducing its range of
colors to areas of common color.
Applies an even pattern to the shadow tones and midtones. A smoother,
more saturated pattern is added to the lighter areas. This filter is useful for
eliminating banding in blends and visually unifying elements from various
Paints an image in a coarse style using short, rounded, and hastily applied
Filters from the Artistic submenu help you achieve painterly and artistic effects for
for collages
or typography. These filters replicate natural or traditional media effects. All the
Draws an image using colored pencils on a solid background. Important
edges are retained and given a rough crosshatch appearance; the solid
For a parchment effect, change the background color just before
Makes an image appear as though it were constructed from roughly cut
contrast images appear as if in silhouette,
s of colored paper.
Paints the edges of the image using a dry brush technique (between oil
and watercolor). The filter simplifies an image by reducing its range of
adow tones and midtones. A smoother,
more saturated pattern is added to the lighter areas. This filter is useful for
eliminating banding in blends and visually unifying elements from various
ounded, and hastily applied
133
Neon Glow
Adds various types of glows to the objects in an image. This filter is useful
for colorizing an image while softening its look. To select a glow color,
click the glow box, and select a color from the color picker.
Paint Daubs
Lets you choose from various brush sizes (from 1 to 50) and types for a
painterly effect. Brush types include Simple, Light Rough, Dark Rough,
Wide Sharp, Wide Blurry, and Sparkle.
Palette Knife
Reduces detail in an image to give the effect of a thinly painted canvas
that reveals the texture underneath.
Plastic Wrap
Coats the image in shiny plastic, accentuating the surface detail.
Poster Edges
Reduces the number of colors in an image (posterizes it) according to the
posterization option you set, and finds the edges of the image and draws
black lines on them. Large broad areas have simple shading, and fine
dark detail is distributed throughout the image.
Rough Pastels
Applies strokes of pastel chalk on a textured background. In areas of
bright color, the chalk appears thick with little texture; in darker areas, the
chalk appears scraped off to reveal the texture.
Smudge Stick
Softens an image using short diagonal strokes to smudge or smear the
darker areas. Lighter areas become brighter and lose detail.
Sponge
Creates images with highly textured areas of contrasting color, simulating
the effect of sponge painting.
134
Under painting
Paints the image on a textured background, and then paints the final
image over it.
Watercolor
Paints the image in a watercolor style using a medium brush loaded with
water and color, simplifying details. Where significant tonal changes occur
at the edges, the filter saturates the color.
Distort Filters
The Distort filters geometrically distort an image, creating 3D or other reshaping
effects. Note that these filters can be very memory intensive. The Diffuse Glow,
Glass, and Ocean Ripple filters can be applied through the Filter Gallery.
Diffuse Glow
Renders an image as though it were viewed through a soft diffusion filter.
The filter adds see-through white noise, with the glow fading from the
center of a selection.
Displace
Uses an image, called a displacement map, to determine how to distort a
selection. For example, using a parabola-shaped displacement map, you
can create an image that appears to be printed on a cloth held up by its
corners.
Glass
Makes an image appear as if it were being viewed through different types
of glass. You can choose a glass effect or create your own glass surface
as a Photoshop file and apply it. You can adjust scaling, distortion, and
smoothness settings. When using surface controls with a file, follow the
instructions for the Displace filter.
Lens Correction
135
The Lens Correction filter fixes common lens flaws such as barrel and
pincushion distortion, vignetting, and chromatic aberration.
Ocean Ripple
Adds randomly spaced ripples to the surface of the image so that it
appears to be underwater.
Pinch
Squeezes a selection. A positive value up to 100% shifts a selection
toward its center; a negative value up to –100% shifts a selection outward.
Polar Coordinates
Converts a selection from its rectangular to polar coordinates, and vice
versa, according to a selected option. You can use this filter to create a
cylinder anamorphosis – an art form popular in the 18th century – in which
the distorted image appears normal when viewed in a mirrored cylinder.
Ripple
Creates an undulating pattern on a selection, like ripples on the surface of
a pond. For greater control, use the Wave filter. Options include the
number and size of ripples.
Shear
Distorts an image along a curve. Specify the curve by dragging the line in
the box. You can adjust any point along the curve. Click Default to change
the curve back to a straight line. In addition, you choose how to treat
undistorted areas.
Sphere
Gives objects a 3D effect by wrapping a selection around a spherical
shape, distorting the image and stretching it to fit the selected curve.
Twirl
Rotates a selection more sharply in the center than at the edges.
Specifying an angle produces a twirl pattern.
Wave
Works much as the Ripple filter does, but with greater control. Options
include the number of wave generators, wavelength (distance from one

wave crest to the next), height of the wave, and wave type: Sine (rolling),
Triangle, or Square. The Randomize option applies random values. You
can also define undistorted areas.
To replicate wave results on other selections, click Randomize, set
Number Of Generators to 1, and set the minimum and maximum
Wavelength and Amplitude parameters to the same value.
Zigzag
Distorts a selection radially, depending on the radius of the pixels in your
selection. The Ridges option sets the number of direction reversals of the
zigzag from the center of the selection to its edge. You also specify how to
displace the pixels: Pond R
lower right, Out From Center displaces pixels toward or away from the
center of the selection, and Around Center rotates pixels around the
center.
Render Filters
The Render filters create 3D shapes, cloud patt
simulated light reflections in an image. You can also manipulate objects in 3D
space, create 3D objects (cubes, spheres, and cylinders), and create texture fills
from grayscale files to produce 3D
Clouds
Generates a soft cloud pattern using random values that vary between the
foreground and the background colors. To generate a more stark cloud
pattern, hold down Alt (Windows) or Option (Mac
Filter > Render > Clouds. When you apply
data on the active layer is replaced.
Difference Clouds
Uses randomly generated values that vary between the foreground and
background color to produce a cloud pattern. The filter blends the cloud
data with the existing pixels
136
wave crest to the next), height of the wave, and wave type: Sine (rolling),
Triangle, or Square. The Randomize option applies random values. You
also define undistorted areas.
To replicate wave results on other selections, click Randomize, set
Number Of Generators to 1, and set the minimum and maximum
Wavelength and Amplitude parameters to the same value.
Distorts a selection radially, depending on the radius of the pixels in your
Ridges option sets the number of direction reversals of the
zigzag from the center of the selection to its edge. You also specify how to
displace the pixels: Pond Ripples displaces pixels to the upper left or
lower right, Out From Center displaces pixels toward or away from the
center of the selection, and Around Center rotates pixels around the
The Render filters create 3D shapes, cloud patterns, refraction patterns, and
simulated light reflections in an image. You can also manipulate objects in 3D
space, create 3D objects (cubes, spheres, and cylinders), and create texture fills
from grayscale files to produce 3D-like effects for lighting.
Generates a soft cloud pattern using random values that vary between the
foreground and the background colors. To generate a more stark cloud
pattern, hold down Alt (Windows) or Option (Mac OS) as you choose
> Clouds. When you apply the Clouds filter, the image
data on the active layer is replaced.
Uses randomly generated values that vary between the foreground and
background color to produce a cloud pattern. The filter blends the cloud
data with the existing pixels in the same way the Difference mode blends
wave crest to the next), height of the wave, and wave type: Sine (rolling),
Triangle, or Square. The Randomize option applies random values. You
To replicate wave results on other selections, click Randomize, set
Number Of Generators to 1, and set the minimum and maximum
Distorts a selection radially, depending on the radius of the pixels in your
Ridges option sets the number of direction reversals of the
zigzag from the center of the selection to its edge. You also specify how to
ipples displaces pixels to the upper left or
lower right, Out From Center displaces pixels toward or away from the
center of the selection, and Around Center rotates pixels around the
erns, refraction patterns, and
simulated light reflections in an image. You can also manipulate objects in 3D
space, create 3D objects (cubes, spheres, and cylinders), and create texture fills
Generates a soft cloud pattern using random values that vary between the
foreground and the background colors. To generate a more stark cloud
OS) as you choose
the Clouds filter, the image
Uses randomly generated values that vary between the foreground and
background color to produce a cloud pattern. The filter blends the cloud
in the same way the Difference mode blends
colors. The first time you choose this filter, portions of the image are
inverted in a cloud pattern. Applying the filter several times creates rib and
vein patterns that resemble a marble texture. When you apply
Difference Clouds filter, the image data on the active layer is replaced.
Fibers
Creates the look of woven fibers using the foreground and background
colors. You use the Variance slider to control how the colors vary (a low
value produces long streak
fibers with more varied distribution of color). The Strength slider controls
how each fiber looks. A Twirl
than at the edges. Specifying an angle produces a t
Wave
Works much as the Ripple filter does, but with greater control. Options
include the number of wave generators, wavelength (distance from one
wave crest to the next), height of the wave, and wave type: Sine (rolling),
Triangle, or Square
can also define undistorted areas.
To replicate wave results on other selections, click Randomize, set
Number Of Generators to 1, and set the minimum and maximum
Wavelength and Amplitude parameters to the
Zigzag
Distorts a selection
selection. The Ridges option sets the number of direction reversals of the
zigzag from the center of the selection to its edge. You also specify how to
displace the pixels: Pond Ripples displaces pixels to the upper left or
lower right, Out From Center displaces pixels toward or away from the
center of the selection, and Around Center rotates pixels around the
center.
Solarize
137
colors. The first time you choose this filter, portions of the image are
inverted in a cloud pattern. Applying the filter several times creates rib and
vein patterns that resemble a marble texture. When you apply
Difference Clouds filter, the image data on the active layer is replaced.
Creates the look of woven fibers using the foreground and background
colors. You use the Variance slider to control how the colors vary (a low
value produces long streaks of color, and a high value results in very short
fibers with more varied distribution of color). The Strength slider controls
how each fiber looks. A Twirl rotates a selection more sharply in the center
than at the edges. Specifying an angle produces a twirl pattern.
Works much as the Ripple filter does, but with greater control. Options
include the number of wave generators, wavelength (distance from one
wave crest to the next), height of the wave, and wave type: Sine (rolling),
Triangle, or Square. The Randomize option applies random values. You
can also define undistorted areas.
To replicate wave results on other selections, click Randomize, set
Number Of Generators to 1, and set the minimum and maximum
Wavelength and Amplitude parameters to the same value.
Distorts a selection racially, depending on the radius of the pixels in your
Ridges option sets the number of direction reversals of the
zigzag from the center of the selection to its edge. You also specify how to
e the pixels: Pond Ripples displaces pixels to the upper left or
lower right, Out From Center displaces pixels toward or away from the
center of the selection, and Around Center rotates pixels around the
colors. The first time you choose this filter, portions of the image are
inverted in a cloud pattern. Applying the filter several times creates rib and
vein patterns that resemble a marble texture. When you apply the
Difference Clouds filter, the image data on the active layer is replaced.
Creates the look of woven fibers using the foreground and background
colors. You use the Variance slider to control how the colors vary (a low
s of color, and a high value results in very short
fibers with more varied distribution of color). The Strength slider controls
a selection more sharply in the center
wirl pattern.
Works much as the Ripple filter does, but with greater control. Options
include the number of wave generators, wavelength (distance from one
wave crest to the next), height of the wave, and wave type: Sine (rolling),
. The Randomize option applies random values. You
To replicate wave results on other selections, click Randomize, set
Number Of Generators to 1, and set the minimum and maximum
, depending on the radius of the pixels in your
Ridges option sets the number of direction reversals of the
zigzag from the center of the selection to its edge. You also specify how to
e the pixels: Pond Ripples displaces pixels to the upper left or
lower right, Out From Center displaces pixels toward or away from the
center of the selection, and Around Center rotates pixels around the
138
Blends a negative and a positive image—similar to exposing a
photographic print briefly to light during development.
Tiles
Breaks up an image into a series of tiles, creating an offset between the
selection and its original position. You can choose one of the following to
fill the area between the tiles: the background color, the foreground color,
a reverse version of the image, or an unaltered version of the image,
which puts the tiled version on top of the original and reveals part of the
original image underneath the tiled edges.
Trace Contour
Finds the transitions of major brightness areas and thinly outlines them for
each color channel, for an effect similar to the lines in a contour map.
Wind
Places tiny horizontal lines in the image to create a windblown effect.
Methods include Wind; Blast, for a more dramatic wind effect; and
Stagger, which offsets the lines in the image.
Create a Web Layout
1. Open Photoshop and create a new document [File > New].
2. In the dialog box enter the width and height of the layout. Usually design
for a width of 780 pixels width. This works well in monitors with 800 x600
resolution as it leaves 20 pixels for the browser scroll bar. The resolution
for the web is 72.
3. You can choose between white, background color (the color will be taken
from the background color specified in the toolbox) and transparent
background.

139
4. Click OK.
5. A new Photoshop document/ canvas will be created with a locked
Background layer in the 'Layers Palette'.
6. You can still change the background color by filling the Background layer
with the color of your choice (specified in the Foreground Color of the
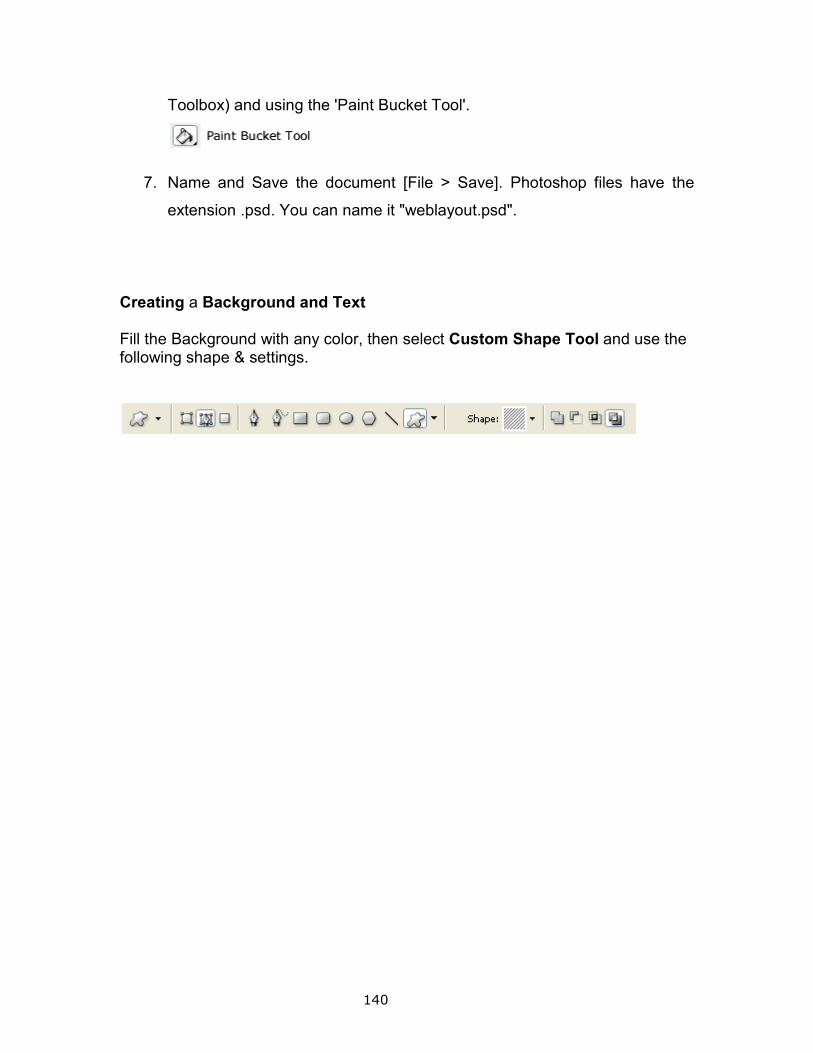
140
Toolbox) and using the 'Paint Bucket Tool'.
7. Name and Save the document [File > Save]. Photoshop files have the
extension .psd. You can name it "weblayout.psd".
Creating a Background and Text Fill the Background with any color, then select Custom Shape Tool and use the following shape & settings.
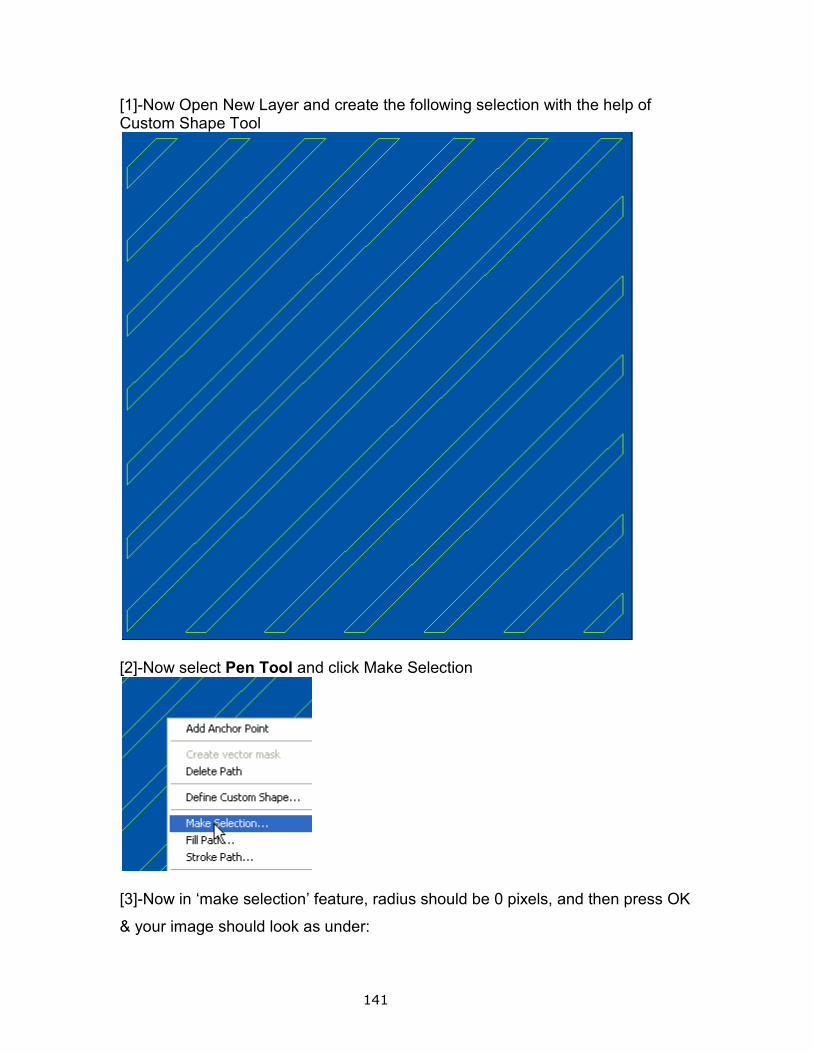
141
[1]-Now Open New Layer and create the following selection with the help of Custom Shape Tool
[2]-Now select Pen Tool and click Make Selection
[3]-Now in ‘make selection’ feature, radius should be 0 pixels, and then press OK
& your image should look as under:
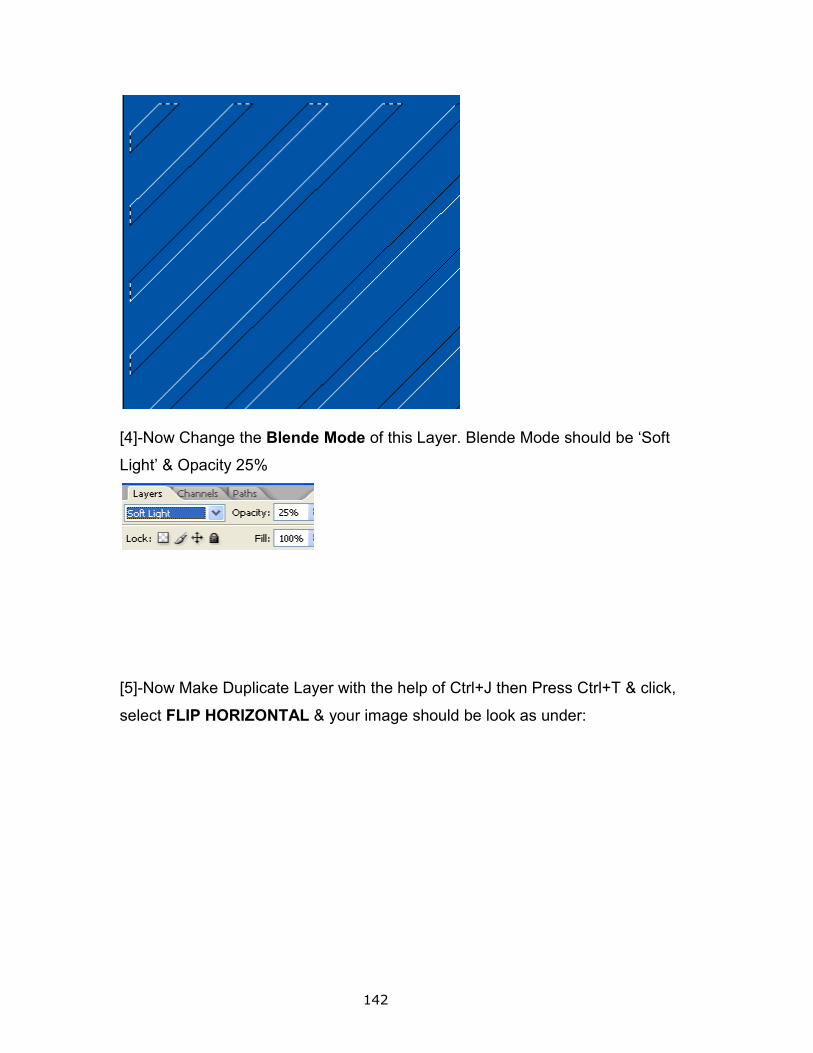
142
[4]-Now Change the Blende Mode of this Layer. Blende Mode should be ‘Soft
Light’ & Opacity 25%
[5]-Now Make Duplicate Layer with the help of Ctrl+J then Press Ctrl+T & click,
select FLIP HORIZONTAL & your image should be look as under:
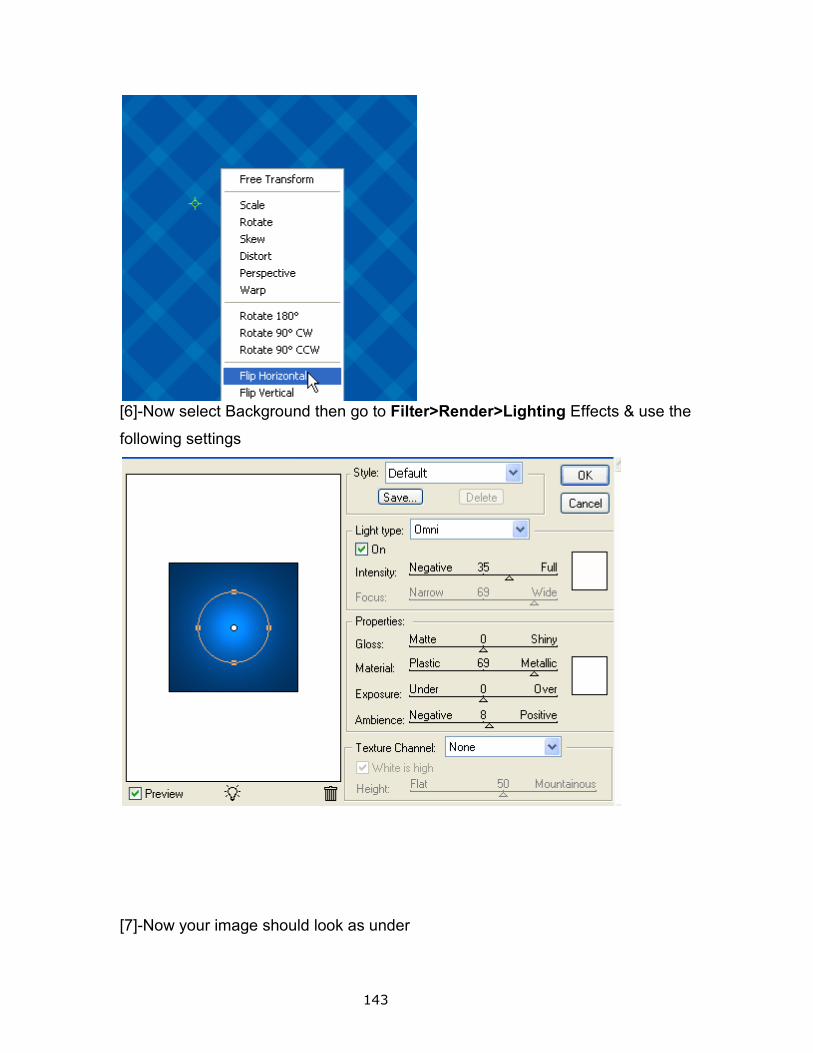
143
[6]-Now select Background then go to Filter>Render>Lighting Effects & use the
following settings
[7]-Now your image should look as under
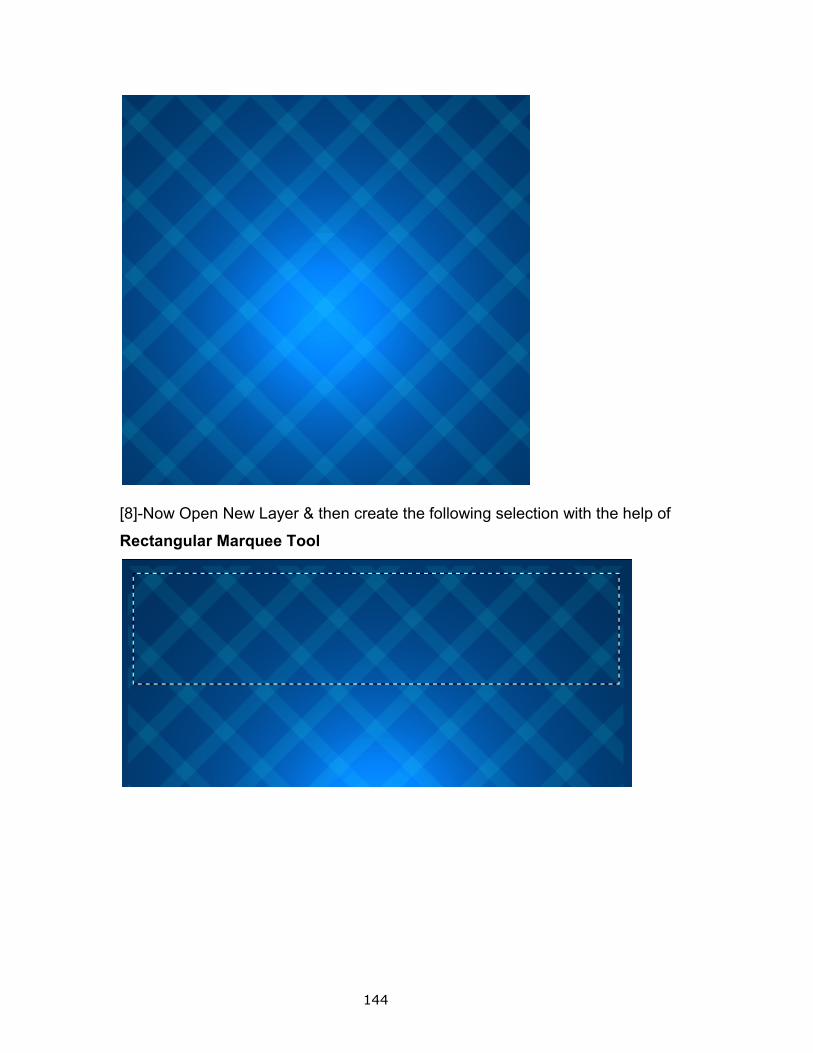
144
[8]-Now Open New Layer & then create the following selection with the help of
Rectangular Marquee Tool
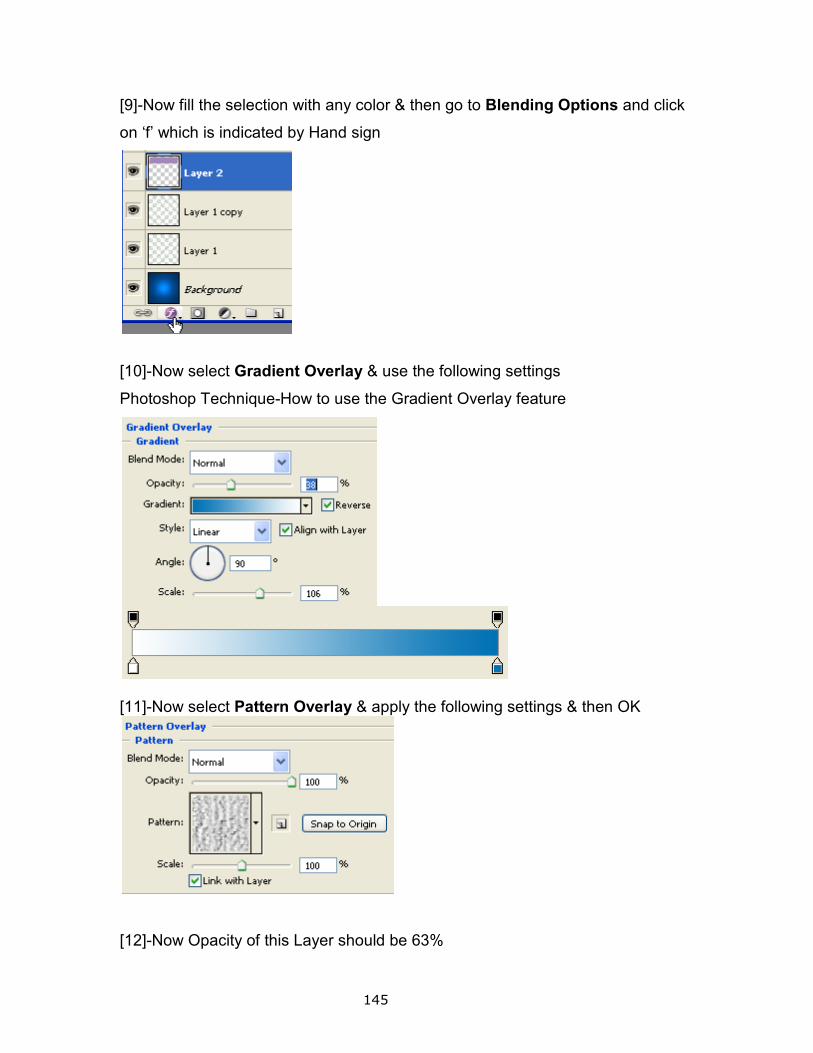
145
[9]-Now fill the selection with any color & then go to Blending Options and click
on ‘f’ which is indicated by Hand sign
[10]-Now select Gradient Overlay & use the following settings
Photoshop Technique-How to use the Gradient Overlay feature
[11]-Now select Pattern Overlay & apply the following settings & then OK
[12]-Now Opacity of this Layer should be 63%
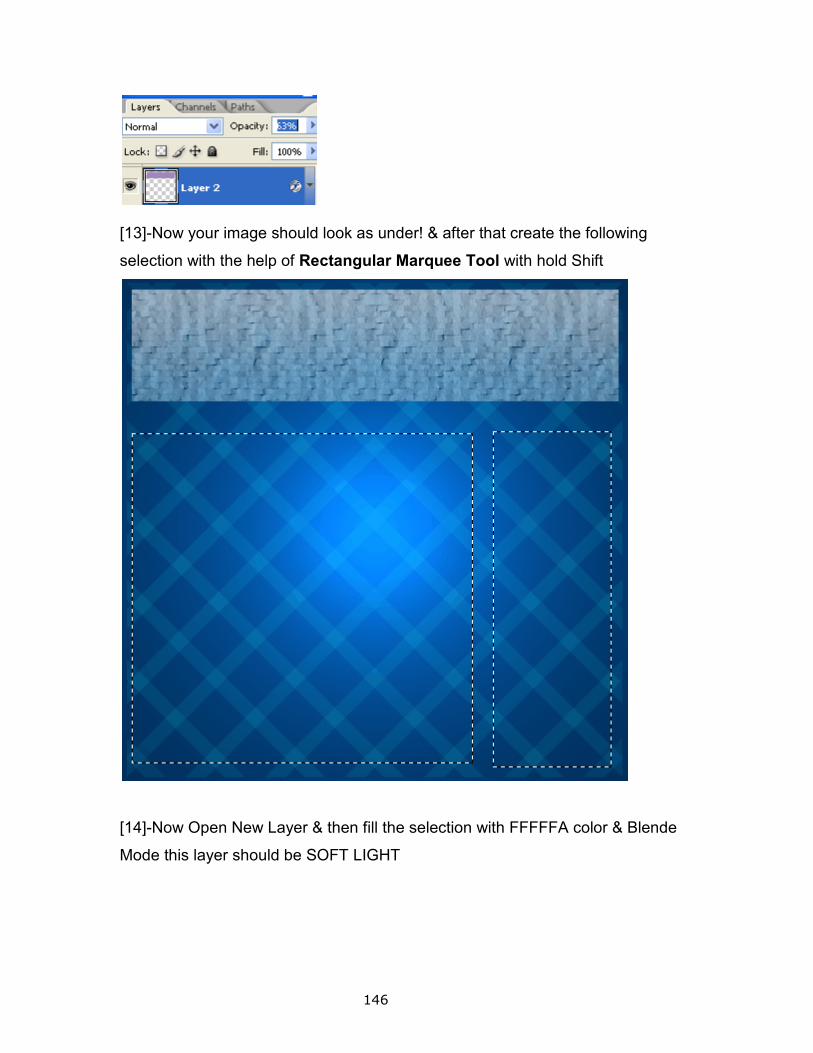
146
[13]-Now your image should look as under! & after that create the following
selection with the help of Rectangular Marquee Tool with hold Shift
[14]-Now Open New Layer & then fill the selection with FFFFFA color & Blende
Mode this layer should be SOFT LIGHT
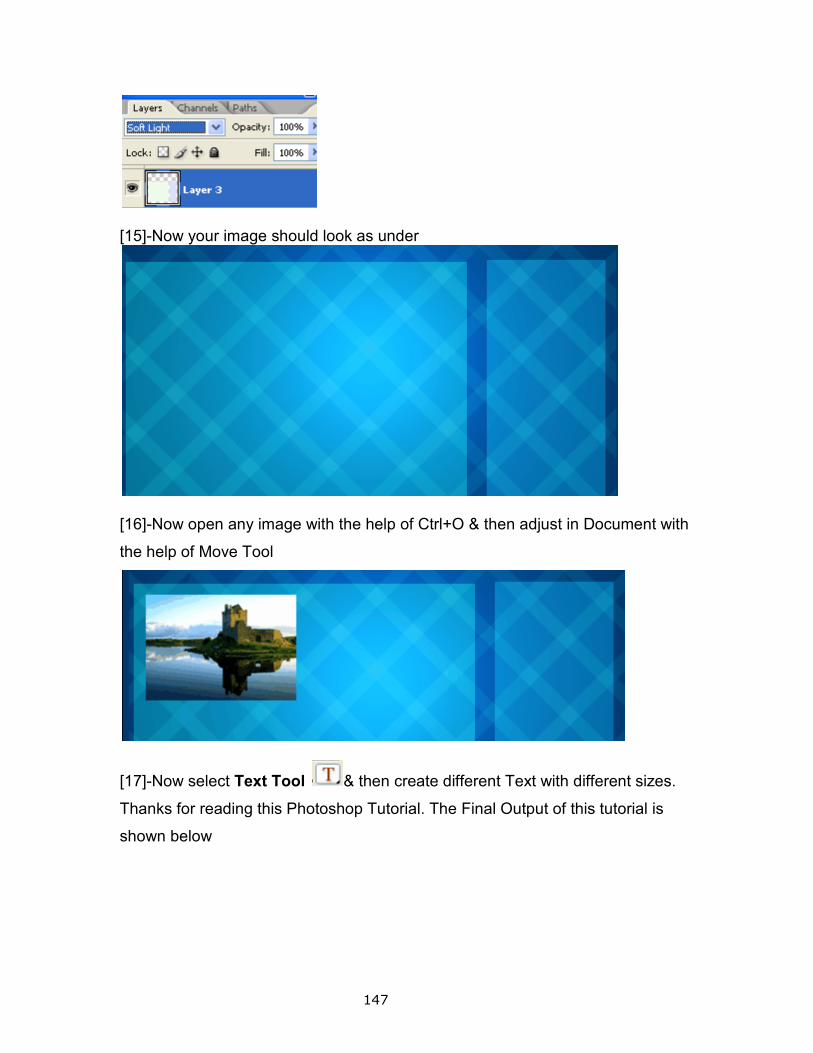
147
[15]-Now your image should look as under
[16]-Now open any image with the help of Ctrl+O & then adjust in Document with
the help of Move Tool
[17]-Now select Text Tool & then create different Text with different sizes.
Thanks for reading this Photoshop Tutorial. The Final Output of this tutorial is
shown below
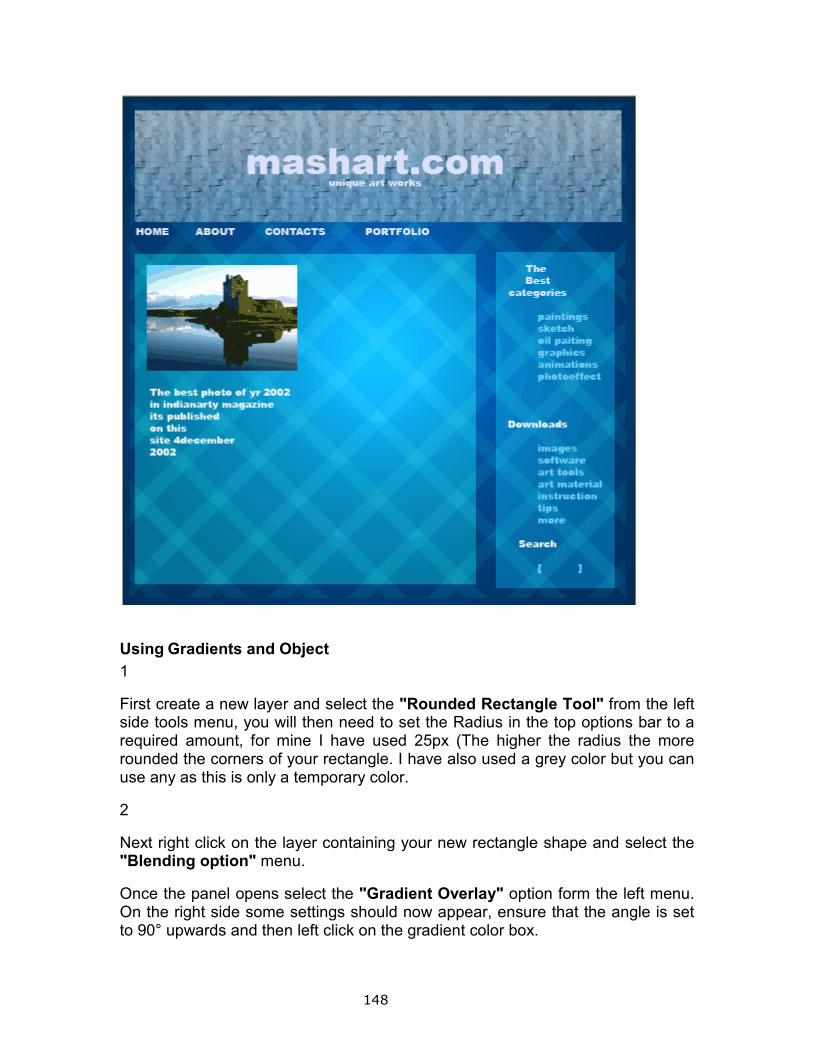
148
Using Gradients and Object
1
First create a new layer and select the "Rounded Rectangle Tool" from the left side tools menu, you will then need to set the Radius in the top options bar to a required amount, for mine I have used 25px (The higher the radius the more rounded the corners of your rectangle. I have also used a grey color but you can use any as this is only a temporary color.
2
Next right click on the layer containing your new rectangle shape and select the "Blending option" menu.
Once the panel opens select the "Gradient Overlay" option form the left menu. On the right side some settings should now appear, ensure that the angle is set to 90° upwards and then left click on the gradient color box.
149
3
A new panel should now open with the gradient color options, all you need to do to set the color is double click on the color sliders (shown above) a color selection panel should then appear.
For this example I have chosen to use two closely related shades of blue, keeping the colors closely related is the key to gradients, see the "Becoming a Gradient Junkie" article for more.
4
Now click "OK" for both the gradient and blending options panels.
Next create a new layer above the first (you do this my clicking the small paper icon in the bottom of the layers panel).
Now ensure that you have this new layer selected and once again select the "Rounded Rectangle Tool". Important: Before you continue you also need to make sure that the style setting in the top options panel is set to "None".
5
Now draw a rounded rectangle similar to the one above, so that it just covers the top half of your original rectangle.
Note: You can also experiment with the size and roundness of the corners of this shape to create your desired reflection effects.
6
When you are happy with your second rectangle shape click the "Add Layer Mask" button at the bottom of the layers panel (shown above). This will turn the area into a mask so that you can add color into that specific area.
Next select the gradient tool from the left hand tools menu. It can be found by holding down the left mouse button on the fill tool.
7
Since adding the layer mask you will notice that the colors in your palette have turned to black and white, these colors are used to define masks, and in other words black areas are not seen.
Now with your gradient tool selected and the top options panel displaying the black to transparent setting, click and drag from the bottom to the top of your new rectangle shape.
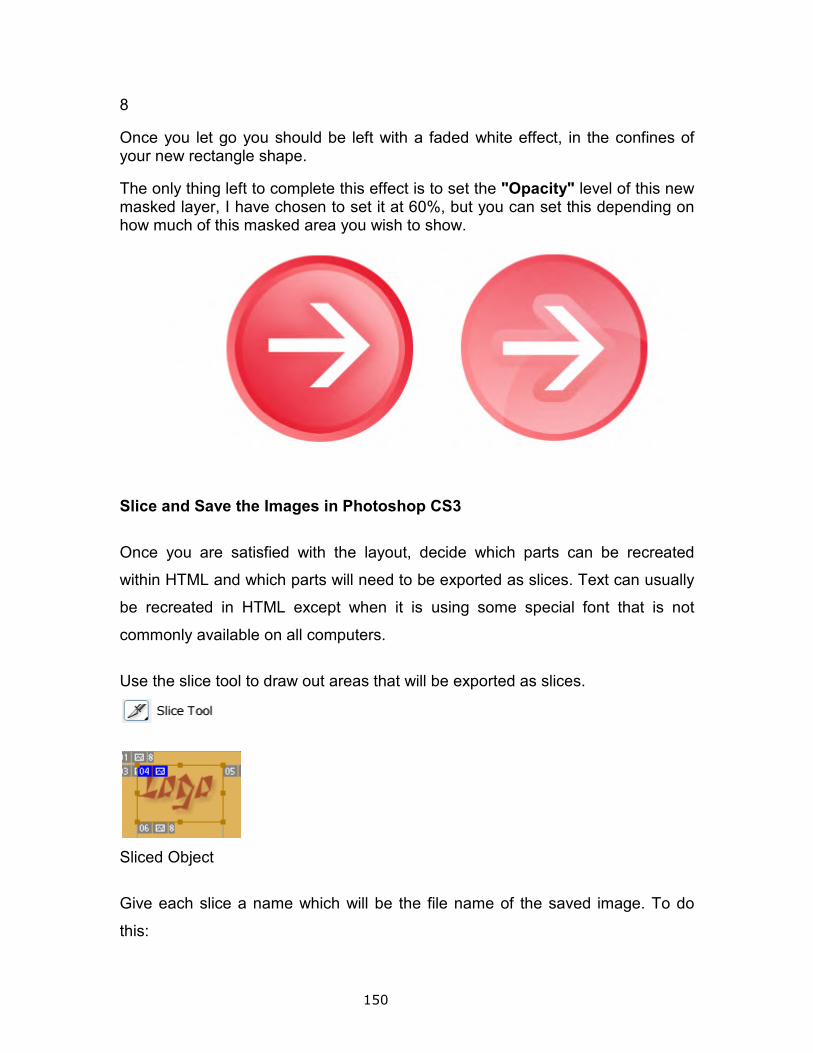
150
8
Once you let go you should be left with a faded white effect, in the confines of your new rectangle shape.
The only thing left to complete this effect is to set the "Opacity" level of this new masked layer, I have chosen to set it at 60%, but you can set this depending on how much of this masked area you wish to show.
Slice and Save the Images in Photoshop CS3
Once you are satisfied with the layout, decide which parts can be recreated
within HTML and which parts will need to be exported as slices. Text can usually
be recreated in HTML except when it is using some special font that is not
commonly available on all computers.
Use the slice tool to draw out areas that will be exported as slices.
Sliced Object
Give each slice a name which will be the file name of the saved image. To do
this:
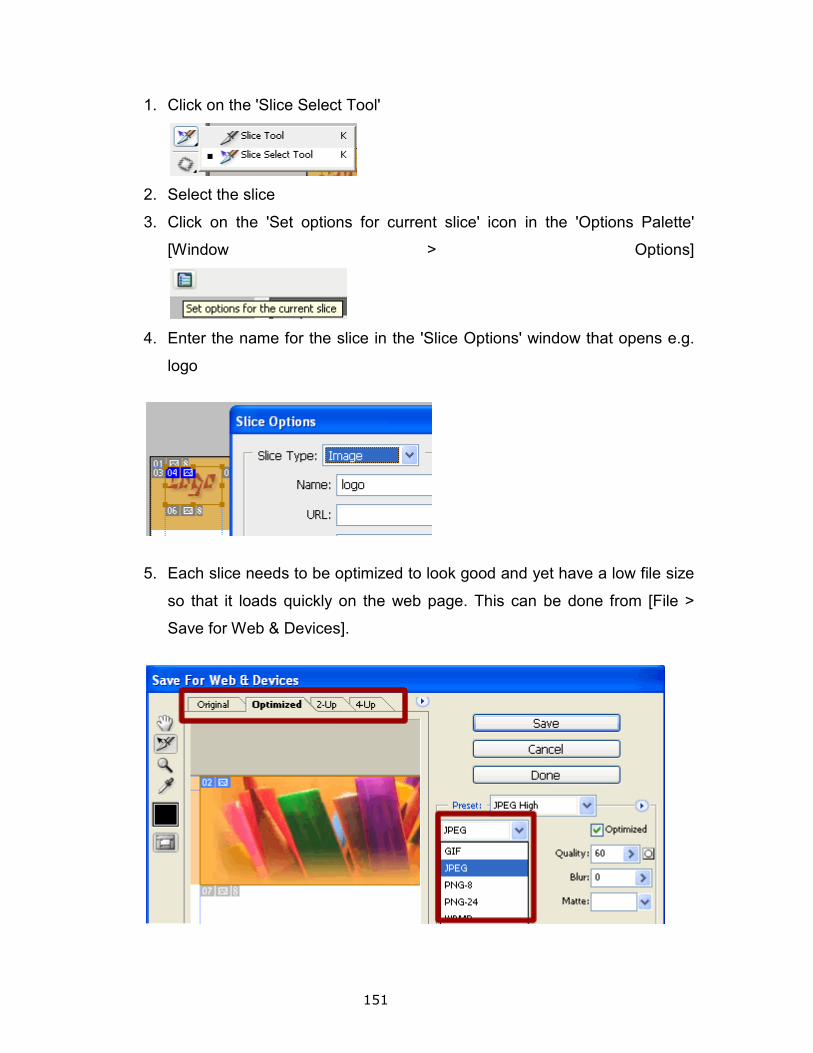
151
1. Click on the 'Slice Select Tool'
2. Select the slice
3. Click on the 'Set options for current slice' icon in the 'Options Palette'
[Window > Options]
4. Enter the name for the slice in the 'Slice Options' window that opens e.g.
logo
5. Each slice needs to be optimized to look good and yet have a low file size
so that it loads quickly on the web page. This can be done from [File >
Save for Web & Devices].
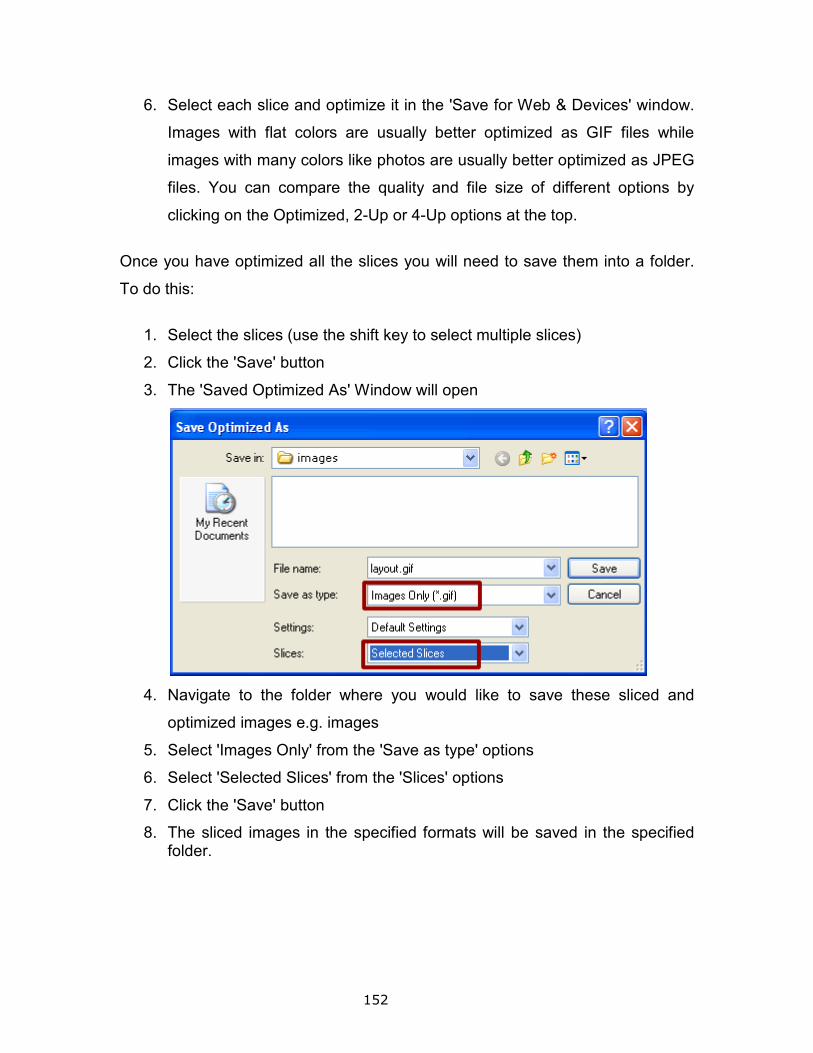
152
6. Select each slice and optimize it in the 'Save for Web & Devices' window.
Images with flat colors are usually better optimized as GIF files while
images with many colors like photos are usually better optimized as JPEG
files. You can compare the quality and file size of different options by
clicking on the Optimized, 2-Up or 4-Up options at the top.
Once you have optimized all the slices you will need to save them into a folder.
To do this:
1. Select the slices (use the shift key to select multiple slices)
2. Click the 'Save' button
3. The 'Saved Optimized As' Window will open
4. Navigate to the folder where you would like to save these sliced and
optimized images e.g. images
5. Select 'Images Only' from the 'Save as type' options
6. Select 'Selected Slices' from the 'Slices' options
7. Click the 'Save' button
8. The sliced images in the specified formats will be saved in the specified folder.
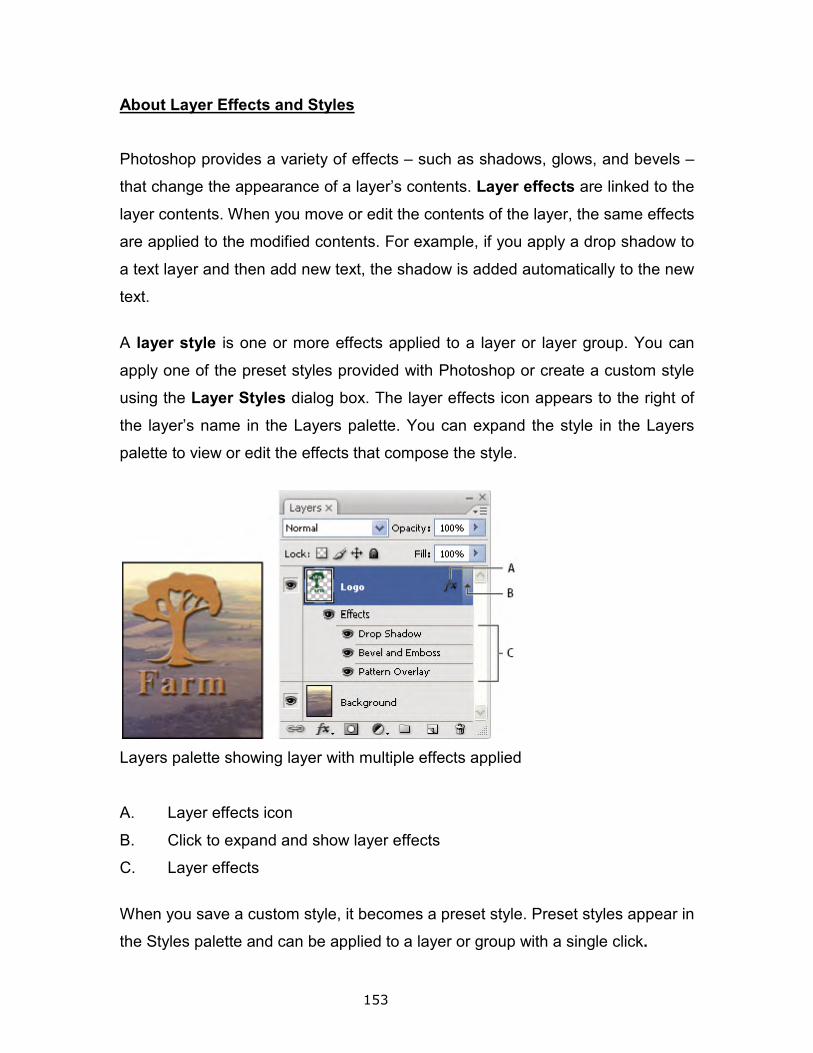
153
About Layer Effects and Styles
Photoshop provides a variety of effects – such as shadows, glows, and bevels –
that change the appearance of a layer’s contents. Layer effects are linked to the
layer contents. When you move or edit the contents of the layer, the same effects
are applied to the modified contents. For example, if you apply a drop shadow to
a text layer and then add new text, the shadow is added automatically to the new
text.
A layer style is one or more effects applied to a layer or layer group. You can
apply one of the preset styles provided with Photoshop or create a custom style
using the Layer Styles dialog box. The layer effects icon appears to the right of
the layer’s name in the Layers palette. You can expand the style in the Layers
palette to view or edit the effects that compose the style.
Layers palette showing layer with multiple effects applied
A. Layer effects icon
B. Click to expand and show layer effects
C. Layer effects
When you save a custom style, it becomes a preset style. Preset styles appear in
the Styles palette and can be applied to a layer or group with a single click.
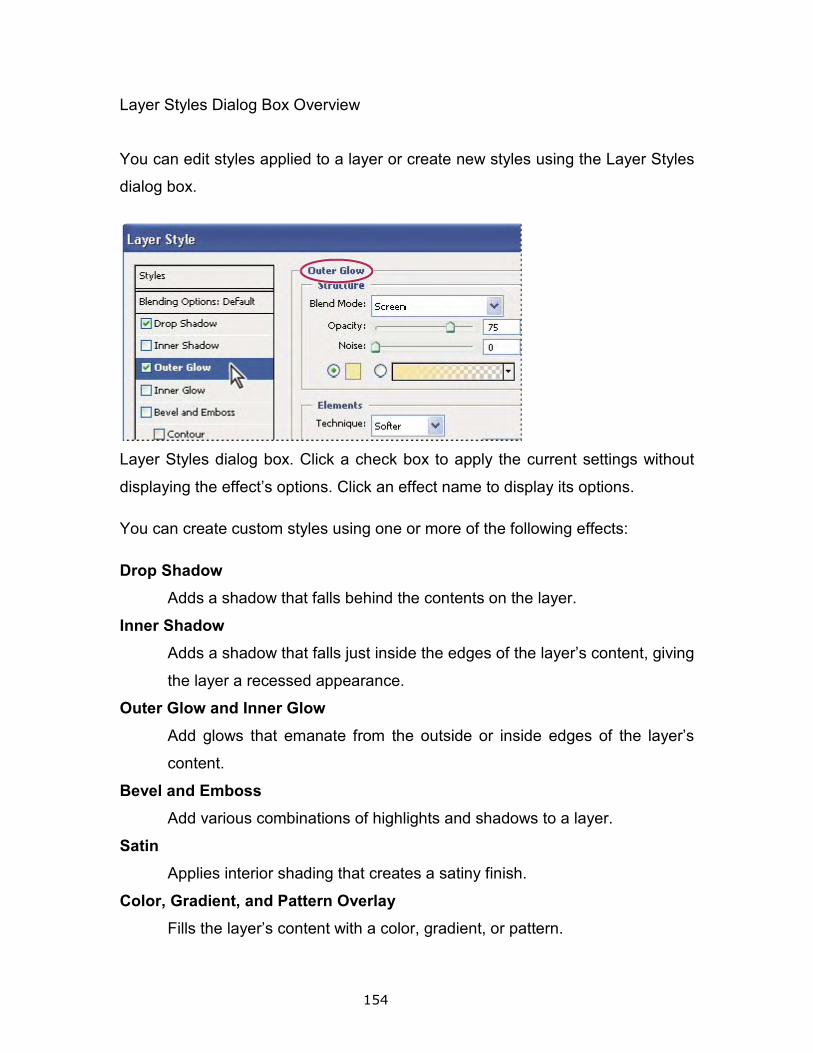
154
Layer Styles Dialog Box Overview
You can edit styles applied to a layer or create new styles using the Layer Styles
dialog box.
Layer Styles dialog box. Click a check box to apply the current settings without
displaying the effect’s options. Click an effect name to display its options.
You can create custom styles using one or more of the following effects:
Drop Shadow
Adds a shadow that falls behind the contents on the layer.
Inner Shadow
Adds a shadow that falls just inside the edges of the layer’s content, giving
the layer a recessed appearance.
Outer Glow and Inner Glow
Add glows that emanate from the outside or inside edges of the layer’s
content.
Bevel and Emboss
Add various combinations of highlights and shadows to a layer.
Satin
Applies interior shading that creates a satiny finish.
Color, Gradient, and Pattern Overlay
Fills the layer’s content with a color, gradient, or pattern.
Stroke
Outlines the object on the current layer using color, a gradient, or a
pattern. It is particularly useful on hard
Apply or Edit a Custom Layer Style
Note: You cannot apply layer styles to a background layer, a locked layer, or a
group. To apply a layer style to a background layer, first convert it into a regular
layer.
1. Select a single layer from the Layers palette.
2. Do one of the following:
• Double-click the layer, outside the layer name or thumbnail.
• Click the Layer Styles button
palette and choose an effect from the list.
• Choose an effect from the Layer
• To edit an existing style, double
below the layer name in the Layers palette. (Click the
triangle next to the “fx” icon
contained in the style.)
Set effect options in the Layer Style dialog box. See
options.
Add other effects to the style, if desired. In the Layer Style dialog box,
click the check box to the left of the effect name to add the effect
without selecting it.
You can edit multiple effects without closing the Layer Style dialog
box. Click the name
display its options.
Layer Style Options
155
Outlines the object on the current layer using color, a gradient, or a
pattern. It is particularly useful on hard-edged shapes such as type.
Apply or Edit a Custom Layer Style
You cannot apply layer styles to a background layer, a locked layer, or a
group. To apply a layer style to a background layer, first convert it into a regular
Select a single layer from the Layers palette.
Do one of the following:
click the layer, outside the layer name or thumbnail.
Click the Layer Styles button at the bottom of the Layers
palette and choose an effect from the list.
Choose an effect from the Layer > Layer Style submenu.
an existing style, double-click an effect displayed
below the layer name in the Layers palette. (Click the
triangle next to the “fx” icon to display the effects
contained in the style.)
Set effect options in the Layer Style dialog box. See Layer style
Add other effects to the style, if desired. In the Layer Style dialog box,
click the check box to the left of the effect name to add the effect
You can edit multiple effects without closing the Layer Style dialog
of an effect on the left side of the dialog box to
Outlines the object on the current layer using color, a gradient, or a
edged shapes such as type.
You cannot apply layer styles to a background layer, a locked layer, or a
group. To apply a layer style to a background layer, first convert it into a regular
click the layer, outside the layer name or thumbnail.
at the bottom of the Layers
> Layer Style submenu.
click an effect displayed
below the layer name in the Layers palette. (Click the
to display the effects
Layer style
Add other effects to the style, if desired. In the Layer Style dialog box,
click the check box to the left of the effect name to add the effect
You can edit multiple effects without closing the Layer Style dialog
of an effect on the left side of the dialog box to
156
Altitude
For the Bevel and Emboss effect, sets the height of the light source. A
setting of 0 is equivalent to ground level, 90 is directly above the layer.
Angle
Determines the lighting angle at which the effect is applied to the layer.
You can drag in the document window to adjust the angle of a Drop
Shadow, Inner Shadow, or Satin effect.
Anti-alias
Blends the edge pixels of a contour or gloss contour. This option is most
useful on shadows with a small size and complicated contour.
Blend Mode
Determines how the layer style blends with the underlying layers, which
may or may not include the active layer. For example, an inner shadow
blends with the active layer because the effect is drawn on top of that
layer, but a drop shadow blends only with the layers beneath the active
layer. In most cases, the default mode for each effect produces the best
results. List of blending modes.
Choke
Shrinks the boundaries of the matte of an Inner Shadow or Inner Glow
prior to blurring.
Color
Specifies the color of a shadow, glow, or highlight. You can click the color
box and choose a color.
Contour
With solid-color glows, Contour allows you to create rings of transparency.
With gradient-filled glows, Contour allows you to create variations in the
repetition of the gradient color and opacity. In beveling and embossing,
Contour allows you to sculpt the ridges, valleys, and bumps that are
shaded in the embossing process. With shadows, Contour allows you to
157
specify the fade. For more information, see Modify layer effects with
contours.
Distance
Specifies the offset distance for a shadow or satin effect. You can drag in
the document window to adjust the offset distance.
Depth
Specifies the depth of a bevel. It also specifies the depth of a pattern.
Use Global Light
This setting allows you to set one “master” lighting angle that is then
available in all the layer effects that use shading: Drop Shadow, Inner
Shadow, and Bevel and Emboss. In any of these effects, if Use Global
Light is selected and you set a lighting angle, that angle becomes the
global lighting angle. Any other effect that has Use Global Light selected
automatically inherits the same angle setting. If Use Global Light is
deselected, the lighting angle you set is “local” and applies only to that
effect. You can also set the global lighting angle by choosing Layer Style >
Global Light.
Gloss Contour
Creates a glossy, metallic appearance. Gloss Contour is applied after
shading a bevel or emboss.
Gradient
Specifies the gradient of a layer effect. Click the gradient to display the
Gradient Editor, or click the inverted arrow and choose a gradient from the
pop-up palette. You can edit a gradient or create a new gradient using the
Gradient Editor. You can edit the color or opacity in the Gradient Overlay
palette the same way you edit them in the Gradient Editor. For some
effects, you can specify additional gradient options. Reverse flips the
orientation of the gradient, AlignWith Layer uses the bounding box of the
layer to calculate the gradient fill, and Scale scales the application of the
gradient. You can also move the center of the gradient by clicking and
dragging in the image window. Style specifies the shape of the gradient.
158
Highlight or Shadow Mode
Specifies the blending mode of a bevel or emboss highlight or shadow.
Jitter
Varies the application of a gradient’s color and opacity.
Layer Knocks out Drop Shadow
Controls the drop shadow’s visibility in a semitransparent layer.
Noise
Specifies the number of random elements in the opacity of a glow or
shadow. Enter a value or drag the slider.
Opacity
Sets the opacity of the layer effect. Enter a value or drag the slider.
Pattern
Specifies the pattern of a layer effect. Click the pop-up palette and choose
a pattern. Click the New preset button to create a new preset pattern
based on the current settings. Click Snap To Origin to make the origin of
the pattern the same as the origin of the document (when Link With Layer
is selected), or to place the origin at the upper left corner of the layer (if
Link With Layer is deselected). Select Link With Layer if you want the
pattern to move along with the layer as the layer moves. Drag the Scale
slider or enter a value to specify the size of the pattern. Drag a pattern to
position it in the layer; reset the position by using the Snap To Origin
button. The Pattern option is not available if no patterns are loaded.
Position
Specifies the position of a stroke effect as Outside, Inside, or Center.
Range
Controls which portion or range of the glow is targeted for the contour.
Size
Specifies the amount of blur or the size of the shadow.
Soften
159
Blurs the results of shading to reduce unwanted artifacts.
Source
Specifies the source for an inner glow. Choose Center to apply a glow that
emanates from the center of the layer’s content, or Edge to apply a glow
that emanates from the inside edges of the layer’s content.
Spread
Expands the boundaries of the matte prior to blurring.
Style
Specifies the style of a bevel: Inner Bevel creates a bevel on the inside
edges of the layer contents; Outer Bevel creates a bevel on the outside
edges of the layer contents; Emboss simulates the effect of embossing the
layer contents against the underlying layers; Pillow Emboss simulates the
effect of stamping the edges of the layer contents into the underlying
layers; and Stroke Emboss confines embossing to the boundaries of a
stroke effect applied to the layer. (The Stroke Emboss effect is not visible
if no stroke is applied to the layer.)
Technique
Smooth, Chisel Hard, and Chisel Soft are available for bevel and
emboss effects; Softer and Precise apply to Inner Glow and Outer
Glow effects.
Smooth
Blurs the edges of a matte slightly and is useful for all types of mattes,
whether their edges are soft or hard. It does not preserve detailed
features at larger sizes.
Chisel Hard
Uses a distance measurement technique and is primarily useful on
hard-edged mattes from anti-aliased shapes such as type. It
preserves detailed features better than the Smooth technique.
Chisel Soft
160
Uses a modified distance measurement technique and, although not
as accurate as Chisel Hard, is more useful on a larger range of
mattes. It preserves features better than the Smooth technique.
Softer
Applies a blur and is useful on all types of mattes, whether their edges
are soft or hard. At larger sizes, Softer does not preserve detailed
features.
Precise
Uses a distance measurement technique to create a glow and is
primarily useful on hard-edged mattes from anti-aliased shapes such
as type. It preserves features better than the softer technique.
Texture
Applies a texture. Use Scale to scale the size of the texture. Select Link
With Layer if you want the texture to move along with the layer as the
layer moves. Invert inverts the texture. Depth varies the degree and
direction (up/down) to which the texturing is applied. Snap To Origin
makes the origin of the pattern the same as the origin of the document (if
Link With Layer is deselected) or places the origin in the upper left corner
of the layer (if Link With Layer is selected). Drag the texture to position it in
the layer.
Modify Layer Effects with Contours
When you create custom layer styles, you can use contours to control the shape
of Drop Shadow, Inner Shadow, Inner Glow, Outer Glow, Bevel and Emboss,
and Satin effects over a given range. For example, a Linear contour on a Drop
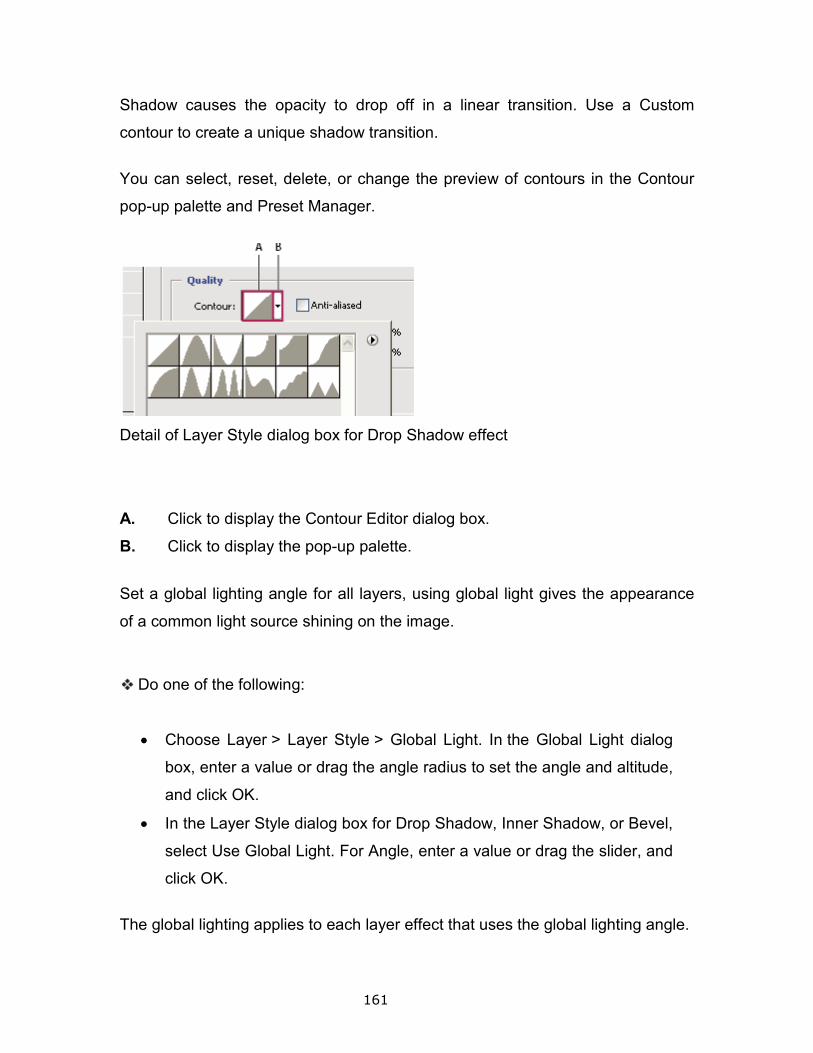
161
Shadow causes the opacity to drop off in a linear transition. Use a Custom
contour to create a unique shadow transition.
You can select, reset, delete, or change the preview of contours in the Contour
pop-up palette and Preset Manager.
Detail of Layer Style dialog box for Drop Shadow effect
A. Click to display the Contour Editor dialog box.
B. Click to display the pop-up palette.
Set a global lighting angle for all layers, using global light gives the appearance
of a common light source shining on the image.
Do one of the following:
• Choose Layer > Layer Style > Global Light. In the Global Light dialog
box, enter a value or drag the angle radius to set the angle and altitude,
and click OK.
• In the Layer Style dialog box for Drop Shadow, Inner Shadow, or Bevel,
select Use Global Light. For Angle, enter a value or drag the slider, and
click OK.
The global lighting applies to each layer effect that uses the global lighting angle.
Copy Layer Styles
Copying and pasting styles is an easy way to apply the same effects to multiple
layers.
Copy Layer Styles between Layers
1. From the Layers palette, select the layer containing the style you want to
copy.
2. Choose Layer > Layer Style
3. Select the destination layer from the palette, and choose Layer
Style > Paste Layer Style.
The pasted layer style
destination layer or layers.
Copy Layer Styles between Layers by dragging
Do one of the following:
• In the Layers palette, Alt
single layer effect from one layer to another to dupl
or drag the Effects bar from one layer to another to duplicate the layer
style.
• Drag one or more layer effects from the Layers palette to the image to
apply the resulting layer style to the highest layer in the Layers palette
that contains pixels at the drop point.
Creating Effect Layer Style
Step 1:
Background Layer
162
Copying and pasting styles is an easy way to apply the same effects to multiple
Copy Layer Styles between Layers
From the Layers palette, select the layer containing the style you want to
> Layer Style > Copy Layer Style.
Select the destination layer from the palette, and choose Layer > Layer
> Paste Layer Style.
The pasted layer style replaces the existing layer style on the
destination layer or layers.
Copy Layer Styles between Layers by dragging
In the Layers palette, Alt-drag (Windows) or Option-drag (Mac
single layer effect from one layer to another to duplicate the layer effect,
or drag the Effects bar from one layer to another to duplicate the layer
Drag one or more layer effects from the Layers palette to the image to
apply the resulting layer style to the highest layer in the Layers palette
ontains pixels at the drop point.
Creating Effect Layer Style
Copying and pasting styles is an easy way to apply the same effects to multiple
From the Layers palette, select the layer containing the style you want to
> Layer
replaces the existing layer style on the
drag (Mac OS) a
icate the layer effect,
or drag the Effects bar from one layer to another to duplicate the layer
Drag one or more layer effects from the Layers palette to the image to
apply the resulting layer style to the highest layer in the Layers palette
163
We start as always with a background gradient. I've used a Radial Gradient with
two shades of a lovely light green. The exact color codes are:
Foreground color - #93cc1a Background color -
#7eb704
Step 2:
To give our background a bit more oomph we will next fade it off at the edges. So
using a big soft brush and a foreground color of black create a new layer and just
go around the edges as shown.
164
Then switch the layer to opacity 30%.
Step 3:
Now duplicate that last layer of black edge and go to Filters > Blur > Gaussian
Blur and use a setting of 20px to blur out the layer and give it a softer effect.
You may be wondering why we didn't just use a different radial gradient in the
first place, and indeed you probably could do that. I like to use this method on the
edges as it's more precise.
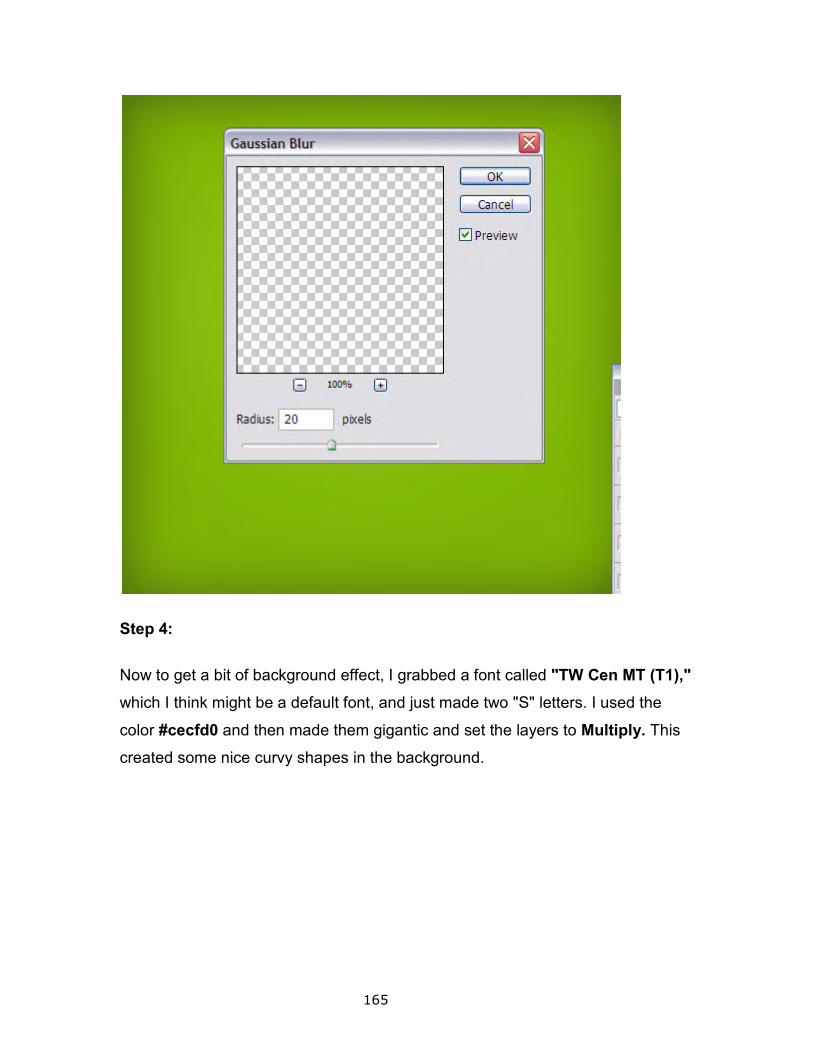
165
Step 4:
Now to get a bit of background effect, I grabbed a font called "TW Cen MT (T1),"
which I think might be a default font, and just made two "S" letters. I used the
color #cecfd0 and then made them gigantic and set the layers to Multiply. This
created some nice curvy shapes in the background.
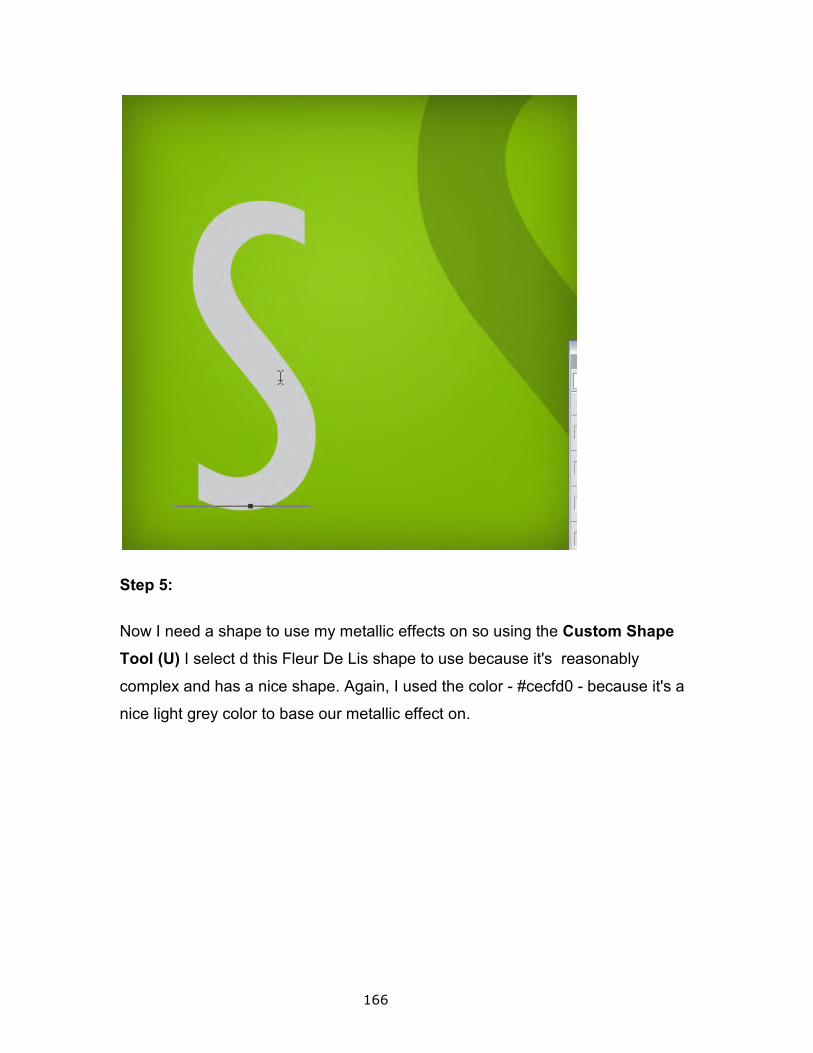
166
Step 5:
Now I need a shape to use my metallic effects on so using the Custom Shape
Tool (U) I select d this Fleur De Lis shape to use because it's reasonably
complex and has a nice shape. Again, I used the color - #cecfd0 - because it's a
nice light grey color to base our metallic effect on.

167
Step 6:
To start the metallic effect, right click on the layer and choose Blending
Options.
First add a Drop Shadow to lift the shape off the background. The key to drop
shadows is not to make them too full on. A good drop shadow should be subtle. I
often don't use black, but rather a variation of the background color–so in this
case a dark green.
Next we add a Stroke. I've used an Inside stroke of 4px. But the key here is to
switch Fill Type to Gradient and then use a nice gradient of grey and white.
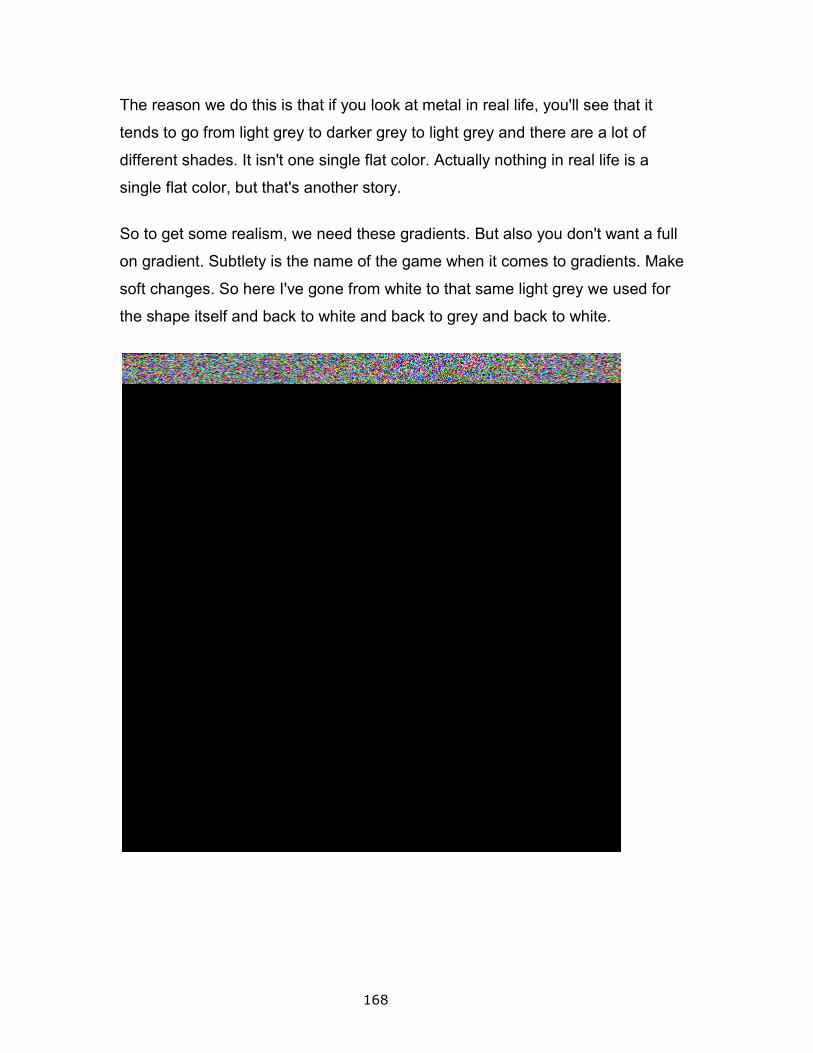
168
The reason we do this is that if you look at metal in real life, you'll see that it
tends to go from light grey to darker grey to light grey and there are a lot of
different shades. It isn't one single flat color. Actually nothing in real life is a
single flat color, but that's another story.
So to get some realism, we need these gradients. But also you don't want a full
on gradient. Subtlety is the name of the game when it comes to gradients. Make
soft changes. So here I've gone from white to that same light grey we used for
the shape itself and back to white and back to grey and back to white.
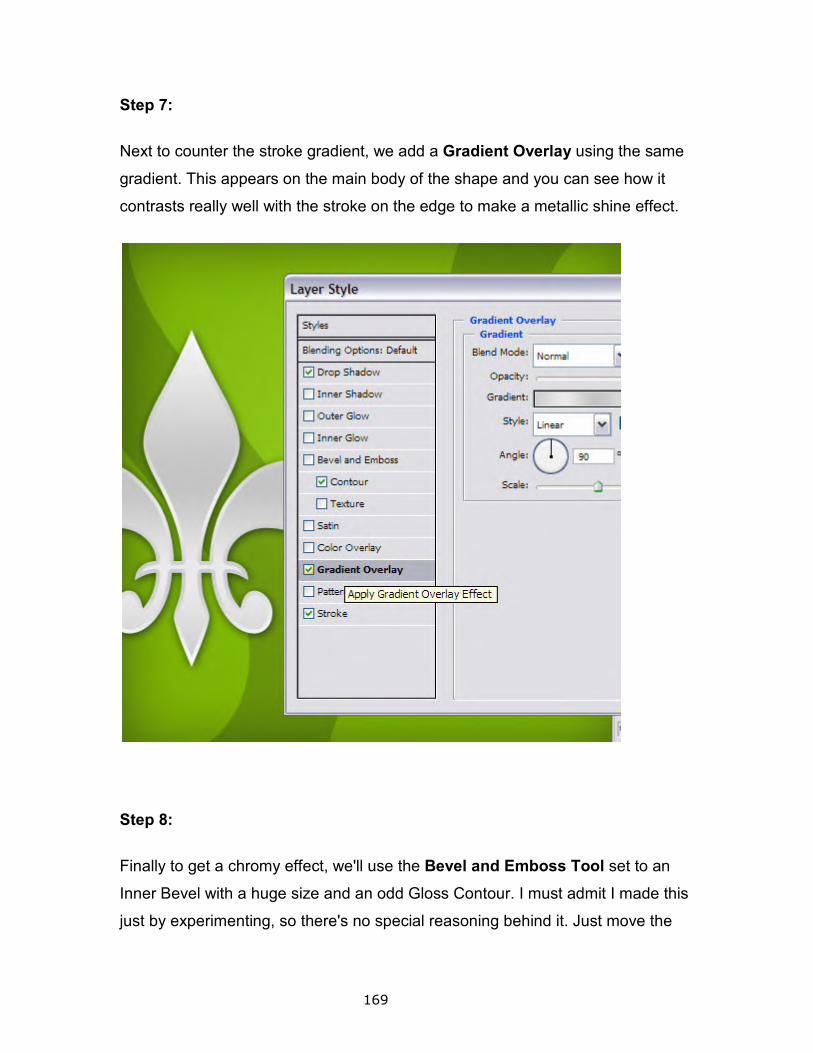
169
Step 7:
Next to counter the stroke gradient, we add a Gradient Overlay using the same
gradient. This appears on the main body of the shape and you can see how it
contrasts really well with the stroke on the edge to make a metallic shine effect.
Step 8:
Finally to get a chromy effect, we'll use the Bevel and Emboss Tool set to an
Inner Bevel with a huge size and an odd Gloss Contour. I must admit I made this
just by experimenting, so there's no special reasoning behind it. Just move the
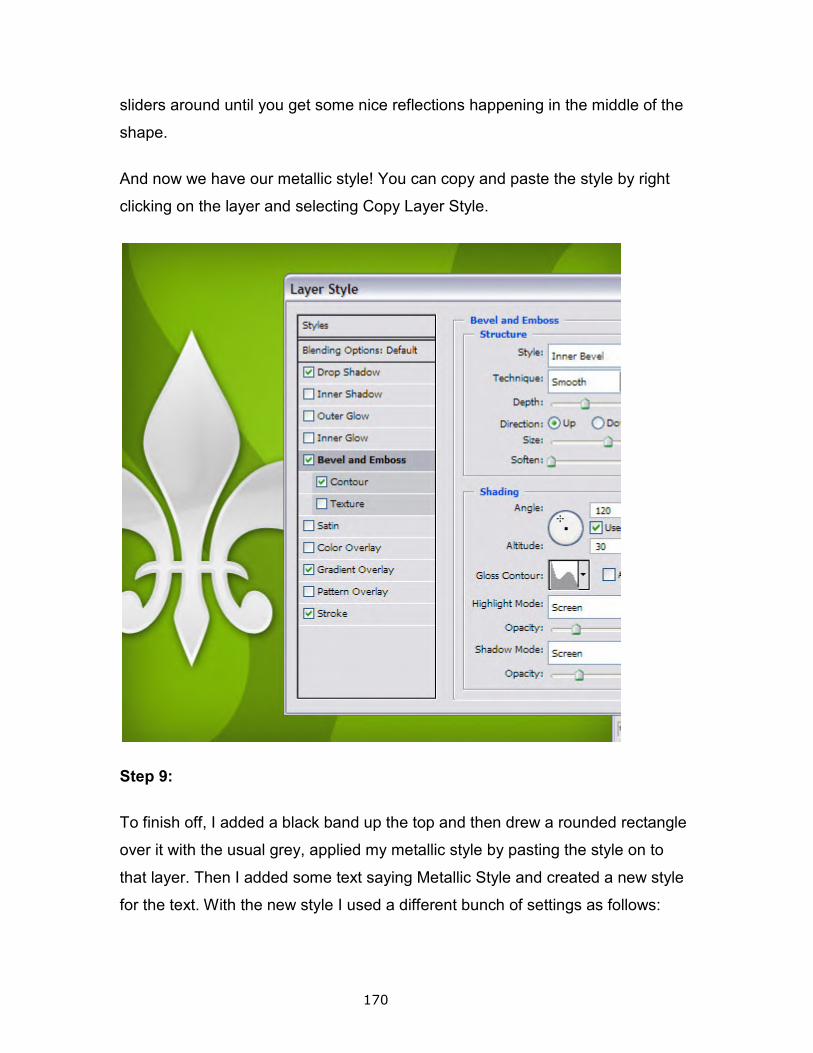
170
sliders around until you get some nice reflections happening in the middle of the
shape.
And now we have our metallic style! You can copy and paste the style by right
clicking on the layer and selecting Copy Layer Style.
Step 9:
To finish off, I added a black band up the top and then drew a rounded rectangle
over it with the usual grey, applied my metallic style by pasting the style on to
that layer. Then I added some text saying Metallic Style and created a new style
for the text. With the new style I used a different bunch of settings as follows:
171
Inner Shadow
Since I want the letters to look like they are punched into the metal, I added an
inner shadow. Make it nice and subtle though, not too full on!
Gradient Overlay
Gradients make things look more natural, but again subtle color changes only!
Stroke
Again I use a gradient stroke, however this time it is an Outer Stroke and it is a
gradient going from dark at the top to light at the bottom. The reason for this is
that it makes it look like the letters have an edge where they were punched into
the metal. And it looks like there is light coming from the top and landing on that
edge so that one side is lit up and the other is in a bit of shadow. This gives it a
much more metallic effect.
172
Step 10:
And there you have it: a nice pair of metallic styles!
173
About Layer Comps
Designers often create multiple compositions or comps of a page layout to show
clients. Using layer comps, you can create, manage, and view multiple versions
of a layout in a single Photoshop file.
A layer comp is a snapshot of a state of the Layers palette. Layer comps record
three types of layer options:
• Layer visibility–whether a layer is showing or hidden.
• Layer position in the document.
• Layer appearance–whether a layer style is applied to the layer and the
layer’s blending mode.
174
Note: Unlike layer effects, Smart Filter settings cannot be changed across layer
comps. Once a Smart Filter is applied to a layer, it appears in all layer comps for
the image.
You can export layer comps to separate files, to a single PDF, or to a web photo
gallery.
Choose Window > Layer Comps to show the palette.
Layer Comps palette
A. Apply Layer Comp icon
B. Last Document State
C. Selected comps
D. Layer Comp Cannot Be Fully Restored icon
Create a Layer Comp
1. Choose Window > Layer Comps to display the Layer Comp palette.
2. Click the Create New Layer Comp button at the bottom of the Layer
Comps palette. The new comp reflects the current state of layers in the
Layers palette.
3. In the New Layer Comp dialog box, name the comp, add descriptive
comments, and choose options to apply to layers: Visibility, Position,
and Appearance.
4. Click OK. Any new comp preserves the options you chose for the
previous one, so you don’t have to make
want the comps to be identical.
To duplicate a comp, select a comp in the Layer Comps palette and
drag the comp to the New Comps button.
Apply and View Layer Comps
1. Do any of the following:
• To view a layer comp, you first need
document. In the Layer Comp palette, click the Apply Layer
Comp icon
• To cycle through a view of all the layer comps, use the
Previous and Next
• To cycle through a view o
comps in the Layer Comps palette, and then click the Next
and Previous buttons at the bottom of the palette.
through only the comps you selected.
• To restore the document to its state before you chose a
layer comp, cl
Document State at the top of the Layer Comp palette.
Change and Update a Layer Comp
If you change the configuration of a layer comp, you need to update it.
175
Click the Create New Layer Comp button at the bottom of the Layer
Comps palette. The new comp reflects the current state of layers in the
In the New Layer Comp dialog box, name the comp, add descriptive
comments, and choose options to apply to layers: Visibility, Position,
Click OK. Any new comp preserves the options you chose for the
previous one, so you don’t have to make these choices again if you
want the comps to be identical.
To duplicate a comp, select a comp in the Layer Comps palette and
drag the comp to the New Comps button.
Apply and View Layer Comps
Do any of the following:
To view a layer comp, you first need to apply it in the
document. In the Layer Comp palette, click the Apply Layer
next to a selected comp.
To cycle through a view of all the layer comps, use the
and Next buttons at the bottom of the palette.
To cycle through a view of selected comps, select the
comps in the Layer Comps palette, and then click the Next
and Previous buttons at the bottom of the palette. This cycle
through only the comps you selected.
To restore the document to its state before you chose a
layer comp, click the Apply Layer Comp icon next to Last
Document State at the top of the Layer Comp palette.
Change and Update a Layer Comp
If you change the configuration of a layer comp, you need to update it.
Click the Create New Layer Comp button at the bottom of the Layer
Comps palette. The new comp reflects the current state of layers in the
In the New Layer Comp dialog box, name the comp, add descriptive
comments, and choose options to apply to layers: Visibility, Position,
Click OK. Any new comp preserves the options you chose for the
these choices again if you
To duplicate a comp, select a comp in the Layer Comps palette and
to apply it in the
document. In the Layer Comp palette, click the Apply Layer
To cycle through a view of all the layer comps, use the
buttons at the bottom of the palette.
f selected comps, select the
comps in the Layer Comps palette, and then click the Next
This cycle
To restore the document to its state before you chose a
next to Last
If you change the configuration of a layer comp, you need to update it.
176
1. Select the layer comp in the Layer Comps palette.
2. Make changes to the layer’s visibility, position, or style. You may
need to change the layer comp’s options to record these changes.
3. To change your comp options, select Layer Comp Options from the
palette menu and select additional options to record layer position
and style.
4. Click the Update Layer Comp button at the bottom of the palette.
Delete a Layer Comp
Do one of the following:
• Select the layer comp in the Layer Comps palette and click the Delete
icon in the palette, or choose Delete Layer Comp from the palette
menu.
• Drag it to the Delete icon in the palette.
Export Layer Comps
You can export layer comps to individual files, to a PDF file containing multiple
layer comps, or to a web photo gallery of layer comps.
Choose File > Scripts and then choose one of the following commands:
Layer Comps To Files
Exports all layer comps to individual files, one for each comp.
Layer Comps To PDF
Exports all layer comps to a PDF file.
Layer Comps To WPG
Exports all layer comps to a web photo gallery.
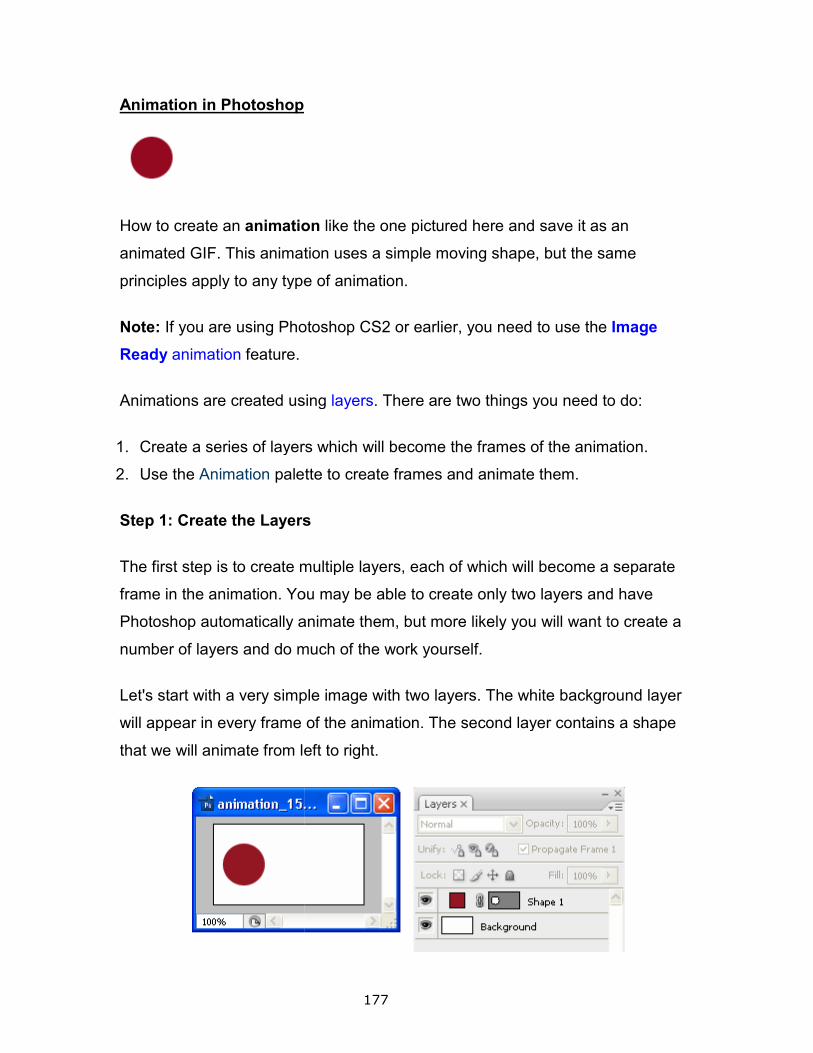
Animation in Photoshop
How to create an animation
animated GIF. This animation uses a simple moving shape, but the same
principles apply to any type of animation.
Note: If you are using Photoshop CS2 or earlier, you need to use the
Ready animation feature.
Animations are created using
1. Create a series of layers which will become the frames of the animation.
2. Use the Animation palette to create frames and animate them.
Step 1: Create the Layers
The first step is to create multi
frame in the animation. You may be able to create only two layers and have
Photoshop automatically animate them, but more likely you will want to create a
number of layers and do much of the work yourself.
Let's start with a very simple image with two layers. The white background layer
will appear in every frame of the animation. The second layer contains a shape
that we will animate from left to right.
177
animation like the one pictured here and save it as an
animated GIF. This animation uses a simple moving shape, but the same
principles apply to any type of animation.
If you are using Photoshop CS2 or earlier, you need to use the
Animations are created using layers. There are two things you need to do:
Create a series of layers which will become the frames of the animation.
palette to create frames and animate them.
Step 1: Create the Layers
The first step is to create multiple layers, each of which will become a separate
frame in the animation. You may be able to create only two layers and have
Photoshop automatically animate them, but more likely you will want to create a
number of layers and do much of the work yourself.
et's start with a very simple image with two layers. The white background layer
will appear in every frame of the animation. The second layer contains a shape
that we will animate from left to right.
like the one pictured here and save it as an
animated GIF. This animation uses a simple moving shape, but the same
If you are using Photoshop CS2 or earlier, you need to use the Image
. There are two things you need to do:
Create a series of layers which will become the frames of the animation.
ple layers, each of which will become a separate
frame in the animation. You may be able to create only two layers and have
Photoshop automatically animate them, but more likely you will want to create a
et's start with a very simple image with two layers. The white background layer
will appear in every frame of the animation. The second layer contains a shape
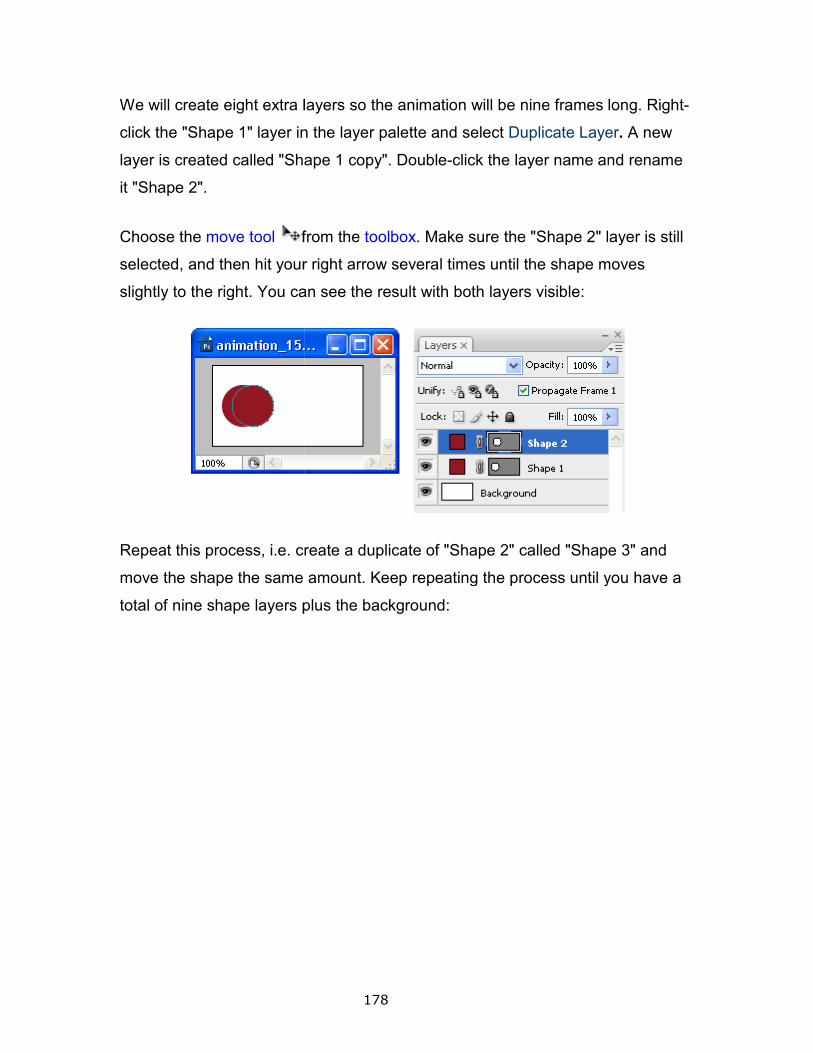
We will create eight extra layers so the animation wil
click the "Shape 1" layer in the layer palette and select
layer is created called "Shape 1 copy". Double
it "Shape 2".
Choose the move tool from the
selected, and then hit your right arrow several times until the shape moves
slightly to the right. You can see the result with both layers visible:
Repeat this process, i.e. create a duplicate of "Shape 2" called "Shape 3" and
move the shape the same amount. Keep repeating the process until you have a
total of nine shape layers plus the
178
We will create eight extra layers so the animation will be nine frames long. Right
click the "Shape 1" layer in the layer palette and select Duplicate Layer
layer is created called "Shape 1 copy". Double-click the layer name and rename
from the toolbox. Make sure the "Shape 2" layer is still
selected, and then hit your right arrow several times until the shape moves
ight. You can see the result with both layers visible:
Repeat this process, i.e. create a duplicate of "Shape 2" called "Shape 3" and
move the shape the same amount. Keep repeating the process until you have a
total of nine shape layers plus the background:
l be nine frames long. Right-
Duplicate Layer. A new
click the layer name and rename
. Make sure the "Shape 2" layer is still
selected, and then hit your right arrow several times until the shape moves
Repeat this process, i.e. create a duplicate of "Shape 2" called "Shape 3" and
move the shape the same amount. Keep repeating the process until you have a
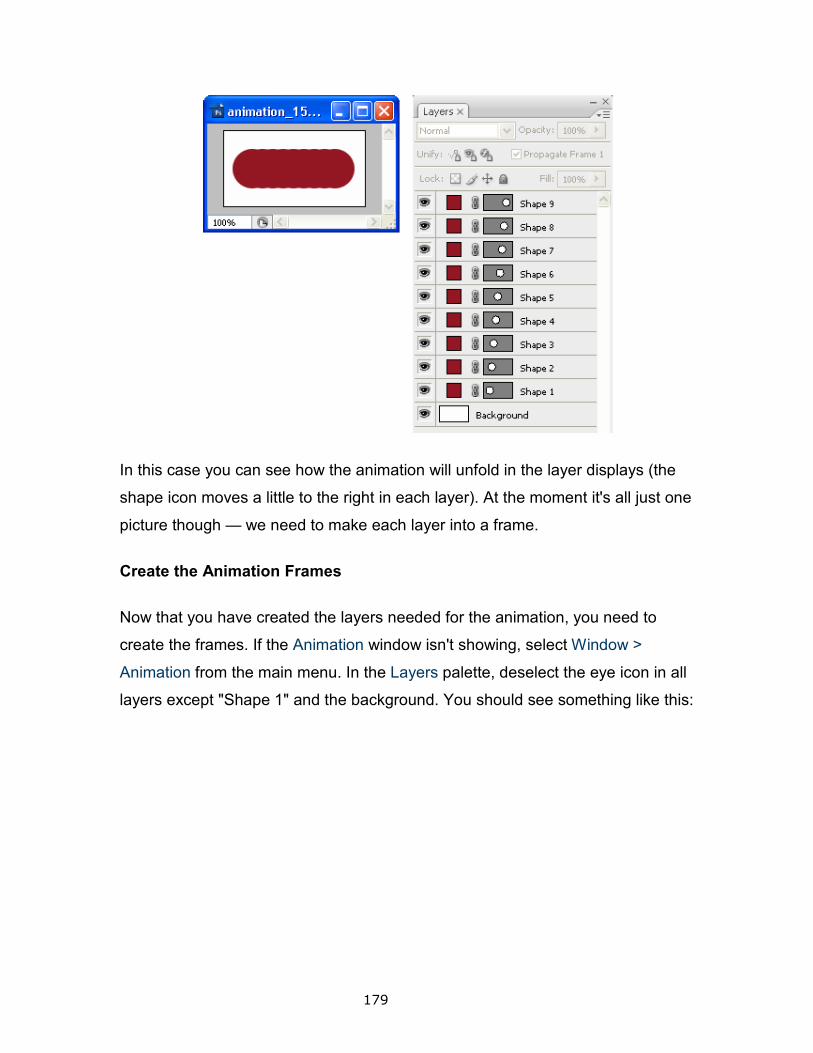
179
In this case you can see how the animation will unfold in the layer displays (the
shape icon moves a little to the right in each layer). At the moment it's all just one
picture though — we need to make each layer into a frame.
Create the Animation Frames
Now that you have created the layers needed for the animation, you need to
create the frames. If the Animation window isn't showing, select Window >
Animation from the main menu. In the Layers palette, deselect the eye icon in all
layers except "Shape 1" and the background. You should see something like this:
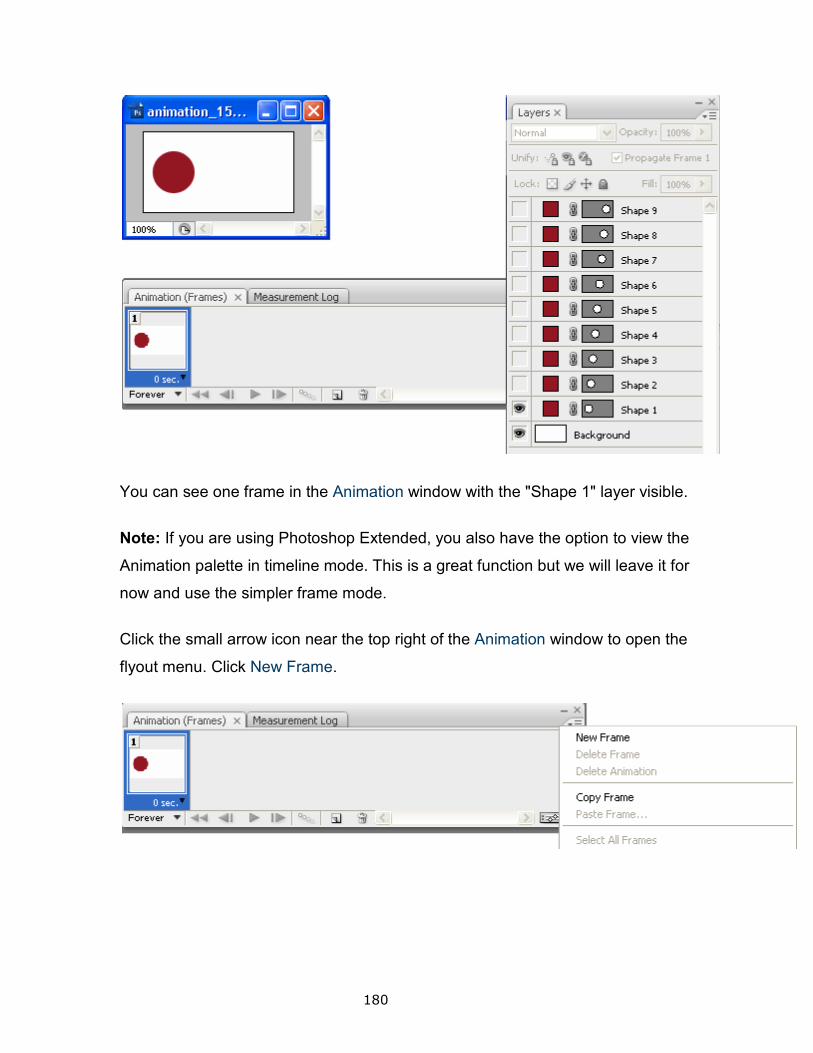
180
You can see one frame in the Animation window with the "Shape 1" layer visible.
Note: If you are using Photoshop Extended, you also have the option to view the
Animation palette in timeline mode. This is a great function but we will leave it for
now and use the simpler frame mode.
Click the small arrow icon near the top right of the Animation window to open the
flyout menu. Click New Frame.
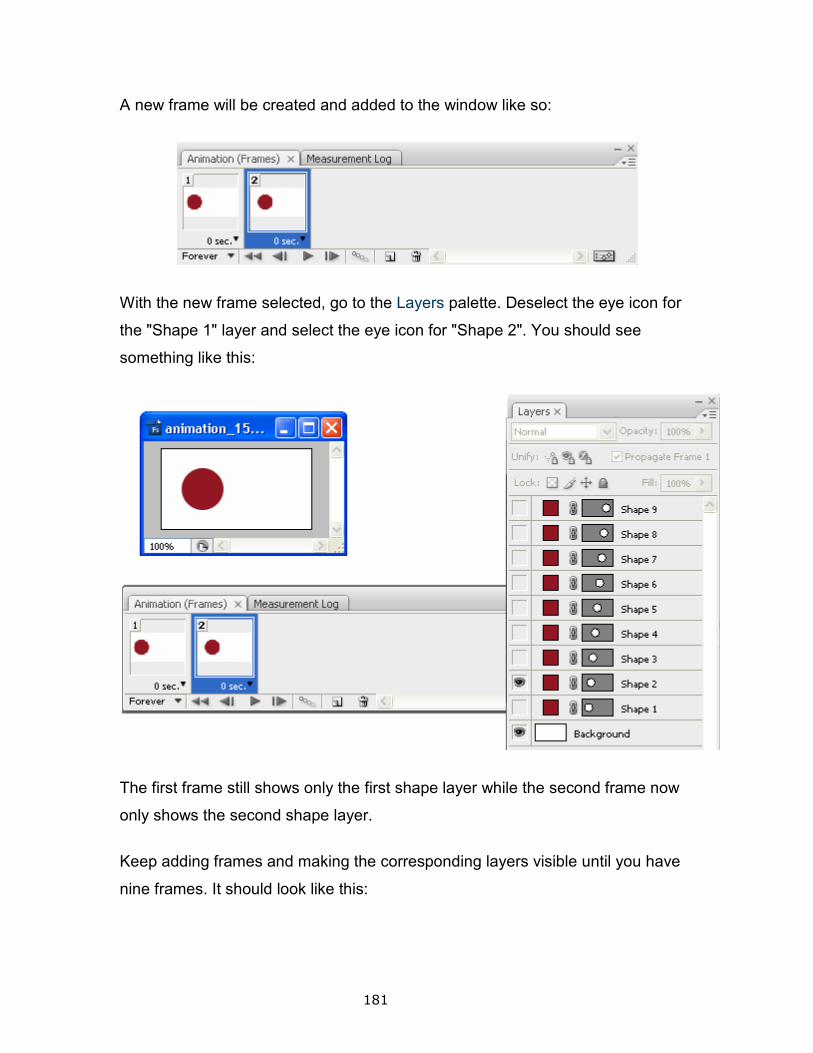
181
A new frame will be created and added to the window like so:
With the new frame selected, go to the Layers palette. Deselect the eye icon for
the "Shape 1" layer and select the eye icon for "Shape 2". You should see
something like this:
The first frame still shows only the first shape layer while the second frame now
only shows the second shape layer.
Keep adding frames and making the corresponding layers visible until you have
nine frames. It should look like this:
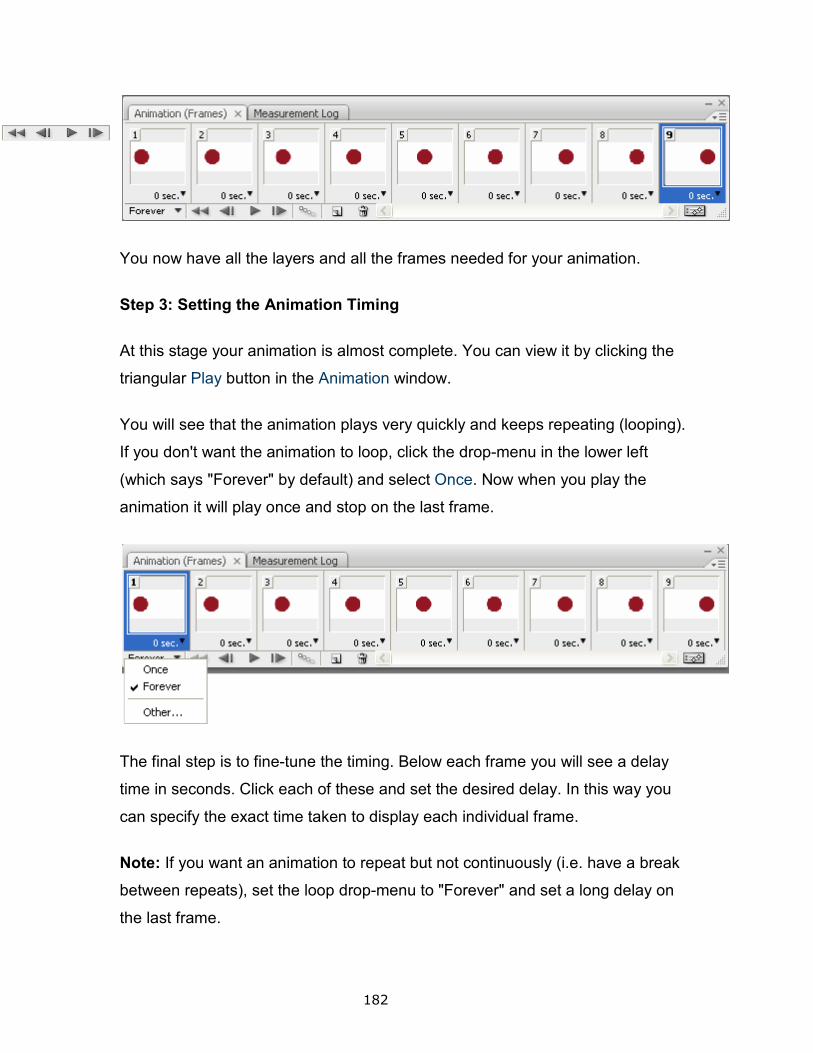
182
You now have all the layers and all the frames needed for your animation.
Step 3: Setting the Animation Timing
At this stage your animation is almost complete. You can view it by clicking the
triangular Play button in the Animation window.
You will see that the animation plays very quickly and keeps repeating (looping).
If you don't want the animation to loop, click the drop-menu in the lower left
(which says "Forever" by default) and select Once. Now when you play the
animation it will play once and stop on the last frame.
The final step is to fine-tune the timing. Below each frame you will see a delay
time in seconds. Click each of these and set the desired delay. In this way you
can specify the exact time taken to display each individual frame.
Note: If you want an animation to repeat but not continuously (i.e. have a break
between repeats), set the loop drop-menu to "Forever" and set a long delay on
the last frame.
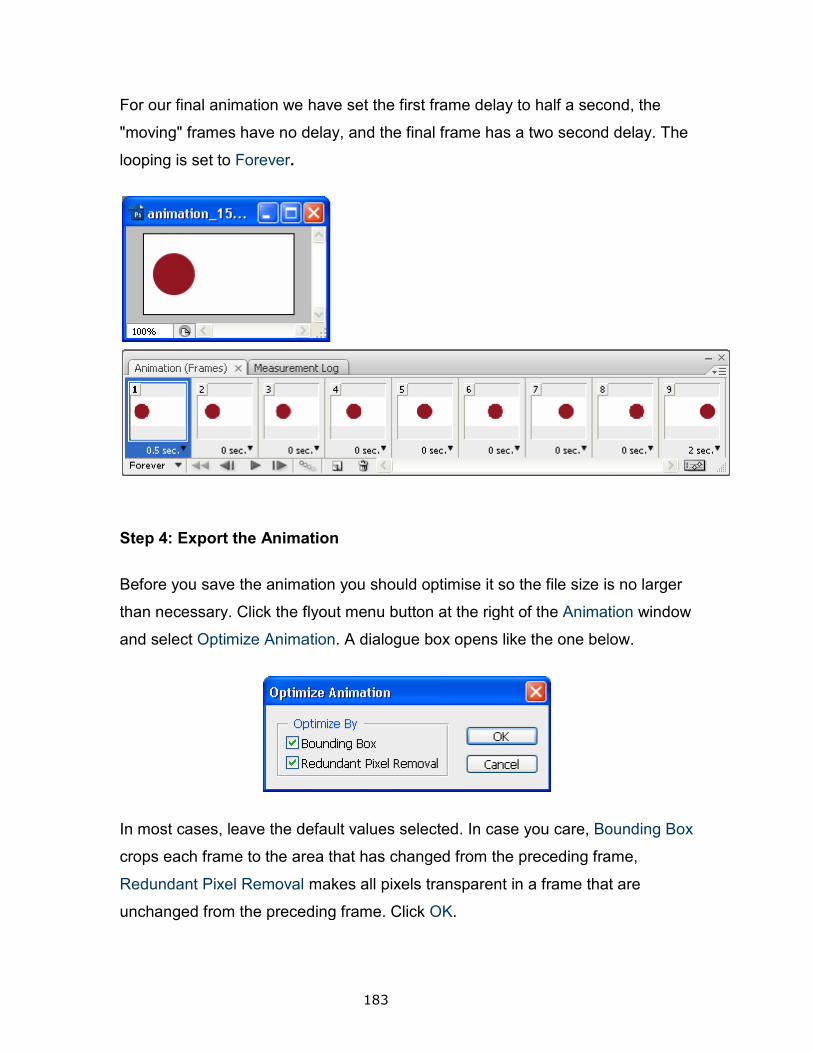
For our final animation we have set the first frame delay to half a secon
"moving" frames have no delay, and the final frame has a two second delay. The
looping is set to Forever.
Step 4: Export the Animation
Before you save the animation you should optimise it so the file size is no larger
than necessary. Click the flyout menu button at the right of the
and select Optimize Animation
In most cases, leave the default values selected. In case you care,
crops each frame to the area that has changed from the preceding frame,
Redundant Pixel Removal
unchanged from the preceding frame. Click
183
For our final animation we have set the first frame delay to half a secon
"moving" frames have no delay, and the final frame has a two second delay. The
Step 4: Export the Animation
Before you save the animation you should optimise it so the file size is no larger
than necessary. Click the flyout menu button at the right of the Animation
Optimize Animation. A dialogue box opens like the one below.
ave the default values selected. In case you care, Bounding Box
crops each frame to the area that has changed from the preceding frame,
Redundant Pixel Removal makes all pixels transparent in a frame that are
preceding frame. Click OK.
For our final animation we have set the first frame delay to half a second, the
"moving" frames have no delay, and the final frame has a two second delay. The
Before you save the animation you should optimise it so the file size is no larger
Animation window
. A dialogue box opens like the one below.
Bounding Box
crops each frame to the area that has changed from the preceding frame,
makes all pixels transparent in a frame that are
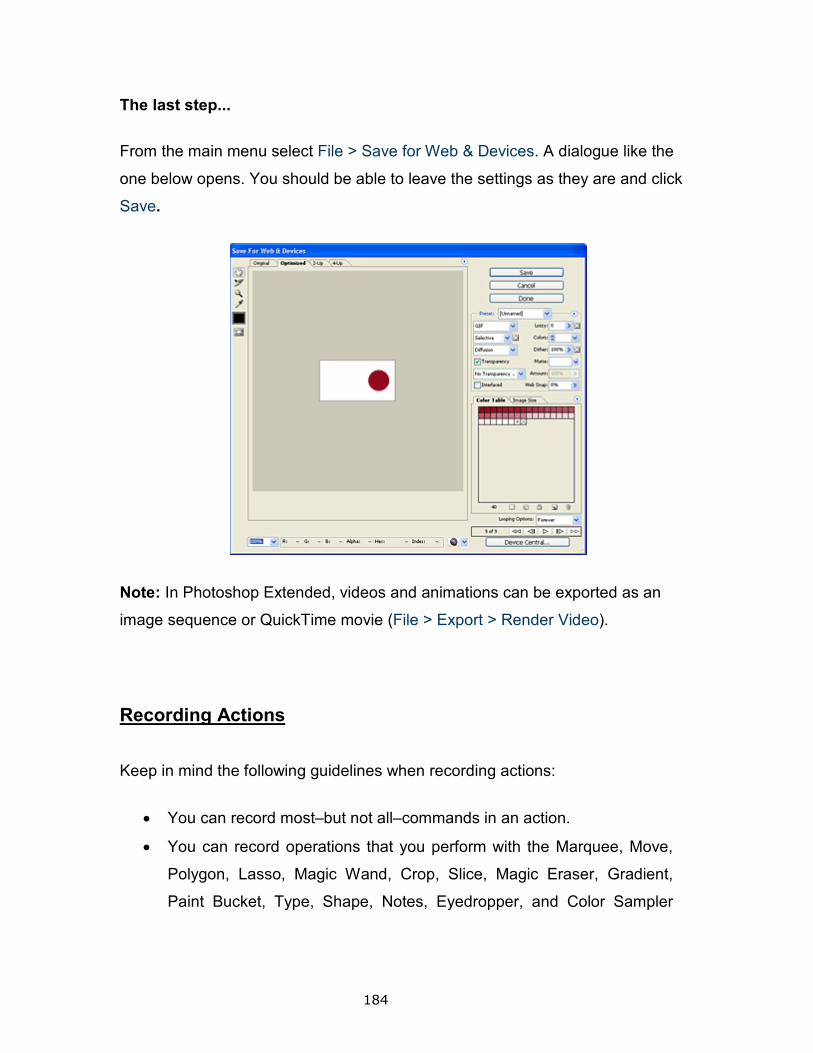
184
The last step...
From the main menu select File > Save for Web & Devices. A dialogue like the
one below opens. You should be able to leave the settings as they are and click
Save.
Note: In Photoshop Extended, videos and animations can be exported as an
image sequence or QuickTime movie (File > Export > Render Video).
Recording Actions
Keep in mind the following guidelines when recording actions:
• You can record most–but not all–commands in an action.
• You can record operations that you perform with the Marquee, Move,
Polygon, Lasso, Magic Wand, Crop, Slice, Magic Eraser, Gradient,
Paint Bucket, Type, Shape, Notes, Eyedropper, and Color Sampler
tools–as well as those that you perform in the History, Swat
Paths, Channels, Layers, Styles, and Actions palettes.
• Results depend on file and program setting variables, such as the
active layer and the foreground color. For example, a 3
blur won’t create the same effect on a 72
Nor will Color Balance work on a grayscale file.
• When you record actions that include specifying settings in dialog
boxes and palettes, the action will reflect the settings in effect at the
time of the recording. If you change a sett
while recording an action, the changed value is recorded.
Note: Most dialog boxes retain the settings specified at the previous use.
Check carefully that those are the values you want to record.
• Modal operations and tools
the units currently specified for the ruler. A modal operation or tool is
one that requires you to press Enter or Return to apply its effect, such
as transforming or cropping. Tools that record position include the
Marquee, Slice, Gradient, Magic Wand, Lasso, Shape, Path,
Eyedropper, and Notes tools.
If you record an action that will be played on files of different sizes, set
the ruler units to percentages. As a result, the action will always play back
in the same relative position in the
• You can record the Play command listed on the Actions palette menu
to cause one action to play
Record an Action
When you create a new action, the commands and tools you use are added to
the action until you stop recor
To guard against mistakes, work in a copy: at the beginning of the action
before applying other commands, record the File
(Illustrator) or record the File
185
as well as those that you perform in the History, Swatches, Color,
Paths, Channels, Layers, Styles, and Actions palettes.
Results depend on file and program setting variables, such as the
active layer and the foreground color. For example, a 3-pixel Gaussian
blur won’t create the same effect on a 72-ppi file as on a 144
Nor will Color Balance work on a grayscale file.
When you record actions that include specifying settings in dialog
boxes and palettes, the action will reflect the settings in effect at the
time of the recording. If you change a setting in a dialog box or palette
while recording an action, the changed value is recorded.
Most dialog boxes retain the settings specified at the previous use.
Check carefully that those are the values you want to record.
Modal operations and tools–as well as tools that record position
the units currently specified for the ruler. A modal operation or tool is
one that requires you to press Enter or Return to apply its effect, such
as transforming or cropping. Tools that record position include the
rquee, Slice, Gradient, Magic Wand, Lasso, Shape, Path,
Eyedropper, and Notes tools.
If you record an action that will be played on files of different sizes, set
the ruler units to percentages. As a result, the action will always play back
ative position in the image.
You can record the Play command listed on the Actions palette menu
to cause one action to play another.
When you create a new action, the commands and tools you use are added to
recording.
To guard against mistakes, work in a copy: at the beginning of the action
before applying other commands, record the File > Save A Copy command
(Illustrator) or record the File > Save As command and select As A Copy
ches, Color,
Results depend on file and program setting variables, such as the
pixel Gaussian
as on a 144-ppi file.
When you record actions that include specifying settings in dialog
boxes and palettes, the action will reflect the settings in effect at the
ing in a dialog box or palette
Most dialog boxes retain the settings specified at the previous use.
well as tools that record position–use
the units currently specified for the ruler. A modal operation or tool is
one that requires you to press Enter or Return to apply its effect, such
as transforming or cropping. Tools that record position include the
rquee, Slice, Gradient, Magic Wand, Lasso, Shape, Path,
If you record an action that will be played on files of different sizes, set
the ruler units to percentages. As a result, the action will always play back
You can record the Play command listed on the Actions palette menu
When you create a new action, the commands and tools you use are added to
To guard against mistakes, work in a copy: at the beginning of the action
> Save A Copy command
> Save As command and select As A Copy
186
(Photoshop). Alternatively, in Photoshop you can click the New Snapshot button
on the History palette to make a snapshot of the image before recording the
action.
1. Open a file.
2. In the Actions palette, click the Create New Action button , or
choose New Action from the Actions palette menu.
3. Enter an action name, select an action set, and set additional options:
Function Key
Assigns a keyboard shortcut to the action. You can choose any
combination of a function key, the Ctrl key (Windows) or Command
key (Mac OS), and the Shift key (for example, Ctrl+Shift+F3), with
these exceptions: In Windows, you cannot use the F1 key, nor can
you use F4 or F6 with the Ctrl key.
Note: If you assign an action the same shortcut that is used for a
command, the shortcut will apply the action rather than the command.
Color
Assigns a color for display in Button mode.
4. Click Begin Recording. The Begin Recording button in the Actions
palette turns red.
Important: When recording the Save As command, do not change
the filename. If you enter a new filename, that new name is recorded
and used each time you run the action. Before saving, if you navigate
to a different folder, you can specify a different location without having
to specify a filename.
5. Perform the operations and commands you want to record.
Not all tasks in actions can be recorded directly; however, you can
insert most nonrecordable tasks using commands in the Actions palette
menu.
6. To stop recording, either click the Stop Playing/Recording button, or
choose Stop Recording from the Actions palette menu. (In Photoshop,
you can also press the Esc key.)
To resume recording in the same action, choose Start Recording from the
Actions palette menu.
Record a Path
The Insert Path command lets you include a complex path (a path created with a
pen tool or pasted from Adobe Illustrator) as part of an action. Wh
played back, the work path is set to the recorded path. You can insert a path
when recording an action or after it has been recorded.
1. Do one of the following:
a. Start recording an action.
b. Select an action’s name to record a path at the end
action.
c. Select a command to record a path after the command.
2. Select an existing path from the Paths palette.
3. Choose Insert Path from the Actions palette menu.
If you record multiple Insert Path commands in a single action, each path
replaces the previous one in the target file. To add multiple paths, record a Save
Path command using the Paths palette after recording each Insert Path
command.
Note: Playing actions that insert complex paths may require significant amounts
of memory. If you encounter
to Photoshop.
It is easy to edit and customize actions. You can change the settings of any
specific command within an action, add commands to an existing action, or step
through an entire action and change
187
To stop recording, either click the Stop Playing/Recording button, or
choose Stop Recording from the Actions palette menu. (In Photoshop,
you can also press the Esc key.)
To resume recording in the same action, choose Start Recording from the
The Insert Path command lets you include a complex path (a path created with a
pen tool or pasted from Adobe Illustrator) as part of an action. When the action is
played back, the work path is set to the recorded path. You can insert a path
when recording an action or after it has been recorded.
Do one of the following:
Start recording an action.
Select an action’s name to record a path at the end of the
Select a command to record a path after the command.
Select an existing path from the Paths palette.
Choose Insert Path from the Actions palette menu.
If you record multiple Insert Path commands in a single action, each path
revious one in the target file. To add multiple paths, record a Save
Path command using the Paths palette after recording each Insert Path
Playing actions that insert complex paths may require significant amounts
of memory. If you encounter problems, increase the amount of memory available
It is easy to edit and customize actions. You can change the settings of any
specific command within an action, add commands to an existing action, or step
through an entire action and change any or all settings.
To stop recording, either click the Stop Playing/Recording button, or
choose Stop Recording from the Actions palette menu. (In Photoshop,
To resume recording in the same action, choose Start Recording from the
The Insert Path command lets you include a complex path (a path created with a
en the action is
played back, the work path is set to the recorded path. You can insert a path
of the
If you record multiple Insert Path commands in a single action, each path
revious one in the target file. To add multiple paths, record a Save
Path command using the Paths palette after recording each Insert Path
Playing actions that insert complex paths may require significant amounts
problems, increase the amount of memory available
It is easy to edit and customize actions. You can change the settings of any
specific command within an action, add commands to an existing action, or step
188
Overwrite a Single Command
1. In the Actions palette, double-click the command.
2. Enter the new values, and click OK.
Add Commands to an Action
1. Do one of the following:
a. Select the action name to insert a new command at the end
of the action.
b. Select a command in the action to insert a command after it.
2. Click the Begin Recording button, or choose Start Recording from the
Actions palette menu.
3. Record the additional commands.
4. When finished, click the Stop Playing/Recording button in the Actions
palette or choose Stop Recording from the palette menu.
Rearrange Commands within an Action
In the Actions palette, drag a command to its new location within the same or
another action. When the highlighted line appears in the desired position, release
the mouse button.
Record an Action again
1. Select an action, and choose Record Again from the Actions palette
menu.
2. If a modal tool appears, use the tool to create a different result, and
press Enter or Return, or just press Enter or Return to retain the
same settings.
3. If a dialog box appears, change the settings, and click OK to record them, or click
Cancel to retain the same values.
189
USING CHANNELS
Step 1
Start with the image of your choice, I chose this one.
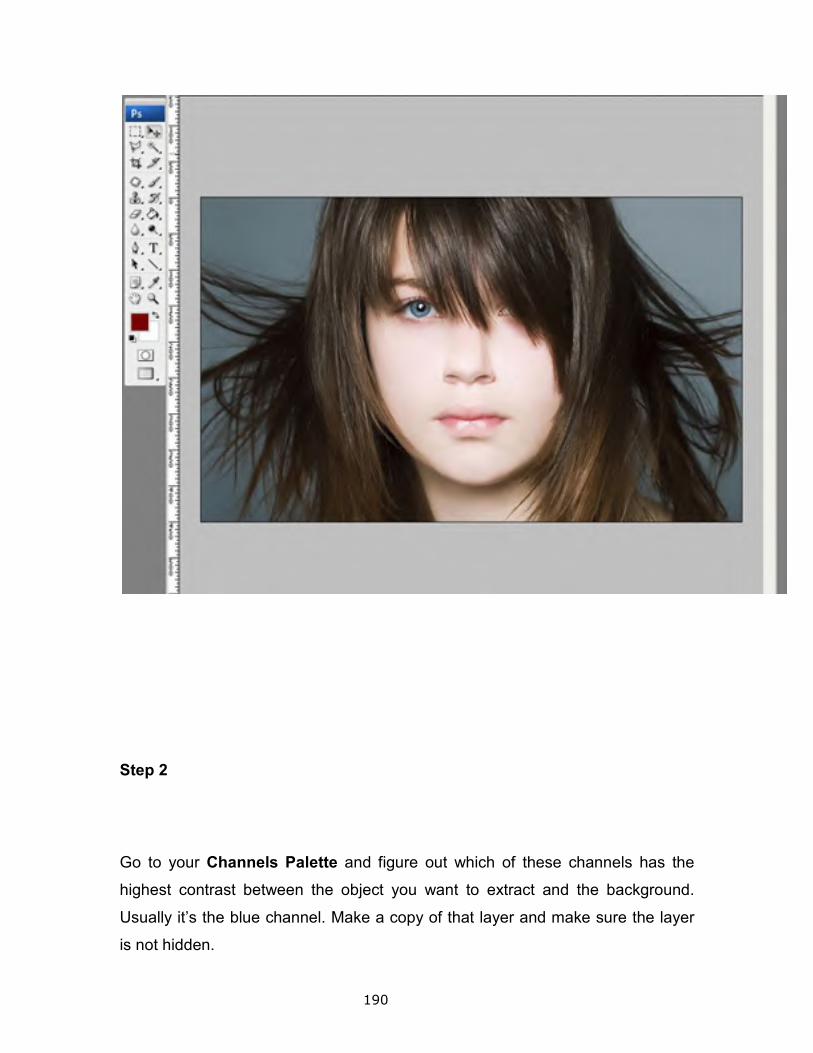
190
Step 2
Go to your Channels Palette and figure out which of these channels has the
highest contrast between the object you want to extract and the background.
Usually it’s the blue channel. Make a copy of that layer and make sure the layer
is not hidden.
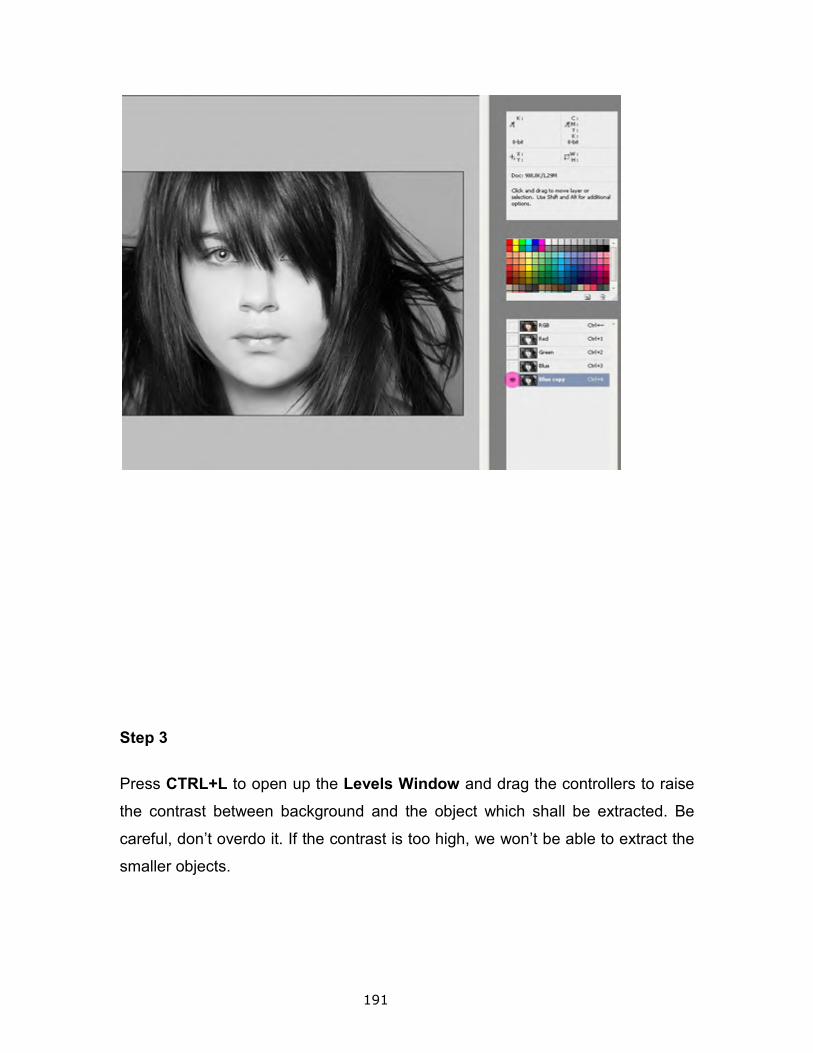
191
Step 3
Press CTRL+L to open up the Levels Window and drag the controllers to raise
the contrast between background and the object which shall be extracted. Be
careful, don’t overdo it. If the contrast is too high, we won’t be able to extract the
smaller objects.
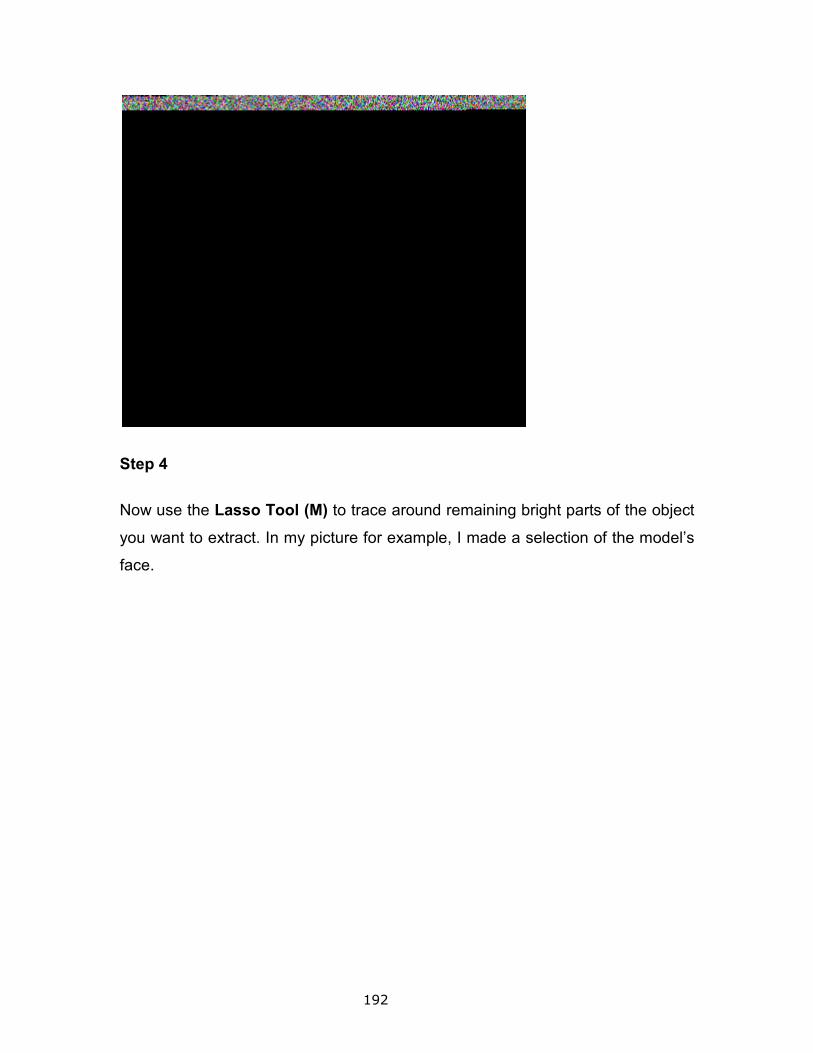
192
Step 4
Now use the Lasso Tool (M) to trace around remaining bright parts of the object
you want to extract. In my picture for example, I made a selection of the model’s
face.
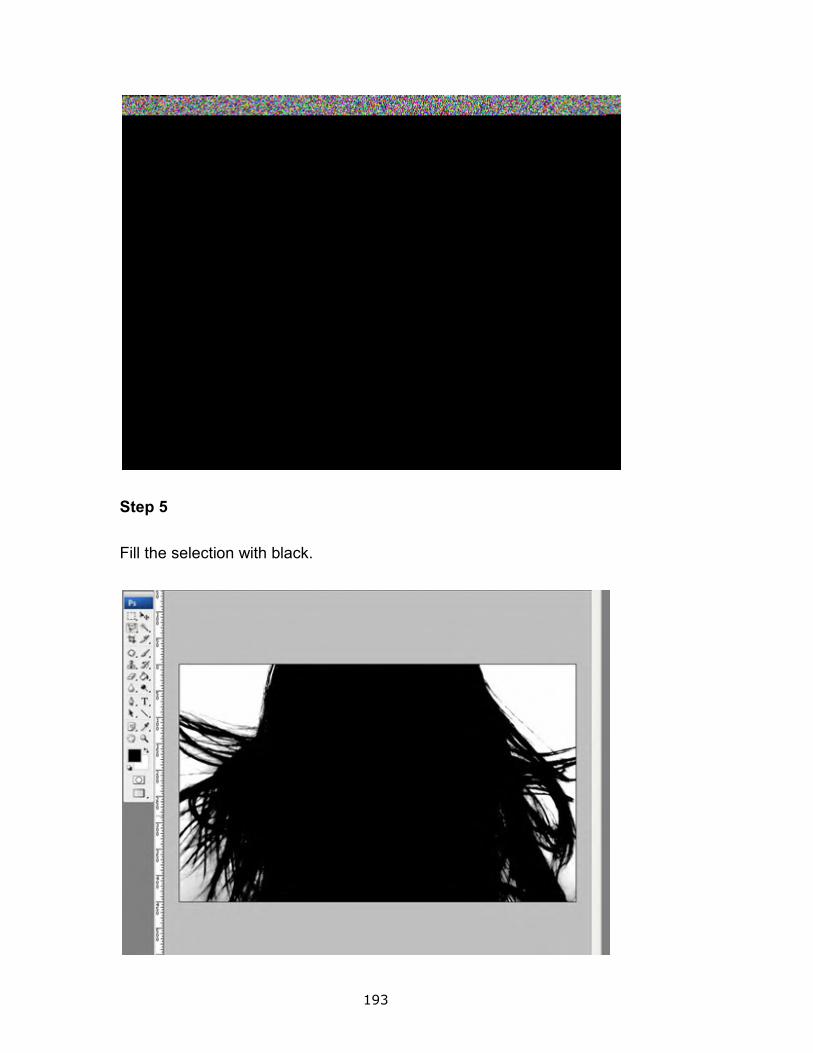
193
Step 5
Fill the selection with black.
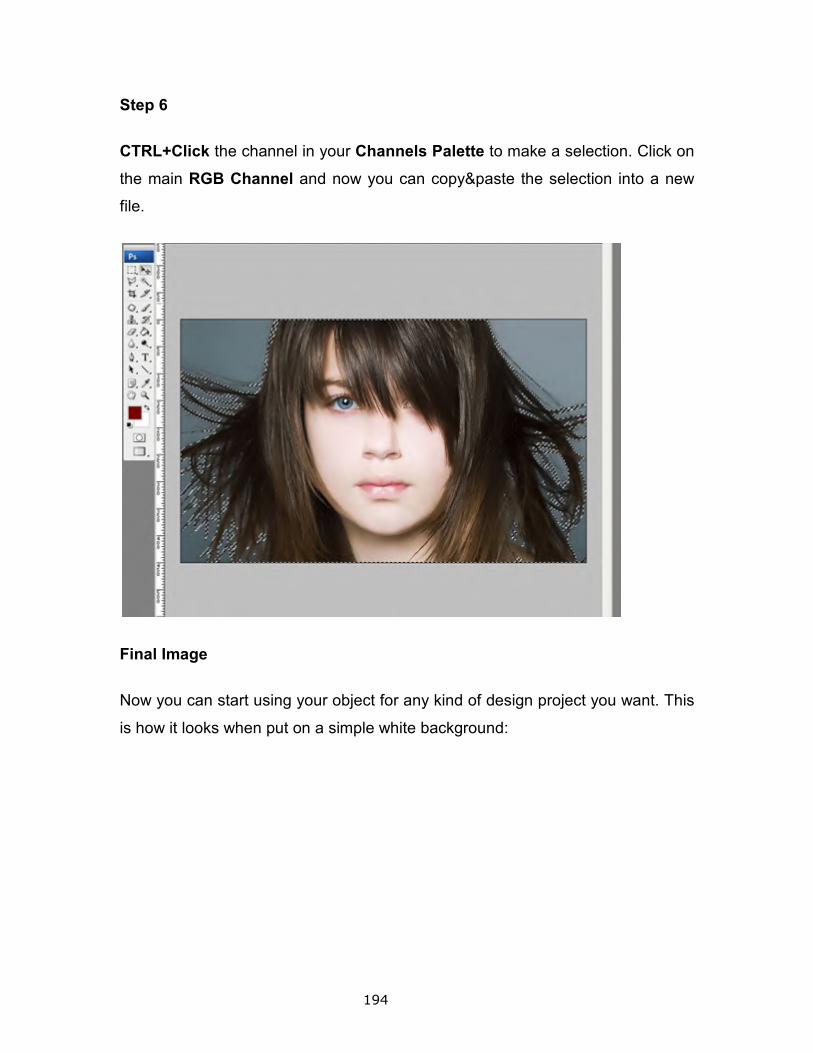
194
Step 6
CTRL+Click the channel in your Channels Palette to make a selection. Click on
the main RGB Channel and now you can copy&paste the selection into a new
file.
Final Image
Now you can start using your object for any kind of design project you want. This
is how it looks when put on a simple white background:
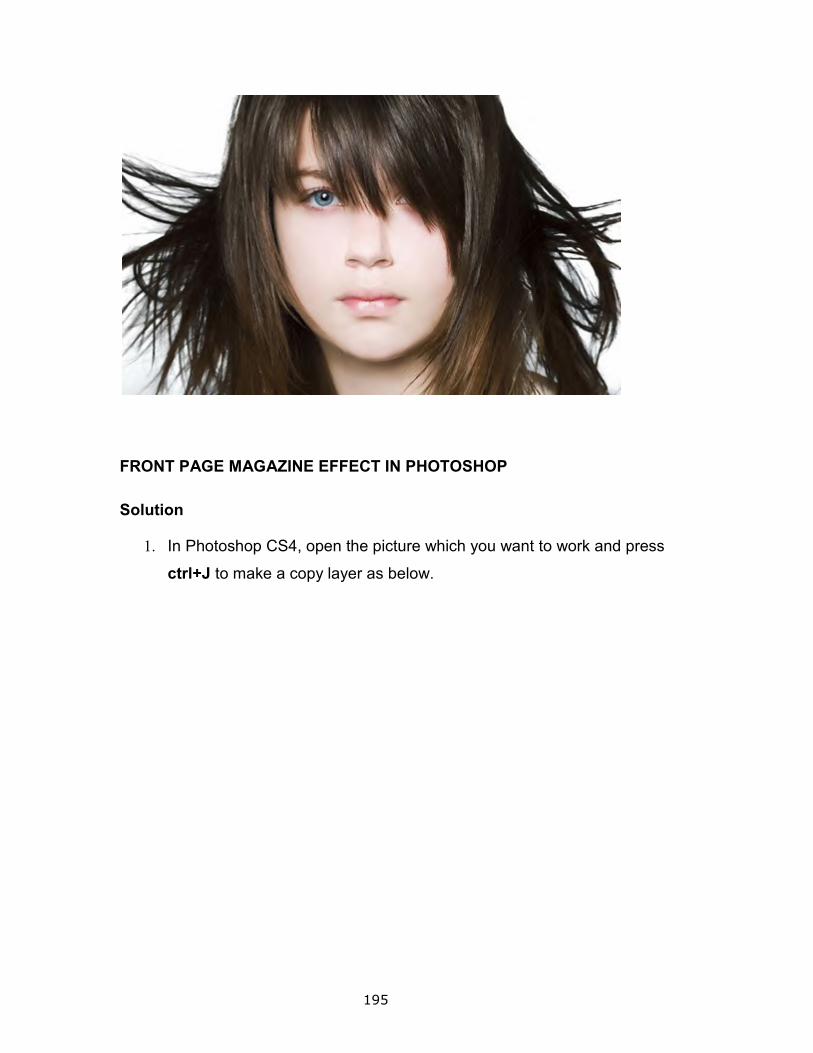
195
FRONT PAGE MAGAZINE EFFECT IN PHOTOSHOP
Solution
1. In Photoshop CS4, open the picture which you want to work and press
ctrl+J to make a copy layer as below.
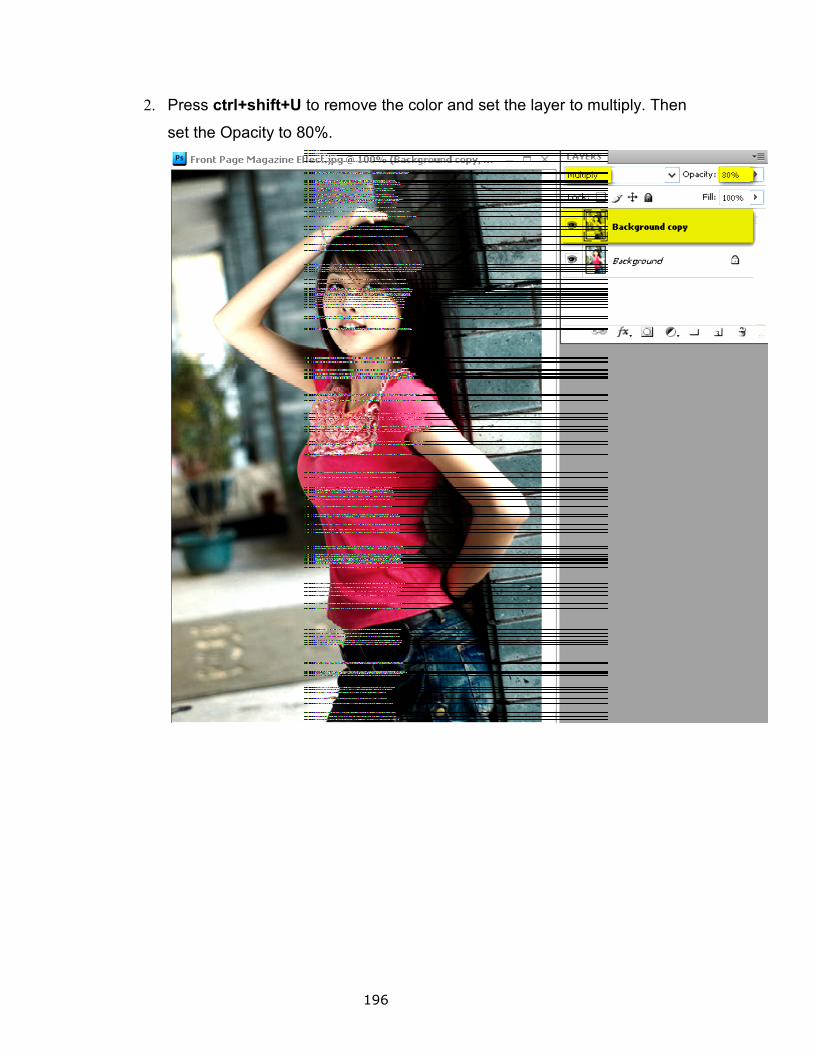
2. Press ctrl+shift+U
set the Opacity to 80%.
196
to remove the color and set the layer to multiply
80%.
multiply. Then
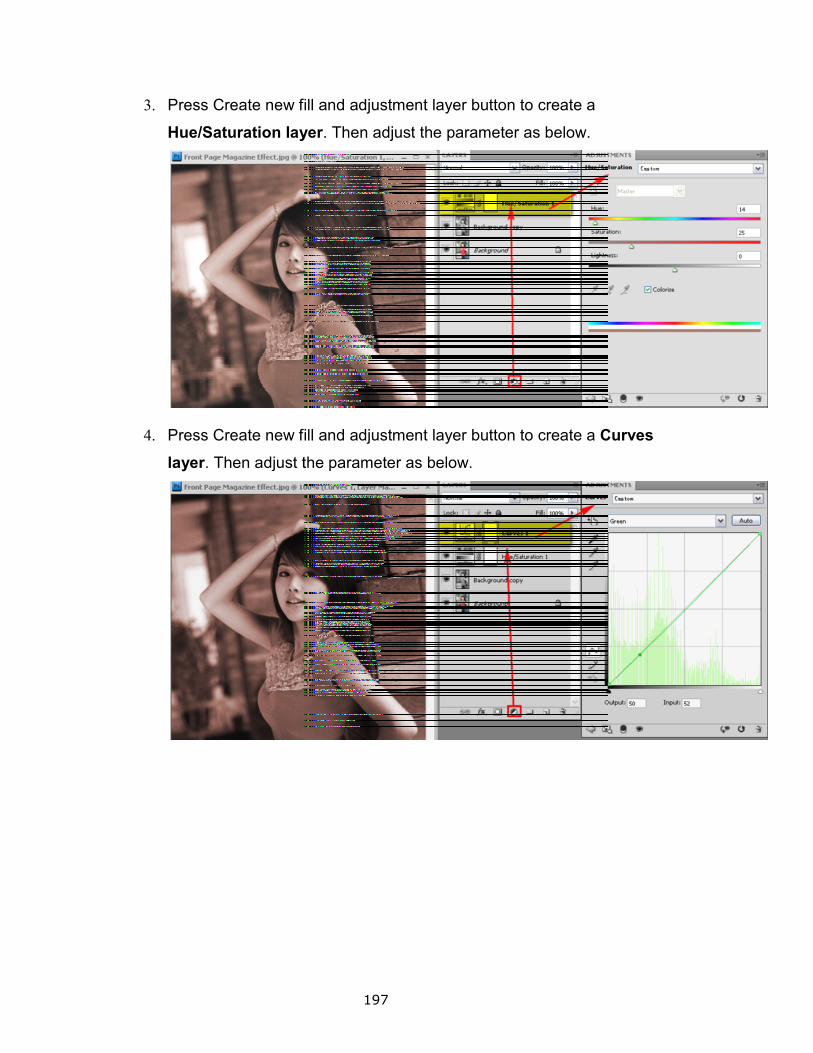
3. Press Create new fill and adjustment layer
Hue/Saturation layer
4. Press Create new fill and adjustment layer
layer. Then adjust the parameter as belo
197
Create new fill and adjustment layer button to create a
layer. Then adjust the parameter as below.
Create new fill and adjustment layer button to create a Curves
. Then adjust the parameter as below.
Curves
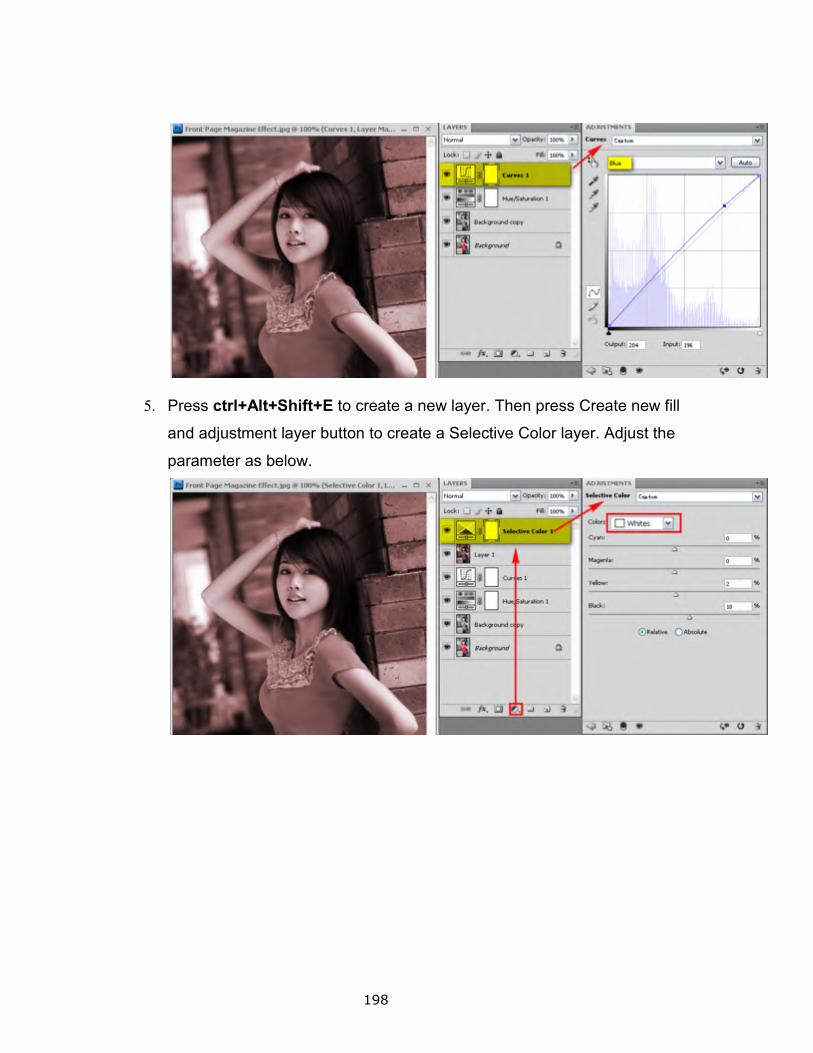
5. Press ctrl+Alt+Shift+E
and adjustment layer
parameter as below.
198
ctrl+Alt+Shift+E to create a new layer. Then press Create new fill
and adjustment layer button to create a Selective Color layer. Adjust the
parameter as below.
Create new fill
layer. Adjust the

6. Press Create new fill and adjustment layer
Hue/Saturation layer. Then adjust the parameter as below.
199
Create new fill and adjustment layer button to create a
layer. Then adjust the parameter as below.
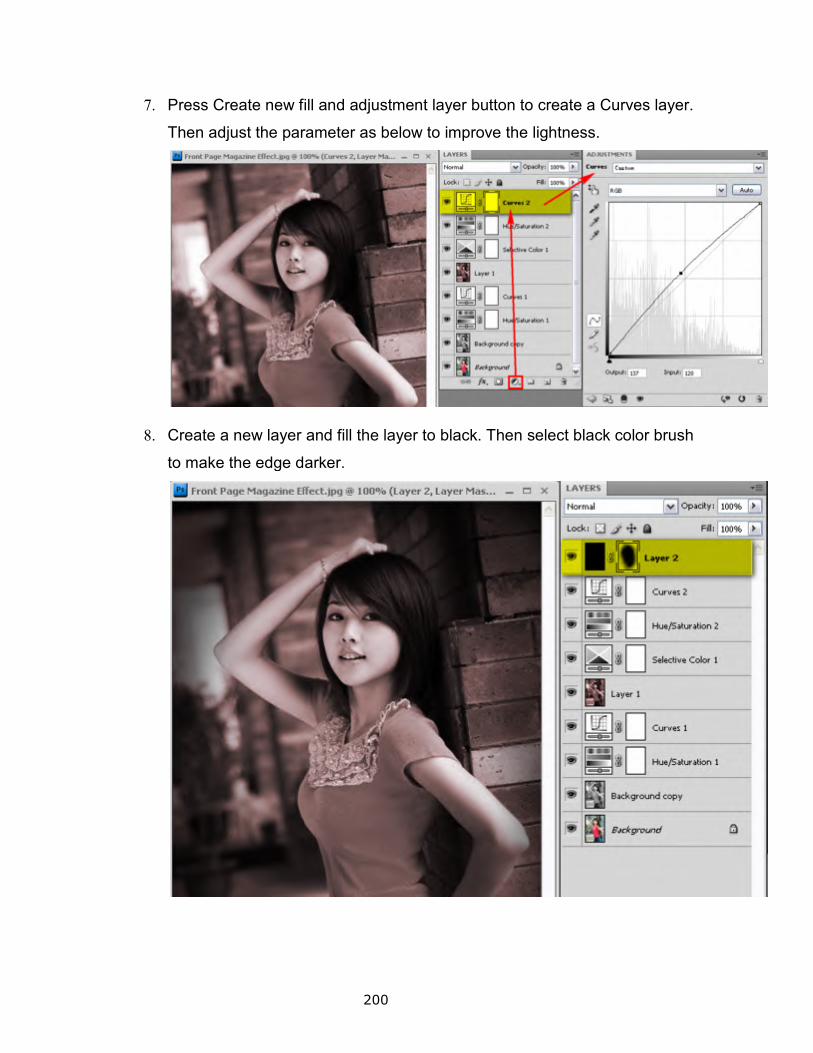
7. Press Create new fill and adjustment layer
Then adjust the parameter as below to improve the lightness.
8. Create a new layer and fill the layer to black. Then select black
to make the edge darker.
200
Create new fill and adjustment layer button to create a Curves
Then adjust the parameter as below to improve the lightness.
Create a new layer and fill the layer to black. Then select black
to make the edge darker.
Curves layer.
Create a new layer and fill the layer to black. Then select black color brush
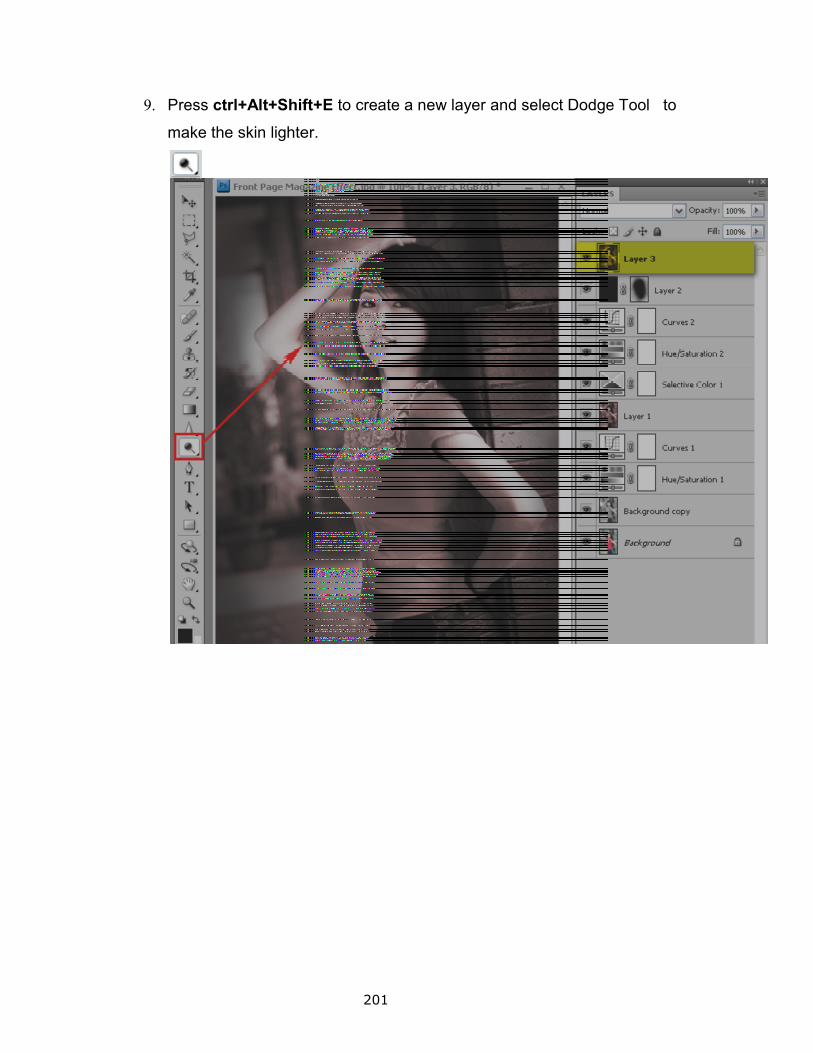
9. Press ctrl+Alt+Shift+E
make the skin lighter.
201
ctrl+Alt+Shift+E to create a new layer and select Dodge Tool
make the skin lighter.
Dodge Tool to
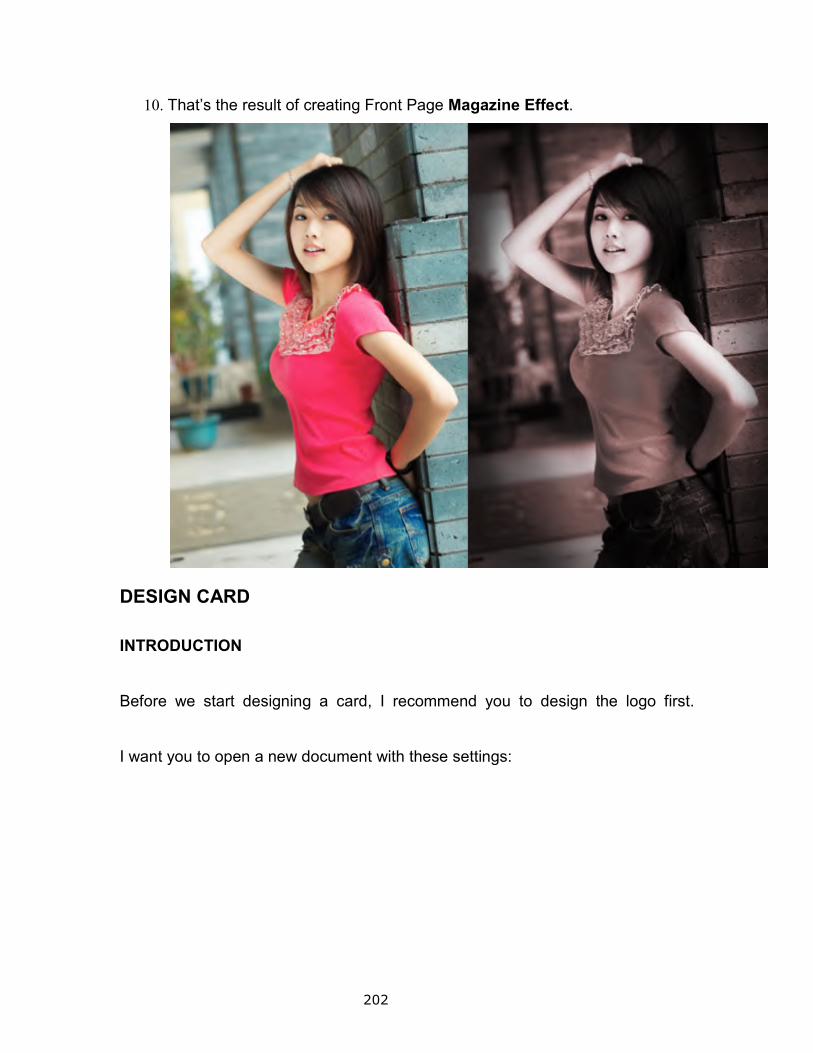
10. That’s the result of creating Front Page
DESIGN CARD
INTRODUCTION
Before we start designing a card, I recommend you to design the logo first.
I want you to open a new document with these settings:
202
That’s the result of creating Front Page Magazine Effect.
Before we start designing a card, I recommend you to design the logo first.
I want you to open a new document with these settings:
Before we start designing a card, I recommend you to design the logo first.
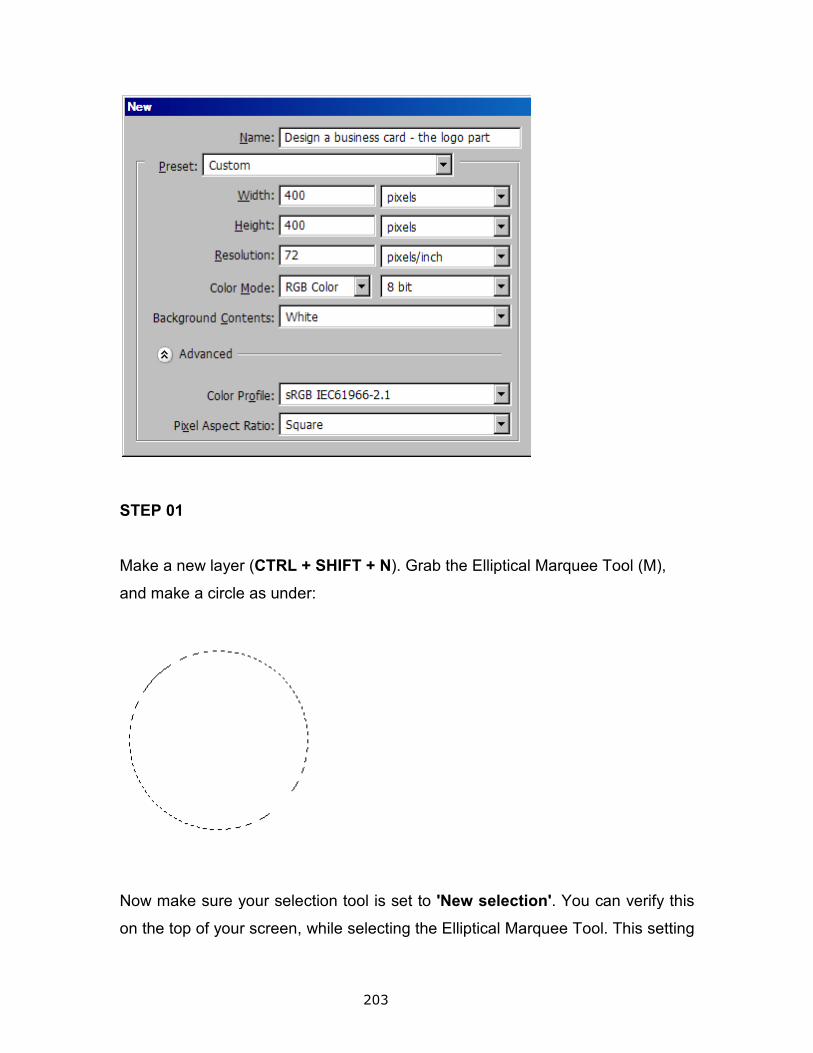
STEP 01
Make a new layer (CTRL + SHIFT + N
and make a circle as under:
Now make sure your selection tool is set to
on the top of your screen, while selecting the
203
CTRL + SHIFT + N). Grab the Elliptical Marquee Tool (M)
and make a circle as under:
Now make sure your selection tool is set to 'New selection'. You can verify this
on the top of your screen, while selecting the Elliptical Marquee Tool. This setting
Elliptical Marquee Tool (M),
. You can verify this
. This setting
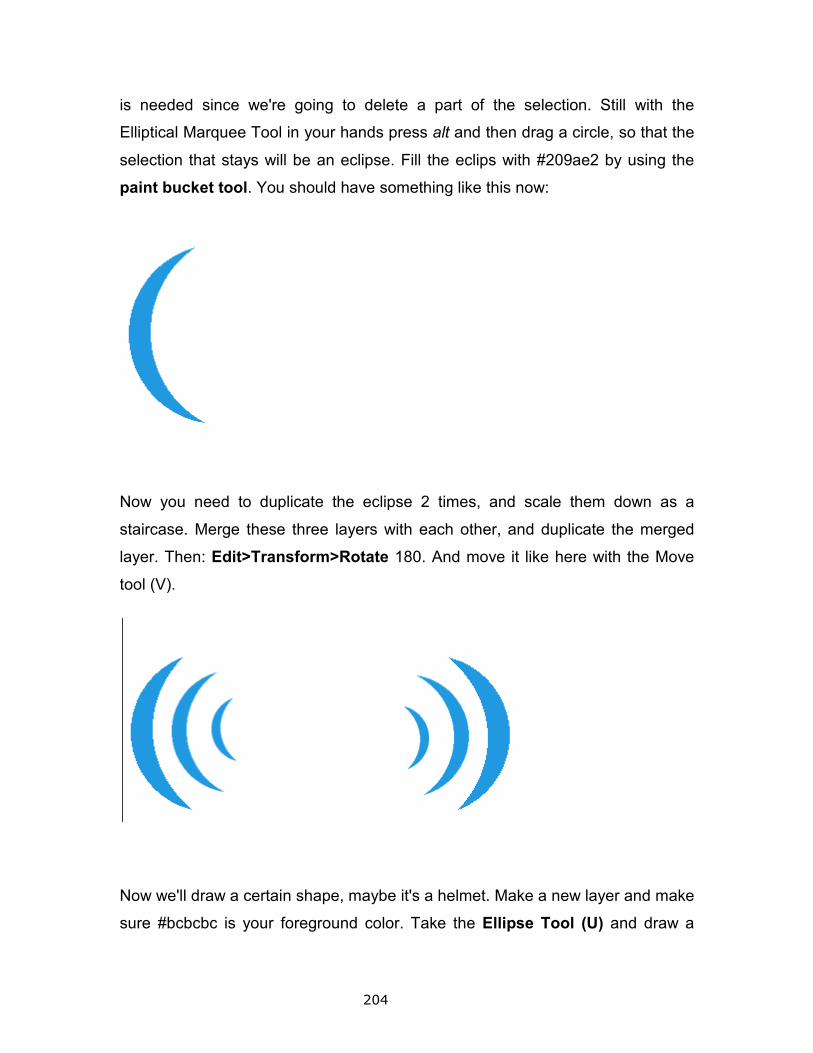
204
is needed since we're going to delete a part of the selection. Still with the
Elliptical Marquee Tool in your hands press alt and then drag a circle, so that the
selection that stays will be an eclipse. Fill the eclips with #209ae2 by using the
paint bucket tool. You should have something like this now:
Now you need to duplicate the eclipse 2 times, and scale them down as a
staircase. Merge these three layers with each other, and duplicate the merged
layer. Then: Edit>Transform>Rotate 180. And move it like here with the Move
tool (V).
Now we'll draw a certain shape, maybe it's a helmet. Make a new layer and make
sure #bcbcbc is your foreground color. Take the Ellipse Tool (U) and draw a
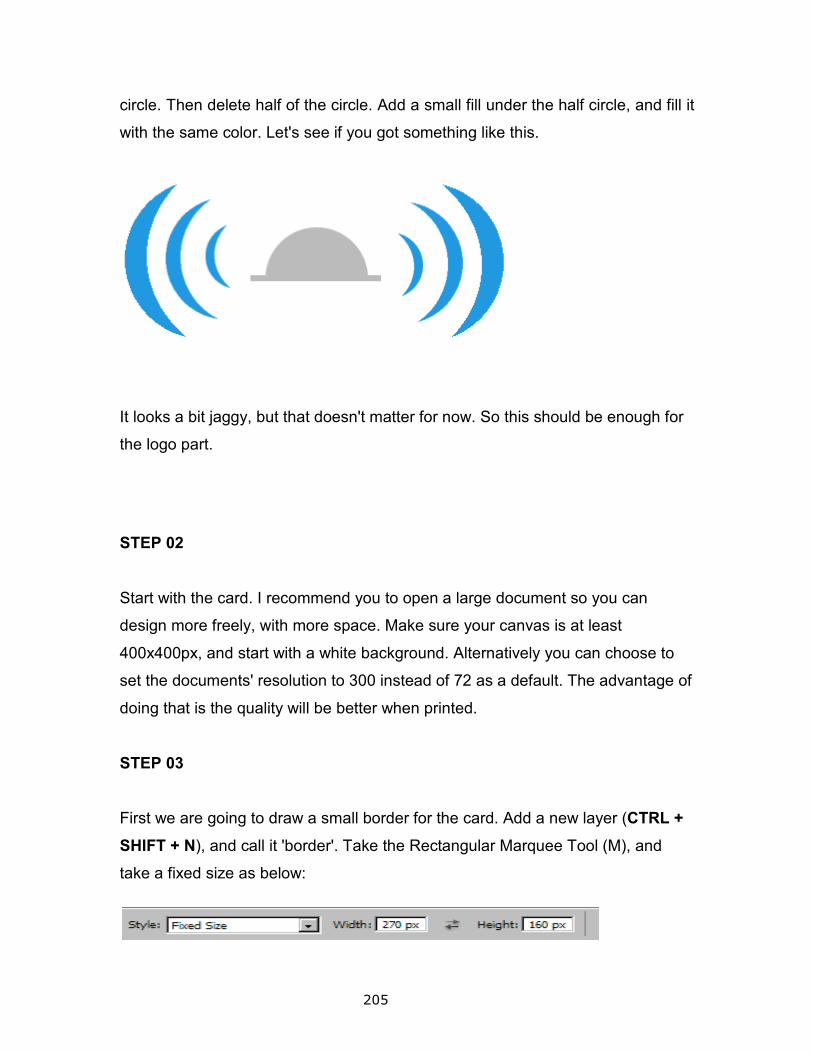
205
circle. Then delete half of the circle. Add a small fill under the half circle, and fill it
with the same color. Let's see if you got something like this.
It looks a bit jaggy, but that doesn't matter for now. So this should be enough for
the logo part.
STEP 02
Start with the card. I recommend you to open a large document so you can
design more freely, with more space. Make sure your canvas is at least
400x400px, and start with a white background. Alternatively you can choose to
set the documents' resolution to 300 instead of 72 as a default. The advantage of
doing that is the quality will be better when printed.
STEP 03
First we are going to draw a small border for the card. Add a new layer (CTRL +
SHIFT + N), and call it 'border'. Take the Rectangular Marquee Tool (M), and
take a fixed size as below:
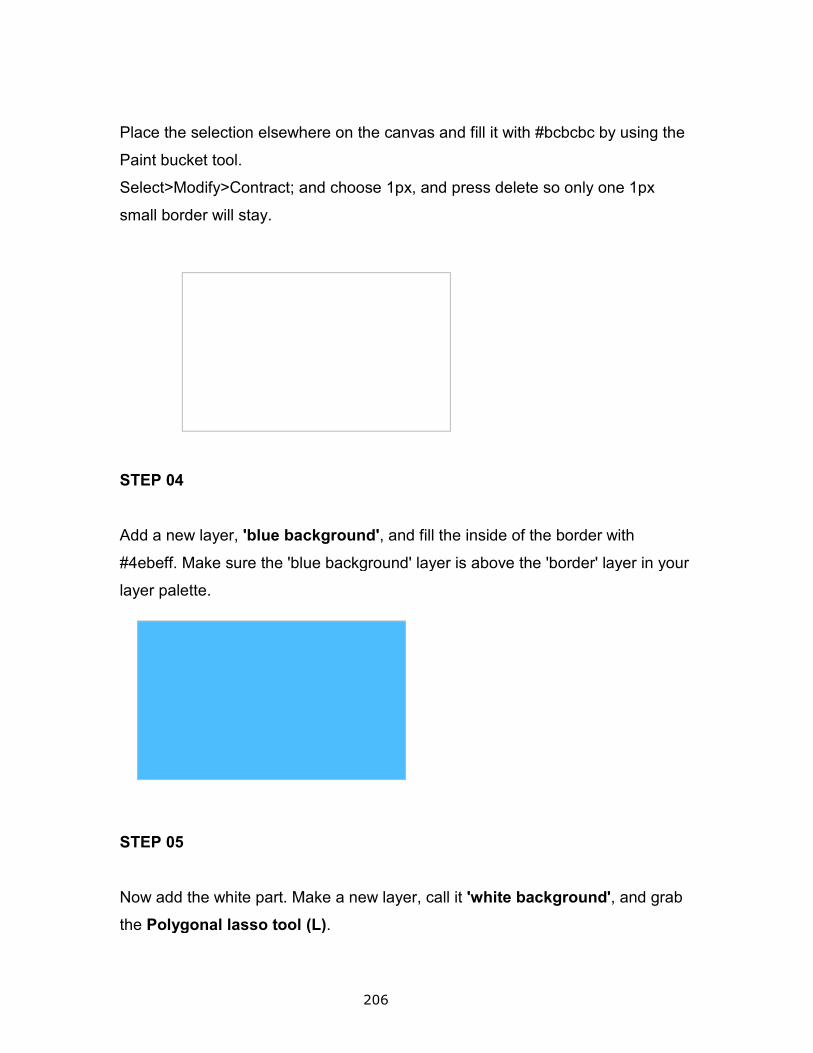
Place the selection elsewhere on the canvas and fill it with #bcbcbc by using the
Paint bucket tool.
Select>Modify>Contract; and choose 1px, and press delete so only one 1px
small border will stay.
STEP 04
Add a new layer, 'blue background'
#4ebeff. Make sure the 'blue background' layer is above th
layer palette.
STEP 05
Now add the white part. Make a new layer, call it
the Polygonal lasso tool (L)
206
Place the selection elsewhere on the canvas and fill it with #bcbcbc by using the
; and choose 1px, and press delete so only one 1px
'blue background', and fill the inside of the border with
#4ebeff. Make sure the 'blue background' layer is above the 'border' layer in your
Now add the white part. Make a new layer, call it 'white background'
Polygonal lasso tool (L).
Place the selection elsewhere on the canvas and fill it with #bcbcbc by using the
; and choose 1px, and press delete so only one 1px
, and fill the inside of the border with
e 'border' layer in your
'white background', and grab
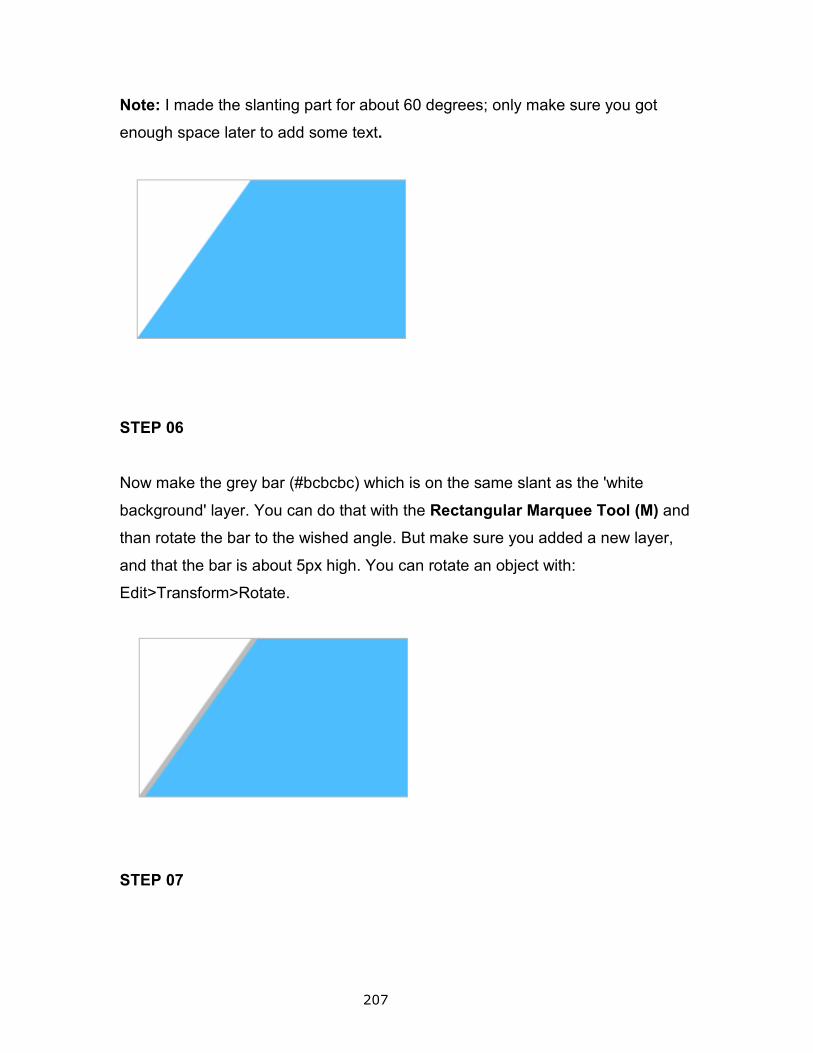
207
Note: I made the slanting part for about 60 degrees; only make sure you got
enough space later to add some text.
STEP 06
Now make the grey bar (#bcbcbc) which is on the same slant as the 'white
background' layer. You can do that with the Rectangular Marquee Tool (M) and
than rotate the bar to the wished angle. But make sure you added a new layer,
and that the bar is about 5px high. You can rotate an object with:
Edit>Transform>Rotate.
STEP 07
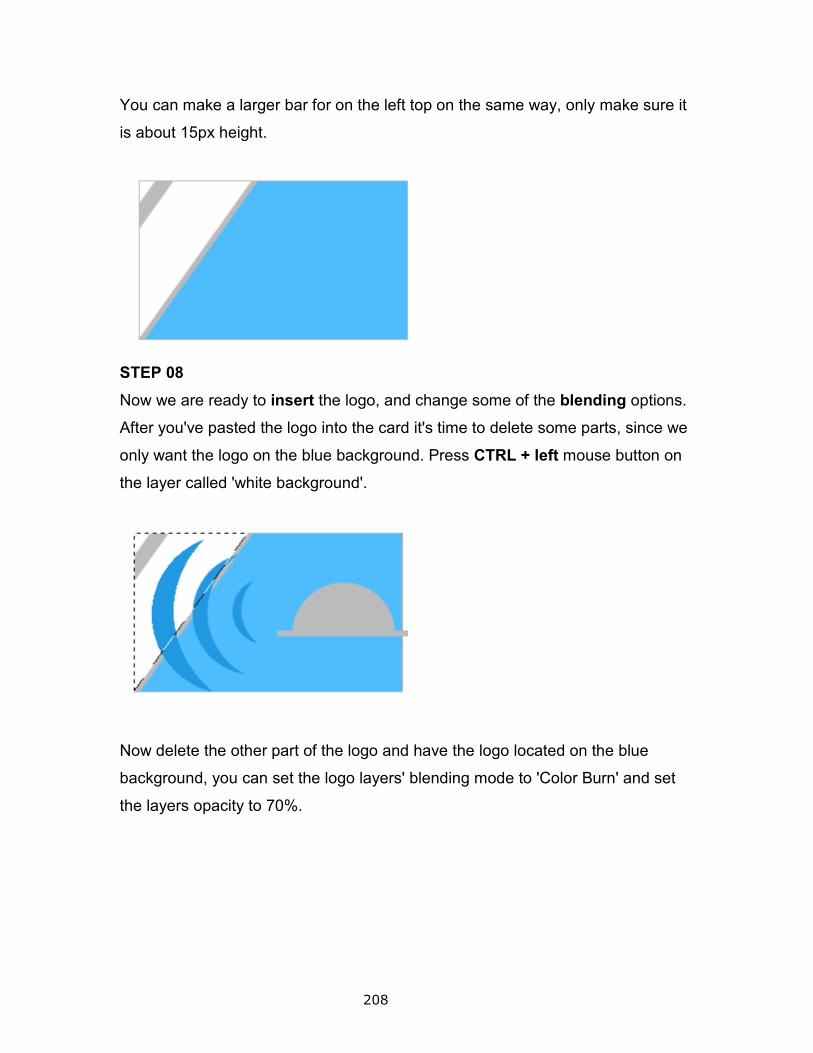
208
You can make a larger bar for on the left top on the same way, only make sure it
is about 15px height.
STEP 08
Now we are ready to insert the logo, and change some of the blending options.
After you've pasted the logo into the card it's time to delete some parts, since we
only want the logo on the blue background. Press CTRL + left mouse button on
the layer called 'white background'.
Now delete the other part of the logo and have the logo located on the blue
background, you can set the logo layers' blending mode to 'Color Burn' and set
the layers opacity to 70%.
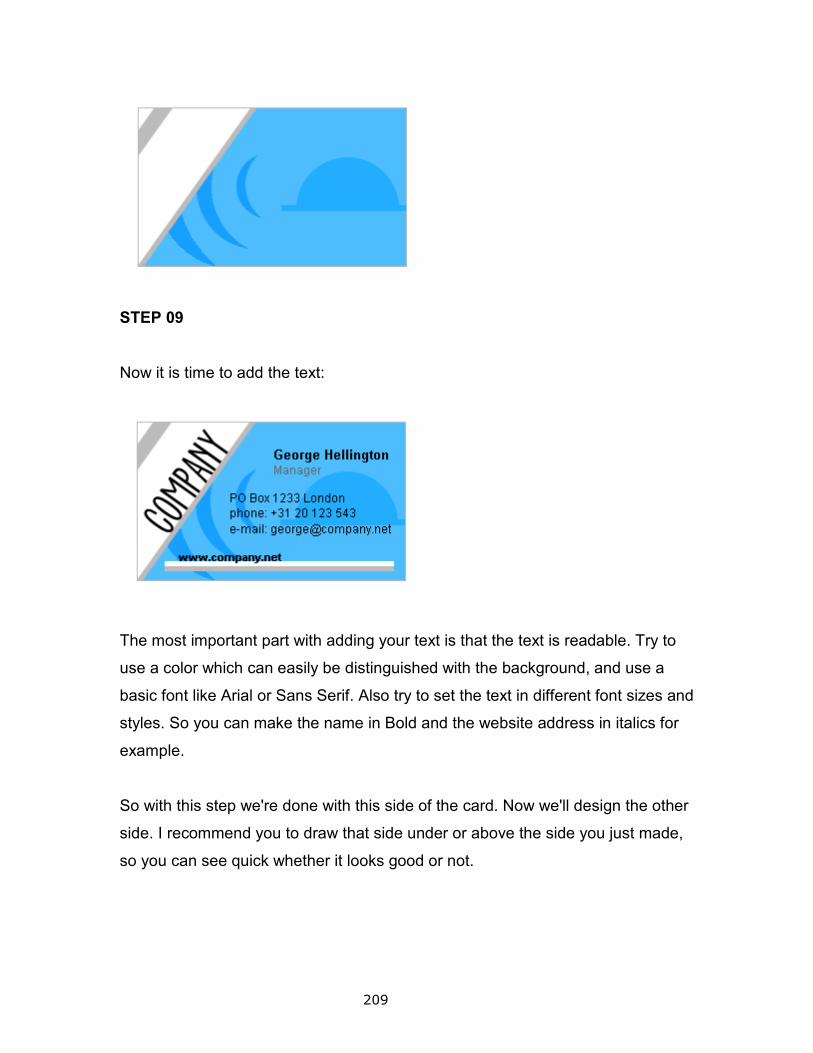
209
STEP 09
Now it is time to add the text:
The most important part with adding your text is that the text is readable. Try to
use a color which can easily be distinguished with the background, and use a
basic font like Arial or Sans Serif. Also try to set the text in different font sizes and
styles. So you can make the name in Bold and the website address in italics for
example.
So with this step we're done with this side of the card. Now we'll design the other
side. I recommend you to draw that side under or above the side you just made,
so you can see quick whether it looks good or not.
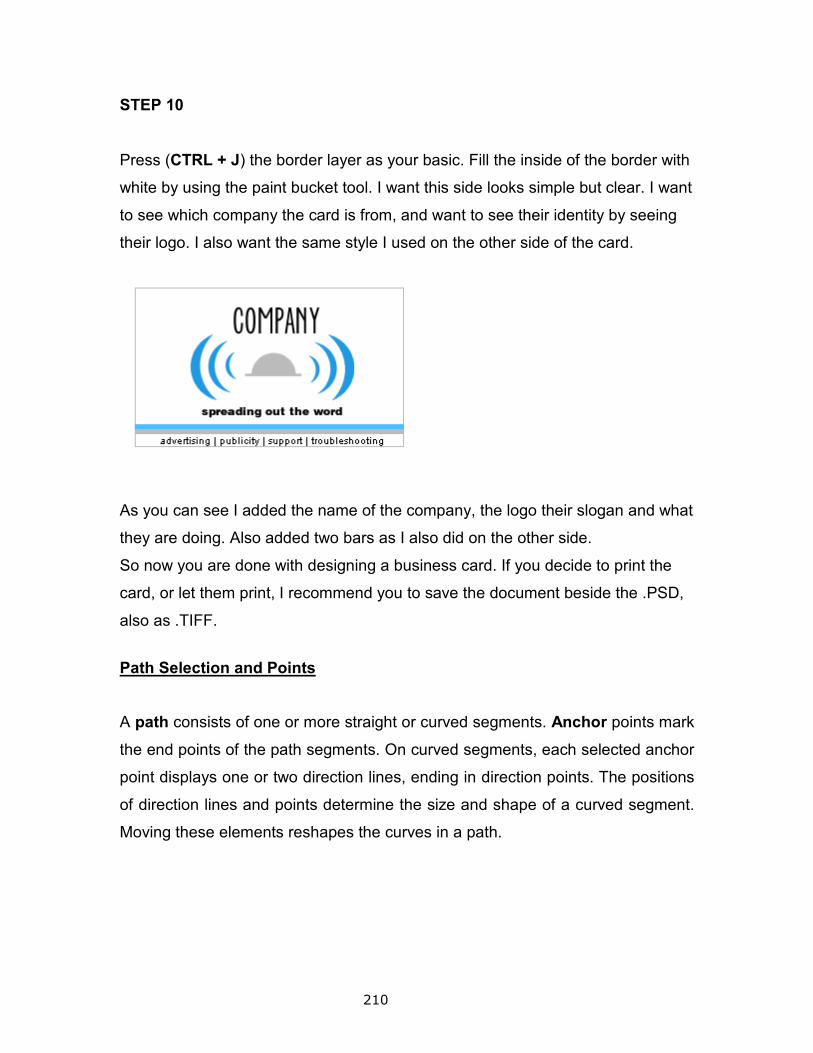
210
STEP 10
Press (CTRL + J) the border layer as your basic. Fill the inside of the border with
white by using the paint bucket tool. I want this side looks simple but clear. I want
to see which company the card is from, and want to see their identity by seeing
their logo. I also want the same style I used on the other side of the card.
As you can see I added the name of the company, the logo their slogan and what
they are doing. Also added two bars as I also did on the other side.
So now you are done with designing a business card. If you decide to print the
card, or let them print, I recommend you to save the document beside the .PSD,
also as .TIFF.
Path Selection and Points
A path consists of one or more straight or curved segments. Anchor points mark
the end points of the path segments. On curved segments, each selected anchor
point displays one or two direction lines, ending in direction points. The positions
of direction lines and points determine the size and shape of a curved segment.
Moving these elements reshapes the curves in a path.

211
A path
A. Curved line segment
B. Direction point
C. Direction line
D. Selected anchor point
E. Unselected anchor point
A path can be closed, with no beginning or end (for example, a circle), or
open, with distinct end points (for example, a wavy line).
Smooth curves are connected by anchor points called smooth points. Sharply
curved paths are connected by corner points.
Smooth point and corner point
When you move a direction line on a smooth point, the curved segments on both
sides of the point are adjusted simultaneously. By comparison, when you move a
direction line on a corner point, only the curve on the same side of the point as
the direction line is adjusted.
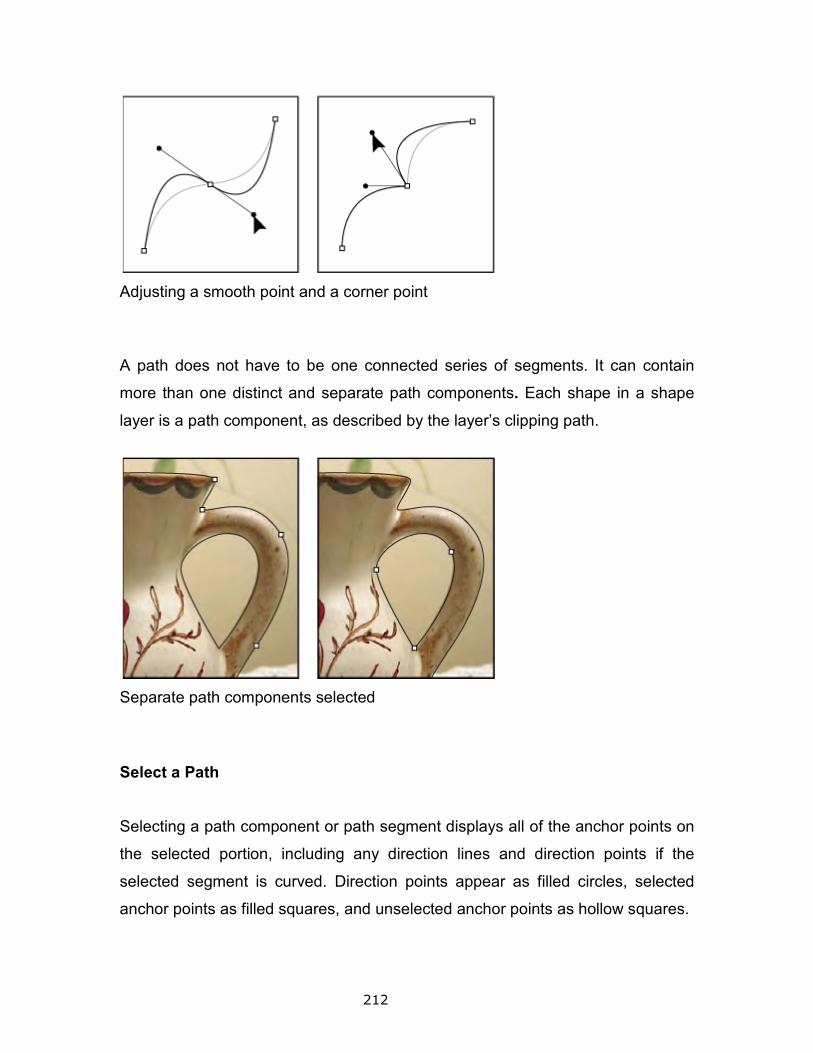
212
Adjusting a smooth point and a corner point
A path does not have to be one connected series of segments. It can contain
more than one distinct and separate path components. Each shape in a shape
layer is a path component, as described by the layer’s clipping path.
Separate path components selected
Select a Path
Selecting a path component or path segment displays all of the anchor points on
the selected portion, including any direction lines and direction points if the
selected segment is curved. Direction points appear as filled circles, selected
anchor points as filled squares, and unselected anchor points as hollow squares.
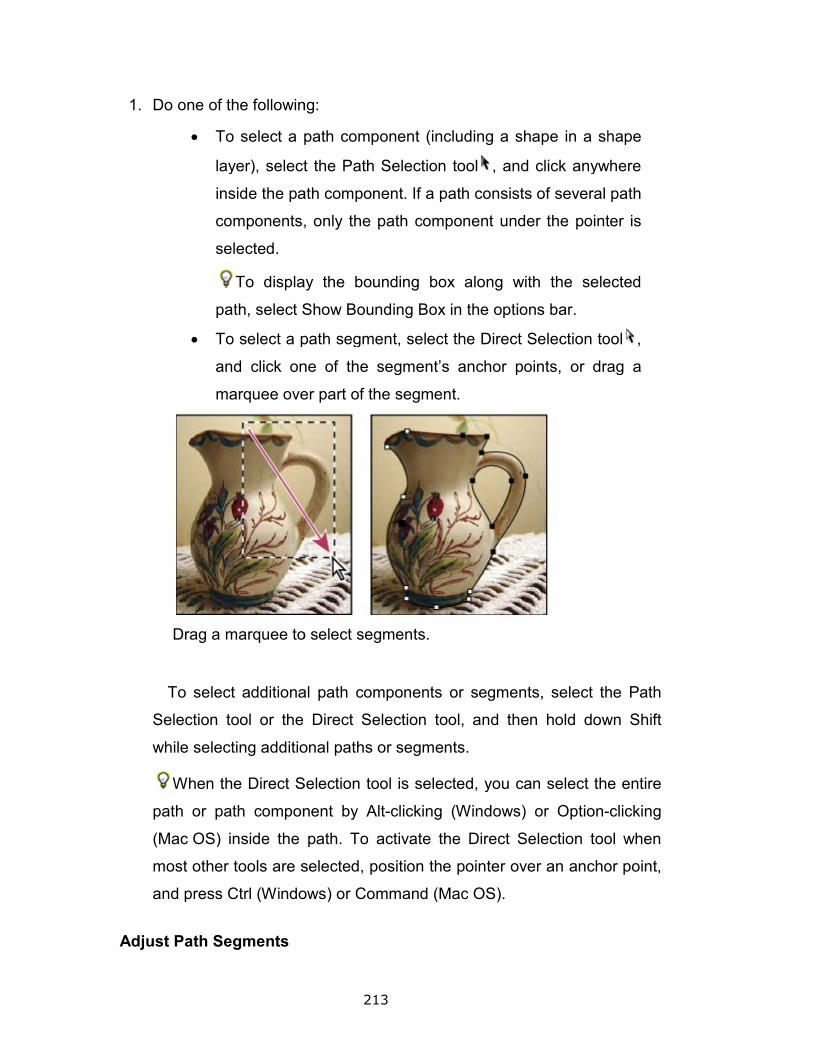
1. Do one of the following:
• To select a path component (including a shape
layer), select the Path Selection tool
inside the path component. If a path consists of several path
components, only the path component under the pointer is
selected.
To display the bounding box along with the selected
path, select Show Bounding Box in the options bar.
• To select a path segment, select the Direct Selection tool
and click one of the segment’s anchor points, or drag a
marquee over part of the segment.
Drag a marquee to select segments.
To select additional path components or segments, select the Path
Selection tool or the Direct Selection tool, and then hold down Shift
while selecting additional paths or segments.
When the Direct Selection tool is selected, you can select the entire
path or path component by Alt
(Mac OS) inside the path. To activate the Direct Selection tool when
most other tools are selected, position the pointer over an anchor point,
and press Ctrl (Windows) or Command (Mac
Adjust Path Segments
213
Do one of the following:
To select a path component (including a shape in a shape
layer), select the Path Selection tool , and click anywhere
inside the path component. If a path consists of several path
components, only the path component under the pointer is
To display the bounding box along with the selected
th, select Show Bounding Box in the options bar.
To select a path segment, select the Direct Selection tool
and click one of the segment’s anchor points, or drag a
marquee over part of the segment.
Drag a marquee to select segments.
To select additional path components or segments, select the Path
Selection tool or the Direct Selection tool, and then hold down Shift
while selecting additional paths or segments.
When the Direct Selection tool is selected, you can select the entire
path or path component by Alt-clicking (Windows) or Option-
OS) inside the path. To activate the Direct Selection tool when
most other tools are selected, position the pointer over an anchor point,
and press Ctrl (Windows) or Command (Mac OS).
in a shape
, and click anywhere
inside the path component. If a path consists of several path
components, only the path component under the pointer is
To display the bounding box along with the selected
To select a path segment, select the Direct Selection tool ,
and click one of the segment’s anchor points, or drag a
To select additional path components or segments, select the Path
Selection tool or the Direct Selection tool, and then hold down Shift
When the Direct Selection tool is selected, you can select the entire
-clicking
OS) inside the path. To activate the Direct Selection tool when
most other tools are selected, position the pointer over an anchor point,
214
You can edit a path segment at any time, but editing existing segments is slightly
different from drawing them. Keep the following tips in mind when editing
segments:
• If an anchor point connects two segments, moving that anchor
point always changes both segments.
• When drawing with the Pen tool, you can temporarily activate
the Direct Selection tool (In Design and Photoshop) so that you
can adjust segments you’ve already drawn; press Ctrl
(Windows) or Command (Mac OS) while drawing. In Illustrator,
pressing Ctrl or Command while drawing activates the last-used
selection tool.
• When you initially draw a smooth point with the Pen tool,
dragging the direction point changes the length of the direction
line on both sides of the point. However, when you edit an
existing smooth point with the Direct Selection tool, you change
the length of the direction line only on the side you’re dragging.
Adjust Path Components
You can reposition a path component (including a shape in a shape layer)
anywhere within an image. You can copy components within an image or
between two Photoshop images. Using the Path Selection tool, you can merge
overlapping components into a single component. All vector objects, whether
they are described by a saved path, work path, or vector mask, can be moved,
reshaped, copied, or deleted.
Add or Delete Anchor Points
Adding anchor points can give you more control over a path or it can extend an
open path. However, it’s a good idea not to add more points than necessary. A
path with fewer points is easier to edit, display, and print. You can reduce the
complexity of a path by deleting unnecessary points.
The toolbox contains three tools for adding or deleting points: the Pen tool
Add Anchor Point tool , and the Delete Ancho
By default, the Pen tool changes to the Add Anchor Point tool as you position it
over a selected path or to the Delete Anchor Point tool as you position it over an
anchor point. (In Photoshop, you must select Auto Add/Delete in the options
to enable the Pen tool to automatically change to the Add Anchor Point or Delete
Anchor Point tool.)
You can select and edit multiple paths simultaneously in Photoshop and
Design; however, you can add or delete points to only one path at a time in
Illustrator. In Photoshop and
anchor points by clicking and dragging as you add.
Note: Don’t use the Delete, Backspace, and Clear keys or the Edit
Edit > Clear commands to delete anchor points: these
delete the point and the line segments that connect to that point.
1. Select the path you want to modify.
2. Select the Pen tool, the Add Anchor Point tool, or the Delete Anchor
Point tool.
3. To add an anchor point, position the pointer over a
click. To delete an anchor point, position the pointer over an anchor
point and click.
In Illustrator, you can add anchor points to a path by selecting the object and
choosing Object > Path > Add Anchor Points.
Disable or temporarily override automatic Pen tool switchin
215
th fewer points is easier to edit, display, and print. You can reduce the
complexity of a path by deleting unnecessary points.
The toolbox contains three tools for adding or deleting points: the Pen tool
, and the Delete Anchor Point tool .
By default, the Pen tool changes to the Add Anchor Point tool as you position it
over a selected path or to the Delete Anchor Point tool as you position it over an
anchor point. (In Photoshop, you must select Auto Add/Delete in the options
to enable the Pen tool to automatically change to the Add Anchor Point or Delete
You can select and edit multiple paths simultaneously in Photoshop and
; however, you can add or delete points to only one path at a time in
llustrator. In Photoshop and In Design, you can reshape a path while adding
anchor points by clicking and dragging as you add.
Don’t use the Delete, Backspace, and Clear keys or the Edit
> Clear commands to delete anchor points: these keys and commands
delete the point and the line segments that connect to that point.
Select the path you want to modify.
Select the Pen tool, the Add Anchor Point tool, or the Delete Anchor
To add an anchor point, position the pointer over a path segment and
click. To delete an anchor point, position the pointer over an anchor
In Illustrator, you can add anchor points to a path by selecting the object and
> Add Anchor Points.
override automatic Pen tool switching
th fewer points is easier to edit, display, and print. You can reduce the
The toolbox contains three tools for adding or deleting points: the Pen tool , the
By default, the Pen tool changes to the Add Anchor Point tool as you position it
over a selected path or to the Delete Anchor Point tool as you position it over an
anchor point. (In Photoshop, you must select Auto Add/Delete in the options bar
to enable the Pen tool to automatically change to the Add Anchor Point or Delete
You can select and edit multiple paths simultaneously in Photoshop and In
; however, you can add or delete points to only one path at a time in
, you can reshape a path while adding
Don’t use the Delete, Backspace, and Clear keys or the Edit > Cut or
keys and commands
Select the Pen tool, the Add Anchor Point tool, or the Delete Anchor
path segment and
click. To delete an anchor point, position the pointer over an anchor
In Illustrator, you can add anchor points to a path by selecting the object and
216
You can override automatic switching of the Pen tool to the Add Anchor Point
tool or the Delete Anchor Point tool. This is useful when you want to start a new
path on top of an existing path.
• In Photoshop, deselect Auto Add/Delete in the options bar.
• In Illustrator or In Design, hold down Shift as you position the
Pen tool over the selected path or an anchor point. (To prevent
Shift from constraining the Pen tool, release Shift before you
release the mouse button.)
Fill Paths with Color
A path created with the Pen tool does not become an image element until you
stroke or fill it. The Fill Path command fills a path with pixels using a specified
color, a state of the image, a pattern, or a fill layer.
Path selected (left) and filled (right)
Important: When you fill a path, the color values appear on the active layer.
Make sure that the layer you want is active before beginning. You cannot fill a
path when a layer mask or text layer is active.