PHOTOGRAM - Redlands Camera Club 2017 06.pdf · included in the Photogram. A big welcome goes to...
17
~ 1 ~ _____________________________________________________ ColorMunki – Have your photos submitted for QuickPix, Members’ Night, or competitions not looked the way you expected? The problem is probably a difference in how your computer and the club projector display colors and brightness. You can fix this by calibrating your computer the same way our club calibrates our projector – with the ColorMunki. Set up is simple and the calibration process only takes a few minutes. Contact Jim Selby at [email protected] to reserve the ColorMunki. Kelby One – Kelby One, the premier online photography training site has graciously agreed to extend the Redlands Camera Club discount for another year. The service features more than 500 classes on a variety of photographic subjects and costs $20/month or $199/year, but our members can get a year’s access for $179. New subscribers can use their discount by going to kelbyone.com/redeem and entering discount code rlcc20 (case- sensitive) to begin the process. If you are already a subscriber to Kelby One, you may use the discount code to renew, but you must call Customer Service at 1-800.201.7323 to do so. Programs for June 2017 Details for the current month’s programs may be found in the Programs article. June 5 All About Printing June 19 Capturing Great Wildlife Photos With Brent Paull July 3 Summer Competition July 17 Competition Awards PHOTOGRAM Monthly Newsletter of the Redlands Camera Club June 2017 Photogram Editor - Wayne (Woody) Wood Deadline for entries is the 25th of every month Redlands Camera Club meets: 1 st & 3 rd Mondays, 7:00 pm First Presbyterian Church - 100 Cajon St - Redlands, CA Guests are always welcome © Redlands Camera Club & Contributors The contents of the Photogram are copyrighted. No material herein may be reproduced in any manner without the written permission of either the Editor or the material’s specific contributor.
Transcript of PHOTOGRAM - Redlands Camera Club 2017 06.pdf · included in the Photogram. A big welcome goes to...

~ 1 ~
_____________________________________________________ ColorMunki – Have your photos submitted for QuickPix, Members’ Night, or competitions not looked the way you expected? The problem is probably a difference in how your computer and the club projector display colors and brightness. You can fix this by calibrating your computer the same way our club calibrates our projector – with the ColorMunki. Set up is simple and the calibration process only takes a few minutes. Contact Jim Selby at [email protected] to reserve the ColorMunki. Kelby One – Kelby One, the premier online photography training site has graciously agreed to extend the Redlands Camera Club discount for another year. The service features more than 500 classes on a variety of photographic subjects and costs $20/month or $199/year, but our members can get a year’s access for $179. New subscribers can use their discount by going to kelbyone.com/redeem and entering discount code rlcc20 (case-sensitive) to begin the process. If you are already a subscriber to Kelby One, you may use the discount code to renew, but you must call Customer Service at 1-800.201.7323 to do so.
Programs for June 2017
Details for the current month’s programs may be found in the Programs article.
June 5
All About Printing
June 19
Capturing Great Wildlife Photos With Brent Paull
July 3
Summer Competition
July 17
Competition Awards
PHOTOGRAM Monthly Newsletter of the Redlands Camera Club
June 2017 Photogram Editor - Wayne (Woody) Wood
Deadline for entries is the 25th of every month
Redlands Camera Club meets: 1st& 3rd Mondays, 7:00 pm First Presbyterian Church - 100 Cajon St - Redlands, CA
Guests are always welcome
© Redlands Camera Club & Contributors The contents of the Photogram are copyrighted. No material herein may be reproduced in any manner without the written permission of either the Editor or the material’s specific contributor.

~ 2 ~
Prez Sez - Dave Ficke
I was going to write about how summer is quickly approaching, with Memorial Day sliding by us on sneaky bare feet, along with the many photographic opportunities of summer. After all, July 4th is a little over a month away, and with it, summer picnics, vacation trips to the beach, family gatherings, and the highly anticipated solar eclipse. But then I thought, how boring! This topic must be used as summer rolls around each year!
Therefore, allow me to expound a little on the topic of ‘learning and practice.’ It is often said that learning is a life-long process and no matter our age or occupation, there is always something to learn. For example, if we observe the works of famous painters we see that their technique, style, subject, etc. evolve over time. As we put more time into what we do, we learn various processes and techniques that we were unsure of before, improve with practice. Although at times this is frustrating, it’s a process that takes time and patience. I have found that as I read various articles, attend workshops and classes, and get out the camera to implement these new skills, that over time my photographic skills are evolving for the better. I think we can all agree that if we had appendicitis, we would prefer a surgeon not read a manual while doing surgery. Same logic goes when we drive a car. It takes practice and there is a learning curve. As summer approaches and with it these great opportunities to capture the moments, a few questions come to mind. When was the last time your sensor/camera was cleaned? Do you know how to take that shot at the birthday party with only the candles of the cake for light? Do you know how to effectively use your on camera flash without the ‘deer in the headlights’ look? Can you change from aperture to shutter to manual settings without looking and thinking about it? How about taking that eponymous family photo of all those beloved folks at the beach with the sun in the background? Do you know how to control your depth of field? These skills are all part of summer, family, and fun and the learning process. Anticipating that birthday or beach party, family gathering or opportunity to shoot sun-drenched landscapes or tiny wildflowers, make sure you have all those ‘tools in your tool box’ or ask for help from a fellow photographer and then get some practice! As many great painters and photographers began their craft, trained, practiced, and evolved, they, and their ability matured over time. Just as we learned to drive a car with a stick shift, stalling out several times, we eventually could shift gears, turn on the signal, press the button with our left foot to turn on the high beams, turn on the windshield wipers, and switch radio stations, AND shift gears without having a cerebral overload, we can learn how to use our cameras and take better photographs. It’s a process. June 5th we are excited to have a special program with Paul Speaker from Bay Photo talking to us about the print and don’t forget about our metal print contest. I would like to here from you so if you have a comment or suggestion please email me at [email protected] and in the subject line put RCC Comments.

~ 3 ~
Programs Jim Hendon
July 3 - Summer Competition July 17 - Competition Awards Dinner

~ 4 ~
Presentation/Workshop Invitation
Joe Ligori I will be doing a Presentation/Workshop on Camera Focus/Auto Focus at the following times and places. A limited number may be able to attend as 'guests' at the two Camera Clubs, but most certainly you would be welcome to attend at either of the Image One events. Please see the dates and times below along with a narrative. If you'd like more information please email me at [email protected]. Thursday May 18th, 6 pm. - Rancho Cucamonga Photo Club (please note this is a shorter, condensed version) http://rcphotoclub.com/ Saturday June 17th, 3 pm. - Image One Camera https://imageonecamera.com/events/ Monday June 26th, 7 pm. - Photochromers (Sierra Madre) http://photochromers.com/calendar/ Saturday/Sunday August 19th/20th - Image One Camera EXPO (day and time to be announced) https://imageonecamera.com/events/ Auto Focus Mystique The Auto Focus Mystique presentation/workshop will delve into the mysteries of Camera Auto Focus Systems. Almost every image you create with your camera uses the Auto Focus System. Knowing more about Camera Focus Systems will surely add to your photography skills. We will look at some of the technical aspects of Auto Focus, but will concentrate on how to use this unique and complex part of your camera. We will discuss problems with using Auto Focus and how to diagnose and solve those problems. We will cover a brief history of Auto Focus, the types of Auto Focus systems and types of focus detection systems. We recommend bringing your camera so you can follow along as we discuss and demonstrate using your Auto Focus System. Focus modes, areas and Focus Points will be covered in detail as well as focus point sensor types and Back Button Focus. We will finish up with concentration on any problems and Issues you may be experiencing and lastly we will look at the Creative use of Focus. This will be a lively, hands on presentation/workshop that you'll surely not want to miss. Join us and you're sure to learn something new about Auto Focus. BE SURE TO BRING YOUR CAMERA AND MANUAL TO THE WORKSHOP.

~ 5 ~
Membership - Stephanie Billings NEWS FLASH! You may now join RCC or renew your membership via PayPal Just go to our WebSite at www.redlandscameraclub.com and click on the link
Membership Renewal – We have started the renewal process for the current year which started April 1, 2017. So please make a concerted effort to renew your membership as soon as possible. $35 is a great deal for all of the benefits that Redlands Camera Club offers. Only currently paid members can take part in education classes, competitions, events, free workshops, and field trips. Dues are the primary source of club revenue allowing us to provide you with quality programs and
training. Contact Stephanie Billings at [email protected] if you have any questions about your membership renewal. Prospective new members please note: At Redlands Camera Club you’ll find a group of photo-enthusiasts with a wide range of interests, a ton of experience and a willingness to help you become a better photographer. Our regular club meetings offer stimulating programs, members’ nights and competitions; in addition, we offer field trips, workshops, classes and opportunities for mentoring. You can obtain an application form at one of our regular meetings or from our website by going to the club web site (www.redlandscameraclub.org), clicking on the “Downloads” tab and then clicking on “Membership Application” tab. Follow the instructions on the form and your all set! All members please introduce yourself to our newest members and help direct them to members who can assist them with their photography needs. We try to get a brief Bio from each of our new members. Contact me by email ([email protected]) if your Bio has not appeared and you wish to have it included in the Photogram. A big welcome goes to the following newest members: DeeDee Schilt Nathan Schilt Dianna Macias Marana Elder Timothy Elder

~ 6 ~
Southern California Council of Cameras Clubs Deborah Seibly
Headline-Redlands Camera Club members do well in S4C competition!!! Results of the April S4C competition: April was the last competition for 2016-2017. Competitions resume in September 2017. 933 photos were submitted and 26 awards and honorable mentions were received by members of the Redlands Camera Club. Honorable Mentions were received by: Mary Ann Ponder(2), Joe Ligori (5), Christine Pence, Beverly Brett, Rick Strobaugh (2), Deborah Seibly (2), Joe Niehaus(2) and Pete Bechtol (3). Awards were won by Rick Strobaugh (3), Deborah Seibly (2), Bitsy Bernor and Joe Niehaus (2) in varying categories. The April catalogue can be viewed on the website. The Awards banquet is planned for June 3 at Almansor Court. One can register to attend on the S4C website. Year end standing and rankings will be announced and awarded at the banquet. "The Pali" - Photo by Woody

~ 7 ~
Field Trips - Debra Dorothy
Cherry Valley Lavender Festival June Field Trip
Date: Saturday June 10th
Location: 10600 HIGHLAND SPRINGS AVE. CHERRY VALLEY, CALIFORNIA 92223 Time: 10:00am-5:00pm or until we're ready to leave.
Price:Adults (18-64 years) $8 Seniors (65+ years) $6
For more information please check out their website: http://hsresort.com/thelavenderfestival/
We will meet at the Bobs Big Boy on 540 Sandalwood Dr, Calimesa, CA 92320 at 9:30 to carpool to this event.
If you plan on attending this event please call or email me at 909 794-3887, 909 633-2913, [email protected]

~ 8 ~
Competitions Russ Trozera
2017 Summer Competition
This week I took a walk down memory lane I have been entering the Redlands photo competitions for over 10 years now. My earliest entry was titled Sea Urchin it scored 83.8 in Close up category and won a second place WOW . Some of the images I submitted have scored 75. I have thought back over the years of the many entries I have submitted. I have never won a best of show. I compete more against myself than others. The competition give me an opportunity to see how others judge my work. What makes the competitions interesting is to see the variety of entries. The more we have the more variety.
Speaking of competitions we have our Summer Competition coming up July 3, 2017. This competition you can submit 3 images. You can begin uploading your images June 5, 2017. Image uploads ends at 11 PM June 19, 2017. Judging the images is July 3, with ribbons being awarded on July 17, 2017 at our Annual Picnic
"Reflections" Photo by: Bruce Bonnett
~ 9 ~
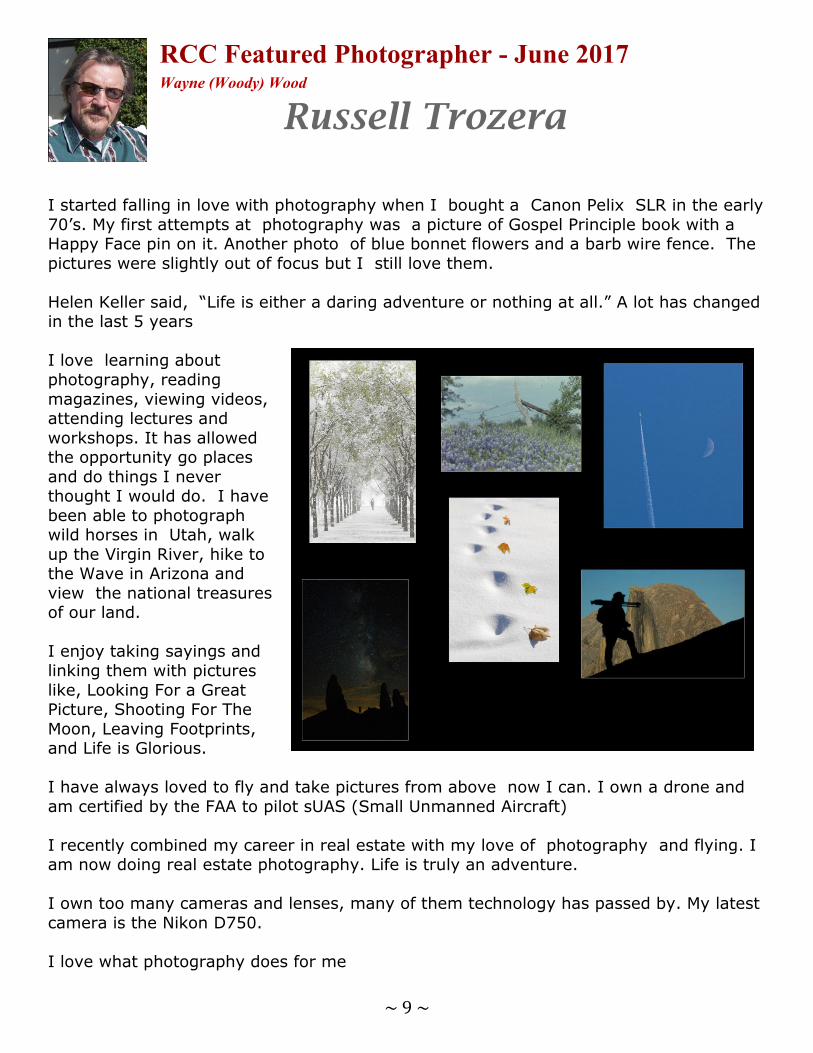
RCC Featured Photographer - June 2017 Wayne (Woody) Wood Russell Trozera
I started falling in love with photography when I bought a Canon Pelix SLR in the early 70’s. My first attempts at photography was a picture of Gospel Principle book with a Happy Face pin on it. Another photo of blue bonnet flowers and a barb wire fence. The pictures were slightly out of focus but I still love them. Helen Keller said, “Life is either a daring adventure or nothing at all.” A lot has changed in the last 5 years I love learning about photography, reading magazines, viewing videos, attending lectures and workshops. It has allowed the opportunity go places and do things I never thought I would do. I have been able to photograph wild horses in Utah, walk up the Virgin River, hike to the Wave in Arizona and view the national treasures of our land. I enjoy taking sayings and linking them with pictures like, Looking For a Great Picture, Shooting For The Moon, Leaving Footprints, and Life is Glorious. I have always loved to fly and take pictures from above now I can. I own a drone and am certified by the FAA to pilot sUAS (Small Unmanned Aircraft) I recently combined my career in real estate with my love of photography and flying. I am now doing real estate photography. Life is truly an adventure. I own too many cameras and lenses, many of them technology has passed by. My latest camera is the Nikon D750. I love what photography does for me

~ 10 ~
Tips - Rick Strobaugh
Lens Selection I know I often find myself shooting with the same lens, my 17-40, every time I stop for shots while traveling. I have to remind myself, use other lenses too. While shooting landscape photos, a wide angle gives great coverage of a large landscape area. I often zoom in to the 40mm setting when I am cropping out stuff that is not contributing to the photo but even that can cover a large area.. After your 17-40 or whatever wide angle you use, pull out your telephoto and start shooting the "intimate" landscapes. Within your large landscape, there are probably many much smaller photo subjects that are just as interesting, if not more so. With your zoom, you can
now isolate different aspects of that landscape that you found so interesting in the first place. Then, if you really want to go wild, pull out a macro or use your telephoto for macro shots. There are lots of macro subjects, literally, at your feet. Work a scene for all it's worth and you may find many shots that you like even better than your wide angle shot . "Skimming" - Photo by Bruce Bonnett

~ 11 ~
Club Calendar Information that was available to the editor at the time of publication June 5 - All about printing June 10 - Field Trip - Cherry Valley Lavender Festival June 19 - Capturing great wildlife photos with Brent Paull Future Field Trips - July: Old Fort MacArther Days 7/8/2017 August: Big Bear Renaissance Faire 8/19/2017 September: Deuces 'N Diggers Antique Car Show 9/30/2017 October: Bolsa Chica birding 10/28/2017 November: The Living Desert Zoo and Garden 11/18/2017 December: Mission Inn Festival Of Lights 12/13/2017 January: San Diego Zoo Safari Park 01/25/2018 RCC Members: Unique opportunity to make a difference Frank Peele, Education/Workshops Chair
This newly-established museum needs quality photography of items in its collection, and has asked RCC for support. This sounds like a win-win situation, both for the museum and for our members who want to develop skills in “product” photography. I envision a workshop to teach the fundamentals, and one or more shooting sessions to get into creating great images for the museum’s use. If you’re interested in being part of this service to the community, or just want to find out more about the opportunity, shoot me an email:
Museum of Redlands
[email protected] Thanks, Frank "Pali Tunnel"
Photo by Woody

~ 12 ~
RCC Photo Blog Carl O’Day
59 users and 600 images later the RCC Photo Blog is still going strong. If you do not already have an account, send an e-mail to [email protected] and we will get you set up.
A few members have been experiencing problems with images showing up pixelated. We are looking into the issue and should have it resolved soon
The blog is a great place to get input on your images – particularly with a competition coming up. Other Members’ images can help you find some inspiration (and perhaps some motivation).
Would anyone be interested in starting a monthly photographic challenge or theme on the blog? If so, head over to the blog and leave a reply to the “Want a Challenge?” post.
For those that haven’t already done so, sign up today!
Photo by Woody - "Dusk At The Racetrack"

~ 13 ~
Members Night Processing Techniques • Add Natural Saturation and Contrast Boost in Photoshop: Duplicate the Background Layer (Ctrl+J) or do a visible stamp (Ctrl+Shift+Alt+E). Note: It is best to do
this boost technique after you do all your adjustment editing and place this layer on top of all other layers.
Invert your image (Ctrl+I). Note the image will not look pleasing at this point. Inverting takes all your colors and inverts each color to its exact opposite color (complementary colors). Blues are inverted to yellow, reds to cyan, greens to magenta and browns to blues. This inverts all of the colors on the layer, making each color its exact opposite color
Change the Layer Blend mode to Subtract. When you use the subtract mode you are subtracting the complement color from the prominent color in the layer below. For example, a blue sky will have yellow (complement color) subtracted. Green foliage will have Magenta subtracted.
Reduce the Layer Opacity to taste (normally 15%–25%). Remember you do not want an oversaturated image and you may want to decrease the Opacity slider further.
You can add a Hue/Saturation Adjustment layer and use the Targeted Adjustment tool to increase or decrease saturation.
The chart below shows how the invert and subtract mode handles color. If you click on the Blue color with the Color Picker the RGB values for the left figure are: R =125; G=115; B=201. On the right figure the RGB values are: R=0; G =0; Blue=147. You will notice that the gray areas darken resulting in more contrast. When you Invert the layer and use the Subtract Blend Mode, the complementary colors of the Invert layer will be subtracted from the base colors. This increases the saturation and contrast. The right figure below shows the grays become more saturated and dark grays turn black. Also the RGB colors become more saturated.
• Automatically reduce image blurring: If you have a shot that is slightly out of focus, you may be in luck using a filter called Shake Reduction. It can reduce the
blur caused by shots where your camera moved a bit (it’s not for shots where your subject is moving) or some parts of the image are blurry. This filter works best on images that don’t have a lot of noise, are properly exposed, and where you didn’t use flash. It doesn’t work on every image, but when it does, it works great to sharpen your photo.
Selectively bring areas of your photo into sharper focus:
o Do this edit on a separate layer. Consider changing the layer to a Smart Object so you can return to the Filter and make further adjustments.
~ 14 ~
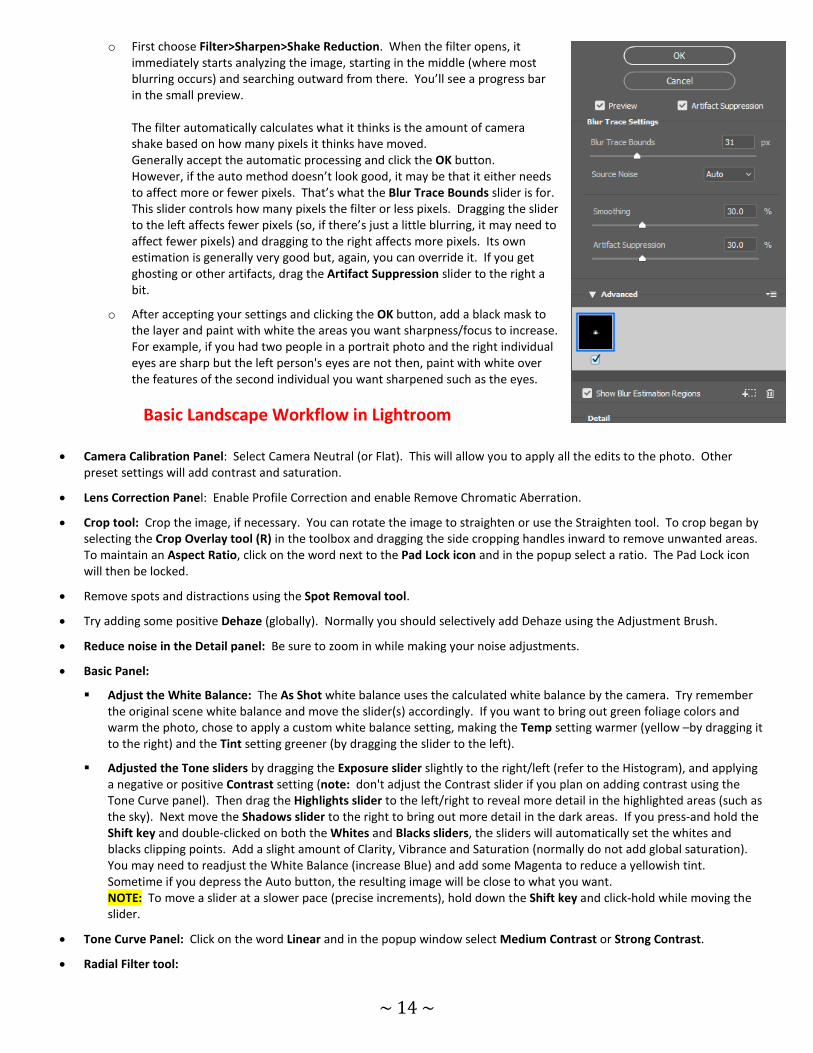
o First choose Filter>Sharpen>Shake Reduction. When the filter opens, it immediately starts analyzing the image, starting in the middle (where most blurring occurs) and searching outward from there. You’ll see a progress bar in the small preview. The filter automatically calculates what it thinks is the amount of camera shake based on how many pixels it thinks have moved. Generally accept the automatic processing and click the OK button. However, if the auto method doesn’t look good, it may be that it either needs to affect more or fewer pixels. That’s what the Blur Trace Bounds slider is for. This slider controls how many pixels the filter or less pixels. Dragging the slider to the left affects fewer pixels (so, if there’s just a little blurring, it may need to affect fewer pixels) and dragging to the right affects more pixels. Its own estimation is generally very good but, again, you can override it. If you get ghosting or other artifacts, drag the Artifact Suppression slider to the right a bit.
o After accepting your settings and clicking the OK button, add a black mask to the layer and paint with white the areas you want sharpness/focus to increase. For example, if you had two people in a portrait photo and the right individual eyes are sharp but the left person's eyes are not then, paint with white over the features of the second individual you want sharpened such as the eyes.
Basic Landscape Workflow in Lightroom
• Camera Calibration Panel: Select Camera Neutral (or Flat). This will allow you to apply all the edits to the photo. Other
preset settings will add contrast and saturation.
• Lens Correction Panel: Enable Profile Correction and enable Remove Chromatic Aberration.
• Crop tool: Crop the image, if necessary. You can rotate the image to straighten or use the Straighten tool. To crop began by selecting the Crop Overlay tool (R) in the toolbox and dragging the side cropping handles inward to remove unwanted areas. To maintain an Aspect Ratio, click on the word next to the Pad Lock icon and in the popup select a ratio. The Pad Lock icon will then be locked.
• Remove spots and distractions using the Spot Removal tool.
• Try adding some positive Dehaze (globally). Normally you should selectively add Dehaze using the Adjustment Brush.
• Reduce noise in the Detail panel: Be sure to zoom in while making your noise adjustments.
• Basic Panel:
Adjust the White Balance: The As Shot white balance uses the calculated white balance by the camera. Try remember the original scene white balance and move the slider(s) accordingly. If you want to bring out green foliage colors and warm the photo, chose to apply a custom white balance setting, making the Temp setting warmer (yellow –by dragging it to the right) and the Tint setting greener (by dragging the slider to the left).
Adjusted the Tone sliders by dragging the Exposure slider slightly to the right/left (refer to the Histogram), and applying a negative or positive Contrast setting (note: don't adjust the Contrast slider if you plan on adding contrast using the Tone Curve panel). Then drag the Highlights slider to the left/right to reveal more detail in the highlighted areas (such as the sky). Next move the Shadows slider to the right to bring out more detail in the dark areas. If you press-and hold the Shift key and double-clicked on both the Whites and Blacks sliders, the sliders will automatically set the whites and blacks clipping points. Add a slight amount of Clarity, Vibrance and Saturation (normally do not add global saturation). You may need to readjust the White Balance (increase Blue) and add some Magenta to reduce a yellowish tint. Sometime if you depress the Auto button, the resulting image will be close to what you want. NOTE: To move a slider at a slower pace (precise increments), hold down the Shift key and click-hold while moving the slider.
• Tone Curve Panel: Click on the word Linear and in the popup window select Medium Contrast or Strong Contrast.
• Radial Filter tool:

~ 15 ~
Enhance the Sky: Select the Graduated Filter and reduce Exposure slightly, increase Contrast, Clarity and Saturation. Note: for washed out skies it normally works best to export you're image into Photoshop CC and use a Luminosity Mask to make a selection of the sky area and then add a Curves adjustment.
Consider adding a few Radial Filter adjustments to the edges of the photograph. To add more color increase the Clarity and Saturation sliders thereby adding more color saturation and midtone contrast to balance the contrast of the other areas of the image.
• Enhance the Foreground: Select the Graduated Filter and increase Exposure, Contrast, Clarity and Dehaze. Use the Adjustment Brush to be apply adjustment to localized areas.
• Add highlights to your image: Select the Adjustment brush and double-click the word Effect to reset the sliders and click on New. Increase the Exposure slider and click ONCE on areas in the photo you want to brighten. Finally adjust the Exposure slider to taste. You can also use the Radial Filter to spot highlight areas (be sure to select Invert to apply the effect inside the oval area).
• Add Clarity to specific areas in the photo: Select the Adjustment brush and double-click Effect to reset the sliders and click on New. Increase the Clarity slider and then paint on areas in the photo you want to add clarity (detail). Finally adjust the Exposure slider to taste.
• Make a rock look wet: Use the Adjustment brush and slide the Contrast and Clarity slider far right (100). Then paint over the rock. To back off the adjustment equally, click on the down facing black triangle to the far right of the word Effect. Then in the new dialog box reduce the Amount slider.
• Detail Panel. Increase the Sharpness. Be sure to zoom in to a ratio of 1:1.
• Detail Enhancing: If you took your landscape photo with a telephoto lens, then may want to bring the background forward (called lens compression). Set a New Adjustment Brush with base setting of Clarity (+25), and Sharpness (+10). Then paint over the area you what to enhance such as the sky/clouds. Then bring the value for Clarity up and then back off until it looks correct. You may want to add some Contrast.
• Camera Calibration Panel: Adjust the RGB Primary Saturation sliders to your liking.
• Effects Panel: Add a Vignette by moving the Amount slider to the left (a –11 value will give you a suttle vignette).
Photo by Bruce Bonnett - "Stormy Sunset"

~ 16 ~
For Sale

~ 17 ~
For Sale: New in Box
Tascam DR-60D Digital Audio Recorder
Want to greatly improve the audio quality of videos made with your DSLR, Mirrorless or other digital camera? Tascam, the professional division of Teac Audio, has your solution – the DR-60D 4-channel audio recorder. Built to mount under your camera either on or off a tripod, this recorder offers 2 professional balanced XLR or ¼” TRS mic inputs plus a 3.5 mm stereo mic input. Its many modes allow you to capture very high-quality sound, tailor the sound to your preferences, and use microphones of widely different types. The LCD screen is fully visible in any lighting condition (even direct sunlight), and complete controls put you in charge of your recordings. In addition to its potential for recording audio for video, its many capabilities make it an excellent choice for any high-quality audio recording – music, voice or you-name-it. Unit is in original box, has never been used, and comes with all included accessories. Sells on Amazon for $179; priced for quick sale at $119. Frank Peele, 909.798.7999, or email to [email protected] Approximately 30 brand new photo frames for sale. Sized from 8x12 on up to 18x24 and much larger. Contact Rick Strobaugh: [email protected]
Redlands Camera Club P.O. Box 7261 Redlands, CA 92375 www.RedlandsCameraClub.com
Officers (2017-2018) President: Dave Ficke - Vice President/Programs: Jim Hendon - Secretary: Judith Sparhawk
Treasurer: Joe Ligori - Past President: Carl Detrow -
Chairs (2017-2018) Competition: Russ Trozera - Education/Workshops: Frank Peele Facebook/Event
Photographer: Bruce Woodcock - Field Trips: Debra Dorothy Historian: Bruce Bonnett - Hospitality/Events: Lucy McGee - Librarian: Mary Ann Ponder
Membership: Stephanie Billings - Mentor: Rick Strobaugh - Photogram: Wayne (Woody) Wood Publicity: Alex Woodcock - S4C: Deborah Seibly
Webmaster: Wayne (Woody) Wood - Welcome: Stephanie Billings