
Persistence, drag'n'drop -...
83
02/12/13 Persistence, drag'n'drop classroom.w3devcampus.com/mod/book/tool/print/index.php?id=1248 1/83 Persistence, drag'n'drop Introduction This week, we will talk about HTML5 persistence, and about offline web applications, yes, applications you can use even when your internet connexion is down! You certainly think about mobile web applications, when connectivity cannot be as trusted as when browsing from home or from the office. However, even for desktop applications, for games, for web based email clients, for a contact database, an HTML5 based presentation, etc. users expect them to keep on working even when the connection goes down. There are of course applications for which that is simply not possible: if you are creating a chat application, there is no way in which you can usefully maintain a chat session when your users are not connected — but that is fine, users typically understand that magic is not possible. But even in the case of an application that can store data on a remote service, it is much preferable for users to be able to manipulate their data locally and only synchronise remotely when there is a viable connection. This requires the ability to persistently store data locally. Thankfully, our HTML5 toolkit contains not one but several solutions to this problem: A File API for dealing with... files on the client side! A new Cache API that gives more control over what is being cached, from JavaScript code, Web Storage, sort of super cookies for storing string based valuepairs locally on the browser side, The more complex (but more powerful) approach, IndexedDB, is a real indexed JavaScript obejct store, that supports transactions and comes with a large API. Three long subchapters are dedicated to its study. The WebSQL database, implemented by all major browsers but not part of the HTML5 standard ( there is only a single implementation and W3C requieres at least two different implementations for validating a standard, also it seems a bit overweighted for manipulating structured data client side, not adapted to JavaScript objects, etc). We will present it briefly for this reason. Site: Classrooms Online training for Web developers Course: HTML5 Sept. 2013 Book: Persistence, drag'n'drop Printed by: Michel Buffa Date: Monday, 2 December 2013, 5:13 PM
Transcript of Persistence, drag'n'drop -...

02/12/13 Persistence, drag'n'drop
classroom.w3devcampus.com/mod/book/tool/print/index.php?id=1248 1/83
Persistence, drag'n'drop
IntroductionThis week, we will talk about HTML5 persistence, and about offline web applications, yes, applications you can use even whenyour internet connexion is down! You certainly think about mobile web applications, when connectivity cannot be as trusted aswhen browsing from home or from the office. However, even for desktop applications, for games, for web based email clients,for a contact database, an HTML5 based presentation, etc. users expect them to keep on working even when the connectiongoes down.
There are of course applications for which that is simply not possible: if you are creating a chat application, there is no way inwhich you can usefully maintain a chat session when your users are not connected — but that is fine, users typically understandthat magic is not possible.
But even in the case of an application that can store data on a remote service, it is much preferable for users to be able tomanipulate their data locally and only synchronise remotely when there is a viable connection. This requires the ability topersistently store data locally.
Thankfully, our HTML5 toolkit contains not one but several solutions to this problem:
A File API for dealing with... files on the client side!A new Cache API that gives more control over what is being cached, from JavaScript code,Web Storage, sort of super cookies for storing string based valuepairs locally on the browser side,The more complex (but more powerful) approach, IndexedDB, is a real indexed JavaScript obejct store, that supportstransactions and comes with a large API. Three long subchapters are dedicated to its study.The WebSQL database, implemented by all major browsers but not part of the HTML5 standard ( there is only a singleimplementation and W3C requieres at least two different implementations for validating a standard, also it seems a bitoverweighted for manipulating structured data client side, not adapted to JavaScript objects, etc). We will present it brieflyfor this reason.
Site: Classrooms Online training for Web developersCourse: HTML5 Sept. 2013Book: Persistence, drag'n'dropPrinted by: Michel Buffa
Date: Monday, 2 December 2013, 5:13 PM

02/12/13 Persistence, drag'n'drop
classroom.w3devcampus.com/mod/book/tool/print/index.php?id=1248 2/83
Table of contents
1 Introduction
2 HTML5 cache / Offline applications
3 TheWeb Storage API (LocalStorage, SessionStorage)
4 The File API
5 Drag'n'drop API part 1, principles
6 Drag'n'drop API part 2: files!
7 Several examples of form submission using Xhr2/Ajax, files and also PHP code for the server side.
8 The Filesystem and FileWriter APIs
9 The WebSQL API (deprecated)
10 [ADVANCED] IndexedDB: introduction and current support
11 [ADVANCED] IndexedDB: basic concepts
12 [ADVANCED] Using IndexedDB
13 [ADVANCED] High level libraries for using IndexedDB, other useful ressources
14 Conclusion about clientside persistence

02/12/13 Persistence, drag'n'drop
classroom.w3devcampus.com/mod/book/tool/print/index.php?id=1248 3/83
1 Introduction
IntroductionThis week, we will talk about HTML5 persistence (client side), and about offline web applications. Yes! Applications you canuse even when your internet connection is down! You certainly think first about mobile web applications, when theirconnectivity cannot be as trusted as browsing from home or the office. However, even for desktop applications, for games, forwebbased email clients, for contact database, for an HTML5 based presentation, etc. users expect them to keep working even ifthe connection goes down.
There are of course applications for which that is simply not possible: if you are creating a chat application, there is no way youcan usefully maintain a chat session when your users are not connected — but that's fine, users typically understand that magic isnot possible.
But even in the case of an application that can't store data on a remote service, it is much more preferable for users to manipulatetheir data locally and only synchronise remotely when there is a viable connection. This requires the ability to persistently storedata locally.
Thankfully, our HTML5 toolkit contains not one but several solutions to this problem:
A File API for dealing with... files on the client side!A new Cache API that gives more control over what is being cached from JavaScript code,A "Web Storage" API, sort of super cookies for storing string based valuepairs locally on the browser side,A real JavaScript object store: IndexedDB. This is a more complex (but more powerful) approach, that supportstransactions and comes with a large API. Three long subchapters are dedicated to its study.A WebSQL database, implemented by all major browsers but not part of the HTML5 standard (there is only a singleimplementation, and the W3C requires at least two different implementations to validate a standard). Furthermore it seemsa bit overweighted for manipulating structured data on the client side, and not adapted to JavaScript objects, etc., and somevendors have no plans to support it (i.e. Microsoft). For this reason, we will not study it here.
Checking that the browser is online/offline
The new HTML5 persistence APIs are very often used with the navigator.onLine property, part of the DOM API. Thisfeature is available on all browsers. The property onLine property returns true or false depending on whether or not the apphas network connectivity:
Online example: http://jsbin.com/ebotog/4/edit
12345678910111213141516171819202122232425262728
<!DOCTYPE html><html lang="en"><head><meta charset=utf-8><meta name="viewport" content="width=620"><title>HTML5 Demo: Online connectivity monitoring</title><body> <header> <h1>Online connectivity monitoring</h1> <style> #status color: #FFFFFF; padding: 5px; .online background: none repeat scroll 0 0 #00CC00; .offline background: none repeat scroll 0 0 #FF0000; </style> </header> <article> <p>Current network status (try to disconnect wifi or unplug you ethernet cable): <span id="status">checking...</span></p>

02/12/13 Persistence, drag'n'drop
classroom.w3devcampus.com/mod/book/tool/print/index.php?id=1248 4/83
293031323334353637383940414243444546
<ol id="state"></ol></article><script>var statusElem = document.getElementById('status'), state = document.getElementById('state'); function online(event) statusElem.className = navigator.onLine ? 'online' : 'offline'; statusElem.innerHTML = navigator.onLine ? 'online' : 'offline'; state.innerHTML += '<li>New event: ' + event.type + '</li>'; window.addEventListener('online', online);window.addEventListener('offline', online);// just to call the online function so that it refreshed displayonline( type: 'ready' );</script></html>
Usually, one checks if the application is running in online or offline mode (in this last case, data may be retrieved from the clientside, using one of the various methods presented in this week's course):
1234567
window.addEventListener('online', function(e) // Re-sync data with server., false); window.addEventListener('offline', function(e) // Queue up events for server., false);
Special note about FireFox and FireFox OS / virtual lan VMs etc.
With FireFox the above example does not work except if you manually use the "switch to offline mode menu. As stated here thebrowsers handle the navigator.onLine property differently: https://developer.mozilla.org/enUS/docs/Web/API/window.navigator.onLine
In particular : "In Firefox and Internet Explorer, switching the browser to offline mode sends a false value. All otherconditions return a true value."
There are also issues when the connectivity is lost by your router instead of the client machine. It takes time before the clientmachine says it is offline even if from a user point of view internet access does not work. There are timeouts in that case.
There are also problems in case you installed some "virtual LAN adapters on your machine", on computers with VirtualBoxinstalled, all the virtual adapters have to be turned off otherwise the navigator.onLine property is always true, with all browsers.
Interesting article here about how we can detect if we are online or offline in a more reliable way, it includes testingnavigator.online but also making ajax calls... http://www.html5rocks.com/en/mobile/workingoffthegrid/
People from FireFox OS are also investigating the way the online/offline status could be checked and what is the proper userinterface to display. If you are curious about that read: https://bugzilla.mozilla.org/show_bug.cgi?id=882186

02/12/13 Persistence, drag'n'drop
classroom.w3devcampus.com/mod/book/tool/print/index.php?id=1248 5/83
2 HTML5 cache / Offline applications
Introduction
All browsers have a native way of caching files, however the implementations and heuristics differ from one browser to another,and there is no easy way to control at the application layer which parts will be cached.
HTML5 in its "offline applications" specification", brings a new way to handle caching. By "offline applications", this means 1)that a web site can be browsed while no internet connexion is available, but it also says that 2) the web page may be an"application", not just a static page.
It may be a video game that usually retrieves data from a web server, saves high scores, etc. It may be a mail application (likegmail) that shows the most recent emails, checks for new ones, and has features for composing and sending new emails.
In these cases, having a controllable "cache API", we can implement things like: "when offline, you can read and composemails, but you cannot get new emails or send new ones". Or, in a static web site, everything can be retrieved from the cache, sothat a user can read the web site offline, but the login page will not be available... Instead, a disclaimer page will be displayed,etc.
The HTML5 cache will try to address all these needs, and is pretty useful for mobile web applications, where connections arenot always available/reliable. "Unfortunately, a web app cannot run offline" is often emphased by native mobile applicationsfanatics. This is a false statement.
Using the HTML5 cache is not useful only for mobile applications, or only for web application developers. Any web site (evenmade 100% of static pages/images/videos etc.) can benefit from being intelligently cached, as the HTML5 cache can seriouslydecrease the load time for any given site, especially if the same browser/person visits the web site regularly, as illustrated bythese pictures (borrowed from a MSDN blog post about offline applications that is worth reading):
External resources:
The W3C specification about Offline Web Applications / cache.Article from html5rocks.com about the cache APIArticle from webdirections.com about the cache API.Appcache facts: good resume of the cache API + best practices.Tools
Cache manifest validator tool,ManifestR bookmarklet, a tool for automatically generating a cache manifest file.
Current support
Support as of March 2013 is pretty good:

02/12/13 Persistence, drag'n'drop
classroom.w3devcampus.com/mod/book/tool/print/index.php?id=1248 6/83
Uptodate version of this table: http://caniuse.com/#feat=offlineapps
Principles: HTML5 introduced a cache manifest file
HTML5 introduced a "manifest file" as an attribute to the <html> element. This file will tell the browser what to cache, whatnot to cache, and some other goodies we will see together in this section.
Example of the inclusion of a manifest file (it is best practice/recommandation to use the .appcache suffix)
123
<html manifest="myCache.appcache"> ...</html>
You must include the manifest attribute on every page for which you want to cache resources (images included in the page,JavaScript files, CSS files).
The manifest file will contain lines that will tell which image/js/css needs to be cached, which ones must never be cached, etc.
The page with the manifest is de facto included in the files that will be cached. This means that any page the usernavigates to that include a manifest will be implicitly added to the application cache.
The browser does not cache a page if it does not contain the manifest attribute. The default cache behavior, prior to HTML5will be used (it depends on browser versions).
The manifest attribute value is a relative path (relative to the page URL), but an absolute URL can be used (notrecommended), if it respects the same origin policy.
The manifest file must be served with the correct MIME Type
The HTTP server that serves your files must be configured so that .appcache files are served with the MIME typetext/cachemanifest. For example, with the Apache server, this line must be added in the HTTP.conf configurationfile (or in .htaccess files):
1 AddType text/cache-manifest .appcache
What do we put in the manifest file?First example (taken from the W3C specification, you can try the online example here:http://www.whatwg.org/demos/offline/clock/livedemo/clock.html):
1234
CACHE MANIFEST clock.html clock.css clock.js
This example displays the current time and caches three files: the html page that includes the cache (it is cached by default butthe specifications recommend adding it to the manifest as good practice), a CSS file and a JavaScript file.
Note that the first line (CACHE MANIFEST) is mandatory.

02/12/13 Persistence, drag'n'drop
classroom.w3devcampus.com/mod/book/tool/print/index.php?id=1248 7/83
TRAP: When a file is available in the cache and on the remote HTTP server, it will always be retrieved from the cache! Wewill see in the section "updating the cache" further on, how to control this and update the files in the cache.
SECOND TRAP: If one file cannot be retrieved and cached, zero files will be updated in the cache. There is not "partialupdate" possible. Good practice is to always validate you manifest file using one of the tools listed at the end of this chapter.
The first time you run this in Chrome, you may see the cache content with the dev tools (F12):
With the same example, Firefox asks if you agree to cache some data (the sentence is in French here but it says: "this web sitewould like to save data on your computer for offline use, authorize, never, just for this time"):
Let's have a look at another example of manifest.appcache (this one comes from:http://www.webdirections.org/blog/getoffline/), that does a little more:
12345678910111213141516
CACHE MANIFEST CACHE: #images/images/image1.png/images/image2.png #pages/pages/page1.html/pages/page2.html #CSS/style/style.css #scripts

02/12/13 Persistence, drag'n'drop
classroom.w3devcampus.com/mod/book/tool/print/index.php?id=1248 8/83
17181920212223
/js/script.js FALLBACK:/ /offline.html NETWORK:login.html
This time we notice a few additional things:
We can add comments starting with #,There are three different sections in capital letters: CACHE, FALLBACK and NETWORK.
These three sections are optional, we did not have them in the first example. But as soon as you indicate one of them, you mustindicate the others. (CACHE was defaulted in the first example as we had no explicit section declarations).
The CACHE section specifies the URLs of the resources that must be cached (generally relative to the page, but they canalso be absolute and external, for example for caching jQuery from a google repository, etc.). these resources will be 1) cachedwhen online, and 2) available from the cache when offline.
The NETWORK section is the contrary of the CACHE section: it is useful for specifying resources that should NOT becached. These resources 1) will not be cached when online, and consequently 2) will not be available when the user is offline.EVEN IF THE BROWSER HAS CACHED THEM IN ITS OWN "PRE HTML5" cache! In the previous example, at line 23,the login.html file (the one with the login/password form...) is never cached. Indeed, entering login/password and pressing a"login/connect/signup" button is useless if you are offline.
Using a wildcard * in that section is also common practice, this means "do not cache all files that are not in the CACHE orFALLBACK section":
12NETWORK:*
Partial URLs may also be used in that section, like "/images" that means, all URLs that ends with images/*... should not becached. Notice that wildcards and partial URLs are not allowed in the CACHE section, where all individual files must beexplicitly specified.
The FALLBACK section specifies resources that will be displayed when a resource that is not available when offline isrequested. For example, a login.html file must not be cached nor be available when offline. In that case, accessing tohttp://.../login.html will cause offline.html to be displayed (and this file will be cached, this is forced by being inthe FALLBACK section). The "/ /offline.html" in the FALLBACK section of the example says that for any resource that is notavailable in the cache ("/" means here "any resource"), show the offline.html page.
Partial URLs can be used too. For example:
1 /images/ /images/missing.png
... tells us that all images in the subdirectory "images" relative to the web page that includes the manifest, if unavailable in thecache when offline, will be replaced by an image named "missing.png".
Cache size limitations?
There are size limitations, but they may vary from one browser to another. For example, with Chrome, there is no maximum sizefor cached data, but there is a 5Mbytes limitation for all shared data located on the client side, by domain. However, if you writeHTML5 web apps that you will publish in the Chrome store, this size is unlimited. Usually there is a limit around 5Mbytes,some browsers like Opera allow some user configuration in the browser's preferences, etc.
Updating the cache
When a resource is in the cache, it will ALWAYS be retrieved from the cache, even if you are online, and even if a more recentversion is available on your web server.
Updating the manifest file server side will update the files cached by browsers: the easiest way to make the browser updatethe cache is to update the manifest file itself. Good practice is to add a comment with the last modification date of your web sitein the manifest file. If you update any file on your site, also update this comment. Your manifest last modified date will bechanged, and the browser will check all files in the CACHE section of the manifest for modification, and update the cachedversion if necessary.
Clearing the cache using the browser dev tools/options will also regenerate the cache at the next connection.
The cache can be updated programmatically using the HTML5 cache JavaScript API:
02/12/13 Persistence, drag'n'drop
classroom.w3devcampus.com/mod/book/tool/print/index.php?id=1248 9/83
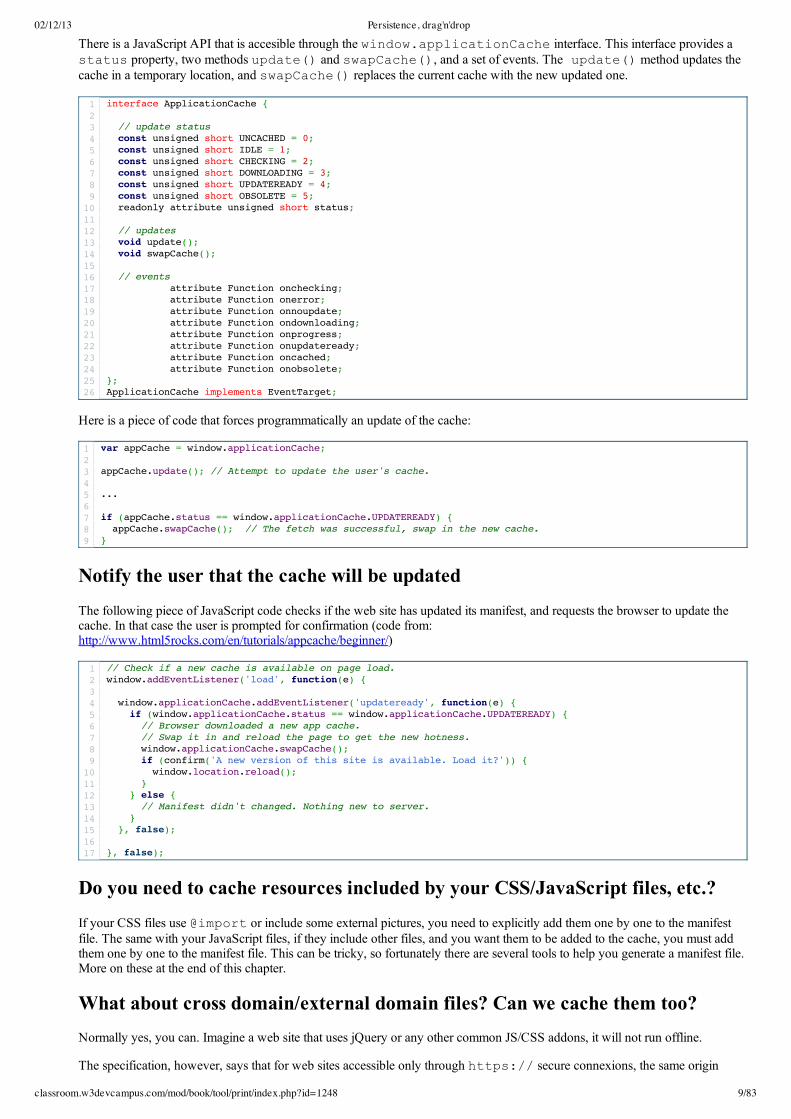
There is a JavaScript API that is accesible through the window.applicationCache interface. This interface provides astatus property, two methods update() and swapCache(), and a set of events. The update() method updates thecache in a temporary location, and swapCache() replaces the current cache with the new updated one.
1234567891011121314151617181920212223242526
interface ApplicationCache // update status const unsigned short UNCACHED = 0; const unsigned short IDLE = 1; const unsigned short CHECKING = 2; const unsigned short DOWNLOADING = 3; const unsigned short UPDATEREADY = 4; const unsigned short OBSOLETE = 5; readonly attribute unsigned short status; // updates void update(); void swapCache(); // events attribute Function onchecking; attribute Function onerror; attribute Function onnoupdate; attribute Function ondownloading; attribute Function onprogress; attribute Function onupdateready; attribute Function oncached; attribute Function onobsolete;;ApplicationCache implements EventTarget;
Here is a piece of code that forces programmatically an update of the cache:
123456789
var appCache = window.applicationCache; appCache.update(); // Attempt to update the user's cache. ... if (appCache.status == window.applicationCache.UPDATEREADY) appCache.swapCache(); // The fetch was successful, swap in the new cache.
Notify the user that the cache will be updated
The following piece of JavaScript code checks if the web site has updated its manifest, and requests the browser to update thecache. In that case the user is prompted for confirmation (code from:http://www.html5rocks.com/en/tutorials/appcache/beginner/)
1234567891011121314151617
// Check if a new cache is available on page load.window.addEventListener('load', function(e) window.applicationCache.addEventListener('updateready', function(e) if (window.applicationCache.status == window.applicationCache.UPDATEREADY) // Browser downloaded a new app cache. // Swap it in and reload the page to get the new hotness. window.applicationCache.swapCache(); if (confirm('A new version of this site is available. Load it?')) window.location.reload(); else // Manifest didn't changed. Nothing new to server. , false); , false);
Do you need to cache resources included by your CSS/JavaScript files, etc.?
If your CSS files use @import or include some external pictures, you need to explicitly add them one by one to the manifestfile. The same with your JavaScript files, if they include other files, and you want them to be added to the cache, you must addthem one by one to the manifest file. This can be tricky, so fortunately there are several tools to help you generate a manifest file.More on these at the end of this chapter.
What about cross domain/external domain files? Can we cache them too?Normally yes, you can. Imagine a web site that uses jQuery or any other common JS/CSS addons, it will not run offline.
The specification, however, says that for web sites accessible only through https:// secure connexions, the same origin

02/12/13 Persistence, drag'n'drop
classroom.w3devcampus.com/mod/book/tool/print/index.php?id=1248 10/83
policy should apply. Chrome in fact does not adhere to this part of the specification, and it has been argued that the single originpolicy for https is too restrictive in the real world for app caching to be of genuine value. I haven't checked about each browser'svendor position on this. Firefox follows the specification.
Useful tools
Check the following tools that can help bootstrapping a cache manifest file:
manifestR: http://westciv.com/tools/manifestR/
Manifest validator: http://manifestvalidator.com/
This web site accepts URLs of manifest files, or directly pasting content. It will validate the file. It also proposes a Chromeextension and a TextMate addon.

02/12/13 Persistence, drag'n'drop
classroom.w3devcampus.com/mod/book/tool/print/index.php?id=1248 11/83

02/12/13 Persistence, drag'n'drop
classroom.w3devcampus.com/mod/book/tool/print/index.php?id=1248 12/83
3 TheWeb Storage API (LocalStorage, SessionStorage)
Web StorageExternal resources:
The W3C specification of the WebStorage API,Interesting article on html5rocks that compares the different ways of doing client side persistence with HTML5, includingWeb Storage.
This W3C specification of this API introduces "two related mechanisms, similar to HTTP session cookies, for storing structureddata on the client side".
Web Storage indeed provides two interfaces called sessionStorage and localStorage, whose main difference is data longevity.With localStorage the data will remain until it is deleted, whereas with sessionStorage the data is erased when the tab/browser isclosed.
For convenience, we will mainly illustrate the examples with the localStorage object. Just change "local" by "session" and itshould work (this time with a session lifetime).
localStorage is a simple keyvalue store, in which the keys and values are strings. There is only one store per origin. Thisfunctionality is exposed through the globally available localStorage object. The same applies to sessionStorage.
Example:
1234567891011
// Using localStorage // store datalocalStorage.lastName = "Buffa";localStorage.firstName = "Michel"; // retrieve datavar lastName = localStorage.lastName;var firstName = localStorage.firstName;
This data is located in a store attached to the origin of the page.
Cookies are also a popular way to store keyvalue pairs. Web Storage however, is a technique more powerful than cookies,which are limited in size (a few Kbytes for cookies, compared to several MBytes for Web Storage) and which generate HTTPtraffic for each additional request (whether to request a web page, an image, a stylesheet, a JavaScript file, etc.). Objectsmanaged by Web Storage are no longer carried on the network and HTTP, and are easily accessible (read, change and delete)from JavaScript, using the Web Storage API.
For security reasons (more on that later), pages loaded with a file:// type of URL cannot use localStorage or sessionStorage. Youmust use http:// or https:// URLs and a web server.
Current support: excellent!
As of January 2013, support is excellent, including mobile browsers.
To see an uptodate version of this table: http://caniuse.com/#feat=namevaluestorage

02/12/13 Persistence, drag'n'drop
classroom.w3devcampus.com/mod/book/tool/print/index.php?id=1248 13/83
First example that uses localStorage
Online code: http://jsbin.com/oyafiv/3/edit
Code from this example:
123456789101112131415161718192021222324252627
<!DOCTYPE html><html><head><meta charset=utf-8 /><title>JS Bin</title> <script> // Using localStorage // store data localStorage.lastName = "Buffa"; localStorage.firstName = "Michel"; function getData() // retrieve data document.querySelector("#lastName").innerHTML = localStorage.lastName; document.querySelector("#firstName").innerHTML = localStorage.firstName; </script></head><body onload="getData()"> <h1>Data retrieved from localStorage</h1> <ul> <li>Last name : <span id="lastName"></span></li> <li>First name : <span id="firstName"></span></li> </ul></body></html>
And if you run this example and look at the dev tools with Chrome (F12), you can see the local store tied to the jsbin.com origin:
Differences between localStorage and sessionStorage
Here is the list of differences:
data stored using the sessionStorage interface has the same lifetime as the browsing session, and its scope is limited to theactive window or tab. When the tab or the active window is closed, the data is erased. Unlike cookies, there is nointerference. Each session storage is limited to a domain. data stored using localStorage has unlimited lifetime. Unlike sessionStorage, data is not deleted when closing a tab or thewindow/browser. The scope of localStorage is de facto wider: it is possible to work with the same data across multipletabs opened at the same time on the same domain/subdomain, in the same browser.
Different browsers cannot share data. The Web Storage is unique per browser.
More methods from localStorage/sessionStorage

02/12/13 Persistence, drag'n'drop
classroom.w3devcampus.com/mod/book/tool/print/index.php?id=1248 14/83
This time we will look at another example that uses new methods from the API: localStorage.setItem(...),localStorage.getItem(...), localStorage.removeItem(...), localStorage.clear().
If you want to keep a simple counter of the number of times a given user has loaded your application, you can use the followingcode (just to show setItem/removeItem):
123
var counter = localStorage.getItem("count") || 0;counter++;localStorage.setItem("count", counter);
As you can easily guess from the above, we use getItem() to retrieve a key's value and setItem() to set it.
Deleting a key completely can be performed through removeItem(), and if you wish to reset the entire store, simplycall localStorage.clear().
Note that it may be quite rare that you will want the entire store to be cleared by the user in production software (since thateffectively deletes their entire data), but it is a rather common operation needed during development, since bugs may store faultydata the persistence of which can break your application, since the way you store data may evolve over time, or simply becauseyou also need to test the experience of the user when first using the application. One way of handling that is to add a userinterface button that calls clear() when clicked, but you then have to be sure not to forget to remove it when you ship! Theapproach recommended to use (when possible) is to simply open the console and type localStorage.clear() there — it'ssafer and works just as well.
Local stores can also be iterated through in order to list all the content that they contain. The order is not guaranteed, but this canbe useful at times (if only for debugging purposes!). The following code lists everything in the current store:
1234
for (var i = 0, n = localStorage.length; i < n; i++) var k = localStorage.key(i); console.log(k + ": " + localStorage[k]);
Astute students will note something off in the example above: instead of calling localStorage.getItem(k) we simplyaccess localStorage[k]. Why? Because keys in the local store can also be accessed as if the store were a simple JavaScriptobject. So instead of localStorage.getItem("foo") and localStorage.setItem("foo", "bar") one canwrite localStorage.foo and localStorage.foo = "bar". Of course there are limitations to this mapping: any string canserve as a key, so that localStorage.getItem("one two three") works, whereas that string would not be a valid identifierafter the dot (but it could still work as localStorage["one two three"]).
An example that shows all these things: http://jsbin.com/esexib/3/edit
Run it, then click on the first button to show all key/values in the localStorage. Open the URL in another tab, and see that thedata is shared between tabs. Then click on the second button to add some data in the store, click on the third to remove somedata. FInally, the last one clears the whole data store.
Code from this example:
12345678910
<!DOCTYPE html><html><head><meta charset=utf-8 /><title>JS Bin</title> <script> // Using localStorage var counter = localStorage.getItem("count") || 0; counter++; localStorage.setItem("count", counter);

02/12/13 Persistence, drag'n'drop
classroom.w3devcampus.com/mod/book/tool/print/index.php?id=1248 15/83
11121314151617181920212223242526272829303132333435363738394041424344454647484950515253545556575859606162636465
function getCountValue() // retrieve data document.querySelector("#counter").innerHTML = localStorage.count; function seeAllKeyValuePairsStored() // clear list first document.querySelector('#list').innerHTML=""; for (var i = 0, n = localStorage.length; i < n; i++) var key = localStorage.key(i); var value = localStorage[key]; console.log(key + ": " + value); var li = document.createElement('li'); li.innerHTML = key + ": " + value; document.querySelector('#list').insertBefore(li, null); function resetStore() // erase all key values from store localStorage.clear(); // reset displayed list too document.querySelector('#list').innerHTML=""; function addSomeData() // store data localStorage.lastName = "Buffa"; localStorage.firstName = "Michel"; // refresh display seeAllKeyValuePairsStored(); function removeSomeData() // store data localStorage.removeItem("lastName"); localStorage.removeItem("firstName"); // refresh display seeAllKeyValuePairsStored(); </script></head><body onload="getCountValue()"> <h1>Number of time this page has been seen on this browser: <span id="counter"></span></h1> <button onclick="seeAllKeyValuePairsStored()">Show all key value pairs stored in localStorage</button><br/> <output id="list"></output> <button onclick="addSomeData()">Add some data to the store</button><br/> <button onclick="removeSomeData()">Remove some data</button><br/> <button onclick="resetStore()">reset store (erase all key/value pairs)</button></body></html>
We tried to use some HTML5 goodies as well as the Web Storage API. We used the new document.querySelector() method thathas been added to the DOM API by HTML5 (the additions to this API were studied in the Week 5 course), and we used an<output> element (Week 2 course) to display the keys/values retrieved from the data store. You can check in the Chrome devtools user interface that the content of the localStorage changes as you click on the buttons.
Another useful example: store form content as you type, in session storage
I bet that at least once you have lost everything you typed in a long form, because you pressed backspace or clicked on a link bymistake. You went back to the URL of the form and bing! Everything you typed was lost! Cry baby cry...
In this example, we will be listening to every key you type in an input field, storing the field's content in a sessionStorage. Trythe example, change to another page or reload. You will get the form back in the state you left it!
Online example: http://jsbin.com/utuyiv/2/edit

02/12/13 Persistence, drag'n'drop
classroom.w3devcampus.com/mod/book/tool/print/index.php?id=1248 16/83
Code from this example:
Size limitation, security, localStorage or sessionStorage?
The specification states that:
User agents should limit the total amount of space allowed for storage areas.User agents should guard against sites storing data under the origins other affiliated sites, e.g. storing up to the limit ina1.example.com, a2.example.com, a3.example.com, etc, circumventing the main example.com storage limit.User agents may prompt the user when quotas are reached, allowing the user to grant a site more space. This enablessites to store many usercreated documents on the user's computer, for instance.User agents should allow users to see how much space each domain is using.A mostly arbitrary limit of five megabytes per origin is recommended. Implementation feedback is welcome and will beused to update this suggestion in the future.
Indeed, the five megabytes limit is the one implemented in Chrome and Firefox, we haven't checked all the browsers'documentation, but we guess they all do the same.
In many cases, local storage is all that your application will need, but be careful with several aspects. One is that the user maydecline to provide your application with that storage, so be sure to write your application in such a way that it can survive notbeing granted storage rights (or if that is impossible, make it clear to your users why it is needed).
Additionally, there will be a limit on the amount of data that you can store there. Browsers enforce quotas that will prevent youfrom cluttering your users' drives excessively. Those quotas can vary from platform to platform, but are usually reasonablygenerous for simple cases (around 5MB), so if you are careful not to store anything huge there, you should be fine. Finally, keepin mind that this storage is not necessarily permanent. Browsers are inconsistent in how they allow for it to be wiped, but inseveral cases it gets deleted with cookies — which is logical when you think of how it can be used for tracking in a similar
12345678910111213141516171819202122232425262728293031323334
<!DOCTYPE html><html> <head> <meta charset="utf-8"> <title>HTML5 : Web Storage</title></head> <body> <h1>Pre filled form using session storage</h1> <p>This forms will store the content of the input field as you type...using an onchange JavaScript event... If you reload this page any time, or press by mistake the Backspace key, and come back to this page, you will find the form in the exact state you left it. <p><label for="message">Message</label></p> <p><textarea id="message" name="message" onchange="sessionStorage.message=this.value"></textarea></p> <script> if(typeof sessionStorage!='undefined') if('message' in sessionStorage) alert("Message restored from sessionStorage"); document.getElementById('message').value = sessionStorage.getItem('message'); else alert("sessionStorage is not supported by Your browser");</script> </body></html>

02/12/13 Persistence, drag'n'drop
classroom.w3devcampus.com/mod/book/tool/print/index.php?id=1248 17/83
fashion. It is therefore important to ensure that you synchronize data that is there with the server on a regular basis, in order toavoid data loss (and in general, because users enjoy using the same service from multiple devices at once).
Note that if all you need is to store sessionbased data in a manner that is more powerful than cookies, you can usethe sessionStorage object which works in the exact same way as localStorage, but the lifetime of which is limited to asingle browser session. Also note that in addition to being more convenient and capable of storing more data than cookies, it alsohas the advantage of being scoped to a given browser tab (or similar execution context). If a user has two tabs open to the samesite, they will share the same cookies. Which is to say that if you are storing information about a given operation using cookies inone tab, that information will leak to the other side — something that can be confusing if the user is performing different tasks ineach. Using sessionStorage, the data you store will be scoped and therefore not leak across tabs.
Storing more than strings? Use JSON!
Storing strings is all nice and well, but quickly limiting: it is not rare to need to store more complex data with at least a modicumof structure. There are some simple approaches to this, such as creating your own minimal record format (e.g. a string with fieldsseparated with a given character, using join() on store and split() upon retrieval) or using multiple keys(e.g.post_17_title, post_17_content, post_17_author, etc.) but these are really hacks. Thankfully, there's a better way, JSON stringify() and parse() methods.
JSON provides a great way of encoding and decoding data that is a really good match for JavaScript. You have to be careful notto use circular data structures or nonserialisable objects, but in the vast majority of cases plugging JSON support into your localstore is straightforward. The following example is one way of doing so:
Online example: http://jsbin.com/uwonof/3/edit
Source code from the example:
123
<!DOCTYPE html><html><head>

02/12/13 Persistence, drag'n'drop
classroom.w3devcampus.com/mod/book/tool/print/index.php?id=1248 18/83
45678910111213141516171819202122
<meta charset=utf-8 /><title>Storing JSON Objects with Local Storage</title> <script> var personObject= 'firstName': 'Michel', 'lastName': 'Buffa'; // Store the object as a JSON StringlocalStorage.setItem('testObject', JSON.stringify(personObject)); // Retrieve the object from storagevar retrievedObject = JSON.parse(localStorage.getItem('testObject')); console.log(retrievedObject.firstName + " " + retrievedObject.lastName); // then you can use retrievedObject.firstName, retrievedObject.lastName... </script></head><body></body></html>
Notice that this is how jsbin.com stores the user's preferences (the last two lines of data):
Conclusion about Web Storage
Advantages:
Simple to use,We may store objects/images using JSON/dataURLs,Simple to use,Simple to use :)
Disadvantages:
Not accessible from Web Workers,Synchronous access (may take time if you work with big objects or images, may freeze the UI)If you need to store big objects, have performance concerns, need access from multiple tabs, from Web Workers, then useIndexedDB.

02/12/13 Persistence, drag'n'drop
classroom.w3devcampus.com/mod/book/tool/print/index.php?id=1248 19/83
4 The File API
Introduction
Previously, HTML5 file management was limited to multiparts forms and Ajax. Possible actions were not very interesting,neither for the developer or user. However, HTML5 is now providing an API called "File" (and two others "Filesystem andFileWriter APIs" that only have experimental implementation in Chrome and will not be addressed in this course, not yet stableenough...), that provides features for accessing information about files (name, size, type) and read their content. Furthermore,some improvements on XMLHttpRequest, together with the file API make uploading/downloading files much easier.
In the next chapters, we will look at the drag'n'drop API that can also work with files and the File API.
The objective of this chapter is to provide an overview of the File API.
External resources
The W3C specification about the File APIArticle on html5rocks.com about the file API (and drag'n'drop)Article from developer.mozilla.org about the file API
Getting details about a file
Imagine you have an input field like this:
1 Select one or more files: <input type="file" id="input"/>
This will render as a "select files" or "browse files" button. If you select one file in the file choser dialog that has popped up, youcan get details about the first file selected. Look at the the code below: it uses the file API, in particular, this API defines afiles property on the DOM node corresponding to the <input type="file".../> input field.
1234
var selectedFile = document.getElementById('input').files[0]; // do something with selectedFile.name, selectedFile.size, selectedFile.type...
Example 1
Here is a complete online example that uses the files property to get details about the first selectedfile: http://jsbin.com/axuyin/4/edit
Code from the example:
12345678910111213141516171819
<!DOCTYPE html><html><head><meta charset=utf-8 /><title>JS Bin</title> <script> function displayFirstSelectedFile() var selectedFile = document.getElementById('input').files[0]; document.querySelector("#singleName").innerHTML = selectedFile.name; document.querySelector("#singleSize").innerHTML = selectedFile.size + " bytes"; document.querySelector("#singleType").innerHTML = selectedFile.type; </script></head><body> Select one or more files: <input type="file" id="input"> <br/> <button onclick="displayFirstSelectedFile()">Click me to see details about the selected files</button>

02/12/13 Persistence, drag'n'drop
classroom.w3devcampus.com/mod/book/tool/print/index.php?id=1248 20/83
2021222324252627
<ul> <li>First selected file name is: <span id="singleName"></span></li> <li>First selected file name is: <span id="singleSize"></span></li> <li>First selected file name is: <span id="singleType"></span></li> </ul> </body></html>
Example 2
You can also do something just after the files have been selected, using the "change" event on the input field. This example is abit more complicated, as it will display details about all files selected (not only the first) and allows only images to be selected,using the accept attribute of the input field: <input type="file" accept="image/*".../>.
It also shows the use of the lastModifiedDate property on a File object (aka a file descriptor)
Online example: http://jsbin.com/ofelet/14/edit
Code from the example:
Line 1 shows how we added an onchange handler to the inputfield: onchange="filesProcess(this.files)". Here, this.files corresponds to the collection of files thathave been selected. The accept="image/*" is a filter that makes only selection possible on images.
The event handler function (line 618) iterates on the file collection and for each file, displays in a table row its details (usingfile.name, file.size, etc. see lines 1113).
Blob and File, what is that?
The HTML5 File API specification introduces several new Interfaces, like the FileList interface (we met it, the filesproperty is a FileList), the File interface (the file variable in the last example is of that type) that is useful for gettingdetails about a file, the Blob interface that is for read only binary data that can be accessed slice by slice (as chunks of data,each one is a "Blob"), and a FileReader interface for reading file content. We will not use all of them, but let's explain alittle the difference between Blob and File, as most of the methods exposed by the FireReader interface takeindifferently a Blob or a File as parameter.
The Blob object
An object of type Blob is a structure that represents binary data available as readonly. Most of the time, you will encounterthese objects only when you handle files.
Blob objects have two properties named size and type which respectively retrieve the size in bytes of the data handled by
1234567891011121314151617181920
Select several images: <input type="file" accept="image/*" multiple onchange="filesProcess(this.files)" name="selection"<br/><br/><div id="result">...</div><script> function filesProcess(files) selection = "<table><tr><th>Name</th><th></th><th>Bytes</th><th></th><th>MIME Type</th><th>Last modified date</th></tr>" for(i=0; i<files.length ;i++) file = files[i]; selection += "<tr><td>"+file.name+"</td><td> | </td><td style=\"text-align:right\">" +file.size+"</td><td> | </td><td>" +file.type+"</td><td> | "+file.lastModifiedDate+"</td></tr>"; selection += "</table>"; document.getElementById("result").innerHTML = selection; </script>

02/12/13 Persistence, drag'n'drop
classroom.w3devcampus.com/mod/book/tool/print/index.php?id=1248 21/83
the Blob and their MIME type. There is also a method called slice (), but this is a subject too advanced for this course,and is not used in common applications. If you are curious, check the "slicing a file" section of thisarticle: http://www.html5rocks.com/en/tutorials/file/dndfiles/
The File object
File objects are useful for manipulating... files! They inherit the properties and methods of Blob objects, and have twoadditional properties that are name for the file name and lastModifiedDate to get the date of the last modification of thefile (in the form of a JavaScript Date object, obviously) .
Most of the time, we will work with File objects. Blob objects will have real interest when the Filesystem API is widelyavailable (at the moment there is only an experimental version in Chrome).
Reading a file
The file API proposes several methods for reading a file content, each proposed by the FileReader interface. Here is howyou create a FileReader object:
1 var reader = new FileReader();
From http://www.html5rocks.com/en/tutorials/file/dndfiles/:
"Once you create an instance of FileReader, you can call one of these asynchronous methods:
FileReader.readAsText(Blob|File, opt_encoding) The result property will contain the file/blob's data as a textstring. By default the string is decoded as 'UTF8'. Use an optional encoding parameter to specify a different encoding.
FileReader.readAsDataURL(Blob|File) The result property will contain the file/blob's data encoded as a dataURL.
FileReader.readAsArrayBuffer(Blob|File) The result property will contain the file/blob's data asan ArrayBuffer object.
Once one of these read methods is called on your FileReader object,the onloadstart, onprogress, onload, onabort, onerror, and onloadend events can be used to track its progress"
We will see examples that use each of these methods...
Example 3: read file content with readAsDataURL()
This example is just a modified version of example 2, except that this tilme, instead of displaying file details, we display theselected files as image thumbnails...
Online example: http://jsbin.com/erepek/3/edit
Code from this example:
1234567891011121314
<style> .thumb height: 75px; border: 1px solid #000; margin: 10px 5px 0 0; </style> Choose multiple files :<input type="file" id="files" multiple /><br/> <output id="list"></output> <script>

02/12/13 Persistence, drag'n'drop
classroom.w3devcampus.com/mod/book/tool/print/index.php?id=1248 22/83
151617181920212223242526272829303132333435363738394041424344454647
function readFilesAndDisplayPreview(files) // Loop through the FileList and render image files as thumbnails. for (var i = 0, f; f = files[i]; i++) // Only process image files. if (!f.type.match('image.*')) continue; var reader = new FileReader(); //capture the file information. reader.onload = function(e) // Render thumbnail. var span = document.createElement('span'); span.innerHTML = "<img class='thumb' src='" + e.target.result + "'/>"; document.getElementById('list').insertBefore(span, null); ; // Read in the image file as a data URL. reader.readAsDataURL(f); function handleFileSelect(evt) var files = evt.target.files; // FileList object readFilesAndDisplayPreview(files); document.getElementById('files').addEventListener('change', handleFileSelect, false); </script>
And the interesting part is in the function readFilesAndDisplayPreview(files), located lines 1538.
We loop on the collection of selected files, line 17. The loop variable that corresponds to the current file in the collection isnamed f,We instanciate a file Reader (line 24),We read the content of file f (line 36), this can take some time. When the file is completely loaded in memory, as a dataURL, the asynchronous method reader.onload() is called (located line 2732).The onload callback takes a DOM event as a unique parameter, and e.target.result is the content of the filethat has been read, as a data URL.
A data URL is a URL that includes type and content at the same time. It is useful, for example, for inlining images or video inthe HTML of a web page. Here is an example of a red square, as a data URL. Copy and paste it in the address bar of yourbrowser, you should see the red square:
This data URL in a browser address bar:
If we set the src attribute of an image element with the data URL of an image, it will work. Exactly as if you use a url thatstarts with http://
Example with the same picture:
123
<img src="data:image/png;base64,iVBORw0KGgoAAAANSUhEUgAAAAUAAAAFCAYAAACNbyblAAAAHElEQVQI12P4//8/w38GIAXDIBKE0DHxgljNBAAO9TXL0Y4OHwAAAABJRU5ErkJggg==" alt="Red square" />
This dataURL format enables storing a file content in a base64 format (as a string), and adds the MIME type specification of thecontent. The dataURL can therefore store a file as a URL readable with modern browsers. Its use is becoming more common onthe Web, especially for mobile applications, as inlining images reduces the number of HTTP requests and makes web page loadfaster.
So, in our example at line 29 we create an empty <span> element, at line 30 we add an <img> element in the span, with thesrc attribute that has its value set to e.target.result (the dataURL of the image that has been read by theFileReader) and at line 31 we add this span+img to the <output> element of id "list". Simple and powerful!
Example 4: use readAsText() to read a file content
In this example we show how to read text files content:
1 data:image/png;base64,iVBORw0KGgoAAAANSUhEUgAAAAUAAAAFCAYAAACNbyblAAAAHElEQVQI12P4//8/w38GIAXDIBKE0DHxgljNBAAO9TXL0Y4OHwAAAABJRU5ErkJggg==

02/12/13 Persistence, drag'n'drop
classroom.w3devcampus.com/mod/book/tool/print/index.php?id=1248 23/83
Online example: http://jsbin.com/idevur/3/edit
Code of this example:
12345678910111213141516171819202122232425262728293031
Choose multiple text files :<input type="file" id="files" multiple /><br/> <output id="list"></output> <script> function readFilesAndDisplayAsText(files) console.log("dans read files"); // Loop through the FileList and render image files as thumbnails. for (var i = 0, f; f = files[i]; i++) var reader = new FileReader(); //read the file content. reader.onload = function(e) alert('Text file content :\n\n' + e.target.result); ; // Read in the tfile as text console.log("reading" + f.name); reader.readAsText(f); function handleFileSelect(evt) var files = evt.target.files; // FileList object readFilesAndDisplayAsText(files); document.getElementById('files').addEventListener('change', handleFileSelect, false);</script>
Note that you can optionally indicate the encoding of the file you are going to read (default is UTF8):
123
reader.readAsText(file, 'UTF-8');reader.readAsText(file, 'ISO-8859-1');...
Example 5: using readAsArrayBuffer() to read binary file content
This time we will look at an example that uses the readAsArrayBuffer()method. This method reads and stores data inan object of type ArrayBuffer. This method and type were designed to allow the reading and writing of binary data directlyin its native form. They are mostly used in demanding fields such as the WebGL API or the WebAudio API.
We will look now at a more complicated example that runs only in Chrome, as it uses the WebAudio API, that is for the momentonly implemented by this browser. We talked rapidlly about this API at the end of the Week 3 course (HTML5 multimedia), butdid not see any details. Among its features is the option to load a sound sample in memory, and play it without any latency dueto streaming. Possible uses are video games and musical applications.

02/12/13 Persistence, drag'n'drop
classroom.w3devcampus.com/mod/book/tool/print/index.php?id=1248 24/83
The example displays a web page, asks the user for a sound file, and loads it in the memory before playing it (detailedexplanations are availble here, written by the author of the example: http://ericbidelman.tumblr.com/post/13471195250/webaudioapihowtoplayingaudiobasedonuser). We adapted this code.
Online example: http://jsbin.com/aluyix/3/edit
Code from this example:
12345678910111213141516171819202122232425262728293031323334353637383940414243444546474849505152535455565758596061626364
<!DOCTYPE html><!-- Author: Eric Bidelman ([email protected]) --><html><head> <meta charset="utf-8" /> <meta http-equiv="X-UA-Compatible" content="chrome=1" /> <title>Web Audio API: Simple load + play</title></head><body> <p>Example of using the Web Audio API to load a sound file and start playing on user-click.</p> <input type="file" accept="audio/*"> <button onclick="playSound()" disabled>Start</button> <button onclick="stopSound()" disabled>Stop</button><script>var context = new window.webkitAudioContext();var source = null;var audioBuffer = null; function stopSound() if (source) source.noteOff(0); function playSound() // source is global so we can call .noteOff() later. source = context.createBufferSource(); source.buffer = audioBuffer; source.loop = false; source.connect(context.destination); source.noteOn(0); // Play immediately. function initSound(arrayBuffer) context.decodeAudioData(arrayBuffer, function(buffer) // audioBuffer is global to reuse the decoded audio later. audioBuffer = buffer; var buttons = document.querySelectorAll('button'); buttons[0].disabled = false; buttons[1].disabled = false; , function(e) console.log('Error decoding file', e); ); // User selects file, read it as an ArrayBuffer and pass to the API.var fileInput = document.querySelector('input[type="file"]'); fileInput.addEventListener('change', function(e) var reader = new FileReader(); reader.onload = function(e) initSound(this.result); ; // THIS IS THE INTERESTING PART! reader.readAsArrayBuffer(this.files[0]);, false); </script></body></html>
The interesting parts are at line 57 (start the reading of the sound file), and in lines 5355 where the result is processed. The filecontent, located in the variable this.result in this example, is sent to a function as an ArrayBuffer object(indeed,initSound() takes an ArrayBuffer object as input). ArrayBuffer is not a string, nor a base64 encoded data, it ispure binary, native format.

02/12/13 Persistence, drag'n'drop
classroom.w3devcampus.com/mod/book/tool/print/index.php?id=1248 25/83
Reading ArrayBuffer objects using Ajax and XMLHttpRequest level 2
If you are uncomfortable with Ajax programming, you can avoid this part of the course.
HTML5 added some novelties to the XMLHttpRequest for AjaxApplications (see:http://www.w3.org/TR/XMLHttpRequest2/). We won't go too much into detail here, but recent browsers (> 2012) usuallysupport XMLHttpRequest level 2, that adds the option to exchange directly binary data of type ArrayBuffer. HTTP is atext based protocol, and when you upload/download images, videos or any binary file, it is text encoded, then decoded on the flyby browsers or JavaScript libs. This improvement on the low level of the XMLHttpRequest enables easier control of binaryexchange from the JavaScript code.
Here is a function that loads a sound sample using XMLHttpRequest level 2, and that works with the previous example:
1234567891011
// Load file from a URL as an ArrayBuffer.// Example: loading via xhr2: loadSoundFile('sounds/test.mp3');function loadSoundFile(url) var xhr = new XMLHttpRequest(); xhr.open('GET', url, true); xhr.responseType = 'arraybuffer'; // THIS IS NEW WITH HTML5! xhr.onload = function(e) initSound(this.response); // this.response is an ArrayBuffer. ; xhr.send();
There is a very interesting article about XMLHttpRequest level 2 onhtml5rocks.com: http://www.html5rocks.com/en/tutorials/file/xhr2/
We will see in the next section how to use a variant of this method for uploading files using Ajax (the above code is fordownloading a file).
XMLHttpRequest level 2 and HTML5 file API: upload text/binary files andmonitor progress
Here is an example that uses a FormData object for uploading one or more files to an HTTP server. Notice that the URL of theserver is fake, so the request normally fails here. However, sending a file to a fake server takes time, and it is interesting to seehow it works. For real working code with server side PHP source, see for example http://wabism.com/html5fileapihowtouploadfilesdynamicallyusingajax/, or Google for examples in Java, C#/.net etc.
Online example: http://jsbin.com/akomuy/3/edit, try it with a big file (a few megabytes long). The next two exampels have beeninspired by this article on a French web site:
Source code of the example:
12345678910111213
<!DOCTYPE html><html> <head> <meta charset="utf-8" /> <title>File upload with XMLHttpRequest and HTML5</title> </head> <body> <input id="file" type="file" /> <script> var fileInput = document.querySelector('#file');

02/12/13 Persistence, drag'n'drop
classroom.w3devcampus.com/mod/book/tool/print/index.php?id=1248 26/83
14151617181920212223242526272829303132
fileInput.onchange = function() var xhr = new XMLHttpRequest(); xhr.open('POST', 'upload.html'); // With FormData, POST is mandatory xhr.onload = function() alert('Upload complete!'); ; var form = new FormData(); form.append('file', fileInput.files[0]); // send the request xhr.send(form); ; </script> </body></html>
This is the same example, but this time we monitor the progress of the upload. We bind an event handler to the progress event anXMLHttpRequest can trigger. The event has two properties: loaded and total that corresponds to the number of byte thathave been uploaded, and the total number of bytes we need to upload.
Here is the code of such an event listener:
1234
xhr.upload.onprogress = function(e) e.loaded; // number of bytes uploaded e.total; // number total of bytes in the file that is being uploaded;
We will also use a <progress> element to display the percentage of the file that is being uploaded:
1 <progress id="progress"></progress>
Here is the complete online example: http://jsbin.com/ahasoz/2/edit
Code from this example:
1234567891011121314151617181920212223
<!DOCTYPE html><html> <head> <meta charset="utf-8" /> <title>HTML5 file upload with monitoring</title> </head> <body> <input id="file" type="file" /> <br/><br /> <progress id="progress"></progress> <script> var fileInput = document.querySelector('#file'), progress = document.querySelector('#progress'); fileInput.onchange = function() var xhr = new XMLHttpRequest(); xhr.open('POST', 'upload.html'); xhr.upload.onprogress = function(e) progress.value = e.loaded; progress.max = e.total;

02/12/13 Persistence, drag'n'drop
classroom.w3devcampus.com/mod/book/tool/print/index.php?id=1248 27/83
2425262728293031323334353637
; xhr.onload = function() alert('Upload complete!'); ; var form = new FormData(); form.append('file', fileInput.files[0]); xhr.send(form); ; </script> </body></html>
The interesting part is at lines 22 and 23, in only 2 lines we update the progression bar. The loaded and total propertieshave been designed for setting the value and max attributes of a <progress> element!

02/12/13 Persistence, drag'n'drop
classroom.w3devcampus.com/mod/book/tool/print/index.php?id=1248 28/83
5 Drag'n'drop API part 1, principles
Introduction
From the W3C specification: "the drag'n'drop API defines an eventbased draganddrop mechanism, it does not define exactlywhat a draganddrop operation actually is".
We decided to present this API in a book more dedicated to the HTML5 clientside persistence, as it is very often used fordragging and dropping files.
In this chapter, we present the API itself, and we will focus on the particular case of drag'n'dropping files in the next chapter.
External resources
W3C specification about drag'n'dropArticle from opera dev channel, lots of demos included,Article about drag'n'drop in HTML5 at html5rocks.comNice shopping cart demo: http://nettutsplus.s3.amazonaws.com/64_html5dragdrop/demo/index.html
Detect a drag
This is a very simple example that allows some HTML elements to be dragged. In order to make an element draggable, just addan attribute draggable="true" to any visible HTML5 element. Notice that some elements are draggable by default, like<IMG> elements. In order to detect a drag, add an event listener for the dragstart event:
12345
<ol ondragstart="dragStartHandler(event)"> <li draggable="true" data-value="fruit-apple">Apples</li> <li draggable="true" data-value="fruit-orange">Oranges</li> <li draggable="true" data-value="fruit-pear">Pears</li> </ol>
In the above code, we made all <LI> elements draggable, and we detect the dragstart event on the whole list: <OLondragstart="dragStarthandler(event)">
Here is the complete example: http://jsbin.com/uvuvew/4/edit
Code from this example:
12345678910111213141516
<!DOCTYPE html><html> <head> <script> function dragStartHandler(event) alert('dragstart event, target: ' + event.target); </script> </head><body> <p>What fruits do you like? Try to drag an element!</p> <ol ondragstart="dragStartHandler(event)"> <li draggable="true" data-value="fruit-apple">Apples</li> <li draggable="true" data-value="fruit-orange">Oranges</li> <li draggable="true" data-value="fruit-pear">Pears</li> </ol>

02/12/13 Persistence, drag'n'drop
classroom.w3devcampus.com/mod/book/tool/print/index.php?id=1248 29/83
1718
<body> <html>
In this code, the event handler just displays an alert with the target element that lauched the event. If you look at what isdisplayed, you will see that it's a JavaScript object, with a type equal to HTMLLIElement ("HTML <LI> element", in plainEnglish).
How to detect a drop and do something with the dragged elements
In this example, that is the continuation of the previous example, we show how to drag an element and detect a drop, gettingback some value corresponding to the dragged element, and modifiy the page content.
Steps 1: in the dragstart handler, copy a value in the drag'n'drop clipboard, for later use
In the dragstart handler, when a draggable <LI> element has been dragged, get the value of its datavalue attribute(you remember the data* attributes from Week 1, don't you?), and copy it in the "drag'n'drop clipboard, for later use. When avalue is copied in this clipboard, a key/name must be given. Data copied in the clipboard is associated with this name. Thevariable event.target at line 5 below is the <LI> element that has been dragged, andevent.target.dataset.value is the value of its datavalue attribute (in our case Apples, Oranges or Pears):
123456
function dragStartHandler(event) console.log('dragstart event, target: ' + event.target); // Copy in the drag'n'drop clipboard the value of the data* attribute of the target, with a type "Fruit". event.dataTransfer.setData("Fruit", event.target.dataset.value);
Step 2: define a "drop zone"
Any visible HTML element may become a "drop zone", just add an event listener for the drop event. Notice that most of thetime, as events may be propagated, we will also listen to ondragover or dragend events and stop the propagation. Moreon this later...
1234
<div ondragover="return false" ondrop="dropHandler(event);"> Drop your favorite fruits below: <ol id="droppedFruits"></ol></div>
Step 3: write a drop handler, get content from the clipboard, do something with it
1234567891011
function dropHandler(event) console.log('drop event, target: ' + event.target); ... // get the data from the drag'n'drop clipboard, with a type="Fruit" var data = event.dataTransfer.getData("Fruit"); // do something with the data ...
Complete online example: http://jsbin.com/uvuvew/7/edit

02/12/13 Persistence, drag'n'drop
classroom.w3devcampus.com/mod/book/tool/print/index.php?id=1248 30/83
Code from this example:
In the above code, notice:
Line 40 we define the zone where we can drop (ondrop=...) and when a drag enters the zone, we stop the eventpropagation (ondragover="return false")When we enter the dragstart listener (line 5), we copy the content of the datavalue attribute of the object that is
12345678910111213141516171819202122232425262728293031323334353637383940414243
<!DOCTYPE html><html> <head> <script> function dragStartHandler(event) console.log('dragstart event, target: ' + event.target); // Copy in the drag'n'drop clipboard the value of the data* attribute of the target, with a type "Fruits". event.dataTransfer.setData("Fruit", event.target.dataset.value); function dropHandler(event) console.log('drop event, target: ' + event.target); var li = document.createElement('li'); // get the data from the drag'n'drop clipboard, with a type="Fruit" var data = event.dataTransfer.getData("Fruit"); if (data == 'fruit-apple') li.textContent = 'Apples'; else if (data == 'fruit-orange') li.textContent = 'Oranges'; else if (data == 'fruit-pear') li.textContent = 'Pears'; else li.textContent = 'Unknown Fruit'; // add the dropped data as a child of the list. document.querySelector("#droppedFruits").appendChild(li); </script> </head><body> <p>What fruits do you like? Try to drag an element!</p> <ol ondragstart="dragStartHandler(event)"> <li draggable="true" data-value="fruit-apple">Apples</li> <li draggable="true" data-value="fruit-orange">Oranges</li> <li draggable="true" data-value="fruit-pear">Pears</li> </ol>
<div ondragover="return false" ondrop="dropHandler(event);"> Drop your favorite fruits below: <ol id="droppedFruits"></ol> </div> <body> <html>

02/12/13 Persistence, drag'n'drop
classroom.w3devcampus.com/mod/book/tool/print/index.php?id=1248 31/83
being dragged, in the drag'n'drop clipboard, with a name/key equal to "Fruit" (line 8),When a drop occurs in the "drop zone" (the <div> at line 40), the dropHandler(event) function is called, italways occurs after a call to the dragstart handler. In other words, when we enter the drop handler, there is alwayssomething in the clipboard. We do a event.dataTransfer.setData(...) in the dragstart handler, anda event.dataTransfer.getData(...) in the drop handler.The dropHandler function is called (line 11), we get the object (line 15) that is in the clipboard, the one with aname/key equal to "Fruit" , we create a <LI> element (line 13) and we set its value depending on the value read in theclipboard (lines 1725),Finally we add the <LI> element to the <OL> list that is in the <DIV>
Notice that we use some CSS to make the drop zone nicer (not presented in the source code above, but available in the onlineexample):
12345678910111213141516171819
div height: 150px; width: 150px; float: left; border: 2px solid #666666; background-color: #ccc; margin-right: 5px; -webkit-border-radius: 10px; -ms-border-radius: 10px; -moz-border-radius: 10px; border-radius: 10px; -webkit-box-shadow: inset 0 0 3px #000; -ms-box-shadow: inset 0 0 3px #000; box-shadow: inset 0 0 3px #000; text-align: center; cursor: move;
Add visual feedback when you enter a drop zone, when you drag something,etc.
We can associate some CSS styling to the lifecycle of a drag'n'drop. This is easy to do as the drag'n'drop API provides manyevents we can listen to, and that can be used on the draggable elements as well as the drop zones:
dragstart: already seen, this event is usually used on draggable elements. We used it for getting some value from theelement dragged + copy it onto the clipboard. It's a nice place to add some visual feedback, for example by adding a CSS classto the draggable object.
dragend: this event is launched when the drag has ended (on a drop or if the user released the mouse button while not in adroppable zone). In both cases, one good practice is to reset the style of the draggable object to default.
The next example shows how to add some style (green backgriound + dashed border) when a drag is started, and to reset thestyle of the dragged object to default when the drag is ended. The full runnable online example is a bit further (it includes visualfeedback on the drop zone):

02/12/13 Persistence, drag'n'drop
classroom.w3devcampus.com/mod/book/tool/print/index.php?id=1248 32/83
Code from this example:
dragenter: usually we bind this event to the drop zone. The event occurs when a dragged object enters a drop zone. It's agood place for changing the look of the droppable zone.
dragleave: this event is also used on the drop zone. When a dragged element leaves the drop zone (maybe the user changedhis mind?), we must set the look of the droppable zone back to normal.
dragover: this event is also generally binded to elements that correspond to a drop zone. Good practice is to prevent thepropagation of the event, and also to prevent the defaut behavior of the browser (i.e. if we drop an image, the default behaviouris to display its full size in a new page, etc.)
drop: also on the drop zone. This is where we really process the drop (get the value from the clipboard, etc). It's also necessaryto reset the look of the drop zone to default.
Complete example with visual feedback on draggable objects and on the drop zone
12345678910111213141516171819202122232425262728293031
...<style> .dragged border: 2px dashed #000; background-color: green; </style><script> function dragStartHandler(event) // Change css class for visual feedback event.target.style.opacity = '0.4'; event.target.classList.add('dragged'); console.log('dragstart event, target: ' + event.target); // Copy in the drag'n'drop clipboard the value of the data* attribute of the target, with a type "Fruits". event.dataTransfer.setData("Fruit", event.target.dataset.value); function dragEndHandler(event) console.log("drag end"); // Set draggable object to default style event.target.style.opacity = '1'; event.target.classList.remove('dragged'); </script>... <ol ondragstart="dragStartHandler(event)" ondragend="dragEndHandler(event)" > <li draggable="true" data-value="fruit-apple">Apples</li> <li draggable="true" data-value="fruit-orange">Oranges</li> <li draggable="true" data-value="fruit-pear">Pears</li> </ol>

02/12/13 Persistence, drag'n'drop
classroom.w3devcampus.com/mod/book/tool/print/index.php?id=1248 33/83
The next example shows how to use these events on the droppable zone. We used a real handler this time for the dragoverevent, in order to prevent the browser default behavior.
Online example with drag and drop visual feedbacks: http://jsbin.com/uvuvew/10/edit
Code from this example:
1234567891011121314151617181920212223242526272829303132333435363738394041424344454647484950
<!DOCTYPE html><html> <head> <style> div height: 150px; width: 150px; float: left; border: 2px solid #666666; background-color: #ccc; margin-right: 5px; -webkit-border-radius: 10px; -ms-border-radius: 10px; -moz-border-radius: 10px; border-radius: 10px; -webkit-box-shadow: inset 0 0 3px #000; -ms-box-shadow: inset 0 0 3px #000; box-shadow: inset 0 0 3px #000; text-align: center; cursor: move; .dragged border: 2px dashed #000; background-color: green; .draggedOver border: 2px dashed #000; background-color: green; </style> <script> function dragStartHandler(event) // Change css class for visual feedback event.target.style.opacity = '0.4'; event.target.classList.add('dragged'); console.log('dragstart event, target: ' + event.target); // Copy in the drag'n'drop clipboard the value of the data* attribute of the target, with a type "Fruits". event.dataTransfer.setData("Fruit", event.target.dataset.value); function dragEndHandler(event) console.log("drag end"); event.target.style.opacity = '1'; event.target.classList.remove('dragged'); function dragLeaveHandler(event)

02/12/13 Persistence, drag'n'drop
classroom.w3devcampus.com/mod/book/tool/print/index.php?id=1248 34/83
More feedback using the dropEffect property: change the cursor shape
It is possible to change the cursor shape during the drag process. The cursor will turn into a "copy", "move", "link" icon,depending on the semantic of your drag'n'drop, when you enter a drop zone during a drag. For example, if you "copy" a fruitinto the drop zone, like in the previous example, you would like to have a "copy" cursor like this:
If you are "moving" objects, it's more a cursor like this that you would like:
And if you are making a "link" or e "shortcut", it is more a cursor like this:
51525354555657585960616263646566676869707172737475767778798081828384858687888990919293949596979899100101102103
console.log("drag leave"); event.target.classList.remove('draggedOver'); function dragEnterHandler(event) console.log("Drag enter"); event.target.classList.add('draggedOver'); function dragOverHandler(event) //console.log("Drag over a droppable zone"); event.preventDefault(); // Necessary. Allows us to drop. function dropHandler(event) console.log('drop event, target: ' + event.target); // reset the visual look of the drop zone to default event.target.classList.remove('draggedOver'); var li = document.createElement('li'); // get the data from the drag'n'drop clipboard, with a type="Fruit" var data = event.dataTransfer.getData("Fruit"); if (data == 'fruit-apple') li.textContent = 'Apples'; else if (data == 'fruit-orange') li.textContent = 'Oranges'; else if (data == 'fruit-pear') li.textContent = 'Pears'; else li.textContent = 'Unknown Fruit'; // add the dropped data as a child of the list. document.querySelector("#droppedFruits").appendChild(li); </script> </head><body> <p>What fruits do you like? Try to drag an element!</p> <ol ondragstart="dragStartHandler(event)" ondragend="dragEndHandler(event)" > <li draggable="true" data-value="fruit-apple">Apples</li> <li draggable="true" data-value="fruit-orange">Oranges</li> <li draggable="true" data-value="fruit-pear">Pears</li> </ol> <div id="droppableZone" ondragenter="dragEnterHandler(event)" ondrop="dropHandler(event)" ondragover="dragOverHandler(event)" ondragleave="dragLeaveHandler(event)"> Drop your favorite fruits below: <ol id="droppedFruits"></ol></div> <body> <html>

02/12/13 Persistence, drag'n'drop
classroom.w3devcampus.com/mod/book/tool/print/index.php?id=1248 35/83
You can also use any image/icon you like:
For giving this visual feedback, we use the effectAllowed and dropEffect property of the dataTransfertobject. For setting one of the possible predefined cursors, we allow an effect in the dragstart handler, and we set the effect(to "move", "copy", etc.) in the dragEnter or dragOver handler.
Here is an extract of the code we can add to the example we saw earlier:
12345
function dragStartHandler(event) // Allow a "copy" cursor effect event.dataTransfer.effectAllowed = 'copy'; ...
And here is where we can set the cursor to an allowed value:
12345
function dragEnterHandler(event) // change the cursor shape to a "+" event.dataTransfer.dropEffect = 'copy'; ...
For setting a custom image, we also do this in the dragstart handler:
123456789101112131415
function dragStartHandler(event) // allowed cursor effects event.dataTransfer.effectAllowed = 'copy'; // Load and create an image var dragIcon = document.createElement('img'); dragIcon.src = 'anImage.png'; dragIcon.width = 100; // set the cursor to this image, with an offset in X, Y event.dataTransfer.setDragImage(dragIcon, -10, -10); ...
Complete online example:
Here is the previous example (with Apples, Oranges, etc) that sets a "copy" cursor and a customimage: http://jsbin.com/uvuvew/12/edit
Here are the various possible values for the cursor effects (not all may be supported by your browser, we noticed thatcopyMove, etc. had no effects with Chrome, for example. Value of "move", "copy", "link" are widely supported.
All possible values for dropEffect and effectAllowed:
dataTransfer.effectAllowed: can be set to the following

02/12/13 Persistence, drag'n'drop
classroom.w3devcampus.com/mod/book/tool/print/index.php?id=1248 36/83
values: none, copy, copyLink, copyMove, link,linkMove, move, all, and uninitialized.
dataTransfer.dropEffect: can take on one of the following values: none, copy, link, move.
Other examples that drag and drop images, HTML sub trees, text selection,etc
We saw the main principles in the previous sections. There are other interesting uses, that differs on how we copy and pastethings to/from the clipboard. The clipboard is accessed through the dataTransfer property of the different events.
123
event.dataTransfer.setData("Fruit", event.target.dataset.value);...var data = event.dataTransfer.getData("Fruit");
Example: drag and drop images or any HTML element
Adapted from: http://html5demo.braincracking.org/demo/dragNDrop.php
Online example: http://jsbin.com/ezobiv/3/edit
Code from the example:
1234567891011121314151617181920212223242526272829303132333435363738
<html><head> <style> .box border: silver solid; width: 256px; height: 128px; margin: 10px; padding: 5px; float: left; </style> <script> function drag(target, evt) evt.dataTransfer.setData("Text", target.id); function drop(target, evt) var id = evt.dataTransfer.getData("Text"); target.appendChild(document.getElementById(id)); // prevent default behavior evt.preventDefault(); </script></head><body> Drag and drop browser images in a zone:<br/> <img src="http://html5demo.braincracking.org/img/logos/chrome1.png" id="cr" ondragstart="drag(this, event)" <img src="http://html5demo.braincracking.org//img/logos/firefox1.png" id="ff" ondragstart="drag(this, event)" <img src="http://html5demo.braincracking.org//img/logos/ie1.png" id="ie" ondragstart="drag(this, event)" <img src="http://html5demo.braincracking.org//img/logos/opera1.png" id="op" ondragstart="drag(this, event)" <img src="http://html5demo.braincracking.org//img/logos/safari1.png" id="sf" ondragstart="drag(this, event)" <div class="box" ondragover="return false" ondrop="drop(this, event)"> <p>Good web browsers</p> </div> <div class="box" ondragover="return false" ondrop="drop(this, event)"> <p>Bad web browsers</p> </div>

02/12/13 Persistence, drag'n'drop
classroom.w3devcampus.com/mod/book/tool/print/index.php?id=1248 37/83
The trick here is only to work on the DOM directly. We used a variant of the event handler proposed by the DOM API. Thistime, we used handlers with two parameters (the first parameter, target, is the element that triggered the event, and the secondparameter is the event itself). In the dragstart handler we copy just the id of the element in the DOM (line 15).
In the drop handler, we just move the element from one part of the DOM to another part (under the <div> defined at line 36,that is the drop zone). This occurs at line 18 (get back the id from the clipboard), and line 19 (make it a child of the div.Consequence: it is no longer a child of the <body> and indeed, we "moved" one <img> from its previous location to anotherone in the page).
Drag and drop a text selection
There is no need to add a dragstart handler on an element that contains text. Any text that is selected is added automaticallyto the clipboard with a name/key equals to "text/plain". Just add a drop event handler on the drop zone and get the datafrom the clipboard using "text/plain" as the access key:
1234
function drop(target, event) event.preventDefault(); target.innerHTML = event.dataTransfer.getData('text/plain');;
Complete online example: http://jsbin.com/ezobiv/6/edit
Code from the example:
3940
</body></html>
123456789101112131415161718192021222324252627282930313233343536
<html><head> <style> .box border: silver solid; width: 256px; height: 128px; margin: 10px; padding: 5px; float: left; .notDraggable -moz-user-select: none; -khtml-user-select: none; -webkit-user-select: none; user-select: none; </style> <script> function drop(target, event) event.preventDefault(); target.innerHTML = event.dataTransfer.getData('text/plain'); ; </script></head><body> <p id="text"><b>Drag and drop a text selection from this paragraph</b>. Drag and drop any part of this text in the drop zone. Notice in the code: there is no need for a dragstart handler in case of text selection: the text is added to the clipboard when dragged with a key/name equals to "text/plain". Just write a drop handler that will do a event.dataTransfert.getData("text/plain") and you are done!</p> <p class="notDraggable">This paragraphe is not selectable however. Look at the CSS in the source code.</p> <div class="box" ondragover="return false" ondrop="drop(this, event)"> <p>Drop some text selection here.</p>

02/12/13 Persistence, drag'n'drop
classroom.w3devcampus.com/mod/book/tool/print/index.php?id=1248 38/83
Here we used a CSS trick to make the second paragraph nonselectable, by setting the userselected property to none.
In the next chapter we will see how we can drag'n'drop files!
37 </div> </body></html>

02/12/13 Persistence, drag'n'drop
classroom.w3devcampus.com/mod/book/tool/print/index.php?id=1248 39/83
6 Drag'n'drop API part 2: files!
Introduction
Here we will look at how we can drag'n'drop files between the browser and the desktop.
External resources
Article from HTML5 rocks about drag'n'drop, cover filesArticle from theCSSninjas.com about dragging files from browser to desktop
Drag and drop files from the desktop to the browserThe principle is the same as in the examples from the last chapter, except that we do not need to worry about a dragstarthandler. Files will be dragged from the desktop, so the browser will do the job of copying their content to the clipboard andmake it available in our JavaScript code.
Indeed, the main work will be done in the drop handler, where we will use the files property from the dataTransfer/clipboardobjects. This is where the browser will copy the files that have been dragged from the desktop. In the files property of thedataTransfer object (aka the clipboard).
This files object is the same one we saw in the chapter about the File API: it is a collection, each member being a fileobject. From each file object we will be able to get the name of the file, its type, size, last modification date, read it, etc. like inthe examples from the File API chapter.
Example of a drop handler that works on files that have been dragged and dropped:
123456789101112131415161718
function dropHandler(event) // Do not propagate the event event.stopPropagation(); // Prevent default behavior, in particular when we drop images or links event.preventDefault(); // get the files from the clipboard var files = event.dataTransfer.files; var filenames = ""; // do something with the files...here we iterate on them and log the filenames for(var i = 0 ; i < filesLen ; i++) filenames += '\n' + files[i].name; console.log(files.length + ' file(s) have been dropped:\n' + filenames);
At lines 78, we get the files that have been dropped. Lines 1215 iterate on the collection and build a string that contains the listof file names. Line 17 displays this string on the debugging console.
When dragging and dropping images or links, we need to prevent thebrowser's default behavior
The previous piece of code shows at the beginning of the drop handler two lines of code that stop the propagation of the dropevent, and prevent the default behavior of the browser. Try to drop on a web page an image or an HTTP link: the browser willdisplay the image or the web page pointed by the link into a new tab/window. This is not what we would like in an applicationthat controls the drag'n'drop process. These two lines are necessary to prevent the default behavior of the browser:
1234
// Do not propagate the eventevent.stopPropagation();// Prevent default behavior, in particular when we drop images or linksevent.preventDefault();
Good practice: add these lines to the drop handler and to the dragOver handler attached to the drop zone:
12345678910
function dragOverHandler(event) // Do not propagate the event event.stopPropagation(); // Prevent default behavior, in particular when we drop images or links event.preventDefault(); ... function dropHandler(event)

02/12/13 Persistence, drag'n'drop
classroom.w3devcampus.com/mod/book/tool/print/index.php?id=1248 40/83
11121314151617
// Do not propagate the event event.stopPropagation(); // Prevent default behavior, in particular when we drop images or links event.preventDefault(); ...
First example: drag and drop files to a drop zone, display file details in a list
Online example: http://jsbin.com/itiriv/2/edit
Code from the example:
123456789101112131415161718192021222324252627
<!DOCTYPE html><html> <head> <style> div height: 150px; width: 350px; float: left; border: 2px solid #666666; background-color: #ccc; margin-right: 5px; -webkit-border-radius: 10px; -ms-border-radius: 10px; -moz-border-radius: 10px; border-radius: 10px; -webkit-box-shadow: inset 0 0 3px #000; -ms-box-shadow: inset 0 0 3px #000; box-shadow: inset 0 0 3px #000; text-align: center; cursor: move; .dragged border: 2px dashed #000; background-color: green;

02/12/13 Persistence, drag'n'drop
classroom.w3devcampus.com/mod/book/tool/print/index.php?id=1248 41/83
Note that:
We prevented the browser default behavior in the drop and dragOver handlers,Lines 7577 create a <LI> element, its value is initalized with the file name of the current file in the collection, and addedto the <OL> list.
This example in its principle is very similar to the ones we saw in the previous chapter, with Apples, Oranges, etc. Except thatthis time we work with files. And when we work with files, it is important to prevent the browser's default behavior.
Drag'n'drop images with thumbnail previews
This time we will reuse the readFIlesAndDisplayPreview() method we saw in example 3 of the File API chapter,available online at: http://jsbin.com/erepek/3/edit. You can take a look again at this section of the course, as detailed explanationsabout how we read and display the file content as images are given.
Code from this method:
12function readFilesAndDisplayPreview(files) // Loop through the FileList and render image files as thumbnails.
28293031323334353637383940414243444546474849505152535455565758596061626364656667686970717273747576777879808182838485868788899091
.draggedOver border: 2px dashed #000; background-color: green; </style> <script> function dragLeaveHandler(event) console.log("drag leave"); // Set style of drop zone to default event.target.classList.remove('draggedOver'); function dragEnterHandler(event) console.log("Drag enter"); // Show some visual feedback event.target.classList.add('draggedOver'); function dragOverHandler(event) //console.log("Drag over a droppable zone"); // Do not propagate the event event.stopPropagation(); // Prevent default behavior, in particular when we drop images or links event.preventDefault(); function dropHandler(event) console.log('drop event'); // Do not propagate the event event.stopPropagation(); // Prevent default behavior, in particular when we drop images or links event.preventDefault(); // reset the visual look of the drop zone to default event.target.classList.remove('draggedOver'); // get the files from the clipboard var files = event.dataTransfer.files; var filesLen = files.length; var filenames = ""; // iterate on the files, get details using the file API // Display file names in a list. for(var i = 0 ; i < filesLen ; i++) filenames += '\n' + files[i].name; // Create a li, set its value to a file name, add it to the ol var li = document.createElement('li'); li.textContent = files[i].name; document.querySelector("#droppedFiles").appendChild(li); console.log(files.length + ' file(s) have been dropped:\n' + filenames); </script> </head><body> <h2>Drop your files here!</h2> <div id="droppableZone" ondragenter="dragEnterHandler(event)" ondrop="dropHandler(event)" ondragover="dragOverHandler(event)" Drop zone <ol id="droppedFiles"></ol> </div><body><html>

02/12/13 Persistence, drag'n'drop
classroom.w3devcampus.com/mod/book/tool/print/index.php?id=1248 42/83
34567891011121314151617181920212223
for (var i = 0, f; f = files[i]; i++) // Only process image files. if (!f.type.match('image.*')) continue; var reader = new FileReader(); //capture the file information. reader.onload = function(e) // Render thumbnail. var span = document.createElement('span'); span.innerHTML = "<img class='thumb' src='" + e.target.result + "'/>"; document.getElementById('list').insertBefore(span, null); ; // Read in the image file as a data URL. reader.readAsDataURL(f);
At line 17, we insert the <IMG> element that has been created and initalized with the dataURL of the image file, to a list ofid "list". So, let's add this method to our previous example, and add to the HTML of the pagean <output id="list"></output>.
Complete example of drag'n'drop + thumbnails of images
Online example: http://jsbin.com/iwuleq/9/edit
Code from the example:
123456789101112131415161718
<!DOCTYPE html><html> <head> <style> div height: 150px; width: 350px; border: 2px solid #666666; background-color: #ccc; margin-right: 5px; -webkit-border-radius: 10px; -ms-border-radius: 10px; -moz-border-radius: 10px; border-radius: 10px; -webkit-box-shadow: inset 0 0 3px #000; -ms-box-shadow: inset 0 0 3px #000; box-shadow: inset 0 0 3px #000; text-align: center;

02/12/13 Persistence, drag'n'drop
classroom.w3devcampus.com/mod/book/tool/print/index.php?id=1248 43/83
192021222324252627282930313233343536373839404142434445464748495051525354555657585960616263646566676869707172737475767778798081828384858687888990919293949596979899100101102103104105106107108
cursor: move; .dragged border: 2px dashed #000; background-color: green; .draggedOver border: 2px dashed #000; background-color: green; </style> <script> function dragLeaveHandler(event) console.log("drag leave"); // Set style of drop zone to default event.target.classList.remove('draggedOver'); function dragEnterHandler(event) console.log("Drag enter"); // Show some visual feedback event.target.classList.add('draggedOver'); function dragOverHandler(event) //console.log("Drag over a droppable zone"); // Do not propagate the event event.stopPropagation(); // Prevent default behavior, in particular when we drop images or links event.preventDefault(); function dropHandler(event) console.log('drop event'); // Do not propagate the event event.stopPropagation(); // Prevent default behavior, in particular when we drop images or links event.preventDefault(); // reset the visual look of the drop zone to default event.target.classList.remove('draggedOver'); // get the files from the clipboard var files = event.dataTransfer.files; var filesLen = files.length; var filenames = ""; // iterate on the files, get details using the file API // Display file names in a list. for(var i = 0 ; i < filesLen ; i++) filenames += '\n' + files[i].name; // Create a li, set its value to a file name, add it to the ol var li = document.createElement('li'); li.textContent = files[i].name; document.querySelector("#droppedFiles").appendChild(li); console.log(files.length + ' file(s) have been dropped:\n' + filenames); readFilesAndDisplayPreview(files); function readFilesAndDisplayPreview(files) // Loop through the FileList and render image files as thumbnails. for (var i = 0, f; f = files[i]; i++) // Only process image files. if (!f.type.match('image.*')) continue; var reader = new FileReader(); //capture the file information. reader.onload = function(e) // Render thumbnail. var span = document.createElement('span'); span.innerHTML = "<img class='thumb' width='100' src='" + e.target.result + "'/>"; document.getElementById('list').insertBefore(span, null); ; // Read in the image file as a data URL. reader.readAsDataURL(f); </script>

02/12/13 Persistence, drag'n'drop
classroom.w3devcampus.com/mod/book/tool/print/index.php?id=1248 44/83
We just added the readFilesAndDisplayPreview() method we saw in example 3 of the File API chapter. We calledit at the end of the drop handler (line 82), and we just added the <output> element that will contain the <img> elementscorresponding to the thumbnails (line 117).
Let's go further and also add an <input type="file">
If you look (again) at example 3 from the File API chapter, you will notice that the event handler we used to track the filesselected using <input type="file"/> looks like this:
12345678910111213
<script> function handleFileSelect(evt) var files = evt.target.files; // FileList object // do something with files... why not call readFilesAndDisplayPreview! readFilesAndDisplayPreview(files); document.getElementById('files').addEventListener('change', handleFileSelect, false);</script>...<body> Choose multiple files :<input type="file" id="files" multiple /><br/></body>
It calls readFilesAndDisplayPreview() too! We can then add to our drag'n'drop example an <inputtype="file"> element, and this handler. Like that, we will be able to indifferently select files with drag'n'drop, or by usinga file selector.
Just for fun, we also added an experimental "directory choser" that is implemented by Chrome (notice, <inputtype="file" webkitdirectory=""/> is not in the HTML5 specification, we added it here just for fun. Thedrag'n'drop and file choser will work with any modern browser, only this feature will work only with Chrome).
Online example: http://jsbin.com/iwuleq/11/edit
In this screenshot, we selected some files using the first button, that is an <input type="file" multiple.../>,then we used the second button , that is a <input type="file" webkitdirectory="".../> selected a directorythat contained 11 files, then we dragged and dropped some other images to the drop zone. Every time, thumbnails weredisplayed.
109110111112113114115116117118119120121
</head><body> <h2>Drop your files here!</h2> <div id="droppableZone" ondragenter="dragEnterHandler(event)" ondrop="dropHandler(event)" ondragover="dragOverHandler(event)" Drop zone <ol id="droppedFiles"></ol> </div> <br/> <output id="list"></output> <body> <html>

02/12/13 Persistence, drag'n'drop
classroom.w3devcampus.com/mod/book/tool/print/index.php?id=1248 45/83
Code from this example:
123456789101112131415161718192021222324252627
<!DOCTYPE html><html> <head> <style> div height: 150px; width: 350px; border: 2px solid #666666; background-color: #ccc; margin-right: 5px; -webkit-border-radius: 10px; -ms-border-radius: 10px; -moz-border-radius: 10px; border-radius: 10px; -webkit-box-shadow: inset 0 0 3px #000; -ms-box-shadow: inset 0 0 3px #000; box-shadow: inset 0 0 3px #000; text-align: center; cursor: move; .dragged border: 2px dashed #000; background-color: green; .draggedOver

02/12/13 Persistence, drag'n'drop
classroom.w3devcampus.com/mod/book/tool/print/index.php?id=1248 46/83
282930313233343536373839404142434445464748495051525354555657585960616263646566676869707172737475767778798081828384858687888990919293949596979899100101102103104105106107108109110111112113114115116117
border: 2px dashed #000; background-color: green; </style> <script> function dragLeaveHandler(event) console.log("drag leave"); // Set style of drop zone to default event.target.classList.remove('draggedOver'); function dragEnterHandler(event) console.log("Drag enter"); // Show some visual feedback event.target.classList.add('draggedOver'); function dragOverHandler(event) //console.log("Drag over a droppable zone"); // Do not propagate the event event.stopPropagation(); // Prevent default behavior, in particular when we drop images or links event.preventDefault(); function dropHandler(event) console.log('drop event'); // Do not propagate the event event.stopPropagation(); // Prevent default behavior, in particular when we drop images or links event.preventDefault(); // reset the visual look of the drop zone to default event.target.classList.remove('draggedOver'); // get the files from the clipboard var files = event.dataTransfer.files; var filesLen = files.length; var filenames = ""; // iterate on the files, get details using the file API // Display file names in a list. for(var i = 0 ; i < filesLen ; i++) filenames += '\n' + files[i].name; // Create a li, set its value to a file name, add it to the ol var li = document.createElement('li'); li.textContent = files[i].name; document.querySelector("#droppedFiles").appendChild(li); console.log(files.length + ' file(s) have been dropped:\n' + filenames); readFilesAndDisplayPreview(files); function readFilesAndDisplayPreview(files) // Loop through the FileList and render image files as thumbnails. for (var i = 0, f; f = files[i]; i++) // Only process image files. if (!f.type.match('image.*')) continue; var reader = new FileReader(); //capture the file information. reader.onload = function(e) // Render thumbnail. var span = document.createElement('span'); span.innerHTML = "<img class='thumb' width='100' src='" + e.target.result + "'/>"; document.getElementById('list').insertBefore(span, null); ; // Read in the image file as a data URL. reader.readAsDataURL(f); function handleFileSelect(evt) var files = evt.target.files; // FileList object // do something with files... why not call readFilesAndDisplayPreview! readFilesAndDisplayPreview(files); </script> </head><body>

02/12/13 Persistence, drag'n'drop
classroom.w3devcampus.com/mod/book/tool/print/index.php?id=1248 47/83
The added parts have been highlighted. As you can see, all the methods share the same code for previewing the images.
Uploading files using XMLHttpRequest level 2
This time we will mix the last example of the File API chapter, with one of the examples from this page that used drag'n'drop.We just copied and pasted some code in a method called uploadAllFilesUsingAjax() and added a <progress>element.
Online example: http://jsbin.com/amebem/3/edit
Code from this example:
123456789101112131415161718192021222324252627282930313233
<!DOCTYPE html><html> <head> <style> div height: 150px; width: 350px; border: 2px solid #666666; background-color: #ccc; margin-right: 5px; -webkit-border-radius: 10px; -ms-border-radius: 10px; -moz-border-radius: 10px; border-radius: 10px; -webkit-box-shadow: inset 0 0 3px #000; -ms-box-shadow: inset 0 0 3px #000; box-shadow: inset 0 0 3px #000; text-align: center; cursor: move; .dragged border: 2px dashed #000; background-color: green; .draggedOver border: 2px dashed #000; background-color: green; </style> <script>
118119120121122123124125126127128129130131132133
<h2>Use one of these input fields for selecting files</h2> Beware, the directory choser works only in Chrome and may overload your browser memory if there are too many big images in the directory you choose.
<p>Choose multiple files :<input type="file" id="files" multiple onchange="handleFileSelect(event)"/></p> <p>Choose a directory (Chrome only): <input type="file" id="dir" webkitdirectory="" onchange="handleFileSelect(event)"/></p> <h2>Drop your files here!</h2> <div id="droppableZone" ondragenter="dragEnterHandler(event)" ondrop="dropHandler(event)" ondragover="dragOverHandler(event)" ondragleave="dragLeaveHandler(event)"> Drop zone <ol id="droppedFiles"></ol></div> <br/> <output id="list"></output> <body> <html>

02/12/13 Persistence, drag'n'drop
classroom.w3devcampus.com/mod/book/tool/print/index.php?id=1248 48/83
343536373839404142434445464748495051525354555657585960616263646566676869707172737475767778798081828384858687888990919293949596979899100101102103104105106107108109110111112113114115116117118119120
function dragLeaveHandler(event) console.log("drag leave"); // Set style of drop zone to default event.target.classList.remove('draggedOver'); function dragEnterHandler(event) console.log("Drag enter"); // Show some visual feedback event.target.classList.add('draggedOver'); function dragOverHandler(event) //console.log("Drag over a droppable zone"); // Do not propagate the event event.stopPropagation(); // Prevent default behavior, in particular when we drop images or links event.preventDefault(); function dropHandler(event) console.log('drop event'); // Do not propagate the event event.stopPropagation(); // Prevent default behavior, in particular when we drop images or links event.preventDefault(); // reset the visual look of the drop zone to default event.target.classList.remove('draggedOver'); // get the files from the clipboard var files = event.dataTransfer.files; var filesLen = files.length; var filenames = ""; // iterate on the files, get details using the file API // Display file names in a list. for(var i = 0 ; i < filesLen ; i++) filenames += '\n' + files[i].name; // Create a li, set its value to a file name, add it to the ol var li = document.createElement('li'); li.textContent = files[i].name; document.querySelector("#droppedFiles").appendChild(li); console.log(files.length + ' file(s) have been dropped:\n' + filenames); uploadAllFilesUsingAjax(files); function uploadAllFilesUsingAjax(files) var xhr = new XMLHttpRequest(); xhr.open('POST', 'upload.html'); xhr.upload.onprogress = function(e) progress.value = e.loaded; progress.max = e.total; ; xhr.onload = function() alert('Upload complete!'); ; var form = new FormData(); for(var i = 0 ; i < files.length ; i++) form.append('file', files[i]);
// Send the Ajax request xhr.send(form); </script> </head><body> <h2>Drop your files here!</h2> <div id="droppableZone" ondragenter="dragEnterHandler(event)" ondrop="dropHandler(event)" ondragover="dragOverHandler(event)" ondragleave="dragLeaveHandler(event)"> Drop zone <ol id="droppedFiles"></ol> </div> <br/> Uploading progress: <progress id="progress"></progress> <body> <html>
We highlighted the interesting parts. In this example we build an object of type FormData (this comes from the standard

02/12/13 Persistence, drag'n'drop
classroom.w3devcampus.com/mod/book/tool/print/index.php?id=1248 49/83
JavaScript DOM API level 2), we fill this object with the file contents (line 100), then we send the Ajax request and monitor theupload progress.
It could be interesting to upload one file at a time with a visual feedback like this; "uploading file MichaelJackson.jpg....." etc.instead of uploading all files at once. We leave this to you, as an exercise.
Dragging files "out" from the browser to the desktop
Dragging out files from the browser to the desktop is supported by most desktop browsers, except Internet Explorer (evenversion 10). Notice that you can drag and drop not only from browser to desktop, but also from browser to browser.
There is nothing about dragging files out of the browser in the W3C specification about drag'n'drop. The W3C specificationdefines a drag'n'drop model based on events, but does not define the way the data that is drag'n'dropped will behandled.
Browser vendors defined a de facto standard for dragging files out of the browser.
To be more specific, they defined:
A standard way to copy a file to the clipboard during a drag, if we want this file to be draggable out of the browser.They implemented the download code for copying the content of the clipboard in the case of a drop on the desktop.
For step 1, the file copied to the clipboard must have a key/name equal to DownloadURL, and the data itself should follow aformat like that:
MIME type:filename:URL of source file
Where the filename is the name of the file downloaded on the desktop, once the download is complete.
Example of a dragStartHandler that copies a PNG image in the clipboard:
Complete example: drag an <img> to the Desktop
Tested with Chrome, Firefox and Opera. Does not work with Internet Explorer, even version 10.
Online example: http://jsbin.com/irerim/6/edit
1 ondragstart="event.dataTransfer.setData('DownloadURL', 'image/png:logo.png:http://www.w3devcampus.com/logo.png');"

02/12/13 Persistence, drag'n'drop
classroom.w3devcampus.com/mod/book/tool/print/index.php?id=1248 50/83
Code from the example:
12345678910111213141516171819
<!DOCTYPE html><html><head><meta charset=utf-8 /><title>JS Bin</title></head><body> I'm a link to Michel Buffa's picture, drag me to the desktop! This will work with Chrome, Opera, Safari and Firefox so far, noit in IE10, 9, 8 etc....<br/> <a href="http://www.w3devcampus.com/wp-content/uploads/2013/01/michelbuffa.png" draggable="true" ondragstart="event.dataTransfer.setData('DownloadURL', 'image/png:michelbuffa.png:http://www.w3devcampus.com/wp-content/uploads/2013/01/michelbuffa.png');" onclick="return false"> <img src="http://www.w3devcampus.com/wp-content/uploads/2013/01/michelbuffa.png" alt="Michel Buffa"/></a> <p>Notice that you can also try to drag'n'drop from one browser to another one, i.e. from Firefox to Chrome or to Opera!</p></body></html>
In this example, there is no javascript, we wrote the dragstart handler instructions directly in the ondragstart attribute(line 12)The <IMG> element is wrapped by an <A HREF>...</A> element that is draggable (line 11) and not clickable(prevent defaut behavior, line 14). When dragged, this element calls the dragstart handler that just adds to the clipboard an object withkey="DownloadURL", and value equal to image/png:michelbuffa.png:url of the file
You need to indicate the MIME type of the file, followed by ":", followed by the filename of the files that will be copied to thedesktop, followed by the URL of the file.
Example: drag out a canvas image
This example draws in one canvas, builds one <IMG> element from the canvas content, and allows indifferently the canvas or

02/12/13 Persistence, drag'n'drop
classroom.w3devcampus.com/mod/book/tool/print/index.php?id=1248 51/83
the image to be dragged out from the browser to the desktop : http://jsbin.com/oboyiw/5/edit
Code from the example:
123456789101112131415161718192021222324252627282930313233343536373839404142
<html> <head><script src="http://ajax.googleapis.com/ajax/libs/jquery/1/jquery.min.js"></script> <script> function dragStartHandler(e) console.log("drag start"); var element = e.target; var src; if (element.tagName === "IMG" && element.src.indexOf("data:") === 0) src = element.src; if (element.tagName === "CANVAS") try src = element.toDataURL(); catch(e) if (src) var name = element.getAttribute("alt") || "download"; var mime = src.split(";")[0].split("data:")[1]; var ext = mime.split("/")[1] || "png"; var download = mime + ":" + name + "." + ext + ":" + src; // Prepare file content to be draggable to the desktop e.dataTransfer.setData("DownloadURL", download); function drawCanvas() var canvas = document.getElementById('mycanvas'); var ctx = canvas.getContext('2d'); var lingrad = ctx.createLinearGradient(0,0,0,150); lingrad.addColorStop(0, '#000'); lingrad.addColorStop(0.5, '#669'); lingrad.addColorStop(1, '#fff'); ctx.fillStyle = lingrad;

02/12/13 Persistence, drag'n'drop
classroom.w3devcampus.com/mod/book/tool/print/index.php?id=1248 52/83
Notice the way we build the data corresponding to the canvas or image (lines 2329).
4344454647484950515253545556575859606162636465666768697071
ctx.fillRect(0, 0, canvas.width, canvas.height); // Create an image from the canvas var img = new Image(); img.src = canvas.toDataURL("image/png"); img.alt = 'downloaded-from-image'; //img.draggable='true' is not necessary, images are draggable by default img.addEventListener('dragstart', dragStartHandler, false); // Add the image to the document document.querySelector("body").appendChild(img); </script> </head> <body onload="drawCanvas()"> <h2>Drag out a canvas or an image to the desktop</h2> <p>Demo adapted by M.Buffa from: : <a href="http://jsfiddle.net/bgrins/xgdSC/"/>http://jsfiddle.net/bgrins/xgdSC/</a> (courtesy of TheCssNinja & Brian Grinstead)</p> Drag out the image or the canvas. Notice that the filenames will be different on desktop. This example is interesting as it works with canvas data <br/> <br/>The Canvas:<br/> <canvas id='mycanvas' alt='downloaded-from-canvas' draggable='true' ondragstart="dragStartHandler(event)"></ <br/> <br/> The Image<br/> </body></html>

02/12/13 Persistence, drag'n'drop
classroom.w3devcampus.com/mod/book/tool/print/index.php?id=1248 53/83
7 Several examples of form submission using Xhr2/Ajax,files and also PHP code for the server side.
Introduction
Hi all, I've got many questions about how to submit a form with regular input fields AND files AND a progress bar. This part ofthe course will cover an example and we will propose different implementations. I asked two of my student (thanks a lot Loïseand Cedrik who work at W3C now!) to help me writing these examples. We included PHP server side code.
Imagine that we have a regular HTML5 form, but aside input fields for entering name, address, age, etc. we want also to selectmultiple files (that can be images). And we want to get all the data on the server side.
To begin with, there are two different approaches we can use :
Upload the files "automatically" as soon as they are drag'n'dropped or selected (using a <input type="file".../>), withAjax/Xhr2 + progress bars as we saw in the examples from the File API. This first approach is similar to what Gmail doeswhen you write a new email and upload files/pictures to your message. The attachments are uploaded as soon as they areselected, and the message is sent when you press the "send" button. The interesting part here is that the "regular" part ofthe form will benefit from the HTML5 validation system built in the browser. A empty field with a "required" attribute, ifleft empty, will pop up some nice error messages in a bubble and the form will not be submitted. Nice! However, on theserver side, we need a way to "join" the files that have been asynchronously uploaded with the rest of the form values. It'seasier to do than it sounds. Look at the provided PHP code further in this message.We can also send all the form content (regular input fields values + the files selected) at once, using a single Ajax request(we will have only one progress bar), or we may use more than one Ajax requests, and we start them only after the submitbutton has been clicked. If we use a single request, we will have only one progress bar for the whole content we aresending. Of course we are still using Ajax/Xhr2 in order to will monitor the progress of the upload with multiple progressbars. The difference with the first approach is that we are sending everything using Ajax/JavaScript, including the regularinput field content. We cannot benefit from the HTML5 form validation system. This approach is less convenient, needsmore work client side (for validating by hand all the fields' contents) but the server side code may be simpler. PHP code isalso provided. We also have played with some form validation API functions likedocument.getElementById("MyForm").checkValidity() to see if they could trigger the built in validation systemimplemented in the browser. Apparently not :( I asked some friends at W3C if this is possible with currentimplementations, apparently not yet...
So, we also made two versions of each of these approach (one that uses only a file selector and one that uses drag'n'drop). Wecould have merged file selector + drag'n'drop like we did in the examples in the course but the code would have been longer andmore difficult to follow. So let's start with the first approach, the one that auto loads the files as soon as they are selected.
Autoloading of the files, regular form submission, benefit from the HTML5 form validationsystem
Here is the online example (this one does not have the PHP code running, but works anyway even if the files are not uploaded).Just change the "upload.html" URL to "upload.php", install our php code in an apache server somewhere and it will be 100%working) : http://jsbin.com/eCInIH/4/edit
Full working example (that calls PHP code listed further on) : http://88.191.177.121/Buffa/autoUpload/indexInput.html
In this example the "send" button is disabled and becomes enabled as soon as all the files have been uploaded completely.
Example of submission after file transfer completed and an invalid input field:
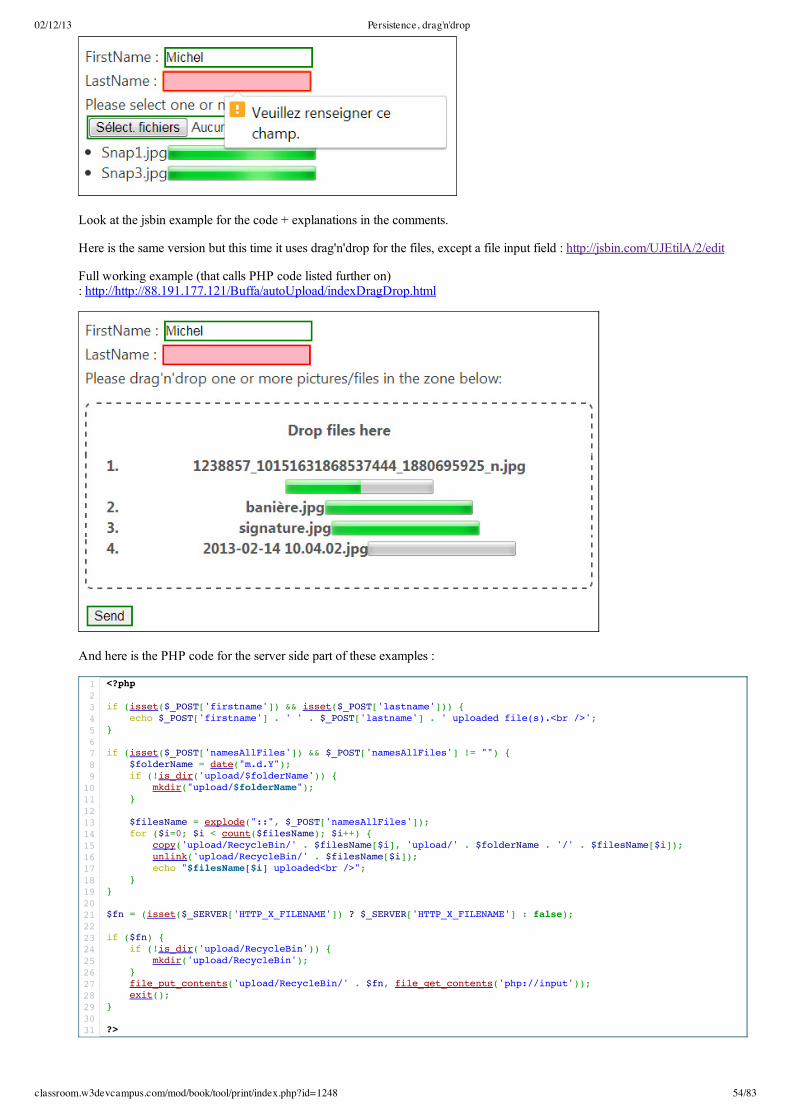
02/12/13 Persistence, drag'n'drop
classroom.w3devcampus.com/mod/book/tool/print/index.php?id=1248 54/83
Look at the jsbin example for the code + explanations in the comments.
Here is the same version but this time it uses drag'n'drop for the files, except a file input field : http://jsbin.com/UJEtilA/2/edit
Full working example (that calls PHP code listed further on): http://http://88.191.177.121/Buffa/autoUpload/indexDragDrop.html
And here is the PHP code for the server side part of these examples :
12345678910111213141516171819202122232425262728293031
<?php if (isset($_POST['firstname']) && isset($_POST['lastname'])) echo $_POST['firstname'] . ' ' . $_POST['lastname'] . ' uploaded file(s).<br />'; if (isset($_POST['namesAllFiles']) && $_POST['namesAllFiles'] != "") $folderName = date("m.d.Y"); if (!is_dir('upload/$folderName')) mkdir("upload/$folderName"); $filesName = explode("::", $_POST['namesAllFiles']); for ($i=0; $i < count($filesName); $i++) copy('upload/RecycleBin/' . $filesName[$i], 'upload/' . $folderName . '/' . $filesName[$i]); unlink('upload/RecycleBin/' . $filesName[$i]); echo "$filesName[$i] uploaded<br />"; $fn = (isset($_SERVER['HTTP_X_FILENAME']) ? $_SERVER['HTTP_X_FILENAME'] : false); if ($fn) if (!is_dir('upload/RecycleBin')) mkdir('upload/RecycleBin'); file_put_contents('upload/RecycleBin/' . $fn, file_get_contents('php://input')); exit(); ?>

02/12/13 Persistence, drag'n'drop
classroom.w3devcampus.com/mod/book/tool/print/index.php?id=1248 55/83
Second approach : upload everything at once !
This time, we add the files to the HTML5 FormData object before sending Xhr2 Ajax requests to the server (one for each file +one for the rest of the form, we could have send only one single request with everything in it, example to come). There is nobuiltin HTML5 form validation.
First example that does not use drag'n'drop: http://jsbin.com/ObeGipO/2/edit
Full working example (that calls PHP code listed further on): http://88.191.177.121/Buffa/autoUpload/indexInput.htmlBuffa/sendUpload/indexInput.html
And version with drag'n'drop here: http://jsbin.com/OtItIpO/2/edit
Full working example (that calls PHP code listed further on) : http://37.187.52.167/Buffa/sendUpload/indexDragDrop.html
PHP code for this approach (with and without drag'n'drop, the PHP code is the same):
Variant of the last approach : use a single Xhr2 request, pack everything into one big FormDataobject
Online example : http://jsbin.com/exePiY/5/edit
Source code of this example
12345678910111213141516171819202122232425262728293031323334353637383940
<?php $fn = (isset($_SERVER['HTTP_X_FILENAME']) ? $_SERVER['HTTP_X_FILENAME'] : false); if (isset($_POST['firstname']) && isset($_POST['lastname'])) echo $_POST['firstname'] . ' ' . $_POST['lastname'] . ' try to upload file(s).'; $folderName = date("m.d.Y");if (!is_dir('upload/$folderName')) mkdir("upload/$folderName"); if ($fn) file_put_contents('upload/' . $folderName . '/' . $fn, file_get_contents('php://input')); echo "$fn uploaded"; exit();else if (isset($_FILES) && is_array($_FILES)) $number_files_send = count($_FILES['formFiles']['name']); $dir = realpath('.') . '/upload/' . $folderName . '/'; if ($number_files_send > 0) for ($i = 0; $i < $number_files_send; $i++) echo '<br/>Reception of : ' . $_FILES['formFiles']['name'][$i]; $copy = move_uploaded_file($_FILES['formFiles']['tmp_name'][$i], $dir . $_FILES['formFiles']['name' if ($copy) echo '<br />File ' . $_FILES['formFiles']['name'][$i] . ' copy'; else echo '<br />No file to upload'; ?>

02/12/13 Persistence, drag'n'drop
classroom.w3devcampus.com/mod/book/tool/print/index.php?id=1248 56/83
123456789101112131415161718192021222324252627282930313233343536373839404142434445464748495051525354555657585960616263646566676869707172737475767778798081828384858687888990
<!DOCTYPE html><html lang="en"> <head> <meta charset="UTF-8" /> <title>HTML5 File</title> <link rel="stylesheet" type="text/css" media="all" href="styles.css" /> <script type="text/javascript"> // object that hold form values var formValues = new Object; // function that iterates through the form and dynamically assigns properties/values to form values object, and stores it to sessionStorage storeValues = function () var formElements = document.formUpload.elements; for (i = 0; i < formElements.length; i++) var formElement = formElements[i]; if (formElement.localName == "input") var name = formElements[i].name; var value = formElements[i].value; formValues[name] = value; // Store the object as a JSON String sessionStorage.setItem('formUploadSave', JSON.stringify(formValues)); // on loading, retrieve any form values previously stored this session. // called by body onLoad // function that retrieves form values from sessionStorage, iterates through form and restores properties/values to form elements; also assigns onchange event listener. retrieveValues = function () var formElements = document.formUpload.elements; // Retrieve the object from storage var retrievedValues = JSON.parse(sessionStorage.getItem("formUploadSave")); // If found, populate form for (i = 0; i < formElements.length; i++) var formElement = formElements[i]; if (formElement.localName == "input") // Assign onchange event listener formElement.addEventListener("change", storeValues, false); var formElementName = formElement.name; if (retrievedValues) // != null formElement.value = retrievedValues[formElementName]; function uploadFileWithoutParameters() // creates a FormData object that contains all the different fields values. var fd = new FormData(document.getElementById("formUpload"); // add the files var inputFiles = document.getElementById('formFiles'); var memFiles = inputFiles.files; for(i=0; i<memFiles.length; i++) fd.append(inputFiles.name, memFiles[i]); // prepare the request var xhr = new XMLHttpRequest(); xhr.open("POST", formUpload.getAttribute("action"), true); // Define the callbacks xhr.upload.onprogress = function(e) progress.value = e.loaded; progress.max = e.total; ; xhr.onload = function() //alert("Upload termine"); ; // send the request xhr.send(fd); </script> </head> <body onload="retrieveValues();">

02/12/13 Persistence, drag'n'drop
classroom.w3devcampus.com/mod/book/tool/print/index.php?id=1248 57/83
And here is the PHP code :
919293949596979899
<form id="formUpload" name="formUpload" method="post" action="upload.php" enctype="multipart/form-data"> FirstName : <input type="text" name="firstname" required/><br /> LastName : <input type="text" name="lastname" required/><br /> <input type="file" multiple name="formFiles[]" id="formFiles" onchange="uploadFileWithoutParameters()"/> <input type="submit" value="Send"> </form> <progress id="progress" value="0" max="100"></progress> </body></html>
123456789101112131415161718192021222324252627
<?php if (isset($_POST['firstname']) && isset($_POST['lastname'])) echo $_POST['firstname'] . ' ' . $_POST['lastname'] . ' try to upload file(s).'; if (isset($_FILES) && is_array($_FILES)) $number_files_send = count($_FILES['formFiles']['name']); $dir = realpath('.') . '/upload/'; if ($number_files_send > 0) for ($i = 0; $i < $number_files_send; $i++) echo '<br/>Reception of : ' . $_FILES['formFiles']['name'][$i]; $copy = move_uploaded_file($_FILES['formFiles']['tmp_name'][$i], $dir . $_FILES['formFiles']['name' if ($copy) echo '<br />File ' . $_FILES['formFiles']['name'][$i] . ' copy'; else echo '<br />No receive file'; ?>

02/12/13 Persistence, drag'n'drop
classroom.w3devcampus.com/mod/book/tool/print/index.php?id=1248 58/83
8 The Filesystem and FileWriter APIs
Introduction
Manage a clientside, sandboxed, filesystem from your web application? Yes it is possible... but only in Chrome for themoment...
The Filesystem and Filewriter APIs will not be studied in the course this year, as they are only partially implemented as anexperimental build in Google Chrome, and are not available on any other browser. Furthermore, the specification is still subjectto change. However, if you are curious have a look at the following links:
The W3C specification of the Filesystem and FileWriter APIsArticle on html5rocks.com about the Chrome implementation of these APIsTutorial about how to use the first implementation: http://net.tutsplus.com/tutorials/htmlcsstechniques/toyingwiththehtml5filesystemapi/
This API will be complemetary to the cache API for offline applications, giving lot more flexibility. It will also allow JavaScriptcode from applications to create files and directory client side!
Current support
As of April 2013, an experimental implementation (prefixed by "webkit") is available in Chrome:
Uptodate version of this table:http://caniuse.com/#feat=filesystem

02/12/13 Persistence, drag'n'drop
classroom.w3devcampus.com/mod/book/tool/print/index.php?id=1248 59/83
9 The WebSQL API (deprecated)
Introduction
This API has been abandonned. See the disclaimer at the top of the last version of the specification(http://www.w3.org/TR/webdatabase/).
Beware. This specification is no longer in active maintenance, and the Web Applications Working Group does not intend tomaintain it further.
This API proposed a standard way to use a SQL database embedded in web browsers. The main problem was that there wasonly one single implementation based on the SQLite database, and there needs to be at least two different implementations tovalidate a specification. Another problem was that some vendors (Microsoft, Mozilla) had no plans to have a workingimplementation.
If you are interested, google "WebSQL" API, but beware, this is a dead end.

02/12/13 Persistence, drag'n'drop
classroom.w3devcampus.com/mod/book/tool/print/index.php?id=1248 60/83
10 [ADVANCED] IndexedDB: introduction and currentsupport
IntroductionIndexedDB is presented as an alternative to the WebSQL Database, which the W3C deprecated on November 18, 2010 (whilestill being implemented by all major browsers, it is no longer in the HTML5 specification). Both are solutions for storage, butthey do not offer the same functionalities. WebSQL Database is a relational database access system, whereas IndexedDB is anindexed table system.
From the W3C specification about IndexedDB: "User agents (apps running in browsers) may need to store large numbers ofobjects locally in order to satisfy offline data requirements of Web applications. Where WebStorage (as seen in the previouschapter) is useful for storing pairs of keys and their corresponding values, IndexedDB provides inorder retrieval of keys,efficient searching of values, and the storage of duplicate values for a key.
The W3C specification provides a concrete API to perform advanced keyvalue data management that is at the heart of mostsophisticated query processors. It does so by using transactional databases to store keys and their corresponding values (one ormore per key), and providing a means of traversing keys in a deterministic order. This is often implemented through the use ofpersistent Btree data structures that are considered efficient for insertion and deletion, as well as inorder traversal of verylarge numbers of data records."
So, in other words, IndexedDB is a transactional Object Store in which you will be able to store JavaScript objects, andput indexes on some properties of these objects for faster retrievial and search. Applications that use IndexedDB canwork both online and offline.
Examples of applications where IndexedDB should be considered:
a catalog of DVDs in a lending library,mail clients, todo lists, notepads,data for games: hi scores, level definitions, etc.
External resources:
A lot of this chapter is an adaptation / built on the content of the following articles posted on the Mozilla DeveloperNetwork site (articles are: IndexedDB, Basic Concepts of IndexedDB and Using IndexedDB).
W3C specification about IndexedDB,Mozilla developer's page about IndexedDB,Getting started with IndexedDB article from codeproject.com,Example that runs using the new version of the specification:https://files.myopera.com/RAJUDASA/web/IndexedDB/iDB_Test.html, explanationson http://rajudasa.blogspot.in/2012/12/indexeddbjsupdated.html
Current Support
IndexedDB is supported mainly on Desktop browsers and on recent versions only (IE 10, FF recent, Chrome canary 24+).Support on mobile is not available yet. Notice that the "synchronous API", which was designed specifically for use fromWebWorkers, has a good chance of being removed from the specification as implementers have encountered numerousdifficulties.
Support as in March 2013:

02/12/13 Persistence, drag'n'drop
classroom.w3devcampus.com/mod/book/tool/print/index.php?id=1248 61/83
Uptodate version of this table: http://caniuse.com/#feat=indexeddb

02/12/13 Persistence, drag'n'drop
classroom.w3devcampus.com/mod/book/tool/print/index.php?id=1248 62/83
11 [ADVANCED] IndexedDB: basic conceptsImportant notice: A lot of this chapter'c content is adapted from the W3C specification about IndexedDB and from thefollowing articles posted on the Mozilla Developer Network site (articles are: IndexedDB, Basic Concepts ofIndexedDB and Using IndexedDB).
IndexedDB is very different from SQL databases. Don't be afraid if you've only used SQL database, IndexedDB might seemcomplex at first sight, but it really isn't.
Let's quickly look at the main concepts of IndexedDB, we will go into detail later on:
IndexedDB stores and retrieves objects which are indexed by a "key",Changes to the database happen within transactions. IndexedDB follows a sameorigin policy. So while you can access stored data within a domain, you cannot access dataacross different domains.The API includes both an asynchronous API and a synchronous API. The asynchronous API can be used in most cases,including WebWorkers, while the synchronous API was intended for use only with WebWorkers. Currently, no browsersupports the synchronous API and there is a good chance that this API will be removed from the W3C specification, asstated in one paragraph : "The following features are at risk, and may be removed, due to the potential lack ofimplementations: 3.3 Synchronous APIs"
"Using the asynchronous API" means that most processing will be done in callback functions, and here we mean in LOTS ofcallback functions!
Detailed overview
IndexedDB databases store keyvalue pairs. The values can be complex structured objects (hint: imagine JSON objects), andkeys can be properties of those objects. You can create indexes that use any property of the objects for quick searching, as wellas sorted enumeration.
Example of data (from: https://developer.mozilla.org/enUS/docs/IndexedDB/Using_IndexedDB)
12345
// This is what our customer data looks like.const customerData = [ ssn: "444-44-4444", name: "Bill", age: 35, email: "[email protected]" , ssn: "555-55-5555", name: "Donna", age: 32, email: "[email protected]" ];
IndexedDB is built on a transactional database model. Everything you do in IndexedDB always happens in the context ofa transaction. The IndexedDB API provides lots of objects that represent indexes, tables, cursors, and so on, but each is tied to aparticular transaction. Thus, you cannot execute commands or open cursors outside a transaction.
Example of a transaction:
1234567891011121314151617181920
// Open a transaction in for reading and writing on the DB "customer"var transaction = db.transaction(["customers"], "readwrite"); // Do something when all the data is added to the database.transaction.oncomplete = function(event) alert("All done!");; transaction.onerror = function(event) // Don't forget to handle errors!; // Use the transaction to add data...var objectStore = transaction.objectStore("customers");
for (var i in customerData) var request = objectStore.add(customerData[i]); request.onsuccess = function(event) // event.target.result == customerData[i].ssn ;
Transactions have a welldefined lifetime, so attempting to use a transaction after it has completed throws exceptions.
Transactions also autocommit and cannot be committed manually.

02/12/13 Persistence, drag'n'drop
classroom.w3devcampus.com/mod/book/tool/print/index.php?id=1248 63/83
This transaction model is really useful when you consider what might happen if a user opened two instances of your web app intwo different tabs simultaneously. Without transactional operations, the two instances could stomp all over each other'smodifications.
The IndexedDB API is mostly asynchronous. The API doesn't give you data by returning values; instead, you have to pass acallback function. You don't "store" a value into the database, or "retrieve" a value out of the database through synchronousmeans. Instead, you "request" that a database operation happens. You get notified by a DOM event when the operation finishes,and the type of event you get lets you know if the operation succeeded or failed. This sounds a little complicated at first, butthere are some sanity measures baked in. After all, you are a JavaScript programmer aren't you ;)
So look at previous extracts of code: transaction.oncomplete, transaction.onerror,request.onsuccess, etc...
IndexedDB uses requests all over the place. Requests are objects that receive the success or failure DOM events that werementioned previously. They have onsuccess and onerror properties, and you cancall addEventListener() and removeEventListener() on them. They also have readyState, result,and errorCode properties that tell you the status of the request.
The result property is particularly magical, as it can be many different things, depending on how the request was generated(for example, an IDBCursor instance, or the key for a value that you just inserted into the database). We will see this in detail inthe next chapter "Using IndexedDB".
IndexedDB uses DOM events to notify you when results are available. DOM events always have a type property (inIndexedDB, it is most commonly set to "success" or "error"). DOM events also have a target property that shows wherethe event is headed. In most cases, the target of an event is the IDBRequest object that was generated as a result of doing somedatabase operation. Success events don't bubble up and they can't be cancelled. Error events, on the other hand, do bubble, andcan be cancelled. This is quite important, as error events abort whatever transactions they're running in, unless they arecancelled.
IndexedDB is objectoriented. IndexedDB is not a relational database, which has tables with collections of rows and columns.This important and fundamental difference affects the way you design and build your applications, it is an Object Store!
In a traditional relational data store, you would have a table that stores a collection of rows of data and columns of named typesof data. IndexedDB, on the other hand, requires you to create an object store for a type of data and simply persist JavaScriptobjects to that store. Each object store can have a collection of indexes (corresponding to the properties of the JavaScript objectyou store in the store) that makes it efficient to query and iterate across.
IndexedDB does not use Structured Query Language (SQL). It uses queries on an index that produces a cursor, which youuse to iterate across the result set. If you are not familiar with NoSQL systems, read the Wikipedia article on NoSQL.
IndexedDB adheres to a sameorigin policy. An origin is the domain, application layer protocol, and port of a URL of thedocument where the script is being executed. Each origin has its own associated set of databases. Every database has a name thatidentifies it within an origin. Think of it as "an application, a Database". What defines "same origin" does not include the port orthe protocol. For example, an app in a page with this URL http://www.example.com/app/ and an app in a page withthis URL http://www.example.com/dir/ both can access the same IndexedDB database because they have the sameorigin (example.com), http://www.example.com:8080/dir/ (different port)or https://www.example.com/dir/ (different protocol), cannot be considered of the same origin (port and protocolare different from http://www.example.com)
Definitions
These definitions come from the W3C specification, they are just commented on to clarify when needed...
Database
Each origin (you may consider as "each application") has an associated set of databases. A database comprises one ormore object stores which hold the data stored in the database.Every database has a name which identifies it within a specific origin. The name can be any string value, including theempty string, and stays constant for the lifetime of the database.

02/12/13 Persistence, drag'n'drop
classroom.w3devcampus.com/mod/book/tool/print/index.php?id=1248 64/83
Each database also has a current version. When a database is first created, its version is 0, if not specified otherwise. Eachdatabase can only have one version at any given time. A database can't exist in multiple versions at once.The act of opening a database creates a connection. There may be multiple connections to a given database at any giventime.
Object store
A object sotre is the mechanism by which data are stored in the database. Every object store has a name. The name is unique within the database to which it belongs.The object store persistently holds records (JavaScript objects), which are keyvalue pairs. One of these keys is a kind of"primary key" in the SQL database sense... This "key" is a property which every object in the datastore must contain.Values in the object store are structured, but this structure may vary (i.e if we store persons in a database, and use theemail as "the key all objects must define", some may have first name and last name in addition, others may have an adressor no address at all, etc.)Records within an object store are sorted according to the keys in ascending order.
Every object store also optionally has a key generator and an optional key path. If the object store has a key path, itis said to use inline keys. Otherwise it is said to use outofline keys.
The object store can derive the key from one of three sources:A key generator. A key generator generates a monotonically increasing numbers every time a key is needed. This isa bit similar to autoincremented primary keys in a SQL database.Keys can be derived via a key path.Keys can also be explicitly specified when a value is stored in the object store.
More details will be given in the next chapter "Using IndexedDB".
Version
Important notice: as of January 2013 many examples presented in IndexedDB articles or tutorials available on the web use adeprecated API, regarding the version management of IndexedDB databases, in particular the popular A simple TODO listusing HTML5 IndexedDB tutorial from the html5rocks.com web site uses the deprecated setVersion() method and givenexamples do not run on recent browsers.
When a database is first created, its version is the integer 0. Each database has one version at a time; a database can't existin multiple versions at once.The only way to change the version is by opening it with a higher version than the current one. This will starta versionchange transaction and fire an upgradeneeded event. The only place where the schema of the database can beupdated is inside the handler of that event.
This definition describes the most recent specification, which is only implemented in uptodate browsers. Old browsersimplemented the now deprecated and removed IDBDatabase.setVersion() method.
Transaction
From the specification: "A transaction is used to interact with the data in a database. Whenever data is read or written to thedatabase, this is done by using a transaction.
All transactions are created through a connection, which is the transaction's connection. The transaction has a mode (read,readwrite or versionchange) that determines which types of interactions can be performed upon that transaction.The mode is set when the transaction is created and remains fixed for the life of the transaction. The transaction also hasa scope that determines the object stores with which the transaction may interact."
A transaction in IndexedDB is similar to a transaction in SQL database. It defines: "An atomic and durable set of dataaccessand datamodification operations". Either all operations succeed or fail.
A database connection can have several active transactions associated with it at a time, but these write transactions cannot haveoverlapping scopes (they cannot work on the same data at the same time). The scope of transactions, which is defined atcreation time, determines which object that stores the transaction can interact with, and remains constant for the lifetime of thetransaction. So, for example, if a database connection already has a writing transaction with a scope that just coversthe flyingMonkey object store, you can start a second transaction with a scope ofthe unicornCentaur and unicornPegasus object stores. As for reading transactions, you can have several even overlappingones. A "versionchange" transaction never runs concurrently with other transactions (reminder: usually we use such

02/12/13 Persistence, drag'n'drop
classroom.w3devcampus.com/mod/book/tool/print/index.php?id=1248 65/83
transactions when we create the object store or when we modify the schema).
Generally speaking, the above requirements mean that "readwrite" transactions which have overlapping scopes always run inthe order they were created, and never run in parallel. A "versionchange" transaction is automatically created when a databaseversion number is provided that is greater than the current database version. This transaction will be active insidethe onupgradeneeded event handler, allowing the creation of new object stores and indexes.
Request
The operation by which reading and writing on a database is done. Every request represents one read or one write operation.Requests are always run within a transaction. The example below adds a customer into the object store named "customers".
12345678
// Use the transaction to add data...var objectStore = transaction.objectStore("customers"); for (var i in customerData) var request = objectStore.add(customerData[i]); request.onsuccess = function(event) // event.target.result == customerData[i].ssn ;
Index
It is sometimes useful to retrieve records in an object store through other means than their key. An index allows lookingup records in an object store using the properties of the values in the object stores records. Indexes are a common concept indatabases. Indexes can speed up object retrieval and allow multicriteria searches. For example, if you store persons in yourobject store, and add an index on the "email" property of each person, then looking for some person by email will be muchfaster.
An index is a specialized persistent keyvalue storage and has a referenced object store. For example, you have your "persons"object store that is the referenced data store, and this reference store can have an index storage associated with it that containsindexes that map email values to key values in the reference store.
The index has a list of records which hold the data stored in the index. The records in an index are automatically populatedwhenever records in the referenced object store are inserted, updated or deleted. There can be several indexes referencing thesame object store, in which changes to the object store cause all such indexes to get updated.
An index contains a unique flag. When this flag is set to true, the index enforces that no two records in the index has the samekey. If a record in the index's referenced object store is attempted to be inserted or modified, such that evaluating the index's keypath on the records new value yields a result which already exists in the index, then the attempted modification to the object storefails.
Key and values
key
A data value by which stored values are organized and retrieved in the object store. The object store can derive the keyfrom one of three sources: a key generator, a key path, and an explicitly specified value.
The key must be of a data type that has a number that is greater than the one before. Each record in an object store musthave a key that is unique within the same store, so you cannot have multiple records with the same key in a given objectstore.
A key can be one of the following type: string, date, float, and array. For arrays, the key can range from an emptyvalue to infinity. And you can include an array within an array.
Alternatively, you can also look up records in an object store using the index.
key generator
A mechanism for producing new keys in an ordered sequence. If an object store does not have a key generator, then theapplication must provide keys for records being stored. Similar to autogenerated primary keys in SQL databases.
inline key
A key that is stored as part of the stored value. Example: the email of a person or a student number in an objectrepresentingt a student in a student store. It is found using a key path. An inline key can be generated using a generator.

02/12/13 Persistence, drag'n'drop
classroom.w3devcampus.com/mod/book/tool/print/index.php?id=1248 66/83
After the key has been generated, it can then be stored in the value using the key path, or it can also be used as a key.
outofline key
A key that is stored separately from the value being stored. Ex: an autoincremented id that is not part of the object.Example: you store persons name:Buffa, firstName:Michel and name:Gandon, firstName: Fabien, each will have akey (think of it as a primary key, an id...) that can be autogenerated or specified, but that is not part of the objects stored.
key path
Defines where the browser should extract the key from a value in the object store or index. A valid key path can includeone of the following: an empty string, a JavaScript identifier, or multiple JavaScript identifiers separated byperiods. It cannot include spaces.
value
Each record has a value, which could include anything that can be expressed in JavaScript,including: boolean, number, string, date, object, array, regexp, undefined, and null.
When an object or an array is stored, the properties and values in that object or array can also be anything that is a validvalue.
Blobs and files can be stored, (support anly in FF >= 11 and Chrome > 24 or Chrome canary > 24). The example in thenext chapter stores images using blobs.
Range and scope
scope
The set of object stores and indexes to which a transaction applies. The scopes of readonly transactions can overlap andexecute at the same time. On the other hand, the scopes of writing transactions cannot overlap. You can still start severaltransactions with the same scope at the same time, but they just queue up and execute one after another.
cursor
A mechanism for iterating over multiple records with a key range. The cursor has a source that indicates which index orobject store it is iterating. It has a position within the range, and moves in a direction that is increasing or decreasing in theorder of record keys. For the reference documentation on cursors, see IDBCursor.
key range
A continuous interval over some data type used for keys. Records can be retrieved from object stores and indexes usingkeys or a range of keys. You can limit or filter the range using lower and upper bounds. For example, you can iterate overall values of a key between x and y.
For the reference documentation on key range, see IDBKeyRange.

02/12/13 Persistence, drag'n'drop
classroom.w3devcampus.com/mod/book/tool/print/index.php?id=1248 67/83
12 [ADVANCED] Using IndexedDB
IntroductionThis page details simple examples for creating, adding, removing, updating, and searching data in an IndexedDB database. Itexplains the basic steps to perform such common operations, while explaining the programmation principles behind IndexedDB.
External resources:
Using IndexedDB from the Firefox Developer's site. This chapter is an adaptation of this web page.Storing images and files in IndexedDB, Storing and retrieving videos with IndexedDB,How to see IndexedDB content in other browsers than Chrome: the linq2indexedDB tool.How to view IndexedDB content in Firefox,
In this page you will learn:
Creating and populating a databaseWorking with data
Transactions,Inserting, deleting, updating and getting data
Creating and populating a database
Online example here: http://jsbin.com/uviyah/11/edit
This example shows how to create / open a database using IndexedDB. We tried this example on Chrome version 23 andFirefox version 19.
With Chrome, open the Developper tool console (F12) and press the "Create CustomerDB" button, it will call the createDB()JavaScript function that creates a new IndexedDB database, a datastore in it ("customers") and inserts two javascript objects (seethem on the right in the console). Note that the social security number is the "Primary key", called a Key path in the IndexedDBvocabulary (red arrow on the right).
Notice that with Firefox or other browsers it is not as easy to see the IndexedDB databases, object stores and data. Werecommend using a JavaScript library called linq2indexedDB. Note also that Firefox implements the indexedDB API usingSQlite, and the database can be "explored" using the Firefox extension sqlite manager. See this discussion if you are interested...
Chrome DevTools (F12) shows the IndexedDB databases, object stores and data:

02/12/13 Persistence, drag'n'drop
classroom.w3devcampus.com/mod/book/tool/print/index.php?id=1248 68/83
Normally, when you create the database for the first time, the console should show this message:
This message comes from the JavaScript request.onupgradeneeded callback. Indeed, the first time we open the databasewe ask for a specific version (in this example: version 2) with:
var request = indexedDB.open(dbName, 2);
..and if there is no version "2" of the database, then we enter the onupgradeneeded callback where we really create thedatabase.
You can try to click again on the button "CreateCustomerDatabase", if database version "2" exists, this time therequest.onsuccess callback will be called. This is where we will add/remove/search data (you should see a message onthe console).
Notice that the version number cannot be a float: "1.2" and "1.4" will automatically be rounded to "1".
JavaScript code from the example:
123456789101112131415
var db; // the database connexion we need to initialize
function createDatabase() if(!window.indexedDB) window.alert("Your browser does not support a stable version of IndexedDB"); // This is what our customer data looks like. var customerData = [ ssn: "444-44-4444", name: "Bill", age: 35, email: "[email protected]" , ssn: "555-55-5555", name: "Donna", age: 32, email: "[email protected]" ]; var dbName = "CustomerDB";

02/12/13 Persistence, drag'n'drop
classroom.w3devcampus.com/mod/book/tool/print/index.php?id=1248 69/83
161718192021222324252627282930313233343536373839404142434445464748495051525354
// version must be an integer, not 1.1, 1.2 etc... var request = indexedDB.open(dbName, 2); request.onerror = function(event) // Handle errors. console.log("request.onerror" + event.target.errorCode); ; request.onupgradeneeded = function(event) console.log("request.onupgradeneeded, we are creating a new version of the dataBase"); db = event.target.result; // Create an objectStore to hold information about our customers. We're // going to use "ssn" as our key path because it's guaranteed to be // unique. var objectStore = db.createObjectStore("customers", keyPath: "ssn" ); // Create an index to search customers by name. We may have duplicates // so we can't use a unique index. objectStore.createIndex("name", "name", unique: false ); // Create an index to search customers by email. We want to ensure that // no two customers have the same email, so use a unique index. objectStore.createIndex("email", "email", unique: true ); // Store values in the newly created objectStore. for (var i in customerData) objectStore.add(customerData[i]); ; // end of request.onupgradeneeded request.onsuccess = function(event) // Handle errors. console.log("request.onsuccess, database opened, now we can add / remove / look for data in it!"); // The result is the database itself db = event.target.result; ; // end of function createDatabase
Explanations:
All the "creation" process is done in the onupgradeneeded callback:
Get the database created in the result of the dom event: db = event.target.result;Create an object store named "customers" with the primary key being the social security number ("ssn" property of theJavaScript objects we want to store in the object store): var objectStore =db.createObjectStore("customers", keyPath: "ssn");Create indexes on the "name" and "email" properties of JavaScriptobjects: objectStore.createIndex("name", "name", unique: false);Populate the database: objectStore.add(...).
Note that we did not create any transaction, as the onupgradeneeded callback on a create database request is always in adefault transaction that cannot overlap with another transation at the same time.If we try to open a database version that exists, then the request.onsuccess callback is called. This is where we are going to workwith data. The DOM event result attribute is the database itself, so it is wise to store it in a variable for later use: db =event.target.result;
Working with data
Explicit use of a transaction is necessary
All operations in the dabase should occur within a transaction. While the creation of the database occured in a transaction thatwas run "under the hood" with no explicit "transaction" keyword used, for adding/removing/updating/retrieving data, explicituse of a transaction is required.
You need to get a transaction from the database object and indicate on which object store the transaction will be associated.Transactions, when created, must have a mode set that is either read, readwrite or versionchange (this last mode isonly for creating a new database or for modifying its schemas: i.e. change the primary key or the indexes). When you can, usethe transaction in read mode as multiple read transactions can run concurrently in this mode.
123456
var transaction = db.transaction(["customers"], "readwrite"); // or "read"... // Note: Older experimental implementations use the deprecated constant // IDBTransaction.READ_WRITE instead of "readwrite".// In case you want to support such an implementation, you can // just write:

02/12/13 Persistence, drag'n'drop
classroom.w3devcampus.com/mod/book/tool/print/index.php?id=1248 70/83
78// var transaction = db.transaction(["customers"], // IDBTransaction.READ_WRITE);
Inserting data in an objectStore
Example1: basic steps
Online example:
http://jsbin.com/ocaxeh/11/edit. Execute this example and look at the IndexedDB object store content from the Chromedev tools (F12). One more customer should have been added.
Be sure to click on the "create database" button before clicking the "insert new customer" button.
The indexedDB store in Chrome dev tools, after pressing the left button, the right button adds a customer named Michel Buffa inthe database (press F12/ressources/IndexedDB):
Code from the example, explanations:
We just added one single function into the example from the previous section, the function AddACustomer() that adds onesingle object:
1 ssn: "123-45-6789", name: "Michel Buffa", age: 47, email: "[email protected]"
Here is the complete source code of the addACustomer function:
1234
function addACustomer() // 1 - get a transaction on the "customers" object store // in readwrite, as we are going to insert a new object var transaction = db.transaction(["customers"], "readwrite");

02/12/13 Persistence, drag'n'drop
classroom.w3devcampus.com/mod/book/tool/print/index.php?id=1248 71/83
Explanations:
In the code above, in lines 4, 18 and 21 are the main calls you have to perform in order to add a new object in the store: 1) createa transaction, 2) map the transaction on the object store, 3) create an "add" request that will take part in the transaction.
The different callbacks are in lines 8 and 13 for the transaction, and in lines 24 and 29 for the request. You may have severalrequests for the same transaction. Once all requests have finished, the transaction.oncomplete callback is called. Inany other case the transaction.onerror callback is called, and the datastore remains unchanged.
Here is the trace from the dev tools console:
Example2: adding a form and validating inputs
Online example available here: http://jsbin.com/ocaxeh/21/edit
You can try this example. Press first on the "Create database" button, then enter a new customer in the form, then press F12 touse the Chrome dev tools and check for the indexedDB store content. Sometimes it is necessary to refresh the view (right clickon indexedDB/refresh), and sometimes it is necessary to close/open the dev tools to have a view that shows the changes (pressF12 twice). Chrome dev tools are a bit strange from time to time.
This time we added some tests for checking that the database is opened before trying to insert an element + we added a smallform for entering a new customer.
Notice that the insert will fail and display an alert with an error message if:
The ssn is already present in the database. This property has been declared as the keyPath (sort of primary key) in theobject store schema, and it should be unique: db.createObjectStore("customers", keyPath:
56789101112131415161718192021222324252627282930313233
// Do something when all the data is added to the database. // This callback is called after transaction has been completely executed (comitted) transaction.oncomplete = function(event) alert("All done!"); ; // This callback is called in case of error (rollback) transaction.onerror = function(event) console.log("transaction.onerror" + event.target.errorCode); ; // 2 - Init the transaction on the objectStore var objectStore = transaction.objectStore("customers"); // 3 - Get a request from the transaction for adding a new object var request = objectStore.add( ssn: "123-45-6789", name: "Michel Buffa", age: 47, email: "[email protected]" // The insertion was ok request.onsuccess = function(event) console.log("Customer with ssn= " + event.target.result + " added."); ; // the insertion led to an error (object already in the store, for example) request.onerror = function(event) console.log("request.onerror, could not insert customer, errcode = " + event.target.errorCode); ;

02/12/13 Persistence, drag'n'drop
classroom.w3devcampus.com/mod/book/tool/print/index.php?id=1248 72/83
"ssn" );The email is already present in the object store, remember that in our schema, the email property is an index that wedeclared unique: objectStore.createIndex("email", "email", unique: true );
Try to insert twice the same customer, or different customers with the same ssn. An alert like this should pop up:
Here is the updated version of the HTML code of this example:
And here is the new version of the addACustomer() JavaScript function:
123456789101112131415161718192021222324252627282930313233343536
function addACustomer() if(db === null) alert('Database must be opened, please click the Create CustomerDB Database first'); return; var transaction = db.transaction(["customers"], "readwrite"); // Do something when all the data is added to the database. transaction.oncomplete = function(event) console.log("All done!"); ; transaction.onerror = function(event) console.log("transaction.onerror" + event.target.errorCode); ; var objectStore = transaction.objectStore("customers"); // adds the customer data var newCustomer=; newCustomer.ssn = document.querySelector("#ssn").value; newCustomer.name = document.querySelector("#name").value; newCustomer.age = document.querySelector("#age").value; newCustomer.email = document.querySelector("#email").value; alert('adding customer ssn=' + newCustomer.ssn);
var request = objectStore.add(newCustomer); request.onsuccess = function(event) console.log("Customer with ssn= " + event.target.result + " added."); ;
request.onerror = function(event) alert("request.onerror, could not insert customer, errcode = " + event.target.errorCode + ". Certainly either the ssn or the email is already present in the Database"); ;
It is also possible to shorten the code of the above function by chaining the different operations using the "." operator (getting atransaction from the db, opening the store, adding a new customer, etc.). Here is the short version:123
var request = db.transaction(["customers"], "readwrite") .objectStore("customers") .add(newCustomer);
The above code does not perform all the tests, but you may encounter such a way of coding (!).
Note also that if you try to insert some empty data it works:
123456789
<fieldset> SSN: <input type="text" id="ssn" placeholder="444-44-4444" required/><br> Name: <input type="text" id="name"/><br> Age: <input type="number" id="age" min="1" max="100"/><br> Email:<input type="email" id="email"/> reminder, email must be unique (we declared it as a "unique" index)<br</fieldset> <button onclick="addACustomer();">Add a new Customer</button>

02/12/13 Persistence, drag'n'drop
classroom.w3devcampus.com/mod/book/tool/print/index.php?id=1248 73/83
Indeed, entering an empty value for the keyPath or for indexes is a valid value (in the indexedDB sense). In order to avoidthis, you should add more JavaScript code. We will let you do this as an exercise...
Removing data from an object store
Online example: http://jsbin.com/ocaxeh/25/edit
See the changes in Chrome dev tools: refresh the view (right click/refresh) or press F12 twice. There is a bug in the refreshfeature with Chrome 23+.
Be sure to click the create database button to open the existing database. Then check with Chrome dev tools that the customerwith ssn=44444444 exists. In case, just insert into the database. Right click on indexDB in the Chrome dev tools and refreshthe display of the IndexedDB's content if necessary. Then click on the "Remove Customer ssn=444444444(Bill)" button.Refresh the display of the database. Normally, Bill should have disappeared!
Code added in this example:
123456789101112131415161718192021222324
function removeACustomer() if(db === null) alert('Database must be opened first, please click the Create CustomerDB Database first'); return; var transaction = db.transaction(["customers"], "readwrite"); // Do something when all the data is added to the database. transaction.oncomplete = function(event) console.log("All done!"); ; transaction.onerror = function(event) console.log("transaction.onerror" + event.target.errorCode); ; var objectStore = transaction.objectStore("customers"); alert('removing customer ssn=444-44-4444'); var request = objectStore.delete("444-44-4444"); request.onsuccess = function(event) console.log("Customer removed.");

02/12/13 Persistence, drag'n'drop
classroom.w3devcampus.com/mod/book/tool/print/index.php?id=1248 74/83
Notice that after the deletion of the Customer (line 22), the request.onsuccess callback is called. And if you try to printthe value event.target.result, it is "undefined". Even if you try to remove a customer with a non existing ssn, thesame callback request.onsuccess is called, and the value of event.target.result is also undefined. This isstrange (tested on Chrome 23), and looks like an incomplete implementation or a bug.
Short way of doing the delete:
It is also possible to shorten the code of the above function a lot by concatenating the different operations (getting the store fromthe db, getting the request, calling delete, etc.). Here is the short version:
123
var request = db.transaction(["customers"], "readwrite") .objectStore("customers") .delete("444-44-4444");
Modifying data from an object store
We used request.add(object) to add a new customer, request.delete(keypath) to remove a customer, thenwe will use request.put(keypath) to put a customer!
Online example: http://jsbin.com/ocaxeh/28/edit
The above screenshot shows how we added an empty customer with ssn="", (we just clicked on the open database button, thenon the "add a new customer button" with an emtpy form.
Then we just filled the name, age and email input fields for updating the object with ssn="" and clicked on the "update dataabout an existing customer". This updates the data in the object store, as shown in this screenshot:
Here is the code added to this example:
1 function updateACustomer()
2526272829303132
; request.onerror = function(event) alert("request.onerror, could not remove customer, errcode = " + event.target.errorCode + ". The ssn does not exist in the Database" ;

02/12/13 Persistence, drag'n'drop
classroom.w3devcampus.com/mod/book/tool/print/index.php?id=1248 75/83
2345678910111213141516171819202122232425262728293031323334353637
if(db === null) alert('Database must be opened first, please click the Create CustomerDB Database first'); return; var transaction = db.transaction(["customers"], "readwrite"); // Do something when all the data is added to the database. transaction.oncomplete = function(event) console.log("All done!"); ; transaction.onerror = function(event) console.log("transaction.onerror" + event.target.errorCode); ; var objectStore = transaction.objectStore("customers"); var customerToUpdate=; customerToUpdate.ssn = document.querySelector("#ssn").value; customerToUpdate.name = document.querySelector("#name").value; customerToUpdate.age = document.querySelector("#age").value; customerToUpdate.email = document.querySelector("#email").value;
alert('updating customer ssn=' + customerToUpdate.ssn); var request = objectStore.put(customerToUpdate); request.onsuccess = function(event) console.log("Customer updated."); ;
request.onerror = function(event) alert("request.onerror, could not update customer, errcode = " + event.target.errorCode + ". The ssn is not in the Database"); ;
The update occurs at line 27.
Getting data from a data store
There are several way to retrieve data from a data store.
Getting data when we know its key
The simplest function from the API is the request.get(key) function. It retrieves an object when we know itskey/keypath.
Online example: http://jsbin.com/ocaxeh/36/edit

02/12/13 Persistence, drag'n'drop
classroom.w3devcampus.com/mod/book/tool/print/index.php?id=1248 76/83
If the ssn exists in the object store, then the results are displayed in the form itself (the code that gets the results and updates theform is in the request.onsuccess callback)
Here is the code we added to that example:
123456789101112131415161718192021222324252627
function searchACustomer() if(db === null) alert('Database must be opened first, please click the Create CustomerDB Database first'); return; var transaction = db.transaction(["customers"], "readwrite"); // Do something when all the data is added to the database. transaction.oncomplete = function(event) console.log("All done!"); ; transaction.onerror = function(event) console.log("transaction.onerror" + event.target.errorCode); ; var objectStore = transaction.objectStore("customers"); // Init a customer object with just the ssn property initialized from the form var customerToSearch=; customerToSearch.ssn = document.querySelector("#ssn").value; alert('Looking for customer ssn=' + customerToSearch.ssn); // Look for the customer corresponding to the ssn in the object store var request = objectStore.get(customerToSearch.ssn);

02/12/13 Persistence, drag'n'drop
classroom.w3devcampus.com/mod/book/tool/print/index.php?id=1248 77/83
282930313233343536373839
request.onsuccess = function(event) console.log("Customer found" + event.target.result.name); document.querySelector("#name").value = event.target.result.name; document.querySelector("#age").value = event.target.result.age; document.querySelector("#email").value = event.target.result.email; ;
request.onerror = function(event) alert("request.onerror, could not find customer, errcode = " + event.target.errorCode + ". The ssn is not in the Database"); ;
The search is done on line 27, and the callback in the case of success is request.onsuccess, lines 2934.event.target.result is the resulting object.
Well, this is a lot of code isn't it? We can do a mush shorter version of this function, while admitting that we won't take care ofall possible errors... Here is the shortened version:
12345678
function searchACustomerShort() db.transaction("customers").objectStore("customers") .get(document.querySelector("#ssn").value).onsuccess = function(event) document.querySelector("#name").value = event.target.result.name; document.querySelector("#age").value = event.target.result.age; document.querySelector("#email").value = event.target.result.email; ;
You can try this version of the online example that uses this shortened version (the function is at the end of the JavaScript code):
12345678910111213
function searchACustomerShort() if(db === null) alert('Database must be opened first, please click the Create CustomerDB Database first'); return; db.transaction("customers").objectStore("customers") .get(document.querySelector("#ssn").value).onsuccess = function(event) document.querySelector("#name").value = event.target.result.name; document.querySelector("#age").value = event.target.result.age; document.querySelector("#email").value = event.target.result.email; ;
What's happening here:
Since there's only one object store, you can avoid passing a list of object stores you need in your transaction and just passthe name as a string (line 7),We are only reading from the database, so we don't need a "readwrite" transaction. Calling transaction() with no modespecified gives a "readonly" transaction (line 7),We don't actually save the request object to a variable. Since the DOM event has the request as its target we can use theevent to get to the result property (line 8).
Using a cursor
Using get() requires that you know which key you want to retrieve. If you want to step through all the values in your objectstore, or just between a certain range, then you can use a cursor.
Here's what it looks like:
1234567891011121314151617181920
function listAllCustomers() var objectStore = db.transaction("customers").objectStore("customers"); objectStore.openCursor().onsuccess = function(event) // we enter this callback for each object in the store // The result is the cursor itself var cursor = event.target.result; if (cursor) alert("Name for SSN " + cursor.key + " is " + cursor.value.name); // Calling continue on the cursor will make this callback to be called // again if there are other objects in the store cursor.continue(); else alert("No more entries!"); ; // end of onsuccess... // end of listAllCustomers()
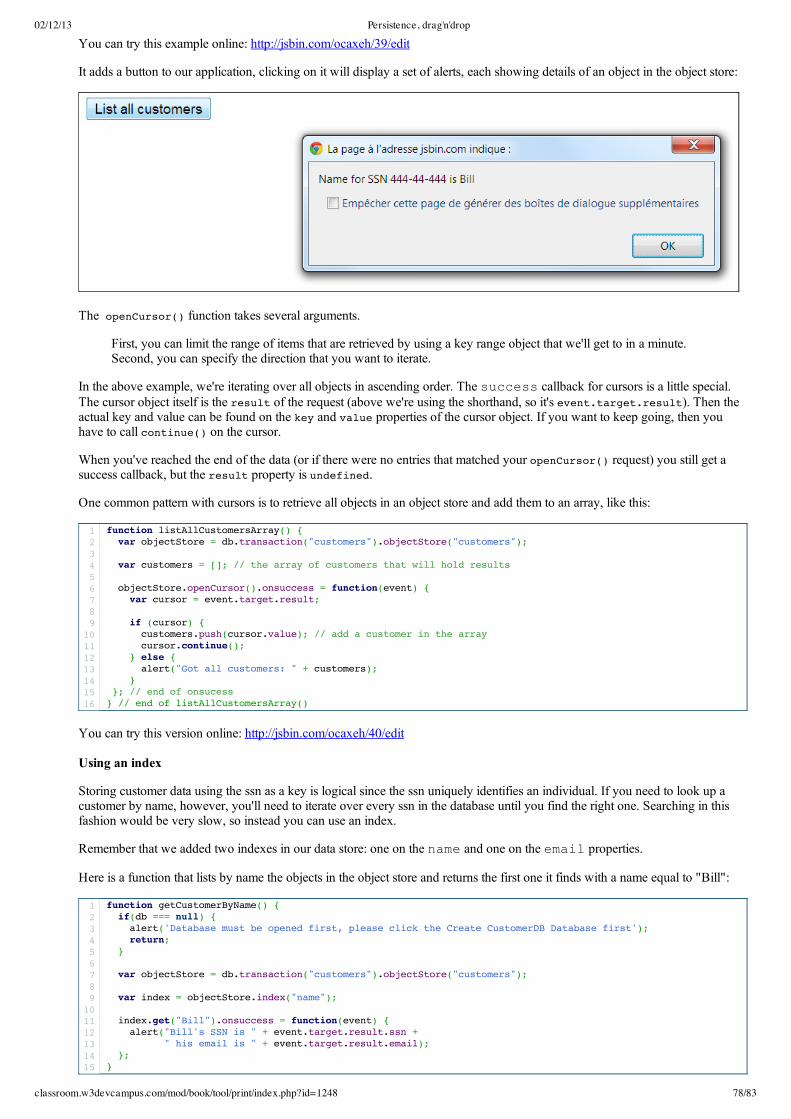
02/12/13 Persistence, drag'n'drop
classroom.w3devcampus.com/mod/book/tool/print/index.php?id=1248 78/83
You can try this example online: http://jsbin.com/ocaxeh/39/edit
It adds a button to our application, clicking on it will display a set of alerts, each showing details of an object in the object store:
The openCursor() function takes several arguments.
First, you can limit the range of items that are retrieved by using a key range object that we'll get to in a minute.Second, you can specify the direction that you want to iterate.
In the above example, we're iterating over all objects in ascending order. The success callback for cursors is a little special.The cursor object itself is the result of the request (above we're using the shorthand, so it's event.target.result). Then theactual key and value can be found on the key and value properties of the cursor object. If you want to keep going, then youhave to call continue() on the cursor.
When you've reached the end of the data (or if there were no entries that matched your openCursor() request) you still get asuccess callback, but the result property is undefined.
One common pattern with cursors is to retrieve all objects in an object store and add them to an array, like this:
12345678910111213141516
function listAllCustomersArray() var objectStore = db.transaction("customers").objectStore("customers"); var customers = []; // the array of customers that will hold results objectStore.openCursor().onsuccess = function(event) var cursor = event.target.result; if (cursor) customers.push(cursor.value); // add a customer in the array cursor.continue(); else alert("Got all customers: " + customers); ; // end of onsucess // end of listAllCustomersArray()
You can try this version online: http://jsbin.com/ocaxeh/40/edit
Using an index
Storing customer data using the ssn as a key is logical since the ssn uniquely identifies an individual. If you need to look up acustomer by name, however, you'll need to iterate over every ssn in the database until you find the right one. Searching in thisfashion would be very slow, so instead you can use an index.
Remember that we added two indexes in our data store: one on the name and one on the email properties.
Here is a function that lists by name the objects in the object store and returns the first one it finds with a name equal to "Bill":
123456789101112131415
function getCustomerByName() if(db === null) alert('Database must be opened first, please click the Create CustomerDB Database first'); return; var objectStore = db.transaction("customers").objectStore("customers"); var index = objectStore.index("name"); index.get("Bill").onsuccess = function(event) alert("Bill's SSN is " + event.target.result.ssn + " his email is " + event.target.result.email); ;

02/12/13 Persistence, drag'n'drop
classroom.w3devcampus.com/mod/book/tool/print/index.php?id=1248 79/83
The search by index occurs lone 9 and 11. Line 9 gets back an "index" object that corresponds to the index on the "name"property. Line 11 ucalls the get() method on this object to retrieve all objects that have a name equal to "Bill" in thedataStore.
And here is the online example you can try: http://jsbin.com/ocaxeh/45/edit
The above example retrieves only the first object that has an name/index with the value="Bill". Notice that there are two "Bill"sin the object store.
Getting more than one result
In order to get all the "Bill"s, we have to use again a cursor. When we work with indexes, we can open two different types ofcursors on indexes:
A normal cursor that maps the index property to the object in the object store, or,A key cursor that maps the index property to the key used to store the object in the object store.
The differences are illustrated here:
12345678
index.openCursor().onsuccess = function(event) var cursor = event.target.result; if (cursor) // cursor.key is a name, like "Bill", and cursor.value is the whole object. alert("Name: " + cursor.key + ", SSN: " + cursor.value.ssn + ", email: " + cursor.value.email); cursor.continue(); ;
and
12345678
index.openKeyCursor().onsuccess = function(event) var cursor = event.target.result; if (cursor) // cursor.key is a name, like "Bill", and cursor.value is the SSN (the key). // No way to directly get the rest of the stored object. alert("Name: " + cursor.key + ", "SSN: " + cursor.value); cursor.continue();

02/12/13 Persistence, drag'n'drop
classroom.w3devcampus.com/mod/book/tool/print/index.php?id=1248 80/83
9 ;
Online example: http://jsbin.com/ocaxeh/51/edit
Press the create/Open CustomerDB database, then you may add some customers, then press the last button. This will iterate allthe customers with name equals to "Bill" in the object store. There should be two "Bills", if this is not the case, add twocustomers with a name equal to "Bill", then press the last Button.
Code from the example:
123456789101112131415161718192021222324
function getAllCustomersByName() if(db === null) alert('Database must be opened first, please click the Create CustomerDB Database first'); return; var objectStore = db.transaction("customers").objectStore("customers"); var index = objectStore.index("name"); // Only match "Bill" var singleKeyRange = IDBKeyRange.only("Bill"); index.openCursor(singleKeyRange).onsuccess = function(event) var cursor = event.target.result; if (cursor) // cursor.key is a name, like "Bill", and cursor.value is the whole object. alert("Name: " + cursor.key + ", SSN: " + cursor.value.ssn + ", email: " + cursor.value.email); cursor.continue(); ;

02/12/13 Persistence, drag'n'drop
classroom.w3devcampus.com/mod/book/tool/print/index.php?id=1248 81/83
13 [ADVANCED] High level libraries for using IndexedDB,other useful ressources
Introduction
The learning curve of indexedDB is steep, furthermore, it requires a lot of callbacks/spaghetti code to use it properly. On theother hand, IndexedDB provides really cool stuff:
It is asynchronous!It's versioned!It's transactional! useful when used by several instances of the same webapp in different tabs, useful when used withWebWorkers, useful when used on Windows 8 desktop apps, Windows/Chrome stores, Firefox OS apps.Support indexes for faster searches!Works with objects, no need to work with JSON!Offers bigger space (5 to 50 MB) and can be surpassed if user agree (especially for non "web" apps, for apps in stores orweb os like Firefox OS).
This section will just proposes links to highlevel libraries that are being developed. We haven't tested them so far, and prefer towait until one these libs emerges as "the one you need to know"..
External libraries/tools for IndexedDB
DB.js : http://aaronpowell.github.io/db.js/JQuery : https://github.com/axemclion/jqueryindexeddbIDBWrapper: https://github.com/jensarps/IDBWrapperPouchDB : http://pouchdb.com/
Even the guys from Firefox OS created their own utility: https://github.com/mozillab2g/gaia/blob/master/shared/js/async_storage.js

02/12/13 Persistence, drag'n'drop
classroom.w3devcampus.com/mod/book/tool/print/index.php?id=1248 82/83
14 Conclusion about clientside persistence
Conclusion
Hmmm... this week we have studied a lot, and it may be that you have trouble identifying which of the different techniques wepresented best suits your needs.
I copied here (source: http://www.html5rocks.com/en/tutorials/offline/storage/, follow this link for details) some tables thatsummarize the advantages and disadvantages of the different approaches.
To sum up:
If you need to work with transactions (in the database sense: protect data against concurrent access, etc), or do somesearches on a large amount of data, if you need indexes, etc. then use IndexedDB,
If you need a way to simply store strings, or JSON objects, use localStorage/sessionStorage. Example: store HTML formcontent as you type, store a game hiscores, preferences of an application, etc.
if you need to cache files for faster access: today, use the cache API, tomorrow you will have the choice to createdirectories and files in a sandbow filesystem, using the Filesystem and Filewriter APIs.
If you need an SQL database, just use WebSQL. oops, no, forget this idea, please...
Web Storage
WebSQL
Beware: not part of the HTML5 standard! May never be implemented by some browsers!

02/12/13 Persistence, drag'n'drop
classroom.w3devcampus.com/mod/book/tool/print/index.php?id=1248 83/83
IndexedDB
Filesystem API