Performance Watch User Guide - Timex.com...
73
W-218 607-095000 NA ©2005 Timex Corporation performance watch user guide Performance Watch User Guide BODYLINK SYSTEM ® English page 1 Français page 71 Español página 145 Português página 219
Transcript of Performance Watch User Guide - Timex.com...

W-218
607-095000
NA
©2005 Timex Corporation
pe
rf
or
ma
nc
e
wa
tc
h
us
er
g
ui
de
Performance Watch User Guide
BODYLINK SYSTEM®
English page 1
Français page 71
Español página 145
Português página 219
32
Alarm Mode ..............................................................................33
Configure Mode ......................................................................36
Optional GPS functionality ................................................41
Enabling GPS features ............................................................42
Configuring GPS features for first use ..................................42
Additional GPS functionality in existing modes ....................43
New Modes..............................................................................53
Vertical Mode ............................................................................54
Finish Mode ..............................................................................56
Care & Maintenance ............................................................60
Changing the battery ..............................................................60
INDIGLO® night-light ............................................................61
Water resistance ......................................................................62
Legal Information ................................................................62
International warranty (U.S. limited warranty) ....................62
FCC Notice (U.S.) / IC Notice (Canada) ..................................66
Declaration of Conformity ......................................................68
I N T R O D U C T I O N
Welcome!
Congratulations! With your purchase of the Timex® Bodylink®System you have hired your new personal trainer. Using yourPerformance Watch in partnership with your digital Heart RateSensor offers you an unprecedented ability to track, store, andanalyze key indicators of your personal fitness level.
We dedicate this manual to information regarding yourPerformance Watch. This sport watch functions as the brain foryour Bodylink System, providing you comprehensive, real-timeworkout data gathered from your digital Heart Rate Sensor.
You will find your Performance Watch provides very user-friendlyfitness technology. But, like any new technology, you should takethe time to familiarize yourself with its features and functions tooptimize the usefulness of your purchase.
So, have fun exploring! Check out the Performance Watch modes.Review the Quick Start Guide to develop a basic understanding ofyour digital Heart Rate Monitor System. Most of all, enjoy yournew fitness partner on your road to increased performance!

544
Before you begin
This manual contains information about, and instructions for,setting up your new Performance Watch and using it with theHeart Rate Sensor. To assist you in learning about yourPerformance Watch, this manual contains several elements toincrease your understanding.
ä An overview of the Performance Watch buttons, display icons,
and modes
ä A glossary for each section that explains many of the references
used for the Performance Watch and the Performance Watch modes.
ä Complete, comprehensive instructions for setting up and using
your Performance Watch in each mode.
ä Real-world scenarios that explain how you might use your
Performance Watch as part of your activity routine. You will seethese scenarios throughout the manual, appearing in grey textboxes.
Watch terminology
Your Bodylink System has its own language that you will learn as you become proficient in operating it. As you learn thislanguage, you will encounter some important words and phrases.We promise; no one will make you take a vocabulary test!
But, reviewing key terminology will help you more quickly
understand how your Bodylink System operates. So, take a minute to review some of the words that will appear throughoutthis manual.
Bodylink® System: The Bodylink System allows you to track andstore real time data using a family of wireless devices inconjunction with your Performance Watch.
Performance Watch: The Performance Watch, (Watch) houses thedata center for the Bodylink System.
Heart Rate Sensor: The Heart Rate Sensor (HR Sensor) measuresyour heart rate. The Fitness Sensor User Guide provides detailedinformation for setting up and using your HR Sensor.
P E R F O R M A N C E W AT C H O V E R V I E W
The chronograph
As you use this manual to learn about your Watch, the wordchronograph can potentially cause some confusion. Try toremember this: a chronograph is a tool for measuring time. So, you will notice a Chronograph Mode, but any time your Watchfunctions as a timing tool, it operates using chronograph (ortiming) functionality.
6 7
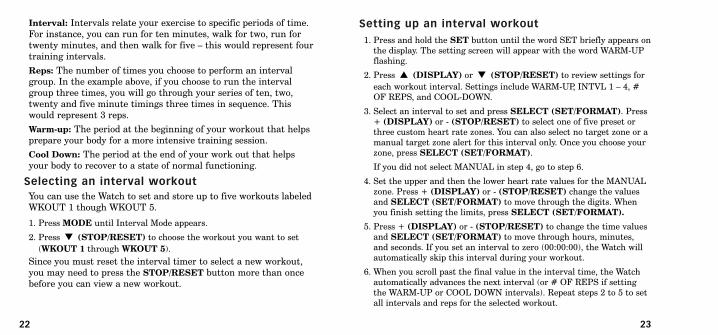
Resources
Print resources
In addition to this manual, your Bodylink System includes thesevaluable resources:
ä Bodylink System Quick Start Guide: Information to help you set
up and begin using your Performance Watch in conjunction withyour HR Sensor, and an overview map of the differentPerformance Watch modes.
ä Fitness Sensors User Guide: Information for set-up, operation,
and maintenance of your HR Sensor.
ä Heart Zones® Tools for Success: Information to use your Heart
Rate Sensor in conjunction with the Heart Zones® TrainingSystem fitness program, meant to help you to increase thestrength and endurance of your heart.
Web resources
The Timex Websites offer beneficial information to help youoptimize your Bodylink System.
ä www.timex.com/bodylink/: Information about Bodylink System
features and product simulations.
ä www.timex.com/software/: Current software releases for Timex
products.
ä www.timex.com/fitness/: Fitness and training tips for
using the Bodylink System.
In addition to the Timex sites, you may also want to visit the Website referred to in Heart Zones® Tools for Success. Atwww.heartzones.com you will find information to complement thematerial provided in the booklet.
Watch buttons
The Watch offers multi-functional buttons that serve threepurposes. You do not have to memorize button functions for eachmode. Let the Watch serve as your guide.
Most of the time, the Watch buttons function according to thelabels printed on the case. If you do not see any symbols aroundthe edge of the display, follow the information printed on theWatch case to guide you in using the buttons.

9
Setting buttons
Use Watch buttons to set Watch functions (for example, setting thetime or a target heart rate zone). When the + and – symbolsappear at the edge of the Watch display, you have initiated thesetting process.
The steps listed here allow you to set Watch functions.
1. Press and hold the SET button until the word SET briefly appearson the display, followed by a flashing value.
3. Set the first value by pressing + (DISPLAY) or – (STOP/RESET).
4. Press SELECT (SET/FORMAT) to move to the next value to set.
5. Repeat steps 3 and 4 for all the values that need adjustment.
6. Press DONE (MODE) to save your changes and complete the settingprocess.
8
Additionally, in any mode where you can view your heart rate, youcan hold the INDIGLO® button to quickly silence an audibletarget zone alert. Once you push the button to change the alert, itwill remain silent until you change it to another target zone alerttype in Configure Mode. See page 37 for more information.
MODE
Press to go to
the next mode
START/SPLIT
Press to start timing
or take a split
INDIGLO®
night-light Press
to light the watch;
hold to silence
target zone alert
DISPLAY
Press to display
performance data
SET/FORMAT
Press to set or
change the display
format
STOP/RESET
Press to stop or
press and hold to
reset
DONE
Press when
finished setting
INDIGLO®
night-light
Press to light
the watch
+Press to increase the
displayed value
SELECT
Press to move to the
next value
– Press to decrease
the displayed value

10 11
Messages
When using the Watch with the HR Sensor, the Watch may displaymessages to communicate the status of the Sensor in conjunctionwith the Watch. Messages include:
NO DATA FROM HRM The Watch is not receiving data from the HR Sensor. Ensure the Sensor is not more than 3 feet (1 meter) away from the Watch, is operating, or has notinadvertently locked on to someone else’s Sensor. The Watch will attempt to establish a connection for one minute after thismessage displays.
Viewing buttons
Watch buttons can help you navigate through viewing options.When you see the s and t triangles on the edge of the display,
you know there is information to view.
Display icons
MODE
Press to go to
the next mode
INDIGLO®
night-light
Press to light
the watch
s
Press to display
next data value
t
Press to display
previous data value
Watch display icons
Interval or basic
timer running
Chronograph
running
Night Mode enabled
GPS-3D Sensor
battery low
Sensor(s) activated
(blinks when trouble)
Alarm armed
Hourly chime
enabled

The booklet Heart Zones® Tools For Success included in yourWatch packaging provides excellent procedures and Timexrecommends you use one of these methodologies. However, if youcannot use any of the procedures described in Heart Zones® Tools
for Success, you might consider using the widely used, thoughhighly debated, age-based method. Begin with the number 220 andthen subtract your age. For instance, a 35 year old would beginwith 220 and subtract 35 (the person’s age) which gives anestimated maximum heart rate of 185.
Setting your Watch for first use
Once you determine your heart rate, set the following parametersprior to using your Watch:
1. Set the time of day. For detailed information on Time of Day Mode,including instructions for setting time of day, refer to page 15 of thismanual.
2. Enter your maximum heart rate. In Configure Mode, selectHRM SETTINGS and then MAX HR. Your maximum heart ratesetting determines your five preset heart rate target zones. For moreinformation on Configure Mode, refer to page 36.
3. Select your desired heart rate display units. In Configure Mode,select HRM SETTINGS and then HRM DISPLAY. Your Watch givesyou the option to view your heart rate in beats per minute (BPM) oras a percentage of your maximum heart rate (PERCENT). For moreinformation on Configure Mode, refer to page 36.
13
NOISY DATA FROM HRM The Watch is experiencing radiointerference. Try to move away from any potential sources ofinterference (for example, televisions, monitors, or motorizeddevices). The Watch will attempt to establish a connection for 30 seconds after this message displays.
Display formatting
In Chronograph Mode, you can press and release SET/FORMAT toswitch the data values displayed in the upper and middle displaylines. This allows you to display the value most important to you inthe larger, middle display.
Preparing to use your Watch
Determining your heart rate
In addition to many other useful features, your Watch usestechnology that helps you track detailed information about yourheart rate. But, before you can track this information, you firstneed to determine your maximum heart rate. You can use manymethods to estimate your maximum heart rate.
12
Time
Heart Rate Time
Heart Rate

Time of Day Mode
Your Watch can act as an ordinary watch to display the time, date,and day for two different time zones, using a 12- or 24-hour format.
Setting the time
1. Press MODE until Time of Day Mode appears.
2. Press and hold the SET button until the word SET briefly appearson the display, followed by a flashing value.
3. Set the first value by pressing + (DISPLAY) or – (STOP/RESET).
4. Press SELECT (SET/FORMAT) to move to the next value to set.
5. Repeat steps 3 and 4 for all the values that need adjustment.
6. Press DONE (MODE) to save your changes and complete the settingprocess.
15
4. Determine your target heart rate zone and alert. In ConfigureMode, select HRM SETTINGS and then TZ ALERT. Use the targetzone alert to keep your heart rate within a defined range to maximizeyour performance and prevent either over exertion or underutilization of your heart during exercise.For more information onConfigure Mode, refer to page 37.
W AT C H M O D E S
You can cycle through each of the eight modes by pressing MODE.
ä Time of Day allows you to display the time, date, and day of the
week for two different time zones.
ä Chronograph tracks and displays performance data.
ä Interval Timer lets you set up the Watch for interval workouts.
ä Lap Data presents stored lap information.
ä Summary displays data recorded while the chronograph runs.
ä Basic Timer enables you to time an event that counts down from
a specific time to zero.
ä Alarm manages up to five alarms.
ä Configure permits you to customize Watch functions
to meet your needs.
14
View performance
data in conjunction
with the HR Sensor
View or switch to
secondary time
Hold to set
INDIGLO®
night-light
To
Chronograph
Mode

ä The Watch does not automatically adjust for Daylight Savings
Time. When switching between Standard Time and DaylightSavings Time, you must manually adjust the hour value.
ä When you use the HR Sensor with the Watch, you can view your
current heart rate on the bottom line of the Watch display. Youmay elect to continue viewing the day of the week instead bypressing DISPLAY until the day of the week becomes visible.
ä If the Watch does not detect the HR Sensor, the day of the week
will appear on the bottom line of the display.
ä You can only reset the seconds value to zero.
Time of Day Mode example
17
For Time of Day, you can set the following values:
Switching time zones
The Watch can track two time zones (T1 and T2). Look at thesecond zone by pressing START/SPLIT. Or, switch from T1 to T2using these steps:
1. Press and hold START/SPLIT until HOLD FOR TIME 2 appears.
2. Continue to hold until the time switches and the Watch beeps.
3. Repeat steps 1 and 2 to switch back to T1. The message will readHOLD FOR TIME 1.
Note that you must independently set the time of day for each time zone.
Time of Day Mode tips & tricks
ä You can return to Time of Day Mode from any other mode on the
Watch by pressing and holding MODE until the time of day displays.
• Hour
• Minute
• Seconds
• Year
• Month
•Date (automatically
sets the day of week
when you set the
date)
• Hour format
(i.e., AM/PM
versus 24-hours)
16
Assume that you live in San Francisco and work with a client inSingapore. Like all busy people, it is imperative you keep track oftime, so you set T1 to your local time. But it is also important tohave a quick reminder of your client’s time, so you set T2 toSingapore time. With both time zones available, you can quicklycheck your client’s time or even switch your monitor to display T2when you travel to Singapore.

Operating Chronograph Mode
When using Chronograph Mode, take splits manually by pressingSTART/SPLIT or you can set the Watch to automatically takesplits by time. For more information on setting the Watch toautomatically take splits, refer to “Hands-free settings” on page 39.
Use these steps to operate the chronograph.
1. Press MODE until Chronograph Mode appears.
2. Press START/SPLIT to begin timing.
3. Press START/SPLIT again to take a split and automatically begintiming a new lap. Press MODE to immediately display new lapinformation OR wait for a few seconds and the Watch willautomatically begin to display data for a new lap.
4. Press STOP/RESET to stop timing when you want to take a breakor you reach the end of your activity.
5. Press START/SPLIT to continue timing OR press and holdSTOP/RESET to reset the chronograph display to zero.
Chronograph Mode tips & tricks
ä If you press MODE to switch the Watch to a different mode while
the chronograph continues to run, the stopwatch icon willappear to indicate the chronograph still operates.
ä If you use the HR Sensor with the Watch, you can view heart
rate for both percent of your maximum heart rate (PERCENT)and beats per minute (BPM).
19
Chronograph Mode
Mode operates as the main workout data center for your Watch. Itcan record elapsed time for up to 100 hours. It can also registerinformation for up to 100 laps, including average heart rate whenusing the HR Sensor.
Chronograph Mode terminology
Chronograph: The chronograph records time segments for theduration of your activity.
Lap: Lap time records the time for one segment of your activity.
Split: Split time records the total elapsed time since the beginningof your current activity.
Taking a split: When you take a split, the chronograph willcomplete timing one lap and begin timing a new one.
18
View performance
data in conjunction
with the HR Sensor
Swap upper and
middle lines
Stop or reset the
chronograph
INDIGLO®
night-light
Start timing
or take a split
To Interval
Mode or hold
for time

Interval Timer Mode
Interval Timer Mode offers a flexible six-interval countdown timer,and can retain settings for up to five different training sessions. Itincludes warm up and cool down intervals and four trainingintervals for each training session. You can set the group of fourtraining intervals to repeat up to 99 times. You can set the warm-up interval to run one time at the beginning of your trainingsession and the cool down interval to run one time at the end ofyour training session.
Interval Mode terminology
Interval Training: You can use interval training to help you varythe intensity level within one workout, ultimately helping youwork out longer and harder.
2120
ä The Watch stores average heart rate statistics for each lap if you
use the HR Sensor with the Watch.
ä If you use the Watch with the HR Sensor you can set it to
automatically begin taking a heart rate recovery calculation eachtime you press STOP/RESET to stop the chronograph. However,if you press START/SPLIT again before the recovery cycle hascompleted, you will cancel the recovery. For more information,refer to Configure Mode on page 37.
Chronograph Mode example
Recently you heard that a training method for long distancerunners called the run/walk method can help you increase youroverall endurance and burn more calories. This method calls forrunning for a period of time followed by a short period of walking.You decide to use Chronograph Mode to help you try this method.You press START/SPLIT to begin your run and then after 10minutes of running you press START/SPLIT again and walk for 2minutes. You continue using these two timing sequences until youhave completed a 60 minute run/walk.
Start timing the
interval workout
s
View performance
data
t
Select, stop, or
reset a workout
INDIGLO®
night-light
To Lap Data
Mode or hold
for time
Hold to set
Setting up an interval workout
1. Press and hold the SET button until the word SET briefly appears onthe display. The setting screen will appear with the word WARM-UPflashing.
2. Press s (DISPLAY) or t (STOP/RESET) to review settings for
each workout interval. Settings include WARM-UP, INTVL 1 – 4, #OF REPS, and COOL-DOWN.
3. Select an interval to set and press SELECT (SET/FORMAT). Press+ (DISPLAY) or - (STOP/RESET) to select one of five preset orthree custom heart rate zones. You can also select no target zone or amanual target zone alert for this interval only. Once you choose yourzone, press SELECT (SET/FORMAT).
If you did not select MANUAL in step 4, go to step 6.
4. Set the upper and then the lower heart rate values for the MANUALzone. Press + (DISPLAY) or - (STOP/RESET) change the valuesand SELECT (SET/FORMAT) to move through the digits. Whenyou finish setting the limits, press SELECT (SET/FORMAT).
5. Press + (DISPLAY) or - (STOP/RESET) to change the time valuesand SELECT (SET/FORMAT) to move through hours, minutes,and seconds. If you set an interval to zero (00:00:00), the Watch willautomatically skip this interval during your workout.
6. When you scroll past the final value in the interval time, the Watchautomatically advances the next interval (or # OF REPS if settingthe WARM-UP or COOL DOWN intervals). Repeat steps 2 to 5 to setall intervals and reps for the selected workout.
23
Interval: Intervals relate your exercise to specific periods of time.For instance, you can run for ten minutes, walk for two, run fortwenty minutes, and then walk for five – this would represent fourtraining intervals.
Reps: The number of times you choose to perform an intervalgroup. In the example above, if you choose to run the intervalgroup three times, you will go through your series of ten, two,twenty and five minute timings three times in sequence. Thiswould represent 3 reps.
Warm-up: The period at the beginning of your workout that helpsprepare your body for a more intensive training session.
Cool Down: The period at the end of your work out that helpsyour body to recover to a state of normal functioning.
Selecting an interval workout
You can use the Watch to set and store up to five workouts labeledWKOUT 1 though WKOUT 5.
1. Press MODE until Interval Mode appears.
2. Press t (STOP/RESET) to choose the workout you want to set
(WKOUT 1 through WKOUT 5).
Since you must reset the interval timer to select a new workout,you may need to press the STOP/RESET button more than oncebefore you can view a new workout.
22

the alert type (AUDIBLE, VISUAL, or NO ALRT) in Configuremode will still operate while you run the interval timer. The Watchonly ignores the limit settings.
Keep in mind that these settings affect the target zone alert only.The target zone alert settings used in the interval timer do notaffect the heart rate statistical data tracked and displayed inSummary Mode.
Interval Mode tips & tricks
You can set the Watch to take a split when an interval ends byusing SYNC TIMER & CHRONO (see page 40). This will overridethe Auto split function and allow you to have a record of yourperformance for each interval.
Interval Mode example
25
7. Press DONE (MODE) to save your workout and complete thesetting procedure.
For Interval Timer Mode, you can set the following values:
ä Warm up (set target heart rate zone and time)
ä Intervals 1 through 4 (set target heart rate zone and time)
ä Number of Reps (does not include warm-up or cool down
intervals)
ä Cool down (set target heart rate zone and time)
Operating Interval Timer Mode
Use these steps to operate the interval timer for a workout.
1. Press MODE until Interval Timer Mode appears.
2. Press START/SPLIT to begin timing.
3. Press STOP/RESET to stop timing when you want to take a breakor you reach the end of your activity.
4. Press START/SPLIT to continue timing OR press and holdSTOP/RESET to reset the chronograph display to zero.
Heart rate target zones and alerts
During the setting process, you have the option to use one of thefive standard, three custom or a unique heart rate target zonealert for each interval. You may also choose to use no target zonealert. While you run the interval timer, the target zone alertsettings you select will override the heart rate target zone alertyou set in Configure Mode (see page 36). However, the setting for
24
For cross training purposes, you decide to add a one-hour spinclass to your workout routine one time per week. You decide touse Interval Mode to help you track both time and heart rate foryour class. You set up WKOUT 1 as follows: WARM-UP for 5minutes with NO TZ (indicating no heart rate goal), INTVL 1 for5 minutes at Z4: 156 – 175 (in beats per minute), INTVL 2 for 1minute in Z3: 136 – 156, INTVL 3 for 10 minutes in Z4 andINTVL 4 for 2 minutes in Z3. You then set the # OF REPS to 3,indicating you want to repeat INTVL 1 through INTVL 4 threetimes. Finally, you set the COOL DOWN to 5 minutes with NOTZ. This entire workout takes you approximately 60 minutes andhelps you track both time and endurance goals.

ä Lap average heart rate and time in average heart rate:
Average heart rate displays the average heart rate for the lap,and time in average heart rate shows how much time during thelap you spent at the average heart rate.
Lap Data Mode tips & tricks
ä Once you restart the chronograph from zero for your next
activity, you erase lap data from your previous activity.
ä If you want to view information for your entire activity refer to
Summary Mode in the next section.
ä If you have activated SYNC TIMER & CHRONO (see page 40)
then your lap data is equivalent to your performance for eachinterval.
Lap Data Mode example
27
Lap Data Mode
Lap Data Mode allows you to review stored lap information fortime and heart rate information. To record lap data, you must runthe chronograph.
When you use Lap Data Mode, each recalled lap will display threelines of data. The lower line will show the lap number labeled RCL(for recall) for each lap you stored in the chronograph.
Access this information using these steps.
1. Press MODE until the Lap Data Mode appears.
2. Press s (DISPLAY) or t (STOP/RESET) to navigate through
data for each lap.
Viewing data in Lap Data Mode
As you press the buttons, you will review information for each lap.This information includes:
ä Lap and split time: Lap time includes data for each segment of
your activity, and split time shows data for the overall activity.
26
s
data value
t
data value
INDIGLO®
night-light
To Summary
Mode or hold
for time
You love to ride your bike, but you just finished a long ride andyou are exhausted! In your exhaustion, you forget to look at thelap data for your ride and you reset the chronograph to zero. Youthink you have lost your data, but then you remember. You canstill view lap data for your ride, as long as you do not restart thechronograph first.

Viewing heart rate data in Summary Mode
If you do not use your HR Sensor, the only information you canview in Summary Mode is the total time for your activity while thechronograph was running. Event time is equivalent to split time inChronograph Mode.
If you use the Watch with the HR Sensor, you can view thefollowing information:
ä Average Heart Rate: Your average heart rate calculated over the
period the chronograph was running.
ä Peak Heart Rate: The highest recorded heart rate during your
activity.
ä Minimum Heart Rate: The lowest recorded heart rate during
your activity.
ä Time in Zones: Taking into account your total workout time, the
Watch displays how much time you spent in each of the heartrate zones during your activity, including all five preset zones, allthree custom zones, and below Zone 1 (sometimes referred to as“Zone 0”) (refer to “HRM settings” on page 38 for informationon setting up this feature).
ä Average Heart Rate in Zones: The average heart rate in each of
the heart rate zones, including all five preset zones, all threecustom zones, and below Zone 1.
29
Summary Mode
Summary Mode allows you to review overall information recordedby the chronograph for your most recent activity. Data does notupdate while displayed.
Summary Mode terminology
Zone: A predetermined heart rate range for your activity.
Recovery: A measure of your fitness and fatigue based on thedifference of your heart rate over a short period of time afterstrenuous exercise. For further information, refer to Heart Zones® Tools for Success.
Operating Summary Mode
1. Press MODE until the Summary Mode appears.
2. Press s (DISPLAY) or t (STOP/RESET) to navigate through
summary data
28
s
data value
t
data value
INDIGLO®
night-light
To Basic Timer
Mode or hold
for time
31
ä Recovery: Your heart rate change over a selected period of time
recorded at the end of your activity (refer to “HRM settings” onpage 38 for information on setting up this feature).
Summary Mode tips & tricks
ä Once you restart the chronograph from zero for your next
activity, you erase summary data from your previous activity.
ä If you are wearing the HR Sensor, you can initiate a recovery
calculation while in Summary Mode by pressing and holdingSTART/SPLIT while viewing your recovery data.
ä If you want to view information for each segment of your activity
refer to Lap Data Mode in the previous section.
Summary Mode example
30
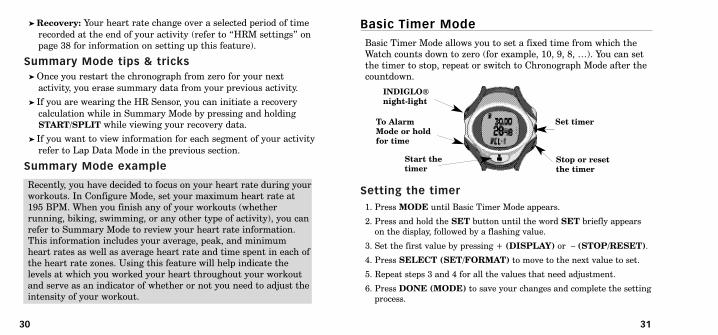
Basic Timer Mode
Basic Timer Mode allows you to set a fixed time from which theWatch counts down to zero (for example, 10, 9, 8, …). You can setthe timer to stop, repeat or switch to Chronograph Mode after thecountdown.
Setting the timer
1. Press MODE until Basic Timer Mode appears.
2. Press and hold the SET button until the word SET briefly appearson the display, followed by a flashing value.
3. Set the first value by pressing + (DISPLAY) or – (STOP/RESET).
4. Press SELECT (SET/FORMAT) to move to the next value to set.
5. Repeat steps 3 and 4 for all the values that need adjustment.
6. Press DONE (MODE) to save your changes and complete the settingprocess.
Recently, you have decided to focus on your heart rate during yourworkouts. In Configure Mode, set your maximum heart rate at195 BPM. When you finish any of your workouts (whetherrunning, biking, swimming, or any other type of activity), you canrefer to Summary Mode to review your heart rate information.This information includes your average, peak, and minimumheart rates as well as average heart rate and time spent in each ofthe heart rate zones. Using this feature will help indicate thelevels at which you worked your heart throughout your workoutand serve as an indicator of whether or not you need to adjust theintensity of your workout.
Set timer
Stop or reset
the timer
INDIGLO®
night-light
Start the
timer
To Alarm
Mode or hold
for time

Timer Mode tips & tricks
ä You can press MODE within Timer Mode to switch the display to
another mode without disrupting the operation of thetimer. The timer icon will appear indicating timeroperation.
ä The timer will only switch to the Chronograph Mode if you reset
the chronograph to zero and Sync Timer & Chrono is turned off(see “Hand-free settings” on page 39).
Basic Timer Mode example
Alarm Mode
You can use your Watch as an alarm clock for up to five separatealarms. When you set an alarm, the alarm clock icon appears inTime of Day Mode. The alarm can alert you at the same time everyday, or only weekdays, weekends, or even only one time (useful forappointment reminders).
32 33
For Timer Mode, you can set the following values:
ä Time (hours, minutes, seconds for up to 99 hours, 59 minutes,
and 59 seconds)
ä End action (STOP, REPEAT, or CHRONO)
Operating the timer
1. Press START/SPLIT to start the timer countdown.
2. Pause the countdown by pressing STOP/RESET. You may resumethe countdown by pressing START/SPLIT again, OR reset the timerby pressing and holding STOP/RESET.
3. When the timer reaches zero, a brief alert sounds.
4. The timer will stop after the alert if set to STOP.
OR
the timer will begin another countdown if set to REPEAT andcontinue until you press STOP/RESET.
The lower line of the display will show RPT and a number (forexample, RPT 2). RPT indicates the timer is repeatingand the number indicates how many times the timer hascycled through the repeat countdown. You will also seethe repeat icon, indicating the timer is set to repeat.
OR
The timer will switch to Chronograph Mode if set to that mode. Youwill see the switch mode icon, indicating the timer willswitch modes at the end of the countdown.
As part of your overall health plan, you decide to take a 30-minutewalk during your lunch hour two times a week. To help keeptrack of time so you do not return late from your lunch hour, youset the timer to 15 minutes and then set it to repeat one time.After 15 minutes the Watch beeps telling you to begin walkingback to your office. Since you set the timer to repeat, the Watchbegins timing another 15 minute session helping you track howmuch time you have to return to your office.

Setting an alarm
1. Press MODE until Alarm Mode appears.
2. Press and hold the SET button until the word SET briefly appearson the display, followed by a flashing value.
3. Set the first value by pressing + (DISPLAY) or – (STOP/RESET).
4. Press SELECT (SET/FORMAT) to move to the next value to set.
5. Repeat steps 3 and 4 for all the values that need adjustment.
6. Press DONE (MODE) to save your changes and complete the settingprocess.
For Alarm Mode, you can set the following values:
ä Alarm type (WEEKDAYS, WEEKENDS, ONCE, or DAILY).
A DAILY alarm will ring every day at the selected time, aWEEKDAYS alarm will ring Monday through Friday at theselected time, a WEEKENDS alarm will ring Saturday andSunday at the selected time, and a ONCE alarm will only ring one time at the selected time and then automatically turn off.
ä Alarm time (hours, minutes and AM/PM if the time is set to
12-hour format).
ä Alarm status (OFF or ON). You can also press START/SPLIT to
switch the alarm status.
Note that if you change any alarm settings, you automatically turnon the alarm.
35
When the Watch reaches a scheduled alarm, the alarm tone sounds
and the INDIGLO® night light flashes for a period of 20 seconds.You can silence the alarm during this period by pressing anybutton on the Watch, or, if you do not silence the alarm before thealert finishes, a backup alarm will sound after five minutes.
Selecting an alarm
You can use the Watch to set and store up to five alarms labeledALM1 though ALM5
1. Press MODE until Alarm Mode appears.
2. Press s (DISPLAY) or t (STOP/RESET) to choose the alarm
you want to set (ALM1 through ALM5).
34
s
alarm
Set alarm
t
alarm
INDIGLO®
night-light
Turn alarm
ON or OFF
To Configure
Mode or hold for
time
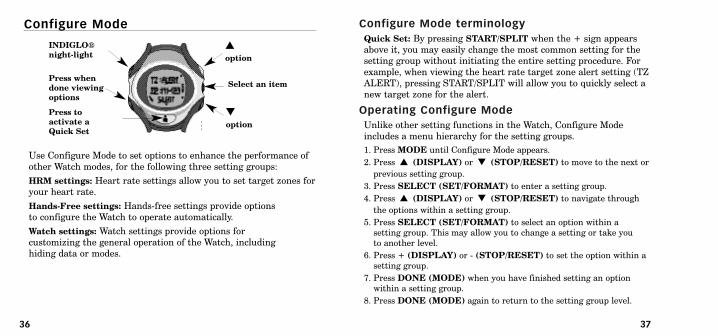
Configure Mode terminology
Quick Set: By pressing START/SPLIT when the + sign appearsabove it, you may easily change the most common setting for thesetting group without initiating the entire setting procedure. Forexample, when viewing the heart rate target zone alert setting (TZALERT), pressing START/SPLIT will allow you to quickly select anew target zone for the alert.
Operating Configure Mode
Unlike other setting functions in the Watch, Configure Modeincludes a menu hierarchy for the setting groups.
1. Press MODE until Configure Mode appears.
2. Press s (DISPLAY) or t (STOP/RESET) to move to the next or
previous setting group.
3. Press SELECT (SET/FORMAT) to enter a setting group.
4. Press s (DISPLAY) or t (STOP/RESET) to navigate through
the options within a setting group.
5. Press SELECT (SET/FORMAT) to select an option within a setting group. This may allow you to change a setting or take you to another level.
6. Press + (DISPLAY) or - (STOP/RESET) to set the option within asetting group.
7. Press DONE (MODE) when you have finished setting an optionwithin a setting group.
8. Press DONE (MODE) again to return to the setting group level.
3736
Configure Mode
Use Configure Mode to set options to enhance the performance ofother Watch modes, for the following three setting groups:
HRM settings: Heart rate settings allow you to set target zones foryour heart rate.
Hands-Free settings: Hands-free settings provide options to configure the Watch to operate automatically.
Watch settings: Watch settings provide options for customizing the general operation of the Watch, including hiding data or modes.
s
option
Select an item
t
option
INDIGLO®
night-light
Press to
activate a
Quick Set
Press when
done viewing
options

39
HRM settings
Prior to configuring your heart rate settings, refer to Heart
Zones® Tools for Success for information on the importance oftracking your heart rate and how to determine your maximumheart rate. Then, configure the following heart rate settings:
TZ Zone and Alert: You may select from one of five preset heartrate zones (labeled Z1 to Z5) or three custom heart rate zones(labeled C1 to C3). You may also choose to have the Watch eitheralert you or not if your heart rate goes outside of your target zone.Options for alerts include NO ALRT, AUDIBLE, or SILENT. NOALRT turns off the alert completely, SILENT warns you with avisual indication (an up or down arrow on the Watch display) ifyou go above or below your target heart rate zone, and AUDIBLEcombines a warning melody to the visual alert. You will hear anascending melody if you go above your zone and a descendingmelody if you go below your zone.
Custom Zones: You may set the upper and lower target zonenumber or percentage (depending on how you choose to show yourheart rate) for up to three custom heart rate zones, labeledCUSTOM 1, CUSTOM 2, and CUSTOM 3.
Recovery: This setting determines how the Watch automaticallycalculates a recovery heart rate when you stop the chronograph.You can set the recovery time to one minute, two minutes, or off.This helps you determine how quickly your heart rate returns to a
38
lower heart rate value at the end of your activity; the quicker youreturn, the better your fitness level.
Selecting OFF will prevent the Watch from automaticallycalculating a recovery heart rate when you stop the chronograph.You may still manually calculate your recovery rate in SummaryMode, set to one minute if you select OFF in Configure Mode.
Max heart rate: Enter your Maximum Heart Rate. The Watchuses this value to calculate the five preset heart rate zones andserves as a reference for displaying your heart rate as a percent ofyour maximum heart rate (PERCENT).
Heart rate display: You can set the Watch to display your heart rate as either a percentage of your maximum heart rate(PERCENT) or in beats per minute (BPM). The setting you choosewill determine how your heart rate displays in all other Watchsettings.
Hands-Free settings
Hands-free features automate chronograph features, freeing you tofocus on your workout instead of operating your Watch. Evenwhen enabled, you can still take manual splits without affectingthe hands-free operation. Configure the following hands-freesettings:
Auto Split: This feature enables the chronograph to automaticallytake splits based on a time you determine. For instance, you canconfigure the Watch to take a split every 10 minutes.
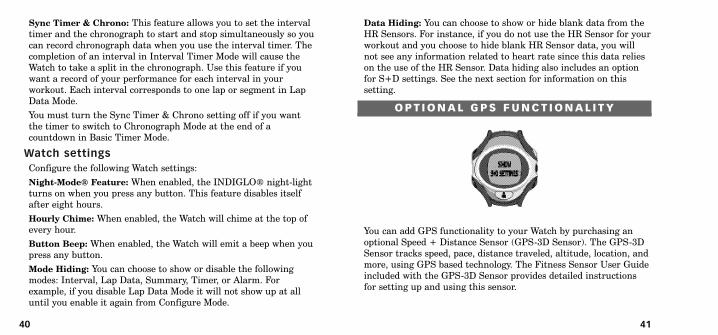
Data Hiding: You can choose to show or hide blank data from theHR Sensors. For instance, if you do not use the HR Sensor for yourworkout and you choose to hide blank HR Sensor data, you willnot see any information related to heart rate since this data relieson the use of the HR Sensor. Data hiding also includes an optionfor S+D settings. See the next section for information on thissetting.
O P T I O N A L G P S F U N C T I O N A L I T Y
You can add GPS functionality to your Watch by purchasing anoptional Speed + Distance Sensor (GPS-3D Sensor). The GPS-3DSensor tracks speed, pace, distance traveled, altitude, location, andmore, using GPS based technology. The Fitness Sensor User Guideincluded with the GPS-3D Sensor provides detailed instructionsfor setting up and using this sensor.
41
Sync Timer & Chrono: This feature allows you to set the intervaltimer and the chronograph to start and stop simultaneously so youcan record chronograph data when you use the interval timer. Thecompletion of an interval in Interval Timer Mode will cause theWatch to take a split in the chronograph. Use this feature if youwant a record of your performance for each interval in yourworkout. Each interval corresponds to one lap or segment in LapData Mode.
You must turn the Sync Timer & Chrono setting off if you wantthe timer to switch to Chronograph Mode at the end of acountdown in Basic Timer Mode.
Watch settings
Configure the following Watch settings:
Night-Mode® Feature: When enabled, the INDIGLO® night-lightturns on when you press any button. This feature disables itselfafter eight hours.
Hourly Chime: When enabled, the Watch will chime at the top ofevery hour.
Button Beep: When enabled, the Watch will emit a beep when youpress any button.
Mode Hiding: You can choose to show or disable the followingmodes: Interval, Lap Data, Summary, Timer, or Alarm. Forexample, if you disable Lap Data Mode it will not show up at alluntil you enable it again from Configure Mode.
40
43
Ascent Rate Update: This setting in the ALTITUDE SETTINGSgroup determines how often the Watch calculates your ascent rate(vertical speed). Set this feature shorter for faster verticalactivities such as skiing or longer for slower vertical activities suchas climbing. Refer to page 51 for detailed setting information.
Though not necessary to adjust before your first workout, you maywant to review and configure the speed or pace target zones (page 50),distance alert (page 50) or additional hands-free features (page 51).
Additional GPS functionality in existing modes
GPS messages
When using the Watch with the GPS-3D Sensor, the Watch maydisplay messages to communicate the status of the Sensor inconjunction with the Watch. Messages include:
SEARCHING The GPS-3D Sensor is still trying to link to GPSdata. You cannot view speed, pace, distance, or positionalinformation until the Sensor locates GPS satellites.
WEAK GPS SIGNAL The GPS-3D Sensor lost its link with GPSsatellites. The GPS-3D Sensor operates more accurately in moreopen areas (such as an area without a lot of tree or cloud cover)and at quicker speeds.
NO DATA FROM GPS The Watch is not receiving data from theGPS-3D Sensor. Ensure that the Sensor is not more than 3 feet (1meter) away from the Watch, is operating, or has not inadvertently
42
Enabling GPS features
With your GPS-3D Sensor, you can expand the features of yourWatch. But first you need to enable the GPS based features of yourWatch in Configure Mode.
1. Press MODE until Configure Mode appears.
2. Press s (DISPLAY) or t (STOP/RESET) until WATCH
SETTINGS appears.
3. Press SELECT (SET/FORMAT) to enter the Watch setting group.
4. Press s (DISPLAY) or t (STOP/RESET) until DATA HIDING
appears.
5. Press SELECT (SET/FORMAT) to enter the Data Hiding settings.
6. Press s (DISPLAY) or t (STOP/RESET) until DISABLE S+D
SETTINGS appears.
7. Press + (START/SPLIT) until SHOW appears on the display.
8. Press DONE (MODE) four times to save the setting and exitConfigure Mode.
Configuring GPS features for first use
Before starting your first workout, you should check the followingsettings and adjust them if necessary:
Units: In Configure Mode set length, speed, pace and altitude unitsto your liking. Refer to page 52 for further information.

44
ä Note that you cannot adjust the seconds when you enable
the GPS features; they will always remain synchronized to UTC time.
ä You may adjust the minutes value ahead or behind the correct
time and the Watch will remember your setting. This featurehelps people who like to set their Watches a little ahead to keepthem on time.
When using the GPS-3D Sensor with your Watch, you can scrollthrough performance data by pressing and releasing DISPLAY.
You can view:
ä Speed: Current velocity
ä Pace: Current velocity, expressed in minutes per selected
distance unit, such as miles or kilometers
ä Distance: Distance traveled since you began operating the
chronograph
ä Altitude: Current elevation above sea level
GPS functions in Chronograph Mode
Chronograph Mode includes more functionality for Hands-freesettings when used in conjunction with the GPS-3D Sensor. Inaddition to automatically taking splits based on time, you can setChronograph Mode to start when you begin moving and to stopwhen you stop moving or automatically take splits based ondistance. See “Hands-free settings” on page 51.
45
locked on to someone else’s Sensor. The Watch will attempt toestablish a connection for one minute after this message displays.
NOISY DATA FROM GPS The Watch is experiencing radiointerference. Try to move away from any potential sources ofinterference (for example, televisions, monitors, or motorizeddevices). The Watch will attempt to establish a connection for 30 seconds after this message displays.
FATAL GPS ERROR The GPS-3D Sensor has encountered asevere internal error. Contact Timex Customer Service.
GPS functions in Time of Day Mode
When you use the Watch in conjunction with the GPS-3D Sensor, it will align with UTC (Universal Time, Coordinated formerly known asGMT). This describes the local time zone in relationship to theGreenwich Meridian. For example, New York City is in the -5 UTC zone,since New York is five hours earlier than Greenwich Meridian; Moscowis +3 UTC, since it is three hours later than Greenwich Meridian.
When you first activate the GPS-3D Sensor in conjunction withyour Watch, you can expect one of the following scenarios:
ä If you activate the GPS-3D Sensor before setting the time of day,
the Watch will synchronize both T1 and T2 with UTC. You willneed to adjust the hour for both time zones to your local time.
ä If you activate the GPS-3D Sensor after setting the time of day,
the Watch maintains the hour and date settings andsynchronizes minutes and seconds to UTC for each time zone.

47
When using the GPS-3D Sensor with your Watch, you can scrollthrough performance data by pressing and releasing DISPLAY.
You can view:
ä Speed: Current velocity
ä Average Speed: Average velocity for the period that chronograph
has been running
ä Pace: Current velocity, expressed in minutes per selected
distance unit, such as miles or kilometers
ä Average Pace: Average per-minute speed for the period that
chronograph has been running
ä Distance: Distance traveled since you began operating the
chronograph
GPS functions in Interval Timer Mode
When using the GPS-3D Sensor with your Watch, you can scrollthrough performance data by pressing and releasing DISPLAY.
You can view:
ä Speed: Current velocity
ä Pace: Current velocity, expressed in minutes per selected
distance unit, such as miles or kilometers
ä Distance: Distance traveled since you began operating the
interval timer
ä Altitude: Current height above sea level
46
GPS functions in Lap Data Mode
When using the GPS-3D Sensor with your Watch, you can scroll through performance data by pressing and releasing s (DISPLAY) or t (STOP/RESET). You can view:
ä Lap Average Speed: Average velocity for the period that
chronograph has been running
ä Lap Average Pace: Average per-minute speed for the period that
chronograph has been running
ä Lap Distance: Distance traveled for the lap
ä Lap Altitude: Altitude displays the height above sea level at the
end of your lap
ä Lap Elevation Change: Elevation is the change in altitude
during the lap
GPS functions in Summary Mode
When using the GPS-3D Sensor with your Watch, you can scroll through performance data by pressing and releasing s (DISPLAY) or t (STOP/RESET). GPS-3D Sensor
data viewing options for Summary Mode include data for thefollowing four data groups:
Speed
Average Speed and Average Pace are the same value expressed twodifferent ways. However, Best Pace is not related to MaximumSpeed. Best Pace is calculated from the pace values of your

GPS
ä GPS Battery Level: The current voltage level for the GPS-3D
Sensor displayed in bar graph format. You must be receiving datafrom the GPS-3D Sensor to view this information. When the graphdisplays only one segment (you will also see the battery icon on theWatch display), you should change the battery.
GPS functions in Basic Timer Mode
With the addition of the GPS-3D Sensor, you can set the timer toswitch to either Vertical (VERTI) or Finish (FINISH) Mode at theend of timing an event.
GPS functions in Configure Mode
For information on accessing Configure Mode settings refer to page37. GPS-3D Sensor data viewing options for Configure Modeinclude data for the following five data groups:
S+D settings: Speed and distance settings affect the Watchresponse to data received from the GPS-3D Sensor.
Altitude settings: Altitude settings configure target altitude andset smoothing and ascent rate calculations.
Hands-Free settings: Hands-free settings provide options toconfigure the Watch to operate automatically in conjunction withthe GPS-3D Sensor.
Watch settings: Watch settings provide options for customizing thegeneral operation of the Watch, including hiding data or modes.
49
activity; Maximum Speed is the fastest speed read by the GPS-3DSensor during your activity. The two values may not agree becausethey come from different sources of data.
ä Average Speed: Your average speed calculated by dividing
distance by time.
ä Maximum Speed: Your quickest speed.
ä Average Pace: Your average speed expressed as minutes per
distance unit traveled.
ä Best Pace: Your fastest time traveled per minute.
Distance
ä Event Distance: Your accumulated distance traveled during the
activity while the chronograph was running.
ä Odometer: Your accumulated distance traveled since you last
manually reset the odometer. Since the odometer does notoperate in conjunction with the chronograph, you can use thisfeature to track accumulated distance over several workouts.
Time
ä Event Time: The total time for your activity while the
chronograph was running. Event time is equivalent to split timein the chronograph modes.
48
Altitude settings
Smoothing: Smoothing is useful if you feel that the displayedaltitude value appears to be too erratic. Smoothing applies anaveraging filter and may cause the displayed altitude value torespond more slowly to changes. You can turn altitude smoothingoff or on.
Update Ascent Rate: Set the Watch to update the period at whichthe ascent rate is calculated. You can choose intervals of 30seconds, or 1, 10, 30, or 60 minutes. Set this feature shorter forfaster vertical activities such as skiing or longer for slower verticalactivities such as climbing.
Hands-Free settings
In addition to Auto Split, you can use the Watch to set otherhands-free settings when used in conjunction with the GPS-3DSensor. Even when enabled, you can still start and stop thechronograph manually without affecting the hands-free operation.
Auto Start: This feature enables the chronograph to start whenyou start moving. It may take a few seconds for the GPS-3DSensor to detect movement, causing a slight delay in start time.
Auto Stop: This feature enables the chronograph to stop when youstop moving. It may take a few seconds for the GPS-3D Sensor todetect that you have stopped moving, causing a slight delay in stoptime.
Auto Split: This feature enables the chronograph to take splitsautomatically according to the distance traveled. For example, if
51
Unit settings: Unit settings allow you to determine distance (forexample miles versus kilometers) and heart rate (beats versuspercentage) display units.
S+D settings
Configure the following speed and distance settings:
Zone Type: Similar in concept to a heart rate target zone alert,you can set the Watch to track your speed or your pace and to alertyou if you move too slowly or too quickly (alert types include anaudible alert that beeps or a silent alert that flashes). You can setspeed and pace limits independently. For instance, set pace limitsto control pace for your run and set speed limits to values usefulfor cycling. Then simply switch between the settings for eachactivity.
Distance Alert: Set the Watch to alert you for distance intervals.For example, you can set the Watch to alert you for every mile youtravel. The distance alert will only function when you run thechronograph. If you would like the Watch to take a split based ondistance traveled, refer to the Hands-Free Settings on page 52.
Smoothing: Smoothing is useful if you feel that the displayedspeed or pace values appear to be too erratic. Smoothing applies anaveraging filter and may cause the displayed speed or pace valuesto respond more slowly to changes.
Speed Smoothing: Turn speed smoothing off or on.
Pace Smoothing: Turn pace smoothing off or on.
50

53
you set Auto Split to 1 MI, then the Watch will automatically takea split every mile.
Watch settings
Mode Hiding: You can choose to show, hide, or disable VerticalMode or Finish Mode when using the GPS-3D Sensor.
Data Hiding: You can choose to show or hide blank data from theGPS-3D Sensor.
Unit settings
Configure the following unit settings:
Distance: Set the Watch to display distance in terms of miles,kilometers (KM), or nautical miles (NM).
Speed: Set the Watch to display speed in terms of miles per hour(MPH), kilometers per hour (KPH), nautical miles (NM), or auto.
Pace: Set the Watch to display pace in terms of miles (MPH),kilometers (KPH), nautical miles (NM), or auto.
Altitude: Set the Watch to display altitude in terms of feet, meters,or auto.
In unit settings you can set speed, pace, and altitude to any unitindependently or to the default auto setting. When set to auto,each setting automatically follows the distance unit setting. Thisallows you to quickly change units for all your data displayswithout having to adjust every setting every time, yet allowsflexibility for certain situations.
52
N E W M O D E S
Vertical and Finish Modes operate from chronograph technology.Remember that a chronograph is a tool for measuring time. Anytime your Watch functions as a timing tool, it operates usingchronograph (or timing) functionality. So, Vertical and FinishModes operate from the chronograph.
For example, a runner typically chooses kilometers for her unitsettings. However, when running a marathon, she changes herdistance unit to miles (a marathon is always 26.2 miles), but shechooses the kilometers unit setting for pace. During themarathon, the runner can view her distance in miles to matchthe course markers of the race, but she can view her pace in themore familiar minutes per kilometers for a greaterunderstanding of how quickly she is running.

Vertical Mode terminologyAscent rate: How quickly you climb or descend.
Vertical speed: Another term for ascent rate.
Operating Vertical Mode
1. Press MODE until Vertical Mode appears.
2. Press START/SPLIT to begin timing.
3. Press START/SPLIT again to take a split and automatically begintiming a new lap.
4. Press STOP/RESET to stop timing when you reach the end of youractivity.
5. Press START/SPLIT to continue timing.
OR
Press and hold STOP/RESET again to reset the display to zero.
Viewing performance data in Vertical Mode
When using either the HR Sensor and/or the GPS-3D Sensor withyour Watch, scroll through performance data by pressing andreleasing DISPLAY. Performance data viewing options for VerticalMode include:
Heart Rate: Current heart rate
Ascent Rate: Vertical speed
Pace: Current velocity, expressed in minutes per selected distanceunit, such as miles or kilometers
Speed: Current velocity
55
Vertical Mode
Vertical Mode operates as a viewing mode in conjunction with theGPS-3D Sensor with a focus on displaying altitudinal data. Inparticular, Vertical Mode tailors the Watch to view data related tovertical activities (for example, climbing or skiing). If you do notuse the GPS-3D Sensor, you cannot enter Vertical Mode and youwill see the message NO GPS DATA.
54
chronograph
measures time
ChronographMode
Vertical Mode Finish Mode
View
performance data
Swap upper and
middle lines
Stop or reset the
chronograph
INDIGLO®
night-light
Start lap or
take a split
To Finish Mode
or hold for time
If you do not use the GPS-3D Sensor, you cannot use Finish Modeand will see the message NO GPS DATA on the Watch displaywhen you enter this mode. Additionally, you must reset thechronograph to zero prior to operating Finish Mode or it will notoperate properly.
Finish Mode Terminology
Target time: Your desired time to complete the race or workout.The Watch uses this time to alert you if you are going too slowly tocomplete the event within the selected time.
Setting Finish Mode
You must stop and reset the chronograph to allow theconfiguration of Finish Mode. However, you can still configureFinish Mode even when when you see the message NO GPS DATAdisplayed.
57
Distance: Distance traveled while you run the chronograph
Altitude: Current height above sea level
Elevation: Difference between your current altitude and thealtitude when you started the chronograph
Vertical Mode example
Finish Mode
Finish Mode allows you to predict how much time it will take youto finish a specified event distance (a marathon or 5K race, forexample) based on current GPS-3D Sensor data. To help you stayon pace for your predicted finish, you can also set the Watch toalert you if you are moving either too quickly or too slowly for yourdesired pace.
56
View
performance
data
Stop timing
INDIGLO®
night-light
Start timing or
take a split.
To Interval
Timer Mode or
hold for time Hold to set
You are heli-skiing in Banff on a run estimated at 2,700 verticalfeet 214 vertical meters). Curious about the accuracy of theestimate as well as how long it will take you to make your run,you start your GPS-3D Sensor, navigate to Vertical Mode andpress START as you take off down the mountain. At the end ofyour run, you press STOP and then DISPLAY until you seeAscent Rate and Elevation (expressed in a negative number sinceyou traveled downhill). Use this information to see how fast youskied and compare the Watch expression of elevation to theestimate given to you by your guide.
5. Press START/SPLIT to continue timing.
OR
7. Press and hold STOP/RESET again to reset the display to zero.
Viewing performance data in Finish Mode
When using either the HR Sensor and/or the GPS-3D Sensor withyour Watch, scroll through performance data by pressing andreleasing DISPLAY. Performance data viewing options for FinishMode include:
ä Finish Time: The predicted finish time based on your current
speed and distance. The finish time will flash if your currentpace will not allow you to finish within your selected target time.If you stop moving, the Watch display replaces the finish timewith the word STOPPED.
ä Heart Rate: Current heart rate
ä Pace: Current velocity, expressed in minutes per selected
distance unit, such as miles or kilometers
ä Average Pace: Average per-minute speed for the period that
chronograph has been running
ä Speed: Current velocity
ä Average Speed: Average velocity for the period that you run the
chronograph
ä Distance: Distance traveled while you run the chronograph
59
1. While in Finish Mode, press and hold the SET button until the wordSET briefly appears on the display, followed by a flashing value.
2. Set the first value by pressing + (DISPLAY) or – (STOP/RESET).
3. Press SELECT (SET/FORMAT) to move to the next value to set.
4. Repeat steps 2 and 3 for all the values that need adjustment.
5. Press DONE (MODE) to save your changes and complete the settingprocess.
For Finish Mode, you can set the following values:
ä Pre-set or custom event distance (for custom set the distance
(up to 999.99)
ä Unit (NM, KM, or MI)
ä Target time
ä Alert option (an audible alert will cause the Watch to both beep
and flash the predicted finish time and a silent alert will onlyflash the predicted finish time)
Operating Finish Mode
1. Press MODE until Finish Mode appears.
2. Press START/SPLIT to begin timing.
3. Press START/SPLIT again to take a split and automatically begintiming a new lap.
4. Press STOP/RESET to stop timing when you reach the end of youractivity.
58

You must install the caseback in the same direction you removed it orthe buzzer element will not function after reassembly.
3. Using a 00 Phillips-head screwdriver, remove the four screws thatsecure the caseback and set them aside. Carefully remove thecaseback and set it aside.
WARNING: ALWAYS KEEP THE WATCH FACE DOWN ONYOUR WORK SURFACE. IF YOU TURN THE WATCH OVER TOREMOVE THE SCREWS OR CASEBACK YOU MAY LOSE THESMALL ELECTRICAL CONNECTORS INSIDE THE WATCH.
4. Carefully open the battery clamp and remove the battery.
5. Place a new battery in the battery compartment, making sure theside with the + marking faces you.
6. Reattach the battery clamp.
7. Replace the caseback, making sure the black gasket sits firmly in thecase groove and the caseback properly aligns with the Watch toensure the buzzer will line up with the internal connections (see noteafter Step 2).
8. Carefully reattach the bands or straps so that the shorter piece withthe buckle attaches to the upper set of lugs.
INDIGLO® night-light
Patented (U.S. Patent Numbers 4,527,096 and 4,775,964)electroluminescent technology illuminates the entire Watch face atnight and in low light conditions.
61
Finish Mode example
C A R E & M A I N T E N A N C E
Changing the battery
WARNING: CHANGING THE BATTERY YOURSELF MAYRESULT IN DAMAGE TO THE WATCH. TIMEXRECOMMENDS YOU HAVE A WATCH RETAILER ORJEWELER REPLACE THE BATTERY.
If you choose to replace the battery yourself, check the back of theWatch (caseback) for the specific battery type and size required foryour Watch. Carefully follow the steps below:
1. Place the Watch face-down on a flat work surface.
2. Separate both halves of the Watch band or strap using a small flatscrewdriver.
60
You are training for a 100 KM bicycle race. Last year you rode inthe same race and finished in 4 hours, 15 minutes. This year yourgoal is to finish in less than 4 hours. You read in a trainingmagazine that, when training for a race, you should devote oneday a week to riding at a distance equal to your event workingtoward your goal time. To help keep you on pace, you set FinishMode to 100 KM for a distance and 4 hours for a time. You set theWatch to alert you audibly when you go slower than your requiredpace to help keep you on track as you ride.

Please note that Timex may, at its option, repair your Watch byinstalling new or thoroughly reconditioned and inspectedcomponents or replace it with an identical or similar model.
WARNING: THIS WARRANTY DOES NOT COVER DEFECTSOR DAMAGES TO YOUR PRODUCT BASED ON THESECONDITIONS:
1. after the warranty period expires;
2. if the product was not originally purchased from an authorizedretailer;
3. from repair services not performed by the manufacturer;
4. from accidents, tampering or abuse; and
5. case, attachments or battery. You may be charged for replacing any ofthese parts.
THIS WARRANTY AND THE REMEDIES CONTAINED HEREINARE EXCLUSIVE AND IN LIEU OF ALL OTHERWARRANTIES, EXPRESS OR IMPLIED, INCLUDING ANYIMPLIED WARRANTY OF MERCHANTABILITY OR FITNESSFOR PARTICULAR PURPOSE. TIMEX IS NOT LIABLE FORANY SPECIAL, INCIDENTAL OR CONSEQUENTIALDAMAGES.
Some countries and states do not allow limitations on impliedwarranties and do not allow exclusions or limitations on damages,so these limitations may not apply to you. This warranty gives youspecific legal rights and you may also have other rights which varyfrom country to country and state to state.
63
Water resistance
Your Watch withstands water pressure up to 86 psi (equalsimmersion to 164 feet or 50 meters below sea level). This 50-meterresistance remains intact so long as you keep the lens, pushbuttons, and case intact.
WARNING: TO MAINTAIN WATER RESISTANCE, DO NOTPRESS ANY BUTTONS WHILE UNDER WATER.
While your Watch will resist water, you should not use this Watchfor diving, as it is not a diver’s Watch and you should rinse yourWatch with fresh water after exposure to salt water. The Watchwill not display Sensor data when operated under water.
L E G A L I N F O R M AT I O N
TIMEX and NIGHT-MODE are registered trademarks of TimexCorporation. BODYLINK is a registered trademark of TimexGroup, B.V. INDIGLO is a registered trademark of IndigloCorporation in the U.S. and other countries. HEART ZONES is atrademark of Sally Edwards.
International warranty (U.S. limited warranty)
Your Watch is warranted against manufacturing defects by TimexCorporation for a period of ONE YEAR from the original purchasedate. Timex and its worldwide affiliates will honor thisInternational Warranty.
62

THIS IF YOUR WATCH REPAIR COUPON; PLEASE KEEP IT IN A SAFE PLACE.
TIMEX INTERNATIONAL WARRANTY — WATCH REPAIR COUPON
Original Purchase Date:(Attach copy of sales receipt, if available)
Purchased by:(Name, address and telephone number)
Place of Purchase:(Name and address)
Reason for Return:
65
To obtain warranty service, please return your Watch to themanufacturer, one of its affiliates or the retailer where the productwas purchased, together with a completed original Product RepairCoupon or, in the U.S. and Canada only, the completed originalProduct Repair Coupon or a written statement identifying yourname, address, telephone number and date and place of purchase.Please include the following with your Watch to cover postage andhandling (this is not a repair charge): a US$ 7.00 check or moneyorder in the U.S.; a CAN$6.00 cheque or money order in Canada;and a UK£ 2.50 cheque or money order in the U.K. In othercountries, you will be charged for postage and handling.
WARNING: NEVER INCLUDE ANY ARTICLE OF PERSONALVALUE IN YOUR SHIPMENT.
U.S.: call 1-800-328-2677 for additional warranty information.Canada: call 1-800-263-0981. Brazil: call 0800-168787. Mexico:
call 01-800-01-060-00. Central America, the Caribbean,
Bermuda and the Bahamas: call (501) 370-5775 (U.S.). Asia:
call 852-2815-0091. The U.K.: call 44 020 8687 9620. Portugal:
call 351 212 946 017. France: call 33 3 81 63 42 00. Germany:
call +43 662 88 92130. The Middle East and Africa: call 971-4-310850. Other Areas: contact your local Timex retailer ordistributor for warranty information.
64

Product Name: Watch Receivers: HRM/Speed+Distance Series
M6xx/M5xx/M1xx
Data Recorders – HRM/Speed+Distance Series
M5xx/M1xx
Product Type: Unintentional Radiator
This equipment has been tested and found to comply with thelimits for a Class B digital device, pursuant to Part 15 of the FCCrules. These limits are designed to provide reasonable protectionagainst harmful interference in a residential environment. Thisequipment generates, uses, and can radiate radio frequency energyand, if not used in accordance with the instruction manual, maycause harmful interference to radio communications. If thisequipment does cause harmful interference to radio or televisionreception, which can be determined by turning the equipment offand on, the user is encouraged to try to correct the interference byreorienting or relocating the receiving antenna; or by increasingthe separation between the equipment and receiver.
Caution: Any changes or modifications to the equipment listedabove, not expressly approved by Timex Corporation, could voidthe user’s authority to operate this equipment.
Industry Canada Notice: This Class B digital apparatuscomplies with Canadian ICES-003. Cet appariel numérique de laclasse B est conforme à la norme NMB-003 du Canada.
67
FCC Notice (U.S.) / IC Notice (Canada)
Timex Corporation declares that the following products, whichinclude all components of the Timex Bodylink System, arecompliant to the relevant FCC Part 15 and Industry Canada rulesfor Class B devices as follows:
Product Name: Speed + Distance System: GPS Transceiver Series M5xx/M1xx
Heart Rate Monitor System: HRM Transmitter Series M6xx/M5xx
Product Type: Intentional Radiator
These devices comply with Part 15 of the FCC rules. Operation issubject to the following two conditions: (1) The device may notcause harmful interference, and (2) the device must accept anyinterference received, including interference that may causeundesired operation.
66
Model FCC ID No. IC Cert. No.
M850/M576 Speed+Distance Monitor EP9TMXM850 3348A-12181
M185/M187 Speed+Distance Monitor EP9TMXM185 3348A-TMXM185
M515/M579 Heart Rate Monitor EP9TMXM515 3348A-M515
M640 Heart Rate Monitor EP9TMXM640 3348A-TMXM640
Immunity: EN300-683Radiated Immunity 80MHz to 1000MHz, Ref. EN61000-4-3ESD Electrostatic discharge, Ref. EN61000-4-2
Supplemental Information: The above products comply withthe requirements of the Low-Voltage Directive 72/23/EEC and theEMC Directive 89/336/EEC (including amendments 92/31/EEC,93/68/EEC, and 98/13/EEC) and carry the 0983(!) markingaccordingly. Notifying Body – Underwriters Laboratories Inc.,CAB# - 0983; 1285 Walt Whitman Road, Melville, NY 11747.
Timex Corporation declares that these low power radio equipmentdevices are in compliance with the essential requirements andother relevant provisions of R&TTE Directive 1999/5/EC.
Product Name:
Watch Receivers: HRM/Speed+Distance Series M6xx/M5xx/M1xx
Data Recorders: HRM/Speed+Distance Series M5xx/M1xx
conforms to the following product specifications:
Generic Emissions Standard EN 55022: 1998
Generic Immunity Standard EN 55024: 1998
69
Declaration of Conformity
Manufacturers Name: Timex Corporation
Manufacturers Address: 555 Christian RoadMiddlebury, CT 06762United States of America
declares that the following products, which include all componentsof the Timex Bodylink System, are compliant to the relevant EUDirectives as follows:
Product Name:
Speed + Distance System: GPS Transceiver Series M5xx/M1xx
Heart Rate Monitor System: HRM Transmitter Series M6xx/M5xx
conforms to the following product specifications:
LVD: 72/23/EEC
Safety: IEC 60950
EMC: 89/336/EEC and amendments 92/31/EEC, 93/68/EEC,
and 98/13/EEC
Emissions: EN300-330-1, -2Radiated Emission 9kHz to 30MHz H-Field(magnetic)Radiated Emission 30MHz to 1000MHz E-Field(electric), Ref. EN55022
68

Supplemental Information: The above products comply withthe requirements of Electromagnetic Compatibility (EMC)Directive 89/336/EEC (including amendments 92/31/EEC,93/68/EEC, and 98/13/EEC) and carry the markingaccordingly. Conformity Assessment Body (CAB) – UnderwritersLaboratories Inc., CAB# 0983; 1285 Walt Whitman Road, Melville,NY 11747.
Timex Corporation declares that these low power electronic devicesare in compliance with the essential requirements and otherrelevant provisions of the EMC Directive.
Agent:
Brian J. Hudson
Director, Test Engineering and Module Development
Date: 22 June 2005, Middlebury, Connecticut, U.S.A.
70
144
Í N D I C E D E C O N T E N I D O S
Introducción ........................................................................147
¡Bienvenido! ............................................................................147
Antes de que empiece ............................................................148
Terminología del reloj ............................................................148
Descripción del reloj Performance ..................................149
El cronógrafo ..........................................................................149
Recursos ..................................................................................150
Botones del reloj ....................................................................151
Símbolos en la pantalla ..........................................................154
Mensajes ..................................................................................155
Formato de la pantalla ..........................................................155
Disponiéndose a usar su reloj ................................................156
Modos del reloj ....................................................................158
Modo Hora del Día..................................................................159
Modo Cronógrafo ....................................................................162
Modo Temporizador Interválico ............................................165
Modo Datos de Vuelta ............................................................170
Modo Resumen ......................................................................173
Modo Temporizador Básico....................................................176
145
147146
Modo Alarma ..........................................................................180
Modo Configurar ....................................................................182
Función GPS opcional ......................................................188
Habilitando las funciones GPS..............................................189
Configurando las funciones GPS por primera vez ..............190
Funciones adicionales GPS en los modos existentes............191
Nuevos modos ......................................................................202
Modo Vertical ..........................................................................202
Modo Finalizar........................................................................205
Cuidado & mantenimiento ................................................210
Cambiando la pila ..................................................................210
Luz nocturna INDIGLO®......................................................211
Resistencia al agua ................................................................212
Información legal ................................................................212
Garantía internacional (garantía limitada para EUA) ........213
Aviso de FCC (EUA) / Aviso de IC (Canadá) ........................216
I N T R O D U C C I Ó N
¡Bienvenido!
¡Felicitaciones! Con la compra de su sistema Bodylink® de Timex®usted ha contratado a su nuevo entrenador personal. Usando sureloj Performance acompañado con su medidor digital defrecuencia cardiaca, usted está en condición excepcional deregistrar, guardar y analizar indicadores claves de su nivel personalde estado físico.
Dedicamos este manual a la información relativa a su relojPerformance. Este reloj deportivo funciona como el cerebro de susistema Bodylink, suministrándole información integral en tiemporeal de su ejercicio recopilada desde el medidor de frecuenciacardiaca.
Usted notará que su reloj Performance le suministra tecnología defácil manejo sobre estado físico. Pero, como con cualquier nuevatecnología, usted debe tomar el tiempo para familiarizarse con suscaracterísticas y funciones para optimizar la utilidad de su compra.
Por lo tanto, ¡diviértase explorando! Revise los modos del relojPerformance. Revise la Guía Rápida para obtener una comprensiónbásica de su sistema de medidor de frecuencia cardiaca.Principalmente, ¡disfrute de su nuevo compañero de estado físicoen su ruta hacia un mejor desempeño!

149148148
Antes de que empiece
Este manual contiene información acerca de su nuevo relojPerformance, e instrucciones para programarlo y usarlo con elmedidor de frecuencia cardiaca. Para asesorarle en el conocimientode su reloj Performance, este manual contiene varios elementospara mejorar su comprensión.
ä Una descripción de los botones del reloj Performance, símbolos
en la pantalla y modos.
ä Un glosario para cada sección que explica muchas de las
referencias usadas para el reloj Performance y los modos delmismo.
ä Instrucciones amplias y completas para programar y usar su reloj
Performance en cada modo.
ä Ejemplos de la vida real para explicarle cómo puede usar su reloj
Performance en cuanto parte de su actividad usual. Usted veráesos ejemplos a lo largo del manual, en los cuadros de textogrises.
Terminología del reloj
Su sistema Bodylink tiene su propio idioma que usted aprenderá amedida que se haga un experto en manejarlo. A medida que loaprende, usted encontrará algunas palabras y frases importantes.¡Le prometemos que nadie le va a tomar un examen sobre elvocabulario!
Pero, repasar la terminología clave le ayudará a entender con másrapidez cómo funciona su sistema Bodylink. Por consiguiente,tómese unos minutos para repasar algunas de las palabras queaparecen a lo largo de este manual.
Sistema Bodylink®: El sistema Bodykink le permite registrar yguardar información en tiempo real utilizando un grupo dedispositivos inalámbricos en forma conjunta con su relojPerformance.
Reloj Performance: El reloj Performance, (reloj) contiene lacentral de datos para el sistema Bodylink.
Medidor de Ritmo Cardiaco: El medidor de ritmo cardiaco(medidor HR) mide su pulso. La Guía del Usuario del Medidor deEstado Físico suministra instrucciones detalladas para programary usar su medidor HR.
D E S C R I P C I Ó N D E L R E L O J P E R F O R M A N C E
El cronógrafo
A medida que use este manual para informarse acerca de su reloj,la palabra cronógrafo podría causar alguna confusión. Trate derecordar esto: un cronógrafo es un instrumento para medir eltiempo. Por lo tanto usted observará un modo Cronógrafo, pero acualquier momento su reloj es un instrumento de medición detiempo que opera utilizando la funcionalidad de cronógrafo (ocronometraje).
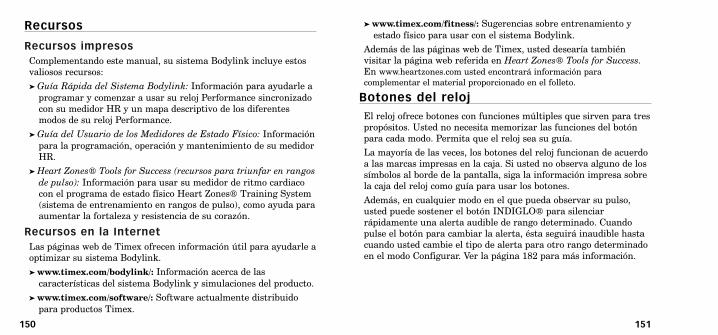
150 151
Recursos
Recursos impresos
Complementando este manual, su sistema Bodylink incluye estosvaliosos recursos:
ä Guía Rápida del Sistema Bodylink: Información para ayudarle a
programar y comenzar a usar su reloj Performance sincronizadocon su medidor HR y un mapa descriptivo de los diferentesmodos de su reloj Performance.
ä Guía del Usuario de los Medidores de Estado Físico: Información
para la programación, operación y mantenimiento de su medidorHR.
ä Heart Zones® Tools for Success (recursos para triunfar en rangos
de pulso): Información para usar su medidor de ritmo cardiacocon el programa de estado físico Heart Zones® Training System(sistema de entrenamiento en rangos de pulso), como ayuda paraaumentar la fortaleza y resistencia de su corazón.
Recursos en la Internet
Las páginas web de Timex ofrecen información útil para ayudarle aoptimizar su sistema Bodylink.
ä www.timex.com/bodylink/: Información acerca de las
características del sistema Bodylink y simulaciones del producto.
ä www.timex.com/software/: Software actualmente distribuido
para productos Timex.
ä www.timex.com/fitness/: Sugerencias sobre entrenamiento y
estado físico para usar con el sistema Bodylink.
Además de las páginas web de Timex, usted desearía tambiénvisitar la página web referida en Heart Zones® Tools for Success.
En www.heartzones.com usted encontrará información para
complementar el material proporcionado en el folleto.
Botones del reloj
El reloj ofrece botones con funciones múltiples que sirven para trespropósitos. Usted no necesita memorizar las funciones del botónpara cada modo. Permita que el reloj sea su guía.
La mayoría de las veces, los botones del reloj funcionan de acuerdoa las marcas impresas en la caja. Si usted no observa alguno de lossímbolos al borde de la pantalla, siga la información impresa sobrela caja del reloj como guía para usar los botones.
Además, en cualquier modo en el que pueda observar su pulso,usted puede sostener el botón INDIGLO® para silenciarrápidamente una alerta audible de rango determinado. Cuandopulse el botón para cambiar la alerta, ésta seguirá inaudible hastacuando usted cambie el tipo de alerta para otro rango determinadoen el modo Configurar. Ver la página 182 para más información.

153
Los pasos indicados aquí le permiten programar las funciones delreloj.
1. Pulse y sostenga el botón SET hasta que la palabra SET aparezcabrevemente en la pantalla, seguida por un valor que destella.
3. Ajuste el primer valor pulsando + (DISPLAY) o – (STOP/RESET).
4. Pulse SELECT (SET/FORMAT) para ir al siguiente valor a serajustado.
5. Repita los pasos 3 y 4 para todos los valores que necesite ajustar.
6. Pulse DONE (MODE) para guardar sus cambios y completar elproceso de programación.
Visualización de los botones
Los botones del reloj le ayudan a navegar a través de las distintasopciones de visualización. Cuando observe los triángulos s y t
al borde de la pantalla, usted sabe que hay información para ver.
152
Programación de los botones
Use los botones del reloj también para programar funciones delreloj (por ejemplo, ajustar la hora o un rango de pulsodeterminado). Cuando los símbolos + y – aparecen al borde de lapantalla del reloj, usted ha iniciado el proceso de programación.
DONE
Pulsar al acabar
la programación
INDIGLO®
night-light
Pulsar para
iluminar
el reloj
+
Pulsar para
incrementar el valor
expuesto
SELECT
Pulsar para ir al
siguiente valor
– Pulsar para
disminuir el valor
expuesto
MODEPulsar para ir almodo siguiente
START/SPLITPulsar para empezar cronometraje o tomar tiempo parcial
INDIGLO® night-
light Pulsar para
iluminar el reloj;
sostener para
silenciar la alerta de
rango determinado
DISPLAYPulsar para verdatos de desempeño
SET/FORMATPulsar paraprogramar ocambiar el formatode la pantalla
STOP/RESETPulsar paradetener o pulsar ysostener parareiniciar
MODE
Pulsar para ir
al siguiente
modo
INDIGLO®
night-light
Pulsar para
iluminar
el reloj
ss
Pulsar para ver
los siguientes
datos
tt
Pulsar para ver los
datos anteriores

154 155
Mensajes
Cuando use el reloj con el medidor HR, el reloj puede mostrarmensajes para comunicar el status del medidor sincronizado con elreloj. Los mensajes incluyen:
NO DATA FROM HRM El reloj no recibe información del medidorHR. Asegúrese que el medidor se encuentre a un máximo de 3 pies(1 metro) de distancia del reloj, que esté funcionando o que no sehaya bloqueado inadvertidamente con el medidor de alguien más.El reloj intentará establecer una conexión por un minuto despuésde mostrar este mensaje.
NOISY DATA FROM HRM El reloj tiene interferencias de radio.Trate de alejarse de posibles fuentes de interferencia (por ejemplotelevisores, monitores o aparatos con motor). El reloj intentaráestablecer una conexión por 30 segundos después de mostrar estemensaje.
Formato de la pantalla
En el modo Cronógrafo, usted puede pulsar y soltar SET/FORMAT
para pasar a los datos expuestos en la línea superior y en la delmedio de la pantalla. Esto permite mostrar el valor másimportante para usted en el medio de la pantalla, en mayortamaño.
Símbolos en la pantalla
Símbolos en la
pantalla del reloj
Temporizador
interválico o básico
funcionando
Cronógrafo en
marcha
Modo nocturno
activado
Carga baja en la pila
del medidor GPS-3D
Medidor(es)
activado(s) (destella si
hay problema)
Alarma activada
Timbre a cada hora
activado

Programando su reloj por primera vez
Una vez usted determine su pulso, ajuste los siguientes parámetrosantes de usar su reloj:
1. Ajustar la hora del día. Para información detallada sobre el modoHora del Día, incluyendo instrucciones para fijar la hora del día, ir ala página 159 de este manual.
2. Ingrese su pulso máximo. En el modo Configurar, seleccione HRMSETTINGS (programación del HRM) y luego MAX HR (pulsomáximo). Su ajuste de pulso máximo determina sus cinco rangos depulso preestablecidos. Para más información sobre el modoConfigurar, ir a la página 182.
3. Escoja las unidades para mostrar su rango de pulso deseado.
En el modo Configurar, seleccione HRM SETTINGS y luego HRMDISPLAY. Su reloj le da la opción de presentar su pulso enpulsaciones por minuto (BPM) o como un porcentaje de su máximapulsación (POR CIENTO). Para más información sobre el modoConfigurar, ir a la página 182.
4. Determine su rango de pulso deseado y la alerta. En el modoConfigurar, seleccione HRM SETTINGS y luego TZ ALERT. Use laalerta para mantener su pulso dentro de un rango para optimizar sudesempeño y prevenir tanto el sobreejercicio como la poca exigenciapara su corazón durante un ejercicio. Para más información sobre elmodo configurar, ir a la página 182.
157
Disponiéndose a usar su reloj
Determinando su pulso
Además de muchas otras funciones útiles, su reloj usa tecnologíaque le ayuda a registrar información detallada sobre su pulso.Pero, antes que pueda registrar esta información, usted necesitadeterminar primero su pulso máximo. Puede usar muchos métodospara calcular su pulso máximo.
El folleto Heart Zones® Tools For Success incluido en el empaquede su reloj proporciona procedimientos excelentes y Timex lerecomienda que use una de esas metodologías. Sin embargo, si nopuede usar ninguno de los procedimientos descritos en Heart
Zones® Tools for Success, usted puede considerar el uso delmétodo con base en la edad, de uso popular aunque bastantediscutido. Comience con el número 220 y luego reste su edad. Porejemplo, alguien de 35 años comenzaría con 220 y restaría 35 (laedad de la persona) lo que da un pulso máximo estimado de 185.
156
Hora
Pulso Hora
Pulso

Modo Hora del Día
Su reloj puede funcionar como un reloj convencional para mostrarla hora, fecha y día para dos diferentes zonas horarias, usando unformato de 12 o 24 horas.
Ajustando la hora
1. Pulse MODE hasta que el modo Hora del día aparezca.
2. Pulse y sostenga el botón SET hasta que la palabra SET aparezcabrevemente en la pantalla, seguida por un valor que destella.
3. Ajuste el primer valor pulsando + (DISPLAY) o – (STOP/RESET).
4. Pulse SELECT (SET/FORMAT) para ir al siguiente valor a serajustado.
5. Repita los pasos 3 y 4 para todos los valores que necesite ajustar.
6. Pulse DONE (MODE) para guardar sus cambios y completar elproceso de programación.
159
M O D O S D E L R E L O J
Uste puede pasar por cada uno de los ocho modos pulsando MODE.
ä Time of Day (hora del día) le permite ver la hora, fecha y día de
la semana para dos diferentes zonas horarias.
ä Chronograph (cronógrafo) registra y presenta los datos de
desempeño.
ä Interval Timer (temporizador interválico) le permite programar
su reloj para ejercicios interválicos.
ä Lap Data (datos de vuelta) presenta la información de vuelta
registrada.
ä Summary (resumen) presenta la información grabada mientras
el cronógrafo está en marcha.
ä Basic Timer (temporizador básico) le permite cronometrar un
evento con cuenta regresiva desde un tiempo específico hastacero.
ä Alarm (alarma) controla hasta cinco alarmas.
ä Configure (configurar) le permite programar su reloj de acuerdo
a sus necesidades.
158
Ver los datos de
desempeño junto
con el medidor HR
Ver o cambiar a la
hora secundaria
Sostener para
programar
INDIGLO®
night-light
Para modo
Cronógrafo

ä El reloj no ajusta automáticament la hora de verano. Cuando se
cambia entre la hora estándar y la hora de verano, ajuste la horamanualmente.
ä Cuando utilice el medidor HR con el reloj, usted puede ver su
pulso actual en la línea inferior de la pantalla del reloj. Puedeelegir seguir viendo el día de la semana pulsando a cambioDISPLAY hasta que el día de la semana se haga visible.
ä Si el reloj no detecta el medidor HR, el día de la semana
aparecerá en la línea inferior de la pantalla.
ä Usted sólo puede reajustar el valor de segundos a cero.
Ejemplo del modo Hora del Día
161
Para Hora del Día, usted puede ajustar los siguientes valores:
Cambiar las zonas horarias
El reloj puede seguir dos zonas horarias (T1 y T2). Observe la otrazona pulsando START/SPLIT. O, cambie de T1 a T2 siguiendoestos pasos:
1. Pulse y sostenga START/SPLIT hasta que aparezca HOLD FORTIME 2.
2. Continúe sosteniendo hasta que la hora cambie y el reloj emita unsonido.
3. Repita los pasos 1 y 2 para regresar a T1. El mensaje será HOLD
FOR TIME 1.
Usted debe fijar por separado la hora del día para cada zonahoraria.
Sugerencias & trucos para el modo Hora del Día
ä Usted puede regresar al modo Hora del Día desde cualquier otro
modo en el reloj pulsando y sosteniendo MODE hasta queaparezca la hora en pantalla.
160
Suponga que usted vive en San Francisco y trabaja con un clienteen Singapur. Como toda persona ocupada, es imperativo que llevecuenta de la hora, de modo que ajusta T1 a su hora local. Perotambién es importante tener un rápido recordatorio de la hora desu cliente, por lo tanto usted ajusta T2 a la hora de Singapur. Conambas zonas horarias disponibles, puede revisar rápidamente lahora de su cliente o incluso cambiar su monitor para mostrar T2cuando usted viaje a Singapur.
• Hora
• Minuto
• Segundos
• Año
• Mes
• Fecha (ajusta
automáticamente el día
de la semana cuando
usted ajusta la fecha)
• Formato de hora (p.e.,
AM/PM versus 24 horas)
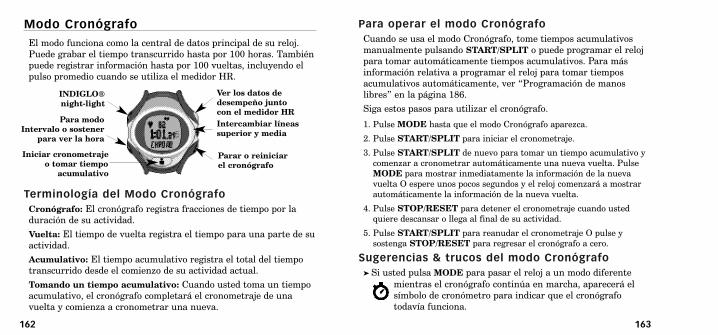
Para operar el modo Cronógrafo
Cuando se usa el modo Cronógrafo, tome tiempos acumulativosmanualmente pulsando START/SPLIT o puede programar el relojpara tomar automáticamente tiempos acumulativos. Para másinformación relativa a programar el reloj para tomar tiemposacumulativos automáticamente, ver “Programación de manoslibres” en la página 186.
Siga estos pasos para utilizar el cronógrafo.
1. Pulse MODE hasta que el modo Cronógrafo aparezca.
2. Pulse START/SPLIT para iniciar el cronometraje.
3. Pulse START/SPLIT de nuevo para tomar un tiempo acumulativo ycomenzar a cronometrar automáticamente una nueva vuelta. PulseMODE para mostrar inmediatamente la información de la nuevavuelta O espere unos pocos segundos y el reloj comenzará a mostrarautomáticamente la información de la nueva vuelta.
4. Pulse STOP/RESET para detener el cronometraje cuando ustedquiere descansar o llega al final de su actividad.
5. Pulse START/SPLIT para reanudar el cronometraje O pulse ysostenga STOP/RESET para regresar el cronógrafo a cero.
Sugerencias & trucos del modo Cronógrafo
ä Si usted pulsa MODE para pasar el reloj a un modo diferente
mientras el cronógrafo continúa en marcha, aparecerá elsímbolo de cronómetro para indicar que el cronógrafotodavía funciona.
163
Modo Cronógrafo
El modo funciona como la central de datos principal de su reloj.Puede grabar el tiempo transcurrido hasta por 100 horas. Tambiénpuede registrar información hasta por 100 vueltas, incluyendo elpulso promedio cuando se utiliza el medidor HR.
Terminología del Modo Cronógrafo
Cronógrafo: El cronógrafo registra fracciones de tiempo por laduración de su actividad.
Vuelta: El tiempo de vuelta registra el tiempo para una parte de suactividad.
Acumulativo: El tiempo acumulativo registra el total del tiempotranscurrido desde el comienzo de su actividad actual.
Tomando un tiempo acumulativo: Cuando usted toma un tiempoacumulativo, el cronógrafo completará el cronometraje de unavuelta y comienza a cronometrar una nueva.
162
Ver los datos de
desempeño junto
con el medidor HR
Intercambiar líneas
superior y media
Parar o reiniciar
el cronógrafo
INDIGLO®
night-light
Iniciar cronometraje
o tomar tiempo
acumulativo
Para modo
Intervalo o sostener
para ver la hora

Modo Temporizador Interválico
El modo Temporizador Interválico ofrece un contador regresivoflexible de seis intervalos, y puede conservar los ajustes hasta paracinco sesiones diferentes de entrenamiento. Este incluye intervalosde calentamiento y de relajación y cuatro intervalos deentrenamiento para cada sesión. Usted puede programar el grupode cuatro intervalos de entrenamiento para que se repitan hastapor 99 veces. Puede programar el intervalo de calentamiento parainiciarse una vez al comienzo de su sesión de entrenamiento y elintervalo de relajación para iniciarse una vez al final de su sesión.
Terminología del modo Intervalo
Entrenamiento interválico: Usted puede usar el entrenamientointerválico para ayudarle a variar el nivel de intensidad dentro deun ejercicio, lo que le facilita finalmente ejercitarse por más tiempoy con más exigencia.
165164
ä Si utiliza el medidor HR con el reloj, usted puede ver el pulso
como porcentage de su pulso máximo (POR CIENTO) y comolatidos por minuto (BPM).
ä El reloj conserva las estadísticas del pulso promedio para cada
vuelta si usted utiliza el medidor HR con el reloj.
ä Si usa el reloj con el medidor HR usted puede programarlo para
que empiece automáticamente a tomar un cálculo del pulso derecuperación cada que vez que usted pulsa STOP/RESET paradetener el cronógrafo. Sin embargo, si usted pulsaSTART/SPLIT de nuevo antes de haberse completado el ciclo derecuperación, cancelará la recuperación. Para más información,ver el modo Configurar en la página 182.
Ejemplo del modo Cronógrafo
Escuchó recientemente que un método de entrenamiento paracorredores de larga distancia llamado el método de correr/caminarpuede ayudarle a incrementar su resistencia general y quemarmás calorías. Este método propone correr por un rato seguido poruna corta caminata. Usted decide utilizar el modo Cronógrafocomo ayuda para ensayar este método. Pulse START/SPLIT paracomenzar a correr y luego de 10 minutos de carrera pulseSTART/SPLIT de nuevo y camine por 2 minutos. Continúeusando estas dos secuencias de cronometraje hasta que hayacompletado 60 minutos de correr/caminar.
Empieza el
cronometraje del
ejercicio interválico
s
Ver datos de
desempeño
t
Escoger, parar, o
reiniciar un
ejercicio
INDIGLO®
night-light
Para modo Datos de
Vuelta o sostener
para ver la hora
Sostener para
programar

Programando un ejercicio interválico
1. Pulse y sostenga el botón SET hasta que la palabra SET aparezcabrevemente en la pantalla. La pantalla de ajuste aparecerá con lapalabra WARM-UP destellando.
2. Pulse s (DISPLAY) o t (STOP/RESET) para revisar los ajustes
de cada ejercicio por intervalos. Los ajustes incluyen WARM-UP(calentamiento), INTVL 1 – 4 (intervalos), # OF REPS(repeticiones), y COOL-DOWN (relajación).
3. Escoja un intervalo para ajustar y pulse SELECT (SET/FORMAT).Pulse + (DISPLAY) o - (STOP/RESET) para escoger uno de loscinco rangos de pulso preestablecidos o tres personalizados. Tambiénpuede no escoger un rango determinado o escoger una alerta manualde rango determinado para este intervalo únicamente. Una vez escojasu rango, pulse SELECT (SET/FORMAT).
Si usted no escogió MANUAL en el paso 4, vaya al paso 6.
4. Establezca los valores del rango de pulso superior y luego del inferiorpara el rango MANUAL. Pulse + (DISPLAY) o - (STOP/RESET)
para cambiar los valores y SELECT (SET/FORMAT) para mover losdígitos. Cuando termine de establecer los límites, pulse SELECT
(SET/FORMAT).
5. Pulse + (DISPLAY) o - (STOP/RESET) para cambiar los valores detiempo y SELECT (SET/FORMAT) para recorrer las horas, minutosy segundos. Si usted establece un intervalo a cero (00:00:00), el relojomitirá este intervalo en forma automática durante su ejercicio.
167
Intervalo: Los intervalos relacionan su ejercicio con períodosespecíficos de tiempo. Por ejemplo, usted puede correr por diezminutos, caminar por dos, correr por veinte minutos, y luegocaminar por cinco – lo cual representaría cuatro intervalos deentrenamiento.
Repeticiones: El número de veces que usted elije para realizar ungrupo de intervalos. En el ejemplo anterior, si usted elije recorrerel grupo de intervalos tres veces, usted pasará por su series decronometrajes de diez, dos, veinte y cinco minutos tres veces ensecuencia. Esto representaría 3 repeticiones.
Calentamiento: El periodo al comienzo de su ejercicio que permitea su cuerpo prepararse para una sesión de entrenamiento másintensa.
Relajación: El periodo al final de su ejercicio que le permite a sucuerpo recuperar su estado de funcionamiento normal.
Escogiendo un ejercicio por intervalos
Usted puede usar el reloj para programar y conservar hasta cincoejercicios marcados del WKOUT 1 hasta WKOUT 5.
1. Pulse MODE hasta que el modo Intervalo aparezca.
2. Pulse t (STOP/RESET) para escoger el ejercicio que desea
programar (WKOUT 1 hasta WKOUT 5).
Al tener que reiniciar el temporizador interválico para escoger unnuevo ejercicio, usted necesitaría pulsar el botón STOP/RESET
más de una vez antes de poder observar un nuevo ejercicio.
166

Alertas y rangos de pulso determinados
Durante el proceso de programación, usted tiene la opción de usaruno de los cinco rangos de pulso estandarizados, trespersonalizados o una sola alerta de rango de pulso para cadaintervalo. Puede también no escoger alerta de rango determinado.Cuando usted pone en marcha el temporizador interválico, lasconfiguraciones de alerta de rango de pulso seleccionadassustituirán a la alerta de rango de pulso deseado que ustedestableció en el modo Configurar (ver página 182). Sin embargo,los ajustes para el tipo de alerta (AUDIBLE, VISUAL o SINALERTA) en el modo Configurar todavía funcionarán mientrasusted tiene en marcha el temporizador interválico. El reloj sóloignora los ajustes del límite.
Tenga presente que estos ajustes afectan la alerta del rangodeterminado únicamente. Los ajustes de alerta de rangodeterminado usados en el temporizador interválico no afectan losdatos estadísticos del pulso registrados y exhibidos en el modoResumen.
Sugerencias & trucos del modo Intervalo
Usted puede programar el reloj para tomar un tiempo acumulativocuando finaliza un intervalo usando SYNC TIMER & CHRONO
(sincronizar temporizador y cronógrafo) (ver página 187). Lo cualsustituirá a la función de tiempo acumulativo automático y lepermitirá tener un registro de su desempeño para cada intervalo.
169
6. Cuando usted se pasa del valor final del tiempo del intervalo, el relojavanza automáticamente al siguiente intervalo (o # OF REPS si seestán fijando los intervalos de CALENTAMIENTO o RELAJACIÓN).Repita los pasos del 2 al 5 para establecer todos los intervalos yrepeticiones para el ejercicio escogido.
7. Pulse DONE (MODE) para guardar su ejercicio y completar elproceso de programación.
Para el modo Temporizador Interválico, usted puede ajustar lossiguientes valores:
ä Calentamiento (establece el rango de pulso deseado y tiempo)
ä Intervalos del 1 al 4 (establece el rango de pulso deseado y
tiempo)
ä Número de repeticiones (no incluye los intervalos de
calentamiento o de relajación)
ä Relajación (establece el rango de pulso deseado y tiempo)
Utilizando el Modo Temporizador Interválico
Siga estos pasos para utilizar el temporizador interválico para unejercicio.
1. Pulse MODE hasta que el modo Temporizador Interválico aparezca.
2. Pulse START/SPLIT para iniciar el cronometraje.
3. Pulse STOP/RESET para detener el cronometraje cuando ustedquiere tomar un descanso o llega al final de su actividad.
4. Pulse START/SPLIT para reanudar el cronometraje O pulse ysostenga STOP/RESET para regresar el cronógrafo a cero.
168
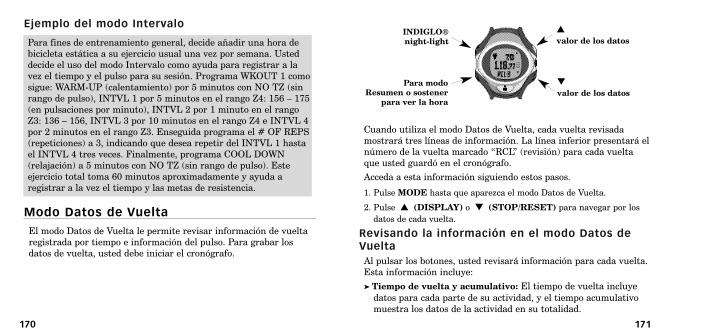
Cuando utiliza el modo Datos de Vuelta, cada vuelta revisadamostrará tres líneas de información. La línea inferior presentará elnúmero de la vuelta marcado “RCL” (revisión) para cada vueltaque usted guardó en el cronógrafo.
Acceda a esta información siguiendo estos pasos.
1. Pulse MODE hasta que aparezca el modo Datos de Vuelta.
2. Pulse s (DISPLAY) o t (STOP/RESET) para navegar por los
datos de cada vuelta.
Revisando la información en el modo Datos deVuelta
Al pulsar los botones, usted revisará información para cada vuelta.Esta información incluye:
ä Tiempo de vuelta y acumulativo: El tiempo de vuelta incluye
datos para cada parte de su actividad, y el tiempo acumulativomuestra los datos de la actividad en su totalidad.
171
Ejemplo del modo Intervalo
Modo Datos de Vuelta
El modo Datos de Vuelta le permite revisar información de vueltaregistrada por tiempo e información del pulso. Para grabar losdatos de vuelta, usted debe iniciar el cronógrafo.
170
s
valor de los datos
t
valor de los datos
INDIGLO®
night-light
Para modo
Resumen o sostener
para ver la hora
Para fines de entrenamiento general, decide añadir una hora debicicleta estática a su ejercicio usual una vez por semana. Usteddecide el uso del modo Intervalo como ayuda para registrar a lavez el tiempo y el pulso para su sesión. Programa WKOUT 1 comosigue: WARM-UP (calentamiento) por 5 minutos con NO TZ (sinrango de pulso), INTVL 1 por 5 minutos en el rango Z4: 156 – 175(en pulsaciones por minuto), INTVL 2 por 1 minuto en el rangoZ3: 136 – 156, INTVL 3 por 10 minutos en el rango Z4 e INTVL 4por 2 minutos en el rango Z3. Enseguida programa el # OF REPS(repeticiones) a 3, indicando que desea repetir del INTVL 1 hastael INTVL 4 tres veces. Finalmente, programa COOL DOWN(relajación) a 5 minutos con NO TZ (sin rango de pulso). Esteejercicio total toma 60 minutos aproximadamente y ayuda aregistrar a la vez el tiempo y las metas de resistencia.

Modo Resumen
El modo Resumen le permite revisar la información total grabadapor el cronógrafo para su actividad más reciente. Los datos no seactualizan mientras están en pantalla.
Terminología del modo Resumen
Rango: Un rango de pulsaciones preestablecido para su actividad.
Recuperación: Una medida de su estado físico y fatiga basada enla diferencia de sus pulsaciones durante un breve periodo detiempo después de un ejercicio extenuante. Para más información,ver Heart Zones® Tools for Success.
Utilizando el modo Resumen
1. Pulse MODE hasta que aparezca el modo Resumen.
2. Pulse s (DISPLAY) o t (STOP/RESET) para navegar por los
datos del resumen.
173
ä Pulso promedio para la vuelta y tiempo en el pulso promedio:
El pulso promedio presenta el promedio de pulso para la vuelta,y tiempo en el pulso promedio muestra el tiempo invertido porusted durante la vuelta al pulso promedio.
Sugerencia & trucos del modo Datos de Vuelta
ä Una vez que usted reinicia el cronógrafo desde cero para su
siguiente actividad, borra los datos de vuelta de la actividadanterior.
ä Si desea ver información para el total de su actividad vaya al
modo Resumen en la siguiente sección.
ä Si usted ha activado SYNC TIMER & CHRONO (ver página 187)
su información de vuelta equivale por tanto a su desempeño encada intervalo.
Ejemplos del modo Datos de Vuelta
172
s
valor de los datos
t
valor de los datos
INDIGLO®
night-light
Para modo
Temporizador
básico o sostener
para ver la hora
Le gusta montar en bicicleta, ¡pero acaba de terminar un largorecorrido y usted está agotado! En su agotamiento, olvidó mirarlos datos de vuelta de su recorrido y puso el cronógrafo a cero.Cree que ha perdido sus datos, pero luego se acuerda. Todavíapuede revisar los datos de vuelta, en tanto usted no reinicieprimero el cronógrafo.

175
Observando información del pulso en el modoResumen
Si no usa su medidor HR, la única información que usted puedever en el modo Resumen es el tiempo total para su actividadmientras el cronógrafo estuvo en marcha. El tiempo del evento esequivalente al tiempo acumulativo en el modo Cronógrafo.
Si usa su reloj con el medidor HR, puede observar la siguienteinformación:
ä Promedio de pulsaciones: Su promedio de pulsaciones calculado
sobre el periodo en que el cronógrafo estuvo en marcha.
ä Pulso máximo: La pulsación más alta grabada durante su
actividad.
ä Pulso mínimo: La pulsación más baja grabada durante su
actividad.
ä Tiempo en rangos: Tomando en cuenta el tiempo total de su
ejercicio, el reloj muestra el tiempo invertido por usted en cadauno de los rangos de pulso durante su actividad, incluyendotodos los cinco rangos preestablecidos, todos los tres rangospersonalizados, y por debajo del rango 1 (algunas veces referidocomo “rango 0”) (ver “programación del HRM” en la página 184para información relacionada con la programación de estafunción).
ä Pulso promedio en rangos: El pulso promedio en cada uno de
los rangos de pulso, incluyendo todos los cinco rangos
174
preestablecidos, todos los tres personalizados y por debajo delrango 1.
ä Recuperación: Su pulso cambia sobre un periodo de tiempo
elegido grabado al final de su actividad (ver “Programación delHRM” en la página 185 para información al programar estafunción).
Sugerencias & trucos del modo Resumen
ä Una vez que usted reinicia el cronógrafo desde cero para su
siguiente actividad, borra los datos de resumen de la actividadanterior.
ä Si usted tiene puesto el medidor HR, puede iniciar un cálculo de
recuperación al estar en modo Resumen pulsando y sosteniendoSTART/SPLIT mientras observa sus datos de recuperación.
ä Si desea ver información para cada parte de su actividad vaya al
modo Datos de Vuelta en la sección anterior.

Programación del temporizador
1. Pulse MODE hasta que aparezca el modo Temporizador básico.
2. Pulse y sostenga el botón SET hasta que la palabra SET aparezcabrevemente en la pantalla, seguida por un valor que destella.
3. Ajuste el primer valor pulsando + (DISPLAY) o – (STOP/RESET).
4. Pulse SELECT (SET/FORMAT) para ir al siguiente valor a serajustado.
5. Repita los pasos 3 y 4 para todos los valores que necesite ajustar.
6. Pulse DONE (MODE) para guardar sus cambios y completar elproceso de programación.
Para el modo Temporizador, usted puede ajustar los siguientesvalores:
ä Tiempo (horas, minutos, segundos hasta 99 horas, 59 minutos y
59 segundos)
176 177
Ejemplo del modo Resumen
Modo Temporizador Básico
El modo temporizador básico le permite establecer un tiempo fijodesde el cual el reloj cuenta regresivamente hasta cero (porejemplo, 10, 9, 8, ...). Usted puede programar el temporizador paradetenerse, repetir o cambiar al modo Cronógrafo después delconteo regresivo.
Recientemente, usted ha decidido centrar su atención en su pulsodurante sus ejercicios. En el modo Configurar, establece su pulsomáximo en 195 BPM (pulsaciones por minuto). Cuando acabecualquiera de sus ejercicios (sea correr, montar en bicicleta, nadaro cualquier otro tipo de actividad), puede ir al modo Resumenpara revisar datos de su pulso. Esta información incluye su pulsopromedio, máximo y mínimo como también su pulso promedio ytiempo invertido en cada uno de los rangos de pulso. Usar estafunción será útil para indicar los niveles a los cuales su corazóntrabajó durante el ejercicio e indicará si usted necesita ajustar onó la intensidad de su ejercicio.
Programar el
temporizador
Parar o reiniciar el
temporizador
INDIGLO®
night-light
Iniciar el
temporizador
Para modo Alarma
o sostener para
ver la hora
El temporizador cambiará al modo Cronógrafo si está programadopara tal modo. Usted verá el símbolo de cambiar, paraindicar que el temporizador cambiará de modo al finaldel conteo regresivo.
Sugerencias & trucos del modo Temporizador
ä Puede pulsar MODE desde el modo Temporizador para pasar la
pantalla hacia otro modo sin interrumpir elfuncionamiento del temporizador. El símbolo del reloj dearena aparecer· para indicar el funcionamiento deltemporizador.
ä El temporizador sólo cambiará al modo Cronógrafo si usted pone
el cronógrafo a cero y se desactiva la función “Sync Timer &Chrono” (ver “Programación de manos libres” en la página 186).
Ejemplo del modo Temporizador Básico
179
ä Terminar la acción (STOP (parar), REPEAT (repetir), o
CHRONO (cronógrafo))
Utilizando el temporizador
1. Pulse START/SPLIT para iniciar el conteo regresivo deltemporizador.
2. Pause el conteo regresivo pulsando STOP/RESET. Puede reanudarel conteo regresivo pulsando START/SPLIT de nuevo, O reiniciar eltemporizador pulsando y sosteniendo STOP/RESET.
3. Cuando el temporizador llega a cero, suena una breve alerta.
4. El temporizador se detendrá después de la alerta si está programadoa STOP (parar).
O
El temporizador comenzará otro conteo regresivo si se programa aREPEAT y continúa hasta que usted pulse STOP/RESET.
La línea inferior de la pantalla mostrará “RPT” y un número (porejemplo, RPT 2). “RPT” indica que el temporizador está repitiendo yel número las veces que el temporizador ha circulado por larepetición del conteo regresivo. Usted verá igualmente elsímbolo de repetición para indicar que el temporizador estáprogramado para repetir.
O
178
Como parte de su plan general de salud, usted decide realizar unacaminata de 30 minutos durante su hora de almuerzo dos vecespor semana. Como ayuda para marcar el tiempo de modo que noregrese tarde de su hora de almuerzo, programa su temporizadora 15 minutos y luego lo programa a repetir una vez. Después de 15minutos el reloj suena para indicarle empezar a caminar de vueltaa su oficina. Como programó el temporizador a repetir, el relojempieza a cronometrar otra sesión de 15 minutos para ayudarle amarcar cuánto tiempo tiene para volver a la oficina.
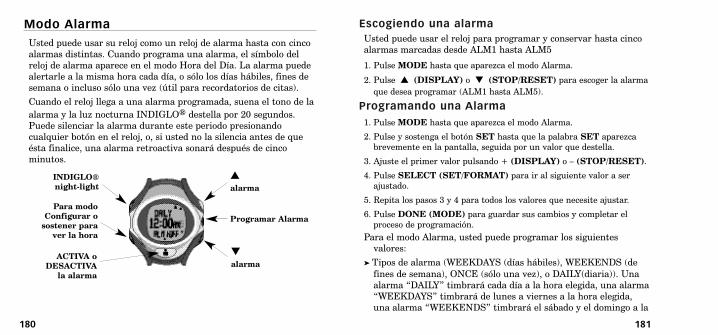
Escogiendo una alarma
Usted puede usar el reloj para programar y conservar hasta cincoalarmas marcadas desde ALM1 hasta ALM5
1. Pulse MODE hasta que aparezca el modo Alarma.
2. Pulse s (DISPLAY) o t (STOP/RESET) para escoger la alarma
que desea programar (ALM1 hasta ALM5).
Programando una Alarma
1. Pulse MODE hasta que aparezca el modo Alarma.
2. Pulse y sostenga el botón SET hasta que la palabra SET aparezcabrevemente en la pantalla, seguida por un valor que destella.
3. Ajuste el primer valor pulsando + (DISPLAY) o – (STOP/RESET).
4. Pulse SELECT (SET/FORMAT) para ir al siguiente valor a serajustado.
5. Repita los pasos 3 y 4 para todos los valores que necesite ajustar.
6. Pulse DONE (MODE) para guardar sus cambios y completar elproceso de programación.
Para el modo Alarma, usted puede programar los siguientesvalores:
ä Tipos de alarma (WEEKDAYS (días hábiles), WEEKENDS (de
fines de semana), ONCE (sólo una vez), o DAILY(diaria)). Unaalarma “DAILY” timbrará cada día a la hora elegida, una alarma“WEEKDAYS” timbrará de lunes a viernes a la hora elegida,una alarma “WEEKENDS” timbrará el sábado y el domingo a la
181180
Modo Alarma
Usted puede usar su reloj como un reloj de alarma hasta con cincoalarmas distintas. Cuando programa una alarma, el símbolo delreloj de alarma aparece en el modo Hora del Día. La alarma puedealertarle a la misma hora cada día, o sólo los días hábiles, fines desemana o incluso sólo una vez (útil para recordatorios de citas).
Cuando el reloj llega a una alarma programada, suena el tono de la
alarma y la luz nocturna INDIGLO® destella por 20 segundos.Puede silenciar la alarma durante este periodo presionandocualquier botón en el reloj, o, si usted no la silencia antes de queésta finalice, una alarma retroactiva sonará después de cincominutos.
s
alarma
Programar Alarma
t
alarma
INDIGLO®
night-light
ACTIVA o
DESACTIVA
la alarma
Para modo
Configurar o
sostener para
ver la hora

183
hora elegida, y una alarma “ONCE” timbrará sólo una vez a lahora elegida y luego se apagará automáticamente.
ä Hora de alarma (horas, minutos y AM/PM si la hora se ajusta en
el formato de 12 horas).
ä Status de la alarma (OFF or ON (activada o desactivada)).
También puede pulsar START/SPLIT para cambiar el status dela alarma.
Observe que si usted cambia cualquier ajuste de la alarma,automáticamente la deja activada.
Modo Configurar
182
Use el modo Configurar para establecer opciones que mejoran eldesempeño de otros modos del reloj, para los tres grupos deprogramación siguientes:
Programación del HRM: Los ajustes de pulso le permitenestablecer rangos de pulso determinados para su frecuenciacardiaca.
Programación de “manos libres”: Los ajustes de “manos libres”le permiten opciones de configuración del reloj para funcionar enforma automática.
Programación del reloj: Los ajustes del reloj dan opciones parapersonalizar el funcionamiento general del reloj, incluyendoocultar datos o modos.
Terminología del modo Configurar
Programación Rápida: Pulsando START/SPLIT cuando apareceel signo + sobre éste, usted puede cambiar la programación máscomún para el grupo programado sin iniciar el procedimientoentero de programación. Por ejemplo, cuando se observa laprogramación de alerta para el rango de pulso determinado (TZALERT), pulsando START/SPLIT le permitirá escogerrápidamente un nuevo rango de pulso determinado para la alerta.
s
opción
Seleccionar un
elemento
t
opción
INDIGLO®
night-light
Pulsar para
activar una
programación
rápida
Pulsar al
terminar de ver
las opciones

Rango TZ y alerta: Usted puede escoger de uno a cinco rangos depulso preestablecidos (marcados Z1 a Z5) o tres rangos de pulsopersonalizados (marcados C1 a C3). También puede elegir que elreloj le de una señal de alerta o nó si sus pulsaciones están fuerade su rango determinado. Las opciones para la alerta incluyen NOALRT (sin alerta), AUDIBLE (sonora), o SILENT (silenciosa). NOALRT apaga la alerta por completo, SILENT le advierte con unaseñal visible (una flecha hacia arriba o hacia abajo en la pantalladel reloj) si usted va sobre o abajo de su rango de pulsodeterminado, y AUDIBLE combina una melodía de advertencia conla alerta visual. Escuchará una melodía ascendente si ustedsobrepasa su rango y una melodía descendente si va abajo de surango.
Rangos personalizados: Usted puede establecer el número para elrango determinado superior e inferior o el porcentage(dependiendo de la forma que escoja para presentar su pulso) hastapara tres rangos de pulso personalizados, marcados CUSTOM 1,CUSTOM 2, y CUSTOM 3.
Recuperación: Esta configuración determina la forma como elreloj calcula automáticamente un pulso de recuperación cuandousted detiene el cronógrafo. Usted puede programar el tiempo derecuperación a un minuto, dos, o apagarlo. Esto le ayuda adeterminar cuán rápido su corazón retorna a un nivel más bajo depulso al final de su actividad, entre más rápido retorne, mejor parasu nivel de estado físico.
185
Utilizando el modo Configurar
A diferencia de otras funciones de programación en el reloj, elmodo Configurar incluye un menú por jerarquía para los gruposque se programan.
1. Pulse MODE hasta que el modo Configurar aparezca.
2. Pulse s (DISPLAY) o t (STOP/RESET) para ir al siguiente
grupo de programación o al anterior.
3. Pulse SELECT (SET/FORMAT) para ingresar un grupo deprogramación.
4. Pulse s (DISPLAY) o t (STOP/RESET) para navegar por las
opciones dentro de un grupo de programación.
5. Pulse SELECT (SET/FORMAT) para elegir una opción dentro deun grupo de programación. Esto puede permitirle cambiar unaprogramación o llevarle a otro nivel.
6. Pulse + (DISPLAY) o - (STOP/RESET) para establecer la opcióndentro de un grupo de programación.
7. Pulse DONE (MODE) cuando haya acabado de establecer una opcióndentro de un grupo de programación.
8. Pulse DONE (MODE) de nuevo para volver al nivel del grupo deprogramación.
Programación del HRM
Antes de configurar los ajustes de su pulso, consulte Heart Zones®
Tools for Success para información sobre la importancia delseguimiento de su pulso y cómo determinar su pulso máximo.Después, configure los siguientes ajustes de pulso:
184

187
Sync Timer & Chrono: Esta función le permite programar eltemporizador interválico y el cronógrafo para que se inicien yparen simultáneamente, de modo que usted pueda grabar lainformación del cronógrafo cuando use el temporizador interválico.Completar un intervalo en el modo Temporizador Interválico haráque el reloj tome un tiempo acumulativo en el cronógrafo. Utiliceesta función si usted desea un registro de su desempeño para cadaintervalo de su ejercicio. Cada intervalo corresponde a una vuelta ouna parte en el modo Datos de Vuelta.
Usted debe desactivar la configuración “Sync Timer & Chrono” sidesea que el temporizador cambie al modo Cronógrafo al final deun conteo regresivo en el modo Temporizador Básico.
Programación del reloj
Configure los siguientes ajustes del reloj:
Función Night-Mode®: Cuando está activada, la luz nocturnaINDIGLO® se enciende cuando usted pulsa cualquier botón. Estafunción se desactiva automáticamente después de ocho horas.
Timbre a cada hora: Cuando está activado, el reloj timbrará acada hora en punto.
Sonido al pulsar: Cuando está activado, el reloj emitirá un sonidocuando usted pulsa cualquier botón.
Modo Ocultar: A su elección usted puede presentar o desactivarlos siguientes modos: Intervalo, Datos de Vuelta, Resumen,Temporizador o Alarma. Por ejemplo, si desactiva el modo Datos de
186
Escogiendo OFF evitará que el reloj calcule automáticamente unpulso de recuperación cuando usted detiene el cronógrafo. Ustedpuede todavía calcular su pulso de recuperación en el modoResumen, estableciéndolo a un minuto si usted escoge OFF en elmodo Configurar.
Pulso máximo: Ingrese su pulso máximo. El reloj usa este valorpara calcular los cinco rangos de pulso preestablecidos y sirve comouna referencia para mostrar su pulso como un porcentaje de supulso máximo (POR CIENTO).
Visualización del pulso: Usted puede programar su reloj parapresentar su pulso o como un porcentaje de su máxima pulsación(POR CIENTO) o en pulsaciones por minuto (BPM). Laconfiguración que usted escoja determinará la visualización de supulso en las otras configuraciones del reloj.
Programación de “manos libres”
“Manos libres” consiste en automatizar las funciones delcronógrafo, para que usted se concentre en su ejercicio en vez deestar operando el reloj. Inclusive cuando está activada, todavíausted puede tomar tiempos acumulativos manualmente sin afectarla operación “manos libres”. Configure los siguientes ajustes demanos libres:
Acumulativo automático: Esta función permite al cronógrafotomar automáticamente tiempos acumulativos con base en untiempo que usted determine. Por ejemplo, usted puede configurarel reloj para tomar un tiempo parcial cada 10 minutos.

188
Habilitando las funciones GPS
Con su medidor GPS-3D, usted puede expandir las funciones de sureloj. Pero primero necesita habilitar las funciones para GPS de sureloj en el modo Configurar.
1. Pulse MODE hasta que el modo Configurar aparezca.
2. Pulse s (DISPLAY) o t (STOP/RESET) hasta que WATCH
SETTINGS (programación del reloj) aparezca.
3. Pulse SELECT (SET/FORMAT) para ingresar el grupo deprogramación del reloj.
4. Pulse s (DISPLAY) o t (STOP/RESET) hasta que DATA
HIDING (ocultar datos) aparezca.
5. Pulse SELECT (SET/FORMAT) para ingresar a la programación deocultar datos.
6. Pulse s (DISPLAY) o t (STOP/RESET) hasta que DISABLE
S+D SETTINGS (desactivar S+D) aparezca.
7. Pulse + (START/SPLIT) hasta que SHOW (presentar) aparezca enla pantalla.
8. Pulse DONE (MODE) cuatro veces para guardar la configuración ysalir del modo Configurar.
189
Vuelta éste no se mostrará hasta cuando usted lo active de nuevodesde el modo Configurar.
Ocultar datos: A su elección usted puede presentar u ocultar datosde cada una de los medidores HR. Por ejemplo, si no usa elmedidor HR para su ejercicio y elige ocultar los datos del medidorHR, usted no verá ninguna información relacionada con el pulsoporque estos datos se basan en el uso del medidor HR. Ocultardatos también incluye una opción para la programación del S+D.Ver la siguiente sección para información sobre esta programación.
F U N C I Ó N G P S O P C I O N A L
Usted puede agregar funciones de GPS a su reloj comprando unmedidor de Velocidad + Distancia (medidor GPS-3D). El medidorGPS-3D registra la velocidad, paso, distancia recorrida, altitud,ubicación y más, usando tecnología GPS. La Guía del Usuario delMedidor de Estado Físico incluida con el medidor GPS-3D traeinstrucciones detalladas para programar y usar este medidor.

191
Configurando las funciones GPS por primera vez
Antes de comenzar su primer ejercicio, usted debe revisar lassiguientes configuraciones y ajustarlas si es necesario:
Unidades: En el modo configurar establezca unidades de longitud,velocidad, paso y altitud de acuerdo a su preferencia. Ver la página200 para más información.
Actualizar la Tasa de Ascenso: Este ajuste en el grupoALTITUDE SETTINGS (programación de altitud) determina concuanta frecuencia el reloj calcula su tasa de ascenso (velocidadvertical). Programe esta función de menor duración paraactividades verticales más rápidas como esquiar, o de mayorduración para actividades verticales más lentas como escalar. Ver lapágina 199 para información detallada sobre la programación.
Aunque no es necesario ajustarlos antes de su primer ejercicio, ustedpudiera desear revisar y configurar la velocidad o paso de los rangos depulso (página 198), alerta de distancia (página 198) o funcionesadicionales de “manos libres” (página 200).
190
Funciones adicionales GPS en los modos existentes
Mensajes GPS
Cuando se usa el reloj con el medidor GPS-3D, el reloj puedemostrar mensajes para comunicar el status del medidorsincronizado con el reloj. Los mensajes incluyen:
SEARCHING El medidor GPS-3D aún intenta enlazarse con lainformación de GPS. Usted no puede ver información de velocidad,paso, distancia o de posición hasta que el medidor localice lossatélites GPS.
WEAK GPS SIGNAL El medidor GPS-3D perdió su enlace con lossatélites GPS. El medidor GPS-3D funciona mejor en zonas másabiertas (como en el caso de una zona sin muchos árboles odespejada de nubes) y a mayores velocidades.
NO DATA FROM GPS El reloj no recibe información del medidorGPS-3D. Asegúrese que el medidor se encuentre a un máximo de 3pies (1 metro) de distancia del reloj, que esté funcionando o que nose haya bloqueado inadvertidamente con el medidor de alguienmás. El reloj intentará establecer una conexión por un minutodespués de mostrar este mensaje.
NOISY DATA FROM GPS El reloj tiene interferencias de radio. Tratede alejarse de posibles fuentes de interferencia (por ejemplo televisores,monitores o aparatos con motor). El reloj intentará establecer unaconexión por 30 segundos después de mostrar este mensaje.

ä Puede ajustar el valor de los minutos adelante o atrás de la hora
correcta y el reloj conservará su ajuste. Esta característica es útilpara la gente que prefiere ajustar sus relojes un pocoadelantados para mantenerse a tiempo.
Cuando usa el medidor GPS-3D con su reloj, puede explorar losdatos de desempeño pulsando y soltando DISPLAY. Usted puedeobservar:
ä Velocidad: Velocidad actual
ä Paso: Velocidad actual, expresada en minutos por unidad de
distancia seleccionada, como millas o kilómetros
ä Distancia: La distancia recorrida desde cuando puso en marcha
el cronógrafo
ä Altitud: La altura actual sobre el nivel del mar
Funciones GPS en el modo Cronógrafo
El modo Cronógrafo incluye más funcionalidad para laprogramación de “manos libres” cuando lo usa con el medidorGPS-3D. Además de tomar tiempos acumulativos con base en eltiempo, usted puede programar el modo Cronógrafo para que seinicie cuando usted comienza a moverse y parar cuando usted sedetiene o tomar automáticamente tiempos parciales con base en ladistancia. Ver “Programación de manos libres” en la página 200.
193
FATAL GPS ERROR El medidor GPS-3D ha encontrado un graveerror interno. Comuníquese con Servicio al Cliente de Timex.
Funciones GPS en el modo Hora del Día
Cuando usted usa el reloj sincronizado con el medidor GPS-3D, este sealineará con la hora UTC (tiempo universal coordinado, conocidoanteriormente como GMT). Éste describe la zona horaria local enrelación con el meridiano de Greenwich. Por ejemplo, la ciudad deNueva York se encuentra en la zona UTC -5, puesto que Nueva Yorkestá ubicada cinco horas antes del meridiano de Greenwich; Moscú seencuentra en la zona UTC +3 al estar tres horas después del meridianode Greenwich.
Cuando active por primera vez el medidor GPS-3D sincronizadocon su reloj, usted puede esperar una de las siguientesposibilidades:
ä Si activa el medidor GPS-3D antes de ajustar la hora del día, el
reloj sincronizará a la vez T1 y T2 con el UTC. Usted necesitaráajustar la hora para ambas zonas horarias a su hora local.
ä Si activa el medidor GPS-3D después de ajustar la hora del día,
el reloj mantiene el ajuste de hora y fecha y sincroniza minutos ysegundos con el UTC para cada zona horaria.
ä Observe que usted no puede ajustar los segundos cuando habilita
las funciones GPS; estos seguirán sincronizados siempre con lahora UTC.
192
Funciones GPS en el modo Datos de Vuelta
Cuando use el medidor GPS-3D con su reloj, puede explorar losdatos de desempeño pulsando y soltando s (DISPLAY) o t
(STOP/RESET). Usted puede observar:
ä Velocidad promedio de vuelta: La velocidad promedio para el
período en que el cronógrafo ha estado funcionando
ä Paso promedio de vuelta: La velocidad promedio por minuto
para el período en que el cronógrafo ha estado funcionando
ä Distancia de vuelta: La distancia recorrida en la vuelta
ä Altitud de vuelta: La altitud muestra la altura sobre el nivel del
mar al final de su vuelta
ä Cambio de ascensión de vuelta: Ascensión es el cambio en
altitud durante la vuelta
Funciones GPS en el modo Resumen
Cuando use el medidor GPS-3D con su reloj, puede explorar losdatos de desempeño pulsando y soltando s (DISPLAY) o t
(STOP/RESET). Las opciones para ver los datos del medidor GPS-3D en el modo Resumen incluyen información de los siguientescuatro grupos de datos:
Velocidad
Velocidad promedio y paso promedio representan el mismo valorexpresado en dos formas diferentes. Sin embargo, el mejor paso noestá relacionado con velocidad máxima. El mejor paso se calcula a
195
Cuando usa el medidor GPS-3D con su reloj, puede explorar losdatos de desempeño pulsando y soltando DISPLAY. Usted puedeobservar:
ä Velocidad: Velocidad actual
ä Velocidad promedio: La velocidad promedio para el período en
que el cronógrafo ha estado funcionando
ä Paso: Velocidad actual, expresada en minutos por unidad de
distancia seleccionada, como millas o kilómetros
ä Paso promedio: La velocidad promedio por minuto para el
período en que el cronógrafo ha estado funcionando
ä Distancia: La distancia recorrida desde cuando puso en marcha
el cronógrafo
Funciones GPS en el modo TemporizadorInterválico
Cuando usa el medidor GPS-3D con su reloj, puede explorar losdatos de desempeño pulsando y soltando DISPLAY. Usted puedeobservar:
ä Velocidad: Velocidad actual
ä Paso: Velocidad actual, expresada en minutos por unidad de
distancia seleccionada, como millas o kilómetros
ä Distancia: La distancia recorrida desde cuando puso en marcha
el temporizador interválico
ä Altitud: La altura actual sobre el nivel del mar
194
197
partir de los valores de paso de su actividad; velocidad máxima esla mayor velocidad leída por el medidor GPS-3D durante suactividad. Los dos valores pueden no coincidir pues provienen dedistintas fuentes de información.
ä Velocidad promedio: Su velocidad promedio calculada dividiendo
distancia por tiempo.
ä Velocidad máxima: Su mayor velocidad.
ä Paso promedio: Su velocidad promedio expresada como minutos
por unidad de distancia recorrida.
ä Mejor paso: Su menor tiempo recorrido por minuto.
Distancia
ä Distancia del evento: Su distancia acumulada recorrida durante
la actividad mientras el cronógrafo estuvo en marcha.
ä Odómetro: Su distancia acumulada recorrida desde la última vez
que reinició manualmente el odómetro. Puesto que el odómetrono funciona conjuntamente con el cronógrafo, usted puedeutilizar esta función para registrar la distancia acumulada a lolargo de varios ejercicios.
Tiempo
ä Tiempo del evento: El tiempo total de su actividad mientras el
cronógrafo estuvo en marcha. El tiempo del evento esequivalente al tiempo acumulativo en los modos del cronógrafo.
196
GPS
ä Nivel de la pila del GPS: El voltaje actual para el medidor GPS-
3D presentado en un gráfico de barras. Usted debe recibirinformación del medidor GPS-3D para ver esta información.Cuando el gráfico muestra sólo una parte (usted verá también elsímbolo de pila en la pantalla del reloj), debe cambiar la pila.
Funciones GPS en el modo Temporizador Básico
Agregando el medidor GPS-3D, usted puede programar eltemporizador para cambiar al modo VERTI (vertical) o al modoFINISH (finalizar) al final del cronometraje de un evento.
Funciones GPS en el modo Configurar
Para información sobre el acceso a los ajustes del modo Configurar,ver la página 183. Las opciones para ver los datos del medidorGPS-3D en el modo Configurar incluyen información para lossiguientes cinco grupos de datos:
Programación de S+D: Los ajustes de velocidad y distanciaafectan la respuesta del reloj a los datos recibidos del medidorGPS-3D.
Programación de altitud: Los ajustes de altitud configuran la alturadeseada y fijan cálculos de tasa de ascenso y nivelación.
Programación de “manos libres”: El ajuste de “manos libres” daopciones de programación del reloj para que funcioneautomáticamente sincronizado con el medidor GPS-3D.

Nivelación: La nivelación es útil si usted siente que los valoresmostrados de velocidad o de paso aparentan ser demasiadoinestables. La nivelación aplica un filtro promediante y puedecausar que los valores mostrados de velocidad o de paso respondanmás despacio a los cambios.
Nivelación de Velocidad: Activa o desactiva la nivelación develocidad.
Nivelación del Paso: Activa o desactiva la nivelación del paso.
Programación de altitud
Nivelación: La nivelación es útil si usted siente que los valoresmostrados de altitud aparentan ser demasiado inestables. Lanivelación aplica un filtro promediante y puede causar que losvalores mostrados de altitud respondan más despacio a loscambios. Usted puede activar o desactivar la nivelación de altitud.
Actualizar la Tasa de Ascenso: Ajuste el reloj para actualizar elperiodo al cual se calcula la tasa de ascenso. Puede elegir intervalosde 30 segundos, o de 1, 10, 30 o 60 minutos. Programe esta funcióna una menor duración para actividades verticales más rápidascomo esquiar, o a una mayor duración para actividades verticalesmás lentas como escalar.
Programación de “manos libres”
Además de tiempo acumulativo automático, usted puede usar elreloj para programar otros ajustes de “manos libres”conjuntamente con el medidor GPS-3D. Incluso cuando está
199
Programación del reloj: Los ajustes del reloj dan opciones parapersonalizar el funcionamiento general del reloj, incluyendoocultar datos o modos.
Programación de unidad: Los ajustes de unidad le permitendeterminar las unidades para mostrar la distancia (por ejemplomillas vs kilómetros) y de pulso (pulsaciones vs porcentaje).
Programación de S+D:
Configure los siguientes ajustes de velocidad y distancia:
Tipo de rango: Similar en concepto a una alerta de rango de pulsodeterminado, usted puede programar el reloj para llevar cuenta desu velocidad o de su paso y alertarle si usted va demasiado lento odemasiado rápido (los tipos de alerta incluyen una alerta audibleque suena o una alerta silenciosa que destella). Usted puede fijarlos límites de velocidad y paso independientemente. Por ejemplo,establezca límites de paso para controlar el ritmo de su carrera yfije límites de velocidad útiles para ciclismo. Después cambiesimplemente los ajustes para cada actividad.
Alerta de Distancia: Programa el reloj para alertarle sobre losintervalos de distancia. Por ejemplo, usted puede programar elreloj para alertarle sobre cada milla que recorre. La alerta dedistancia funcionará solamente cuando usted tiene el cronógrafo enmarcha. Si usted desea que el reloj tome un tiempo acumulativocon base en la distancia recorrida, ver la programación de “manoslibres” en la página 200.
198
Velocidad: Programe el reloj para presentar la velocidad entérminos de millas por hora (MPH), kilómetros por hora (KPM),millas náuticas (NM), o automática.
Paso: Programe el reloj para presentar el paso en términos demillas (MPH), kilómetros (KPH), millas náuticas (NM) oautomático.
Altitud: Programe el reloj para presentar la altitud en términos depies, metros o automática.
En la programación de unidad usted puede ajustar la velocidad,paso y altitud a cualquier unidad independientemente o a laconfiguración automática preestablecida. Cuando se establece comoautomático, cada ajuste sigue automáticamente la configuraciónestablecida para la unidad de distancia. Esto le permite un cambiorápido de unidades para toda su información en pantalla sin tenerque ajustar cada configuración a cada momento, y a la vez permiteflexibilidad para ciertas situaciones.
201
activada, usted puede todavía iniciar y parar manualmente elcronógrafo sin afectar la función “manos libres”.
Inicio automático: Esta función habilita al cronógrafo parainiciarse cuando usted se pone en movimiento. Puede tomar variossegundos para que el medidor GPS-3D detecte su movimiento,causando un ligero atraso en el tiempo de inicio.
Parada automática: Esta función habilita al cronógrafo paradetenerse cuando usted se detiene. Puede tomar varios segundospara que el medidor GPS-3D detecte que usted se ha detenido,causando un ligero atraso en el tiempo de parar.
Acumulativo automático: Esta función habilita al cronógrafopara tomar tiempos acumulativos automáticamente de acuerdo a ladistancia recorrida. Por ejemplo, si usted programa el acumulativoautomático a 1 MI, el reloj tomará automáticamente un tiempoacumulativo a cada milla.
Programación del reloj
Modo Ocultar: A su elección usted puede presentar, ocultar odesactivar el modo Vertical o el modo Finalizar cuando usa elmedidor GPS-3D.
Ocultar datos: A su elección usted puede presentar u ocultar datosdel medidor GPS-3D.
Programación de unidad
Configure los siguientes ajustes de unidad:
Distancia: Programe el reloj para presentar la distancia entérminos de millas, kilómetros (KM) o millas náuticas (NM).
200
Por ejemplo, una corredora escoge usualmente kilómetros parasus ajustes de unidad. Sin embargo, cuando corre una maratón,ella cambia su unidad de distancia a millas (una maratón essiempre de 26,2 millas), pero escoge kilómetros como el ajuste deunidad para el paso. Durante la maratón, la corredora puede versu distancia en millas para comparar las marcaciones delrecorrido de la competencia, pero puede ver su paso en la formamás acostumbrada en kilómetros para entender con más claridadcuán rápido va corriendo.

Terminología del modo VerticalTasa de ascenso: Lo rápido que usted escala o desciende.
Velocidad vertical: Otro término para la tasa de ascenso.
Utilizando el modo Vertical
1. Pulse MODE hasta que el modo Vertical aparezca.
2. Pulse START/SPLIT para iniciar el cronometraje.
3. Pulse START/SPLIT de nuevo para tomar un tiempo parcial ycomenzar a cronometrar automáticamente una nueva vuelta.
4. Pulse STOP/RESET para detener el cronometraje cuando ustedllega al final de su actividad.
5. Pulse START/SPLIT para continuar el cronometraje.
O
Pulse y sostenga STOP/RESET de nuevo para poner la pantalla encero.
203
N U E V O S M O D O S
Los modos Vertical y Finalizar funcionan a partir de la tecnologíadel cronógrafo. Recuerde que un cronógrafo es un instrumentopara medir el tiempo. A cualquier momento en que su relojfunciona como un instrumento de medición del tiempo, lo haceusando la función cronógrafo (o temporización). Por consiguiente,los modos Vertical y Finalizar funcionan desde el cronógrafo.
Modo Vertical
El modo Vertical funciona como un modo de visualizaciónsincronizado con el medidor GPS-3D con énfasis en la presentaciónde los datos de altitud. Particularmente, el modo Vertical adapta elreloj para ver la información relacionada con actividades verticales(por ejemplo escalar o esquiar). Si no usa el medidor GPS-3D,usted no puede ingresar al modo Vertical y verá el mensaje NOGPS DATA.
202
Ver datos de
desempeño
Intercambiar líneas
superior y media
Parar o reiniciar
el cronógrafo
INDIGLO®
night-light
Iniciar la vuelta o
tomar tiempo
acumulativo
Para modo Finalizar
o sostener para
ver la hora
cronógrafo
mide el tiempo
ModoCronógrafo
Modo Vertical Modo
Finalizar

Ejemplo del modo Vertical
Modo Finalizar
El modo Finalizar le permite predecir cuánto tiempo le tomaráterminar una distancia de un evento específico (una maratón ocompetencia de 5K, por ejemplo) con base en la información actualdel medidor GPS-3D. Para ayudarle a mantener el paso para sufinal previsto, puede también programar el reloj para que le avisesi usted va muy rápido o muy despacio para su paso deseado.
205
Observando los datos de desempeño en el modo Vertical
Cuando esté usando el medidor HR y/o el medidor GPS-3D con sureloj, explore los datos de desempeño pulsando y soltandoDISPLAY. Las opciones para ver los datos de desempeño en elmodo Vertical incluyen:
Pulso: Pulso actual
Tasa de ascenso: Velocidad vertical
Paso: Velocidad actual, expresada en minutos por unidad dedistancia seleccionada, como millas o kilómetros
Velocidad: Velocidad actual
Distancia: Distancia recorrida mientras tiene el cronógrafo enmarcha
Altitud: La altura actual sobre el nivel del mar
Ascensión: La diferencia entre su altitud actual y la altitud cuandousted inició el cronógrafo
204
Usted está haciendo esquí extremo en Banff en un recorridoestimado de 2.700 pies verticales (214 metros verticales). Coninterés en la precisión de lo estimado como también del tiempoque le tomará hacer su recorrido, usted inicia su medidor GPS-3D, va al modo Vertical y pulsa START cuando comienza adescender la montaña. Al final de su trayecto, pulsa STOP yluego DISPLAY hasta ver la Tasa de Ascenso y Ascensión(expresados en números negativos ya que usted se desplazócuesta abajo). Utilice esta información para ver cuán rápidoesquió y comparar la ascensión expuesta por el reloj con laestimación que le dió su guía.

1. Estando en el modo Finalizar, pulse y sostenga el botón SET hastaque la palabra SET aparezca brevemente en la pantalla, seguida porun valor que destella.
2. Ajuste el primer valor pulsando + (DISPLAY) o – (STOP/RESET).
3. Pulse SELECT (SET/FORMAT) para ir al siguiente valor a serajustado.
4. Repita los pasos 2 y 3 para todos los valores que necesite ajustar.
5. Pulse DONE (MODE) para guardar sus cambios y completar elproceso de programación.
Para el modo Finalizar, usted puede ajustar los siguientes valores:
ä Distancia del evento preestablecida o personalizada (para ajustar
a su preferencia la distancia (hasta 999.99)
ä Unidad (NM, KM, o MI)
ä Tiempo previsto
ä Opción de alerta (una alerta audible hará que el reloj emita un
sonido y destelle a la vez sobre el tiempo previsto y una alertasilenciosa hará que destelle solamente sobre el tiempo previstofinal)
Utilizando el modo Finalizar
1. Pulse MODE hasta que aparezca el modo Finalizar.
2. Pulse START/SPLIT para iniciar el cronometraje.
3. Pulse START/SPLIT de nuevo para tomar un tiempo parcial ycomenzar a cronometrar automáticamente una nueva vuelta.
207
Si no usa el medidor GPS-3D, usted no puede ingresar al modoFinalizar y verá el mensaje NO GPS DATA en la pantalla del relojcuando ingrese a este modo. De igual modo, debe colocar elcronógrafo a cero antes de utilizar el modo Finalizar o de locontrario no funcionará apropiadamente.
Terminología del modo Finalizar
Tiempo previsto: Su tiempo deseado para terminar la competenciao ejercicio. El reloj emplea este tiempo para alertarle si usted vamuy despacio para completar el evento dentro del tiemposeleccionado.
Programación del modo Finalizar
Usted debe parar y reiniciar el cronógrafo para permitir laconfiguración del modo Finalizar. Sin embargo, puede todavíaconfigurar el modo Finalizar incluso cuando usted ve el mensajeNO GPS DATA en la pantalla.
206
Ver datos de
desempeño
Parar el
cronometraje
INDIGLO®
night-light
Iniciar cronometraje otomar un tiempoacumulativo
Sostener para
programar
Para modoTemporizadorInterválico o sostenerpara ver la hora
ä Velocidad: Velocidad actual
ä Velocidad promedio: Velocidad promedio para el periodo en el
que tiene el cronógrafo en marcha
ä Distancia: Distancia recorrida mientras tiene el cronógrafo en
marcha
Ejemplo del modo Finalizar
209
4. Pulse STOP/RESET para detener el cronometraje cuando ustedllega al final de su actividad.
5. Pulse START/SPLIT para continuar el cronometraje.
O
7. Pulse y sostenga STOP/RESET de nuevo para poner la pantalla encero.
Observando los datos de desempeño en el modoFinalizar
Cuando esté usando el medidor HR y/o el medidor GPS-3D con sureloj, explore los datos de desempeño pulsando y soltandoDISPLAY. Las opciones para ver los datos de desempeño en elmodo Finalizar incluyen:
ä Tiempo de finalización: El tiempo de finalización previsto
basado en su actual velocidad y distancia. El tiempo definalización destellará si su velocidad actual no le permitiráfinalizar dentro de su tiempo previsto seleccionado. Si usted sedetiene, el reloj reemplaza el tiempo de finalización por lapalabra STOPPED (detenido).
ä Pulso: Pulso actual
ä Paso: Velocidad actual, expresada en minutos por unidad de
distancia seleccionada, como millas o kilómetros
ä Paso promedio: La velocidad promedio por minuto para el
período en que el cronógrafo ha estado funcionando
208
Usted se entrena para una competencia de ciclismo de 100 KM. Elaño pasado corrió en la misma competencia y finalizó en 4 horas,15 minutos. Su meta para este año es finalizar en menos de 4 horas. Lee en una revista de entrenamiento que, cuando seentrena para una competencia, usted debe dedicar una día porsemana a recorrer una distancia igual a la de su evento paralograr su tiempo. Para ayudarle a mantener el ritmo, usted ajustael modo Finalizar a 100 KM para distancia y 4 horas para tiempo.Programa el reloj con una alerta audible para avisarle cuando vamás despacio que su ritmo para ayudarle a mantener su tren decompetencia a medida que corre.

4. Abra con cuidado la abrazadera de la pila y saque la pila.
5. Ponga una pila nueva en el compartimento de la pila, asegurándoseque el lado con la marca “+” esté al frente.
6. Cierre la abrazadera de la pila.
7. Coloque la tapa, asegurándose que el empaque oscuro se ajustefirmemente en la ranura de la caja y que la tapa se alineeadecuadamente con el reloj para asegurar que el timbre se alinearácon las conexiones internas (ver nota después del paso 2).
8. Sujete con cuidado las correas de modo que la parte más corta con lahebilla se enganche al juego superior de agarraderas.
Luz nocturna INDIGLO®
La tecnología electroluminiscente patentada (patentes de EUA4.527.096 y 4.775.964) ilumina toda la cara del reloj por la noche yen condiciones de poca luz.
211
C U I D A D O & M A N T E N I M I E N T O
Cambiando la pila
ADVERTENCIA: CAMBIAR LA PILA POR SU CUENTAPUEDE CAUSAR UN DAÑO AL RELOJ. TIMEX RECOMIENDALLEVAR EL RELOJ A UN JOYERO O DISTRIBUIDOR PARAQUE REEMPLACE LA PILA.
Si decide cambiar la pila usted mismo, busque al respaldo del reloj(caja) el tamaño y el tipo de pila que necesita su reloj. Sigacuidadosamente los pasos a continuación:
1. Coloque el reloj bocabajo sobre una superficie plana.
2. Separe las dos mitades de la pulsera del reloj usando undestornillador pequeño de cabeza plana.
Usted debe instalar la tapa de la caja en la misma dirección en que laquitó o el timbre no funcionará después de reensamblado.
3. Usando un destornillador Phillips 00, quite los cuatro tornillos queaseguran la tapa y póngalos a un lado. Quite la tapa con cuidado ypóngala a un lado.
ADVERTENCIA: MANTENGA SIEMPRE EL RELOJBOCABAJO SOBRE SU SUPERFICIE DE TRABAJO. SI USTEDVOLTEA EL RELOJ PARA QUITAR LOS TORNILLOS O LATAPA PUEDE PERDER LOS PEQUEÑOS CONECTORESELÉCTRICOS ADENTRO DEL RELOJ.
210

Garantía internacional (garantía limitada para EUA)
Timex Corporation garantiza su reloj contra defectos defabricación por un período de UN AÑO a partir de la fecha decompra original. Timex y sus sucursales en todo el mundorespaldan esta Garantía Internacional.
Cabe aclarar que Timex puede, a su elección, reparar su reloj concomponentes nuevos o reacondicionados e inspeccionadoscuidadosamente o reemplazarlo por un modelo idéntico o similar.
ADVERTENCIA: ESTA GARANTÍA NO CUBRE DEFECTOS ODAÑOS A SU PRODUCTO BASADOS EN ESTASCONDICIONES:
1. después de que vence el plazo de la garantía;
2. si el producto inicialmente no se compró a un distribuidor autorizado;
3. si las reparaciones efectuadas no las hizo el fabricante;
4. si son consecuencia de accidentes, manipulación no autorizada oabuso; y
5. si son en la caja, los accesorios o la pila. Se le podría cobrar por elreemplazo de cualquiera de estas piezas.
ESTA GARANTÍA SE OFRECE EN FORMA EXCLUSIVA Y ENLUGAR DE CUALQUIER OTRA GARANTÍA, SEA EXPRESA OIMPLÍCITA, INCLUSIVE TODA GARANTÍA IMPLÍCITA PARAFINES COMERCIALES O DE ADECUACIÓN A FINES
213
Resistencia al agua
Su reloj puede resistir presión del agua hasta por 86 psi(equivalente a una inmersión de 164 pies o 50 metros bajo el niveldel mar). Esta resistencia a 50 metros permanece invariable hastatanto usted mantenga el cristal, los botones y la caja intactos.
ADVERTENCIA: PARA MANTENER LA RESISTENCIA ALAGUA, NO OPRIMA NINGÚN BOTÓN BAJO EL AGUA.
Aunque su reloj resistirá el agua, usted no debe usarlo para buceo,pues no es un reloj de buzo y usted debe lavar su reloj con aguafresca después de estar expuesto al agua salada. El reloj nomostrará los datos del medidor mientras se utilice bajo el agua.
I N F O R M A C I Ó N L E G A L
TIMEX y NIGHT-MODE son marcas registradas de TimexCorporation. BODYLINK es marca registrada de Timex Group,B.V. INDIGLO es una marca registrada de Indiglo Corporation enEUA y en otros países. HEART ZONES es una marca de SallyEdwards.
212
0800-168787. México: al 01-800-01-060-00. Centroamérica, el
Caribe, Bermuda y las Bahamas: al (501) 370-5775 (EUA).Asia: al 852-2815-0091. El Reino Unido: al 44 020 8687 9620.Portugal: al 351 212 946 017. Francia: al 33 3 81 63 42 00.
Alemania: al +43 662 88 92130. Oriente Medio y África: al 971-4-310850. Otras zonas: comuníquese con su vendedor odistribuidor local de Timex para información sobre garantía.
ESTE ES SU CUPÓN DE REPARACIÓN; POR FAVOR GUÁRDELO EN UN LUGAR
SEGURO.
215
PARTICULARES. TIMEX NO ASUME NINGUNARESPONSABILIDAD POR PERJUICIOS DIRECTOS,INDIRECTOS NI ESPECIALES.
En ciertos países y estados no se permiten limitaciones de lasgarantías implícitas ni exclusiones o limitaciones de perjuicios, porlo cual estas limitaciones podrían no aplicarse en su casoparticular. Esta garantía le otorga derechos establecidos por ley,pero usted también podría tener otros derechos que difieren de unpaís a otro, o de un estado a otro.
Para solicitar los servicios incluidos en la garantía, por favordevolver el reloj al fabricante, a una de sus sucursales o alcomercio minorista adonde se compró el producto, adjuntando elCupón de Reparación diligenciado o, solamente en EUA y Canadá,el Cupón de Reparación diligenciado o una nota en la que figure sunombre, domicilio, número de teléfono y fecha y lugar de compra.Para cubrir el costo de envío, adjuntar el siguiente importe (esteimporte no es para el pago de la reparación): en EUA, un cheque ogiro postal (money order) por US$7.00; en Canadá, un cheque ogiro postal por CAN$6.00; en Reino Unido, un cheque o giro postalpor UK£ 2.50. En otros países se le cobrará por gastos demanipulación y envío.
ADVERTENCIA: JAMÁS INCLUYA NINGÚN ARTÍCULO DEVALOR PERSONAL EN SU ENVÍO.
EUA: llamar al 1-800-328-2677 por información de garantíaadicional. Canadá: llamar al 1-800-263-0981. Brasil: al
214
GARANTÍA INTERNACIONAL DE TIMEX — CUPÓN
DE REPARACIÓN DEL RELOJ
Fecha de compra original:(Si lo tiene, adjunte el recibo de compra)
Comprado por:(Nombre, dirección y teléfono)
Sitio de compra:(Nombre y dirección)
Razón de devolución:
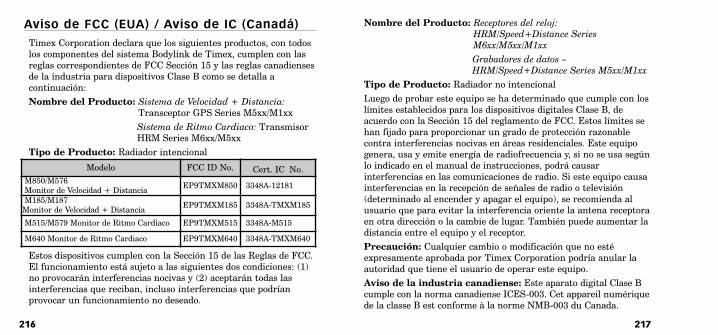
Nombre del Producto: Receptores del reloj:
HRM/Speed+Distance Series
M6xx/M5xx/M1xx
Grabadores de datos –
HRM/Speed+Distance Series M5xx/M1xx
Tipo de Producto: Radiador no intencional
Luego de probar este equipo se ha determinado que cumple con loslímites establecidos para los dispositivos digitales Clase B, deacuerdo con la Sección 15 del reglamento de FCC. Estos límites sehan fijado para proporcionar un grado de protección razonablecontra interferencias nocivas en áreas residenciales. Este equipogenera, usa y emite energía de radiofrecuencia y, si no se usa segúnlo indicado en el manual de instrucciones, podrá causarinterferencias en las comunicaciones de radio. Si este equipo causainterferencias en la recepción de señales de radio o televisión(determinado al encender y apagar el equipo), se recomienda alusuario que para evitar la interferencia oriente la antena receptoraen otra dirección o la cambie de lugar. También puede aumentar ladistancia entre el equipo y el receptor.
Precaución: Cualquier cambio o modificación que no estéexpresamente aprobada por Timex Corporation podría anular laautoridad que tiene el usuario de operar este equipo.
Aviso de la industria canadiense: Este aparato digital Clase Bcumple con la norma canadiense ICES-003. Cet appareil numériquede la classe B est conforme à la norme NMB-003 du Canada.
217
Aviso de FCC (EUA) / Aviso de IC (Canadá)
Timex Corporation declara que los siguientes productos, con todoslos componentes del sistema Bodylink de Timex, cumplen con lasreglas correspondientes de FCC Sección 15 y las reglas canadiensesde la industria para dispositivos Clase B como se detalla acontinuación:
Nombre del Producto: Sistema de Velocidad + Distancia:
Transceptor GPS Series M5xx/M1xx
Sistema de Ritmo Cardiaco: TransmisorHRM Series M6xx/M5xx
Tipo de Producto: Radiador intencional
Estos dispositivos cumplen con la Sección 15 de las Reglas de FCC.El funcionamiento está sujeto a las siguientes dos condiciones: (1)no provocarán interferencias nocivas y (2) aceptarán todas lasinterferencias que reciban, incluso interferencias que podríanprovocar un funcionamiento no deseado.
216
Modelo FCC ID No. Cert. IC No.
M850/M576 Monitor de Velocidad + Distancia
EP9TMXM850 3348A-12181
M185/M187 Monitor de Velocidad + Distancia
EP9TMXM185 3348A-TMXM185
M515/M579 Monitor de Ritmo Cardiaco EP9TMXM515 3348A-M515
M640 Monitor de Ritmo Cardiaco EP9TMXM640 3348A-TMXM640