PeopleSoft Enterprise Financials/Supply Chain Management 9 ... · PeopleSoft Enterprise...
167
PeopleSoft Enterprise Financials/Supply Chain Management 9.1 for Argentina Installation APRIL 2011
Transcript of PeopleSoft Enterprise Financials/Supply Chain Management 9 ... · PeopleSoft Enterprise...
PeopleSoft EnterpriseFinancials/Supply Chain Management9.1 for ArgentinaInstallation
APRIL 2011

PeopleSoft Enterprise Financials/Supply Chain Management 9.1 for ArgentinaInstallationSKU ifscm91ARG.xmlCopyright © 2011 Oracle. All rights reserved.
Trademark NoticeOracle is a registered trademark of Oracle Corporation and/or its affiliates. Other namesmay be trademarks of theirrespective owners.
License Restrictions Warranty/Consequential Damages DisclaimerThis software and related documentation are provided under a license agreement containing restrictions on use anddisclosure and are protected by intellectual property laws. Except as expressly permitted in your license agreementor allowed by law, youmay not use, copy, reproduce, translate, broadcast, modify, license, transmit, distribute,exhibit, perform, publish or display any part, in any form, or by anymeans. Reverse engineering, disassembly, ordecompilation of this software, unless required by law for interoperability, is prohibited.
Warranty DisclaimerThe information contained herein is subject to change without notice and is not warranted to be error-free. If you findany errors, please report them to us in writing.
Restricted Rights NoticeIf this software or related documentation is delivered to the U.S. Government or anyone licensing it on behalf of theU.S. Government, the following notice is applicable:
U.S. GOVERNMENT RIGHTS
Programs, software, databases, and related documentation and technical data delivered to U.S. Government customersare “commercial computer software” or “commercial technical data” pursuant to the applicable Federal AcquisitionRegulation and agency-specific supplemental regulations. As such, the use, duplication, disclosure, modification, andadaptation shall be subject to the restrictions and license terms set forth in the applicable Government contract, and,to the extent applicable by the terms of the Government contract, the additional rights set forth in FAR 52.227-19,Commercial Computer Software License (December 2007). Oracle USA, Inc., 500 Oracle Parkway, Redwood City,CA 94065.
Hazardous Applications NoticeThis software is developed for general use in a variety of informationmanagement applications. It is not developedor intended for use in any inherently dangerous applications, including applications whichmay create a riskof personal injury. If you use this software in dangerous applications, then you shall be responsible to take allappropriate fail-safe, backup, redundancy and other measures to ensure the safe use of this software. OracleCorporation and its affiliates disclaim any liability for any damages caused by use of this software in dangerousapplications.
Third Party Content, Products, and Services DisclaimerThis software and documentationmay provide access to or information on content, products and services from thirdparties. Oracle Corporation and its affiliates are not responsible for and expressly disclaim all warranties of any kindwith respect to third party content, products and services. Oracle Corporation and its affiliates will not be responsiblefor any loss, costs, or damages incurred due to your access to or use of third party content, products or services.

Contents
PrefaceAbout This Documentation.... . . . . . . . . . .. . . . . . . . . . . . . . . . . . . . . . . . . . . . . . . . . .. . . . . . . . . . . . . . . . . . . . . . . . . . . . . . . . . .xiUnderstanding This Documentation.. . . . . . . . . . . . . . . . . . . . . . . . . . . . . . . . . . . . . . . . . . . . . . . . . . . . . . . . . . . . . . . . . . . . . . . . . . . . . . . . .xiAudience.. . . . . . . . . . . . . . . . . . . . . . . . . . . . . . . . . . . . . . . . . . . . . . . . . . . . . . . . . . . . . . . . . . . . . . . . . . . . . . . . . . . . . . . . . . . . . . . . . . . . . . . . . . . . . . . . .xiTypographical Conventions.. . . . . . . . . . . . . . . . . . . . . . . . . . . . . . . . . . . . . . . . . . . . . . . . . . . . . . . . . . . . . . . . . . . . . . . . . . . . . . . . . . . . . . . . . . .xiiProducts.. . . . . . . . . . . . . . . . . . . . . . . . . . . . . . . . . . . . . . . . . . . . . . . . . . . . . . . . . . . . . . . . . . . . . . . . . . . . . . . . . . . . . . . . . . . . . . . . . . . . . . . . . . . . . . . .xiiiRelated Information.. . . . . . . . . . . . . . . . . . . . . . . . . . . . . . . . . . . . . . . . . . . . . . . . . . . . . . . . . . . . . . . . . . . . . . . . . . . . . . . . . . . . . . . . . . . . . . . . . . .xivComments and Suggestions.. . . . . . . . . . . . . . . . . . . . . . . . . . . . . . . . . . . . . . . . . . . . . . . . . . . . . . . . . . . . . . . . . . . . . . . . . . . . . . . . . . . . . . . . .xiv
Chapter 1Part I: Common Elements to Install PeopleSoft FMS, ESA, SFO, and SCMApplications for Argentina..... . . . . . . .. . . . . . . . . . . . . . . .. . . . . . . . . . . . . .. . . . . . . . . . . . . .. . . . . . . . . . . . . .. .. . . . . . . . . . . .1Understanding Part I. . . . . . . . . . . . . . . . . . . . . . . . . . . . . . . . . . . . . . . . . . . . . . . . . . . . . . . . . . . . . . . . . . . . . . . . . . . . . . . . . . . . . . . . . . . . . . . . . . . . .1Using Oracle E-Delivery to Obtain Installation Files.. . . . . . . . . . . . . . . . . . . . . . . . . . . . . . . . . . . . . . . . . . . . . . . . . . . . . . . . . . . . . . . .1
Chapter 2Installing PeopleSoft PeopleTools and Creating the PeopleSoft EnterpriseFinancials/Supply Chain Management Database for Argentina..... . . . . . . . . . . .. . . . . . . . . . . . . . . . . . . . . .3Prerequisites.. . . . . . . . . . . . . . . . . . . . . . . . . . . . . . . . . . . . . . . . . . . . . . . . . . . . . . . . . . . . . . . . . . . . . . . . . . . . . . . . . . . . . . . . . . . . . . . . . . . . . . . . . . . . .3Installing PeopleSoft PeopleTools and Creating the PeopleSoft FSCM Database. . . . . . . . . . . . . . . . . . . . . . . . . . . . . .3
Verifying the PeopleSoft PeopleTools Version.. . . . . . . . . . . . . . . . . . . . . . . . . . . . . . . . . . . . . . . . . . . . . . . . . . . . . . . . .. . . . . . . . . .4Reviewing the PeopleSoft FSCM Demo Database Sizing Information.. . . . . . . . . . . . . . . . . . . . . . . . . . . . .. . . . . . . . . .4Reviewing EDM Pool Considerations.. . . . . . . . . . . . . . . . . . . . . . . . . . . . . . . . . . . . . . . . . . . . . . . . . . . . . . . . . . . . . . . . . . .. . . . . . . . . .4Setting Up Installation Defaults for the PeopleSoft FSCM System Database.. . . . . . . . . . . . . . . . . . . . .. . . . . . . . . .4Deleting Summary Trees for the PeopleSoft FSCM System Database.. . . . . . . . . . . . . . . . . . . . . . . . . . . .. . . . . . . . . .4
Chapter 3Configuring Application SQRs and COBOL for DB2 and the OS/390 Server forArgentina......... . . . . . . . . . . . . . . . . . . . . . . . . . . . . . . . . . . . . . . . . . . . . . . . . . . . . . . . . . . . . . . . . . . . . . . . . . . . . . . . . . . . . ... . . . . . . . . . .7Understanding SQR and COBOL Processing on the DB2 z/OS Server. . . . . . . . . . . . . . . . . . . . . . . . . . . . . . . . . . . . . . . . . .7Allocating Data Sets on the OS/390 File Systems... . . . . . . . . . . . . . . . . . . . . . . . . . . . . . . . . . . . . . . . . . . . . . . . . . . . . . . . . . . . . . . . .7Modifying the JCL Shells. . . . . . . . . . . . . . . . . . . . . . . . . . . . . . . . . . . . . . . . . . . . . . . . . . . . . . . . . . . . . . . . . . . . . . . . . . . . . . . . . . . . . . . . . . . . . . . .9
Copyright © 2011, Oracle and/or its affiliates. All rights reserved. iii

Contents
Chapter 4Setting Database Requirements to Run the ChartField Configuration Process forArgentina....... . . . . . . . . . . . . . . . . . . . . . . . . . . . . . . . . . . . . . . . . . . . . . . . . . . . . . . . . . . . . . . . . . . . . . . . . . . . . . . . . . . . . . . . . . . . . . . . . .11Understanding Database Requirements for the ChartField Configuration Process for Argentina. . . . . . . . . . .11Defining Settings to Run ChartField Configuration.. . . . . . . . . . . . . . . . . . . . . . . . . . . . . . . . . . . . . . . . . . . . . . . . . . . . . . . . . . . . . . . .11
Chapter 5Part II: Installing PeopleSoft FMS, ESA and SFO Applications for Argentina. . . . . . . . . . . . . . . . . .13Understanding Part II. . . . . . . . . . . . . . . . . . . . . . . . . . . . . . . . . . . . . . . . . . . . . . . . . . . . . . . . . . . . . . . . . . . . . . . . . . . . . . . . . . . . . . . . . . . . . . . . . .13
Chapter 6Installing PeopleSoft 9.1 General Ledger for Argentina... . . . . . . . . . . . . . . . .. . . . . . . . . . . . . . . . . . . . . . . . . .15Prerequisites.. . . . . . . . . . . . . . . . . . . . . . . . . . . . . . . . . . . . . . . . . . . . . . . . . . . . . . . . . . . . . . . . . . . . . . . . . . . . . . . . . . . . . . . . . . . . . . . . . . . . . . . . . . .15Changing a URL Definition for General Ledger File Import (Optional). . . . . . . . . . . . . . . . . . . . . . . . . . . . . . . . . . . . . . . . . .15Defining an Environmental Variable on a Process Scheduler Server. . . . . . . . . . . . . . . . . . . . . . . . . . . . . . . . . . . . . . . . . . .16Running File Import Processes Using the z/OS Database.. . .. . . . . . . . . . . . . . . . . . . . . . . . . . . . . . . . . . . . . . . . . . . . . . . . . . . .16
Chapter 7Installing and Setting Up Forms Processing for PeopleSoft Enterprise 9.1 Grantsfor Argentina.... . . . . . . . . . . . . . . . . . .. . . . . . . . . . . . . . . . . . . . . . . .. . . . . . . . . . . . . . . . . . . . . . . .. . . . . . . . . . . . . . . . . . . . . . . . . . . . .17Understanding Forms Processing for Argentina.. . . . . . . . . . . . . . . . . . . . . . . . . . . . . . . . . . . . . . . . . . . . . . . . . . . . . . . . . . . . . . . . . .17Downloading the Forms from the Sponsor Web Sites.. . . . . . . . . . . . . . . . . . . . . . . . . . . . . . . . . . . . . . . . . . . . . . . . . . . . . . . . . . . .18Setting Up the Forms URL Maintenance Area in PeopleSoft.. . . . . . . . . . . . . . . . . . . . . . . . . . . . . . . . . . . . . . . . . . . . . . . . . . . .18Entering the Names of the PDF Templates (Optional).. . . . . . . . . . . . . . . . . . . . . . . . . . . . . . . . .. . . . . . . . . . . . . . . . . . . . . . . . . . .19Printing the Forms (Optional). . . . . . . . . . . . . . . . . . . . . . . . . . . . . . . . . . . . . . . . . . . . . . . . . . . . . . . . . . . . . . . . . . . . . . . . . . . . . . . . . . . . . . . . .20Viewing Reports.. . . . . . . . . . . . . . . . . . . . . . . . . . . . . . . . . . . . . . . . . . . . . . . . . . . . . . . . . . . . . . . . . . . . . . . . . . . . . . . . . . . . . . . . . . . . . . . . . . . . . . .21
Chapter 8Installing PeopleSoft Enterprise 9.1 Expenses for Argentina... . . . . . . . . . . . . . . . . . . . . . . . . . . . . . . . . . . .23Configuring PeopleSoft Integration Broker.. . . . . . . . . . . . . . . . . . . . . . . . . . . . . . . . . . . . . . . . . . . . . . . . . . . . . . . . . . . . . . . . . . . . . . . . .23
Understanding the PeopleSoft Integration Broker Configuration.. . . . . . . . . . . . . . . . . . . . . . . . . . . . . . . . . . . .. . . . . . . .23Setting Up Quick Configuration.. . . . . . . . . . . . . . . . . . . . . . . . . . . . . . . . . . . . . . . . . . . . . . . . . . . . . . . . . . . . . . . . . . . . . . . . . .. . . . . . . .23Setting Up Gateways.. . . . . . . . . . . . . . . . . . . . . . . . . . . . . . . . . . . . . . . . . . . . . . . . . . . . . . . . . . . . . . . . . . . . . . . . . . . . . . . . . . . . . .. . . . . . . .24Activating the Local Domain... . . . . . . . . . . . . . . . . . . . . . . . . . . . . . . . . . . . . . . . . . . . . . . . . . . . . . . . . . . . . . . . . . . . . . . . . . . . .. . . . . . . .27Activating Queue Definitions.. . . . . . . . . . . . . . . . . . . . . . . . . . . . . . . . . . . . . . . . . . . . . . . . . . . . . . . . . . . . . . . . . . . . . . . . . . . . .. . . . . . . .27Setting up Service and Handlers.. . . . . . . . . . . . . . . . . . . . . . . . . . . . . . . . . . . . . . . . . . . . . . . . . . . . . . . . . . . . . . . . . . . . . . . .. . . . . . . .28
iv Copyright © 2011, Oracle and/or its affiliates. All rights reserved.

Contents
Verifying the Message Channel Status.. . . . . . . . . . . . . . . . . . . . . . . . . . . . . . . . . . . . . . . . . . . . . . . . . . . . . . . . . . . . . . . . .. . . . . . . .30Configuring the Employee Portal Servlet URL.... . . . . . . . . . . . . . . . . . . . . . . . . . . . . . . . . . . . . . . . . . . . . . . . . . . . . . . . . . . . . . . . . . .31Installing Oracle iReceipts for Your Apple iPhone... . . . . . . . . . . . . . . . . . . . . . . . . . . . . . . . . . . . . . . . . . . . . . . . . . . . . . . . . . . . . . . .31
Prerequisites.. . . . . . . . . . . . . . . . . . . . . . . . . . . . . . . . . . . . . . . . . . . . . . . . . . . . . . . . . . . . . . . . . . . . . . . . . . . . . . . . . . . . . . . . . . . . . . .. . . . . . . .31Verifying Correct Namespaces for Messaging.. . . . . . . . . . . . . . . . . . . . . . . . . . . . . . . . . . . . . . . . . . . . . . . . . . . . . . . . .. . . . . . . .32Setting Up Web Services for My Wallet Transactions.. . . . . . . . . . . . . . . . . . . . . . . . . . . . . . . . . . . . . . . . . . . . . . . .. . . . . . . .33Setting Up Service Operations for My Wallet Transactions.. . . . . . . . . . . . . . . . . . . . . . . . . . . . . . . . . . . . . . . . . .. . . . . . . .35
Chapter 9Installing PeopleSoft Enterprise 9.1 Pay/Bill Management for Argentina. . . . . . . . . . . . . . . . . . . . . . .39Understanding PeopleSoft Enterprise 9.1 Pay/Bill Management for Argentina.. . . . . . . . . . . . . . . . . . . . . . . . . . . . . . .39Prerequisites.. . . . . . . . . . . . . . . . . . . . . . . . . . . . . . . . . . . . . . . . . . . . . . . . . . . . . . . . . . . . . . . . . . . . . . . . . . . . . . . . . . . . . . . . . . . . . . . . . . . . . . . . . . .39Verifying Integration Points.. . . . . . . . . . . . . . . . . . . . . . . . . . . . . . . . . . . . . . . . . . . . . . . . . . . . . . . . . . . . . . . . . . . . . . . . . . . . . . . . . . . . . . . . . . .40
Understanding Integration Points Verification... . . . . . . . . . . . . . . . . . . . . . . . . . . . . . . . . . . . . . . . . . . . . . . . . . . . . . . . .. . . . . . . .40Setting Up Node Definitions for Single Signon.. . . . . . . . . . . . . . . . . . . . . . . . . . . . . . . . . . . . . . . . . . . . . . . . . . . . . . . .. . . . . . . .40Setting Up Portal Nodes.. . . . . . . . . . . . . . . . . . . . . . . . . . . . . . . . . . . . . . . . . . . . . . . . . . . . . . . . . . . . . . . . . . . . . . . . . . . . . . . . . .. . . . . . . .44Setting Up Single Signon.. . . . . . . . . . . . . . . . . . . . . . . . . . . . . . . . . . . . . . . . . . . . . . . . . . . . . . . . . . . . . . . . . . . . . . . . . . . . . . . . .. . . . . . . .48Setting Up Integration Gateways.. . . . . . . . . . . . . . . . . . . . . . . . . . . . . . . . . . . . . . . . . . . . . . . . . . . . . . . . . . . . . . . . . . . . . . . .. . . . . . . .49Activating Local Domains.. . . . . . . . . . . . . . . . . . . . . . . . . . . . . . . . . . . . . . . . . . . . . . . . . . . . . . . . . . . . . . . . . . . . . . . . . . . . . . . . .. . . . . . . .55Activating Queue Definitions.. . . . . . . . . . . . . . . . . . . . . . . . . . . . . . . . . . . . . . . . . . . . . . . . . . . . . . . . . . . . . . . . . . . . . . . . . . . . .. . . . . . . .56Setting up the Delivered Service Operations.. . . . . . . . . . . . . . . . . . . . . . . . . . . . . . . . . . . . . . . . . . . . . . . . . . . . . . . . . .. . . . . . . .58
Checking the Installation Table for PeopleSoft HCM and PeopleSoft FSCM... . . . . . . . . . . . . . . . . . . . . . . . . . . . . . . . .58Checking the Installation Table for PeopleSoft HCM... . . . . . . . . . . . . . . . . . . . . . . . . . . . . . . . . . . . . . . . . . . . . . . .. . . . . . . .58Checking the Installation Table for PeopleSoft FSCM... . . . . . . . . . . . . . . . . . . . . . . . . . . . . . . . . . . . . . . . . . . . . . .. . . . . . . .59
Chapter 10Installing PeopleSoft Enterprise 9.1 ESA and FSCM Portal Packs for Argentina.. . . . . . . . . . . . .61Granting Access to Navigation Pages.. . . . . . . . . . . . . . . . . . . . . . . . . . . . . . . . . . . . . . . . . . . . . . . . . . . . . . . . . . . . . . . . . . . . . . . . . . . . . .61Granting Access to Personalize the Portal Homepage... . . . . . . . . . . . . . . . . . . . . . . . . . . . . . . . . . . . . . . . . . . . . . . . . . . . . . . . . .61Enabling Pagelet Creation and Access with Portal Utilities.. . . . . . . . . . . . . . . . . . . . . . . . . . . . . . . . . . . . . . . . . . . . . . . . . . . . . .61
Chapter 11Integrating PeopleSoft Enterprise 9.1 Project Costing and Program Managementfor Argentina with Microsoft Project 2007..................... ................. ................. . . . . . . . .63Understanding the PeopleSoft-Microsoft Project Integration.. . . . . . . . . . . . . . . . . . . . . . . . . . . . . . . . . . . . . . . . . . . . . . . . . . . .63Installing the PeopleSoft-Microsoft Project Integrator. . . . . . . . . . . . . . . . . . . . . . . . . . . . . . . . . . . . . . . . . . . . . . . . . . . . . . . . . . . . .63Configuring the PeopleSoft-Microsoft Project Integrator. . . . . . . . . . . . . . . . . . . . . . . . . . . . . . . . . . . . . . . . . . . . . . . . . . . . . . . . . .64
Copyright © 2011, Oracle and/or its affiliates. All rights reserved. v

Contents
Chapter 12Defining an FTP Server for File Attachments in PeopleSoft Enterprise 9.1 ProjectCosting for Argentina.... . . . . . . . . . . . . . .. . . . . . . . . . . . . . . . . . . . .. . . . . . . . . . . . . . . . . . . .. . . . . . . . . . . . . . . . . . . . . . . . . . . . .67Understanding File Attachment Storage.. . . . . . . . . . . . . . . . . . . . . . . . . . . . . . . . . . . . . . . . . . . . . . . . . . . . . . . . . . . . . . . . . . . . . . . . . . .67Setting Up File Attachment Storage on the Database.. . . . . . . . . . . . . . . . . . . . . . . . . . . . . . . . . . . . . . . . . . . . . . . . . . . . . . . . . . . .67Setting Up File Attachment Storage on a File Server.. . . . . . . . . . . . . . . . . . . . . . . . . . . . . . . . . . . . . . . . . . . . . . . . . . . . . . . . . . . . .67
Chapter 13Setting Up PeopleSoft Enterprise 9.1 Staffing Front Office for Argentina.... . . . . . . . . . . . . . . . . . . .69Setting Up Document Attachments.. . . . . . . . . . . . . . . . . . . . . . . . . . . . . . . . . . . . . . . . . . . . . . . . . . . . . . . . . . . . . . . . . . . . . . . . . . . . . . . . .69Setting Up the Verity Search Engine (Optional). . . . . . . . . . . . . . . . . . . . . . . . . . . . . . . . . . . . . . . . . . . . . . . . . . . . . . . . . . . . . . . . . . . .71
Chapter 14Integrating PeopleSoft Transaction Billing Processor with PeopleSoft CustomerRelationship Management for Argentina.... . . . . . . . . . . . . . . . . . . . . . . . . . . . . . . . . . . . . . . . . . . . . . . . . . . . . . . . . . . . .73Understanding PeopleSoft Transaction Billing Processor and PeopleSoft CRM Integration. . . . . . . . . . . . . . . . .73Turning On and Activating the Integration Queues.. . . . . . . . . . . . . . . . . . . . . . . . . . . . . . . . . . . . . . . . . . . . . . . . . . . . . . . . . . . . . . .73Turning On and Activating the Integration Services and Routings.. . . . . . . . . . . . . . . . . . . . . . . . . . . . . . . . . . . . . . . . . . . . . .74Transforming the Contract Transaction Service.. . . . . . . . . . . . . . . . . . . . . . . . . . . . . . . . . . . . . . . . . . . . . . . . . . . . . . . . . . . . . . . . . . .80
Chapter 15Installing PeopleSoft Enterprise 9.1 Maintenance Management for Argentina withMicrosoft Project 2007..... . . . . . . . . . . . . . . . .. . . . . . . . . . . . . . . . . . . .. . . . . . . . . . . . . . . . . . .. . . . . . . . . . . . . . . . . . . . . . . . . . .85Prerequisites.. . . . . . . . . . . . . . . . . . . . . . . . . . . . . . . . . . . . . . . . . . . . . . . . . . . . . . . . . . . . . . . . . . . . . . . . . . . . . . . . . . . . . . . . . . . . . . . . . . . . . . . . . . .85Installing the PeopleSoft PeopleTools Process Scheduler on a Microsoft Windows Machine. . . . . . . . . . . . . . .85Installing Microsoft Project 2007... . . . . . . . . . . . . . . . . . . . . . . . . . . . . . . . . . . . . . . . . . . . .. . . . . . . . . . . . . . . . . . . . . . . . . . . . . . . . . . . . . . .86Configuring the Microsoft Project Integration Process.. . . . . . . . . . . . . . . . . . . . . . . . . . . . . . . . . . . . . . . . . . . . . . . . . . . . . . . . . . . .86
Chapter 16Integrating PeopleSoft Enterprise 9.1 Asset Management for Argentina witheCenterOne Space Management Solution (Optional)........ . . . . . . . . . . . . . . . . . . . . . . . . . . . . . . . .. . . . . . . . .89Understanding the Integration with eCenterOne Space Management. . . . . . . . . . . . . . . . . . . . . . . . . . . . . . . . . . . . . . . . . .89Installing the Target Connector for eCenterOne... . . . . . . . . . . . . . . . . . . . . . . . . . . . . . . . . . . . . . . . . . . . . . . . . . . . . . . . . . . . . . . . . .90Configuring the Local Gateway and Connector Properties. . . . . . . . . . . . . . . . . . . . . . . . . . . . . . . . . . . . . . . . . . . . . . . . . . . . . . .90Running Message Channel. . . . . . . . . . . . . . . . . . . . . . . . . . . . . . . . . . . . . . . . . . . . . . . . . . . . . . . . . . . . . . . . . . . . . . . . . . . . . . . . . . . . . . . . . . .93Activating the Domain for Asynchronous Messaging.. . . . . . . . . . . . . . . . . . . . . . . . . . . . . . . . . . . . . . . . . . . . . . . . . . . . . . . . . . . . .93
vi Copyright © 2011, Oracle and/or its affiliates. All rights reserved.

Contents
Activating Routings, Service Operations, and Updating Transaction Routings Properties. . . . . . . . . . . . . . . . . . .95Testing the eCenterOne Node... . . . . . . . . . . . . . . . . . . . . . . . . . . . . . . . . . . . . . . . . . . . . . . . . . . . . . . . . . . . . . . . . . . . . . . . . . . . . . . . . . . . . .96Activating the Space Management Install Option.. . . . . . . . . . . . . . . . . . . . . . . . . . . . . . . . . . . . . . . . . . . . . . . . . . . . . . . . . . . . . . . . .97Verifying the Integration.. . . . . . . . . . . . . . . . . . . . . . . . . . . . . . . . . . . . . . . . . . . . . . . . . . . . . . . . . . . . . . . . . . . . . . . . . . . . . . . . . . . . . . . . . . . . . .99
Verifying Node Definitions.. . . . . . . . . . . . . . . . . . . . . . . . . . . . . . . . . . . . . . . . . . . . . . . . . . . . . . . . . . . . . . . . . . . . . . . . . . . . . . . .. . . . . . . .99Verifying Service Operations.. . . . . . . . . . . . . . . . . . . . . . . . . . . . . . . . . . . . . . . . . . . . . . . . . . . . . . . . . . . . . . . . . . . . . . . . . . . . .. . . . . . .100
Chapter 17Integrating PeopleSoft 9.1 Asset Management for Argentina with PhysicalInventory Solutions...... . . . . . . . . . . . . . . . . . . . . . . . . . . . . . . . . . . . . . . . . . . . . . . . . . . . . . . . . . . . . . . . . . . . . . . . . . . . . . . . . . . . .103Understanding PeopleSoft 9.1 Asset Management and Physical Inventory Integration. . . . . . . . . . . . . . . . . . . . .103Configuring the Local Gateway.. . . . . . . . . . . . . . . . . . . . . . . . . . . . . . . . . . . . . . . . . . . . . . . . . . . . . . . . . . . . . . . . . . . . . . . . . . . . . . . . . . . . .103Configuring the Inbound Nodes.. . . . . . . . . . . . . . . . . . . . . . . . . . . . . . . . . . . . . . . . . . . . . . . . . . . . . . . . . . . . . . . . . . . . . . . . . . . . . . . . . . . .104Activating Service Operations.. . . . . . . . . . . . . . . . . . . . . . . . . . . . . . . . . . . . . . . . . . . . . . . . . . . . . . . . . . . . . . . . . . . . . . . . . . . . . . . . . . . . . .106Running Message Channel. . . . . . . . . . . . . . . . . . . . . . . . . . . . . . . . . . . . . . . . . . . . . . . . . . . . . . . . . . . . . . . . . . . . . . . . . . . . . . . . . . . . . . . . . .110Activating the Domain for Asynchronous Messaging.. . . . . . . . . . . . . . . . . . . . . . . . . . . . . . . . . . . . . . . . . . . . . . . . . . . . . . . . . . . .111
Chapter 18Integrating PeopleSoft Enterprise 9.1 IT Asset Management for Argentina withNetwork Inventory Discovery Systems.... . . . . . . . . . . . . . . . . . . . . . . . . . . . . . . . . . . . . . . . . . . . . . . . . . . . . . . . . . . . . .115Understanding the Integration of PeopleSoft 9.1 IT Asset Management with Network InventoryDiscovery Systems.... . . . . . . . . . . . . . . . . . . . . . . . . . . . . . . . . . . . . . . . . . . . . . . . . . . . . . . . . . . . . . . . . . . . . . . . . . . . . . . . . . . . . . . . . . . . . . . . .115Configuring the Local Gateway.. . . . . . . . . . . . . . . . . . . . . . . . . . . . . . . . . . . . . . . . . . . . . . . . . . . . . . . . . . . . . . . . . . . . . . . . . . . . . . . . . . . . .115Configuring the Inbound Nodes.. . . . . . . . . . . . . . . . . . . . . . . . . . . . . . . . . . . . . . . . . . . . . . . . . . . . . . . . . . . . . . . . . . . . . . . . . . . . . . . . . . . .116Activating Service Operations.. . . . . . . . . . . . . . . . . . . . . . . . . . . . . . . . . . . . . . . . . . . . . . . . . . . . . . . . . . . . . . . . . . . . . . . . . . . . . . . . . . . . . .118Managing Queue Status.. . . . . . . . . . . . . . . . . . . . . . . . . . . . . . . . . . . . . . . . . . . . . . . . . . . . . . . . . . . . . . . . . . . . . . . . . . . . . . . . . . . . . . . . . . . . .121Activating the Domain for Asynchronous Messaging.. . . . . . . . . . . . . . . . . . . . . . . . . . . . . . . . . . . . . . . . . . . . . . . . . . . . . . . . . . . .122
Chapter 19Part III: Installing PeopleSoft SCM Applications for Argentina...... ... . . . . . . . . . . . . . . . . . . . . . . . . . . .125Understanding Part III. . . . . . . . . . . . . . . . . . . . . . . . . . . . . . . . . . . . . . . . . . . . . . . . . . . . . . . . . . . . . . . . . . . . . . . . . . . . . . . . . . . . . . . . . . . . . . . . .125
Chapter 20Installing PeopleSoft Enterprise 9.1 eProcurement for Argentina........ . . . . . . . . . . . . . . . . . . . . . . . .127Understanding PeopleSoft Enterprise eProcurement 9.1 for Argentina.. . . . . . . . . . . . . . . . . . . . . . . . . . . . . . . . . . . . . . .127Installing PeopleSoft eProcurement CUP Item Export. . . . . . . . . . . . . . . . . . . . . . . . . . . . . . . . . . . . . . . . . . . . . . . . . . . . . . . . . . .127
Copyright © 2011, Oracle and/or its affiliates. All rights reserved. vii

Contents
Chapter 21Configuring eMail URLS in PeopleSoft SCM Applications for Argentina... . . . . . . . . . . . . . . . . . . . .131Understanding eMail Configuration for Argentina.. . . . . . . . . . . . . . . . . . . . . . . . . . . . . . . . . . . . . . . . . . . . . . . . . . . . . . . . . . . . . . . .131Configuring eMail URLs for Item Loader Exceptions.. . . . . . . . . . . . . . . . . . . . . . . . . . . . . . . . . . . . . . . . . . . . . . . . . . . . . . . . . . . .131Configuring eMail URLs for Supplier Facing Applications.. . . . . . . . . . . . . . . . . . . . . . . . . . . . . . . . . . . . . . . . . . . . . . . . . . . . . .132Configuring eMail URLs for eBill Payment. . . . . . . . . . . . . . . . . . . . . . . . . . . . . . . . . . . . . . . . . . . . . . . . . . . . . . . . . . . . . . . . . . . . . . . . .133
Chapter 22Setting Up PeopleSoft Enterprise 9.1 Supplier Contract Management for Argentina. .. . . . . .135Understanding the PeopleSoft Enterprise 9.1 Supplier Contract Management Setup for Argentina. .. . . . . .135
Chapter 23Setting Up PeopleSoft SCM Pagelets for Argentina... . . . . . . . . . . . . . . . . . . . . . . . . . . . . . . . . . . . . . . . . . . . . . .137Accessing Pagelets.. . . . . . . . . . . . . . . . . . . . . . . . . . . . . . . . . . . . . . . . . . . . . . . . . . . . . . . . . . . . . . . . . . . . . . . . . . . . . . . . . . . . . . . . . . . . . . . . . .137Enabling Pagelet Creation and Access with Portal Utilities.. . . . . . . . . . . . . . . . . . . . . . . . . . . . . . . . . . . . . . . . . . . . . . . . . . . . .137
Chapter 24Granting Access to Navigation Pages in PeopleSoft SCM for Argentina... . . . . . . . . . . . . . . . . . . . .139Adding User Roles to All User IDs.. . . . . . . . . . . . . . . . . . . . . . . . . . . . . . . . . . . . . . . . . . . . . . . . . . . . . . . . . . . . . . . . . . . . . . . . . . . . . . . . .139
Chapter 25Accessing PeopleSoft Financials, ESA, and SCM Applications for Argentina inPeopleSoft Enterprise 9.1 Portal Solutions.... . . . . . .. . . . . . . . . . . . . . . . . . . . . . . . . . . . . . . . . . . . . . . . . . . . . . . . . .141Accessing Applications.. . . . . . . . . . . . . . . . . . . . . . . . . . . . . . . . . . . . . . . . . . . . . . . . . . . . . . . . . . . . . . . . . . . . . . . . . . . . . . . . . . . . . . . . . . . . . .141
Appendix AConfiguring PeopleSoft Enterprise 9.1 Asset Management with eCenterOne SpaceManagement Solution...... . . . . . . . . . . . . . . . . . . . . . . . . . . . . . . . . . . . . . . . . . . . . . . . . . . . . . . . . . . . . . . . . . . . . . . . . . . . . . . . . .143
Appendix BConfiguring PeopleSoft Enterprise 9.1 IT Asset Management with NetworkDiscovery Systems.... . . . . . .. . . . . . . . . . . . . . . . . . . . . . . .. . . . . . . . . . . . . . . . . . . . . . . .. . . . . . . . . . . . . . . . . . . . . . . . . . . . . . . .145
viii Copyright © 2011, Oracle and/or its affiliates. All rights reserved.

Contents
Index ..... . . . . . . . . . . . . .. . . . . . . . . . . . . . . .. . . . . . . . . . . . . . . . .. . . . . . . . . . . . . . . .. . . . . . . . . . . . . . . .. . . . . . . . . . . . . . . .. . . . . . . . .147
Copyright © 2011, Oracle and/or its affiliates. All rights reserved. ix

Contents
x Copyright © 2011, Oracle and/or its affiliates. All rights reserved.

About This Documentation
This preface discusses:
• Understanding This Documentation
• Audience
• Typographical Conventions
• Products
• Related Information
• Comments and Suggestions
Understanding This DocumentationThis documentation is designed to direct you through a basic PeopleSoft installation. It is not a substitute for thedatabase administration documentation provided by your relational database management system (RDBMS)vendor, the network administration documentation provided by your network vendor, or the installation andconfiguration documentation for additional software components that are used with PeopleSoft products.
Required updates to this installation documentation are provided in the form of “Required for Install”incidents, which are available on My Oracle Support.
Instructions for installing Oracle’s PeopleSoft Enterprise PeopleTools are provided in PeopleSoft PeopleToolsinstallation guides. Application-specific installation instructions are provided in a separate document forthe PeopleSoft application. For instance, if you are installing Oracle’s PeopleSoft Enterprise CustomerRelationship Management (CRM), you need both the PeopleSoft PeopleTools installation guide and theadditional instructions provided for installing PeopleSoft CRM.
To find the installation documentation for PeopleSoft PeopleTools or for your PeopleSoft application, go toMy Oracle Support and search for the installation guide for your product and release.
Note. Before proceeding with your installation, check My Oracle Support to ensure that you have the latestversion of this installation guide for the correct release of the PeopleSoft product that you are installing.
AudienceThis documentation is written for the individuals responsible for installing and administering the PeopleSoftenvironment. This documentation assumes that you have a basic understanding of the PeopleSoft system.One of the most important components in the installation and maintenance of your PeopleSoft system isyour on-site expertise.
You should be familiar with your operating environment and RDBMS and have the necessary skills to supportthat environment. You should also have a working knowledge of:
• SQL and SQL command syntax.
• PeopleSoft system navigation.
Copyright © 2011, Oracle and/or its affiliates. All rights reserved. xi
Preface
• PeopleSoft windows, menus, and pages, and how to modify them.• Microsoft Windows.
Oracle recommends that you complete training, particularly the PeopleSoft Server Administration andInstallation course, before performing an installation.
See Oracle University http://education.oracle.com
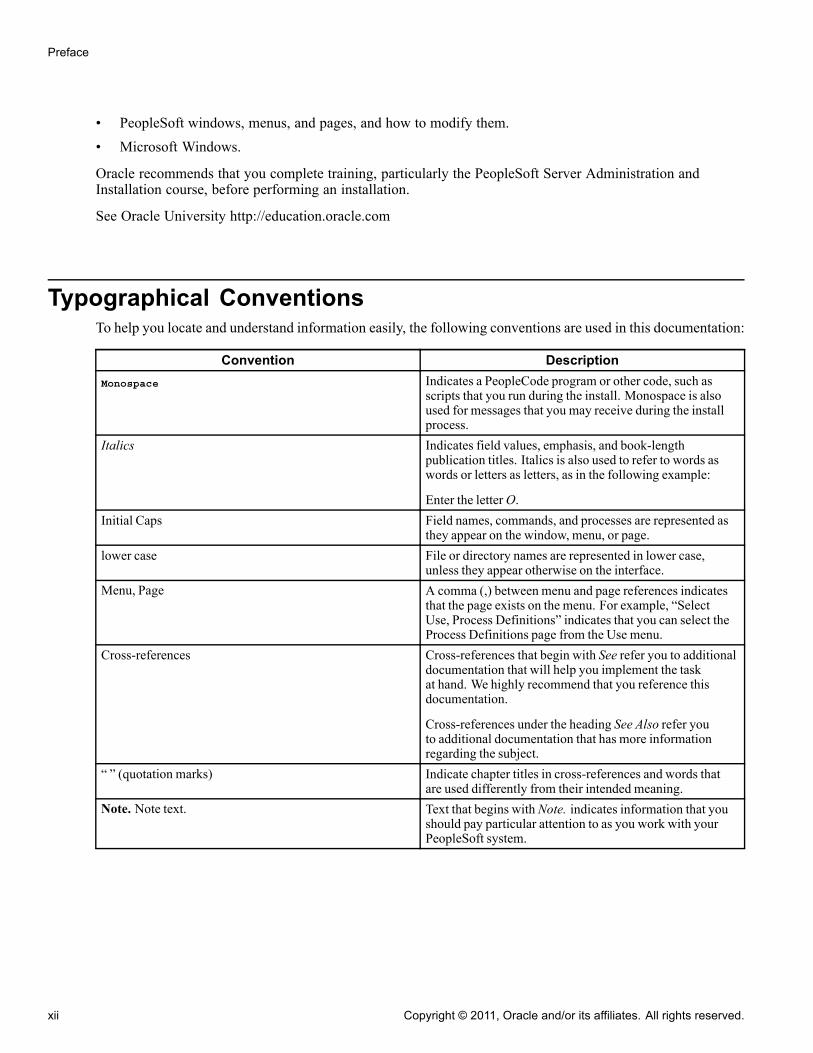
Typographical ConventionsTo help you locate and understand information easily, the following conventions are used in this documentation:
Convention DescriptionMonospace Indicates a PeopleCode program or other code, such as
scripts that you run during the install. Monospace is alsoused for messages that you may receive during the installprocess.
Italics Indicates field values, emphasis, and book-lengthpublication titles. Italics is also used to refer to words aswords or letters as letters, as in the following example:
Enter the letterO.Initial Caps Field names, commands, and processes are represented as
they appear on the window, menu, or page.lower case File or directory names are represented in lower case,
unless they appear otherwise on the interface.Menu, Page A comma (,) between menu and page references indicates
that the page exists on the menu. For example, “SelectUse, Process Definitions” indicates that you can select theProcess Definitions page from the Use menu.
Cross-references Cross-references that begin with See refer you to additionaldocumentation that will help you implement the taskat hand. We highly recommend that you reference thisdocumentation.
Cross-references under the heading See Also refer youto additional documentation that has more informationregarding the subject.
“ ” (quotation marks) Indicate chapter titles in cross-references and words thatare used differently from their intended meaning.
Note. Note text. Text that begins with Note. indicates information that youshould pay particular attention to as you work with yourPeopleSoft system.
xii Copyright © 2011, Oracle and/or its affiliates. All rights reserved.

Preface
Convention DescriptionImportant! Important note text. A note that begins with Important! is crucial and includes
information about what you need to do for the system tofunction properly.
Warning! Warning text. A note that begins withWarning! contains criticalconfiguration information or implementationconsiderations; for example, if there is a chance of losing orcorrupting data. Pay close attention to warning messages.
ProductsThis documentation may refer to these products and product families:
• Oracle® BPEL Process Manager• Oracle® Enterprise Manager• Oracle® Tuxedo• Oracle® WebLogic Server• Oracle’s PeopleSoft Application Designer• Oracle’s PeopleSoft Change Assistant• Oracle’s PeopleSoft Change Impact Analyzer• Oracle’s PeopleSoft Data Mover• Oracle’s PeopleSoft Process Scheduler• Oracle’s PeopleSoft Pure Internet Architecture• Oracle’s PeopleSoft Enterprise Customer Relationship Management• Oracle’s PeopleSoft Enterprise Financial Management• Oracle’s PeopleSoft Enterprise Human Resources Management Systems• Oracle’s PeopleSoft Enterprise Learning Management• Oracle’s PeopleSoft Enterprise Pay/Bill Management• Oracle’s PeopleSoft Enterprise PeopleTools• Oracle’s PeopleSoft Enterprise Performance Management• Oracle’s PeopleSoft Enterprise Portal Solutions• Oracle’s PeopleSoft Enterprise Staffing Front Office• Oracle’s PeopleSoft Enterprise Supply Chain Management
Note. This documentation may refer to both Oracle’s PeopleSoft Enterprise Portal Solutions and to PeopleSoftPeopleTools portal or portal technologies. PeopleSoft Enterprise Portal Solutions is a separate applicationproduct. The PeopleSoft PeopleTools portal technologies consist of PeopleSoft Pure Internet Architecture andthe PeopleSoft PeopleTools portal technology used for creating and managing portals.
See http://www.oracle.com/applications/peoplesoft-enterprise.html for a list of PeopleSoft Enterprise products.
Copyright © 2011, Oracle and/or its affiliates. All rights reserved. xiii

Preface
Related InformationOracle provides reference information about PeopleSoft PeopleTools and your particular PeopleSoftapplication. The following documentation is available on My Oracle Support:
• Enterprise PeopleTools PeopleBook: Getting Started with PeopleTools for your release. Thisdocumentation provides a high-level introduction to PeopleTools technology and usage.
• PeopleSoft Enterprise Application Fundamentals PeopleBook for your PeopleSoft application and release.This documentation provides essential information about the setup, design, and implementation of yourPeopleSoft application.
To access PeopleSoft PeopleBooks, go to My Oracle Support and search for the PeopleSoft PeopleBooks foryour application and release.
To install additional component software products for use with PeopleSoft products, including those productsthat are packaged with your PeopleSoft products, you should refer to the documentation provided with thoseproducts, as well as this documentation.
Comments and SuggestionsYour comments are important to us. We encourage you to tell us what you like, or what you would likechanged about our documentation, PeopleBooks, and other Oracle reference and training materials. Pleasesend your suggestions to:
While we cannot guarantee to answer every email message, we will pay careful attention to your commentsand suggestions. We are always improving our product communications for you.
xiv Copyright © 2011, Oracle and/or its affiliates. All rights reserved.
CHAPTER 1
Part I: Common Elements to Install PeopleSoftFMS, ESA, SFO, and SCM Applicationsfor Argentina
Understanding Part IThe chapters in this section of the documentation include installation instructions that apply to PeopleSoftEnterprise Financial Management Solutions (FMS), PeopleSoft Enterprise Service Automation (ESA),PeopleSoft Staffing Front Office (SFO), and PeopleSoft Enterprise Supply Chain Management (SCM)applications for Argentina.
This section includes:
• Installing PeopleSoft PeopleTools and Creating the PeopleSoft Enterprise Financials/Supply ChainManagement Database
• Configuring Application SQRs and COBOL for DB2 and the OS/390 Server• Setting Database Requirements to Run the ChartField Configuration Process
Task 1-1: Using Oracle E-Delivery to Obtain Installation FilesBefore beginning the installation, you must obtain the PeopleSoft Financials and PeopleSoft Supply ChainManagement 9.1 installation software by downloading the necessary zip files from the Oracle E-Deliveryweb site. Use the documentation available on E-Delivery to ensure that you obtain all of the zip files that arerequired for your environment.
See http://edelivery.oracle.com
Copyright © 2011, Oracle and/or its affiliates. All rights reserved. 1

Part I: Common Elements to Install PeopleSoft FMS, ESA, SFO, and SCM Applications for Argentina Chapter 1
2 Copyright © 2011, Oracle and/or its affiliates. All rights reserved.

CHAPTER 2
Installing PeopleSoft PeopleTools and Creatingthe PeopleSoft Enterprise Financials/SupplyChain Management Database for Argentina
This chapter discusses:
• Prerequisites
• Installing PeopleSoft PeopleTools and Creating the PeopleSoft FSCM Database
PrerequisitesThis section provides prerequisite installation instructions required to create the PeopleSoft EnterpriseFinancials/Supply Chain Management (FSCM) database for Argentina.
Before you install specific applications, you must install PeopleSoft Enterprise PeopleTools and create yourPeopleSoft FSCM database. You must also set up the installation defaults and delete the summary treesfrom the System (SYS) database.
Note. Unless otherwise noted, PeopleSoft PeopleTools 8.51 or higher is required at install.
See PeopleSoft Enterprise PeopleTools 8.51 Installation, "Creating a Database."
Task 2-1: Installing PeopleSoft PeopleTools and Creatingthe PeopleSoft FSCM Database
This section discusses:
• Verifying the PeopleSoft PeopleTools Version
• Reviewing the PeopleSoft FSCM Demo Database Sizing Information
• Reviewing EDM Pool Considerations
• Setting Up Installation Defaults for the PeopleSoft FSCM System Database
• Deleting Summary Trees for the PeopleSoft FSCM System Database
Copyright © 2011, Oracle and/or its affiliates. All rights reserved. 3

Installing PeopleSoft PeopleTools and Creating the PeopleSoft Enterprise Financials/Supply Chain Management Database forArgentina Chapter 2
Task 2-1-1: Verifying the PeopleSoft PeopleTools VersionThe PeopleSoft Enterprise FSCM 9.1 database for Argentina requires the installation of PeopleSoftPeopleTools 8.51 or higher.
Task 2-1-2: Reviewing the PeopleSoft FSCM DemoDatabase Sizing InformationThe following table lists the approximate PeopleSoft FSCM 9.1 Demo database size for each RDBMS platform.
Platform Approximate Database SizeOracle—Non-Unicode/Unicode 28.5 GBDB2 LUW—Non-Unicode 37 GBDB2 LUW—Unicode 71 GBDB2 z/OS—Non-Unicode 24.7 GBDB2 z/OS—Unicode 31.8 GBMicrosoft SQL Server—Non-Unicode 5.5 GBMicrosoft SQL Server—Unicode 7.6 GB
Note. Oracle recommends that the Database Size Heap for the DB2 LUW platform only, should be increasedto 20,000 (minimum) to avoid any temporary table failure during Demo database creation.
Note. For the sake of brevity, this documentation sometimes refers to DB2 UDB for z/OS as DB2 z/OS, and itsometimes refers to DB2 UDB for Linux, UNIX, and Microsoft Windows as DB2 LUW.
Task 2-1-3: Reviewing EDM Pool ConsiderationsThe PeopleSoft installation procedure places all tables for the product you are installing into multiple, physicalDB2 z/OS databases using a shared table space methodology. Depending on the applications that you areinstalling, the DB2 subsystem may have a minimum EDM Pool Size of 10–30 MB.
Task 2-1-4: Setting Up Installation Defaults for thePeopleSoft FSCM System DatabaseRun the following script against the System (SYS) database only for PeopleSoft FSCM:
EAINSSYS.DMS -- Installation Defaults
This script establishes the installation defaults for the database. You should only run this script against theSystem (SYS) database.
Task 2-1-5: Deleting Summary Trees for the PeopleSoftFSCM System DatabaseRun the following script against the System (SYS) database only for PeopleSoft FSCM:
EPCLNTRE.DMS -- Tree Definitions
4 Copyright © 2011, Oracle and/or its affiliates. All rights reserved.

Chapter 2 Installing PeopleSoft PeopleTools and Creating thePeopleSoft Enterprise Financials/Supply Chain Management Database for Argentina
This script deletes all of the summary trees from the database. You should only run this script against theSystem (SYS) database.
Copyright © 2011, Oracle and/or its affiliates. All rights reserved. 5

Installing PeopleSoft PeopleTools and Creating the PeopleSoft Enterprise Financials/Supply Chain Management Database forArgentina Chapter 2
6 Copyright © 2011, Oracle and/or its affiliates. All rights reserved.
CHAPTER 3
Configuring Application SQRs and COBOL forDB2 and the OS/390 Server for Argentina
This chapter discusses:
• Understanding SQR and COBOL Processing on the DB2 z/OS Server
• Allocating Data Sets on the OS/390 File Systems
• Modifying the JCL Shells
Understanding SQR and COBOL Processingon the DB2 z/OS Server
This section applies to PeopleSoft FSCM product customers for Argentina using the DB2 OS/390 databaseplatform who want to run SQR and COBOL processes on the OS390 Server that require reading of or writingto external files.
For both SQR and COBOL processing on the DB2 z/OS server, standard JCL templates are provided, whichare used by the Process Scheduler to submit jobs in the z/OS server. These shells accommodate basic inputand output files determined by the program engines themselves, but for those SQR and COBOL processesthat require special input or output files, additional modifications must be made to the JCL templates toaccommodate these files.
PeopleSoft Enterprise General Ledger and PeopleSoft Enterprise Cash Management both contain several ofthese special files in certain SQR processes. To accommodate these files, data sets must be pre-allocated on theOS/390 file system as well as modifications made to the JCL shells.
Task 3-1: Allocating Data Sets on the OS/390 File SystemsSequential or partitioned data sets can be used in COBOL and SQR processing. The DISP parameter in theJCL is critical to the successful execution of a JCL job submission, and very sensitive to the data set dispositionat the initiation of the job. For this reason, we strongly recommend the use of a partitioned data set, rather thansequential data sets—particularly for output files—and for input files, when the existence of the actual filedrives the processing path that the program takes.
Copyright © 2011, Oracle and/or its affiliates. All rights reserved. 7
Configuring Application SQRs and COBOL for DB2 and the OS/390 Server for Argentina Chapter 3
The same JCL Shells are shared by all like processes, and an invalid file disposition can prevent all processesfrom executing successfully, not just the process that actually uses the file. For this reason we recommendusing DISP=SHR in the JCL Shells, which will be discussed later. DISP=SHR presumes that the data setexists at the time a job execution is initiated. If the data set does not exist, a JCL error will occur. For aPDS, the individual member does not need to exist, only the root data set. If the member does not exist, itwill automatically be created by the OS/390 file management system.
Partitioned data sets should be allocated including the following attributes:
• The record format should be variable block (RECFM=VB).• The record length should be slightly wider than the record length of the file, as defined within the SQR
itself.Refer to the table that follows for SQR LRECL definitions.
• The data set name type should be PDS (DSORG=PO).
Here is an example of a JCL statement to allocate a PDS:
//*
//PDSALL DD DSN=PSHLQ.PPVVV.SQRFILES,
// DISP=(,CATLG,DELETE),
// DCB=(DSORG=PO,RECFM=VB,LRECL=500),
// VOL=SER=,
// SPACE=(TRK,(200,95,75),RLSE),
// UNIT=SYSDA
// *
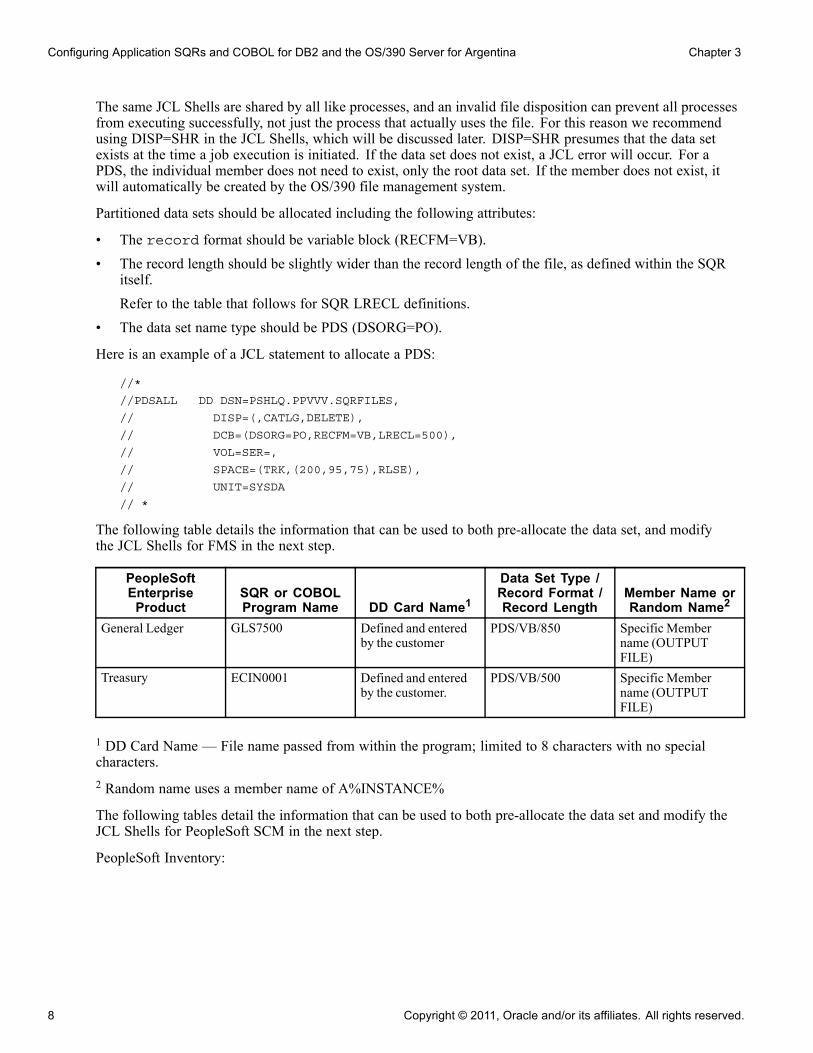
The following table details the information that can be used to both pre-allocate the data set, and modifythe JCL Shells for FMS in the next step.
PeopleSoftEnterpriseProduct
SQR or COBOLProgram Name DD Card Name1
Data Set Type /Record Format /Record Length
Member Name orRandom Name2
General Ledger GLS7500 Defined and enteredby the customer
PDS/VB/850 Specific Membername (OUTPUTFILE)
Treasury ECIN0001 Defined and enteredby the customer.
PDS/VB/500 Specific Membername (OUTPUTFILE)
1 DD Card Name — File name passed from within the program; limited to 8 characters with no specialcharacters.2 Random name uses a member name of A%INSTANCE%
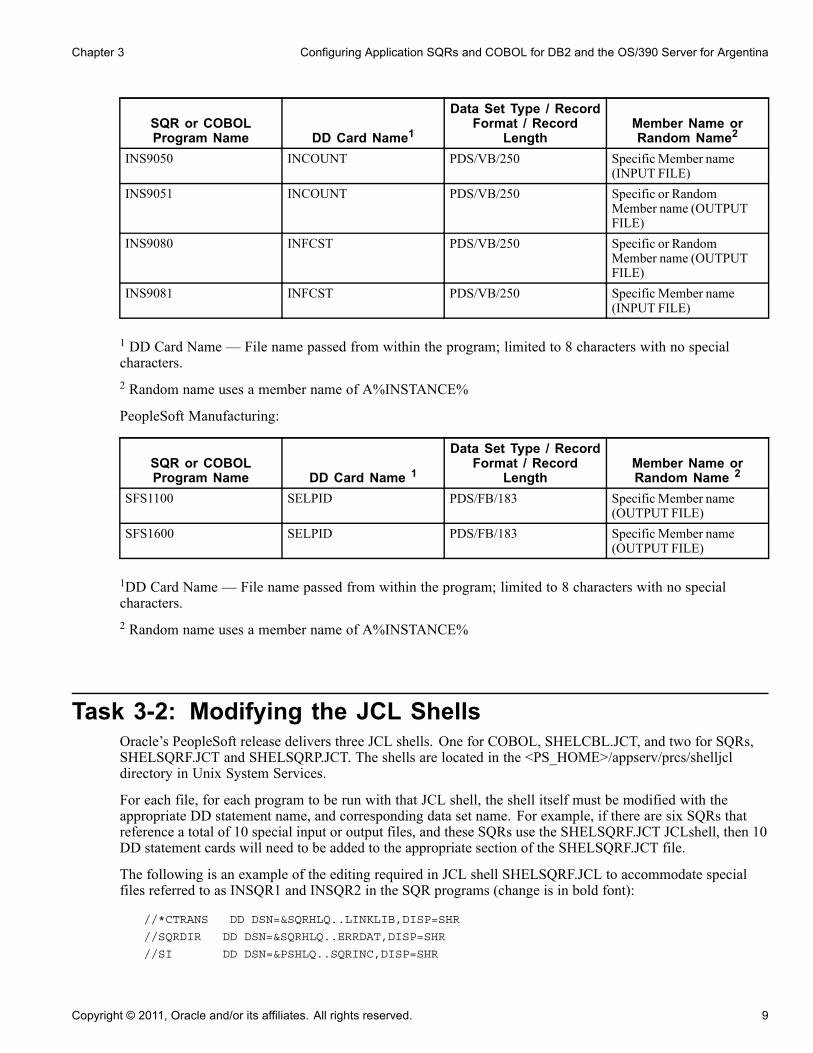
The following tables detail the information that can be used to both pre-allocate the data set and modify theJCL Shells for PeopleSoft SCM in the next step.
PeopleSoft Inventory:
8 Copyright © 2011, Oracle and/or its affiliates. All rights reserved.
Chapter 3 Configuring Application SQRs and COBOL for DB2 and the OS/390 Server for Argentina
SQR or COBOLProgram Name DD Card Name1
Data Set Type / RecordFormat / Record
LengthMember Name orRandom Name2
INS9050 INCOUNT PDS/VB/250 Specific Member name(INPUT FILE)
INS9051 INCOUNT PDS/VB/250 Specific or RandomMember name (OUTPUTFILE)
INS9080 INFCST PDS/VB/250 Specific or RandomMember name (OUTPUTFILE)
INS9081 INFCST PDS/VB/250 Specific Member name(INPUT FILE)
1 DD Card Name — File name passed from within the program; limited to 8 characters with no specialcharacters.2 Random name uses a member name of A%INSTANCE%
PeopleSoft Manufacturing:
SQR or COBOLProgram Name DD Card Name 1
Data Set Type / RecordFormat / Record
LengthMember Name orRandom Name 2
SFS1100 SELPID PDS/FB/183 Specific Member name(OUTPUT FILE)
SFS1600 SELPID PDS/FB/183 Specific Member name(OUTPUT FILE)
1DD Card Name — File name passed from within the program; limited to 8 characters with no specialcharacters.2 Random name uses a member name of A%INSTANCE%
Task 3-2: Modifying the JCL ShellsOracle’s PeopleSoft release delivers three JCL shells. One for COBOL, SHELCBL.JCT, and two for SQRs,SHELSQRF.JCT and SHELSQRP.JCT. The shells are located in the <PS_HOME>/appserv/prcs/shelljcldirectory in Unix System Services.
For each file, for each program to be run with that JCL shell, the shell itself must be modified with theappropriate DD statement name, and corresponding data set name. For example, if there are six SQRs thatreference a total of 10 special input or output files, and these SQRs use the SHELSQRF.JCT JCLshell, then 10DD statement cards will need to be added to the appropriate section of the SHELSQRF.JCT file.
The following is an example of the editing required in JCL shell SHELSQRF.JCL to accommodate specialfiles referred to as INSQR1 and INSQR2 in the SQR programs (change is in bold font):
//*CTRANS DD DSN=&SQRHLQ..LINKLIB,DISP=SHR
//SQRDIR DD DSN=&SQRHLQ..ERRDAT,DISP=SHR
//SI DD DSN=&PSHLQ..SQRINC,DISP=SHR
Copyright © 2011, Oracle and/or its affiliates. All rights reserved. 9

Configuring Application SQRs and COBOL for DB2 and the OS/390 Server for Argentina Chapter 3
//SYSTERM DD SYSOUT=*
//SYSOUT DD SYSOUT=*
//DBGLOG DD SYSOUT=*
//SYSTMPDB DD UNIT=WORK,SPACE=(TRK,25) VS1 ONLY
//SP DD DSN=&PSHLQ..SQRSRC(&SQRID),DISP=SHR
//* ADD DD STATEMENTS HERE FOR LIBRARY CONCATENATION
//*
//SYSTERM DD SYSOUT=*
//*
%SQROUT%
//*
//SQRPOST DD DSN=&SQRHLQ..DAT(POSTSCRI),DISP=SHR
//SYSERR DD SYSOUT=*
//SYSTSIN DD DSN=&PSHLQ..PARMLIB(NOPARMS),DISP=SHR
//SYSIN DD DSN=&PSHLQ..PARMLIB(&PRMID),DISP=SHR
//SQRINI DD DSN=&PSHLQ..SQRSRC(PSSQRINI),DISP=SHR
//INSQR1 DD DSN=&PSHLQ..INSQRPDS(A%INSTANCE%),DISP=SHR
//INSQR2 DD DSN=&PSHLQ..INSQRPDS(INFILE),DISP=SHR
// PEND
//*
//%PRCSNAME% EXEC SQRPROC,SQRID=%PRCSNAME%
//SYSTSIN DD *
DSN SYSTEM(%DB2SUB%)
RUN PROG(SQR) -
PLAN(SQRPLAN) -
LIB(’SYS5.SQR614B1.SQR.UNICODE.LOAD’) -
%SQRFLAGS%
END
//*
//SYSIN DD *
%SQRPARMS%
/*
If you have already configured a process scheduler, the shells used by that configuration can be found in:<PS_HOME>/appserv/prcs/<process scheduler name>/shelljcl.
Note. You must stop and restart the process scheduler for the edits in the JCL shells to take effect.
10 Copyright © 2011, Oracle and/or its affiliates. All rights reserved.

CHAPTER 4
Setting Database Requirements to Run theChartField Configuration Process for Argentina
Understanding Database Requirements for the ChartFieldConfiguration Process for Argentina
Due to the large number of updates performed by the ChartField Configuration Application Engine program(FS_CFCONFIG) for Argentina, you may encounter certain database errors when running the program. Thisis particularly true if you are adding or deleting ChartFields in your configuration. To address this, Oraclerecommends the database settings provided in the following section as a starting point. However, you mayneed to adjust these upward if you encounter errors while running the utility.
Task 4-1: Defining Settings to Run ChartField ConfigurationOracle recommends that you use the following settings when you run the ChartField Configuration processfor the supported database platforms:
• DB2 LUW• Update the locking mode to share:
db2set DB2_RR_TO_RS = yes
This sets Lock mode requested = Next Key Share (NS).• Include the following command in the DBMCFG.SQL configuration file:
UPDATE DBM CFG USING QUERY_HEAP_SZ 64000
• Log file size (4KB): (LOGFILSIZ) = 24000
• Number of primary log files: (LOGPRIMARY) = 20
Copyright © 2011, Oracle and/or its affiliates. All rights reserved. 11

Setting Database Requirements to Run the ChartField Configuration Process for Argentina Chapter 4
• Use the following minimum Tablespace sizes (these may need to be increased):
BDAPP 9720
BDAPPIDX 2680
BDLARGE 1191
FAAPP 11312
FSLARGEIDX 13568
LCAPP 28572
LCAPPIDX 2600• Recycle the instance after changing the settings.
• DB2 z/OSNo changes recommended.
• Microsoft SQL Server 2000
Log Space = 1500MB
• Oracle• Rollback or UNDO Tablespace = 1536MB
• Rollback Segment sizing: Initial Extent + (Next Extent * Maxextents) = 1024MB (approximate).
• dml_locks = 1024 (set in init.ora).
• Changing the dml_locks setting requires recycling the instance.
12 Copyright © 2011, Oracle and/or its affiliates. All rights reserved.
CHAPTER 5
Part II: Installing PeopleSoft FMS, ESA andSFO Applications for Argentina
Understanding Part IIThis section includes:
• Installing PeopleSoft Enterprise 9.1 General Ledger• Installing and Setting Up Forms Processing for PeopleSoft Enterprise 9.1 Grants• Installing PeopleSoft Enterprise 9.1 Expenses• Installing PeopleSoft Enterprise 9.1 Pay/Bill Management• Installing PeopleSoft Enterprise 9.1 ESA and FSCM Portal Packs• Integrating PeopleSoft Enterprise 9.1 Project Costing and Program Management with Microsoft Project
2007• Defining an FTP Server for File Attachments in PeopleSoft Enterprise 9.1 Project Costing• Setting Up PeopleSoft Enterprise 9.1 Staffing Front Office• Integrating PeopleSoft Transaction Billing Processor with PeopleSoft Customer Relationship Management• Installing PeopleSoft Enterprise 9.1 Maintenance Management with Microsoft Project 2007• Integrating PeopleSoft Enterprise 9.1 Asset Management with eCenterOne Space Management Solution
(Optional)• Integrating PeopleSoft 9.1 Asset Management with Physical Inventory Solutions• Integrating PeopleSoft Enterprise 9.1 IT Asset Management with Network Inventory Discovery Systems
Copyright © 2011, Oracle and/or its affiliates. All rights reserved. 13

Part II: Installing PeopleSoft FMS, ESA and SFO Applications for Argentina Chapter 5
14 Copyright © 2011, Oracle and/or its affiliates. All rights reserved.

CHAPTER 6
Installing PeopleSoft 9.1 General Ledgerfor Argentina
This chapter discusses:
• Prerequisites
• Changing a URL Definition for General Ledger File Import (Optional)
• Defining an Environmental Variable on a Process Scheduler Server
• Running File Import Processes Using the z/OS Database
PrerequisitesThis document describes the steps necessary to establish the file attachment storage location for documentsthat are imported to PeopleSoft Enterprise General Ledger for Argentina and database specifics for variousfile import processes.
The file import processes discussed in this chapter depend on the setup described in the following table:
Process DescriptionGL_JRNL_IMP Flat file journal importGL_LED_IMP Flat file ledger importGL_EXCL_JRNL Spreadsheet journal batch importGL_F2_MAF FACTS II LoadMAF DataGLFACTSI_MAF FACTS I Load Data (FACTSIMAF, SGL Accounts,
Trading Partners)GL_GOALS_IMP GOALS Disbursement/Receipt Files (Ledger Activity and
Trial Balance)
Task 6-1: Changing a URL Definition for GeneralLedger File Import (Optional)
The storage location of the file attachment is defined by the URL definition GL_FILE_IMPORT. By default, itpoints to a database record. You may want to change the storage location of the file attachment to anotherlocation, such as an FTP server. This is optional.
To change this URL definition:
Copyright © 2011, Oracle and/or its affiliates. All rights reserved. 15

Installing PeopleSoft 9.1 General Ledger for Argentina Chapter 6
1. Select PeopleTools, Utilities, Administration, URLs.2. Open GL_FILE_IMPORT.3. Change to an FTP server location of your choice.
See AlsoEnterprise PeopleTools 8.51 PeopleBook: PeopleCode Developer’s Guide, "Understanding File Attachmentsand PeopleCode."
Task 6-2: Defining an Environmental Variable ona Process Scheduler Server
You are required to define an environmental variable, PS_FILEDIR. This variable defines the temporary flatfile location on the process scheduler that runs the file import process.
• If you have a UNIX or z/OS process scheduler, edit the psconfig.sh file and specify in environmentvariable PS_FILEDIR the flat file location. For example:
PS_FILEDIR=/tmp;export PS_FILEDIR
• If you have a Microsoft Windows process scheduler, select Start, Programs, Control Panel, System. Selectthe Advanced Tab, and click Environment Variables. Add or modify the system variable PS_FILEDIR,and specify its value. For example:
C:\TEMP
Note. For more technical information on this topic, please refer to the PeopleTools description of GetFile()PeopleCode for details, or consult your system administrator.
Task 6-3: Running File Import Processes Usingthe z/OS Database
This is a general reminder for those who run import processes. If the import process enables you to specifyCharacter Set, select the Character Set appropriate to the flat file being imported. For example, you may selectISO_8859-6 for Arabic, and JIS_X_0208 or Shift_JIS for Japanese.
For those running the following specific import processes:
GL_F2_MAF
GLFACTSI_MAF
GL_GOALS_IMP
If you have a DB2/390 database and you prepare the flat file in ASCII format, you can run the process only onMicrosoft Windows or UNIX process schedule servers. If you prepare the flat file in EBCDIC format, you canrun the import process only on OS390 process schedule servers. For all other databases, there is no limitation onthe type of process schedule servers. The appropriate process schedulers should be set up for these processes.
16 Copyright © 2011, Oracle and/or its affiliates. All rights reserved.

CHAPTER 7
Installing and Setting Up Forms Processing forPeopleSoft Enterprise 9.1 Grants for Argentina
This chapter discusses:
• Understanding Forms Processing for Argentina
• Downloading the Forms from the Sponsor Web Sites
• Setting Up the Forms URL Maintenance Area in PeopleSoft
• Entering the Names of the PDF Templates (Optional)
• Printing the Forms (Optional)
• Viewing Reports
Understanding Forms Processing for ArgentinaThe PeopleSoft Enterprise Grants forms printing solution for Argentina uses file layouts to generate XML.This is accomplished using existing PeopleSoft PeopleTools functionality. Through the use of XML/XFDF,the PeopleSoft Grants forms solution maps all of the required data elements to the actual sponsor forms.As a result, you can edit and print forms online using Adobe Acrobat Reader 5.0. Because this solutionuses standard PeopleSoft PeopleTools technology, you no longer need to engage an additional component(third-party) vendor to fulfill your forms printing needs.
You can use the new forms printing solution with the following forms:
• Grant Application (PHS 398)This is the set of proposal application forms that the National Institutes of Health requires for fundingrequests. It should be noted that this form set is in the process of being superceded by SF-424 R&Rsubmissions through Grants.gov.
• Non-Competing Grant Progress Report (PHS 2590)This is an interim progress report that the National Institutes of Health requires recipients to submit forfunding. This form is typically submitted on an annual basis.
• Federal Cash Transaction Report (SF- 272)This is an Office of Management and Budget form that is utilized to provide an accounting of yourcash position with the government during a specific time frame. This form is typically submitted on aquarterly basis.
• Financial Status Report (SF-269)This is an Office of Management and Budget form. It is utilized to provide a periodic accounting on grantsthat you have received. It includes information such as expenditures, budget, and remaining balances.
Copyright © 2011, Oracle and/or its affiliates. All rights reserved. 17

Installing and Setting Up Forms Processing for PeopleSoft Enterprise 9.1 Grants for Argentina Chapter 7
Task 7-1: Downloading the Forms from the SponsorWeb SitesTo set up the forms solution for your database, you must download all of the following .pdf files from thesponsor Web sites:
• http://grants.nih.gov/grants/funding/2590/2590_forms.pdf
Full Package of 2590 Reports that include: Grant Progress Report, Form Page 1 - Continued, DetailedBudget for Next Budget Period – Direct Costs Only, Budget Justification/Current Budget Period, ProgressReport Summary, Checklist, All Personnel Report, Next Budget Period, Targeted/Planned EnrollmentTable, Inclusion Enrollment Report, Trainee Diversity Report
• http://grants.nih.gov/grants/funding/phs398/398_forms.pdf
Grant Application
• http://grants.nih.gov/grants/funding/phs398/biosketch.pdf
Biographical Sketch
• http://grants.nih.gov/grants/funding/phs398/continuation.pdf
Continuation Format Page
• http://grants.nih.gov/grants/funding/phs398/fp4.pdf
Detailed Budget for Initial Budget Period Direct Costs Only
• http://grants.nih.gov/grants/funding/2590/enrollment.pdf
Targeted/Planned Enrollment Form
• http://www.fhwa.dot.gov/aaa/pdfs/sf269a.pdf
Financial Status Report - Short Form
• http://www.whitehouse.gov/sites/default/files/omb/grants/sf269.pdf
Financial Status Report - Long Form
• http://www.whitehouse.gov/sites/default/files/omb/grants/sf272.pdf
Federal Cash Transactions Report
• http://www.tc.faa.gov/logistics/grants/forms/sf272a.pdf
Report of Federal Cash Transactions - Continued
Place these files in the location defined for the URL maintenance area, as described in the following section.
See Setting Up the Forms URL Maintenance Area in PeopleSoft.
Task 7-2: Setting Up the Forms URL MaintenanceArea in PeopleSoft
To set up the forms URL maintenance area:
1. Select PeopleTools, Utilities, Administration, URLs to access the URL Maintenance page.2. On the URL search page, search for and select the URL identifier GM_FORMS_LOCATION.
18 Copyright © 2011, Oracle and/or its affiliates. All rights reserved.
Chapter 7 Installing and Setting Up Forms Processing for PeopleSoft Enterprise 9.1 Grants for Argentina
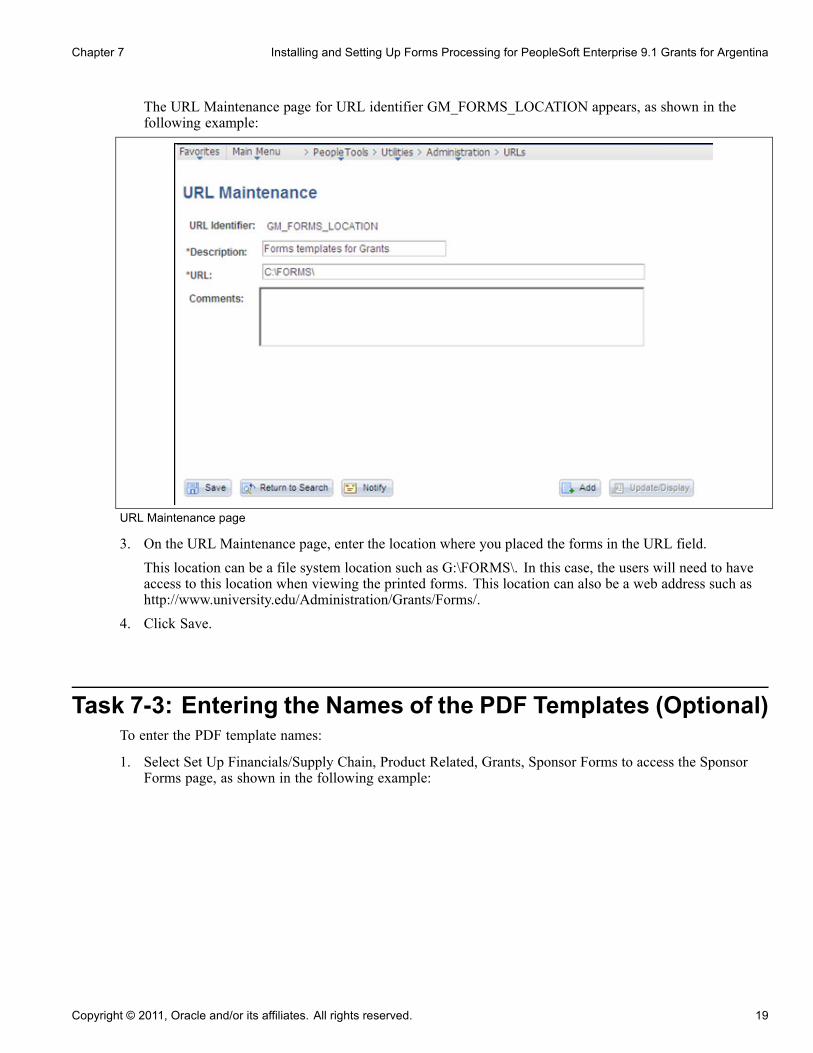
The URL Maintenance page for URL identifier GM_FORMS_LOCATION appears, as shown in thefollowing example:
URL Maintenance page
3. On the URL Maintenance page, enter the location where you placed the forms in the URL field.This location can be a file system location such as G:\FORMS\. In this case, the users will need to haveaccess to this location when viewing the printed forms. This location can also be a web address such ashttp://www.university.edu/Administration/Grants/Forms/.
4. Click Save.
Task 7-3: Entering the Names of the PDF Templates (Optional)To enter the PDF template names:
1. Select Set Up Financials/Supply Chain, Product Related, Grants, Sponsor Forms to access the SponsorForms page, as shown in the following example:
Copyright © 2011, Oracle and/or its affiliates. All rights reserved. 19

Installing and Setting Up Forms Processing for PeopleSoft Enterprise 9.1 Grants for Argentina Chapter 7
Sponsor Forms page
2. Search for and access the pages for the forms in the following table using an appropriate SETID value.Then verify that the file names listed in the following table are reflected in the File Name field.
Note. If you are making changes to currently effective dated values, you must do so by first clicking theCorrect History button to enter the correction mode.
Form ID File Name (example)PHS398 398_Forms.PDF2590 2590_Forms.PDFNIHMOD 398_Modular.PDF
Task 7-4: Printing the Forms (Optional)To print the forms:
1. Select Grants, Proposal, Print Proposal to access the Create Printed Proposal page.2. Create your own Run Control ID.3. On the Print Proposal page, in the corresponding fields, select the Business Unit, Proposal ID, Version ID,
and Form ID of the proposal that you are submitting.Select the valid values from the options that display when you click the look up button, as shown inthe following example:
20 Copyright © 2011, Oracle and/or its affiliates. All rights reserved.

Chapter 7 Installing and Setting Up Forms Processing for PeopleSoft Enterprise 9.1 Grants for Argentina
Proposal to be Submitted page
4. Click Run.The system displays the Process Scheduler Request page.
5. In the Server Name field, select the server that you want to use and then click OK.
Task 7-5: Viewing ReportsYou need Adobe Reader 5.0 or later to view reports.
To view reports:
1. Select Reporting Tools, Report Manager, Administration, to access the Report Manager - Administrationpage, as shown in the following example:
Report Manager - Administration page
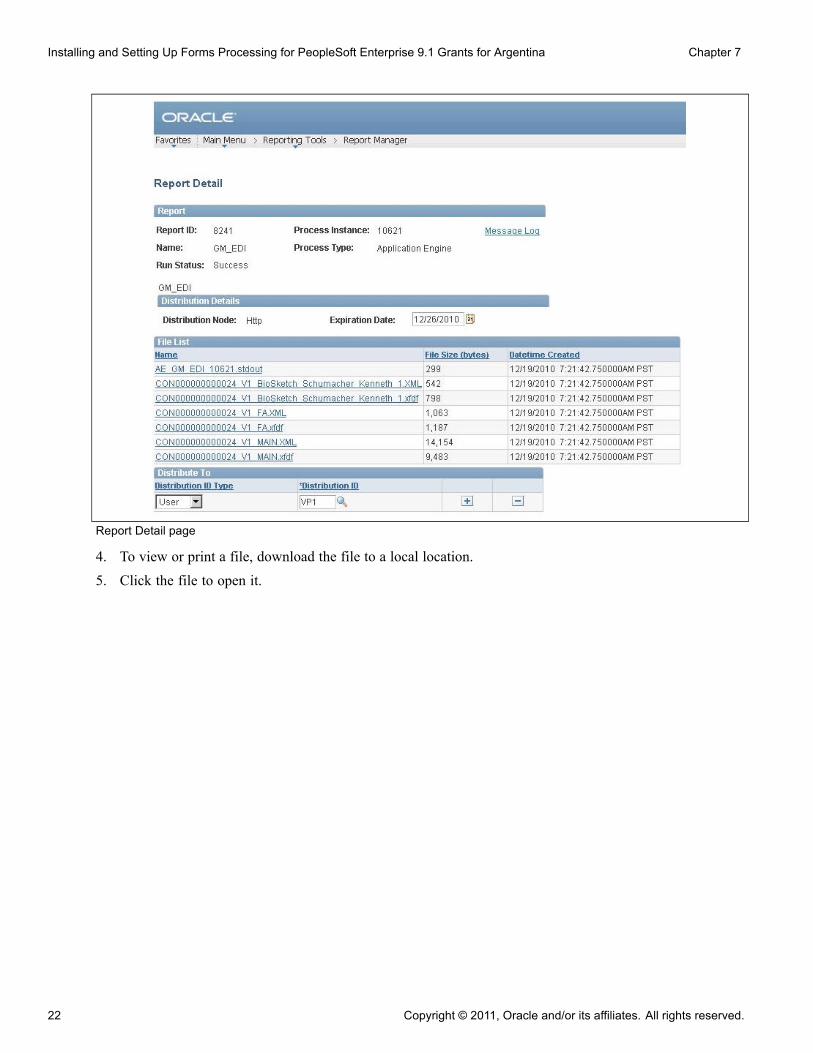
2. On the Administration page, locate your process instance (the report description is GM_EDI).3. Click the Details link in the GM_EDI row to access the Report Detail page and view the list of files that
are related to the proposal, as shown in the following example:
Copyright © 2011, Oracle and/or its affiliates. All rights reserved. 21
Installing and Setting Up Forms Processing for PeopleSoft Enterprise 9.1 Grants for Argentina Chapter 7
Report Detail page
4. To view or print a file, download the file to a local location.5. Click the file to open it.
22 Copyright © 2011, Oracle and/or its affiliates. All rights reserved.
CHAPTER 8
Installing PeopleSoft Enterprise 9.1Expenses for Argentina
This chapter discusses:
• Configuring PeopleSoft Integration Broker
• Configuring the Employee Portal Servlet URL
• Installing Oracle iReceipts for Your Apple iPhone
Task 8-1: Configuring PeopleSoft Integration BrokerUnderstanding the PeopleSoft Integration Broker ConfigurationThis chapter covers the configuration of the PeopleSoft Integration Broker for Approvals.
This task confirms that the settings for Quick Configuration, Gateways and Service Configuration are properlyconfigured.
Task 8-1-1: Setting Up Quick ConfigurationTo verify the quick configuration settings:
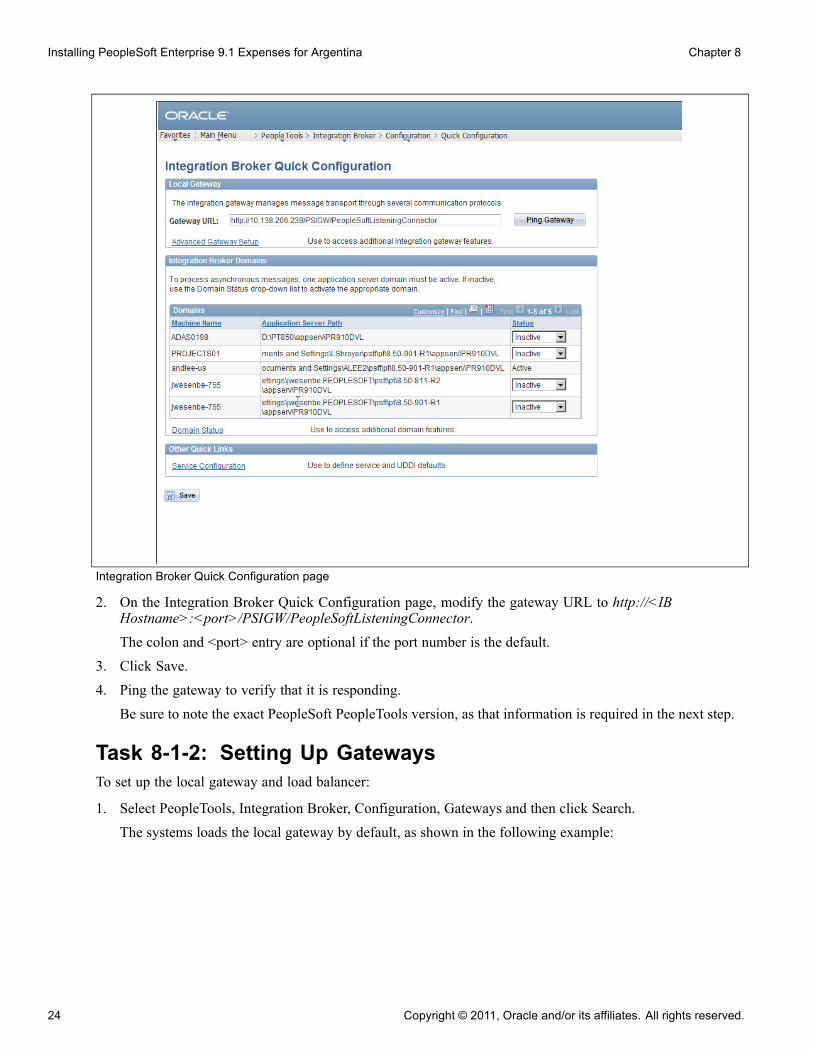
1. Select PeopleTools, Integration Broker, Configuration, Quick Configuration to access the IntegrationBroker Quick Configuration page, as shown in the following example:
Copyright © 2011, Oracle and/or its affiliates. All rights reserved. 23
Installing PeopleSoft Enterprise 9.1 Expenses for Argentina Chapter 8
Integration Broker Quick Configuration page
2. On the Integration Broker Quick Configuration page, modify the gateway URL to http://<IBHostname>:<port>/PSIGW/PeopleSoftListeningConnector.The colon and <port> entry are optional if the port number is the default.
3. Click Save.4. Ping the gateway to verify that it is responding.
Be sure to note the exact PeopleSoft PeopleTools version, as that information is required in the next step.
Task 8-1-2: Setting Up GatewaysTo set up the local gateway and load balancer:
1. Select PeopleTools, Integration Broker, Configuration, Gateways and then click Search.
The systems loads the local gateway by default, as shown in the following example:
24 Copyright © 2011, Oracle and/or its affiliates. All rights reserved.

Chapter 8 Installing PeopleSoft Enterprise 9.1 Expenses for Argentina
Gateways page
2. On the Gateways page for the local gateway, select the Local Gateway check box and the Load Balancercheck box.
3. In the URL field, enter the following URL for the Local Gateway and the Physical Gateway:
http://<IB Hostname>:<port>/PSIGW/PeopleSoftListeningConnector
4. Click the Load Gateway Connectors button.
5. Click Save.
6. Click the Ping Gateway button to ensure connectivity and proper configuration.
7. Click the Gateway Setup Properties link to access the Gateway Properties sign in page, as shown inthe following example:
Copyright © 2011, Oracle and/or its affiliates. All rights reserved. 25

Installing PeopleSoft Enterprise 9.1 Expenses for Argentina Chapter 8
Gateways - Gateway Properties Sign in page
8. On the Gateway Properties sign in page, enter administrator in the User ID field and your password inthe Password field, and then click OK.
9. On the Gateway Properties page, in the Gateway Default App. Server section, enter values for thefollowing fields:
• App server URL
• User ID• Password• Tools release
10. Add the node PSFT_EP (the PeopleSoft FSCM application server node).
Use the PeopleTools release number that you obtained when you pinged the gateway, as it must matchexactly.
11. Click Save.
12. Ping the PSFT_EP node to verify that it is responding.
If a ping is successful, the Ping Node Results page shows Success in the Message Text column, as shownin the following example:
Ping Node Results page
26 Copyright © 2011, Oracle and/or its affiliates. All rights reserved.

Chapter 8 Installing PeopleSoft Enterprise 9.1 Expenses for Argentina
Task 8-1-3: Activating the Local DomainTo activate the local domain:
Note. Verify that your PUB server is up and running before you perform this step.
1. Select PeopleTools, Integration Broker, Service Operations Monitor, Administration, Domain Status.
The Domain Status page appears, as shown in the following example:
Domain Status page
2. On the Domain Status page, click the Purge Domain Status button.3. In the Domains group box, select Active from the Domain Status drop-down list box.4. Click the Update button.
Note. After you click Update, if your machine name does not appear in the Dispatcher Status list, clickthe Purge Domain Status button and then click the Refresh button.
Task 8-1-4: Activating Queue DefinitionsTo activate queue definitions:
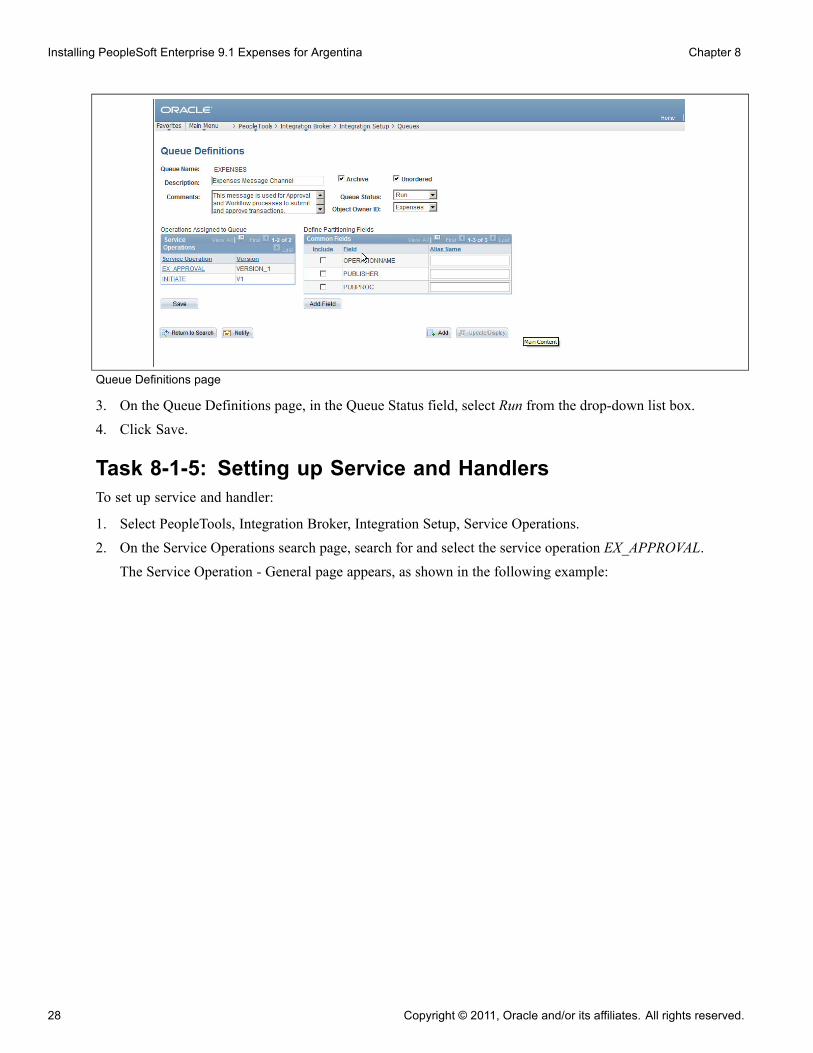
1. Select PeopleTools, Integration Broker, Integration Setup, Queues.2. On the Queues search page, search for and select the queue name EXPENSES.
The Queue Definitions page appears, as shown in the following example:
Copyright © 2011, Oracle and/or its affiliates. All rights reserved. 27
Installing PeopleSoft Enterprise 9.1 Expenses for Argentina Chapter 8
Queue Definitions page
3. On the Queue Definitions page, in the Queue Status field, select Run from the drop-down list box.4. Click Save.
Task 8-1-5: Setting up Service and HandlersTo set up service and handler:
1. Select PeopleTools, Integration Broker, Integration Setup, Service Operations.2. On the Service Operations search page, search for and select the service operation EX_APPROVAL.
The Service Operation - General page appears, as shown in the following example:
28 Copyright © 2011, Oracle and/or its affiliates. All rights reserved.

Chapter 8 Installing PeopleSoft Enterprise 9.1 Expenses for Argentina
Service Operations - General page
3. On the General page, in the Default Service Operation Version group box, select the Active check box.
4. Click Save.
5. Select the Handlers tab to access the Handlers page, as shown in the following example:
Service Operations - Handlers page
Copyright © 2011, Oracle and/or its affiliates. All rights reserved. 29

Installing PeopleSoft Enterprise 9.1 Expenses for Argentina Chapter 8
6. On the Handlers page, in the Status field, select Active from the drop-down list box.7. Click Save.8. Select the Routings tab to access the Routings page, as shown in the following example:
Service Operation - Routings page
9. On the Routings page, select the check boxes for the routings that you want to activate.
10. Click the Activate Selected Routings button.
11. Click Save.
Task 8-1-6: Verifying the Message Channel StatusTo run the message channel:
1. Select PeopleTools, Integration Broker, Service Operations Monitor, Administration, Queue Status.The Queue Status page appears, as shown in the following example:
Queue Status page
2. On the Queue Status page, verify that the status for queue name EXPENSES is Running.If the status is Paused, click the Run button next to the EXPENSES Status field.
30 Copyright © 2011, Oracle and/or its affiliates. All rights reserved.

Chapter 8 Installing PeopleSoft Enterprise 9.1 Expenses for Argentina
Task 8-2: Configuring the Employee Portal Servlet URLTo configure the URL for the Employee Portal Servlet (EMP_SERVLET):
1. Select PeopleTools, Utilities, Administration, URLs.
2. On the URL search page, search for and select the URL identifier EMP_SERVLET.
The URL Maintenance page for EMP_SERVLET appears, as shown in the following example:
URL Maintenance page
3. On the URL Maintenance page, in the URL field, enter the URL to your machine’s server name andappend it as follows:/psp/<employeeportaldomain>/ where <employeeportaldomain> is the site name of your employeeportal domain, as shown in the preceding example.For example: http://serverx/psp/empdb910
4. Click Save.
Task 8-3: Installing Oracle iReceipts for Your Apple iPhoneThis section discusses:
• Prerequisites
• Verifying Correct Namespaces for Messaging
• Setting Up Web Services for My Wallet Transactions
• Setting Up Service Operations for My Wallet Transactions
PrerequisitesOracle iReceipts is a financial application that enables you to capture cash receipts, create expense lines, andsend expense lines to your expense application using a mobile device.
Copyright © 2011, Oracle and/or its affiliates. All rights reserved. 31

Installing PeopleSoft Enterprise 9.1 Expenses for Argentina Chapter 8
To use the Oracle iReceipts feature in PeopleSoft Enterprise Expenses 9.1 with your Apple iPhone™, you mustcomply with the following requirements:
• License and install the PeopleSoft Expenses 9.1 application to allow captured data to be sent to PeopleSoftExpenses and create expense reports.
• Install the required patch to interface Oracle iReceipts with Oracle’s PeopleSoft Expenses 9.1.
This patch is available on My Oracle Support (https://support.oracle.com/CSP/ui/flash.html).
• Ensure that your Apple iPhone™ is running the minimum operating system of 3.0 or higher.
• License and install the Oracle iReceipts application from the Apple iTunes Store to your Apple iPhone™.
For set up and configuration details, refer to the following documentation that is available on My OracleSupport:
See PeopleSoft Enterprise Expenses 9.1 PeopleBook.
Task 8-3-1: Verifying Correct Namespaces for MessagingTo set up messaging, you must verify that a correct namespace is entered for the following required messages:
• My Wallet request message (EX_MYWALLET_REQ)
• My Wallet response message (EX_MYWALLET_RES)
• Container message for My Wallet requests (EX_MYWALLET_REQ_PART)
• Container message for My Wallet responses (EX_MYWALLET_RES_PART)
Note. These steps are only required if you are sending expense information from the Oracle iReceiptsapplication on your Apple iPhone™ to PeopleSoft Expenses.
To verify that the correct namespaces are entered for each of the required messages:
1. Select PeopleTools, Integration Broker, Integration Setup, Messages.
2. On the Message search page, in the Message Name field, enter EX_MYWALL and click Search.
The Messages search page displays results for EX_MYWALL in the Search Results grid, as shown inthe following example:
32 Copyright © 2011, Oracle and/or its affiliates. All rights reserved.

Chapter 8 Installing PeopleSoft Enterprise 9.1 Expenses for Argentina
Messages search page
The messages that display in the Message Name column of the preceding search resultsexample (EX_MYWALLET_REQ, EX_MYWALLET_REQ_PART, EX_MYWALLET_RES, andEX_MYWALLET_RES_PART) are the four required messages that you must verify correct namespaces.
3. In the Search Results grid, in the Message Name field, click the link for the messageEX_MYWALLET_REQ to access the Message Definition - Schema page, as shown in the followingexample:
Message Definition - Schema page
4. On the Message Definition - Schema page, verify that a correct namespace is entered for theEX_MYWALLET_REQ message.
Note. Namespaces will vary according to how each environment is set up. Therefore, it is necessary toenter the correct namespace that is defined specifically for your system. This should be performed for allfour messages.
5. Repeat steps 3–4 for each of the four messages to verify that correct namespaces are entered.
Task 8-3-2: Setting Up Web Services for My Wallet TransactionsTo set up web services for My Wallet transactions:
1. Select PeopleTools, Integration Broker, Web Services, Provide Web Service.
Copyright © 2011, Oracle and/or its affiliates. All rights reserved. 33

Installing PeopleSoft Enterprise 9.1 Expenses for Argentina Chapter 8
The Provide Web Service Wizard - Select Services page (Step 1 of 4) appears, as shown in the followingexample:
Provide Web Service Wizard - Select Services page (Step 1 of 4)
2. In the Service Name field, enter EX_MYWALLET.3. Click Search.4. In the Service search results that display, select the EX_MYWALLET service.5. Click Next.
The Provide Web Service Wizard - Select Service Operations page (Step 2 of 4) appears, as shown inthe following example:
Provide Web Service Wizard - Select Service Operations page (Step 2 of 4)
6. In the Operations grid, select the EX_MYWALLET_CREATE.v1 service operation.7. Click Next.
34 Copyright © 2011, Oracle and/or its affiliates. All rights reserved.

Chapter 8 Installing PeopleSoft Enterprise 9.1 Expenses for Argentina
The Provide Web Service Wizard - View WSDL page (Step 3 of 4) appears, as shown in the followingexample:
Provide Web Service Wizard - View WSDL page (Step 3 of 4)
8. Click Next.The Provide Web Service Wizard - Specify Publishing Options page (Step 4 of 4) appears, as shown inthe following example:
Provide Web Service Wizard - Specify Publishing Options page (Step 4 of 4)
9. Click Finish.
Task 8-3-3: Setting Up Service Operations for MyWallet TransactionsTo set up service operations for My Wallet transactions:
1. Select PeopleTools, Integration Broker, Integration Setup, Service Operations.The Service Operations - General page appears, as shown in the following example:
Copyright © 2011, Oracle and/or its affiliates. All rights reserved. 35
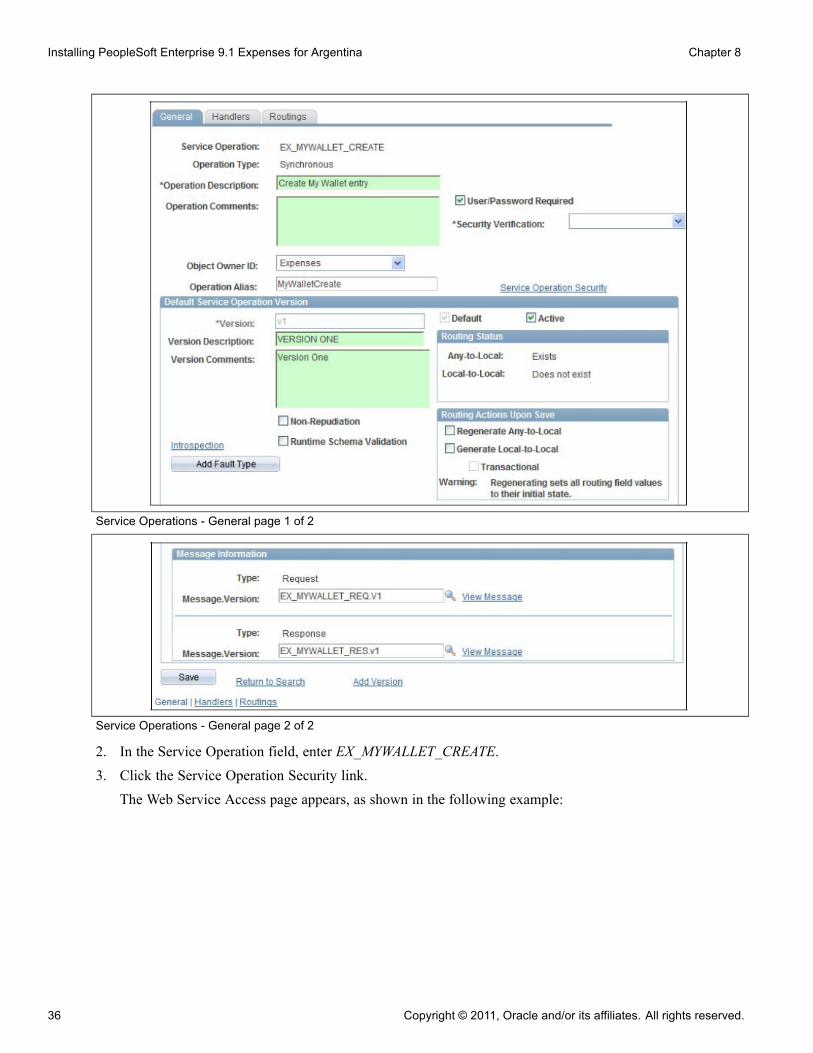
Installing PeopleSoft Enterprise 9.1 Expenses for Argentina Chapter 8
Service Operations - General page 1 of 2
Service Operations - General page 2 of 2
2. In the Service Operation field, enter EX_MYWALLET_CREATE.3. Click the Service Operation Security link.
The Web Service Access page appears, as shown in the following example:
36 Copyright © 2011, Oracle and/or its affiliates. All rights reserved.
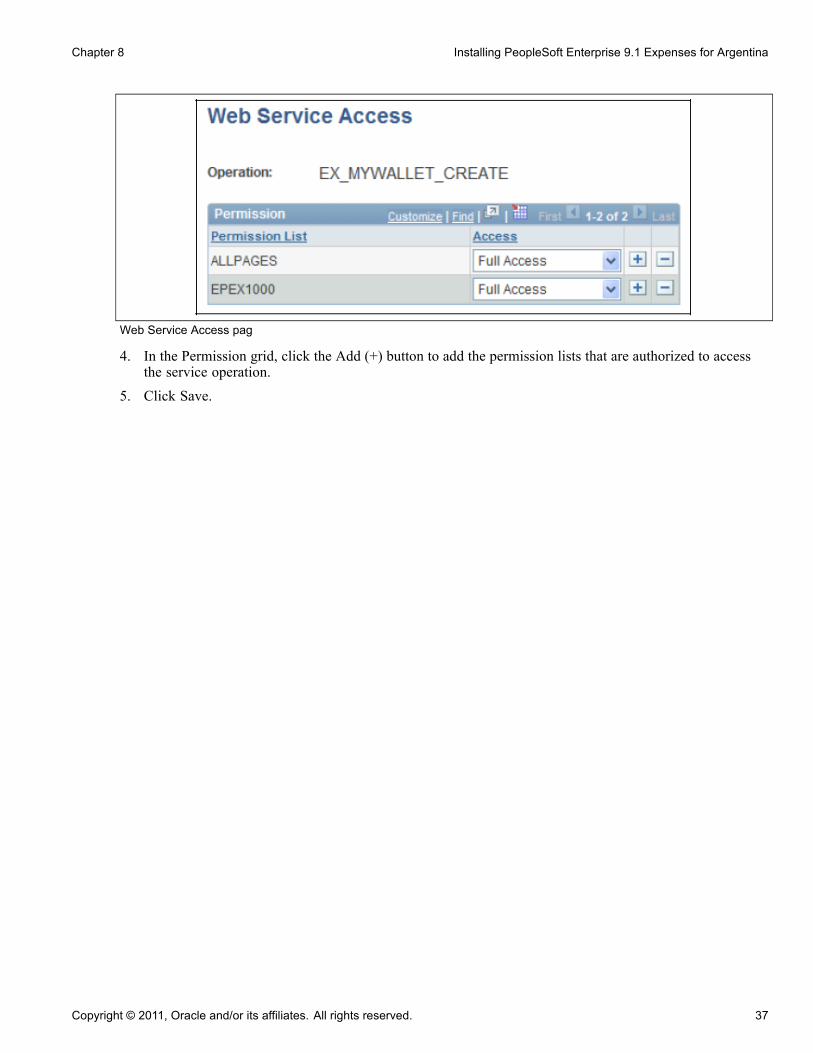
Chapter 8 Installing PeopleSoft Enterprise 9.1 Expenses for Argentina
Web Service Access pag
4. In the Permission grid, click the Add (+) button to add the permission lists that are authorized to accessthe service operation.
5. Click Save.
Copyright © 2011, Oracle and/or its affiliates. All rights reserved. 37

Installing PeopleSoft Enterprise 9.1 Expenses for Argentina Chapter 8
38 Copyright © 2011, Oracle and/or its affiliates. All rights reserved.

CHAPTER 9
Installing PeopleSoft Enterprise 9.1 Pay/BillManagement for Argentina
This chapter discusses:
• Understanding PeopleSoft Enterprise 9.1 Pay/Bill Management for Argentina
• Prerequisites
• Verifying Integration Points
• Checking the Installation Table for PeopleSoft HCM and PeopleSoft FSCM
Understanding PeopleSoft Enterprise 9.1 Pay/BillManagement for Argentina
Oracle delivers all PeopleSoft Pay/Bill Management for Argentina Enterprise Integration Points (EIPs) withsettings enabled for full functionality, with the exception of PeopleSoft Integration Broker web services. Whenyou integrate PeopleSoft Pay/Bill Management for Argentina with PeopleSoft HRMS for Argentina, you mustactivate PeopleSoft Integration Broker web services. For more information, refer to the following:
See PeopleSoft Enterprise Pay/Bill Management 9.1 PeopleBook.
See Enterprise PeopleTools PeopleBook: Integration Broker Administration for your release.
PrerequisitesIn this section, you set up node definitions for your PeopleSoft HCM environment.
You must install PeopleSoft Enterprise Pay/Bill Management 9.1 for PeopleSoft HRMS before you can fullyuse the PeopleSoft Pay/Bill Management application. The complete installation instructions for PeopleSoftPay/Bill Management for PeopleSoft HRMS are posted on My Oracle Support.
See PeopleSoft Enterprise Human Resources Management System 9.1 Installation Guide.
Note. PeopleSoft Pay/Bill Management is only supported on Microsoft SQL Server, Oracle and DB2 UDB forLinux, UNIX, and Microsoft Windows.
Copyright © 2011, Oracle and/or its affiliates. All rights reserved. 39

Installing PeopleSoft Enterprise 9.1 Pay/Bill Management for Argentina Chapter 9
Task 9-1: Verifying Integration PointsUnderstanding Integration Points VerificationIn this task, you verify integration points for the PeopleSoft Financials/Supply Chain Management (FSCM)and PeopleSoft Human Capital Management (HCM) environments. Each environment contains both PSFT_EPand PSFT_HR message nodes. You must set both message nodes in both PeopleSoft FSCM and PeopleSoftHCM environments.
PSFT_EP is the default local node in PeopleSoft FSCM, but PSFT_HR also exists in PeopleSoft FSCM. Thissection details how to set both nodes in the PeopleSoft FSCM environment.
PSFT_HR is the default local node for PeopleSoft HCM, but PSFT_EP also exists in PeopleSoft HCM. Thissection details how to set both nodes in the PeopleSoft HCM environment.
Note. Ensure that your application servers, for both PeopleSoft HRMS and PeopleSoft FSCM installations, areset to manage Pub/Sub server.
Task 9-1-1: Setting Up Node Definitions for Single SignonUnderstanding Node Definition Set Up for Single SignonThe PeopleSoft FSCM and PeopleSoft HCM environments contain both message nodes PSFT_EP andPSFT_HR. You must set both message nodes in both environments.
PSFT_EP is the default local node in PeopleSoft FSCM. PSFT_HR also exists in PeopleSoft FSCM andmust be set.
PSFT_HR is the default local node for PeopleSoft HCM. PSFT_EP also exists in PeopleSoft HCM andmust be set.
Setting Up Message Node Definitions in PeopleSoft FSCMTo set up message node definitions in the PeopleSoft FSCM environment:
1. In your PeopleSoft FSCM 9.1 environment, select PeopleTools, Integration Broker, Integration Setup,Nodes.
2. On the Nodes search page, search for and select the node name PSFT_EP.The Node Definitions page for the PSFT_EP node appears, as shown in the following example:
40 Copyright © 2011, Oracle and/or its affiliates. All rights reserved.

Chapter 9 Installing PeopleSoft Enterprise 9.1 Pay/Bill Management for Argentina
Node Definitions for FSCM - PSFT_ EP Node
3. On the Node Definitions page, in the Authentication Option field, select Password from the drop-down listbox.
4. In the Node Password field, enter a password.5. In the Confirm Password field, re-enter your password.6. Click Save, and then click the Return to Search button.7. On the Nodes search page, search for and select the node name PSFT_HR.
The Node Definitions page for the PSFT_HR node appears, as shown in the following example:
Copyright © 2011, Oracle and/or its affiliates. All rights reserved. 41
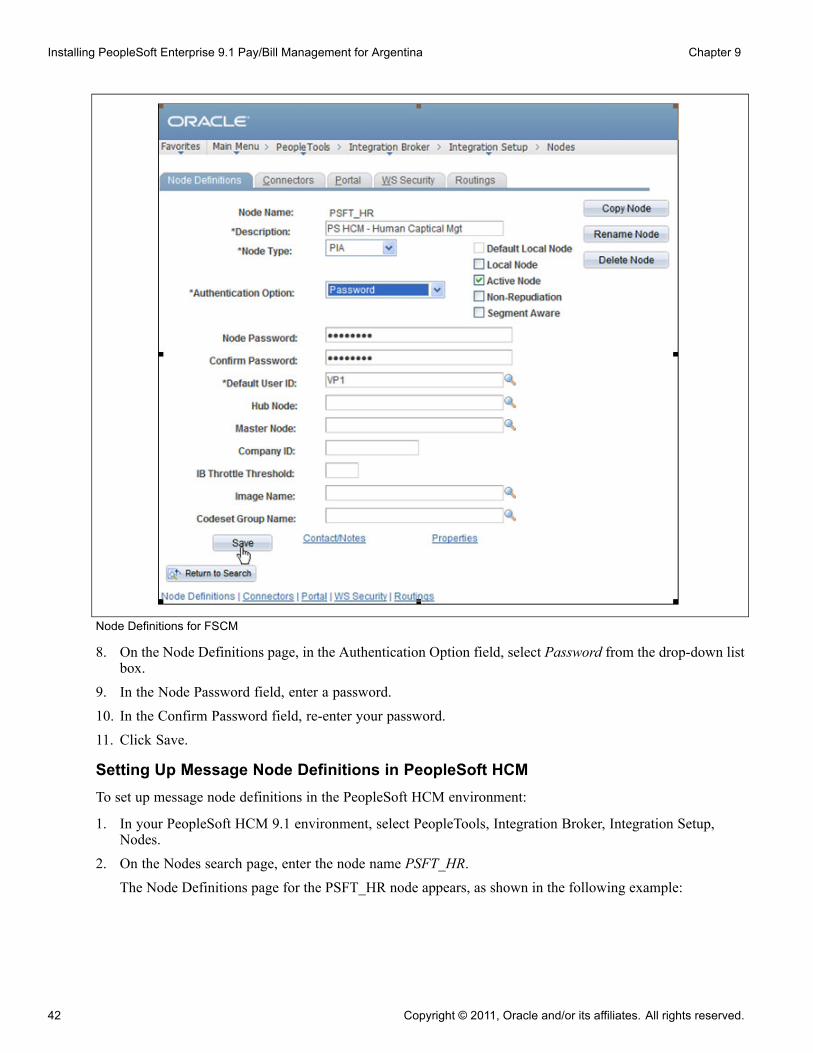
Installing PeopleSoft Enterprise 9.1 Pay/Bill Management for Argentina Chapter 9
Node Definitions for FSCM
8. On the Node Definitions page, in the Authentication Option field, select Password from the drop-down listbox.
9. In the Node Password field, enter a password.10. In the Confirm Password field, re-enter your password.11. Click Save.
Setting Up Message Node Definitions in PeopleSoft HCMTo set up message node definitions in the PeopleSoft HCM environment:
1. In your PeopleSoft HCM 9.1 environment, select PeopleTools, Integration Broker, Integration Setup,Nodes.
2. On the Nodes search page, enter the node name PSFT_HR.The Node Definitions page for the PSFT_HR node appears, as shown in the following example:
42 Copyright © 2011, Oracle and/or its affiliates. All rights reserved.
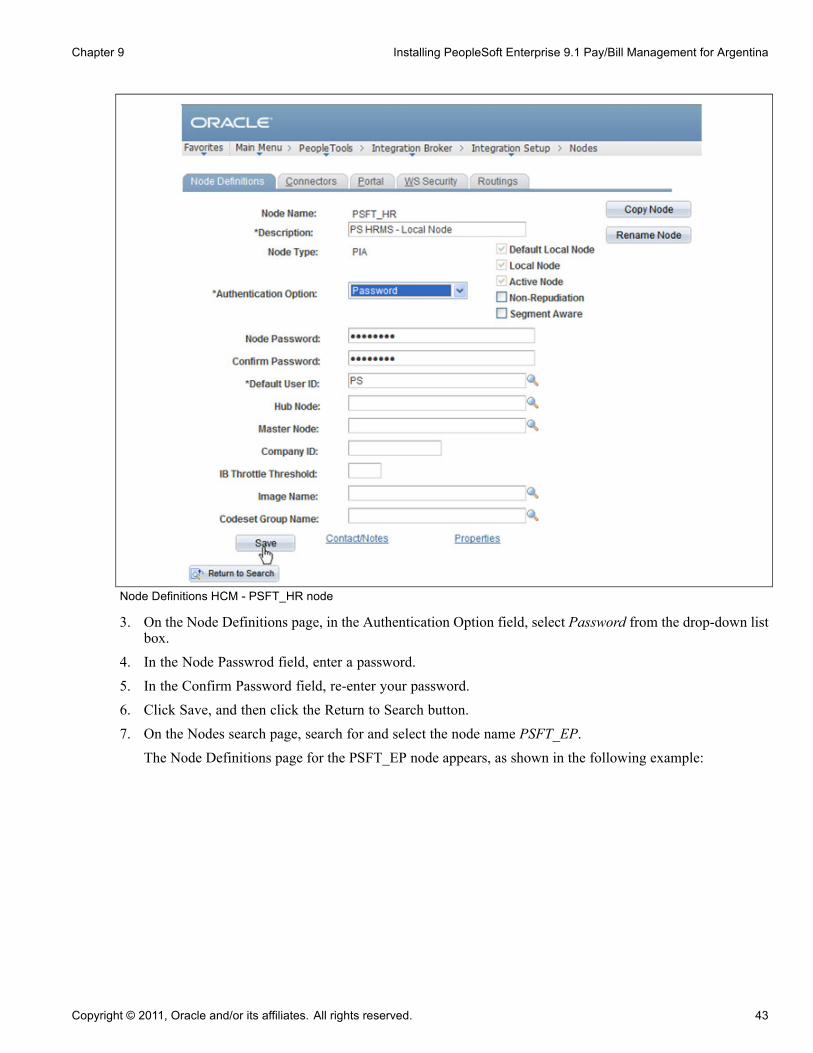
Chapter 9 Installing PeopleSoft Enterprise 9.1 Pay/Bill Management for Argentina
Node Definitions HCM - PSFT_HR node
3. On the Node Definitions page, in the Authentication Option field, select Password from the drop-down listbox.
4. In the Node Passwrod field, enter a password.5. In the Confirm Password field, re-enter your password.6. Click Save, and then click the Return to Search button.7. On the Nodes search page, search for and select the node name PSFT_EP.
The Node Definitions page for the PSFT_EP node appears, as shown in the following example:
Copyright © 2011, Oracle and/or its affiliates. All rights reserved. 43

Installing PeopleSoft Enterprise 9.1 Pay/Bill Management for Argentina Chapter 9
Node Definitions for HCM - PSFT_EP node
8. On the Node Definitions page, in the Authentication Option field, select Password from the drop-down listbox.
9. In the Node Passwrod field, enter a password.
10. In the Confirm Password field, re-enter your password.
11. Click Save.
Task 9-1-2: Setting Up Portal NodesUnderstanding Portal Nodes Set UpThe PeopleSoft FSCM and PeopleSoft HCM environments contain both ERP and HRMS Portal Nodes. Youmust set both Portal Nodes in both environments.
ERP is the local node in PeopleSoft FSCM. HRMS also exists in PeopleSoft FSCM and must be set.
HRMS is the local node in PeopleSoft HCM. ERP also exists in PeopleSoft HCM and must be set.
Setting Up Portal Nodes in PeopleSoft FSCMTo set up Portal Node Definitions in the PeopleSoft FSCM environment:
44 Copyright © 2011, Oracle and/or its affiliates. All rights reserved.
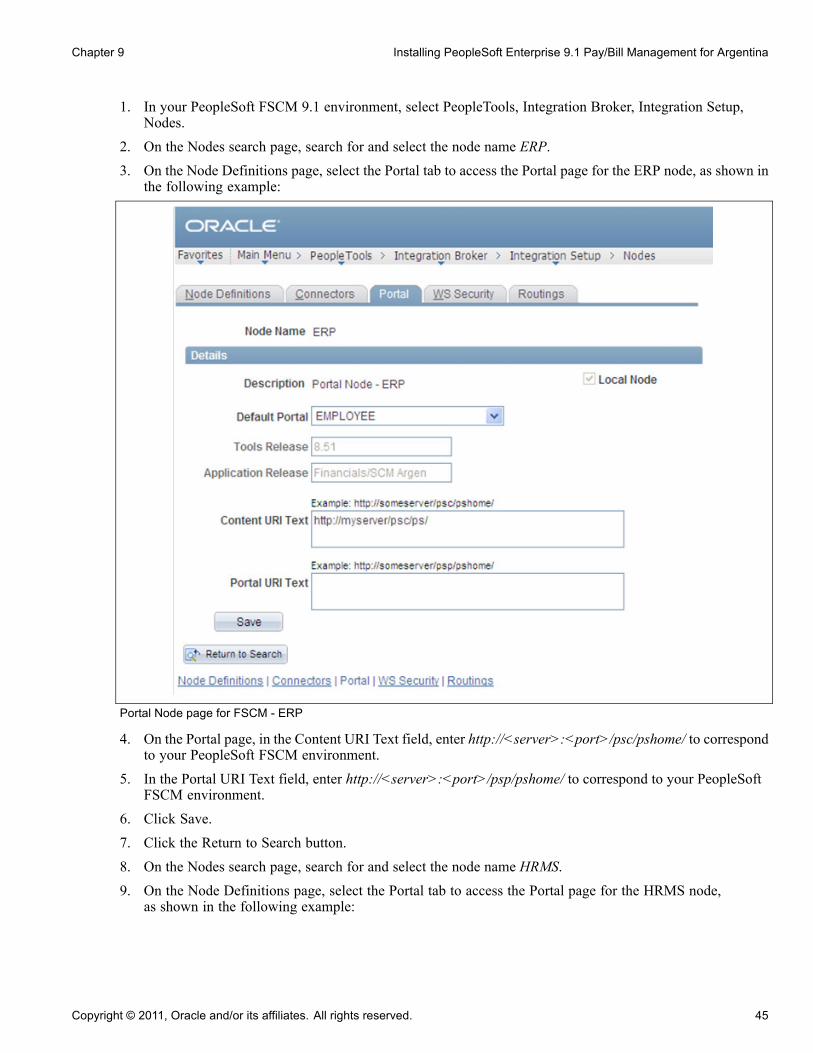
Chapter 9 Installing PeopleSoft Enterprise 9.1 Pay/Bill Management for Argentina
1. In your PeopleSoft FSCM 9.1 environment, select PeopleTools, Integration Broker, Integration Setup,Nodes.
2. On the Nodes search page, search for and select the node name ERP.3. On the Node Definitions page, select the Portal tab to access the Portal page for the ERP node, as shown in
the following example:
Portal Node page for FSCM - ERP
4. On the Portal page, in the Content URI Text field, enter http://<server>:<port>/psc/pshome/ to correspondto your PeopleSoft FSCM environment.
5. In the Portal URI Text field, enter http://<server>:<port>/psp/pshome/ to correspond to your PeopleSoftFSCM environment.
6. Click Save.7. Click the Return to Search button.8. On the Nodes search page, search for and select the node name HRMS.9. On the Node Definitions page, select the Portal tab to access the Portal page for the HRMS node,
as shown in the following example:
Copyright © 2011, Oracle and/or its affiliates. All rights reserved. 45

Installing PeopleSoft Enterprise 9.1 Pay/Bill Management for Argentina Chapter 9
Portal Node page for FSCM - HRMS
10. On the Portal page, in the Content URI Text field, enter http://<server>:<port>/psc/pshome/ to correspondto your PeopleSoft HCM environment.
11. In the Portal URI Text field, enter http://<server>:<port>/psp/pshome/ to correspond to your PeopleSoftHCM environment.
12. Click Save.
Setting Up Portal Nodes in PeopleSoft HCMTo set up Portal Node Definitions in the PeopleSoft HCM environment:
1. In your PeopleSoft HCM 9.1 environment, select Home, Integration Broker, Integration Setup, Nodes.2. On the Nodes search page, search for and select the node name HRMS.3. On the Node Definitions page, select the Portal tab to access the Portal page for the HRMS node,
as shown in the following example:
46 Copyright © 2011, Oracle and/or its affiliates. All rights reserved.

Chapter 9 Installing PeopleSoft Enterprise 9.1 Pay/Bill Management for Argentina
Portal Nodes page
4. On the Portal page, in the Content URI Text field, enter http://<server>:<port>/psc/pshome/ to correspondto your PeopleSoft HCM environment.
5. In the Portal URI Text field, enter http://<server>:<port>/psp/pshome/ to correspond to your PeopleSoftHCM environment.
6. Click the Return to Search button.7. On the Nodes search page, search for and select the node name ERP.8. On the Node Definitions page, select the Portal tab to access the Portal page for the ERP node, as shown in
the following example:
Copyright © 2011, Oracle and/or its affiliates. All rights reserved. 47
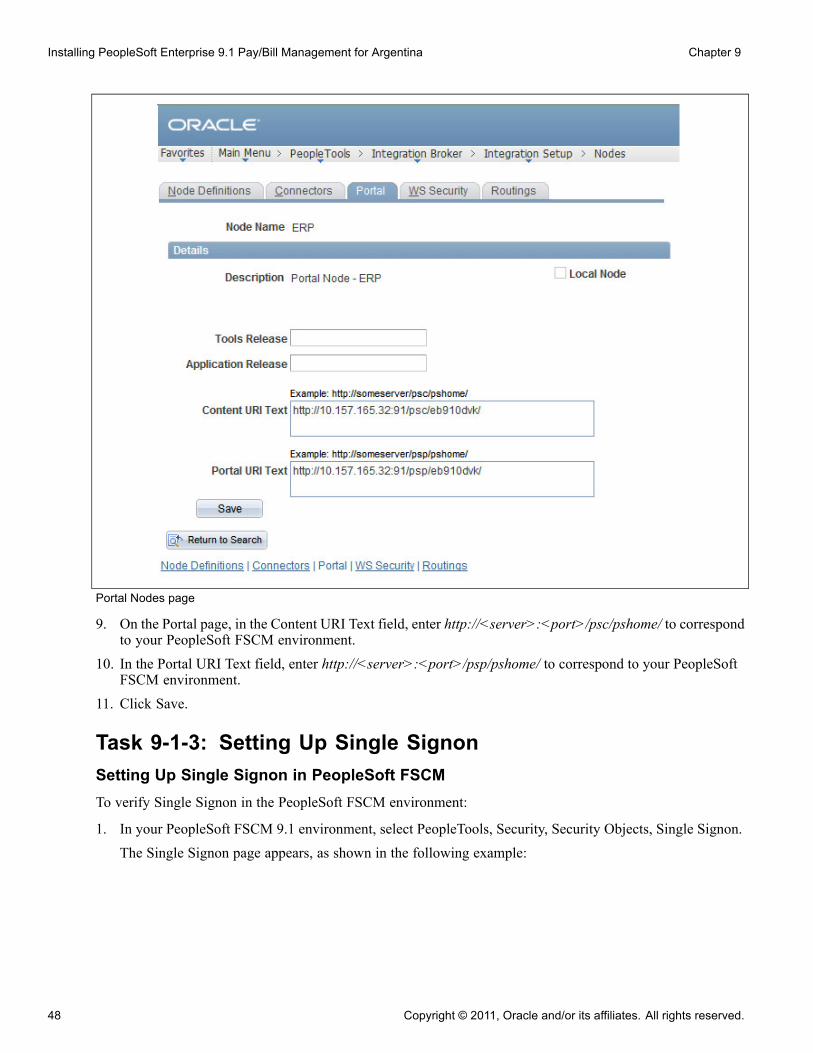
Installing PeopleSoft Enterprise 9.1 Pay/Bill Management for Argentina Chapter 9
Portal Nodes page
9. On the Portal page, in the Content URI Text field, enter http://<server>:<port>/psc/pshome/ to correspondto your PeopleSoft FSCM environment.
10. In the Portal URI Text field, enter http://<server>:<port>/psp/pshome/ to correspond to your PeopleSoftFSCM environment.
11. Click Save.
Task 9-1-3: Setting Up Single SignonSetting Up Single Signon in PeopleSoft FSCMTo verify Single Signon in the PeopleSoft FSCM environment:
1. In your PeopleSoft FSCM 9.1 environment, select PeopleTools, Security, Security Objects, Single Signon.The Single Signon page appears, as shown in the following example:
48 Copyright © 2011, Oracle and/or its affiliates. All rights reserved.

Chapter 9 Installing PeopleSoft Enterprise 9.1 Pay/Bill Management for Argentina
Single Signon page
2. In the Trust Authentication Tokens issued by these nodes group box, inform the message nodes PSFT_EPand PSFT_HR.
3. Click Save.
Setting Up Single Signon in PeopleSoft HCMTo verify Single Signon in the PeopleSoft HCM environment:
1. In your PeopleSoft HCM 9.1 environment, select PeopleTools, Security, Security Objects, Single Signon.2. In the Trust Authentication Tokens issued by these nodes group box, inform the message nodes PSFT_EP
and PSFT_HR.3. Click Save.
Task 9-1-4: Setting Up Integration GatewaysSetting Up Integration Gateway in PeopleSoft FSCMTo set up Integration Gateways in the PeopleSoft FSCM environment:
1. In your PeopleSoft FSCM 9.1 environment, select Integration Broker, Configuration, Gateways.2. Click Search.
The Gateways page for the local gateway automatically appears by default, as shown in the followingexample:
Copyright © 2011, Oracle and/or its affiliates. All rights reserved. 49

Installing PeopleSoft Enterprise 9.1 Pay/Bill Management for Argentina Chapter 9
Gateways page
3. On the Gateways page, in the URL field, enter http://<IBHostname>:<port>/PSIGW/PeopleSoftListeningConnectorfor the local gateway URL.
4. Click the Load Gateway Connectors button.5. Click Save.6. Click Ping Gateway to ensure connectivity and proper configuration.7. Click the Gateway Setup Properties link, as shown in the following example:
Gateway Setup Properties page
The Gateway Properties Signon page appears, as shown in the following example:
50 Copyright © 2011, Oracle and/or its affiliates. All rights reserved.
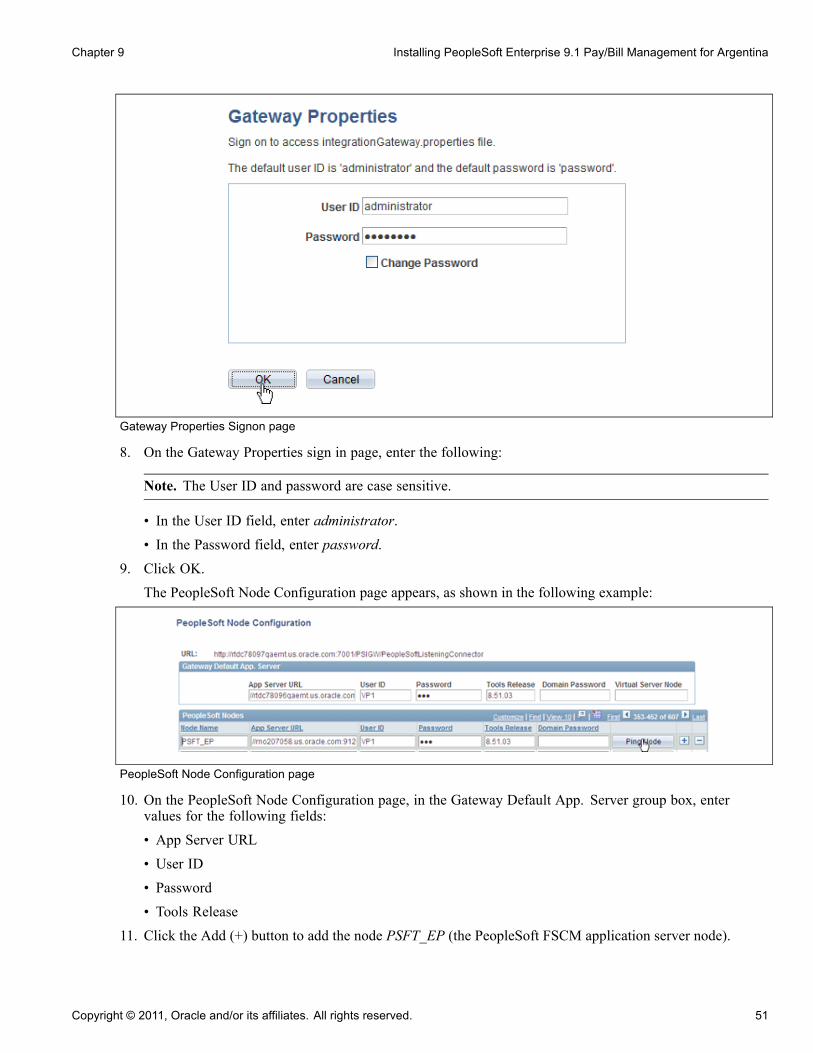
Chapter 9 Installing PeopleSoft Enterprise 9.1 Pay/Bill Management for Argentina
Gateway Properties Signon page
8. On the Gateway Properties sign in page, enter the following:
Note. The User ID and password are case sensitive.
• In the User ID field, enter administrator.
• In the Password field, enter password.
9. Click OK.The PeopleSoft Node Configuration page appears, as shown in the following example:
PeopleSoft Node Configuration page
10. On the PeopleSoft Node Configuration page, in the Gateway Default App. Server group box, entervalues for the following fields:• App Server URL• User ID• Password• Tools Release
11. Click the Add (+) button to add the node PSFT_EP (the PeopleSoft FSCM application server node).
Copyright © 2011, Oracle and/or its affiliates. All rights reserved. 51

Installing PeopleSoft Enterprise 9.1 Pay/Bill Management for Argentina Chapter 9
12. In the Tools Release field, enter the PeopleTools Release number that you obtained when you pingingthe gateway (it must match exactly).
13. Click Save.14. Click the Ping Node button to ping the PSFT_EP node to verify that it is responding.15. If the ping is successful, the Ping Node Results page shows Success in the Message Text column,
as shown in the following example:
Ping Node Results
16. Click the Return button.
Setting Up Integration Gateway in PeopleSoft HCMTo set up Integration Gateway in the PeopleSoft HCM environment:
1. In your PeopleSoft HCM 9.1 environment, select PeopleTools, Integration Broker, Configuration,Gateways
2. Click Search.The Gateways page for the Local Gateway automatically appears by default, as shown in the followingexample:
52 Copyright © 2011, Oracle and/or its affiliates. All rights reserved.

Chapter 9 Installing PeopleSoft Enterprise 9.1 Pay/Bill Management for Argentina
Gateways page
3. On the Gateways page, enter http://<IBHostname>:<port>/PSIGW/PeopleSoftListeningConnectorfor the Local Gateway.
4. Click the Load Gateway Connectors button.5. Click Save.6. Click Ping Gateway to ensure connectivity and proper configuration.7. Click the Gateway Setup Properties link, as shown in the following example:
Gateways page - Gateways Setup Properties
The Gateway Properties - Sign in page appears, as shown in the following example:
Copyright © 2011, Oracle and/or its affiliates. All rights reserved. 53

Installing PeopleSoft Enterprise 9.1 Pay/Bill Management for Argentina Chapter 9
Gateway Properties - sign in page
8. On the Gateways Properties sign in page, enter values for the following fields:
Note. The User ID and password fields are case sensitive.
• In the User ID field, enter adminstrator.• In the Password field, enter password.
9. Click OK.The PeopleSoft Node Configuration page appears, as shown in the following example:
PeopleSoft Node Configuration page
10. On the PeopleSoft Node Configuration page, in the Gateway Default App. Server group box, entervalues for the following fields:• App Server URL
54 Copyright © 2011, Oracle and/or its affiliates. All rights reserved.
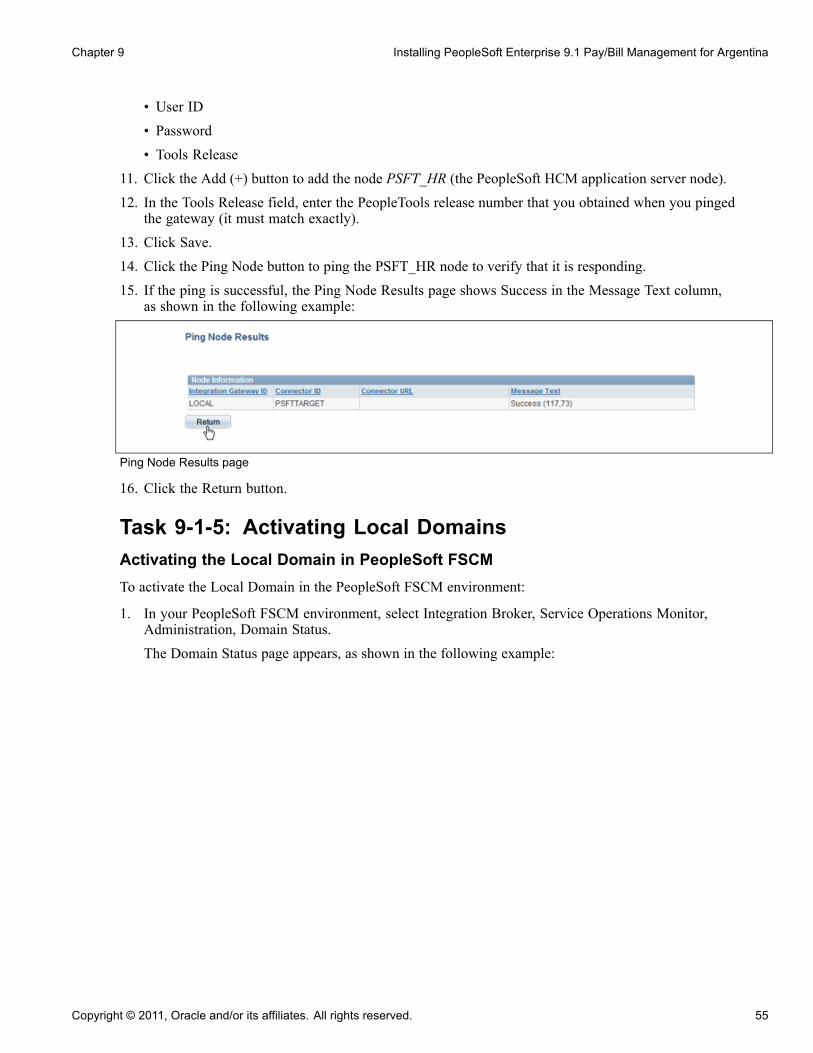
Chapter 9 Installing PeopleSoft Enterprise 9.1 Pay/Bill Management for Argentina
• User ID• Password• Tools Release
11. Click the Add (+) button to add the node PSFT_HR (the PeopleSoft HCM application server node).12. In the Tools Release field, enter the PeopleTools release number that you obtained when you pinged
the gateway (it must match exactly).13. Click Save.14. Click the Ping Node button to ping the PSFT_HR node to verify that it is responding.15. If the ping is successful, the Ping Node Results page shows Success in the Message Text column,
as shown in the following example:
Ping Node Results page
16. Click the Return button.
Task 9-1-5: Activating Local DomainsActivating the Local Domain in PeopleSoft FSCMTo activate the Local Domain in the PeopleSoft FSCM environment:
1. In your PeopleSoft FSCM environment, select Integration Broker, Service Operations Monitor,Administration, Domain Status.
The Domain Status page appears, as shown in the following example:
Copyright © 2011, Oracle and/or its affiliates. All rights reserved. 55

Installing PeopleSoft Enterprise 9.1 Pay/Bill Management for Argentina Chapter 9
Domain Status page
2. On the Domain Status page, in the Domains Status field, select Active from the drop-down list box.3. Click Update.
Note. After you click Update, if your machine name does not appear in this list, click the Purge DomainStatus button and then click the Refresh button.
Activating the Local Domain in PeopleSoft HCMTo activate the Local Domain in the PeopleSoft HCM environment:
1. In your PeopleSoft HCM 9.1 environment, select Integration Broker, Service Operations Monitor,Administration, Domain Status.
2. On the Domain Status page, in the Domains Status field, select Active from the drop-down list box.3. Click Update.
Note. After you click Update, if your machine name does not appear in this list, click the Purge DomainStatus button and then click the Refresh button.
Task 9-1-6: Activating Queue DefinitionsUnderstanding Queue DefinitionsThe following Queue Definitions must be set to Active for Staffing:
ACTION_REASON
ACTUAL_TIME
COMPETENCY
CUSTOMER
ELAPSED_TIME
ENTERPRISE_SETUP
ESTIMATED_TIME
FO_APP_HIRE
56 Copyright © 2011, Oracle and/or its affiliates. All rights reserved.

Chapter 9 Installing PeopleSoft Enterprise 9.1 Pay/Bill Management for Argentina
FO_ASSIGNMENTS
FO_MASS_CHANGES
FO_SETUP
FO_SYNC
GL_SETUP
HR_SETUP
MARKET_RATES
MARKET_RATE_LOAD
PAYGROUP_SETUP
PERSON_DATA
PERSON_SETUP
PROJECTS_SETUP
RATING_MODEL
TIME_AND_LABOR_SETUP
Activating Queue Definitions in PeopleSoft FSCMTo activate Queue Definitions in the PeopleSoft FSCM environment:
1. In your PeopleSoft FSCM 9.1 environment, select Integration Broker, Integration Setup, Queues.
2. On the Queues search page, search for and select the queue that you want to activate.
The Queue Definitions page appears, as shown in the following example:
Queue Definitions page
Copyright © 2011, Oracle and/or its affiliates. All rights reserved. 57

Installing PeopleSoft Enterprise 9.1 Pay/Bill Management for Argentina Chapter 9
3. On the Queue Definitions page, in the Queue Status field, select Run from the drop-down list box.4. Click Save.
Activating Queue Definitions in PeopleSoft HCMTo activate Queue Definitions in the PeopleSoft HCM environment:
1. In your PeopleSoft HCM 9.1 environment, select PeopleTools, Integration Broker, Integration Setup,Queues.
2. On the Queues search page, search for and select the queue that you want to activate.3. On the Queue Definitions page, in the Queue Status field, select Run from the drop-down list box..4. Click Save.
Task 9-1-7: Setting up the Delivered Service OperationsThe Service Operations described here are meant to keep tables in sync between PeopleSoft FSCM 9.1 andPeopleSoft HCM 9.1. You must make decisions about how to implement the integration. These decisionsdetermine your tasks in activating handlers and routings. For information about implementing serviceoperations, refer to the following:
See PeopleSoft Enterprise Pay/Bill Management 9.1 PeopleBook, "Using Enterprise Integration Points."
Task 9-2: Checking the Installation Table for PeopleSoftHCM and PeopleSoft FSCM
Task 9-2-1: Checking the Installation Table for PeopleSoft HCMIn this step, you check the PeopleSoft Pay/Bill Management and PeopleSoft Project Costing installation inthe Installation Table.
To check the installation table for PeopleSoft HCM:
1. In PeopleSoft HCM, select Set Up HRMS, Install, Installation Table.
The PeopleSoft HRMS Installation Table - Installed Products page appears, as shown in the followingexample:
58 Copyright © 2011, Oracle and/or its affiliates. All rights reserved.

Chapter 9 Installing PeopleSoft Enterprise 9.1 Pay/Bill Management for Argentina
HRMS Installation Table page
2. Verify that the Pay/Bill Management check box and the Project Costing check box are selected.
Task 9-2-2: Checking the Installation Table for PeopleSoft FSCMIn this step, you check the PeopleSoft Pay/Bill Management for Contracts installation in the Installation table.
To check the installation table for PeopleSoft FSCM:
1. In PeopleSoft FSCM, select Set Up Financials/Supply Chain, Install, Installation Options.2. Select the Contracts tab, as shown in the following example:
Copyright © 2011, Oracle and/or its affiliates. All rights reserved. 59

Installing PeopleSoft Enterprise 9.1 Pay/Bill Management for Argentina Chapter 9
FSCM Installation Options - Contracts page
3. Verify that the Pay/Bill Management Installed check box is selected.
60 Copyright © 2011, Oracle and/or its affiliates. All rights reserved.
CHAPTER 10
Installing PeopleSoft Enterprise 9.1 ESA andFSCM Portal Packs for Argentina
This chapter discusses:
• Granting Access to Navigation Pages
• Granting Access to Personalize the Portal Homepage
• Enabling Pagelet Creation and Access with Portal Utilities
Task 10-1: Granting Access to Navigation PagesTo access the navigation pages, security to the Navigation Page IScripts must be granted to all users. UsePeopleSoft Data Mover to run the EOPP_ ADD_ROLE.DMS script that is located in <PS_HOME>\scripts.
Note. When a new user ID is created, the EOPP_USER role should be added to the new user ID.
Task 10-2: Granting Access to Personalize thePortal Homepage
To add, remove or change the layout of the homepage, the homepage personalization security access must begranted to all non-guest users.
To update the homepage personalization permission list, use PeopleSoft Data Mover to run thePORTAL_HP_PERS.DMS script. To add the Portal User role to the user IDs, use PeopleSoft Data Mover torun the PORTAL_ADD_ROLE.DMS script. Both scripts are located in <PS_HOME>\scripts.
Note. The PAPP_USER role should be granted to all new user IDs for access to the homepage personalization.After running this script, the role PAPP_USER should be manually removed from any GUEST User ID, sincethe GUEST user should not be personalizing the common homepage.
Task 10-3: Enabling Pagelet Creation and Accesswith Portal Utilities
Use PeopleSoft Data Mover to run the EOPP_PORTAL_PACK.DMS script located in <PS_HOME>\scripts.This script enables you to create and view pagelets using the Enterprise Components Portal Utilities.
Note. Only perform this task if you have licensed PeopleSoft Financials Portal Pack or Enterprise Portal.
Copyright © 2011, Oracle and/or its affiliates. All rights reserved. 61

Installing PeopleSoft Enterprise 9.1 ESA and FSCM Portal Packs for Argentina Chapter 10
62 Copyright © 2011, Oracle and/or its affiliates. All rights reserved.

CHAPTER 11
Integrating PeopleSoft Enterprise 9.1 ProjectCosting and Program Management for Argentinawith Microsoft Project 2007
This chapter discusses:
• Understanding the PeopleSoft-Microsoft Project Integration
• Installing the PeopleSoft-Microsoft Project Integrator
• Configuring the PeopleSoft-Microsoft Project Integrator
Understanding the PeopleSoft-Microsoft Project IntegrationThe PeopleSoft-Microsoft Project Integrator is required if you are integrating PeopleSoft Project Costing forArgentina or PeopleSoft Program Management for Argentina with Microsoft Project 2007 (Windows XP).The PeopleSoft-Microsoft Project Integrator must be installed and running on each file server that you areusing as a point of integration.
Note. The PeopleSoft-Microsoft Project Integrator must be installed on a machine that is configured withMicrosoft Project 2007. It is important that you do not use this machine for any other purpose. ThePeopleSoft-Microsoft Project Integrator supports Windows Terminal Server, which means that one machinemay be used to run multiple Integrators.
Task 11-1: Installing the PeopleSoft-MicrosoftProject Integrator
To install the project integrator :
1. Create a directory, <MSP_HOME>, for the MSP Integrator on the Microsoft Windows machine thatis dedicated as the Microsoft Project Integrator.For example: C:\MSP\.
2. From your file server, copy the files in <PS_HOME>/src/vb/msp to the <MSP_HOME> directory.3. To register any missing ActiveX controls in the Microsoft Windows machine that is dedicated as the
Microsoft Project Integrator, check the Windows system installation directory (<WINDOWS_INST>), forexample C:\WINNT\SYSTEM32 or C:\WINDOWS\SYSTEM32, for the following OCX files:• Richtx32.ocx• TABCTL32.OCX
Copyright © 2011, Oracle and/or its affiliates. All rights reserved. 63

Integrating PeopleSoft Enterprise 9.1 Project Costing and Program Management for Argentina with Microsoft Project 2007 Chapter11
• MSINET.OCX4. If any files are missing, do the following:
a. Copy the three files from <PS_HOME>/src/vb/msp to <WINDOWS_INST>.b. Copy the file regmsp.bat from <PS_HOME>/src/vb/msp to <WINDOWS_INST>.c. Run <WINDOWS_INST>\regmsp.bat to register the OCXs.For example:
C:\WINNT\system32\regmsp.bat.
Task 11-2: Configuring the PeopleSoft-MicrosoftProject Integrator
After the Microsoft Project Integrator is running, you must configure it for your environment.
To configure the project integrator:
1. Launch <MSP_HOME>\PC_MSP2.EXE to start the Microsoft Project Integrator application.
2. Select the Configuration tab, as shown in the following example:
PeopleSoft-Microsoft Project Integrator - Configuration page
3. On the Configuration page, enter the following values:
64 Copyright © 2011, Oracle and/or its affiliates. All rights reserved.
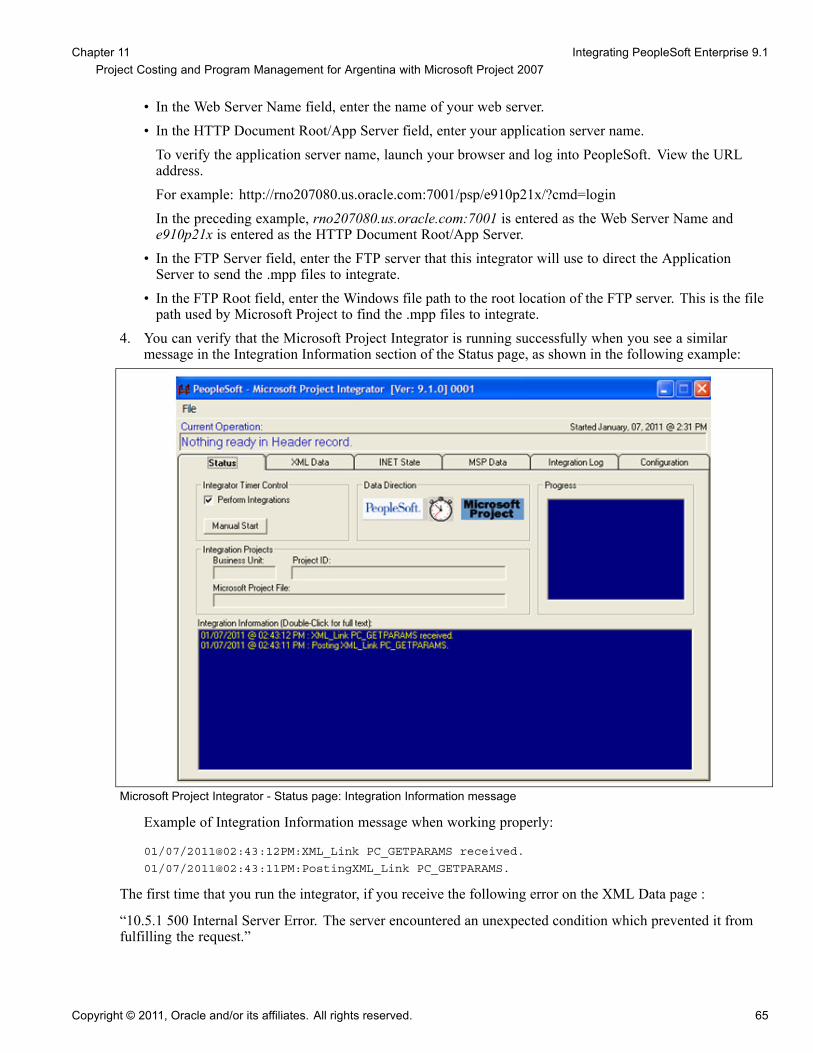
Chapter 11 Integrating PeopleSoft Enterprise 9.1Project Costing and Program Management for Argentina with Microsoft Project 2007
• In the Web Server Name field, enter the name of your web server.• In the HTTP Document Root/App Server field, enter your application server name.To verify the application server name, launch your browser and log into PeopleSoft. View the URLaddress.For example: http://rno207080.us.oracle.com:7001/psp/e910p21x/?cmd=loginIn the preceding example, rno207080.us.oracle.com:7001 is entered as the Web Server Name ande910p21x is entered as the HTTP Document Root/App Server.
• In the FTP Server field, enter the FTP server that this integrator will use to direct the ApplicationServer to send the .mpp files to integrate.
• In the FTP Root field, enter the Windows file path to the root location of the FTP server. This is the filepath used by Microsoft Project to find the .mpp files to integrate.
4. You can verify that the Microsoft Project Integrator is running successfully when you see a similarmessage in the Integration Information section of the Status page, as shown in the following example:
Microsoft Project Integrator - Status page: Integration Information message
Example of Integration Information message when working properly:
01/07/2011@02:43:12PM:XML_Link PC_GETPARAMS received.
01/07/2011@02:43:11PM:PostingXML_Link PC_GETPARAMS.
The first time that you run the integrator, if you receive the following error on the XML Data page :
“10.5.1 500 Internal Server Error. The server encountered an unexpected condition which prevented it fromfulfilling the request.”
Copyright © 2011, Oracle and/or its affiliates. All rights reserved. 65

Integrating PeopleSoft Enterprise 9.1 Project Costing and Program Management for Argentina with Microsoft Project 2007 Chapter11
Do the following:
1. Open a browser and run the following URL:
http://<WebServerName>/xmllink/<ApplicationServerName>/
For example: http://rno207080.us.oracle.com:7001/xmllink/e910p21x/
2. Run the integrator again.
To launch the project integrator upon start up, create a shortcut to PC_MSP2.EXE in the server’s Startupfolder to ensure it initiates upon start up.
66 Copyright © 2011, Oracle and/or its affiliates. All rights reserved.

CHAPTER 12
Defining an FTP Server for File Attachments inPeopleSoft Enterprise 9.1 Project Costingfor Argentina
This chapter discusses:
• Understanding File Attachment Storage
• Setting Up File Attachment Storage on the Database
• Setting Up File Attachment Storage on a File Server
Understanding File Attachment StorageThis chapter details how to specify an FTP server for project and activity file attachments. You can storefile attachments on the database or on a file server. You can then upload and download files by using theAttachments page that is available at both the project and activity levels in PeopleSoft Enterprise ProjectCosting for Argentina.
Task 12-1: Setting Up File Attachment Storageon the Database
To store file attachments on the database:
1. Select Set Up Financials/Supply Chain, Install, Installation Options, Project Costing.2. On the Project Costing page, in the File Attachment Option group box, select the Database option.3. Click Save.
Note. PeopleSoft Project Costing delivers the PC_PROJECTS_DB_ATTACHMENT URL. No additional stepis required to set up this method for file attachments.
Task 12-2: Setting Up File Attachment Storage on a File ServerTo store file attachments on a file server:
1. Ensure that the FTP server has adequate disk storage to store the project and activity documents.
Copyright © 2011, Oracle and/or its affiliates. All rights reserved. 67
Defining an FTP Server for File Attachments in PeopleSoft Enterprise 9.1 Project Costing for Argentina Chapter 12
2. Select PeopleTools, Utilities, Administration, URLs.3. On the URL search page, search for and select the URL PC_PROJECTS_DOC_ATTACHMENT.
Note. PeopleSoft Project Costing delivers this URL.
4. On the URL Maintenance page, enter the URL path to the designated FTP server in the following format:ftp://<userID>:<password>@<machinename>
Note. The user name and password that you specify here are critical. The system uses these to connectall users to the FTP attachment server.
• In the User ID field, enter the userID of the user account under which all users connect to the FTP serverfor adding, updating, viewing, and deleting documents.
• In the Password field, enter the password that is associated with the user account under which all usersconnect to the FTP server.
• In the Machine Name field, enter the machine name by which the FTP server is physically identifiedon the network.If you create an optional directory for document storage on the server, include the directory name whenciting the path. You can also store attachments in the root directory of the FTP server.
5. Click Save.6. On the Installation Options - Project Costing page, in the File Attachment Option group box, select the File
Server option and enter the home directory where the attachment files will be stored.
7. Click Save.
For information on the URL Maintenance page:
See Enterprise PeopleTools 8.51 PeopleBook: System and Server Administration, "Using PeopleToolsUtilities."
For information on the Installation Options - Project Costing page:
See PeopleSoft Enterprise 9.1 Application Fundamentals for Financial Management Solutions, EnterpriseService Automation, and Supply Chain Management PeopleBook, "Setting Installation Options for PeopleSoftApplications."
68 Copyright © 2011, Oracle and/or its affiliates. All rights reserved.

CHAPTER 13
Setting Up PeopleSoft Enterprise 9.1 StaffingFront Office for Argentina
This chapter discusses:
• Setting Up Document Attachments
• Setting Up the Verity Search Engine (Optional)
Task 13-1: Setting Up Document AttachmentsPeopleSoft Staffing Front Office 9.1 for Argentina uses the standard file attachments functionality. Thisfunctionality is used in many components by multiple PeopleSoft products.
Note. PeopleSoft Staffing Front Office is only supported on Microsoft SQL Server, Oracle and DB2 UDB forLinux, UNIX, and Microsoft Windows.
If you are planning to use file attachments for Applicants, Employees, Orders, Assignments, Customers, orContacts, then you need to set up an FTP server.
Select Set Up Financials/Supply Chain, Common Definitions, File Attachments, Administer File Attachmentsto access the correct page.
Attachments to PeopleSoft Staffing Front Office Orders and Assignments are stored and retrieved from theserver locations defined here. System administrators can configure one or more servers to store attachments.These servers can be FTP servers or database servers.
Using this page, system administrators can set up new servers and identify the active server. Administratorscan add or modify the FTP root folder for FTP servers.
Use the following example and list of fields on the Administer File Attachments page to configure the FTPserver:
Copyright © 2011, Oracle and/or its affiliates. All rights reserved. 69

Setting Up PeopleSoft Enterprise 9.1 Staffing Front Office for Argentina Chapter 13
Administer File Attachments page
• In the Pick Active Server drop-down list box, select the server ID of the active (or default) server whereall of the newly created attachments are stored.You can switch the active server at any time. All previously created attachments are still retrieved fromthe server where they were originally stored. The attachments keep a reference to the original server.This field is required.
• Click the Add FTP Server button (add file transfer protocol server) to insert a new row in the grid todefine a new FTP server for attachments.
• The Add Database Server button is not applicable for PeopleSoft Staffing Front Office attachments.• The ID field displays the system-assigned ID number for each server on this page.
When an attachment is stored to the server, the server ID is inserted into the attachment record. Whenyou request to download (view) this attachment, the system retrieves the attachment from the originalserver, based on the server ID.
• The Type field identifies the type of server, based on whether you click the Add FTP Server button or theAdd Database Server button.After you save the row and exit the component, you cannot change the server type.The server type values are:• FTP (file transfer protocol server)Only FTP server is supported for PeopleSoft Staffing Front Office attachments.
• DB (database server)• In the Login field, enter or change the login name. The login is required for FTP servers only.• In the Password field, enter or change the password corresponding to the Login Name. The password is
required for FTP servers only.• In the Server/Record Name field, enter the machine name for the FTP server.
After you save the information, change the machine name only if the same FTP server is renamed.To add a different FTP server, click the Add FTP Server button to insert a new row into the grid and definethe new server. You cannot delete servers because attachments may already be stored on these servers.
• In the Path field, enter the subdirectory path under the server’s FTP root where all attachments are to bestored. The path is required for FTP servers only.
70 Copyright © 2011, Oracle and/or its affiliates. All rights reserved.

Chapter 13 Setting Up PeopleSoft Enterprise 9.1 Staffing Front Office for Argentina
• The Component Subdirectories group box is not applicable for PeopleSoft Staffing Front Officeattachments.
Note. You cannot delete a server after you save the page. After you exit the component, the system assumesthat attachments may already be stored on this server location.
Task 13-2: Setting Up the Verity Search Engine (Optional)PeopleSoft Staffing Front Office 9.1 utilizes the Verity Search Engine to address its search needs. The VeritySearch Engine is a common functionality between Staffing and Resource Management.
If you plan to use any of the search functionality in PeopleSoft Staffing Front Office 9.1, you can set up yourSearch Configuration under:
Set Up Financials/Supply Chain, Common Definitions, Resource Search, Search Configuration.
See PeopleSoft Enterprise Resource Management 9.1 PeopleBook, "Enabling Resource Matching and CacheProcesses."
Copyright © 2011, Oracle and/or its affiliates. All rights reserved. 71

Setting Up PeopleSoft Enterprise 9.1 Staffing Front Office for Argentina Chapter 13
72 Copyright © 2011, Oracle and/or its affiliates. All rights reserved.

CHAPTER 14
Integrating PeopleSoft Transaction BillingProcessor with PeopleSoft Customer RelationshipManagement for Argentina
This chapter discusses:
• Understanding PeopleSoft Transaction Billing Processor and PeopleSoft CRM Integration
• Turning On and Activating the Integration Queues
• Turning On and Activating the Integration Services and Routings
• Transforming the Contract Transaction Service
Understanding PeopleSoft Transaction Billing Processorand PeopleSoft CRM Integration
The following instructions describe the process to integrate PeopleSoft 9.1 Transaction Billing Processor (TBP)for Argentina with the PeopleSoft Enterprise 9.1 Customer Relationship Management (CRM) for Argentinadatabase. PeopleSoft TBP functionality is also used by PeopleSoft Enterprise Real Estate Management (REM)for Argentina, however; being in the same database does not require any additional setup. The following stepsare applicable only if you want to integrate your PeopleSoft FSCM and PeopleSoft CRM databases.
Task 14-1: Turning On and Activating the Integration QueuesTo turn on the integration queues (channels):
1. Sign in to the PeopleSoft Pure Internet Architecture (PIA).2. Select PeopleTools, Integration Broker, Integration Setup, Queues.3. On the Queues search page, search for and select the queue name CONTRACT.4. On the Queue Definitions page, in the Queue Status field, select Run from the drop-down list box,
as shown in the following example:
Copyright © 2011, Oracle and/or its affiliates. All rights reserved. 73
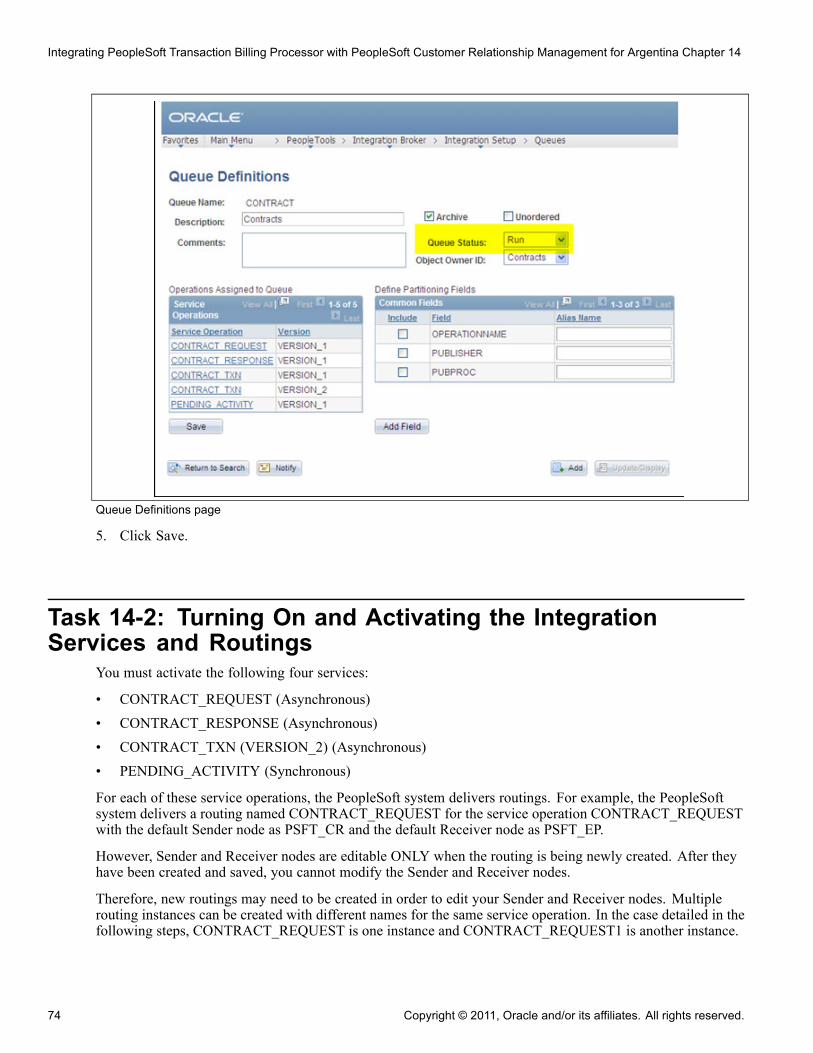
Integrating PeopleSoft Transaction Billing Processor with PeopleSoft Customer Relationship Management for Argentina Chapter 14
Queue Definitions page
5. Click Save.
Task 14-2: Turning On and Activating the IntegrationServices and Routings
You must activate the following four services:
• CONTRACT_REQUEST (Asynchronous)• CONTRACT_RESPONSE (Asynchronous)• CONTRACT_TXN (VERSION_2) (Asynchronous)• PENDING_ACTIVITY (Synchronous)
For each of these service operations, the PeopleSoft system delivers routings. For example, the PeopleSoftsystem delivers a routing named CONTRACT_REQUEST for the service operation CONTRACT_REQUESTwith the default Sender node as PSFT_CR and the default Receiver node as PSFT_EP.
However, Sender and Receiver nodes are editable ONLY when the routing is being newly created. After theyhave been created and saved, you cannot modify the Sender and Receiver nodes.
Therefore, new routings may need to be created in order to edit your Sender and Receiver nodes. Multiplerouting instances can be created with different names for the same service operation. In the case detailed in thefollowing steps, CONTRACT_REQUEST is one instance and CONTRACT_REQUEST1 is another instance.
74 Copyright © 2011, Oracle and/or its affiliates. All rights reserved.

Chapter 14 Integrating PeopleSoft Transaction Billing Processor with PeopleSoft Customer Relationship Management for Argentina
Since the PeopleSoft-delivered routings have already been created and the nodes are not editable, you canconfigure your nodes using one of the following three methods:
• Configure the nodes PSFT_CR and PSFT_EP with the valid databases so that the Sender Node PSFT_CRand Receiver Node PSFT_EP are valid and functional.
• Create a new routing instance of the service operation with a different name, such asCONTRACT_REQUEST1 as shown in the following steps, and then supply the proper Sender andReceiver nodes (this is a prerequisite listed at the start).
Note. Creating a new routing instance of the service operation with a different name is the method that isdetailed in the following steps. If you use one of the other methods, verify that the correct routings areactive by navigating to PeopleTools, Integration Broker, Integration Setup, Services. Open each serviceoperation and select the Routings tab to see their status.
• Delete the PeopleSoft system-supplied routing (CONTRACT_REQUEST) and then create a new instanceof the Service operation.
To activate the integration services (messages):
1. Sign in to PeopleSoft Pure Internet Architecture.2. Select PeopleTools, Integration Broker, Integration Setup, Services.3. On the Services search page, search for and select the service name CONTRACT_REQUEST.
You can open a service operation to activate using one of the following two methods (a. or b.):a. Directly open a service operation.Select PeopleTools, Integration Broker, Integration Setup, Service Operations. Search forCONTRACT_REQUEST.You can choose to filter through the Service Name or Service Operation, as shown in the followingexample:
Find Service Operation page
Copyright © 2011, Oracle and/or its affiliates. All rights reserved. 75

Integrating PeopleSoft Transaction Billing Processor with PeopleSoft Customer Relationship Management for Argentina Chapter 14
b. Open a service and then its corresponding service operation.Each service has a corresponding PeopleSoft-delivered service operation. For each of the serviceoperations previously listed, you can open the service that has the same name.Select PeopleTools, Integration Broker, Integration Setup, Services, and search for the service nameCONTRACT_REQUEST, as shown in the following example:
Services - Contract Request page
Select the CONTRACT_REQUEST.VERSION_1 link in the Operation tab of the Existing Operationsgrid that lists the Default Version. This link opens the service operation.After a service operation is opened using either method, you can activate and configure the service.
4. On the General tab, select the Active check box to activate the service, as shown in the following example:
76 Copyright © 2011, Oracle and/or its affiliates. All rights reserved.

Chapter 14 Integrating PeopleSoft Transaction Billing Processor with PeopleSoft Customer Relationship Management for Argentina
Contract Request page - General page
5. Click Save.6. Select the Handlers tab to access the Handlers page.7. On the Handlers page, if there are any handlers, set the Status field to Active.
In the example that follows, the status has been set to Active for the handler name ContractRequest.
Note. CONTRACT_REQUEST and CONTRACT_TXN have handlers defined in PeopleSoft FSCM forContracts.
Copyright © 2011, Oracle and/or its affiliates. All rights reserved. 77

Integrating PeopleSoft Transaction Billing Processor with PeopleSoft Customer Relationship Management for Argentina Chapter 14
Contract Request page - Handlers page
8. Select the Routings tab to access the Routings page.9. On the Routings page, in the Routing Name field, enter a routing name such as CONTRACT_REQUEST1.10. Click the Add (+) button to add the routing.
The Routing Definitions page for the new routing CONTRACT_REQUEST1 appears.11. Review the following example and prerequisite details before you configure the new routing definition in
the steps that follow:
78 Copyright © 2011, Oracle and/or its affiliates. All rights reserved.
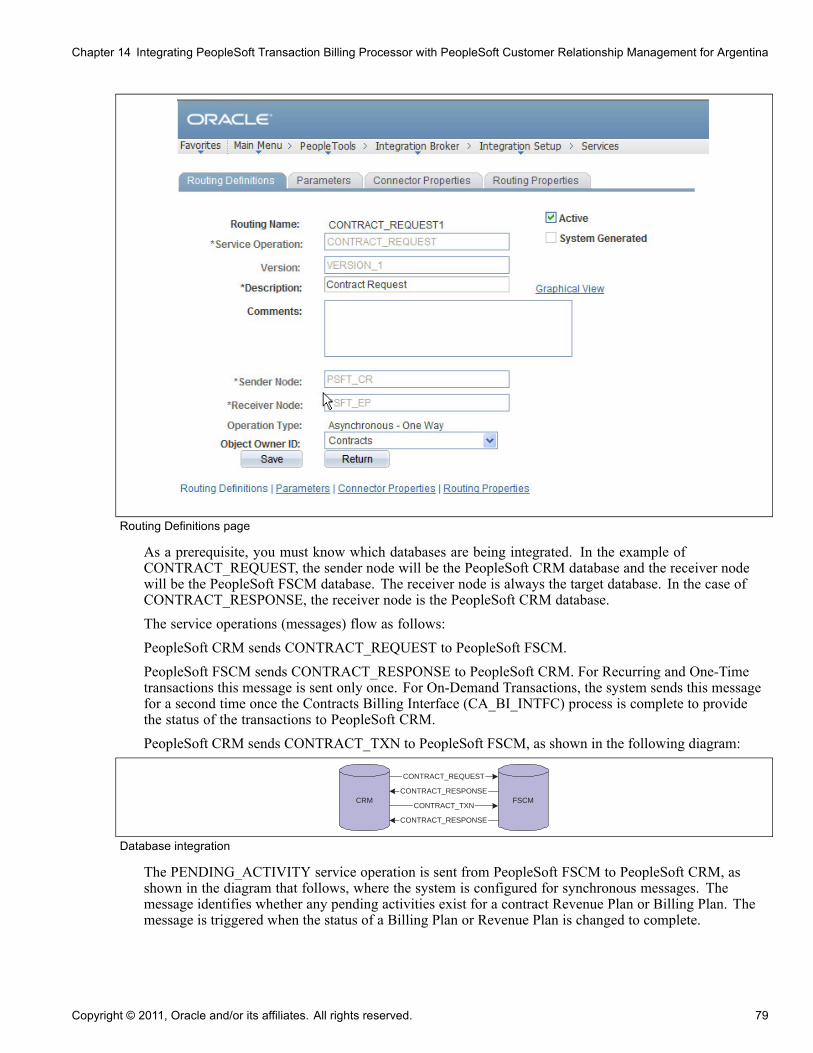
Chapter 14 Integrating PeopleSoft Transaction Billing Processor with PeopleSoft Customer Relationship Management for Argentina
Routing Definitions page
As a prerequisite, you must know which databases are being integrated. In the example ofCONTRACT_REQUEST, the sender node will be the PeopleSoft CRM database and the receiver nodewill be the PeopleSoft FSCM database. The receiver node is always the target database. In the case ofCONTRACT_RESPONSE, the receiver node is the PeopleSoft CRM database.The service operations (messages) flow as follows:PeopleSoft CRM sends CONTRACT_REQUEST to PeopleSoft FSCM.PeopleSoft FSCM sends CONTRACT_RESPONSE to PeopleSoft CRM. For Recurring and One-Timetransactions this message is sent only once. For On-Demand Transactions, the system sends this messagefor a second time once the Contracts Billing Interface (CA_BI_INTFC) process is complete to providethe status of the transactions to PeopleSoft CRM.PeopleSoft CRM sends CONTRACT_TXN to PeopleSoft FSCM, as shown in the following diagram:
CONTRACT_REQUEST
CRM FSCMCONTRACT_TXN
CONTRACT_RESPONSE
CONTRACT_RESPONSE
Database integration
The PENDING_ACTIVITY service operation is sent from PeopleSoft FSCM to PeopleSoft CRM, asshown in the diagram that follows, where the system is configured for synchronous messages. Themessage identifies whether any pending activities exist for a contract Revenue Plan or Billing Plan. Themessage is triggered when the status of a Billing Plan or Revenue Plan is changed to complete.
Copyright © 2011, Oracle and/or its affiliates. All rights reserved. 79

Integrating PeopleSoft Transaction Billing Processor with PeopleSoft Customer Relationship Management for Argentina Chapter 14
Pending Activity
Note. If the node fields are grayed out and unavailable for edit, you can create a new routing and configurethat routing with the nodes that you are configuring.
12. Use the preceding example and prerequisite details to configure the new routing definition as follows:a. Select the Active check box.b. Enter the correct sender node.c. Enter the correct receiver node.d. Enter the correct object owner ID if applicable.
Note. In the PeopleSoft FSCM database, the Object Owner ID is always Contracts.
e. Click Save.13. Repeat the preceding steps for the following service operations (messages):
• CONTRACT_RESPONSE• CONTRACT_TXN (VERSION_2)• PENDING_ACTIVITY
Task 14-3: Transforming the Contract Transaction ServicePeopleSoft Enterprise Contracts in PeopleSoft FSCM uses CONTRACT_TXN version 2 for all the processingrelated to PeopleSoft Transaction Billing Processor. PeopleSoft CRM uses CONTRACT_TXN version 1.The default version is version 1 in PeopleSoft CRM whereas it is version 2 in PeopleSoft FSCM. Due to thedifference in the versions of the same message there is a need to set up the transformation of incoming messageversion 1 from PeopleSoft CRM to version 2 in PeopleSoft FSCM.
You need to open the CONTRACT_TXN Service Operation (Message) properties and activate the non-defaultversion 1 of the message (you have already activated the default version 2 in earlier steps). Both versions mustbe active in order for the transformation to work correctly. The necessary required steps are as follows:
1. Select PeopleTools, Integration Broker, Integration Setup, Service Operations.2. On the Service Operations search page, search for the service name CONTRACT_TXN.
Alternatively, select PeopleTools, Integration Broker, Integration Setup, Services, and search for servicename CONTRACT_TXN.Then click the CONTRACT_TXN.VERSION_2 link in the Operation tab of the Existing Operations area.
80 Copyright © 2011, Oracle and/or its affiliates. All rights reserved.

Chapter 14 Integrating PeopleSoft Transaction Billing Processor with PeopleSoft Customer Relationship Management for Argentina
The Service Operation - General page for CONTRACT_TXN appears, as shown in the following example:
Service Operations - General page for CONTRACT_TXN
3. On the General page, click the VERSION_1 link listed in the Non-Default Versions area to open theNon-Default Version – VERSION_1 page for the CONTRACT_TXN. Enter the values as shown inthe following example:
Copyright © 2011, Oracle and/or its affiliates. All rights reserved. 81

Integrating PeopleSoft Transaction Billing Processor with PeopleSoft Customer Relationship Management for Argentina Chapter 14
Service Operation Version page
4. On the Service Operation Version page, select the Active check box to activate the service operation.5. In the Transform to Default field, enter CA_TBP_TXN.6. Click Save.7. On the Service Operation page for CONTRACT_TXN, select the Routings tab to access the Routings page.8. On the Routings page, click the routing link that you added or activated in the previous task.9. Select the Parameters tab to access the Parameters page, as shown in the following example:
82 Copyright © 2011, Oracle and/or its affiliates. All rights reserved.
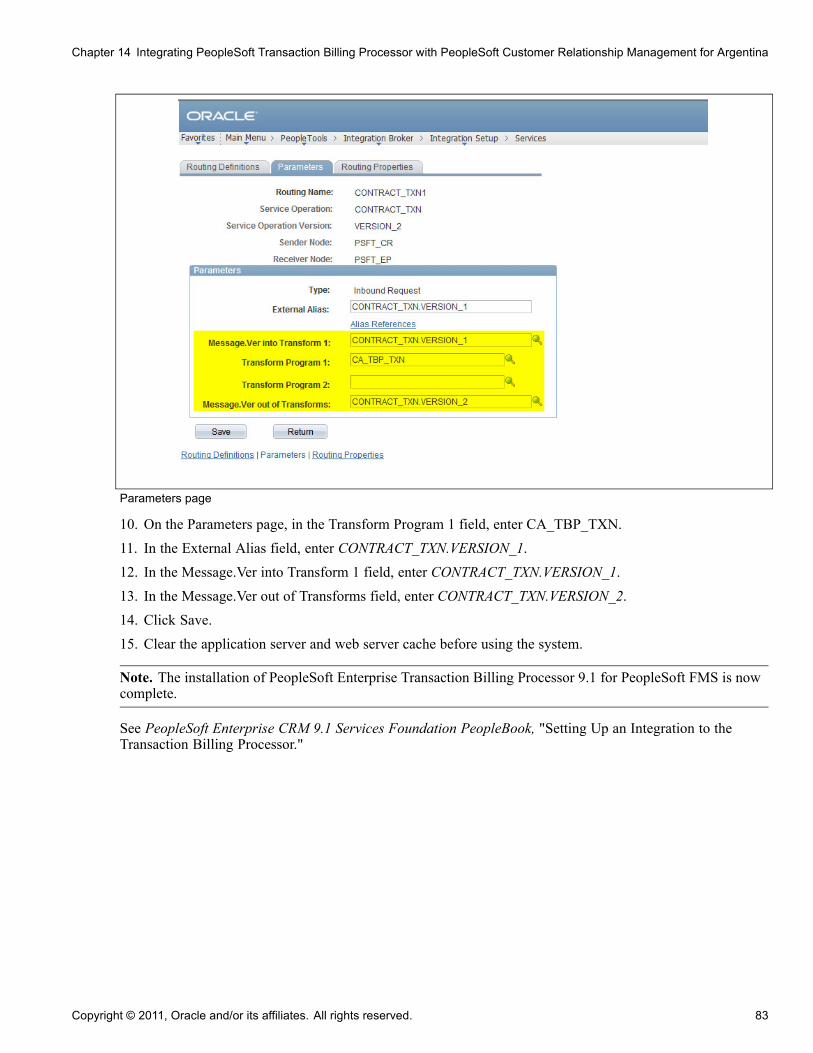
Chapter 14 Integrating PeopleSoft Transaction Billing Processor with PeopleSoft Customer Relationship Management for Argentina
Parameters page
10. On the Parameters page, in the Transform Program 1 field, enter CA_TBP_TXN.11. In the External Alias field, enter CONTRACT_TXN.VERSION_1.12. In the Message.Ver into Transform 1 field, enter CONTRACT_TXN.VERSION_1.13. In the Message.Ver out of Transforms field, enter CONTRACT_TXN.VERSION_2.14. Click Save.15. Clear the application server and web server cache before using the system.
Note. The installation of PeopleSoft Enterprise Transaction Billing Processor 9.1 for PeopleSoft FMS is nowcomplete.
See PeopleSoft Enterprise CRM 9.1 Services Foundation PeopleBook, "Setting Up an Integration to theTransaction Billing Processor."
Copyright © 2011, Oracle and/or its affiliates. All rights reserved. 83

Integrating PeopleSoft Transaction Billing Processor with PeopleSoft Customer Relationship Management for Argentina Chapter 14
84 Copyright © 2011, Oracle and/or its affiliates. All rights reserved.
CHAPTER 15
Installing PeopleSoft Enterprise 9.1 MaintenanceManagement for Argentina with MicrosoftProject 2007
This chapter discusses:
• Prerequisites
• Installing the PeopleSoft PeopleTools Process Scheduler on a Microsoft Windows Machine
• Installing Microsoft Project 2007
• Configuring the Microsoft Project Integration Process
PrerequisitesThis chapter describes the installation to integrate PeopleSoft Enterprise Maintenance Management forArgentina with Microsoft Project 2007. The integration software requires that you previously install andconfigure the following items:
• You must have a process scheduler server set up on a Microsoft Windows machine to run againstthe PeopleSoft Enterprise 9.1 Maintenance Management for Argentina database. The integration withMicrosoft Project 2007 uses a PeopleSoft Process Scheduler server to communicate with MicrosoftProject 2007.
• The Microsoft Project 2007 software must be installed on the process scheduler server.
Note. Be sure to carry out the tasks in this chapter in the order provided.
Task 15-1: Installing the PeopleSoft PeopleTools ProcessScheduler on a Microsoft Windows Machine
Follow the standard installation instructions to install PeopleSoft PeopleTools on a Microsoft Windowsmachine, configuring it as a process scheduler to connect to the PeopleSoft Enterprise 9.1 FSCM databasewhere the PeopleSoft Maintenance Management product resides.
Copyright © 2011, Oracle and/or its affiliates. All rights reserved. 85

Installing PeopleSoft Enterprise 9.1 Maintenance Management for Argentina with Microsoft Project 2007 Chapter 15
Task 15-2: Installing Microsoft Project 2007Install Microsoft Project 2007 on the same Microsoft Windows machine where the process scheduler serveris installed.
Note. Caution! You should NOT install the PeopleSoft-Microsoft Project Integrator on the process pchedulerthat runs the PeopleSoft Maintenance Management- Microsoft Project integration.
Task 15-3: Configuring the Microsoft ProjectIntegration Process
To configure the integration process:
1. Sign in to PeopleSoft Pure Internet Architecture.
2. Select PeopleTools, Process Scheduler, Processes.
3. On the Process search page, search for and select the process name WM_MSP.
4. On the Process Definition page, select the Process Definition Options tab to access the Process DefinitionOptions page.
5. On the Process Definition Options page, in the Server Name field, enter the name of the process schedulerthat you configured in the task titled “Installing PeopleSoft PeopleTools Process Scheduler on a MicrosoftWindows Machine,” as shown in the following example:
Process Definition Options page for process name WM_MSP
6. Click Save.7. Select PeopleTools, Process Scheduler, Processes.
86 Copyright © 2011, Oracle and/or its affiliates. All rights reserved.

Chapter 15 Installing PeopleSoft Enterprise 9.1 Maintenance Management for Argentina with Microsoft Project 2007
8. On the Process search page, search for and select the process name WM_MSP_IMP.9. On the Process Definition page, select the Process Definition Options tab to access the Process Definitions
Options page.10. On the Process Definitions Options page, in the Server Name field, enter the name of the process scheduler
that you configured in the task titled “Installing PeopleSoft PeopleTools Process Scheduler on a MicrosoftWindows Machine,” as shown in the following example:
Process Definition Options page for process name WM_MSP_IMP
11. Click Save.
Copyright © 2011, Oracle and/or its affiliates. All rights reserved. 87

Installing PeopleSoft Enterprise 9.1 Maintenance Management for Argentina with Microsoft Project 2007 Chapter 15
88 Copyright © 2011, Oracle and/or its affiliates. All rights reserved.

CHAPTER 16
Integrating PeopleSoft Enterprise 9.1 AssetManagement for Argentina with eCenterOneSpace Management Solution (Optional)
This chapter discusses:
• Understanding the Integration with eCenterOne Space Management
• Installing the Target Connector for eCenterOne
• Configuring the Local Gateway and Connector Properties
• Running Message Channel
• Activating the Domain for Asynchronous Messaging
• Activating Routings, Service Operations, and Updating Transaction Routings Properties
• Testing the eCenterOne Node
• Activating the Space Management Install Option
• Verifying the Integration
Understanding the Integration with eCenterOneSpace Management
PeopleSoft 9.1 Asset Management for Argentina integrates with CenterStone Software’s eCenterOne SpaceManagement solution to provide the following functionality:
• Maintain floor plans, import CAD drawings into CAFM.• Design and maintain layout space in CAFM.• Assign resources or employees to spaces.• Manage occupancy and vacancy rate in CAFM.• Analyze capacity and forecast capacity needs in CAFM.
This is an optional integration.
If you want to integrate with eCenterOne, you must purchase licensing directly from CenterStone, an additionalcomponent (third-party) vendor, before you proceed with this installation.
See Also"Configuring the PeopleSoft Enterprise 9.1 Asset Management with eCenterOne Space Management Solution."
Copyright © 2011, Oracle and/or its affiliates. All rights reserved. 89

Integrating PeopleSoft Enterprise 9.1 Asset Management for Argentina with eCenterOne Space Management Solution(Optional) Chapter 16
Task 16-1: Installing the Target Connector for eCenterOneYou must download connector files to integrate with the eCenterOne software.
1. Download the following connector files from http://www.centerstonesoft.com/integration.
Note. eCenterOne software has been acquired by Manhattan Associates. The link in step 1 redirectsyou to the Manhattan Associates Site.
Note. If you encounter problems accessing the URL, locating or downloading the files, please contactCenterStone support at (508) 435–1510, option 4. For all other issues contact Oracle Customer Support.
• eCenterOneTargetConnector.class• insert-email.xslt• soap.jar
2. Copy the files eCenterOneTargetConnector.class and insert-email.xslt to the following directory:<PS_HOME>\webserv\peoplesoft\applications\peoplesoft\PSIGW\WEB-INF\classes\com⇒\peoplesoft\pt\integrationgateway\targetconnector
3. Copy the file soap.jar to the following directory:
<PS_HOME>\webserv\peoplesoft\applications\peoplesoft\PSIGW\WEB-INF\lib
4. After you copy the files, restart the web server.
Task 16-2: Configuring the Local Gateway andConnector Properties
To use Integration Broker to configure the Local gateway for the eCenterOne integration:
1. Select PeopleTools, Integration Broker, Configuration, Gateways.2. Click Search.
The system automatically displays the information for the Local gateway.3. Change the URL to http://<WEBSRV>/PSIGW/PeopleSoftListeningConnector.4. Click Save.5. Click the Load Gateway Connectors button.
This ensures that all of the existing connectors install on the gateway.6. Verify that one of the connectors is ECENTERONETARGET.7. Click Save again. This installs the connectors, as shown in the following example:
90 Copyright © 2011, Oracle and/or its affiliates. All rights reserved.

Chapter 16 Integrating PeopleSoft Enterprise 9.1 AssetManagement for Argentina with eCenterOne Space Management Solution (Optional)
Local Gateway page
8. In the Connectors group box, click the Properties link to access the Connector Properties page.9. On the Connector Properties page, configure the eCenterOne Connector Properties to enable Messaging to
the eCenterOne Server, as shown in the following example:
Copyright © 2011, Oracle and/or its affiliates. All rights reserved. 91

Integrating PeopleSoft Enterprise 9.1 Asset Management for Argentina with eCenterOne Space Management Solution(Optional) Chapter 16
Connector Properties page
10. On the Local Gateway page in the previous section, select the Properties link besideECENTERONETARGET.
11. Select the Connector Properties and update the Value field for the Property Names listed in the followingtable:
Property ID Property Name DescriptionECENTERONETARGET Database Target eCenterOne Database NameECENTERONETARGET Email Email Address for Notifications from
CenterStoneECENTERONETARGET eCenterOne URL eCenterOne Server URLECENTERONETARGET Password eCenterOne Server PasswordECENTERONETARGET User Name eCenterOne Server Username
12. Click Save.
92 Copyright © 2011, Oracle and/or its affiliates. All rights reserved.

Chapter 16 Integrating PeopleSoft Enterprise 9.1 AssetManagement for Argentina with eCenterOne Space Management Solution (Optional)
Task 16-3: Running Message ChannelTo run message channel:
1. Select PeopleTools, Integration Broker, Integration Setup, Monitor Message Queues.
2. On the Queues search page, search for and select the queue message ASSET_MANAGEMENT.
3. On the Queue Definitions page, verify that the Queue Status is set to Run, as shown in the followingexample:
Queue Definitions page
4. If the Queue Status is Paused, set to Run (or click the Run button).5. Click Save.
Task 16-4: Activating the Domain forAsynchronous Messaging
Asynchronous message handling in the PeopleSoft system is different from synchronous message handling. Inthe asynchronous mode, a message is dumped in a queue and a message handler then picks up the message andgives it to the message dispatcher. The dispatcher then delivers the message to the target node. To enablethe message handler and dispatcher, make sure that your domain has publish/subscribe servers configuredin psadmin.
Copyright © 2011, Oracle and/or its affiliates. All rights reserved. 93

Integrating PeopleSoft Enterprise 9.1 Asset Management for Argentina with eCenterOne Space Management Solution(Optional) Chapter 16
Launch psadmin.exe from <PS_HOME>/appserv, and verify that the option Pub/Sub servers is set to Yes, asshown in the following example:
Setting the pub/sub servers option in psadmin
Note. Psadmin configuration supports asynchronous messaging. After starting your application server you seetwo new processes—one for message handler, and one for message dispatcher.
After configuring your application server, you need to activate your domain through PeopleSoft Pure InternetArchitecture to ensure that the Handler and Dispatcher pick up your asynchronous messages.
To activate your domain:
1. Select the Connector Properties and update the Value field with the Property Names that follow.2. Select PeopleTools, Integration Broker, Service Operations Monitor, Monitor Message, Administration,
Domain Status.3. Click the Domain Status tab to access the Domain Status page.4. On the Domain Status page, search for your domain and select Active from the Domain Status drop-down
list box.In the following example, notice that the domain is distinguished through the machine name:
94 Copyright © 2011, Oracle and/or its affiliates. All rights reserved.

Chapter 16 Integrating PeopleSoft Enterprise 9.1 AssetManagement for Argentina with eCenterOne Space Management Solution (Optional)
FO_WC_CO_STATE_SYNC
Task 16-5: Activating Routings, Service Operations, andUpdating Transaction Routings Properties
For Oracle customers only: Run the following statement against the PeopleSoft FSCM 9.1 database usingSQL*PLUS before running the scripts in this section:
ALTER SESSION set NLS_Date_Format = ’YYYY-MM-DD’
1. Using a database query tool (such as iSQL, SQL*Plus, and DB2 Command Window) sign in to the targetPeopleSoft FSCM database.
2. Edit the AM_CAFM_IB_UPDATE.SQL script from the Scripts directory under the folder where the AssetManagement FSCM CD was installed.Edit the entries in the AM_CAFM_IB_UPDATE.SQL file and update the following values betweendelimiters << and >> in single quotes. Cornerstone should provide these values when the eCenterOnesoftware is purchased.
<<URL>>
<<DATABASE>>
<<USERNAME>>
<<PASSWORD>>
For example:Update PSRTNGDFNCONPRP set PROPVALUE = ’http://centerstone3.ecenterone.com’⇒where PROPNAME = ’eCenter One URL’ and ROUTINGDEFNNAME IN (select⇒ROUTINGDEFNNAME from PSIBRTNGDEFN where RECEIVERNODENAME = ’PSFT_XOUTBND’ and⇒IB_OPERATIONNAME IN (’ADD_EMP_PUB’,’ADD_PROP_PUB’,’SYN_DEPT_HIER_PUB’,’SYN_EMP_⇒
⇒PUB’,’UPD_EMP_PUB’,’UPD_PROPID_PUB’,’LST_DELETEDPROPS_REQ’,’LST_NEWPROPS_⇒REQ’,’UPD_EMPLOC_REQ’,’UPD_PROP_REQ’));
Copyright © 2011, Oracle and/or its affiliates. All rights reserved. 95

Integrating PeopleSoft Enterprise 9.1 Asset Management for Argentina with eCenterOne Space Management Solution(Optional) Chapter 16
3. Run the script.
Task 16-6: Testing the eCenterOne NodeCreate an eCenterOne test node and ping to verify that the connection properties are good.
To test the eCenterOne node:
1. Select PeopleTools, Integration Broker, Integration Setup, Nodes.2. Click the Add (+) button to add a new test node, such as ECENTERONE_TEST.3. Select the Node Definitions tab to access the Node Definitions page.4. On the Node Definitions page, enter values in the Description and Default User ID fields, as shown in
the following example:
Node Definitions page
5. Select the Connectors tab to access the Connectors page.
6. On the Connectors page, in the Connector ID field, click the lookup button to selectECENTERONETARGET, as shown in the following example:
96 Copyright © 2011, Oracle and/or its affiliates. All rights reserved.

Chapter 16 Integrating PeopleSoft Enterprise 9.1 AssetManagement for Argentina with eCenterOne Space Management Solution (Optional)
Node Connectors page
7. Click Save.8. Click Ping Node to verify that it is successful.
The Message Text displays Success, as shown in the following example:
Ping Node Results page
9. Shut down and then restart the application server and web server.
Task 16-7: Activating the Space Management Install OptionTo activate the Space Management install option:
1. Select Set Up Financials/Supply Chain, Install, Installation Options.
Copyright © 2011, Oracle and/or its affiliates. All rights reserved. 97
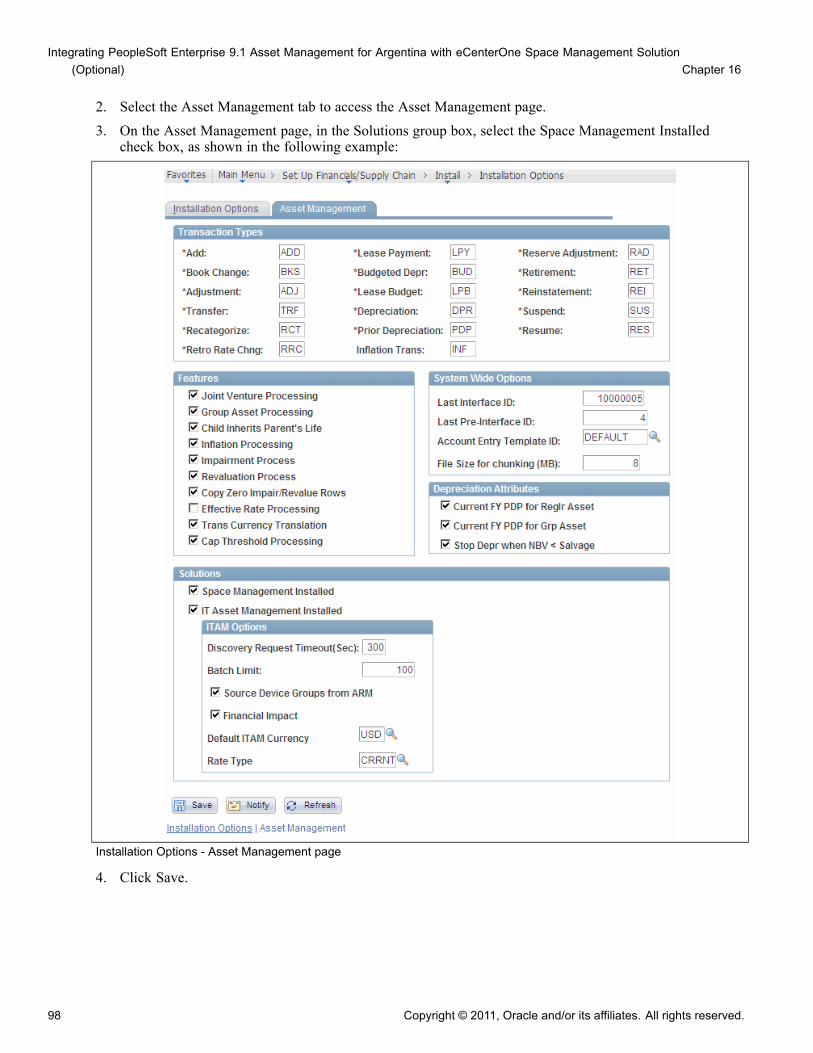
Integrating PeopleSoft Enterprise 9.1 Asset Management for Argentina with eCenterOne Space Management Solution(Optional) Chapter 16
2. Select the Asset Management tab to access the Asset Management page.3. On the Asset Management page, in the Solutions group box, select the Space Management Installed
check box, as shown in the following example:
Installation Options - Asset Management page
4. Click Save.
98 Copyright © 2011, Oracle and/or its affiliates. All rights reserved.
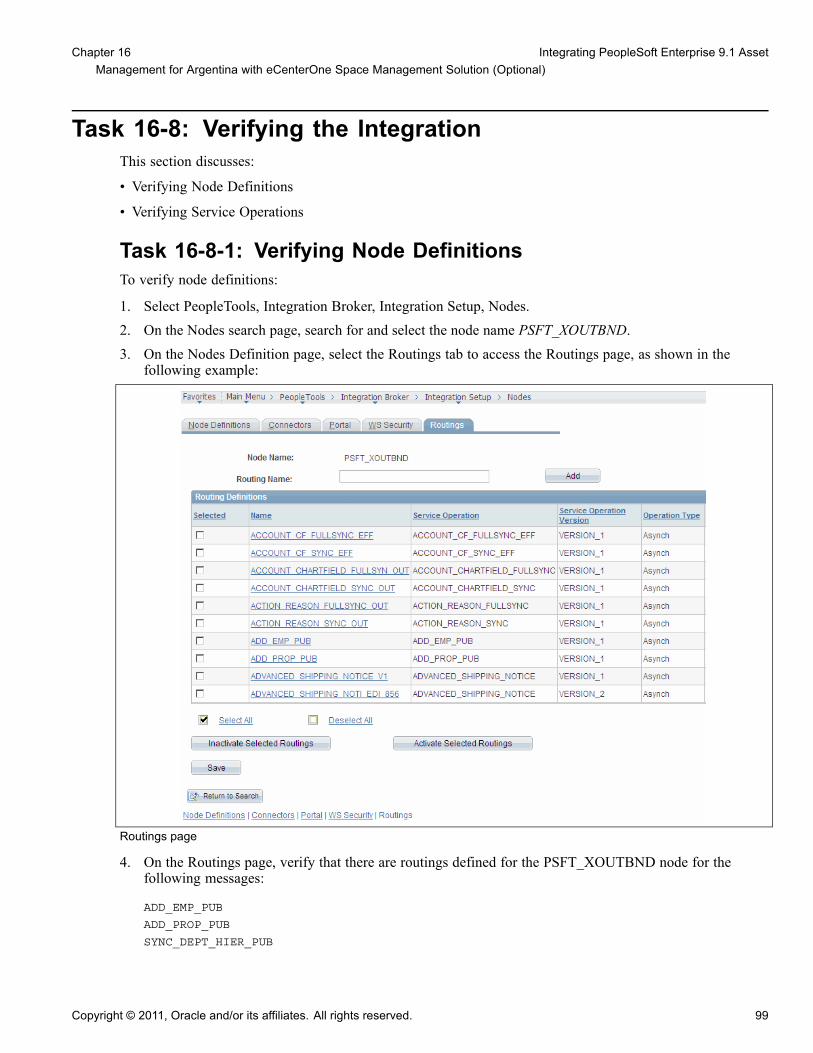
Chapter 16 Integrating PeopleSoft Enterprise 9.1 AssetManagement for Argentina with eCenterOne Space Management Solution (Optional)
Task 16-8: Verifying the IntegrationThis section discusses:
• Verifying Node Definitions
• Verifying Service Operations
Task 16-8-1: Verifying Node DefinitionsTo verify node definitions:
1. Select PeopleTools, Integration Broker, Integration Setup, Nodes.2. On the Nodes search page, search for and select the node name PSFT_XOUTBND.3. On the Nodes Definition page, select the Routings tab to access the Routings page, as shown in the
following example:
Routings page
4. On the Routings page, verify that there are routings defined for the PSFT_XOUTBND node for thefollowing messages:
ADD_EMP_PUB
ADD_PROP_PUB
SYNC_DEPT_HIER_PUB
Copyright © 2011, Oracle and/or its affiliates. All rights reserved. 99

Integrating PeopleSoft Enterprise 9.1 Asset Management for Argentina with eCenterOne Space Management Solution(Optional) Chapter 16
SYN_EMP_PUB
UPD_EMP_PUB
UPD_PROPID_PUB
LST_DELETEDPROPS_REQ
LST_NEWPROPS_REQ
UPD_EMPLOC_REQ
UPD_PROP_REQ
5. For each routing, click on the Detail link and verify that the details are correct.
Task 16-8-2: Verifying Service OperationsTo verify service operations:
1. Select PeopleTools, Integration Broker, Integration Setup, Service Operations.2. On the Service Operations search page, search for and select the service operation ADD_EMP_PUB.3. On the Service Operations - General page, verify that the details are correct.
Verify that the details are correct for all of the other service operations, as shown in the following example:
Service Operations - General page
100 Copyright © 2011, Oracle and/or its affiliates. All rights reserved.

Chapter 16 Integrating PeopleSoft Enterprise 9.1 AssetManagement for Argentina with eCenterOne Space Management Solution (Optional)
For additional information about this integration, refer to the following PeopleSoft PeopleBooks:
See PeopleSoft Enterprise Real Estate Management 9.1 PeopleBook, "Integrating with Other Applications."
See PeopleSoft Enterprise Asset Lifecycle Management Fundamentals 9.1 PeopleBook, "IntegratingPeopleSoft Asset Management with Other Products."
Copyright © 2011, Oracle and/or its affiliates. All rights reserved. 101

Integrating PeopleSoft Enterprise 9.1 Asset Management for Argentina with eCenterOne Space Management Solution(Optional) Chapter 16
102 Copyright © 2011, Oracle and/or its affiliates. All rights reserved.
CHAPTER 17
Integrating PeopleSoft 9.1 Asset Management forArgentina with Physical Inventory Solutions
Understanding PeopleSoft 9.1 Asset Managementand Physical Inventory Integration
PeopleSoft 9.1 Asset Management for Argentina integrates with additional component (third-party) PhysicalInventory Solutions to provide the following functionality:
• Publish lists of assets in the asset repository that need to undergo the physical inventory process.• Upload results of physical inventory into the asset repository.
Note. In prior PeopleSoft releases, this feature is only available using flat files. The tasks in this chapterare optional if the Physical Inventory feature is not implemented, or if the Physical Inventory feature isimplemented using flat files.
Task 17-1: Configuring the Local GatewayTo configure the local gateway:
1. Select PeopleTools, Integration Broker, Configuration, Gateways.
2. Click Search.
The Local Gateway page appears, as shown in the following example:
Copyright © 2011, Oracle and/or its affiliates. All rights reserved. 103

Integrating PeopleSoft 9.1 Asset Management for Argentina with Physical Inventory Solutions Chapter 17
Gateways page
3. On the Gateways page, in the URL field, enter http://<WEBSRV:PORT>/PSIGW/PeopleSoftListeningConnector.
4. Click Save.5. Click the Load Gateway Connectors button.
This ensures that all of the existing connectors install on the gateway.6. Click Save.
The connectors are installed.
Task 17-2: Configuring the Inbound NodesTo configure the inbound nodes:
1. Select PeopleTools, Integration Broker, Integration Setup, Nodes.2. On the Nodes search page, search for and select the node name PSFT_XINBND.3. The Node Definitions page appears, as shown in the following example:
104 Copyright © 2011, Oracle and/or its affiliates. All rights reserved.
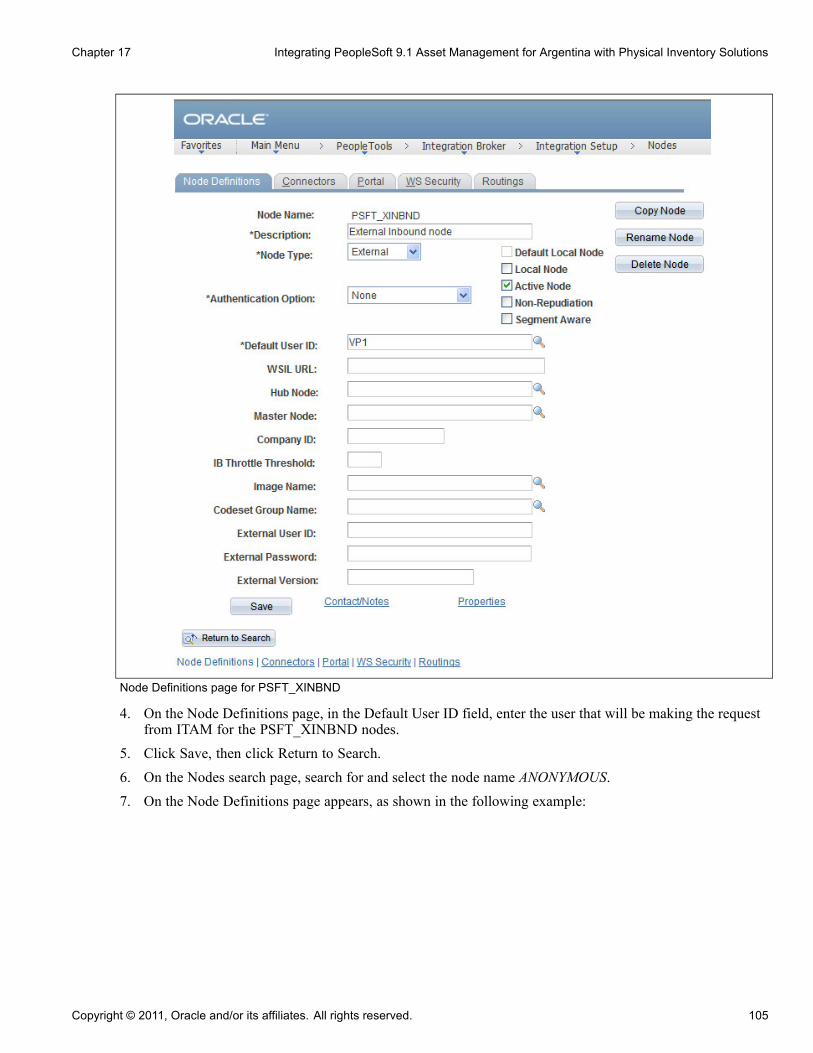
Chapter 17 Integrating PeopleSoft 9.1 Asset Management for Argentina with Physical Inventory Solutions
Node Definitions page for PSFT_XINBND
4. On the Node Definitions page, in the Default User ID field, enter the user that will be making the requestfrom ITAM for the PSFT_XINBND nodes.
5. Click Save, then click Return to Search.6. On the Nodes search page, search for and select the node name ANONYMOUS.7. On the Node Definitions page appears, as shown in the following example:
Copyright © 2011, Oracle and/or its affiliates. All rights reserved. 105
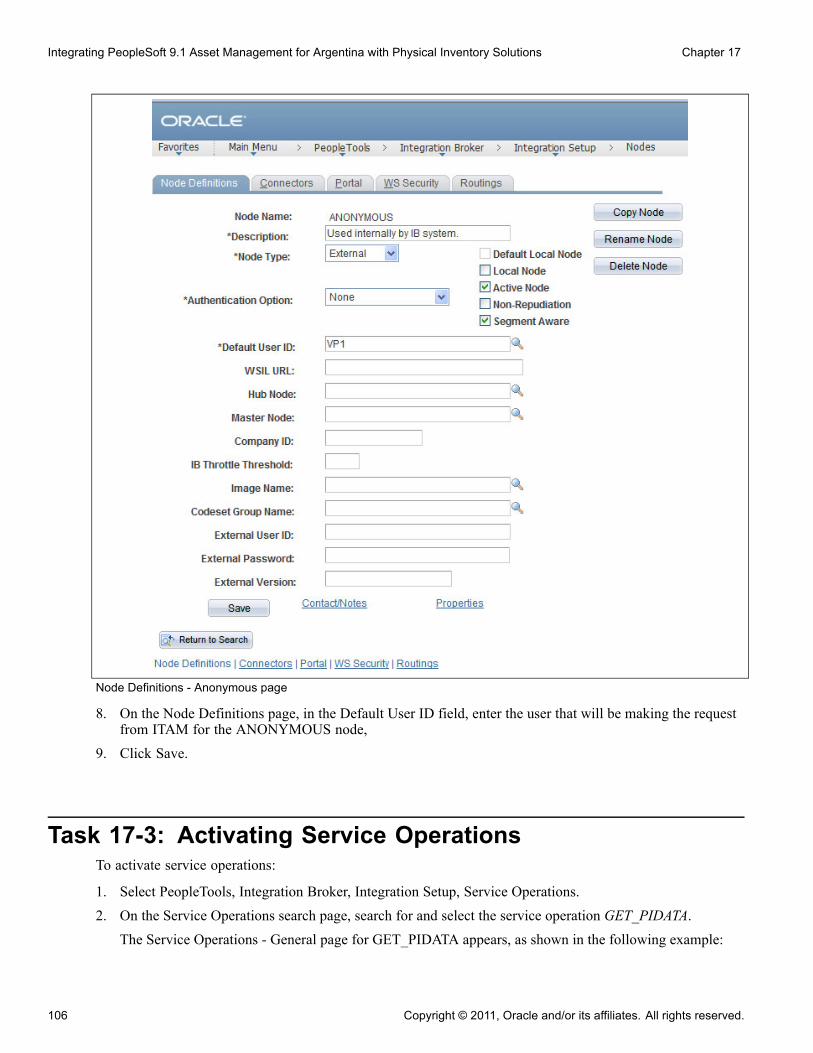
Integrating PeopleSoft 9.1 Asset Management for Argentina with Physical Inventory Solutions Chapter 17
Node Definitions - Anonymous page
8. On the Node Definitions page, in the Default User ID field, enter the user that will be making the requestfrom ITAM for the ANONYMOUS node,
9. Click Save.
Task 17-3: Activating Service OperationsTo activate service operations:
1. Select PeopleTools, Integration Broker, Integration Setup, Service Operations.2. On the Service Operations search page, search for and select the service operation GET_PIDATA.
The Service Operations - General page for GET_PIDATA appears, as shown in the following example:
106 Copyright © 2011, Oracle and/or its affiliates. All rights reserved.
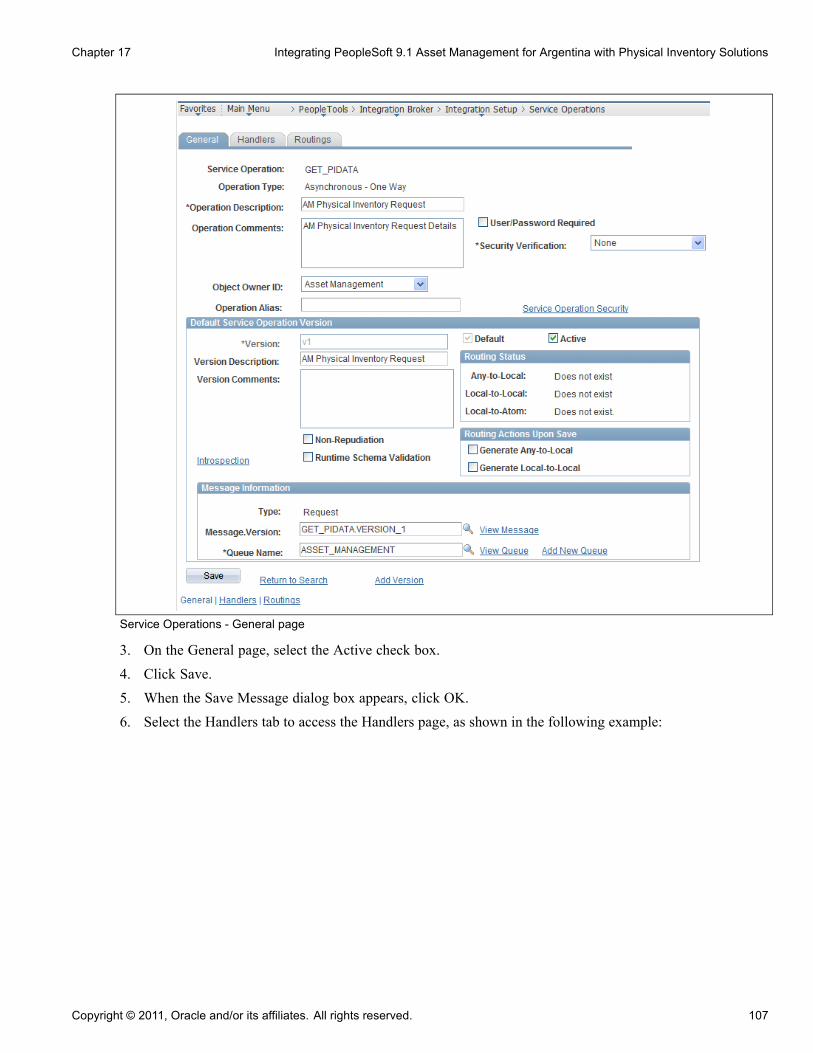
Chapter 17 Integrating PeopleSoft 9.1 Asset Management for Argentina with Physical Inventory Solutions
Service Operations - General page
3. On the General page, select the Active check box.
4. Click Save.
5. When the Save Message dialog box appears, click OK.
6. Select the Handlers tab to access the Handlers page, as shown in the following example:
Copyright © 2011, Oracle and/or its affiliates. All rights reserved. 107

Integrating PeopleSoft 9.1 Asset Management for Argentina with Physical Inventory Solutions Chapter 17
Service Operations - Handlers page
7. On the Handlers page, select Active from the Status drop-down list box.8. Click Save.9. Select the Routings tab to access the Routings page, as shown in the following example:
Service Operations - Routings page
10. Select the check box for the routing GET_PIDATA, as shown in the following example:
Service Operations - Routings: Selected page
11. Click the Activate Selected Routings button.
108 Copyright © 2011, Oracle and/or its affiliates. All rights reserved.

Chapter 17 Integrating PeopleSoft 9.1 Asset Management for Argentina with Physical Inventory Solutions
12. Select the General tab to access the General page.13. Click the Return to Search link.14. On the Service Operations search page, search for and select the service operation GET_PIDATA_ACK.
The Service Operations - General page for the service operation GET_PIDATA_ACK appears, as shown inthe following example:
Service Operations - General page
15. On the General page, select the Active check box and then click Save.16. When the Save Message dialog box appears, click OK.17. Select the Handlers tab to access the Handlers page, as shown in the following example:
Copyright © 2011, Oracle and/or its affiliates. All rights reserved. 109

Integrating PeopleSoft 9.1 Asset Management for Argentina with Physical Inventory Solutions Chapter 17
Service Operations - Handlers page
18. Select Active from the Status drop-down list box.19. Click Save.20. Select the Routings tab to access the Routings page, as shown in the following example:
Service Operations - Routings page
21. On the Routings page, select the check box for the routing that you want to activate.22. Click the Activate Selected Routings button.23. Click Save.
Task 17-4: Running Message ChannelTo run the message channel:
1. Select PeopleTools, Integration Broker, Integration Setup, Queues.2. On the Queues search page, search for and select the queue name ASSET_MANAGEMENT.
110 Copyright © 2011, Oracle and/or its affiliates. All rights reserved.

Chapter 17 Integrating PeopleSoft 9.1 Asset Management for Argentina with Physical Inventory Solutions
The Queue Definitions page appears, as shown in the following example:
Queue Definitions
3. On the Queue Definitions page, verify that the Queue Status is set to Run.4. If the Queue Status is Paused, select Run from the Queue Status drop-down list box.5. Click Save.6. When the Queue Saved Message dialog box appears, click OK.
Task 17-5: Activating the Domain forAsynchronous Messaging
Asynchronous message handling in PeopleSoft is different from synchronous message handling. In theasynchronous mode, a message is dumped in a queue and a message handler then picks the message and givesit to message dispatcher. The dispatcher in turn delivers the message to the target node.
Copyright © 2011, Oracle and/or its affiliates. All rights reserved. 111

Integrating PeopleSoft 9.1 Asset Management for Argentina with Physical Inventory Solutions Chapter 17
To enable message handler and dispatcher:
1. Execute the psadmincommand.
2. Ensure that your domain has publish/subscribe servers configured in psadmin.
3. Set Pub/Sub servers to Yes, as shown in the following example of the PSADMIN Quick Configure menu:
PSADMIN Quick-configure menu page
Note. PSADMIN configuration supports asynchronous messaging. After starting your application server youwill see two new processes—one for Message Handler, and one for message dispatcher. After configuringyour application server, you need to activate your domain through PeopleSoft Pure Internet Architecture toensure that the Handler and Dispatcher pick up your asynchronous messages.
To activate the domain:
1. Select PeopleTools, Integration Broker, Service Operations Monitor, Administration, Domain Status.The Domain Status page appears, as shown in the following example:
112 Copyright © 2011, Oracle and/or its affiliates. All rights reserved.
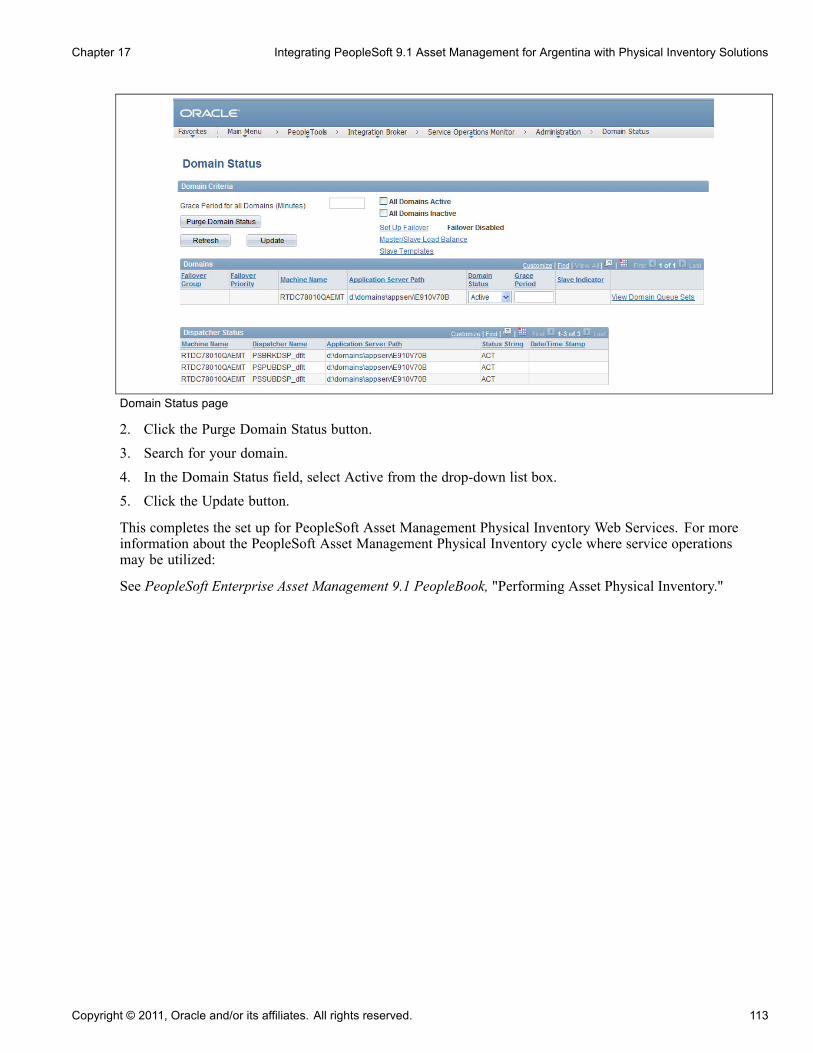
Chapter 17 Integrating PeopleSoft 9.1 Asset Management for Argentina with Physical Inventory Solutions
Domain Status page
2. Click the Purge Domain Status button.3. Search for your domain.4. In the Domain Status field, select Active from the drop-down list box.5. Click the Update button.
This completes the set up for PeopleSoft Asset Management Physical Inventory Web Services. For moreinformation about the PeopleSoft Asset Management Physical Inventory cycle where service operationsmay be utilized:
See PeopleSoft Enterprise Asset Management 9.1 PeopleBook, "Performing Asset Physical Inventory."
Copyright © 2011, Oracle and/or its affiliates. All rights reserved. 113

Integrating PeopleSoft 9.1 Asset Management for Argentina with Physical Inventory Solutions Chapter 17
114 Copyright © 2011, Oracle and/or its affiliates. All rights reserved.

CHAPTER 18
Integrating PeopleSoft Enterprise 9.1 IT AssetManagement for Argentina with NetworkInventory Discovery Systems
This chapter discusses:
• Understanding the Integration of PeopleSoft 9.1 IT Asset Management with Network Inventory Discovery Systems
• Configuring the Local Gateway
• Configuring the Inbound Nodes
• Activating Service Operations
• Managing Queue Status
• Activating the Domain for Asynchronous Messaging
Understanding the Integration of PeopleSoft 9.1 IT AssetManagement with Network Inventory Discovery Systems
PeopleSoft 9.1 IT Asset Management for Argentina integrates with additional component (third-party)Network Inventory Discovery Systems to provide the following functionality:
• Retrieve the physical attributes of IT Assets in the discovered Inventory database to compare to theassets in the financial books.
• Retrieve software of interest installed on the IT Assets.• Process Hardware and Software Progress Report data based on integration data and user-defined
parameters.
See "Configuring PeopleSoft Enterprise 9.1 IT Asset Management with Network Discovery Systems."
Task 18-1: Configuring the Local GatewayTo configure the local gateway:
1. Select PeopleTools, Integration Broker, Configuration, Gateways.2. Click Search.
The Gateways page for the Local Gateway appears.
Copyright © 2011, Oracle and/or its affiliates. All rights reserved. 115
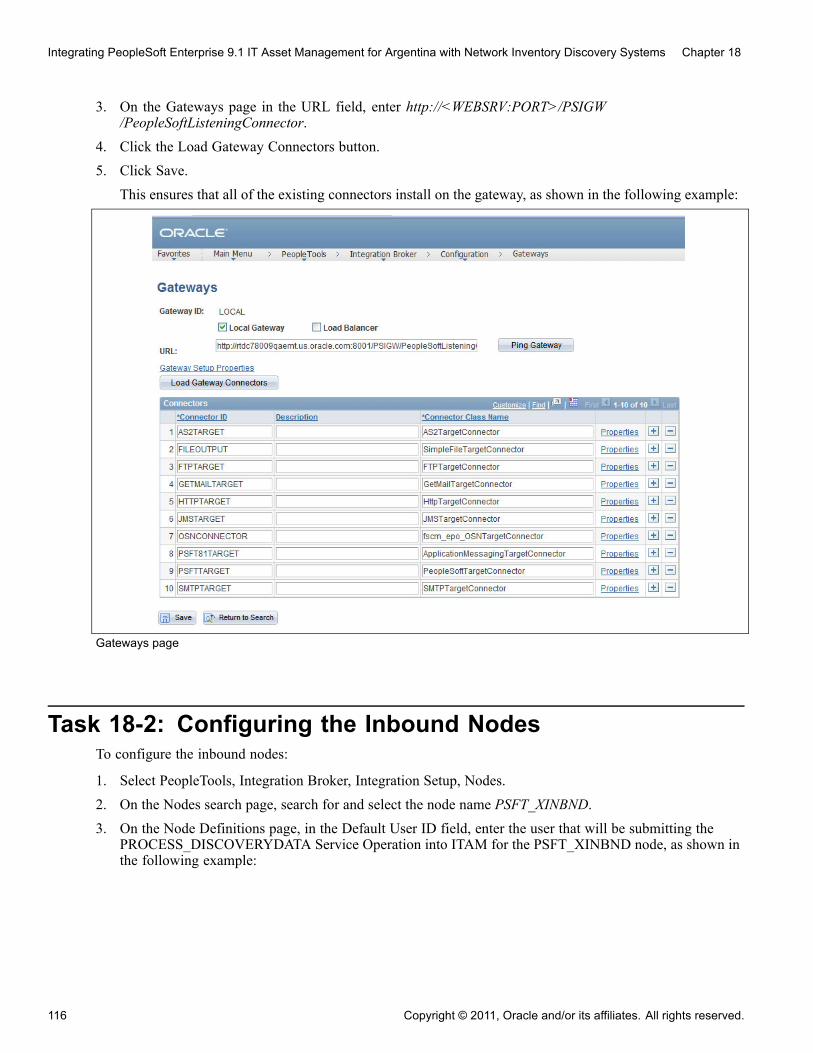
Integrating PeopleSoft Enterprise 9.1 IT Asset Management for Argentina with Network Inventory Discovery Systems Chapter 18
3. On the Gateways page in the URL field, enter http://<WEBSRV:PORT>/PSIGW/PeopleSoftListeningConnector.
4. Click the Load Gateway Connectors button.5. Click Save.
This ensures that all of the existing connectors install on the gateway, as shown in the following example:
Gateways page
Task 18-2: Configuring the Inbound NodesTo configure the inbound nodes:
1. Select PeopleTools, Integration Broker, Integration Setup, Nodes.2. On the Nodes search page, search for and select the node name PSFT_XINBND.3. On the Node Definitions page, in the Default User ID field, enter the user that will be submitting the
PROCESS_DISCOVERYDATA Service Operation into ITAM for the PSFT_XINBND node, as shown inthe following example:
116 Copyright © 2011, Oracle and/or its affiliates. All rights reserved.

Chapter 18 Integrating PeopleSoft Enterprise 9.1 IT Asset Management for Argentina with Network Inventory Discovery Systems
Node Definitions page for PSFT_XINBND
4. Click Save.5. Click Return to Search.6. On the Nodes search page, search for and select the node name ANONYMOUS.7. On the Node Definitions page, in the Default User ID field, enter the user that will be submitting the
PROCESS_DISCOVERYDATA Service Operation into ITAM for the ANONYMOUS node, as shown inthe following example:
Copyright © 2011, Oracle and/or its affiliates. All rights reserved. 117
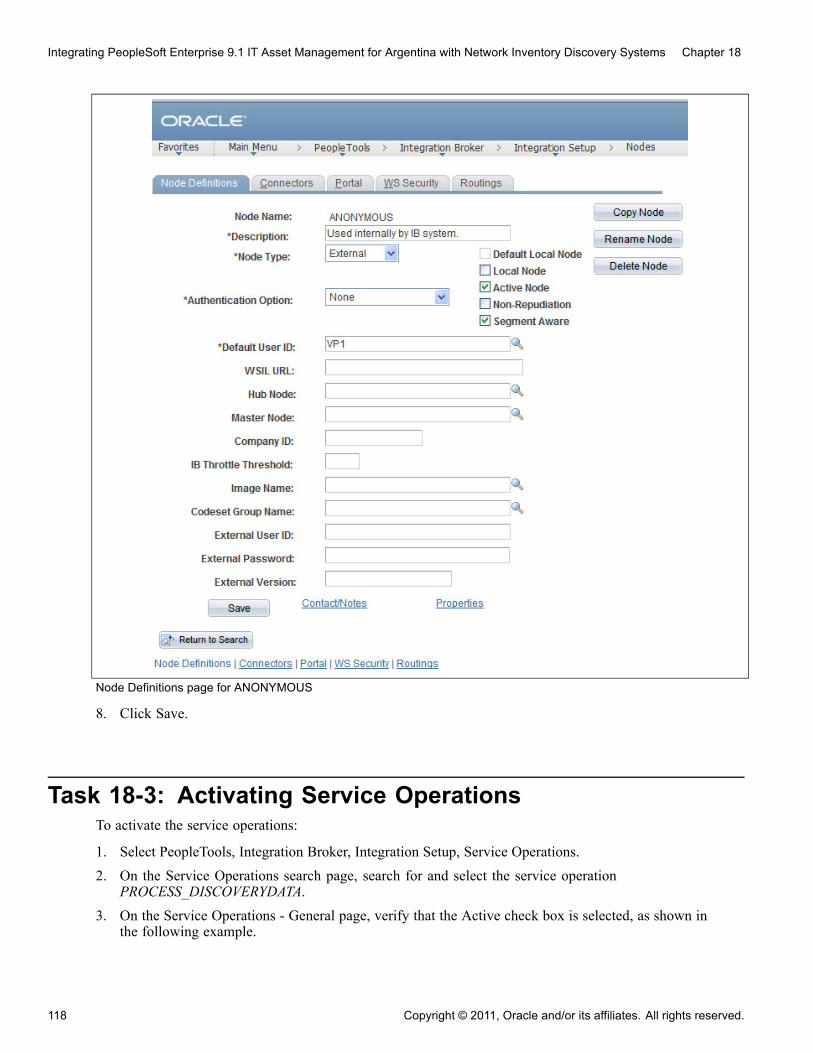
Integrating PeopleSoft Enterprise 9.1 IT Asset Management for Argentina with Network Inventory Discovery Systems Chapter 18
Node Definitions page for ANONYMOUS
8. Click Save.
Task 18-3: Activating Service OperationsTo activate the service operations:
1. Select PeopleTools, Integration Broker, Integration Setup, Service Operations.2. On the Service Operations search page, search for and select the service operation
PROCESS_DISCOVERYDATA.3. On the Service Operations - General page, verify that the Active check box is selected, as shown in
the following example.
118 Copyright © 2011, Oracle and/or its affiliates. All rights reserved.

Chapter 18 Integrating PeopleSoft Enterprise 9.1 IT Asset Management for Argentina with Network Inventory Discovery Systems
Service Operations - General page
4. Click Save.5. The message “Service operation saved” displays, as shown in the following example:
Service Operation: Saved Message page
6. Click OK.7. Select the Handlers tab to access the Handlers page, as shown in the following example:
Copyright © 2011, Oracle and/or its affiliates. All rights reserved. 119

Integrating PeopleSoft Enterprise 9.1 IT Asset Management for Argentina with Network Inventory Discovery Systems Chapter 18
Service Operations: Handlers page
8. On the Handlers page, in the Status field, select Active from the drop-down list box.9. Click Save.10. Select the Routings tab to access the Routings page.11. On the Routings page, verify that the status of the routing is Active.12. Click the Activate Selected Routings button, as shown in the following example:
Service Operations: Routings page
13. Click Save.14. Click the Return to Search link.
120 Copyright © 2011, Oracle and/or its affiliates. All rights reserved.

Chapter 18 Integrating PeopleSoft Enterprise 9.1 IT Asset Management for Argentina with Network Inventory Discovery Systems
Task 18-4: Managing Queue StatusTo run the message channel:
1. Select PeopleTools, Integration Broker, Integration Setup, Queues.
2. On the Queues search page, search for and select the queue name ASSET_MANAGEMENT.
3. On the Queue Definitions page, verify that the Queue Status is set to Run.
4. If the Queue Status is Paused, select Run in the Queue Status field, as shown in the following example:
Queue Definition
5. Click Save.6. The “Queue Saved” message displays, as shown in the following example:
Copyright © 2011, Oracle and/or its affiliates. All rights reserved. 121

Integrating PeopleSoft Enterprise 9.1 IT Asset Management for Argentina with Network Inventory Discovery Systems Chapter 18
Queue Saved message
7. Click OK.
Task 18-5: Activating the Domain forAsynchronous Messaging
Asynchronous message handling in PeopleSoft is different from synchronous message handling. In theasynchronous mode, a message is dumped in a queue and a message handler then picks the message and givesit to message dispatcher; the dispatcher in turn delivers the message to the target node. To enable messagehandler and dispatcher, make sure that your domain has publish/subscribe servers configured in psadmin.
Set Pub/Sub servers to Yes, as shown in the following example:
PSADMIN page
Note. PSADMIN configuration supports asynchronous messaging. After starting your application server yousee two new processes—one for Message Handler, and one for Message Dispatcher.
After configuring your application server, you need to activate your domain through PeopleSoft Pure InternetArchitecture to ensure that the Handler and Dispatcher pick up your asynchronous messages.
122 Copyright © 2011, Oracle and/or its affiliates. All rights reserved.

Chapter 18 Integrating PeopleSoft Enterprise 9.1 IT Asset Management for Argentina with Network Inventory Discovery Systems
To activate the domain:
1. Select PeopleTools, Integration Broker, Service Operations Monitor, Administration, Domain Status.
2. On the Domain Status page, click the Purge Domain Status button.
3. Search for and select your domain/machine name.
4. In the Domain Status field, select Active from the drop-down list box.
5. Click the Update button, as shown in the following example:
Domain Status page
This completes the set up for PeopleSoft Asset Management with Network Inventory Discovery Systems. Formore information about this integration, refer to the following:
See PeopleSoft Enterprise Asset Management 9.1 PeopleBook, "Working with the IT Asset Inventory Tool."
Copyright © 2011, Oracle and/or its affiliates. All rights reserved. 123
Integrating PeopleSoft Enterprise 9.1 IT Asset Management for Argentina with Network Inventory Discovery Systems Chapter 18
124 Copyright © 2011, Oracle and/or its affiliates. All rights reserved.

CHAPTER 19
Part III: Installing PeopleSoft SCM Applicationsfor Argentina
Understanding Part IIIThis section includes:
• Installing PeopleSoft Enterprise 9.1 eProcurement• Configuring eMail URLS in PeopleSoft SCM Applications• Setting Up PeopleSoft Enterprise 9.1 Supplier Contract Management• Setting Up PeopleSoft SCM Pagelets• Granting Access to Navigation Pages in PeopleSoft SCM• Accessing PeopleSoft SCM Applications in PeopleSoft Enterprise 9.1 Portal Solutions
Copyright © 2011, Oracle and/or its affiliates. All rights reserved. 125

Part III: Installing PeopleSoft SCM Applications for Argentina Chapter 19
126 Copyright © 2011, Oracle and/or its affiliates. All rights reserved.

CHAPTER 20
Installing PeopleSoft Enterprise 9.1eProcurement for Argentina
Understanding PeopleSoft Enterprise eProcurement9.1 for Argentina
PeopleSoft eProcurement for Argentina is an application that enables all employees to use web pages to meettheir procurement needs. Using electronic catalogs, employees can order the supplies and services they needto do their jobs. Buyers can use PeopleSoft eProcurement to efficiently create and process purchase orders.Suppliers can use PeopleSoft eProcurement to enter invoices.
Note. To install PeopleSoft eProcurement, you must have administrator access rights to the local machinethat you plan to use for the installation.
Task 20-1: Installing PeopleSoft eProcurementCUP Item Export
When you install the PeopleSoft Financials/Supply Chain Management (FSCM) application, the systemdownloads the Catalog Update Process (CUP) Export setup program on your workstation.
To install PeopleSoft eProcurement CUP Item Export:
The installation of the PeopleSoft FSCM application CD-ROM downloads the PeopleSoft eProcurement CUPsetup to the following directory path on your local drive:
C:\<PS_HOME>setup\eProcurement\eng\Setup.exe
Note. You can find the Setup.exe file in the folder that is named according to your language code. Forexample, if the language is English, the Setup.exe should reside in the eng folder.
1. Double click Setup.exe.The PeopleSoft CUP Item Export - Welcome page appears, as shown in the following example:
Copyright © 2011, Oracle and/or its affiliates. All rights reserved. 127

Installing PeopleSoft Enterprise 9.1 eProcurement for Argentina Chapter 20
CUP Item Export Welcome page
2. Click Next to access the Choose Destination Location page, as shown in the following example:
Choose Destination Location page
128 Copyright © 2011, Oracle and/or its affiliates. All rights reserved.

Chapter 20 Installing PeopleSoft Enterprise 9.1 eProcurement for Argentina
The Choose Destination Location page displays the default destination (C:\Program Files\PeopleSoft,Inc\CUP Item Export) to which the installer will load the CUP Item Export Setup program. To useanother installation destination, click Browse and enter the new destination path, or navigate to anotherfolder or network drive.
3. Click Next to display the Ready to Install the Program page, as shown in the following example:
Ready to Install the Program page
4. Click Install to start copying files.After the system finishes copying the files, the PeopleSoft InstallShield Wizard Complete page appears,as shown in the following example:
Copyright © 2011, Oracle and/or its affiliates. All rights reserved. 129
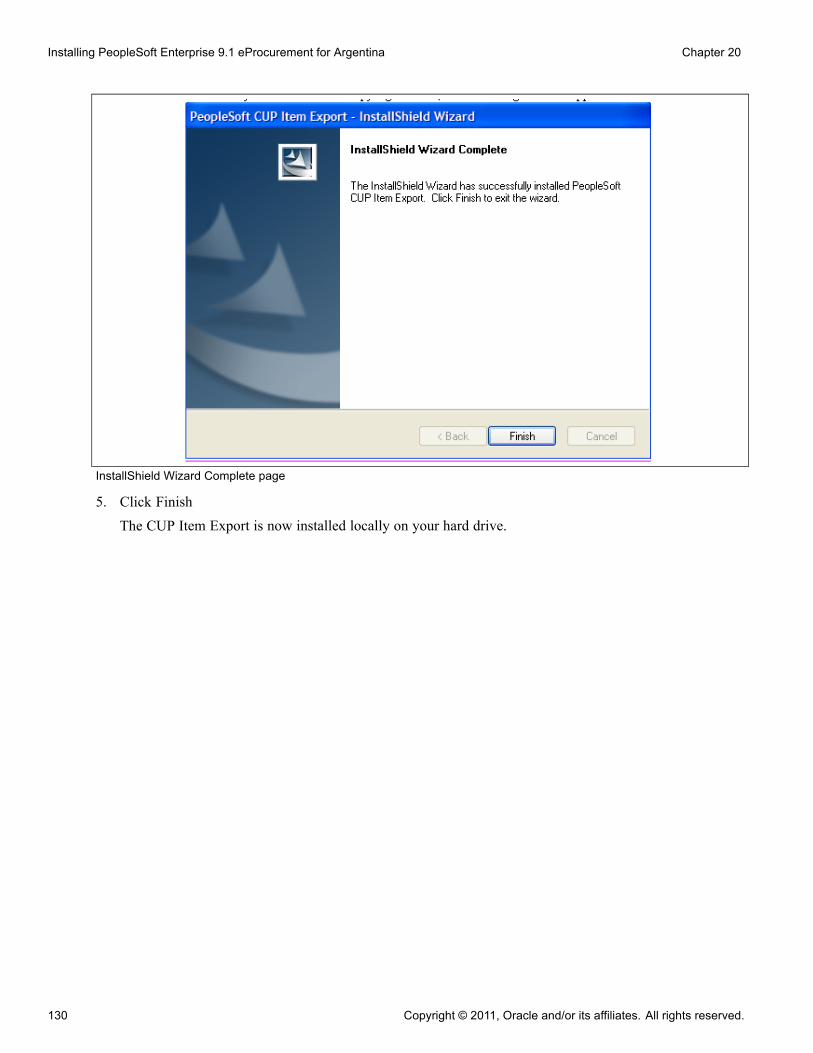
Installing PeopleSoft Enterprise 9.1 eProcurement for Argentina Chapter 20
InstallShield Wizard Complete page
5. Click Finish
The CUP Item Export is now installed locally on your hard drive.
130 Copyright © 2011, Oracle and/or its affiliates. All rights reserved.

CHAPTER 21
Configuring eMail URLS in PeopleSoft SCMApplications for Argentina
This chapter discusses:
• Understanding eMail Configuration for Argentina
• Configuring eMail URLs for Item Loader Exceptions
• Configuring eMail URLs for Supplier Facing Applications
• Configuring eMail URLs for eBill Payment
Understanding eMail Configuration for ArgentinaSome products in PeopleSoft Supply Chain Management (SCM) for Argentina can send out email notificationscontaining web addresses (URLs) that enable your employees and external parties to link back to your website.For emails to contain the correct embedded URLs to PeopleSoft Inventory, PeopleSoft Purchasing andPeopleSoft eProcurement pages, you need to edit the URL discussed in this section.
Task 21-1: Configuring eMail URLs for Item Loader ExceptionsYou modify SCM_SERVLET_INT to point to an internal server used to access the PeopleSoft SCM database.This URL is used to create standard PeopleSoft Internet Architecture links for internal users such as employeesto access pertinent components and pages.
To set up the URL:
1. Select PeopleTools, Utilities, Administration, URLs to access the PeopleTools URL Maintenance page.2. Search for the URL identifier SCM_SERVLET_INT.3. Modify the URL to point to an internal server to access the PeopleSoft Supply Chain database, as shown in
the following example:
Copyright © 2011, Oracle and/or its affiliates. All rights reserved. 131

Configuring eMail URLS in PeopleSoft SCM Applications for Argentina Chapter 21
URL Maintenance page for SCM_SERVLET_INT
4. Click Save.
Task 21-2: Configuring eMail URLs for SupplierFacing Applications
The information in this section applies to PeopleSoft eSupplier Connection, Collaborative SupplyManagement, Supplier Contract Management, Strategic Sourcing, and Services Procurement.
You need to modify EMP_SERVLET and SUP_SERVLET to point to the correct servers used to access thePeopleSoft SCM database. These are necessary when not using an Enterprise Portal, as there is no other way toidentify the different webservers that are used for the Employee or Supplier side.
To set up the URLs:
1. Select PeopleTools, Utilities, Administration, URLs to access the PeopleTools URL Maintenance page.2. Search for the URL identifier SUP_SERVLET.3. Modify the URL to point to an EXTERNAL server to access the supply chain database.
That is, the server that the suppliers use to log onto the SUPPLIER registry, as shown in the followingexample:
URL Maintenance page for SUP_SERVLET
132 Copyright © 2011, Oracle and/or its affiliates. All rights reserved.

Chapter 21 Configuring eMail URLS in PeopleSoft SCM Applications for Argentina
4. Click Save.5. Search for the URL identifier EMP_SERVLET.6. Modify the URL to point to an INTERNAL server to access the supply chain database.
That is, the server that the employees use to log onto the EMPLOYEE registry, as shown in the followingexample:
URL Maintenance page for EMP_SERVLET
7. Click Save.
Task 21-3: Configuring eMail URLs for eBill PaymentYou need to modify the EB_SERVLET to point to the correct server used to access the PeopleSoft SCMdatabase for the CUSTOMER registry. This is needed so that PeopleSoft Billing can generate the correctlink to the eBill Payment components.
To set up the URL:
1. Select PeopleTools, Utilities, Administration, URLs to access the PeopleTools URL Maintenance page.2. Search for the URL identifier EB_SERVLET.3. Modify the URL to point to an EXTERNAL server to access the supply chain database.
That is, the server that your customers use to log onto the CUSTOMER registry, as shown in the followingexample:
Copyright © 2011, Oracle and/or its affiliates. All rights reserved. 133

Configuring eMail URLS in PeopleSoft SCM Applications for Argentina Chapter 21
URL Maintenance page for EB_SERVLET
4. Click Save.
134 Copyright © 2011, Oracle and/or its affiliates. All rights reserved.
CHAPTER 22
Setting Up PeopleSoft Enterprise 9.1 SupplierContract Management for Argentina
Understanding the PeopleSoft Enterprise 9.1 SupplierContract Management Setup for Argentina
Only perform this task if you use PeopleSoft Supplier Contract Management for Argentina. For completeinstallation of Supplier Contracts, refer to the PeopleSoft Enterprise Supplier Contract Management 9.1PeopleBook.
To use PeopleSoft Supplier Contract Management you must, at a minimum, set up a database or FTP file serverand have either Microsoft Word 2003 Professional or Word 2007 installed on at least one client. Refer to thesection “Setting Up Supplier Contract Attachment FTP Servers and Directories” in the following reference:
See PeopleSoft Enterprise Supplier Contract Management 9.1 PeopleBook, "Setting Up PeopleSoft SupplierContract Management."
Further setup is detailed in the same chapter of the PeopleSoft Enterprise Supplier Contract Management 9.1PeopleBook for the following:
• Setup of a Microsoft Word template
See Defining Document Templates and Styles.• Optional setup for individual clients to allow certain users to look up clauses and bind variables in the
PeopleSoft database from within Word 2003 using Microsoft Research task pane functionality
See Setting Up PeopleSoft Integration Broker and Microsoft Word Configuration Files, Installing andConfiguring Microsoft Word Components on Workstations.
• Optional setup to allow users to do server side compares of Word documents, and optional dispatch ofcontracts to suppliers in a .doc or .pdf format (versus the default .xml format)
See Defining Installation Options for Supplier Contract Management.
• Optional installation setup for Verity.
See Defining Installation Options for Supplier Contract Management.
• Optional installation setup for workflow.
See Defining Installation Options for Supplier Contract Management.
• Optional XML import Word Schema Setup for individual clients to allow certain users to import clausesfrom existing Word documents.
See Setting Up PeopleSoft Supplier Contract Management.
• Optional installation setup for Syndication.
Copyright © 2011, Oracle and/or its affiliates. All rights reserved. 135

Setting Up PeopleSoft Enterprise 9.1 Supplier Contract Management for Argentina Chapter 22
• Optional setup that enables documents to use digital signatures (PDF or Word 2007).
See Defining Installation Options for Supplier Contract Management.
136 Copyright © 2011, Oracle and/or its affiliates. All rights reserved.

CHAPTER 23
Setting Up PeopleSoft SCM Pagelets for Argentina
This chapter discusses:
• Accessing Pagelets
• Enabling Pagelet Creation and Access with Portal Utilities
Task 23-1: Accessing PageletsYou can access pagelets within the PeopleSoft 9.1 Supply Chain Management application databases. Scriptsmust be applied to your database to allow access to the pagelet configuration homepage.
Note. You must complete the following steps for both the System and Demo databases unless otherwiseindicated.
To add, remove, or change the layout of the homepage, the homepage personalization security access must begranted to all non-guest users. To update the homepage personalization permission list, use PeopleSoft DataMover to run the PORTAL_HP_PERS.DMS script. To add the Portal User role to the user IDs, use PeopleSoftData Mover to run the PORTAL_ADD_ROLE.DMS script. Both scripts are located in <PS_HOME>\scripts.
Note. The PAPP_USER role should be granted to all new user IDs for access to the homepage personalization.After running this script, the role PAPP_USER should be manually removed from any GUEST User ID, sincethe GUEST user should not be personalizing the common homepage.
Task 23-2: Enabling Pagelet Creation and Accesswith Portal Utilities
Use PeopleSoft Data Mover to run the EOPP_PORTAL_PACK.DMS script located in <PS_HOME>\scripts.This script enables creating and viewing pagelets using the Enterprise Components Portal Utilities.
Note. Only perform this task if you are licensed for the PeopleSoft Supply Chain Portal Pack or EnterprisePortal.
Copyright © 2011, Oracle and/or its affiliates. All rights reserved. 137

Setting Up PeopleSoft SCM Pagelets for Argentina Chapter 23
138 Copyright © 2011, Oracle and/or its affiliates. All rights reserved.
CHAPTER 24
Granting Access to Navigation Pages inPeopleSoft SCM for Argentina
Task 24-1: Adding User Roles to All User IDsTo access the navigation pages, security to the Navigation Page IScripts must be granted to all users. To addthe EOPP_USER role to all users, use PeopleSoft Data Mover to run the EOPP_ADD_ROLE.DMS scriptthat is located in <PS_HOME>\scripts.
Note. When you create a new user ID, add the EOPP_USER role to the new user ID.
Copyright © 2011, Oracle and/or its affiliates. All rights reserved. 139

Granting Access to Navigation Pages in PeopleSoft SCM for Argentina Chapter 24
140 Copyright © 2011, Oracle and/or its affiliates. All rights reserved.
CHAPTER 25
Accessing PeopleSoft Financials, ESA, andSCM Applications for Argentina in PeopleSoftEnterprise 9.1 Portal Solutions
Task 25-1: Accessing ApplicationsOnly perform this task if you use the PeopleSoft Enterprise Portal product and want to access your applicationfrom within the Enterprise Portal database.
The installation phase of your PeopleSoft application should only entail setting up a single link to thePeopleSoft application content provider. To set up the single link and the single sign on, see the PeopleSoftEnterprise Portal Solutions 9.1 Installation documentation on My Oracle Support. Chapter 3 discusses settingup single sign on to your application database. Chapter 4 discusses accessing the PeopleSoft content providers.Appendices H and I discuss additional product-specific steps you may need to perform for fully functionalnavigation within the Enterprise Portal database.
See PeopleSoft Enterprise Portal Solutions 9.1 Installation.
Copyright © 2011, Oracle and/or its affiliates. All rights reserved. 141

Accessing PeopleSoft Financials, ESA, and SCM Applications for Argentina in PeopleSoft Enterprise 9.1 Portal Solutions Chapter 25
142 Copyright © 2011, Oracle and/or its affiliates. All rights reserved.

APPENDIX A
Configuring PeopleSoft Enterprise 9.1Asset Management with eCenterOne SpaceManagement Solution
Use these values when integrating PeopleSoft Enterprise 9.1 Asset Management with eCenterOne Space Management.
The following table lists eCenterOne Connector Properties (N/A = Not Applicable):
*Property ID *Property Name Required Value DefaultECENTERONETARGET eCenterOne URL Y N/A YECENTERONETARGET Username Y N/A YECENTERONETARGET Password Y N/A YECENTERONETARGET Database Y N/A YECENTERONETARGET Email N N/A NECENTERONETARGET Asynchronous Y true YECENTERONETARGET Native Y false YECENTERONETARGET Message Name N N/A NECENTERONETARGET XSLT File Name N N/A NHEADER sendUncompressed Y N Y
The following table lists the PeopleSoft-delivered NODE Transactions for PSFT_XOUTBND Node:
Transaction Type Request Message Request Message VersionOutAsync ADD_EMP_PUB VERSION_1OutAsync ADD_PROP_PUB VERSION_1OutAsync SYN_DEPT_HIER_PUB VERSION_1OutAsync SYN_EMP_PUB VERSION_1OutAsync UPD_EMP_PUB VERSION_1OutAsync UPD_PROPID_PUB VERSION_1OutSync LST_DELETEDPROPS_REQ VERSION_1OutSync LST_NEWPROPS_REQ VERSION_1OutSync UPD_EMPLOC_REQ VERSION_1OutSync UPD_PROP_REQ VERSION_1
Note. The following properties must be configured for PSFT_XOUTBND Node Transaction Connector Properties. Ifthe properties are not set correctly, the integration will not work properly.
The following table lists Properties for Asynchronous Node Transactions:
Copyright © 2011, Oracle and/or its affiliates. All rights reserved. 143

Configuring PeopleSoft Enterprise 9.1 Asset Management with eCenterOne Space Management Solution Appendix A
*Property ID *Property Name ValueECENTERONETARGET Asynchronous trueECENTERONETARGET Native falseHEADER sendUncompressed Y
The following table lists Properties for Synchronous Node Transactions:
*Property ID *Property Name ValueECENTERONETARGET Asynchronous falseECENTERONETARGET Native falseHEADER sendUncompressed N
The following table lists the PeopleSoft-delivered Transactions for PSFT_XOUTBND RELATIONSHIP (N/A = NotApplicable):
Initial NodeTransaction
TypeRequest Message
NameRequest
TransformationResponse
TransformationPSFT_XOUTBND OA ADD_EMP_PUB RE_HRADD_XFM N/APSFT_XOUTBND OA ADD_PROP_PUB RE_PRADD_XFM N/APSFT_XOUTBND OA SYN_DEPT_HIER_PUB RE_DEPT_XFM N/APSFT_XOUTBND OA SYN_EMP_PUB RE_HRSYN_XFM N/APSFT_XOUTBND OA UPD_EMP_PUB RE_HRUPD_XFM N/APSFT_XOUTBND OA UPD_PROPID_PUB RE_PRPID_XFM N/APSFT_XOUTBND OS UPD_EMPLOC_REQ RE_REQ_1_XFM RE_RES_1_XFMPSFT_XOUTBND OS UPD_PROP_REQ RE_REQ_2_XFM RE_RES_2_XFMPSFT_XOUTBND OS LST_NEWPROPS_REQ RE_REQ_3_XFM RE_RES_3_XFMPSFT_XOUTBND OS LST_DELETEDPROPS_
REQRE_REQ_4_XFM RE_RES_4_XFM
144 Copyright © 2011, Oracle and/or its affiliates. All rights reserved.

APPENDIX B
Configuring PeopleSoft Enterprise 9.1 IT AssetManagement with Network Discovery Systems
Use these values when integrating PeopleSoft Enterprise 9.1 IT Asset Management with Network Inventory DiscoverySystems.
The following table lists HTTPTARGET Connector Properties:
*Property ID *Property Name Required Value DefaultHEADER sendUncompressed Y Y YHTTPPROPERTY Method Y Post YPRIMARYURL URL Y http://<LocalHost>
/<DiscoveredInventorySystem>/<ConnectorName>
N
The following table lists PeopleSoft-delivered routing definitions for PSFT_EP Node:
Routing Type Request Message Request Message VersionAsync GET_DISCOVERYDATA VERSION_1Async GET_DISCOVERYDATA_LCL VERSION_1Async GET_DISCOVERYDATA_ACK VERSION_1Async GET_DISCOVERYDATA_STATUS_ACK VERSION_1
Copyright © 2011, Oracle and/or its affiliates. All rights reserved. 145

Configuring PeopleSoft Enterprise 9.1 IT Asset Management with Network Discovery Systems Appendix B
146 Copyright © 2011, Oracle and/or its affiliates. All rights reserved.

Index
AActiveX controls, installing forPeopleSoft-Microsoft projectintegrator 63Apple iPhone, installing OracleiReceipts 31asynchronous messagesactivating domain for eCenterOne SpaceManagement 93activating domain for PeopleSoft AssetManagement 111activating domain for PeopleSoft ITAsset Management 122
audience xi
CCenterStone eCenterOne SpaceManagement 89ChartField Configuration Processsetting database requirements to run 11understanding 11
COBOLconfiguring for DB2 z/OS 7modifying JCL shell SHELCBL.JCT 9
comments and suggestions xivcommon elementsinstalling PeopleSoft ESA 1installing PeopleSoft FMS 1installing PeopleSoft Staffing FrontOffice (SFO) 1
Contract Transaction Service, transformingin PeopleSoft Transaction Billing 80CONTRACT_TXN, transforming 80CUP Item Export, installing for PeopleSofteProcurement 127
DDB2 z/OS, EDM pool size 4DB2 z/OS, running file import forPeopleSoft General Ledger 16demo database sizing for PeopleSoftFSCM 4documentation, understanding thisguide xi
domains, activating for PeopleSoft IT AssetManagement 122
EEBINSSYS.DMS script, running 4eCenterOneactivating domain for asynchronousmessaging in PeopleSoft AssetManagement 93activating routings and services forPeopleSoft Asset Management 95configuring the local gateway 90installing target connectors forPeopleSoft Asset Management 90testing the node 96
eCenterOne Space Managementconfiguring for PeopleSoft AssetManagement 143integrating with PeopleSoft AssetManagement 89
EDM Pool size 4emailconfiguring for internal users 131configuring for PeopleSoft CollaborativeSupply Management 132configuring for PeopleSoft eBillPayment 133configuring for PeopleSoft eSupplierConnection 132configuring for PeopleSoft SCMproducts 131configuring for PeopleSoft ServicesProcurement 132configuring for PeopleSoft StrategicSourcing 132
Employee Portal Servlet URL,configuring 31EOPP_ ADD_ROLE.DMS script,runningg 61EPCLNTRE.DMS script, running 4
Ffile attachmentsstoring on a file server for PeopleSoftProject Costing 67
Copyright © 2011, Oracle and/or its affiliates. All rights reserved. 147
Index
storing on the database for PeopleSoftProject Costing 67
formsdownloading from sponsor websites 18entering PDF template names 19printing 20processing for PeopleSoft Grants 17viewing 21
FTP serverdefining for PeopleSoft ProjectCosting 67setting up for PeopleSoft Staffing FrontOffice 69
Ggranting access to personalize Portalhomepage 61
Iinbound nodesconfiguring for PeopleSoft AssetManagement 104configuring for PeopleSoft IT AssetManagement 116
installation files, obtaining from OracleE-Delivery 1installation table optionsactivating for eCenterOne SpaceManagement 97verifying in PeopleSoft FSCM 59verifying in PeopleSoft HCM 58
integration gatewayssetting up in PeopleSoft FSCM 49setting up in PeopleSoft HCM 52
integration points, verifying for PeopleSoftPayBill Management 40integration queues, activating forPeopleSoft Transaction BillingProcessor 73integration services, activating forPeopleSoft Transaction Billing 75
JJCL shells, modifying 9
Llocal domainsactivating in PeopleSoft FSCM 55
activating in PeopleSoft HCM 56local gatewaysconfiguring for PeopleSoft AssetManagement 103configuring for PeopleSoft IT AssetManagement 115
Mmessage channelsrunning for eCenterOne SpaceManagement 93running for PeopleSoft AssetManagement 110running for PeopleSoft IT AssetManagement 121
Microsoft Project 2007configuring for PeopleSoft MaintenanceManagement 86installing for PeopleSoft MaintenanceManagement 86installing PeopleSoft-Microsoft ProjectIntegrator 63integrating with PeopleSoft MaintenanceManagement 85integrating with PeopleSoft ProgramManagement 63integrating with PeopleSoft ProjectCosting 63
Nnamespaces, verifying for OracleiReceipts 32Navigation Page IScriptsgranting security access 61, 139
navigation pagesadding user roles to user IDs 139granting access for PeopleSoftSCM 139granting access in PeopleSoft PortalPacks 61
Network Inventory Discovery Systemsconfiguring for PeopleSoft IT AssetManagement 145integrating with PeopleSoft IT AssetManagement 115
node definitionssetting up in PeopleSoft FSCM 40setting up in PeopleSoft HCM 42understanding 40
148 Copyright © 2011, Oracle and/or its affiliates. All rights reserved.
Index
verifying for eCenterOne SPaceManagement integration 99verifying for PeopleSoft AssetManagement integration 99
OOracle E-Delivery, obtaining installationfiles 1Oracle iReceiptsinstalling 31prerequisites 31setting up service operations for MyWallet transactions 35setting up web services for My Wallettransactions 33verifying correct namespaces 32
Oracle’s PeopleSoft products xiiiOS/390 file systems, allocating data sets 7
Ppageletsaccessing for PeopleSoft SCM 137enabling creation with PortalUtilities 61, 137
PeopleSoft Asset Managementactivating domain for asynchronousmessaging for Physical InventorySolutions 111activating service operations for PhysicalInventory Solutions 106configuring inbound nodes for PhysicalInventory Solutions 104configuring the local gateway forPhysical Inventory Solutions 103integrating with eCenterOne SpaceManagement 89, 143integrating with Physical InventorySolutions 103running message channels for PhysicalInventory Solutions 110understanding integration witheCenterOne Space Management 89
PeopleSoft Asset Management integrationactivating domain for asynchronousmessaging for eCenterOne SpaceManagement 93activating installation options foreCenterOne Space Management 97
activating routings for eCenterOne SpaceManagement 95activating service operations foreCenterOne Space Management 95configuring for eCenterOne SpaceManagement 90installing target connectors foreCenterOne Space Management 90running message channels foreCenterOne Space Management 93testing the eCenterOne node 96updating transactions for eCenterOneSpace Management 95verifying node definitions for eCenterOneSpace Management 99verifying service operations foreCenterOne Space Management 100verifying with eCenterOne SpaceManagement 99
PeopleSoft Collaborative SupplyManagement, configuring emailURLs 132PeopleSoft eBill Payment, configuringemail URLs 133PeopleSoft eProcurementinstalling CUP Item Export 127understanding 127
PeopleSoft eSupplier Connection,configuring email URLs 132PeopleSoft Expensesactivating queue definitions 27activating the local domain 27configuring Employee Portal ServletURL 31configuring PeopleSoft IntegrationBroker 23installing 23installing Oracle iReceipts 31prerequisites for Oracle iReceipts 31setting up gateways 24setting up Quick Configuration 23setting up service operations andhandlers 28verifying message channel status 30
PeopleSoft FSCMdeleting summary trees 4demo database sizing 4prerequisites 3setting up installation defaults 4
PeopleSoft General Ledger
Copyright © 2011, Oracle and/or its affiliates. All rights reserved. 149
Index
defining environmental variables 16installing 15modifying URL definition for fileimport 15prerequisites 15running file import using DB2 z/OS 16
PeopleSoft Grantsdownloading forms 18entering PDF form template names 19printing forms 20processing forms 17setting up forms processing 17setting up URL Maintenance area 18viewing forms 21
PeopleSoft Integration Brokeractivating queue definitions 27activating the local domain 27configuring for PeopleSoftExpenses 23configuring the local gateway foreCenterOne integration 90setting up gateways 24setting up Quick Configuration 23setting up service operations andhandlers 28verifying message channel status 30
PeopleSoft IT Asset Managementactivating domains for NetworkInventory Discovery Systems 122configuring inbound nodes for NetworkInventory Discovery Systems 116configuring local gateways for NetworkInventory Discovery Systems 115configuring service operations forNetwork Inventory DiscoverySystems 118integrating with Network InventoryDiscovery Systems 115, 145running message channels for NetworkInventory Discovery Systems 121
PeopleSoft Maintenance Managementconfiguring Microsoft Project 2007 86installing Microsoft Project 2007 86integrating with Microsoft Project2007 85
PeopleSoft PayBill Managementactivating local domains in PeopleSoftFSCM 55activating local domains in PeopleSoftHCM 56
activating queue definitions in PeopleSoftFSCM 57activating queue definitions in PeopleSoftHCM 58prerequisites 39setting up delivered service operations inPeopleSoft FSCM 58setting up delivered service operations inPeopleSoft HCM 58setting up integration gateways inPeopleSoft FSCM 49setting up integration gateways inPeopleSoft HCM 52setting up node definitions 40setting up node definitions in PeopleSoftFSCM 40setting up node definitions in PeopleSoftHCM 42setting up portal nodes 44setting up portal nodes in PeopleSoftFSCM 44setting up portal nodes in PeopleSoftHCM 46setting up single signon in PeopleSoftFSCM 48setting up single signon in PeopleSoftHCM 49understanding Enterprise IntegrationPoints (EIPs) 39understanding queue definitions forStaffing 56verifying installation table options inPeopleSoft FSCM 59verifying installation table options inPeopleSoft HCM 58verifying integration points 40
PeopleSoft PeopleToolsinstalling 3prerequisites 3verifying install version 4
PeopleSoft Portal Packs 61granting access to navigation pages 61granting security to the Navigation PageIScripts 61
PeopleSoft Portal Solutions, accessingapplications 141PeopleSoft Process Scheduler Server,defining environmental variables 16PeopleSoft Program Management
150 Copyright © 2011, Oracle and/or its affiliates. All rights reserved.

Index
configuring PeopleSoft-MicrosoftProject Integrator 64installing PeopleSoft-Microsoft ProjectIntegrator 63integrating with Microsoft 2007 63
PeopleSoft Project Costingconfiguring PeopleSoft-MicrosoftProject Integrator 64defining file attachment storage 67installing PeopleSoft-Microsoft ProjectIntegrator 63integrating with Microsoft 2007 63setting up file attachment storage on thedatabase 67setting up file attachment storage on theon a file server 67
PeopleSoft SCM, granting navigation pageaccess 139PeopleSoft Services Procurement,configuring email URLs 132PeopleSoft Staffing Front Office (SFO)setting up document attachments 69setting up Verity search engine 71
PeopleSoft Strategic Sourcing, configuringemail URLs 132PeopleSoft Supplier Contract Management,setting up 135PeopleSoft Supply Chain Management(SCM), configuring email 131PeopleSoft Transaction Billing Processoractivating integration queues 73activating integration services 74installing 73prerequisites to configuring new routingdefinitions 79transforming the Contract TransactionService 80understanding integration withPeopleSoft CRM 73
PeopleSoft-Microsoft project integratorconfiguring 64installing 63
Physical Inventory Solutionsactivating domain in PeopleSoft AssetManagement 111activating service operations inPeopleSoft Asset Management 106configuring inbound nodes in PeopleSoftAsset Management 104
configuring local gateways in PeopleSoftAsset Management 103integrating with PeopleSoft AssetManagement 103running message channels in PeopleSoftAsset Management 110
Portal homepage, granting access topersonalize 61portal nodessetting up in PeopleSoft FSCM 44setting up in PeopleSoft HCM 46understanding 44
Portal user role, adding to User ID 61Portal Utilities, enabling pagelet creationand access 61, 137prerequisitesconfiguring new routing definitionsfor PeopleSoft Transaction BillingProcessor 79creating the PeopleSoft FSCMdatabase 3installing PeopleSoft PeopleTools 3integrating Microsoft Project 2007 85Oracle iReceipts 31PeopleSoft General Ledger 15PeopleSoft Maintenance Managementintegration with Microsoft Project2007 85PeopleSoft PayBill Management 39
Qqueue definitionsactivating in PeopleSoft FSCM 57activating in PeopleSoft HCM 58understanding for PeopleSoft PayBillManagement 56
Rrelated informationEnterprise PeopleToolsPeopleBook xivPeopleSoft Enterprise ApplicationFundamentals PeopleBook xiv
Sservice operationsactivating for PeopleSoft AssetManagement 106
Copyright © 2011, Oracle and/or its affiliates. All rights reserved. 151
Index
activating for PeopleSoft TransactionBilling Processor 74configuring for PeopleSoft IT AssetManagement 118configuring new routing definitions forPeopleSoft Transaction Billing 80setting up for Oracle iReceipts 35setting up in PeopleSoft FSCM 58setting up in PeopleSoft HCM 58verifying for PeopleSoft AssetManagement 100
SHELCBL.JCT 9SHELSQRF.JCT 9SHELSQRP.JCT 9single signonsetting up in PeopleSoft FSCM 48setting up in PeopleSoft HCM 49
SQRconfiguring for DB2 z/OS 7modifying JCL shellSHELSQRF.JCT 9modifying JCL shellSHELSQRP.JCT 9
Ttypographical conventions xii
UURLdefinition, modifying for PeopleSoftGeneral Ledger 15maintenance area, setting up forms 18specifying for email in PeopleSoftSCM 131
VVerity search, setting up for PeopleSoftStaffing Front Office 71
Wweb servicessetting up for Oracle iReceipts 33
152 Copyright © 2011, Oracle and/or its affiliates. All rights reserved.