Pentaho BI Server Ceça Moraes Outubro/2015. Pentaho BI Server – =typ_redirect.
Pentaho Data Integration 4.1 Administrator's Guide

This document is copyright © 2011 Pentaho Corporation. No part may be reprinted without written permission fromPentaho Corporation. All trademarks are the property of their respective owners.
Help and Support ResourcesIf you have questions that are not covered in this guide, or if you would like to report errors in the documentation,please contact your Pentaho technical support representative.
Support-related questions should be submitted through the Pentaho Customer Support Portal athttp://support.pentaho.com.
For information about how to purchase support or enable an additional named support contact, please contact yoursales representative, or send an email to [email protected].
For information about instructor-led training on the topics covered in this guide, visithttp://www.pentaho.com/training.
Limits of Liability and Disclaimer of WarrantyThe author(s) of this document have used their best efforts in preparing the content and the programs containedin it. These efforts include the development, research, and testing of the theories and programs to determine theireffectiveness. The author and publisher make no warranty of any kind, express or implied, with regard to theseprograms or the documentation contained in this book.
The author(s) and Pentaho shall not be liable in the event of incidental or consequential damages in connectionwith, or arising out of, the furnishing, performance, or use of the programs, associated instructions, and/or claims.
TrademarksPentaho (TM) and the Pentaho logo are registered trademarks of Pentaho Corporation. All other trademarks are theproperty of their respective owners. Trademarked names may appear throughout this document. Rather than listthe names and entities that own the trademarks or insert a trademark symbol with each mention of the trademarkedname, Pentaho states that it is using the names for editorial purposes only and to the benefit of the trademarkowner, with no intention of infringing upon that trademark.
Company InformationPentaho CorporationCitadel International, Suite 3405950 Hazeltine National DriveOrlando, FL 32822Phone: +1 407 812-OPEN (6736)Fax: +1 407 517-4575http://www.pentaho.com
E-mail: [email protected]
Sales Inquiries: [email protected]
Documentation Suggestions: [email protected]
Sign-up for our newsletter: http://community.pentaho.com/newsletter/
| TOC | 3
Contents
Introduction................................................................................................................................4Adding a JDBC Driver................................................................................................................5PDI Functions in the Pentaho Enterprise Console.................................................................... 6
Connecting to the Data Integration Server................................................................................................... 6Monitoring Current Activity and Alerts.......................................................................................................... 6Registering PDI Jobs and Transformations.................................................................................................. 6
Registering Transformations and Jobs from the Pentaho Enterprise Repository.............................. 6Registering Transformations and Jobs from a Database Repository................................................ 7Registering Transformations and Jobs from a File System............................................................... 8
Monitoring Jobs and Transformations.......................................................................................................... 8Monitoring Performance Trends for Jobs and Transformations.........................................................8
License Management.............................................................................................................. 11Managing Licenses from the Command Line Interface.............................................................................. 11
Installing an Enterprise Edition Key on Windows (CLI)....................................................................11Installing an Enterprise Edition Key on Linux (CLI)..........................................................................11
Security and Authorization Configuration................................................................................ 13Changing the Admin Credentials for the Pentaho Enterprise Console.......................................................13Managing Users and Roles in the Pentaho Enterprise Repository.............................................................13
Adding Users................................................................................................................................... 13Editing User Information.................................................................................................................. 14Deleting Users................................................................................................................................. 14Adding Roles....................................................................................................................................15Editing Roles....................................................................................................................................15Deleting Roles..................................................................................................................................16Assigning Users to Roles.................................................................................................................16Making Changes to the Admin Role................................................................................................ 16
Assigning Permissions in the Pentaho Enterprise Repository....................................................................17Permissions Settings....................................................................................................................... 18Enabling System Role Permissions in the Pentaho Enterprise Repository..................................... 18
Configuring LDAP for the Pentaho Data Integration Server....................................................................... 19Configuring Slave Servers.......................................................................................................21
Configuring Carte as a Slave Instance....................................................................................................... 21Executing Scheduled Jobs on a Remote Carte Server.............................................................................. 21
List of Server Ports Used by PDI.............................................................................................23How to Change Service Port Numbers.......................................................................................................23
How to Enable Logging............................................................................................................24How to Change the DI Server URL..........................................................................................25How to Back Up the Enterprise Repository............................................................................. 26Using PDI Data Sources in Action Sequences........................................................................27Monitoring Job and Transformation Results............................................................................28
slave-server-config.xml...............................................................................................................................28Troubleshooting.......................................................................................................................30
I don't know what the default login is for the DI Server, Enterprise Console, and/or Carte........................ 30Jobs scheduled on the DI Server cannot execute a transformation on a remote Carte server.................. 30

4 | Pentaho BI Suite Official Documentation | Introduction
Introduction
This guide contains instructions for configuring and managing a production or development Pentaho Data Integration(PDI) 4.1 server. Installation is not covered here; for installation procedures, refer to the Pentaho Data IntegrationInstallation Guide instead.

Pentaho BI Suite Official Documentation | Adding a JDBC Driver | 5
Adding a JDBC Driver
Before you can connect to a data source in any Pentaho server or client tool, you must first install the appropriatedatabase driver. Your database administrator, CIO, or IT manager should be able to provide you with the proper driverJAR. If not, you can download a JDBC driver JAR file from your database vendor or driver developer's Web site. Onceyou have the JAR, follow the instructions below to copy it to the driver directories for all of the BI Suite components thatneed to connect to this data source.
Note: Microsoft SQL Server users frequently use an alternative, non-vendor-supported driver called JTDS. Ifyou are adding an MSSQL data source, ensure that you are installing the correct driver.
Backing up old drivers
You must also ensure that there are no other versions of the same vendor's JDBC driver installed in these directories.If there are, you may have to back them up and remove them to avoid confusion and potential class loading problems.This is of particular concern when you are installing a driver JAR for a data source that is the same database typeas your Pentaho solution repository. If you have any doubts as to how to proceed, contact your Pentaho supportrepresentative for guidance.
Installing JDBC drivers
Copy the driver JAR file to the following directories, depending on which servers and client tools you are using(Dashboard Designer, ad hoc reporting, and Analyzer are all part of the BI Server):
Note: For the DI Server: before copying a new JDBC driver, ensure that there is not a different version of thesame JAR in the destination directory. If there is, you must remove the old JAR to avoid version conflicts.
• BI Server: /pentaho/server/biserver-ee/tomcat/lib/• Enterprise Console: /pentaho/server/enterprise-console/jdbc/• Data Integration Server: /pentaho/server/data-integration-server/tomcat/webapps/pentaho-di/
WEB-INF/lib/
• Data Integration client: /pentaho/design-tools/data-integration/libext/JDBC/• Report Designer: /pentaho/design-tools/report-designer/lib/jdbc/• Schema Workbench: /pentaho/design-tools/schema-workbench/drivers/• Aggregation Designer: /pentaho/design-tools/agg-designer/drivers/• Metadata Editor: /pentaho/design-tools/metadata-editor/libext/JDBC/
Note: To establish a data source in the Pentaho Enterprise Console, you must install the driver in both theEnterprise Console and the BI Server or Data Integration Server. If you are just adding a data source throughthe Pentaho User Console, you do not need to install the driver to Enterprise Console.
Restarting
Once the driver JAR is in place, you must restart the server or client tool that you added it to.
Connecting to a Microsoft SQL Server using Integrated or Windows Authentication
The JDBC driver supports Type 2 integrated authentication on Windows operating systems through theintegratedSecurity connection string property. To use integrated authentication, copy the sqljdbc_auth.dll file to allthe directories to which you copied the JDBC files.
The sqljdbc_auth.dll files are installed in the following location:
<installation directory>\sqljdbc_<version>\<language>\auth\
Note: Use the sqljdbc_auth.dll file, in the x86 folder, if you are running a 32-bit Java Virtual Machine (JVM)even if the operating system is version x64. Use the sqljdbc_auth.dll file in the x64 folder, if you are running a64-bit JVM on a x64 processor. Use the sqljdbc_auth.dll file in the IA64 folder, you are running a 64-bit JVM onan Itanium processor.
6 | Pentaho BI Suite Official Documentation | PDI Functions in the Pentaho Enterprise Console
PDI Functions in the Pentaho Enterprise Console
The PDI features of the Pentaho Enterprise Console allow you to monitor all activity on a Data Integration serverremotely. You can also register specific jobs and transformations to monitor for more detailed information such asperformance trends, execution history, and error logs.
Important: Before you can monitor jobs and transformations, you must first configure logging and monitoringfeatures in Pentaho Data Integration. See How to Enable Logging on page 24 for details.
To start viewing jobs and transformations, you must perform at least one of the following tasks:
• Configure the connection to the Data Integration Server you want to monitor• Register transformations and jobs specific transformations and jobs you want to monitor in detail
Connecting to the Data Integration ServerYou must register your Data Integration server to link it to the Pentaho Enterprise Console. After registration you canmonitor activity associated with jobs and transformations being processed by the Data Integration server from the PDIdashboard in the Pentaho Enterprise Console.
To register your Data Integration server:
1. Make sure your Data Integration server is up and running.
2. In the Pentaho Enterprise Console home page, click Pentaho Data Integration.
3.Click to open the Carte Configuration dialog box.
4. In the Carte Configuration dialog box, enter the Data Integration server URL, (for example, http://localhost:9080/pentaho-di/), the server user name, and password.
Note: You can still configure the Pentaho Enterprise Console to connect to a basic Carte server using theappropriate URL; (for example, http://localhost:80/kettle/).
5. Click OK to complete the registration.A message appears if the connection to the Data Integration server is successful. If you see an error message,check to make sure your Data Integration server is running and that your access credentials are correct.
Monitoring Current Activity and AlertsOnce your Data Integration or Carte server is running and you have registered jobs and transformations, the CurrentActivity chart on the PDI dashboard displays the total number of jobs and transformations that are waiting, running,or paused on a configured server. Also displayed is a list of alerts associated with registered jobs and transformations.Alerts help you determine if a job or transformation is taking too long to run, has completed too quickly, or has loggederrors.
Click Refresh to update the dashboard. Click in the History list box to view performance history (All History) associatedwith registered jobs and transformations.
Registering PDI Jobs and TransformationsThe Pentaho Enterprise Console allows you to register jobs and transformations contained in an enterprise or databaserepository. Registering a job or transformation allows you to analyze additional related information such as the loghistory and performance trends.
Registering Transformations and Jobs from the Pentaho Enterprise Repository
To register jobs and transformations stored in a database repository, you must connect to the repository by defining adatabase connection.
1. Make sure your Data Integration server is running.
2. In the Pentaho Enterprise Console, click the Pentaho Data Integration tab.

Pentaho BI Suite Official Documentation | PDI Functions in the Pentaho Enterprise Console | 7
3.Click (Registration) to view the Register Jobs and Transformations page.
4. In the Register Jobs and Transformations page, click the plus sign (+) next to Repository.The New Repository Connection dialog box appears.
5. Enter the information about your repository in the appropriate fields and click OK.
Note: No fields in the New Repository Connection dialog box are allowed to be blank and your portnumber must be valid.
6. Select the new repository and click Browse.When you connect to your database repository successfully, a list of all jobs and transformations in the repositoryappears.
7. Select the jobs and transformations you want to monitor and click Register.
Note: Use CTRL+ CLICK to select multiple jobs and transformations.
The jobs and transformations you selected appear in the Registered list box. Previously registered jobs andtransformations are not displayed.
Registering Transformations and Jobs from a Database Repository
To register jobs and transformations stored in a classic Kettle database repository, you must connect to the repositoryby defining a database connection.
Caution: To avoid database connection errors, be sure you have accurate database connection details.Depending on the database vendor, incorrect entries associated with database connections result in errormessages that may not identify issues clearly.
1. Make sure your repository is running.
2. In the Pentaho Enterprise Console, click the Pentaho Data Integration tab.
3.Click (Registration) to view the Register Jobs and Transformations page.
4. In the Register Jobs and Transformations page, click the plus sign (+) next to Repository.The New Repository Connection dialog box appears.
5. Click the Kettle Repository radio button.
6. Enter the information about your database in the appropriate fields and click OK.
Note: No fields in the New Repository Connection dialog box are allowed to be blank and your portnumber must be valid.
7. Select the new repository and click Browse.
8 | Pentaho BI Suite Official Documentation | PDI Functions in the Pentaho Enterprise Console
When you connect to your database repository successfully, a list of all jobs and transformations in the databaserepository appears.
8. Select the jobs and transformations you want to monitor and click Register.
Note: Use CTRL+ CLICK to select multiple jobs and transformations.
The jobs and transformations you selected appear in the Registered list box.
Registering Transformations and Jobs from a File System
To register and view jobs and transformations that are stored in a file system, you must browse for the files that containthem.
1. In the Pentaho Enterprise Console, click the Pentaho Data Integration tab.
2.Click (Registration) to view the Register Jobs and Transformations page.
3. In the File text box type the path name to the file that contains the job or transformation or click Browse to locate thefile.
4. Click RegisterThe jobs and transformations you selected appear in the Registered list box.
Monitoring Jobs and TransformationsYou can monitor the status of all PDI-related jobs and transformations from the Pentaho Enterprise Console. In
the console, click the PDI menu item then click (Monitoring Status) to display all jobs and transformationsthat are currently running on the Carte server and those which are registered. You will see all registered jobs andtransformations and all jobs and transformations that have run on Carte since it was last restarted. Registered jobs andtransformations that are registered but which have not been run on Carte since it was last restarted, display a status of"unpublished." Also displayed are runtime thresholds (Alert Min and Max), if specified.
From this page you can start running pause , and stop running jobs and transformations that have been sent
to the server since it was last restarted. Click (Refresh) to refresh the list of jobs and transformations as needed.
Monitoring Performance Trends for Jobs and Transformations
The job and transformation details page associated with the PDI feature of the Pentaho Enterprise Console allows you,among other things, to look a performance trends for a specific job or transformation, to set up alert thresholds, andrender results by occurrence or date. In addition, you can view the job or transformation log file (if running on the DataIntegration server or Carte) and the step metrics (if running on the Data Integration server or Carte) associated with aspecific job or transformation.
To display the job and transformation details page, click the PDI tab in the console, then click (Monitoring Status) toopen the Monitor Status page. Double-click on a specific job and transformation to display the activity details page. Theinformation available on the details page depends on the settings you configured in the Transformation Settings dialogbox in Spoon. See the Pentaho Data Integration User Guide for details.
Pentaho BI Suite Official Documentation | PDI Functions in the Pentaho Enterprise Console | 9
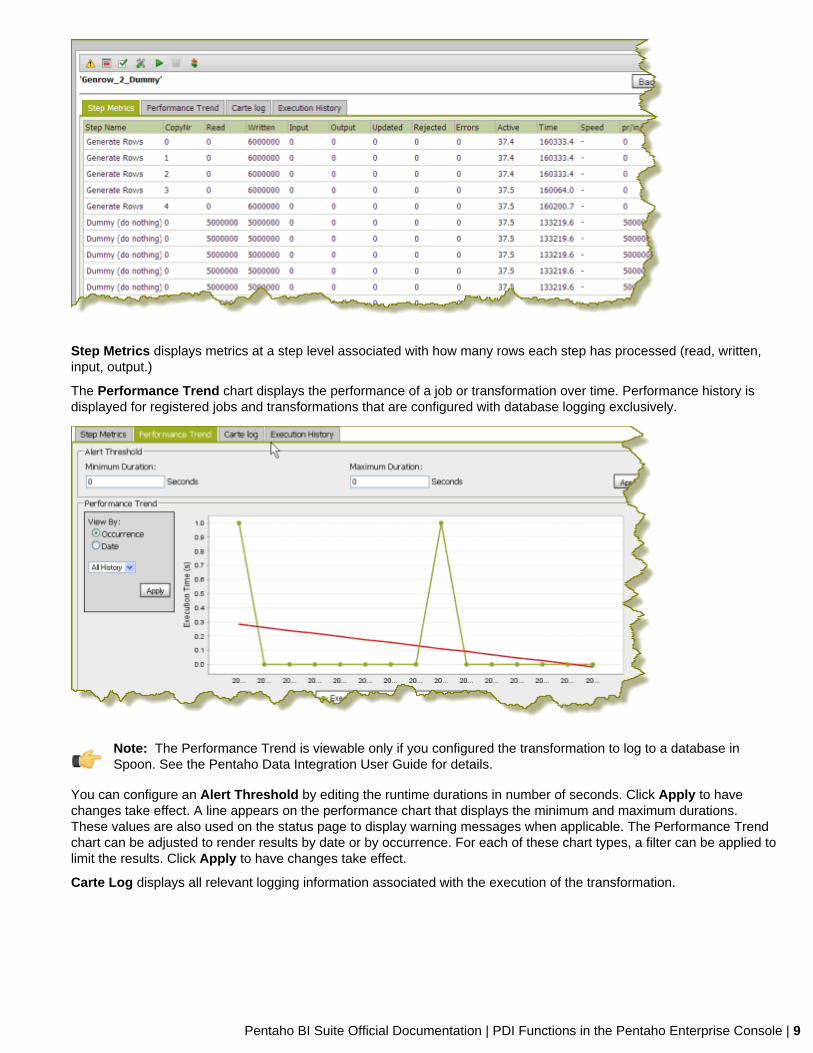
Step Metrics displays metrics at a step level associated with how many rows each step has processed (read, written,input, output.)
The Performance Trend chart displays the performance of a job or transformation over time. Performance history isdisplayed for registered jobs and transformations that are configured with database logging exclusively.
Note: The Performance Trend is viewable only if you configured the transformation to log to a database inSpoon. See the Pentaho Data Integration User Guide for details.
You can configure an Alert Threshold by editing the runtime durations in number of seconds. Click Apply to havechanges take effect. A line appears on the performance chart that displays the minimum and maximum durations.These values are also used on the status page to display warning messages when applicable. The Performance Trendchart can be adjusted to render results by date or by occurrence. For each of these chart types, a filter can be applied tolimit the results. Click Apply to have changes take effect.
Carte Log displays all relevant logging information associated with the execution of the transformation.

10 | Pentaho BI Suite Official Documentation | PDI Functions in the Pentaho Enterprise Console
Execution History allows you to view log information from previous executions. This is particularly helpful when youare troubleshooting an error. In the image below, the transformation has run multiple times. The user has selected todisplay details about the fourth time the transformation ran.
Note: Execution History is viewable only if you configured the transformation to log to a database in Spoon(LOG_FIELD table). See the Pentaho Data Integration User Guide for details.

Pentaho BI Suite Official Documentation | Installing or Updating an Enterprise Edition Key | 11
Installing or Updating an Enterprise Edition Key
You must install Pentaho Enterprise Edition keys associated with products for which you have purchased supportentitlements. The keys you install determine the layout and capabilities of the Pentaho Enterprise Console, and thefunctionality of the BI Server and DI Server. Follow the instructions below to install an Enterprise Edition key throughthe Pentaho Enterprise Console for the first time, or to update an expired or expiring key. If you would prefer to use acommand line tool instead, see Appendix: Working From the Command Line Interface on page 11.
Note: If your Pentaho Enterprise Console server is running on a different machine than your BI or DI Server,you must use the command line tool to install and update license files; you will not be able to use the PentahoEnterprise Console for this task.
1. If you have not done so already, log into the Pentaho Enterprise Console by opening a Web browser and navigatingto http://server-hostname:8088, changing server-hostname to the hostname or IP address of your BI or DIserver.
2. Click the + (plus) button in the upper right corner of the Subscriptions section.
An Install License dialog box will appear.
3. Click Browse, then navigate to the location you saved your LIC files to, then click Open.
LIC files for each of your supported Pentaho products were emailed to you along with your Pentaho Welcome Kit. Ifyou did not receive this email, or if you have lost these files, contact your Pentaho support representative. If you donot yet have a support representative, contact the Pentaho salesperson you were working with.
Note: Do not open your LIC files with a text editor; they are binary files, and will become corrupt if they aresaved as ASCII.
4. Click OK.
The Setup page changes according to the LIC file you installed.
You can now configure your licensed products through the Pentaho Enterprise Console.
Appendix: Working From the Command Line InterfaceThough the Pentaho Enterprise Console is the quickest, easiest, and most comprehensive way to manage PDI and/orthe BI Server, some Pentaho customers may be in environments where it is difficult or impossible to deploy or use theconsole. This appendix lists alternative instructions for command line interface (CLI) configuration.
Installing an Enterprise Edition Key on Windows (CLI)
To install a Pentaho Enterprise Edition Key from the command line interface, follow the below instructions.
Note: Do not open your LIC files with a text editor; they are binary files, and will become corrupt if they aresaved as ASCII.
1. Navigate to the \pentaho\server\enterprise-console\license-installer\ directory, or the\license-installer\ directory that was part of the archive package you downloaded.
2. Run the install_license.bat script with the install switch and the location and name of your license file as aparameter.
install_license.bat install "C:\Users\pgibbons\Downloads\Pentaho BI Platform Enterprise Edition.lic"
Upon completing this task, you should see a message that says, "The license has been successfully processed. Thankyou."
Installing an Enterprise Edition Key on Linux (CLI)
To install a Pentaho Enterprise Edition Key from the command line interface, follow the below instructions.
Note: Do not open your LIC files with a text editor; they are binary files, and will become corrupt if they aresaved as ASCII.

12 | Pentaho BI Suite Official Documentation | Installing or Updating an Enterprise Edition Key
1. Navigate to the /pentaho/server/enterprise-console/license-installer/ directory, or the /license-installer/ directory that was part of the archive package you downloaded.
2. Run the install_license.sh script with the install switch and the location and name of your license file as aparameter. You can specify multiple files, separated by spaces, if you have more than one license key to install.
Note: Be sure to use backslashes to escape any spaces in the path or file name.
install_license.sh install /home/pgibbons/downloads/Pentaho\ BI\ Platform\ Enterprise\ Edition.lic
Upon completing this task, you should see a message that says, "The license has been successfully processed. Thankyou."
Pentaho BI Suite Official Documentation | Security and Authorization Configuration | 13
Security and Authorization Configuration
The information in this section explains how to configure users, roles, and other permissions settings for your PDIenterprise repository.
Changing the Admin Credentials for the Pentaho Enterprise ConsoleThe default user name and password for the Pentaho Enterprise Console are admin and password, respectively. Youmust change these credentials if you are deploying the BI Server to a production environment. Follow the instructionsbelow to change the credentials:
1. Stop the Pentaho Enterprise Console.
/pentaho/server/enterprise-console/stop-pec.sh
2. Open a terminal or command prompt window and navigate to the /pentaho/server/enterprise-console/directory.
3. Execute the pec-passwd script with two parameters: the Enterprise Console username and the new password youwant to set.
This script will make some configuration changes for you, and output an obfuscated password hash to the terminal.
./pec-passwd.sh admin newpass
4. Copy the hash output to the clipboard, text buffer, or to a temporary text file.
5. Edit the /pentaho/server/enterprise-console/resource/config/login.properties file with a texteditor.
6. Replace the existing hash string with the new one, leaving all other information in the file intact.
admin: OBF:1uo91vn61ymf1yt41v1p1ym71v2p1yti1ylz1vnw1unp,server-administrator,content-administrator,admin
7. Save and close the file, and restart Enterprise Console.
The Pentaho Enterprise Console password is now changed.
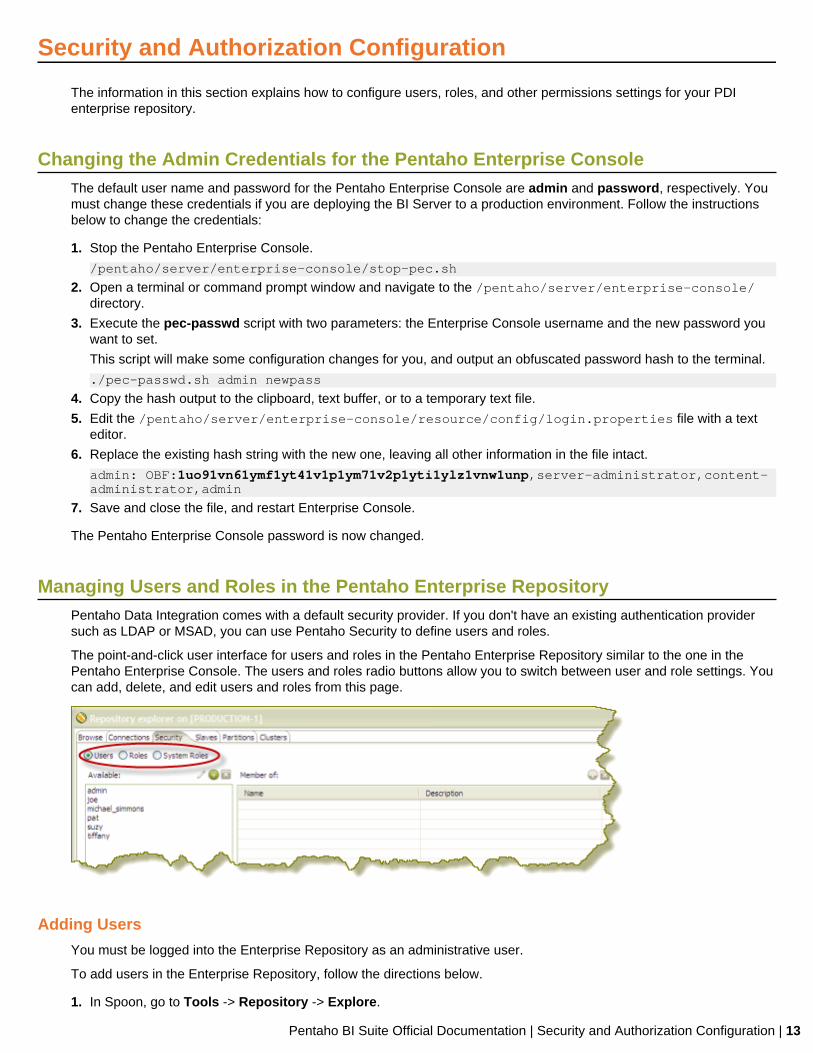
Managing Users and Roles in the Pentaho Enterprise RepositoryPentaho Data Integration comes with a default security provider. If you don't have an existing authentication providersuch as LDAP or MSAD, you can use Pentaho Security to define users and roles.
The point-and-click user interface for users and roles in the Pentaho Enterprise Repository similar to the one in thePentaho Enterprise Console. The users and roles radio buttons allow you to switch between user and role settings. Youcan add, delete, and edit users and roles from this page.
Adding Users
You must be logged into the Enterprise Repository as an administrative user.
To add users in the Enterprise Repository, follow the directions below.
1. In Spoon, go to Tools -> Repository -> Explore.
14 | Pentaho BI Suite Official Documentation | Security and Authorization Configuration
The Repository Explorer opens.
2. Click the Security tab.
Note: The Users radio button is selected by default.
3. Next to Available, click (Add).The Add User dialog box appears.
4. Enter the User Name and Password associated with your new user account in the appropriate fields.
Note: An entry in the Description field is optional.
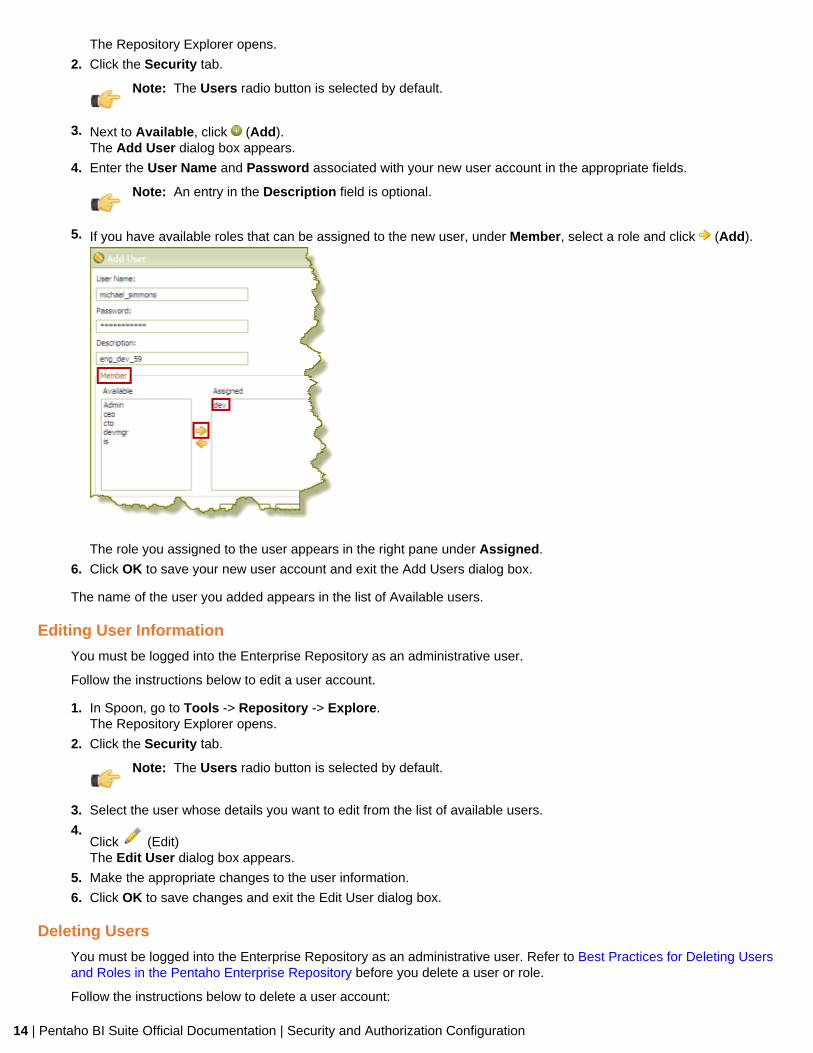
5. If you have available roles that can be assigned to the new user, under Member, select a role and click (Add).
The role you assigned to the user appears in the right pane under Assigned.
6. Click OK to save your new user account and exit the Add Users dialog box.
The name of the user you added appears in the list of Available users.
Editing User Information
You must be logged into the Enterprise Repository as an administrative user.
Follow the instructions below to edit a user account.
1. In Spoon, go to Tools -> Repository -> Explore.The Repository Explorer opens.
2. Click the Security tab.
Note: The Users radio button is selected by default.
3. Select the user whose details you want to edit from the list of available users.
4.Click (Edit)The Edit User dialog box appears.
5. Make the appropriate changes to the user information.
6. Click OK to save changes and exit the Edit User dialog box.
Deleting Users
You must be logged into the Enterprise Repository as an administrative user. Refer to Best Practices for Deleting Usersand Roles in the Pentaho Enterprise Repository before you delete a user or role.
Follow the instructions below to delete a user account:
Pentaho BI Suite Official Documentation | Security and Authorization Configuration | 15
1. In Spoon, go to Tools -> Repository -> Explore.The Repository Explorer opens.
2. Click the Security tab.
3. Select the user you want to delete from the list of available users.
4. Next to Users, click (Remove).A confirmation message appears.
5. Click Yes to delete the user.
The specified user account is deleted.
Best Practices for Deleting Users and Roles in the Pentaho Enterprise Repository
If a user or role is deleted in the Pentaho Enterprise Repository, (currently used by Pentaho Data Integration), contentthat refers to the deleted user (either by way of owning the content or having an ACL that mentions the user or role) isleft unchanged; therefore, it is possible that you may create a new user or role, at a later date, using an identical name.In this scenario, content ownership and access control entries referring to the deleted user or role now apply to the newuser or role.
To avoid this problem, Pentaho recommends that you disable a user or role instead of deleting it. This prevents a useror role with an identical name from ever being created again. The departmental solution (also referred to as Hibernateor the Pentaho Security back-end), does not have disable functionality. For this back-end, Pentaho recommends thatyou use the following alternatives rather than deleting the user or role:
IF THENYou are dealing with a role Unassign all current members associated with the roleYou are dealing with a user Reset the password to a password that is so cryptic that it
is impossible to guess and is unknown to any users
Adding Roles
You must be logged into the Enterprise Repository as an administrative user.
To add roles in the Enterprise Repository, follow the directions below:
1. In Spoon, go to Tools -> Repository -> Explore.The Repository Explorer opens.
2. Click the Security tab.
3. Click the Roles radio button.The list of available roles appear.
4. Click (Add)The Add Role dialog box appears.
5. Enter the Role Name in the appropriate field.
Note: An entry in the Description field is optional.
6. If you have users to assign to the new role, select them (using the <SHIFT> or <CTRL> keys) from the list ofavailable users and click (Add).The user(s) assigned to your new role appear in the right pane.
7. Click OK to save your entries and exit the Add Role dialog box.
The specified role is created and is ready to be assigned to user accounts.
Editing Roles
You must be logged into the Enterprise Repository as an administrative user.
To edit roles in the Enterprise Repository, follow the directions below.
1. In Spoon, go to Tools -> Repository -> Explore.The Repository Explorer opens.
2. Click the Security tab.

16 | Pentaho BI Suite Official Documentation | Security and Authorization Configuration
3. Click the Roles radio button.The list of available roles appear.
4.Select the role you want to edit and click (Edit)The Edit Role dialog box appears.
5. Make the appropriate changes.
6. Click OK to save your changes and exit the Edit Role dialog box.
Deleting Roles
You must be logged into the Enterprise Repository as an administrative user. Refer to Best Practices for Deleting Usersand Roles in the Pentaho Enterprise Repository before you delete a user or role.
Follow the instructions below to delete a role:
1. In Spoon, go to Tools -> Repository -> Explore.The Repository Explorer opens.
2. Click the Security tab.
3. Select the role you want to delete from the list of available roles.
4. Click (Remove).A confirmation message appears.
5. Click Yes to delete the role.
The specified role is deleted.
Assigning Users to Roles
You must be logged into the Enterprise Repository as an administrative user.
You can assign users to roles, (and vice-versa), when you add a new user or role; however, you can also assign usersto roles as a separate task.
1. In Spoon, go to Tools -> Repository -> Explore.The Repository Explorer opens.
2. Click the Security tab.
3. Click the Roles radio button.The list of available roles appear.
4. Select the role to which you want to assign one or more users.
Note: If the role has users currently assigned to it, the names of the users appear in the table on the rightunder Members. You can assign or unassign any users to a role. You can select a single item or multipleitems from the list of members. Click (Remove) to remove the user assignment.
5. Next to Members, click (Add).The Add User to Role dialog box appears.
6. Select the user (or users) you want assigned to the role and click (Add).The user(s) assigned to the role appear in the right pane.
7. Click OK to save your entries and to exit the Add User to Role dialog box.
The specified users are now assigned to the specified role.
Making Changes to the Admin Role
The assigning of task-related permissions, (Read, Create, and Administrate), associated with the Admin role in thePentaho Enterprise Repository cannot be edited in the user interface. The Admin role is the only role that is assignedthe Administrate permission; the Administrate permission controls user access to the Security tab.
Deleting the Admin role prevents all users from accessing the Security tab, unless another role is assigned theAdministrate permission. Below are the scenarios that require a non-UI configuration change:
• You want to delete the Admin role• You want to unassign the Administrate permission from the Admin role

Pentaho BI Suite Official Documentation | Security and Authorization Configuration | 17
• You want to setup LDAP
Follow the instructions below to change the Admin role:
1. Shut down the Data Integration server.
2. Open the repository.spring.xml file located at \pentaho\server\data-integration-server\pentaho-solutions\system\.
3. Locate the element with an ID of immutableRoleBindingMap.
4. Replace the entire node with the XML shown below. Make sure you change yourAdminRole to the role that willhave Administrate permission.
<util:map id="immutableRoleBindingMap"> <entry key="yourAdminRole"> <util:list> <value>org.pentaho.di.reader</value> <value>org.pentaho.di.creator</value> <value>org.pentaho.di.securityAdministrator</value> </util:list> </entry></util:map>
5. Restart the Data Integration server.
The Admin role is changed according to your requirements.
Assigning Permissions in the Pentaho Enterprise RepositoryYou must be logged into the Enterprise Repository as an administrative user.
There are "action based" permissions associated with the roles. Roles help you define what users or members of agroup have the permission to do. You can create roles that restrict users to reading content exclusively. You can createadministrative groups who are allowed to administer security and create new content.
In the example below, user "joe" has an "admin" role. As such, Joe's permissions allow him to Read Content,Administer Security, and Create Content.
To assign permissions in the Enterprise Repository, follow the instructions below.
1. In Spoon, go to Tools -> Repository -> Explore.The Repository Explorer opens.
18 | Pentaho BI Suite Official Documentation | Security and Authorization Configuration
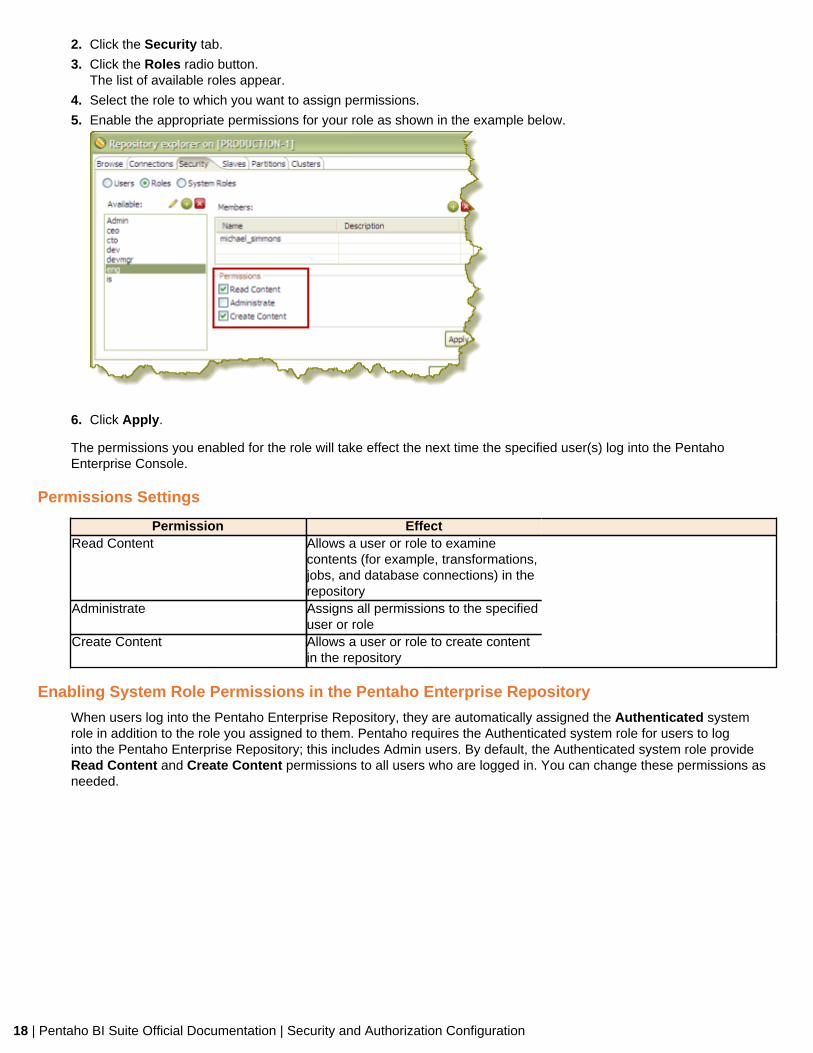
2. Click the Security tab.
3. Click the Roles radio button.The list of available roles appear.
4. Select the role to which you want to assign permissions.
5. Enable the appropriate permissions for your role as shown in the example below.
6. Click Apply.
The permissions you enabled for the role will take effect the next time the specified user(s) log into the PentahoEnterprise Console.
Permissions Settings
Permission EffectRead Content Allows a user or role to examine
contents (for example, transformations,jobs, and database connections) in therepository
Administrate Assigns all permissions to the specifieduser or role
Create Content Allows a user or role to create contentin the repository
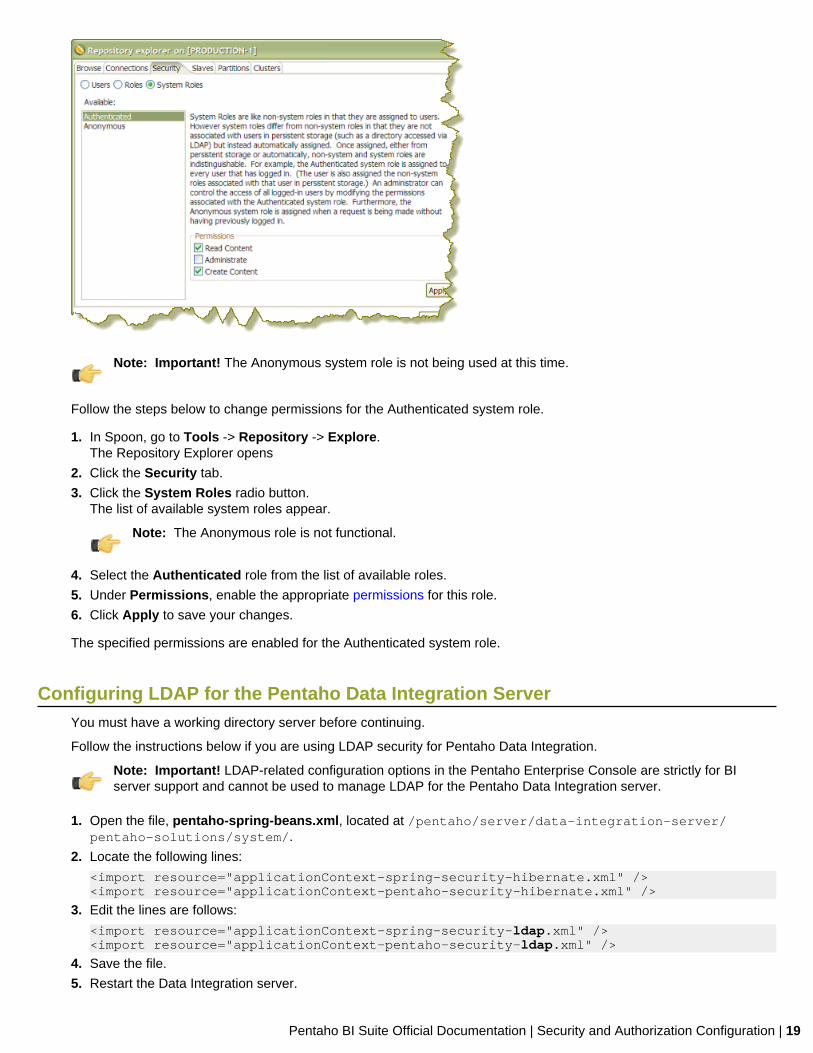
Enabling System Role Permissions in the Pentaho Enterprise Repository
When users log into the Pentaho Enterprise Repository, they are automatically assigned the Authenticated systemrole in addition to the role you assigned to them. Pentaho requires the Authenticated system role for users to loginto the Pentaho Enterprise Repository; this includes Admin users. By default, the Authenticated system role provideRead Content and Create Content permissions to all users who are logged in. You can change these permissions asneeded.
Pentaho BI Suite Official Documentation | Security and Authorization Configuration | 19
Note: Important! The Anonymous system role is not being used at this time.
Follow the steps below to change permissions for the Authenticated system role.
1. In Spoon, go to Tools -> Repository -> Explore.The Repository Explorer opens
2. Click the Security tab.
3. Click the System Roles radio button.The list of available system roles appear.
Note: The Anonymous role is not functional.
4. Select the Authenticated role from the list of available roles.
5. Under Permissions, enable the appropriate permissions for this role.
6. Click Apply to save your changes.
The specified permissions are enabled for the Authenticated system role.
Configuring LDAP for the Pentaho Data Integration ServerYou must have a working directory server before continuing.
Follow the instructions below if you are using LDAP security for Pentaho Data Integration.
Note: Important! LDAP-related configuration options in the Pentaho Enterprise Console are strictly for BIserver support and cannot be used to manage LDAP for the Pentaho Data Integration server.
1. Open the file, pentaho-spring-beans.xml, located at /pentaho/server/data-integration-server/pentaho-solutions/system/.
2. Locate the following lines:
<import resource="applicationContext-spring-security-hibernate.xml" /><import resource="applicationContext-pentaho-security-hibernate.xml" />
3. Edit the lines are follows:
<import resource="applicationContext-spring-security-ldap.xml" /><import resource="applicationContext-pentaho-security-ldap.xml" />
4. Save the file.
5. Restart the Data Integration server.

20 | Pentaho BI Suite Official Documentation | Security and Authorization Configuration
You are now running the Pentaho Data Integration server in LDAP mode..
Pentaho BI Suite Official Documentation | Configuring Slave Servers | 21
Configuring Slave Servers
You can set up multiple instances of Carte, which is essentially a version of Spoon without an interface, to operate asslave servers managed by the DI Server. Follow the instructions below to install and configure slave servers.
Configuring Carte as a Slave InstanceThrough the Repository Explorer in PDI you can easily set up Carte servers to execute PDI jobs and transformations asslaves or clusters. The first step in configuring slave servers is to deploy a copy of the Data Integration client tools to themachine you want to delegate work to. Follow the directions below to set up Carte slaves.
1. Retrieve a pdi-ee-client archive package from the Pentaho Enterprise Edition FTP site.
2. On each machine that will act as a Carte server (slave), create a /pentaho/design-tools/ directory.
3. Unpack the archive to the /pentaho/design-tools/ directory on each machine.
Two directories will be created: data-integration and license-installer.
4. Use the license utility to install the PDI Enterprise Edition and Pentaho Hadoop Enterprise Edition licenses, ifapplicable.
5. Copy over any required JDBC drivers from your development instances of PDI to the Carte instances.
6. Run the Carte script with your preferred options.
./carte.sh 127.0.0.1 8080
7. Ensure that the Carte service is running as intended, accessible from your primary PDI development machines, andthat it can run your jobs and transformations.
8. To start this slave server every time the operating system boots, create a startup or init script to run Carte at boottime with the same options you tested with.
You now have one or more Carte slave servers that you can delegate job and transformation work to in the RepositoryExplorer.
See the Pentaho Data Integration User Guide for more information about assigning slaves and configuring clusters.
Executing Scheduled Jobs on a Remote Carte ServerFollow the instructions below if you need to schedule a job that you want to run on a remote Carte server. Withoutmaking these configuration changes, you will be unable to remotely execute scheduled jobs.
1. Stop the DI Server and remote Carte server.
2. Open the /pentaho/server/data-integration-server/tomcat/webapps/pentaho-di/WEB-INF/web.xml file with a text editor.
3. Find the Proxy Trusting Filter filter section, and add your Carte server's IP address to the param-value element.
<filter> <filter-name>Proxy Trusting Filter</filter-name> <filter-class>org.pentaho.platform.web.http.filters.ProxyTrustingFilter</filter-class> <init-param> <param-name>TrustedIpAddrs</param-name> <param-value>127.0.0.1,192.168.0.1</param-value> <description>Comma separated list of IP addresses of a trusted hosts.</description> </init-param> <init-param> <param-name>NewSessionPerRequest</param-name> <param-value>true</param-value> <description>true to never re-use an existing IPentahoSession in the HTTP session; needs to be true to work around code put in for BISERVER-2639</description> </init-param></filter>
4. Uncomment the proxy trusting filter-mappings between the <!-- begin trust --> and <!-- end trust --> markers.
<!-- begin trust -->
22 | Pentaho BI Suite Official Documentation | Configuring Slave Servers
<filter-mapping> <filter-name>Proxy Trusting Filter</filter-name> <url-pattern>/webservices/authorizationPolicy</url-pattern> </filter-mapping>
<filter-mapping> <filter-name>Proxy Trusting Filter</filter-name> <url-pattern>/webservices/roleBindingDao</url-pattern> </filter-mapping>
<filter-mapping> <filter-name>Proxy Trusting Filter</filter-name> <url-pattern>/webservices/userRoleListService</url-pattern> </filter-mapping>
<filter-mapping> <filter-name>Proxy Trusting Filter</filter-name> <url-pattern>/webservices/unifiedRepository</url-pattern> </filter-mapping>
<filter-mapping> <filter-name>Proxy Trusting Filter</filter-name> <url-pattern>/webservices/userRoleService</url-pattern> </filter-mapping>
<filter-mapping> <filter-name>Proxy Trusting Filter</filter-name> <url-pattern>/webservices/Scheduler</url-pattern> </filter-mapping>
<filter-mapping> <filter-name>Proxy Trusting Filter</filter-name> <url-pattern>/webservices/repositorySync</url-pattern> </filter-mapping> <!-- end trust -->
5. Save and close the file, then edit the carte.sh or Carte.bat startup script on the machine that runs your Carte server.
6. Add -Dpentaho.repository.client.attemptTrust=true to the java line at the bottom of the file.
java $OPT -Dpentaho.repository.client.attemptTrust=true org.pentaho.di.www.Carte "${1+$@}"
7. Save and close the file.
8. Start your Carte and DI Server
You can now schedule a job to run on a remote Carte instance.

Pentaho BI Suite Official Documentation | List of Server Ports Used by PDI | 23
List of Server Ports Used by PDI
The port numbers below must be available internally on the machine that runs the DI Server. The only exception isSampleData, which is only for evaluation and demonstration purposes and is not necessary for production systems. Ifyou are unable to open these ports, or if you have port collisions with existing services, refer to How to Change ServicePort Numbers on page 23 for instructions on how to change them.
Service Port NumberEnterprise Console 8088Data Integration Server 9080H2 (SampleData) 9092Embedded BI Server (Jetty) 10000
How to Change Service Port Numbers
Enterprise Console (Jetty)
Edit the /pentaho/server/enterprise-console/resource/config/console.properties file. The portnumber entries are in the first section at the top of the file.
# Management Server Console's Jetty Server Settings
console.start.port.number=8088console.stop.port.number=8033
DI Server (Tomcat)
Edit the /pentaho/server/data-integration-server/tomcat/conf/server.xml file and change the portnumbers in the section shown below.
<!-- A "Connector" represents an endpoint by which requests are received and responses are returned. Documentation at : Java HTTP Connector: /docs/config/http.html (blocking & non-blocking) Java AJP Connector: /docs/config/ajp.html APR (HTTP/AJP) Connector: /docs/apr.html Define a non-SSL HTTP/1.1 Connector on port 9080 --> <Connector URIEncoding="UTF-8" port="9080" protocol="HTTP/1.1" connectionTimeout="20000" redirectPort="9443" /> <!-- A "Connector" using the shared thread pool--> <!-- <Connector URIEncoding="UTF-8" executor="tomcatThreadPool" port="9080" protocol="HTTP/1.1" connectionTimeout="20000" redirectPort="9443" />
Note: You may also have to change the SSL and SHUTDOWN ports in this file, depending on yourconfiguration.
Next, follow the directions in How to Change the DI Server URL on page 25 to accommodate for the new portnumber.
Embedded BI Server (Jetty)
This server port is hard-coded in Pentaho Data Integration and cannot be changed. If port 10000 is unavailable, thesystem will increment by 1 until an available port is found.
24 | Pentaho BI Suite Official Documentation | How to Enable Logging
How to Enable Logging
The logging functionality in PDI enables you to more easily track down complex errors and failures, and measureperformance. To turn on logging in PDI, follow the below procedure.
1. Create a database or table space called pdi_logging.
If you don't have a database set aside specifically for logging and other administrative tasks, you can use theSampleData H2 database service included with PDI. H2 does not require you to create a database or table space; ifyou specify one that does not exist, H2 silently creates it.
2. Start Spoon, and open a transformation or job that you want to enable logging for.
3. Go to the Edit menu and select Settings...
The Settings dialogue will appear.
4. Select the Logging tab.
5. In the list on the left, select the function you want to log.
6. Click the New button next to the Log Connection field.
The Database Connection dialogue will appear.
7. Enter in your database connection details, then click Test to ensure that they are correct. Click OK when you'redone.
If you are using the included H2 instance, it is running on localhost on port 9092. Use the hibuser username withthe password password.
8. Look through the list of fields to log, and ensure that only the fields you are interested in are checked.
Logging can negatively impact system performance, so don't record any information that you aren't going to use.
Logging is now enabled for the job or transformation in question.
When you run a job or transformation that has logging enabled, you have the option of choosing the log verbosity levelin the execution dialogue:
• Nothing Don't record any output• Error Only show errors• Minimal Only use minimal logging• Basic This is the default level• Detailed Give detailed logging output• Debug For debugging purposes, very detailed output• Row level Logging at a row level. This will generate a lot of log data
If the Enable time option is enabled, all lines in the logging will be preceded by the time of day.
Pentaho BI Suite Official Documentation | How to Change the DI Server URL | 25
How to Change the DI Server URL
You can change the DI Server hostname from localhost to a specific IP address, hostname, or domain name byfollowing the instructions below. This procedure is also a requirement if you are changing the DI Server port number.
1. Stop the DI Server through your preferred means.
2. Open the /pentaho/server/data-integration-server/tomcat/webapps/pentaho-di/WEB-INF/web.xml file with a text editor.
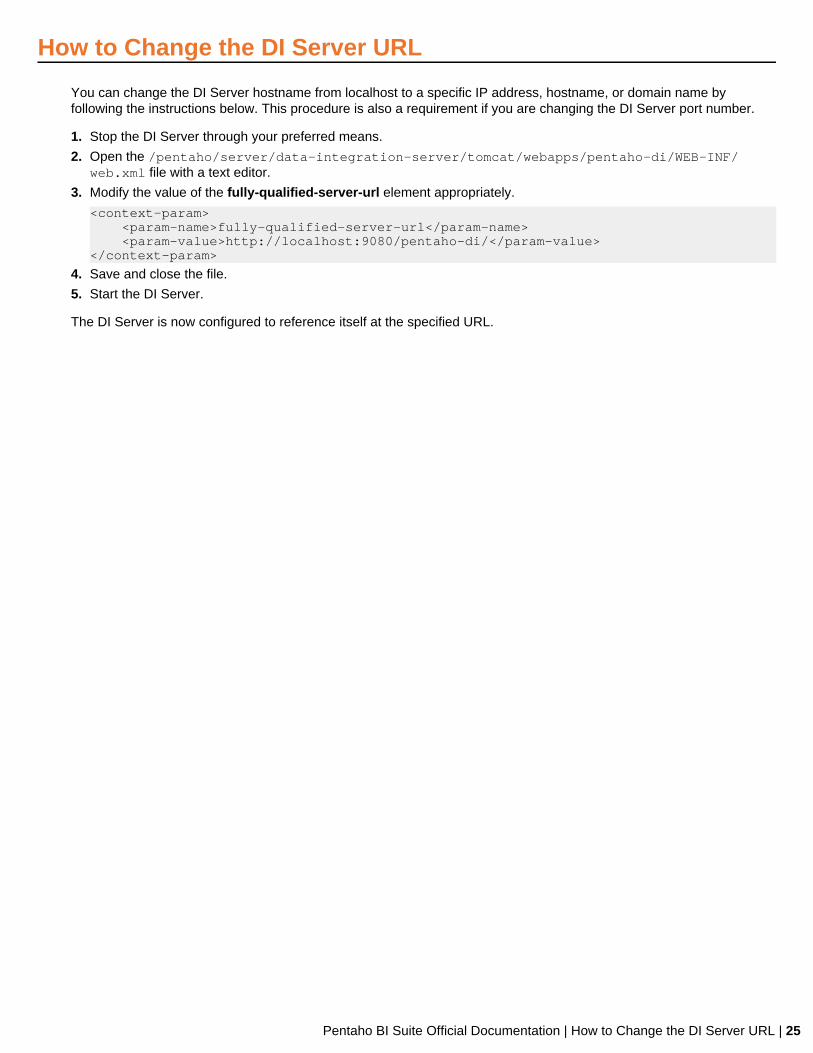
3. Modify the value of the fully-qualified-server-url element appropriately.
<context-param> <param-name>fully-qualified-server-url</param-name> <param-value>http://localhost:9080/pentaho-di/</param-value></context-param>
4. Save and close the file.
5. Start the DI Server.
The DI Server is now configured to reference itself at the specified URL.
26 | Pentaho BI Suite Official Documentation | How to Back Up the Enterprise Repository
How to Back Up the Enterprise Repository
Follow the instructions below to create a backup of your PDI enterprise repository.
Note: If you've made any changes to the Pentaho Enterprise Console or DI Server Web applicationconfiguration, such as changing the port number or base URL, you will have to modify this procedure to includethe entire /pentaho/server/ directory.
1. Stop the DI Server.
/pentaho/server/data-integration-server/stop-pentaho.sh
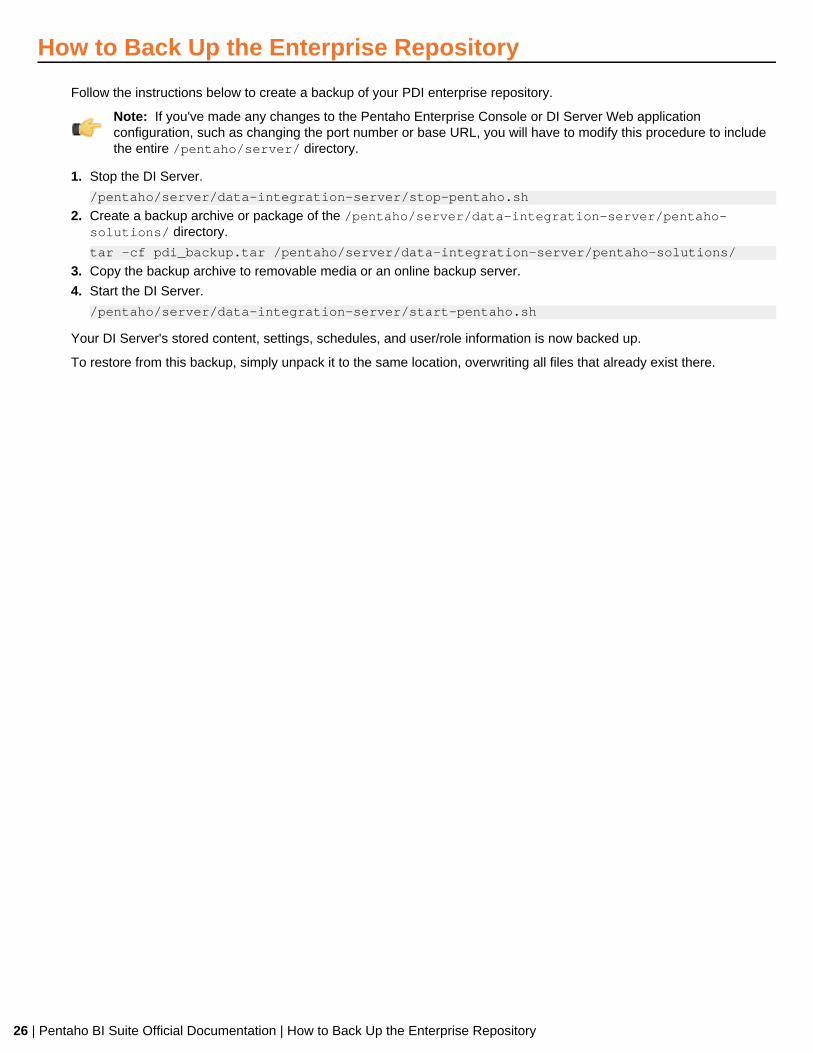
2. Create a backup archive or package of the /pentaho/server/data-integration-server/pentaho-solutions/ directory.
tar -cf pdi_backup.tar /pentaho/server/data-integration-server/pentaho-solutions/
3. Copy the backup archive to removable media or an online backup server.
4. Start the DI Server.
/pentaho/server/data-integration-server/start-pentaho.sh
Your DI Server's stored content, settings, schedules, and user/role information is now backed up.
To restore from this backup, simply unpack it to the same location, overwriting all files that already exist there.

Pentaho BI Suite Official Documentation | Using PDI Data Sources in Action Sequences | 27
Using PDI Data Sources in Action Sequences
If you have any action sequences that rely on Pentaho Data Integration (PDI) data sources that are stored in anenterprise repository, you must make a configuration change in order to run them.
Create a .kettle directory in the home directory of the user account that runs the BI Server, and copy therepositories.xml file from your local PDI configuration directory to the new one you just created on the BI Servermachine.
You must also edit the /pentaho-solutions/system/kettle/settings.xml file and put in your PDI enterpriserepository information.
Once these changes have been made, restart the BI Server. When it comes back up, the Use Kettle Repositoryfunction in Pentaho Design Studio should properly connect to the DI Server.

28 | Pentaho BI Suite Official Documentation | Monitoring Job and Transformation Results
Monitoring Job and Transformation Results
You can view remotely executed and scheduled job and transformation details, including the date and time that theywere run, and their status and results, through the Kettle Status page. To view it, navigate to the /pentaho-di/kettle/status page on your DI Server (change the hostname and port to match your configuration):
http://internal-di-server:9080/pentaho-di/kettle/status
If you aren't yet logged into the DI Server, you'll be redirected to the login page before you can continue. Once loggedin, the Kettle Status page should look something like this:
You can get to a similar page in Spoon by using the Monitor function of a slave server.
Notice the Configuration details table at the bottom of the screen. This shows the three configurable settings forschedule and remote execution logging. See slave-server-config.xml on page 28 for more information on what thesesettings do and how you can modify them.
Note: This page is cleared when the server is restarted, or at the interval specified by theobject_timeout_minutes setting.
slave-server-config.xmlRemote execution and logging -- any action done through the Carte server embedded in the Data Integration Server-- is controlled through the /pentaho/server/data-integration-server/pentaho-solutions/system/kettle/slave-server-config.xml file. The three configurable options are explained below.
Note: Your DI Server must be stopped in order to make modifications to slave-server-config.xml.
Property Values Descriptionmax_log_lines Any value of 0 (zero) or greater. 0
indicates that there is no limit.Truncates the execution log when itgoes beyond this many lines.
Pentaho BI Suite Official Documentation | Monitoring Job and Transformation Results | 29
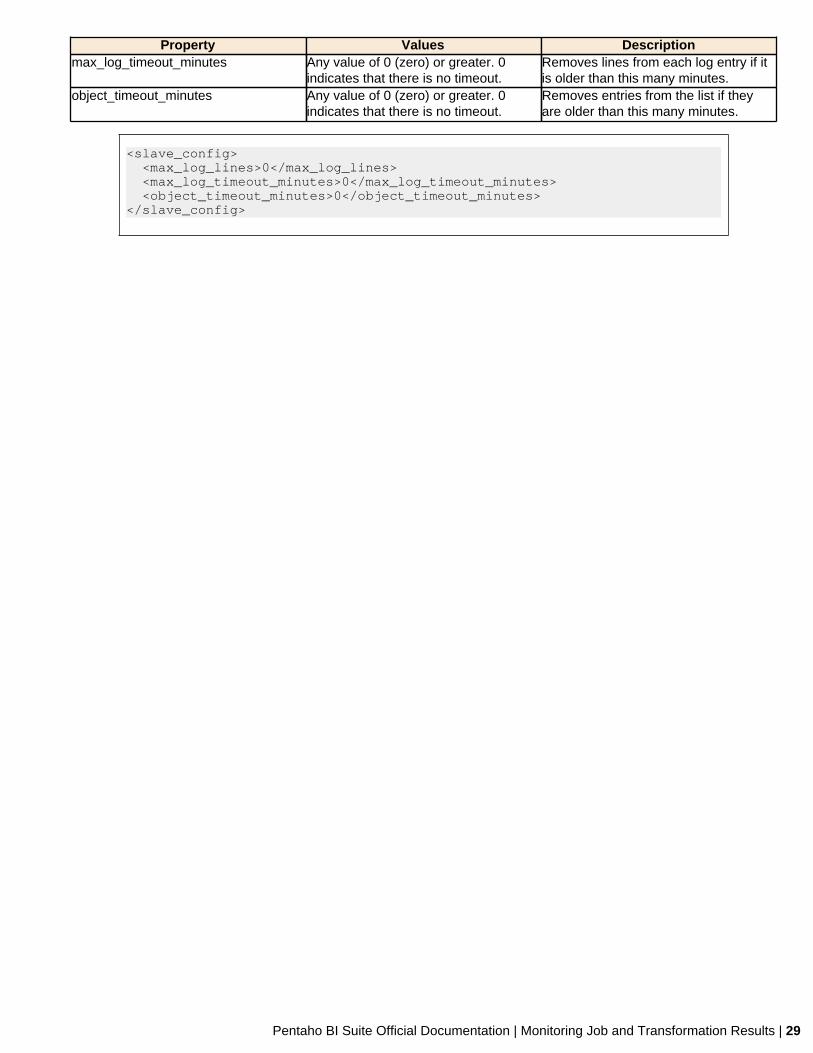
Property Values Descriptionmax_log_timeout_minutes Any value of 0 (zero) or greater. 0
indicates that there is no timeout.Removes lines from each log entry if itis older than this many minutes.
object_timeout_minutes Any value of 0 (zero) or greater. 0indicates that there is no timeout.
Removes entries from the list if theyare older than this many minutes.
<slave_config> <max_log_lines>0</max_log_lines> <max_log_timeout_minutes>0</max_log_timeout_minutes> <object_timeout_minutes>0</object_timeout_minutes></slave_config>

30 | Pentaho BI Suite Official Documentation | Troubleshooting
Troubleshooting
This section contains known problems and solutions relating to DI Server administration.
I don't know what the default login is for the DI Server, Enterprise Console, and/orCarte
For the DI Server administrator, it's username admin and password secret.
For Enterprise Console administrator, it's username admin and password password.
For Carte, it's username cluster and password cluster.
Be sure to change these to new values in your production environment.
Note: DI Server users are not the same as BI Server users.
Jobs scheduled on the DI Server cannot execute a transformation on a remoteCarte server
You may see an error lie this one when trying to schedule a job to run on a remote Carte server:
ERROR 11-05 09:33:06,031 - !UserRoleListDelegate.ERROR_0001_UNABLE_TO_INITIALIZE_USER_ROLE_LIST_WEBSVC! com.sun.xml.ws.client.ClientTransportException: The server sent HTTP status code 401: Unauthorized
To fix this, follow the instructions in Executing Scheduled Jobs on a Remote Carte Server on page 21


![[ Getting Acquainted with Pentaho Components ]reportes.fuxionbiotech.com/pentaho/docs/components.pdf · [ Getting Acquainted with Pentaho Components ]] ... Pentaho BA Suite helps](https://static.fdocuments.in/doc/165x107/5ad7ac027f8b9a991b8c5bad/-getting-acquainted-with-pentaho-components-getting-acquainted-with-pentaho-components.jpg)