PAN9420 - eu.industrial.panasonic.com · XAMPP OpenSSL ... mobile hotspots and thereby allows...
49
PAN9420 Software Guide Rev. 1.0 Wireless Modules
Transcript of PAN9420 - eu.industrial.panasonic.com · XAMPP OpenSSL ... mobile hotspots and thereby allows...

PAN9420
Software Guide
Rev. 1.0
Wireless Modules

PAN9420 Wi-Fi Module
Software Guide Rev. 1.0 Page 2
By purchase of any of the products described in this document the customer accepts the document's
validity and declares their agreement and understanding of its contents and recommendations. Panasonic
Industrial Devices Europe GmbH (Panasonic) reserves the right to make changes as required at any time
without notification.
© Panasonic Industrial Devices Europe GmbH 2019.
This document is copyrighted. Reproduction of this document is permissible only if reproduction is without
alteration and is accompanied by all associated warranties, conditions, limitations, and notices. Do not
disclose it to a third party.
All rights reserved.
This Software Guide does not lodge the claim to be complete and free of mistakes.
The information contained herein is presented only as guidance for Product use. No responsibility is
assumed by Panasonic for any infringement of patents or any other intellectual property rights of third
parties that may result from the use of Product. No license to any intellectual property right is granted by
this document, whether express or implied, by estoppel or otherwise.
Description of hardware, software, and other information in this document is only intended to illustrate the
functionality of the referred Panasonic product. It should not be construed as guaranteeing specific
functionality of the product as described or suitable for a particular application.
Any provided (source) code shall not be used or incorporated into any products or systems whose
manufacture, use or sale is prohibited under any applicable laws or regulations.
Any outlined or referenced (source) code within this document is provided on an “as is” basis without any
right to technical support or updates and without warranty of any kind on a free of charge basis according
to § 516 German Civil Law (BGB) including without limitation, any warranties or conditions of title,
non-infringement, merchantability, or fitness for a particular purpose. Customer acknowledges that
(source) code may bear defects and errors.
The third-party tools mentioned in this document are offered by independent third-party providers who are
solely responsible for these products. Panasonic has no responsibility whatsoever for the performance,
product descriptions, specifications, referenced content, or any and all claims or representations of these
third-party providers. Panasonic makes no warranty whatsoever, neither express nor implied, with respect
to the goods, the referenced contents, or any and all claims or representations of the third-party providers.
To the maximum extent allowable by Law Panasonic assumes no liability whatsoever including without
limitation, indirect, consequential, special, or incidental damages or loss, including without limitation loss of
profits, loss of opportunities, business interruption, and loss of data.

PAN9420 Wi-Fi Module
Software Guide Rev. 1.0 Page 3
Table of Contents
1 About This Document ......................................................................................................................... 5
1.1 Purpose and Audience .............................................................................................................. 5
1.2 Revision History ......................................................................................................................... 5
1.3 Use of Symbols ......................................................................................................................... 5
1.4 Related Documents ................................................................................................................... 6
2 Introduction ......................................................................................................................................... 7
3 Prerequisites ....................................................................................................................................... 8
3.1 Hardware ................................................................................................................................... 8
3.2 Software .................................................................................................................................... 8
4 Module Firmware Basics .................................................................................................................... 9
4.1 Interfaces ................................................................................................................................... 9
4.2 Wi-Fi Configuration .................................................................................................................. 10
4.3 Command Structure................................................................................................................. 11
4.4 Memory Layout ........................................................................................................................ 14
4.5 File System .............................................................................................................................. 15
4.6 Default TLS Certificates on PAN9420...................................................................................... 17
4.7 Configuration Layout................................................................................................................ 18
5 Tools for Development ..................................................................................................................... 20
5.1 The WIFIgurator ...................................................................................................................... 20
5.2 Dir2Flash ................................................................................................................................. 21
5.3 FWGen (Firmware File Generator) .......................................................................................... 21
5.4 CustomerConfig (Customer Configuration) .............................................................................. 22
6 Using Third Party Tools ................................................................................................................... 24
6.1 HTerm ...................................................................................................................................... 24
6.2 Tera Term ................................................................................................................................ 25
6.3 Wget ........................................................................................................................................ 25
6.4 Wireshark ................................................................................................................................ 25
6.5 InSSIDer .................................................................................................................................. 26
6.6 Packet Sender ......................................................................................................................... 27
6.7 XAMPP .................................................................................................................................... 27
6.8 OpenSSL ................................................................................................................................. 28
7 Guided Tutorials ............................................................................................................................... 29
7.1 Communication ........................................................................................................................ 29
7.2 HTTP/JSON Command Interface ............................................................................................ 30
7.3 WebCat Client ......................................................................................................................... 30
7.4 MQTT Client ............................................................................................................................ 31
7.5 HTTP Client ............................................................................................................................. 31
7.6 Email Client ............................................................................................................................. 37
7.7 Customer Configuration and Parameter Settings .................................................................... 37
7.8 Change SSID ........................................................................................................................... 39
7.9 Scan for AP Devices ................................................................................................................ 39
7.10 Establish a Connection to an AP ............................................................................................. 40

PAN9420 Wi-Fi Module
Software Guide Rev. 1.0 Page 4
7.11 Working with Netcat ................................................................................................................. 41
7.12 Over the Air Software Upload .................................................................................................. 43
8 Appendix ........................................................................................................................................... 49
8.1 Contact Details ........................................................................................................................ 49

PAN9420 Wi-Fi Module
1 About This Document
Software Guide Rev. 1.0 Page 5
1 About This Document
1.1 Purpose and Audience
This Software Guide provides details about the features of the preprogrammed firmware and
the PAN9420 Wi-Fi module and PAN9420 Experimenter Kit as well as an overview of how the
features may be used. In addition to examples of connection scenarios, instructions are
provided for using PAN9420 Experimenter Kit.
The document is intended for software engineers.
1.2 Revision History
Revision Date Modifications/Remarks
1.0 2019-02-20 First version
1.3 Use of Symbols
Symbol Description
Note
Indicates important information for the proper use of the product.
Non-observance can lead to errors.
Attention
Indicates important notes that, if not observed, can put the product’s functionality
at risk.
Tip
Indicates useful information designed to facilitate working with the software.
[chapter number]
[chapter title]
Cross reference
Indicates cross references within the document.
Example:
Description of the symbols used in this document 1.3 Use of Symbols.
Requirement
Indicates a requirement that must be met before the corresponding tasks can be
completed.
Result
Indicates the result of a task or the result of a series of tasks.
This font GUI text
Indicates fixed terms and text of the graphical user interface.
Example:
Click Save.

PAN9420 Wi-Fi Module
1 About This Document
Software Guide Rev. 1.0 Page 6
Symbol Description
Menu > Menu item Path
Indicates a path, e.g. to access a dialog.
Example:
In the menu, select File > Setup page.
This font File names, messages, user input
Indicates file names or messages and information displayed on the screen or to
be selected or entered by the user.
Examples:
main.c contains the actual module initialization.
The message Failed to save your data is displayed.
Enter the value Product 123.
[ Key ] Key
Indicates a key on the keyboard, e.g. [ F10 ].
1.4 Related Documents
[1] PAN9420 Product Specification
[2] PAN9420 Communication Specification Firmware Version 1.1.x.x
Please refer to the Panasonic website for related documents 8.1.2 Product Information.

PAN9420 Wi-Fi Module
2 Introduction
Software Guide Rev. 1.0 Page 7
2 Introduction
The PAN9420 is a 2.4 GHz 802.11 b/g/n embedded Wi-Fi module with integrated stack and API
that minimizes firmware development and includes a full security suite. The module is
specifically designed for highly integrated and cost-effective applications. The module includes
a fully shielded case, integrated crystal oscillators, and a chip antenna.
The PAN9420 combines a high-performance CPU, high sensitivity wireless radio, baseband
processor, medium access controller, encryption unit, boot ROM with patching capability,
internal SRAM, and in-system programmable flash memory. The module’s integrated memory is
available to the application for storing web content such as HTML pages or image data.
Parallel support of access point and infrastructure mode allows easy setup of simultaneous
Wi-Fi connections from the module to smart devices and home network routers.
The PAN9420 firmware was developed to provide customers the following key features,
precompiled and loaded, all readily available.
Simultaneous micro access point (µAP) and client/station (STA) mode
WPA, WPA2 security
TLS 1.2
TCP/IPv4
UDP/IPv4
HTTP(s) client
MQTT client
Email client
WebCat client
Time module
Firmware updates
HTTP(s) web server with AJAX/JSON command interface
User management for web server access
Netcat service for data tunneling
mDNS/DNS-SD/NBNS, Bonjour
The feature list is based on the firmware version 1.1.x.x.

PAN9420 Wi-Fi Module
3 Prerequisites
Software Guide Rev. 1.0 Page 8
3 Prerequisites
This chapter describes which prerequisites have to be met to successfully work through the
remaining document.
3.1 Hardware
In order to start the evaluation of the PAN9420 Wi-Fi module the following resources should be
available:
PAN9420 Experimenter Kit
Two USB 2.0 type B cables
PC or Laptop preferably running Windows® 7 with two spare USB ports
3.2 Software
When using the PAN9420 Experimenter Kit, the module can be controlled from a computer
using either: Panasonic’s WiFigurator or a terminal software, such as
HTerm,
Tera Term, and
HyperTerminal.
The following tools might as well be useful for some investigation, evaluation and development:
Wireshark
InSSIDer
Packet Sender
XAMPP
OpenSSL

PAN9420 Wi-Fi Module
4 Module Firmware Basics
Software Guide Rev. 1.0 Page 9
4 Module Firmware Basics
This chapter describes important PAN9420 firmware basics, which are essential to understand
in order to successfully work with the Wi-Fi module.
The PAN9420 with its ready-to-use firmware was made to add Wi-Fi connectivity to a product or
application as fast as possible with minimum resources. Thus application development using
the PAN9420 requires no compilers or IDEs.
It is recommended to utilize a small microcontroller capable of sending ASCII
based commands via UART, even though simple applications may be
implemented on the PAN9420 web server.
4.1 Interfaces
The PAN9420 provides several control and status pins as well as two UART interfaces and
GPIOs. From a hardware point of view it is recommended to at least connect the control, status
and UART interfaces with the microcontroller in order to have the full control of the module.
4.1.1 Control Pins
The PAN9420 provides the following control pins that can be controlled using a microcontroller.
Pin Name Description
37 RESETn Reset MCU, active low
38 WAKE UP0 Wake up signal for MCU/WLAN SoC, active high
42 FACTORY RESET Factory reset (valid after 10 seconds), active high
C3 WAKE UP1 Wake up signal for MCU/WLAN SoC (equal WAKE UP0), active high
4.1.2 Status Pins
The PAN9420 provides the following five output pins to indicate different states. These pins can
be used for connecting LEDs or for reading the status using a microcontroller.
Pin Name Description
26 W STAT LED Wireless status, active low
33 STAT LED1 MCU status (heartbeat), active low
34 STAT LED2 IP Connectivity, active low
35 STA LED3 Error, active low
41 MCU READY MCU ready, active high
PAN9420 Wi-Fi Module
4 Module Firmware Basics
Software Guide Rev. 1.0 Page 10
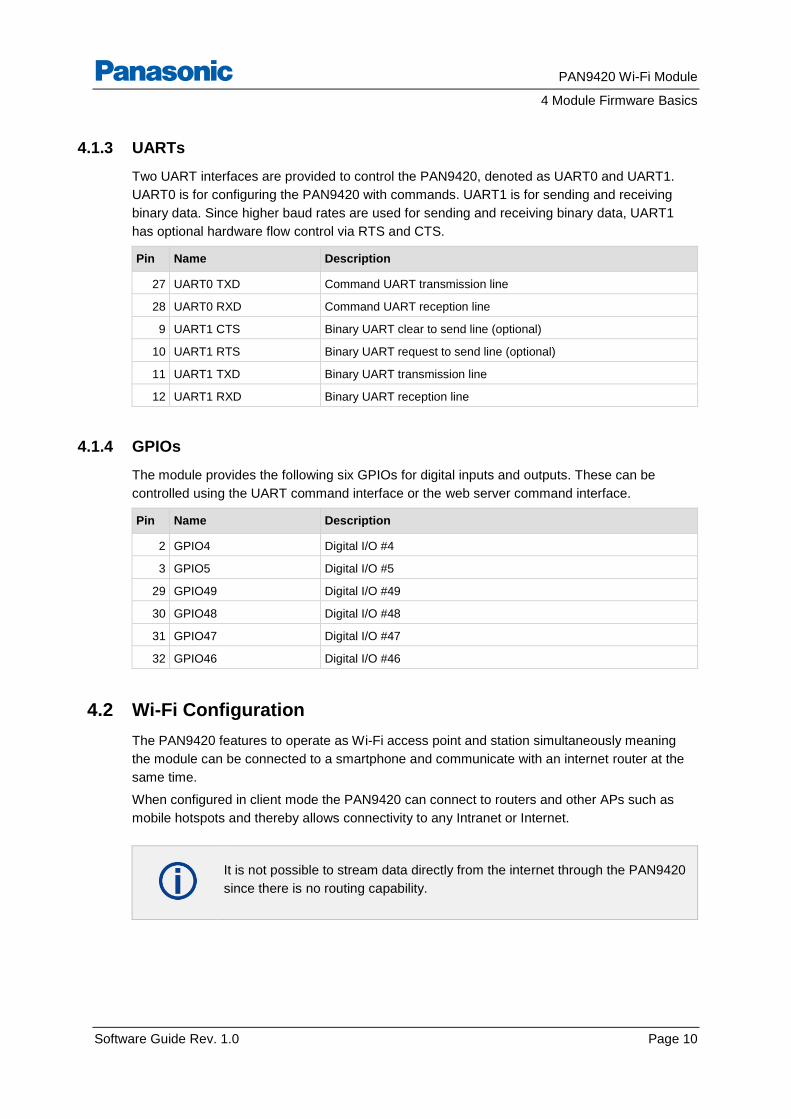
4.1.3 UARTs
Two UART interfaces are provided to control the PAN9420, denoted as UART0 and UART1.
UART0 is for configuring the PAN9420 with commands. UART1 is for sending and receiving
binary data. Since higher baud rates are used for sending and receiving binary data, UART1
has optional hardware flow control via RTS and CTS.
Pin Name Description
27 UART0 TXD Command UART transmission line
28 UART0 RXD Command UART reception line
9 UART1 CTS Binary UART clear to send line (optional)
10 UART1 RTS Binary UART request to send line (optional)
11 UART1 TXD Binary UART transmission line
12 UART1 RXD Binary UART reception line
4.1.4 GPIOs
The module provides the following six GPIOs for digital inputs and outputs. These can be
controlled using the UART command interface or the web server command interface.
Pin Name Description
2 GPIO4 Digital I/O #4
3 GPIO5 Digital I/O #5
29 GPIO49 Digital I/O #49
30 GPIO48 Digital I/O #48
31 GPIO47 Digital I/O #47
32 GPIO46 Digital I/O #46
4.2 Wi-Fi Configuration
The PAN9420 features to operate as Wi-Fi access point and station simultaneously meaning
the module can be connected to a smartphone and communicate with an internet router at the
same time.
When configured in client mode the PAN9420 can connect to routers and other APs such as
mobile hotspots and thereby allows connectivity to any Intranet or Internet.
It is not possible to stream data directly from the internet through the PAN9420
since there is no routing capability.

PAN9420 Wi-Fi Module
4 Module Firmware Basics
Software Guide Rev. 1.0 Page 11
4.2.1 Access Point (AP)
By default, the PAN9420 will start up in AP mode. Once power is applied, it will commence
broadcasting its SSID after approximately seven seconds. Clients will receive the default SSID
“PAN9420_AP” and may use the default password PAN_9420 to connect with the module.
• The maximum number of connected clients at the same time without security is eight, and with security (TLS) is four.
• By default, auto channeling will be used when creating the AP. If the station interface is connected or will be connected later, this channel will be set to the channel from the configured AP of the station interface.
• Supported SSID length = up to 32 bytes
• Supported PSK length = up to 63 bytes
Temporary AP Mode
Temporary AP mode is automatically enabled at start up when:
Both AP and infrastructure interfaces of the PAN9420 are disabled or
The AP interface is disabled and the station interface is unable to connect to the
configured AP.
In the temporary AP mode, an AP is created for 120 seconds, after which the access point will
shut down automatically if no station is connected to the PAN9420. If one or more stations are
connected to the access point, the temporary AP will remain active until all stations are
disconnected.
This mode is enabled after a reset or power down and not during a runtime
infrastructure disconnect.
4.2.2 Station/Client
This mode is used to connect the PAN9420 module to other access points operating at 2.4 GHz.
The Client can connect to AP using any of the following security types:
Open
WEP
WPA
WPA2
4.3 Command Structure
The PAN9420 is controlled using ASCII based commands via UART ending with carriage return
and line feed (CR-LF ≙ 0x0D 0x0A) or HTTP(s) using JSON telegrams.

PAN9420 Wi-Fi Module
4 Module Firmware Basics
Software Guide Rev. 1.0 Page 12
There are four different types of commands:
Request
Response
Error message
Info message
For detailed information and a complete list of commands please refer to the
“PAN9420 Communication Specification Firmware Version 1.1.x.x”.
4.3.1 Request Command
Structure
Type Module Variable Parameters
Name Definition
Type The command type, which is either “get” or “set”.
Module The functional software module.
Variable The subset of the selected software module.
Parameters The set of parameters depending on the module and variable.
4.3.2 Response Command
Sending a correct request command triggers a synchronous response.
Structure
Type Module Variable Return Code Parameters
Name Definition
Type The command type, which is “get” or “set”.
Module The functional software module.
Variable The subset of the selected software module.
Return Code The return code of the execution of the request.
Parameters The set of parameters depending on the module and variable.
PAN9420 Wi-Fi Module
4 Module Firmware Basics
Software Guide Rev. 1.0 Page 13
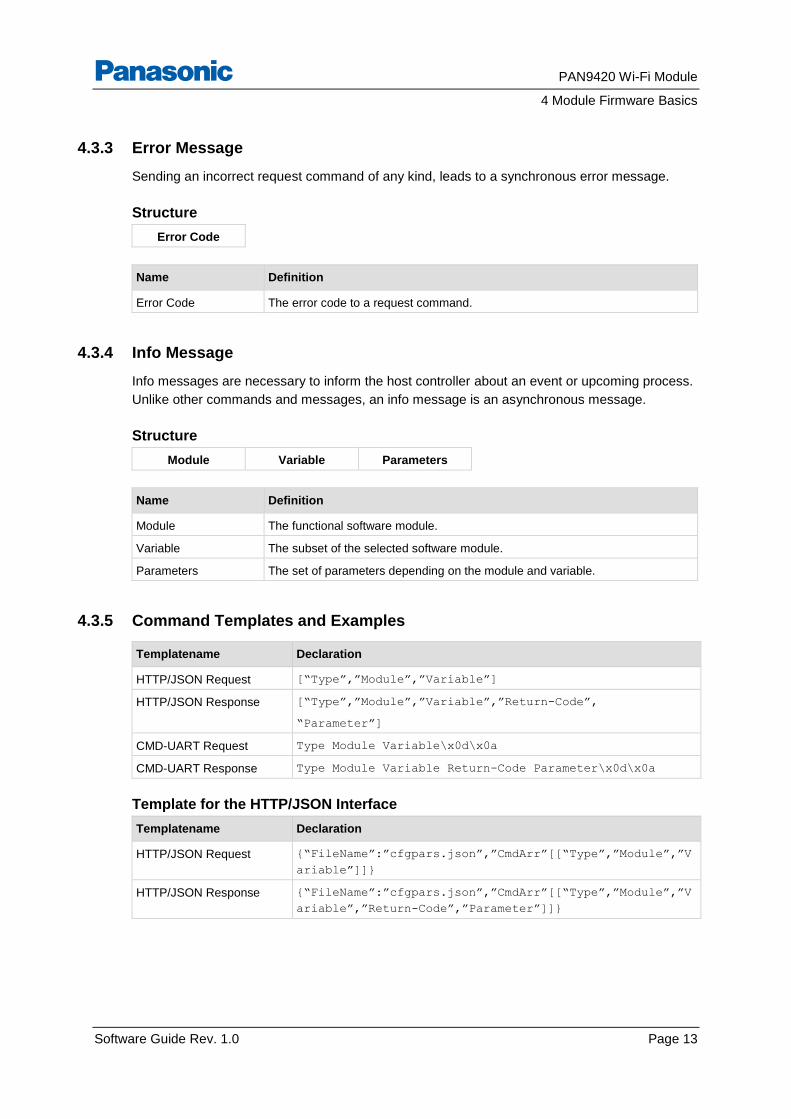
4.3.3 Error Message
Sending an incorrect request command of any kind, leads to a synchronous error message.
Structure
Error Code
Name Definition
Error Code The error code to a request command.
4.3.4 Info Message
Info messages are necessary to inform the host controller about an event or upcoming process.
Unlike other commands and messages, an info message is an asynchronous message.
Structure
Module Variable Parameters
Name Definition
Module The functional software module.
Variable The subset of the selected software module.
Parameters The set of parameters depending on the module and variable.
4.3.5 Command Templates and Examples
Templatename Declaration
HTTP/JSON Request [“Type”,”Module”,”Variable”]
HTTP/JSON Response [“Type”,”Module”,”Variable”,”Return-Code”,
“Parameter”]
CMD-UART Request Type Module Variable\x0d\x0a
CMD-UART Response Type Module Variable Return-Code Parameter\x0d\x0a
Template for the HTTP/JSON Interface
Templatename Declaration
HTTP/JSON Request {“FileName”:”cfgpars.json”,”CmdArr”[[“Type”,”Module”,”V
ariable”]]}
HTTP/JSON Response {“FileName”:”cfgpars.json”,”CmdArr”[[“Type”,”Module”,”V
ariable”,”Return-Code”,”Parameter”]]}

PAN9420 Wi-Fi Module
4 Module Firmware Basics
Software Guide Rev. 1.0 Page 14
Example of a JSON-Request (with HTTP-Header)
POST /ajax/cfgpars.json?rauth=0x00 HTTP/1.1
Host: 192.168.1.1
Connection: keep-alive
Content-Length: 221
Accept: text/html, */*; q=0.01
Origin: http://192.168.1.1
X-Requested-With: XMLHttpRequest
User-Agent: Mozilla/5.0 (Windows NT 10.0; WOW64) AppleWebKit/537.36 (KHTML, like Gecko)
Chrome/52.0.2743.116 Safari/537.36
Content-Type: application/json; charset=UTF-8
Referer: http://192.168.1.1/webdesktop/index.html
Accept-Encoding: gzip, deflate
Accept-Language: de-DE,de;q=0.8,en-US;q=0.6,en;q=0.4
{“FileName”:”cfgpars.json”,”CmdArr”:[[“get”,”system”,”version”,””],[“get”,”system”,”firm
ware”,””],[“get”,”system”,”serialnum”,””],[“get”,”system”,”macaddr”,””],[“get”,”system”,
”hwrev”,””]]}
Example of a JSON-Response (with HTTP-Header)
HTTP/1.1 200 OK
Connection: keep-alive
Content-Type: application/json
Keep-Alive: timeout=8, max=65535
Transfer-Encoding: chunked
{“FileName”:”cfgpars.json”,”CmdArr”:[[“get”,”system”,”version”,”0”,”1.0”],[“get”,”system
”,”firmware”,”0”,”1.1.0.0”],[“get”,”system”,”serialnum”,”0”,”00000001”],[“get”,”system”,
”macaddr”,”0”,”00:01:02:03:04:05”],[“get”,”system”,”hwrev”,”0”,”03”]]}
4.4 Memory Layout
The PAN9420 has 4 MB of internal flash memory, of which ~2 MB are available for user content
such as configuration files, webpages, certificates and keys. The remaining 2 MB are reserved
for internal use.
PAN9420 Wi-Fi Module
4 Module Firmware Basics
Software Guide Rev. 1.0 Page 15
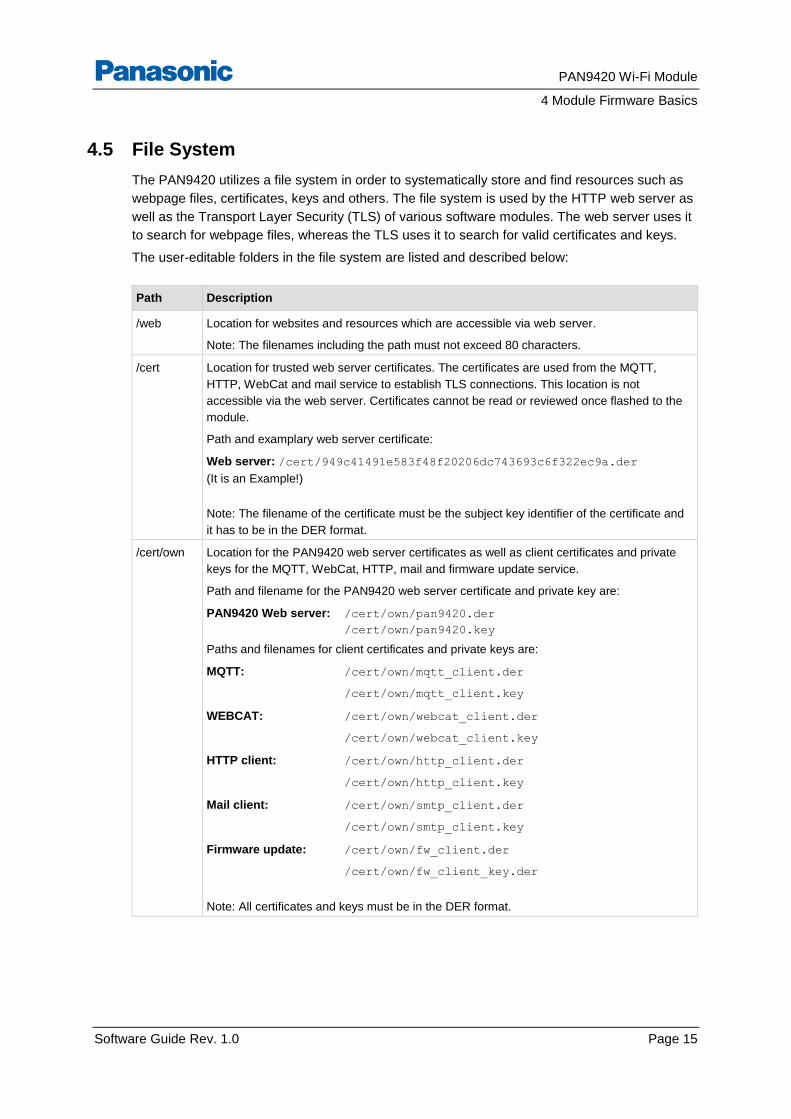
4.5 File System
The PAN9420 utilizes a file system in order to systematically store and find resources such as
webpage files, certificates, keys and others. The file system is used by the HTTP web server as
well as the Transport Layer Security (TLS) of various software modules. The web server uses it
to search for webpage files, whereas the TLS uses it to search for valid certificates and keys.
The user-editable folders in the file system are listed and described below:
Path Description
/web Location for websites and resources which are accessible via web server.
Note: The filenames including the path must not exceed 80 characters.
/cert Location for trusted web server certificates. The certificates are used from the MQTT,
HTTP, WebCat and mail service to establish TLS connections. This location is not
accessible via the web server. Certificates cannot be read or reviewed once flashed to the
module.
Path and examplary web server certificate:
Web server: /cert/949c41491e583f48f20206dc743693c6f322ec9a.der
(It is an Example!)
Note: The filename of the certificate must be the subject key identifier of the certificate and
it has to be in the DER format.
/cert/own Location for the PAN9420 web server certificates as well as client certificates and private
keys for the MQTT, WebCat, HTTP, mail and firmware update service.
Path and filename for the PAN9420 web server certificate and private key are:
PAN9420 Web server: /cert/own/pan9420.der
/cert/own/pan9420.key
Paths and filenames for client certificates and private keys are:
MQTT: /cert/own/mqtt_client.der
/cert/own/mqtt_client.key
WEBCAT: /cert/own/webcat_client.der
/cert/own/webcat_client.key
HTTP client: /cert/own/http_client.der
/cert/own/http_client.key
Mail client: /cert/own/smtp_client.der
/cert/own/smtp_client.key
Firmware update: /cert/own/fw_client.der
/cert/own/fw_client_key.der
Note: All certificates and keys must be in the DER format.
PAN9420 Wi-Fi Module
4 Module Firmware Basics
Software Guide Rev. 1.0 Page 16
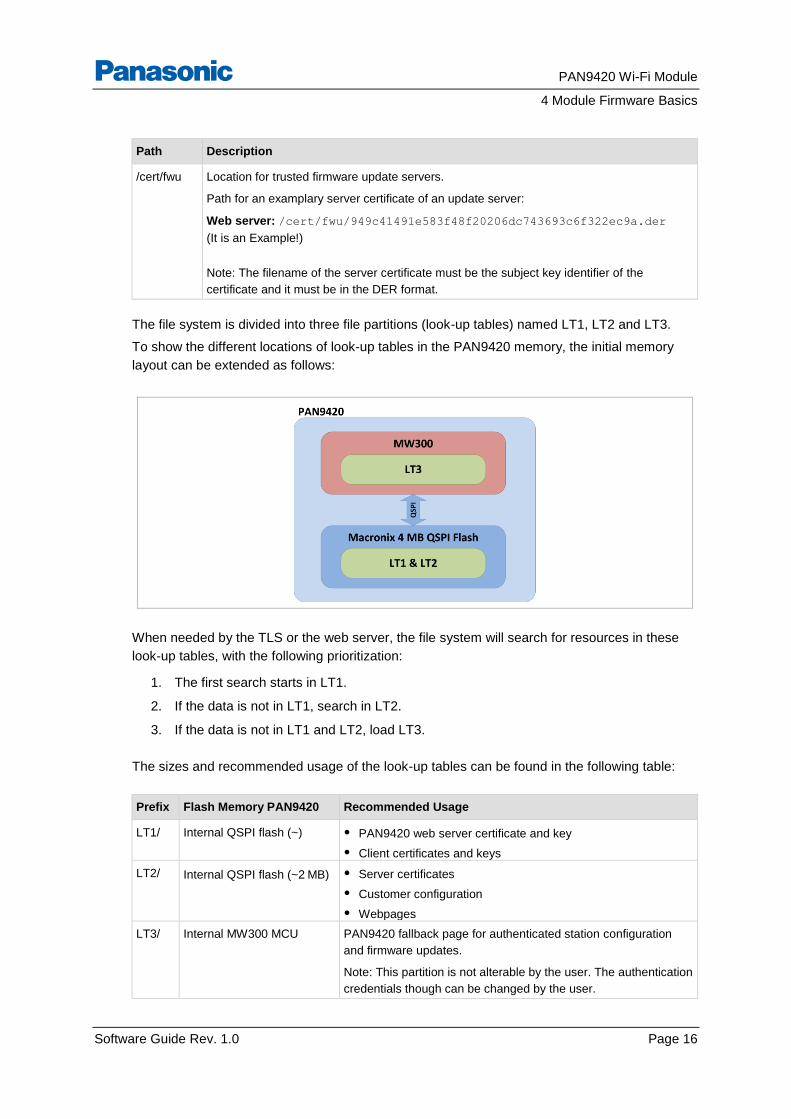
Path Description
/cert/fwu Location for trusted firmware update servers.
Path for an examplary server certificate of an update server:
Web server: /cert/fwu/949c41491e583f48f20206dc743693c6f322ec9a.der
(It is an Example!)
Note: The filename of the server certificate must be the subject key identifier of the
certificate and it must be in the DER format.
The file system is divided into three file partitions (look-up tables) named LT1, LT2 and LT3.
To show the different locations of look-up tables in the PAN9420 memory, the initial memory
layout can be extended as follows:
When needed by the TLS or the web server, the file system will search for resources in these
look-up tables, with the following prioritization:
1. The first search starts in LT1.
2. If the data is not in LT1, search in LT2.
3. If the data is not in LT1 and LT2, load LT3.
The sizes and recommended usage of the look-up tables can be found in the following table:
Prefix Flash Memory PAN9420 Recommended Usage
LT1/ Internal QSPI flash (~) • PAN9420 web server certificate and key
• Client certificates and keys
LT2/ Internal QSPI flash (~2 MB) • Server certificates
• Customer configuration
• Webpages
LT3/ Internal MW300 MCU PAN9420 fallback page for authenticated station configuration
and firmware updates.
Note: This partition is not alterable by the user. The authentication
credentials though can be changed by the user.
PAN9420 Wi-Fi Module
4 Module Firmware Basics
Software Guide Rev. 1.0 Page 17
Even though it is not recommended and possible to place web content in each look-up table,
web content can be directly addressed using a URL with the look-up table prefix. All other files
cannot be accessed using the web server for security reasons.
Example
1. Enter the following URL into the browser: http://192.168.1.1/LT3/index.html
to directly access the PAN9420 fallback webpage.
2. As long as the defaults have not been amended, the authentication can be done using
the default username admin and password admin.
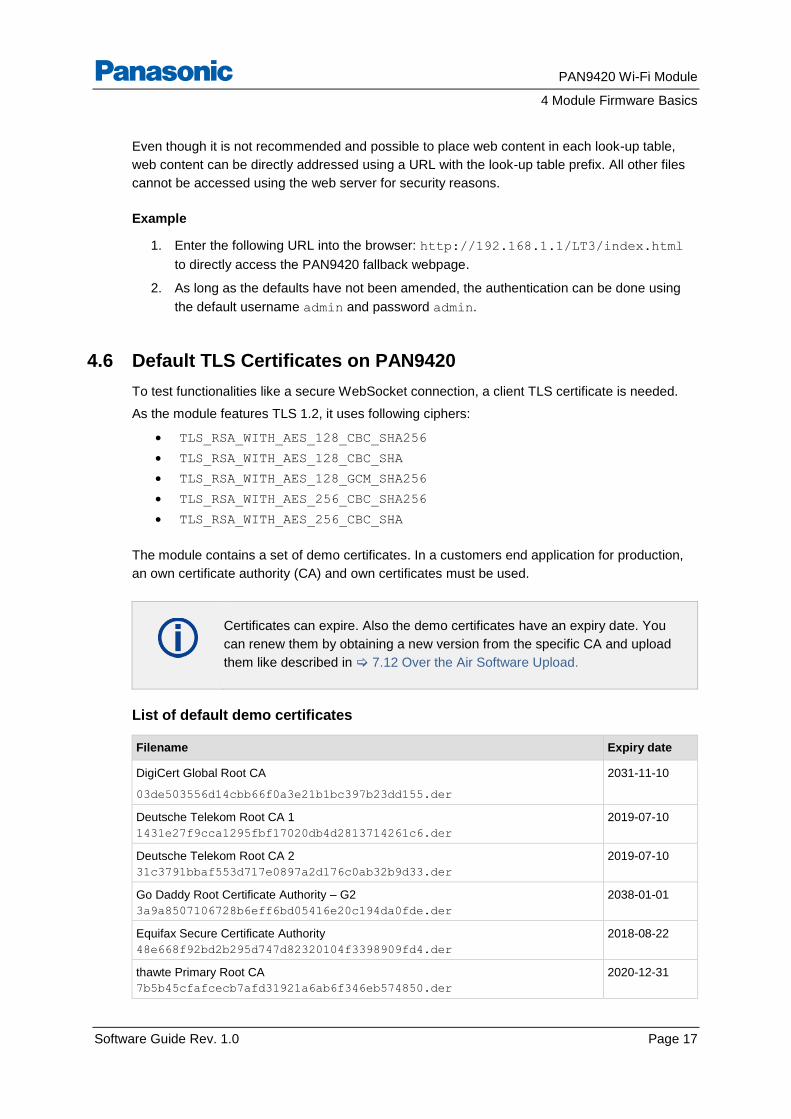
4.6 Default TLS Certificates on PAN9420
To test functionalities like a secure WebSocket connection, a client TLS certificate is needed.
As the module features TLS 1.2, it uses following ciphers:
TLS_RSA_WITH_AES_128_CBC_SHA256
TLS_RSA_WITH_AES_128_CBC_SHA
TLS_RSA_WITH_AES_128_GCM_SHA256
TLS_RSA_WITH_AES_256_CBC_SHA256
TLS_RSA_WITH_AES_256_CBC_SHA
The module contains a set of demo certificates. In a customers end application for production,
an own certificate authority (CA) and own certificates must be used.
Certificates can expire. Also the demo certificates have an expiry date. You
can renew them by obtaining a new version from the specific CA and upload
them like described in 7.12 Over the Air Software Upload.
List of default demo certificates
Filename Expiry date
DigiCert Global Root CA
03de503556d14cbb66f0a3e21b1bc397b23dd155.der
2031-11-10
Deutsche Telekom Root CA 1
1431e27f9cca1295fbf17020db4d2813714261c6.der
2019-07-10
Deutsche Telekom Root CA 2
31c3791bbaf553d717e0897a2d176c0ab32b9d33.der
2019-07-10
Go Daddy Root Certificate Authority – G2
3a9a8507106728b6eff6bd05416e20c194da0fde.der
2038-01-01
Equifax Secure Certificate Authority
48e668f92bd2b295d747d82320104f3398909fd4.der
2018-08-22
thawte Primary Root CA
7b5b45cfafcecb7afd31921a6ab6f346eb574850.der
2020-12-31

PAN9420 Wi-Fi Module
4 Module Firmware Basics
Software Guide Rev. 1.0 Page 18
Filename Expiry date
VeriSign Class 3 Public Primary Certification Authority – G5
7fd365a7c2ddecbbf03009f34339fa02af333133.der
2021-11-08
AddTrust External CA Root
adbd987a34b426f7fac42654ef03bde024cb541a.der
2020-05-30
DigiCert High Assurance EV Root CA
b13ec36903f8bf4701d498261a0802ef63642bc3.der
2031-11-10
T-TeleSec GlobalRoot Class 3
b503f7763b61826a12aa1853eb032194bffececa.der
2033-10-02
T-TeleSec GlobalRoot Class 2
bf5920360079a0a0226b8cd5f261d2b82ccb824a.der
2033-10-02
GeoTrust EV SSL CA – G4
decf5c50b7ae021f1517aa16e80db5289d6a5af3.der
2023-10-31
Baltimore CyberTrust Root
e59d5930824758ccacfa085436867b3ab5044df0.der
2025-05-13
Google Internet Authority G3
77c2b8509a677676b12dc286d083a07ea67eba4b.der
2021-12-15
4.7 Configuration Layout
The configuration of the PAN9420 consists of three options on top of the firmware.
Configuration Option Description
Default Contains basic configuration parameters.
Customer Configuration parameters set by the customer.
User Configuration parameters set by the user at runtime.
The following figure shows these configuration options in a stacked manner.

PAN9420 Wi-Fi Module
4 Module Firmware Basics
Software Guide Rev. 1.0 Page 19
The basis of the PAN9420 configuration layout is the module firmware with the bootloader and
radio driver. The behavior of this firmware can be configured over three configuration layers of
which only two can be used by the customer. The default configuration is done by Panasonic in
order to not endanger the certification of the module and the end application.
The customer configuration enables to customize most of the PAN9420 default settings of
access point, station, UART interfaces, GPIOs, HTTP client, firmware update server and others.
The user configuration is the configuration which is done by the host and user at runtime and
can address most of the previously mentioned settings depending on the user rights. The
PAN9420 firmware prioritizes the configuration from top to bottom. This means for example,
when there is a customer configuration file loaded into the flash, the PAN9420 will always use
this configuration over its default configuration.

PAN9420 Wi-Fi Module
5 Tools for Development
Software Guide Rev. 1.0 Page 20
5 Tools for Development
Panasonic provides tools for development with the PAN9420. These tools can be downloaded
with the PAN9420_EvalEMK.zip package.
Scripts for creating and converting e.g. websites for the upload process are:
Dir2Flash.exe
fwgen.exe
CustomCfg.exe
For evaluation and first steps:
WIFIgurator (download separately)
5.1 The WIFIgurator
The Wifigurator is a tool to quickly get an overview of the modules functionalities.
For more information on how to use the tool, please refer to the “PAN9420 Quick Start Guide”.
Download the WIFIgurator here: https://pideu.panasonic.de/produkte/wifi/PAN9420-Fully-
Embedded-Stand-Alone-Wi-Fi-Module.html#tab3.
Read out System Information
Change AP and STA Settings

PAN9420 Wi-Fi Module
5 Tools for Development
Software Guide Rev. 1.0 Page 21
5.2 Dir2Flash
Websites or TLS certificates that should be deployed on the modules web server must be
converted in the proper format before uploading. This is done with the Dir2Flash script:
Dir2Flash.exe --name=serialflash.bin --input-path=.\in --output-path=.\
Parameters for Dir2Flash tool
Parameter Description
Name File name of the output file.
Input-path Path to the resources (please note the information for folders below). Please only use
filenames (incl. path) up to a length of 80 characters! Longer names are not supported.
Output-path Path where the output file will be generated.
5.3 FWGen (Firmware File Generator)
The firmware file generator tool is located in the WIFIgurator root folder fwgen.exe.
It can be used standalone. Therefore it has to be called with following parameters:
Fwgen.exe -v 0.0.0.0 -c "Panasonic GmbH" -p PAN9420 -i fwgen.txt
Parameter Description
-v Indicates the customer version, e.g. to track different configuration versions.
-c Must be Panasonic GmbH
-p Must be PAN9420
-i The index file that describes the flash layout position and the location the content is
deployed on the module.
All parameters have to be set.
Please note that the specified version (e.g. –v 0.0.0.1) has to be equal or
higher than the one on the module. Otherwise, the module will not accept the
file as a valid update file.
The current version can be requested using the following command:
get system version<\r><\n>
Company and Product name must be equal from module to FWU file.

PAN9420 Wi-Fi Module
5 Tools for Development
Software Guide Rev. 1.0 Page 22
Fwgen.txt
The structure of this configuration file is: file name, file type, file ID and version number,
which can be used multiple times to combine multiple files. A detailed description of the
parameters can be found below.
Parameter Description
File name The file name including the path.
File type The type of the file (firmware, configuration file, etc.).
File ID The ID of the file. This specifies the desired location of the file in the memory.
Version The version number of the file (currently not used by the tool fwgen.exe).
The possible file types and IDs can be found in the table below.
File Type Description
0x0003 Host controller firmware. No file ID is used.
0x0101 Flash image. Images must by generated with Dir2Flash.exe.
File IDs PAN9420: 0 = Internal Flash (Size: 2 MB)
0x0102 Configuration file. Config files must be generated with CustomerConfig.exe.
File ID: 1 = Customer configuration file
5.4 CustomerConfig (Customer Configuration)
To change several default values on the module, you can use this tool to create a customized
configuration. There are two ways to create a customized configuration.
Configuration by Drag and Drop
1. Amend the fw version specific customer config customer.cfg according to your needs.
2. Drag and drop this file onto the fw version specific CustomerConfig.exe.
A new file CustomerCfg.bin will show up.
Configuration by Terminal (recommended)
1. Open a terminal and type:
CustomerConfig.exe -i customer.cfg
2. Create a new text file (e.g. customer_cfg.txt), copy the following line into the file:
CustomerCfg.bin 0x0102 1 1
3. Save it as customer_cfg.txt.
4. Open a terminal, change the current directory to the folder where the files
CustomerCfg.bin, customer.cfg and the fw version specific fwgen.exe are
located.

PAN9420 Wi-Fi Module
5 Tools for Development
Software Guide Rev. 1.0 Page 23
5. Copy the following line into the terminal window and execute it. Specify your version
(e.g. 0.0.0.1) where it says “x.x.x.x".
fwgen.exe -v x.x.x.x -c "Panasonic GmbH" -p PAN9420 -i customer.cfg
Now the resulting file.fwu can then be uploaded to the PAN9420 using the LT3
page.
When this process has been done once, it is recommended to fully erase the
.bin and .fwu file in the working folder before creating an updated version.

PAN9420 Wi-Fi Module
6 Using Third Party Tools
Software Guide Rev. 1.0 Page 24
6 Using Third Party Tools
For evaluation, development, testing and debugging it can be useful to have some tools on
hand which ease for example the communication with the PAN9420 and the monitoring of its
traffic. The list of third party tools in 3.2 Software is an incomplete list and shall only give a
suggestion which tools can be used to fulfill some special needs during development.
The third party tools mentioned in this document are offered by independent
third party providers who are solely responsible for these products. Panasonic
has no responsibility whatsoever for the performance, product descriptions,
specifications, referenced content or any and all claims or representations of
these third party providers.
Panasonic makes no warranty whatsoever neither express nor implied, with
respect to the goods, the referenced contents or any and all claims or
representations of the third party providers.
6.1 HTerm
HTerm is a handy terminal tool for serial communication with the PAN9420 via its UART
interfaces. In order to do this either the PAN9420 Experimenter Kit can be used or the modules
UART interfaces are connected directly to a computer using a USB to UART converter.
HTerm can be used to manually send ASCII based commands (A) with an automatically added
CR-LF to the module (B) and read the responses (C). Sequences can be created and saved for
later use.

PAN9420 Wi-Fi Module
6 Using Third Party Tools
Software Guide Rev. 1.0 Page 25
6.2 Tera Term
Tera Term can either be used as a serial terminal or as a TCP/IP client as a counterpart to a
PAN9420 Netcat TCP/IP server in order to understand the Netcat service easily and fast.
6.3 Wget
For sending “http/Json” formatted strings to the module you can use Wget. The commands
below show how to use the commands of the Command Specification.
Example
wget -qO- --http-user=admin --http-password=admin --header="Content-Type:
application/json" --post-
data="{\"FileName\":\"cfgpars.json\",\"CmdArr\":[[\"get\",\"system\",\"firmware\",\"\"]]
}" 192.168.1.1/ajax/cfgpars.json?rauth=0xFF
pause
wget -qO- --http-user=admin --http-password=admin --header="Content-Type:
application/json" --post-
data="{\"FileName\":\"cfgpars.json\",\"CmdArr\":[[\"set\",\"wlan\",\"sta\",\"on\"]]}"
192.168.1.1/ajax/cfgpars.json?rauth=0xFF
pause
6.4 Wireshark
Wireshark is a packet sniffer, protocol based traffic analyzer for network interfaces. At times, it
is useful to see packet contents, which expose the protocols, headers and other
key parameters. Those parameters can be used to assert issues and connectivity within your
network, for example TCP, UDP or ICMP traffic, as well as for investigating DNS information.

PAN9420 Wi-Fi Module
6 Using Third Party Tools
Software Guide Rev. 1.0 Page 26
Wireshark, or any other packet sniffer, is useful for examining message contents as well as key
features such as ACK, CRC error and more.
6.5 InSSIDer
InSSIDer is a helpful Wi-Fi network scanner which shows all available networks in an
environment with detailed data such as SSID, MAC, vendor, channel, security, data rate, etc.
These features can be used to analyze the PAN9420 Wi-Fi access point configuration of SSID,
channel and security.
PAN9420 Wi-Fi Module
6 Using Third Party Tools
Software Guide Rev. 1.0 Page 27
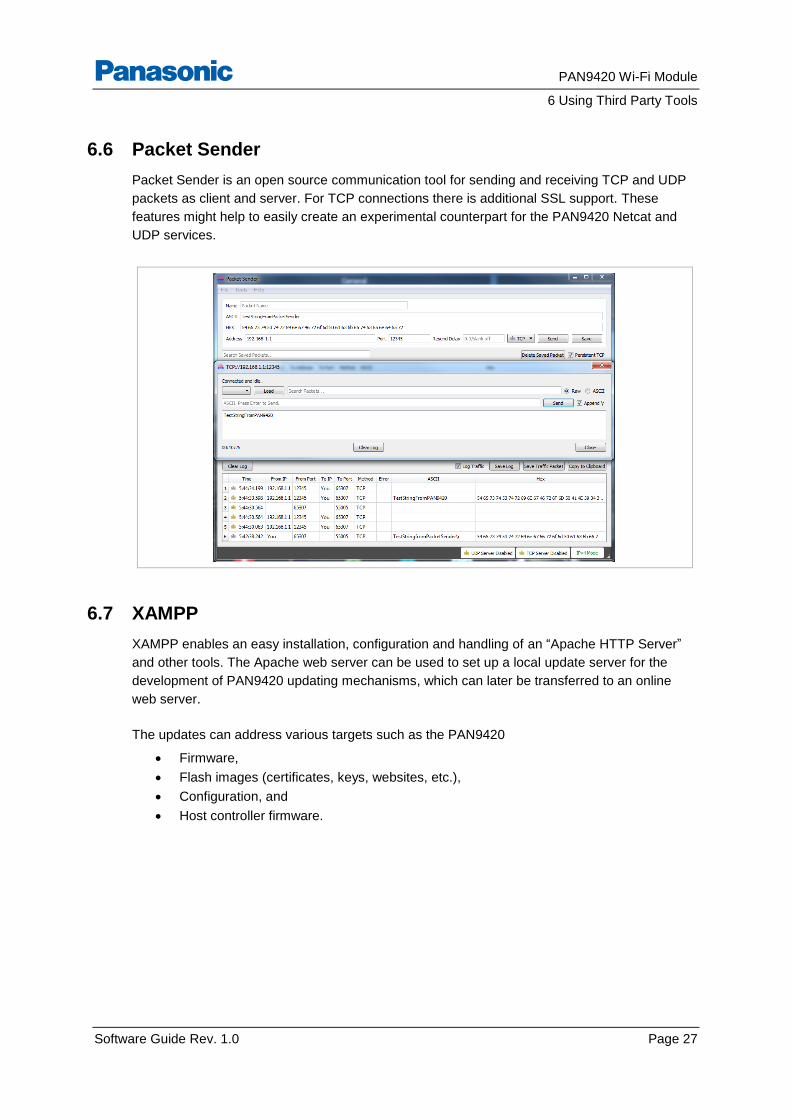
6.6 Packet Sender
Packet Sender is an open source communication tool for sending and receiving TCP and UDP
packets as client and server. For TCP connections there is additional SSL support. These
features might help to easily create an experimental counterpart for the PAN9420 Netcat and
UDP services.
6.7 XAMPP
XAMPP enables an easy installation, configuration and handling of an “Apache HTTP Server”
and other tools. The Apache web server can be used to set up a local update server for the
development of PAN9420 updating mechanisms, which can later be transferred to an online
web server.
The updates can address various targets such as the PAN9420
Firmware,
Flash images (certificates, keys, websites, etc.),
Configuration, and
Host controller firmware.

PAN9420 Wi-Fi Module
6 Using Third Party Tools
Software Guide Rev. 1.0 Page 28
The basic structure of XAMPP
6.8 OpenSSL
OpenSSL is a full-featured toolkit for the Transport Layer Security (TLS) protocol as well as a
cryptography library. Within this context OpenSSL is used to create certificate authority (CA),
server and client certificates and keys.

PAN9420 Wi-Fi Module
7 Guided Tutorials
Software Guide Rev. 1.0 Page 29
7 Guided Tutorials
The following tutorials provide practical examples on how PAN9420 features can be used for
evaluation and application implementation. These tutorials will cover configuration of the
PAN9420, connections and data transfer as well as using the additional tooling.
The tools to be used will be Panasonic’s WiFigurator, HTerm and Tera Term. The
hardware platform is the PAN9420 Experimenter Kit.
In addition, examples will show the implementation of an application host controller using an
Arduino DUE.
Find it under the following link:
https://developer.ibm.com/recipes/tutorials/one-click-to-cloud-with-panasonic-pan9420-arduino-
due-wifi-shield/.
7.1 Communication
There are several ways to communicate with the module. The table and the picture below show
the possibilities.
For all TCP/HTTP based services, a one-to-one connection at the same time is supported: The
host controller can establish e.g. one WebCat connection to one server. To change the service,
the host has to reconfigure the module.
How to communicate with the module:
Service Protocol TLS Support Description
Netcat
Server/Client
TCP No Simple data tunnel
WebCat
Client
TCP Yes Socket based; for streaming data
MQTT Client TCP Yes Basically for IoT edge to cloud communication
HTTP Client HTTP(s) Yes Session based solution to handle data
UDP UDP No Broadcast data to the whole network or send Unicast
packets
PAN9420 Wi-Fi Module
7 Guided Tutorials
Software Guide Rev. 1.0 Page 30
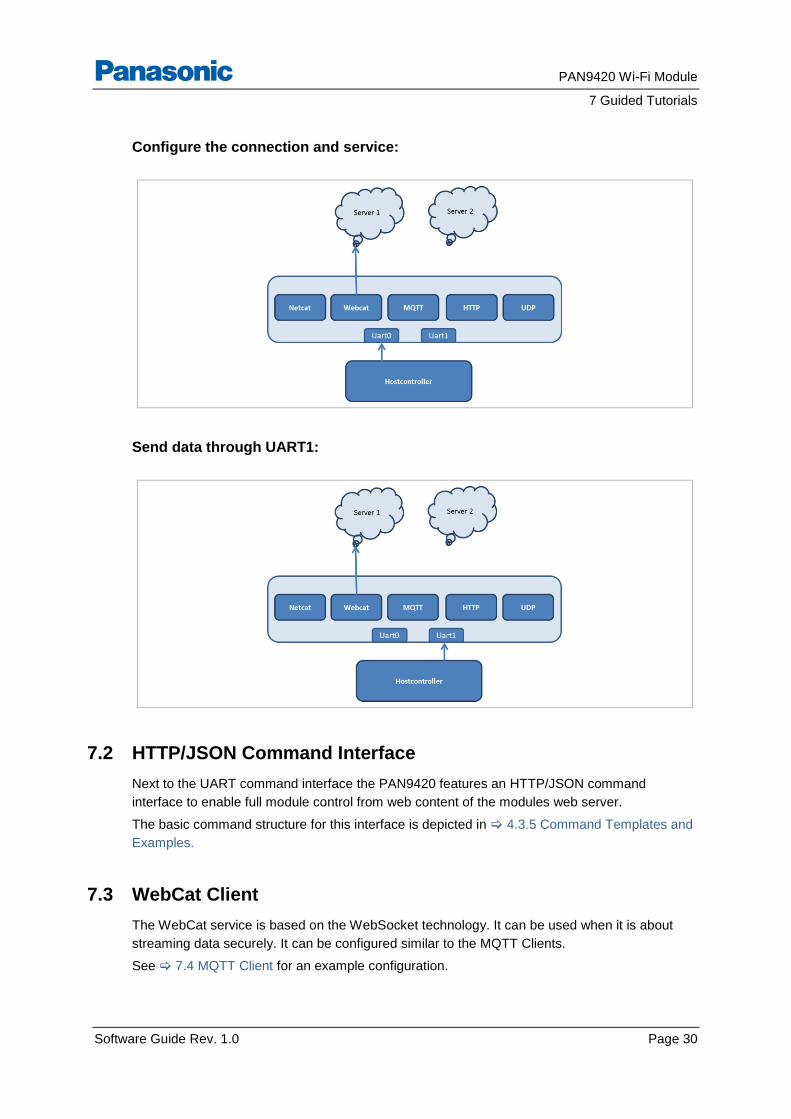
Configure the connection and service:
Send data through UART1:
7.2 HTTP/JSON Command Interface
Next to the UART command interface the PAN9420 features an HTTP/JSON command
interface to enable full module control from web content of the modules web server.
The basic command structure for this interface is depicted in 4.3.5 Command Templates and
Examples.
7.3 WebCat Client
The WebCat service is based on the WebSocket technology. It can be used when it is about
streaming data securely. It can be configured similar to the MQTT Clients.
See 7.4 MQTT Client for an example configuration.

PAN9420 Wi-Fi Module
7 Guided Tutorials
Software Guide Rev. 1.0 Page 31
7.4 MQTT Client
To connect the module easily to a cloud service, the MQTT Client can be used.
It works with e. g.:
IBM Watson
Microsoft Azure
Amazon Web Service
Configure the MQTT client (Arduino code):
Serial2.write("set wlan cfg ap PAN9420_AP PAN_9420 4 0\x0d\x0a");
Serial2.write("set wlan cfg sta \"SSID\" PW 4\x0d\x0a");
Serial2.write("set wlan state sta on\x0d\x0a");
Serial2.write("set mqttc state off\x0d\x0a");
Serial2.write("set mqttc resource \"/\"\x0d\x0a");
Serial2.write("set mqttc server
\"quickstart.messaging.internetofthings.ibmcloud.com\" 1883 off \"\"
\"\"\x0d\x0a");
Serial2.write("set mqttc cfg \"d:quickstart:PAN9420_AP:PAN9420_AP\" 1 30
60\x0d\x0a");
Serial2.write("set binuart cfg 115200 8 0 1 0\x0d\x0a");
Serial2.write("set mqttc state on\x0d\x0a");
Serial2.write("get mqttc status\x0d\x0a");
7.5 HTTP Client
The PAN9420 hosts an HTTP(S) client which enables an application to communicate with web
services and remote APIs. These web services and APIs are mostly not in the hand of the
embedded software engineer or not ready to be used, hence it can be helpful to have a
web server for testing and development purposes.
As there are several different types of web servers with different setup procedures and
configurations, it is beyond the scope of this document to explain them all in detail. Thus, this
document simply describes how to perform HTTP(S) GET and POST requests to a local web
server. The setup and configuration can then be transferred to other web servers accordingly.
Performing HTTP(S) Requests
This chapter describes how to set up the PAN9420 and its HTTP(S) client as well as how to
perform HTTP(S) requests to a server.
The PAN9420 currently offers two modes for transferring an HTTP(S) payload:
1. The payload can be handed to the module in the request command using the CMD
UART of the PAN9420. This mode has a payload limitation of 299 bytes.

PAN9420 Wi-Fi Module
7 Guided Tutorials
Software Guide Rev. 1.0 Page 32
2. The payload is handed to the module using the BIN UART of the PAN9420. This mode
does not have any payload limitation.
Both modes will be covered for GET and POST requests in the following sections.
The example data Post.php and Get.php is to be considered on the web server you use.
7.5.1 Setting up the PAN9420
In order to actually perform HTTP(S) requests, the following tasks have to be taken care of first:
The module has to be connected to the network the server is on. If the server is online, the
module has to be connected to a network with an internet connection.
The HTTP(S) client of the module has to be set up according to the application needs, when
this has not already been done in the customer configuration file.
The time module of the PAN9420 has to be properly set up in order for the module to vali-
date the server certificate.
In order to connect the PAN9420 to a local network, the WLAN station of the module has to be
configured and the station has to be turned on.
Depending on the hardware setup used, the commands to perform these actions might reach
the modules CMD UART from different sources. If a PAN9420 ETU is connected via USB to a
PC, the commands can be sent using a terminal, such as HTerm. If an embedded setup is used
the commands have to be sent using a host controller.
Configuring the PAN9420 WLAN station
Template:
set wlan cfg sta <ssid> <psk> <security><\r><\n>
Example:
set wlan cfg sta testnetwork password 4<\r><\n>
Turning on the PAN9420 WLAN station
set wlan state sta on<\r><\n>
After the module has successfully connected to the network, the HTTP(S) client has to be set up.

PAN9420 Wi-Fi Module
7 Guided Tutorials
Software Guide Rev. 1.0 Page 33
7.5.2 Setting up the HTTP(S) Client
The PAN9420’s HTTP(S) client API offers four variables for configuration.
Variable Description
Server Configures which server the HTTP(S) client should connect to and with which encryption state.
Resource Configures which resource on the server the HTTP(S) client should request.
Token Configures in which path the resource is located (<token>/<resource>).
State Configures the state of the client.
All these variables can be set by a host as shown in the following configuration example:
Server configuration (IP address: 192.168.2.100, Port: 443: Security: off)
Template:
set httpc server <server-addr> <port> <security> <username> <password><\r><\n>
Example:
set httpc server 192.168.2.100 443 on<\r><\n>
Resource configuration (Get.php)
Template:
set httpc resource <resource><\r><\n>
Example:
set httpc resource Get.php<\r><\n>
Token configuration (None)
Template:
set httpc token <token><\r><\n>
Example:
set httpc token “”<\r><\n>
State configuration (On)
Template:
set httpc state <state><\r><\n>
Example:
set httpc state on<\r><\n>
It is recommended to check the status of the HTTP(S) client after the configuration has been
made to make sure the client was set up properly.

PAN9420 Wi-Fi Module
7 Guided Tutorials
Software Guide Rev. 1.0 Page 34
Request HTTP(S) client status
Request:
get httpc status<\r><\n>
Response:
get httpc status 0 1<\r><\n>
The different statuses can be found in the following status table.
Return Value Description
0 Not configured
1 Ready to send and receive data
2 Data is sending
3 Error
7.5.3 Performing HTTP(S) GET Requests
The resource Get.php on the server is used for testing HTTP(S) GET requests. This script
simply returns the HTTP(S) header. The resource has to be addressed using the HTTP(S)
resource command as previously described:
Resource configuration (Get.php)
set httpc resource Get.php<\r><\n>
7.5.3.1 GET Request via CMD UART
To perform a GET request using the CMD UART the following command is used:
Initiate HTTP(S) GET request via CMD UART
set httpc get<\r><\n>
In order to get the requested data from the module, the following command is used:
Get HTTP(S) GET data via CMD UART
get httpc get<\r><\n>
Considering the previous configuration and setup including the resource on the server
(Get.php), the data received from the server on the CMD UART looks like this:
<\n>
PAN9420 GET Test<\n>
Host: 192.168.2.100<\n>
User-Agent: HTTP-Client<\n>

PAN9420 Wi-Fi Module
7 Guided Tutorials
Software Guide Rev. 1.0 Page 35
7.5.3.2 GET Request via BIN UART
To perform a GET request using the BIN UART the following command is used:
Initiate HTTP(S) GET request via CMD UART
send httpc get<\r><\n>
The advantage of using the BIN UART for HTTP(S) communication is, that the GET data does
not have to be prompted using a special command. The PAN9420 will inform the host via the
CMD UART about received data on the BIN UART.
HTTP(S) received data information via CMD UART
Template:
info httpc header <status-code> <mode> <datasize><\r><\n>
info httpc status <status> <datasize><\r><\n>
Example:
info httpc header 200 0 62<\r><\n>
info httpc status 1 62<\r><\n>
Considering the previous configuration and setup including the resource on the server
(Get.php), the data received from the server on the BIN UART looks like this:
<\n>
PAN9420 GET Test<\n>
Host: 192.168.2.100<\n>
User-Agent: HTTP-Client<\n>
7.5.4 Performing HTTP(S) POST Requests
The resource Post.php on the server is used for testing HTTP(S) POST requests. This script
simply returns the HTTP(S) header and the posted data.
The resource has to be addressed using the HTTP(S) resource command:
Resource configuration (Post.php)
set httpc resource Post.php<\r><\n>

PAN9420 Wi-Fi Module
7 Guided Tutorials
Software Guide Rev. 1.0 Page 36
7.5.4.1 POST Request via CMD UART
To perform a POST request using the CMD UART the following command is used:
Initiate HTTP(S) POST request via CMD UART
Template:
set httpc post <data><\r><\n>
Example:
set httpc post TEST<\r><\n>
In order to get the response to this post from the module, the following command is used:
Get HTTP(S) response via CMD UART
get httpc get<\r><\n>
Considering the previous configuration and setup including the resource on the server
(Post.php), the data received from the server looks like this:
<\n>
PAN9420 POST Test<\n>
Content-Type: text/plain<\n>
Host: 192.168.2.100<\n>
Transfer-Encoding: chunked<\n>
User-Agent: HTTP-Client<\n>
Data: TEST<\n>
7.5.4.2 POST Request via BIN UART
To perform a POST request using the BIN UART the following command is used:
Initiate HTTP(S) POST request via CMD UART
Template:
send httpc post <datasize><\r><\n>
Example:
send httpc post 451<\r><\n>
As with the BIN UART GET request, the response does not have to be prompted using a
special command. The PAN9420 informs the host via the CMD UART about received data on
the BIN UART.
HTTP(S) received response via CMD UART
info httpc header 200 0 573<\r><\n>
info httpc status 1 573<\r><\n>
PAN9420 Wi-Fi Module
7 Guided Tutorials
Software Guide Rev. 1.0 Page 37
Considering the previous configuration and setup including the resource on the server
(Post.php), the data received from the server on the BIN UART looks like this:
<\n>
PAN9420 POST Test<\n>
Content-Type: text/plain<\n>
Host: 192.168.2.100<\n>
Transfer-Encoding: chunked<\n>
User-Agent: HTTP-Client<\n>
Data: Lorem ipsum dolor sit amet, consetetur sadipscing elitr, sed diam nonumy eirmod
tempor invidunt ut labore et dolore magna aliquyam erat, sed diam voluptua. At vero
Eos sed diam nonumy eirmod tempor invidunt ut labore et dolore magna aliquyam erat,
sed diam voluptua. <\n>
7.6 Email Client
The PAN9420 provides a simple mail client.
The following sequence of commands has to be issued to the PAN9420 CMD UART, whereas
email addresses are placeholder/examples.
As a precondition a mail server in the internet is required to run the mail client on PAN9420.
1. Enter the command in terminal:
Set mail from [email protected].
2. Issue the smtp cfg and port of your server:
set mail server securesmtp.t-online.de 465
[email protected] MYPassword
3. Configure the Receiver mail address:
set mail send [email protected] "this is my subject"
"this is the mail text”
get mail status 1
get mail error 0
7.7 Customer Configuration and Parameter Settings
Preconfigured for the regulatory domain FCC/ISED
The model M/N “ENW49A01A3KF” is preconfigured for the regulatory domain
FCC/ISED and only intended to be used in the countries of US and Canada
because only the channels 1 to 11 (2 412 MHz to 2 462 MHz) are supported in
the 2.4 GHz ISM band. This model contains the FCC Grant ID on the labeling.
Changing the customer configuration parameter region_code has no effect.

PAN9420 Wi-Fi Module
7 Guided Tutorials
Software Guide Rev. 1.0 Page 38
Preconfigured for the regulatory domain ETSI
The model M/N “ENW49A02A3KF” is preconfigured for the regulatory domain
ETSI and is mainly intended to be used in European countries because the
channels 1 to 13 (2 412 MHz to 2 472 MHz) are supported. The Region Code
is preconfigured to regulatory domain ETSI and thus the module labeling does
not contain the FCC ID. The customer is able to change the applied
region code via the customer configuration parameter region_code in order
to support FCC regulatory configuration. In this case the FCC certification is
up to the customer.
The settings below are configurable and will remain in the flash after power down. A copy of the
customer configuration file is in the PAN9420_evalEMK.zip.
# User instructions
# =================
# - Sections should not be missing, even if no options indicated.
# - The sequence of the individual sections is not important.
# - All or some options of any single section may be missing. Commenting options out
is sufficient.
# - The sequence of the individual options of a section is not important.
[NET]
#Following values will change the configuration of the Station network settings
Fixed_IP_Adresse = 0.0.0.0
Fixed_Subnet = 0.0.0.0
Fixed_Gateway = 0.0.0.0
Fixed_DNS = 0.0.0.0
# automatic = 3
# fixed = 1 mode = 3
PAN9420 Wi-Fi Module
7 Guided Tutorials
Software Guide Rev. 1.0 Page 39
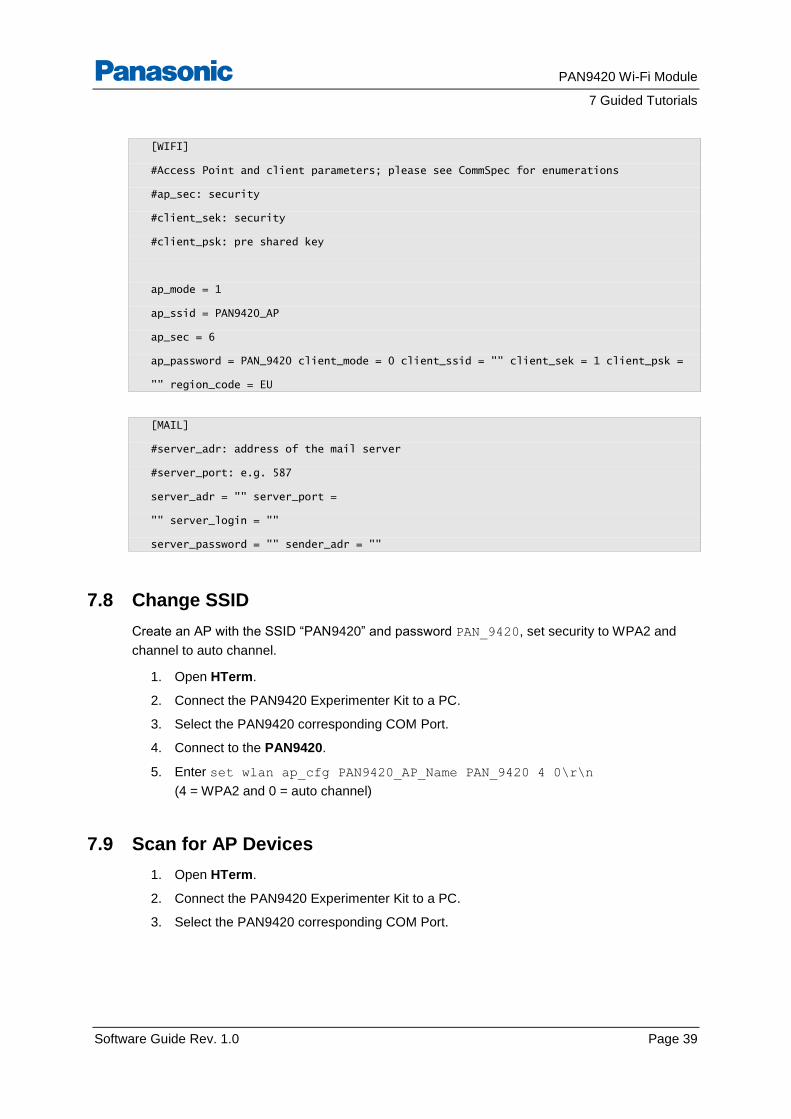
[WIFI]
#Access Point and client parameters; please see CommSpec for enumerations
#ap_sec: security
#client_sek: security
#client_psk: pre shared key
ap_mode = 1
ap_ssid = PAN9420_AP
ap_sec = 6
ap_password = PAN_9420 client_mode = 0 client_ssid = "" client_sek = 1 client_psk =
"" region_code = EU
[MAIL]
#server_adr: address of the mail server
#server_port: e.g. 587
server_adr = "" server_port =
"" server_login = ""
server_password = "" sender_adr = ""
7.8 Change SSID
Create an AP with the SSID “PAN9420” and password PAN_9420, set security to WPA2 and
channel to auto channel.
1. Open HTerm.
2. Connect the PAN9420 Experimenter Kit to a PC.
3. Select the PAN9420 corresponding COM Port.
4. Connect to the PAN9420.
5. Enter set wlan ap_cfg PAN9420_AP_Name PAN_9420 4 0\r\n
(4 = WPA2 and 0 = auto channel)
7.9 Scan for AP Devices
1. Open HTerm.
2. Connect the PAN9420 Experimenter Kit to a PC.
3. Select the PAN9420 corresponding COM Port.

PAN9420 Wi-Fi Module
7 Guided Tutorials
Software Guide Rev. 1.0 Page 40
4. Enter set wlan scan.
The PAN9420 will perform a scan over all channels. This takes approximately sev-
en seconds.
5. Enter get wlan list\r\n to get the list of found AP’s.
7.10 Establish a Connection to an AP
Example with Experimenter Kit and web desktop:
1. Using your PC or Tablet scan for SSID PAN9420.
2. Establish a Wi-Fi connection between the PAN9420 Experimenter Kit and a PC.
3. Open your browser.
4. Enter the URL 192.168.1.1.
You will be directed to the web desktop.
5. Click Infrastructure Mode.
6. The Infrastructure must be On. Click Off, if it is set to Off.
7. Click Scan to start a scan.

PAN9420 Wi-Fi Module
7 Guided Tutorials
Software Guide Rev. 1.0 Page 41
The found APs will be shown in the list:
8. Select the network from the list.
9. Click Apply.
The PAN9420 will connect to the AP. This takes approximately 10 seconds.
7.11 Working with Netcat
7.11.1 Example A: Create a TCP Server with Netcat using HTerm
Though the PAN9420 is acting as an AP, it needs the assistance of the provided Netcat to
tunnel IP traffic from the UART to the Wi-Fi and vice versa.
1. Open HTerm.
2. Connect the PAN9420 Experimenter Kit to a PC.
3. Select the COM Port.
4. Connect to the PAN9420.
5. Enter the following sequence to configure a server :
netcat mode server\r\n
netcat tcp_port 12345\r\n
netcat auth off\r\n
netcat telopt off\r\n
netcat state on\r\n
The PAN9420 is configured as server and ready to receive and send data from the
UART and rout it to a Wi-Fi client.
7.11.2 Example B: Create a TCP Client with Netcat using HTerm
1. Open HTerm.
2. Connect the PAN9420 Experimenter Kit to a PC.
3. Select the COM Port.

PAN9420 Wi-Fi Module
7 Guided Tutorials
Software Guide Rev. 1.0 Page 42
4. Connect to the PAN9420.
5. Enter the following sequence to configure a server:
set netcat mode client\r\n
set netcat tcp_ip 192.168.1.1 set netcat auth off\r\n
set netcat telopt off\r\n
set netcat state on\r\n
6. Set the IP address to the device that will receive data.
7.11.3 Data Loopback: from the PAN9420 to a PC
The following tutorial explains how to setup the PAN9420’s Netcat server and a PC acting as a
client.
The following requirements must be met:
Laptop with Wi-Fi interface
HTerm
Tera Term
PAN9420 Experimenter Kit
Two USB cables
1. Connect both USB ports of the Experimenter Kit to a PC.
2. Open HTerm.
3. Select the USB0 port and connect to the USB0 port.
4. Enter the sequence to configure a server like in 7.11.1 Example A: Create a TCP
Server with Netcat using HTerm.
5. Open Tera Term.
6. Enter values as in the following figure.
7. Click OK.
8. Open HTerm.
9. Connect to the USB1 port.
10. Enter Hello WiFi.

PAN9420 Wi-Fi Module
7 Guided Tutorials
Software Guide Rev. 1.0 Page 43
11. Click ASend.
A Tera Term view with a string received will show up:
7.12 Over the Air Software Upload
7.12.1 Generating Flash Images (Dir2Flash Tool)
The Dir2Flash tool may be used to generate flash files, which can be included in firmware
update images. See 5.2 Dir2Flash.
Dir2Flash.exe --name=outfile.bin --input-path=.\inFolder –output-path=.\outFolder
The folders for websites and certificates are defined and must be adhered to
separate these files. The websites must be located in the folder web and the
certificates which are used from SMTP and HTTP-Client must be located in
the folder cert. If the web server uses its own certificate the file
pan9420.der and pan9420.key must be located in the folder cert/own.

PAN9420 Wi-Fi Module
7 Guided Tutorials
Software Guide Rev. 1.0 Page 44
7.12.2 Generating a Firmware Update Image
FWU-Files are generated using fwgen.exe and can be uploaded to the PAN9420 web server
or firmware update server. The tool will open the file FwConfig.txt after start up (it must be in
the same directory) and scan the file list which must reside in the FWU image.
After a successful firmware upload the PAN9420 will restart automatically.
7.12.3 Create and Upload a Customer Configuration File for Shared/Single
UART Mode
The following requirements must be met:
PAN9420_EvalEMK.zip package (from Panasonic’s website)
1. Open the CustomerCfg.cfg.
2. Edit the following value in line 125 from two to one:
#[TARGET]
uart_count = 2
3. Run the CustomerConfig.exe –I customer.cfg
The file CustomerCfg.bin is created.
4. Copy the file CustomerCfg.bin into the folder in the FWGen folder.
5. Adjust the path in the FwConfig.txt to reflect your path.
6. Run the FWgen.exe -v 0.0.0.0 -c "Panasonic GmbH" -p PAN9420 -i
FWConfig.txt to create a FWU.
7. Open the internal web page to upload the bin file to the PAN9420.

PAN9420 Wi-Fi Module
7 Guided Tutorials
Software Guide Rev. 1.0 Page 45
8. Click Search and select your FWU file (1).
9. Click Update to start uploading (2).
7.12.4 How to Flash Customized Web Content
The following requirements must be met to convert custom web content into a file, which can be
flashed:
PAN9420_EvalEMK.zip package (from Panasonic’s website)
WIFIgurator 2.1
The demo websites on ETU will be overwritten!
1. Connect the PAN9420 ETU to your USB port (USB0 on the ETU).
2. Open the WIFIgurator and determine the COM port (1).
3. Click Connect (2).

PAN9420 Wi-Fi Module
7 Guided Tutorials
Software Guide Rev. 1.0 Page 46
4. Select the tab Convert Content and follow the steps described.
7.12.5 How to Flash the Customer Configuration to the Module
The following requirements must be met to create a custom configuration file, which can be
flashed:
PAN9420_EvalEMK.zip package (from Panasonic’s website)
Within this package, you will find the folder Customer Config. It includes the files
CustomerConfig.exe and customer.cfg. The customer.cfg is a text file that includes all
configurable parameters.

PAN9420 Wi-Fi Module
7 Guided Tutorials
Software Guide Rev. 1.0 Page 47
1. Edit the values in the customer.cfg with a text editor.
2. Save the customer.cfg.
3. Run the CustomerConfig.exe.
The file CustomerCfg.bin will show up.
4. Copy the file CustomerCfg.bin into the folder using the WiFigurator.
5. Adjust the path in the FwConfig.txt to reflect your path.
6. Run the FWgen.exe -v 0.0.0.0 -c "Panasonic GmbH" -p PAN9420 -i
FWConfig.txt to create a FWU.
7. Open the internal web page. Select 192.168.1.1/LT3/index.html.

PAN9420 Wi-Fi Module
7 Guided Tutorials
Software Guide Rev. 1.0 Page 48
8. Click Search and select your FWU file (1)
9. Click Update to start uploading (2).
The customer configurations will still remain in effect after a HW reset.

PAN9420 Wi-Fi Module
8 Appendix
Software Guide Rev. 1.0 Page 49
8 Appendix
8.1 Contact Details
8.1.1 Contact Us
Please contact your local Panasonic Sales office for details on additional product options and
services:
For Panasonic Sales assistance in the EU, visit
https://eu.industrial.panasonic.com/about-us/contact-us
Email: [email protected]
For Panasonic Sales assistance in North America, visit the Panasonic website
“Sales & Support” to find assistance near you at
https://na.industrial.panasonic.com/distributors
Please visit the Panasonic Wireless Technical Forum to submit a question at
https://forum.na.industrial.panasonic.com
8.1.2 Product Information
Please refer to the Panasonic Wireless Connectivity website for further information on our
products and related documents:
For complete Panasonic product details in the EU, visit
http://pideu.panasonic.de/products/wireless-modules.html
For complete Panasonic product details in North America, visit
http://www.panasonic.com/rfmodules