
P5 Reference Manual - Archiware...
35
Archiware Pure User Manual
Transcript of P5 Reference Manual - Archiware...

Archiware PureUser Manual
Content
1 Preface......................................................................................................................... 31.1 About This Manual.................................................................................................31.2 Who Should Read This Document?.........................................................................31.3 Software Description..............................................................................................31.4 Software Licensing.................................................................................................31.5 Registration...........................................................................................................31.6 Technical Support..................................................................................................3
2 Installation...................................................................................................................42.1 System Requirements............................................................................................42.2 Other Deployment Considerations.........................................................................42.3 Deploying the Virtual Appliance.............................................................................52.4 Configuring storage...............................................................................................9
3 Configuring the Virtual Appliance...............................................................................103.1 Configuring the access password.........................................................................103.2 Using the console menu......................................................................................113.3 Accessing the Archiware Pure web GUI.................................................................123.4 Initial Setup Wizard..............................................................................................12
4 Backing Up Virtual Machines.......................................................................................174.1 Automatic Backups..............................................................................................174.2 Verify.................................................................................................................. 184.3 Manual Backup and Verify....................................................................................18
5 Archiware Pure web GUI..............................................................................................195.1 Virtual Machines View..........................................................................................205.2 App Configuration...............................................................................................275.3 System settings...................................................................................................31
Document revision 06/17, Pure 1.0.0
Archiware Pure User Manual 2/35
1 Preface
1.1 About This Manual
This document describes the installation and configuration procedures for ArchiwarePure. You will also find examples and case studies for installing, managing andemploying Archiware Pure in a typical production environment.
1.2 Who Should Read This Document?
The information contained in this manual is intended for system administrators who willinstall and maintain Archiware Pure as well as for users who will employ Archiware Pureas a data protection system.
1.3 Software Description
Archiware Pure is a software for protecting virtual machines by backing up the content oftheir virtual disks and allowing their easy recovery. Data is saved to a separate storage,preferably independent of the virtualization system, in order to increase the overallsecurity and level of protection. Archiware Pure is deployed as a virtual appliance,running within the virtualization system being protected and is designed to bereplaceable at any time. In case of a failure within the virtualization system, a newArchiware Pure instance can simply be downloaded and deployed. After importing theexisting backup storage, previously protected virtual machines can easily be restored andwork can be seamlessly continued.
1.4 Software Licensing
Archiware Pure may freely be used for a period of 90 days and must be licensed thereafter.
1.5 Registration
You can register your Archiware Pure software on Archiware’s web site. Upon correctlycompleting the form, you will receive an activation code. You have to create a license andenter this activation code to enable the functionality that it provides.
You may find further information regarding licensing in section 5.3.2 Software settings.
1.6 Technical Support
Contact information, software updates, technical documentation and information aboutthe current support programs and options may be found on Archiware’s web site.
Archiware Pure User Manual 3/35
2 Installation
Archiware Pure is delivered as a ready to use virtual appliance and does not requiresoftware installation beyond the deployment of the virtual machine template in yourvirtualization environment.
2.1 System Requirements
• VMware vSphere 6.0 or later, any non-free edition1
• VMware ESXi 6.0 Express Patch 4 (build number 3247720, 2015-11-25) or later• vCenter Server 6.0 or later (optional)• CPU: x86-64 processor• Memory: 4 GB RAM• Disk space: 10 GB, not including disk space used for the separate backup
repository
The above are the minimum supported system requirements. Provisioning moreprocessor power and memory to the Archiware Pure's virtual appliance will help increaseperformance when using advanced options such as data de-duplication or whenperforming multiple parallel backups.
2.2 Other Deployment Considerations
Archiware Pure protects all types and versions of virtual machines supported by VMware.Because backup operations leverage VM snapshots and virtual disk hot-adding, virtualdisks not supported by these mechanisms are automatically skipped from backup.2
In order for the Archiware Pure virtual appliance to be able to backup a virtual machine, itneeds access to its virtual disks. This means that Archiware Pure can backup only thosevirtual machines whose disks reside on data stores visible by the ESXi host managing theArchiware Pure virtual appliance. Virtual machines residing on inaccessible data storeswill be shown within the Archiware Pure GUI but their backup will always fail with thereason: “none of the disks were backed up”.
1 This limitation is imposed by VMware as necessary vSphere APIs are disabled in free ESXi2 VMware does not support snapshots of raw disks, RDM physical mode disks, independent disks, PCI
vSphere Direct Path I/O devices, disks configured for bus sharing or disks that use iSCSI initiator in the guest operating system.
Archiware Pure User Manual 4/35

2.3 Deploying the Virtual Appliance
The Archiware Pure Virtual Appliance is preconfigured to meet the minimum hardwarerequirements for the CPU and RAM. However, disks to be used for the Backup Repositoryare not pre-configured and need to be configured after deploying the appliance.
To deploy the Virtual Appliance using the VMware vSphere Web Client, follow the stepsillustrated below. For deployment through a vCenter server or on a standalone ESXiversion 6.5 hosts, please follow the official VMware instructions for OVF and OVATemplates3. For standalone ESXi version 6.0 hosts, please follow the instructions fordeployment using the vSphere Client (please note that VMWare is phasing out thevSphere Client and as a result the latest instructions are for vSphere 5.0)4
1. Log in to the VMware ESXi web GUI, right click on the Host and select the Create/Register VM option from the context menu.
3 https://docs.vmware.com/en/VMware-vSphere/6.5/com.vmware.vsphere.vm_admin.doc/GUID-AFEDC48B-C96F-4088-9C1F-4F0A30E965DE.html
4 https://pubs.vmware.com/vsphere-50/index.jsp#com.vmware.vsphere.vm_admin.doc_50/GUID-AFEDC48B-C96F-4088-9C1F-4F0A30E965DE.html
Archiware Pure User Manual 5/35
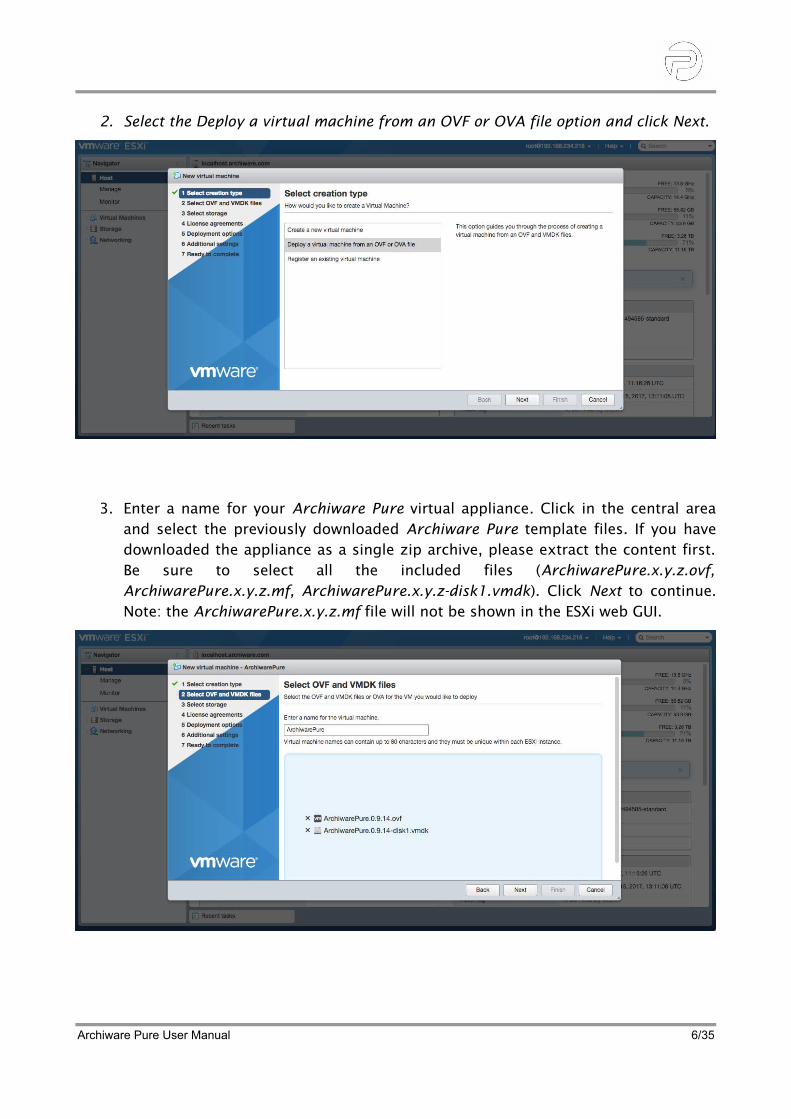
2. Select the Deploy a virtual machine from an OVF or OVA file option and click Next.
3. Enter a name for your Archiware Pure virtual appliance. Click in the central areaand select the previously downloaded Archiware Pure template files. If you havedownloaded the appliance as a single zip archive, please extract the content first.Be sure to select all the included files (ArchiwarePure.x.y.z.ovf,ArchiwarePure.x.y.z.mf, ArchiwarePure.x.y.z-disk1.vmdk). Click Next to continue.Note: the ArchiwarePure.x.y.z.mf file will not be shown in the ESXi web GUI.
Archiware Pure User Manual 6/35
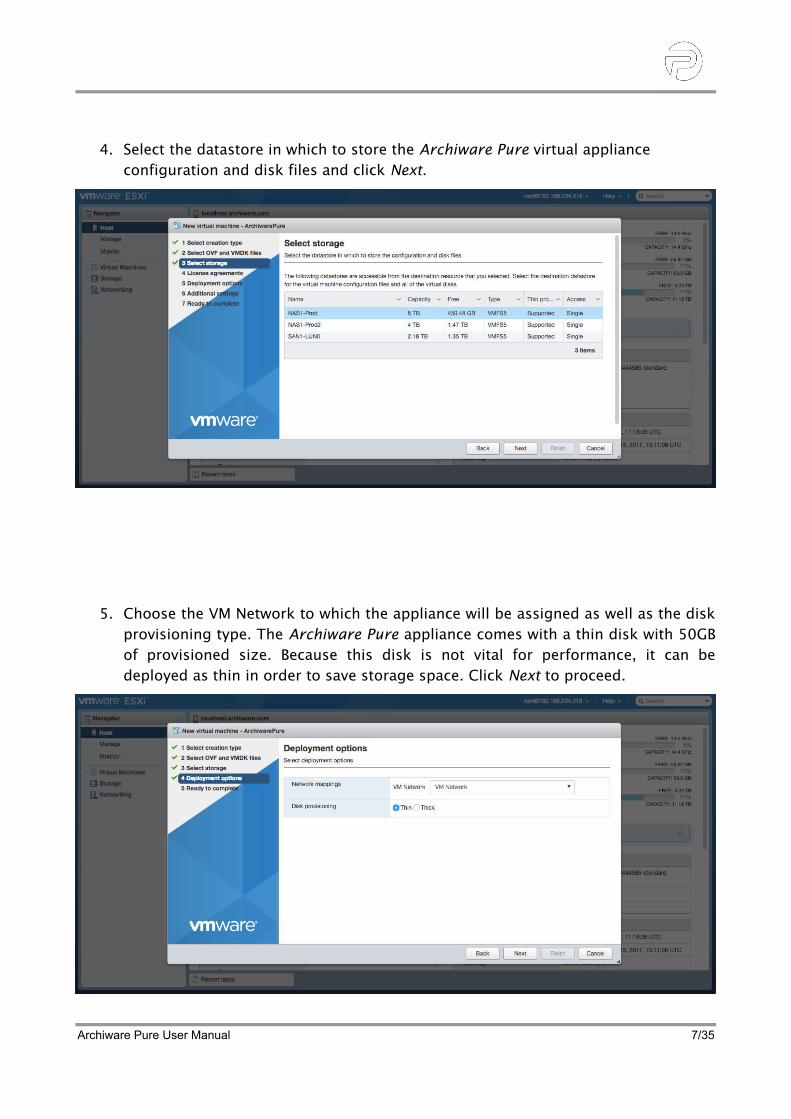
4. Select the datastore in which to store the Archiware Pure virtual appliance configuration and disk files and click Next.
5. Choose the VM Network to which the appliance will be assigned as well as the diskprovisioning type. The Archiware Pure appliance comes with a thin disk with 50GBof provisioned size. Because this disk is not vital for performance, it can bedeployed as thin in order to save storage space. Click Next to proceed.
Archiware Pure User Manual 7/35
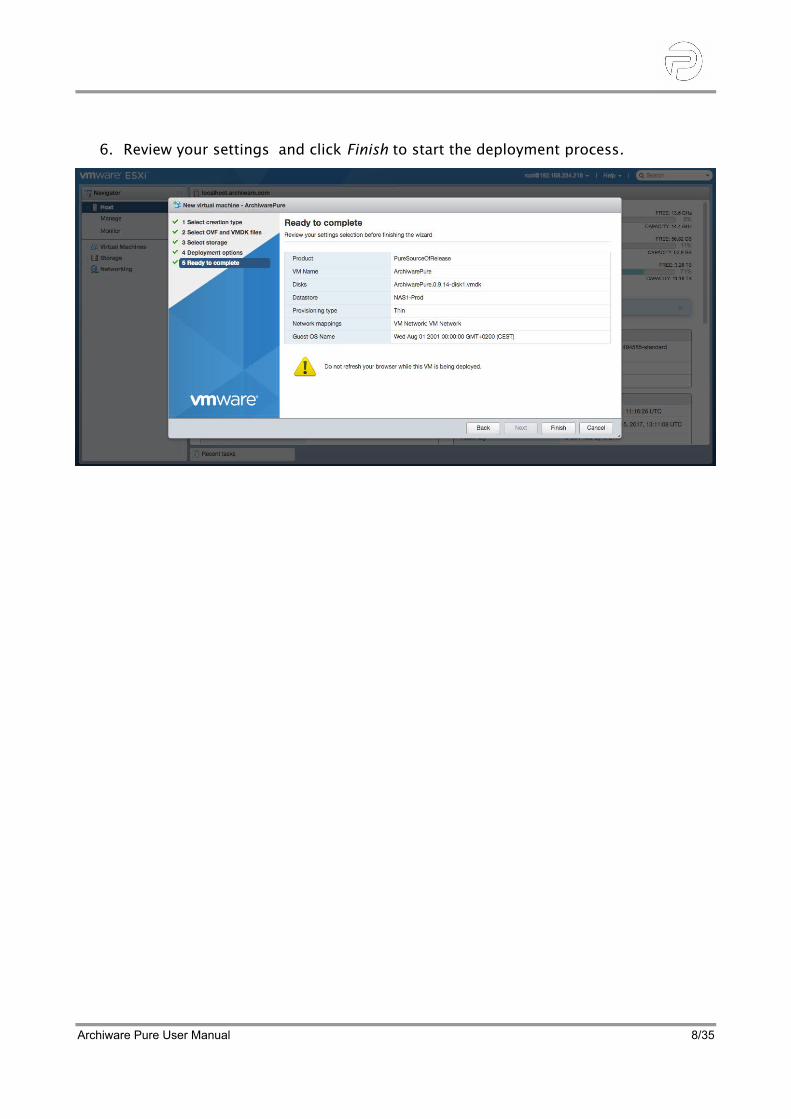
6. Review your settings and click Finish to start the deployment process.
Archiware Pure User Manual 8/35
2.4 Configuring storage
Before Archiware Pure can be used for virtual machine backups, it is necessary toconfigure at least one storage location as the Backup Repository where the backup dataof the protected virtual machines will be saved. Although Archiware Pure supports allstorage options supported by VMware, event to configure virtual disks on the samedatastore where the VMs to be protected are deployed, we strongly suggest using adedicated external storage for the added security. For best performance, we recommendconfiguring a SAN LUN in raw device mapping mode.
Due to VMware limitations, RDM disks must be configured on the SCSI controller 0 so asnot to interfere with Archiware Pure operations. When adding new virtual disks throughthe VMware GUI, controller 0 is selected by default. It is possible to configure up to 14virtual disks as Backup Repositories.
Please consult the official VMware instructions on adding hard disks to a virtual machine.5
5 https://docs.vmware.com/en/VMware-vSphere/6.5/com.vmware.vsphere.vm_admin.doc/GUID-79116E5D-22B3-4E84-86DF-49A8D16E7AF2.html
Archiware Pure User Manual 9/35
3 Configuring the Virtual Appliance
3.1 Configuring the access password
For security reasons, the Archiware Pure appliance does not have a preconfigured defaultpassword and does not accept external SSH connections until manually enabled.
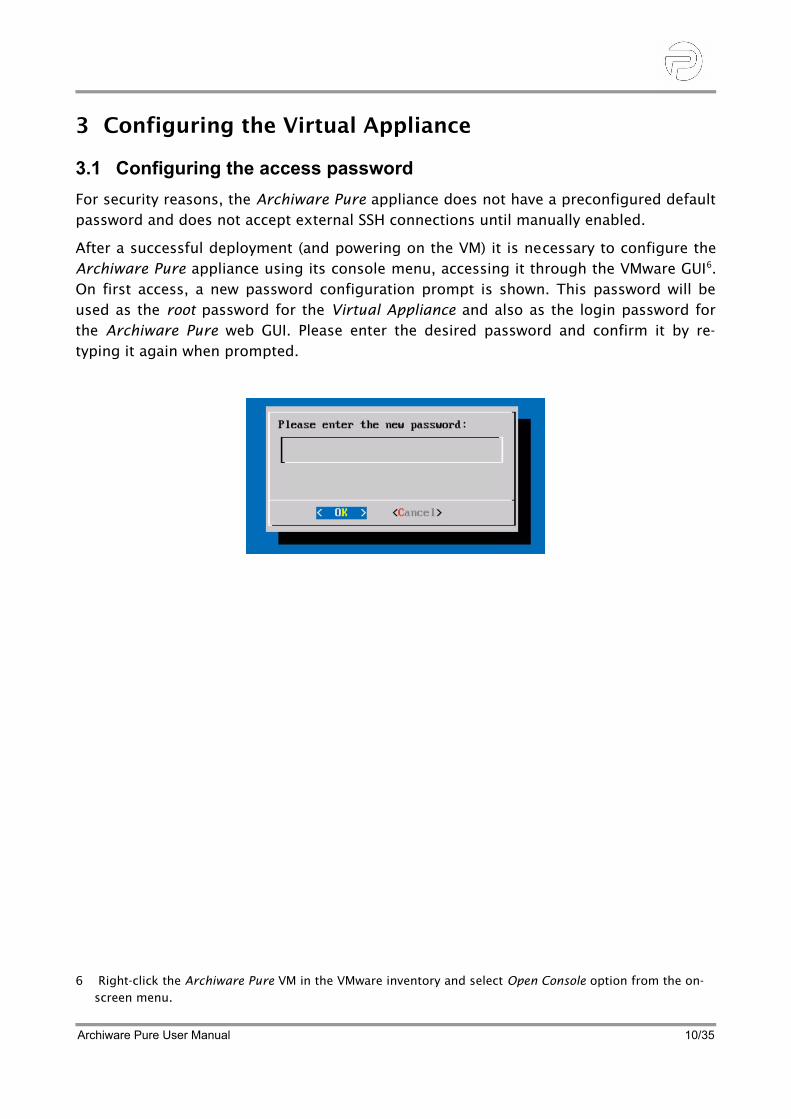
After a successful deployment (and powering on the VM) it is necessary to configure theArchiware Pure appliance using its console menu, accessing it through the VMware GUI6.On first access, a new password configuration prompt is shown. This password will beused as the root password for the Virtual Appliance and also as the login password forthe Archiware Pure web GUI. Please enter the desired password and confirm it by re-typing it again when prompted.
6 Right-click the Archiware Pure VM in the VMware inventory and select Open Console option from the on-screen menu.
Archiware Pure User Manual 10/35
3.2 Using the console menu
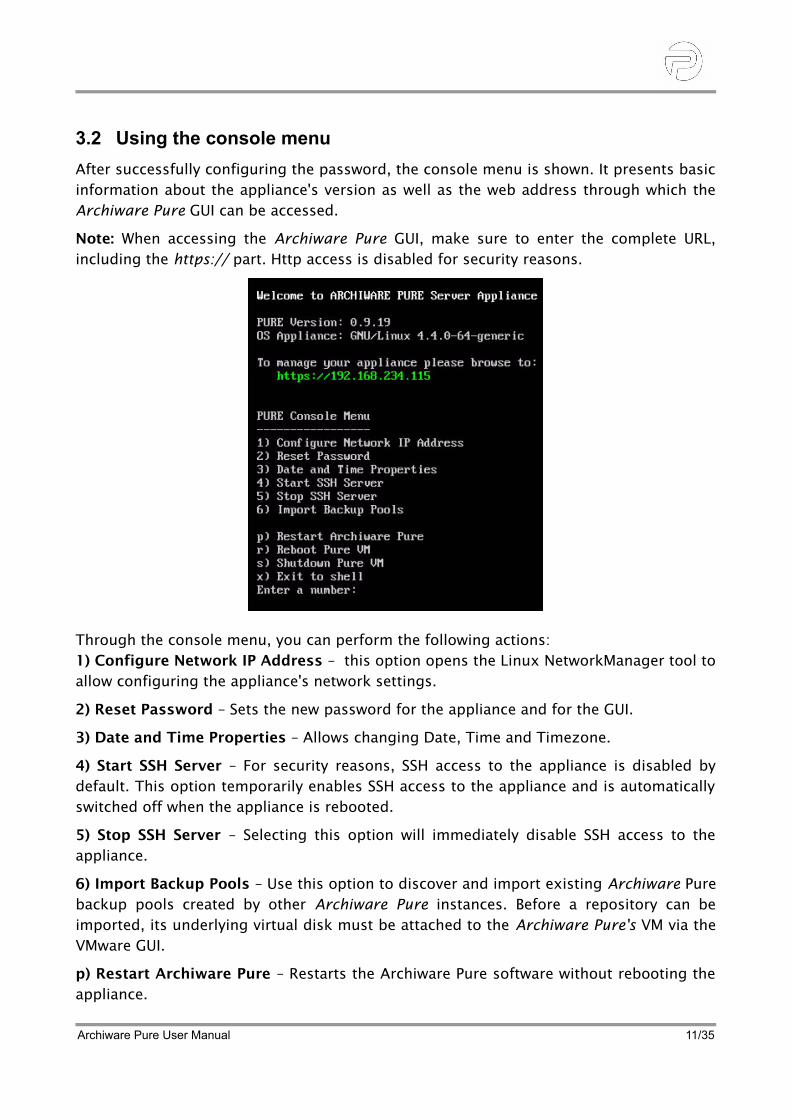
After successfully configuring the password, the console menu is shown. It presents basicinformation about the appliance's version as well as the web address through which theArchiware Pure GUI can be accessed.
Note: When accessing the Archiware Pure GUI, make sure to enter the complete URL,including the https:// part. Http access is disabled for security reasons.
Through the console menu, you can perform the following actions:1) Configure Network IP Address – this option opens the Linux NetworkManager tool toallow configuring the appliance's network settings.
2) Reset Password – Sets the new password for the appliance and for the GUI.
3) Date and Time Properties – Allows changing Date, Time and Timezone.
4) Start SSH Server – For security reasons, SSH access to the appliance is disabled bydefault. This option temporarily enables SSH access to the appliance and is automaticallyswitched off when the appliance is rebooted.
5) Stop SSH Server – Selecting this option will immediately disable SSH access to theappliance.
6) Import Backup Pools – Use this option to discover and import existing Archiware Purebackup pools created by other Archiware Pure instances. Before a repository can beimported, its underlying virtual disk must be attached to the Archiware Pure's VM via theVMware GUI.
p) Restart Archiware Pure – Restarts the Archiware Pure software without rebooting theappliance.
Archiware Pure User Manual 11/35

r) Reboot Pure VM – Restarts the whole Archiware Pure virtual machine.
s) Shut down Pure VM – Powers off the Archiware Pure virtual machine.
x) Exit to shell – Exits the console menu into a Linux shell. When in the shell, use theshell's ‘exit’ command to return back to the console menu.
Archiware Pure User Manual 12/35
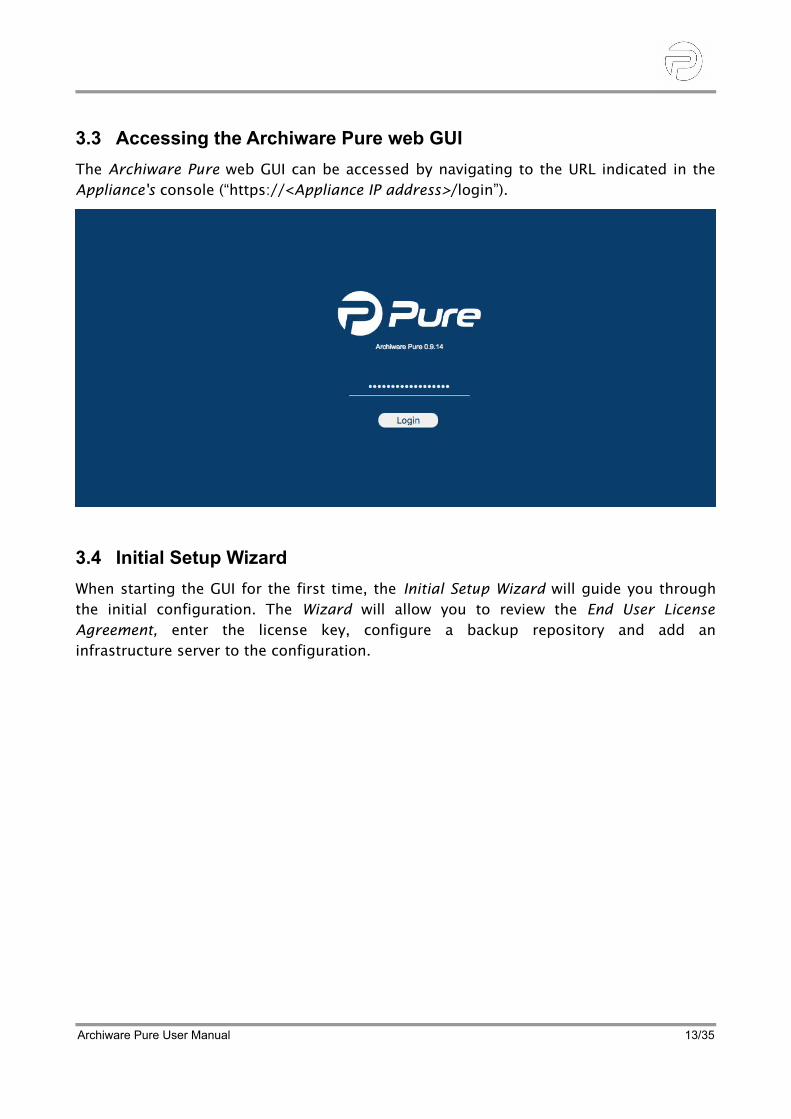
3.3 Accessing the Archiware Pure web GUI
The Archiware Pure web GUI can be accessed by navigating to the URL indicated in theAppliance's console (“https://<Appliance IP address>/login”).
3.4 Initial Setup Wizard
When starting the GUI for the first time, the Initial Setup Wizard will guide you throughthe initial configuration. The Wizard will allow you to review the End User LicenseAgreement, enter the license key, configure a backup repository and add aninfrastructure server to the configuration.
Archiware Pure User Manual 13/35
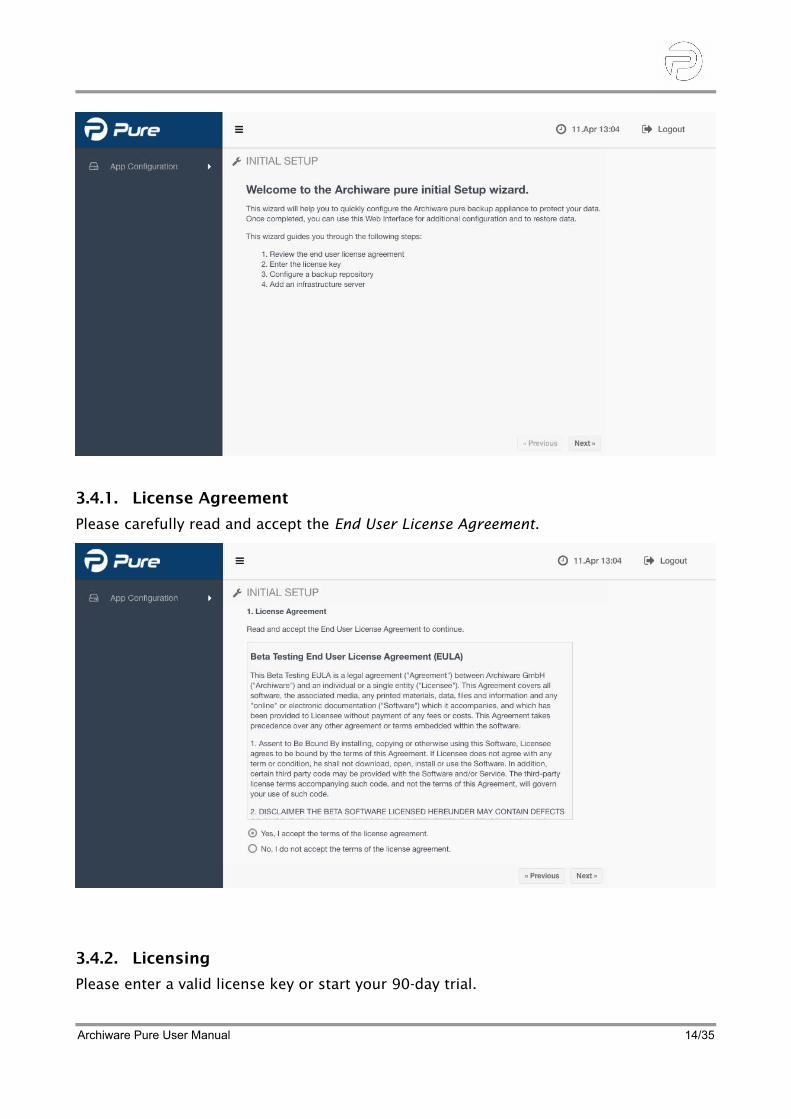
3.4.1. License Agreement
Please carefully read and accept the End User License Agreement.
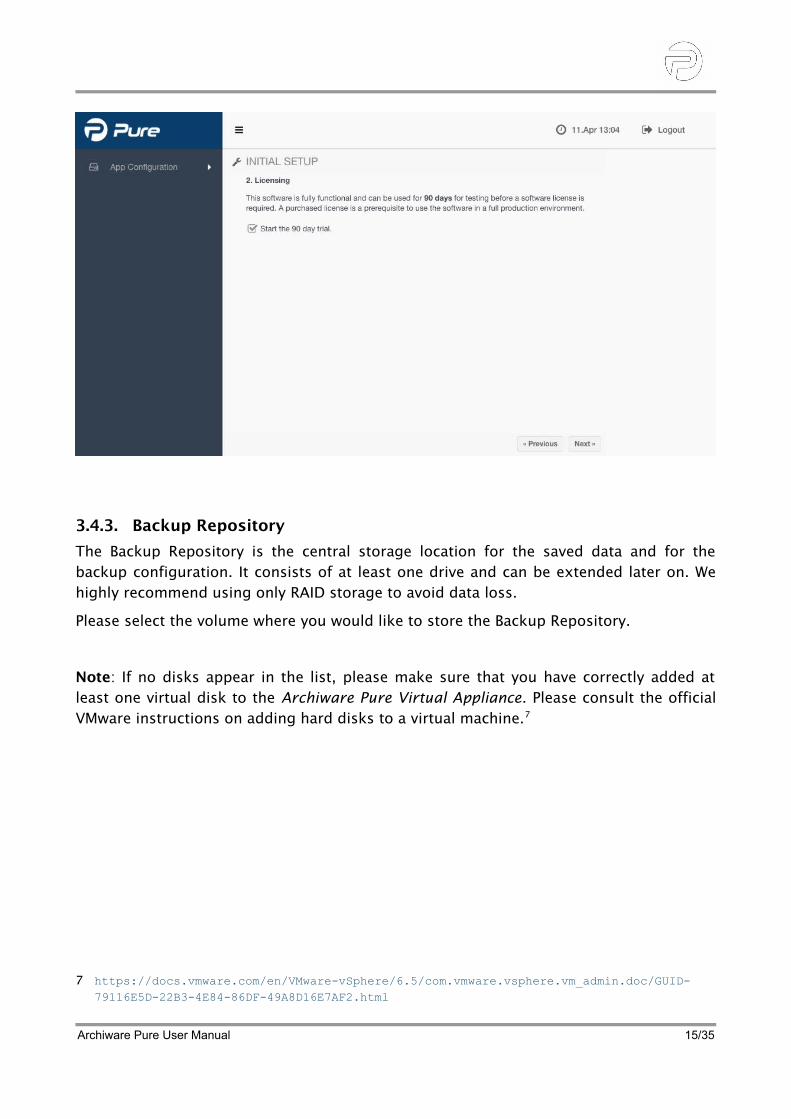
3.4.2. Licensing
Please enter a valid license key or start your 90-day trial.
Archiware Pure User Manual 14/35
3.4.3. Backup Repository
The Backup Repository is the central storage location for the saved data and for thebackup configuration. It consists of at least one drive and can be extended later on. Wehighly recommend using only RAID storage to avoid data loss.
Please select the volume where you would like to store the Backup Repository.
Note: If no disks appear in the list, please make sure that you have correctly added atleast one virtual disk to the Archiware Pure Virtual Appliance. Please consult the officialVMware instructions on adding hard disks to a virtual machine.7
7 https://docs.vmware.com/en/VMware-vSphere/6.5/com.vmware.vsphere.vm_admin.doc/GUID-79116E5D-22B3-4E84-86DF-49A8D16E7AF2.html
Archiware Pure User Manual 15/35

Archiware Pure User Manual 16/35
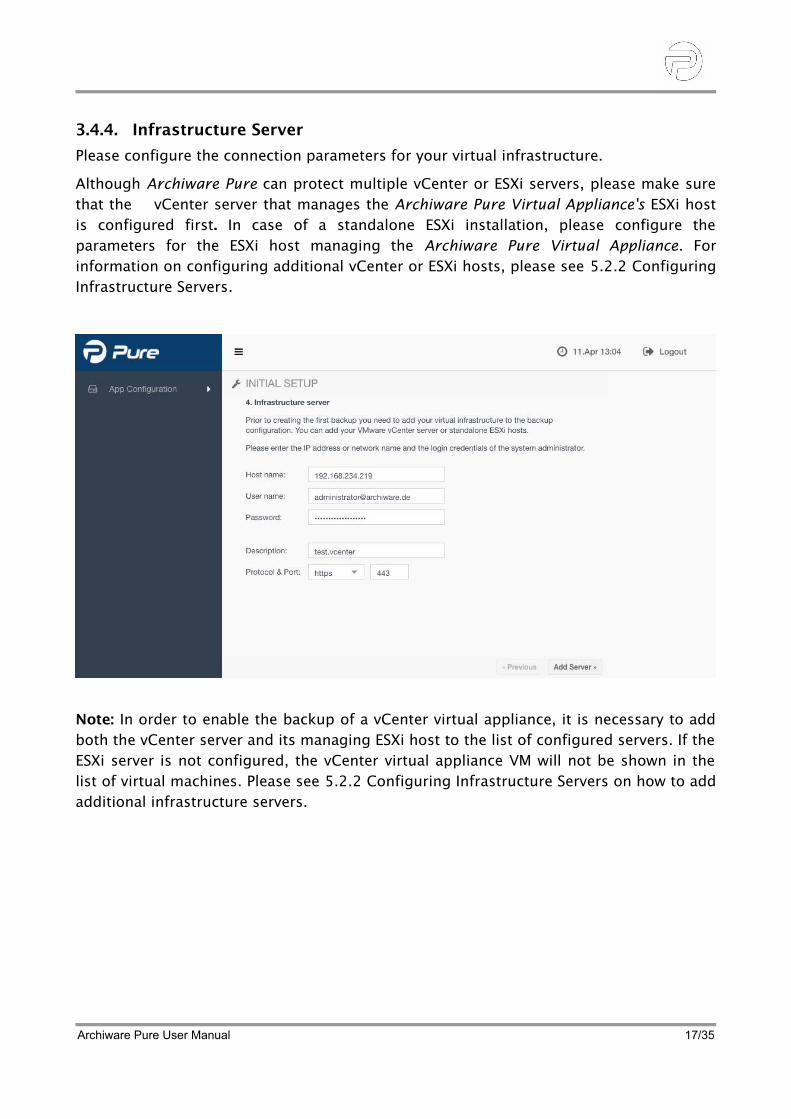
3.4.4. Infrastructure Server
Please configure the connection parameters for your virtual infrastructure.
Although Archiware Pure can protect multiple vCenter or ESXi servers, please make surethat the vCenter server that manages the Archiware Pure Virtual Appliance's ESXi hostis configured first. In case of a standalone ESXi installation, please configure theparameters for the ESXi host managing the Archiware Pure Virtual Appliance. Forinformation on configuring additional vCenter or ESXi hosts, please see 5.2.2 ConfiguringInfrastructure Servers.
Note: In order to enable the backup of a vCenter virtual appliance, it is necessary to addboth the vCenter server and its managing ESXi host to the list of configured servers. If theESXi server is not configured, the vCenter virtual appliance VM will not be shown in thelist of virtual machines. Please see 5.2.2 Configuring Infrastructure Servers on how to addadditional infrastructure servers.
Archiware Pure User Manual 17/35
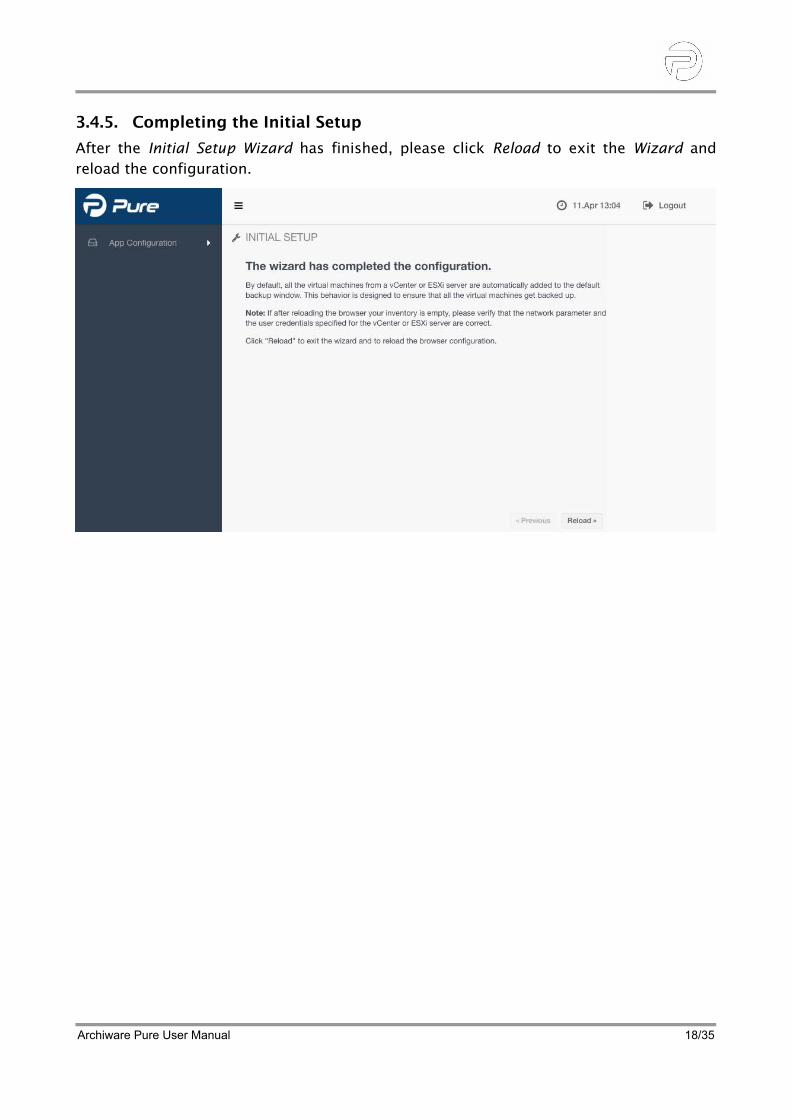
3.4.5. Completing the Initial Setup
After the Initial Setup Wizard has finished, please click Reload to exit the Wizard andreload the configuration.
Archiware Pure User Manual 18/35
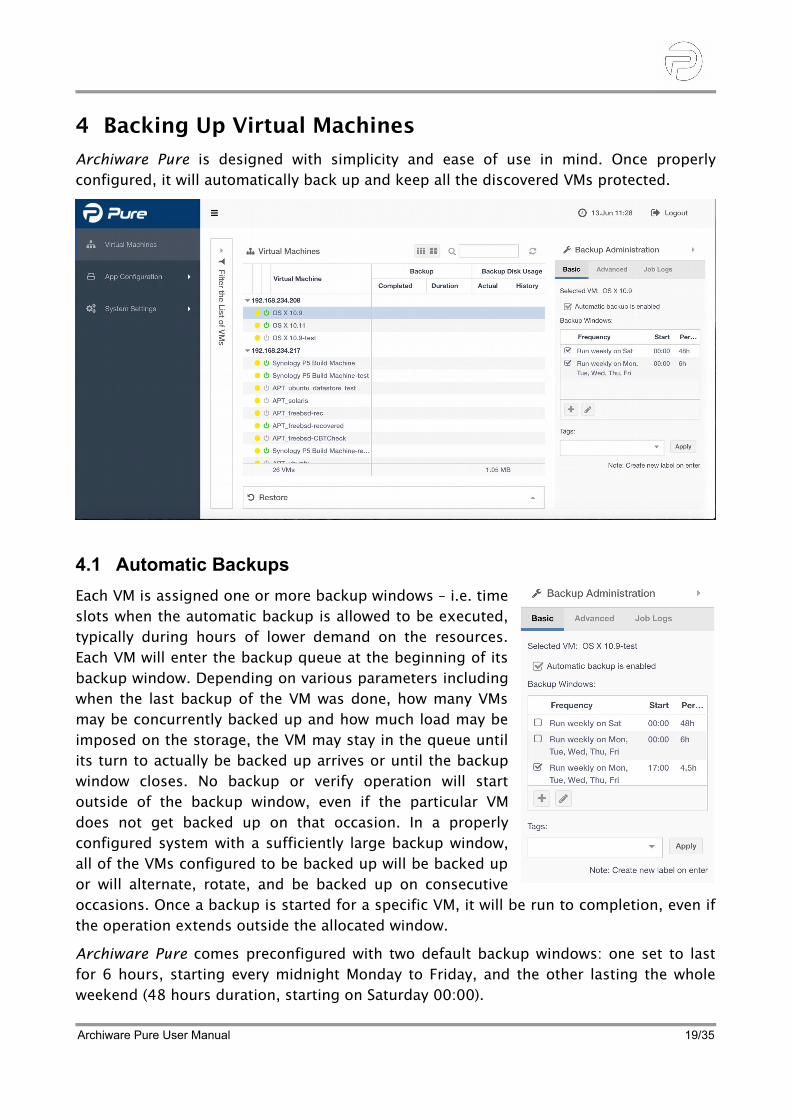
4 Backing Up Virtual Machines
Archiware Pure is designed with simplicity and ease of use in mind. Once properlyconfigured, it will automatically back up and keep all the discovered VMs protected.
4.1 Automatic Backups
Each VM is assigned one or more backup windows – i.e. timeslots when the automatic backup is allowed to be executed,typically during hours of lower demand on the resources.Each VM will enter the backup queue at the beginning of itsbackup window. Depending on various parameters includingwhen the last backup of the VM was done, how many VMsmay be concurrently backed up and how much load may beimposed on the storage, the VM may stay in the queue untilits turn to actually be backed up arrives or until the backupwindow closes. No backup or verify operation will startoutside of the backup window, even if the particular VMdoes not get backed up on that occasion. In a properlyconfigured system with a sufficiently large backup window,all of the VMs configured to be backed up will be backed upor will alternate, rotate, and be backed up on consecutiveoccasions. Once a backup is started for a specific VM, it will be run to completion, even ifthe operation extends outside the allocated window.
Archiware Pure comes preconfigured with two default backup windows: one set to lastfor 6 hours, starting every midnight Monday to Friday, and the other lasting the wholeweekend (48 hours duration, starting on Saturday 00:00).
Archiware Pure User Manual 19/35
Note: Because the very first backup for each VM needs to transfer the entire content of allits virtual disks, it is possible that not all the VMs will fit inside the default backupwindow. Subsequent backups will use Changed Block Tracking information, whichsignificantly decreases the backup time.
Additional backup windows may be configured by clicking on the “+” icon and selectingthe desired start time and duration. Note that backup windows cannot overlap.
Warning: A Backup operation will automatically consolidate and remove all existingVMWare snapshots of the Virtual Machine that is being backed up. If you temporarilyneed to keep snapshots of a VM, please make sure to disable automatic backups in theBackup Configuration side panel.
4.2 Verify
Backup consistency is ensured through an automatic Verify process, where the backed upcontent is compared, byte by byte, with the actual virtual disk content of the VM.Verifications of the machines that are queued for backup are automatically queued to berun after all the backups are completed. The VM that has not been verified for the longestwill be verified first. In the course of a verification, detected mismatches are corrected torender a consistent backup snapshot.
Note: Please ensure a sufficiently large backup window to enable verify to run for all theVMs scheduled in that window.
4.3 Manual Backup and Verify
Backup and verify operations can also be run on demand by clicking on the icon left ofthe desired VM and selecting the Start Backup Now.
Archiware Pure User Manual 20/35
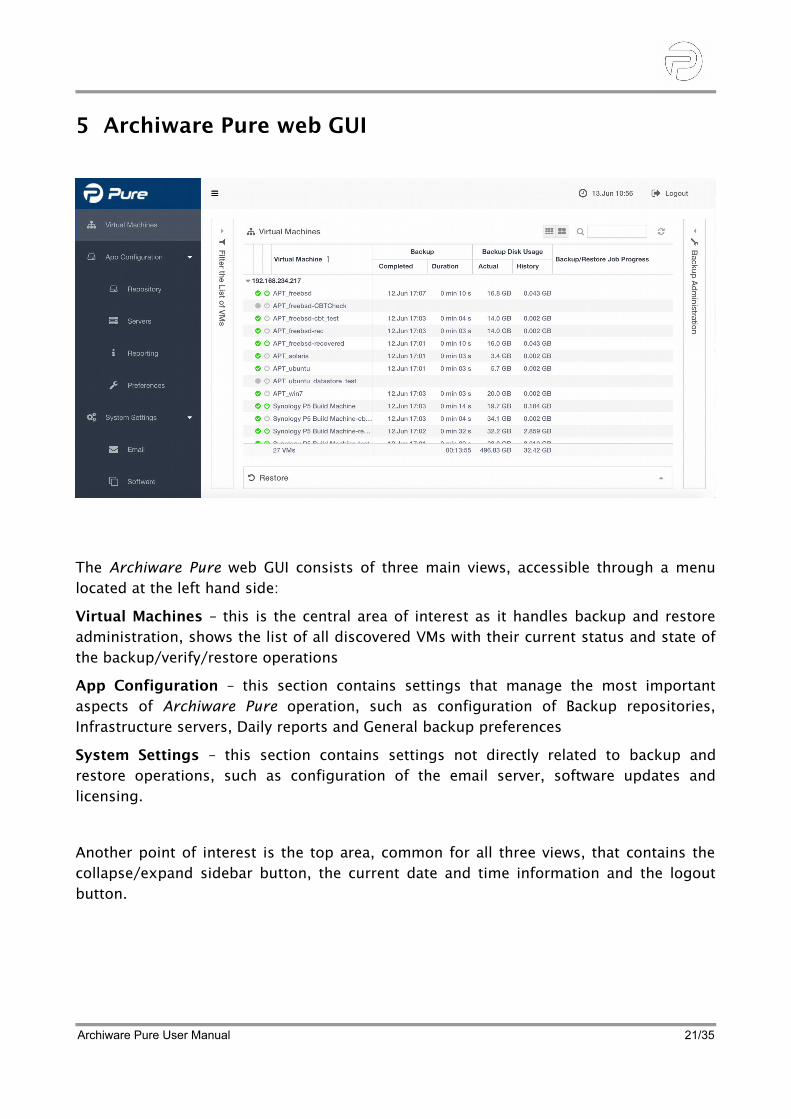
5 Archiware Pure web GUI
The Archiware Pure web GUI consists of three main views, accessible through a menulocated at the left hand side:
Virtual Machines – this is the central area of interest as it handles backup and restoreadministration, shows the list of all discovered VMs with their current status and state ofthe backup/verify/restore operations
App Configuration – this section contains settings that manage the most importantaspects of Archiware Pure operation, such as configuration of Backup repositories,Infrastructure servers, Daily reports and General backup preferences
System Settings – this section contains settings not directly related to backup andrestore operations, such as configuration of the email server, software updates andlicensing.
Another point of interest is the top area, common for all three views, that contains thecollapse/expand sidebar button, the current date and time information and the logoutbutton.
Archiware Pure User Manual 21/35
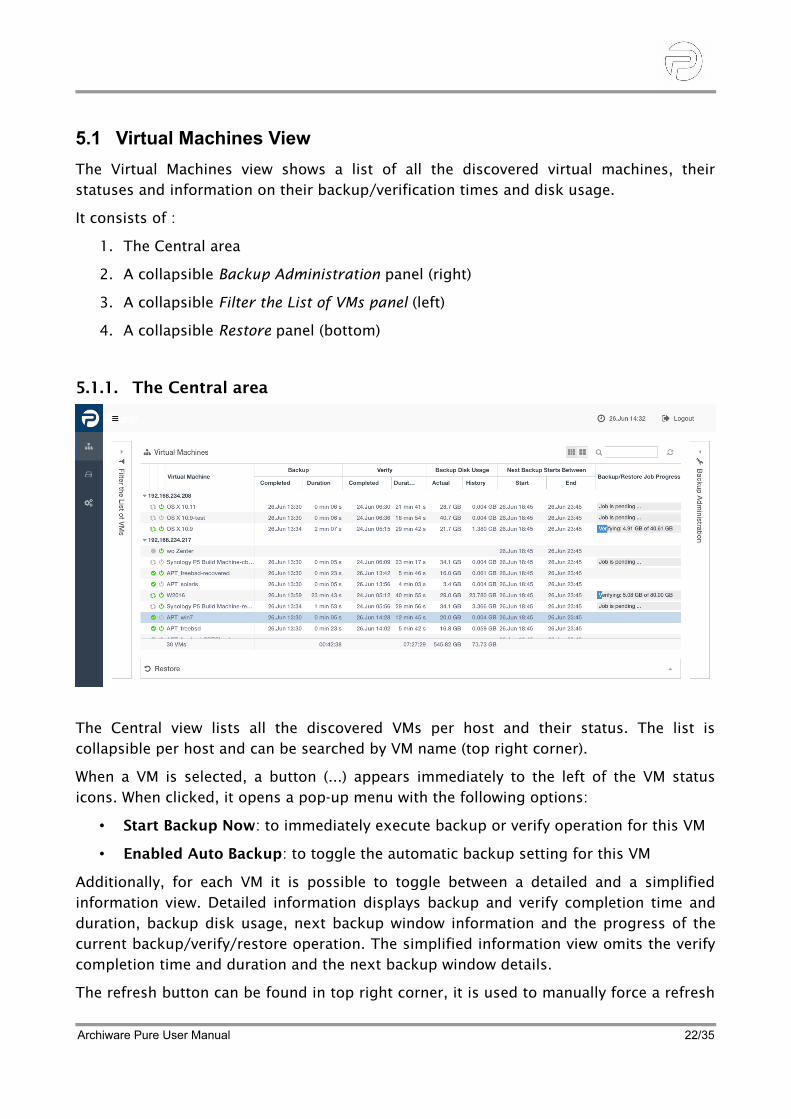
5.1 Virtual Machines View
The Virtual Machines view shows a list of all the discovered virtual machines, theirstatuses and information on their backup/verification times and disk usage.
It consists of :
1. The Central area
2. A collapsible Backup Administration panel (right)
3. A collapsible Filter the List of VMs panel (left)
4. A collapsible Restore panel (bottom)
5.1.1. The Central area
The Central view lists all the discovered VMs per host and their status. The list iscollapsible per host and can be searched by VM name (top right corner).
When a VM is selected, a button (...) appears immediately to the left of the VM statusicons. When clicked, it opens a pop-up menu with the following options:
• Start Backup Now: to immediately execute backup or verify operation for this VM
• Enabled Auto Backup: to toggle the automatic backup setting for this VM
Additionally, for each VM it is possible to toggle between a detailed and a simplifiedinformation view. Detailed information displays backup and verify completion time andduration, backup disk usage, next backup window information and the progress of thecurrent backup/verify/restore operation. The simplified information view omits the verifycompletion time and duration and the next backup window details.
The refresh button can be found in top right corner, it is used to manually force a refresh
Archiware Pure User Manual 22/35
of the VM list and information.
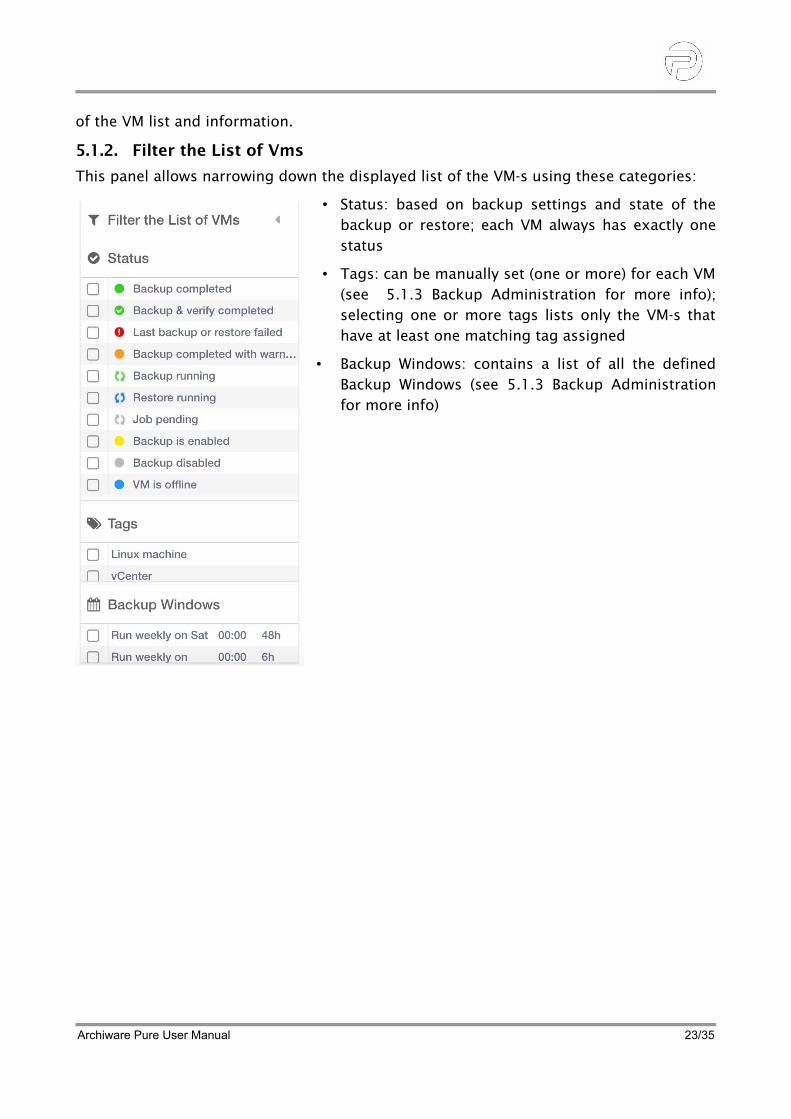
5.1.2. Filter the List of Vms
This panel allows narrowing down the displayed list of the VM-s using these categories:
• Status: based on backup settings and state of thebackup or restore; each VM always has exactly onestatus
• Tags: can be manually set (one or more) for each VM(see 5.1.3 Backup Administration for more info);selecting one or more tags lists only the VM-s thathave at least one matching tag assigned
• Backup Windows: contains a list of all the definedBackup Windows (see 5.1.3 Backup Administrationfor more info)
Archiware Pure User Manual 23/35
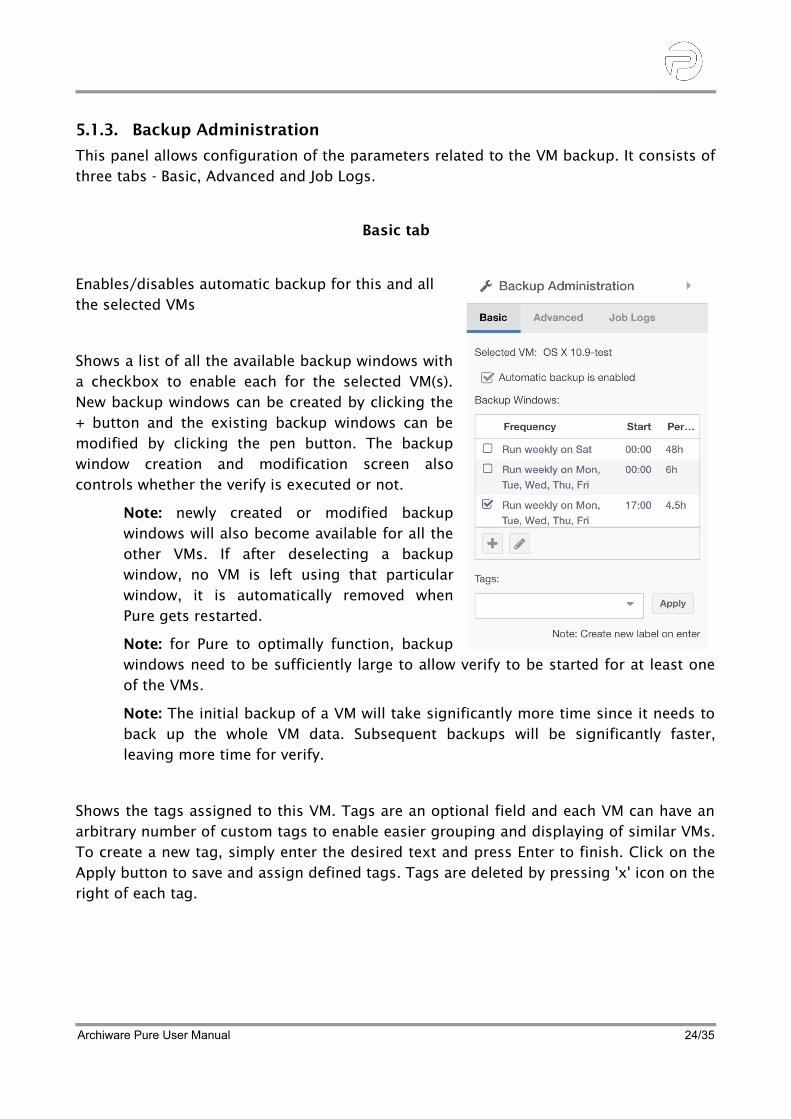
5.1.3. Backup Administration
This panel allows configuration of the parameters related to the VM backup. It consists ofthree tabs - Basic, Advanced and Job Logs.
Basic tab
Enables/disables automatic backup for this and allthe selected VMs
Shows a list of all the available backup windows witha checkbox to enable each for the selected VM(s).New backup windows can be created by clicking the+ button and the existing backup windows can bemodified by clicking the pen button. The backupwindow creation and modification screen alsocontrols whether the verify is executed or not.
Note: newly created or modified backupwindows will also become available for all theother VMs. If after deselecting a backupwindow, no VM is left using that particularwindow, it is automatically removed whenPure gets restarted.
Note: for Pure to optimally function, backupwindows need to be sufficiently large to allow verify to be started for at least oneof the VMs.
Note: The initial backup of a VM will take significantly more time since it needs toback up the whole VM data. Subsequent backups will be significantly faster,leaving more time for verify.
Shows the tags assigned to this VM. Tags are an optional field and each VM can have anarbitrary number of custom tags to enable easier grouping and displaying of similar VMs.To create a new tag, simply enter the desired text and press Enter to finish. Click on theApply button to save and assign defined tags. Tags are deleted by pressing 'x' icon on theright of each tag.
Archiware Pure User Manual 24/35
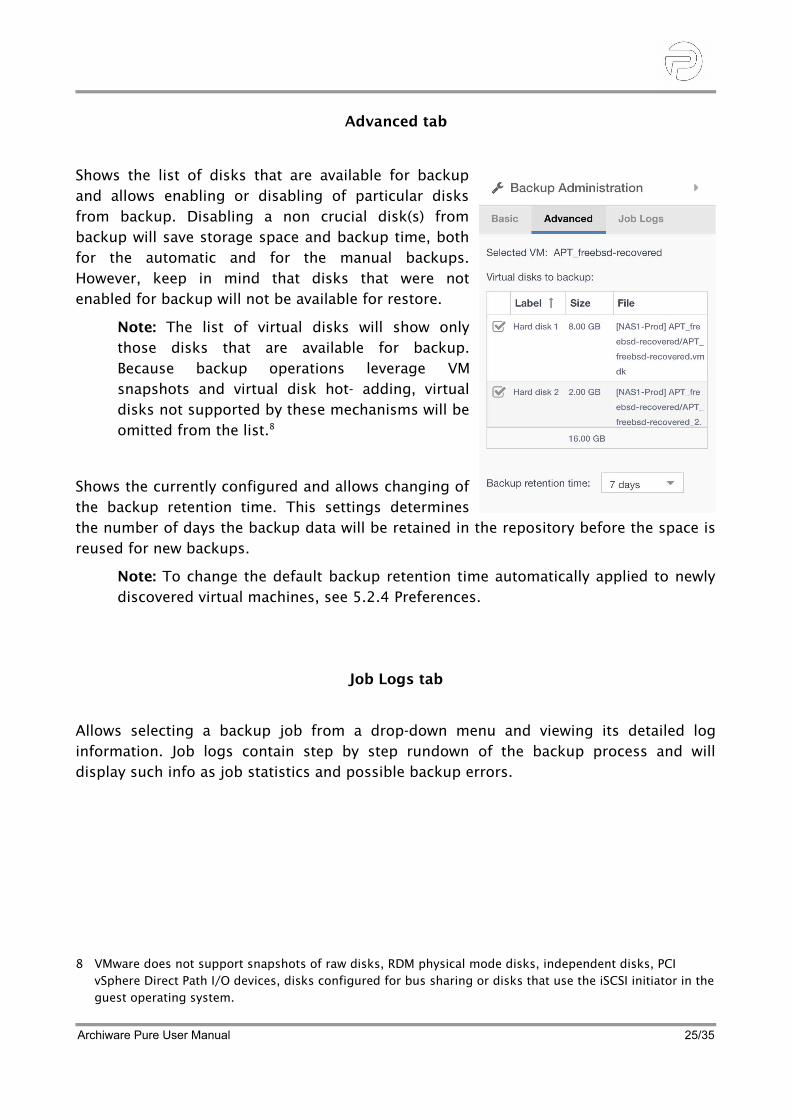
Advanced tab
Shows the list of disks that are available for backupand allows enabling or disabling of particular disksfrom backup. Disabling a non crucial disk(s) frombackup will save storage space and backup time, bothfor the automatic and for the manual backups.However, keep in mind that disks that were notenabled for backup will not be available for restore.
Note: The list of virtual disks will show onlythose disks that are available for backup.Because backup operations leverage VMsnapshots and virtual disk hot- adding, virtualdisks not supported by these mechanisms will beomitted from the list.8
Shows the currently configured and allows changing ofthe backup retention time. This settings determinesthe number of days the backup data will be retained in the repository before the space isreused for new backups.
Note: To change the default backup retention time automatically applied to newlydiscovered virtual machines, see 5.2.4 Preferences.
Job Logs tab
Allows selecting a backup job from a drop-down menu and viewing its detailed loginformation. Job logs contain step by step rundown of the backup process and willdisplay such info as job statistics and possible backup errors.
8 VMware does not support snapshots of raw disks, RDM physical mode disks, independent disks, PCI vSphere Direct Path I/O devices, disks configured for bus sharing or disks that use the iSCSI initiator in theguest operating system.
Archiware Pure User Manual 25/35
5.1.4. Restore
All the restore operations are accessible through the Restore panel. Depending on thedesired operation, choose one of the available tabs:
• Restore VM – to restore an entire virtual machine from the backed up data
• Restore File – to select a single file from one of the backed up virtual disks and download it directly to your workstation
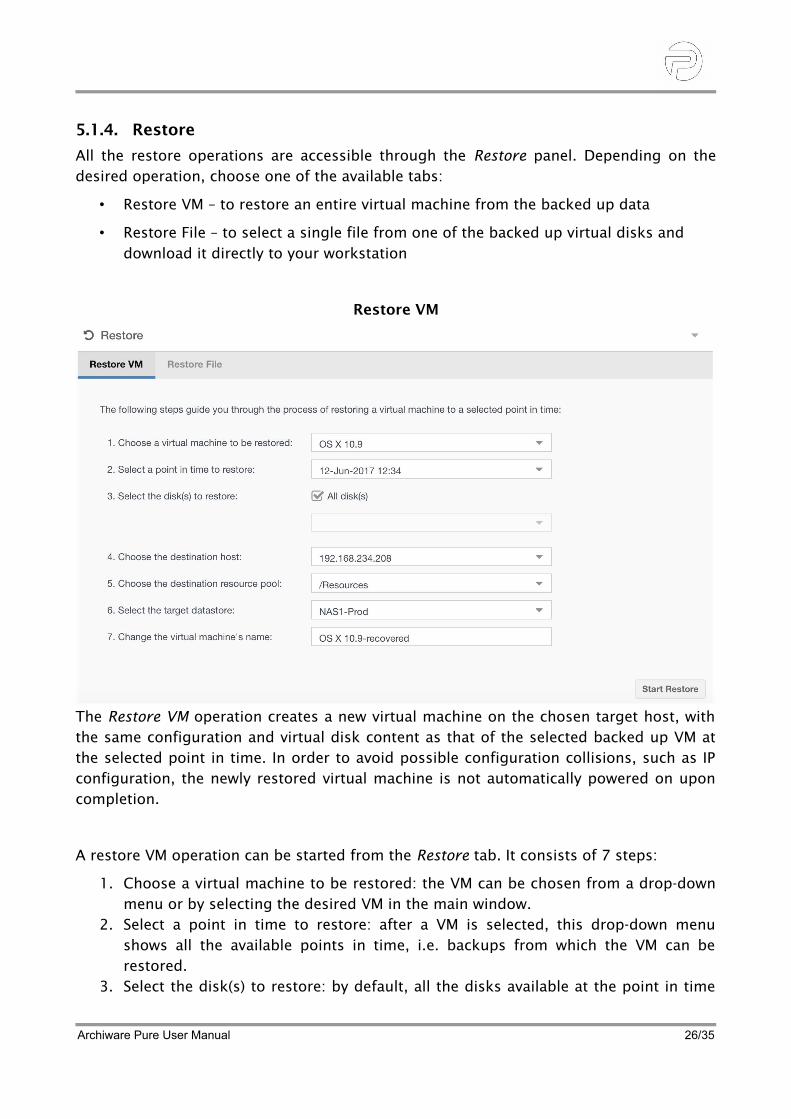
Restore VM
The Restore VM operation creates a new virtual machine on the chosen target host, withthe same configuration and virtual disk content as that of the selected backed up VM atthe selected point in time. In order to avoid possible configuration collisions, such as IPconfiguration, the newly restored virtual machine is not automatically powered on uponcompletion.
A restore VM operation can be started from the Restore tab. It consists of 7 steps:
1. Choose a virtual machine to be restored: the VM can be chosen from a drop-downmenu or by selecting the desired VM in the main window.
2. Select a point in time to restore: after a VM is selected, this drop-down menushows all the available points in time, i.e. backups from which the VM can berestored.
3. Select the disk(s) to restore: by default, all the disks available at the point in time
Archiware Pure User Manual 26/35
selected in step 2 will be restored. If some disk(s) are not required to be restored,the All disk(s) checkbox has to be deselected and the desired disk(s) selected fromthe drop-down menu. Please note that that menu shows only the disk(s) that werebacked-up at the particular point in time selected in step 2. If the desired disk doesnot appear in the list, a different point in time must be selected in step 2.
4. Choose the destination host: by default this is automatically set to the originalhost, but can be changed to any available host by selecting it from the drop-downmenu.
5. Choose the destination resource pool: by default this is automatically set to theoriginal resource pool, but can be changed to any available resource pool byselecting it from the drop-down menu.
6. Select the target datastore: by default this is automatically set to the originaldatastore, but can be changed to any available datastore by selecting it from thedrop-down menu.
7. Change the virtual machine's name: by default this is automatically set to theoriginal name with an added ‘-recovered’ suffix, but can be changed to any desiredname provided that a VM with the same name does not already exist on theselected host.
After following all these steps, click Start Restore to begin the restore operation. Restoreprogress can be tracked in the central view (depending on the browser window size, youmay need to colapse the Restore panel first).
Archiware Pure User Manual 27/35
Restore File
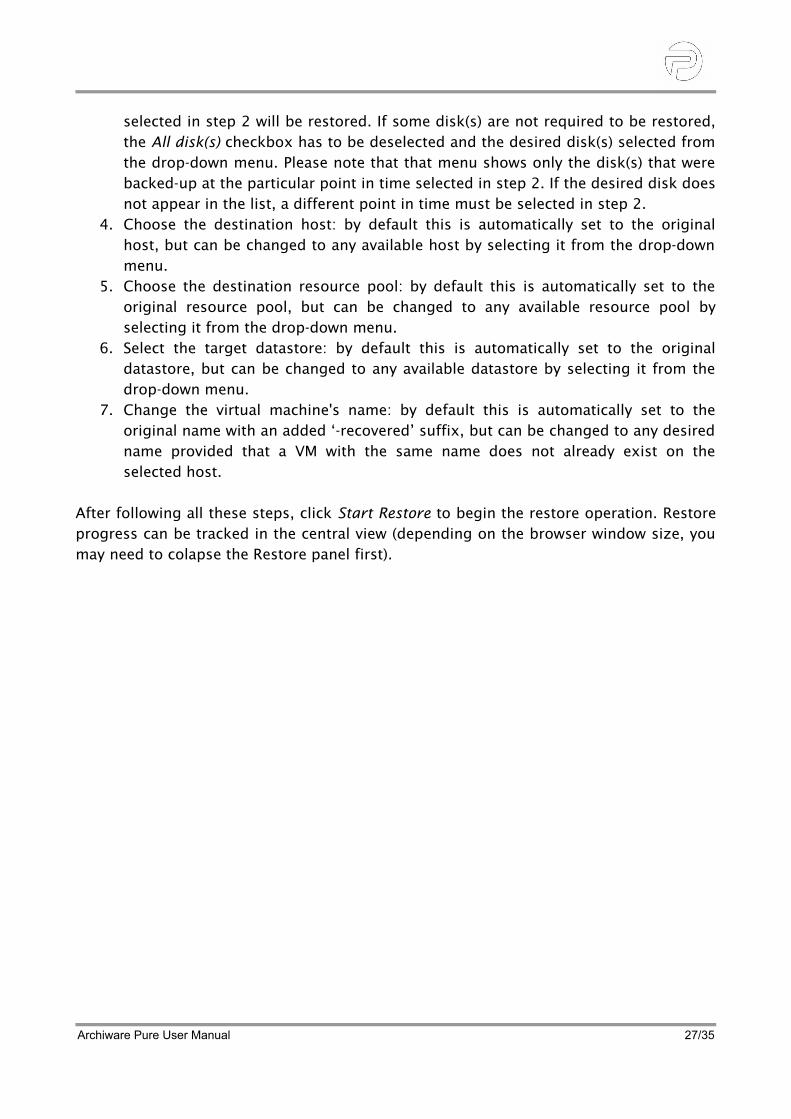
Restore File operation allows browsing the content of backed up virtual disks anddownloading a single file directly to your workstation.
Restoring of a single file is a straightforward operation: First select the VM that has therequired file and then choose the desired point in time to browse for files.
Only the disks that were part of the backup at that point in time are shown. Expandingeach disk shows its partitions and their sizes. Supported partitions can then be furtherexpanded and browsed for the desired file to download. When the file is located, mark itand press download to initiate the download process. The file will be downloaded to thedownload location determined by your web browser.
Note: Archiware Pure currently supports the following file systems for Restore File operations: HFS+, NTFS, FAT32, ExFAT, UFS2, ext2, ext3, ext4, Btrfs
Archiware Pure User Manual 28/35
5.2 App Configuration
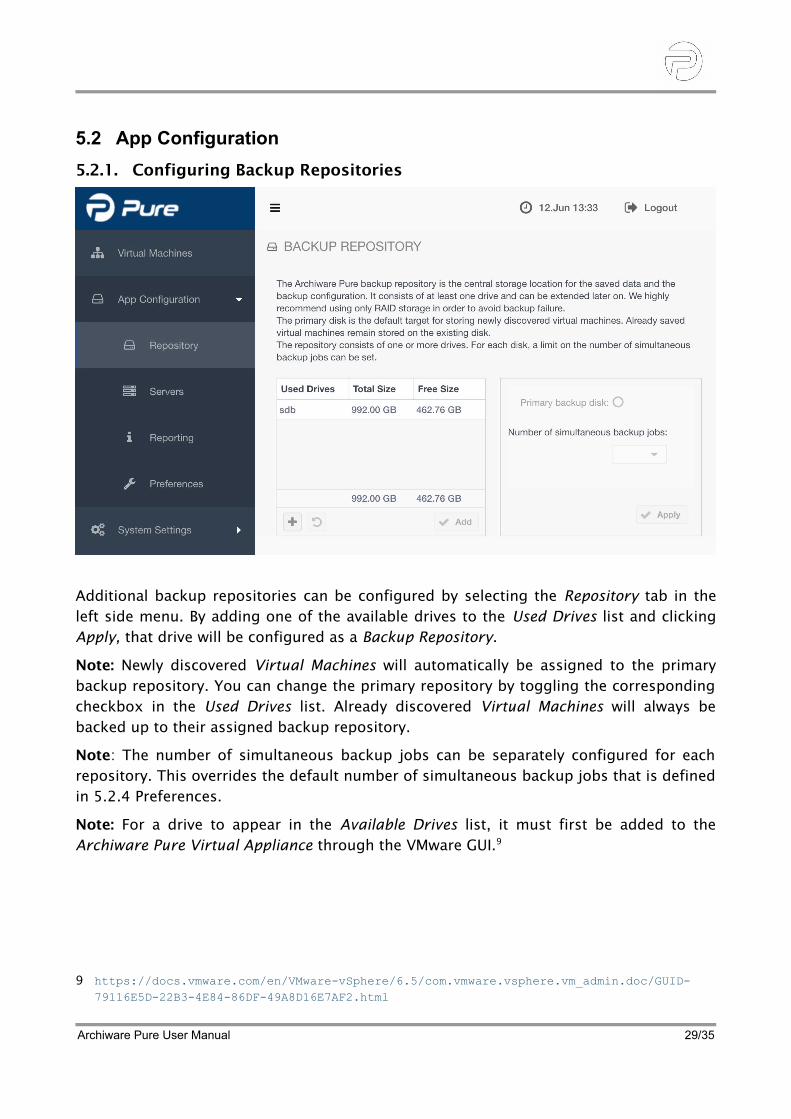
5.2.1. Configuring Backup Repositories
Additional backup repositories can be configured by selecting the Repository tab in theleft side menu. By adding one of the available drives to the Used Drives list and clickingApply, that drive will be configured as a Backup Repository.
Note: Newly discovered Virtual Machines will automatically be assigned to the primarybackup repository. You can change the primary repository by toggling the correspondingcheckbox in the Used Drives list. Already discovered Virtual Machines will always bebacked up to their assigned backup repository.
Note: The number of simultaneous backup jobs can be separately configured for eachrepository. This overrides the default number of simultaneous backup jobs that is definedin 5.2.4 Preferences.
Note: For a drive to appear in the Available Drives list, it must first be added to theArchiware Pure Virtual Appliance through the VMware GUI.9
9 https://docs.vmware.com/en/VMware-vSphere/6.5/com.vmware.vsphere.vm_admin.doc/GUID-79116E5D-22B3-4E84-86DF-49A8D16E7AF2.html
Archiware Pure User Manual 29/35
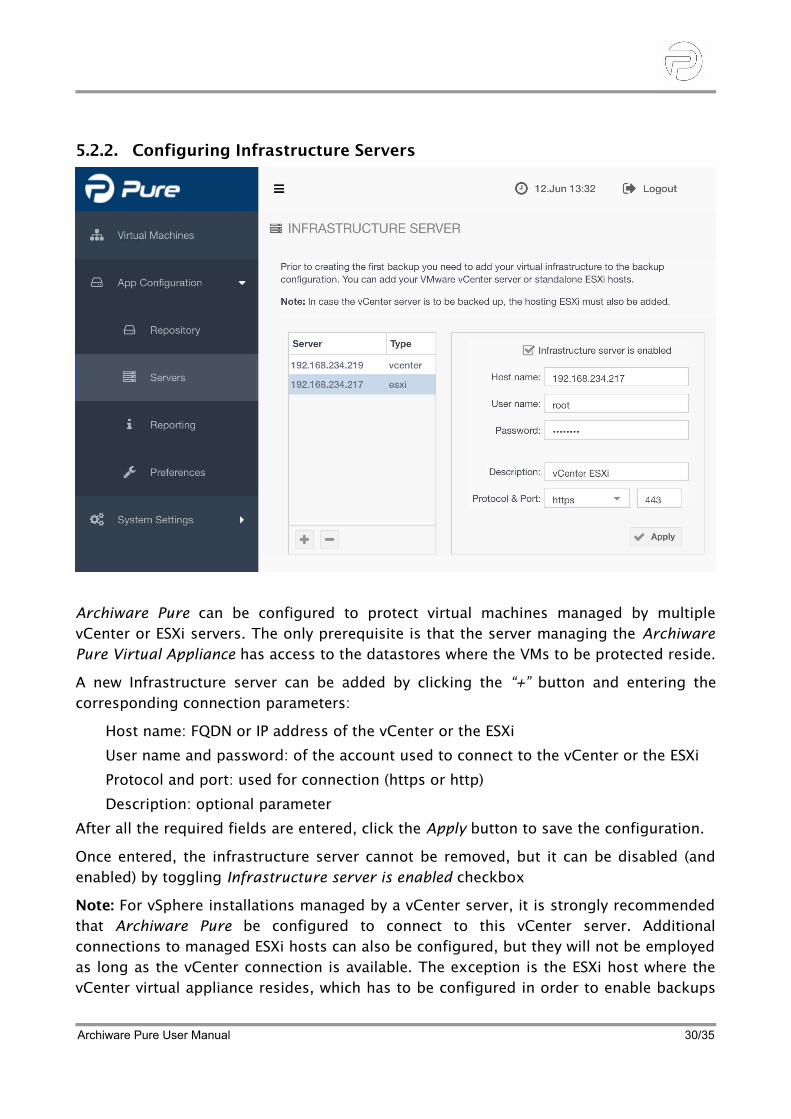
5.2.2. Configuring Infrastructure Servers
Archiware Pure can be configured to protect virtual machines managed by multiplevCenter or ESXi servers. The only prerequisite is that the server managing the ArchiwarePure Virtual Appliance has access to the datastores where the VMs to be protected reside.
A new Infrastructure server can be added by clicking the “+” button and entering thecorresponding connection parameters:
Host name: FQDN or IP address of the vCenter or the ESXi
User name and password: of the account used to connect to the vCenter or the ESXi
Protocol and port: used for connection (https or http)
Description: optional parameter
After all the required fields are entered, click the Apply button to save the configuration.
Once entered, the infrastructure server cannot be removed, but it can be disabled (andenabled) by toggling Infrastructure server is enabled checkbox
Note: For vSphere installations managed by a vCenter server, it is strongly recommendedthat Archiware Pure be configured to connect to this vCenter server. Additionalconnections to managed ESXi hosts can also be configured, but they will not be employedas long as the vCenter connection is available. The exception is the ESXi host where thevCenter virtual appliance resides, which has to be configured in order to enable backups
Archiware Pure User Manual 30/35
of the vCenter virtual machine itself.
Note: When configuring an Infrastructure Server, if the given user belongs to a vSphererole other than Administrators, please ensure that the corresponding user has sufficientvSphere privileges to execute all the operations required for backup.
Note: In order to enable normal operation in environments with vSphere lockdown modeenabled, user names configured for access to ESXi servers will automatically be added tothe VMWare's Exception Users List.10
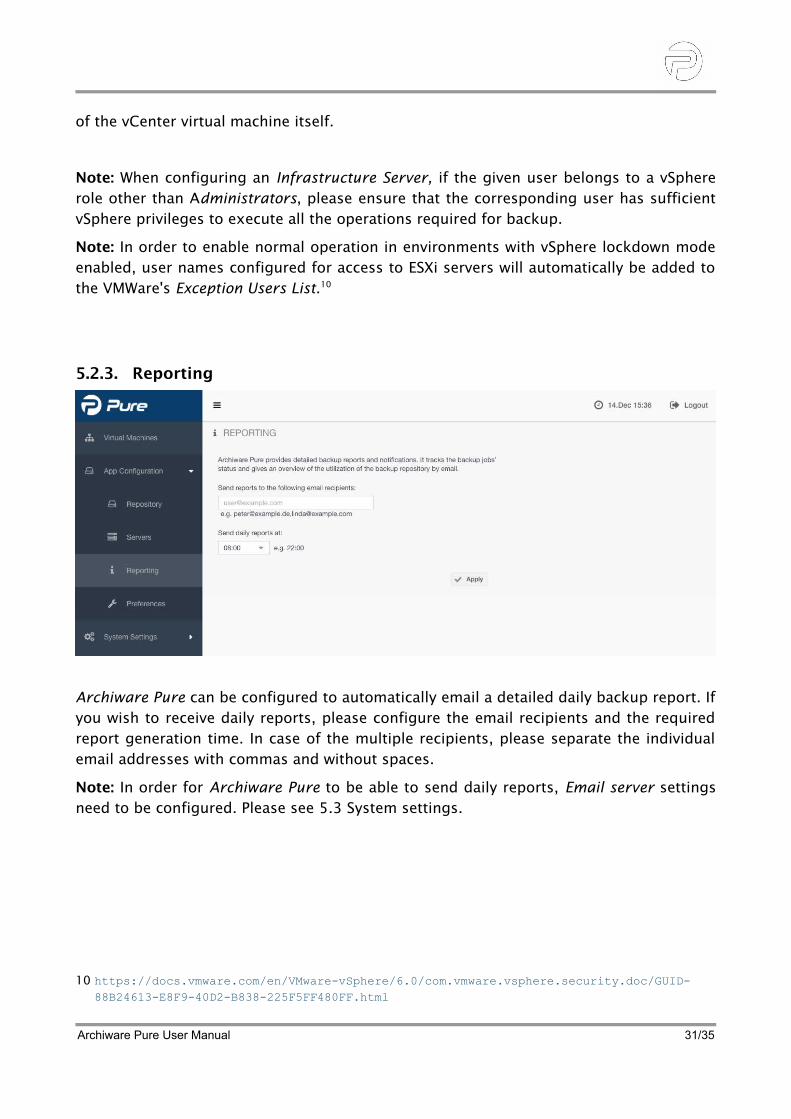
5.2.3. Reporting
Archiware Pure can be configured to automatically email a detailed daily backup report. Ifyou wish to receive daily reports, please configure the email recipients and the requiredreport generation time. In case of the multiple recipients, please separate the individualemail addresses with commas and without spaces.
Note: In order for Archiware Pure to be able to send daily reports, Email server settingsneed to be configured. Please see 5.3 System settings.
10 https://docs.vmware.com/en/VMware-vSphere/6.0/com.vmware.vsphere.security.doc/GUID-88B24613-E8F9-40D2-B838-225F5FF480FF.html
Archiware Pure User Manual 31/35
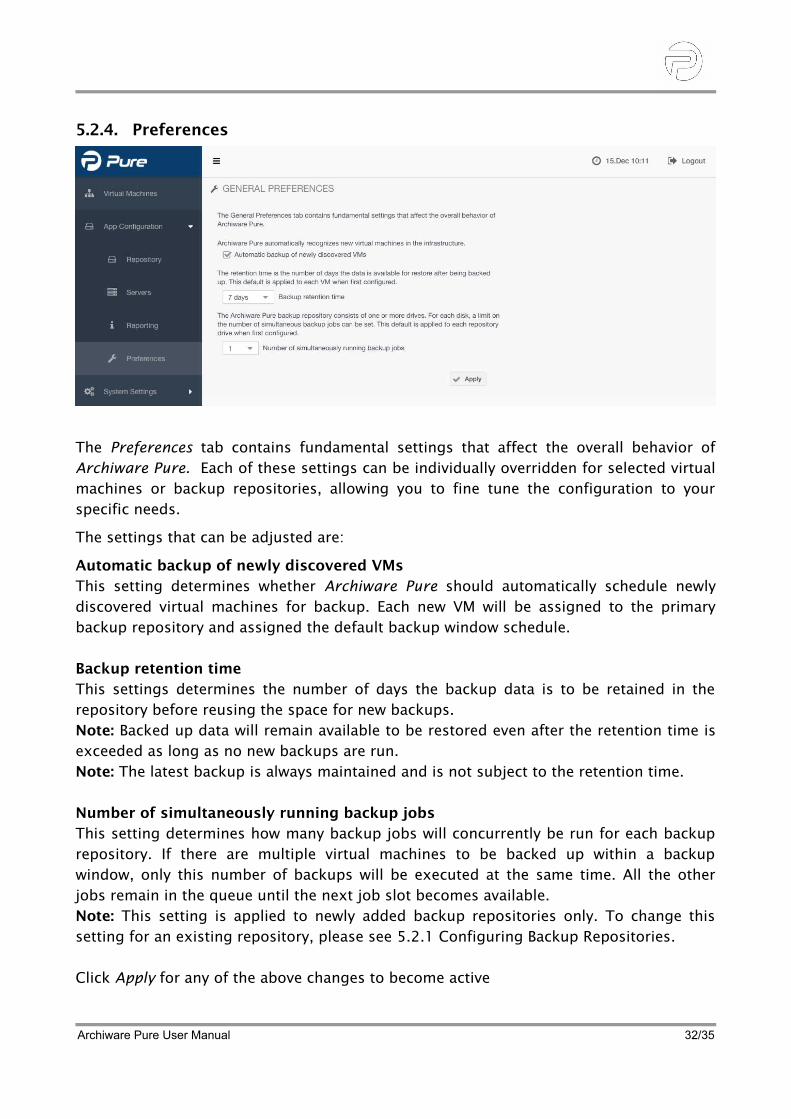
5.2.4. Preferences
The Preferences tab contains fundamental settings that affect the overall behavior ofArchiware Pure. Each of these settings can be individually overridden for selected virtualmachines or backup repositories, allowing you to fine tune the configuration to yourspecific needs.
The settings that can be adjusted are:
Automatic backup of newly discovered VMsThis setting determines whether Archiware Pure should automatically schedule newlydiscovered virtual machines for backup. Each new VM will be assigned to the primarybackup repository and assigned the default backup window schedule.
Backup retention timeThis settings determines the number of days the backup data is to be retained in therepository before reusing the space for new backups.Note: Backed up data will remain available to be restored even after the retention time isexceeded as long as no new backups are run.Note: The latest backup is always maintained and is not subject to the retention time.
Number of simultaneously running backup jobsThis setting determines how many backup jobs will concurrently be run for each backuprepository. If there are multiple virtual machines to be backed up within a backupwindow, only this number of backups will be executed at the same time. All the otherjobs remain in the queue until the next job slot becomes available. Note: This setting is applied to newly added backup repositories only. To change thissetting for an existing repository, please see 5.2.1 Configuring Backup Repositories.
Click Apply for any of the above changes to become active
Archiware Pure User Manual 32/35
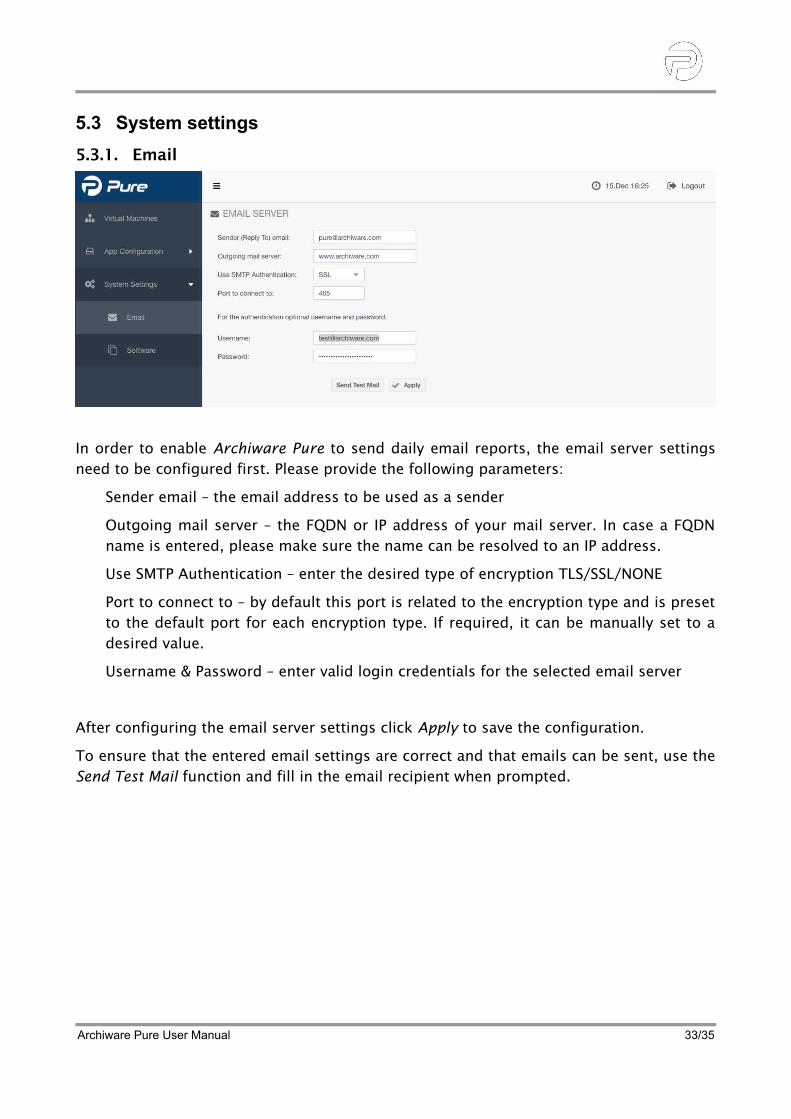
5.3 System settings
5.3.1. Email
In order to enable Archiware Pure to send daily email reports, the email server settingsneed to be configured first. Please provide the following parameters:
Sender email – the email address to be used as a sender
Outgoing mail server – the FQDN or IP address of your mail server. In case a FQDNname is entered, please make sure the name can be resolved to an IP address.
Use SMTP Authentication – enter the desired type of encryption TLS/SSL/NONE
Port to connect to – by default this port is related to the encryption type and is presetto the default port for each encryption type. If required, it can be manually set to adesired value.
Username & Password – enter valid login credentials for the selected email server
After configuring the email server settings click Apply to save the configuration.
To ensure that the entered email settings are correct and that emails can be sent, use theSend Test Mail function and fill in the email recipient when prompted.
Archiware Pure User Manual 33/35
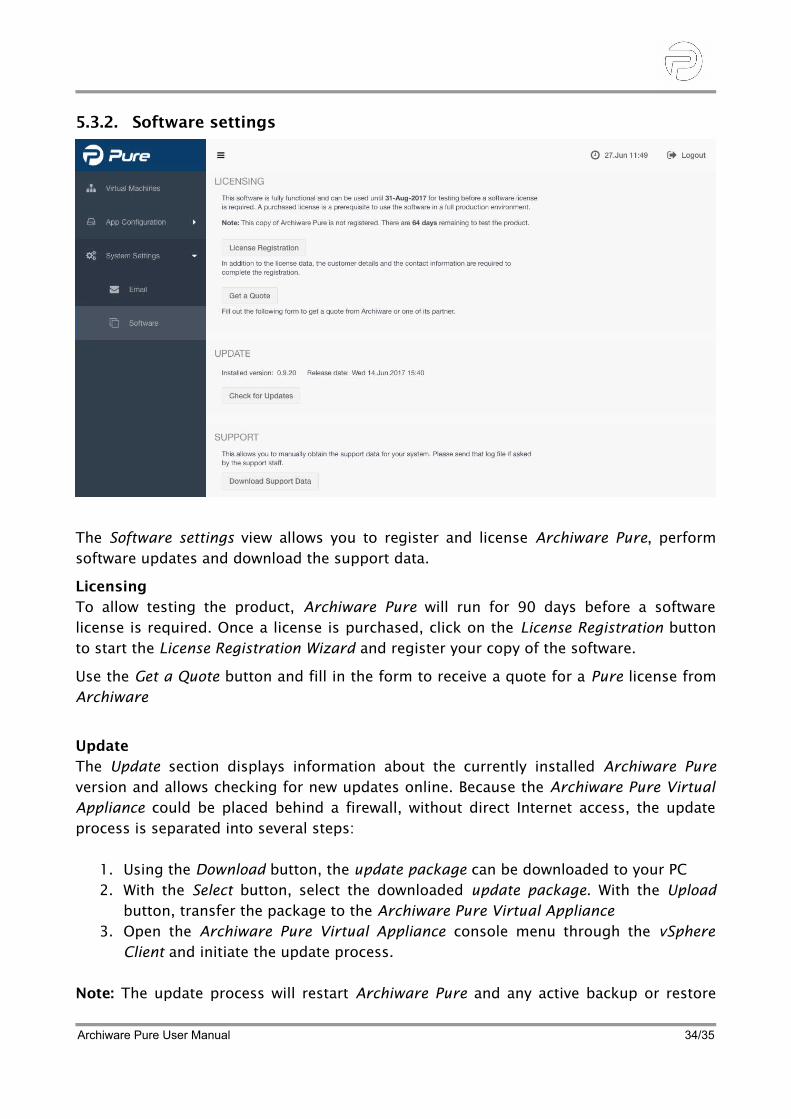
5.3.2. Software settings
The Software settings view allows you to register and license Archiware Pure, performsoftware updates and download the support data.
LicensingTo allow testing the product, Archiware Pure will run for 90 days before a softwarelicense is required. Once a license is purchased, click on the License Registration buttonto start the License Registration Wizard and register your copy of the software.
Use the Get a Quote button and fill in the form to receive a quote for a Pure license fromArchiware
UpdateThe Update section displays information about the currently installed Archiware Pureversion and allows checking for new updates online. Because the Archiware Pure VirtualAppliance could be placed behind a firewall, without direct Internet access, the updateprocess is separated into several steps:
1. Using the Download button, the update package can be downloaded to your PC2. With the Select button, select the downloaded update package. With the Upload
button, transfer the package to the Archiware Pure Virtual Appliance3. Open the Archiware Pure Virtual Appliance console menu through the vSphere
Client and initiate the update process.
Note: The update process will restart Archiware Pure and any active backup or restore
Archiware Pure User Manual 34/35

tasks will consequently be interrupted. Please make sure that there are no active jobs atthe time of the update.
SupportIn order to aid customer support, Archiware Pure can collect and pack the necessarysupport data to be forwarded to the support staff if requested. The support packagecontains the Archiware Pure's log files, configuration, selected OS logs and the vSphere'sinventory and configuration. Click on the Download Support Data button to prepare anddownload a zip archive to be attached to your support ticket, if requested by theArchiware support staff.
Archiware Pure User Manual 35/35