P4 Game Scratch Notes Chapter 1: Getting StartedMalbow/COMP1671/Notes/ScratchNotes_1.pdfP4 Game...
25
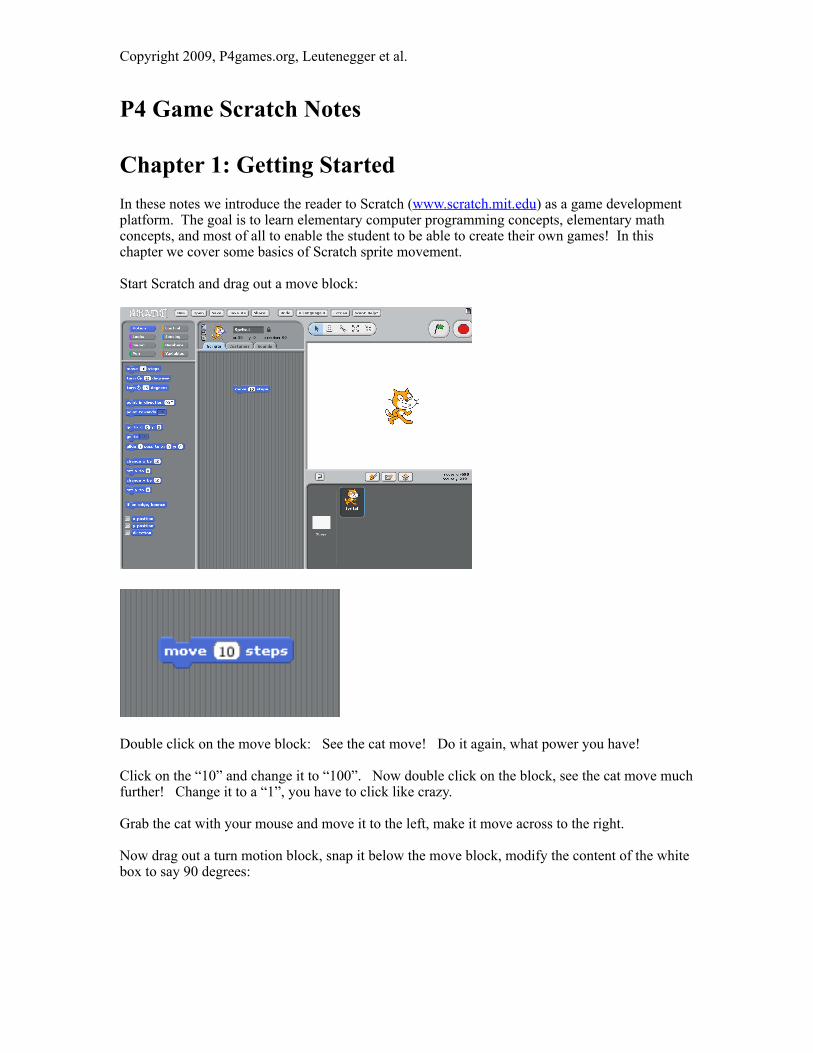
P4 Game Scratch Notes Chapter 1: Getting Started In these notes we introduce the reader to Scratch (www.scratch.mit.edu ) as a game development platform. The goal is to learn elementary computer programming concepts, elementary math concepts, and most of all to enable the student to be able to create their own games! In this chapter we cover some basics of Scratch sprite movement. Start Scratch and drag out a move block: Double click on the move block: See the cat move! Do it again, what power you have! Click on the “10” and change it to “100”. Now double click on the block, see the cat move much further! Change it to a “1”, you have to click like crazy. Grab the cat with your mouse and move it to the left, make it move across to the right. Now drag out a turn motion block, snap it below the move block, modify the content of the white box to say 90 degrees: Copyright 2009, P4games.org, Leutenegger et al.
Transcript of P4 Game Scratch Notes Chapter 1: Getting StartedMalbow/COMP1671/Notes/ScratchNotes_1.pdfP4 Game...
P4 Game Scratch Notes
Chapter 1: Getting StartedIn these notes we introduce the reader to Scratch (www.scratch.mit.edu) as a game development platform. The goal is to learn elementary computer programming concepts, elementary math concepts, and most of all to enable the student to be able to create their own games! In this chapter we cover some basics of Scratch sprite movement.
Start Scratch and drag out a move block:
Double click on the move block: See the cat move! Do it again, what power you have!
Click on the “10” and change it to “100”. Now double click on the block, see the cat move much further! Change it to a “1”, you have to click like crazy.
Grab the cat with your mouse and move it to the left, make it move across to the right.
Now drag out a turn motion block, snap it below the move block, modify the content of the white box to say 90 degrees:
Copyright 2009, P4games.org, Leutenegger et al.
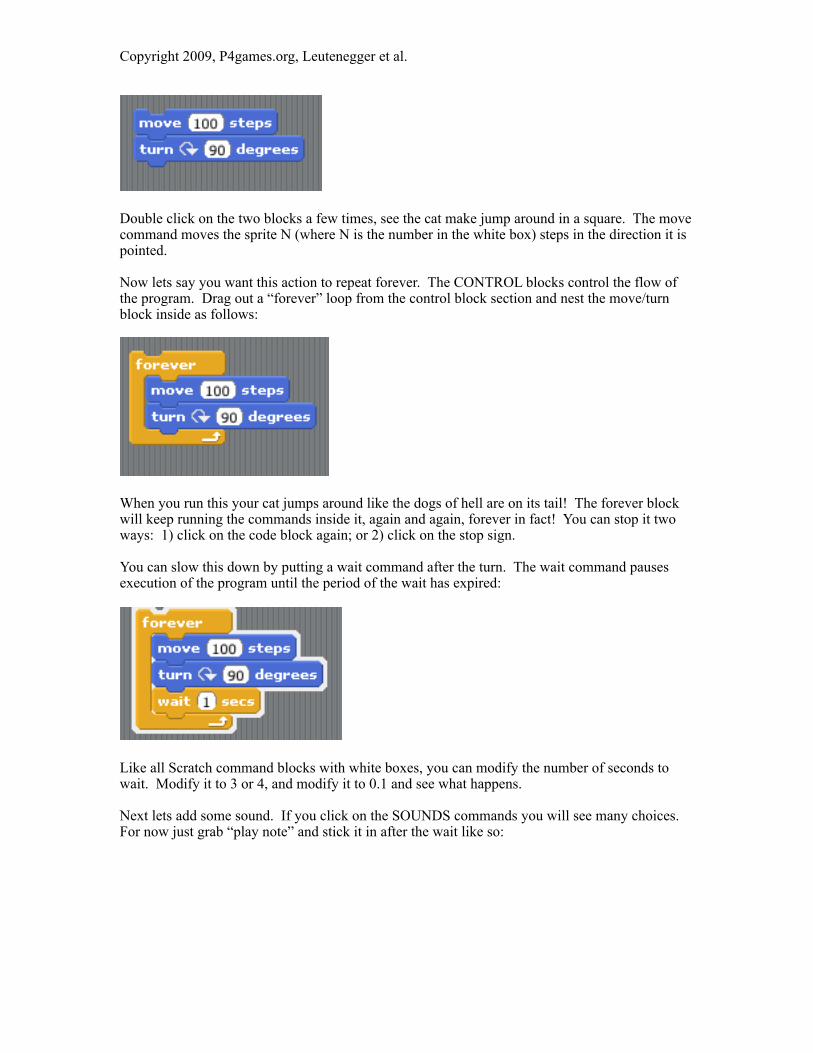
Double click on the two blocks a few times, see the cat make jump around in a square. The move command moves the sprite N (where N is the number in the white box) steps in the direction it is pointed.
Now lets say you want this action to repeat forever. The CONTROL blocks control the flow of the program. Drag out a “forever” loop from the control block section and nest the move/turn block inside as follows:
When you run this your cat jumps around like the dogs of hell are on its tail! The forever block will keep running the commands inside it, again and again, forever in fact! You can stop it two ways: 1) click on the code block again; or 2) click on the stop sign.
You can slow this down by putting a wait command after the turn. The wait command pauses execution of the program until the period of the wait has expired:
Like all Scratch command blocks with white boxes, you can modify the number of seconds to wait. Modify it to 3 or 4, and modify it to 0.1 and see what happens.
Next lets add some sound. If you click on the SOUNDS commands you will see many choices. For now just grab “play note” and stick it in after the wait like so:
Copyright 2009, P4games.org, Leutenegger et al.
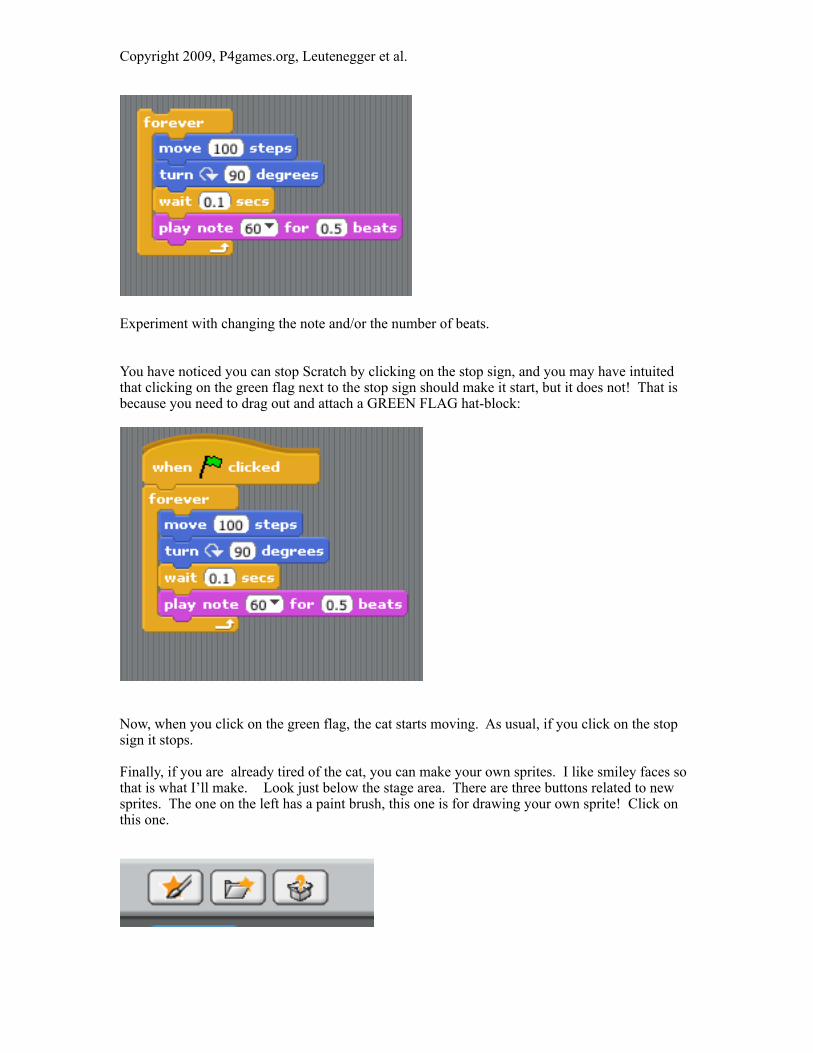
Experiment with changing the note and/or the number of beats.
You have noticed you can stop Scratch by clicking on the stop sign, and you may have intuited that clicking on the green flag next to the stop sign should make it start, but it does not! That is because you need to drag out and attach a GREEN FLAG hat-block:
Now, when you click on the green flag, the cat starts moving. As usual, if you click on the stop sign it stops.
Finally, if you are already tired of the cat, you can make your own sprites. I like smiley faces so that is what I’ll make. Look just below the stage area. There are three buttons related to new sprites. The one on the left has a paint brush, this one is for drawing your own sprite! Click on this one.
Copyright 2009, P4games.org, Leutenegger et al.
It opens a paint editor that is pretty self-explanatory. When you are done drawing click okay and a new sprite is created. You will notice this new sprite has no code blocks associated with it. Just start dragging some in and make a script for this sprite. If you give this sprite a script that also uses the green flag hat-block then when you click the green flag both sprites will run their own script. In the games you create later you will have many sprites, most will have their own scripts, and many will be running simultaneously.
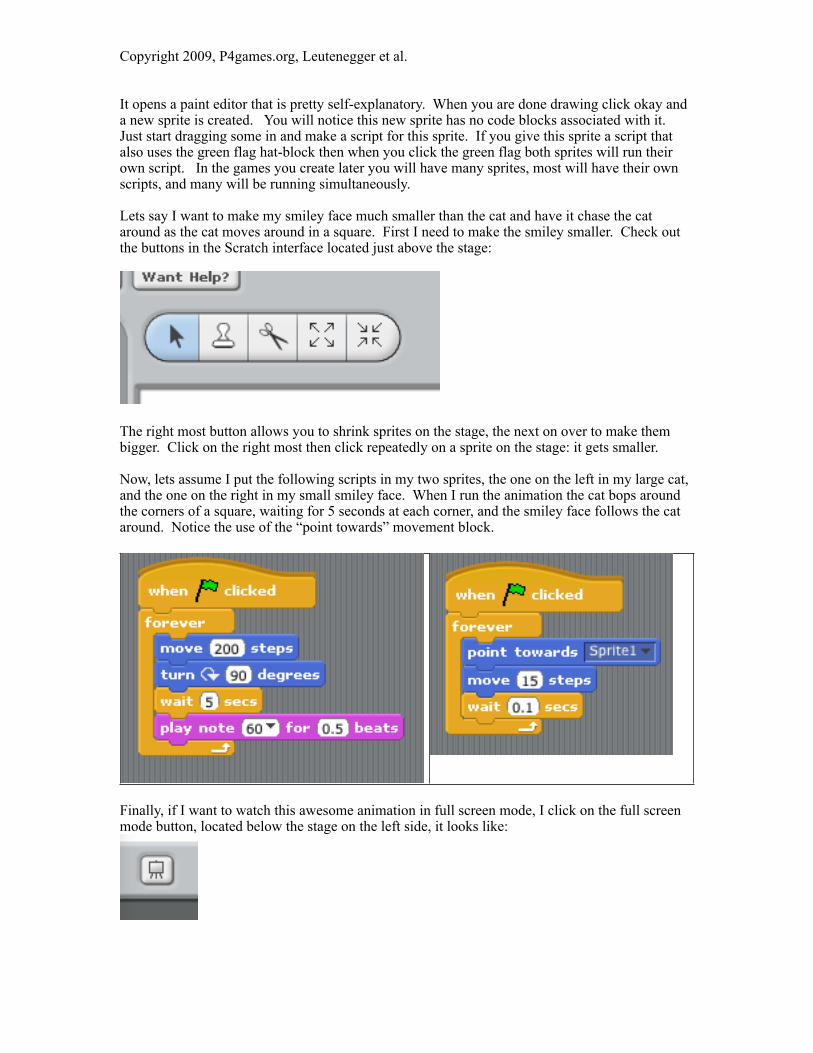
Lets say I want to make my smiley face much smaller than the cat and have it chase the cat around as the cat moves around in a square. First I need to make the smiley smaller. Check out the buttons in the Scratch interface located just above the stage:
The right most button allows you to shrink sprites on the stage, the next on over to make them bigger. Click on the right most then click repeatedly on a sprite on the stage: it gets smaller.
Now, lets assume I put the following scripts in my two sprites, the one on the left in my large cat, and the one on the right in my small smiley face. When I run the animation the cat bops around the corners of a square, waiting for 5 seconds at each corner, and the smiley face follows the cat around. Notice the use of the “point towards” movement block.
Finally, if I want to watch this awesome animation in full screen mode, I click on the full screen mode button, located below the stage on the left side, it looks like:
Copyright 2009, P4games.org, Leutenegger et al.

Chapter 2: Simple 2D Motion
A common task in a game is to have a sprite move around the screen on its own. A very simple way to make a sprite move around the screen is as follows:
In this example when you click on the start flag the sprite is first set to point in the direction of 35 degrees. Then, there is a forever loop that moves 6 steps in that direction and checks to see if the sprite is on a screen edge. If the sprite is on an edge it “bounces”, i.e. resets its direction to bounce away from the edge.
You will note the cat rotates. You may instead want the cat to just remain upright instead of rotating. To do this look at the area above the script box, as pictured below. You will see three buttons on the left. If you click on the middle button, the sprite will be constrained to remain upright, only turning left-right. Note, the direction of the sprite as well as the current coordinates can be seen in this window. In the example below, the cat is pointed 35 degrees and is at location ( -9, 52 ). Also notice the blue line on the sprite picture, this is pointing in the direction the sprite is pointing. Now change the sprite to left-right only, by clicking the middle button, and run again. Observe how the direction of the sprite, i.e. the direction it will move when issued a “move 6 steps” command, does change as indicated by the blue line, but the sprite itself remains facing left-right only.
Copyright 2009, P4games.org, Leutenegger et al.
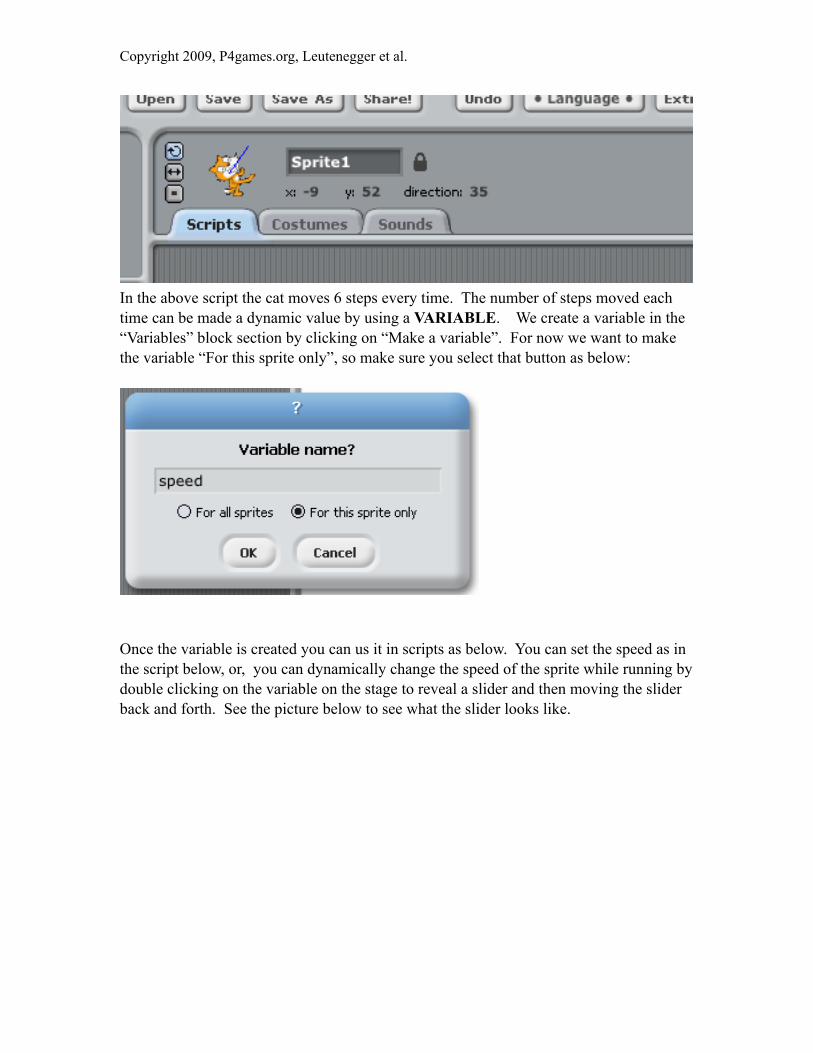
In the above script the cat moves 6 steps every time. The number of steps moved each time can be made a dynamic value by using a VARIABLE. We create a variable in the “Variables” block section by clicking on “Make a variable”. For now we want to make the variable “For this sprite only”, so make sure you select that button as below:
Once the variable is created you can us it in scripts as below. You can set the speed as in the script below, or, you can dynamically change the speed of the sprite while running by double clicking on the variable on the stage to reveal a slider and then moving the slider back and forth. See the picture below to see what the slider looks like.
Copyright 2009, P4games.org, Leutenegger et al.
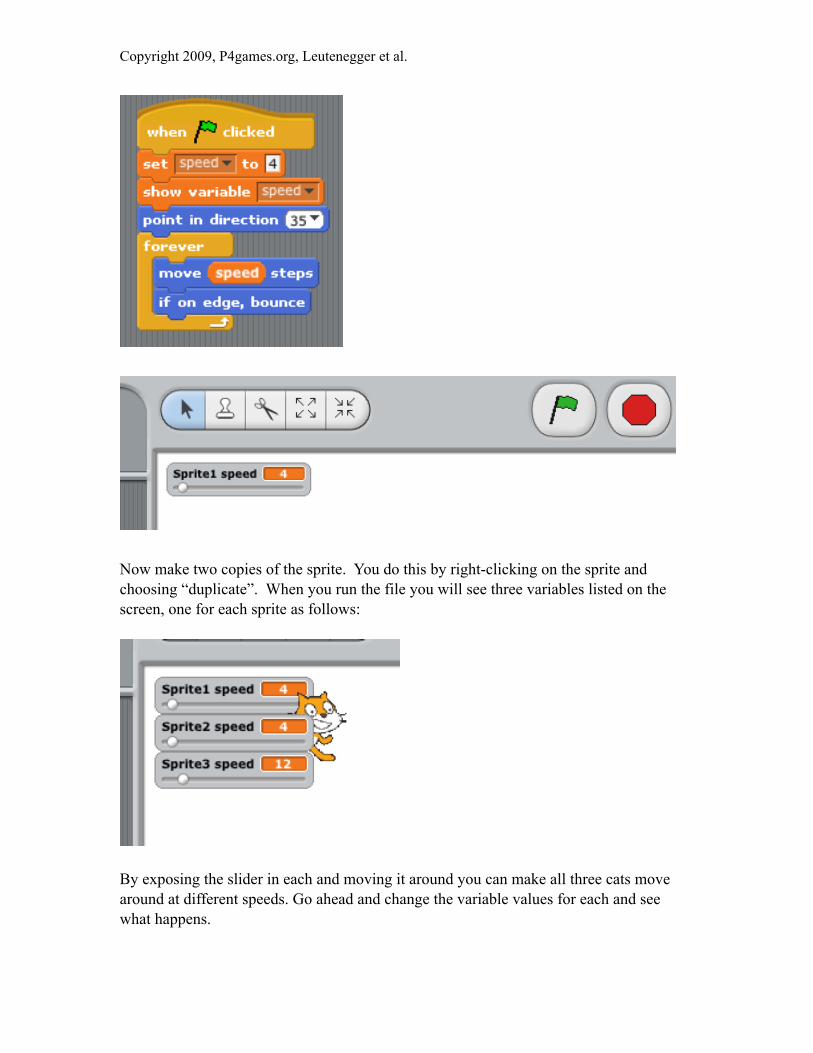
Now make two copies of the sprite. You do this by right-clicking on the sprite and choosing “duplicate”. When you run the file you will see three variables listed on the screen, one for each sprite as follows:
By exposing the slider in each and moving it around you can make all three cats move around at different speeds. Go ahead and change the variable values for each and see what happens.
Copyright 2009, P4games.org, Leutenegger et al.

Coordinate System
In Scratch, each sprite has an x,y position corresponding to its location on the coordinate system. Unlike many other graphics programming languages, the coordinate system in Scratch is the same one you were taught in middle school. The origin, (0,0), is in the middle of the screen, x increases to the right, and y increases going up. The scratch stage is 480x360 pixels. Thus, the larges positive X position is 240, and the largest positive Y position is 180. To assist understanding the coordinate system you can include this coordinate system background, below, in your projects as you continue to learn Scratch. We recommend this while learning. Just download the example file and use it for experimenting. Note, unless you are making a math game you will probably not use this background once you understand the coordinate system in Scratch.
PLEASE DO NOT rush and skip this section, a thorough understanding of the coordinate system will make the rest of learning Scratch much easier.
EXAMPLE CODE:
• ex_coordinateTemplate.sb
Copyright 2009, P4games.org, Leutenegger et al.
This is the first of many Scratch files for you to download to accompany the examples in these notes. Just go to the web site, right-click on the desired file, chose “download linked file as”, and save it on your computer. Then just double click on the file to open it in Scratch. Note, in some cases your browser will download this file and name it: ex_coordinateTemplate.sb.txt and then try to open it as a .txt (or text) file. If this happens to you, just change the name of the file on your computer to remove the .txt suffix, leaving the .sb suffix as the end of the file name.
EXERICSE: Open up ex_coordinaeTemplate.sb. Notice there is one sprite on the screen, a small black circle. Double click on the move block in the script area for this sprite and see the sprite move. Look at the location on the coordinate system background image and look at it at the top of the middle window where the x/y position and direction are shown. Experiment by moving the circle around using the move and turn blocks as well as dragging it around with your mouse. Notice the x,y location change.
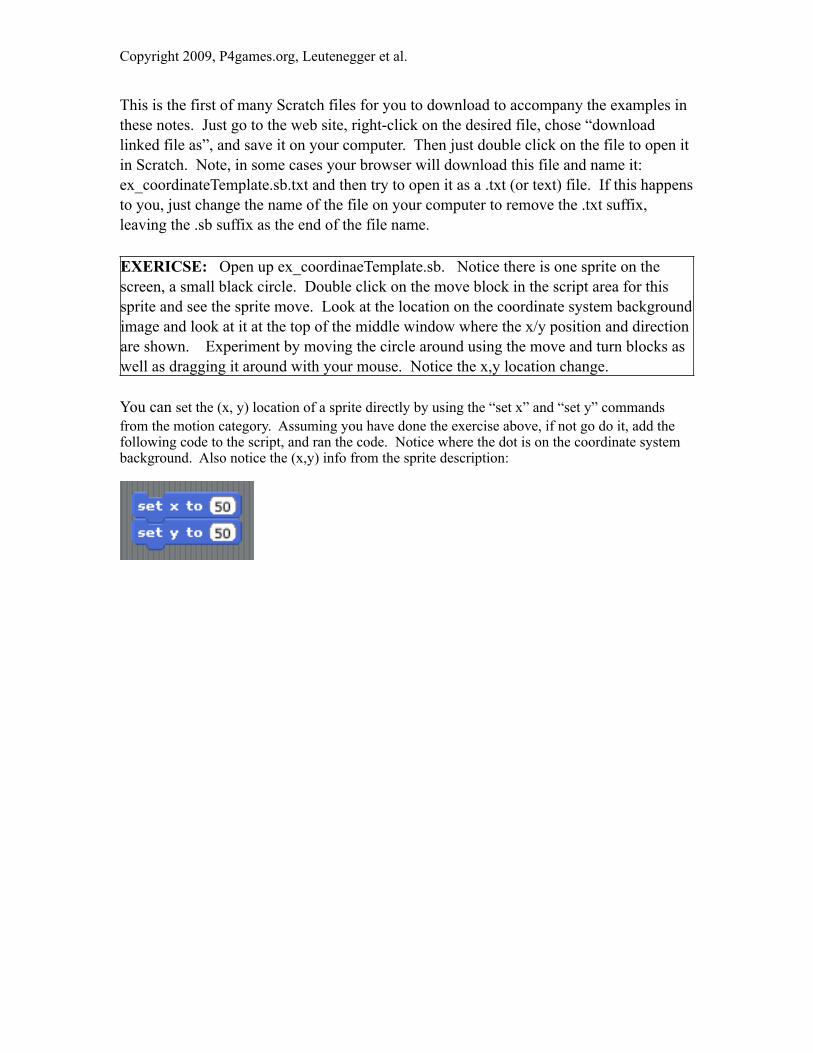
You can set the (x, y) location of a sprite directly by using the “set x” and “set y” commands from the motion category. Assuming you have done the exercise above, if not go do it, add the following code to the script, and ran the code. Notice where the dot is on the coordinate system background. Also notice the (x,y) info from the sprite description:
Copyright 2009, P4games.org, Leutenegger et al.

In addition to using the “set x” and “set y” blocks, there is a block that sets both at once. Using the “go to x y” block below, the sprite will be moved to location (150, -50).
Copyright 2009, P4games.org, Leutenegger et al.

Chapter 3: If/Else, Removing Sprites With the Mouse, Keyboard-Control Sprites, and Global Counters
If/Else and If
Often in programming one needs to do some set of actions if the condition is true and another set of actions if the condition is not true. In other cases one needs to do a set of actions if a condition is true but does not want to do anything if not true. The former is an if/else statement while the later is known as an if statement.
As a concrete example in Scratch, lets say you want the cat to move around the screen and be normal size when it is in the right hand of the stage (i.e. the sprite’s x-coordinate is greater than zero) and you want the cat to be half size when on the left side of the stage. First, note the “set size” command scales the sprite to some percentage of its size. For example, the following command makes the sprite half size:
Now, here is the code to do move the cat around and set the size according to its x-coordinate:
Copyright 2009, P4games.org, Leutenegger et al.

This code uses the if/else statement:
If the condition put into sideways diamond space is true, do the first set of commands, i.e. any commands put into the first space, else do the second set of commands, i.e. any commands put into the second space. The condition is built up of operators from the operators blocks (called the numbers blocks in version 1.3 and before). Note, only diamond shaped blocks will fit into the space including:
In the script above we chose the > condition for the if statement, i.e. if the left operand is greater than the right operand. We chose the x-position (from the Looks blocks) for the left operand and 0 for the right operand. The operators “and”, “or”, “not” can be used to create more complicated expressions as you will see later on.
Note, in general, one does not always have a desired else behavior, in which case one just uses the if command.
If the condition is true do the commands you put into the space. If not true, do nothing.
Copyright 2009, P4games.org, Leutenegger et al.
Removing Sprites With the Mouse
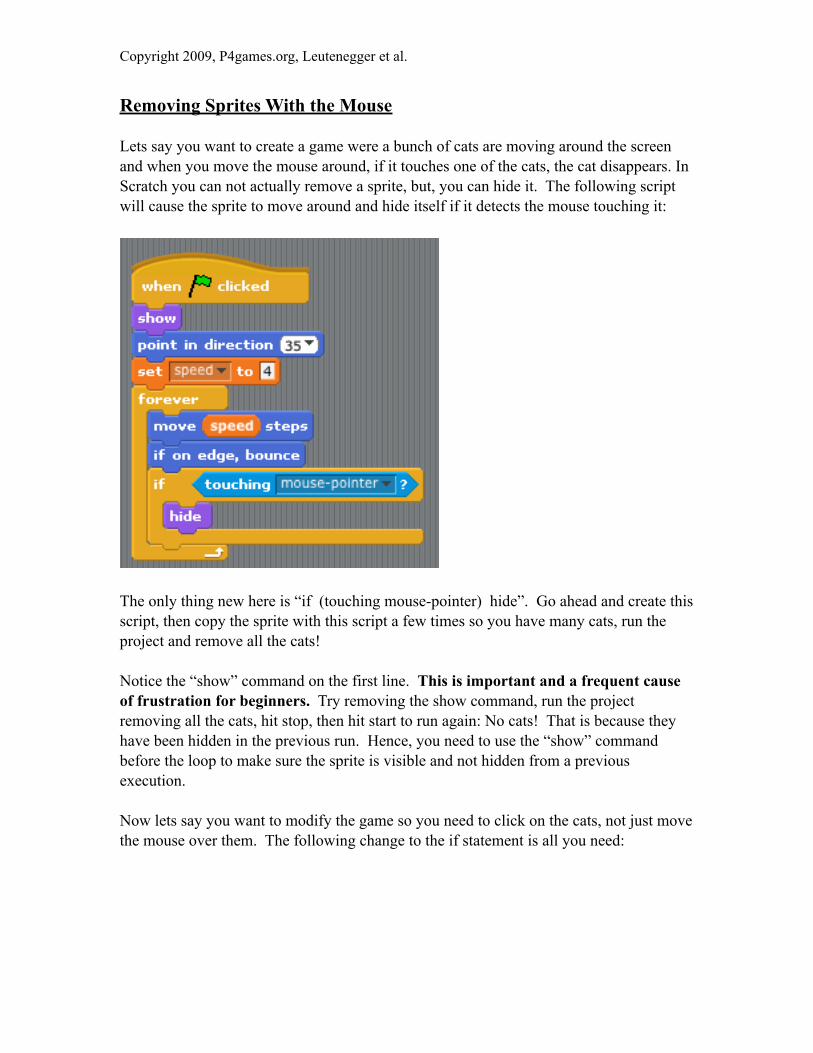
Lets say you want to create a game were a bunch of cats are moving around the screen and when you move the mouse around, if it touches one of the cats, the cat disappears. In Scratch you can not actually remove a sprite, but, you can hide it. The following script will cause the sprite to move around and hide itself if it detects the mouse touching it:
The only thing new here is “if (touching mouse-pointer) hide”. Go ahead and create this script, then copy the sprite with this script a few times so you have many cats, run the project and remove all the cats!
Notice the “show” command on the first line. This is important and a frequent cause of frustration for beginners. Try removing the show command, run the project removing all the cats, hit stop, then hit start to run again: No cats! That is because they have been hidden in the previous run. Hence, you need to use the “show” command before the loop to make sure the sprite is visible and not hidden from a previous execution.
Now lets say you want to modify the game so you need to click on the cats, not just move the mouse over them. The following change to the if statement is all you need:
Copyright 2009, P4games.org, Leutenegger et al.
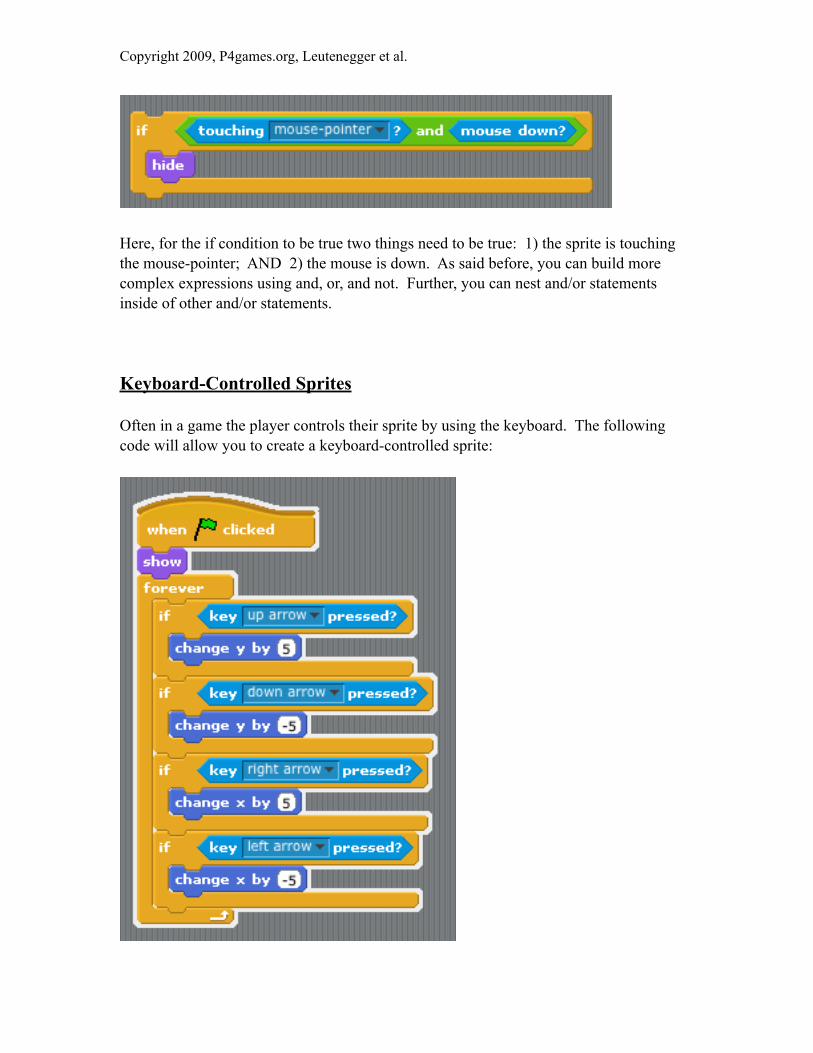
Here, for the if condition to be true two things need to be true: 1) the sprite is touching the mouse-pointer; AND 2) the mouse is down. As said before, you can build more complex expressions using and, or, and not. Further, you can nest and/or statements inside of other and/or statements.
Keyboard-Controlled Sprites
Often in a game the player controls their sprite by using the keyboard. The following code will allow you to create a keyboard-controlled sprite:
Copyright 2009, P4games.org, Leutenegger et al.
Note in the above code we are using the “change x by” and “change y by” commands. We have not used these before, they simply change the x and y location of the sprite by the amount specified. Often in keyboard controlled games the WASD keys, i.e. “w”, “a”, “s”, and “d” keys, are used to control sprite movement. It should be obvious now how to make WASD keys move the sprite.
EXERCISE: Create a game were you have 5 sprites, say 5 smiley faces, that move around the screen on their own and one player key-controlled sprite. Make it so that when the player touches one of the smiley faces the smiley face disappears.
Gobal Counters (Variables)
Example code files for this section:
• ex_globalCounter.sb• ex_globalCounterMouse1.sb• ex_globalCounterMouse2.sb• ex_globalCounterMouse3.sb• ex_globalCounterMouse4.sb
Often we will want to keep of a count during gameplay, for example the number of coins left or the number of bad guys captured. We use a variable to hold this information. Unlike previous variable examples, this time instead of selecting the variable “for this sprite only” we set the variable to be “for all sprites”. This way the counter variable can be accessed from the script code in any sprite on in the stage script. This type of variable is knows as a “global variable” in most other programming languages as it is accessible globally, i.e. from anyplace.
Say I am creating a variable I will use to keep track of the number of mice sprites left, then this is what the variable creation window would look like. Notice how I check the “For all sprites” button:
Copyright 2009, P4games.org, Leutenegger et al.
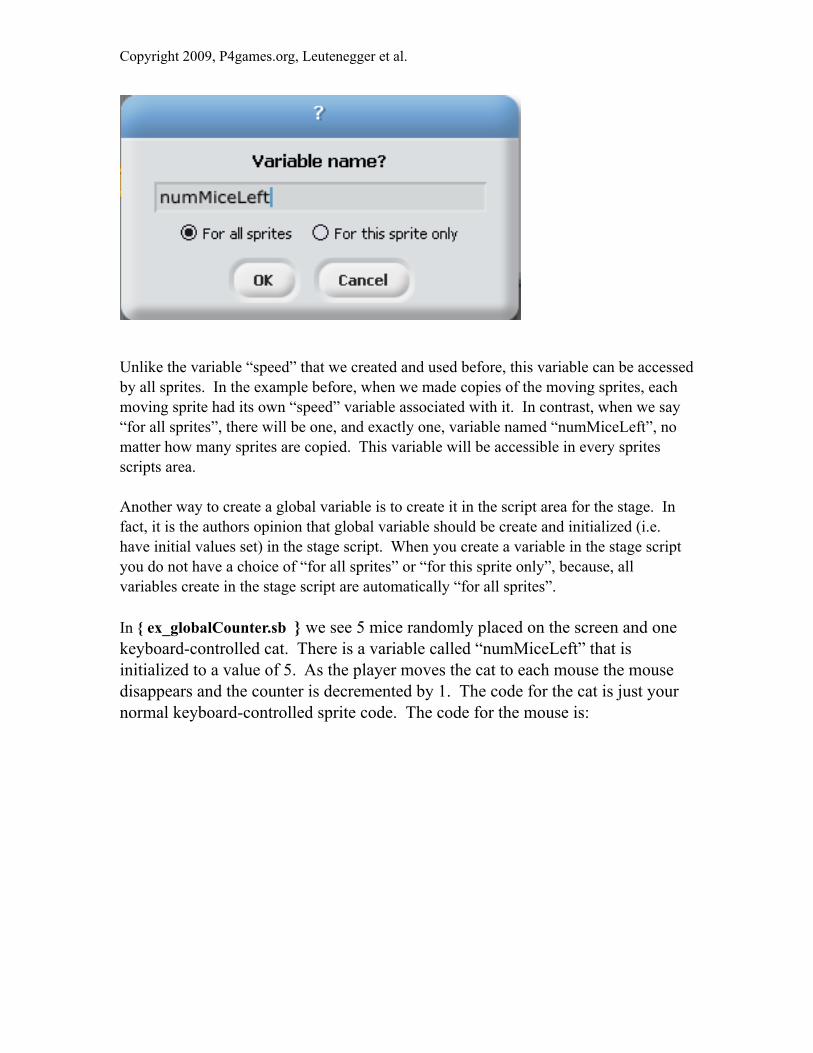
Unlike the variable “speed” that we created and used before, this variable can be accessed by all sprites. In the example before, when we made copies of the moving sprites, each moving sprite had its own “speed” variable associated with it. In contrast, when we say “for all sprites”, there will be one, and exactly one, variable named “numMiceLeft”, no matter how many sprites are copied. This variable will be accessible in every sprites scripts area.
Another way to create a global variable is to create it in the script area for the stage. In fact, it is the authors opinion that global variable should be create and initialized (i.e. have initial values set) in the stage script. When you create a variable in the stage script you do not have a choice of “for all sprites” or “for this sprite only”, because, all variables create in the stage script are automatically “for all sprites”.
In { ex_globalCounter.sb } we see 5 mice randomly placed on the screen and one keyboard-controlled cat. There is a variable called “numMiceLeft” that is initialized to a value of 5. As the player moves the cat to each mouse the mouse disappears and the counter is decremented by 1. The code for the cat is just your normal keyboard-controlled sprite code. The code for the mouse is:
Copyright 2009, P4games.org, Leutenegger et al.
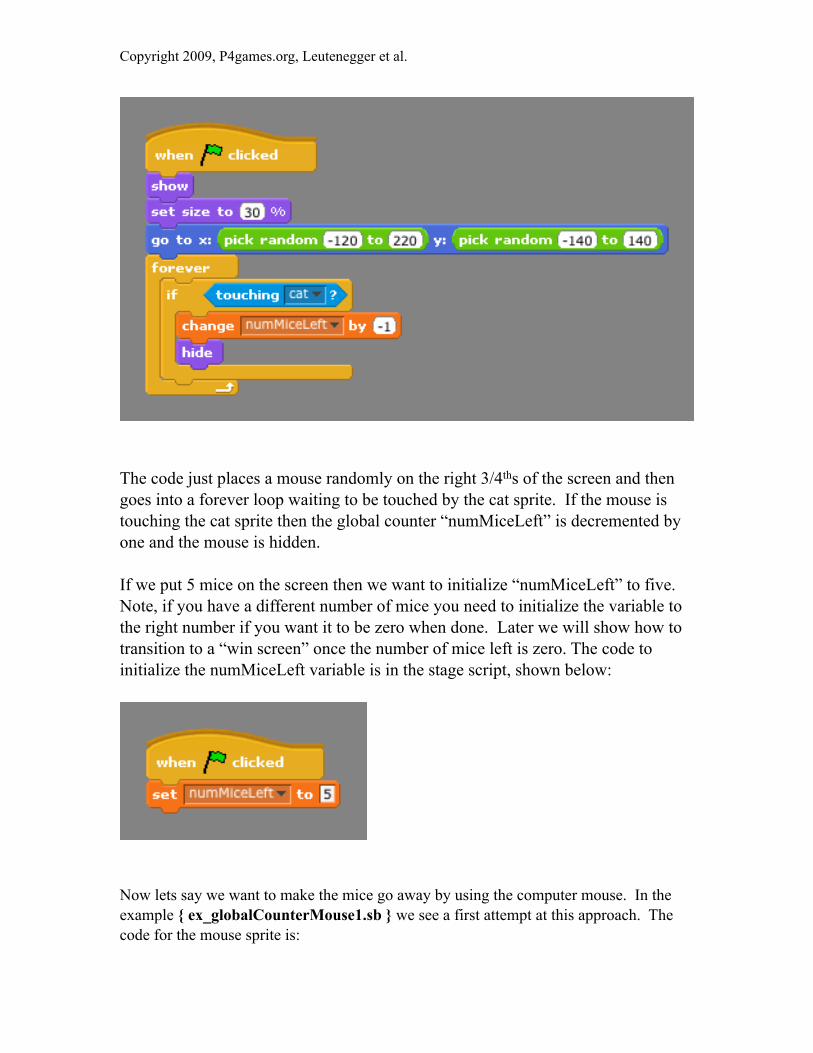
The code just places a mouse randomly on the right 3/4ths of the screen and then goes into a forever loop waiting to be touched by the cat sprite. If the mouse is touching the cat sprite then the global counter “numMiceLeft” is decremented by one and the mouse is hidden.
If we put 5 mice on the screen then we want to initialize “numMiceLeft” to five. Note, if you have a different number of mice you need to initialize the variable to the right number if you want it to be zero when done. Later we will show how to transition to a “win screen” once the number of mice left is zero. The code to initialize the numMiceLeft variable is in the stage script, shown below:
Now lets say we want to make the mice go away by using the computer mouse. In the example { ex_globalCounterMouse1.sb } we see a first attempt at this approach. The code for the mouse sprite is:
Copyright 2009, P4games.org, Leutenegger et al.
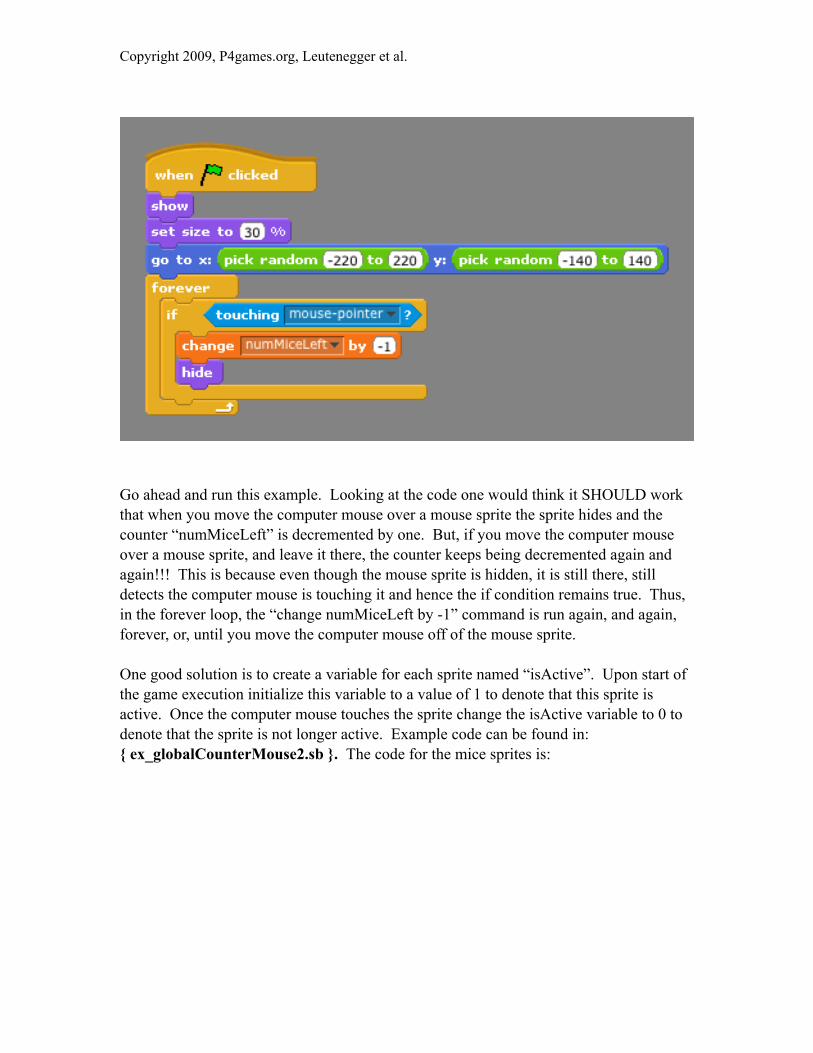
Go ahead and run this example. Looking at the code one would think it SHOULD work that when you move the computer mouse over a mouse sprite the sprite hides and the counter “numMiceLeft” is decremented by one. But, if you move the computer mouse over a mouse sprite, and leave it there, the counter keeps being decremented again and again!!! This is because even though the mouse sprite is hidden, it is still there, still detects the computer mouse is touching it and hence the if condition remains true. Thus, in the forever loop, the “change numMiceLeft by -1” command is run again, and again, forever, or, until you move the computer mouse off of the mouse sprite.
One good solution is to create a variable for each sprite named “isActive”. Upon start of the game execution initialize this variable to a value of 1 to denote that this sprite is active. Once the computer mouse touches the sprite change the isActive variable to 0 to denote that the sprite is not longer active. Example code can be found in: { ex_globalCounterMouse2.sb }. The code for the mice sprites is:
Copyright 2009, P4games.org, Leutenegger et al.

Notice that for the if statement to evaluate to “true”, and hence for the numMiceLeft variable to be decremented, two conditions must both be met: the sprite must be touching the mouse-pointer AND the variable isActive must be equal to 1. Inside the commands for the if statement we set the variable isActive to zero, hence, this if statement will only evaluate to true once and numMiceLeft only gets decremented once, even if the mouse is allowed to remain over the hidden sprite.
Note, we now have an “isActive” variable for each sprite, and, we have one global variable for holding “numMiceLeft”. In Scratch one can tell “for all sprites” variables versus “for this sprite only” variables by looking at the variables in the Variable command block section. If you click on variables in this example you will see the following:
Copyright 2009, P4games.org, Leutenegger et al.
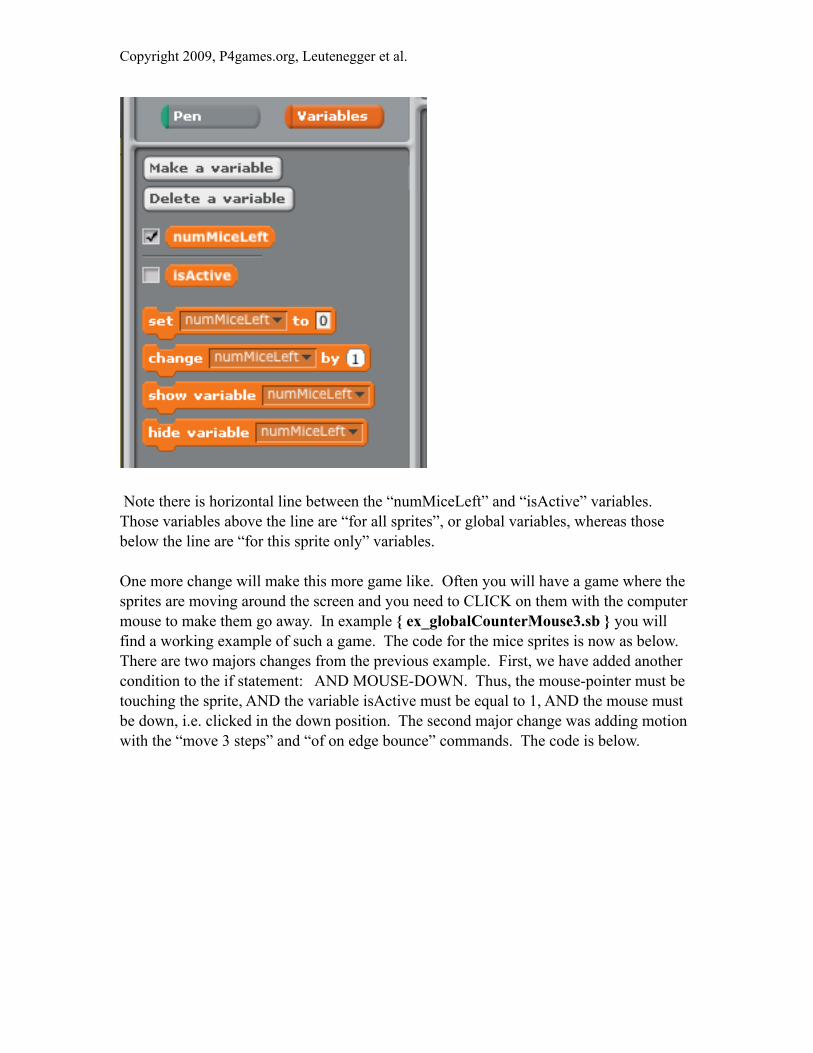
Note there is horizontal line between the “numMiceLeft” and “isActive” variables. Those variables above the line are “for all sprites”, or global variables, whereas those below the line are “for this sprite only” variables.
One more change will make this more game like. Often you will have a game where the sprites are moving around the screen and you need to CLICK on them with the computer mouse to make them go away. In example { ex_globalCounterMouse3.sb } you will find a working example of such a game. The code for the mice sprites is now as below. There are two majors changes from the previous example. First, we have added another condition to the if statement: AND MOUSE-DOWN. Thus, the mouse-pointer must be touching the sprite, AND the variable isActive must be equal to 1, AND the mouse must be down, i.e. clicked in the down position. The second major change was adding motion with the “move 3 steps” and “of on edge bounce” commands. The code is below.
Copyright 2009, P4games.org, Leutenegger et al.

One final note: there are almost always more than one way to solve a problem. The problem that we had was the sprites still existed after being hidden and kept detecting the mouse pointer even after they were clicked on once. We solved this problem by adding a “isActive” variable to each sprite so that the action from clicking on the sprite, i.e. decrementing the number of mice left variable, could only be done once per sprite. Another option would have been to stop the script as found in example { ex_globalCounterMouse4.sb }. Here, we do not use an extra variable, instead, when we hide the sprite we also call “stop script” that stops this one script from running, hence, it will not detect the mouse any more. One can argue this is a simpler solution, and it is, but, we then would have deprived you of learning more about using variables to solve problems! The code is below, notice the “stop script” command just below the “hide” command:
Copyright 2009, P4games.org, Leutenegger et al.

Copyright 2009, P4games.org, Leutenegger et al.

Chapter 4: Chase and Patrol Behavior
Example Code:
• ex_chase.sb• ex_patrolAndChase.sb
In some games you will want sprites to chase the player. When a sprite moves about on its own it is usually called a “Non Player Character”, or NPC for short. Lets say you want to create a ghost sprite that chases the player around. Assume the player is a keyboard-controlled sprite and the sprite is named “Boy”. The following script will make the ghost follow the boy around:
Copyright 2009, P4games.org, Leutenegger et al.
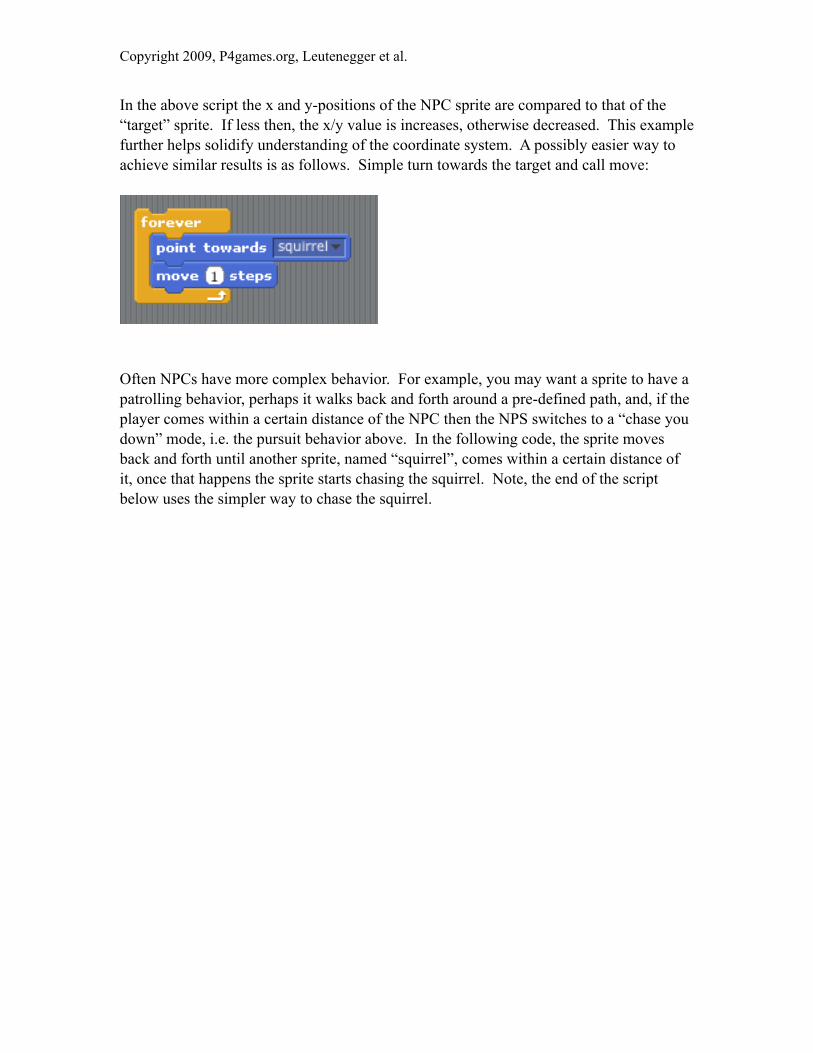
In the above script the x and y-positions of the NPC sprite are compared to that of the “target” sprite. If less then, the x/y value is increases, otherwise decreased. This example further helps solidify understanding of the coordinate system. A possibly easier way to achieve similar results is as follows. Simple turn towards the target and call move:
Often NPCs have more complex behavior. For example, you may want a sprite to have a patrolling behavior, perhaps it walks back and forth around a pre-defined path, and, if the player comes within a certain distance of the NPC then the NPS switches to a “chase you down” mode, i.e. the pursuit behavior above. In the following code, the sprite moves back and forth until another sprite, named “squirrel”, comes within a certain distance of it, once that happens the sprite starts chasing the squirrel. Note, the end of the script below uses the simpler way to chase the squirrel.
Copyright 2009, P4games.org, Leutenegger et al.

Copyright 2009, P4games.org, Leutenegger et al.


![Βίντεο για εκμάθηση Scratch 1€¦ · Φύλλα εργασίας για εκμάθηση Scratch 1͙4 – Κοκκόρη Αθηνά [3] Εφαρογή σο Scratch:](https://static.fdocuments.in/doc/165x107/5fa1e23ac073f719dc091d73/-f-scratch-1-f-.jpg)