P2302HWL QSG V3-40 2006-7-19download.from.zyxel.ru/caba56da-c3fc-4825-b4f4-771... ·...
12
P-2302HW/HWL-P1 802.11b/g Wireless VoIP Station Gateway Quick Start Guide Version 3.60 Edition 1 8/2006
Transcript of P2302HWL QSG V3-40 2006-7-19download.from.zyxel.ru/caba56da-c3fc-4825-b4f4-771... ·...

P-2302HW/HWL-P1802.11b/g Wireless VoIP Station Gateway
Quick Start Guide
Version 3.60Edition 18/2006
P-2302HW/HWL-P1 Series Quick Start Guide
2
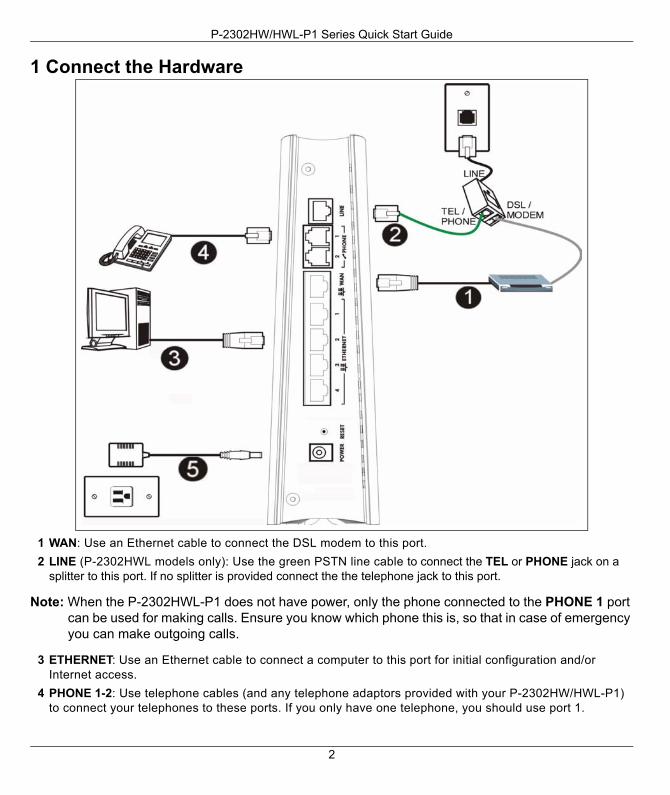
1 Connect the Hardware
1 WAN: Use an Ethernet cable to connect the DSL modem to this port.2 LINE (P-2302HWL models only): Use the green PSTN line cable to connect the TEL or PHONE jack on a
splitter to this port. If no splitter is provided connect the the telephone jack to this port.
Note: When the P-2302HWL-P1 does not have power, only the phone connected to the PHONE 1 port can be used for making calls. Ensure you know which phone this is, so that in case of emergency you can make outgoing calls.
3 ETHERNET: Use an Ethernet cable to connect a computer to this port for initial configuration and/or Internet access.
4 PHONE 1-2: Use telephone cables (and any telephone adaptors provided with your P-2302HW/HWL-P1) to connect your telephones to these ports. If you only have one telephone, you should use port 1.

P-2302HW/HWL-P1 Series Quick Start Guide
3
5 POWER: Use the power adaptor provided with your P-2302HW/HWL-P1 to connect an appropriate power source to this socket.
1.1 LEDs (Lights)• The POWER light blinks during start-up and is green once the P-2302HWL-P1 is ready.
• Each ETHERNET light turns on if the corresponding ETHERNET port is properly connected. The lights blink when the P-2302HWL-P1 is sending or receiving data through the correspond-ing ETHERNET port.
• The WAN light stays on if a physical connection with your DSL modem exists. The INTERNET light stays on when Internet access is available.
• The PHONE lights stay on when your SIP account is registered and they blink if the receiver is off the hook.
• The WLAN light turns on when the wireless LAN is ready. It blinks when the P-2302HWL-P1 is sending/receiving data through the wireless LAN.
2 Initial Configuration
If none of the LEDs are on, turn the device off and recheck your hardware connections.
1 Open your browser, and go to http://192.168.1.1. 2 Enter the password 1234. Then, click Login.

P-2302HW/HWL-P1 Series Quick Start Guide
4
2.1 Connection Wizard
The connection wizard helps you set up your Internet connection as well as your wireless settings. Click CONNECTION WIZARD. .
Note: Enter the Internet access information exactly as given to you by your ISP in each wizard screen and then click Next to continue or click Back to return to the previous screen.
Current screen information will be lost if you click Back.
3 Follow the directions in this screen. 4 Click Go to Wizard setup.

P-2302HW/HWL-P1 Series Quick Start Guide
5
STEP 1: System Information
STEP 2: Wireless LANA Select None for your initial wireless security.B Select No in the Do you want to enable OTIST ? radio button.
Note: These settings allow you to access the wireless network without setting up any security on your wireless client. This means that any wireless device within range of your P-2302HW/HWL-P1 can access your wireless network.
If you know the security settings you want to set up you can also enter them in these screens. If you want to set up OTIST, see the following section. Refer to your User’s Guide for more information on setting up your wireless network.
This screen is optional. You can just click Next.• System Name is for identifying the P-2302HW/
HWL-P1. You can enter your computer's "Com-puter Name".
• If you leave the Domain Name blank, the domain name obtained by DHCP from the ISP is used.
A
B

P-2302HW/HWL-P1 Series Quick Start Guide
6
OTISTZyXEL's One-Touch Intelligent Security Technology (OTIST) feature allows you to automatically configure the SSID and WPA-PSK on all OTIST-equipped wireless clients within range of the P-2302HW/HWL-P1.
Note: If you enable OTIST but select Disable wireless security using the wireless wizard, the P-2302HW/HWL-P1 will create a WPA-PSK automatically.
If you enable OTIST and select Manually assign a WEP key using the wireless wizard, the P-2302HW/HWL-P1 will replace the WEP key with a WPA-PSK.
Enable OTIST only if your wireless clients support WPA and OTIST.
You must enable OTIST on the P-2302HW/HWL-P1 and all wireless clients within three minutes in any order.
To enable OTIST on wireless clients, click Start in the Adapter screen. The Setup Key is 01234567 by default. If you have previously saved a setup key on the P-2302HW/HWL-P1, use it instead of the default.
STEP 3: WANSelect one connection type from the drop-down list box. Check with your ISP to make sure you use the correct type:
1 Ethernet2 PPPoE
Note: If you were given Internet access settings, enter them in the following fields. Otherwise leave the default settings and just click Next.

P-2302HW/HWL-P1 Series Quick Start Guide
7
A Select Ethernet as your WAN connection type.B Select Get automatically from your ISP if your ISP did not assign you a fixed IP address. Skip to C.
OrSelect Use fixed IP address provided by your ISP to give the P-2302HW/HWL-P1 a fixed, unique IP address. Go to B1.B1 If you select Use fixed IP address provided by your ISP, enter a WAN IP address, WAN IP Subnet Mask
and the neighboring device’s IP address given by your ISP. If you were given DNS server settings, enter them in the fields. Otherwise leave the default settings and just click Next.
C Select Factory Default to use the factory assigned default MAC address. Click Apply to save your changes. The OTIST in Progress screen appears if you enable OTIST in the previous wizard screen. Wait for the P-2302HW/HWL-P1 to finish transferring OTIST settings.
D Click Finish to complete the wizard.
Ethernet Connection

P-2302HW/HWL-P1 Series Quick Start Guide
8
A
B
C
B1

P-2302HW/HWL-P1 Series Quick Start Guide
9
A Select PPPoE as your WAN connection type.B Type a Service Name (Optional), User Name and Password.C Select Get automatically from your ISP if your ISP did not assign you a fixed IP address. Skip to D.
Or Select Use fixed IP address provided by your ISP to give the P-2302HW/HWL-P1 a fixed, unique IP address. Go to C1.C1 If you select Use fixed IP address provided by your ISP, enter a WAN IP address, WAN IP Subnet Mask
and the neighboring device’s IP address given by your ISP. If you were given DNS server settings, enter them in the fields. Otherwise leave the default settings and just click Next.
D Select Factory Default to use the factory assigned default MAC address. Click Apply to save your changes. The OTIST in Progress screen appears if you enable OTIST in the previous wizard screen. Wait for the P-2302HW/HWL-P1 to finish transferring OTIST settings.
E Click Finish to complete the wizard.
PPPoE Connection

P-2302HW/HWL-P1 Series Quick Start Guide
10
3 Configure VoIPClick VOIP SETUP.
Note: You should have the information provided by your VoIP service provider.
Enter the information provided by your VoIP service provider. Keep the default settings if your VoIP service provider did not provide some information. If you have a SIP account like [email protected], the SIP Number is 1234567, and the SIP Service Domain is VoIP-provider.com. When you are done, the PHONE light should be on. Close the wizard.
AB
C
C1
D
P-2302HW/HWL-P1 Series Quick Start Guide
11
3.1 Regular Phone Line Setup (P-2302HWL-P1 only)When one of your VoIP accounts is registered, the P-2302HWL-P1 normally uses the Internet (not the regular phone line) to make phone calls. Follow the directions in this section to make sure you can also use the regular phone line while one of your VoIP accounts is registered.
Note: When the P-2302HW/HWL-P1 does not have power, only the phone connected to the PHONE 1 port can be used for making calls. Ensure you know which phone this is, so that in case of emergency you can make outgoing calls.
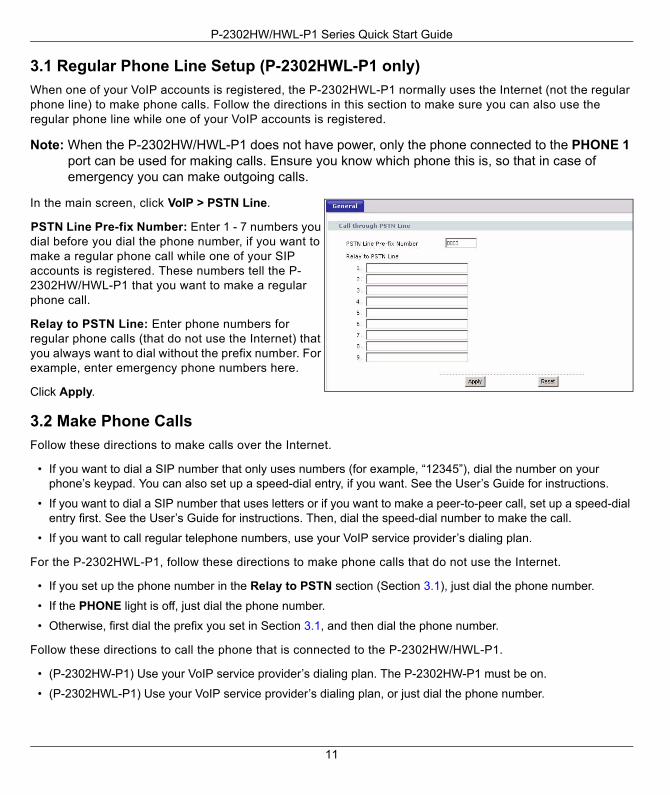
In the main screen, click VoIP > PSTN Line.
PSTN Line Pre-fix Number: Enter 1 - 7 numbers you dial before you dial the phone number, if you want to make a regular phone call while one of your SIP accounts is registered. These numbers tell the P-2302HW/HWL-P1 that you want to make a regular phone call.
Relay to PSTN Line: Enter phone numbers for regular phone calls (that do not use the Internet) that you always want to dial without the prefix number. For example, enter emergency phone numbers here.
Click Apply.
3.2 Make Phone CallsFollow these directions to make calls over the Internet.
• If you want to dial a SIP number that only uses numbers (for example, “12345”), dial the number on your phone’s keypad. You can also set up a speed-dial entry, if you want. See the User’s Guide for instructions.
• If you want to dial a SIP number that uses letters or if you want to make a peer-to-peer call, set up a speed-dial entry first. See the User’s Guide for instructions. Then, dial the speed-dial number to make the call.
• If you want to call regular telephone numbers, use your VoIP service provider’s dialing plan.
For the P-2302HWL-P1, follow these directions to make phone calls that do not use the Internet.
• If you set up the phone number in the Relay to PSTN section (Section 3.1), just dial the phone number.
• If the PHONE light is off, just dial the phone number.
• Otherwise, first dial the prefix you set in Section 3.1, and then dial the phone number.
Follow these directions to call the phone that is connected to the P-2302HW/HWL-P1.
• (P-2302HW-P1) Use your VoIP service provider’s dialing plan. The P-2302HW-P1 must be on.
• (P-2302HWL-P1) Use your VoIP service provider’s dialing plan, or just dial the phone number.

P-2302HW/HWL-P1 Series Quick Start Guide
12
3.3 VoIP Trunking Overview VoIP trunking connects an IP network (like the Internet) and the Public Switched Telephone Network (PSTN). PSTN includes the world’s circuit-switched telephone network which is composed of fixed and mobile telephones. VoIP trunking allows you to create VoIP links which PSTN (Public Switched Telephone Network) callers can use to:
• Make phone calls via the Internet - Make a PSTN call to the P-2302HW/HWL-P1 and it forwards the call to any SIP based VoIP phone.In the example below, we call the P-2302HW/HWL-P1 (B) from a regular phone (A), the P-2302HW/HWL-P1 then forwards the call to a VoIP phone (C).
• Save on long distance calls - The P-2302HW/HWL-P1 creates a VoIP link which can be used to connect to a PSTN phone in another country, province, region and so on. Below is an example of a VoIP trunking call. A calls the P-2302HW/HWL-P1 (B), B makes a VoIP connection to another VoIP trunking device C and C for-wards the call to a PSTN phone D.
See the User’s Guide for information on how to configure VoIP trunking.
Viewing Your Product’s Certifications1 Go to www.zyxel.com.2 Select your product from the drop-down list box on the ZyXEL home page to go to that product's page.3 Select the certification you wish to view from this page.