P118 CONFETTI - Amazon Web Services · 2015-12-08 · AMC DESIGNS Page 3 P118 CONFETTI 11. Sew the...
10
CONFETTI P118 Finished Size: 16" x 16" or 40" x 40" Designed by Annis Clapp fast2sew™ Ultimate Seam Guide
Transcript of P118 CONFETTI - Amazon Web Services · 2015-12-08 · AMC DESIGNS Page 3 P118 CONFETTI 11. Sew the...
CONFETTIP118
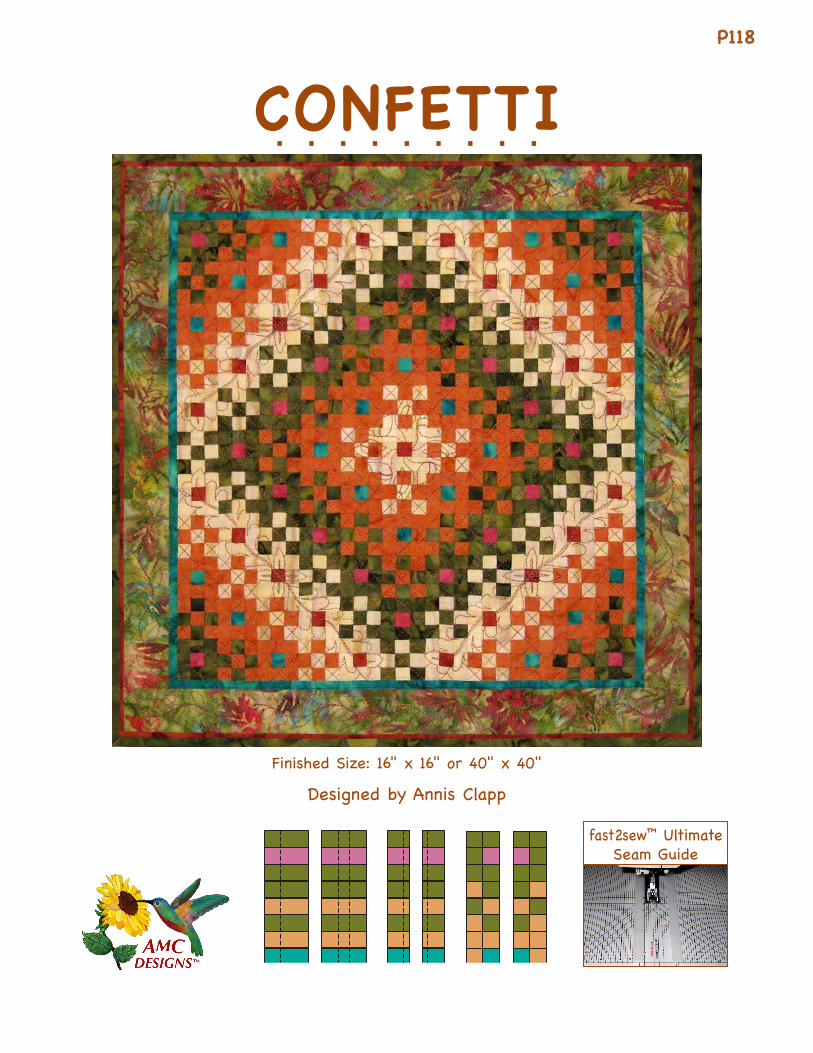
Finished Size: 16" x 16" or 40" x 40"
Designed by Annis Clapp
fast2sew™ Ultimate Seam Guide

CONFETTIRead all instructions carefully before starting.Prewash and iron fabrics.
All strips are cut on the crosswise grain of the fabric. Remove selvage edges before cutting strips. Press seams in the direction of the arrows. Instructions for the larger quilt size are in parenthesis.
PREPARING TO SEW Using an Ultimate Seam Guide will give you a smoother sewing surface and longer, easy to see seam allowance markings for more accurate piecing. It covers the uneven surface between the needle plate and sewing machine cabinet or tray so your fabric will feed smoothly and evenly.
Place the Seam Guide on the sewing machine. (Follow instructions to cut opening for needle and feed dogs.) Make sure the needle lines up with the red sewing line on the Seam Guide and tape in place.
Set sewing machine stitch length to 12-15 stitches per inch (2.0 on some sewing machines).
If you aren’t using a Seam Guide, you can still make this quilt the traditional way by cutting 7/8" (11/2") fabric strips for the strip sets and sewing with a 1/4" seam. Trim seams to 3/16" after sewing on miniature size. The seam alignment may not be as accurate using this technique, but depending on the fabric you are using and your level of perfection this may not be a problem.
Fabric chart
1 4
2 5
3 6
AMC DESIGNS Page 1 P118 CONFETTI
MaKiNG thE QUiLt cENtEr
cUttiNG
Note: These cutting measurements allow for about 1" or more extra width for squaring fabric ends or slight miscuts. There will be additional extra width on Strip Sets B and D.
From each of fabrics 1, 2, & 3, cut:• 6 strips 20" x 11/2" (40" x 3")• 5 strips 10" x 11/2" (20" x 3")From each of fabrics 4, 5, & 6, cut:• 1 strip 10" x 11/2" (20" x 3")
Cut a small swatch from the leftover scraps of each fabric and label 1 thru 6.
MaKiNG a tEst bLocK
1. Adjust Seam Guide Bars for a 3/16" (1/4") seam allowance by placing the left Guide Bar slightly over 9/16" (11/4") from needle. This will allow for the width of the thread and the fold of the seam allowance when it’s pressed to one side. Position the right Guide Bar at the edge of the fabric strip.
2. Cut two 11/2" x 5" (3" x 7") strips from scrap fabrics. Layer and place between the Guide Bars and sew from end to end. The sewn strip should measure exactly 11/8" (21/2") when pressed open. Reposition Guide Bars if needed, sew on the other side of the strip and recheck the measurement.
9/16" (11/4") 11/8" (21/2")

PiEciNG
1. Layer 20"w (40"w) strips right sides together in the following order for sewing. The 2nd number should be on top.
3/3 3/2 3/2 2/2 2/1 2/1 1/1 1/3 1/3
2. Place the 11/2" (3") layered strips between the Guide Bars to sew. The left Guide Bar is the one that determines the seam allowance. Make sure the layered fabric stays against the left Guide Bar as you sew. Chain-sew all strips sets at the same time.
3. Rotate the strips 180º and sew again in the opposite direction.
4. Press seam lines to set seams and cut between sewn lines. Fold longer sewn strips in half for faster cutting. Keep the right and left side in separate stacks as they will be used for separate strip sets.
Left Right
5. Refer to the chart in Step 11 for the pressing directions. Place in order and label as you press.
Left strips for Strip Set A
Right strips for Strip Set B
AMC DESIGNS Page 2 P118 CONFETTI
6. Layer 10"w (20"w) strips right sides together in the following order for sewing:
3/6 3/3 2/3 2/5 2/2 1/2 1/4 1/1 3/1
7. Repeat Steps 2 and 3.
8. Press seam lines to set seams and cut between sewn lines. Keep the right and left side in separate stacks as they will be used for separate strip sets.
Left Right
9. Refer to the chart in Step 12 for the pressing directions. Place in order and label as you press.
Left strips for Strip Set C
Right strips for Strip Set D
10. Remove the left Guide Bar, but remember its position. You will need to use it again. Leave the right Guide Bar in place.
TIP: As you press the seams in Steps 5 and 9, place the strip sets in sewing order as shown in Steps 11 and 12 and circle the numbers (3/3, 3/2, etc.) as you press. Label every other strip set with A1, A2, etc. to help keep in order while sewing.
TIP: An easy way to make labels is to place a strip of masking tape on the cutting mat, write the letters or numbers on the masking tape with a permanent marker, and cut apart with a rotary cutter. These stick to the fabric better than packaged labels.
TIP: If the adhesive on the guide bars does not stick well to the seam guide, add a strip of 3M Poster Tape and trim excess width with a x-acto knife.
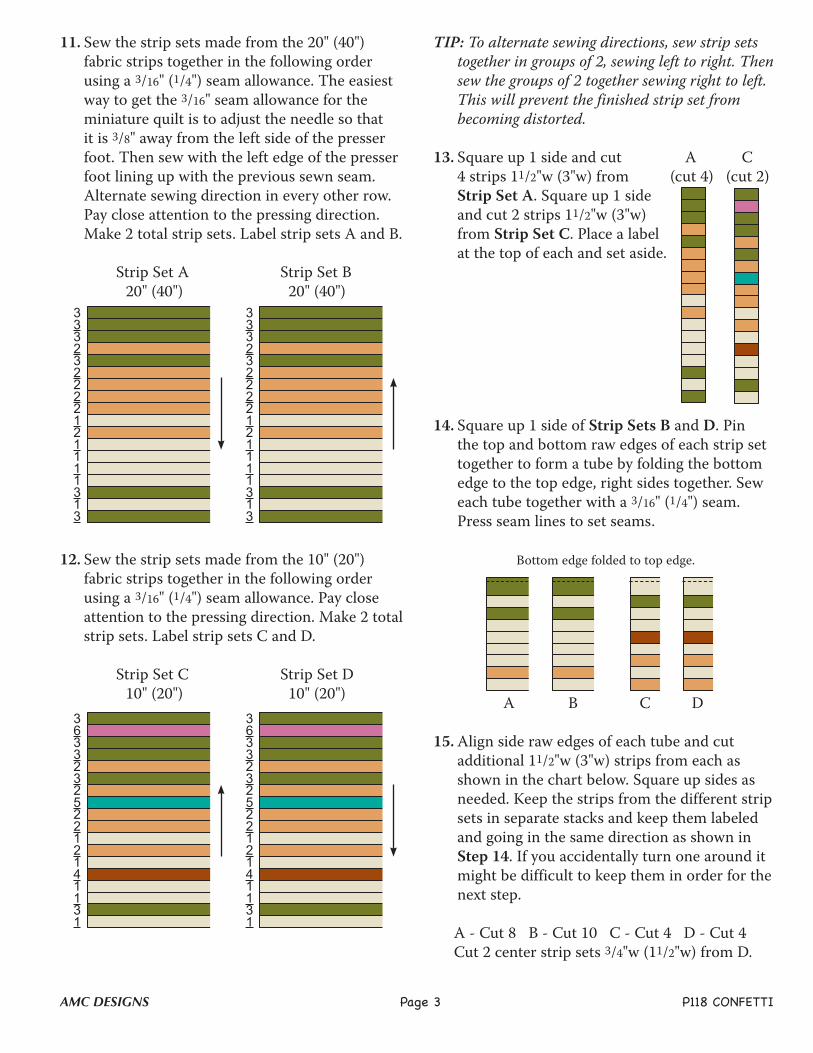
TIP: To alternate sewing directions, sew strip sets together in groups of 2, sewing left to right. Then sew the groups of 2 together sewing right to left. This will prevent the finished strip set from becoming distorted.
13. Square up 1 side and cut A C 4 strips 11/2"w (3"w) from (cut 4) (cut 2) Strip Set A. Square up 1 side and cut 2 strips 11/2"w (3"w) from Strip Set C. Place a label at the top of each and set aside.
14. Square up 1 side of Strip Sets B and D. Pin the top and bottom raw edges of each strip set together to form a tube by folding the bottom edge to the top edge, right sides together. Sew each tube together with a 3/16" (1/4") seam. Press seam lines to set seams.
Bottom edge folded to top edge.
A B C D
15. Align side raw edges of each tube and cut additional 11/2"w (3"w) strips from each as shown in the chart below. Square up sides as needed. Keep the strips from the different strip sets in separate stacks and keep them labeled and going in the same direction as shown in Step 14. If you accidentally turn one around it might be difficult to keep them in order for the next step.
A - Cut 8 B - Cut 10 C - Cut 4 D - Cut 4 Cut 2 center strip sets 3/4"w (11/2"w) from D.
AMC DESIGNS Page 3 P118 CONFETTI
11. Sew the strip sets made from the 20" (40") fabric strips together in the following order using a 3/16" (1/4") seam allowance. The easiest way to get the 3/16" seam allowance for the miniature quilt is to adjust the needle so that it is 3/8" away from the left side of the presser foot. Then sew with the left edge of the presser foot lining up with the previous sewn seam. Alternate sewing direction in every other row. Pay close attention to the pressing direction. Make 2 total strip sets. Label strip sets A and B.
Strip Set A Strip Set B 20" (40") 20" (40")
12. Sew the strip sets made from the 10" (20") fabric strips together in the following order using a 3/16" (1/4") seam allowance. Pay close attention to the pressing direction. Make 2 total strip sets. Label strip sets C and D.
Strip Set C Strip Set D 10" (20") 10" (20")
333232222121111313
363323252212141131
333232222121111313
363323252212141131
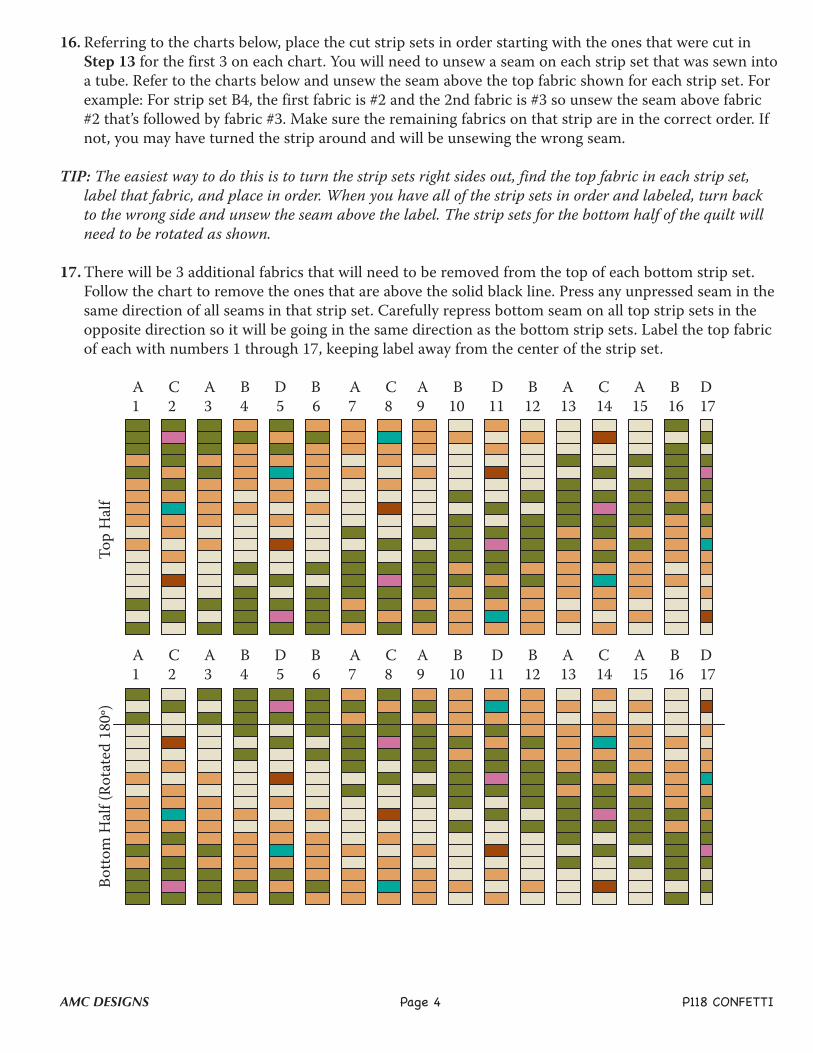
16. Referring to the charts below, place the cut strip sets in order starting with the ones that were cut in Step 13 for the first 3 on each chart. You will need to unsew a seam on each strip set that was sewn into a tube. Refer to the charts below and unsew the seam above the top fabric shown for each strip set. For example: For strip set B4, the first fabric is #2 and the 2nd fabric is #3 so unsew the seam above fabric #2 that’s followed by fabric #3. Make sure the remaining fabrics on that strip are in the correct order. If not, you may have turned the strip around and will be unsewing the wrong seam.
TIP: The easiest way to do this is to turn the strip sets right sides out, find the top fabric in each strip set, label that fabric, and place in order. When you have all of the strip sets in order and labeled, turn back to the wrong side and unsew the seam above the label. The strip sets for the bottom half of the quilt will need to be rotated as shown.
17. There will be 3 additional fabrics that will need to be removed from the top of each bottom strip set. Follow the chart to remove the ones that are above the solid black line. Press any unpressed seam in the same direction of all seams in that strip set. Carefully repress bottom seam on all top strip sets in the opposite direction so it will be going in the same direction as the bottom strip sets. Label the top fabric of each with numbers 1 through 17, keeping label away from the center of the strip set.
A C A B D B A C A B D B A C A B D 1 2 3 4 5 6 7 8 9 10 11 12 13 14 15 16 17
A C A B D B A C A B D B A C A B D 1 2 3 4 5 6 7 8 9 10 11 12 13 14 15 16 17
AMC DESIGNS Page 4 P118 CONFETTI
Botto
m H
alf (
Rota
ted
180º
)
Top
Hal
f

18. Sew top and bottom strip sets together as shown using a 3/16" (1/4") seam. Press seams in the direction of the bottom strip sets with every other row going in opposite directions. All odd numbered rows should be pressed toward the center which is 2 rows above the solid black line, and all even numbered rows should be pressed away from the center.
1 2 3 4 5 6 7 8 9 10 11 12 13 14 15 16 17
Center
19. Reposition the left Guide Bar. Use your test block to make sure it’s positioned correctly. Refer to the chart below to layer the odd and even numbered strip sets together for sewing with the even number on top. For example: Layer Strip Set 1 with Strip Set 2, right sides together, with top labeled edges matching and all raw edges even. Align seams and place a pin at the center of the strip under each seam. Use short pins on the miniature size. Repeat for each layered strip set.
1/2 3/4 5/6 7/8 9/10 11/12 13/14 15/16
AMC DESIGNS Page 5 P118 CONFETTI
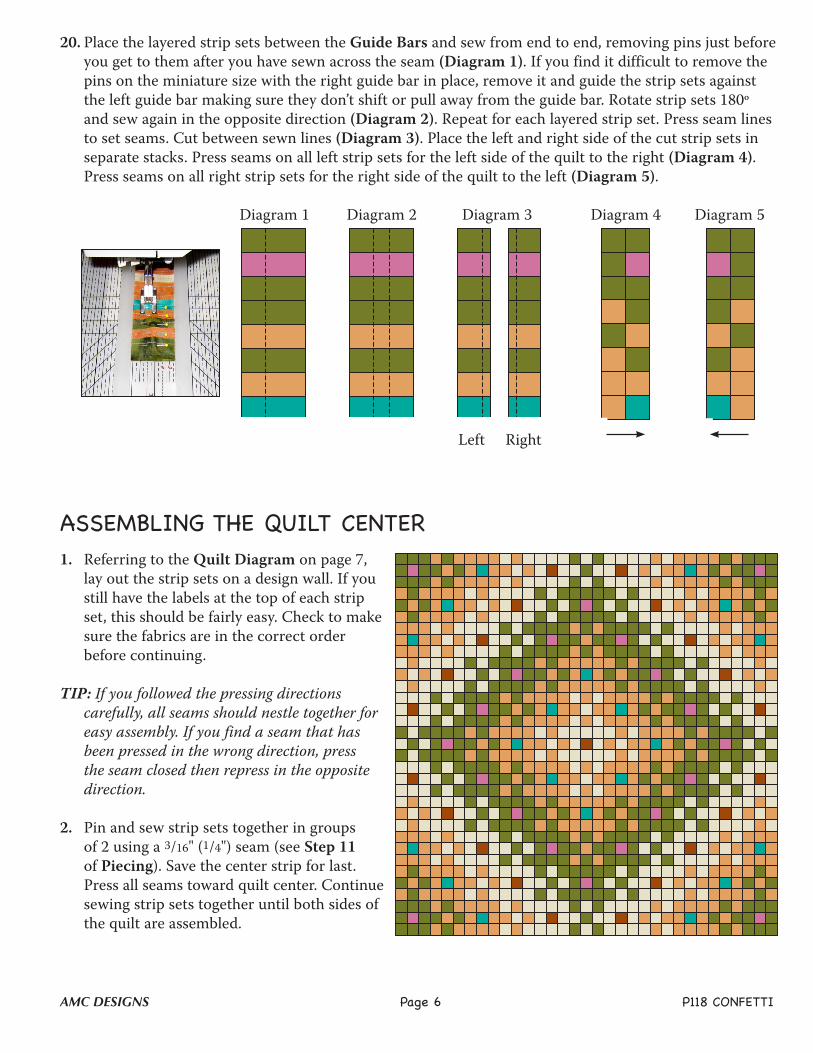
20. Place the layered strip sets between the Guide Bars and sew from end to end, removing pins just before you get to them after you have sewn across the seam (Diagram 1). If you find it difficult to remove the pins on the miniature size with the right guide bar in place, remove it and guide the strip sets against the left guide bar making sure they don’t shift or pull away from the guide bar. Rotate strip sets 180º and sew again in the opposite direction (Diagram 2). Repeat for each layered strip set. Press seam lines to set seams. Cut between sewn lines (Diagram 3). Place the left and right side of the cut strip sets in separate stacks. Press seams on all left strip sets for the left side of the quilt to the right (Diagram 4). Press seams on all right strip sets for the right side of the quilt to the left (Diagram 5).
Diagram 1 Diagram 2 Diagram 3 Diagram 4 Diagram 5
Left Right
assEMbLiNG thE QUiLt cENtEr
AMC DESIGNS Page 6 P118 CONFETTI
1. Referring to the Quilt Diagram on page 7, lay out the strip sets on a design wall. If you still have the labels at the top of each strip set, this should be fairly easy. Check to make sure the fabrics are in the correct order before continuing.
TIP: If you followed the pressing directions
carefully, all seams should nestle together for easy assembly. If you find a seam that has been pressed in the wrong direction, press the seam closed then repress in the opposite direction.
2. Pin and sew strip sets together in groups of 2 using a 3/16" (1/4") seam (see Step 11 of Piecing). Save the center strip for last. Press all seams toward quilt center. Continue sewing strip sets together until both sides of the quilt are assembled.
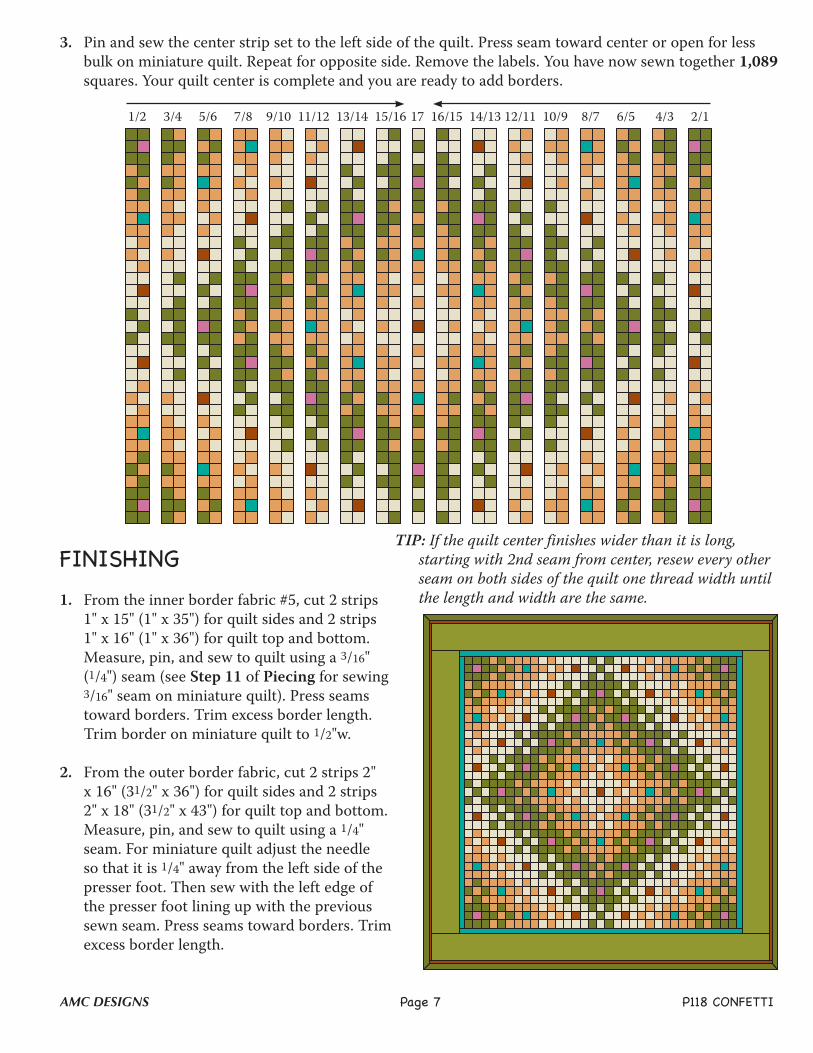
3. Pin and sew the center strip set to the left side of the quilt. Press seam toward center or open for less bulk on miniature quilt. Repeat for opposite side. Remove the labels. You have now sewn together 1,089 squares. Your quilt center is complete and you are ready to add borders.
1/2 3/4 5/6 7/8 9/10 11/12 13/14 15/16 17 16/15 14/13 12/11 10/9 8/7 6/5 4/3 2/1
AMC DESIGNS Page 7 P118 CONFETTI
FiNishiNG1. From the inner border fabric #5, cut 2 strips
1" x 15" (1" x 35") for quilt sides and 2 strips 1" x 16" (1" x 36") for quilt top and bottom. Measure, pin, and sew to quilt using a 3/16" (1/4") seam (see Step 11 of Piecing for sewing 3/16" seam on miniature quilt). Press seams toward borders. Trim excess border length. Trim border on miniature quilt to 1/2"w.
2. From the outer border fabric, cut 2 strips 2" x 16" (31/2" x 36") for quilt sides and 2 strips 2" x 18" (31/2" x 43") for quilt top and bottom. Measure, pin, and sew to quilt using a 1/4" seam. For miniature quilt adjust the needle so that it is 1/4" away from the left side of the presser foot. Then sew with the left edge of the presser foot lining up with the previous sewn seam. Press seams toward borders. Trim excess border length.
TIP: If the quilt center finishes wider than it is long, starting with 2nd seam from center, resew every other seam on both sides of the quilt one thread width until the length and width are the same.
3. Layer the quilt top with batting and backing. Baste the layers together and quilt as desired. I used a leaf pattern in the center light area, a feather design in the diagonal light area, diagonal lines in the rest of the quilt center, in-the-ditch between borders, and a leaf pattern in the outer border.
4. For binding trim (also called crumb catcher) cut 4 strips 3/4"w (1"w) from fabric #4 the length of the quilt top. Fold in half lengthwise and press.
5. With raw edges matching, add binding trim to quilt sides using a scant 1/4" seam allowance. Be exact with your stitching as you will be using the seam on the back side of the quilt as a guide for adding binding. Repeat to add binding trim to top and bottom of quilt. Trim excess batting and backing fabric.
6. For single fold binding, cut enough fabric lengths 11/4"w from fabric #3 to go around the perimeter of the quilt. Diagonally piece, trim seams, and press seams open. With raw edges matching, add binding to quilt starting near the center of any side. Leave the first 6-8" unsewn. Pin binding to corner. Sew on the back side of the quilt next to the seam for the binding trim in the direction shown, starting at the corner.
These instructions are presented in good faith, but no warranty is given, nor results guaranteed. AMC Designs disclaims any liability for unfavorable results.
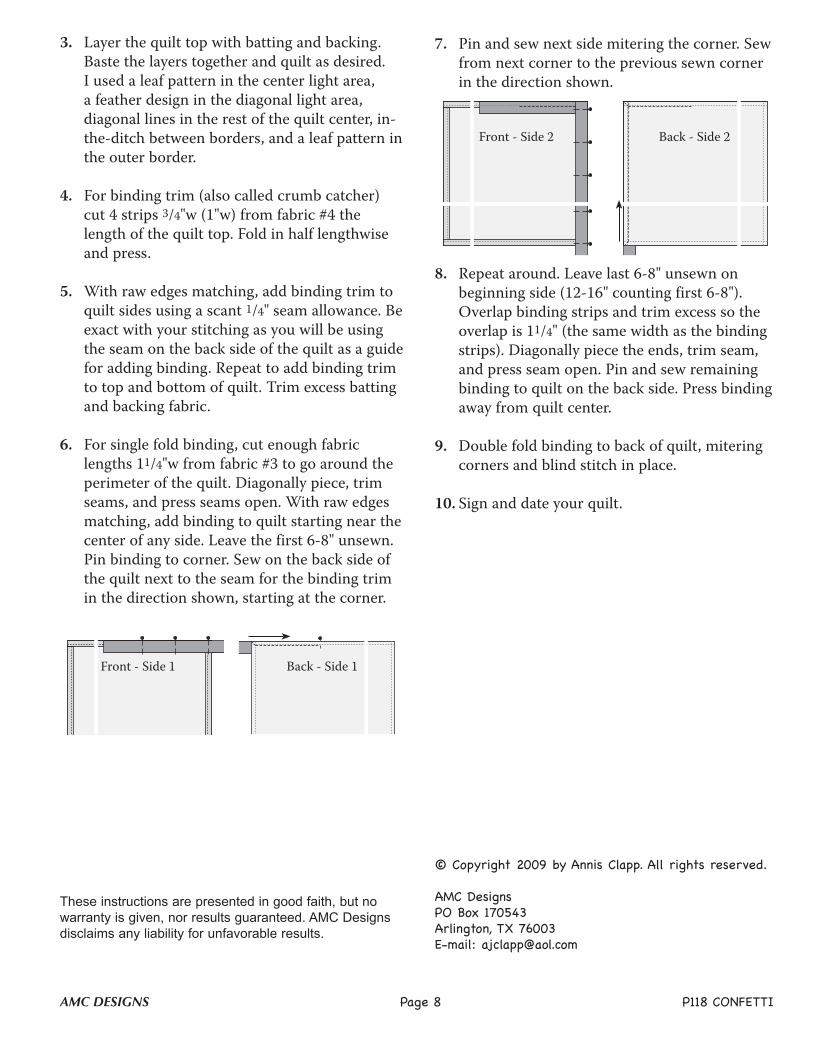
7. Pin and sew next side mitering the corner. Sew from next corner to the previous sewn corner in the direction shown.
8. Repeat around. Leave last 6-8" unsewn on beginning side (12-16" counting first 6-8"). Overlap binding strips and trim excess so the overlap is 11/4" (the same width as the binding strips). Diagonally piece the ends, trim seam, and press seam open. Pin and sew remaining binding to quilt on the back side. Press binding away from quilt center.
9. Double fold binding to back of quilt, mitering corners and blind stitch in place.
10. Sign and date your quilt.
© Copyright 2009 by Annis Clapp. All rights reserved.
AMC DesignsPO Box 170543Arlington, TX 76003E-mail: [email protected]
Front - Side 1 Back - Side 1
Front - Side 2 Back - Side 2
AMC DESIGNS Page 8 P118 CONFETTI
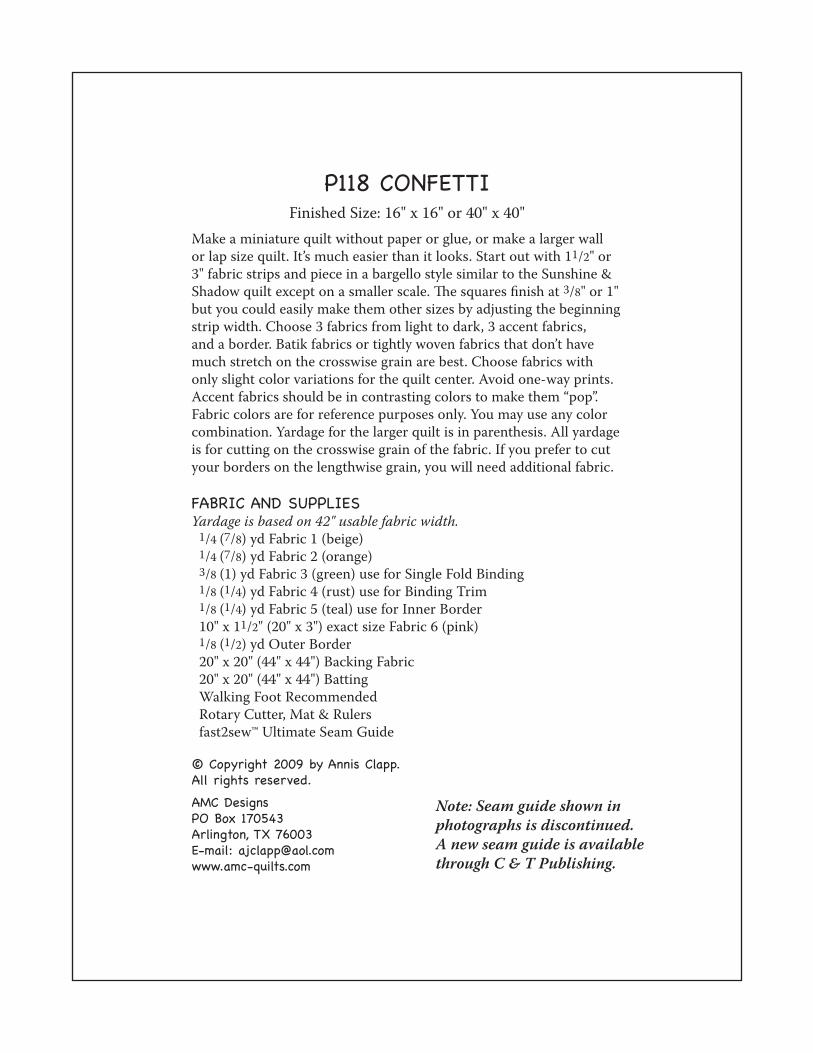
P118 CONFETTIFinished Size: 16" x 16" or 40" x 40"
Make a miniature quilt without paper or glue, or make a larger wall or lap size quilt. It’s much easier than it looks. Start out with 11/2" or 3" fabric strips and piece in a bargello style similar to the Sunshine & Shadow quilt except on a smaller scale. The squares finish at 3/8" or 1" but you could easily make them other sizes by adjusting the beginning strip width. Choose 3 fabrics from light to dark, 3 accent fabrics, and a border. Batik fabrics or tightly woven fabrics that don’t have much stretch on the crosswise grain are best. Choose fabrics with only slight color variations for the quilt center. Avoid one-way prints. Accent fabrics should be in contrasting colors to make them “pop”. Fabric colors are for reference purposes only. You may use any color combination. Yardage for the larger quilt is in parenthesis. All yardage is for cutting on the crosswise grain of the fabric. If you prefer to cut your borders on the lengthwise grain, you will need additional fabric.
FABRIC AND SUPPLIESYardage is based on 42" usable fabric width. 1/4 (7/8) yd Fabric 1 (beige) 1/4 (7/8) yd Fabric 2 (orange) 3/8 (1) yd Fabric 3 (green) use for Single Fold Binding 1/8 (1/4) yd Fabric 4 (rust) use for Binding Trim 1/8 (1/4) yd Fabric 5 (teal) use for Inner Border 10" x 11/2" (20" x 3") exact size Fabric 6 (pink) 1/8 (1/2) yd Outer Border 20" x 20" (44" x 44") Backing Fabric 20" x 20" (44" x 44") Batting Walking Foot Recommended Rotary Cutter, Mat & Rulers fast2sew™ Ultimate Seam Guide
© Copyright 2009 by Annis Clapp.All rights reserved.AMC DesignsPO Box 170543Arlington, TX 76003E-mail: [email protected]
Note: Seam guide shown in photographs is discontinued. A new seam guide is available through C & T Publishing.