OXFORD DIGITAL HELP GUIDE - Oxford University...
46
OXFORD DIGITAL HELP GUIDE oxforddigital.com.au NEED HELP? Contact Oxford Digital Support. Email [email protected] or call 1300 650 616. version 2.11 updated 10/03/2015
Transcript of OXFORD DIGITAL HELP GUIDE - Oxford University...

OXFORD DIGITAL HELP GUIDEoxforddigital.com.au
NEED HELP?Contact Oxford Digital Support. Email [email protected] or call 1300 650 616.
version 2.11 updated 10/03/2015

i
TABLE OF CONTENTSMY LIBRARY
Getting started (teachers) 11. Create an account and log in 12. Create classes 23. Manage classes 64. Remove class 74. Teacherverificationrequests 74. FAQs: Teachers 8
MY LIBRARY
Creating an account 9Log into my library 10Activating products 10Reactivating Products 11Reactivation 11How to reactivate 11Need help? 11Where do I get an activation code? 11Browsing obook contents in my library 12Find tab: contents 12Find tab: bookmarks 13Find tab: index 13Search options in my library 14Go to page 14Search this obook 14Search my library 15Browsing obook extras in my library 15Extras tab 15Recently assigned 16To do 17Notes 17All messages 17All bookmarks 18Link to my teacher 18Edityourprofile 18Forgot your password? 18Suitable web browsers 19Secure access 19
OBOOK
obook overview 20Key obook features 20Working in the Menu panel 21Hiding and displaying the Menu panel 21Navigating to a topic 21Navigating between topics 21Using the toolbar functions 22Go to page 22Bookmark 22Dictionary search 23Search 23Increase / decrease font size 23Page view 24Save answers 24Email 25Export as .docx 25Print page 25Help 25Working in the Content panel 26Enlarging images 26Highlighting text 27Searching your obook 27Working with Extras 27Working with Notes 28Exporting, printing or emailing notes 28Get technical support 28Contact Oxford Digital Support 28obookminimumsystemrequirements 28
ASSESS
What is assess? 29Overview of assess? 29Testbank (teacher only) 29Assessments 31Accessing assess 32Assigning work using assess (Teachers) 33Having trouble assigning work? 37Still having trouble? 37Completing work using assess (Students) 37Using results in assess (Teachers) 39
COMING SOON
MY EXTRAS 43

1
Getting started: teachers Using the Teacher obook you can assign reading, extras and assessments; set reminders and view student progress; or share notes with your classes. Follow these simple steps to get started and make the most of this enhanced functionality.
CREATE AN ACCOUNT AND LOG IN 1. Go to oxforddigital.com.au. 2. Follow the on-‐screen instructions to create an account or log in. 3. If you haven’t already done so, activate your Teacher obook using your unique activation code. 4. Confirm or update your details:
(a) school name (b) role (ensure you select ‘teacher’) (c) school type (i.e. Secondary) (d) preferred title (your preferred title will be visible to your students/classes).
5. If you are creating a teacher account for the first time, your account will need to be verified with someone else at your school, or by Oxford Digital Support. Follow the prompts onscreen to request to join your school portal. 6. Once you have requested verification, you’ll be able to access the classes tab functionality to create and manage classes.

2
CREATE CLASSES 1. Click on the classes tab. 2. Click on the create classes button. 3. Choose how you would like to create your classes: (a) create classes via spreadsheet upload; or (b) create classes and add new members to a class individually; (c) create classes and add existing members to a class.
a. Create classes by spreadsheet upload • Click on the template button to download the CSV template. • Complete or paste class data into the template, and save it. • Click the upload button to upload your completed class data in the template. • Choose file and click next. • The class members you have added will be displayed.

3
Upload successful: • Optional: Tick ‘notify class of their login details via email’, close and send. To
preview the email your class members will see, click view sample.
Upload fail:
• Red indicates the details that failed during the upload. • Select the export fail list button to correct details and upload the file again. • To seek assistance, contact Oxford Digital Support via
email: [email protected] or call toll-‐free on: 1300 650 616.

4
b. Create classes and add new members to a class individually • Click create. • Select the calendar year the class will commence, the designated year level of the
class and give the class a name (i.e. 7 Yellow Science); then click add.
• Click manage class to add class members. Or select close to create another class name.
• Choose to either add new teacher or add new student. • Enter the class member’s first name, surname, and email address, then click add. • Optional: to notify the class member of their login details via email, check the box
bottom left. Click close and send to issue a notification. Alternatively, uncheck the tick box if you do not wish to send an email notification.
• The class members you have added will be displayed.
• Click on the back button to view the full mange classes menu.
There is no limit to the number of teachers or students you can have in a class, which is ideal for shared teaching of classes, or Head of Department access. Any teacher in the class will be able to assign work.

5
c. Create classes and add existing members to a class • To add existing members to a class click create classes then create. • Name the class, then click add. • Click the find members button to search for an existing class member. • Choose whether to search the school portal by user or by class.
• A list of users will be displayed based on your search criteria. To add an existing user to your class, click beside the user’s name and click save.
• The updated class list will be displayed.

6
MANAGE CLASSES After creating classes, you’ll see a manage classes screen similar to the one shown below. The red exclamation marks indicate any incomplete details.
1. Allocate products to the class Adding products:
• Click select under the products column to allocate products to a particular class. • Select resources from your Oxford Digital library to add to your class. Tick to add,
then click close. • The title of the product will now display beside the class under the products
column. Note: Teachers will only be able to allocate products from within their own Oxford Digital library. Students will need to have purchased an activation code to activate their resource.
Removing products:
• Click manage to remove a product, click the cross to remove it, then click close.
2. My groups (optional setting) A group is a subset of a class and can be used to assign tasks to selected groups of students within a class. To create a group:
• Click create groups. • Select a product to add a group or manage an existing group. • Name the group and click add.
Note: all groups for a product must have a unique name. Review any existing group names before adding a new group. To manage a group:
• Click manage in the ‘classes: manage’ screen under ‘group’. • Select the group you wish to add members to and click confirm or cancel.

7
3. Show classes (optional setting) By default, you will be able to see all classes in your school’s portal. The show classes ‘star’ is a way to filter your view of classes listed to display only those relevant to you.
• Select the classes you display to see by clicking on the show classes star beside the class. This setting will be retained each time you log in.
• You can still toggle between your classes and all classes using the show all classes / show my classes drop down options.
4. Manage members • To modify, add or remove existing members to a class click manage under the
members column. • From this screen you can add a new teacher, student, or find an existing user
from your school portal. • To remove a member of the class, click the red cross to remove, then click OK to
confirm.
REMOVE CLASS • To remove a class, click the red cross beside it.
• Deleting a class will remove all results data and activity recorded against it. You
and the members of the class will not be able to access that data again. • Click to cancel or confirm.
TEACHER VERIFICATION REQUESTS • If you have received an email request to verify another teacher in your school
portal, click the link to go directly to the teacher verification screen. • To verify the request from the teacher, click on the grey tick under the verified
column. • Alternatively, if for any reason you are unable to approve the request, click the
cross to remove the teacher from your school portal.

8
FAQS: teachers
Getting started FAQs:
1. What if students activate codes and create their own accounts over the holidays? • Schools can still get their students up and running over the school holidays and
arrange class set-‐up later. As long as students are using the same email address to log in, all of their assess data will become visible once teachers have set up the class.
• If students go ahead and create an account using a personal email address, students/schools can liaise with Digital Support to have the code/product moved across into their correct account.
2. What if a student already has an Oxford Digital account set up before I add them to my class?
• The system will recognize the existing account and whatever password the student currently uses to log in will still be able to be used.
3. Can schools/teachers specify passwords for students to log in? • Teachers who add students to a class cannot set a password. Passwords will be
generated automatically. • Once logged in, students can edit their profile to change their password to
anything they want or whatever their teacher or school wants them to use. • Oxford Digital Support can specify a password in the school set-‐up process upon
request.
4. Can schools/teachers add products to students’ accounts? • No. Teachers/schools can allocate an obook product for their classes, but
students will still need to log in and activate a code. • Oxford Digital Support can still populate libraries with products via bulk upload
on the school’s behalf upon request and confirmation of purchase.

9
MY LIBRARYCREATING AN ACCOUNT1. Click on the create an account button at oxforddigital.com.au
2. Complete the form then click create account.
3. Youwillbesentaconfirmationemail.Clickonthelinkintheemailtoactivateyouraccount.
4. Aconfirmationpagewillloadinyourwebbrowser.Clickreturn to login, enter your email and password, then click login to enter my library.

10
LOG INTO MY LIBRARYEnter your email and password in the login section of oxforddigital.com.au then click login to enter my library.
my library displays your Oxford products.
ACTIVATING PRODUCTS1. Locate your activation code found on the inside cover of your Oxford textbook
or under the tearaway strip on your Oxford activation card.
2. Entertheactivationcodeinthefieldprovidedonthemy library page.
3. Click activate or the arrow icon.
4. To purchase an Oxford product with an activation code, go to www.oup.com.au.

11
REACTIVATING PRODUCTS
REACTIVATION
Expired activation codes can be reactivated upon expiry of the ‘active’ licence period (after31December).
HOW TO REACTIVATE
1. Go to oxforddigital.com.au and either create an account or log in to your library.
2. Clickonthefield:+ enter your activation or reactivation code and enter the expired activation code.
3. Dependingontheproductlicence,youmayneedtopayareactivationcharge.Ifrequired,followthe prompts for payment.
4. You will have immediate access to the product in your library.
NEED HELP?
Contact Oxford Digital Support. Email [email protected] or call 1300 650 616.
WHERE DO I GET AN ACTIVATION CODE?
Activation codes are located on the inside covers of designated Oxford textbooks or under the tearaway strip on Oxford activation cards.
To purchase an Oxford product with an activation code, go to www.oup.com.au.

12
BROWSING OBOOK CONTENTS IN MY LIBRARY
FIND TAB: CONTENTS
1. Click on any book cover featured on the my library carousel. The find tab will automatically open display to view the obook contents.
2. Click the plus icon to expand the heading list. Or click the minus icon to collapse the heading list. Then click the heading you want to open the obook to.
13
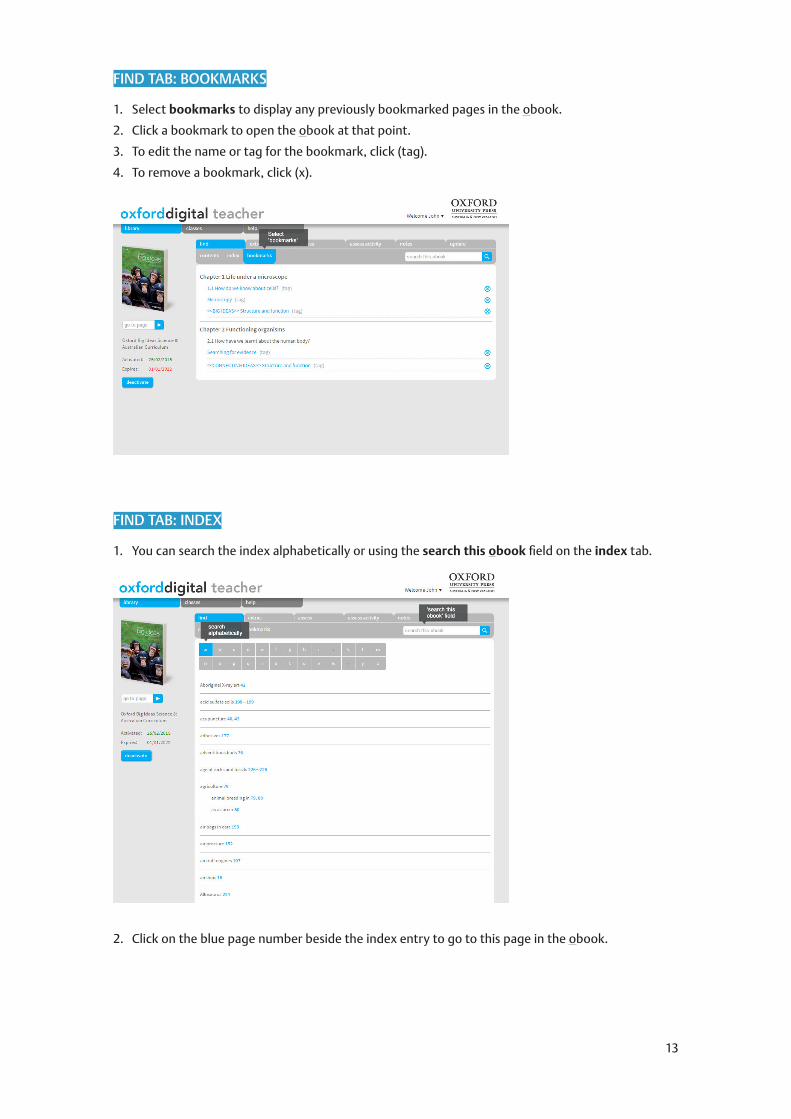
FIND TAB: BOOKMARKS
1. Select bookmarks to display any previously bookmarked pages in the obook.
2. Click a bookmark to open the obook at that point.
3. To edit the name or tag for the bookmark, click (tag).
4. To remove a bookmark, click (x).
FIND TAB: INDEX
1. You can search the index alphabetically or using the search this obookfieldontheindex tab.
2. Click on the blue page number beside the index entry to go to this page in the obook.

14
SEARCH OPTIONS IN MY LIBRARY
GO TO PAGE
Thissearchfieldcorrespondstotheprintedbookpagenumbers.Enterthepagenumber you want to search for and click the blue arrow.
SEARCH THIS OBOOK
Usethissearchfieldforakeywordsearchoftheselectedobook. Enter the keyword(s) you want to search for and click the blue magnifying glass.

15
BROWSING OBOOK EXTRAS IN MY LIBRARY
EXTRAS TAB
1. Student obook extras are organised by chapter. To browse extras, click on the chapter heading (or the + symbol).
Note: The number of extras available for each chapter is displayed in (brackets) beside the chapter heading.

16
2. By default, all lists each extra in the order it appears throughout the chapter.
3. Thelistofextrascanbefilteredbycategory,suchasfiles,videos,weblinksorinteractives.
RECENTLY ASSIGNED
1. Once you are linked to your teacher, he or she teacher will be able to assign you reading, viewing extras, assessment, or tests to complete.
2. The most recently assigned tasks are listed in this panel.
3. If a due date was assigned for the task by your teacher, it will be displayed here.
4. Clicking on the blue links will launch to open that content directly.
5. A complete itemised list of tasks is recorded on the all messages tab. For more details about the tasks assigned, click to open the all messages tab.

17
TO DO
1. Once you are linked to your teacher, he or she will be able to assign you reading, viewing extras, assessment, or tests to complete.
2. The to do tab displays both active and completed tasks that have been assigned by a teacher. Informationdisplayedincludesdatetheworkwasassigned,duedate(ifspecifiedbytheteacher),and status (i.e. in progress/completed).
3. Clicking on the blue links will launch to open that content directly.
4. Upon completion of a task that was assigned to you, tick it in the status column to mark it as completed. The task will then drop down to the list of completed tasks.
NOTES
1. The notes tab displays a list of all notes saved in the obook. Notes can be edited, saved, emailed, exported or printed from this screen.
2. Click on the blue link to go to the topic the note is linked to in the obook.
ALL MESSAGES
1. Once you’ve linked to your teacher, he or she will be able to assign you reading, viewing extras, assessment, or tests to complete.
2. The all messagesisahandydashboardofthemostrecentnotificationsaboutassignedtasks for each obook in your Oxford Digital library. It is designed to help you organise your study timeeffectively.
3. Informationdisplayedincludesdatetheworkwasassigned,duedate(ifspecifiedbytheteacher),and status (i.e. in progress/completed).
4. Clicking on the blue links will launch to open that content directly.
5. To mark tasks as completed, go to the to do tab

18
EDIT YOUR PROFILE
1. Click on the welcome drop down menu on the my library page.
2. Click edit my profile, edit your details, then click update.
FORGOT YOUR PASSWORD?
1. Click on forgot your password? in the login section of oxforddigital.com.au
2. Enter your email address in the forgot your password? form and click submit.
19
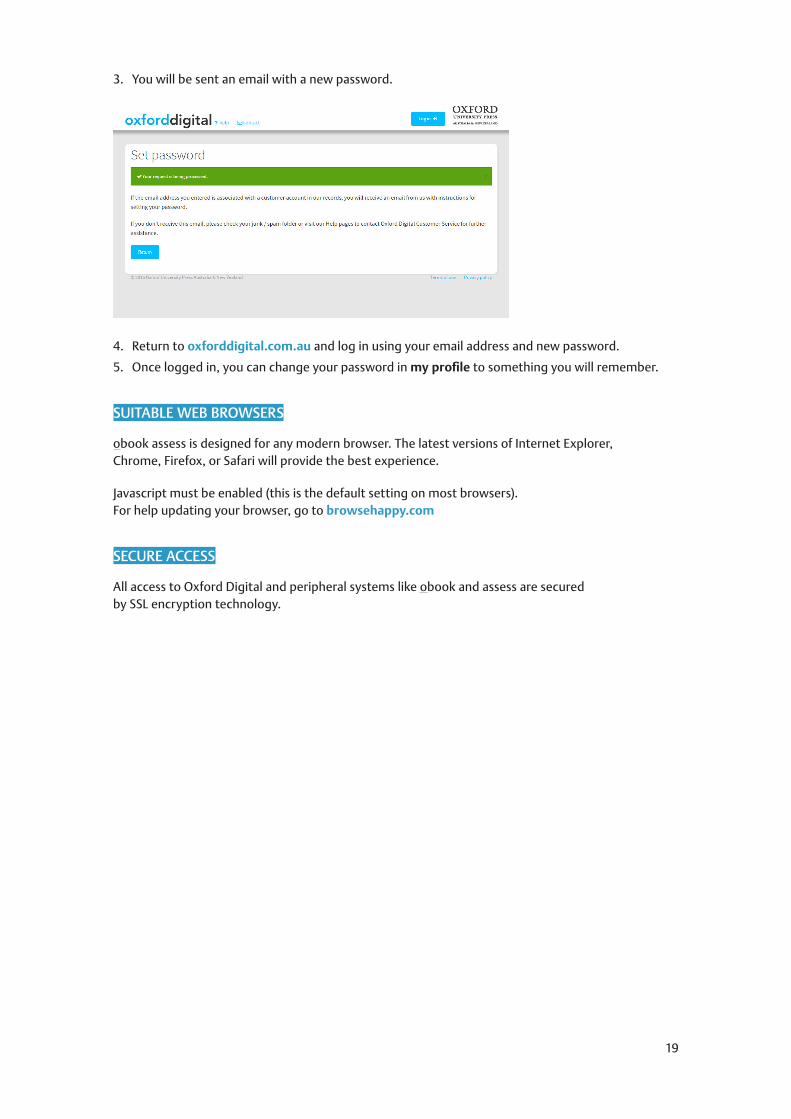
3. You will be sent an email with a new password.
4. Return to oxforddigital.com.au and log in using your email address and new password.
5. Once logged in, you can change your password in my profile to something you will remember.
SUITABLE WEB BROWSERS
obook assess is designed for any modern browser. The latest versions of Internet Explorer, Chrome, Firefox, or Safari will provide the best experience.
Javascript must be enabled (this is the default setting on most browsers). For help updating your browser, go to browsehappy.com
SECURE ACCESS
All access to Oxford Digital and peripheral systems like obook and assess are secured by SSL encryption technology.

20
OBOOKOBOOK OVERVIEWYour obook has an intuitive design that is easy to manage, and makes navigating and accessing the features of your obook easy.
KEY OBOOK FEATURES:
1. toolbar: for all key functions in the obook
2. menu panel: for navigating your obook or returning to my library
3. content panel: where the topics of your obook will be displayed.
4. notes panel: for all highlighting and note taking functionality
5. forward / back buttons:toclickthroughcontentsequentially
6. welcome menu: to log in and log out
1.
2.
3.
6.
4.
5.

21
WORKING IN THE MENU PANEL
The menu panel provides a complete contents list of the obook.Youcanquicklynavigatetoachapteror topic by clicking its corresponding heading in the menu panel.
HIDING AND DISPLAYING THE MENU PANEL
Hide or reveal the menu panel by clicking the menu tab.
NAVIGATING TO A TOPIC
To navigate to a topic via the Menu panel:
1. Select the chapter that contains the topic you wish to read.
2. Expand the headings until you locate the topic you want. Click to select.
The content for the selected topic will appear in the Content panel
NAVIGATING BETWEEN TOPICS
You can also navigate between topics using the previous
and next buttons available in the main content panel.

22
USING THE TOOLBAR FUNCTIONS
GO TO PAGE
Thissearchfieldcorrespondstotheprintedbookpagenumbers.Enterthepagenumber you want to search for and click the blue arrow.
BOOKMARK
To place a bookmark:
1. Navigate to the text in the obook that you want to bookmark.
2. Click the bookmark icon in the toolbar.
3. The selected topic in the book is bookmarked. The bookmark will appear at the top right of that topic for easy reference.
You can view all your bookmarks from my library > find > bookmarks

23
DICTIONARY SEARCH
To look up the definition of a word in your obook:
• Click the dictionary icon.
• Type the word you want to look up.
The Oxford Concise Dictionarydefinitionoftheselectedwordisdisplayedinalight-boxwindow.
SEARCH
To use the keyword search in your obook:
• Click the search icon.
• Type your keyword and press the blue search button.
• The keyword search will give you a list of instances where the word appears. Click on a link to go that place in the obook.
INCREASE / DECREASE FONT SIZE
To increase the size of the text, click the big A character in the toolbar. To decrease the text size, click the small A character.

24
PAGE VIEW
Click the page view icon to view the student text in PDF page view.
Offlineuse:
Todownloadabackupversionforofflineuse,youwillneedAdobeReaderApplicationsoftwareoranyotherPDF-readablesoftware.Eithersavethefilefromthebrowser,ortrydownloadingitfromtheextras tab.
Oncedownloaded,thePDFcanbedisplayedintwo-pageview.GotoView > Page Display > Two Page View. If the PDF contains a cover, tick the Show Cover Page in Two Page View option to ensure facing page spreads marry up.
Note: The page view icon will not appear in the toolbar if this option is not available for the obook you are working in.
SAVE ANSWERS
Youcantypeyouranswerstoquestionsintheobookasyougo.Tosave,clickthesave icon. Youranswersaresavedwiththeselectedquestion.
Note: It’s good practice to save your work frequently. Save your work before you export or email the topic.

25
Click the email icon to email the contents of the topic to your email account.
EXPORT AS .DOCX
To export the contents of the topic, including any answers you may have saved:
• Click the export icon.
• The save as dialog box will open.
• Browseforandselectthelocationwhereyouwishtosavethefile.
• Click save.
• The topic in the content panel including any images or answers you have saved will be saved as a .docx to the selected location.
PRINT PAGE
To print the topic in the Content panel:
• Click the print icon. The print dialog box opens.
• Select your printer, then click OK.
• The topic in the content panel is printed.
HELP
Displaysthehelpfileforworkingintheobook.

26
WORKING IN THE CONTENT PANEL
ENLARGING IMAGES
1. To enlarge an image in the content panel, click the enlarge icon on the image.
2. Ahighresolutionimageisdisplayedinalight-boxwindow. To close the window, click the ‘x’ button.

27
HIGHLIGHTING TEXT
To highlight text in the Content panel:
1. Click on the highlight icon on the toolbar
2. Choose a color.
3. Select text to highlight and add a label or note to the highlight.
4. Save your highlights.
5. Click the highlight icon on the toolbar to change colours.
6. Deselect the highlighticononthetoolbartoturnoffhighlighting.
To remove highlighted text in the Content panel:
• Click the strikethrough option in the highlight palette.
• Click on the word or swipe to select the text you want to remove highlighting from.
SEARCHING YOUR OBOOK
The searchfeatureenablesyoutosearchforkeywords.Searchtermscanberefined usingtheauto-completefeature.
To perform a search:
• Click the search icon in the toolbar. The search window opens.
• In the search window, type a keyword and then click go. The search results are populated in the content panel.
Click the search result link to open.
WORKING WITH EXTRAS
You can view videos and links that are related to a topic, and provide additional information on the topic displayed in the content panel.
To view the related videos or links:
• Click on the extra title to launch.
• Your obook extras content will open in a new window.
Note: you can also use the extras tab in my library.

28
WORKING WITH NOTES
To add a new note:
1. Go to the topic in the obook you want to add a note to.
2. Click to open the Notes panel.
3. Click on the plus icon to create a new note.
4. Typeorcopytextintothefield.
5. Add an optional heading.
6. Save the note.
7. Your note will appear with this topic each time you log in to use your obook.
8. A summary of your notes can also be viewed on the Notes tab in my Library
EXPORTING, PRINTING OR EMAILING NOTES
To export, print or email notes you have added, use the notes tab in my library.
GET TECHNICAL SUPPORT
CONTACT OXFORD DIGITAL SUPPORT
Email [email protected] or call 1300 650 616.
OBOOK MINIMUM SYSTEM REQUIREMENTSobookassessisdesignedforanyup-to-datebrowser.ThelatestversionsofInternetExplorer, Chrome, Firefox, or Safari will provide the optimum experience.
Javascript must be enabled (this is the default setting on most browsers). For help updating your browser, go to www.browsehappy.com

29
ASSESSWHAT IS ASSESS?Oxford’s obook assess is structured to support the importance of developing deep conceptual understanding. obook assess provides students and teachers instant access to a huge range of assessment and tests for the Australian Curriculum.
OVERVIEW OF ASSESS
Teachers can:
1. Assign assessments and tests
2. Monitor student and class results
3. Graph, print, or export results
Students can:
1. Reviseusingauto-correctingassessments
2. Completeteacher-assignedtests
3. Review their own progress and results
TESTBANK (TEACHER ONLY)
The assesstestbankisabankofunseenexam-stylequestionsforteachers.
Features:
• Everyquestionisaccompaniedwithamarkingguideandsuggestedsolutions.Testbank canbeusedtocreatetestsforend-of-chapter,mid-yearorend-of-year.

30
• Selectfromabankofmultiple-choice,short-answer,extended-responsequestions,allofwhichare unseen to students until assigned.
• Createchaptertests,orcombinequestionsfromaselectionofchapters.
• Tailoreachtest:removequestions,settestlengthandduration,andinsertinstructions.
• Assign tests, set due dates or reminders.
• Receivenotificationswhentestsarecompleted.
• Grade tests online, adding comments/feedback, and schedule a date to return graded tests.
• Record class and individual student results.
• Download and edit tests as Word docs.

31
ASSESSMENTS
Theassessmentsareauto-correctingmultiple-choicequestionsforstudents.Theycaneither beassignedashomework,orusedbystudentsforself-revision.
Features:
• AssessmentFOR,ASandOFlearningasstudentsprogressthroughachapter(pre-,mid-andpost-unit)
• Get ready(pre-unitdiagnosticassessment)
• Checkpoint(mid-unitformativeassessment)
• Review(post-unitsummativeassessment)
• Thereisgenerallyoneofeachquizperunitthroughoutthechapter.
• Studentscanreviewtheirquizresultstoseewhichquestionstheygotrightandwrong, andthecorrectanswersforquestionstheygotwrong.

32
• Studentscanimprovetheirresultsbyattemptingthequizagainwiththechallenge of randomised answer options.
• Alignment to ACARA content descriptor codes is displayed onscreen to teachers with the AC icon.
• Difficultygradingofquestions(foundation,standard,oradvanced)helpswithdiagnosingstudents’ conceptual understanding.
Availability:
• Oxford’s obook assess is available for selected obooks. If it is not available for the obook you are working in, the assess tab will not be visible.
• Assess is not available for ‘obook-only’chapters.
• Assess is available for the duration of your obook licence period at no extra charge.
ACCESSING ASSESS
You will be able to access assess directly from your obook as well as from my library.
From your obook:
1. Students can click on the links to assessments in the obook to revise their learning as they progress through a chapter.

33
From mylibrary:
1. Assess can be accessed by selecting the assess tab in your library.
2. If assessments or tests have been assigned by your teacher, you can also access these directly from the to do tab.
ASSIGNING WORK USING ASSESS (TEACHERS)
Assign assessments (get ready / checkpoint / review)
1. Go to the assess tab in your library.
2. Drill down through the chapters using the ‘+’ to select a unit from your chapter of study.
3. Select the blue ‘a’icontotherighttopreviewthequizquestions.
4. Select the check box to the right and click assign.
1.
2.3.
4.

34
5. Set date to assign and date due for completion.
6. Choosefromthedrop-downmenutoassigntotheclassoranindividualstudent.
7. Click assign.
Create a test from the testbank
1. In the assess tab in your library click on testbank.
2. Create a name for your test and select question types to include (multiple choice / short answer / extended response), and click continue.
5.
7.
2.
1.
6.

35
3. Choose a chapterorseveralchapterstodrawquestionsfrom.
4. Refinethetestbyreducingthenumberofquestionsrequiredforeachquestionstyle(multiplechoice/short answer/extended response).
5. Click view test to preview.
4.
3.
5.
6. Use the cover notesfieldtoaddinstructionstostudents(e.g.Thisisonlyapracticetest; do your best!).
7. Modifythetestbyremovinganyquestionsyoudon’twanttoinclude.
8. Click the ‘AC’icontoviewACARAcontentdescriptormappingforeachquestion.
9. Click the mark allocationforeachopen-endedquestiontorevealthemarkingguidance/suggested solutions.
10. Click save changes.
8.
6.
9.
7.

36
Assign a test from the testbank
1. Under the heading manage and assign set tests select your test (using the radio button ontheleft)andclickassign.
2. Set the date due and set date to assign.
3. Choosefromthedrop-downmenutoassigntotheclassoranindividualstudent.
4. Click assign.

37
HAVING TROUBLE ASSIGNING WORK?
Check that you have:
• confirmedyourprofile.
• an obook teacher licence.
• your students linked to you and classes set up.
STILL HAVING TROUBLE?
Contact Oxford Digital Support. Email [email protected] or call 1300 650 616.
COMPLETING WORK USING ASSESS (STUDENTS)
Complete an assessment
1. Check your recently assigned tasks or to do tab.
2. Click on the assessmentassignedtostartthequiz.
3. Complete the assigned assessment and click submitattheendofthequiz.
4. Click on review your results to see correct and incorrect answers.
5. Try the test again to improve your result (optional).
6. Return to my library.

38
Complete a test
1. Check your recently assigned tasks or to do tab. Or click on assess and tests to view tests your teacher has assigned.
2. Complete the assigned test.
3. Submit test.
39
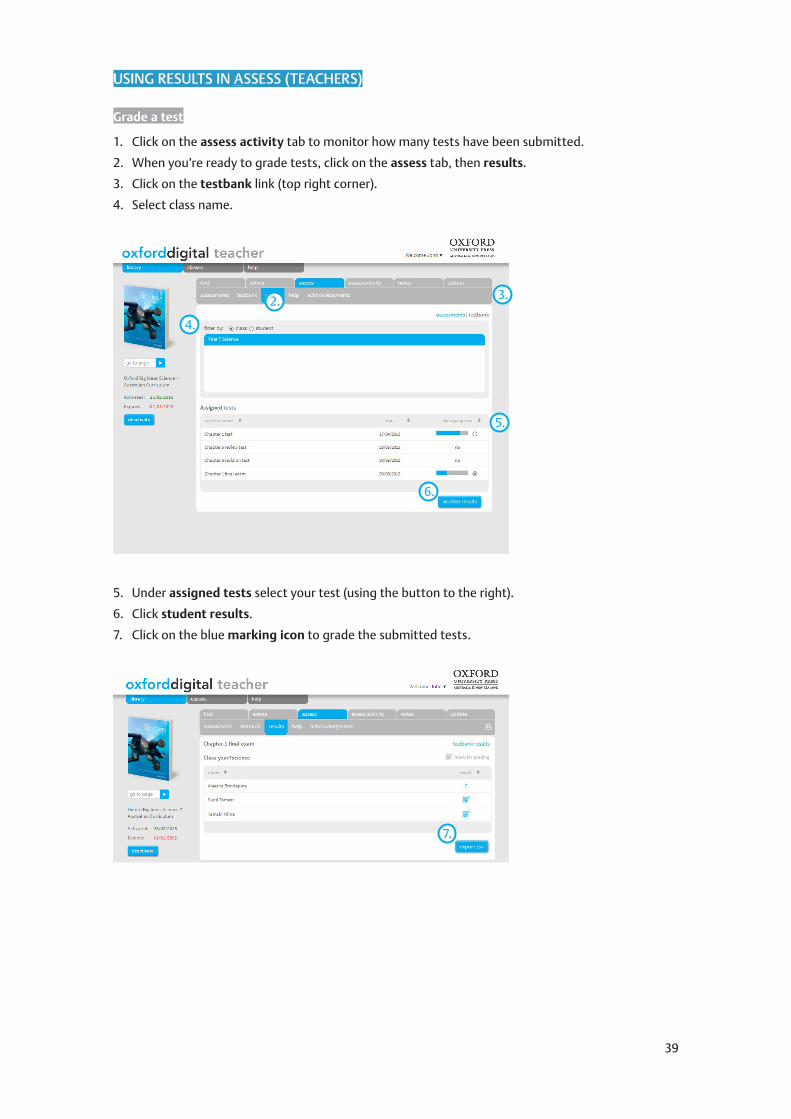
USING RESULTS IN ASSESS (TEACHERS)
Grade a test
1. Click on the assess activity tab to monitor how many tests have been submitted.
2. When you’re ready to grade tests, click on the assess tab, then results.
3. Click on the testbank link (top right corner).
4. Select class name.
5. Under assigned tests select your test (using the button to the right).
6. Click student results.
7. Click on the blue marking icon to grade the submitted tests.
4.
2. 3.
5.
6.
7.

40
8. Anymultiple-choicequestionsareautomaticallymarked.Thestudent’sanswerisdisplayed,andthe correct answer is listed below the answer options. Each correct answer is worth one mark.
9. Use the feedbackfieldtotypeacommenttothestudent(optional).
10. Use the markfieldtotypethestudent’smarkforeachquestion.
11. Use the overall commentfieldtotypeacommenttothestudent.
12. Use the overall markfieldtoinsertthegradeyouwantthestudenttosee.
13. Either tick the box to send results to student now, or schedule when they should be sent.
14. Click save and send.
10.9.
11.12.
13. 14.

41
View results: assessments
1. In the assess tab in your library, click on results.
2. The assessments view will be the default view.
3. Select class name.
4. Drill down through the chapters using the ‘+’ to select the unit you assigned the assessment for.
5. Select assessment type to view (using the button to the right).
6. Click student results.
3.
1.
4.
5.
2.

42
7. Click on the student’s latest score percentage in blue to view the entire test showing correct and incorrect answers.
8. You may wish to export of print student results. Or return to the previous view using the my library button.
View results: testbank
1. In the assess tab in your library, click on testbank, click on results.
2. Click on the blue testbank link (top right corner).
3. Select class name.
4. Under assigned tests select your test (using the button to the right).
7.

43
5. Click student results.
MY EXTRASCOMING SOON!Teachers can upload their own resources to my extras, located on the extras tab. Once resources are uploaded, teachers can also share or assign their own resources with classes and students.

44