Outlook Via the Internet
47
OUTLOOK VIA THE INTERNET Table of Contents Page LESSON 1: GETTING STARTED ........................................................................................1 ♦ Logging On ....................................................................................................1 ♦ Parts of the Outlook Window ........................................................................3 ♦ Terms .............................................................................................................4 LESSON 2: E-MAIL................................................................................................................6 ♦ Mail Folders ...................................................................................................6 ♦ Composing a New Message ...........................................................................7 ♦ Accessing and Reading Messages ...............................................................11 ♦ Replying to and Forwarding Messages........................................................12 ♦ Creating New Folders & Moving Messages ................................................14 ♦ Printing Messages ........................................................................................16 ♦ Deleting Messages .......................................................................................17 LESSON 3: CONTACTS ......................................................................................................19 ♦ Creating a New Contact ...............................................................................19 ♦ Composing a Message to a Contact .............................................................22 ♦ Editing Contacts...........................................................................................22 ♦ Deleting Contacts.........................................................................................23 LESSON 4: CALENDAR ......................................................................................................24 ♦ Calendar Views ............................................................................................24 ♦ Creating an Appointment or Event ..............................................................26 ♦ Recurring Appointments ..............................................................................27 ♦ Scheduling a Meeting ..................................................................................29 ♦ Responding to a Meeting Request ...............................................................32 ♦ Editing Calendar Items ................................................................................34 ♦ Deleting Calendar Items ..............................................................................34 LESSON 5: GENERAL OPTIONS ......................................................................................36 ♦ The Out of Office Assistant .........................................................................36 ♦ Changing Your Outlook Password ..............................................................37 ♦ Calendar Settings .........................................................................................38 LESSON 6: LOGGING OFF ................................................................................................40 LESSON 7: GIVE IT A TRY! ..............................................................................................42
Transcript of Outlook Via the Internet

OUTLOOK VIA THE INTERNET
Table of Contents Page
LESSON 1: GETTING STARTED........................................................................................1
♦ Logging On ....................................................................................................1 ♦ Parts of the Outlook Window ........................................................................3 ♦ Terms .............................................................................................................4
LESSON 2: E-MAIL................................................................................................................6
♦ Mail Folders...................................................................................................6 ♦ Composing a New Message...........................................................................7 ♦ Accessing and Reading Messages ...............................................................11 ♦ Replying to and Forwarding Messages........................................................12 ♦ Creating New Folders & Moving Messages................................................14 ♦ Printing Messages ........................................................................................16 ♦ Deleting Messages .......................................................................................17
LESSON 3: CONTACTS ......................................................................................................19
♦ Creating a New Contact...............................................................................19 ♦ Composing a Message to a Contact.............................................................22 ♦ Editing Contacts...........................................................................................22 ♦ Deleting Contacts.........................................................................................23
LESSON 4: CALENDAR......................................................................................................24
♦ Calendar Views............................................................................................24 ♦ Creating an Appointment or Event ..............................................................26 ♦ Recurring Appointments..............................................................................27 ♦ Scheduling a Meeting ..................................................................................29 ♦ Responding to a Meeting Request ...............................................................32 ♦ Editing Calendar Items ................................................................................34 ♦ Deleting Calendar Items ..............................................................................34
LESSON 5: GENERAL OPTIONS......................................................................................36
♦ The Out of Office Assistant .........................................................................36 ♦ Changing Your Outlook Password ..............................................................37 ♦ Calendar Settings .........................................................................................38
LESSON 6: LOGGING OFF................................................................................................40
LESSON 7: GIVE IT A TRY! ..............................................................................................42

NICE TO KNOW.........................................................................................................................44
♦ Using a SecurID Card ..................................................................................44
This workbook may be reproduced in whole or in part by an employee of the Department of Health and Human Services. All other reproduction is prohibited unless written permission is obtained from the Training Institute.
Last Updated: July 29, 2004
Outlook Via the Internet Page 1
NOTES
LESSON 1: GETTING STARTED
OBJECTIVE: Log on to Outlook. Discuss the components of the Outlook window.
OVERVIEW Microsoft Outlook is a personal organization system that allows you to send and receive e-mail, schedule appointments and meetings, add and maintain contacts, create task lists, and eliminate sticky notes from your work area. This class focuses on the use of Outlook through a web browser, which is quite different from the direct application. ♦ Logging On OVERVIEW
If your job requires you to be out of the office, you may be missing important information sent to you via e-mail. If you are connected to the State of Maine’s Wide Area Network (i.e. you are at another office and working at a different State PC than your own) you can simply follow the steps below. If you are not connected to the State’s Wide Area Network, you will need to have your manager approve you for a SecurID card, and then you can access your e-mail over the Internet. Instructions for using this card appear in the Nice To Know section of the courseware. STEPS
1. Connect to the Internet by double-clicking the INTERNET EXPLORER
icon on your Desktop. 2. Click in the area that displays the current web address. Type the address
https://web.mail.state.me.us. 3. Next, you may see a SECURITY ALERT dialog box. Click OK.
Helpful Hint: If you intend to access Outlook from the same machine frequently, you may want to mark the site as a FAVORITE, so you will not need to type it in each time.

Page 2 Outlook Via the Internet
NOTES
4. On the WEB ACCESS screen type your name in the format First.Last in the LOG ON area. Press ENTER on your keyboard.
5. In the ENTER NETWORK PASSWORD dialog box, type your USER NAME in the format: Domain Name/first.last. You will need to get your domain name from your Network Administrator.
6. Press the TAB key and type your PASSWORD. Click OK, or press
ENTER.

Outlook Via the Internet Page 3
NOTES
Domain Name/first.last
first.last
https://web.mail.state.me.us
Use the following as a pocket reference
WAN WEB ADDRESS:
LOG ON:
USER NAME:
(Use the back of this card for your own specific information.)
♦ Parts of the Outlook Window OVERVIEW When you first log into Outlook, you will see the following screen. The top portion of the window maintains the web browser functionality, so you may navigate to another web site at any time.
Web Browser
Outlook Bar
Working Area
Toolbar Active Folder
Folder List
Status Bar
Naviga- tional Tool

Page 4 Outlook Via the Internet
NOTES
♦ Terms
Web Browser - the area at the top of the window associated with navigating the internet.
Toolbar – a row of icons representing shortcuts to common features.
Outlook Bar – column of icons on the left of the window that represent the different folders that may be accessed in Outlook. Active Folder – the folder that has been chosen; its name appears directly under the toolbar. Folder List – displays the selected folder and any subfolders it contains. Navigational Tool – since only a certain amount of information may appear at one time, this tool allows you to go to another page of information in the same folder. Working Area – where you manipulate the current folder items. Status Bar - is at the very bottom of the program window; it displays the number of items in the current folder.

Outlook Via the Internet Page 5
NOTES
Lesson Example
You wish to log onto Outlook via the Internet.
STEPS
1. Connect to the Internet by double-clicking the INTERNET EXPLORER icon on your Desktop.
2. Click in the area that displays the current web address. Type the
address https://web.mail.state.me.us. 3. Next, you may see a SECURITY ALERT dialog box. Click OK. 4. On the WEB ACCESS screen type your student log on name in the
LOG ON area. Press ENTER on your keyboard. If your monitor does not have a sticker with your log on information, your instructor will provide you with the information.
5. In the ENTER NETWORK PASSWORD dialog box type your
USERNAME. 6. Press the TAB key and type your PASSWORD. Click OK, or press
ENTER.
Page 6 Outlook Via the Internet
NOTES
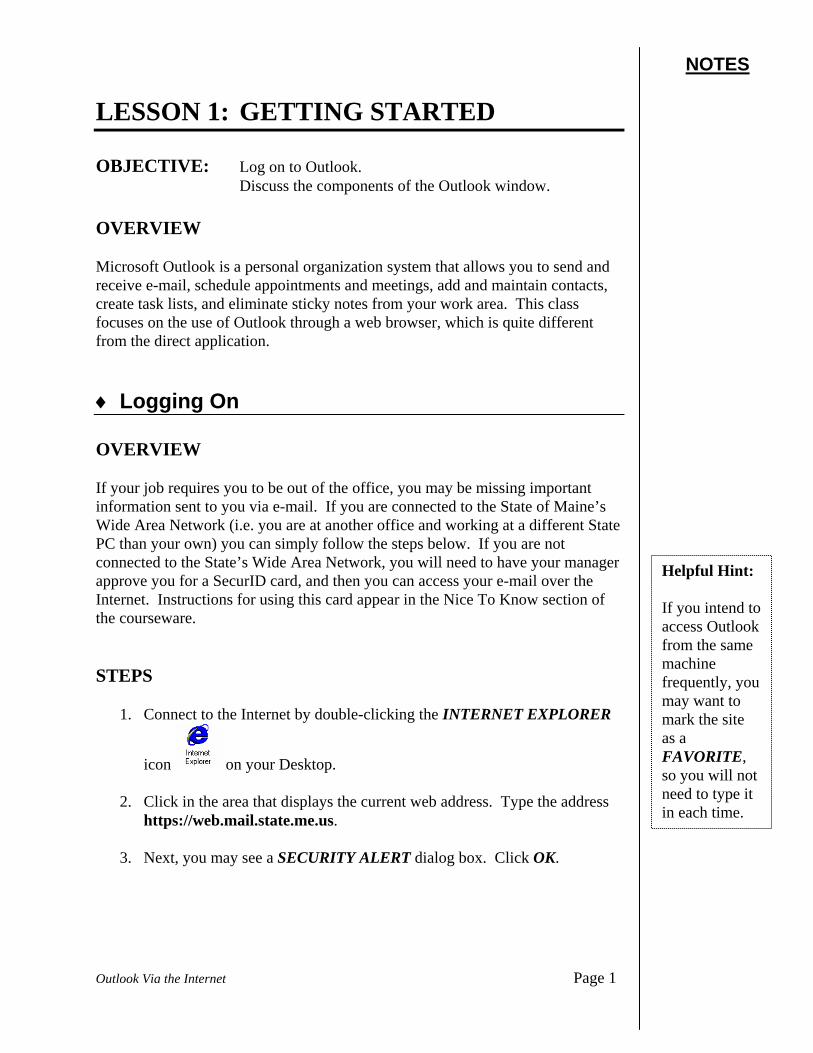
LESSON 2: E-MAIL OBJECTIVES: Read and respond to e-mail. Compose new messages. Utilize the Global Address List. Manage your mail folders. ♦ Mail Folders OVERVIEW The e-mail feature of Outlook allows you to read, reply to, forward, and compose electronic messages. Outlook automatically opens to the Inbox folder when accessed via the Internet. The Inbox is where you receive your incoming messages and can perform all other e-mail functions. Some of the details of your e-mail messages appear in the Inbox before you even open the message. Each message comprises one row and may include one or more of the following elements:
Check box that you may click to indicate that this message should be deleted the next time you delete
Indicates that this message is of high importance
Indicates the message to be of low importance
General e-mail message
Message requesting your presence at a meeting
Indicates the presence of an attachment
From Tells you who sent the message and provides the link to open the message
Subject Provides a brief description of the message content
Did You Know?
In the normal version of Outlook, the date and time a message was sent or received also appears in the folder; however, when using the Internet version, you must open the message to see this detail.

Outlook Via the Internet Page 7
NOTES
♦ Composing a New Message
OVERVIEW You may compose new messages from any of the Outlook e-mail folders. Typically, you will do this from your INBOX. STEPS
1. If not already in the Inbox, click the INBOX folder in the Outlook Bar.
2. Click the NEW MAIL MESSAGE icon . The following window appears:
3. Click in the TO: line, and type the first and last name of the recipient of your message. Spelling counts. If you would like more than one person to receive the message, separate their names with semicolons (;).
4. Press the TAB key or click in the CC: line and type the name(s) of those
to whom you would like to send a carbon copy of the message.
Helpful Hint: The only names Outlook will recognize are those in the Global Address List. If your recipient is a Contact, you must originate your message from the Contacts folder.

Page 8 Outlook Via the Internet
NOTES
5. Press the TAB key or click in the SUBJECT: line and type an appropriate
description for your message.
6. Press the TAB key or click in the MESSAGE WINDOW and type your message.
7. To indicate the importance of the message, click either the HIGH or
LOW importance icon. 8. To check the names of the recipients, click the CHECK NAMES icon
. This is not a required step; Outlook automatically checks names before sending.
9. To send an attachment, click the ATTACHMENTS tab.
10. Click the BROWSE button , and locate the file to attach.
11. Select the appropriate file and click the OPEN button.
12. Click the ADD ATTACHMENT NOW button
.
13. Repeat steps 10-12 for any additional attachments.
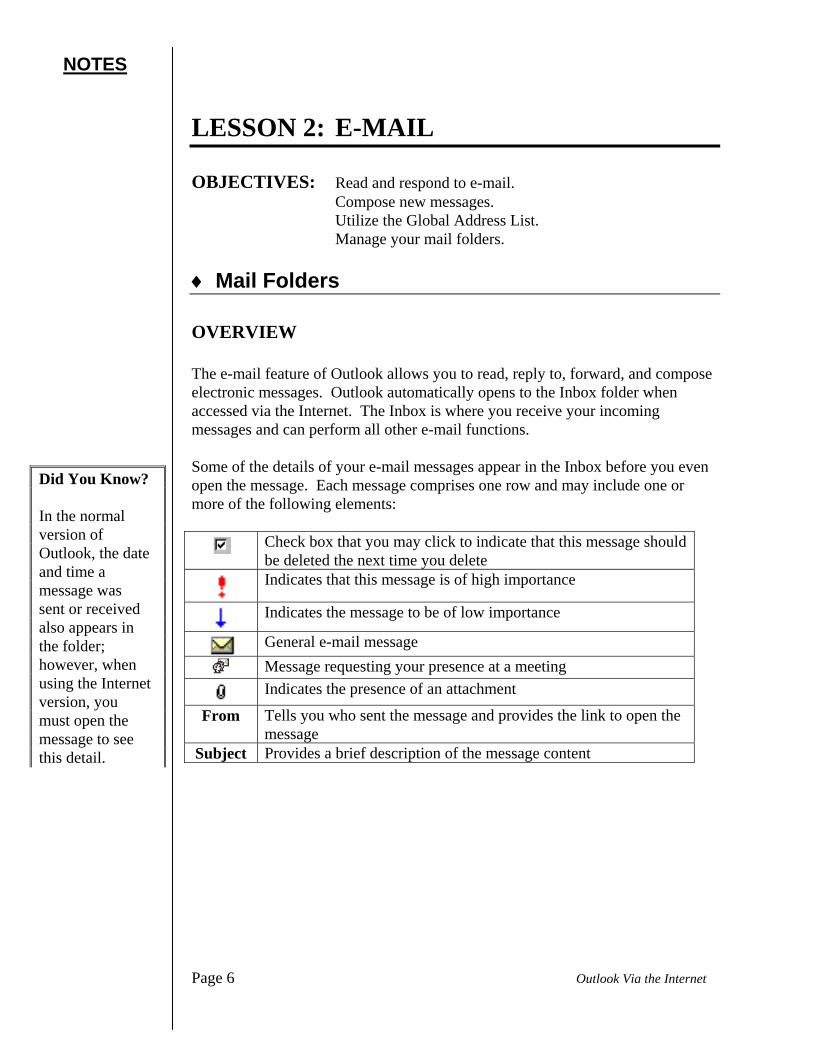
14. To choose additional options, click the OPTIONS tab.
15. Click to add or remove checkmarks from the options as desired.
Did You Know?
Unlike regular Outlook, there is no Formatting toolbar with which you may change text formatting in your message. There is also no SPELLCHECK option, so proofread well before clicking SEND.
Outlook Via the Internet Page 9
NOTES
16. Click the SEND icon to send the message.

Page 10 Outlook Via the Internet
NOTES
Lesson Example
You would like to send a message to someone else in class.
STEPS
1. Click the NEW MAIL MESSAGE icon.
2. Click in the TO: line, and type student# muskie (use the student number of another person in the class as directed by the instructor).
3. Click in the SUBJECT: line and type This is My Test E-Mail. 4. Press the TAB key or click in the MESSAGE WINDOW and type
your message. 5. Type the message I’m so glad I’m learning how to do this. in the
message pane.
6. Click the SEND icon. EXERCISE: 1) Send a new message to several fellow students using both the To and
CC lines. Text is as follows: Subject: Here is another practice e-mail from (your name) Body: Practice makes perfect! 2) Attach the XYZ.doc document to the message, and send. 3) On Your Own: Compose and send another new message to the other
class participants. Put your name in the subject line.

Outlook Via the Internet Page 11
NOTES
♦ Accessing and Reading Messages OVERVIEW When you open Outlook on the Internet, your Inbox is the initial folder displayed. Some information about your messages is displayed here. However, you must open each message to actually read the contents. In addition, the Internet version does not automatically update your list of messages as new ones arrive. You must refresh the screen periodically to access new messages. STEPS
1. To open a message, click the name of the sender in the FROM area.
2. To read the next or previous message, click the NEXT ITEM icon
or the PREVIOUS ITEM icon .
3. When finished reading messages, scroll to the top of the open message and
click the CLOSE button .
4. To move between pages of messages in your Inbox, click the arrow to
the left or right of the PAGE indicator at the top of the Inbox window.
5. To check for new messages, click the CHECK FOR NEW MAIL icon
.

Page 12 Outlook Via the Internet
NOTES
♦ Replying to and Forwarding Messages OVERVIEW It is often necessary to respond to the person who sent you a message or to send the original message to another person so that they may have the information. STEPS
1. To reply to the sender of the message, click the REPLY icon in the toolbar. Click in the message area, and type your response. When finished, click SEND .
2. To reply to the sender, as well as everyone else who received the
message, click the REPLY TO ALL icon in the toolbar. Click in the message area, and type your response. When finished, click SEND .
3. To forward a message, click the FORWARD icon on the toolbar
and follow the steps for selecting recipients as described in Composing a New Message. If you choose to, you may add information to the message. When finished, click SEND .

Outlook Via the Internet Page 13
NOTES
Lesson Example
You want to read any new mail and respond appropriately.
STEPS
1. Click the CHECK FOR NEW MAIL icon. 2. Click the name of the sender in the FROM area of the first message. 3. Click the NEXT ITEM icon to read the next message. 4. Click the REPLY TO ALL icon on the toolbar. Click in the message
area and type a response. 5. Click the SEND icon.
EXERCISE: 1) Check for new messages. 2) Open an unread message, and forward it to another student. 3) On Your Own: Open and reply to any message. 4) Check for new messages, and read all remaining unread messages.

Page 14 Outlook Via the Internet
NOTES
♦ Creating New Folders & Moving Messages OVERVIEW Rather than keeping everything in your Inbox, you may want to create new folders for storing specific messages. For example, you may create a folder for messages from a certain person or related to a particular project. STEPS
1. From the Inbox folder, click the NEW FOLDER icon .
2. Type a name for your folder in the EXPLORER USER PROMPT. Click OK.
3. When you are back at the INBOX, open the message you want to move to
another folder.
4. Click the MOVE/COPY icon .
5. Click the INBOX folder in the Folder List area. This will open it to display any Inbox subfolders.

Outlook Via the Internet Page 15
NOTES
6. Click the folder in which you want to move the message and click the MOVE button (you may choose COPY to keep copies of the message in both the Inbox and the subfolder).
7. To delete a subfolder, display the folder in the working area of Outlook,
and click the DELETE CURRENT FOLDER icon .
Lesson Example
You would like to create a new subfolder within your INBOX so that you can file your e-mails for future reference.
STEPS
1. From the Inbox folder, click the NEW FOLDER icon. 2. In the EXPLORER USER PROMPT type Test. Click OK. 3. From the INBOX, open the first message. 4. Click the MOVE/COPY icon. 5. Click the INBOX folder in the Folder List area. 6. Click the TEST folder, then the MOVE button.
Page 16 Outlook Via the Internet
NOTES
EXERCISE: 1) Create another subfolder for the Inbox named Project. 2) Copy any two messages into the Project folder. 3) Delete the Test folder. 4) On Your Own: Move a message into the Project folder. 5) Delete the Project folder. ♦ Printing Messages
OVERVIEW You may print messages that you would like to keep as paper copies.
STEPS
1. Open the message(s) you wish to print, and click FILE, PRINT. 2. Choose the appropriate printer, print range, and number of copies. 3. To print any attachments associated with the message at the same
time, click the check box next to PRINT ALL LINKED DOCUMENTS. 4. Click OK.

Outlook Via the Internet Page 17
NOTES
♦ Deleting Messages
OVERVIEW Once you read a message and no longer need it, you may delete it from your Inbox or subfolder. It will be placed in the Deleted Items folder, which should be emptied regularly in order to permanently delete the items and free up space.
STEPS
1. Open the folder from which you wish to delete items. 2. Mark the item(s) you wish to delete by clicking in the check box to the left
of the item to place a checkmark in the box.
3. Click the DELETE MARKED ITEMS icon .
4. To permanently delete items, click the EMPTY DELETED ITEMS
FOLDER icon at the top of any Mail folder window.
Did You Know?
You may also delete individual items when they are open by clicking the DELETE icon
. When you return to the Inbox folder; however, the item will not appear to be deleted until you refresh the screen.

Page 18 Outlook Via the Internet
NOTES
Lesson Example
You would like a hard copy of a message. After printing, you want to delete the e-mail.
STEPS
1. Go to the INBOX and open any message (read or unread).
2. Click FILE, PRINT.
3. Keep the default printer, and simply click the PRINT button.
4. Mark the message by clicking the check box to the left of the item. 5. Click the DELETE MARKED ITEMS icon.
EXERCISE: 1) Choose another message to print. 2) Mark the message to be deleted. 3) On Your Own: Print one final message. 4) Delete all but one message from your Inbox.

Outlook Via the Internet Page 19
NOTES
LESSON 3: CONTACTS OBJECTIVES: Create a new contact.
Compose messages to contacts. OVERVIEW The Outlook Contacts folder is like an electronic card file. It allows you to store information including names, addresses, phone numbers, and e-mail addresses for people who are not on your Global Address List.
♦ Creating a New Contact STEPS
1. Click the CONTACTS folder in the Outlook Bar. The following window will appear:
2. Click the COMPOSE NEW CONTACT icon .

Page 20 Outlook Via the Internet
NOTES
3. Click in the FIRST NAME textbox, and type the contact’s first name. Press the TAB key.
4. Continue to enter the information you want to include for the contact. Additional fields are available on the DETAILS tab.
5. When finished, click the SAVE AND CLOSE icon .

Outlook Via the Internet Page 21
NOTES
Lesson Example
You would like to make some Outlook contacts for people you e-mail outside the State of Maine system.
STEPS
1. Go to the CONTACTS folder in the Outlook Bar. 2. Click the NEW CONTACT icon.
3. Type the following information for this new contact:
Pamela Small Financial Advisor Thompson's Financial Planning 111 West River Road Thompson, AZ 44444 Phone: 800-555-4321 Fax: 333-666-9999 [email protected]
4. Click the SAVE AND CLOSE icon.
EXERCISE: 1) Create another new contact using the following information:
Joseph James Jackson Nickname: Joe Spouse's Name: Janet Technology Consultant Florida Consulting Firm 456 Palm Springs Drive Daytona Beach, FL 88888 Phone: 888-555-6789 Fax: 111-222-3333 [email protected]
2) On Your Own: Create another new contact using your own
information.

Page 22 Outlook Via the Internet
NOTES
♦ Composing a Message to a Contact OVERVIEW You are not able to send a message to a Contact in the quite same way you send one to someone on the Global Address List. If you simply type their name in the To line of a message, Internet Outlook will not find the address. It is simpler to initiate a message directly from the Contacts folder. STEPS
1. From the Contacts folder, open the desired contact by clicking their last name.
2. Click the NEW MESSAGE TO CONTACT icon . 3. Click in the SUBJECT box to type the subject of the message. Press the
TAB key.
4. Type your message, and click SEND . ♦ Editing Contacts OVERVIEW If someone should move, change phone numbers, get promoted, etc., you will want to change their information in your Contacts folder. STEPS
1. From the Contacts folder, open the contact(s) you want to edit by clicking their name.
2. Make the appropriate changes to the information.
3. Click the SAVE AND CLOSE icon .

Outlook Via the Internet Page 23
NOTES
♦ Deleting Contacts STEPS
1. From the Contacts folder, mark the contact(s) you want to delete by clicking the check box to the left of the name.
2. Click the DELETE MARKED ITEMS icon .
Lesson Example
You would like to send a message to a contact.
STEPS
1. Click the CONTACTS folder in the Outlook Bar.. 2. Click the NEW CONTACT icon.
3. Open the Pamela Small contact. 4. Click the NEW MESSAGE TO CONTACT icon.
5. Compose and send a message to Pamela.
EXERCISE: 1) Send a message to Joseph Jackson. 2) Delete the Pamela Small contact. 3) On Your Own: Send a message to your own contact. 4) Delete all remaining contacts.

Page 24 Outlook Via the Internet
NOTES
LESSON 4: CALENDAR OBJECTIVES: View the calendar in its different formats.
Create various types of appointments and events. Send and respond to meeting requests.
OVERVIEW Your Outlook Calendar can replace a calendar on your desk. Microsoft Outlook allows you to electronically keep track of your time without the chaos of adding and erasing appointments in pencil. You may add three types of items to your calendar: appointments, events, and meetings. ♦ Calendar Views OVERVIEW The Outlook Calendar may be displayed either one day at a time or for an entire week of time. STEPS
1. Click the CALENDAR folder in the Outlook Bar.

Outlook Via the Internet Page 25
NOTES
2. To choose a view, click the VIEW drop-down list and select either DAILY or WEEKLY. Outlook will update your view to look like one of the following:
Daily Weekly 3. To view a particular day or week, click the desired date or week number
in the small calendar on the right side of the window. You may also
change the date below this calendar, and click the GO button .
4. To return to today, click the TODAY button .

Page 26 Outlook Via the Internet
NOTES
♦ Creating an Appointment or Event OVERVIEW Appointments are activities that occur for a specific period of time and no other parties need to be invited to them. There are two types of appointments: one time or recurring. An event is an activity that lasts for 24 hours or longer; for example, a vacation or a holiday. STEPS
1. Click the COMPOSE NEW APPOINTMENT icon .
2. Click in the SUBJECT line to type a description of the appointment. Press the TAB key.
3. Enter a location for your appointment.
4. You may edit your START and END times by using the drop-down arrows for the month and typing over the day and time.
5. To set an activity as an event, click the ALL DAY EVENT check box.
.
Helpful Hint: In order for Outlook to remind you of your appointments, REMINDER must be selected, and the regular Outlook program must be active. You will not be reminded on the Internet version.
Outlook Via the Internet Page 27
NOTES
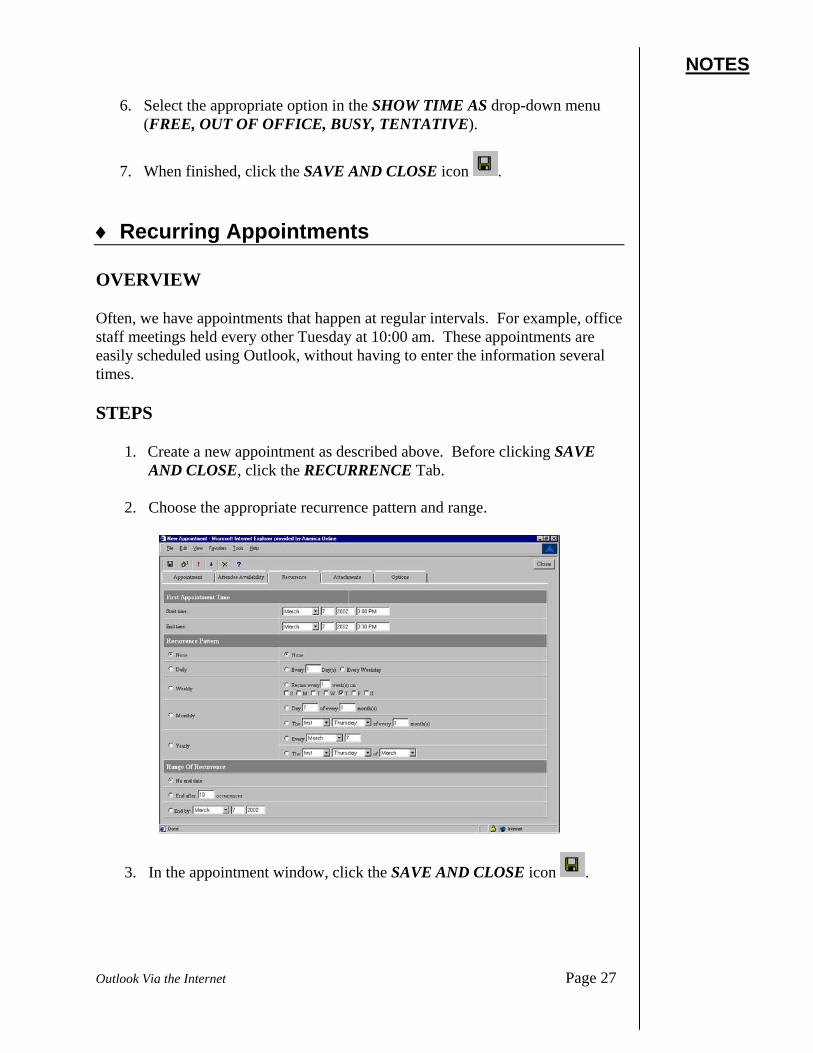
6. Select the appropriate option in the SHOW TIME AS drop-down menu (FREE, OUT OF OFFICE, BUSY, TENTATIVE).
7. When finished, click the SAVE AND CLOSE icon . ♦ Recurring Appointments OVERVIEW Often, we have appointments that happen at regular intervals. For example, office staff meetings held every other Tuesday at 10:00 am. These appointments are easily scheduled using Outlook, without having to enter the information several times. STEPS
1. Create a new appointment as described above. Before clicking SAVE AND CLOSE, click the RECURRENCE Tab.
2. Choose the appropriate recurrence pattern and range.
3. In the appointment window, click the SAVE AND CLOSE icon .

Page 28 Outlook Via the Internet
NOTES
Lesson Example
You would like to view this week's schedule, enter an appointment for tomorrow, and enter a recurring event.
STEPS
1. Click the number to the left of this week in the calendar in the upper right corner.
2. Click anywhere on tomorrow's area of the weekly calendar. 3. Click the NEW APPOINTMENT icon. 4. Click in the SUBJECT line and type Practice Outlook. Press TAB. 5. Enter My Desk in LOCATION. 6. Click and drag over the START TIME and END TIME and change
them to 1:00 PM and 3:00 PM, respectively. 7. Verify that your time will be considered Busy in the SHOW TIME AS
field. 8. Click the SAVE AND CLOSE icon. 9. Navigate to the month of your birthday in the small calendar, and
click on your birthday. 10. Click the NEW APPOINTMENT icon. 11. Click in the SUBJECT line and type My Birthday. 12. Click the RECURRENCE tab, and select YEARLY. 13. Click the SAVE AND CLOSE icon.

Outlook Via the Internet Page 29
NOTES
EXERCISE: 1) Create an appointment for next Wednesday from 8:00 a.m. to 9:00
a.m. titled Update Meeting with Staff to take place in the Conference Room.
2) Fill in the following agenda in the body of the appointment window.
Agenda
8:00-8:15 Breakfast and introductions 8:15-8:45 Discussion of 2002 work plan 8:45-9:00 Questions and wrap-up 3) Make this a recurring appointment on the same Wednesday of each
month. 4) On Your Own: Enter an appointment titled Haircut from 5:30 p.m. to
6:30 p.m. today. 5) Fill in all pertinent information, making it up where necessary.
♦ Scheduling a Meeting OVERVIEW One of the most helpful features of Outlook is the ability to schedule a meeting and then invite participants from your Global Address List to attend via e-mail. In addition, if the participants use the Outlook Calendar, you can identify a time for the meeting when your desired attendees are free. STEPS
1. From the Calendar folder, click the NEW MEETING REQUEST icon
. If you already have the appointment created in the Calendar, open
the appointment, and click the INVITE ATTENDEES icon .
2. In the TO: text box, type the names of the people you would like to invite, separated by semi-colons.

Page 30 Outlook Via the Internet
NOTES
3. Enter a SUBJECT, LOCATION, and TIMES as you would a typical appointment.
4. Click on the ATTENDEE AVAILABILITY tab.
5. Outlook will display a color-coded version of each attendee's schedule.
This allows you to determine if the meeting is scheduled for an appropriate time.
6. If desired, go to the OPTIONS tab to make additional selections regarding your meeting.
7. Click the SEND icon . This will send an e-mail message to each invitee’s Inbox, and the meeting will be scheduled in your Calendar.

Outlook Via the Internet Page 31
NOTES
Lesson Example
You are planning a meeting that requires the presence of several coworkers.
STEPS
1. Navigate to tomorrow. 2. Click the NEW MEETING REQUEST icon.
3. In the TO: text box, type the names of all other students separated by
semi-colons.
4. Type Planning Meeting in the SUBJECT line, and Conference Room for the LOCATION.
5. Make the START TIME and END TIME 11:00 AM and 12:00 PM,
respectively. 6. Click the ATTENDEE AVAILABILITY tab. 7. Click the SEND icon
EXERCISE: 1) Invite three students to the Update Meeting with Staff appointment
scheduled for next Wednesday. 2) On Your Own: Create another meeting next Tuesday with the subject,
location, and times of your choice. 3) Invite all other students.

Page 32 Outlook Via the Internet
NOTES
♦ Responding to a Meeting Request OVERVIEW When you receive a meeting request from an individual, Outlook makes it very easy to respond to them. STEPS
1. Click to open the meeting request (depicted with the symbol in front of it in your INBOX).
2. You may choose ACCEPT , TENTATIVE , or DECLINE by clicking on the appropriate icon. You may edit the response to inform the meeting host of any extra information.
3. If you accept the meeting, it will automatically update your calendar.
Did You Know?
By selecting DON’T SEND A RESPONSE, the host will not have the ability to see your status and will not know if they should expect your attendance.
Outlook Via the Internet Page 33
NOTES
Lesson Example
You have received some meeting requests from people and you would like to respond to them.
STEPS
1. Click the INBOX folder in the OUTLOOK BAR. 2. Open any meeting request (depicted with the symbol in front of it)
by clicking the name in the FROM area. 3. Choose to accept the meeting request by clicking on the ACCEPT
icon. 4. Return to your CALENDAR folder and notice that Outlook has
automatically updated your calendar with the meeting. EXERCISE: 1) Open up another meeting request from your Inbox. 2) Decline the meeting request and choose to Edit the Response Before
Sending. 3) Send the following response: I apologize for not being able to
attend your meeting, I have another meeting taking place at this time.
4) On Your Own: Open up another meeting request and this time, give a
Tentative response. Let the person know the reason why your response is tentative.

Page 34 Outlook Via the Internet
NOTES
♦ Editing Calendar Items OVERVIEW All calendar items (appointments, events and meetings) may be changed as needed. STEPS
1. Open the appointment/meeting you would like to change.
2. To change all of the appointments in a recurring series, click the
EDIT SERIES icon .
3. Make the desired changes.
4. To save the changes to an appointment or an event, click the SAVE
AND CLOSE icon .
5. To save the changes to a meeting, click the SEND icon to redistribute invitations with the updated information.
♦ Deleting Calendar Items STEPS
1. From the Calendar folder, open the appointment you want to delete by clicking the subject of the appointment.
2. Click the DELETE icon or the DELETE SERIES icon .

Outlook Via the Internet Page 35
NOTES
Lesson Example
You need to change the time of the Planning Meeting.
STEPS
1. Click the CALENDAR folder in the Outlook Bar. 2. Open the Planning Meeting. 3. In the APPOINTMENT tab make the meeting last a half hour longer
than originally planned. 4. Click the SEND icon to redistribute invitations with the updated
information.
EXERCISE: 1) Open the Practice Outlook appointment, and change the date to next
Thursday. 2) On Your Own: Open up your Haircut appointment and delete it.

Page 36 Outlook Via the Internet
NOTES
LESSON 5: GENERAL OPTIONS
OBJECTIVE: Set the Out of Office Assistant. Change your Outlook Password. Modify Calendar Settings Empty the Deleted Items Folder. ♦ The Out of Office Assistant OVERVIEW
If you plan to be out of the office for a vacation or a business trip, you may have Outlook forward an automatic message to each person who sends you a message while you are away. Each sender will only receive this message the first time they e-mail you. STEPS
1. Click the OPTIONS folder in the Outlook Bar.
2. Click the I AM CURRENTLY OUT OF THE OFFICE radio button. 3. Click in the message text area to compose or revise the message you wish
to send upon receipt of an e-mail.

Outlook Via the Internet Page 37
NOTES
4. Scroll to the bottom of the OPTIONS window, and click the OK button
.
5. To turn off the Out of Office Assistant, click the I AM CURRENTLY IN THE OFFICE radio button in the OPTIONS folder. Click OK.
♦ Changing Your Outlook Password OVERVIEW It is a good idea to change your password to access Outlook on a regular basis. STEPS
1. In the OPTIONS folder, click the CHANGE PASSWORD button
. 2. Click in the DOMAIN text box and type your domain (the same as when
logging in). Press TAB. 3. Type your ACCOUNT, which will be your name in first.last format.
Press TAB.
4. Type your OLD PASSWORD. Press TAB.
5. Type your NEW PASSWORD. Press TAB.

Page 38 Outlook Via the Internet
NOTES
6. Retype your NEW PASSWORD. Click OK.
7. Scroll to the bottom of the OPTIONS window, and click the OK button
.
♦ Calendar Settings OVERVIEW
You may choose to set your work week and business hours to reflect the hours and days you typically work. STEPS
1. In the OPTIONS folder, make the appropriate CALENDAR OPTIONS
selections.
2. Click the OK button at the bottom of the OPTIONS window.

Outlook Via the Internet Page 39
NOTES
Lesson Example
You're going on vacation, and need to turn on your Out of Office Assistant.
STEPS
1. Click on the OPTIONS folder. 2. Click I AM CURRENTLY OUT OF THE OFFICE.
3. Click in the message area, delete any text that may appear, and type I
will be out of the office until next week. I will respond to your e-mail upon my return.
4. Return to the INBOX folder.
EXERCISE: 1) Set your Calendar to specify that your working hours are 9:00 AM to
5:00 PM. 2) On Your Own: Clear the message from the Out of Office Assistant,
and turn it off. 3) Return the Calendar settings to 8:00 AM to 4:00 PM.

Page 40 Outlook Via the Internet
NOTES
LESSON 6: LOGGING OFF OVERVIEW
When you are finished using Outlook, you need to log off the system. Additionally, the Internet itself may time you out of your Outlook session and request that you log back in to continue use. STEPS
1. Close any open items.
2. If desired, click the EMPTY DELETED ITEMS FOLDER icon at the top of any Mail folder.
3. Click the LOG OFF icon in the Outlook Bar.
4. Close your Internet connection if you are through.
Outlook Via the Internet Page 41
NOTES
Lesson Example
You are finished using Outlook for the time being.
STEPS
1. Click the LOG OFF icon. 2. Click the CLOSE button for INTERNET EXPLORER.

Page 42 Outlook Via the Internet
NOTES
LESSON 7: GIVE IT A TRY! OBJECTIVE: Practice Outlook features learned in class. EXERCISE:
Refer to Lesson 1 for assistance 1) Log on to Outlook from Internet Explorer.
Refer to Lesson 2 for assistance 2) Compose and send a message to another student in class. 3) Reply to a message in your Inbox. 4) Forward it to a different student. 5) Delete the message. 6) Create a new folder under your Inbox titled Work Stuff. 7) Check for new messages. 8) Move a message to the Work Stuff folder. 9) Delete the Work Stuff folder.
Refer to Lesson 3 for assistance 10) Create a new Contact using the following information:
Harold Harrison 123 State St.
Augusta, ME 04330 (207) 555-2345 [email protected]
11) Compose a message to the contact.

Outlook Via the Internet Page 43
NOTES
12) Close the message without sending. 13) Delete this contact and any others remaining.
Refer to Lesson 4 for assistance 14) Create an appointment called (Your Name)’s Meeting for this
evening. 15) Make it a weekly recurring appointment that ends after seven
occurrences. 16) Invite two other training participants to the appointment to make it a
meeting. 17) Decline a meeting request in your Inbox. 18) Delete all occurrences of your meeting. 19) Delete all appointments, events and meetings in your Calendar (don't
forget your birthday).
Refer to Lesson 6 for assistance 20) Check for new messages, and delete all remaining items in your
Inbox. 21) Empty the Deleted Items folder. 22) Log off and close Internet Explorer.

Page 44 Outlook Via the Internet
NOTES
NICE TO KNOW ♦ Using a SecurID Card OVERVIEW
If you do not have access to a computer that resides on the State Wide Area Network, you must use a device called a SecurID card to penetrate the firewall around our system. The card is about the size of a credit card, and on it is a series of numbers that change approximately once a minute. These numbers are synchronized with the State server, so when you enter them, you are recognized as an authorized user of the system. STEPS
1. Log on to the Internet. 2. Go to the following web address: https://web.mail.state.me.us
You may want to add this site to your Favorites.
3. Click in the text box, and enter your USERNAME and press the TAB key.
Helpful Hint: The first time you log in using your SecurID card, you will not have a PIN number. Simply use the SecurID number, and a PIN will be assigned for you to use each time thereafter.

Outlook Via the Internet Page 45
NOTES
4. Click in the PASSCODE text box, and enter your four-digit PIN number plus the digits on your SecurID card. Press ENTER.
5. If you are not successful, you will need to enter your Username and Passcode again.
6. If you are successful, you will see the following screen, which will automatically forward you to the State of Maine E-mail Web Access page. Log in as usual.
IMPORTANT NOTE: Internet Explorer accessed through work channels is for work purposes only – whenever you go through the state system, your usage is monitored.
Did You Know?
The tiny horizontal lines to the left of the SecurID code identify the amount of time left for a particular code. The fewer the lines, the less time you have to use that code.
Helpful Hint: If you are logged on but aren't active for a while, you may be asked to reenter the Passcode.