Otoscope & Ophthalmoscope Instrument Set re… · This instruction manual is for use with the...
17
Otoscope & Ophthalmoscope Instrument Set Use, Care, & Maintenance
Transcript of Otoscope & Ophthalmoscope Instrument Set re… · This instruction manual is for use with the...
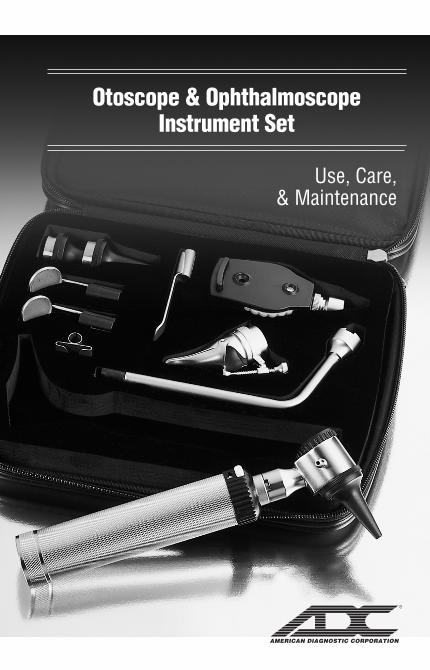
Otoscope & OphthalmoscopeInstrument Set
Use, Care,& Maintenance
2
Thank you for choosing an ADC® Diagnostc Instrument Set. We’re proud of the careand quality that goes into the manufacture of each and every diagnostic instrument thatbears our name. Every component has been carefully designed to maximize perform-ance. (For item 5212, also used in 5210, 5215, 5211, 5211V)
Device Description and Intended UseThe ophthalmoscope is a handheld, battery-powered device containing illuminationand viewing optics intended to examine the media (cornea, aqueous, lens, and vitre-ous) and the retina of the eye. It is intended to be used by a trained healthcare profes-sional.
Otoscope Attachment (5210 and 5215) - The otoscope is a handheld batterypowered device with magnifying system that provides illumination of the ear canal andtympanic membrane.
Nasal Speculum Adapter for Otoscope Attachment (5215 only) - When usingthe otoscope attachment with a nasal speculum adapter, the device allows for directexamination of the nares while maintaining a line of sight.
Bent Arm Illuminator (5215 only) - The bent arm illuminator is a handheld lightthat can be used to illuminate a patient’s mouth and upper throat during an examina-tion. The bent arm illuminator is a non-invasive light source designed to facilitate theexamination of the oropharynx area. It can also be used to assist in assessing papil-lary light response and for transillumination of the sinuses. When used with laryngealmirrors, it allows for non invasive, indirect visualization of the hypopharynx.
Latex Statement - This device and all accessories are not made with natural rubberlatex.
This device should be used by a trained healthcare professional.
3
ContraindicationsThe use of this device is contraindicated in patients who have already received pro-longed or intense light exposure, especially if the patients are infants, aphakes, or per-sons with diseased eyes. Excessive exposure to light may result in patient injury. Seewarnings for additional information.
General WarningsA warning statement in this manual identifies a condition or practicewhich, if not corrected or discontinued immediately, could lead to patientinjury, illness, or death.
CAUTION: Because prolonged intense light exposure can damage the retina, the useof the device for ocular examination should not be unnecessarily prolonged, and thebrightness setting should not exceed what is needed to provide clear visualization ofthe target structures.
The retinal exposure dose for a photochemical hazard is a product of the radiance andthe exposure time. If the value of radiance were reduced in half, twice the time wouldbe needed to reach the maximum exposure limit.
While no acute optical radiation hazards have been identified for direct or indirect oph-thalmoscopes, it is recommended that the intensity of light directed into the patient'seye be limited to the minimum level which is necessary for diagnosis. Infants,aphakes and persons with diseased eyes will be at greater risk. The risk may also beincreased if the person being examined has had any exposure with the same instru-ment or any other ophthalmic instrument using a visible light source during the previ-ous 24 hours. This will apply particularly if the eye has been exposed to retinalphotography.
WARNING: The carrying cases provided with these devices are intended for longterm storage or transport between facilities or when shipping devices to and fromADC’s facility for repair or servicing. Carry cases (including internal liners) can NOTbe cleaned or disinfected and should be safely discarded if contaminated. Do notcarry the case into a contaminated environment.
4
WARNING: When replacing lamp, allow lamp to cool for five minutes before han-dling.
WARNING: When cleaning/disinfecting devices that have been used on patients, besure to use appropriate personal protective equipment and follow all safety precau-tions/warnings.
CAUTION: Consult the cleaning and disinfection instructions for each part for furtherinformation about cleaning and disinfecting this product. Always remove batteriesprior to cleaning or disinfecting any device.
WARNING: No form of sterilization has been validated for this device or its corre-sponding components and sterilization may compromise the safety and effectivenessof this device. (This includes steam sterilization.)
WARNING: Use of any accessories or materials not indicated in the user's manualcan degrade the minimum safety of the equipment.
CAUTION: Federal law restricts this device to sale by or on the order of a physician orlicensed health care practitioner.
WARNING: During use metal components near instrument head can become warm.This is especially true if device is on for extended periods of time. Do not leave deviceon when not in use.
OtoscopeThis instruction manual is for use with the Complete 2.5v Instrument Set (Item #5215),2.5v Diagnostic Set (Item #5210), 2.5v Otoscope (Item #5211 or 5211V), and all ac-cessories and replacement parts.
Battery Handle: (Item #5211-5) All instrument sets come equipped with a "C" cellknurled chrome handle with rheostatic power switch.

5
Battery ReplacementRequires 2 "C" cell batteries. Remove the knurled cap at thebase of the handle by turning counterclockwise. Insert twofresh "C" cell batteries (not included) with the positive polaritytowards the instrument head. Replace battery compartmentcap by turning clockwise. (Fig. 1).
Removing and Attaching the Instrument HeadAll instrument heads feature a bayonet style mount. To re-move, push down firmly and rotate counterclockwise. To en-gage, align slots on base of instrument head with tabs onbayonet. Push head and twist clockwise until engaged.(Fig. 2).
Turning the Instrument OnTo illuminate, press the white power switch and rotate therheostatic bezel clockwise until desired lamp intensity is ob-tained (0 position is off, red 1 position is full power) Slidethe switch in the opposite direction to turn off. (Fig. 3).
Handle Care and MaintenanceThe handle can be cleaned following the guidelines in the‘Cleaning and Disinfection’ section below. Periodically checkthe condition of the batteries, making sure there is no sign ofcorrosion or oxidation. Always replace BOTH batteries. Alka-line batteries are recommended. Remove batteries from han-dle if instrument will not be used for an extended period oftime.
Instrument headsOtoscope Head (provided on 5215, 5210, 5211, and 5211V) (Item #5220). This instru-ment head is designed for examination of the ear canal – specifically the externalacoustic duct and tympanic membrane. The head comes complete with a 3x removableviewing lens, insufflator fitting, and 3 reusable specula (standard models with 2.5mm,3.5mm, and 4.5mm specula; veterinary model with 4mm, 5mm, and 7mm specula).
(Fig. 2)
(Fig. 3)
(Fig. 1)

6
Attaching the specula Push the flanged end of the desired speculum onto the instru-ment head aligning the slot in the speculum flange with therivet at the top of the instrument head and twist clockwise toengage. Reverse procedure to remove. (Fig.4)NOTE: Otoscope must be used with specula.
Using Welch Allyn or equivalent disposable specula:Attach the disposable specula adaptor, Item #5211-AD in thesame manner as the reusable specula. Attach Welch Allyn orequivalent disposable speculum by pushing the flanged end ofthe desired speculum onto the chrome socket and twist coun-terclockwise to engage (Fig.4b). Reverse procedure to re-move and discard after each use.
Removing Viewing lens To remove the Viewing lens (Item #5211-L) during an exami-nation, rotate lens counterclockwise and pull. Reverse proce-dure to attach. (Fig. 5).
Replacing lamp Remove speculum. Pull black sleeve off of lamp. Twist lampcounterclockwise to remove. Replace with ADC Item #5211-4.Reverse procedure to install new lamp. (Fig. 6).
Insufflator The unit comes equipped with an insufflator fitting already at-tached. The insufflator bulb and tubing (Item #5122N) can be purchased separately.(Fig. 7).
Ophthalmoscope(provided on sets #5212, #5215 and #5210)This instrument head (Item #5240) is equipped with 24 lensesfrom -25 to +40 diopters. (Fig. 8).
(Fig. 5)
(Fig. 6)
(Fig. 7)
(Fig. 4b)
(Fig. 8)
(Fig. 4)
7
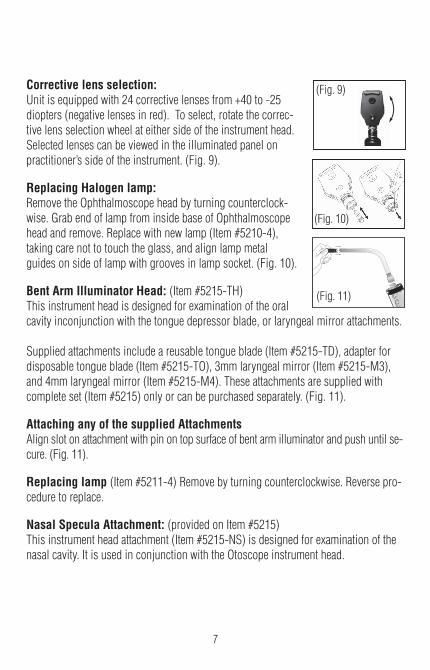
Corrective lens selection: Unit is equipped with 24 corrective lenses from +40 to -25diopters (negative lenses in red). To select, rotate the correc-tive lens selection wheel at either side of the instrument head.Selected lenses can be viewed in the illuminated panel onpractitioner’s side of the instrument. (Fig. 9).
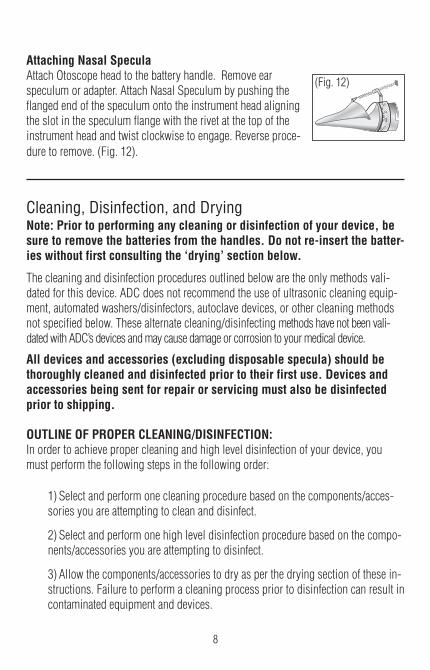
Replacing Halogen lamp: Remove the Ophthalmoscope head by turning counterclock-wise. Grab end of lamp from inside base of Ophthalmoscopehead and remove. Replace with new lamp (Item #5210-4),taking care not to touch the glass, and align lamp metalguides on side of lamp with grooves in lamp socket. (Fig. 10).
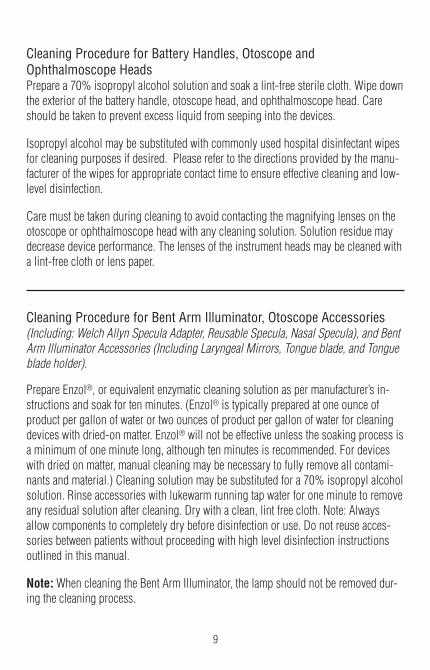
Bent Arm Illuminator Head: (Item #5215-TH)This instrument head is designed for examination of the oralcavity inconjunction with the tongue depressor blade, or laryngeal mirror attachments.
Supplied attachments include a reusable tongue blade (Item #5215-TD), adapter fordisposable tongue blade (Item #5215-TO), 3mm laryngeal mirror (Item #5215-M3),and 4mm laryngeal mirror (Item #5215-M4). These attachments are supplied withcomplete set (Item #5215) only or can be purchased separately. (Fig. 11).
Attaching any of the supplied AttachmentsAlign slot on attachment with pin on top surface of bent arm illuminator and push until se-cure. (Fig. 11).
Replacing lamp (Item #5211-4) Remove by turning counterclockwise. Reverse pro-cedure to replace.
Nasal Specula Attachment: (provided on Item #5215)This instrument head attachment (Item #5215-NS) is designed for examination of thenasal cavity. It is used in conjunction with the Otoscope instrument head.
(Fig. 11)
(Fig. 10)
(Fig. 9)
8
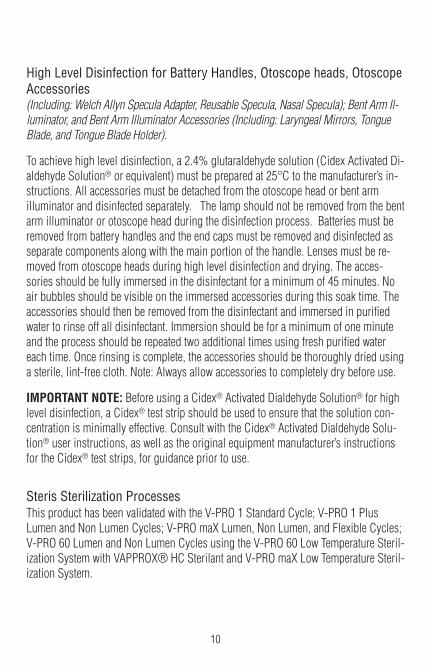
Attaching Nasal SpeculaAttach Otoscope head to the battery handle. Remove earspeculum or adapter. Attach Nasal Speculum by pushing theflanged end of the speculum onto the instrument head aligningthe slot in the speculum flange with the rivet at the top of theinstrument head and twist clockwise to engage. Reverse proce-dure to remove. (Fig. 12).
Cleaning, Disinfection, and DryingNote: Prior to performing any cleaning or disinfection of your device, besure to remove the batteries from the handles. Do not re-insert the batter-ies without first consulting the ‘drying’ section below.
The cleaning and disinfection procedures outlined below are the only methods vali-dated for this device. ADC does not recommend the use of ultrasonic cleaning equip-ment, automated washers/disinfectors, autoclave devices, or other cleaning methodsnot specified below. These alternate cleaning/disinfecting methods have not been vali-dated with ADC’s devices and may cause damage or corrosion to your medical device.
All devices and accessories (excluding disposable specula) should bethoroughly cleaned and disinfected prior to their first use. Devices andaccessories being sent for repair or servicing must also be disinfectedprior to shipping.
OUTLINE OF PROPER CLEANING/DISINFECTION:In order to achieve proper cleaning and high level disinfection of your device, youmust perform the following steps in the following order:
1) Select and perform one cleaning procedure based on the components/acces-sories you are attempting to clean and disinfect.
2) Select and perform one high level disinfection procedure based on the compo-nents/accessories you are attempting to disinfect.
3) Allow the components/accessories to dry as per the drying section of these in-structions. Failure to perform a cleaning process prior to disinfection can result incontaminated equipment and devices.
(Fig. 12)
9
Cleaning Procedure for Battery Handles, Otoscope and Ophthalmoscope HeadsPrepare a 70% isopropyl alcohol solution and soak a lint-free sterile cloth. Wipe downthe exterior of the battery handle, otoscope head, and ophthalmoscope head. Careshould be taken to prevent excess liquid from seeping into the devices.
Isopropyl alcohol may be substituted with commonly used hospital disinfectant wipesfor cleaning purposes if desired. Please refer to the directions provided by the manu-facturer of the wipes for appropriate contact time to ensure effective cleaning and low-level disinfection.
Care must be taken during cleaning to avoid contacting the magnifying lenses on theotoscope or ophthalmoscope head with any cleaning solution. Solution residue maydecrease device performance. The lenses of the instrument heads may be cleaned witha lint-free cloth or lens paper.
Cleaning Procedure for Bent Arm Illuminator, Otoscope Accessories (Including: Welch Allyn Specula Adapter, Reusable Specula, Nasal Specula), and BentArm Illuminator Accessories (Including Laryngeal Mirrors, Tongue blade, and Tongueblade holder).
Prepare Enzol®, or equivalent enzymatic cleaning solution as per manufacturer’s in-structions and soak for ten minutes. (Enzol® is typically prepared at one ounce ofproduct per gallon of water or two ounces of product per gallon of water for cleaningdevices with dried-on matter. Enzol® will not be effective unless the soaking process isa minimum of one minute long, although ten minutes is recommended. For deviceswith dried on matter, manual cleaning may be necessary to fully remove all contami-nants and material.) Cleaning solution may be substituted for a 70% isopropyl alcoholsolution. Rinse accessories with lukewarm running tap water for one minute to removeany residual solution after cleaning. Dry with a clean, lint free cloth. Note: Alwaysallow components to completely dry before disinfection or use. Do not reuse acces-sories between patients without proceeding with high level disinfection instructionsoutlined in this manual.
Note: When cleaning the Bent Arm Illuminator, the lamp should not be removed dur-ing the cleaning process.
10
High Level Disinfection for Battery Handles, Otoscope heads, OtoscopeAccessories(Including: Welch Allyn Specula Adapter, Reusable Specula, Nasal Specula); Bent Arm Il-luminator, and Bent Arm Illuminator Accessories (Including: Laryngeal Mirrors, TongueBlade, and Tongue Blade Holder).
To achieve high level disinfection, a 2.4% glutaraldehyde solution (Cidex Activated Di-aldehyde Solution® or equivalent) must be prepared at 25°C to the manufacturer’s in-structions. All accessories must be detached from the otoscope head or bent armilluminator and disinfected separately. The lamp should not be removed from the bentarm illuminator or otoscope head during the disinfection process. Batteries must beremoved from battery handles and the end caps must be removed and disinfected asseparate components along with the main portion of the handle. Lenses must be re-moved from otoscope heads during high level disinfection and drying. The acces-sories should be fully immersed in the disinfectant for a minimum of 45 minutes. Noair bubbles should be visible on the immersed accessories during this soak time. Theaccessories should then be removed from the disinfectant and immersed in purifiedwater to rinse off all disinfectant. Immersion should be for a minimum of one minuteand the process should be repeated two additional times using fresh purified watereach time. Once rinsing is complete, the accessories should be thoroughly dried usinga sterile, lint-free cloth. Note: Always allow accessories to completely dry before use.
IMPORTANT NOTE: Before using a Cidex® Activated Dialdehyde Solution® for highlevel disinfection, a Cidex® test strip should be used to ensure that the solution con-centration is minimally effective. Consult with the Cidex® Activated Dialdehyde Solu-tion® user instructions, as well as the original equipment manufacturer’s instructionsfor the Cidex® test strips, for guidance prior to use.
Steris Sterilization ProcessesThis product has been validated with the V-PRO 1 Standard Cycle; V-PRO 1 PlusLumen and Non Lumen Cycles; V-PRO maX Lumen, Non Lumen, and Flexible Cycles;V-PRO 60 Lumen and Non Lumen Cycles using the V-PRO 60 Low Temperature Steril-ization System with VAPPROX® HC Sterilant and V-PRO maX Low Temperature Steril-ization System.
11
Disposable Specula Cleaning/Disinfection InstructionsDisposable specula should not be cleaned or disinfected in any way. Disposable spec-ula are single patient use only and must be discarded after use. Disposable speculashould not be used if they appear to be visibly contaminated or have accidentally comeinto contact with contaminated materials prior to use
DryingAll devices and components must be thoroughly dried prior to battery insertion or usein accordance with the instructions specified in this section. Components and devicesshould be allowed to dry for a minimum of two hours to ensure that all moisture hasbeen eliminated prior to reinsertion of batteries.
Battery handles must be given a visual inspection for corrosion or damage prior to thereinsertion of batteries. Check for damaged, corroded, or discolored parts within thebattery compartment.
Any handles showing signs of damage from cleaning and disinfection should not beused and must be serviced.
TroubleshootingThe following guidelines should be used to determine if your device has reached itsend of life or requires servicing. If the corrective actions described in this section donot resolve your issues, please see the warranty section of this manual to have yourdevice serviced.
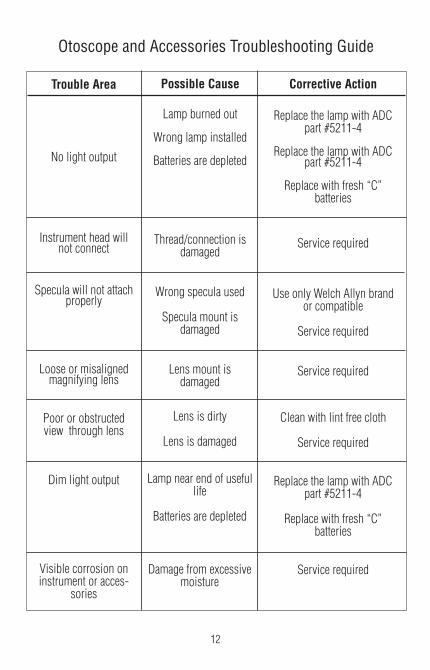
Trouble Area
No light output
Instrument head willnot connect
Specula will not attachproperly
Loose or misalignedmagnifying lens
Poor or obstructedview through lens
Dim light output
Visible corrosion oninstrument or acces-
sories
12
Possible Cause
Lamp burned out
Wrong lamp installed
Batteries are depleted
Thread/connection is damaged
Wrong specula used
Specula mount is damaged
Lens mount is damaged
Lens is dirty
Lens is damaged
Lamp near end of usefullife
Batteries are depleted
Damage from excessivemoisture
Corrective Action
Replace the lamp with ADCpart #5211-4
Replace the lamp with ADCpart #5211-4
Replace with fresh “C” batteries
Service required
Use only Welch Allyn brandor compatible
Service required
Service required
Clean with lint free cloth
Service required
Replace the lamp with ADCpart #5211-4
Replace with fresh “C” batteries
Service required
Otoscope and Accessories Troubleshooting Guide

13
Trouble Area
No light output
Instrument head will notconnect
Spot is not centered
Dim light output
Aperture or lens wheelwill not turn or does so
with difficulty
Visible corrosion on in-strument
Possible Cause
Aperture dial is betweenpositions
Lamp Burned out
Wrong Lamp Installed
Lamp not fully inserted
Thread/connection isdamaged
The aperture dial is notcentered
Lamp near end of usefullife
Batteries are depleted
Dirt in or damage tomechanism
Damage from excessivemoisture
Corrective Action
Rotate Aperture dial
Replace the lamp with ADC part#5210-4
Replace the lamp with ADC part#5210-4
Re-insert lamp
Service required
Move aperture dial to the fulldetent position
Replace the lamp with ADC part #5210-4
Replace with fresh “C” batteries
Service required
Service required
Ophthalmoscope Troubleshooting Guide
14
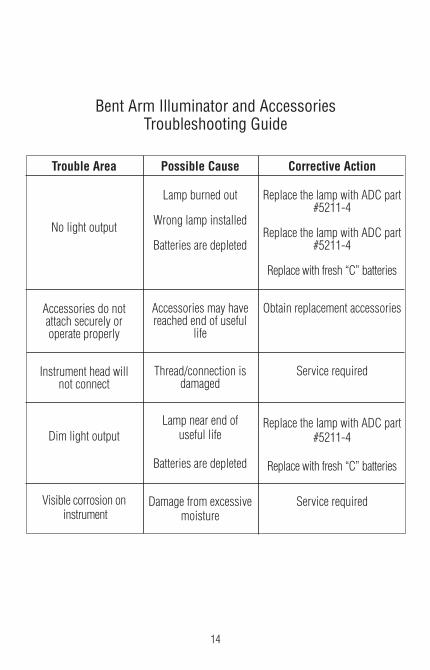
Bent Arm Illuminator and Accessories Troubleshooting Guide
Trouble Area
No light output
Accessories do not attach securely or operate properly
Instrument head willnot connect
Dim light output
Visible corrosion oninstrument
Possible Cause
Lamp burned out
Wrong lamp installed
Batteries are depleted
Accessories may havereached end of useful
life
Thread/connection isdamaged
Lamp near end of useful life
Batteries are depleted
Damage from excessivemoisture
Corrective Action
Replace the lamp with ADC part#5211-4
Replace the lamp with ADC part#5211-4
Replace with fresh “C” batteries
Obtain replacement accessories
Service required
Replace the lamp with ADC part#5211-4
Replace with fresh “C” batteries
Service required

15
Do not dispose of this product as unsorted municipal waste.Prepare this product for reuse or separate collection as specifiedby Directive 2002/96/EC of the European Parliament and the Coun-cil of the European Union on Waste Electronic and Electrical Equip-ment (WEEE). If this product is contaminated, this directive doesnot apply.
Symbols
Attention: Read Operating Manual for Cautions and Instructions for Use.
TYPE B. Indicates this is a product with Type B applied parts.
Environment
-4°F to 120.2°F (-20°C to +49°C)RH 95 %500 hpa – 1060 hpa, Altitude
50°F to 120.2°F (10°C to 49°C)RH 95 % (Max)500 hpa – 1060 hpa, Altitude
95°F (35°C)
Attention: This is NOT an AP or APG apparatus
Transportation / Storage:
Environmental OperatingRange:
Maximum Operating Temperature:
16
LIMITED WARRANTYAmerican Diagnostic Corporation (ADC®) warrants its products against defectsin materials and workmanship under normal use and service as follows:1. Warranty service extends to the original retail purchaser only and commenceswith the date of delivery.2. The optical system is warranted for one year.
What is Covered:Repair, or replacement of parts, and labor.
What is Not Covered:Transportation charges to and from ADC®. Damages caused by abuse, misuse,accident, or negligence. Incidental, special, or consequential damages. Somestates do not allow the exclusion or limitation of incidental, special, or conse-quential damages, so this limitation may not apply to you.
To Obtain Warranty Service:Send item(s) postage paid to ADC®, Attn: Repair Dept., 55 Commerce Dr., Haup-pauge, NY 11788. Please include your name and address, phone no., proof ofpurchase, and a brief note explaining the problem.
Implied Warranty:Any implied warranty shall be limited in duration to the terms of this warrantyand in no case beyond the original selling price (except where prohibited by law).
This warranty gives you specific legal rights and you may have other rightswhich vary from state to state.

17
ADC 55 Commerce Drive Hauppauge, NY 11788
ADC (UK) Ltd. Unit 6, PO14 1TH United Kingdom
Inspected, Assembled, andPackaged in the U.S.A.
Made in Pakistantel: 631-273-9600
toll free: 1-800-232-2670fax: 631-273-9659
www.adctoday.com
IB p/n 93-5215-00 rev 7 Printed in the U.S.A.