OPERATOR'S MANUAL CRRFrSMRX - c.searspartsdirect.com · Ball bearing slide -Pull slides and slide...
8
OPERATOR'S MANUAL CRRFrSMRX ° [ s, 1 INDUSTRIAL ROLLER CABINET 564NCH CABINET MAXIMUM WEIGHT LIMIT (4800) LBS. 75-INCH CABINET MAXIMUM WEIGHT LIMIT (5600) LBS. CALL 1-800-366-7278 FOR SERVICE PARTS. Refer to Service Parts Drawing for full listing of Service Parts. LOCATING MODEL # INFORMATION Model numbers and other information required for service parts is located on a label on the interior right side of the top most drawer. • The maximum weight for each 2-inch deep drawer is 120 pounds. • The maximum weight for each drawer 3-inches deep or more is 200 pounds. • The maximum weight for the top 4-inch drawer on roller cabinets is 320 pounds. • The maximum weight for each drawer 9-inches deep or more is 400 pounds. Ball bearing slides • For casters, use high quality bearing grease (yearly). • Lubricate the slides with grease or equivalent(twice yearly.) • Lubricate lock with graphite (yearly). • Periodically the drawer fronts, drawer trim, and other surfaces should be cleaned with a mild detergent and water. • Auto wax will preserve the unit's luster finish. Apply the wax as to a car. The wax will also help protect the unit against scratches. • Grease and oil can be removed with most standard cleaning fluids. For safety, use a nonflammable cleaning fluid. • If drawer liners are supplied, it is recommended they are used to protect the finish inside the drawers and to make the drawers easier to clean. The drawer liners may be cleaned with soap and water. DANGER ,_ is used to indicate a hazardous situation which, if not avoided, will result in serious injury or death. WARNING ,4k indicates a hazardous situation which, if not avoided, could result in serious injury or death. CAUTION is used to indicate a hazardous situation which, if not avoided, may result in minor injury, moderate injury, or property damage. CAUTION: Read and follow all Safety Rules and Operating Instructions before first use of this product. DANGER _, • DO NOT stand on this product. You may fall or cause product to tip. • DO NOT open more than one drawer. The product may become unstable and tip. • DO NOT step in the drawers. You may fall or cause product to tip. • DO NOT mount this product on a truck bed or any other moving object. • DO NOT move the product prior to closing and locking all the drawers. The drawers could come open and make the product unstable and tip. • The work surface must be removed if a chest is placed on top of a cabinet. Stacked products should be bolted together. The products could become unstable and tip. WARNING z_ • WEAR SAFETY GLASSES when removing or repositioning the slides. • DO NOT pull the unit, push it when moving. • USE THE BRAKES when not moving this product. This will prevent the product from rolling. • DO NOT alter this product in any manner. For example, do not weld external Iockbars or attach electrical equipment. • Keep the product on level surfaces. The product may become unstable and tip if stored or moved on an uneven surface. CAUTION • This product is not designed to be directly lifted with a fork lift, or to be towed with any mechanical devices. • The maximum weight for each drawer should never be exceeded. • Only transport this product empty. Properly secure when trans- porting. • DO NOT exceed maximum product weight, including contents. See Capacities for more information. Distributed by Sears Brands Management Corporation, Hoffman Estates, IL 60179 F1969
Transcript of OPERATOR'S MANUAL CRRFrSMRX - c.searspartsdirect.com · Ball bearing slide -Pull slides and slide...

OPERATOR'S MANUAL
CRRFrSMRX °
[ s, 1INDUSTRIAL ROLLER CABINET
564NCH CABINET
MAXIMUM WEIGHT LIMIT (4800) LBS.
75-INCH CABINET
MAXIMUM WEIGHT LIMIT (5600) LBS.
CALL 1-800-366-7278 FOR SERVICE PARTS. Refer to Service
Parts Drawing for full listing of Service Parts.
LOCATING MODEL # INFORMATION
Model numbers and other information required for service parts islocated on a label on the interior right side of the top most drawer.
• The maximum weight for each 2-inch deep drawer is120 pounds.
• The maximum weight for each drawer 3-inches deep or more is200 pounds.
• The maximum weight for the top 4-inch drawer on roller cabinetsis 320 pounds.
• The maximum weight for each drawer 9-inches deep or more is400 pounds.
Ball bearing slides
• For casters, use high quality bearing grease (yearly).• Lubricate the slides with grease or equivalent(twice yearly.)• Lubricate lock with graphite (yearly).
• Periodically the drawer fronts, drawer trim, and other surfacesshould be cleaned with a mild detergent and water.
• Auto wax will preserve the unit's luster finish. Apply the waxas to a car. The wax will also help protect the unit againstscratches.
• Grease and oil can be removed with most standard
cleaning fluids. For safety, use a nonflammable cleaning fluid.• If drawer liners are supplied, it is recommended they are used
to protect the finish inside the drawers and to make the drawerseasier to clean. The drawer liners may be cleanedwith soap and water.
DANGER ,_ is used to indicate a hazardous situation which,
if not avoided, will result in serious injury or death.WARNING ,4k indicates a hazardous situation which,if not avoided, could result in serious injury or death.CAUTION is used to indicate a hazardous situation which, if not
avoided, may result in minor injury, moderate injury, or propertydamage.
CAUTION: Read and follow all Safety Rules and OperatingInstructions before first use of this product.
DANGER _,
• DO NOT stand on this product. You may fall or cause productto tip.
• DO NOT open more than one drawer. The product maybecome unstable and tip.
• DO NOT step in the drawers. You may fall or cause productto tip.
• DO NOT mount this product on a truck bed or any othermoving object.
• DO NOT move the product prior to closing and locking all thedrawers. The drawers could come open and make the productunstable and tip.
• The work surface must be removed if a chest is placed on topof a cabinet. Stacked products should be bolted together. Theproducts could become unstable and tip.
WARNING z_
• WEAR SAFETY GLASSES when removing or repositioningthe slides.
• DO NOT pull the unit, push it when moving.• USE THE BRAKES when not moving this product. This will
prevent the product from rolling.• DO NOT alter this product in any manner. For example, do not
weld external Iockbars or attach electrical equipment.• Keep the product on level surfaces. The product may become
unstable and tip if stored or moved on an uneven surface.
CAUTION
• This product is not designed to be directly lifted with a fork lift, orto be towed with any mechanical devices.
• The maximum weight for each drawer should never be exceeded.• Only transport this product empty. Properly secure when trans-
porting.• DO NOT exceed maximum product weight, including contents.
See Capacities for more information.
Distributed by Sears Brands Management Corporation, Hoffman Estates, IL 60179 F1969

Use spacer blocks (1-1/2 minimum) in front and back for supportwhen lifting your box. Place support blocks as close to front andback flanges as possible.
Always use adequate support to lift your box. Failure to do socould result in product damage.
'_ ,t, T I_
SIDE HANDLE ATTACHMENT
Attach handle using four 1/4-20 x 1-1/2 screws.• Tighten with screwdriver.
1ol/2" min \_support blockfront and back
TOOLS REQUIRED:Screwdriver
O _ _± 0 7
REMOVING AND iNSTALLiNG DRAWERS
NOTE: The drawers in these units can be rearrangedto fit your specific needs. This means that drawersmay be moved or replaced as desired. For example, a6oinch drawer may be repJaced by a 2dnch and a 4oinch drawer, or three 2dnch drawers. The quickre,ease slides detach easily from the drawers and theunit.
HARDWARE iNCLUDED:
1/4-20 x 1-1/2 Hex Screw
(Qty: 4)
- Empty the drawer.- Fully extend the drawer.
Release
Cabinet:Literature
Hardware BagHandle
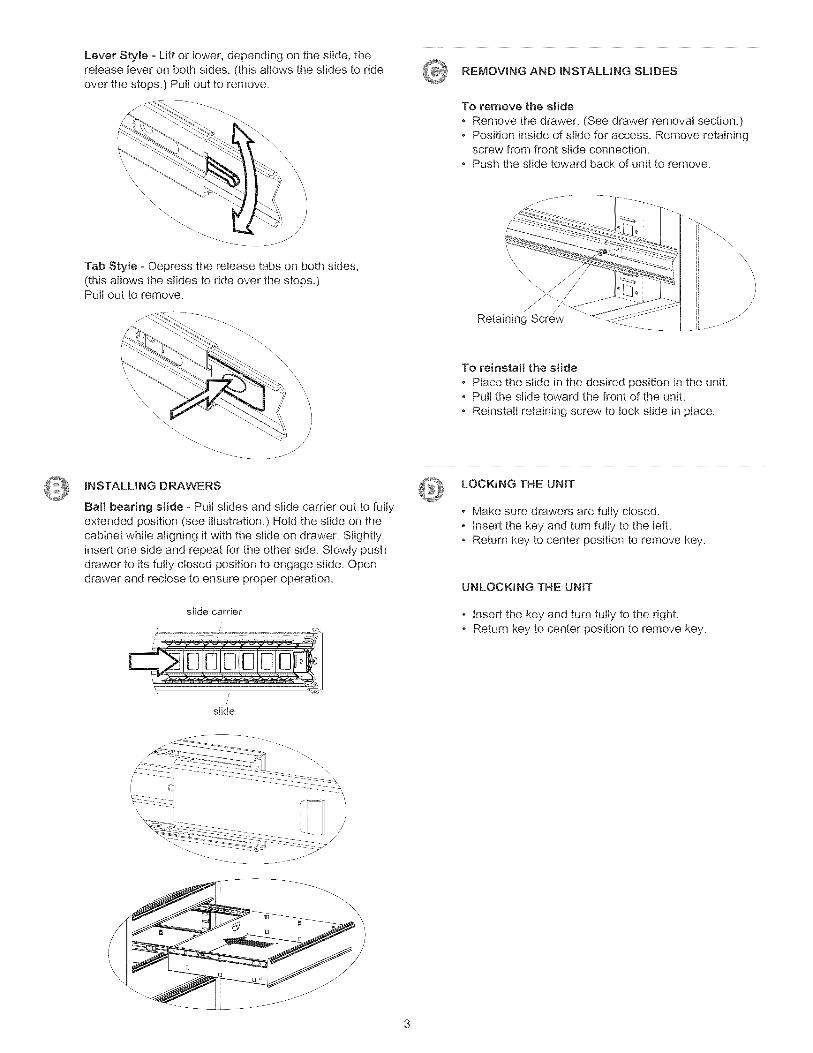
LeverStyle- Lift or lower, depending on the slide, therelease lever on both sides, (this allows the slides to rideover the stops.) Putt out to remove.
REMOVING AND iNSTALLiNG SLIDES
To remove the slide
Remove the drawer. (See drawer removal section.)Position inside of slide for access. Remove retainingscrew from front slide connection.Push the slide toward back of unit to remove.
Tab Style - Depress the release tabs on both sides,(this allows the slides to ride over the stops.)Putt out to remove.
Retaining
iNSTALLiNG DRAWERS
Ball bearing slide - Pull slides and slide carrier out to fullyextended position (see illustration.) Hold the slide on thecabinet while aligning it with the slide on drawer. Slightlyinsert one side and repeat for the other side. Slowly pushdrawer to its fully closed position to engage slide. Opendrawer and rectose to ensure proper operation.
slide carrier
i'
slide
To reinstall the slide
- Place the slide in the desired position in the unit.- Pull the slide toward the front of the unit.
- Reinstall retaining screw to lock slide in place.
LOCKING THE UNIT
Make sure drawers are fully closed.• Insert the key and turn fully to the left.
Return key to center position to remove key.
UNLOCKING THE UNIT
insert the key and turn fully to the righLReturn key to center position to remove key.
J


MANUAL DE USUARIO
®
,i
GABINETES RODANTES DE TIPO INDUSTRIAL
i
jEL LIMITE DE PESO MA×IMO (2179,2) KG.
56 PUL ARMARIO
75 PUL ARMARIO
EL LiMITE DE PESO MAXlMO (2542,4) KG.
EN ESTADOS UNIDOS LLAME AL 1o800-659o7084 PARA
PJEZAS DE REPUESTO. FUERA DE ESTADOS UNJDOS LLAME
A SU DJSTRIBUJ[)OR LOCAL. Suministre el nQmero de modelo alcomunicarse.
UBICACION DE JNFORMACION DEL NO. DE MODELO
El nQmero de modelo y demos informaci6n requerida para Jas piezas deservicio se encuentran en una etiqueta en el lado interior derecho de lagaveta superior.
Et peso m_ximo pot cada gaveta de 2 putgadas (5 cm) es 120tibras (54,4 kg).Et peso m_ximo pot cada gaveta de 3 putgadas (7,6 cm) es 200tibras (90,7 kg).Et peso m_ximo para la gaveta superior de 4 putgadas (10,1 cm)es 300 libras (145,12 kg)Et peso m_ximo por cada gaveta de 9 putgadas (22,8 cm) es400 tibras (181,6 kg)
Cojinetes de bolas
• Para las ruedas, utilice grasa para rodamientos de alta calidad(anualmente).
• Lubrique las gulas con grasa o equivalente (dos veces por aSo).• Lubrique la cerradura con grafito (anualmente).
• Limpie con detergente suave y agua los frontales y los bordes lateralesde los cajones y las demos superficies.
• La cera para autom6viles preservar8 el acabado brilloso de la unidad.Aplique la cera como Io haria al carro. La cera tambi6n ayudar8 a proteoger la unidad contra raspones.
• La grasa y el aceite pueden retirarse con la mayoria de los liquidosest_ndar para limpieza. Por razones de seguridad, utilice un liquidoincombustible para limpieza.
• Si se suministran forros para las gavetas, se recomienda que se utilicenpara proteger el acabado interno de las mismas y para facilitar la limpoieza. Los forros para gavetas pueden limpiarse con agua y jab6n.
PELIGRO _ se utiliza para indicar una situaci6npeligrosa que, de no evitarse, resultar_ en lesiones graves o la muerte.
ADVERTENOIA Z_ indica una situaci6n peligrosa que, de noevitarse, podria producir lesiones graves o la muerte.PREOAUOJON se utiliza para indicar una situaci6n peligrosa que, deno evitarse, puede derivar en lesiones leves o moderadas, o en da_o a lapropiedad.
ATENOK)N: Lea y siga todas las Normas de Seguridad y lasInstrucciones de Funcionamiento antes de utilizar por primera vez esteproducto.
PEUGRO
• NO se ponga de pie sobre esta unidad. Puede caerse u ocasionar que
el producto se vuelque.• NO abra m_s de una gaveta. El producto podria quedar inestable y
volcarse.
• NO utilice las gavetas como pelda_os. Puede caerse u ocasionar queel producto se vuelque.
• NO monte este producto en una cama de carro o ningQn otro objetom6viL
• NO mueva la unidad antes de cerrar y asegurar todas las gavetas. Lasgavetas podrian abrirse y hacer que la unidad se vuelva inestable y sevuelque.
• Se debe quitar la superficie de trabajo si se pone una cajaportaherramientas encima de un gabinete. Los productos apiladosdeben empernarse entre sL Estos podrian perder el equilibrio yvolcarse,
ADVERTENClA A
• USE GAFAS DE SEGURIDAD al quitar o volver a poner lascorrederas.
• NO jale Ja unidad, empOjeJa cuando Ja mueva.UTILICE LOS FRENOS cuando el producto no est6 en movimiento.Esto impedir8 que se desJice.
NO aJtere la unidad en modo aJguno. Por ejempJo, no sueJde Jas barrasde sujeci6n externas ni Je incorpore equipos eJ6ctricos.Mantenga la unidad en superficies niveJadas. La unidad puede tornarseinestabJe y voJcarse si se aJmacena o se moviJiza en una superficie nonivelada.
PRECAUCION
Este producto no est_ dise_ado para ser levantado directamente con unmontacargas, ni para ser remolcado con unidades mecanizadas.Nunca debe exceder el peso mSximo de cada gaveta.$61o transporte esta unidad cuando est6 vacia. AsegOrelaadecuadamente cuando la transporte.NO exceda el peso m_ximo del producto, incluyendo el contenido.Refi6rase alas Capacidades para m_s informaci6n.
Waterloo Industries, 139 West Forest Hill Avenue, Oak Creek, Wl 53154 F1969

Utilice btoques espaciadores (de 1-1/2" [3,8 cm] minimo) enta parte frontal y posterior para apoyo cuando levante su caja.Cotoque btoques de apoyo tan cercano como sea posibte a tasbridas det frente y postedores.
Siempre utilice apoyo adecuado para tevantar su caja. No hacedopodria ocasionar da_o at producto.
INSTALACION DE LA MANIJA LATERAL
- Instate manija en cada extremo det baQl, utitizando(4) torniltos 1/4-20 x1-1/2 en cada manija.
- Apriete los tomittos.
frontal y posterior
HERRAMIENTAS NECESARIAS:Desarmador
PIEZAS INCLUIDAS:
Tornillo Hexagonal de 1/4-20 x 1-1/2(Cant: 4)
REMOCION E INSTALACION DE GAVETAS
NOTA: Los cajones en estas unidades se puedencambiar para caber sue necesidades especificas.Esto significa que los eajones se pueden mover osubstituir segQn _odeseado. Pot ejemp_o, un cajSnde 6 pulgadas se puede substituir pot cajones de2 pulgadas y un caj6n de 4 pulgadas, o tres de 2pulgadas. Las diapositivas dei lanzamiento rapidoseparan f_ci_mente de los cajones y de la unidad.
• Vacie la gaveta,• Abra completamente la gaveta,
Libere
Gabinete:
Material ImpresoBolsa de Accesorios
Mango

Estilo palanca - Levante o baje (dependiendo de la corredera)la palanca de Nberaci6n en ambos lados (esto permite que lascorrederas pasen sobre los topes). Jale hacia afuera para retirar.
Estilo leng_ieta - Oprima las lengQetas de Nberaci6n en amboslados (esto permite que las correderas pasen sobre los topes).Jale hacia afuera para retirar.
INSTALACI6N Y DESINSTALCI6N DE CORREDERAS
Para retirar la corredera.
Quite et cajOn (Vea tas instrucciones para ta extracciOn delos cajones.)Posicione la parte interior de ta corredera para acceso.Retire et tornitto retenedor de ta conexi0n de ta correderadel frente.
Empuje la corredera hacia ta parte posterior de ta unidadpara retirada.
Saca el remachecon el taladro
INSTALACION DE GAVETAS
Correderas de rodamientos esf6ricos =hale hacia
afuera tas correderas y et soporte de las correderas hastaque queden en posici6n totatmente extendida (vet itus-traciOn). Sostenga ta corredera en et gabinete mientras toaNnea con ta corredera de ta gaveta.
Soporte de las correderas/
/ ,
/Corredera
Para volver a instalar la corredera.
Coloque ta corredera en la posiciOn deseada en ta unidad.Jate la corredera hacia et frente de ta unidad.
Vuetva a colocar el tomitto de retenciOn para asegurar tacorredera en su sitio.
C6MO BLOQUEAR LA UNIDAD
Compruebe que tas gavetas est6n comptetamentecerradas.
: Inserte ta llave y gire comptetamente hacia taizquierda.
: Regrese ta ttave a ta posiciOn central para retirar tattave.
DESBLOQUEO DE LA UNIDAD
Inserte la ttave y gire comptetamente hacia taderecha.
Regrese ta ttave a ta posiciOn central para retirar tattave.
\\