Operation Manual - Cemcem.com/media/contenttype/media/literature/515_Manual_SMART6... · instrument...
59
600762 Rev. 3 3/16 Operation Manual
Transcript of Operation Manual - Cemcem.com/media/contenttype/media/literature/515_Manual_SMART6... · instrument...
1
600762 Rev. 3 3/16
Operation Manual
2
CEM Corporation
Matthews, North Carolina 28104 (704) 821-7015
email: [email protected]
Copyright 2015 by CEM Corporation All Rights Reserved
This manual contains proprietary information which shall not
be reproduced or transferred to other documents or disclosed to others without prior written permission from CEM Corporation
CEM, iPower, and One Touch Technology are registered trademarks of CEM Corporation.
SMART 6 and iDri are trademarks of CEM Corporation.
Patents Pending
Manufactured in the United States of America

3
CEM Corporation
PO Box 200 Matthews, NC 28104
3100 Smith Farm Road Matthews, NC 28106
Tel: 800-726-3331 Tel: 704-821-7015 Fax: 704-821-7894
Email: [email protected] www.cem.com
France CEM ųWave S.A.S.
Immeuble Ariane Domaine Technologique de Saclay 4, rue Rene’ Razel 91892 ORSAY Cedex Tel: +33 (01) 69 35 57 80 Fax: +33 (01) 60 19 64 91 Email: [email protected]
Germany CEM GmbH
Carl-Friedrich-Gauss-Str.9 47475 Kamp-Lintfort Tel: (49) 2842-9644-0 Fax: (49) 2842-9644-11 Email: [email protected]
Ireland CEM Technology (Ireland) Ltd.
Sky Business Centre 9a Plato Business Park Damastown Dublin 15 Tel: +353 (0) 1 885 1752 Fax: +353 (0) 1 885 1601 Email: [email protected]
Japan CEM Japan K.K.
2-18-10 Takanawa Minato-ku, Tokyo 108-0074 Tel: +81-3-5793-8542 Fax: +81-3-5793-8543 Email: [email protected]
Italy CEM S.R.L.
Via Dell’ Artigianato, 6/8 24055 Cologno al Serio (Bg) Tel: (39) 35-896224 Fax: (39) 35-891661 Email: [email protected]
United Kingdom CEM Microwave Technology Ltd.
2 Middle Slade Buckingham Industrial Estate Buckingham MK181WA Tel: (44) 1280-822873 Fax: (44) 1280-822342 Email: [email protected]
4
NOTICE
The following precautions should be observed to avoid possible exposure to excessive microwave energy:
Do not tamper with the safety interlocks. The SMART 6 is equipped with three safety interlocks which prevent the instrument from producing microwave power if the cover is open.
Do not place any object between the cavity and the cover or allow soil or cleaner residue to accumulate on
sealing surfaces.
Do not operate the instrument if it is damaged. It is particularly important that the instrument cover close properly and that there is no damage to the cover (bent), hinges and latch (broken or loosened), or sealing surfaces.
The instrument should be adjusted or repaired only by qualified service personnel.
The following precautions should be observed to avoid instrument-induced electromagnetic interference:
The possibility of instrument-induced electromagnetic interference (EMI) is minimal if precautions outlined above are followed.
The instrument should not be placed close to any electrical device susceptible to EMI. It is suggested that the
user post a sign warning pacemaker wearers that a microwave device is in operation.
If the instrument is suspected of inducing EMI, the cover should be carefully inspected. A microwave leakage measurement should be performed as outlined in the Troubleshooting, Maintenance and Service section of this manual. Leakage measured above the legal limit of 5 mW/cm2 should be reported to the CEM Service Department.
This instrument utilizes high voltages and microwave radiation.
Instrument service and repair should be performed only by those trained in repair and maintenance of high voltage and microwave power systems.
If the SMART 6 System is used in a manner not specified by CEM Corporation, protection provided by the system
may be impaired.
Warnings, cautions and notes are included throughout this manual and should be read thoroughly and strictly followed. WARNING: A warning is inserted for essential information used to emphasize dangerous or hazardous conditions to the operation, cleaning and maintenance of the instrument which may result in personal injury. CAUTION: A caution is inserted for essential information used to emphasize procedures which, if not strictly followed, may result in damage or destruction of the instrument or improper instrument operation. NOTE: A note is inserted for emphasis of procedures or conditions which may otherwise be misinterpreted or overlooked and to clarify possible confusing situations.
5
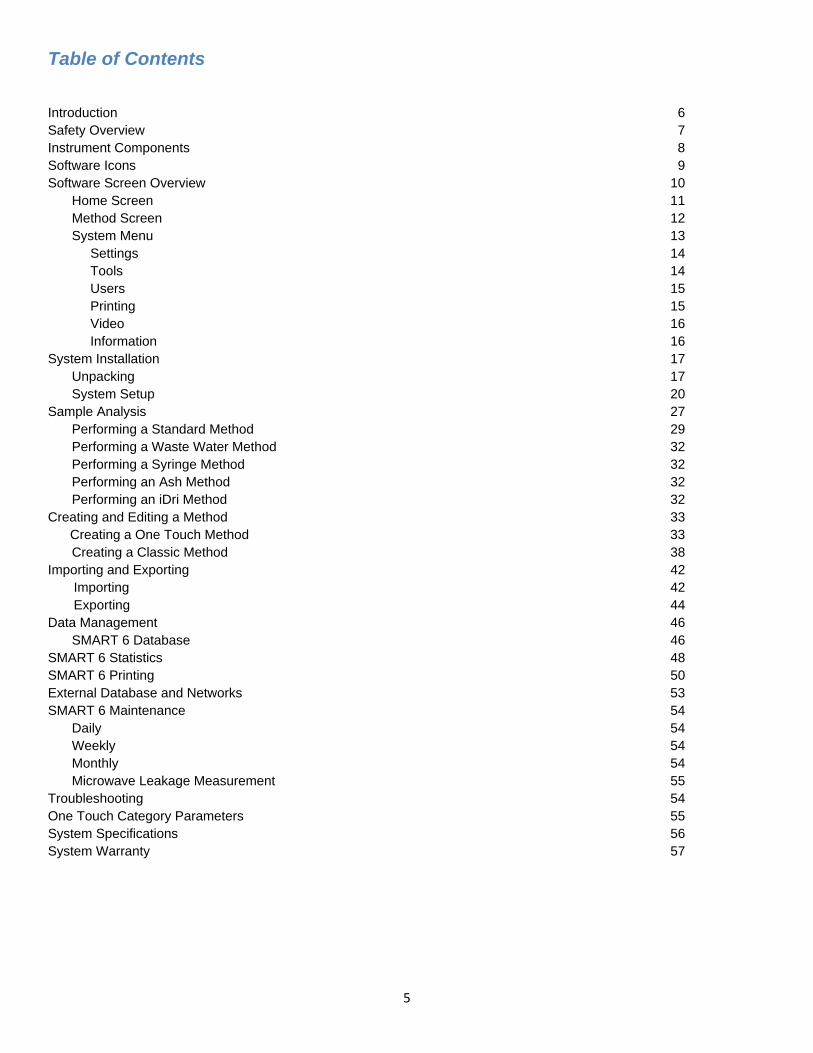
Table of Contents
Introduction 6 Safety Overview 7 Instrument Components 8 Software Icons 9 Software Screen Overview 10
Home Screen 11 Method Screen 12 System Menu 13 Settings 14 Tools 14 Users 15 Printing 15 Video 16 Information 16
System Installation 17 Unpacking 17 System Setup 20
Sample Analysis 27 Performing a Standard Method 29 Performing a Waste Water Method 32 Performing a Syringe Method 32 Performing an Ash Method 32 Performing an iDri Method 32
Creating and Editing a Method 33 Creating a One Touch Method 33
Creating a Classic Method 38 Importing and Exporting 42 Importing 42 Exporting 44 Data Management 46
SMART 6 Database 46 SMART 6 Statistics 48 SMART 6 Printing 50 External Database and Networks 53 SMART 6 Maintenance 54
Daily 54 Weekly 54 Monthly 54 Microwave Leakage Measurement 55
Troubleshooting 54 One Touch Category Parameters 55 System Specifications 56 System Warranty 57

6
Introduction
The SMART 6tm Analyzer is designed to provide a rapid direct determination of the moisture, or other volatile components, of any and every product. Through the introduction and utilization of iPower, the SMART 6 is able to accurately analyze samples with moisture content from 0.01-99.99%, as well as samples containing polar or non-polar solvents, in less than three minutes.
The SMART 6 consists of an integrated 4 place balance to 0.1 mg sensitivity for continuous weight monitoring and feedback, as well as two separate power sources, each using a different electromagnetic frequency to spur moisture and other volatiles to evaporate. Each system also includes an infrared sensor for determining sample temperature, USB ports for the transference of data or methods, and Ethernet ports for network integration, and a printer option if a paper trail is required. The system is controlled via a 7” TFT-LED glass capacitance touchscreen interface which can accommodate a hierarchy of user logins to protect data and methods and maintain CFR compliance, and is available in multiple languages (English, Spanish, German, French, Italian, Chinese, Japanese, Dutch, and more).
Samples are analyzed by first being weighed onto one or two CEM glass fiber samples pads, which have been previously tared out, and spread according to the optimum sample spread technique. The sample is then heated according to the optimized method parameters, using a combination of the one or both heating sources until the sample stops volatilizing. Results are then instantly calculated to provide the final result to be stored in the system for future review. Results can be statistically analyzed by method, date, time, or user on the SMART 6 or transmitted to a LIMS network for real-time data analysis.
7
Safety Overview
Safety measures have been installed in the system, ensuring safety and confidence for users. Three interlock switches are utilized to monitor the proper sealing of the system to avoid any possibility of microwave leakage. Flame detection with infrared feedback has been integrated to detect excessive temperature and immediately render the instrument inoperable prior to creating a dangerous environment for users. If the system is used in a manner not specified by CEM Corporation, these protection devices may be impaired.
While the SMART 6 contains numerous safety protocols to protect the end users, certain dangerous situations can arise due to improper handling of hazardous samples and materials. It is critical to the prolonged use of the instrument and the safety of the user that these risks are handled in a safe and responsible manner.
WARNING
Samples that can be considered flammable, corrosive, poisonous, or explosive must be discussed with the Process Applications group at CEM Corporation prior to analysis in a SMART 6 analyzer. Failure to obtain approval from CEM will void any warranty or service agreement, but more importantly can create a dangerous testing environment.
Analyzing solvents or products containing harmful volatiles requires connection of an exhaust hose to the exhaust assembly on the rear of the instrument and leading to an approved fume containment or ventilation system.
Beyond validating testing parameters, proper handling of dangerous materials must be followed based on the SDS of the material to further ensure a safe testing environment.
Samples which have just been tested should be given adequate time to cool, based on the heat-retention properties of the sample.
The cover of the SMART 6 will close on its own once it falls below a certain angle. Keep hands and tools clear of the SMART 6 cavity when closing the cover.
Once the cover is closed, do not attempt to place any tools or materials in the cavity while an analysis is being performed.

8
Instrument Components
Front View
Right Side View Left Side View
Rear View
Infrared Air Intake Filter
Printer(Optional)
On/Off Switch
Fuses 15A (100-120V) 10A (200-240V)
Power Cord Receptacle
USB PortsType A (3)
Ethernet Connection
Electronics AirIntake Filter
MagnetronCooling Fan
ExhaustAssembly
USB PortsType B (2)
USB Port Type A (1)
TouchScreen
IsolationTransformer Receptacle (Optional)
Cavity
Cavity Handle
Balance Stem Port
Cavity Air Intake Cover (No Filter)
9
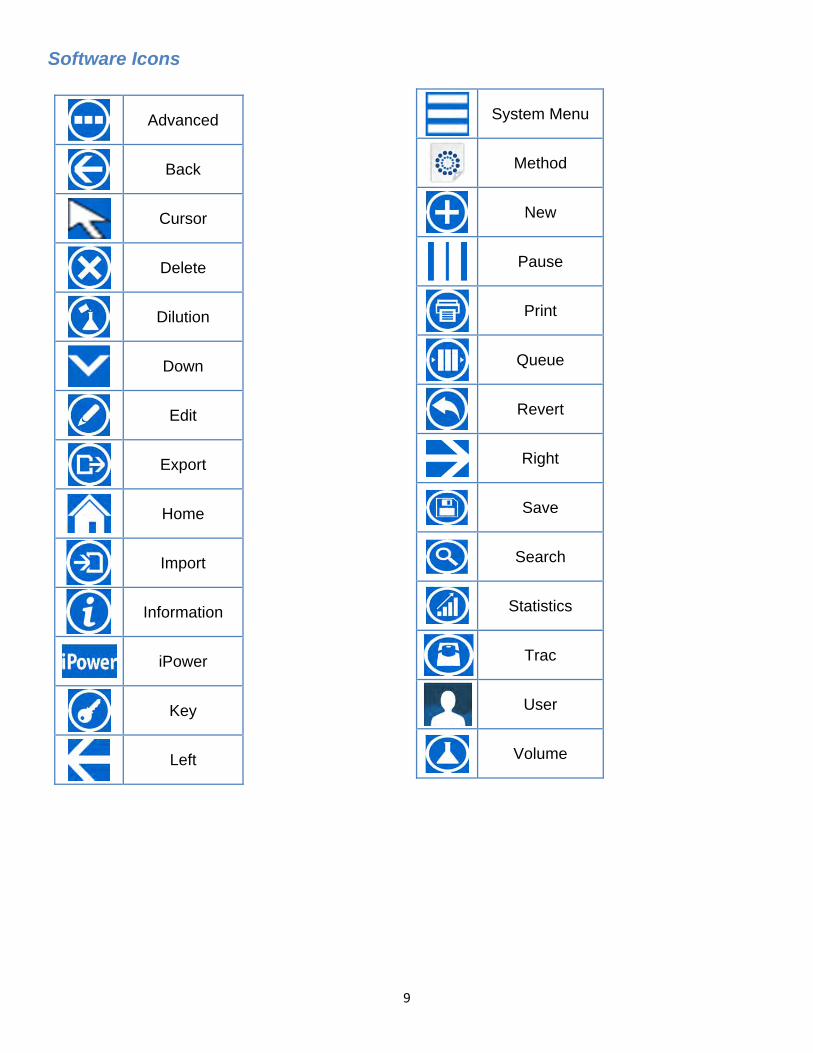
Software Icons
System Menu
Method
New
Pause
Queue
Revert
Right
Save
Search
Statistics
Trac
User
Volume
Advanced
Back
Cursor
Delete
Dilution
Down
Edit
Export
Home
Import
Information
iPower
Key
Left
10
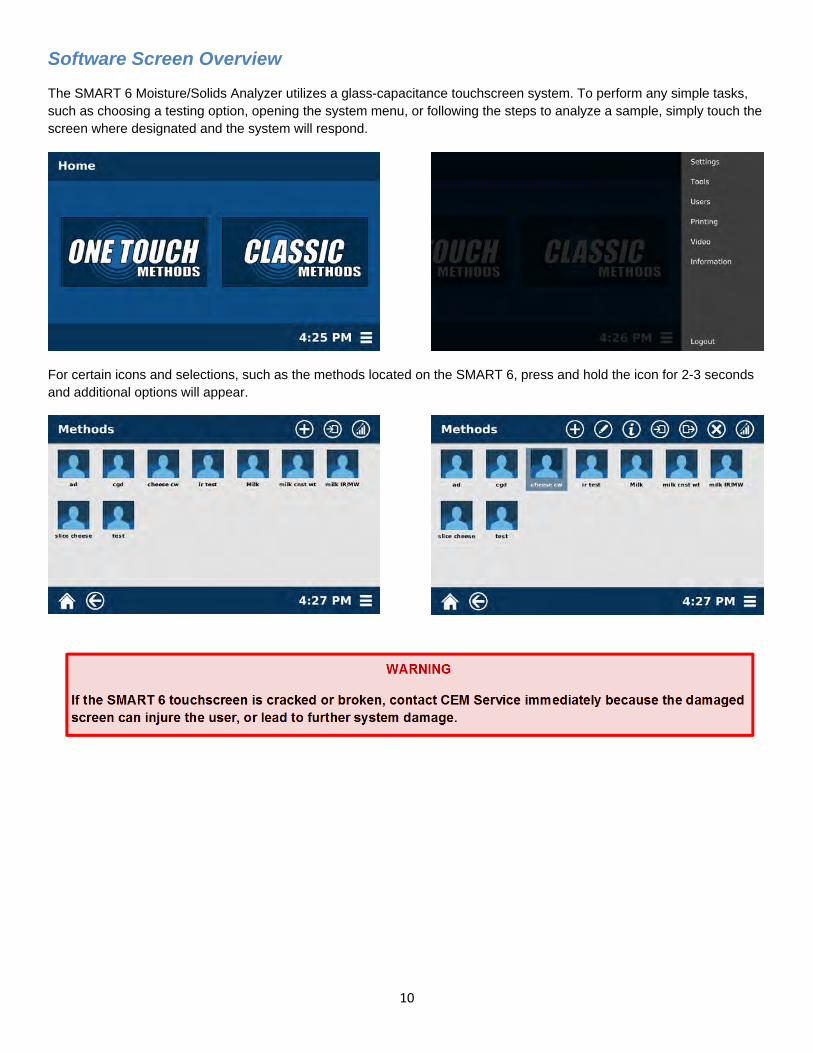
Software Screen Overview
The SMART 6 Moisture/Solids Analyzer utilizes a glass-capacitance touchscreen system. To perform any simple tasks, such as choosing a testing option, opening the system menu, or following the steps to analyze a sample, simply touch the screen where designated and the system will respond.
For certain icons and selections, such as the methods located on the SMART 6, press and hold the icon for 2-3 seconds and additional options will appear.
WARNING
If the SMART 6 touchscreen is cracked or broken, contact CEM Service immediately because the damaged screen can injure the user, or lead to further system damage.
11
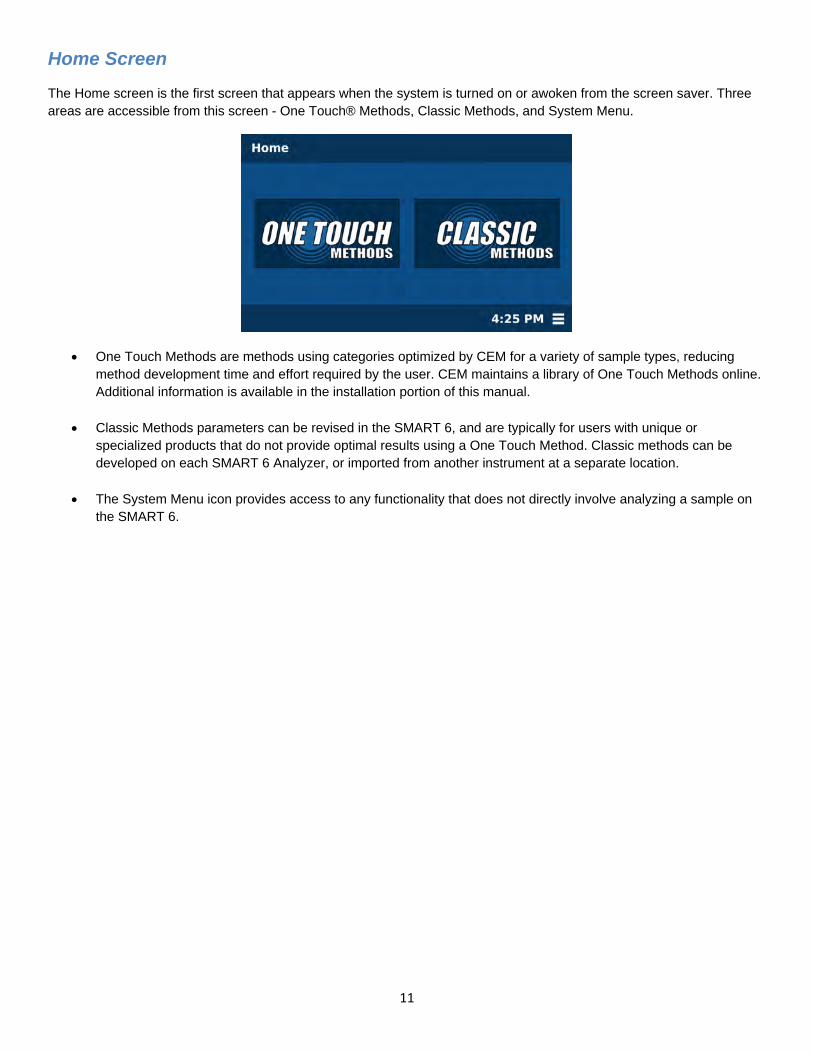
Home Screen
The Home screen is the first screen that appears when the system is turned on or awoken from the screen saver. Three areas are accessible from this screen - One Touch® Methods, Classic Methods, and System Menu.
One Touch Methods are methods using categories optimized by CEM for a variety of sample types, reducing method development time and effort required by the user. CEM maintains a library of One Touch Methods online. Additional information is available in the installation portion of this manual.
Classic Methods parameters can be revised in the SMART 6, and are typically for users with unique or specialized products that do not provide optimal results using a One Touch Method. Classic methods can be developed on each SMART 6 Analyzer, or imported from another instrument at a separate location.
The System Menu icon provides access to any functionality that does not directly involve analyzing a sample on the SMART 6.
12
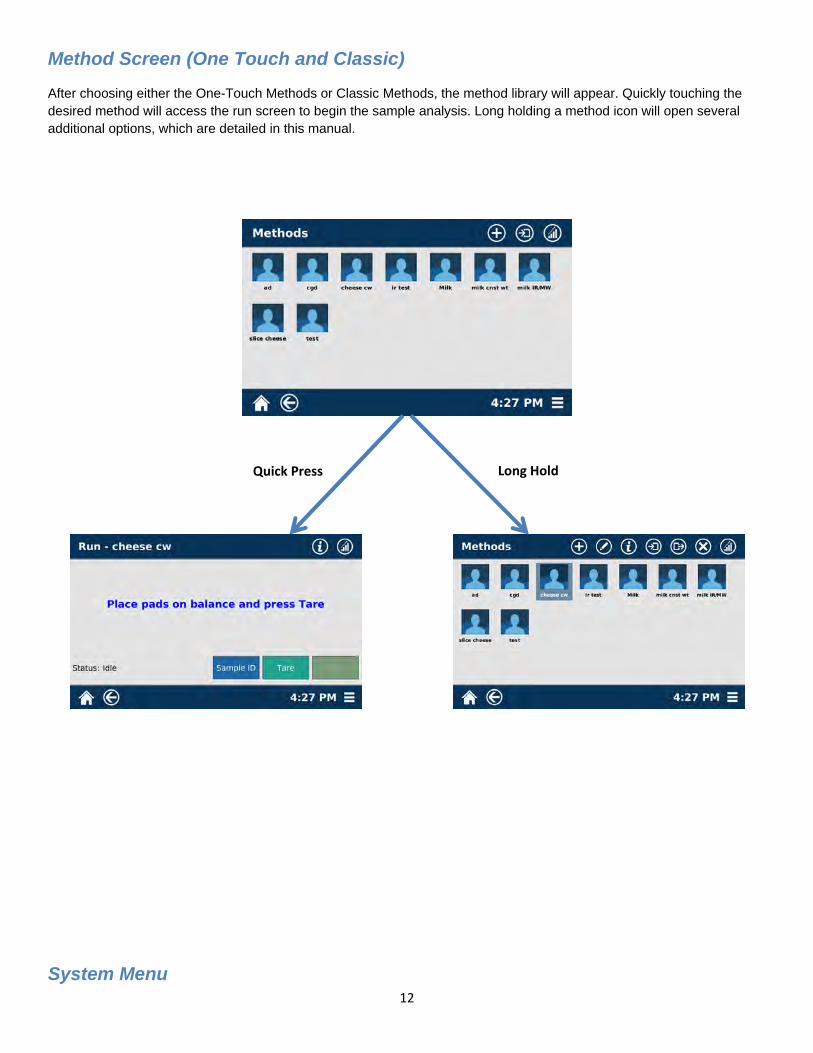
Method Screen (One Touch and Classic)
After choosing either the One-Touch Methods or Classic Methods, the method library will appear. Quickly touching the desired method will access the run screen to begin the sample analysis. Long holding a method icon will open several additional options, which are detailed in this manual.
System Menu
Quick Press Long Hold
13
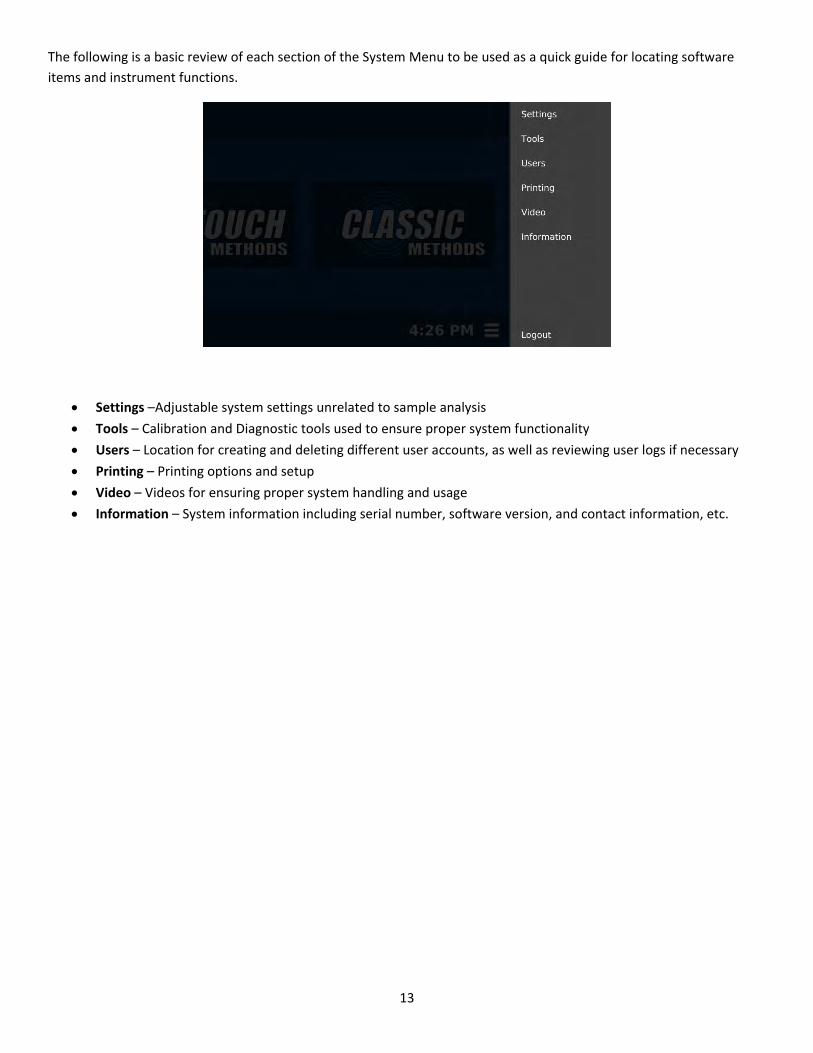
The following is a basic review of each section of the System Menu to be used as a quick guide for locating software items and instrument functions.
Settings –Adjustable system settings unrelated to sample analysis Tools – Calibration and Diagnostic tools used to ensure proper system functionality Users – Location for creating and deleting different user accounts, as well as reviewing user logs if necessary Printing – Printing options and setup Video – Videos for ensuring proper system handling and usage Information – System information including serial number, software version, and contact information, etc.
14
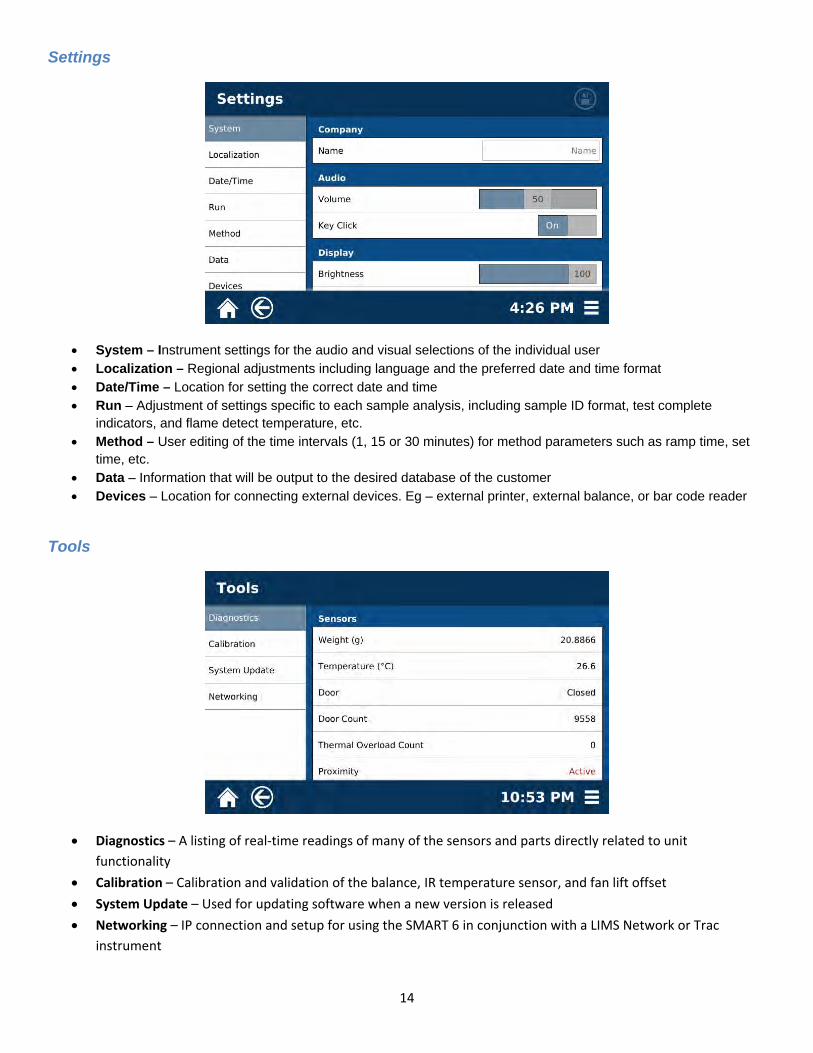
Settings
System – Instrument settings for the audio and visual selections of the individual user Localization – Regional adjustments including language and the preferred date and time format Date/Time – Location for setting the correct date and time Run – Adjustment of settings specific to each sample analysis, including sample ID format, test complete
indicators, and flame detect temperature, etc. Method – User editing of the time intervals (1, 15 or 30 minutes) for method parameters such as ramp time, set
time, etc. Data – Information that will be output to the desired database of the customer Devices – Location for connecting external devices. Eg – external printer, external balance, or bar code reader
Tools
Diagnostics – A listing of real-time readings of many of the sensors and parts directly related to unit functionality
Calibration – Calibration and validation of the balance, IR temperature sensor, and fan lift offset System Update – Used for updating software when a new version is released Networking – IP connection and setup for using the SMART 6 in conjunction with a LIMS Network or Trac
instrument

15
16
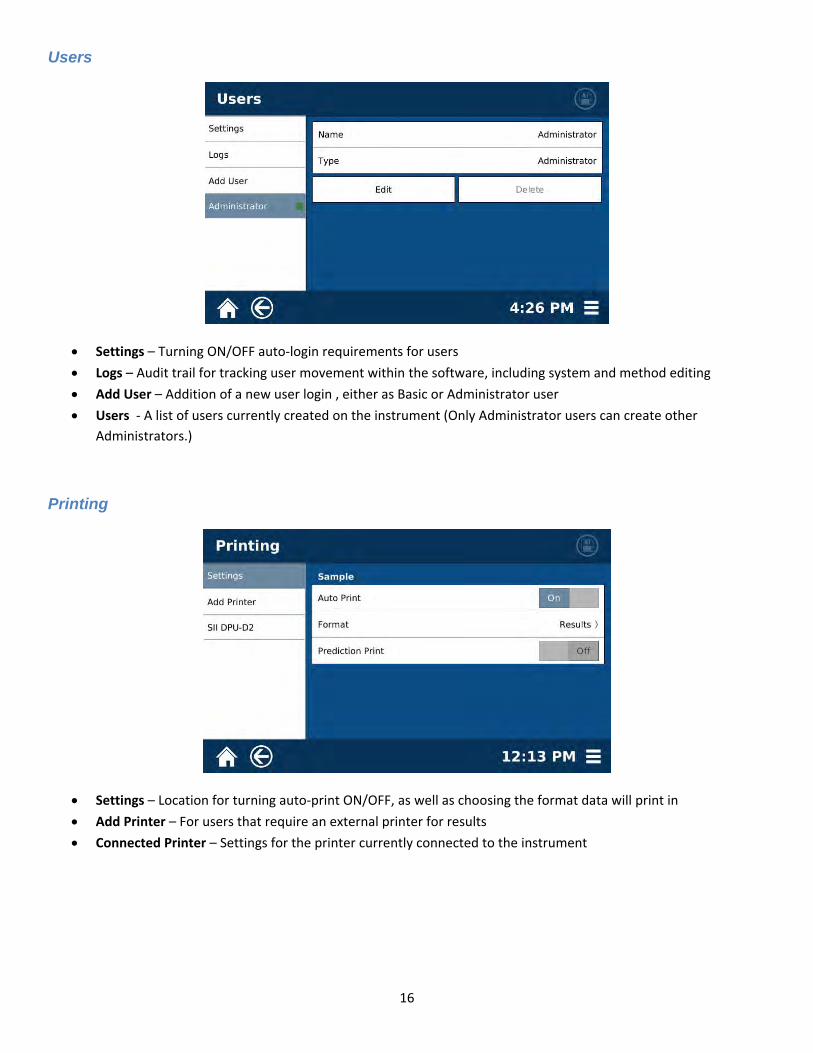
Users
Settings – Turning ON/OFF auto-login requirements for users Logs – Audit trail for tracking user movement within the software, including system and method editing Add User – Addition of a new user login , either as Basic or Administrator user Users - A list of users currently created on the instrument (Only Administrator users can create other
Administrators.)
Printing
Settings – Location for turning auto-print ON/OFF, as well as choosing the format data will print in Add Printer – For users that require an external printer for results Connected Printer – Settings for the printer currently connected to the instrument
17
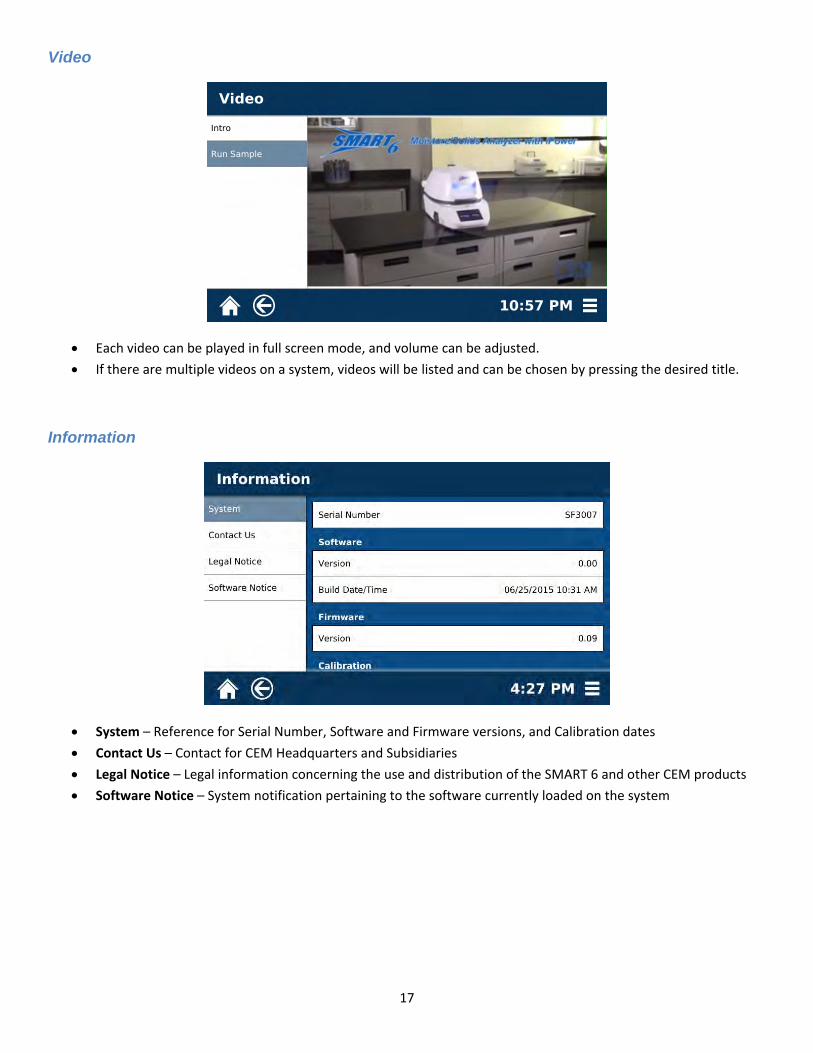
Video
Each video can be played in full screen mode, and volume can be adjusted. If there are multiple videos on a system, videos will be listed and can be chosen by pressing the desired title.
Information
System – Reference for Serial Number, Software and Firmware versions, and Calibration dates Contact Us – Contact for CEM Headquarters and Subsidiaries Legal Notice – Legal information concerning the use and distribution of the SMART 6 and other CEM products Software Notice – System notification pertaining to the software currently loaded on the system
18
System Installation
The SMART 6 is a quantum leap forward in moisture and solids analysis. It utilizes iPower® and iDri technologies to rapidly determine the moisture/solids content for any sample, regardless of moisture content.
Unpacking
1. Carefully inspect the shipping carton, the instrument and accessories for any damage that occurred during shipping. If the instrument or accessories have damage, contact the freight carrier to report the damage and to file a damage report. Contact the CEM Service Department (inside the US1-800-226-5228) or the nearest subsidiary or distributor (listed on www.cem.com/contact.html) to request service information.
WARNING
If any damage to the instrument is noted, do not attempt instrument operation.
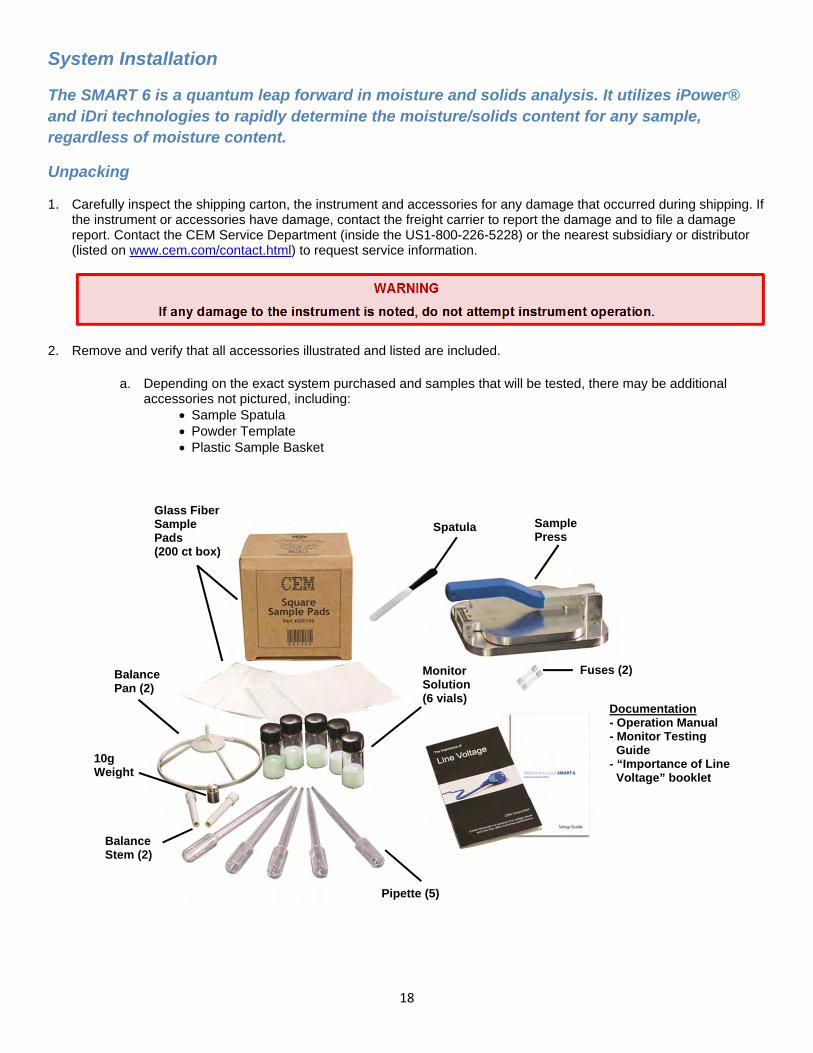
2. Remove and verify that all accessories illustrated and listed are included.
a. Depending on the exact system purchased and samples that will be tested, there may be additional
accessories not pictured, including: Sample Spatula Powder Template Plastic Sample Basket
Sample Press
Glass Fiber Sample Pads (200 ct box)
Balance Pan (2)
Balance Stem (2)
10g Weight
Pipette (5)
Monitor Solution (6 vials)
Documentation- Operation Manual - Monitor Testing Guide - “Importance of Line Voltage” booklet
Spatula
Fuses (2)
19
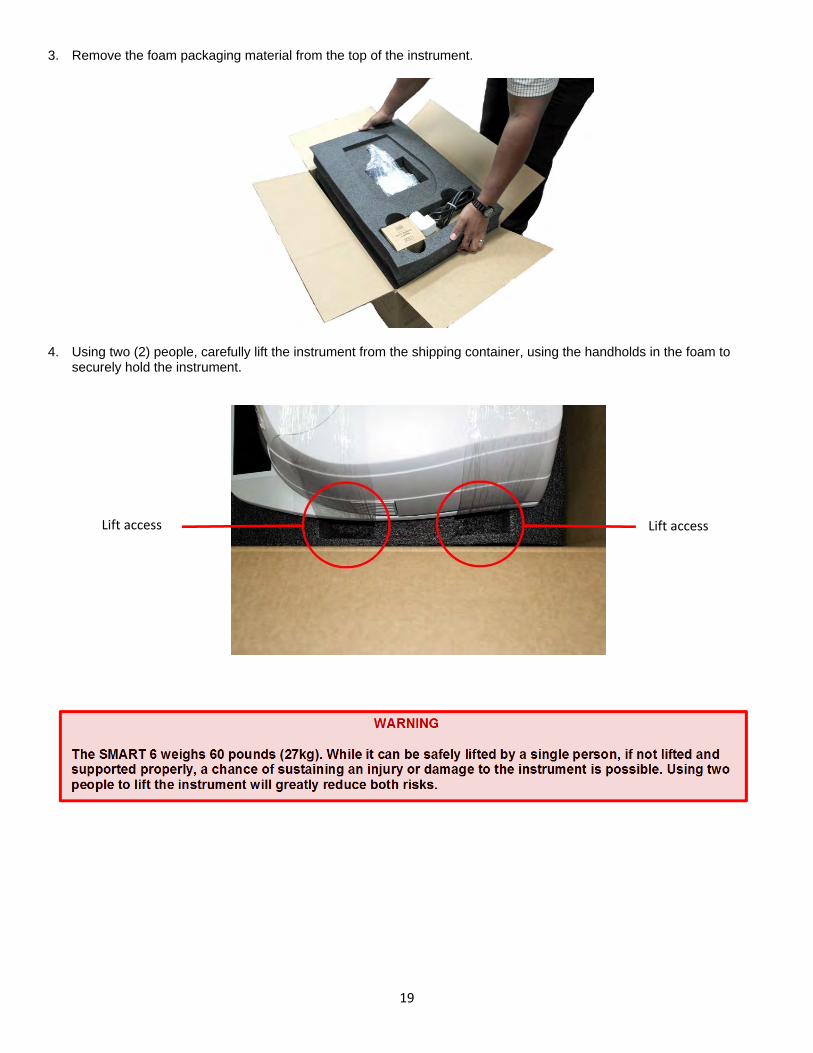
3. Remove the foam packaging material from the top of the instrument.
4. Using two (2) people, carefully lift the instrument from the shipping container, using the handholds in the foam to securely hold the instrument.
WARNING The SMART 6 weighs 60 pounds (27kg). While it can be safely lifted by a single person, if not lifted and supported properly, a chance of sustaining an injury or damage to the instrument is possible. Using two people to lift the instrument will greatly reduce both risks.
Lift access Lift access
20
5. Place the SMART 6 in the designated area on a workbench or laboratory table that:
a. provides at least 8 in. (20 cm) open space on each side, 6 in. (15 cm) open space in the rear of the instrument for ventilation, and an overhead clearance of 24 in. (61 cm).
b. is free from vibration of large equipment and/or excessive walk-through traffic.
NOTE
The SMART 6 is designed to sustain small amounts of high frequency vibration. However, for concerns, contact CEM Corporation for potential solutions prior to continuing the installation process.
c. provides a temperature range of 41 °F (5 °C) to 104 °F (40 °C) and a humidity range of 10 – 85 percent relative humidity.
d. provides adequate bench space for sample handling.
e. allows the instrument to be connected to a dedicated, grounded 120 or 240 VAC outlet. The SMART 6 should always be operated on a stabilized, constant VAC power supply within ± 10% of the specified level.
21
System Setup
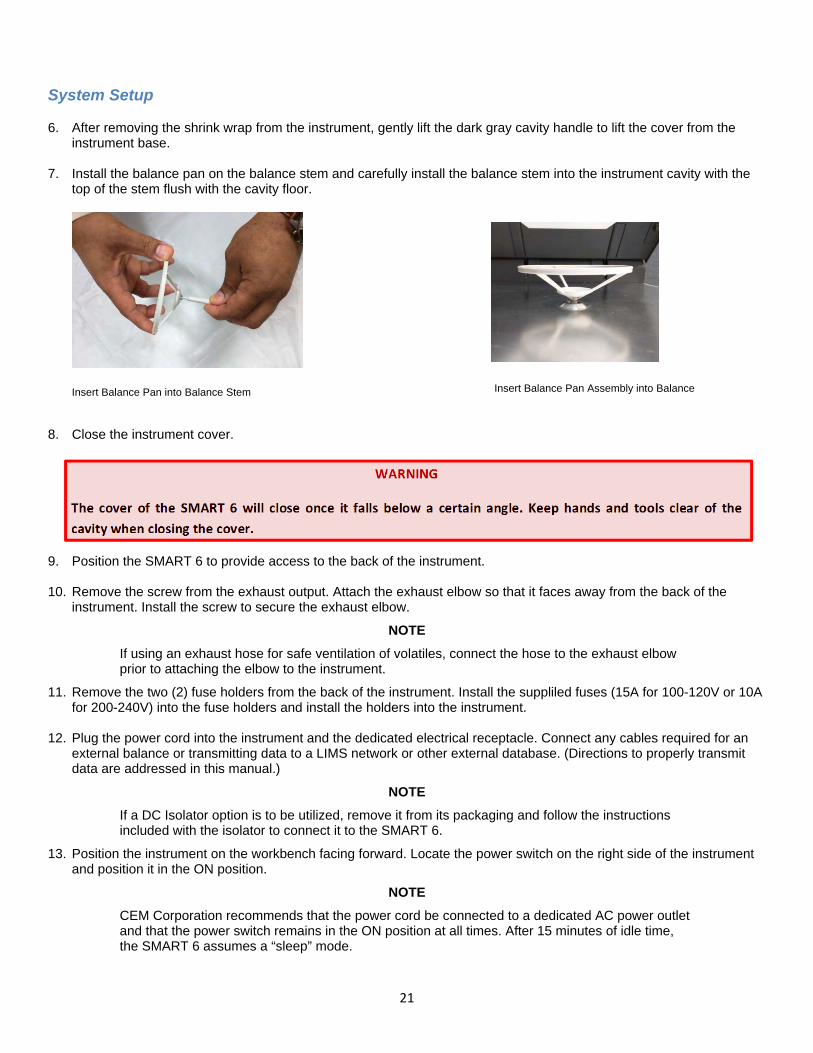
6. After removing the shrink wrap from the instrument, gently lift the dark gray cavity handle to lift the cover from the instrument base.
7. Install the balance pan on the balance stem and carefully install the balance stem into the instrument cavity with the top of the stem flush with the cavity floor.
Insert Balance Pan into Balance Stem Insert Balance Pan Assembly into Balance
8. Close the instrument cover.
WARNING
The cover of the SMART 6 will close once it falls below a certain angle. Keep hands and tools clear of the cavity when closing the cover.
9. Position the SMART 6 to provide access to the back of the instrument.
10. Remove the screw from the exhaust output. Attach the exhaust elbow so that it faces away from the back of the instrument. Install the screw to secure the exhaust elbow.
NOTE
If using an exhaust hose for safe ventilation of volatiles, connect the hose to the exhaust elbow prior to attaching the elbow to the instrument.
11. Remove the two (2) fuse holders from the back of the instrument. Install the suppliled fuses (15A for 100-120V or 10A for 200-240V) into the fuse holders and install the holders into the instrument.
12. Plug the power cord into the instrument and the dedicated electrical receptacle. Connect any cables required for an external balance or transmitting data to a LIMS network or other external database. (Directions to properly transmit data are addressed in this manual.)
NOTE
If a DC Isolator option is to be utilized, remove it from its packaging and follow the instructions included with the isolator to connect it to the SMART 6.
13. Position the instrument on the workbench facing forward. Locate the power switch on the right side of the instrument and position it in the ON position.
NOTE
CEM Corporation recommends that the power cord be connected to a dedicated AC power outlet and that the power switch remains in the ON position at all times. After 15 minutes of idle time, the SMART 6 assumes a “sleep” mode.

22
14. Once the SMART 6 completes the initial powering, the instrument Home Screen will be displayed.
15. Select the System Menu icon in the bottom right corner of the screen.
16. Select Users.
17. “Auto Login” can be toggled on and off. Having Auto Login turned OFF will require the user to choose and log into a user account each time the system is turned on.
23
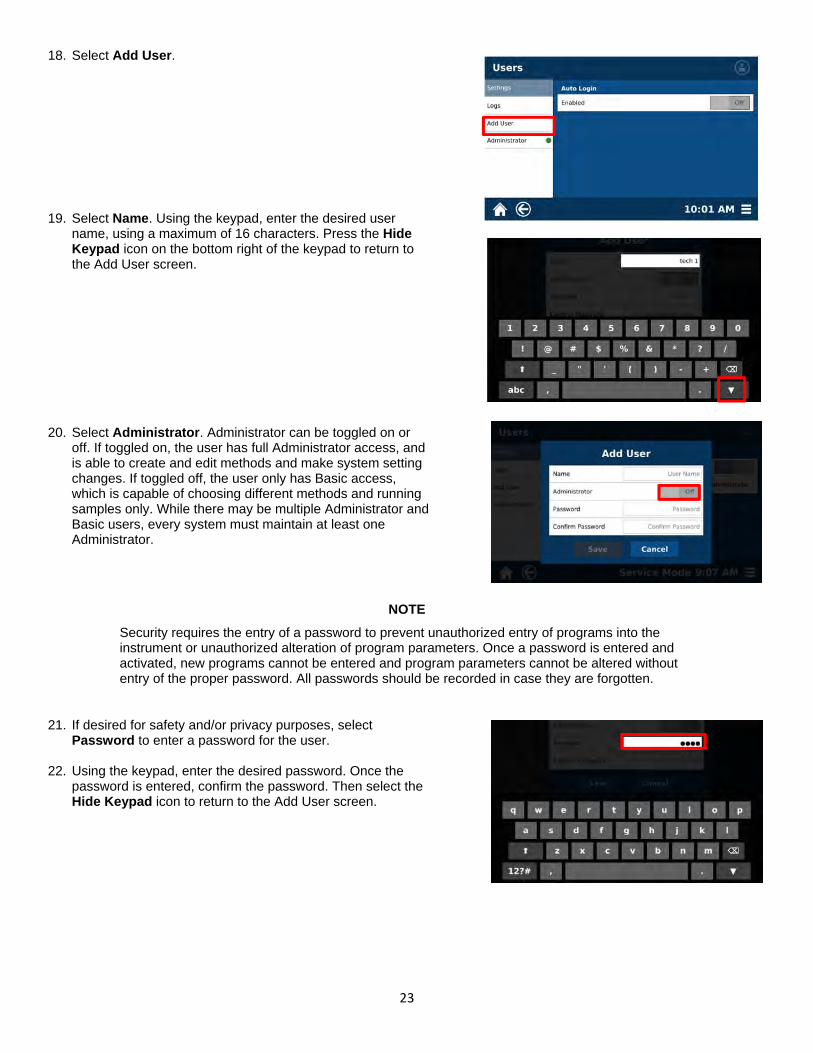
18. Select Add User.
19. Select Name. Using the keypad, enter the desired user name, using a maximum of 16 characters. Press the Hide Keypad icon on the bottom right of the keypad to return to the Add User screen.
20. Select Administrator. Administrator can be toggled on or off. If toggled on, the user has full Administrator access, and is able to create and edit methods and make system setting changes. If toggled off, the user only has Basic access, which is capable of choosing different methods and running samples only. While there may be multiple Administrator and Basic users, every system must maintain at least one Administrator.
NOTE
Security requires the entry of a password to prevent unauthorized entry of programs into the instrument or unauthorized alteration of program parameters. Once a password is entered and activated, new programs cannot be entered and program parameters cannot be altered without entry of the proper password. All passwords should be recorded in case they are forgotten.
21. If desired for safety and/or privacy purposes, select Password to enter a password for the user.
22. Using the keypad, enter the desired password. Once the password is entered, confirm the password. Then select the Hide Keypad icon to return to the Add User screen.
24
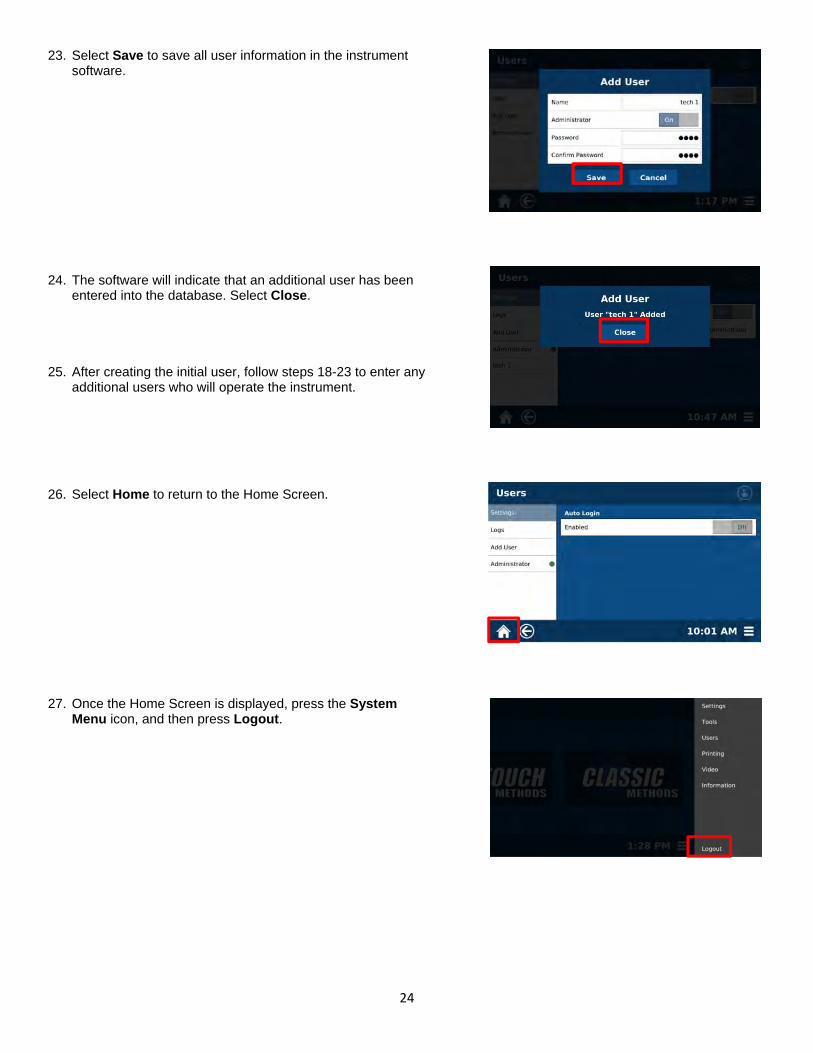
23. Select Save to save all user information in the instrument software.
24. The software will indicate that an additional user has been entered into the database. Select Close.
25. After creating the initial user, follow steps 18-23 to enter any additional users who will operate the instrument.
26. Select Home to return to the Home Screen.
27. Once the Home Screen is displayed, press the System Menu icon, and then press Logout.
25
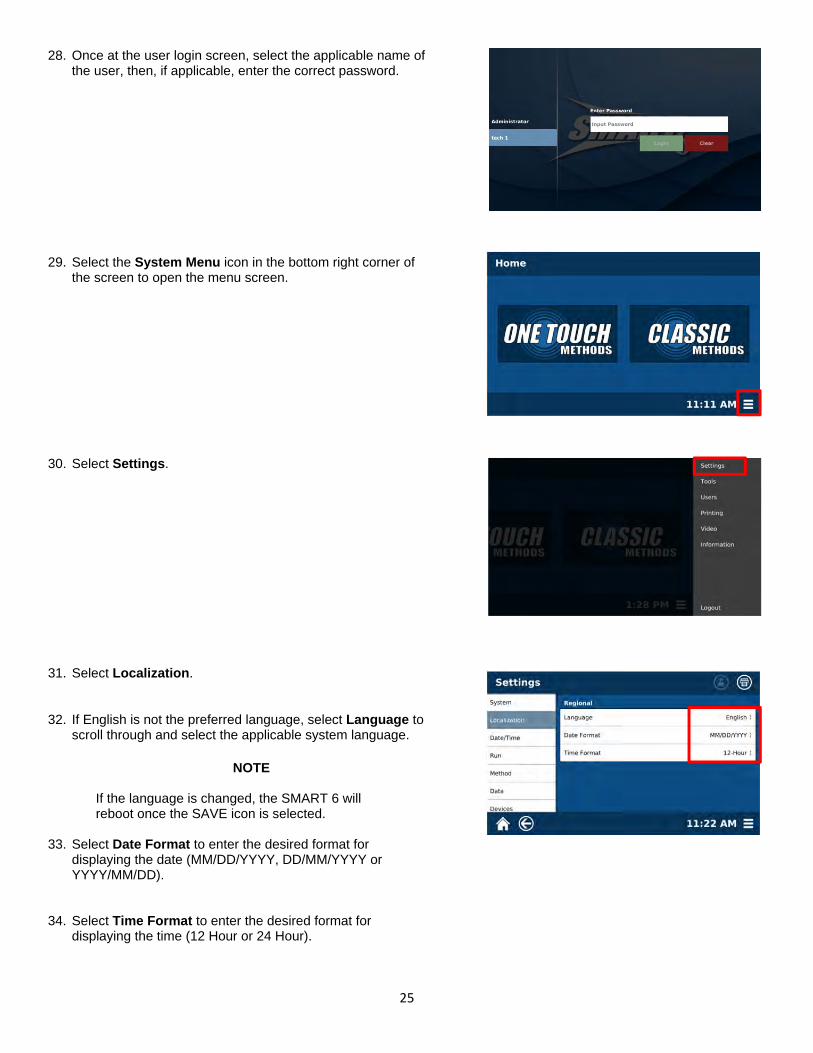
28. Once at the user login screen, select the applicable name of the user, then, if applicable, enter the correct password.
29. Select the System Menu icon in the bottom right corner of the screen to open the menu screen.
30. Select Settings.
31. Select Localization.
32. If English is not the preferred language, select Language to scroll through and select the applicable system language.
NOTE
If the language is changed, the SMART 6 will reboot once the SAVE icon is selected.
33. Select Date Format to enter the desired format for
displaying the date (MM/DD/YYYY, DD/MM/YYYY or YYYY/MM/DD).
34. Select Time Format to enter the desired format for displaying the time (12 Hour or 24 Hour).
26
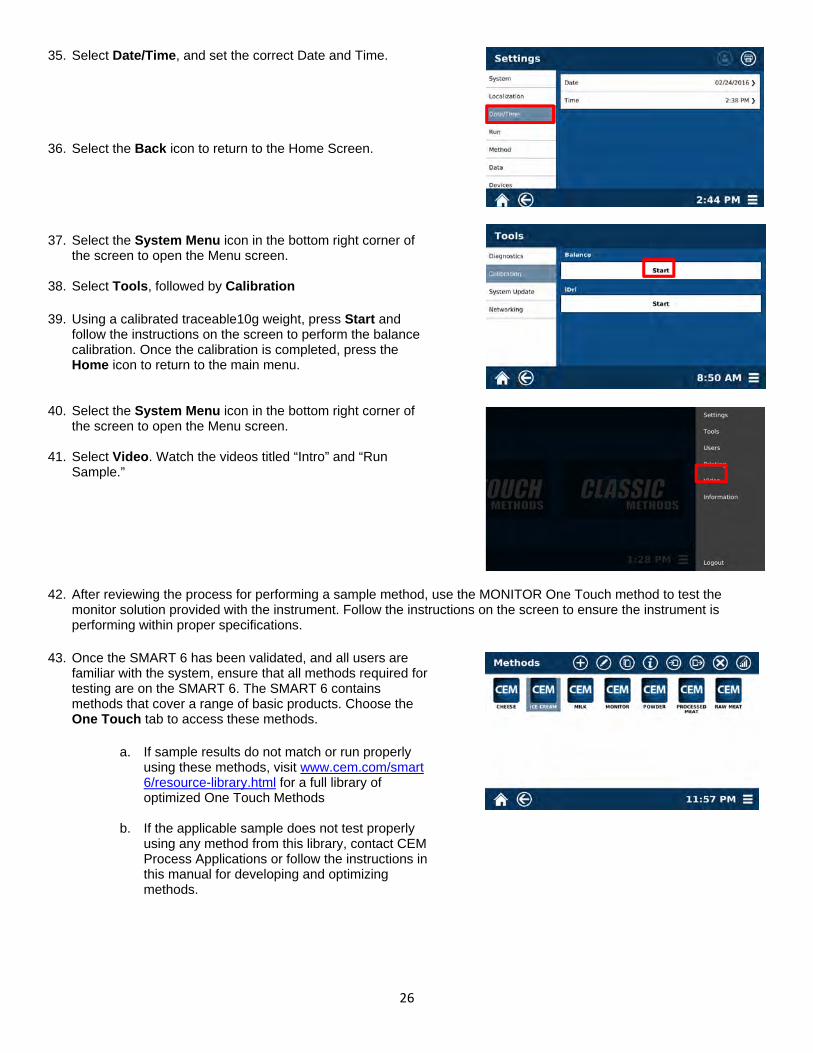
35. Select Date/Time, and set the correct Date and Time.
36. Select the Back icon to return to the Home Screen.
37. Select the System Menu icon in the bottom right corner of the screen to open the Menu screen.
38. Select Tools, followed by Calibration
39. Using a calibrated traceable10g weight, press Start and follow the instructions on the screen to perform the balance calibration. Once the calibration is completed, press the Home icon to return to the main menu.
40. Select the System Menu icon in the bottom right corner of the screen to open the Menu screen.
41. Select Video. Watch the videos titled “Intro” and “Run Sample.”
42. After reviewing the process for performing a sample method, use the MONITOR One Touch method to test the monitor solution provided with the instrument. Follow the instructions on the screen to ensure the instrument is performing within proper specifications.
43. Once the SMART 6 has been validated, and all users are familiar with the system, ensure that all methods required for testing are on the SMART 6. The SMART 6 contains methods that cover a range of basic products. Choose the One Touch tab to access these methods.
a. If sample results do not match or run properly using these methods, visit www.cem.com/smart 6/resource-library.html for a full library of optimized One Touch Methods
b. If the applicable sample does not test properly using any method from this library, contact CEM Process Applications or follow the instructions in this manual for developing and optimizing methods.

27
44. Once the correct methods are located, they can be downloaded to a USB stick, which will then be plugged into the USB port on the side of the instrument and imported into the SMART 6. To import a method, select either the One Touch or Classic library; select a method, and select the Import icon on the top of the screen.
45. After importing and validating all methods and sample types, the SMART 6 is ready for analysis.
46. Register the system by accessing www.cem.com and selecting “account” from the top right corner. Registration provides access to download One Touch Methods, software updates, method notes, replacement part lists and more.
a. For new logins, select “Signup” from the menu and follow the instructions. Name, contact information, and unit serial numbers are required for a new login.
b. For existing logins, login and update your profile with your new serial number to gain access to owner content.
47. Once the product is registered, allow up to 24 hours for settings to update. To find the owner resources, select the
resource library tab of the applicable product. If assistance is required, contact CEM: [email protected]
28
Sample Analysis
Proper product sampling and preparation are critical to achieving optimal accuracy and precision using the SMART 6. Each sample has a unique composition, and therefore may require a unique preparation and application process along with an individual method specific to that sample type. The SMART 6 has been developed to remove many different variables that can affect results, but the guidelines below should be followed to optimize each analysis.
Sampling o Proper sampling of any product type is necessary for a rapid analysis that accurately represents the
entire production batch or line. Many standard procedures have been developed specific to each sample type by various agencies such as AOAC, USDA, or ASTM. Reference each agency for the correct procedure prior to moving forward with analysis on the SMART 6.
Preparation o Sample preparation should be practiced to ensure that a homogenous sample is being analyzed. As with
any chemical analysis, a homogenous sample leads to a more representative test and better results when comparing duplicate results or reference chemistry.
o Sample preparation can entail physical or chemical changes to the sample to improve analysis. Contact the CEM Corporation Process Application group, or review the method note for the sample found at www.cem.com/SMART_6/resource_library.
Weight o Consistent sample weight helps ensure precision and accuracy. While sample size can vary from 1.0
grams to 30 grams depending on the type of product being tested, repeatability within the same sample is important to avoid burning or under-drying of a sample. All methods require inputting the sample weight range during the development process, and this range is clearly displayed during every test to assist the user in sample weight consistency.
Glass Fiber Pads o All SMART 6 systems use the CEM glass fiber sample pads to assist in rapid and accurate testing. The
pads are specially designed to support the sample being tested without absorbing heat, but remaining porous enough to let moisture freely evaporate.
Liquid samples (typically above 25% moisture) normally use 2 glass fiber sample pads to help retain heat in the sample and avoid splattering during the heating process.
Dry samples (typically below 25% moisture) require only a single glass fiber sample pad for the analysis.
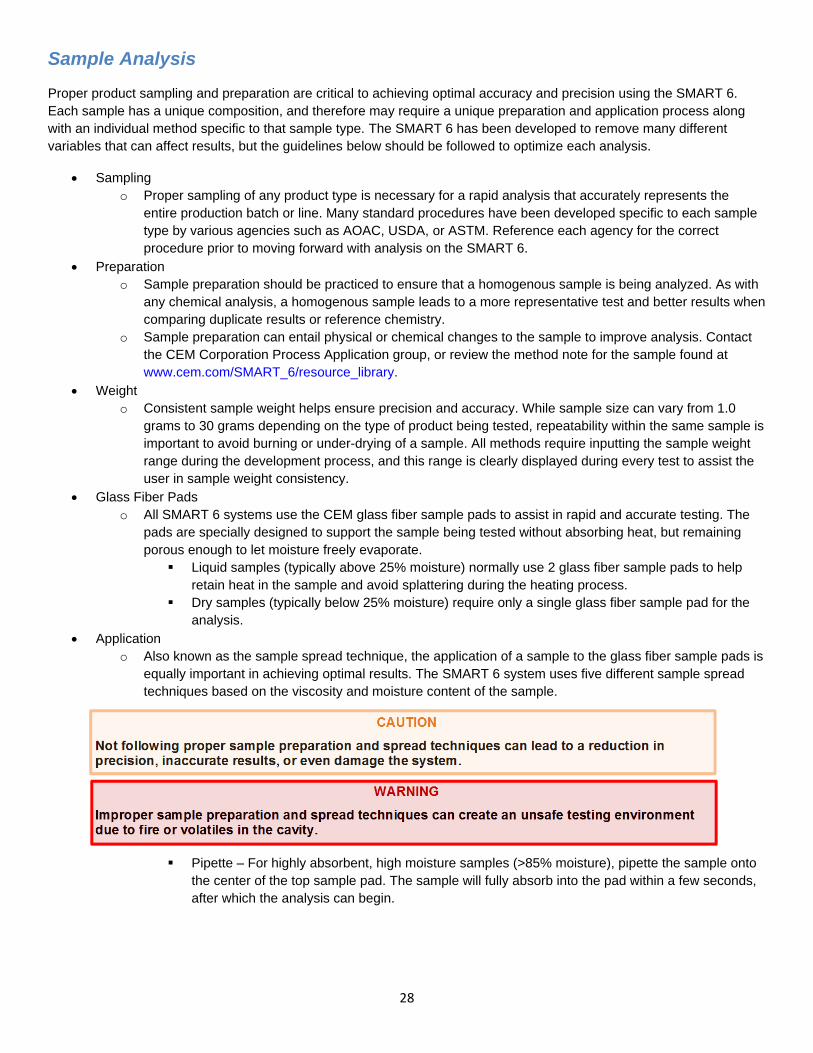
Application o Also known as the sample spread technique, the application of a sample to the glass fiber sample pads is
equally important in achieving optimal results. The SMART 6 system uses five different sample spread techniques based on the viscosity and moisture content of the sample.
CAUTION
Not following proper sample preparation and spread techniques can lead to a reduction in precision, inaccurate results, or even damage the system.
WARNING
Improper sample preparation and spread techniques can create an unsafe testing environment due to fire or volatiles in the cavity.
Pipette – For highly absorbent, high moisture samples (>85% moisture), pipette the sample onto
the center of the top sample pad. The sample will fully absorb into the pad within a few seconds, after which the analysis can begin.

29
Pipette, cover, and press – For slightly less absorbent products that still have a high moisture content, pipette the product onto the center of the top sample pad. Cover the sample with the second sample pad to fully cover the product. Gently use the sample press to spread the sample thinly and evenly between the two pads
Mound, cover, and press – For solid and semi-solid products, use a spatula to place the correct
sample weight on the center of the top glass fiber sample pad while it is still on the balance pan. Remove the pad and sample from the balance pan. Cover the sample with the second sample pad and use the sample press to spread the product thinly and evenly. Ensure that no product has pressed from between the two sample pads.
30
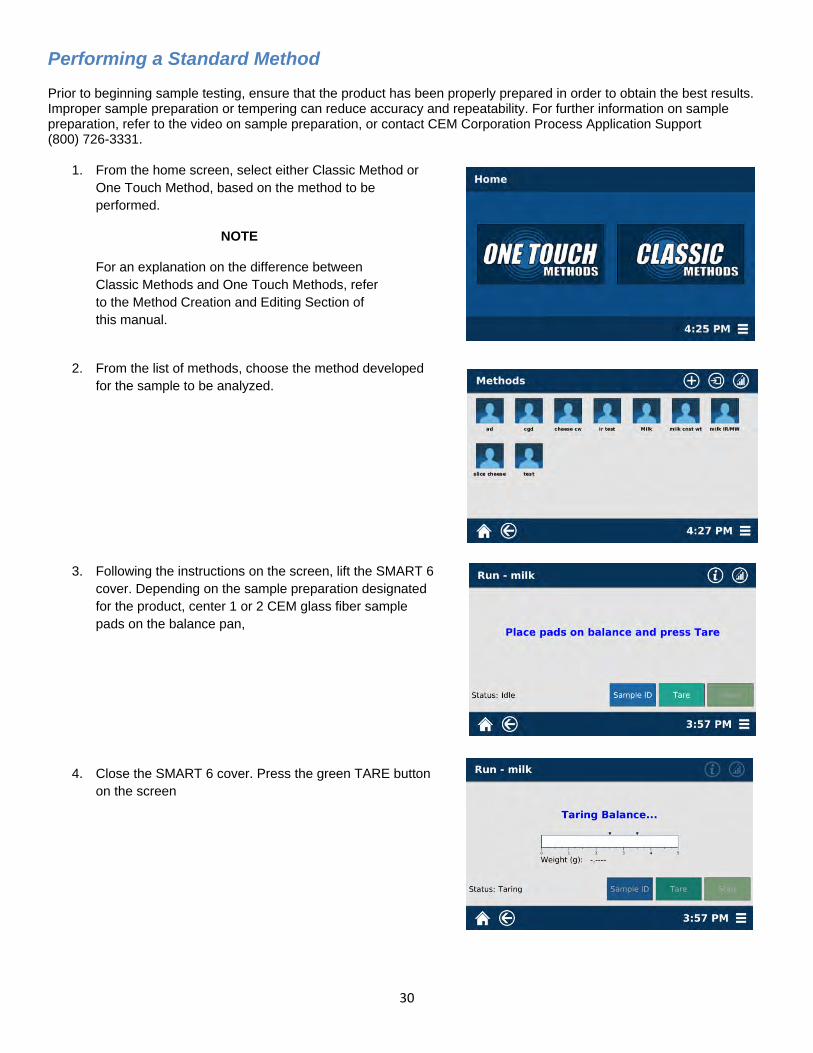
Performing a Standard Method
Prior to beginning sample testing, ensure that the product has been properly prepared in order to obtain the best results. Improper sample preparation or tempering can reduce accuracy and repeatability. For further information on sample preparation, refer to the video on sample preparation, or contact CEM Corporation Process Application Support (800) 726-3331.
1. From the home screen, select either Classic Method or One Touch Method, based on the method to be performed.
NOTE
For an explanation on the difference between Classic Methods and One Touch Methods, refer to the Method Creation and Editing Section of this manual.
2. From the list of methods, choose the method developed
for the sample to be analyzed.
3. Following the instructions on the screen, lift the SMART 6 cover. Depending on the sample preparation designated for the product, center 1 or 2 CEM glass fiber sample pads on the balance pan,
4. Close the SMART 6 cover. Press the green TARE button on the screen
31
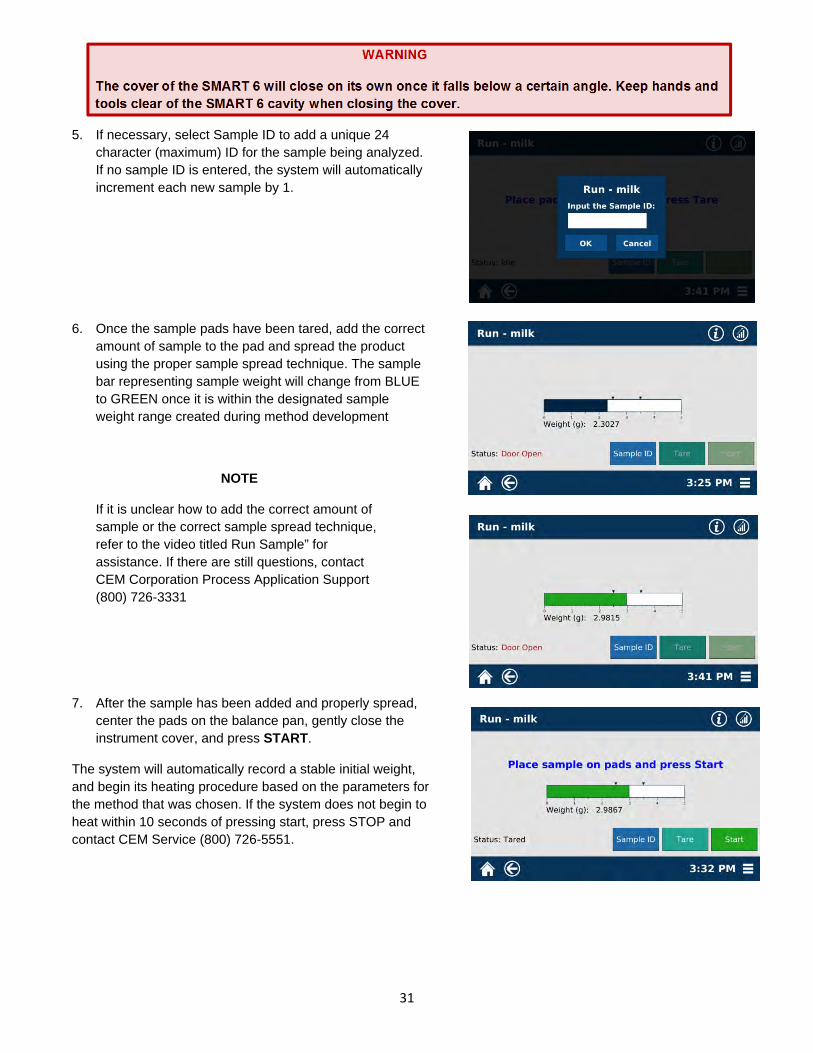
WARNING
The cover of the SMART 6 will close on its own once it falls below a certain angle. Keep hands and tools clear of the SMART 6 cavity when closing the cover.
5. If necessary, select Sample ID to add a unique 24 character (maximum) ID for the sample being analyzed. If no sample ID is entered, the system will automatically increment each new sample by 1.
6. Once the sample pads have been tared, add the correct amount of sample to the pad and spread the product using the proper sample spread technique. The sample bar representing sample weight will change from BLUE to GREEN once it is within the designated sample weight range created during method development
NOTE
If it is unclear how to add the correct amount of sample or the correct sample spread technique, refer to the video titled Run Sample” for assistance. If there are still questions, contact CEM Corporation Process Application Support (800) 726-3331
7. After the sample has been added and properly spread, center the pads on the balance pan, gently close the instrument cover, and press START.
The system will automatically record a stable initial weight, and begin its heating procedure based on the parameters for the method that was chosen. If the system does not begin to heat within 10 seconds of pressing start, press STOP and contact CEM Service (800) 726-5551.

32
8. During the analysis, two screens are available for viewing
a. Simple - This screen presents only the Moisture or Solids result during the testing process.
b. Advanced - This screen includes the weight, sample ID, and all testing parameters specific to the method. No values can be altered while performing the test.
9. Once the sample has reached its optimal dry weight, the
system will stop heating and display the final result in either %Moisture or %Solids, depending on what is designated in the method.

33
Performing a Waste Water Method
1. Place three round sample pads on the balance pan and press TARE. 2. Remove two of the samples from the balance pan, leaving the third. Add the waste water sample to the two tared
sample pads. Place the two pads back on the balance pan, close the lid, and press START. 3. After the initial drying stage, remove the three pads from the balance pan, and follow the necessary filtration steps
as designated by the internal procedure. After filtering the pads and dried sample, place the pads back on the balance pan and press START.
Performing a Syringe Method
The Syringe method is used for samples that are too volatile to get an accurate initial sample weight, either due to having solvents with a low evaporation point or a high temperature sample that is above the boiling point.
1. Using a syringe, aspirate a generous amount of the sample to be analyzed. 2. Determine an initial weight of the full syringe on the SMART 6 balance pan 3. Expel a sufficient amount of sample to be within the designated weight specification that was determined during
method development. 4. Reweigh the syringe, and the SMART 6 will calculate the weight loss of the syringe as the initial weight. 5. Follow steps 6-9 of “Performing a Standard Method” in this manual.
Performing an Ash Method
After the initial drying test is completed, follow the steps outlined for “Performing a Standard Method.” Then place the two sample pads in the muffle furnace at the designated temperature and time. Once the ashing process is completed, use a desiccator to permit the sample pads to cool. Then reweigh both sample pads in the SMART 6 to calculate the %ASH of the sample.
WARNING
Based on the heat retention properties of the sample, samples which have just been analyzed should be given adequate time to coo to prevent burns.
Performing an iDri Method
iDri is a proprietary method analysis that allows the user to reduce test times on certain products to less than two (2) minutes. The SMART 6 is able to analyze the drying curve of a specific sample type and apply an algorithm to the testing in order to achieve an accurate final result in up to half the test time. A large number of samples must first be analyzed in COMBO mode to determine the iDri bias, but once the bias is set, iDri can be fully turned to ON to end the test in less than two (2) minutes. For more information on developing an iDri method, contact the CEM Process Applications group at (800) 726-3331.
1. If iDri is turned ON, the test will perform as normal, just in a reduced time. The iDri bias must be set in order to achieve an accurate analysis.
2. If iDri is turned to COMBO, the test will provide an iDri result, but continue performing the test until the CW parameters specified in the method are achieved. COMBO mode assists in determining the iDri bias required when the iDri is in the ON mode.
34
Creating and Editing a Method
The SMART 6 is supported by the expert application team at CEM Corporation, and this team has collected a library of methods to make method development and validation easier and faster. Prior to creating a new method, contact the CEM Corporation Process Applications Group or visit www.cem.com/SMART6 to locate a method which fits most samples. If there is a method in the library that matches the description of the sample being analyzed, download the method to a USB flash drive and import it into the SMART 6 to begin analyzing the sample. For instructions for importing, refer to the Importing and Exporting section of this manual.
If the SMART 6 Method Library does not contain a method that matches the sample being analyzed, unique methods can be developed on the instrument. One Touch method development uses determined categories of preprogrammed parameters to easily develop and adjust a method. If the categories provided do not optimize sample results, use the Classic Method development to obtain the parameters within the categories. Contact the CEM Process Applications Group for further information concerning how adjusting each parameter will affect the final results.
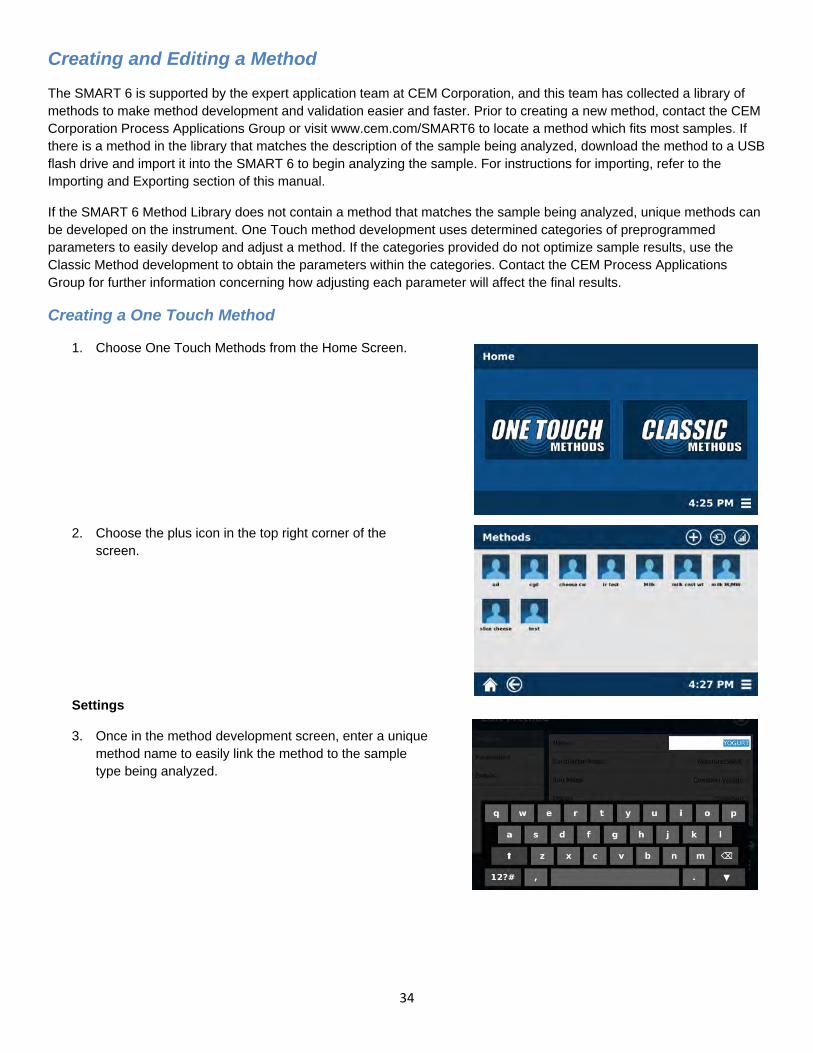
Creating a One Touch Method
1. Choose One Touch Methods from the Home Screen.
2. Choose the plus icon in the top right corner of the screen.
Settings
3. Once in the method development screen, enter a unique method name to easily link the method to the sample type being analyzed.
35
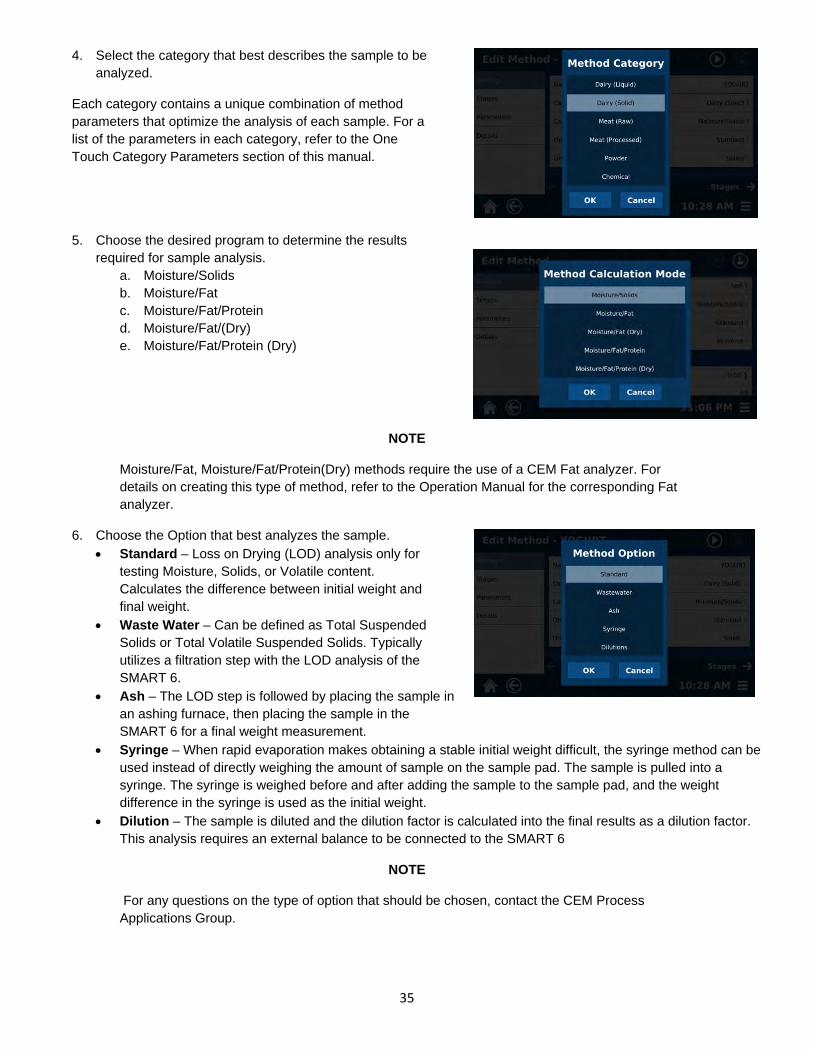
4. Select the category that best describes the sample to be analyzed.
Each category contains a unique combination of method parameters that optimize the analysis of each sample. For a list of the parameters in each category, refer to the One Touch Category Parameters section of this manual.
5. Choose the desired program to determine the results required for sample analysis.
a. Moisture/Solids b. Moisture/Fat c. Moisture/Fat/Protein d. Moisture/Fat/(Dry) e. Moisture/Fat/Protein (Dry)
NOTE
Moisture/Fat, Moisture/Fat/Protein(Dry) methods require the use of a CEM Fat analyzer. For details on creating this type of method, refer to the Operation Manual for the corresponding Fat analyzer.
6. Choose the Option that best analyzes the sample. Standard – Loss on Drying (LOD) analysis only for
testing Moisture, Solids, or Volatile content. Calculates the difference between initial weight and final weight.
Waste Water – Can be defined as Total Suspended Solids or Total Volatile Suspended Solids. Typically utilizes a filtration step with the LOD analysis of the SMART 6.
Ash – The LOD step is followed by placing the sample in an ashing furnace, then placing the sample in the SMART 6 for a final weight measurement.
Syringe – When rapid evaporation makes obtaining a stable initial weight difficult, the syringe method can be used instead of directly weighing the amount of sample on the sample pad. The sample is pulled into a syringe. The syringe is weighed before and after adding the sample to the sample pad, and the weight difference in the syringe is used as the initial weight.
Dilution – The sample is diluted and the dilution factor is calculated into the final results as a dilution factor. This analysis requires an external balance to be connected to the SMART 6
NOTE
For any questions on the type of option that should be chosen, contact the CEM Process Applications Group.
36
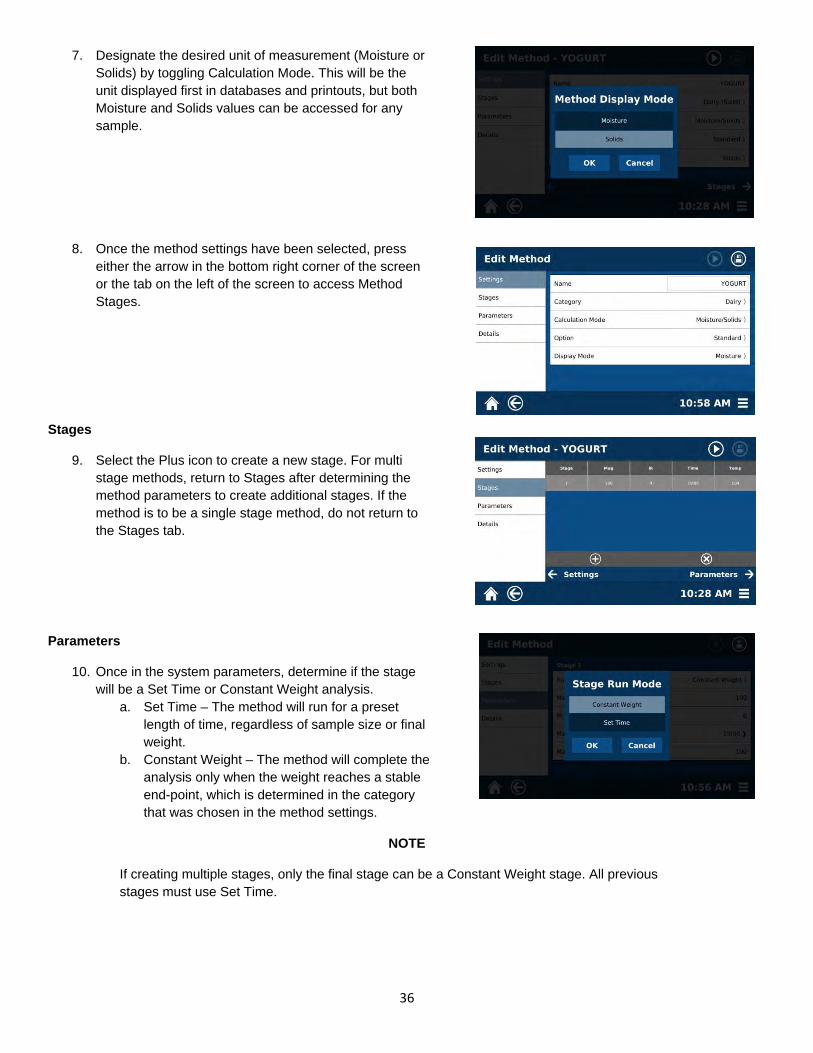
7. Designate the desired unit of measurement (Moisture or Solids) by toggling Calculation Mode. This will be the unit displayed first in databases and printouts, but both Moisture and Solids values can be accessed for any sample.
8. Once the method settings have been selected, press either the arrow in the bottom right corner of the screen or the tab on the left of the screen to access Method Stages.
Stages
9. Select the Plus icon to create a new stage. For multi stage methods, return to Stages after determining the method parameters to create additional stages. If the method is to be a single stage method, do not return to the Stages tab.
Parameters
10. Once in the system parameters, determine if the stage will be a Set Time or Constant Weight analysis.
a. Set Time – The method will run for a preset length of time, regardless of sample size or final weight.
b. Constant Weight – The method will complete the analysis only when the weight reaches a stable end-point, which is determined in the category that was chosen in the method settings.
NOTE
If creating multiple stages, only the final stage can be a Constant Weight stage. All previous stages must use Set Time.
37
Set Time
11. Set the Mag Power and IR power . The power should be set at 0%, 25%, 50%, 75%, or 100%
12. Set the run time for each analysis. 13. Set the Maximum temperature for the sample type.
Some category parameters contain a controlled ramp and do not reach the temperature immediately upon analyzing the sample.
Constant Weight
14. Set the Mag Power and IR power . The power should be set at 0%, 25%, 50%, 75%, or 100%
15. Set the maximum run time the method will run. This is to
prevent samples running too long if constant weight parameters cannot be met. Most samples will not reach this maximum run time. The default is 10 minutes.
16. Set the Maximum temperature for the sample. Some
category parameters contain a controlled ramp and do not reach the temperature immediately upon analyzing the sample.
Details
17. Set the minimum and maximum sample weights (20 g maximum) to be added to the glass fiber pads during sample analysis. During sample testing, the weight graph will change from blue to green when the weight is within the set range.
18. Set the minimum and maximum results which typically correspond to the internal specification of the sample being analyzed.
19. If necessary, add a sample bias to adjust final results up or down to match reference results.
CAUTION
Not following proper sample preparation and spread techniques can lead to a reduction in precision, inaccurate results, or even damage the system.
WARNING
Improper sample preparation and spread techniques can create an unsafe testing environment due to fire or volatiles in the cavity.

38
20. iDri can be set to OFF (default), ON, or COMBO. If iDri is turned ON, an iDri bias must blso be added for accurate iDri analysis. For more information on iDri, refer to page 32 or contact the local CEM representative.
39
Creating a Classic Method
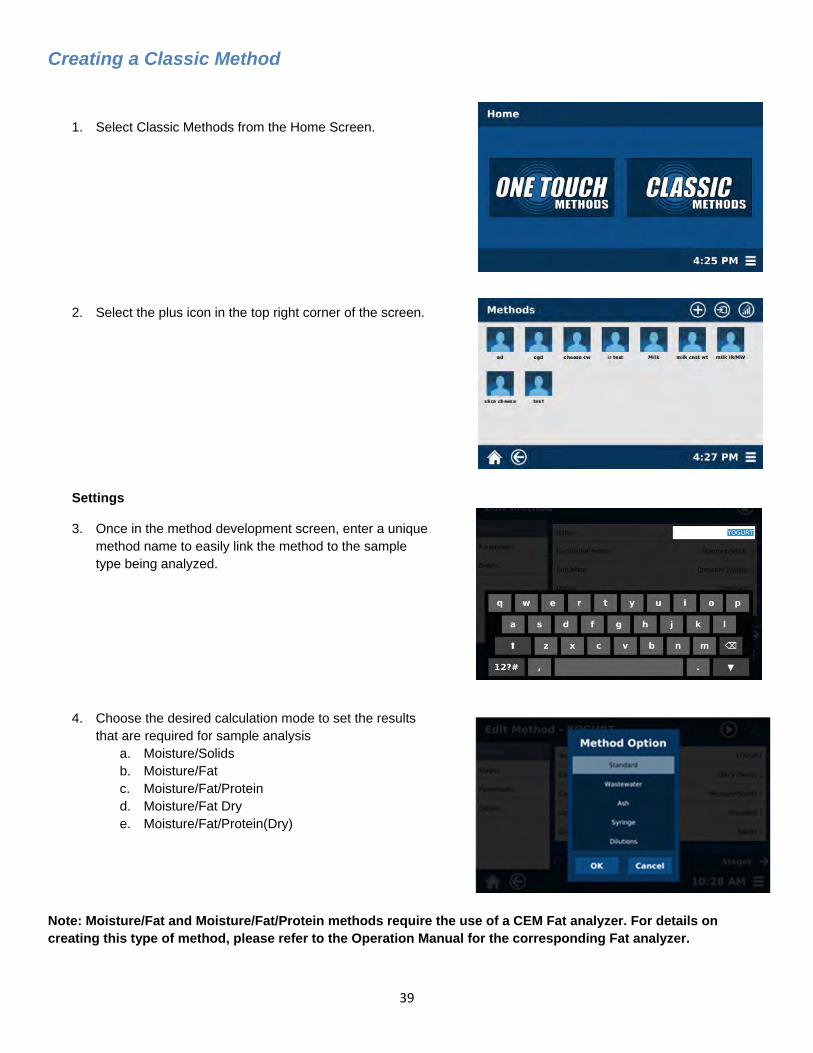
1. Select Classic Methods from the Home Screen.
2. Select the plus icon in the top right corner of the screen.
Settings
3. Once in the method development screen, enter a unique method name to easily link the method to the sample type being analyzed.
4. Choose the desired calculation mode to set the results that are required for sample analysis
a. Moisture/Solids b. Moisture/Fat c. Moisture/Fat/Protein d. Moisture/Fat Dry e. Moisture/Fat/Protein(Dry)
Note: Moisture/Fat and Moisture/Fat/Protein methods require the use of a CEM Fat analyzer. For details on creating this type of method, please refer to the Operation Manual for the corresponding Fat analyzer.
40
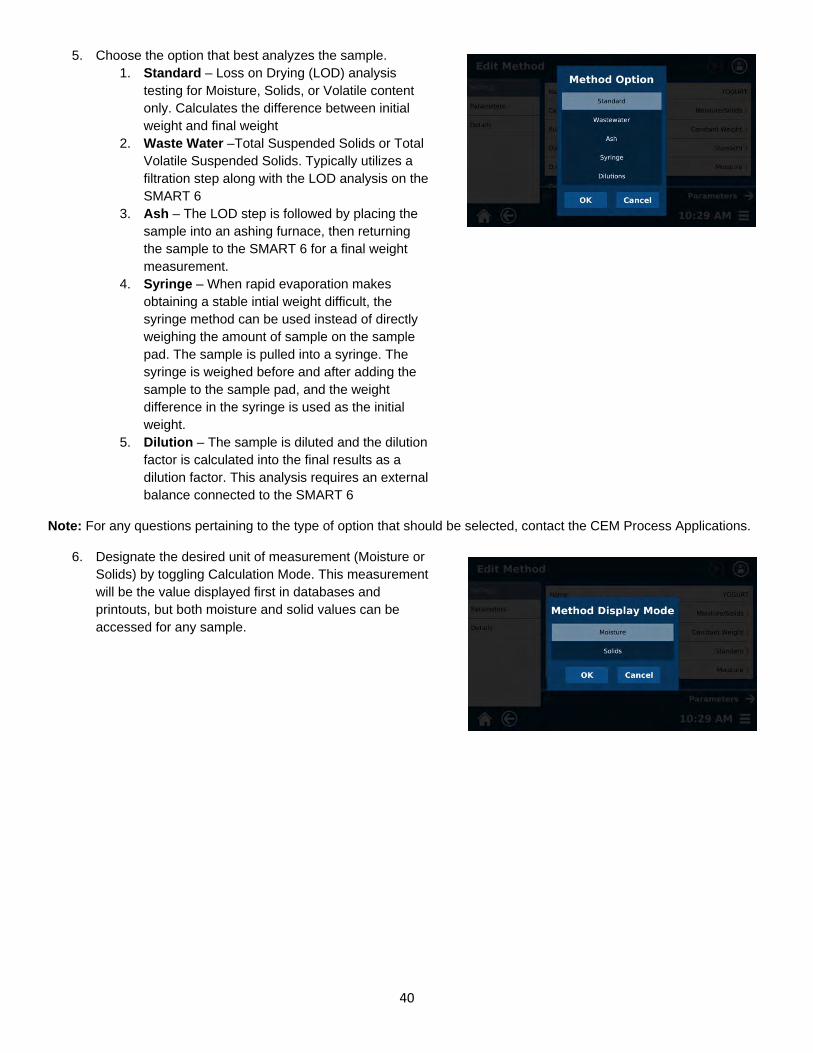
5. Choose the option that best analyzes the sample. 1. Standard – Loss on Drying (LOD) analysis
testing for Moisture, Solids, or Volatile content only. Calculates the difference between initial weight and final weight
2. Waste Water –Total Suspended Solids or Total Volatile Suspended Solids. Typically utilizes a filtration step along with the LOD analysis on the SMART 6
3. Ash – The LOD step is followed by placing the sample into an ashing furnace, then returning the sample to the SMART 6 for a final weight measurement.
4. Syringe – When rapid evaporation makes obtaining a stable intial weight difficult, the syringe method can be used instead of directly weighing the amount of sample on the sample pad. The sample is pulled into a syringe. The syringe is weighed before and after adding the sample to the sample pad, and the weight difference in the syringe is used as the initial weight.
5. Dilution – The sample is diluted and the dilution factor is calculated into the final results as a dilution factor. This analysis requires an external balance connected to the SMART 6
Note: For any questions pertaining to the type of option that should be selected, contact the CEM Process Applications.
6. Designate the desired unit of measurement (Moisture or Solids) by toggling Calculation Mode. This measurement will be the value displayed first in databases and printouts, but both moisture and solid values can be accessed for any sample.
41
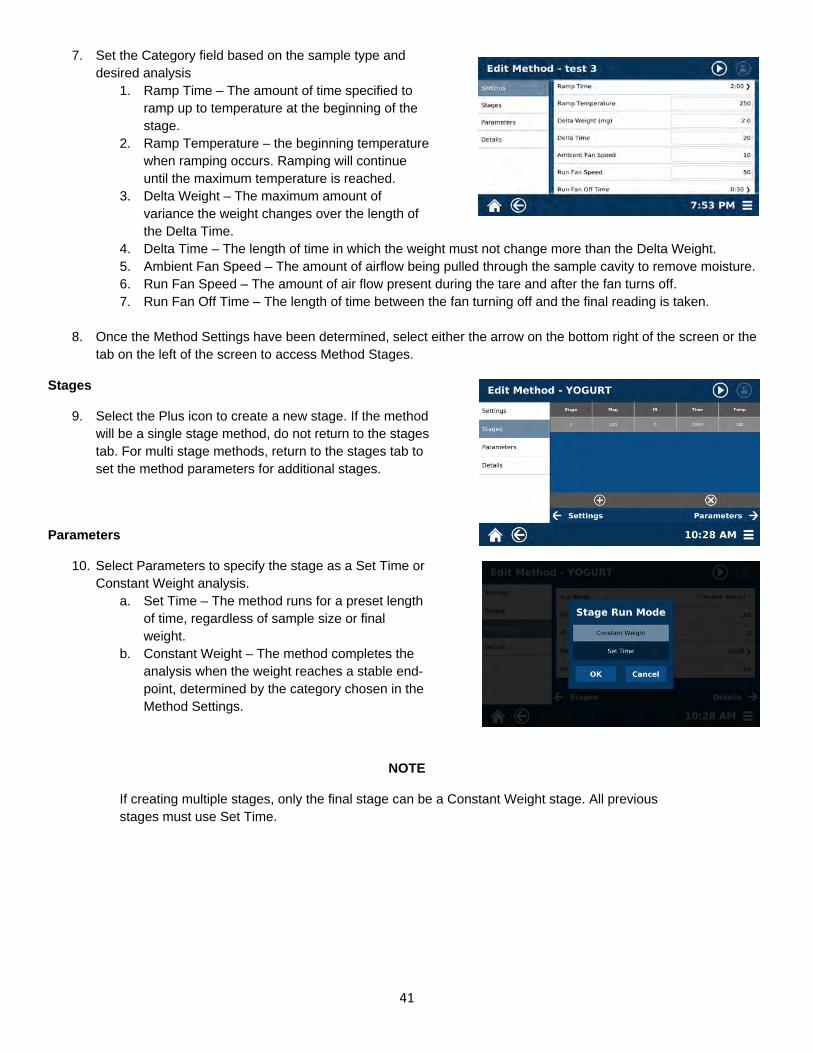
7. Set the Category field based on the sample type and desired analysis
1. Ramp Time – The amount of time specified to ramp up to temperature at the beginning of the stage.
2. Ramp Temperature – the beginning temperature when ramping occurs. Ramping will continue until the maximum temperature is reached.
3. Delta Weight – The maximum amount of variance the weight changes over the length of the Delta Time.
4. Delta Time – The length of time in which the weight must not change more than the Delta Weight. 5. Ambient Fan Speed – The amount of airflow being pulled through the sample cavity to remove moisture. 6. Run Fan Speed – The amount of air flow present during the tare and after the fan turns off. 7. Run Fan Off Time – The length of time between the fan turning off and the final reading is taken.
8. Once the Method Settings have been determined, select either the arrow on the bottom right of the screen or the
tab on the left of the screen to access Method Stages.
Stages
9. Select the Plus icon to create a new stage. If the method will be a single stage method, do not return to the stages tab. For multi stage methods, return to the stages tab to set the method parameters for additional stages.
Parameters
10. Select Parameters to specify the stage as a Set Time or Constant Weight analysis.
a. Set Time – The method runs for a preset length of time, regardless of sample size or final weight.
b. Constant Weight – The method completes the analysis when the weight reaches a stable end-point, determined by the category chosen in the Method Settings.
NOTE
If creating multiple stages, only the final stage can be a Constant Weight stage. All previous stages must use Set Time.
42
Set Time
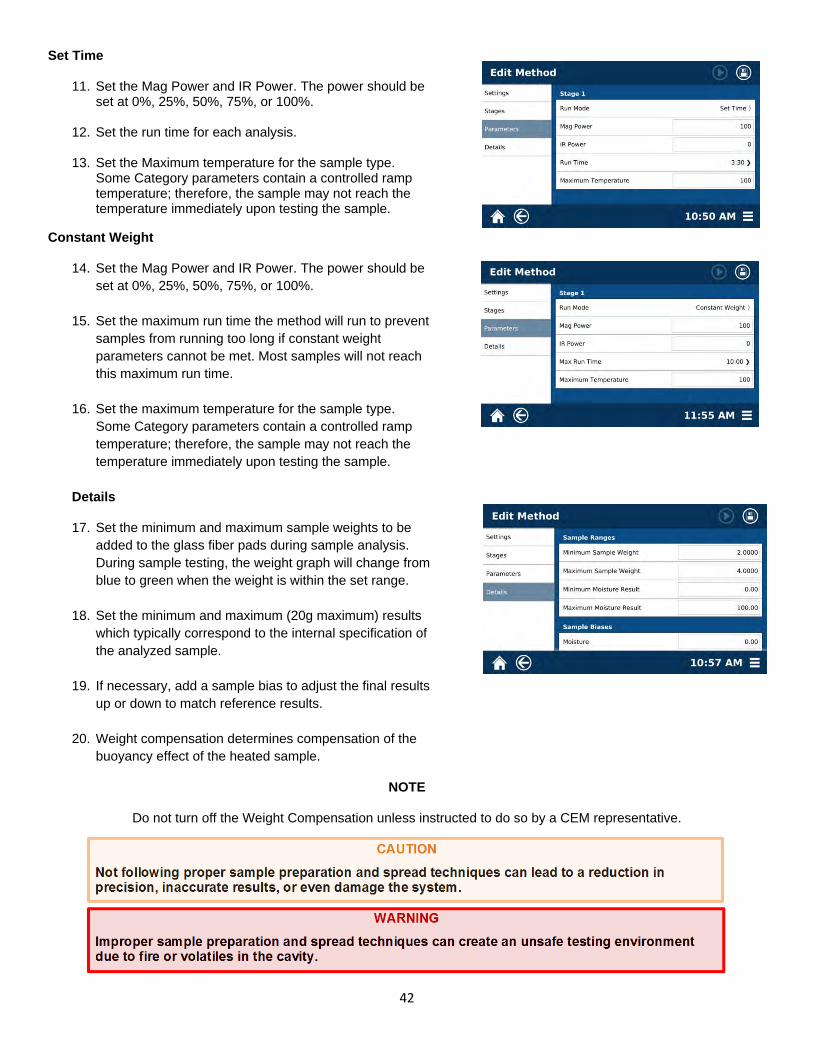
11. Set the Mag Power and IR Power. The power should be set at 0%, 25%, 50%, 75%, or 100%.
12. Set the run time for each analysis.
13. Set the Maximum temperature for the sample type. Some Category parameters contain a controlled ramp temperature; therefore, the sample may not reach the temperature immediately upon testing the sample.
Constant Weight
14. Set the Mag Power and IR Power. The power should be set at 0%, 25%, 50%, 75%, or 100%.
15. Set the maximum run time the method will run to prevent samples from running too long if constant weight parameters cannot be met. Most samples will not reach this maximum run time.
16. Set the maximum temperature for the sample type.
Some Category parameters contain a controlled ramp temperature; therefore, the sample may not reach the temperature immediately upon testing the sample.
Details
17. Set the minimum and maximum sample weights to be added to the glass fiber pads during sample analysis. During sample testing, the weight graph will change from blue to green when the weight is within the set range.
18. Set the minimum and maximum (20g maximum) results which typically correspond to the internal specification of the analyzed sample.
19. If necessary, add a sample bias to adjust the final results up or down to match reference results.
20. Weight compensation determines compensation of the buoyancy effect of the heated sample.
NOTE
Do not turn off the Weight Compensation unless instructed to do so by a CEM representative.
CAUTION
Not following proper sample preparation and spread techniques can lead to a reduction in precision, inaccurate results, or even damage the system.
WARNING
Improper sample preparation and spread techniques can create an unsafe testing environment due to fire or volatiles in the cavity.
43
Importing and Exporting
Prior to creating a new method, contact the CEM Corporation Process Application Group., Years of customer interaction have helped to compile a library of methods with parameters spanning a large range of sample types. These methods can be easily transferred to any SMART 6 system following the steps below.
Importing
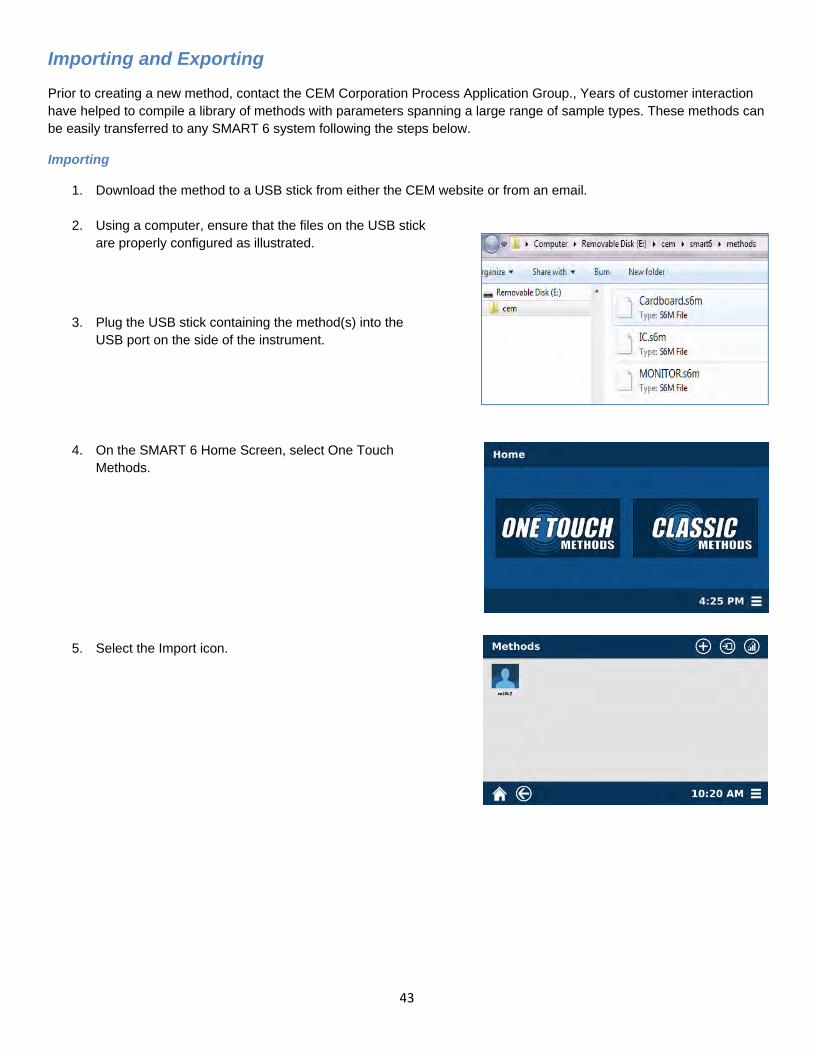
1. Download the method to a USB stick from either the CEM website or from an email.
2. Using a computer, ensure that the files on the USB stick are properly configured as illustrated.
3. Plug the USB stick containing the method(s) into the
USB port on the side of the instrument.
4. On the SMART 6 Home Screen, select One Touch
Methods.
5. Select the Import icon.

44
6. The methods to be imported should be listed on the left side of the screen. Once the correct method is chosen, press the Import icon located in the top right corner of the screen. If the USB is fully plugged in and no methods are shown, the method is not in the correct file configuration. Refer to step 2 to ensure proper file configuration.
7. Once the method has been imported, a window will indicate that the importing process was successful

45
Exporting
1. From the Home Screen, select the One Touch Methods or Classic Methods containing the method to be exported.
2. Using the USB port on the side of the instrument, install a USB stick.
3. Long hold the method to be exported until the additional menu icons appear
4. Select the Export Icon.
5. The system prompts the user to identify the location for the method to be exported. Choose the USB that has been installed.
6. The method will export to the USB stick and display a final window that the export has been successful.

46
NOTE
If the USB stick already contains the method to be exported or a different method that has the same name as the method, a prompt window will request whether or not to overwrite the current method. Rename the current method, remove the method already on the USB stick, or overwrite the method on the USB stick with exported method.

47
Data Management
The SMART 6 is equipped with a variety of options to store and review data. It comes equipped with an internal database which can store a large number of results and methods that can be recalled and analyzed as needed by the user. Data can also be sent to different external databases, including the proprietary CEM Communicator and LIMS Networks. Furthermore, results can be quickly and easily statistically analyzed on the SMART 6 to provide average results, standard deviations, and production trends.
SMART 6 Database
The SMART 6 stores all results internally. These results can be accessed from the method folder or the run screen once an analysis has been completed. Data is separated based on method, and sorted by the Sample ID assigned to each analysis. To access past method results from the Home Screen, follow the instructions below.
1. Select the method folder (One Touch or Classic) that contains the method and long press the method.
2. Select the Information Icon.
3. A list of all samples analyzed with that method will be listed. The top of the list will be a Details tab which contains the method parameters and dates the method was created and last modified.
48
To access past method results from the Run Screen, follow the instructions below.
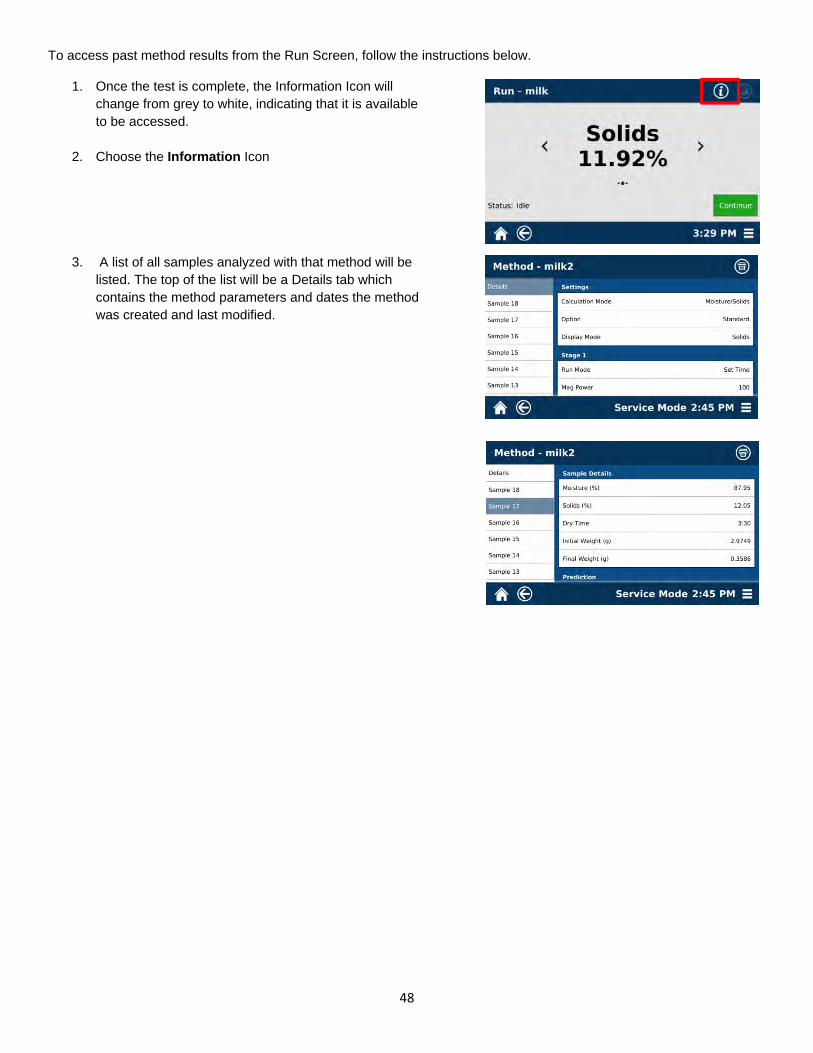
1. Once the test is complete, the Information Icon will change from grey to white, indicating that it is available to be accessed.
2. Choose the Information Icon
3. A list of all samples analyzed with that method will be listed. The top of the list will be a Details tab which contains the method parameters and dates the method was created and last modified.
49
SMART 6 Statistics
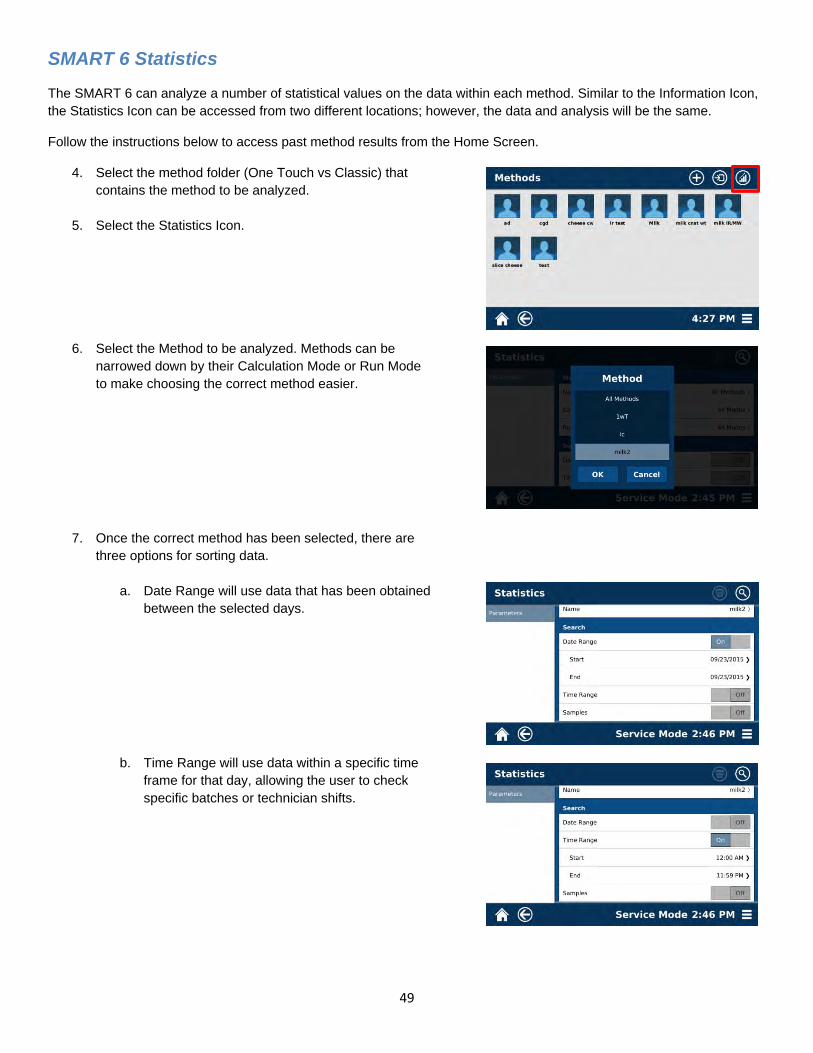
The SMART 6 can analyze a number of statistical values on the data within each method. Similar to the Information Icon, the Statistics Icon can be accessed from two different locations; however, the data and analysis will be the same.
Follow the instructions below to access past method results from the Home Screen.
4. Select the method folder (One Touch vs Classic) that contains the method to be analyzed.
5. Select the Statistics Icon.
6. Select the Method to be analyzed. Methods can be narrowed down by their Calculation Mode or Run Mode to make choosing the correct method easier.
7. Once the correct method has been selected, there are three options for sorting data.
a. Date Range will use data that has been obtained between the selected days.
b. Time Range will use data within a specific time frame for that day, allowing the user to check specific batches or technician shifts.
50
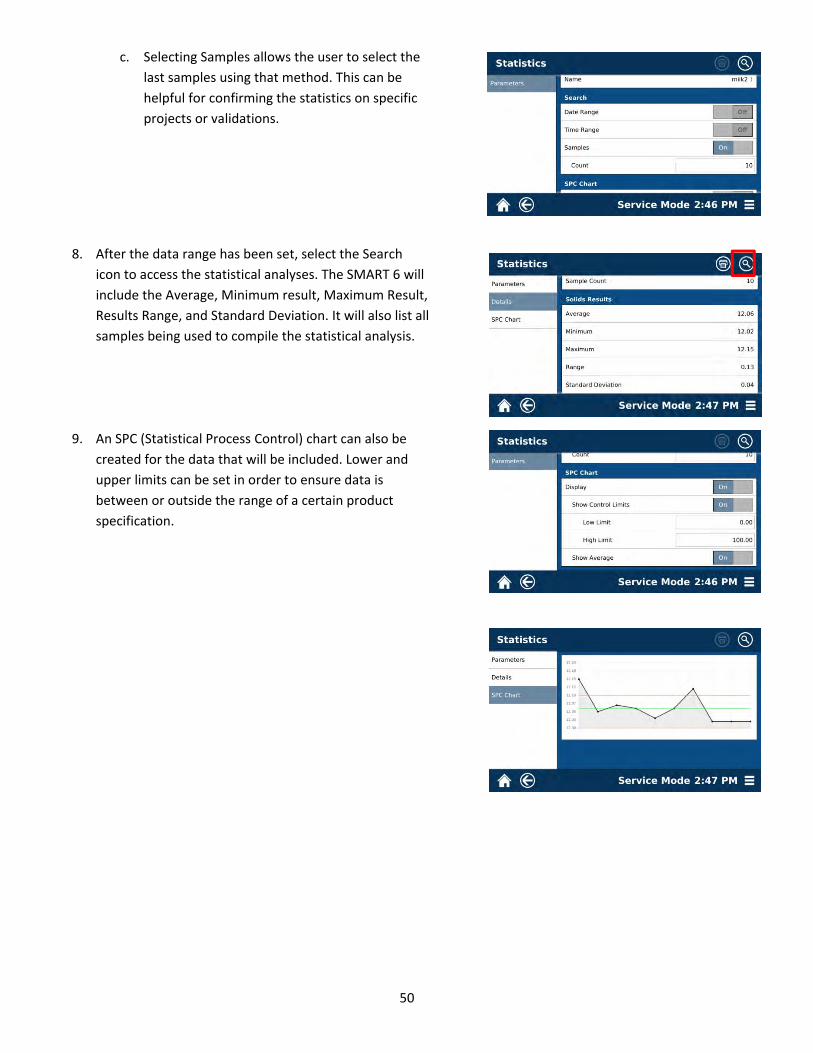
c. Selecting Samples allows the user to select the last samples using that method. This can be helpful for confirming the statistics on specific projects or validations.
8. After the data range has been set, select the Search icon to access the statistical analyses. The SMART 6 will include the Average, Minimum result, Maximum Result, Results Range, and Standard Deviation. It will also list all samples being used to compile the statistical analysis.
9. An SPC (Statistical Process Control) chart can also be created for the data that will be included. Lower and upper limits can be set in order to ensure data is between or outside the range of a certain product specification.
51
SMART 6 Printing
The SMART 6 can print data to assist users in creating and maintaining a paper copy of the results. An internal printer can be purchased as an option, or an external printer at the customer site can be connected to the SMART 6 for printing. To set up an internal printer, follow the instructions below. If using an external printer, contact the printer manufacturer for instructions.
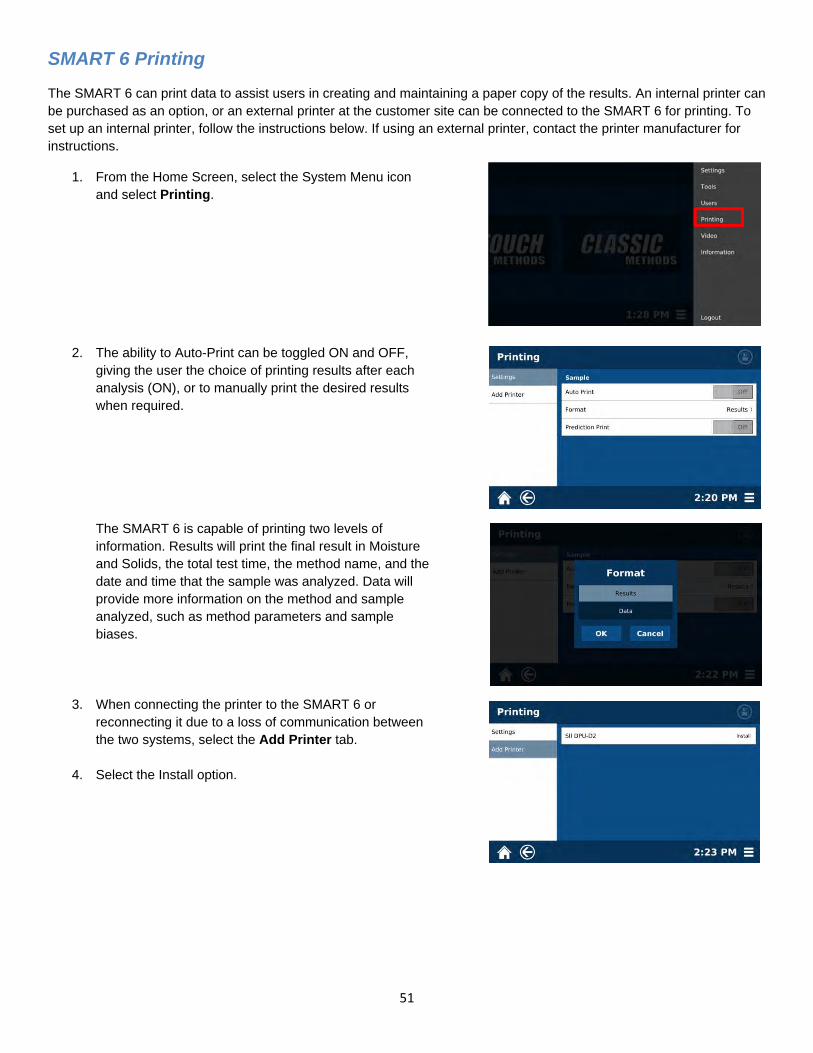
1. From the Home Screen, select the System Menu icon and select Printing.
2. The ability to Auto-Print can be toggled ON and OFF, giving the user the choice of printing results after each analysis (ON), or to manually print the desired results when required. The SMART 6 is capable of printing two levels of information. Results will print the final result in Moisture and Solids, the total test time, the method name, and the date and time that the sample was analyzed. Data will provide more information on the method and sample analyzed, such as method parameters and sample biases.
3. When connecting the printer to the SMART 6 or reconnecting it due to a loss of communication between the two systems, select the Add Printer tab.
4. Select the Install option.
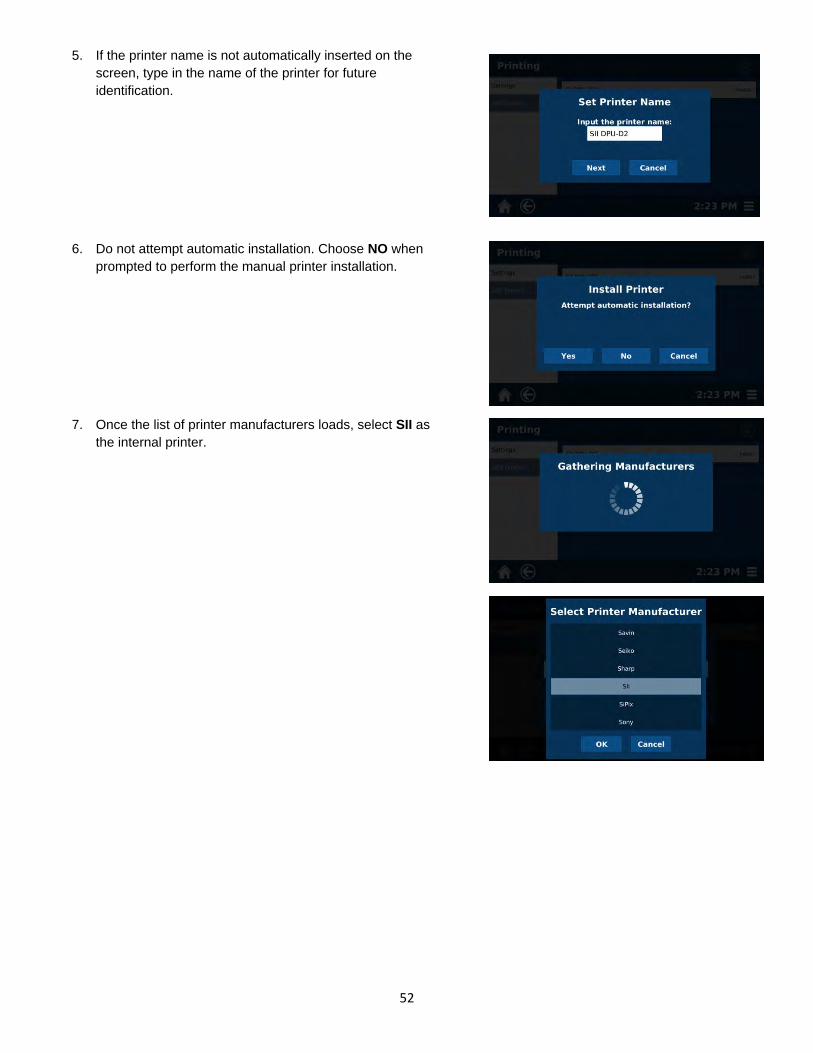
52
5. If the printer name is not automatically inserted on the screen, type in the name of the printer for future identification.
6. Do not attempt automatic installation. Choose NO when prompted to perform the manual printer installation.
7. Once the list of printer manufacturers loads, select SII as the internal printer.
53
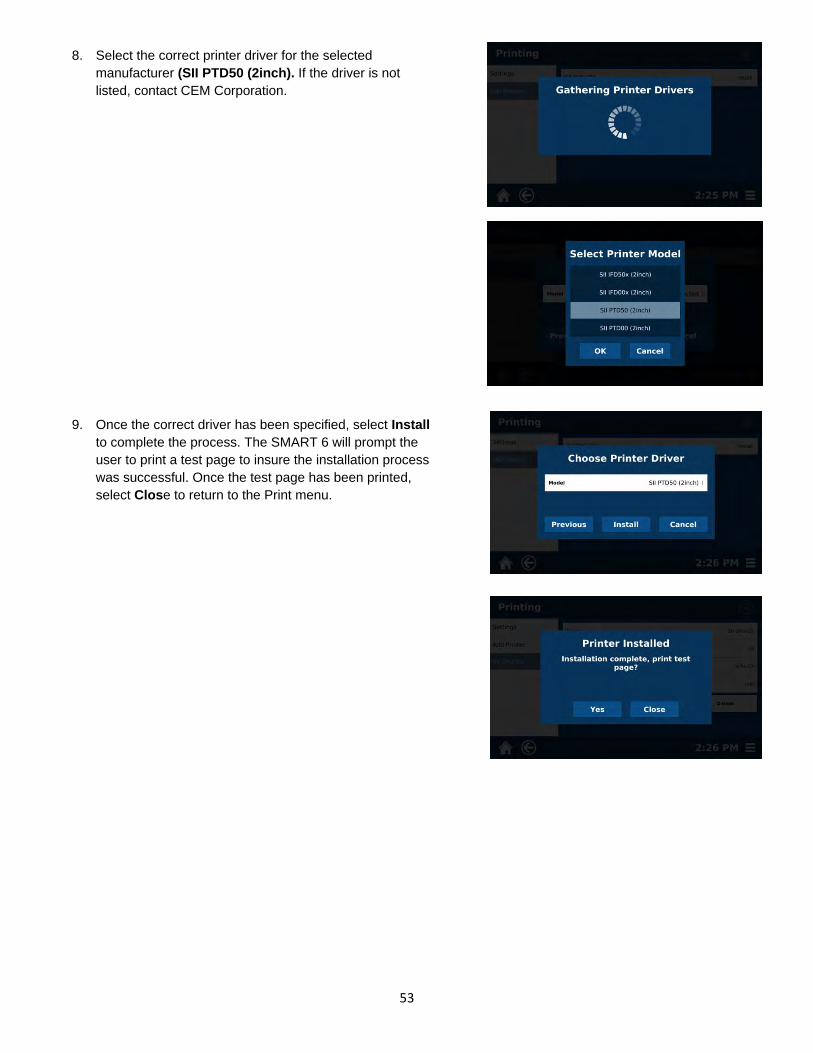
8. Select the correct printer driver for the selected manufacturer (SII PTD50 (2inch). If the driver is not listed, contact CEM Corporation.
9. Once the correct driver has been specified, select Install to complete the process. The SMART 6 will prompt the user to print a test page to insure the installation process was successful. Once the test page has been printed, select Close to return to the Print menu.
54
External Database and Networks
The SMART 6 is capable of sending data to different databases located on external servers or computers. This allows users to automatically store data on their managerial network, integrate SMART 6 with other process control equipment for improved control, and obtain and review results from a mobile platform.
1. Using the available ports located on the rear of the instrument, connect one end of a USB or Ethernet cable to the SMART 6 and the other end to a nearby Ethernet port which is a part of the internal network or directly to the computer or router that will be storing the data.
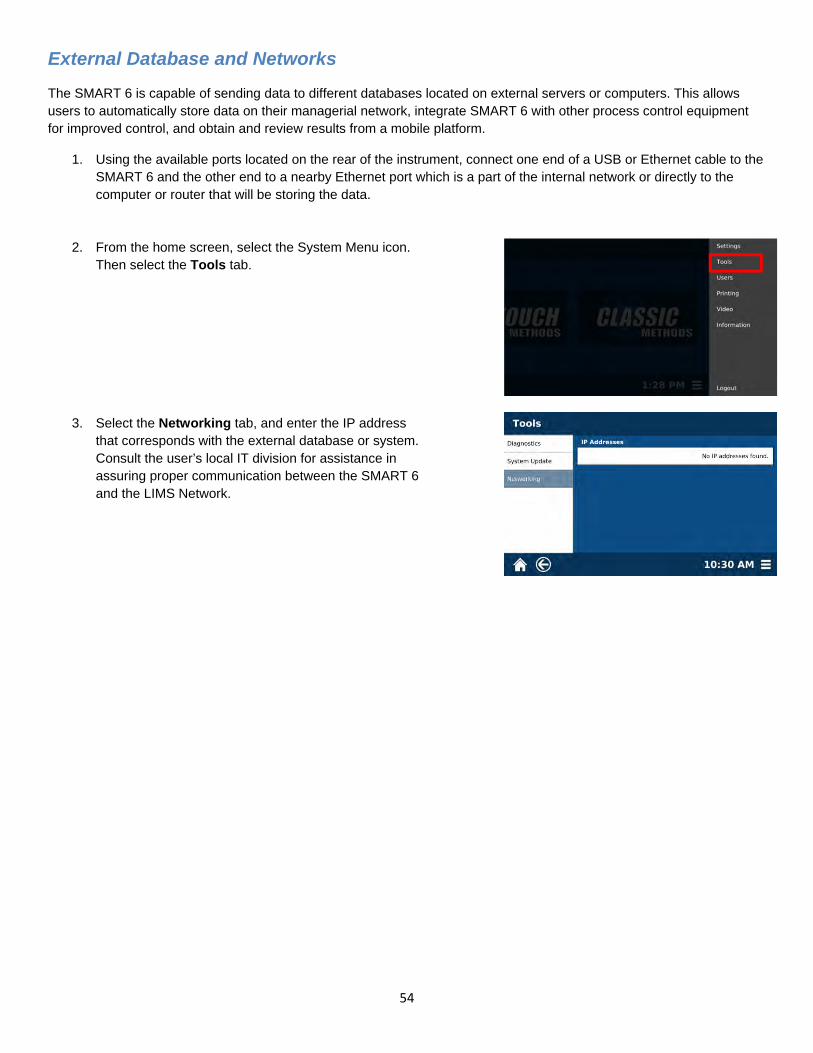
2. From the home screen, select the System Menu icon. Then select the Tools tab.
3. Select the Networking tab, and enter the IP address that corresponds with the external database or system. Consult the user’s local IT division for assistance in assuring proper communication between the SMART 6 and the LIMS Network.
55
SMART 6 Maintenance
The SMART 6 is designed for durability and is intuitive enough to be used on a production floor as well as in a laboratory setting. Therefore, there are relatively few maintenance procedures for the SMART 6 as compared to other moisture/solids analyzers. CEM Corporation offers multiple service contracts to enhance the longevity of the instrument as well as to reduce down time.
Routine Maintenance
Maintaining a clean SMART 6 during day-to-day usage is one of the best ways to reduce down time and ensure proper and accurate testing.
Daily
Turn the instrument off. Clean the SMART 6 cavity using paper towels and a household cleaning solution or soap and water. Use caution to avoid wetting or spraying the touchscreen interface (although it is waterproof) or the cavity openings for the cover latch and balance stem.
Weekly
Remove the infrared and electronics filters and clean them using pressurized air or water. If washing the filters, ensure that they are completely dry prior to installing them in the instrument. o The infrared filter is accessed by removing the instrument front cover which is secured with magnets. Using a
Phillips head screwdriver, remove the two (2) screws securing the white filter bracket. Slide the bracket out. Remove and clean the filter.
o The electronics filter is located below the touchscreen. The drawer securing the filter is held in place by magnets. Slide the drawer out to remove and clean the filter.
Inspect the cavity intake filter on the side of the magnet and the ports and fans in the back of the instrument for excessive buildup. Use a pressurized air source or dry towel to remove any dust or particulate from these areas. Note: Refer to the instrument components to assist in locating the filters.
Monthly
Balance Calibration o The SMART 6 is equipped with an internal high precision 4-place analytical balance to monitor and calculate
sample weight. To ensure the balance is performing correctly, regular calibration and validation should be performed.
o Following the procedure outlined in this manual, calibrate the balance using a certified traceable weight. When the calibration is complete, the calibration can be verified by selecting any method on the system, following the Tare procedure with an empty balance pan, and placing a 10g certified weight on the balance and confirming that it is 10.0000 +/- 0.0005g.
IntelliTemp Calibration o Sample temperature is controlled by CEM’s trademark IntelliTemp process. In order for IntelliTemp to function
properly and ensure the most accurate results possible, the IR sensor should be calibrated and validated. IntelliTemp calibration can be performed during a preventive maintenance visit by a certified CEM Service Technician, or the calibration device can be purchased from CEM.
o When performing the calibration, follow the instructions included with the calibration device to ensure that the SMART 6 is reading the temperature accurately.
56
Microwave Leakage Measurement o The cover and cavity of the SMART 6 are designed for durability and reliable operation. External radiation
checks are performed on the instrument at several points in the manufacturing process to ensure that microwave leakage is only a fraction of that permitted by U.S. law (5 mW/cm2).The instrument is equipped with a safety interlock system which stops the generation of microwave energy when the instrument cover is not securely closed. If the interlock system fails, a monitoring mechanism will blow the fuse through which power is supplied to the magnetron, rendering the microwave power system inoperable.
o To verify that the cover is sealing and the interlock system is operating properly, the SMART 6 should be routinely tested for microwave leakage. To test for leakage, operate the instrument at 100% power for five (5) minutes. While it is operating, use a federally approved microwave leakage detector such as the Holaday Model HI-1500 to measure the microwave leakage around the cavity and at the fan grill. Leakage should not exceed 5 mW/cm2. If the instrument shows excessive microwave leakage, do not attempt further operation. Contact the CEM Service Department or the nearest CEM subsidiary or distributor.
o Microwave test meters are available from CEM Corporation. CEM does not recommend use of inexpensive meters available in electronics stores because they lack the necessary sensitivity to properly test an instrument for microwave leakage.
WARNING
Failure to perform the necessary maintenance to keep the SMART 6 clean and operational can lead to a reduction in precision, inaccurate results, or damage the system, creating an unsafe testing environment due to fire or volatiles in the cavity.
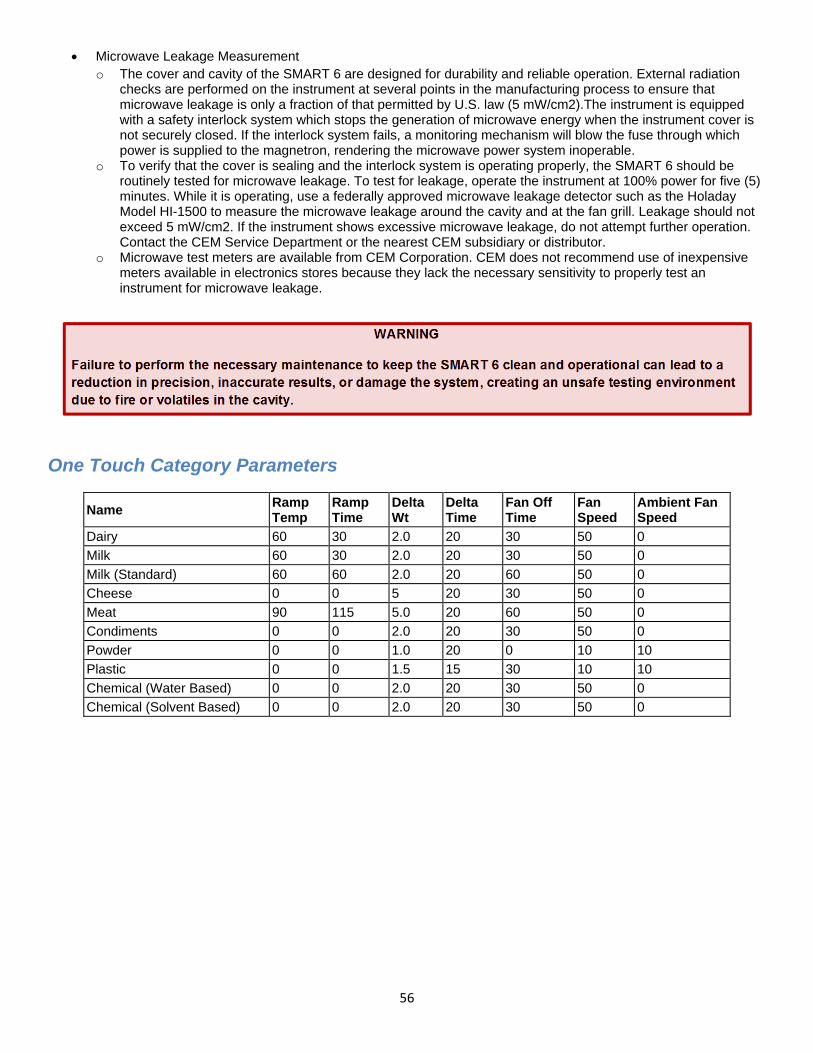
One Touch Category Parameters
Name Ramp Temp
Ramp Time
Delta Wt
Delta Time
Fan Off Time
Fan Speed
Ambient Fan Speed
Dairy 60 30 2.0 20 30 50 0
Milk 60 30 2.0 20 30 50 0
Milk (Standard) 60 60 2.0 20 60 50 0
Cheese 0 0 5 20 30 50 0
Meat 90 115 5.0 20 60 50 0
Condiments 0 0 2.0 20 30 50 0
Powder 0 0 1.0 20 0 10 10
Plastic 0 0 1.5 15 30 10 10
Chemical (Water Based) 0 0 2.0 20 30 50 0
Chemical (Solvent Based) 0 0 2.0 20 30 50 0
57
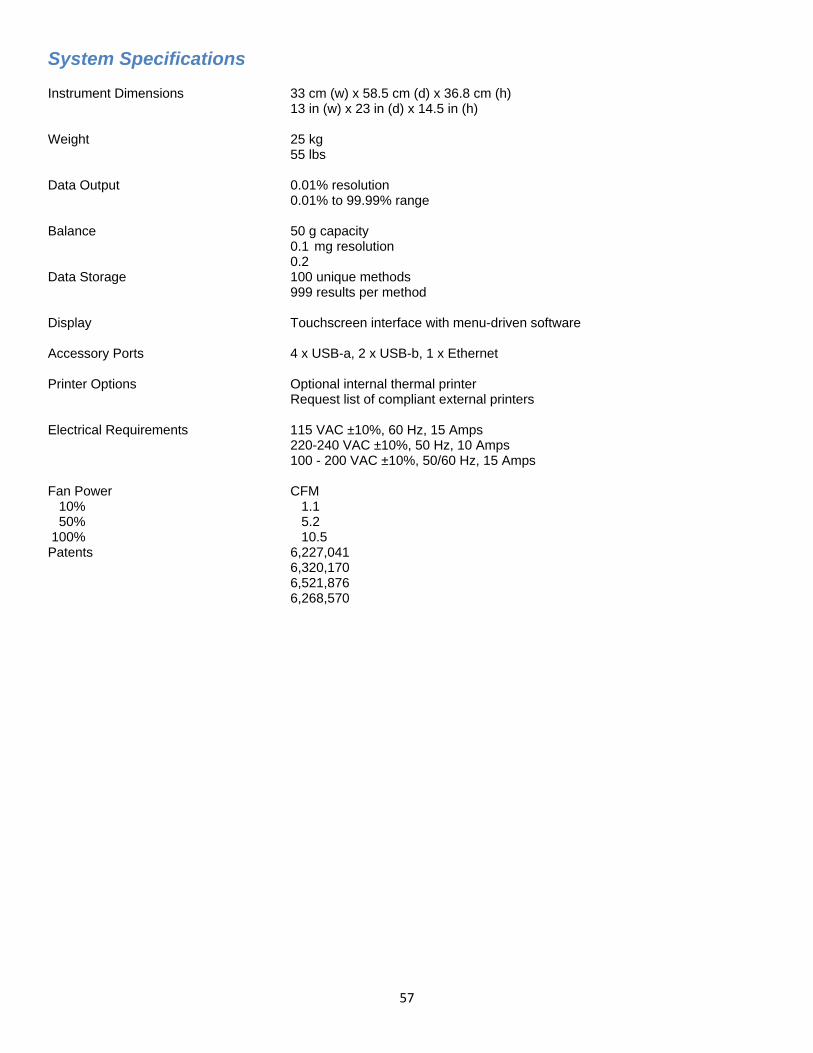
System Specifications
Instrument Dimensions 33 cm (w) x 58.5 cm (d) x 36.8 cm (h) 13 in (w) x 23 in (d) x 14.5 in (h)
Weight 25 kg 55 lbs
Data Output 0.01% resolution 0.01% to 99.99% range
Balance 50 g capacity 0.1 mg resolution 0.2
Data Storage 100 unique methods 999 results per method
Display Touchscreen interface with menu-driven software
Accessory Ports 4 x USB-a, 2 x USB-b, 1 x Ethernet
Printer Options Optional internal thermal printer Request list of compliant external printers
Electrical Requirements 115 VAC ±10%, 60 Hz, 15 Amps 220-240 VAC ±10%, 50 Hz, 10 Amps 100 - 200 VAC ±10%, 50/60 Hz, 15 Amps
Fan Power 10% 50% 100%
CFM 1.1 5.2 10.5
Patents 6,227,041 6,320,170 6,521,876 6,268,570
58
Limited Warranty
What Is Covered: CEM Corporation warrants that the instrument will be free of any defect in parts or workmanship and will, at its option, replace or repair any defective part (excluding consumables) or instrument. For How Long: This warranty remains in effect for 365 days from date of delivery to the original purchaser. What Is Not Covered: This warranty does not cover parts or workmanship damaged due to: • Neglect, abuse or misuse, • Damage caused by or to test samples, • Damage incurred during instrument relocation, • Damage caused by or to any attached equipment, • Use of incorrect line voltages or fuses, • Fire, flood, "acts of God" or other contingencies beyond the control of CEM Corporation, • Improper or unauthorized repair, or • Any other damage caused by purchaser or its agents. Responsibilities of Purchaser: To ensure warranty coverage, the purchaser must: • Use the instrument according to directions, • Connect the instrument properly to a power supply of proper voltage, • Replace blown fuses, • Replace consumables and • Clean the instrument as required. How to Get Service: Purchaser should contact the Service Department of CEM Corporation or the nearest CEM subsidiary or distributor for return authorization and for proper crating and shipping instructions to return instrument, freight prepaid, for service. On-site repairs by an authorized service technician are available through the CEM Service Department. Travel costs will be charged to the purchaser for onsite repairs. Within the U.S. Outside the U.S. CEM Corporation CEM Corporation 3100 Smith Farm Rd. 3100 Smith Farm Rd. Matthews, NC 28105-5044 Matthews, NC 28105-5044 (800) 726-5551 (704) 821-7015 Fax: (704) 821-4368 Fax: (704) 821-4368 Warranty Disclaimer: CEM Corporation hereby excludes and disclaims any warranty of merchantability or fitness for any particular purpose. No warranty, express or implied, extends beyond the face hereof. CEM Corporation shall not be liable for loss of use of instrument or other incidental or consequential costs, expenses or damages incurred by the purchaser or any other user. This warranty is not transferable. Purchaser's Rights under State Law: This warranty gives the purchaser specific legal rights, and the purchaser may also have other rights that vary from state to state.

59