OpenStack Installation: A Practitioner’s Guide · OpenStack Installation: A Practitioner’s...
22
TECH GUIDE OpenStack Installation: A Practitioner’s Guide
Transcript of OpenStack Installation: A Practitioner’s Guide · OpenStack Installation: A Practitioner’s...

TECH GUIDE
OpenStack Installation: A Practitioner’s Guide
TECH GUIDE: OpenStack Installation: A Practitioner’s Guide
2
Introduction
One of the great things about OpenStack is all the options you have for deploying it – from homebrew to hosted OpenStack to vendor appliances to OpenStack-as-a-service. Previously, Platform9 published a tech guide comparing various OpenStack deployment models. If you opt for a do-it-yourself (DIY) approach, then you face the question of which tool to use. This guide will familiarize you with the landscape of OpenStack installation tools, including an overview of the most popular ones: DevStack, RDO Packstack, OpenStack-Ansible, Fuel and TripleO.
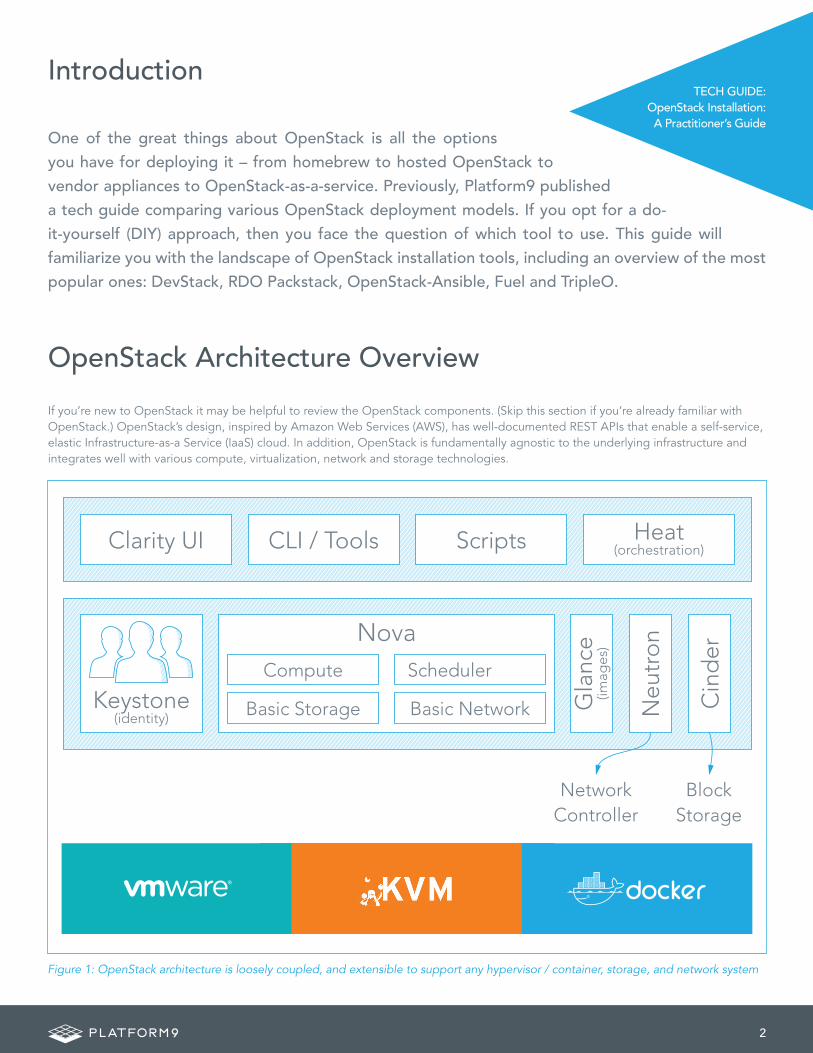
OpenStack Architecture Overview
If you’re new to OpenStack it may be helpful to review the OpenStack components. (Skip this section if you’re already familiar with OpenStack.) OpenStack’s design, inspired by Amazon Web Services (AWS), has well-documented REST APIs that enable a self-service, elastic Infrastructure-as-a Service (IaaS) cloud. In addition, OpenStack is fundamentally agnostic to the underlying infrastructure and integrates well with various compute, virtualization, network and storage technologies.
Figure 1: OpenStack architecture is loosely coupled, and extensible to support any hypervisor / container, storage, and network system
Clarity UI
BlockStorage
NetworkController
CLI / Tools
Keystone(identity)
Scripts
Compute Scheduler
Basic Storage Basic Network
Nova
Heat(orchestration)
Cin
der
Neu
tro
n
Gla
nce
(imag
es)

3
Plan to get help to install & manage
OpenStack?
Have budget for Professional
Services?
Prefer to own infrastructure?
Brown�eld Environment?
Need high customization?
Want to use existing
infrastructure?
Prefer minimal OpenStack
lifecycle management?
Avoid Vendor lock-in?
Short timeline to build private
cloud?
Use OpenStack-as-a-service
Use hosted OpenStack
DIY OpenStack install
DevStackRDO PackstackOpenStack-AnsibleFuelTripleO
IBM BlueBoxRackspace
Platform9
Use OpenStack-as-a-service
Platform9
Use OpenStack-as-a-service
Platform9
Use OpenStack appliances
Cisco MetapodStratoscaleZeroStackVMware VIO
Use OpenStack-as-a-service
Platform9
Use OpenStack vendor distro
Red HatRackspaceMirantis
Use OpenStack vendor distro
Red HatRackspaceMirantis
DIY OpenStack install
DevStackRDO PackstackOpenStack-AnsibleFuelTripleO
YES
YESYES
YES
NO
NO
NO
YESNO
YESNO
NO
YESNO
YESNO
YESNO
Figure 2: How to choose an OpenStack Deployment Model

4
How to Choose an OpenStack Deployment Model
The primary question that drives the choice of deployment models is whether your IT team has the expertise, and the inclination, to install and manage OpenStack. Depending on the desire to host your infrastructure and avoid vendor lock-in, various deployment models are available. If there’s a need for a high degree of customization, along with the flexibility to choose hypervisors, then a DIY install is probably the best option (see highlighted section of the flowchart on previous page).
If you choose DIY install, there’s a wide choice of open source tools that are very easy to use and can create environments for use in development, testing or production. These tools can deploy OpenStack on bare metal, virtual machines or even containers. Some even install OpenStack in a production-grade, highly available architecture.
But which tools are best suited for your requirements? Read on for an overview of some of the most popular tools, followed by a handy comparison matrix to summarize the options. More detailed documentation is available on each tool’s dedicated website.¹
OpenStack Installation: DevStack
DevStack is a series of extensible scripts used to quickly bring up a complete OpenStack environment suitable for non-production use. It’s used interactively as a development environment. Since DevStack installs all-in-one OpenStack environments, it can be used to deploy OpenStack on a single VM, a physical server or a single LXC container. Each option is suitable depending on the hardware capacity available and the degree of isolation required. A multi-node OpenStack environment can also be deployed using DevStack, but that’s not a thoroughly tested use case.
For either kind of setup, the steps involve installing a minimal version of one of the supported Linux distributions and downloading the DevStack Git repository. The repo contains a script stack.sh that must be run as a non-root user and will perform the complete install based on configuration settings.
The official approved and tested Linux distributions are Ubuntu (LTS plus current dev release), Fedora (latest and previous release) and CentOS/RHEL 7 (latest major release). The supported databases are MySQL and PostgreSQL. RabbitMQ and Qpid are the recom-mended messaging service along with Apache as the web server. The setup defaults to a FlatDHCP network using Nova Network or a similar configuration in Neutron.
The default services configured by DevStack are Keystone, Swift, Glance, Cinder, Nova, Nova Networking, Horizon and Heat. DevStack supports a plugin architecture to include additional services that are not included directly in the install.
Summary of the Installation Process
1. Install one of the supported Linux Distributions2. Download DevStack from git 3. git clone https://git.openstack.org/openstack-dev/devstack4. Make any desired changes to the configuration5. Add a non-root user, with sudo enabled, to run the install script 6. devstack/tools/create-stack-user.sh; su stack7. Run the install and go grab a coffee8. cd devstack
/stack.sh

5
Configuration Options
DevStack provides a bunch of configuration options that can be modified as needed. The sections below summarize some of the important ones.
local.conf
DevStack configuration is modified via the file local.conf. It’s a modified .ini format file that introduces a meta-section header to carry additional information regarding the configuration files to be changed.
The new header is similar to [[‘ <phase> ‘|’ <config–file–name> ‘]]’, where <phase> is one of a set of phase names defined by stack.sh and <config-file-name> is the configuration filename. If the path of the config file does not exist, it is skipped. The file is processed strictly in sequence and any repeated settings will override previous values.
The defined phases are:
• local – extracts localrc from local.conf before stackrc is sourced• post-config – runs after the layer 2 services are configured and before they are started• extra – runs after services are started and before any files in extra.d are executed• post-extra – runs after files in extra.d are executed
A specific meta-section local|localrc is used to provide a default localrc file. This allows all custom settings for DevStack to be con-tained in a single file. If localrc exists it will be used instead to preserve backward compatibility.
[[post-config|$NOVA_CONF]] [DEFAULT] use_syslog = True
[osapi_v3] enabled = False
[[local|localrc]] FIXED_RANGE=10.20.30.40/49 ADMIN_PASSWORD=secret LOGFILE=$DEST/logs/stack.sh.log

6
openrc
openrc configures login credentials suitable for use with the OpenStack command-line tools. openrc sources stackrc at the beginning in order to pick up HOST_IP and/or SERVICE_HOST to use in the endpoints. The values shown below are the default values.
Minimal Configuration
While stack.sh can run without a localrc section in local.conf, it’s easier to repeat installs by setting a few minimal variables. Below is an example of a minimal configuration for values that are often modified. Note: if the *_PASSWORD variables are not set, the install script will prompt for values:
• No logging• Pre-set the passwords to prevent interactive prompts• Move network ranges away from the local network• Set the host IP if detection is unreliable
Service Repositories
The Git repositories used to check out the source for each service are controlled by a pair of variables set for each service. *_REPO points to the repository and *_BRANCH selects which branch to check out. These may be overridden in local.conf to pull source from a different repo. GIT_BASE points to the primary repository server.
OS_PROJECT_NAME=demo OS_USERNAME=demo OS_PASSWORD=secret #The usual cautions about putting passwords in environment variables apply
HOST_IP=127.0.0.1 #Typically set in thelocalrc section SERVICE_HOST=$HOST_IP
OS_AUTH_URL=http://$SERVICE_HOST:5000/v2.0
#commented out by default # export KEYSTONECLIENT_DEBUG=1 # export NOVACLIENT_DEBUG=1
[[local|localrc]]ADMIN_PASSWORD=secretDATABASE_PASSWORD=$ADMIN_PASSWORDRABBIT_PASSWORD=$ADMIN_PASSWORDSERVICE_PASSWORD=$ADMIN_PASSWORD#FIXED_RANGE=172.31.1.0/24#FLOATING_RANGE=192.168.20.0/25#HOST_IP=10.3.4.5 # export NOVACLIENT_DEBUG=1
NOVA_REPO=$GIT_BASE/openstack/nova.git NOVA_BRANCH=master
7
The installation directory defaults to /opt/stack and can be set by the DEST parameter.
Logging
By default stack.sh output is only written to the console where it runs. It can be sent to a file in addition to the console by setting LOGFILE to the fully qualified name of the destination log file. Old log files are cleaned automatically if LOGDAYS is set to the number of days to keep old log files.
DevStack will log the stdout output of the services it starts. When using screen this logs the output in the screen windows to a file. Without screen this simply redirects stdout of the service process to a file in LOGDIR. Some of the project logs will be colorized by default and can be turned off as below.
Logging all services to a single syslog can be convenient. If the destination log host is not localhost, the settings below can be used to direct the message stream to the log host.
Database Backend
The available databases are defined in the lib/databases directory. MySQL is the default database but can be replaced in the localrc section:
Messaging Backend
Support for RabbitMQ is included. Additional messaging backends may be available via external plugins. Enabling or disabling RabbitMQ is handled via the usual service functions
LOGFILE=$DEST/logs/stack.sh.log LOGDAYS=1 LOG_COLOR=False LOGDIR=$DEST/logs
SYSLOG=True SYSLOG_HOST=$HOST_IP SYSLOG_PORT=516
disable_service mysql enable_service postgresql
DEST=/opt/stack
disable_service rabbit

8
Apache Frontend
The Apache web server can be enabled for wsgi services that support being deployed under HTTPD + mod_wsgi. Each service that can be run under HTTPD + mod_wsgi also has an override toggle available that can be set. See examples below.
Clean Install
By default stack.sh only clones the project repos if they do not exist in $DEST. This can be overridden as below and avoids having to manually remove repos to get the current branch from $GIT_BASE.
Guest Images
Images provided in URLS, via the comma-separated IMAGE_URLS variable, will be downloaded and uploaded to glance by DevStack. Default guest images are predefined for each type of hypervisor and their testing requirements in stack.sh and can be overridden as below.
Instance Type
DEFAULT_INSTANCE_TYPE can be used to configure the default instance type. When this parameter is not specified, DevStack creates additional micro and nano flavors for really small instances to run Tempest tests.
Cinder
The logical volume group, logical volume name prefix and the size of the volume backing file are set as below.
KEYSTONE_USE_MOD_WSGI=”True” NOVA_USE_MOD_WSGI=”True”
RECLONE=yes
DOWNLOAD_DEFAULT_IMAGES=False IMAGE_URLS=”http://pf9.com/image1.qcow,” IMAGE_URLS+=”http://pf9.com/image2.qcow”
DEFAULT_INSTANCE_TYPE=m1.tiny
VOLUME_GROUP=”stack-volumes” VOLUME_NAME_PREFIX=”volume-” VOLUME_BACKING_FILE_SIZE=10250M

9
Disable Identity API v2
The Identity API v2 is deprecated as of Mitaka and it is recommended to only use the v3 API.
Tempest
If Tempest has been successfully configured, a basic set of smoke tests can be run as below.
Things to Consider
DevStack is optimized for ease of use, making it less suitable for highly customized installations. DevStack supplies a monolithic installer script that installs all the configured modules. To add or remove modules, the whole environment must be torn down using unstack.sh. Then, the updated configuration is installed by re-running stack.sh.
DevStack installs OpenStack modules in a development environment, which is very different from a typical production deployment. It’s not possible to mix and match components in a production configuration with others in development configuration. In DevStack, dependencies are shared among all the modules. So a simple action of syncing the dependencies for one module may unintentionally update several other modules. DevStack is popular with developers working on OpenStack, most typically used to test changes and verify they work in a running OpenStack deployment. Since it’s easy to use, DevStack is ideal for setting up an OpenStack environment for use in demos or proof of concept (POC). For production-grade installs, other tools are more appropriate (see OpenStack-Ansible, Fuel or TripleO).
OpenStack Installation: RDO Packstack
The 2016 OpenStack survey report asked what tools are being used to deploy OpenStack. Puppet was at the top of the list, and Ansible came in a close second. RDO Packstack is a Puppet-based utility to install OpenStack. RDO is the Red Hat distribution for OpenStack and it packages the OpenStack components for Fedora-based Linux.
Prerequisites for Packstack
Packstack is based on OpenStack Puppet modules. It’s a good option when installing OpenStack for a POC or when all OpenStack controller services may be installed on a single node. Packstack defines OpenStack resources declaratively and sets reasonable default values for all settings that are essential to installing OpenStack. The settings can be read or modified in a file, called the answerfile in Packstack.
Packstack runs on RHEL 7 or later versions and the equivalent version for CentOS. The machine where Packstack will run needs at least 4GB of memory, at least one network adapter and x86 64-bit processors with hardware virtualization extensions.
ENABLE_IDENTITY_V2=False
$ cd /opt/stack/tempest $ tox -efull tempest.scenario.test_network_basic_ops

10
Install RDO Repository
To install OpenStack, first download the RDO repository rpm and install it. On RHEL $ sudo yum install -y https://rdoproject.org/repos/rdo-release.rpm On CentOS $ sudo yum install -y centos-release-openstack-mitaka
Install OpenStack
Install the Packstack installer and then run packstack to install OpenStack on a single node. $ sudo yum install -y openstack-packstack $ packstack --allinone Once the installer completes, verify the installation by login at http://${YourIp}/dashboard.
Things to Consider
During the early days of our product development, Platform9 used Packstack to perform around 400 setups in a day. At this volume, the performance was not reliable and there were random timeouts. It was difficult to investigate deployment errors. In addition, it was non-trivial to customize the scripts to build and deploy our custom changes.
In general, it is probably best to use Packstack for installing OpenStack on a single node during a POC, when there isn’t a need to customize the install process.
OpenStack Installation: OpenStack Ansible
Ansible is one of the top choices to deploy OpenStack. OpenStack-Ansible (OSA) deploys a production-capable OpenStack environ-ment using Ansible and LXC containers. This approach isolates the various OpenStack services into their own containers and makes it easier to install and update OpenStack.
What is OpenStack-Ansible Deployment (OSAD)
OSAD is a source-based installation of OpenStack, deployed via Ansible playbooks. It deploys OpenStack services on LXC containers for complete isolation between components and services hosted on a node. OSAD is well suited for deploying production environ-ments. Ansible requires only SSH and Python to be available on the target host, no client or agents are installed. This makes it very easy to run Ansible playbooks to manage environments of any size or type. There are a large number of existing Ansible modules for overall Linux management and OpenStack-Ansible playbooks can be written against the OpenStack APIs or Python CLIs.

11
Deployment Prerequisites
The host that will run OpenStack-Ansible needs at least 16GB of RAM and 80GB of disk space. The host must have Ubuntu 14.04 or newer. It is recommended that all nodes hosting the Nova compute service have multi-core processors with hardware-assisted virtualization extensions. All other infrastructure nodes should have multi-core processors for best performance.
Disk Requirements
• Deployment hosts – 10GB of disk space for the OpenStack-Ansible repository content and other software• Compute hosts – At least 100GB of disk space available. Disks with higher throughput, lower latency• Storage hosts – At least 1TB of disk space. Disks with highest I/O throughput with the lowest latency• Infrastructure hosts – At least 100GB of disk space for the services in the OpenStack control plane• Logging hosts – At least 50GB disk space for storing logs on logging hosts, with enough storage performance to keep up with
the log traffic• Hosts that provide Block Storage (Cinder) volumes must have logical volume manager (LVM) support and a volume group
named cinder-volumes.
Network Requirements
• Bonded network interfaces– Increases performance and reliability• VLAN offloading– Increases performance by adding and removing VLAN tags in hardware• 1Gb or 10Gb Ethernet– Supports higher network speeds, may also improve storage performance for Cinder• Jumbo frames– Increase network performance by allowing more data to be sent in each packet.
Software Requirements
• Ubuntu 14.04 LTS or newer• Linux kernel > v3.13.0-34-generic• Secure Shell (SSH) client and server• NTP client for time synchronization• Python 2.7 or later
Installation Workflow
Once these prerequisites are met, proceed to the actual steps in the installation. At a high level, the steps required are
1. Prepare deployment host2. Prepare target hosts3. Configure deployment4. Run foundation playbooks5. Run infrastructure playbooks6. Run OpenStack playbooks
Let’s look at each step in detail below.

12
Prepare Deployment Host
The deployment host contains Ansible and orchestrates the installation on the target hosts. It requires Ubuntu Server 14.04 LTS 64-bit. At least one network interface must be configured to access the Internet or suitable local repositories.
• Install the required utilities as shown below. $ apt-get install aptitude build-essential git ntp ntpdate openssh-server python-dev sudo
• Configure NTP to synchronize with a suitable time source. • Configure the network so that deployment host is on the same network designated for container management.• Clone OSA repository and bootstrap Ansible.• Configure SSH Keys
$ git clone -b VERSION https://github.com/openstack/openstack-ansible.git /opt/openstack-ansible $ scripts/bootstrap-ansible.sh
Prepare Target Hosts
OSA recommends at least five target hosts contain the OpenStack environment and supporting infrastructure for the installation process. On each target host, perform the tasks below:
• Name target hosts• Install the operating system• Generate and set up security measures• Update the operating system and install additional software packages• Create LVM volume groups• Configure networking devices
Configure Deployment
Ansible configuration files have to be updated to define target environment attributes before running the Ansible playbooks. Perform the following tasks:
• Configure target host networking to define bridge interfaces and networks• Configure a list of target hosts on which to install the software• Configure virtual and physical network relationships for OpenStack networking (neutron)• Optionally, configure hypervisor and Cinder service• Configure passwords for all services
Run Foundation Playbooks
This step will prepare target hosts for infrastructure and OpenStack services by doing the following:
• Perform deployment host initial setup• Build containers on target hosts• Restart containers on target hosts• Install common components into containers on target hosts• cd to /opt/openstack-ansible/playbook
$ openstack-ansible setup-hosts.yml• deploy HAProxy
$ openstack-ansible haproxy-install.yml

13
Run Infrastructure Playbooks
The main Ansible infrastructure playbook installs infrastructure services and performs the following operations:
• Installs Memcached and the repository server• Installs Galera and RabbitMQ• Installs and configure Rsyslog• cd to /opt/openstack-ansible/playbooks
$ openstack-ansible setup-infrastructure.yml• Confirm success with zero items unreachable or failed:
PLAY RECAP ********************************************************* deployment_host : ok=XX changed=0 unreachable=0 failed=0
Run OpenStack playbook
Finally, this step installs the OpenStack services as configured, in this order: Keystone, Glance, Cinder, Nova, Heat, Horizon, Ceilometer, Aodh, Swift, Ironic:
• cd to /opt/openstack-ansible/playbooks $ openstack-ansible setup-openstack.yml
Verify the Install
Since OpenStack can be consumed by either APIs or the UI, you’ll need to verify both after the install steps above complete successfully.
Verify OpenStack APIs
The utility container provides a CLI environment for additional configuration and testing.
• Determine the utility container name: $ lxc-ls | grep utility XX_utility_container_YY
• Access the utility container: $ lxc-attach -n XX_utility_container_YY
• Source the admin tenant credentials: $ source /root/opener
• Run an OpenStack command that uses one or more APIs. For example: $ openstack user list +----------------------------------+--------------------+ | ID | Name | +----------------------------------+--------------------+
Verify UI Dashboard
• With a web browser, access the dashboard using the external load balancer IP address defined by the external_lb_vip_address option in the /etc/openstack_deploy/openstack_user_config.yml file.
• Authenticate with admin username and password defined by the keystone_auth_admin_password option in file /etc/openstack_deploy/user_variables.yml

14
Benefits of OpenStack-Ansible Deployment
• No dependency conflicts among services due to container-based architecture. Updating a service with new dependencies doesn’t affect other services.
• Deploy redundant services even on a single-node install. Galera, RabbitMQ, and Keystone are deployed with redundancy, and HAProxy is installed in the host.
• Easy to do local updates or repairs to an existing installation. Ansible can destroy a container and regenerate one with a newer version of the service.
• Mix and match services by using development packages on some, while keeping the rest configured for production use.
Things to Consider
OSAD is easy to install on a single node for a POC. Yet, it is robust enough for a production install. Due to the containerized architecture, it is easy to upgrade services individually or all at the same time. Compared to Puppet, Ansible playbooks are easier to customize. Despite all this ease, it is still non-trivial to investigate deployment errors due to the volume of logs.
OpenStack Installation: Fuel
Fuel is an open source tool that simplifies and accelerates the initial deployment of OpenStack environments and facilitates their ongoing management. Fuel deploys an OpenStack architecture that is highly available and load balanced. It provides REST APIs, which can be accessed via a graphical or a command line interface, to provision, configure and manage OpenStack environments.
Fuel deploys a master node and multiple slave nodes. The master node is a server with the installed Fuel application that performs initial configuration, provisioning, and PXE booting of the slave nodes, as well as assigning the IP addresses to the slave nodes. The slave nodes are servers provisioned by the master node. A slave node can be a controller, compute, or storage node.
This section will describe how to install Fuel on Oracle VirtualBox and use it to deploy the Mirantis OpenStack environment. With the default configurations, such an environment is suitable for testing or a quick demo. For a production environment, the configuration must specify network topology and IPAM, storage, the number, type and flavor of service nodes, monitoring, any Fuel plug-ins etc.
Fuel Installation Prerequisites
The environment must meet the following software prerequisites:
• A 64-bit host operating system with at least 8 GB RAM and 300 GB of free space with virtualization enabled in the BIOS• Access to the Internet or to a local repository containing the required files• Oracle VirtualBox• Oracle VM VirtualBox Extension Pack• Mirantis OpenStack ISO• Mirantis VirtualBox scripts with a version matching that of Mirantis OpenStack.• The latest versions of VirtualBox would work with these specific versions or newer of: Ubuntu Linux 12, Fedora 19, OpenSUSE
12.2 and Microsoft Windows x64 with cygwin x64. MacOS 10.7.5 requires VirtualBox 4.3.x

15
Overview of the Installation Process
Mirantis provides VirtualBox scripts that include configurations for the virtual machine network and hardware settings. The script provisions the virtual machines with all required settings automatically. The steps involved in the process are:
1. Install Oracle VirtualBox and Oracle VM VirtualBox Extension Pack.2. Download the Mirantis OpenStack ISO and place it in a directory named iso.3. Download the Mirantis VirtualBox scripts.4. Modify the config.sh script to specify parameters that automate the Fuel installation. For example, specify the number of virtual
nodes to create, as well as how much memory, storage, and CPU to allocate to each machine. The parameter names are listed below: along with the default values in ( )
o vm_master_memory_mb (1536) o vm_master_disk_mb (65 GB) o vm_master_nat_network (192.168.200.0/24) o vm_master_ip ( 10.20.0.2) o vm_master_username (root) o vm_master_password (r00tme) o cluster_size o vm_slave_cpu (1) o vm_slave_memory_mb (If the host system has 8 GB, default value is 1536 MB. If the host system has 16 GB, default value
is 2048 MB)5. Run one of launch.sh, launch_8GB.sh or launch_16GB.sh scripts, depending on the amount of memory on the computer. Each
script creates one Fuel master node. The slave nodes differ for each script. o launch.sh – one salve node with 2048 MB RAM and 2 slave nodes with 1024 MB RAM each o launch_8GB.sh – three slave nodes with 1536 MB RAM each o launch_16GB.sh – five slave nodes with 2048 MB RAM each
6. The script installs the Fuel master node on VirtualBox and may take up to 30 minutes to finish.7. Once the launch script completes, access the Fuel web UI to create an OpenStack environment as shown in the section below.
Create a New OpenStack environment
After the Fuel master node is installed, the slave nodes appear as unallocated nodes in the web UI. Now the OpenStack environment can be created, configured and deployed. A single Fuel master node can deploy and manage multiple OpenStack environments, but each environment must be created separately.
To create an OpenStack environment:
1. Access the Fuel web UI at http://10.20.0.2:8443.2. Log in to the Fuel web UI as admin. The default password is same as set earlier.3. Click New OpenStack environment to start the deployment wizard.4. In the Name and Release screen, type a name of the OpenStack environment, select an OpenStack release and an operating
system on which to deploy the OpenStack environment.5. In the Compute screen, select a hypervisor. By default, Fuel uses QEMU with KVM acceleration.6. In the Networking Setup screen, select a network topology. By default, Fuel deploys Neutron with VLAN segmentation.7. In the Storage Backends screen, select appropriate options. By default, Fuel deploys Logical Volume Management (LVM) for
Cinder, local disk for Swift, and Swift for Glance.8. In the Additional Services screen, select any additional OpenStack programs to deploy.9. In the Finish screen, click Create. Fuel now creates an OpenStack environment. Before using the environment, follow the UI
options to add nodes, verify network settings, and complete other configuration tasks.

© 2016 Platform9 <> 16
Things to Consider
Fuel makes it very easy to install a test OpenStack environment using Oracle VirtualBox. The automated script will spin up a master node and configure and deploy the slave nodes that will host compute, storage and other OpenStack services. Using Fuel you can also deploy multiple production-grade, highly available OpenStack environments on virtual or bare metal hardware. Fuel can be used to configure and verify network configurations, test interoperability between the OpenStack components and easily scale the OpenStack environment by adding and removing nodes.
OpenStack Installation: TripleO
TripleO is short for “OpenStack on OpenStack,” an official OpenStack project for deploying and managing a production cloud onto bare metal hardware. The first “OpenStack” in the name is for an operator-facing deployment cloud called the Undercloud. This will contain the necessary OpenStack components to deploy and manage a tenant-facing workload cloud called the Overcloud, the second “OpenStack” in the name.
The Undercloud server is a basic single-node OpenStack installation running on a single physical server used to deploy, test, manage and update the Overcloud servers. It contains a strictly limited subset of OpenStack components, just enough to interact with the Overcloud. The Overcloud is the deployed solution and can represent a cloud for dev, test, production etc. The Overcloud is the functional cloud available to run guest virtual machines and workloads.
Overview of the Installation Process
1. Prepare the baremetal or virtual environment.2. Install Undercloud.3. Prepare Images and Flavours for Overcloud.4. Deploy Overcloud.
Prepare the Baremetal or Virtual Environment
At a minimum, TripleO needs one environment for the Undercloud and one each for the Overcloud Controller and Compute. All three environments can be virtual machines and each would need 4GB of memory and 40GB of disk space. If all three environments are completely on bare metal then each would need multi-core CPU with 4GB memory and 60GB free disk space. For each additional Overcloud role, such as Block Storage or Object Storage, an additional bare metal machine would be required. TripleO supports the following operating systems: RHEL 7.1 x86_64 or CentOS 7 x86_64
The steps below are for a completely virtualized environment.
Undercloud
Undercloud Node
Overcloud
Horizon
Ceilometer
MariaDB
Nova
Heat
Keystone
Ironic
Neutron
Glance
RabbitMQ
Open StackClients
Ceph-mon
Controller Node
Horizon
Glance
MariaDB
ObjectStorageNode
SwiftStorage
CeliometerAgent
NeutronOpen
VSwitchAgent
BlockStorageNoce
CinderVolume
CeilometerAgent
NeutronOpen
VSwitchAgent
ComputeNode
Nova KVM
NovaCompute
CeliometerAgent
NeutronOpen
VSwitchAgent
CephStorageNode
Ceph-OSD
SwiftStorage
OpenStackClients
Keystone
Ceilometer
Nova API
NeutronServer
Cinder API
CinderVolune
Swift Proxy
Heat API
HeatEngine
RabbitMQ
NeutronOpen
VSwitchAgent
NeutronOpen
VSwitchAgent
Image Credit: http://docs.openstack.org

© 2016 Platform9 <> 17
1. Install RHEL 7.1 Server x86_64 or CentOS 7 x86_64 on the host machine.
2. Make sure sshd service is installed and running.
3. The user performing all of the installation steps on the virt host needs to have sudo enabled. If required, use the following commands to create a new user called stack with password-less sudo enabled. Do not run the rest of the steps in this guide as root.
4. Enable needed repositories: o Enable epel:
o Enable last known good RDO Trunk Delorean repository for core openstack packages
o Enable latest RDO Trunk Delorean repository only for the TripleO packages
o Enable the Delorean Deps repository
5. Install the Undercloud:
6. The virt setup automatically sets up a vm for the Undercloud, installed with the same base OS as the host.
sudo useradd stack sudo passwd stack # specify a password echo “stack ALL=(root) NOPASSWD:ALL” | sudo tee -a /etc/sudoers.d/stack sudo chmod 0440 /etc/sudoers.d/stack
sudo curl -o /etc/yum.repos.d/delorean-current.repo http://trunk.rdoproject.org/centos7/current/delorean.repo sudo sed -i ‘s/\[delorean\]/\[delorean-current\]/’ /etc/yum.repos.d/delorean-current.repo sudo /bin/bash -c “cat <<EOF>>/etc/yum.repos.d/delorean-current.repo includepkgs=diskimage-builder,instack,instack-undercloud,os-apply-config,os-cloud-con-fig,os-collect-config,os-net-config,os-refresh-config,python-tripleoclient,tripleo-common,open-stack-tripleo-heat-templates,openstack-tripleo-image-elements,openstack-tripleo,open-stack-tripleo-puppet-elements,openstack-puppet-modules EOF”
sudo yum -y install epel-release
sudo curl -o /etc/yum.repos.d/delorean.repo http://trunk.rdoproject.org/centos7/current-tripleo/delorean.repo
sudo curl -o /etc/yum.repos.d/delorean-deps.repo http://trunk.rdoproject.org/centos7/delo-rean-deps.repo
sudo yum install -y instack-undercloud
instack–virt–setup

© 2016 Platform9 <> 18
7. When the script has completed successfully, it will output the IP address of the VM that has now been installed with a base OS.
8. You can ssh to the vm as the root user:
9. The vm contains a stack user to be used for installing the Undercloud. You can su – stack to switch to the stack user account.
Install Undercloud
1. Log in to your machine where you want to install the Undercloud as a non-root user: ssh <non-root-user>@<undercloud-machine>
2. Enable needed repositories using the same commands as in the section above on preparing the environment.3. Install the yum-plugin-priorities package so that the Delorean repository takes precedence over the main RDO repositories:
sudo yum -y install yum-plugin-priorities4. Install the TripleO CLI, which will pull in all other necessary packages as dependencies:
sudo yum install -y python-tripleoclient5. Run the command to install the Undercloud:
openstack undercloud install
Once the install has completed, you should take note of the files stackrc and undercloud-passwords.conf. You can source stackrc to interact with the Undercloud via the OpenStack command-line client. undercloud-passwords.conf contains the passwords used for each service in the Undercloud.
Prepare Images and Flavours for Overcloud
1. Log into your Undercloud virtual machine as non-root user:
2. In order to use CLI commands easily you need to source needed environment variables:
3. Choose the image operating system: The built images will automatically have the same base OS as the running Undercloud. To choose a different OS set NODE_DIST to ‘centos7’ or ‘rhel7’
4. Install the current-tripleo delorean repo and deps repo into the Overcloud images:
5. Build the required images:
export USE_DELOREAN_TRUNK=1 export DELOREAN_TRUNK_REPO=”http://trunk.rdoproject.org/centos7/current-tripleo/” export DELOREAN_REPO_FILE=”delorean.repo”
ssh root@<undercloud-machine> su – stack
openstack overcloud image build --all
source stackrc
ssh root@<instack-vm-ip>

© 2016 Platform9 <> 19
6. Load the images into the Undercloud Glance:
7. Register and configure nodes for your deployment with Ironic. The file to be imported may be either JSON, YAML or CSV format:
8. Introspect hardware attributes of nodes:
9. Introspection has to finish without errors. The process can take up to 5 minutes for VM and up to 15 minutes for bare metal.
10. Create flavors i.e. node profiles:The Undercloud will have a number of default flavors created at install time. In most cases, these flavors do not need to be modified. By default, all Overcloud instances will be booted with the bare metal flavor, so all bare metal nodes must have at least as much memory, disk, and CPU as that flavor. In addition, there are profile-specific flavors created which can be used with the profile-matching feature.
Deploy OverCloud
Overcloud nodes can have a nameserver configured in order to resolve hostnames via DNS. The nameserver is defined in the Undercloud’s neutron subnet. If needed, define the nameserver to be used for the environment:
1. List the available subnets:
2. By default 1 compute and 1 control node will be deployed, with networking configured for the virtual environment. To customize this, see the output of:
3. Run the deploy command, including any additional parameters as necessary:
4. When deploying the Compute node in a virtual machine, add –libvirt-type qemu otherwise launching instances on the de-ployed Overcloud will fail. This command will use Heat to deploy templates. In turn, Heat will use Nova to identify and reserve the appropriate nodes. Nova will use Ironic to startup nodes and install the correct images. Finally, services on nodes of the Overcloud are registered with Keystone.
5. To deploy the Overcloud with network isolation, bonds or custom network interface configurations, follow the workflow here: Configuring Network Isolation
openstack baremetal introspection bulk start
openstack help overcloud deploy
openstack overcloud deploy --templates [additional parameters]
neutron subnet-list neutron subnet-update <subnet-uuid> –dns-nameserver <nameserver-ip>
openstack baremetal import instackenv.json
openstack overcloud image upload

© 2016 Platform9 <> 20
6. Openstack Overcloud deploy generates an overcloudrc file appropriate for interacting with the deployed Overcloud in the current user’s home directory. To use it, simply source the file:
7. To return to working with the Undercloud, source the stackrc file again:
Benefits of TripleO
Since TripleO uses OpenStack components and APIs, it has the following benefits when used to deploying and operating an OpenStack private cloud:
• The APIs are well documented and come with client libraries and command line tools. Users already familiar with OpenStack find it easier to understand TripleO.
• TripleO automatically inherits all the new features, bug fixes and security updates which are added to the included OpenStack components and allows more rapid feature development of TripleO.
• Tight integration with the OpenStack APIs provides a solid architecture that has been extensively reviewed by the OpenStack community.
Things to Consider
TripleO is one more option to deploy a production-grade OpenStack private cloud. It tries to ease the deployment process by “bootstrapping” the process using a subset of OpenStack components to build a smaller cloud first. The benefit of this approach is that operators can use familiar OpenStack APIs to deploy the subsequent consumer-facing OpenStack cloud. While not an intuitive approach, it seems to work well for users of the Red Hat distribution of OpenStack
source ~/overcloudrc
source ~/stackrc

© 2016 Platform9 <> 21
Comparing OpenStack Installation Tools
DevStack RDO Packstack
OpenStack-Ansible
Fuel TripleO
Production readiness
N/A N/A ««« ««« «««
Dev/test ease of use
««« ««« N/A N/A N/A
Deploy onto VMs or physical machines
««« ««« ««« ««« «««
Deploy in containers
N/A N/A ««« N/A N/A
Ease of customization
««« ««« «« «« «
Upgrade individual OpenStack services
N/A N/A ««« N/A N/A
Underlying configuration management tool
N/A Puppet Ansible N/A N/A
Vendor support N/A Red Hat N/A Mirantis Red Hat

© 2016 Platform9 <> 22
Key Takeaways
While each of the tools discussed in this guide are able to install an OpenStack environment, it is important to choose one based on your needs and skills available on your team. For example, users already comfortable with Ansible may prefer to use OpenStack-Ansible, while those familiar with Puppet may prefer RDO Packstack. Even though the tools are open source and part of the OpenStack project, remember that some tools are included with an OpenStack vendor’s distribution. As a result, the tool would be tested, and probably work best, with that particular vendor’s distribution of OpenStack e.g. Fuel with Mirantis OpenStack, TripleO With Red Hat’s distribution. So choosing an installation tool means committing to the related vendor’s OpenStack distribution.
As you consider the options for OpenStack deployment, you may find you do not have the skills or capacity on your team to install and manage OpenStack. Platform9 provides a way to get OpenStack up and running easily in just a few minutes. Platform9 pioneered the OpenStack-as-a-Service model and our Managed OpenStack offering realizes significant cost and time savings for customers deploying an OpenStack private cloud. There is no vendor lock-in and you can choose your own hardware along with one or all of VMware vSphere, KVM and Docker.
About Platform9
Platform9 makes cloud infrastucture easy by delivering OpenStack-as-a-Service. To learn more about Platform9’s OpenStack-as-a-Service, request your free trial at www.platform9.com/free-trial.
Resources
1. DevStack documentation - http://docs.openstack.org/developer/devstack/index.html
2. RDO Packstack Documentation - http://www.rdoproject.org
3. OpenStack-Ansible Guide - http://docs.openstack.org/developer/openstack-ansible/install-guide
4. Fuel documentation - http://docs.openstack.org/developer/fuel-docs
5. TripleO Documentation - http://docs.openstack.org/developer/tripleo-docs/index.html


![Signaling Delivery Controller Virtual Openstack ... Signaling Delivery Controller Virtual Openstack Installation, Upgrade, and Maintenance Guide [II] Proprietary and Confidential …](https://static.fdocuments.in/doc/165x107/5b2c679b7f8b9afd358c129a/signaling-delivery-controller-virtual-openstack-signaling-delivery-controller.jpg)