Cisco ACI Installation Guide for Red Hat OpenStack Using ...€¦ · Installation Guide for Red Hat...
44
Cisco ACI Installation Guide for Red Hat OpenStack Using OpenStack Platform 10 Director First Published: 2017-09-15 Last Modified: 2019-10-01 Americas Headquarters Cisco Systems, Inc. 170 West Tasman Drive San Jose, CA 95134-1706 USA http://www.cisco.com Tel: 408 526-4000 800 553-NETS (6387) Fax: 408 527-0883
Transcript of Cisco ACI Installation Guide for Red Hat OpenStack Using ...€¦ · Installation Guide for Red Hat...

Cisco ACI Installation Guide for Red Hat OpenStack Using OpenStackPlatform 10 DirectorFirst Published: 2017-09-15
Last Modified: 2019-10-01
Americas HeadquartersCisco Systems, Inc.170 West Tasman DriveSan Jose, CA 95134-1706USAhttp://www.cisco.comTel: 408 526-4000
800 553-NETS (6387)Fax: 408 527-0883

THE SPECIFICATIONS AND INFORMATION REGARDING THE PRODUCTS IN THIS MANUAL ARE SUBJECT TO CHANGE WITHOUT NOTICE. ALL STATEMENTS,INFORMATION, AND RECOMMENDATIONS IN THIS MANUAL ARE BELIEVED TO BE ACCURATE BUT ARE PRESENTED WITHOUT WARRANTY OF ANY KIND,EXPRESS OR IMPLIED. USERS MUST TAKE FULL RESPONSIBILITY FOR THEIR APPLICATION OF ANY PRODUCTS.
THE SOFTWARE LICENSE AND LIMITED WARRANTY FOR THE ACCOMPANYING PRODUCT ARE SET FORTH IN THE INFORMATION PACKET THAT SHIPPED WITHTHE PRODUCT AND ARE INCORPORATED HEREIN BY THIS REFERENCE. IF YOU ARE UNABLE TO LOCATE THE SOFTWARE LICENSE OR LIMITED WARRANTY,CONTACT YOUR CISCO REPRESENTATIVE FOR A COPY.
The Cisco implementation of TCP header compression is an adaptation of a program developed by the University of California, Berkeley (UCB) as part of UCB's public domain version ofthe UNIX operating system. All rights reserved. Copyright © 1981, Regents of the University of California.
NOTWITHSTANDING ANY OTHERWARRANTY HEREIN, ALL DOCUMENT FILES AND SOFTWARE OF THESE SUPPLIERS ARE PROVIDED “AS IS" WITH ALL FAULTS.CISCO AND THE ABOVE-NAMED SUPPLIERS DISCLAIM ALL WARRANTIES, EXPRESSED OR IMPLIED, INCLUDING, WITHOUT LIMITATION, THOSE OFMERCHANTABILITY, FITNESS FOR A PARTICULAR PURPOSE AND NONINFRINGEMENT OR ARISING FROM A COURSE OF DEALING, USAGE, OR TRADE PRACTICE.
IN NO EVENT SHALL CISCO OR ITS SUPPLIERS BE LIABLE FOR ANY INDIRECT, SPECIAL, CONSEQUENTIAL, OR INCIDENTAL DAMAGES, INCLUDING, WITHOUTLIMITATION, LOST PROFITS OR LOSS OR DAMAGE TO DATA ARISING OUT OF THE USE OR INABILITY TO USE THIS MANUAL, EVEN IF CISCO OR ITS SUPPLIERSHAVE BEEN ADVISED OF THE POSSIBILITY OF SUCH DAMAGES.
Any Internet Protocol (IP) addresses and phone numbers used in this document are not intended to be actual addresses and phone numbers. Any examples, command display output, networktopology diagrams, and other figures included in the document are shown for illustrative purposes only. Any use of actual IP addresses or phone numbers in illustrative content is unintentionaland coincidental.
All printed copies and duplicate soft copies of this document are considered uncontrolled. See the current online version for the latest version.
Cisco has more than 200 offices worldwide. Addresses and phone numbers are listed on the Cisco website at www.cisco.com/go/offices.
Cisco and the Cisco logo are trademarks or registered trademarks of Cisco and/or its affiliates in the U.S. and other countries. To view a list of Cisco trademarks, go to this URL: www.cisco.comgo trademarks. Third-party trademarks mentioned are the property of their respective owners. The use of the word partner does not imply a partnership relationship between Cisco and anyother company. (1721R)
© 2017–2019 Cisco Systems, Inc. All rights reserved.

C O N T E N T S
Preface vP R E F A C E
Audience v
Document Conventions v
Related Documentation vii
Documentation Feedback viii
Obtaining Documentation and Submitting a Service Request viii
New and Changed Information 1C H A P T E R 1
New and Changed Information 1
Cisco ACI Installation Guide for Red Hat OpenStack Using OSP Director 3C H A P T E R 2
ACI with OpenStack Using OSP Director Overview 3
Requirements and Prerequisites for Cisco ACI with OpenStack Using OSP Director 4
Related Documentation 5
Deploying OpFlex Using Unified Mode 5
Preparing ACI for OpenStack Installation 6
Setting Up the APIC and the Network 6
Setting Up Overcloud 10
Preparing for ACI with OpFlex Orchestration 10
Preparing Undercloud for Cisco ACI with OpFlex Orchestration 10
Installing Overcloud 11
Reference Links 14
ACI Fabric Initialization Example 15
Upgrade ACI and OSP 17C H A P T E R 3
Guidelines for Upgrading Cisco APIC and OSP 17
Cisco ACI Installation Guide for Red Hat OpenStack Using OpenStack Platform 10 Directoriii

Pre-upgrade Guidelines 17
Upgrade Guidelines 17
Post-upgrade Guidelines 18
Upgrading the Cisco ACI Packages 18
Performing an OSP Major Release Upgrade 19
Release Specific Changes 20
Add an OpenStack External Network 21C H A P T E R 4
Adding an OpenStack External Network 21
Reference Information 25A P P E N D I X A
Sample Deployment Templates 25
controller.yaml 25
compute.yaml 28
Configuring Hierarchical Port Binding 30
Configuring UCS B-Series 31A P P E N D I X B
Configuring UCS B-Series for Cisco ACI and OpenStack Orchestration 31
Configuration on Linux Hosts 31
Bind the NICs 31
Run the Bond Watch Service 32
Identify Which NIC Is Active in the Bond 33
Set the NIC MTU 34
Verify MTU Settings for the NICs 34
Configuration on Cisco UCS 35
Configuration on Leaf Switches 35
Cisco ACI Installation Guide for Red Hat OpenStack Using OpenStack Platform 10 Directoriv
Contents
Preface
This preface includes the following sections:
• Audience, on page v• Document Conventions, on page v• Related Documentation, on page vii• Documentation Feedback, on page viii• Obtaining Documentation and Submitting a Service Request, on page viii
AudienceThis guide is intended primarily for data center administrators with responsibilities and expertise in one ormore of the following:
• Virtual machine installation and administration
• Server administration
• Switch and network administration
• Cloud administration
Document ConventionsCommand descriptions use the following conventions:
DescriptionConventionBold text indicates the commands and keywords that you enter literallyas shown.
bold
Italic text indicates arguments for which the user supplies the values.Italic
Square brackets enclose an optional element (keyword or argument).[x]
Square brackets enclosing keywords or arguments separated by a verticalbar indicate an optional choice.
[x | y]
Cisco ACI Installation Guide for Red Hat OpenStack Using OpenStack Platform 10 Directorv

DescriptionConvention
Braces enclosing keywords or arguments separated by a vertical barindicate a required choice.
{x | y}
Nested set of square brackets or braces indicate optional or requiredchoices within optional or required elements. Braces and a vertical barwithin square brackets indicate a required choice within an optionalelement.
[x {y | z}]
Indicates a variable for which you supply values, in context where italicscannot be used.
variable
A nonquoted set of characters. Do not use quotation marks around thestring or the string will include the quotation marks.
string
Examples use the following conventions:
DescriptionConventionTerminal sessions and information the switch displays are in screen font.screen font
Information you must enter is in boldface screen font.boldface screen font
Arguments for which you supply values are in italic screen font.italic screen font
Nonprinting characters, such as passwords, are in angle brackets.< >
Default responses to system prompts are in square brackets.[ ]
An exclamation point (!) or a pound sign (#) at the beginning of a lineof code indicates a comment line.
!, #
This document uses the following conventions:
Means reader take note. Notes contain helpful suggestions or references to material not covered in the manual.Note
Means reader be careful. In this situation, you might do something that could result in equipment damage orloss of data.
Caution
IMPORTANT SAFETY INSTRUCTIONS
This warning symbol means danger. You are in a situation that could cause bodily injury. Before you workon any equipment, be aware of the hazards involved with electrical circuitry and be familiar with standardpractices for preventing accidents. Use the statement number provided at the end of each warning to locateits translation in the translated safety warnings that accompanied this device.
SAVE THESE INSTRUCTIONS
Warning
Cisco ACI Installation Guide for Red Hat OpenStack Using OpenStack Platform 10 Directorvi
PrefacePreface

Related DocumentationCisco Cloud APIC Documentation
The Cisco Cloud APIC documentation is available at the following URL: https://www.cisco.com/c/en/us/support/cloud-systems-management/cloud-application-policy-infrastructure-controller/tsd-products-support-series-home.html
Cisco Application Policy Infrastructure Controller (APIC) Documentation
The following companion guides provide documentation for Cisco APIC:
• Cisco APIC Getting Started Guide
• Cisco APIC Basic Configuration Guide
• Cisco ACI Fundamentals
• Cisco APIC Layer 2 Networking Configuration Guide
• Cisco APIC Layer 3 Networking Configuration Guide
• Cisco APIC NX-OS Style Command-Line Interface Configuration Guide
• Cisco APIC REST API Configuration Guide
• Cisco APIC Layer 4 to Layer 7 Services Deployment Guide
• Cisco ACI Virtualization Guide
• Cisco Application Centric Infrastructure Best Practices Guide
All these documents are available at the following URL: http://www.cisco.com/c/en/us/support/cloud-systems-management/application-policy-infrastructure-controller-apic/tsd-products-support-series-home.html
Cisco Application Centric Infrastructure (ACI) Documentation
The broader Cisco ACI documentation is available at the following URL: http://www.cisco.com/c/en/us/support/cloud-systems-management/application-policy-infrastructure-controller-apic/tsd-products-support-series-home.html.
Cisco Application Centric Infrastructure (ACI) Simulator Documentation
The Cisco ACI Simulator documentation is available at http://www.cisco.com/c/en/us/support/cloud-systems-management/application-centric-infrastructure-simulator/tsd-products-support-series-home.html.
Cisco Nexus 9000 Series Switches Documentation
The Cisco Nexus 9000 Series Switches documentation is available at http://www.cisco.com/c/en/us/support/switches/nexus-9000-series-switches/tsd-products-support-series-home.html.
Cisco ACI Installation Guide for Red Hat OpenStack Using OpenStack Platform 10 Directorvii
PrefaceRelated Documentation

Cisco Application Virtual Switch Documentation
The Cisco Application Virtual Switch (AVS) documentation is available at http://www.cisco.com/c/en/us/support/switches/application-virtual-switch/tsd-products-support-series-home.html.
Cisco ACI Virtual Edge Documentation
The Cisco Application Virtual Edge documentation is available at https://www.cisco.com/c/en/us/support/cloud-systems-management/application-policy-infrastructure-controller-apic/tsd-products-support-series-home.html.
Cisco ACI Virtual Pod Documentation
The Cisco Application Virtual Pod (vPod) documentation is available at https://www.cisco.com/c/en/us/support/cloud-systems-management/application-policy-infrastructure-controller-apic/tsd-products-support-series-home.html.
Cisco Application Centric Infrastructure (ACI) Integration with OpenStack Documentation
Cisco ACI integration with OpenStack documentation is available at http://www.cisco.com/c/en/us/support/cloud-systems-management/application-policy-infrastructure-controller-apic/tsd-products-support-series-home.html.
Documentation FeedbackTo provide technical feedback on this document, or to report an error or omission, please send your commentsto [email protected]. We appreciate your feedback.
Obtaining Documentation and Submitting a Service RequestFor information on obtaining documentation, using the Cisco Bug Search Tool (BST), submitting a servicerequest, and gathering additional information, see What's New in Cisco Product Documentation at:http://www.cisco.com/c/en/us/td/docs/general/whatsnew/whatsnew.html
Subscribe to What’s New in Cisco Product Documentation, which lists all new and revised Cisco technicaldocumentation as an RSS feed and delivers content directly to your desktop using a reader application. TheRSS feeds are a free service.
Cisco ACI Installation Guide for Red Hat OpenStack Using OpenStack Platform 10 Directorviii
PrefaceDocumentation Feedback
C H A P T E R 1New and Changed Information
This chapter contains the following sections:
• New and Changed Information, on page 1
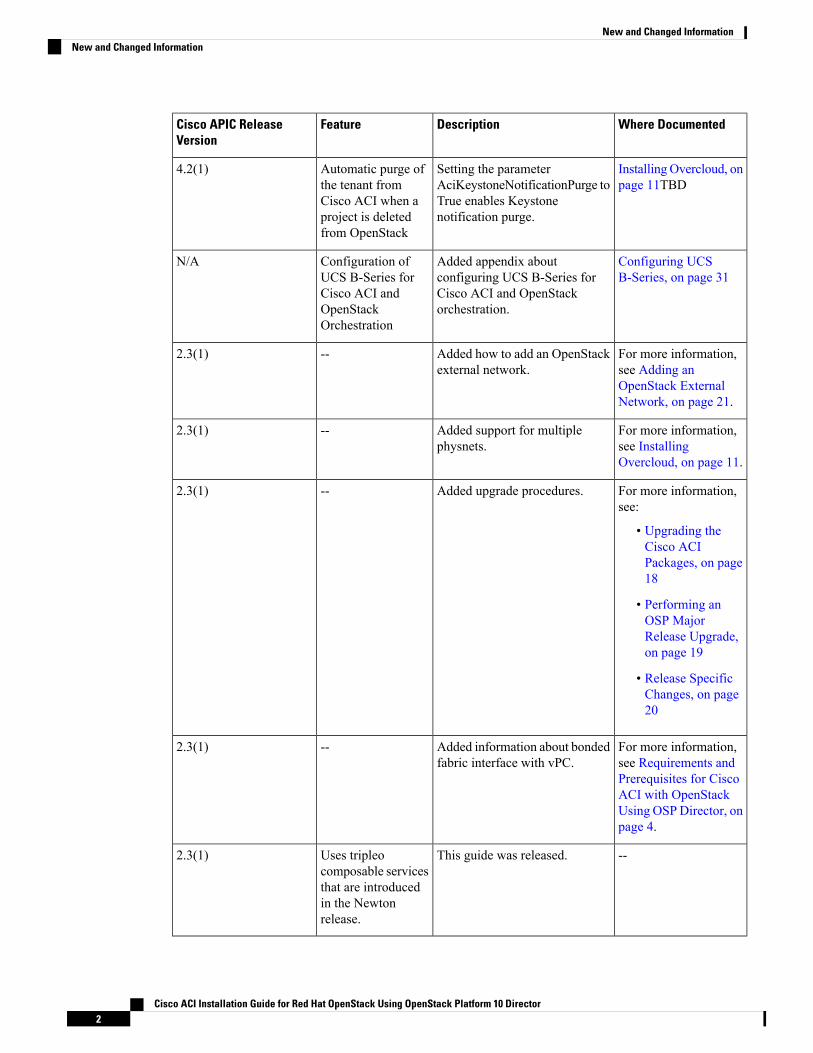
New and Changed InformationThe following table provides an overview of the significant changes to this guide up to this current release.The table does not provide an exhaustive list of all changes made to the guide or of the new features up tothis release.
Table 1: New Features and Changed Behavior
Where DocumentedDescriptionFeatureCisco APIC ReleaseVersion
Run the Bond WatchService, on page 32
When integrating Cisco UCSB-Series to work with Cisco ACIandOpenStack orchestration, youcan run the bond watch serviceby enabling a parameter to theHeat template.
The parameterACIEnableBondWatchServiceenables the apic-bond-watchservice when it is added to theCiscoACI resources template andset to true.
Run Bond WatchService from Heattemplate
4.2(1)
InstallingOvercloud, onpage 11
Add the ACIApicCertName andACIApicPrivateKey parametersto the Heat template to enablecertificate-based authenticationfor Cisco ACI.
OpenStack Directordeployments cannow usecertificate-basedauthentication withCisco ACI.
4.2(1)
Cisco ACI Installation Guide for Red Hat OpenStack Using OpenStack Platform 10 Director1
Where DocumentedDescriptionFeatureCisco APIC ReleaseVersion
InstallingOvercloud, onpage 11TBD
Setting the parameterAciKeystoneNotificationPurge toTrue enables Keystonenotification purge.
Automatic purge ofthe tenant fromCisco ACI when aproject is deletedfrom OpenStack
4.2(1)
Configuring UCSB-Series, on page 31
Added appendix aboutconfiguring UCS B-Series forCisco ACI and OpenStackorchestration.
Configuration ofUCS B-Series forCisco ACI andOpenStackOrchestration
N/A
For more information,see Adding anOpenStack ExternalNetwork, on page 21.
Added how to add an OpenStackexternal network.
--2.3(1)
For more information,see InstallingOvercloud, on page 11.
Added support for multiplephysnets.
--2.3(1)
For more information,see:
• Upgrading theCisco ACIPackages, on page18
• Performing anOSP MajorRelease Upgrade,on page 19
• Release SpecificChanges, on page20
Added upgrade procedures.--2.3(1)
For more information,see Requirements andPrerequisites for CiscoACI with OpenStackUsing OSPDirector, onpage 4.
Added information about bondedfabric interface with vPC.
--2.3(1)
--This guide was released.Uses tripleocomposable servicesthat are introducedin the Newtonrelease.
2.3(1)
Cisco ACI Installation Guide for Red Hat OpenStack Using OpenStack Platform 10 Director2
New and Changed InformationNew and Changed Information

C H A P T E R 2Cisco ACI Installation Guide for Red HatOpenStack Using OSP Director
This chapter contains the following sections:
• ACI with OpenStack Using OSP Director Overview, on page 3• Requirements and Prerequisites for Cisco ACI with OpenStack Using OSP Director, on page 4• Deploying OpFlex Using Unified Mode, on page 5• Preparing ACI for OpenStack Installation, on page 6• Setting Up Overcloud, on page 10• Installing Overcloud, on page 11• ACI Fabric Initialization Example, on page 15
ACI with OpenStack Using OSP Director OverviewThis document uses tripleo composable services that are introduced in the Newton release. This Cisco ACIInstallation Guide for Red Hat OpenStack Using OSP Director, Release 2.3(x) or later document replacesthe Cisco ACI Installation Guide for Red Hat OpenStack Using OSP Director, Release 2.2(x) and should beused for Releases 2.3 or later. For more information about composable services, see the OpenStack ComposableServices Tutorial at:
https://docs.openstack.org/tripleo-docs/latest/install/developer/tht_walkthrough/tht_walkthrough.html
Cisco Application Centric Infrastructure (ACI) is a comprehensive policy-based architecture that provides anintelligent, controller-based network switching fabric. This fabric is designed to be programmatically managedthrough anAPI interface that can be directly integrated intomultiple orchestration, automation, andmanagementtools, including OpenStack. Integrating ACI with OpenStack allows dynamic creation of networking constructsto be driven directly from OpenStack requirements, while providing additional visibility within the ACIApplication Policy Infrastructure Controller (APIC) down to the level of the individual virtual machine (VM)instance.
OpenStack defines a flexible software architecture for creating cloud-computing environments. The referencesoftware-based implementation of OpenStack allows for multiple Layer 2 transports including VLAN, GRE,and VXLAN. The Neutron project within OpenStack can also provide software-based Layer-3 forwarding.When utilized with ACI, the ACI fabric provides an integrated Layer 2 and Layer 3 VXLAN-based overlaynetworking capability that can offload network encapsulation processing from the compute nodes onto thetop-of-rack or ACI leaf switches. This architecture provides the flexibility of software overlay networking inconjunction with the performance and operational benefits of hardware-based networking.
Cisco ACI Installation Guide for Red Hat OpenStack Using OpenStack Platform 10 Director3

The Cisco ACI OpenStack plugin can be used in either ML2 or GBP mode. In Modular Layer 2 (ML2) mode,a standard Neutron API is used to create networks. This is the traditional way of deploying VMs and servicesin OpenStack. In Group Based Policy (GBP) mode, a new API is provided to describe, create, and deployapplications as policy groups without worrying about network-specific details. Keep in mind that mixing GBPand Neutron APIs in a single OpenStack project is not supported. For more information, see the OpenStackGroup-Based Policy User Guide at:
http://www.cisco.com/c/en/us/td/docs/switches/datacenter/aci/apic/sw/1-x/openstack/b_OpenStack_Group-Based_Policy_User_Guide.html
In previous OpFlex plugin versions (referred to as Classical mode), it was necessary to decide at the time ofdeployment if the mode of the plugin will be Neutron/ML2 or GBP, and it was not possible to use both GBPand Neutron/ML2 APIs at the same time. Starting from OpFlex plugin version 2.2.1. It is possible to deploythe plugin in “Unified” mode. In unified mode it is possible to create application topologies using eitherNeutron or GBP API. Unified plugin mode also requires OpenStack release Mitaka or later and ACI release2.2(1) or later.
This guide covers deployment of the OpFlex plugins in Unified installation mode.
While creating GBP groups in Unified mode, an (auto-ptg) group will also appear, these groups are for internaluse and user interaction (attaching VM, adding members) is not supported.
Note
Requirements and Prerequisites for Cisco ACI with OpenStackUsing OSP Director
• Target audience: You must have working knowledge of Linux, Red Hat OpenStack distribution, CiscoACI policy model and GUI-based APIC configuration. Also familiarity with OpenStack architecture anddeployment.
• Cisco ACI fabric: Cisco ACI fabric is installed and initialized with the minimum supported version thatis documented in the Cisco ACI Virtualization Compatibility Matrix. For basic guidelines on initializinga new Cisco ACI fabric, see the ACI Fabric Initialization Example, on page 15, on page.
For communication betweenmultiple leaf pairs, the fabric must have a BGP routereflector enabled to use an OpenStack external network.
Note
• When using bonded fabric interface with vPC, adding the ovs_bond for the fabric interface is notsupported because it must be added as a single interface to the ovs bridge. You must set the type tolinux_bond for aggregating the fabric interfaces. Here is a rough example of how the fabric interfaceneeds to be created in the nic-config templates:type: ovs_bridge
name: {get_input: bridge_name}mtu: 1500members:-type: linux_bondname: bond1
Cisco ACI Installation Guide for Red Hat OpenStack Using OpenStack Platform 10 Director4
Cisco ACI Installation Guide for Red Hat OpenStack Using OSP DirectorRequirements and Prerequisites for Cisco ACI with OpenStack Using OSP Director

ovs_options: {get_param: BondInterfaceOvsOptions}mtu: 1600members:-type: interfacename: nic1primary: truemtu: 1600
-type: interfacename: nic2mtu: 1600
• When using bonding, only 802.3ad is supported.
• When deploying with UCS-B series, only dual vNICs with bonding is supported for fabric interface forredundancy.
Do not use a single vNIC with hardware failover.Note
• In the Cisco APIC GUI, disable the OpFlex authentication in the fabric. Make sure "To enforce OpFlexclient certificate authentication for GOLF and Linux." is not checked in System > System Settings >Fabric Wide Setting > Fabric Wide Setting Policy pane.
• When you delete the Overcloud Heat stack, the Overcloud nodes are freed, but the Virtual MachineManager (VMM) domain remains present in Cisco APIC. The VMM appears in Cisco APIC as a staleVMM domain along with the tenant unless you delete the VMM domain manually.
Before you delete the VMM domain, verify that the stack has been deleted from the undercloud. Alsocheck that any hypervisors appearing under the VMM domain are no longer in the connected state. Onceboth of these conditions are met, then you can safely delete the VMM domain from Cisco APIC.
Related DocumentationFor more information, see theDirector Installation and Usage Red Hat OpenStack Platform 10 documentationat:
https://access.redhat.com/documentation/en-us/red_hat_openstack_platform/10/html/director_installation_and_usage/
Deploying OpFlex Using Unified ModeThis section describes how to install and configure the Cisco ACI OpenStack Plug-in on a Red Hat OpenStackdistribution.
These example steps were validated on OpenStack Platform 10 releases of Red Hat OpenStack. OpenStacksystems can vary widely in how they are installed. Therefore, you can adapt the example steps according tothe specifics of your installation.
Follow the Red Hat OpenStack Platform Director installation document to prepare the OpenStack PlatformDirector and create the correct deployment and resource files.
For more information, see the Related Documentation, on page 5.
Cisco ACI Installation Guide for Red Hat OpenStack Using OpenStack Platform 10 Director5
Cisco ACI Installation Guide for Red Hat OpenStack Using OSP DirectorRelated Documentation

Preparing ACI for OpenStack Installation
Setting Up the APIC and the NetworkThis section describes how to set up the Cisco APIC and the network.
Refer to the Network Planning section of the OpenStack Platform Director documentation for network layoutsuch as the one shown in the figure below.
For more information, see Related Documentation, on page 5.
Cisco ACI Installation Guide for Red Hat OpenStack Using OpenStack Platform 10 Director6
Cisco ACI Installation Guide for Red Hat OpenStack Using OSP DirectorPreparing ACI for OpenStack Installation

Figure 1: A typical OpenStack Platform topology
Cisco ACI Installation Guide for Red Hat OpenStack Using OpenStack Platform 10 Director7
Cisco ACI Installation Guide for Red Hat OpenStack Using OSP DirectorSetting Up the APIC and the Network

Figure 2: A typical topology for installation of Red Hat OpenStack Platform 10 with the ACI plug-in
• PXE Network is out-of-band (OOB) and uses a dedicated interface.
• All OpenStack Platform (OSP) networks except for PXE are in-band (IB) through ACI.
• API - VLAN 10
• Storage - VLAN 11
• StorageMgmt - VLAN 12
• Tenant - VLAN 13
• External - VLAN 14
• ACI Infra - VLAN 4093
• L3Out is pre-configured (In this example it is called L3-Out and EPG is L3-Out-EPG).
To prepare Cisco ACI for in-band configuration you can use the physical domain and the static binding to theendpoint groups (EPGs) created for these networks. This involves creating the required physical domain andattachable access entity profile (AEP). Important thing to note is that Infra VLAN should be enabled for theAEP. For more details, see:
http://www.cisco.com/c/en/us/td/docs/switches/datacenter/aci/apic/sw/kb/b_KB_Creating_AEP_Physical_Domains_VLANS_to_Deploy_an_EPG_on_a_Specific_Port.html
Cisco ACI Installation Guide for Red Hat OpenStack Using OpenStack Platform 10 Director8
Cisco ACI Installation Guide for Red Hat OpenStack Using OSP DirectorSetting Up the APIC and the Network
Procedure
Step 1 Log in to the Cisco APIC GUI and create a VLAN Pool for VLANs required for OpenStack Platforminstallation.a) On the menu bar, choose Fabric > Access Policies > Pools and right-click VLAN to create a VLAN
Pool.b) In the Name field, enter the VLAN range namespace policy name (OSP8-infra).c) (Optional) In the Description field, enter the description of the VLAN range namespace policy.d) In the Encap Blocks section, click on the + icon to enter the encap block range.e) Click SUBMIT.
Step 2 Create an attachable entity profile and assign the above PhysDom to it. Also make sure Enable Infra VLANis selected:a) On the menu bar, choose Fabric > Access Policies > Global Policies and right-click Attachable Access
Entity Profile to create an attachable access entity profile.b) In the Name field, enter the name of the attachable access entity profile (OSP8-AEP).c) (Optional) In the Description field, enter the description of the attachable access entity profile.d) Check the Enable Infrastructure VLAN check box to enable the infrastructure VLAN.e) In the Domains (VMM, Physical or External) To Be Associated To Interfaces: section, click on the
+ icon, from the drop-down list, choose the domain profile and click Update.f) Click Next.g) Click Finish.
Step 3 Create a Physical Domain (PhysDom) and assign the VLAN pool to it.a) On the menu bar, choose Fabric > Access Policies > Physical and External Domains and right-click
Physical Domains to create a Physical Domain.b) In the Name field, enter the name of the physical domain (OSP8-Phys).c) In the Associated Attachable Entity Profile field, choose an associated attachable entity profile.d) In the VLAN Pool field, choose a VLAN pool ([OSP8-infra-dynamic]).e) Click SUBMIT.
Step 4 In a separate tenant, you can also use Common to create an application profile (For example: OSP-8). Createthe EPGs, bridge domains, and a VRF for the OSP Networks. If the PXE network is also going through ACIthen also create EPG and BD for PXE (This is not shown in this example).
Step 5 Add static bindings (Paths) for the required VLANs. You have to expand the EPG to see the ":Static BindingPaths".a) Make sure the physical domain you created is attached to this EPG. You can add the physical domain
using Application Profiles > EPG > EPG_name > Domains.b) On the menu bar, chooseTenants >Tenant common >Application Profiles > ACI-OSP8 >Application
EPGs > EPG API > Static Binding Paths.
Step 6 Make sure the PhysDom is attached to the EPG.
Cisco ACI needs to be provisioned for networks mentioned above except for Tenant, External andFloating IP network. This involves creating the required phys-doms and attached entity profile.Important thing to note is that Infra VLAN should be enabled for the attached entity profile.
Note
Cisco ACI should now be ready for OpenStack deployment.
Cisco ACI Installation Guide for Red Hat OpenStack Using OpenStack Platform 10 Director9
Cisco ACI Installation Guide for Red Hat OpenStack Using OSP DirectorSetting Up the APIC and the Network
Setting Up OvercloudFollow the Red Hat OpenStack Platform Director installation document to prepare the OpenStack PlatformDirector and create the correct deployment and resource files.
At the time of writing, the overcloud nodes try to resolve ipv6 DNS entries for localdomain, this can causesignificant slowdown if the DNS server actually tries to resolve the name instead of sending the NXDomain.If you notice a significant slowdown, make sure that your DNS server is configured correctly.
Note
Once the OpenStack Platform (OSP) Director is setup, you need to install the ACI TripleO orchestrationbefore proceeding with deployment.
Preparing for ACI with OpFlex OrchestrationTo install and enable ACI OpFlex on Overcloud, the following is a summary of steps that are required.
• Modify the undercloud to include the necessary software packages.
• Add to the Neutron puppet manifests, which are part of Overcloud image.
• Add the OpFlex puppet manifests.
• Modify some files on the undercloud tripleO infrastructure.
• Create a HEAT environment file to provide ACI-related parameter values.
• After the above modifications, Overcloud can be provisioned using the openstack overcloud deploycommand and add the new environment file to the openstack overcloud deploy command.
Preparing Undercloud for Cisco ACI with OpFlex OrchestrationThis section describes how to install integration package for Cisco ACI with OpFlex Orchestration.
The following steps automatically create a local RPM repository on the undercloud, which will host CiscoACI OpFlex RPM packages.
Note
Procedure
Step 1 Log in to undercloud as user stack.Step 2 Source the stackrc file.
Example:$ source stackrc
Step 3 Download the latest ACI OSP (tripleo-ciscoaci) rpm from cisco.com.
Cisco ACI Installation Guide for Red Hat OpenStack Using OpenStack Platform 10 Director10
Cisco ACI Installation Guide for Red Hat OpenStack Using OSP DirectorSetting Up Overcloud

For more information, see the APIC OpenStack Plugins.
Step 4 Install the rpm. This installs the dependencies. If the rpm is installed using the rpm command, some dependencymay need to be manually installed.
Example:$ sudo yum --nogpgcheck localinstall <rpm file>
Installing OvercloudThis section describes how to install Overcloud.
Procedure
Step 1 To use Cisco ACI certificate-based authentication, create a local user with a X.509 certificate.
Follow the procedure "Creating a Local User and Adding a User Certificate" in the Cisco APIC SecurityConfiguration Guide, Release 4.2(x) .
When you use certificate-based authentication, make sure that the parameter ACIApicPassword isnot specified.
Note
Step 2 Copy the /opt/tripleo-ciscoaci/example_ciscoaci.yaml file to the/home/stack/templates/apic_gbp_config.yaml file. Edit the apic_gbp_config.yamlfile and change the parameter_defaults to reflect the setup details.parameter_defaults:NeutronCorePlugin: 'ml2plus'NeutronServicePlugins: 'group_policy,ncp,apic_aim_l3'NeutronEnableIsolatedMetadata: trueEnablePackageInstall: trueACIYumRepo: http://10.10.250.10/acirepoACIApicHosts: 172.31.218.136,172.31.218.137,172.31.218.138ACIApicUsername: adminACIApicPassword: cisco123ACIApicSystemId: osp10_csACIApicEntityProfile: f-aepACIApicInfraVlan: 4093ACIApicInfraSubnetGateway: 10.0.0.30ACIApicInfraAnycastAddr: 10.0.0.32ACIOpflexUplinkInterface: nic2ACIOpflexEncapMode: vxlanACIOpflexVlanRange: 1200:1300NeutronEnableForceMetadata: trueACIOpflexBridgeToPatch: br-custom
DescriptionParameter
Where the IP address is in the URL should be replacedwith IP address of the director. This is where theOpFlex RPM will be installed from. The Repo isautomatically created when tripleo_ciscoacipackage is installed.
ACIYumRepo: http://10.10.250.10/acirepo
Cisco ACI Installation Guide for Red Hat OpenStack Using OpenStack Platform 10 Director11
Cisco ACI Installation Guide for Red Hat OpenStack Using OSP DirectorInstalling Overcloud

DescriptionParameter
This lists the IP addresses or hostnames for the APICs.ACIApicHosts:
172.31.218.136,172.31.218.137,172.31.218.138
This is the APIC username.ACIApicUsername: admin
This is the APIC password.ACIApicPassword: cisco123
This should be a unique string to identify thisparticular OpenStack instance.
ACIApicSystemId: osp10_cs
This is the name of the AEP to attach the VMMdomain in the ACI. This AEP needs to be createdmanually and should pre-exist before installing theOvercloud.
ACIApicEntityProfile: f-aep
The ACI Infra VLAN is the OpFlex infra VLAN. Itis picked during the ACI fabric initialization.
ACIApicInfraVlan: 4093
This is the anycast IP address assigned to the SVI ofthe infra VLAN.
ACIApicInfraSubnetGateway: 10.0.0.30
This IP address matches the anycast IP addressassigned to interface Loopback 1023 on the leafswitches.
ACIApicInfraAnycastAddr: 10.0.0.32
The interface is used for OpFlex. This is the fabricinterface, it can be a individual or bonded interface.Follow the OSP director template guidelines fordetermining the interface name.
ACIOpflexUplinkInterface: nic2
The encapsulation to be used between compute nodesand leaf switches is vxlan or vlan.
ACIOpflexEncapMode: vxlan
This is the VLAN range for encapsulation. Onlyneeded when using the vlan encapsulation.
ACIOpflexVlanRange: 1200:1300
This is required to enable OpFlex optimizedmetadata.NeutronEnableForceMetadata: true
This parameter is only needed when using the VLANencapsulation and customized templates. Thisparameter should be set to name of the bridge whichis attached to the fabric uplink interface (or bond).The default bridge in Red Hat template is ‘br-ex’. Ifthe default ‘br-ex’ is used for the deployment, thisparameter is not needed. Otherwise set the value tothe bridge name and a patch will be created betweenthis bridge and integration bridge ‘br-int’.
ACIOpflexBridgeToPatch: br-custom
Cisco ACI Installation Guide for Red Hat OpenStack Using OpenStack Platform 10 Director12
Cisco ACI Installation Guide for Red Hat OpenStack Using OSP DirectorInstalling Overcloud

DescriptionParameter
• Value: Name of the Cisco APIC cert User (usedfor certificate-based authentication
• Type: String
• Default: None
• Mandatory: No
ACIApicCertName
• Value: Private key for the cert User
• Type: String
• Default: None
• Mandatory: No
ACIApicPrivateKey
• Value: True or False
• Type: Boolean
• Default: False
• Comment Set this parameter to True if you useCisco Unified Computing System (UCS) bladeservers for OpenStack nodes.
ACIEnableBondWatchService
• Value: True or False
• Type: Boolean
• Default: False
• Comment Enables automatic purge of CiscoAPIC tenants when the project is deleted inOpenStack.
AciKeystoneNotificationPurge
Step 3 Edit the/home/stack/templates/network-environment.yaml file and set the following values:NeutronEnableTunnelling: FalseNeutronTunnelTypes: "''"NeutronEnableL3Agent: FalseNeutronEnableOVSAgent: False
These settings are necessary in order to make sure the default agents that are replaced by OpFlexagents are disabled. We recommend to keep these setting as indicated.
Note
Step 4 Deploy Overcloud as described in the installation document.
For more information, see the Director Installation and Usage Red Hat OpenStack Platform, chapter 7.
a) Deploy the new environment file created.
Example:openstack overcloud deploy --templates -e/usr/share/openstack-tripleo-heat-templates/environments/network-isolation.yaml -e
Cisco ACI Installation Guide for Red Hat OpenStack Using OpenStack Platform 10 Director13
Cisco ACI Installation Guide for Red Hat OpenStack Using OSP DirectorInstalling Overcloud

~/templates/network-environment.yaml -e~/templates/apic_gbp_config.yaml
Step 5 On successful deployment, the appropriate VMM domain is created on Cisco APIC. Make sure to add thisVMM domain to the right attached entity profile before creating OpenStack networks. If the attached entityprofile is specified in the Cisco ACI yaml file using the parameter "ACIApicEntityProfile," this step is notrequired.
Step 6 Configuring multiple physnets and Hierarchical Port Binding (HPB).
It is now possible to deploy OSP with ACI, automatically configured for HPB and multiple physnets. Theplug-in supports specification of multiple mechanism drives for HPB. The HPB requires pre-creation ofphysical domains in ACI per HPB physnet with VLAN pool for the NetworkVLANRanges for that particularphysnet.
To specify physnet to physical interface or bond relationship:
You need to add the following parameters to the apic_gbp_config.yaml file as in step 1:NeutronPhysicalDevMappings: physnet1:ens11,physnet2:ens7,physnet3:bond1NeutronNetworkVLANRanges: physnet1:1200:1250,physnet2:1251:1300,physnet3:1301:1350ACIMechanismDrivers: 'sriovnicswitch,apic_aim'
DescriptionParameter
This parameter specifies which interface belongs towhich physnet. For this to work correctly APICphysdoms need to be pre-created with names prefixedwith pdom_.
For example:
For physnet2, create a physdom with namepdom_physnet2.
NeutronPhysicalDevMappings
This lists the IP addresses or hostnames for the APICs.NeutronNetworkVLANRanges
The mechanism drivers to configure in ml2configuration. For HPB to work correctly, theapic_aim should be the last one in the list.
ACIMechanismDrivers
Reference Links• Director Installation and Usage Red Hat OpenStack Platform 8 documentation:
https://access.redhat.com/documentation/en/red-hat-openstack-platform/version-8/director-installation-and-usage/#chap-Introduction
• VLAN static binding to ports knowledge base article:
http://www.cisco.com/c/en/us/td/docs/switches/datacenter/aci/apic/sw/kb/b_KB_Creating_AEP_Physical_Domains_VLANS_to_Deploy_an_EPG_on_a_Specific_Port.html
Cisco ACI Installation Guide for Red Hat OpenStack Using OpenStack Platform 10 Director14
Cisco ACI Installation Guide for Red Hat OpenStack Using OSP DirectorReference Links
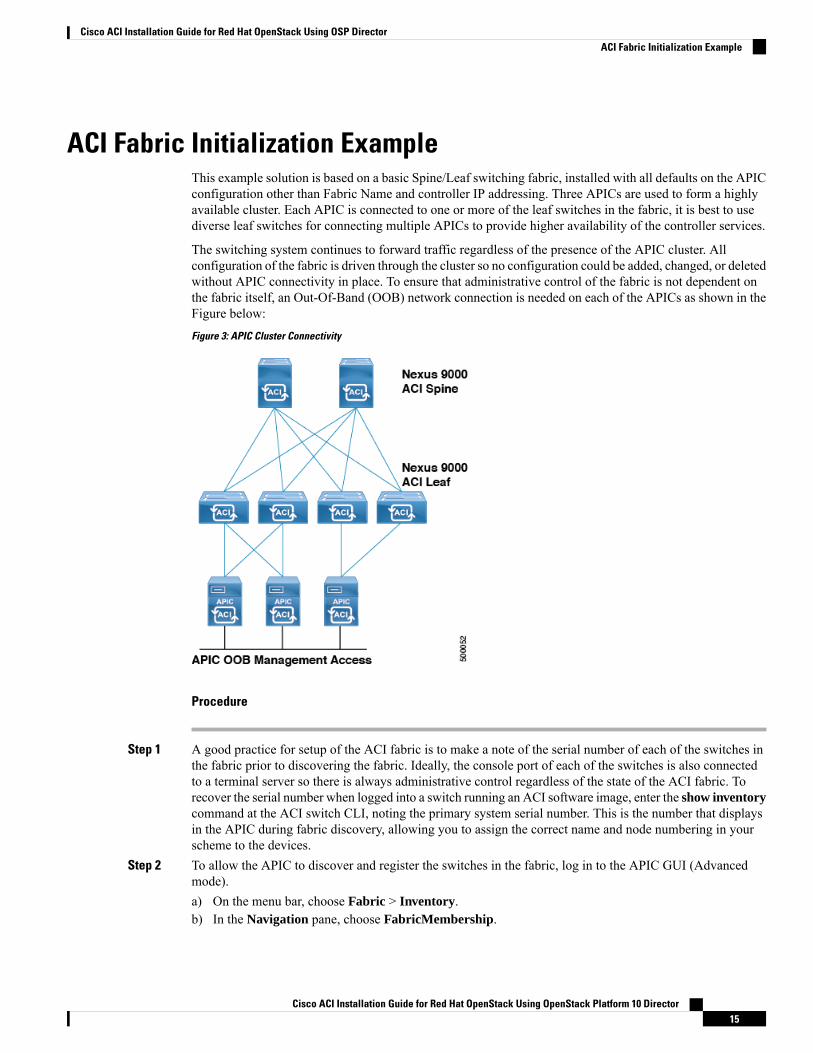
ACI Fabric Initialization ExampleThis example solution is based on a basic Spine/Leaf switching fabric, installed with all defaults on the APICconfiguration other than Fabric Name and controller IP addressing. Three APICs are used to form a highlyavailable cluster. Each APIC is connected to one or more of the leaf switches in the fabric, it is best to usediverse leaf switches for connecting multiple APICs to provide higher availability of the controller services.
The switching system continues to forward traffic regardless of the presence of the APIC cluster. Allconfiguration of the fabric is driven through the cluster so no configuration could be added, changed, or deletedwithout APIC connectivity in place. To ensure that administrative control of the fabric is not dependent onthe fabric itself, an Out-Of-Band (OOB) network connection is needed on each of the APICs as shown in theFigure below:
Figure 3: APIC Cluster Connectivity
Procedure
Step 1 A good practice for setup of the ACI fabric is to make a note of the serial number of each of the switches inthe fabric prior to discovering the fabric. Ideally, the console port of each of the switches is also connectedto a terminal server so there is always administrative control regardless of the state of the ACI fabric. Torecover the serial number when logged into a switch running an ACI software image, enter the show inventorycommand at the ACI switch CLI, noting the primary system serial number. This is the number that displaysin the APIC during fabric discovery, allowing you to assign the correct name and node numbering in yourscheme to the devices.
Step 2 To allow the APIC to discover and register the switches in the fabric, log in to the APIC GUI (Advancedmode).a) On the menu bar, choose Fabric > Inventory.b) In the Navigation pane, choose FabricMembership.
Cisco ACI Installation Guide for Red Hat OpenStack Using OpenStack Platform 10 Director15
Cisco ACI Installation Guide for Red Hat OpenStack Using OSP DirectorACI Fabric Initialization Example

c) In the Work pane, you should see an entry for the first switch discovered by the APIC.d) Verify this is the expected first switch for the first APIC in the cluster based on serial number.e) In the Work pane, choose the switch, right-click and choose Register Switch.
Assign logical numeric node IDs and node names that make sense for future troubleshooting,and Virtual Port Channel (vPC) pairing plans. For example, Node IDs 101/102 for the first twoleaf switches, to be named leaf1/leaf2.
Note
Step 3 Once the first leaf is discovered, the system will pass through that leaf to discover the spine switches, andthen use the spine switches to discover remaining leaf switches. Register the additional nodes assigning logicalnode ID numbers and names according to the spine/leaf fabric layout.
Step 4 Confirm visually that the topology is discovered and physically connected as expected, perform the followingactions:a) On the menu bar, choose Fabric > Inventory.b) In the Navigation pane, choose Topology.
Figure 4: Discovered Spine/Leaf Topology
c) Once the fabric is discovered, choose Admin > Firmware and validate the firmware versions runningon all APICs, and fabric nodes (switches). If needed, upgrade to current or consistent versions beforebeginning initial configuration.
Cisco ACI Installation Guide for Red Hat OpenStack Using OpenStack Platform 10 Director16
Cisco ACI Installation Guide for Red Hat OpenStack Using OSP DirectorACI Fabric Initialization Example
C H A P T E R 3Upgrade ACI and OSP
This chapter contains the following sections:
• Guidelines for Upgrading Cisco APIC and OSP , on page 17• Upgrading the Cisco ACI Packages, on page 18• Performing an OSP Major Release Upgrade, on page 19
Guidelines for Upgrading Cisco APIC and OSPThe OpenStack plug-in is released with Cisco Application Policy Infrastructure ControllerAPIC releases, andtherefore uses the same semantic version as Cisco APIC. For example, the 4.2(1) plug-in is provided with theCisco APIC 4.2(1) release. Generally, the OpenStack plug-in releases are tested against the matching CiscoAPIC release, as well as the previous Long Term Support (LTS) Cisco APIC release. However, a given plug-inrelease may be compatible with additional Cisco APIC releases. See theCisco ACI Virtualization CompatibilityMatrix to verify that the version of the plug-in used is compatible with the version of Cisco APIC.
See the Cisco ACI Virtualization Compatibility Matrix for information about compatible Cisco APIC andRed Hat OSP releases.
Pre-upgrade GuidelinesYou need to first upgrade the Cisco Application Centric Infrastructure (ACI) plug-in.
For more information about the compatibility of the plug-in with various OpenStack versions, see the CiscoACI Virtualization Compatibility Matrix at:
https://www.cisco.com/c/dam/en/us/td/docs/Website/datacenter/aci/virtualization/matrix/virtmatrix.html
Upgrade GuidelinesThe Cisco ACI fabric can be upgraded following the information on Cisco Application Policy InfrastructureController (APIC) Management, Installation, Upgrade, and Downgrade Guide at:
https://www.cisco.com/c/en/us/td/docs/switches/datacenter/aci/apic/sw/2-x/managing_ACI_fabric_upgrades_and_downgrades/b_Managing_ACI_Fabric_Upgrades_and_Downgrades/b_Managing_ACI_Fabric_Upgrades_and_Downgrades_chapter_01.html
Cisco ACI Installation Guide for Red Hat OpenStack Using OpenStack Platform 10 Director17

Optionally, you can upgrade the Cisco ACI fabric without upgrading the plug-in, as long as the Cisco ACIplug-in and Cisco ACI fabric release combination is supported. For more information, see the Cisco ACIVirtualization Compatibility Matrix at:
https://www.cisco.com/c/dam/en/us/td/docs/Website/datacenter/aci/virtualization/matrix/virtmatrix.html
Post-upgrade GuidelinesAfter you upgrade the Cisco ACI fabric, you can optionally upgrade the OpenStack ACI packages to a versionwhich is equal or lower than the ACI fabric code you have upgraded to. You should also refer to the OpenStackACI Plugin Release Notes for specific information:
https://www.cisco.com/c/en/us/support/cloud-systems-management/application-policy-infrastructure-controller-apic/tsd-products-support-series-home.html#Cisco_APIC_OpenStack_Release_Notes
For more information on how to upgrade the OpenStack ACI plugin, see Upgrading the Cisco ACI Packages,on page 18
Upgrading the Cisco ACI PackagesThe Cisco Application Centric Infrastructure (ACI) release upgrade can be live; follow the Red Hat directordocumentation. See the "Director-Based Environments: Performing Updates to Minor Versions" chapter ofUpgrading Red Hat OpenStack Platform for Platform 10 on the Red Hat website.
The update of ACI packages from pre-2.3 releases to 2.3 or later is not supported. In other words, onlycomposable services deployments are upgradable.
Note
Here are example steps to perform an upgrade in a fully deployed Overcloud:
Procedure
Step 1 Copy the updated version of the tripeo-ciscoaci RPM from CCO to the OSP Director.Step 2 Remove the existing RPM package by entering the following command:
sudo rpm -ev tripleo-ciscoaci
Step 3 Install the tripleo-ciscoaci package using yum:
sudo yum install tripleo-ciscoaci-<version number>.rpm
Step 4 Update the current plan using your original openstack overcloud deploy command but including the--update-plan-only option.
Example:openstack overcloud deploy --update-plan-only --templates -e \
#/home/stack/templates/scheduler_hints_env.yaml -e \#/usr/share/openstack-tripleo-heat-templates/environments/network-isolation.yaml
\#-e ~/templates/network-environment.yaml -e /home/stack/templates/aci_cs.yaml \
Cisco ACI Installation Guide for Red Hat OpenStack Using OpenStack Platform 10 Director18
Upgrade ACI and OSPPost-upgrade Guidelines

#-e ~/templates/rhel-registration-resource-registry.yaml -e \#~/templates/environment-rhel-registration.yaml --control-flavor control
--compute-flavor compute
Step 5 Update the stack to push the new packages to the Overcloud:
openstack overcloud update stack -i overcloud
Upon completion of the preceding command, the Overcloud updates with the new version of the plug-in.
Performing an OSP Major Release UpgradeFor a major release upgrade, you must follow the Red Hat director documentation for a major release upgrade.For more information, see the "Director-Based Environments: Performing a Major Version Upgrade" sectionof Upgrading Red Hat OpenStack Platform on the Red Hat website.
In release 2.3 or later, live upgrade is only supported with composable services as described in this document.You cannot upgrade from previous versions.
Note
You may also need to update some templates and update the tripleo-ciscoaci package. Using the rightprocedure, it is possible to perform a live upgrade of the Overcloud. Here is the summary of the steps:
Procedure
Step 1 Remove the tripleo-ciscoaci package from the existing OpenStack version.Step 2 Stop and upgrade the undercloud by following the Red Hat director documentation to the end of section
"Upgrading the Overcloud Images" in Upgrading Red Hat OpenStack Platform on the Red Hat website.Step 3 Stop the aim processes on all overcloud controller nodes. This can be accomplished by using the following
commands on the director:
Example:source stackrcfor IP in $(nova list | grep ACTIVE | sed 's/.*ctlplane=//' | sed's/ |//'); do ssh -o UserKnownHostsFile=/dev/null -oStrictHostKeyChecking=no heat-admin@$IP "sudo systemctl stopaim-event-service-rpc; sudo systemctl stop aim-aid; sudo systemctlstop aim-event-service-polling"; done
Step 4 Install the tripleo-ciscoaci package for the new major Red Hat release.Step 5 Update the templates required for a specific release.
This step may be release-specific, and the Cisco ACI plug-in upgrade may require changes. For moreinformation, see the Release Specific Changes, on page 20.
Step 6 Upgrade the Overcloud by following the rest of Red Hat the document.
Cisco ACI Installation Guide for Red Hat OpenStack Using OpenStack Platform 10 Director19
Upgrade ACI and OSPPerforming an OSP Major Release Upgrade

Release Specific ChangesThis section describe release specific changes to the templates that maybe require to upgrade between releases.Follow the section that correspond to your release version.
In OSP 11 and Ocata release of OpFlex plugin, the package "neutron-ml2-cisco" is deprecated andneeds to be removed during the upgrade to OSP 11. These changes in theopenstack-tripleo-templates are required for the upgrade from OSP 10 to OSP 11.
Procedure
Step 1 Edit the/usr/share/openstack-tripleo-heat-templates/puppet/services/tripleo-packages.yamlfiel and add the highlighted lines:- name: Fail when rpm-python wasn't presentfail: msg="rpm-python package was not present before this run! Check environment before
re-running"when: rpm_python_check.changed != falsetags: step0
- name: clean yum cachetags: step0command: yum clean allignore_errors: True
- name: remove neutron-ml2-ciscotags: step3yum: name=neutron-ml2-driver-apic state=removed
- name: Update all packagestags: step3yum: name=* state=latest
Step 2 Edit the/usr/share/openstack-tripleo-heat-templates/extraconfig/tasks/tripleo_upgrade_node.shfile and add the highlighted line:set -euyum -y remove neutron-ml2-driver-apic || trueNOVA_COMPUTE=""
Cisco ACI Installation Guide for Red Hat OpenStack Using OpenStack Platform 10 Director20
Upgrade ACI and OSPRelease Specific Changes

C H A P T E R 4Add an OpenStack External Network
This chapter contains the following sections:
• Adding an OpenStack External Network, on page 21
Adding an OpenStack External NetworkThis section describes how to add an OpenStack External Network.
A preexistng L3Out and corresponding endpoint group (EPG) is required for external connectivity.Note
There is a change in the command for configuring external-network (new extensions have been added) in theOpenStack to correspond to the above pre-existing L3Out and its EPG. The configuration requires the DN ofthe EPG for the specific the L3Out in APIC. It can be done in two ways:
Procedure
Step 1 Go to the APIC and get the DN of the external network using the API-Inspector:
Step 2 Use the aimctl manager command on the Openstack-Controller to get the dn as shown below:
See the example for L3Out: Datacenter-Out.Note
Example:
Cisco ACI Installation Guide for Red Hat OpenStack Using OpenStack Platform 10 Director21

aimctl manager external-network-find+---------------+----------------+------------+| tenant_name | l3out_name | name ||---------------+----------------+------------|| common | Datacenter-Out | DcExtPol || common | Management-Out | MgmtExtPol || common | default | MgmtNet |+---------------+----------------+------------+
aimctl manager external-network-get common Datacenter-Out DcExtPol+-------------------------+-------------------------------------------------+|Property |Value ||-------------------------+--------------------------------------------------| tenant_name | common || l3out_name | Datacenter-Out || name | DcExtPol || display_name | || nat_epg_dn | || provided_contract_names | [] || consumed_contract_names | [] || monitored | True || dn | uni/tn-common/out-Datacenter-Out/instP-DcExtPol |+---------------------------------------------------------------------------+
Now the dn from above can be used to create the external network.
For Distributed NAT:
Example:
neutron net-create Datacenter-Out --router:external True --shared --apic:distinguished_names\type=dict ExternalNetwork=uni/tn-common/out-Datacenter-Out/instP-DcExtPol
For No NAT:
Example:
neutron net-create Datacenter-Out --router:external True --shared --apic:distinguished_names\type=dict ExternalNetwork=uni/tn-common/out-Datacenter-Out/instP-DcExtPol --apic:nat_type""
For Floating IPs, add a subnet to external network with the desired floating IP pool cidr.
For SNAT, add a subnet to the external network as below:
Example:
neutron subnet-create Datacenter-Out 10.104.21.0/24 --name ext-subnet --disable-dhcp --gateway\10.104.21.1 --apic:snat_host_pool True
For GBP external connectivity, first create the external segment using the SNAT subnet:
Example:
gbp external-segment-create Datacenter-Out --subnet-id <SNAT Subnet>
Now this segment can be used as usual to create the network service policy.
Example:
Cisco ACI Installation Guide for Red Hat OpenStack Using OpenStack Platform 10 Director22
Add an OpenStack External NetworkAdding an OpenStack External Network

gbp nat-pool-create nat-pool-0 --ip-pool 10.104.31.0/24 --external-segment Datacenter-Out
gbp network-service-policy-create --network-service-paramstype=ip_pool,name=nat-pool-0,value=nat_pool \net-svc-nat-0
Cisco ACI Installation Guide for Red Hat OpenStack Using OpenStack Platform 10 Director23
Add an OpenStack External NetworkAdding an OpenStack External Network

Cisco ACI Installation Guide for Red Hat OpenStack Using OpenStack Platform 10 Director24
Add an OpenStack External NetworkAdding an OpenStack External Network

A P P E N D I X AReference Information
This chapter contains the following sections:
• Sample Deployment Templates, on page 25• Configuring Hierarchical Port Binding, on page 30
Sample Deployment TemplatesThis appendix lists the sample deployment files. These are for reference only and are not intended for aproduction system. Create your deployment files to reflect your topology and deployment scenario.
controller.yamlheat_template_version: 2015-04-30
description: >Software Config to drive os-net-config to configure VLANs for thecontroller role.
parameters:ControlPlaneIp:default: ''description: IP address/subnet on the ctlplane networktype: string
ExternalIpSubnet:default: ''description: IP address/subnet on the external networktype: string
InternalApiIpSubnet:default: ''description: IP address/subnet on the internal API networktype: string
StorageIpSubnet:default: ''description: IP address/subnet on the storage networktype: string
StorageMgmtIpSubnet:default: ''description: IP address/subnet on the storage mgmt networktype: string
TenantIpSubnet:default: ''description: IP address/subnet on the tenant network
Cisco ACI Installation Guide for Red Hat OpenStack Using OpenStack Platform 10 Director25

type: stringManagementIpSubnet: # Only populated when including environments/network-management.yamldefault: ''description: IP address/subnet on the management networktype: string
ExternalNetworkVlanID:default: 10description: Vlan ID for the external network traffic.type: number
InternalApiNetworkVlanID:default: 20description: Vlan ID for the internal_api network traffic.type: number
StorageNetworkVlanID:default: 30description: Vlan ID for the storage network traffic.type: number
StorageMgmtNetworkVlanID:default: 40description: Vlan ID for the storage mgmt network traffic.type: number
TenantNetworkVlanID:default: 50description: Vlan ID for the tenant network traffic.type: number
ManagementNetworkVlanID:default: 60description: Vlan ID for the management network traffic.type: number
ExternalInterfaceDefaultRoute:default: '10.0.0.1'description: default route for the external networktype: string
ControlPlaneSubnetCidr: # Override this via parameter_defaultsdefault: '24'description: The subnet CIDR of the control plane network.type: string
DnsServers: # Override this via parameter_defaultsdefault: []description: A list of DNS servers (2 max for some implementations) that will be added
to resolv.conf.type: comma_delimited_list
EC2MetadataIp: # Override this via parameter_defaultsdescription: The IP address of the EC2 metadata server.type: string
resources:OsNetConfigImpl:type: OS::Heat::StructuredConfigproperties:group: os-apply-configconfig:os_net_config:network_config:-type: interfacename: nic1dns_servers: {get_param: DnsServers}addresses:-ip_netmask:list_join:- '/'- - {get_param: ControlPlaneIp}
Cisco ACI Installation Guide for Red Hat OpenStack Using OpenStack Platform 10 Director26
Reference InformationReference Information

- {get_param: ControlPlaneSubnetCidr}routes:-ip_netmask: 169.254.169.254/32next_hop: {get_param: EC2MetadataIp}
-type: ovs_bridgename: {get_input: bridge_name}members:-type: interfacename: nic2# force the MAC address of the bridge to this interfaceprimary: true
-type: vlanvlan_id: {get_param: ExternalNetworkVlanID}addresses:-ip_netmask: {get_param: ExternalIpSubnet}
routes:-default: truenext_hop: {get_param: ExternalInterfaceDefaultRoute}
-type: vlanvlan_id: {get_param: InternalApiNetworkVlanID}addresses:-ip_netmask: {get_param: InternalApiIpSubnet}
-type: vlanvlan_id: {get_param: StorageNetworkVlanID}addresses:-ip_netmask: {get_param: StorageIpSubnet}
-type: vlanvlan_id: {get_param: StorageMgmtNetworkVlanID}addresses:-ip_netmask: {get_param: StorageMgmtIpSubnet}
-type: vlanvlan_id: {get_param: TenantNetworkVlanID}addresses:-ip_netmask: {get_param: TenantIpSubnet}
#- # Uncomment when including environments/network-management.yaml# type: vlan# vlan_id: {get_param: ManagementNetworkVlanID}# addresses:# -# ip_netmask: {get_param: ManagementIpSubnet}
outputs:OS::stack_id:description: The OsNetConfigImpl resource.value: {get_resource: OsNetConfigImpl}
Cisco ACI Installation Guide for Red Hat OpenStack Using OpenStack Platform 10 Director27
Reference InformationReference Information

compute.yamlheat_template_version: 2015-04-30
description: >Software Config to drive os-net-config to configure VLANs for thecompute role.
parameters:ControlPlaneIp:default: ''description: IP address/subnet on the ctlplane networktype: string
ExternalIpSubnet:default: ''description: IP address/subnet on the external networktype: string
InternalApiIpSubnet:default: ''description: IP address/subnet on the internal API networktype: string
StorageIpSubnet:default: ''description: IP address/subnet on the storage networktype: string
StorageMgmtIpSubnet:default: ''description: IP address/subnet on the storage mgmt networktype: string
TenantIpSubnet:default: ''description: IP address/subnet on the tenant networktype: string
ManagementIpSubnet: # Only populated when including environments/network-management.yamldefault: ''description: IP address/subnet on the management networktype: string
InternalApiNetworkVlanID:default: 20description: Vlan ID for the internal_api network traffic.type: number
StorageNetworkVlanID:default: 30description: Vlan ID for the storage network traffic.type: number
TenantNetworkVlanID:default: 50description: Vlan ID for the tenant network traffic.type: number
ManagementNetworkVlanID:default: 60description: Vlan ID for the management network traffic.type: number
ControlPlaneSubnetCidr: # Override this via parameter_defaultsdefault: '24'description: The subnet CIDR of the control plane network.type: string
ControlPlaneDefaultRoute: # Override this via parameter_defaultsdescription: The default route of the control plane network.type: string
DnsServers: # Override this via parameter_defaultsdefault: []description: A list of DNS servers (2 max for some implementations) that will be added
to resolv.conf.
Cisco ACI Installation Guide for Red Hat OpenStack Using OpenStack Platform 10 Director28
Reference Informationcompute.yaml
type: comma_delimited_listEC2MetadataIp: # Override this via parameter_defaultsdescription: The IP address of the EC2 metadata server.type: string
resources:OsNetConfigImpl:type: OS::Heat::StructuredConfigproperties:group: os-apply-configconfig:os_net_config:network_config:-type: interfacename: nic1dns_servers: {get_param: DnsServers}addresses:-ip_netmask:list_join:- '/'- - {get_param: ControlPlaneIp}- {get_param: ControlPlaneSubnetCidr}
routes:-ip_netmask: 169.254.169.254/32next_hop: {get_param: EC2MetadataIp}
-type: ovs_bridgename: {get_input: bridge_name}members:-type: interfacename: nic2# force the MAC address of the bridge to this interfaceprimary: true
-type: vlanvlan_id: {get_param: InternalApiNetworkVlanID}addresses:-ip_netmask: {get_param: InternalApiIpSubnet}
-type: vlanvlan_id: {get_param: StorageNetworkVlanID}addresses:-ip_netmask: {get_param: StorageIpSubnet}
-type: vlanvlan_id: {get_param: TenantNetworkVlanID}addresses:-ip_netmask: {get_param: TenantIpSubnet}
# Uncomment when including environments/network-management.yaml#-# type: vlan# vlan_id: {get_param: ManagementNetworkVlanID}# addresses:# -# ip_netmask: {get_param: ManagementIpSubnet}
outputs:
Cisco ACI Installation Guide for Red Hat OpenStack Using OpenStack Platform 10 Director29
Reference InformationReference Information

OS::stack_id:description: The OsNetConfigImpl resource.value: {get_resource: OsNetConfigImpl}
Configuring Hierarchical Port BindingThis section describes configuring the Single Root I/O Virtualization (SR-IOV) and other VLAN-based ml2mechanism agents to work with opflex plug-in. This is accomplished by using Hierarchical Port Binding(HPB) and should work without any special modification to the configuration. Here are the basic steps neededto configure opflex with SR-IOV.
When using HPB, datapath connectivity in Cisco Application Centric Infrastructure (ACI) is accomplishedby creating static VLAN bindings to the EPGs for networks created by OpenStack. There maybe otherconfiguration required for datapath, for example, setting up VLAN on SR-IOV NIC or configuring OVS (ora load balancer in case of LBaaS). This is done by the third party agent or mechanism driver (e.g.sriovnicswitch).
How to create these assets:
Before you begin
In order to configure the datapath using static VLAJN bindings. The plug-in requires following assets:
• A physical domain (physdom) with the correct VLAN pool.
• Host-link information (which compute node fabric ethernet interface is connected to which leaf switchport)
• Host-link-network-label information (describing which fabric ethernet interface on compute node is usedto serve which physnet)
This information is only needed if the deployment uses multiple physnets.
Procedure
Step 1 Before deploying OpenStack Platform Overcloud, make sure you have one Physical Domain (physdom)created per each physnet required. Add pdom_ prefix to the name of physical domain created. For examplefor physnet1 create pdom_physnet1, and attach the right VLAN pool.
Step 2 The host-link information usually comes from LLDP auto discovery. It can also be provided statically usingACIHostLinks parameter in the Cisco ACI deployment template as shown in example below.
You also need to set NeutronNetworkVLANRanges and enable the third party mechanism drivers usingACIMechanismDrivers parameter, make sure that the apic_aim is the last mechanism in the list.
Example:NeutronPhysicalDevMappings: physnet1:ens11,physnet2:ens7,physnet3:ens9NeutronNetworkVLANRanges:physnet1:1200:1250,physnet2:1251:1300,physnet3:1301:1350ACIMechanismDrivers: 'sriovnicswitch,apic_aim'ACIHostLinks: '{"101": [{"host01|ens11": "1/14"}], "102": [{"host02|ens9": "1/14"}]}'
Cisco ACI Installation Guide for Red Hat OpenStack Using OpenStack Platform 10 Director30
Reference InformationConfiguring Hierarchical Port Binding

A P P E N D I X BConfiguring UCS B-Series
• Configuring UCS B-Series for Cisco ACI and OpenStack Orchestration, on page 31• Configuration on Linux Hosts, on page 31• Configuration on Cisco UCS, on page 35• Configuration on Leaf Switches, on page 35
Configuring UCS B-Series for Cisco ACI and OpenStackOrchestration
You need three levels on configuration for Cisco Unified Computing System (UCS) B-Series to work withCisco Application Centric Infrastructure (ACI) and OpenStack orchestration. The first layer is on Cisco UCS,the second on the host, and the third on the leaf switches.
This document applies to the Cisco UCS B-Series and C-Series servers connected to Fabric Interconnects inUCS mode and provides additional configuration required to install OpenStack on Cisco UCS.
Note
Configuration on Linux HostsConfiguration on Linux hosts includes binding the NICs in Active Backup mode, running the BondWatchservice, and setting the NIC maximum transmission unit (MTU).
Bind the NICsBind the NICs in Active Backup mode, which you can do by setting the appropriate configuration in yourOSP network environment NIC templates.
Procedure
Set the appropriate configuration.
Example:
Cisco ACI Installation Guide for Red Hat OpenStack Using OpenStack Platform 10 Director31

type: linux_bondbonding_options: "mode=active-backup miimon=10"name: bond0mtu: 1600members:-type: interfacename: nic2mtu: 1600-type: interfacename: nic3primary: truemtu: 1600
Run the Bond Watch ServiceThe bond watch service (apic-bond-watch) detects failure of a NIC in the bond and sends gratuitous ARPrequests to inform the fabric of the currently active NIC. We recommend that you run the bond watch serviceon the undercloud.
There are two ways you run the apic-bond-watch service, depending on which version of Cisco ApplicationPolicy Infrastructure Controller (APIC) that you use:
• Cisco APIC Release 4.1(x) and earlier: You perform a short series of steps.
• Cisco APIC Release 4.2(1) and later: You set a single parameter, and the apic-bond-watch is enabledand started. There are no manual steps that are required to set up, enable, or start the apic-bond-watchservice.
The following is list of guidelines and recommendations for running the bond watch service:
• Verify that you have installed /usr/bin/apic-bond-watch.
The file is part of the apicapi package.
• Add the OpFlex uplink device to /etc/environments (opflex_bondif=bond1)
You must perform this step if the interface is other than default (bond0).
• Enable the bond watch service: systemctl enable apic-bond-watch.
• Start the bond watch service: systemctl start apic-bond-watch.
In releases earlier than Cisco Cisco Application Policy Infrastructure Controller (APIC) 4.1(2), you may needto manually run apic-bond-watch because the service file may be missing. To manually start the binary,you can use nohup /usr/bin/apic-bond-watch <interface name>& as the root user. Thedefault interface name is bond0. For example:nohup /usr/bin/apic-bond-watch & //To use bond0nohup /usr/bin/apic-bond-watch bond1 & //To use bond1
Note
Cisco ACI Installation Guide for Red Hat OpenStack Using OpenStack Platform 10 Director32
Configuring UCS B-SeriesRun the Bond Watch Service

Procedure
Step 1 Complete one of the following actions, depending on your version of Cisco Application Policy InfrastructureController (APIC).
• Cisco APIC 4.2(1) or later: Set the parameter ACIEnableBondWatchService to True. See the section"Installing Overcloud" inCisco ACI Installation Guide for Red Hat OpenStack Using OpenStack Platform10 Director or the section "Parameters for the Cisco ACI Environment" in Cisco ACI Installation Guidefor Red Hat OpenStack Using the OpenStack Platform 13 Director. Do not complete the remaining stepsof this procedure.
• Cisco APIC 4.1(x) or earlier: Complete step 2 through step 4 in this procedure.
Step 2 Create an inventory of all compute node IP addresses.
Example:source ~/stackrcopenstack server list --flavor compute -f value -c Networks|cut -d= -f2 >~/compute-nodes
If necessary, you can create an inventory of all controllers:openstack server list --flavor control -f value -c Networks|cut -d= -f2 >>~/compute-nodes
Step 3 Install and enable the service.
Example:ansible --become --inventory=compute-nodes all -m shell -u heat-admin -a "yum -y installapicapi"
Step 4 Start the bond watch service.
Example:ansible --become --inventory=compute-nodes all -m shell -u heat-admin -a "systemctl startapic-bond-watch"ansible --become --inventory=compute-nodes all -m shell -u heat-admin -a "systemctl enableapic-bond-watch"
For versions that do not define bond watch, you can start the service manually:ansible --become --inventory=compute-nodes all -m shell -u heat-admin -a 'nohup/usr/bin/apic-bond-watch&'
Identify Which NIC Is Active in the BondThe bond0 file in the /proc/net/bonding directory shows which of the two NICs is active.
Procedure
Examine the bond0 to see which NIC is active.
Example:[root@overcloud-compute-0 heat-admin]# cat /proc/net/bonding/bond0Ethernet Channel Bonding Driver: v3.7.1 (April 27, 2011)
Cisco ACI Installation Guide for Red Hat OpenStack Using OpenStack Platform 10 Director33
Configuring UCS B-SeriesIdentify Which NIC Is Active in the Bond

Bonding Mode: fault-tolerance (active-backup)Primary Slave: NoneCurrently Active Slave: enp13s0MII Status: upMII Polling Interval (ms): 1Up Delay (ms): 0Down Delay (ms): 0
Slave Interface: enp13s0MII Status: upSpeed: 10000 MbpsDuplex: fullLink Failure Count: 3Permanent HW addr: 00:25:b5:00:00:0fSlave queue ID: 0
Slave Interface: enp14s0MII Status: upSpeed: 10000 MbpsDuplex: fullLink Failure Count: 3Permanent HW addr: 00:25:b5:00:00:10Slave queue ID: 0[root@overcloud-compute-0 heat-admin]#
Set the NIC MTUSet and verify the maximum transmission unit (MTU) of the NICs. The MTU is based on settings that youspecify in the Cisco Unified Computing System (UCS) Manager.
Procedure
Step 1 Set the MTU of the NICs to either 1600 or 9000.Step 2 Verify the MTU setting by navigating to the UCS B-Series server, choosing the NIC, and then checking the
value in the MTU field.
Verify MTU Settings for the NICsCheck the maximum transmission unit (MTU) setting on a NIC.
Procedure
Enter the following command:ip link
You should see output similar to the following:5: enp13s0: <BROADCAST,MULTICAST> mtu 9000 qdisc noop state DOWN mode DEFAULT qlen 1000
link/ether 00:25:b5:00:00:03 brd ff:ff:ff:ff:ff:ff
Cisco ACI Installation Guide for Red Hat OpenStack Using OpenStack Platform 10 Director34
Configuring UCS B-SeriesSet the NIC MTU

6: enp14s0: <BROADCAST,MULTICAST> mtu 9000 qdisc noop state DOWN mode DEFAULT qlen 1000link/ether 00:25:b5:00:00:04 brd ff:ff:ff:ff:ff:ff
Configuration on Cisco UCSConfigure Cisco Unified Computing System (UCS) B-Series properly to integrate it with the Cisco ApplicationCentric Infrastructure (ACI) and OpenStack. A supportable configuration must include the following:
• Configuring the CiscoUCS service profile with twoNICs. TheseNICs are used for OpFlex communicationand VM data path.
• Disabling fabric failover on these NICs.
• Connecting the virtual NICs (vNICs) to different fabric interconnects.
• Setting the maximum transmission unit (MTU) on the vNICs.
• Ensuring that the VNICs allow the desired VLANs.
• Turning multicast on for the fabric interconnects.
• Configuring a port channel interface policy on the fabric interconnects.
Configuration on Leaf SwitchesFor path redundancy, configure a virtual port channel (vPC) interface policy across the two leaf switches.There are different ways to configure a virtual port channel (vPC), see the Cisco APIC Layer 2 NetworkingConfiguration Guide for details.
Regardless of the method you choose to configure the UCS and vPCs, the configuration should resemble thefollowing illustration:
Cisco ACI Installation Guide for Red Hat OpenStack Using OpenStack Platform 10 Director35
Configuring UCS B-SeriesConfiguration on Cisco UCS

Figure 5: Configuration on Leaf Switches
Cisco ACI Installation Guide for Red Hat OpenStack Using OpenStack Platform 10 Director36
Configuring UCS B-SeriesConfiguring UCS B-Series