
OpenEMR DICOM Interoperability
12
A ViSolve, Inc. Technical Guide www.visolve.com OpenEMR: Achieving DICOM Interoperability using Mirth 4010, Moorpark Avenue, #205, San Jose, California 95117 USA Tel: +1-602-842-2738 Email: [email protected]
-
Upload
raphaelromerogarrido -
Category
Documents
-
view
47 -
download
1
description
Interoperabilidad DICOM usando MIRTH
Transcript of OpenEMR DICOM Interoperability
A ViSolve, Inc. Technical Guide
www.visolve.com
OpenEMR: Achieving DICOM Interoperability using Mirth
4010, Moorpark Avenue, #205, San Jose, California 95117 USA Tel: +1-602-842-2738 Email: [email protected]

Table of Contents
1. Objective ................................................................................................................ 3
2. DICOM Images....................................................................................................... 3
3. DICOM Image Viewers .......................................................................................... 4
4. Sending and Receiving DICOM Messages .......................................................... 5
5. Integrating DICOM with OpenEMR ...................................................................... 9
6. Further Work.......................................................................................................... 12
TABLE OF CONTENTS
www.visolve.com
4010, Moorpark Avenue, #205, San Jose, California 95117 USA Tel: +1-602-842-2738 Email: [email protected]

1. Objective To gain good knowledge in Radiology, imaging & DICOM standards of Healthcare domain and also demonstrating the interoperability of DICOM in OpenEMR using Mirth Interface Engine
2. DICOM Images a. What is DICOM? What is its structure?
Unlike other image formats like bmp, jpg, png etc, DICOM image structure has 2 components (i) Header (metadata) (ii) Actual Radiology Image. The header contains the Metadata of the image such as Patient Name, Patient ID, Physician details, Modality etc. The following is the detailed representation of Radiology image exchange using DICOM standard.
DICOM Images
www.visolve.com
4010, Moorpark Avenue, #205, San Jose, California 95117 USA Tel: +1-602-842-2738 Email: [email protected]

b. Downloading DICOM Images
For the understanding of DICOM images, we need to download it from the freely available links or if we have radiology department database/share access, we can even get it from there. Note:
1. The DICOM standard images cannot be viewed by ordinary image viewers like MSPaint, Photoshop, web browsers etc. But it seems that the latest version of Adobe Photoshop has the support for DICOM standard images.
2. DICOM standard images can be viewed by ‘DICOM viewer’ tools, which are available for free too.
3. To understand the meta information of the DICOM standard image, just open it with some text editors and try understanding the information
3. DICOM Image Viewers To view/read DICOM images, we need DICOM viewer tool or utility. These utilities should have the capability to read the raw DICOM files and parse the header information and the image. There are 2 types of DICOM viewers, which are mostly developed in Java. c. Standalone DICOM Viewers
These viewers are standalone utility which will run the local machine or in the network and it has its own VIEW part. One such utility experimented is JiveX DICOM Viewer. Free DICOM Viewer d. Browser based DICOM Viewers
There are few DICOM viewers which have the parsing engine with itself and render the VIEW part in a web browser. Since OpenEMR is a web based application, browser based DICOM viewer would get easily sync with the OpenEMR application. One such browser based Open source free utility analyzed and implemented is “Radscaper”.
DICOM Image Viewers
www.visolve.com
4010, Moorpark Avenue, #205, San Jose, California 95117 USA Tel: +1-602-842-2738 Email: [email protected]

4. Sending and Receiving DICOM Messages e. dcm4che Utility
dcm4che is an implementation of DICOM and IHE actors in Java. dcm4che is a collection of open source applications and utilities for the healthcare enterprise. These applications have been developed in the Java programming language for performance and portability, supporting deployment on JDK 1.4 and up. dcm4chee is an advancement of dcm4che, with UI. List of dcm4che utilities:
• dcm2txt – Convert a DICOM object to text
• dcm2xml – Convert a DICOM object to XML
• dcmdir – Manipulate a DICOM dir
• dcmecho – Initiate a C-ECHO command as an SCU
• dcmgpwl – Query a General Purpose Worklist SCP
• dcmmwl – Query a Modality Worklist SCP
• dcmof – Simulate an Order Filler application
• dcmqr – Perform C-FIND, C-GET and C-MOVE operations as an SCU
• dcmrcv – DICOM receiver (C-STORE SCP)
• dcmsnd – Perform C-STORE operations as an SCU
• dcmups – Unified Work list and Procedure Step SCU
• dcmwado - Initiate DICOM WADO requests
• jpg2dcm - Convert a JPEG image to DICOM
• logger - Log files to a Syslog destination
• mkelmdic - Create the serialized dcm4che2 DICOM Dictionary
• mkuiddic - Create the dcm4che2 UID dictionary
• mkvrmap - Create the dcm4che2 VR Mappings
• pdf2dcm - Convert a PDF document to DICOM
• rgb2ybr - Convert pixel data from YBR to RGB format
• txt2dcmsr - Convert text to a DICOM Structured Report
• xml2dcm - Convert XML to DICOM
Sending and Receiving DICOM Messages
www.visolve.com
4010, Moorpark Avenue, #205, San Jose, California 95117 USA Tel: +1-602-842-2738 Email: [email protected]

To exchange DICOM messages, the 2 utilities - dcmsnd and dcmrcv were used.
Step 1: Start the DICOM message Receiver utility and make it to listen to 11112 port. Bind a directory to the DICOM receiver to store the received DICOM images.
Step 2: Now send a DICOM message to 11112 port and verify that it is being stored in attached directory.
When the port is not active, it throws error. f. Mirth Interface Engine
Mirth Connect has support for DICOM SR (Structured Report). But it does not support DICOM querying. Configuring Mirth for DICOM support The following is the step by step instructions on configuring Mirth connect for DICOM communication. Step 1: Create new channel to accept the Incoming Data DICOM data.
Step 2: Move to source tab and configure it. Set the Connector Type to ‘DICOM listener’ and configure the listener address and listener port. Then, click “Edit Transformer” to add rules for the incoming DICOM message.
Step 3: In the Source Transformer, input the xml structure of the DICOM messages as the message template and configure it according to the requirements.
Step 4: Now configure the “Channel Destination”.
Here, configure the directory to save the received DICOM message (image). Make sure the connector type is “File Writer”.
Sending and Receiving DICOM Messages
www.visolve.com
4010, Moorpark Avenue, #205, San Jose, California 95117 USA Tel: +1-602-842-2738 Email: [email protected]

g. Sending and Receiving DICOM Messages
Here, it is assumed dcm2che as the radiology department and Destination location in the Mirth as the Hospital. The Mirth will be listening to the port 11113 port. If there is any message received at this port, then it is parsed and stored in the location specified in the ‘destination’. Now the dcm2che is sending a radiology image of DICOM format to 11113 port. Mirth Connect will listen to this port and receives the image. The below screenshot depicts the Mirth dashboard and the status of the channel we created. Now send the image to the port 11113. The message is received by the mirth and the status is updated. Refer the screenshot below. Though Mirth status report shows that 1 message is received and 1 message is sent, it is always good to verify it. h. Mirth Channel: Information Exchange Status
1. From the Mirth Dashboard, double click the channel
2. It will show the status, protocol, timestamp etc of both the Channel Source and Channel Destination
3. Just click the latest ‘Source’ info
4. The tabbed panel (below the listing) will reflect the corresponding information
5. Click the ‘Raw Message’ tab. It will show the ‘raw message’ of the source connector and below screenshot shows the same.
Sending and Receiving DICOM Messages
www.visolve.com
4010, Moorpark Avenue, #205, San Jose, California 95117 USA Tel: +1-602-842-2738 Email: [email protected]
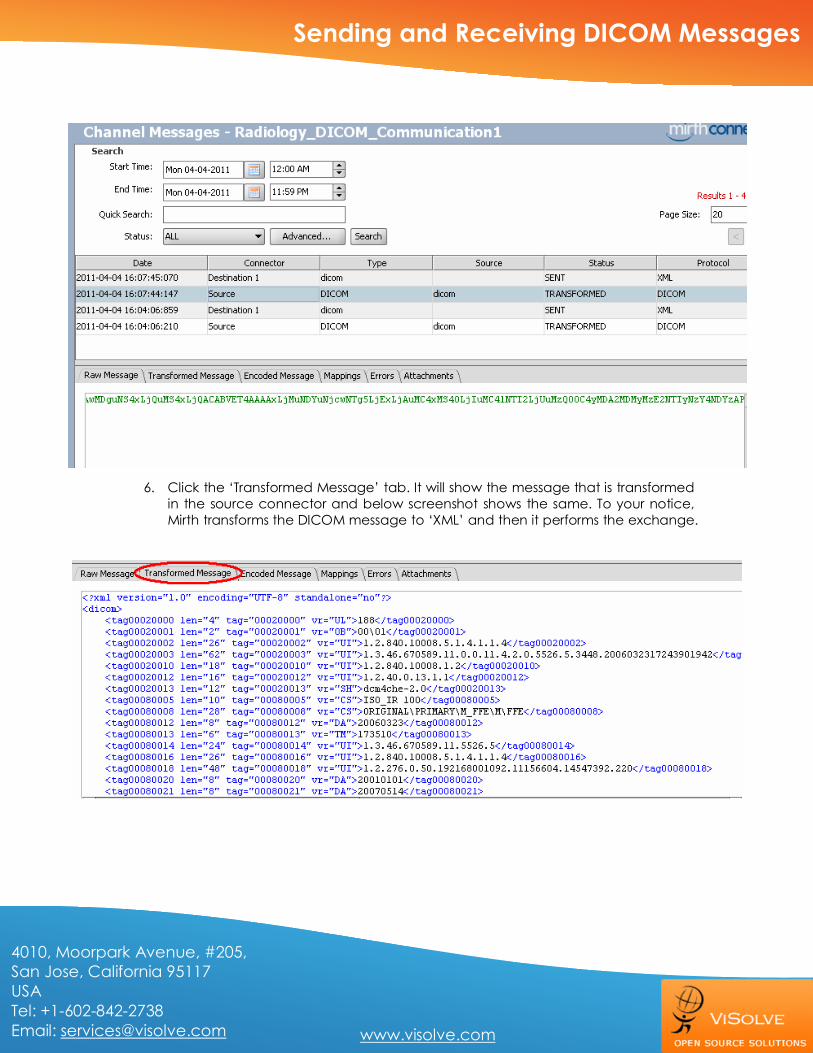
6. Click the ‘Transformed Message’ tab. It will show the message that is transformed in the source connector and below screenshot shows the same. To your notice, Mirth transforms the DICOM message to ‘XML’ and then it performs the exchange.
Sending and Receiving DICOM Messages
www.visolve.com
4010, Moorpark Avenue, #205, San Jose, California 95117 USA Tel: +1-602-842-2738 Email: [email protected]

7. Click the ‘Mappings’ tab. It will show the mapping that the source connector uses. Here there are 2 mappings – one for Modality and another for PatientID. To your notice, the mirth parses the DICOM message and extracts the corresponding value. The below screenshot shows the mapping variable and its corresponding DICOM extracted value.
8. Click the ‘Attachments’ tab. It shows one attachment. As we discussed, the DICOM message is communicated in 2 parts. One is the Metadata of the radiology/DICOM image and the other one is the ‘Image’. Mirth parses the metadata and sends the Image as attachment. The below screenshot shows the ‘Image as attachment’ by the mirth.
5. Integrating DICOM with OpenEMR OpenEMR is a web-based application, whose 40% of the code is PHP. So customizing the application to integrate DICOM functionality is done with minimal effort. a. OpenEMR Files modification To demonstrate interoperability of DICOM using Mirth in OpenEMR, I have edited the left navigation tree to add a new item “DICOM” under “Patient Client”. And create a new file /interface/patient_file/dicom/load_form.php which lists all the DICOM image files from the stored location (This is the location where Mirth Channel Destination is configured; which is the placeholder for DICOM images which are transferred via Mirth). Now, DICOM Image viewer file. As said, the ‘radscaper’ DICOM image viewer is in different port. Modify the radscaper index file such that, it will accept the filename and pass it to the Applet, so as to view in the browser.
Interacting with DICOM and OpenEMR
www.visolve.com
4010, Moorpark Avenue, #205, San Jose, California 95117 USA Tel: +1-602-842-2738 Email: [email protected]

b. Accessing the OpenEMR application after customizing for DICOM
Now access the OpenEMR -> Patient/Client -> DICOM, which lists all the DICOM images for the specified location. Below screenshot shows the same. We have extracted the (customized) filename and shown separately. To your notice, we have given a link to view the DICOM image and have highlighted the same in the below screenshot.
Interacting with DICOM and OpenEMR
www.visolve.com
4010, Moorpark Avenue, #205, San Jose, California 95117 USA Tel: +1-602-842-2738 Email: [email protected]
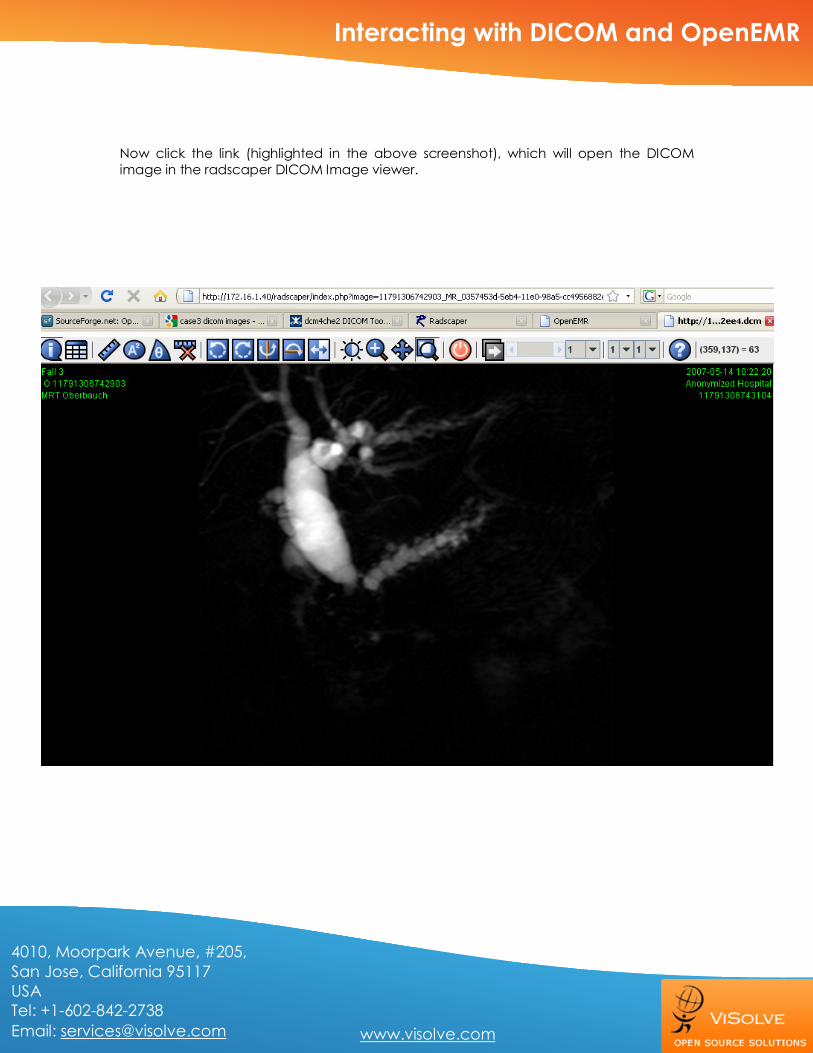
Now click the link (highlighted in the above screenshot), which will open the DICOM image in the radscaper DICOM Image viewer.
Interacting with DICOM and OpenEMR
www.visolve.com
4010, Moorpark Avenue, #205, San Jose, California 95117 USA Tel: +1-602-842-2738 Email: [email protected]

6. Further Work This work can be enhanced further in the following avenues: a. DICOM: Analyzing on the following items:
1. Radiology Video files and DICOM standards
2. DICOM viewers for Radiology video support
3. DICOM viewers for rendering Multiple images in a single snapshot
4. Highly downloaded Open Source PACS servers & DICOM Viewers
b. Mirth Scripts:
1. Configuring Mirth Engine to integrate with Multiple radiology labs and multiple EMR/EHR’s and developing Mirth scripts to as to route radiology images from the labs to the respective EMRs
2. Configuring Mirth to transform and parse the Source DICOM information and Storing the images based on the Modality and in the respective Patient Documents Folder
c. OpenEMR:
1. Customizing Patient’s Document Tree to list Radiology images in the respective patient Document Tree
Further Work
www.visolve.com
4010, Moorpark Avenue, #205, San Jose, California 95117 USA Tel: +1-602-842-2738 Email: [email protected]


![DICOM Conformance Statement9d48995e-cb8b-4ac4-ae9b... · 2020. 2. 20. · DICOM protocol. 1.5 References [DICOM PS 3 2006] The Digital Imaging and Communications in Medicine (DICOM)](https://static.fdocuments.in/doc/165x107/60e78a442d236e0f92518d06/dicom-conformance-statement-9d48995e-cb8b-4ac4-ae9b-2020-2-20-dicom-protocol.jpg)

