OpenEMR INSTALLATION AND UPGRADE Quick...
19
Page 1 of 19 OpenEMR INSTALLATION AND UPGRADE Quick guide September 2 nd , 2009 Updated February 1 st , 2010 Amended on July 13 th , 2010 Amended September 22, 2010 Preliminary documentation
Transcript of OpenEMR INSTALLATION AND UPGRADE Quick...

Page 1 of 19
OpenEMR INSTALLATION AND UPGRADE
Quick guide
September 2nd , 2009 Updated February 1st , 2010 Amended on July 13th, 2010
Amended September 22, 2010
Preliminary documentation

Page 2 of 19
Preliminary notes
1. This guideline has been designed assuming you have some basic knowledge about Linux
operating systems.
2. It also assumes that a reasonably current Debian or Ubuntu Linux distribution has been
previously installed as OS.
3. The process followed by the package, in any case, New Installation or Upgrade an existing
one, assumes OpenEMR will be/is installed in the /var/www/openemr directory.
4. For the reason above, for multiple installations in one single computer these instructions do not
apply. Please contact the system consultants to guide you through, if this is the case

Page 3 of 19
Installation of IPPF OpenEMR 3.2.0.x (New installation)
1. Make sure you have the latest “.deb” package for openemr-ippf. You can find it at http://184.106.201.49/download As of this writing the recent release is openemr-ippf.3.2.0.2.deb. Please download the file with the higher release number, or the one you need to install.
Then make sure the following dependent packages are installed. You can use the Synaptic package manager to check this:
apache2-mpm-prefork cupsys cupsys-bsd cupsys-client cups-pdf imagemagick libapache2-mod-php5 libdate-calc-perl libdbd-mysql-perl libdbi-perl libhtml-parser-perl libtiff-tools libwww-mechanize-perl libxml-parser-perl mysql-server php5-cli php5-mysql php-pear
Make sure all the dependencies above are installed before installing or upgrading OpenEMR.

Page 4 of 19
2. Now, once the previous step has been completed, you can proceed to install the OpenEMR package. To do this, open a terminal window and type the following command as the root user:
dpkg -i <filename>
where “<filename>” is the full /path/name of the package file.
Or if you have any Ubuntu distributon, please add the “sudo” command at the beginning, as showed below:
sudo dpkg –i <filename> NOTE: “sudo” must be typed any time a command line is entered, when ubuntu is the linux distribution in use and the command must be run as root.
After the install you will have a new directory /var/www/openemr.
3. You will probably need to fix the PHP configuration a bit. Enter this command to edit/modify
the following file:
nano /etc/php5/apache2/php.ini
and change the following variables to the values indicated (remove the ";" from the start of the "error_log" line to uncomment it):
allow_call_time_pass_reference = On max_execution_time = 60 max_input_time = 90 register_long_arrays = On register_argc_argv = On memory_limit = 128M display_errors = Off log_errors = On upload_max_filesize = 8M session.gc_maxlifetime = 14400
And as before: Ctrl-X, Y, and hit Enter.
4. Now, restart the web server with this command as root:
/etc/init.d/apache2/restart

Page 5 of 19
5. Creating the OpenEMR database
Now, we are ready to create the OpenEMR database. Follow the instructions given in the next screens: Step No. 6.1. Browse to http://localhost/openemr/setup.php . Click on the “continue” button at the bottom of the screen.
Step No. 6.2. OpenEMR expects the following information. Please take note of all the parameters provided since they might be used later for maintenance or upgrade tasks

Page 6 of 19
In the SERVER section leave the default values as they are shown; only need to add the Password parameter.
Follow the recommended type of password the screen shows. Again take note of the password, since it can be required later for maintenance or upgrades.
Fill in the SERVER, CLIENT and USER sections as shown above. Click Continue.
Assuming everything works as shown, click Continue as illustrated.
Again, follow the instructions provided in the screen above to set the CLIENT and USER section. Then click on the “continue” button

Page 7 of 19
Step No. 6.3. If the previous information is OK, this step will run automatically, and the “continue button should be showed, as in the following screen
Step No. 6.4 It will also run automatically if the setup does not find any previous error. The screen will look like the next one
When click on the “continue” button, other scripts will be showed indicating that OpenEMR database has been properly created and it will be ready to test log into it browsing as follows:
http://localhost/openemr/
Note that the initial login name is "admin" with a password of "pass". It is recommended to change the Administrator password as soon as possible.
And of course you and others can access it via the network IP address, with something like http://192.168.8.95/openemr/ (the IP in this case in only an example, you should use the appropriate IP address)

Page 8 of 19
At this point, OpenEMR system has been properly installed.

Page 9 of 19
Upgrading an Existing IPPF OpenEMR Installation
Before upgrading, you should know if the existing installation is a “package” or not. If you are not sure, enter this command from the Terminal
dpkg –l | grep openemr
If the result is a line of information something like this:
ii openemr-ippf 3.0.1.1 OpenEMR medical practice management system.
... then you know that it is installed as a “.deb” package. If there is no output, then it is not. Proceed accordingly with the following “Case A” or “Case B” as explained in the next pages

Page 10 of 19
Case A: If the existing installation is a .deb package.
Step No. A.1: Back up the old installation using the Backup option in the Administration section in OpenEMR
Step No. A.2: Make sure you have the latest “.deb” package for openemr-ippf. You can find it at http://184.106.201.49/download. Current releases are openemr-ippf-3.2.0.x.deb (“x” is the release number) Step No. A.3: As root, make a copy of the old web directory for possible later reference, like this:
cd /var/www cp -a openemr openemr.old
Step No. A.4: To install the new package, open a terminal window and type
dpkg -i <filename>
where “<filename>” is the full /path/name of the package file.
After the install you will have an updated directory /var/www/openemr. No database changes have been applied yet.
Step No. A.5: Examine the old globals.php file and take note of some parameters value, in order to use the same in the new installations. Use a command as follows:
less /var/www/openemr.old/interface/globals.php
and make a note of any custom settings. These are likely to include the following, but there may be others, take note all of the relevant:
$GLOBALS['schedule_start'] $GLOBALS['schedule_end']
However you will not modify the new globals.php, instead the related customizations will be later applied via the “Globals” administrative interface after the database has been upgraded.

Page 11 of 19
Step No. A.6: Because this is an upgrade, do not run setup.php. Instead, you need to run three upgrade scripts using the web browser:
http://localhost/openemr/sql_upgrade.php This script will ask you for the previous version installed. This information is shown usually at the left top corner in the system login page, as showed in the example below. In this example the version number is 3.1.1. The “6” in this case indicates the installation package consecutive number. You can select from the drop-down list that the script will show, an older version that the one is currently installed, but never a later version. Next, run the following script: http://localhost/openemr/acl_upgrade.php Finally, run the following script only if upgrading from a 3.1.1.x release. Not needed for 3.2.0.x and above: http://localhost/openemr/ippf_upgrade.php By running these three scripts we are assuring the database is being upgraded accordingly. Warning messages will be produced when runs those files. Please save them as a text file for later reference, especially if some troubles arise during the process Step No. A.7: If the previous installation used SQL-Ledger (probably not if you are
Page 12 of 19
upgrading from 3.0.1.x), then you must convert the SQL-Ledger data to OpenEMR's internal A/R management. To do that, browse to:
http://localhost/openemr/sl_convert.php
This conversion may take some time to run and as in the previous script (step A.6) a list of warning could come up. Please save them as a txt file for later references. HINT: Please remember to clear de internet browser (firefox or IE) after you finishing upgrading the system. This step will avoid to keep in the temporary memory old elements.

Page 13 of 19
Case B: If the existing installation is not a .deb package.
Step No.B.1: Back up the old installation, using the Administration option on OpenEMR
Step No. 2: Make sure you have the latest “.deb” package for openemr-ippf. You can find it at http://184.106.201.49/download As of this writing the current releases are openemr-ippf-3.2.0.x.deb. where “.x” is the latest system release.
Step No. B.3: Move your /var/www/openemr directory out of the way so it will not interfere with the new installation, for example:
cd /var/www mv openemr openemr.old
Step No. B.4: To install the new package, open a terminal window and type
dpkg -i <filename>
where “<filename>” is the full /path/name of the package file. After the install you will have a new directory /var/www/openemr.
Step No. B.5: Examine old openemr/library/sqlconf.php, in order to take note of some parameters value relevant for next steps. Use the following command (in the Terminal window)
cat /var/www/openemr.old/library/sqlconf.php
Make a note of the database name, user and password in that file, and then edit /var/www/openemr/sites/default/sqlconf.php to contain those same values. Note that the new release has a different location for sqlconf.php!
nano /var/www/openemr/sites/default/sqlconf.php
Step No. B.6: Review settings in globals.php. Examine the old globals.php like this:
less /var/www/openemr.old/interface/globals.php
and make a note of any custom settings. These are likely to include the following, but there may be others: $openemr_name $GLOBALS['schedule_start'] $GLOBALS['schedule_end']
Do not modify the new globals.php. Instead, make appropriate changes in the Globals

Page 14 of 19
administrative of the upgraded system after upgrading is complete. Step No. B.7: Because this is an upgrade, do not run setup.php. Instead you need to run three upgrade scripts using the web browser: http://localhost/openemr/sql_upgrade.php This script will ask you for the previous version installed. This information is showed usually at the left top corner in the system login page, as showed in the example below In this example the version number is 3.1.1. – The“6” in this case indicates the installation package consecutive number You can select from the drop-down list that the script will show, an older version that the one is currently installed, but never a later version. Next, run the following script: http://localhost/openemr/acl_upgrade.php Finally, run the following script only if upgrading from a 3.1.1.x release. Not needed for 3.2.0.x and above: http://localhost/openemr/ippf_upgrade.php By running these three scripts we are assuring the database is being upgraded accordingly. Warning messages will be produced when running those files. Please save them as a text file

Page 15 of 19
for later reference, especially if some troubles arise during the process Step No B.8: If the previous installation used SQL-Ledger (probably not if you are upgrading from 3.0.1.x), then you must convert the SQL-Ledger data to OpenEMR's internal A/R management. To do that, browse to:
http://localhost/openemr/sl_convert.php
This conversion may take some time to run.

Page 16 of 19
Installing a Virtual Printer The remainder of these instructions is for creating a “virtual printer”. This is optional, and most sites will probably not need it.
Next we'll create a "virtual" PDF printer. This is possible because we installed the cups-pdf package. Select Desktop/Administration/Printing and then double-click the "New Printer" icon.
Select "PDF Printer" and click Forward. Select "Generic" as the manufacturer, and "postscript color printer rev4" as the model. Click Apply.
Page 17 of 19
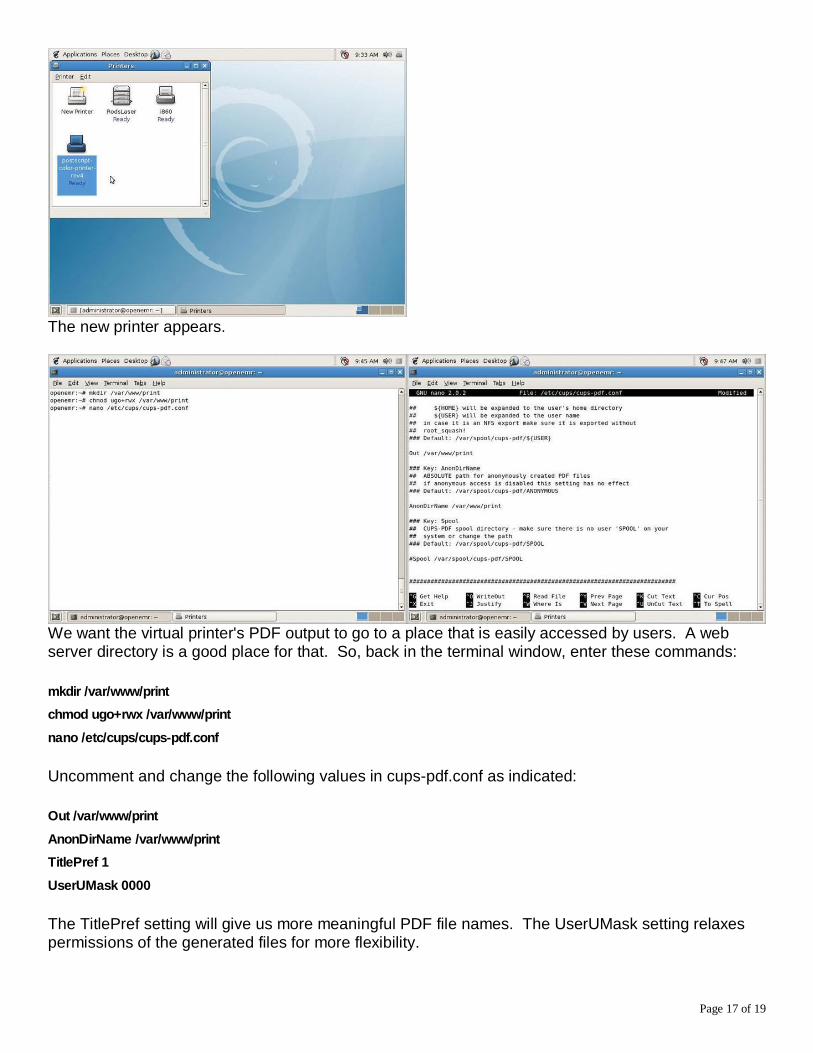
The new printer appears.
We want the virtual printer's PDF output to go to a place that is easily accessed by users. A web server directory is a good place for that. So, back in the terminal window, enter these commands: mkdir /var/www/print chmod ugo+rwx /var/www/print nano /etc/cups/cups-pdf.conf Uncomment and change the following values in cups-pdf.conf as indicated: Out /var/www/print AnonDirName /var/www/print TitlePref 1 UserUMask 0000 The TitlePref setting will give us more meaningful PDF file names. The UserUMask setting relaxes permissions of the generated files for more flexibility.

Page 18 of 19
Edit /var/www/openemr/custom/statement.inc.php so that it references the new printer name (postscript-color-printer-rev4) as indicated above. This will allow us to use the PDF printer for printing patient statements.
Select Desktop/Administration/Printing again to bring up the Printers window. Right-click on the new printer and select "Make Default". Then right-click again and select Properties.

Page 19 of 19
Let's test it! Click "Print a Test Page".
Browse to http://localhost/print/. If everything worked, you'll see the generated file and can click on it to view its contents.