Open enrollment training april 2015
60
SentricWorkforce Open Enrollment Taking the Stress Out of Open Enrollment Sentric, Inc.
-
Upload
sentrictraining -
Category
Recruiting & HR
-
view
104 -
download
1
Transcript of Open enrollment training april 2015
SentricWorkforce Open Enrollment
Taking the Stress Out of Open Enrollment
Sentric, Inc.

• Josh Davis
• Sentric Product Support Specialist
• Over 16 years working with HRIS systems
Questions?
Hang on until the end, we’ll have 15 minutes of
Q&A or email me at [email protected]
Introduction

Webinar How To I will not be able to hear you during the webinar until we get to the question and answer portion, but you have some tools to tell me if you need some help. By your attendee status are some status icons to help me know if you need me to speak up or speak more softly. You can also put out the life saver to tell me if you need some assistance.

Agenda
Overall process with timing
Set-up or Update Benefit Plans and Options
Set-up
Open Enrollment Groups
Testing
Generate choices
Open the process to employees
Manage the process
Clean up

Poll
Last Open Enrollment Poll

OPEN ENROLLMENT PROCESS Open Enrollment

Update Plans
Prepare System
Determine Groups
Test the Process
Create Training
Train Employees
Generate Choices
Employees Enter Choices
Create Benefit Records
Clean up
Sentric Workforce Open Enrollment Process

PREPARE Open Enrollment

Poll
Next Open Enrollment Poll

1. Update Benefit Plans 2. Set messages and documents 3. Determine Enrollment Groups
Prepare

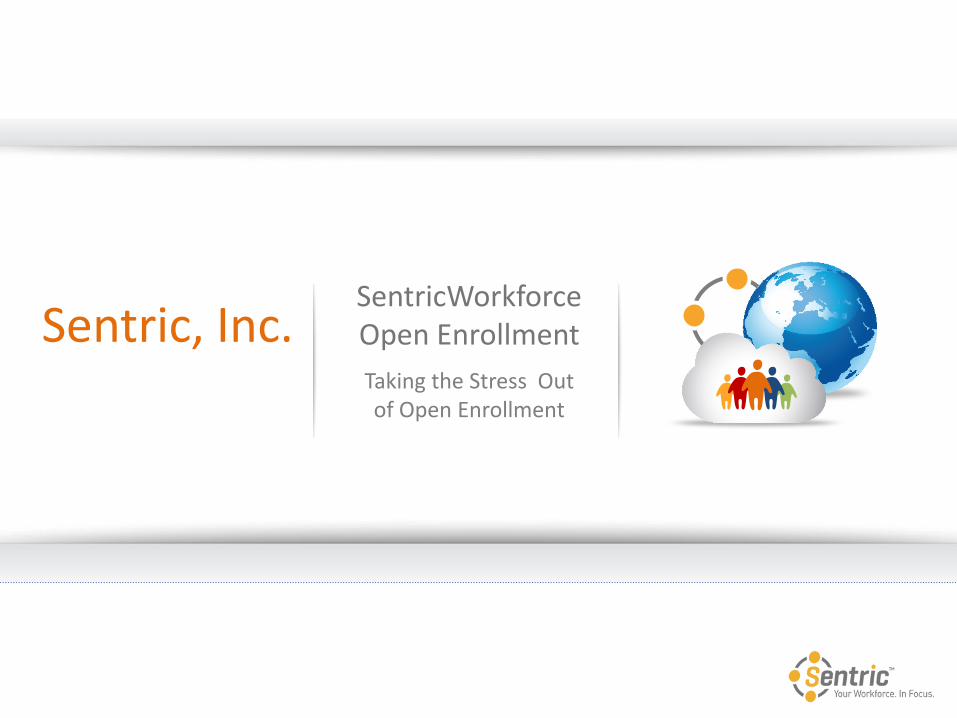
1. Get the new rates as early as you can 2. Usually it is only necessary to update the
parameters tab 3. Make sure to copy the record and put in a Start
Date when the rates will be effective 4. Each plan option that changed should be
updated 5. Comments may help
Update Benefits Plans
Update Benefits Plans

Update Benefits Plans
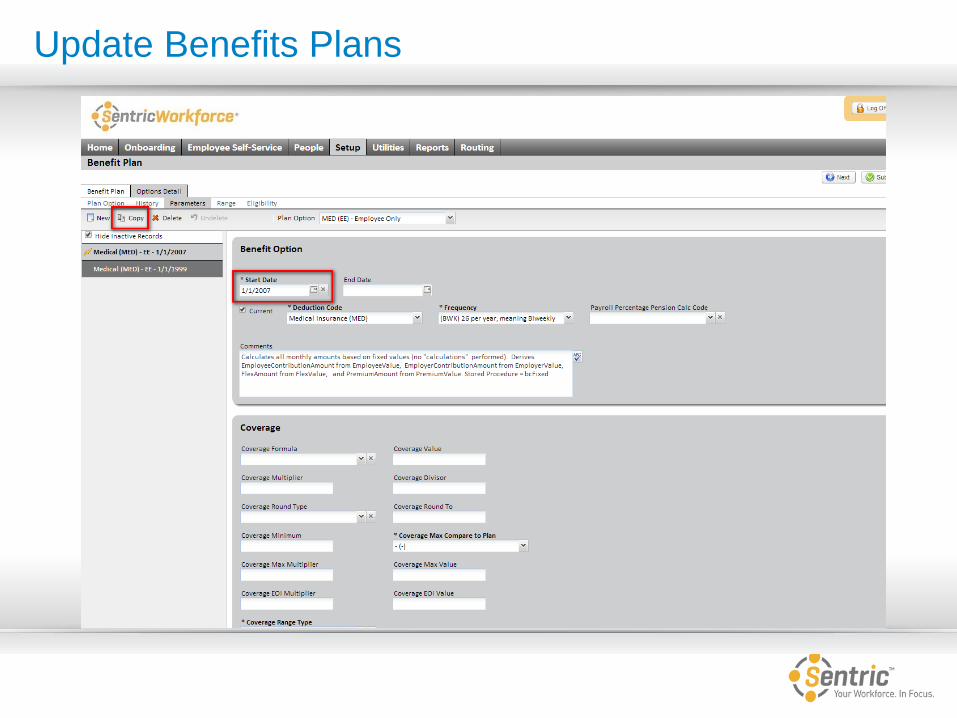
Age based or salary band based plan rates are updated on the Range tab
Be sure to copy the record
Update Benefits Plans

There are a number of places where you can control the messages and documents your employees will see as they complete their
open enrollment
Make sure you review and/or update these messages and documents prior to your open
enrollment period
Set Messages and Documents

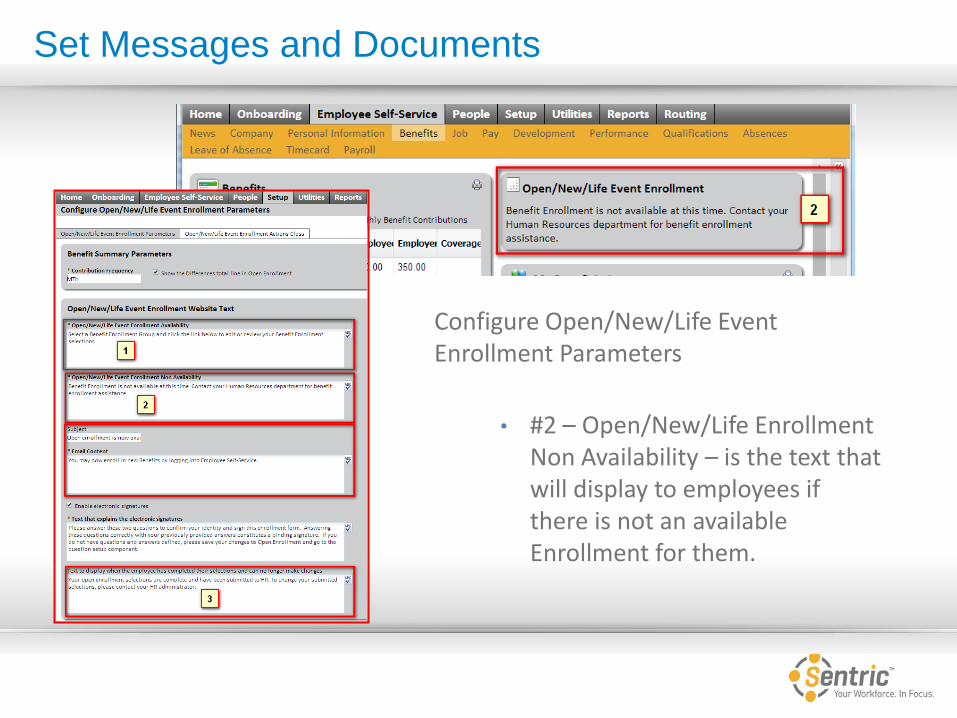
Configure Open/New/Life Event Enrollment Parameters
• #1 – “Open/New/Life Enrollment Availability” – is the text that will display to employees if there is an available Enrollment for them.
Set Messages and Documents
Configure Open/New/Life Event Enrollment Parameters
• #2 – Open/New/Life Enrollment Non Availability – is the text that will display to employees if there is not an available Enrollment for them.
Set Messages and Documents
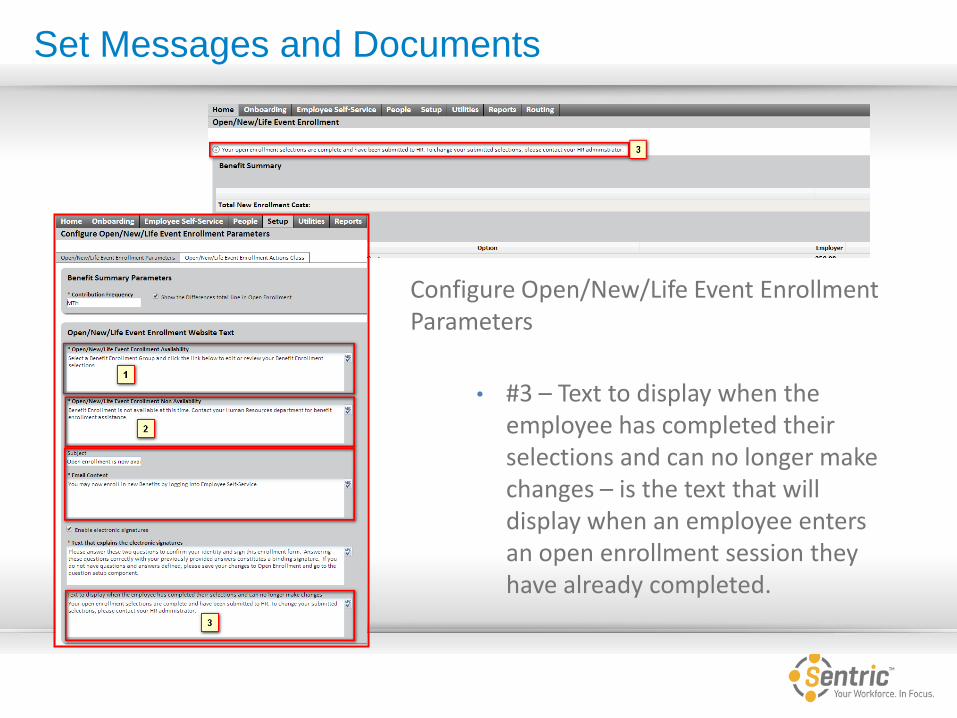
Configure Open/New/Life Event Enrollment Parameters
• #3 – Text to display when the employee has completed their selections and can no longer make changes – is the text that will display when an employee enters an open enrollment session they have already completed.
Set Messages and Documents

On the Benefit Plan Code set up page
#4 Plan Notes– add notes that show up on the form where employees enroll for the plan/option
Set Messages and Documents

On the Benefit Plan Code set up page
#5 Plan Documentation URL – add the path to plan documentation that can be accessed by employees during open enrollment
Set Messages and Documents

On the Create/Modify an Open/New/Life Event Enrollment Group set up page
#6 - Text below Open Enrollment Link in self service
Set Messages and Documents

On the Create/Modify an Open/New/Life Event Enrollment Group set up page
#7 - Message in Open Enrollment on the top of the page of all selections
Set Messages and Documents
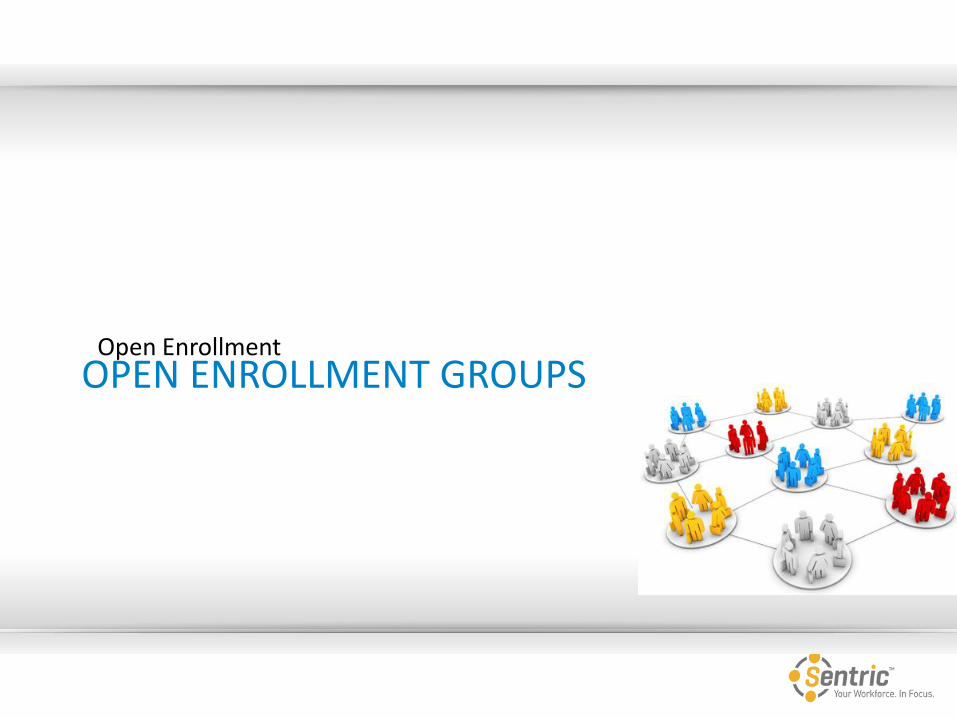
OPEN ENROLLMENT GROUPS Open Enrollment

1. Add groups of people 2. Try to keep groups of 50 or less for best results 3. Group by
1. Location 2. Job 3. Benefit Group 4. First Initial of Last Name
Determine Open Enrollment Groups

TESTING Open Enrollment
Testing is the key to success 1. Test at least 2-3 weeks before Open Enrollment 2. Use employees who will use all benefit plans 3. Use employees with different #’s of dependents
Testing
TRAINING Open Enrollment

1. Provide a bit of “how to” for your staff 2. Cut down on phone calls to HR 3. Step-by-step guides
Training

GENERATE CHOICES Open Enrollment

1. Use your determined groups generate choices 2. People > Benefits > Create/Modify an
Open/New/Life Event Enrollment Group 3. Select Benefit plans and options 4. Benefits for a group can be selected manually,
but if eligibility is correct the system will only show eligible benefits
Generate Choices

Generate Choices
Choose plans on the Benefits Tab
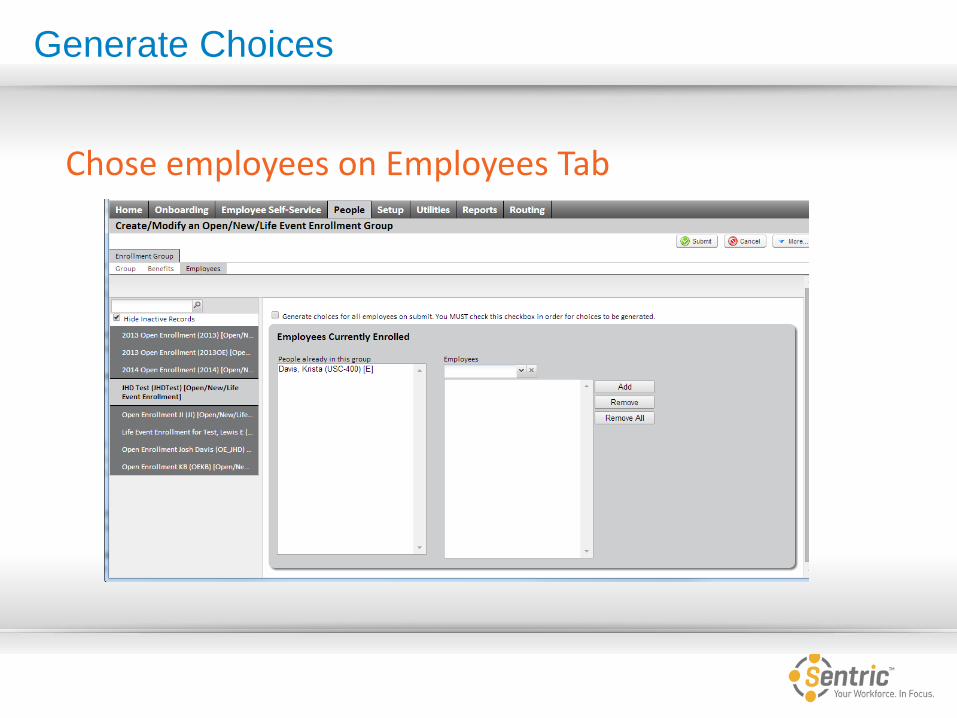
Generate Choices
Chose employees on Employees Tab
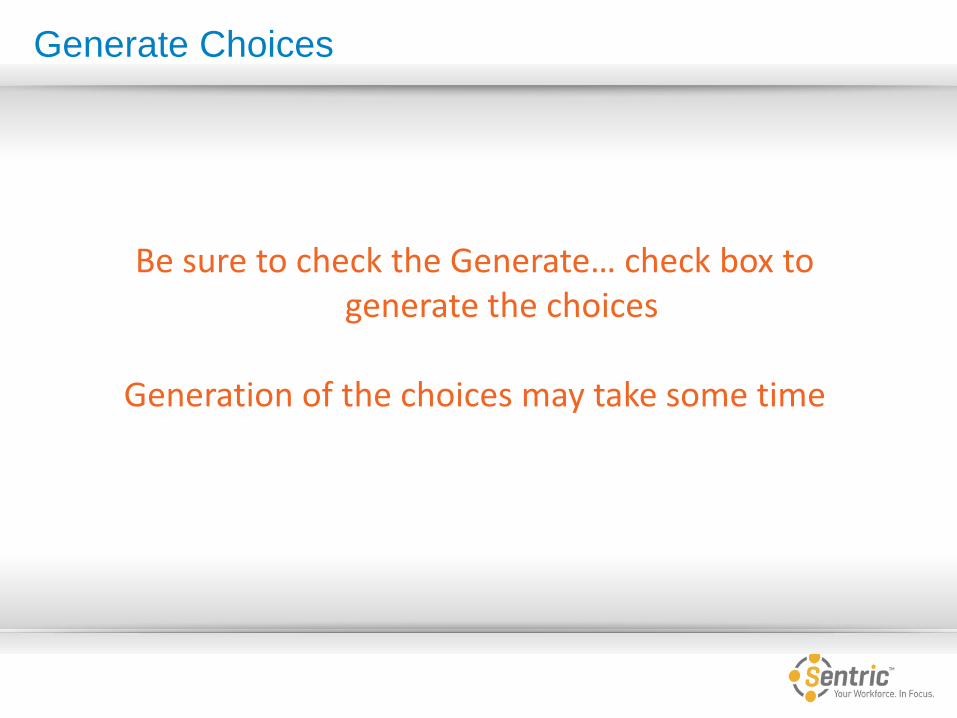
Be sure to check the Generate… check box to generate the choices
Generation of the choices may take some time
Generate Choices

EMPLOYEES ENTER CHOICES Open Enrollment

Employees Enter Choices
Avoid problems during Open Enrollment by preparing your system and employees ahead of time.
Employees Enter Choices
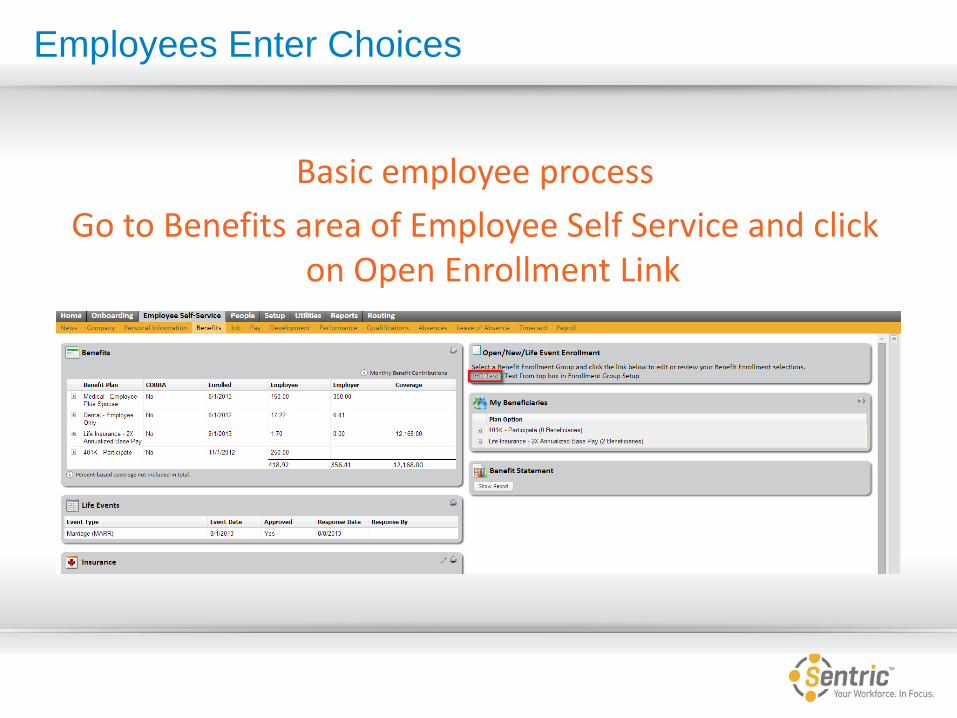
Basic employee process
Go to Benefits area of Employee Self Service and click on Open Enrollment Link
Employees Enter Choices
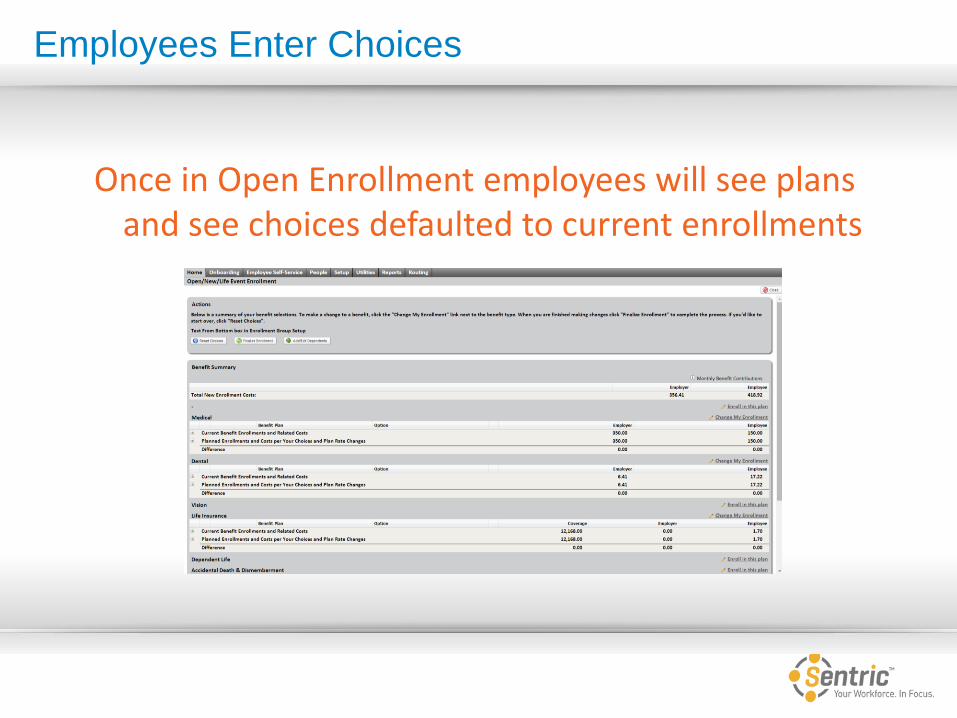
Once in Open Enrollment employees will see plans and see choices defaulted to current enrollments

Employees Enter Choices
To Enroll in plan they were not in before they can click the Enroll in this plan link.

Employees Enter Choices
The employee is then taken to a screen to pick the option they want and add dependents or
beneficiaries if necessary

Employees Enter Choices
To update an enrollment in a plan they were in before they can click the Change My Enrollment link.

Employees Enter Choices
In the change Enrollment form it will show the current enrollment and all choices
Employees Enter Choices
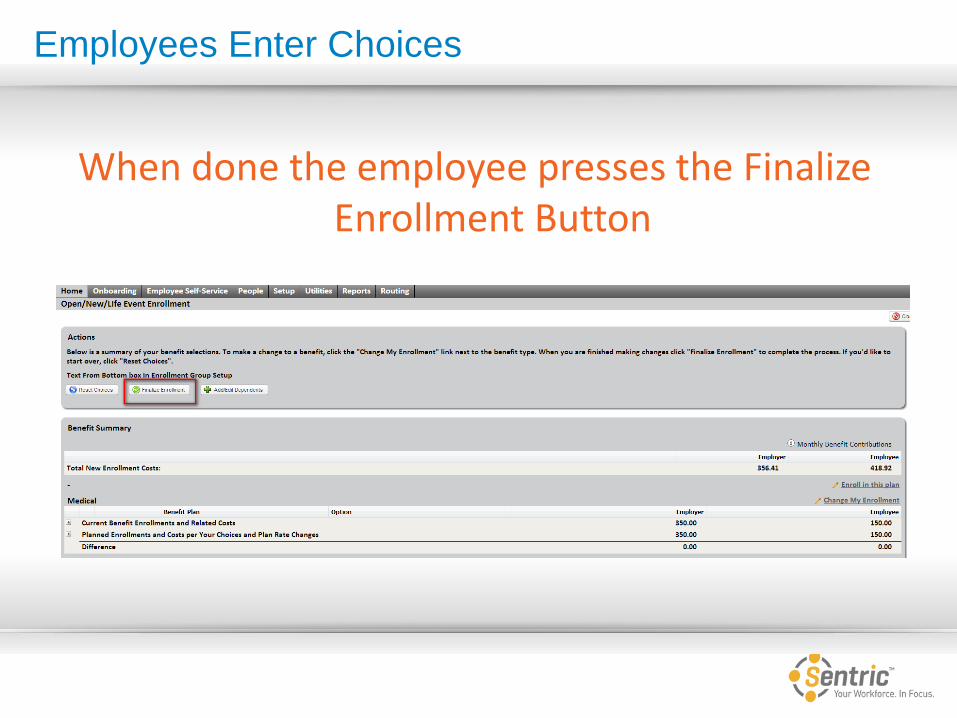
When done the employee presses the Finalize Enrollment Button

Employees Enter Choices
If Electronic Signature is turned
on the employee will get this message

Employees Enter Choices
They will then get a summary page that they can print and they also need to Submit to HR to complete the process

ISSUES AND HOW TO HANDLE Open Enrollment
Issues that can come up and how to handle
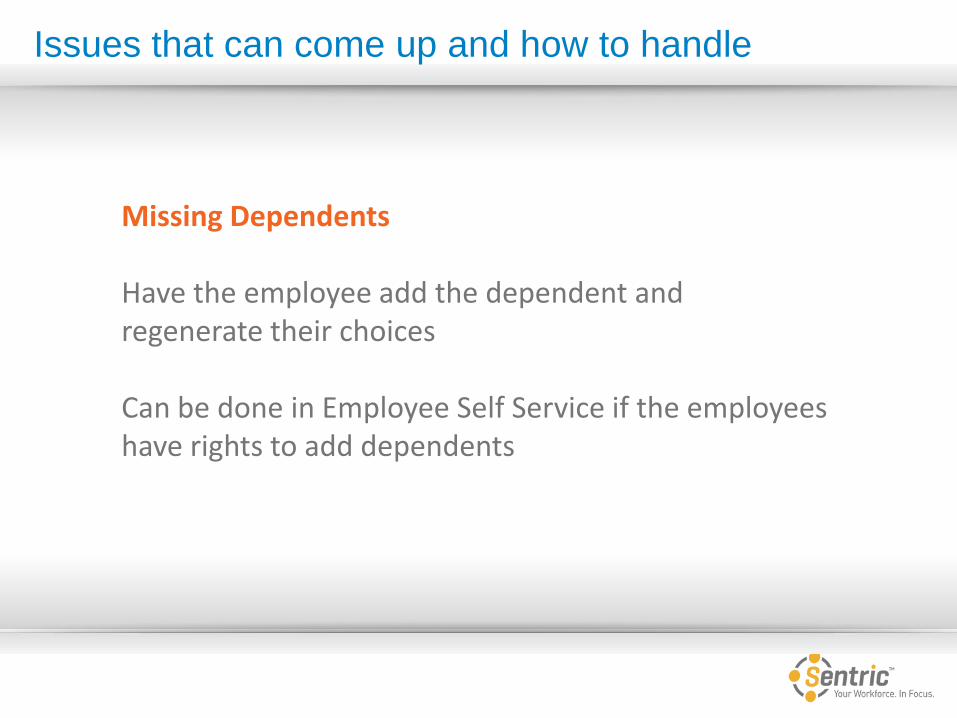
Missing Dependents Have the employee add the dependent and regenerate their choices Can be done in Employee Self Service if the employees have rights to add dependents
Issues that can come up and how to handle
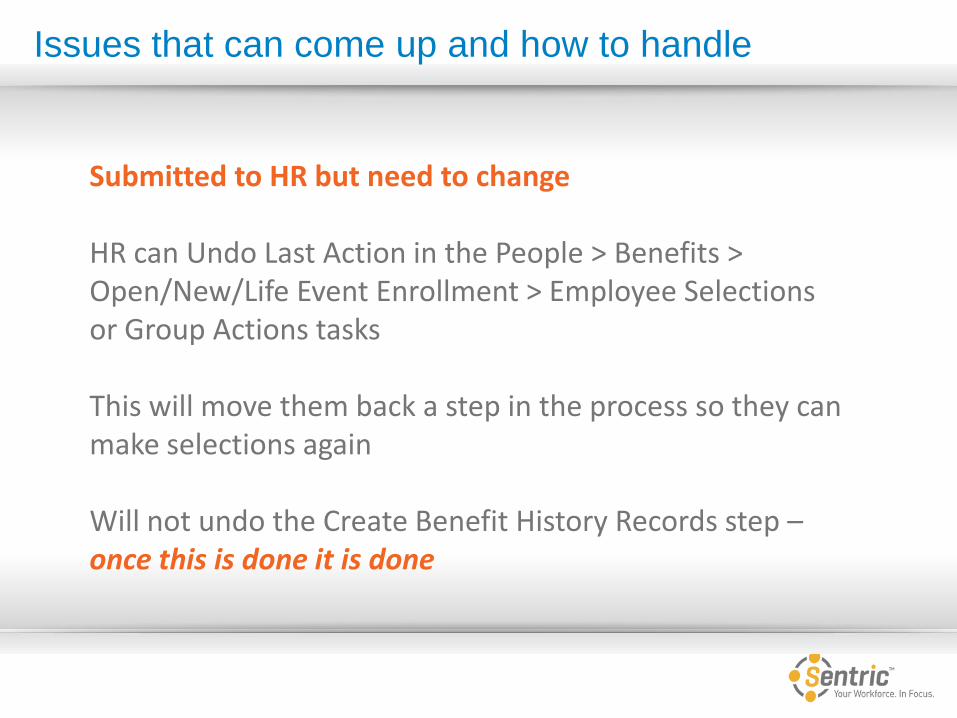
Submitted to HR but need to change HR can Undo Last Action in the People > Benefits > Open/New/Life Event Enrollment > Employee Selections or Group Actions tasks This will move them back a step in the process so they can make selections again Will not undo the Create Benefit History Records step – once this is done it is done

Issues that can come up and how to handle
The employee thinks they are done but they are not Often employees will not press the Submit to HR Link to finish the process because they think they are done This should be covered in training to minimize this problem. If this does happen remind employees to take the final step in Open Enrollment

WRITE THE DATE TO THE DATABASE Open Enrollment
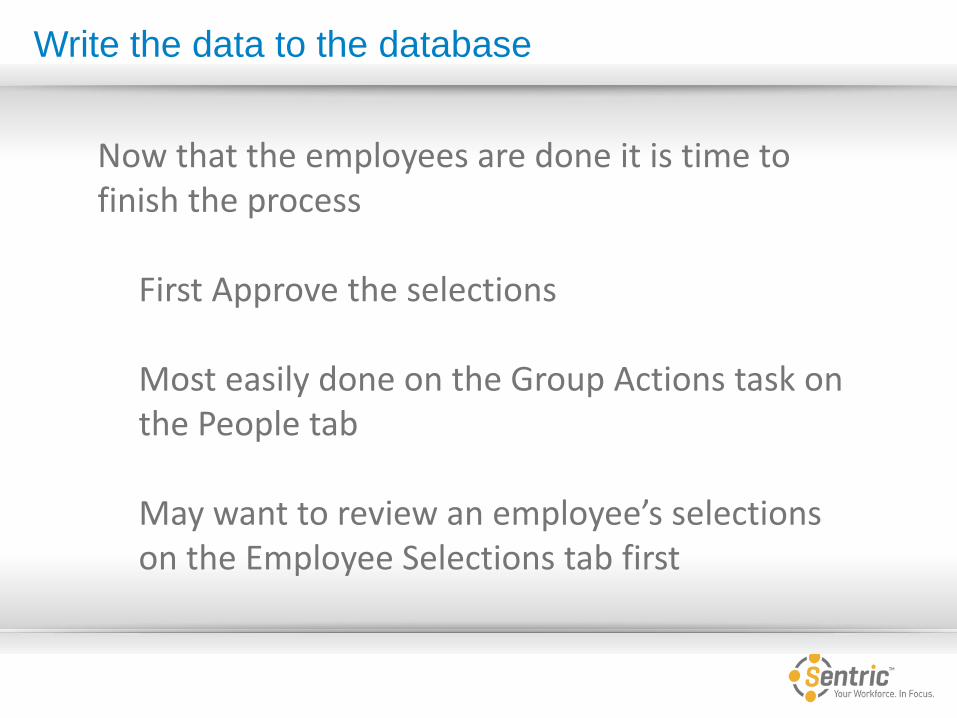
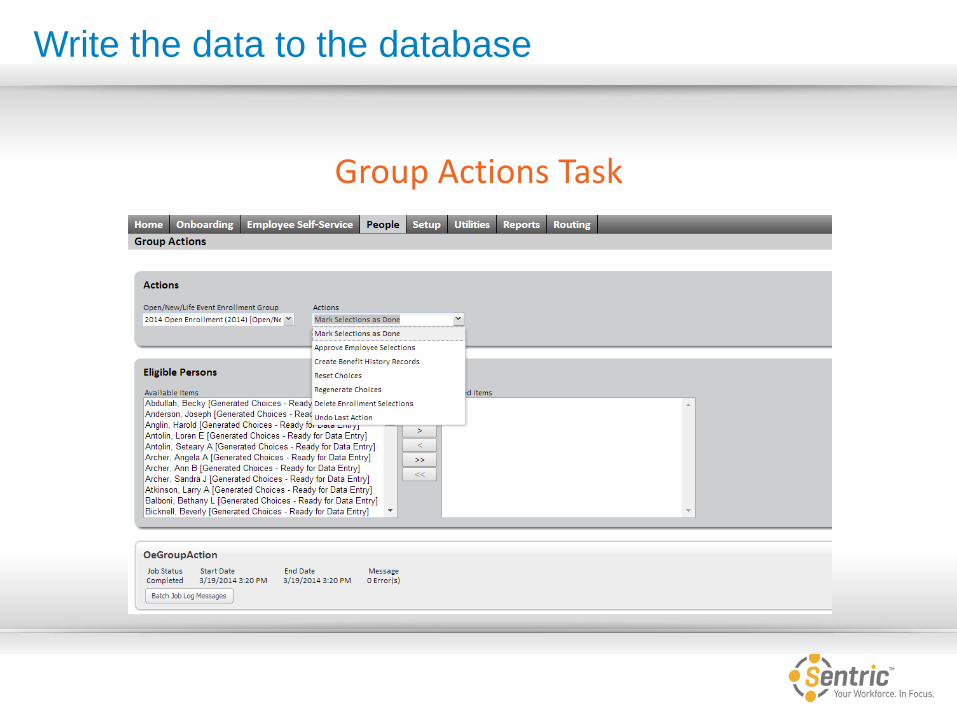
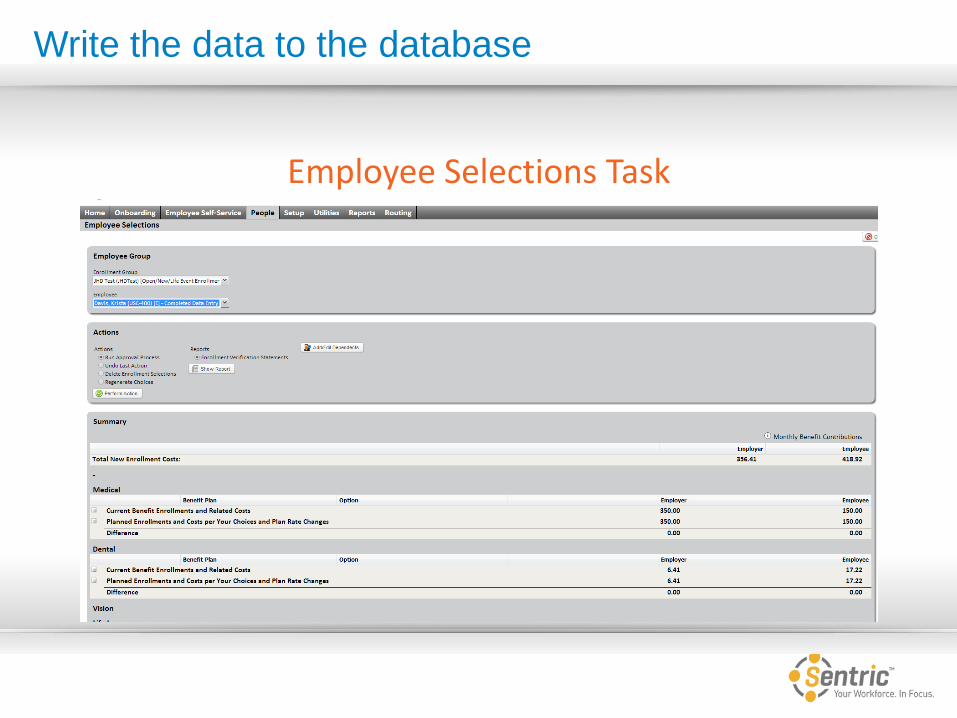
Write the data to the database
Now that the employees are done it is time to finish the process
First Approve the selections Most easily done on the Group Actions task on the People tab May want to review an employee’s selections on the Employee Selections tab first
Write the data to the database
Group Actions Task
Write the data to the database
Employee Selections Task

Write the data to the database
Now that the employees are done it is time to finish the process • Create the Benefit History Records • Recommend doing this is small batches • Most easily done in Group Actions task • There is no undo for this step

CLEAN-UP Open Enrollment

Clean Up
Once records have been written to the Benefit History they can be deleted. We recommend: • Run an Audit query prior to deletion (Sentric
can provide a basic query for this purpose) • Wait until after the benefit records are current • Do not set the system to delete choices
automatically • Clear prior to next open enrollment

• Open Enrollment
Demonstration

Test
Test Your Knowledge

Questions
If you called in on the phone please enter *5 on your phone to ask a question.
(=*5
If you are listening on your computer please press the File question request button on your screen.
I will un-mute your line one at a time, so once you press *5 or press the button you may need to wait just a bit for your turn.

Poll
Future Webinars Poll

60
Thank You!
Please take a moment to fill out the survey