OFF - Amazon Web Servicesmedia.prod.babylock.com.s3.us-east-1.amazonaws.com/... · Never operate...
42
-
Upload
vuongkhanh -
Category
Documents
-
view
219 -
download
0
Transcript of OFF - Amazon Web Servicesmedia.prod.babylock.com.s3.us-east-1.amazonaws.com/... · Never operate...


Never operate this sewing machine if it has a damaged cord or plug, if it is not working properly, if it has been dropped or damaged, dropped into water. Return this sewing machine to the nearest authorized retailer for examination, repair, electrical or mechanical adjustment.
The incorrect or damaged plate can cause the needle to break.
OFF,threading bobbin, or changing presser foot, etc.
CAUTION-
When storing this machine, avoid direct sunlight and high humidity location. Do not use or storethe machine near a space heater, iron, halogen lamp, or other hot objects in order to have a longer service life.
18.
Appliance (110-120V) is provided.19.
Do not use the machine near a heat source, such as a stove or iron; otherwise, the machine power cord or garment being sewn may ignite, resulting in fire or an electric shock.
SAVE THESE INSTRUCTIONS
Moving parts- To reduce risk of injury, switch off before servicing.Close cover before operating machine.
This product is for household use, or equivalent.


NEEDLE UP/DOWN BUTTON
SEWING SPEED CONTROLLER
SEWING LETTERS
PATCH WORK
32
AND PIPING
STRAIGHT STITCH SEAMING AND QUILTING DARNING
31
31
29
29
OPERATIONAL PANEL
STITCH REFERENCE CHART 33-37
OPENING THE ACCESSORY COMPARTMENT
LARGE EXTENSION TABLE
CHANGING THE NEEDLE
REVERSE STITCH BUTTON
LOCK STITCH
START/STOP BUTTON
NEEDLE THREADER
SEAM GUIDE ON THE STITCH PLATE
USING THE ALL-PURPOSE FOOT
CORDED BUTTONHOLES 24

Thread Tension Dial
Face Cover
Sewing Speed Controller
with Accessory CompartmentUpper Thread Guide
Reverse Stitch Button
Start/Stop Button
Needle Up/Down Button
Horizontal Spool Pin Bobbin Winder Shaft Bobbin Winder Stop Handwheel Stitch Width Button Pattern Selector Buttons Stitch Length Button Thread Cutter Forward Button
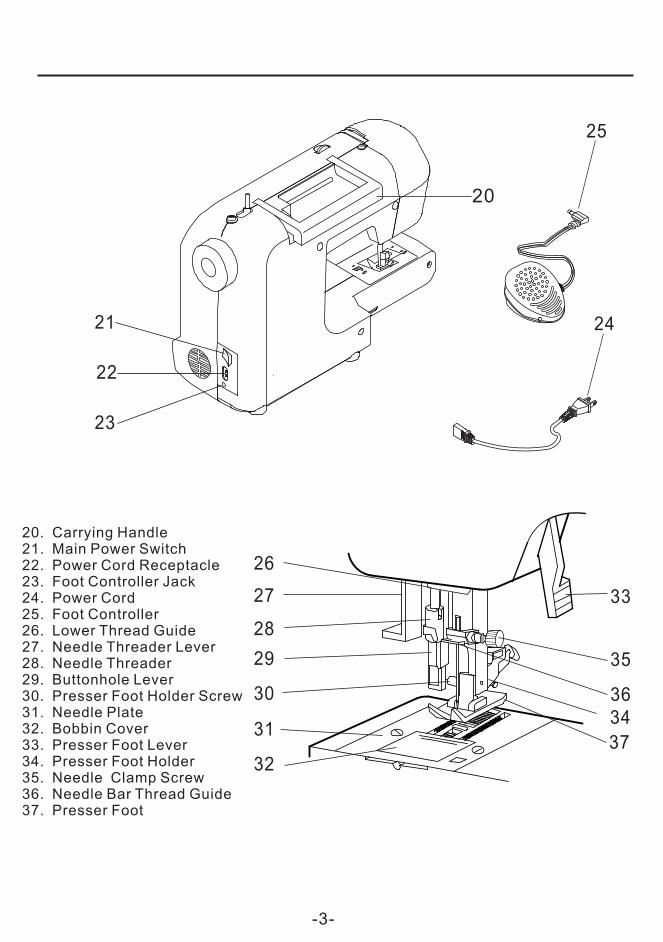
20. Carrying Handle21. Main Power Switch22. Power Cord Receptacle23. Foot Controller Jack24. Power Cord25. Foot Controller26. Lower Thread Guide27. Needle Threader Lever28. Needle Threader29. Buttonhole Lever30. Presser Foot Holder Screw31. Needle Plate32. Bobbin Cover33. Presser Foot Lever34. Presser Foot Holder 35. Needle 36.
Clamp ScrewNeedle Bar Thread Guide
37. Presser Foot

15
16 17 18 19
1. Needle Set2. Bobbin(4) (one in machine)3. Spool Cap(large)4. Spool Cap(small)5. Needle Plate Screwdriver6. Screwdriver(small)7. Seam Ripper with Brush8. Buttonhole Foot9. Overcasting Foot10. Zipper Foot11. 12.
Open Toe FootStraight Stitch Foot
13. Darning Foot14. 1/4 Inch Foot15. Blind Hem Foot16. All Purpose Foot (on machine )17. Large Extension Table18. Tote Bag19. Darning Plate
FLAT BED ATTACHMENT WITH ACCESSORY COMPARTMENT
Accessories can be stored in the flat bed attachment within theaccessory compartment.
OPENING THE ACCESSORY COMPARTMENT
To open the accessary compartment, remove flat bed attachment from machine, turn attachment so the inside of the compartment is facing you. Slip thumb into opening and pull down.

Pull the flat bed attachment off to the left.
REMOVING THE FLAT BED ATTACHMENT
1
2 Install the flat bed attachment back in its original position.
With the flat bed attachment removed, free arm sewing is available for another sewing purpose.
TOTE BAG
Unzip the tote bag for placing or removing the machine. Tote bag can be used for storingor carrying the machine.

3
4
1presser feet.
holder
To attach, tighten the screw after raising the presser foot holder.
CHANGING THE NEEDLE
Presser foot holder screw
lever.
with screwdriver.

NoteThis appliance has a polarized plug(one bladewider than the other). To reduce the risk of electricalshock , this plug is intended to fit in a polarized outletonly one way. If the plug does not fit fully into the outlet reverse the plug. If it still does not fit, contact a qualifiedelectrician to install the proper outlet. Do not modify the plug in any way.

Stitches 1, 2 and 6: The REVERSE STITCH button will sew in reverse while the button ispressed and return to forward stitching when the button is released.
Other stitches: The REVERSE STITCH button will sew 3-4 stitches to tie-off the stitchingand then stop sewing. Continue sewing by pressing the START/STOP button or foot control.
Press the needle up /down button to raise or lower the needle. Pressing the button twice sews one stitch.
The needle may be set so it will stop in the DOWN position or UP position.
Stop machine and then press Lock Stitch button to sew 4 tie-off stitches at same position.Machine will then automatically stop.
LOCK STITCH
SEWING SPEED CONTROLLER
Slide the sewing speed controller to right or left to adjust the sewing speed.
The machine will start running when START/STOP button is pressed and will stop when pressed the second time.The machine will stitch slowly for the first 3 stitches.

When using stitches 1,2 and 6, the machine will continue to sew reverse at slow speed while this button is pressed. When released, the machine will sew forward.
START/STOP BUTTON This button will be deactivated.
SEWING SPEED CONTROLLERThe sewing speed controller only functions while using the START/STOP button. It will not operate when foot control is being used.
When sewing other stitches, the reverse stitch button is used as a reinforcement stitch.
If replacement is necessary, use
electronic Model YSD180034(USA only)

Stitch length : Press stitch length button, indicator light, LEDdisplay auto change to show the size of stitch length.
Stitch width : Press stitch width button, indicator light, LEDdisplay auto change to show the size of stitch width.
Pattern selector : Press pattern selector button; LED displays number. To choose the various pattern selections pressthe pattern selector buttons.
Forward button :By pressing the forward button, the pattern will jump 10 patternseach time the button is pressed. This allows easy access for selectionof pattern.
Forward button
OPERATIONAL PANEL

Remove the bobbin cover by slidingthe bobbin cover latch to right and push down the left lower corner of this cover at same time.
5 6
Use a bobbin that has been correctly woundwith thread, otherwise the needle may breakor the thread tension will be incorrect.
Slightly raise horizontal spool pin.
Slide a spool of thread onto the spool pin so the thread unwinds to the front from the top of the thread spool. Secure it with the spool cap that best fits the size of spool being used to ensure smooth flow of thread.
Pass thread from spool around and under the upper thread guide as shown. Pull end of thread through hole in bobbin as shown.
Make sure the bobbin winder shaft is in left position. Place bobbin onto shaft and rotate until it snaps into position with end of thread coming from top of bobbin.
Start machine to wind bobbin. Stop machine after several turns to trim the thread tail with scissors. Bobbin will cease turning when completely filled. Cut thread and push shaft to the left to remove bobbin.

Insert the bobbin into bobbin case with the thread unwinding counterclockwise.
the bobbin cover.

1. Raise presser foot lever.2. Press the needle up/down button or rotate the handwheel toward you to raise the needle into the up position.3. Place a spool of thread onto the spool pin and secure with the proper size spool cap.(see page 11)4. Pass the thread around upper thread guide for upper threading.5. Bring thread forward down the right channel, then to the left and up the left channel.6. Pull the thread through and into the take-up lever from right to left.7. Pass the thread down the left channel and into the lower thread guide. Slide the thread from right to left into the thread guide on the needle clamp.8. Thread the needle from front to back or follow directions for using the needle threader.(see page 14)

NEEDLE THREADER
Lower the lever as far as it will go so the threader turns and the hookpin will go through the needle eye.
Position thread below the needle eyeand under the hook pin.
Hold thread loosely and release the lever. Hook will turn and pass thread through needle eye while making a loop.
Raise presser foot and pull thread out about 10 inches from needle eye.Note: The needle threader is used for needle sizes 11, 14 and 16.
3.Lower the threader slowly and draw thread through thread guide(A) and pull toward the right.
2.Set needle in up position.
Hold the upper thread loosely and pressneedle up/down button twice.The handwheel will turn one completeturn.
Pull both upper and bobbin threads about 10 inches toward the back and under thepresser foot.

Cut the threads with the thread cutter on left sideof the machine.

(If using foot control, press pedal while pressingreverse stitch button.)
(If using foot control, release reverse stitch buttonand press foot control to sew forward.)
SEAM GUIDE ON THE STITCH PLATE

Top side of fabric
Bobbin thread is visible
Bottom side of fabric
Upper thread is visible
Upper and bobbin threads should interlock approximatelyin the middle of fabric.
Turn the tension dial to a lower number toloosen the upper thread tension.
Turn the tension dial to a higher number to tighten the upper thread tension
To sew zigzag stitches, the thread tension should be set to a slightly weaker tension than when sewing straightstitches.You will obtain a nicer stitch when upper thread appearsslightly on bottom side of fabric.

5 7 8 9 10 11 12 13 14 16 18 19 20 21 22 23
45 55 60 65 70 75 80 85 90 100110120125130140160
Needle system
Ha×1
System 705
Needle size
Like shown in drawing, stitches on top side of fabric are good but bottom side tends to have a bunch of thread, it usually means that the upper thread is not threaded correctly (especially threading of the upper thread tension regulator may not correct.)Refer to page 13 for correct threading.
The feed dog will feed the fabric automatically.Do not pull or push on fabric with hands.It will cause needle breakages or poor qualitystitches.
70/09-75/1170/10-80/12
80/12-90/14
90/14-100/16
80/12-90/14
Stitch length
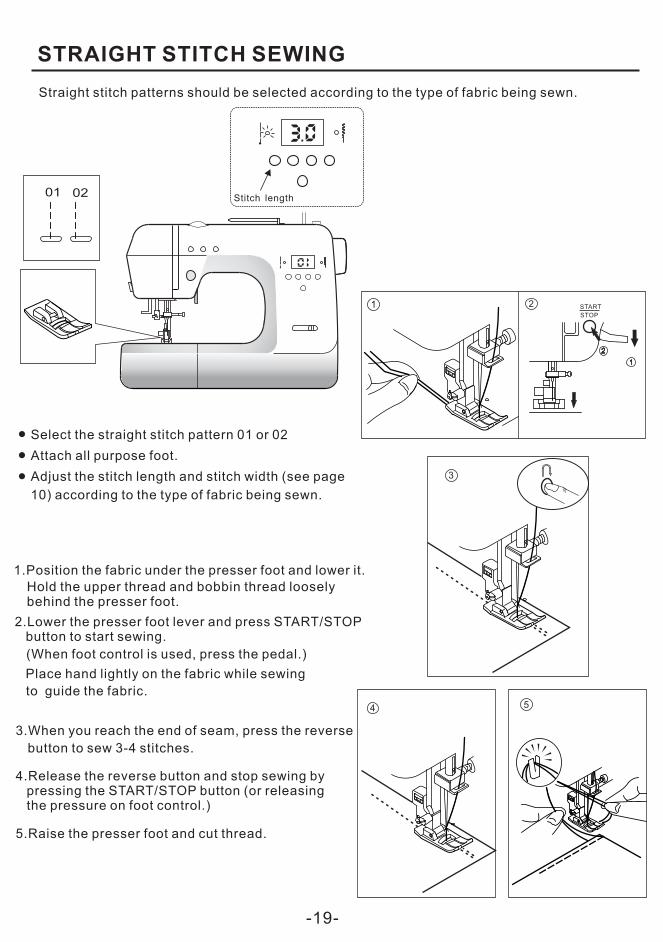
Hold the upper thread and bobbin thread loosely behind the presser foot.

Stitch Width
When you sew a satin stitch by shortening the stitch length, attach the open toe foot.
By simply removing the flat bed attachment, machine becomes a free arm machine makinghard to reach areas readily accessible.
Refer to page 5 for removing flat bed attachment.

15
39
18 19 20
Overcasting stitches (width 7.0-5.0) are usedfor preventing raveling of fabrics.Some stitches can sew the seam and overcasting at the same time.Therefore, it is convenient for sewing easy to ravel and stretch fabrics.
18 19 3906
D. Adjust the width and length for various weights of knit and stretch fabrics.(When using overcasting foot,do not change the width narrower than 5.0 mmE. For ½ inch seam allowances, sew then trim the excess fabric close to the stitching. Be careful not to cut thread when cutting the fabric edge.
USING THE ALL-PURPOSE FOOT

This stitch will sew without stitches showing on right side of fabric.
Note:
If too much of the stitching shows on the right side
of the fabric, change to a narrower stitch width or
move the guide on the foot to the right.
If the zigzag does not meet the fold, widen the stitch
width or move the guide on the foot to the left.
21 22
21

07 131211100908 14
If this lever is not in position, the number will be flashed on LED screen.

,

15
17
51

0
01
1
Note: You may use stitch #02 if needle position has to be adjusted closer to your zipper or piping.
CAUTION:When using this stitch be extremely careful that the needle does not hit the presser foot. Turn handwheel towards you to insure the needle passes through the zipper foot opening. For the left side of the zipper foot it is recommended to adjust width no higher than 4.0 mm. For the right side of the zipper foot it is recommended to adjust width no lower than 3.5mm

Darning
STRAIGHT STITCH SEAMING AND QUILTING
STRAIGHT STITCH SEAMING
QUILTING
Select center needle position, straight stitch sewing stitch number 01. Set darning plate on the top of the needle plate over feed dog teeth. Align tabs on bottom of darning plate and snap into the two openings located on each side of feed dog teeth on needle plate. Remove the presser foot and presser foot holder. Screwthe darning foot onto the presser bar with the extended arm of the foot resting above the needle clamp screw.Holding the needle thread, take one stitch and pick up bobbin thread through the fabric.Lower presser foot lever and start sewing at a slow to mediumspeed, moving the fabric back and forth with a steady rhythm.Turn fabric and sew another layer of stitching across the first layer of stitching.
CAUTION: When using darning foot on machine with zig-zag stitches do not set the stitch width any wider than 4.0. Otherwise needle may deflect and hit the darning foot causing damage to machine or possible injury.

2
25
5
26 28 55
-28-
a variety of different fabrics.
.

39 40
36
63
29
36 37 38
29 30
-29-

When you sew letters please use the open toefoot instead of all-purpose presser foot, it will have good effect and quality on your sewing.
Select desired letters by pressing pattern selector.Please refer to pattern chart on right side.
Please refer to letter chart to select numbers for the desired letters you want to sew.
4.A letter will sew each time, you may measure the distance among letters before sewing.
SEWING LETTERS
64
-30-

4.Clean the feed dog and hook area with the lint brush.
-31-
supply by removing the plug from the electric outlet.
Please switch off the power and unplugfrom electric outlet before you start cleaning.
Remove the bobbin and bobbin case(2)

-32-
Dirt in the bobbin and hook area. Clean the bobbin and hook area.
Incorrect size of needle on stretch fabric.
Darning plate attached.
.Clean the feed dog area.
.
Use stretch needle
Remove the needle plate and bobbin case and clean the hookrace and feed dog.
power switch.
31
of needle
31
31
Remove darning plate. 27

-33-
STITCH REFERENCE CHART
Stitch name Pattern ApplicationStitch Width (mm) Stitch Length (mm)
Auto Manual Auto Manual
Straight Stitch(Center)
Attaching zippers, basic stitching and sewing gathers or pintucks,etc
3.5 3.5 3.0 0.5-4.5
Straight Stitch(Left,Center,Right) Basic stitching, sewing gathers or pintucks,etc
0.0(Left)
0.0,3.5,7.0(Left -Middle- Right) 3.0 0.5-4.5
Quilt Stitch(Left,Center,Right)
Straight stitch quilting that looks hand-sewn 3.5 0.0,3.5,7.0(Left -Middle- Right) 2.5 0.7-3.0
Triple StitchAttaching sleeves, sewing inseams, sewing
stretch fabrics and decorative stitching.3.5 0.0,3.5,7.0
(Left -Middle- Right) 2.5 0.7-3.0
Stretch Stitch Sewing stretch fabrics and decorative stitching 3.0 1.0-5.0 3.0 1.5-3.5
Zigzag Overcasting and attaching applique’s 5.0 0.0-7.0 2.5 0.0-4.5
Bartack buttonhole
Buttonholes for stretch fabric 5.0 5.0 0.4 0.2-0.8
Buttonhole Buttonholes for stretch fabric 6.0 6.0 0.4 0.2-0.8
Keyhole buttonhole
Keyhole buttonholes for thick or furry fabric 7.0 7.0 0.4 0.3-0.8
Keyhole buttonhole
Keyhole buttonholes for thick or furry fabric 7.0 7.0 0.4 0.3-0.8
Buttonhole Buttonholes on thin, medium weight fabric 5.0 5.0 0.5 0.3-0.8
Buttonhole Buttonholes on thin, medium weight fabric 6.0 6.0 0.4 0.3-0.8
ButtonholeHorizontal buttonholes on thin, medium
weight fabric5.0 5.0 0.4 0.3-0.8
01
02
03
04
05
06
07
08
09
10
11
12
13

Stitch name Pattern ApplicationStitch Width (mm) Stitch Length (mm)
Auto Manual Auto Manual
Buttonhole Buttonholes on thin, medium weight fabric 6.0 6.0 0.4 0.3-0.8
3-step zigzagOvercasting on medium weight or stretch fabric, attaching elastic, darning, etc
6.0 3.0-7.0 1.0 0.5-2.0
Satin stitch Satin stitching 6.0 3.0-7.0 1.0 0.5-2.0
Rick-rack Decorative stitching, elastic stitching 6.0 3.0-7.0 2.5 1.0-3.0
Over-lockOvercasting on thin or medium weight fabric.Overcasting on thick fabrics.
6.0 3.0-7.0 2.5 1.0-3.0
Double-overlock
Decorative hemming on thin, medium weight and plain weave fabric, heirloom stitching, etc.
6.0 3.0-7.0 2.5 1.0-3.0
Shell Overcasting on thin or medium weight fabrics 4.0 2.0-6.0 2.0 1.0-3.5
Blind hem Blind hem stitching on medium weight fabric 4.0 2.0-6.0 2.0 1.0-3.5
Zigzag blind hem
Blind hem stitching on stretch fabric 5.0 3.0-7.0 2.0 1.0-3.5
Double action Attaching elastic to stretch fabrics 6.0 3.0-7.0 2.5 1.5-4.5
Bridging Patchwork stitching and decorative stitching 6.0 3.0-7.0 2.0 1.0-3.0
Feather Decorative stitching, patchwork 6.0 3.0-7.0 2.0 1.0-3.0
Fagoting stitch Fagoting, patchwork and decorative stitching 7.0 3.0-7.0 2.5 1.0-3.0
-34-
14
15
16
17
18
19
20
21
22
23
24
25
26
STITCH REFERENCE CHART

-35-
Stitch name Pattern ApplicationStitch Width (mm) Stitch Length (mm)
Auto Manual Auto Manual
Decorative Decorative stitching 7.0 3.0-7.0 2.5 1.0-3.0
Faggoting stitch
Decorative stitch 7.0 5.0-7.0 2.0 1.0-2.0
Decorative Decorative stitching 7.0 7.0 1.5 1.0-2.0
Decorative Decorative stitching 7.0 7.0 2.0 1.0-2.0
Decorative Decorative stitching 7.0 7.0 4.5 4.5
Decorative Decorative stitching 7.0 5.0-7.0 2.0 1.0-2.0
Decorative Decorative stitch 7.0 3.0-7.0 2.0 1.0-2.0
Decorative Decorative stitching 6.0 3.0-7.0 2.5 1.0-3.0
Decorative Decorative stitching 5.0 3.0-7.0 2.0 1.0-3.0
OvercastingOvercasting on thick or stretch fabrics,applique
5.0 3.0-7.0 2.5 1.5-3.5
DecorativeApplique
Applique, decorative stitching 5.0 3.0-7.0 2.5 1.5-4.5
Decorative Applique, decorative stitching 5.0 3.0-7.0 2.5 1.5-4.5
DecorativeOvercasting
Applique, decorative stitching 5.0 3.0-7.0 2.0 1.0-3.0
27
28
29
30
31
32
33
34
35
36
37
38
39
STITCH REFERENCE CHART

-36-
Stitch name Pattern ApplicationStitch Width (mm) Stitch Length (mm)
Auto Manual Auto Manual
Decorative Applique, decorative stitching 5.0 3.0-7.0 2.0 1.0-3.0
DecorativeDecorative hemming on thin medium weight and plain weave fabrics, heirloom stitching, etc.
6.0 3.0-7.0 2.5 1.0-3.0
Decorative Decorative stitching 7.0 7.0 4.5 4.5
Decorative Decorative stitching 7.0 7.0 4.5 4.5
Decorative Decorative stitching 7.0 7.0 4.5 4.5
Decorative Decorative stitching 7.0 7.0 4.5 4.5
Decorative Decorative stitching 7.0 7.0 4.5 4.5
Decorative Decorative stitching 7.0 7.0 4.5 4.5
Decorative Decorative stitching 7.0 3.0-7.0 2.5 0.7-2.5
Decorative Decorative stitching 7.0 5.0-7.0 2.0 1.0-2.0
Decorative Decorative stitching 7.0 3.0-7.0 3.5 1.5-3.5
Decorative Decorative stitching 7.0 7.0 4.5 4.5
Decorative Decorative stitching 7.0 7.0 4.5 4.5
40
41
42
43
44
45
46
47
48
49
50
51
52
STITCH REFERENCE CHART

-37-
Stitch name Pattern ApplicationStitch Width (mm) Stitch Length (mm)
Auto Manual Auto Manual
Decorative Decorative stitching 7.0 5.0-7.0 2.5 1.5-2.0
Decorative Decorative stitching 7.0 3.0-7.0 3.5 1.5-3.5
Decorative Decorative stitching 7.0 5.0-7.0 2.0 1.0-2.0
Decorative Decorative stitching 7.0 5.0-7.0 2.0 1.0-2.0
DecorativeCross stitch
Decorative and cross stitching 7.0 5.0-7.0 2.0 1.0-2.0
DecorativeCross stitch
Decorative and cross stitching 6.0 3.0-7.0 3.0 1.0-3.0
DecorativeCross stitch
Decorative and cross stitching 7.0 5.0-7.0 2.0 1.0-2.0
DecorativeCross stitch
Decorative and cross stitching 7.0 5.0-7.0 2.0 1.0-2.0
DecorativeSatin stitch
Decorative and satin stitching 7.0 5.0-7.0 0.5 0.3-1.0
DecorativeSatin stitch
Decorative and satin stitching 7.0 5.0-7.0 0.5 0.3-1.0
DecorativeSatin stitch
Decorative and satin scallop stitching 7.0 7.0 0.3 0.3-1.0
Character stitches
Character stitches 7.0 7.0 4.5 4.5
53
54
55
56
57
58
59
60
61
62
63
64~99
STITCH REFERENCE CHART