of a Disk option backup - Acronis Forum · from prior use or botched attempts, my recommendation is...
12
2012 Disk Option Restore of a Disk option backup by GroverH The purpose of a “Disk option” restore is to make the target disk become identical to the source in content and in size. This implies that the target disk should be the same capacity as the source disk which is the basis of this guide. Yes, it is possible to perform a disk option restore to both a larger or smaller disk but the user has no control over the resulting partition sizes. For an XP system restore, this may not be too bad. If the restore involves Windows 7, then a disk option restore to a different size disk will probably result in additional partition size modifications being necessary or use of the Window repair option. If operating system is Windows 7 and the goal is to restore to a larger or smaller disk, my other guide which is “Restore a TIH2012 backup to larger or smaller disk” offers a much better chance of success with far less troubles. That guide restores each partition individually so user has complete control over partition sizes. Index item 3-LL. This guide illustrates the use of the TrueImage “Add new disk” option as to the first step in preparing the disk for the disk option restore. The “Add new disk” option deletes any partitions or existing data from the target disk so all of the new space is unallocated. Partitioning or formatting is not necessary for the target disk. It is suggested that several practice runs be performed so to become familiar with the procedures. Do NOT use the Proceed option during practice. Use the Cancel option during practice. The disk option restore procedures next. Page 1 of 12
-
Upload
nguyenkhuong -
Category
Documents
-
view
219 -
download
0
Transcript of of a Disk option backup - Acronis Forum · from prior use or botched attempts, my recommendation is...

2012 Disk Option Restore
of a Disk option backup
by GroverH The purpose of a “Disk option” restore is to make the target disk become identical to the
source in content and in size. This implies that the target disk should be the same capacity
as the source disk which is the basis of this guide.
Yes, it is possible to perform a disk option restore to both a larger or smaller disk but the
user has no control over the resulting partition sizes. For an XP system restore, this may
not be too bad. If the restore involves Windows 7, then a disk option restore to a different
size disk will probably result in additional partition size modifications being necessary or use
of the Window repair option.
If operating system is Windows 7 and the goal is to restore to a larger or smaller disk, my
other guide which is “Restore a TIH2012 backup to larger or smaller disk” offers a much
better chance of success with far less troubles. That guide restores each partition
individually so user has complete control over partition sizes. Index item 3-LL.
This guide illustrates the use of the TrueImage “Add new disk” option as to the first step
in preparing the disk for the disk option restore. The “Add new disk” option deletes any
partitions or existing data from the target disk so all of the new space is unallocated.
Partitioning or formatting is not necessary for the target disk.
It is suggested that several practice runs be performed so to become familiar with the
procedures. Do NOT use the Proceed option during practice. Use the Cancel option during
practice.
The disk option restore procedures next.
Page 1 of 12

Disk Option Restore Procedures
Begin
If you have not already done so, assign unique names (volume labels) to each partition of your
computer's disks before the required “disk” option backups are created (example: Win7-C). This
will allow for identification of the partitions by their names (<11 characters with no spaces) and not
by the disk letters. Windows Disk letters may differ when booting from the rescue media. The names
will help you find the drive containing your backups, as well as the target (new) drive. Information on
partition sizes, drive capacities, their manufacturer’s, and model numbers can also help to correctly
identify the drives. Best time to assign names is prior to a backup so the changes will appear in all
future backups and restorations.
º Important! »
It is highly recommended to install the new hard drive to the same position in the computer
and to use the same cable and connector that was used for the original drive.
This is not always possible, e.g. the old drive may be an IDE and the new drive may be a SATA.
º In any case, install the blank new drive to where it will be used. »
I. If necessary, arrange the boot order in BIOS so as to make your rescue media device
(CD, DVD or USB stick) the first boot device. See Arranging boot order in BIOS (UM-
p. 89).
Attach the external drive if it contains the backup to be used for recovery and make sure
that the drive is powered on. This must be done before booting from Acronis rescue media.
II. Boot from the rescue media and validate the backup you want to use for recovery.
If ATIH considers the backup corrupted, it will not proceed with recovery. If backup has
been recently validated, this step may be bypassed.
III. Before performing the disk restore, if the disk has been used or contains any data
from prior use or botched attempts, my recommendation is that the TI Utilities “add
disk” option be used and any existing partitions or data be deleted so the blank space
is unallocated without partitions. Partitioning or formatting is normally not
necessary for the target disk. The “Add new disk” option is performed prior to the
disk option recovery. See “Add Disk” section (page 10) for illustrations.
Page 2 of 12

Figure 1: This is the Windows Disk Management graphical view of disk. This provides
important information about the disk configuration. Note that partition 2 is the boot
partition and the active partition.
Note this example has 3 partitions. This can be used as confirmation that your backup
contains all the partitions needed to create a new disk. The information displayed in figure
7 should include all the partitions listed in Figure 1.
Figure 2: Select Recovery in the main menu.
Select “Disk & Partition” Recovery.
Figure 1
Figure 2
Page 3 of 12
Figure 3: Browse to the backup storage folder and select the *.tib file being used for
restoration.
Figure 4: After the backup file is selected and highlighted, click OK.
Figure 3
Figure 4
Page 4 of 12

Figure 5: Click Next. Only one backup file should be selected.
Figure 6: Select Recover Disks and Partitions.
Click Next.
Figure 5
Figure 6
Page 5 of 12
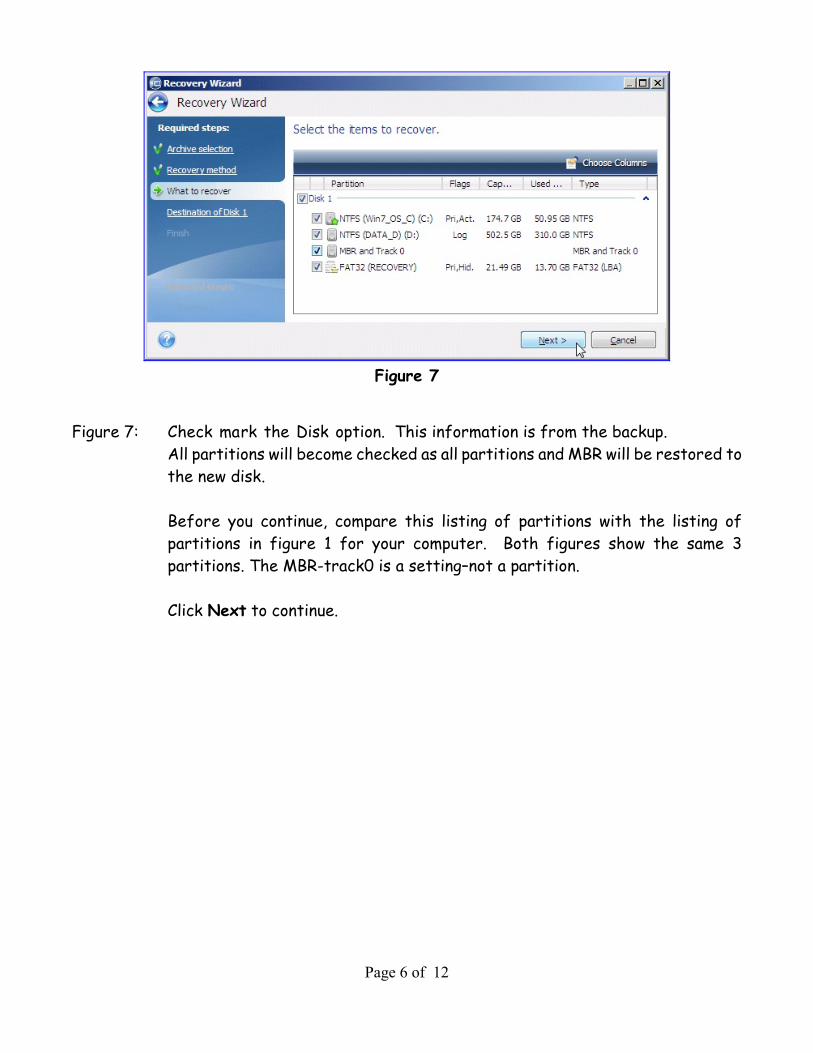
Figure 7: Check mark the Disk option. This information is from the backup.
All partitions will become checked as all partitions and MBR will be restored to
the new disk.
Before you continue, compare this listing of partitions with the listing of
partitions in figure 1 for your computer. Both figures show the same 3
partitions. The MBR-track0 is a setting–not a partition.
Click Next to continue.
Figure 7
Page 6 of 12

Figure 8: Check mark the “Recover Disk Signature” for restoration.
Select the target disk to receive the backup. If you used the “Add New Disk”
option, the space on the target disk will appear as unallocated. If you are
overwriting a disk containing data, an info window will appear asking you to
confirm the overwrite. Be careful to select the correct target disk.
Figure 9: Click the Finish Option. No selections are necessary.
Figure 8
Figure 9
Page 7 of 12
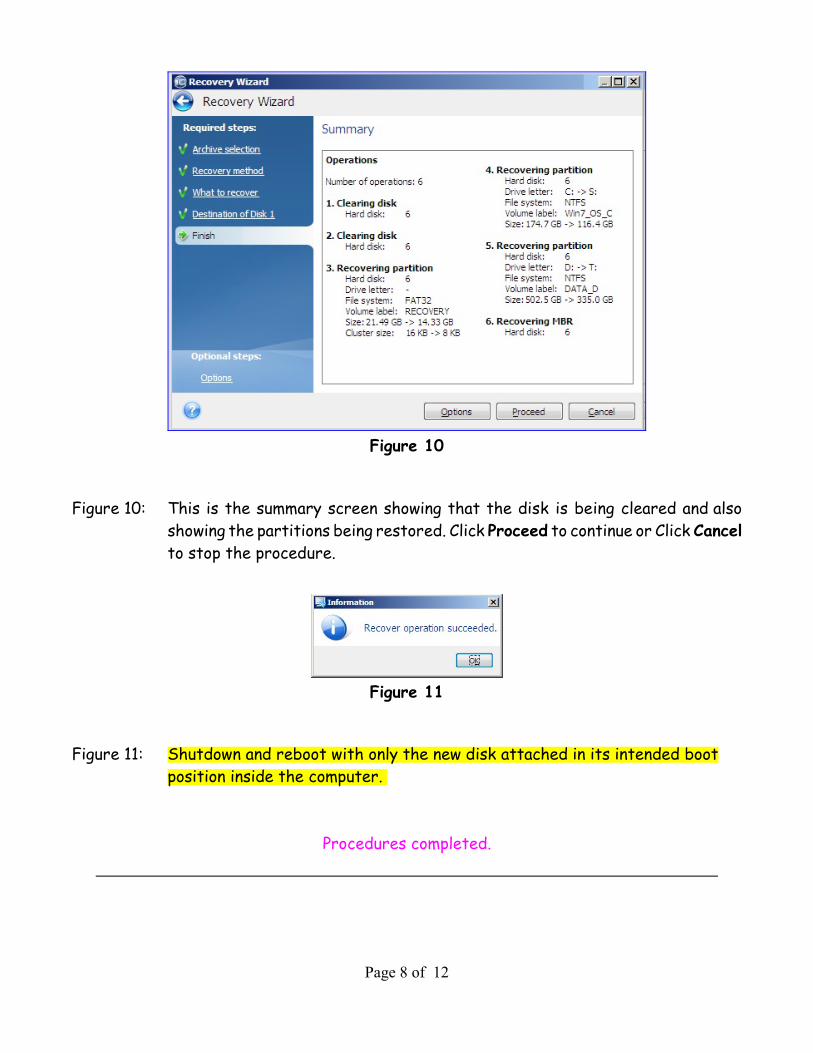
Figure 10: This is the summary screen showing that the disk is being cleared and also
showing the partitions being restored. Click Proceed to continue or Click Cancel
to stop the procedure.
Figure 11: Shutdown and reboot with only the new disk attached in its intended boot
position inside the computer.
Procedures completed.
Figure 10
Figure 11
Page 8 of 12
Addendum - I
Assorted Information
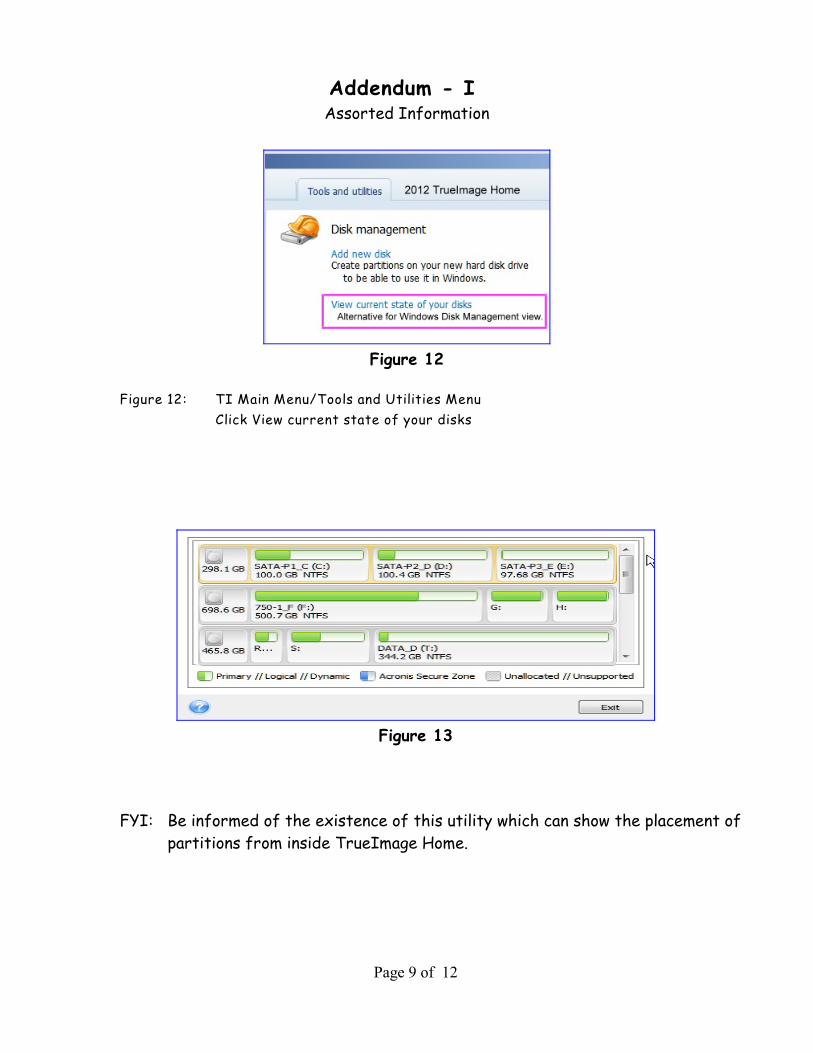
Figure 12: TI Main Menu/Tools and Utilities Menu
Click View current state of your disks
FYI: Be informed of the existence of this utility which can show the placement of
partitions from inside TrueImage Home.
Figure 12
Figure 13
Page 9 of 12
Addendum - II
True Image Add New Disk option
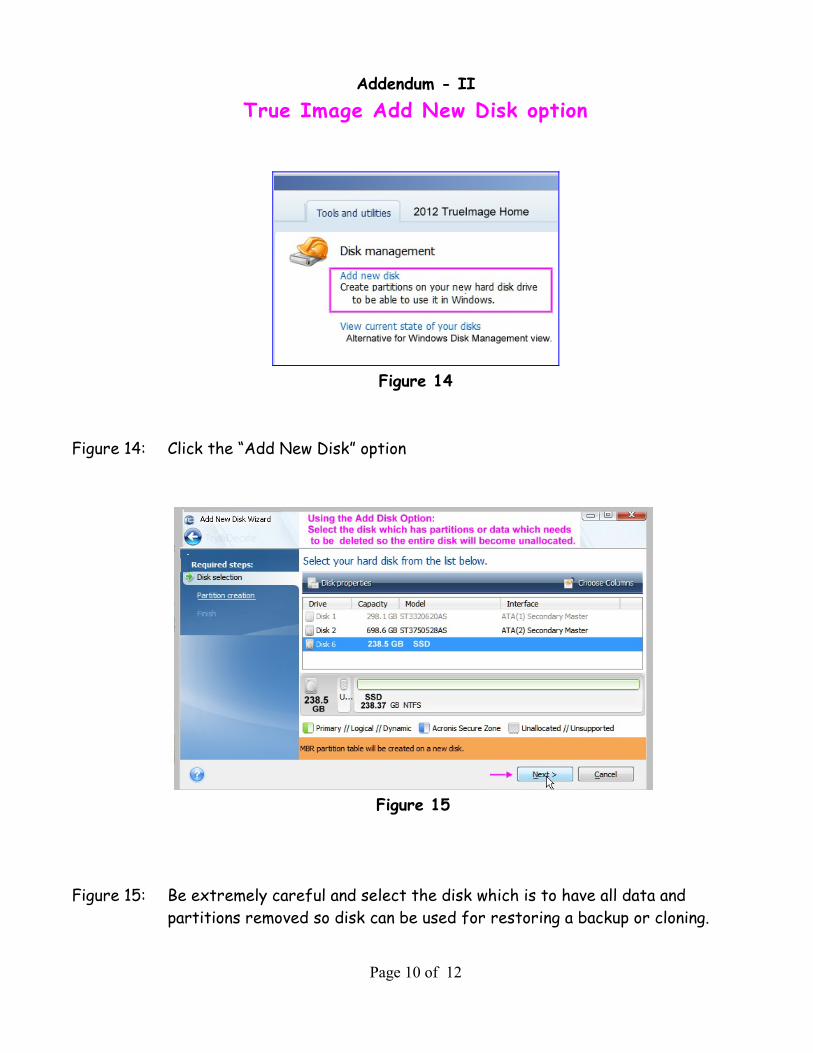
Figure 14: Click the “Add New Disk” option
Figure 15: Be extremely careful and select the disk which is to have all data and
partitions removed so disk can be used for restoring a backup or cloning.
Figure 14
Figure 15
Page 10 of 12

Figure 16: To delete partitions and make disk space unallocated,
Right Click on disk name and choose the Delete partitions option.
Click Next.
Figure 17: The space should show as unallocated with no drive letters. If drive letters are
still displayed, the partition delete was not exercised and needs to be repeated.
Figure 16
Figure 17
Page 11 of 12
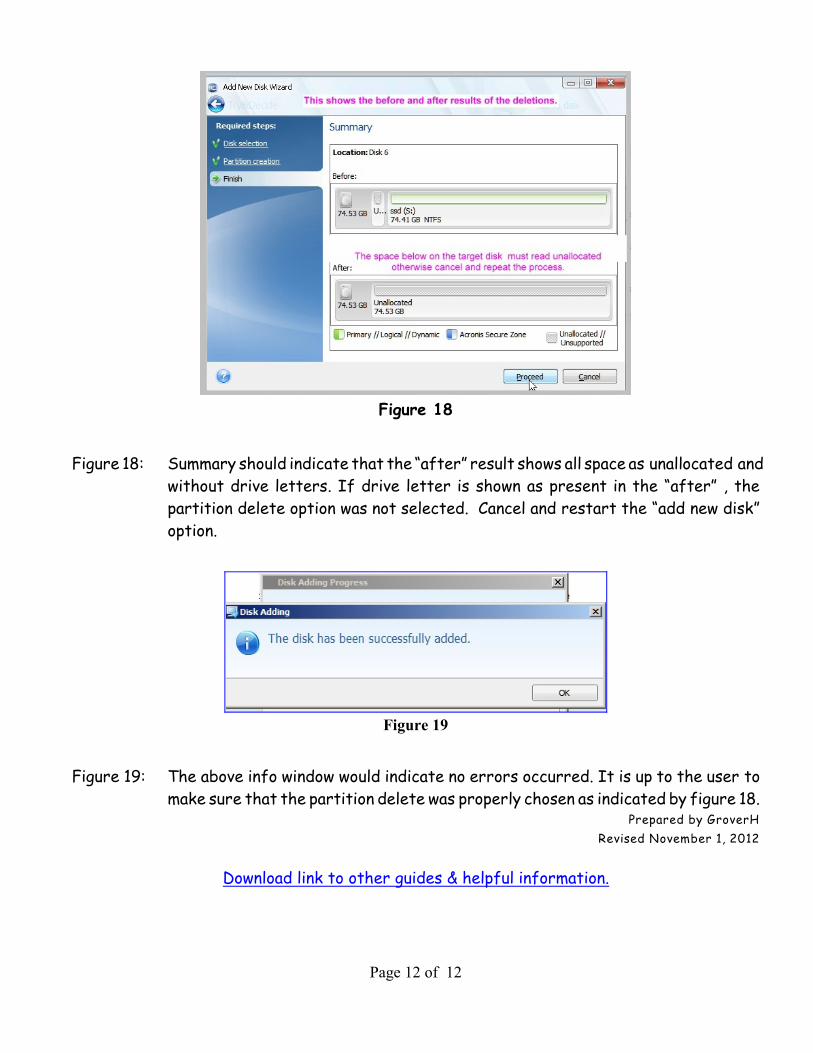
Figure 18: Summary should indicate that the “after” result shows all space as unallocated and
without drive letters. If drive letter is shown as present in the “after” , the
partition delete option was not selected. Cancel and restart the “add new disk”
option.
Figure 19: The above info window would indicate no errors occurred. It is up to the user to
make sure that the partition delete was properly chosen as indicated by figure 18.Prepared by GroverH
Revised November 1, 2012
Download link to other guides & helpful information.
Figure 18
Figure 19
Page 12 of 12