
Normandale Campus Access: Tutorial Microsoft Office · PDF file1 CAMPUS ACCESS: A MANUAL FOR...
103
1 CAMPUS ACCESS: A MANUAL FOR UNIVERSAL DESIGN Microsoft Word 2010 Microsoft PowerPoint 2010 Microsoft Excel 2010 Adobe Acrobat 9 Pro NORMANDALE COMMUNITY COLLEGE BLOOMINGTON, MN Online Learning Department
Transcript of Normandale Campus Access: Tutorial Microsoft Office · PDF file1 CAMPUS ACCESS: A MANUAL FOR...

1
CAMPUS ACCESS: A MANUAL FOR UNIVERSAL DESIGN
Microsoft Word 2010
Microsoft PowerPoint 2010
Microsoft Excel 2010
Adobe Acrobat 9 Pro
NORMANDALE COMMUNITY COLLEGE BLOOMINGTON, MN Online Learning Department

2
CONTENTS
The Electronic Curb Cut .................................................................................................. 5
Checklist ...................................................................................................................... 5
Techniques For Creating Accessible Microsoft Office 2010 Documents ......................... 6
Styles and Headings .................................................................................................... 6
Use of tables ................................................................................................................ 8
Color to Differentiate .................................................................................................... 8
Adding Pattern Fill to Chart Data ............................................................................... 10
Graphs and Charts are Images .................................................................................. 12
Document Protection ................................................................................................. 12
Property Settings ....................................................................................................... 14
Creating a Table of Contents ..................................................................................... 15
Use of Header and Footer.......................................................................................... 16
Checking your Documents for Accessibility ................................................................... 17
Accessibility Checker in Microsoft office 2010 ........................................................... 17
Accessibility Checker Report in Microsoft Office 2010 ............................................... 20
Accessibility Checker in Adobe Acrobat 9 Pro ........................................................... 20
Accessibility Errors in Microsoft Office 2010 ................................................................. 23
Applying Alternative Text ........................................................................................... 24
Check Reading Order of Table .................................................................................. 26
Table Header Rows Specified .................................................................................... 27
Header Rows in Excel ................................................................................................ 29
Bookmark the Top Left Table Cell .............................................................................. 31
Insert a Page Break ................................................................................................... 32
Using Blank Space ..................................................................................................... 33
Formatting Table Cells in Excel ................................................................................. 34
Hide Decorative Images in Word ............................................................................... 35
Floating Images ......................................................................................................... 36
Creating Accessible Forms in Microsoft Word 2010 .................................................. 37
PowerPoint Slide Titles .............................................................................................. 40
Accessibility Warnings in Microsoft Office 2010 ............................................................ 42

3
Hyperlinks Have Text Displayed ................................................................................ 42
Use the Outline Pane in PowerPoint .......................................................................... 45
Create New Slide Layouts in PowerPoint .................................................................. 46
Naming All Sheets in Excel ........................................................................................ 50
Additional Tips ........................................................................................................... 50
Choose .docx Over .rtf ............................................................................................... 51
How to Create an Accessible PDF ................................................................................ 51
Saving your Document as a PDF ............................................................................... 51
Converting Your Document to Accessible HTML .......................................................... 55
Check Your Web Page for Accessibility ..................................................................... 55
Adding Headings to Your Content in D2L .................................................................. 57
Accessibility Issues Converting Word Documents to Web Pages .............................. 60
Convert Your Accessible Word Document to HTML in D2L ....................................... 60
Check Your Color Contrast ........................................................................................ 63
Accessibility Errors in Adobe Acrobat Pro 9 .................................................................. 65
Adding Tags ............................................................................................................... 66
Adding a Language Attribute...................................................................................... 66
Adding Alt Text to an Image ....................................................................................... 69
Deleting Hidden Text Boxes....................................................................................... 70
Read Order ................................................................................................................ 73
Listen to How Your PDF Will be Read ....................................................................... 76
Fixing Objects Labeled Incorrectly ............................................................................. 77
Fixing Elements with Alternative Text but No Page Content ...................................... 79
Adding a Table summary / Alt Text to a table in a PDF ............................................. 81
Specifying Table Header Columns and Rows ............................................................ 83
Associating Table Cells with Column and Row Headers ........................................... 86
Creating an Accessible Scanned PDF Document ...................................................... 90
Scan an Accessible PDF............................................................................................ 93
Creating an Accessible Document from a Scanned PDF ........................................... 94
Creating an Accessible Fillable Form in Acrobat Pro ................................................. 97
Contact Information ..................................................................................................... 101

4
Additional Resources .................................................................................................. 102

5
THE ELECTRONIC CURB CUT
The Americans with Disabilities Act (ADA) and the term “reasonable accommodation”
provides the legal foundation for providing accessible technology. Accessibility and
accommodation are words often used interchangeably, but they have two different
meanings. An example of an accommodation is changing a cubicle setup to
accommodate an employee in a wheelchair. An accommodation is focused on the
individual. Accessibility, on the other hand is focused on the technology used by
everyone. Everyone, regardless of their disability status uses the same technology
(hardware or software) and has access to the same information.
A curb cut makes a great example of an accessible adaptation to the sidewalk. Curb
cuts were installed to accommodate accessible hardware, but are used by bicyclists and
parents with strollers or shopping carts. What was once considered an accommodation
is now viewed as a standard for sidewalks. Accessible transcripts or closed captioning
is used by hearing impaired persons so they can understand corresponding audio or
video files, but people use closed captions on videos at work so they don’t disturb their
co-workers while they’re watching a research tutorial, or that people may like to use
their keyboard for everything rather than using a mouse. People who are color deficient
need information conveyed without the use of color alone to convey contextual
meaning. Accessibility is the feature that allows not only screen readers, but screen
magnification, speech recognition and other assistive technologies to interpret data and
display it in multiple fashions.
CHECKLIST
In 2009, the Minnesota Legislature passed, and the governor signed into law, a statute
and funding to advance the accessibility of State of Minnesota information technology
systems used by both citizens and employees (3.302 LEGISLATIVE REFERENCE
LIBRARY). The State of Minnesota Office of Enterprise Technology has developed a
number of excellent accessibility resources. One such resource is the accessibility
checklist link provided in the next paragraph. The checklist is a quick resource tool that
can serve as a guideline for creating accessible documents and spreadsheets.
The following hyperlink is a CHECKLIST FOR ACCESSIBLE WORD AND PDF
DOCUMENTS.

6
TECHNIQUES FOR CREATING ACCESSIBLE MICROSOFT OFFICE 2010 DOCUMENTS
Creating accessible documents does not mean that your document has to be boring
and look the same as everyone else’s. It simply means you have to give your document
more structure so that assistive technologies can access the content and interpret it to
the user as it was intended to be read. Here are some best practices that will keep your
documents accessible and will make them easier to read.
STYLES AND HEADINGS
Styles and headings are used by screen readers to quickly navigate a document and
are the most important item in making a document accessible. They are also used to
create table of contents quickly.
Open your document
Highlight the text you want as the first heading on your page (see the styles
dialog box located in the ribbon). The example image shows a Normal Style
applied to the text selected.
Open the style dialog box and click heading 1. The style applied to the text will
preview immediately.

7
You should apply styles to all headings throughout your document for easier navigation.
Tip: Microsoft has preconfigured the styles template. If you don’t want to use the
preconfigured settings or if you want to develop a template with your own settings,
follow these steps:
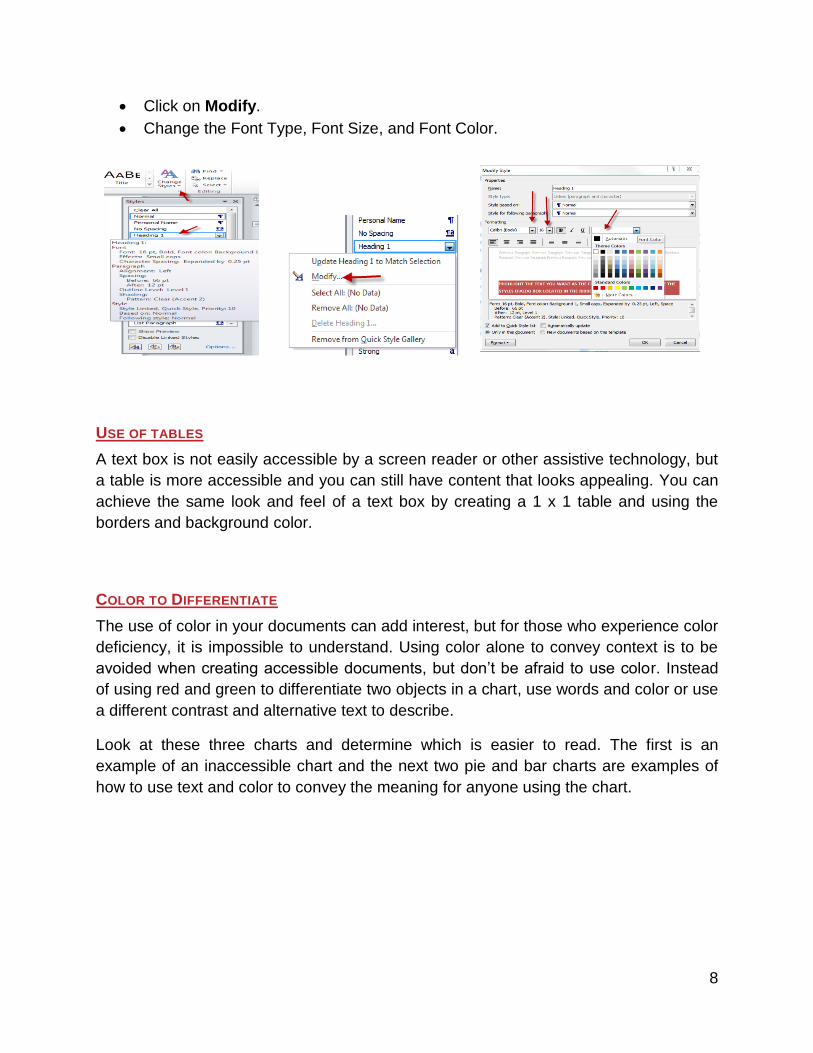
Click on the Styles dialog box on the home tab on the ribbon.
Right click on Heading 1.
8
Click on Modify.
Change the Font Type, Font Size, and Font Color.
USE OF TABLES
A text box is not easily accessible by a screen reader or other assistive technology, but
a table is more accessible and you can still have content that looks appealing. You can
achieve the same look and feel of a text box by creating a 1 x 1 table and using the
borders and background color.
COLOR TO DIFFERENTIATE
The use of color in your documents can add interest, but for those who experience color
deficiency, it is impossible to understand. Using color alone to convey context is to be
avoided when creating accessible documents, but don’t be afraid to use color. Instead
of using red and green to differentiate two objects in a chart, use words and color or use
a different contrast and alternative text to describe.
Look at these three charts and determine which is easier to read. The first is an
example of an inaccessible chart and the next two pie and bar charts are examples of
how to use text and color to convey the meaning for anyone using the chart.

9

10
ADDING PATTERN FILL TO CHART DATA
Using the pre-defined chart styles in Microsoft word is a great practice. However, it
doesn’t always have the chart you’re looking for. This is how you can easily change the
look of chart items to display a pattern of your choice.
1) Right-Click on a chart item and select Format Data Series.

11
2) Click on Fill, in the left pane of the pop up window.
3) Click the Radio button for Pattern Fill, in the right pane.
4) Select the pattern you want.
5) Click Close.
12
GRAPHS AND CHARTS ARE IMAGES
When a graph or chart is used in a Word document or a .pdf, it is interpreted by a
screen reader as an image. So, if use a graph/chart to display content in your
document, be sure to present all of the information you would like a user to learn from it,
in an alternative method. For example, if a chart shows that 60% of men surveyed like
apples and 40% like oranges, you should either describe that concept in a paragraph
leading up to the graph/chart or put that information in the alternative description text.
DOCUMENT PROTECTION
To assure that your document is not tampered with after you have made it accessible;
you should restrict the editing of your document. This also makes it easier for someone
using a screen reader to navigate your document.
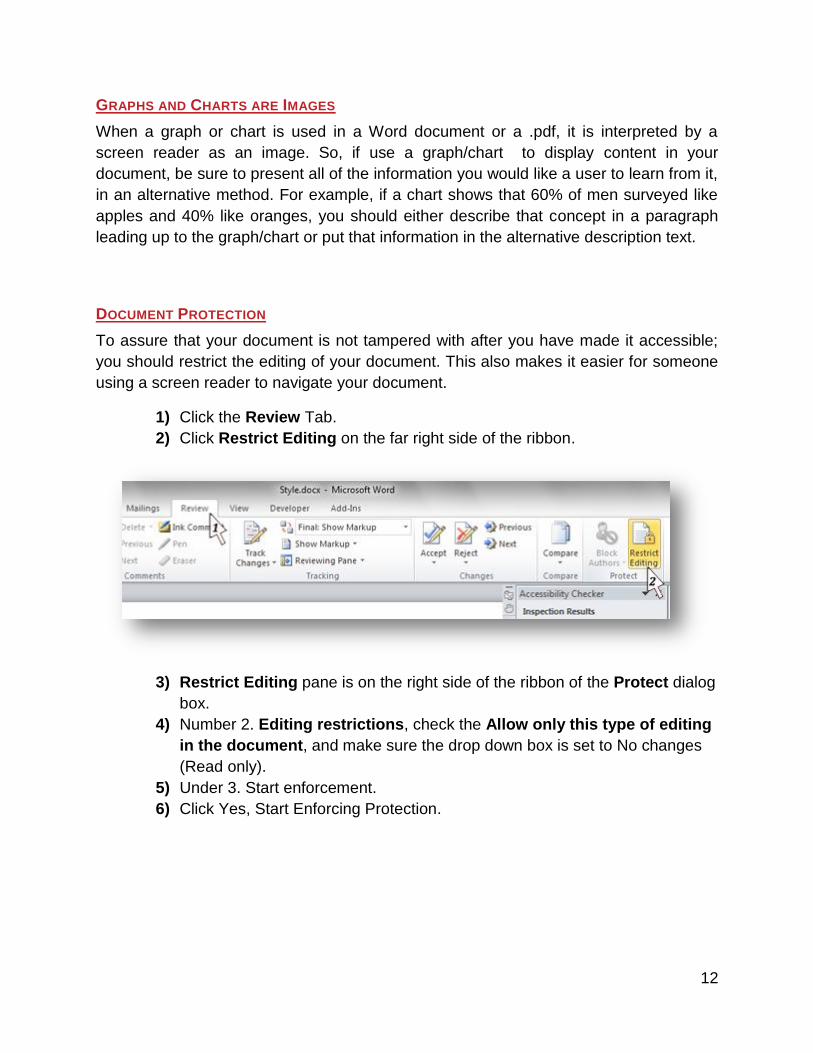
1) Click the Review Tab.
2) Click Restrict Editing on the far right side of the ribbon.
3) Restrict Editing pane is on the right side of the ribbon of the Protect dialog
box.
4) Number 2. Editing restrictions, check the Allow only this type of editing
in the document, and make sure the drop down box is set to No changes
(Read only).
5) Under 3. Start enforcement.
6) Click Yes, Start Enforcing Protection.

13
7) Choose to either enter a password or leave it blank. A password would
make it very inconvenient to access your document, so it is a discouraged.
8) Click OK.

14
PROPERTY SETTINGS
The properties of your document are what will let a screen reader know the title, subject
and author of your document. It is a best practice to always include this for your
intellectual property rights for both personal and institutional reasons.
1) Click the File.
2) Click Info.
3) Then go over to the far right and click Properties
4) Click Advanced Properties from the drop down menu.
5) Click the Summary tab.
6) Fill in the Title, Subject and Author.
7) Click OK.

15
CREATING A TABLE OF CONTENTS
You no longer need to manually type a chapter name, followed by a series of periods
and then the page number. A screen reader would read every period you placed in the
line! Using the styles technique, you will be able to create a Table of Contents with the
click of the button!
1) Click the References tab.
2) Click the Table of Contents, in the far left dialog box.
3) Choose a style of Table of Contents from the drop down menu.

16
USE OF HEADER AND FOOTER
Important text in your header or footer sections should be somewhere in the content
area too because screen readers ignore these sections. A screen reader would not
read the address and important information you had perhaps included in a header or
footer, so include a reference page or the same content in the body of your text. You
can see that in the example below the title was in the header and also was included in
the body of the document.

17
CHECKING YOUR DOCUMENTS FOR ACCESSIBILITY
Thanks to Microsoft Office 2010 and Adobe Acrobat 9 Pro, checking documents for
accessibility is easy. The next section will walk you through how to run the accessibility
checker in Microsoft Word, PowerPoint and Excel 2010, as well as Adobe Acrobat 9
Pro. You will see examples of the common errors that may occur when you run the
accessibility checker and how to fix these problems.
ACCESSIBILITY CHECKER IN MICROSOFT OFFICE 2010
Microsoft Office 2010 now comes with its own accessibility checker. You won’t
want to use this as your sole method for determining if a document is
accessible, but it is an effective tool and is easy to use. The following

18
information applies to Microsoft Word, PowerPoint and Excel . In addition, Adobe
Acrobat Pro 9 has an accessibility check feature for checking your PDF’s.
1) First you must save your Document.
2) Click File.
3) Click Check for Issues button. (Located in the middle column).
4) Click Check Accessibility.

19
5) The Accessibility Checker opens on the right hand side of the document.
Notice how in the image the Inspection Results shows Errors and lists
Missing Alt Text and then it identifies where in your document the error
occurs. Table, Picture 1 and No Header Row Specified are listed as
errors. The Accessibility Checker also identified warnings and listed
Repeated Blank Characters. You click on the listed item and fix the error.

20
ACCESSIBILITY CHECKER REPORT IN MICROSOFT OFFICE 2010
After you have run the accessibility checker, the accessiblity report will provide a few
different types of responses to let you know how accessible your document is. The
accessiblity report responses you may see are; No accessiblity issues found, Error,
Warning and Tip. Below I have listed the accessiblity report responses and what they
mean to you.
1) No accessiblity issues found – The document is considered accessible by the
checker tool.
2) Error – This document contains some content that may make the document in
accessible for some users.
3) Warning – This document contains some content that in most (but not all)
cases,will make it difficult to navigate.
4) Tip – This document contains some content that would be fully accessible
presented in an alternative way for an optimal experience.
ACCESSIBILITY CHECKER IN ADOBE ACROBAT 9 PRO
1) Click Advanced.
2) Hover over Accessibility.
3) Follow the arrow to the right of Accessibility to get to the next drop down
menu.
4) Click Full Check. (Skip the Quick Check option).

21
5) Click Start Checking on the popup window (leave all options as they are
listed).
6) Next you will be prompted with one of the following two dialog boxes.
A) If your document has accessibility errors. Click OK and make
corrections stated in the Accessibility Report.

22
B) If your document doesn’t have any accessibility errors. Click OK and
you can close the Accessibility Report
7) Next you will see the Accessibility Report open on the left hand side of the
report screen.

23
ACCESSIBILITY ERRORS IN MICROSOFT OFFICE 2010
When you are fixing errors in Microsoft Office, you can simply click on an error
in the Accessibility checker pane, and it will automatically highlight what is
causing the error.

24
APPLYING ALTERNATIVE TEXT
If you have run the accessibility checker and received the error that says Missing Alt
Text, then you will need to add the alternative text to describe the image, chart or object
in your document.
1) Click Picture 1 to select the image, or you can manually select an image.
2) Right-Click the selected image.
3) Click Format Picture for an image, Table Properties for a table, and
Format Chart Area for a Chart or other object.

25
4) Image: Click Alt Text in the left pane of the popup window.
Table: Click Alt Text tab on the top right of the popup window.
Chart: Click Alt Text in the left pane of the popup window.
5) Type a brief description of your image in the Description box and add a
title.
TIP: The data within a chart is not read by a screen reader, so any information you want
your user to take away from viewing your chart, you must put in the alt description.
TIP: Use a title if your description is detailed, but avoid using the title field to
replace a description so your document is better navigated by screen readers.

26
6) Click Close.
CHECK READING ORDER OF TABLE
If you have a table in your document, you may receive a tip from the accessibility
checker to, “Check Reading Order”. This is very easy to fix and it will also make your
document look more professional. The reason this is an accessibility tip and not an
error, is because if you are using a table just to organize your content structure, this
method will not benefit that specific use of a table. You only need to use a table style if
you’re using your table to display data.
1) Highlight Table and click the Design tab from the Table Tools menu in the
Microsoft Ribbon

27
2) Select a table Style.
TABLE HEADER ROWS SPECIFIED
1) Click Table in the Accessibility Checker to highlight the error(s).
2) Right click the highlighted text and select Table Properties.

28
3) Check Repeat as header row at the top of each page.
4) Click OK.

29
HEADER ROWS IN EXCEL
In order for a table to be accessible, it must have a header row specified. In Excel, the
best way to do this is by applying a table style.
1) Highlight your table.
2) Click the Home tab.
3) Click Format as Table.
4) Choose a style.

30
5) Make Sure My table has headers is checked.
6) Click OK.
7) While your table is highlighted, you now have a Table Tools tab in the ribbon.
8) Click on Table Tools, and make sure that the Header Row checkbox is
checked.
TIP: If you put a check in the Total Row checkbox, a neat separator will be added to
your table between the table data and a total row. Here is how the other checkboxes will
format your table.
First Column & Last Column – Will Bold all of the text in the first and last columns.
Banded Rows & Banded Columns – Will format all the even rows and columns
differently from the odd rows and columns so that there is a clear division between the
cells.

31
BOOKMARK THE TOP LEFT TABLE CELL
By bookmarking the top left cell in your table, you create a reference point for a screen
reader. This is so the screen reader can return to the beginning of the table, at any
point, while viewing the document. You can bookmark text or objects in your Word
document to create a reference points by using this method; it is a good practice to
book mark the top left cell in all tables.
1) Highlight the top left cell in your table.
2) Click Insert Tab.
3) Click Bookmark.
4) When the Bookmark window opens, Type in a Bookmark name.
5) Click Add.

32
INSERT A PAGE BREAK
If you would like the paragraph in your document to start on a new page, you can use
the page break feature in Microsoft Word. A page break will insert blank space that will
not be read by a screen reader. To insert a page break, follow the directions below.
1) Place your cursor in front of the text you want to insert a page break.
2) Click on the Insert tab on the Microsoft ribbon.
3) Click Page Break, which is towards the left hand side of the ribbon.

33
USING BLANK SPACE
Blank table rows, columns and characters are not easily read. A blank space or
line is not read by a screen reader and you will want to avoid the use of space in
your document. You will receive an accessibility error if you are using spaces
ineffectively in your document. If you want or need to use spacing in between or
below cells in tables, use space before or space after feature.
1) Click Table Row in the Accessibility Checker to highlight the error, or manually
highlight all blank rows/columns/characters.
2) Right-Click highlighted cells / blank characters in table.
3) Click Delete Rows.
4) Highlight the cells that you want to add space.
5) Click the Page Layout.
6) Click arrows up/ down to add or remove spacing around highlighted text.

34
FORMATTING TABLE CELLS IN EXCEL
Empty cells create another obstacle for people using screen readers because users are
unable to recognize the difference between the end of a table and a blank cell between
categories. So you should never use an empty cell to format a table.

35
TIP: The Total Row in the image above, was styled by highlighting the table > Clicking
on the Table Tools tab > Put a check in the Total Row Checkbox. (See Excel
Spreadsheets must have a Header Row if more details are needed).
HIDE DECORATIVE IMAGES IN WORD
If an image in a Microsoft Word document is strictly for decorative purposes, you should
either hide the image in front of or behind text. This way the image will not get
recognized by a screen reader (the alt text will not be read). However, if you save that
same Word document as a pdf. The image will then be recognized and the alt text will
be read by the screen reader.
Right-click on your image.
Click either Behind Text or In Front of Text.

36
FLOATING IMAGES
If you want to achieve the look of one photo over another, photo over text, etc.,
you can use a photo editing software (Photoshop or Gimp is a great FREE tool)
to merge the two photos/objects into one photo and then paste the new merged
photo back into MS Word. Floating images are not read by screen readers and if
these images are conveying important context to your document, you will want
to recreate the effect accessibly.
1) Click on the error in the Accessibility Checker or manually click on the picture
that is floating to highlight it.
2) Click Format.
3) Click Position.
4) Click In Line with Text (will allow a screen reader to recognize the picture).

37
CREATING ACCESSIBLE FORMS IN MICROSOFT WORD 2010
1) If you have the Developer Tab in your Microsoft Word Ribbon, skip to step 7,
otherwise continue on to step 2.
2) Click File.
3) Click Options (bottom left column).
4) Click Customize.

38
5) Click Developer.
6) Click OK.
7) Click a spot on your document and put the cursor where you want a text field
input box to appear.
8) Click Legacy Forms, see next image (looks like a folder with a hammer and
wrench crossed in front of it).
9) Click Text Form Field (looks like this, “ab|”).
10) Repeat steps 8-10 until all text fields have been added to the document.

39
11) Right-click on a text field.
12) Click Properties.

40
13) Click Add Help Text, in the dialog options box.
14) Click Status Bar, in the Form Field Help Text dialog box.
15) Click in the Type your own dialog box.
16) In the box, enter the text that you want read to the user when they tab or click
onto the text field.
17) Click OK on the form field help text.
18) Click OK on the text form field options.
POWERPOINT SLIDE TITLES
In PowerPoint, all slides should have titles and each title should be a unique name in
order to better navigate your presentation. If you always choose the template that has a
title and text format, you can avoid time spent later creating unique titles for each slide.
You need to be in Normal view to see the outline titles of each slide. Steps two and
three will show you how to get into the Normal view so that if you didn’t include a title or
need to change the title, you may follow these steps.
1) If you do not see a Slides or Outline view on the left hand side of the page, do
steps 2 & 3. If you do see these views, skip to step 4.
2) Click View.
3) Click Normal (on the left).

41
4) In Outline mode you can click beside an empty slide and type your title for that
slide. Slide 3 was empty and there was an error for a missing title.

42
5) To fix the Duplicate Slide Title warning, highlight one of the duplicate titles in
the Outline that you would like to change.
6) Then type in a new unique title.
ACCESSIBILITY WARNINGS IN MICROSOFT OFFICE 2010
As demonstrated with accessibility errors, you will occasionally find accessibility
warnings generated by the Accessibility Checker. It is important to remember how
your document will be read or presented to the user and that is why warnings occur. An
accessibility warning simply means that in most, but not all cases, the document may
not be accessible for all persons. An error means it won’t be viewed and a warning
means it may not be accessible.
HYPERLINKS HAVE TEXT DISPLAYED
If you have a hyperlink in a document, the screen reader will read that URL as if it were
an English word. You should replace the link text with English words that represent the

43
link so the user can better understand what is being read on the screen. You also could
have text preceding the link so that the reader knows the link is next and why s/he
should follow the link.
1) Click hyperlink error in the Accessibility Checker or manually highlight the
entire URL you want to replace with text.
2) Right-Click on the highlighted text.
3) Click on Edit Hyperlink in the drop down menu.
4) In the Text to display box, delete the URL address and type the text you would
like displayed.
The next picture shows an image before the text is changed.

44
Picture below is after the text was changed.
5) Click OK.

45
Below is an in-text example that shows what a new link will look like after you have
made the changes.
In this paper, I will discuss the MN Twins season. I have a site for
you to check out the Twins Schedule for the rest of the season. The
link would have text that explains what the reader would click on the
link and expect to see by going to that link.
USE THE OUTLINE PANE IN POWERPOINT
People with disabilities often prefer to use text versions of PowerPoint presentations
because it makes navigating them so much easier with a screen reader. This is why it is
necessary to use the Outline pane when creating an Accessible PowerPoint
presentation. To find out how to use the Outline pane correctly, see the instructions
below.
1) Open up a new PowerPoint presentation.
2) Click on the Outline tab on the left.
Type your text into the highlighted field on the presentation canvas. (CTL +
Enter, is a shortcut that will put your cursor inside the first input box.) Tip: You
can hit CTL + Enter multiple times to tab through the different input boxes on the
presentation page and also to add a new slide on the outline pane.
If you wanted to use a different slide layout, rather than the default click on the
Home tab.

46
Click the Layout button.
Then click the slide layout in that you would like to use in your presentation.
TIP: The Text within Text Boxes will not be seen on the Outline Tab. Slide Layouts
must be used or you can create your own slide layouts. (See Create New Slide
Layouts)
CREATE NEW SLIDE LAYOUTS IN POWERPOINT
In PowerPoint Presentations all text entered into layout input boxes will be added to the
outline pane. However, if we don’t like any of the slide layouts, we will have to create
our own customized layout. DO NOT USE A TEXTBOX TO DO THIS! If you were to
insert a text box on your slide, none of the text that you type into it will show up in the
outline pane. So the proper method of customizing slides is to insert placeholders on
the Slide Master tab.
Click the View tab.
Click Slide Master.

47
Select a slide template.
Click Insert Placeholder on the top ribbon.
Click Text from the dropdown menu.
Then your cursor will change into cross hairs. Click your cursor and drag the
highlighted box the size of the input box which you would like have in your layout.

48
With that slide still selected and on the stage, Click Rename in the ribbon.
Type in a name you will recognize for your slide and click Rename.
Click Close Master View on the right side of the ribbon.
Click New Slide in the ribbon.
Then click on the slide that you just created from the drop down menu.

49
Now notice that the text you type into this input box will be represented on the
Outline pane.

50
NAMING ALL SHEETS IN EXCEL
1) To fix the default sheet names warning, Double-Click a worksheet name to
highlight it.
2) Then type in a unique worksheet title. A descriptive title makes the workbook
more navigable.
ADDITIONAL TIPS
The accessibility checker also gives you tips on how you could organize your content
to maximize the best possible way to display content so that it is accessible. You also
should always keep in mind these additional tips to making your documents accessible.
1) Make sure your videos have closed captions or a transcript provided.

51
2) If you have audio files, be sure to include a transcript version.
CHOOSE .DOCX OVER .RTF
If you save a Word Document as an .rtf (rich text file) the formatting and styles will stay
the same. However, you will be unable to run the Microsoft Word Accessibility
Checker on an .rtf file. In addition, if you had previously checked your document for
accessibility and it passed, as soon as you save it as an .rtf, the alt tags on your tables
will be removed so it is a better idea to keep your files in the .docx format.
HOW TO CREATE AN ACCESSIBLE PDF
It is important to save your document as a PDF and not to use the print as a PDF
option. Be sure you save first and don’t print a file into a PDF. By doing this, there are
some file configurations that do not get transferred over into the PDF correctly and your
document will not be accessible! TIP- By saving your accessible Word document as a
PDF, your document will maintain all of the proper structure tags for accessibility.
However, this does not guarantee that the reading order of the PDF will be correct.
Always check the reading order of your PDF’s with either Adobe Acrobat’s Read Out
Loud feature or the Touchup Reading Order tool.
SAVING YOUR DOCUMENT AS A PDF
1) Click File.
2) Click Save As.

52
3) Click into the Save as type from the drop down menu, and select PDF (*.pdf).
4) Name your file in the File name.
5) Click on the Options button

53
6) Make sure that the Document structure tags for accessibility is checked.
7) Click OK.
54
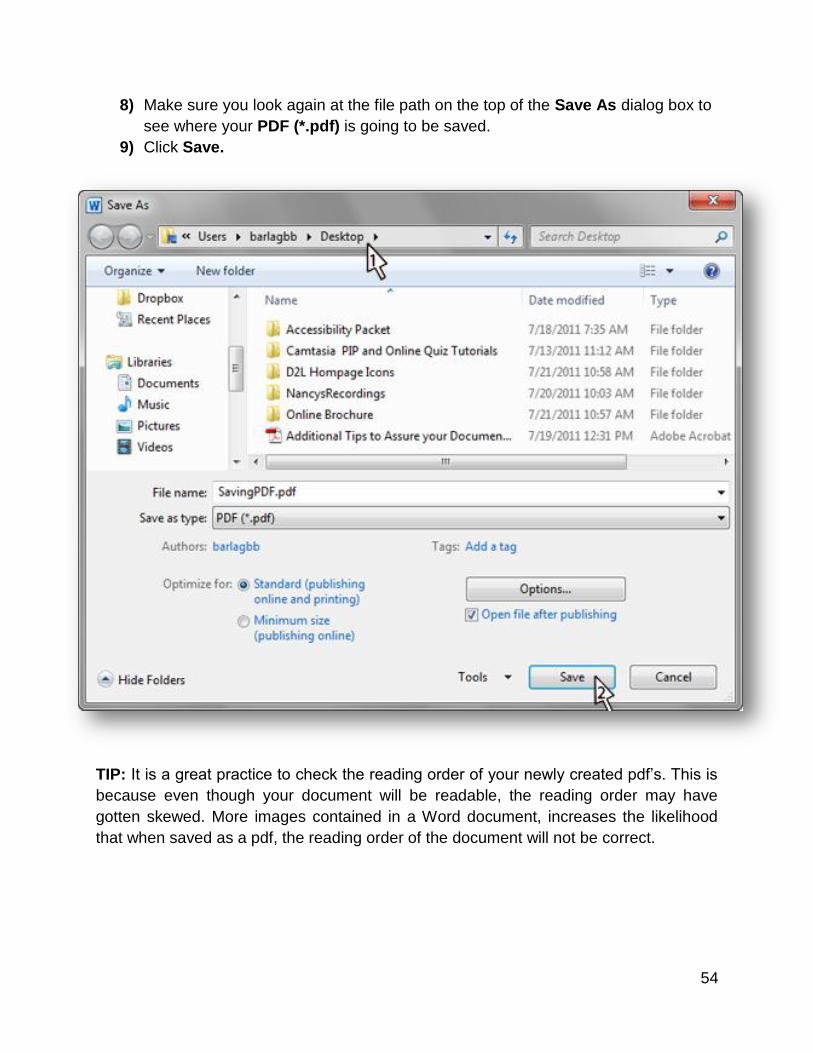
8) Make sure you look again at the file path on the top of the Save As dialog box to
see where your PDF (*.pdf) is going to be saved.
9) Click Save.
TIP: It is a great practice to check the reading order of your newly created pdf’s. This is
because even though your document will be readable, the reading order may have
gotten skewed. More images contained in a Word document, increases the likelihood
that when saved as a pdf, the reading order of the document will not be correct.

55
CONVERTING YOUR DOCUMENT TO ACCESSIBLE HTML
Before you attempt to convert your Accessible Word Document into HTML, you should
review this section to ensure you do it properly. By converting your document the wrong
way, you can produce an inaccessible document, and undo all of the hard work you did
to make your document accessible in the first place.
CHECK YOUR WEB PAGE FOR ACCESSIBILITY
In order to check your HTML page for accessibility, the first thing that you will need to
do is download the Internet Explorer Web Accessibility Toolbar. You will find the web
address to download toolbar in the instructions below.
1) To download the Internet Explorer Web Accessibility Toolbar, go to Paciello
Group’s Accessibility website - (http://www.paciellogroup.com/resources/wat-ie-
about.html)
2) Scroll down to the bottom of the page and it is the first link under “Download”.
3) Once you have the Internet Explorer Accessibility Toolbar downloaded and
installed, open up Internet explorer.
4) Go to the URL of the web page you would like to check for accessibility
5) Right-click in the toolbar (just below the address bar) and select the Web
Accessibility Toolbar to enable it.
56
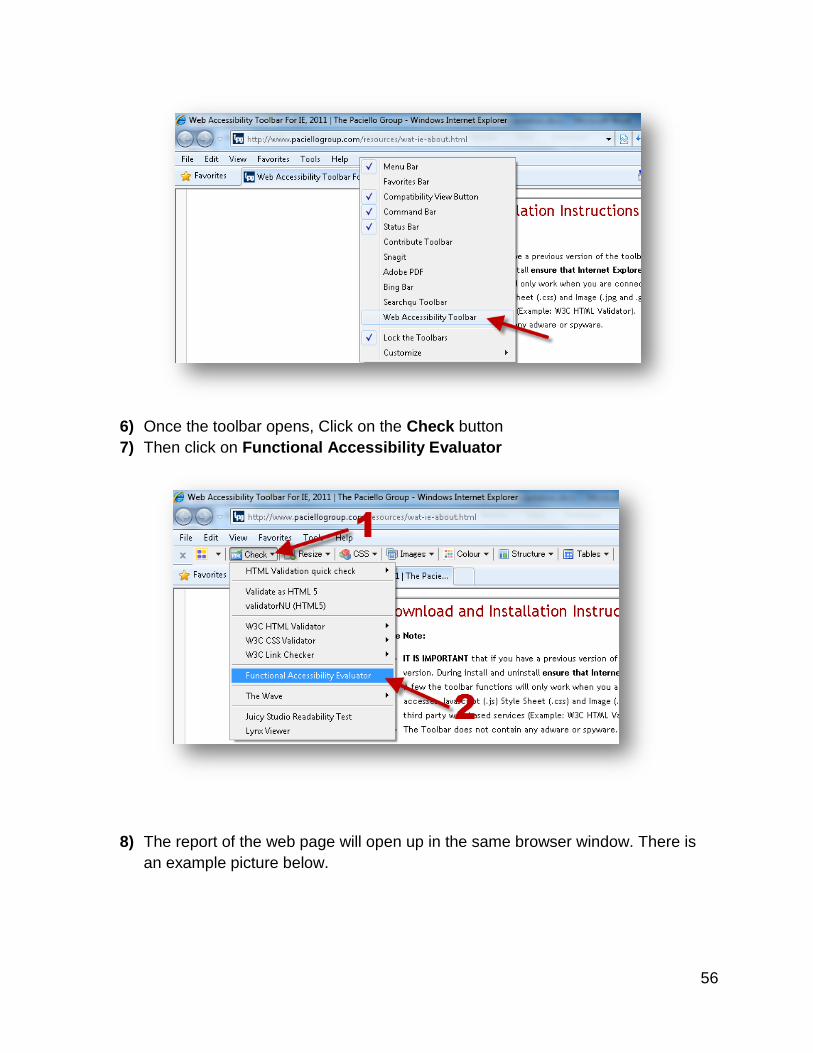
6) Once the toolbar opens, Click on the Check button
7) Then click on Functional Accessibility Evaluator
8) The report of the web page will open up in the same browser window. There is
an example picture below.

57
ADDING HEADINGS TO YOUR CONTENT IN D2L
It’s very important to identify and label the headings in your content/documents because
this provides reference points for screen readers. A person navigating a page/document
with headings applied, would be able to simply hit the, “H” key on their keyboard and
jump from heading to heading. This saves a lot of time because you can very easily
search a document for the content that you looking for. Anywhere in D2L that you enter
content in a text editor (like the one below), you should be adding headings, and there
are six different levels of headings that you can use to structure your document.
1) Highlight the text that you want to be identified as a heading.
58
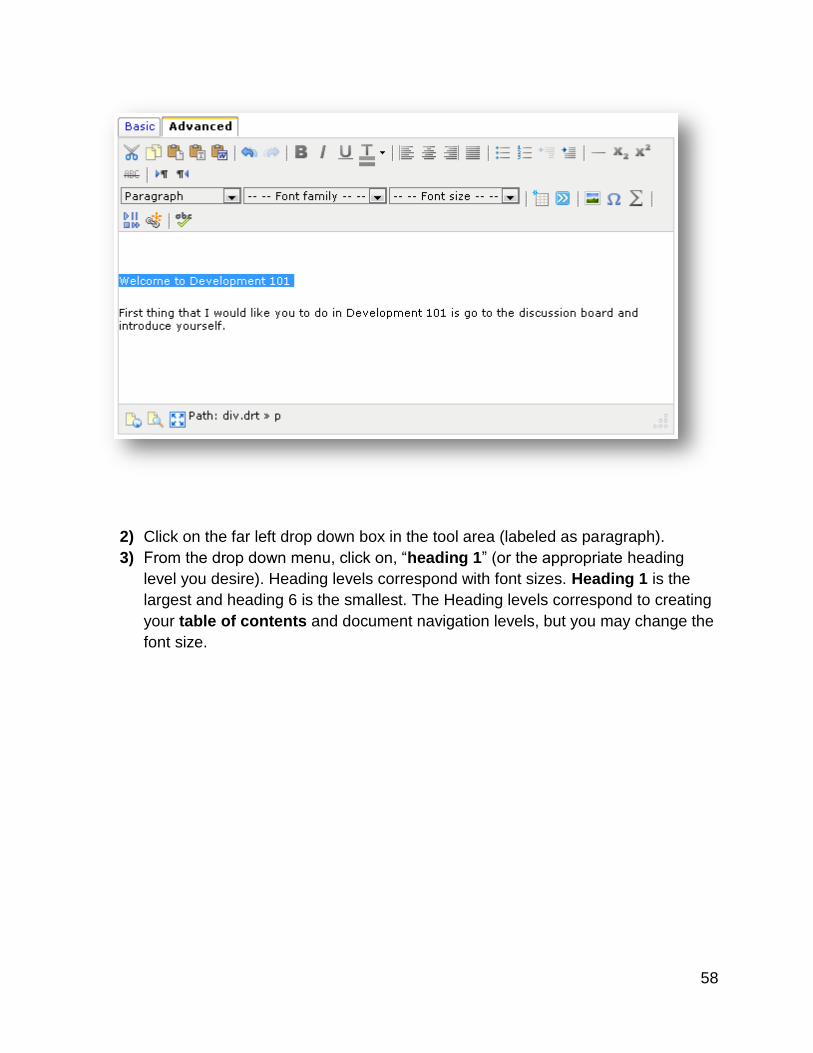
2) Click on the far left drop down box in the tool area (labeled as paragraph).
3) From the drop down menu, click on, “heading 1” (or the appropriate heading
level you desire). Heading levels correspond with font sizes. Heading 1 is the
largest and heading 6 is the smallest. The Heading levels correspond to creating
your table of contents and document navigation levels, but you may change the
font size.

59
4) You now have a heading applied to your document and you can continue
entering your content.

60
ACCESSIBILITY ISSUES CONVERTING WORD DOCUMENTS TO WEB PAGES
Microsoft Word has features to save a document as a single file web page, a web page,
and a web page (filtered). You should never use the Save as a Web Page or Single
File Web Page options because there are many HTML tags that will not get converted,
and are necessary for accessibility. Your document may even look fine and be
functional in internet explorer, but the HTML flaws will be evident when viewing your
document in some of the other major web browsers like Mozilla Firefox and Google
Chrome.
However, you may use the Save as a Web Page, Filtered option WITH CAUTION.
When you use the web page filtered option, most of the HTML tags will get converted
into accessible HTML (if you have applied heading tags and followed all of the other
accessibility principals). The reason I say most of the HTML tags will get converted is
because all of the heading tags, alt tags, and table tags will get converted into
accessible HTML, but if you used a form or list in your document, those HTML tags
would not get converted correctly.
CONVERT YOUR ACCESSIBLE WORD DOCUMENT TO HTML IN D2L
D2L has created an easy method to convert your accessible word documents into
accessible HTML. If your document has passed Microsoft Word’s Accessibility Checker

61
and you copy your document into D2L by following these steps, it will be converted into
accessible HTML.
1) Go to the Content section
2) Click on New topic
3) Then click on Create New File
4) Select a Parent Module or Add a Module if there are none
5) Type in a Title for your document

62
6) Now you will need to minimize your D2L window and open up your Word
document that has already passed the Accessibility Checker.
7) Highlight all of the content in your document, Right-click on it and select copy
8) Then go back to the D2L window to the item you just created(Content tab > New
Topic), scroll down to the text input area and Click on the Advanced tab
9) Click on the little folder icon with the Word logo on it
10) A popup window will open, Right-click in the text area and Paste your content
into the popup window.
11) Click the Insert button in the lower left corner.

63
12) Click the Save button and you’re finished.
CHECK YOUR COLOR CONTRAST
Contrast is the difference between two colors. The foreground and background colors in
your webpage should be high contrast, especially your text. Black and white is the
highest contrast available, but sometimes you like to use colors. You can check the
contrast of your colors to make sure they are accessible with the Colour Checker on
the Internet Explorer Web Accessibility Toolbar.
1) If you have the Internet explorer Web Accessibility Toolbar installed proceed to
step 2. If not, please see the previous section on how to check your web page for
accessibility.
2) Open up Internet Explorer.
3) Enable the Web Accessibility Toolbar.
4) Click on the Colour Button and select Contrast Analyzer [application].
5) In the popup window, select the eye dropper tool button next to the Foreground
Colour select option.

64
6) Your cursor will turn into a magnifying glass (square).
7) Hover the magnifying glass over the color of the foreground in which you would
like to check and left click on the mouse.
8) Now click the eye dropper tool for the Background Colour Select and choose
your next color.
9) After you have your foreground and background colors selected, the accessibility
results will be displayed in the bottom of the Colour Contrast Analyzer window.
10) Notice that there are results for regular sized text and large text at two different
levels (AA & AAA).
11) Minnesota State law requires your colors to be accessible at the AA level, but
encourage accessibility at the AAA level.

65
12) In order to meet Minnesota state law, you must have a, “Pass (AA)” in the text,
and large text fields in the Colour Contrast Checker.
ACCESSIBILITY ERRORS IN ADOBE ACROBAT PRO 9
When you have an existing PDF file that is not accessible and you do not have the
original document, it is a little more tedious to correct your accessibility errors in Adobe
Acrobat Pro, but possible. If you do have the original Microsoft Word or other Office
document, I recommend that you open up that file, run the accessibility checker, correct
your accessibility errors in the Microsoft Office Suite and then re-save your file as a
PDF. One great reason for making the corrections in the original file is the fact that if
you need to create an another.pdf of that file later on, your document will still be
accessible. If you had just corrected your errors in the PDF, you would need to make
the same corrections over and over again when you create new PDF’s from that file.
However, we’re not always fortunate enough to have the original document, so here are
some tips to help you correct your accessibility errors using Adobe Acrobat Pro 9. In this
next section, I am going to discuss some common PDF fixes you may need to make in
order to have your document accessible. This next section will discuss adding tags, alt

66
text, deleting hidden text boxes, read order, labeling, table headers, scanned
documents, and fillable forms.
ADDING TAGS
It is an important first step to make sure that your document has tags. Tags are used to
put structure into your document and help screen reading programs interpret how text
should be read on any given page.
1) Click Advanced.
2) Hover Accessibility in the drop down and follow the arrow to navigate to the
right.
3) Click Add Tags to Document from the drop down menu on the right.
ADDING A LANGUAGE ATTRIBUTE
1) Click File.
2) Click Properties.

67
3) Click Advanced.
4) Select your desired language from the drop down menu.

68
5) Click OK.

69
ADDING ALT TEXT TO AN IMAGE
1) Click Tools.
2) Hover over Advanced Editing and follow the arrow on the right to the next drop
down menu.
3) Click on TouchUp Object Tool so that there is a check mark next to it.
4) Left-Click somewhere on the image to select it.
5) Right-Click that same image and click on Properties from the drop down menu.
70
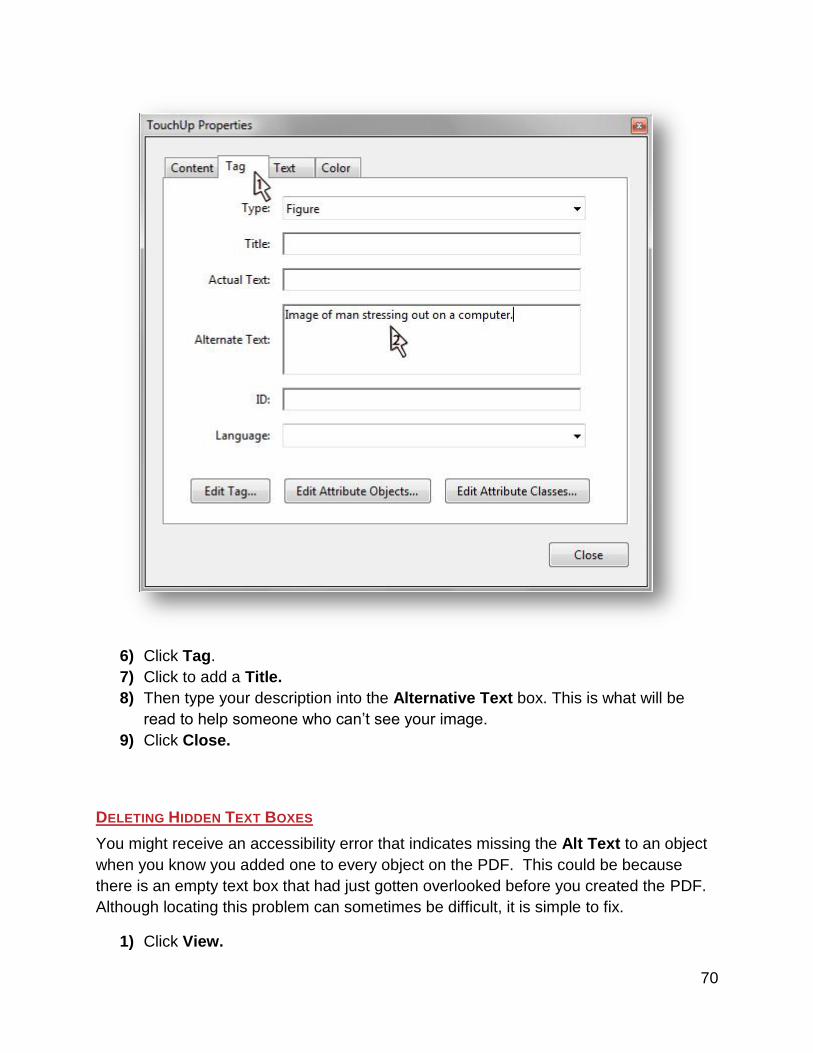
6) Click Tag.
7) Click to add a Title.
8) Then type your description into the Alternative Text box. This is what will be
read to help someone who can’t see your image.
9) Click Close.
DELETING HIDDEN TEXT BOXES
You might receive an accessibility error that indicates missing the Alt Text to an object
when you know you added one to every object on the PDF. This could be because
there is an empty text box that had just gotten overlooked before you created the PDF.
Although locating this problem can sometimes be difficult, it is simple to fix.
1) Click View.
71
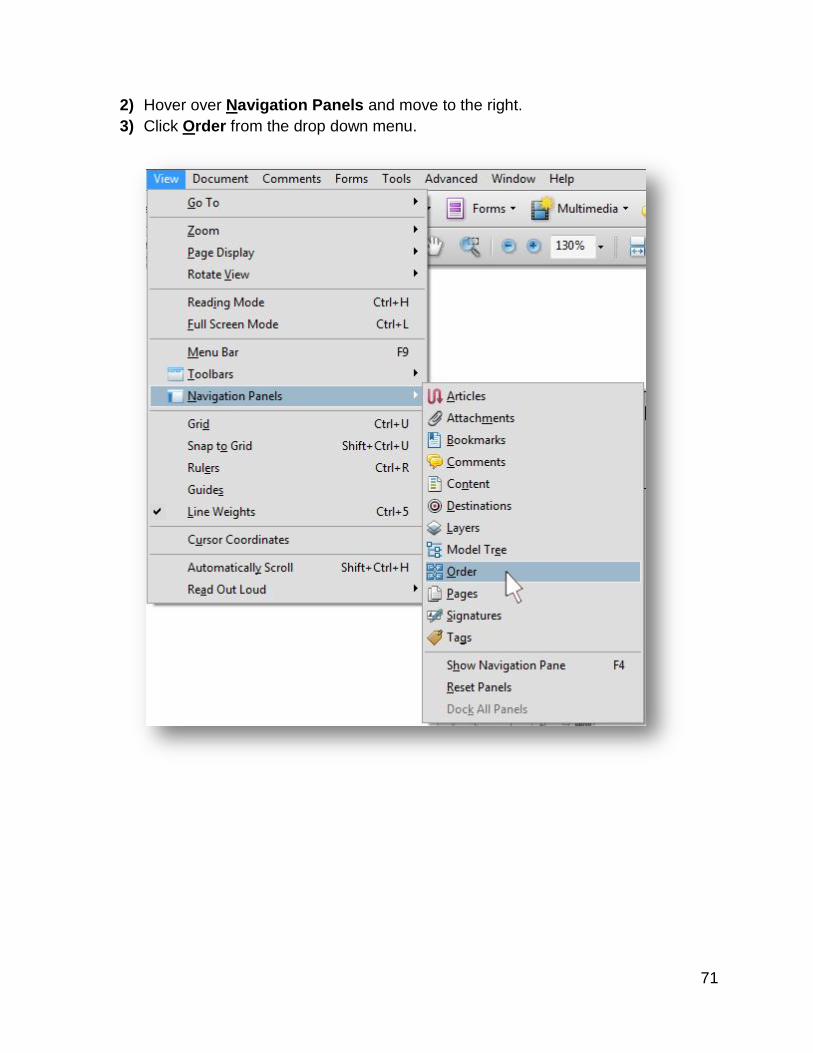
2) Hover over Navigation Panels and move to the right.
3) Click Order from the drop down menu.

72
4) In the Navigation Panel popup window, under the Order tab. Right-Click the
number representing the empty element.
5) Click Delete Selected Item Structure.

73
READ ORDER
We are accustomed to reading from left to right, top to bottom, and you might think that
computers could read it the same way. Well, computers and software read text a little
differently. In the example below you will see that when we created our document in
MS Word, our document seemed to be in order. However, after creating a PDF of this
document we realize they are not in read order.

74
Documents that are designed with objects or elements scattered across a document are
difficult for people with vision impairment to navigate. Although the technique of
dragging boxes or tables through a document seems more visually appealing, always
keep your audience in mind when creating your documents. What may look great may
not be read logically or in order.
These objects may look the same once created into a PDF, but may read out of
order. When you open the Order tool in Adobe Acrobat Pro, you will see the
numbers on your boxes which represent the order in which a screen reader will
read them. You want to order these boxes so they are read correctly. In the
example, the boxes look like they are in order, but when you go into the order
tool, you notice they are in different number order and seven is being read first.

75
To fix this problem, you first open the Order tool.
1) Click View.
2) Hover over Navigation Panels and follow the arrow over to the right.
3) Click Order from the drop down menu.
4) Once the Order Panel opens, Click on the Order.
5) Click and drag a Path Image into the desired position.
This will not move the actual elements on the document; it will only change the order in
which the elements are read by a screen reader.

76
6) Pay attention to the numbers in the figure elements when you’re moving the Path
Images in the Order tab. This makes it easy to maneuver your elements into the
proper position.
LISTEN TO HOW YOUR PDF WILL BE READ
Adobe Acrobat 9 Pro enables you to listen to a screen reader read your document so
that you can know it will be interpreted correctly.
1) Click View.
2) Hover over Read Out Loud, and follow the arrow to the right.
3) Click Activate Read Out Loud.
4) Click View again.

77
5) Hover over Read Out Loud, and follow the arrow to the right.
6) Click Read this Page Only or Read To End of Document.
Another Great Way to Check the Reading Order of Your PDF is by exporting a
Text (.txt) Version of Your PDF. After you have done this you can open up the
text file and view it to see if the text is in the order you intended it to be read.
1) Click File.
2) Click Save As.
3) Type a name for your file.
4) Select Text (Accessible) (*.txt) in the Save as type.
(Make sure to notice the Destination in the Save In option so that you know where your
file will be saved.)
5) Click Save.
FIXING OBJECTS LABELED INCORRECTLY
If objects in your document have been labeled incorrectly, it can sometimes cause
screen readers to read the elements on your page out of order too. So, if you preview
your document and it isn’t being read correctly, some of your objects may be labeled
incorrectly.
For example, if you are using an image for your document background, the screen
reader read the alt tag of the image along with the rest of the document. So, you need
to change the label of the object to “background”. This way the blue background would
be understood and the reader wouldn’t think s/he was missing important content.
Here is a picture of the document in Microsoft Word. Once you create a PDF and
preview it with a screen reader, you may realize that some of the objects need
to be re-labeled.
78
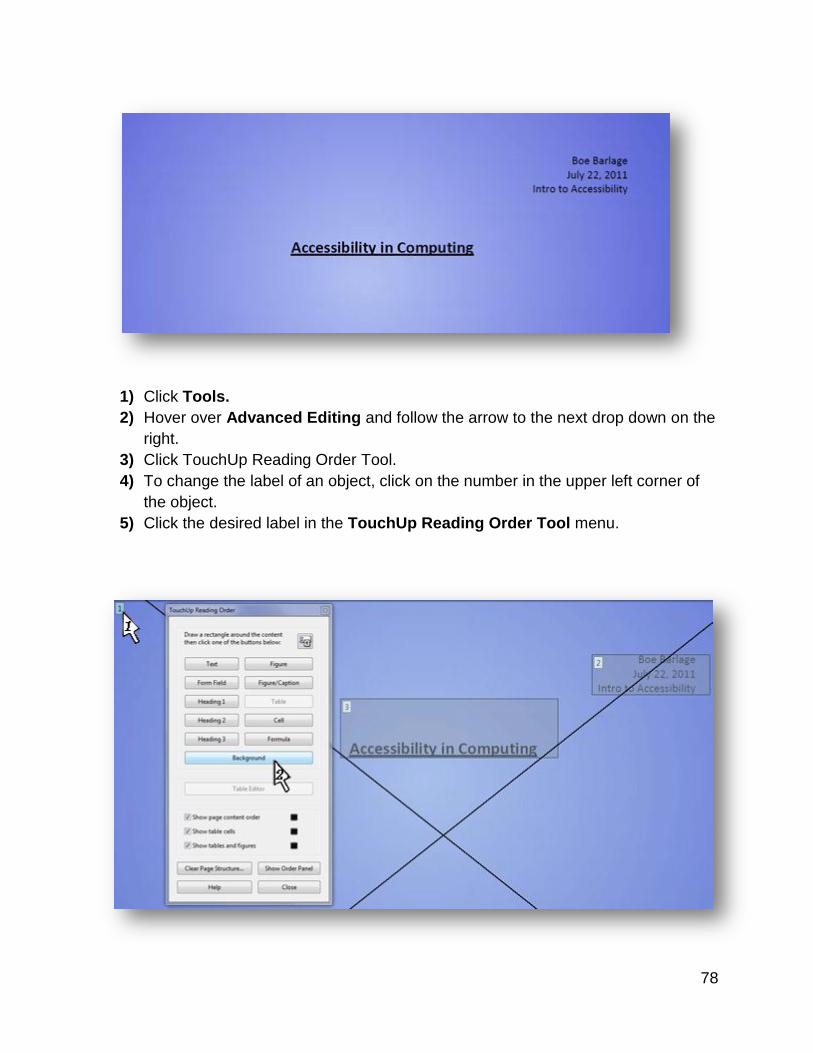
1) Click Tools.
2) Hover over Advanced Editing and follow the arrow to the next drop down on the
right.
3) Click TouchUp Reading Order Tool.
4) To change the label of an object, click on the number in the upper left corner of
the object.
5) Click the desired label in the TouchUp Reading Order Tool menu.

79
FIXING ELEMENTS WITH ALTERNATIVE TEXT BUT NO PAGE CONTENT
1) Click View
2) Go down to Navigation Panels and follow the arrow to the right to the next drop
down menu
3) Click Tags
4) Click the plus sign next to the Tags and <Part> elements to expand all tags of
the document. The <Figure> elements with no plus or minus sign next to them
are most likely the culprits.

80
5) Click the little gears in the upper left corner of the Tags panel.
6) Click Properties, from the drop down menu.

81
7) Place the Tags dialog box and the TouchUp Properties dialog box next to each
other.
8) Select a <Figure> element with no plus/minus sign next to it.
9) If the Alternative Text field in the TouchUp Properties window maintains text.
10) Delete the empty <Figure> element in the Tags dialog window by selecting the
item and pressing the Delete key on the keyboard.
ADDING A TABLE SUMMARY / ALT TEXT TO A TABLE IN A PDF
1) Click Tools
2) Hover over Advanced Editing and follow arrow on the right to drop down menu
3) Click TouchUp Reading Order tool
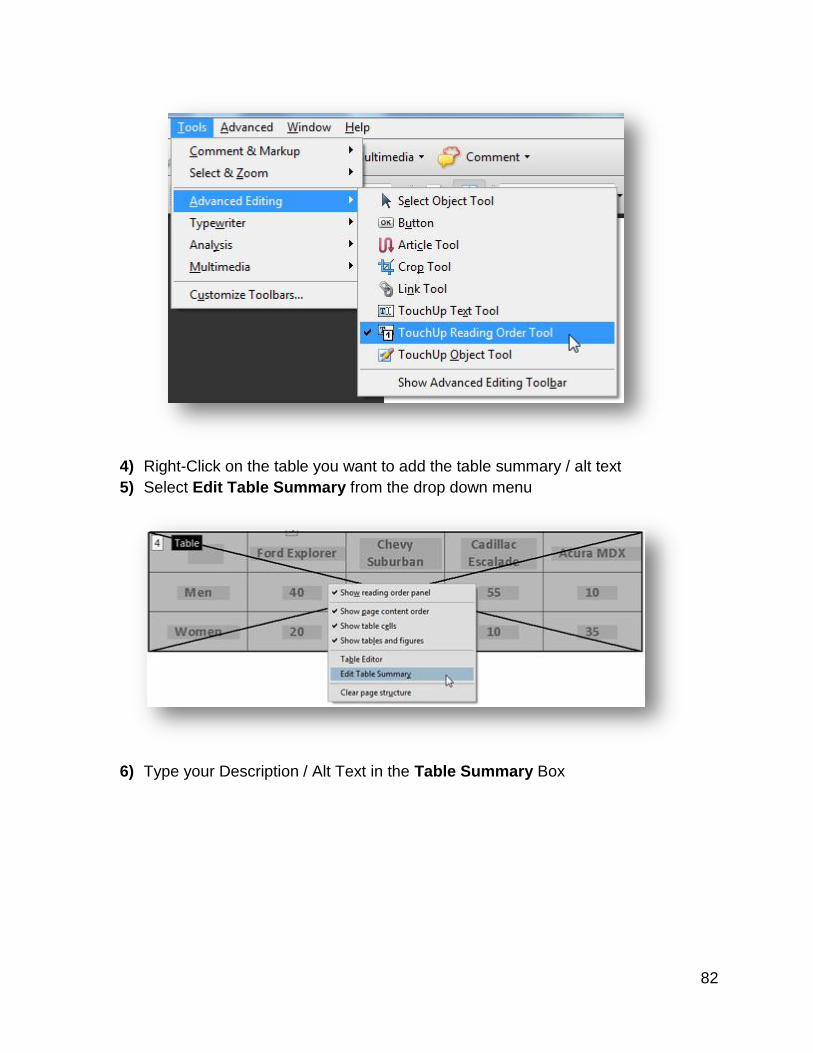
82
4) Right-Click on the table you want to add the table summary / alt text
5) Select Edit Table Summary from the drop down menu
6) Type your Description / Alt Text in the Table Summary Box

83
7) Click Ok
SPECIFYING TABLE HEADER COLUMNS AND ROWS
You can give your document better structure by specifying which cells in your table are
headings. This is important because a well-structured document can be read much
smoother by a screen reader by being able to determine the difference between a
header cell and a data cell.
1) Click Tools.
2) Hover over Advanced Editing and follow the arrow to the next drop down menu
on the right.
3) Click TouchUp Reading Order Tool.

84
4) If the table does not show up with an X through it and a number in the upper left
corner, then you will need to select the table by left-clicking and dragging a box
around your table.
5) When the entire table is selected, click Table, in the TouchUp Reading Order
Tool.
6) Click the number in the upper left hand side of the table to highlight the table.
7) Click Table Editor in the TouchUp Reading Order Tool.

85
8) Select all of the cells that are headings.
9) Right-Click and select Table Cell Properties from the drop down menu.
10) Select Header Cell if you are declaring header cells and or Data Cell if you are
selecting data cells.
11) If you are declaring a Header Cell, you must select a Scope from the drop down
menu, to the right of the Header Cell/Data cell radio buttons. Select Column if it
is a column header, Row, if it is a row header or both if the cell is a row and a
column header.
12) For the Row Span and Column Span options, make sure to type the number of
Rows or Columns this header cell is spanning.

86
13) Click OK, and your Header Cells have now been declared.
ASSOCIATING TABLE CELLS WITH COLUMN AND ROW HEADERS
1) Click Tools
2) Hover over Advanced Editing and follow arrow on the right to drop down menu
3) Click TouchUp Reading Order Tool

87
4) Click TouchUp Reading Order Tool.
5) Find the table you want to associate Data cells with the header cells and click on
the number in the upper left corner of the table.
6) In the TouchUp Reading Order window, Click on the Table Editor Button.
7) All of the Cells in your table will then be highlighted.
8) Right-Click on a Column Header and select Table Cell Properties.

88
9) Click on the Header Cell radio button to declare this cell as a Header.
10) Then type a unique name in the ID field to differentiate this cell from all of the
other cells.
11) Click OK.

89
12) You will now notice that the Header Cell turns a different color, and that is how
you can tell the difference between data and header cells.
13) If there is also a Row Header for this data, Repeat steps 8-11 for the Row
Header, and be sure to create a unique ID that is different than all of the other
cells
14) Now, Right-Click on the data cell that is associated with this Column
Header/Row Header and select Table Cell Properties.
15) Click on the Data Cell radio button to declare this a Data Cell.
16) Then Click the Green addition plus sign next to the Associated Header Cell ID’s
textbox.
17) In the pop-up window, select the Header Cell ID’s that you want to associate
with this Data Cell and Click OK. *If there is a Row and a Column Header, there
should be two ID’s that get added*
90
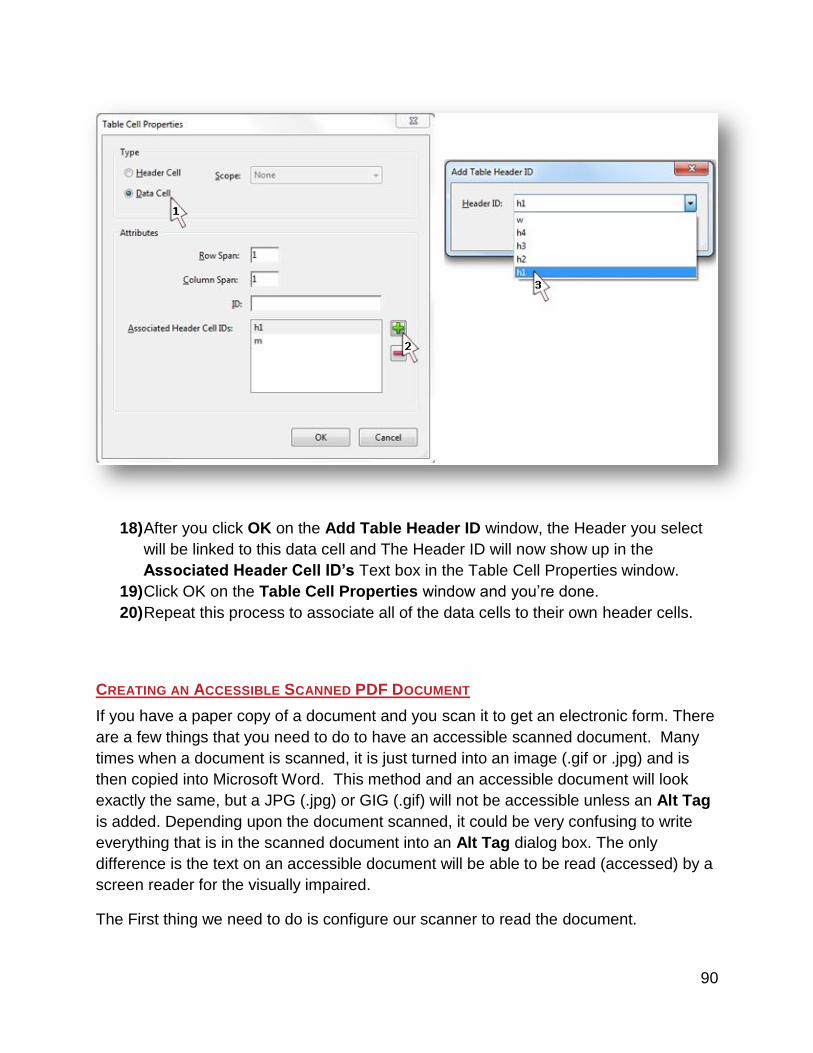
18) After you click OK on the Add Table Header ID window, the Header you select
will be linked to this data cell and The Header ID will now show up in the
Associated Header Cell ID’s Text box in the Table Cell Properties window.
19) Click OK on the Table Cell Properties window and you’re done.
20) Repeat this process to associate all of the data cells to their own header cells.
CREATING AN ACCESSIBLE SCANNED PDF DOCUMENT
If you have a paper copy of a document and you scan it to get an electronic form. There
are a few things that you need to do to have an accessible scanned document. Many
times when a document is scanned, it is just turned into an image (.gif or .jpg) and is
then copied into Microsoft Word. This method and an accessible document will look
exactly the same, but a JPG (.jpg) or GIG (.gif) will not be accessible unless an Alt Tag
is added. Depending upon the document scanned, it could be very confusing to write
everything that is in the scanned document into an Alt Tag dialog box. The only
difference is the text on an accessible document will be able to be read (accessed) by a
screen reader for the visually impaired.
The First thing we need to do is configure our scanner to read the document.

91
1) Click File.
2) Hover over Create PDF and follow the arrow over to the next drop down.
3) Hover over From Scanner and follow the arrow to the next drop down.
4) Click Configure Presets.
5) When the Configure Preset opens, there will be several settings that will need to
be checked.

92
6) In the Scanner and Options, select the device which you will be using for this
process (most likely your scanner).
7) In Presets, select the option suitable for your needs. For accessibility purposes,
your selection should be Black and White Document, Gray scale Document or
Color Document. *IMPORTANT* Remember which Preset you select because
you’ll need to know it later.
8) In the Input section you can change the Sides, Color Mode, Resolution, and
Paper Size options to suit the needs of your document. (Also, if you are scanning
more than one page, make sure to check the box, prompt for scanning more
pages).
9) In the Text Recognition and Metadata section at the bottom, make sure that the,
Make Searchable (Run OCR) and Add Metadata are both checked. (If there is
currently no Metadata within the document, you will be prompted after the scan
to add Metadata).
10) Click the Options to make Searchable (Run OCR) option.
11) Make sure the Primary OCR Language is set to English.
12) Make sure the PDF Output Style is set to Searchable Image. (This title is
deceiving by being labeled an “Image”. What this option does is when the
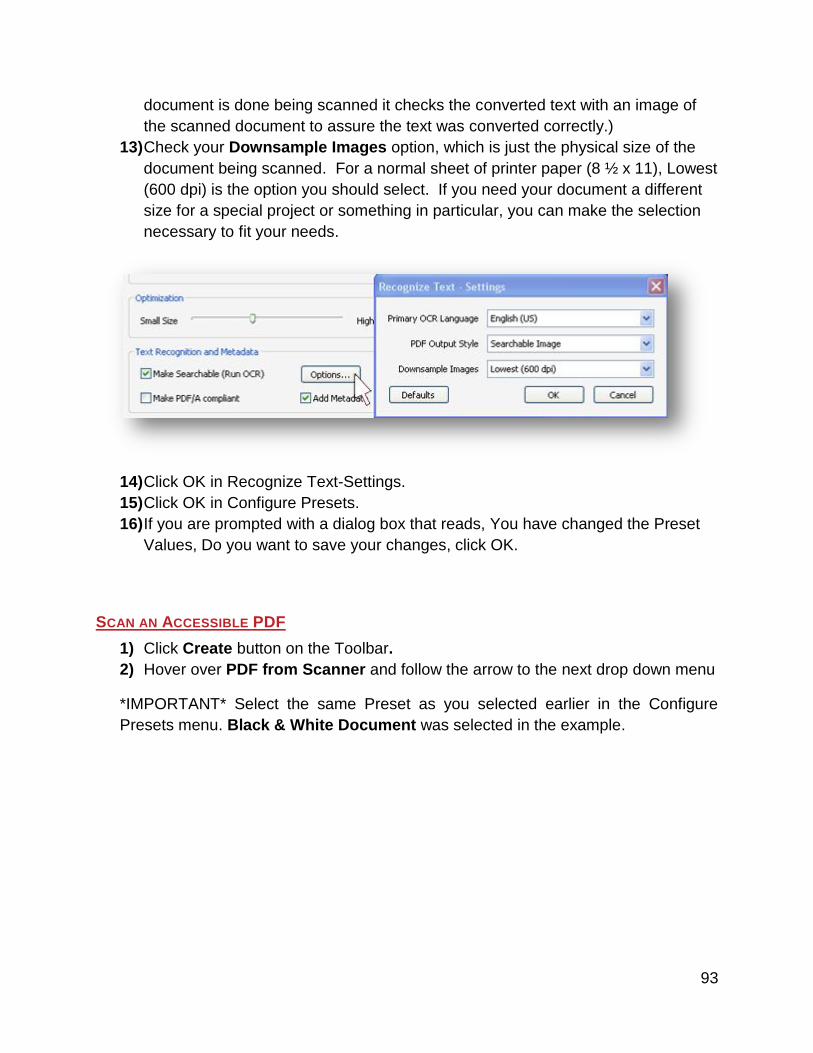
93
document is done being scanned it checks the converted text with an image of
the scanned document to assure the text was converted correctly.)
13) Check your Downsample Images option, which is just the physical size of the
document being scanned. For a normal sheet of printer paper (8 ½ x 11), Lowest
(600 dpi) is the option you should select. If you need your document a different
size for a special project or something in particular, you can make the selection
necessary to fit your needs.
14) Click OK in Recognize Text-Settings.
15) Click OK in Configure Presets.
16) If you are prompted with a dialog box that reads, You have changed the Preset
Values, Do you want to save your changes, click OK.
SCAN AN ACCESSIBLE PDF
1) Click Create button on the Toolbar.
2) Hover over PDF from Scanner and follow the arrow to the next drop down menu
*IMPORTANT* Select the same Preset as you selected earlier in the Configure
Presets menu. Black & White Document was selected in the example.

94
3) Now your document will start scanning. If you checked the box earlier that said
you have multiple pages to scan, when your first page is completed being
scanned, you will be prompted with a dialog box asking you to make a selection
of either Scan more pages or scanning complete.
4) Select the option you need and click OK.
5) Your document will open up in Acrobat immediately when finished scanning.
6) If your document does not contain any Metadata, you will be prompted to enter
that immediately as well. Fill in the Title, Author, Subject, and Keywords fields.
7) Do a Full accessibility check, make the minor changes necessary and save
your document.
CREATING AN ACCESSIBLE DOCUMENT FROM A SCANNED PDF
If you already have an existing PDF that you received from a co-worker or you
downloaded from the Internet and it’s not accessible, you can still convert the PDF to
recognizable text. When an image is scanned and converted into text, this process is
known as Optical Character Recognition, OCR.
1) Open the PDF in Adobe Acrobat.
2) Click Document.
3) Hover over the OCR Text Recognition and follow the arrow on the right over to
the next drop down menu.
4) Click Recognize Text Using OCR.

95
5) Click the radio button for the option of pages in which you want to be converted
(All Pages, Current Page or From Page - to -, are your possible choices).
6) Directly below that option you’ll see the settings which can be changed by
clicking on Edit. Make sure your settings are correct. The three settings should
be set to; Primary OCR Language English (US), PDF Output Style:
Searchable Image, Downsample: Lowest (600 dpi). These are the most
common settings for regular 8 ½ by 11 scanned documents. If you are scanning
something other than this, you may need to modify these settings.

96
7) Click OK, then you will see the OCR Progress bar in the bottom right hand side
of the screen.

97
8) When the progress bar is finished and you do not see it anymore, your document
has successfully been rendered.
9) Run the Full Accessibility Check and make any the minor adjustments.
CREATING AN ACCESSIBLE FILLABLE FORM IN ACROBAT PRO
It can be helpful to create a PDF with fields that you can type information into rather
than having to print a copy, write the answers in pen/pencil and then scan the
document. PDF fillable forms are also easy to create. Using the fields method simplifies
the task of completing a form for people with visual impairments, and arthritis, plus the
added benefit is less error interpreting the content of someone’s handwriting. There are
endless reasons why PDF Fillable Forms are a good practice, but the bottom line is that
they are simple to create; they save time and just make things easier.
1) Open Adobe Acrobat.
2) Click Forms.
3) Click Start Form Wizard.
4) Make sure an existing electronic document is selected and click next.

98
5) Click Browse and select the file you would like to convert to into form.
6) Click Next.

99
7) Adobe Acrobat will then start processing the form and will take about 15-20
seconds for conversion.
8) When the form is done being processed, you may get a popup box that reads,
No new form field annotations were detected. If so, click OK and move on to
next step.
9) Click Add New Field.
10) Select Text Field from the drop down menu.
11) Click where ever you want the user to type their data and drag a square to the
appropriate size.

100
12) After you have created the text box, right-click on it.
13) Click Properties from the drop down menu.
14) Under General Tab, enter a label the Name and Tooltip. *You can use the
same label in both text boxes but the Tooltip is what will be read to the user by a
screen reader.*
15) Click Close.
101
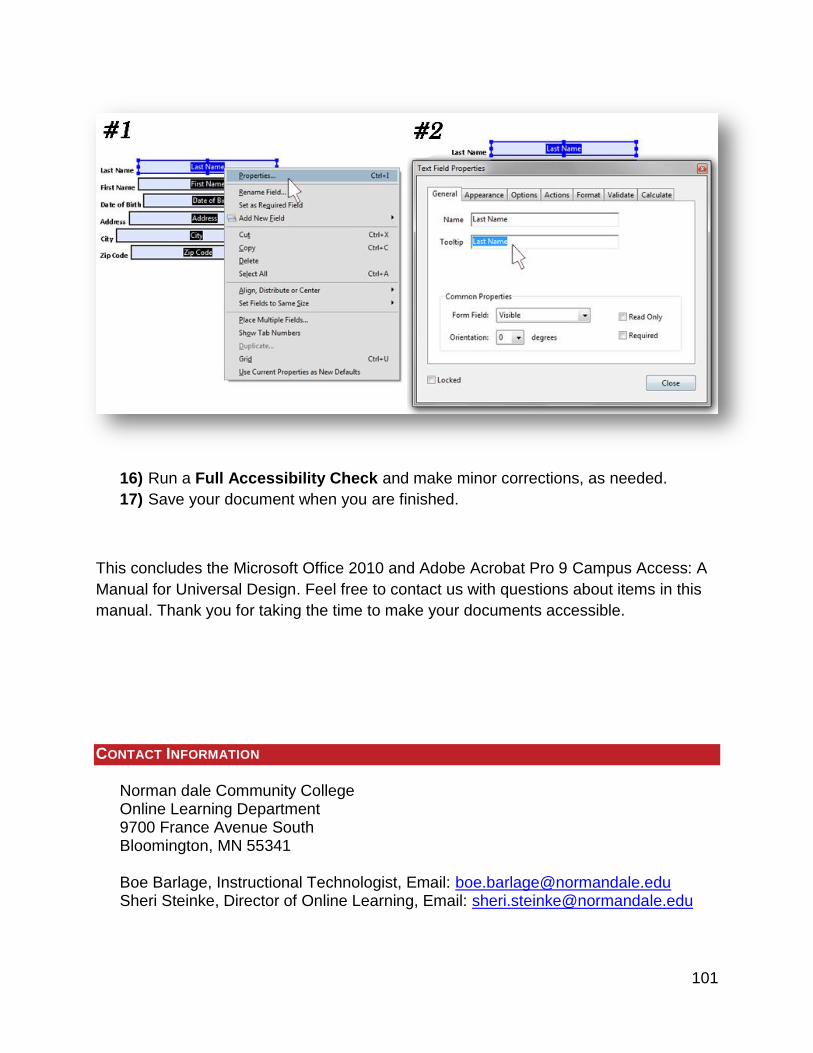
16) Run a Full Accessibility Check and make minor corrections, as needed.
17) Save your document when you are finished.
This concludes the Microsoft Office 2010 and Adobe Acrobat Pro 9 Campus Access: A
Manual for Universal Design. Feel free to contact us with questions about items in this
manual. Thank you for taking the time to make your documents accessible.
CONTACT INFORMATION
Norman dale Community College Online Learning Department 9700 France Avenue South Bloomington, MN 55341 Boe Barlage, Instructional Technologist, Email: [email protected] Sheri Steinke, Director of Online Learning, Email: [email protected]

102
ADDITIONAL RESOURCES
In this final section, we will give you a list of State of Minnesota and other resources
available for you to use.
The State of Minnesota Office of Enterprise Technology website includes an
Accessibility Implementation guide section to find a customizable Implementation
plan, Communication Plan, and training plan to get started in your organization.
The website includes a complete set of videos for accomplishing the tasks
discussed in this manual. Project Management Office of Enterprise Technology,
State of Minnesota 651.201.1056. Visit the Minnesota Office of Enterprise
Technology Accessibility Website .
WebAIM’s 8-Step Implementation Process.
Minnesota Learning Commons Website is a site that houses the resources for
K12, University of Minnesota, and Higher Education.
Minnesota Online Learning Website is included as a resource for the initiative for
accessible education in higher education.
University of Minnesota Accessibility Website includes information for further
research on accessible documents and individual page-website evaluation.
Normandale Community College, Online Learning Department.
[email protected] offers accessibility training and consultation
on making your campus accessible.
Watch the Electronic Curb Cut Video and you will see many reasons for making
your content accessible.
Using Microsoft Word 2010 to Create Accessible Documents – Demonstration
Video Modules.
In order for screen readers to correctly read math information, that information
must be composed in MathML. Otherwise, graphics of math equations will not be
accessible to screen readers or text readers. A number of commonly used
screen readers can utilize MathML content when used with the MathPlayer plug-
in. For example, the screen readers JAWS, Window-Eyes, and HAL, as well as
the text readers Read&Write and BrowseAloud all support MathML.
Tech-ease has many video tutorials and other resources to help assure that your
content for the web is accessible.
Web-based video captioning services (Free). Create subtitles for your YouTube
and other streamed videos without any downloads or installations at Universal
Subtitles or create captions for your videos by uploading a file at dotSUB. Both of
these web sites provide the ability to download a .SRT file.
Visit the Web Accessibility Workgroup’s website for an electronic copy of this
manual.

103