New Query ETL Dashboard Bisualize History Sandbox Joins · PDF fileNew Query ETL Dashboard...
73
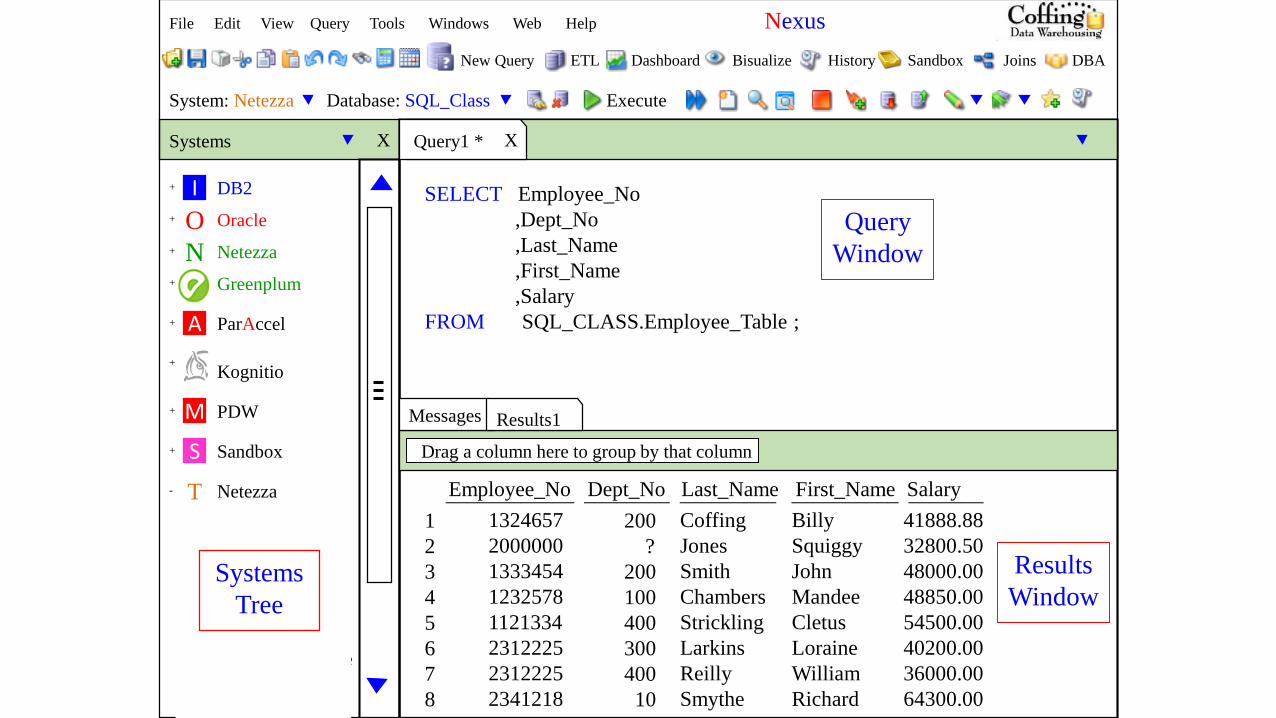
File Edit View Query Tools Windows Web Help Nexus New Query ETL Dashboard Bisualize History Sandbox Joins DBA System: Netezza Database: SQL_Class Execute + DB2 Oracle Netezza Greenplum ParAccel Kognitio Netezza PDW Sandbox N O A M S T + + + + + + + - - SQL_Class - Tables + Addresses + Claims + Course_Table + Department X Systems Query1 * X I Messages Results1 Drag a column here to group by that column SELECT Employee_No ,Dept_No ,Last_Name ,First_Name ,Salary FROM SQL_CLASS.Employee_Table ; Query Window Results Window Employee_No Dept_No Last_Name First_Name Salary 1324657 2000000 1333454 1232578 1121334 2312225 2312225 2341218 200 ? 200 100 400 300 400 10 Coffing Jones Smith Chambers Strickling Larkins Reilly Smythe Billy Squiggy John Mandee Cletus Loraine William Richard 41888.88 32800.50 48000.00 48850.00 54500.00 40200.00 36000.00 64300.00 ____________ ________ _________ __________ _______ 1 2 3 4 5 6 7 8 Systems Tree
Transcript of New Query ETL Dashboard Bisualize History Sandbox Joins · PDF fileNew Query ETL Dashboard...
File Edit View Query Tools Windows Web Help Nexus
New Query ETL Dashboard Bisualize History Sandbox Joins DBA
System: Netezza Database: SQL_Class Execute
+ DB2
Oracle
Netezza
Greenplum
ParAccel
Kognitio
Netezza
PDW
Sandbox
N
O
A
M
S
T
+
+
+
+
+
+
+
-
-
SQL_Class
- Tables
+Addresses
+ Claims+ Course_Table
+ Department
XSystems Query1 * X
I
Messages Results1
Drag a column here to group by that column
SELECT Employee_No
,Dept_No
,Last_Name
,First_Name
,Salary
FROM SQL_CLASS.Employee_Table ;
Query
Window
Results
Window
Employee_No Dept_No Last_Name First_Name Salary
1324657
2000000
1333454
1232578
1121334
2312225
2312225
2341218
200
?
200
100
400
300
400
10
Coffing
Jones
Smith
Chambers
Strickling
Larkins
Reilly
Smythe
Billy
Squiggy
John
Mandee
Cletus
Loraine
William
Richard
41888.88
32800.50
48000.00
48850.00
54500.00
40200.00
36000.00
64300.00
____________ ________ _________ __________ _______
1
2
3
4
5
6
7
8
Systems
Tree
File Edit View Query Tools Windows Web Help Nexus
New Query ETL Dashboard Bisualize History Sandbox Joins DBA
System: Netezza Database: SQL_Class Execute
+ DB2
Oracle
Netezza
Greenplum
ParAccel
Kognitio
Netezza
PDW
Sandbox
N
O
A
M
S
T
+
+
+
+
+
+
+
-
- SQL_Class
- Tables
+ Addresses
+ Claims
+ Course_Table
+ Department
XSystems Query1 * X
I
Messages Results1
Drag a column here to group by that column
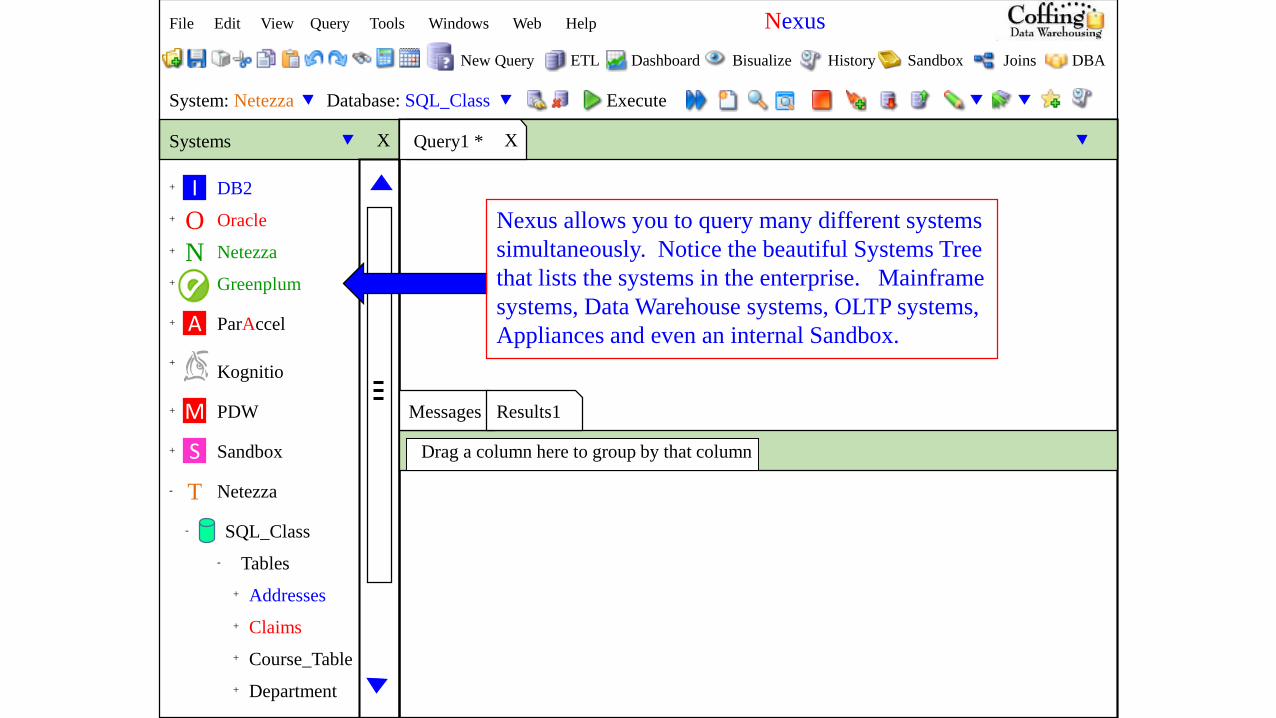
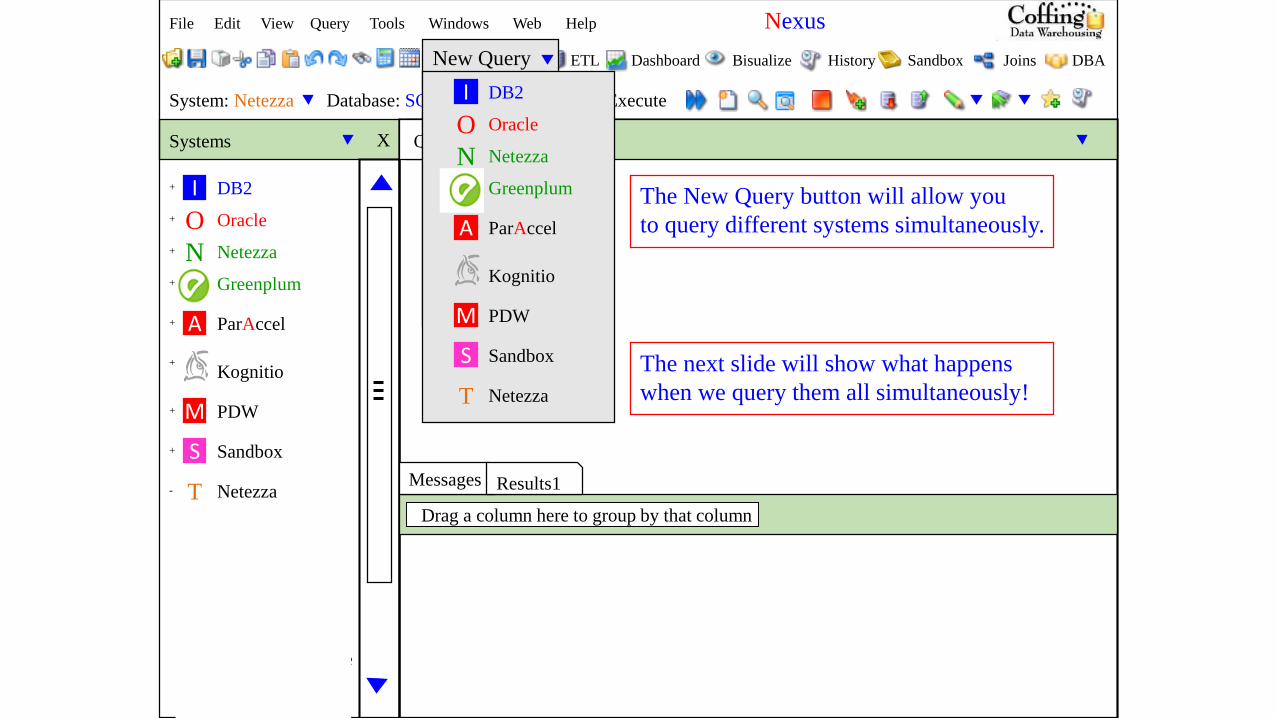
Nexus allows you to query many different systems
simultaneously. Notice the beautiful Systems Tree
that lists the systems in the enterprise. Mainframe
systems, Data Warehouse systems, OLTP systems,
Appliances and even an internal Sandbox.
File Edit View Query Tools Windows Web Help Nexus
New Query ETL Dashboard Bisualize History Sandbox Joins DBA
System: Netezza Database: SQL_Class Execute
NetezzaT-
XSystems Query1 * X
SQL_Class
Tables
Addresses+
-
-
Claims+
Course_Table+
Customer_Table+
Department_Table+
Employee_Table+
Order_Table+
Providers+
Views+
Macros+
Procedures+
Triggers+
Join Indexes+
Functions+
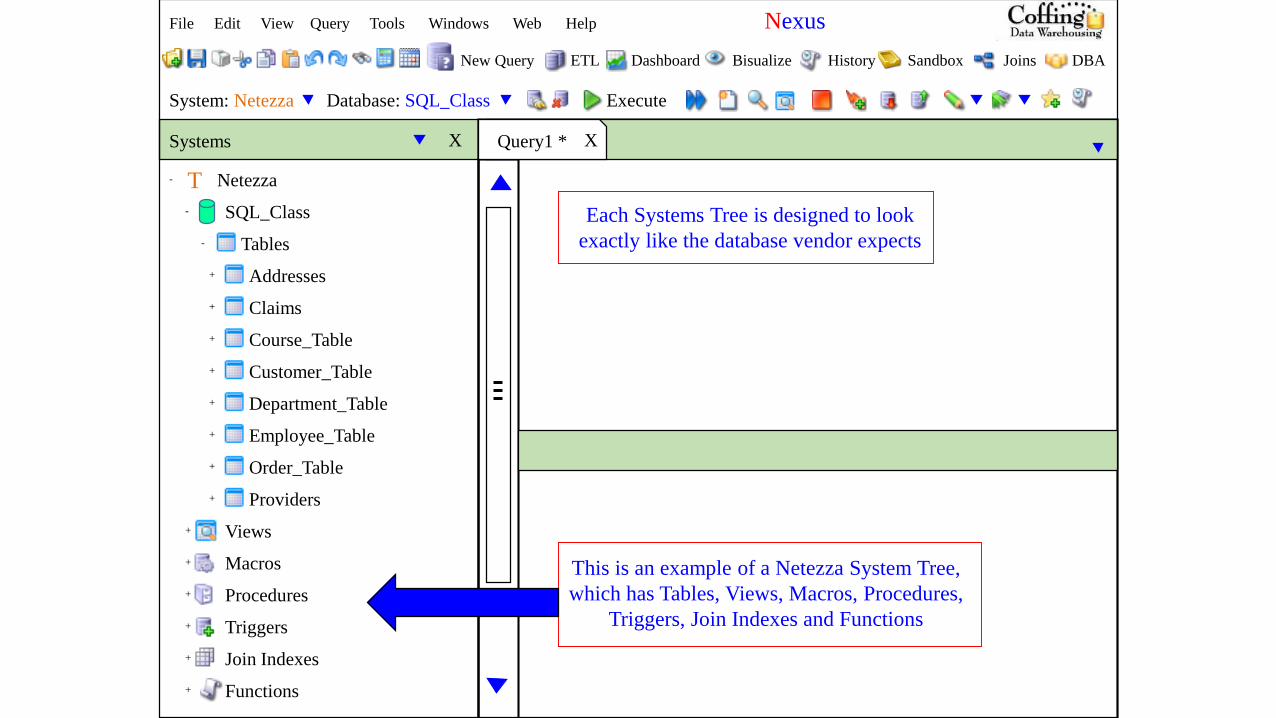
Each Systems Tree is designed to look
exactly like the database vendor expects
This is an example of a Netezza System Tree,
which has Tables, Views, Macros, Procedures,
Triggers, Join Indexes and Functions
File Edit View Query Tools Windows Web Help Nexus
New Query ETL Dashboard Bisualize History Sandbox Joins DBA
System: Netezza Database: SQL_Class Execute
NetezzaT-
XSystems Query1 * X
SQL_Class
Tables
Addresses+
-
-
Claims+
Course_Table+
Customer_Table+
Department_Table+
Employee_Table+
Order_Table+
Providers+
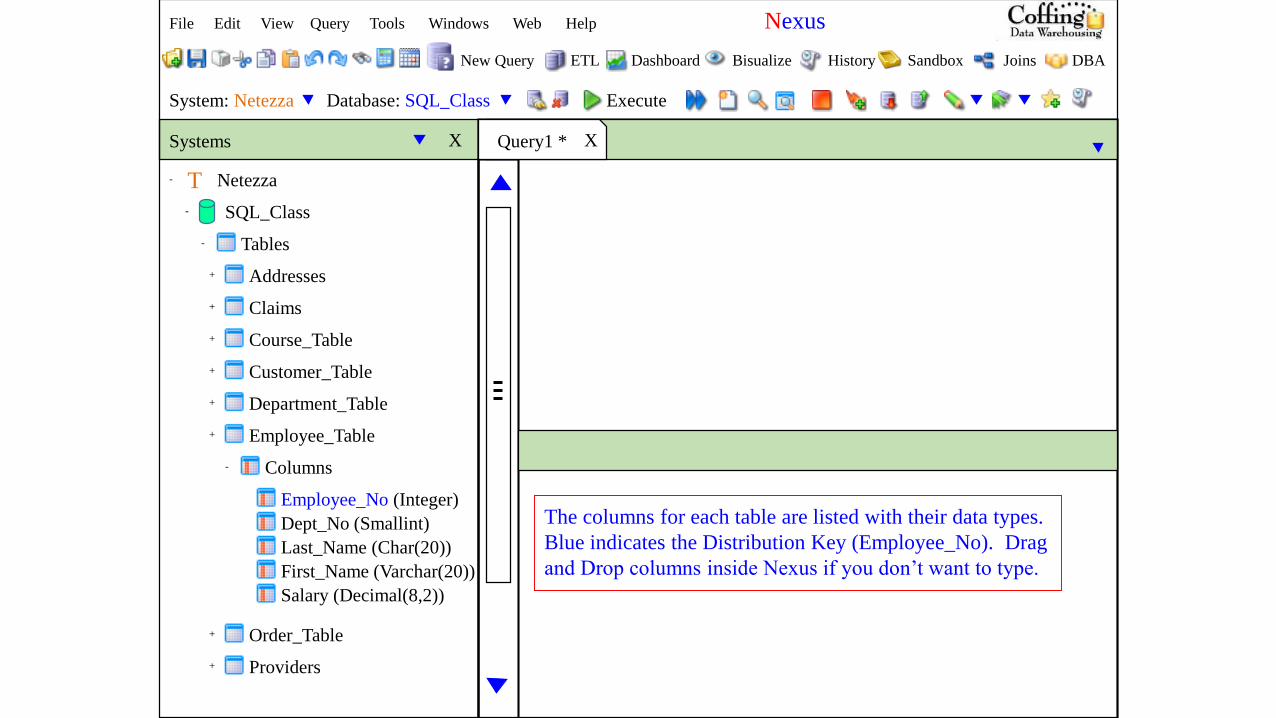
The columns for each table are listed with their data types.
Blue indicates the Distribution Key (Employee_No). Drag
and Drop columns inside Nexus if you don’t want to type.
Columns-
Employee_No (Integer)
Dept_No (Smallint)
Last_Name (Char(20))
First_Name (Varchar(20))
Salary (Decimal(8,2))
New Query ETL Dashboard Bisualize History Sandbox Joins DBA
System: Netezza Database: SQL_Class Execute
NetezzaT-
XSystems Query1 * X
SQL_Class
Tables
Addresses+
-
-
Claims+
Course_Table+
Customer_Table+
Department_Table+
Employee_Table+
Order_Table+
Providers+
Views+
Macros+
Procedures+
Triggers+
Join Indexes+
Functions+
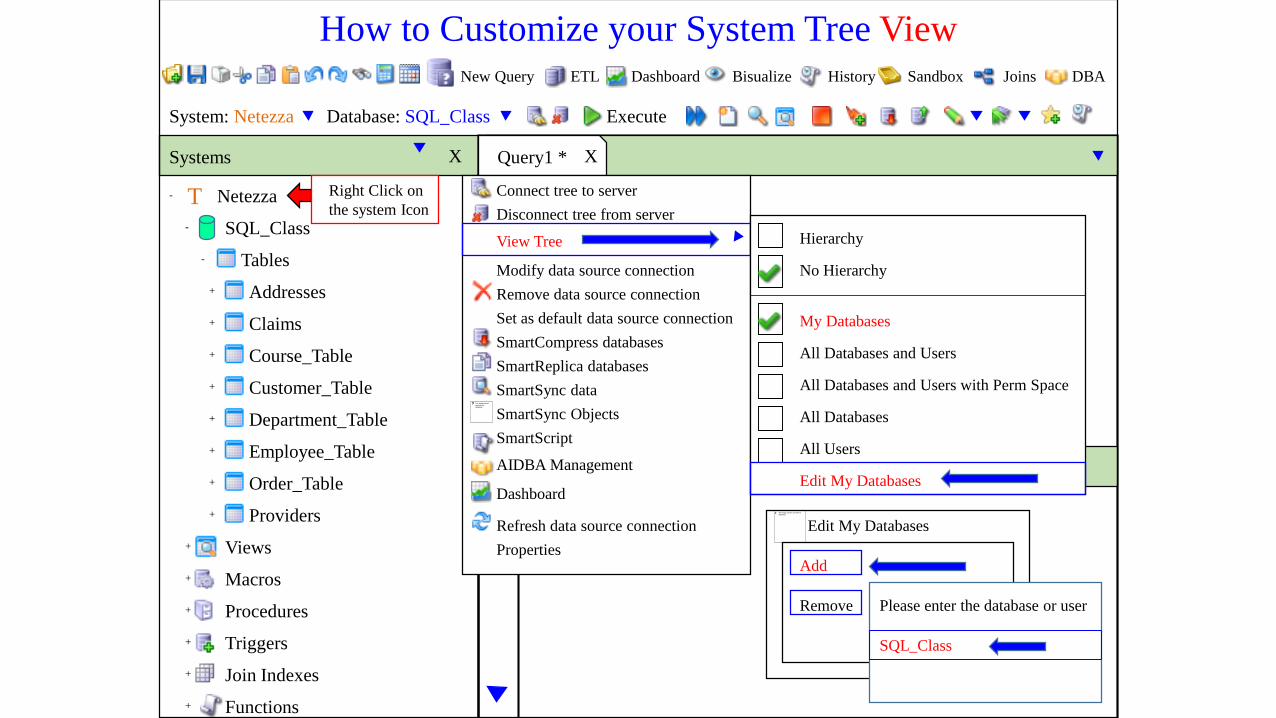
Connect tree to server
Disconnect tree from server
View Tree
Modify data source connection
Remove data source connection
Set as default data source connection
SmartCompress databases
SmartReplica databases
SmartSync data
SmartSync Objects
SmartScript
AIDBA Management
Dashboard
Refresh data source connection
Properties
How to Customize your System Tree View
Right Click on
the system Icon
Hierarchy
No Hierarchy
My Databases
All Databases and Users
All Databases and Users with Perm Space
All Databases
All Users
Edit My Databases
Edit My Databases
Add
Remove Please enter the database or user
SQL_Class
File Edit View Query Tools Windows Web Help Nexus
New Query ETL Dashboard Bisualize History Sandbox Joins DBA
System: Netezza Database: SQL_Class Execute
+ DB2
Oracle
Netezza
Greenplum
ParAccel
Kognitio
Netezza
PDW
Sandbox
N
O
A
M
S
T
+
+
+
+
+
+
+
-
Course_Table
+ Department
XSystems Query1 * X
I
Messages Results1
Drag a column here to group by that column
New Query
DB2
Oracle
Netezza
ParAccel
Kognitio
Netezza
PDW
Sandbox
N
O
A
M
S
T
I
Greenplum The New Query button will allow you
to query different systems simultaneously.
The next slide will show what happens
when we query them all simultaneously!

File Edit View Query Tools Windows Web Help Nexus
New Query ETL Dashboard Bisualize History Sandbox Joins DBA
System: Netezza Database: SQL_Class Execute
+ DB2
Oracle
Netezza
Greenplum
ParAccel
Kognitio
Netezza
PDW
Sandbox
N
O
A
M
S
T
+
+
+
+
+
+
+
-
Course_Table
+ Department
X
I
Messages Results1
Drag a column here to group by that column
SELECT Employee_No
,Dept_No
,Last_Name
,First_Name
,Salary
FROM SQL_CLASS.Employee_Table ;
Each Query
(and answer set)
is placed in a colored
tab that identifies the
system
Employee_No Dept_No Last_Name First_Name Salary
1324657
2000000
1333454
1232578
1121334
2312225
2312225
2341218
200
?
200
100
400
300
400
10
Coffing
Jones
Smith
Chambers
Strickling
Larkins
Reilly
Smythe
Billy
Squiggy
John
Mandee
Cletus
Loraine
William
Richard
41888.88
32800.50
48000.00
48850.00
54500.00
40200.00
36000.00
64300.00
____________ ________ _________ __________ _______
1
2
3
4
5
6
7
8
Systems Query 6 * xQuery 1 * x xQuery 2 * xQuery 3 * xQuery 4 * xQuery 5 *
+ DB2
Oracle
Netezza
Greenplum
ParAccel
Kognitio
Netezza
PDW
Sandbox
N
O
A
M
S
T
+
+
+
+
+
+
+
-
- SQL_Class
- Tables
+ Addresses
+ Claims
+ Course_Table
+ Department
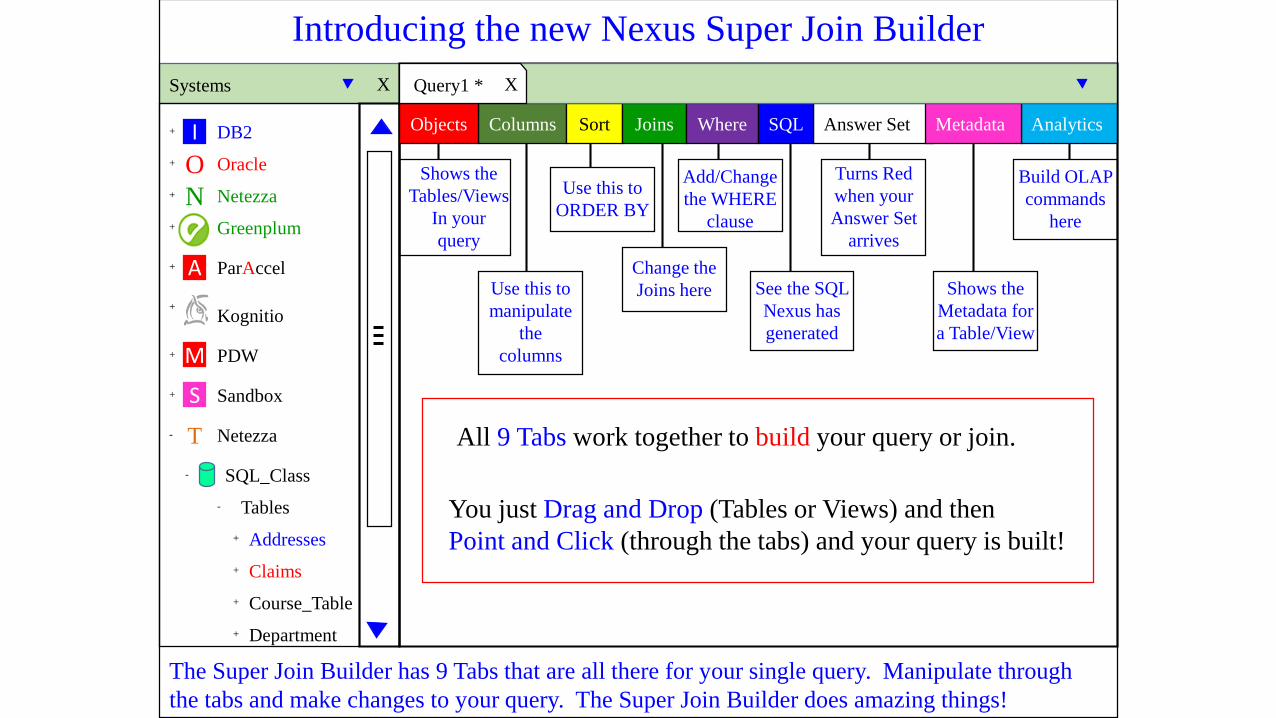
Columns Answer Set AnalyticsSort Joins Where SQLObjects Metadata
The Super Join Builder has 9 Tabs that are all there for your single query. Manipulate through
the tabs and make changes to your query. The Super Join Builder does amazing things!
XSystems Query1 * X
I
Introducing the new Nexus Super Join Builder
All 9 Tabs work together to build your query or join.
Shows the
Tables/Views
In your
query
Use this to
manipulate
the
columns
Use this to
ORDER BY
Change the
Joins here
Add/Change
the WHERE
clause
See the SQL
Nexus has
generated
Turns Red
when your
Answer Set
arrives
Shows the
Metadata for
a Table/View
Build OLAP
commands
here
You just Drag and Drop (Tables or Views) and then
Point and Click (through the tabs) and your query is built!
+ DB2
Oracle
Netezza
Greenplum
ParAccel
Kognitio
Netezza
PDW
Sandbox
N
O
A
M
S
T
+
+
+
+
+
+
+
-
- SQL_Class
- Tables
+ Addresses
+ Claims
+ Course_Table
+ Department
Columns Answer Set AnalyticsSort Joins Where SQLObjects Metadata
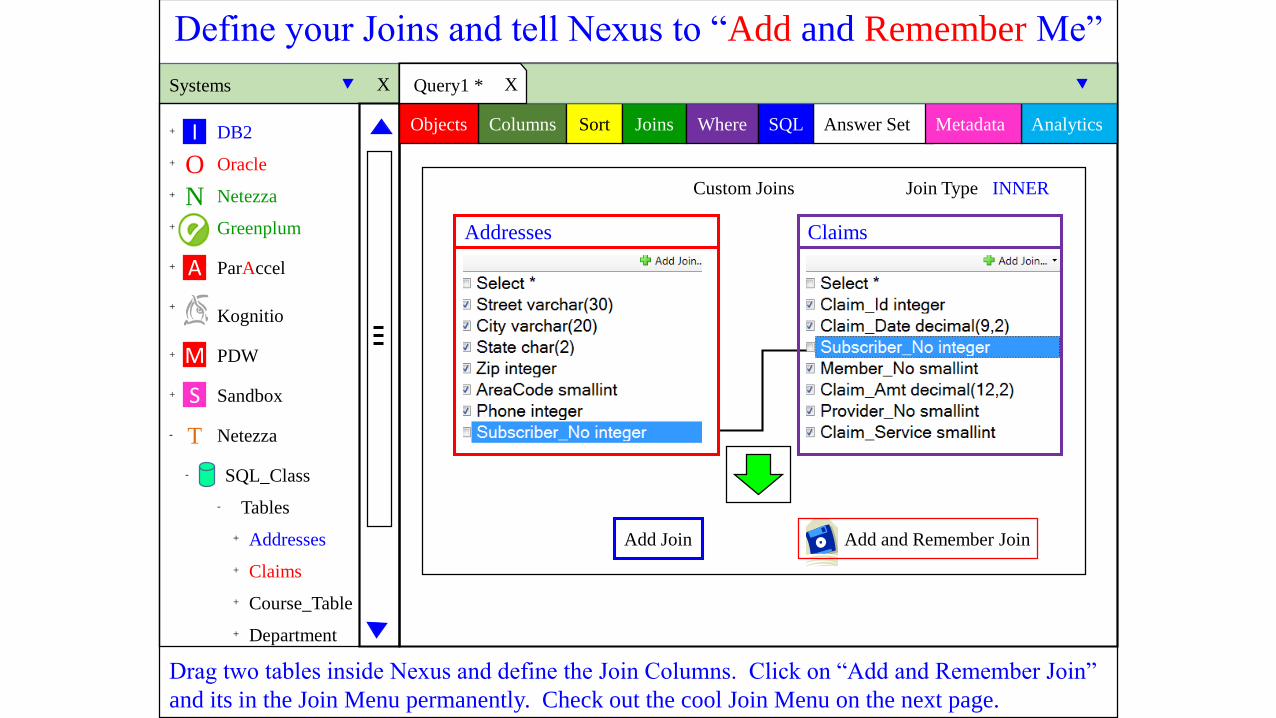
Add Join Add and Remember Join
Drag two tables inside Nexus and define the Join Columns. Click on “Add and Remember Join”
and its in the Join Menu permanently. Check out the cool Join Menu on the next page.
Custom Joins Join Type INNER
ClaimsAddresses
XSystems Query1 * X
I
Define your Joins and tell Nexus to “Add and Remember Me”
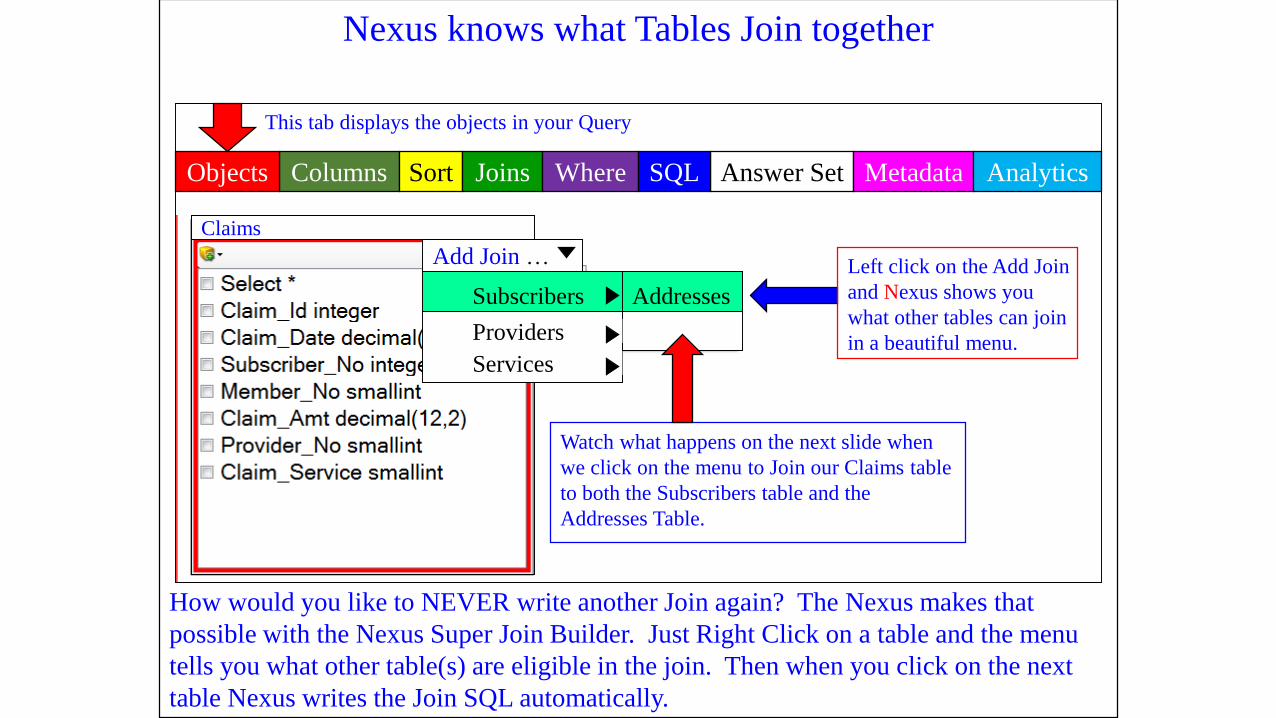
Nexus knows what Tables Join together
How would you like to NEVER write another Join again? The Nexus makes that
possible with the Nexus Super Join Builder. Just Right Click on a table and the menu
tells you what other table(s) are eligible in the join. Then when you click on the next
table Nexus writes the Join SQL automatically.
Left click on the Add Join
and Nexus shows you
what other tables can join
in a beautiful menu.
Columns Answer Set Metadata AnalyticsSort Joins Where SQL
Add Join …
Providers
Services
Subscribers
Claims
Addresses
Objects
This tab displays the objects in your Query
Watch what happens on the next slide when
we click on the menu to Join our Claims table
to both the Subscribers table and the
Addresses Table.
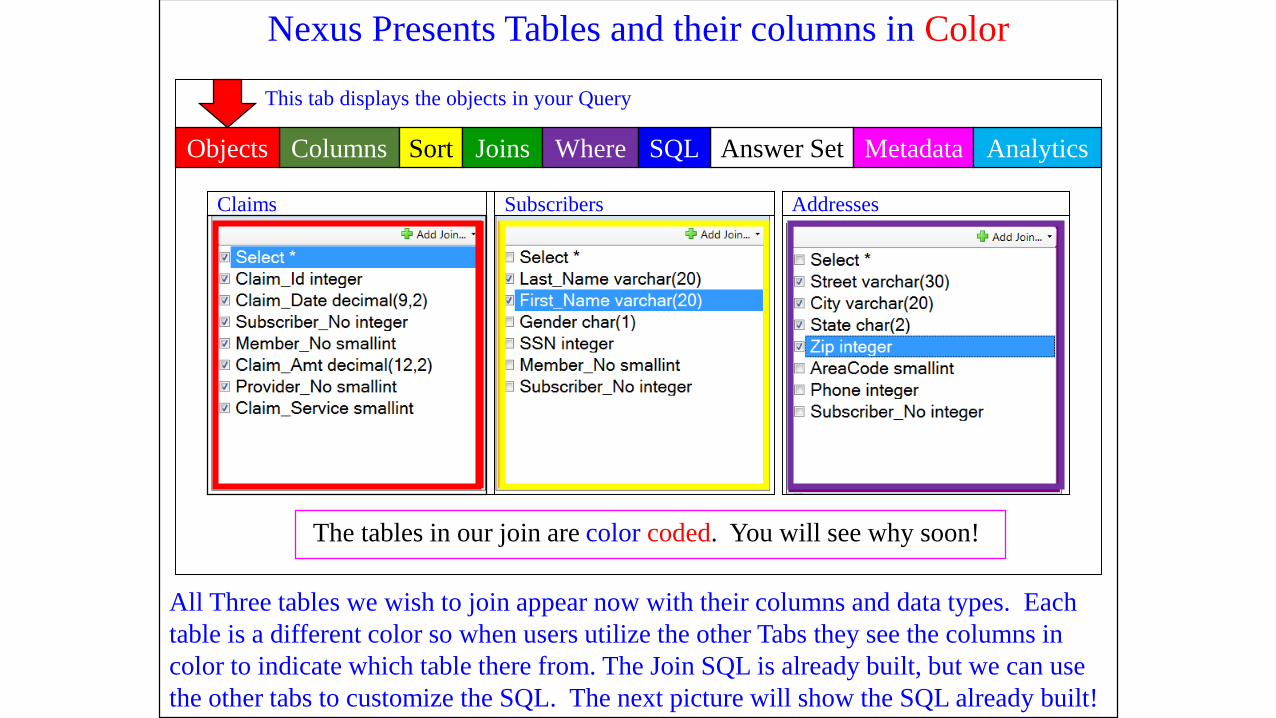
Nexus Presents Tables and their columns in Color
All Three tables we wish to join appear now with their columns and data types. Each
table is a different color so when users utilize the other Tabs they see the columns in
color to indicate which table there from. The Join SQL is already built, but we can use
the other tabs to customize the SQL. The next picture will show the SQL already built!
Claims Subscribers Addresses
The tables in our join are color coded. You will see why soon!
Columns Answer Set Metadata AnalyticsSort Joins Where SQLObjects
This tab displays the objects in your Query
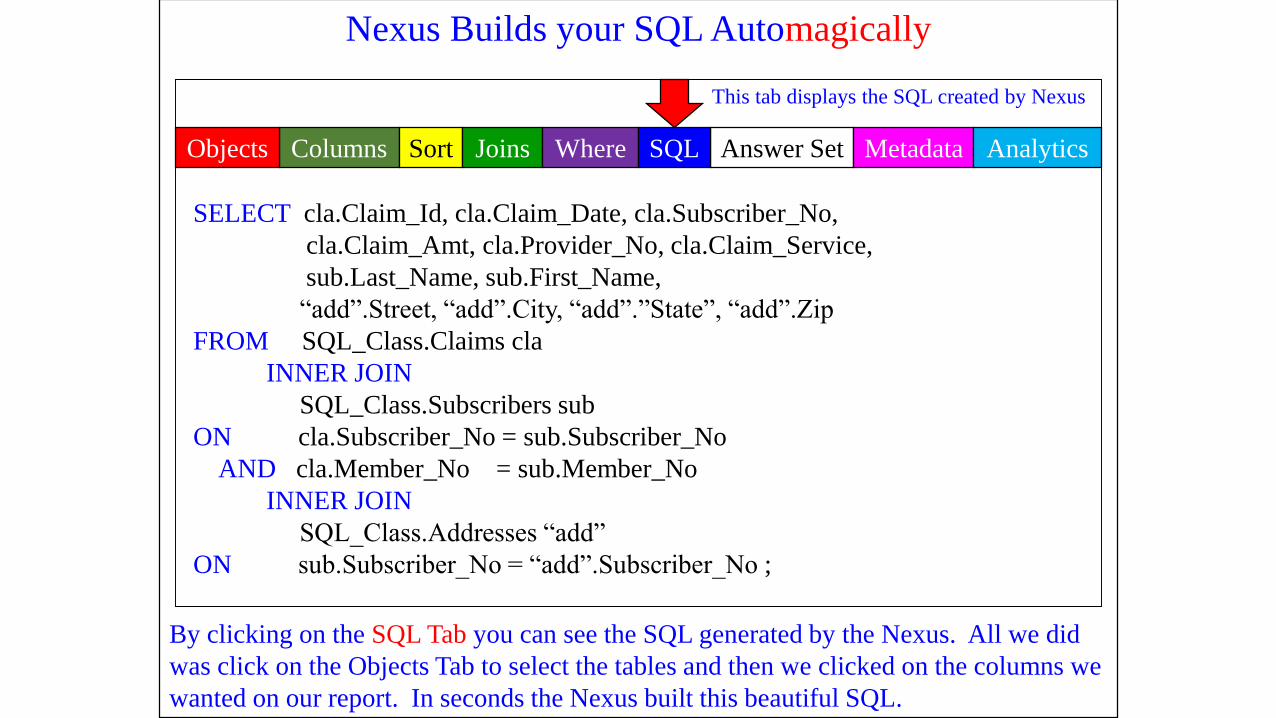
Nexus Builds your SQL Automagically
By clicking on the SQL Tab you can see the SQL generated by the Nexus. All we did
was click on the Objects Tab to select the tables and then we clicked on the columns we
wanted on our report. In seconds the Nexus built this beautiful SQL.
SELECT cla.Claim_Id, cla.Claim_Date, cla.Subscriber_No,
cla.Claim_Amt, cla.Provider_No, cla.Claim_Service,
sub.Last_Name, sub.First_Name,
“add”.Street, “add”.City, “add”.”State”, “add”.Zip
FROM SQL_Class.Claims cla
INNER JOIN
SQL_Class.Subscribers sub
ON cla.Subscriber_No = sub.Subscriber_No
AND cla.Member_No = sub.Member_No
INNER JOIN
SQL_Class.Addresses “add”
ON sub.Subscriber_No = “add”.Subscriber_No ;
Columns Answer Set Metadata AnalyticsSort Joins Where SQLObjects
This tab displays the SQL created by Nexus
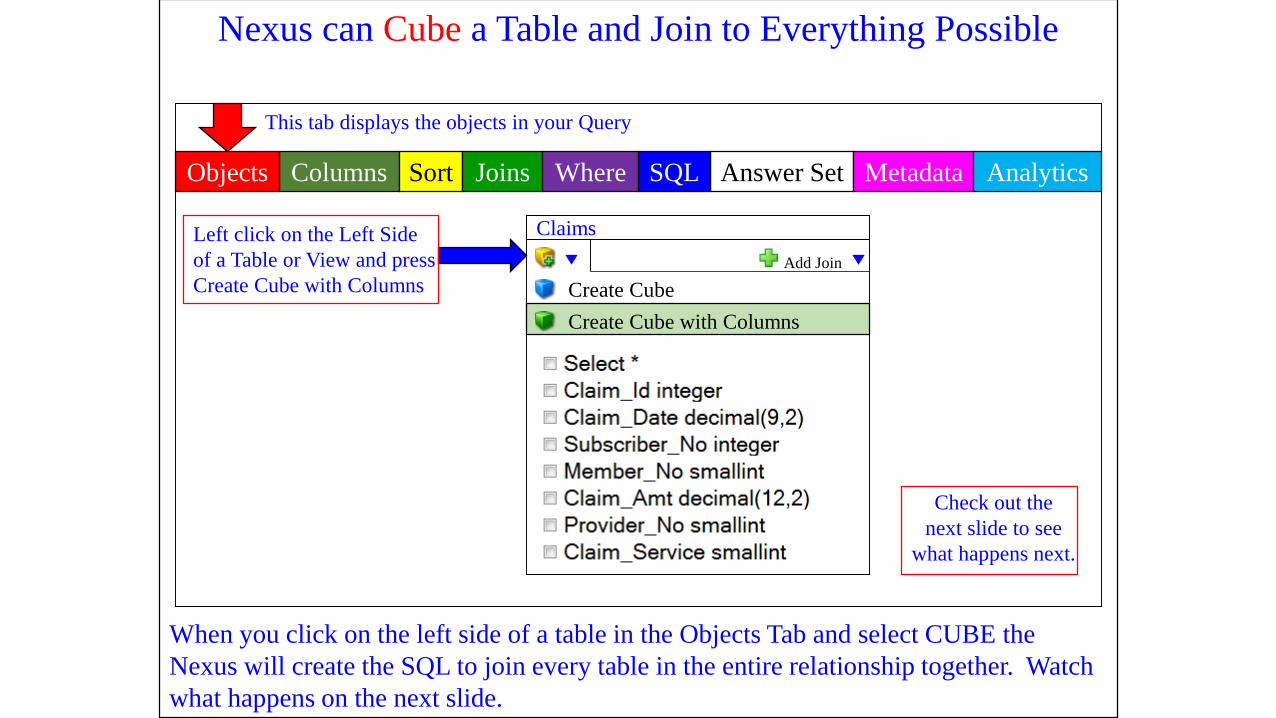
Nexus can Cube a Table and Join to Everything Possible
When you click on the left side of a table in the Objects Tab and select CUBE the
Nexus will create the SQL to join every table in the entire relationship together. Watch
what happens on the next slide.
Left click on the Left Side
of a Table or View and press
Create Cube with Columns
Columns Answer Set Metadata AnalyticsSort Joins Where SQL
Claims
Objects
This tab displays the objects in your Query
Create Cube
Create Cube with Columns
Add Join
Check out the
next slide to see
what happens next.

Nexus can Cube a Table and Join to Everything Possible
After hitting Cube with all Columns all tables in the relationship are joined.
Columns Answer Set Metadata AnalyticsSort Joins Where SQLObjects
Add Join
Claims
Add Join
Subscribers
Add Join
Addresses
Add Join
Providers
Add Join
Services All five tables
have now been
joined by Nexus
Check out the
SQL tab on the
next slide

The Cube SQL created Automagically
SELECT cla.Claim_Id, cla.Claim_Date, cla.Subscriber_No, cla.Member_No,
cla.Claim_Amt, cla.Provider_No, cla.Claim_Service,
sub.Last_Name, sub.First_Name, sub.Gender, sub.SSN,
sub.Member_No, sub.Subscriber_No,
"add".Street, "add".City, "add"."State", "add".Zip, "add".AreaCode, "add".Phone,
"add".Subscriber_No,
pro.Provider_Code, pro.Provider_Name, pro.P_Address, pro.P_City,
pro.P_State, pro.P_Zip, pro.P_Error_Rate,
ser.Service_Code, ser.Service_Desc, ser.Service_Pay
FROM SQL_CLASS.CLAIMS cla
INNER JOIN SQL_CLASS.SUBSCRIBERS sub
ON cla.Subscriber_No = sub.Subscriber_No
AND cla.Member_No = sub.Member_No
INNER JOIN SQL_CLASS.ADDRESSES "add"
ON sub.Subscriber_No = "add".Subscriber_No
INNER JOIN SQL_CLASS.PROVIDERS pro
ON cla.Provider_No = pro.Provider_Code
INNER JOIN SQL_CLASS.SERVICES ser
ON cla.Claim_Service = ser.Service_Code;
Columns Answer Set Metadata AnalyticsSort Joins Where SQLObjects
This SQL created by hitting
CREATE Cube with Columns
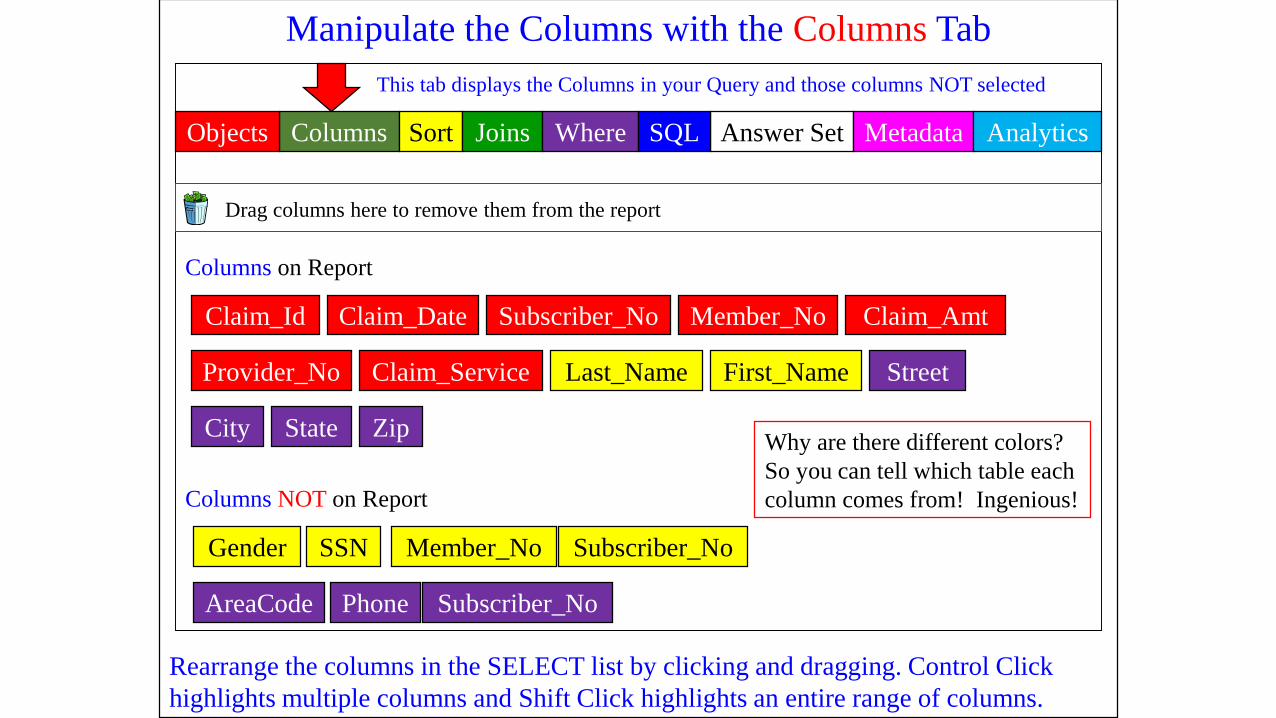
Manipulate the Columns with the Columns Tab
Rearrange the columns in the SELECT list by clicking and dragging. Control Click
highlights multiple columns and Shift Click highlights an entire range of columns.
Claim_Id Claim_Date Subscriber_No Member_No Claim_Amt
Provider_No Claim_Service Last_Name First_Name Street
City State Zip
Gender SSN Member_No Subscriber_No
AreaCode Phone Subscriber_No
Columns on Report
Columns NOT on Report
Drag columns here to remove them from the report
Columns Answer Set Metadata AnalyticsSort Joins Where SQLObjects
This tab displays the Columns in your Query and those columns NOT selected
Why are there different colors?
So you can tell which table each
column comes from! Ingenious!

Single Click and ORDER BY using the Sort Tab
Double-Click or drag any column to sort by that column(s) in ASC or DESC mode.
Columns Answer Set Metadata AnalyticsSort Joins Where SQLObjects
Claim_Id Claim_Date Subscriber_No Member_No Claim_Amt
Provider_No Claim_Service Last_Name First_Name Street
City State Zip
Gender SSN Member_No Subscriber_No
AreaCode Phone Subscriber_No
Columns on Report
Columns NOT on Report
Column Name Sort Type
Claim_Id ASC Double Click on a column
and it will ORDER BY that
column(s) in your SQL.Street DESC
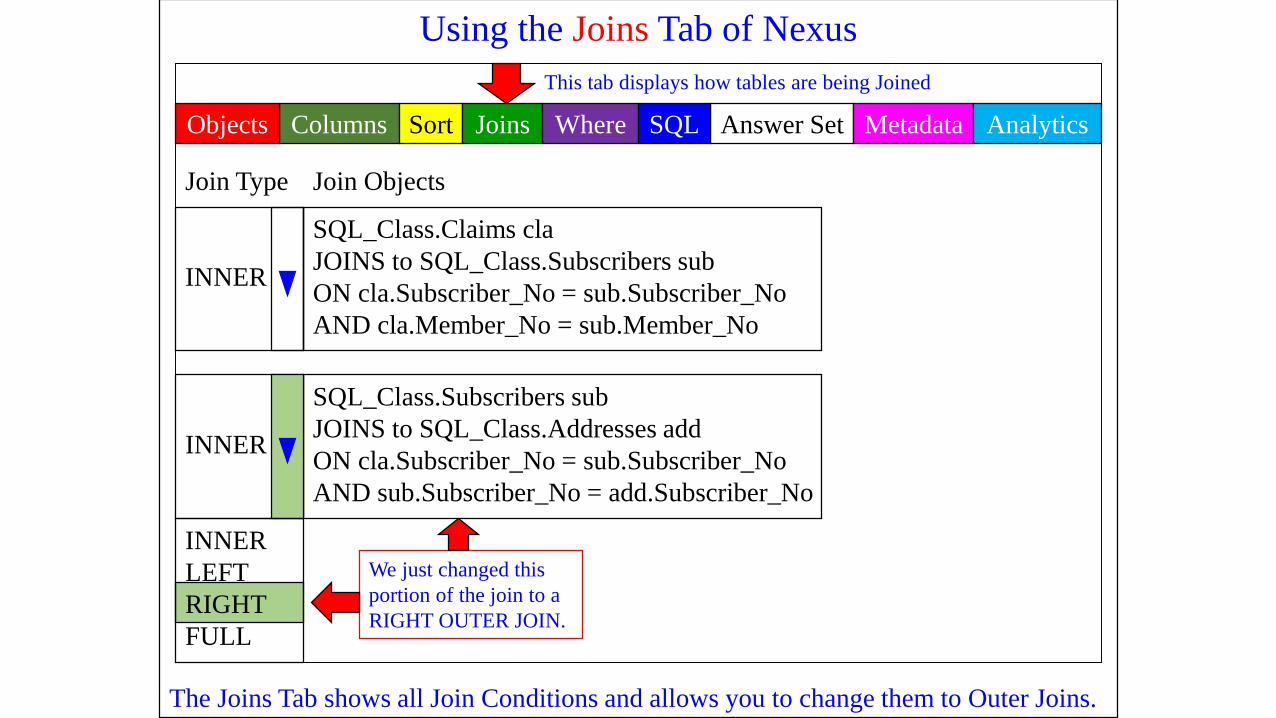
Using the Joins Tab of Nexus
The Joins Tab shows all Join Conditions and allows you to change them to Outer Joins.
Join Type Join Objects
INNER
SQL_Class.Claims cla
JOINS to SQL_Class.Subscribers sub
ON cla.Subscriber_No = sub.Subscriber_No
AND cla.Member_No = sub.Member_No
SQL_Class.Subscribers sub
JOINS to SQL_Class.Addresses add
ON cla.Subscriber_No = sub.Subscriber_No
AND sub.Subscriber_No = add.Subscriber_No
INNER
INNER
LEFT
RIGHT
FULL
We just changed this
portion of the join to a
RIGHT OUTER JOIN.
Columns Answer Set Metadata AnalyticsSort Joins Where SQLObjects
This tab displays how tables are being Joined
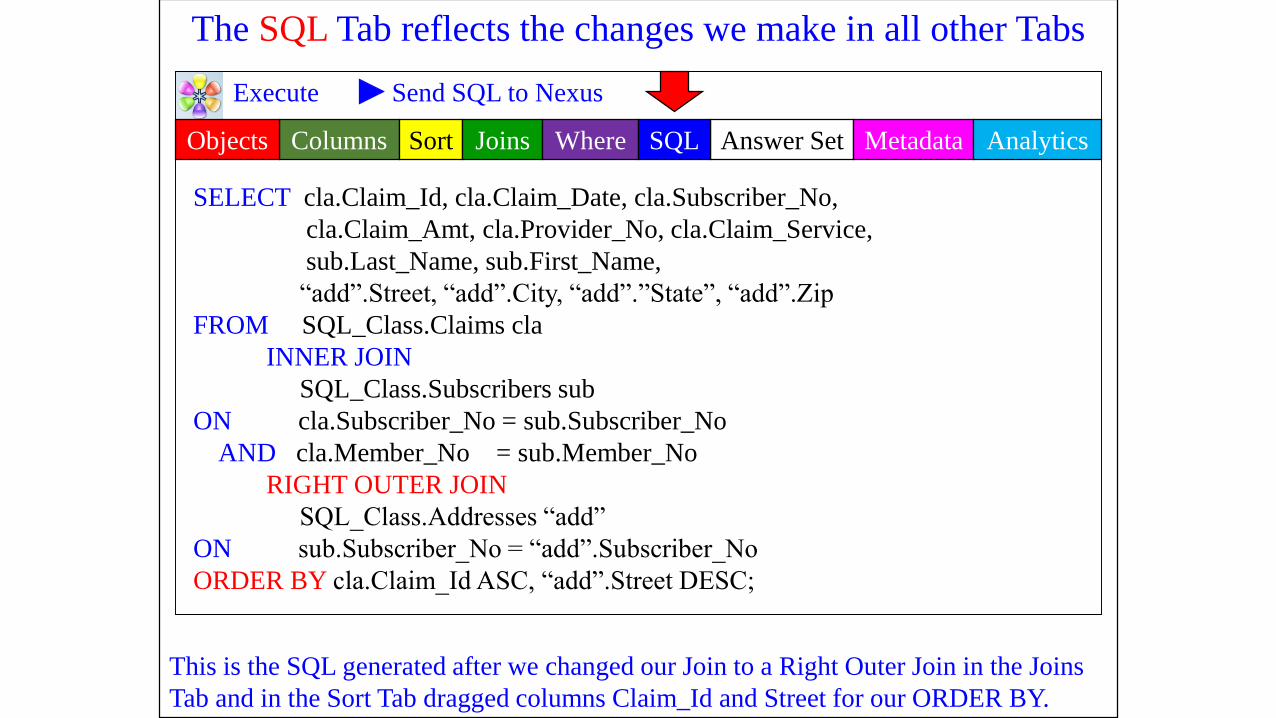
The SQL Tab reflects the changes we make in all other Tabs
This is the SQL generated after we changed our Join to a Right Outer Join in the Joins
Tab and in the Sort Tab dragged columns Claim_Id and Street for our ORDER BY.
Columns Answer Set Metadata AnalyticsSort Joins Where SQL
Execute Send SQL to Nexus
Objects
SELECT cla.Claim_Id, cla.Claim_Date, cla.Subscriber_No,
cla.Claim_Amt, cla.Provider_No, cla.Claim_Service,
sub.Last_Name, sub.First_Name,
“add”.Street, “add”.City, “add”.”State”, “add”.Zip
FROM SQL_Class.Claims cla
INNER JOIN
SQL_Class.Subscribers sub
ON cla.Subscriber_No = sub.Subscriber_No
AND cla.Member_No = sub.Member_No
RIGHT OUTER JOIN
SQL_Class.Addresses “add”
ON sub.Subscriber_No = “add”.Subscriber_No
ORDER BY cla.Claim_Id ASC, “add”.Street DESC;
File Edit View Query Tools Windows Web Help Nexus
New Query ETL Dashboard Bisualize History Sandbox Joins DBA
System: Netezza Database: SQL_Class Execute
+ DB2
Oracle
Netezza
Greenplum
ParAccel
Kognitio
Netezza
PDW
Sandbox
N
O
A
M
S
T
+
+
+
+
+
+
+
-
- SQL_Class
- Tables
+ Addresses
+ Claims
+ Course_Table
+ Department
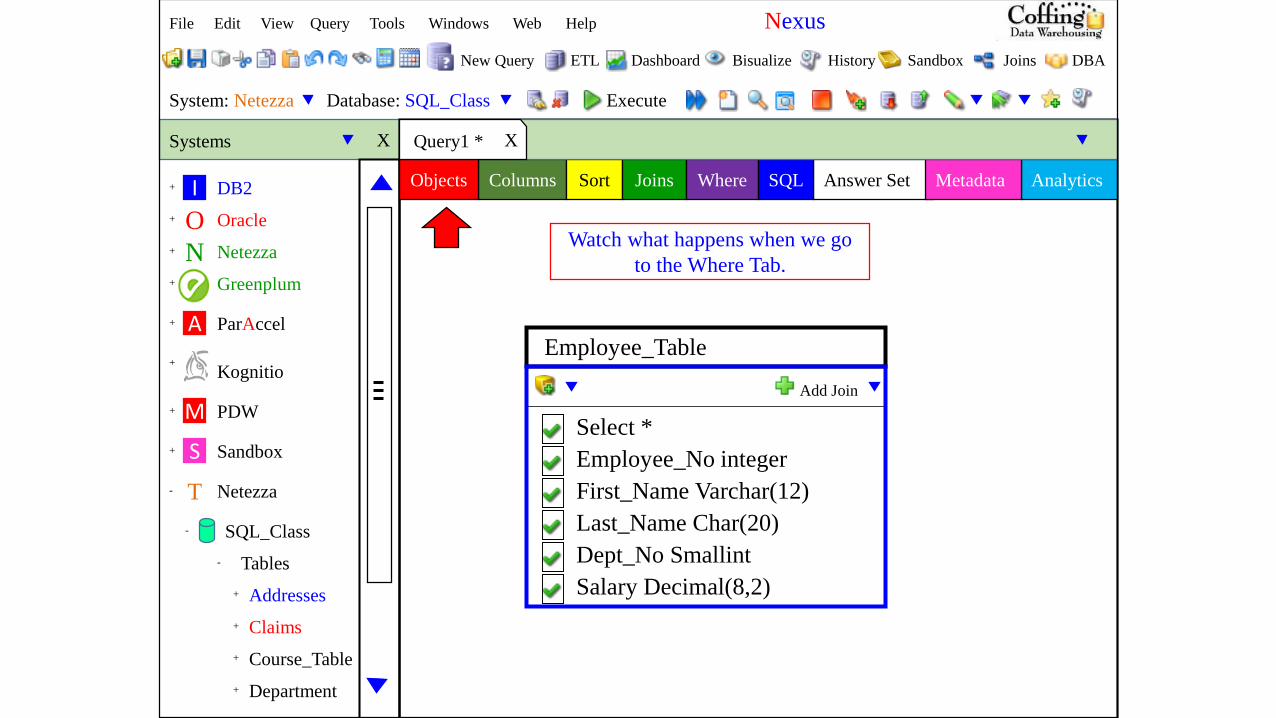
Columns Answer Set AnalyticsSort Joins Where SQLObjects Metadata
XSystems Query1 * X
I
Watch what happens when we go
to the Where Tab.
Employee_Table
Add Join
Select *
Employee_No integer
First_Name Varchar(12)
Last_Name Char(20)
Dept_No Smallint
Salary Decimal(8,2)

WHERE Tab shows Tables Indexes
Columns Answer Set Metadata AnalyticsSort Joins Where SQLObjects
Where
WHERE Employee_No = < value >
AND
OR
IN
BETWEEN
LIKE
NOT IN
= <>
>
Click on any column or index and it
goes in the WHERE clause. Notice
here we clicked on Employee_No.
Employee_No
Columns Used in Report
First_Name Last_Name
Dept_No Salary
Unique Distribution Key
Employee_No
Unique Secondary Index
Last_Name First_Name
Non-Unique Secondary Index
Last_Name Dept_No Salary
Indexes
File Edit View Query Tools Windows Web Help Nexus
New Query ETL Dashboard Bisualize History Sandbox Joins DBA
System: Netezza Database: SQL_Class Execute
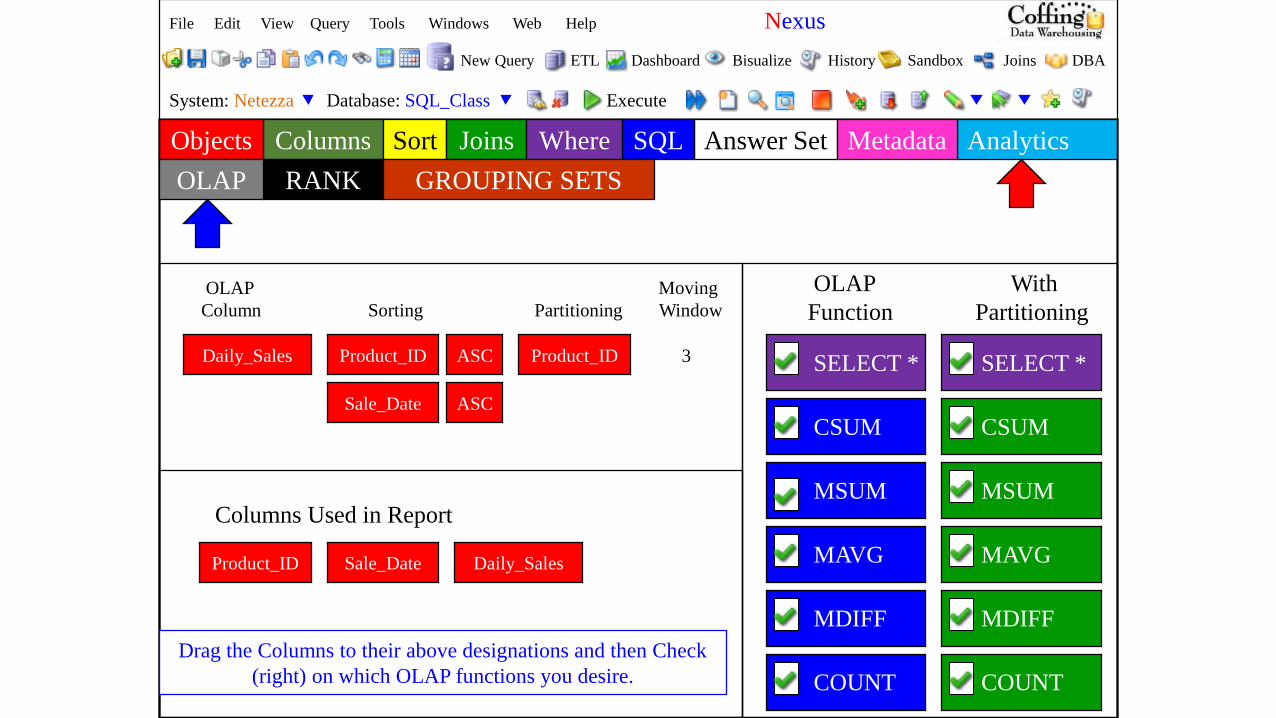
Columns Answer Set AnalyticsSort Joins Where SQLObjects Metadata
OLAP Moving
Column Sorting Partitioning Window
Daily_Sales Product_ID ASC
Sale_Date ASC
Product_ID 3
Columns Used in Report
Product_ID Sale_Date Daily_Sales
OLAP
Function
With
Partitioning
SELECT * SELECT *
CSUM CSUM
MSUM MSUM
MAVG MAVG
MDIFF MDIFF
COUNT COUNT
RANK GROUPING SETSOLAP
Drag the Columns to their above designations and then Check
(right) on which OLAP functions you desire.

File Edit View Query Tools Windows Web Help Nexus
New Query ETL Dashboard Bisualize History Sandbox Joins DBA
System: Netezza Database: SQL_Class Execute
Columns Answer Set AnalyticsSort Joins Where SQLObjects Metadata
OLAP
Column Sorting Partitioning
Daily_Sales Product_ID DESC Product_ID
Columns Used in Report
Product_ID Sale_Date Daily_Sales
OLAP
Function
With
Partitioning
RANK RANK
RANK GROUPING SETSOLAP
Drag the Columns to their above designations and then Check
(right) on which OLAP functions you desire.
Turn the Page and check
out the Answer Set
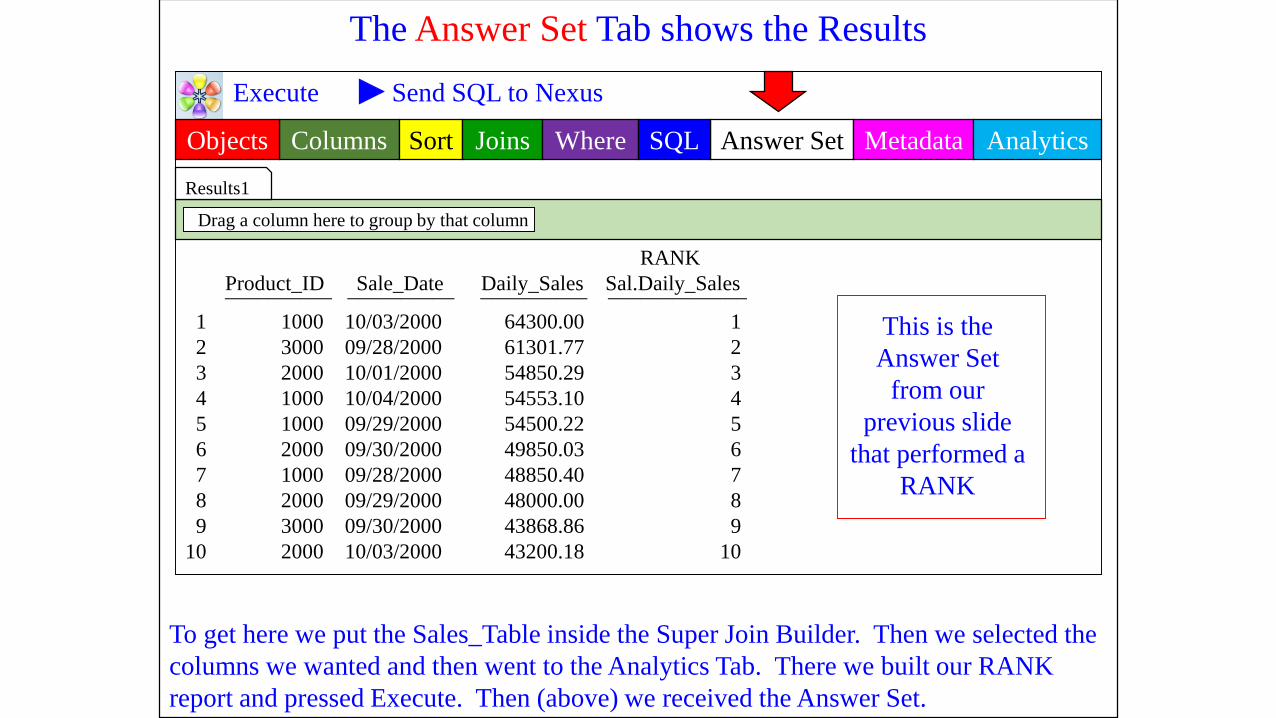
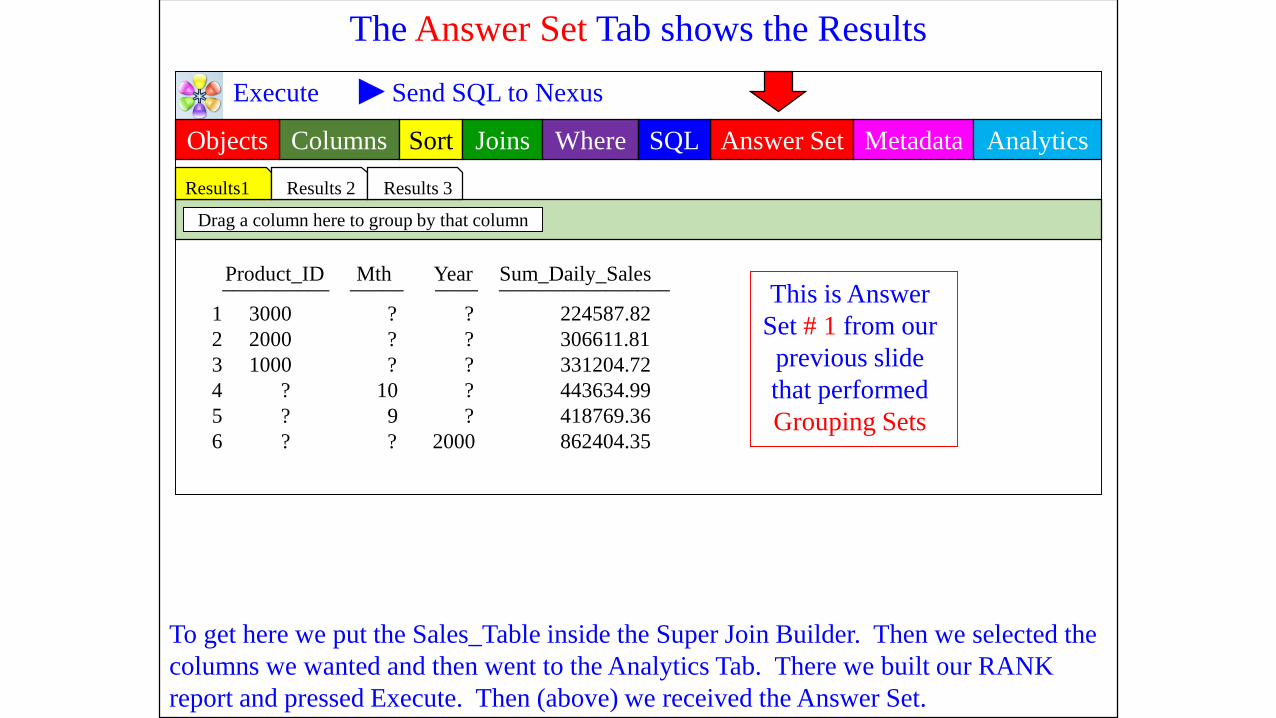
The Answer Set Tab shows the Results
To get here we put the Sales_Table inside the Super Join Builder. Then we selected the
columns we wanted and then went to the Analytics Tab. There we built our RANK
report and pressed Execute. Then (above) we received the Answer Set.
Columns Answer Set Metadata AnalyticsSort Joins Where SQL
Execute Send SQL to Nexus
Objects
Results1
Drag a column here to group by that column
This is the
Answer Set
from our
previous slide
that performed a
RANK
RANK
Product_ID Sale_Date Daily_Sales Sal.Daily_Sales
1000
3000
2000
1000
1000
2000
1000
2000
3000
2000
10/03/2000
09/28/2000
10/01/2000
10/04/2000
09/29/2000
09/30/2000
09/28/2000
09/29/2000
09/30/2000
10/03/2000
1
2
3
4
5
6
7
8
9
10
__________ __________ __________ _____________
64300.00
61301.77
54850.29
54553.10
54500.22
49850.03
48850.40
48000.00
43868.86
43200.18
1
2
3
4
5
6
7
8
9
10

File Edit View Query Tools Windows Web Help Nexus
New Query ETL Dashboard Bisualize History Sandbox Joins DBA
System: Netezza Database: SQL_Class Execute
Columns Answer Set AnalyticsSort Joins Where SQLObjects Metadata
Product Date Column Sum
Product_ID
Columns
Product_ID Sale_Date Daily_Sales
Group By Functions
SELECT *
RANK GROUPING SETSOLAP
Drag the Columns to their above designations and then Check
(right) on which Grouping Sets desire. Turn the Page and check
out how to Execute the queries
Sale_Date Daily_Sales
Date Extract
Year
Month
Grouping Sets
Rollup
Cubes
Columns Answer Set AnalyticsSort Joins Where SQLObjects Metadata
Product Date Column Sum
Product_ID
Columns
Product_ID Sale_Date Daily_Sales
Group By Functions
SELECT *
RANK GROUPING SETSOLAP
Sale_Date Daily_Sales
Date Extract
Year
Month Grouping Sets
Rollup
Cubes
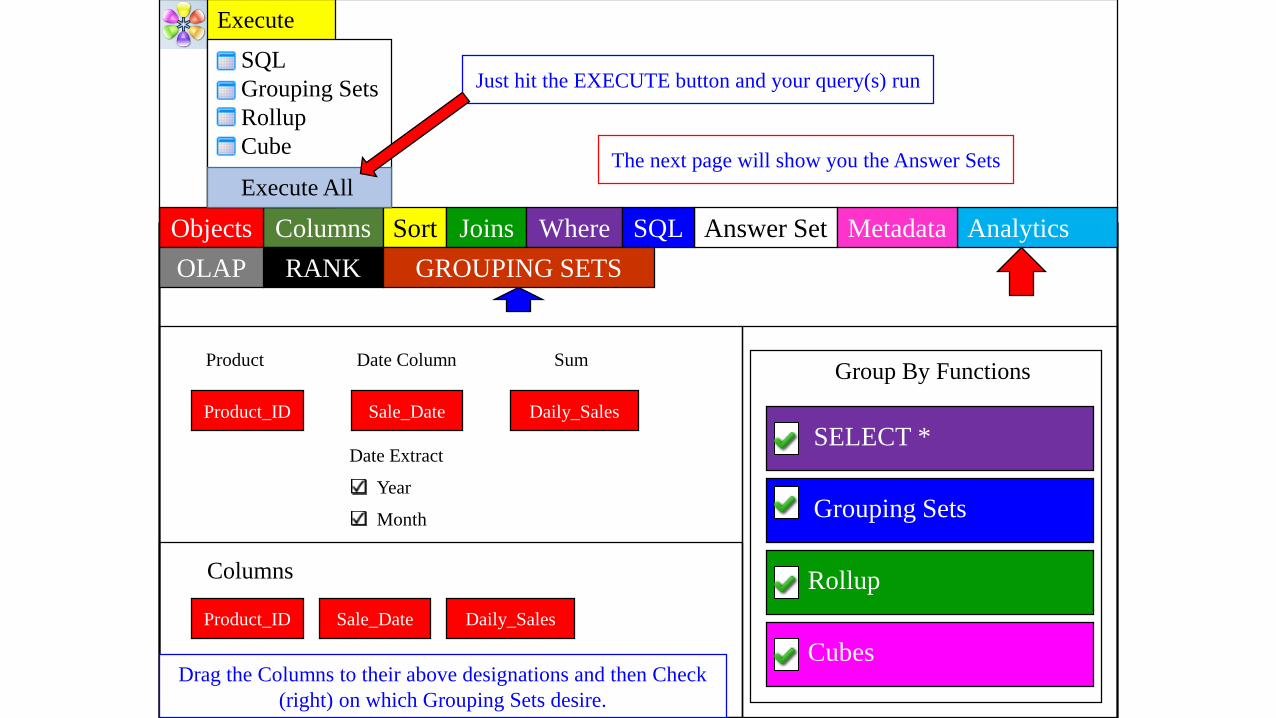
Execute
SQL
Grouping Sets
Rollup
Cube
Execute All
Drag the Columns to their above designations and then Check
(right) on which Grouping Sets desire.
Just hit the EXECUTE button and your query(s) run
The next page will show you the Answer Sets
The Answer Set Tab shows the Results
To get here we put the Sales_Table inside the Super Join Builder. Then we selected the
columns we wanted and then went to the Analytics Tab. There we built our RANK
report and pressed Execute. Then (above) we received the Answer Set.
Columns Answer Set Metadata AnalyticsSort Joins Where SQL
Execute Send SQL to Nexus
Objects
Drag a column here to group by that column
This is Answer
Set # 1 from our
previous slide
that performed
Grouping Sets
Product_ID Mth Year Sum_Daily_Sales
3000
2000
1000
?
?
?
?
?
?
10
9
?
224587.82
306611.81
331204.72
443634.99
418769.36
862404.35
__________ _____ ____ ________________
?
?
?
?
?
2000
1
2
3
4
5
6
Results1 Results 2 Results 3

The Answer Set Tab shows the Results
Columns Answer Set Metadata AnalyticsSort Joins Where SQL
Execute Send SQL to Nexus
Objects
Drag a column here to group by that column
This is Answer
Set # 2 from our
previous slide
that performed
Group by Rollup
Product_ID Mth Year Sum_Daily_Sales
3000
3000
3000
3000
3000
2000
2000
2000
2000
2000
1000
1000
1000
1000
1000
?
10
10
9
9
?
10
10
9
9
?
10
10
9
9
?
?
84908.06
84908.06
139679.76
139679.76
224587.82
166872.90
166872.90
139738.91
139738.91
306611.81
191854.03
191854.03
139350.69
139350.69
331204.72
862404.35
__________ _____ ____ ________________
2000
?
2000
?
?
2000
?
2000
?
?
2000
?
2000
?
?
?
1
2
3
4
5
6
7
8
9
10
11
12
13
14
15
16
Results1 Results 2 Results 3

The Answer Set Tab shows the Results
Columns Answer Set Metadata AnalyticsSort Joins Where SQL
Execute Send SQL to Nexus
Objects
Drag a column here to group by that column
This is Answer
Set # 3 from our
previous slide
that performed
Group by Cube
Product_ID Mth Year Sum_Daily_Sales
3000
3000
3000
3000
3000
3000
2000
2000
2000
2000
2000
2000
1000
1000
1000
1000
10
10
9
9
?
?
10
10
9
9
?
?
10
10
9
9
84908.06
84908.06
139679.76
139679.76
224587.82
224587.82
166872.90
166872.90
139738.91
139738.91
306611.81
306611.81
191854.03
191854.03
139350.69
139350.69
__________ _____ ____ ________________
2000
?
2000
?
2000
?
2000
?
2000
?
2000
?
2000
?
2000
?
1
2
3
4
5
6
7
8
9
10
11
12
13
14
15
16
Results1 Results 2 Results 3
Entire result set not
displayed
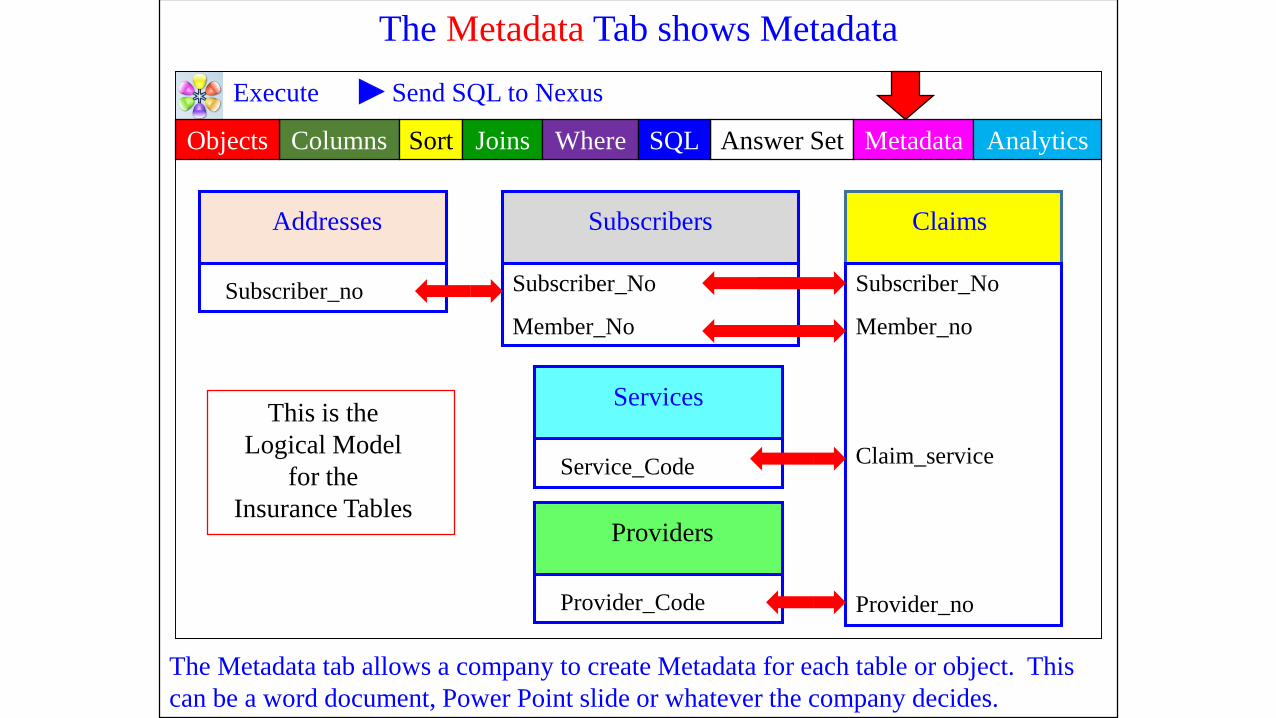
The Metadata Tab shows Metadata
Columns Answer Set Metadata AnalyticsSort Joins Where SQL
Execute Send SQL to Nexus
Objects
Subscriber_No
Member_no
Claim_service
Provider_no
Claims
Subscriber_no
Addresses Subscribers
Subscriber_No
Member_No
Service_Code
Services
Provider_Code
Providers
This is the
Logical Model
for the
Insurance Tables
The Metadata tab allows a company to create Metadata for each table or object. This
can be a word document, Power Point slide or whatever the company decides.
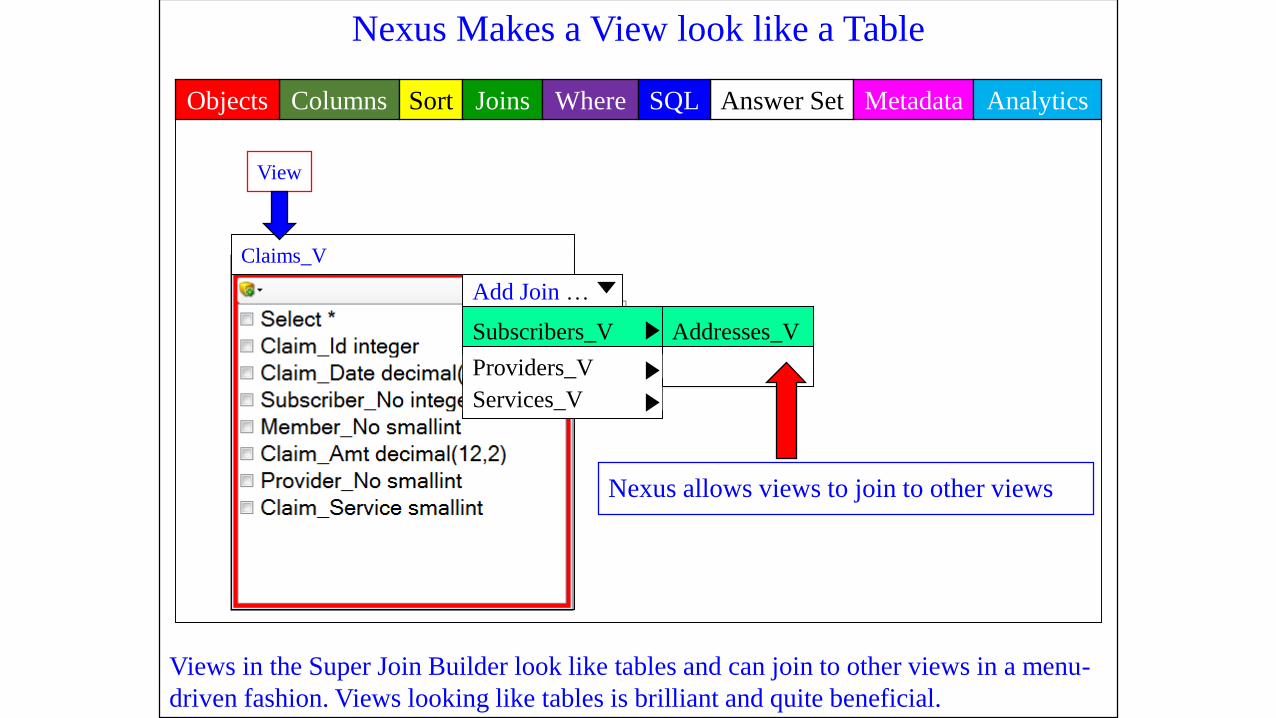
Nexus Makes a View look like a Table
Views in the Super Join Builder look like tables and can join to other views in a menu-
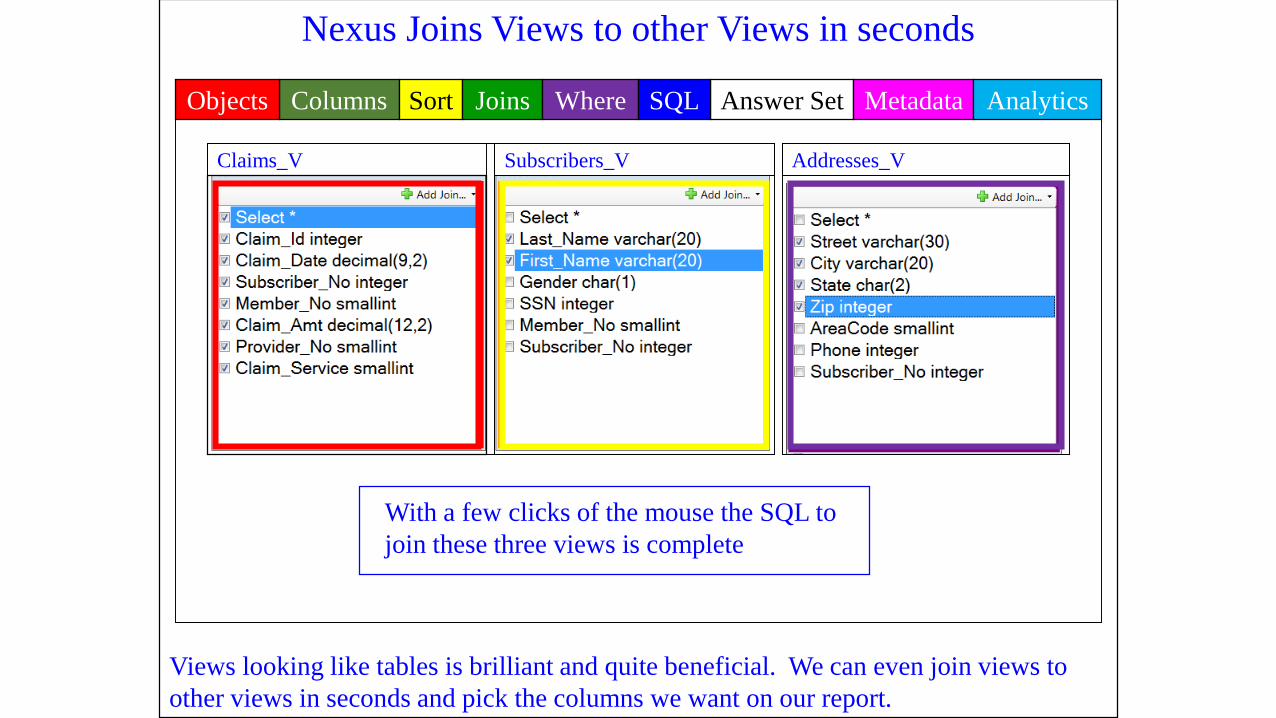
driven fashion. Views looking like tables is brilliant and quite beneficial.
Add Join …
Providers_V
Services_V
Subscribers_V
Claims_V
Addresses_V
Nexus allows views to join to other views
Columns Answer Set Metadata AnalyticsSort Joins Where SQLObjects
View
Nexus Joins Views to other Views in seconds
Views looking like tables is brilliant and quite beneficial. We can even join views to
other views in seconds and pick the columns we want on our report.
Columns Answer Set Metadata AnalyticsSort Joins Where SQLObjects
Claims_V Subscribers_V Addresses_V
With a few clicks of the mouse the SQL to
join these three views is complete
Nexus can Cube a View and Join to all other related Views
When you click on the left side of a View in the Objects Tab and select CUBE the
Nexus will create the SQL to join every View in the entire relationship together. Watch
what happens on the next slide.
Left click on the Left Side
of a View and select
Create Cube with Columns
Columns Answer Set Metadata AnalyticsSort Joins Where SQL
Claims_V
Objects
This tab displays the objects in your Query
Create Cube
Create Cube with Columns
Add Join
Check out the
next slide to see
what happens next.

Nexus Cubes Views in Seconds
After hitting Cube with all Columns all Views in the relationship are joined.
Columns Answer Set Metadata AnalyticsSort Joins Where SQLObjects
Add Join
Claims_V
Add Join
Subscribers_V
Add Join
Addresses_V
Add Join
Providers_V
Add Join
Services_V All five Views
have now been
joined by Nexus

The Cube SQL created on Views is done Automagically
SELECT cla.Claim_Id, cla.Claim_Date, cla.Subscriber_No, cla.Member_No,
cla.Claim_Amt, cla.Provider_No, cla.Claim_Service,
sub.Last_Name, sub.First_Name, sub.Gender, sub.SSN,
sub.Member_No, sub.Subscriber_No,
"add".Street, "add".City, "add"."State", "add".Zip, "add".AreaCode, "add".Phone,
"add".Subscriber_No,
pro.Provider_Code, pro.Provider_Name, pro.P_Address, pro.P_City,
pro.P_State, pro.P_Zip, pro.P_Error_Rate,
ser.Service_Code, ser.Service_Desc, ser.Service_Pay
FROM SQL_CLASS.CLAIMS_V cla
INNER JOIN SQL_CLASS.SUBSCRIBERS_V sub
ON cla.Subscriber_No = sub.Subscriber_No
AND cla.Member_No = sub.Member_No
INNER JOIN SQL_CLASS.ADDRESSES_V "add"
ON sub.Subscriber_No = "add".Subscriber_No
INNER JOIN SQL_CLASS.PROVIDERS_V pro
ON cla.Provider_No = pro.Provider_Code
INNER JOIN SQL_CLASS.SERVICES_V ser
ON cla.Claim_Service = ser.Service_Code;
Columns Answer Set Metadata AnalyticsSort Joins Where SQLObjects
This SQL created by hitting
CREATE Cube with Columns
is seen here joining five views.
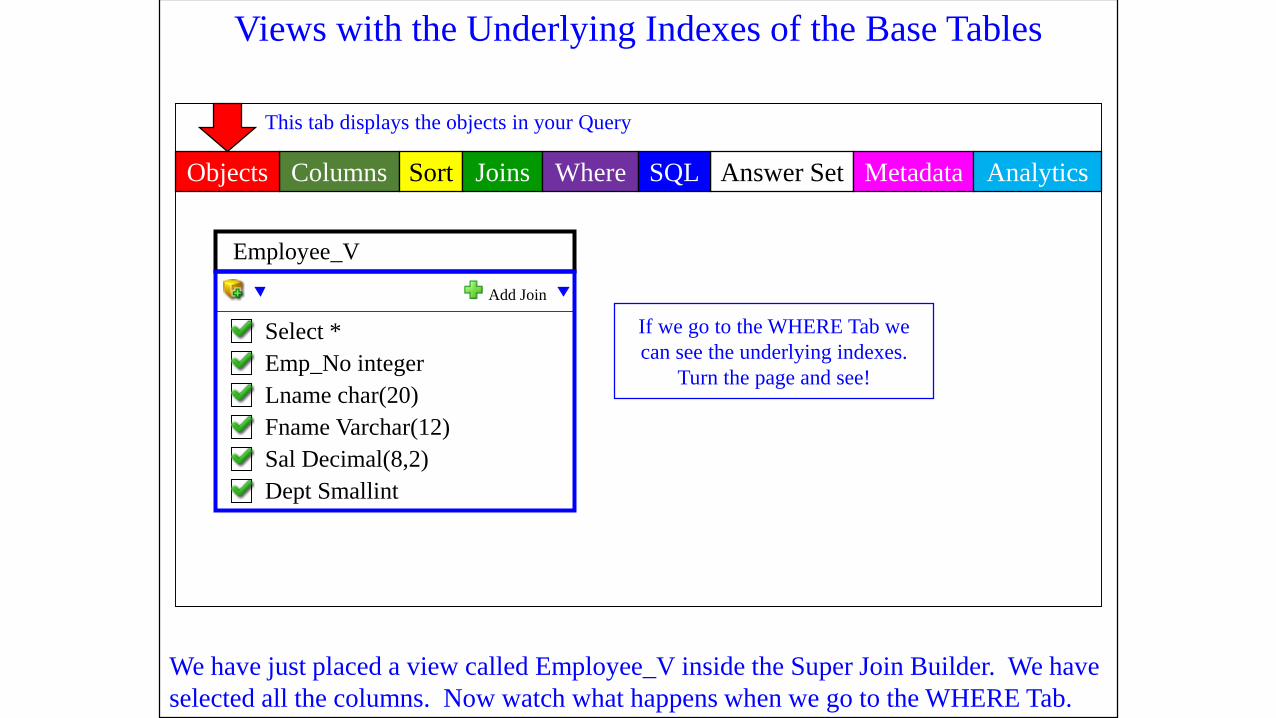
Views with the Underlying Indexes of the Base Tables
We have just placed a view called Employee_V inside the Super Join Builder. We have
selected all the columns. Now watch what happens when we go to the WHERE Tab.
Columns Answer Set Metadata AnalyticsSort Joins Where SQLObjects
This tab displays the objects in your Query
Employee_V
Add Join
Select *
Emp_No integer
Lname char(20)
Fname Varchar(12)
Sal Decimal(8,2)
Dept Smallint
If we go to the WHERE Tab we
can see the underlying indexes.
Turn the page and see!
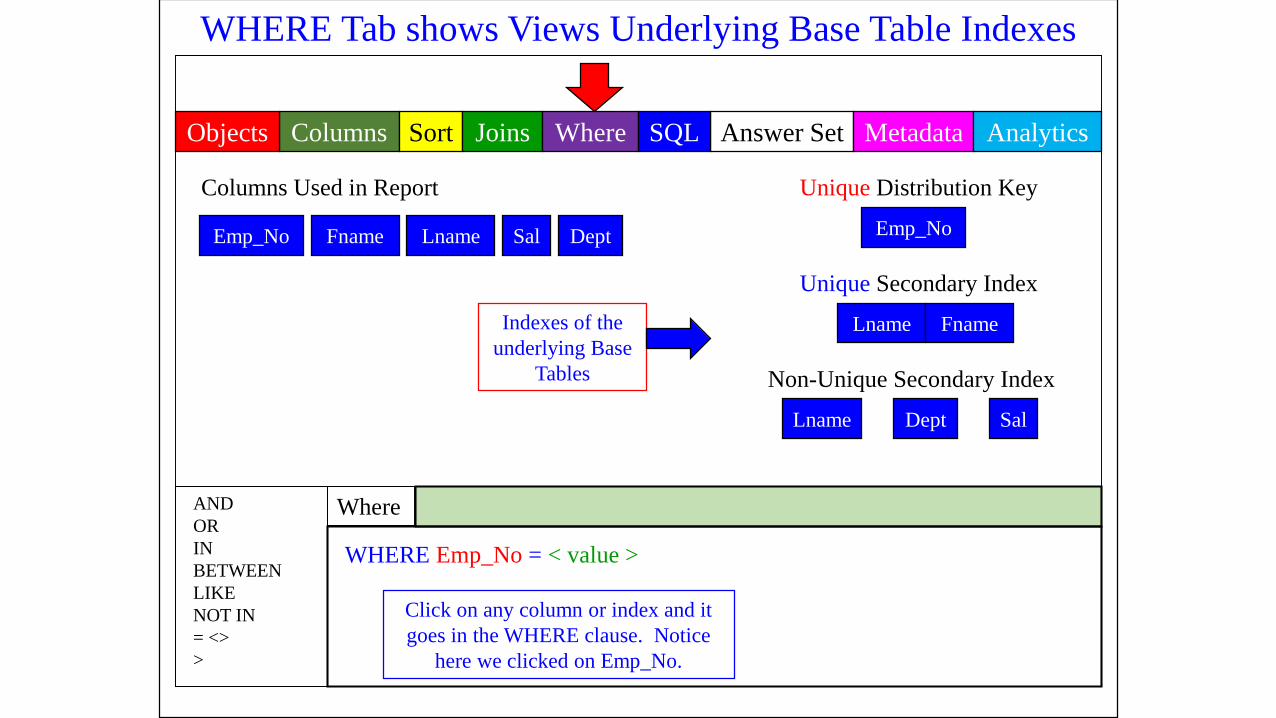
WHERE Tab shows Views Underlying Base Table Indexes
Columns Answer Set Metadata AnalyticsSort Joins Where SQLObjects
Emp_No
Columns Used in Report
Fname Lname DeptSal
Unique Distribution Key
Emp_No
Unique Secondary Index
Lname Fname
Non-Unique Secondary Index
Lname Dept Sal
Where
WHERE Emp_No = < value >
AND
OR
IN
BETWEEN
LIKE
NOT IN
= <>
>
Click on any column or index and it
goes in the WHERE clause. Notice
here we clicked on Emp_No.
Indexes of the
underlying Base
Tables
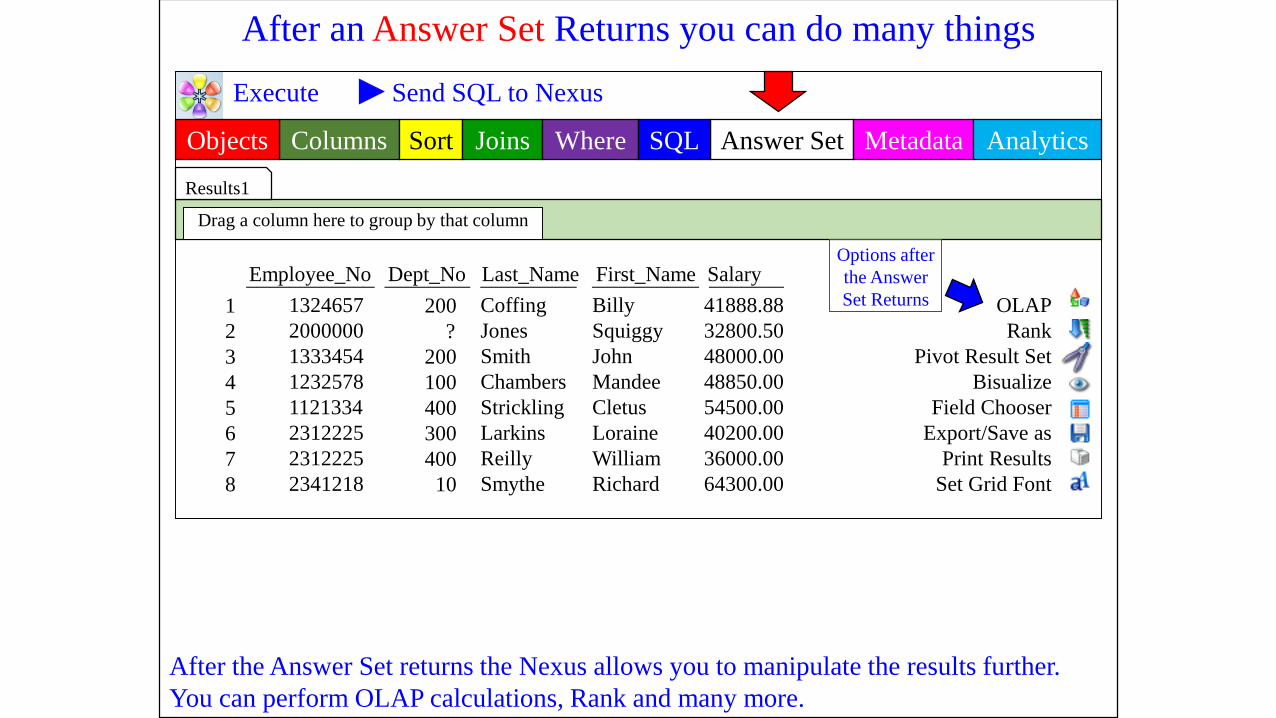
After an Answer Set Returns you can do many things
After the Answer Set returns the Nexus allows you to manipulate the results further.
You can perform OLAP calculations, Rank and many more.
Columns Answer Set Metadata AnalyticsSort Joins Where SQL
Execute Send SQL to Nexus
Objects
Results1
Drag a column here to group by that column
Options after
the Answer
Set Returns
Employee_No Dept_No Last_Name First_Name Salary
1324657
2000000
1333454
1232578
1121334
2312225
2312225
2341218
200
?
200
100
400
300
400
10
Coffing
Jones
Smith
Chambers
Strickling
Larkins
Reilly
Smythe
Billy
Squiggy
John
Mandee
Cletus
Loraine
William
Richard
41888.88
32800.50
48000.00
48850.00
54500.00
40200.00
36000.00
64300.00
____________ ________ _________ __________ _______
1
2
3
4
5
6
7
8
OLAP
Rank
Pivot Result Set
Bisualize
Field Chooser
Export/Save as
Print Results
Set Grid Font

MSUM MSUM
After an Answer Set Returns Perform OLAP Calculations
We just performed OLAP on the answer set. Now the report comes (above in yellow),
but what is amazing is that all calculations were performed internally by Nexus.
Columns Answer Set Metadata AnalyticsSort Joins Where SQLObjects
Employee_No Dept_No Last_Name First_Name Salary
1324657
2000000
1333454
1232578
1121334
2312225
2312225
2341218
200
?
200
100
400
300
400
10
Coffing
Jones
Smith
Chambers
Strickling
Larkins
Reilly
Smythe
Billy
Squiggy
John
Mandee
Cletus
Loraine
William
Richard
41888.88
32800.50
48000.00
48850.00
54500.00
40200.00
36000.00
64300.00
____________ ________ _________ __________ _______
1
2
3
4
5
6
7
8
OLAP Moving
Column Sorting Partitioning Window
Salary Dept_No ASC Dept_No 3
OLAP
Function
With
Partitioning
SELECT * SELECT *
CSUM CSUMUse Ctrl and Drag to move result grid column headers to OLAP Control
Results1 Report1
Drag a column here to group by that column

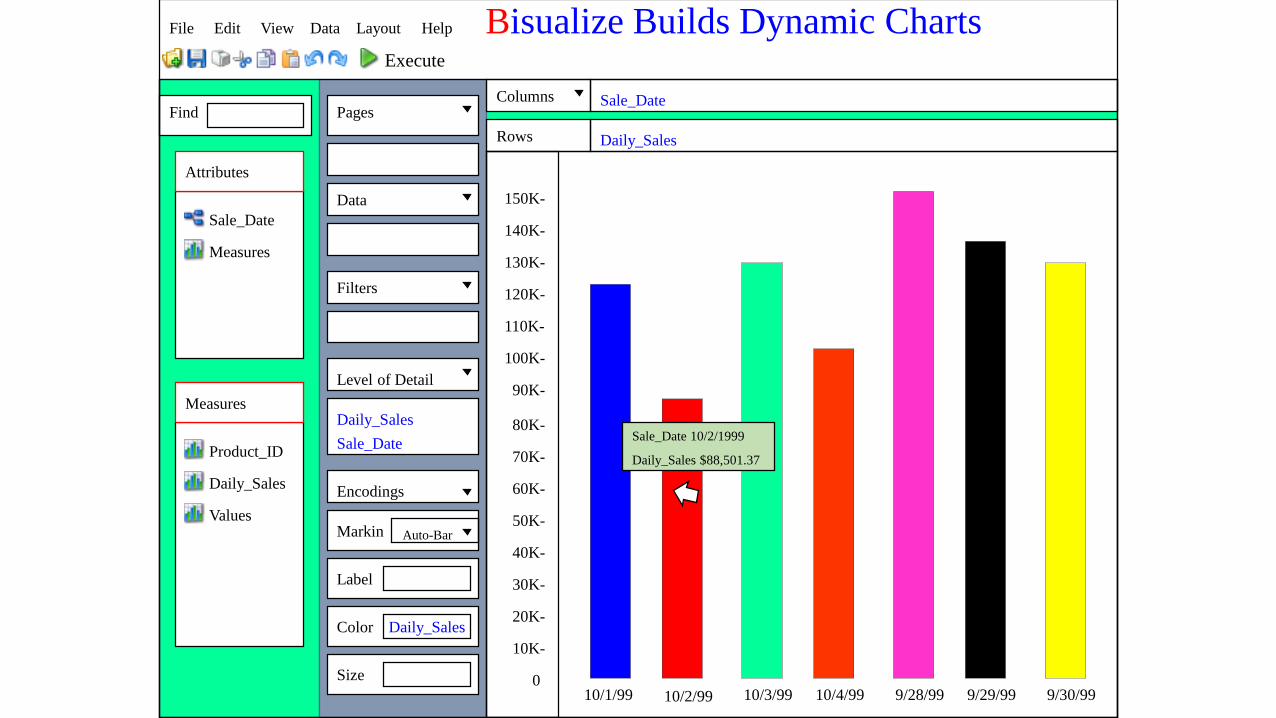
After an Answer Set Returns you can Graph and Chart
After the Answer Set returns the Nexus allows you to manipulate the results further.
You can use Bisualize to Graph and Chart your answer set dynamically.
Columns Answer Set Metadata AnalyticsSort Joins Where SQL
Execute Send SQL to Nexus
Objects
Results1
Drag a column here to group by that column
Options after
the Answer
Set Returns
Employee_No Dept_No Last_Name First_Name Salary
1324657
2000000
1333454
1232578
1121334
2312225
2312225
2341218
200
?
200
100
400
300
400
10
Coffing
Jones
Smith
Chambers
Strickling
Larkins
Reilly
Smythe
Billy
Squiggy
John
Mandee
Cletus
Loraine
William
Richard
41888.88
32800.50
48000.00
48850.00
54500.00
40200.00
36000.00
64300.00
____________ ________ _________ __________ _______
1
2
3
4
5
6
7
8
OLAP
Rank
Pivot Result Set
Bisualize
Field Chooser
Export/Save as
Print Results
Set Grid Font

Rows
Columns
Auto-Text
Encodings
Markin
Label
Pages
Color
Size
Find
Sale_Date
Measures
Product_ID
Daily_Sales
Values
Data
Filters
Level of Detail
Attributes
Measures
File Edit View Data Layout Help BisualizeExecute
Bisualize Builds Dynamic Charts
Pay attention to the next slide because we are
going to Drag and Drop the Attributes and
Measures to their proper places and our chart
will display beautifully!
Rows
Columns
Auto-Bar
Encodings
Markin
Label
Pages
Color
Size
Find
Sale_Date
Measures
Product_ID
Daily_Sales
Values
Data
Filters
Level of Detail
Attributes
Measures
File Edit View Data Layout Help Bisualize Builds Dynamic ChartsExecute
Sale_Date
Daily_Sales
Daily_Sales
Sale_Date
Daily_Sales
150K-
140K-
130K-
120K-
110K-
100K-
90K-
80K-
70K-
60K-
50K-
40K-
30K-
20K-
10K-
010/1/99 10/2/99 10/3/99 10/4/99 9/28/99 9/29/99 9/30/99
Sale_Date 10/2/1999
Daily_Sales $88,501.37

Saving an Answer Set in another Format
You can save an Answer Set directly to Excel or to many different formats.
Columns Answer Set Metadata AnalyticsSort Joins Where SQLObjects
Results1
Drag a column here to group by that column
Options after
the Answer
Set Returns
Employee_No Dept_No Last_Name First_Name Salary
1324657
2000000
1333454
1232578
1121334
2312225
2312225
2341218
200
?
200
100
400
300
400
10
Coffing
Jones
Smith
Chambers
Strickling
Larkins
Reilly
Smythe
Billy
Squiggy
John
Mandee
Cletus
Loraine
William
Richard
41888.88
32800.50
48000.00
48850.00
54500.00
40200.00
36000.00
64300.00
____________ ________ _________ __________ _______
1
2
3
4
5
6
7
8
OLAP
Rank
Pivot Result Set
Bisualize
Field Chooser
Export/Save as
Print Results
Set Grid Font
Microsoft Excel (*.xlsx)
Microsoft Excel (97-2003) (*.xls)
Comma separated values (*.csv)
User delimited text (*.txt)
XML (*.xml)
Microsoft Access (*.mdb)
Export/Save As
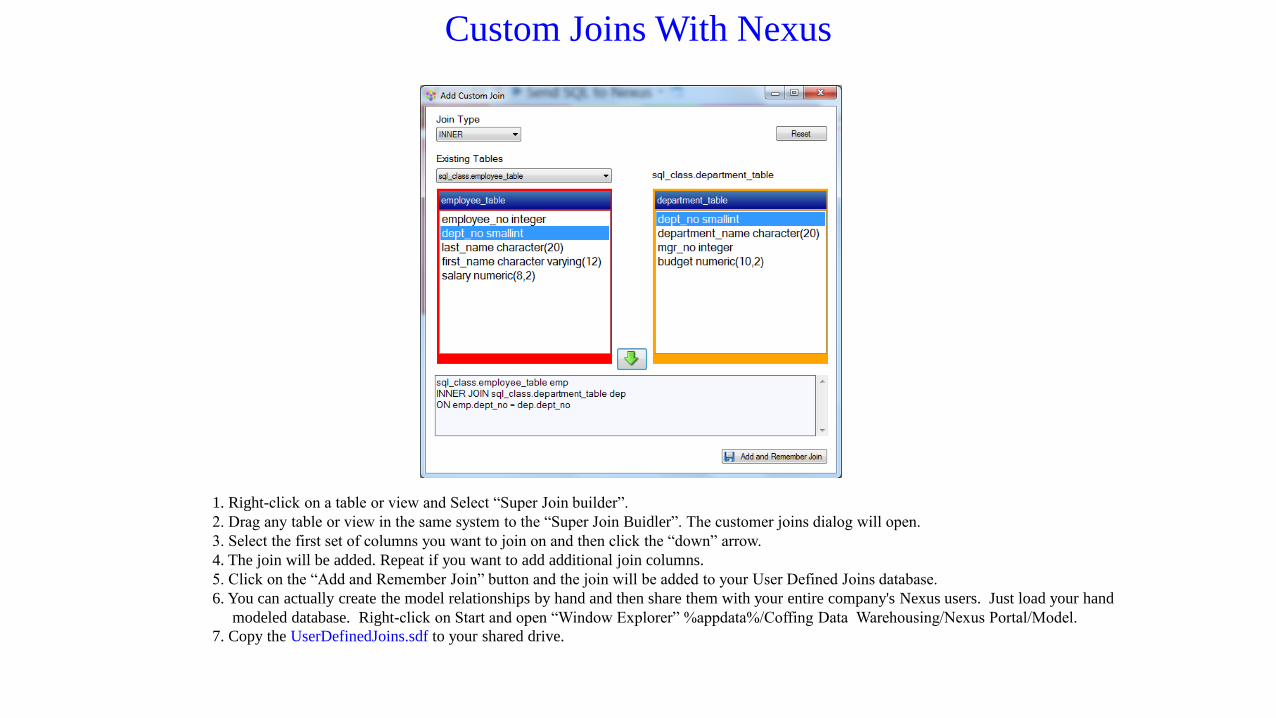
Custom Joins With Nexus
1. Right-click on a table or view and Select “Super Join builder”.
2. Drag any table or view in the same system to the “Super Join Buidler”. The customer joins dialog will open.
3. Select the first set of columns you want to join on and then click the “down” arrow.
4. The join will be added. Repeat if you want to add additional join columns.
5. Click on the “Add and Remember Join” button and the join will be added to your User Defined Joins database.
6. You can actually create the model relationships by hand and then share them with your entire company's Nexus users. Just load your hand
modeled database. Right-click on Start and open “Window Explorer” %appdata%/Coffing Data Warehousing/Nexus Portal/Model.
7. Copy the UserDefinedJoins.sdf to your shared drive.
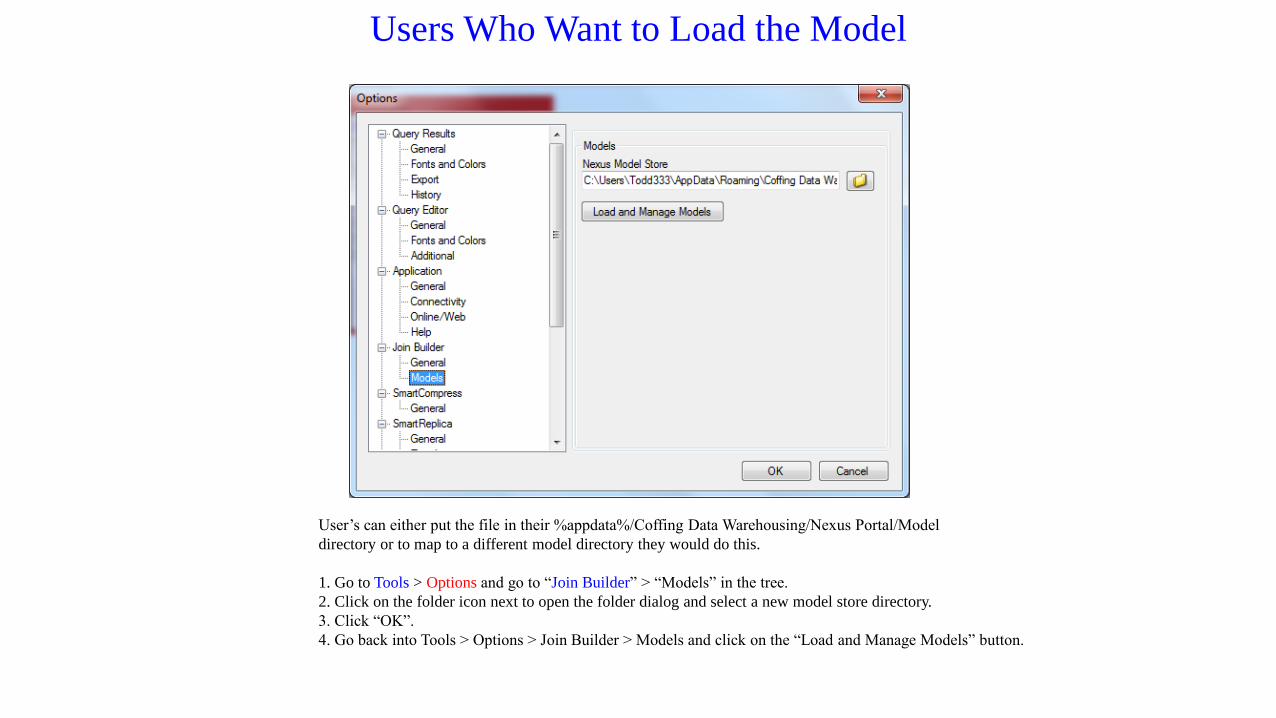
Users Who Want to Load the Model
User’s can either put the file in their %appdata%/Coffing Data Warehousing/Nexus Portal/Model
directory or to map to a different model directory they would do this.
1. Go to Tools > Options and go to “Join Builder” > “Models” in the tree.
2. Click on the folder icon next to open the folder dialog and select a new model store directory.
3. Click “OK”.
4. Go back into Tools > Options > Join Builder > Models and click on the “Load and Manage Models” button.
Users Who Want to Load the Model (Continued)
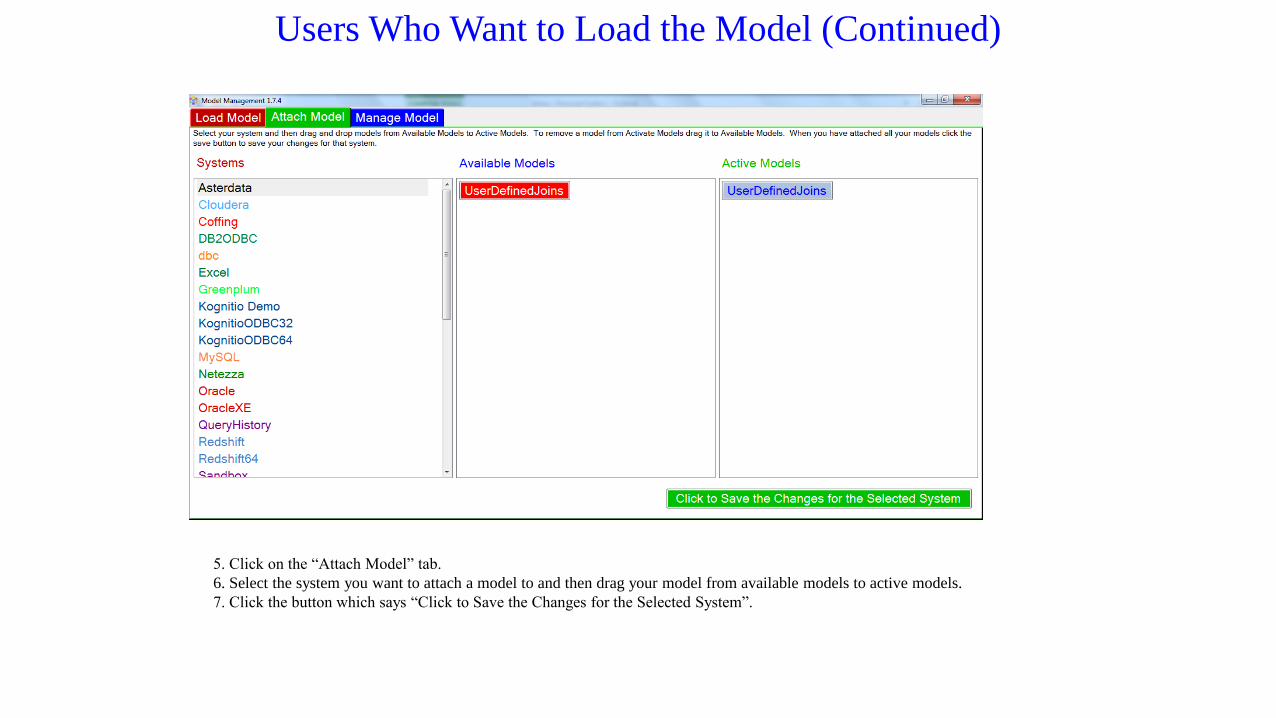
5. Click on the “Attach Model” tab.
6. Select the system you want to attach a model to and then drag your model from available models to active models.
7. Click the button which says “Click to Save the Changes for the Selected System”.
How Customer Joins Will Look in the Super Join Builder
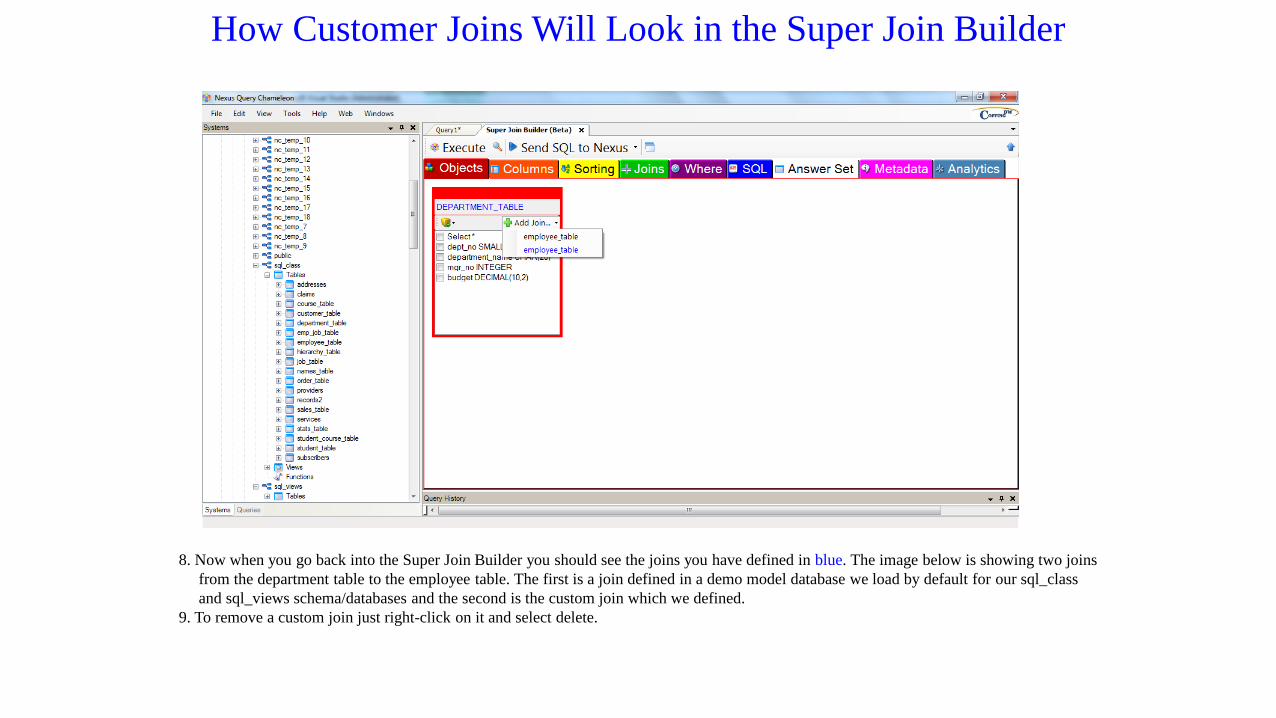
8. Now when you go back into the Super Join Builder you should see the joins you have defined in blue. The image below is showing two joins
from the department table to the employee table. The first is a join defined in a demo model database we load by default for our sql_class
and sql_views schema/databases and the second is the custom join which we defined.
9. To remove a custom join just right-click on it and select delete.
Loading an ERwin Model
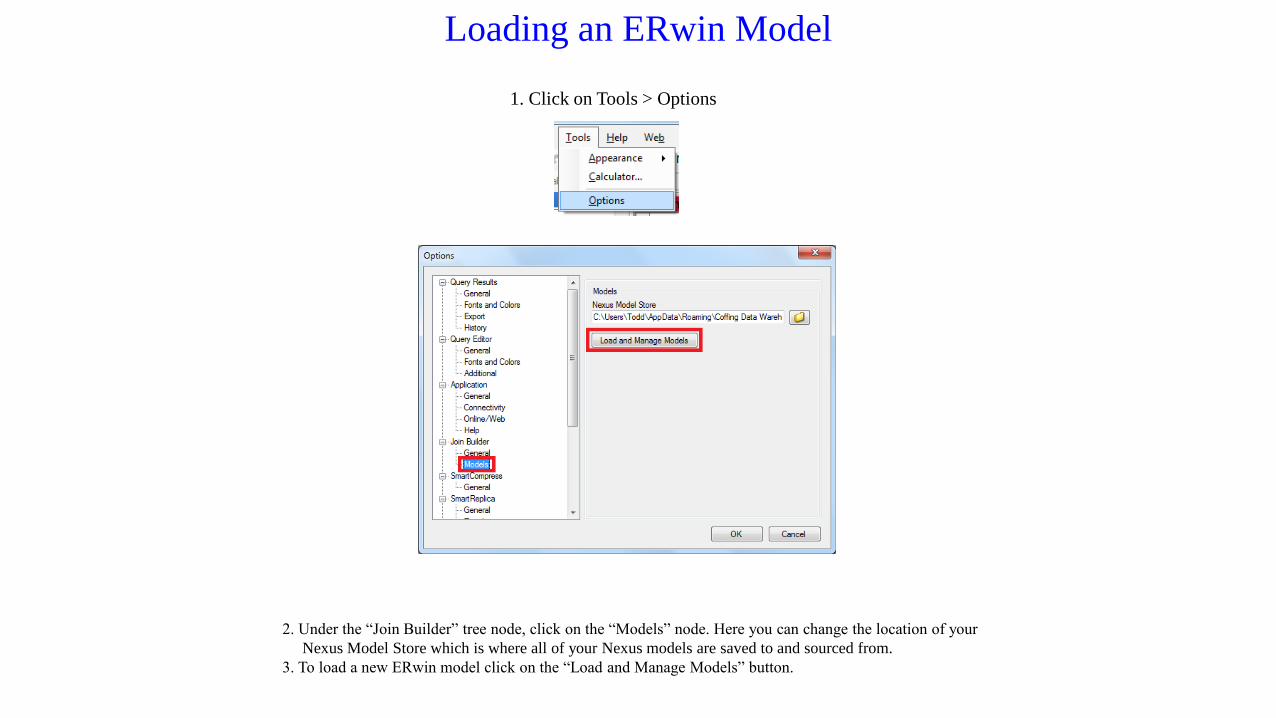
2. Under the “Join Builder” tree node, click on the “Models” node. Here you can change the location of your
Nexus Model Store which is where all of your Nexus models are saved to and sourced from.
3. To load a new ERwin model click on the “Load and Manage Models” button.
1. Click on Tools > Options
Loading an ERwin Model (Continued)
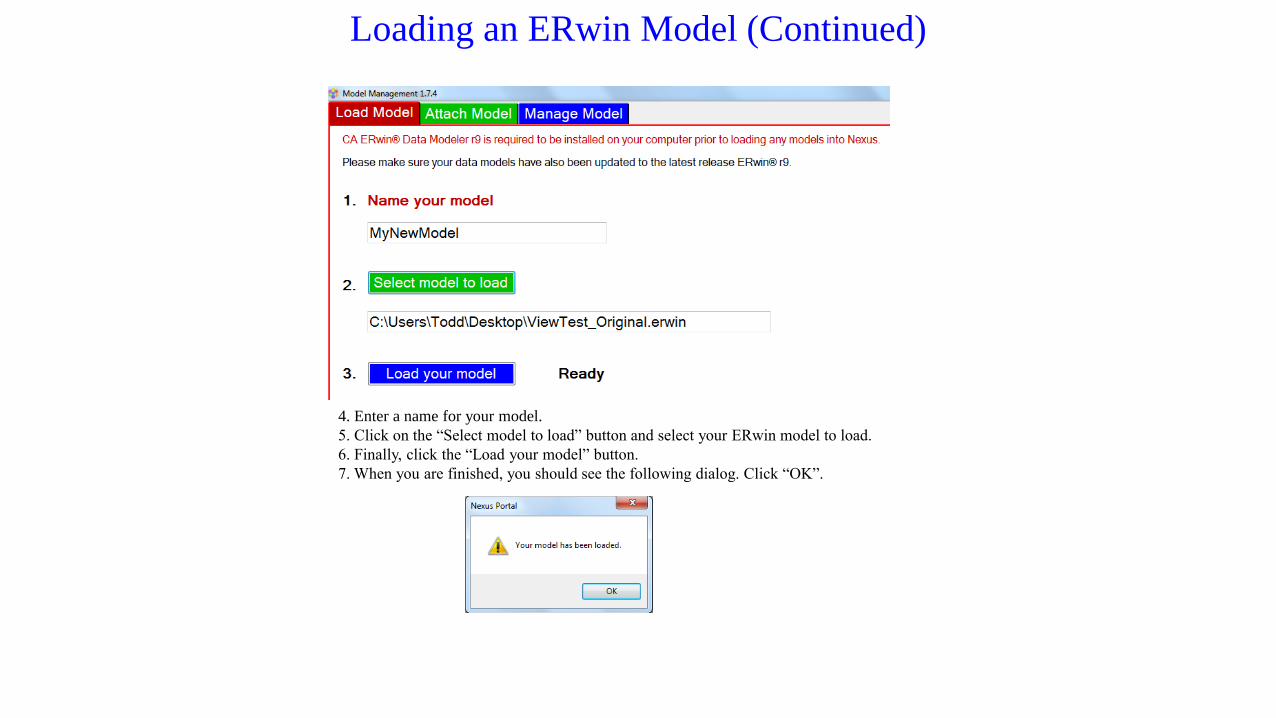
4. Enter a name for your model.
5. Click on the “Select model to load” button and select your ERwin model to load.
6. Finally, click the “Load your model” button.
7. When you are finished, you should see the following dialog. Click “OK”.
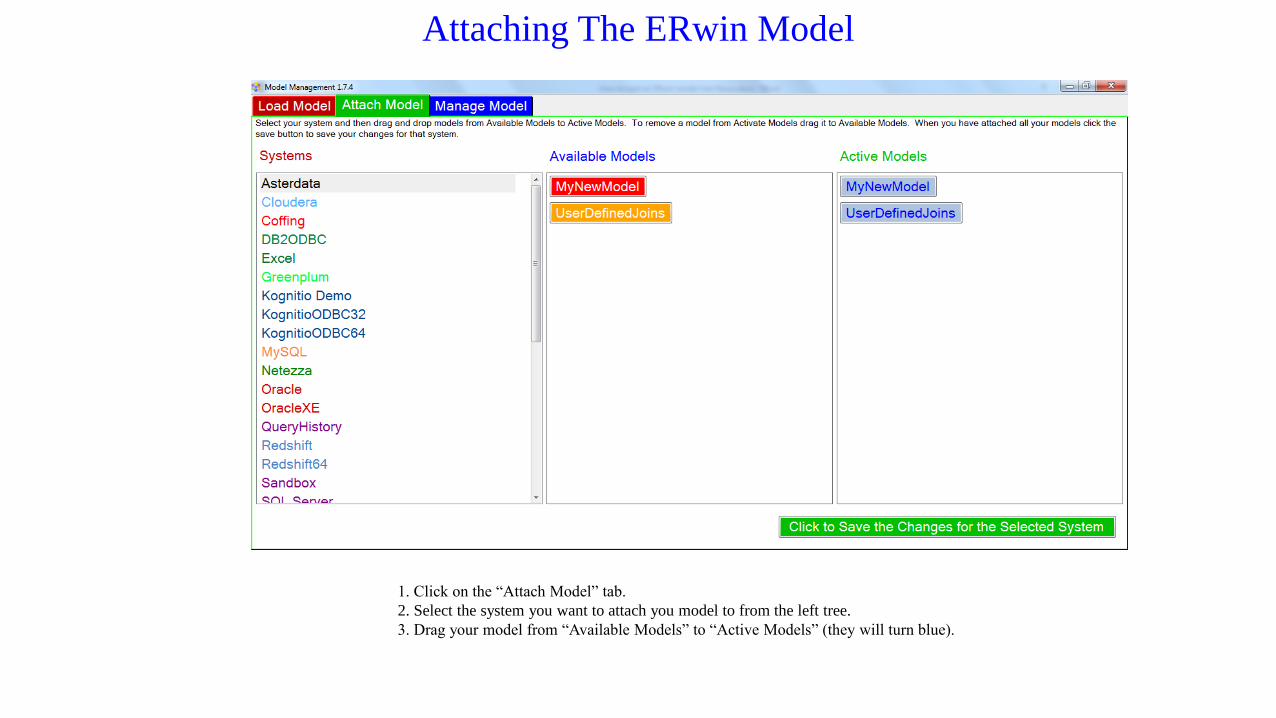
Attaching The ERwin Model
1. Click on the “Attach Model” tab.
2. Select the system you want to attach you model to from the left tree.
3. Drag your model from “Available Models” to “Active Models” (they will turn blue).
Attaching The ERwin Model (Continued)
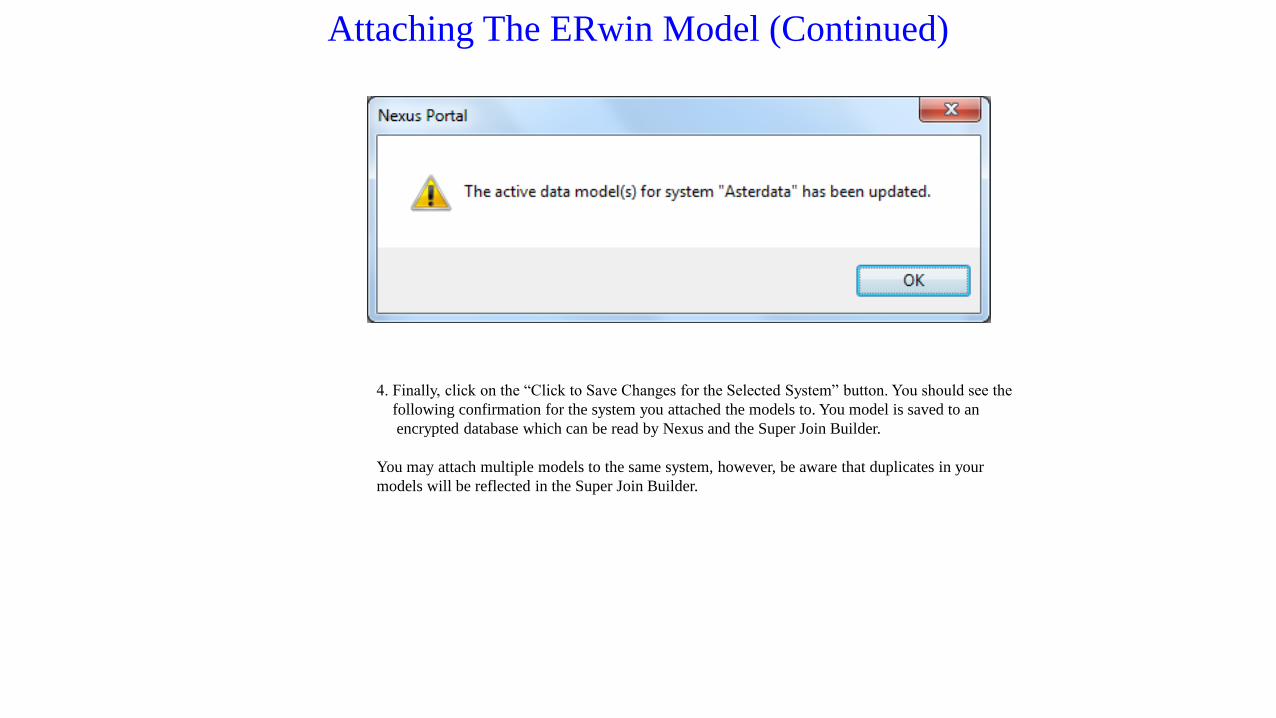
4. Finally, click on the “Click to Save Changes for the Selected System” button. You should see the
following confirmation for the system you attached the models to. You model is saved to an
encrypted database which can be read by Nexus and the Super Join Builder.
You may attach multiple models to the same system, however, be aware that duplicates in your
models will be reflected in the Super Join Builder.
Managing The ERwin Model (Continued)
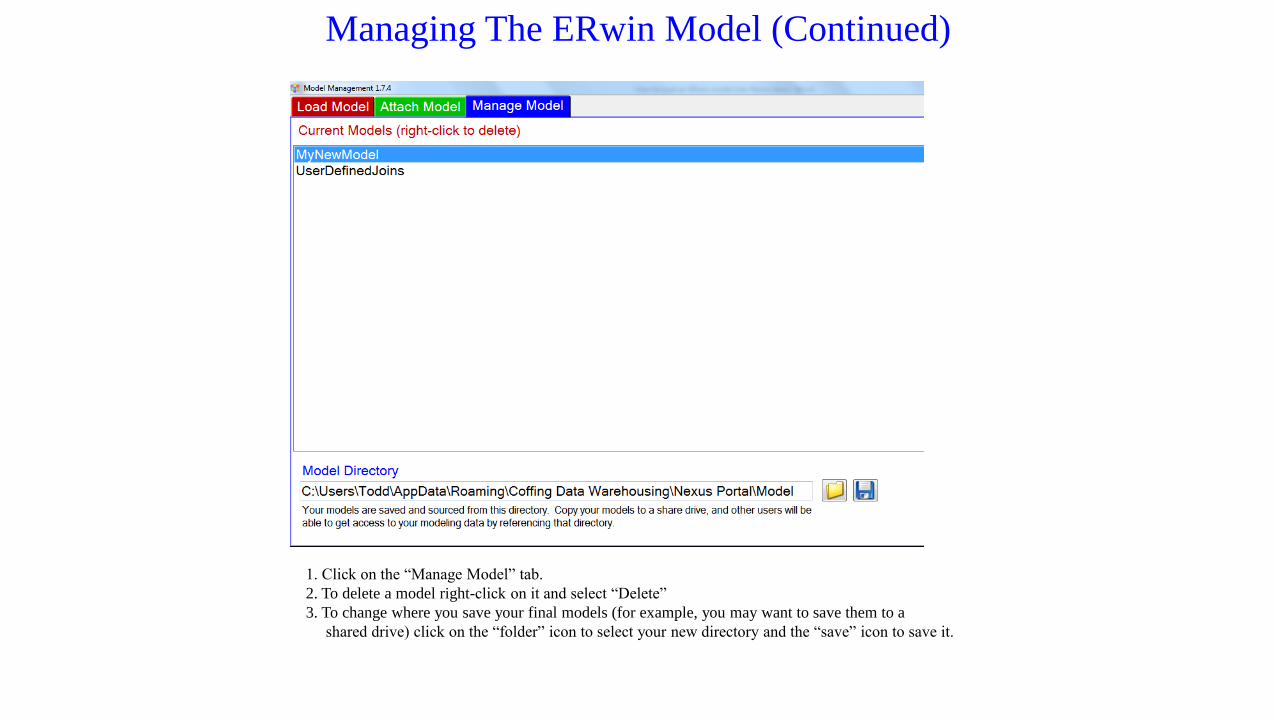
1. Click on the “Manage Model” tab.
2. To delete a model right-click on it and select “Delete”
3. To change where you save your final models (for example, you may want to save them to a
shared drive) click on the “folder” icon to select your new directory and the “save” icon to save it.
New Query ETL Dashboard Bisualize History Sandbox Joins DBA
System: Netezza Database: SQL_Class Execute
+ DB2
Oracle
Netezza
Greenplum
ParAccel
Kognitio
Netezza
PDW
N
O
A
M
T
+
+
+
+
+
+
-
XSystems Query1 * X
I
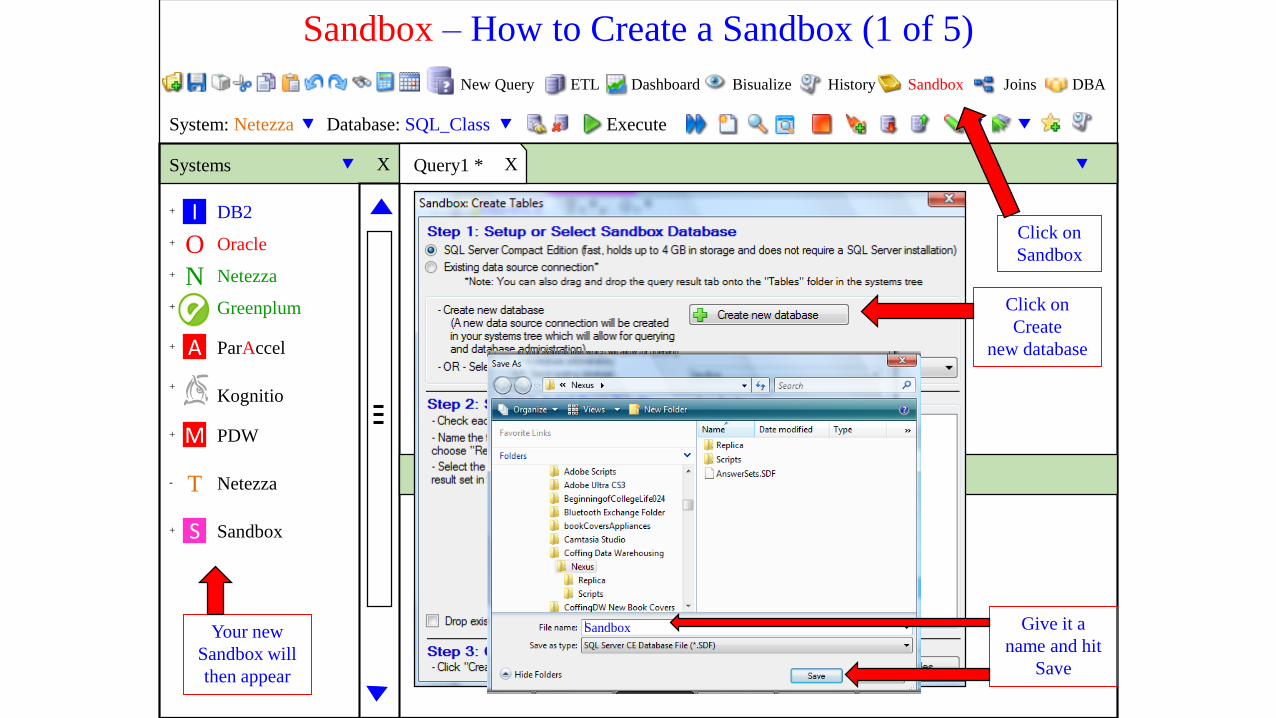
Sandbox – How to Create a Sandbox (1 of 5)
Click on
Sandbox
Click on
Create
new database
Give it a
name and hit
Save
Your new
Sandbox will
then appear
SandboxS+
Sandbox
System: Netezza Database: SQL_Class Execute
+ DB2
Oracle
Netezza
Greenplum
ParAccel
Kognitio
PDW
Sandbox
N
O
A
M
S
+
+
+
+
+
+
+
XSystems Query1 * X
I
Messages Results1
Drag a column here to group by that column
SELECT Employee_No
,Dept_No
,Last_Name
,First_Name
,Salary
FROM SQL_CLASS.Employee_Table ;
Employee_No Dept_No Last_Name First_Name Salary
1324657
2000000
1333454
1232578
1121334
2312225
2312225
2341218
200
?
200
100
400
300
400
10
Coffing
Jones
Smith
Chambers
Strickling
Larkins
Reilly
Smythe
Billy
Squiggy
John
Mandee
Cletus
Loraine
William
Richard
41888.88
32800.50
48000.00
48850.00
54500.00
40200.00
36000.00
64300.00
____________ ________ _________ __________ _______
1
2
3
4
5
6
7
8
Database
Tables
+
+
+ Oracle_Dept_Tbl
This is your
sandbox.
Drag answer
sets here and
re-query or
join them
along with
other answer
sets.
All queries on
your sandbox
Tables run
internally on
your PC!
Sandbox - Join Answer Sets from different Systems (2 of 5)
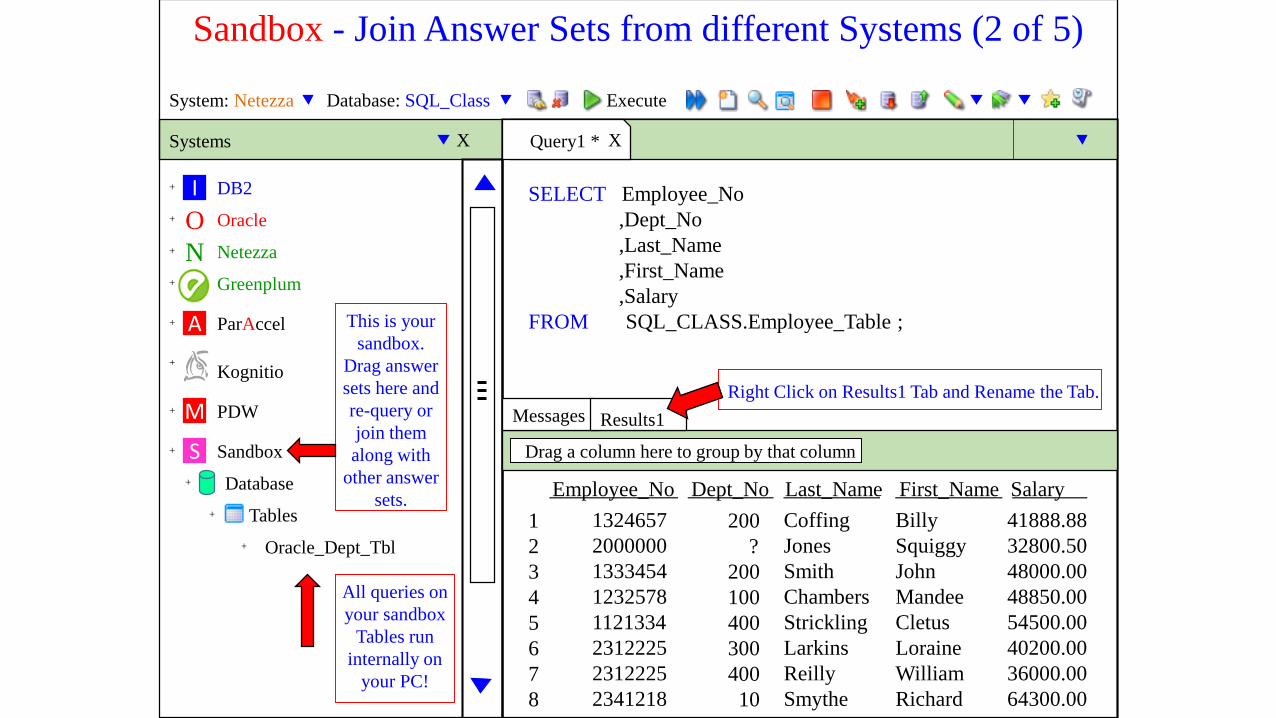
Right Click on Results1 Tab and Rename the Tab.
System: Netezza Database: SQL_Class Execute
+ DB2
Oracle
Netezza
Greenplum
ParAccel
Kognitio
PDW
Sandbox
N
O
A
M
S
+
+
+
+
+
+
+
XSystems Query1 * X
I
Messages Netezza_Emp_Tbl
Drag a column here to group by that column
SELECT Employee_No
,Dept_No
,Last_Name
,First_Name
,Salary
FROM SQL_CLASS.Employee_Table ;
Employee_No Dept_No Last_Name First_Name Salary
1324657
2000000
1333454
1232578
1121334
2312225
2312225
2341218
200
?
200
100
400
300
400
10
Coffing
Jones
Smith
Chambers
Strickling
Larkins
Reilly
Smythe
Billy
Squiggy
John
Mandee
Cletus
Loraine
William
Richard
41888.88
32800.50
48000.00
48850.00
54500.00
40200.00
36000.00
64300.00
____________ ________ _________ __________ _______
1
2
3
4
5
6
7
8
Database
Tables
+
+
+ Oracle_Dept_Tbl
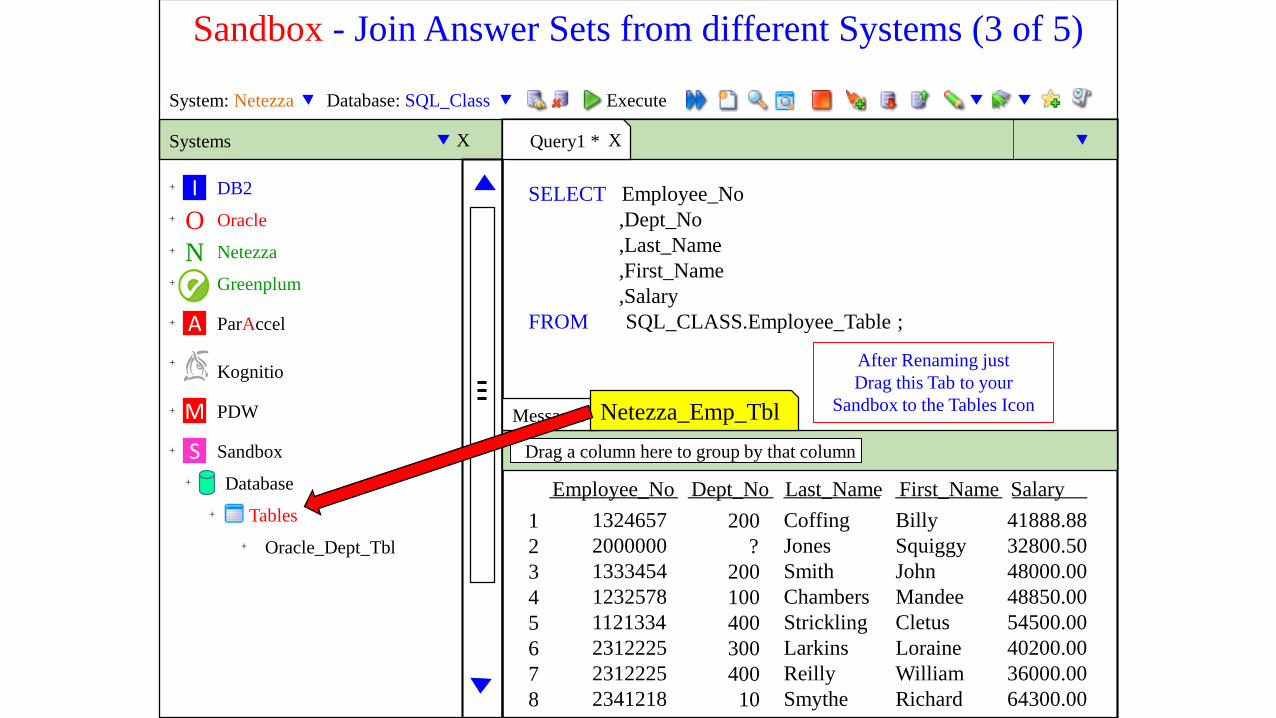
Sandbox - Join Answer Sets from different Systems (3 of 5)
After Renaming just
Drag this Tab to your
Sandbox to the Tables Icon
System: Netezza Database: SQL_Class Execute
+ DB2
Oracle
Netezza
Greenplum
ParAccel
Kognitio
PDW
Sandbox
N
O
A
M
S
+
+
+
+
+
+
+
XSystems Query1 * X
I
Messages Netezza_Emp_Tbl
Drag a column here to group by that column
SELECT Employee_No
,Dept_No
,Last_Name
,First_Name
,Salary
FROM SQL_CLASS.Employee_Table ;
Employee_No Dept_No Last_Name First_Name Salary
1324657
2000000
1333454
1232578
1121334
2312225
2312225
2341218
200
?
200
100
400
300
400
10
Coffing
Jones
Smith
Chambers
Strickling
Larkins
Reilly
Smythe
Billy
Squiggy
John
Mandee
Cletus
Loraine
William
Richard
41888.88
32800.50
48000.00
48850.00
54500.00
40200.00
36000.00
64300.00
____________ ________ _________ __________ _______
1
2
3
4
5
6
7
8
Database
Tables
+
+
+ Oracle_Dept_Tbl
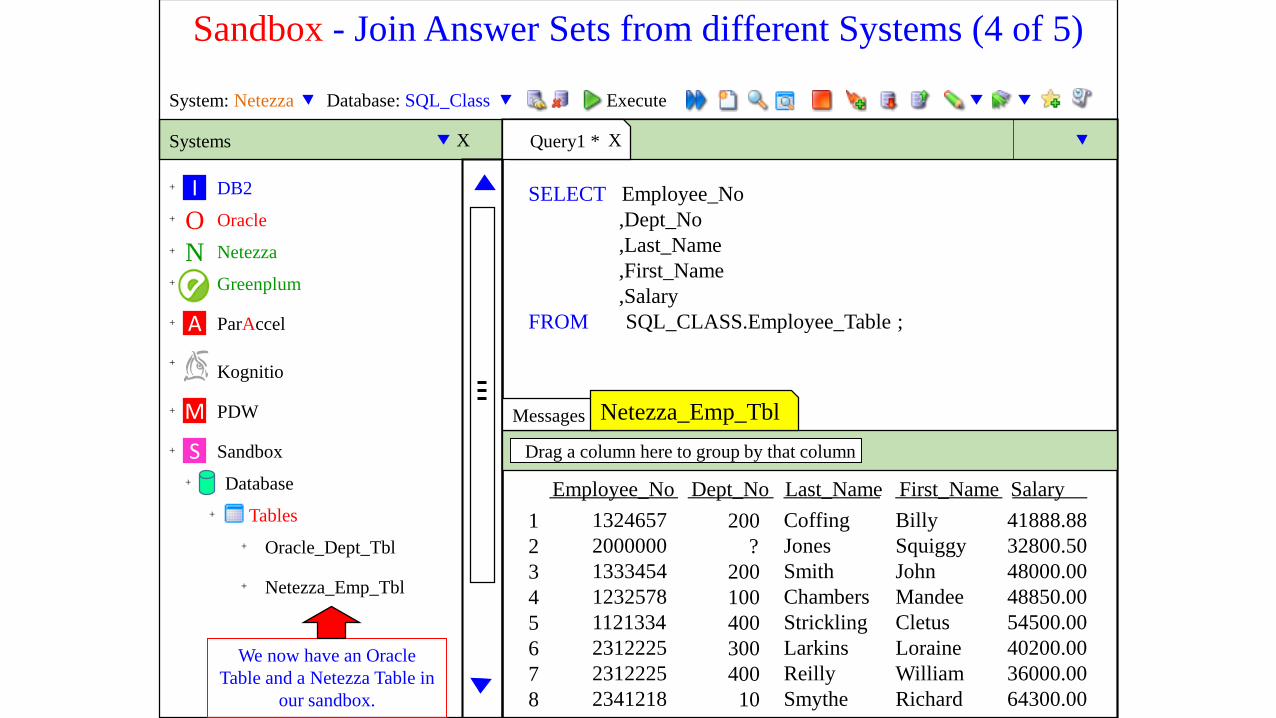
Sandbox - Join Answer Sets from different Systems (4 of 5)
Netezza_Emp_Tbl+
We now have an Oracle
Table and a Netezza Table in
our sandbox.
System: Netezza Database: SQL_Class Execute
+ DB2
Oracle
Netezza
Greenplum
ParAccel
Kognitio
PDW
Sandbox
N
O
A
M
S
+
+
+
+
+
+
+
XSystems Query1 * X
I
Messages
Drag a column here to group by that column
SELECT T.*, Mgr_No
FROM Oracle_Dept_Tbl as O
INNER JOIN
Netezza_Emp_Tbl as T
ON O.Dept_No = T.Dept_No ;
Emp_No Dept_No Last_Name First_Name Salary Mgr_No
1324657
2000000
1333454
1232578
1121334
2312225
2312225
2341218
200
?
200
100
400
300
400
10
Coffing
Jones
Smith
Chambers
Strickling
Larkins
Reilly
Smythe
Billy
Squiggy
John
Mandee
Cletus
Loraine
William
Richard
41888.88
32800.50
48000.00
48850.00
54500.00
40200.00
36000.00
64300.00
________ ________ _________ __________ ________ _______
Database
Tables
+
+
+ Oracle_Dept_Tbl
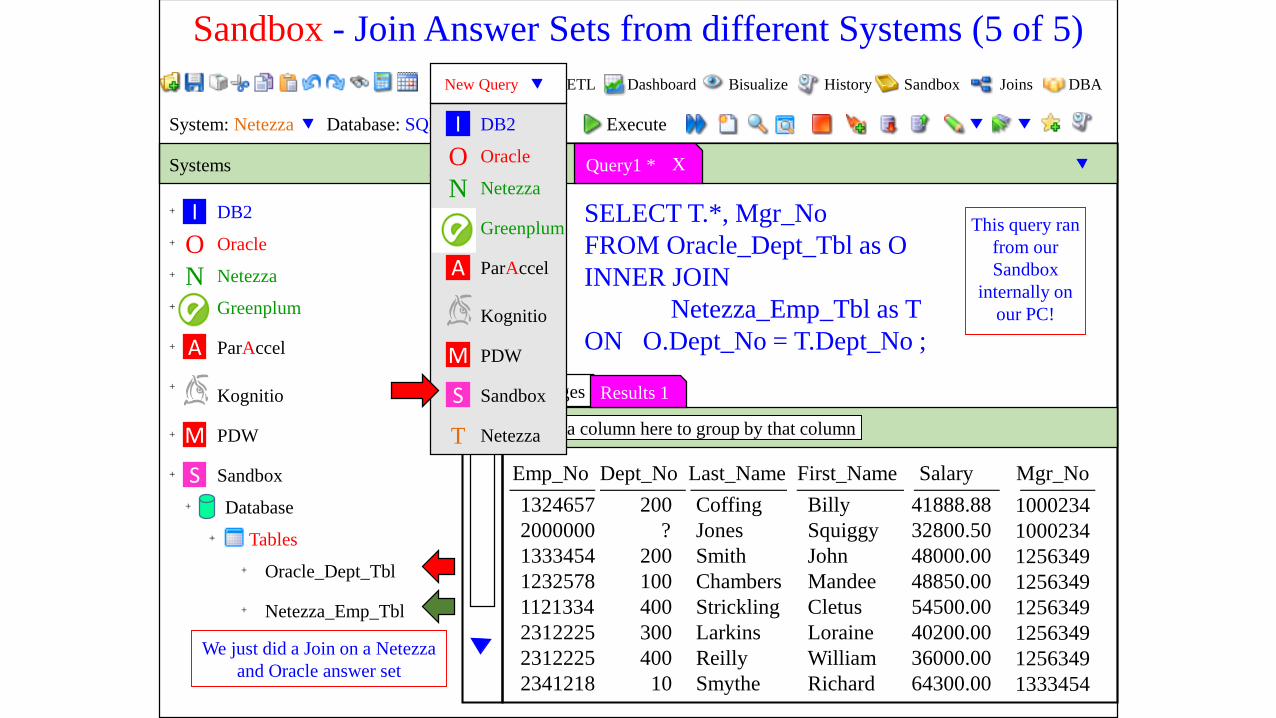
Sandbox - Join Answer Sets from different Systems (5 of 5)
Netezza_Emp_Tbl+
New Query ETL Dashboard Bisualize History Sandbox Joins DBA
DB2
Oracle
Netezza
ParAccel
Kognitio
Netezza
PDW
Sandbox
N
O
A
M
S
T
I
Greenplum
Results 1
1000234
1000234
1256349
1256349
1256349
1256349
1256349
1333454
This query ran
from our
Sandbox
internally on
our PC!
We just did a Join on a Netezza
and Oracle answer set
New Query ETL Dashboard Bisualize History Sandbox Joins DBA
System: Netezza Database: SQL_Class Execute
NetezzaT-
XSystems Query1 * X
SQL_Class
Tables
Addresses+
-
-
Claims+
Course_Table+
Customer_Table+
Department_Table+
Employee_Table+
Order_Table+
Providers+
Views+
Macros+
Procedures+
Triggers+
Join Indexes+
Functions+
Show all objects
Create database
Create user
Drop database
Add to My Databases
SmartCompress database
SmartReplica database
SmartSync data
SmartSync objects
SmartScript
SmartDBAdmin
Refresh database
Properties
Refresh data source connection
Properties
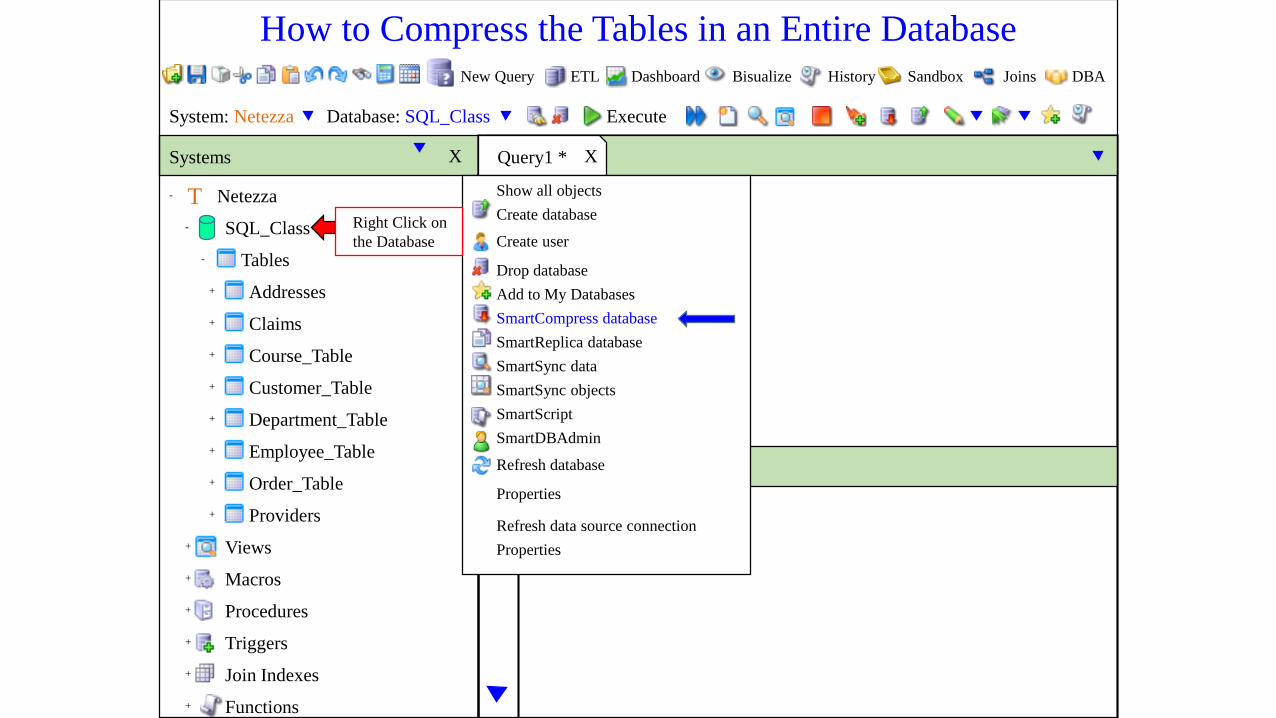
How to Compress the Tables in an Entire Database
Right Click on
the Database
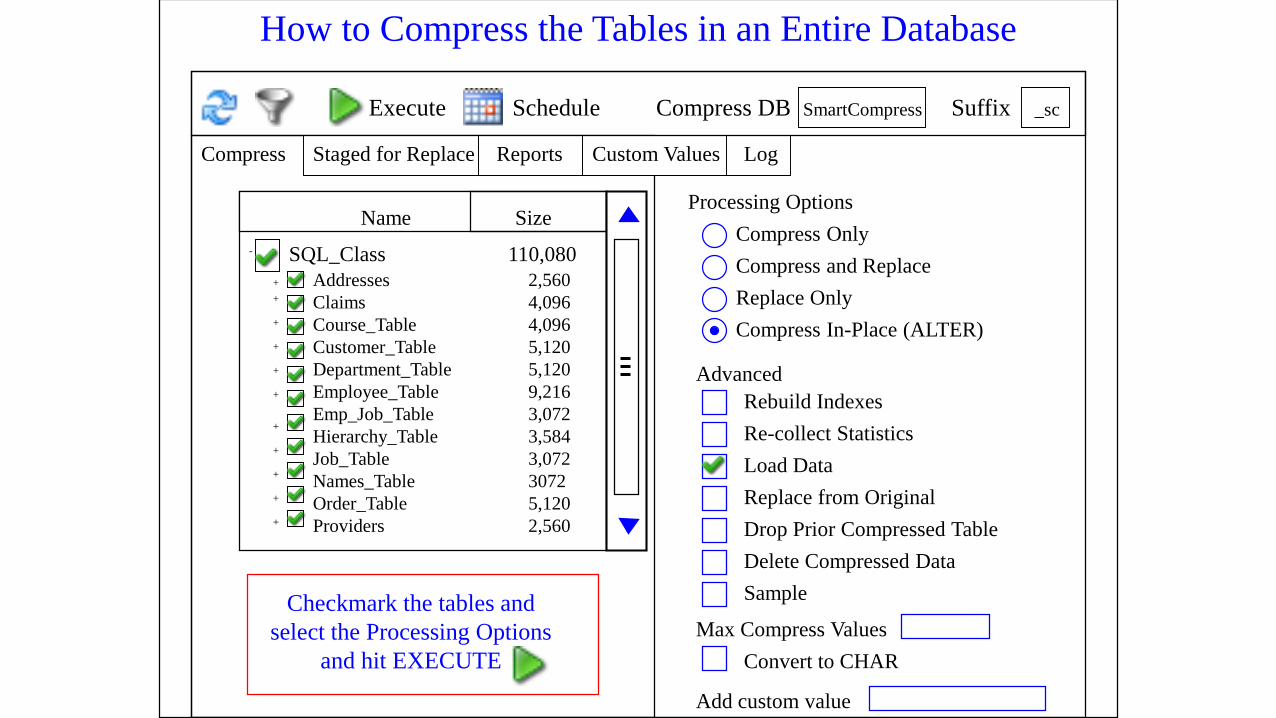
Execute Schedule Compress DB SmartCompress Suffix _sc
Compress Staged for Replace Reports Custom Values Log
SQL_Class 110,080
Addresses
Claims
Course_Table
Customer_Table
Department_Table
Employee_Table
Emp_Job_Table
Hierarchy_Table
Job_Table
Names_Table
Order_Table
Providers
2,560
4,096
4,096
5,120
5,120
9,216
3,072
3,584
3,072
3072
5,120
2,560
Name Size
-
+
+
+
+
+
+
+
+
+
+
+
Processing Options
Compress Only
Compress and Replace
Replace Only
Compress In-Place (ALTER)
Advanced
Rebuild Indexes
Re-collect Statistics
Load Data
Replace from Original
Drop Prior Compressed Table
Delete Compressed Data
Sample
Max Compress Values
Add custom value
Convert to CHAR
How to Compress the Tables in an Entire Database
Checkmark the tables and
select the Processing Options
and hit EXECUTE

System: Netezza Database: SQL_Class Execute
NetezzaT-
XSystems Query1 * X
SQL_Class
Tables
Addresses+
-
-
Claims+
Course_Table+
Customer_Table+
Department_Table+
Employee_Table+
Order_Table+
Providers+
Views+
Macros+
Procedures+
Triggers+
Join Indexes+
Functions+
Super Join Builder
Quick Select
View DDL
Query Designer
Query Templates
SmartCompress Table
SmartReplica Object
SmartSync data
SmartSync object
SmartScript
Data Cleanser
Create Cube
Open – All rows
Open - Selection
Drop table
How to Compress A Single Table
Right Click on
the Table
Rename table
Refresh table
Properties
+

Execute Schedule Compress DB SmartCompress Suffix _sc
Compress Staged for Replace Reports Custom Values Log
SQL_Class 110,080
Addresses 2,560
Name Size
-
+
Processing Options
Compress Only
Compress and Replace
Replace Only
Compress In-Place (ALTER)
Advanced
Rebuild Indexes
Re-collect Statistics
Load Data
Replace from Original
Drop Prior Compressed Table
Delete Compressed Data
Sample
Max Compress Values
Add custom value
Convert to CHAR
How to Compress a Single Table
Checkmark the table and
select the Processing Options
and hit EXECUTE
Execute Schedule Compress DB SmartCompress Suffix _sc
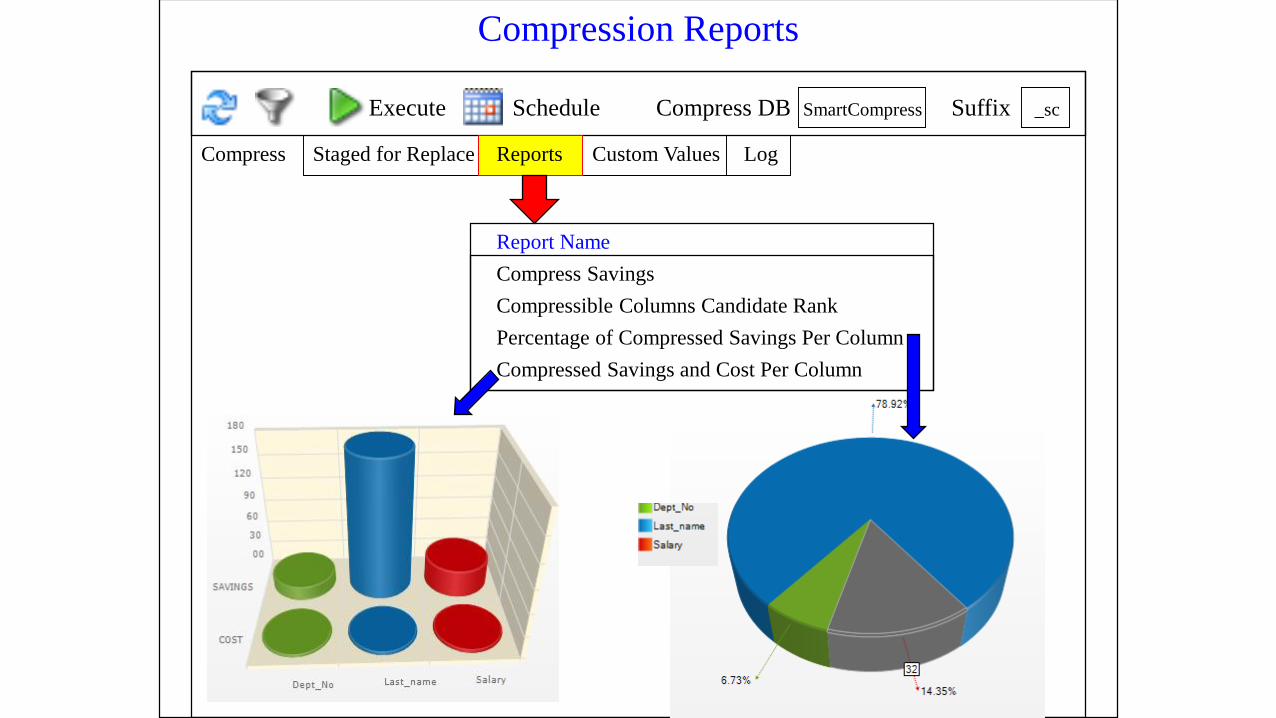
Compress Staged for Replace Custom Values Log
Report Name
Compression Reports
Compress Savings
Compressible Columns Candidate Rank
Percentage of Compressed Savings Per Column
Compressed Savings and Cost Per Column
Reports
System: Netezza Database: SQL_Class Execute
NetezzaT-
XSystems Query1 * X
SQL_Class
Tables
Addresses+
-
-
Claims+
Course_Table+
Customer_Table+
Department_Table+
Employee_Table+
Order_Table+
Providers+
Views+
Macros+
Procedures+
Triggers+
Join Indexes+
Functions+
Super Join Builder
Quick Select
View DDL
Query Designer
Query Templates
SmartCompress Table
SmartReplica Object
SmartSync data
SmartSync object
SmartScript
Data Cleanser
Create Cube
Open – All rows
Open - Selection
Drop table
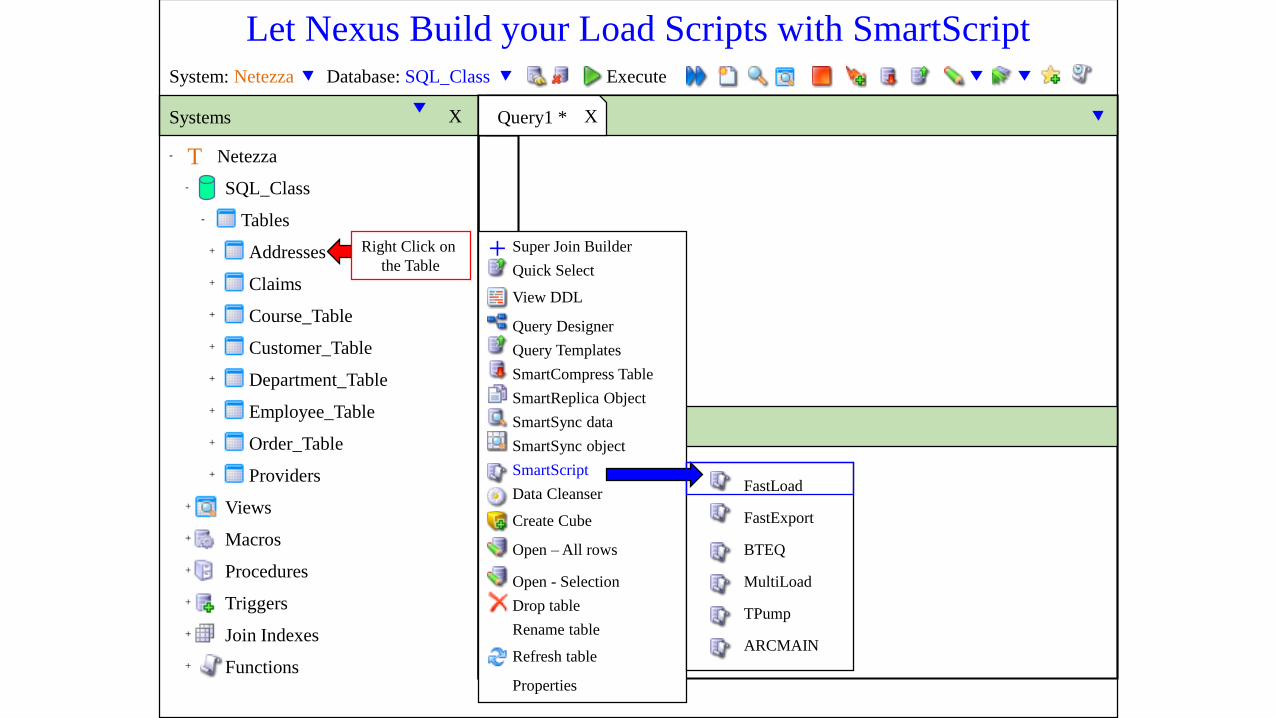
Let Nexus Build your Load Scripts with SmartScript
Right Click on
the Table
Rename table
Refresh table
Properties
+
FastLoad
FastExport
BTEQ
MultiLoad
TPump
ARCMAIN

Execute System: Netezza Edit…
Quick Start Script Log
SmartScript FastLoad
* Indicates required information
Database *
Table *
SQL_Class
Addresses
Error Database *
Error Table 1 *
SQL_Class
Addresses_ERR1
Error Table 2 * Addresses_ERR2
Drop Existing Table
Drop Existing Error Tables
Drop Existing Table
Drop Existing Error Tables Define Table
Standard Advanced
Input
Type *
File *
FILE Format * FORMATTED
Options
Indicators
Display Errors
No Stop
Insert Into Values
Define Statement
Delimiter
Build Script
C:\Temp\Address_Flatfile.txt
.LOGON Netezza/dbc,**PASSWORD**;
SET RECORD FORMATTED ;
Preview of Script
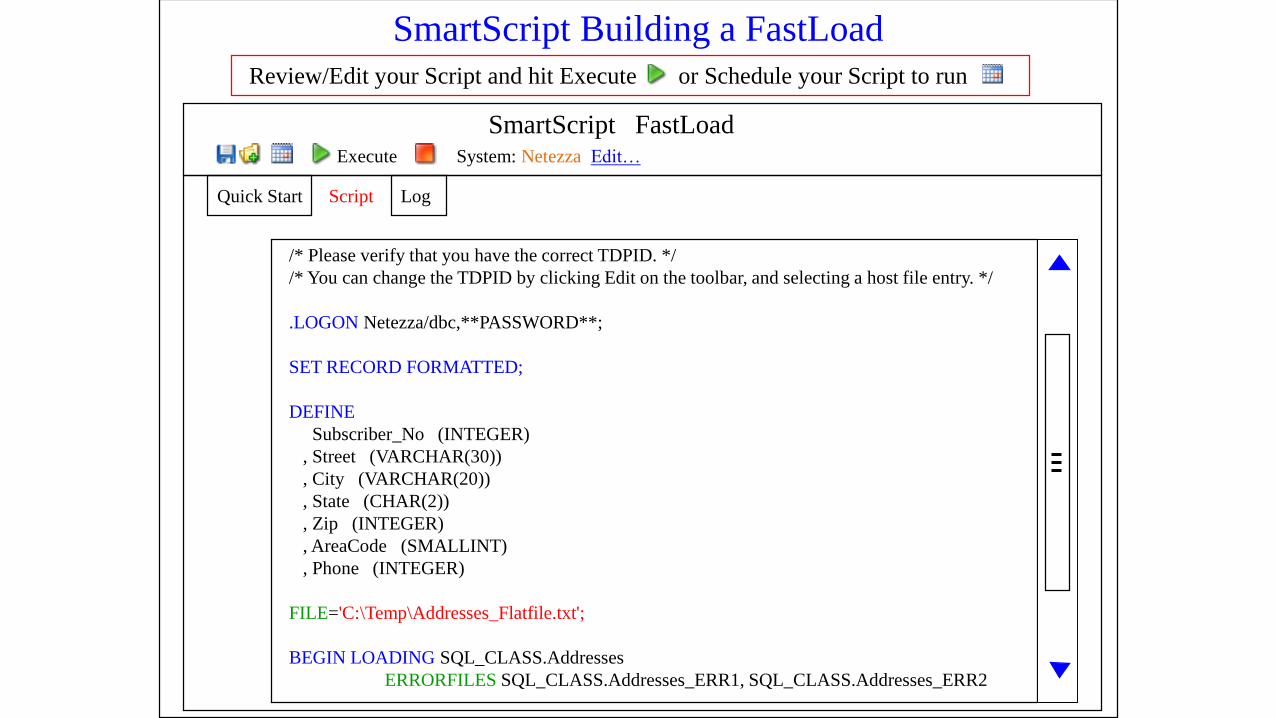
SmartScript Building a FastLoad
Put in the Input Filename and hit BUILD SCRIPT
Execute System: Netezza Edit…
Quick Start Script Log
SmartScript FastLoad
SmartScript Building a FastLoad
/* Please verify that you have the correct TDPID. */
/* You can change the TDPID by clicking Edit on the toolbar, and selecting a host file entry. */
.LOGON Netezza/dbc,**PASSWORD**;
SET RECORD FORMATTED;
DEFINE
Subscriber_No (INTEGER)
, Street (VARCHAR(30))
, City (VARCHAR(20))
, State (CHAR(2))
, Zip (INTEGER)
, AreaCode (SMALLINT)
, Phone (INTEGER)
FILE='C:\Temp\Addresses_Flatfile.txt';
BEGIN LOADING SQL_CLASS.Addresses
ERRORFILES SQL_CLASS.Addresses_ERR1, SQL_CLASS.Addresses_ERR2
Review/Edit your Script and hit Execute or Schedule your Script to run

DBA Launchpad
Please select a menu item on the
left to get started
Direct Data Export
Direct Data Import
SmartReplica
DBAdmin
AI DBA
Create User
Create Database
DDL Builder
View Builder
Convert DDL
Tera-Trivia
Data Cleanser
New Query ETL Dashboard Bisualize History Sandbox Joins DBA
System: Netezza Database: SQL_Class Execute
The Netezza DBA Launchpad
New Query ETL Dashboard Bisualize History Sandbox Joins DBA
System: Netezza Database: SQL_Class Execute
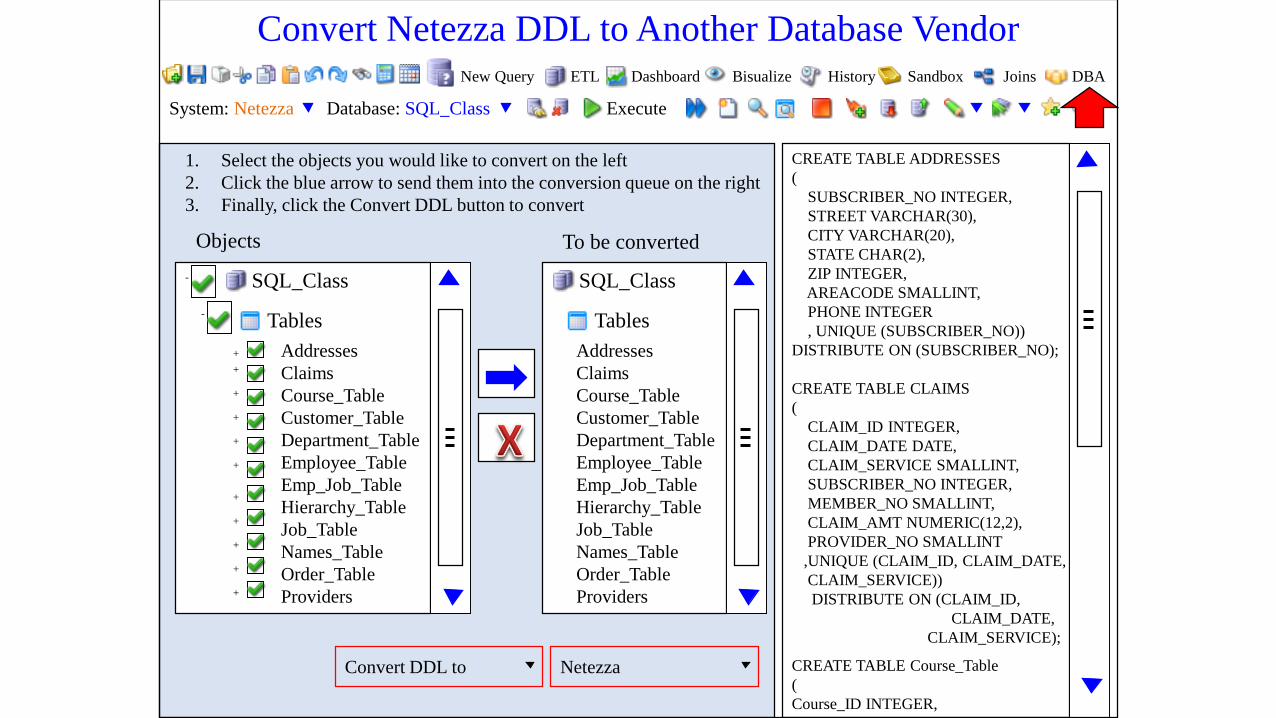
Convert Netezza DDL to Another Database Vendor
SQL_Class
Addresses
Claims
Course_Table
Customer_Table
Department_Table
Employee_Table
Emp_Job_Table
Hierarchy_Table
Job_Table
Names_Table
Order_Table
Providers
-
+
+
+
+
+
+
+
+
+
+
+
Tables -
SQL_Class
Addresses
Claims
Course_Table
Customer_Table
Department_Table
Employee_Table
Emp_Job_Table
Hierarchy_Table
Job_Table
Names_Table
Order_Table
Providers
Tables
Objects To be converted
1. Select the objects you would like to convert on the left
2. Click the blue arrow to send them into the conversion queue on the right
3. Finally, click the Convert DDL button to convert
Convert DDL to Netezza
CREATE TABLE ADDRESSES
(
SUBSCRIBER_NO INTEGER,
STREET VARCHAR(30),
CITY VARCHAR(20),
STATE CHAR(2),
ZIP INTEGER,
AREACODE SMALLINT,
PHONE INTEGER
, UNIQUE (SUBSCRIBER_NO))
DISTRIBUTE ON (SUBSCRIBER_NO);
CREATE TABLE CLAIMS
(
CLAIM_ID INTEGER,
CLAIM_DATE DATE,
CLAIM_SERVICE SMALLINT,
SUBSCRIBER_NO INTEGER,
MEMBER_NO SMALLINT,
CLAIM_AMT NUMERIC(12,2),
PROVIDER_NO SMALLINT
,UNIQUE (CLAIM_ID, CLAIM_DATE,
CLAIM_SERVICE))
DISTRIBUTE ON (CLAIM_ID,
CLAIM_DATE,
CLAIM_SERVICE);
CREATE TABLE Course_Table
(
Course_ID INTEGER,
New Query ETL Dashboard Bisualize History Sandbox Joins DBA
System: Netezza Database: SQL_Class Execute
Replicate Data from One Netezza System to Another
SQL_Class
Addresses
Claims
Course_Table
Customer_Table
Department_Table
Employee_Table
Emp_Job_Table
Hierarchy_Table
Job_Table
Names_Table
Order_Table
Providers
-
+
+
+
+
+
+
+
+
+
+
+
Tables -
SQL_Class
Addresses
Claims
Course_Table
Customer_Table
Department_Table
Employee_Table
Emp_Job_Table
Hierarchy_Table
Job_Table
Names_Table
Order_Table
Providers
Tables
Source System Target System- Package
Execute
Source: Netezza Production Target: Netezza Test Database Setting
SQL_Test
Same name as source
Object Setting
Same name as source
Data
Data Quantity Volume
All Data
None
Subset
Sample
Selection Edit
SmartReplica

System: Netezza Database: SQL_Class Execute
NetezzaT-
XSystems Query1 * X
SQL_Class
Tables
Addresses+
-
-
Claims+
Course_Table+
Customer_Table+
Department_Table+
Employee_Table+
Order_Table+
Providers+
Views+
Macros+
Procedures+
Triggers+
Join Indexes+
Functions+
Super Join Builder
Quick Select
View DDL
Query Designer
Query Templates
SmartCompress Table
SmartReplica Object
SmartSync data
SmartSync object
SmartScript
Data Cleanser
Create Cube
Open – All rows
Open - Selection
Drop table
Compare and Synchronize with SmartSync
Right Click on
a Database
Rename table
Refresh table
Properties
+
Right Click on
a Table
OR
SmartSync Data will allow you
to compare the data on two different
Netezza Systems, Databases or Tables
and it will show you the differences.
SmartSync Data will also be able to
reconcile those differences!
SmartSync Object will allow you
to compare the DDL on two different
Netezza Systems, Databases or Tables
and it will show you the differences.

Execute Source: Netezza Target: Netezza Edit…
Objects Results Synchronize
Compare Data on Two tables with SmartSync
Source System Target System
Database
Object
SQL_Class
Employee_Table
Database
Object
SQL_Class_BKP
Employee_Table
Employee_Table
Employee_No
Dept_No
Last_Name
First_Name
Salary (Decimal
Object Settings (blue indicates Distribution
Key)Data Quantity
All Data
Subset
Selection Edit
Options
Intersystem compare
Show identical rows
Difference Threshold 500
Choose your Target System
and then press Execute
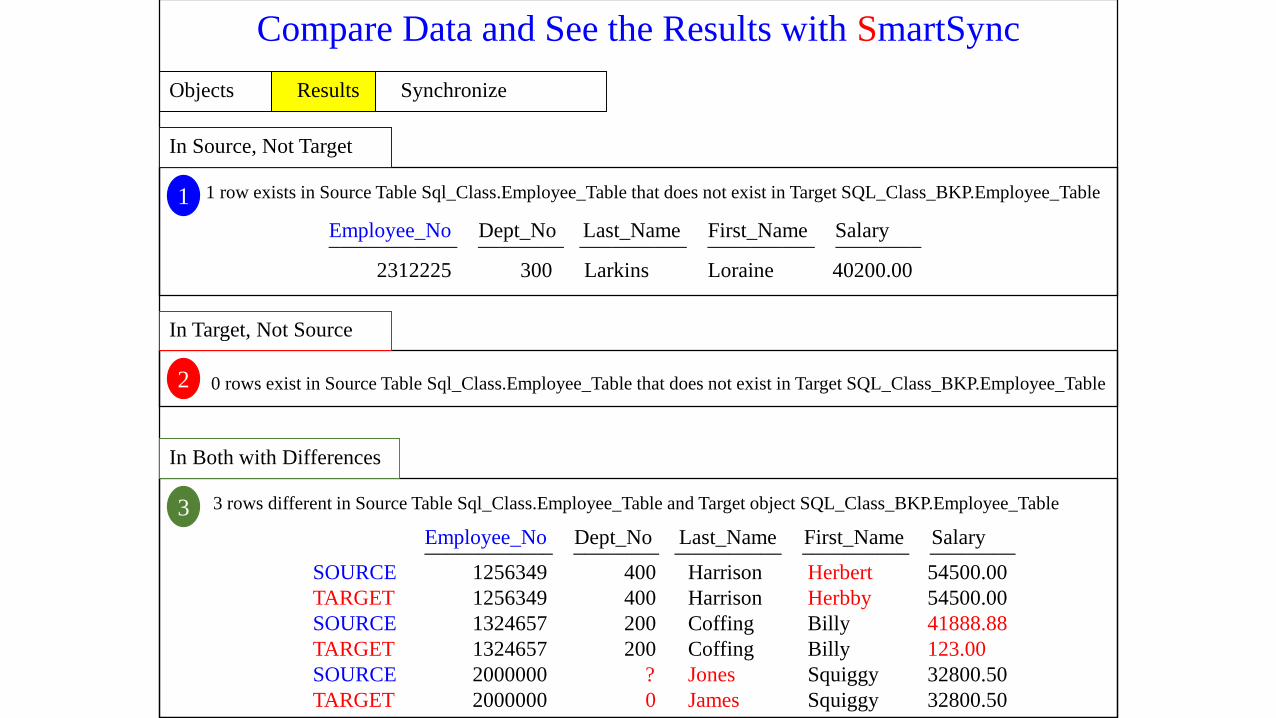
Compare Data and See the Results with SmartSync
1 row exists in Source Table Sql_Class.Employee_Table that does not exist in Target SQL_Class_BKP.Employee_Table
Employee_No Dept_No Last_Name First_Name Salary
2312225 300 Larkins Loraine 40200.00
____________ ________ __________ __________ ________
0 rows exist in Source Table Sql_Class.Employee_Table that does not exist in Target SQL_Class_BKP.Employee_Table
3 rows different in Source Table Sql_Class.Employee_Table and Target object SQL_Class_BKP.Employee_Table
Employee_No Dept_No Last_Name First_Name Salary
SOURCE
TARGET
SOURCE
TARGET
SOURCE
TARGET
____________ ________ __________ __________ ________
1256349
1256349
1324657
1324657
2000000
2000000
400
400
200
200
?
0
Harrison
Harrison
Coffing
Coffing
Jones
James
Herbert
Herbby
Billy
Billy
Squiggy
Squiggy
54500.00
54500.00
41888.88
123.00
32800.50
32800.50
3
In Source, Not Target
1
2
In Target, Not Source
In Both with Differences
Objects Results Synchronize

Execute Source: Netezza Target: Netezza Edit…
Objects Results Synchronize
Synchronize the Data with SmartSync
Synchronize Target Object to Source Object
Insert missing rows
Delete extra rows
Update differences with matching rows
Perform Synchronization
Preview in Query Window
Synchronize Source Object to Target Object
Insert missing rows
Delete extra rows
Update differences with matching rows
Perform Synchronization
Preview in Query Window
You have the ability to choose how you
want to synchronize!
Execute Source: Netezza Target: Netezza Edit…
Objects Results Log
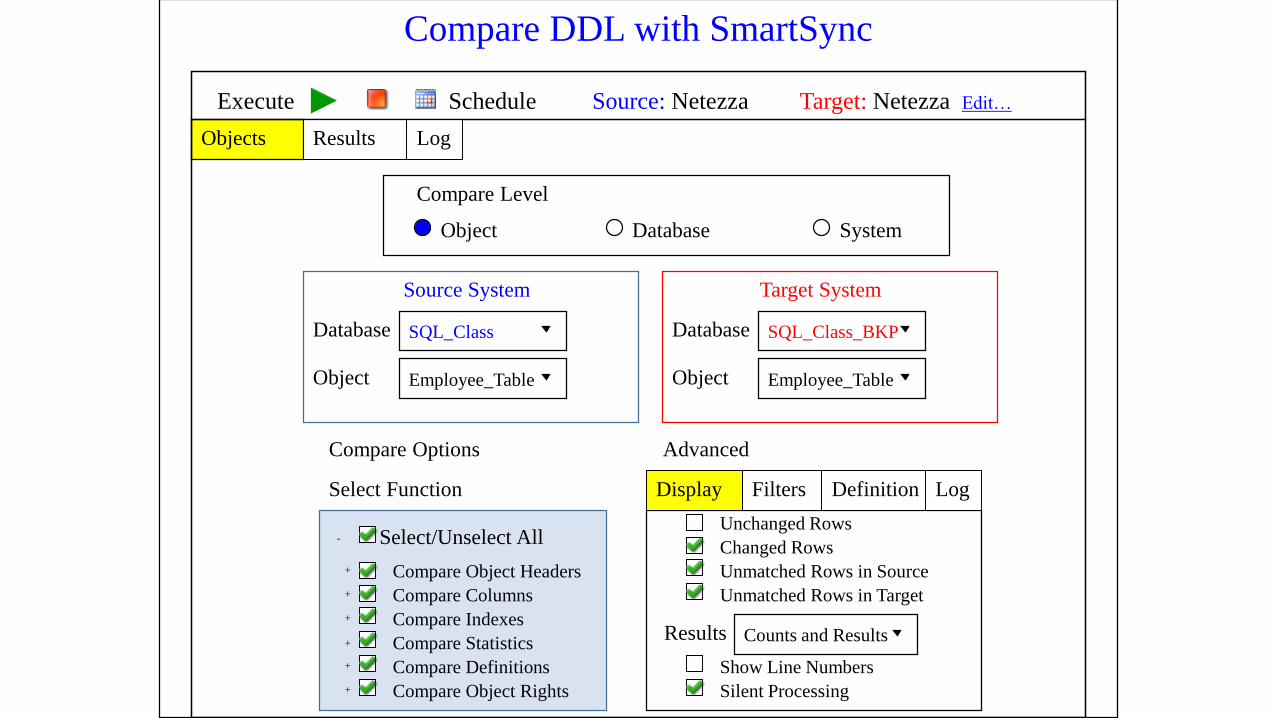
Compare DDL with SmartSync
Source System Target System
Database
Object
SQL_Class
Employee_Table
Database
Object
SQL_Class_BKP
Employee_Table
Compare Level
Object Database System
Select/Unselect All
Compare Object Headers
Compare Columns
Compare Indexes
Compare Statistics
Compare Definitions
Compare Options
Select Function
Compare Object Rights
-
+
+
+
+
+
+
Unchanged Rows
Changed Rows
Unmatched Rows in Source
Unmatched Rows in Target
Show Line Numbers
Silent Processing
Results Counts and Results
Advanced
Filters LogDefinitionDisplay
Schedule