Nero Mobile Manual - Nero Multimedia...
40
Nero Mobile Manual Nero AG
Transcript of Nero Mobile Manual - Nero Multimedia...
Nero Mobile Manual
Nero AG
Copyright and Trademark Information
The Nero Mobile manual and all its contents are protected by copyright and are the property of Nero AG. All rights reserved. This manual contains material that is protected by internationally valid copyright. No part of this manual may be reproduced, transmitted or transcribed without the express written permission of Nero AG.
All trade names and trademarks are the property of their respective owners.
Nero AG rejects any claims that transcend the clauses of the guarantee rights. Nero AG does not undertake any liability for the correctness of the content of the Nero Mobile manual. The contents of the software supplied, as well as of the Nero Mobile manual, may be changed without prior warning.
The trademarks mentioned here are named for information purposes only.
Copyright © 2007 Nero AG and its licensors. All rights reserved.
SW 1.5.0.10
General information
Page 3
Contents
1 General information 5 1.1 Conventions of the manual 5 1.2 About Nero Mobile 6 1.3 Nero Mobile versions 7
2 Technical information 8 2.1 System requirements 8 2.1.1 Operating system 8 2.1.2 Processor 8 2.1.3 Memory 8 2.1.4 Communication between PC and smartphone 8 2.2 Formats supported 9
3 Installing Nero Mobile on a PDA or smartphone 10
4 User interface of Nero Mobile 12 4.1 Nero Mobile on PDA and smartphone 12 4.1.1 Control on PDAs 13 4.1.2 Key controls on smartphones 14 4.2 Menu button 15 4.3 Activate button 15 4.4 Settings 16 4.4.1 General Settings screen 16 4.4.2 Audio Settings screen 18
5 Main menus 19
6 Content Browsers main screen 20 6.1 Creating a Media Library 21
7 Jukebox main screen 22 7.1 Playback control 23
8 Music Library main screen 24 8.1 Playing music 25
9 Slide Show main screen 26 9.1 Creating a new slide show 27 9.2 Settings for slide shows 27 9.3 Playing slide shows 28 9.4 Editing a slide show 28

General information
Page 4
10 Video Library main screen 30 10.1 Playing videos 31
11 Collections main screen 32 11.1 Playing a collection 33 11.2 Editing a collection 34 11.3 Allocating new content to a collection 36 11.4 Creating a new collection 37
12 Index 38
13 Contact 40 13.1 Contact details 40
General information
Page 5
1 General information
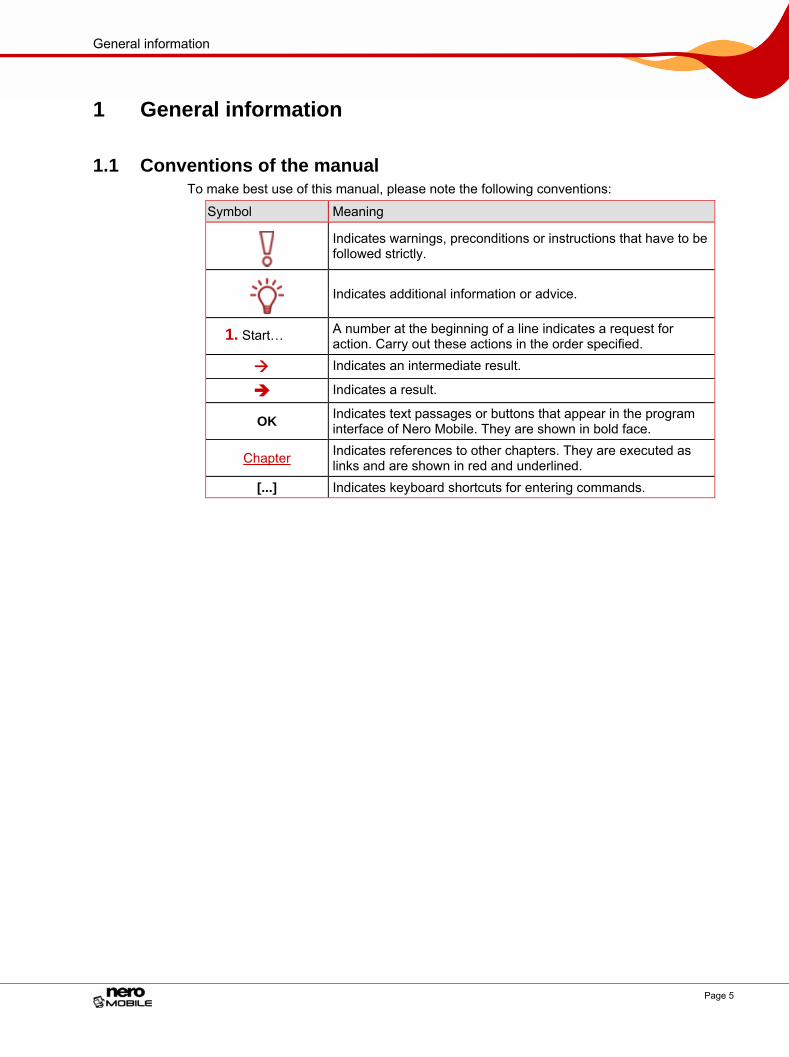
1.1 Conventions of the manual To make best use of this manual, please note the following conventions:
Symbol Meaning
Indicates warnings, preconditions or instructions that have to be followed strictly.
Indicates additional information or advice.
1. Start… A number at the beginning of a line indicates a request for action. Carry out these actions in the order specified.
Indicates an intermediate result.
Indicates a result.
OK Indicates text passages or buttons that appear in the program interface of Nero Mobile. They are shown in bold face.
Chapter Indicates references to other chapters. They are executed as links and are shown in red and underlined.
[...] Indicates keyboard shortcuts for entering commands.
General information
Page 6
1.2 About Nero Mobile Nero Mobile is the new and impressive media suite that provides a central repository for a wide range of media files, turning smartphones and personal digital assistants (PDA) into powerful mobile media centers.
Nero Mobile's integrated media archive makes accessing all types of media file much easier and also provides direct access to them when the user is away from their PC. The required media files - videos, music or photos - are loaded onto a PDA or smartphone at the click of a mouse with the help of the Nero 7 Premium Suite installed on the PC.
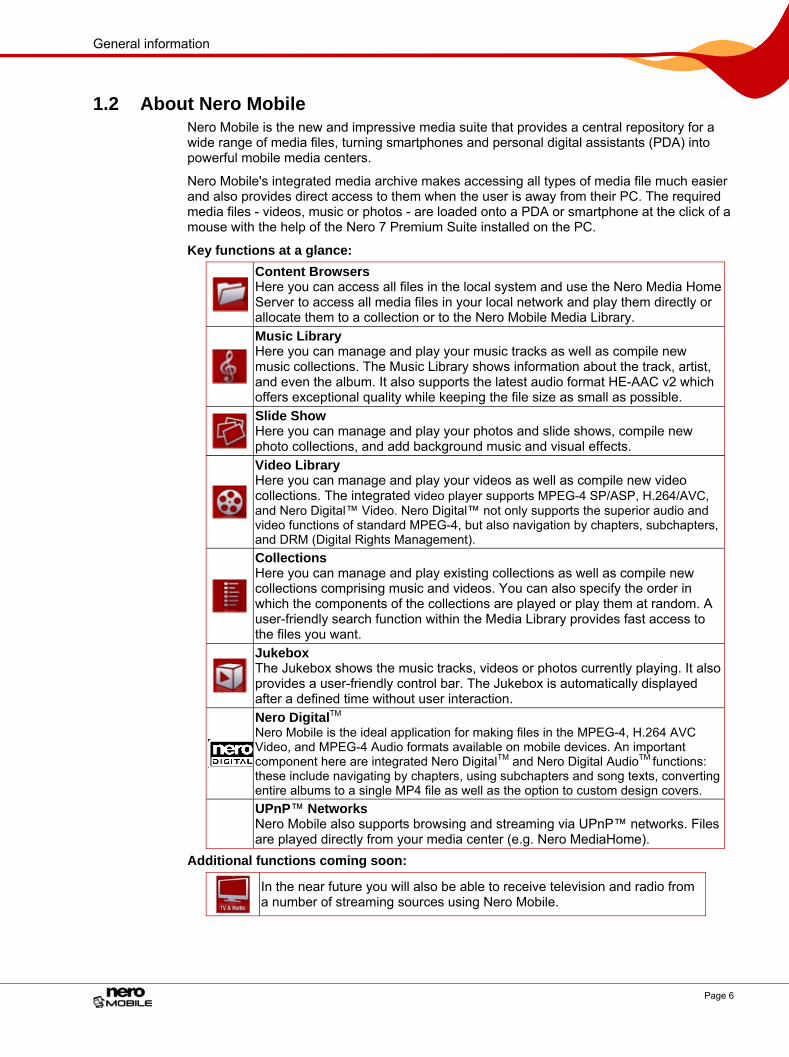
Key functions at a glance:
Content Browsers Here you can access all files in the local system and use the Nero Media Home Server to access all media files in your local network and play them directly or allocate them to a collection or to the Nero Mobile Media Library.
Music Library Here you can manage and play your music tracks as well as compile new music collections. The Music Library shows information about the track, artist, and even the album. It also supports the latest audio format HE-AAC v2 which offers exceptional quality while keeping the file size as small as possible.
Slide Show Here you can manage and play your photos and slide shows, compile new photo collections, and add background music and visual effects.
Video Library Here you can manage and play your videos as well as compile new video collections. The integrated video player supports MPEG-4 SP/ASP, H.264/AVC, and Nero Digital™ Video. Nero Digital™ not only supports the superior audio and video functions of standard MPEG-4, but also navigation by chapters, subchapters, and DRM (Digital Rights Management).
Collections Here you can manage and play existing collections as well as compile new collections comprising music and videos. You can also specify the order in which the components of the collections are played or play them at random. A user-friendly search function within the Media Library provides fast access to the files you want.
Jukebox The Jukebox shows the music tracks, videos or photos currently playing. It also provides a user-friendly control bar. The Jukebox is automatically displayed after a defined time without user interaction. Nero DigitalTM Nero Mobile is the ideal application for making files in the MPEG-4, H.264 AVC Video, and MPEG-4 Audio formats available on mobile devices. An important component here are integrated Nero DigitalTM and Nero Digital AudioTM functions: these include navigating by chapters, using subchapters and song texts, converting entire albums to a single MP4 file as well as the option to custom design covers.
UPnP™ Networks Nero Mobile also supports browsing and streaming via UPnP™ networks. Files are played directly from your media center (e.g. Nero MediaHome).
Additional functions coming soon:
In the near future you will also be able to receive television and radio from a number of streaming sources using Nero Mobile.
General information
Page 7
1.3 Nero Mobile versions The following versions of N versionsero Mobile are available:
Nero Mobile Trial This is the demo version of Nero Mobile. Full functionality is available for 30 days. After this period you cannot use Nero Mobile Trial again.
Nero Mobile Pro This version provides full functionality and unlimited accessibility of all codecs. It is available through Nero's web shop (www.nero.com).
Codecs are needed for encoding (editing) and decoding (playing) audio and video files. With the Nero DigitalTM codec you can fit the entire audio and video contents of a DVD on a regular data CD for instance with no perceivable loss in quality.
Technical information
Page 8
2 Technical information
2.1 System requirements
2.1.1 Operating system
Microsoft® PocketPC/Smartphone
Microsoft® Windows Mobile® 5.0
2.1.2 Processor
Intel® XScale™. Minimum required frequency:
▪ 200 MHz (audio + video software)
▪ 24 MHz (LC AAC audio)
▪ 78 MHz (HE-AAC audio)
Freescale i.MX21/31 Minimum required frequency:
▪ 200 MHz (audio + video software)
▪ 24 MHz (LC AAC audio)
▪ 78 MHz (HE-AAC audio)
ARM4 compatible Minimum required frequency:
▪ 200 MHz (audio + video software)
▪ 24 MHz (LC AAC audio)
▪ 78 MHz (HE-AAC audio)
TI OMAP 17xx/24xx
2.1.3 Memory
1.25 MB + codecs (1.4 MB) + languages (0.2 MB) + skins (1.3 MB) = approx. 4 MB for full installation
2.1.4 Communication between PC and smartphone
Microsoft® ActiveSync® when using Windows® XP and Windows® 2000
Microsoft Mobile Device Center when using Windows Vista™
USB cable
Bluetooth® connection
Technical information
Page 9
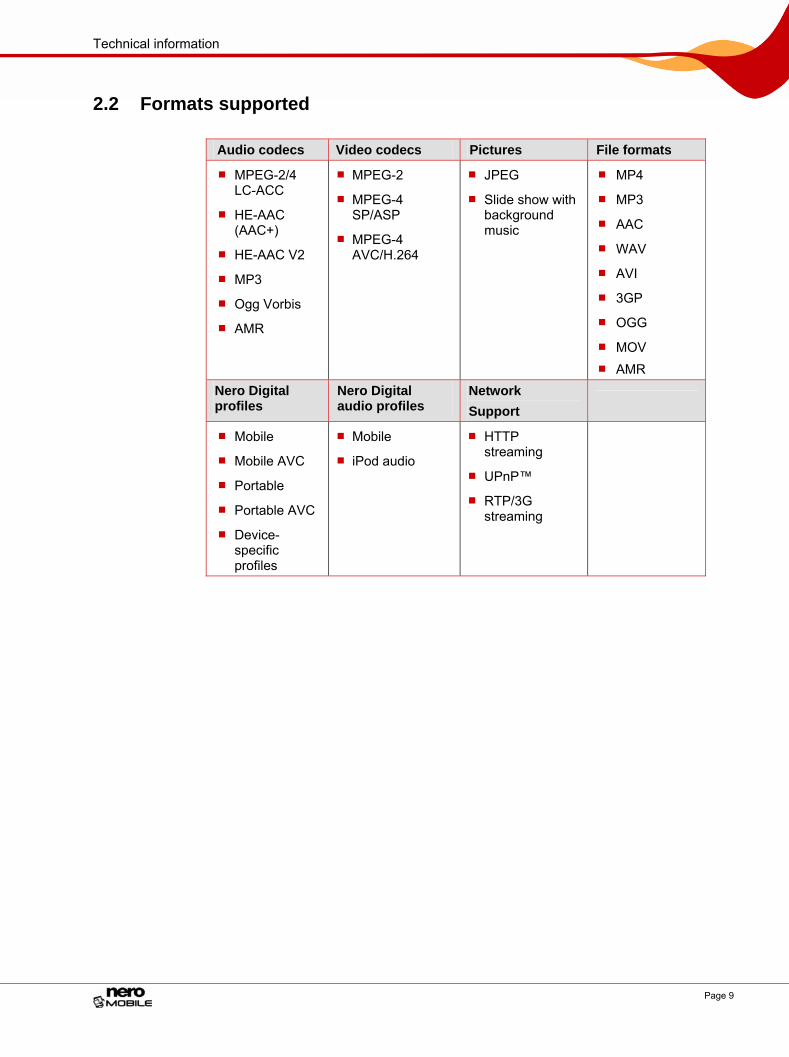
2.2 Formats supported
Audio codecs Video codecs Pictures File formats
MPEG-2/4 LC-ACC
HE-AAC (AAC+)
HE-AAC V2
MP3
Ogg Vorbis
AMR
MPEG-2
MPEG-4 SP/ASP
MPEG-4 AVC/H.264
JPEG
Slide show with background music
MP4
MP3
AAC
WAV
AVI
3GP
OGG
MOV
AMR Nero Digital profiles
Nero Digital audio profiles
Network Support
Mobile
Mobile AVC
Portable
Portable AVC
Device-specific profiles
Mobile
iPod audio HTTP streaming
UPnP™
RTP/3G streaming
Installing Nero Mobile on a PDA or smartphone
Page 10
3 Installing Nero Mobile on a PDA or smartphone
For the synchronization between your computer and the mobile device you either require Microsoft® ActiveSync® (if using Windows® XP or Windows® 2000) or Windows Mobile Device Center (if using Windows Vista™).
The prerequisites for installing Nero Mobile on your PDA or smartphone are automatically met when Nero 7 is installed. Simply connect your PDA or smartphone to your PC. Then just follow the instructions in the installation dialog that is displayed. In detail, proceed as follows:
The prerequisites for installing Nero Mobile on your PDA or smartphone are automatically met when Nero 7 is installed. Simply connect your PDA or smartphone to your PC. Then just follow the instructions in the installation dialog that is displayed. In detail, proceed as follows:
1. Please make sure that Microsoft® ActiveSync® is installed if using Windows® XP or Windows® 2000 as the operating system of your computer. You can download this synchronization tool free of charge from www.microsoft.com/windowsmobile/activesync/default.mspx, where you will also find an installation manual for it.
2. Please make sure that Windows Mobile Device Center is installed if using Windows Vista™ or Windows® 2000 as the operating system of your computer. You can download this synchronization tool free of charge from www.microsoft.com/windowsmobile/devicecenter.mspx, where you will also find an installation manual for it.
3. Connect your PDA or smartphone to your PC as described in the instructions for the respective device.
A dialog box asking if you wish to install Nero Mobile is displayed.
4. Click on the OK button.
The Nero Mobile installation wizard is displayed with its initial screen.
5. Click on the Next button.
The second screen of the installation wizard, License Agreement, is displayed.
6. Click on the Accept button.
The third screen of the installation wizard, Installation, is displayed and shows the progress of the installation process. Once the installation process is complete, a dialog box informing you of this is displayed.
If Nero Mobile is already installed on the connected PDA or smartphone, a dialog box informing you of this is displayed. Click on the Yes button to continue with the installation process or the No button to cancel it.
7. Click on the OK button.
The fourth and last screen of the installation wizard is displayed.
8. Click on the Exit button.

Installing Nero Mobile on a PDA or smartphone
Page 11
You have installed Nero Mobile on your PDA or smartphone. The Nero Mobile product icon for launching the application appears in the program folder for the PDA or smartphone:
Nero Mobile
When you purchase Nero Mobile Pro, you will receive a new installer that you must start on your PC with the smartphone or PDA connected. The first screen of the installation wizard is then displayed and you can install Nero Mobile Pro as described above.
Memory problems may occur with devices that have older versions of Windows Mobile 5 without the latest Microsoft patch. This error particularly occurs when uninstalling or reinstalling Nero Mobile, but also during installation. The operation is aborted and a misleading error message is displayed. The manufacturers of most devices make the latest update patches available on their websites. The problem will have been permanently solved as soon as the patch has been implemented. However, you can also perform a soft-reset of your device. After that you can − at least for one time − install, uninstall, or reinstall without any problems.
User interface of Nero Mobile
Page 12
4 User interface of Nero Mobile
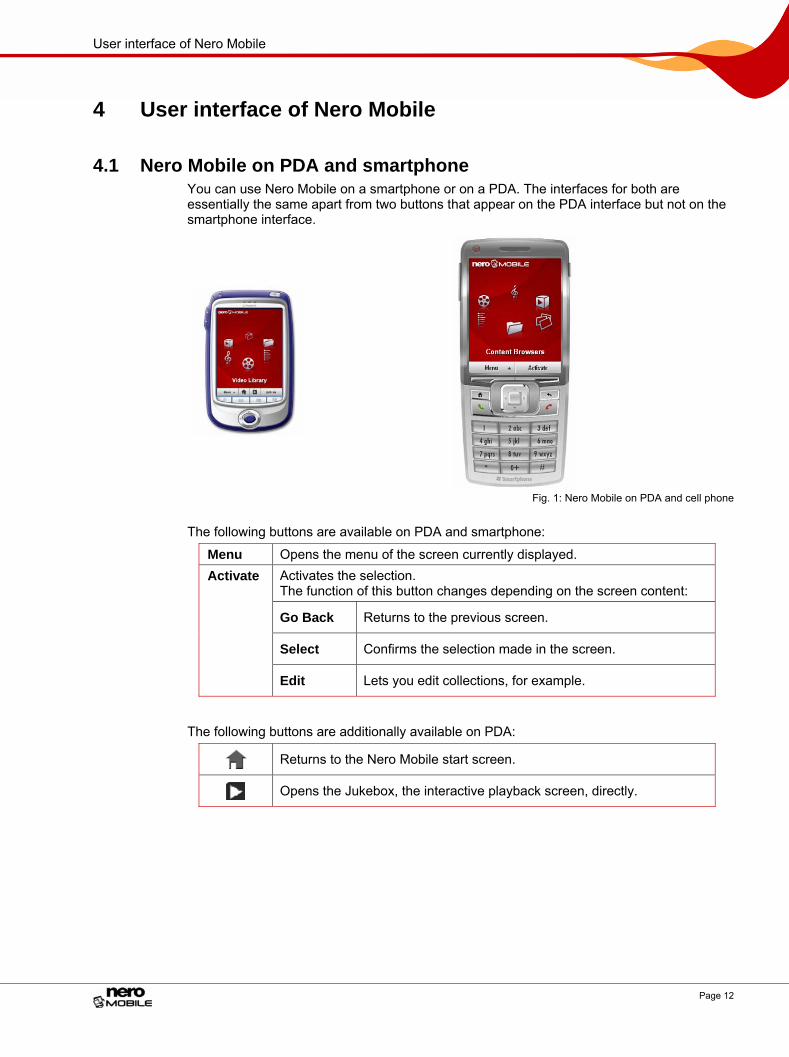
4.1 Nero Mobile on PDA and smartphone You can use Nero Mobile on a smartphone or on a PDA. The interfaces for both are essentially the same apart from two buttons that appear on the PDA interface but not on the smartphone interface.
Fig. 1: Nero Mobile on PDA and cell phone
The following buttons are available on PDA and smartphone:
Menu Opens the menu of the screen currently displayed. Activates the selection. The function of this button changes depending on the screen content:
Go Back Returns to the previous screen.
Select Confirms the selection made in the screen.
Activate
Edit Lets you edit collections, for example.
The following buttons are additionally available on PDA:
Returns to the Nero Mobile start screen.
Opens the Jukebox, the interactive playback screen, directly.
User interface of Nero Mobile
Page 13
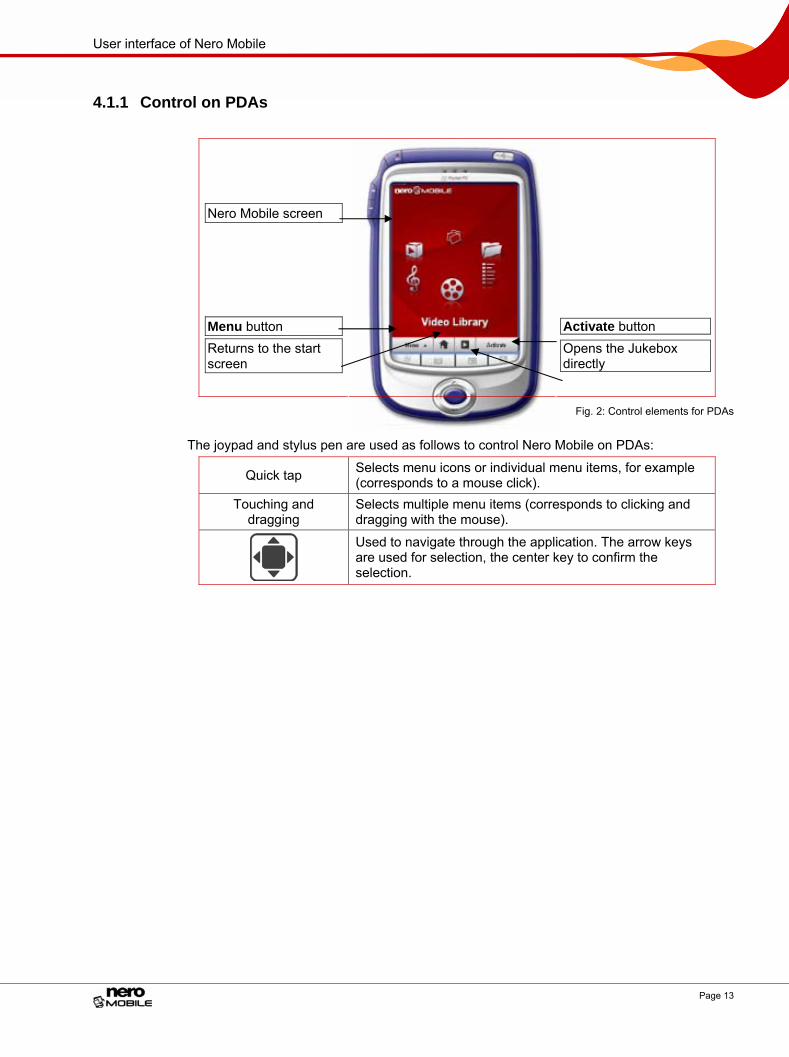
4.1.1 Control on PDAs
Nero Mobile screen
Menu button Activate button Returns to the start screen
Opens the Jukebox directly
Fig. 2: Control elements for PDAs
The joypad and stylus pen are used as follows to control Nero Mobile on PDAs:
Quick tap Selects menu icons or individual menu items, for example (corresponds to a mouse click).
Touching and dragging
Selects multiple menu items (corresponds to clicking and dragging with the mouse).
Used to navigate through the application. The arrow keys are used for selection, the center key to confirm the selection.

User interface of Nero Mobile
Page 14
4.1.2 Key controls on smartphones
Nero Mobile screen
Menu button Activate button Key control for the Menu button = Menu key
Key control for the Activate button = Activate key
Keypad
Joypad for selecting a service, collection, etc.
Fig. 3: Control elements for smartphones
The following keys are used to control Nero Mobile on smartphones using keys:
Top left key Activates the Menu button.
Top right key Activates the Activate button, which depending on the context, may also be called Edit, Done, Select, Go Back or Play/Pause.
Used to navigate through the application. The arrow keys are used for selection, the center key to confirm the selection.
Keypad Used for various tasks such as entering text, shortcut commands, etc.
User interface of Nero Mobile
Page 15
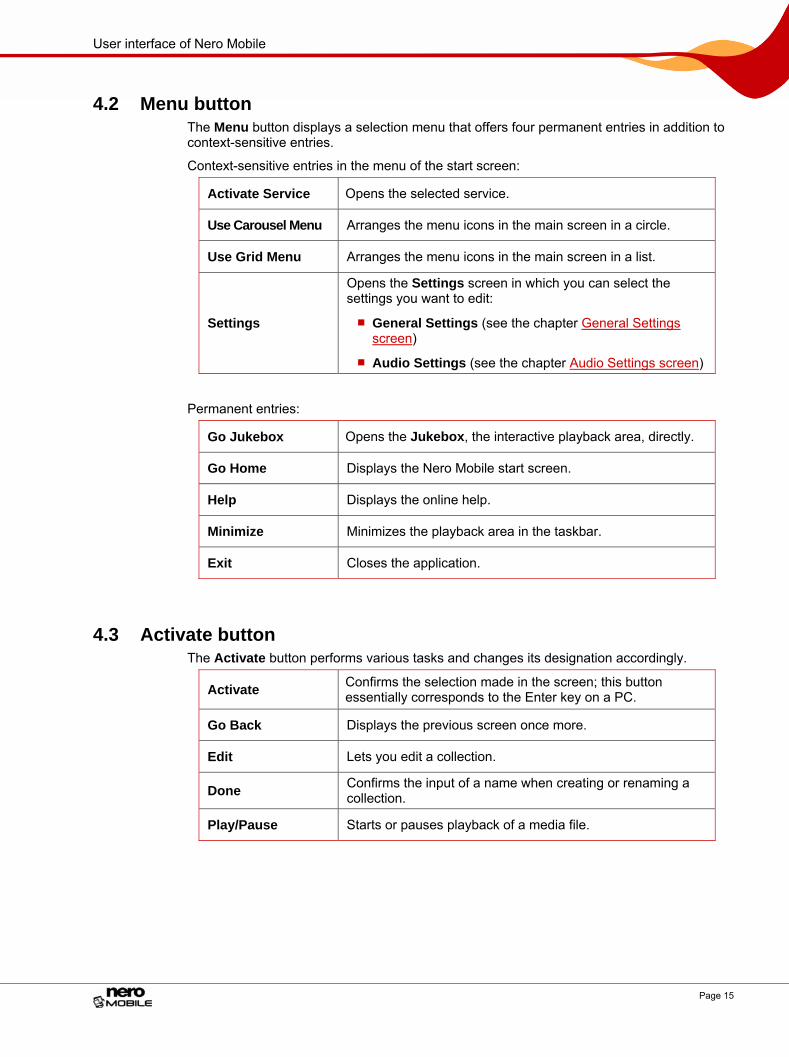
4.2 Menu button The Menu button displays a selection menu that offers four permanent entries in addition to context-sensitive entries.
Context-sensitive entries in the menu of the start screen:
Activate Service Opens the selected service.
Use Carousel Menu Arranges the menu icons in the main screen in a circle.
Use Grid Menu Arranges the menu icons in the main screen in a list.
Settings
Opens the Settings screen in which you can select the settings you want to edit:
General Settings (see the chapter General Settings screen)
Audio Settings (see the chapter Audio Settings screen)
Permanent entries:
Go Jukebox Opens the Jukebox, the interactive playback area, directly.
Go Home Displays the Nero Mobile start screen.
Help Displays the online help.
Minimize Minimizes the playback area in the taskbar.
Exit Closes the application.
4.3 Activate button The Activate button performs various tasks and changes its designation accordingly.
Activate Confirms the selection made in the screen; this button essentially corresponds to the Enter key on a PC.
Go Back Displays the previous screen once more.
Edit Lets you edit a collection.
Done Confirms the input of a name when creating or renaming a collection.
Play/Pause Starts or pauses playback of a media file.
User interface of Nero Mobile
Page 16
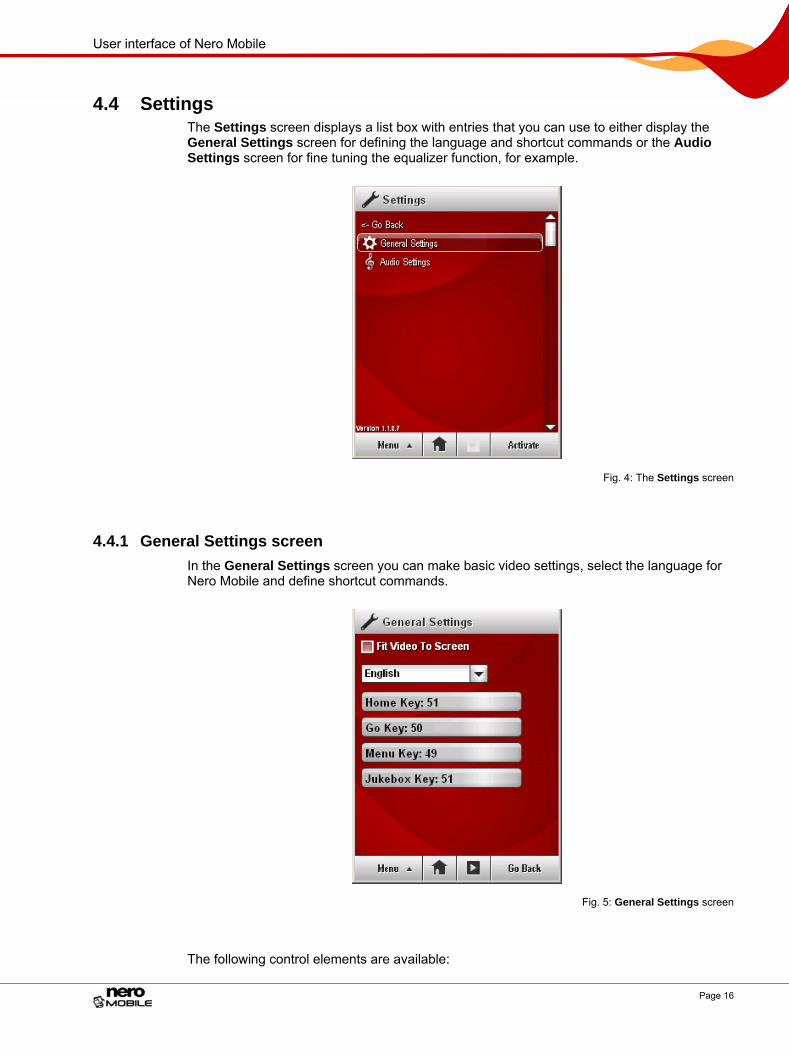
4.4 Settings The Settings screen displays a list box with entries that you can use to either display the General Settings screen for defining the language and shortcut commands or the Audio Settings screen for fine tuning the equalizer function, for example.
Fig. 4: The Settings screen
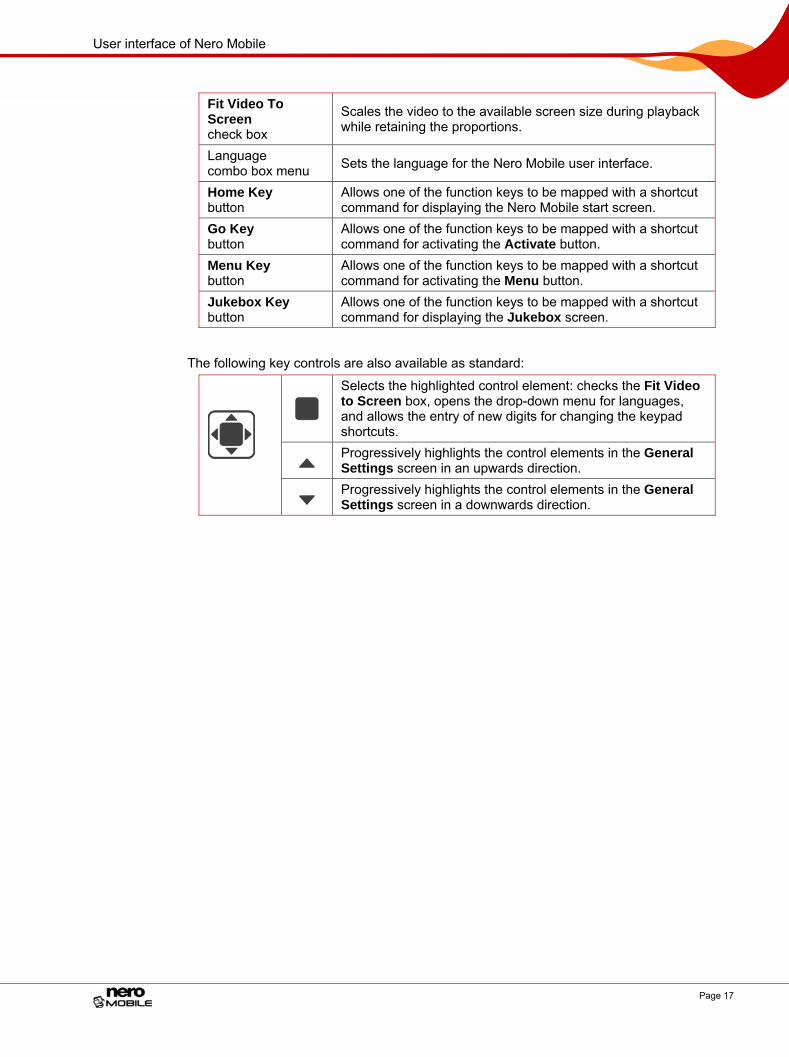
4.4.1 General Settings screen In the General Settings screen you can make basic video settings, select the language for Nero Mobile and define shortcut commands.
Fig. 5: General Settings screen
The following control elements are available:
User interface of Nero Mobile
Page 17
Fit Video To Screen check box
Scales the video to the available screen size during playback while retaining the proportions.
Language combo box menu Sets the language for the Nero Mobile user interface.
Home Key button
Allows one of the function keys to be mapped with a shortcut command for displaying the Nero Mobile start screen.
Go Key button
Allows one of the function keys to be mapped with a shortcut command for activating the Activate button.
Menu Key button
Allows one of the function keys to be mapped with a shortcut command for activating the Menu button.
Jukebox Key button
Allows one of the function keys to be mapped with a shortcut command for displaying the Jukebox screen.
The following key controls are also available as standard:
Selects the highlighted control element: checks the Fit Video to Screen box, opens the drop-down menu for languages, and allows the entry of new digits for changing the keypad shortcuts.
Progressively highlights the control elements in the General Settings screen in an upwards direction.
Progressively highlights the control elements in the General Settings screen in a downwards direction.
User interface of Nero Mobile
Page 18
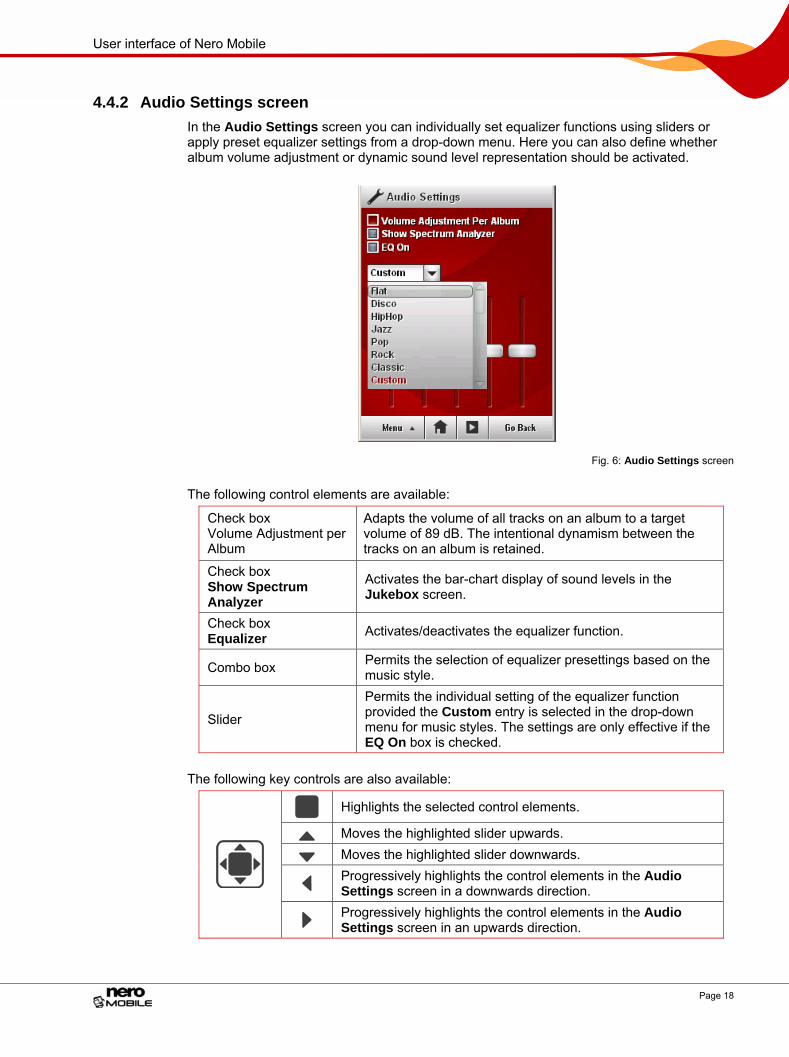
4.4.2 Audio Settings screen In the Audio Settings screen you can individually set equalizer functions using sliders or apply preset equalizer settings from a drop-down menu. Here you can also define whether album volume adjustment or dynamic sound level representation should be activated.
Fig. 6: Audio Settings screen
The following control elements are available:
Check box Volume Adjustment per Album
Adapts the volume of all tracks on an album to a target volume of 89 dB. The intentional dynamism between the tracks on an album is retained.
Check box Show Spectrum Analyzer
Activates the bar-chart display of sound levels in the Jukebox screen.
Check box Equalizer Activates/deactivates the equalizer function.
Combo box Permits the selection of equalizer presettings based on the music style.
Slider
Permits the individual setting of the equalizer function provided the Custom entry is selected in the drop-down menu for music styles. The settings are only effective if the EQ On box is checked.
The following key controls are also available:
Highlights the selected control elements.
Moves the highlighted slider upwards.
Moves the highlighted slider downwards.
Progressively highlights the control elements in the Audio Settings screen in a downwards direction.
Progressively highlights the control elements in the Audio Settings screen in an upwards direction.
Main menus
Page 19
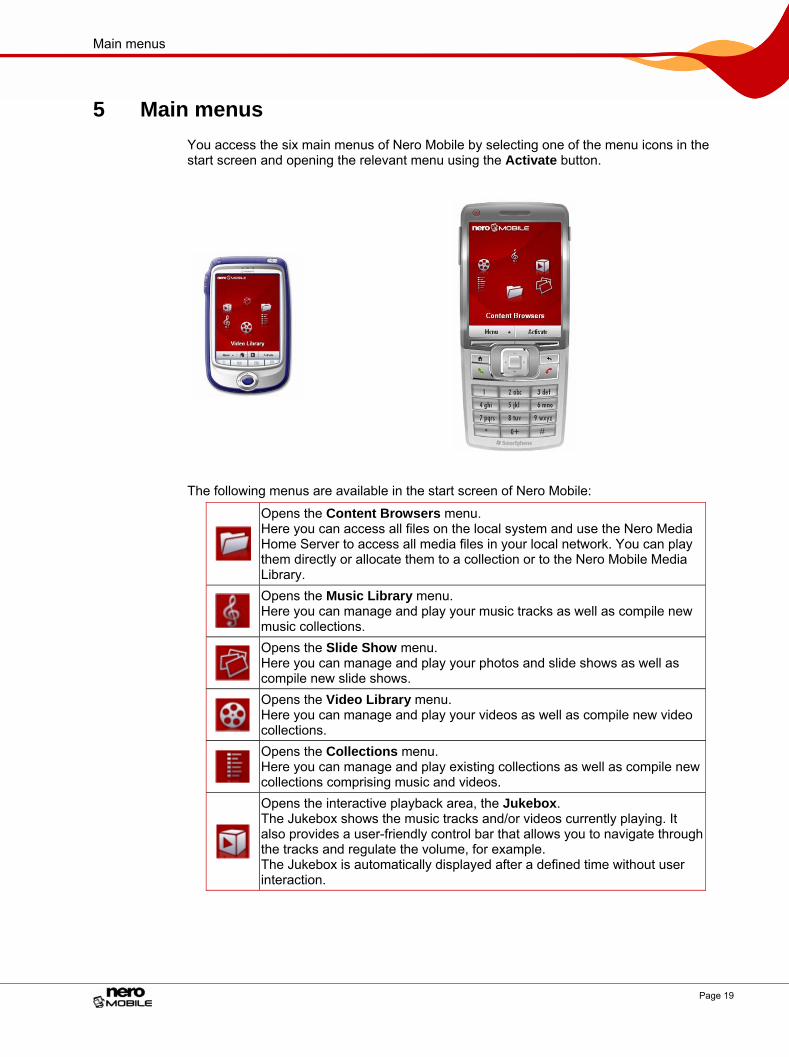
5 Main menus You access the six main menus of Nero Mobile by selecting one of the menu icons in the start screen and opening the relevant menu using the Activate button.
The following menus are available in the start screen of Nero Mobile:
Opens the Content Browsers menu. Here you can access all files on the local system and use the Nero Media Home Server to access all media files in your local network. You can play them directly or allocate them to a collection or to the Nero Mobile Media Library.
Opens the Music Library menu. Here you can manage and play your music tracks as well as compile new music collections.
Opens the Slide Show menu. Here you can manage and play your photos and slide shows as well as compile new slide shows.
Opens the Video Library menu. Here you can manage and play your videos as well as compile new video collections.
Opens the Collections menu. Here you can manage and play existing collections as well as compile new collections comprising music and videos.
Opens the interactive playback area, the Jukebox. The Jukebox shows the music tracks and/or videos currently playing. It also provides a user-friendly control bar that allows you to navigate through the tracks and regulate the volume, for example. The Jukebox is automatically displayed after a defined time without user interaction.
Content Browsers main screen
Page 20
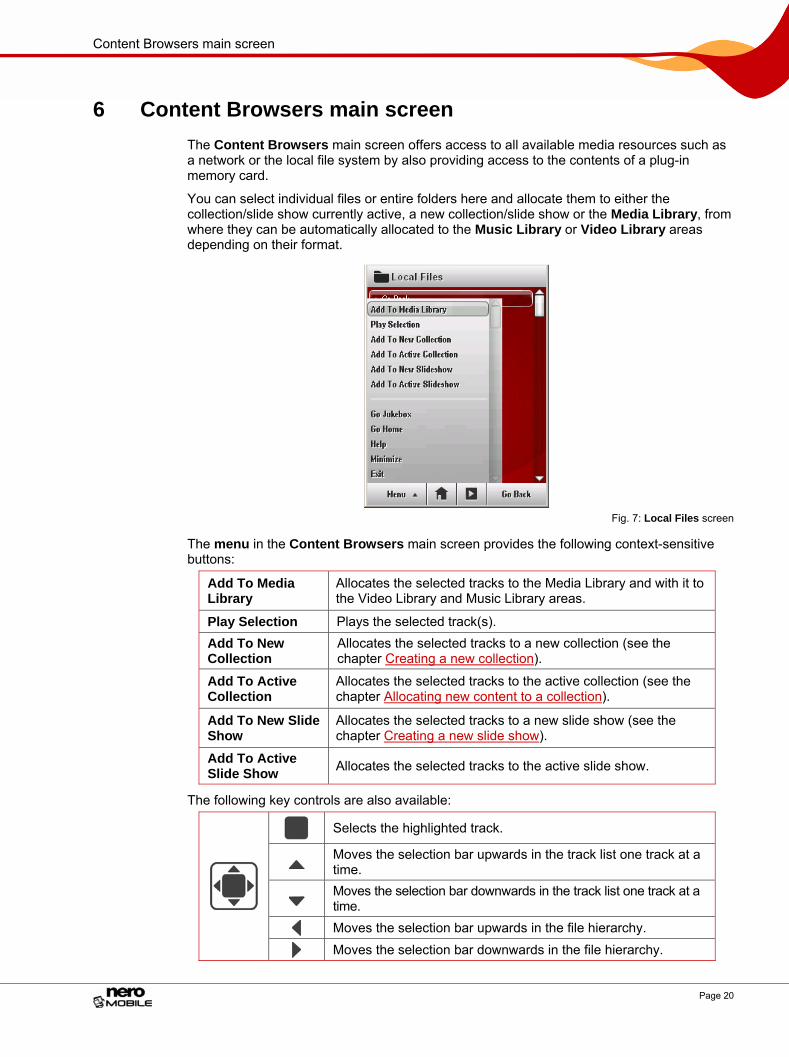
6 Content Browsers main screen The Content Browsers main screen offers access to all available media resources such as a network or the local file system by also providing access to the contents of a plug-in memory card.
You can select individual files or entire folders here and allocate them to either the collection/slide show currently active, a new collection/slide show or the Media Library, from where they can be automatically allocated to the Music Library or Video Library areas depending on their format.
Fig. 7: Local Files screen
The menu in the Content Browsers main screen provides the following context-sensitive buttons:
Add To Media Library
Allocates the selected tracks to the Media Library and with it to the Video Library and Music Library areas.
Play Selection Plays the selected track(s). Add To New Collection
Allocates the selected tracks to a new collection (see the chapter Creating a new collection).
Add To Active Collection
Allocates the selected tracks to the active collection (see the chapter Allocating new content to a collection).
Add To New Slide Show
Allocates the selected tracks to a new slide show (see the chapter Creating a new slide show).
Add To Active Slide Show Allocates the selected tracks to the active slide show.
The following key controls are also available:
Selects the highlighted track.
Moves the selection bar upwards in the track list one track at a time.
Moves the selection bar downwards in the track list one track at a time.
Moves the selection bar upwards in the file hierarchy.
Moves the selection bar downwards in the file hierarchy.
Content Browsers main screen
Page 21
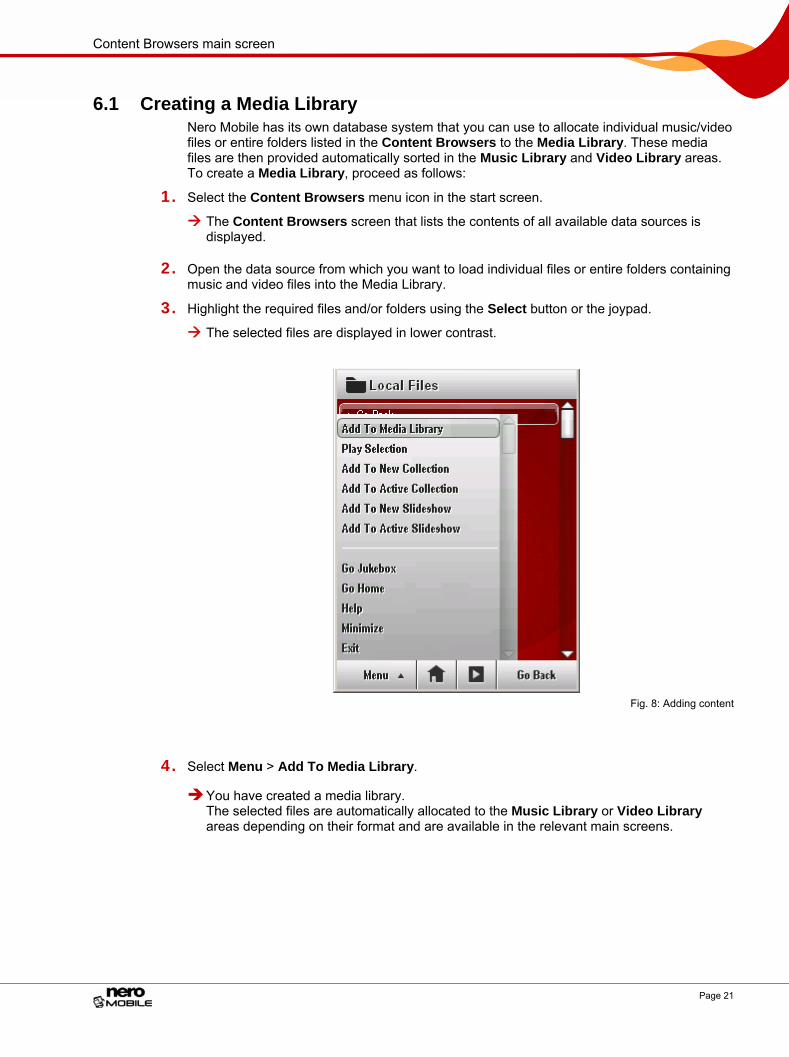
6.1 Creating a Media Library Nero Mobile has its own database system that you can use to allocate individual music/video files or entire folders listed in the Content Browsers to the Media Library. These media files are then provided automatically sorted in the Music Library and Video Library areas. To create a Media Library, proceed as follows:
1. Select the Content Browsers menu icon in the start screen.
The Content Browsers screen that lists the contents of all available data sources is displayed.
2. Open the data source from which you want to load individual files or entire folders containing music and video files into the Media Library.
3. Highlight the required files and/or folders using the Select button or the joypad.
The selected files are displayed in lower contrast.
Fig. 8: Adding content
4. Select Menu > Add To Media Library.
You have created a media library. The selected files are automatically allocated to the Music Library or Video Library areas depending on their format and are available in the relevant main screens.
Jukebox main screen
Page 22
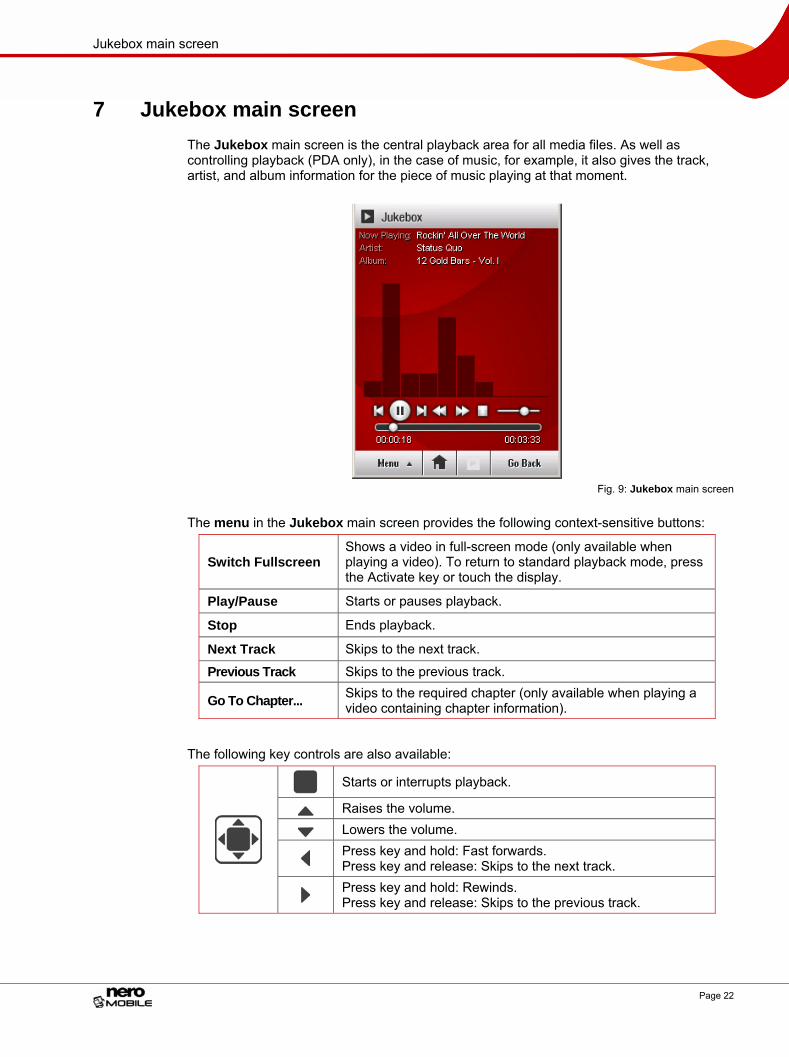
7 Jukebox main screen The Jukebox main screen is the central playback area for all media files. As well as controlling playback (PDA only), in the case of music, for example, it also gives the track, artist, and album information for the piece of music playing at that moment.
Fig. 9: Jukebox main screen
The menu in the Jukebox main screen provides the following context-sensitive buttons:
Switch Fullscreen Shows a video in full-screen mode (only available when playing a video). To return to standard playback mode, press the Activate key or touch the display.
Play/Pause Starts or pauses playback.
Stop Ends playback.
Next Track Skips to the next track.
Previous Track Skips to the previous track.
Go To Chapter... Skips to the required chapter (only available when playing a video containing chapter information).
The following key controls are also available:
Starts or interrupts playback.
Raises the volume.
Lowers the volume.
Press key and hold: Fast forwards. Press key and release: Skips to the next track.
Press key and hold: Rewinds. Press key and release: Skips to the previous track.
Jukebox main screen
Page 23
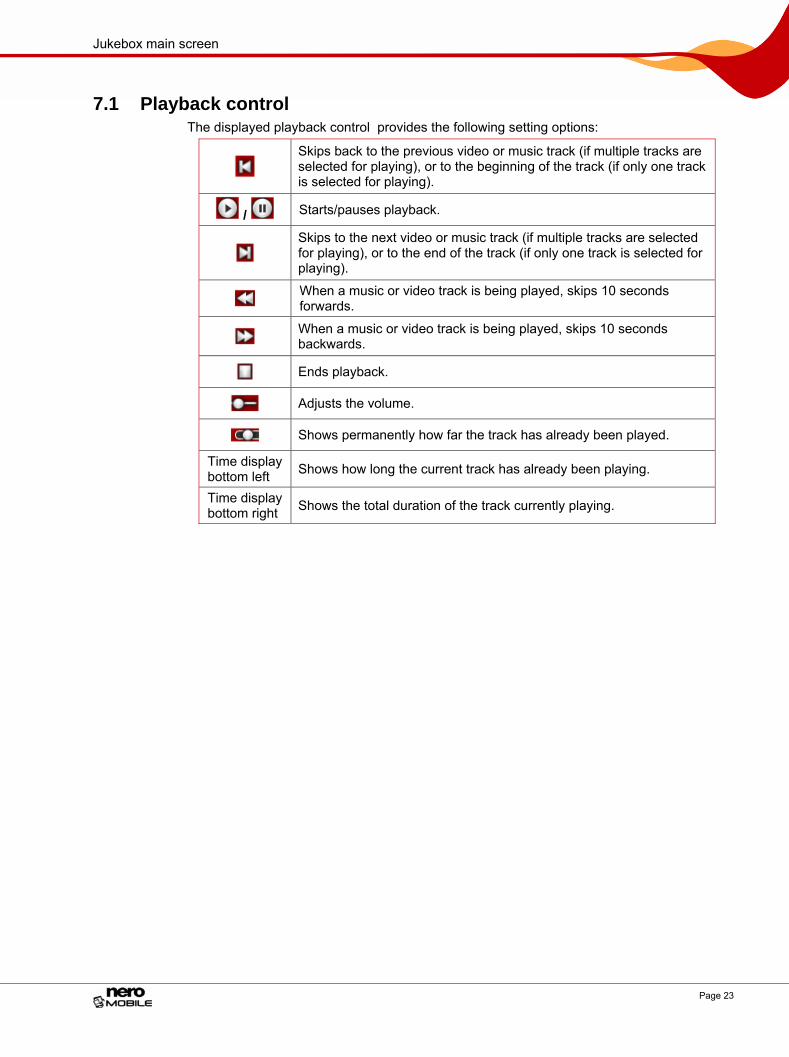
7.1 Playback control The displayed playback control provides the following setting options:
Skips back to the previous video or music track (if multiple tracks are selected for playing), or to the beginning of the track (if only one track is selected for playing).
/ Starts/pauses playback.
Skips to the next video or music track (if multiple tracks are selected for playing), or to the end of the track (if only one track is selected for playing).
When a music or video track is being played, skips 10 seconds forwards.
When a music or video track is being played, skips 10 seconds backwards.
Ends playback.
Adjusts the volume.
Shows permanently how far the track has already been played.
Time display bottom left Shows how long the current track has already been playing.
Time display bottom right Shows the total duration of the track currently playing.
Music Library main screen
Page 24
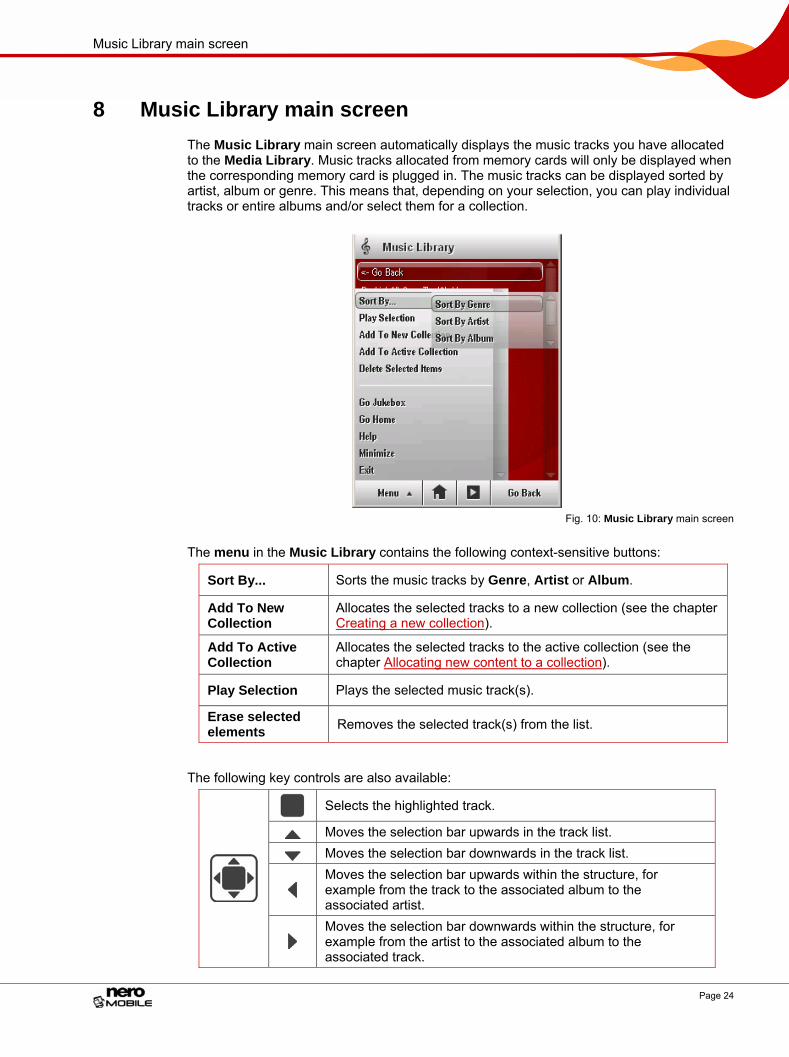
8 Music Library main screen The Music Library main screen automatically displays the music tracks you have allocated to the Media Library. Music tracks allocated from memory cards will only be displayed when the corresponding memory card is plugged in. The music tracks can be displayed sorted by artist, album or genre. This means that, depending on your selection, you can play individual tracks or entire albums and/or select them for a collection.
Fig. 10: Music Library main screen
The menu in the Music Library contains the following context-sensitive buttons:
Sort By... Sorts the music tracks by Genre, Artist or Album.
Add To New Collection
Allocates the selected tracks to a new collection (see the chapter Creating a new collection).
Add To Active Collection
Allocates the selected tracks to the active collection (see the chapter Allocating new content to a collection).
Play Selection Plays the selected music track(s).
Erase selected elements Removes the selected track(s) from the list.
The following key controls are also available:
Selects the highlighted track.
Moves the selection bar upwards in the track list.
Moves the selection bar downwards in the track list.
Moves the selection bar upwards within the structure, for example from the track to the associated album to the associated artist.
Moves the selection bar downwards within the structure, for example from the artist to the associated album to the associated track.

Music Library main screen
Page 25
8.1 Playing music In the Music Library main screen you can select one or more tracks, entire albums, as well as all music tracks allocated to an artist or genre. To play music, proceed as follows:
1. Select the Music Library menu icon in the start screen.
The Music Library screen is displayed.
Fig. 11: Playing music
2. Move the selection bar to an individual music track, album or artist.
3. Press the Select button.
The individual music track, the contents of the album or the music tracks allocated to the artist are selected and displayed in lower contrast in the Music Library screen.
4. Select further music tracks, albums or artists as desired.
5. Select Menu > Play selection.
The selected music is played. The Jukebox screen in which you can conveniently regulate the volume, for example, is automatically displayed after a few seconds (see Playback control).
Slide Show main screen
Page 26
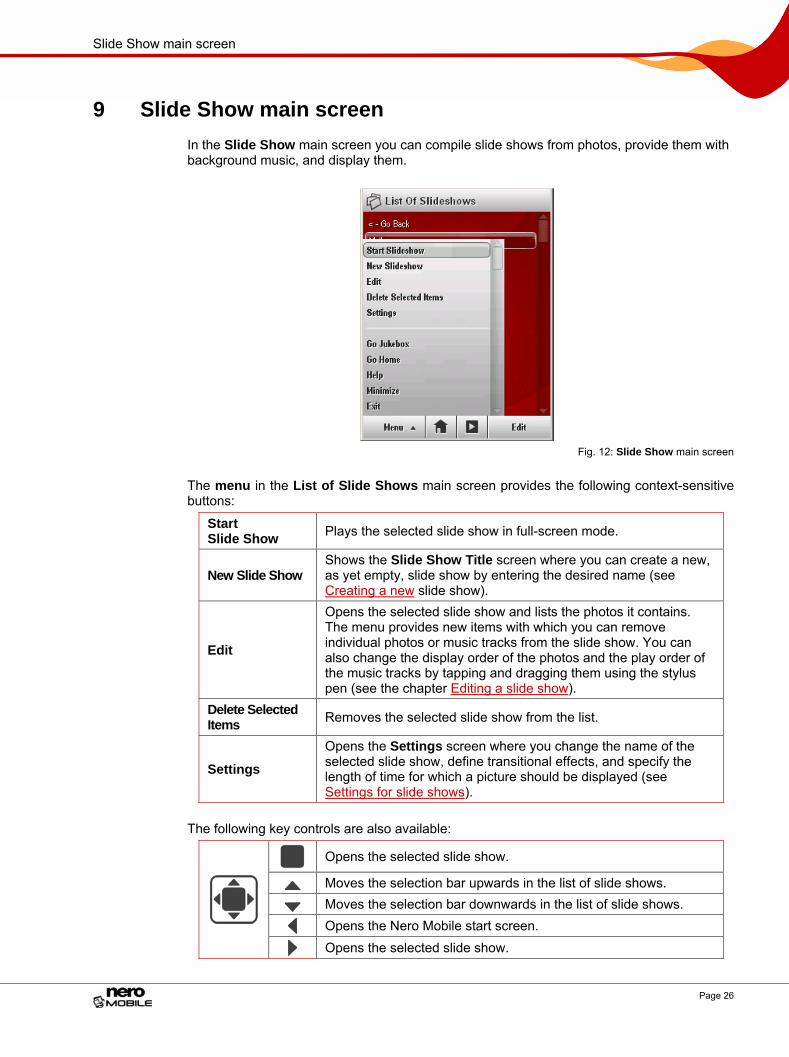
9 Slide Show main screen In the Slide Show main screen you can compile slide shows from photos, provide them with background music, and display them.
Fig. 12: Slide Show main screen
The menu in the List of Slide Shows main screen provides the following context-sensitive buttons:
Start Slide Show Plays the selected slide show in full-screen mode.
New Slide Show Shows the Slide Show Title screen where you can create a new, as yet empty, slide show by entering the desired name (see Creating a new slide show).
Edit
Opens the selected slide show and lists the photos it contains. The menu provides new items with which you can remove individual photos or music tracks from the slide show. You can also change the display order of the photos and the play order of the music tracks by tapping and dragging them using the stylus pen (see the chapter Editing a slide show).
Delete Selected Items Removes the selected slide show from the list.
Settings
Opens the Settings screen where you change the name of the selected slide show, define transitional effects, and specify the length of time for which a picture should be displayed (see Settings for slide shows).
The following key controls are also available:
Opens the selected slide show.
Moves the selection bar upwards in the list of slide shows.
Moves the selection bar downwards in the list of slide shows.
Opens the Nero Mobile start screen.
Opens the selected slide show.
Slide Show main screen
Page 27
9.1 Creating a new slide show You create a new slide show by first defining its name and then allocating it photos from the Content Browsers. You can also allocate music tracks from the Content Browsers that will be automatically played as background music when the slide show is played. To create a slide show with background music, proceed as follows:
1. Select Menu > New Slide Show in the main screen of List of Slide Shows. The Slide Show Title screen containing the Name text field is displayed.
2. Enter the name you want to give your new slide show in the Name text field.
3. Press the Done button. The new, as yet empty, slide show is created with the specified name.
4. Select the Content Browsers menu icon in the Nero Mobile start screen. The Content Browsers screen is displayed.
5. Select the required photo files and highlight them using the Select button. The highlighted files are displayed in lower contrast.
6. Select Menu > Add To Active Slide Show. The selected photos are allocated to the slide show.
7. If you want to create a slide show with background music, select the required music tracks and highlight them using the Select button.
8. Select Menu > Add To Active Collection. You have created a new slide show with background music. It can be accessed under the selected name in the List of Slide Shows screen.
9.2 Settings for slide shows In the Settings screen you can change the name of the selected slide show and define whether and, if so, which transitional effects should be used between pictures and for how long.
The following input options are provided in the Settings screen for this purpose:
Name text field Displays the name of the selected slide show and allows you to change the name.
Transition drop-down menu
Makes available a selection of various transitional effects. The Random setting uses all transitional effects.
Fit Video To Screen (Resolution) check box
Adapts the slide show to the available screen size.
Rotate check box
Rotates the pictures 90° to the right during viewing, allowing a bigger format to be displayed.
Slide Duration text field
Defines the length of time a single picture is shown for. However, you can also use the keypad to move from one picture to the next during viewing ( backwards, forwards ).
Transition Duration text field
Defines the length of time for the transitional effect between two pictures.
Slide Show main screen
Page 28
9.3 Playing slide shows The List of Slide Shows main screen provides all slide shows for playing. To play a slide show, proceed as follows:
1. Select the Slide Shows menu icon in the start screen. The List of Slide Shows screen is displayed.
2. Move the selection bar to the title of a slide show.
3. Press the center key on the joypad. The selected slide show is opened and the photos it contains are displayed.
4. Select Menu > Start Slide Show. The selected slide show is played in full-screen mode with background music and the transitional effects that have been allocated (see Settings for slide shows).
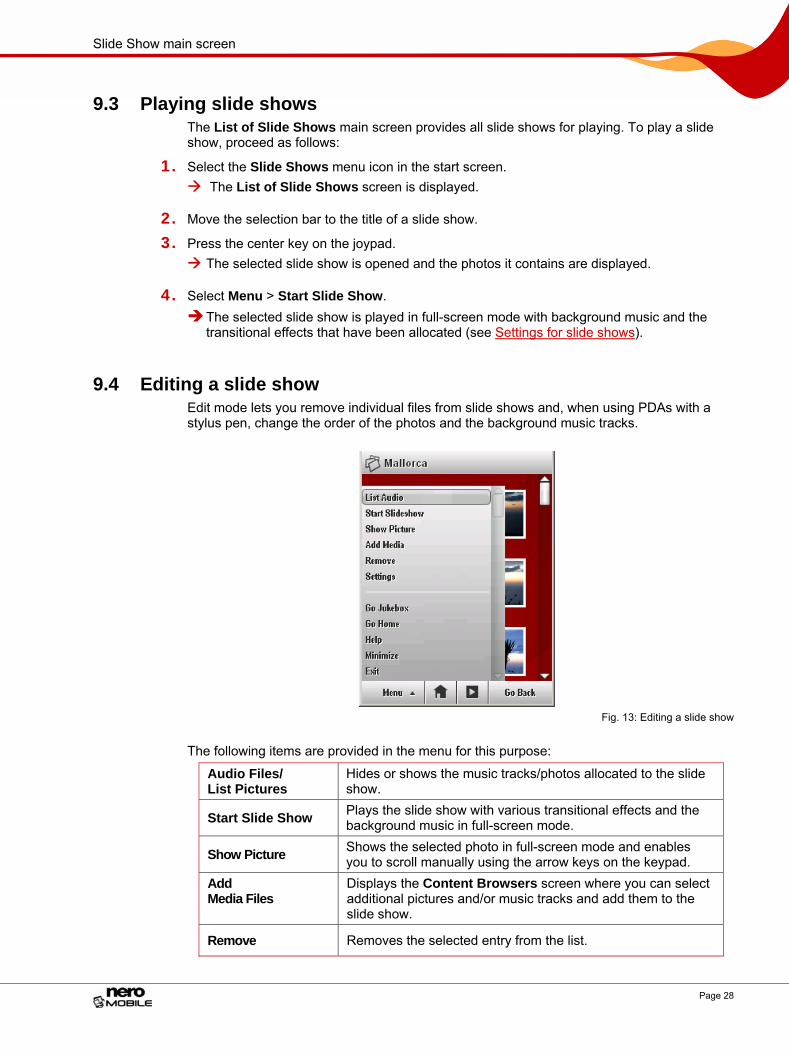
9.4 Editing a slide show Edit mode lets you remove individual files from slide shows and, when using PDAs with a stylus pen, change the order of the photos and the background music tracks.
Fig. 13: Editing a slide show
The following items are provided in the menu for this purpose:
Audio Files/ List Pictures
Hides or shows the music tracks/photos allocated to the slide show.
Start Slide Show Plays the slide show with various transitional effects and the background music in full-screen mode.
Show Picture Shows the selected photo in full-screen mode and enables you to scroll manually using the arrow keys on the keypad.
Add Media Files
Displays the Content Browsers screen where you can select additional pictures and/or music tracks and add them to the slide show.
Remove Removes the selected entry from the list.

Slide Show main screen
Page 29
Settings Opens the Settings screen where you can change the name of the selected slide show and define transitional effects (see Settings for slide shows).
To edit a slide show with background music, proceed as follows:
1. Move the selection bar to the required slide show in the List of Slide Shows main screen.
2. Select Menu > Edit. The screen for the selected slide show is displayed. All the photos contained in the slide show are displayed.
3. If you want to change the order of the photos, tap on a photo using the stylus pen and drag it to the desired location. (This function is only available when using a PDA.)
4. If you want to remove a photo from the slide show, move the selection frame to the relevant photo using the joypad arrow keys and select Menu > Remove.
5. If you want to display the photos one after the other and without transitional effects: 1. Select Menu > Show Picture.
The selected photo is displayed as large as possible. 2. If you want to display the next or previous photo, select Menu > Next or Menu >
Previous. You can also use the arrow keys and of the joypad to scroll through the photos.
3. If you want to rotate the selected photo 90° to the right or left, select Menu > Settings and check or uncheck the Rotate box.
6. If you want to display the screen for the selected slide show again, select Menu > Go Back.
7. If you want to display the list of music tracks that together form the background music for the selected slide show: 1. Select Menu > List Audio Files.
The list of music tracks used is displayed. 2. If you want to remove a track from the list, select Menu > Remove. 3. If you want to add a new music track to the collection, select the Menu > Add Music.
The Content Browsers screen is displayed. You can select more music tracks here and add them to the active slide show.
4. If you want to display the screen for the selected slide show again, select Menu > List Pictures.
8. If you want to change the name of the slide show or define transitional effects, select Menu > Settings.
The Settings screen is displayed.
9. Make the desired settings (see Settings for slide shows).
10. Press the Done button to show the screen for the active slide show again. The selected slide show is available for playing in edited form in the List of Slide Shows screen.
Video Library main screen
Page 30
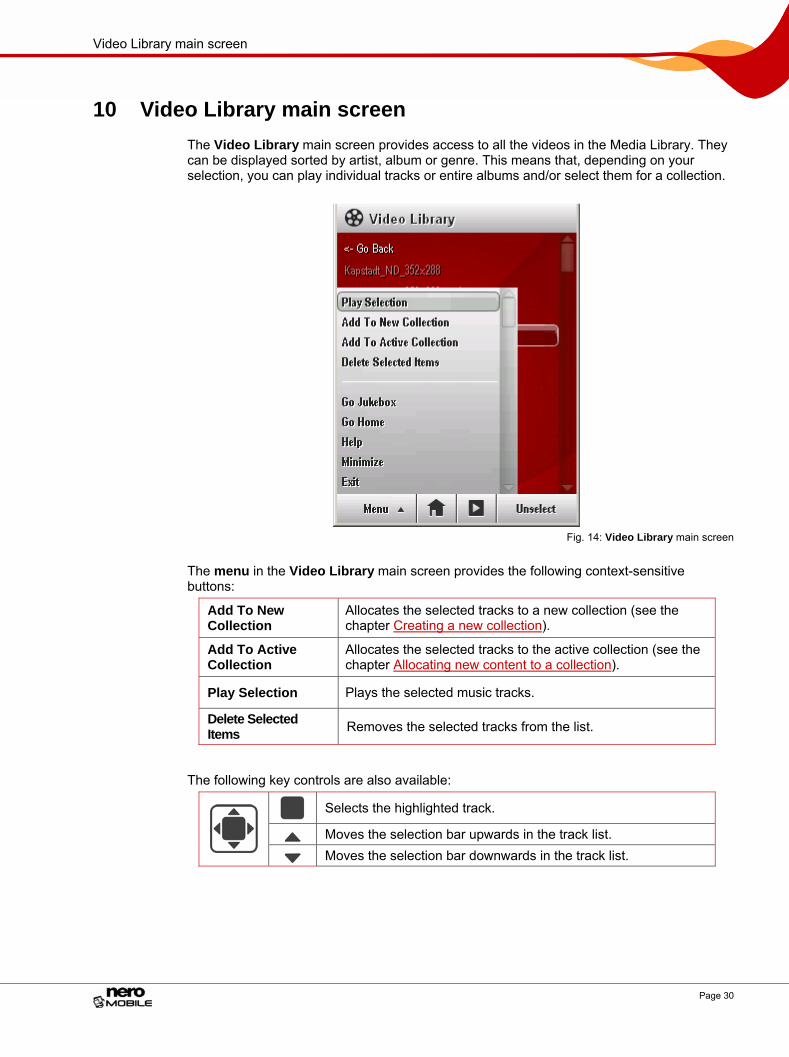
10 Video Library main screen The Video Library main screen provides access to all the videos in the Media Library. They can be displayed sorted by artist, album or genre. This means that, depending on your selection, you can play individual tracks or entire albums and/or select them for a collection.
Fig. 14: Video Library main screen
The menu in the Video Library main screen provides the following context-sensitive buttons:
Add To New Collection
Allocates the selected tracks to a new collection (see the chapter Creating a new collection).
Add To Active Collection
Allocates the selected tracks to the active collection (see the chapter Allocating new content to a collection).
Play Selection Plays the selected music tracks.
Delete Selected Items Removes the selected tracks from the list.
The following key controls are also available:
Selects the highlighted track.
Moves the selection bar upwards in the track list.
Moves the selection bar downwards in the track list.
Video Library main screen
Page 31
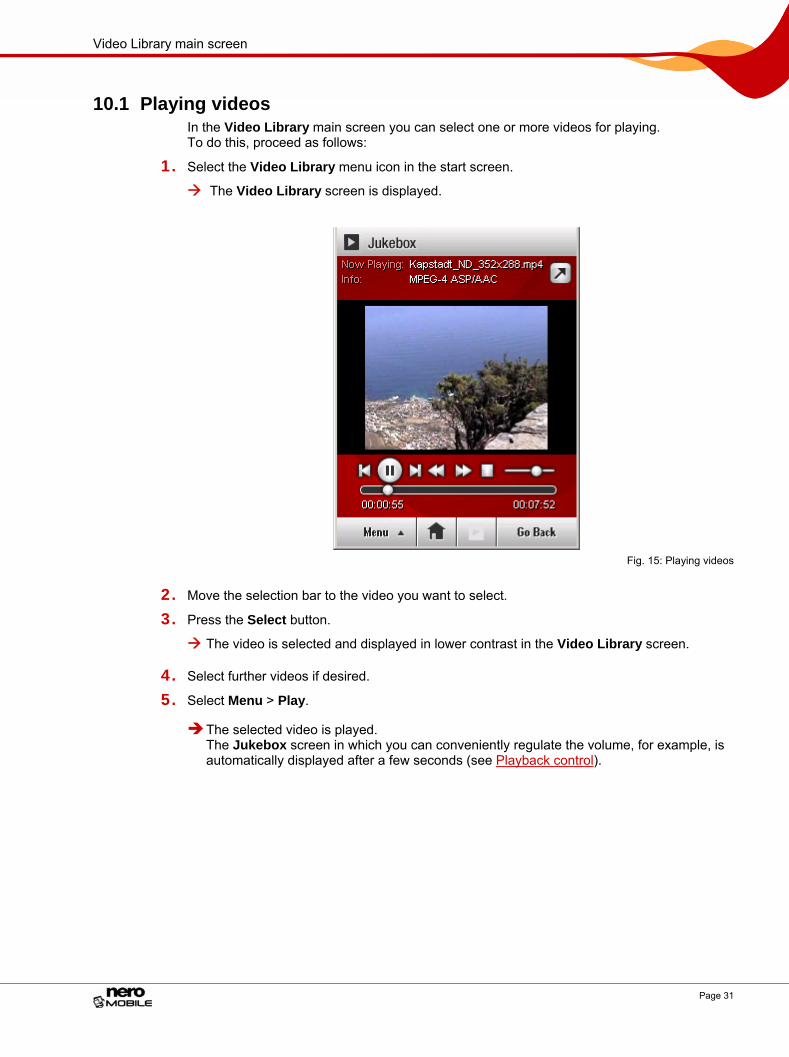
10.1 Playing videos In the Video Library main screen you can select one or more videos for playing. To do this, proceed as follows:
1. Select the Video Library menu icon in the start screen.
The Video Library screen is displayed.
Fig. 15: Playing videos
2. Move the selection bar to the video you want to select.
3. Press the Select button.
The video is selected and displayed in lower contrast in the Video Library screen.
4. Select further videos if desired.
5. Select Menu > Play.
The selected video is played. The Jukebox screen in which you can conveniently regulate the volume, for example, is automatically displayed after a few seconds (see Playback control).
Collections main screen
Page 32
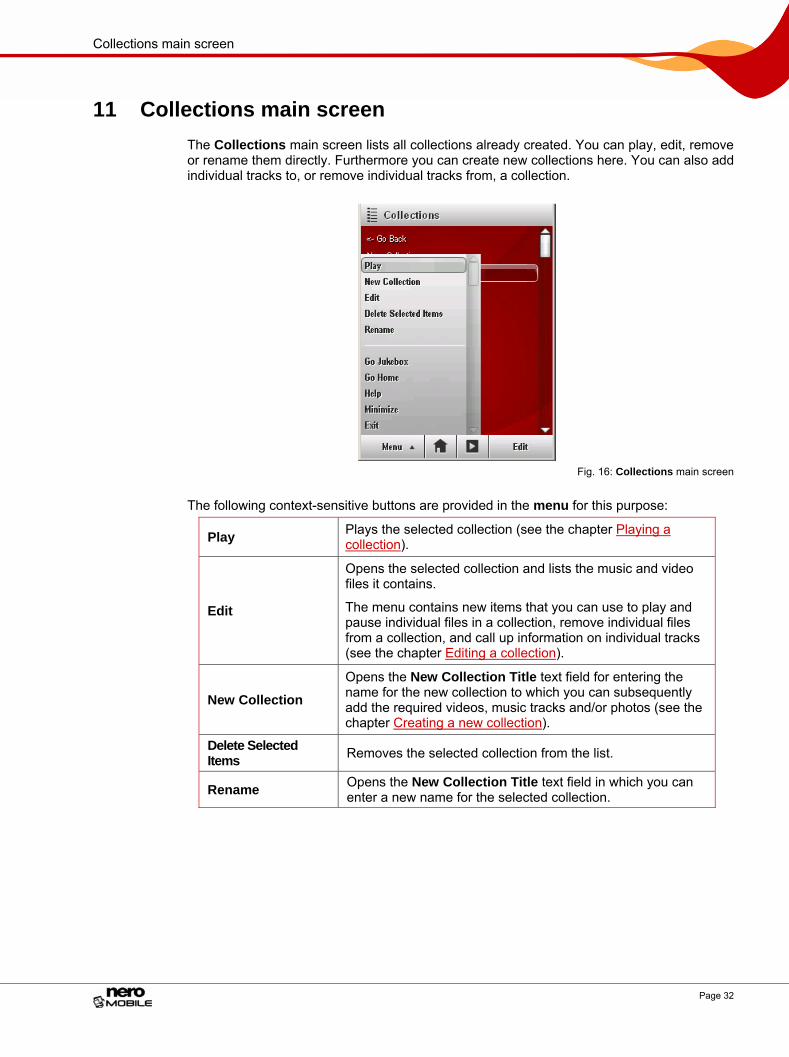
11 Collections main screen The Collections main screen lists all collections already created. You can play, edit, remove or rename them directly. Furthermore you can create new collections here. You can also add individual tracks to, or remove individual tracks from, a collection.
Fig. 16: Collections main screen
The following context-sensitive buttons are provided in the menu for this purpose:
Play Plays the selected collection (see the chapter Playing a collection).
Edit
Opens the selected collection and lists the music and video files it contains.
The menu contains new items that you can use to play and pause individual files in a collection, remove individual files from a collection, and call up information on individual tracks (see the chapter Editing a collection).
New Collection Opens the New Collection Title text field for entering the name for the new collection to which you can subsequently add the required videos, music tracks and/or photos (see the chapter Creating a new collection).
Delete Selected Items Removes the selected collection from the list.
Rename Opens the New Collection Title text field in which you can enter a new name for the selected collection.
Collections main screen
Page 33
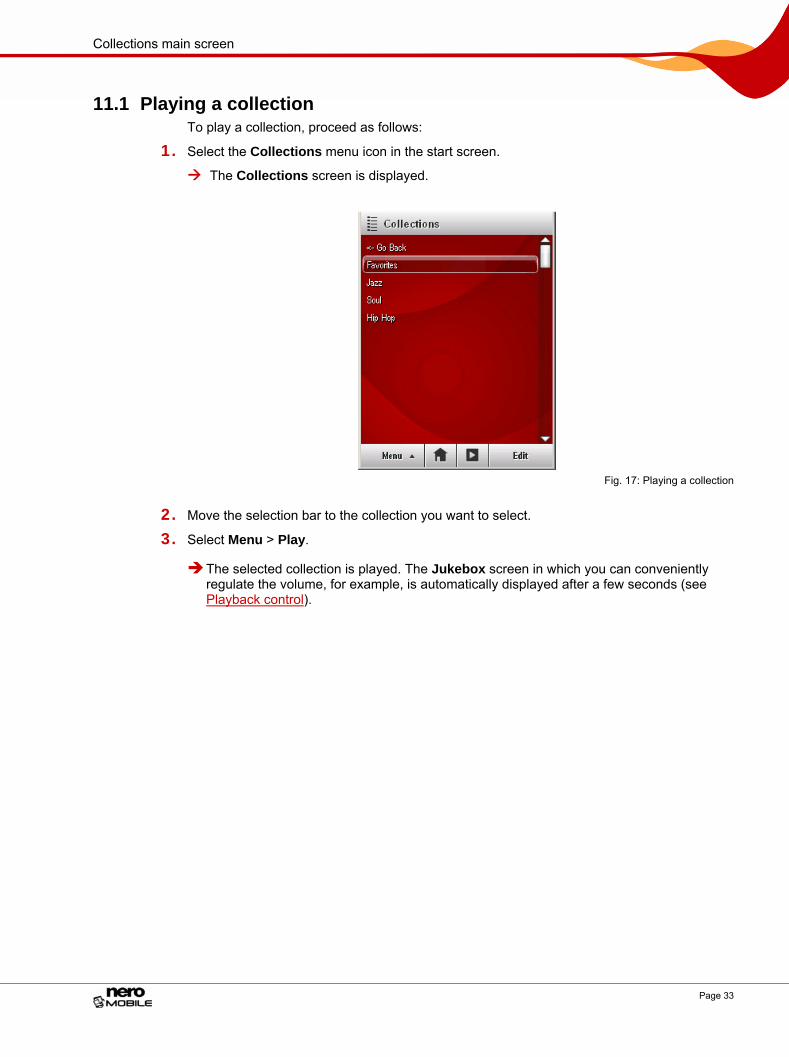
11.1 Playing a collection To play a collection, proceed as follows:
1. Select the Collections menu icon in the start screen.
The Collections screen is displayed.
Fig. 17: Playing a collection
2. Move the selection bar to the collection you want to select.
3. Select Menu > Play.
The selected collection is played. The Jukebox screen in which you can conveniently regulate the volume, for example, is automatically displayed after a few seconds (see Playback control).
Collections main screen
Page 34
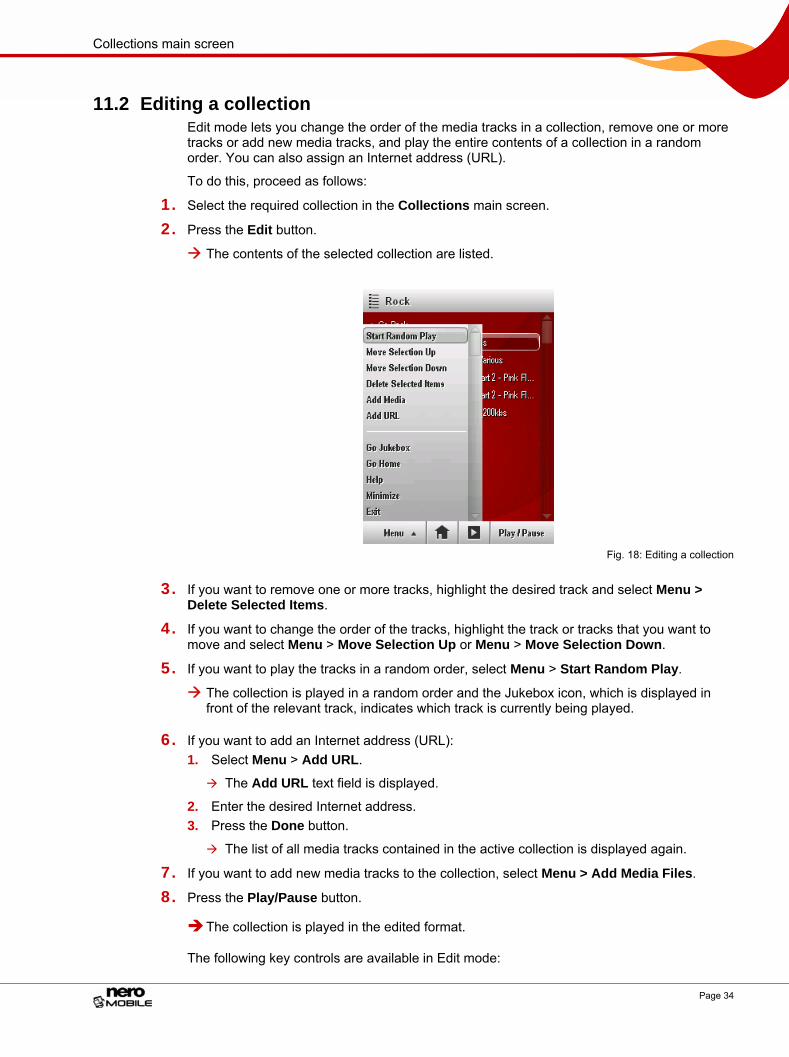
11.2 Editing a collection Edit mode lets you change the order of the media tracks in a collection, remove one or more tracks or add new media tracks, and play the entire contents of a collection in a random order. You can also assign an Internet address (URL).
To do this, proceed as follows:
1. Select the required collection in the Collections main screen.
2. Press the Edit button.
The contents of the selected collection are listed.
Fig. 18: Editing a collection
3. If you want to remove one or more tracks, highlight the desired track and select Menu > Delete Selected Items.
4. If you want to change the order of the tracks, highlight the track or tracks that you want to move and select Menu > Move Selection Up or Menu > Move Selection Down.
5. If you want to play the tracks in a random order, select Menu > Start Random Play.
The collection is played in a random order and the Jukebox icon, which is displayed in front of the relevant track, indicates which track is currently being played.
6. If you want to add an Internet address (URL): 1. Select Menu > Add URL.
The Add URL text field is displayed.
2. Enter the desired Internet address. 3. Press the Done button.
The list of all media tracks contained in the active collection is displayed again.
7. If you want to add new media tracks to the collection, select Menu > Add Media Files.
8. Press the Play/Pause button.
The collection is played in the edited format.
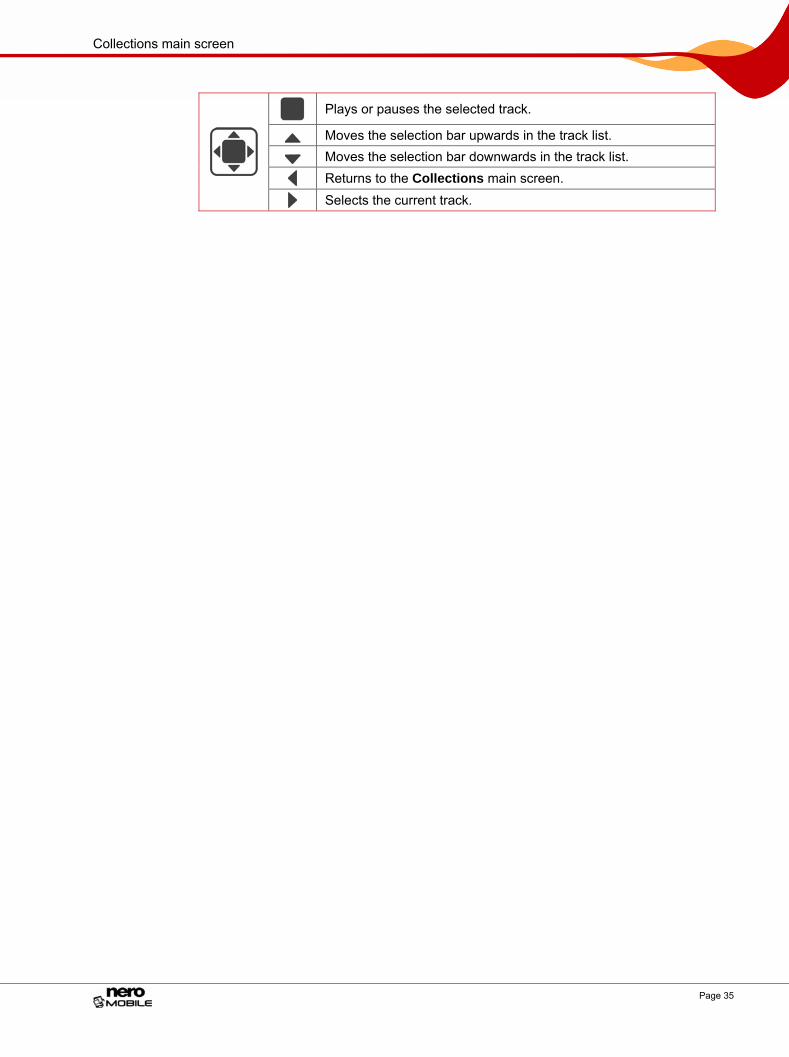
The following key controls are available in Edit mode:
Collections main screen
Page 35
Plays or pauses the selected track.
Moves the selection bar upwards in the track list.
Moves the selection bar downwards in the track list.
Returns to the Collections main screen.
Selects the current track.
Collections main screen
Page 36
11.3 Allocating new content to a collection You can allocate new content - music tracks and/or videos from the Music Library, Video Library or Content Browsers - to an existing collection at any time.
To do this, proceed as follows:
1. In the Collections main screen, select the collection to which you want to allocate the new content.
2. Select Menu > Go Home or, if you are using a PDA, the button.
The Nero Mobile main screen is displayed.
3. If you want to add a new music track to the collection, select the Music Library menu icon.
The Music Library screen is displayed.
4. Highlight the required music tracks in succession using the Select button.
The highlighted tracks are displayed in lower contrast.
5. Select Menu > Add To Active Collection.
The tracks are added to the new collection.
6. Repeat steps 3 to 5 in all areas – the Video Library and/or the Content Browsers – from which you want to add content to the new collection.
You have added the new content to the selected collection.
Collections main screen
Page 37
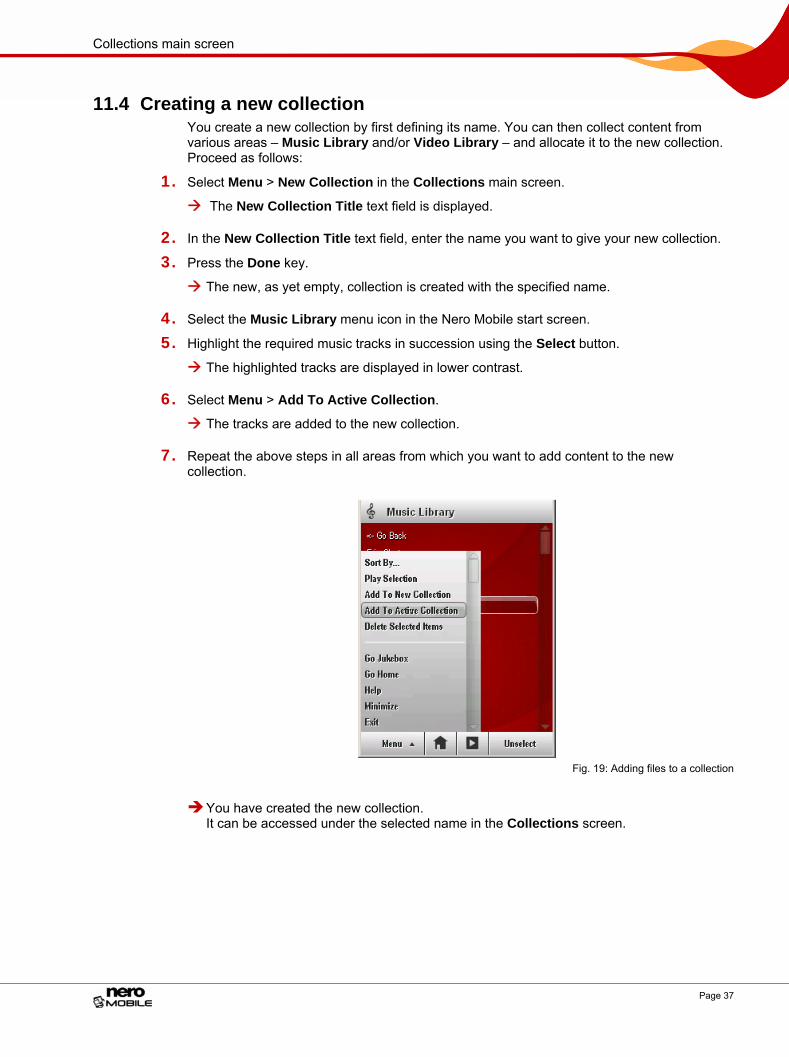
11.4 Creating a new collection You create a new collection by first defining its name. You can then collect content from various areas – Music Library and/or Video Library – and allocate it to the new collection. Proceed as follows:
1. Select Menu > New Collection in the Collections main screen.
The New Collection Title text field is displayed.
2. In the New Collection Title text field, enter the name you want to give your new collection.
3. Press the Done key.
The new, as yet empty, collection is created with the specified name.
4. Select the Music Library menu icon in the Nero Mobile start screen.
5. Highlight the required music tracks in succession using the Select button.
The highlighted tracks are displayed in lower contrast.
6. Select Menu > Add To Active Collection.
The tracks are added to the new collection.
7. Repeat the above steps in all areas from which you want to add content to the new collection.
Fig. 19: Adding files to a collection
You have created the new collection. It can be accessed under the selected name in the Collections screen.
Index
Page 38
12 Index
A
About Nero Mobile........................................................6
Audio Settings ...................................................... 16, 18
Equalizer .............................................................................18
Music Title ...........................................................................18
C
Collection.................................................. 33, 34, 36, 37
Adding Content....................................................................20
Allocating New Contents .....................................................36
Creating...............................................................................37
Editing .................................................................................34
Playing.................................................................................33
Collections.................................................................. 32
Overview .........................................................................6, 19
Contact ....................................................................... 40
Content Browsers ....................................................... 20
Overview .........................................................................6, 19
Control
PDA.....................................................................................13
Controls
Smartphones .......................................................................14
Conventions..................................................................5
E
Enable, Button .......................................... 12, 13, 14, 15
Equalizer ....................................................................18
F
Formats ........................................................................9
Audio Codecs ........................................................................9
File Formats ..........................................................................9
Formats Supported................................................................9
Nero Digital Audio Profiles ....................................................9
Nero Digital Profiles...............................................................9
Network Support....................................................................9
Picture Formats .....................................................................9
Video Codecs ........................................................................9
Full-Screen Mode ....................................................... 22
G
General Settings .........................................................16
I
Installation...................................................................10
On PDA And Smartphone................................................... 10
J
Joypad
Control Video Library.......................................................... 30
Controls .............................................................................. 18
Controls for Collection ........................................................ 34
Controls for Content Browsers ........................................... 20
Controls for Music Library................................................... 22
Controls for Slide Show ...................................................... 24
Controls for Video Library................................................... 26
Jukebox ......................................................................22
Overview......................................................................... 6, 19
L
Language
Selection............................................................................ 17
M
Main Menu ..................................................................19
Collections .......................................................................... 32
Content Browsers ............................................................... 20
Jukebox .............................................................................. 22
Music Library ...................................................................... 24
Slide Show.......................................................................... 26
Video Library....................................................................... 30
Main Menus
Start Screen........................................................................ 19
Media Library ........................................................20, 21
Add Content........................................................................ 20
Creating .............................................................................. 21
Memory.........................................................................8
Menu....................................... 20, 22, 24, 26, 28, 30, 32
Collections .......................................................................... 32
Index
Page 39
Content Browsers................................................................20
Editing Slide Shows.............................................................28
Jukebox ...............................................................................22
Music Library .......................................................................24
Slide Show ..........................................................................26
Video Library .......................................................................30
Menu, Button ............................................ 12, 13, 14, 15
Music .......................................................................... 25
Playing.................................................................................25
Music Library ........................................................ 20, 24
Overview .........................................................................6, 19
Music Title .................................................................. 18
N
Nero Digital...................................................................6
O
Operating System.........................................................8
P
Playback Control ........................................................ 23
Processor .....................................................................8
R
Radio ............................................................................6
S
Settings ...................................................................... 16
Audio Settings ...............................................................16, 18
Equalizer .............................................................................18
General Settings..................................................................16
Music Styles........................................................................ 18
Slide Show......................................................26, 27, 28
Adding Content ................................................................... 20
Creating .............................................................................. 27
Editing................................................................................. 28
Overview......................................................................... 6, 19
Viewing ............................................................................... 28
Start Screen................................................................19
System Requirements ..................................................8
Memory................................................................................. 8
Operating System................................................................. 8
Processor.............................................................................. 8
T
Television......................................................................6
U
UPnP™ Networks.........................................................6
User Interface .............................................................12
V
Versions
Nero Mobile Pro.................................................................... 7
Nero Mobile Trial .................................................................. 7
Video ..........................................................................31
Playing ................................................................................ 31
Scale................................................................................... 17
Video Library.........................................................20, 30
Overview......................................................................... 6, 19
Contact
Page 40
13 Contact
13.1 Contact details Nero Mobile is a Nero AG product.
Nero AG Im Stoeckmaedle 18 76307 Karlsbad Germany
Web: www.nero.com Help: http://support.nero.com Fax: +49 7248 928 499
Copyright © 2007 Nero AG and its licensors. All rights reserved.