national Account Doc Type A - Tire-hq Account - Doc... · National Account – Doc Type A 2 The...
14
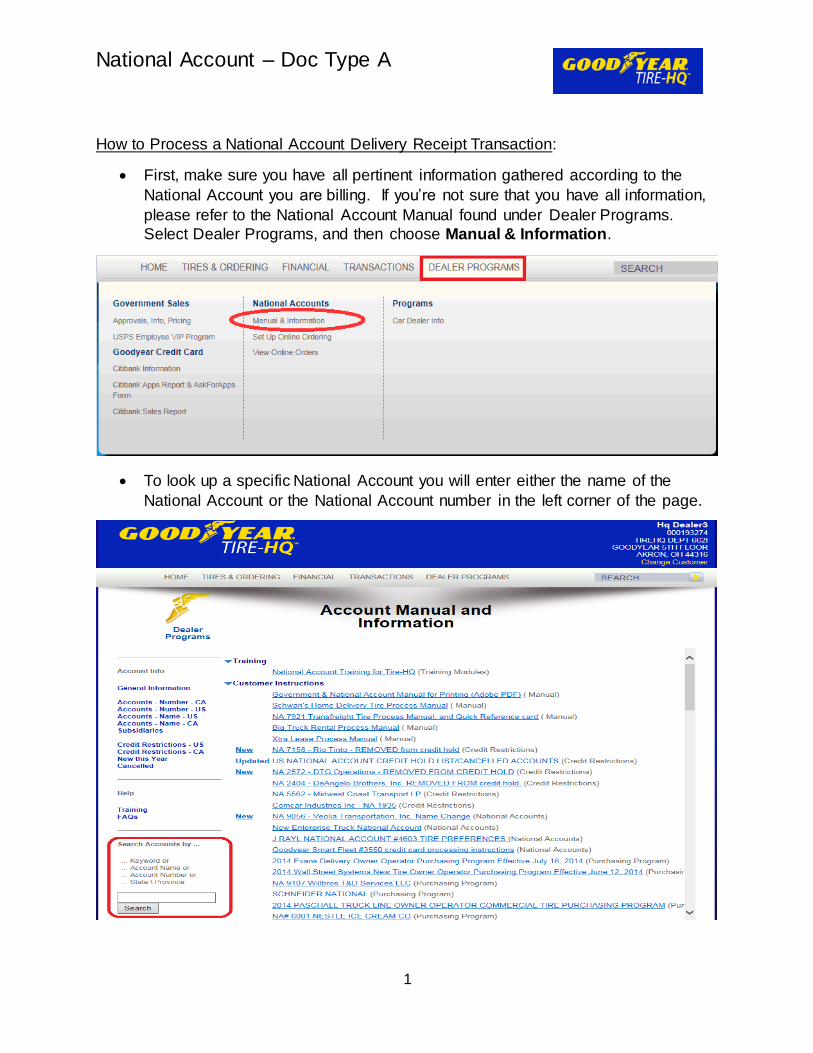
National Account – Doc Type A 1 How to Process a National Account Delivery Receipt Transaction: First, make sure you have all pertinent information gathered according to the National Account you are billing. If you’re not sure that you have all information, please refer to the National Account Manual found under Dealer Programs. Select Dealer Programs, and then choose Manual & Information. To look up a specific National Account you will enter either the name of the National Account or the National Account number in the left corner of the page.
Transcript of national Account Doc Type A - Tire-hq Account - Doc... · National Account – Doc Type A 2 The...
National Account – Doc Type A
1
How to Process a National Account Delivery Receipt Transaction:
First, make sure you have all pertinent information gathered according to the
National Account you are billing. If you’re not sure that you have all information,
please refer to the National Account Manual found under Dealer Programs.
Select Dealer Programs, and then choose Manual & Information.
To look up a specific National Account you will enter either the name of the
National Account or the National Account number in the left corner of the page.

National Account – Doc Type A
2
The National Account or a list of accounts matching your search criteria will
appear. You will be able to select the account link related to the National
Account you are looking for to see the Account Manual page.
Use the scroll bar at the bottom of the manual page to find the printer icon in the
right corner of the page. Select this printer icon to print the manual page for your
reference.

National Account – Doc Type A
3
Now that you have all information needed according to the National Account’s
Manual page – it’s time to start the Delivery Receipt. From the Transactions
screen you will select ‘A’ for National Account.
On the 1st page of the National Account Delivery Receipt you will enter:
1. The National Account Doc # which is your invoice document number.
2. The Date in (month, day, year) format.
3. Select your store’s Nonsig account number.
4. Input the 4 digit National Account Number. (Found on the NA Manual
page)
5. The Bill To/Name Search can be left blank.
6. Input the Ship To Name Search if you have saved the Ship To
name/address in your address book previously. (Otherwise leave
blank)
7. Select the Vehicle type. (Auto, Stock, Truck or Trailer)
8. Standard DR is the default selection. If this is a Correction, Return,
or an Adjustment you will need to mark it as such.
National Account – Doc Type A
4
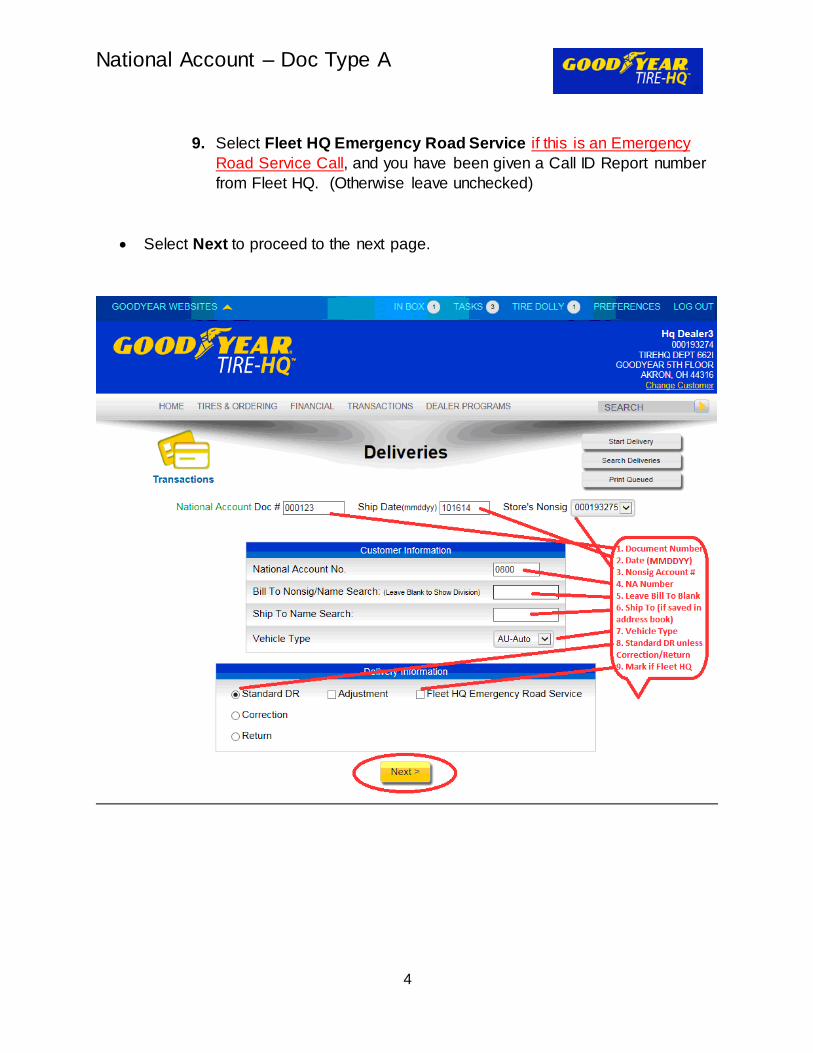
9. Select Fleet HQ Emergency Road Service if this is an Emergency
Road Service Call, and you have been given a Call ID Report number
from Fleet HQ. (Otherwise leave unchecked)
Select Next to proceed to the next page.

National Account – Doc Type A
5
The 2nd screen of the National Account Delivery Receipt is the Bill To/Ship To
screen.
On this screen you will enter:
1. The Ship To name and address of the location that the vehicle physically
came from. The Bill To information for the National Account should automatically populate. Select the drop down arrow on the Ship To side to
select New Entry. Input the Name and the Address of the Ship To.
National Account – Doc Type A
6
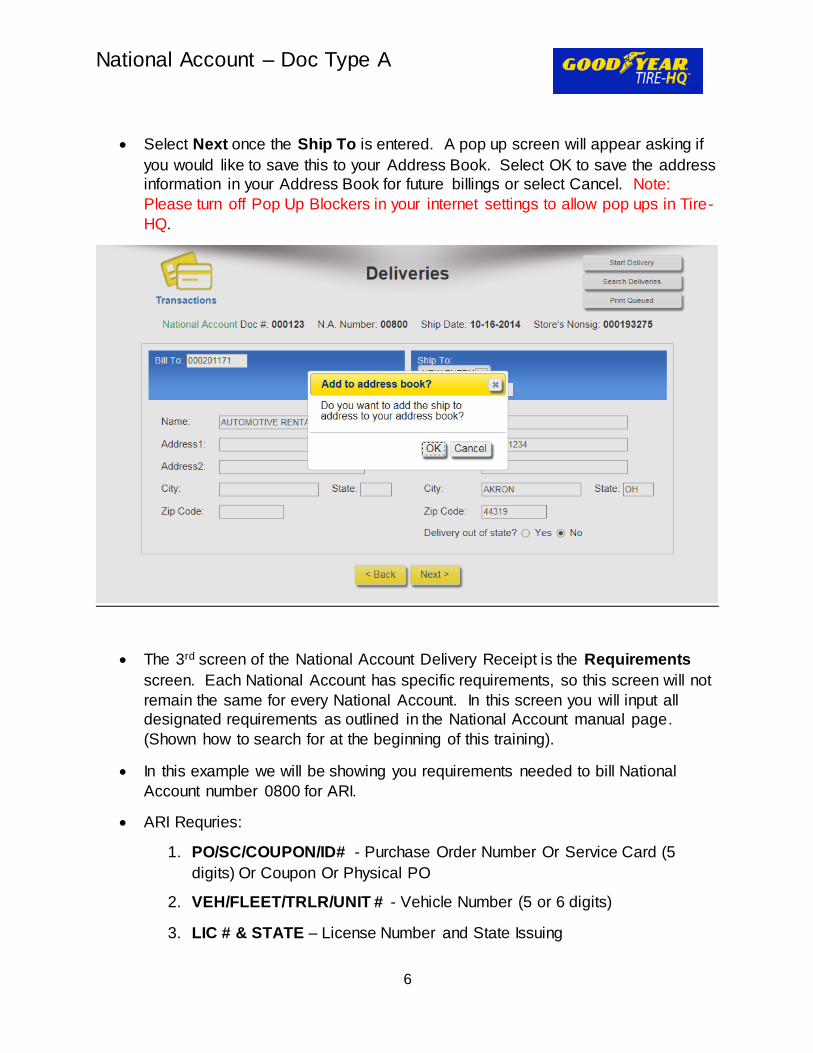
Select Next once the Ship To is entered. A pop up screen will appear asking if
you would like to save this to your Address Book. Select OK to save the address
information in your Address Book for future billings or select Cancel. Note:
Please turn off Pop Up Blockers in your internet settings to allow pop ups in Tire-
HQ.
The 3rd screen of the National Account Delivery Receipt is the Requirements
screen. Each National Account has specific requirements, so this screen will not
remain the same for every National Account. In this screen you will input all
designated requirements as outlined in the National Account manual page.
(Shown how to search for at the beginning of this training).
In this example we will be showing you requirements needed to bill National
Account number 0800 for ARI.
ARI Requries:
1. PO/SC/COUPON/ID# - Purchase Order Number Or Service Card (5
digits) Or Coupon Or Physical PO
2. VEH/FLEET/TRLR/UNIT # - Vehicle Number (5 or 6 digits)
3. LIC # & STATE – License Number and State Issuing

National Account – Doc Type A
7
4. ODOMETER/HUBDOMETER REA – Odometer Reading
5. VEHICLE TYPE – Year Make and Model
6. LESSEE/CLIENT # - (Up to 6 digits) Obtain from driver’s Coupon Book,
Service Card or Purchase order
7. AUTHOR PHONE # - Phone Number of Fleet Manager Authorizing the
Purchase
8. AUTHORIIZED BY – Name of Fleet Manager Authorizing the Purchase
9. VIN # - Vin number of the Vehicle
10. DRIVER/BUYER NAME
11. COUPON MILEAGE – Required only when a Coupon is Used
12. CREDIT CARD LIMIT – Indicate NA when no Service Card is used or
when they state “unlimited”.
National Account – Doc Type A
8
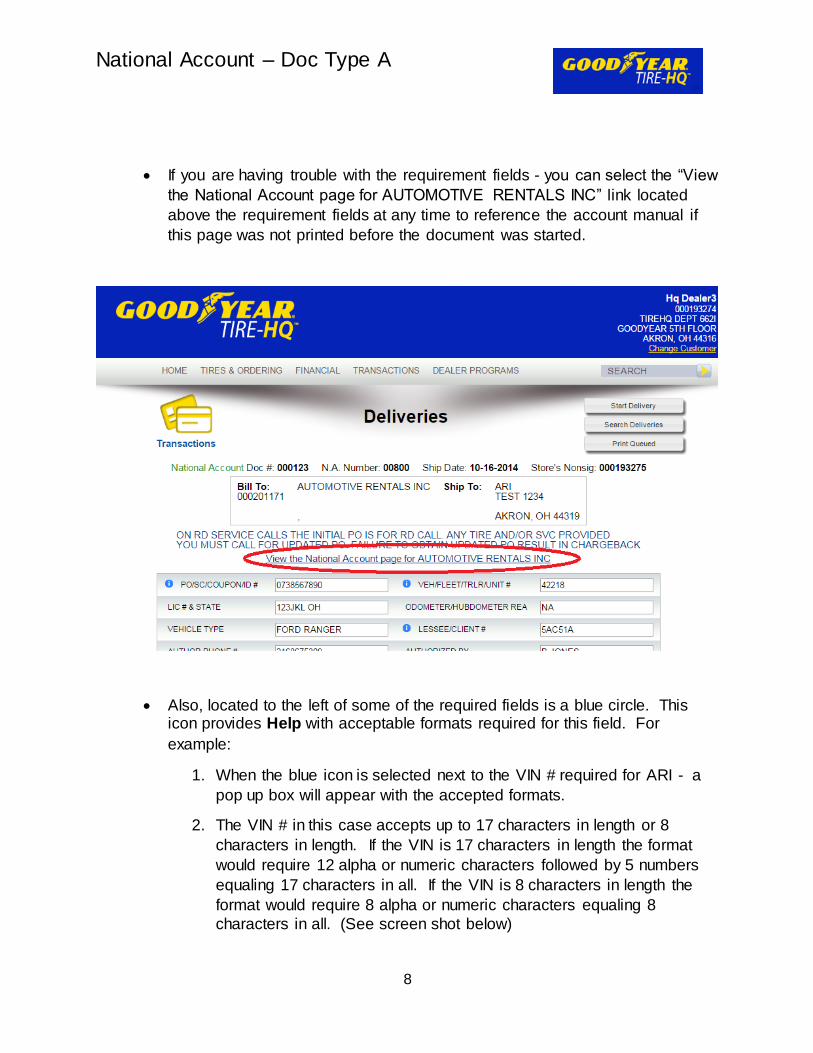
If you are having trouble with the requirement fields - you can select the “View
the National Account page for AUTOMOTIVE RENTALS INC” link located
above the requirement fields at any time to reference the account manual if
this page was not printed before the document was started.
Also, located to the left of some of the required fields is a blue circle. This icon provides Help with acceptable formats required for this field. For
example:
1. When the blue icon is selected next to the VIN # required for ARI - a
pop up box will appear with the accepted formats.
2. The VIN # in this case accepts up to 17 characters in length or 8
characters in length. If the VIN is 17 characters in length the format
would require 12 alpha or numeric characters followed by 5 numbers
equaling 17 characters in all. If the VIN is 8 characters in length the
format would require 8 alpha or numeric characters equaling 8
characters in all. (See screen shot below)
National Account – Doc Type A
9
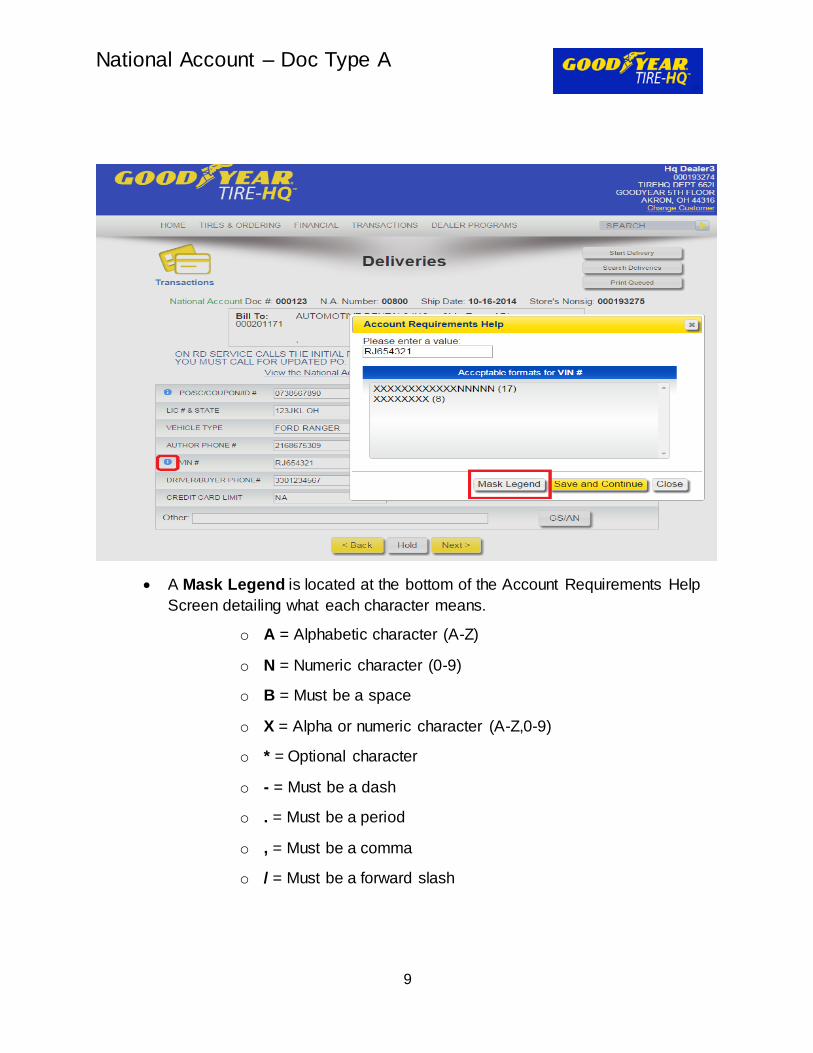
A Mask Legend is located at the bottom of the Account Requirements Help
Screen detailing what each character means.
o A = Alphabetic character (A-Z)
o N = Numeric character (0-9)
o B = Must be a space
o X = Alpha or numeric character (A-Z,0-9)
o * = Optional character
o - = Must be a dash
o . = Must be a period
o , = Must be a comma
o / = Must be a forward slash
National Account – Doc Type A
10
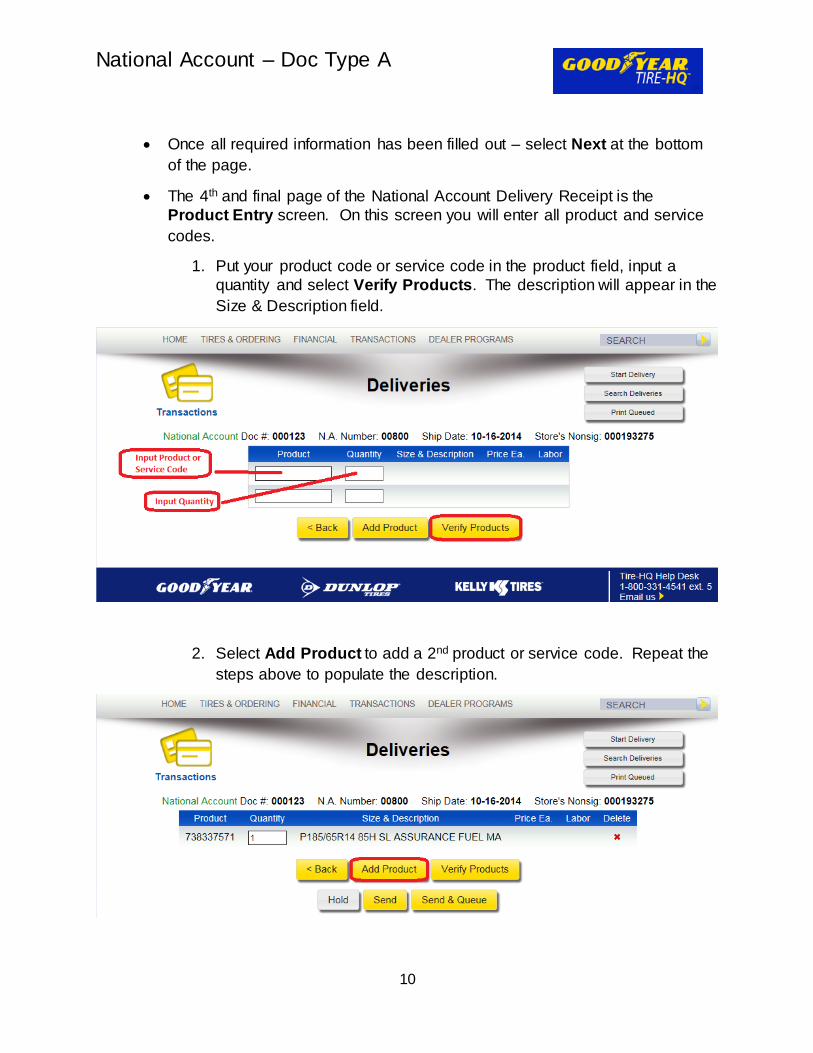
Once all required information has been filled out – select Next at the bottom
of the page.
The 4th and final page of the National Account Delivery Receipt is the
Product Entry screen. On this screen you will enter all product and service
codes.
1. Put your product code or service code in the product field, input a
quantity and select Verify Products. The description will appear in the
Size & Description field.
2. Select Add Product to add a 2nd product or service code. Repeat the
steps above to populate the description.
National Account – Doc Type A
11
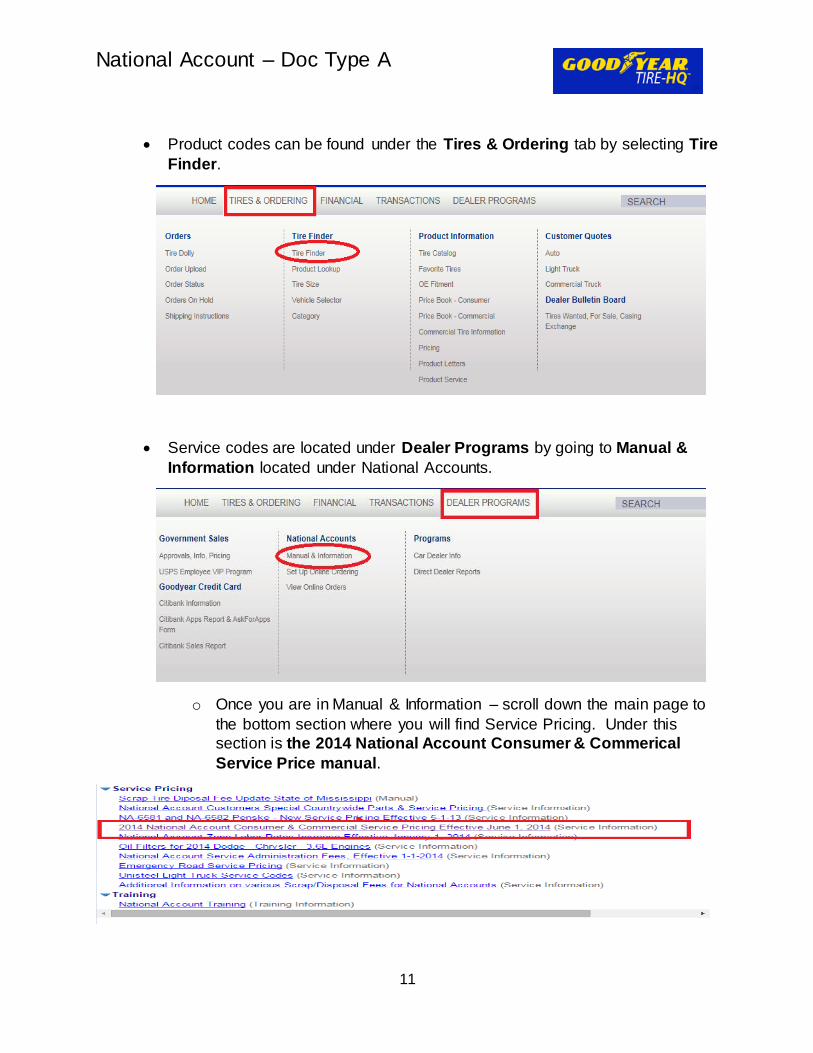
Product codes can be found under the Tires & Ordering tab by selecting Tire
Finder.
Service codes are located under Dealer Programs by going to Manual &
Information located under National Accounts.
o Once you are in Manual & Information – scroll down the main page to
the bottom section where you will find Service Pricing. Under this
section is the 2014 National Account Consumer & Commerical
Service Price manual.
National Account – Doc Type A
12
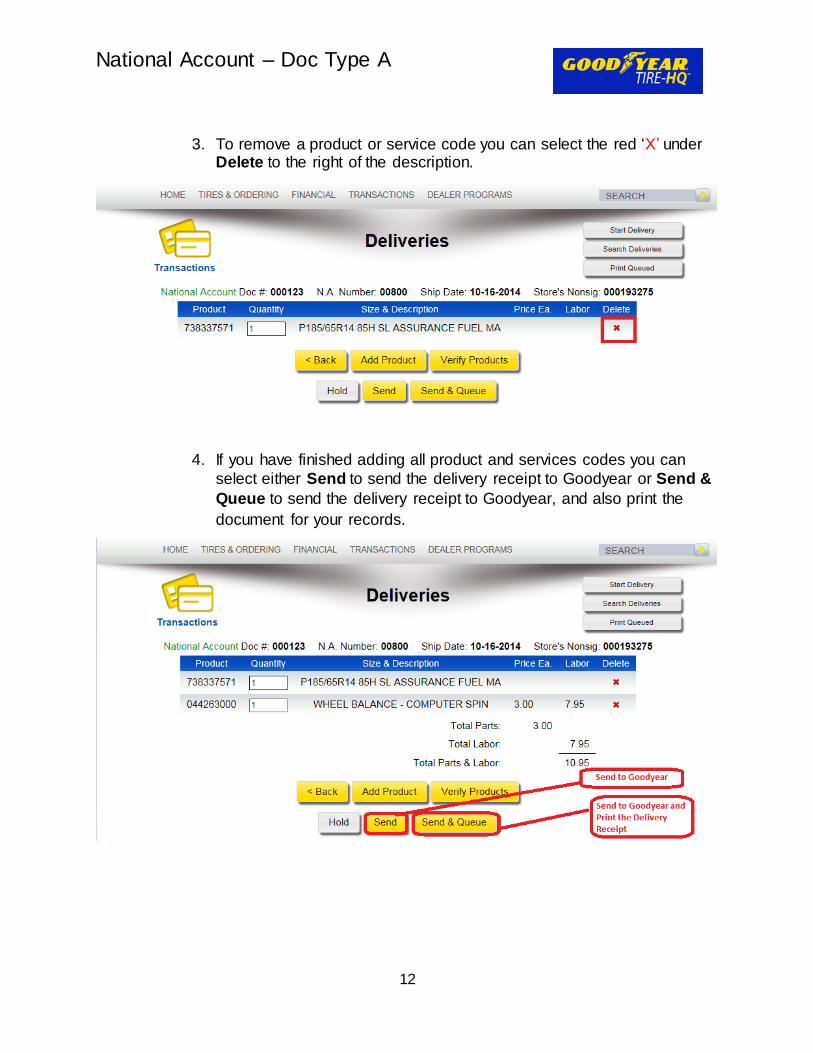
3. To remove a product or service code you can select the red ‘X’ under Delete to the right of the description.
4. If you have finished adding all product and services codes you can
select either Send to send the delivery receipt to Goodyear or Send &
Queue to send the delivery receipt to Goodyear, and also print the
document for your records.
National Account – Doc Type A
13
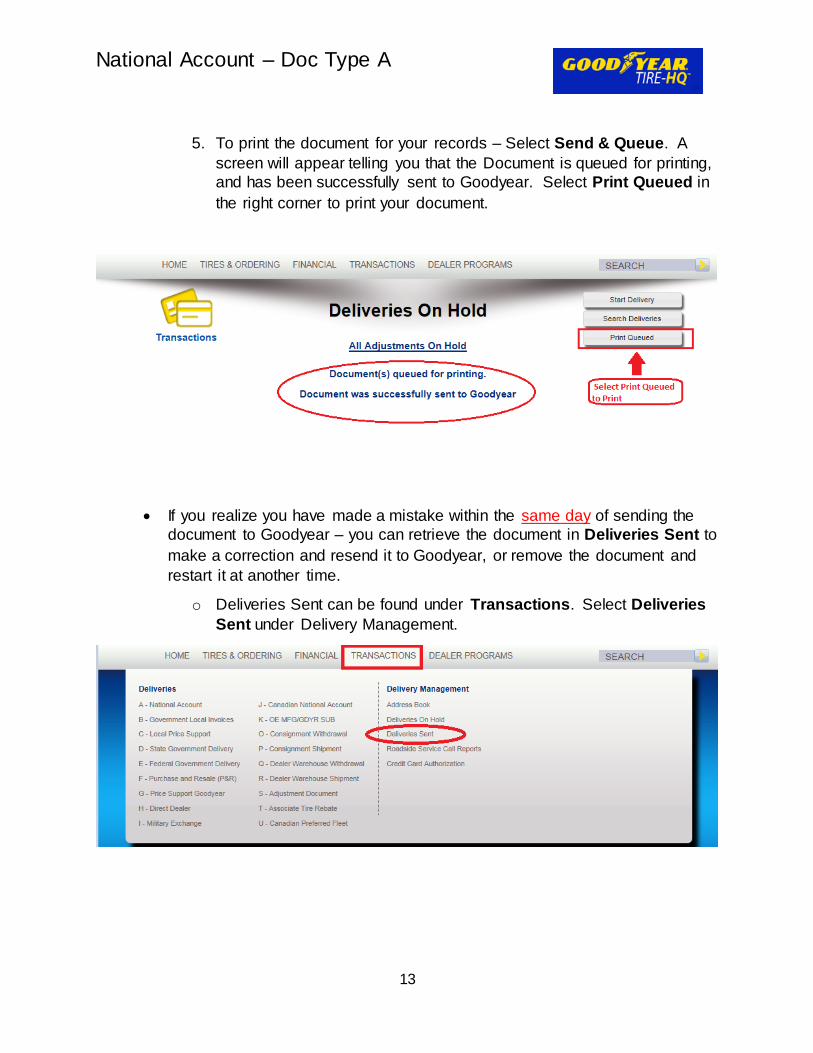
5. To print the document for your records – Select Send & Queue. A
screen will appear telling you that the Document is queued for printing,
and has been successfully sent to Goodyear. Select Print Queued in
the right corner to print your document.
If you realize you have made a mistake within the same day of sending the
document to Goodyear – you can retrieve the document in Deliveries Sent to
make a correction and resend it to Goodyear, or remove the document and
restart it at another time.
o Deliveries Sent can be found under Transactions. Select Deliveries
Sent under Delivery Management.
National Account – Doc Type A
14
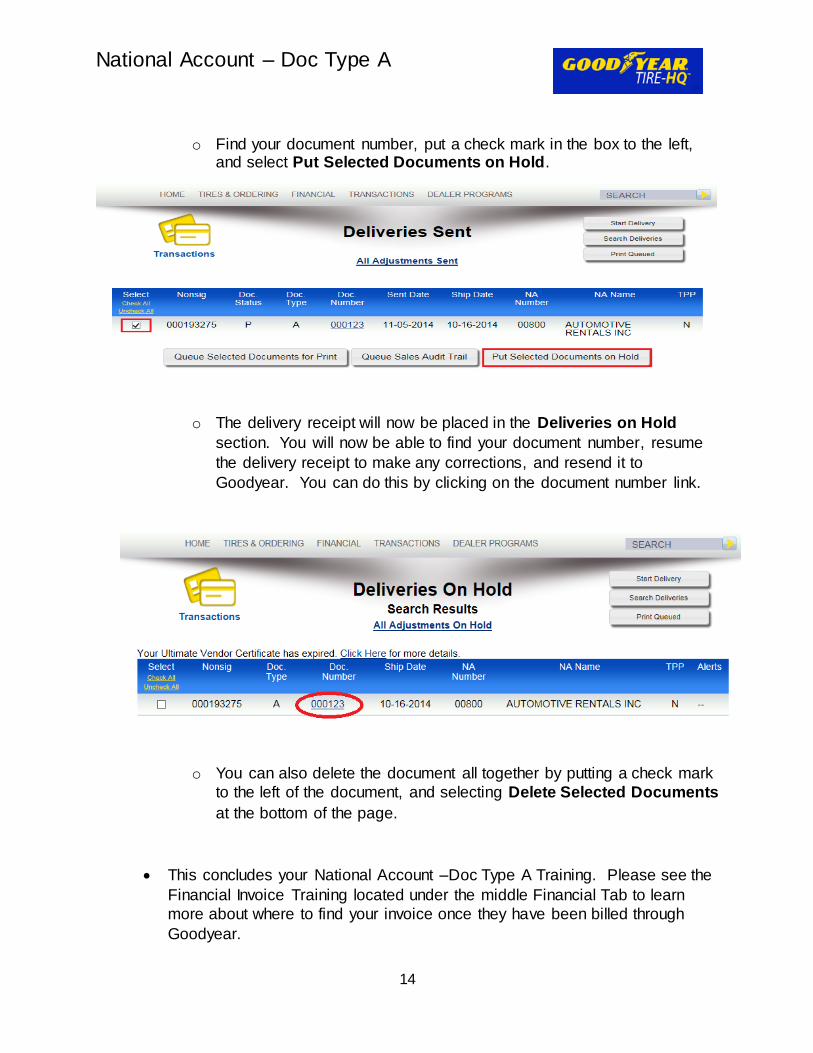
o Find your document number, put a check mark in the box to the left, and select Put Selected Documents on Hold.
o The delivery receipt will now be placed in the Deliveries on Hold
section. You will now be able to find your document number, resume
the delivery receipt to make any corrections, and resend it to
Goodyear. You can do this by clicking on the document number link.
o You can also delete the document all together by putting a check mark
to the left of the document, and selecting Delete Selected Documents
at the bottom of the page.
This concludes your National Account –Doc Type A Training. Please see the
Financial Invoice Training located under the middle Financial Tab to learn
more about where to find your invoice once they have been billed through
Goodyear.