MZ1000 MZ1100 - Support location selector Press STOP•EJECT Ç to eject the disc. õ Setting the...
25
3139 115 21641 MZ1000 MZ1100 MZ1200 owner’s guide
Transcript of MZ1000 MZ1100 - Support location selector Press STOP•EJECT Ç to eject the disc. õ Setting the...

1
3139 115 21641
MZ1000
MZ1100
MZ1200
owner’s guide

PHONES
AUX IN
LINE OUT
TO POWERUNIT
AMFM
ANTENNA
R
R
L
L
1
2
3
Hook UpGuide
Hook UpGuide
MZ-1000MZ-1000MZ-1100MZ-1100MZ-1200MZ-1200
12nc : 3139 115 21851

õ Listening to radio stationFirst time power up...1 “AUTO INSTALL PRESS PLAY” appears on the display.
2 Press PLAY•PAUSE ÉÅ on the system.
3 Once completed, you can listen to the last tuned radio station.
If “P” appears on the display, you can press S T to select the previous/next presetting radiostations.
When tuning to a weak reception or non-preset radio station, press ÉÅ to deactivate the preset
mode (“P” will disappear from the display), then press S T.
õ Listening to a CD/MP3-CD
1 Load in a CD/MP3 CD with the label facing right.
2 For MP3-CD, press S T to select the album, followed by ÉÅ to confirm, then press
S T again to select the track.
For CD, press S T to select the track.
3 Press ÉÅ to start playback.
During playback, hold down S T to search backward/forward.During playback, press S T briefly and repeatedly to skip backward/forward.
4 Press Ç to stop playback.
5 Press STOP•EJECT Ç to eject the disc.
õ Setting the Clock
1 In standby mode, press CLK/TIMER.
2 Press or hold down S T to set minutes and hours.
3 Press PROGRAM to select 12- or 24-hour clock mode.
4 Press CLK/TIMER to confirm the clock setting.
õ Switching to or waking up from Eco Power standby mode
1 Hold down ECO POWER or B to switch on Eco Power standby mode.
2 Press ECO POWER on the system or MP3-CD, TUNER or AUX on the remote control to
wake up from Eco Power standby mode.
Quick UseGuide
Quick UseGuide
Detailed playbackfeatures and additional
functions are described inthe accompanyingowner’s manual.

2
3139 115 21641
Important notes for users in theU.K.
Mains plugThis apparatus is fitted with an approved 13Amp plug. To change a fuse in this type of plugproceed as follows:
1 Remove fuse cover and fuse.
2 Fix new fuse which should be a BS1362 5 Amp,A.S.T.A. or BSI approved type.
3 Refit the fuse cover.
If the fitted plug is not suitable for your socketoutlets, it should be cut off and an appropriateplug fitted in its place.If the mains plug contains a fuse, this shouldhave a value of 5 Amp. If a plug without a fuseis used, the fuse at the distribution boardshould not be greater than 5 Amp.
Note: The severed plug must be disposed of toavoid a possible shock hazard should it beinserted into a 13 Amp socket elsewhere.
How to connect a plugThe wires in the mains lead are coloured withthe following code: blue = neutral (N),brown = live (L).
¶ As these colours may not correspond with thecolour markings identifying the terminals inyour plug, proceed as follows:– Connect the blue wire to the terminalmarked N or coloured black.– Connect the brown wire to the terminalmarked L or coloured red.– Do not connect either wire to the earthterminal in the plug, marked E (or e) orcoloured green (or green and yellow).
Before replacing the plug cover, make certainthat the cord grip is clamped over the sheathof the lead - not simply over the two wires.
Copyright in the U.K.Recording and playback of material mayrequire consent. See Copyright Act 1956 andThe Performer’s Protection Acts 1958 to 1972.
NorgeTypeskilt finnes på apparatens underside.
Observer: Nettbryteren er sekundertinnkoplet. Den innebygde netdelen erderfor ikke frakoplet nettet så lengeapparatet er tilsluttet nettkontakten.
For å redusere faren for brann eller elektriskstøt, skal apparatet ikke utsettes for regn ellerfuktighet.
ItaliaDICHIARAZIONE DI CONFORMITA’
Si dichiara che l’apparecchio MZ1000, MZ1100,MZ1200, Philips risponde alle prescrizioni dell’art.2 comma 1 del D.M. 28 Agosto 1995 n. 548.
Fatto a Eindhoven
Philips Consumer ElectronicsPhilips, Glaslaan 2
5616 JB Eindhoven, The Netherlands
CAUTIONUse of controls or adjustments orperformance of procedures other thanherein may result in hazardousradiation exposure or other unsafeoperation.

3
3139 115 21641
DKAdvarsel: Usynlig laserstråling ved åbningnår sikkerhedsafbrydere er ude af funktion.Undgå utsættelse for stråling.
Bemærk: Netafbryderen er sekundærtindkoblet og ofbryder ikke strømmen franettet. Den indbyggede netdel er derfortilsluttet til lysnettet så længe netstikketsidder i stikkontakten.
SKlass 1 laseraparatVarning! Om apparaten används på annatsätt än i denna bruksanvisning specificerats,kan användaren utsättas för osynliglaserstrålning, som överskrider gränsen förlaserklass 1.
Observera! Stömbrytaren är sekundärtkopplad och bryter inte strömmen frånnätet. Den inbyggda nätdelen är därföransluten till elnätet så länge stickproppensitter i vägguttaget.
SFLuokan 1 laserlaite
Varoitus! Laitteen käyttäminen muullakuin tässä käyttöohjeessa mainitulla tavallasaattaa altistaa käyttäjänturvallisuusluokan 1 ylittävällenäkymättömälle lasersäteilylle.
Oikeus muutoksiin varataan. Laite eisaa olla alttiina tippu-ja roiskevedelle.
Huom. Toiminnanvalitsin on kytkettytoisiopuolelle, eikä se kytke laitetta irtisähköverkosta. Sisäänrakennettu verkko-osa on kytkettynä sähköverkkoon ainasilloin, kun pistoke on pistorasiassa.

4
3139 115 21641

5
En
glis
hFr
ança
isP
ort
ugu
êsE
spañ
ol
Deu
tsch
Ned
erla
nds
Ital
ian
oS
ven
ska
Dan
skS
uo
mi
∂ÏÏ
ËÓÈ
ο
3139 115 21641
Po
lski
Index
English ------------------------------------------------ 6
Français -------------------------------------------- 24
Español --------------------------------------------- 42
Deutsch --------------------------------------------- 60
Nederlands ---------------------------------------- 78
Italiano ---------------------------------------------- 96
Svenska ------------------------------------------- 114
Dansk --------------------------------------------- 132
Suomi --------------------------------------------- 150
Português ---------------------------------------- 168
∂ÏÏËÓÈο ----------------------------------------- 186
Polski ---------------------------------------------- 204

6
En
glish
3139 115 21642
Contents
General InformationEnvironmental information ................................ 7Maintenance .......................................................... 7Safety information ................................................ 7
ConnectionsSupplied accessories ............................................ 8Rear connections ............................................. 8–9
PreparationsBefore using the remote control .................... 10Replacing battery (lithium CR2025) intothe remote control ............................................ 10Placing the power box ...................................... 10
Introduction of Features ............... 11
Radio ReceptionPlug and Play ........................................................ 12
First time setup/power upReinstalling Plug and Play
Switching on to tuner mode ............................ 12Presetting radio stations ............................ 13–14
Automatic preset programmingManual preset programmingListening to the preset radio stationsDeleting a preset radio station
CD/MP3-CD OperationsDiscs for playback .............................................. 15Loading/Unloading the disc .............................. 15
Inserting the discEjecting the disc
Playing a CD/MP3-CD ....................................... 16Selecting a desired MP3 Album/Track ............ 17Programming the disc tracks ........................... 17
MP3-CD programming
Clock/TimerAbout Clock ........................................................ 18
Setting the clockAbout Timer ........................................................ 19
Setting the timerCancel/Disable the timerActivating the timer to the last setting
Other FeaturesSwitching on ........................................................ 20
Switching to Eco Power standby modeSwitching to standby modeSwitching to active mode
Sound control ..................................................... 20Adjusting the Bass/Treble levelActivating/deactivating Incredible Surround effect
Other ConnectionsConnecting external devices ........................... 21
Connecting an external device for listeningto music/soundConnecting an external device for analoguerecording
Listening to an external source ...................... 21
Specifications ........................................... 22
Troubleshooting .................................... 23

7
En
glis
h
3139 115 21642
General Information
This product complies with the radiointerference requirements of theEuropean Community.
The type plate is located at the rear of thesystem.For users in the U.K.: please follow theinstructions on page 2.
Environmental informationAll unnecessary packaging has been omitted. Wehave tried to make the packaging easy toseparate into three materials: cardboard (box),polystyrene foam (buffer) and polyethylene (bags,protective foam sheet).
Your system consists of materials which can berecycled and reused if disassembled by aspecialised company. Please observe the localregulations regarding the disposal of packagingmaterials, exhausted batteries and oldequipment.
Maintenance
To clean a CD, wipe it in a straightline from the centre toward theedge using a soft, lint-free cloth. Acleaning agent may damage thedisc! Write only on the printedside of a disc and only with a softfelt-tipped pen.
Clean the system with a soft,slightly dampened, lint-freecloth. Do not use anycleaning agents as they mayhave a corrosive effect.
Do not expose the systembatteries or discs tohumidity, rain, sand orexcessive heat (caused byheating equipment or directsunlight).
Safety information
Place the system on a flat, hard and stablesurface.
Place the system in a location with adequateventilation to prevent internal heat build-up inyour system. Allow at least 10 cm (4 inches)clearance from the rear and the top of the unitand 5 cm (2 inches) from each side.
The lens may cloud over when the system issuddenly moved from cold to warmsurroundings, making it impossible to play a disc.Leave the system in the warm environment untilthe moisture evaporates.
The mechanical parts of the set contain self-lubricating bearings and must not be oiled orlubricated.
When the system is switched to Standby mode,it is still consuming some power. To disconnectthe system from the power supply completely,remove the AC power plug from the wall socket.
To avoid overheating of the system, a safetycircuit has been built in. Therefore, your systemmay switch to Standby mode automaticallyunder extreme conditions. If this happens, letthe system cool down before reusing it.

8
En
glish
3139 115 21642
Speakers
Power boxRemote control
AM antenna
Power cord
FM antenna
Telescopicantenna
interconnect cable
Supplied accessories Rear connections
WARNING!– Never make or change anyconnections with the power switched on.– Connect the power cord from the“power box” to the power outlet onlyafter you have finished hooking upeverything.
Adjust the position of the antenna for optimalreception.
Position the antenna as far as possible from a TV,VCR or other radiation source.
For better FM stereo reception, connectexternal FM antenna.
It is not possible to connect other than thesupplied speakers.
The optional equipments and connecting cordsare not supplied.
If you are connecting to equipment with onlymono output (a single audio out terminal),connect it to the AUX IN left terminal.Alternatively, you can use a “single to double”cinch cable, but the output sounds still remainmono.
Do not connect equipment to both theLINE OUT and AUX IN terminals at the sametime. Otherwise, noise will be generated andmalfunction might occur.
Connections

9
En
glis
h
3139 115 21642
Connections
PHONES
AUX IN
LINE OUT
TO POWERUNIT
AM
FMANTENNA
R
R
L
L
AM
FMANTENNA
alternativeFM antennaconnection

10
En
glish
3139 115 21642
Before using the remote control
1 Pull out the plastic protective sheet.
2 Select the source you wish to control by pressingone of the source select keys on the remotecontrol (for example MP3-CD, TUNER).
3 Then select the desired function (for exampleÉ,S, T).
Replacing battery (lithiumCR2025) into the remote control
1 Pull out the knob A slightly to the left
2 Pull out the battery compartment B.
3 Replace a new battery and fully insert thebattery compartment back to the originalposition.
CAUTION!Batteries contain chemical substances, sothey should be disposed off properly.
Placing the power box
Place the power box as close as possible to thepower supply.
Do not place this unit in closed spaces, cover itor block the air vents.
Do not insert or drop anything into this unitthrough the air vents as this could cause seriousdamage.
Preparations
A
CR 2025LIT HIUM
B
plasticprotectivesheet

11
En
glis
h
3139 115 21642
Introduction of Features
ECOPOWER
VOL VOL
SOURCE
CD
GR
APH
IC T
HIS
SID
E
PLAY•PAUSE
SEARCH
iR
STOP•EJECT
8cm
DIS
C
ÉÅ - press to start or interrupt playback.- press to enter track selection mode.
S T press to select a desired album/ track.
Ç - in playback mode, press to stop thedisc.- in stop mode, press to eject the disc.- press to enter album selection mode.
REPEAT press to select repeat the current trackor repeat the whole disc or switch offthe repeat mode.
ÉÅ press to toggle between frequencytuning and preset number selectionmode.
S T - press to select a preset radio station.- press to change the radio frequency.
PROGRAM- press to start manual preset programming.- press and hold to start automatic preset
programming.
Ç press to stop programming or to erasea selected preset.
MP3-CDTuner
ÉÅ - in standby mode, press and hold to initiatePlug and Play mode.- press briefly to start plug & play installation.
Ç press to exit.
Plug and PlayECO POWER or y- press and hold to switch the system to low power
standby mode.
Eco Power standby
ECO POWER or y
- press briefly to enter standby mode.
Standby mode
SOURCE press repeatedly to select :CD ™ TUNER-FM ™ MW ™AUX ™ CDR ™ CD ...
MP3-CD / TUNER / AUX- press to enter the selected source mode.- in Tuner mode, press TUNER to toggle
between FM and MW band.- in AUX mode, press AUX to toggle
between AUX and CDR mode.
Source selection
VOL 34, VOLUME +/-- press to increase/decease the volume.
MUTE- press to silence or restore the volume.
Volume
I.S. press to switch on/off theincredible surround soundeffect.
BASS / - press to select low tone/highTREBLE tone sound effect.
- press VOLUME+/-on theremote control to change thetone level.
Sound control
ÉÅ press to start or interrupt playback.
S T - press briefly to select a desired track.- press and hold to search backward/forward.
Ç - in playback mode, press to stop thedisc.- in stop mode, press to eject the disc.
REPEAT press to select repeat the current trackor repeat the whole disc or switch offthe repeat mode.
CD
CLK/TIMER- press to view clock or enter clock setting mode.- press and hold to enter timer setting mode.
PROGRAM- in clock setting mode, press to change clock display
mode : 24- or 12- hour.
S T press to set the minutes and hours.
Clock/Timer
DIM press to select half or fullbrightness for display screen.
Dimming the display

12
En
glish
3139 115 21642
Radio Reception
Plug and PlayPlug and Play allows you to store all availableradio stations automatically, starting from FM andfollowed by MW band.
When all the available radio stations are storedor the memory for 40 presets are used, the lastpreset radio station will be played.
ö First time setup/power up
ö Reinstalling Plug and Play All previously stored radio stations will bereplaced.
Notes:– If no stereo frequency is detected during Plugand Play, "CHECK ANTENNA" will be displayed.– During Plug and Play, if no button is pressedwithin 15 seconds, the system will exit Plug andPlay mode.
To exit without storing the Plug and Play Press Çon the system.
If you do not complete the Plug and Playinstallation, the function will be restarted whenyou next turn on the main supply again.
Switching on to tuner mode
Press SOURCE or TUNER repeatedly toselect FM or MW band.
plug in thepower cord
press and hold
In standby mode,
TUNER-FM î MW
ECOPOWER
VOL VOL
SOURCE
CD
GR
APH
IC T
HIS
SID
E
PLAY•PAUSE
SEARCH
iR
M Z 1 1 0 0
STOP•EJECT
SOURCE
TUNER
CD TUNER-FM
AUXCDR MW
PLAY•PAUSE
PLAY•PAUSE PLAY•PAUSE

13
En
glis
h
3139 115 21642
Radio Reception
Presetting radio stationsYou can preset up to 40 radio stations in thememory.
IMPORTANT!When “P” appears on the display, it onlyenables preset number selection.Press ÉÅ to toggle between frequencytuning and preset number selection.
öAutomatic preset programming
It enables you to programme all available radiostations automatically from a selected presetnumber, starting from FM and followed by MWband.
If no preset number is shown, automatic presetwill begin from preset (1) and all your formerpresets will be overridden.
Note:– If a radio station has been stored in one of thepresets, it will not be stored again under anotherpreset number.
To exit programming mode Press PROGRAM or Ç.
öManual preset programming
It enables you to programme only the favouriteradio stations.
Hold down S T for fast tuning, release itwhen the frequency indication starts to change.For tuning to a weak reception radio station,press S T briefly and repeatedly.
Repeat the steps again to store other radiostations.
Notes:– If you attempt to programme more than 40preset radio stations, "PROGRAM FULL" isdisplayed.– During programming, if no key is pressed within20 seconds, the system will exit the programmemode automatically.
To exit without storing the preset setting Press Ç.
tune to a radiostation
select a presetnumber
store setting and exitprogramming mode
press and holduntil “AUTO”
appears
In tuner mode,
select a presetnumber
/
P 01
99 80
PROG
P 01
99 80 /PROG
In tuner mode,
/P 01
99 80
make sure “P”appears, if not
pressÉÅ.

14
En
glish
3139 115 21642
ö Listening to the preset radiostations
öDeleting a preset radio station
When the preset radio station is deleted The deleted radio frequency remains on thedisplay until you select another preset number. The preset numbers of all other preset radiostations in the band with higher numbers arealso decreased by one.
Note:– If you press the STOP•EJECT (Ç) button forless than three seconds, it will eject the disc (ifavailable) from the disc loader.
Radio Reception
In tuner mode,
select a presetnumber
In tuner mode,
press and holduntil “PRESETDELETED”
appears
/P 01
99 80
STOP•EJECT
/ P 01
99 80
select a presetnumber
make sure “P”appears, if not
pressÉÅ.
make sure “P”appears, if not
pressÉÅ.

15
En
glis
h
3139 115 21642
CD/MP3-CD Operations
Discs for playbackThis system is able to play :– All pre-recorded audio CDs (8cm/12cm)– All finalised audio CDR and audio
CDRW discs– MP3-CDs (CD-ROMs with MP3 tracks)
maximum albums = 99maximum titles = 999 (depending on filename length)ISO9660/Joliet or UDF1.5 formatBitrates = 32-256 kpbs, variable bitratesID3 tags = V1.1, V2.2, V2.3, V2.4
Loading/Unloading the disc
WARNING!– Do not load more than one disc intothe disc loader.– When loading an 8cm disc, slot intothe middle of the disc loader.
ö Inserting the disc
Slot the disc slightly into the disc loader andwithdraw your fingers immediately. "READ" is displayed, followed by total numberof tracks and the playing time.
Notes:– Load the disc with the label side facing right.– Loading the disc in any source mode will switchfrom the current mode to disc mode.– For MP3 disc, the disc reading time may exceed10 seconds due to the large number of songscompiled into one disc.
ö Ejecting the disc All the programmed tracks will be erased.
STOP•EJECT
In stop mode,

16
En
glish
3139 115 21642
CD/MP3-CD Operations
Playing a CD/MP3-CD
You can also access the functions via thesame buttons on the remote control.
ECOPOWER
VOL VOL
SOURCE
CD
GR
APH
IC T
HIS
SID
E
PLAY•PAUSE
SEARCH
iR
STOP•EJECT
8cm
DIS
C
Switching on to discmode
Press SOURCE (or MP3-CD on theremote control) to select CD mode.
Stop playback / Ejectthe disc
During playback, press to stopplayback.
In stop mode, press to eject thedisc.
Start / Interrupt /Resume playback
In stop mode, press to start
playback.
During playback, press to pause.
In pause mode, press to resumeplayback. During playback, the tracknumber and elapsed playing time ofthe current track are displayed. For mixed mode MP3 discs, onlyone mode will be selected forplayback depending on the recordingformat.
Searching backward/forward
During playback, hold down thebutton until it reaches the desiredpassage. For MP3 disc, it is only possibleto search within the current track.
Selecting a desiredtrack
Press the button briefly andrepeatedly to go to the beginningof the current / next/ previoustrack.
In stop/programme mode,hold down the button to increasethe speed of track selection.
Repeat play Press REPEAT repeatedly to select :
Repeat the current track – RPT lights up. Repeat all tracks – RPT ALL lights up.
To stop repeat play Press REPEAT repeatedly until RPT ALL
disappears from the display.
Notes:– If programme mode is active, it will repeat theprogrammed tracks.– When the disc is being ejected from the discslot, it will cancel the repeat mode.

17
En
glis
h
3139 115 21642
CD/MP3-CD Operations
Selecting a desired MP3 Album/Track
If you want to change the album afterconfirming the selection
1 Press Ç while TRACK icon is flashing.
2 Press S T to select the desired albumand repeat steps 3-6.
Programming the disc tracksProgramming tracks is possible when playback isstopped. Up to 99 tracks can be stored in thememory in any order.
If you attempt to programme more than99 tracks, “PROGRAM FULL” willappear on the display. In this case : The system will exit programming modeautomatically. Pressing Ç button will erase all theprogrammed tracks. Pressing ÉÅ button will start the playbackof the programmed tracks.
öMP3-CD programming
Notes:– During programming, if no button is pressedwithin 20 seconds, the system will exit theprogramme mode automatically.– The programme will be erased when the systemexits from CD source.
To erase all the programmed tracks In stop mode, press Ç.
Once the programmed tracks have been erased,pressing Ç will eject the disc.
After inserting the MP3 disc,
select an albumnumber
select a tracknumber
start playback
confirm thealbum selection
In stop mode,
select a tracknumber
/ 01 01
ALBUM TRACK
/ 01 01
ALBUM TRACK
/
PROG
01
TRACK10:80
PROG
20
TRACK98:80
repeat steps 2 and3 to store other
tracks
stop programmingmode
start playback
In stop mode,
select an albumnumber
select a tracknumber
ALBUM
TRACK
/
/PROG
01 01
TRACK10:80ALBUM
PROG
01 01
TRACK10:80ALBUM
to store othertracks under the
same album, repeatsteps 4 and 5
to select tracksfrom another album,pressÇ and repeat
steps 2 to 5
stop programmingmode
start playback

18
En
glish
3139 115 21642
IMPORTANT!When in Eco Power standby mode, it isnot possible to view or set theclock/timer.
Notes:– The clock/timer setting will be cancelled whenthe power cord is disconnected or if a power failureoccurs.– During clock/timer setting, if no button ispressed within 90 seconds, the system will exit thesetting mode automatically.
About ClockThe clock can be set in either 12-hour or24-hour mode ("11:59 PM" or "23:59", forexample).
ö Setting the clock
If you press and hold S T for more thantwo seconds, it will change the minutes in fasterspeed. The changes in minutes will rollover tothe hours, refer to the example shown below.
î12:0011:59
AMPMAMPM
12:01î
AMPM
î 00:0023:59 00:01î
To check the time in other source mode Press CLK/TIMER once.
To exit without storing the setting Press Ç.
In standby mode,
select clockmode
set minutesand hours
Clock/Timer
/
19
En
glis
h
3139 115 21642
Clock/Timer
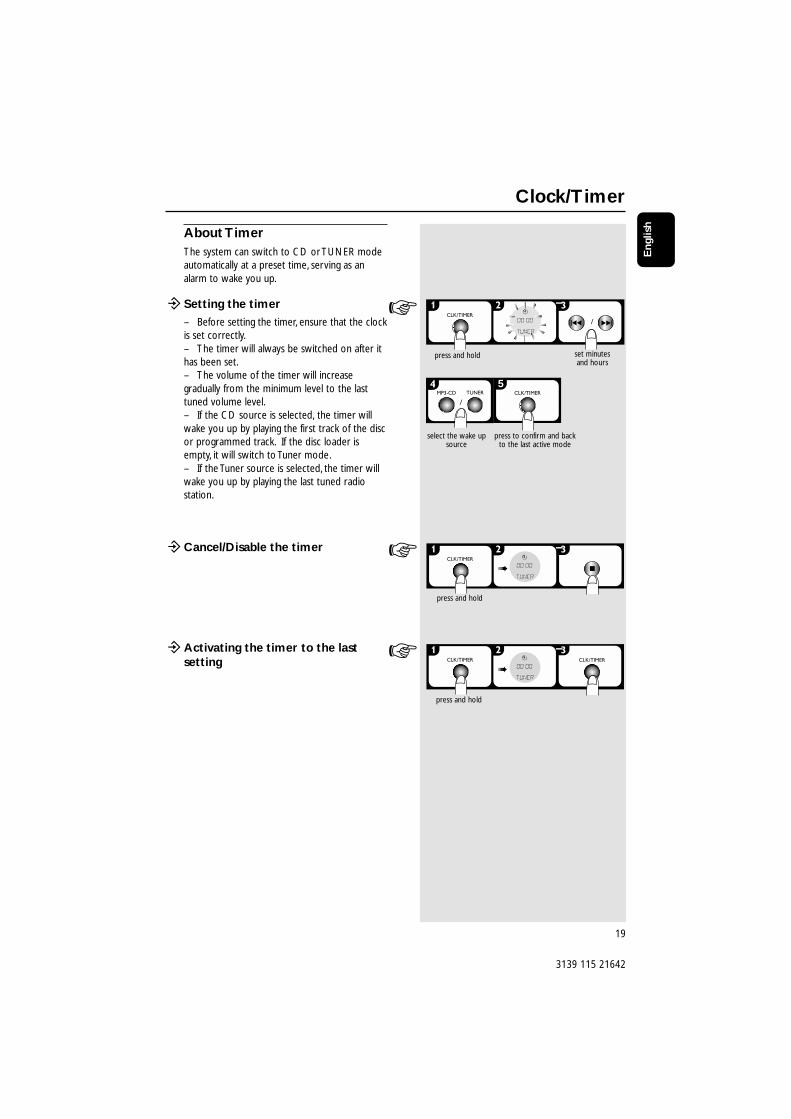
About TimerThe system can switch to CD or TUNER modeautomatically at a preset time, serving as analarm to wake you up.
ö Setting the timer
– Before setting the timer, ensure that the clockis set correctly.– The timer will always be switched on after ithas been set.– The volume of the timer will increasegradually from the minimum level to the lasttuned volume level.– If the CD source is selected, the timer willwake you up by playing the first track of the discor programmed track. If the disc loader isempty, it will switch to Tuner mode.– If the Tuner source is selected, the timer willwake you up by playing the last tuned radiostation.
öCancel/Disable the timer
öActivating the timer to the lastsetting
press and hold set minutesand hours
select the wake upsource
press to confirm and backto the last active mode
press and hold
press and hold
/
/
5

20
En
glish
3139 115 21642
IS
press and hold
press briefly
ECOPOWER
ECOPOWER
VOL VOL
SOURCE
CD
GR
APH
IC T
HIS
SID
E
PLAY•PAUSE
SEARCH
iR
M Z 1 1 0 0
STOP•EJECT
ECOPOWER
ECOPOWER
VOL VOL
SOURCE
CD
GR
APH
IC T
HIS
SID
E
PLAY•PAUSE
SEARCH
iR
M Z 1 1 0 0
STOP•EJECT
/ /
/ /
-3 î -2 î -1
3 î 2 î 1 î 0
î
ECOPOWER
VOL VOL
SOURCE
CD
GR
APH
IC T
HIS
SID
E
PLAY•PAUSE
SEARCH
iR
M Z 1 1 0 0
STOP•EJECT
SOURCE
CD TUNER-FM
AUXCDR MW
Other Features
Switching on
ö Switching to Eco Power standbymode
To save the power consumption, it is advisable toswitch the system to Eco Power standby modeor disconnect the system from the power supplycompletely when not in use. LED will display a red light. The display screen will go blank.
ö Switching to standby mode LED will display a green light.
ö Switching to active mode
Sound control
öAdjusting the Bass/Treble level
The BASS (low tone) and TREBLE (high tone)feature enables you to define the sound-processor settings.
To adjust the Bass or Treble tone level, press thevolume buttons on the remote controlimmediately after you have selected the Bass orTreble sound feature. If the volume button is notused within five seconds, it will resume its normalvolume control function.
öActivating/deactivating IncredibleSurround effect
The Incredible Surround magnifies the virtualdistance between the front speakers for anincredibly wide, enveloping, stereo effect. If the Incredible Surround is activated, IS isshown on the display.
press and hold
OR
OR
press briefly

21
En
glis
h
3139 115 21642
Connecting external devices
öConnecting an external device forlistening to music/soundConnect the “AUDIO OUT” terminals of theexternal device (TV, VCR, Laser Disc player, DVDplayer, for example) to the AUX IN terminals ofyour system.
öConnecting an external device foranalogue recordingConnect the “AUDIO IN” terminals of theexternal device (CD/tape recorder, for example)to the LINE OUT terminals of your system.
Listening to an external source
1 Press SOURCE or AUX repeatedly. Select “AUX” when connecting to a TV, VCRor Laser Disc player. Select “CDR” when connecting to a CDrecorder or DVD player.
2 Play the external device.
When CDR mode is selected, any audioequipment connected to the LINE OUTterminals will be muted. You will not be able torecord or listen to the sound on equipmentconnected to the LINE OUT terminals.
Notes:– You are advised not to listen to and record fromthe same source simultaneously.– All the sound control features (IS., BASS/TREBLE,for example) are available for selection.– Refer to the operating instructions of theconnected equipment for details.
PHONES
AUX IN
LINE OUT
TO POWER
R
R
L
L
PHONES
AUX IN
LINE OUT
TO POWERUNIT
AM
FMANTENNA
R
R
L
L
L
R
AUDIO OUT
AUX IN
LINE OUT
TO POWERUNIT
AM
FM
R
R
L
L
PHONES
AUX IN
LINE OUT
TO POWERUNIT
AM
FMANTENNA
R
R
L
L
L
R
AUDIO IN
AUX î CDR
ECOPOWER
VOL VOL
SOURCE
CD
GR
APH
IC T
HIS
SID
E
PLAY•PAUSE
SEARCH
iR
M Z 1 1 0 0
STOP•EJECT
SOURCE
CD TUNER-FM
AUXCDR
AUX
MW
Other Connections

22
En
glish
3139 115 21642
Specifications
AMPLIFIEROutput power ..................................... 2 x 50 W MPO................................................................... 2 x 25 W RMS(1)
Signal-to-noise ratio .......................... ≥ 67 dBA (IEC)Frequency response .......................... 50 – 16000 HzInput sensitivity
AUX / CDR In ....................................... 500 mV / 1VOutput
Speakers ....................................................................≥ 8 ΩHeadphones ...................................... 32 Ω – 1000 ΩLine Out ...................... 500 mV ±2dB, > 22000 Ω
(1) (8 Ω, 1 kHz, 10% THD)
CD/MP3-CD PLAYERNumber of programmable tracks ......................... 99Frequency range .................................. 20 – 20000 HzSignal-to-noise ratio ....................................... ≥ 80 dBAChannel separation .......................... ≥ 60 dB (1 kHz)Total harmonic distortion ........................... < 0.003%MPEG 1 Layer 3 (MP3-CD) .......... MPEG AUDIOMP3-CD bit rate ....................................... 32-256 kbps
(128 kbps advised)Sampling frequencies ....................... 32, 44.1, 48 kHz
TUNERFM wave range ................................... 87.5 – 108 MHzMW wave range ................................ 531 – 1602 kHzNumber of presets ........................................................ 40Antenna
FM ......................... 75 Ω wire /telescopic antenna AM ............................................................ Loop antenna
POWER UNITMaterial .............................................................. PolystyreneAC Power ..................................... 220 – 230 V / 50 HzPower Consumption
Active .......................................................................... 33 WStandby ................................................................. < 10 WEco Power Standby ............................................≤ 1 W
Dimensions (w x h x d) .... 238 x 68 x 158 (mm)Weight (without speakers) ................................. 1.2 kg
SPEAKERSSystem ................................................................ Bass reflexImpedance ........................................................................ 8 ΩWoofer ......................................... 2 x 3” polypropyleneTweeter ........ 1 x 18mm Ferrofluid cooled DomeDimensions (w x h x d) . 112 x 245 x 235 (mm)Weight ................................................................ 2.9 kg each
GENERAL INFORMATIONMaterial
MZ1000 .......................... Polymethyl methacrylate MZ1100 ................................................. Rubber/Lucite MZ1200 ............................................. Aluminium alloy
Main unit Dimensions (w x h x d)112 x 245 x 235 (mm) Weight ..................................................................... 2.85 kg
Specifications and external appearance aresubject to change without notice.

23
En
glis
h
3139 115 21642
WARNINGUnder no circumstances should you try to repair the system yourself, as this willinvalidate the warranty. Do not open the system as there is a risk of electric shock.
If a fault occurs, first check the points listed below before taking the system for repair. If youare unable to solve a problem by following these hints, consult your dealer or service centre.
Troubleshooting
The disc is ejected automatically.
Radio reception is poor.
The system does not react when buttons arepressed.
Sound cannot be heard or is of poor quality.
The left and right sound outputs are reversed.
The remote control does not functionproperly.
The timer is not working.
Load in the disc with label facing right.
Replace or clean the disc, see “Maintenance”.
Use a finalised CD-RW or a correct MP3-CD format
disc.
If the signal is too weak, adjust the antenna or connect
an external antenna for better reception.
Increase the distance between the system and your TV
or VCR.
Remove and reconnect the AC power plug and switch
on the system again.
Adjust the volume.
Disconnect the headphones.
Check that the speakers are connected correctly.
Make sure the MP3-CD was recorded within 32-256
kbps bit rate with sampling frequencies at 48 kHz,
44.1 kHz or 32 kHz.
Check the speaker connections and location.
Select the source (MP3-CD or TUNER, for example)
before pressing the function button (É, S , T).
Reduce the distance between the remote control and
the system.
Replace the battery.
Point the remote control directly toward the IR sensor.
Set the clock correctly.
Press and hold CLK/TIMER to switch on the timer.
Problem Solution