MUNIS System Administration (MSA-1)...Munis Guide Munis System Administration (MSA-1) Updated:...
17
Kentucky Department of Education Munis Guide Munis System Administration (MSA-1) Updated: January 2020 MUNIS System Administration (MSA-1) Questions: [email protected]
Transcript of MUNIS System Administration (MSA-1)...Munis Guide Munis System Administration (MSA-1) Updated:...
Kentucky Department of Education Munis Guide
Munis System Administration (MSA-1) Updated: January 2020
MUNIS System Administration (MSA-1) Questions: [email protected]
Kentucky Department of Education Munis Guide
Munis System Administration (MSA-1) Updated: January 2020
2 | P a g e
Contents
OVERVIEW ............................................................................................................................................. 3
CONFIGURING MUNIS ......................................................................................................................... 3
MUNIS System Control Table ....................................................................................................................................... 3
Updating District # in the Munis System Control Table ................................................................................................ 7
MUNIS Menu Maintenance ......................................................................................................................................... 7
Menu Security ........................................................................................................................................................... 10
Granting User Permissions ........................................................................................................................................ 13
Add a User Account ................................................................................................................................................... 13
Role Maintenance & Access to Modules Permissions ................................................................................................ 13
Maintaining Spool Files (Saved Reports) .................................................................................................................... 14
MAINTAINING MUNIS AUDIT HISTORY ................................................................................................ 16
Kentucky Department of Education Munis Guide
Munis System Administration (MSA-1) Updated: January 2020
3 | P a g e
Overview This document outlines some of the basic MUNIS system administration functions required for the operation of MUNIS. This document addresses only MUNIS system administration tasks.
The following topics are addressed in this document:
1. Configuring Basic MUNIS Settings
2. Setting Up MUNIS Users
3. Setting Up Roles and Role Maintenance
4. Setting Up Advanced User Permissions
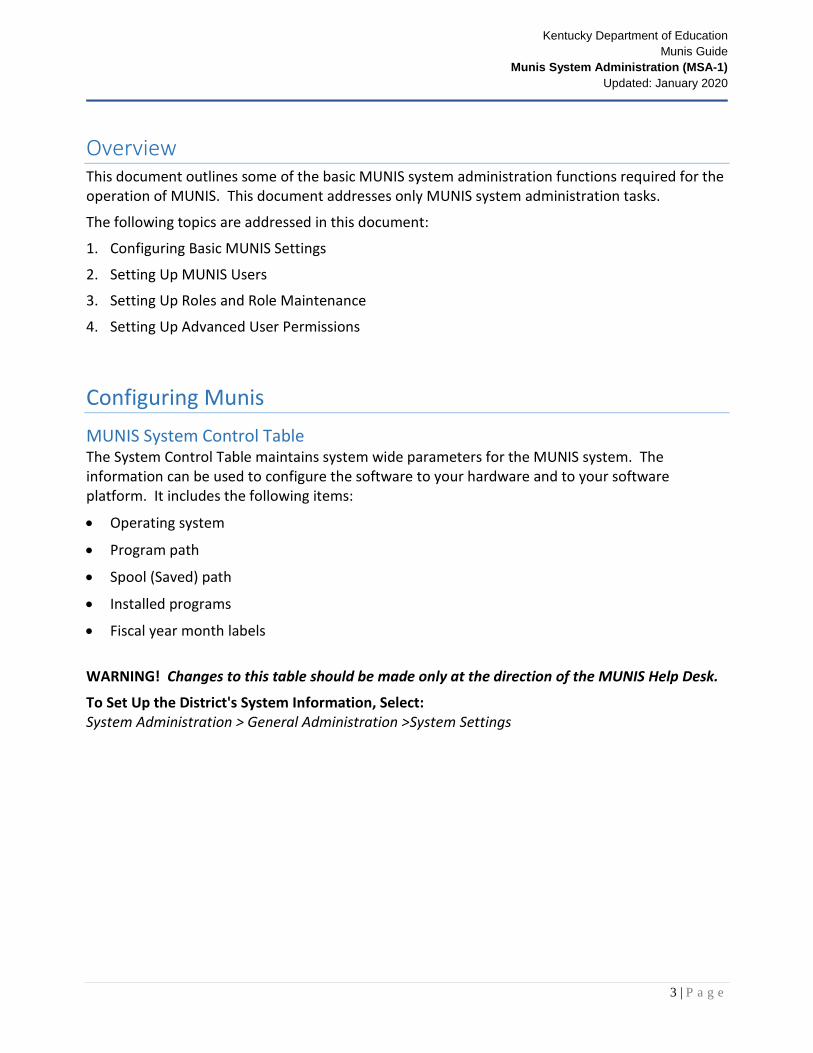
Configuring Munis MUNIS System Control Table The System Control Table maintains system wide parameters for the MUNIS system. The information can be used to configure the software to your hardware and to your software platform. It includes the following items:
• Operating system
• Program path
• Spool (Saved) path
• Installed programs
• Fiscal year month labels
WARNING! Changes to this table should be made only at the direction of the MUNIS Help Desk.
To Set Up the District's System Information, Select: System Administration > General Administration >System Settings
Kentucky Department of Education Munis Guide
Munis System Administration (MSA-1) Updated: January 2020
4 | P a g e
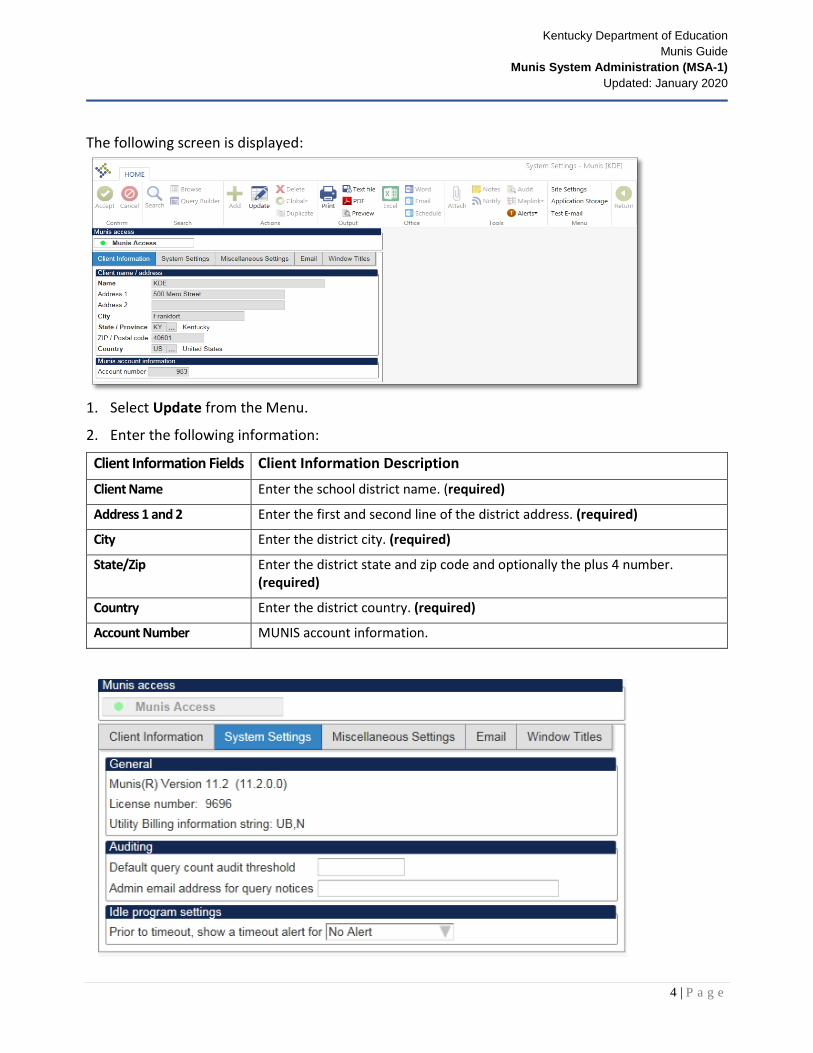
The following screen is displayed:
1. Select Update from the Menu.
2. Enter the following information:
Client Information Fields Client Information Description
Client Name Enter the school district name. (required)
Address 1 and 2 Enter the first and second line of the district address. (required)
City Enter the district city. (required)
State/Zip Enter the district state and zip code and optionally the plus 4 number. (required)
Country Enter the district country. (required)
Account Number MUNIS account information.
Kentucky Department of Education Munis Guide
Munis System Administration (MSA-1) Updated: January 2020
5 | P a g e
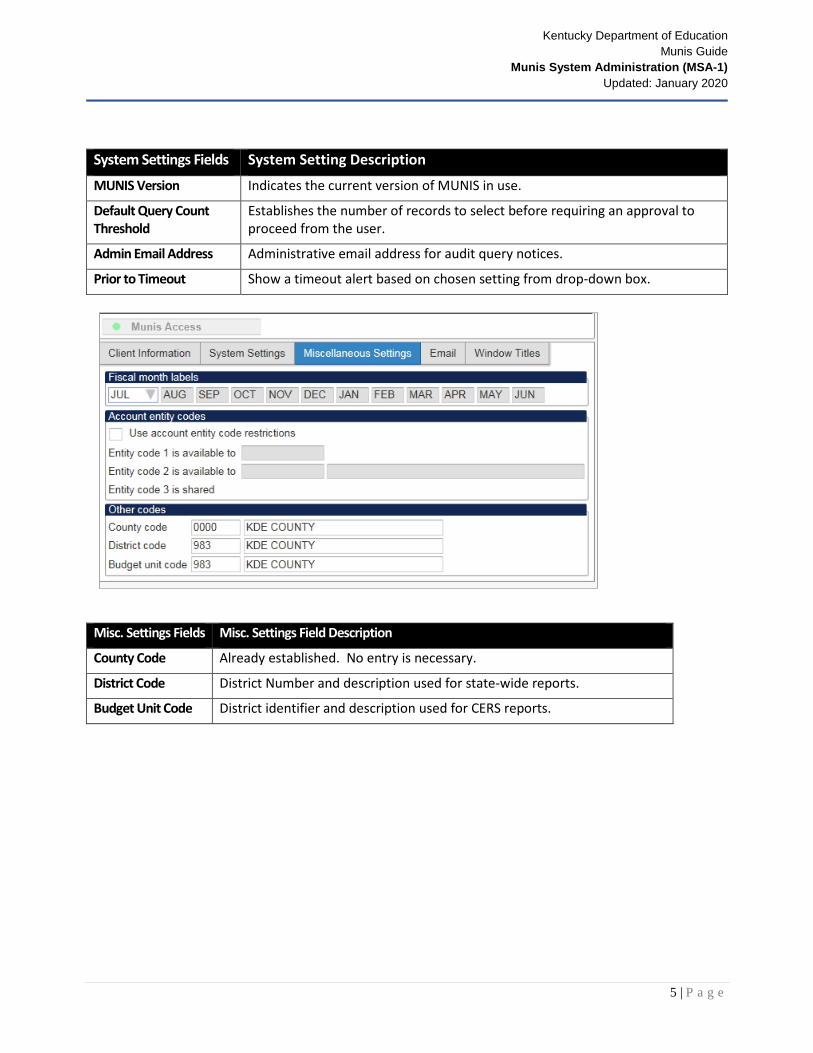
System Settings Fields System Setting Description
MUNIS Version Indicates the current version of MUNIS in use.
Default Query Count Threshold
Establishes the number of records to select before requiring an approval to proceed from the user.
Admin Email Address Administrative email address for audit query notices.
Prior to Timeout Show a timeout alert based on chosen setting from drop-down box.
Misc. Settings Fields Misc. Settings Field Description
County Code Already established. No entry is necessary.
District Code District Number and description used for state-wide reports.
Budget Unit Code District identifier and description used for CERS reports.
Kentucky Department of Education Munis Guide
Munis System Administration (MSA-1) Updated: January 2020
6 | P a g e
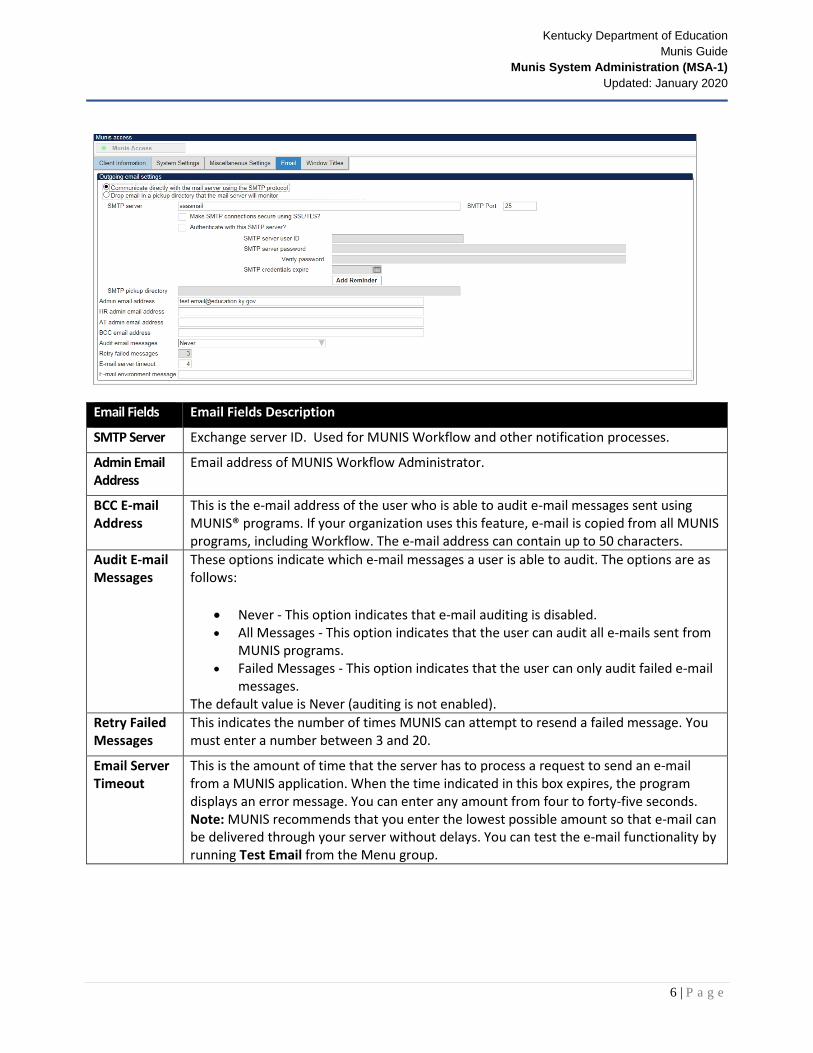
Email Fields Email Fields Description
SMTP Server Exchange server ID. Used for MUNIS Workflow and other notification processes.
Admin Email Address
Email address of MUNIS Workflow Administrator.
BCC E-mail Address
This is the e-mail address of the user who is able to audit e-mail messages sent using MUNIS® programs. If your organization uses this feature, e-mail is copied from all MUNIS programs, including Workflow. The e-mail address can contain up to 50 characters.
Audit E-mail Messages
These options indicate which e-mail messages a user is able to audit. The options are as follows:
• Never - This option indicates that e-mail auditing is disabled. • All Messages - This option indicates that the user can audit all e-mails sent from
MUNIS programs. • Failed Messages - This option indicates that the user can only audit failed e-mail
messages. The default value is Never (auditing is not enabled).
Retry Failed Messages
This indicates the number of times MUNIS can attempt to resend a failed message. You must enter a number between 3 and 20.
Email Server Timeout
This is the amount of time that the server has to process a request to send an e-mail from a MUNIS application. When the time indicated in this box expires, the program displays an error message. You can enter any amount from four to forty-five seconds. Note: MUNIS recommends that you enter the lowest possible amount so that e-mail can be delivered through your server without delays. You can test the e-mail functionality by running Test Email from the Menu group.
Kentucky Department of Education Munis Guide
Munis System Administration (MSA-1) Updated: January 2020
7 | P a g e
Updating District # in the Munis System Control Table District # identifies your district on reports. Before producing these files, the district # must be accurate in MUNIS.
To Update the MUNIS District Number, Select:
System Administration > General Administration >System Settings
1. Select Update.
2. Click on the Miscellaneous Settings tab.
3. Update DISTRICT Code and Description with the correct values.
MUNIS Menu Maintenance Menu File Maintenance is used to:
♦ Create new MUNIS menus or alter the delivered menus.
♦ Create a global effect (i.e., any update made to the menu files will change the look and feel of a given menu for all users who have access to it.).
WARNING! Software releases and updates will override any changes made to MUNIS provided menus. Menus created by the District will remain after applying updates. If you alter the standard MUNIS menu structure, it is your responsibility to reconfigure the menus after the updates. It is recommended that you print/store a copy of the menus, and then reconfigure the menus after the release/update is completed.
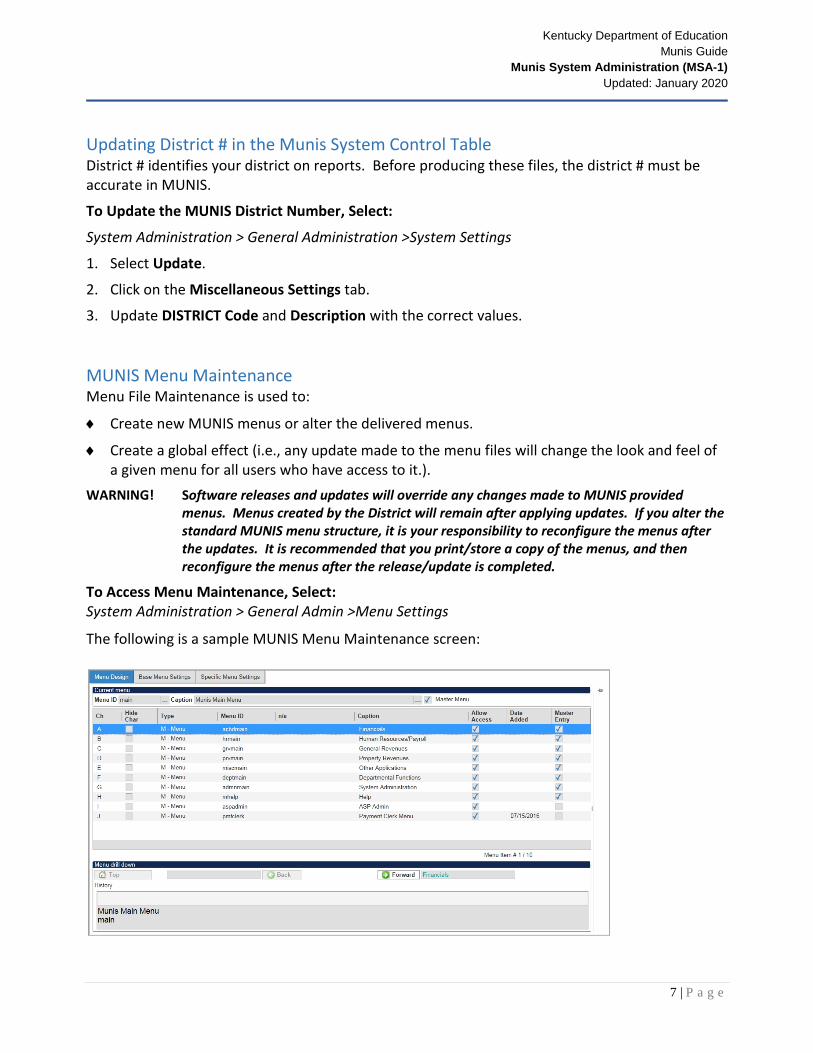
To Access Menu Maintenance, Select: System Administration > General Admin >Menu Settings
The following is a sample MUNIS Menu Maintenance screen:
Kentucky Department of Education Munis Guide
Munis System Administration (MSA-1) Updated: January 2020
8 | P a g e
To Create a New/Custom MUNIS Menu: You can create custom menus within MUNIS to group together various programs all under one menu. An example would be for payment entry clerks who need to access ONLY these programs: Payment Entry, Bill Inquiry, and Customer FM. Since these programs are all found on different menus in MUNIS, let’s put them all on one menu. Start by locating the menus names and their corresponding program names that the clerks will need. To Access Menu Maintenance, Select: System Administration > General Administration > Menu Settings
Example:
Menu Name Program Name Payment Entry arcshrct Bill Inquiry arbilinq Customer FM arcstmnt (Inquiry Mode Only)
Now, build a custom menu with only those programs on it. To do this click ADD and enter information into the Current Menu fields. • Menu ID = Give it a meaningful Menu name like, “pmtclerk” (8 characters or less) • Caption = Put in a meaningful caption for the new marenu like, “Payment Clerk Menu”. • Click Accept
In the program/menu listing enter: • Type = I: MUNIS Application (for all these menus). • Program ID = the program name from above: “arcshrct” for the first line, “arbilinq” for the next, etc… • Parameters = If this is for Inquiry Mode Only, you should put in an “I” here. Otherwise, leave blank. • Caption = Leave as-is so if you have a problem, it is easier for MUNIS support to diagnose. • Access = Checked. This just indicates that it is available for anyone to see if using this menu. Tab through all the fields and enter a different program on each line. The end result is this:

Kentucky Department of Education Munis Guide
Munis System Administration (MSA-1) Updated: January 2020
9 | P a g e
TIP: This menu (pmtclerk) may be used as the ‘Startup Menu’ for users that only need access to these programs. This is assigned to a user via System Administration, General Admin, Menu Settings program. This eliminates all the other menus making it very easy for the user to find the programs they access. You can now add this new menu (pmtclerk) onto an existing menu like “main” or “armain” within Menu Maintenance. Start by finding the ‘main’ menu then click Update. Tab through all the fields until your cursor is in a new field in the “Type” column:
Kentucky Department of Education Munis Guide
Munis System Administration (MSA-1) Updated: January 2020
10 | P a g e
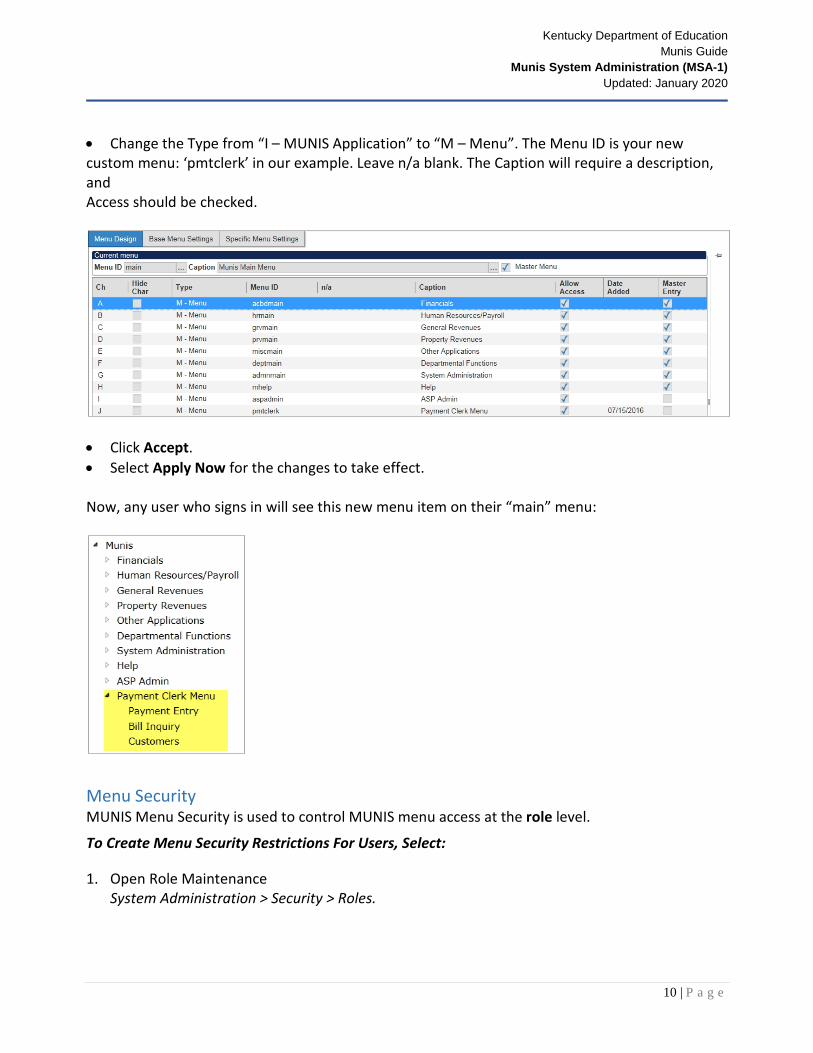
• Change the Type from “I – MUNIS Application” to “M – Menu”. The Menu ID is your new custom menu: ‘pmtclerk’ in our example. Leave n/a blank. The Caption will require a description, and Access should be checked.
• Click Accept. • Select Apply Now for the changes to take effect. Now, any user who signs in will see this new menu item on their “main” menu:
Menu Security MUNIS Menu Security is used to control MUNIS menu access at the role level.
To Create Menu Security Restrictions For Users, Select: 1. Open Role Maintenance
System Administration > Security > Roles.

Kentucky Department of Education Munis Guide
Munis System Administration (MSA-1) Updated: January 2020
11 | P a g e
The following is a sample screen showing the menu security set up for a role:
Navigation Button Navigation Button Description Top Return to the top level of the menu (Munis main menu) Back Move back one level in the menu tree Forward Move forward one level in the menu tree Edit Allows access to the menu programs
Menu Security Field
Menu Security Description
Current The current menu option you are viewing as well as the menu path. Access These check boxes indicate whether the role has access to the menu option.
When the check box is selected, the role has access to that menu option. # Menu option’s position on the menu Type This is the menu option type. When you select a type M-Menu option, MUNIS
opens a sub-menu. When you select a type I-MUNIS Application option, MUNIS opens a program.
Caption Description of the menu option. Prg/Menu Program name or menu option. Parameters Program parameter associated with the menu option. Similar to a command
line argument or switch, the parameters indicate how MUNIS runs the program.

Kentucky Department of Education Munis Guide
Munis System Administration (MSA-1) Updated: January 2020
12 | P a g e
1. Select Add from the Menu or Click Search to search for a role. Many districts do not have user roles created and the actual roles are for individual users.
2. Enter the user’s MUNIS User Code in Role Key and enter a Description.
3. Click on the Menu Security tab to control MUNIS menu access at the role level. Many districts do not have user roles created and the actual roles are for individual users.
4. To limit menu access, click the Edit button.
5. For menu security that is limited to a few programs, click the Deselect All button.
6. To move one level down in the menu, click to left of the Access field for the menu item. This places a Green Arrow next to the menu.
7. Click the Forward button to move one level down. Note: When you have reached the lowest level of the menu, the forward button is no longer available.
8. Repeat steps 4 and 5 until the Menu level or Program that requires access is reached.
Kentucky Department of Education Munis Guide
Munis System Administration (MSA-1) Updated: January 2020
13 | P a g e
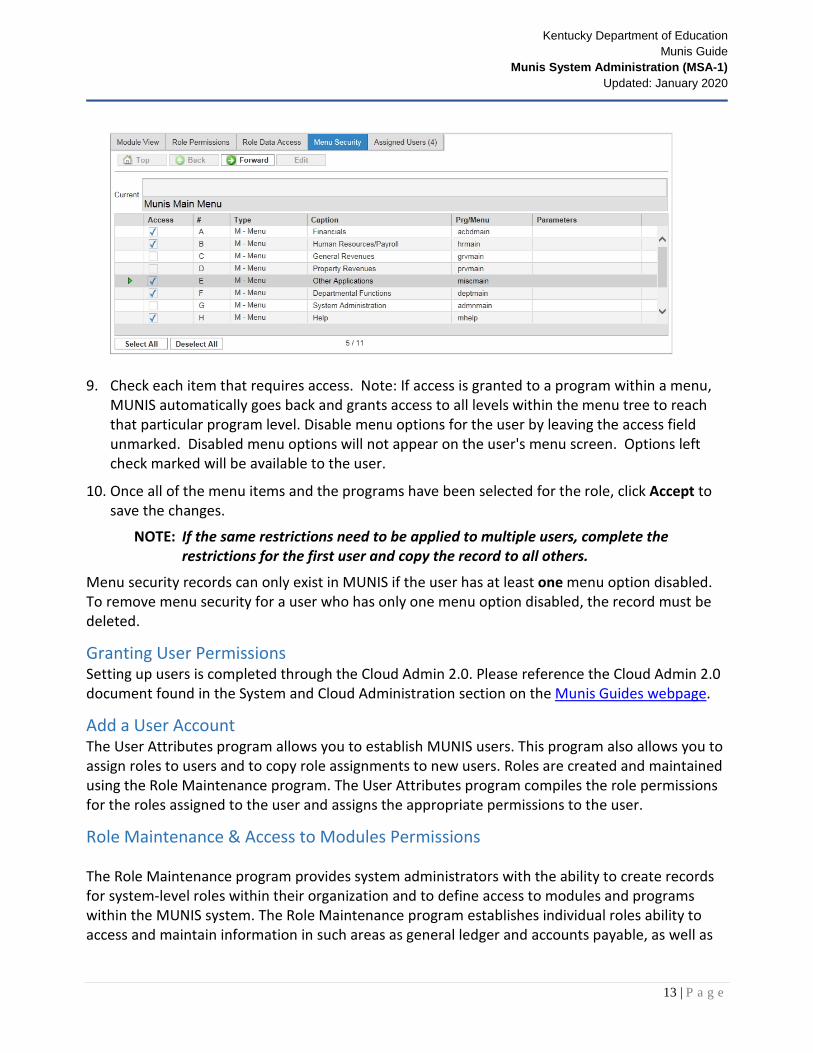
9. Check each item that requires access. Note: If access is granted to a program within a menu,
MUNIS automatically goes back and grants access to all levels within the menu tree to reach that particular program level. Disable menu options for the user by leaving the access field unmarked. Disabled menu options will not appear on the user's menu screen. Options left check marked will be available to the user.
10. Once all of the menu items and the programs have been selected for the role, click Accept to save the changes.
NOTE: If the same restrictions need to be applied to multiple users, complete the restrictions for the first user and copy the record to all others.
Menu security records can only exist in MUNIS if the user has at least one menu option disabled. To remove menu security for a user who has only one menu option disabled, the record must be deleted.
Granting User Permissions Setting up users is completed through the Cloud Admin 2.0. Please reference the Cloud Admin 2.0 document found in the System and Cloud Administration section on the Munis Guides webpage.
Add a User Account The User Attributes program allows you to establish MUNIS users. This program also allows you to assign roles to users and to copy role assignments to new users. Roles are created and maintained using the Role Maintenance program. The User Attributes program compiles the role permissions for the roles assigned to the user and assigns the appropriate permissions to the user.
Role Maintenance & Access to Modules Permissions
The Role Maintenance program provides system administrators with the ability to create records for system-level roles within their organization and to define access to modules and programs within the MUNIS system. The Role Maintenance program establishes individual roles ability to access and maintain information in such areas as general ledger and accounts payable, as well as
Kentucky Department of Education Munis Guide
Munis System Administration (MSA-1) Updated: January 2020
14 | P a g e
with forms such as requisitions and purchase orders. You can assign roles to users using Role Maintenance, or you can assign roles using User Account Maintenance.
You can update permissions using the general Role Maintenance program and through the specific role maintenance program for each module. When you add a role, it does not have access to any MUNIS applications. You must add the role on the main screen and then add the role on the module Role Maintenance screen in order to grant the role access to the module. When you add a role on a module Role Maintenance screen, that role has the minimum level of permissions available for that module. If the role requires a higher level of permissions, you must explicitly grant the role more permission.
For more information on how to add or manage roles please see Role Maintenance (MSA- 7) which may be found in the System and Cloud Administration section on the Munis Guides webpage.
Maintaining Spool Files (Saved Reports) Almost all MUNIS programs provide an Output option on the Ribbon with a Print, Preview, PDF or Text File (Spool) option.
The Output functions can be used to:
♦ Save files to the spooler.
♦ Print or preview reports.
♦ Create a PDF copy of the report
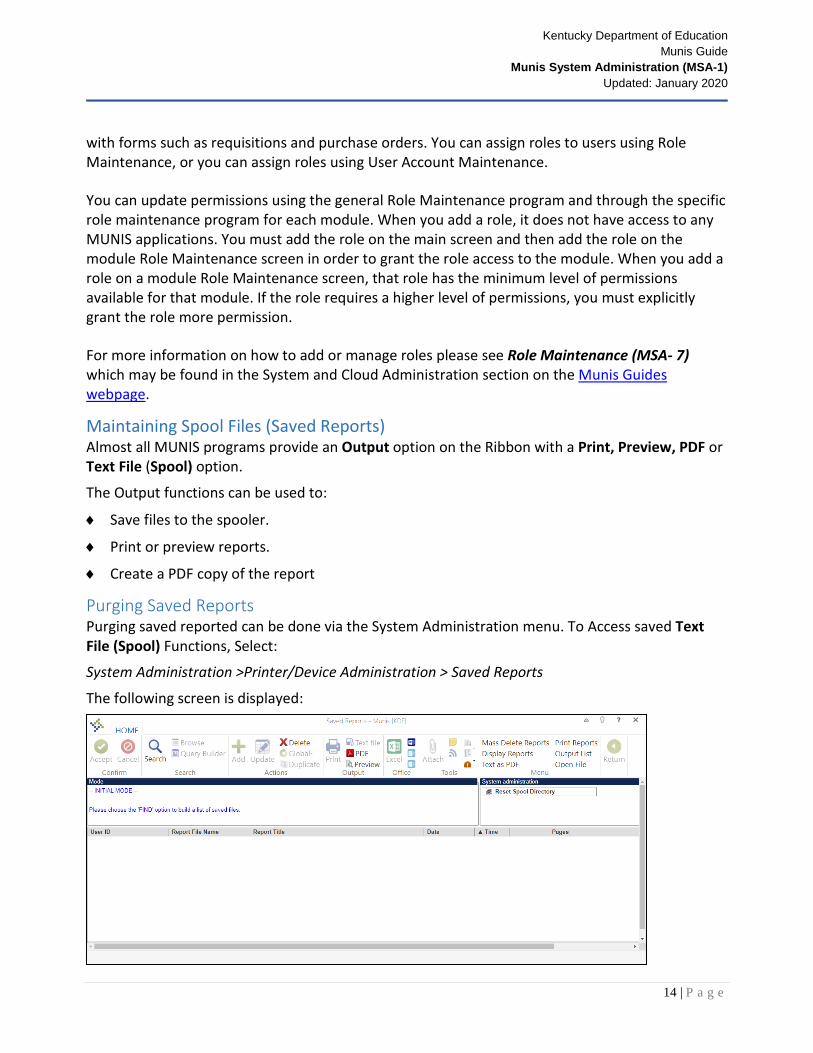
Purging Saved Reports Purging saved reported can be done via the System Administration menu. To Access saved Text File (Spool) Functions, Select:
System Administration >Printer/Device Administration > Saved Reports
The following screen is displayed:
Kentucky Department of Education Munis Guide
Munis System Administration (MSA-1) Updated: January 2020
15 | P a g e
The following Menu options are available on the Saved Reports screen:
Action Select
Display a spooled file on the screen from the current list. On selecting this option:
1. Click Search and Accept to search all the reports in the spool file. 2. Click Display Reports to view a file or files.
The report displays a Display Options box. 3. Do one of the following:
• Select No Filter to view all the files. • Select Use Page Ranges to view only specific pages. • Select Use Line Ranges to view only specific lines. • Click OK
3. Select the files to display. If you selected Use Page Ranges or Use File Ranges, complete the Start and End boxes with the page or line numbers that you want to view for each file. You can click Select All to select all of the files. You can click Select None to clear all of your selections.
4. Click Accept. 5. Choose File>Print to print the report.
Display Files
Print a spooled file from the current list. On selecting this option:
1. Click Search and Accept to search all the reports in the spool file. 2. Choose Print Reports from the Menu group on the ribbon. 3. Do one of the following:
1. Select No Filter to print all files. 2. Select Use Page Ranges to print only specific pages. 3. Select Use Line Ranges to print only specific lines. 4. Click OK
4. Select the check box next to the report or reports that you wish to print. 5. Type the number of copies in the Cpy box. 6. Then choose the printer name. 7. Select the Lnd check box to print the document in landscape (11 inches x 8 1/2
inches format). 8. If you selected Use Page Ranges or Use File Ranges, complete the Start and End
boxes with the page or line numbers that you want to print for each file. You may also click Select All to select all of the files. You can click Select None to clear all of your selections.
9. Click Accept.
Print Files
Delete a spooled file from the current list. On selecting this option:
1. Click Reset Spool Directory. The program finds all records that do not have corresponding files in the spool directory and prompts you to delete these records.
Delete Obsolete Files (Reset Spool File)
Kentucky Department of Education Munis Guide
Munis System Administration (MSA-1) Updated: January 2020
16 | P a g e
Action Select
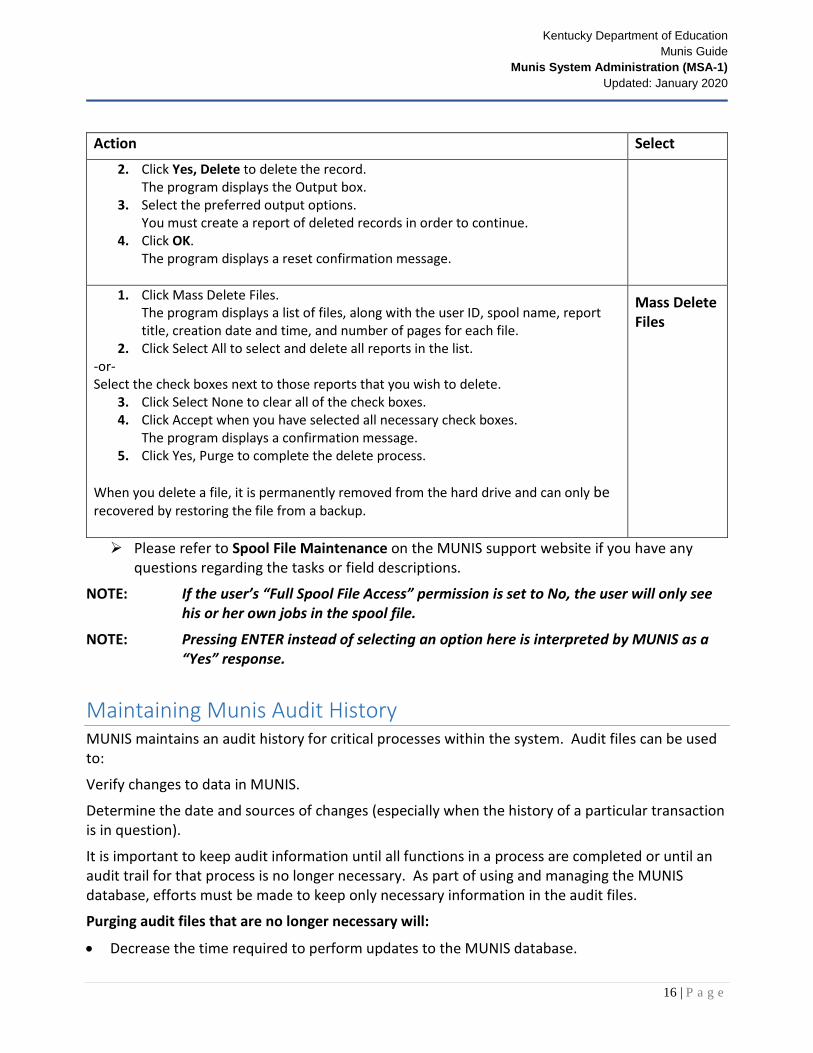
2. Click Yes, Delete to delete the record. The program displays the Output box.
3. Select the preferred output options. You must create a report of deleted records in order to continue.
4. Click OK. The program displays a reset confirmation message.
1. Click Mass Delete Files.
The program displays a list of files, along with the user ID, spool name, report title, creation date and time, and number of pages for each file.
2. Click Select All to select and delete all reports in the list. -or- Select the check boxes next to those reports that you wish to delete.
3. Click Select None to clear all of the check boxes. 4. Click Accept when you have selected all necessary check boxes.
The program displays a confirmation message. 5. Click Yes, Purge to complete the delete process.
When you delete a file, it is permanently removed from the hard drive and can only be recovered by restoring the file from a backup.
Mass Delete Files
Please refer to Spool File Maintenance on the MUNIS support website if you have any questions regarding the tasks or field descriptions.
NOTE: If the user’s “Full Spool File Access” permission is set to No, the user will only see his or her own jobs in the spool file.
NOTE: Pressing ENTER instead of selecting an option here is interpreted by MUNIS as a “Yes” response.
Maintaining Munis Audit History MUNIS maintains an audit history for critical processes within the system. Audit files can be used to:
Verify changes to data in MUNIS.
Determine the date and sources of changes (especially when the history of a particular transaction is in question).
It is important to keep audit information until all functions in a process are completed or until an audit trail for that process is no longer necessary. As part of using and managing the MUNIS database, efforts must be made to keep only necessary information in the audit files.
Purging audit files that are no longer necessary will:
• Decrease the time required to perform updates to the MUNIS database.
Kentucky Department of Education Munis Guide
Munis System Administration (MSA-1) Updated: January 2020
17 | P a g e
• Minimize the size of the database and, therefore, hard disk utilization. • Improve the efficiency and operation of the application.
NOTE: Refer to the document entitled MUNIS Purge MUNIS Audit Files (MSA-2) in the MUNIS System and Cloud Administration User Guide for assistance in managing the MUNIS audit files.