MULTI-LOOP PANEL
48
GLT-261-7-3 Doc: GLT-261-7-1 Issue: W.I.P Date: 25/08/2018 Doc: GLT-261-7-10 Issue: 001 Date: 14.08.2020 MULTI-LOOP PANEL Installation Manual
Transcript of MULTI-LOOP PANEL

GLT-261-7-3 Doc: GLT-261-7-1 Issue: W.I.P Date: 25/08/2018 Doc: GLT-261-7-10 Issue: 001 Date: 14.08.2020
MULTI-LOOP PANEL
Installation Manual

Smart Connect Multi-loop Installation Manual
www.zetaalarmsystems.com 2
Contents Introduction .................................................................................................................................................................................................. 4
About the Smart Connect Multi-loop Fire Alarm System .......................................................................................................................... 4
Overall Features ........................................................................................................................................................................................ 4
Additional Features ....................................................................................................................................................................................... 5
Document Conventions ................................................................................................................................................................................. 6
Circuits and Zones ..................................................................................................................................................................................... 6
Wiring Styles .............................................................................................................................................................................................. 6
System Components ..................................................................................................................................................................................... 7
Panel Types ............................................................................................................................................................................................... 7
Panel Modules ........................................................................................................................................................................................... 8
Control Panel Installation and Dimensions ................................................................................................................................................. 10
Enclosure Dimensions ............................................................................................................................................................................. 10
Panel Construction Details ...................................................................................................................................................................... 10
Locating the Fire Alarm Control Panel ..................................................................................................................................................... 11
Mounting the Enclosure .......................................................................................................................................................................... 11
Mounting Hole Dimensions ..................................................................................................................................................................... 11
Planning Cable Entry ............................................................................................................................................................................... 13
Cable Grounding ...................................................................................................................................................................................... 13
Mains Wiring ........................................................................................................................................................................................... 13
Battery Wiring ......................................................................................................................................................................................... 15
Assembling the panel .................................................................................................................................................................................. 18
Initial Power Up ....................................................................................................................................................................................... 19
Module Installation ................................................................................................................................................................................. 19
TRM RJ45 Port Address Designation ....................................................................................................................................................... 20
Securing the modules .............................................................................................................................................................................. 20
Before Powering the Panel On ................................................................................................................................................................ 20
Power on Procedure ................................................................................................................................................................................ 21
Field Wiring ................................................................................................................................................................................................. 22
Wiring Overview ...................................................................................................................................................................................... 22
SCM-ACM Field Wiring Connections ....................................................................................................................................................... 23
Wiring recommendations for Alarm Circuits (SCM-ACM) ....................................................................................................................... 24
SCM-ACM Specifications ......................................................................................................................................................................... 24
Compatible Warning Devices .................................................................................................................................................................. 25
Maximum Warning Devices per Circuit ................................................................................................................................................... 25
SCM-MIM Field Wiring Connections ....................................................................................................................................................... 25
Wiring Recommendations for Input Circuits (SCM-MIM) ....................................................................................................................... 25
SCM-MIM Specifications ......................................................................................................................................................................... 25
SCM-RM Field Wiring Connections.......................................................................................................................................................... 26
SCM-RM Specifications............................................................................................................................................................................ 26
SCM-ZMM Field Wiring Connections ...................................................................................................................................................... 27
Wiring Recommendations for Zone Monitor Circuits (SCM-ZMM) ......................................................................................................... 27
Smart Connect Multi-loop Installation Manual
www.zetaalarmsystems.com 3
SCM-ZMM Specifications ........................................................................................................................................................................ 27
SCM-NM Field Wiring Connections ......................................................................................................................................................... 28
Wiring Recommendations for Network Wiring (SCM-NM) ..................................................................................................................... 29
SCM-NM Specifications ........................................................................................................................................................................... 29
SCM-LCM Field Wiring Connections ........................................................................................................................................................ 30
Wiring Recommendations for Loop Card Modules (SCM-LCM) .............................................................................................................. 31
Loop Device Wiring and Device Information ........................................................................................................................................... 31
SCM-LCM Specifications .......................................................................................................................................................................... 36
Compatible Loop Card Devices ................................................................................................................................................................ 36
Power Supply ............................................................................................................................................................................................... 37
PSU Specifications ................................................................................................................................................................................... 37
PSU Fuses ................................................................................................................................................................................................ 38
Power Supply Status Indications ............................................................................................................................................................. 38
Power Supply Signals ............................................................................................................................................................................... 38
Panel Printer ................................................................................................................................................................................................ 39
Loading/Replacing the Printer Paper Roll ............................................................................................................................................... 39
Status LED’s ............................................................................................................................................................................................. 40
Printer Maintenance ............................................................................................................................................................................... 40
Fault Finding ................................................................................................................................................................................................ 41
Appendix A: SPECIFICATIONS ...................................................................................................................................................................... 41
FUNCTIONS REQUIRED BY EUROPEAN STANDARD EN54-2 ..................................................................................................................... 42
FUNCTIONS REQUIRED BY EUROPEAN STANDARD EN54-4 ..................................................................................................................... 42
Appendix B: STANDBY BATTERY REQUIREMENTS ....................................................................................................................................... 42
Appendix C: LOOP DEVICE ADDRESS SETTING............................................................................................................................................. 43
Appendix D: PRODUCT CODES .................................................................................................................................................................... 46
Appendix E: Ground Fault Impedance values.............................................................................................................................................. 46

Smart Connect Multi-loop Installation Manual
www.zetaalarmsystems.com 4
Introduction
About the Smart Connect Multi-loop Fire Alarm System The Smart Connect Multi-loop Control Panel is a powerful intelligent fire alarm control system with a user friendly 4.3 inch touch
screen display, which has been designed to provide reliable life safety and property protection, while also being easy to install,
commission and operate. The Smart Connect Multi-loop system is totally modular which enables it to satisfy any size building fire alarm
needs.
By adding intelligent loop modules, the Smart Connect Multi-loop can be upgraded to support up to 3000 addressable devices spread
across a flexible number of loop cards (maximum of twelve loop cards). The system can also be expanded by adding Form C relay
output modules, network interface modules, alarm circuit modules, and zone monitor modules for conventional detectors and devices.
The Smart Connect Multi-loop system’s touchscreen interface is designed to make status information clear, and system control
functions simple to operate. Through the use of function buttons on the systems display the user can easily “SILENCE BUZZER”, “STOP
SOUNDERS” or “START SOUNDERS”, or “RESET” the system. The system status presentation is structured to allow the different types of
system events (Alarms, technical alarms, and faults) to be viewed independently. Each system event presents the user with a message
describing the location of the alarm report and the type of event (manual alarm, smoke, or heat). If additional details about the nature
of the alarm report or its location are required, the user can add a text label to the device or zone.
The 32-bit microcontroller (MCU) at the heart of Smart Connect Multi-loop rapidly processes logical decisions based on the status of
the smoke detection and other initiating devices to control the system outputs. The Windows based software ‘Smart Configurator’ is
used to configure the system’s operation based on the customer specified operating requirements, and reduce
commissioning/installation times.
The Smart Connect Multi-loop system continuously checks all software and hardware for proper operation. It checks all control panel
electronic hardware, system memory components, and the system program. A hardware watchdog circuit is provided to ensure that
System programs are functioning properly. If a problem develops with the program or processor, the watchdog circuit places the
System into a fault condition and resets it.
The Smart Connect Multi-loop system is equipped with a backup microprocessor on its termination board. To ensure reliable
operation, if the main panel’s CPU stops, the backup CPU will take over and allow the system to still be able to detect and annunciate
alarms.
The fire alarm operation is always processed as the highest priority over all other operating modes.
Overall Features • Modular construction allows a panel to be specified using just the required modules.
• Up to 4, 6 or 12 Loop modules (depending on panel model).
• 4.3” colour touch screen display.
• Capacity for up to 26 intelligent modules (depending on panel model).
• Full system redundancy.
• Extensive Day/Night mode programming.
• Full cause & effect programming via front of panel or the ‘Smart Configurator’ PC software.
• 250 ZETA addressable MKII devices per loop card.
• 254 available programmable zones.
• Up to 64 panel peer-to-peer network.
• Positive Alarm Sequence.
• Alarm Verification.
• Alarm circuit special application 24V mode.
• 15A power supply.

Smart Connect Multi-loop Installation Manual
www.zetaalarmsystems.com 5
EXPLANATION OF ACCESS LEVELS The Smart Connect System has the following access levels.
ACCESS
LEVEL ACCESSED BY ACCESS METHOD FUNCTIONS ACCESSED
1 General public Default state View Panel
Override delay (if used)
2a Responsible person Enter user access code
(default 0001)
Start sounders
stop sounders
Silence buzzer
Reset panel
Access User Menu
2b Responsible person
Enter user access code
(default 0001), and press
Menu Access Icon
Enable / disable sections of system
Test Mode
View Zones / Points
View event log
Turn off delay
3a Installer / Engineer
Enter Engineer Password
(Default 9999), and press
Menu Access Icon
Configure loops
Assign zones
Assign Text to each point
Modify Alarm Operation Programming
Configure network (if fitted)
System Diagnostics (LED blink / loop Autocheck)
Change passwords
Configure TCP/IP Port
3b Installer / Engineer Open Enclosure
Connect wiring during Install
Battery check during Maintenance
Update Cause & Effect programming via USB
4 Authorised Service Engineer Open Enclosure & PC S/W Update Panel Firmware, Add new language
Care should be taken to ensure that the access method for each level is only available to suitably qualified personnel.
Additional Features
There is PC configuration software, a mobile monitoring application, a repeater panel and a LED Expander PCB available.
PC Configuration Software: Smart Configurator
Repeater Panel: SMART/REP

Smart Connect Multi-loop Installation Manual
www.zetaalarmsystems.com 6
Document Conventions Circuits and Zones Circuit = this refers to an actual electrical interface, initiating (detection), indicating (signal), or relay.
Zone = this is a logical concept for a fire alarm protected area, and will consist of at least one circuit.
The terms zone and circuit are used interchangeably throughout this manual.
On the Smart Connect Multi-loop, circuits can be either conventional or addressable inputs or outputs. Both hardwired conventional
inputs and outputs, and addressable inputs and outputs may be grouped together to form logical zones.
Wiring Styles Loop Circuits have a redundant pathway (powered from both sides of the circuit) and are able to be wired either in the Class A
designation or in the Class X designation (designed to operate past any a single short circuit with the addition of EN54 listed isolators).
Conventional Zone Circuits do not have a redundant path. The SCM-ZMM has 6 Class B circuits and simply terminates at the last
device.
Alarm Circuits do not have a redundant path. The SCM-ACM has 2 Class B circuits and simply terminates at the last device.
Typical SMART Connect Multi-loop Network Fire Alarm Wiring

Smart Connect Multi-loop Installation Manual
www.zetaalarmsystems.com 7
System Components
Panel Types Model Description
SMART6
• W:380mm x H:530mm
• Space for up to 6 small modules
• Supplied with a 400W 15A PSU
• Space for 2 x 14Ah batteries.
SMART6/32
• W:380mm x H:530mm
• Space for up to 6 small modules
• Equipped with 32 zone LED expansion
• Supplied with a 400W 15A PSU
• Space for 2 x 14Ah batteries.
SMART10/64
• W:500mm x H:600mm
• Space for up to 10 small modules
• Equipped with 64 zone LED expansion
• Supplied with a 400W 15A PSU
• Space for 2 x 38Ah batteries
SMART10/P/64
• W:500mm x H:600mm
• Space for up to 10 small modules
• Equipped with panel printer
• Equipped with 64 zone LED expansion
• Supplied with a 400W 15A PSU
• Space for 2 x 38Ah batteries
SMART26/64
• W:1000mm x H:665mm
• Space for up to 26 small modules
• Equipped with 64 zone LED expansion
• Supplied with a 400W 15A PSU
• Space for 2 x 38Ah batteries

Smart Connect Multi-loop Installation Manual
www.zetaalarmsystems.com 8
SMART26/P/64
• W:1000mm x H:665mm
• Space for up to 26 small modules
• Equipped with panel printer
• Equipped with 64 zone LED expansion
• Supplied with a 400W 15A PSU
• Space for 2 x 38Ah batteries
SMART/REP
• W:300mm x H:200mm
• Smart Connect Repeater
• Please refer to GLT-261-7-12 Smart Connect Repeater Manual for further information
Panel Modules Model No. Description Technical
SCM-LCM
Loop Card Module The plug-in loop card module provides power for, and handles communications to the analogue addressable devices. It has 4 fault status LED’s for added fault finding assistance.
Loop Voltage: 35V Nominal Maximum Loop Current: 450mA Maximum Loop Capacity: 250 Addresses Maximum Loop Length: 2KM Maximum Loop Resistance: 22Ω + to +, 22Ω - to - Maximum SLC Capacitance: 500nF Maximum SLC Baud Rate: 1024 bits per second Compatible Devices: MKII-AOP, MKII-AOH, MKII-AHR, MKII-AHF, MKII-AHF/CS90, ZAI-MI, ZAIO-MI, ZAZM-MI, ZAIO/230, ZASC-MI, MKII-SSB, MKII-AXT, MKII-AXTB, ZRAP, ZRAPB (All are EN54 approved)
SCM-ACM
Alarm Circuit Module The plug-in alarm circuit module provides power for, and handles communications to the non-addressable sounder appliances. It has 2 x Class B circuits and can be programmed to provide two 24v DC auxiliary outputs.
Circuit Voltage: 29VDC Nominal Maximum Circuit Current: 500mA per circuit Maximum Circuit Impedance: 4Ω Maximum Circuit Length: Depends on AWG Special Applications: Auxiliary 24 VDC Output [Power limited & Unsupervised] End of Line Resistor: 4K7Ω Compatible Devices: ZXT, ZXTB, ZRP, ZRPB (All are EN54 approved)
SCM-RM
Multi Relay Output A Relay module that is designed to be DIN mounted inside of a SMART Connect Multi-loop panel. It’s powered and interfaced to the CIE via a RJ45 connection. Can be configured as a programmable relay or a common alarm, common fault or common tech alarm relay via the panel settings.
Relay Type: Form C x 3 Switching Capacity: 5 A, 30 VDC (resistive) 5 A, 250 VAC (general use) Quiescent Current @ 30V: 39.3mA Relay Operated Current (LEDs ON): 115.26mA

Smart Connect Multi-loop Installation Manual
www.zetaalarmsystems.com 9
SCM-NM
RS485 Network The SMART Connect Multi-loop system network has the facility to monitor, indicate and control the functions of a fire alarm installation, thus allowing signals to be distributed around a large site. The network will accommodate up to 64 nodes. The network uses RS485 data communication.
Communication Protocol: RS485 Maximum Network Size: 64 Nodes Maximum Distance Between Nodes: 1KM (using a screened data cable) or 100M (using a standard fireproof cable) Network Wiring Typologies: Bus or Ring NOTE: Only 1 network module allowed per panel. If a second module is fitted, it will be powered down when the panel starts.
SCM-MIM
Multi Input Unit An input module that is used to monitor and raise alarm from any ancillary equipment such as sprinkler flow switch, aspiration detectors, secondary fire control panel, beam detectors, external power supplies etc.
Input Voltage: 23.7VDC Nominal Wiring Class: 6 x Class B Quiescent Current @ 30V: 39.3mA Input Max Impedance: 10Ω Input End of Line: 4K7Ω Alarm Triggering Resistor: 1KΩ
SCM-ZMM
Zone Monitor A zone monitor that can be typically used for conventional devices and/or for special detectors that are not available in addressable form. It has 6 x Class B input circuits.
Zone Voltage: 26VDC Nominal Wiring Class: 6 x Class B[Power limited & Supervised] Zone Maximum Line Impedance: 10Ω End of Line Resistor: 4K7Ω Alarm Triggering Resistor: 1KΩ Compatible Detectors: MKII-OP, MKII-HR, MKII-HF, MKII-HF-CS90, MKII-OH, ZT-CP3 (All are EN54 approved)
SCM-PM
RS232 Printer
The plug-in RS232 module
will give a Smart Connect
Multi-loop panel the ability to
interface to RS232 serial
equipment and devices. This
is most commonly used to
connect the panel to an
RS232 panel printer, or a
desktop printer for real time
event log printing. The
module also has a 5V aux
output that is used to provide
power to the panel’s internal
printer.
Communication Protocol: RS232 Baud Rate: 9600 Data Bits: 8 Parity: None Stop Bits: 1 Compatible Devices: CUSTOM PLUS2 Panel Printer

Smart Connect Multi-loop Installation Manual
www.zetaalarmsystems.com 10
Control Panel Installation and Dimensions Enclosure Dimensions See table 1 for full dimensions see table 1.
Table 1
Panel A B C D E F Top Knock outs
Side Knock outs
Bottom Knock outs
Max Battery Size
SMART/6 535mm 385mm 355mm 150mm 120mm 505mm 18 12 4 2 x 14Ah
SMART/10 665mm 535mm 505mm 200mm 170mm 635mm 26 8 4 2 x 38Ah
SMART/26 665mm 975mm 945mm 200mm 170mm 635mm 64 28 20 2 x 38Ah
Panel Construction Details
All components are manufactured from Zintec.
Large and Medium Smart Multi-loop Enclosures
Back box and door 1.5 mm
Door plate 0.9 mm
All internal parts are 0.9 mm
Small Smart Multi-loop Enclosure
All parts are 0.9 mm
Smart Repeater Enclosure
All parts 0.9 mm.
The paint colour for the main box and door is RAL9005 Black Leatherette (Black version).
The internals are RAL9005 Black Leatherette.

Smart Connect Multi-loop Installation Manual
www.zetaalarmsystems.com 11
The control cabinet can be semi flushed into a wall or surface mounted.
Locating the Fire Alarm Control Panel
The control panel should be installed per BS5839-1:2017 recommendations: -
The panel should be close to the main entrance of the building, so that it can be viewed by any fire-fighting personnel entering the
building.
• It should be fitted to a sturdy wall that will not flex unnecessarily.
• It should ideally be mounted at eye level, for it to be viewed without need of a ladder.
• It should be installed in a dry, weatherproof place, preferably NOT in direct sunlight.
• It should be easily accessible, so that the responsible person can perform their regular fire alarm checks.
The panel must be in a clean, dry position, which is not subject to excessive shock or vibration and at least 2 meters away from pager
systems or any other radio transmitting equipment. The operating temperature range is -5°C (23°F) to 40°C (104°F); maximum humidity
is 95%. The panel will withstand vibrations between 5 & 150 Hz.
Mounting the Enclosure Fix the enclosure to the wall using all the mounting points provided:
SMART6: 4 x Mounting Points. See Fig 1
SMART10: 4 x Mounting Points See Fig 2
SMART26: 6 x Mounting Points. See Fig 3
Check the build and condition of the wall to decide a suitable screw fixing. The mounting holes are designed for No 8 roundhead or
countersunk woodscrews (or similar). Remove any debris from the enclosure. Take care not to damage the FACP during installation.
Mounting Hole Dimensions
Fig 1
ATTENTION: DO NOT DRILL ANY ENTRY HOLES INTO THE PSU SECTION OF THE ENCLOSURE WHICH IS LOCATED ON THE LEFT-
HAND SIDE OF THE CONTROL PANEL CABINET.

Smart Connect Multi-loop Installation Manual
www.zetaalarmsystems.com 12
Fig 2
Fig 3

Smart Connect Multi-loop Installation Manual
www.zetaalarmsystems.com 13
Planning Cable Entry The Knock-out cable entries can be easily removed by tapping with a suitable screwdriver or chisel from outside the control panel box.
Alternatively, the entry can be drilled out, using a 20mm hole cutter. Care should be taken if using a drill. Consider removing the PCBs
to prevent damaging them.
The SMART Connect Multi-loop comes with many cable entry holes. If another entry hole is required, it is strongly recommended that
the panel door is removed to avoid accidental damage. Also, the power supply and termination board should be removed and stored in
a safe place. This would also help while fixing the back box to the wall.
Cable Grounding
The panel is provided earth bars located along the top of the panel for grounding incoming wiring if needed.
The SMART6 panel has 1 x 12 way Earth bar
The SMART10 panel has 2 x 12 way Earth bar
The SMART26 panel has 3 x 12 way Earth bar
Mains Wiring
ATTENTION: DO NOT DRILL ANY ENTRY HOLES INTO THE PSU SECTION OF THE ENCLOSURE.
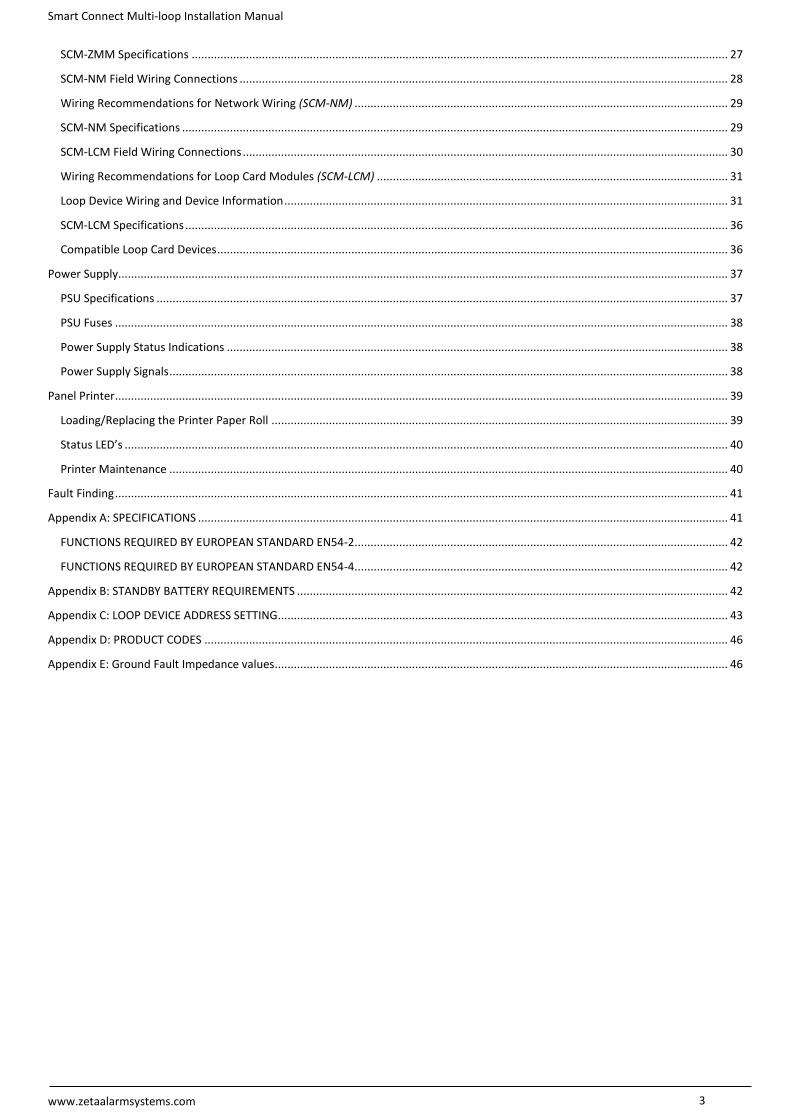
Note: The AC (mains) input wiring, and the back-up battery connections are non-power-limited. All other connections on the
SMART connect multi-loop panel are power limited. Ensure that a minimum ¼” separation exists between non-power-limited and
power-limited circuits.
Smart Connect Multi-loop Installation Manual
www.zetaalarmsystems.com 14
Recommendations
The Mains supply to the FACP is fixed wiring, using Fire resisting 3-core cable (Between 1 mm² and 2.5mm²), or equivalent, fed from an
isolating double pole switch fused spur, and fused at 5A. This should be secure from unauthorized operation and be marked ‘FIRE
ALARM: DO NOT SWITCH OFF’. The supply must be exclusive to the Fire Panel.
Connecting the Mains Power
The AC Live (L), Earth (E) and Neutral (N) connections are marked on the power supply cage. It is essential that the mains Earth cable is
connected to the PSU’s Earth terminal. The incoming mains cable should be kept separate from the loop card cables to help minimise
mains interference.
It is advisable to apply power to the panel before connecting any devices, to check for correct operation, and to familiarise yourself
with the fire alarm panels controls.
If a knockout is removed, fill the hole with a suitable cable gland. If any knockout is removed, but subsequently not used, it should be
covered up.
The AC Mains cable must be fed into the enclosure via one of the cable entries at the top left corner of the back box (Refer to Figure 3
below).
ATTENTION: MAKE SURE ANY SPARE ENTRY HOLES THAT HAVE BEEN OPENED, BUT NOT USED ARE COVERED WITH SUITABLE
GROMMETS OR BLANKING SCREWS.

Smart Connect Multi-loop Installation Manual
www.zetaalarmsystems.com 15
Figure 3: Wiring the mains power supply
Panel Input Voltage Input Frequency
PSU Cage Size
Max Input Current Max Surge current Fuse Installed
SMART6 120-230V AC 47-63 Hz 400W 3.6Amax@120Vac & Full-Load, 2.0Amax@220Vac & Full-Load
65A peak, 1.2ms duration, <0.25A2s@230Vac, Cold Start
3.15A (230 V AC)
SMART10 120-230V AC 47-63 Hz 400W 3.6Amax@120Vac & Full-Load, 2.0Amax@220Vac & Full-Load
65A peak, 1.2ms duration, <0.25A2s@230Vac, Cold Start
3.15A (230 V AC)
SMART26 120-230V AC 47-63 Hz 400W 3.6Amax@120Vac & Full-Load, 2.0Amax@220Vac & Full-Load
65A peak, 1.2ms duration, <0.25A2s@230Vac, Cold Start
3.15A (230 V AC)
Battery Wiring
The SMART Connect Multi-loop panel uses two 12 Volt batteries, wired in series to give a 24 Volt back-up supply.
The +ve of one battery is connected to the red battery lead.
The –ve of the other battery is connected to the black battery lead.
The –ve of the first battery is connected to the +ve of the second battery using the link wire supplied.
Recommended Battery Types:
Panel Recommended Battery size
SMART6 2 x Powersonic 12V,14Ah
SMART10 2 x Powersonic 12V,38Ah
SMART26 2 x Powersonic 12V,38Ah
To calculate the required backup battery capacity, use the information in Appendix B
Other makes and sizes of battery may be suitable. Calculate the standby requirements to determine the most suitable size of batteries.
Figure 4: Battery location and connection

Smart Connect Multi-loop Installation Manual
www.zetaalarmsystems.com 16
Panel Charger Boost Voltage
Charger Float Voltage
PSU Cage Size Max Charger Current Max Battery Size Fuse Installed
SMART6 29.5V DC 27.6V DC 400W 1.1A 2 x 12V, 14 Ah 5A
SMART10 29.5V DC 27.6V DC 400W 2.2A 2 x 12V, 38 Ah 8A
SMART26 29.5V DC 27.6V DC 400W 2.2A 2 x 12V, 38 Ah 15A
Securing the batteries
The SMART Connect Multi-loop has been designed so that the batteries are secured in the panel with Velcro strips.

Smart Connect Multi-loop Installation Manual
www.zetaalarmsystems.com 17

Smart Connect Multi-loop Installation Manual
www.zetaalarmsystems.com 18
Assembling the panel The SMART Connect Multi-loop is a modular panel, designed to be flexible to install. It will normally be supplied as the base panel with
a number of expansion modules packed separately. The Modules are Din Rail Mounted, and connect to the panel’s motherboard with a
small RJ45 cable (supplied with the module). The Base panel is available in 3 sizes:
SMART6 SMART10
SMART26
The above diagrams show the port addresses for each panel size
A typical panel set up would include:-
At least one module for initiating devices (Either a conventional zone module [SCM-ZMM], or an addressable loop module [SCM-LCM])
At least one module for warning devices (Either a conventional sounder circuit module [SCM-ACM], or an addressable loop module
[SCM-LCM])

Smart Connect Multi-loop Installation Manual
www.zetaalarmsystems.com 19
Initial Power Up
It is recommended to initially power up the panel with no modules connected to confirm that the base panel is functioning as
expected. To do this:-
1. Check that the AC cable is connected correctly and the proper grounding has been made (as per BS5839-1:2017).
2. Close the panel door
3. Turn on the mains power. The following will be observed:-
a. Power, Fault and System Fault LEDs will light for around 6 seconds
b. Fault and System Fault LEDs will turn off. Power LED will blink a few times
c. LCD will show touch for calibration. Press the screen within 3 seconds to perform a screen calibration. (The screen is
calibrated at the factory, so this step is not usually required)
d. The LCD shows the Zeta logo for a few seconds, while it checks to see what modules are fitted. (Note: the usual
“System Healthy” banner is not shown during the module check.)
e. If the panel finds no modules, it displays “No Modules” on its LCD
f. The panel has passed its power on test. It can now be turned off and the modules can be fitted.
Module Installation
The Smart Multi-loop panel uses the expansion port number to reference modules. It is recommended that any Loop Card modules are
fitted first to the first expansion ports, so that the loop circuit numbers follow a logical sequence (loop 1 in port 1, loop 2 in port 2 etc.)
1. Ensure that the installation area is free from any cables or wires that may get caught, and that there is enough space on the
DIN rail to mount the module. Also ensure that the DIN clip underneath the module is in the open position.
2. Place the module onto the DIN rail, hooking the metal earth clip underneath onto the rail first.
3. Once the earth clip is hooked, push the bottom of the module onto the rail so that the module sits flat.
4. Push the plastic DIN clip (located at the bottom of the module) upwards to lock and secure the module into position.
5. Once the module is secured to the DIN rail, simply connect the supplied CAT5E cable to the module’s RJ45 port.
6. Connect the other end of CAT5E cable to the nearest unoccupied RJ45 port on the termination PCB.
ATTENTION: THE PANEL MUST BE POWERED DOWN, AND DISCONNECTED FROM THE BATTERIES BEFORE INSTALLING OR
REMOVING ANY MODULES.
*Viewed from the side*

Smart Connect Multi-loop Installation Manual
www.zetaalarmsystems.com 20
TRM RJ45 Port Address Designation Each RJ45 port on the SMART Connect Multi-loop termination PCB has its own unique port address. This port address is important to
keep note of as it is displayed on Alarm/Fault messages and is used when configuring or setting up cause and effects on the panel (See
operation manual GLT-261-7-11).
Securing the modules
The modules are designed to clip together to make them more secure. In addition, the SMART Connect Multi-loop panel is supplied
with DIN rail end stoppers. These should be fitted before the first module, and after the last module on each rail.
Before Powering the Panel On 1. To prevent the risk of a spark, do not connect the batteries. Only connect the batteries after powering on the system from its
main AC supply.
2. Check that all external field wiring is clear from any open, shorts and ground faults.
3. Check that all the modules have been installed properly, with correct connections and placement
4. Check that all switches and jumper links are at their correct settings.
5. Check that all interconnection cables are plugged in properly, and that they are secure.
6. Check that the AC power wiring is correct.
7. Ensure that the panel chassis has been correctly earth grounded (See BS5839-1:2017 recommendations).
8. Before powering on from the main AC supply, make sure that the front panel door is closed.

Smart Connect Multi-loop Installation Manual
www.zetaalarmsystems.com 21
Power on Procedure 1. After the above has been completed, turn the panel on (Via AC Only). The panel will follow the same power up sequence
described in initial power up section above
2. The panel will now display one of the following messages
Message Meaning
The Panel has not detected any modules fitted during its power up check. Power down the panel and check that the expected modules are fitted, and that all module cables are correctly inserted. Note that the panel will need at least one module fitted to run.
The panel has detected a new module added to a port that was previously empty. This is the usual message seen the first time a panel is configured
The panel has detected a different type of module fitted to a port that was previously occupied.
The panel has detected a module fitted to a port that is the same type, but it`s serial number has changed. This could happen if a loop module was swapped with another one, for example.
The panel has detected no module fitted to a port that was previously occupied.

Smart Connect Multi-loop Installation Manual
www.zetaalarmsystems.com 22
The panel has detected no module changes, so has powered up and started running
1. Check that the module configuration is as expected using the and to navigate the through the port numbers. Press the
icon to confirm the changes.
2. The new module is now configured into the panel and is ready for use.
3. Since the batteries are not connected, the panel will report them as removed, lighting the yellow “Fault” LED, intermittently
sounding the fault buzzer, and displaying battery removed message on the screen.
4. Connect the batteries, ensuring that the polarity is correct (Red wire = +ve) & (Black wire = -ve). Acknowledge the fault event
via the display screen, and reset the panel to clear the battery fault.
5. The panel should now remain in the normal condition, and you can configure the panel as normal.
Field Wiring
Wiring Overview
AC Power ON
DC Power ON
Charger Trouble
Battery Trouble
Battery Hi Z Trouble
Fuse Trouble
BATTERYFuse E
SIG NALS
- + - +
Do not short circuit battery terminals - +
+-
+-
+-
+-
NO
CM
NC
NO
CM
NC
MAINS FUSEFuse F
AC: 120 VAC 50/60 Hz
240 VAC 50/60 Hz
SIG NALS
POWER CONNECTIONS 30V DC
LIVE (Brown)
NEUTRAL (Blue)
EARTH (Green)
- +NEG POS- +NEG POS
BLACK
RED
BATTERY CABLE: OBSERVE POLARITY
RED +BLACK -
SCM-LCM SCM-ACM SCM-ZMM
SCM-MIM SCM-RM SCM-NM SCM-PM
A+A- B+B-NAC1
A
A
A
A
C
C
C
C
C
C
C
C
C
C
C
C
C C C
+ - + - + - + - + - + -ZM1 ZM2 ZM3 ZM4 ZM5 ZM6
+ - + - + - + - + - + -I/P1 I/P2 I/P3 I/P4 I/P5 I/P6
C NCO/P1
NO C NCO/P2
NO CNCO/P3
NO
+ - + -NAC2
B SCNNET 1
A B SCNNET 2
A
A
A
C
C
To Previous Network Panel
To Next Network Panel
Cable To PrinterNo User Wiring
EOLR4k7
EOLR4k7
EOLR4k7
EOLR4k7
EOLR4k7
EOLR4k7
EOLR4k7
Tr ouble Out put (Nor m al Stat us)
* Close B et ween N/C and CM
* Open B et ween N/O and CM
A lar m Out put (Nor m al Stat us)
* Close B et ween N/C and CM
* Open B et ween N/O and CM
PROGRAMMABLE RELAYSDRY CONTACT (NOT-SUPERVISED)
RATED @ 5A, 250V RESISTIVE
Fit
End
Of
Lin
e R
esis
tors
to
unu
se
d C
lass B
Circu
its
Addressable Detector
Addressable Interface
Sounder
Conventional Detector
Dry Contact Switch / Relay
NOTE: The Smart Connect Multi-loop panel is a modular system, where any module can be expansion port. The above diagram gives an example configuration for
illustrative purposes.connected to any
(Supervised)
(Supervised)
(Supervised)
(Sup
erv
ised
)
(Su
pe
rvis
ed)
(Su
pe
rvis
ed)
(Su
perv
ise
d)
(Not Supervised)
(Not Supervised)
AUX POWER B
AUX POWER A
Regulated 28V DC @ 1A
Regulated 28V DC @ 1A
ATTENTION: DO NOT EXCEED POWER SUPPLY RATINGS, OR MAXIMUM CURRENT RATINGS.
NOTE: The terminal blocks are removable to make wiring easier.

Smart Connect Multi-loop Installation Manual
www.zetaalarmsystems.com 23
SCM-ACM Field Wiring Connections Typical Wiring Diagram (Class B) – Zeta Conventional Sounders
Typical Wiring Diagram (Class B) - Bell Devices
NOTE: When an ACM is configured as a bell output, the “24V On”
LED on the front of the module will be flashing ON/OFF.

Smart Connect Multi-loop Installation Manual
www.zetaalarmsystems.com 24
Typical Wiring Diagram (Auxiliary 24VDC)
Wiring recommendations for Alarm Circuits (SCM-ACM) The SCM-ACM circuits are rated for 500mA each. The table shows the maximum wire run in metres for different wire gauges and alarm
loads.
Wire Gauge 125mA Load 250mA Load 500mA Load
18 AWG 765 m 510 m 340 m
16 AWG 1530 m 1020 m 680 m
14 AWG 1869 m 1246 m 831 m
SCM-ACM Specifications Alarm Circuit Module (SCM-ACM)
Circuit Voltage 29VDC Nominal (19V – 29V)
Circuit Type Regulated 24V DC. Power limited & Supervised.
Maximum Alarm Circuit Current 2 x 500mA
Maximum Aux 24V Current 2 x 400mA
Maximum RMS current for a single sounder device 350mA
Maximum Line Impedance 3.6Ω total (1.8Ω per core)
Wiring Class 2 x Class B [Power limited & Supervised]
End of Line Resistor 4K7Ω
Recommended cable sizes 18 AWG to 14 AWG (0.8mm2 to 2.5mm2)
Special Applications 24V auxiliary voltage output
NOTE: When an alarm circuit is configured as a 24v aux output, the
“24V On” LED on the front of the module will be ON.
NOTE: This wiring diagram demonstrates the option to
program one or more SCM-ACM outputs to become a
regulated constant 24VDC output.
RECOMMENDED CABLE:
Cable should be BS approved FPL, FPLR, FPLP or equivalent.

Smart Connect Multi-loop Installation Manual
www.zetaalarmsystems.com 25
Compatible Warning Devices
Alarm Circuit Devices
ZXT Xtratone Conventional Wall Sounder
ZXTB Xtratone Conventional Combined Wall Sounder Beacon
ZRP Conventional Raptor Sounder
ZRPB Conventional Raptor Sounder Beacon
Maximum Warning Devices per Circuit
Some of the above warning devices have selectable settings for sound and beacon output. Please refer to the device manuals to
calculate the maximum number allowed on each alarm circuit.
SCM-MIM Field Wiring Connections
Wiring Recommendations for Input Circuits (SCM-MIM)
Wire Gauge (AWG) Maximum Wiring Run (Metres)
22 910
20 1450
18 2300
SCM-MIM Specifications Multi Input Module (SCM-MIM)
Circuit Voltage 24VDC Nominal (16V – 24.5V with EOL fitted)
Wiring Class 6 x Class B circuits
Input Maximum Line Impedance 10Ω
End of Line Resistor 4K7Ω
Recommended cable sizes 22 AWG to 18 AWG (0.3mm2 to 0.8mm2)
Alarm Trigger Resistor 1KΩ
RECOMMENDED CABLE:
Cable should be BS approved FPL, FPLR, FPLP or equivalent.

Smart Connect Multi-loop Installation Manual
www.zetaalarmsystems.com 26
SCM-RM Field Wiring Connections
SCM-RM Specifications Multi Relay Modules (SCM-RM)
Contact Form 3 x Form C
Switching Capacity 5 A, 30VDC (resistive) 5 A, 250VAC (general use)
Circuit Type Power limited & Not Supervised.
Modes Common alarm, Common fault, Common tech alarm or Programmable
Recommended cable sizes 18 AWG to 14 AWG (0.8mm2 to 2.5mm2)
NOTE: When an MRM relay is configured as an alarm output, it will act as a common
alarm relay, and cannot be controlled by cause and effect.

Smart Connect Multi-loop Installation Manual
www.zetaalarmsystems.com 27
SCM-ZMM Field Wiring Connections
Wiring Recommendations for Zone Monitor Circuits (SCM-ZMM)
Wire Gauge (AWG) Maximum Wiring Run (Metres)
22 910
20 1450
18 2300
SCM-ZMM Specifications Zone Monitor Modules (SCM-ZMM)
Circuit Voltage 26VDC Nominal (17.5V - 26.5V with EOL connected)
Circuit Type Power limited & Supervised
Wiring Class Class B
Zone Maximum Line Impedance 10Ω
Zone Maximum Current (under S/C conditions) 56mA
Wiring Class 6 x Class B circuits
Recommended cable sizes 22 AWG to 14 AWG (0.3mm2 to 2.5mm2)
End of Line Resistor 4K7Ω
Alarm Trigger Resistor 1KΩ
Compatible Devices MKII-OP, MKII-HR, MKII-HF, MKII-HF-CS90, MKII-OH, ZT-CP3 (All are EN54 approved)
Maximum Detectors Per Zone 20
RECOMMENDED CABLE:
Cable should be BS approved FPL, FPLR, FPLP or equivalent.
While SMART Connect Multi-loop conventional Zone modules can
support cable runs greater than 2000m, it is generally better to plan
the system to use more manageable lengths.
NOTE: It is not recommended to mix
different detector manufacturers on
a zone.
NOTE: It is recommended that all
manual call points are connected at
the start of the zone.

Smart Connect Multi-loop Installation Manual
www.zetaalarmsystems.com 28
SCM-NM Field Wiring Connections Ring Topology
Bus Topology
NOTE: It is recommended to install the network in a ring topology for
protection against open circuit and short circuit faults.

Smart Connect Multi-loop Installation Manual
www.zetaalarmsystems.com 29
Wiring Recommendations for Network Wiring (SCM-NM) The SMART Connect Multi-loop network can support up to 64 panels.
SCM-NM Specifications Network Module (SCM-NM)
Maximum Network Size 64 Nodes
Maximum Distance Between Nodes 1KM (with screened data cable)
Communication Protocol RS485
Network Wiring Typologies Bus or Ring
RECOMMENDED CABLE: Belden type

Smart Connect Multi-loop Installation Manual
www.zetaalarmsystems.com 30
SCM-LCM Field Wiring Connections
Class X Wiring
Class A Wiring
Note: If a loop using Class A wiring is used for 2 or more detection zones, short circuit
isolators, or devices with built in short circuit isolators (such as interfaces) should be
fitted to the zone boundaries to prevent a single short circuit affecting more than one
zone.
Note: Detectors can be fitted to isolator bases, or fitted between isolator modules for
Class X wiring. Manual stations should be fitted between isolator modules.

Smart Connect Multi-loop Installation Manual
www.zetaalarmsystems.com 31
Wiring Recommendations for Loop Card Modules (SCM-LCM) The SCM-LCM’s are rated for 450mA each, but it is recommended that you leave an allowance ~100mA for any future loop expansion.
Wire Gauge (AWG) Maximum Wiring Run (Metres)
18 861
16 1290
14 2000
Loop Device Wiring and Device Information Loop device configuration for addressable devices
MKII-AOP
MKII-AOP - The Fyreye MKII optical smoke detector (MKII-AOP) uses a pulsing IR LED & photodiode to detect IR scatter caused by smoke entering the chamber. The detector is particularly suitable for detecting optically dense smoke, involving materials such as soft furnishings, PVC, plastic, foam and all similar materials which produce small visible particles (0.5 to 10μm).
MKII-AHR, MKII-AHFand MKII-AHF/CS90
MKII-AHR, MKII-AHF and MKII-AHF/CS90 - The Fyreye MKII Rate of Rise heat detector (MKII-AHR) uses a thermistor arrangement to sense a quick rise in temperature and also a final threshold temperature of 57°C. The Fyreye fixed heat detector (MKII-AHF) has a single thermistor arrangement that gives an alarm at a temperature of 57°C, where the MKII-AHF/ CS90 give an alarm above 86°C.
MKII-AOH
NOTE:
• Line capacitance shall not exceed 0.1µf (100nF)
• Inductance shall not exceed 1mH
• Resistance shall not exceed 50 Ohms.
RECOMMENDED CABLE: The general recommendation would be to use a standard fire resistant cable, such as
Firetuf™, FP200 or an equivalent, 1.0mm2 to 2.5mm2. These cables are screened, and will provide good EMC
shielding when properly grounded at the panel.

Smart Connect Multi-loop Installation Manual
www.zetaalarmsystems.com 32
MKII-AOH–The Fyreye MKII optical heat Detector contains both an optical smoke detector and a thermistor temperature sensor for full fire detection. The smoke sensor uses a pulsing IR LED & photodiode to detect IR scatter caused by smoke entering the chamber. The heat sensor has a single thermistor arrangement that gives an alarm at a temperature of 57°C.
MKII-CB
MKII-CB series base is detector base which is designed to be used with the model MKII-AOP, MKII-AHF, MKII-AHF/CS90, MKII-AHR, and MKII-AOH detector series heads. The series includes MKII-CB, which is a 4 inch standard base, and MKII-CB/D, which is 4 inch deep base. MKII-CB & MKII-CB/D are supplied with 5 terminals as standard. The Terminals of the bases are configured as follows.
L1IN=Loop Negative L1OUT= Not Used L2=Loop Positive -R=(Used for remote indicators only) = Earth screen
MKII-CB/D
ZAI-MI
ZAI-MI – The ZAI-MI is used to monitor and raise alarm from any ancillary equipment such as sprinkler flow switch, aspiration detectors, secondary fire control panel, beam detectors, external power supplies etc. For more details and connection information consult the installation guide.
Addressable device – Wiring diagram
Position of terminals (MKII-CB)

Smart Connect Multi-loop Installation Manual
www.zetaalarmsystems.com 33
ZAI-MI typical wiring diagram (E.g. connecting to fire panel / beam detector / UV IR detector):
ZAIO-MI
ZAIO-MI – The ZAIO-MI is used when both an input needs to be monitored and at the same time a local output (relay output) needs to be triggered to switch ancillary equipment on or off during an alarm condition. Typical output triggering includes: controlling lift operation during an alarm, starting fire pump, stopping ventilation fans etc.
ZAIO-MI typical wiring diagram(E.g. connecting to a door magnet):
ZAZM-MI
ZAZM-MI – The ZAZM-MI is a conventional zone that can be used for conventional devices and/or for special detectors that are not available in addressable form such as UV detectors, Aspiration detectors etc. For more details and connection information consult the installation guide.
ZAZM-MI typical wiring diagram(E.g. connecting to conventional initiating devices):

Smart Connect Multi-loop Installation Manual
www.zetaalarmsystems.com 34
ZASC-MI
ZASC-MI –The ZASC-MI can be used to supply a monitored 24Vdc to operate external relays and as a conventional sounder circuit to run bells or beacon flashers where the current consumption prohibits the use of addressable loop powered devices. The unit also includes input connections to monitor the external power supply status and report the findings to the addressable control panel.
ZASC-MI typical wiring diagram (E.g. connecting to conventional sounder devices):
ZAIO/230
ZAIO/230 – The interface is used to monitor the contacts of an external system which must be interfaced to the Fire Alarm System, for example a Flow Switch in a sprinkler system to indicate if the sprinklers have been activated or extinguisher level monitoring in Gas Extinguishing systems, etc. Module is provided with a loop short-circuit isolator and with a voltage free single pole change over mains rated output. The output relay is always powered directly from the detection loop. It is not required to use an external 24V DC power supply. Relay operation is confirmed by an on-board red LED
ZAIO/230 typical wiring diagram (E.g. Loop wiring):
MKII-SSB
MKII-SSB – The Fyreye II Sandwich sounder base is a platform sounder that works with the Zeta Fyreye MKII protocol. The sounder can be triggered from its detectors remote LED output, allowing the sounders to be triggered individually. It can also be triggered using the Protocol`s common sounder group command, meaning that it can be triggered even if it`s detector has been removed. This sounder has been designed to be sandwiched between a common base and an addressable Fyreye II Detector
MKII-SSB typical setup:

Smart Connect Multi-loop Installation Manual
www.zetaalarmsystems.com 35
MKII-AXT& MKII-AXTB
(MKII-AXTB/R pictured)
MKII-AXT & MKII-AXTB – The Xtratone addressable sounder beacon is a small, high output device, suitable for indoor wall mounted applications. It is available in red or white and has a selection of 16 alarm tones, selectable at the control panel. Termination of field wiring is made to the back box for a clean first fix. The AXTB beacon has a coverage pattern of W-3.1-9.1.
MKII-AXT & MKII-AXTB typical wiring diagram (E.g. Loop wiring):
ZRAP & ZRAPB
(ZRAPB/R pictured)
ZRAP & ZRAPB – The Raptor addressable sounder is a large weatherproof horn sounder suitable for many indoor & outdoor applications. It is available in red or white and has a selection of 16 tones, selectable at the control panel. Termination of field wiring is made to the back box for a clean first fix. The ZRAPB beacon has a coverage pattern of W-3.0-8.7 and has a flash rate between 0.33Hz and 1.5Hz.
ZRAP & ZRAPB typical wiring diagram (E.g. Loop wiring):

Smart Connect Multi-loop Installation Manual
www.zetaalarmsystems.com 36
SCM-LCM Specifications Loop Card Modules (SCM-LCM)
Circuit Voltage 28V + 9V Data (Nominal)
Protocol Data Address Phase: Pulse Width Modulation Reply Phase: Synchronous 20mA Current Pulses
Circuit Type Power limited & Supervised
Recommended cable sizes 1.0mm2 to 2.5mm2 (18 AWG to 14 AWG)
Maximum Loop Current 450mA
Maximum Loop Capacity 250 Addresses
Maximum Loop Resistance 25Ω per core @ 200mA / 10Ω per core @ 450mA
Maximum Loop Capacitance 500nF
Maximum Loop Baud Rate 1024 Bits Per Second (typical)
Compatible Loop Card Devices Loop Card Devices
Description Model No.
MKII Addressable Optical Smoke Detector MKII-AOP
MKII Addressable Combined Optical Smoke & Heat (A1R) Detector MKII-AOH
MKII Addressable Fixed Heat Only A2S Detector MKII-AHF
MKII Addressable Fixed Heat Only CS Detector MKII-AHF/CS90
MKII Addressable Rate of Rise & Fixed Heat Detector A1R Detector MKII-AHR
MKII Addressable Optical Smoke Detector With Built-In Isolator MKII-AOPI
MKII Addressable Combined Optical Smoke & Heat (A1R) Detector With Built-In Isolator MKII-AOHI
MKII Addressable Fixed Heat Only A2S Detector With Built-In Isolator MKII-AHFI
MKII Addressable Fixed Heat Only CS Detector With Built-In Isolator MKII-AHFI/ CS90
MKII Addressable Rate of Rise & Fixed Heat Detector A1R Detector With Built-In Isolator MKII-AHRI
Addressable Remote LED Indicator MKII-ARL
Zeta Addressable CP3 Manual Call Point ZT-CP3/AD
MKII Sandwich Sounder MKII-SSB
Xtratone Addressable Wall Sounder MKII-AXT
Xtratone Addressable Combined Sounder Beacon MKII-AXTB
Raptor Addressable Weatherproof Sounder ZRAP
Raptor Addressable Weatherproof Sounder Beacon ZRAPB
MKII Addressable Input Module with S/C Isolator ZAI-MI
MKII Addressable Input/Output Module with S/C Isolator ZAIO-MI
MKII Addressable Sounder Circuit Controller with S/C Isolator ZASC-MI
MKII Addressable Zone Monitoring Unit with S/C Isolator ZAZM-MI
MKII Addressable Mains switching I/O unit 8A @ 230V AC ZAIO/230
Special Mini Module (Yellow) - Alarm Devices SMM/S
Special Mini Module (White) - Beam Detector SMM/B
Special Mini Module (Red) - Call Point SMM/C
MKII Shallow Common Base MKII-CB
MKII Deep Common Base MKII-CB/D
MKII Isolator Base MKII-IB
MKII Common Base For Use With Detectors /w Isolator MKII-CBI

Smart Connect Multi-loop Installation Manual
www.zetaalarmsystems.com 37
Power Supply The SMART Connect Multi-loop Power supply is located on the left hand size of the back box. There are three different power supply sizes, depending on whether the panel is a 6 ports, 10 ports, or 26 ports version.
PSU Specifications SMART6 SMART10 SMART26
AC Line Voltage 120 – 230 VAC 120 – 230 VAC 120 – 230 VAC
Power Supply Rating 400 Watts 400 Watts 400 Watts
DC Output Voltage 30 VDC 30 VDC 30 VDC
Maximum Output Current 11.1 Amp 11.1 Amp 11.1 Amp
Battery Voltage 27.6VDC 27.6VDC 27.6VDC
Battery Charging Capability Up to 14.0Ah Up to 38.0Ah Up to 38.0Ah
Max Battery Charging Current 1.1 Amp 2.2 Amp 2.2 Amp
ATTENTION:
• DO NOT EXCEED POWER SUPPLY RATINGS, OR MAXIMUM CURRENT RATINGS.
• TO AVOID SPARKING, CONNECT BATTERIES AFTER THE SYSTEM’S MAIN AC POWER IS
TURNED ON.
• COMPLY WITH VOLTAGE MARKINGS AS SPECIFIED ON LABELS.

Smart Connect Multi-loop Installation Manual
www.zetaalarmsystems.com 38
PSU Fuses All fuses are quick blow, rating as shown.
Panel Designation SMART6 SMART10 SMART26
Fuse A 1A 1A 1A
Fuse B 1A 1A 1A
Fuse C 7.5A 7.5A 7.5A
Fuse D 7.5A 7.5A 7.5A
Fuse E 5A 8A 15A
Fuse F 3.15A 3.15A 3.15A
Power Supply Status Indications
LED
Description
LED
Colour
Indication
Method
Event
AC Power ON Green ON Mains power present, converter in operating state
OFF Mains power off
DC Power ON Green ON No mains power or converter off
OFF When mains power present
Charger Fault Yellow OFF Normal
Flashing Charger Fault
Battery Fault Yellow
OFF Normal
Flashing
Battery disconnected /
Battery fuse blown or removed/
Low Battery
Battery Hi Z Yellow OFF Normal
Flashing Battery internal high impedance present
Blown Fuse Yellow OFF Normal
Flashing Fuse A, B, C, or D, are blown
Power Supply Signals
Description Details
MAINS FAULT Continuity between NC & C in normal operating condition. When there is a fault condition on the mains power, continuity is switched to NO & C. Relay is normally energized and “fail-safe” as the relay will change over in the event of total power failure.
FAULT RELAY Continuity between NC & C in normal operating condition. When there is any fault on the PSU or Charger, continuity is switched to NO & C. Relay is normally energized and “fail-safe” as the relay will change over in the event of total power failure.
PSU DATA Serial data connection from PSU to termination PCB. TO BE USED TO CONNECT TO PANEL ONLY.
1. Switch SW2 on the charger PCB is used to determine if temperature compensation is used or not.
Power down panel completely before removing cover to change the setting.
2. Battery circuit resistance measurement is required by BS EN 54-4. The maximum resistance of several
tens to hundreds of milliohms varies for different power supplies and depends on their nominal
output voltage and power. It can be set on or off by using switch 4 of dip switch SW1 on the charger
PCB. Power down panel completely before removing cover to change the setting.
Smart Connect Multi-loop Installation Manual
www.zetaalarmsystems.com 39
Panel Printer (SMART Connect Multi-loop systems with a fitted panel printer only)
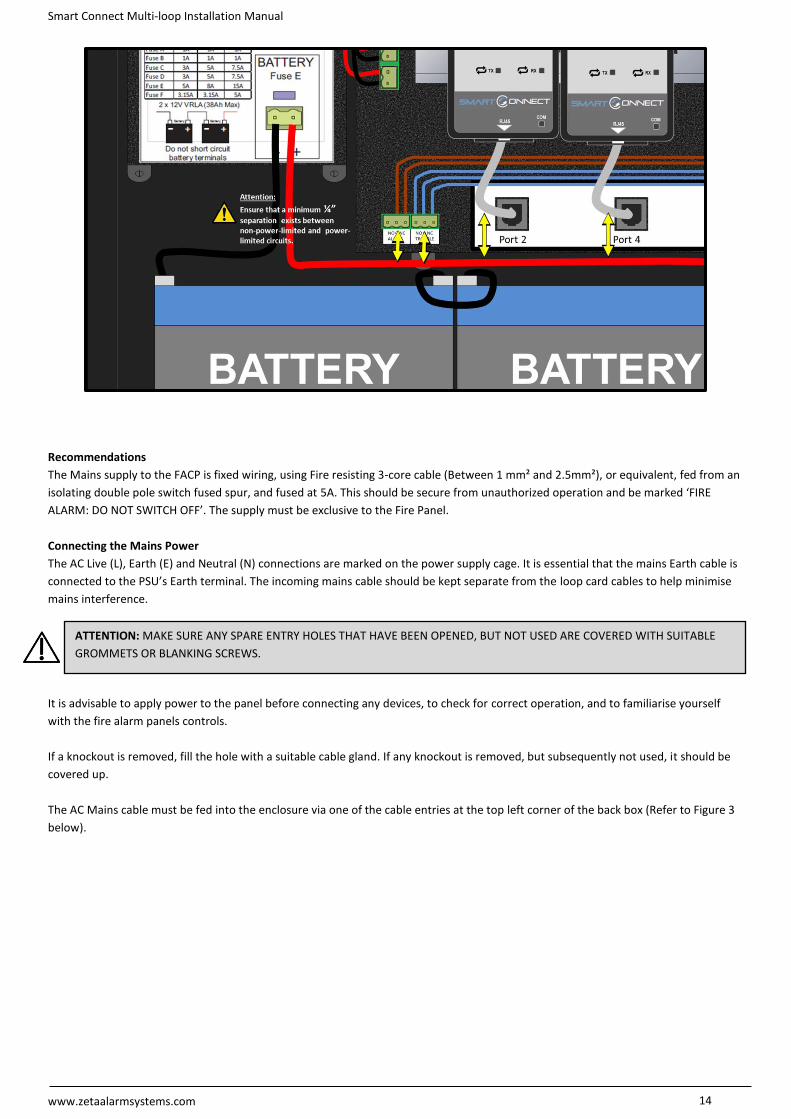
Loading/Replacing the Printer Paper Roll The SMART Connect Multi-loop uses a CUSTOM PLUS2 RS232 panel printer. This printer will accept printer rolls that meet the following
requirements:
Specification PLUS2
Paper Type Thermal Paper Roll
Paper Width 57mm
Roll Diameter 50mm
Roll Length 30m (See note)
Paper Weight 55 to 70gsm
To change the printer roll, proceed as follows. Every time the paper is changed, check inside the device to locate and remove any Scrap pieces of paper.
1. Open the printer cover.
2. Place the roll in the paper compartment and pull out a few centimetres of paper.
3.Close the printer cover.
4. Remove any excess paper.
Note: Paper roll length is approximate, based upon readily available UK sourced paper
with 12.7mm core.

Smart Connect Multi-loop Installation Manual
www.zetaalarmsystems.com 40
Status LED’s The status of the device is shown via visual feedback. The status LED identifies the hardware status of the printer. The table below
shows the various LED signals and their corresponding status.
Status LED LED Colour Description
OFF Green Printer is off
ON Green Printer is on: No error
ON Flash x 2 Green Printer head over temperature
ON Flash x 3 Green Printer paper empty
ON Flash x 4 Green Power supply voltage is incorrect
ON Flash x 5 Green Reception errors (Parity, frame error, overrun error)
ON Flash x 6 Green Command is not recognised
ON Flash x 7 Green Command reception has timed out
Printer Maintenance The regular cleaning of the panel printer will help maintain its print quality and extend its lifetime. The table below shows the
recommended maintenance timeline and cleaning operations.
Every Paper Change
Printer Head Use Isopropyl Alcohol
Rollers Use Isopropyl Alcohol
Every 5 Paper Changes
Paper Path Use Compressed Air
Sensors Use Compressed Air
Every 6 Months or as Needed
Printer Case Use Compressed Air or a Soft Cloth
Note: If the SMART Connect Multi-loop panel is installed in a dusty environment, the
times between the cleaning operations should be reduced.

Smart Connect Multi-loop Installation Manual
www.zetaalarmsystems.com 41
Fault Finding
See troubleshooting section in SMART Connect Multi-loop Operation Manual (Doc: GLT-261-7-11)
Appendix A: SPECIFICATIONS
Code
Description SMART Connect Multi-loop Fire Alarm Panel
Standard EN 54-2 EN 54-4
Main Supply
Mains Voltage 120-240V AC
Mains Frequency 50-60 Hz
Battery Secondary Supply SMART6 SMART10 SMART26
Battery Voltage 2 x 12V SLA 2 x 12V SLA 2 x 12V SLA
Battery Charge Current 1.1A 2.2A 2.2A
Battery Charge Voltage 27.3V @ 25°C 27.3V @ 25°C 27.3V @ 25°C
Battery Derating Factor
On-board Relay Outputs
Fire Relay (Termination PCB) (C,NO,NC) Contact rating: 125VAC @ 0.5A / 30VDC @ 1A
Fault Relay (Termination PCB) Normally Energised (C,NO,NC) Contact rating: 125VAC @ 0.5A / 30VDC @ 1A
Mains Fault Relay (Charger PCB) Normally Energised (C,NO,NC) Contact rating: 125VAC @ 0.5A / 30VDC @ 1A
Fault Relay (Charger PCB) Normally Energised (C,NO,NC) Contact rating: 125VAC @ 0.5A / 30VDC @ 1A
Power Supply Outputs SMART6 SMART10 SMART26
Output A (Auxiliary Power) 29V @ 1A 29V @ 1A 29V @ 1A
Output B (Auxiliary Power) 29V @ 1A 29V @ 1A 29V @ 1A
Output C (Control Panel Power) 29V @7.5A 29V @7.5A 29V @7.5A
Output D (Control Panel Power) 29V @7.5A 29V @7.5A 29V @7.5A
Display
LCD Display 4.3” Resistive touch screen. 480 x 272 pixel resolution
LED Indicators
Fire, Sounder Fault, Fault, Sounder Active, Power, Controls Active, General Disablement, General Test, Sounder Disablement, Sounder Delay, Relay Delay, System Fault, More Data 32 zone LED indication (Optional MMP6) 64 zone LED indication (Optional MMP10/26)
Button Controls Stop Sounders, Silence Buzzer, Silence Buzzer, Scroll Display, Reset, Start Sounders (All other controls via touchscreen)
General Panel Information
Maximum Software Zones 254 Zones
Maximum Event Log 8032 Events
Software Programming Via touchscreen or Windows ‘Smart Configurator’ software
Enclosure SMART6 SMART10 SMART26
Dimensions H x W x D (mm) H: 535mm x W: 385mm x D: 150mm
H: 665mm x W: 535mm x D: 200mm
H: 665mm x W: 975mm x D: 200mm
Weight 8.5 kg 15 kg 27 kg
Cable Entries Top 18
Sides 12 Base 4
Top 26 Sides 8 Base 4
Top 66 Sides 28 Base 20
Module Capacity 6 10 26
Power Supply 15A 15A 15A
Battery Capacity 14Ah max 38Ah max 38Ah max
Environmental
Operating Temperature -5°C (23°F) to 40°C (104°F)
Relative Humidity 93% Non-condensing

Smart Connect Multi-loop Installation Manual
www.zetaalarmsystems.com 42
FUNCTIONS REQUIRED BY EUROPEAN STANDARD EN54-2 The Smart Connect Multi-loop fire alarm control panel provides the following mandatory and optional functions as prescribed by the
European standard EN54-2.
(a) Mandatory Functions
The mandatory functions and corresponding indications provided by this panel are:
• Fire alarm condition
• Fault warning condition
• Disablement condition
• Quiescent condition (when the CIE is powered by a power supply conforming to EN 54-4 and no other functional
condition is indicated)
(b) Optional Functions (Options with Requirements)
The options with requirements provided by this panel are:
• Clause 7.8 – Output to fire alarm device(s)
• Clause 7.11 – Delays to outputs
• Clause 7.12.2 – Dependencies on more than one alarm signal - Type B
• Clause 7.12.3 – Dependencies on more than one alarm signal - Type C
• Clause 8.3 – Fault signals from points
• Clause 9.5 – Disablement of each address points
• Clause 10 –Test Condition
(c) Other Functions outside EN54
• USB port (For PC configuration and software upgrading)
• RS485 Network / Repeater connection
• TCP/IP (Ethernet) connection (Remote access)
• Programmable Cause / Effect on Outputs (Phased Evacuation)
• Printer Option
• Auxiliary Power Supply Output (via SCM-ACM)
• Auxiliary Relay Outputs
FUNCTIONS REQUIRED BY EUROPEAN STANDARD EN54-4 The Smart Connect Multi-loop fire alarm control panel provides the following mandatory functions as prescribed by the European
standard EN54-4.
(a) Mandatory Functions
The mandatory functions and corresponding indications provided by this panel are:
• Clause 5.1 – Power supply from the main power source
• Clause 5.2 – Power supply from the standby power source (battery)
• Clause 5.3 – Charger
• Clause 5.4 – Faults
Appendix B: STANDBY BATTERY REQUIREMENTS A spreadsheet is available for calculating the standby battery requirements. The table below is provided for information:
Model Number Description Standby Current (mA) (Mains Fail Condition)
Alarm Current (mA)
SMART6 Smart Connect Multi-loop 6 expansion port FACP 110
SMART10 Smart Connect Multi-loop 10 expansion port FACP 112
SMART26 Smart Connect Multi-loop 26 expansion port FACP 120
SCM-LCM Loop Card Module 87* 87*

Smart Connect Multi-loop Installation Manual
www.zetaalarmsystems.com 43
SCM-MIM Multi Input Module 48 73
SCM-ZMM Zone Monitor Module 62 97
SCM-RM Multi Relay Module 28 116
SCM-ACM Alarm Circuit Module 32 32+ alarm load
SCM-NM Network Module - RS485
SCM-PM RS232 Module (Printer Driver) 37 37**
MKII-AOP MKII Addressable Optical Smoke Detector 0.5 5
MKII-AOH MKII Addressable Combined Optical Smoke & Heat (A1R) Detector
0.5 5
MKII-AHF MKII Addressable Fixed Heat Only A2S Detector 0.5 5
MKII-AHF/CS90 MKII Addressable Fixed Heat Only CS Detector 0.5 5
MKII-AHR MKII Addressable RoR & Fixed Heat Detector A1R Detector 0.5 5
MKII-AOPI MKII Addressable Optical Smoke Detector With Built-In Isolator 0.5 5
MKII-AOHI MKII Addressable Combined Optical Smoke & Heat (A1R) Detector With Built-In Isolator
0.5 5
MKII-AHFI MKII Addressable Fixed Heat Only A2S Detector With Built-In Isolator
0.5 5
MKII-AHFI/ CS90 MKII Addressable Fixed Heat Only CS Detector With Built-In Isolator
0.5 5
MKII-AHRI MKII Addressable Rate of Rise & Fixed Heat Detector A1R Detector With Built-In Isolator
0.5 5
MKII-ARL MKII Addressable Remote LED Indicator 0.5 5
ZT-CP3/AD Addressable CP3 Manual Call Point 0.45 2.3
ZAI-MI MKII Addressable Input Module with S/C Isolator 1 3.6
ZAIO-MI MKII Addressable Input/Output Module with S/C 1 2
ZASC-MI MKII Addressable Sounder Circuit Controller with S/C Isolator 0.6 0.8
ZAZM-MI MKII Addressable Zone Monitoring Unit with S/C Isolator 3.5 13.2
ZAIO/230 MKII Addressable Mains switching Input/Output Module 1.5 4.6
SMM/B Special Mini Modules (White) - Beam Detector 1.1 12
MKII-SSB MKII Sandwich Sounder (No Address Required) 0.65 5.5
MKII-AXT MKII Addressable Xtratone Wall Sounder 1.5 5.4
MKII-AXTB MKII Addressable Xtratone Combined Sounder Beacon 1.5 19-44***
ZRAP MKII Addressable Raptor Weatherproof Sounder 1.5 5.4
ZRAPB MKII Addressable Raptor Weatherproof Sounder Beacon 1.5 19-44***
MKII-OP MKII Conventional Fyreye Optical Smoke Detector 0.07 35-45****
MKII-HR MKII Conventional Fyreye ROR Heat Detector 0.07 35-45****
MKII-HF MKII Conventional Fyreye Fixed Heat Detector 0.07 35-45****
MKII-HF-CS90 MKII Conventional Fyreye Fixed Heat (CS) Detector 0.07 35-45****
MKII-OH MKII Conventional Fyreye Opto-Heat Detector 0.07 35-45****
MKII-RL MKII Conventional Remote LED Indicator 0.45 2.1****
ZXT Xtratone Conventional Wall Sounder 0 10
ZXTB Xtratone Conventional Combined Wall Sounder Beacon 0 60-70***
ZRP Conventional Raptor Sounder 0 10
ZRPB Conventional Raptor Sounder Beacon 0 60-70***
*Loop device current and alarm current not included. On batteries use 1.5x current to allow for DC-DC step up voltage
**Current for printing out alarm message not included
***Depends on flasher intensity setting
****For use with either SCM-ZMM, or the MKII-ZAZM loop powered module
Appendix C: LOOP DEVICE ADDRESS SETTING Soft Addressing (with handheld programming tool)
The MKII Handheld Programmer is designed to complement all MKII devices and to assist the commissioning engineer on site. The unit
will softly address all devices without using the incorporated dip-switch on the field devices.

Smart Connect Multi-loop Installation Manual
www.zetaalarmsystems.com 44
Smoke and heat detectors can be tested when plugged on the programmer and alarm LED’s can be verified prior to installation.
The MKII Programmer can also re-program the OPT-HEAT detectors to either heat or smoke detector.
For instructions and further details on how to soft address devices, please refer to the “MKII-TOOL-Manual” (GLT-252-7-1).
Hard Addressing (with DIP switches)
If the soft address programming tool is not available, the device Address can still be set with a DIP switch on the rear of the device.
The example shown would be: switches 6, 4 & 1 = 32 + 8 + 1 = Address 41
If you are not familiar with binary, use the following rule: Switch 8 off = Add 128 Switch 7 off = Add 64 Switch 6 off = Add 32 Switch 5 off = Add 16 Switch 4 off = Add 8 Switch 3 off = Add 4 Switch 2 off = Add 2 Switch 1 off = Add 1 The Address setting is binary, with the ON position being binary 0, and the OFF position being binary 1.
DIP Switch Address Settings (Full table)
ADDRESS SWITCHES
ADDRESS SWITCHES
ADDRESS SWITCHES
1 2 3 4 5 6 7 8 1 2 3 4 5 6 7 8 1 2 3 4 5 6 7 8
0 = N O T U S E D 43 = OFF OFF ON OFF ON OFF ON ON 86 = ON OFF OFF ON OFF ON OFF ON
1 = OFF ON ON ON ON ON ON ON 44 = ON ON OFF OFF ON OFF ON ON 87 = OFF OFF OFF ON OFF ON OFF ON
2 = ON OFF ON ON ON ON ON ON 45 = OFF ON OFF OFF ON OFF ON ON 88 = ON ON ON OFF OFF ON OFF ON
3 = OFF OFF ON ON ON ON ON ON 46 = ON OFF OFF OFF ON OFF ON ON 89 = OFF ON ON OFF OFF ON OFF ON
4 = ON ON OFF ON ON ON ON ON 47 = OFF OFF OFF OFF ON OFF ON ON 90 = ON OFF ON OFF OFF ON OFF ON
5 = OFF ON OFF ON ON ON ON ON 48 = ON ON ON ON OFF OFF ON ON 91 = OFF OFF ON OFF OFF ON OFF ON
6 = ON OFF OFF ON ON ON ON ON 49 = OFF ON ON ON OFF OFF ON ON 92 = ON ON OFF OFF OFF ON OFF ON
7 = OFF OFF OFF ON ON ON ON ON 50 = ON OFF ON ON OFF OFF ON ON 93 = OFF ON OFF OFF OFF ON OFF ON
8 = ON ON ON OFF ON ON ON ON 51 = OFF OFF ON ON OFF OFF ON ON 94 = ON OFF OFF OFF OFF ON OFF ON
9 = OFF ON ON OFF ON ON ON ON 52 = ON ON OFF ON OFF OFF ON ON 95 = OFF OFF OFF OFF OFF ON OFF ON
10 = ON OFF ON OFF ON ON ON ON 53 = OFF ON OFF ON OFF OFF ON ON 96 = ON ON ON ON ON OFF OFF ON
11 = OFF OFF ON OFF ON ON ON ON 54 = ON OFF OFF ON OFF OFF ON ON 97 = OFF ON ON ON ON OFF OFF ON
12 = ON ON OFF OFF ON ON ON ON 55 = OFF OFF OFF ON OFF OFF ON ON 98 = ON OFF ON ON ON OFF OFF ON
13 = OFF ON OFF OFF ON ON ON ON 56 = ON ON ON OFF OFF OFF ON ON 99 = OFF OFF ON ON ON OFF OFF ON
14 = ON OFF OFF OFF ON ON ON ON 57 = OFF ON ON OFF OFF OFF ON ON 100 = ON ON OFF ON ON OFF OFF ON
15 = OFF OFF OFF OFF ON ON ON ON 58 = ON OFF ON OFF OFF OFF ON ON 101 = OFF ON OFF ON ON OFF OFF ON
16 = ON ON ON ON OFF ON ON ON 59 = OFF OFF ON OFF OFF OFF ON ON 102 = ON OFF OFF ON ON OFF OFF ON
17 = OFF ON ON ON OFF ON ON ON 60 = ON ON OFF OFF OFF OFF ON ON 103 = OFF OFF OFF ON ON OFF OFF ON
18 = ON OFF ON ON OFF ON ON ON 61 = OFF ON OFF OFF OFF OFF ON ON 104 = ON ON ON OFF ON OFF OFF ON
1 765432 8
ON

Smart Connect Multi-loop Installation Manual
www.zetaalarmsystems.com 45
19 = OFF OFF ON ON OFF ON ON ON 62 = ON OFF OFF OFF OFF OFF ON ON 105 = OFF ON ON OFF ON OFF OFF ON
20 = ON ON OFF ON OFF ON ON ON 63 = OFF OFF OFF OFF OFF OFF ON ON 106 = ON OFF ON OFF ON OFF OFF ON
21 = OFF ON OFF ON OFF ON ON ON 64 = ON ON ON ON ON ON OFF ON 107 = OFF OFF ON OFF ON OFF OFF ON
22 = ON OFF OFF ON OFF ON ON ON 65 = OFF ON ON ON ON ON OFF ON 108 = ON ON OFF OFF ON OFF OFF ON
23 = OFF OFF OFF ON OFF ON ON ON 66 = ON OFF ON ON ON ON OFF ON 109 = OFF ON OFF OFF ON OFF OFF ON
24 = ON ON ON OFF OFF ON ON ON 67 = OFF OFF ON ON ON ON OFF ON 110 = ON OFF OFF OFF ON OFF OFF ON
25 = OFF ON ON OFF OFF ON ON ON 68 = ON ON OFF ON ON ON OFF ON 111 = OFF OFF OFF OFF ON OFF OFF ON
26 = ON OFF ON OFF OFF ON ON ON 69 = OFF ON OFF ON ON ON OFF ON 112 = ON ON ON ON OFF OFF OFF ON
27 = OFF OFF ON OFF OFF ON ON ON 70 = ON OFF OFF ON ON ON OFF ON 113 = OFF ON ON ON OFF OFF OFF ON
28 = ON ON OFF OFF OFF ON ON ON 71 = OFF OFF OFF ON ON ON OFF ON 114 = ON OFF ON ON OFF OFF OFF ON
29 = OFF ON OFF OFF OFF ON ON ON 72 = ON ON ON OFF ON ON OFF ON 115 = OFF OFF ON ON OFF OFF OFF ON
30 = ON OFF OFF OFF OFF ON ON ON 73 = OFF ON ON OFF ON ON OFF ON 116 = ON ON OFF ON OFF OFF OFF ON
31 = OFF OFF OFF OFF OFF ON ON ON 74 = ON OFF ON OFF ON ON OFF ON 117 = OFF ON OFF ON OFF OFF OFF ON
32 = ON ON ON ON ON OFF ON ON 75 = OFF OFF ON OFF ON ON OFF ON 118 = ON OFF OFF ON OFF OFF OFF ON
33 = OFF ON ON ON ON OFF ON ON 76 = ON ON OFF OFF ON ON OFF ON 119 = OFF OFF OFF ON OFF OFF OFF ON
34 = ON OFF ON ON ON OFF ON ON 77 = OFF ON OFF OFF ON ON OFF ON 120 = ON ON ON OFF OFF OFF OFF ON
35 = OFF OFF ON ON ON OFF ON ON 78 = ON OFF OFF OFF ON ON OFF ON 121 = OFF ON ON OFF OFF OFF OFF ON
36 = ON ON OFF ON ON OFF ON ON 79 = OFF OFF OFF OFF ON ON OFF ON 122 = ON OFF ON OFF OFF OFF OFF ON
37 = OFF ON OFF ON ON OFF ON ON 80 = ON ON ON ON OFF ON OFF ON 123 = OFF OFF ON OFF OFF OFF OFF ON
38 = ON OFF OFF ON ON OFF ON ON 81 = OFF ON ON ON OFF ON OFF ON 124 = ON ON OFF OFF OFF OFF OFF ON
39 = OFF OFF OFF ON ON OFF ON ON 82 = ON OFF ON ON OFF ON OFF ON 125 = OFF ON OFF OFF OFF OFF OFF ON
40 = ON ON ON OFF ON OFF ON ON 83 = OFF OFF ON ON OFF ON OFF ON 126 = ON OFF OFF OFF OFF OFF OFF ON
41 = OFF ON ON OFF ON OFF ON ON 84 = ON ON OFF ON OFF ON OFF ON 127 = OFF OFF OFF OFF OFF OFF OFF ON
42 = ON OFF ON OFF ON OFF ON ON 85 = OFF ON OFF ON OFF ON OFF ON
128 = ON ON ON ON ON ON ON OFF 171 = OFF OFF ON OFF ON OFF ON OFF 214 = ON OFF OFF ON OFF ON OFF OFF
129 = OFF ON ON ON ON ON ON OFF 172 = ON ON OFF OFF ON OFF ON OFF 215 = OFF OFF OFF ON OFF ON OFF OFF
123 = ON OFF ON ON ON ON ON OFF 173 = OFF ON OFF OFF ON OFF ON OFF 216 = ON ON ON OFF OFF ON OFF OFF
131 = OFF OFF ON ON ON ON ON OFF 174 = ON OFF OFF OFF ON OFF ON OFF 217 = OFF ON ON OFF OFF ON OFF OFF
132 = ON ON OFF ON ON ON ON OFF 175 = OFF OFF OFF OFF ON OFF ON OFF 218 = ON OFF ON OFF OFF ON OFF OFF
133 = OFF ON OFF ON ON ON ON OFF 176 = ON ON ON ON OFF OFF ON OFF 219 = OFF OFF ON OFF OFF ON OFF OFF
134 = ON OFF OFF ON ON ON ON OFF 177 = OFF ON ON ON OFF OFF ON OFF 220 = ON ON OFF OFF OFF ON OFF OFF
135 = OFF OFF OFF ON ON ON ON OFF 178 = ON OFF ON ON OFF OFF ON OFF 221 = OFF ON OFF OFF OFF ON OFF OFF
136 = ON ON ON OFF ON ON ON OFF 179 = OFF OFF ON ON OFF OFF ON OFF 222 = ON OFF OFF OFF OFF ON OFF OFF
137 = OFF ON ON OFF ON ON ON OFF 180 = ON ON OFF ON OFF OFF ON OFF 223 = OFF OFF OFF OFF OFF ON OFF OFF
138 = ON OFF ON OFF ON ON ON OFF 181 = OFF ON OFF ON OFF OFF ON OFF 224 = ON ON ON ON ON OFF OFF OFF
139 = OFF OFF ON OFF ON ON ON OFF 182 = ON OFF OFF ON OFF OFF ON OFF 225 = OFF ON ON ON ON OFF OFF OFF
140 = ON ON OFF OFF ON ON ON OFF 183 = OFF OFF OFF ON OFF OFF ON OFF 226 = ON OFF ON ON ON OFF OFF OFF
141 = OFF ON OFF OFF ON ON ON OFF 184 = ON ON ON OFF OFF OFF ON OFF 227 = OFF OFF ON ON ON OFF OFF OFF
142 = ON OFF OFF OFF ON ON ON OFF 185 = OFF ON ON OFF OFF OFF ON OFF 228 = ON ON OFF ON ON OFF OFF OFF
143 = OFF OFF OFF OFF ON ON ON OFF 186 = ON OFF ON OFF OFF OFF ON OFF 229 = OFF ON OFF ON ON OFF OFF OFF
144 = ON ON ON ON OFF ON ON OFF 187 = OFF OFF ON OFF OFF OFF ON OFF 230 = ON OFF OFF ON ON OFF OFF OFF
145 = OFF ON ON ON OFF ON ON OFF 188 = ON ON OFF OFF OFF OFF ON OFF 231 = OFF OFF OFF ON ON OFF OFF OFF
146 = ON OFF ON ON OFF ON ON OFF 189 = OFF ON OFF OFF OFF OFF ON OFF 232 = ON ON ON OFF ON OFF OFF OFF
147 = OFF OFF ON ON OFF ON ON OFF 190 = ON OFF OFF OFF OFF OFF ON OFF 233 = OFF ON ON OFF ON OFF OFF OFF
248 = ON ON OFF ON OFF ON ON OFF 191 = OFF OFF OFF OFF OFF OFF ON OFF 234 = ON OFF ON OFF ON OFF OFF OFF
149 = OFF ON OFF ON OFF ON ON OFF 192 = ON ON ON ON ON ON OFF OFF 235 = OFF OFF ON OFF ON OFF OFF OFF
150 = ON OFF OFF ON OFF ON ON OFF 193 = OFF ON ON ON ON ON OFF OFF 236 = ON ON OFF OFF ON OFF OFF OFF
151 = OFF OFF OFF ON OFF ON ON OFF 194 = ON OFF ON ON ON ON OFF OFF 237 = OFF ON OFF OFF ON OFF OFF OFF
152 = ON ON ON OFF OFF ON ON OFF 195 = OFF OFF ON ON ON ON OFF OFF 238 = ON OFF OFF OFF ON OFF OFF OFF

Smart Connect Multi-loop Installation Manual
www.zetaalarmsystems.com 46
153 = OFF ON ON OFF OFF ON ON OFF 196 = ON ON OFF ON ON ON OFF OFF 239 = OFF OFF OFF OFF ON OFF OFF OFF
154 = ON OFF ON OFF OFF ON ON OFF 197 = OFF ON OFF ON ON ON OFF OFF 240 = ON ON ON ON OFF OFF OFF OFF
155 = OFF OFF ON OFF OFF ON ON OFF 198 = ON OFF OFF ON ON ON OFF OFF 241 = OFF ON ON ON OFF OFF OFF OFF
156 = ON ON OFF OFF OFF ON ON OFF 199 = OFF OFF OFF ON ON ON OFF OFF 242 = ON OFF ON ON OFF OFF OFF OFF
157 = OFF ON OFF OFF OFF ON ON OFF 200 = ON ON ON OFF ON ON OFF OFF 243 = OFF OFF ON ON OFF OFF OFF OFF
158 = ON OFF OFF OFF OFF ON ON OFF 201 = OFF ON ON OFF ON ON OFF OFF 244 = ON ON OFF ON OFF OFF OFF OFF
159 = OFF OFF OFF OFF OFF ON ON OFF 202 = ON OFF ON OFF ON ON OFF OFF 245 = OFF ON OFF ON OFF OFF OFF OFF
160 = ON ON ON ON ON OFF ON OFF 203 = OFF OFF ON OFF ON ON OFF OFF 246 = ON OFF OFF ON OFF OFF OFF OFF
161 = OFF ON ON ON ON OFF ON OFF 204 = ON ON OFF OFF ON ON OFF OFF 247 = OFF OFF OFF ON OFF OFF OFF OFF
162 = ON OFF ON ON ON OFF ON OFF 205 = OFF ON OFF OFF ON ON OFF OFF 248 = ON ON ON OFF OFF OFF OFF OFF
163 = OFF OFF ON ON ON OFF ON OFF 206 = ON OFF OFF OFF ON ON OFF OFF 249 = OFF ON ON OFF OFF OFF OFF OFF
164 = ON ON OFF ON ON OFF ON OFF 207 = OFF OFF OFF OFF ON ON OFF OFF 250 = ON OFF ON OFF OFF OFF OFF OFF
165 = OFF ON OFF ON ON OFF ON OFF 208 = ON ON ON ON OFF ON OFF OFF 251 = N O T U S E D
166 = ON OFF OFF ON ON OFF ON OFF 209 = OFF ON ON ON OFF ON OFF OFF 252 = N O T U S E D
167 = OFF OFF OFF ON ON OFF ON OFF 210 = ON OFF ON ON OFF ON OFF OFF 253 = N O T U S E D
168 = ON ON ON OFF ON OFF ON OFF 211 = OFF OFF ON ON OFF ON OFF OFF 254 = N O T U S E D
169 = OFF ON ON OFF ON OFF ON OFF 212 = ON ON OFF ON OFF ON OFF OFF 255 = N O T U S E D
170 = ON OFF ON OFF ON OFF ON OFF 213 = OFF ON OFF ON OFF ON OFF OFF
Appendix D: PRODUCT CODES Description Product Code
Panels
6 Module Capacity – LCD Only SMART6
6 Module Capacity – LCD & 32 Zonal LED’s SMART6/32
10 Module Capacity – LCD & 64 Zonal LED’s SMART10/64
10 Module Capacity – LCD & Printer & 64 Zonal LED’s SMART10/P/64
26 Module Capacity – LCD & 64 Zonal LED’s SMART26/64
26 Module Capacity – LCD & Printer & 64 Zonal LED’s SMART26/P/64
Repeater Panel SMART/REP
Modules
Loop Card Module SCM-LCM
Multi Input Module SCM-MIM
Zone Monitor Module SCM-ZMM
Multi Relay Module SCM-RM
Alarm Circuit Module SCM-ACM
RS485 Network Module SCM-NM
RS232 Printer Module SCM-PM
Appendix E: Ground Fault Impedance values Below is a table of the impedance values that will cause a ground fault on the SMART Connect Multi-loop under normal operating
conditions (running on mains power).
Circuit Impedance that will signal a Ground Fault
PSU Output + 10kΩ
PSU Output - 10kΩ
Alarm Circuit Module (ACM) +* 10kΩ
Alarm Circuit Module (ACM) -* 10kΩ
Loop Card Module (LCM) + 10kΩ
Loop Card Module (LCM) - 10kΩ
Multi-Input Module (MIM) + 10kΩ
Multi-Input Module (MIM) - 10kΩ

Smart Connect Multi-loop Installation Manual
www.zetaalarmsystems.com 47
Zone Monitor Module (ZMM) + 10kΩ
Zone Monitor Module (ZMM) - 10kΩ
Network Module (NM) terminal A N/A (Isolated from system voltage)
Network Module (NM) terminal B N/A (Isolated from system voltage)
Multi-Relay Module (RM) NO N/A (Isolated from system voltage)
Multi-Relay Module (RM) CM N/A (Isolated from system voltage)
Multi-Relay Module (RM) NC N/A (Isolated from system voltage)
*In quiescent condition, the ACM has a reverse voltage on its terminals. So that a ground fault to ACM + will cause a negative ground
fault, and a ground fault to ACM - will cause a negative ground fault. When active, the impedance levels, and the fault messages
reverse.

Smart Connect Multi-loop Installation Manual
www.zetaalarmsystems.com 48
Installation Manual Modification History
Issue Date Changes
001 19/03/2020
- Added manual modification history table.
- Impedance values changed to 10KΩ.
- Removed non-LED MMP10 & MMP26 version.
- Changed PSU specifications.
- Added functions required by European standard section.