MOUNTING INSTRUCTIONS microScan3 Core I/O
14
MOUNTING INSTRUCTIONS microScan3 Core I/O Safety laser scanner de en
Transcript of MOUNTING INSTRUCTIONS microScan3 Core I/O

M O U N T I N G I N S T R U C T I O N S
microScan3 Core I/O
Safety laser scanner
de
en

M O N T A G E A N L E I T U N G
microScan3 Core I/O
Sicherheits-Laserscanner
de
en
Alle Rechte vorbehalten. Irrtümer und Änderungen vorbehalten.
1 Zu diesem DokumentDieses Dokument gilt für den Sicherheits-Laserscanner microScan3 und den zugehöri‐gen Systemstecker mit folgenden Artikelnummern:
Sicherheits-Laserscanner Sicherheits-Laserscannerohne Systemstecker
Systemstecker
• 1075842
• 1075843
• 1089492
• 1067360
• 1067875
• 1089325
• 2073156
Symbole und Dokumentkonventionen
A, B Verweise auf die Abbildungen am Ende dieses Dokuments sindmit schwarzem Hintergrund gekennzeichnet.
2 Zu Ihrer Sicherheit
GEFAHRGefahr der Unwirksamkeit der SchutzeinrichtungDer Gefahr bringende Zustand der Maschine wird bei Nichtbeachtung möglicherweisenicht oder nicht rechtzeitig beendet.
b Beachten Sie den beiliegenden Sicherheitshinweis.
Der Sicherheits-Laserscanner ist unter anderem für folgende Verwendungen nichtgeeignet:
• Im Freien• Unter Wasser• In explosionsgefährdeten Bereichen
Weitere Informationen zur Arbeit mit der Schutzeinrichtung enthält die Maschinendoku‐mentation oder die Betriebsanleitung der Schutzeinrichtung. Sie finden die EU-Konfor‐mitätserklärung und die aktuelle Betriebsanleitung der Schutzeinrichtung, indem Sieauf www.sick.com im Suchfeld die Artikelnummer eingeben (Artikelnummer: sieheTypenschildeintrag im Feld „Ident. no.“).
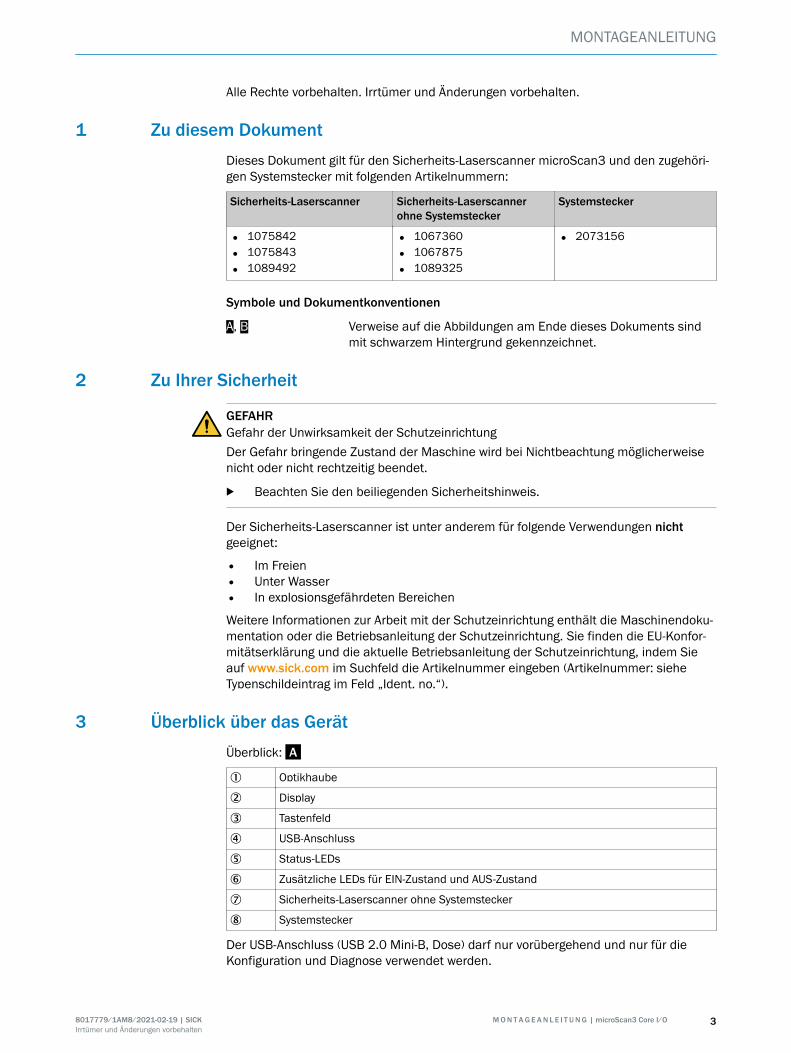
3 Überblick über das GerätÜberblick: A
1 Optikhaube
2 Display
3 Tastenfeld
4 USB-Anschluss
5 Status-LEDs
6 Zusätzliche LEDs für EIN-Zustand und AUS-Zustand
7 Sicherheits-Laserscanner ohne Systemstecker
8 Systemstecker
Der USB-Anschluss (USB 2.0 Mini-B, Dose) darf nur vorübergehend und nur für dieKonfiguration und Diagnose verwendet werden.
MONTAGEANLEITUNG
8017779/1AM8/2021-02-19 | SICK M O N T A G E A N L E I T U N G | microScan3 Core I/O 3Irrtümer und Änderungen vorbehalten

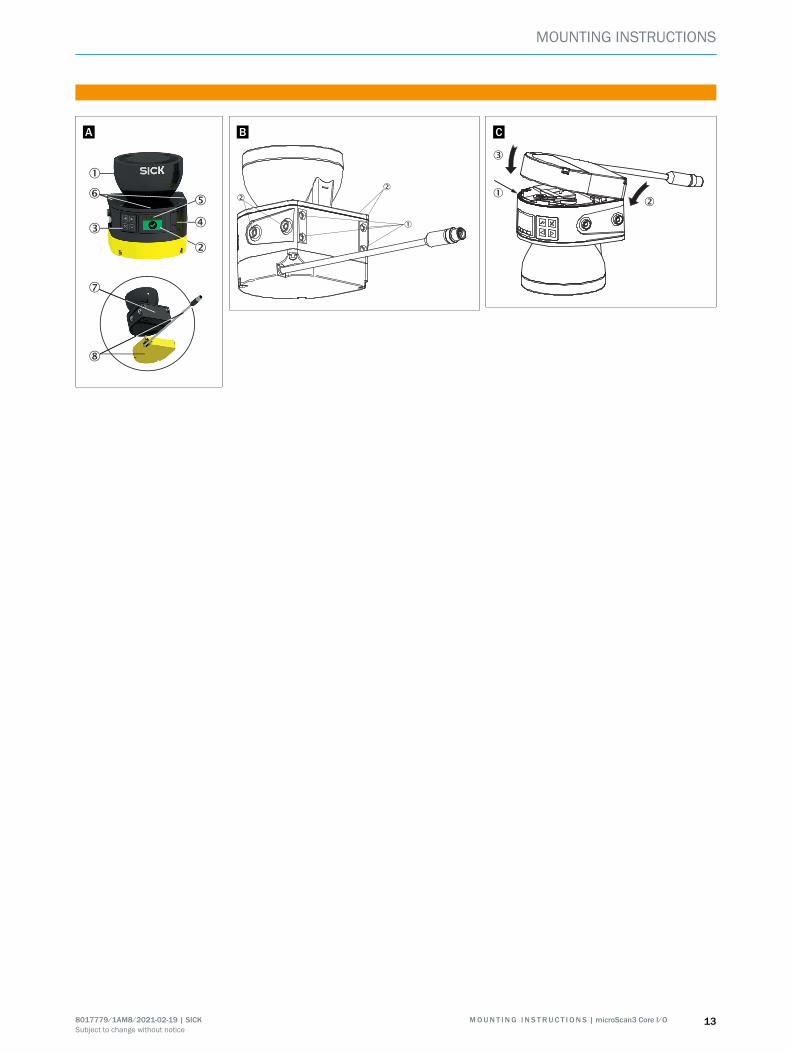
4 Sicherheits-Laserscanner direkt montierenDirektmontage: B
Der Sicherheits-Laserscanner hat an der Rückseite 4 M5-Gewindebohrungen. Wenn Siedie Montagefläche von hinten durchbohren können, können Sie den Sicherheits-Laser‐scanner mit diesen Gewindebohrungen direkt montieren.
b Zur Direktmontage entweder die rückseitigen 1 oder die seitlichen 2 M5-Gewin‐debohrungen verwenden.
b Zur Direktmontage alle 4 rückseitigen oder alle 4 seitlichen M5-Gewindebohrun‐gen verwenden, damit die im Datenblatt genannten Werte für Schwing- undSchockfestigkeit erreicht werden.
b Maximale Einschraubtiefe: 7,5 mm.b Anzugsdrehmoment: 4,5 Nm … 5,0 Nm.
5 AnschlussübersichtMICSX-ABIZZZZZ1 (Artikelnummer: 2073156)
6 Anschlussbelegung
6.1 Anschlussleitung mit M12-SteckverbinderStecker, M12, 8-polig, A-codiert.
7
6
8
5
4
2
3
1
Pin Bezeichnung Funktion Aderfarbe 1)
1 +24 V DC Versorgungsspannung (+24 V DC) Braun
2 OSSD 1.A OSSD-Paar 1, OSSD A Weiß
3 0 V DC Versorgungsspannung (0 V DC) Blau
4 OSSD 1.B OSSD-Paar 1, OSSD B Schwarz
5 Uni-I/O 1 Universal-I/O 1 Grau
6 Uni-I/O 2 Universal-I/O 2 Pink
7 Uni-I/O 3 Universal-I/O 3 Violett
8 FE Funktionserde/Abschirmung Orange
1) Gilt für die als Zubehör empfohlenen Verlängerungsleitungen.
7 Sicherheits-Laserscanner tauschenWenn der Sicherheits-Laserscanner beschädigt oder defekt ist, müssen Sie ihn austau‐schen.
MONTAGEANLEITUNG
4 M O N T A G E A N L E I T U N G | microScan3 Core I/O 8017779/1AM8/2021-02-19 | SICKIrrtümer und Änderungen vorbehalten

GEFAHRGefahr der Unwirksamkeit der SchutzeinrichtungFalls im Systemstecker eine ungeeignete Konfiguration gespeichert ist, wird der Gefahrbringende Zustand möglicherweise nicht oder nicht rechtzeitig beendet.
b Sicherstellen, dass nach dem Austausch derselbe Systemstecker verwendet oderdie Konfiguration wiederhergestellt wird.
b Sicherstellen, dass die Ausrichtung des Sicherheits-Laserscanners nach dem Aus‐tausch korrekt ist.
WICHTIGDie Schutzart IP65 gilt nur, wenn der Sicherheits-Laserscanner verschlossen ist undder Systemstecker montiert ist.
WICHTIGWenn der Systemstecker mit zu großem Kraftaufwand montiert wird, können die Kon‐takte abbrechen oder sich verbiegen.
b Systemstecker vorsichtig aufstecken.b Keine Gewalt anwenden.
Benötigtes Werkzeug:• Schraubenschlüssel Innensechsrund TX10• Schraubenschlüssel Innensechsrund TX20
7.1 Sicherheits-Laserscanner ohne Systemstecker tauschen
1. Sicherstellen, dass die Umgebung sauber und frei von Nebel, Feuchtigkeit undStaub ist.
2. Schrauben des Systemsteckers lösen und Systemstecker vom defekten Sicher‐heits-Laserscanner entfernen.
3. Befestigungsschrauben lösen und defekten Sicherheits-Laserscanner entfernen.4. Systemstecker am neuen Sicherheits-Laserscanner montieren, siehe „Systemste‐
cker tauschen“.5. Neuen Sicherheits-Laserscanner montieren, siehe „Sicherheits-Laserscanner
direkt montieren“.6. Wirksamkeit der Schutzeinrichtung prüfen. Weitere Informationen: siehe Betriebs‐
anleitung.
7.2 Sicherheits-Laserscanner komplett tauschen
1. Anschlussleitungen vom Systemstecker lösen.2. Befestigungsschrauben lösen und defekten Sicherheits-Laserscanner entfernen.
MONTAGEANLEITUNG
8017779/1AM8/2021-02-19 | SICK M O N T A G E A N L E I T U N G | microScan3 Core I/O 5Irrtümer und Änderungen vorbehalten

3. Neuen Sicherheits-Laserscanner montieren, siehe „Sicherheits-Laserscannerdirekt montieren“.
4. Anschlussleitungen wieder am Systemstecker anbringen.5. Den Sicherheits-Laserscanner konfigurieren.6. Erneute Inbetriebnahme durchführen, insbesondere alle beschriebenen Prüfungen
durchführen. Weitere Informationen: siehe Betriebsanleitung.
8 Systemstecker tauschen
WICHTIGDie Schutzart IP65 gilt nur, wenn der Sicherheits-Laserscanner verschlossen ist undder Systemstecker montiert ist.
WICHTIGWenn der Systemstecker mit zu großem Kraftaufwand montiert wird, können die Kon‐takte abbrechen oder sich verbiegen.
b Systemstecker vorsichtig aufstecken.b Keine Gewalt anwenden.
Systemstecker tauschen: C
Benötigtes Werkzeug:• Schraubenschlüssel Innensechsrund TX10
Vorgehensweise
1. Sicherstellen, dass die Umgebung sauber und frei von Nebel, Feuchtigkeit undStaub ist.
2. Anschlussleitungen vom Systemstecker lösen.3. Bei Bedarf: Den Sicherheits-Laserscanner an einen sauberen Ort bringen.4. Schrauben des Systemsteckers lösen und defekten Systemstecker vom Sicher‐
heits-Laserscanner entfernen.5. Auf richtigen Sitz der Dichtung 1 achten.6. Neuen Systemstecker vorsichtig hinten auf den Sicherheits-Laserscanner aufset‐
zen 2.7. Systemstecker vorsichtig auf den Sicherheits-Laserscanner klappen 3.8. Systemstecker mit den unverlierbaren Schrauben anschrauben. Anzugsdrehmo‐
ment: 1,6 Nm … 1,9 Nm.9. Anschlussleitungen wieder am Systemstecker anbringen.10. Den Sicherheits-Laserscanner konfigurieren.11. Erneute Inbetriebnahme durchführen, insbesondere alle beschriebenen Prüfungen
durchführen. Weitere Informationen: siehe Betriebsanleitung.
MONTAGEANLEITUNG
6 M O N T A G E A N L E I T U N G | microScan3 Core I/O 8017779/1AM8/2021-02-19 | SICKIrrtümer und Änderungen vorbehalten

A
B
1
2
2
C
1
3
2
MONTAGEANLEITUNG
8017779/1AM8/2021-02-19 | SICK M O N T A G E A N L E I T U N G | microScan3 Core I/O 7Irrtümer und Änderungen vorbehalten

M O U N T I N G I N S T R U C T I O N S
microScan3 Core I/O
Safety laser scanner
de
en

All rights reserved. Subject to change without notice.
1 About this documentThis document applies to the microScan3 safety laser scanner and the associatedsystem plug with the following part numbers:
Safety laser scanner Safety laser scanner withoutsystem plug
System plug
• 1075842
• 1075843
• 1089492
• 1067360
• 1067875
• 1089325
• 2073156
Symbols and document conventions
A, B References to the figures at the end of this document are indi‐cated by a black background.
2 Safety information
DANGERHazard due to lack of effectiveness of the protective deviceIn the case of non-compliance, it is possible that the dangerous state of the machinemay not be stopped or not stopped in a timely manner.
b Please observe the safety notes provided.
The safety laser scanner is not suitable for the following applications, among others:
• Outdoors• Underwater• In explosive environments
For more information about how to work with the protective device, refer to the machi‐nery documentation or the operating instructions for the protective device. You cancall up the EU declaration of conformity and the current operating instructions for theprotective device by entering the part number in the search field at www.sick.com (partnumber: see the type label entry in the “Ident. no.” field).
3 Device overviewOverview: A
1 Optics cover
2 Display
3 Keypad
4 USB port
5 Status LEDs
6 Additional LEDs for ON state and OFF state
7 Safety laser scanner without system plug
8 System plug
The USB connection (USB 2.0 Mini-B, female connector) may only be used temporarilyand only for configuration and diagnostics.
MOUNTING INSTRUCTIONS
8017779/1AM8/2021-02-19 | SICK M O U N T I N G I N S T R U C T I O N S | microScan3 Core I/O 9Subject to change without notice

4 Mounting the safety laser scanner directlyDirect mounting: B
The safety laser scanner has 4 M5 threaded holes on the back. If you are able to drillthrough the mounting surface from the rear, you can mount the safety laser scannerdirectly using these threaded holes.
b Use either the rear 1 or the side 2 M5 threaded holes for direct mounting.b Use all four rear or all four side M5 threaded holes for direct mounting, so that the
values given in the data sheet for vibration and shock resistance are achieved.b Maximum depth of thread engagement: 7.5 mm.b Tightening torque: 4.5 Nm to 5.0 Nm.
5 Connection overviewMICSX-ABIZZZZZ1 (part number: 2073156)
6 Pin assignment
6.1 Connecting cable with M12 plug connectorMale connector, M12, 8-pin, A-coded.
7
6
8
5
4
2
3
1
Pin Designation Function Wire color 1)
1 +24 V DC Supply voltage (+24 V DC) Brown
2 OSSD 1.A OSSD pair 1, OSSD A White
3 0 V DC Supply voltage (0 V DC) Blue
4 OSSD 1.B OSSD pair 1, OSSD B Black
5 Uni-I/O 1 Universal I/O 1 Gray
6 Uni-I/O 2 Universal-I/O 2 Pink
7 Uni-I/O 3 Universal-I/O 3 Violet
8 FE Functional earth/shield Orange
1) Applies to the extension cables recommended as accessories.
7 Replacing the safety laser scannerIf the safety laser scanner is damaged or defective, you must replace it.
MOUNTING INSTRUCTIONS
10 M O U N T I N G I N S T R U C T I O N S | microScan3 Core I/O 8017779/1AM8/2021-02-19 | SICKSubject to change without notice

DANGERHazard due to lack of effectiveness of the protective deviceIf an unsuitable configuration is saved in the system plug, it may cause the dangerousstate to not end in time.
b After replacement, make sure the same system plug is used or the configuration isrestored.
b Make sure that the safety laser scanner is aligned correctly after the replacement.
NOTICEEnclosure rating IP65 only applies if the safety laser scanner is closed and the systemplug is mounted.
NOTICEIf the system plug is mounted with excessive force, the contacts can break or bend.
b Plug in the system plug carefully.b Do not force it.
Tool required:• TX10 Torx wrench• TX20 Torx wrench
7.1 Replacing the safety laser scanner without system plug
1. Make sure that the environment is clean and clear of fog, moisture, and dust.2. Unscrew screws in the system plug and remove the system plug from the defective
safety laser scanner.3. Unscrew the fixing screws and remove the defective safety laser scanner.4. Mount the system plug on the new safety laser scanner, see “Replacing the
system plug”.5. Mount the new safety laser scanner, see “Mounting the safety laser scanner
directly”.6. Check the effectiveness of the protective device. For more information, see the
operating instructions.
7.2 Completely replacing the safety laser scanner
1. Disconnect the connecting cables the system plug.2. Unscrew the fixing screws and remove the defective safety laser scanner.3. Mount the new safety laser scanner, see “Mounting the safety laser scanner
directly”.4. Reconnect the connecting cables to the system plug.
MOUNTING INSTRUCTIONS
8017779/1AM8/2021-02-19 | SICK M O U N T I N G I N S T R U C T I O N S | microScan3 Core I/O 11Subject to change without notice

5. Configure the safety laser scanner.6. Perform commissioning again, taking particular care to conduct all of the thorough
checks described. For more information, see the operating instructions.
8 Replacing the system plug
NOTICEEnclosure rating IP65 only applies if the safety laser scanner is closed and the systemplug is mounted.
NOTICEIf the system plug is mounted with excessive force, the contacts can break or bend.
b Plug in the system plug carefully.b Do not force it.
Replacing the system plug: C
Tool required:• TX10 Torx wrench
Approach
1. Make sure that the environment is clean and clear of fog, moisture, and dust.2. Disconnect the connecting cables the system plug.3. If necessary: move the safety laser scanner to a clean location.4. Unscrew screws in the defective system plug and remove the system plug from the
safety laser scanner.5. Make sure that the seal 1 is seated correctly.6. Carefully place the new system plug onto the safety laser scanner at the back 2.7. Carefully fold the system plug onto the safety laser scanner 3.8. Screw in the system plug using the captive screws. Tightening torque: 1.6 Nm …
1.9 Nm.9. Reconnect the connecting cables to the system plug.10. Configure the safety laser scanner.11. Perform commissioning again, taking particular care to conduct all of the thorough
checks described. For more information, see the operating instructions.
MOUNTING INSTRUCTIONS
12 M O U N T I N G I N S T R U C T I O N S | microScan3 Core I/O 8017779/1AM8/2021-02-19 | SICKSubject to change without notice
A
B
1
2
2
C
1
3
2
MOUNTING INSTRUCTIONS
8017779/1AM8/2021-02-19 | SICK M O U N T I N G I N S T R U C T I O N S | microScan3 Core I/O 13Subject to change without notice

Detailed addresses and further locations at www.sick.com
Australia Phone +61 (3) 9457 0600 1800 33 48 02 – tollfree E-Mail [email protected] Phone +43 (0) 2236 62288-0 E-Mail [email protected]/Luxembourg Phone +32 (0) 2 466 55 66 E-Mail [email protected] Phone +55 11 3215-4900 E-Mail [email protected] Phone +1 905.771.1444 E-Mail [email protected] Republic Phone +420 234 719 500 E-Mail [email protected] Phone +56 (2) 2274 7430 E-Mail [email protected] Phone +86 20 2882 3600 E-Mail [email protected] Phone +45 45 82 64 00 E-Mail [email protected] Phone +358-9-25 15 800 E-Mail [email protected] Phone +33 1 64 62 35 00 E-Mail [email protected] Phone +49 (0) 2 11 53 010 E-Mail [email protected] Phone +30 210 6825100 E-Mail [email protected] Kong Phone +852 2153 6300 E-Mail [email protected]
Hungary Phone +36 1 371 2680 E-Mail [email protected] Phone +91-22-6119 8900 E-Mail [email protected] Phone +972 97110 11 E-Mail [email protected] Phone +39 02 27 43 41 E-Mail [email protected] Phone +81 3 5309 2112 E-Mail [email protected] Phone +603-8080 7425 E-Mail [email protected] Phone +52 (472) 748 9451 E-Mail [email protected] Phone +31 (0) 30 229 25 44 E-Mail [email protected] Zealand Phone +64 9 415 0459 0800 222 278 – tollfree E-Mail [email protected] Phone +47 67 81 50 00 E-Mail [email protected] Phone +48 22 539 41 00 E-Mail [email protected] Phone +40 356-17 11 20 E-Mail [email protected] Phone +7 495 283 09 90 E-Mail [email protected] Phone +65 6744 3732 E-Mail [email protected]
Slovakia Phone +421 482 901 201 E-Mail [email protected] Phone +386 591 78849 E-Mail [email protected] Africa Phone +27 10 060 0550 E-Mail [email protected] Korea Phone +82 2 786 6321/4 E-Mail [email protected] Spain Phone +34 93 480 31 00 E-Mail [email protected] Phone +46 10 110 10 00 E-Mail [email protected] Phone +41 41 619 29 39 E-Mail [email protected] Phone +886-2-2375-6288 E-Mail [email protected] Phone +66 2 645 0009 E-Mail [email protected] Phone +90 (216) 528 50 00 E-Mail [email protected] Arab Emirates Phone +971 (0) 4 88 65 878 E-Mail [email protected] Kingdom Phone +44 (0)17278 31121 E-Mail [email protected] Phone +1 800.325.7425 E-Mail [email protected] Phone +65 6744 3732 E-Mail [email protected]
SICK AG | Waldkirch | Germany | www.sick.com
8017
779/
1AM
8/20
21-0
2-19
/en/
de, e
n