MODULE 7: SET UP DIMENSIONS Module Overview 7: SET UP DIMENSIONS Module Overview When a company...
74
MODULE 7: SET UP DIMENSIONS Module Overview When a company wants to analyze its sales and purchase accounts, it can adjust the chart of accounts by breaking down the accounts into several smaller accounts. For example, a G/L Account can be created for each country where sales are generated or for each customer group to which the company sells. The most profitable regions or customer groups can then be easily determined from the chart of accounts. However, the more breakdowns and analysis a company wants to perform, the more difficult the chart of account structures becomes and the more setup and maintenance the posting groups will require. To avoid these complications, you can use dimensions, therefore keeping the chart of account structure simple and clean. With each entry, additional data can be entered so that entries with similar characteristics and posted to the same (or different) G/L accounts can easily be retrieved and grouped for analysis. Dimensions can be used throughout Microsoft Dynamics NAV on entries in journals, documents, and budgets. Additionally, dimensions offer more extensive analysis and reporting functionalities. The term dimension is used to describe how analysis occurs. A two-dimensional analysis, for example, is sales for every area. When you use more than two dimensions to create an entry, a more complex analysis is achieved, such as sale for every sale, campaign for every customer, and group for each area. Note: Financial analysis and reporting possibilities are covered in the course Finance Advanced in Microsoft Dynamic NAV 2013. Users must allocate enough time to set up the dimensions structure, because it is the basis for all the benefits the Dimensions functionality offers. The dimensions structure must be determined in combination with the chart of accounts, posting group structure, and reporting and analysis requirements of the company. Additionally, by using dimensions and simplifying the chart of accounts provides a better analysis of financial information. The aspects of defining and setting up dimensions include the following: • Dimensions and dimension values • Dimension combinations • Default dimensions • Account type default dimensions • Default dimension priority 7 - 1 Microsoft Official Training Materials for Microsoft Dynamics ® Your use of this content is subject to your current services agreement
Transcript of MODULE 7: SET UP DIMENSIONS Module Overview 7: SET UP DIMENSIONS Module Overview When a company...
MODULE 7: SET UP DIMENSIONS
Module Overview When a company wants to analyze its sales and purchase accounts, it can adjust the chart of accounts by breaking down the accounts into several smaller accounts. For example, a G/L Account can be created for each country where sales are generated or for each customer group to which the company sells. The most profitable regions or customer groups can then be easily determined from the chart of accounts. However, the more breakdowns and analysis a company wants to perform, the more difficult the chart of account structures becomes and the more setup and maintenance the posting groups will require.
To avoid these complications, you can use dimensions, therefore keeping the chart of account structure simple and clean. With each entry, additional data can be entered so that entries with similar characteristics and posted to the same (or different) G/L accounts can easily be retrieved and grouped for analysis. Dimensions can be used throughout Microsoft Dynamics NAV on entries in journals, documents, and budgets. Additionally, dimensions offer more extensive analysis and reporting functionalities.
The term dimension is used to describe how analysis occurs. A two-dimensional analysis, for example, is sales for every area. When you use more than two dimensions to create an entry, a more complex analysis is achieved, such as sale for every sale, campaign for every customer, and group for each area.
Note: Financial analysis and reporting possibilities are covered in the course Finance Advanced in Microsoft Dynamic NAV 2013.
Users must allocate enough time to set up the dimensions structure, because it is the basis for all the benefits the Dimensions functionality offers. The dimensions structure must be determined in combination with the chart of accounts, posting group structure, and reporting and analysis requirements of the company. Additionally, by using dimensions and simplifying the chart of accounts provides a better analysis of financial information.
The aspects of defining and setting up dimensions include the following:
• Dimensions and dimension values
• Dimension combinations
• Default dimensions
• Account type default dimensions
• Default dimension priority
7 - 1 Microsoft Official Training Materials for Microsoft Dynamics ® Your use of this content is subject to your current services agreement
Application Setup in Microsoft Dynamics® NAV 2013 Objectives
The objectives are:
• Explain and set up dimensions and dimension values.
• Explain and set up global and shortcut dimensions.
• Explain and show how dimension combinations are set up.
• Explain and show how single and multiple default dimensions are set up.
• Explain and show how account type default dimensions are set up.
• Explain and show how default dimension priorities are set up.
• Explain the possibility and resolution of conflicting default dimensions.
• Show how to use dimension and dimension values in journals and documents under different dimension setup scenarios.
7 - 2 Microsoft Official Training Materials for Microsoft Dynamics ® Your use of this content is subject to your current services agreement
Module 7: Set Up Dimensions
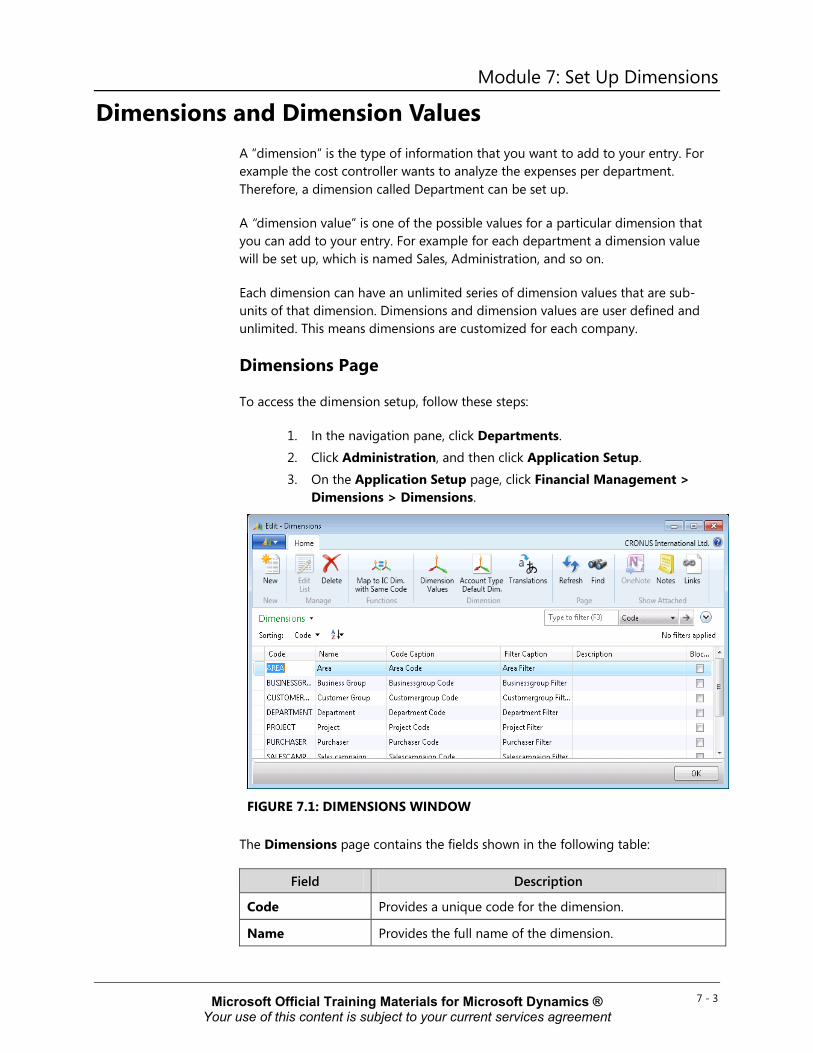
Dimensions and Dimension Values A “dimension” is the type of information that you want to add to your entry. For example the cost controller wants to analyze the expenses per department. Therefore, a dimension called Department can be set up.
A “dimension value” is one of the possible values for a particular dimension that you can add to your entry. For example for each department a dimension value will be set up, which is named Sales, Administration, and so on.
Each dimension can have an unlimited series of dimension values that are sub-units of that dimension. Dimensions and dimension values are user defined and unlimited. This means dimensions are customized for each company.
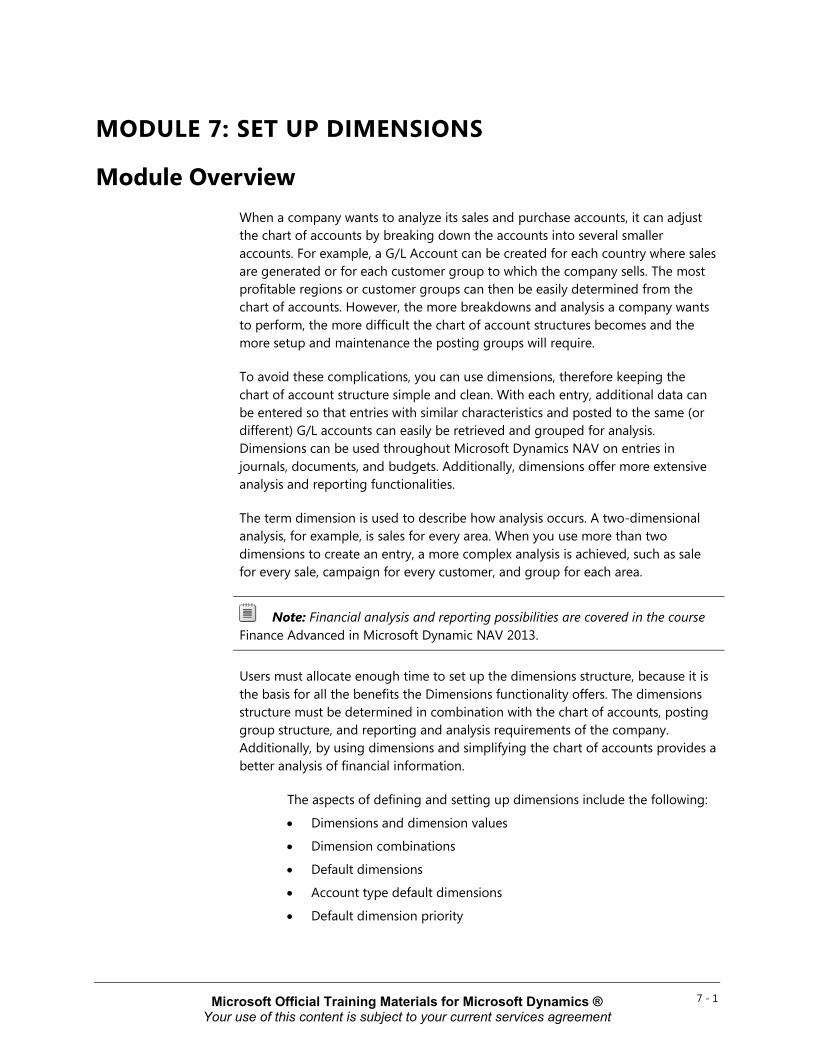
Dimensions Page
To access the dimension setup, follow these steps:
1. In the navigation pane, click Departments. 2. Click Administration, and then click Application Setup. 3. On the Application Setup page, click Financial Management >
Dimensions > Dimensions.
FIGURE 7.1: DIMENSIONS WINDOW
The Dimensions page contains the fields shown in the following table:
Field Description
Code Provides a unique code for the dimension.
Name Provides the full name of the dimension.
7 - 3 Microsoft Official Training Materials for Microsoft Dynamics ® Your use of this content is subject to your current services agreement

Application Setup in Microsoft Dynamics® NAV 2013 Field Description
Code Caption Determines the field name of a shortcut dimension. When a dimension is set up as a shortcut dimension, the dimension will be shown as a field when you are entering dimensions in a journal or document.
Filter Caption Determines the name of the dimension filter field when a dimension is used as a filter.
Description Describes the dimension to clarify its purpose.
Blocked Blocks the posting of journals that contain specific dimensions.
Map-to IC Dimension Code
Indicates which intercompany dimension corresponds to the dimension.
When a dimension code is entered on an intercompany sales or purchase line, the corresponding intercompany dimension code is entered on the line sent to the intercompany partner.
Consolidation Code
Indicates code when a whole company, including dimensions, is transferred to a merged company during the consolidation process.
If a whole company is transferred, enter the dimension code in the merged company that corresponds to the dimension code in this business unit. The same consolidation code can be given to several dimensions if these dimensions are added together when you are combining.
Note: The Map-to IC Dimension Code and Consolidation Code fields are hidden, but can be made available by using the Choose Columns function.
They are used in the Consolidation and intercompany multi-company operations.
The following setup can be accessed through the Navigate tab of the Dimensions page:
• Dimension translations
• Dimension values
• Account type default dimensions
Dimension Values
A dimension value:
7 - 4 Microsoft Official Training Materials for Microsoft Dynamics ® Your use of this content is subject to your current services agreement

Module 7: Set Up Dimensions • Is a subset in a dimension.
• Is used on ledger entries.
• Can have an infinite number of values, with unique value codes in a dimension.
Dimensions and dimension values make it possible to do the following:
• Gain an accurate picture of a company's activities.
• Analyze relationships between dimensions and dimension values.
Users can create a hierarchical relationship between dimension values so that Microsoft Dynamics NAV will consider some dimension values as subsets of another dimension value. This relationship is achieved by using dimension value types.
To access the Dimension Values page, follow these steps:
1. In the navigation pane, click Departments. 2. Click Administration, and then click Application Setup.
3. On the Application Setup page, click Financial Management > Dimensions > Dimensions.
4. Select the AREA dimension. 5. On the Home tab, click Dimension Values.
FIGURE 7.2: DIMENSION VALUES PAGE FOR THE AREA DIMENSION
7 - 5 Microsoft Official Training Materials for Microsoft Dynamics ® Your use of this content is subject to your current services agreement
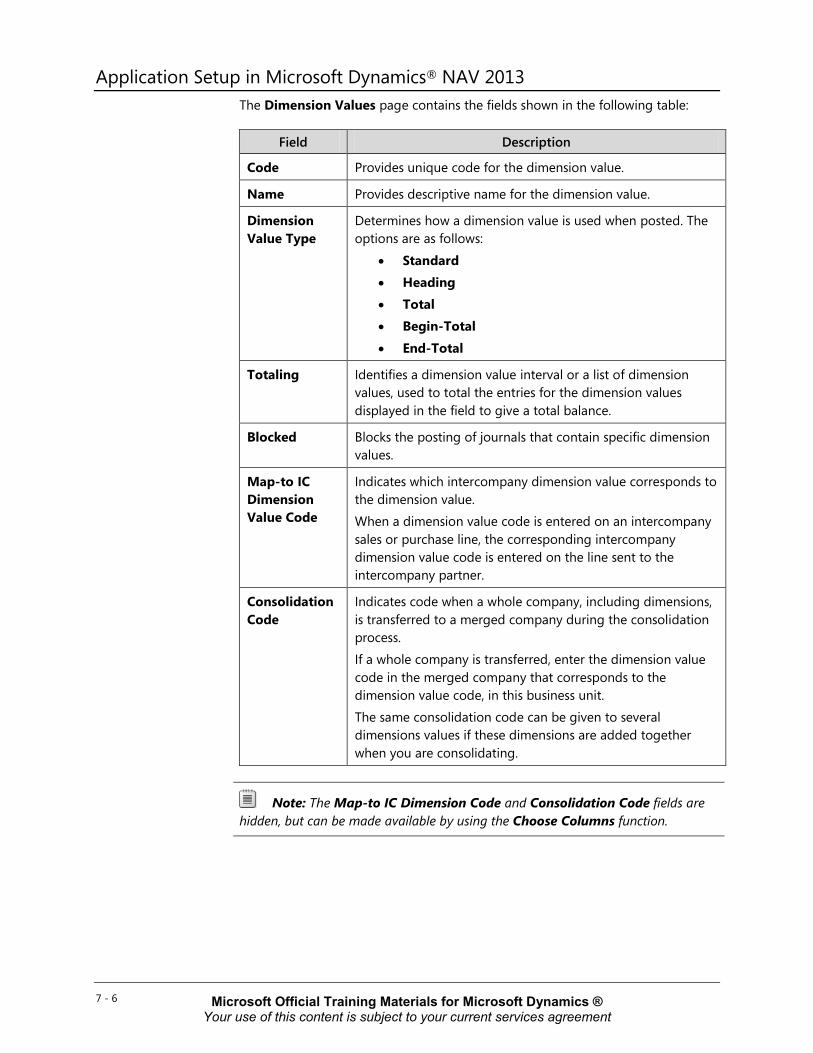
Application Setup in Microsoft Dynamics® NAV 2013 The Dimension Values page contains the fields shown in the following table:
Field Description
Code Provides unique code for the dimension value.
Name Provides descriptive name for the dimension value.
Dimension Value Type
Determines how a dimension value is used when posted. The options are as follows:
• Standard • Heading • Total • Begin-Total • End-Total
Totaling Identifies a dimension value interval or a list of dimension values, used to total the entries for the dimension values displayed in the field to give a total balance.
Blocked Blocks the posting of journals that contain specific dimension values.
Map-to IC Dimension Value Code
Indicates which intercompany dimension value corresponds to the dimension value. When a dimension value code is entered on an intercompany sales or purchase line, the corresponding intercompany dimension value code is entered on the line sent to the intercompany partner.
Consolidation Code
Indicates code when a whole company, including dimensions, is transferred to a merged company during the consolidation process. If a whole company is transferred, enter the dimension value code in the merged company that corresponds to the dimension value code, in this business unit. The same consolidation code can be given to several dimensions values if these dimensions are added together when you are consolidating.
Note: The Map-to IC Dimension Code and Consolidation Code fields are hidden, but can be made available by using the Choose Columns function.
7 - 6 Microsoft Official Training Materials for Microsoft Dynamics ® Your use of this content is subject to your current services agreement

Module 7: Set Up Dimensions The Dimension Value Type and Totaling fields together create the hierarchical relationship in dimension values. The Dimension Value Type options are shown in the following table.
Option Description
Standard Standard posting of dimension values.
Heading Heading for a group of dimension values.
Total Total of a series of balances on dimension values that do not immediately come before the total dimension value.
Begin-Total Marker for the beginning of a series of dimension values to be totaled. Used with the End-Total dimension value type.
End-Total Total of a series of dimension values. Used with the Begin-Total dimension value type.
Note: You can only post to dimension values set up with Standard or Begin-Total value types.
The Totaling field is completed based on the selection made in the Dimension Value Types field:
• If the dimension value type is Standard, Heading, or Begin-Total, the Totaling field must be blank.
• If Total is selected, the Totaling field must be manually populated to indicate which dimension values will be totaled.
• If End-Total is selected, the Totaling field is automatically populated when the Indent Dimension Values function runs.
Note: For dimension values of the End-Total type, you can manually fill in the Totaling field. However, we recommend that you use the Indent Dimension Values function to populate the field.
The Indent Dimension Values function:
• Indents all dimension values between a Begin-Total and the matching End-Total by one level.
• Totals all dimension values within the same range and updates the Totaling field for each End-Total.
Access the Indent Dimension Values function from the Dimension Values page by clicking Indent Dimension Values on the Actions tab.
7 - 7 Microsoft Official Training Materials for Microsoft Dynamics ® Your use of this content is subject to your current services agreement
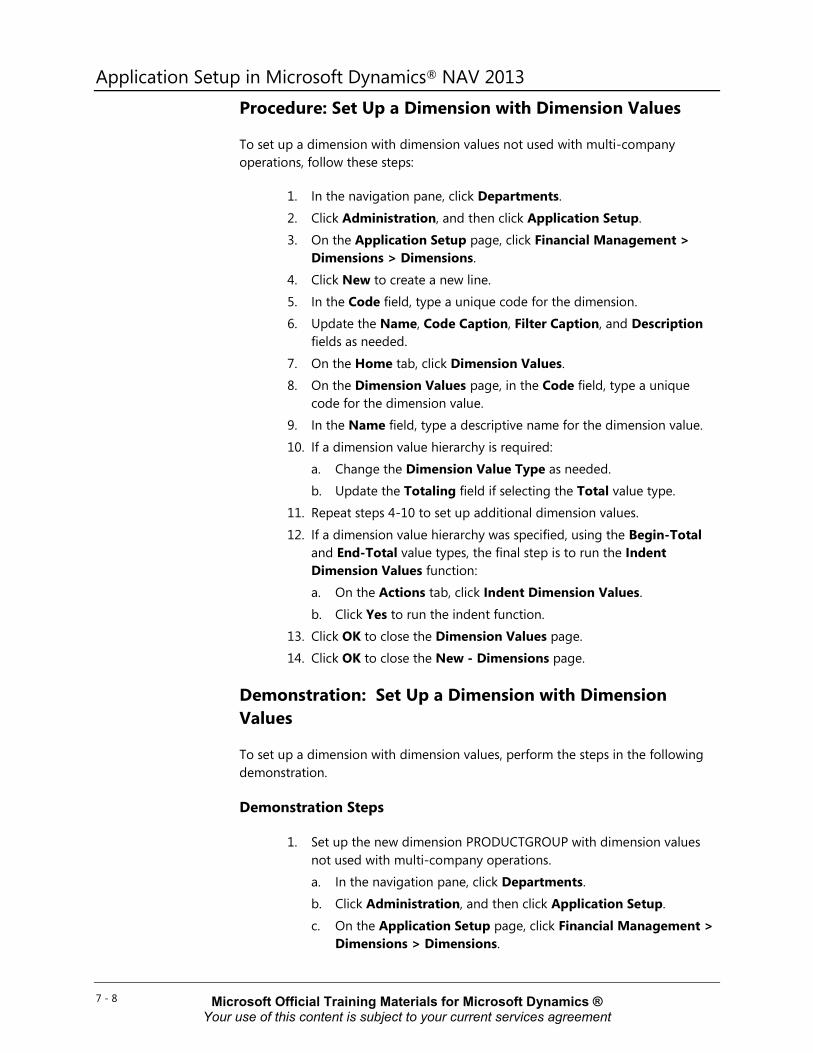
Application Setup in Microsoft Dynamics® NAV 2013 Procedure: Set Up a Dimension with Dimension Values
To set up a dimension with dimension values not used with multi-company operations, follow these steps:
1. In the navigation pane, click Departments.
2. Click Administration, and then click Application Setup. 3. On the Application Setup page, click Financial Management >
Dimensions > Dimensions.
4. Click New to create a new line. 5. In the Code field, type a unique code for the dimension. 6. Update the Name, Code Caption, Filter Caption, and Description
fields as needed.
7. On the Home tab, click Dimension Values. 8. On the Dimension Values page, in the Code field, type a unique
code for the dimension value. 9. In the Name field, type a descriptive name for the dimension value.
10. If a dimension value hierarchy is required: a. Change the Dimension Value Type as needed. b. Update the Totaling field if selecting the Total value type.
11. Repeat steps 4-10 to set up additional dimension values.
12. If a dimension value hierarchy was specified, using the Begin-Total and End-Total value types, the final step is to run the Indent Dimension Values function: a. On the Actions tab, click Indent Dimension Values.
b. Click Yes to run the indent function. 13. Click OK to close the Dimension Values page. 14. Click OK to close the New - Dimensions page.
Demonstration: Set Up a Dimension with Dimension Values
To set up a dimension with dimension values, perform the steps in the following demonstration.
Demonstration Steps
1. Set up the new dimension PRODUCTGROUP with dimension values not used with multi-company operations. a. In the navigation pane, click Departments. b. Click Administration, and then click Application Setup.
c. On the Application Setup page, click Financial Management > Dimensions > Dimensions.
7 - 8 Microsoft Official Training Materials for Microsoft Dynamics ® Your use of this content is subject to your current services agreement
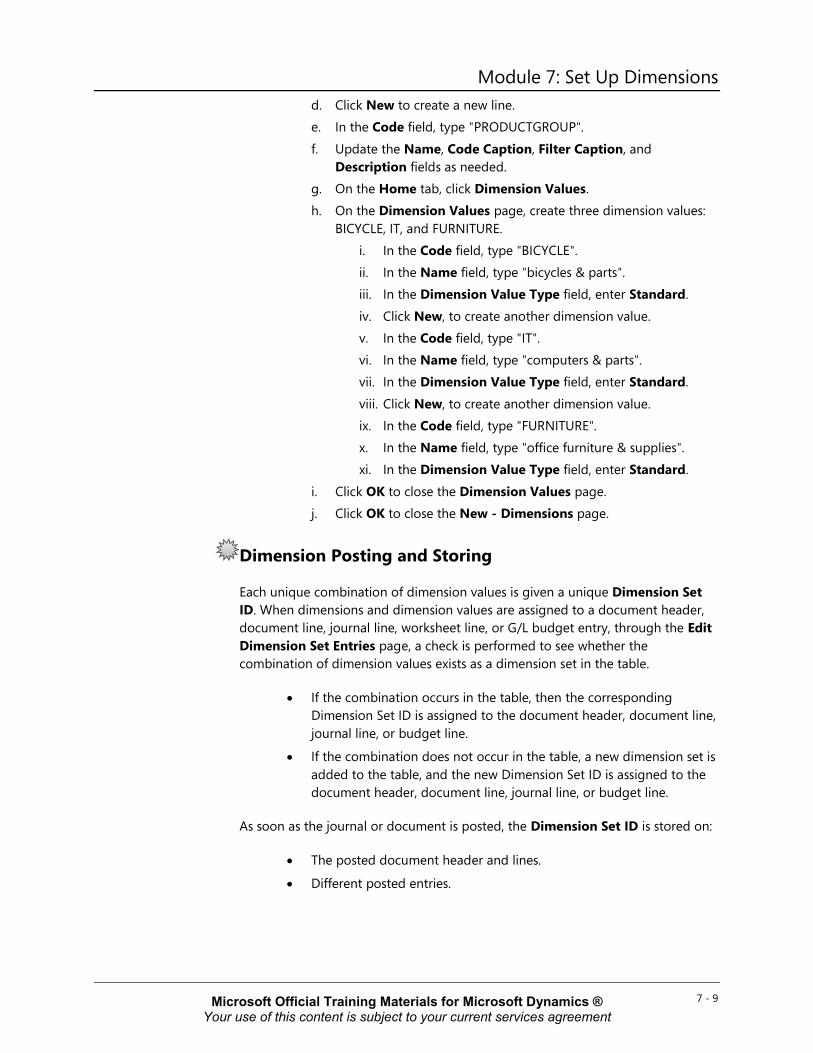
Module 7: Set Up Dimensions d. Click New to create a new line. e. In the Code field, type "PRODUCTGROUP".
f. Update the Name, Code Caption, Filter Caption, and Description fields as needed.
g. On the Home tab, click Dimension Values. h. On the Dimension Values page, create three dimension values:
BICYCLE, IT, and FURNITURE. i. In the Code field, type "BICYCLE". ii. In the Name field, type "bicycles & parts". iii. In the Dimension Value Type field, enter Standard.
iv. Click New, to create another dimension value. v. In the Code field, type "IT". vi. In the Name field, type "computers & parts". vii. In the Dimension Value Type field, enter Standard.
viii. Click New, to create another dimension value. ix. In the Code field, type "FURNITURE". x. In the Name field, type "office furniture & supplies". xi. In the Dimension Value Type field, enter Standard.
i. Click OK to close the Dimension Values page. j. Click OK to close the New - Dimensions page.
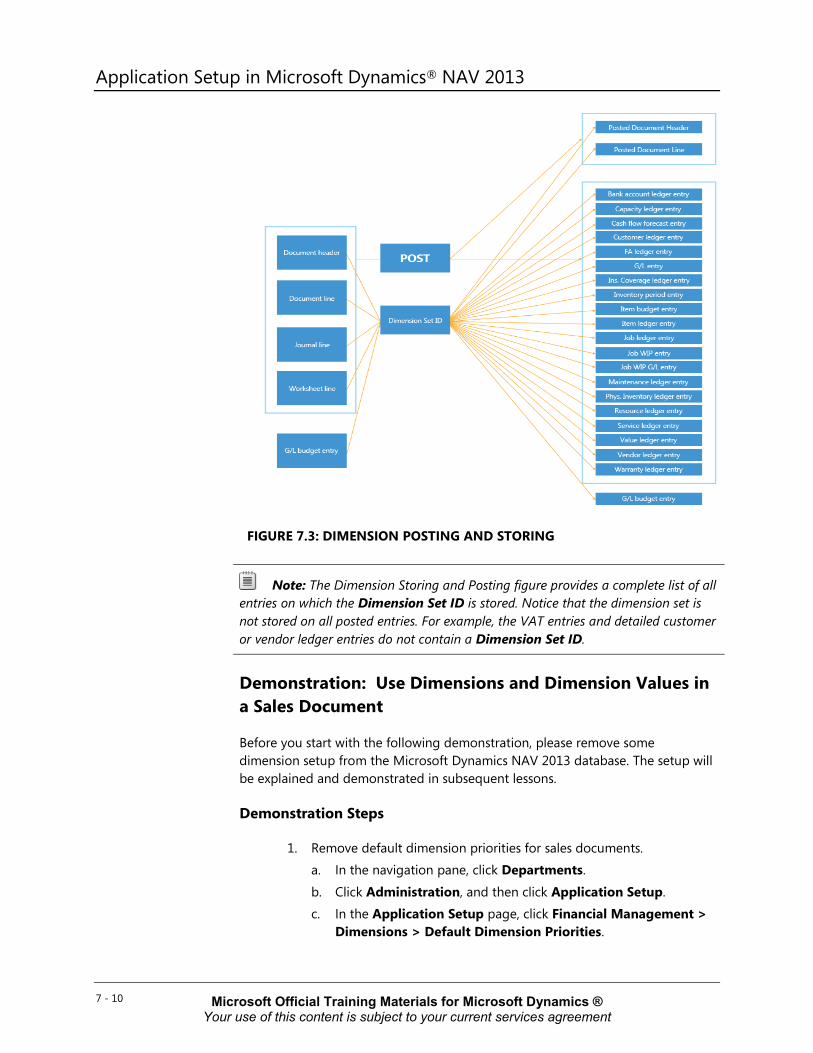
Dimension Posting and Storing
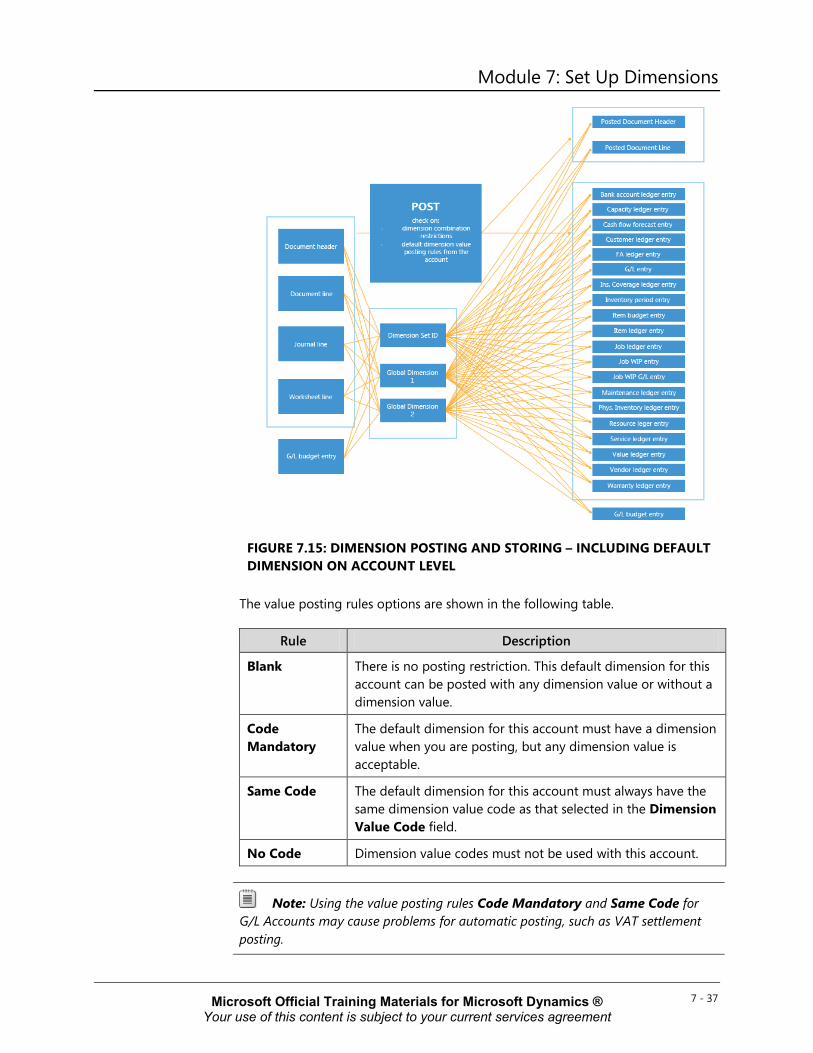
Each unique combination of dimension values is given a unique Dimension Set ID. When dimensions and dimension values are assigned to a document header, document line, journal line, worksheet line, or G/L budget entry, through the Edit Dimension Set Entries page, a check is performed to see whether the combination of dimension values exists as a dimension set in the table.
• If the combination occurs in the table, then the corresponding Dimension Set ID is assigned to the document header, document line, journal line, or budget line.
• If the combination does not occur in the table, a new dimension set is added to the table, and the new Dimension Set ID is assigned to the document header, document line, journal line, or budget line.
As soon as the journal or document is posted, the Dimension Set ID is stored on:
• The posted document header and lines.
• Different posted entries.
7 - 9 Microsoft Official Training Materials for Microsoft Dynamics ® Your use of this content is subject to your current services agreement
Application Setup in Microsoft Dynamics® NAV 2013
FIGURE 7.3: DIMENSION POSTING AND STORING
Note: The Dimension Storing and Posting figure provides a complete list of all entries on which the Dimension Set ID is stored. Notice that the dimension set is not stored on all posted entries. For example, the VAT entries and detailed customer or vendor ledger entries do not contain a Dimension Set ID.
Demonstration: Use Dimensions and Dimension Values in a Sales Document
Before you start with the following demonstration, please remove some dimension setup from the Microsoft Dynamics NAV 2013 database. The setup will be explained and demonstrated in subsequent lessons.
Demonstration Steps
1. Remove default dimension priorities for sales documents. a. In the navigation pane, click Departments.
b. Click Administration, and then click Application Setup. c. In the Application Setup page, click Financial Management >
Dimensions > Default Dimension Priorities.
7 - 10 Microsoft Official Training Materials for Microsoft Dynamics ® Your use of this content is subject to your current services agreement
Module 7: Set Up Dimensions d. Click the Source Code field to view all options. e. On the Source Code page, select SALES and click OK.
f. Select the two existing lines on the Default Dimension Priorities, and on the Home tab click Delete.
g. Click Yes to delete the Default Dimension Priorities. h. Click OK to close the Default Dimension Priorities page.
2. Remove default dimensions from salesperson Linda Marten. a. In the navigation pane, click Departments. b. Click Sales & Marketing, and then click Sales. c. On the Sales page, click Salespeople.
d. Select the line for salesperson Linda Marten. e. On the Navigate tab, click Dimensions – Single. f. Select all lines and then click Delete on the Home tab. g. Click Yes to delete the Default Dimensions.
h. Click OK to close the Default Dimensions page.
Scenario: Susan, a sales order processor at CRONUS International Ltd., receives sales information from Linda Marten, who has made a sale to customer Fairway Sound. Susan has to enter the corresponding sales order into the Microsoft Dynamics NAV database by using the following information:
• Customer 61000 Fairway Sound
• Item 1001 touring bicycle – 10 pieces at 4,000.00 LCY/pcs.
• Item 1920-S ANTWERP conference table – 4 pieces at 420.40 LCY/pcs.
• Dimension Information:
AREA = 30 (Europe North (EU))
BUSINESSGROUP = INDUSTRIAL
CUSTOMERGROUP = SMALL
DEPARTMENT = SALES
PRODUCTGROUP = BICYCLE for item 1001
PRODUCTGROUP = FURNITURE for item 1920-S
SALESPERSON = LM
Note: The previous demonstration Set Up a Dimension with Dimension Values has to be performed to successfully complete this demonstration
3. Enter the sales order with dimension information.
a. In the Search box, type Sales Orders, and choose the related link.
b. Click New to create a new sales order.
7 - 11 Microsoft Official Training Materials for Microsoft Dynamics ® Your use of this content is subject to your current services agreement
Application Setup in Microsoft Dynamics® NAV 2013 c. Press ENTER to go to the next field. The No. field is automatically
populated with the next sales order number according to the set up number series.
d. In the Sell-to Customer No. field, enter 61000. The sales order header is automatically populated with default information from the customer card.
e. In the Salesperson Code field, enter LM. f. On the Navigate tab, click Dimensions.
Note: The dimensions will now be added on the header level of the sales order. This has the following consequences:
• This dimension information will automatically be added as defaults on all sales order lines. However, you can still change this information on line level.
• This dimension information will be compared to the existing dimension sets and an existing or new Dimension Set ID will be assigned to the sales order header.
• The Dimension Set ID will be stored on the posted sales order header, on the G/L entry of the balance sheet account, and on the customer ledger entry as soon as the sales order is posted.
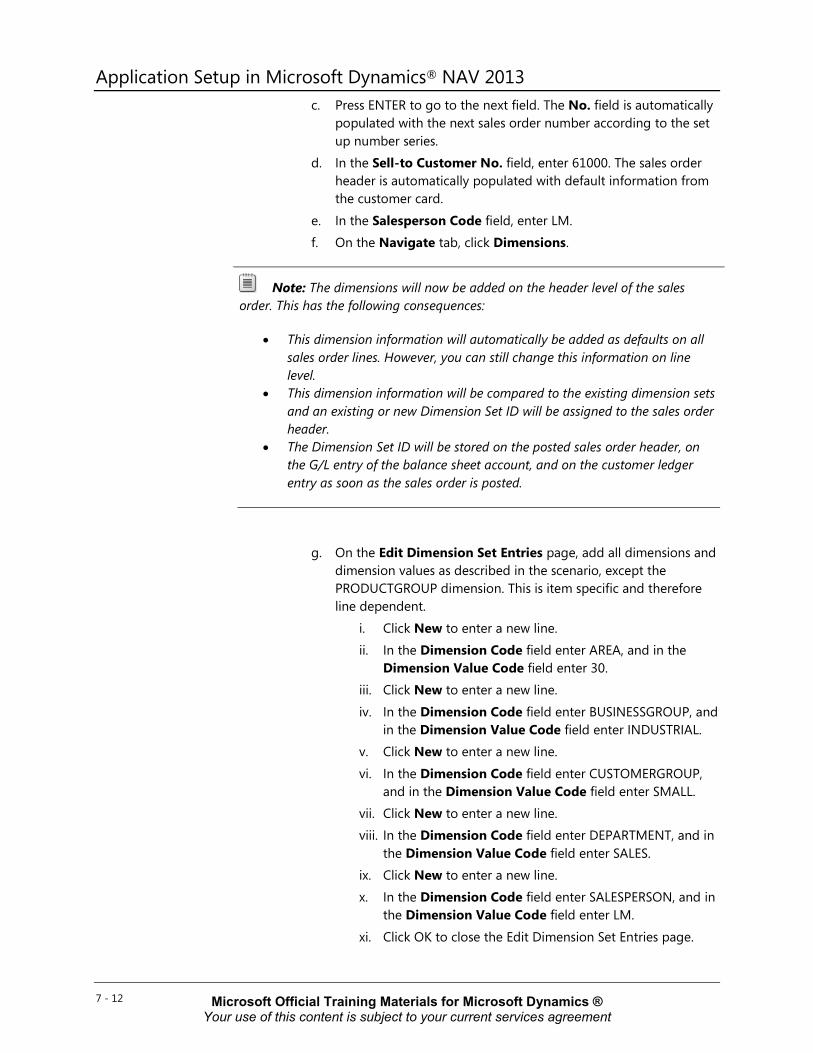
g. On the Edit Dimension Set Entries page, add all dimensions and dimension values as described in the scenario, except the PRODUCTGROUP dimension. This is item specific and therefore line dependent.
i. Click New to enter a new line. ii. In the Dimension Code field enter AREA, and in the
Dimension Value Code field enter 30. iii. Click New to enter a new line.
iv. In the Dimension Code field enter BUSINESSGROUP, and in the Dimension Value Code field enter INDUSTRIAL.
v. Click New to enter a new line.
vi. In the Dimension Code field enter CUSTOMERGROUP, and in the Dimension Value Code field enter SMALL.
vii. Click New to enter a new line. viii. In the Dimension Code field enter DEPARTMENT, and in
the Dimension Value Code field enter SALES. ix. Click New to enter a new line. x. In the Dimension Code field enter SALESPERSON, and in
the Dimension Value Code field enter LM.
xi. Click OK to close the Edit Dimension Set Entries page.
7 - 12 Microsoft Official Training Materials for Microsoft Dynamics ® Your use of this content is subject to your current services agreement
Module 7: Set Up Dimensions
FIGURE 7.4: NEW SALES ORDER HEADER WITH DIMENSION SET ENTRIES
h. On the Lines FastTab, create a new line for each item. i. In the Type field enter Item, in the No. field enter 1001, in the
Location Code field delete WHITE, and in the Quantity field enter 10.
j. On the Check Availability message box, warning about insufficient inventory, click Yes.
k. The Unit Price Excl. VAT field is automatically filled in with 4,000.00.
l. On the Lines FastTab, click Line and then click Dimensions.
Note: The dimensions will now be added on the line level of the sales order. This has the following consequences:
• The dimension information filled on the header level is taken as default to the line level. The default dimension information can be changed or deleted, or other dimension information can be added without changing the dimension information on the header level.
• This dimension information will be compared to the existing dimension sets and an existing or new Dimension Set ID will be assigned to the sales order line.
When the dimension information on the sales order line is the same as on the sales order header, the Dimension Set ID will also be the same.
7 - 13 Microsoft Official Training Materials for Microsoft Dynamics ® Your use of this content is subject to your current services agreement
Application Setup in Microsoft Dynamics® NAV 2013 When the dimension information on the sales order line
differs from that on the sales order header, another existing or new Dimension Set ID will be assigned to the sales order line.
• The Dimension Set ID will be stored on the posted sales order line, on the G/L entry of the income statement, on the G/L entry of the VAT account, and on the value ledger entry as soon as the sales order is posted.
m. On the Edit Dimension Set Entries page, leave all dimensions and dimension values inherited from the sales order header, and only add the PRODUCTGROUP dimension as described in the scenario.
i. Click New to enter a new line.
ii. In the Dimension Code field enter PRODUCTGROUP, and in the Dimension Value Code field enter BICYCLE.
iii. Click OK to close the Edit Dimension Set Entries page. n. On the Lines FastTab of the new sales order, go to the next line
by selecting the Type field. o. In the Type field enter Item, in the No. field enter 1920-S, in the
Location Code field delete WHITE, and in the Quantity field enter 4.
p. On the Check Availability message box, warning about insufficient inventory, click Yes. The Unit Price Excl. VAT field is automatically filled in with 420.40.
q. On the Lines FastTab, click Line and then click Dimensions.
r. On the Edit Dimension Set Entries page, leave all dimensions and dimension values inherited from the sales order header, and only add the PRODUCTGROUP dimension as described in the scenario.
i. Click New to enter a new line. ii. In the Dimension Code field enter PRODUCTGROUP,
and in the Dimension Value Code field enter FURNITURE.
iii. Click OK to close the Edit Dimension Set Entries page. s. On the Home tab, click Post. t. Click Ship and Invoice, and then click OK. During the posting
process, one or more dimension sets will be created and the Dimension Set ID will be stored on the appropriate entries.
7 - 14 Microsoft Official Training Materials for Microsoft Dynamics ® Your use of this content is subject to your current services agreement
Module 7: Set Up Dimensions Demonstration: Review Dimensions on Ledger Entries
To review dimension on ledger entries, perform the steps in the following demonstration.
Demonstration Steps
1. Review how the dimension information is stored. a. In the navigation pane, click Posted Documents. b. Click Posted Sales Invoices.
c. Select the posted sales invoice, created through the previous demonstration.
d. On the Actions tab, click Navigate to review the list of all documents and ledger entries related to this posted invoice.
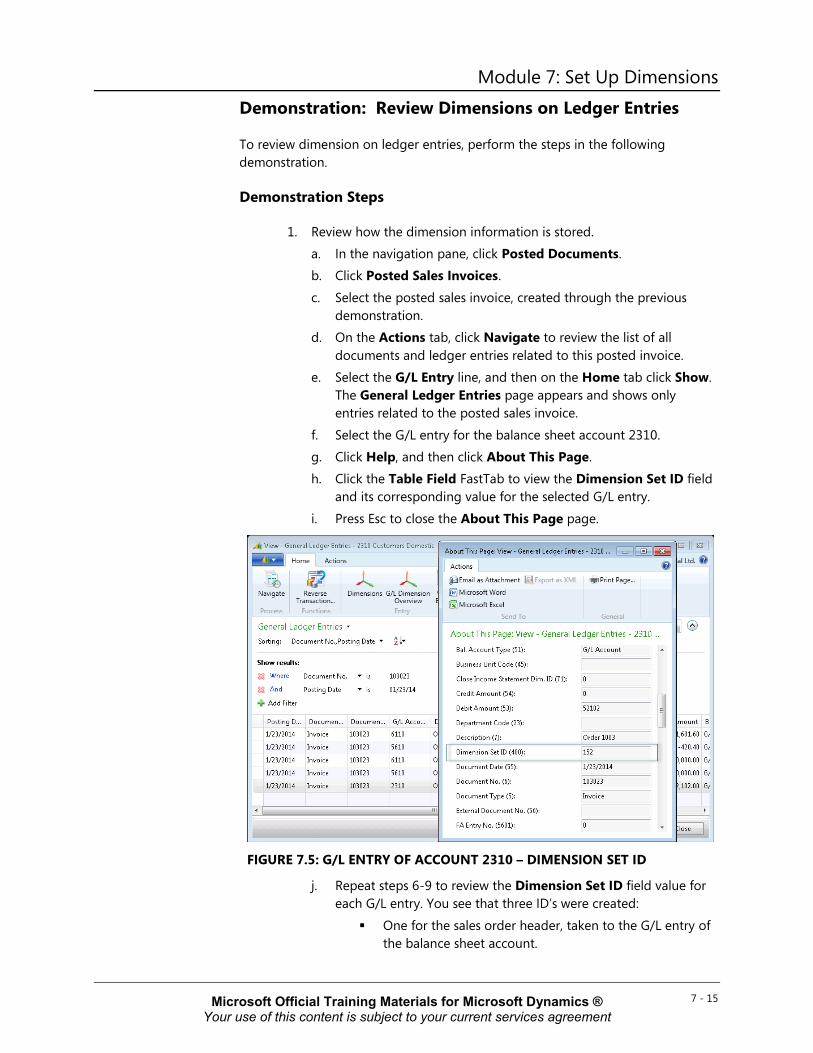
e. Select the G/L Entry line, and then on the Home tab click Show. The General Ledger Entries page appears and shows only entries related to the posted sales invoice.
f. Select the G/L entry for the balance sheet account 2310. g. Click Help, and then click About This Page. h. Click the Table Field FastTab to view the Dimension Set ID field
and its corresponding value for the selected G/L entry.
i. Press Esc to close the About This Page page.
FIGURE 7.5: G/L ENTRY OF ACCOUNT 2310 – DIMENSION SET ID
j. Repeat steps 6-9 to review the Dimension Set ID field value for each G/L entry. You see that three ID’s were created:
One for the sales order header, taken to the G/L entry of the balance sheet account.
7 - 15 Microsoft Official Training Materials for Microsoft Dynamics ® Your use of this content is subject to your current services agreement
Application Setup in Microsoft Dynamics® NAV 2013 One for the sales order line for item 1001, taken to the
G/L entries of the corresponding income statement and VAT account.
One for the sales order line for item 1962-S, taken to the G/L entries of the corresponding income statement and VAT account.
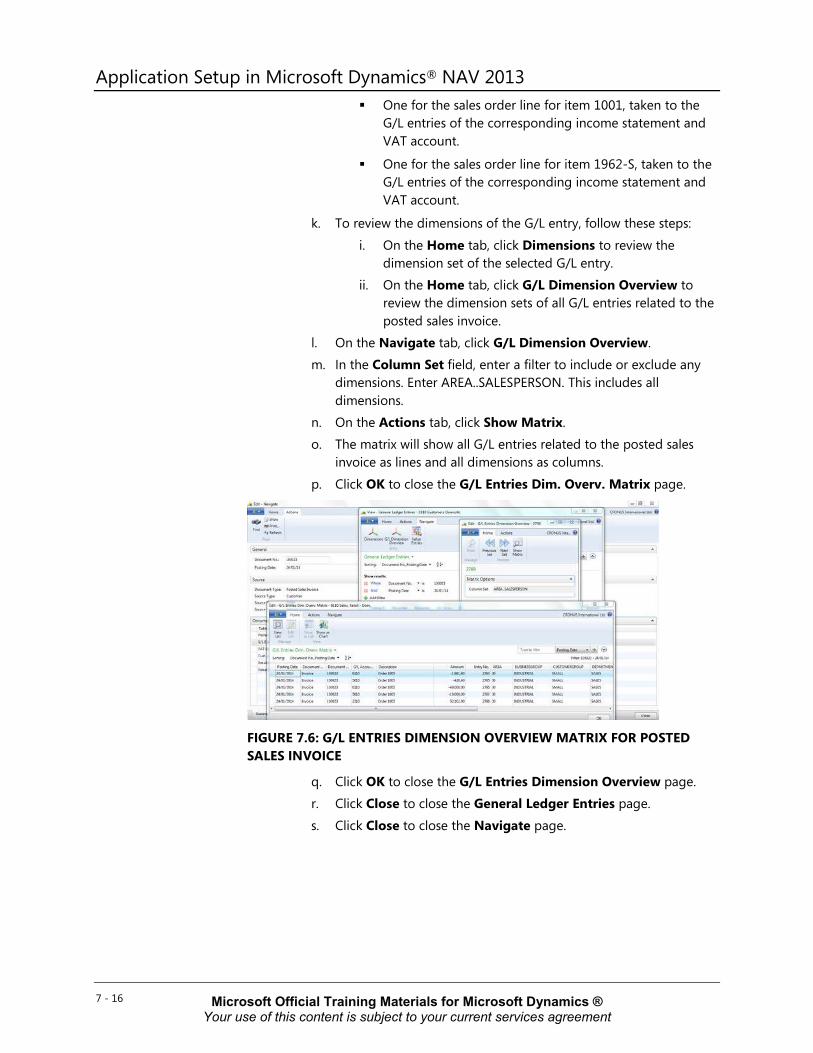
k. To review the dimensions of the G/L entry, follow these steps:
i. On the Home tab, click Dimensions to review the dimension set of the selected G/L entry.
ii. On the Home tab, click G/L Dimension Overview to review the dimension sets of all G/L entries related to the posted sales invoice.
l. On the Navigate tab, click G/L Dimension Overview. m. In the Column Set field, enter a filter to include or exclude any
dimensions. Enter AREA..SALESPERSON. This includes all dimensions.
n. On the Actions tab, click Show Matrix. o. The matrix will show all G/L entries related to the posted sales
invoice as lines and all dimensions as columns.
p. Click OK to close the G/L Entries Dim. Overv. Matrix page.
FIGURE 7.6: G/L ENTRIES DIMENSION OVERVIEW MATRIX FOR POSTED SALES INVOICE
q. Click OK to close the G/L Entries Dimension Overview page. r. Click Close to close the General Ledger Entries page.
s. Click Close to close the Navigate page.
7 - 16 Microsoft Official Training Materials for Microsoft Dynamics ® Your use of this content is subject to your current services agreement
Module 7: Set Up Dimensions
Lab 7.1: Set Up a Dimension with Dimension Values Scenario
CRONUS International Ltd. wants to analyze sales figures connected to trade shows its representatives attend. As the accounting manager, you have to set up a new dimension to meet this requirement.
The new dimension is called Exhibition and includes the following values:
• Hanover
• Frankfurt
• Munich
• London
• Paris
The dimension name, description, and captions do not have to be modified and the values are all standard types.
Objectives
This lab reinforces your understanding of the process required to set up a dimension with dimension values.
Exercise 1: Set Up a Dimension with Dimension Values
Task 1: Set Up a Dimension with Dimension Values
High Level Steps 1. Create the new dimension as stated in the scenario. 2. Assign dimension values as stated in the scenario.
Detailed Steps 1. Create the new dimension as stated in the scenario.
a. In the navigation pane, click Departments. b. Click Administration, and then click Application Setup.
c. On the Application Setup page, click Financial Management > Dimensions > Dimensions.
d. Click New to create a new line. e. In the Code field, type "EXHIBITION".
f. Do not update the Name, Code Caption, Filter Caption, and Description fields.
7 - 17 Microsoft Official Training Materials for Microsoft Dynamics ® Your use of this content is subject to your current services agreement
Application Setup in Microsoft Dynamics® NAV 2013 2. Assign dimension values as stated in the scenario.
a. On the Home tab, click Dimension Values.
b. On the Dimension Values page, create five dimension values: HANOVER, FRANKFURT, MUNICH, LONDON, and PARIS.
i. In the Code field, type "HANOVER". ii. In the Name field, type "Hanover".
iii. In the Dimension Value Type field, enter Standard. iv. Click New to create another dimension value. v. In the Code field, type "FRANKFURT". vi. In the Name field, type "Frankfurt".
vii. In the Dimension Value Type field, enter Standard. viii. Click New to create another dimension value. ix. In the Code field, type "MUNICH". x. In the Name field, type "Munich".
xi. In the Dimension Value Type field, enter Standard. xii. Click New to create another dimension value. xiii. In the Code field, type "LONDON". xiv. In the Name field, type "London".
xv. In the Dimension Value Type field, enter Standard. xvi. Click New to create another dimension value. xvii. In the Code field, type "PARIS".
xviii. In the Name field, type "Paris". xix. In the Dimension Value Type field, enter Standard.
c. Click OK to close the Dimension Values page. d. Click OK to close the New - Dimensions page.
Setting Up Dimensions in General Ledger Setup Through the General Ledger Setup page, dimensions can be set up as either a global dimension or a shortcut dimension. When a dimension is selected as a global or shortcut, Microsoft Dynamics NAV automatically renames all fields that use that dimension type with the Code Caption specified for the selected dimension in the Dimension page.
To access the General Ledger Setup page, follow these steps:
1. On the navigation pane, click Departments.
2. Click Administration, and then click Application Setup. 3. On the Application Setup page, click Financial Management >
Finance > General Ledger Setup. 4. Unfold the Dimensions FastTab.
7 - 18 Microsoft Official Training Materials for Microsoft Dynamics ® Your use of this content is subject to your current services agreement

Module 7: Set Up Dimensions
FIGURE 7.7: GENERAL LEDGER SETUP – DIMENSIONS FASTTAB
5. On the Actions tab, click Change Global Dimensions to set up two of the dimensions from the Dimensions page as global dimensions.
6. Click the Global Dimension 1 Code and Global Dimension 2 Code fields to view a list of all the options, and select the dimension that you want to specify as a global dimension.
7. Click OK.
8. Click Yes to run the Change Global Dimensions batch job, and then click OK. Notice that on the Dimensions FastTab, the Global Dimension 1 Code, Global Dimension 2 Code, Shortcut Dimension 1 Code, and Shortcut Dimension 2 Code are filled in.
9. Notice that six other dimensions from the Dimensions page can be set up as shortcut dimensions by choosing the appropriate field.
10. Click OK to close the General Ledger Setup page.
Note: Microsoft Dynamics NAV 2013 has to be reopened before the renaming of all fields that have the Code Caption will have an effect.
Global Dimensions
Two dimensions can be set up as global dimensions. Typically they are the most used and important dimensions. The advantage of setting them up as global dimensions is their availability throughout the Microsoft Dynamics NAV 2013 database, because of the way that they are stored.
7 - 19 Microsoft Official Training Materials for Microsoft Dynamics ® Your use of this content is subject to your current services agreement
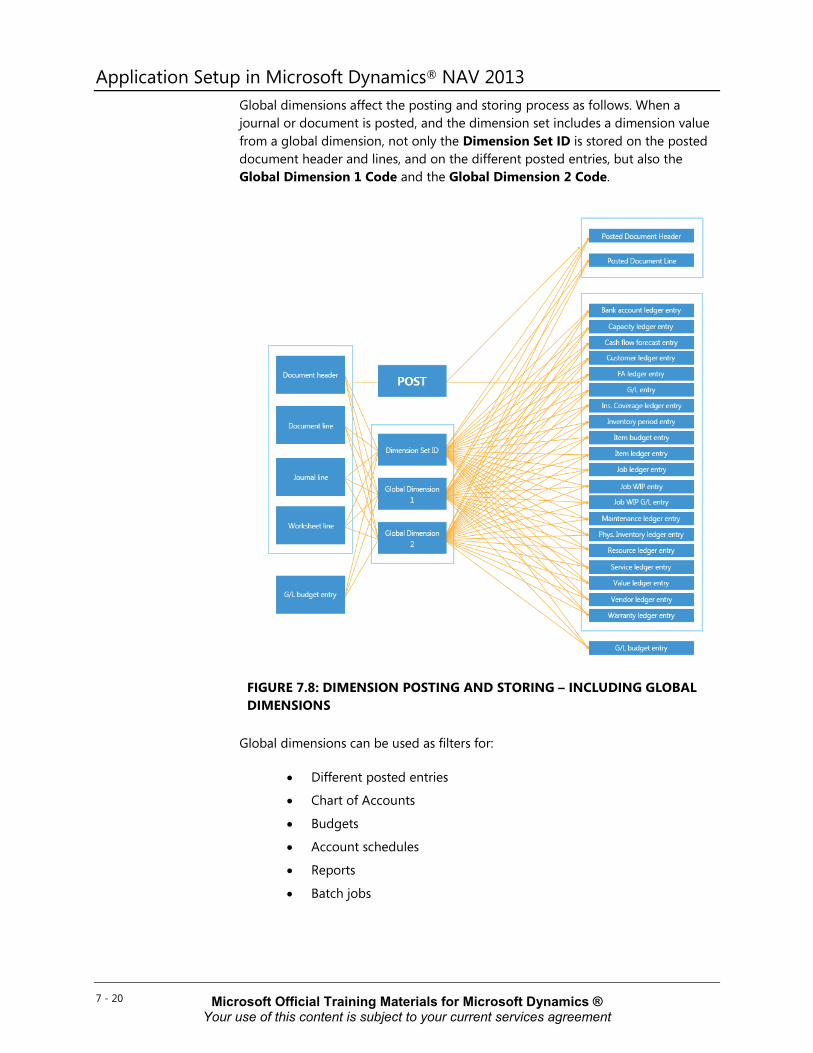
Application Setup in Microsoft Dynamics® NAV 2013 Global dimensions affect the posting and storing process as follows. When a journal or document is posted, and the dimension set includes a dimension value from a global dimension, not only the Dimension Set ID is stored on the posted document header and lines, and on the different posted entries, but also the Global Dimension 1 Code and the Global Dimension 2 Code.
FIGURE 7.8: DIMENSION POSTING AND STORING – INCLUDING GLOBAL DIMENSIONS
Global dimensions can be used as filters for:
• Different posted entries
• Chart of Accounts
• Budgets
• Account schedules
• Reports
• Batch jobs
7 - 20 Microsoft Official Training Materials for Microsoft Dynamics ® Your use of this content is subject to your current services agreement

Module 7: Set Up Dimensions
Note: The figure Dimension Posting and Storing provides a complete list of all entries on which global dimensions are stored, and therefore on which entries you can use the global dimensions as filters.
Shortcut Dimensions
Eight dimensions can be set up as shortcut dimensions. When you set up global dimensions, two dimensions are automatically set up as shortcut dimensions, leaving the option of choosing another six shortcut dimensions.
Shortcut dimensions do not influence the dimension posting and storing process, but have the advantage of being easy to access as a column (made visible by clicking the Click columns function) when assigning dimensions and dimension values on a
• document line
• journal line
• worksheet line
The two shortcut dimensions that are also set up as global dimensions are also available:
• As a field on the document header on the Invoicing FastTab.
• As a column on the G/L budget entry.
Note: Even when a dimension is set up as a shortcut dimension, you can still add the dimension and dimension value through the Edit Dimension Set Entries page.
Demonstration: Set Up Shortcut Dimensions
To set up PRODUCTGROUP and SALESPERSON as shortcut dimensions, perform the steps in the following demonstration.
Demonstration Steps
1. Set up the dimensions PRODUCTGROUP and SALESPERSON as shortcut dimensions. a. On the navigation pane, click Departments.
b. Click Administration, and then click Application Setup. c. On the Application Setup page, click Financial Management >
Finance > General Ledger Setup.
7 - 21 Microsoft Official Training Materials for Microsoft Dynamics ® Your use of this content is subject to your current services agreement
Application Setup in Microsoft Dynamics® NAV 2013 d. Unfold the Dimensions FastTab. e. Click the Shortcut Dimension 7 Code field, to view all the
options. f. Select the dimension PRODUCTGROUP and press Enter. g. Click the Shortcut Dimension 8 Code field to view all the
options.
h. Select the dimension SALESPERSON and press Enter. i. Click OK to close the General Ledger Setup page. j. Close the Microsoft Dynamics NAV 2013 database so that all
fields that use that dimension type will be renamed with the Code Caption specified for the selected dimension in the Dimension page.
Demonstration: Use Dimensions and Dimension Values in a Sales Document
This demonstration completes the same scenario as the demonstration from the previous lesson Dimensions and Dimension Values. However, now global and shortcut dimensions are set up so that you can see the influence on the sales order process and the dimension posting and storing process.
Scenario: Susan, a sales order processor at CRONUS International Ltd., receives sales information from Linda Marten, who has made a sale to customer Fairway Sound. Susan has to enter the corresponding sales order into the Microsoft Dynamics NAV database by using the following information:
• Customer 61000 Fairway Sound
• Item 1001 touring bicycle – 10 pieces at 4,000.00 LCY/pcs.
• Item 1920-S ANTWERP conference table – 4 pieces at 420.40 LCY/pcs.
• Dimension Information:
o AREA = 30 (Europe North (EU))
o BUSINESSGROUP = INDUSTRIAL
o CUSTOMERGROUP = SMALL
o DEPARTMENT = SALES
o PRODUCTGROUP = BICYCLE for item 1001
o PRODUCTGROUP = FURNITURE for item 1920-S
o SALESPERSON = LM
Note: The previous demonstration, Set Up Shortcut Dimensions, has to be performed to successfully complete this demonstration.
7 - 22 Microsoft Official Training Materials for Microsoft Dynamics ® Your use of this content is subject to your current services agreement
Module 7: Set Up Dimensions Demonstration Steps
1. Enter the sales order with dimension information.
a. In the navigation pane, click Home. b. Click Sales Orders. c. Click New to create a new sales order.
d. Press ENTER to go to the next field. The No. field is automatically populated with the next sales order number according to the set up number series.
e. In the Sell-to Customer No. field, enter 61000. The sales order header is automatically populated with default information from the customer card.
f. In the Salesperson Code field, enter LM. g. Unfold the Invoicing FastTab.
h. Click Department Code field to view all the options. Select the dimension SALES and press ENTER.
Note: Notice that the dimension DEPARTMENT, set up as a global dimension and therefore available as a field on the sales order header, is presented with the Code Caption as specified on the Dimensions page.
i. On the Navigate tab, click Dimensions. j. On the Edit Dimension Set Entries page, add all dimensions and
dimension values as described in the scenario, except the PRODUCTGROUP dimension. This is item specific and therefore line dependent.
Note: For the sales order header, the dimensions not set up as global dimensions still have to be assigned through the Edit Dimension Set Entries page.
By filling in the DEPARTMENT dimension on the sales order header, a line was automatically created on the Edit Dimension Set Entries page.
k. Click New to enter a new line. l. In the Dimension Code field enter AREA, and in the Dimension
Value Code field enter 30. m. Click New to enter a new line.
n. In the Dimension Code field enter BUSINESSGROUP, and in the Dimension Value Code field enter INDUSTRIAL.
o. Click New to enter a new line.
p. In the Dimension Code field enter CUSTOMERGROUP, and in the Dimension Value Code field enter SMALL.
q. Click New to enter a new line.
7 - 23 Microsoft Official Training Materials for Microsoft Dynamics ® Your use of this content is subject to your current services agreement
Application Setup in Microsoft Dynamics® NAV 2013 r. In the Dimension Code field enter SALESPERSON, and in the
Dimension Value Code field enter LM.
s. Click OK to close the Edit Dimension Set Entries page. t. On the Lines FastTab, right-click the column header, and then
click Choose Columns. u. From the Available columns add the following fields: Area
Code, Businessgroup Code, Customergroup Code, Department Code, Productgroup Code, and Salesperson Code.
v. Click OK to close the Customize Lines page. The Sales Order page will automatically close and reopen.
w. On the Lines FastTab, create a new line for each item. x. In the Type field enter Item, in the No. field enter 1001, in the
Location Code field delete WHITE, and in the Quantity field enter 10.
y. On the Check Availability message box, warning about insufficient inventory, click Yes.
z. Note the Unit Price Excl. VAT field is automatically filled in with 4,000.00.
aa. Note the Area Code, Businessgroup Code, Customergroup Code, Department Code, and Salesperson Code fields already contain a dimension value. This is inherited from the sales order header.
bb. In the Productgroup Code field, enter the dimension value BICYCLE by choosing the field and selecting the value.
Note: When you open the Edit Dimension Set Entries page, you see that the different lines are automatically created for each dimension and corresponding dimension value, as entered directly on the sales order line.
cc. On the Lines FastTab of the new sales order, go to the next line by clicking the Type field.
dd. In the Type field enter Item, in the No. field enter 1920-S, in the Location Code field delete WHITE, and in the Quantity field enter 4.
ee. On the Check Availability message box, warning about insufficient inventory, click Yes.
ff. Note the Unit Price Excl. VAT field is automatically filled in with 420.40.
gg. Note the Area Code, Businessgroup Code, Customergroup Code, Department Code, and Salesperson Code fields already contain a dimension value. This is inherited from the sales order header.
7 - 24 Microsoft Official Training Materials for Microsoft Dynamics ® Your use of this content is subject to your current services agreement
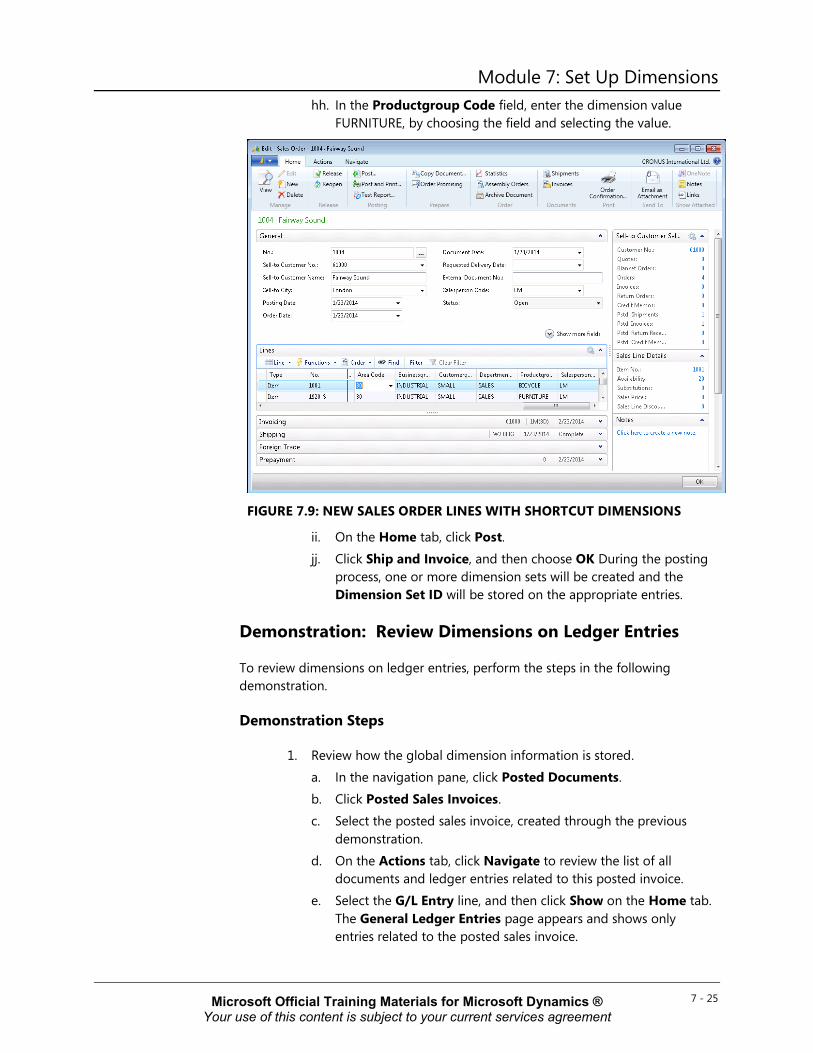
Module 7: Set Up Dimensions hh. In the Productgroup Code field, enter the dimension value
FURNITURE, by choosing the field and selecting the value.
FIGURE 7.9: NEW SALES ORDER LINES WITH SHORTCUT DIMENSIONS
ii. On the Home tab, click Post. jj. Click Ship and Invoice, and then choose OK During the posting
process, one or more dimension sets will be created and the Dimension Set ID will be stored on the appropriate entries.
Demonstration: Review Dimensions on Ledger Entries
To review dimensions on ledger entries, perform the steps in the following demonstration.
Demonstration Steps
1. Review how the global dimension information is stored. a. In the navigation pane, click Posted Documents. b. Click Posted Sales Invoices. c. Select the posted sales invoice, created through the previous
demonstration. d. On the Actions tab, click Navigate to review the list of all
documents and ledger entries related to this posted invoice. e. Select the G/L Entry line, and then click Show on the Home tab.
The General Ledger Entries page appears and shows only entries related to the posted sales invoice.
7 - 25 Microsoft Official Training Materials for Microsoft Dynamics ® Your use of this content is subject to your current services agreement
Application Setup in Microsoft Dynamics® NAV 2013 f. Right-click the column header, and then click Choose Columns. g. From the Available columns add the Department Code field.
h. Click OK to close the Customize General Ledger Entries page. i. Reopen the General Ledger Entries page. j. Select the G/L entry for the balance sheet account 2310. The
dimension value SALES for dimension DEPARTMENT is directly stored on the G/L entry.
k. Click Close to close the General Ledger Entries page. l. Click Close to close the Navigate page.
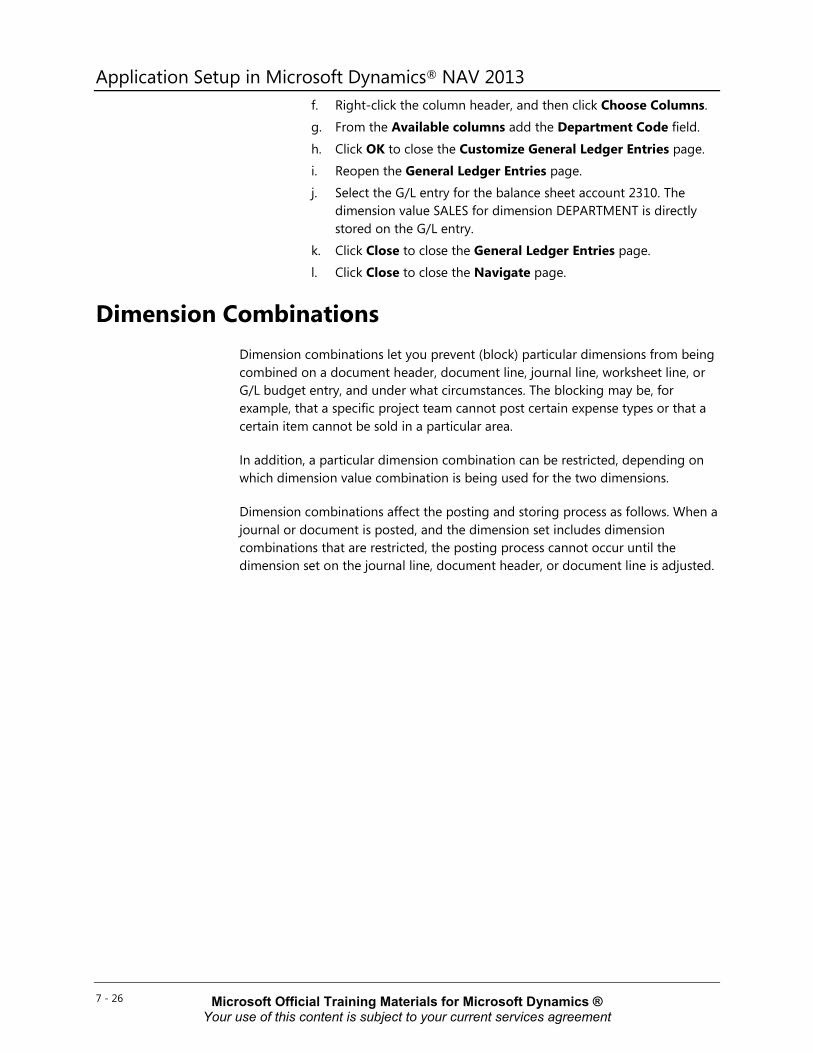
Dimension Combinations Dimension combinations let you prevent (block) particular dimensions from being combined on a document header, document line, journal line, worksheet line, or G/L budget entry, and under what circumstances. The blocking may be, for example, that a specific project team cannot post certain expense types or that a certain item cannot be sold in a particular area.
In addition, a particular dimension combination can be restricted, depending on which dimension value combination is being used for the two dimensions.
Dimension combinations affect the posting and storing process as follows. When a journal or document is posted, and the dimension set includes dimension combinations that are restricted, the posting process cannot occur until the dimension set on the journal line, document header, or document line is adjusted.
7 - 26 Microsoft Official Training Materials for Microsoft Dynamics ® Your use of this content is subject to your current services agreement
Module 7: Set Up Dimensions
FIGURE 7.10: DIMENSION POSTING AND STORING – INCLUDING DIMENSION COMBINATIONS
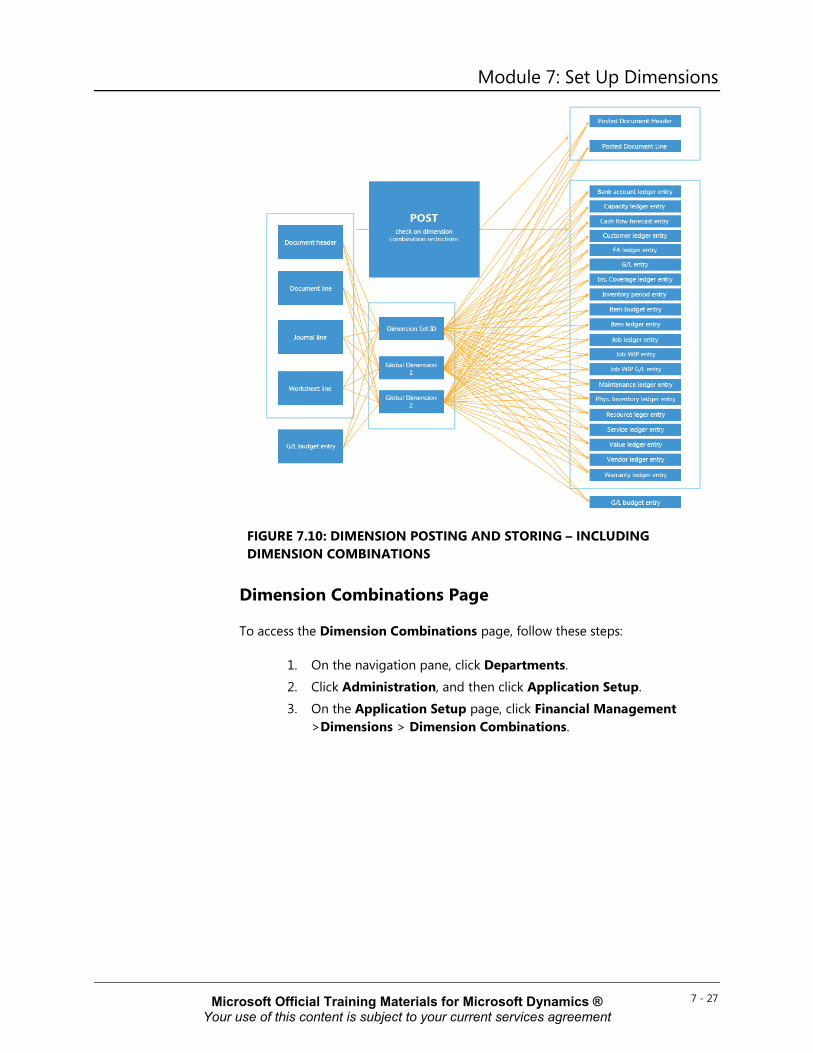
Dimension Combinations Page
To access the Dimension Combinations page, follow these steps:
1. On the navigation pane, click Departments. 2. Click Administration, and then click Application Setup. 3. On the Application Setup page, click Financial Management
>Dimensions > Dimension Combinations.
7 - 27 Microsoft Official Training Materials for Microsoft Dynamics ® Your use of this content is subject to your current services agreement
Application Setup in Microsoft Dynamics® NAV 2013
FIGURE 7.11: DIMENSIONS COMBINATIONS WINDOW
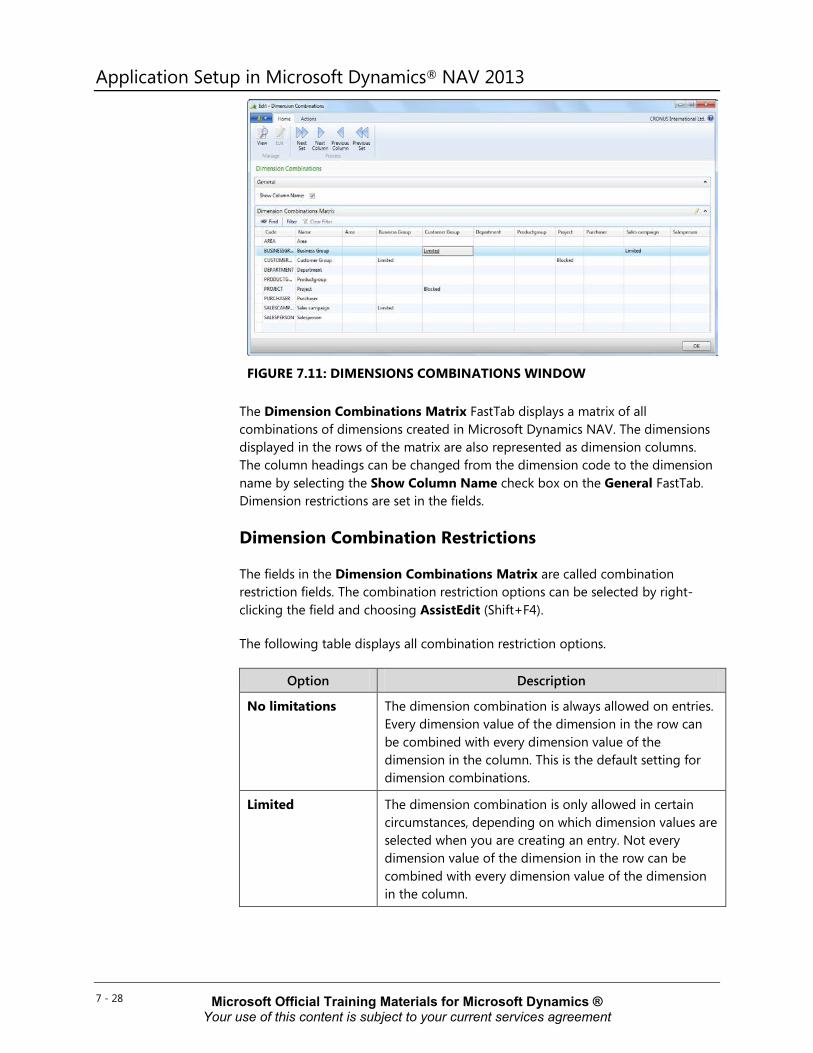
The Dimension Combinations Matrix FastTab displays a matrix of all combinations of dimensions created in Microsoft Dynamics NAV. The dimensions displayed in the rows of the matrix are also represented as dimension columns. The column headings can be changed from the dimension code to the dimension name by selecting the Show Column Name check box on the General FastTab. Dimension restrictions are set in the fields.
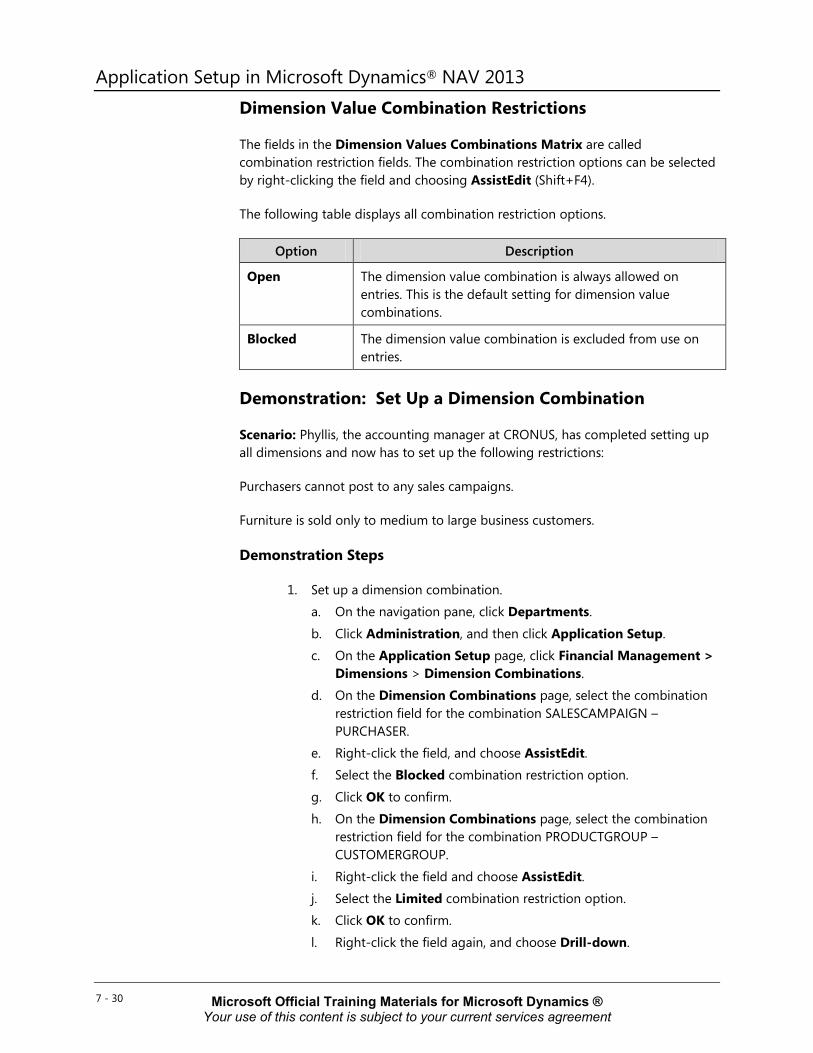
Dimension Combination Restrictions
The fields in the Dimension Combinations Matrix are called combination restriction fields. The combination restriction options can be selected by right-clicking the field and choosing AssistEdit (Shift+F4).
The following table displays all combination restriction options.
Option Description
No limitations The dimension combination is always allowed on entries. Every dimension value of the dimension in the row can be combined with every dimension value of the dimension in the column. This is the default setting for dimension combinations.
Limited The dimension combination is only allowed in certain circumstances, depending on which dimension values are selected when you are creating an entry. Not every dimension value of the dimension in the row can be combined with every dimension value of the dimension in the column.
7 - 28 Microsoft Official Training Materials for Microsoft Dynamics ® Your use of this content is subject to your current services agreement
Module 7: Set Up Dimensions Option Description
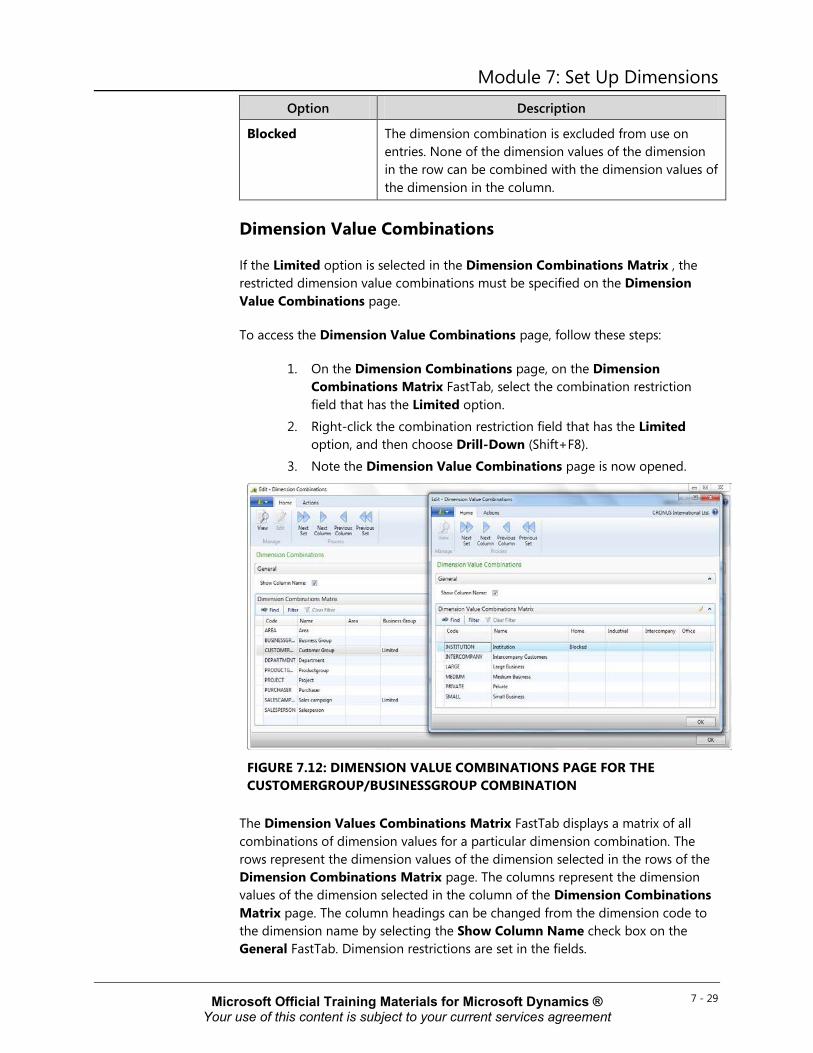
Blocked The dimension combination is excluded from use on entries. None of the dimension values of the dimension in the row can be combined with the dimension values of the dimension in the column.
Dimension Value Combinations
If the Limited option is selected in the Dimension Combinations Matrix , the restricted dimension value combinations must be specified on the Dimension Value Combinations page.
To access the Dimension Value Combinations page, follow these steps:
1. On the Dimension Combinations page, on the Dimension Combinations Matrix FastTab, select the combination restriction field that has the Limited option.
2. Right-click the combination restriction field that has the Limited option, and then choose Drill-Down (Shift+F8).
3. Note the Dimension Value Combinations page is now opened.
FIGURE 7.12: DIMENSION VALUE COMBINATIONS PAGE FOR THE CUSTOMERGROUP/BUSINESSGROUP COMBINATION
The Dimension Values Combinations Matrix FastTab displays a matrix of all combinations of dimension values for a particular dimension combination. The rows represent the dimension values of the dimension selected in the rows of the Dimension Combinations Matrix page. The columns represent the dimension values of the dimension selected in the column of the Dimension Combinations Matrix page. The column headings can be changed from the dimension code to the dimension name by selecting the Show Column Name check box on the General FastTab. Dimension restrictions are set in the fields.
7 - 29 Microsoft Official Training Materials for Microsoft Dynamics ® Your use of this content is subject to your current services agreement
Application Setup in Microsoft Dynamics® NAV 2013 Dimension Value Combination Restrictions
The fields in the Dimension Values Combinations Matrix are called combination restriction fields. The combination restriction options can be selected by right-clicking the field and choosing AssistEdit (Shift+F4).
The following table displays all combination restriction options.
Option Description
Open The dimension value combination is always allowed on entries. This is the default setting for dimension value combinations.
Blocked The dimension value combination is excluded from use on entries.
Demonstration: Set Up a Dimension Combination
Scenario: Phyllis, the accounting manager at CRONUS, has completed setting up all dimensions and now has to set up the following restrictions:
Purchasers cannot post to any sales campaigns.
Furniture is sold only to medium to large business customers.
Demonstration Steps
1. Set up a dimension combination. a. On the navigation pane, click Departments.
b. Click Administration, and then click Application Setup. c. On the Application Setup page, click Financial Management >
Dimensions > Dimension Combinations. d. On the Dimension Combinations page, select the combination
restriction field for the combination SALESCAMPAIGN – PURCHASER.
e. Right-click the field, and choose AssistEdit. f. Select the Blocked combination restriction option.
g. Click OK to confirm. h. On the Dimension Combinations page, select the combination
restriction field for the combination PRODUCTGROUP – CUSTOMERGROUP.
i. Right-click the field and choose AssistEdit. j. Select the Limited combination restriction option. k. Click OK to confirm.
l. Right-click the field again, and choose Drill-down.
7 - 30 Microsoft Official Training Materials for Microsoft Dynamics ® Your use of this content is subject to your current services agreement
Module 7: Set Up Dimensions m. On the Dimension Values Combinations page, select the
combination restriction filed for the combination FURNITURE – INSTITUTION.
n. Right-click the field, and choose AssistEdit. o. Select the Blocked combination restriction option. p. Click OK to confirm.
q. Repeat steps m to p for the combination of FURNITURE with INTERCOMPANY, PRIVATE, and SMALL.
FIGURE 7.13: DIMENSION COMBINATIONS PAGE AND DIMENSION VALUE COMBINATIONS PAGE FOR THE PRODUCTGROUP/CUSTOMERGROUP COMBINATION
r. Click OK to close the Dimension Values Combinations page.
s. Click OK to close the Dimension Combinations page.
Demonstration: Use Dimensions and Dimension Values in a Sales Document
This demonstration completes the same scenario as the demonstration from the previous lesson, Setting Up Dimensions in General Ledger Setup. However, now dimension combinations are set up to demonstrate the influence on the sales order process.
Scenario: Susan, a sales order processor at CRONUS International Ltd., receives sales information from Linda Marten, who has made a sale to customer Fairway Sound. Susan has to enter the corresponding sales order into the Microsoft Dynamics NAV database by using the following information:
• Customer 61000 Fairway Sound
• Item 1001 touring bicycle – 10 pieces at 4,000.00 LCY/pcs.
7 - 31 Microsoft Official Training Materials for Microsoft Dynamics ® Your use of this content is subject to your current services agreement
Application Setup in Microsoft Dynamics® NAV 2013 • Item 1920-S ANTWERP conference table – 4 pieces at 420.40 LCY/pcs.
• Dimension Information:
o AREA = 30 (Europe North (EU))
o BUSINESSGROUP = INDUSTRIAL
o CUSTOMERGROUP = SMALL
o DEPARTMENT = SALES
o PRODUCTGROUP = BICYCLE for item 1001
o PRODUCTGROUP = FURNITURE for item 1920-S
o SALESPERSON = LM
Note: The previous demonstration, Set Up a Dimension Combination, has to be performed to successfully complete this demonstration.
Demonstration Steps
1. Enter the sales order with dimension information. a. In the navigation pane, click Home. b. Click Sales Orders.
c. Click New to create a new sales order. d. Press ENTER to go to the next field. The No. field is automatically
populated with the next sales order number according to the set up number series.
e. In the Sell-to Customer No. field, enter 61000. The sales order header is automatically populated with default information from the customer card.
f. In the Salesperson Code field, enter LM.
g. Unfold the Invoicing FastTab. h. Click Department Code field to view all the options. Select the
dimension SALES and enter. i. On the Navigate tab, click Dimensions.
j. On the Edit Dimension Set Entries page, add all dimensions and dimension values as described in the scenario, except the PRODUCTGROUP dimension. This is item specific and therefore line dependent.
k. Click New to enter a new line. l. In the Dimension Code field enter AREA, and in the Dimension
Value Code field enter 30.
m. Click New to enter a new line. n. In the Dimension Code field enter BUSINESSGROUP, and in the
Dimension Value Code field enter INDUSTRIAL. o. Click New to enter a new line.
7 - 32 Microsoft Official Training Materials for Microsoft Dynamics ® Your use of this content is subject to your current services agreement
Module 7: Set Up Dimensions p. In the Dimension Code field enter CUSTOMERGROUP, and in the
Dimension Value Code field enter SMALL.
q. Click New to enter a new line. r. In the Dimension Code field enter SALESPERSON, and in the
Dimension Value Code field enter LM. s. Click OK to close the Edit dimension Set Entries page.
t. On the Lines FastTab, create a new line for each item. u. In the Type field enter Item, in the No. field enter 1001, in the
Location Code field delete WHITE, and in the Quantity field enter 10.
v. On the Check Availability message box, warning about insufficient inventory, click Yes.
w. Note the Unit Price Excl. VAT field is automatically filled in with 4,000.00.
x. Note the Area Code, Businessgroup Code, Customergroup Code, Department Code, and Salesperson Code fields already contain a dimension value. This is inherited from the sales order header.
y. In the Productgroup Code field, enter the dimension value BICYCLE by clicking the field and selecting the value.
z. On the Lines FastTab of the new sales order, go to the next line by clicking the Type field.
aa. In the Type field enter Item, in the No. field enter 1920-S, in the Location Code field delete WHITE, and in the Quantity field enter 4.
bb. On the Check Availability message box, warning about insufficient inventory, click Yes.
cc. Note the Unit Price Excl. VAT field is automatically filled in with 420.40.
dd. Note the Area Code, Businessgroup Code, Customergroup Code, Department Code, and Salesperson Code fields already contain a dimension value. This is inherited from the sales order header.
ee. In the Productgroup Code field, enter the dimension value FURNITURE by clicking the field and selecting the value.
ff. On the Home tab, click Post. gg. Click Ship and Invoice, and then click OK.
A message box appears, warning about dimension combination restrictions on the sales order line for product 1920-S. The combination of CUSTOMERGROUP – SMALL and PRODUCTGROUP – FURNITURE is not allowed.
7 - 33 Microsoft Official Training Materials for Microsoft Dynamics ® Your use of this content is subject to your current services agreement
Application Setup in Microsoft Dynamics® NAV 2013
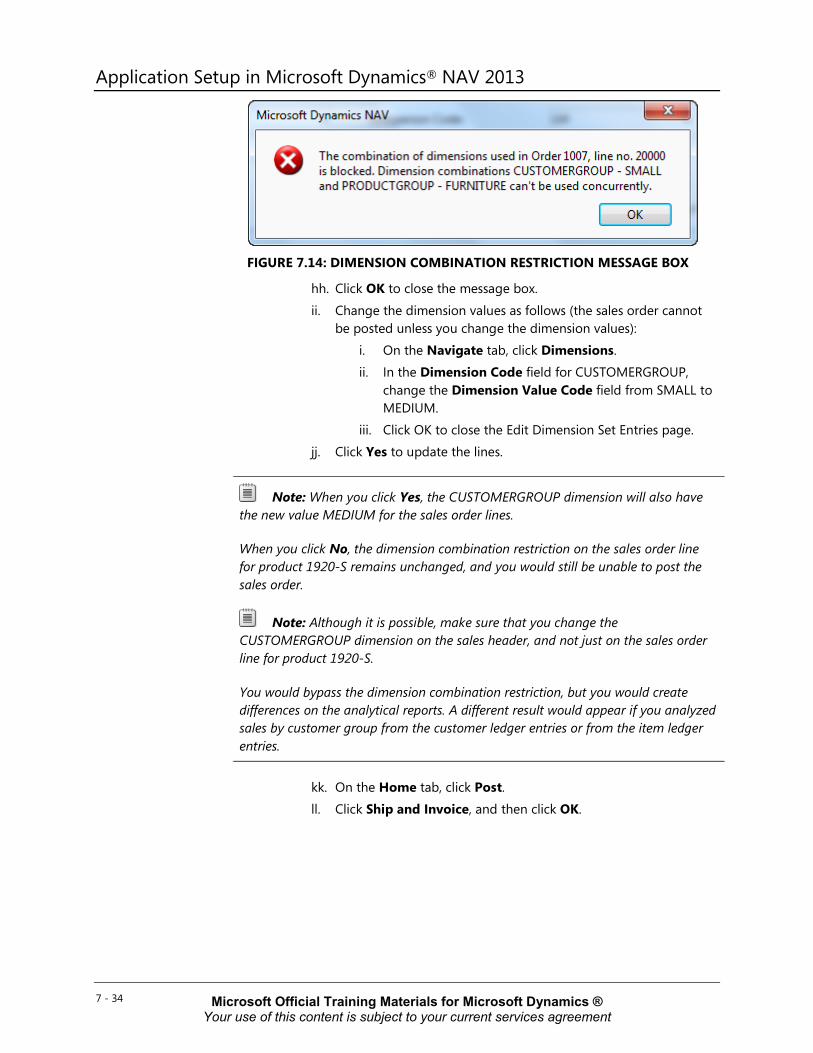
FIGURE 7.14: DIMENSION COMBINATION RESTRICTION MESSAGE BOX
hh. Click OK to close the message box.
ii. Change the dimension values as follows (the sales order cannot be posted unless you change the dimension values):
i. On the Navigate tab, click Dimensions. ii. In the Dimension Code field for CUSTOMERGROUP,
change the Dimension Value Code field from SMALL to MEDIUM.
iii. Click OK to close the Edit Dimension Set Entries page. jj. Click Yes to update the lines.
Note: When you click Yes, the CUSTOMERGROUP dimension will also have the new value MEDIUM for the sales order lines.
When you click No, the dimension combination restriction on the sales order line for product 1920-S remains unchanged, and you would still be unable to post the sales order.
Note: Although it is possible, make sure that you change the CUSTOMERGROUP dimension on the sales header, and not just on the sales order line for product 1920-S.
You would bypass the dimension combination restriction, but you would create differences on the analytical reports. A different result would appear if you analyzed sales by customer group from the customer ledger entries or from the item ledger entries.
kk. On the Home tab, click Post. ll. Click Ship and Invoice, and then click OK.
7 - 34 Microsoft Official Training Materials for Microsoft Dynamics ® Your use of this content is subject to your current services agreement

Module 7: Set Up Dimensions
Lab 7.2: Set Up a Dimension Combination Scenario
It is now necessary to set up combination restrictions on the Exhibition dimension. Because this dimension is strictly related to trade shows, it must never be posted in connection with the Sales Campaign dimension.
In addition, the Exhibition dimension is only applicable to the business groups Industrial, Intercompany, and Office.
Objectives
This lab reinforces your understanding of the process required to set up dimension combinations.
Exercise 1: Set Up a Dimension Combination
Task 1: Set Up a Dimension Combination
High Level Steps 1. Assign the Sales Campaign restriction to the Exhibition dimension. 2. Assign the Business Group restriction to the Exhibition dimension.
Detailed Steps 1. Assign the Sales Campaign restriction to the Exhibition dimension.
a. On the navigation pane, choose Departments. b. Click Administration, and then click Application Setup.
c. On the Application Setup page, click Financial Management > Dimensions > Dimension Combinations.
d. On the Dimension Combinations page, select the combination restriction field for the combination SALESCAMPAIGN – EXHIBITION.
e. Right-click the field, and then choose AssistEdit. f. Select the Blocked combination restriction option. g. Click OK to confirm.
2. Assign the Business Group restriction to the Exhibition dimension. a. On the Dimension Combinations page, select the combination
restriction field for the combination EXHIBITION – BUSINESSGROUP.
b. Right-click the field, and choose AssistEdit. c. Select the Limited combination restriction option. d. Click OK to confirm.
e. Right-click the field again, and choose Drill-down.
7 - 35 Microsoft Official Training Materials for Microsoft Dynamics ® Your use of this content is subject to your current services agreement
Application Setup in Microsoft Dynamics® NAV 2013 f. On the Dimension Values Combinations page, select the
combination restriction field for the combination HANOVER – HOME.
g. Right-click the field, and choose AssistEdit. h. Select the Blocked combination restriction option. i. Click OK to confirm.
j. Repeat steps g to i for the combination of FRANKFURT, MUNICH, LONDON, and PARIS with HOME.
k. Click OK to close the Dimension Values Combinations page. l. Click OK to close the Dimension Combinations page.
Default Dimensions When dimension codes and dimension values are set up, you can define default dimensions. Default dimensions are set up on account level and determine how particular accounts use dimensions and dimension values.
Default dimensions provide the advantage that much dimension information is already filled in when you process documents, journals, and worksheets.
Note: Default dimensions are not filled in when you enter G/L budget entries.
Default dimensions can be entered for a single account or for multiple accounts. Setting up default dimensions for multiple accounts will save setup time. For example, all customers who have a Country/Region Code GB (Great-Britain) will be assigned the dimension AREA with dimension value 30 (Europe North (EU)). Instead of entering the default dimension customer per customer (Dimensions – single), you can first put a filter on the Customer page, select all the customers, and set the default dimension for all customers combined (Dimensions – Multiple).
Value Posting Rules
Default dimensions contain three main areas that are used together:
• Dimension
• Dimension value
• Value posting rule
The value posting rules determine in what way dimension information may be posted, and therefore affect the posting and storing process as follows. When a journal or document is posted, and the dimension set includes dimensions and dimension values that are not aligned with the default dimension value posting rules, the posting process cannot occur until the dimension set on the journal line, document header, or document line is adjusted.
7 - 36 Microsoft Official Training Materials for Microsoft Dynamics ® Your use of this content is subject to your current services agreement
Module 7: Set Up Dimensions
FIGURE 7.15: DIMENSION POSTING AND STORING – INCLUDING DEFAULT DIMENSION ON ACCOUNT LEVEL
The value posting rules options are shown in the following table.
Rule Description
Blank There is no posting restriction. This default dimension for this account can be posted with any dimension value or without a dimension value.
Code Mandatory
The default dimension for this account must have a dimension value when you are posting, but any dimension value is acceptable.
Same Code The default dimension for this account must always have the same dimension value code as that selected in the Dimension Value Code field.
No Code Dimension value codes must not be used with this account.
Note: Using the value posting rules Code Mandatory and Same Code for G/L Accounts may cause problems for automatic posting, such as VAT settlement posting.
7 - 37 Microsoft Official Training Materials for Microsoft Dynamics ® Your use of this content is subject to your current services agreement

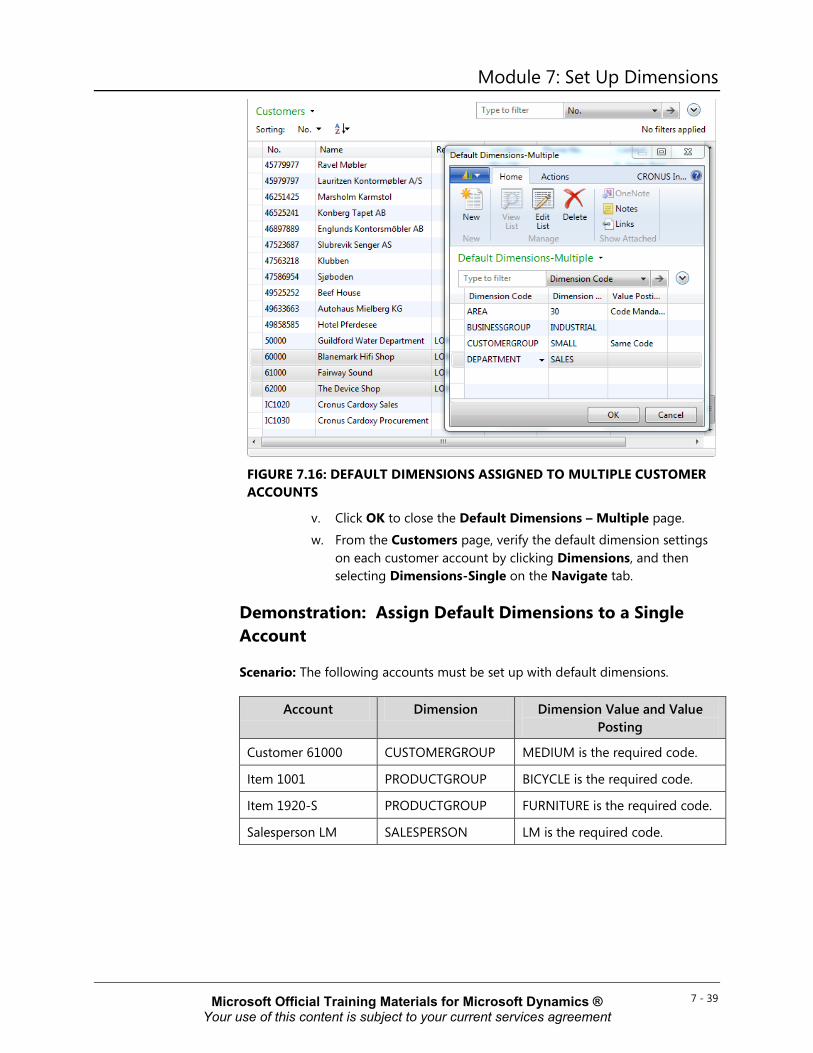
Application Setup in Microsoft Dynamics® NAV 2013 Demonstration: Assign Default Dimensions to Multiple Accounts
Scenario: Customer accounts 60000-62000 must be assigned the multiple default dimensions shown in the following table.
Dimension Dimension Value and Value Posting
Area 30 is the default; a value is required but can be any value.
Business Group Industrial is the default; value not required.
Customer Group Small is the required code.
Department Sales is the default; value not required.
Demonstration Steps
Assign the default dimensions on customer accounts 60000-62000.
a. In the navigation pane, click Departments. b. Click Sales&Marketing > Sales > Customers. c. Highlight the 60000-62000 range of customers.
d. On the Navigate tab, click Dimensions, and then click Dimensions-Multiple.
e. Click New. f. In the Dimension Code field, enter AREA.
g. In the Dimension Value Code field, enter 30. h. In the Value Posting field, enter Code Mandatory. i. Click New. j. In the Dimension Code field, enter BUSINESSGROUP.
k. In the Dimension Value Code field, enter INDUSTRIAL. l. Leave the Value Posting field blank. m. Click New.
n. In the Dimension Code field, enter CUSTOMERGROUP. o. In the Dimension Value Code field, enter SMALL. p. In the Value Posting field, enter Same Code. q. Click New.
r. In the Dimension Code field, enter DEPARTMENT. s. In the Dimension Value Code field, enter SALES. t. In the Value Posting field, enter Code Mandatory. u. Leave the Value Posting field blank.
7 - 38 Microsoft Official Training Materials for Microsoft Dynamics ® Your use of this content is subject to your current services agreement
Module 7: Set Up Dimensions
FIGURE 7.16: DEFAULT DIMENSIONS ASSIGNED TO MULTIPLE CUSTOMER ACCOUNTS
v. Click OK to close the Default Dimensions – Multiple page. w. From the Customers page, verify the default dimension settings
on each customer account by clicking Dimensions, and then selecting Dimensions-Single on the Navigate tab.
Demonstration: Assign Default Dimensions to a Single Account
Scenario: The following accounts must be set up with default dimensions.
Account Dimension Dimension Value and Value Posting
Customer 61000 CUSTOMERGROUP MEDIUM is the required code.
Item 1001 PRODUCTGROUP BICYCLE is the required code.
Item 1920-S PRODUCTGROUP FURNITURE is the required code.
Salesperson LM SALESPERSON LM is the required code.
7 - 39 Microsoft Official Training Materials for Microsoft Dynamics ® Your use of this content is subject to your current services agreement
Application Setup in Microsoft Dynamics® NAV 2013 Demonstration Steps
1. Assign the default dimension on customer account 61000.
a. In the navigation pane, click Departments. b. Click Sales&Marketing, then click Sales, and then click
Customers.
c. Select customer 61000. d. On the Navigate tab, click Dimensions, and then click
Dimensions-Single. e. For the Dimension Code CUSTOMERGROUP, change the
Dimension Value Code field from SMALL to MEDIUM. f. In the Value Posting field, leave the option Code Mandatory. g. Click OK to close the Default Dimensions page.
2. Assign the default dimensions on item accounts 1001 and 1920-S.
a. In the navigation pane, click Departments. b. Click Warehouse, then click Planning&Execution, and then click
Items. c. Select item 1001.
d. On the Navigate tab, click Dimensions, and then click Dimensions-Single.
e. Click New.
f. In the Dimension Code field, enter PRODUCTGROUP. g. In the Dimension Value Code field, enter BICYCLE. h. In the Value Posting field, enter Same Code. i. Click OK to close the Default Dimensions page.
j. Repeat steps 3-9 for item 1920-S and select FURNITURE as the dimension value.
3. Assign the default dimension on salesperson account LM a. In the navigation pane, click Departments.
b. Click Sales&Marketing, then click Sales, and then click Salespeople.
c. Select salesperson LM. d. On the Navigate tab, click Dimensions, and then click
Dimensions – Single. e. Click New. f. In the Dimension Code field, enter SALESPERSON. g. In the Dimension Value Code field, enter LM.
h. In the Value Posting field, enter Same Code. i. Click OK to close the Default Dimensions page.
7 - 40 Microsoft Official Training Materials for Microsoft Dynamics ® Your use of this content is subject to your current services agreement
Module 7: Set Up Dimensions Demonstration: Use Dimensions and Dimension Values in a Sales Document
We will now complete the same scenario as the demonstration from the previous lesson Dimension Combinations. However, now default dimensions are set up and we will demonstrate the influence on the sales order process.
Scenario: Susan, a sales order processor at CRONUS International Ltd., receives sales information from Linda Marten, who has made a sale to customer Fairway Sound. Susan has to enter the corresponding sales order into the Microsoft Dynamics NAV database by using the following information:
• Customer 61000 Fairway Sound
• Item 1001 touring bicycle – 10 pieces at 4,000.00 LCY/pcs.
• Item 1920-S ANTWERP conference table – 4 pieces at 420.40 LCY/pcs.
• Dimension Information:
o AREA = 30 (Europe North (EU))
o BUSINESSGROUP = INDUSTRIAL
o CUSTOMERGROUP = MEDIUM
o DEPARTMENT = SALES
o PRODUCTGROUP = BICYCLE for item 1001
o PRODUCTGROUP = FURNITURE for item 1920-S
o SALESPERSON = LM
Note: The previous demonstration ‘Assign Default Dimensions to a Single Account’ has to be performed, in order to successfully complete this demonstration.
Demonstration Steps
1. Enter the sales order with dimension information. a. In the navigation pane, click the Home button. b. Click Sales Orders. c. Click New to create a new sales order.
d. Press ENTER to go to the next field. The No. field is automatically populated with the next sales order number according to the set up number series.
e. In the Sell-to Customer No. field, enter 61000. The sales order header is automatically populated with default information from the customer card.
f. In the Salesperson Code field, enter LM.
g. Unfold the Invoicing FastTab.
7 - 41 Microsoft Official Training Materials for Microsoft Dynamics ® Your use of this content is subject to your current services agreement
Application Setup in Microsoft Dynamics® NAV 2013 h. The Department Code field is automatically populated with the
dimension SALES.
i. On the Navigate tab, click Dimensions. j. On the Edit Dimension Set Entries page, all dimensions and
dimension values are automatically filled in, except for the PRODUCTGROUP dimension.
k. Remove the line for the Dimension Code AREA. l. For the Dimension Code BUSINESSGROUP, change the
Dimension Value Code field from INDUSTRIAL to OFFICE. m. Click OK to close the Edit dimension Set Entries page.
n. On the Lines FastTab, create a new line for each item. o. In the Type field enter Item, in the No. field enter 1001, in the
Location Code field delete WHITE, and in the Quantity field enter 10.
p. Click Yes on the Check Availability message box, warning about insufficient inventory.
q. The Unit Price Excl. VAT field is automatically filled in with 4,000.00.
r. The Businessgroup Code, Customergroup Code, Department Code, Salesperson Code, and Productgroup Code fields already contain a dimension value.
s. In the Area Code field, enter the dimension value 30, by clicking the field and selecting the value.
t. In the Productgroup Code field, change the dimension value BICYCLE to FURNITURE, by clicking the field and selecting the value.
u. On the Lines FastTab of the new sales order, go to the next line by clicking the Type field.
v. In the Type field enter Item, in the No. field enter 1920-S, in the Location Code field delete WHITE, and in the Quantity field enter 4.
w. Click Yes on the Check Availability message box, warning about insufficient inventory.
x. The Unit Price Excl. VAT field is automatically filled in with 420.40.
y. The Businessgroup Code, Customergroup Code, Department Code, Salesperson Code, and Product Group fields already contain a dimension value.
z. In the Area Code field, enter the dimension value 30, by clicking the field and selecting the value.
aa. On the Actions tab, click Post. bb. Click Ship and Invoice, and then click OK..
7 - 42 Microsoft Official Training Materials for Microsoft Dynamics ® Your use of this content is subject to your current services agreement
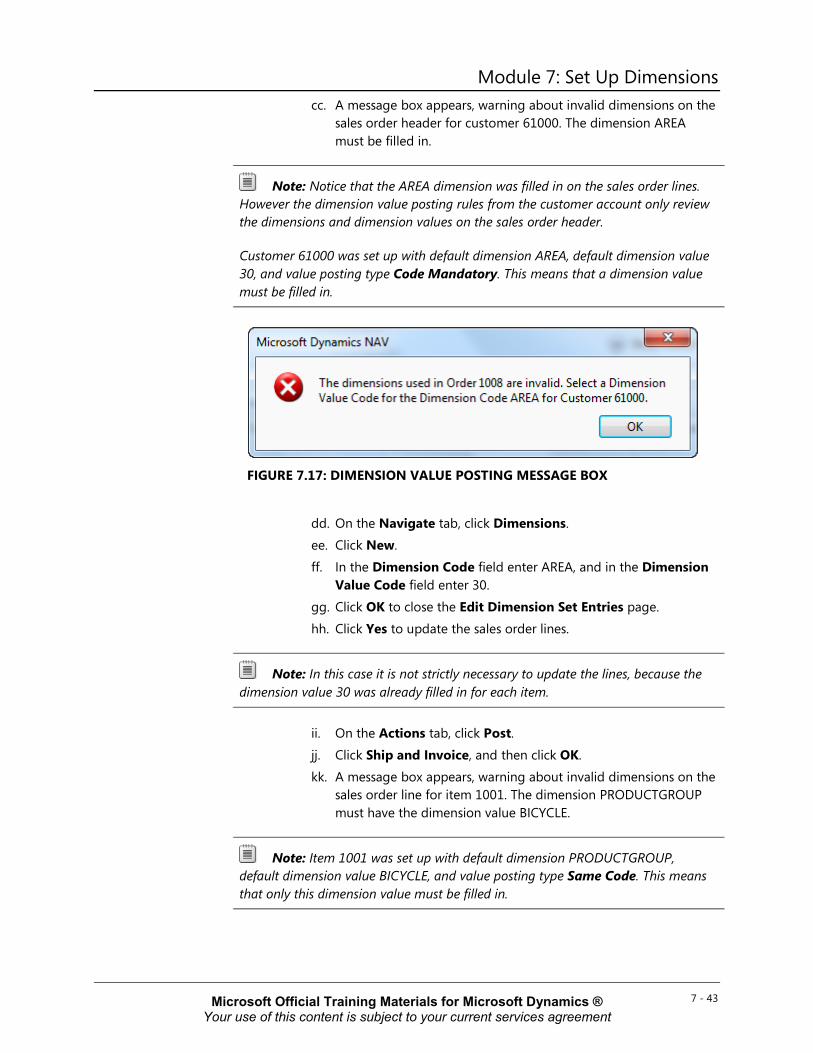
Module 7: Set Up Dimensions cc. A message box appears, warning about invalid dimensions on the
sales order header for customer 61000. The dimension AREA must be filled in.
Note: Notice that the AREA dimension was filled in on the sales order lines. However the dimension value posting rules from the customer account only review the dimensions and dimension values on the sales order header.
Customer 61000 was set up with default dimension AREA, default dimension value 30, and value posting type Code Mandatory. This means that a dimension value must be filled in.
FIGURE 7.17: DIMENSION VALUE POSTING MESSAGE BOX
dd. On the Navigate tab, click Dimensions. ee. Click New. ff. In the Dimension Code field enter AREA, and in the Dimension
Value Code field enter 30. gg. Click OK to close the Edit Dimension Set Entries page. hh. Click Yes to update the sales order lines.
Note: In this case it is not strictly necessary to update the lines, because the dimension value 30 was already filled in for each item.
ii. On the Actions tab, click Post. jj. Click Ship and Invoice, and then click OK. kk. A message box appears, warning about invalid dimensions on the
sales order line for item 1001. The dimension PRODUCTGROUP must have the dimension value BICYCLE.
Note: Item 1001 was set up with default dimension PRODUCTGROUP, default dimension value BICYCLE, and value posting type Same Code. This means that only this dimension value must be filled in.
7 - 43 Microsoft Official Training Materials for Microsoft Dynamics ® Your use of this content is subject to your current services agreement
Application Setup in Microsoft Dynamics® NAV 2013 ll. On the Lines FastTab, select the sales order line for item 1001. mm. For the Productgroup Code field, change the dimension value
from FURNITURE to BICYCLE. nn. On the Actions tab, click Post. oo. Click Ship and Invoice, and then click OK.
Note: Notice that changing the BUSINESSGROUP dimension on the sales order header, did not stop the posting process. Customer 61000 was set up with default dimension BUSINESSGROUP, default dimension value INDUSTRIAL, and a blank value posting. This means that any or no dimension value could be filled in on the sales order header.
pp. Click OK to close the Sales Order page.
7 - 44 Microsoft Official Training Materials for Microsoft Dynamics ® Your use of this content is subject to your current services agreement
Module 7: Set Up Dimensions
Lab 7.3: Assign Default Dimensions to a Single Account Scenario
As the accounting manager at CRONUS, you are responsible for setting up default dimensions. You currently have to set up the following single default:
• Account number 8110 must always be posted with a Department dimension.
• The default value is Administration, but you want to let users override this with another nonblank value.
Access the Default Dimensions page from the Chart of Accounts page.
Objectives
This lab reinforces your understanding of the process required to assign default dimensions to a single account.
Exercise 1: Assign Default Dimensions to a Single Account
Task 1: Assign Default Dimensions to a Single Account
High Level Steps 1. Set up the default dimension on G/L Account 8110 as specified in the
scenario.
Detailed Steps 1. Set up the default dimension on G/L Account 8110 as specified in the
scenario. a. In the navigation pane, click Departments. b. Click Financial Management > General Ledger > Chart of
Accounts. c. Select G/L Account 8110. d. On the Navigate tab, click Dimensions and then click
Dimensions-Single. e. Click New. f. In the Dimension Code field, enter DEPARTMENT. g. In the Dimension Value Code field, enter ADM.
h. In the Value Posting field, enter Code Mandatory. i. Click OK to close the Default Dimensions page.
7 - 45 Microsoft Official Training Materials for Microsoft Dynamics ® Your use of this content is subject to your current services agreement
Application Setup in Microsoft Dynamics® NAV 2013
Lab 7.4: Assign Default Dimensions to Multiple Accounts
Scenario
CRONUS has three Canadian customers who have to be set up with new dimensions. The customers are as follows:
• 01905893
• 01905899
• 01905902
Using multiple default dimensions, assign these customers to the North America area. This dimension value is the required code for these customers.
In addition, because exhibitions are never marketed to the Canadian customers, the exhibition dimension is never used for them.
Objectives
This lab reinforces your understanding of the process required to assign default dimensions to multiple accounts.
Exercise 1: Assign Default Dimensions to Multiple Accounts
Task 1: Assign Default Dimensions to Multiple Accounts
High Level Steps 1. Assign the Area and Exhibition dimensions as defaults to the three
customers as stated in the scenario.
Detailed Steps 1. Assign the Area and Exhibition dimensions as defaults to the three
customers as stated in the scenario. a. In the navigation pane, click Departments. b. Click Sales&Marketing > Sales > Customers.
c. Highlight the 01905893-01905902 range of customers. d. On the Navigate tab, click Dimensions, and then click
Dimensions-Multiple. e. Click New.
f. In the Dimension Code field, enter AREA. g. In the Dimension Value Code field, enter 70. h. In the Value Posting field, enter Same Code.
7 - 46 Microsoft Official Training Materials for Microsoft Dynamics ® Your use of this content is subject to your current services agreement
Module 7: Set Up Dimensions i. Click New. j. In the Dimension Code field, enter EXHIBITION.
k. Leave the Dimension Value Code field blank. l. In the Value Posting field, enter No Code. m. Click OK to close the Default Dimensions – Multiple page.
Account Type Default Dimensions Default dimensions can also be set up on an account type level and determine how particular account types use dimensions and dimension values.
For example, when you have set up all individual customer accounts with a default dimension AREA, by using either the Dimensions – Single function or the Dimensions – Multiple function, you will have to remember to also assign a default AREA dimension value to a new customer. Posting documents or journals will not prohibit the posting of customers without dimensions and dimension values, unless the account type default dimension was set up for the account type Customer.
Value Posting Rules
Value posting rules for an account type are the same as those for an individual account. The value posting rules determine in what way dimension information may be posted, and therefore affect the posting and storing process as follows. When a journal or document is posted, and the dimension set includes dimensions and dimension values that are not aligned with the account type default dimension value posting rules, the posting process cannot occur until the dimension set on the journal line, document header, or document line is adjusted.
7 - 47 Microsoft Official Training Materials for Microsoft Dynamics ® Your use of this content is subject to your current services agreement
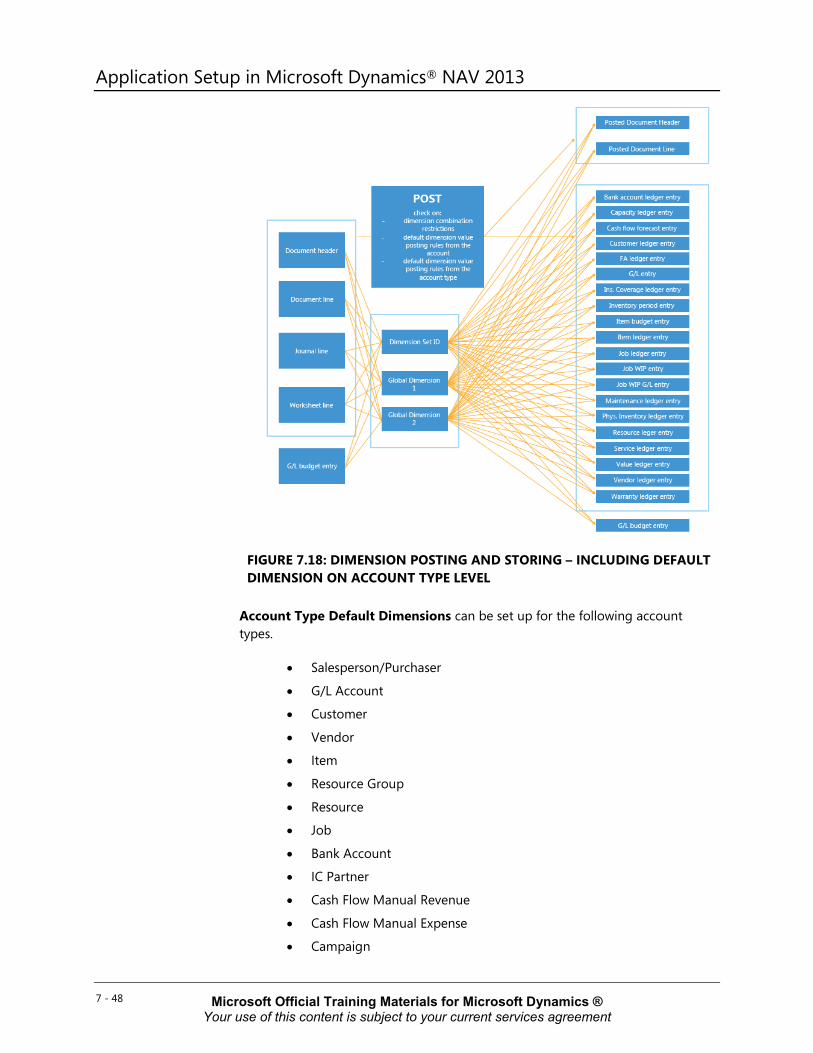
Application Setup in Microsoft Dynamics® NAV 2013
FIGURE 7.18: DIMENSION POSTING AND STORING – INCLUDING DEFAULT DIMENSION ON ACCOUNT TYPE LEVEL
Account Type Default Dimensions can be set up for the following account types.
• Salesperson/Purchaser
• G/L Account
• Customer
• Vendor
• Item
• Resource Group
• Resource
• Job
• Bank Account
• IC Partner
• Cash Flow Manual Revenue
• Cash Flow Manual Expense
• Campaign
7 - 48 Microsoft Official Training Materials for Microsoft Dynamics ® Your use of this content is subject to your current services agreement
Module 7: Set Up Dimensions • Customer Template
• Employee
• Fixed Asset
• Insurance
• Responsibility Center
• Item Charge
• Service Order Type
• Service Item Group
• Service Item
• Service Contract Header
• Service Contract Template
• Work Center
The value posting rules options are shown in the following table.
Rule Description
Blank There is no posting restriction. This default dimension for this account type can be posted with any dimension value or without a dimension value.
Code Mandatory The default dimension for this account type must have a dimension value when you are posting, but any dimension value is acceptable.
Same Code The default dimension for this account type must always have the same dimension value code as that selected in the Dimension Value Code field.
No Code Dimension value codes must not be used with this account type.
Demonstration: Set Up Account Type Default Dimensions
Scenario: To post all customer entries with a specific customer group dimension, instead of entering this dimension every time that a new customer is created, Phyllis wants to set up the customer group dimension as the default account type for the customer table.
Phyllis also wants to analyze all sales per salesperson. Therefore she wants to set up the salesperson dimension as the default account type for the salespeople table.
7 - 49 Microsoft Official Training Materials for Microsoft Dynamics ® Your use of this content is subject to your current services agreement
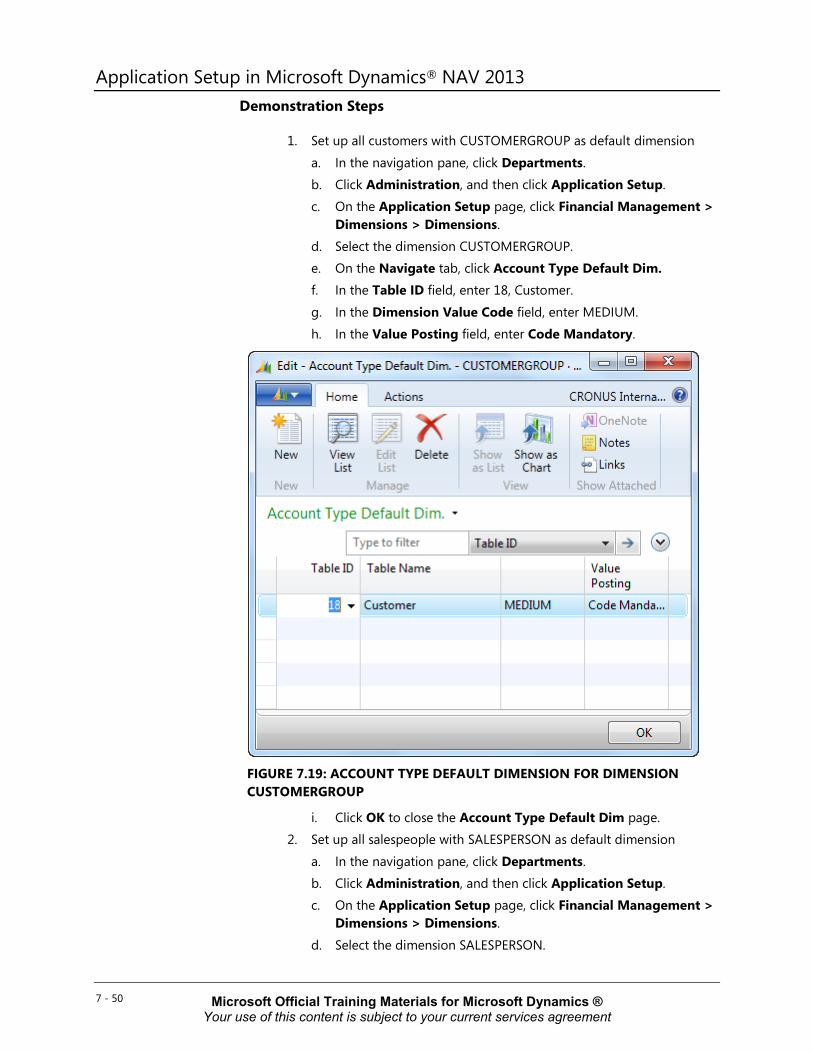
Application Setup in Microsoft Dynamics® NAV 2013 Demonstration Steps
1. Set up all customers with CUSTOMERGROUP as default dimension
a. In the navigation pane, click Departments. b. Click Administration, and then click Application Setup. c. On the Application Setup page, click Financial Management >
Dimensions > Dimensions. d. Select the dimension CUSTOMERGROUP. e. On the Navigate tab, click Account Type Default Dim. f. In the Table ID field, enter 18, Customer.
g. In the Dimension Value Code field, enter MEDIUM. h. In the Value Posting field, enter Code Mandatory.
FIGURE 7.19: ACCOUNT TYPE DEFAULT DIMENSION FOR DIMENSION CUSTOMERGROUP
i. Click OK to close the Account Type Default Dim page. 2. Set up all salespeople with SALESPERSON as default dimension
a. In the navigation pane, click Departments. b. Click Administration, and then click Application Setup. c. On the Application Setup page, click Financial Management >
Dimensions > Dimensions.
d. Select the dimension SALESPERSON.
7 - 50 Microsoft Official Training Materials for Microsoft Dynamics ® Your use of this content is subject to your current services agreement
Module 7: Set Up Dimensions e. On the Navigate tab, click Account Type Default Dim. f. In the Table ID field, enter 13, Salesperson/Purchaser.
g. Leave the Dimension Value Code field blank. h. In the Value Posting field, enter Code Mandatory. i. Click OK to close the Account Type Default Dim page.
Demonstration: Use Dimensions and Dimension Values in a Sales Document
This demonstration completes the same scenario as the demonstration from the previous lesson Dimension Combinations. However, now default dimensions are set up to demonstrate the influence on the sales order process.
Scenario: Susan, a sales order processor at CRONUS International Ltd., receives sales information from a new salesperson, Benjamin, who has made a sale to customer Fairway Sound. Susan has to enter the corresponding sales order into the Microsoft Dynamics NAV database by using the following information:
• Customer 61000 Fairway Sound
• Item 1001 touring bicycle – 10 pieces at 4,000.00 LCY/pcs.
• Item 1920-S ANTWERP conference table – 4 pieces at 420.40 LCY/pcs.
• Dimension Information:
o AREA = 30 (Europe North (EU))
o BUSINESSGROUP = INDUSTRIAL
o CUSTOMERGROUP = MEDIUM
o DEPARTMENT = SALES
o PRODUCTGROUP = BICYCLE for item 1001
o PRODUCTGROUP = FURNITURE for item 1920-S
o SALESPERSON = BENJAMIN
Note: The previous demonstration Set Up Account Type Default Dimensions has to be performed to successfully complete this demonstration.
Demonstration Steps
3. Create a dimension value for salesperson Benjamin. a. In the navigation pane, click Departments > Administration >
Application Setup > Financial Management > Dimensions > Dimensions.
b. Select the line for the SALESPERSON dimension, and on the Home tab, click Dimension Values.
c. In the Home tab, click New to create a new salesperson
7 - 51 Microsoft Official Training Materials for Microsoft Dynamics ® Your use of this content is subject to your current services agreement
Application Setup in Microsoft Dynamics® NAV 2013 dimension value.
d. In the Code field, type BENJAMIN.
e. In the Name field, type Benjamin. f. Click OK.
4. Enter the sales order with dimension information. a. In the navigation pane, click Home.
b. Click Sales Orders. c. Click New to create a new sales order. d. Press ENTER to go to the next field. The No field is automatically
populated with the next sales order number according to the set up number series.
e. In the Sell-to Customer No field, enter 61000. The sales order header is automatically populated with default information from the customer card.
f. Click the Salesperson Code field, and then click New. g. In the Code field, enter BENJAMIN. h. In the Name field, enter Benjamin. i. Click OK to enter BENJAMIN in the Salesperson Code field on
the sales order header. j. Unfold the Invoicing FastTab. k. The Department Code field is automatically populated with the
dimension SALES. l. On the Navigate tab, click Dimensions. m. Notice that on the Edit Dimension Set Entries page, all
dimensions and dimension values are automatically filled in, except for the SALESPERSON, and PRODUCTGROUP dimension.
n. Click OK to close the Edit dimension Set Entries page. o. On the Lines FastTab, create a new line for each item. p. In the Type field enter Item, in the No. field enter 1001, in the
Location Code field delete WHITE, and in the Quantity field enter 10.
q. On the Check Availability message box, warning about insufficient inventory, click Yes.
r. Note the Unit Price Excl VAT field is automatically filled in with 4,000.00.
s. Note the Area Code, Businessgroup Code, Customergroup Code, Department Code, and Productgroup Code fields already contain a dimension value.
t. On the Lines FastTab of the new sales order, go to the next line by clicking the Type field.
7 - 52 Microsoft Official Training Materials for Microsoft Dynamics ® Your use of this content is subject to your current services agreement
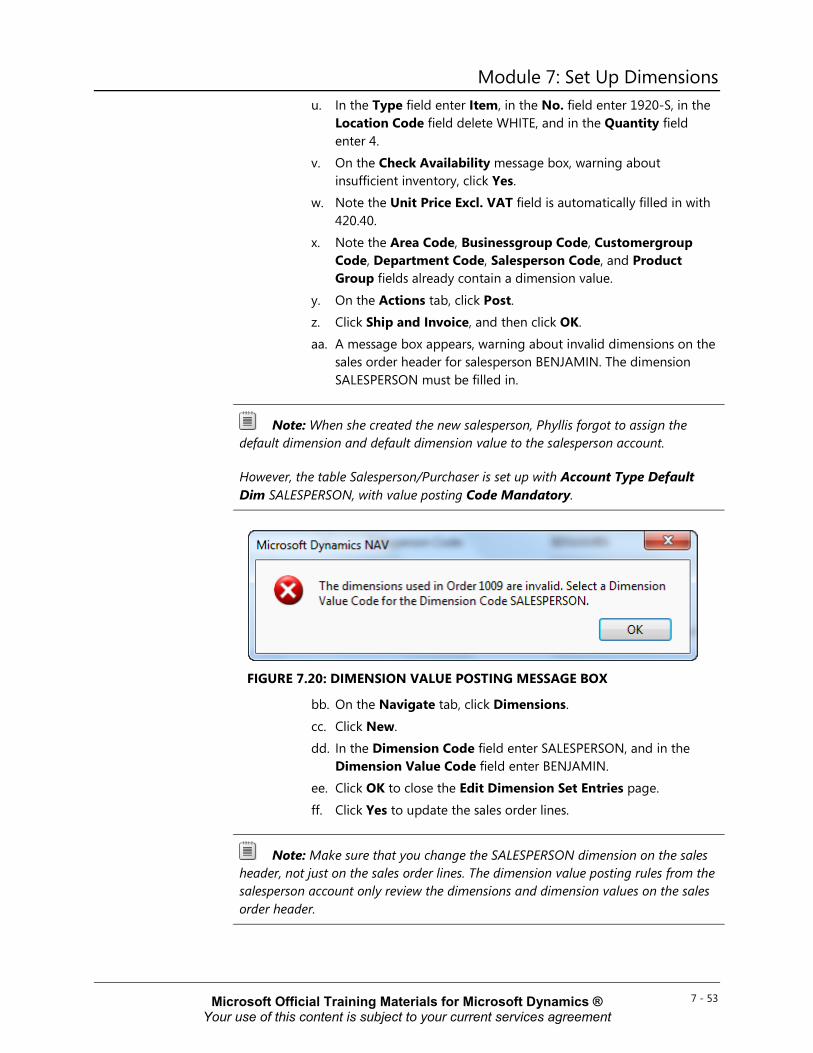
Module 7: Set Up Dimensions u. In the Type field enter Item, in the No. field enter 1920-S, in the
Location Code field delete WHITE, and in the Quantity field enter 4.
v. On the Check Availability message box, warning about insufficient inventory, click Yes.
w. Note the Unit Price Excl. VAT field is automatically filled in with 420.40.
x. Note the Area Code, Businessgroup Code, Customergroup Code, Department Code, Salesperson Code, and Product Group fields already contain a dimension value.
y. On the Actions tab, click Post. z. Click Ship and Invoice, and then click OK. aa. A message box appears, warning about invalid dimensions on the
sales order header for salesperson BENJAMIN. The dimension SALESPERSON must be filled in.
Note: When she created the new salesperson, Phyllis forgot to assign the default dimension and default dimension value to the salesperson account.
However, the table Salesperson/Purchaser is set up with Account Type Default Dim SALESPERSON, with value posting Code Mandatory.
FIGURE 7.20: DIMENSION VALUE POSTING MESSAGE BOX
bb. On the Navigate tab, click Dimensions.
cc. Click New. dd. In the Dimension Code field enter SALESPERSON, and in the
Dimension Value Code field enter BENJAMIN. ee. Click OK to close the Edit Dimension Set Entries page.
ff. Click Yes to update the sales order lines.
Note: Make sure that you change the SALESPERSON dimension on the sales header, not just on the sales order lines. The dimension value posting rules from the salesperson account only review the dimensions and dimension values on the sales order header.
7 - 53 Microsoft Official Training Materials for Microsoft Dynamics ® Your use of this content is subject to your current services agreement
Application Setup in Microsoft Dynamics® NAV 2013 gg. On the Actions tab, click Post. hh. Click Ship and Invoice, and then click OK.
ii. A message box appears, warning about invalid dimensions on the sales order line for item 1001. The dimension PRODUCTGROUP must have the dimension value BICYCLE.
jj. Click OK to close the Sales Order page.
7 - 54 Microsoft Official Training Materials for Microsoft Dynamics ® Your use of this content is subject to your current services agreement
Module 7: Set Up Dimensions
Lab 7.5: Assign Vendor Account Type Default Dimensions
Scenario
The finance department at CRONUS has noticed that the Department and Project dimensions are missing on many of the purchase postings therefore it has decided that all vendors must be set up with Department and Project dimensions.
To make sure that all transactions related to vendors are posted with department and projects, without a particular values, you are asked to set up the Vendor account type to accommodate this requirement.
Objectives
This lab reinforces your understanding of the process required to assign vendor account type default dimensions.
Exercise 1: Assign Vendor Account Type Default Dimensions
Task 1: Assign Vendor Account Type Default Dimensions
High Level Steps 1. Access the Department dimension and set up the vendor posting
requirement.
2. Access the Project dimension and set up the vendor posting requirement.
Detailed Steps 1. Access the Department dimension and set up the vendor posting
requirement. a. In the navigation pane, click Departments. b. Click Administration, and then click Application Setup.
c. On the Application Setup page, click Financial Management > Dimensions>Dimensions.
d. Select the dimension DEPARTMENT.
e. On the Home tab, click Account Type Default Dim. f. In the Table ID field, enter 23, Vendor. g. Leave the Dimension Value Code field blank. h. In the Value Posting field, enter Code Mandatory.
i. Click OK to close the Account Type Default Dim. page.
7 - 55 Microsoft Official Training Materials for Microsoft Dynamics ® Your use of this content is subject to your current services agreement
Application Setup in Microsoft Dynamics® NAV 2013 2. Access the Project dimension and set up the vendor posting
requirement.
a. On the Dimensions page, select the dimension PROJECT. b. On the Navigate tab, click Account Type Default Dim. c. In the Table ID field, enter 23, Vendor. d. Leave the Dimension Value Code field blank.
e. In the Value Posting field, enter Code Mandatory. f. Click OK to close the Account Type Default Dim page.
Default Dimension Priority Default dimensions are set up on different accounts, and different accounts are used on one document or in one journal. So which default dimension will be filled in, when different default dimension values for the same dimension are set up on the different accounts or account types.
Microsoft Dynamics NAV 2013 applies the following rules when you enter default dimensions and default dimension values on documents and journals, when no default dimension priorities are set up.
• The default dimension values of the last entered account take priority over the default dimension values of the previously entered account. For example, on a sales document, the default dimension values of an item account take priority over the default dimension values of the customer account.
• If there is a conflict between the default dimension values set up on a specific account and those set up in an account table, the individual account default dimension value is prioritized. This occurs because default dimension values are usually set up on the individual accounts that have a specific purpose. When a more general prioritization rule is needed, a default dimension value can be assigned to the table.
Default dimension priorities determine which default dimensions are used based on the prioritization of the source account.
Microsoft Dynamics NAV 2013 applies the following rules when you enter default dimensions and default dimension values on documents and journals, when default dimension priorities are set up.
• The dimension values of the account that has the highest priority will be entered on the document or journal. For example, if G/L Accounts are given a higher priority than customer accounts, a conflict between the dimension values suggested for a customer account and the dimension values suggested for a G/L Account are resolved in favor of the G/L Account.
7 - 56 Microsoft Official Training Materials for Microsoft Dynamics ® Your use of this content is subject to your current services agreement
Module 7: Set Up Dimensions • If two accounts have equal priority or are the same account type,
again the default dimension values of the last entered account take priority over the default dimension values of the previously entered account.
Demonstration: Work without Default Dimension Priorities in a Journal
Scenario: Cassie, the accountant at CRONUS, is using the Cash general journal to post an entry for customer 10000 for the amount of 100.00. Currently, no dimension priorities are defined.
This particular journal is set up with the G/L balancing account 2910 (cash) so only the customer has to be entered. Therefore, if there is no specific prioritization, the customer's default dimensions are prioritized when you post since it is the last account entered on the journal line.
Demonstration Steps
1. Assign AREA 40 to the cash G/L Account (2910).
a. In the navigation pane, click Departments. b. Click Financial Management > General Ledger > Chart of
Accounts. c. Select G/L Account 2910.
d. On the Navigate tab, click Dimensions, and then click Dimensions-Single.
e. In the Dimension Code field, enter AREA. f. In the Dimension Value Code field, enter 40.
g. In the Value Posting field, enter Code Mandatory. h. Click OK to close the Default Dimensions page.
2. Fill in the general journal. a. In the navigation pane, click Departments.
b. Click Financial Management > General Ledger > General Journals.
c. Click the Batch Name field to view all general journal batches.
d. Select CASH, and then click OK. e. In the Account Type field, enter Customer. f. In the Account No. field, enter 10000. g. In the Amount field, enter 100.
h. On the Actions tab, click Test Report. i. On the Options FastTab, select the Show Dimensions check box.
7 - 57 Microsoft Official Training Materials for Microsoft Dynamics ® Your use of this content is subject to your current services agreement
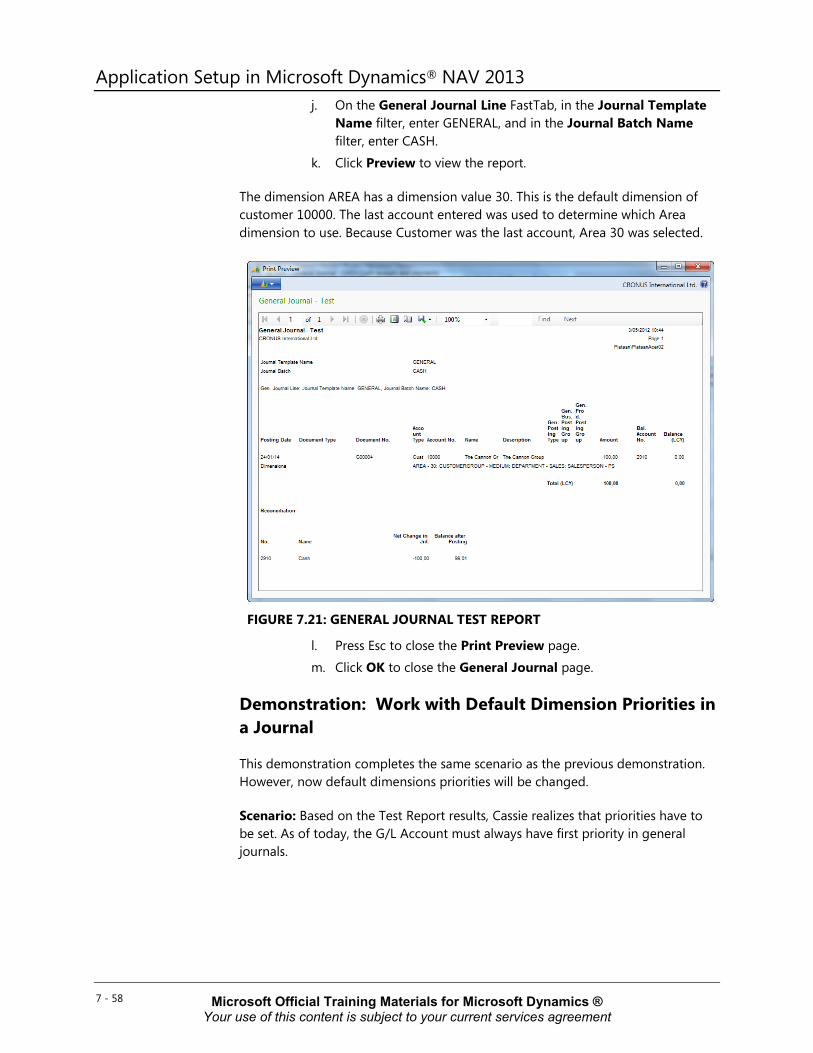
Application Setup in Microsoft Dynamics® NAV 2013 j. On the General Journal Line FastTab, in the Journal Template
Name filter, enter GENERAL, and in the Journal Batch Name filter, enter CASH.
k. Click Preview to view the report.
The dimension AREA has a dimension value 30. This is the default dimension of customer 10000. The last account entered was used to determine which Area dimension to use. Because Customer was the last account, Area 30 was selected.
FIGURE 7.21: GENERAL JOURNAL TEST REPORT
l. Press Esc to close the Print Preview page. m. Click OK to close the General Journal page.
Demonstration: Work with Default Dimension Priorities in a Journal
This demonstration completes the same scenario as the previous demonstration. However, now default dimensions priorities will be changed.
Scenario: Based on the Test Report results, Cassie realizes that priorities have to be set. As of today, the G/L Account must always have first priority in general journals.
7 - 58 Microsoft Official Training Materials for Microsoft Dynamics ® Your use of this content is subject to your current services agreement
Module 7: Set Up Dimensions Demonstration Steps
1. Set the dimension priority.
a. In the navigation pane, click Departments. b. Click Administration, and then click Application Setup. c. On the Application Setup page, click Financial Management >
Dimensions > Default Dimension Priorities. d. In the Source Code field, enter GENJNL. e. Click the Table ID field, to view all the options. Select 15, G/L
Account, and then click OK.
f. In the Priority field, enter 1. This represents the highest priority. g. Click OK to close the Default Dimension Priorities page.
2. Fill in the general journal. a. In the navigation pane, click Departments.
b. Click Financial Management > General Ledger > General Journals.
c. Click the Batch Name field to view all general journal batches. d. Select CASH, and then click OK.
e. Select a new line. f. In the Account Type field, enter Customer. g. In the Account No. field, enter 10000.
h. In the Amount field, enter 100. i. On the Actions tab, click Test Report. j. On the Options FastTab, select the Show Dimensions check box. k. On the General Journal Line FastTab, in the Journal Template
Name filter, enter GENERAL, and in the Journal Batch Name filter, enter CASH.
l. Click Preview to view the report. m. The dimension AREA has a dimension value 40, which is the
default dimension of G/L Account 2910. The default dimension priorities were followed, instead of the last entered account.
7 - 59 Microsoft Official Training Materials for Microsoft Dynamics ® Your use of this content is subject to your current services agreement
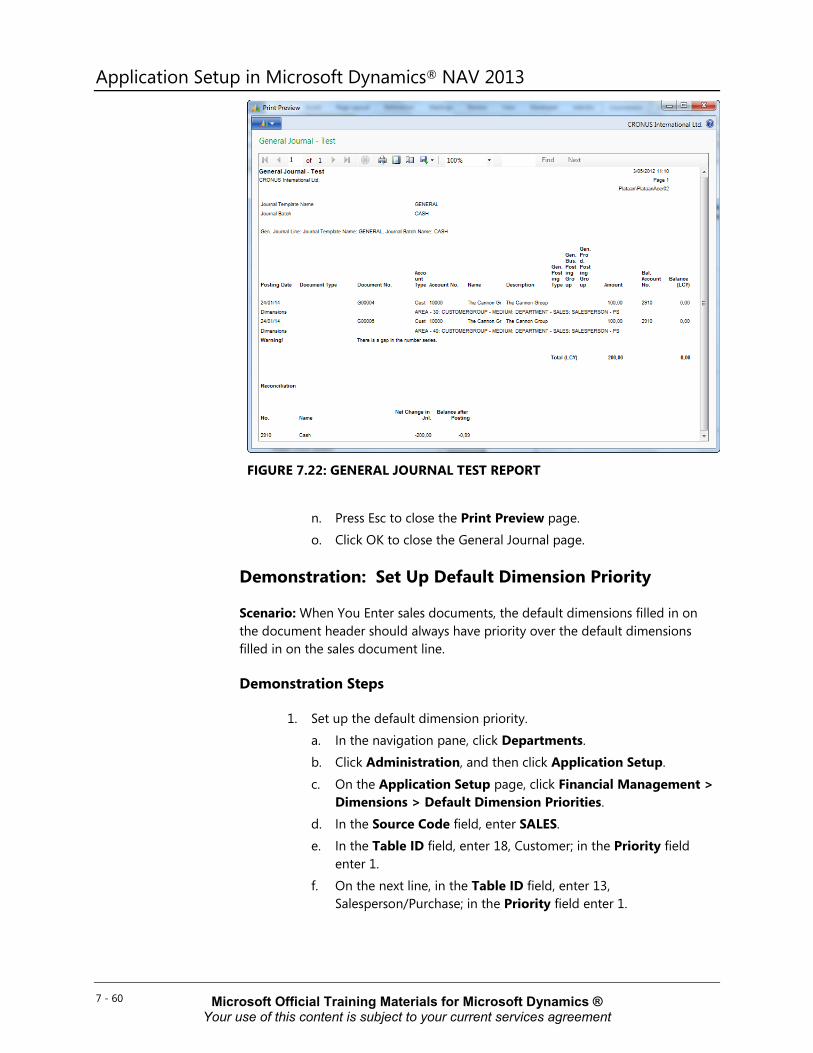
Application Setup in Microsoft Dynamics® NAV 2013
FIGURE 7.22: GENERAL JOURNAL TEST REPORT
n. Press Esc to close the Print Preview page. o. Click OK to close the General Journal page.
Demonstration: Set Up Default Dimension Priority
Scenario: When You Enter sales documents, the default dimensions filled in on the document header should always have priority over the default dimensions filled in on the sales document line.
Demonstration Steps
1. Set up the default dimension priority. a. In the navigation pane, click Departments. b. Click Administration, and then click Application Setup.
c. On the Application Setup page, click Financial Management > Dimensions > Default Dimension Priorities.
d. In the Source Code field, enter SALES. e. In the Table ID field, enter 18, Customer; in the Priority field
enter 1. f. On the next line, in the Table ID field, enter 13,
Salesperson/Purchase; in the Priority field enter 1.
7 - 60 Microsoft Official Training Materials for Microsoft Dynamics ® Your use of this content is subject to your current services agreement
Module 7: Set Up Dimensions g. On the next line, in the Table ID field, enter 15, G/L Account; in
the Priority field enter 2.
h. On the next line, in the Table ID field, enter 27, Item; in the Priority field, enter 2.
Note: The Customer and Salesperson/Purchaser account types are given the same priority, because both are filled in on the document header.
The G/L Account and Item account types are given the same priority, because both are filled in on the document lines.
i. Click OK to close the Default Dimension Priorities page.
Demonstration: Use Dimensions and Dimension Values in a Sales Document
We now complete the same scenario as the demonstration from the previous lesson Default Dimensions. First, we will add default dimensions and then demonstrate the influence of the default dimension priorities set up on the sales order process.
Scenario: The following additional default dimensions must be set up.
Account Dimension Dimension Value and Value Posting
Item 1001 SALESPERSON JR is the default, a value is required but can be any value.
Item 1920-S SALESPERSON JR is the default, a value is required but can be any value.
Demonstration Steps
1. Assign the default dimensions on item accounts 1001 and 1920-S. a. In the navigation pane, click Departments.
b. Click Warehouse > Planning&Execution > Items. c. Select item 1001. d. On the Navigate tab, click Dimensions and then click
Dimensions-Single.
e. Click New. f. In the Dimension Code field, enter SALESPERSON. g. In the Dimension Value Code field, enter JR. h. In the Value Posting field, enter Code Mandatory.
i. Click OK to close the Default Dimensions page. j. Repeat steps 3-9 for item 1920-S.
7 - 61 Microsoft Official Training Materials for Microsoft Dynamics ® Your use of this content is subject to your current services agreement

Application Setup in Microsoft Dynamics® NAV 2013 Scenario: Susan, a sales order processor at CRONUS International Ltd., receives sales information from a new salesperson, Benjamin, who has made a sale to customer Fairway Sound. Susan has to enter the corresponding sales order into the Microsoft Dynamics NAV database by using the following information:
o Customer 61000 Fairway Sound
o Item 1001 touring bicycle – 10 pieces at 4,000.00 LCY/pcs.
o Item 1920-S ANTWERP conference table – 4 pieces at 420.40 LCY/pcs.
o Dimension Information:
AREA = 30 (Europe North (EU))
BUSINESSGROUP = INDUSTRIAL
CUSTOMERGROUP = MEDIUM
DEPARTMENT = SALES
PRODUCTGROUP = BICYCLE for item 1001
PRODUCTGROUP = FURNITURE for item 1920-S
SALESPERSON = LM
Note: The previous demonstration Set Up Default Dimension Priority has to be performed to successfully complete this demonstration.
2. Enter the sales order with dimension information. a. In the navigation pane, click Home. b. Click Sales Orders.
c. Click New to create a new sales order. d. Press ENTER to go to the next field. The No. field is automatically
populated with the next sales order number according to the set up number series.
e. In the Sell-to Customer No. field, enter 61000. The sales order header is automatically populated with default information from the customer card.
f. In the Salesperson Code field, enter LM.
g. Unfold the Invoicing FastTab. h. Note the Department Code field is automatically populated with
the dimension SALES. i. On the Navigate tab, click Dimensions.
j. Note on the Edit Dimension Set Entries page, all dimensions and dimension values are automatically filled in, except for the PRODUCTGROUP dimension.
k. Click OK to close the Edit dimension Set Entries page. l. On the Lines FastTab, create a new line for each item.
7 - 62 Microsoft Official Training Materials for Microsoft Dynamics ® Your use of this content is subject to your current services agreement
Module 7: Set Up Dimensions m. In the Type field enter Item, in the No. field enter 1001, in the
Location Code field delete WHITE, and in the Quantity field enter 10.
n. On the Check Availability message box, warning about insufficient inventory, click Yes.
The Unit Price Excl. VAT field is automatically filled in with 4,000.00.
The Area Code, Businessgroup Code, Customergroup Code, Department Code, Productgroup Code, and Salesperson Code fields already contain a dimension value.
Note: The Salesperson Code field is filled in with the dimension value LM. This is the default from the salesperson account that has a higher priority than the item account.
o. On the Lines FastTab of the new sales order, go to the next line by clicking the Type field.
p. In the Type field enter Item, in the No. field enter 1920-S, in the Location Code field delete WHITE, and in the Quantity field enter 4.
q. On the Check Availability message box, warning about insufficient inventory, click Yes.
r. Note the Unit Price Excl. VAT field is automatically filled in with 420.40.
s. Note the Area Code, Businessgroup Code, Customergroup Code, Department Code, Salesperson Code, Product Group, and Salesperson Code fields already contain a dimension value.
t. On the Actions tab, click Post.. u. Click Ship and Invoice, and then click OK.
Conflicting Default Dimensions When default dimensions are set up on different accounts, the program may be confronted with conflicting default dimension values when it enters the default settings on the documents and journals. This issue is resolved by the rules described in the previous lesson Default Dimension Priority.
In some circumstances, conflicts may exist between the value posting setup of the default dimension on different accounts or account types. With or without default dimension priorities this may result in the inability to post the document or journal.
7 - 63 Microsoft Official Training Materials for Microsoft Dynamics ® Your use of this content is subject to your current services agreement
Application Setup in Microsoft Dynamics® NAV 2013 Value posting conflicts exist in the following situations:
• On a document, when the account from the document header has a higher priority than the account of the document line, a value posting conflict on the document line will exist if:
o The default dimension value posting option of both accounts is set to Same Code, but with different default dimension values.
o The default dimension value posting option of the account on the document header is set to Same Code or Code Mandatory. However, the default dimension value posting option of the account on the document line is set to No Code.
o The default dimension value posting option of the account on the document line is set to No Code. However, the default dimension value posting option of the account on the document line is set to Same Code or Code Mandatory.
• On a document header, a document line or a journal line, a value posting conflict will exist if:
o The default dimension value posting option of the account and the account type is set to Same Code, but with different default dimension values.
o The default dimension value posting option of the account is set to Same Code or Code Mandatory. However, the default dimension value posting option of the account type is set to No Code.
o The default dimension value posting option of the account is set to No Code. However, the default dimension value posting option of the account type is set to Same Code or Code Mandatory.
• On a journal line, a value posting conflict will exist if:
o The default dimension value posting option of the account and the balancing account is set to Same Code, but with different default dimension values.
o The default dimension value posting option of the account is set to Same Code or Code Mandatory. However, the default dimension value posting option of the balancing account is set to No Code.
o The default dimension value posting option of the account is set to No Code. However, the default dimension value posting option of the balancing account is set to Same Code or Code Mandatory.
Note: In a journal, you can resolve conflicts by not using a balancing account and entering the balancing journal line on a separate line.
7 - 64 Microsoft Official Training Materials for Microsoft Dynamics ® Your use of this content is subject to your current services agreement

Module 7: Set Up Dimensions Check Value Posting
To avoid value posting conflicts between accounts and account types, you can use the Check Value Posting function when you set up account type default dimensions. This function checks if other default dimensions exist that conflict with the account type value posting rule created on the Account Type Default Dim. page.
To check for conflicting dimension values in table 18, Customer, follow these steps:
1. In the navigation pane, click Departments. 2. Click Administration, and then click Application Setup. 3. On the Application Setup page, click Financial Management >
Dimensions > Dimensions. 4. Select the dimension CUSTOMERGROUP. 5. On the Home tab, click Account Type Default Dim.
Notice that the CUSTOMERGROUP was set up as a default dimension for account type 18, Customer, in previous demonstrations: “Assign Default Dimensions for Single Accounts” or “Assign Default Dimensions for Multiple Accounts”.
6. On the Actions tab, click Check Value Posting.
7. On the Default Dimension FastTab, set a filter, for example, CUSTOMERGROUP, if it is necessary.
8. Click Preview to view the report.
The Check Value Posting report is displayed. It lists any customers who have dimension values other than the one defined in the Account Type Default Dim page for the table. In this case, no conflicts exist.
Demonstration: Use Dimensions and Dimension Values in a Sales Document
This demonstration completes the same scenario as the demonstration from the previous lesson Default Dimensions. First, it shows how to add default dimensions and the influence of the default dimension priorities set up on the sales order process.
Scenario: The following additional default dimensions must be set up.
Account Dimension Dimension Value and Value Posting
Item 1001 SALESPERSON JR is the required code.
Item 1920-S SALESPERSON JR is the required code.
7 - 65 Microsoft Official Training Materials for Microsoft Dynamics ® Your use of this content is subject to your current services agreement
Application Setup in Microsoft Dynamics® NAV 2013 Demonstration Steps
1. Assign the default dimensions on item accounts 1001 and 1920-S.
a. In the navigation pane, click Departments. b. Click Warehouse, then click Planning&Execution, and then click
Items.
c. Select item 1001. d. On the Navigate tab, click Dimensions > Dimensions-Single. e. Select the dimension SALESPERSON. f. In the Value Posting field, change the option from Code
Mandatory to Same Code. g. Click OK to close the Default Dimensions page. h. Repeat steps 3-7 for item 1920-S.
Scenario: Susan, a sales order processor at CRONUS International Ltd., receives sales information from a new salesperson, Benjamin, who has made a sale to customer Fairway Sound. Susan has to enter the corresponding sales order into the Microsoft Dynamics NAV database by using the following information:
o Customer 61000 Fairway Sound
o Item 1001 touring bicycle – 10 pieces at 4,000.00 LCY/pcs.
o Item 1920-S ANTWERP conference table – 4 pieces at 420.40 LCY/pcs.
o Dimension Information:
AREA = 30 (Europe North (EU))
BUSINESSGROUP = INDUSTRIAL
CUSTOMERGROUP = MEDIUM
DEPARTMENT = SALES
PRODUCTGROUP = BICYCLE for item 1001
PRODUCTGROUP = FURNITURE for item 1920-S
SALESPERSON = LM
2. Enter the sales order with dimension information.
a. In the navigation pane, click Home. b. Click Sales Orders. c. Click New to create a new sales order. d. Press ENTER to go to the next field. The No. field is automatically
populated with the next sales order number according to the set up number series.
e. In the Sell-to Customer No. field, enter 61000. The sales order header is automatically populated with default information from the customer card.
7 - 66 Microsoft Official Training Materials for Microsoft Dynamics ® Your use of this content is subject to your current services agreement
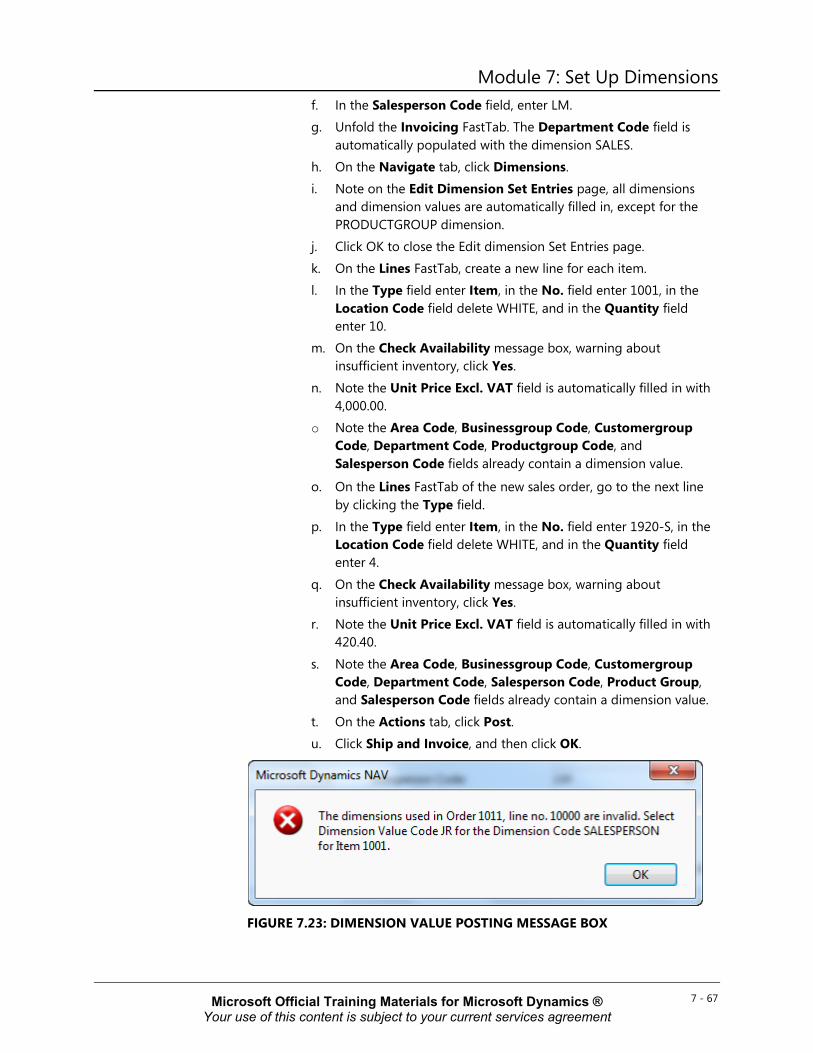
Module 7: Set Up Dimensions f. In the Salesperson Code field, enter LM. g. Unfold the Invoicing FastTab. The Department Code field is
automatically populated with the dimension SALES. h. On the Navigate tab, click Dimensions. i. Note on the Edit Dimension Set Entries page, all dimensions
and dimension values are automatically filled in, except for the PRODUCTGROUP dimension.
j. Click OK to close the Edit dimension Set Entries page. k. On the Lines FastTab, create a new line for each item. l. In the Type field enter Item, in the No. field enter 1001, in the
Location Code field delete WHITE, and in the Quantity field enter 10.
m. On the Check Availability message box, warning about insufficient inventory, click Yes.
n. Note the Unit Price Excl. VAT field is automatically filled in with 4,000.00.
o Note the Area Code, Businessgroup Code, Customergroup Code, Department Code, Productgroup Code, and Salesperson Code fields already contain a dimension value.
o. On the Lines FastTab of the new sales order, go to the next line by clicking the Type field.
p. In the Type field enter Item, in the No. field enter 1920-S, in the Location Code field delete WHITE, and in the Quantity field enter 4.
q. On the Check Availability message box, warning about insufficient inventory, click Yes.
r. Note the Unit Price Excl. VAT field is automatically filled in with 420.40.
s. Note the Area Code, Businessgroup Code, Customergroup Code, Department Code, Salesperson Code, Product Group, and Salesperson Code fields already contain a dimension value.
t. On the Actions tab, click Post. u. Click Ship and Invoice, and then click OK.
FIGURE 7.23: DIMENSION VALUE POSTING MESSAGE BOX
7 - 67 Microsoft Official Training Materials for Microsoft Dynamics ® Your use of this content is subject to your current services agreement
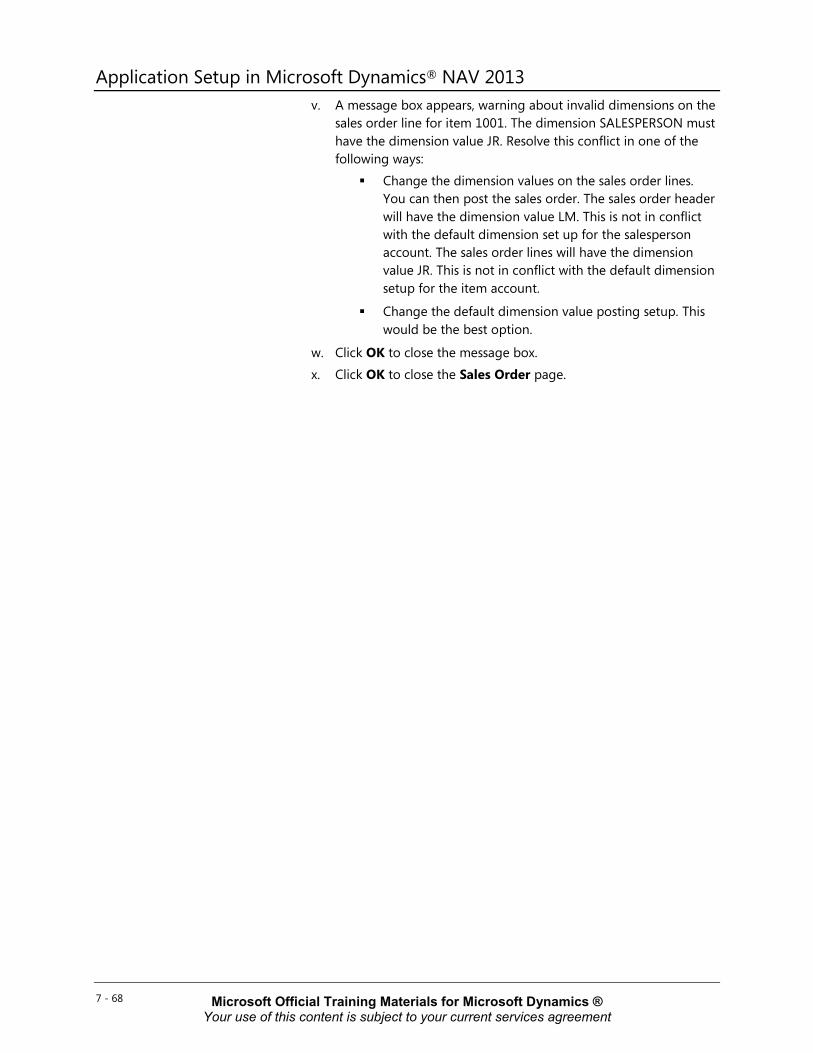
Application Setup in Microsoft Dynamics® NAV 2013 v. A message box appears, warning about invalid dimensions on the
sales order line for item 1001. The dimension SALESPERSON must have the dimension value JR. Resolve this conflict in one of the following ways:
Change the dimension values on the sales order lines. You can then post the sales order. The sales order header will have the dimension value LM. This is not in conflict with the default dimension set up for the salesperson account. The sales order lines will have the dimension value JR. This is not in conflict with the default dimension setup for the item account.
Change the default dimension value posting setup. This would be the best option.
w. Click OK to close the message box. x. Click OK to close the Sales Order page.
7 - 68 Microsoft Official Training Materials for Microsoft Dynamics ® Your use of this content is subject to your current services agreement
Module 7: Set Up Dimensions
Module Review Module Review and Takeaways
Dimensions are an integral aspect of Microsoft Dynamics NAV and are used throughout the product. The ability to set up dimensions and dimension values helps companies customize their reporting needs to their business. By using dimension defaults, combinations, and priorities, companies can control of how dimension entries are posted.
Setting up and using dimensions correctly the first time assists in achieving better financial analysis results later.
Test Your Knowledge
Test your knowledge with the following questions.
1. How can value posting conflicts be identified and resolved?
( ) Check Value Posting function
( ) Dimension Value Conflict function
( ) Dimensions-Multiple page
( ) Default Dimension Priorities
2. Which value posting rule may cause automatic posting problems when it is used on G/L accounts?
( ) All Codes
( ) No Code
( ) Code Mandatory
( ) Blank
3. Which default dimension setup is used to make sure that all items (new or old) are posted with a global dimension requirement?
( ) Posting Group
( ) Account Type
( ) Multiple
( ) Single
7 - 69 Microsoft Official Training Materials for Microsoft Dynamics ® Your use of this content is subject to your current services agreement
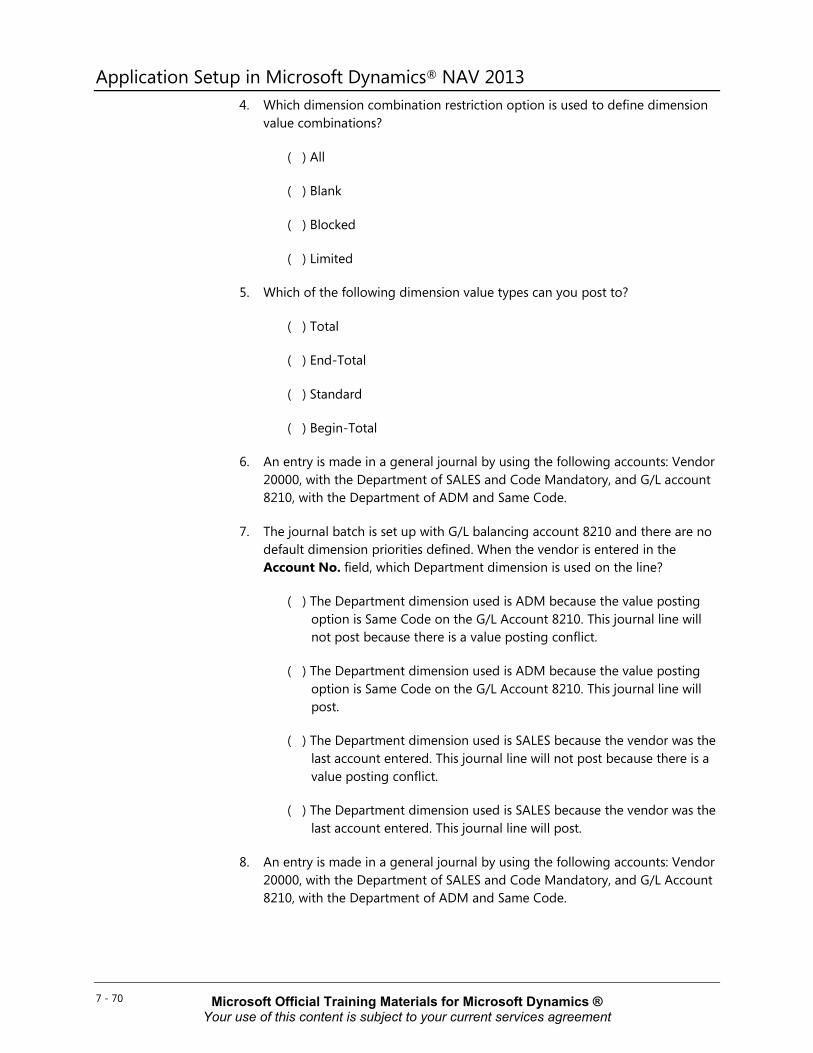
Application Setup in Microsoft Dynamics® NAV 2013 4. Which dimension combination restriction option is used to define dimension
value combinations?
( ) All
( ) Blank
( ) Blocked
( ) Limited
5. Which of the following dimension value types can you post to?
( ) Total
( ) End-Total
( ) Standard
( ) Begin-Total
6. An entry is made in a general journal by using the following accounts: Vendor 20000, with the Department of SALES and Code Mandatory, and G/L account 8210, with the Department of ADM and Same Code.
7. The journal batch is set up with G/L balancing account 8210 and there are no default dimension priorities defined. When the vendor is entered in the Account No. field, which Department dimension is used on the line?
( ) The Department dimension used is ADM because the value posting option is Same Code on the G/L Account 8210. This journal line will not post because there is a value posting conflict.
( ) The Department dimension used is ADM because the value posting option is Same Code on the G/L Account 8210. This journal line will post.
( ) The Department dimension used is SALES because the vendor was the last account entered. This journal line will not post because there is a value posting conflict.
( ) The Department dimension used is SALES because the vendor was the last account entered. This journal line will post.
8. An entry is made in a general journal by using the following accounts: Vendor 20000, with the Department of SALES and Code Mandatory, and G/L Account 8210, with the Department of ADM and Same Code.
7 - 70 Microsoft Official Training Materials for Microsoft Dynamics ® Your use of this content is subject to your current services agreement
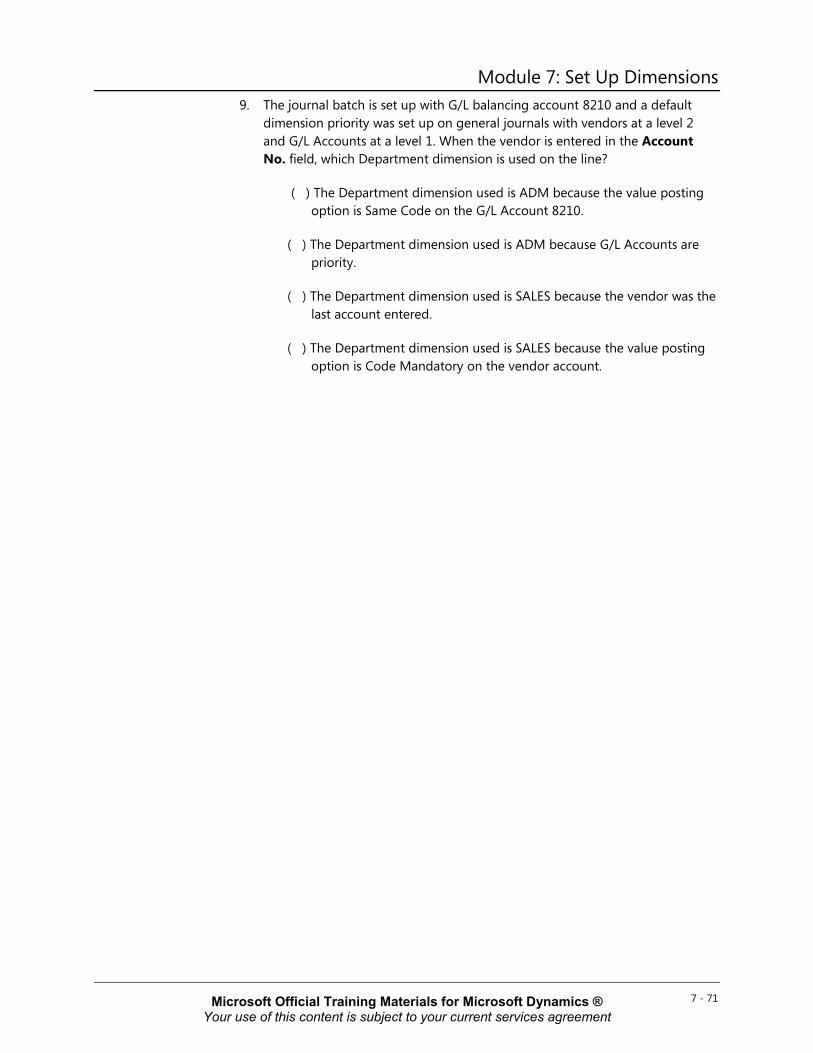
Module 7: Set Up Dimensions 9. The journal batch is set up with G/L balancing account 8210 and a default
dimension priority was set up on general journals with vendors at a level 2 and G/L Accounts at a level 1. When the vendor is entered in the Account No. field, which Department dimension is used on the line?
( ) The Department dimension used is ADM because the value posting option is Same Code on the G/L Account 8210.
( ) The Department dimension used is ADM because G/L Accounts are priority.
( ) The Department dimension used is SALES because the vendor was the last account entered.
( ) The Department dimension used is SALES because the value posting option is Code Mandatory on the vendor account.
7 - 71 Microsoft Official Training Materials for Microsoft Dynamics ® Your use of this content is subject to your current services agreement
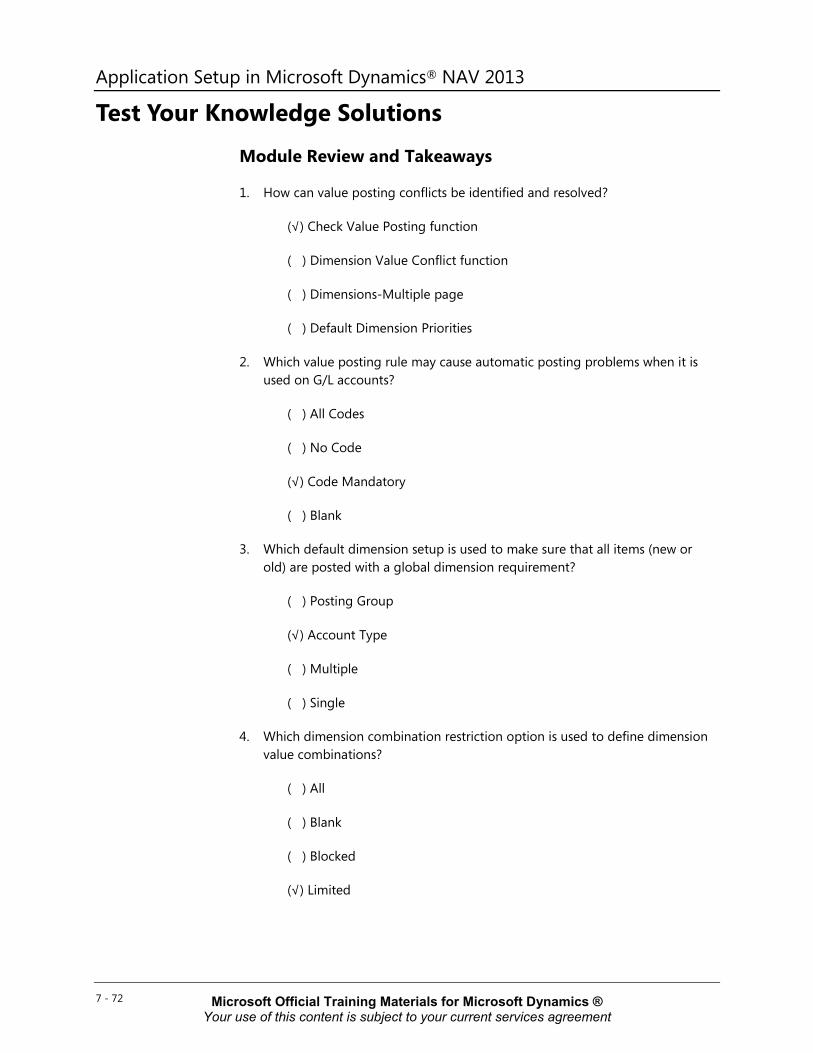
Application Setup in Microsoft Dynamics® NAV 2013
Test Your Knowledge Solutions
Module Review and Takeaways
1. How can value posting conflicts be identified and resolved?
(√) Check Value Posting function
( ) Dimension Value Conflict function
( ) Dimensions-Multiple page
( ) Default Dimension Priorities
2. Which value posting rule may cause automatic posting problems when it is used on G/L accounts?
( ) All Codes
( ) No Code
(√) Code Mandatory
( ) Blank
3. Which default dimension setup is used to make sure that all items (new or old) are posted with a global dimension requirement?
( ) Posting Group
(√) Account Type
( ) Multiple
( ) Single
4. Which dimension combination restriction option is used to define dimension value combinations?
( ) All
( ) Blank
( ) Blocked
(√) Limited
7 - 72 Microsoft Official Training Materials for Microsoft Dynamics ® Your use of this content is subject to your current services agreement
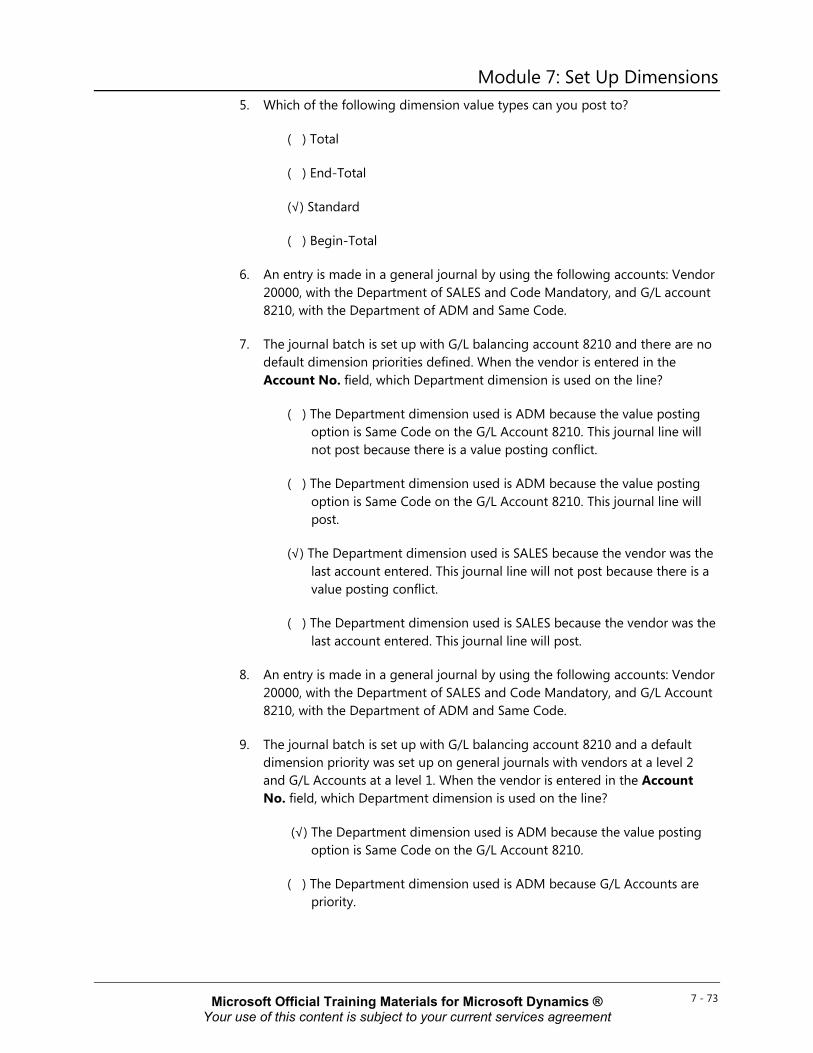
Module 7: Set Up Dimensions 5. Which of the following dimension value types can you post to?
( ) Total
( ) End-Total
(√) Standard
( ) Begin-Total
6. An entry is made in a general journal by using the following accounts: Vendor 20000, with the Department of SALES and Code Mandatory, and G/L account 8210, with the Department of ADM and Same Code.
7. The journal batch is set up with G/L balancing account 8210 and there are no default dimension priorities defined. When the vendor is entered in the Account No. field, which Department dimension is used on the line?
( ) The Department dimension used is ADM because the value posting option is Same Code on the G/L Account 8210. This journal line will not post because there is a value posting conflict.
( ) The Department dimension used is ADM because the value posting option is Same Code on the G/L Account 8210. This journal line will post.
(√) The Department dimension used is SALES because the vendor was the last account entered. This journal line will not post because there is a value posting conflict.
( ) The Department dimension used is SALES because the vendor was the last account entered. This journal line will post.
8. An entry is made in a general journal by using the following accounts: Vendor 20000, with the Department of SALES and Code Mandatory, and G/L Account 8210, with the Department of ADM and Same Code.
9. The journal batch is set up with G/L balancing account 8210 and a default dimension priority was set up on general journals with vendors at a level 2 and G/L Accounts at a level 1. When the vendor is entered in the Account No. field, which Department dimension is used on the line?
(√) The Department dimension used is ADM because the value posting option is Same Code on the G/L Account 8210.
( ) The Department dimension used is ADM because G/L Accounts are priority.
7 - 73 Microsoft Official Training Materials for Microsoft Dynamics ® Your use of this content is subject to your current services agreement
Application Setup in Microsoft Dynamics® NAV 2013 ( ) The Department dimension used is SALES because the vendor was the
last account entered.
( ) The Department dimension used is SALES because the value posting option is Code Mandatory on the vendor account.
7 - 74 Microsoft Official Training Materials for Microsoft Dynamics ® Your use of this content is subject to your current services agreement